

SINGER W3851 User Manual

(iitxiiVxtuit af (iwa rant ^^
This certifies that this Sewing Machine is thoroughly tested
and inspected in the factory and we can fully guarantee it
100% in conformity to A Grade Standard to meet user's best
facilities.
DEALER
............._..__.........._.
ADDRESS
................
_
CITY ................................_
....
.^STATE .
SIGNATURE
S-

INDEX
* general instructions *
Name of Parfcs
Introduction
Safe Guard the Action of Your Machine
To Wind the Bobbin ........................................................................... ....................................... g
To Replace the Needle ........................................
Needles and Thread ................................
To Thread the Bobbin Case ..........................................................................
Removing and Inserting the Bobbin Case .......................................
Threading Machine
To Prepare for Sewing ..................................................................
Thread Tension
Adjusting Pressure on Material
.........................................
............................................ ......................................................................
............................
4* V.
................................................................................
.....................................................................
................................................................................ ^
.............
...............................................................................
.........................................
.....................................................
Adiustng the Stitch ......................................................................................................................... |g
To Regulate the Zigiag stitch
Adjusting the Dropfeeder
To Oil the Machine................................................................................ ....................................
Sewing Hints
☆ OPERATING INSTRCTIONS * ^
Operating Instructions
Straight Stitching ................................................................................................................... 24
Zigiag stitching
For Fancy Embroidery Works ............................................................................................... gg
Embroidering and Monogramming ................................................*
Darning ..................................................................................................................................... 28
Sewing on Buttons
Hamming with Zigiag Sti iche« ................................................................................................ la
Blindstitching .......................................................................................................................... gg
Quilting ................................................................................................................................... 3Q
Cording ..................................................................................................................................... g]
Button Holes .................................................................. _ _ gi
Adjustable Cloth Stitching Guide ..................................................................................
.............................................................
..................;.......................................... ...........................................................
............*.......................
....................................................................... ..........................
.........................................................................
....
.................................
^ ^
............................................................................. 2g
.
...........................-......
........................................
..........................
.....................................
............................................
...............................
...............
.................
"..................
2
3
^
g
g
(Q
11
12
^g
2^
gg
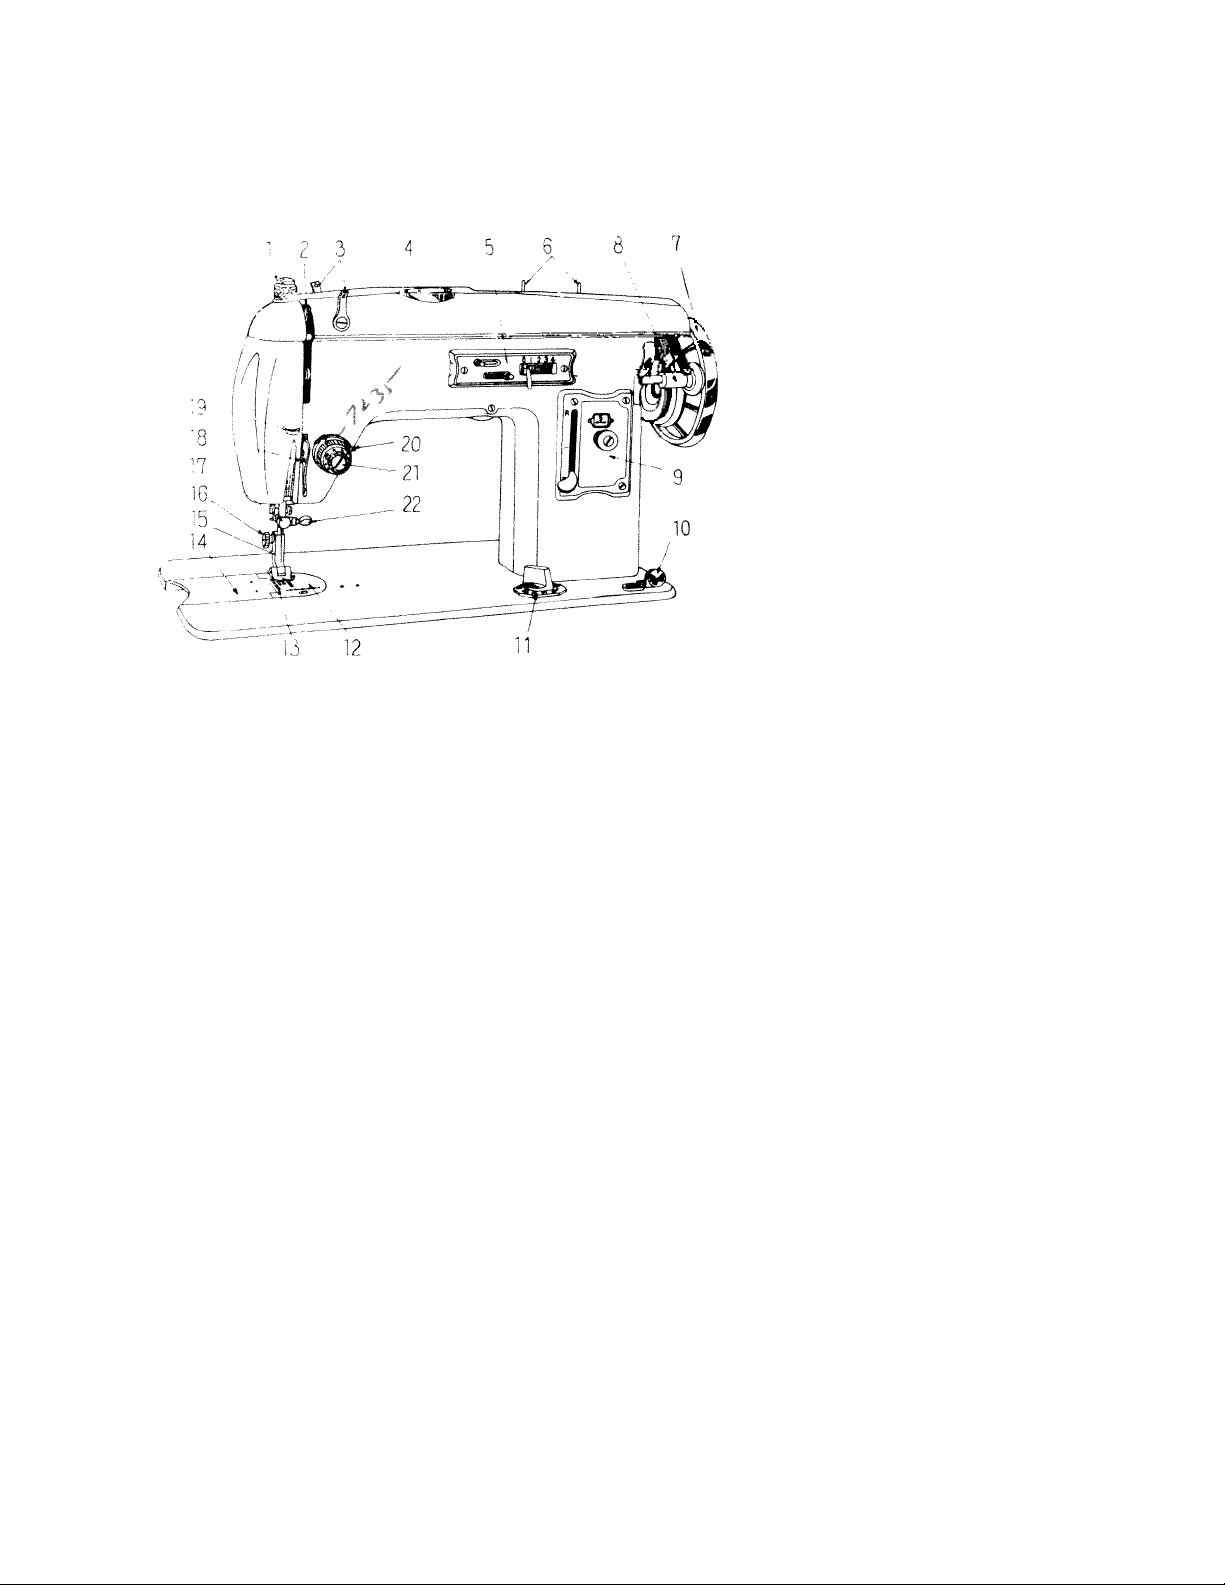
1. Patch-O-Matic Darner
2. Take- up Lever
3. Arm Thread Guide
4. Cam Holder
5. Zigzag Width Regulator
6. Spool Pin
7. Balance Wheel
8. Automatic Bobbin Winder
9. Stitch Length Regulator
10. Bobbin Winder Thread
Guide
11. Drop Feeder
12. Needle Plate
13. Feed Dog
11. Hinged Plate
15. Presser Foot
16. Presser Foot Thumb
Screw
17. Needle Clamp Thread
Guide
18. Retaining Thread Bar
19. Thread Guide
20. Wire Check Spring
21. Thread Tension Dial
22. Needle Clamp Screw

INSTRUCTION MANUAL FOR ZIGZAG
INTRODUCTION
Your Zigzag sewing machine is the product of many years of research and development in the field
of household sewing machines. It is also the ultimate in efficiency, quality and design, yet its moving
and wearing parts such as needles, bobbins, bobbin cases, hooks and so forth are standard and
interchangeable with parts immediately at sewing machine stores throughout the world.
This precision sewing head, with its simplified design and many labour saving extras, is the result
of our incessant exertion and each machine is built to the most exacting specifications under our
rigid quality control program.
You have made an excellent choice and you are deserved of the proud owner of Super De Luxe
sewing machine, which will surely lead to your happy life. You will soon realize how quickly you
will become attached to your new machine as a friend of the family who really lends you a hand.
The ingenious construction makes it possible to do many jobs on the new machine which until
now had to be done by hand.

SAFE GUARD THE ACTION OF YOUR MACHINE
Make sure the balance wheel always turns toward the operator.
Never run the machine with the presser foot in the down position without cloth between the
presser foot and the feed dog.
Never run machine when the bobbin case and the needle are threaded without first placing
material under the presser foot.
Caution, never try to help the machine feed by pulling the material through the feed. This will
create a bent needle condition. The machine’s feed is entirely automatic.
Never operate the machine without the hook race cover the bobbin case in position.
Keep a small piece of cloth underneath presser foot whenever machine is not in use. This will
prevent damage to feed dog and presser foot.
Do not operate machine when presser foot lever is raised.
Keep slide or hinged closed when operating machine.

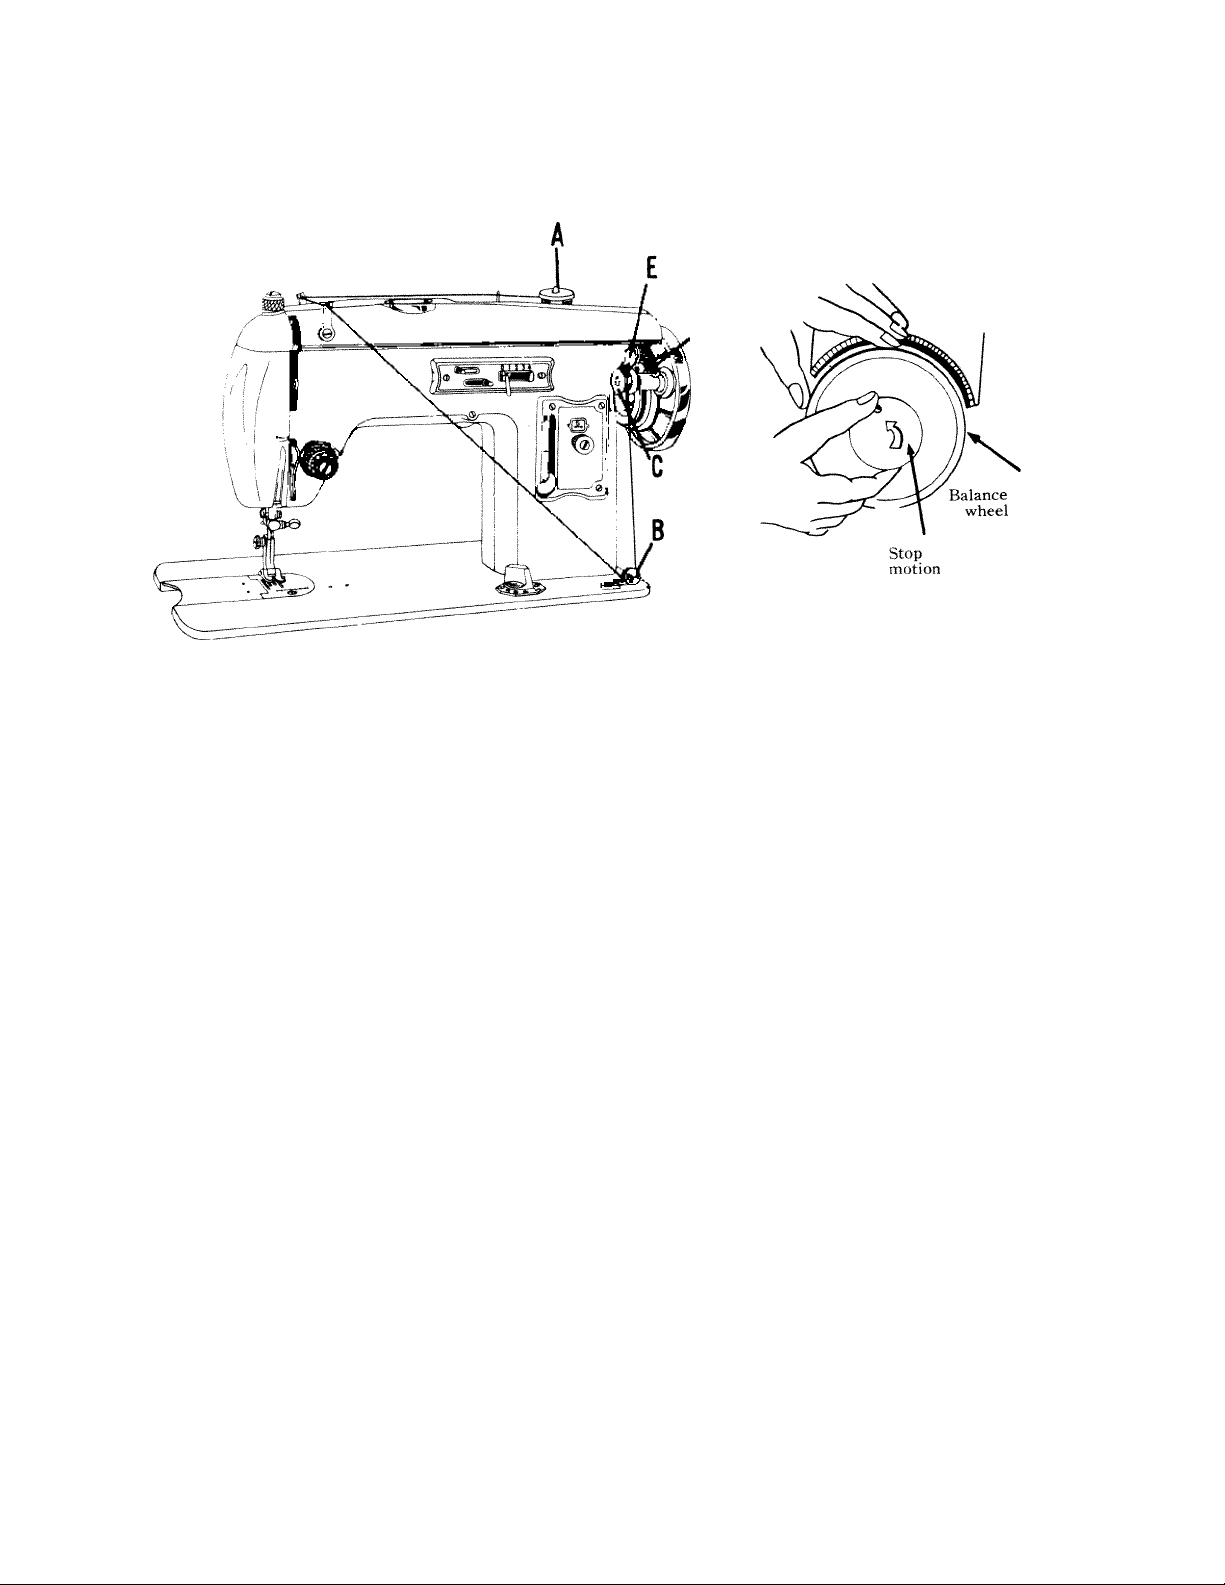
TO WIND THE BOBBIN
It is necessary to understand the function of the Stop Motion by means of which the balance
wheel is disconnected from the sewing mechanism, when required, thus permitting the winding of
the bobbin without sewing. , , , i t ■ c .u i r*
a) Turn the stop motion knob toward you while holding the balance wheel with the left hand.
This will then permit the balance wheel to turn freely while the needle bar remains motio
nless. ^
Place a spool of thread on the spool pin at backside of arm.
b)
Pass the thread through the notched thread guide (3).
c)
Draw the thread down through the bobbin winder thread guide (16) at right corner of the
d)
base of machine. . t • j i
Now wind the end of the thread around an empty bobbin seven or eight times and place
e)
threaded bobbin on the spindle (C) of the bobbin winder.
Press the bobbin into the spindle with the left hand, making sure that the Pm on the spindle
f)
fits into the slot in the bobbin. . ,
Push the bobbin winder levever (D) down until the small rubber wheel presses apmst the
g)
hub of the balance wheel and the clasp (E) falls between the sides of the bobbin holding it
Tum*the”balance wheel toward you and run the machine as in sewing. When bobbin is full,
h)
the bobbin winder will automatically stop.
Break off the thread and detach the bobbin from the spindle.
i)
Hold the balance wheel firmly with left hand and with right hand turn the stop motion knob
j)
away from you until the machine is tight and then the needle bar moves with the turning of
the balance wheel. ,
can perform this operation also when the machine is working. In this case you will operate
You
in the same way as explained above, but without disconnecting the balance wheel.
knob

TO REPLACE THE NEEDLE
li) llu- tuH‘(iie. r;nst.‘ tlu‘ i>ar iu us higiiesl
])oiiU 1>\‘ Uirniii^ ibulaius- wluu'l ii)vvar(i you i)y haiui.
Louscii llu- iR-edlc alam|) screw on ihe ne|il hand --Kie
and die needle clamp will open, allowing die old needle
!o tall oiil.
Remove die old needle and elide die new needle up
i-i„\i^ Slid-; row.xKi) idii; ii\i..\.\n-; wiikkl as
lar as U will yo, Wdu-n the needle hils die slo|) il is in
nosilion corri-clKv Now tasii-ii die needle clamp sneurely.
I-'or liesi resnils clianye ni-edli-s Ircipienlly.
FLAT
S I DE.
NEEDLES AND THREAD
Never use a bent needle, nor one vvidl a blunt point, since this cause imperleel stitches and may
cause the needle to break. Unless the needle is in clear to the stop, liât sidi- toward the baiaiue
wheel, the niaehine will be out of "'rime,'' and skipped or iinperfeet stitches will result and needles
may break.
rhe size of the needle should conlorm to the size ol the thread and both should be suitable to the
material. Use a needle suffieiently large to permit the thread to pass freely through the eye. In
general sewing, use ihe same size thread in the bobbin as is used on loi).
1)
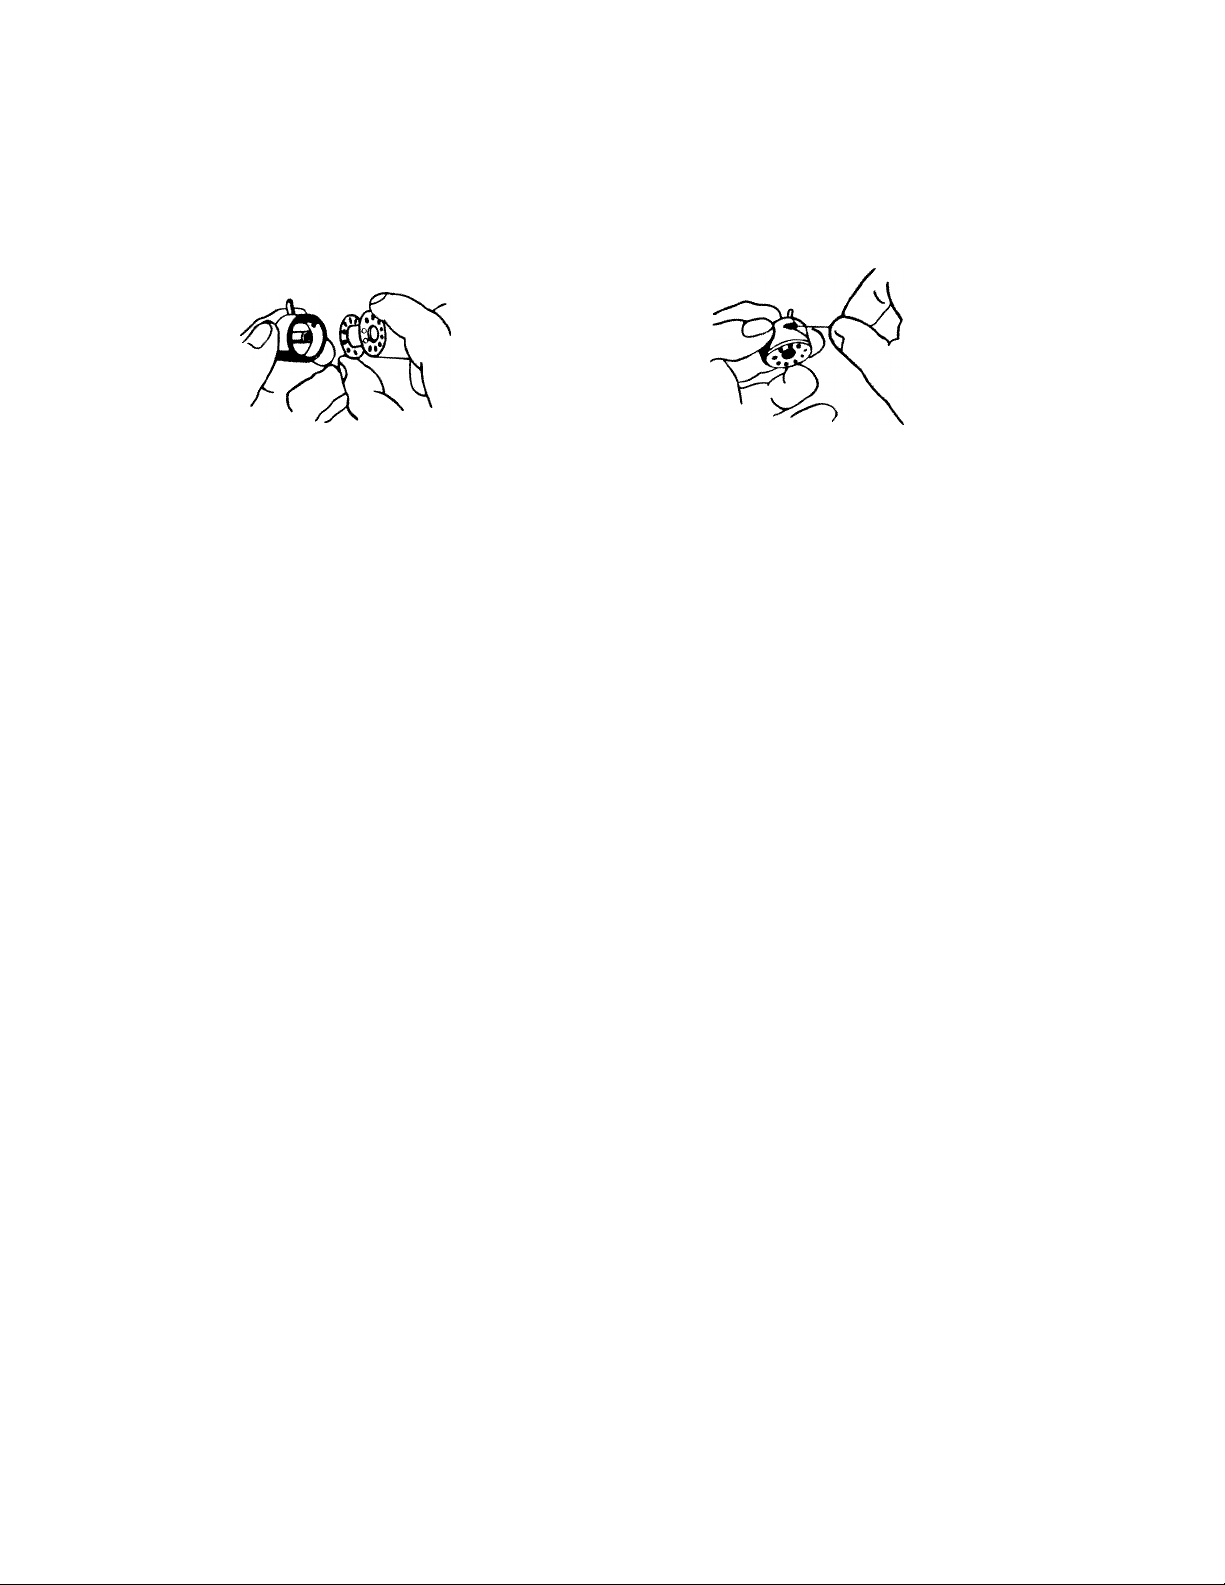
TO THREAD Tm BOBBIN CASE
(A)
(B)
Hold the bobbin case between the left thumb
and forefinger with the slot up. With 5 or 6
inches of thread trailing in the palm, hold
the bobbin between the thumb and first two
fingers of the right hand. Fig. (A)
Insert the bobbin into the bobbin case and
pull the trailing thread into the slot, down
and to the left until it enters the delivery eye
under the tension spring. (A, Fig. C)
Fig. (B)

There should be a slight tension on the thread as it
is pulled through the delivery eye and the bobbin
should unwind freely. The tension may be increased
by turning the tension screw tB) to the RIGHT and
decreased by turning the screw to the LEFT.
Fig. (C)
REMOVING AND INSERTING THE BOBBIN CASE
In the following operations the needle must always be ABOVE the surface of the machine.
Raise the needle by turning the balance wheel TOWARD YOU by hand.
Raise the hinged slide plate, with left thumb and forefinger, open the hinged latch (A) at the
front of the bobbin case and hold securely as you withdraw bobbin case from around the holder
post. When held in the above manner the bobbin will not fall out of the bobbin case.
After winding a fresh bobbin and threading the bobbin case, latch (A) with left thumb and
forefinger, to prevent the bobbin from falling out.
 Loading...