

SINGER W221N User Manual
ti

CONTENTS
Glossary of Sewing Terms
Glossary of Sewing Machine Features
Machine Identification
Accessories
Detaching Extension Table
Connecting Foot Control
Changing Presser Foot
Changing Needle
Bobbin Winding
Inserting Bobbin
Adjusting Lower Tension
Upper Threading
Drawing Up Lower Thread
Adjusting Pressure on Fabric
Adjusting Upper & Lower Tensions
Fabric, Needle & Thread Table
Setting the Stitch Length
Presser Foot Lifter
Cloth Guide
Basting
Staystitching
Zigzag Stitching
Edge Finishing
Interfacing Darts
Bartack
Shell Stitch Edging
Satin Stitch
Stretch Stitching
Flick Rack Stretch Stitch
Topstitching
Seaming Knits
Gathering Over Cord
Lace Applications
Making Buttonholes
Cutting Buttonholes
Corded Buttonholes
Sewing on Buttons
Blind Hot Stitch
Zipper Sewing
Mending/Patching
Mending a Rip
Darning
Lapped Seam Sewing
Applique Work
Embroidery
Maintenance/Cleaning
Oiling
Trouble Chart ,
Changing Light Bulb
Page
1A
IB
2
3
4
5
6
7
8, 9, 10
11
12
13
14
15
16
17
13
19
20
21
21
22
23
23
23
23
23
24
25
26
27
27
27
28, 29
30
30
31
32
33
34
34
35
36
37
38
39
40
41,42
42

1. GLOSSARY OF SEWING TERMS
APPLIQUE
BASTING
BUND HEM
BUTTONHOLE
COUCHING
darning .
embroidery
PACING
gathering
MEM
MONO-
GRAMMING
OVERCASTING
OVERLOCK
{STRETCH}
patching
Applying * material with a specific design
onto another material by using a straight
or zig zag stitch.
To sew with a tennporary stitch that can be
removed with easa. Tt» is possiblt
using the lot^Mt straight stitch, setting
your «3P ter«k»t on "0" and sevwr^ a
line of stitches. The stitch vM be
loose and the bottom stitch tight; ih«
allows you to be able to remove the lower
thread by puIBng. It may be necessary
to cut tha lower tivead at different pants
for easéir remcnori.
A variation of the zig zag stitch used to
finish a hem where can conb-ol the
holding stitch.
A means of stirengttw«ng the aki^ of s
hole in doth by a zig zag stitch to hold
a button.
To fasten down another material, like a
ribbon lace, witir a firw zig zag stitch.
A method of repairing a rip or tear by
stitching ovw the flaw. '
To decorate with stitching, using either a
straight or zig rag stitch.
The addition of anotiw piece of material
to Increase ttw bCKly or edge of material.
Forming a zig zag stitch ov» cord, elastic,
or any separara materlst.
Ariothef term fa shirring.
A fold, Mwn down an «íge of doth.
Using a straight stitch for tracery or zig zag
stitching va form a desi^.
The use of a zig zag stitrh to finish a seam
or edge of clotii. or to prevent the revelling
of a looara weave cloth.
A triple stretch pattern used to finish seams
Of smstch buttonholes.
Same as darning but covering the hole
viñtit a grace of doth.
SATIN STITCH
SEAM
SHELL TUCK
SHIRRING
STRAIGHT
STITCH
STRETCH
STITCH
TACKING
TAPERING
Tf^READ SHANK A space composed of thread betvwran tha
TOPSTITCHING
TRIPLE
STRETCH
A solid line of zig zag stitching formed by
zig zag stitch sewn very dose icgether.
A Kne formed wfran sewing two piecia of
material together.
The use of the zig zag or variation of
ifra zig zag stitch lo give a shall effect
to the edge of material.
To gather dotii by drawing twws or more
threads together.
A forward or reverse singtii line of rawing
which iTHly vary from 6 to 8 stitches
par inch to "0” stitches.
A comblnalton of stitcfras formed by a
forward snd bsekwsrd moticm vvhich aUows
tira stitches to flex and not break, used
on stretch nraterials, double knits, tricot,
Rngerie. etc.
A rarras of stitdtra to lock thread.
A line of zig rag rawing varykig fron i
narrow to a wride range.
butran and doth to engage button to
bunonht^ cm bulky meterial.
A fine Of serie* of Imea of straight « zig
zag rawing which enhances a border giving
the stitching a raised effect.
A rarm used for stretch patterns, a pattern
formed by a forward, sideward and back
ward combination of stitches.
QUILTING Joining raveral doths togetha to form a
RICK RACK A tr^ stretch pattern using e be»c zig zag
‘ bulk cover for becfe, furniture or clothing.
to give a RICK RACK effect.
ZIG ZAG A term which describes the side to side
motion of tfw rraedle which creatra width
to straight savring.
-1A-

2. GLOSSARY OF SEWING MACHINE FEATURES
accessory
BOX/TRAY
lower ten
sion SPRING
BOBBIN
TENSION SCREW
storaga of extra feet, neecfl«». bobbins
and acoK»ortes. Also uutd as extension
of »tn fo” a lai^ woHt surface.
Baiances uppw and lower teiosion threads-
To adKis* teruucm of bobt^ csee.
BOBBIN F« winding boW^ widi thread.
WaMDING SfnNDLE
BOBBIN for automaticaaY stopping bobt^ at full
WINDING STOP capadty.
FACE COVER open for changing the bulb pfovkaea
FEED DOG For feetft^ mabKial tfwHjgh nrachkw.
FOOT
CONTROL
HANDWHEEL For toitwng mechankun W ^«”<1 ^
NEEDLES Used to form a todi stiteh on your machine.
NEEDLE CLAMP
needle clamp
THUMB screw
NEEDLE PLATE
PORTABLE
COVER
PRESSER BAR
PRESSER FOOT
PRESSER FOOT
UFTER
easy access to neeeftes and pre^ bar
«aKNnbly for offing.
F« activating poww to toe ma<tolne,
■mount of pressure exivtod on toe foot
pedal o3ntr^ toe ape^: attach^ wires
plug into msd'wto and wall »ocket.
needle arto talcs up to high potion. Thffi
wheel torfu tovraid otH^tor.
variadons era many: example: sharp, ball,
(eatttof. etc.
For attaching the needle to the lower
end of toe needle bw.
For f^antng needle into neede clamp.
Fa suppOftifHj material when severing. This
plate is msrkoj fa several hem sizes.
A rec^ta^ to protoct s sewing machine
wim not in use.
Controhi toe pretaure exert«! on variojs
matoriels being sewn. Can be var^ by
contrt^ tever.
What towered onto nrtateriai it holds the
materiel against the feed dog.
Fa raising a towering the presw ber
end pmasa femf. When raised, the tension
(5 releaitod and when towered, the tension
is engaged.
PRESSER FOOT For fastening presser foot arto attachments
THUMB SCREW to toe presser bar.
REVERSE for changing from forward to reverse
SEWING BUTTON dlrectiiHt, button must be i»eid In for
^ comincMto raverM sawing.
SOCKET Located under the face cowu to change
SPOOL PIN One ior itowing and far windir^ bobbin.
{RETRACTABLE)
STITCH For changing tfm la\gth of stitch b ^h«^
LENGTH DIAL foward and reverse direction.
TAKE UP for drawrir^ up the top thread to form
LEVER 8 tight stitch.
THREAD For edtting exc^ toread, latated cm the
CUTTER back and mto ths piesw bar.
THREAD GUIDE Hoida thread taut for even wmding.
FOR
BOBBIN WINDING
THREAD GUIDE
FOR UPPER
THREADING
UPPER THREAD Use fa single a two tivead sewing, helps
TENSION control toread lock.
UPPER THREAD Used to change upper tension
TENSION DIAL
ZIGZAG
WIDTH DIAL
toe IHjht bulb.
Guides thread from ^>ocN pira to • toe
tortsion.
For setting width of zigzag stitching. Zgzsg
wkJto may be varied frcmi 0 w^to to 5 mm
width.
1B-
jot
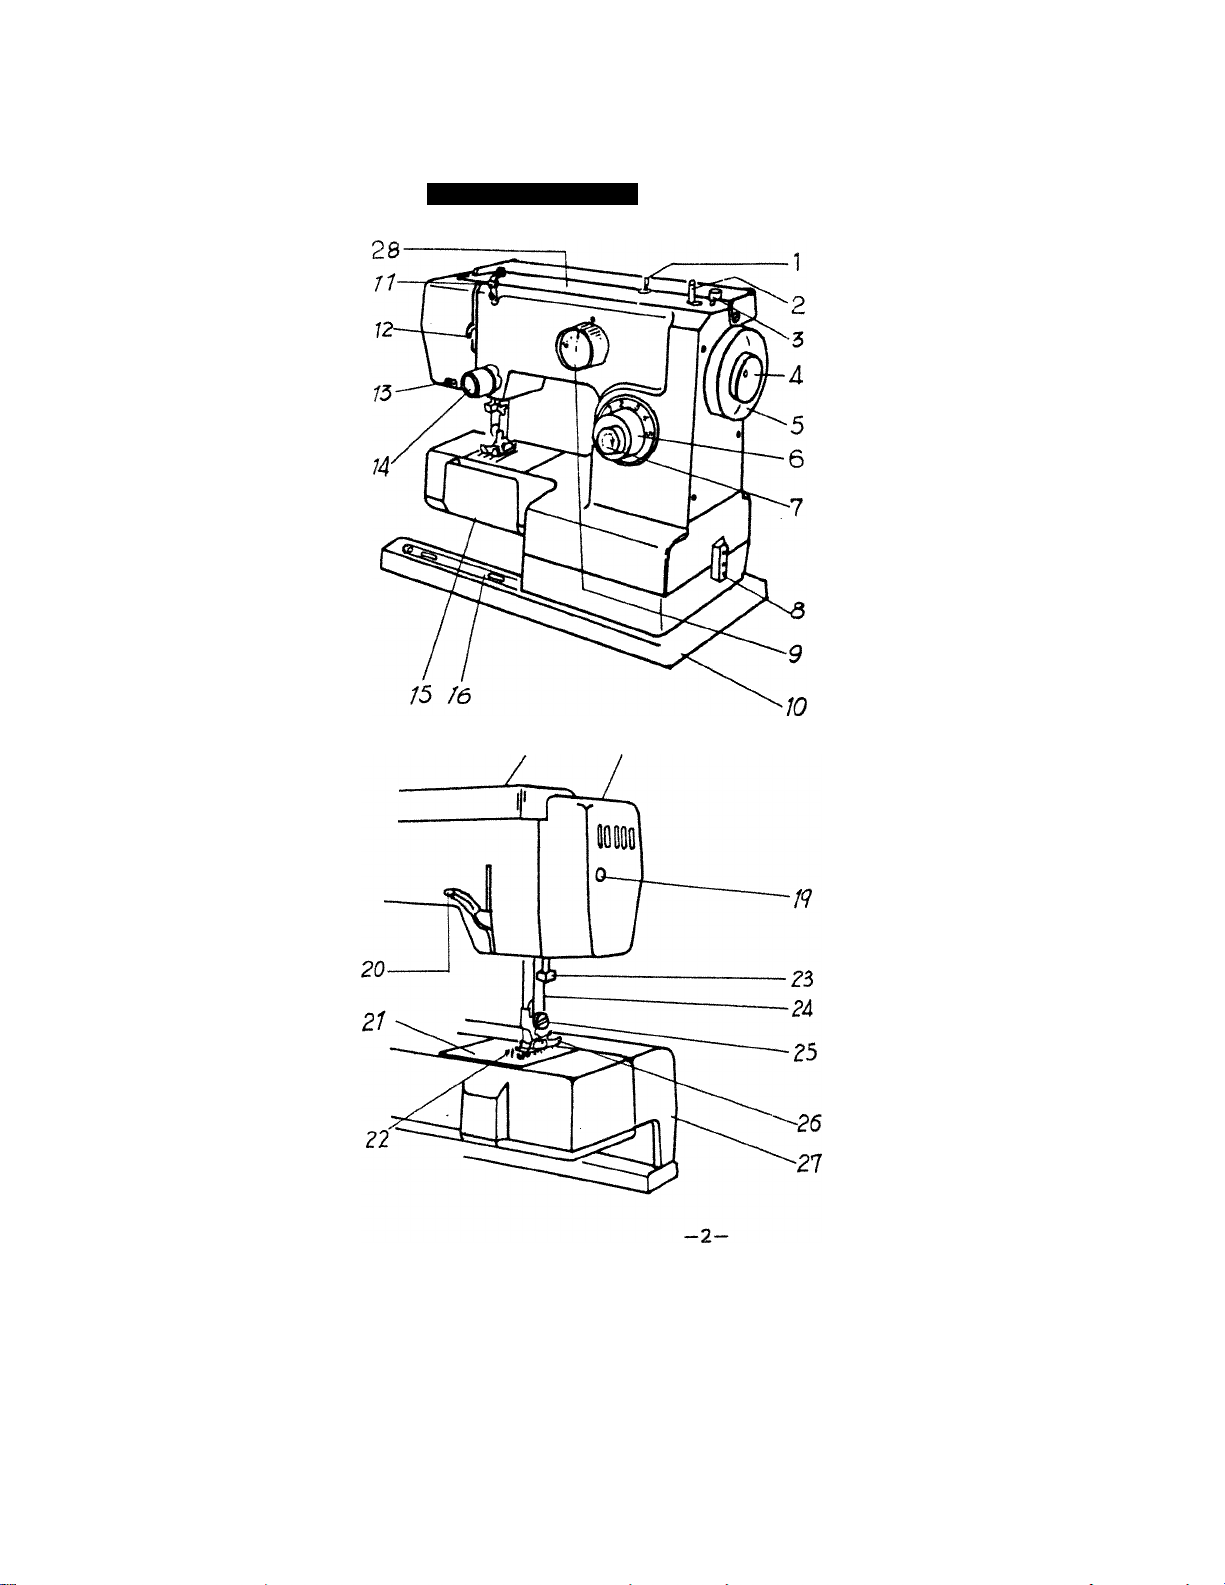
Machíne identification
1. Spool pin
2. Bobbin winder
3. Bobbin winder stop
4. Stop motion knob
5. Hand wheel
6. Stitch length knob
7. Reverse stitch button
8. Connector
9. Stitch pattern knob
10. Base plate
11. Thread guide
12. Thread take-up
13. Thread guide
14. Top tension
15. Bed cover
16. Extension plate guide
17. Handle
18. Faceplate
19. Set screw for face plate
20. Presser foot lifter
21. Needle plate
22. Feed dogs
77
/<5
23. Needle clamp
24. Needle
25. Presser foot holder screw
26. Presser foot
27. Extension plate
28. Top plate.
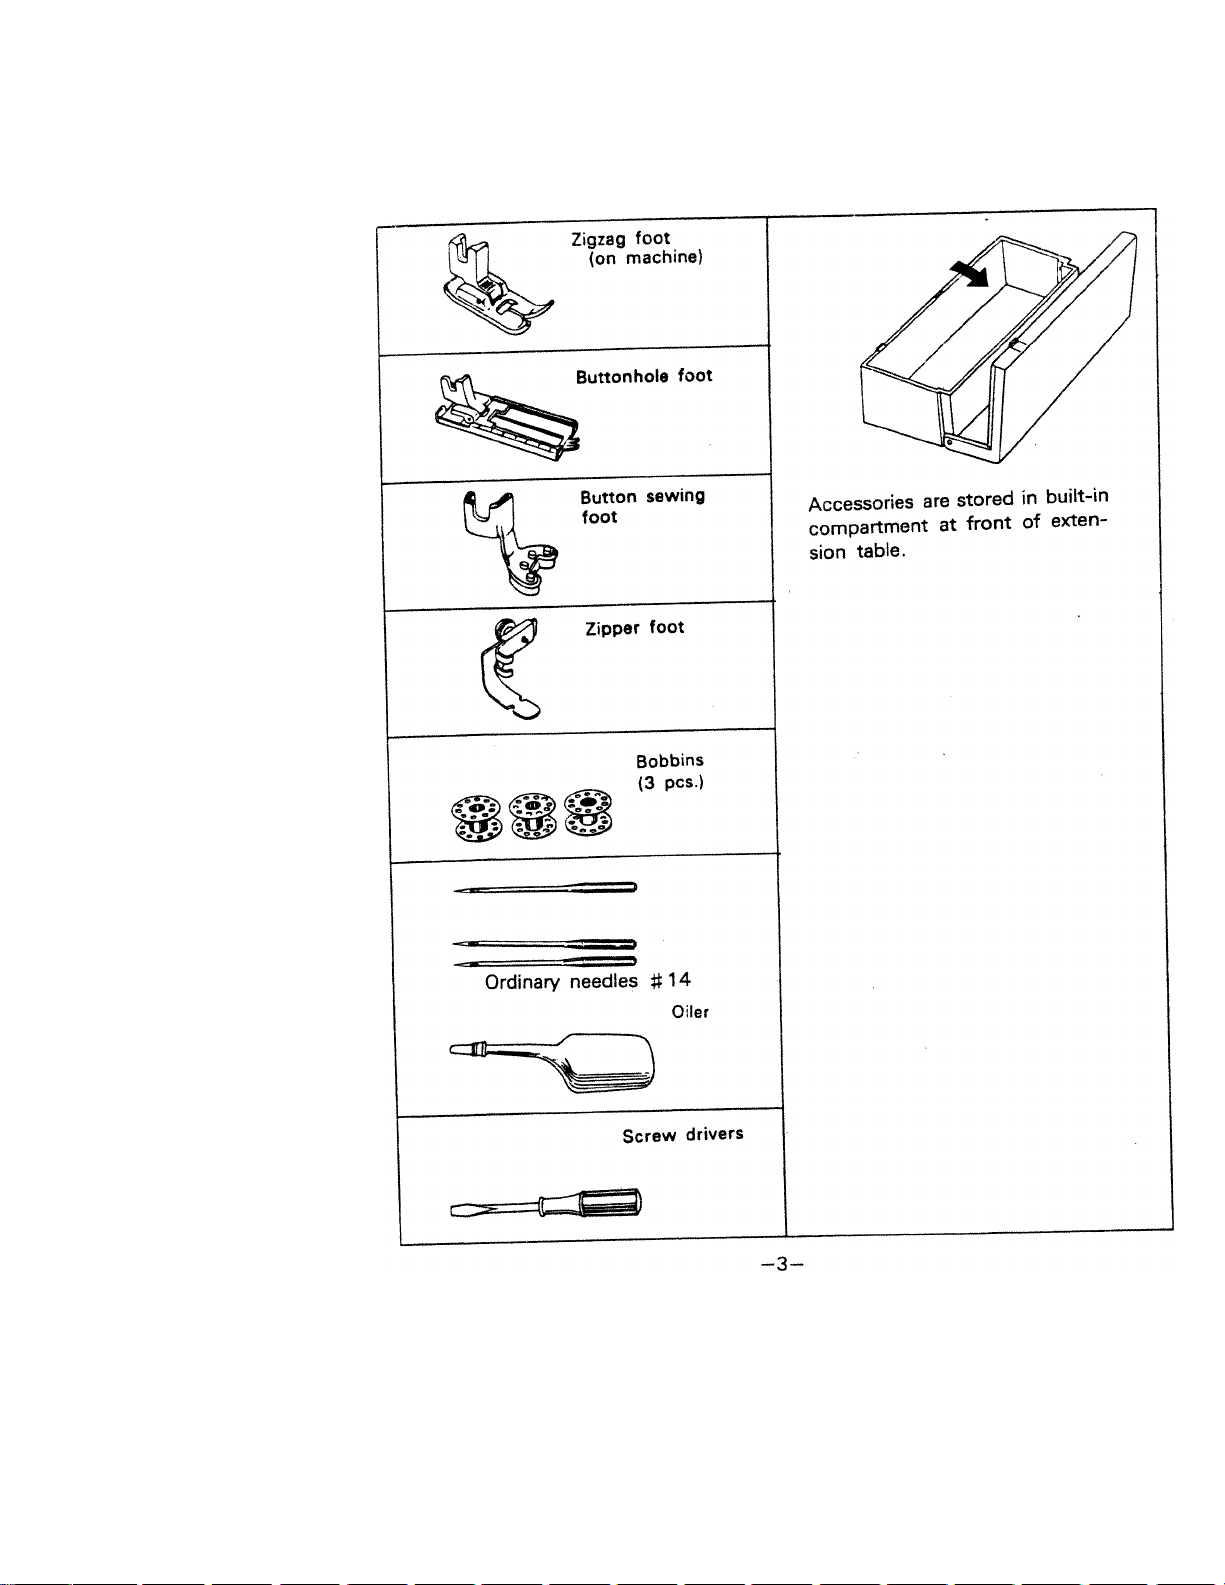
ACCESSORIES
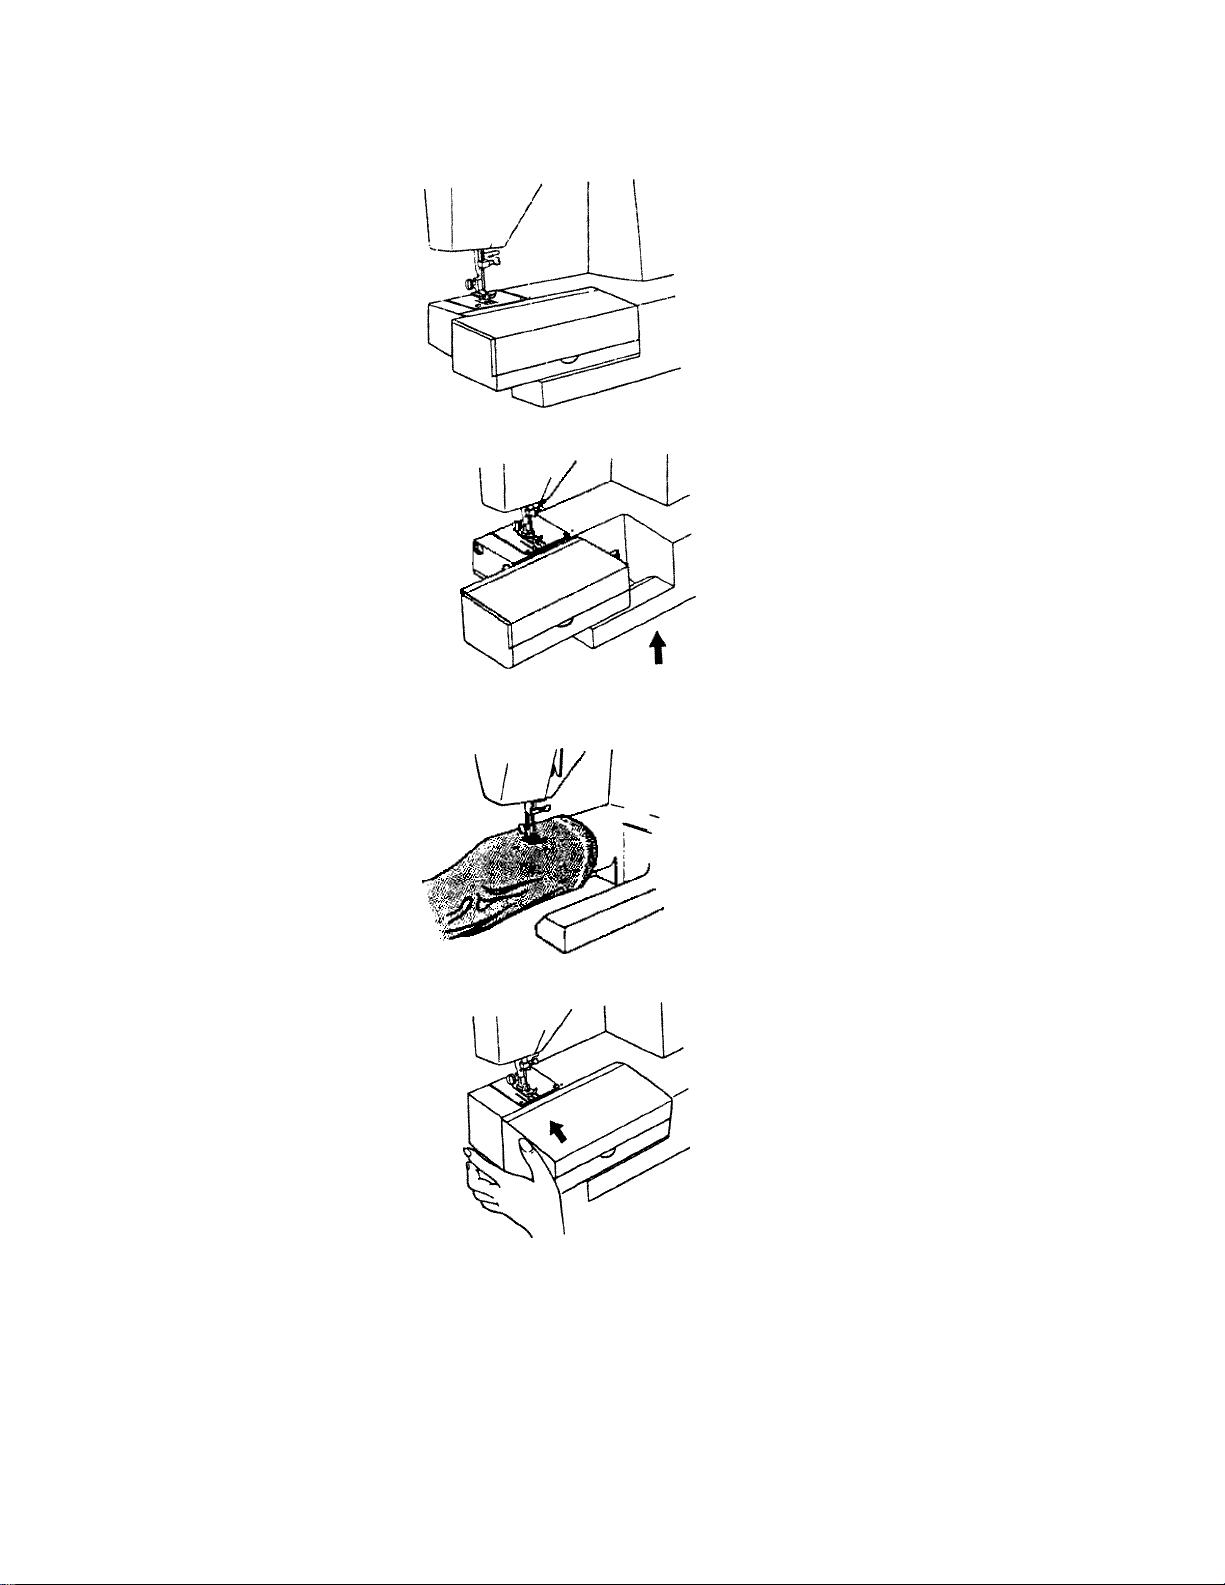
BEFORE SEWING
Machine is stored in flat-bed style
which makes your work easier in
ordinary sewing.
Detaching Extension Table
Pick up and slide it off and the
machine is used as a free-arm
model.
Free-arm is convenient to sew or
embroider ; trousers, sleeves, cuffs
of T-shirts, blouses, etc.
Do vice-versa of above steps to
attach extension table.
To open lid of accesory box, lift
it open, as illustrated.
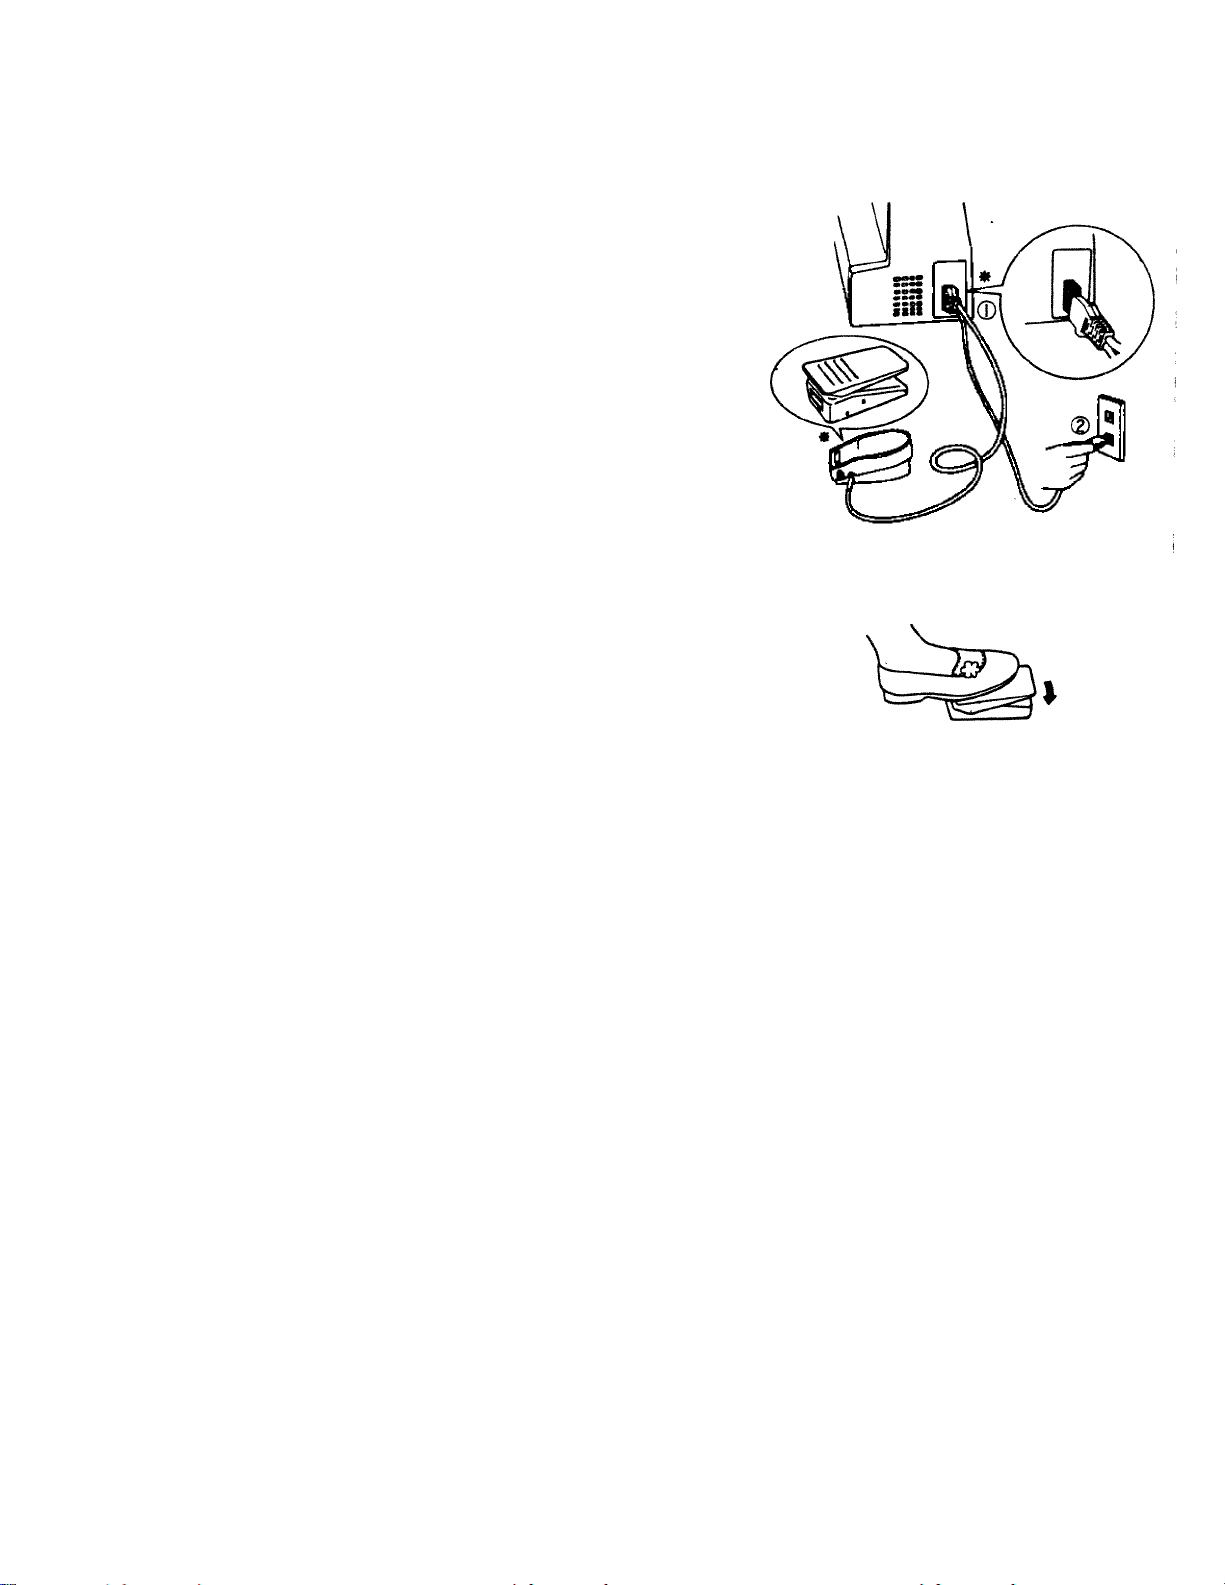
Connecting Foot Controller
and Power Cord
Connect foot controller
power cord ®
Before plugging in your machine,
be sure that voltage is same as
that of your machine, (written on
a plate at back of machine)
^ Specifications vary from country
to country.
Always unplug machine when
not in use.
The more you press foot controller,
the faster the machine runs.
WARNING;
THE FOOT CONTROLLER, FOR WHICH
ATTACHED ON THE SEWING
MACHINE MODEL 221N, IS
DESIGNATED FOR SEWING MACHINE
MODEL 221N ONLY.
FOR YOUR SAFETY, DO NOT APPLY
THIS FOOT CONTROLLER TO ANY
SEWING MACHINE AND/OR
APPLIANCE OTHER THAN MODEL
221N.
and
POLARIZED PLUGS CAUTION
This product is equipped with a polarized alternating current line plug
(a plug having one blade wider than the other). This plug will fit into
the power outlet only one way. This is a safety feature. If you are
unable to insert the plug fully into the outlet, try reversing the plug.
If the plug should still fall to fit contact an electrician to replK:e the
obsolete outlet Do not defeat the safety purpose of the polarized
plug.
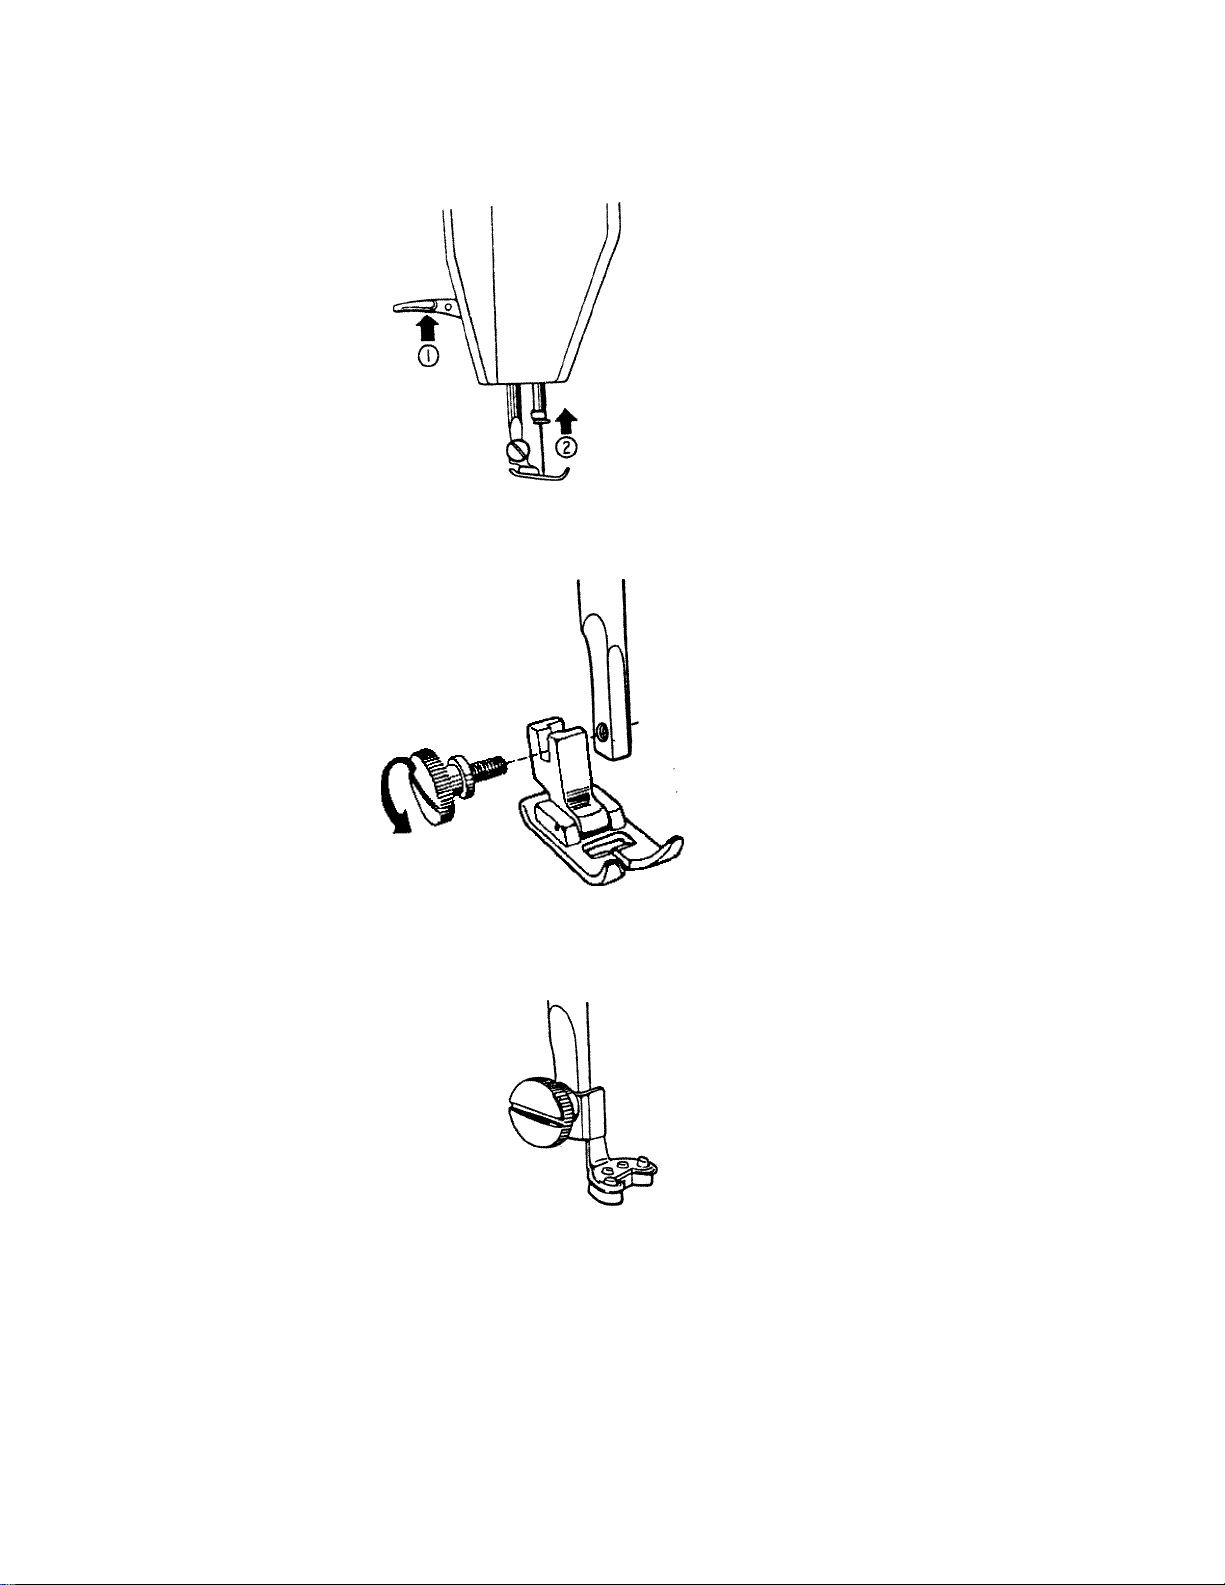
Changing Foot .
Raise presser foot lifter ©.
Set needle in the highest
position by turning handwheel
towards you (2).
Remove foot by loosening screw
with screwdriver.
Replace new foot and tighten
screw.
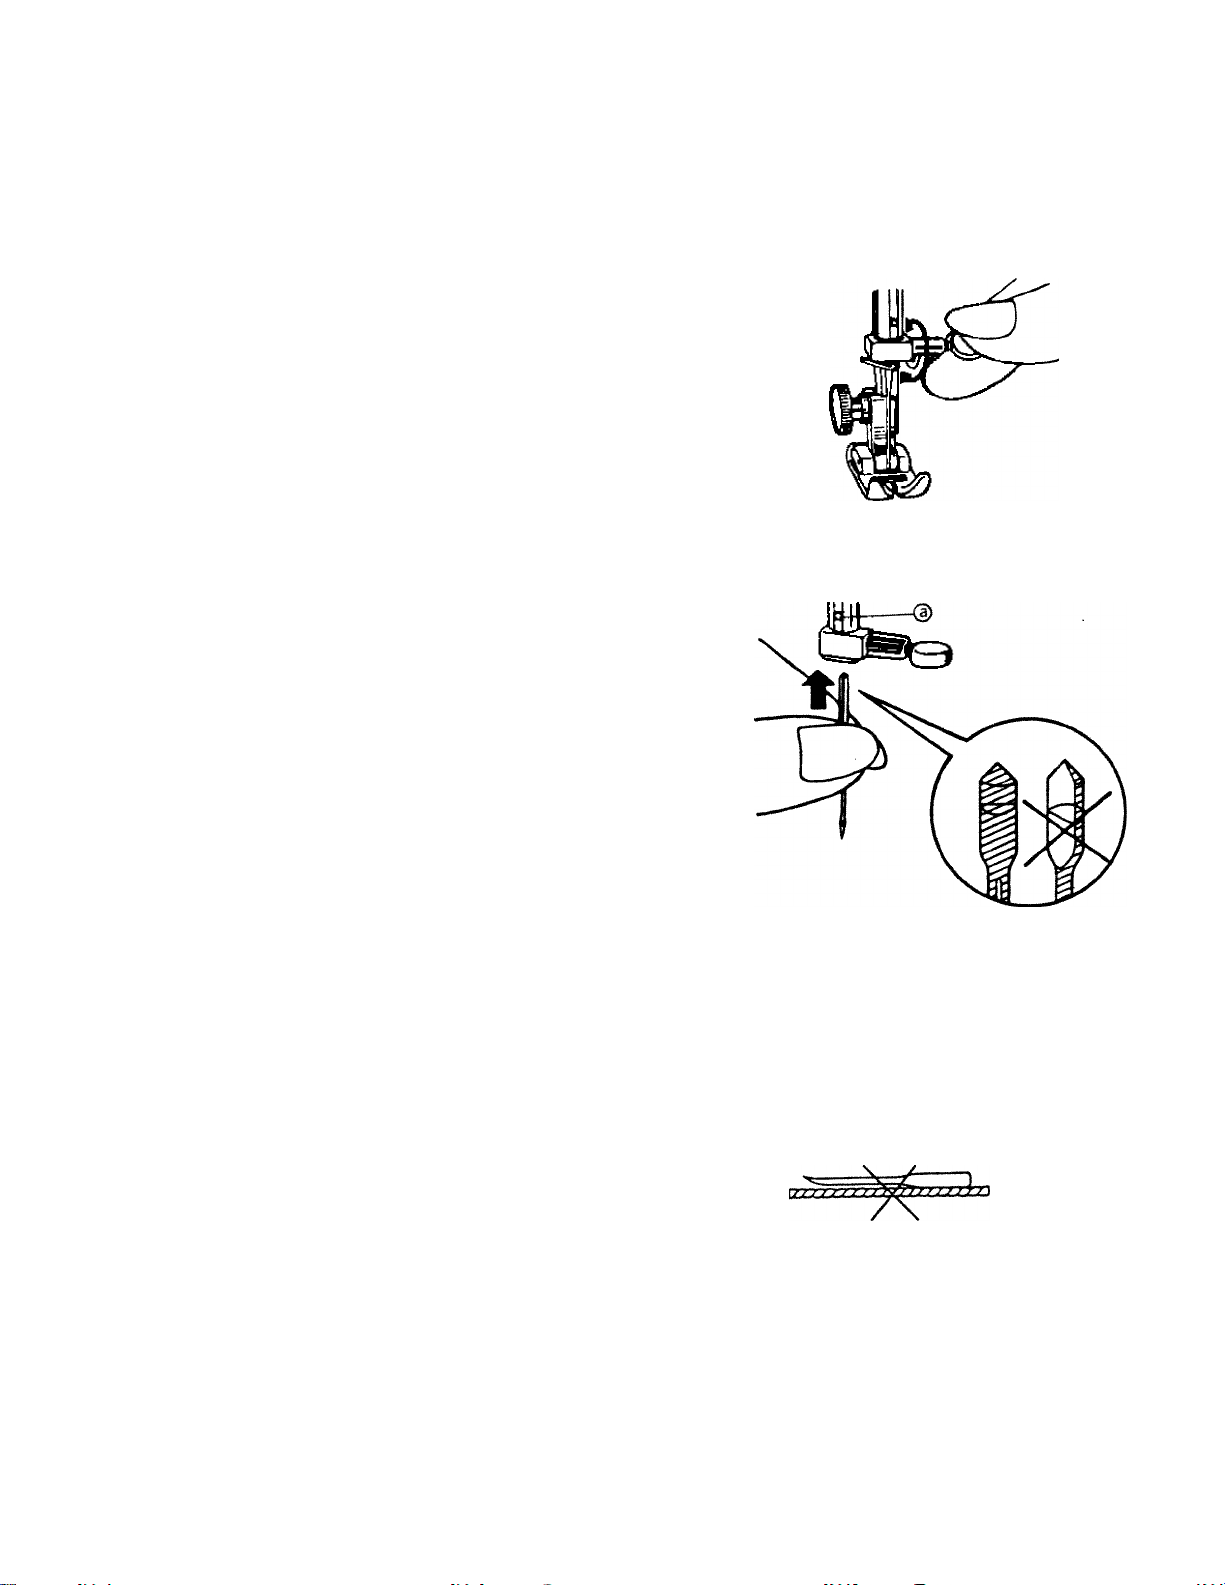
Changing Needle
Set needle
position by
towards you.
Loosen needle clamp screw and
take out needle.
With flat face away from you,
insert a new needle into groove
of needle bar.
Push needle until it reaches
stopper (D and tighten needle
clamp screw firmly.
in the highest
turning handwheel
Always use a straight needle with
a sharp point.
Using defective or worn needles
not only causes stitch skipping,
breakage of needles or snapping
of thread; it also can damage
hook and needle plate.
Proper needle
straight shaft
sharp point
cm
><s
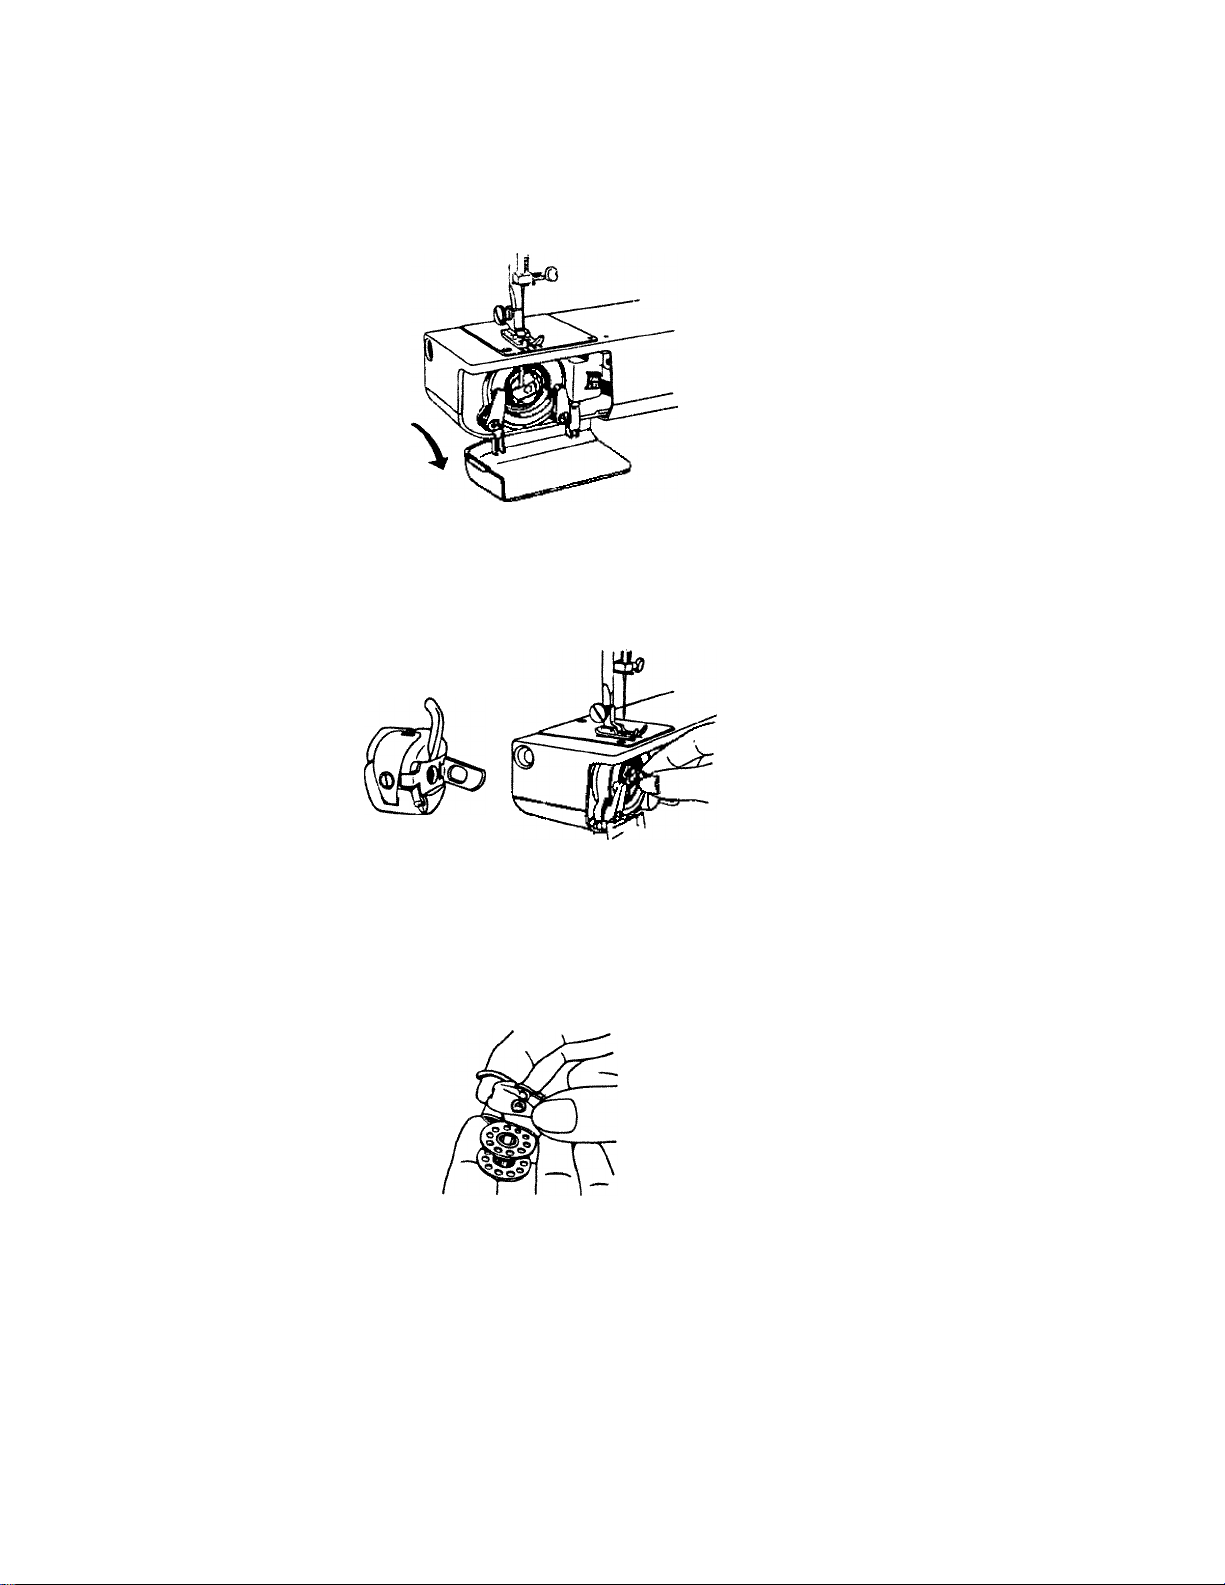
Bobbin Winding
Set needle in ths
position by turning
towards you.
Open shuttle cover.
Open latch of bobbin case and
take it out. . . .
i highest
handwheel
Close latch of bobbin case and
bobbin comes out easily.
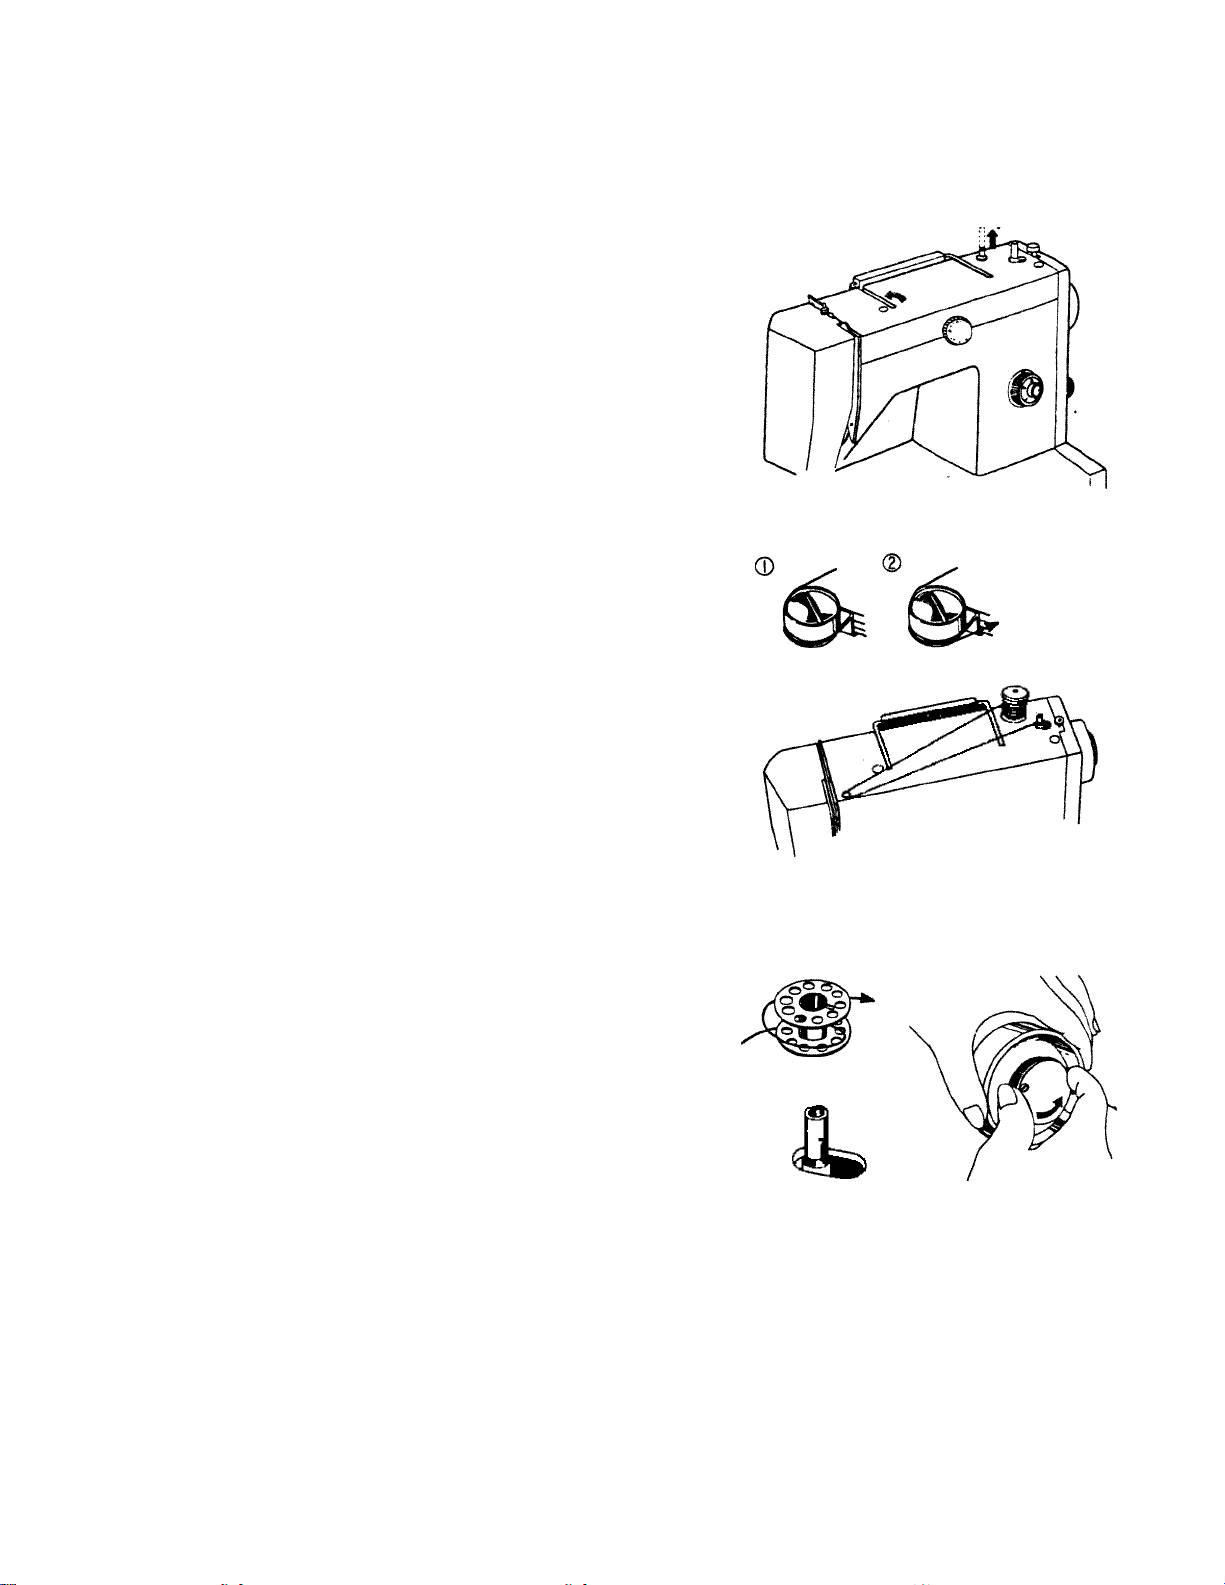
Push back to fold handle.
Pull out spoolpin.
Put a spool on spoolpin.
Draw thread from spoolpin
through pretension device, following
numbers © ®
Wind thread clockwise around
bobbin several times.
Push bobbin on to spindle.
Holding handwheel with your left
hand disengage handwheel by
unscrewing stop motion knob.
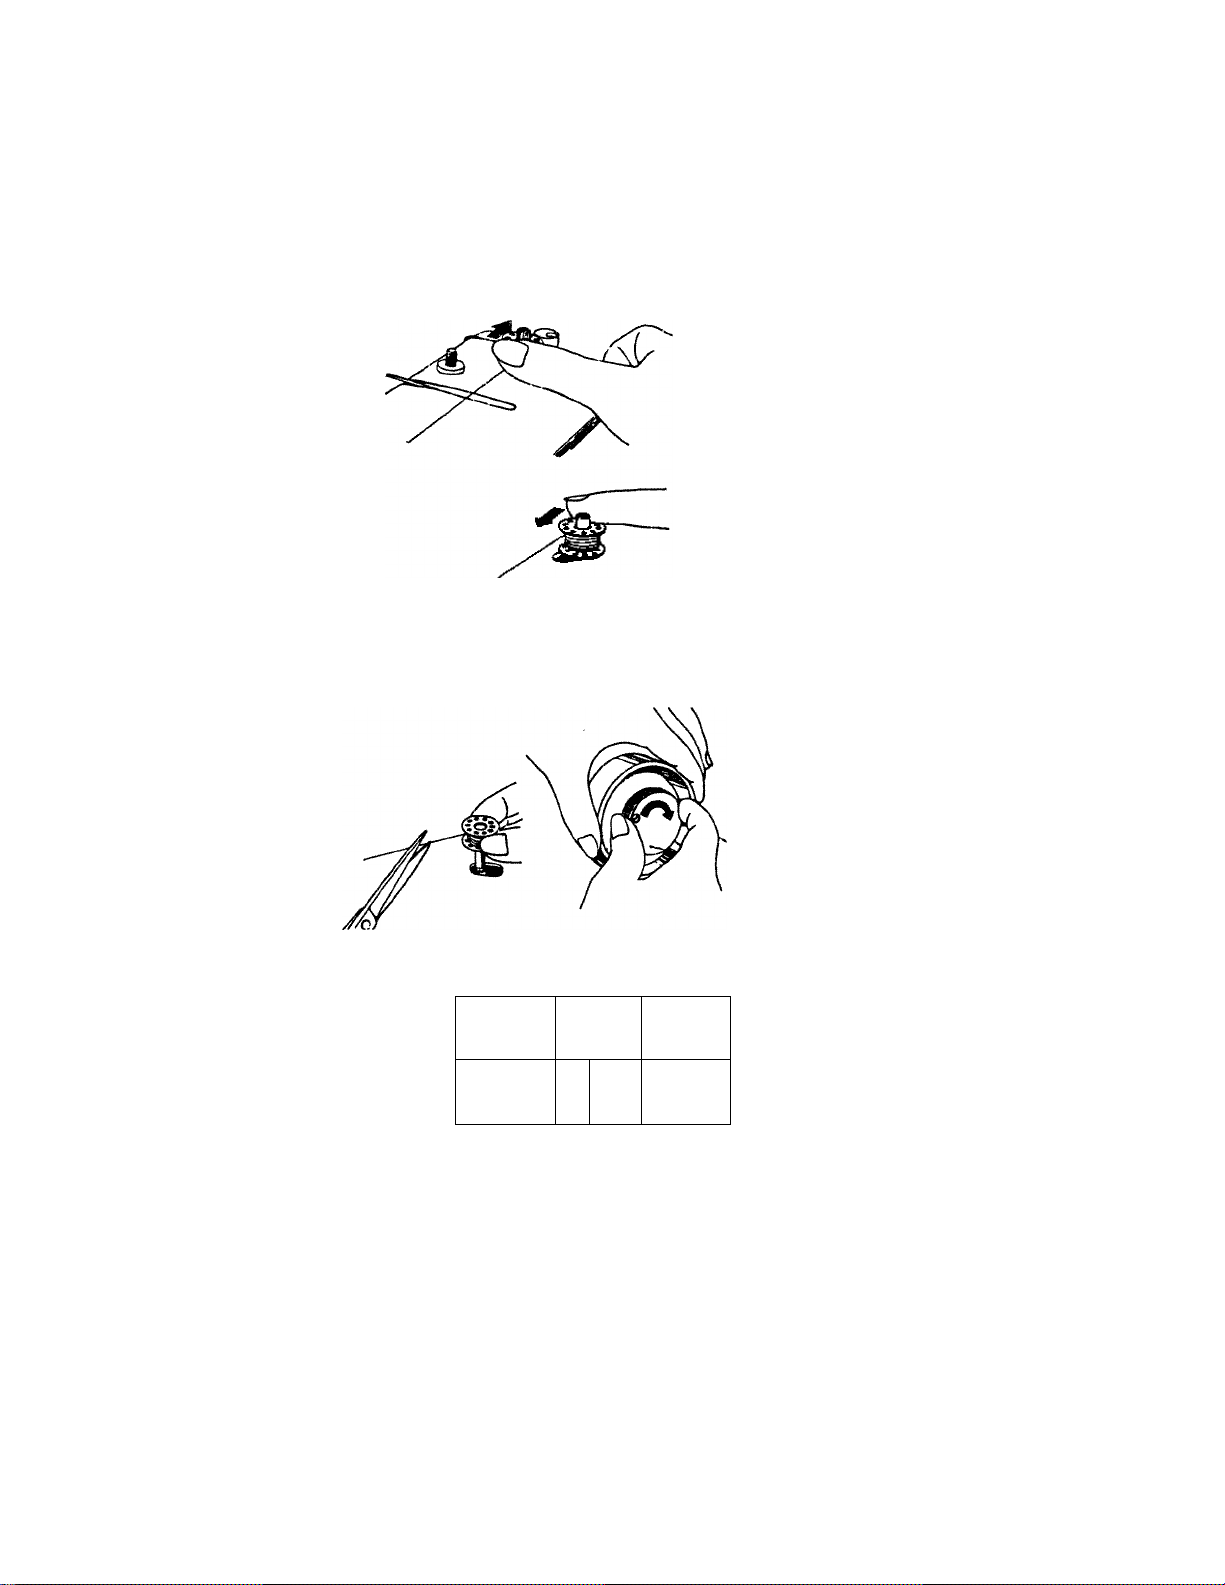
Push bobbin to right and press
down foot controller.
Machine stops automatically
when winding is full.
Push bobbin to left.
Take off bobbin from spindle
and cut thread.
Retighten stop motion knob.
trouble
correction
m
If bobbin is wound unevenly
w
as shown, remove top cover and
loosen set-screw of the guide for
bobbin winding, by using screw
driver and adjust height.
-10-

Inserting Bobbin
Place bobbin in its case with
thread running in direction o
arrow.
Guide thread into slot ®
bobbin case.
Pulling thread to left. bHoQ It
under tension spring then to
delivery eye ®-
■11-
 Loading...