

Page 1

Instruction Book
□
T—iefB.....-r
MODEL 1999
WHITE Sewing machine company
Page 2

POLARIZED PLUG CAUTION
To reduce the risk of electric shock, this appliance has a polarized plug (one blade is wider
than the other). This plug will fit in a polarized outlet only one way. If the plug does not fit fully
in the outlet, reverse the plug. If it still does not fit, contact a qualified electrician to install the
proper outlet. Do not change the plug in any way.
SEWING MACHINE
Record in space provided below the Serial No.
and Model No. of this appliance.
The Serial No. is located Rear of arm.
The Model No. is located Rear of arm.
Serial No.
Model No. 1999
Retain these numbers for future reference.
Foot Controller Model YC482E for use with sewing machine
Model 1999
This sewing machine is for "Household Use".
Page 3

English
IMPORTANT SAFETY INSTRUCTIONS
When using an electrical appliance, basic safety precautions should always be followed, including the following:
Read all instructions before using (this appliance).
DANGER - ■“ To reduce the risk of electric shock:
An appliance should never be left unattended when plugged in. Always unplug this appliance from the electric outlet immediately
after using and before cleaning.
WARNING - — To reduce the risk of burns, fire, electric shock, or injury to persons:
Do not allow to be used as a toy. Close attention is necessary when this appliance is used by or near children.
1.
Use this appliance only for its intended use as described in this manual. Use only attachments recommended by the manufactur
2.
er as contained in this manual.
Never operate this appliance if it has a damaged cord or plug, if it is not working properly, if it has been dropped or damaged, or
3.
dropped into water. Return the appliance to the nearest authorized dealer or service center for examination, repair, electrical or
mechanical adjustment.
Never operate the appliance with any air openings blocked. Keep ventilation openings of the sewing machine and foot controller
4.
free from the accumulation of lint, dust, and loose cloth.
5. Never drop or insert any object into any opening.
6. Do not use outdoors.
7. Do not operate where aerosol (spray) products are being used or where oxygen is being administered.
8. To disconnect, turn all controls to the off (“O”) position, then remove plug from outlet.
9. Do not unplug by pulling on cord. To unplug, grasp the plug, not the cord.
DANGER
1. Always unplug before relamping. Replace the bulb with same type rated 15 watts.
2. Do not reach for an appliance that has fallen into water. Unplug immediately.
3. Do not place or store appliance where it can fall or be pulled into a tub or sink. Do not place or drop into water or other liquid.
Page 4

English
WARNING
1. Keep fingers away from all moving parts. Special care is required around the sewing machine needle.
2. Always use proper needle plate. The wrong plate can cause the needle to break.
3. Do not use bent needles.
4. Do not pull or push fabric while stitching. It may deflect the needle causing it to break.
5. Switch the sewing machine oft (“O”) when making any adjustments in the needle area, such as threading needle, changing nee
dle, threading bobbin, or changing presser foot, etc.
6. Always unplug sewing machine from the electrical outlet when removing covers, lubricating, or when making any other user ser
vicing adjustments mentioned in the instruction manual.
7. Never operate on a soft surface such as a bed or couch where the air openings may be blocked.
SAVE THESE INSTRUCTIONS
Page 5

English
1. NAME OF PARTS..................................................................1
2. ACCESSORIES .....................................................................3
3. BEFORE SEWING
................................................................
DETACHABLE EXTENSION TABLE......................................5
CONNECTING FOOT CONTROLLER AND POWER CORD..6
THREADING UPPER THREAD .............................................7
HOW TO USE NEEDLE THREADER
DRAWING UP LOWER THREAD
...................................
.......................................
10
FOOT PRESSURE REGULATOR...................................... 12
TRIAL SEWING
...................................................................
13
ADJUSTING THREAD TENSION ........................................16
4. STARTING TO SEW.............................................................17
BOBBIN WINDING
INSERTING BOBBIN ........................................................
...............................................................
17
19
CHANGING FOOT...............................................................21
CHANGING NEEDLE ..........................................................22
FABRIC, THREAD AND NEEDLE TABLE
PATTERN SELECTION DIAL
STITCH LENGTH DIAL
TURNING A SQUARE CORNER
.............................................
........................................................
.........................................
...........................
24
26
27
27
REVERSE SEWING ............................................................28
THICK F-ABRIC SEWING
....................................................
30
DOUBLE PRESSER FOOT LIFTER....................................31
HOW TO USE TWIN NEEDLE
5. SELECTING THE STITCH
............................................
...................................................
31
34
STRAIGHT SEWING ...........................................................34
ZIGZAG SEWING ................................................................34
Thread Tension For Zigzag Stitch
......................................
35
BLIND HEM STITCH
...........................................................
OVERCASTING ..................................................................37
5
OVERLOCKING................................................................. 38
STRETCH STITCHING........................................................38
MAKING BUTTONHOLES ................................................ 39
Determine Length
7
Set Position of Butonhole Foot
One Step Buttonhole Sewiog
Balance of Left and Right Side Buttonhole
Cutting Buttonholes
ZIPPER SEWING
MENDING
Patching
................
.................
Mending a Rip
APPLIQUE WORK ...
SMOCKING
..............
DROP FEED LEVER
EMBROIDERY
...........................................................
..........................................
............................................
........................
...................................................
.....
................................
...................................................
...................................................
........
...................................................
...................................................
.
...................................................47
...................................................
.........
...................................................
FREE HAND EMBROIDERY...............................................48
6. MAINTENANCE ............................................................... 50
CLEANING......................................................................... 50
OILING .............................................................................. 51
7. TROUBLE CHART...............................................................52
LOWER TENSION ADJUSTMENT
CLEANING SHUTTLE CASE
CHANGING LIGHT BULB
......................
.....................................
............................................
....'.........................
35
40
40
41
42
42
;....................43
44
44
45
45
48
48
56
58
59
Page 6

Español
INSTRUCCIONES IMPORTANTES DE SEGURIDAD
Cuando utilice un aparato eléctrico, se deben respetar siempre ciertas precanciones básicas de seguridad, incuyendo las siguientes:
Lea todas las instrucciones antes de utilizarlo (este aparato).
PELIGRO - — Para reducir el riesgo de descargas eléctricas:
Nunca se debe dejar desatendido un aparato que esté enchufado a la corriente eléctrica. Desenchufe siempre este aparato de la
toma eléctrica immediatamente después de su utilización y antes de limpiarlo.
ADVERTENCIA - — Para reducir el riesgo de quemaduras, incendios, descargas
eléctricas, o lesiones personales:
1. No permita que sea utilizado como un jugnete. Cuando este aparato es utilizado por, o cerca de, niños, es necesario prestar
especial atención.
2. Utilice este aparato sólo para el uso al que se la destina,tal como se describe en este manual. Utilice únicamente ios acceso
rios recommendados por el fabricante que se incluyen en este manual.
3. No utilice nunca este aparato si el cable o el enchufe están dañados, si no funciona correctamente, si se ha dejado caer o ha
sufrido algún dafio, o si ha sido sumergido en agua, devuelva el aparato al concesionario antorizado más cercano para que sea
examinado, reparado o ajustado mecánica o eléctricamente.
4. No utilice nunca el aparato si los orificios de ventilación están bloqueados. Mantenga los orifcios de ventilación de la máquina
de coser y del pedal control sin acumulaciones de hilo, poiyo y fragmentos de tela.
5. Nunca deje caer o introduzca ningún objecto en ninguna abertura.
6. No lo utilice al aire libre.
7. No utilice nunca este aparato en lugares donde se estén utilizando productos en aerosol (spray) o donde se esté administrado oxigeno.
8. Para disconectarlo, apague todos los controles (posición “O”) y después desconecte el enchufe de la toma de corriente.
9. No desenchufe el aparato tirando del cable. Para desenchufar, tire del enchufe, no del cable.
PELIGRO
1. Desenchufe siempre el aparato antes de cambiar la bombilla. Reemplace la bombilla con una del mismo tipo, homologada para 15 watt.
2. No intente coger un aparato que haya caído ai agua. Desenchúfelo immediatamente.
3. No coloque o guarde el aparato en un lugar donde pueda caerse o ser empujado dentro de una bañera o lavabo. No ponga o
deje gotear agua u otro líquido sobre el aparato.
Page 7

Español
ADVERTENCIA
Mantenga los dedos alejados de las piezas en movimiento. Se debe prestar especial atención en las proximidades de la aguja.
1.
Utilice siempre una placa de aguja adecuada. Una placa incorrecta puede causer la ruptura de la aguja.
2.
No utilice agujas dobladas.
3.
No tire de la tela o la emuje mientras cosa a máquina. Puede desviar la aguja y romperla.
4.
Apague (“O”) la máquina de coser cuando haga ajustes en el área de la aguja, por ejemplo, cuando enhebre le aguja, cuando
5.
cambie la aguja, cuando coloque la bobina o cuando cambie el pedal, etc.
Desenchufe siempre la máquina de coser de la toma eléctrica cuando retire las cubiertas, lubrique el aparato, o cuando realice
cualquier otro ajuste mencionado en el manual de intrucciones
No utilice nunca el aparato sobre una superficie blanda, tal como o un sofá, donde los orificios de ventilación puen quedar blo
7.
queados.
Page 8

Español
1. NOMBRE DE LAS PARTES
................................................
2. ACCESORIOS ......................................................................3
3. ANTES DE EMPEZAR A COSER
TABLERO DE EXTENSIÓN RETIRADLE
CONECCIÓN DEL PEDAL Y CABLE DE CORRIENTE
ENHEBRAMIENTO DEL HILO SUPERIOR
USER EL ENHEBRADOE DE AGUJA
CÓMO LEVANTAR EL HILO INFERIOR
AJUStAR LA PRESION DEL PIE PRENSATELAS
COSTURA DE PRUEBA
.....................................................
AJUSTE DE LA TENSIÓN DEL HILO
.........................................
.............................
........
..........................
..................................
.............................
.............
...................................
12
13
4. COMENZAR A COSER ......................................................17
BOBINADO ....................................................................... 17
COLOCACIÓN DEL CARRETE EN LA BOBINA
..................
CAMBIO DEL PIE PRENSATELA ..................................... 21
CAMBIO DE LA AGUJA
......................................................
22
TABLA DE TELAS, HILOS Y AGUJAS................................25
CONTROL PARA SELECCIONAR LA PUNTADA
CONTROL DEL LARGO DE LA PUNTADA
CAMBIO DE DIRECCIÓN DE PESTUNTE
COSTURA EN REVERSA
COSTURA EN TELAS GRUESAS
..................................................
......................................
.........................
.............
........................
26
27
27
28
30
DOBLE ACCIÓN DEL ELEVADOR DEL PIE PRENSATELA ...31
COMO USAR UNA AGUJA DBLE
5. ESCOGER LA PUNTADA
...................................................
......................................
31
34
COSTURA RECTA .............................................................34
COSTURA EN ZIG-ZAG .....................................................34
Tensión del Hilo para Costura Zig-Zag .............................35
1
COSTURA INVISIBLE Y DOBLADILLO
SOBRE COSTURA
5
5
6
7
7
10
COSTURA “OVERLOCK” ....................................................38
COSTURA ELÁSTICA DE DISEÑOS AUTOMÁTICOS
CONFECCIÓN DE OJALES ................................................39
Determinación del Largo
Determinar la posición del pie prénsatelas para ojale........40
Confección de ojales automatices
Equilibrio de ios lados derecho y izquierdo del ojal............42
Corte del Ojal
16
COSTURA DE CIERRES
COSTURA PARA REMENDAR .......................................... 44
COSTURA DE APLICACIÓN (PARCHES DE ADORNO) ....45
19
FRUNCIDO...........................................................................47
PALANCA PARA MOVER LOS DIENTES
COSTURA PARA BORDAR ................................................48
6. MANTENIMIENTO
KIMPIEZA
ACETADO
7. TABLA DE PROBLEMAS
AJUSTE DE TENSION DE LA BOBINA ................................56
LIMPIEZA DE LA CAJA DEL CANGREJO ...........................
CAMBIO DEL FOCO..............................................................59
..............................
..............................................................
....................................................
.....................................
.....................................................................
.....................................................
...........................
...........
......................
......................
.......
35
37
38
40
41
42
43
48
.50
.50
.51
.54
58
Page 9

Page 10

Page 2
English
1. Handle
2. Thread guide for bobbin winding
3. Take-up lever
4. Upper tension plate
5. Face cover
6. Upper thread tension dial
7. Thread cutter
8. Thread guide for upper threading
9. Presser foot thumb screw
10. Presser foot
11. Feed dog
12. Needle plate
13. Extension table.
14. Spool pin
15. Bobbin winding spindle
16. Handwheel
17. Declutch knob
18. Presser foot lifter
19. Pattern selection dial
20. Socket
21. Switch
22. Free arm
23. Reverse sewing lever
24. Drop feed lever (Inside)
25. Stitch length dial
26. Zigzag width control
^ Position of pattern selection dial differs from
country to country.
Español
1. Manija
2. Gufa para enhebrar el hilo
3. Tira hilo
4. Gufa del hilo superior
5. Тара frontal
6. Control de la tensión del hilo superior
7. Cuchilla para cortar el hilo
8. Guía del hilo superior
9. Tornillo del pie prénsatela
10. Pie prénsatela
11. Dientes
12. Placa de la aguja
13. Tablero de extensión
14. Porta carretel
15. Devanador
16. Volante
17. Seguro del volante
18. Elevados del pie prénsatela
19. Control para seleccionar la puntada
20. Enchufe
21. Interruptor
22. Brazo libre
23. Palanca para coser en veversa
24. Palanca para mover los dientes
25. Control del largo de la puntada
26. Control del ancho del zig-zag
5KLa posición del selector de puntos puede cambiar
de país a un otro.
Page 11
L_
________r____________
I
2. ACCESSORIES / ACCESORIOS
11
Sedioli
2
i;?
5ií
7
8
10
12
13
14
15
Page 12

English Español
Page 4
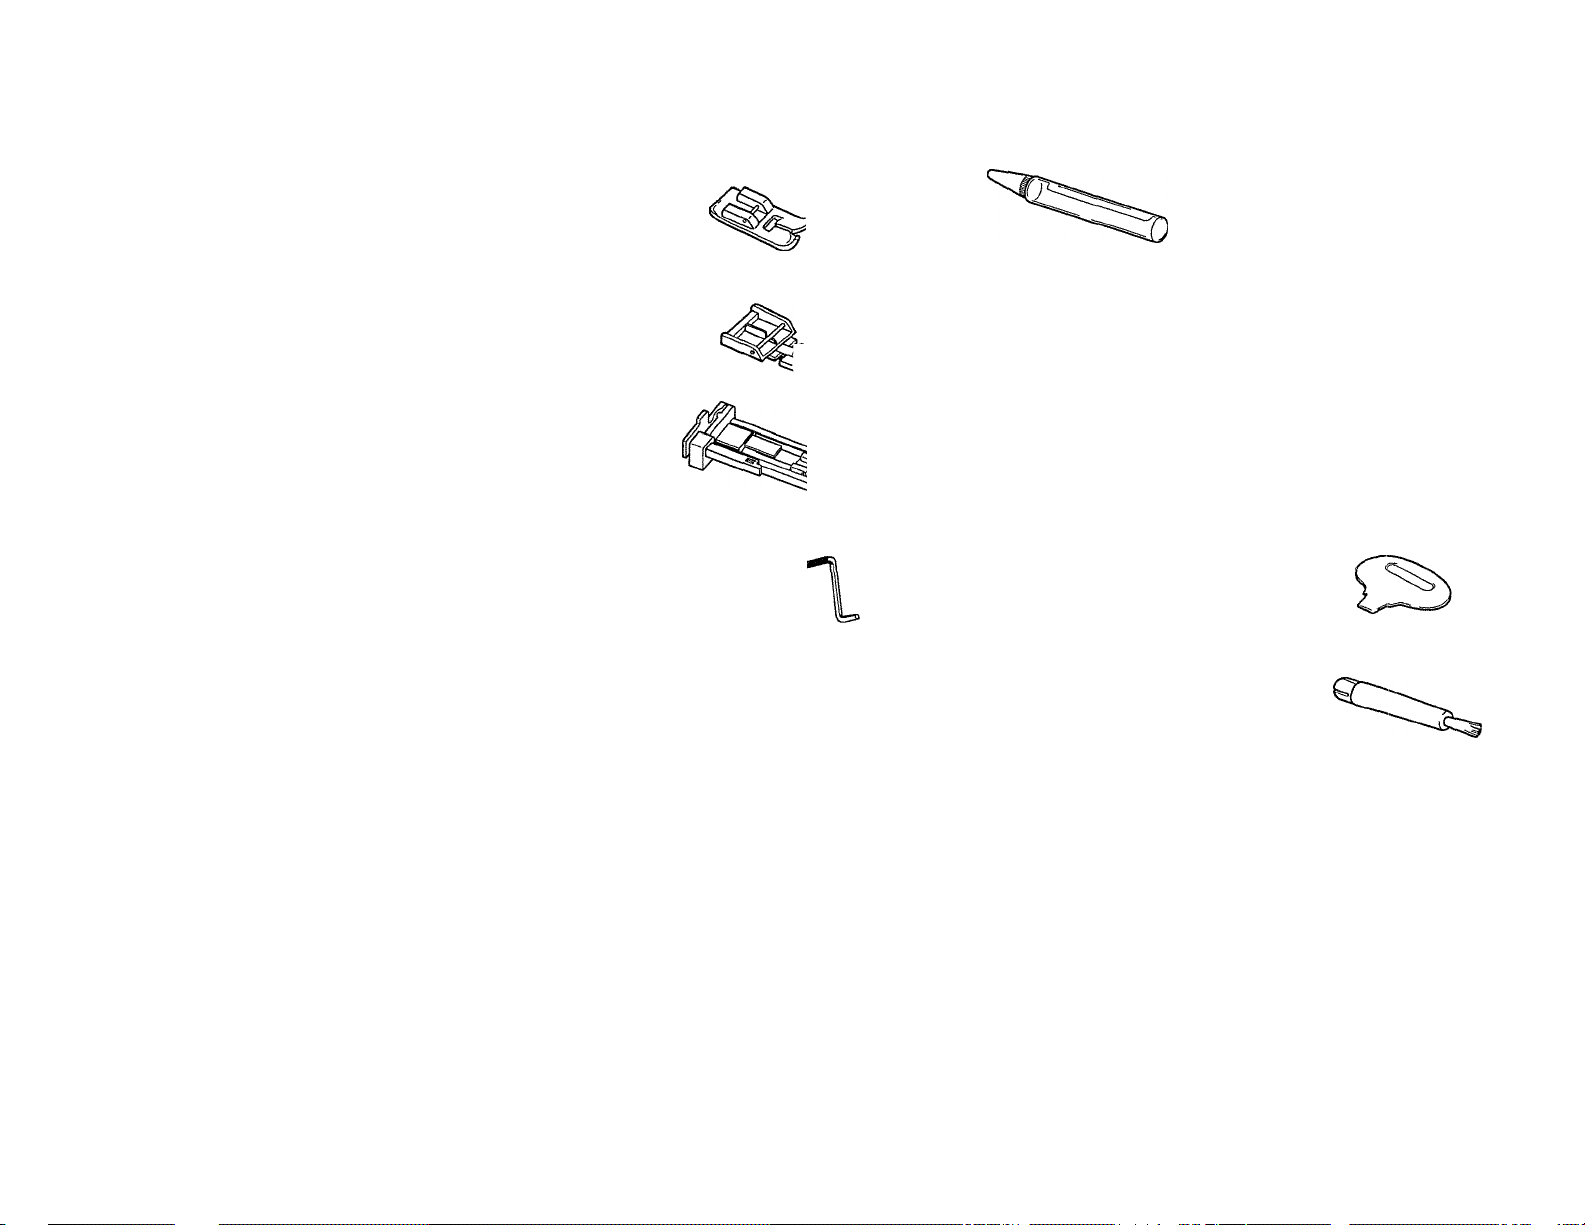
1. Zigzag sewing foot (on machine)
2. Zipper foot
3. Buttonhole foot
4. Quilting guide St
5. Buttonhole cutter
6. Oiler
7. Bobbins (3 pcs.)
8. Standard needles (3 pcs.,#14)
1. Pie de costura zig-zag (en la máquina)
2. Pie para coser cierres
3. Pie para ojal
4. Guía para acolchar ìSi
5. Cortador para el ojal
6. Aceitera
7. Carretes (3 pzas)
8. Agujas normales (3 pzas)
9. Standard needle (1 pc., #11) 9. Agujas normal (1 pza)
10. Ball point needle (1 pc.)
11. Twin needle (1 pc.)
12. Screw driver (small) (1 pc.)
13. Extra spool pin (For twin needle sewing)
14. Needle plate screw driver
15. Cleaning brush >8
555 Optional accessory
Accessory may differ from country to country.
10. Aguja de punta redonda (1 pza)
11. Aguja doble (1 pza)
12. Desarmadores (Pequeño) (1 pza)
13. Porta carretel extra (para costura con c
14. Llave para desatornillar la placa de la a
15. Brocha para limpiar la máquina 5K
58 Accesorio opcional
Los accesorios opcionales puede ser diferente
de acuerdo al páis.
Page 13
English
Español
Section
3
3. BEFORE SEWINGS
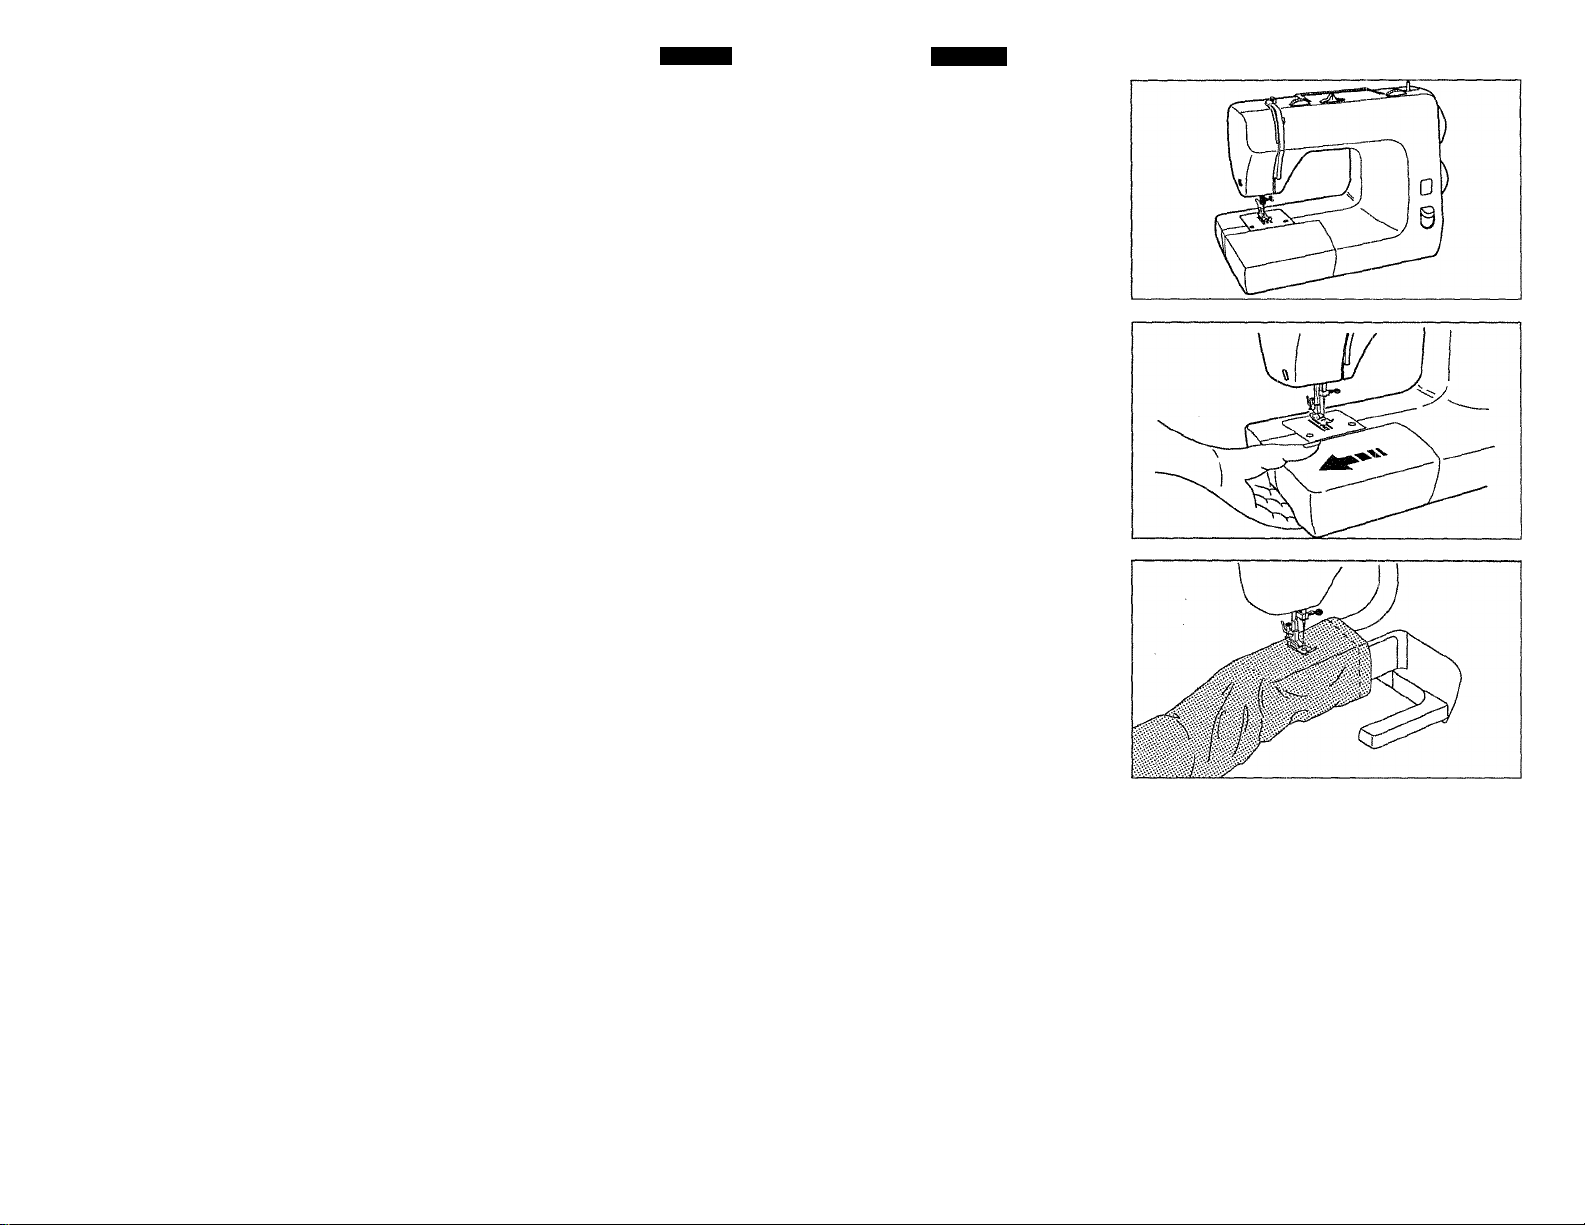
The machine is stored in flat
bed style which makes your
work easier for ordinary
sewing.
DETACHABLE EXTENSION
TABLE
Remove the table and the
machine is used as a freearm machine.
The free-arm is more conve
nient to sew or embroider;
trousers, sleeves, cuffs of Tshirts, blouses, etc.
Reverse the above steps to
attach the extension table.
3. ANTES DE EMPEZAR A COSER
La máquina se presenta en
forma plana para hacer más
fácil su labor en la costura
normal.
TABLERO DE EXTENSION
RETIRADLE
Quitar esta parte y la
máquina se puede usar con
el brazo libre.
E1 brazo libre es recomend
able para coser o bordar pan
talones, mangas,puños de
camisas, blusas, etc.
Colocar nuevamente la caja
de accesorios.
Page 14
Page 6
Section
English
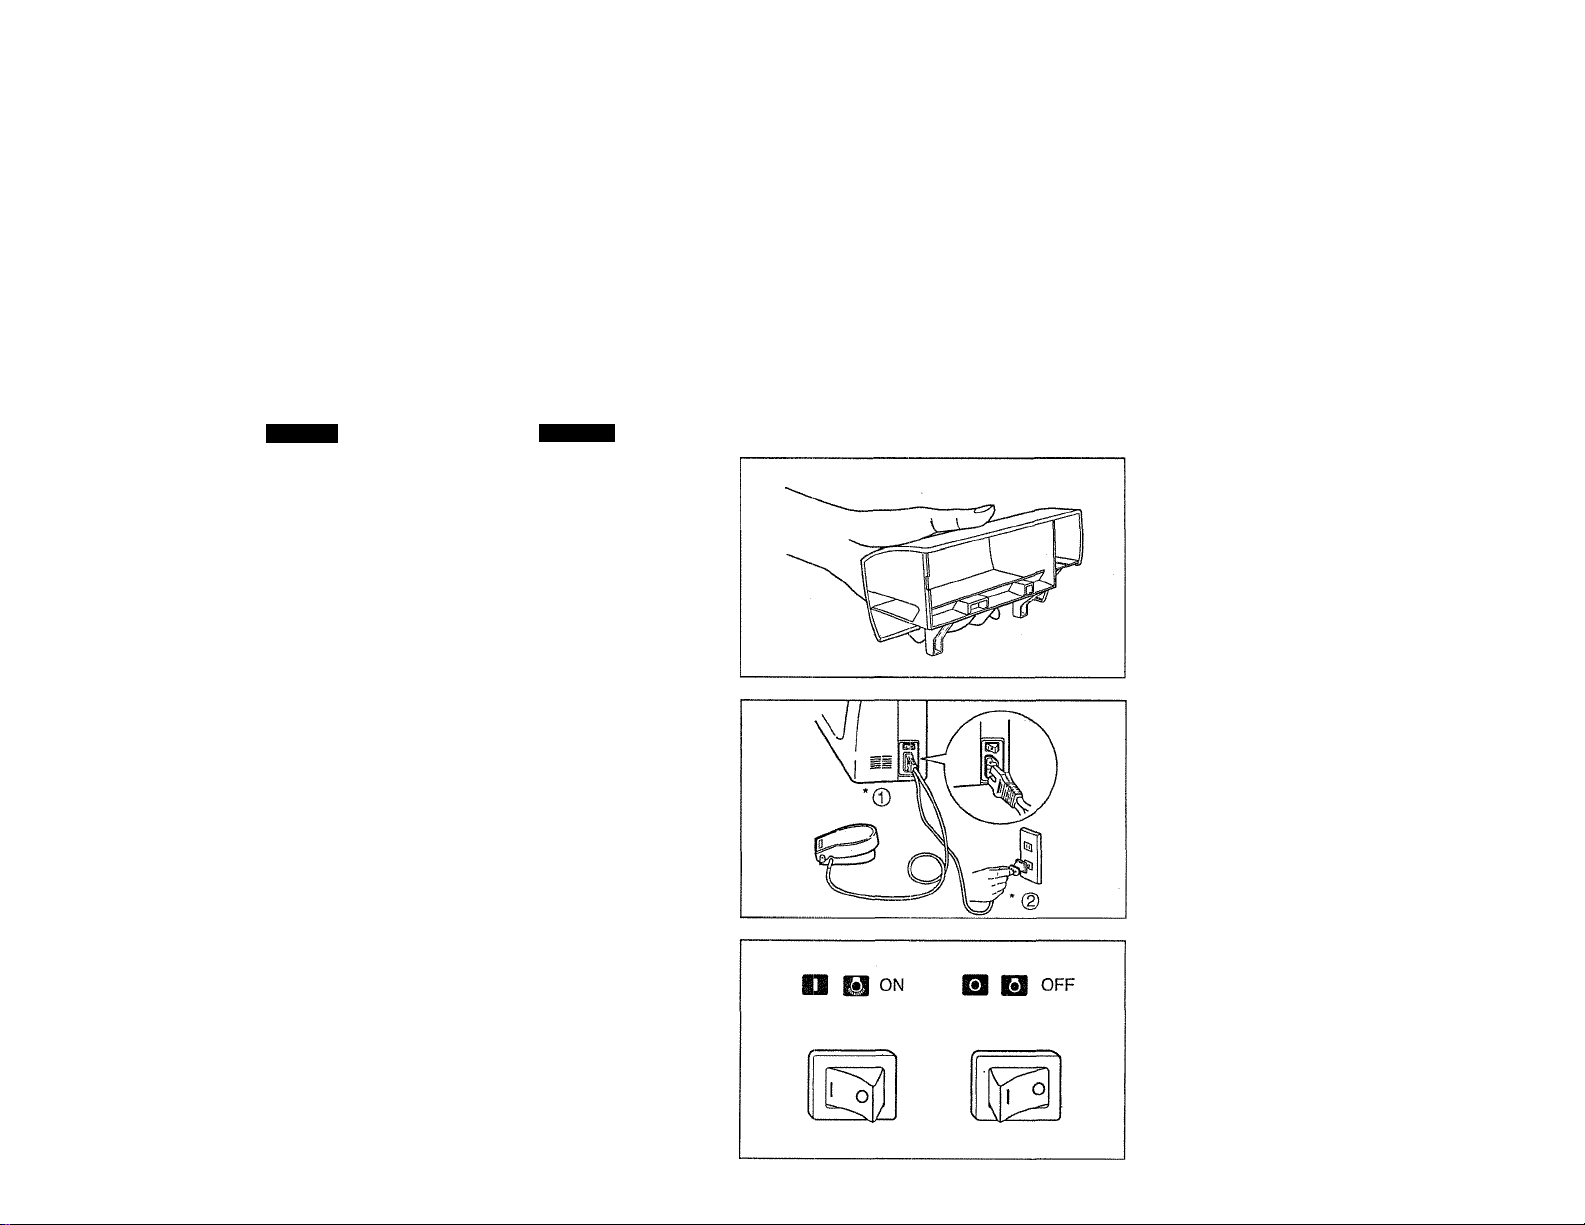
To open the lid of the exten
sion bed, pull it open, as illus
trated.
CONNECTING FOOT
CONTROLLER AND
POWER CORD
Connect foot controller and
power cord © @ .
Before plugging in your
machine, be sure that the
voltage is the same as that of
your machine (written on a
plate at back of machine).
Switch on power to the
machine and turn on the
sewing light.
Switch off power to the
machine and turn off the
sewing light.
Español
Para abrir la tapa de la caja
de accesorios, jalarla como
se indica.
CONECCION DEL PEDAL Y
CABLE DE CORRIENTE
Conectar el pedal y el cable
de corriente siguiendo los
pasos © y (© .
Antes de conectar la clavija
de la máquina, asegurarse de
que el voltaje de la máquina
sea igual que el de su toma
de corriente.
el voltaje está escrito
sobre una placa en la parte
posterior de la máquina.)
Accione el botón de la
máquina, para el fun
cionamiento del pedal y del
foco.
OFF - Apagado
ON - Encendido
Page 15
English
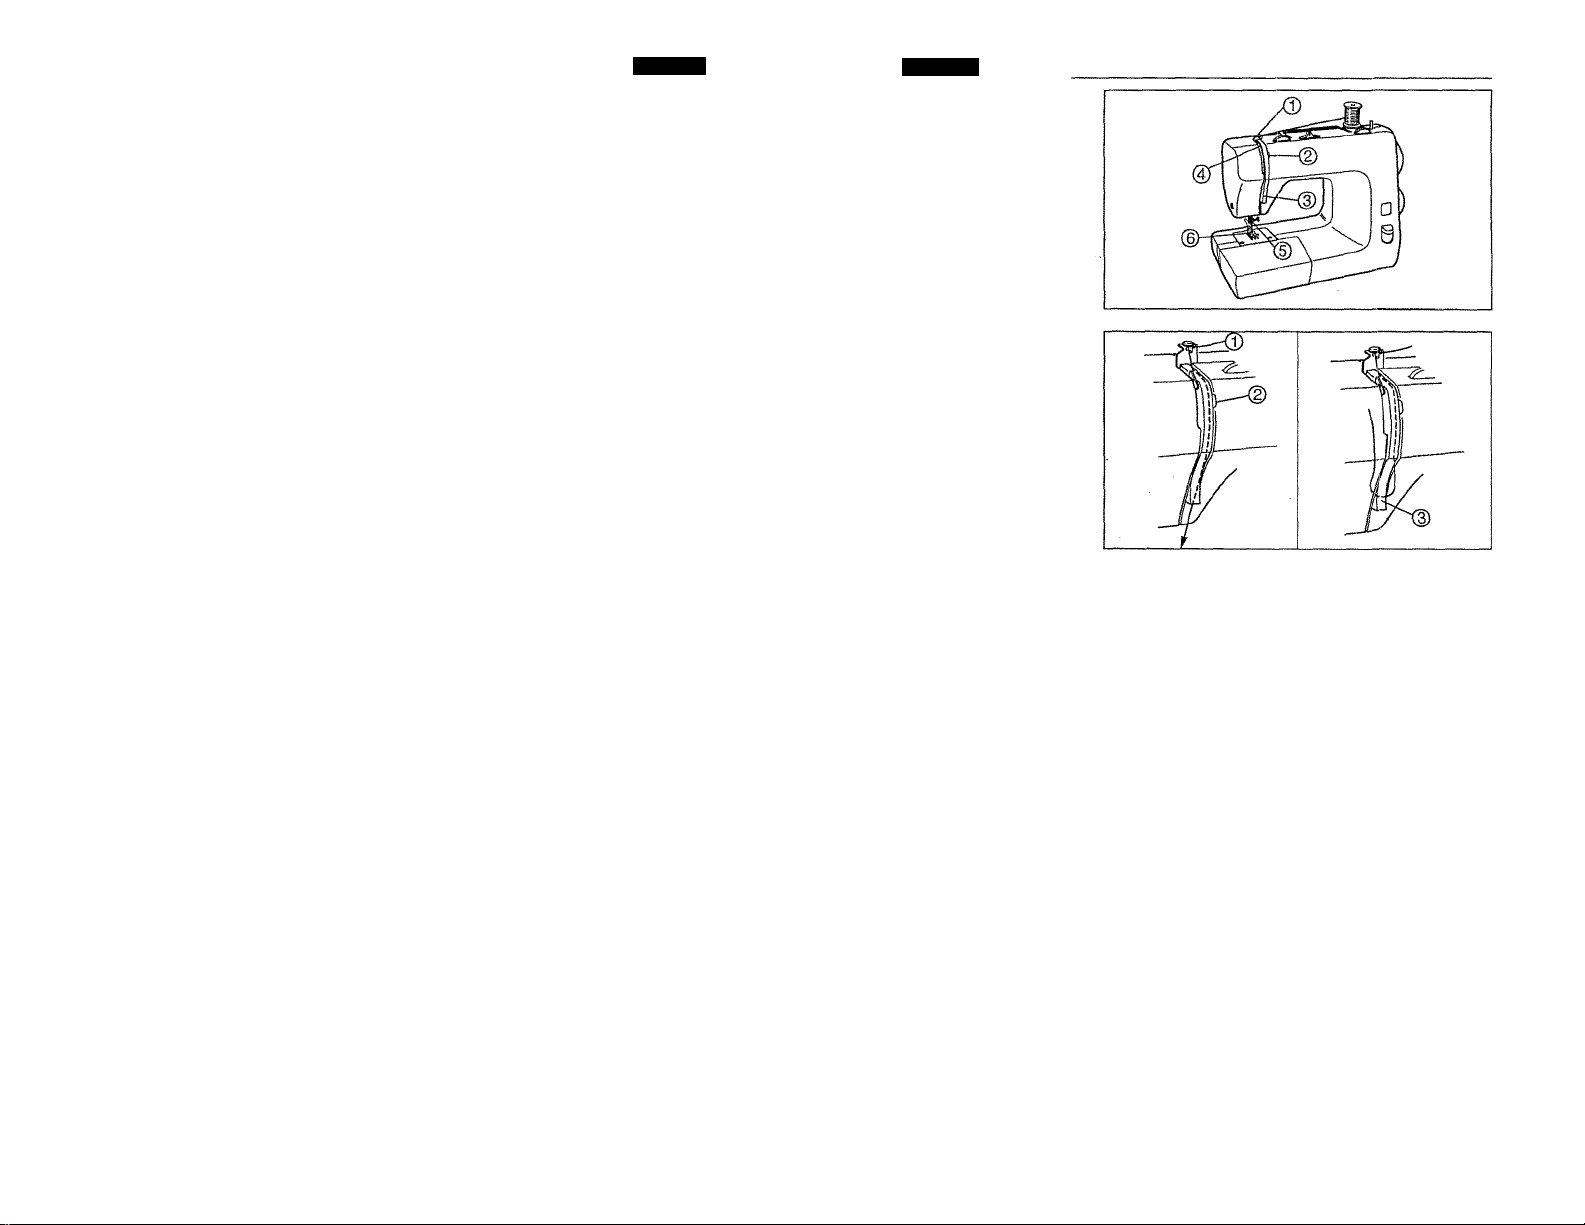
THREADING UPPER THREAD
Raise the presser foot lifter.
Raise the take-up lever to the
highest position by turning the
handwheel towards you.
Thread following numbers 0 -
®.
Pass the thread through
guide 0.
Español
ENHEBRAMIENTO DEL
HILO SUPERIOR
Levantar el elevador del pie
prénsatela.
Levantar el tira hilo a su posi
ción más alta girando el
volante hacia Ud.
Para enhebrar seguir los
pasos del 0 al ©.
Pasar el hilo a través de la
guía©.
Section
3
Lead thread through either
side of tension disc @.
Hook the thread under the
guide © as shown.
Jalar el hilo hacia el frente y
pasarlo por cualquier unidad
de la guía @ .
Enhebrar el hilo en la guía ©
y jalar el hilo hacia arriba para
insertarlo en el resorte.
Page 16
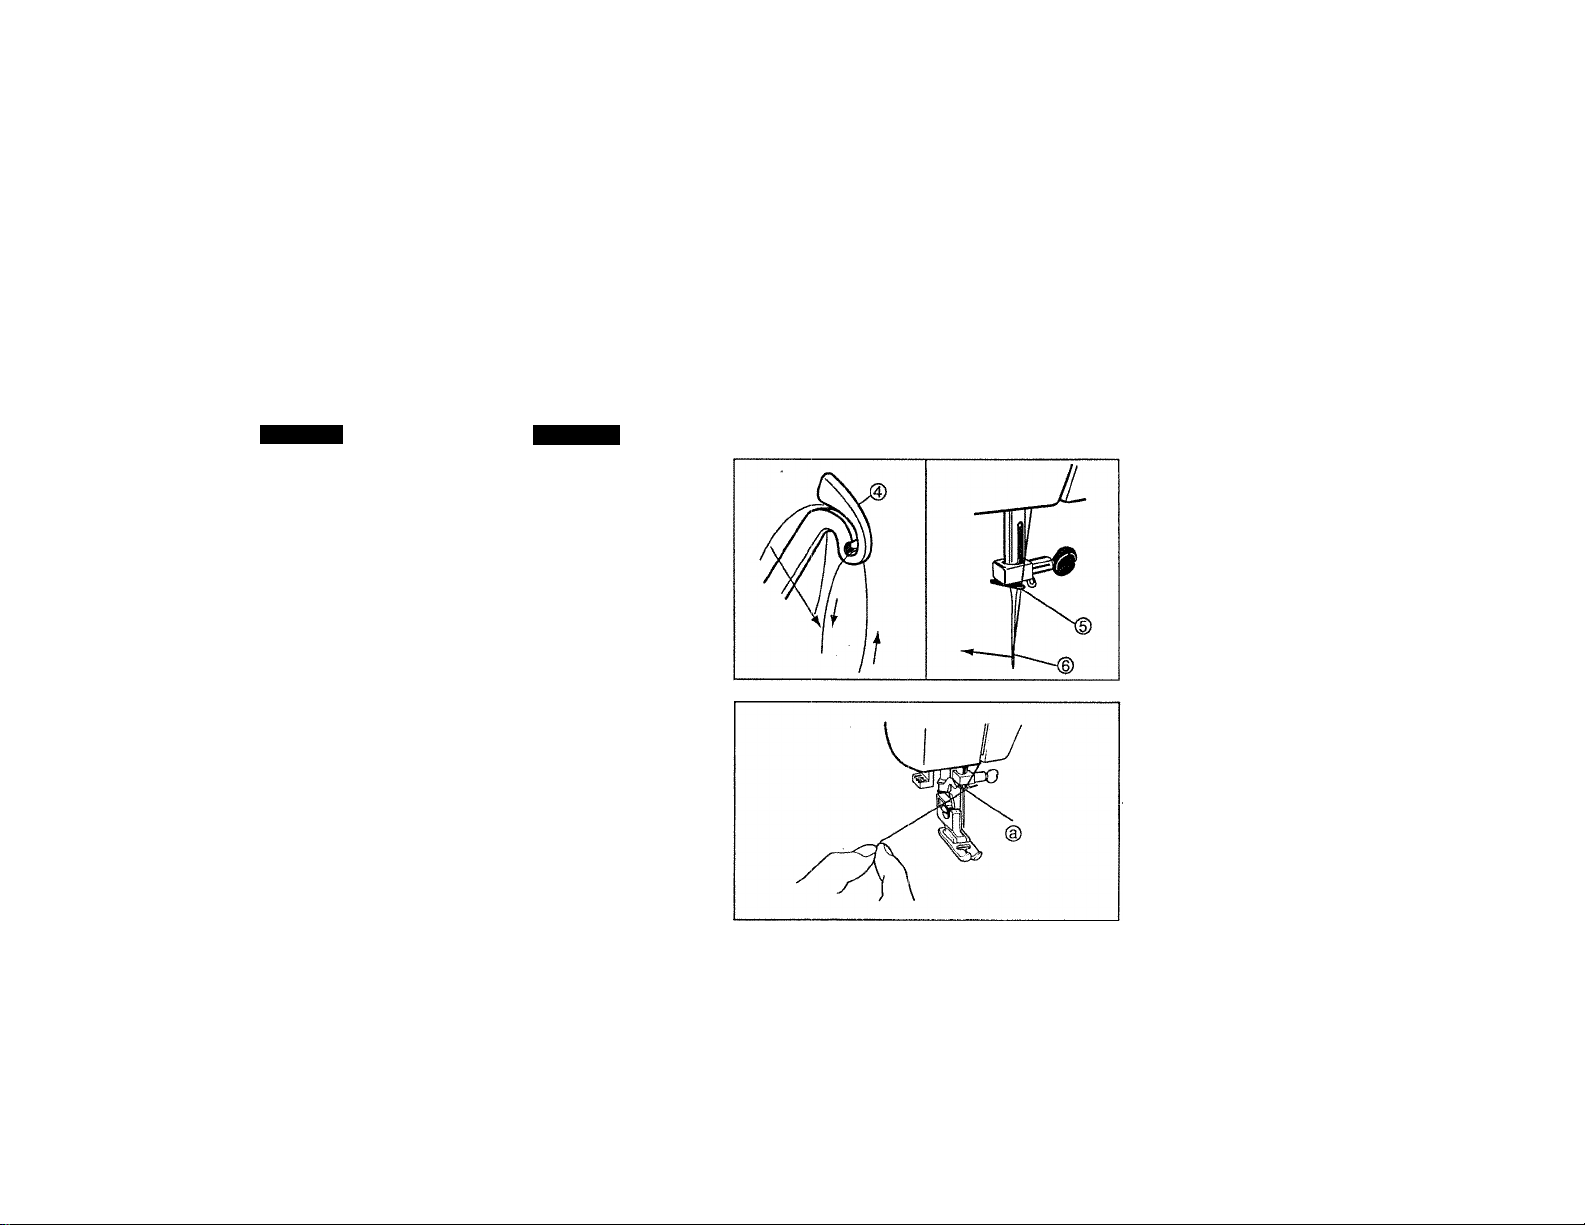
Page 8
Section
3
English
Thread take-up lever @ .
Pass thread through needle
guide ® (use left one) then
through the needle eye ©
from front to back.
Pull about 15 cm (6") of
thread, under the presser
foot and to the back.
HOW TO USE NEEDLE THREADER
Needle threader can be used
to thread needle more easily.
Thread to thread guide of
needle bar (a)
Allow about 15 cm (6”) of
thread extra.
Español
Enhebrar el hilo en la guía ®.
Jalar el hilo a través de la
guía ® (usar izquierda).
Enhebrar en la aguja de ade
lante hacia atrás. (D
Dejar aproximadamente 15
cm de hilo extra.
USER EL ENHEBRADOR
DE AGUJA
El enhebrador de aguja
puede ayudarle a enhebrar
más fácilmente.
Pase el hilo superior por la
guía de la aguja ( @ ).
Tire 15 cm de hilo hacia
atrás.
Page 17
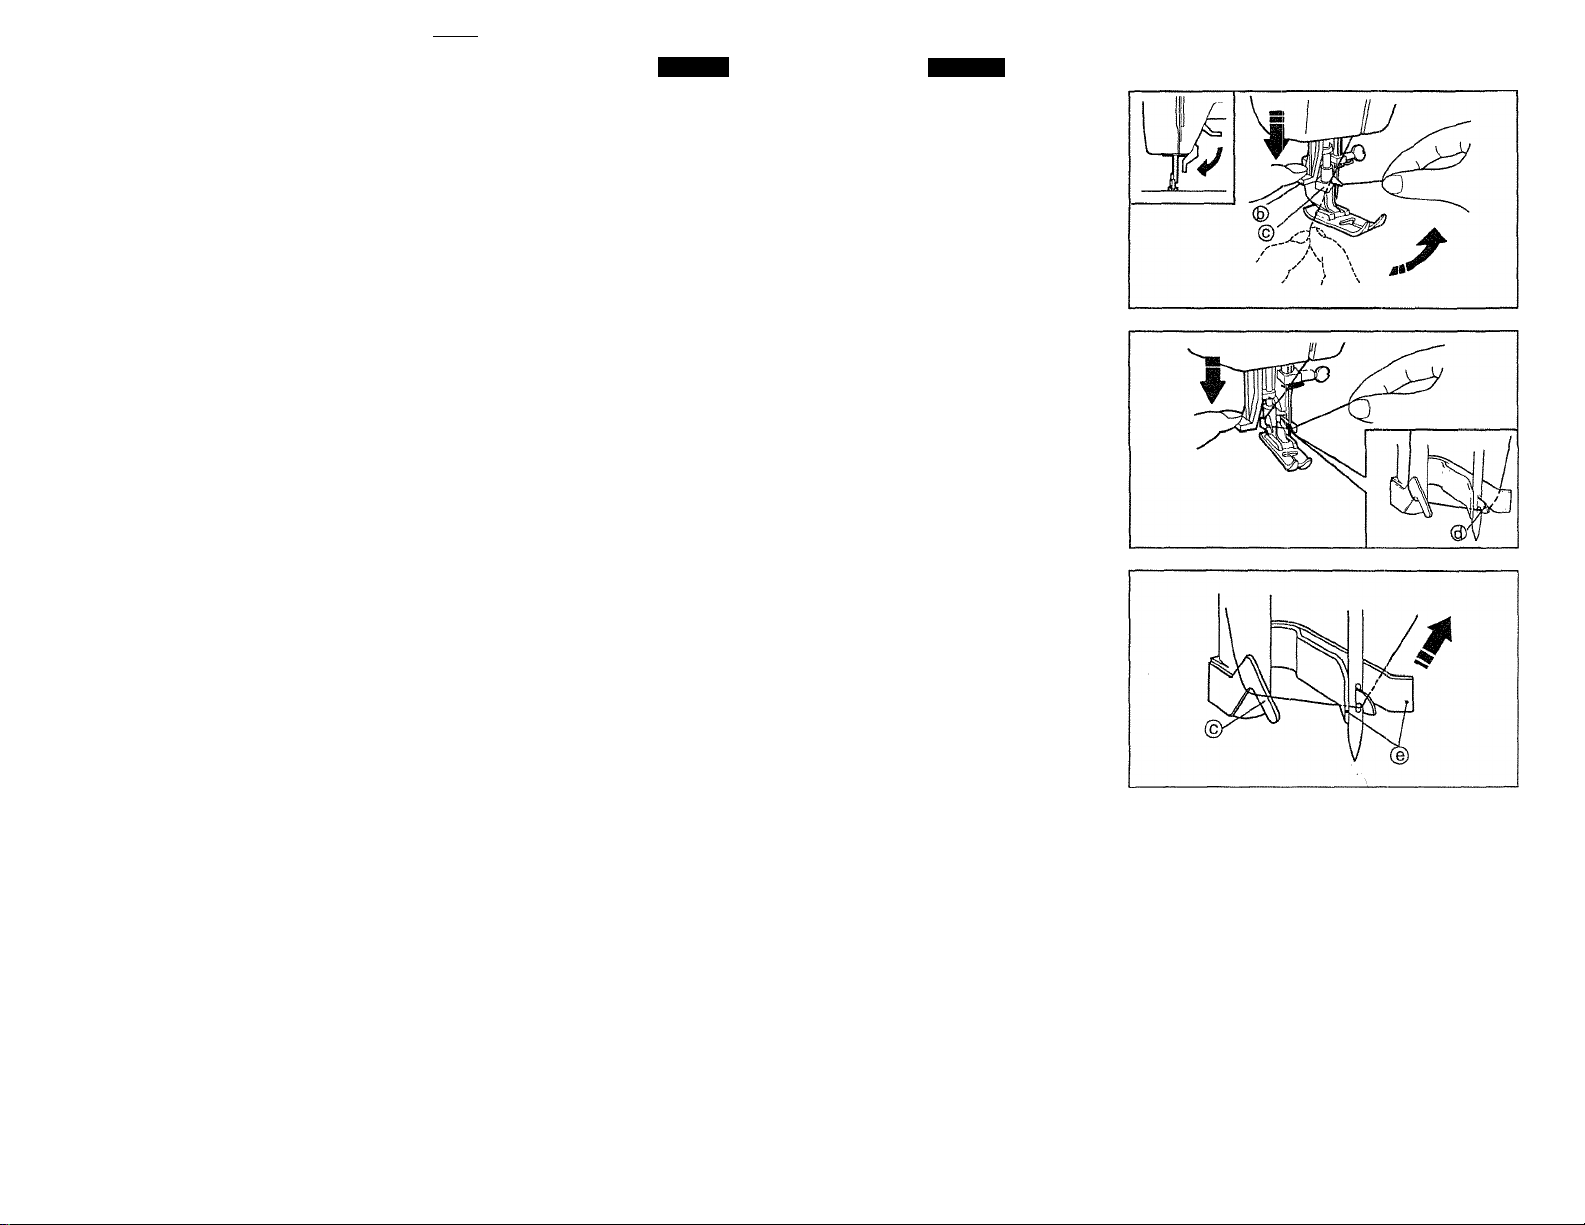
I raye y
______
j
Section
3
English
1. Lower presser foot lifter. 1.
2.
Bring needle to its highest
position by turning handwheel towards you.
3. Lower needle threader
lever® and bring thread
under guide © from left
side.
4. Lower needle threader
lever to its lowest position
so that hook passes
through the needle eye.
5.
Bring thread from guide
© to right side under the
hook© . 5.
Si The knack of hooking;
Take thread under hook
guide ® and bring it up to
the right, pressing thread
against needle.
2.
3.
4.
Español
Baje la palanca del pie de
prénsatelas.
Ponga la aguja en la posi
ción alta girando la rueda
hacia Usted.
Baje la palanca del enhebrador ( ® ) y deslizar
el hilo en el ganchillo de la
izquierda hacia la derecha.
Baje la palanca del
enhebrador en posición
baja hasta que el ganchil
lo entre en el ojo de la
aguja.
Hacer deslizar el hilo des
de la guía ( © ) hacia la
derecha debajo del gan
chillo (@).
Si Enhebrar con talento;
Tire del hilo bajo de la
guía del ganchillo ( © ) y
tírelo hacia ariba, apretán
dolo contra la aguja.
Page 18
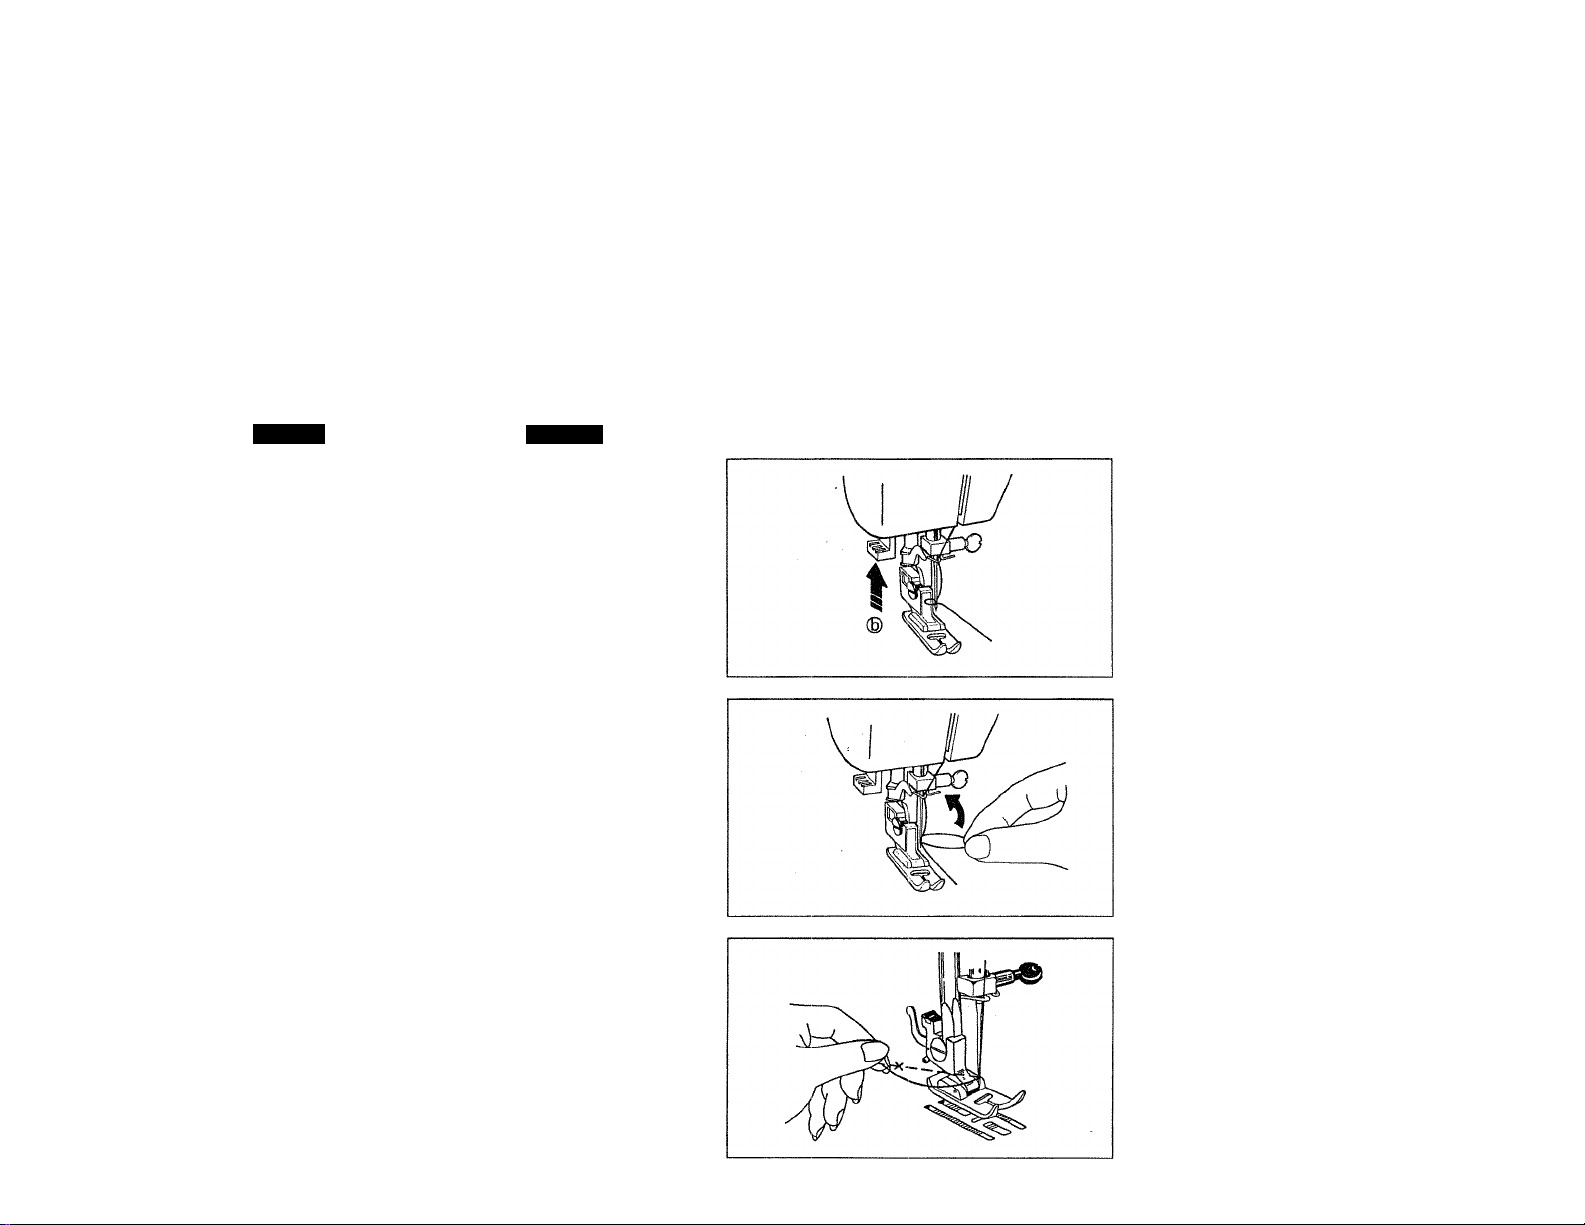
Page 10
Section
English
6. Release the needle thread
lever © and thread at the
same time. Thread is
pulled by hook and pass
es through needle eye.
7. Pull loop of thread through
needle eye.
Note: Repeat above steps
when thread does not
pass through needle
eye correctly. Needle
threader doesn’t work
when needle is not at
highest position.
BRING UP BOBBIN
THREAD
Hold the end of the upper
thread with the left hand as
illustrated.
Turn the handwheel slowly
towards you until the needle
moves down and up again to
its highest position.
Español
6. Afloje la palanca del
enhebrador (©) y enheb
rar al mismo tiempo. El
hilo esta tirado por el gan
chillo y pasa por el ojo de
aguja.
7. Tire el hilo a través del
ojo.
Nota: Vuelva a empezar si el
hilo no está bien enhe
brado.
Si lia aguja no está bien
fijada, no podrá enhe
brarla.
COMO LEVANTAR EL HILO
INFERIOR
Sostener el extremo del hilo
superior con la mano izquierda.
Girar el volante lentamente
hacia Ud. hasta que la aguja
baje y suba otra vez.
Page 19
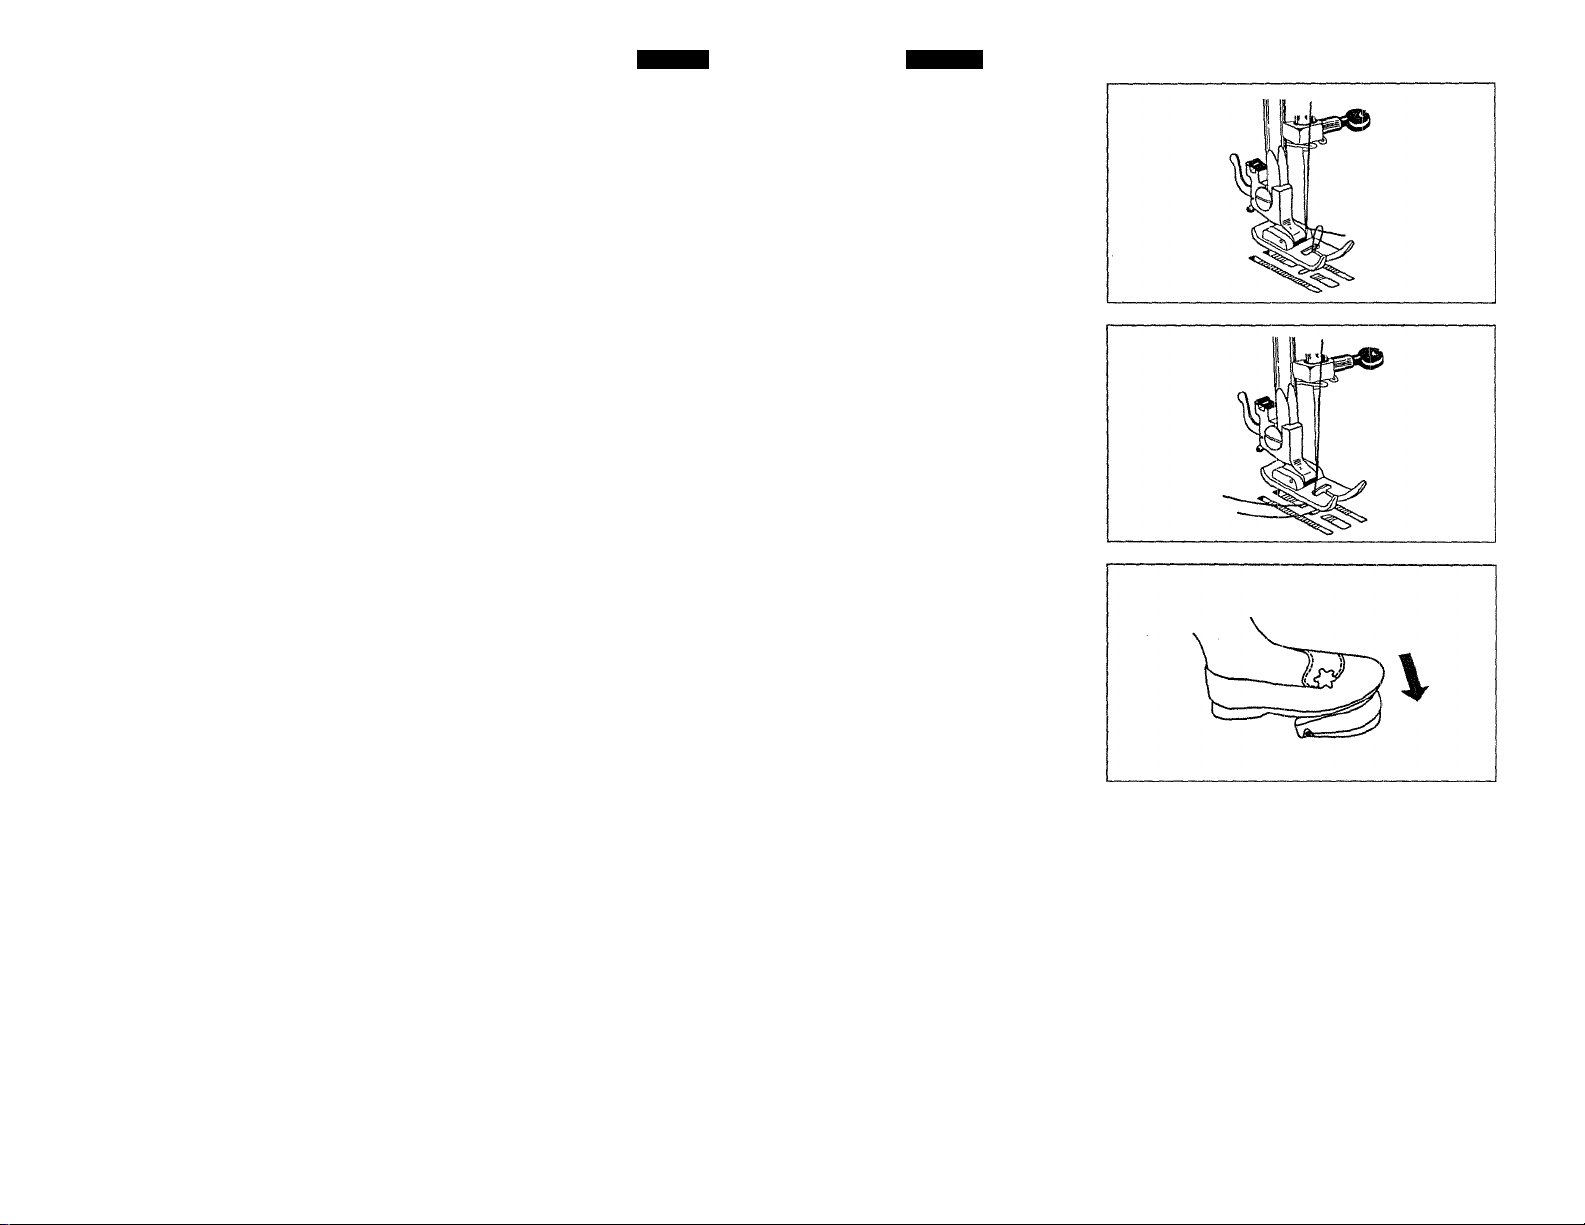
English
Pull the upper thread solwly
and the lower thread will be
brought up in al loop
Español
Jalar el hilo superior lenta
mente y el hilo inferior se
alzará en forma de presilla.
Section
3
Pull out both threads to about
15 cm {6”) and place them
together at the left under the
presser fooot.
The more you press the foot
controller, the faster the
machine runs.
Jalar ambos hilos 15 cm
aproximadamente y ponerlos
juntos debajo de! pie prén
satela hacia el lado izquierdo.
A major presión del pedal,
mayor será la velocidad con
que la máquina coserá.
Page 20
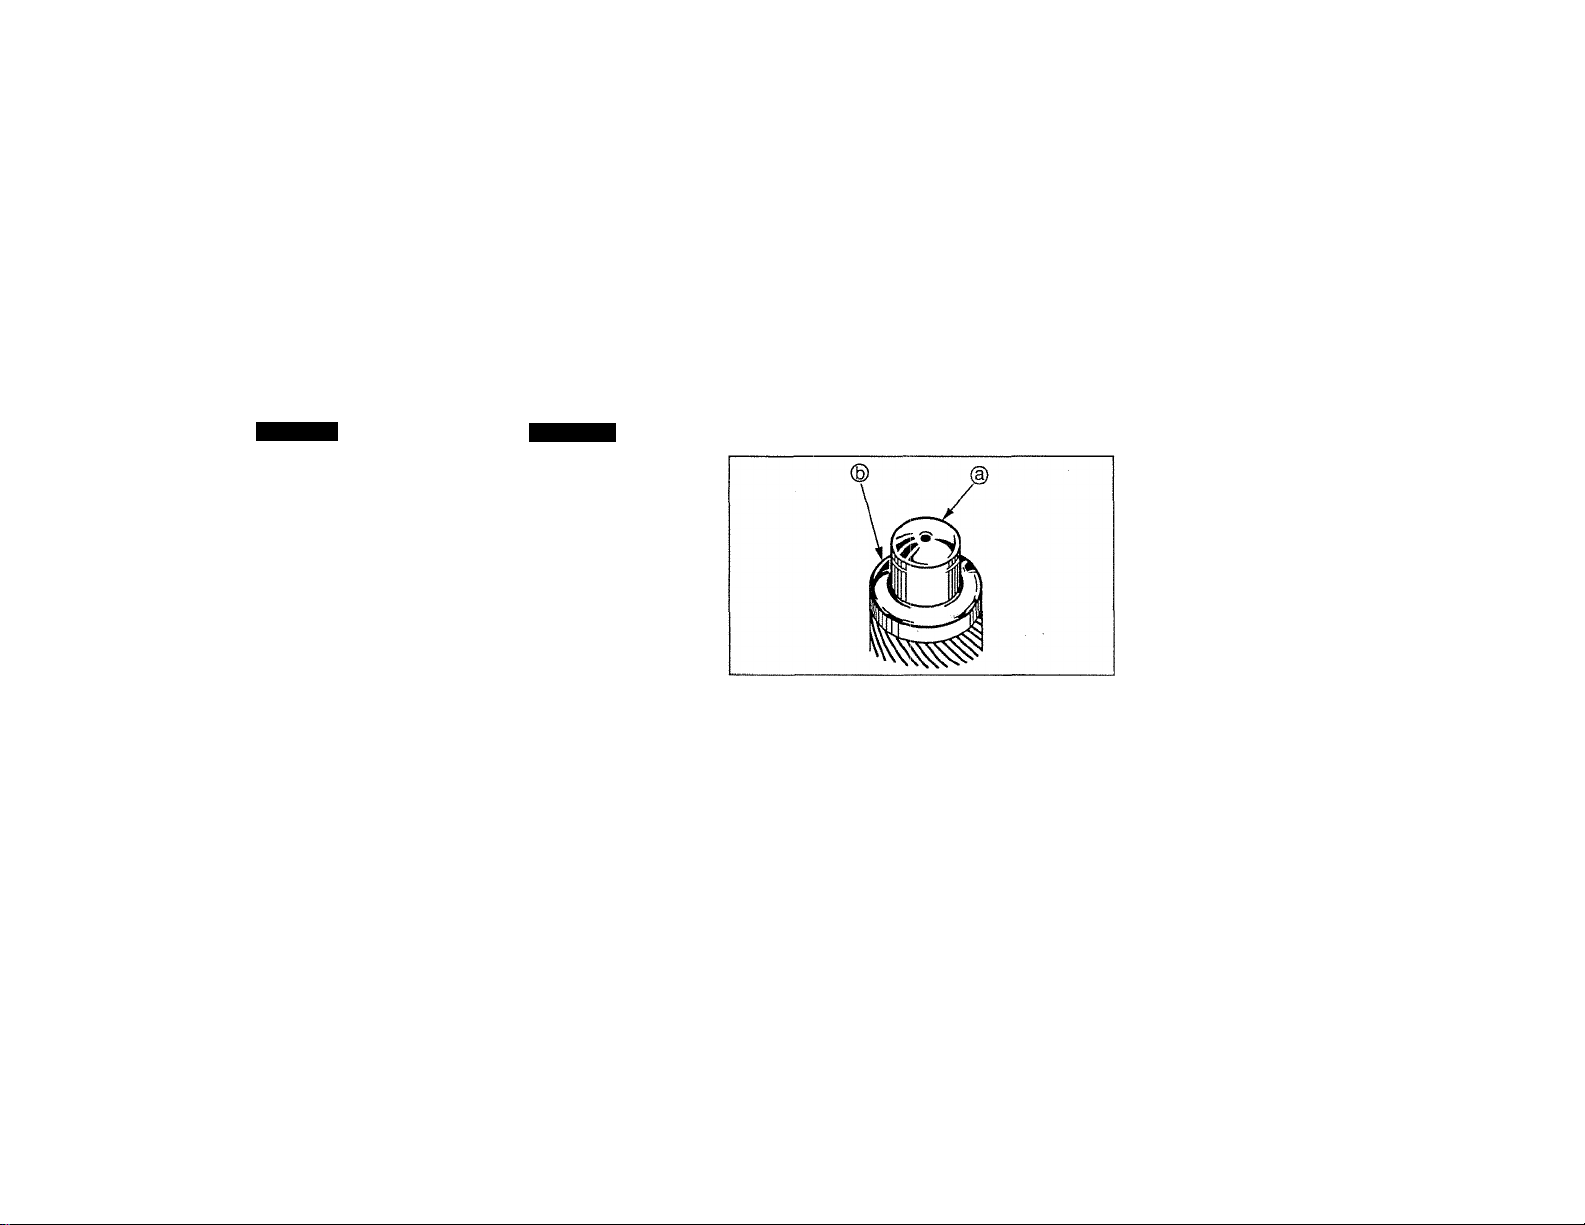
Page 12
Section
3
English
PRESSES FOOT
PRESSURE
Normal fabric sewing: For
straight fabric sewing or
zigzag sewing, pressure but
ton @ should be pushed to
the lower position.
Thin or delicate fabric
sewing: Because lighter
pressure is desirable for per
fect sewing of fine silk or thin
fabric, pressure button should
be adjusted to the middle or
center position.
Release pressure with outer
ring (g) and then push pres
sure button (a) half way down.
Darning and embroidering:
To be able to move fabric
freely for darning, mending,
basting and embroidering,
release pressure button @
by pushing outer ring (g).
Español
AJUSTAR LA PRESION
DEL PIE PRENSATELAS
Costura sobre tejido nor
mal: Normalmente, para hac
er un pespunte o un zigzag,
la palanca de presión (a) debe
mantenerse en la posición
más baja.
Costura sobre tejidos
ligeros o finos: Porque una
presión más ligera es preferable para coser perfecta
mente sedas finas o tejidos
poco resis-tentes, el dispositi
vo debe colocarse a la mitad.
Afloje la presión apretando el
pasador ® y después empu
jar la palanca @ hacia abajo
dejándola a la mitad.
Zurcidos y bordados: Para
mover una labor libremente y
poder remendar, zurcir o bor
dar, afloje el dispositivo de
presión ^completamente
apretando sobre el pasador
Page 21
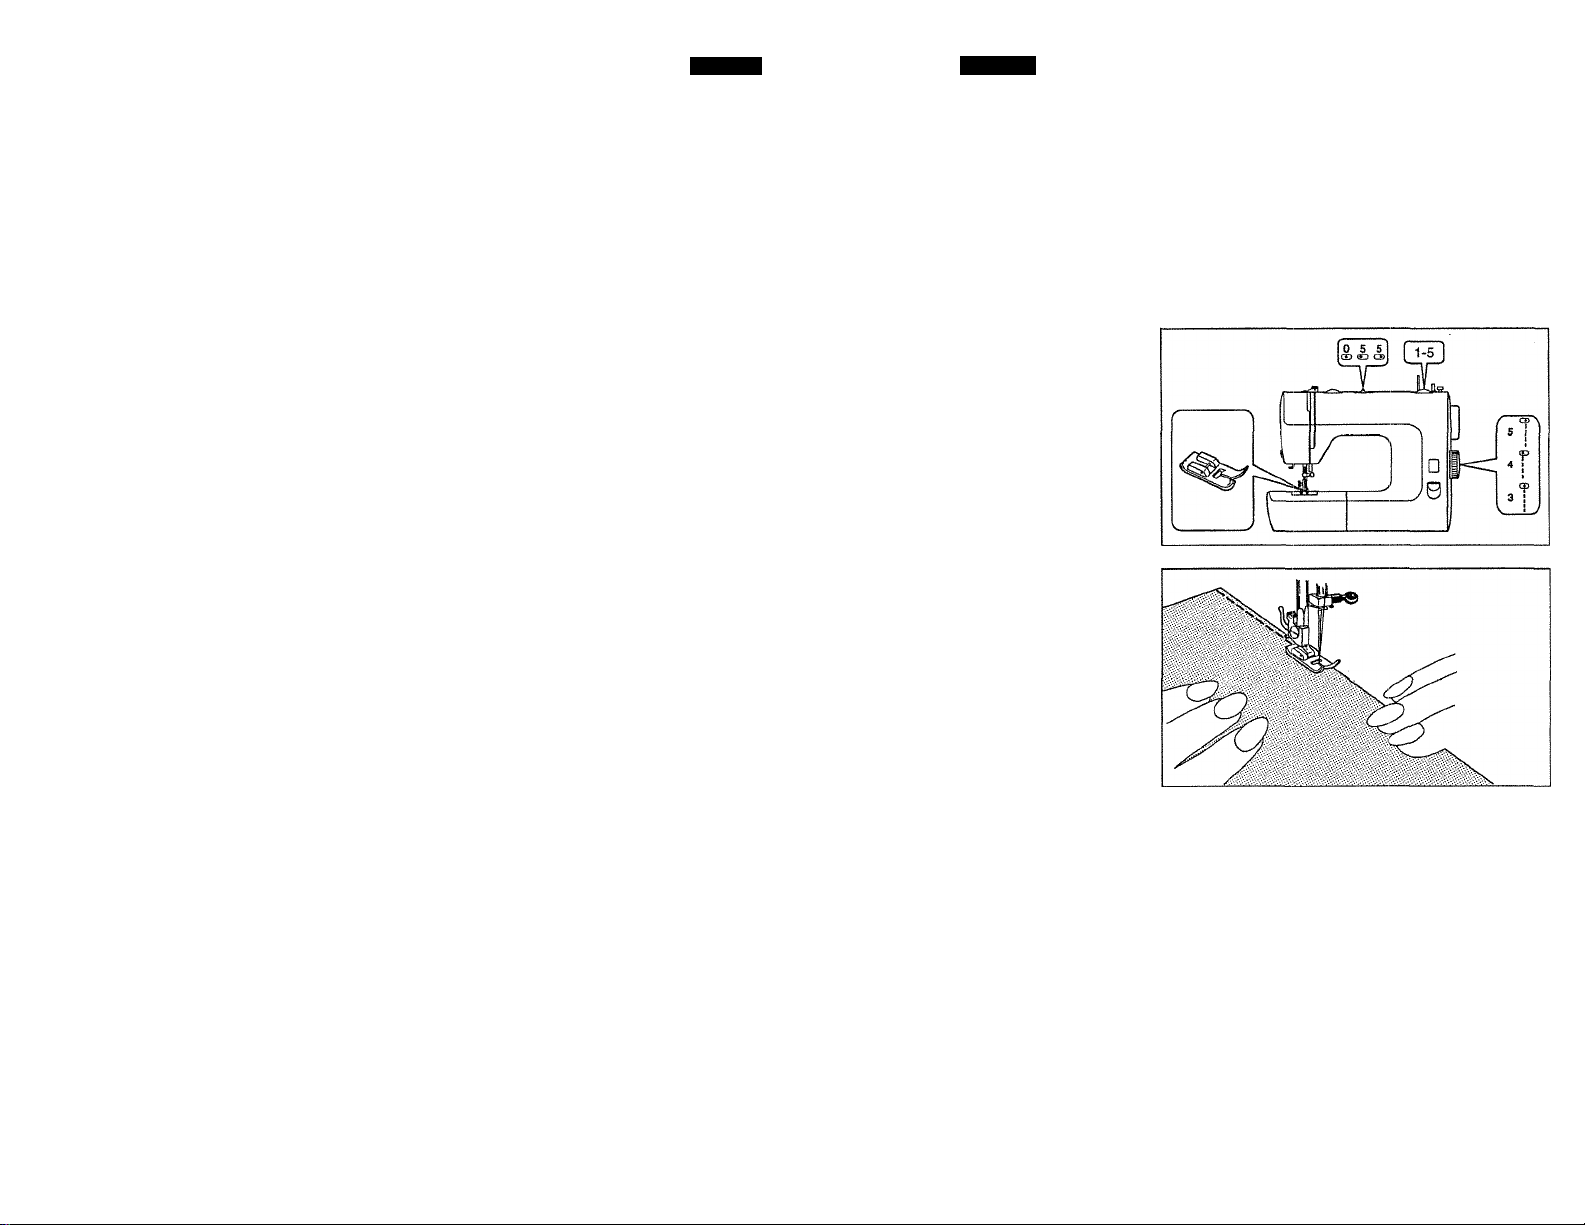
Page 13
Section
3
English
TRIAL SEWING
Now that you have finished
the first steps (page 1-13),
you are familiar with the con
trols on your machine and
with the accessories provided,
you are ready to start to sew
with your new sewing machine.
To sew a straight stitch.
Make sure your machine
1.
is set completely as illus
trated here.
Pattern selection dial to (T).
2.
Upper thread tension dial
3.
to 5.
Place fabric under the
presser foot.
5. Take-up lever in its high
est position.
'Fabric should be placed
under the presser foot with
the bulk of the material to
the left of the needle and the
right edge of the material
placed on the appropriate
seam allowance guideline.
Español
COSTURA DE PRUEBA
Ahora Ud. ha terminado los
primeros pasos (de la página
1 a la 13). El manejo de su
máquina y accesorios le son
familiares a Ud.. Esta todo
en orden para comenzar a
coser con su nueva máquina.
Comenzaremos a probar la
costura recta.
1. Asegurase que su máqu
ina esté completamente
como aparece indicado.
2. Control para seleccionar
la puntada a (I).
3. Control de la tensión del
hilo superior al No. 5.
4. Colocar la tela debajo del
pie prénsatela.
3. Colocar la palanca en la
posición más alta.
' La tela debe quedar coloca
da debajo del pie prénsatela
con la mayor parte sobre la
izquierda de la aguja. Y
colocar el borde del lado
derecho de al tela con el
apropiado espacio para la
costura.
Page 22
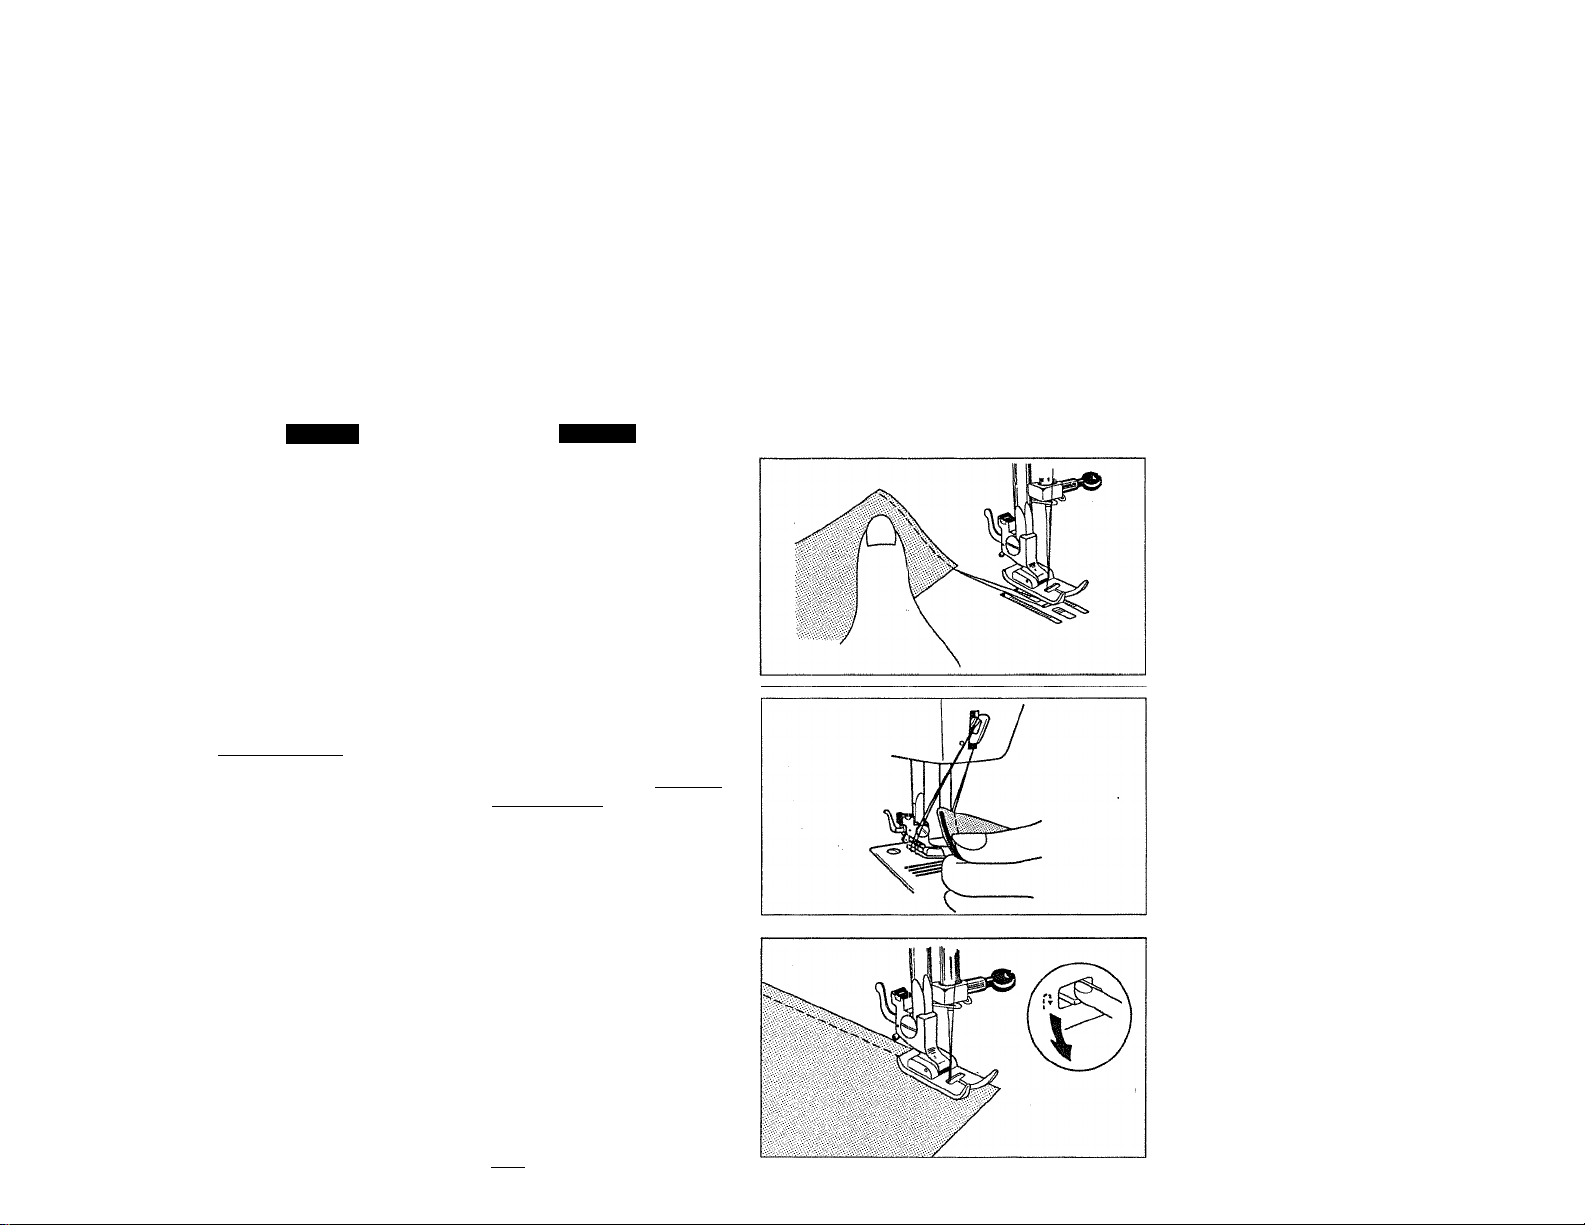
Page 14
Section
English
6. Lower press foot lifter.
7. Press foot controller lightly
and sew forward guiding
the fabric by hand as it is
fed. Never push or pull the
material.
* The more you press the foot
controller, the faster the
machine sews.
8. Draw out fabric to left
when sewing is finished.
* Always finish sewing each
seam with the needle at its
highest position.
* Leave at least 15 cm (6”) of
thread behind the needle so
that it will not be drawn out
of the eye of the needle
when starting the next stitch,
9. Cut threads with thread
cutter.
Reverse sewing
10. At first, sew forward.
Then, push down the
reverse sewing lever to
sew backwards.
11. Release lever to return to
forward sewing.
’Reverse sewing is often
done for reinforcement at
the beginning and ends of
seam (back stitching).
Español
6. Bajar el elevador del pie
prénsatela.
7. Presionar el pedal ligera-
miente y comenzar a coser
guiando la tela con la
miaño mientras avanza
ésta. Nunca se debe
tironear o empujar la tela..
* A mayor presión del pedal,
mayo será la velocida con
qué la máquina coserá.
8. Jalar la tela hacia el lado
izquierdo cuando se haya
terminado de coser.
* Siempre terminar cada cos
tura con la aguja en su posi
ción más alta.
* Dejar aproximadamente 15
cm del hilo extra hacia atrás
para que no se desprendá
el hilo de la aguja.
9. Cortar los hilos con la
cuchilla.
Vamos a probar la costura en reversa.
10. Al principio, coser hacia
adelante.
Después, empujar la
palanca que está sobre la
derecha hasta abajo, como
se indica en la figura.
Esta es la costura en
reversa.
11. Soltar la palanca e iniciar
la costura hacia adelante.
* La costura en reversa es
muchas veces para reforzar
la costura en las orillas de la
tela.
____________________
Page 23
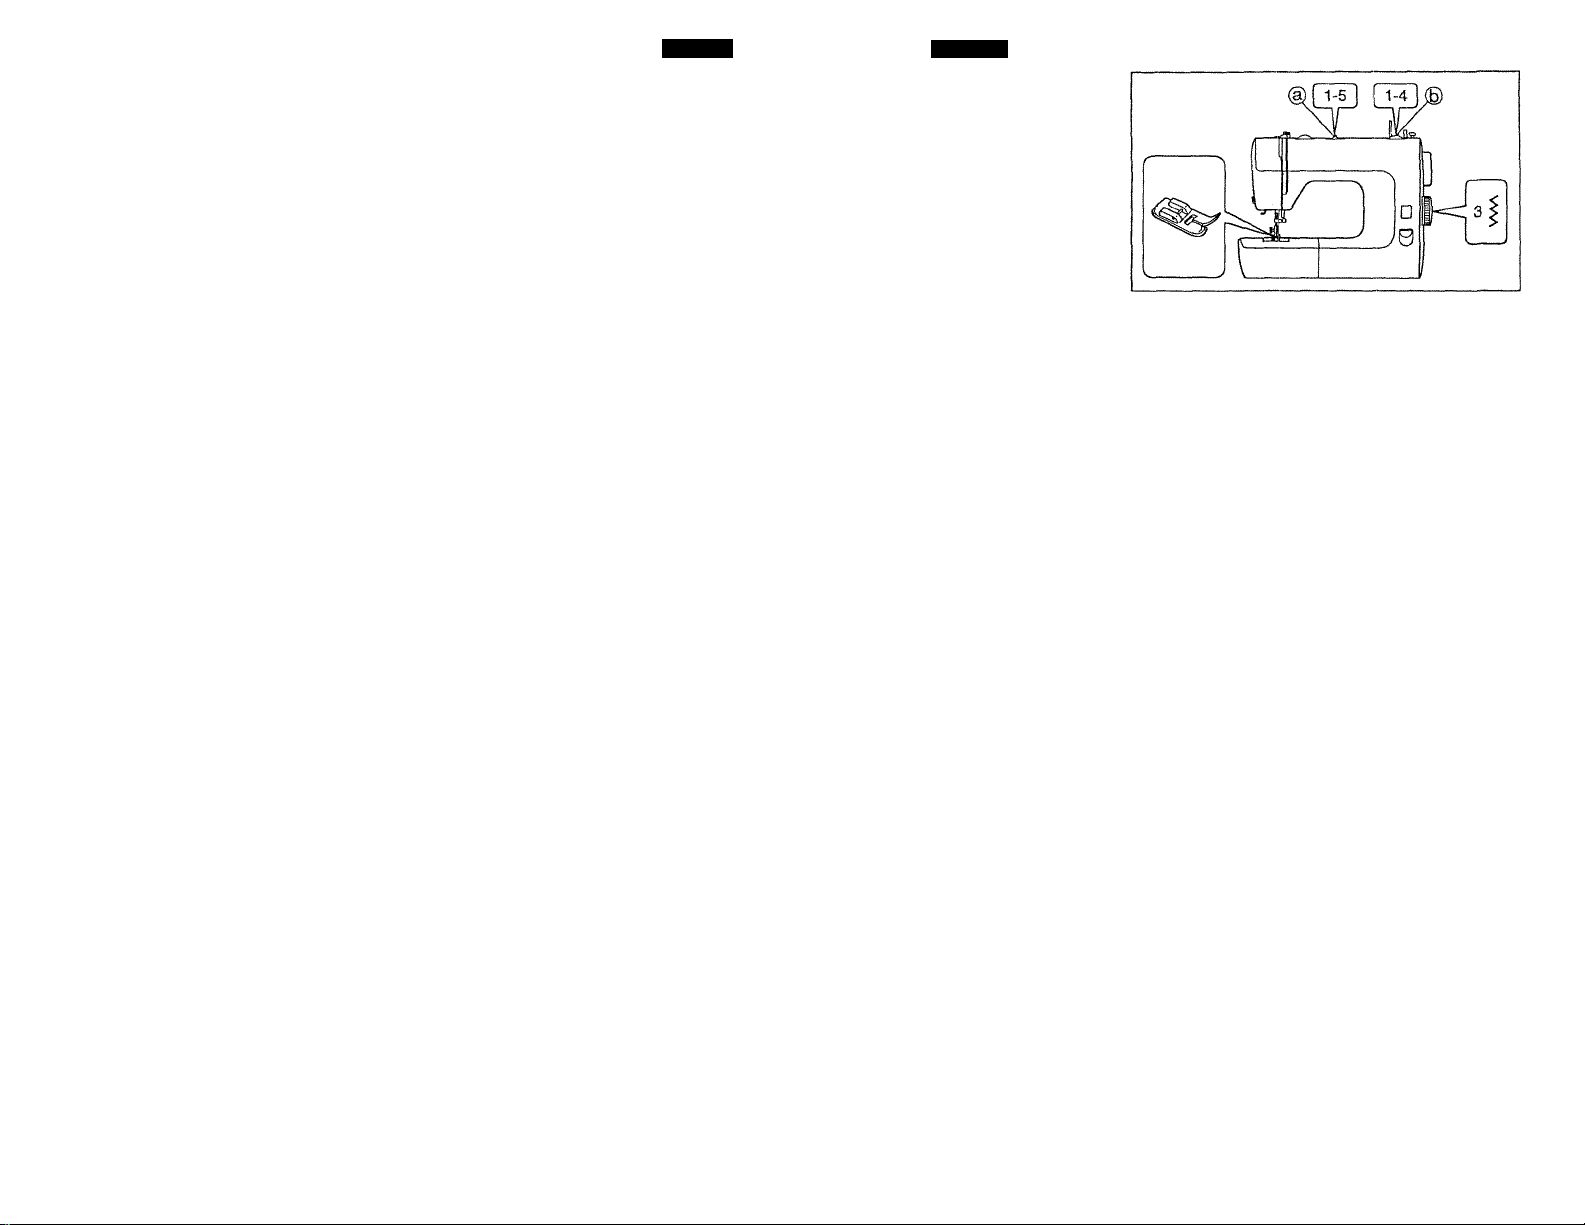
Section
3
English
Zigzag sewing
12. Set pattern selection dial
to(|).
13. Set width dial (a) at
required number, the
higher the number, the
wider the stitch.
Set it at 0 for straight
sewing.
14. Follow above step 4-9.
This is zigzag sewing.
15. Try different stitch lengths
Avery short (low number)
stitch length — satin stitch
—is used foe applique.
Español
Vamos a probar la costura en zig-zag.
12. Colocar el Control para
seleccional ¡a puntada a
($)■
13. Colocar el control en el
número que se requiere.
Para que la puntada sea
más ancha, usar el número
más alto.
Colocar el control en 0
para la constura recta.
14.Seguir los pasos arriba
del 4 a! 9.
Page 24
Page 18
Secti<3n
English
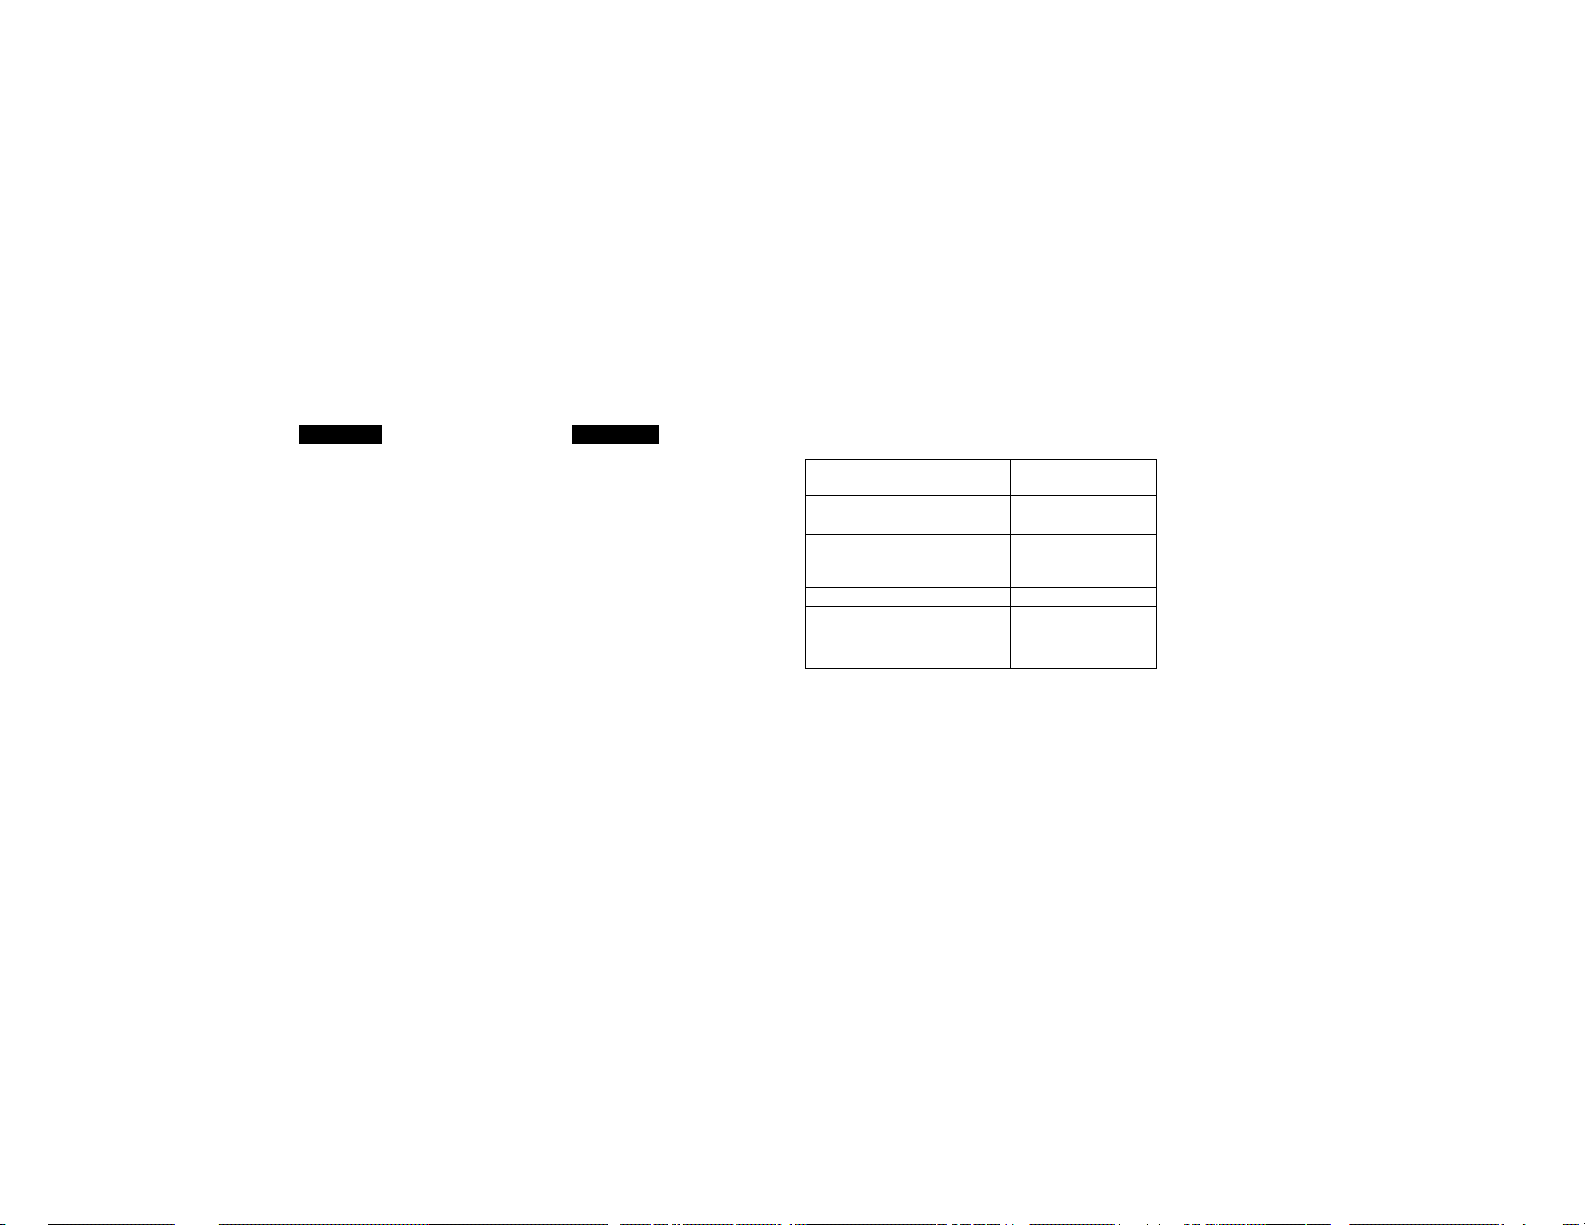
ADJUSTING THREAD
TENSION
After sewing the above stitch
es, check if the upper and
lower thread tensions are
equal and strong enough to
lock both threads in center as
in figure (a).
If upper tension is too tight,
upper thread lies straight
along upper surface of fabric
® .If lower tension is too
tight lower thread lies straight
along lower surface of fabric
© . Correct by turning ten
sion dial in the direction of
arrow.
* Always check the balance of
upper and lower tensions by
test sewing using fabric,
needle, thread and stitch
pattern you plan to use.
{Correct combinations are
described on page 24.)
Español
AJUSTE DE LA TENSION DEL HILO
© F^ara la costura correcta, la
tensión de ambos hilos es
igual y tendrá que juntar
ambos hilos en el centro.
® Si la tensión del hilo supe
rior está muy ajustada, el
hilo superior quedará rec
to a lo largo de la superfi
cie superior de la tela.
Si la tensión del hilo supe-
© rior está muy suelta, el
hilo inferior quedará recto
a lo largo de la superficie
inferior de la tela.
* Es recomendable ensayar
antes en un pedazo de la
tela; el molde de la costura,
la tensión de los hilos (supe
rior ó inferior), la aguja, y el
hilo. (Consultar la Table de
Telas, Hilos y Agujas en la
página 25.)
O
ndfih—Uh—
.1.1.1. .1 .i.jjiij
...........
(D
.............^
(C)
Page 25
Page 17
Section
4
English
4. STARTING TO SEW
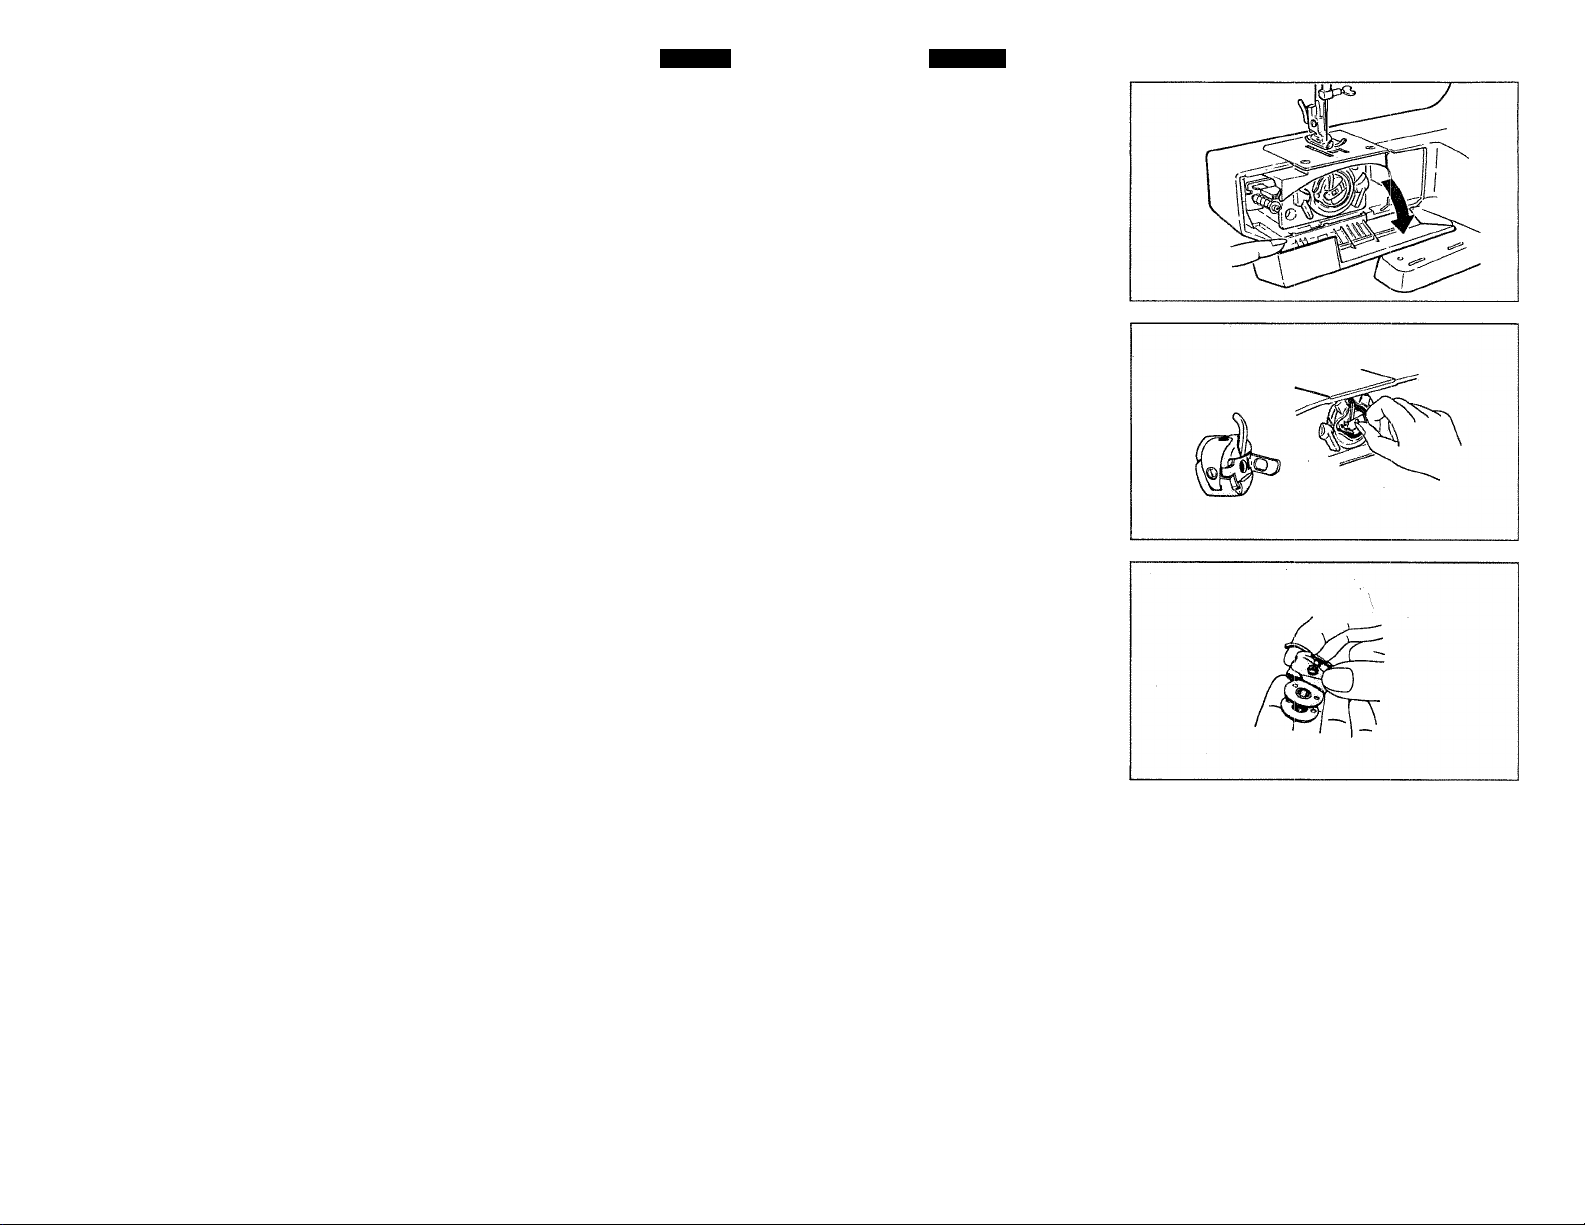
BOBBIN WINDING
Set the needle in the highest
position by turning the handwheel towards you.
Open shuttle cover.
Open latch of bobbin case
and pull it out.
Close latch of bobbin case
and bobbin comes out esaily.
Español
4. COMENZAR A
COSER
BOBINADO
Colocar la aguja en su posi
ción más alta girando el
volante hacia Ud.
Abrir la cubierta del lansadera.
Abrir el seguro de la bobina y
sacarla.
Soltar el seguro de la bobina
y el carrete saldrá fácilmente.
Page 26
Page 18
Section
4
English
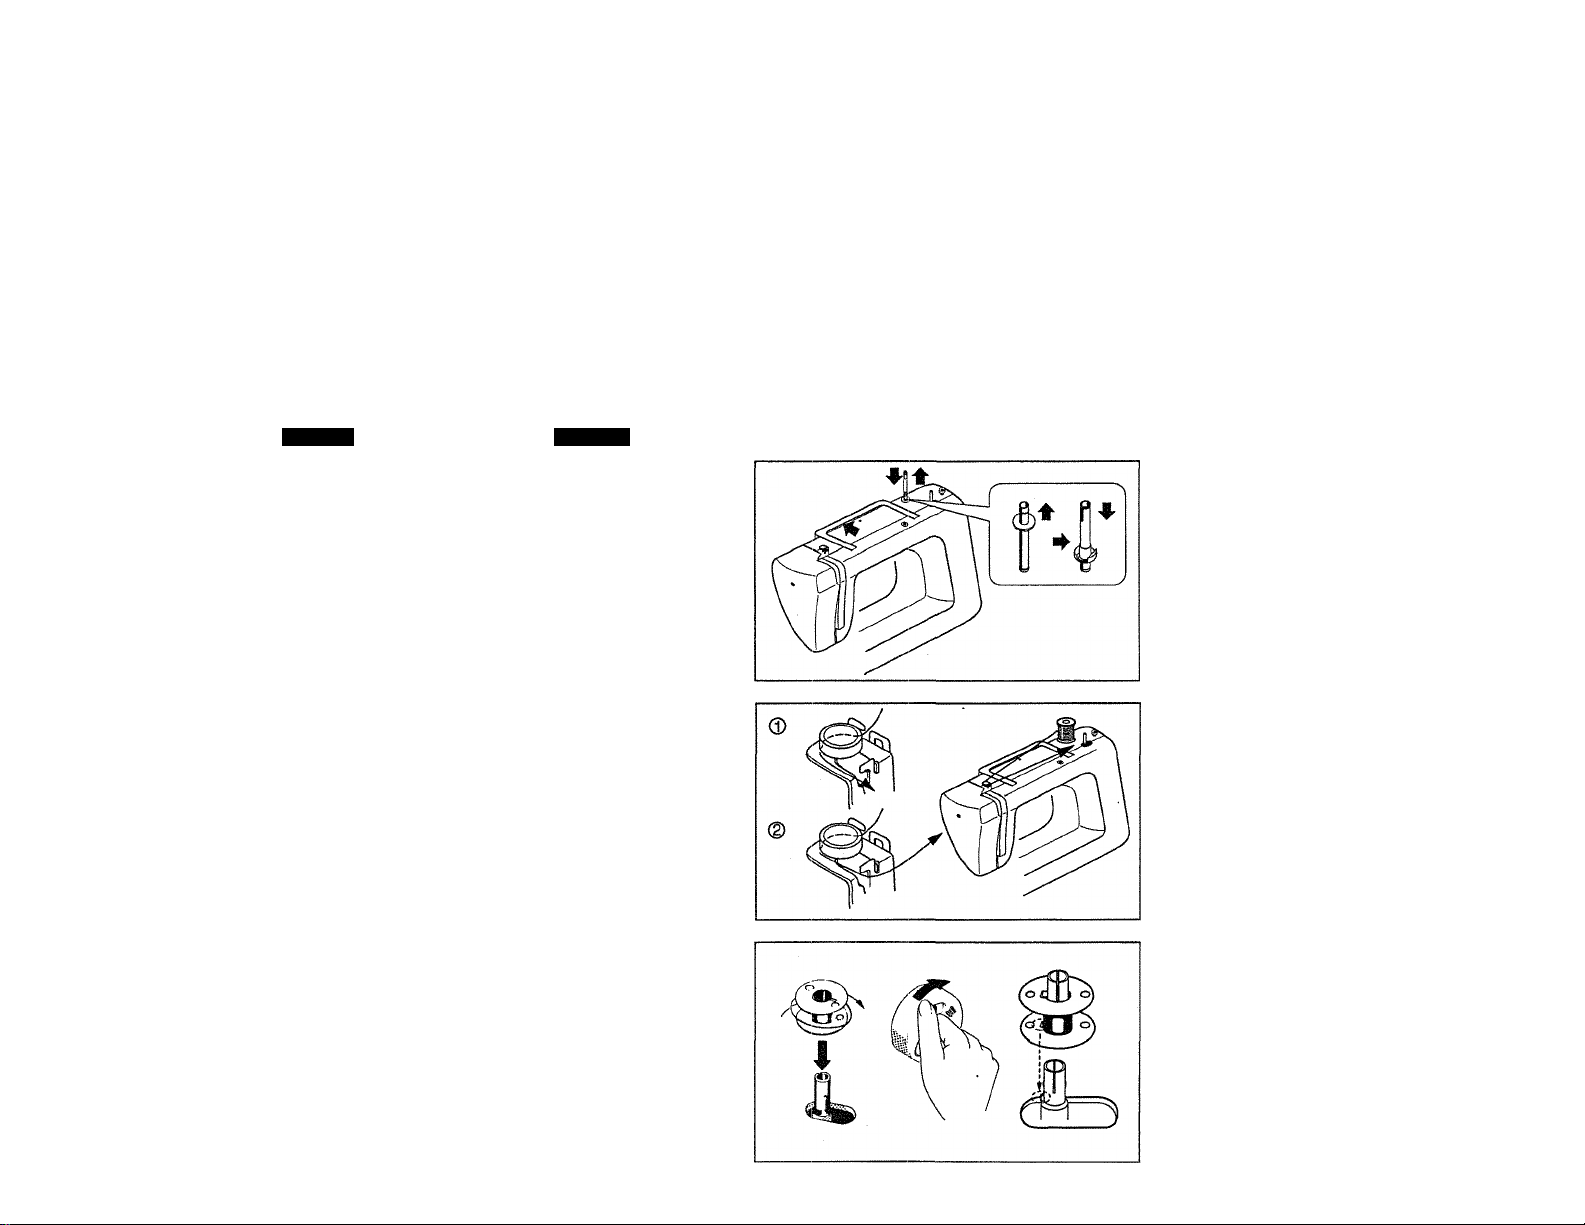
Fold the handle back.
Pull out spool pin.
Put a spool of thread on spool
pin.
Draw thread from spool pin
through thread guide and pre
tension device; following
numbers 0 and @ .
Wind thread clockwise around
bobbin several times.
Push bobbin onto spindle.
Move the declutch knob in the
handwheel to the J direc
tion.Before starting to wind
bobbin, please make sure the
groove in the bobbin is locat
ed into the lug on the spindle
so the bobbin is all the way
on spindle.
Note; Unless groove and lug
are located correctly,
bobbin winding cannot
be done successfully.
Español
Mover hacia atrás la manija.
Levantar el porta carretel.
Colocar un hilo en el porta
carretel.
Pasar el hilo del porta carretel
como se muestra en el dibujo,
(pasos ® y @ )
Enredar el hilo varias veces
alrededor del carrete en direc
ción a las manecillas del reloj.
Colocar el carrete sobre el eje.
Mover el botón que se encuen
tra en el volante hacia el dibujo
( J ). (indicando el carrete).
Antes de empezar a bobinar la
canilla, asegúrese que el hue
co de la canilla esta bien fijado
en el saliente del pivote.
Nota: ¡Puede ser peligroso!
A menos que el hueco
el saliente no esten
ajustados, el bobinar
no se podrá hacer cor
rectamente.
Page 27
Page 19
Section
4
English
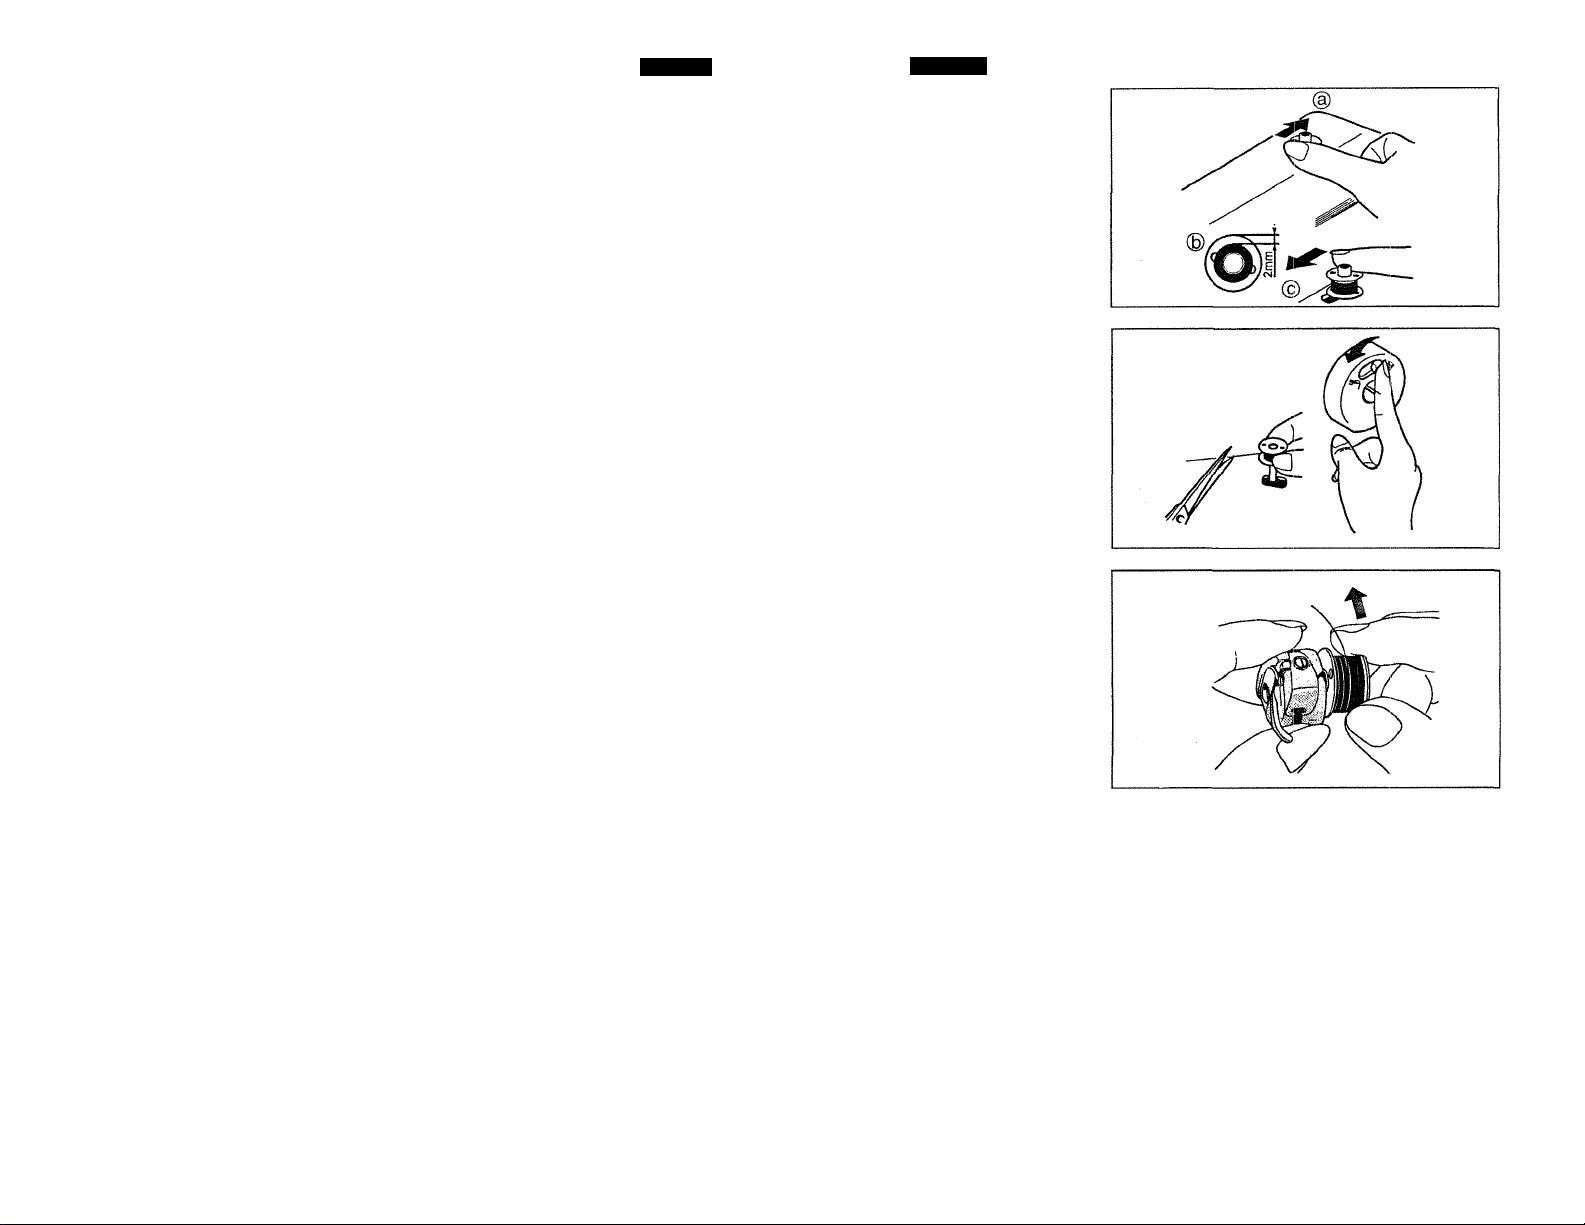
Push bobbin in the direction
of arrow @ .
Press down foot controller to
wind bobbin. When the bob
bin is wiound as shown (g) ,
stop the machine and push
the bobbin to the left as
shown © to remove bobbin.
The bobbin will stop when ful
ly wound.
Take bobbin off the spindle
and cut the thread.
Move the declutch knob in the
handwheel into the ‘I direc
tion.
INSERTING BOBBIN
Place the bobbin in its case
with the thread running in
direction of arrow (clockwise).
Español
Mover el carrete se indica en
la flecha©.
Presionar el pedal para deva
nar. Cuando el carrete está
como se indica en la figura ®
, Pare la máquina y mueva e
carrete hacia la izquierda
como se indie en la figura
© para desparenderlo.
Nota; Al devanar cuide que el
volumen del hilo no
exceda la capacidad
del carrete.
Quitar el carrete del eje y cor
tar el hilo.
Mover el botón del volante en
dirección a la aguja.( f )
COLOCACION DEL
CARRETE EN LA BOBINA
Colocar el carrete dentro de
al bobbin con el hilo en direc
ción a la flecha.
Page 28
Page 20
Section
4
English
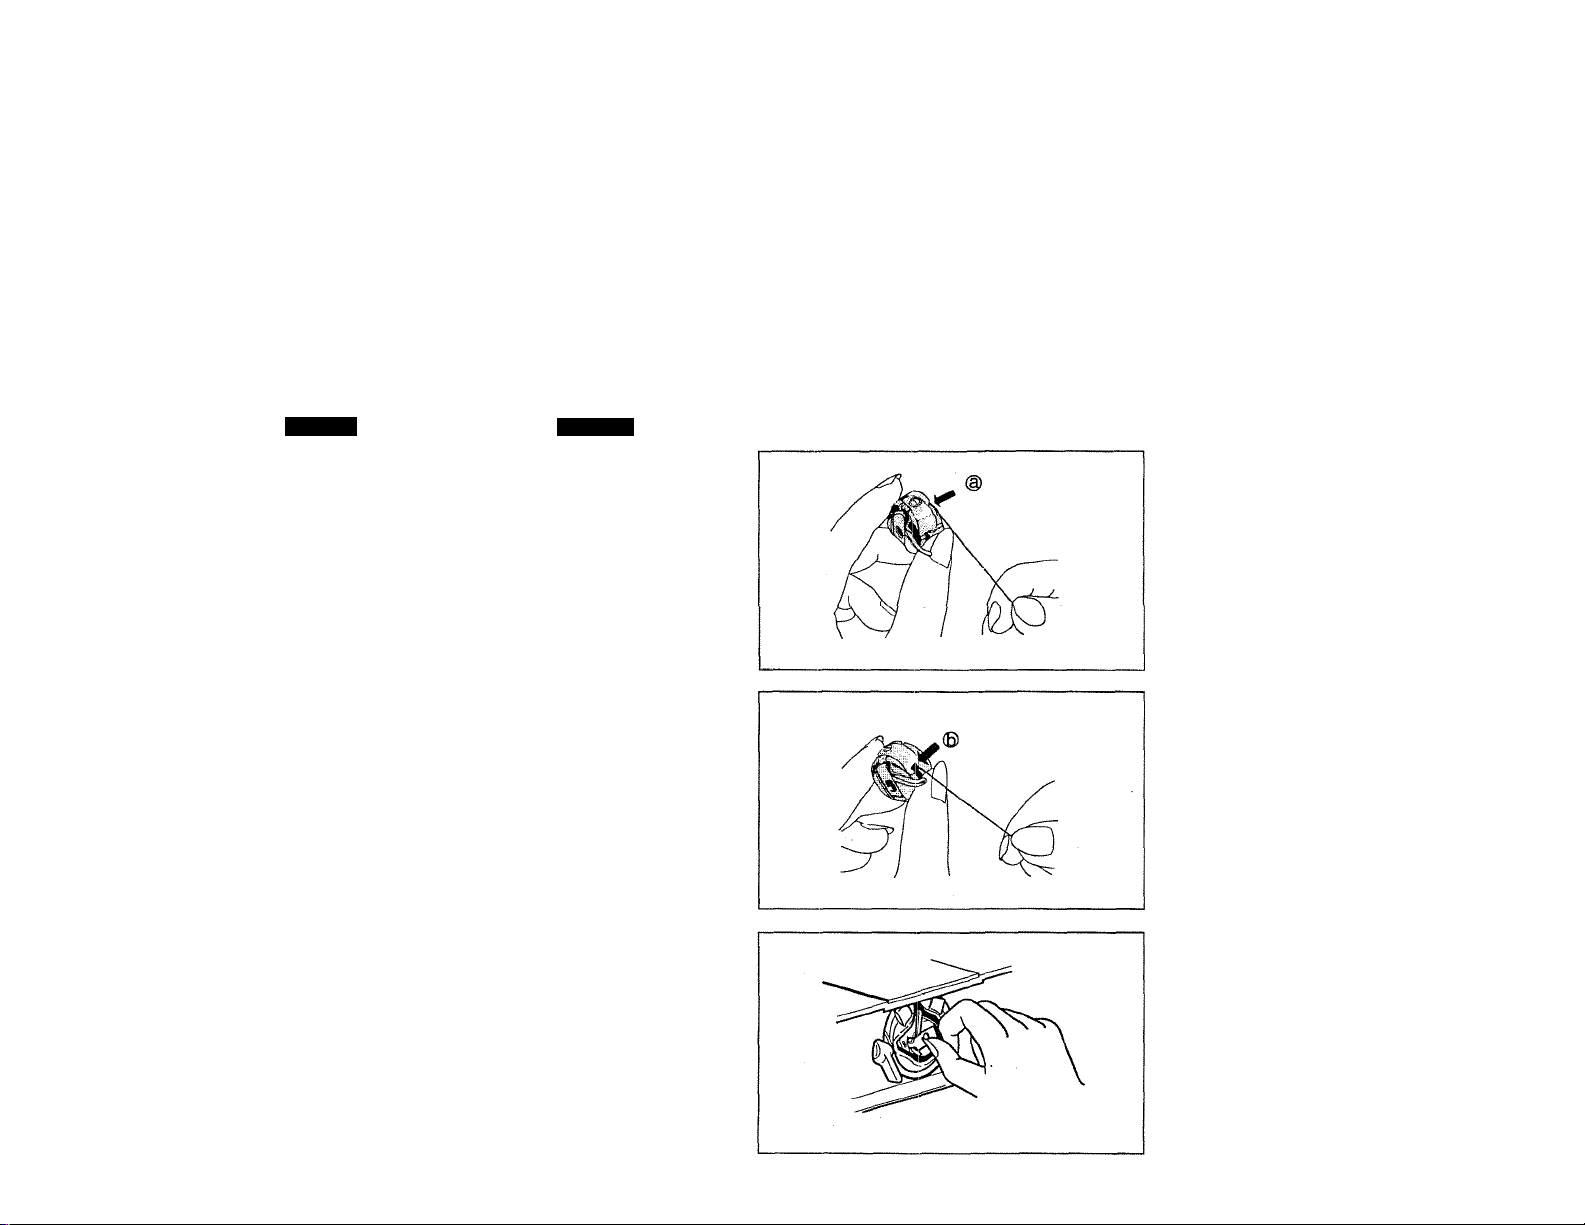
Guide thread into slot(a)of
bobbin case.
Pulling thread to left, bring it
under tension spring then to
delivery eye ®.
Raise the needle to the high
est position.
Leave end of thread of about
10 cm (4“) from bobbin case.
Take hold of latch and push
bobbin case into shuttle, as
illustrated.
Release latch when bobbin
case is fully inserted.
Press firmcy on bobbin case
to besure it is clicked in place.
Español
Guiar el hilo por la ranura
de la caja porta bobina.
Extraer el hilo hacia la
izquierda, conducirlo hacia
abajo del resorte de tensión y
luego pasarlo por la ranura
©■
Levantar la aguja a su posi
ción más alta.
Dejar en el extremo del hilo
unos 10 cm fuera de la bobina.
Tomar el seguro de la bobina
y empujarla hacia adentro del
cangrejo, como se indica.
Soltar el seguro cuando la
bobina esté completamente
adentro del cangrejo.
Page 29
Page 21
Section
4
English
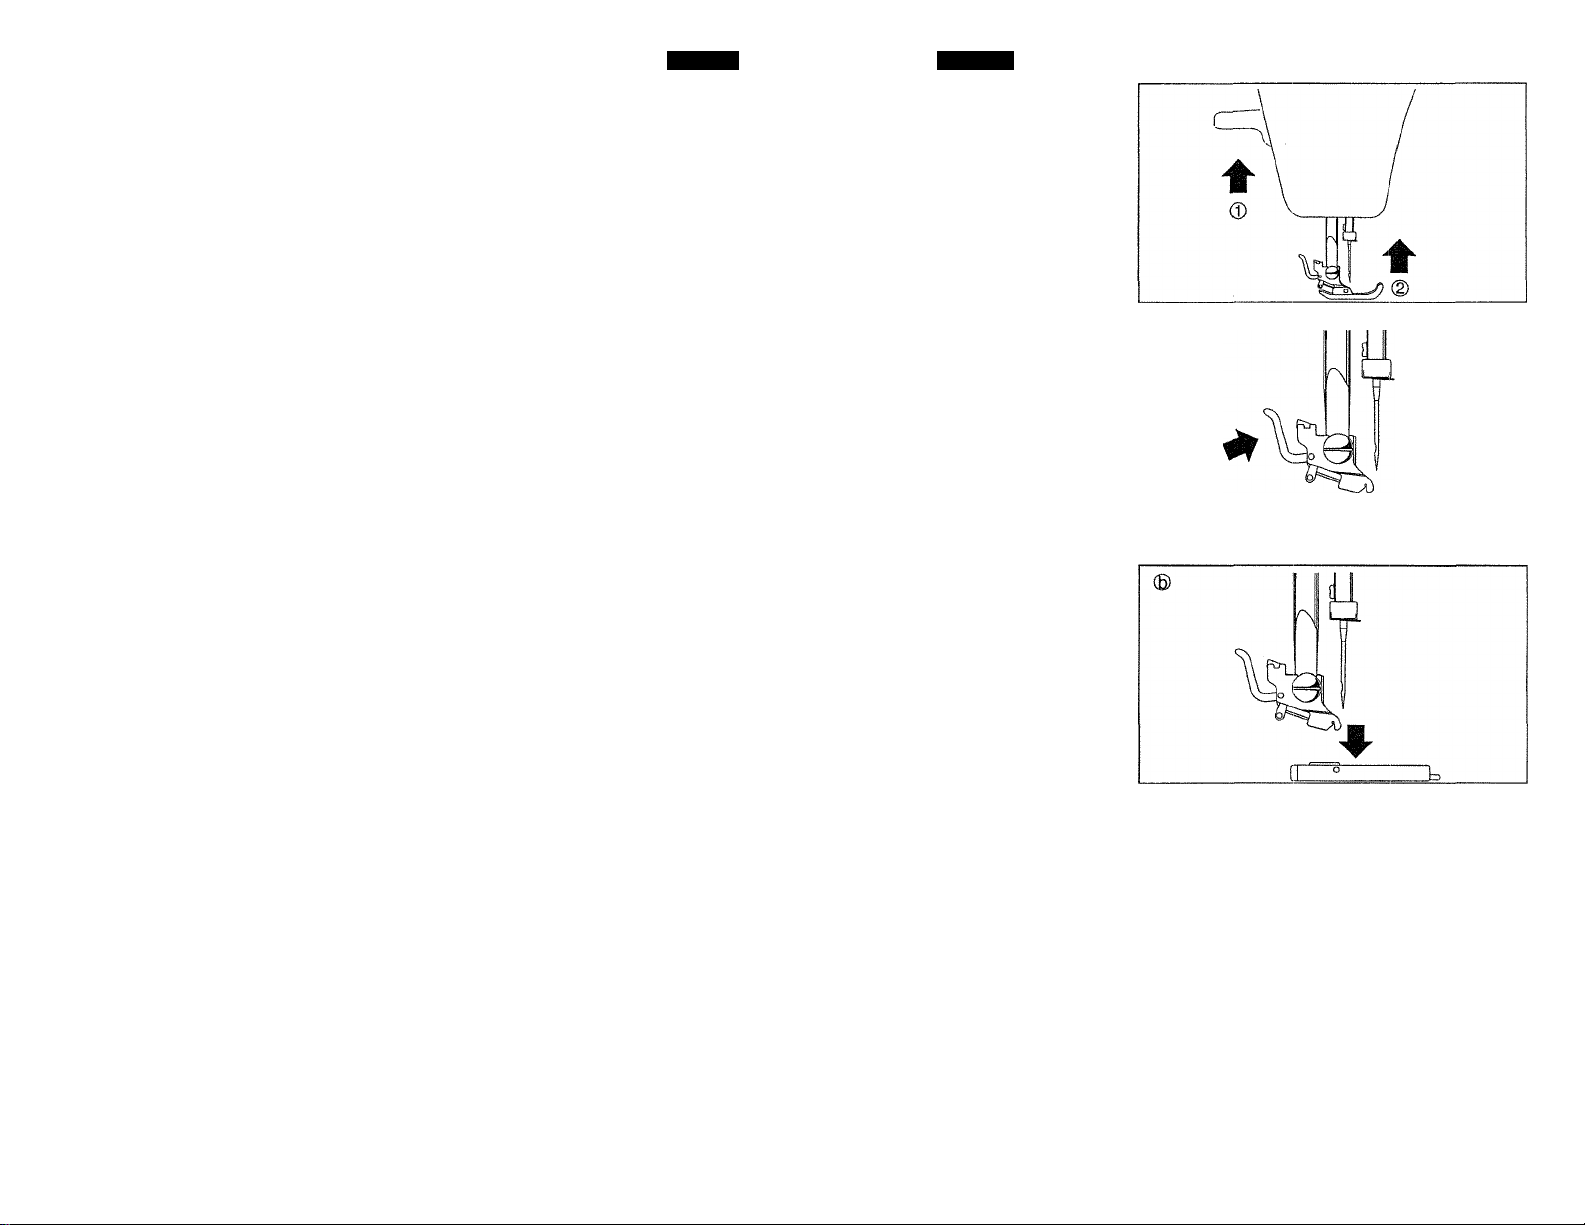
CHANGING FOOT
Raise presser foot lifter ®.
Set needle in the highest
position by turning the handwheel towards you @.
I Push button at back of
presser foot shank
towards you and foot will
come off.
© Position a new foot by
aligning holding groove of
shank with pin of foot.
Lower presser foot lifter so
that shank catches presser
foot.
Español
CAMBIO DEL PIE PRENSATELA
Levantar el elevador del pie
prénsatela.®
Colocar la aguja en la posi
ción más alta, girando el
volante hacia Ud. ® .
I Oprimir la palanca del
soporte del pie prénsatela
hacia Ud. y el pie se sor
tará.
© Poner un pie prénsatela
con el poste justamente
debajo de la hendidura
del soporte.
Bajar el elevador del pie prén
satela y el soporte detendrá
el pie inmediatament.
Page 30
Page 22
Section
4
English
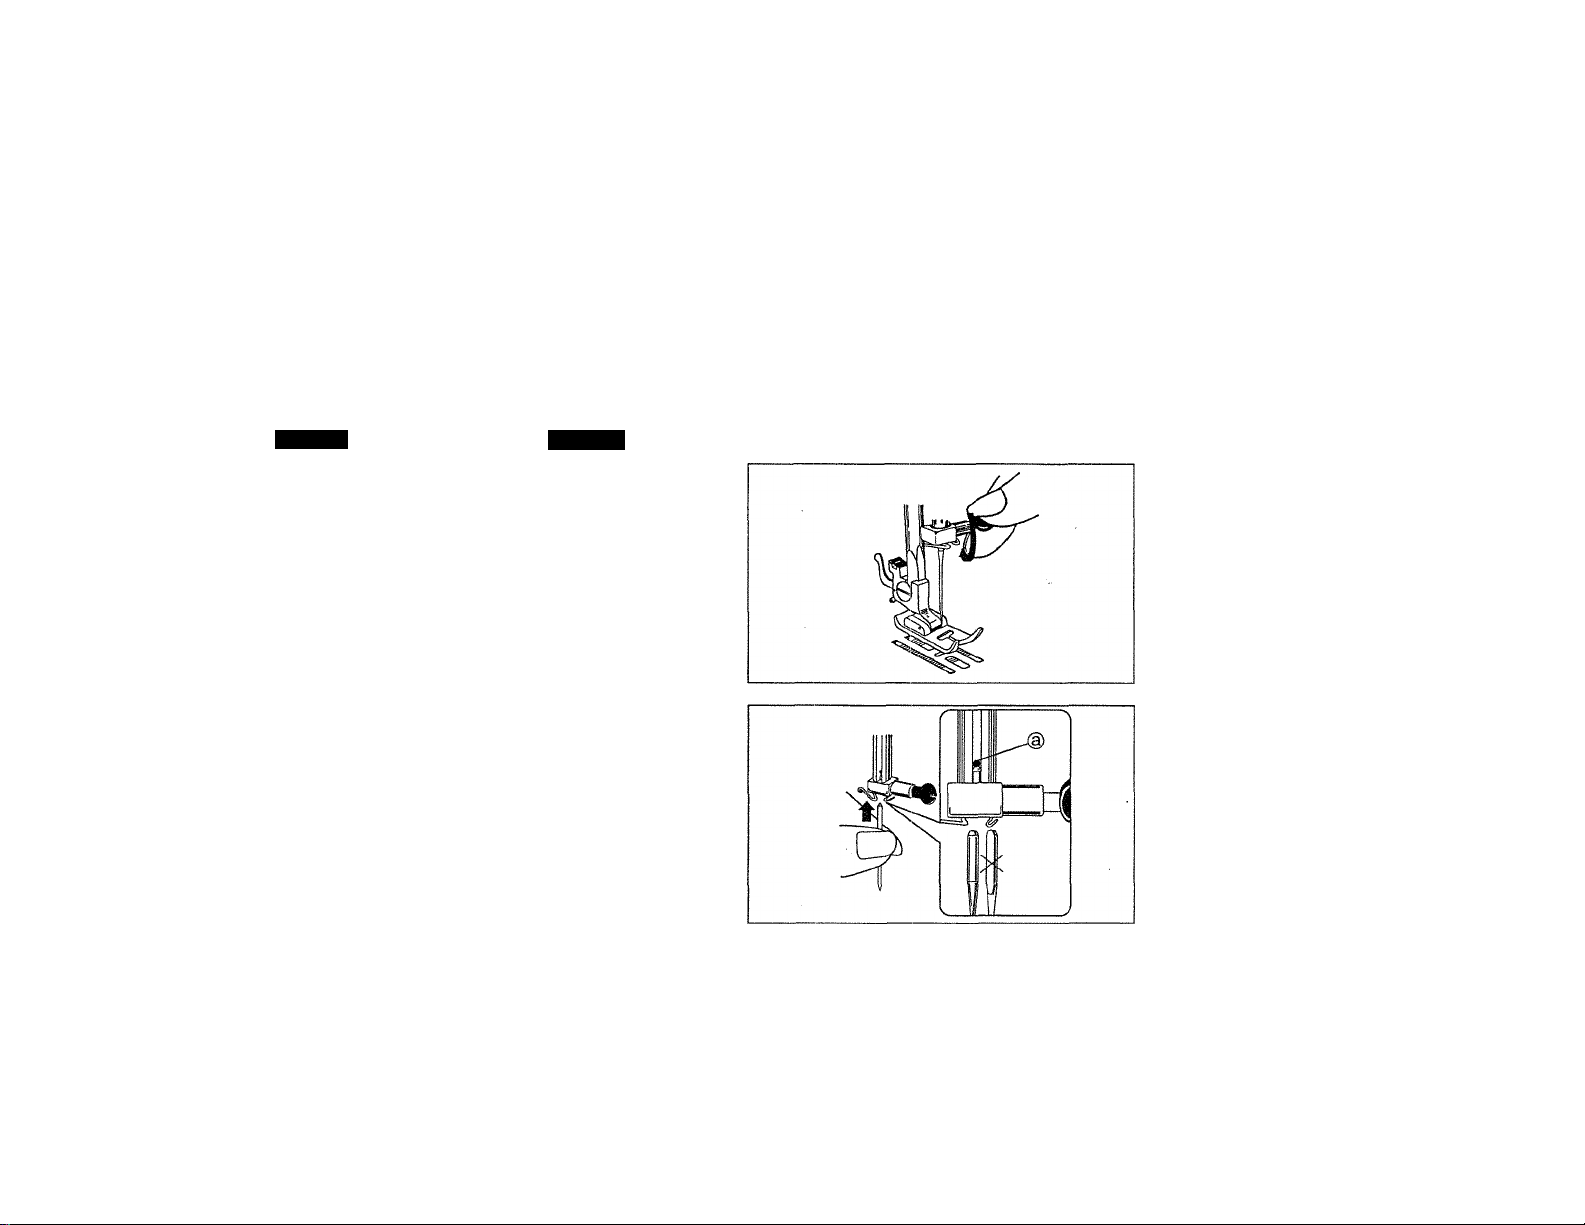
CHANGING NEEDLE
Set the needle in the highest
position by turning the handwheel towards you.
Loosen needle clamp screw
and take out needle.
With the flat side away from
you, insert a new needle into
the needle bar.
Push needle into clamp until it
reaches stop (a) and tighten
needle clamp screw firmly.
Español
CAMBIO DE LA AGUJA
Colocar la aguja en la posi
ción más alta girando el
volance hacia Ud.
Aflojar el tornillo de presión
de la aguja y quitarla.
Con la parte plana hacia
atrás, inserte la nueva aguja
dentro de la cavidad.
Empujar la aguja hacia arriba
hasta el tope figuro (a) y apri
ete el tornillo de presión
firmemente.
Page 31
Section
4
English
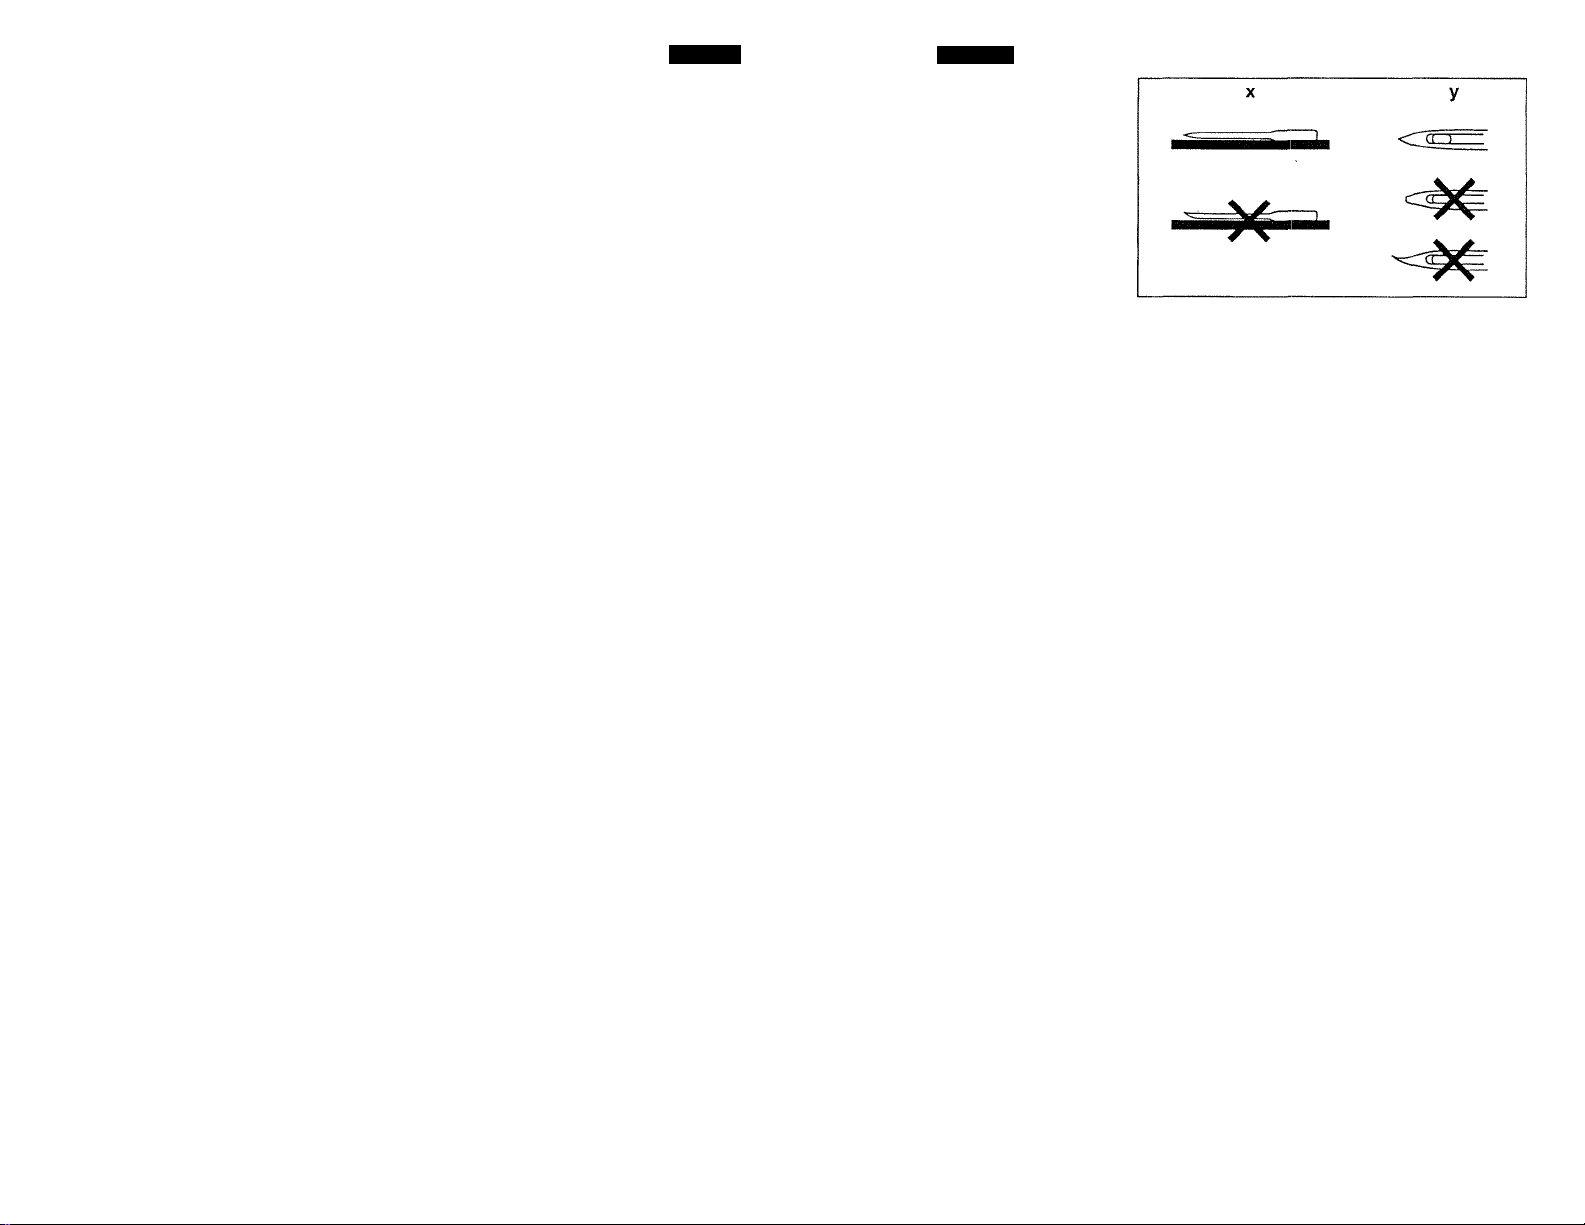
Always use a good quality
needle.
Using defective or worn nee
dles not only causes stitch
skipping, breakage of needles
or snapping of thread; it also
can damage shuttle and nee
dle plate.
Note: Always use needle type
15x1/705
Legend:
X Straight shaft
y Sharp point
Español
Usar siempre agujas bien
derechas, con buena punta.
Usar agujas defectuosas o
gastadas no solamente causa
que se omitan puntadas, rotu
ra de agujas o que se corra el
hilo; también pueden dañarse
el cangrejo y la placa de la
aguja.
Nota: Usar siempre agujas
tipo 15x1.
Leyenda:
X Aguja derecha
y Punta aguda
Page 32
Section
4
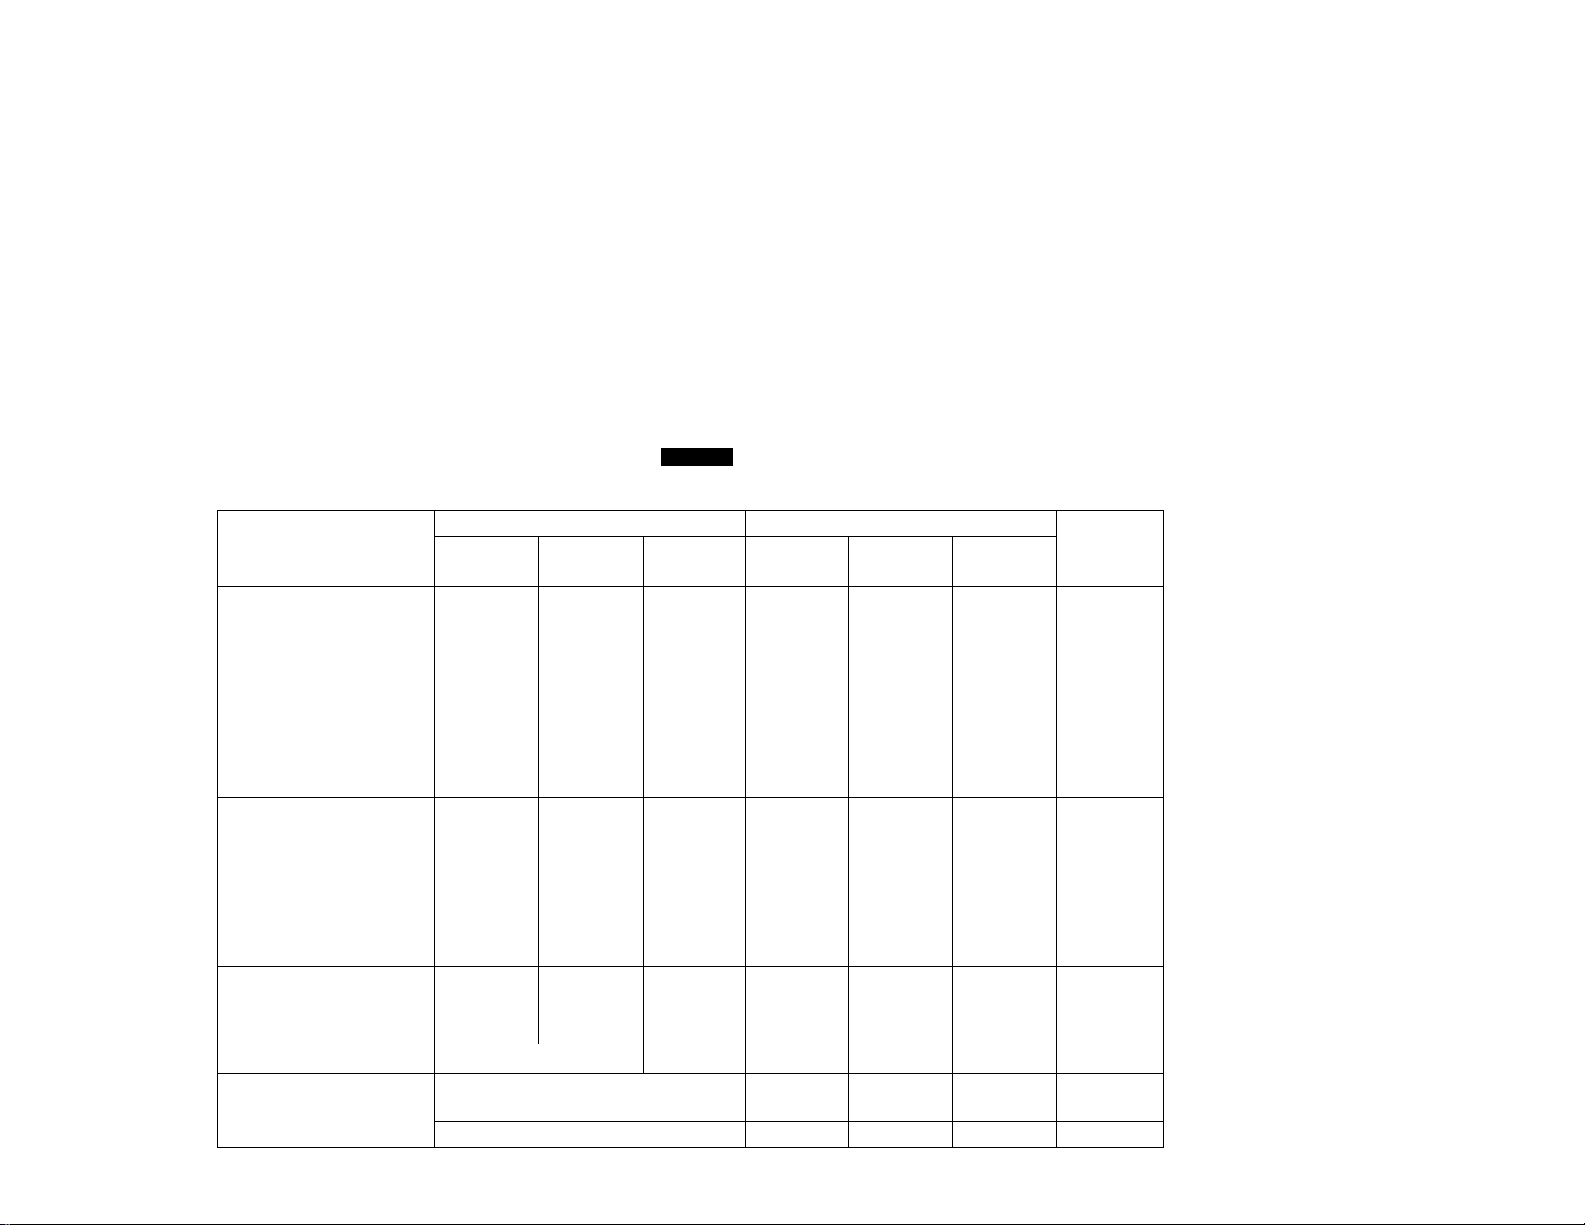
FABRIC, THREAD AND NEEDLE TABLE
THREAD NEEDLE
FABRIC
VERY SHEER: Lace,
Voile, Chiffon, Net
SHEER; Blouse, Crepe
Lawn, Organdy, Taffeta
LIGHT-WEIGHT: Crepe,
Wool, Brocadae, Velvet
MEDIUM: Wool, Silk, Linen,
Velveteen, Cotton, Faille,
Terrycloth
HEAVY; Denim, Duck, Sailcloth
EXTRA HEAVY; Upholstety,
Canvas, Awning
[KNITS]
LIGHT-WEIGHT: Tricot
MEDIUM-WEIGHT; Jersey,
Double knit
HEAVY-WEIGHT; Double knit 30 50
FAKE-FURS, VELOURS
[LEATHER]
VINYLS
LIGHT-TO-MEDIUM-WEIGHT
HEAVY LEATHER 30
[DECORATIVE TOUCHES]
TOP STITCHING Silk twist
MACHINE EMBROIDERY
European
Cotton
70 60
50-70
30 50
30 50 Silk
30 Heavy Duty
30
50-70 60
30 50
30
30 50
30
Size 50-70
Mercerized
Heavy Duty C.C.Poly 120
Heavy Duty
Heavy Duty C.C.Poly 100-110 16-18 Wedge
Cotton
60
50
English
Cotton Covered
Polyester, Silk,
Nylon
Silk, Nylon 65-70 9
Silk, Nylon 65-70
Silk 75-80 11
C.C.Poly 100 16
Silk, Nylon
Silk, Nylon
C.C.Poly Point
Silk, Nylon
C.C.Poly
C.C.Poly
C.C.Poly 90
C.C.Poly 90-100 14-16
European U.S. Size Point
705 15x1 Style
9
80-90 11-14
19
70
70-80
80-90 11-14
90-100 14-16
100-110 16-18
65-80
9
9-10
14
9-11
Regular
"
"
»
"
Ball
Point
Ball
Ball
Point
Ball
Point
Wedge
Wedge
Regular
Regular
Page 24-
REMARKS
Loosen up
per tension
one or two
points
Page 33
Section
4
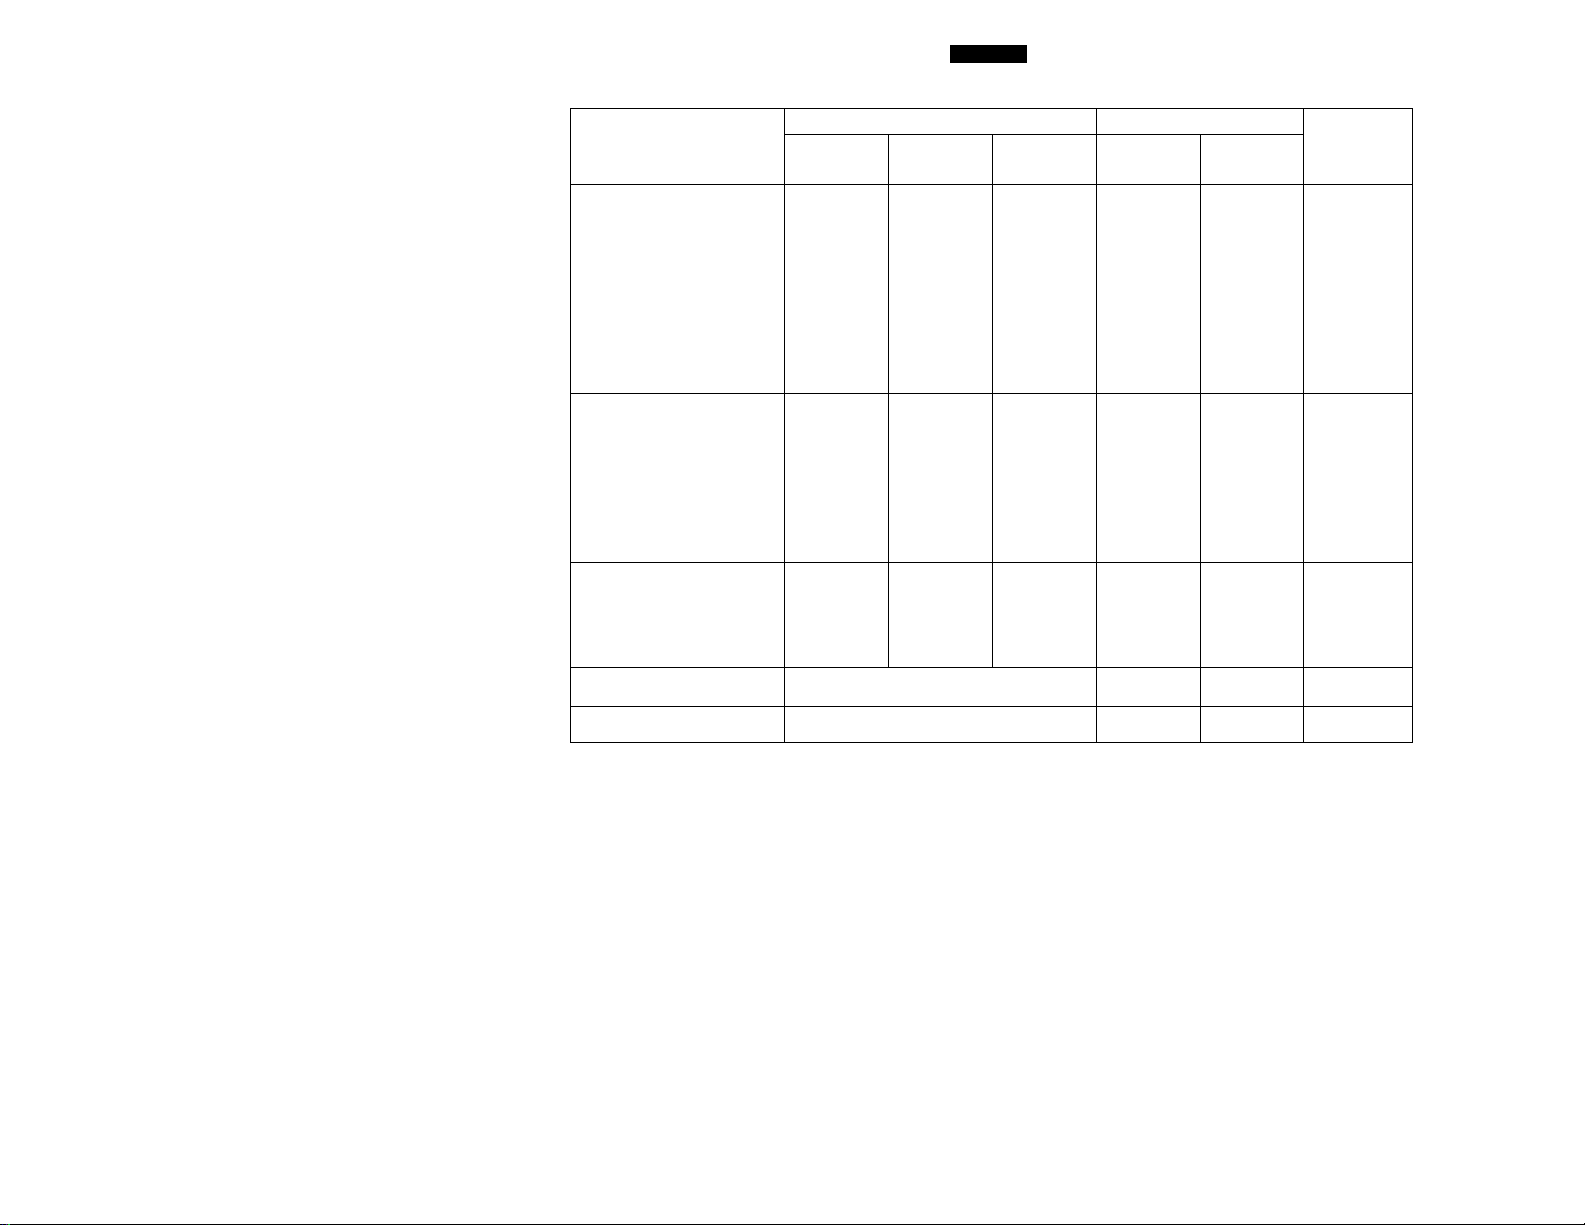
TABLA DE TELAS. HILOS AGUJAS
TELAS
MUY LIGERAS: Encaje,
gasa chifón, tul.
LIGERAS: Crepé, lino,
organdí, tafetán
LIVIANAS: Crepé, lana,
brocado, terciopelo
MEDIANAS: Lana, seda,
pana, lino. Paya,
tela de tolla
PESADAS: Drill, loneta, lona 30
SUPER PESADAS: Tapicería,
cánamo, todos
ITEJIDOS]
LIVIANAS: Tricot
MEDIANAS: Jersey,
Calado doble
PESADAS: Calado doble
IMITACIÓN PIEL, VELOUR 30
[CUERO]
TEUS VINI'LICAS
TELAS VINILICAS
LIVIANAS 0 MEDIANAS
CUERO GRUESO 30
Algodón
70
50-70 60 Seda, Nylon 9
30 50
30
30
50-70
30
30 50
30
30 50 Poliester
Español
HILOS AGUJAS
Algodón
mercerizad
60
50 Seda 11-14
Extrafuerte Poliester 16 ,
Extrafuerte
60
SO
Extrafuerte
50
Extrafuerte
Algodón
Polìester
Seda, Nylon
Seda, Nylon 9
Seda
Polìester 19
Seda, Nylon
Seda, Nylon
Poliester
Seda, Nylon
Poliester
Poliester 14-16
Poliester 14
Poliester
Medida
americana
15x1
11 Normal
9
9-10
11-14
14-16 Cuña
16-18
Tipo de
Puntada
Normal
Normal
Normal
Normal
Normal
Red
Red
Red
Red
Cuña
Cuña
OBSERVA
CIONES
Aflojar la
tensión
superior
uno 0 dos
puntos
[DECORADOS MATEUSSE] Seda retorcida
BORDADO Y MÁQUINA Medida 50 -70 9-11
16-18 Normal
Normal
Page 34
Pagi
IB 26
Section
4
English
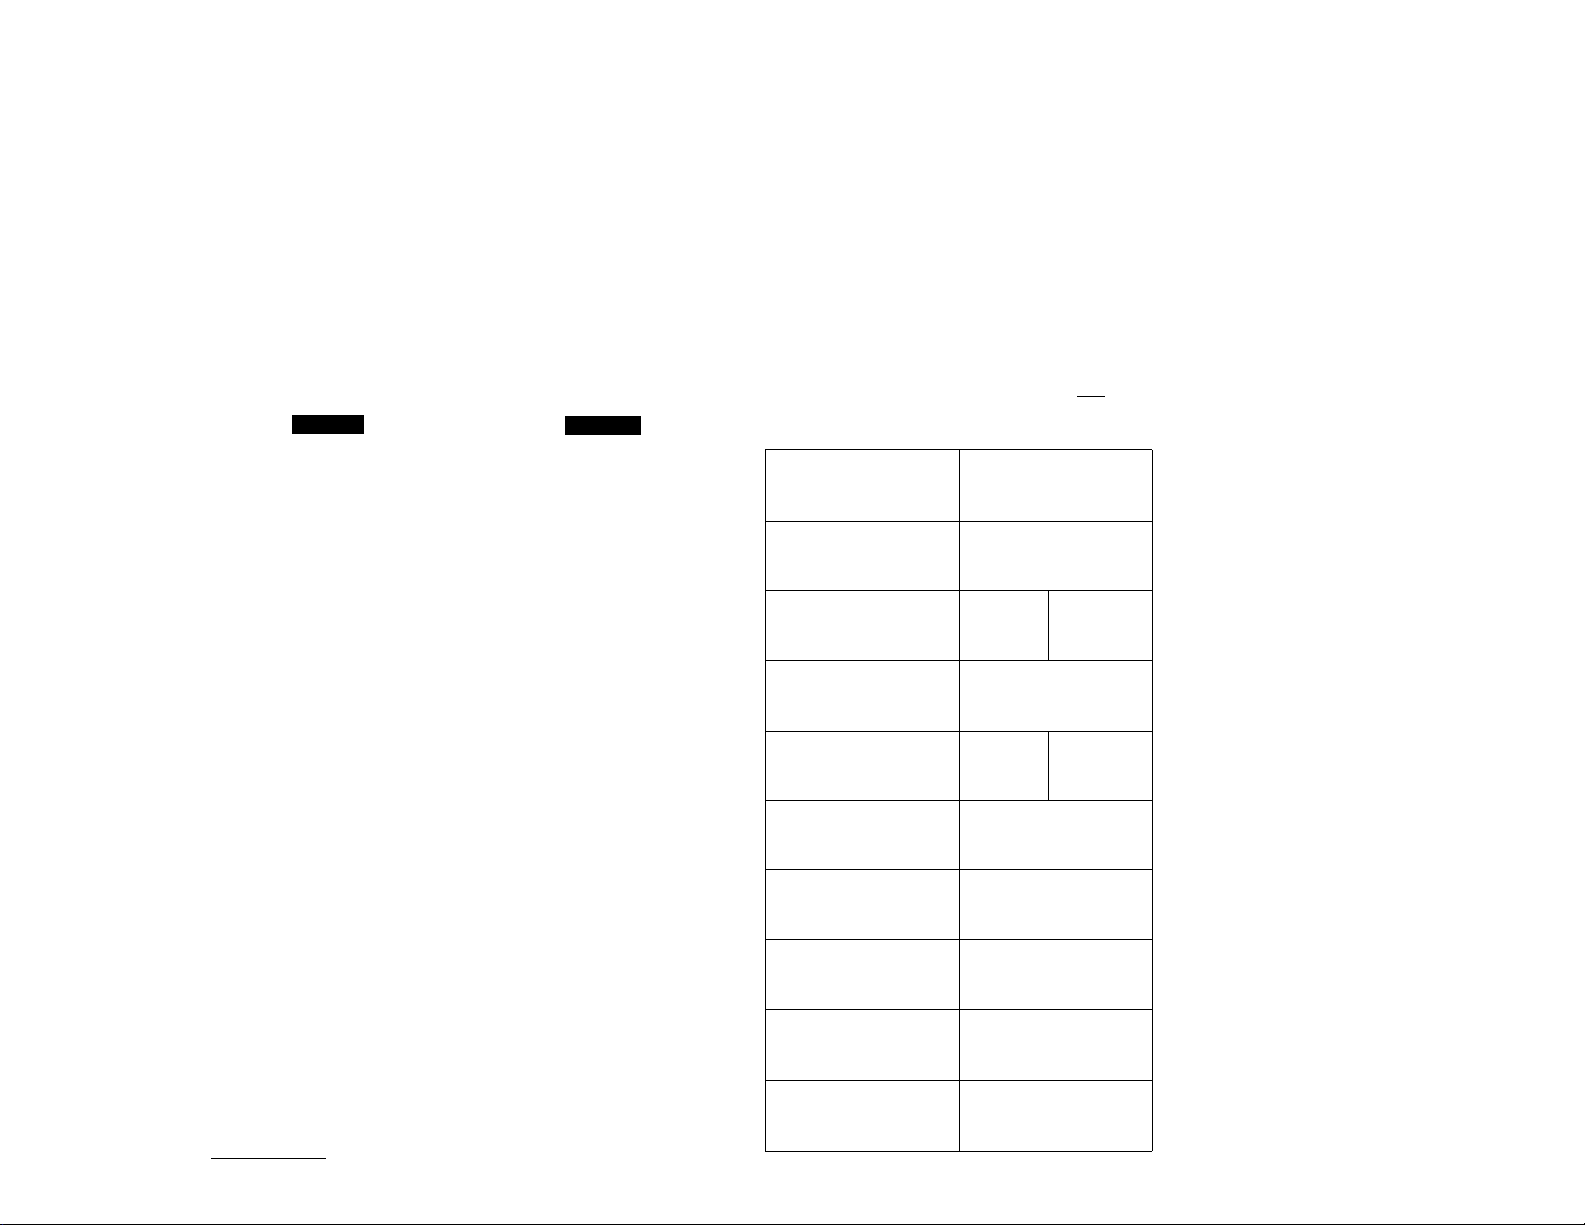
PATTERN SELECTION DIAL
The desired stitch select by
turning the stitch selector, it
can be turned either to the
right or to the left.
Note: When operating selec
tor, make sure the nee
dle is in the highest
position.
The stitches are shown as below.
1 Scallop stitch
2 Pearl decorative stitch
3 Straight stitch center
position Zigzag stitch
4 Straight stitch left
position
5 Straight stitch right
position
6 Blind hem
7 Mending stitch
8 Buttonhole stitch
9-10 Overcast stitch
11 Casing stitch
12 Overlockstitch
13 Flatlock stretch stitch
14 • Featherstitch
15-16 Overlockstitch
17 Straight stretch stitch
RicRac stretch stitch
18 Honeycomb stitch
19-20 Overedge
____________
Español
CONTROL PARA
SELECCIONAR LA
PUNTADA
Girar el control de izquierda a
derecha para seleccionar la
puntada que Ud. desee.
Nota: Siempre asegúrese de
que la aguja se encuen
tre en su posición más
alta cuando se manio
bre este control.
Las puntadas se indican como
sigue;
1 Festón de honda
2 Festón de rombo
3 Costura en zig-zag
4-5 Costura recta
6 Costura invisible
7 Costura para remendar
8 Ojal
9-10 Costura overiock
11 Puntada de unión
12 Costura elástica sobre
las orillas
13 Costura elástica overiock
14 Punto de espiga
15-16 Costura elástica sobre
las orillas
17 Zig-zag elástica costura
18 Costura elástica recta
19-20 Fruncido
1
i 0> 1-5
A ® ^-5
¡ 5
■ i ’?
^ ^ :
7 •> ’-2
^ :=■ 3-5
» Dir
9 i ^-2
10 i> '-2
r 3-5
- 1 5
13
i 5
i 5
-1 ^
15
i 5
R 5 .
1 5
III & C
17 '» € ^
1 ' III r
iiiO^ 5
1 5
^ 5
Page 35
Section
English
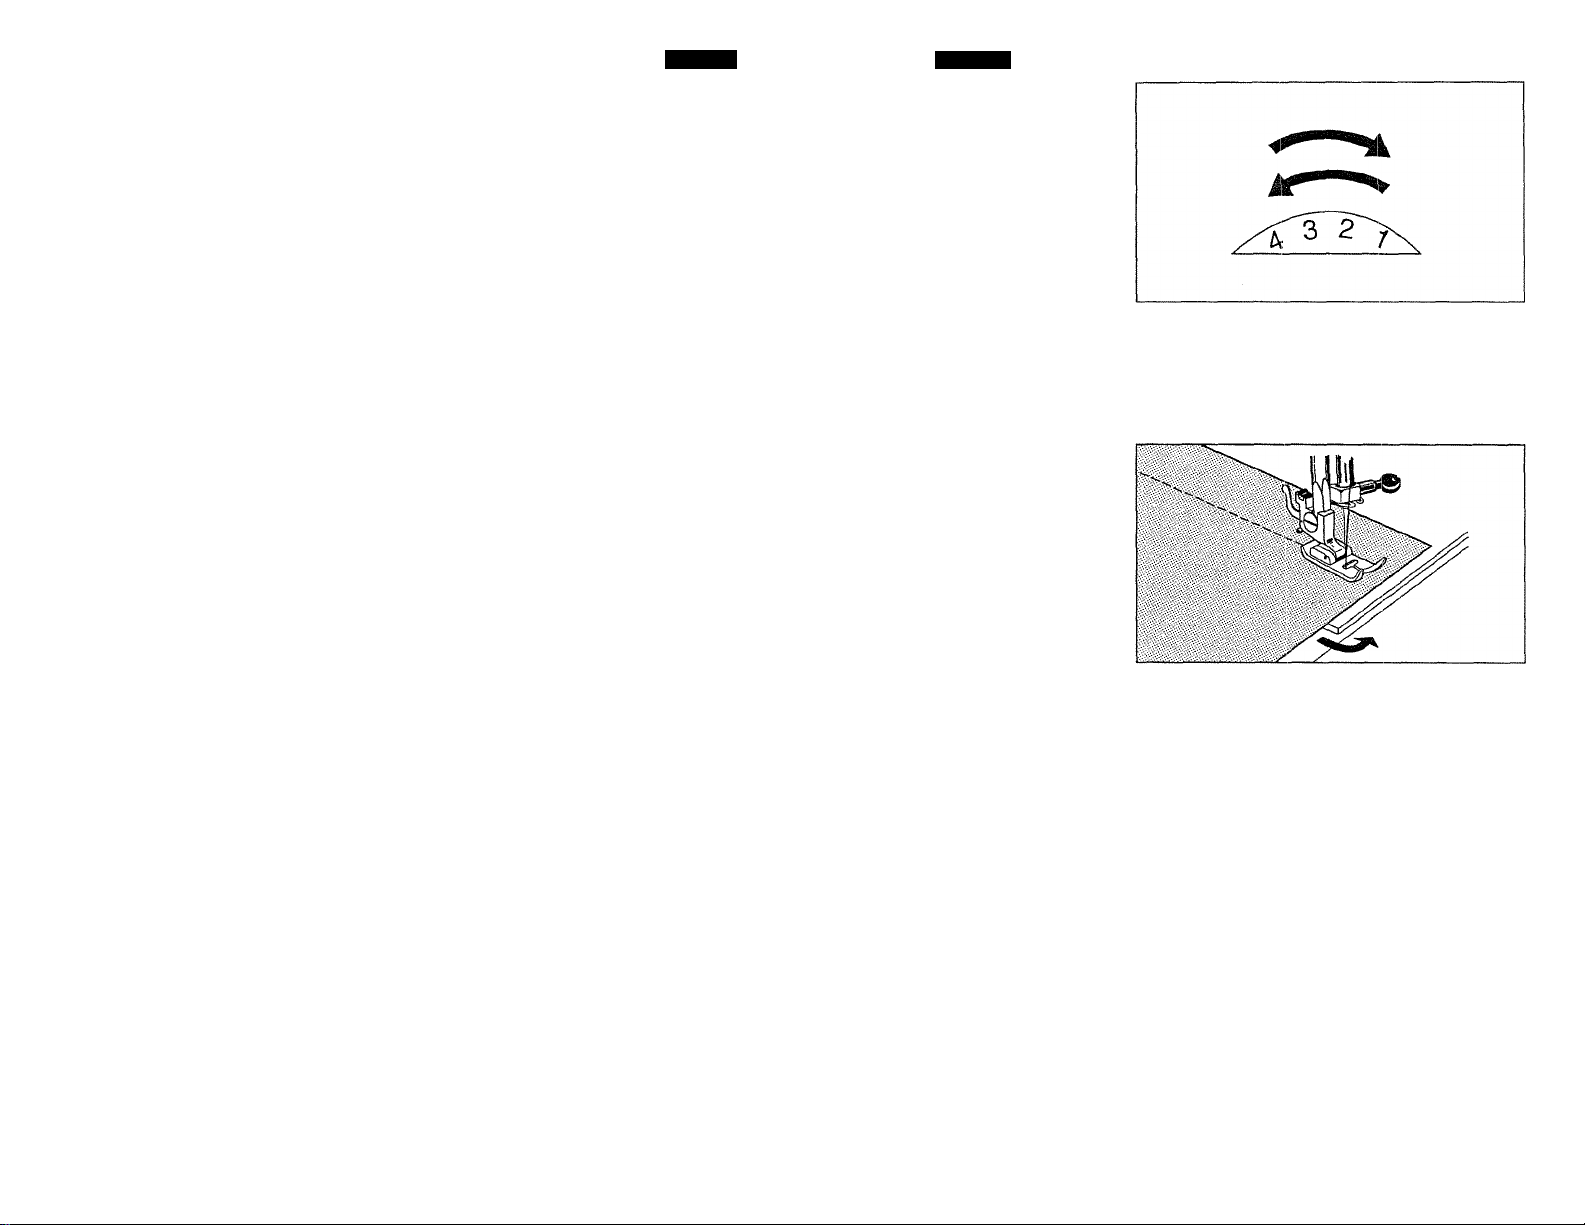
STITCH LENGTH DIAL
Set dial at indicating point
according to stitch length
desired.
For a longer stitch, turn dial to
right. For a shorter stitch,
turn it to left. For normal
sewing it is set between 2 and
3.
Español
CONTROL DEL LARGO DE LA PUNTADA
Poner el control como se indi
ca en el punto de acuerda
con la puntada que se
requiera
Para una puntada más larga
girar el control a la derecha.
Para una puntada más corta
girar el control a la izquierda.
Para la costura norma! poner
el control entre los números 2
y3.
4
TURNING A SQUARE CORNER
To turn a square corner 5/8"
from the fabric edge, stop
stitching with the needle tip
piercing the fabric. Raise the
presser foot, turn fabric. New
stitching line will align with
5/8” seam guide on side of
needle plate. Lower the
presser foot and begin stitch
ing in new direction.
CAMBIO DE DIRECCION DE PESTUNTE
Parar la máquina en e! punto
de rotación con la aguja en el
tejido. Subir la palanca del
pie prénsatelas y girar el teji
do en el sentido deseado.
Bajar la palanca del pie prén
satelas y volver a coser en la
nueva dirección.
Page 36
Page 28
Section
4
English
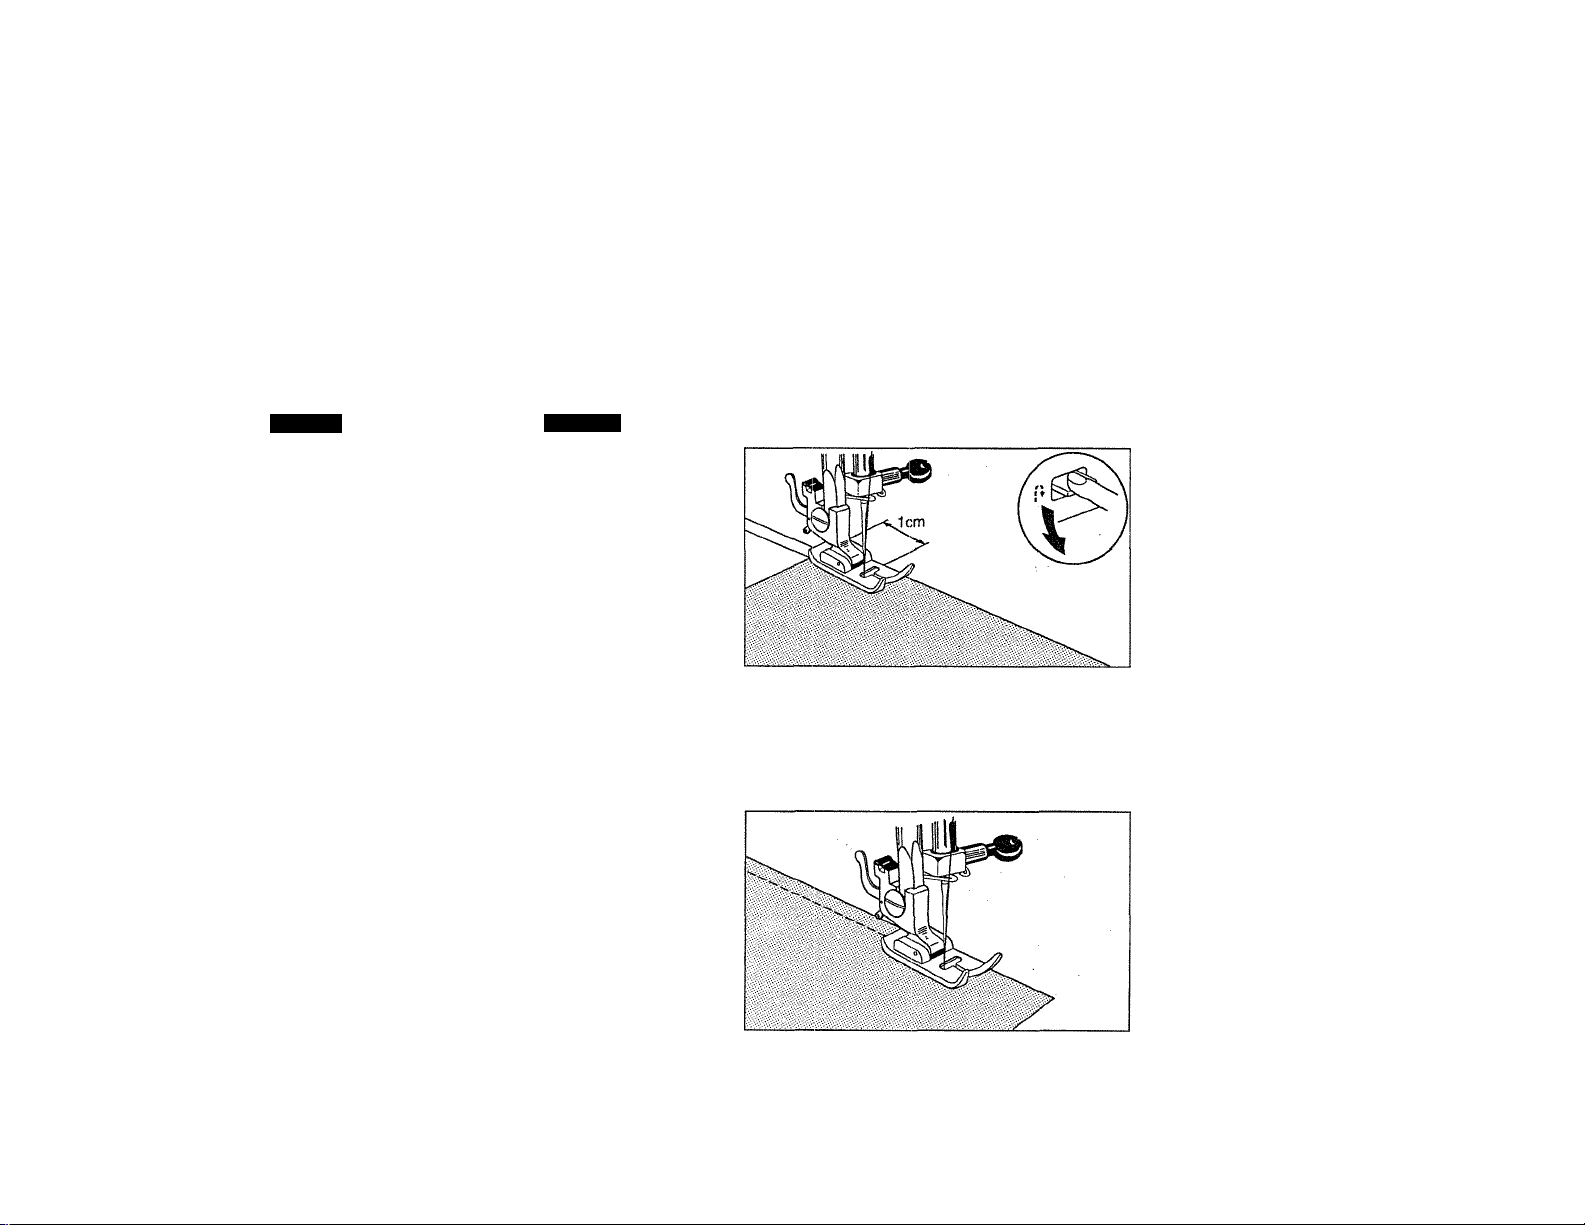
REVERSE SEWING
(Starting to sew)
Place fabric under foot about
1 cm (0.4”) inside the edge.
Lower presser foot lifter.
(Reverse sewing)
To reinforce seam, sew back
wards to the edge of fabric by
pushing reverse sewing button.
Release button and com
mence forward sewing guid
ing fabric by hand as it is fed.
Never pull material.
Release button and com
mence forward sewing guid
ing fabric by hand as it is fed.
Never pull material.
Español
COSTURA EN REVERSA
(Empezar a coser)
Colocar la tela debajo del pie
prénsatela aproximadamente
a 1 cm de la orilla.
Bajar el! elevador del pie prén
satela.
(Costura en reversa)
Para reforzar la costura coser
en sentido contrario de la orilla
de la tela accionando la palan
ca para coser en reversa.
Soltar la palanca e inicial la
costura hacia adelante giran
do la tela con la mano según
se vaya avanzando. Nunca
se debe tironear la tela.
Page 37
fage '¿y
Section
4
English
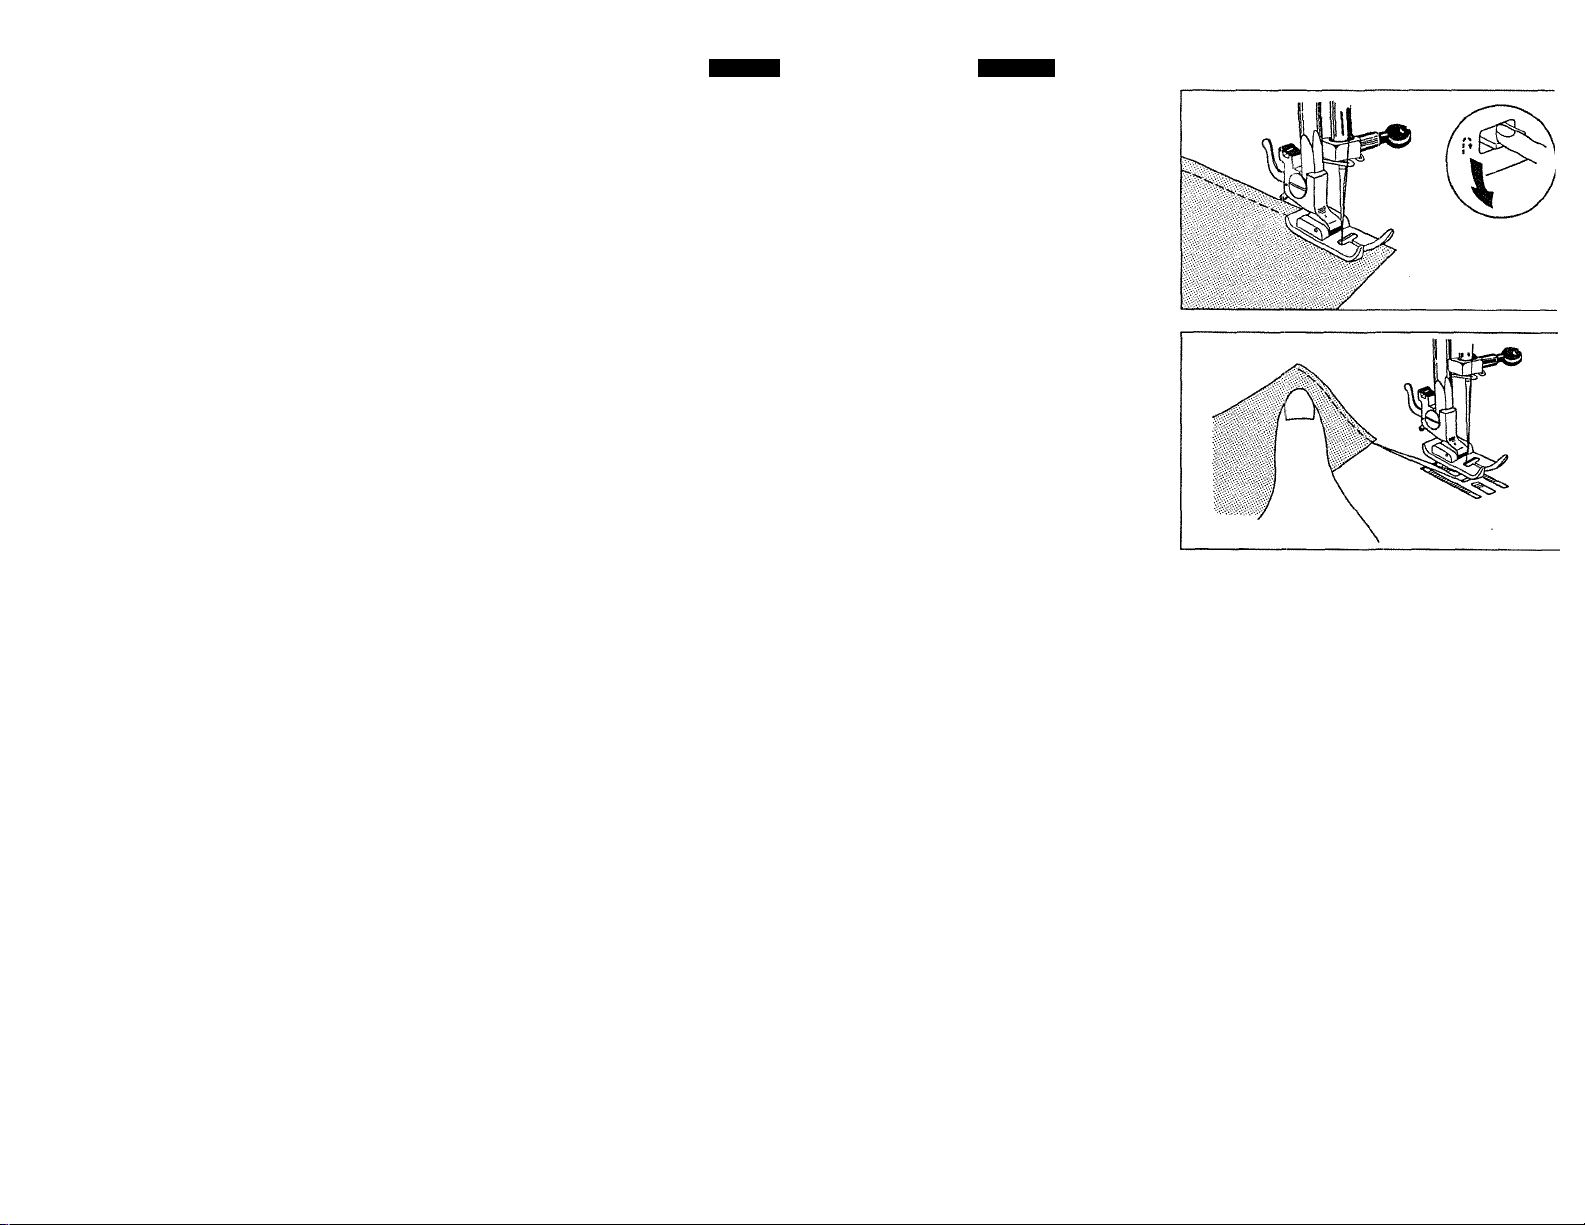
Sew reverse stitches for rein
forcement at end of seam.
Draw fabric to left when
sewing is finished.
Español
Coser con puntadas en rever
sa para reforzar el final de
una costura.
Jalar la tela hacia el lado
izquierdo cuando se haya
teminado de coser.
Page 38
Page 30
Section
4
English
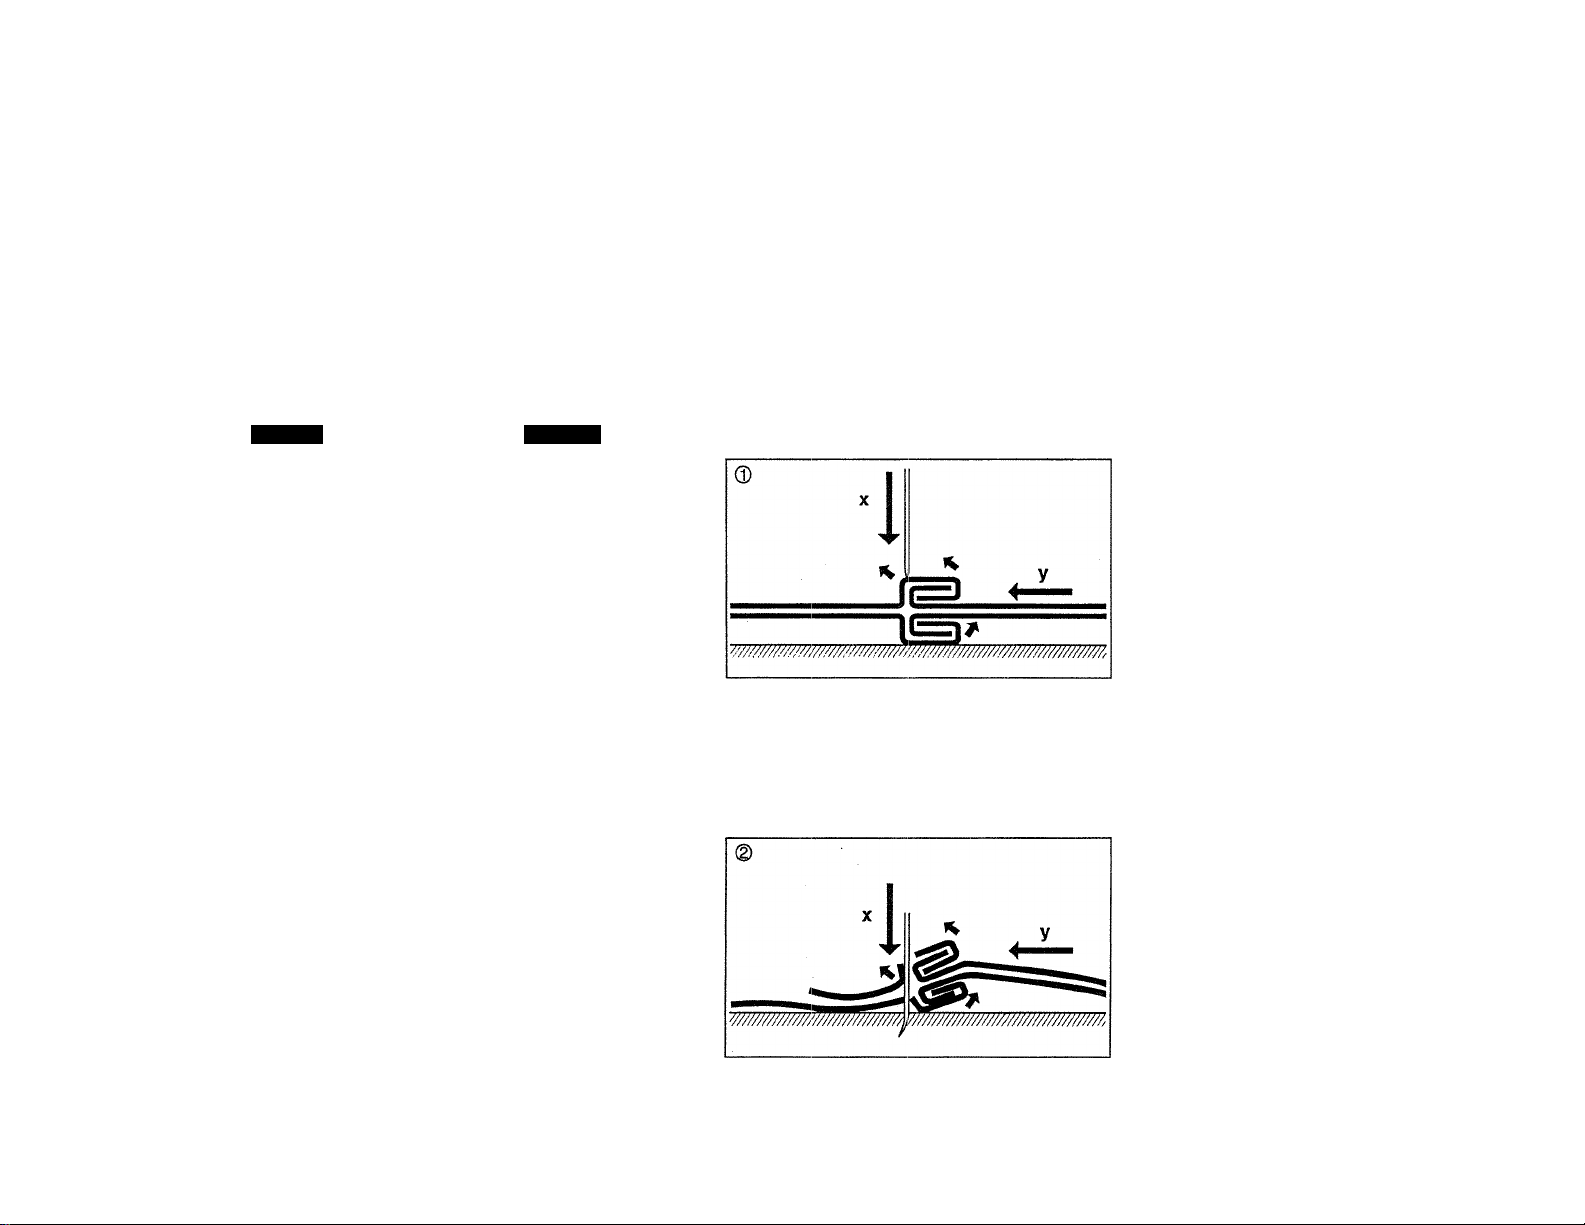
THICK FABRIC SEWING
(Particularly denim)
For thick fabric sewing, it is
important to sew slowly and
use the proper needle size
and type . A sharp needle
works best for denim.
Gently guide the fabric as you
sew.
Legend:
X Direction of needle
y Direction of cloth
Improper maneuvering of
thick fabric causes deflection
and possible breaking of the
needle.
Legend:
X Direction of needle
y Direction of cloth
Español
COSTURA EN TELAS
GRUESAS
(Dril de algodón en particular)
Para coser las telas gruesas,
lo que importa es que se siga
las instrucciones cuidadosa
mente.
Asegurarse de colocar la tela
verticalment. La aguja debe
estar perpendicular a la cos
tura para que la aguja pene
tre la tela apropiadamente,
(ver figura No. 0 )
Leyenda;;
X Dirección aguja
y Dirección tela
La mala colocación causará
que se doble y posiblemente
se rompa la aguja. Para
coser las telas muy gruesas,
coser suavemente mante
niendo la tela en la mano.
La rotura de la aguja no es
problema mecánico, sino mal
uso.
Leyenda:
X Dirección aguja
y Dirección tela
Page 39
English
EXTRA PRESSER FOOT
LIFT
In order to obtain a larger
opening when using very
thick materials, firmly push
presser foot lifter up as far as
it will go.
Español
DOBLE ACCION DEL
ELEVADOR DEL PIE
PRENSATELA
Para tener mayor espacio
entre el pie y la tela, cuando
se usan materiales muy grue
sos llevar hacia arriba el ele
vador del pie tanto como se
pueda.
mak
/
Section
4
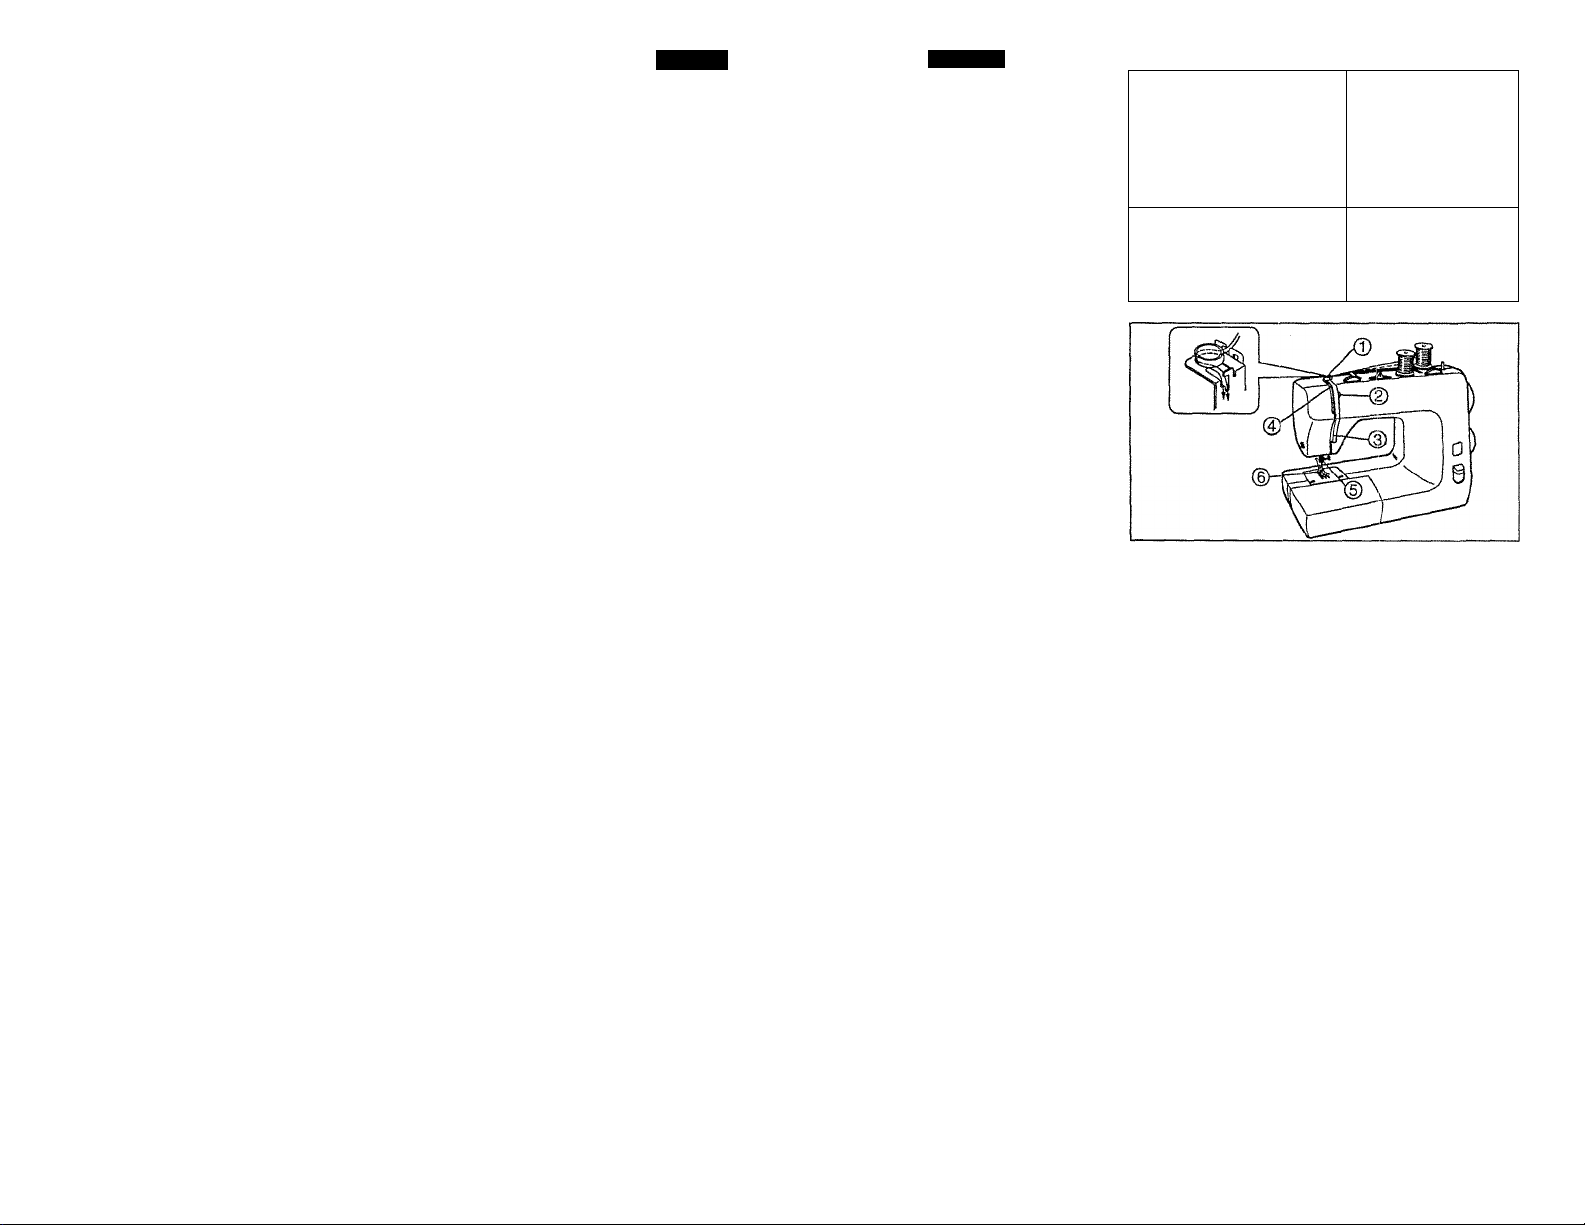
HOW TO USE TWIN NEEDLE
Twin needle threading
Extra spool pin is packed in
accessory tray.
Insert the extra spool pin into
the hole, and put another
spool of thread on it.
Thread in the same way as
normal threading, except at
points®, ©and (|).
COMO USAR UNA AGUJA
DOBLE:
Costura con dos hilos
(Dobie aguja)
Un porta carrete viene
incluido en la caja de los
accesorios.
Insertar el porta carrete en el
espacio correspondiente.
Enhebrar normal, excepto en
los puntos (D , (D y (D.
Page 40
Page 32
Section
4
English
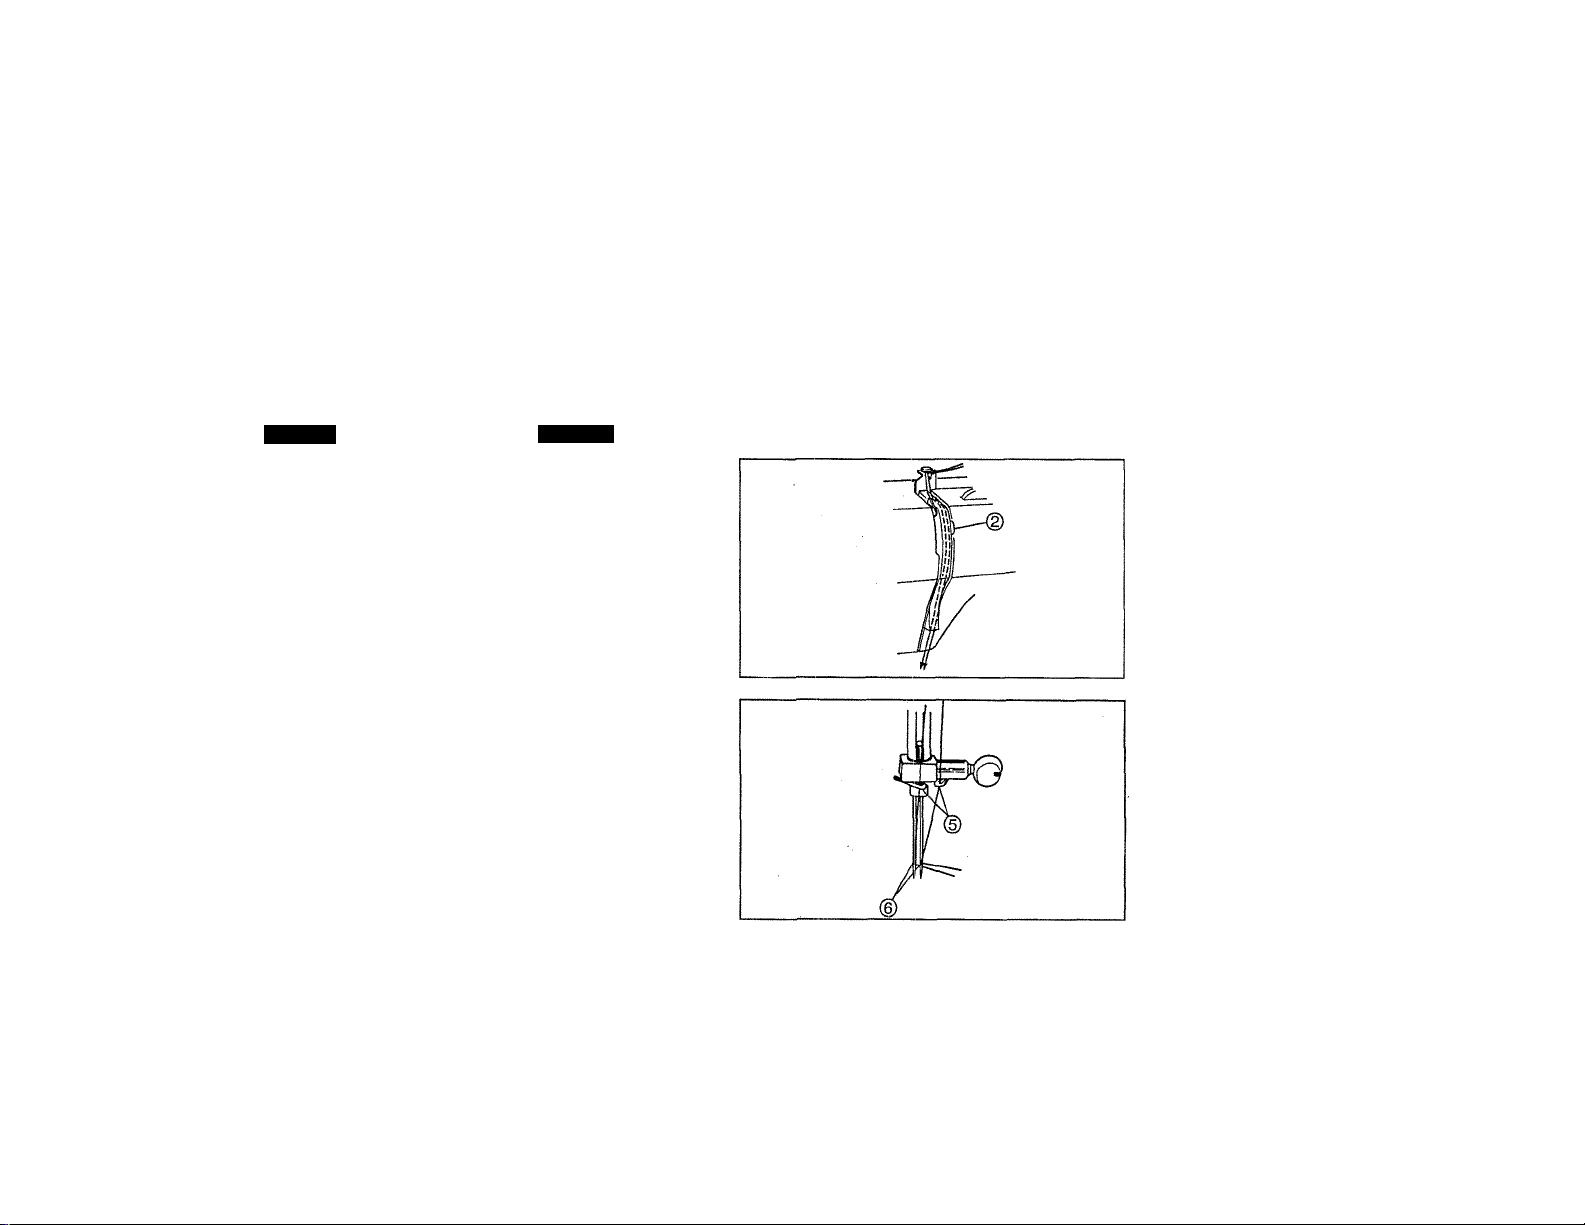
At point (2) , pass threads
separately to right and left of
tension disc.
At point (5) , pass threads
through - separate guides,
one on left, one on right.
At point (6), thread from right
side should be lead to right
needle eye, and thread from
left side to left needle eye.
Allow about 15cm (6”) of
thread extra.
CAUTION:
Remember to use no more
than 2.5 zigzag width.
Needle threader cannot be
used.
Español
En el punto (D , pasar un hilo
por el lado derecho y el otro
por la izquierda de la guía,
(ver figura b)
EI punto (D , Pasar los hilos
en las guias.
En el punto @, enhebrar el
hilo derecho en la aguja
derecha y el hilo izquierdo en
la aguja izquierda.
Dejar un extremo aproxi
madamente de 15 cm.
PRECAUEIÓN:
Recuerde no usar más de
2.5 en el ancho de zig-zag.
Enhebrador automático no
se puede utilizar.
Page 41
Page 33
Section
4
English
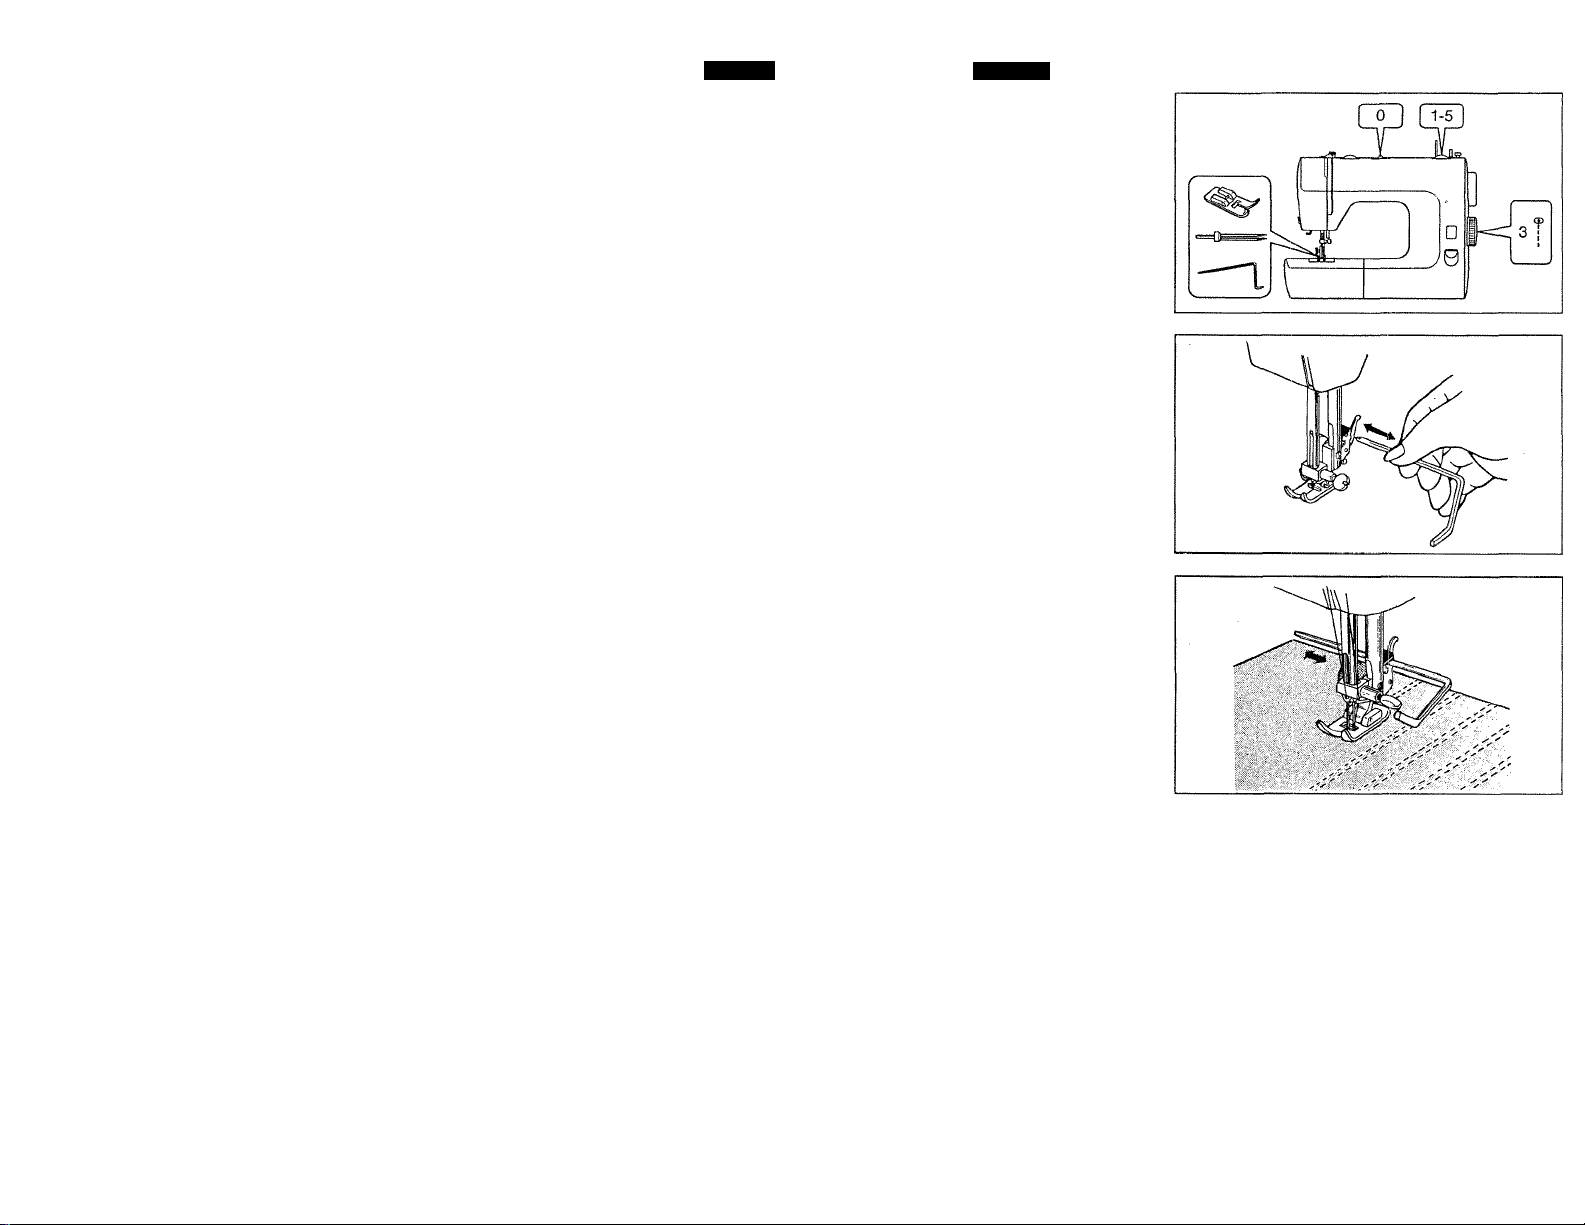
PIN TUCKING USING TWIN
NEEDLE
Set machine as shown.
Sew on light weight fabric
with straight stitch.
Insert the quilting guide under
the spring plate on the shank
Mark the first line with a pen
cil or tailo’s chalk, and sew.
For the second line, just sew
following the stitching of the
first line using the guide.
The intervals between the
lines of stitching can be
adjusted by moving the guide
in the direction of the arrow.
Español
COSTURA ARMADA
Preparar la máquina como se
indica.
Para una mejor apariencia se
aconseja usar telas finas y
aumentar un poco la tensión
del hilo inférion.
Insertar la guía para acolchar
en el soporte del pie prensatela.
Marcar la primera línea con
lápiz o gis de astre y coser.
A partit de la segunda línea
coser siguiendo la costura de
la primera línea con la guía.
El espacio que hay entre las
costuras se puede ajustar
moviendo la guía en dirección
a las flechas.
Page 42
Page 34
Section
English
5. SELECTING THE
STITCH
The desired stitch will be
obtained by turning the Pat
tern Selection Dial.
^ When operating the selec
tor, make sure the needle
is in the highest position.
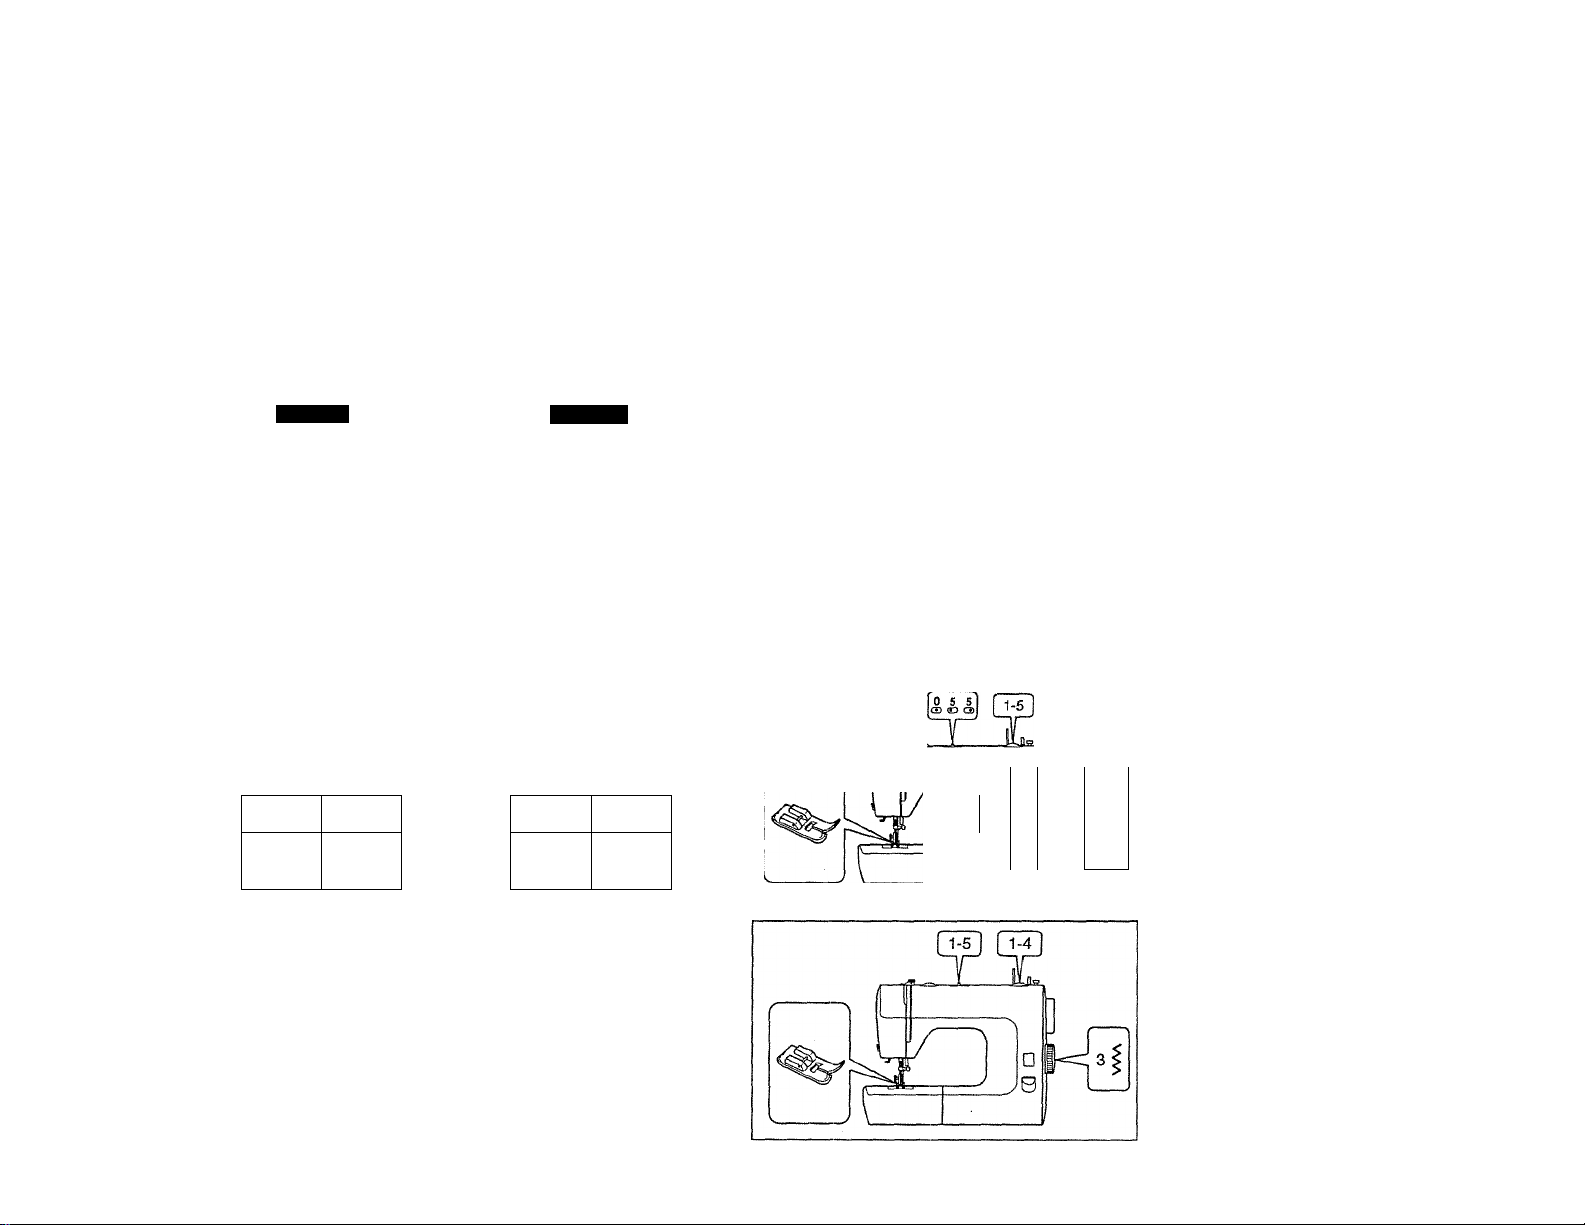
STRAIGHT SEWING
Set machine as shown for
left, right or center needle
position.
stitch
Selector Position
No.3 Center
No.4
No.5 Right
Needle
Left
ZIGZAG SEWING
Set the machine as shown.
To prevent seam ends unrav
elling, set machine for straight
stitch and sew in reverse at
beginning and ending of
seam.
Adjust width dial for wider or
narrower zigzag.
Español
5. ESCOGER LA
PUNTADA
Girar el selector para escoger
la puntada que se requiere.
Asegurarse que la aguja
esté siempre en su posi
ción más alta al operar el
selector.
COSTURA RECTA
Preparar máquina como indi
cado para posición de aguja
izquierda, derecha o recta.
Selection Posición de
de puntada
No.3 Centro
No.4
No.5
aguja
Izquierda
Derecha
COSTURA EN ZIG-ZAG
Preparar la máquina como se
indica.
Para evitar que en la termi
nación de la costura se
deshile, preparar la máquina
para la puntada recta y coser
en reversa al principio y al
final de la costura.
rrN
s 1
J
□
0
4
^ i )
Page 43
r ayö ja
Section
5
English
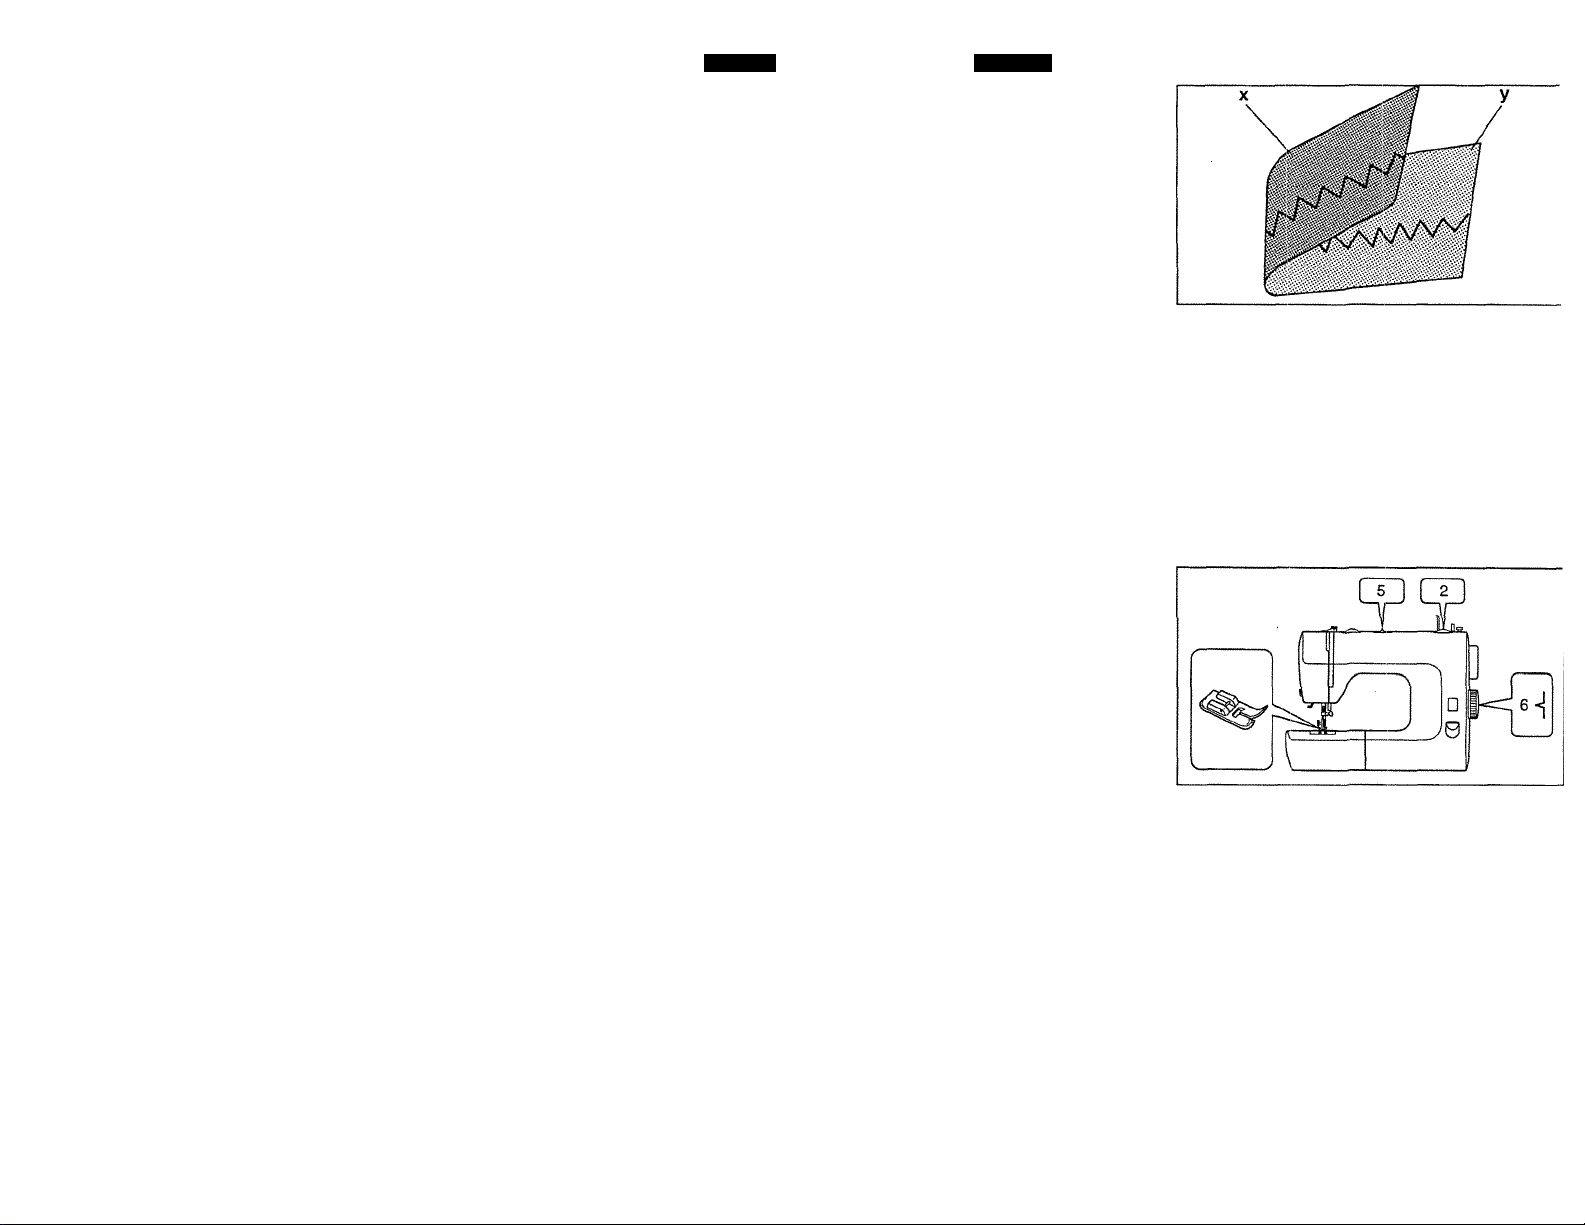
Thread Tension For 2:igzag
Stitch
Satin zigzag stitching requires
less upper tension than
straight stitching.
Loosen upper tension slightly.
Legend:
X Wrong side
y Right side
BLIND HEM STITCH
Set machine as shown.
Español
Tensióin del Hilo para
Costura Zig-Zag
Para una mejor apariencia de
la puntada en zig-zag se
requiere demenor tensión
superior que la que se usa en
la puntada recta. Aflojar la
tensión superior ligeramente.
Leyenda:
X Revés
y Derecho
COSTURA INVISIBLE Y
DOBLADILLO
Preparar la máquina como se
indica.
Page 44
Page 36
Section
5
English
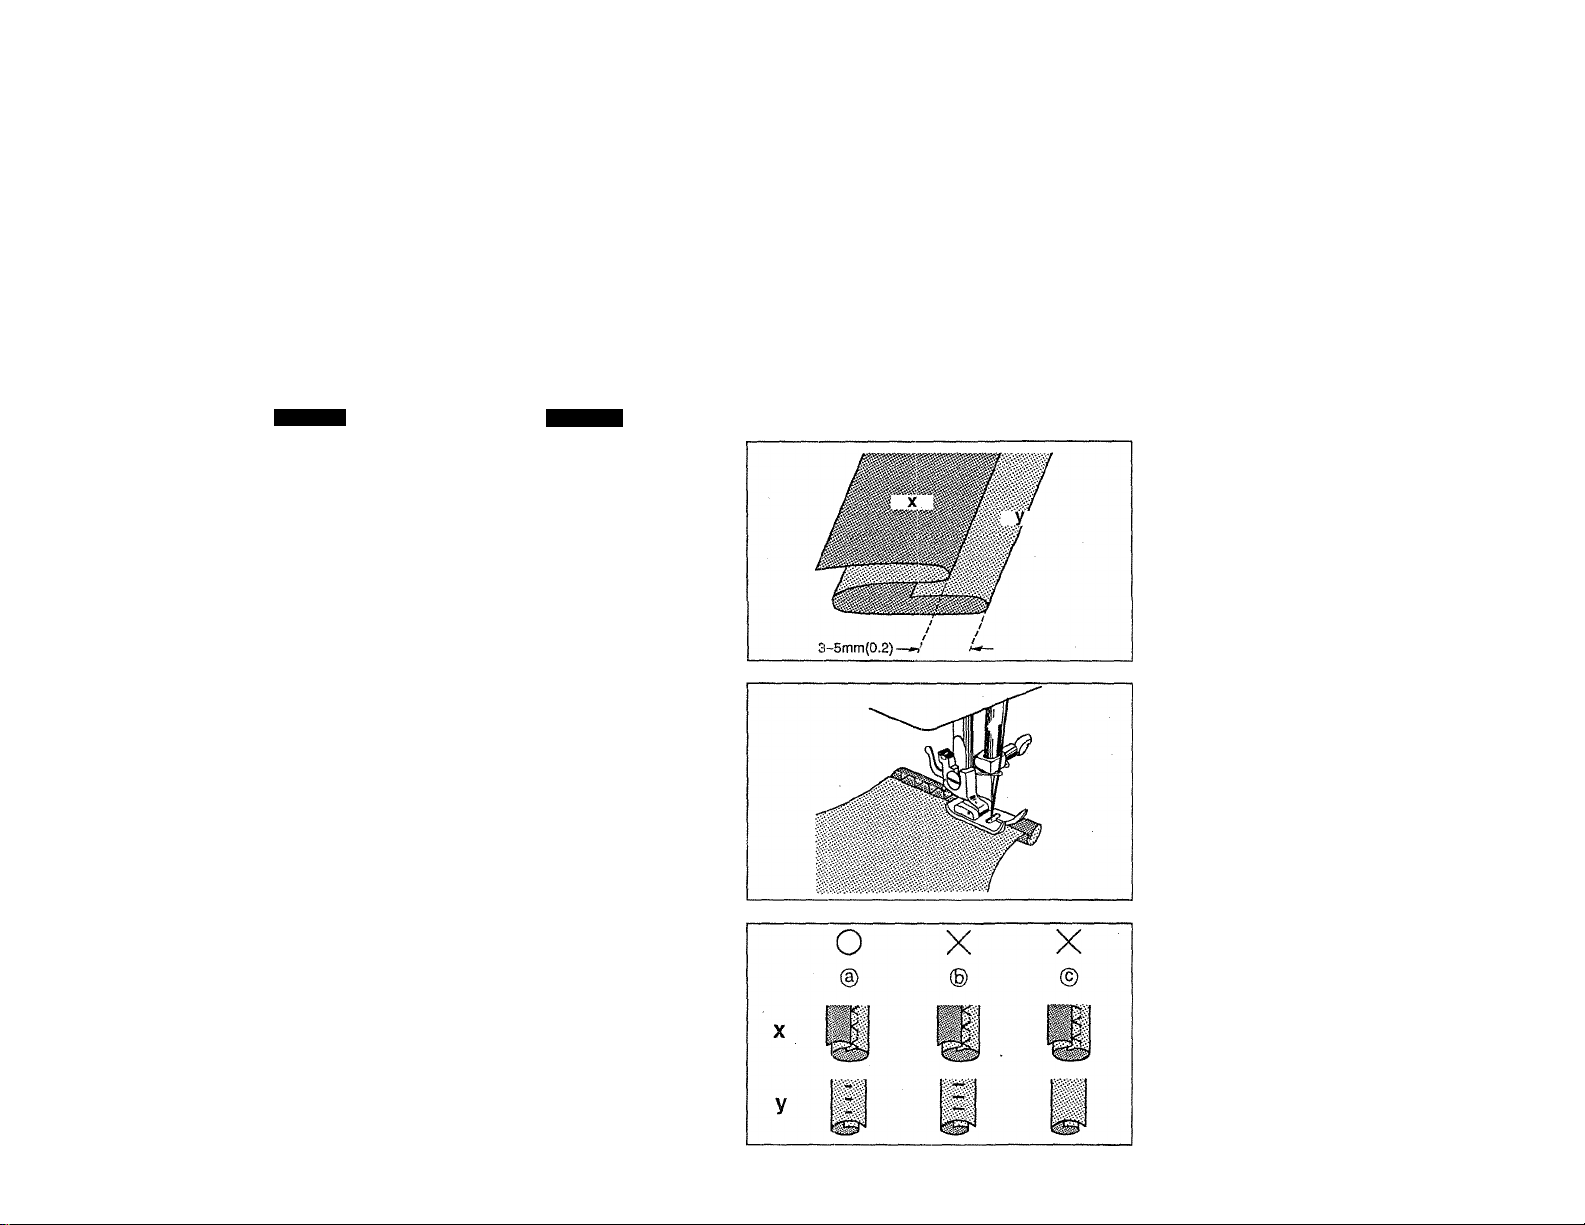
Fold material as shown and
place it under the presser
foot.
For a neater finish, it is prefer
able to pin and press hem
beforehand.
Legend:
X Wrong side
y Right side
Sew carefully, so that straight
stitches are made on hem
edge, and zigzag stitches
catch only one or two threads
of fold.
I® Correct seam.
© Needle is catching edge
of fold too much.
© Needle is not catching
edge of fold at all.
Legend:
X Right side
y wrong side
Español
Plegar la tela como se indica
y coloceir debajo dei pie prén
satela.
Para un mejor acabado es
preferible hilvanar o planchar
el doblez previamente.
Leyenda:
X Revés
y Derecho
Coser cuidadosamente para
que las puntadas estén
hechas sobre la orilla del
pliegue, y las puntadas
desplazadas tomen sola
mente uno o dos hilos del
doblez.
@ Costura correcta
® La aguja está tomando
demasiado la orilla del
doblez.
© La aguja no está tomando
la orilla del doblez.
Leyenda:
X Revés
y Derecho
Page 45
English
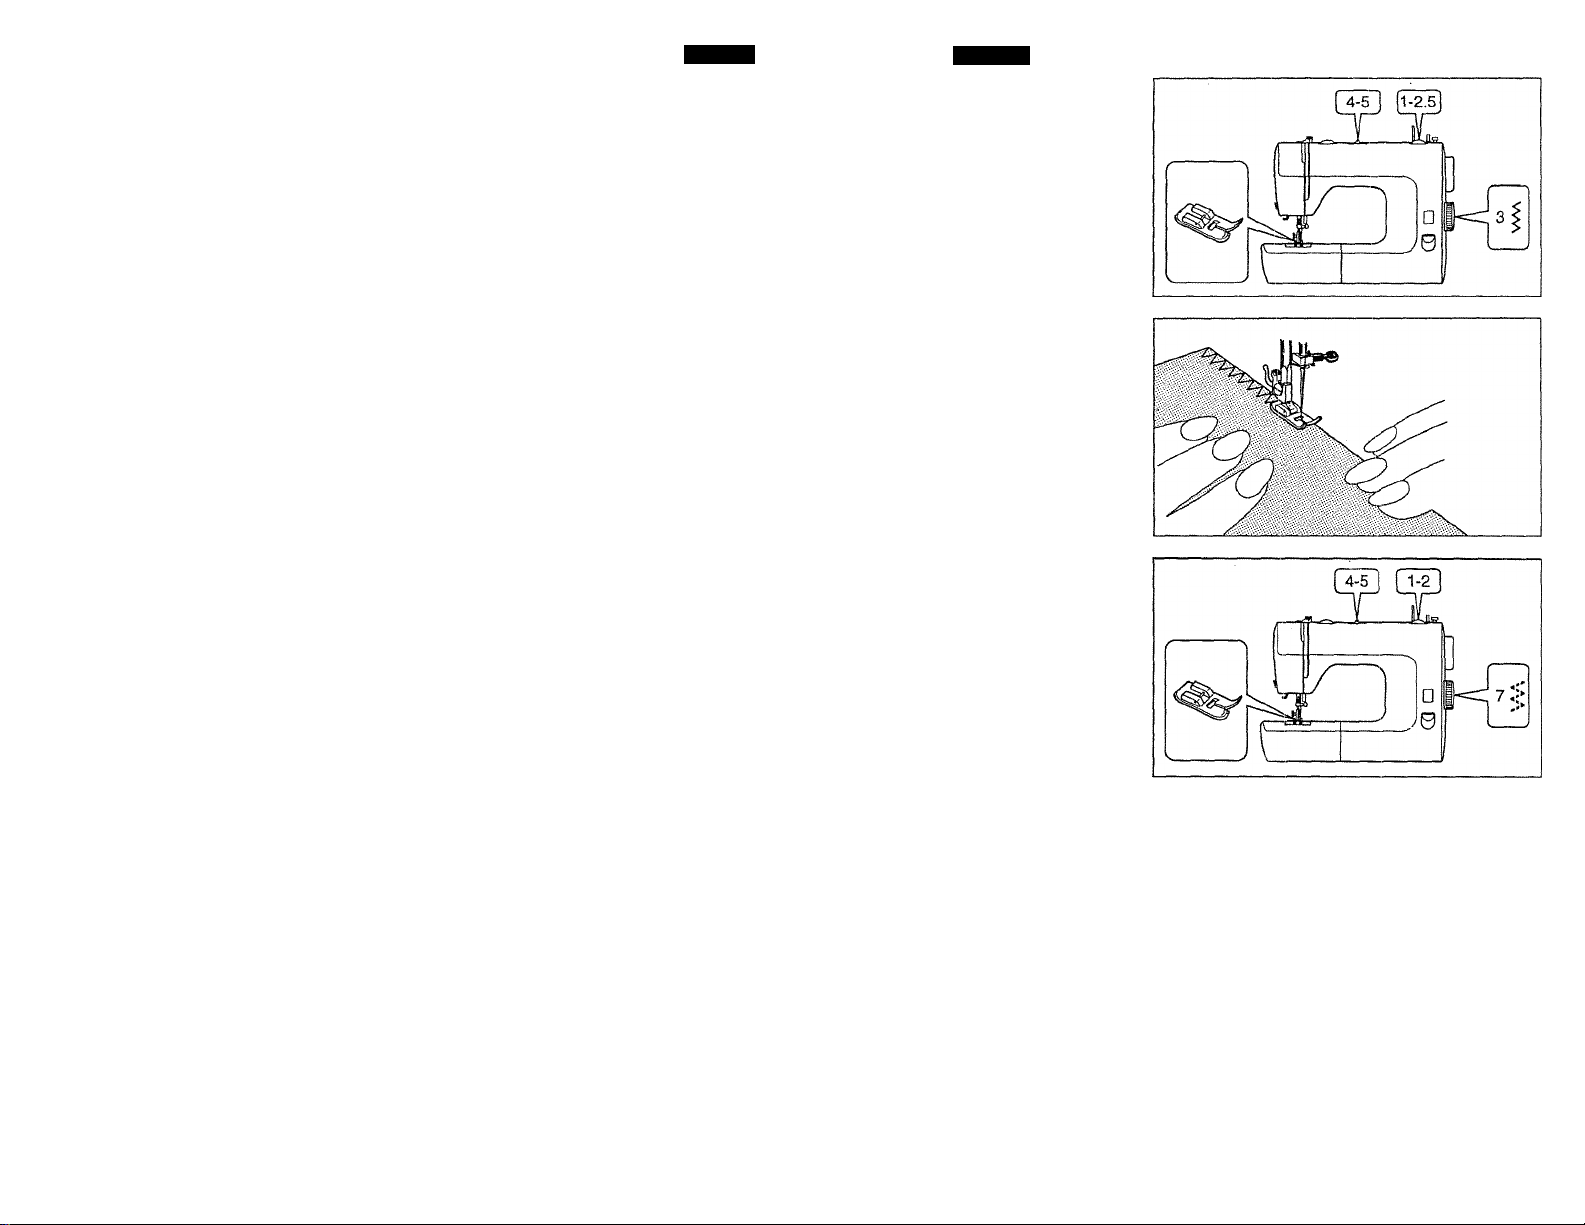
OVERCASTING
Español
SOBRE COSTURA
Section
5
For light-weight material;
Set machine as shown.
Overcasting prevents edge of
fabric from fraying and pro
duces a neat finish.
Place the seam allowance
under the presser foot with
the edge of the fabric in line
with the side of the presser
foot as illustrated.
For thick and elastic, and
also very fine material:
Set machine as shown.
Sew in the same way as
above.
Para materiales ligeros:
Preparar la máquina como se
indica.
Evita que las orillas de la tela
se deshilen y crea una mejor
apariencia en el acabado.
Coser cuidadosamente para
que todas las puntadas estén
niveladas con la orilla de la
tela.
Para telas gruesas y
elásticas:
Preparar la máquina como se
indica.
Coser de la misma forma,
como en las indicaciones
anteriores.
Page 46
Page 38
English
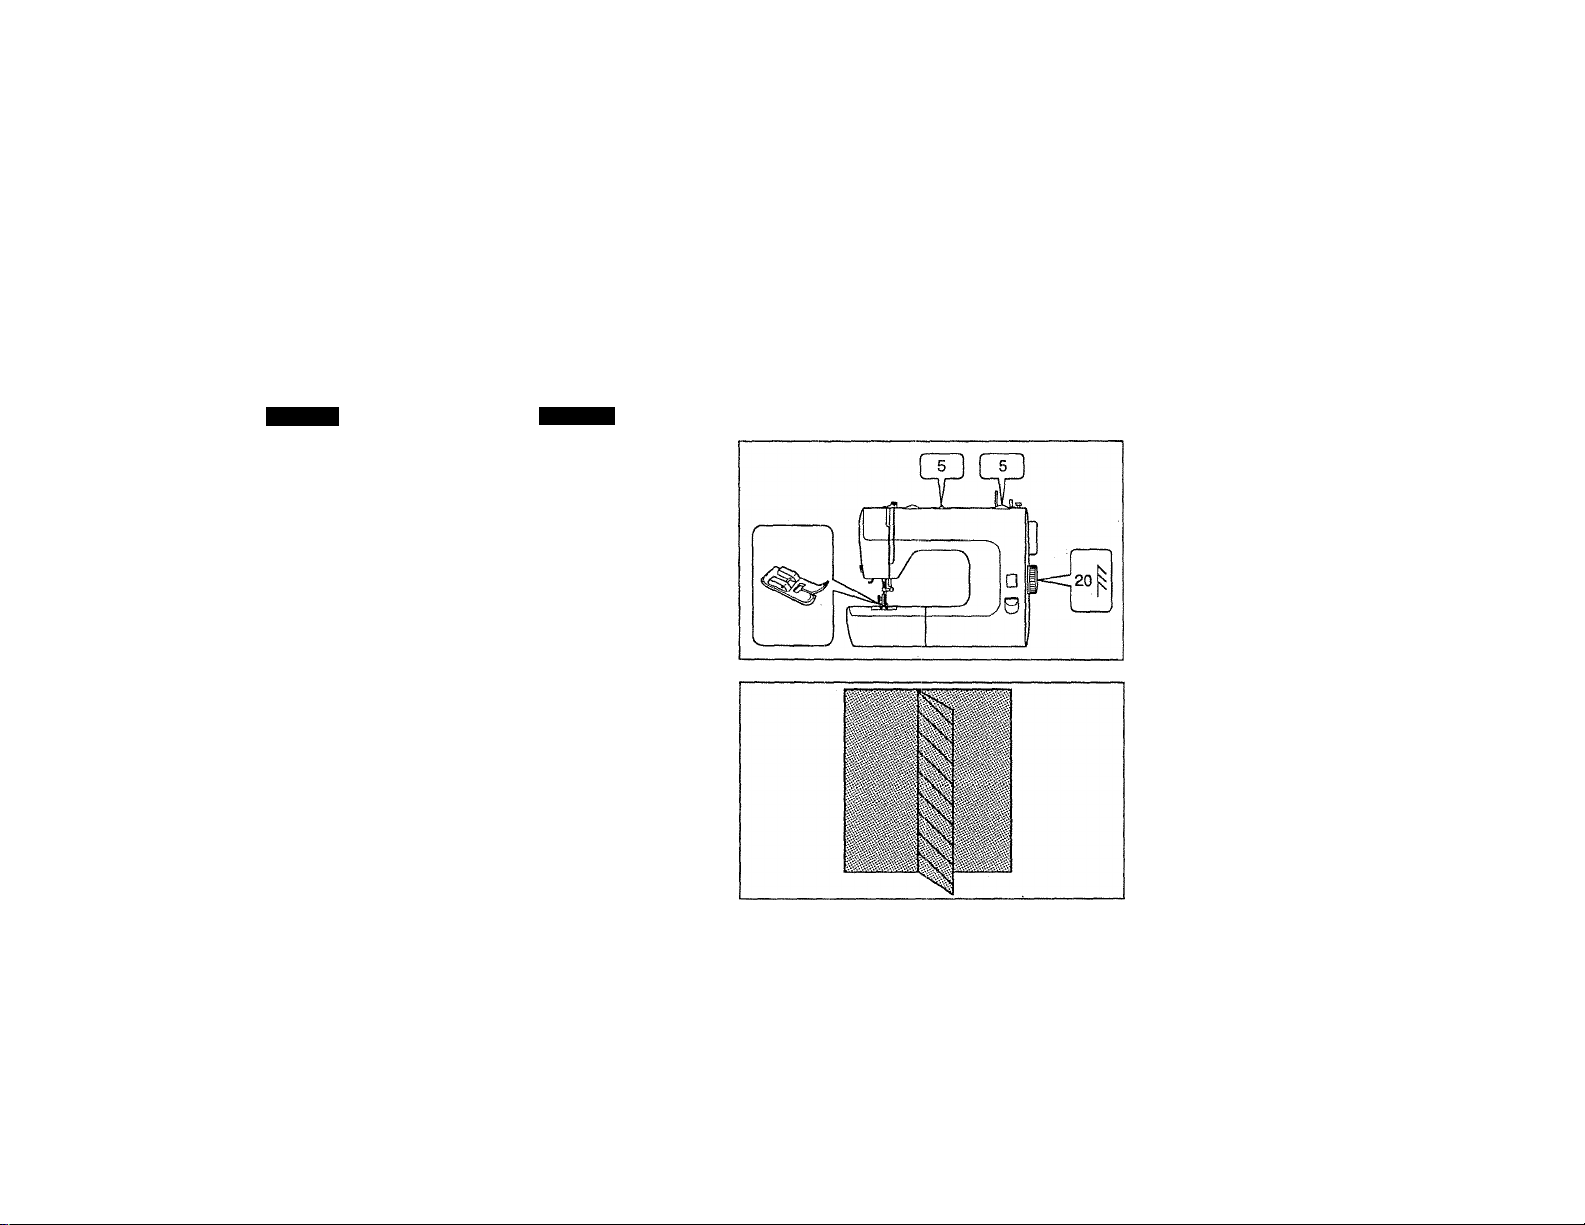
OVERLOOKING
Overlooking stitches make it
possible to sew and overcast
seams at the same time.
Set machine as shown.
Put two pieces of cloth
together with the right sides
Section together and sew.
To prevent edges from fray-
ing. sew so that right side
stitches drop outside the edge
■
of material.
In some cases overlocking
stitches can be used for over
casting.
STRETCH STITCHING
The following stitches shown
can be used with stretch and
knit fabrics. These are special
stitches built in the machine
for your quick selection.
Español
COSTURA“OVERLOCK”
Las puntadas en overlock
hacen posible coser y
reforzar la costura al mismo
tiempo.
Preparar la máquina como se
indica.
Poner dos telas juntas, con el
derecho de las mismas cara a
cara y coser.
Para evitar que se deshilen
las orillas, coser de modo que
el lado derecho de las pun
tadas caiga fuera del borde
de las telas.
En algunos casos la puntada
en overlock puede usarse
para reforzar la costura.
COSTURA ELASTICA DE DISEÑOS AUTOMÁTICOS
Estas puntadas especiales
son de uso práctico en telas
elásticas y tejidos, y vienen
integradas en la máquina.
Page 47
j__i-'age jy }
Section
English
12. Overlook stitch
13. Flatlock stretch stitch
17. RicRac stretch stitch
Set stitch length to 5
Set stitch width to 5
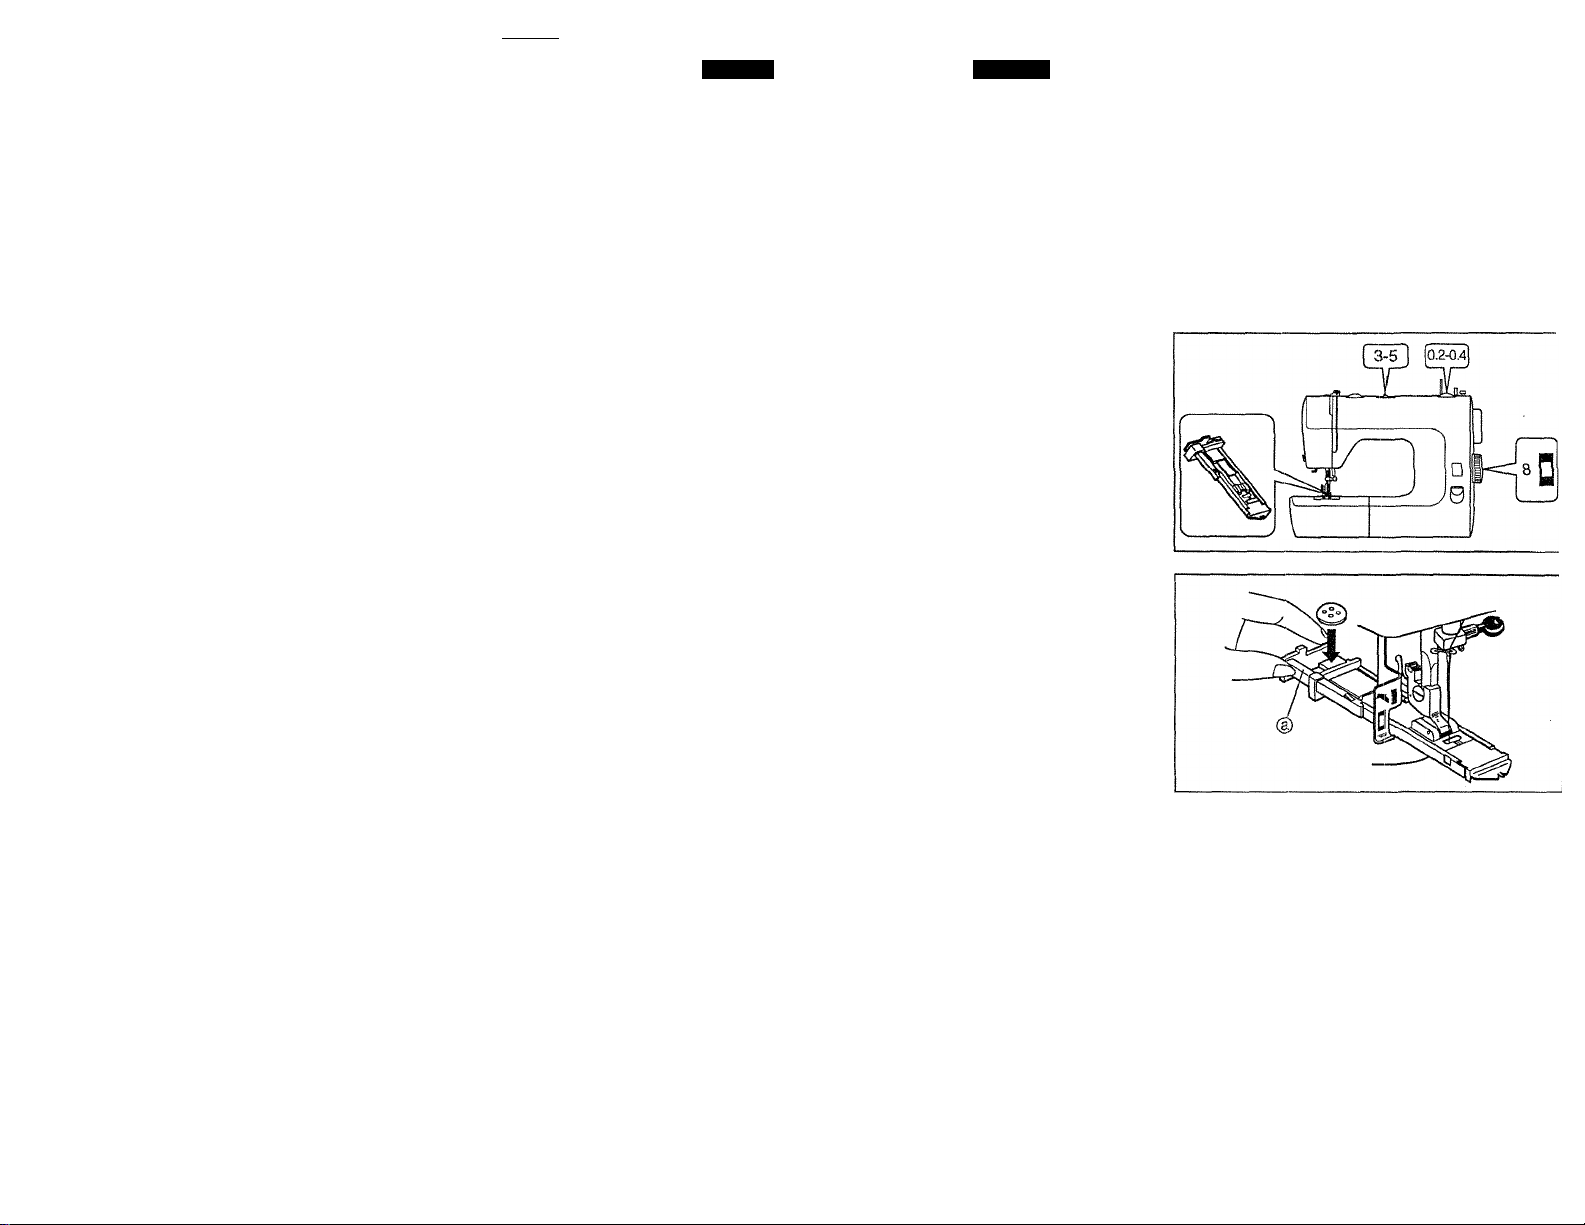
MAKING BUTTONHOLES
Set machine as shown.
^ Snap on buttonhole foot.
When setting buttonhole foot, Ai poner el pie présatelas
make sure button plate
set to back side.
Incorrect setting may cause
needle to break and injury.
12. Puntada overlock elástica
13. Elástica sobre Is orillas
17. Zig-zag elástica constura
CONFECCION DE OJALES
Preparar la máquina como se
indica.
5K Poner e! pie prénsatelas
para ojales.
is para ojales, aseguress de
que la place del botón @ esta
puesta en la parte detrás.
F’oniendola de una manera
incorrecta puede romper el
hilo y perjudicarle.
Español
13
<
<
17
c
€
Page 48
Page 40
Section
English
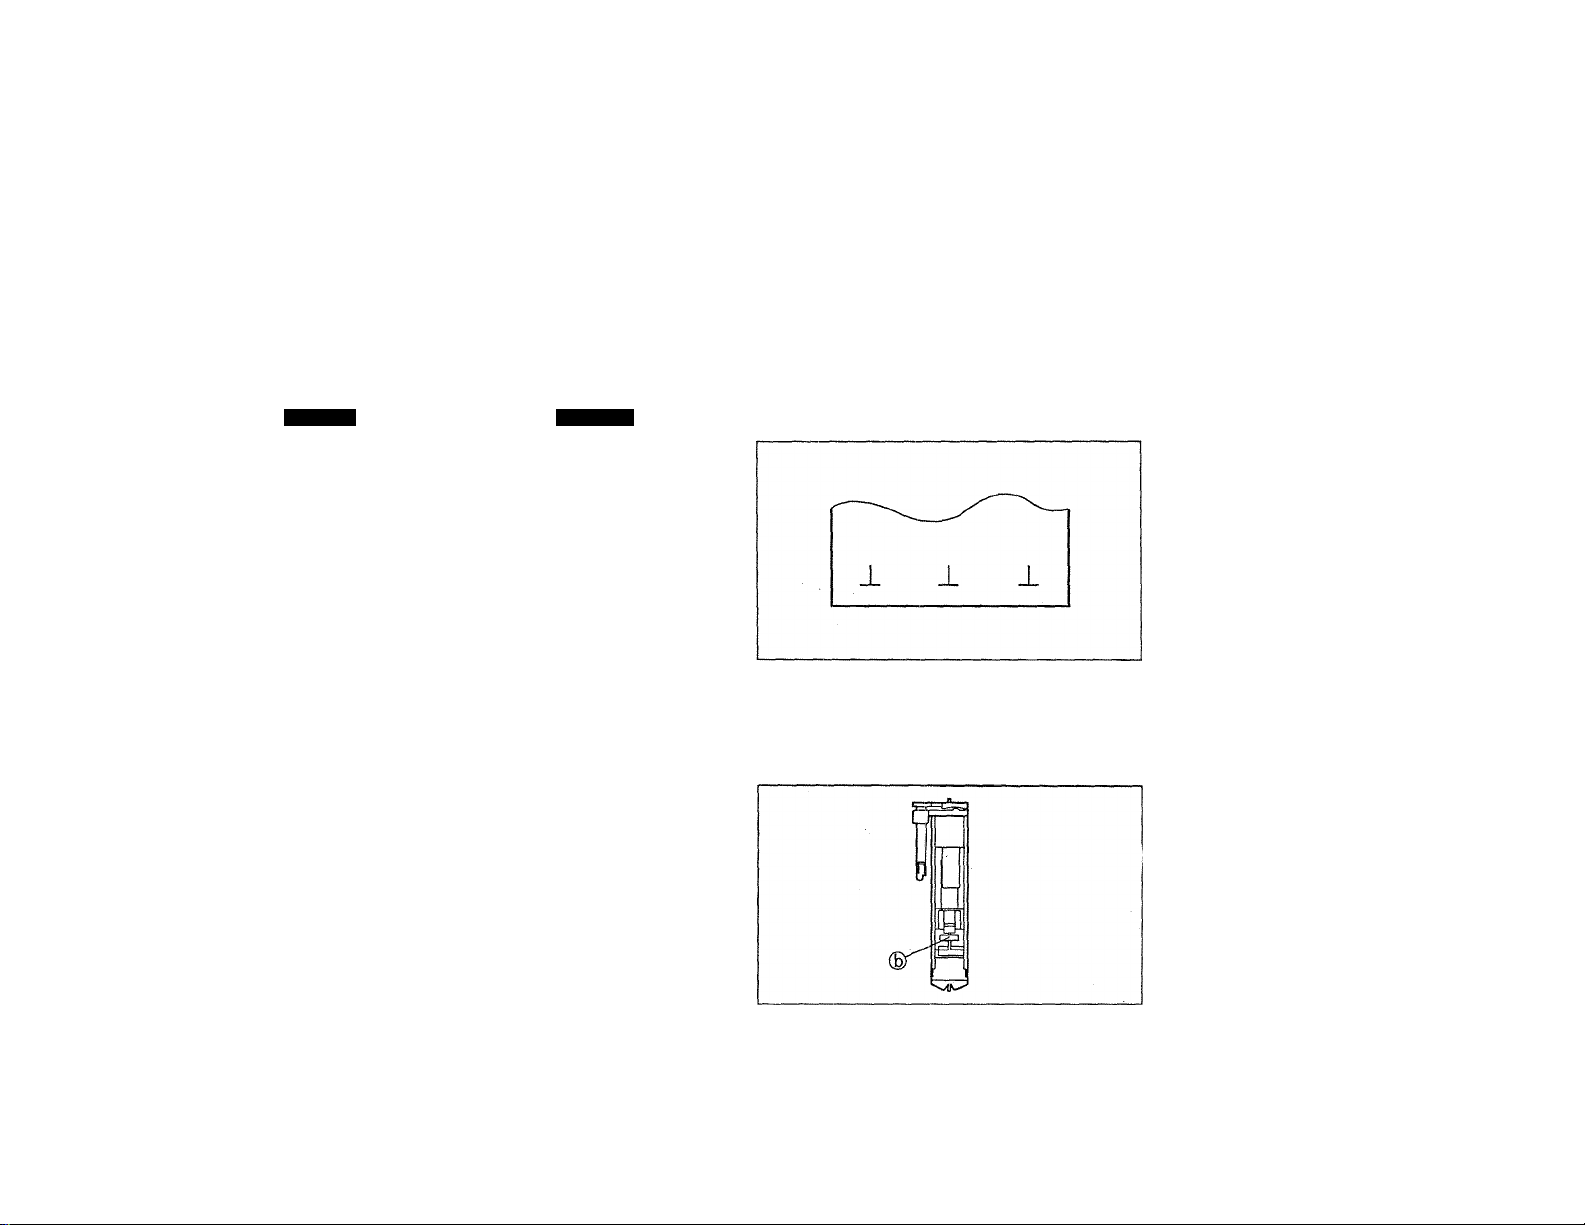
Determine Length
Mark starting point of button
hole on fabric.
Pull part (D of buttonhole foot
back and set button in part as
shown.
Jit When using soft or elastic
fabric, it is recomended to
place interfacing material
between the fabrics.
Set Position of Buttonhole
Foot
Lower the presser foot and
align the slot ® with marking
on the fabrics as shown.
Español
Determinar la longitud
Marcar el punto de partida del
pie prénsatelas sobre el teji
do.
Tirar la parte @ del pie prén
satelas y poner el botón en
las partes como esta indica
do.
Al coser tejidos ligeros o
elásticos, esta recomendado
poner un tejido intermedio
entre los tejidos.
Determinar la posición del
pie prénsatelas para ojales
Bajar el pie prénsatelas y
alinear la ranura ©con la
marca sobre el tejido como
esta indicado.
Page 49
} raye HI }
Section
English
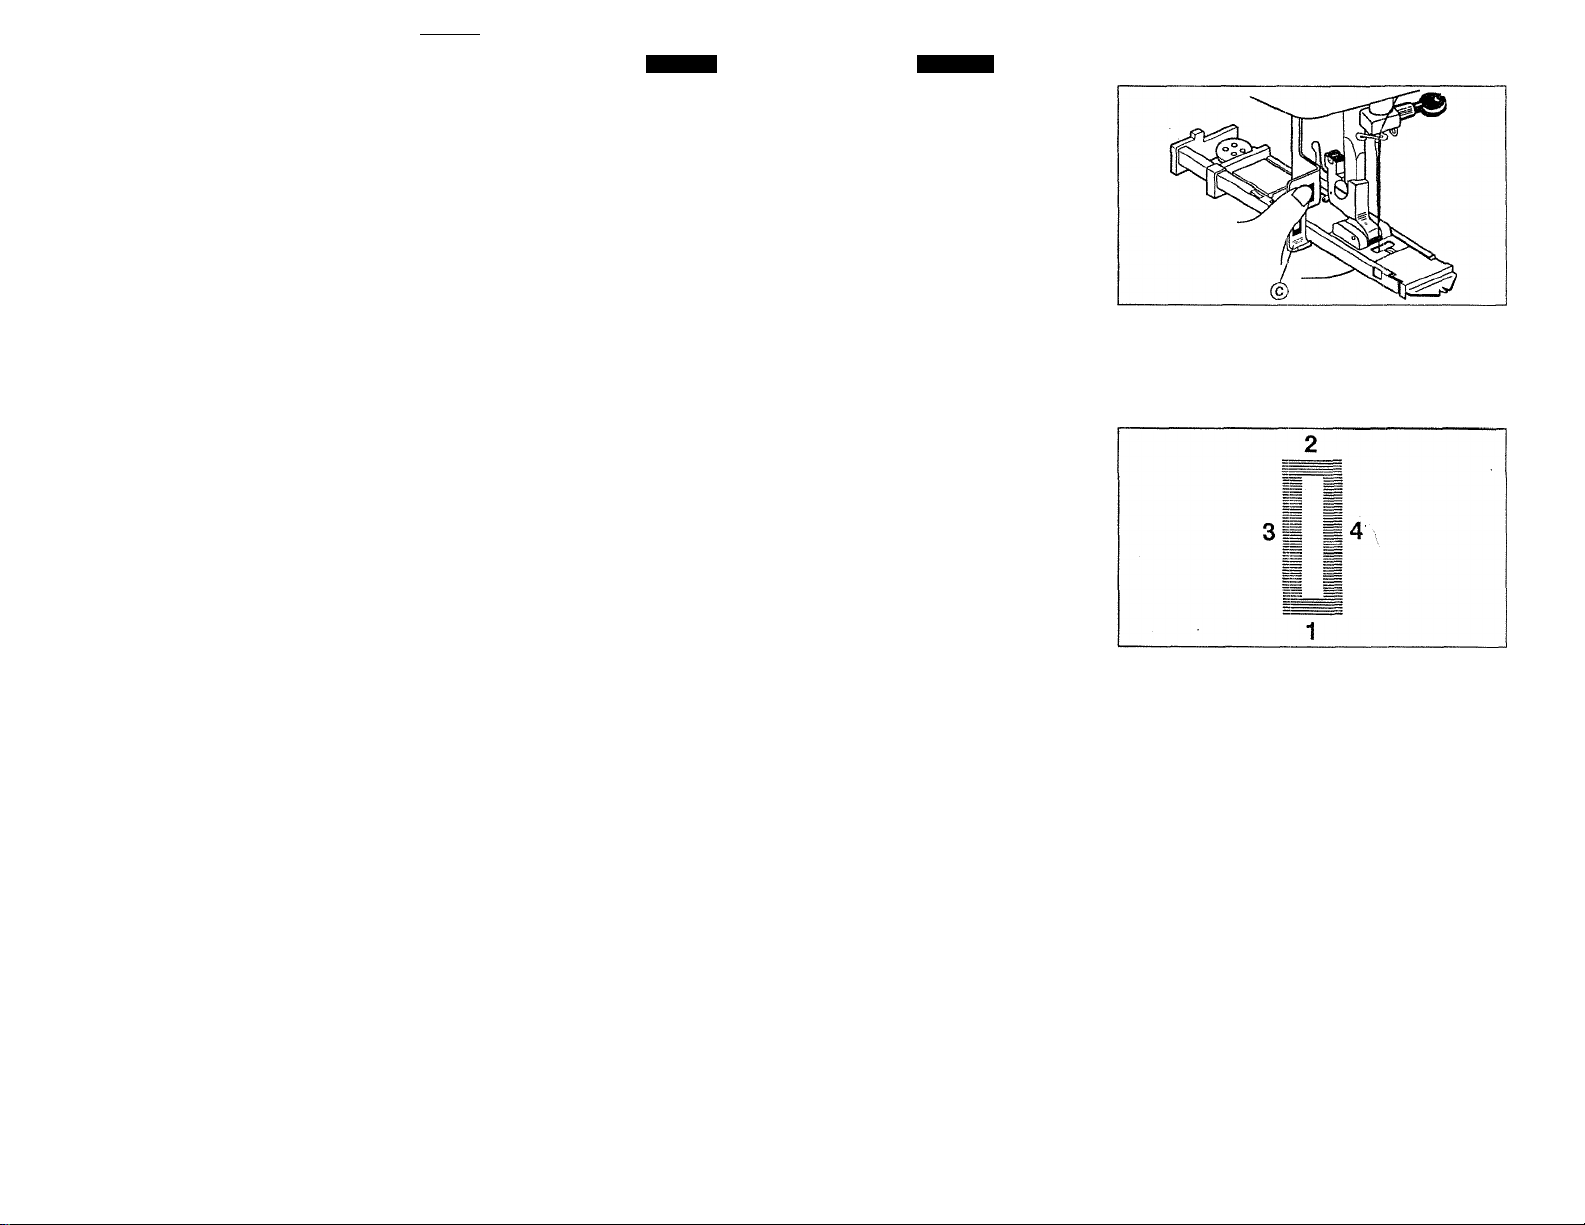
One Step Buttonhole sewing
1.
Set pattern selection dial
to 8 ( Q ).
2.
Pul) down automatic but
tonhole lever © and push
lever towaros the back as
shown.
3.
Hold thread lightly then
start machine.
Buttonhole sewing is done
in order, 1 -4 as shown.
is The front bar tack is sewn
first.
5. Stop machine when the
sewing comes back to
starting point. Then but
tonhole sewing is com
pleted.
is It is recommended to make
a sample buttonhole on a
scrap piece of fabric
before making it on your
garment.
CAUTION:
DO NOT TOUCH METAL
PART OF BUTTONHOLE
LEVER
Español
Confección de ojales
automáticos
1. Ajustar el punto al número
8 ( Q ) con la rueda de
selección.
2. Tirar hasta abajo de la
palanca de ojal
automático © y empujarla
brevemente hasta atrás
como esta indicado.
3. Sujetar el hilo y empezar a
coser.
4. El ojal se hace en el orden
1 -4 como esta sefialacdo.
iS El hilván delantero esta
cosido en primero.
5. Parar la máquuina cuando
llega al punto de partida.
Entonces, el ojale esta
cosido.
Kí Esta recomendado hacer
una prueba sobre una
muestra antes de coser
su tejido.
ATENCIÓN:
NO TOCAR LA PARTE
METÁLICA DE LA
PALANCA DEL OJAL
Page 50
English
Page 42
Section
5
iS In case of repeat button
hole sewing, set the slot®
to each start point and pull
buttonhole lever toward
you @ again then follow
step from 3.
^ Do not forget to push but
tonhole lever back up @
after buttonhole sewing.
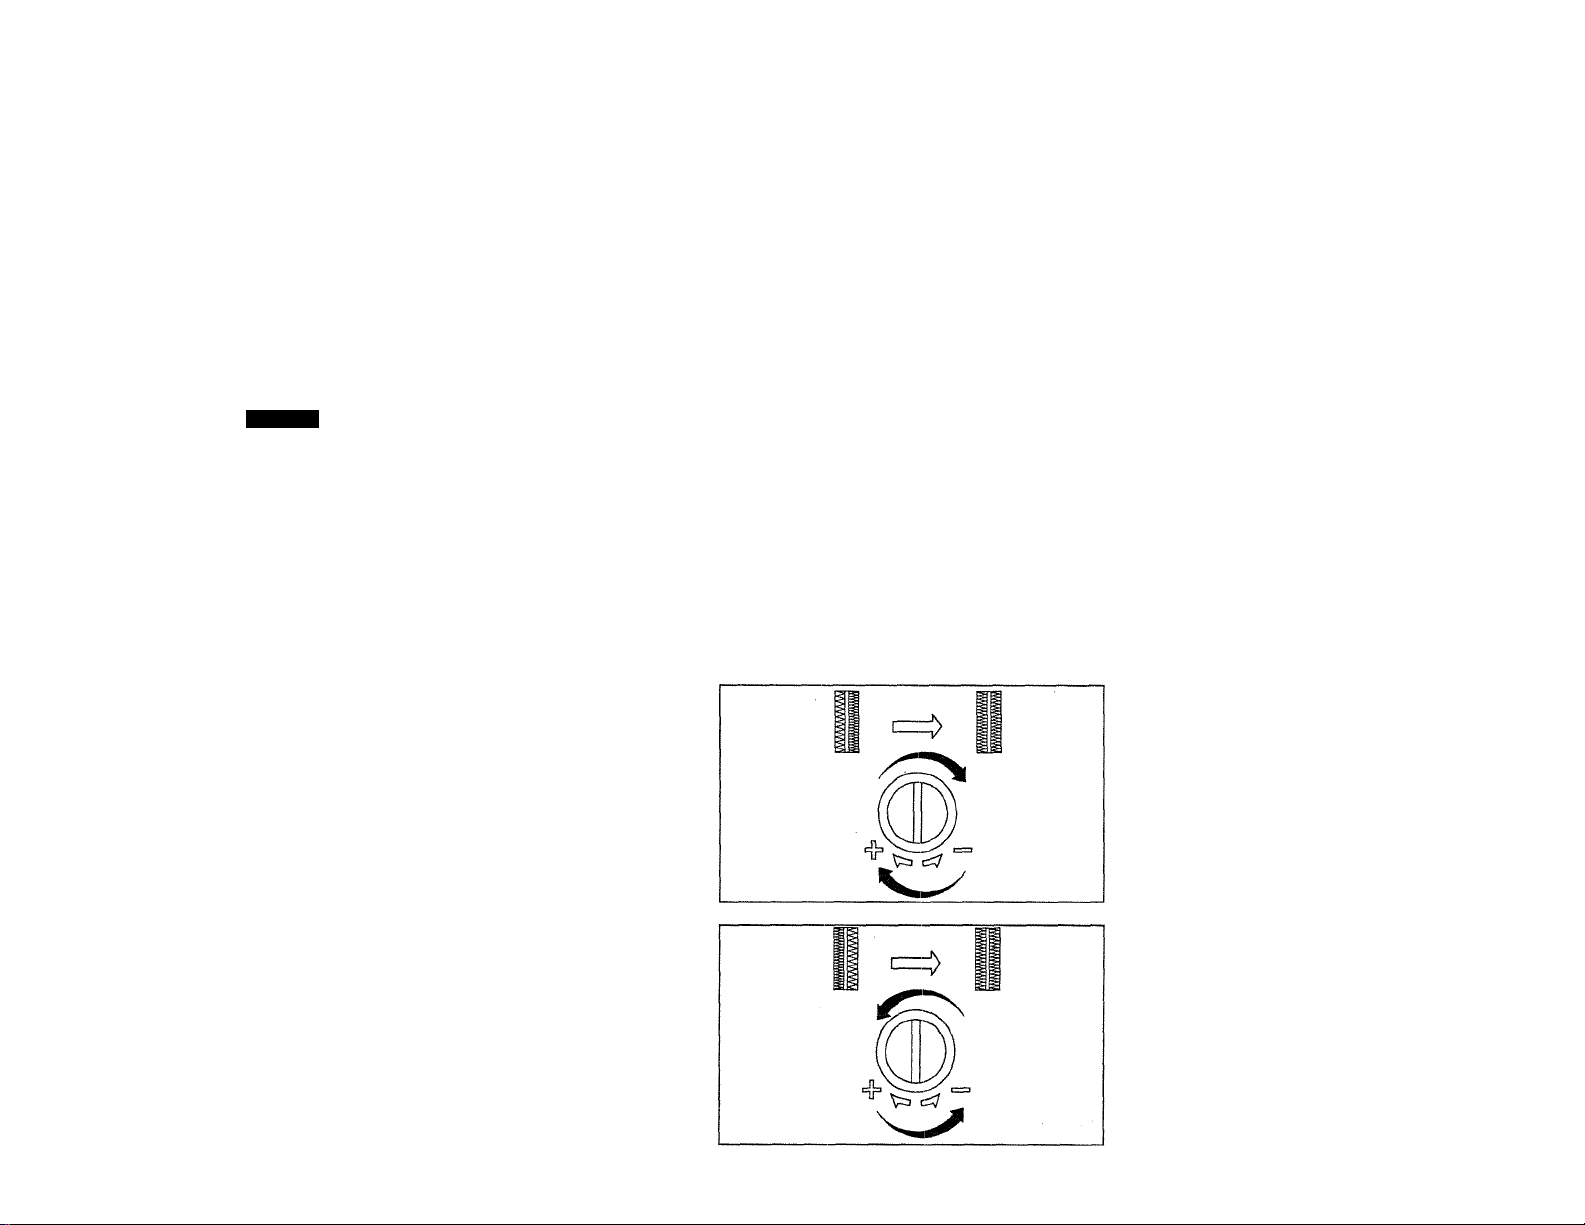
Balance of Left and Right
Side Buttonhole
Occasionally the left and right
buttonhole columns may need
to be balanced on specialty
fabric.
In this case afjust stitch bal
ance by turning adjusting dial
located on the back of the
machine.
If the right side of buttonhole
is too dense , turn dial to left
as shown.
If the left side of the button
hole is too dense , turn dial to
right as shown.
^ En caso de repetición del
ojale, poner la ranura ®
en cada punto de partida
y empujar la palanca (D
de nuevo y seguir desde el
punto 3.
íK No olvidar poner la placa
del botón en su sitio
después de coser ojales.
Equilibrio de los lados
derechio y izquierdo de!
ojal
Los puntos de los lados dere
cho y izquierdo no se pueden
equilibrar sobre tejidos difer
entes. En este caso, ajustar
el equilibro girando el control
de ajuste para ojales.
Si el lado derecho del ojal
esta demasiao cerca del lado
izquierdo, girar el cintrol hasta
la izquierda como esta sefialado.
Si el lado izquierdo del ojl
esta demasiado cerca del
lado derecho, girar el control
hasta la derecha como esta
sefialado.
Page 51
Page 43
Section
5
English
Cutting Buttonholes
Place a pin through the bar
tacks to prevent over-cutting.
Cut the buttonhole along cen
tre (center) with the button
hole cutter.
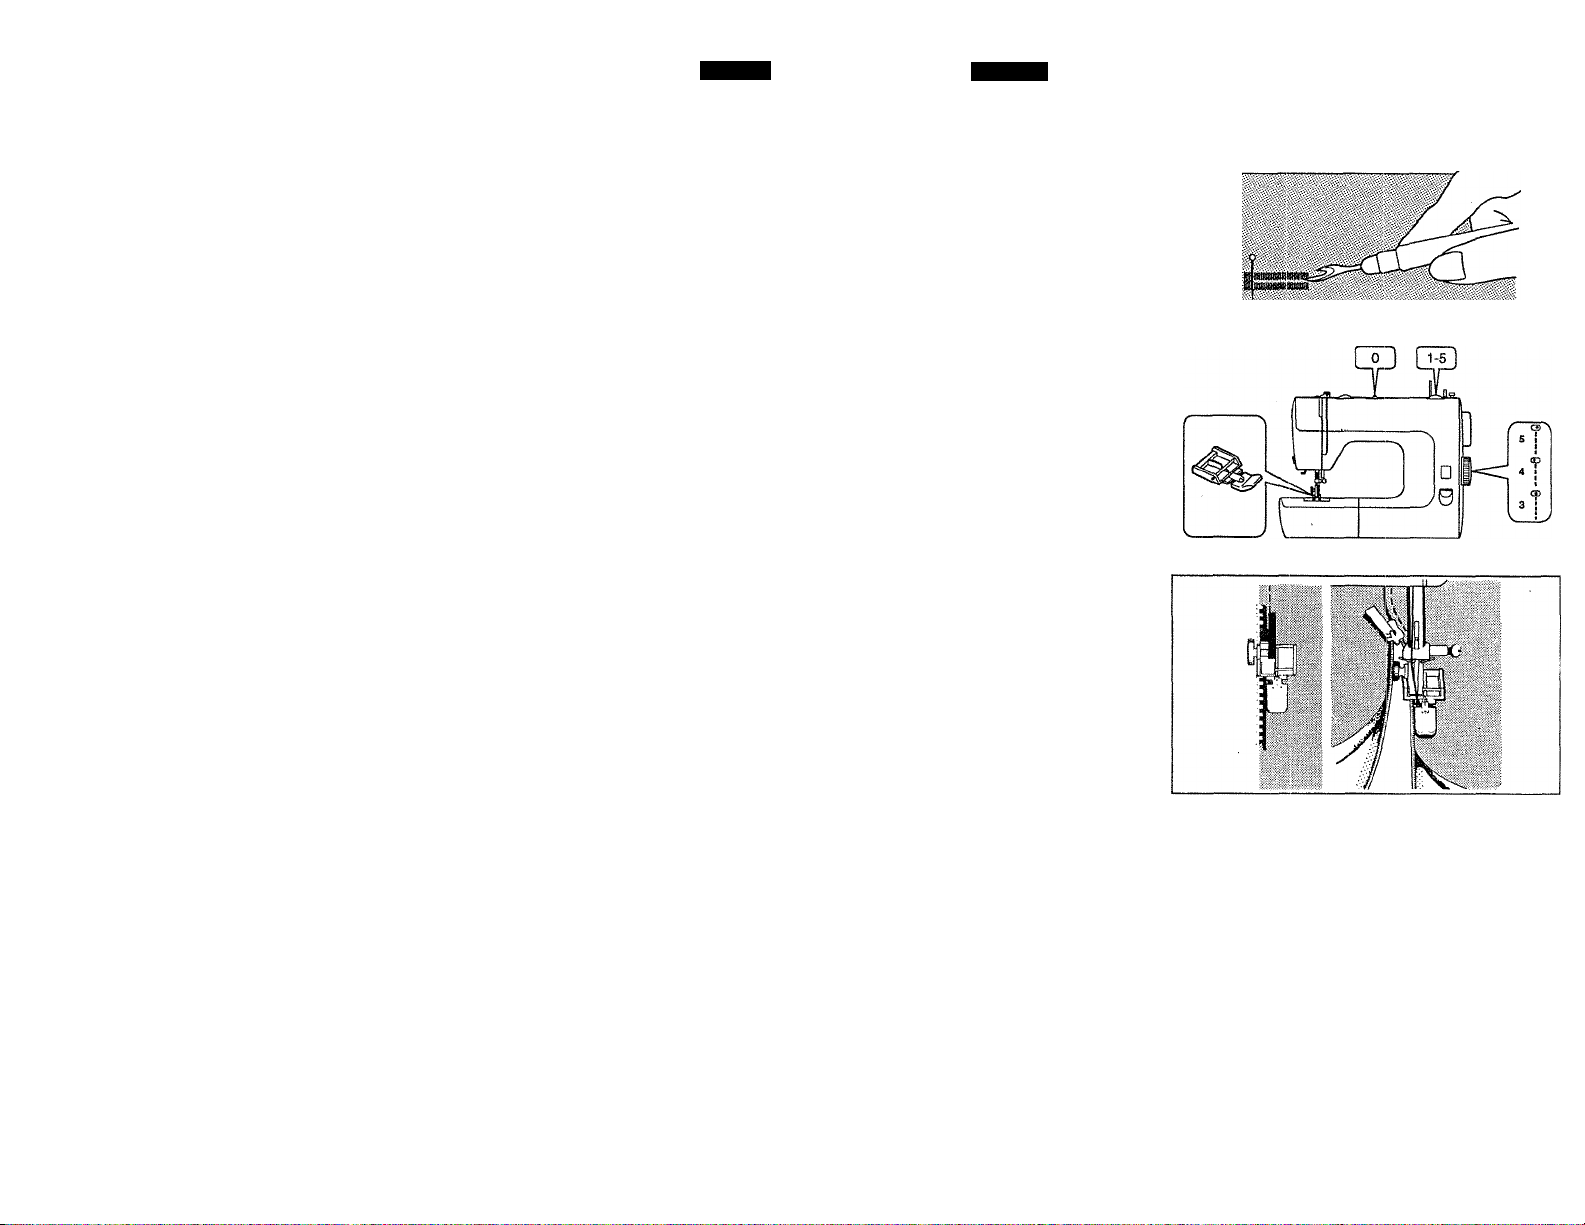
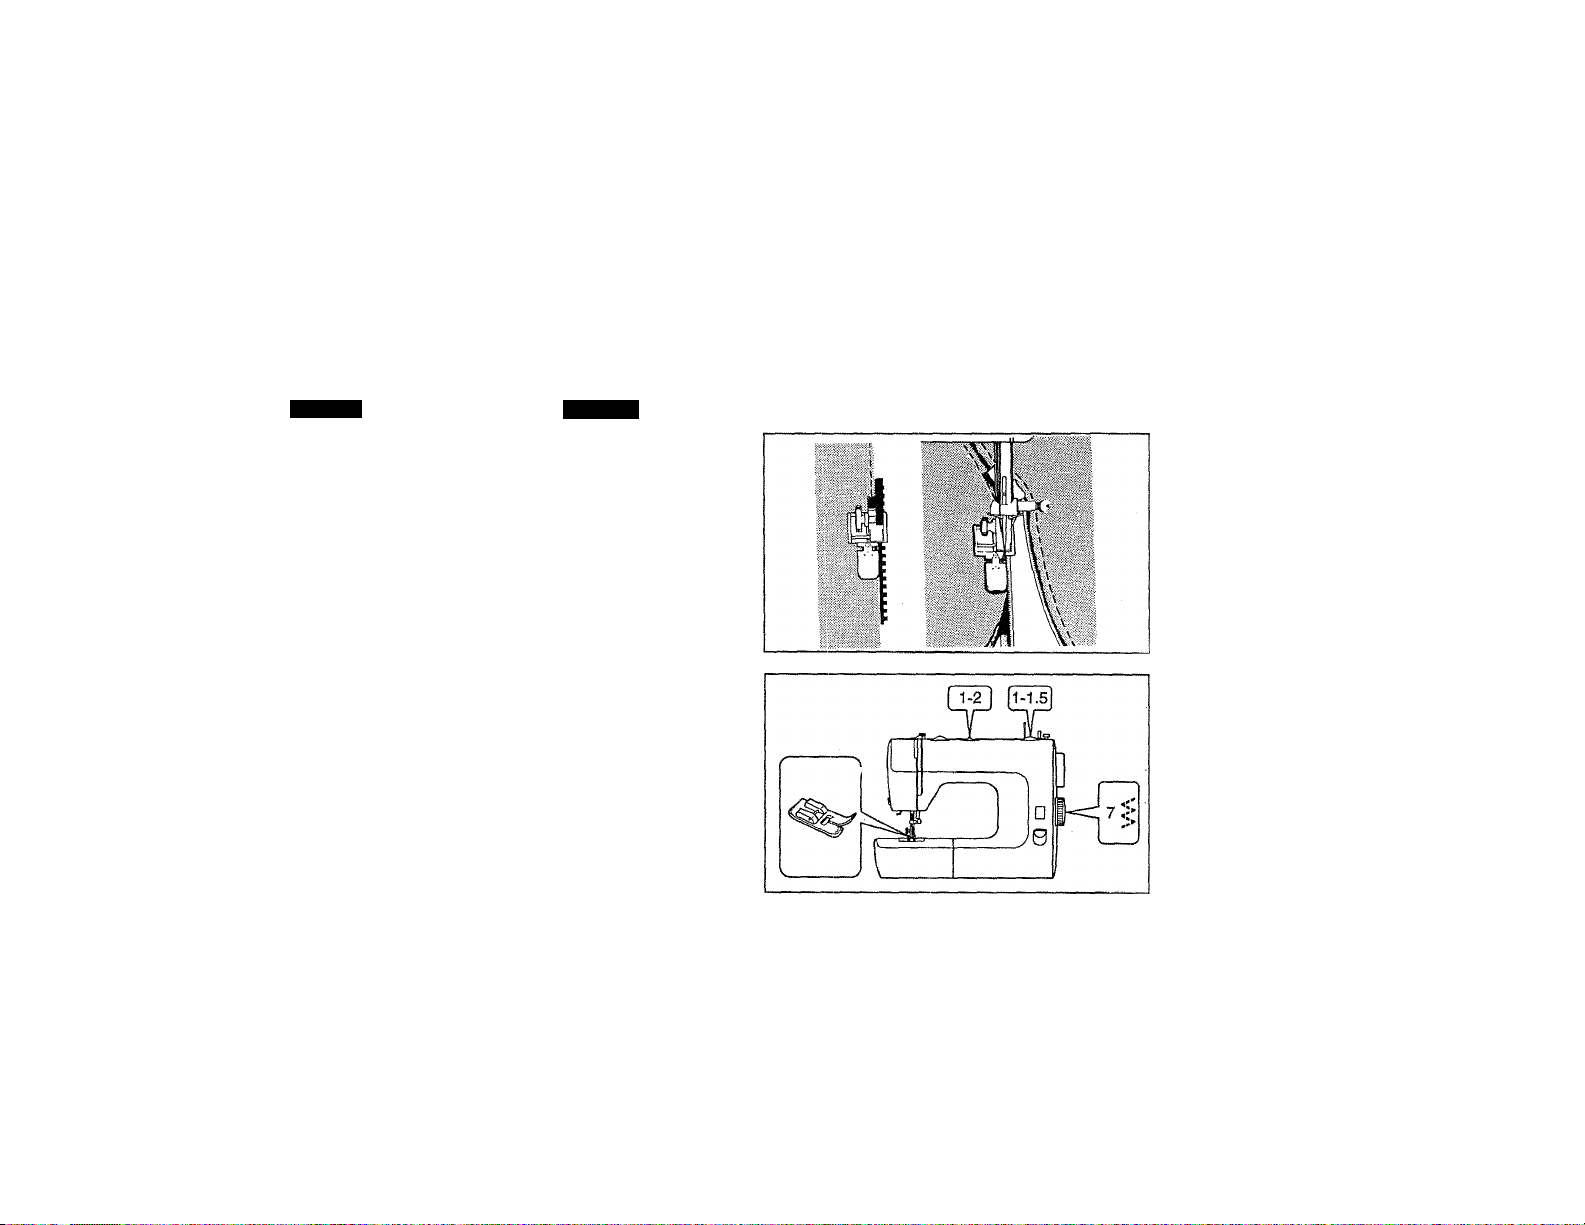
ZIPPER SEWING
Set machine as shown.
By using a special zipper foot,
zipper sewing can be easily
done.
Set the zipper foot on the
right of the needle.
Sew right side of zipper guid
ing fabric carefully so that
right side teeth of zipper are
parallel with left edge of goot.
Español
Corte del ojal
Poner un alfiler en uno de los
extremos del ojal para evitar
un corte de más.
COSTURA DE CIERRES
P reparar la máquina como se
indica.
Al usar el pie prénsatela
especial para cierres la costu
ra puede resultar más fácil sin
dar vuelta a la tela.
Poner el pie para la costura
de cierres a la derecha de ia
aguja.
Coser el lado derecho del
cierre y cuidar que los dientes
del cierre queden paralelos al
borde izquierdo del pie.
Page 52
Page 44
Section
English
Re-set zipper foot to the left
of the needle.
Sew left side of zipper in the
same way.
MENDING
Patching
Set machine as shown.
Place the patch over the worn
part.
Pull the thread ends toward
back or left when starting to
sew.
Sew along the edge of the
parch on the right side. Trim
away the worn part close to
the seam on the wrong side.
Español
Pasar el pie para cierres al
lado izquierdo de la aguja.
Coser el lado izquierdo del
cierre de la misma forma.
COSTURA PARA REMENDAR
Parchado
Preparar la máquina como se
indica.
Poner un parche sobre la
parte rota. Jalar los extremos
de los hilos hacia atrás o a la
iaquierda cuando se va a
empezar a coser.
Coser por el derecho toda la
orilla del parche. Despúes
recortar la parte rota de atrás.
'•UK AAAAHAAA
1 1 » ^ X ^ H 'T'W-.
Page 53
Section
5
English Español
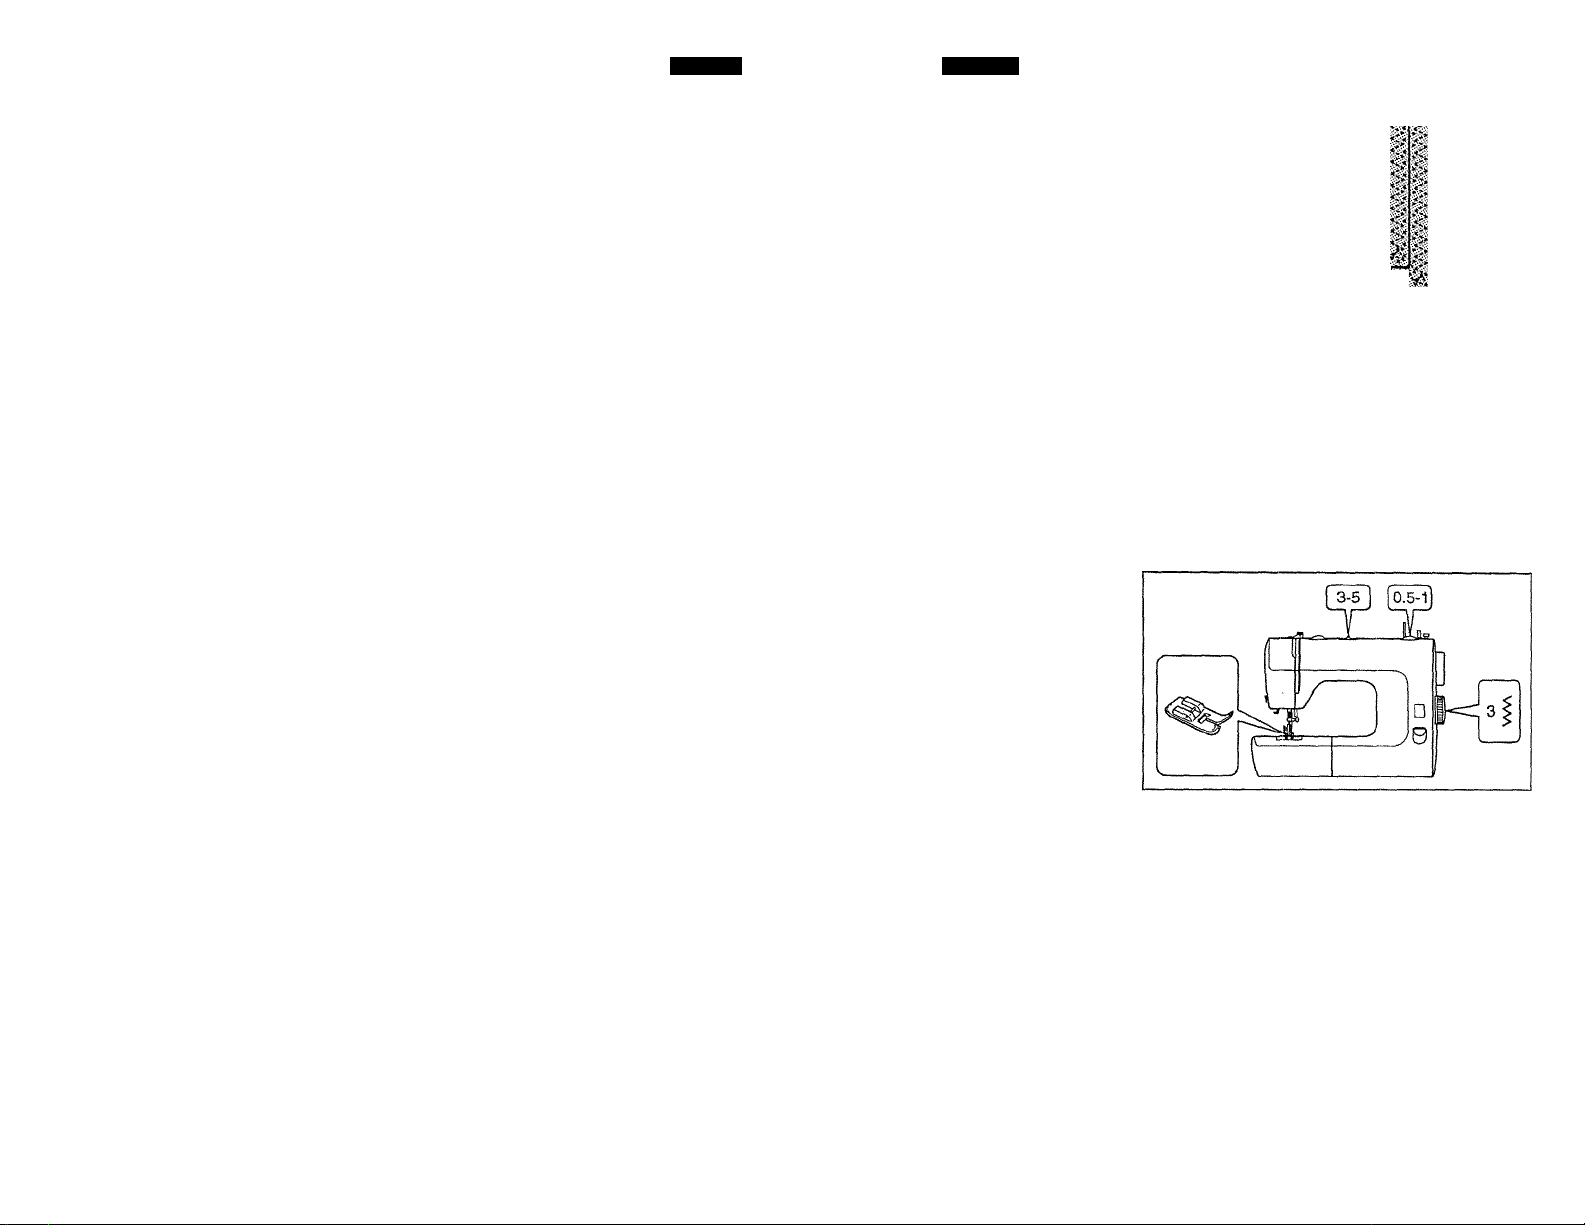
Mending a Rip
Set the machine in the same
way as for patching.
Sew the edges of tear togeth
er first. Then sew two more
seams on either side.
A piece of fabric can be
placed underneath to rein
force the rip.
Remiendo de una Rasgadura
Preparar la máquina de la
misma forma como en el par
chado.
Primero coser las orillas de la
rasgadura abarcando ambos
lados. Después coser más de
dos veces en cada lodo, cer
ca de la costura anterior.
Un pedazo de tela puede ser
colocada debajo, para reforzar
la costura en la rasgadura.
’ ! I"’ ! !'
APPLIQUE WORK
Set machine as shown.
COSTURA DE APLICACIÓN
(PARCHES DE ADORNO)
Preparar la máquina como se
indica.
Page 54
Page 46
Section
5
English
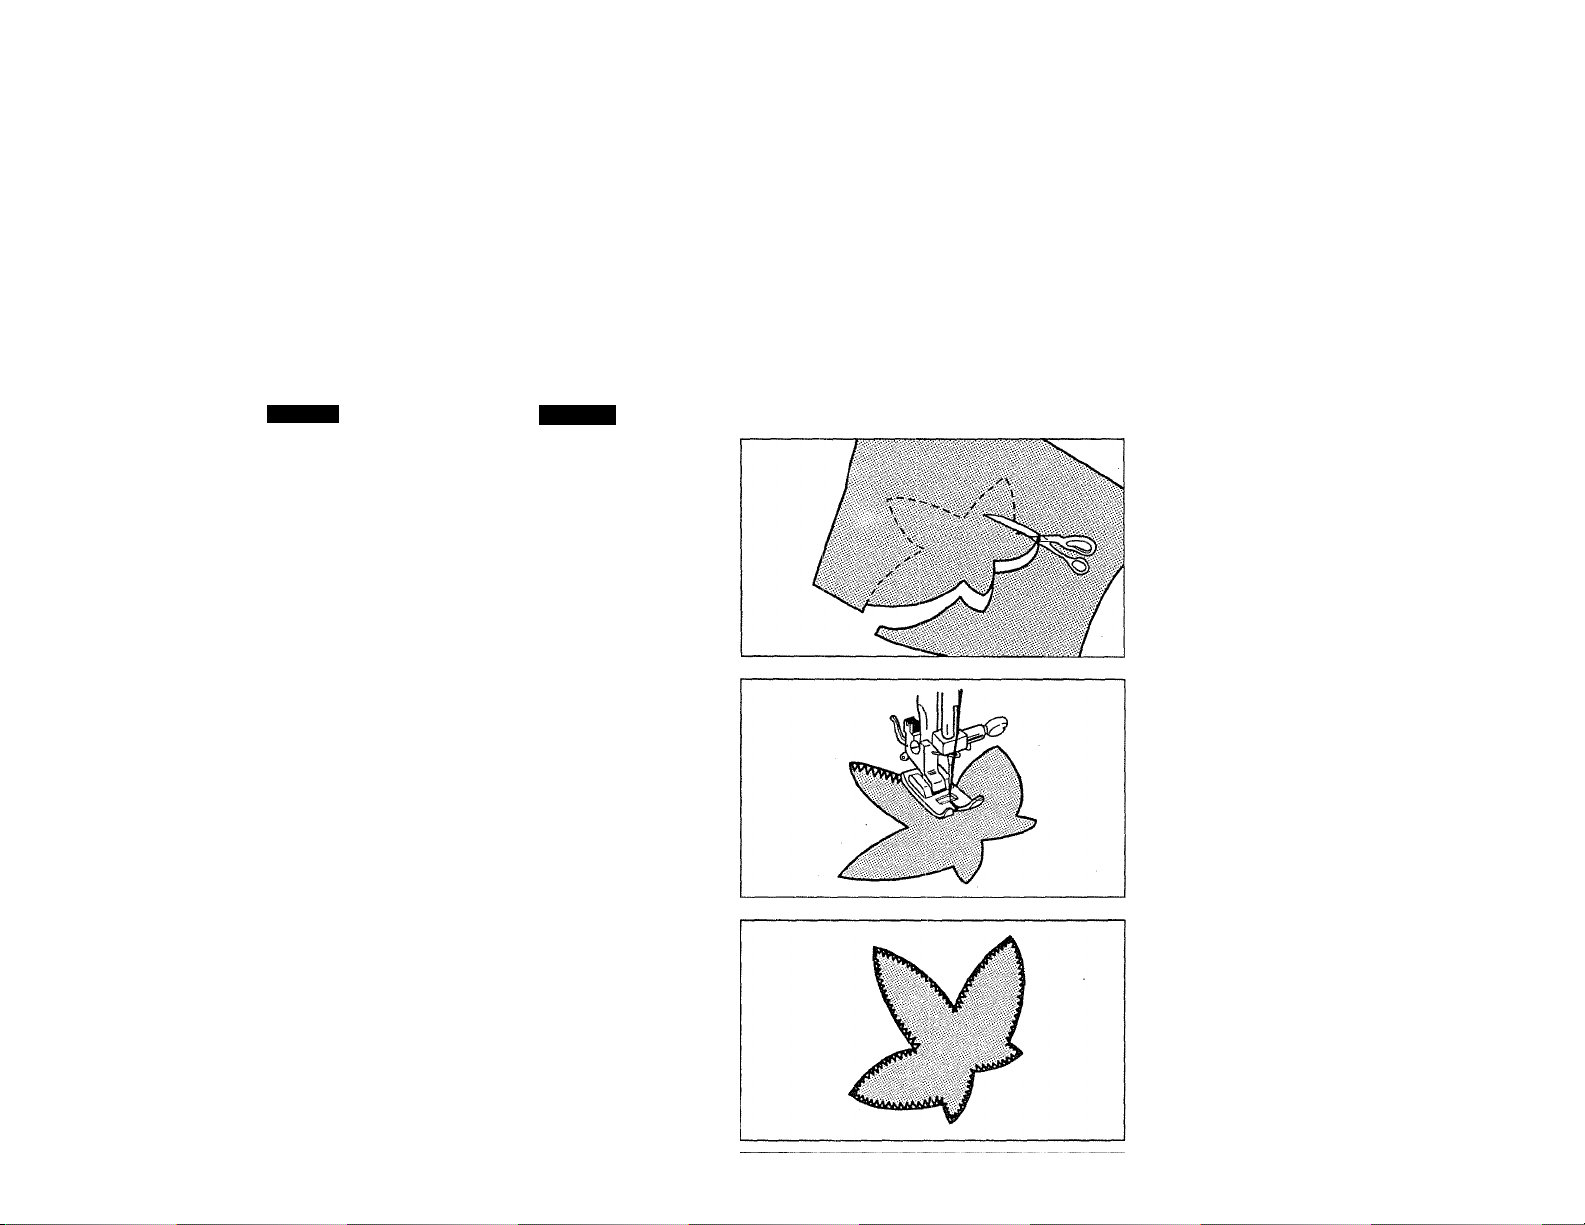
Draw design on materia! to be
used as an applique and cut it
out. Place cut-out on base
material with stabilizer and
baste or pin in place.
Sew around the outline with
satin zigzag stitch.
To change direction at cor
ners, or to sew very small cir
cles, stop machine, position
ing needle just away from
edge of cut-out. lift presser
foot and turn material. Lower
presser foot and continue
sewing.
Español
Dibujar el diseño sobre el
material que se va a utilizar
como parche de adorno y
recortarlo.
Colocar el parche de adorno
sobre el material hilvanarlo.
Coser alrededor del molde
con puntada en zig-zag.
Para cambiar la dirección en
las esqiuinas o par coser en
circuios muy pequeños, parar
la máquina, colocar la aguja
en la punta de la orilla del
parche, levantar el pie prén
satela y girar el materia!.
Después bajar el pie prén
satela y continuar la costura.
Page 55
English
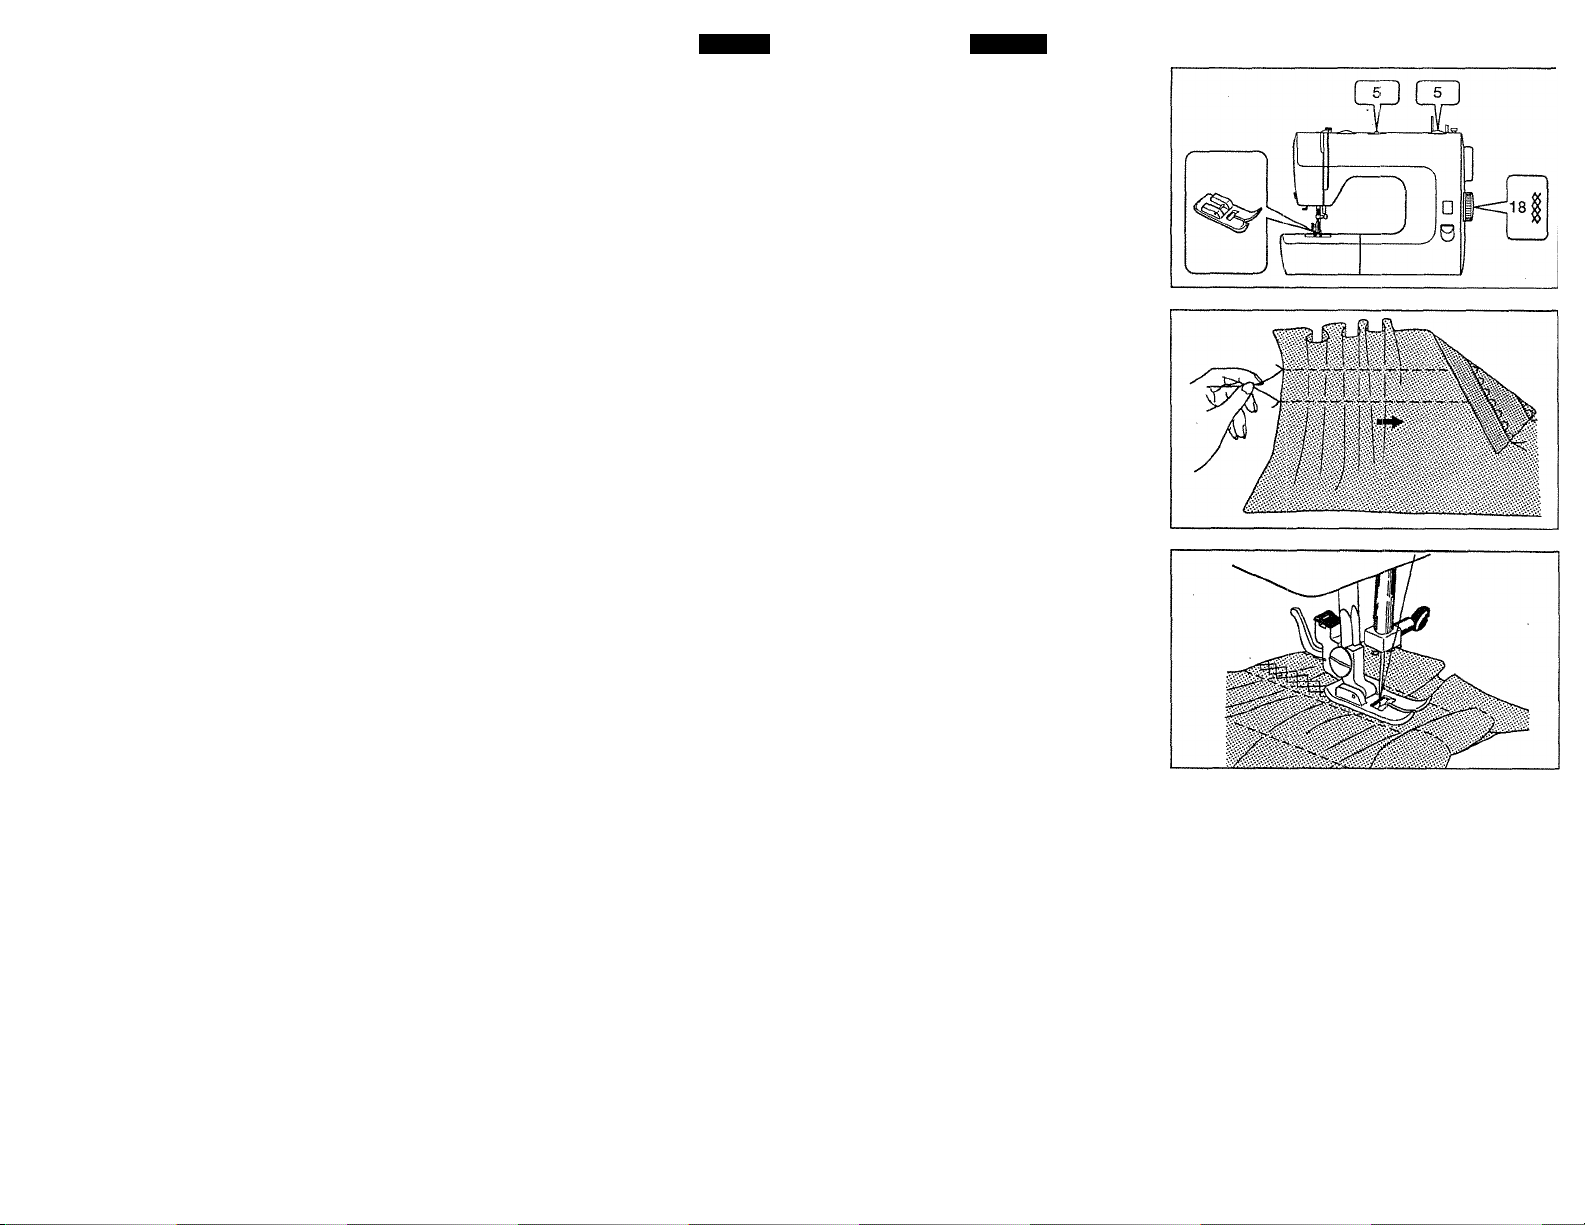
SMOCKING
Set machine as shown.
Español
F^RUNCIDO
Preparar la máquina como se
indica.
Section
5
To gather the fabric, sew two
straight lines with stitch length
5 and very loose upper ten
sion. Make knots in one end.
Gather fabric toward knots
while holding the other end of
lower threads with fingers.
Sew smocking stitches on
gathered part between two
straight lines of stitches.
Take out the threads of the
straight stitching after you fin
ish sewing.
Para fruncir la tela, coser dos
costuras rectas con el largo
de puntada 5, y con la tensión
superior muy suelta.
Hacer algunos nudos al final.
Juntar la tela hacia los nudos
mientras sostiene los
Jextremos de los hilos inferi
ores.
Coser el fruncido sobre la
parte recogida en medio de
las dos costuras rectas.
Sácar los hilos utilizados para
juntar la tela después de ter
minar.
Page 56
Page 48
.'ection
5
English
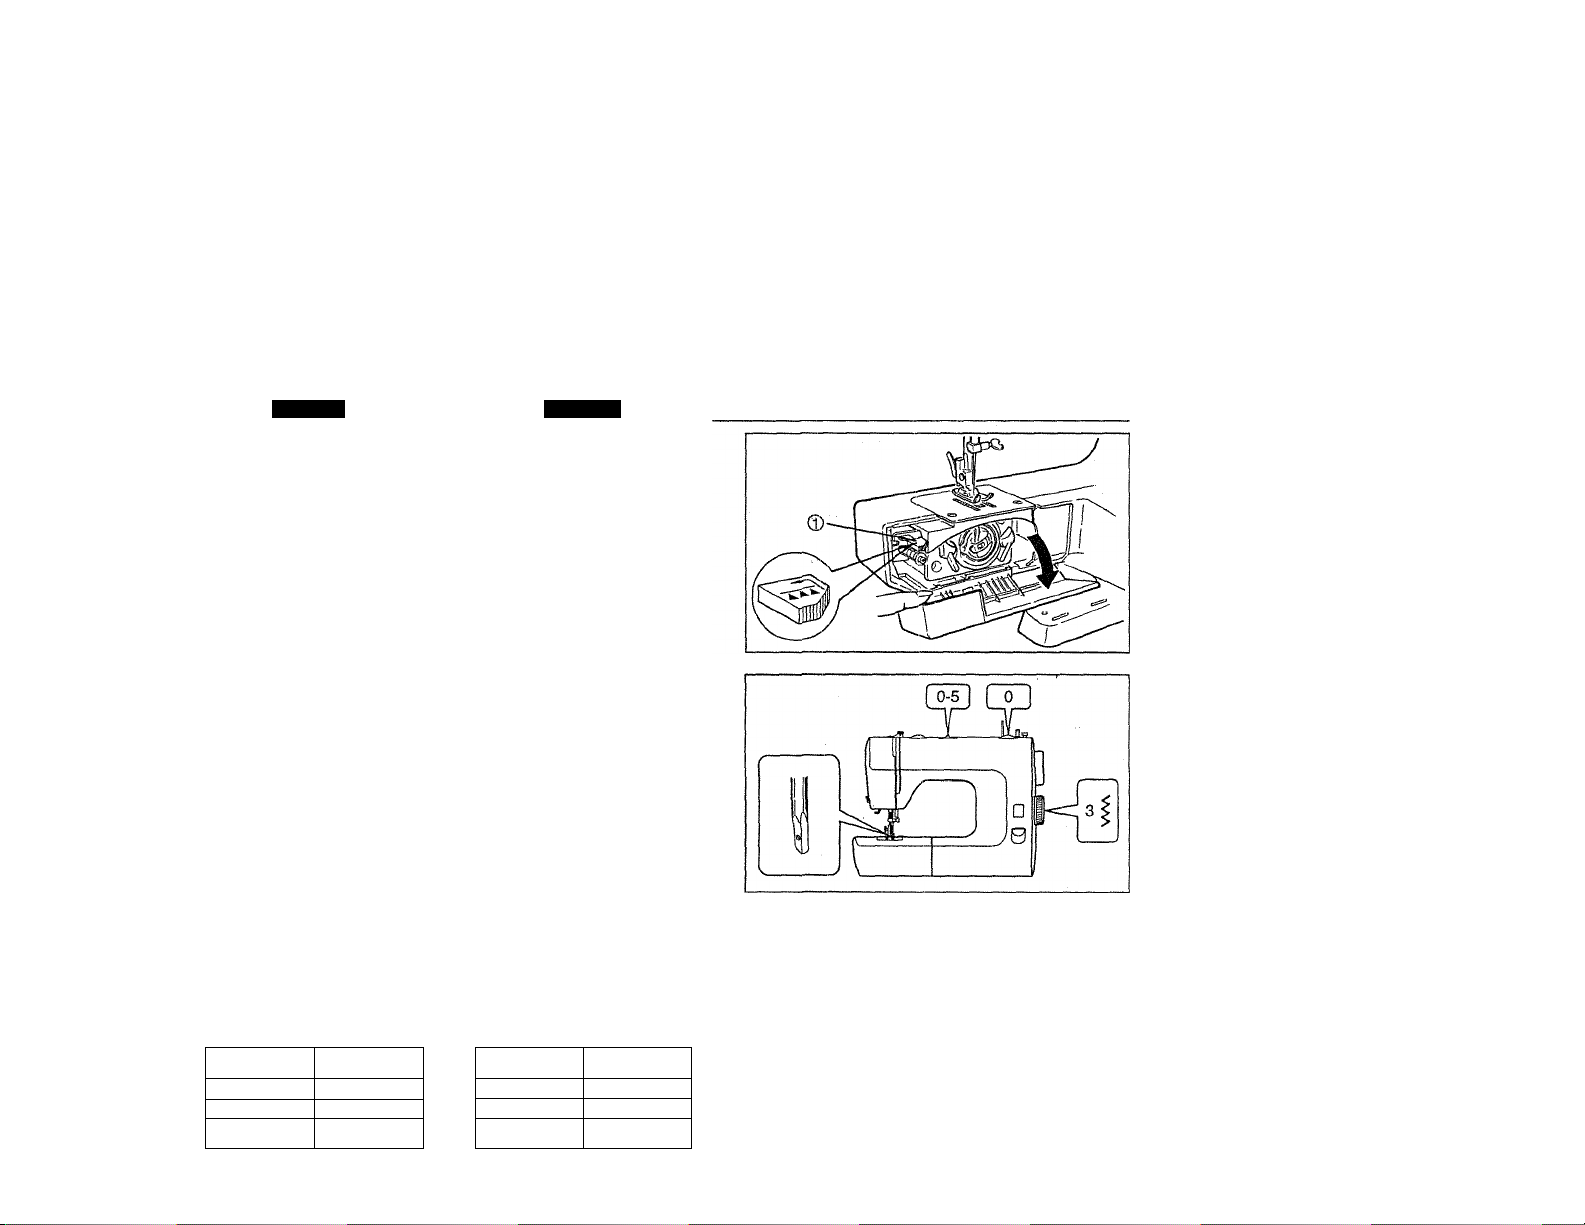
DROP FEED LEVER
Drop feed lever © is in the
inside of shuttle cover. To
lower feed teeth, push the
lever forward, then to the left.
This position is used for but
ton sewing, darning and
embroidery, For normal
sewing, push the lever to the
right, then release it.
FREE HAND EMBROIDERY
Drop feed teeth.
Set machine as shown.
Remove foot, and holder
screw.
To keep lower thread from
being pulled up, reduce upper
thread tension.
For good embroidery, it is
important to use the correct
needles and thread.
Use embroidery thread for
upper thread and a thinner
thread of same kind and color
for lower thread.
Trace your design on material
and center it in embroidery
hoop. Make sure material is
taut.
Needle
No. 9 120-100
No. 11
No. 14
Thread
100-80
60-50
Español
PALANCA PARA MOVER LOS DIENTES
La palanca © está en la parte
de adentro de la cubierta del can
grejo, Para bajar los dientes de
arrastre, apretar al palanca hacia
adelante, después a la izquierda.
Esta posición se utiliza para el
pegado de botones, zurcido y
bordado. Para coser normal,
apretar la palanca a la derecha y
soltarla.
COSTURA PARA BORDAR
Preparar la máquina como se
indica. Quitar el pie prénsatela y
el soporte con el tomillo.
Para evitar que se jale el hilo
inferior reducir la tensión del hilo
superior.
Para hacer un buen bordado es
importante usar las agujas e hilos
apropiados.
Usar hilo de seda en la parte
superior, y en la parte inferior
(carrete) uno más delgado del
mismo color.
Trazar el diseño sobre el material
y centrarlo en el bastidor.
Debe asegurarse que el material
esté estirado.
Aguja Hilo
No. 9
No. 11 100 - 80
No. 14 60-50
120 -100
Page 57
English
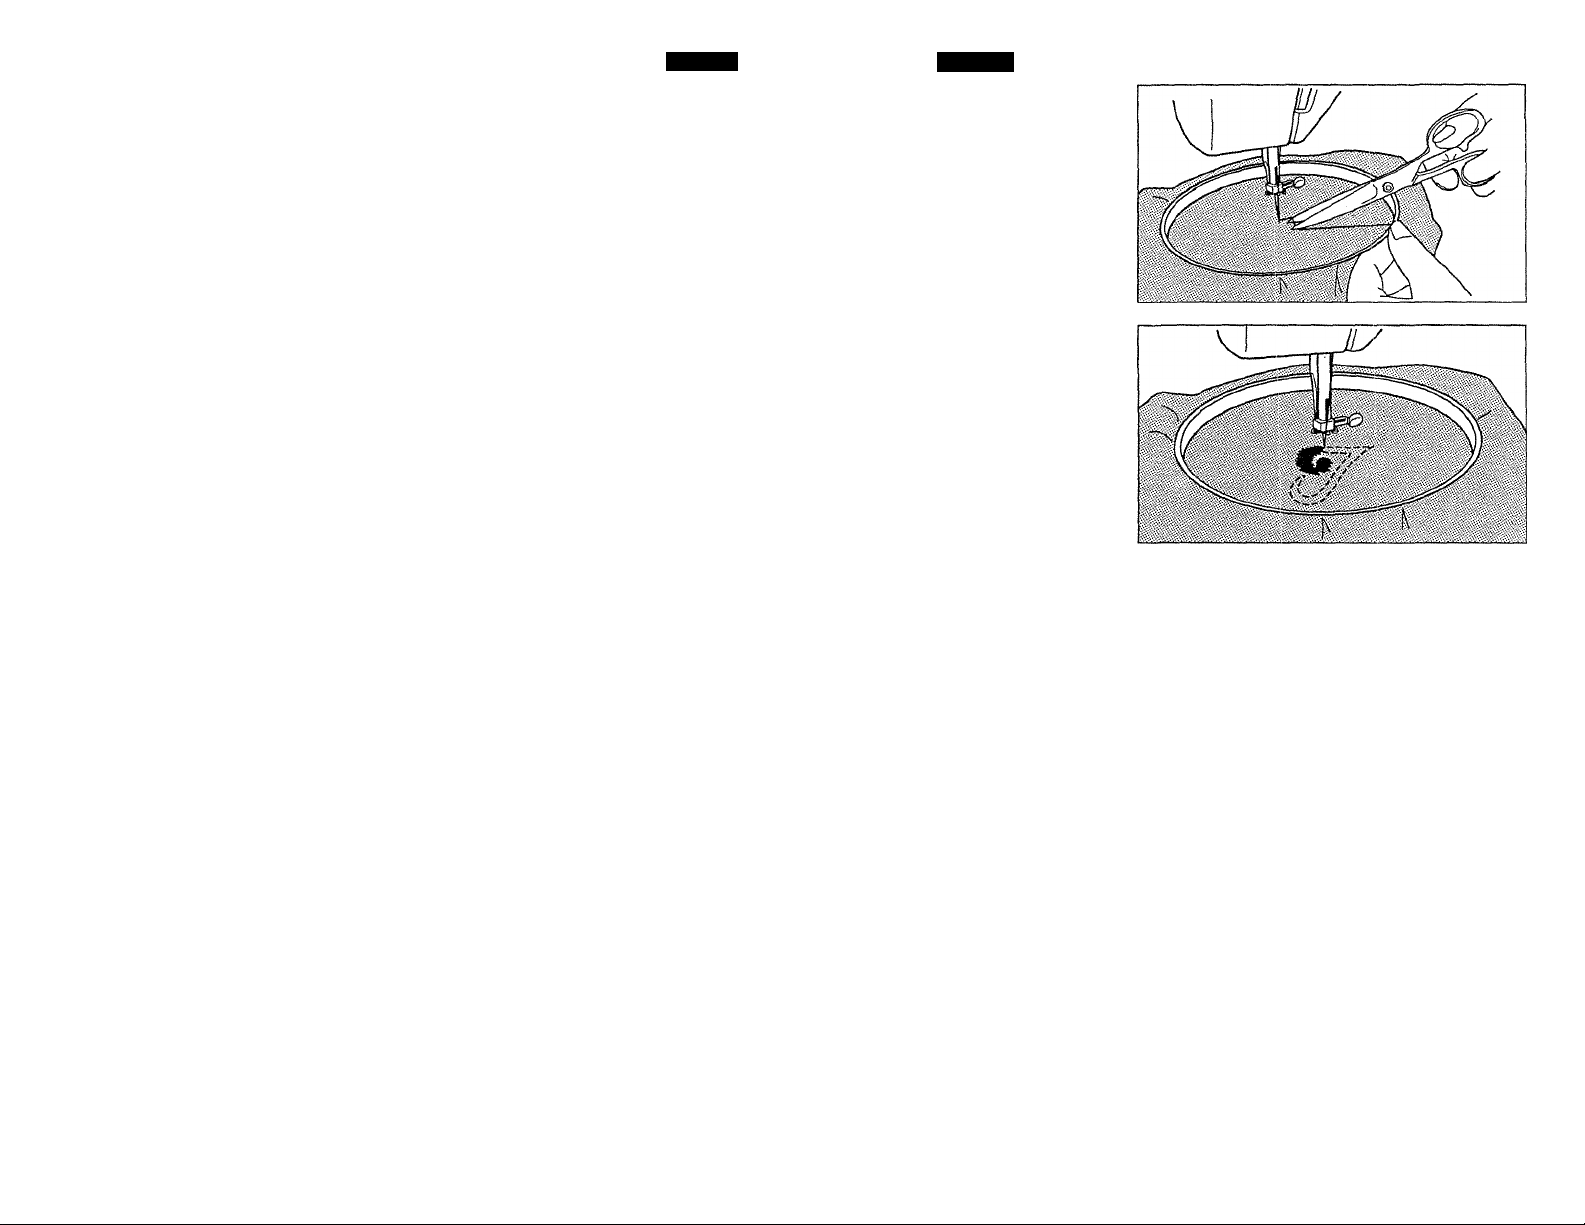
Pull out lower thread by turn
ing handwheel towards you
while holding upper thread
lightly.
Lower presser foot lifter.
Grasp lower thread then
make two or three stitches,
clip off excess threads.
Español
Bajar aguja y volver a subir,
jalando Ud. el hilo superior
saldrá el inferior, para comen
zar a bordar.
Bajar la palanca del pie prén
satela.
Dar de 2 a 3 puntadadas de
preferencia con el volante
(para hacer un nudo) y cortar
hilo sobrante.
Section
5
Starat sewing along outline of
design with satin stitch.
Continue sewing while guid
ing hoop by hand.
To finish filling, sew several
straight stitches.
Lay stabilizer underneath
when embroidering sheer fab
ric.
Comenzar a coser el con
torno del diseño con la punta
da satín. Coninuar cosiendo y
guiando el bastidor con la
mano.
Al terminar de coser, dar
varias puntadas con e!
volante (nudo).
Colocar una hoja de papel
debaijo de la tela cuando ésta
sea muy delgada.
Page 58
Page 50
Section
6
English
6. MAINTENANCE
Your machine requires regu
lar celaning and oiling for sat
isfactory sewing performance.
A machine which is used for a
few hours a day needs to be
cleaned and oiled once a
month.
Important:
Disconnect power supply
before carrying out mainte
nance on machine.
CLEANING
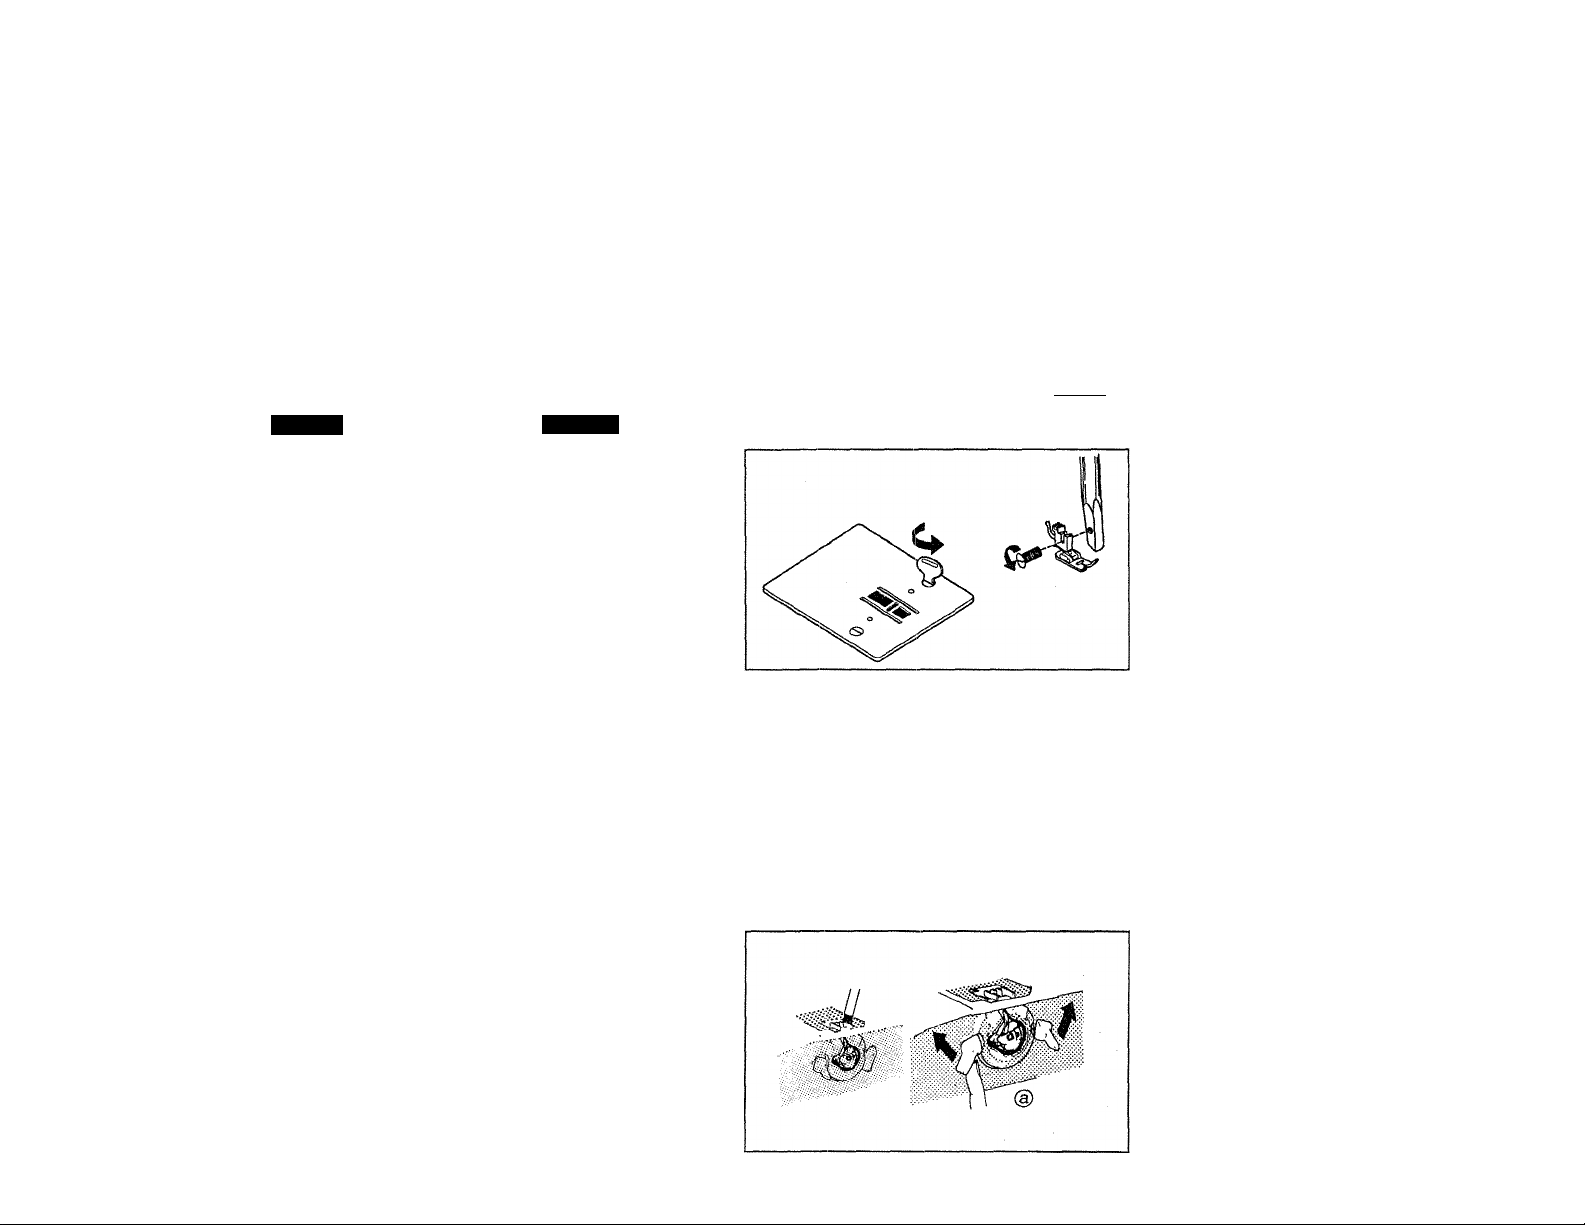
Remove foot and needle.
Remove needle plarte.
Brush off all dust and lint on
feed teeth with a cleaning
brush.
Turn latches of shuttle out
wards (a).
Español
6. MANTENIMIENTO
Para un funcionamiento ade
cuado su máquina requiere
regularmente de limopieza y
aceitado, Una máquina que
se use durante pocas horas
al dfa necesita limpiarse y
aceitarse una vez al mes.
Importante:
Desconectar la clavija de la
máquina para hacerle el man
tenimiento.
LIMPIEZA
Quitar el pie prénsatela y la
aguja.
Quitar al placa de la aguja.
Limpiar con el cepillo todo el
polvo y pelusas de los
dientes.
Girar los seguros hacia
afuera.
Page 59
Page 51
Section
6
English
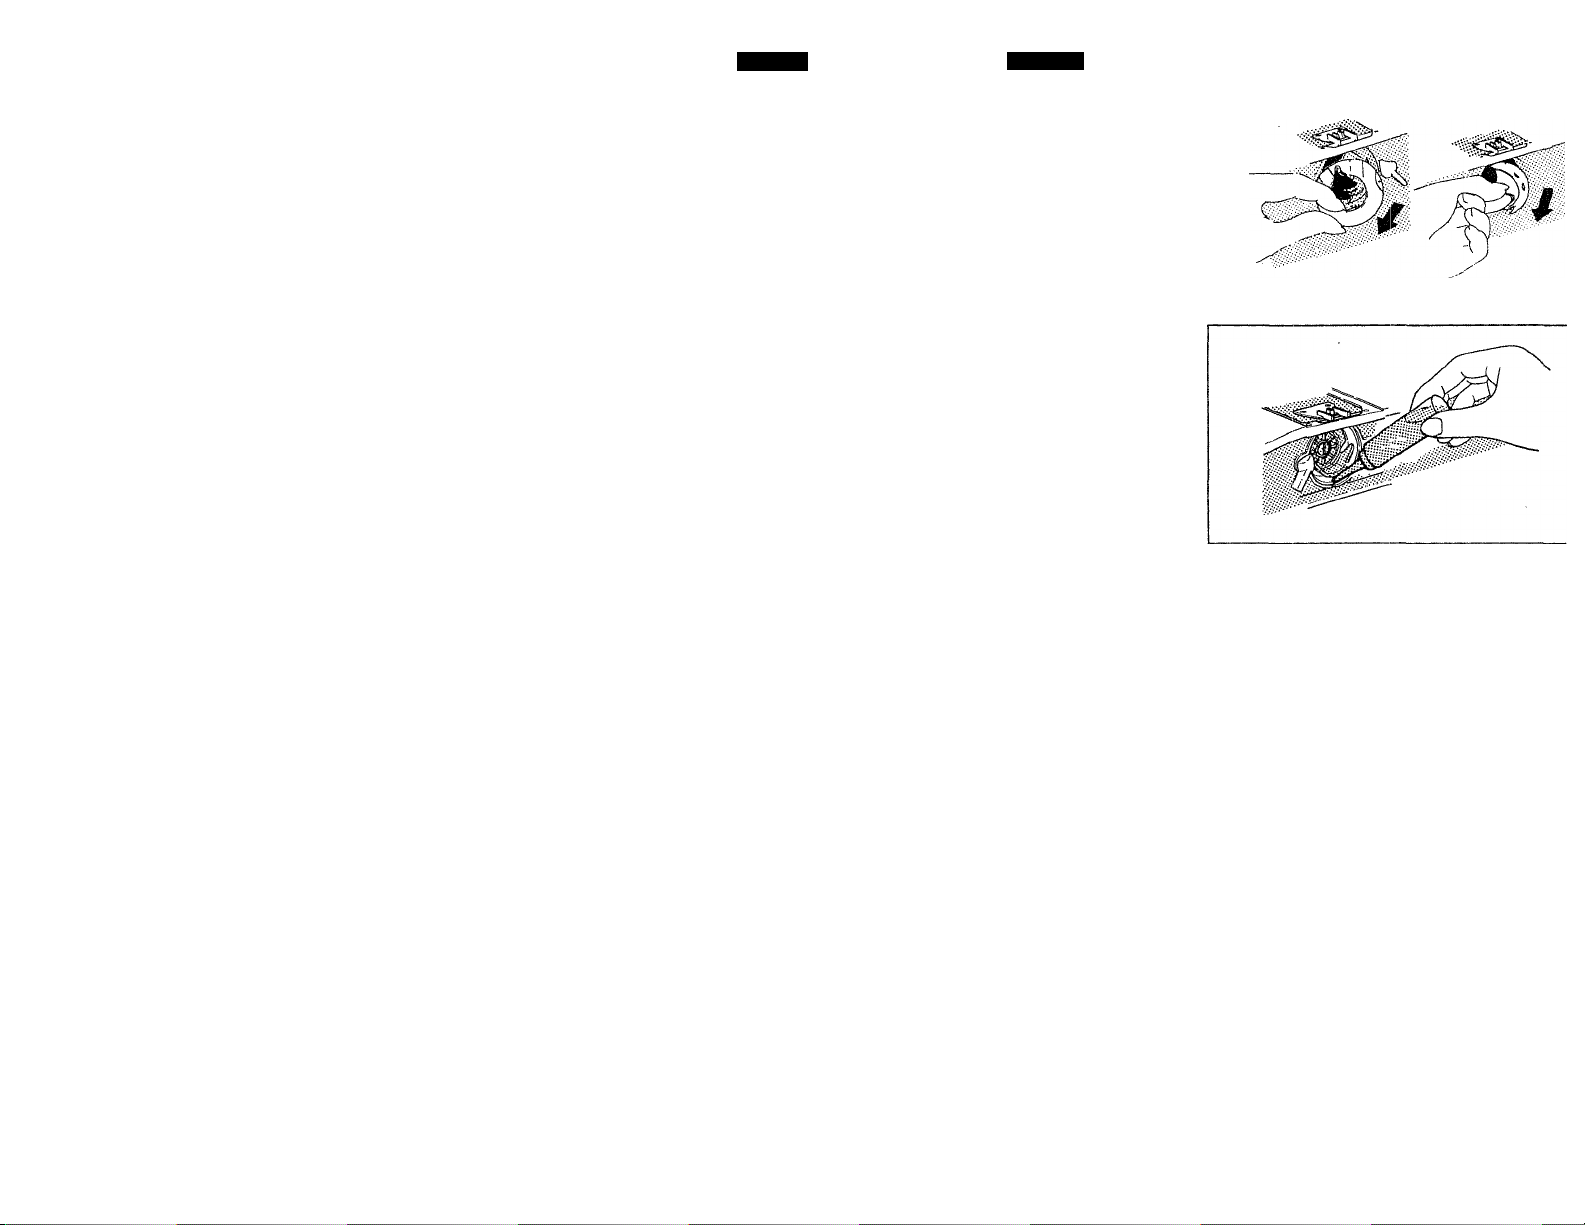
Remove shuttle race cover.
Remove shuttle. Clean shuttle
race with a cleaning brush
and a soft cloth.
OILING
Use oil manufactured special
ly for sewing machine use.
Other oils will eventually
cause mechanism to jam.
Apply one drop of oil to part of
shuttle where friction occurs.
Español
Quitar la tapa del cangrejo.
Quitar el cangrejo. Limpiar la
caja del cangrejo con un
cepillo y un trapo suave.
ACIETADO
Usar solo sceite especial para
máquinas de coser. Otro
aceite causará daños al
mecanismo de la máquina.
Aplicar una gota de aceite al
cangrejo en la parte donde
hace fricción.
Page 60

7. TROUBLE CHART
Page 52
English
Section
7
PROBLEM PROBABLE CAUSE
Breaking lower thread
Skipping stitches
Irregular stitches Incorrect size of needle for the material
The material not fed Pattern selection dial not set correctly P.26
correctly Feed teeth are down
Thread not wound evenly on the bobbin or not drawn up correctly
Lower thread tension too tight P.56, 57
Lint stuck in the bobbin case and inside the tension spring
Needle not fully inserted P.22
Needle bent or burred P.22
Eiize or type of needle and thread not suitable for the material P.24
incorrect upper threading P.7
Too much oil on the machine P.50
Upper thread tension too loose
Incorrect lower tension
Lint stuck on the feed teeth P.49
CORRECTION
P.19, P.7, 8
Remove lint and fluff
with a cleaning brush
P.24
P.16
P.56, 57
p.48
Noisy machine
Check for thread in shuttle, the slightest amount of thread in
shuttle may cause noise or binding, use material like tooth
pick or cotton swab to clean.
P.49
P.58
Page 61
Page 53
English
PROBLEM PROBABLE CAUSE CORRECTION
Section
7
The material puckers
Breaking needle
5« If trouble is still apparent in the machine, please consult yoyr nearest dealer.
Do not try to correct fault by yourself.
Upper or lower thread tension too tight
Stitch too long for material
Thread too thick P.24
Incorrect threading of upper or lower thread
Needle not correctly inserted
Needle bent
Needle clamp screw too loose P.22
Upper thread tension too tight
Needle too fine for the material
Dials have been changed while the needle was down in the
material
P.16. P.57
P.26
P.7, P.20
P.22
P.22
P.16
P.24
P.26
Page 62

7. TABLA DE PROBLEMAS
Page 54
Español
Section
7
PROBLEMA
Se rompe el hilo inferior
Omisión de puntadas
Costuras irregulares
La tela no se mueve
CAUSA PROBABLE
Hilo del carrete disparejo o no conducido hacia arriba correc
tamente.
Demasiada tensión en el hilo inferior.
Pelusa acumulada en la bobina y en el resorte de tensión...
Colocación inadecuada de la aguja.
Aguja doblada.
Hilo 0 aguja inadecuados para la tela.
Enhebrado incorrecto del hilo superior. P.7
Demasiado aceite en el cangrejo.
Medida de aguja no correcta para la tela utilizada.
Tensión del hilo superior demasiado baja.
Tensión incorrecta del hilo inferior.
El selector de diseño no accionado correctamente.
Altura incorrecta o pelusas en los dientes
CORRECCIÓN
P.19, P.7, 8
P.56, 57
Quitar pelusa con
cepillo.
P.22
P.22
P.25
P.50
P.25
P.16
P.56, 57
P.26
P.49
Hace ruido
Pelusa 0 hilo atorados en el cangrejo.
P.49, P.58
Page 63
Español
Section
7
PROBLEMA CAUSA PROBABLE
La tela se arruga Tensión superior o inferior muy alta. P.16, P.57
Puntada demasiada larga para la tela.
Hilo demasiado grueso.
Enhebrado incorrecto de los hilos superior o inferior.
Se rompe la aguja
5SÍ Si aún los problemas continúan, recruuir al centro de servici más cercano.
No tratar d ecorregir la falla Ud. mismo.
Coligación inadecuada de la aguja. P.22
Aguja doblada. P.22
El tornillo de presión de la aguja está muy flojo. P.22
Tensión del hilo superior muy alta.
Aguja demasiada delgada para la tela. P.25
Cambiar el modelo o el ancho de la puntada con la aguja en
posición inferior.
CORRECCIÓN
P.26
P.25
P.7, P.20
P.16
P.26
Page 64
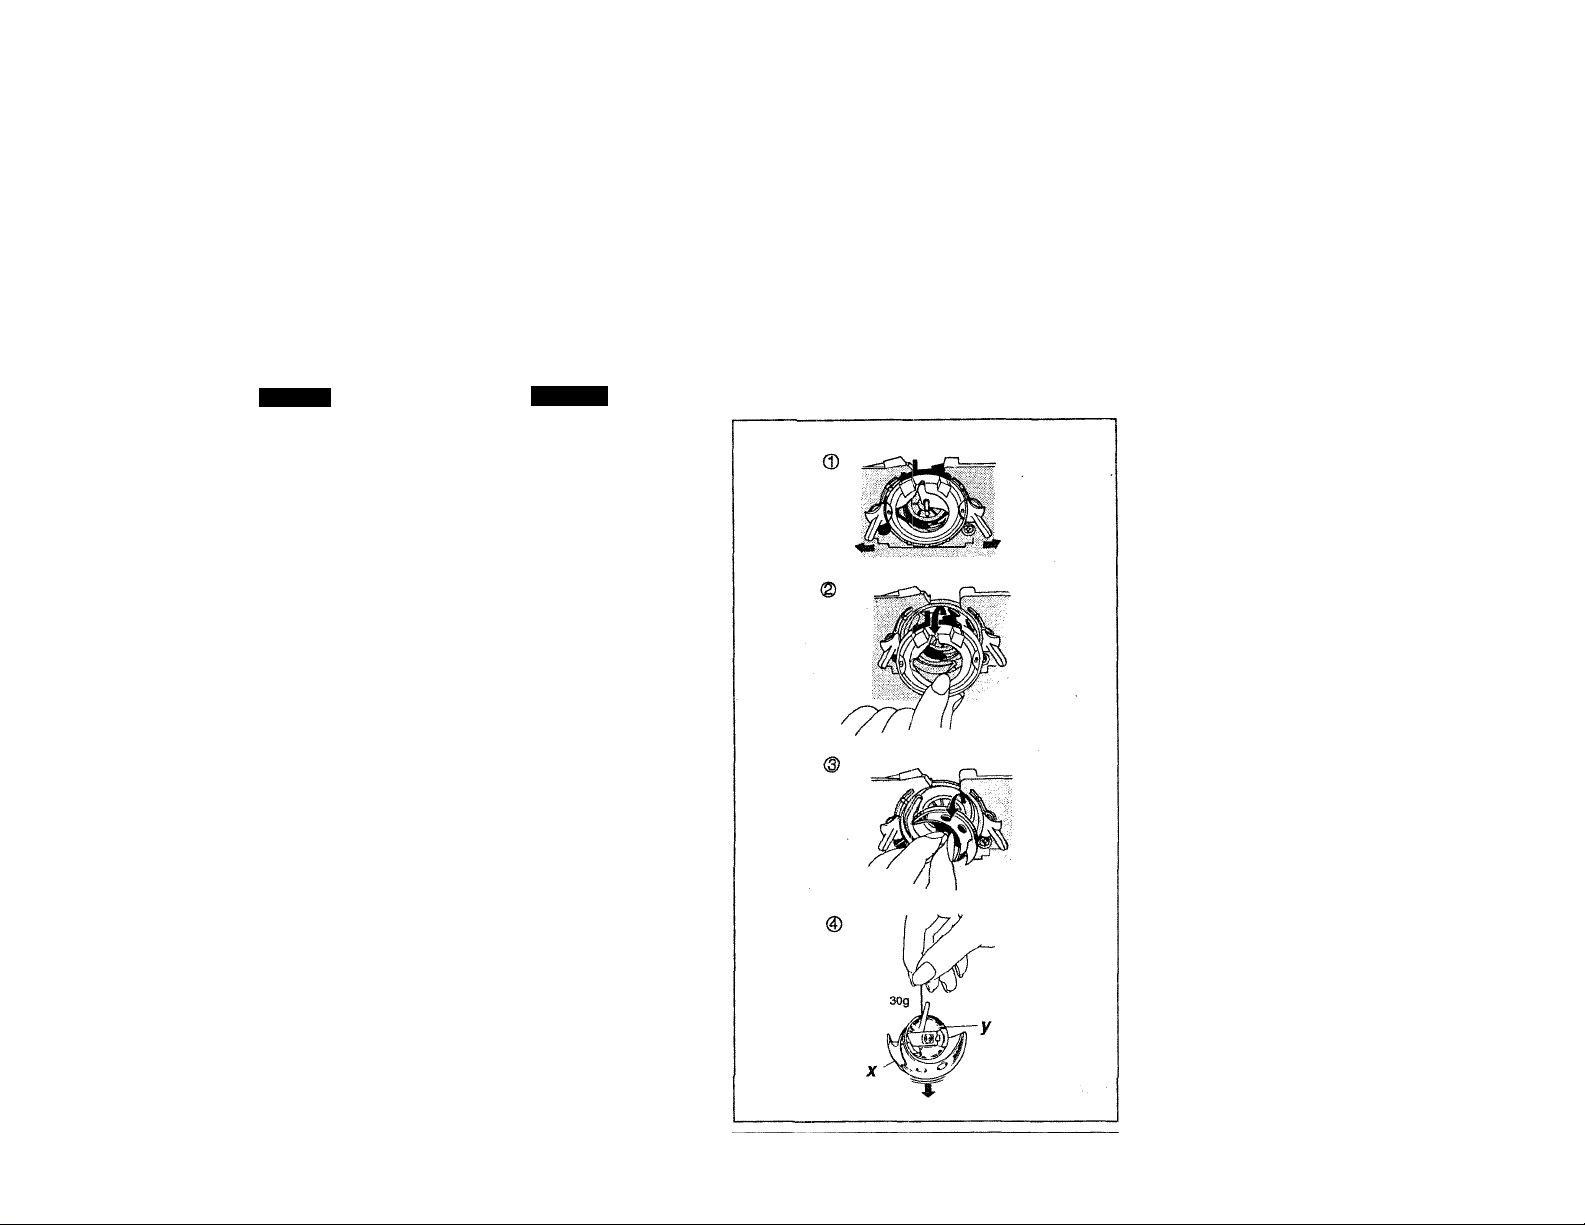
Page 56
Section
7
English
LOWER TENSIION
If you machine skips stitches or
loops stitches, it may require a
tension adjustment. To check the
bobbin tension, foiiow these
steps:
© Push latches of the shuttle
race cover to the outside, as
shown in figure ®.
©Remove shuttle cover as
shown in figure (g).
@ Remove shuttle as shown in
figure d).
©Suspend bobbin, bobbin
case, and shuttle all together
as illustrated in figure © .
When jerking the thread
slightly, all of them should
slide down with light resis
tance .
If they do not slide down with
a slight jerk of the thread, the
bobbin case tension is too
tight. If they slide down too
easily, the bobbin case ten
sion is too loose.
See following page for adjust
ment of the bobbin case.
Once the bobbin case is cor
rectly adjusted, it is easy to
use the upper tension to bal
ance the stitches as shown
on page 16.
X Shuttle
y Bobbin and bobbin case
All of them descend with
light resistance.
Espam>l
AJUSTE DE TENSION DE LA BOBINA
Si la máquina pierde puntos o
hace nudos por el revés en la
costura no es problema de la
máquina, sino de la tensión.
Para verificar la tensión de la
bobina, se debe tomar ésta y
el cangrejo como se indica en
el dibujo, si la tensión es cor
recta se desplazarán lenta
mente.
Después ajustar la tensión
superior con los número 4, 5,
o 6.
® Girar los seguros hacia
afuera.
® Quitar la tapa del cangrejo
® Quitar el cangrejo.
@ X Cancrejo
y Carrete y bobina
El cangrejo y la bobina se
desplazarán lentamente.
Page 65
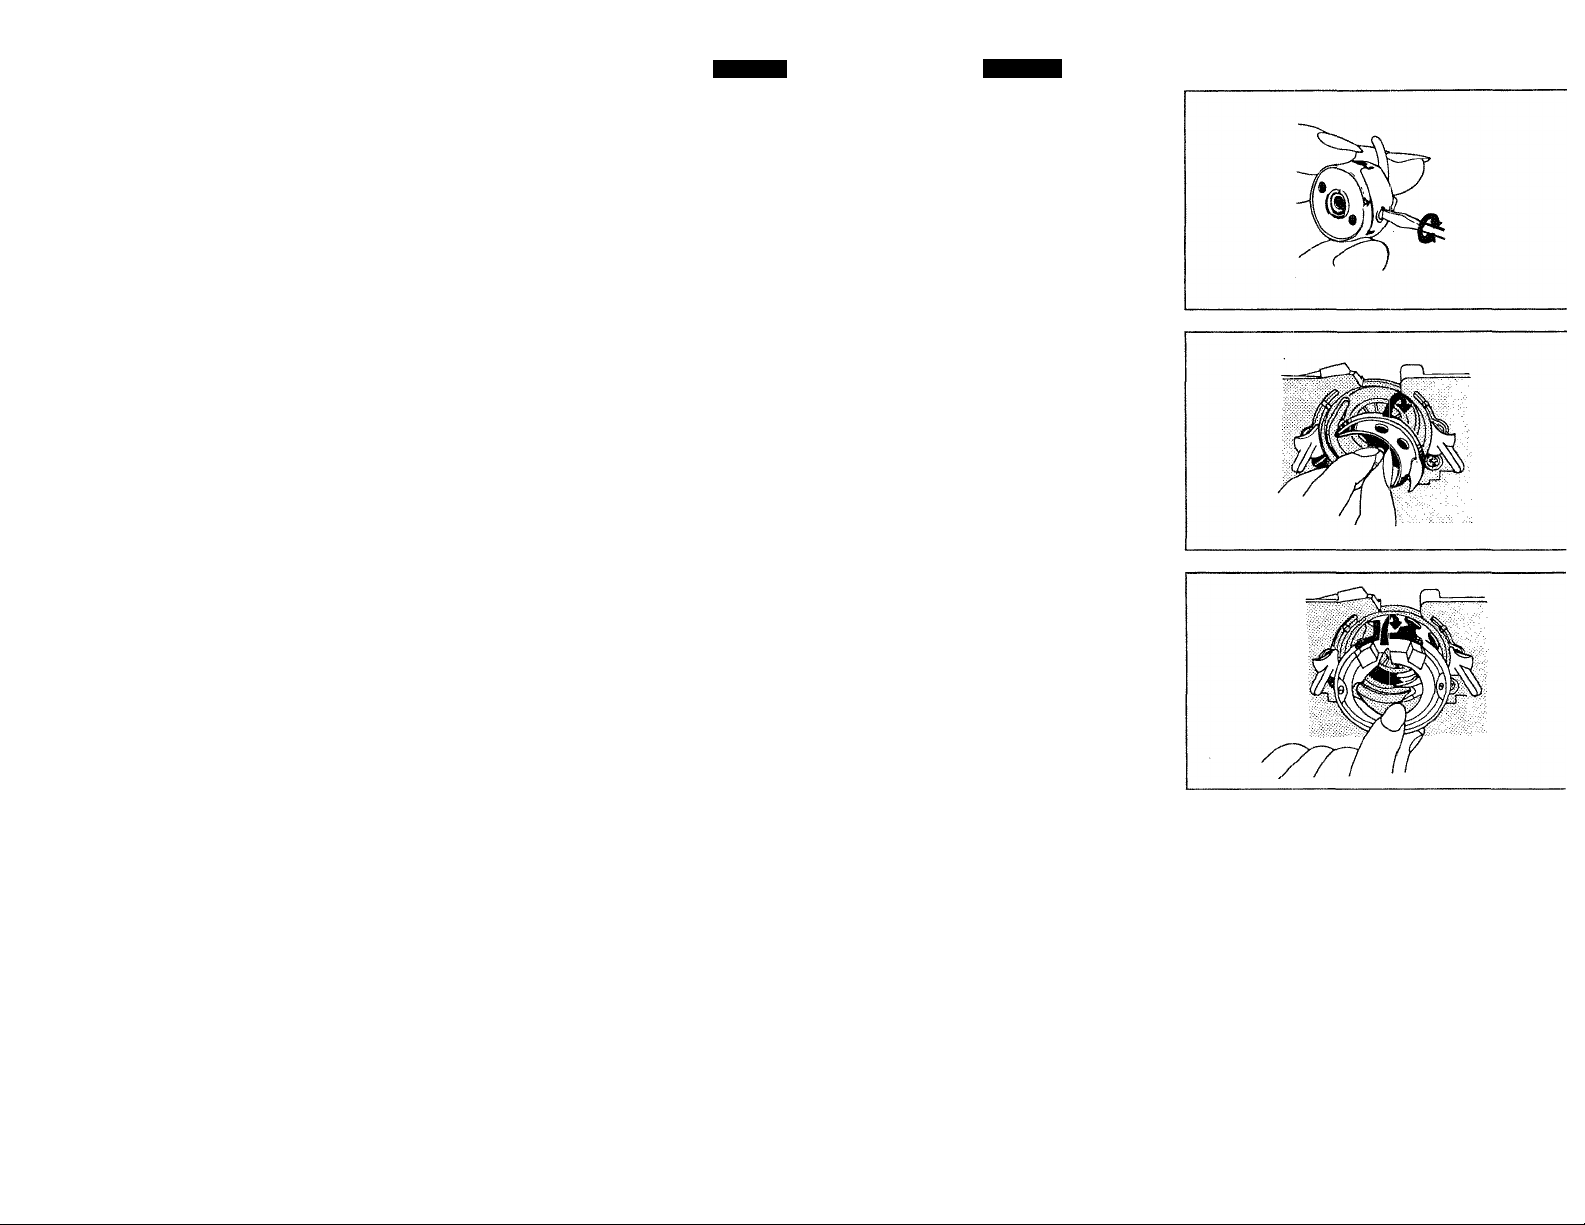
Page 57
S<;ction
7
English
For tension adjustment, turn
screw using small screwdriv
er.
Left to loose
Right to tighten
Replace shuttle.
Lay machine on its back
to make it easier.
Replace shuttle cover. Poner la tapa del cangrejo.
Para ajustar la tensión, uti
lizar el desarmador y apretar
o aflojar el tornillo según sea
necesario.
Apretar: Para hacer la tensión
más alta del hilo inferior.
Aflojar; Parar hacer la tensión
baja del hilo inferior.
Poner el cangrejo,
ísí Para facilitar la operación,
Español
poner la máquina en la
trasera.
Page 66
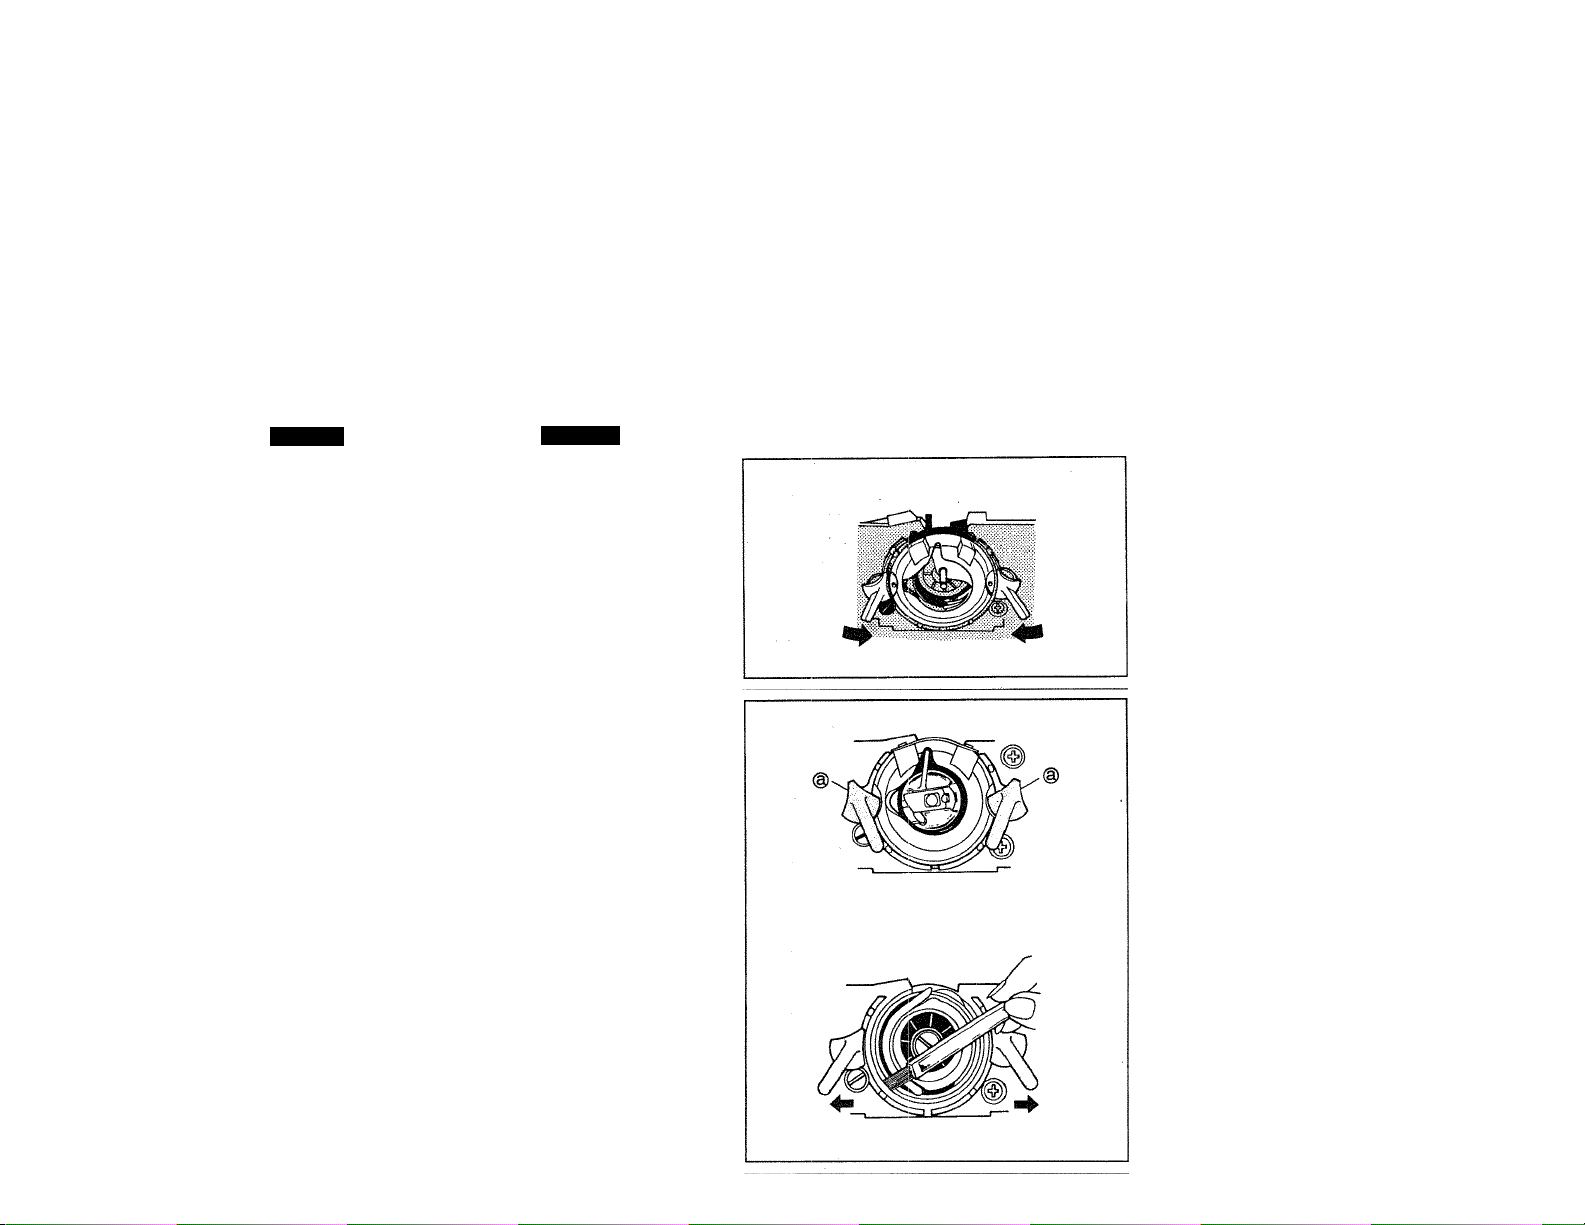
Page 58
Section
7
English
Push latches towards inside.
CLEANING SHUTTLE CASE
Thread stuck between shuttle
and shuttle case causes sud
den rapid running or sudden
stopping of the machine.
In this case you should pro
ceed as follows:
®Lift presser foot and
remove bobbin case.
(D Push latches @ towards
outside and remove shut
tle cover and shuttle with
fingers.
(3) Clean shuttle and shuttle
case and re-assemble
them.
Español
Girar ios seguros hacia den
tro.
LIMPIEZA DE LA CAJA DEL CANGREJO
El hilo atorado en la caja del
cangrejo, causará una
pequeña falla en su máquina.
En este caso proceder como
se describe en seguida.
© Llevar hacia arriba el ele
vador del pie y quitar la
bobina.
(2) Girar los seguros del can
grejo hacia afuera @ , y
quitar la tapa y el cangre
jo.
@ Limpiar cangrejo y caja,
volviéndolos a armar.
Page 67
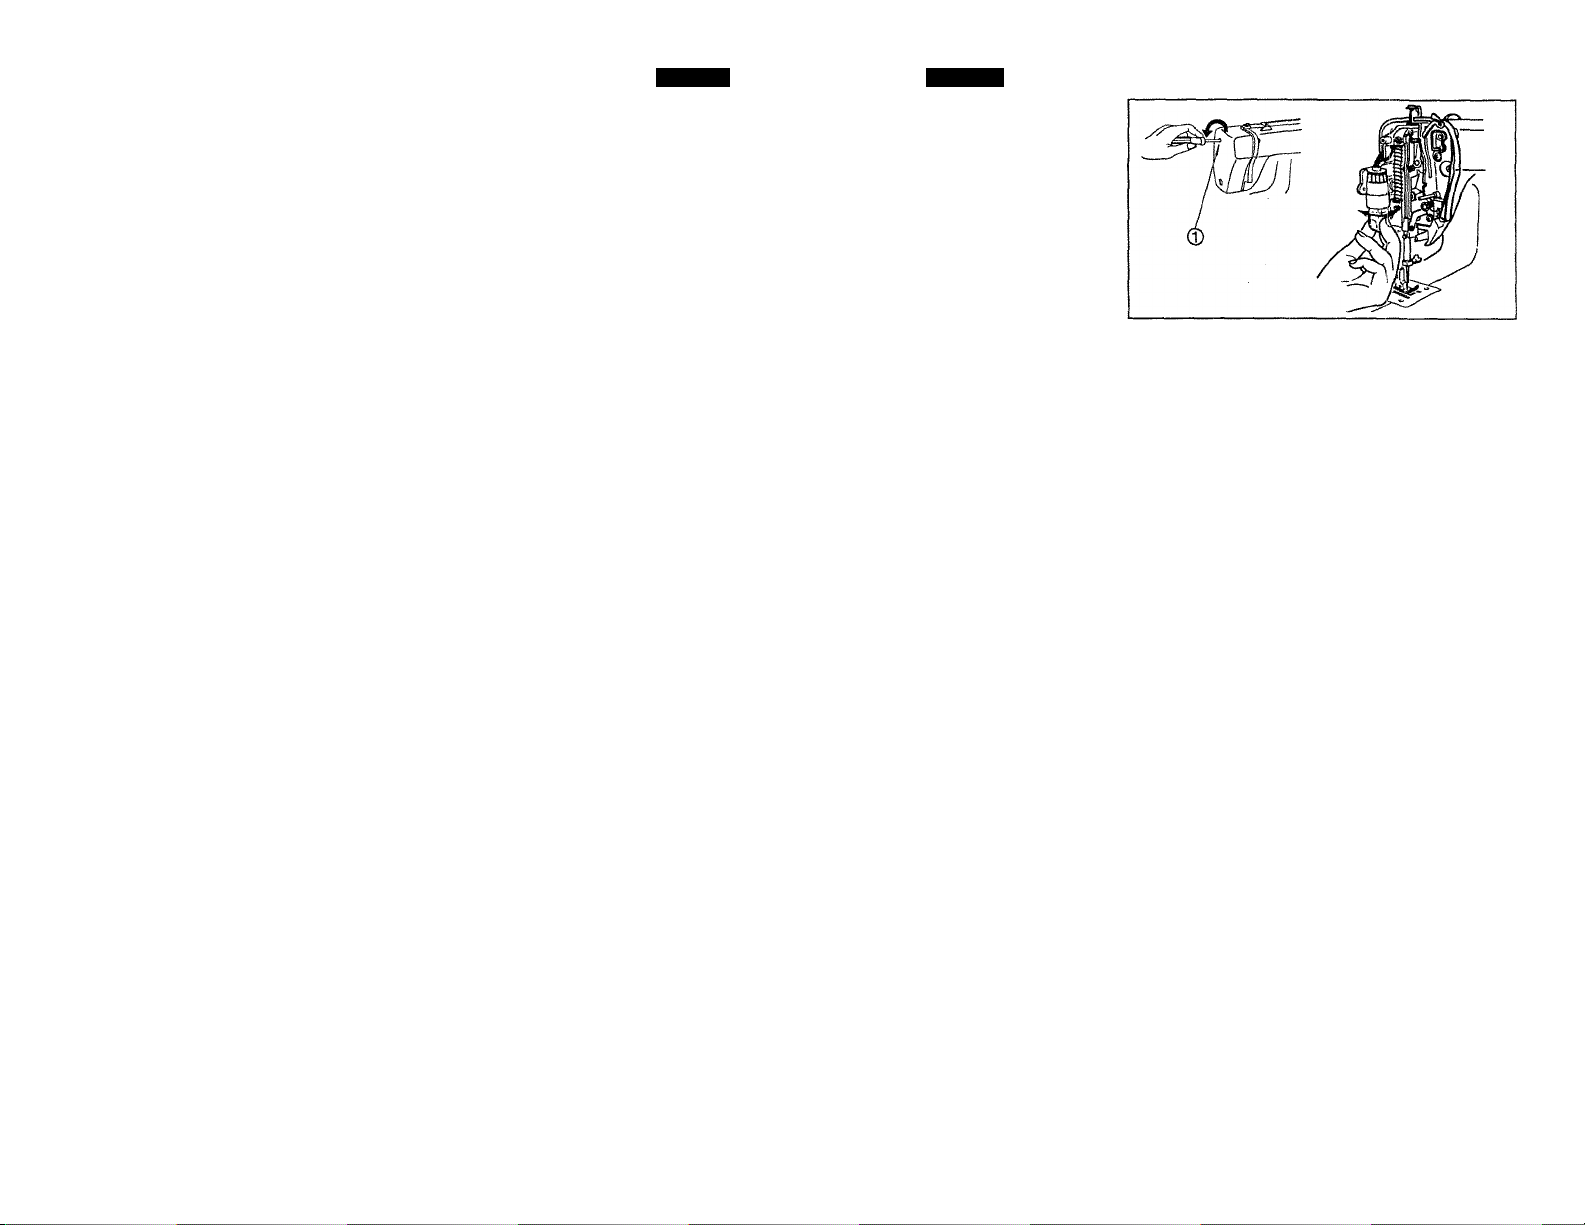
Page 59
Section
7
English
CHANGING LIGHT BULB
Unplug the machine.
Loose the screw ® as shown
and open face cover as
shown.
Remove the bulb by unscrew
ing it in a counterclockwise
direction.
Install a new bulb by screwing
it in clockwise.
Español
CAMBIO DEL FOCO
Desconectar la máquina.
Aflojar el tornillo como se indi
ca, y abrir la cubierta.
Quitar el foco girándolo en
sentido contrario al movimien
to de las menecillas del reloj.
Poner un unevo foco
atornillándolo.
 Loading...