

Page 1
Household Steam Iron
EF
instruction manual
Page 2
2
3
IMPORTANT SAFETY INSTRucTIONS
When using your atiron, basic safety precautions should always be followed,
READ ALL INSTRUCTIONS BEFORE USING.
Save these instructions in a safe place for future reference.
Use appliance only for its intended use.1.
To protect against risk of electrical shock, do not immerse the iron in water 2.
or other liquids.
This appliance should always be turned to “OFF” before plugging or unplug-3.
ging from an outlet. Never yank the cord to disconnect from outlet, always
grasp plug and pull to disconnect.
Always disconnect the appliance from the electrical outlet when filling with 4.
water or emptying or when not in use.
Do not allow cord to touch hot surfaces. Let the iron cool completely before 5.
putting away. Loop cord losely around iron when storing.
Do NOT operate appliance with a damaged cord, or if the appliance has 6.
been dropped or damaged. If electrical cord is damaged it must be replaced
by the manufacturer or authorized service agent to avoid a safety hazard.
To avoid the risk of electrical shock, do NOT disassemble the iron. Ship to 7.
the nearest authorized SINGER
and repair. Incorrect reassembly or repair can cause a risk of fire, electrical
shock, or injury when the appliance is used.
Not intended for use by children. Close supervision is necessary for any 8.
appliance being used near children. Unsupervised use can result in fire or
personal injury. Do not leave appliance unattended while plugged in, on an
ironing board, or while it is still hot.
Burns can occur from touching hot metal parts, hot water or steam. Use 9.
caution when you turn a steam iron upside down as there may be hot water
in the reservoir.
Never use or rest the iron on an unstable surface.10.
When iron is hot, never set on an unprotected surface.11.
including the following:
®
approved service center for examination
SPECIAL INSTRUCTIONS:
To avoid a circuit overload, do not operate another high-wattage appliance on the
same circuit. If an extension cord is absolutely necessary, a 15-amp cord should
be used. Cords rated with less amperage may overheat. Use care to arrange the
cord so that it cannot be pulled or tripped over.
SAVE THESE INSTRUCTIONS
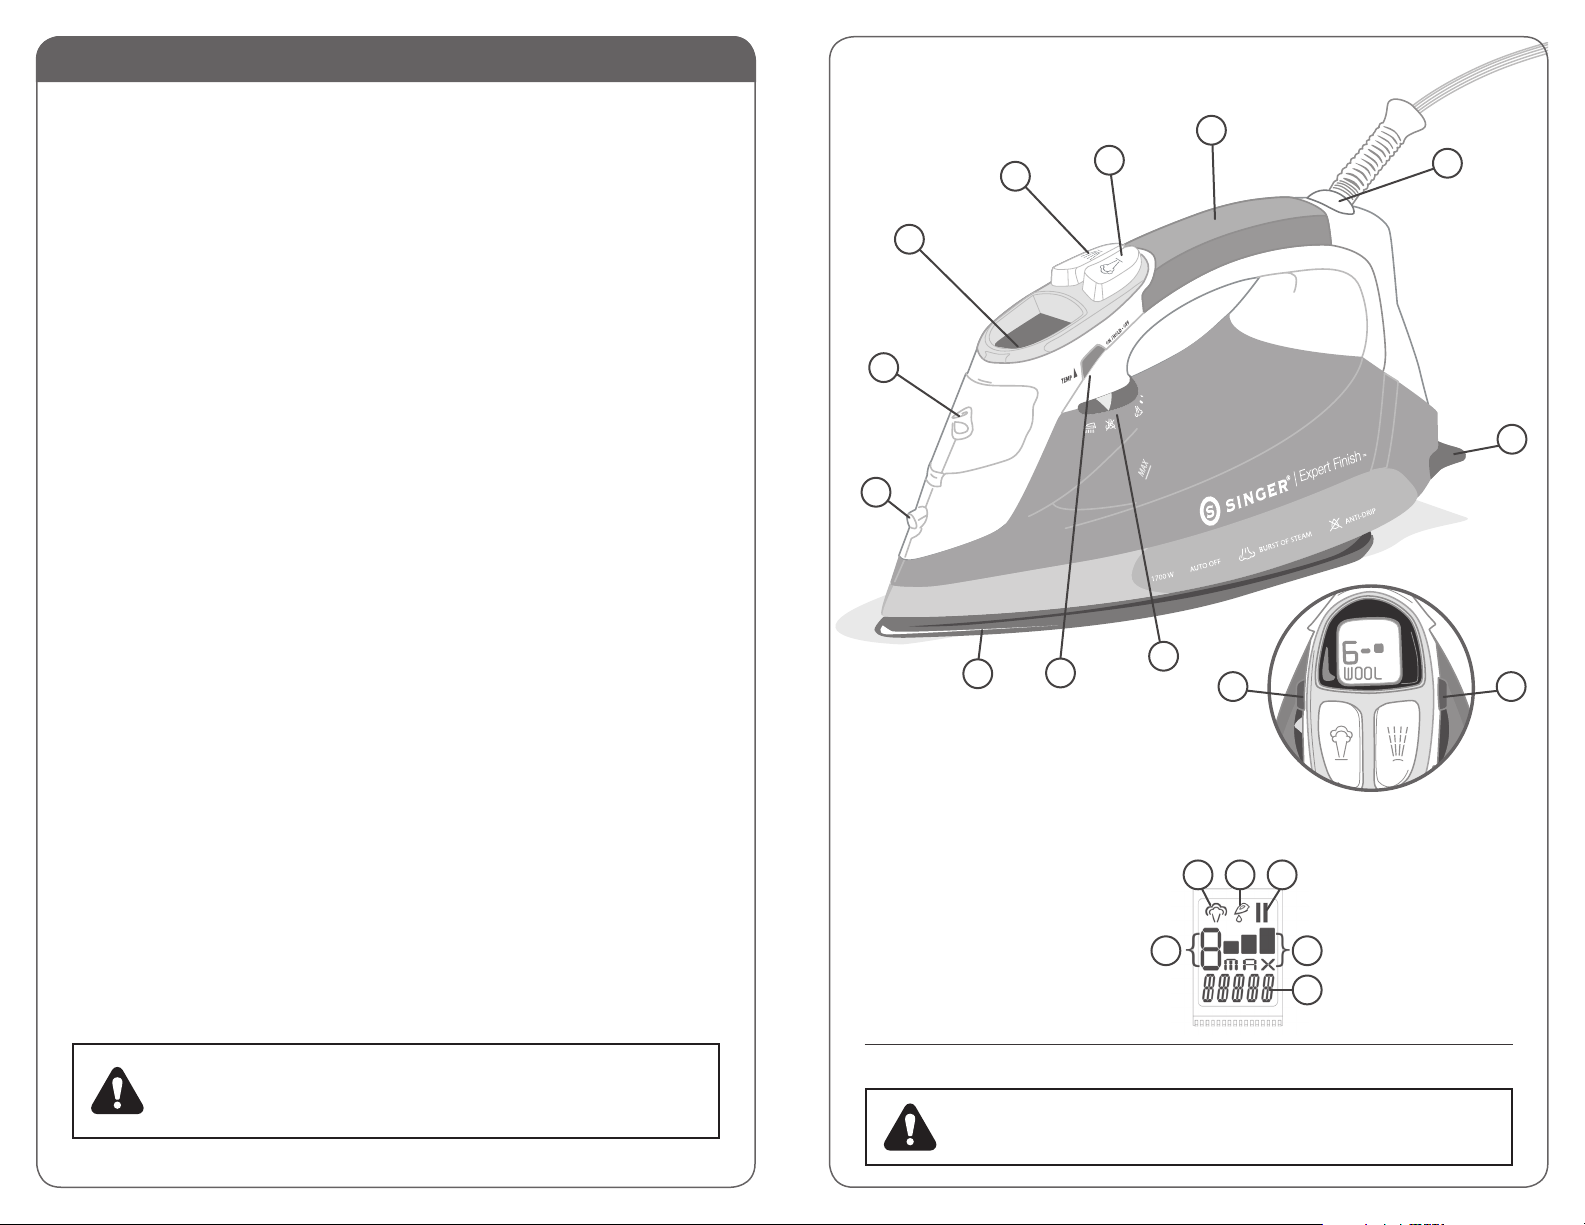
Getting to Know Your SINGER® Iron
1
3
4
5
6
12
Soft Grip Handle1.
Burst of Steam Button2.
Cool Mist Spray Button3.
LCD Display Panel 4.
Water Inlet Cover5.
Spray Nozzle6.
Temperature UP/ON-OFF 7.
Button
Temperature DOWN Button 8.
Variable Steam Control & 9.
Self-Cleaning Dial
Heel Rest10.
360° Swivel Cord11.
Soleplate12.
2
7
9
LCD PANEL DESCRIPTION
A B c
D
D
E
11
10
87
Steam IndicatorA.
Anti-Scale IndicatorB.
Auto-Off IndicatorC.
Temperature Level D.
Indicator
Fabric GuideE.
WARNING: THE POWER CORD ON THIS PRODUCT CONTAINS LEAD, A
CHEMICAL KNOWN TO THE STATE OF CALIFORNIA TO CAUSE BIRTH DEFECTS
OR OTHER REPRODUCTIVE HARM. WASH HANDS AFTER HANDLING.
TECHNICAL SPECIFICATIONS: Voltage: 120V, 60 Hz Power: 1700 Watts
WARNING: TO AVOID FIRE, NEVER LEAVE IRON UNATTENDED WHILE
PLUGGED IN.
FOR HOUSEHOLD USE ONLY
Page 3
4
5
OPERATING INSTRucTIONS
Before First Use
Filling the Water Tank
Ensure iron is unplugged.•
Remove any protective films or stickers from the soleplate and the iron.•
Read all safety and operating instructions.•
Fill the water tank as described in “How to Fill Water”.•
Plug the iron into a grounded electrical outlet. •
The LCD Display will show all symbols and then turn off with an audible beep •
sound.
Press the Temperature UP/ON-OFF button. The LCD Display will indicate the •
setting number, fabric type and temperature bars.
Select the maximum temperature by pressing the Temperature UP button •
until the display indicates level 9.
When the selected temperature is reached, the LCD Display will stop flashing •
and an audible beep will sound. The iron is ready to use.
Move the Variable Steam Control Dial to position.•
Open the Water Inlet Cover and tilt the iron slightly forward, resting on its •
heel.
Using the filling cup provided, fill the water chamber to the MAX mark.•
Close the Water Inlet Cover.•
To refill the water tank during ironing, always unplug the iron. When you •
return to ironing, make sure the iron reheats to the desired level and the LCD
Display stops flashing before continuing.
Move the Variable Steam Control Dial to the maximum position .•
On an ironing board or protected surface, iron an old towel or other heavy •
material until the water tank is empty and no more steam is produced.
It is normal for a small amount of smoke and a light odor to be produced the •
first time the iron is used. This will disappear quickly.
Particles may emit from the iron the first time it is used. They are not harmful •
and should disappear after the iron has been used as described above.
Consult the garment’s label for temperature instructions or use the chart on •
page 6 of this manual for recommendations.
Water Recommendations
Singer Home Essentials irons are designed to be used with regular tap water.•
If your water is especially hard or if you use a water softener, try using •
inexpensive bottled spring water.
Never use water with additives, including scents, starches, or fabric •
conditioners, as they can cause deposits to form in the iron that can stain
clothing.
WARNING: ALWAYS MAKE SURE THE IRON IS UNPLUGGED BEFORE FILLING
WITH WATER OR COMING INTO CONTACT WITH LIQUID OF ANY KIND.
Page 4
6
7
Selecting the Temperature
Plug the iron into a grounded electrical outlet.•
CONSULT THE GARMENT’S LABEL FOR TEMPERATURE INSTRUCTIONS.
WE RECOMMEND USING THE CHART BELOW AS A GUIDE.
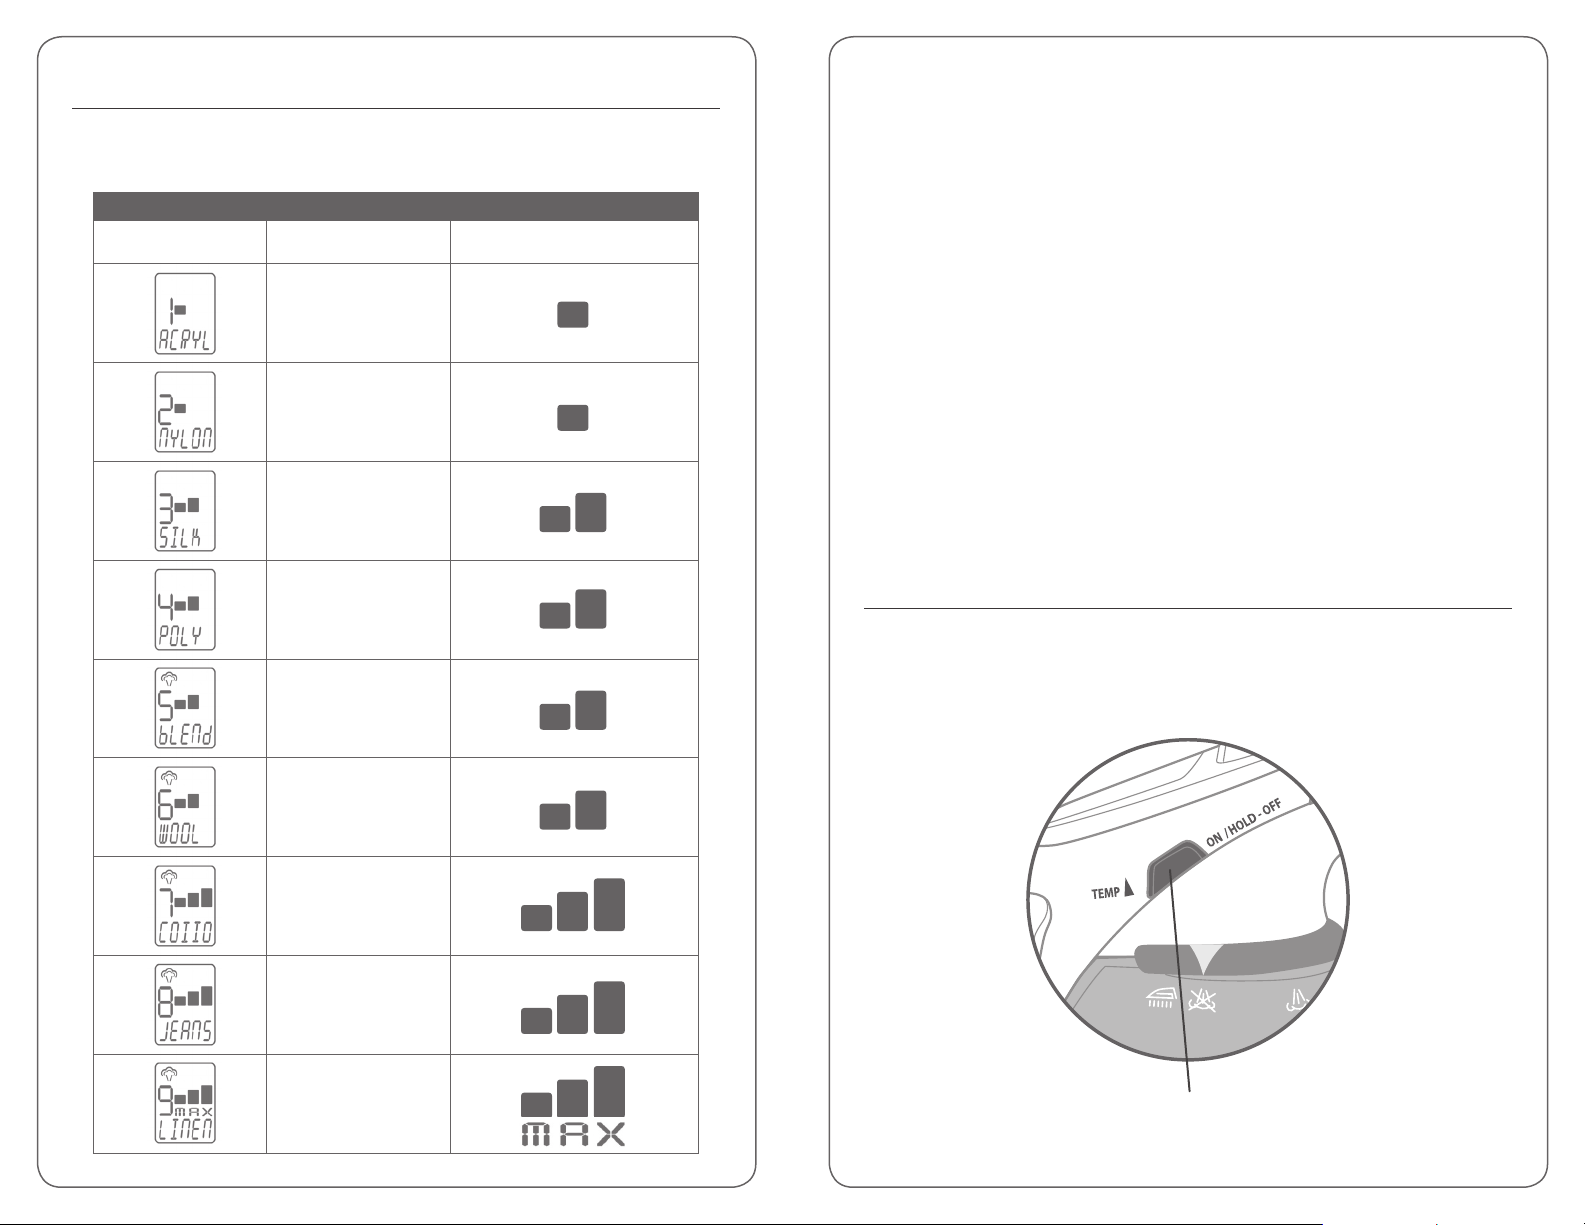
Temperature Control Settings
LCD DISPLAY GARMENT TEMPERATURE BARS
Acrylic
Nylon
Silk
Polyester
The LCD Display will show all symbols and then turn off with an audible beep •
sound.
Press the Temperature UP/ON-OFF button. The LCD Display will indicate the •
setting number, fabric type and temperature bars.
Select the desired temperature by pressing the Temperature UP and •
Temperature DOWN buttons on either side of the LCD Display. An audible
beep will sound each time the temperature is changed.
The steam icon will display when the temperature setting from 5 to 9 has •
been selected.
When temperature is reached, the LCD Display will stop flashing and an •
audible beep will sound.
Turning the Iron Off
To turn the iron off, press and hold the Temperature UP/ON-OFF for 3 •
seconds. The LCD Display will turn off and an audible beep will sound.
Poly-Cotton Blend
Wool
Cotton
Jeans/Denim
Linen
Temperature UP/ON-OFF Button
Page 5
8
9
IRONING YOuR GARMENTS
Burst of Steam
Dry Ironing
To iron without steam, turn the Variable Steam Control Dial to the “no steam” •
position .
Plug the iron into a grounded electrical outlet.•
The LCD Display will show all symbols and then turn off with an audible beep •
sound.
Select the desired temperature using the Temperature UP and DOWN •
buttons.
When temperature is reached, the LCD Display will stop flashing and an •
audible beep will sound.
To iron garments with a dry iron, SINGER recommends using this iron with an •
empty water tank.
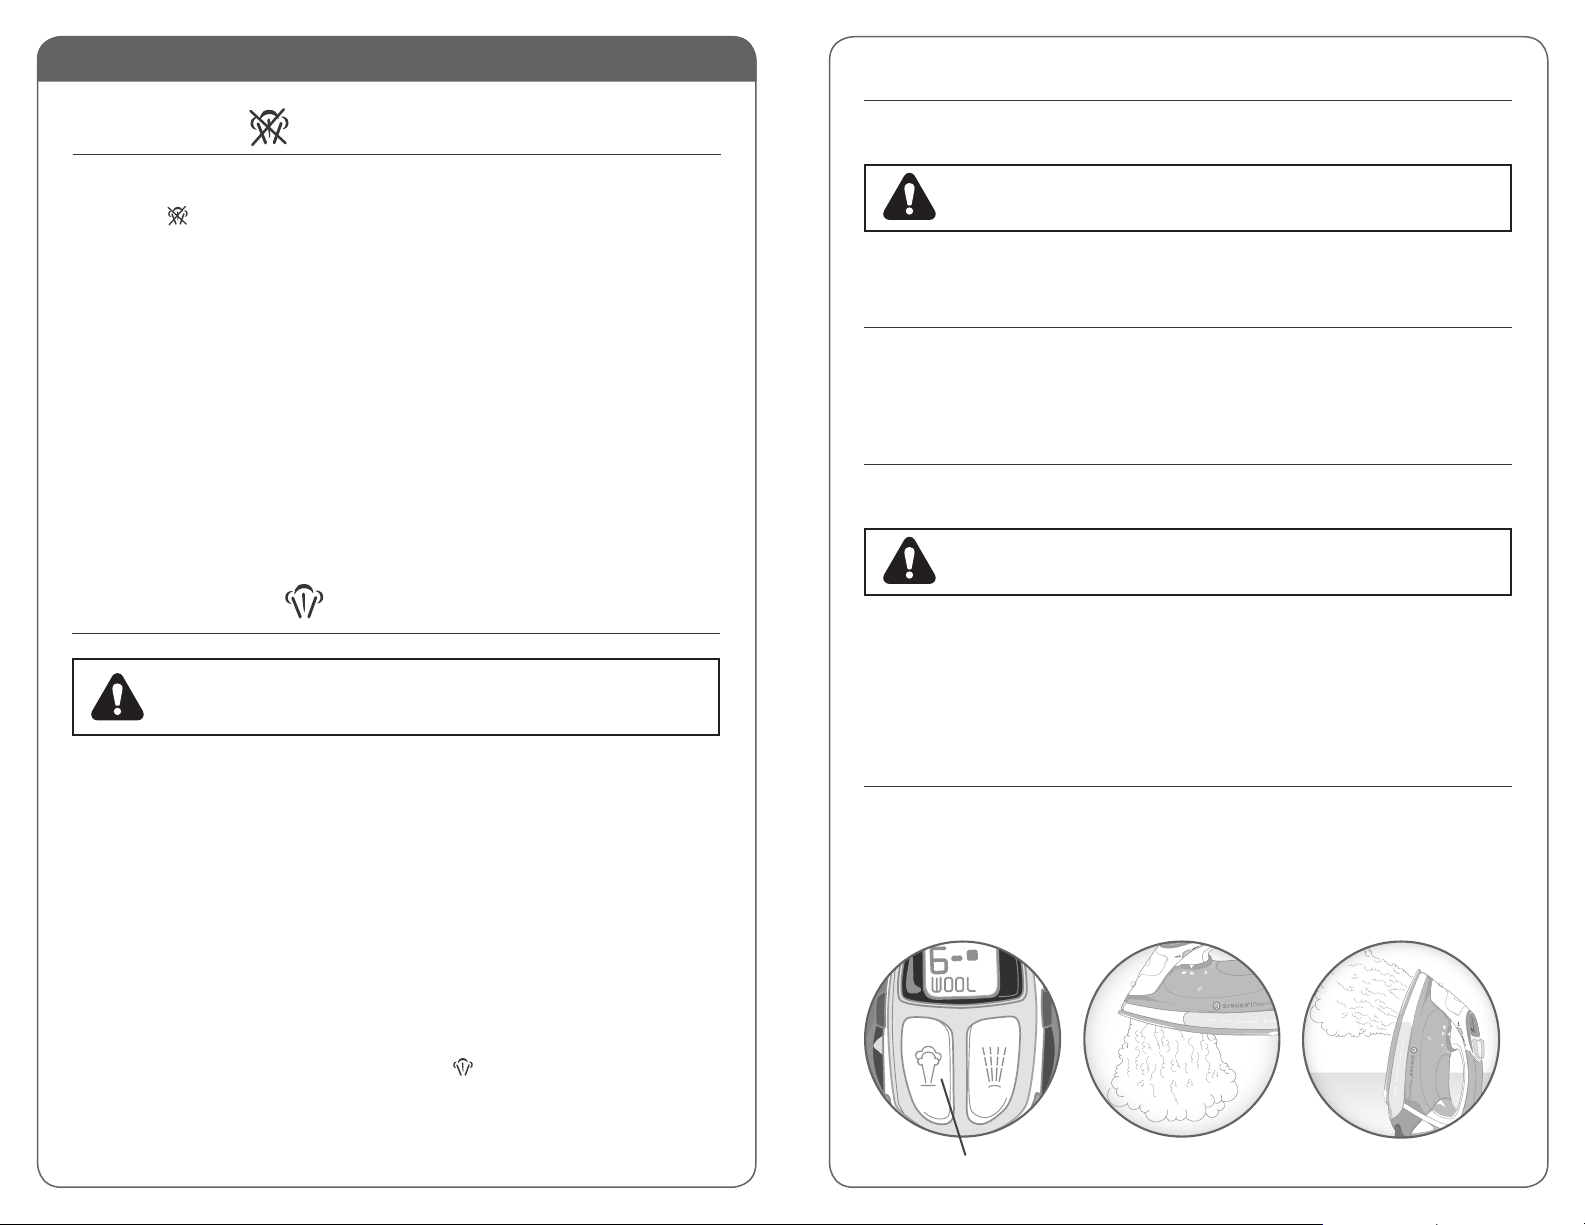
Steam Ironing
WARNING: NEVER IRON OR STEAM CLOTHES WHILE THEY ARE BEING
WORN. NEVER DIRECT THE STEAM JET AT PEOPLE OR ANIMALS.
Fill the water tank as described in “Filling the Water Tank” section. •
This function is ideal for removing stubborn wrinkles or pressing extra-sharp
creases.
WARNING: NEVER IRON OR STEAM CLOTHES WHILE THEY ARE BEING
WORN. NEVER DIRECT THE STEAM JET AT PEOPLE OR ANIMALS.
Follow the instructions as described in the “Steam Ironing” section.•
While steam ironing, press the Burst of Steam button every 4 to 5 •
seconds. Most wrinkles can be removed within three bursts.
NOTE: It may be necessary to press the Burst of Steam button a few times to
start this function. For optimum steam quality, do not operate the Burst of Steam
more than three times in succession.
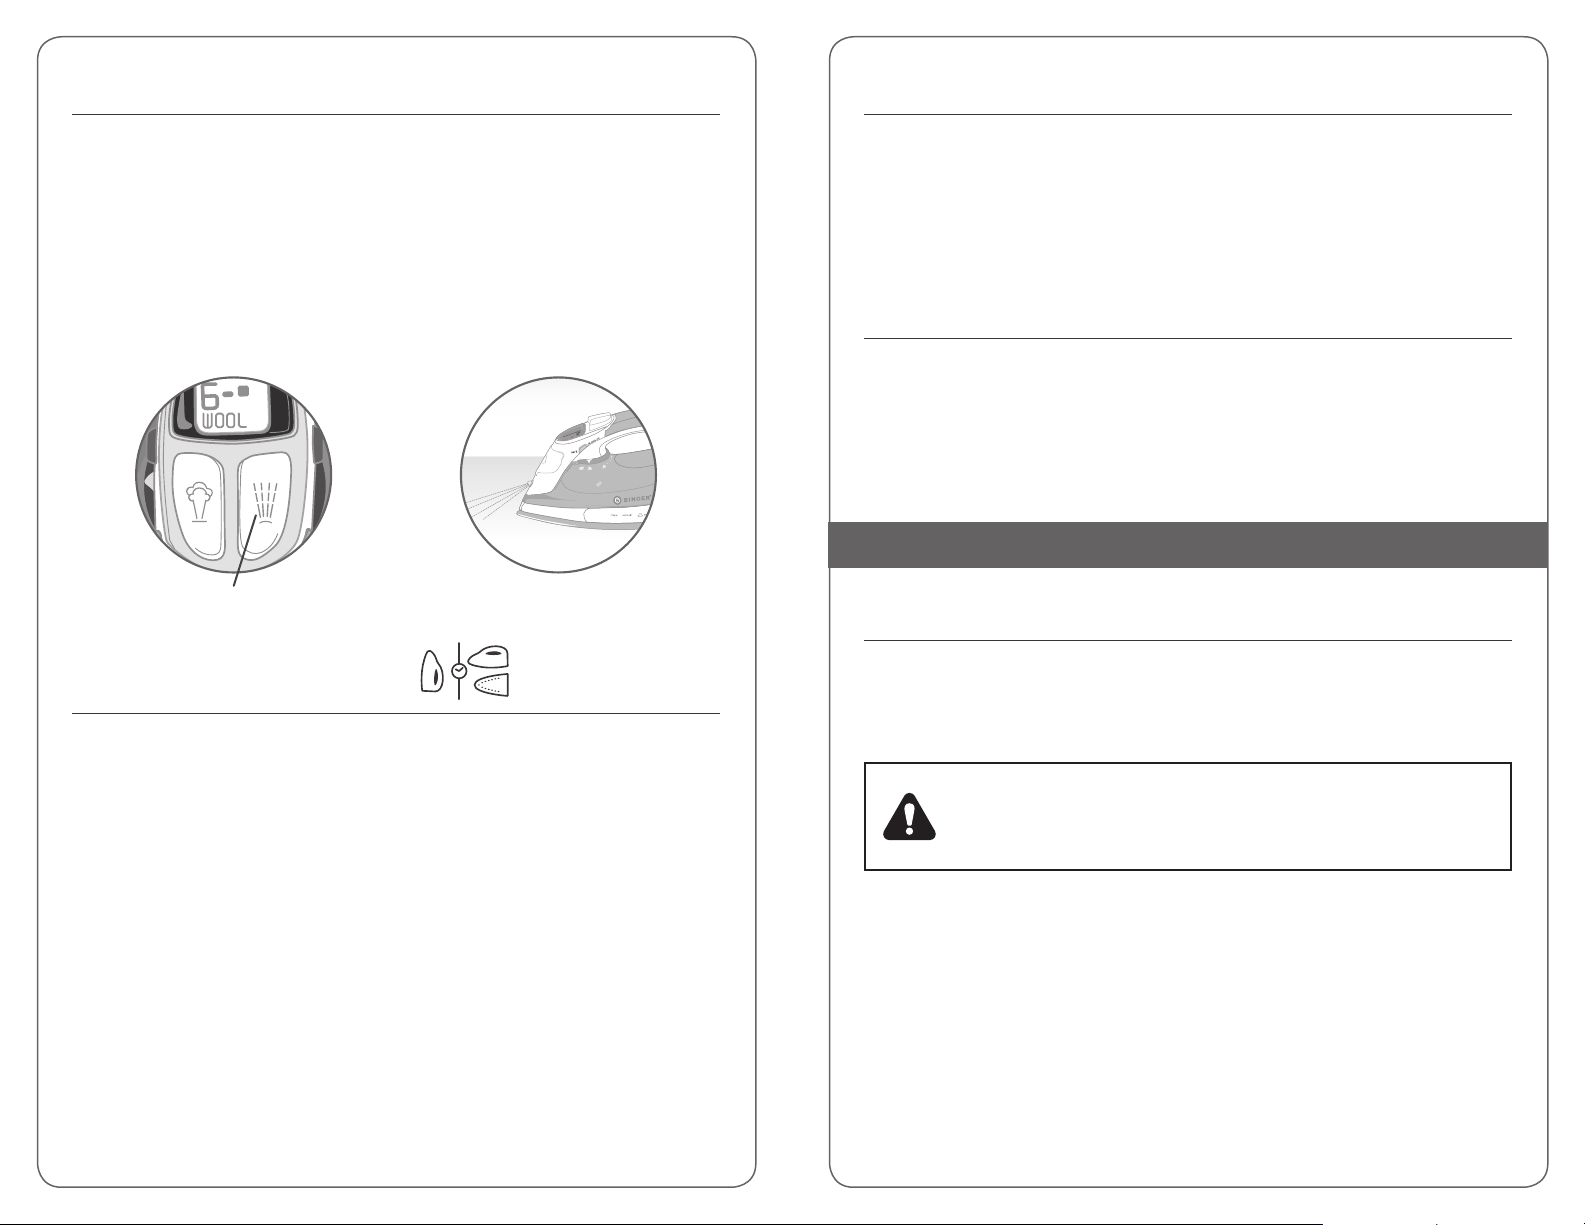
Vertical Burst of Steam
This feature enables you to remove wrinkles from hanging garments (jackets,
coats, shirts), hanging curtains, or other hanging fabric.
WARNING: NEVER IRON OR STEAM CLOTHES WHILE THEY ARE BEING
WORN. NEVER DIRECT THE STEAM JET AT PEOPLE OR ANIMALS.
Follow the instructions as described in the “Steam Ironing” section.•
Hold the iron upright, 6-12 inches away from the garment.•
Press the Burst of Steam button to direct steam at the area.•
Steam will penetrate into the garment, removing the wrinkles.•
For stubborn wrinkles, wait 4 to 5 seconds before pressing the Burst of •
Steam button again. Most wrinkles can be removed within three bursts.
Plug the iron into a grounded electrical outlet.•
The LCD Display will show all symbols and then turn off with an audible beep •
sound.
Select the desired temperature using the Temperature UP and DOWN •
buttons. The recommended steam temperature setting is from 5 to 9.
When the selected temperature is reached, the LCD Display will stop flashing •
and an audible beep will sound.
Move the Variable Steam Control Dial to the position. Steam will vary with •
the temperature setting. The iron is ready to use.
TIP: The tougher the wrinkle, the more steam you will need.
NOTE: Maintain a distance of 6-12 inches from delicate fabric (synthetics, silk,
velvet, etc.), otherwise the fabric could be damaged.
It may be necessary to press the Burst of Steam button a few times to start this
function. For optimum steam quality, do not operate the Burst of Steam more
than three times in succession.
Burst of Steam Button vertical burst of steam
burst of steam
Page 6
10
11
Cool Mist Spray
Anti-Drip
The Cool Mist Spray function can be used on any temperature setting. Use the
spray to dampen fabrics in order to remove tough wrinkles.
Aim the nozzle at the garment.•
Press the Cool Mist Spray Button. You may need to press the button a few •
times before the water sprays at full pressure.
Iron as usual.•
Do not spray silk. •
Cool Mist Spray Button
cool mist spray
3-Way Smart Auto-Off
The SINGER Expert Finish Iron is equipped with an automatic shut-off. The
Smart Auto-Off switches the iron off if it has been left unattended.
NOTE: Auto-Off is not an on/off switch. Always unplug the iron when it is not
in use.
If the iron is left on and is not moved for 8 minutes in a vertical position, it will •
automatically shut off and an audible beep will sound.
This iron is designed to reduce dripping and spitting while in use. Steam is
automatically disabled when the soleplate temperature is too low to create
steam, preventing spitting or dripping.
The Anti-Drip system may make a loud clicking sound during use. This is normal
and indicates that the system is functioning correctly.
Anti-Scale System
The built-in Anti-Scale cartridge is designed to reduce the buildup of mineral
substances in the water which occurs during steam ironing, thereby extending
the life of your SINGER Expert Finish Iron. However, please note that the
anti-scale cartridge will not completely stop the natural process of lime scale
buildup.
clEANING AND STORAGE
Self-Cleaning
This feature removes loose minerals and other impurities that have been built
up in the steam chamber. It is recommended that this function be performed at
least once a month or more regularly depending on the hardness of the water
used.
WARNING: THE SELF-CLEAN FUNCTION WILL CAUSE HOT STEAM AND
WATER TO BE EJECTED FROM THE SOLEPLATE. TAKE ALL PROPER
PRECAUTIONS AND HOLD IRON AWAY FROM BODY. STEAM AND WATER
ARE VERY HOT AND CAN CAUSE BURNS.
If the iron is left on its soleplate or tipped over, it will shut off after 30 seconds •
and an audible beep will sound.
When the iron is preparing to shut off, the Auto-Off symbol will start flashing •
on the LCD Display Panel with an audible beep sound. The LCD back light
will turn off after 5 seconds.
To de-activate the Auto-Off, move the iron or shake gently. The iron will take •
about 60 seconds to reach the previous soleplate temperature.
To turn the iron off, press and hold the Temperature UP/ON-OFF for 3 •
seconds. The LCD Display will turn off and an audible beep will sound.
Fill the water tank half full, as described in the “Filling the Water Tank” •
section.
Place the iron on its heel on a flat surface.•
Plug the iron into a grounded outlet.•
The LCD Display will show all symbols and then turn off with an audible beep •
sound.
Select temperature 9 using the Temperature UP and DOWN buttons. •
Page 7

12
13
When the selected temperature is reached, the LCD Display will stop flashing •
and an audible beep will sound.
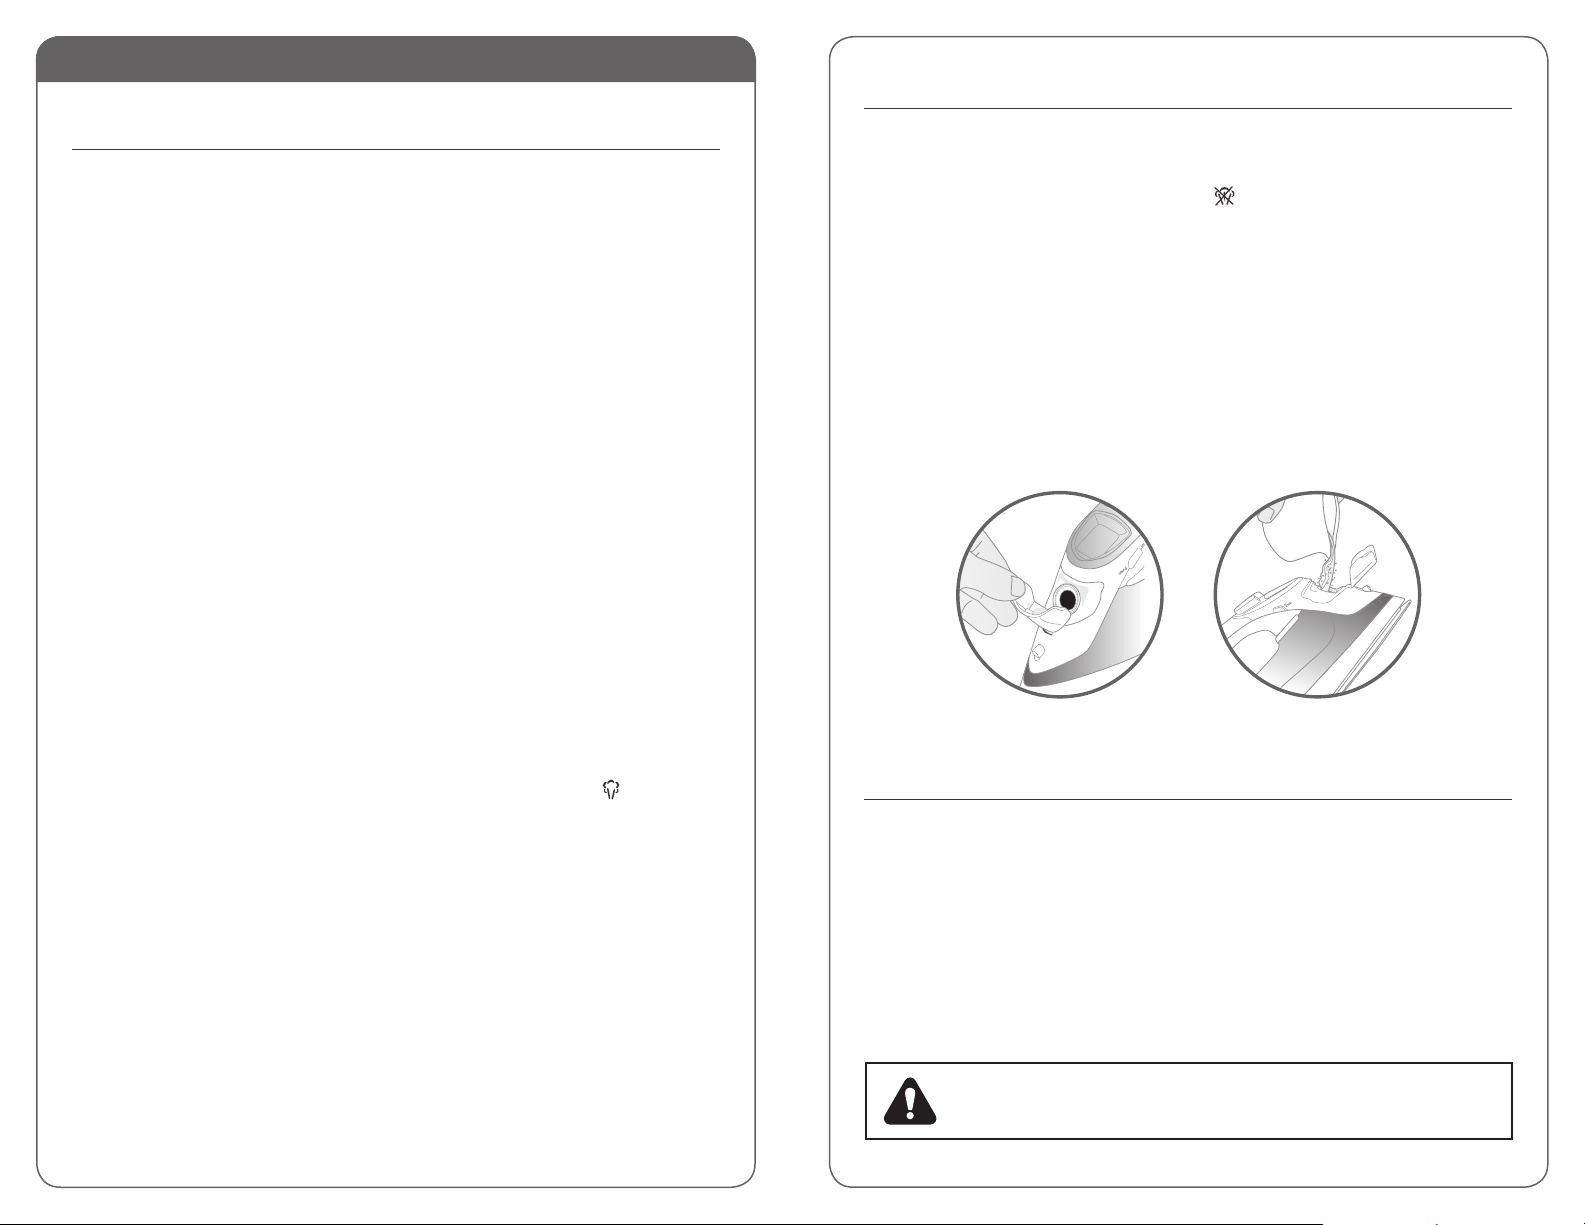
Cleaning the Soleplate
Turn the iron off by pressing and holding the Temperature UP/ON-OFF for 3 •
seconds. The LCD Display will turn off and an audible beep will sound.
Unplug the iron.•
Hold the iron horizontally over a sink with the soleplate pointing away from •
the body.
Turn and hold the Variable Steam Control/Self-Cleaning Dial to Descaling •
Position .
Steam and hot water will drain from from the soleplate holes, washing away •
the scales and minerals that have built up inside the steam chamber.
Gently move the iron back and forth until the water tank is empty.•
When self-cleaning is complete, turn the Variable Steam Control/Self-•
Cleaning Dial to the position.
NOTE: Before using the iron after self-cleaning, test the steam and burst of
steam on an old towel or cloth that can be discarded.
In normal use, a coating may build up on the soleplate from starch, detergent
or burnt synthetic fibers. This can be easily removed by using a quality iron
soleplate cleaner.
When the iron is cold and unplugged, the iron can be cleaned with a damp cloth
and wiped dry.
NOTE: Never use abrasive household cleaners or other chemical agents to
clean the iron.
Never use sharp or rough objects to remove deposits on the soleplate.
TROuBlEShOOTING
PROBLEM REASON & SOLUTION
The iron is not properly plugged in•
The temperature setting is too low – set the temperature •
Iron does not heat
No steam or not enough
steam
to a higher setting
Auto-Off has been engaged – move or shake the iron •
gently to de-activate Auto-Off
The water tank may be low or empty – add water•
The iron is not set to steam setting – for maximum steam, •
temperature should be on MAX
Variable Steam is set too low – turn the Variable Steam •
Control Dial to the position
Emptying and Storing
Turn the Variable Steam Control/Self-Cleaning Dial to the position.•
Unplug the iron.•
Place the iron on its heel and allow to cool completely.•
Empty water from the iron before storing.•
To protect the soleplate, store the iron on its heel.•
Descaling Position
This is normal – follow instructions for first time use•
Iron is emitting small
particles or odor
Iron is dripping water
from steam vents
Water may need to be changed•
Buildup of mineral deposits inside steam chamber – •
see Self-Cleaning section
Overfilled – do not fill past the MAX line on water tank•
The iron may not be hot enough – set the temperature •
to MAX
Over use of Burst of Steam – allow more time between •
bursts
If troubleshooting does not solve the problem, please call SINGER at
1-800-4-SINGER or 1-800-474-6437.
Page 8

14
15
SINGER® SEWING COMPANY LIMITED WARRANTY
EXPERT FINISH™ STEAM IRON
IMPORTANT: SAVE THIS DOCUMENT AND KEEP IT IN A SAFE PLACE
What Does This Limited Warranty Cover?
The SINGER Expert Finish™ Steam Iron is warranted to be free from defects in
material and workmanship.
Does State Law Affect My Rights?
This warranty gives you specific legal rights, and you may also have other rights •
which vary from state to state.
Some states do not allow limitations on how long an implied warranty lasts, •
so the above limitation may not apply to you.
Some states do not allow the exclusion or limitation of incidental or consequential •
damages, so the above limitation or exclusion may not apply to you.
How Long Is This Limited Warranty?
The warranty for the IRON’s wiring and electronic parts is for a period of two (2) years
from the date of purchase.
The warranty for all other parts of the IRON is for a period of ninety (90) days from
the date of purchase.
What Will SINGER Do?
If the electronic parts and/or the other parts in the IRON, after inspection by SINGER,
prove to be defective during the applicable warranty period(s), the electronic parts
and/or the other parts will be repaired or replaced at SINGER’s option, without
charge, except for any expense associated with sending the IRON to SINGER.
If SINGER sends a replacement IRON, it will carry the remaining warranty of the
original IRON.
Who Is Covered By This Limited Warranty?
This warranty may only be used by the original consumer owner of the IRON and
may not be transferred or assigned.
What Are The Other Exclusions or Limitations?
Service under this warranty may only be obtained within the 48 contiguous states, •
Alaska, Hawaii and Canada.
The IRON is warranted only for normal household (non-commercial) use. This •
warranty does not cover defect(s) caused by abuse, lack of maintenance or other
neglect, failure to follow the care, cleaning or other instructions for the IRON,
misuse, or events beyond our control.
ANY IMPLIED WARRANTY APPLICABLE TO THE IRON, INCLUDING WITHOUT •
LIMITATION THE WARRANTIES OF MERCHANTABILITY AND/OR FITNESS
FOR A PARTICULAR PURPOSE, IS LIMITED IN DURATION TO THE DURATION
OF THIS WRITTEN WARRANTY. SINGER SHALL NOT BE LIABLE FOR
CONSEQUENTIAL ECONOMIC DAMAGES RESULTING FROM BREACH OF THIS
WARRANTY OR ANY IMPLIED WARRANTY.
SINGER does not authorize any person to create for it any obligation or liability •
in connection with the IRON and any of its parts beyond those set forth in this
warranty.
SINGER disclaims liability under this warranty for any damage or defect resulting •
from the use of other than SINGER parts and SINGER approved service in the
repair and maintenance of the IRON.
How Do I Get Service Under The Warranty?
Service under the warranty may be obtained by returning the IRON with:
This original warranty document; and 1.
Proof of purchase (such as the purchase receipt) to:2.
SINGER Sewing Company
ATTN: Service Department
1224 Heil Quaker Boulevard
LaVergne, TN 37068
What If I Have Questions About The Warranty?
If you have any questions regarding these warranties, please contact us:
SINGER Sewing Company
1-800-4-SINGER
E-mail: talktoUS@singerco.com
ATTN: Consumer Affairs (1-800-474-6437)
1224 Heil Quaker Boulevard
LaVergne, TN 37068
or through the Customer Service Area of our web site: www.singerco.com
SINGER® IS A REGISTERED TRADEMARK OF THE SINGER COMPANY LIMITED.
Page 9

17
Plancha a vapor para uso doméstico
EF
Manual de instrucciones
Page 10

18
19
INSTRuccIONES DE SEGuRIDAD
IMPORTANTES
Cuando use su plancha, siempre debe seguir las precauciones básicas de
LEA TODAS LAS INSTRUCCIONES ANTES DE UTILIZAR LA PLANCHA.
Guarde estas instrucciones en un lugar seguro para futuras consultas.
Utilice el aparato sólo para el uso que se fabricó.1.
Para proteger la plancha del riesgo de una descarga eléctrica, no la sumerja 2.
en agua ni en otros líquidos.
Este aparato siempre debe apagarse antes de enchufarse o desenchufarse 3.
del tomacorriente. Nunca tire del cable para desconectar la plancha del
tomacorriente; siempre sujete el enchufe para desconectarla.
Siempre desconecte el aparato del tomacorriente cuando lo llene con agua o 4.
lo vacíe, o cuando no esté en uso.
No permita que el cable toque superficies calientes. Deje enfriar la plancha 5.
por completo antes de guardarla. Para guardar, enrolle el cable alrededor de la
plancha sin apretarlo.
NO use el aparato si el cable está dañado o si el aparato se cayó o se dañó. Si 6.
el cable eléctrico está dañado, el fabricante o el agente del servicio autorizado
deberán remplazarlo para evitar un peligro para la seguridad.
Para evitar el riesgo de una descarga eléctrica, NO desarme la plancha. 7.
Envíela al centro de servicio aprobado y autorizado SINGER
para que la examinen y la arreglen. La reparación o el armado incorrectos
puede crear un riesgo de incendio, descarga eléctrica o lesión al usar el
aparato.
La plancha no está diseñada para que la usen los niños. Es necesaria una 8.
supervisión atenta al usar cualquier aparato cerca de niños. El uso sin
supervisión puede ocasionar un incendio o lesiones personales. No deje el
aparato desatendido mientras está enchufado, sobre la tabla de planchar o si
todavía está caliente.
Pueden ocurrir quemaduras al tocar las partes de metal calientes, el agua 9.
caliente o el vapor. Tenga cuidado al colocar la plancha de vapor al revés, ya
que puede haber agua caliente en el depósito.
Nunca utilice o deje la plancha en una superficie inestable. 10.
Cuando la plancha está caliente, nunca la apoye en una superficie inestable.11.
seguridad, incluidas las siguientes:
®
más cercano
INSTRUCCIONES ESPECIALES:
Para evitar una sobrecarga en el circuito, no use ningún otro aparato de alto vataje
en el mismo circuito. Si es absolutamente necesario usar un cable de extensión, se
debe utilizar uno de 15 amperios. Los cables homologados para menor amperaje
pueden sobrecalentarse. Tenga cuidado cuando tender el cable, de manera que no
lo tiren ni se tropiecen con él.
GUARDE ESTAS INSTRUCCIONES
ADVERTENcIA: EL CABLE ELÉCTRICO DE ESTE PRODUCTO CONTIENE
PLOMO, UNA SUSTANCIA QUÍMICA QUE EL ESTADO DE CALIFORNIA
SABE QUE PUEDE CAUSAR DEFECTOS DE NACIMIENTO Y OTROS DAÑOS
REPRODUCTIVOS. LÁVESE LAS MANOS DESPUÉS DE TOCARLO.
Conozca su plancha SINGER
1
3
4
5
6
12
Mango blando1.
Botón de expulsión de vapor2.
Botón de rociado frío3.
Pantalla de cristal líquido 4.
(LCD)
Tapa de la entrada de agua5.
Rociador6.
Botón de aumento de 7.
temperatura, encendido y
apagado
Botón de reducción de 8.
temperatura
Dial de control de vapor 9.
variable y autolimpieza
Talón de apoyo10.
Cable giratorio de 360°11.
Placa12.
ESPECIFICACIONES TÉCNICAS: Voltaje: 120 V, 60 Hz Consumo: 1700 vatios
ADVERTENcIA: PARA EVITAR INCENDIOS, NUNCA DEJE LA PLANCHA
DESATENDIDA MIENTRAS ESTÁ CONECTADA.
2
7
9
DESCRIPCIÓN DE
DE LA PANTALLA LCD
A B c
D
®
11
10
87
Indicador de vaporA.
Indicador antisarroB.
Indicador de C.
D
E
apagado automático
Indicador de nivel de D.
temperatura
Guía de telasE.
SÓLO PARA USO DOMÉSTICO
Page 11

20
21
INSTRuccIONES DE FuNcIONAMIENTO
Antes de usar la plancha por primera vez
Llenado del tanque de agua
Quite cualquier película protectora o etiqueta adhesiva de la placa y de la •
plancha.
Lea todas las instrucciones de seguridad y funcionamiento.•
Llene el tanque de agua según se describe en “Cómo llenar con agua”.•
Enchufe la plancha en un tomacorriente puesto a tierra.•
La pantalla de cristal líquido (LCD) mostrará todos los símbolos y luego se •
apagará, emitiendo un pitido.
Botón de aumento de temperatura, encendido y apagado. La pantalla de •
cristal líquido (LCD) indicará el número de ajuste, el tipo de tela y las barras de
temperatura.
Seleccione la temperatura máxima presionando el botón de aumento de •
temperatura hasta que la pantalla indique el nivel 9.
Cuando se alcance la temperatura seleccionada, la pantalla de cristal líquido •
(LCD) dejará de parpadear y se oirá un pitido. La plancha está lista para usarse.
Gire el dial de control de vapor variable a la posición máxima .•
Sobre una tabla de planchar o una superficie protegida, planche una toalla vieja o •
un material grueso hasta que el tanque se vacíe y ya no se produzca vapor.
Es normal que se genere un poco de humo y se perciba un ligero olor la primera •
vez que se utiliza la plancha. Esto desaparecerá rápidamente.
Pueden salir partículas de la plancha la primera vez que se utiliza. No son dañinas •
y deberán desaparecer después de usar la plancha en la forma descrita arriba.
Consulte la etiqueta de la prenda para conocer las instrucciones de temperatura •
o utilice las recomendaciones presentadas en la tabla de la página 22 de este
manual.
Asegúrese de que la plancha esté desenchufada.•
Gire el dial de control de vapor variable a la posición .•
Abra la tapa de la entrada de agua e incline la plancha levemente hacia •
delante, colocándola sobre su talón de apoyo.
Utilice la taza de llenado provista para llenar la cámara con agua hasta la •
marca MAX.
Cierre la tapa de la entrada de agua.•
Siempre desenchufe la plancha para volver a llenar el tanque durante el •
planchado. Cuando reanude el planchado, antes de continuar asegúrese
de que la plancha se caliente a la temperatura deseada y que la pantalla de
cristal líquido (LCD) deje de parpadear.
Recomendaciones sobre el agua
Las planchas Home Essentials de Singer están diseñadas para ser utilizadas •
con agua del grifo.
Si el agua es especialmente dura o si usa un ablandador de agua, use agua •
de manantial embotellada.
Nunca use agua con aditivos, como serían aromas, almidones o •
acondicionadores de telas, ya que podrían formar depósitos en la plancha
que manchen la ropa.
ADVERTENcIA: SIEMPRE ASEGÚRESE DE QUE LA PLANCHA ESTÉ
DESENCHUFADA ANTES DE LLENARLA CON AGUA O DE QUE TENGA
CONTACTO CON CUALQUIER LÍQUIDO.
Page 12

22
23
Cómo seleccionar la temperatura
Enchufe la plancha en un tomacorriente puesto a tierra.•
CONSULTE LA ETIQUETA DE LA PRENDA PARA CONOCER LAS
INSTRUCCIONES SOBRE LA TEMPERATURA. RECOMENDAMOS USAR LA
TABLA A CONTINUACIÓN COMO GUÍA.
Ajuste de control de temperatura según el tipo de tela
PANTALLA DE
CRISTAL LÍQUIDO
(LCD)
PRENDA BARRAS DE TEMPERATURA
Acrílico
Nailon
Seda
Poliéster
Mezcla de poliéster y
algodón
La pantalla de cristal líquido (LCD) mostrará todos los símbolos y luego se •
apagará, emitiendo un pitido.
Botón de aumento de temperatura, encendido y apagado. La pantalla de •
cristal líquido (LCD) indicará el número de ajuste, el tipo de tela y las barras
de temperatura.
Seleccione la temperatura deseada, presionando los botones aumento y •
reducción de temperatura a ambos lados de la pantalla de cristal líquido
(LCD). Se oirá un pitido cada vez que la temperatura cambie.
El ícono de vapor aparecerá cuando se haya ajustado la temperatura a un •
valor entre 5 y 9.
Cuando se alcance la temperatura, la pantalla de cristal líquido (LCD) dejará •
de parpadear y se oirá un pitido.
Cómo apagar la plancha
Para apagar la plancha, mantenga presionado el botón de aumento de •
temperatura, encendido y apagado durante 3 segundos. La pantalla de
cristal líquido (LCD) se apagará y se oirá un pitido.
Lana
Algodón
Dril o mezclilla
(jeans o pantalones
vaqueros)
Botón de aumento de temperatura, encendido y apagado
Lino
Page 13

24
25
cóMO PlANchAR SuS PRENDAS
Expulsión de vapor
Planchado en seco
Para planchar sin vapor, gire el dial de control de vapor variable a la posición •
“no steam” (sin vapor) .
Enchufe la plancha en un tomacorriente puesto a tierra.•
La pantalla de cristal líquido (LCD) mostrará todos los símbolos y luego se •
apagará, emitiendo un pitido.
Seleccione la temperatura deseada utilizando los botones de aumento y •
reducción de temperatura.
Cuando se alcance la temperatura, la pantalla de cristal líquido (LCD) dejará •
de parpadear y se oirá un pitido.
Para planchar prendas en seco, SINGER recomienda utilizar esta plancha •
con el tanque de agua vacío.
Planchado con vapor
ADVERTENcIA: NUNCA PLANCHE O APLIQUE VAPOR A LA ROPA CUANDO
SE TENGA PUESTA. NUNCA APUNTE EL CHORRO DE VAPOR HACIA
PERSONAS O ANIMALES.
Llene el tanque de agua según se describe en la sección “Llenado del tanque •
de agua”.
Enchufe la plancha en un tomacorriente puesto a tierra.•
La pantalla de cristal líquido (LCD) mostrará todos los símbolos y luego se •
apagará, emitiendo un pitido.
Seleccione la temperatura deseada utilizando los botones de aumento y •
reducción de temperatura. Se recomienda ajustar la temperatura de vapor
entre 5 y 9.
Esta función es ideal para quitar arrugas rebeldes o fijar plisados muy
marcados.
ADVERTENcIA: NUNCA PLANCHE O APLIQUE VAPOR A LA ROPA CUANDO
SE TENGA PUESTA. NUNCA APUNTE EL CHORRO DE VAPOR HACIA
PERSONAS O ANIMALES.
Siga las instrucciones descritas en la sección “Planchado a vapor”.•
Mientras esté planchando con vapor, presione el botón de expulsión de •
vapor cada 4 ó 5 segundos. La mayoría de las arrugas pueden quitarse con
tres expulsiones de vapor.
NOTA: Puede ser necesario presionar el botón de expulsión de vapor unas
cuantas veces para comenzar esta función. Para una calidad de vapor óptima, no
presione el botón de expulsión de vapor más de tres veces seguidas.
Expulsión de vapor vertical
Esta función le permite quitar las arrugas de prendas que están colgadas
(chaquetas, abrigos, camisas), cortinas colgadas y otras telas que cuelguen.
ADVERTENcIA: NUNCA PLANCHE O APLIQUE VAPOR A LA ROPA CUANDO
SE TENGA PUESTA. NUNCA APUNTE EL CHORRO DE VAPOR HACIA
PERSONAS O ANIMALES.
Siga las instrucciones descritas en la sección “Planchado a vapor”.•
Sostenga la plancha en posición vertical a unos 15 a 30 cm (6 a 12 pulgadas) •
de la prenda.
Presione el botón de expulsión de vapor para dirigir el vapor al área.•
El vapor penetrará en la prenda quitando las arrugas.•
Para arrugas rebeldes, espere 4 ó 5 segundos antes de presionar de nuevo el •
botón de expulsión de vapor. La mayoría de las arrugas pueden quitarse con
tres expulsiones de vapor.
NOTA: Mantenga una distancia de 15 a 30 cm (6 a 12 pulgadas) de las telas
delicadas (fibras sintéticas, seda, terciopelo, etc.); de otro modo, la tela podría
dañarse.
Puede ser necesario presionar el botón de expulsión de vapor unas cuantas
veces para comenzar esta función. Para una calidad de vapor óptima, no
presione el botón de expulsión de vapor más de tres veces seguidas.
Cuando se alcance la temperatura seleccionada, la pantalla de cristal líquido •
(LCD) dejará de parpadear y se oirá un pitido.
Gire el dial de control de vapor variable a la posición . El vapor • variará
según el ajuste de temperatura. La plancha está lista para usarse.
cONSEJO: Cuando más rebelde sea la arruga, más vapor necesitará.
Expulsión de vaporBotón de expulsión de vapor Expulsión de vapor vertical
Page 14

26
27
Rociado frío
Prevención de goteo
La función de rociado frío se puede usar con cualquier ajuste de
temperatura. Utilice el rociador para humedecer las telas con el fin de
quitar las arrugas rebeldes.
Apunte el rociador hacia la prenda.•
Presione el botón de rociado frío. Es probable que necesite presionar el •
botón varias veces antes de que el agua salga con toda la presión.
Planche de la manera usual.•
No rocíe la seda.•
Botón de rociado frío
Rociado frío
Apagado automático inteligente
de 3 formas
La plancha Expert Finish de SINGER está equipada con una función de
apagado automático. El apagado automático inteligente apaga la plancha si se
ha quedado encendida sin supervisión.
NOTA: La función de apagado automático no es un interruptor de encendido y
apagado. Siempre desenchufe la plancha cuando no esté en uso.
Si la plancha permanece encendida y no se mueve durante 8 minutos de la •
posición vertical, se apagará automáticamente y emitirá un pitido.
Si la plancha quedó sobre la placa o acostada, se apagará después de 30 •
segundos y emitirá un pitido.
Cuando la plancha se prepara para apagarse, el símbolo de apagado •
automático comenzará a parpadear en la pantalla de cristal líquido (LCD)
y se oirá un pitido. La luz de fondo de la pantalla se apagará después de 5
segundos.
Para desactivar el apagado automático, mueva la plancha o sacúdala •
suavemente. La plancha tardará unos 60 segundos en alcanzar la
temperatura de la placa que tenía anteriormente.
La plancha no está diseñada para reducir el goteo y las salpicaduras mientras
se usa. El vapor se desactiva automáticamente cuando la temperatura de la
placa es demasiado baja como para generar vapor, evitando así el goteo y las
salpicaduras.
El sistema antigoteo puede generar un chasquido fuerte durante el uso. Esto es
normal e indica que el sistema está funcionando correctamente.
Sistema antisarro
El cartucho antisarro incorporado está diseñado para reducir la acumulación de
sustancias minerales en el agua que se genera durante el planchado con vapor,
y por lo tanto prolonga la vida útil de la plancha Classic Finish de SINGER. Sin
embargo, tenga en cuenta que el cartucho antisarro no detendrá totalmente el
proceso natural de la acumulación de sarro calcáreo.
lIMPIEZA Y AlMAcENAMIENTO
Autolimpieza
Esta función elimina los minerales sueltos y otras impurezas que se han
acumulado en la cámara de vapor. Se recomienda realizar esta función
al menos una vez al mes o con mayor frecuencia, dependiendo de la
dureza del agua utilizada.
ADVERTENcIA: LA FUNCIÓN DE AUTOLIMPIEZA EXPULSARÁ VAPOR Y AGUA
CALIENTE POR LA PLACA. TOME TODAS LAS PRECAUCIONES ADECUADAS Y
SOSTENGA LA PLANCHA LEJOS DEL CUERPO. EL VAPOR Y EL AGUA ESTÁN
MUY CALIENTES Y PUEDEN CAUSAR QUEMADURAS.
Llene el tanque de agua hasta la mitad como se describe en la sección •
“Llenado del tanque de agua”.
Coloque la plancha sobre el talón de apoyo en una superficie plana.•
Enchufe la plancha en un tomacorriente puesto a tierra.•
La pantalla de cristal líquido (LCD) mostrará todos los símbolos y luego se •
apagará, emitiendo un pitido.
Para apagar la plancha, mantenga presionado el botón de aumento de •
temperatura, encendido y apagado durante 3 segundos. La pantalla de
cristal líquido (LCD) se apagará y se oirá un pitido.
Seleccione la temperatura 9 utilizando los botones de aumento y reducción •
de temperatura.
Page 15

28
29
Cuando se alcance la temperatura seleccionada, la pantalla de cristal líquido •
(LCD) dejará de parpadear y se oirá un pitido.
Cómo limpiar la placa
Para apagar la plancha, mantenga presionado el botón de aumento de •
temperatura, encendido y apagado durante 3 segundos. La pantalla de
cristal líquido (LCD) se apagará y se oirá un pitido.
Desenchufe la plancha.•
Sostenga la plancha de manera horizontal sobre un fregadero, con la placa •
apuntando lejos del cuerpo.
ire y sostenga el dial de control de vapor variable y autolimpieza a la posición •
de eliminación de sarro .
Saldrán vapor y agua caliente por los agujeros de la placa, eliminando el •
sarro y los minerales que se han acumulado dentro de la cámara de vapor.
Mueva la plancha suavemente hacia atrás y hacia delante hasta que el •
tanque de agua esté vacío.
Cuando se complete la autolimpieza, gire el dial de control de vapor variable •
y autolimpieza a la posición .
NOTA: Antes de utilizar la plancha después de la autolimpieza, pruebe el
vapor y la expulsión de vapor sobre una toalla vieja o un trapo que se puedan
desechar.
En condiciones normales de uso, se puede formar una capa sobre la placa
a causa del almidón, el detergente o las fibras sintéticas quemadas. Estos
residuos se pueden quitar fácilmente utilizando un limpiador de calidad para
placas de planchas.
Cuando la plancha está fría y desenchufada, se puede limpiar con un paño
húmedo y secarse con otro paño.
NOTA: Nunca use limpiadores domésticos abrasivos ni otros agentes químicos
para limpiar la plancha. Nunca use objetos filosos o ásperos para quitar
depósitos de la placa.
RESOlucIóN DE PROBlEMAS
PROBLEMA CAUSA Y SOLUCIÓN
La plancha no está bien enchufada.•
La temperatura seleccionada es demasiado baja; ajuste la •
La plancha no calienta
No sale vapor o no sale
suficiente
temperatura en una posición más alta.
Se activó la función de apagado automático; mueva o •
sacuda la plancha suavemente para desactivarla.
El tanque de agua puede tener un nivel bajo o estar vacío; •
agregue agua.
La plancha no está ajustada para planchado con vapor; •
para un máximo de vapor, la temperatura debe estar en
MAX.
El vapor variable está ajustado a un nivel demasiado bajo; •
gire el dial de control de vapor variable a la posición .
Posición de eliminación de sarro
Vaciado y almacenamiento
Gire el dial de control de vapor variable y autolimpieza a la posición .•
Desenchufe la plancha.•
Coloque la plancha sobre el talón de apoyo y deje que se enfríe por •
completo.
Vacíe el agua de la plancha antes de guardarla.•
Para proteger la placa, guarde la plancha sobre el talón de apoyo.•
Esto es normal; siga las instrucciones de uso por •
La plancha emite
pequeñas partículas o
un olor
La plancha gotea agua
por los orificios de
vapor
primera vez.
Puede ser necesario cambiar el agua.•
Acumulación de depósitos minerales dentro de la cámara •
de vapor; vea la sección de autolimpieza.
Está demasiado llena; no llene el tanque de agua por •
encima de la línea MAX.
La plancha no está lo suficientemente caliente; ajuste la •
temperatura en MAX.
Uso excesivo de la expulsión de vapor; deje pasar más •
tiempo entre las expulsiones.
Si las sugerencias de esta sección no resuelven el problema, llame a SINGER al
1-800-4-SINGER o 1-800-474-6437.
Page 16

30
31
GARANTÍA LIMITADA DE SINGER® SEWING COMPANY
PLANCHA A VAPOR EXPERT FINISH
IMPORTANTE: CONSERVE ESTE DOCUMENTO Y GUÁRDELO EN UN LUGAR SEGURO
™
¿Qué cubre esta garantía limitada?
Se garantiza que la plancha a vapor Classic Finish
™
de SINGER está libre de
defectos de materiales y mano de obra.
¿Qué vigencia tiene esta garantía limitada?
La garantía del cableado y los componentes electrónicos de la PLANCHA tiene una
vigencia de dos (2) años a partir de la fecha de compra. La garantía de las otras
piezas de la PLANCHA tiene una vigencia de noventa (90) días a partir de la fecha
de compra.
¿Qué hará SINGER?
Si después de la inspección de SINGER, los componentes electrónicos o las otras
piezas de la PLANCHA muestran algún defecto durante el período de garantía
correspondiente, se repararán o reemplazarán a criterio de SINGER, sin cargo,
excepto por gastos relacionados con el envío de la PLANCHA a SINGER.
Si SINGER envía una PLANCHA de reemplazo, ésta tendrá el resto de la garantía de
la PLANCHA original.
¿Quién está cubierto por esta garantía limitada?
Esta garantía sólo podrá ser utilizada por el dueño (consumidor) original de la
PLANCHA y no podrá transferirse ni cederse.
¿Cuáles son las otras exclusiones o limitaciones?
El servicio según esta garantía sólo podrá obtenerse dentro de los 48 estados •
contiguos de los Estados Unidos, Alaska, Hawái y Canadá.
La PLANCHA tiene garantía sólo para uso doméstico (no comercial). Esta •
garantía no cubre defectos causados por abuso, falta de mantenimiento,
negligencia, incumplimiento de las instrucciones de cuidado, limpieza o de otro
tipo de la PLANCHA, uso impropio o acontecimientos fuera de nuestro control.
CUALQUIER GARANTÍA IMPLÍCITA APLICABLE A LA PLANCHA, INCLUSO •
PERO NO LIMITADO A LAS GARANTÍAS DE COMERCIALIZACIÓN O IDONEIDAD
PARA UN PROPÓSITO EN PARTICULAR, TENDRÁ UNA DURACIÓN LIMITADA
A LA DURACIÓN DE ESTA GARANTÍA ESCRITA. SINGER NO SE HACER
RESPONSABLE DE DAÑOS ECONÓMICOS CONSECUENTES QUE RESULTEN
DEL INCUMPLIMIENTO DE ESTA GARANTÍA O DE CUALQUIER GARANTÍA
IMPLÍCITA.
SINGER no autoriza a ninguna persona a crear obligaciones o responsabilidades •
con relación a la PLANCHA y cualquiera de sus piezas, que excedan aquellas
establecidas en esta garantía.
A través de esta garantía, SINGER renuncia a toda responsabilidad por daños o •
defectos que resulten del uso de piezas no fabricadas por SINGER o de servicio
no autorizado por SINGER para la reparación y el mantenimiento de la PLANCHA.
¿Las leyes estatales afectan mis derechos?
Esta garantía le brinda derechos legales específicos y también puede tener otros •
derechos que varían de un estado a otro.
Algunos estados no permiten limitaciones a la duración de una garantía implícita; •
por lo tanto, la limitación arriba mencionada podría no aplicarse en su caso.
Algunos estados no permiten la exclusión o limitación de daños incidentes •
o consecuentes; por lo tanto, es posible que la limitación o exclusión arriba
mencionada no se aplique en su caso.
¿Cómo obtengo servicio según esta garantía?
El servicio según esta garantía puede obtenerse devolviendo la PLANCHA con:
Este documento de garantía original y 1.
El comprobante de compra (por ejemplo, el recibo de compra) a:2.
SINGER Sewing Company
ATTN: Service Department
1224 Heil Quaker Boulevard
LaVergne, TN 37068
¿Qué debo hacer si tengo preguntas sobre la garantía?
Si tiene alguna pregunta con respecto a estas garantías, comuníquese con
nosotros a:
SINGER Sewing Company
1-800-4-SINGER
Correo electrónico: talktoUS@singerco.com
ATTN: Consumer Affairs (1-800-474-6437)
1224 Heil Quaker Boulevard
LaVergne, TN 37068
o a través del Área de Servicio al Cliente de nuestro sitio web: www.singerco.com
SINGER® ES UNA MARCA REGISTRADA DE SINGER COMPANY LIMITED.
Page 17

 Loading...