

Page 1
PartNumber/PiezaNº./PièceNº:358456-001
PrintedinBrazil/ImpresoenBrasil/
ImpriméauBrésil-Eng./Spa./Fren.
InstructionBook
5&10Stitches
5y10Puntos
5et10Points
Page 2
Congratulations
Astheownerofanewsewingmachine,youareabouttobeginanexcitingadventurein
creativity.Fromthemomentyoufirstuseyourmachine,youwillknowyouaresewingononeofthe
easiesttousesewingmachinesevermade.
Maywerecommendthat,beforeyoustarttouseyoursewingmachine,youdiscoverthemany
advantagesandtheeaseofoperationbygoingthroughthisinstructionbook,stepbystep,seated
atyourmachine.
Toensurethatyouarealwaysprovidedwiththemostmodernsewingcapabilities,the
manufacturerreservestherighttochangetheappearance,designoraccessoriesofthesewing
machinewhenconsiderednecessary.
isaregisteredtrademarkofTheSingerCompanyLimited
Copyright©2004SingerSewingMachineCompany
Allrightsreserved
Page 3
DearCustomer:
Quefairesi...
Werecommendthatforfuturereferenceyou
recordtheSerialNumberofyourSewing
Machineinthespaceprovided.
Sivouséprouvezquelquesdifficultéslors
del'utilisationdevotremachine,le
questionnaireci-dessousvouspermettra
dedéceleruneéventuellemauvaise
manoeuvre.
Sivotreaiguillenebougepas
Avez-vousbranchévotremachine?
Avez-vousmislamachinesoustensionà
l'aidedel'interrupteur?
Avez-vousbranchélerhéostat?
N'avez-vouspasdébrayélemécanisme
enappuyantsurlesymbolecanetteau
centreduvolant?
Lepointnesefaitpas
L'aiguilleest-elleépointée?
L'aiguilleest-elleentièrementenplace
danslepince-aiguille?
L'enfilagesupérieuretinférieursont-ils
corrects?
Lefildebobinecasse
Lamachineest-ellebienenfilée?
Lefil sedéroule-t'illibrement?
Avez-vousutilisél'étriercorrespondantau
diamètredelabobine?
Lagrosseurdel'aiguilleest-elleadaptéeà
lagrosseurdefilutilisé?
Lesupportdecanetteest-ilbienen
place?
N'ya-t'ilpasdebourresurlebarddela
canette?
Lefildecanettesecasse
Lacanetteest-ellecorrectementremplie?
Lacanetteest-ellecorrectementmiseen
placedanssonsupport?
L'aiguillecasse
L'aiguillen'est-ellepastordue?
Lagrosseurdel'aiguilleconvient-elleàla
naturedufissucousu?
Lessélecteurssont-ilsbienenplace?
Lesaccessoiresutilisésconviennent-ils
autravail?
Confectiondelacanettedifficile
Lefilsedéroule-t'ilfacilementdela
bobine?
Ledévidoirest-ilmisenplace?
Avez-voustenufermementlefilpour
commencerleremplissage?
Lefiln'estpasarrêtéparlafentedela
bobine?
L'enfilagedusupportdecanetteest-il
correct?
Lefilest-ilpassédanslafentedu
support?
Sautedepoint
Lamachineest-ellecorrectementenfilée?
Letissuest-ilbienmaintenuparlepied
presseur?
Lacatégorieet lagrosseurdel'aiguille
sont-ellesbienadaptées?
L'aiguillen'est-ellenitordue,niépointée?
Letissunesedéplacepassous
lepiedpresseur
Lepiedpresseurest-ilcorrectment
attachéenplace?
Lepiedpresseurest-ilbaissé?
Lesélecteurdelongueurdepointest-ilen
positionnormaledecouture?
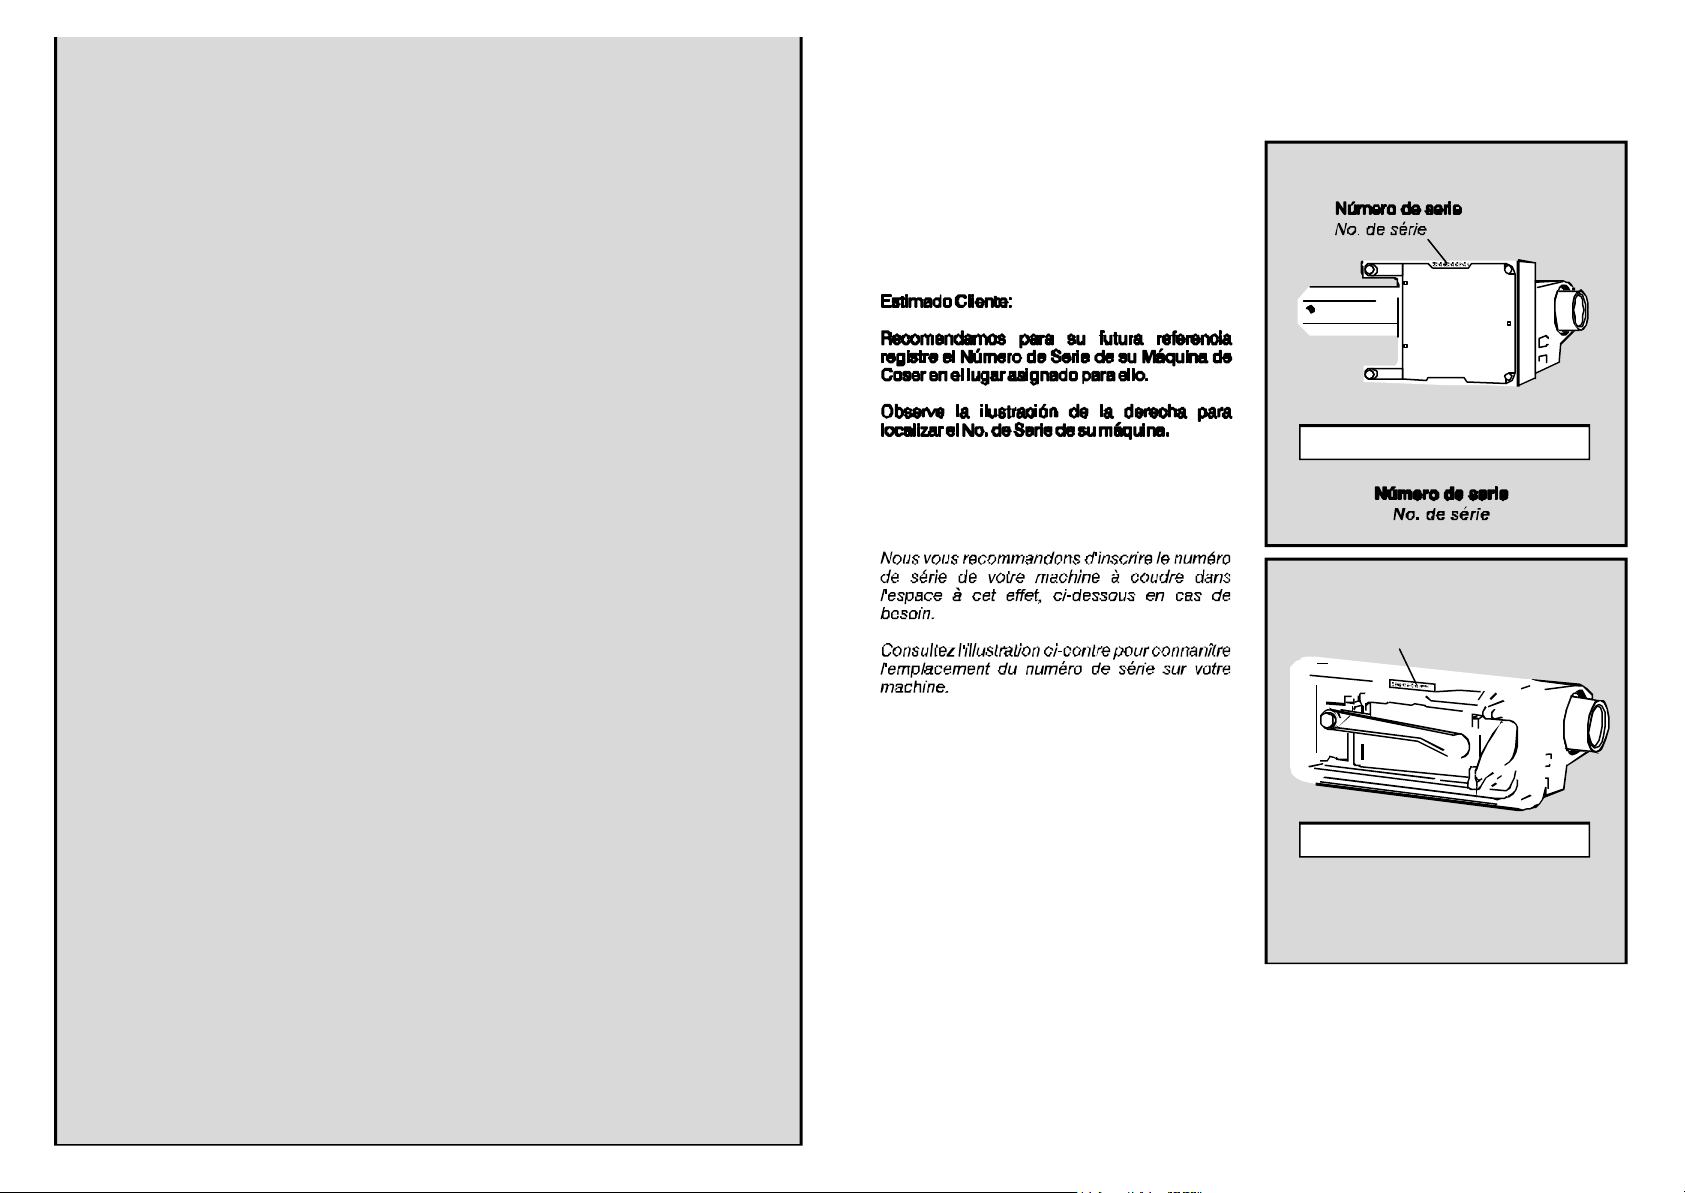
RefertoillustrationatrightforlocationofSerial
Numberonyourmachine.
SerialNo.
SerialNo.
SerialNo.
Númerodeserie
No.desérie
SerialNo.
Númerodeserie
No.desérie
Page 4
Tableofcontents
1.GettingToKnowYourMachine
PrincipalParts4
Accessories6
ImportantSafetyInstructions8
2.GettingReadyToSew
OperatingtheMachine10
ChoosingandChangingNeedles10
ChangingP12
Changing14
AttachingtheFeedCover14
RemovingandReplacingthe
ExtensionTable14
Fabric,ThreadandNeedleTable16
WindingaBobbin18
InsertingaBobbin20
ThreadingtheMachine22
RaisingtheBobbinThread26
3.StraightStitching
StitchWidthSelector28
NeedlePositionSelector28
StitchLengthSelector28
ReverseStitchButton28
AdjustingThreadTension30
SewingaSeam32
StartingaSeam34
Darning36
Quilting36
BasteStitching.............................................38
InsertingaZipper38
4.DecorativeStitching
StitchPatternSelector40
NeedlePositionSelector40
StitchWidthSelector40
AdjustingStitchLength42
NeedleThreadTension42
Zig-ZagStitch44
Corded SatinStitching.................................46
SatinStitchAppliqué.&Blindstitch
Appliqué.......................................................46
Blindstitch48
LadderSeams50
MultiZig-Zag52
StretchBlindhem54
5.Flexi-StitchPatterns
StitchPatternSelector56
StitchWidthSelector58
NeedlePositionSelector58
BalancingFlexi-Stitches58
StraightStretchStitch60
Ric-RacStitch60
SlantOveredgeStitch62
HoneycombStitch64
OveredgedSeams66
6.FourStepButtonhole
7.Free-ArmSewing
8.TwinNeedleSewing
9.CaringForYourMachine
RemovingandReplacingthe
BobbinCase76
ChangingtheLightBulb78
CleaningtheMachine80
LubricatingtheMachine82
AdditionalAccessories
AttachingFingerGuard84
OptionalSew&SergeFoot86
AttachingaButton
PerformanceChecklist
resserFeet
theNeedlePlate
Stitch
.88
10
28
40
56
68
72
74
76
84
90
4
Page 5
Performancechecklist
Whensewingdifficultiesoccur,lookback
throughthismanualtomakesureyouare
correctlyfollowingtheinstructions.Ifyou
stillhaveaproblem,theremindersbelow
mayhelpyoutocorrectit.
Needledoesnotmove
Ismachineconnectedtoelectrical
supply?
Isthepowerandlightswitchon?
Iscontrollerconnected?
Isthehandwheelengagedforbobbin
winding?
Needlemovesbutstitchis
notformed
Isneedledefective?
Isneedlefullyinsertedintoneedleclamp?
Arebobbinandneedlecorrectly
threaded?
Isbobbincorrectlyinsertedintobobbin
case?
Needlebreaks
Isneedlestraightandsharp?
Isneedlecorrectsize?
Isneedlefullyinsertedintoneedleclam p?
Arecontrolsproperlyset?
Areaccessoriescorrectforapplication?
Bobbinwindingdifficulties
Isthreadunwindingfreelyfromspool?
Isbobbinwinderengaged?
Isthreadendsecurelyheldatstartof
wind?
Isthreadhangingupontheslitonthe
threadspool?
Upperthreadbreaks
Ismachineproperlythreaded?
Isthreadfreelyunwindingfromspool?
Isproperspoolcapbeingused?
Isneedlecorrectsizeforthread?
Isupperthreadtensiontootight?
Isbobbincaseproperlyinserted?
Isbobbinrimfreeofnicks?
Lowerthreadbreaks
Isbobbincorrectlywound?
Isbobbincorrectlyinsertedintobobbin
case?
Isbobbincasecorrectlythreaded?
Isthreadhangingupontheslitonthe
threadspool?
Skippedstitches
Ismachineproperlythreaded?
Isfabricfirmlyhelddown?
Isneedlecorrectstyleandsize?
Isneedlestraightandsharp?
Fabricdoesnotmove
properlyunderpresserfoot
Ispresserfootcorrectlyattachedto
machine?
Ispresserfootlowered?
Isstitchlengthcorrectlyset?
Tabledesmatières
1.Faitesconnaissanceavecvotremachine
Piècesprincipales4
Accessoires7
Important9
2.Pourbiencoudre
Fonctionnementdelamachine11
Choisiretchangerl’aiguille11
Commentchangerlespiedpresseursà
enclenchementdirect13
Commentchangerlespiedspresseurs13
Commentchangerlaplaqueàaiguille15
Miseenplaceducouvtegriffe15
Pourdégagerlebras-libre15
Tableaudesfils,aiguilles,tissus17
Remplissagedelacanette19
Miseenplacedelacanette21
Enfilagedelamachine23
Remonterlefildecanette27
3.Lepointdroit
Sèlecteurdelargeurdepoint29
Sèlecteurdepositiond’aiguille29
Sèlecteurdelongueurdepoint29
Marchearrière29
Règlagedelatension31
Assemblerunecouture33
Débuterunecouture35
Repriser37
Faufil39
Poseunefermetureàglissière39
4.CoutureDécoratif
Sélecteurdepoint41
Sélecteurdepositiond’aiguille41
Sèlecteurdelargeurdepoint41
Règlagedelalongueurdepoint43
Tensiondufild’aiguille43
Pointdezig-zag45
BourdonGalonné47
AppliquéBourdonetAppliquéInvisible47
Pointinvisible49
Coutureséchelles51
Zig-zagmultiple53
Pointd’ourletelastique55
5.Pointsextensibles
Sélecteurdepoint57
Réglagedelongueur57
Sélecteurdelargeurdepoint59
Sélecteurdepositiond’aiguille59
Equilibragedespoints59
Point droitextensible61
Pointric-rac61
Surjet63
Pointd’abeille65
Patchworkmatelassé65
Couturessurjetées67
6.Boutonniére4temps
7.Coutureaveclebras-libre
8.CoutureàI’aiguillejumelée
9.Nettoyagedelamachine
Retireretremplacerlesupportde
canette77
ChangerI’ampoule79
Nettoyerlamachine81
Lubrificationdelamachine83
Accessoiresfacultatifs
PiedCoud&RogneFacultatif87
Coudreunbouton
Quefairesi
11
29
41
57
69
73
75
77
85
89
92
4
ForEuropeanTerritories:
ThisSingerSewingMachinewastested
accordingtoEuropeanstandardsandmeets
therequirementsregardingelectrical
safetyradiointerferenceand
electromagneticimmunity.
Theconformityisdocumentedwiththe
mark
PourlesTerritoiresEuropéens:
CetteMachineàCoudreSingeraété
controléeconformémentauxnormes
Européenesetrépondauxexigences
relativesàlasécuritéélectrique,età
laprotectioncontrelesondesradioet
electromagnétiques.
Cetteconformitéestattestéepar
l'appositiondulabel
Page 6
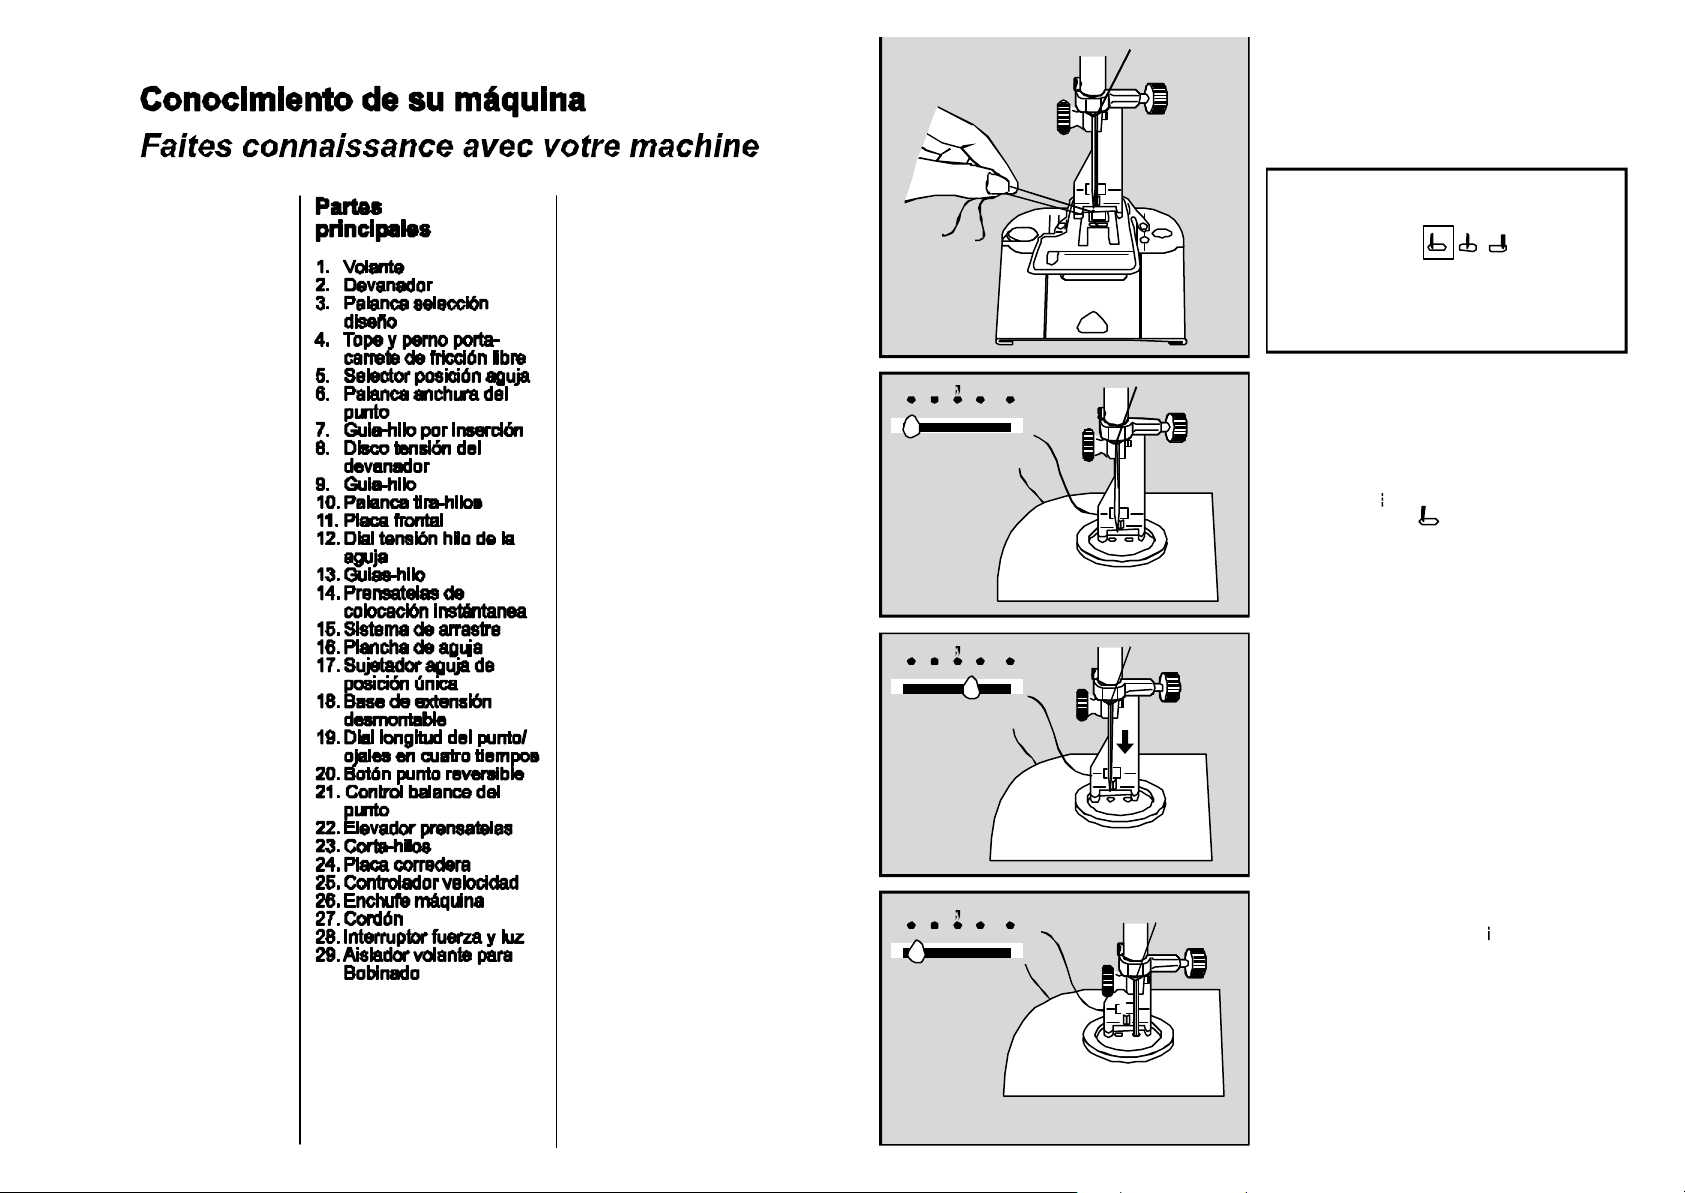
Gettingtoknowyourmachine
Principal
1
Coudreunbouton
parts
1.Handwheel
2.Bobbinwinder
3.Patternselectorlever
4.
Horizontalspoolpinand
holder
5.Needlepositionselector
6.Stitchwidthlever
7.
Snap-inthreadguide
8.
Bobbinwindertension
disc
9.
Threadguide
10.
Takeuplever
11.Faceplate
12.Needlethreadtension
dial
13.Threadguides
14.
Snaponpresserfoot
15.Feedsystem
16.Needleplate
17.
One-wayneedleclamp
18.Removableextension
table
19.Stitchlengthdial/fourstepbuttonhole
20.Pushbuttonreverse
21.Stitchbalancecontrol
22.Presserfootlifter
23.Threadcutter
24.
Slideplate
25.Footcontrol
26.Machineplug
27.
Electricallead
28.
Powerandlightswitch
29.Bobbinwindingindent
Pièces
principales
1.Levolant
2.Devidoir
3.Sélecteurdepoint
4.Porte-bobinehorizontal
etétrier
5.Sélecteurdeposition
d’aiguille
6.Selecteurdelargeurde
point
7.Guide-filàfente
8.Tensiondudevidoir
9.Guide-fil
10.Releveurdefil
11.Plaquedeface
12.Bloctension
13.Guides-fils
14.Piedpresseurà
enclenchementdirect
15.Griffesd’entrainement
16.Plaqueàaiguille
17.Pinceaiguilleàsens
unique
18.Tabletteamovible
19.Sélecteurdelongueur
depoint/boutonnière4
temps
20.Boutondemarche
arrière
21.Equilibragedespoints
extensibles
22.Releveurdupied
presseur
23.Coupefil
24.Plaqueglissière
25.Rhéostat
26.Fichedebranchement
27.Prisedebranchement
électrique
28.Interrupteurmoteur-
-Lampe
29.Debrayage
Vouspouvezcoudrerapidementtousles
boutonsplatsaveclepointdezig-zag.Unpied
spécial(H)estdisponibledansvotremagasin
Réglagesrecommandés
Sélecteurdepoint:Pointzig-zag(B)
Positiond’aiguille:
Largeurdepoint:enfonctiondubouton
Piedpresseur:piedbouton(H)
Plaqueàaiguille:universelle(A)
Plaqueàrepriser(F)
1
2
3
4
5
1
1
2
3
4
5
Note:
1.Positionnezlesélecteurdelargeurdepointsur
pointdroit()etleselecteurd'aiguilleen
positiongauche().Positionnezlebouton
souslepiedpresseuretdescendezl'aiguille
dansletrouduboutonàgauche.Baissezle
piedpresseur.Alamain,tournezlevolantvers
vouspoursortirl'aiguilledubouton.
2.Réglezlesélecteurdelargeurdepointpour
assurerl'aiguilleau-dessusdutroudroitdu
bouton.Pourfixerlebouton,faites5ou6
pointsdezig-zagenterminantl'aiguilleà
gauche.
.
Avantdecommenceràcoudreles
boutons,remontezlefildecanetteà
traversletroudelaplaqueàrepriser.
2
1
2
3
4
5
3.Pourarrêterlacouture,positionnezle
sélecteurdelargeursur()etpiquez3à4
pointssurplace.Retirezletravailentirantvers
l'arrière.Arrêtezetcoupezlesfils.
3
Page 7
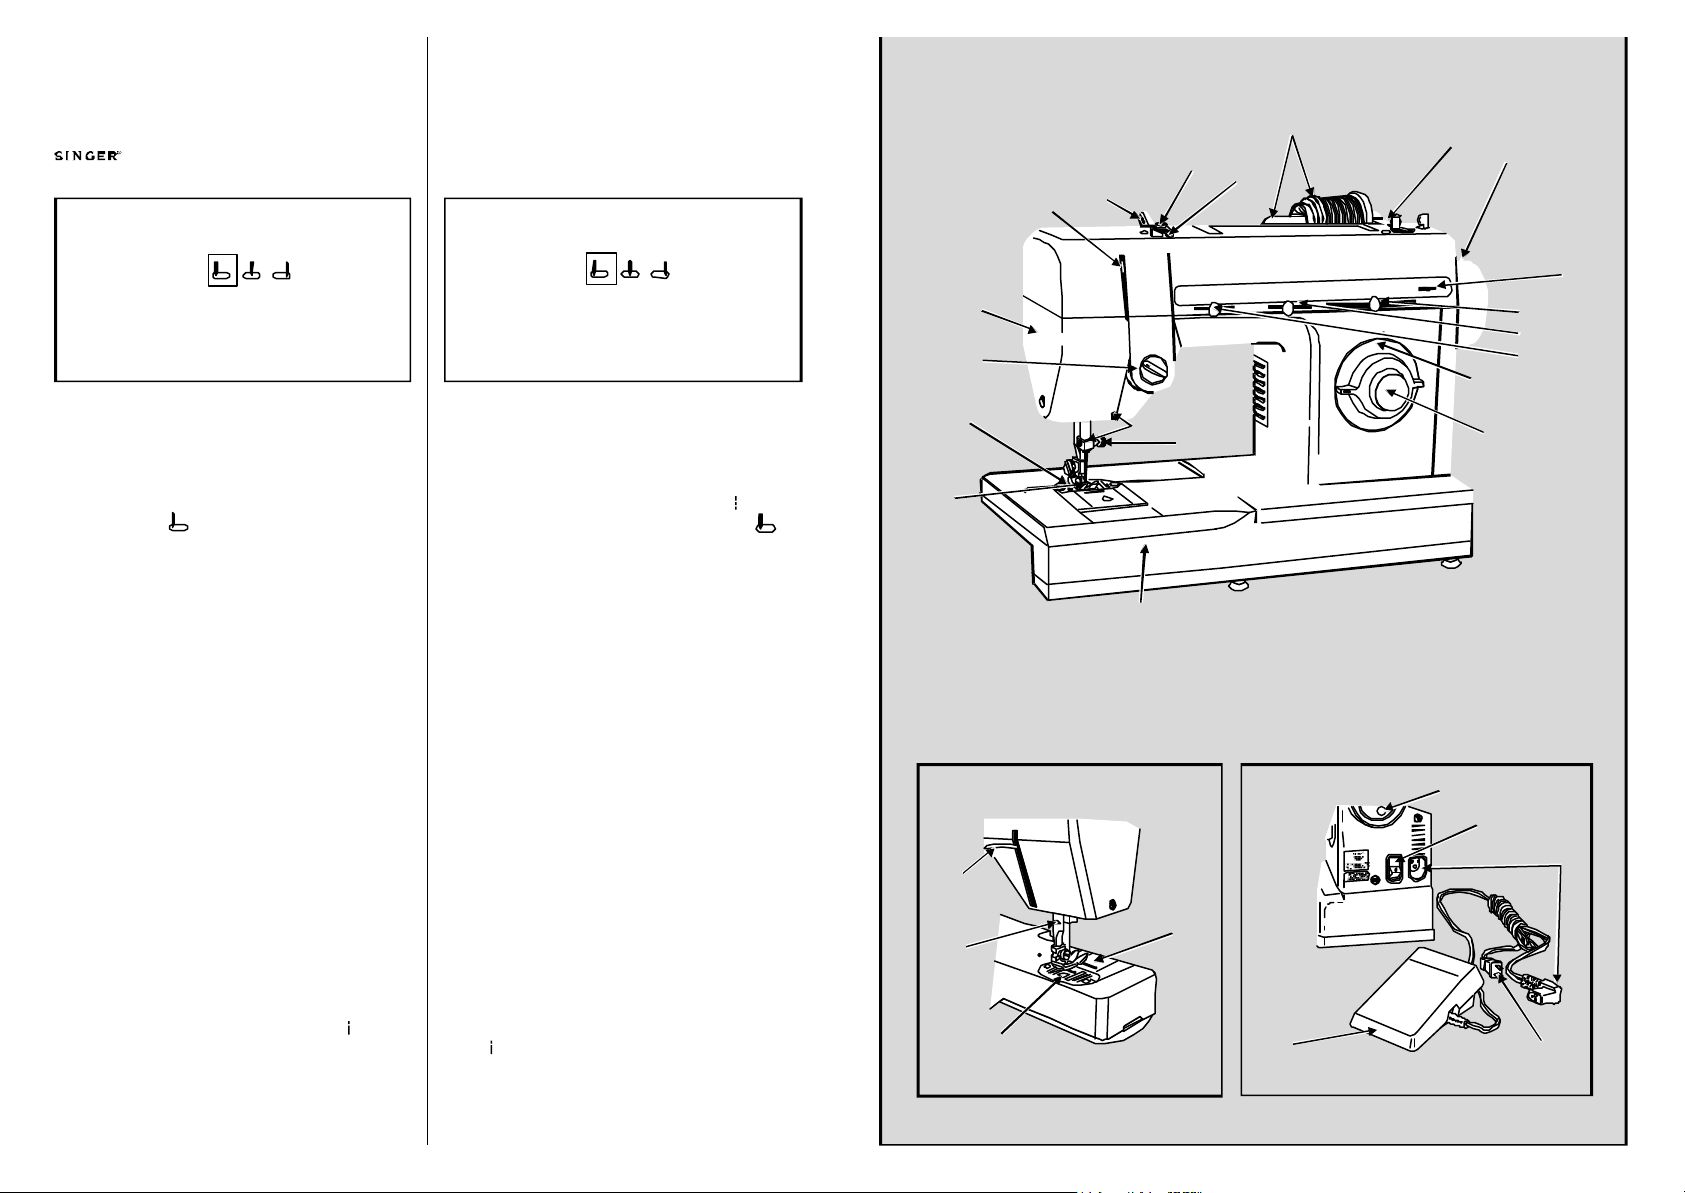
Attachingabutton
Flatbuttonscanbesewnonquicklyandeasily
Pegadodebotones
usingtheplainzig-zagstitch.Aspecialbutton
sewingfoot(H),maybepurchasedfromyour
retailer.
Recommendedsettings
StitchSelection:Zig-zagstitch(B)
Losbotonesplanospuedencosersecon
rapidezyfacilidad,utilizandoelpuntodezigzagplano.Elprensatelasespecialparacoser
botones(H)puedeadquirirloensucentrode
costura.
Posicionesrecomendadas
Selecciónpunto:Puntozig-zag(B)
10
4
8
9
2
1
7
NeedlePosition:
StitchWidth:TosuitButton
Foot:ButtonSewing(H)
NeedlePlate:GeneralPurpose(A)
AttachFeedCover(F)
Beforeyoucanattachabutton,the
Note:
bobbinthreadmustbebroughtup
throughtheholeinthefeedcover.
1.Setstitchwidthat(),andneedleposition
selectorat().Positionbuttonunderfoot
andlowertheneedleintothecenteroftheleft
hole.Lowerthefoot.Turnhandwheeltoward
you untilneedlerisesoutofbuttonandis
abovethefoot.
2.Movestitchwidthselectoruntilneedleisover
theotherholeinthebutton.Then,whenyou
begintostitch,theneedleshouldenterinto
therightholeofthebutton.Takesixormore
zig-zagstitchestoattachbuttonandfinish
withtheneedleontheleftside.
Posiciónaguja:
Anchurapunto:Apropiadaalbotón
Prensatelas:Paracoserbotones(H)
Planchaaguja:Usogeneral(A)
ColocarPlanchaCubreArrastre(F)
Antesdepegarunbotón,elhilodela
Nota:
bobinadebesacarseporelagujerode
laplanchacubrearrastre.
1.Coloqueelanchodelpuntoen()yel
selectordeposicióndeagujaen().
Colocarelbotóndebajodelprensatelasy
bajarlaagujadentrodelcentrodelagujero
izquierdo.Bajarelprensatelas.Gireelvolante
haciaVd.hastaquelaagujasalgadelbotóny
estéporencimadelprensatelas.
2.Muevaelselectordeanchurahastaquela
agujaestésobreelotroagujerodelbotón.
Entonces,cuandoempieceacoser,laaguja
deberíaentrardentrodelagujeroderechodel
botón.Deseisomáspuntosenzig-zagpara
pegarelbotónyacabeconlaagujaenellado
izquierdo.
14
22
15
11
12
13
18
17
21
3
5
6
19
20
29
28
27
3.Tosecurestitching,adjustwidthto()and
takethreeorfourstitches.Removework,draw
threadstounderside,tieandtrim.
3.Paraassegurarelpunto,ajustelaanchuraa
(),ydetresocuatropuntadas.Quitela
labor,lleveloshiloshacialaparteposterior,
anúdelosycorte.
23
16
24
25
26
P/N362095
Page 8
PiedCoud&
Accessories
Thefollowingaccessoriesfurnishedwithyour
sewingmachinearedesignedtosimplifyyour
sewingandincreasetheversatilityofyour
machine.
Theletterinacircleadjacenttotheillustrated
partisreproducedonthepartitselftohelpyou
selectthecorrectattachmentforthetypeof
workyouaredoing.
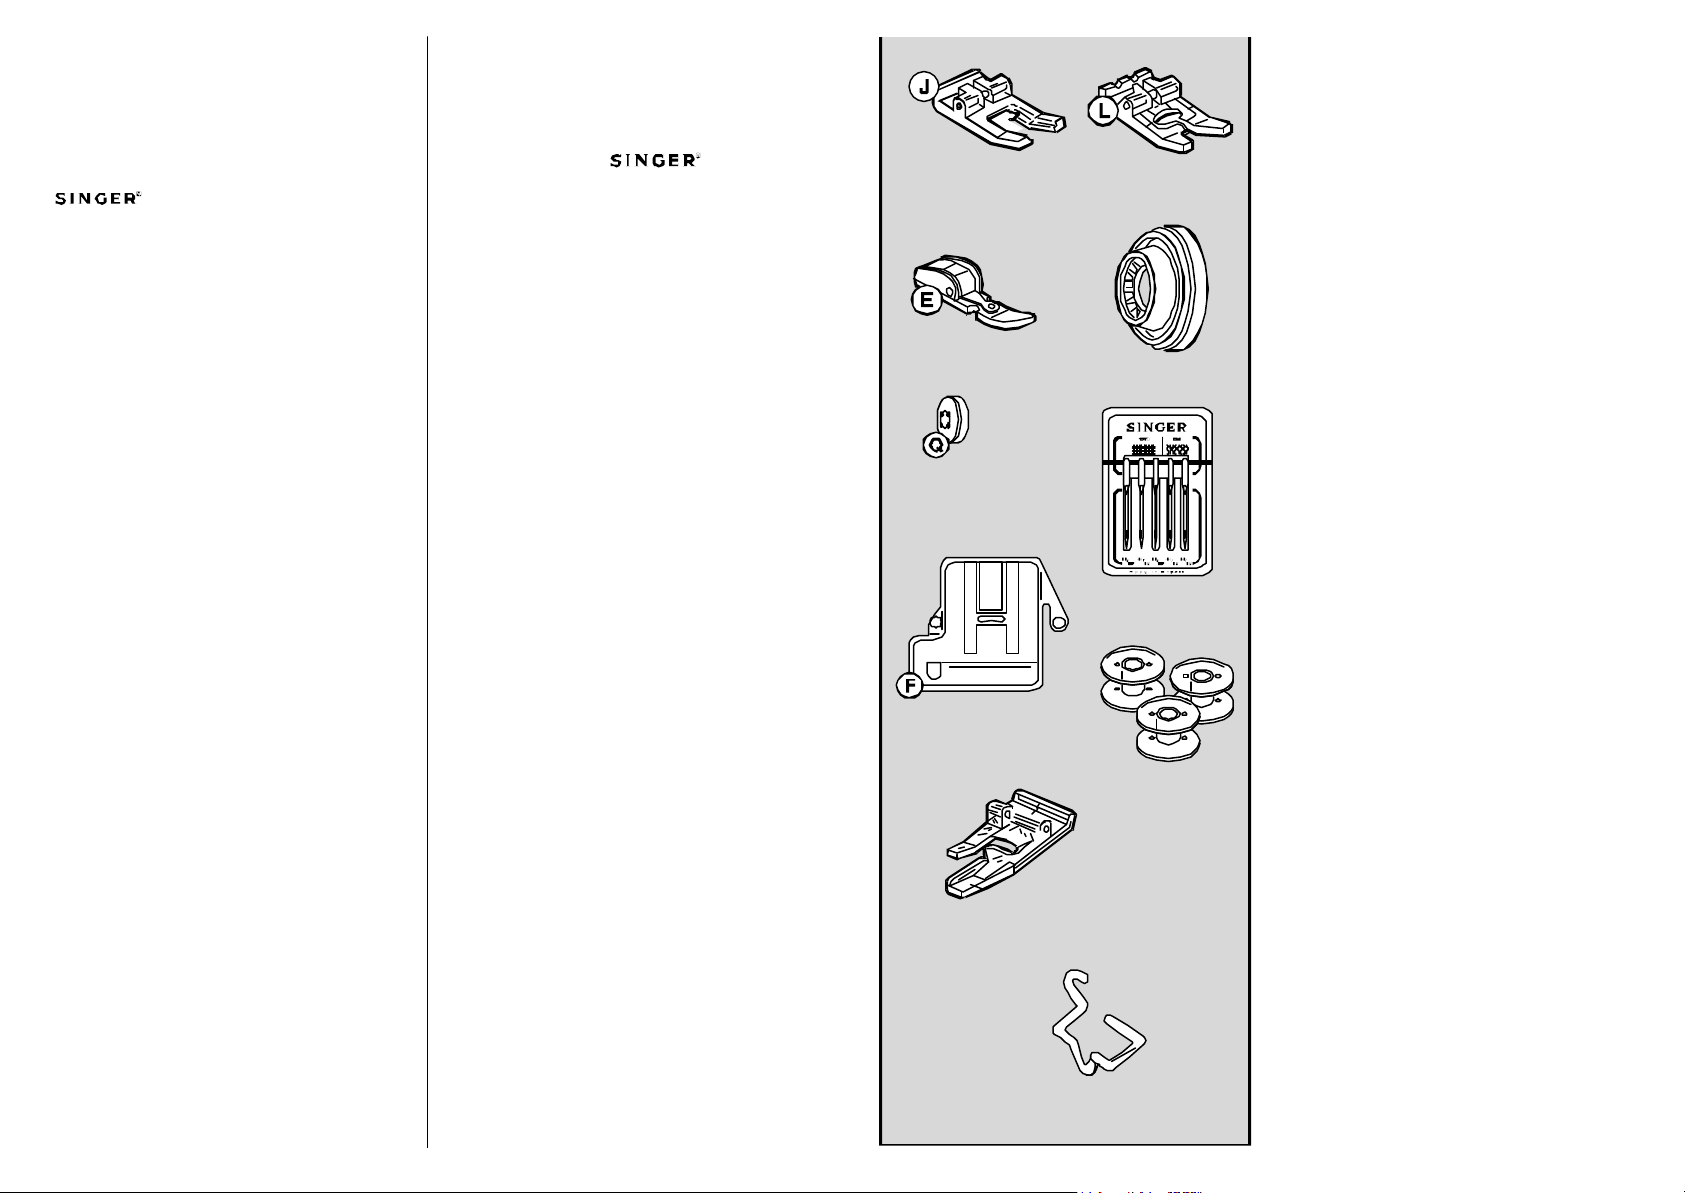
1.Specialpurposepresserfoot(J)
2.Buttonholepresserfoot(L)
3.Zipperfoot(E)
4.Spoolpinholder(large)
5.Spoolpinholder(small)(Q)
6.Needlepack
7.Feedcover(F)
8.Bobbins(3units)
9.Blindstitchhempresserfoot
10.Fingerguard
RogneFacultatif
Lecouteaulatéralestunaccessoirefacultatif
quipermetdecouperl’excèsdetussutouten
cousant.Vouspouvezprocurercette
accessoirechezvotredétaillant.
Préparationdelamachine
!
Sélectionnezl’undespointssuivant:ZigZag
Obliqueoupointsurjet.
!
Réglezlalargeuretlalongueurdepointselon
lesindicationsdevotremanueldemachineá
coudre.Lorsquelecounteaulatéralestfixé,il
peutêtrenécessaired’ajusterlalargeurdu
point.
Installationducouteau
Fixézlecouteauenvousassurantquele“bras”
ducouteautientautourdelavisàmaindela
l’aiguille.Le“bras”estcettelonguepiècede
métalsurlecounteau,quibou gedehauten
bas.
Serrezlavisàmain,pourmaintenirlecouteau.
Tournezdoucementlevolantàmain;L’aiguille
doitpasserpardessusledoigtàpointdu
couteau.Sil’aiguilletouchelemétaldudoigt,à
point,vousdevezélargirlepoint.Sil’aiguille
touchelesbordsenmétalvousdevezréduirela
largeurdepoint.N’utilisezjamaisunpointdroit.
Moded’emploi
1.Coupezuneencochede1pouncepar1dans
lebordsupérieirdevotretissu.Celaes
nécessairecarlalameducouteaucoupeavant
quel’aiguillecouseetc’estmeilleurpourla
machinedegarderdutissusousl’aiguilleen
cousant.
2.PlacezletissuDESSUSlapremièreplaque
demétaletSOUSlasecondeplaquedemétal.
Silecouteaunecoupepas,c’estgénéralement
parcequeletissun’apasétéplacéDESSUSla
premièreplaquedemétal.
3.Piquezlentementetguidezdoucementle
tissu.Lecouteaufonctionnelemieuxlorsque
qu’iln’yapasplusde1pounceenvirondetissu
àcouper.
Page 9
Accessoires
OptionalSew&
Recorta-lados
SergeFoot
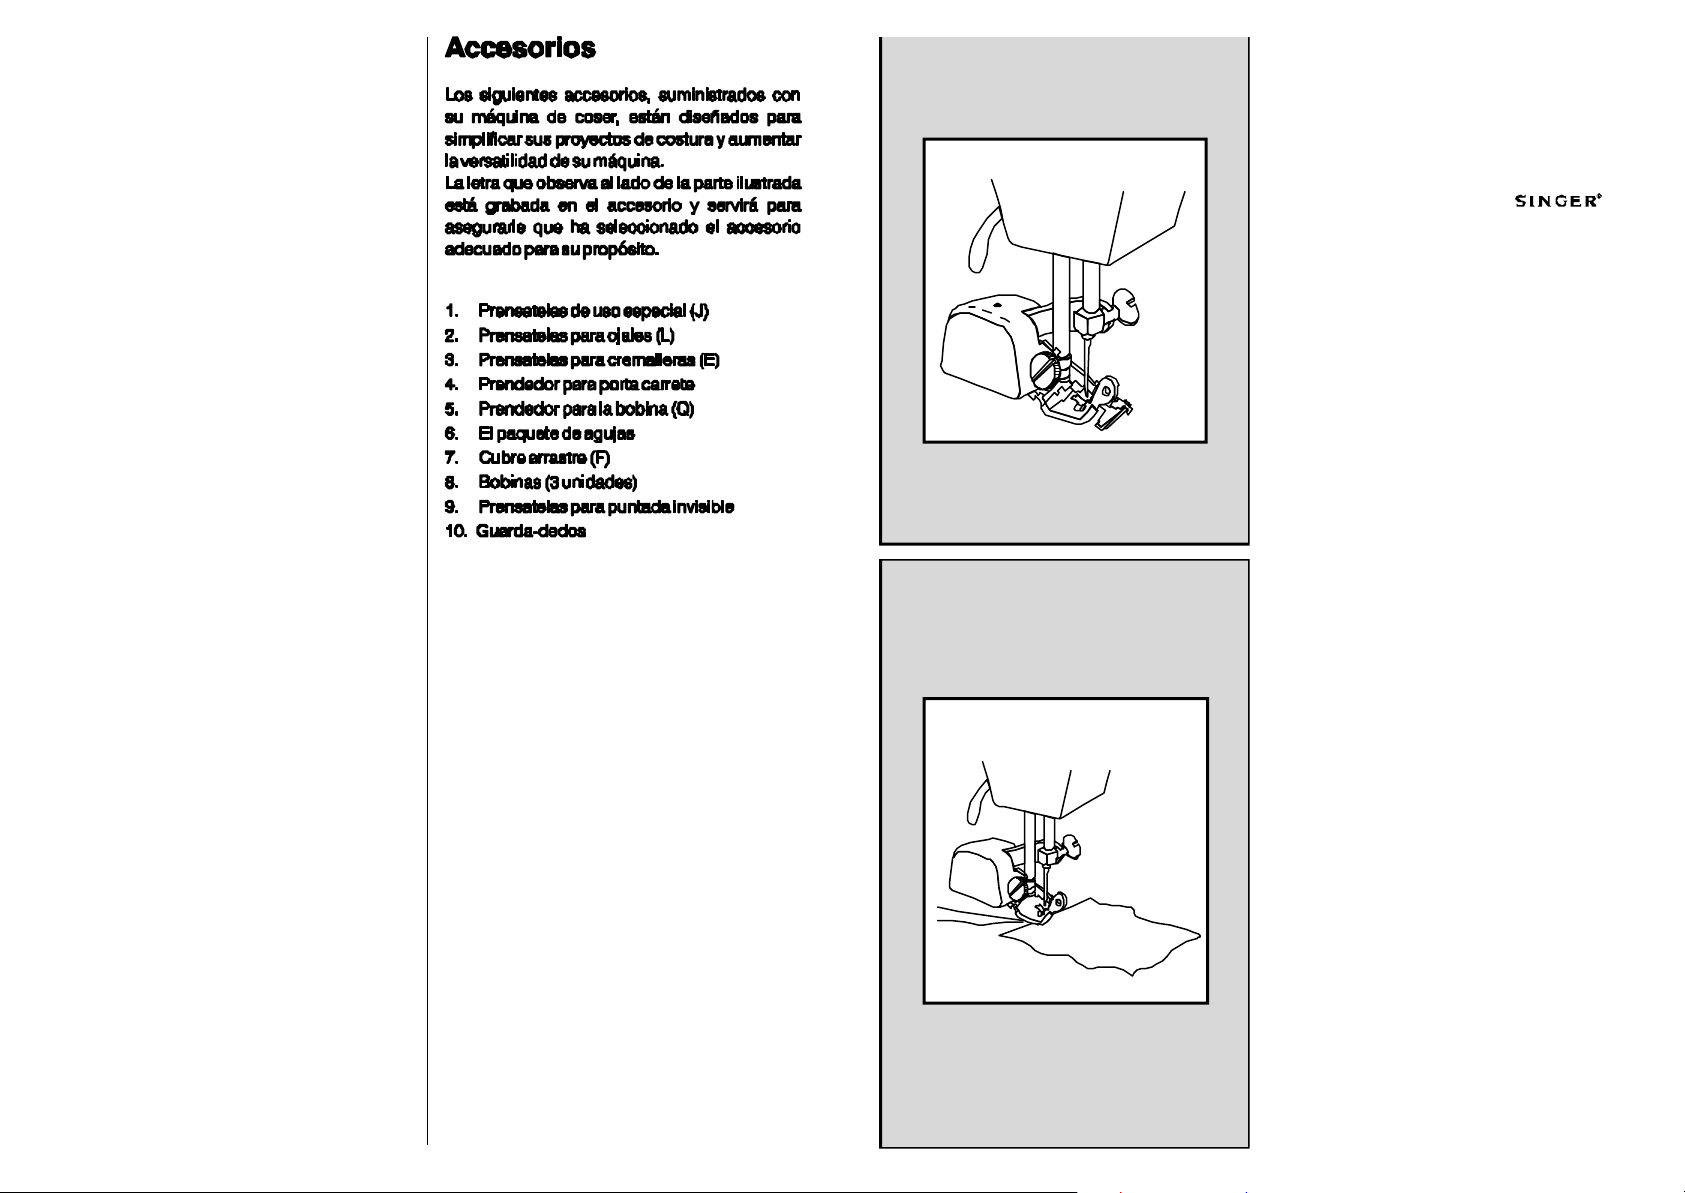
TheSideCutterisanoptionalattachmentthat
willtrimtheexcessmaterialwhilesewing.This
accessorymaybepurchasedfromyour
retailer.
MachinePreparation:
!
Selectoneofthefollowingstitches:Zigzag,
SlantOveredgeorOveredge.
!
Setwidthandlengthaccordingtoyoursewing
machinemanual.Afterthesidecutteris
attached,thestitchwidthmayneedtobe
adjusted.
AttachingtheCutter
AttachtheCutter,makingsurethecutter’s“arm”
fitsaroundtheneedlebarthumbscrew.The
“arm”isthelongmetalpieceontheCutter,
whichmovesupanddown.
Thigthenthethumbscrew,securingtheCutter.
Slowlyturnthehandwheel;theneedleshould
gooverthestitchfingerontheCutter.Ifthe
needleishittingthemetalstitchfingerthen
widenthestitchwidth.Iftheneedleishittingthe
metalsidesthenreducethestitchwidth.Never
useastraightstitch.
SewingInstructions
1.Cuta1x1-inchnotchattopedgeofyour
fabric.Thisisnecessarybecausethecutter’s
bladecutspriortotheneedlestitchinganditis
bestforthemachinetohavematerialunderthe
needlewhilesewing.
2.PlacethematerialOVERthefirstmetal
platformandthenUNDERtheSecondmetal
platform.IftheCutterisnotcutting,itisusually
duetothematerialnotbeingplacedOVERthe
firstplatform.
3.Sewslowlyandgentlyguidethematerial.The
Cutterworksbestifapproximatelynomorethan
1inchisbeingtrimmedaway.
Elrecorta-ladosesunaccesorioquerecorta
elexcessodematerialmientrascose.Los
accesoriosadicionalespuedeadquirirlosen
sucentrodecostura
.
Preparacióndelamáquina
!
Seleccioneunadalassiguientespuntadas:
ZigZag,SobrepuestaLateraloSobrepuesta.
!
Seleccionelapuntadadeacuerdoal
manualdesumáquina.Despuésdequeel
recorta-ladosestépuesto,elanchodela
puntadadebeserajustado.
Colocandoelrecorta-lados
Coloqueelrecorta-ladosasegurándosede
queel“brazo”estéajustadoalrededordel
tornillodelabarradelasagujas.El“brazo”
eslapiezalargademetalenlacortadorael
cualsemuevedearribaparaabajo.
Aprieteeltornilloasegurandoelcortador.
Despaciovolteelarueda/volante;laaguja
debeirsobrelauñetadepuntadadel
cortador.Silaagujaestápegandolealmetal
delauñetaentoncescambieelanchola
puntada.Silaagujaestápegandolealos
lados,entoncesdisminuyaelanchodela
puntada.Nuncausepuntadarecta.
Instruccionesparacoser
1.Corteunamuescade1x1delapartede
arribadelatela.Estoesnecesarioporquela
cuchilladelrecorta-ladoscortaantesdeque
laagujacosayesmejorquelamáquina
tengateladebajodelaagujamientrascose.
2.PongalatelaSOBRElaprimeraplataforma
demetalyluegoDEBAJOdelasegunda
plataforma.Sielrecorta-ladosnoestá
cortandosedebealquelatelanoestapuesta
SOBRElaprimeraplataforma.
3.Cosadespacioyguiélatelasuavemente.
Elrecorta-ladostrabajamejorsisólose
recorta1pulgadaalavez.
446492
507836
5
507664
7
3
313117
9
1
356630
10
6
116863
2
161927
4
179967
353364
172336
Lesaccessoiressuivantssontfournisavecvotre
machinepourfaciliterlacoutureetaugmenter
lespossibilitésdevotremachine.
Lalettrequevousvoyezillustréesetrouvesurla
pièceelle-mêmeetvouspermetdesélectionner
rapidementl’accessoirecorrespondantàvos
besoins.
1.Piedbourdon(J)
2.Piedboutonnière(L)
3.Piedfermetureglissière(E)
4
.Grandétrier
5.Petitétrier(Q)
6.Assortimentd’aiguilles
7.Couvre-griffes(F)
8.Bobines(3unités)
9.Piedpointinvisible
10.Protègedoigt
8
Page 10
Accessoires
ImportantSafetyInstructions
HOWTOREDUCERISKOFFIRE,ELECTRICSHOCKORPERSONALDAMAGE.
•Thismachinehasbeendesignedforcommercial,schoolanddomesticuse.
•ThismachineshouldneverbepluggedinwhileNOTinuse.Alwaysunplugthe
machinefromtheelectricoutletbeforecleaningorafterusingit.
•Beforeswitchingonthemachine,makesurethattheelectricvoltageofthesocket
outletisthesameastheratedvoltage.
•UsethismachineonlyforitsintendeduseasdescribedinthisInstructionBook.Useonly
attachmentsspecificallyrecommendedforthemachine.
•Disconnectthepower-lineplugfromthesocketoutletorswitchthemachineoffwhen
makinganyadjustmentsintheneedlearea,suchasthreadingneedle,changingneedle,
changingtheneedleplate,changingpresserfootorremovingbobbincase,etc.
•Alwaysunplugthemachinefromtheelectricaloutletbeforeremovingcovers,lubricatingor
whenmakinganyotheradjustmentsmentionedinthisInstructionBook.
•Donotattempttoadjustthe motorbelt.ContactyournearestauthorizedSINGERService
Centershouldanyadjustmentberequired.
•Whensewing,keepfingersawayfromallmovingparts.Specialcareisrequiredtoavoid
accidentswithneedlewhileinmovement.
•Donotpullorpushfabricexcessivelywhilestitching.Itmaydeflecttheneedlecausingitto
break.
•Neveroperatethemachinewithanyairopeningsblocked.Keepventilationopeningsofthe
machineandfootcontrolpedalfreefromtheaccumulationoflintanddust.
•Donotoperatewhereaerosol(spray)productsarebeingusedorwhereoxygenisbeing
administered.
•Theapplianceisnotintendedforusebyyoungchildrenorinfirmedpersonswithout
supervision.
•Ifthesupplycordisdamaged,itmustbereplacedbythemanufactureroritsserviceagentor
asimilarlyqualifiedpersoninordertoavoidapotentialhazard.
facultatifs
1
2
4
Vouspouvezvousprocurerlesaccessoires
complémentairesdansvotremagasinSINGER.
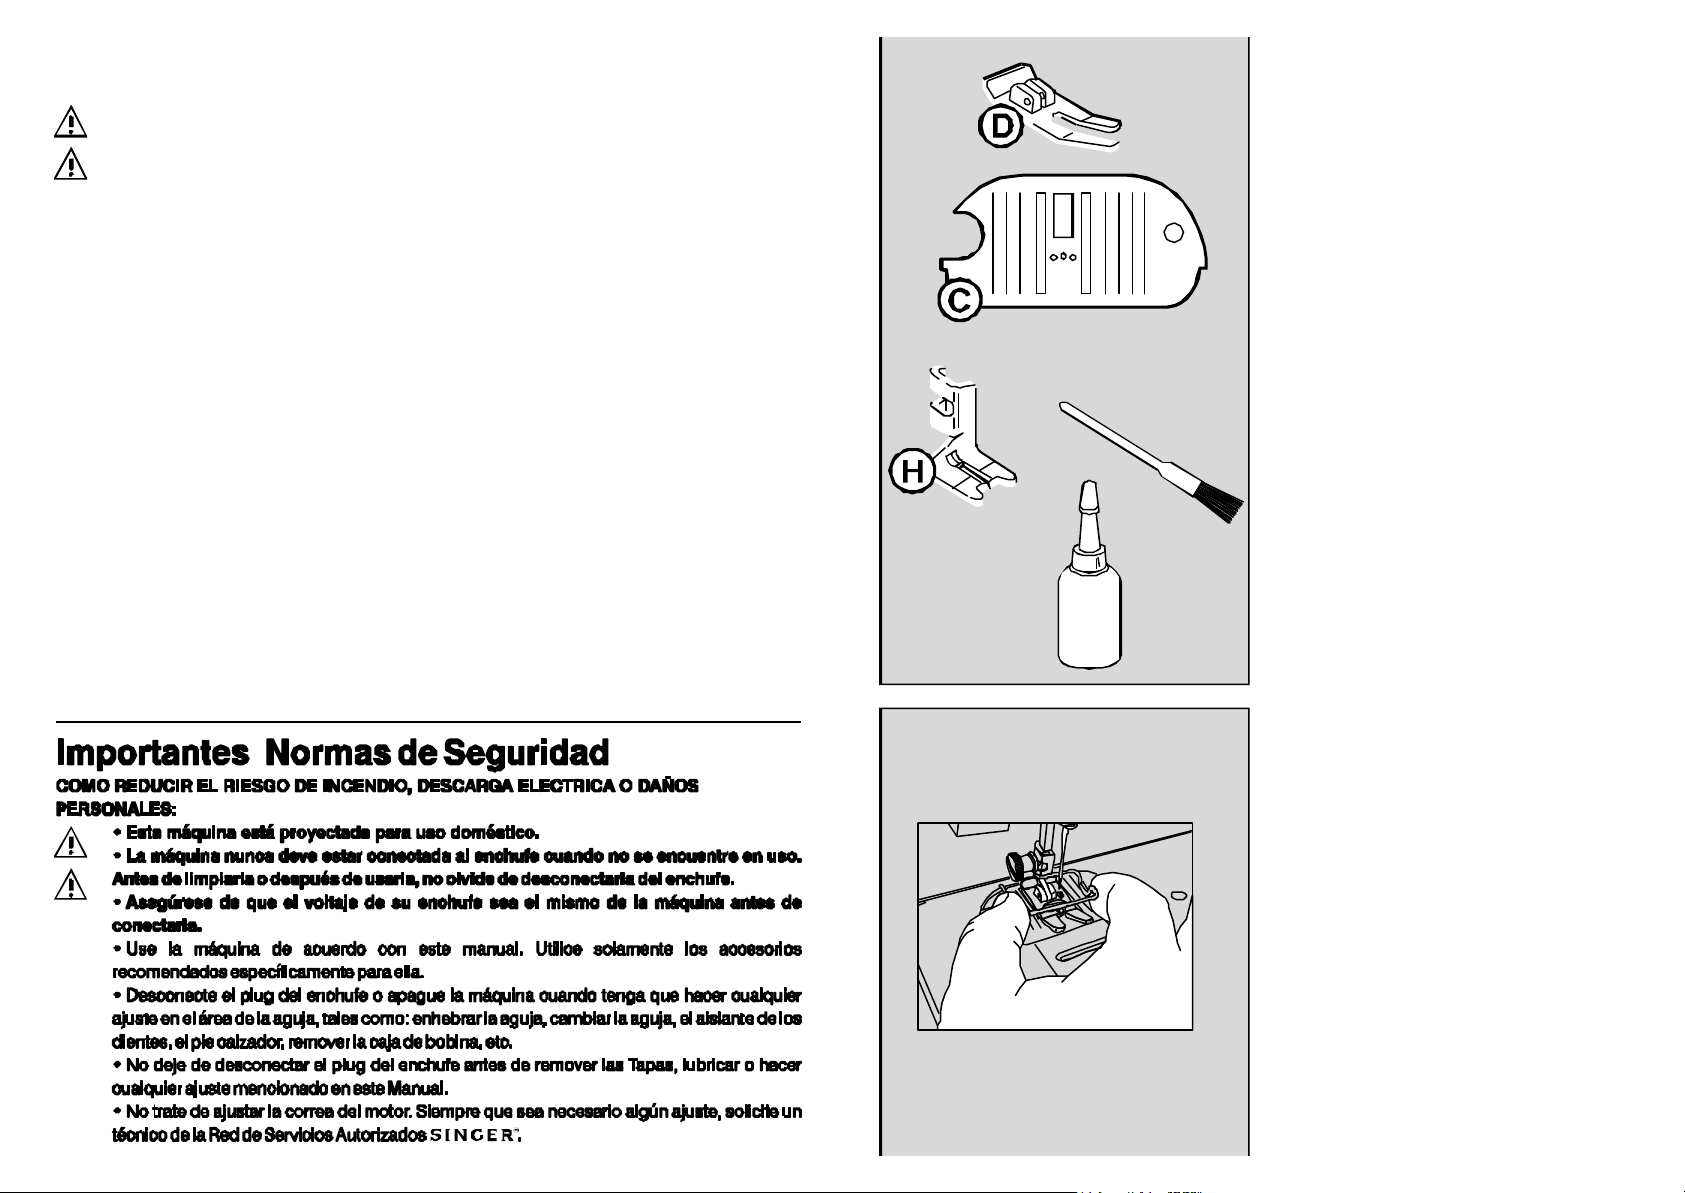
1.Plaqueàaiguillepointdroit(C)etpied
presseurpointdroit(D):
serventàl'assemblagedestissuslégers.
2.Piedpourposerlesboutons(H):
permetlaposedesboutonsplatsà2ou4
trous.
3
3.Lepinceau
4.Bidonnetd'huile.
,pournettoyervotremachine.
Cesaccessoires
Ilvous
MontageduProtègeDoigt
PréparationdelaMachine:
!
Réglerl’interrupteurà“O”
!
Déviserlavisdupiedpresseur..
Positionnerleprotègedoigtaveclecotécourbé
ducotédroitverslebas(voirlaillustré).
Glisserlecrochetversl’arrièreetensuitepardessuslavisdupiedpresseurentreletalonetla
viscommeillustré.
Serrezlavisdupiedpresseur.Vousêtes
maintenantprêtàtravailleraveclegardedu
doigtenplace.
Page 11
Additional
accessories
AdditionalAccessoriesforyoursewing
machineareavailableforpurchasefromyour
retailer.
1.Straightstitchpresserfoot(D)and
needleplate(C)
straightstitchinglightweightfabricsorwhen
yourfabricorsewingprocedurerequires
closecontrol.
2.Buttonsewingfoot(H)
two-holeorfour-holebuttonsecurelyfor
stitching.
3.Lintbrush
areasofyoursewingmachine.
4.Oilcontainer
areusedtogetherwhen
isusedtoholdany
isusedforcleaninghardtoreach
formachinelubrication.
AttachingFingerGuard
MachinePreparation
!
Setpowerswitchto“O”onmachine
!
LoosenPresserFootScrew.
PositionFingerGuardsothatcurvededgeis
turnedtowardsthebottomrighthandside(see
illustration).
Slipthecurvedhookbehindandthenupand
overthepresserfootscrewbetweenthescrew
andtheshankasillustrated.
TightenPresserFootScrew.Youarenowready
toworkwiththeFingerGuardinplace.
:
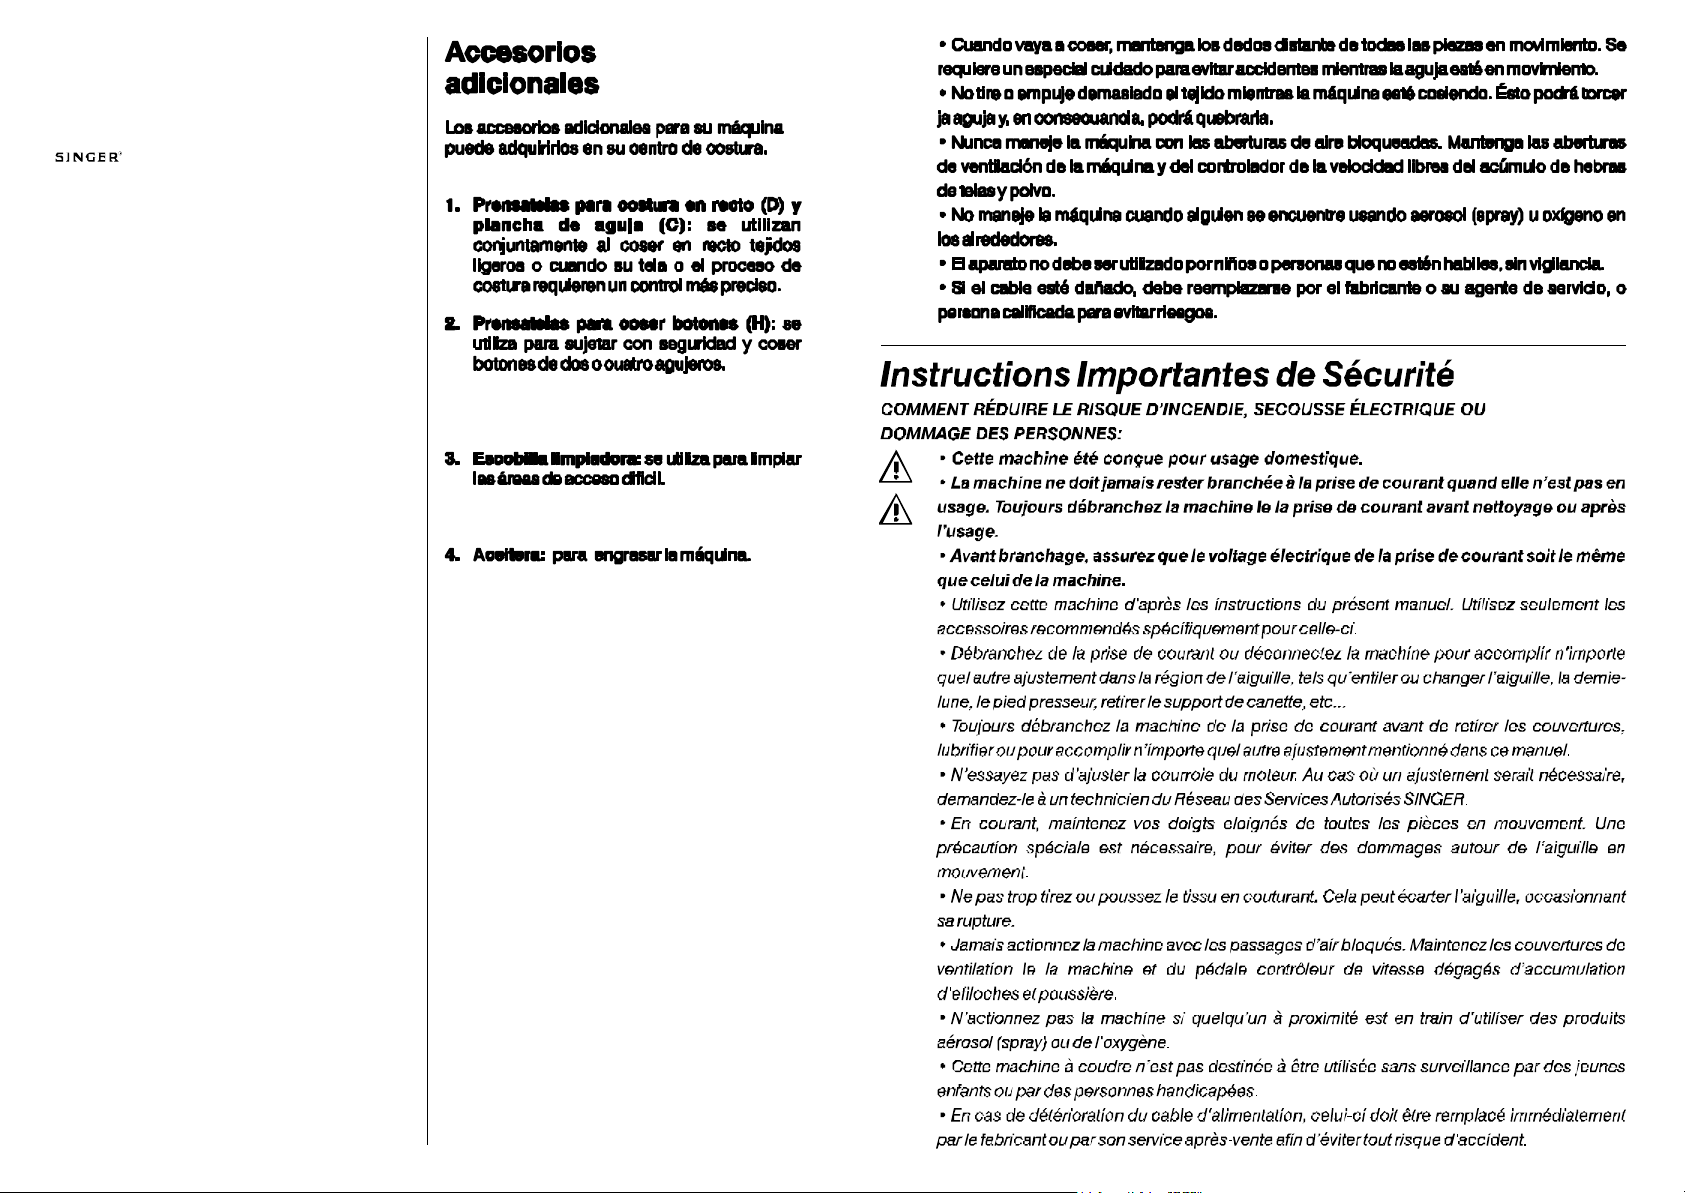
CómoColocarel“GuardaDedos”
PreparacióndelaMáquina:
!
Coloqueelencendedoren“O”
!
AflojeelTornillodelPrensatelas..
PosicioneelGuarda-Dedosdemaneraquela
curvaestvolteadahacialaderecha(vea
ilustración).
Desliceelganchoredondoporlapartedeatrás
yluegohaciaarribadeltornillodelprensatelas
(entreeltornilloylapalancacomomuestrala
ilustración).
AprieteTornillodelPrensatela.Yapuede
comenzaratrabajarconelGuarda-Dedos.
Page 12
Lubrificationdela
2
Gettingready
tosew
Operatingthemachine
Connectingthemachine
Pushplug(1)intothereceptacle(2)attheright
endofthemachine.Thenconnectplug(3)to
yoursocketoutlet.
ForNorthAmerica
Thisappliancehasapolarizedplug(oneblade
widerthantheother).Toreducetheriskof
electricshock,thisplugisintendedtofitina
polarizedoutletonlyoneway.
Iftheplugdoesnotfitfullyintheoutlet,reverse
theplug.Ifitstilldoesnotfit,contactaqualified
electriciantoinstalltheproperoutlet.Donot
modifythepluginanyway.
Runningthemachine
Toturnonmachineandsewinglight,press
upperportionofpowerswitch(4).Toturnoff
machineandlight,presslowerportionof
powerswitch.
Torunthemachineandcontrolspeed,pressthe
footcontrol(5)withyourfoot.Theharderyou
press,thefasterthemachinewillsew.Tostop
machine,removefootfromcontrol.
“I”
“O”
machine
Lafréquencedecetteopérationdépenddela
fréquenced’utilisation.Lesindicationscidessoussontdonnéespouruneutilisation
régulièreplusieursfoisparsemaine.
Sivousutilisezvotremachinechaquejour,
graissez-laplussouventqu’indiqué.
Environunefoisparan,graisseztoutesles
piècesenmouvement,commeillustré,pour
conserverlasouplesseaumécanismeet
protéterlespiècesmétalliquesd’uneusure
excessive.
Pourbiensituerlespiècesnécessitantun
graissage,tournezlevolantàlamainversvous
aprèsavoirretirélaplaquedeface.
Choosingandchanging
needles
Important: Forbestresultsfromyoursewing
machine,useonlyneedles.Checkthe
needlepackage,andtheFabric,Threadand
NeedleTableonpage16,forthecorrectneedle
andfabriccombination.
•Raiseneedletoitshighestposition.
•Loosenneedleclampscrewandremove
needle.
•Withflatsideofneedletotheback,insertnew
needleupintoclampasfarasitwillgo.
•Tightenneedleclampscrewsecurely.
Pourgraisser,n’utilisez quedel’huileSINGER*.
Elleaétéspécialementraffinéeetnecontientpas
dedépôtpouvantnuireaufonctionnementde
précisiondumécanisme.
Page 13
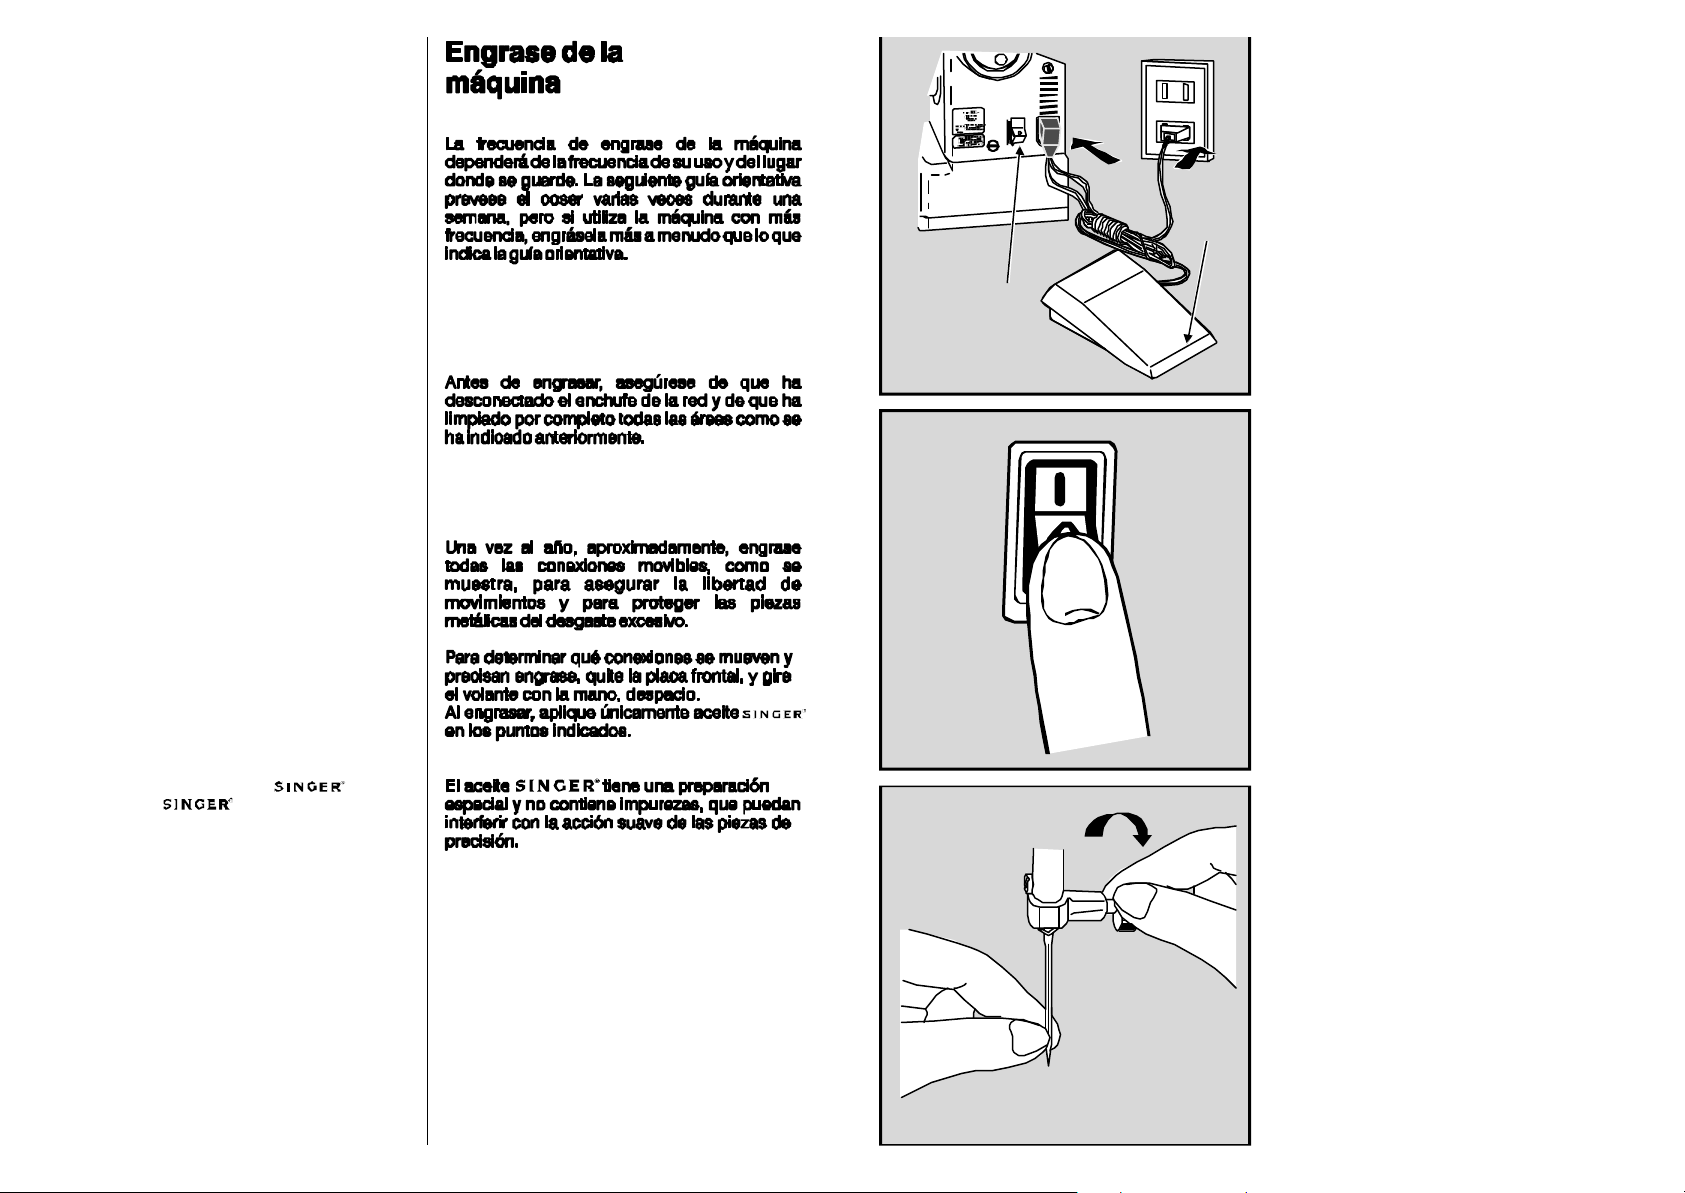
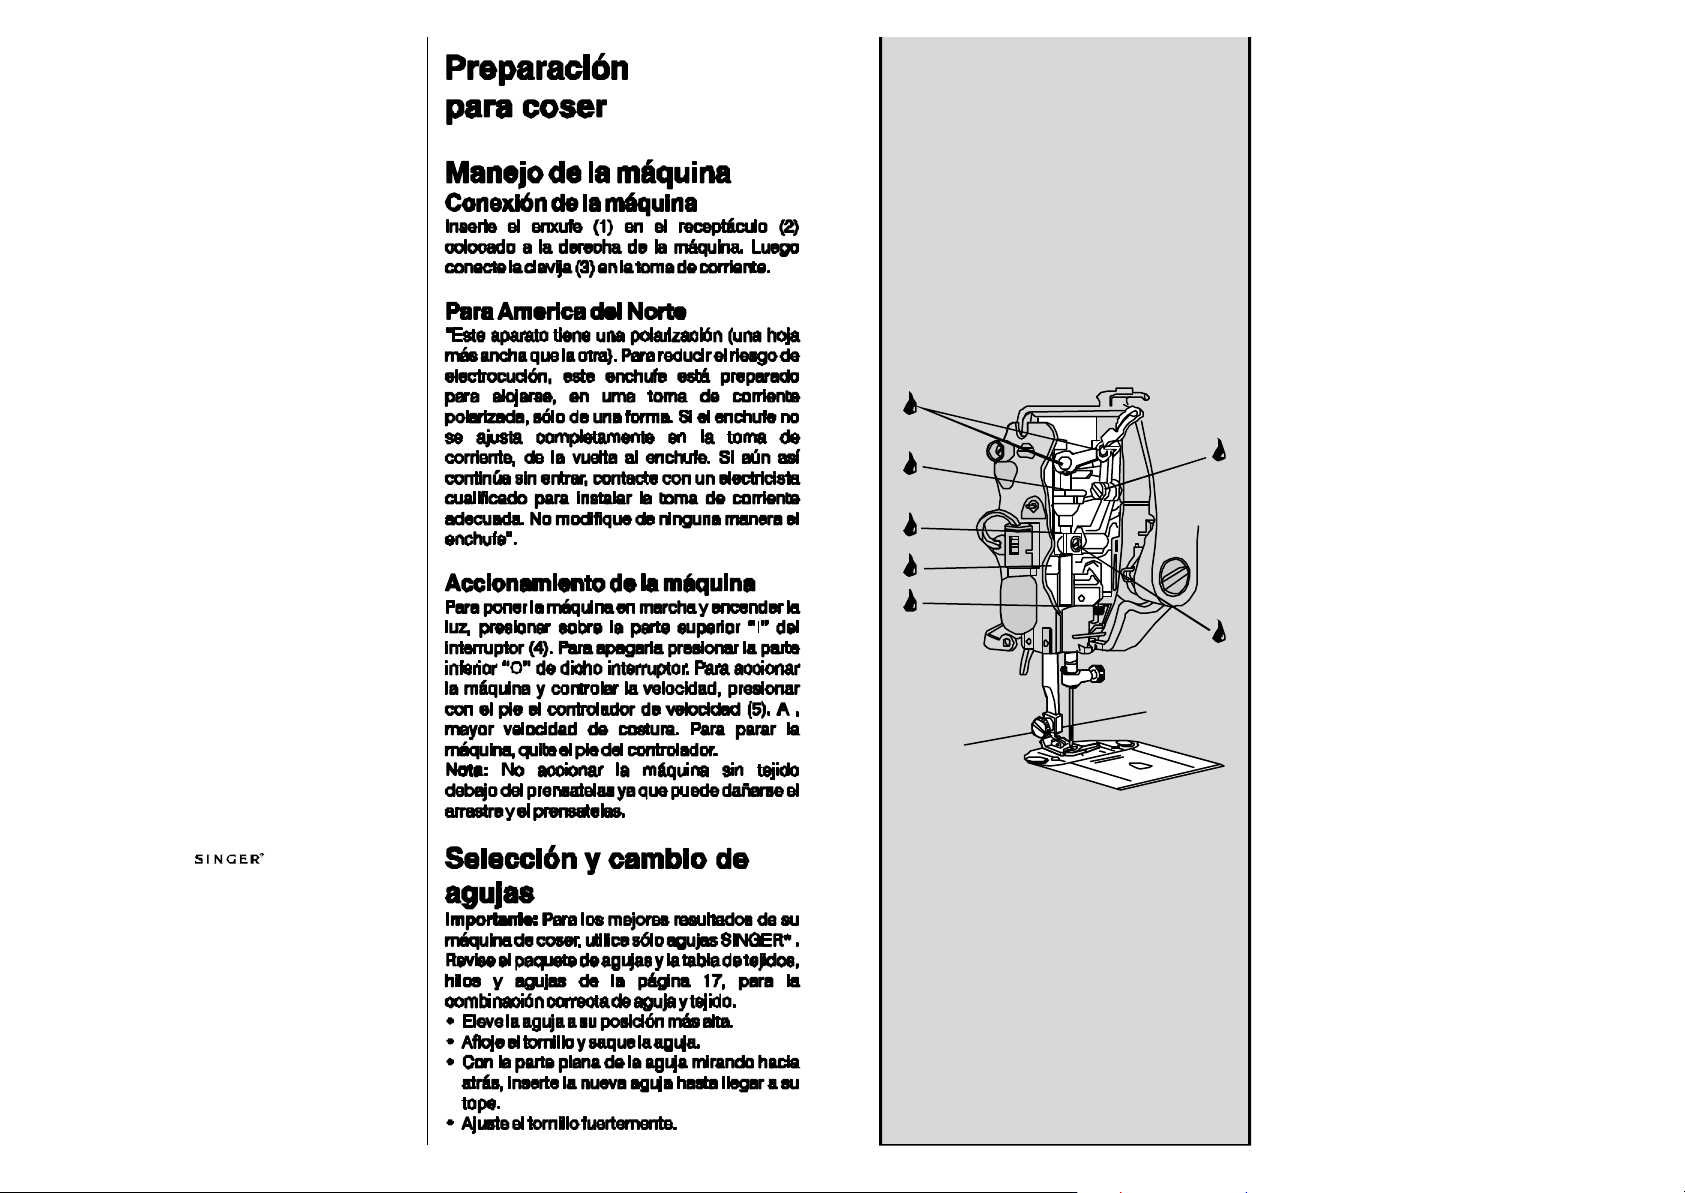
Lubricatingthe
machine
Howoftenyouneedtolubricatethemachine
dependsonhowoftenyouuseitandwhereyou
keepit.Thefollowinggeneralguidelines
assumethatyouwillbesewingseveraltimesa
week.Butifyouuseyourmachinemore
frequently,lubricateitmoreoftenthanthe
guidelinessuggest.
Approximatelyonceayear,lubricateallmoving
connections,asshown,toensurefreedomof
movementandtoprotectmetalpartsfrom
excessivewear.
Todeterminewhichconnectionsmoveand
needlubrication,turnthehandwheelslowly,by
hand,whilefaceplateisremoved.
Whenlubricating,applyonlyoilatthe
pointsshown.oilisspeciallyprepared
anddoesnotcontainharmfuldepositsthatcan
interferewhiththesmoothactionofprecision
parts.
Pourbien
1 2
3
5
4
coudre
Founctionnementde
lamachine
Branchementdelamachine
Introduisezlafichedebranchementdurhéostat
(1)danslaprise(2)àdroitedelamachine,puis
brancherlamachineàl’aidedelaprise(3).
PourL’AmeriqueduNord
“Cetappareilauneprisepolarisée(unelame
pluslargequel’autre).Afinderéduirelerisque
dedéchargeélectrique,cettepriseestconçue
pournepouvoirêtrebranchéequedanslebon
sensavecdesconnecteursmurauxpolarisés.
Silaprisenepeutêtreinséréecomplètement
dansleconnecteurmural,inversezla.Sile
probèmepersiste,vousdevezconsulterun
electricienqualifiéquivousinstalleralesupport
muraladapté.Enaucuncasvousnedevez
modifierlaprise”.
Miseenmarchede
lamachine
Pourcoudreetéclairevotretravail,appuyezsur
l’interrupteur(4).Pouréteindre,appuyezpour
amenerl’interrupteur(4)surlaposition.Pour
mettreenmarchelamachine,appuyezsurle
rhéostat(5);plusvousappuyerez,pluslavitesse
delamachineaugmentera.Pourarrêter,levezle
pied.
Note:
presseuretlesgriffesd’entrainementlorsque
vousarrêtezvotretravail.
“”
I
“”
O
Poserunmorceaudetissuentrelepied
Choisiretchanger
l’aiguille
Important:Survotremachine,n’utilisezquedes
aiguillesSINGER.Adoptezvotreaiguilleautissu
etaufilutilisé.Pourcela,reportez-vousau
tableaupage17.
•Soulevezl’aiguilleenpositionhaute.
•Dévissezlavisdupince-aiguilleetretirez
l’aiguille.
•Insérezlanouvelleaiguilleàfonddansle
pince-aiguille,lecôteplatdutalonàl’arrière.
•Serrezlavisdupince-aiguille.
*
Page 14
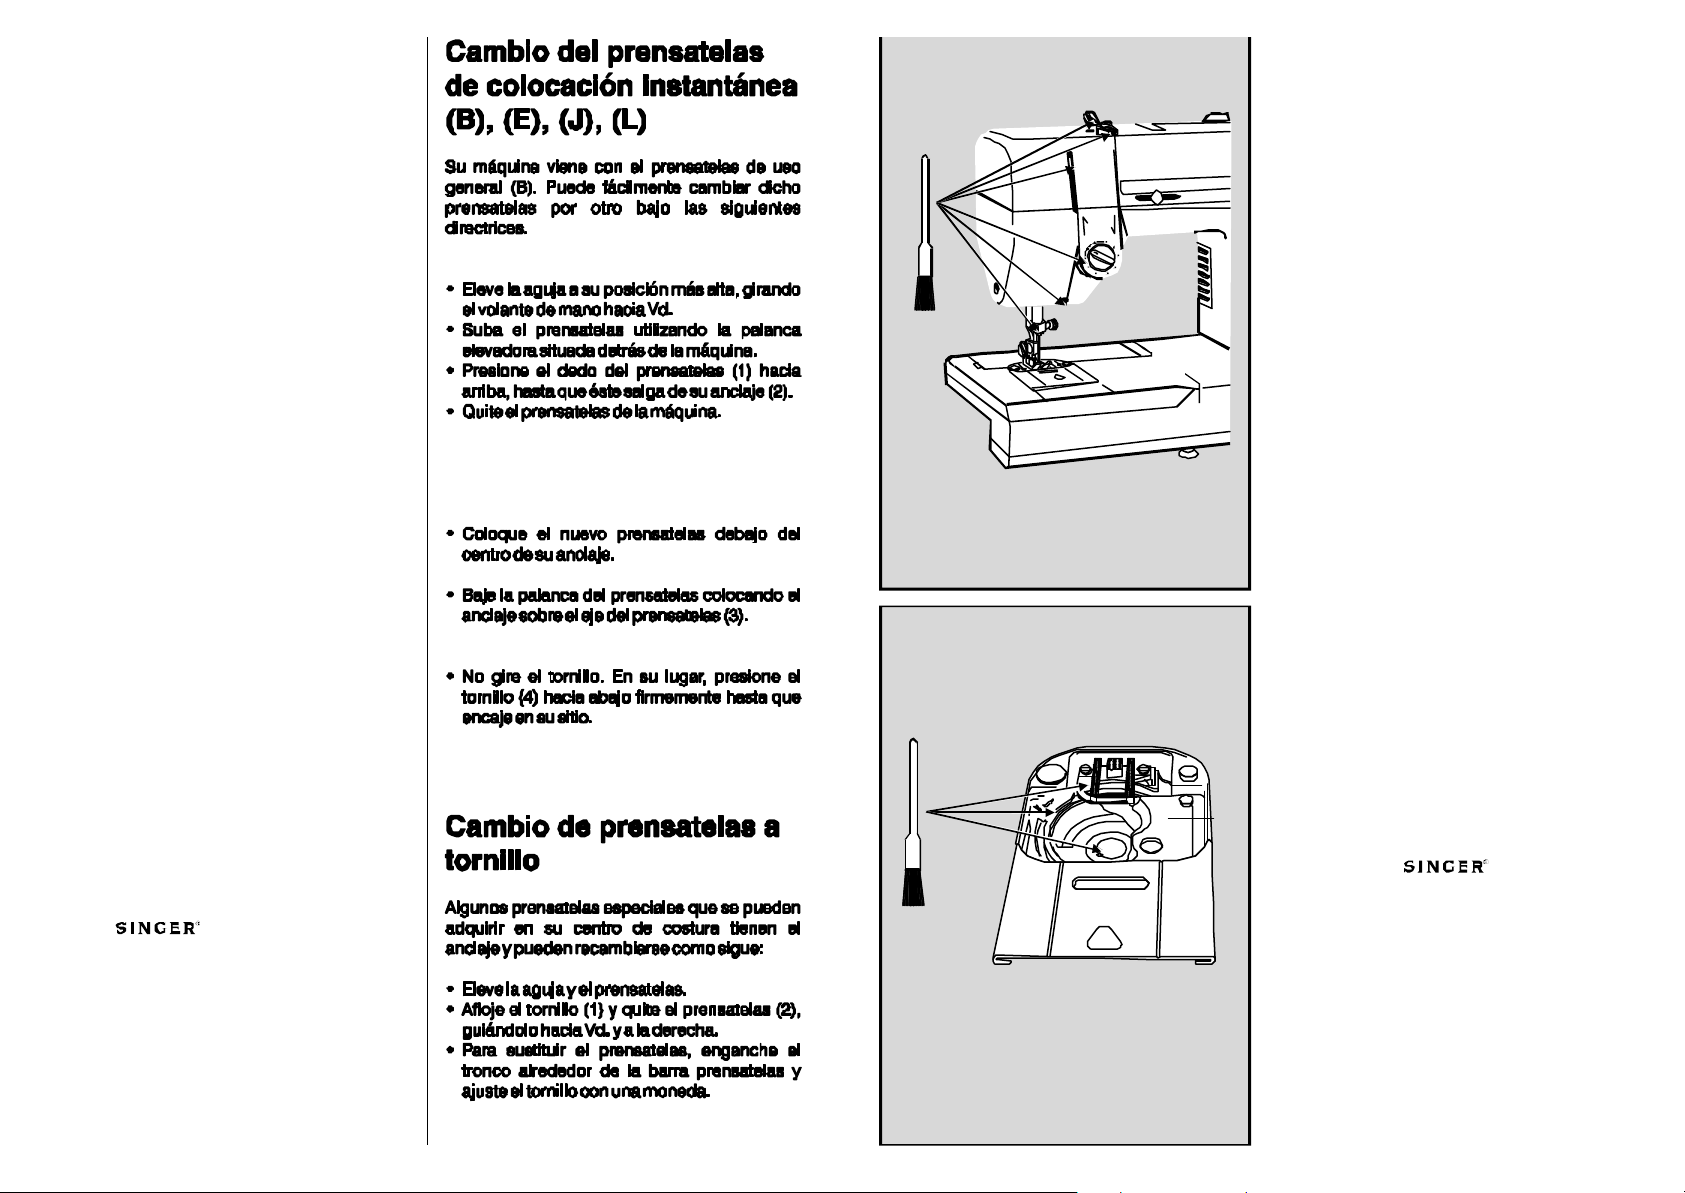
Nettoyerlamachine
Changingsnap-on
presserfeet(B),(E),
(J),(L)
YourmachinecomeswiththeGeneralPurpose
PresserFoot(B)alreadyattached.Youcan
easilychangetoanyoneoftheotherpresser
feet,whichsnapontoacommonshank,by
followingthedirectionsbelow.
•Raiseneedletoitshighestpositionbyturning
handwheeltowardyou.
•Raisepresserfootusingpresserfootlifterat
backofmachine.
•Pushtoeofpresserfoot(1)up,untilitsnaps
offtheshank(2).
•Removefootfrommachine.
•Placenewfootundercenterofshank.
•Lowerpresserfootlifter,fittingshankover
presserfootpin(3).
Votremachinevavousrendredenombreux
servicespendantdelonguesannées.Pour
garantirsonfonctionnement,consacrez
quelquesminutesàsonnettoyage.
Lessurfacesextérieurespeuventêtrenettoyées
avecdusavonetunchiffondoux.
Enlevezpelucheetpoussièreenbrossantà
l’aidedupinceau:
•Danslesguides-filsetleviers.
•Surlepiedpresseuretsabarre.
•Don’tturnscrew.Instead,pushpresserfoot
screw(4) downfirmlyuntilfootsnapsinto
place.
Changingscrew-on
presserfeet
Somespecialpresserfeetcanbepurchased
atyourretailerwhichhavebuilt-in
shanksthatcanbereplacedasfollows:
•Raiseneedleandpresserfoot.
•Loosenpresserfootscrew(1)andremove
presserfootwithshank(2),guidingittoward
youandtotheright.
•Toreplacepresserfootwithshank,hook
shankaroundthepresserbarandtighten
presserfootscrew.
•Danslesupportdecanetteetsurlaplaqueà
aiguille.
A
Votremachinepeutêtreréviséepériodiquement
porvotremagasin.
Page 15
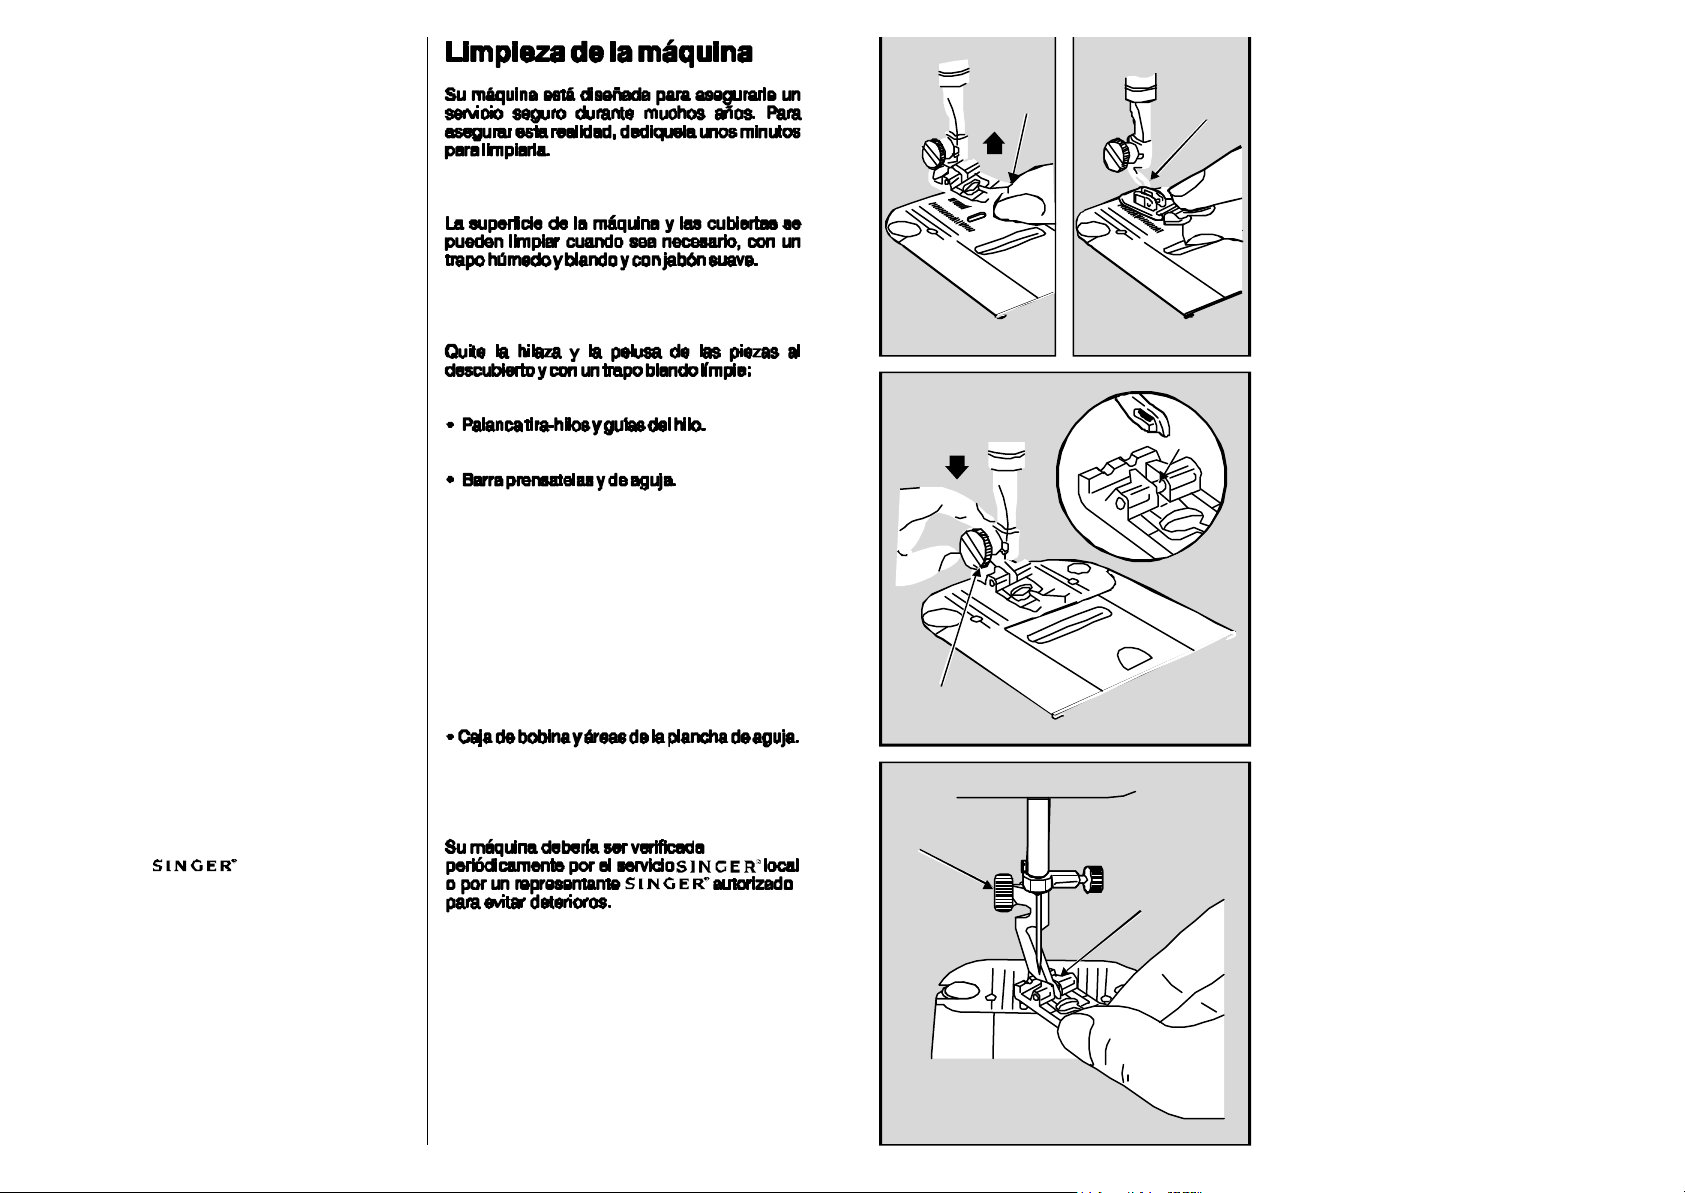
Cleaningthemachine
Yourmachineisdesignedtogiveyoumany
Commentchangerles
yearsofdependableservice.Toensurethis
reliability,takeafewminutestokeepthe
machineclean.
Themachinesurfacesandcoverscanbe
cleanedwhennecessary,withadamp,soft
clothandamildsoap.
Removelintandflufffromexposedparts,and
withalintbrushcleantheseparts:
•Take-upleverandthreadguides.
•Presserandneedlebars.
1
piedspresseursàenclen-
2
chementdirect(B,E,J,L)
Votremachineestlivréeéquipéedupied
presseuruniversel(B).Vouspouvezaisément
changerlepiedetleremplacerpartoutspiedsà
enclenchementdirectquis’adaptentsurlatige
commune.
•Relevezl’aiguilleàsapositionhaute.
•Relevezlepiedenlesoulevantdel’avantvers
l’arrière.
•Appuyezsurlepied(1)jusqu’àcequ’ilde
détache(2).
•Retirez-le.
3
•Placezlenouveaupiedenlecentrantsousla
tige.
•Baissezlereleveurdupiedpresseurpour
engagerlatigedanslatraversedupied(3).
•Bobbincaseandneedleplateareas.
Yourmachineshouldbeperiodicallychecked
byyourlocalretailerforwear.
•Nevissezpasmaisappuyezfermementsurla
4
1
vis(4)jusqu’àenclenchement.
Commentchangerles
piedpresseurs
2
•Relevezl’aiguilleetlepiedpresseur.
•Desserrezlavis(1)etretirezlepiedaveclatige
(2)enlafaisantpivoterversladroite.
•Pourremettreenplaceunpiedpresseuràtige,
accrochezlatigeautourdelabarredupied
presseuretresserrezlavisàl’aided’unepièce
demonnaie.
Page 16
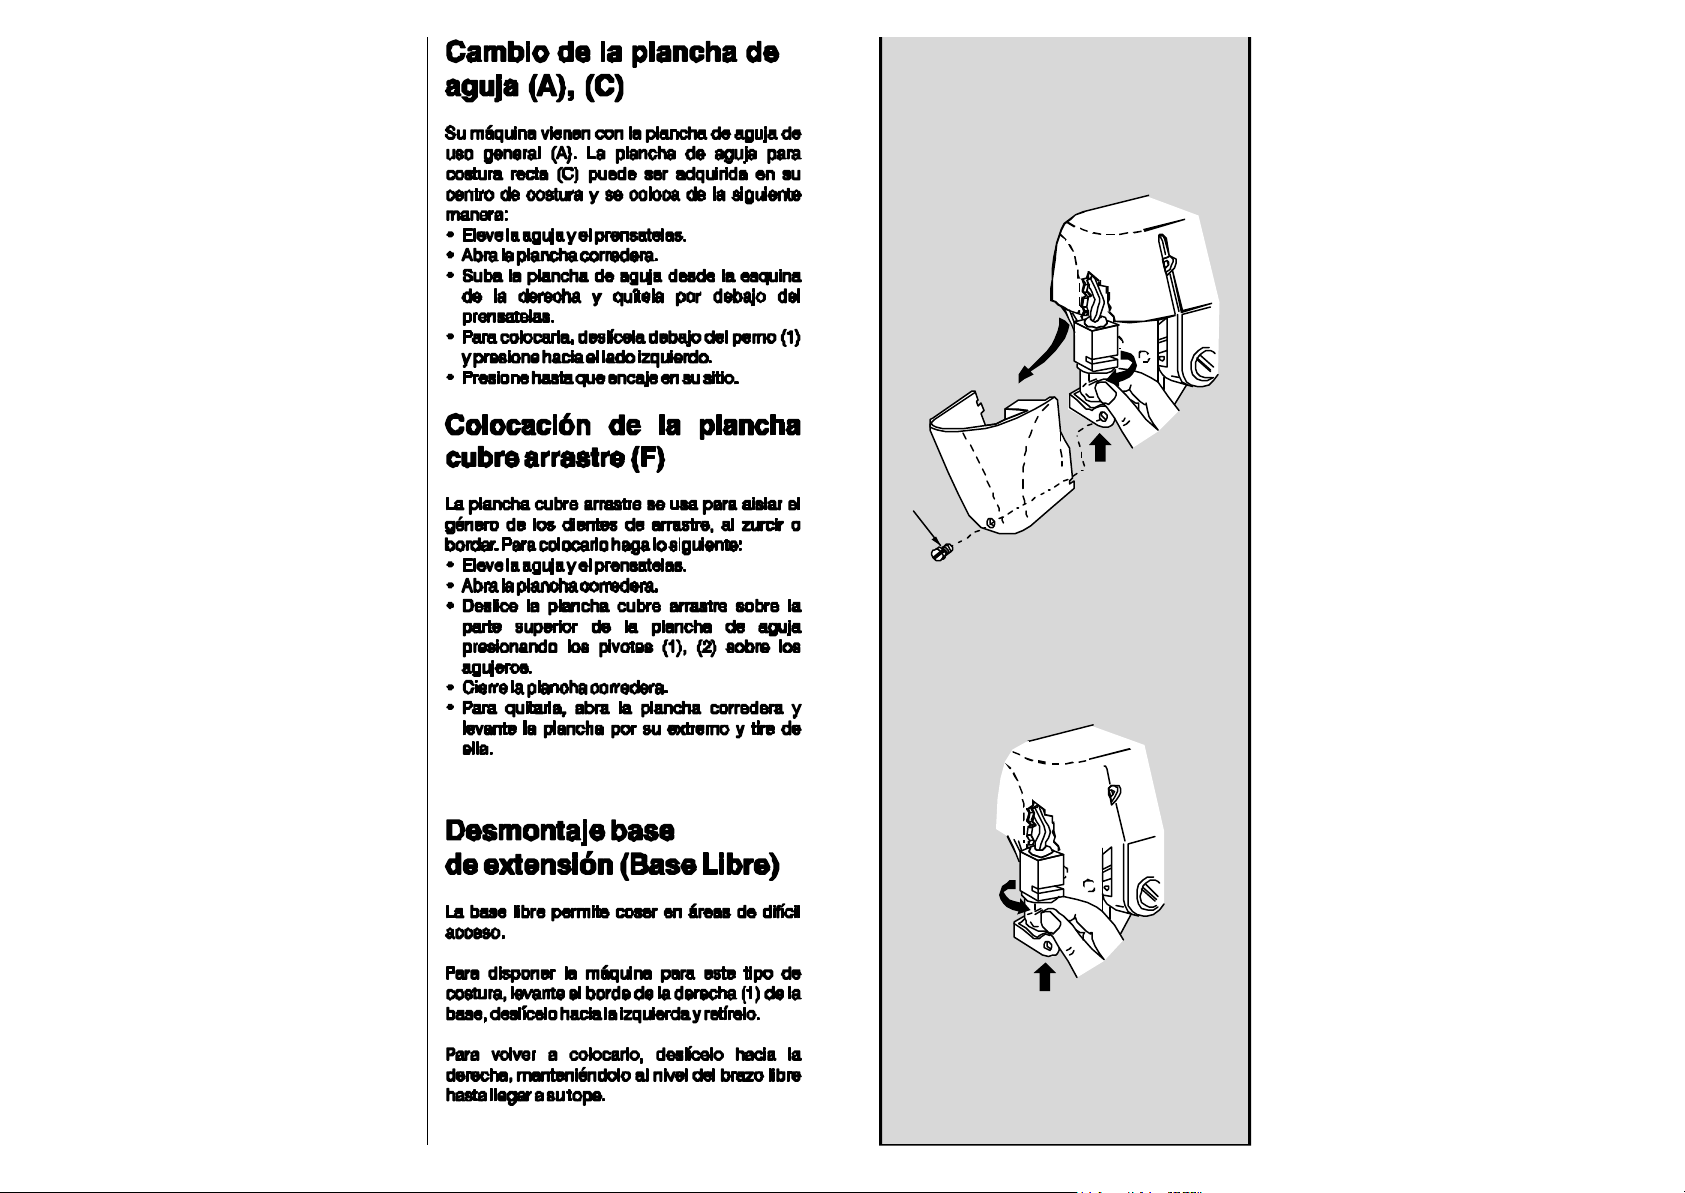
Changerl'ampoule
Changingtheneedleplate
(A),(C)
YourmachinecomeswiththeGeneralPurpose
NeedlePlate(A)attached.TheStraightStitch
NeedlePlate(C)maybepurchasedfrontyour
sewingretailerandcanbeattachedasfollows:
•Raiseneedleandpresserfoot.
•Openslideplate.
•Liftupneedleplatefromrightcornerandslide
outfromunderfoot.
•Toreplaceneedleplate,slideitunderpin(1)
andpushitfirmlytotheleft.
•Pressdownuntilitsnapsintoplace.
Attention: avantdechangerl'ampoule,
débranchezlamachine,retirezlaplaquedeface;
cetteplaquedevraêtreremiseenplaqueaprès
avoirchangél'ampoule,avantdemettrela
machineenmarche.
Pourcettemachine,utilisezuneampouleà
bayonettede15wattsmaximum.
•Dévissezlavis(1)delaplaquedeface.
•Retirezlaplaqueenlatirantverslagaucheet
verslebas.
Attachingthefeed
cover(F)
Thefeedcoverisusedtokeepthefeedfrom
movingthefabricwhenattachingabutton,
darningorsewingfree-motionembroidery.To
attachit,followthedirectionsbelow:
•Raiseneedleandpresserfoot.
•Openslideplate.
•Slidefeedcoverontopofneedleplate,
pressingtabs(1)and(2)intoholes.
•Closeslideplate.
•Toremove,openslideplateandliftfrontedge
ofcover;pullitaway.
Removingthe
extensiontable(Free-Arm)
Freearmsewingmakesiteasiertosewhard-toreachareas.
Tochangemachineforfree-armsewing,liftright
edge(1)ofextensiontable,slideittotheleftand
offthemachine.
•N'essayezpasdedévisserl'ampoule.
•Poussezl'ampouleverslehautdansladouille
ettournezdanslesensdelaflèche.
1
•Retirezl'ampoule.
•Mettezenplacelanouvelleampouledansla
douilleettournezdanslesensdelaflèche
pourverrouillerenposition.
•Assurez-vousquelereleveurdupeidpresseur
estenpositionhaute.Replacezlaplaquede
faceenguidantl’angleavantsouslecouvercle
supérieur:poussezpouralignerlaplaqueavec
lecouverclesupérieur.
•Replacezetserrezlavis.
Toreplacetheextensionta ble,slideittotheright
keepingitevenwiththefree-arm,untilthetabs
ontherightlockintoplace.
Page 17
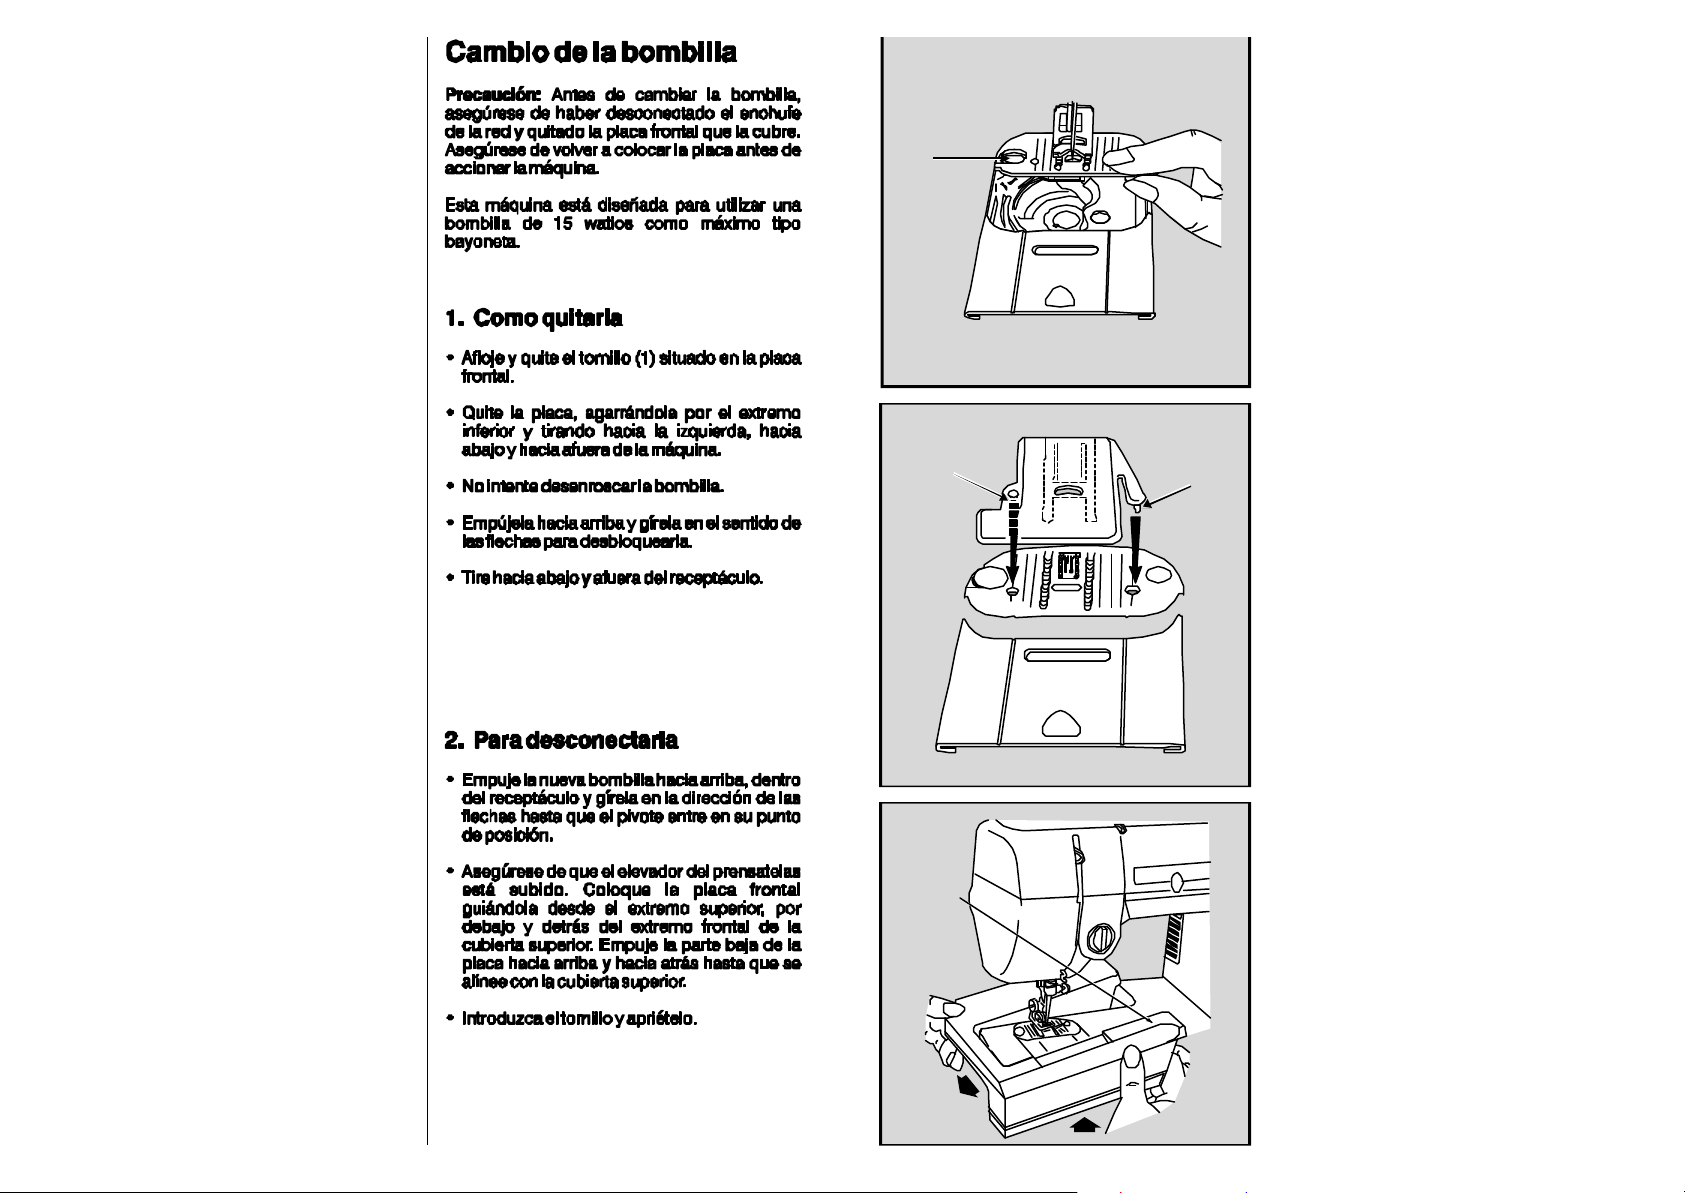
Changingthelightbulb
Caution:Beforechanginglightbulb,makesure
Commentchangerla
youhaveremovedplugfromsocketoutletand
removefaceplatewhichcoversthelightbulb.
Besuretoreplacethefaceplatewhichcovers
thelightbulbbeforeoperatingthemachine.
Thismachineisdesignedtousea15watt
maximumlightbulbwithabayonetfitting.
1.Removingbulb
•Loosenandremovescrew(1)locatedonface
plate.
plaqueàaiguille(A),(C)
Votremachineestlivréeéquipéedelaplaqueà
1
aiguilleuniverselle(A).Laplaqueàaiguillepoint
droit(C)peutvousêtrevendueparvotremagasin
SINGER.
•Relevezl’aiguilleetlepiedpresseur.
•Ouvrezlaplaqueglissière.
•Soulevezlaplaqueàaiguilleducôtedroitet
dégagez-laversladroite.
•Pourremettrelanouvelleplaqueàaiguille,
glissez-lasouslagoupille(1).Poussez
fermementverslagauche.
•Appuyezpourqu’ellesoitbienenclenchée.
•Removefaceplatebygraspingitaroundthe
bottomedgeandpullingtowardtheleft,then
downandawayfrommachine.
•Donotattempttounscrewlightbulb.
•Pushbulbupintosocketandturninthe
directionofarrowstounlockbulbpin.
•Pullbul bdownandoutofsocket.
2.Replacingbulb
•Pushnewbulbupintosocketandturninthe
directionofarrowsuntilpinslockinto
position.
•Makingsurethepresserfootlifterisup,
replacethefaceplatebyguidingfronttop
cornerunderandbehindlowestfrontcorner
oftopcover.Pushbottomoffaceplateupand
backuntilitisalignedwithtopcover.
•Insertscrewandtighten.
Miseenplaceducouvre
1
2
griffe(F)
Cetteplaqueestutiliséepoursupprimer
l’entrainementdutissuquandvouscousezdes
boutons,quandvousreprisezoubrodezàmain
levée.
Miseenplace:
•Relevezl’aiguilleetlepiedpresseur.
•Ouvrezlaplaqueglissière.
•Coulissezlaplaqueau-dessusdelaplaque
glissièresousl’aiguilleetamenezles
extensions1et2danslestrous.
•Fermezlaplaqueglissière.
•Pourretirerlaplaquecouvregriffe,ouvrezla
plaqueglissière,soulevezlebordavantet
enlevezlaplaqueàrepriser.
Pourdégagerlebras-libre
1
Lebras-librefacilitelacouturetubulaire.
Pourtransformervotremachineenbras-libre,
soule vezleborddroit(1)duplateauetglissez
verslagauchepourleretirer.
Pourremettreenplaceleplateau,glissez-levers
ladroitedepartetd’autredubras-librejusqu’à
cequelapattededroitesoitenplace.
Page 18
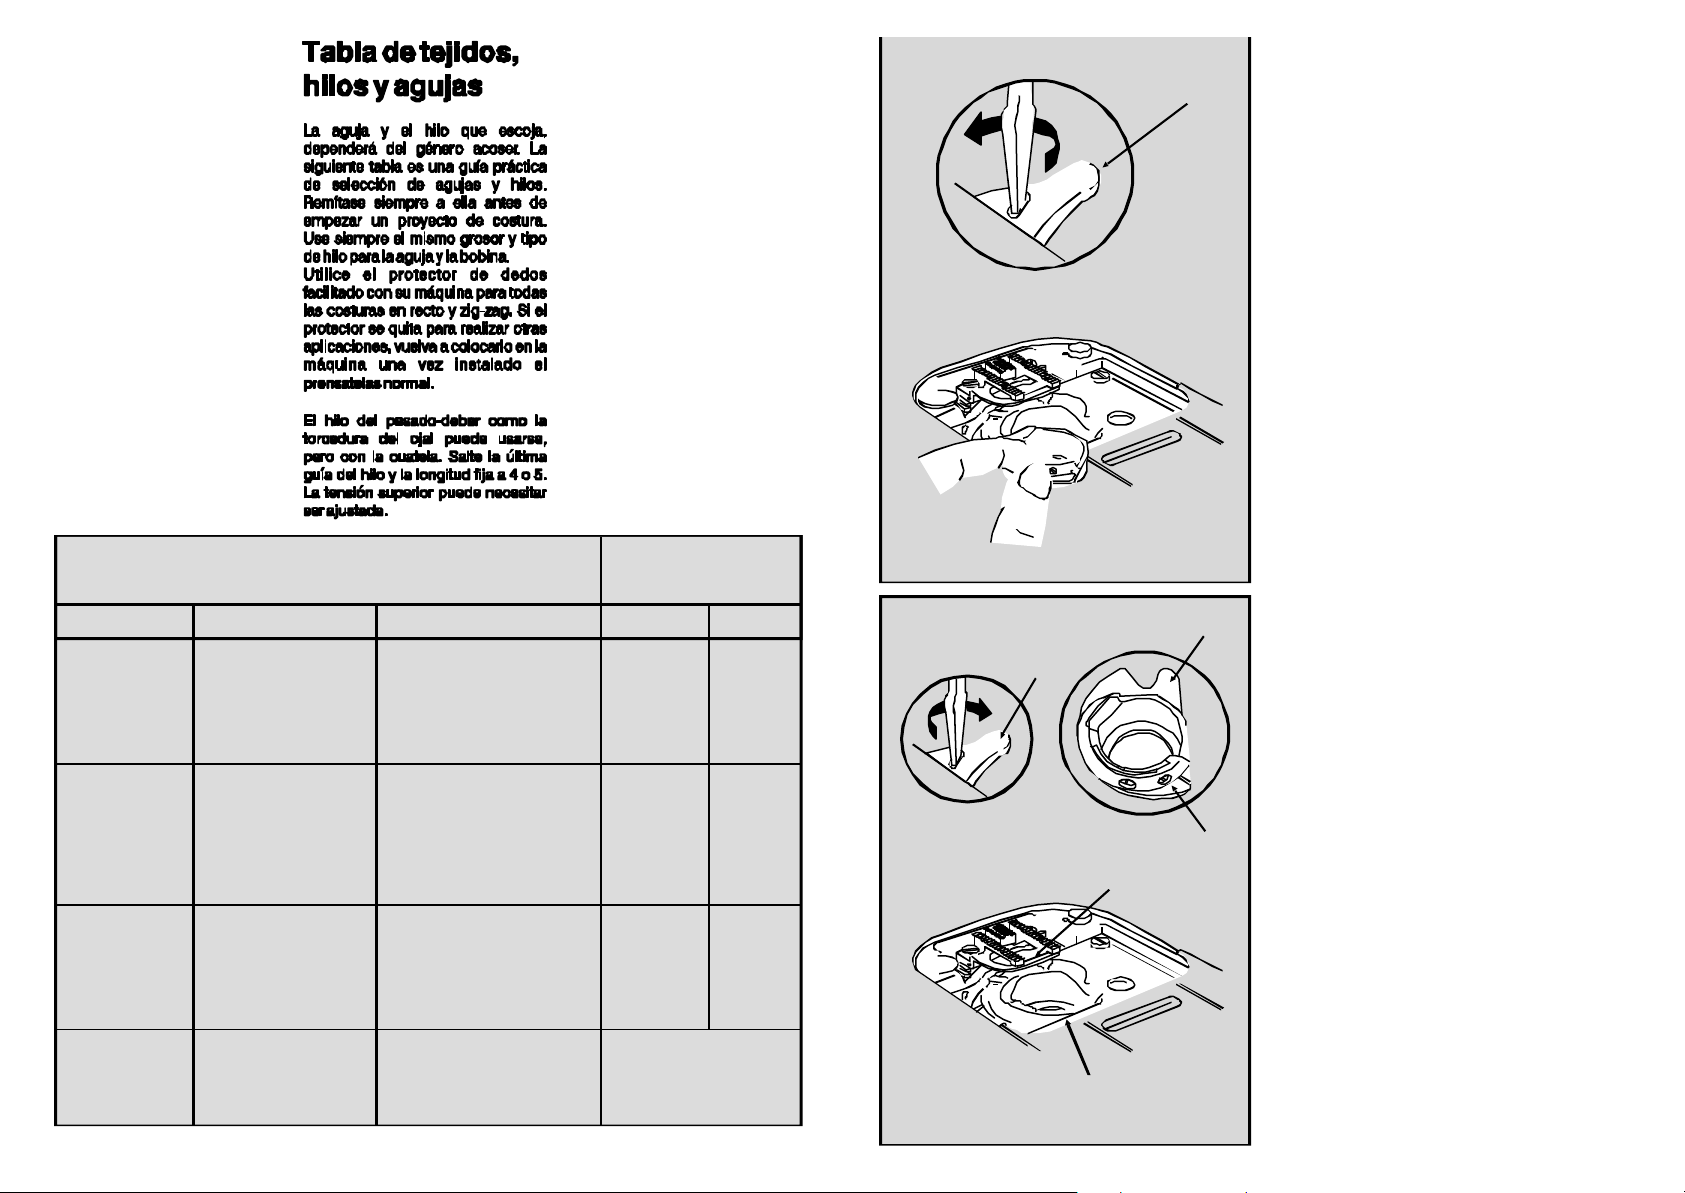
Fabric,thread
andneedletable
Tableaudesfils,
Theneedleandthreadyou
choosewilldependuponthe
fabricbeingsewn.
Thetablebelowisapractical
guidetoneedleandthread
selection.
Alwaysrefertoitbefore
beginningasewingproject.
Besuretousethesamesize
andtypeofthreadinboth
needleandbobbin.
Heavy-dutythreadlike
buttonholetwistcanbeused,
butwithcaution.
Skipthelastthreadguideand
setlengthto4or5.Theupper
tensionmayneedtobe
adjusted.
Thefabricsbelowcanbeofanyfiber:cotton,linen,silk,wool,
synthetic,rayon,blends.Theyarelistedasexamplesofweight.
aiguillesettissus
C'estenfonctiondutissu
cousuquevousallezchoisir
l’aiguilleetlefilàutiliser.
Letableauci-dessousvous
guideradanslechoix.
Consultez-letoujoursavantde
commenceràcoudre.Utilisez
toujourslamêmegrosseurde
filpourl'enfilagesupérieuretla
canette.
Lesgrosfilscommelefilde
Boutonnièrepeuventêtres
utilisés,maisavec
prudence.Eviterledernier
guide-filetréglezla
longueurentre4et5.Il
faudrapeut-êtreréglèla
tensionsupérieure.
Needles
Nettoyagedevotre
1
machine
Retireretreplacerle
supportdecanette
Attention:
débranchez-la.
•Relevezlepiedpresseurell’aiguille.
•Ouvrezlaplaqueglissière,enlevezlacanette
etretirezlaplaqueàaiguille(voirpage15).
Pourretirerlesupportdecanette
•Avecunpetittournevis,tournezleloquet(1)
versl’arrièreaussiloinquepossible.
•Soulevezlecôtégauchedusupportde
canette.Glissez-lehorsdelamachine.
Avantdenettoyervotremachine,
LightWeight
MediumWeight
MediumHeavy
Knits
*Notrecommendedonstretchfabrics.
Batiste
Chiffon
Crepe
Corduroy
Flannel
Gabardine
Gingham
Linen
Muslin
WoolCrepe
Bondedwovens
Canvas
Coating
Denim
Duck
Sailcloth
Bondedknits
Doubleknit
Jersey
Tricot
Cotton-wrapped
PolyesterCore
100%Polyester
*MercerizedSize50
Nylon
Cotton-wrapped
Polyester
100%Polyester
*MercerizedSize50
Nylon
Cotton-wrapped
Polyester
100%Polyester
*MercerizedSize40
*“HeavyDuty”
Cotton-wrapped
Polyester
Polyester
Nylon
SizeTypeThreadFabrics
2020
2020
2020
2020
Ball-Point2045
Size11/80,14/100,
16/110
11/80
14/90
16/100
18/110
A
Pourremettreenplacele
1
C
D
supportdecanette
•Placezlafourche(A)souslesgriffes
d’entrainement(C).
•Placezlebordopposé(B)danssonlogement
(D).Assurez-vousquelecrochetdela
machinetournelibrementautourdusupport,
B
entournantlevolantàlamain.
•Tournezleloquet(1)versl’avantaussiloinque
possible,ilverrouillelesupportenplace.
Note:
contrôlezlabonnemiseenplaceen
tournantlevolantàlamain.
•Replacezlaplaqueàaiguille(voirpage15).
•Remettezenplacelacanette.
Page 19
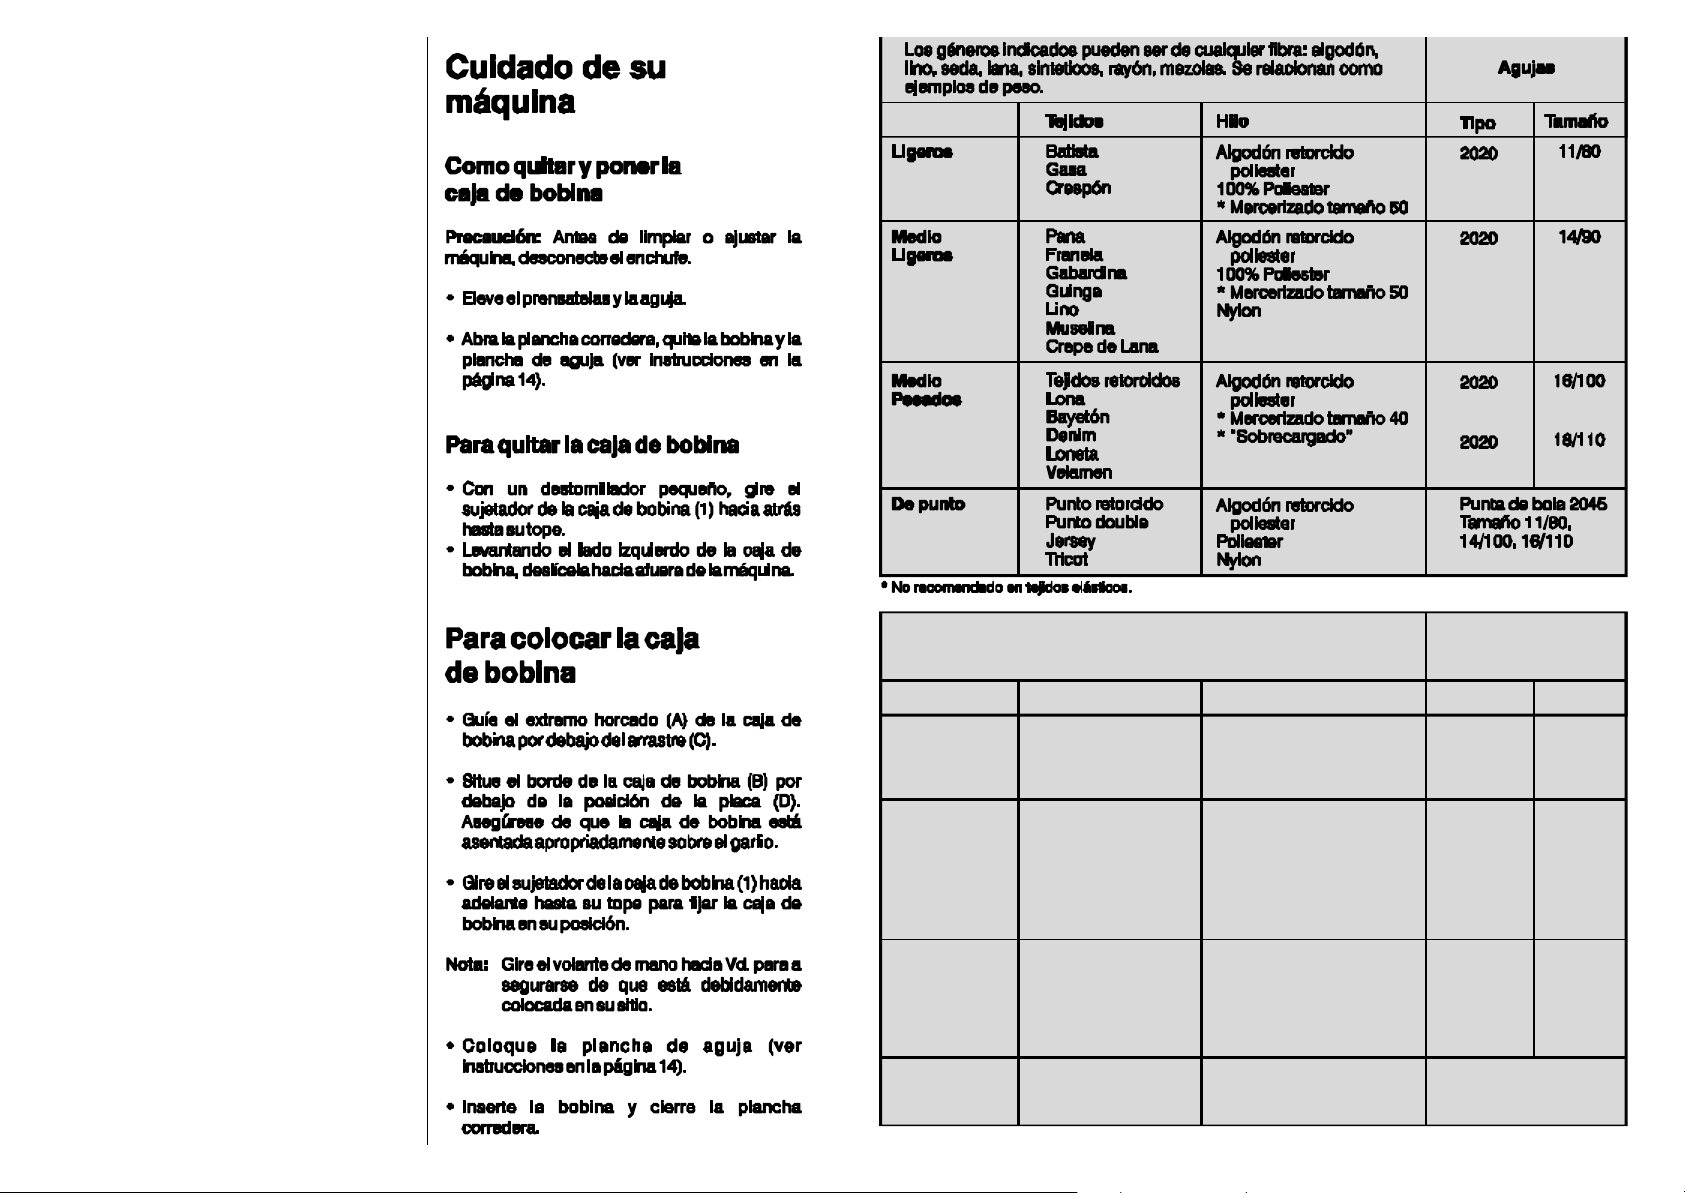
Caringforyour
9
machine
Removingandreplacing
bobbincase
Caution:
machine,removeplugfromthesocketoutlet.
•Raisepresserfootandneedle.
•Openslideplate,removebobbinandremove
needleplate(seeinstructiononpage14).
Beforecleaningoradjustingthe
Toremovebobbincase
•Withasmallscrewdriver,turnbobbincase
holder(1)totherearasfarasitwillgo.
•Liftingtheleftsideofthebobbincase,slideit
outfrommachine.
Toreplacebobbincase
•Guideforkedend(A)ofbobbincaseunder
feed(C).
•Drawrimofbobbincase(B)underposition
plate(D).Besurebobbincaseisfreelyseated
onhookrace.
•Turnbobbincaseholder(1)forwardasfaras
itwillgo,lockingbobbincaseinplace.
Note:
Turnhandwheeltowardsyoutocheckto
makesureitisproperlyreplaced.
•Replaceneedleplate(seeinstructionon
page14).
•Insertbobbinandcloseslideplate.
Lacompositiondestissuspeutêtre:coton,lin,soie,laine,fibres
synthétiques,rayonne,fibresmélangées.Lestissussontlistés
ci-dessousenfonctiondeleursépaisseurs.
Legers Batist
Moyens
Epais
Tricots
*Nonrecommandéspourlestissusextensibles.
Chiffon
Crêpe
Velourscôtelé
Flanelle
Gabardine
Lin
Crêpedelaine
Mousselinede
laine
Lainage(manteau)
Canevas
Jean
Ciré
Vêtementsde
marine
Jersey
Jerseydouble
Tricot
Nylon
Polyester
*Retorsmercerisé50
Cotonmélangé
Polyester
*Retorsmercerisé50
Cotonmélangé
Polyester
*Retorsmercerisé40
Cotonmélangé
Polyester
Nylon
2020
2020
2020
2045
Aiguilles
GrosseurCatégorieFilsTissus
11/80Cotonmélangé
14/90
16/100
11/80
14/100
16/110
Page 20
Coutureàl’aiguille
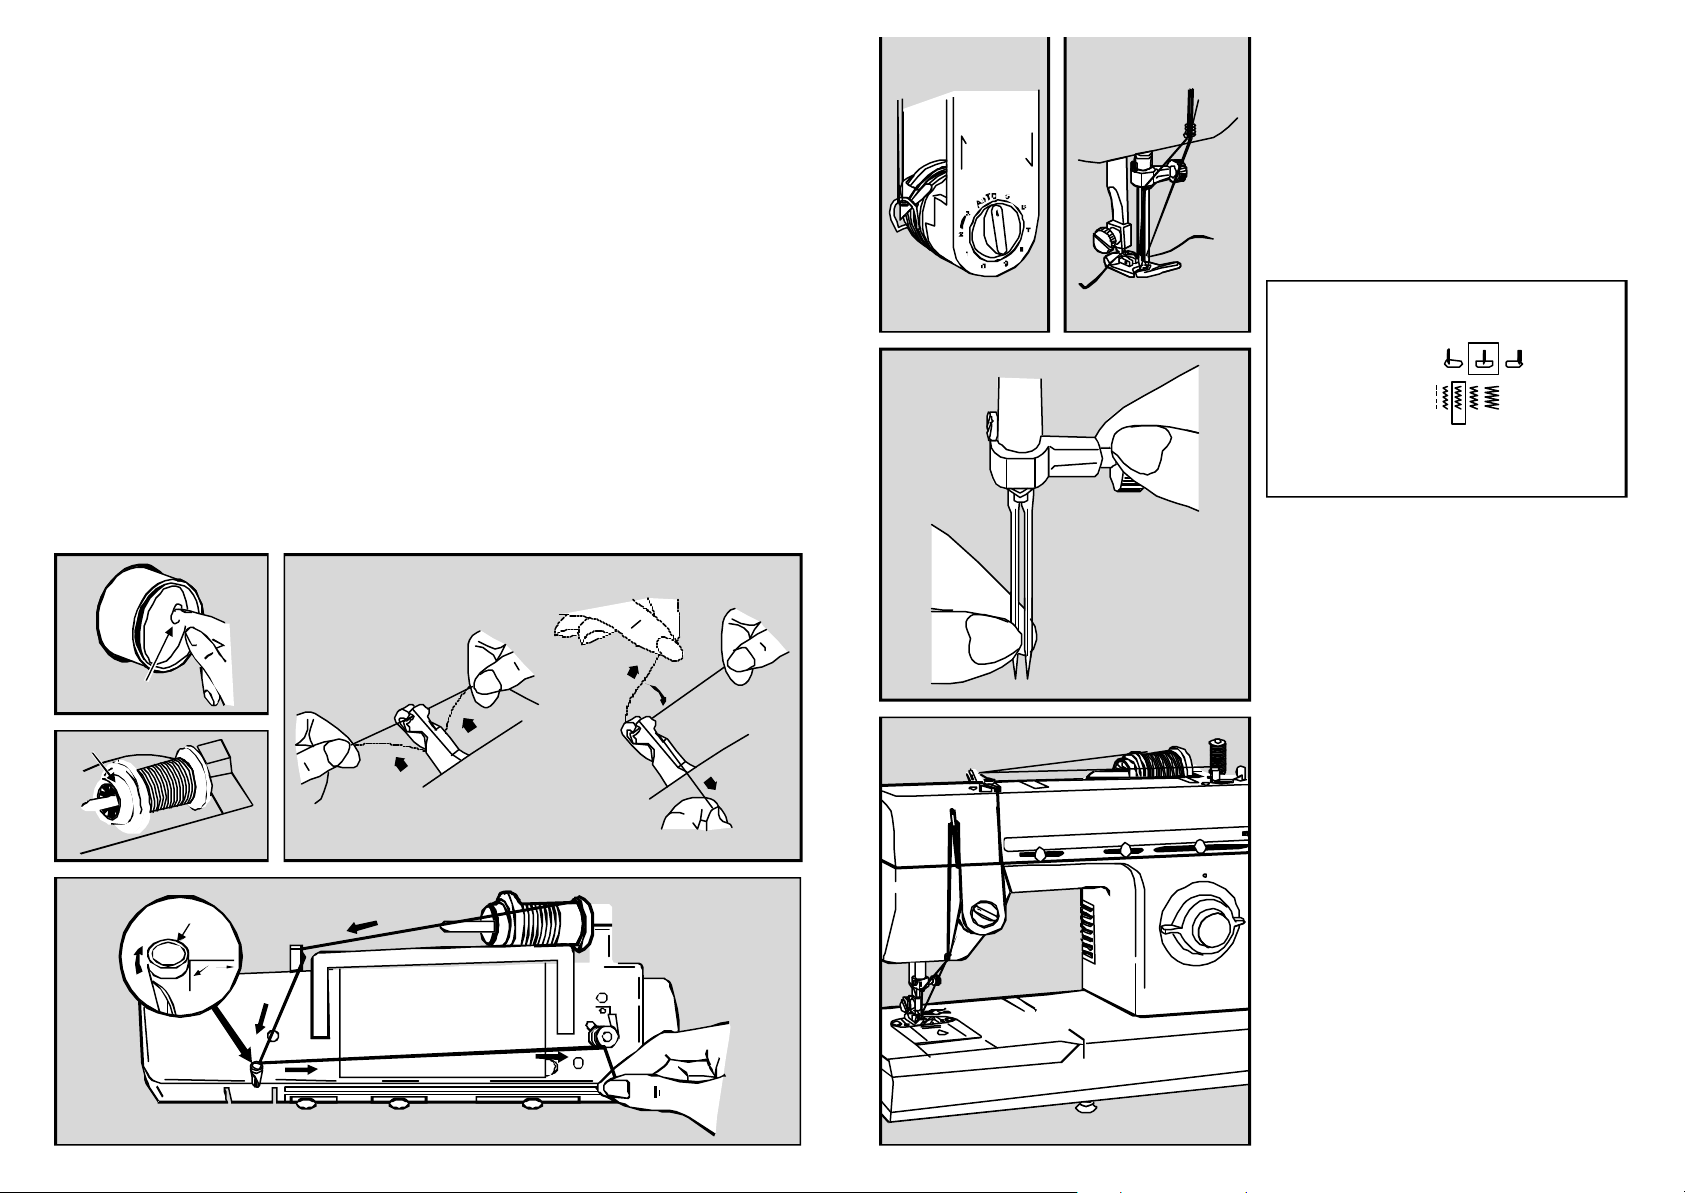
Windingabobbin
Windingabobbinisquickandeasywhenyoufollowthedirectionsbelow.Alwayswindthebobbin
beforethreadingthemachineandneedle.
•Pushinindent(1)onhandwheeldisc.Thiswillstoptheneedlefrommoving.
•Placespoolofthreadonspoolpin.
•Slidespoolcap(2)firmlyoverrimofspooltopreventthreadtangling.
•Leadthreadfromspoolandsnapintothreadguidepost(3).
•Windthreadclockwisearoundfrontofbobbinwindertensiondisc(4).
•Passthreadend,frominside,throughsmallholeinrimofbobbin.
•Placebobbinonspindleandpushittotheright.
•Holdingthreadend,stepon speedcontrollertorunmachineuntildesiredamountofthreadis
wound.(Windingstopsautomaticallyoncebobbinisfull).
•Cutthread;pushbobbintotheleftandremoveitfromspindle.
•Trimthreadendfromtopofbobbin.
•Returnhandwheeldisctosewingpositionbypressingonsideoppositeindent.
3
jumelée
Cetteaiguillepermetlacouturededeuxlignes
parallèlesenuneoudeuxcouleursdefil.
Votreboîted’accessoiresnecontientpas
d’aiguillejumeléenideporte-bobineauxiliaire.
Vouspourrezvouslesprocurerdansvotre
magasinSINGER.
Réglagesrecommandés
Sélectiondepoint:auchoix
Positiond’aiguille:
Largeurdepoint:
3 4 51 2
Sélecteurdelongueur:2-5
Piedpresseuruniversel(B)
Plaqueàaiguille:universelle(A)
•Remontezl’aiguille.
•Insérezl’aiguillejumelée,côtéplatdutalon
versl’arrièredelamachine.
•Enfilezlamachine,commepourlacoutureà
l’aiguillenormaleetpassezlefildanslechas
del’aiguillegauche.
1
2
4
•Mettezenplaceleporte-bobineauxiliairedans
l’orificesituésurledessusdelamachine,
commeillustré.
•Enfileznormalementlamachineavecle
secondfil.
•Passezdanslesautresguides-fils,saufle
dernier,etenfilezlechasdel’aiguilledroite.
•Placezlesfilssouslepiedpresseur.
•Baissezdoucementláiguilleentournantle
volantàlamainpourvousassurerqu’elle
passebiendansletroudelaplaqueàaiguille.
Attention:
Surtout,n’utilisezpasunelargeurdepoint
supérieureàcellequivousaété
recommandée.
Page 21
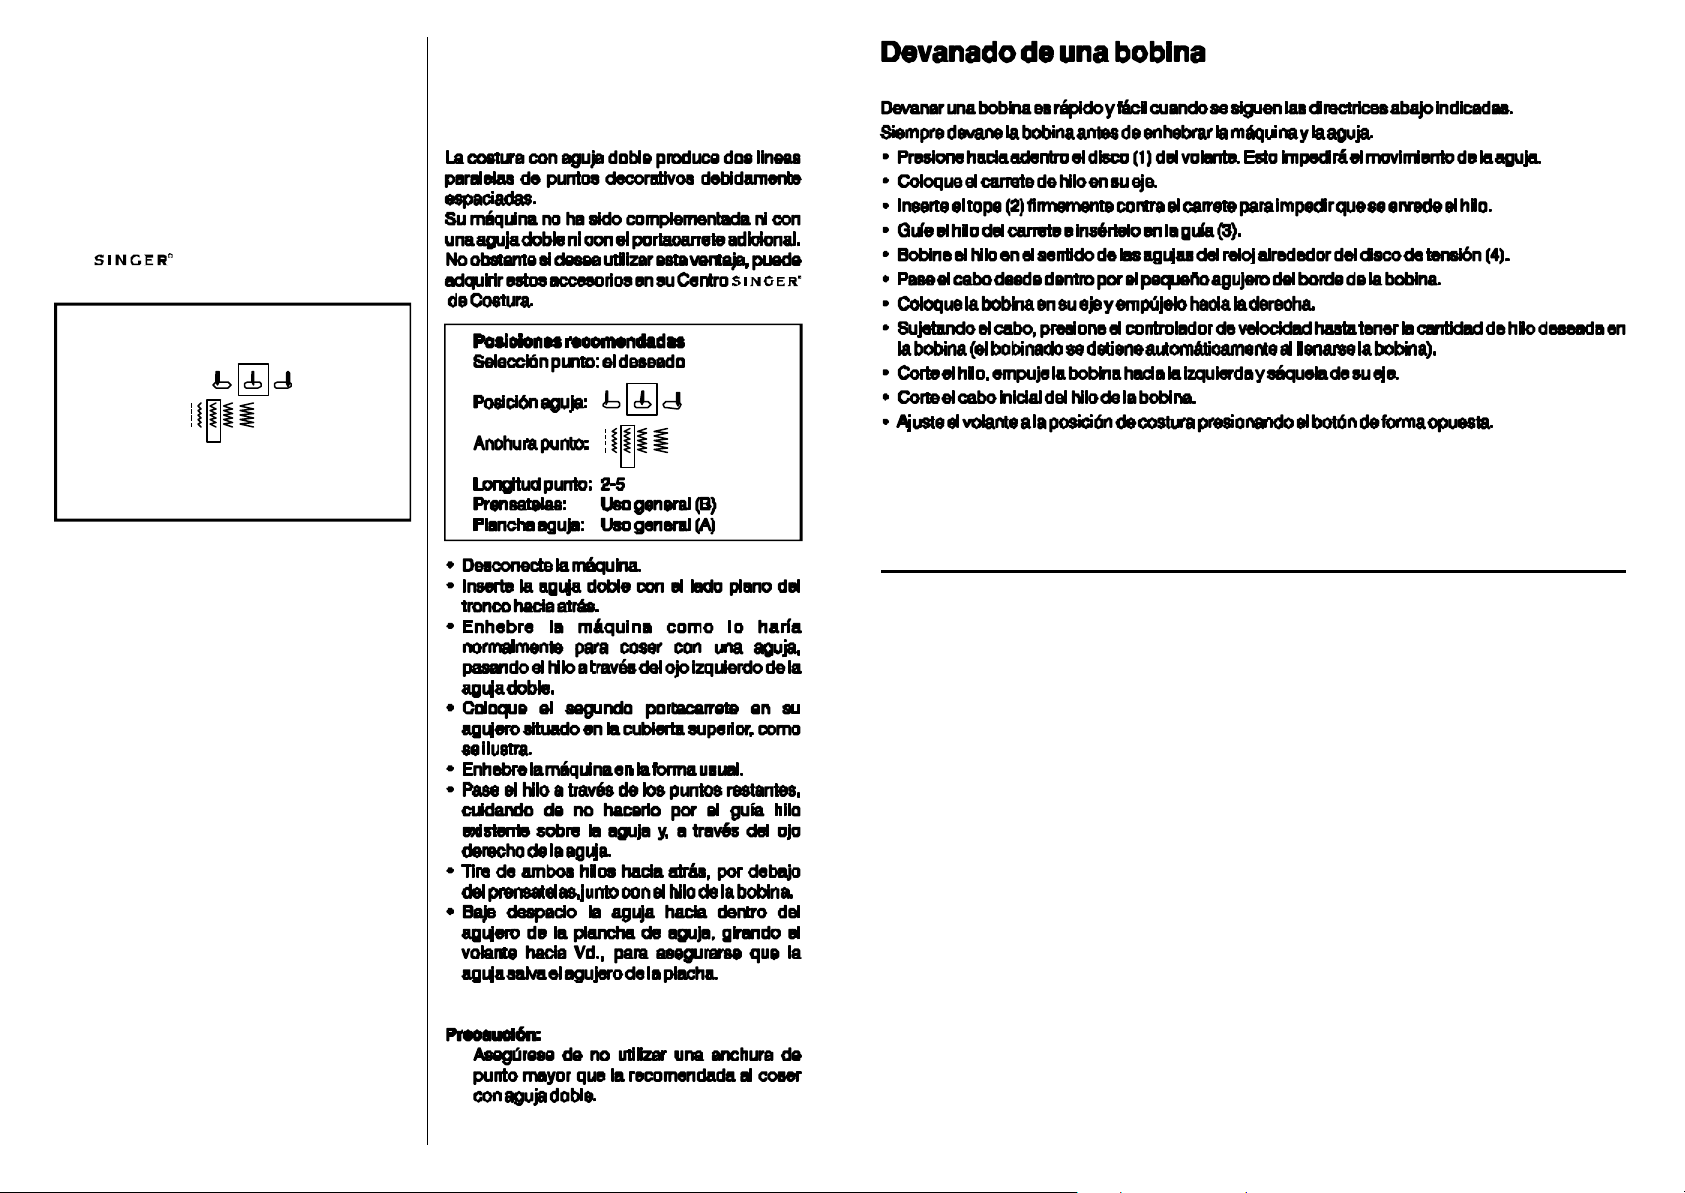
Twinneedle
8
Costuracon
sewing
Twinneedlesewingproducestwoparallellines
ofclosely-spaceddecorativestitching.Youcan
sewwitheitheroneortwothreadcolors.
Yourmachineisnotsupliedwiththetwinneedle
orspoolpin.Thesemaybeobtainedfromyour
localretailerasoptionalaccessories.
Recommendedsettings
StitchSelection:Desiredstitch
NeedlePosition:
StitchWidth:
StitchLength:2-5
Foot:GeneralPurpose(B)
NeedlePlate:GeneralPurpose(A)
•Turnthemachineoff.
•Insertthetwinneedlewiththeflatsideofthe
shanktowardstherearofthemachine.
•Threadthemachineasyounormallywouldfor
singleneedlestitching,andpassthethread
throughthelefteyeofthetwinneedle.
•Insertasecondspoolpinintotheholeonthe
topcoverofthemachine,asillustrated.
•Threadthemachineintheusualway.
•Passthethreadthroughtheremainingpoints,
makingcertaintoomitthethreadguidejust
abovetheneedleandpassthreadthrough
righteyeofneedle.
•Drawboththreadsunderthefootandback
alongwiththebobbinthread.
•Slowlylowertheneedleintotheholeinthe
needleplatebyturningthehandwheeltoward
youtomakesuretheneedleclearstheplate.
Caution:
Makesurenottouseastitchwidthgreater
thanthatwhichisrecommendedwhentwin
needlestitching.
3 4 51 2
agujadoble
3 4 51 2
Remplissagedelacanette
Ensuivantlesconseilsci-dessous,ilestfacilederemplirunecanette.Confectionneztoujoursla
canetteavantd’enfilerlamachine.
•Appuyezsurlapentelurededébrayage(1)pourarrêterlemouvementdel’aiguille.
•Mettezenplacelabobinedefilsurleporte-bobine.
•Bloquezlabobineàl’aidedel’étrier(2)pouréviterquelefils’emmêle.
•Tirezlefiletenclenchez-ledansleguide-fil(3).
•Passezlefilentrelesdisquesdetensiondudévidoir(4)enlecroisantdanslesensmontréparles
flèches.
•Passezl’extrémitédufilàtraversundestrousdelacanette,del’intérieurver sl’extérieur.
•Engagezlacanettesurlesupportdudévidoiretpoussez-laversladroite.
•Tenezl’extrémitédufil,appuyezsurlerhéostat.Remplissezlacanetteaveclaquantitédefildésiré.
(Leremplissages’arrêteraautomatiquementquandlacanetteserapleine).
•Coupezlefiletrepoussezl’axedudévidoirverslagaucheavantderetirerlacanette.
•Coupezl’extrémitédufilsurledessusdelacanette.
•Remettezenplaceledisquededébrayageenappuyantsurlecôtéopposéausigle.
Page 22
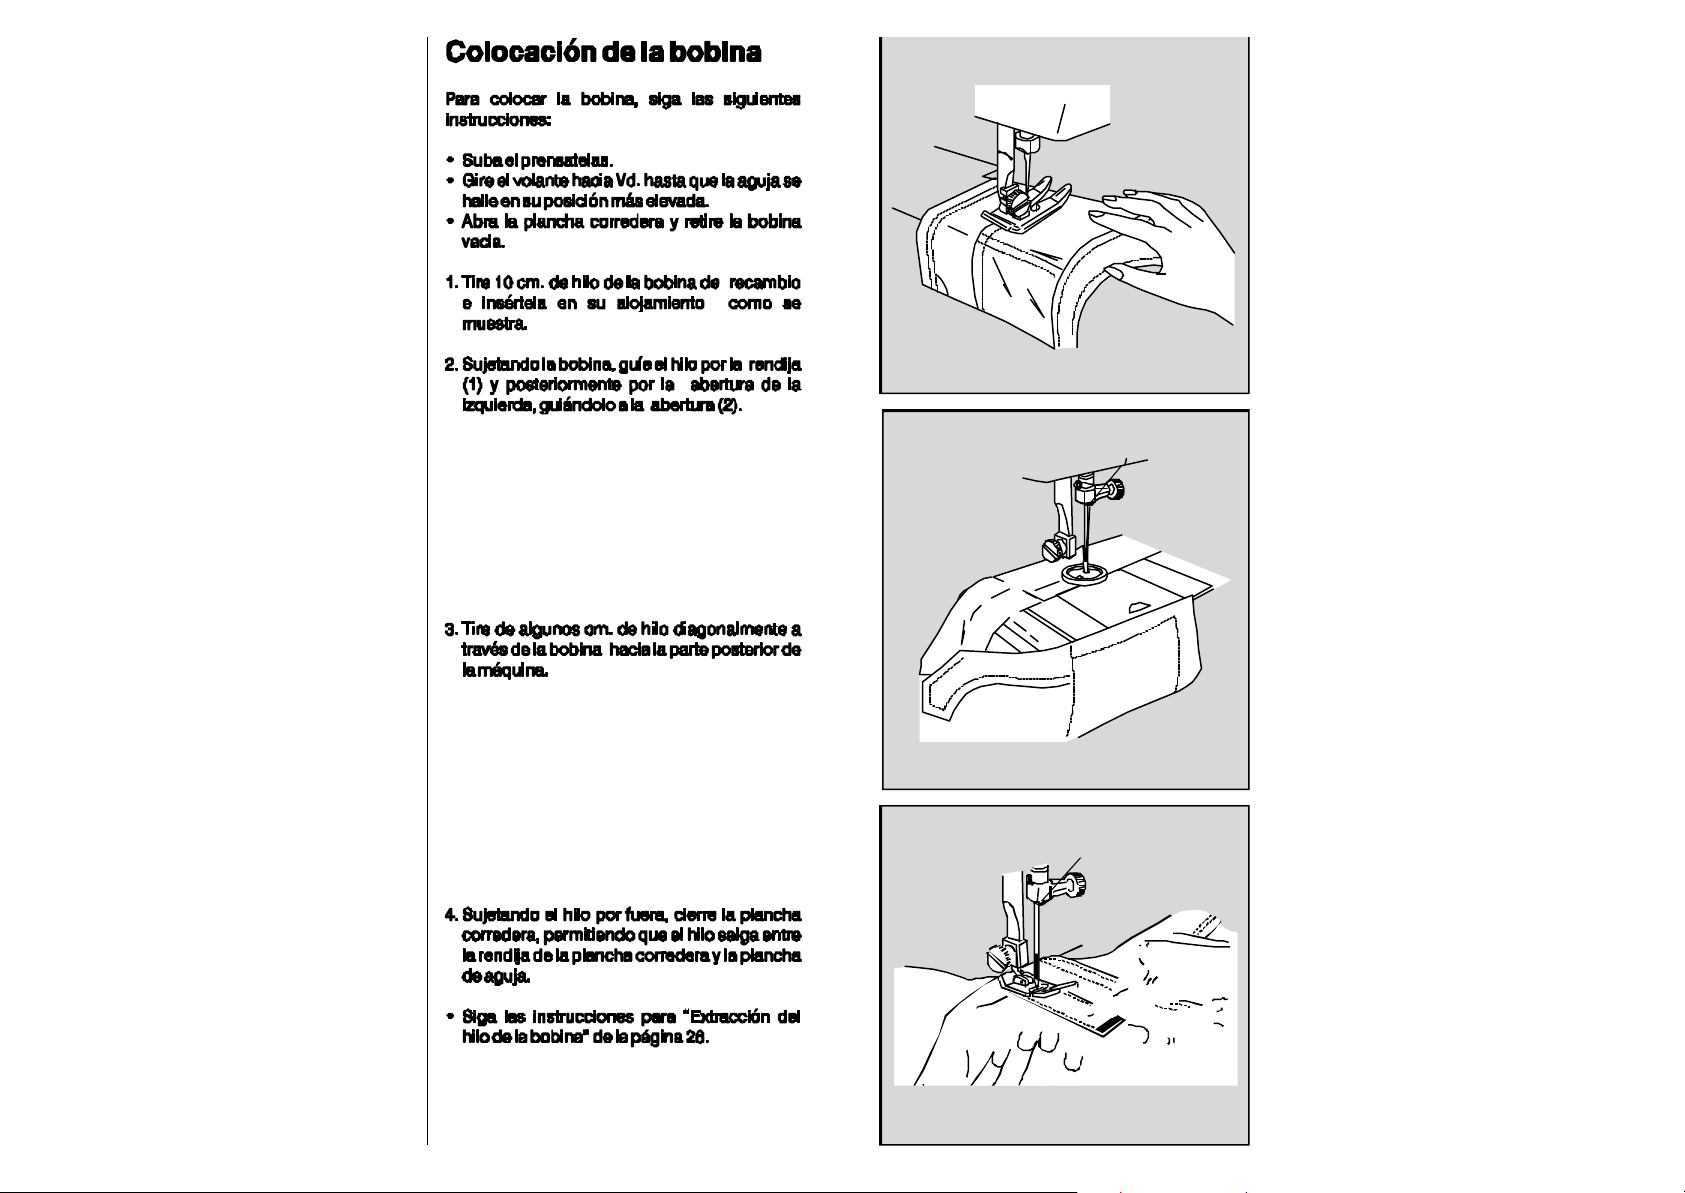
Insertingabobbin
Toinsertabobbin,followtheinstructionsbelow:
•Raisepresserfoot.
•Turnhandwheeltowardyouuntilneedleisin
itshighestposition.
•Openslideplateandremoveemptybobbin.
Coutureavecle
bras-libre
(MachineAvec10points)
Votrecoutureserasimplifiéeenutilisantlebraslibredevotremachinepourlesouvrages
tubulaires.
1.Pull4”(10cm)ofthreadfromreplacement
bobbinandinsertbobbinintocase,as
shown.
2.Holdingbobbininplace,guidethreadinto
notch(1)andthendowntheslottotheleftand
guidearoundintonotch(2).
3.Drawseveralinchesofthreaddiagonally
acrossthebobbintowardthebackofthe
machine.
Manches
•Surpiquerdesemmanchures,poserdes
ceinturesetterminerdesbasdepantalons
sontdestravauxgrandementfacilitésen
utilisantlebras-libre.
Boutons
•Pourcoudrelesboutonssurdespoignetsou
surdesencolures,lebras-librevouspermettra
demieuxsurveillervotretravailetdemieuxle
présentersouslepiedpresseur.
Pointd’arret
4.Whileholdingthreadonoutside,closethe
slideplate,allowingthreadtoextend
throughtheslotbetweentheslideplateand
needleplate.
•Followdirectionsfor“RaisingBobbinThread”
onpage26.
•Cespointsrenforcentlesemplacementsqui
subissentdefortestractions.Vouspouvezles
réalisersurdesvêtementsquevousavez
achetésousurceuxquevousconfectionnez
vous-même.Pourrenforcerlespoches
plaquéesetlesbridesdeceintures,utilisezle
bras-librepouréviterunetropgrandemasse
detissualentourdel’aiguille.
Page 23
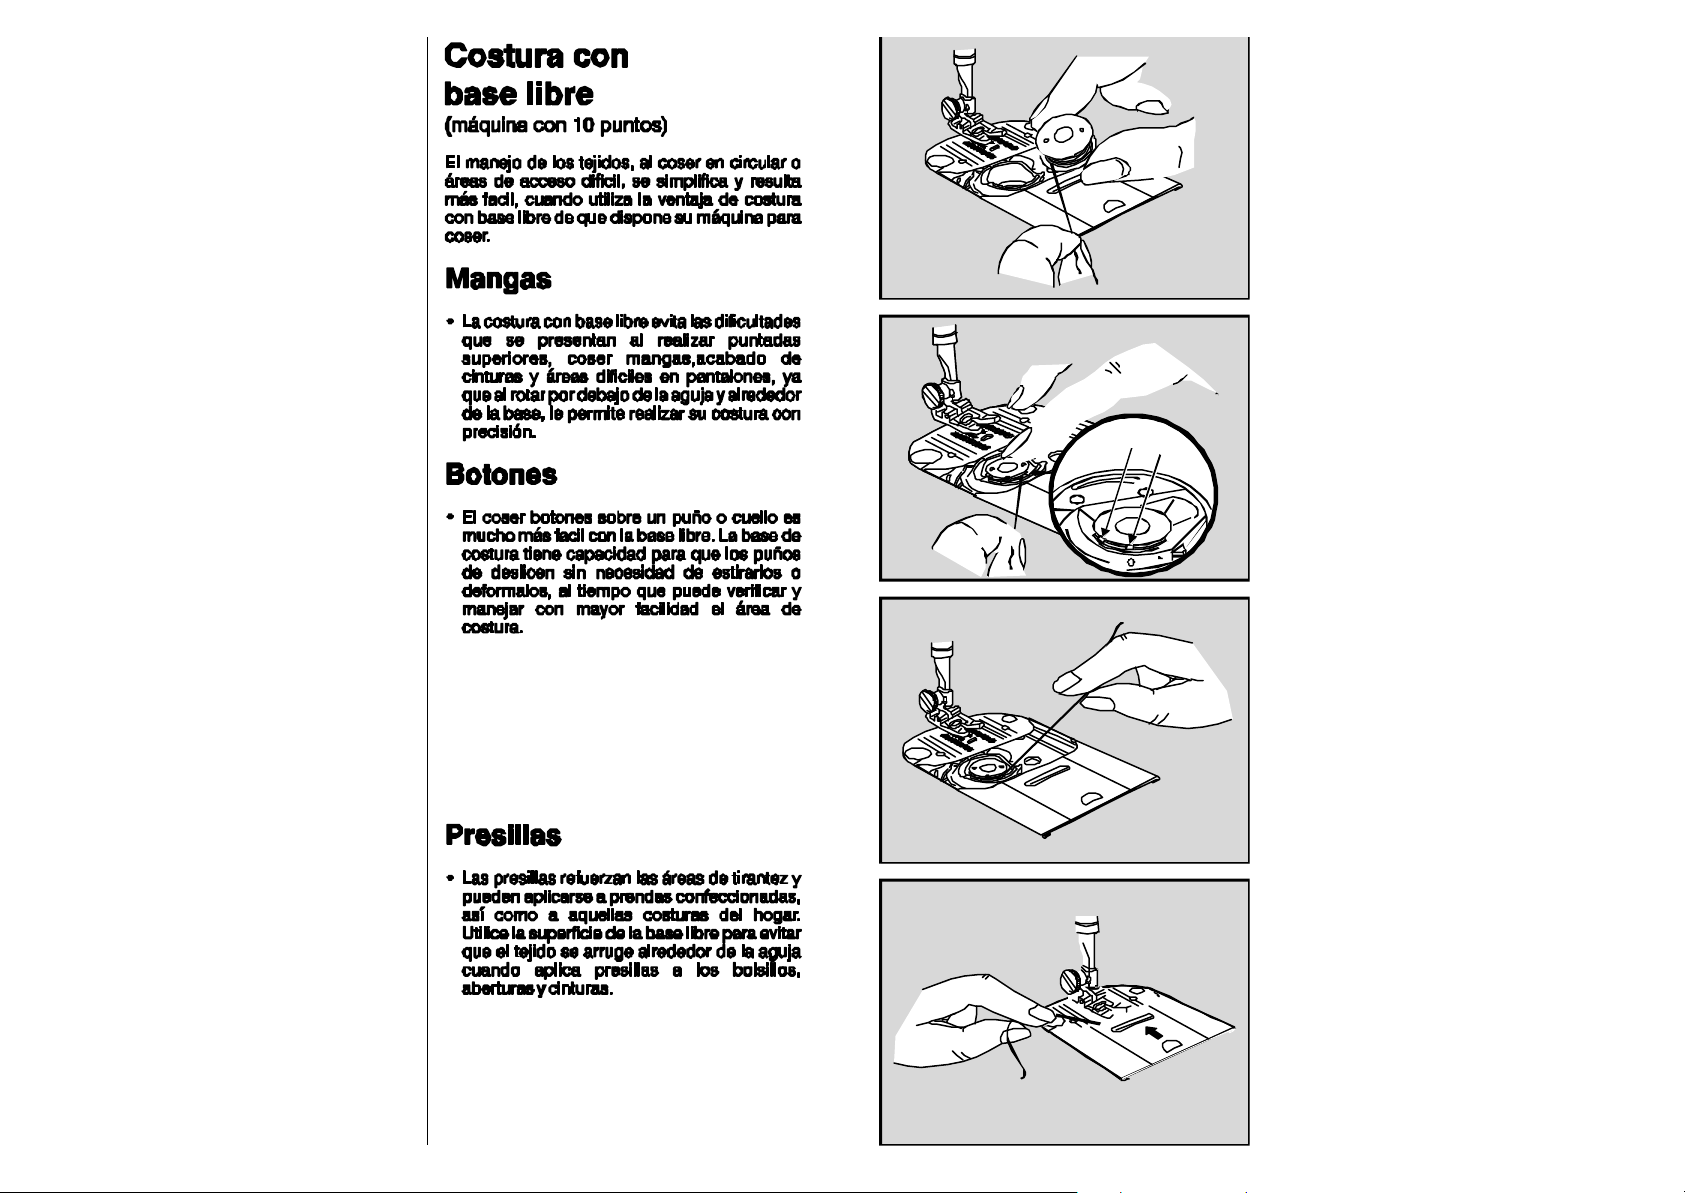
Free-arm
7
Miseenplacedela
sewing
(10StitchMachine)
Fabrichandling,whensewingtubularandhard
reachgarmentareas,issimplifiedandmade
easierwhenyouusethefree-armfeatureofyour
sewingmachine.
canette
Pourmettreenplacelacanette,faitescomme
suit:
•Relevezlepiedpresseur.
•Relevezl'aiguilleenpositionhaute.
•Ouvrezlaplaqueglissièreetretirezlacanette
vide.
Sleeves
•Free-armsewingtakesthedifficultyoutof
topstitching,sleeves,finishingwaistbands
andtrouserlegs.Projectsrotatesmoothly
undertheneedle,aroundthearm,allowing
youtoplaceyourstitchingaccurately.
Buttons
•Sewingbuttonsonacufforneckbandiseasy
withfree-armsewing.Thesewingarmallows
roomforcuffstosliponwithoutbeing
stretchedoutofshape,andyoucanalsosee
andhandlethestitchingareamoreeasily.
Bartacks
1.Tirez10cmdefildenouvellecanetteetposez
lacanettedanssonsupportcommeillustré.
2.Enmaintenantenplacelacanette,tirezlefil
danslecran(1)danslafente(2)surlagauche.
2
1
3.Tirezquelquescentimètresdefilendiagonale
etversl'arrièredelamachine.
•Bartacksreinforceareasofstrainandcanbe
appliedtoready-madegarments,aswellas
tothosesewnathome.Usethefree-arm
surfacetoavoidfabricbulkaroundtheneedle
whenyouapplybartackstopockets,pleats
andwaistlines.
4.Pendantquevoustenezlefilàl'extérieur,
fermezlaplaqueglissièrepourquelefilse
situedanslafenteentrelaplaqueglissièreetla
plaqueàaiguille.
•Suivrelesinstructionspourremonterlefilde
canettepage27.
Page 24
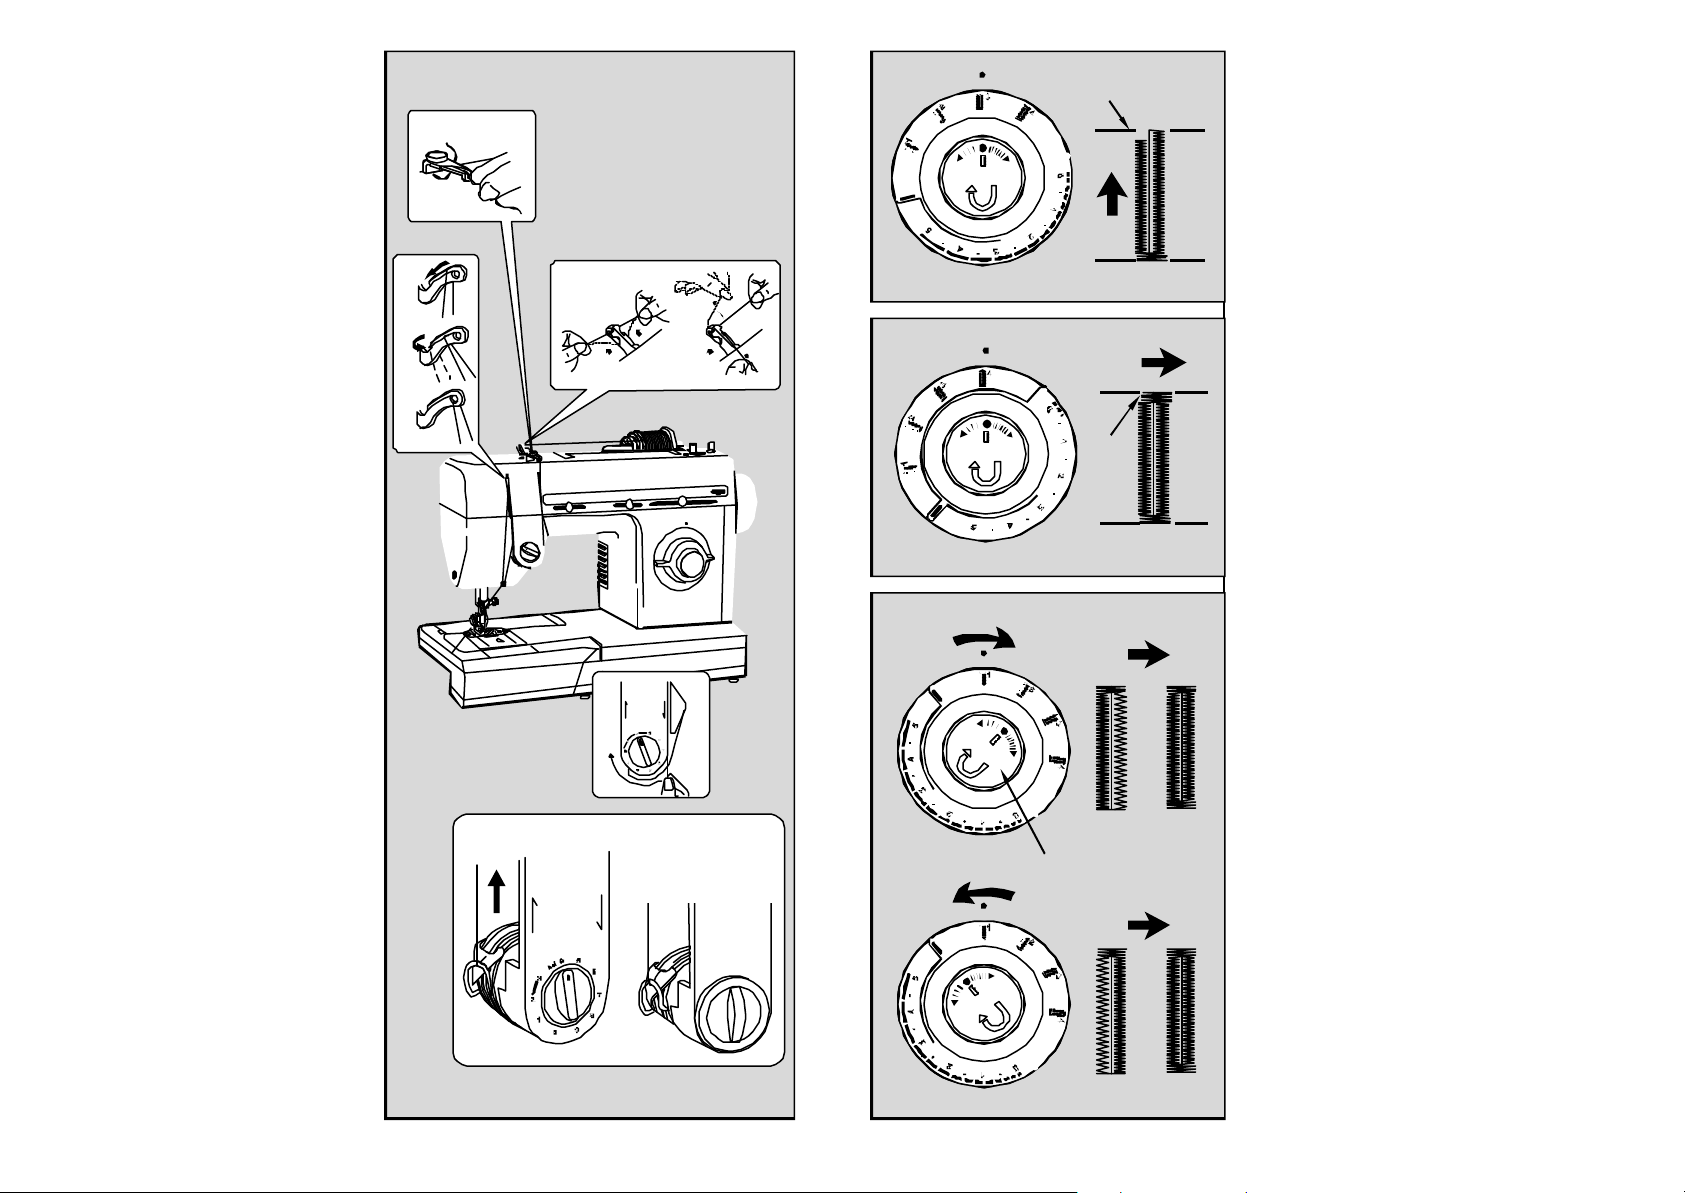
Threadingthemachine
1.Placespoolonspoolpin.Usethe
correctspoolpinholdertohold
spoolfirmlyinplace.
2.Liftthepresserfoot,andturnthe
handwheeltowardsyouuntilthe
take-upleverreachesitshighest
position.
5
2
Étape3
•Relevezl'aiguille.
•Tournezlesélecteurdelongueurpouramener
lesymbole(3)faceaupoint(•).
•Brodez(5).
l´étape3
6
1
Étape4
3.Leadthreadpassingitfirstunderthe
threadguide.Nextthroughthe
upperslot,leadingthethreadtothe
rightandaround(illustration1).
4.Passthethreadthroughthesecond
threadguidebyinsertingitunder,
andthenupfromtheleftandover
thetop(illustration2).
5.Passthethreadaroundthetension,
sothatitslipsbetweenthetension
disks(illustration3).
6.Withyourright handholdingthe
spoolofthread,pullthethread
cominguptheleftsideofthe
tensionuptowardsthetopofthe
machine,allowingthethreadto
slideinsidethehook.Youwillheara
clickingsound.(illustration5).
7.Passthethreadthroughthetake-up
leverasshowninillustration6.
•Relevezl'aiguille.
•Tournezlesélecteurdelongueurpouramener
lesymbole(4)faceaupoint.
6
•Brodezlepointd'arrêt(6).
•Relevezlepiedpresseur.Retirezl'ouvragede
lamachine.
•Coupezlesfils.
•Avecprécaution,coupezentrelesdeuxrangs
delaboutonnièreàl'aidedeciseauxfinsou
d'undécouseur.
Equilibragede
I
3
4
1
II
5
laboutonnière
Danscertainstissus,ilpeutapparaîtreune
différencededensitédepointentre
gaucheetdroitedelaboutonnière.
Cettedifférencepeutêtreaisémentcorrigéeen
tournantleboutonsituéaucentredu
sélecteurdelargeurdepoint.
Undéplacement,mêmetrèsfaibledecebouton
modifieladensité.
•Silespointsdudroitsonttropouverts,
•Silespointsdugauchesonttrop
Aprèsavoirtouteslesboutonnières,
remettezdanssapositioncentralelebouton
poussoirquivousaserviàéquilibrerles
boutonnières.
lecoté
(1)
tournezleboutonpoussoirversladroitejusq'à
coté
cequeladensitédespointsaugmente.
ouverts,tournezleboutonpoussoirversla
gauchejusq'àcequeladensitédespoints
augmente.
completé
(I)
coté
lecoté
(II)
22
71
Page 25
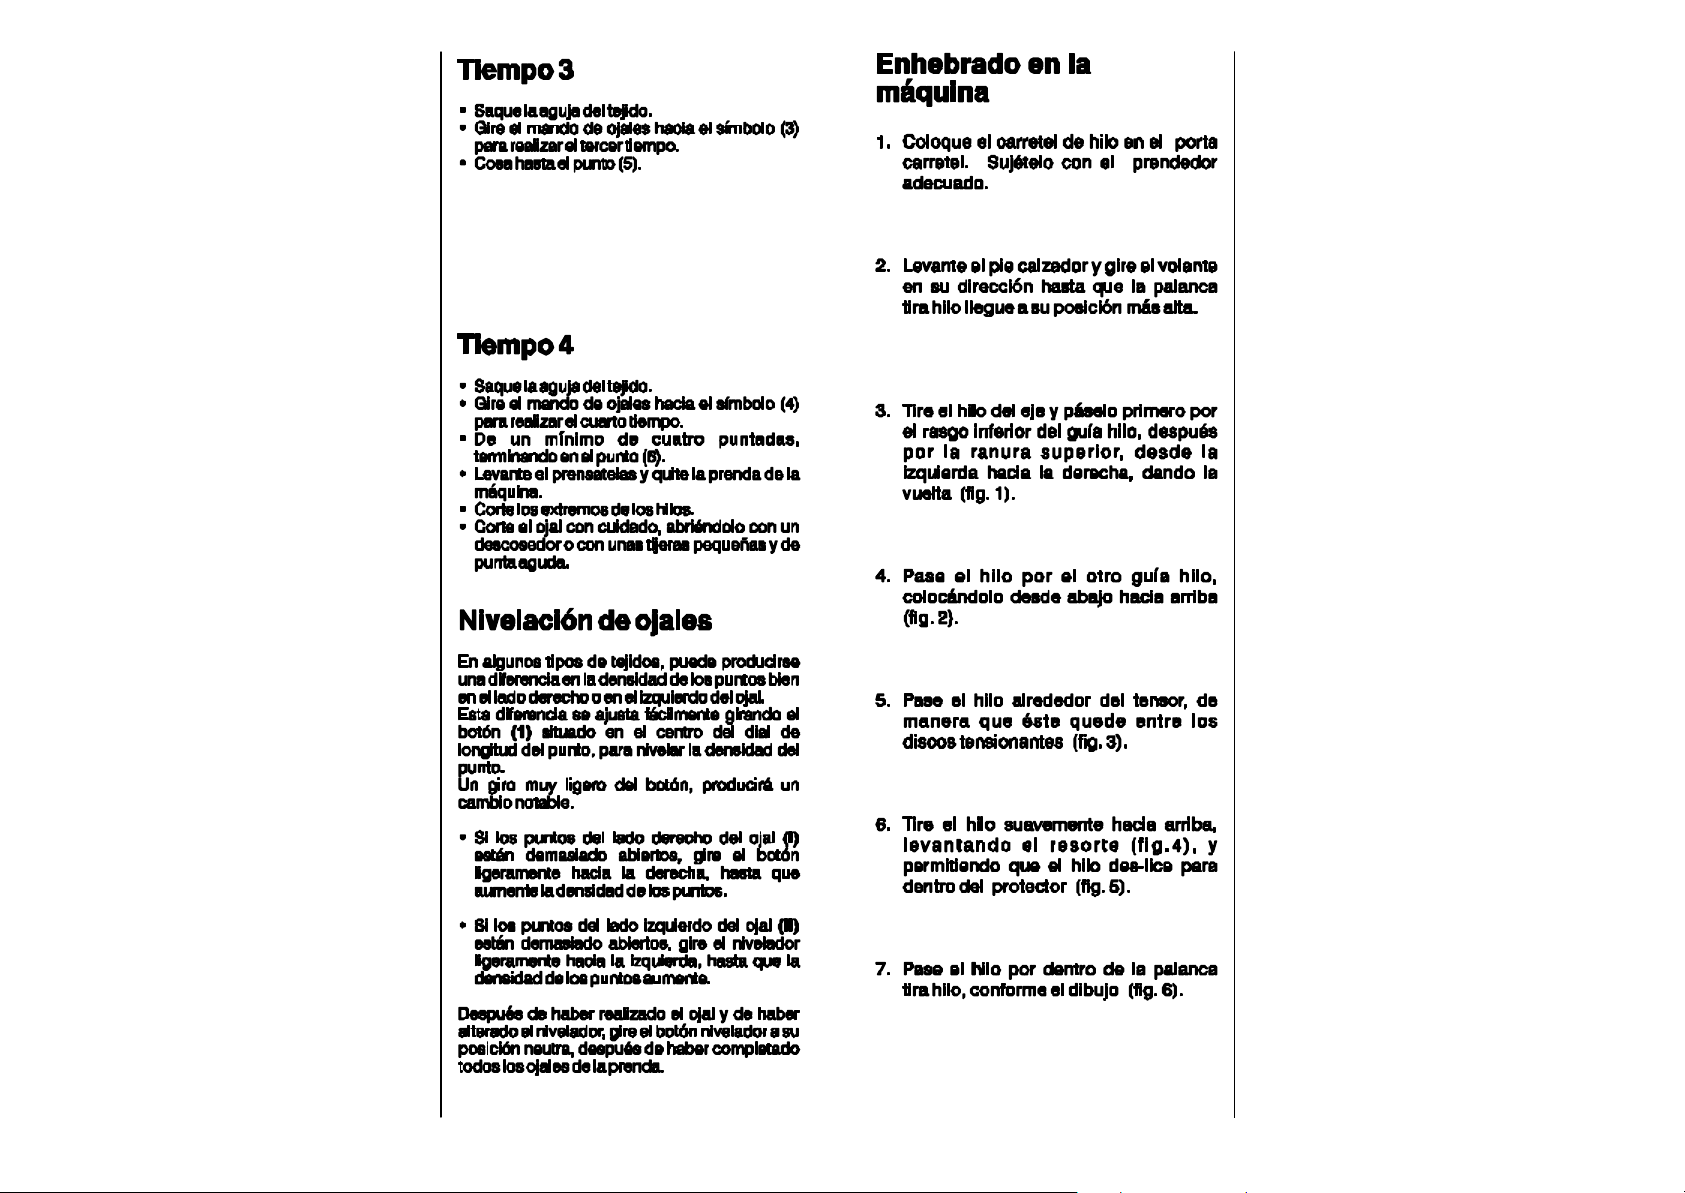
Step3
•Raiseneedleoutoffabric.
•Turnbuttonholedialtothebuttonholesymbol
(3)forthethirdstep.
•Stitchuptopoint(5).
Step4
•Raiseneedleoutoffabric.
•Turnbuttonholedialtothebuttonholesymbol
(4)forthefourthstep.
•Makeatleastfourstitches,endingatpoint(6).
•Raisepresserfootandremovegarmentfrom
machine.
•Clipthreadends.
•Carefullycutbuttonholeopeningwithaseam
ripperorsmall,sharpscissors.
Balancingthebuttonhole
Enfilagedela
machine
1.Placezlabobineoulafusettesurle
porte-bobine.Bloquez-labobineàl'aide
del'étrier.
2.Levezlepiedpresseurettournezle
volantversvousjusqu'àcequele
releveurdefilatteignesapositionlaplus
haute.
3.Tirezlefiletpassez-lepremièrement
danslafenteinférieureduguide-filet
ensuiteparlarainuresupérieure,dela
gaucheversladroite,faisantletour
(fig.1).
4.Passezlefildansl'autreguide-fil,
l'enfilantpar-dessousetensuiteversla
gaucheetpar-dessusleguide.(fig.2).
Onsomekindsoffabrics,theremaybea
differenceinthedensityofthestitchesonthe
rightortheleftsideofthebuttonhole.
Thisiseasilyadjustedbyturningthebalance
knob,inthecenterofthestitchlengthdialto
(1)
balancethedensityofthestitching.
Averyslightturnofthedialwillproducea
noticeablechange.
•Ifthestitchesontherightsideofthe
buttonholearetooopen,turnthebalance
dialslightlytotheright,untilthedensityofthe
stitchesincreases.
•Ifthestitchesontheleftsideofthebuttonhole
(II)
theleft,untilthedensityof thestitches
increases.
Afterthebuttonholehasbeenmadeandthe
balancehasbeenaltered,returnthebalance
dialbacktoitsneutralpositionafterallthe
buttonholesonthegarmenthavebeensewn.
70
(I)
aretooopen,turnthebalanceslightlyto
5.Passezlefilautourdelatension,de
façonqu'ilresteentrelesdisquesde
tension(fig.3).
6.Tirezlefildoucementverslehauten
levantleressort(fig.4),defaçonà
permettrequelefilglisseverslededans
duprotecteur(fig.5).
7.Passezlefildanslereleveurdefil,selon
l'illustration(fig.6).
23
Page 26
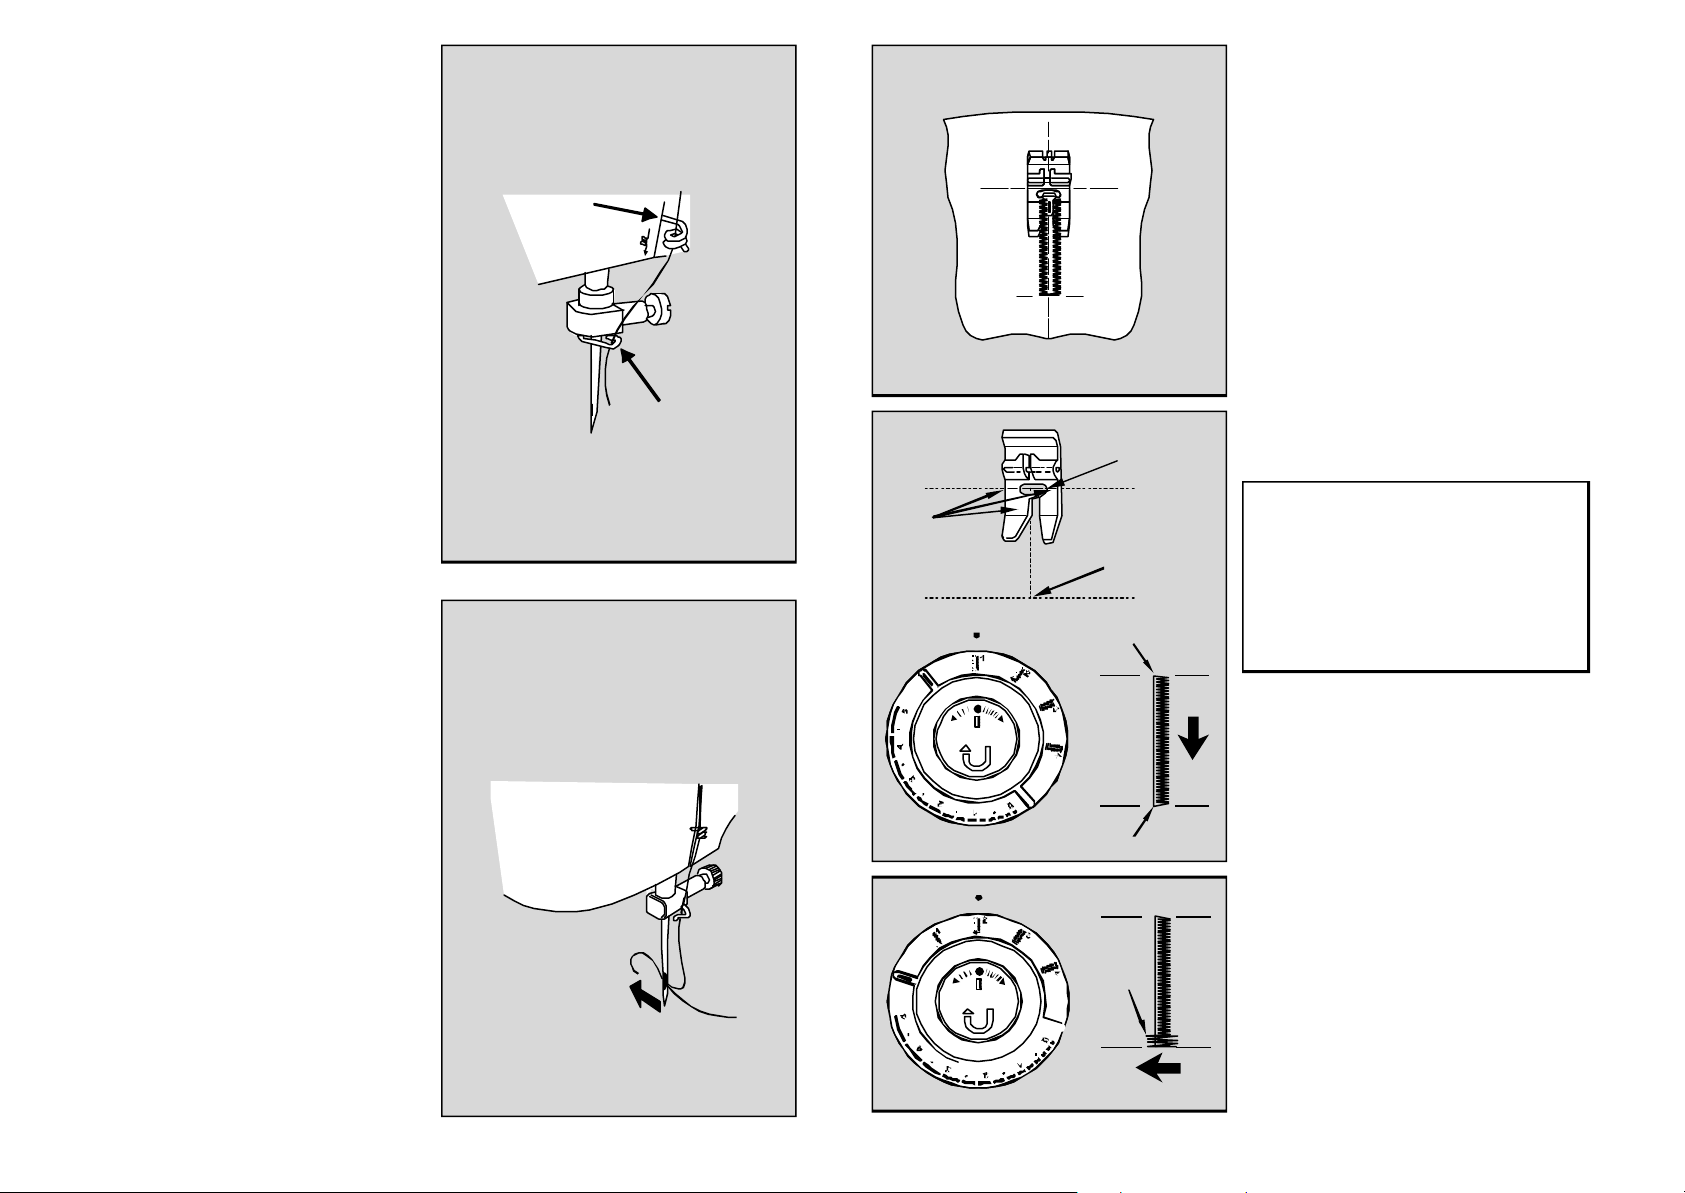
8.Topassthethreadthroughthespiral
threadguide,startfromtheleft,makinga
circularclockwisemovementwithyour
handtwice.Thethreadwillslideinsidethe
centerofthespiral(illustration7).
Boutonnière
7
4Étapes
9.Passthethreadthroughthelastthread
guideandturnhandwheeltowardyouuntil
needleisinitshighestposition.Lower
presserfoot.
10.Threadeyeoftheneedle.(illustration8).
Itisrecommendedthatyousetmachine
Note:
forstraightstitch,theneedleinthe
centerandinitshighestposition,and
thepresserfootloweredtomakethis
operationeasier.
IfthreadloopsornestsundertheFabricwhen
yousew,thethreaddidnotentertheupper
tensiondisks.Gobacktosteps5and6.
Trèsfacilementenquatreétapesvotremachine
brodedesboutonnièresden’importequelle
taille.
•Vousn’avezpasbesoindetournerletissunide
changerlapositiondel’aiguille.
•Faitestoujoursuneboutonnièred´essaissur
unéchantillondevotretissu.
•Assurez-vousquelacanettecontient
suffisammentdefilpourbrodervos
boutonnières.
•Pourbroderdesboutonnièressurdespièces
tubulaires,utilisezlebras-libredevotre
machine.
2
1
3
•Marquezl’emplacementdesboutonnières
commeindiquésurvotrepatron.
Réglagesrecommandés
Sélecteurdepoint:Boutonnière(A)
Largeurdepoint:Pré-sélectionnée
2
8
Plaqueàaiguille:universelle(A)
Étape1
•Relevezlepiedpresseur.
•Placezletissusouslepiedpresseur.
•Alignezlesrepèresrougesdupiedpresseur
surleslignesdetraçagedelaboutonnière(1).
•Tournezlesélecteurdelongueurpouramener
3
lesymbole(1)lèvredelaboutonnièrefaceau
point(•).
•Descendezl’aiguilledansletissu(2)en
tournantlevolantàlamainversvous.
•Brodez(3).
l'étapeun
24
4
Étape2
•Relevezl’aiguille.
•Tournezlesélecteurdelongueurpouramener
lesymbole(2)faceaupoint(•).
•Brodezlepointd’arrêt(4)(quatreàsixpoints).
69
Page 27
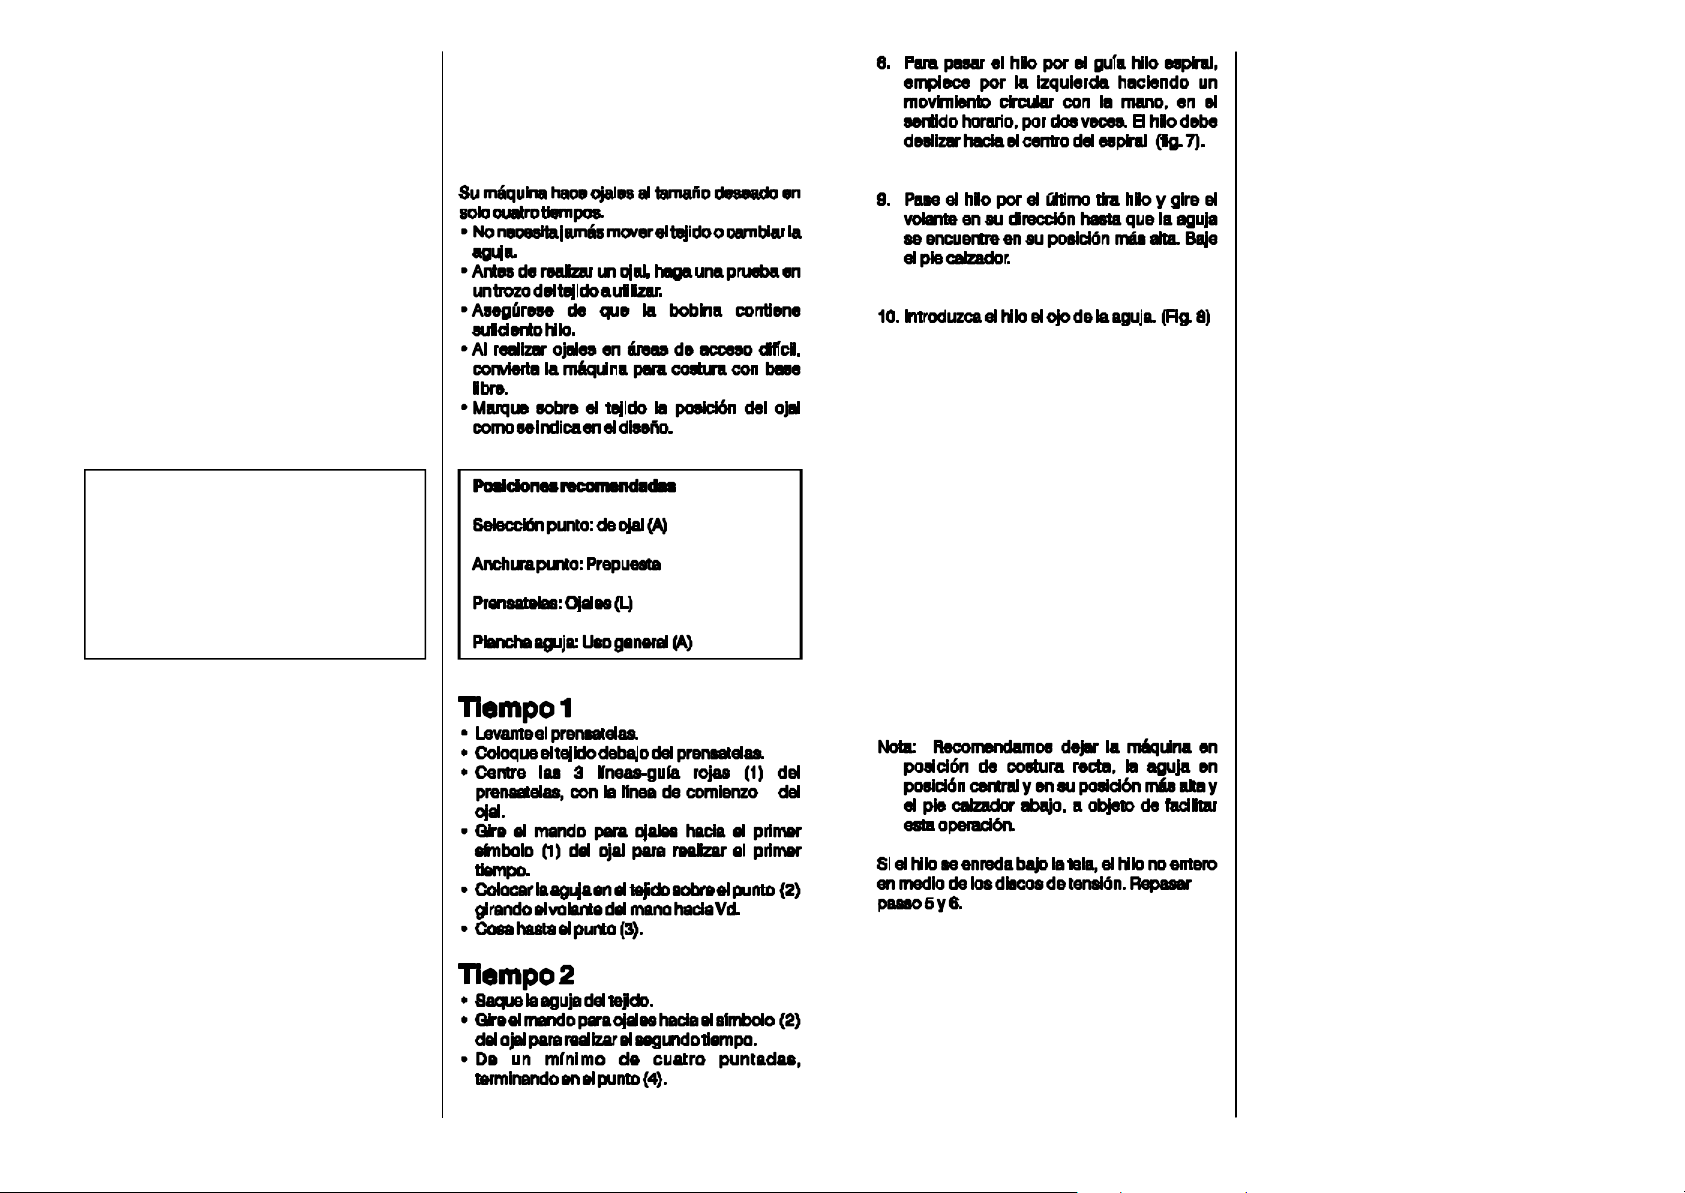
Four-step
6
buttonhole
Ojalesen
cuatrotiempos
8.Pourpasserlefildansleguide-filspiral,
commen-cezparlagauche,enfaisantun
mouvementcirculairedelamain,dansle
senshoraire,deuxfois.Lefildoitglisser
verslecentredelaspirale.(fig.7).
Yourmachinemakesbuttonholesinanysize
youchooseinfour,easysteps.
•Youneverneedtomovethefabricor
repositiontheneedle.
•Alwaysmakeapracticebuttonholeona
sampleofyourfabric.
•Besurebobbincontainsenoughthread.
•Whenmakingbuttonholesonhard-to-reach
areasconvertmachinebedtofree-arm
sewing.
•Markbuttonholepositiononfabricas
indicatedinpattern.
Recommendedsettings
StitchSelection:Buttonholestitch(A)
StitchWidth:Pre-set
Foot:Buttonhole(L)
NeedlePlate:GeneralPurpose(A)
Step1
•Raisepresserfoot.
•Placefabricunderfoot.
•Center3redguidelines(1)offootover
beginninglineofbuttonhole.
•Turnbuttonholedialtothebuttonholesymbol
(1)forthefirststep.
•Positionneedleinfabricatpoint(2)byturning
thehandwheeltowardsyou.
•Stitchdowntopoint3.
9.Passezlefilsurledernierguide-filettournez
levolantdansvotredirectionjusqu'àceque
l'aiguillesoitdanssapositionplushaute.
Baissezlepiedpresseur.
10.Enfilerlechatdel´aiguille.(Illustration8).
Afinderendrel'opérationplusfacile,
Nota:
choisirlepointdroit,l'aiguilledanssa
positioncentrale-etlaplushaute-etle
piedpresseurabaissé.
Silefilbouclesousletissuencousant,lefilsn’a
paspassedanslesdisquesdelatension
supérieure.Réviserlesétapes5at6.
Step2
•Raiseneedleoutoffabric.
•Turnbuttonholedialtothebuttonholesymbol
(2)forthesecondstep.
•Makeatleastfourstitches,endingatpoint(4).
68
25
Page 28
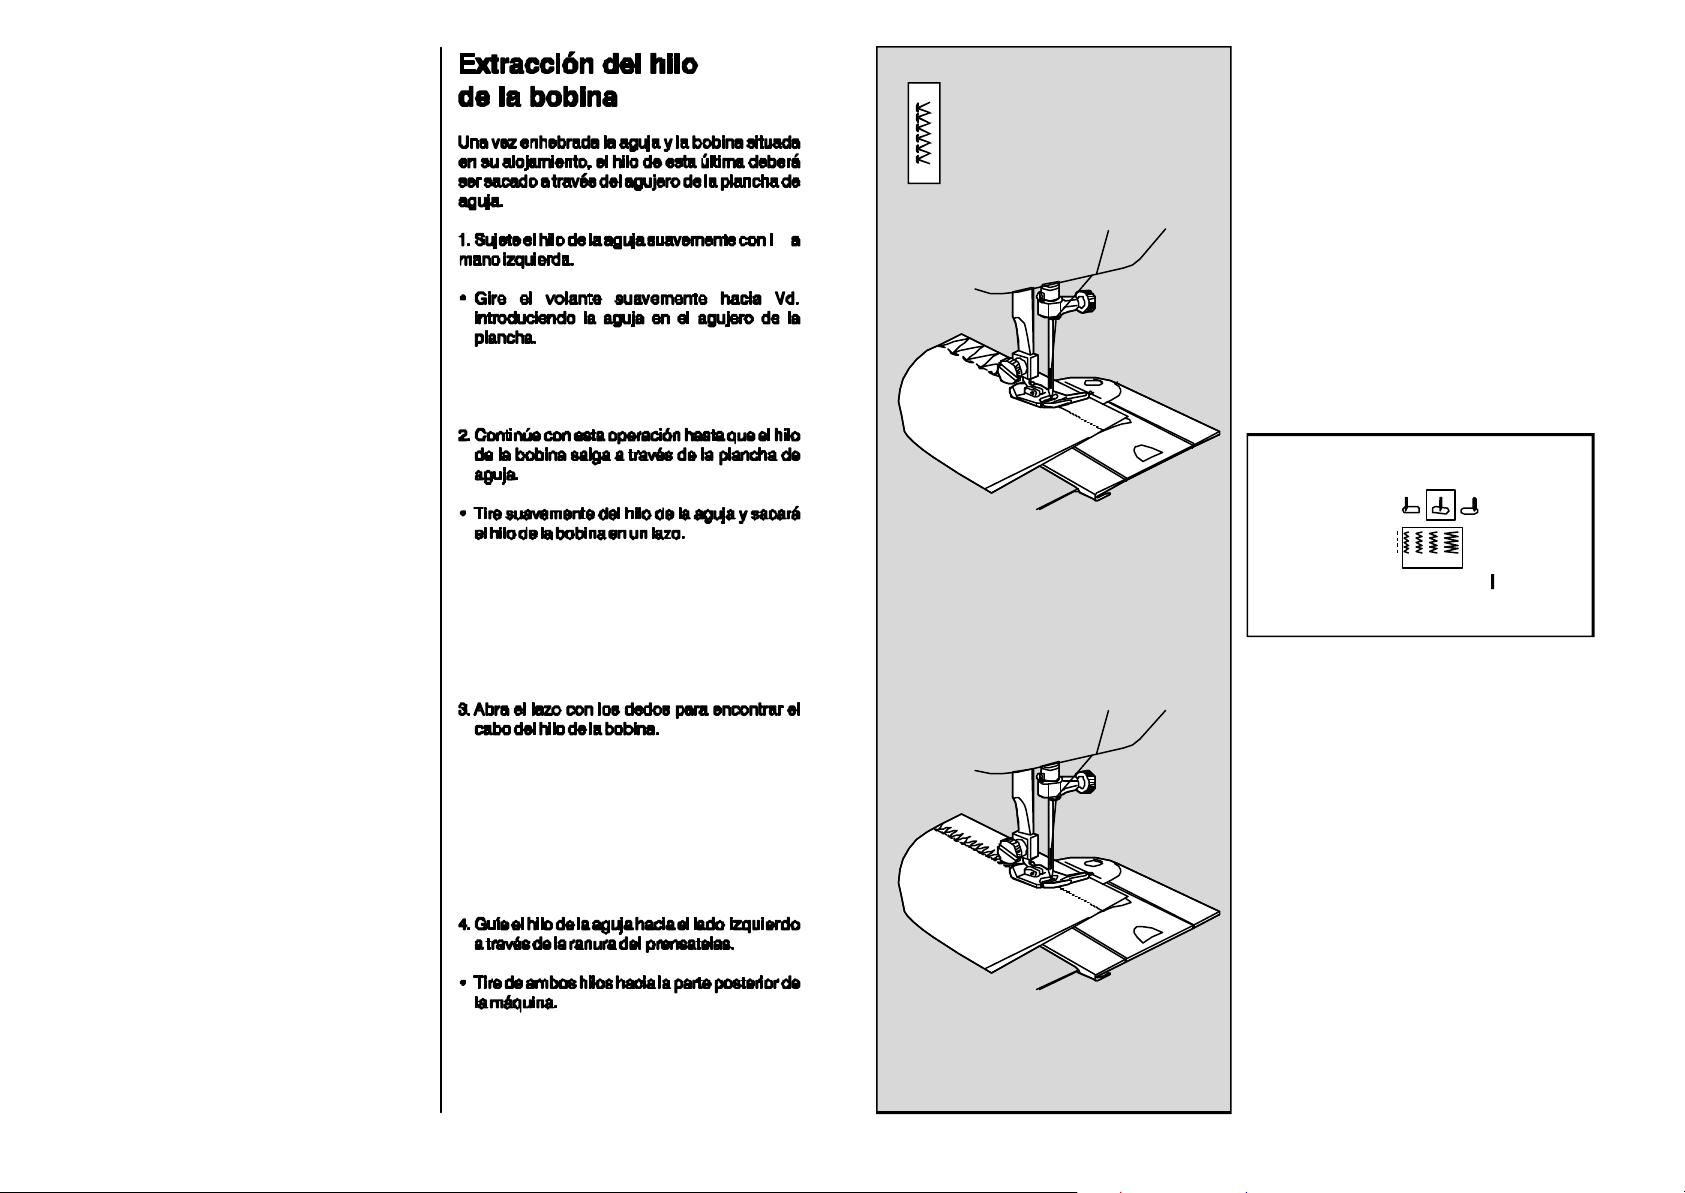
Raisingthebobbinthread
Oncetheneedlehasbeenthreadedandthe
bobbinplacedinthebobbincase,thebobbin
threadmustbebroughtupthroughtheholein
theneedleplate.
1.Holdneedlethreadlooselywithlefthand.
•Turnhandwheelslowlytowardyou,lowering
needleintoholeinplate.
2.Continuetodothisuntilneedlerisesabove
needleplate.
•Pullgentlyonneedlethreadandbringup
bobbinthreadinaloop.
3.Openloopwithfingerstofindendofbobbin
thread.
4.Drawneedlethreadthroughleftsideopening
inpresserfoot.
•Pullboththreadstobackofmachine.
26
Couturessurjetées
(seulementpourmachineavec10points)
Ilestpossibled’assemblerlescouturesdansles
tricotsettissusextensiblestoutenleurdonnant
simultanémentunefinition.Deuxméthodes
existentàceteffet.Onrecommandela1
méthodepourlestissusfermespourlesquels
unevaleurdecouturede6mm(1/4pouce)est
suffisante.Onrecommandela2méthodepour
lestricotsépaisettissusquionttendanceà
valeurdecouturepluslargepoursupporterles
coutures.Effectuezunessalpréalableafinde
déciderlaquelledesdeuxméthodesconvientle
mieuxautissuetauvêtement.
d’utiliseruneaiguilleàpointbille(bande
jaune),Style2045,lorsquevouscousezun
tricotsynthétique.
Réglagesrecommandés
Sélecteurdepoint:Couturessurjetées(E)
Positiond’aiguille:
1
2
Largeurdepoint:
Longueurdepoint:Symbloe()
Piedpresseur:Special(J)
Plaqueàaiguille:Universelle(A)
re
1méthode-Surjet
1.Taillezetajustezlevêtement,toutenallouant
1,6cm(5/8pouce)pourlavaleurdecouture.
Faufilezlalignedecouture.
2.Rognezlalisièredelacoutureégalementà
6mm(1/4pouce)àpeinedelacouture
faufilée.
3.Placezlacouturesouslepiedpresseurde
sortequelespointsdroitstombentsurle
faufilageetlespointszig-zagsverslalisièrede
lacouture1ainsiqu’illustré.
e
2méthode-Imitationdesurjet
1.Taillezetajustezlevêtement,toutenallo uant
1,6cm(5/8pouce)pourlavaleurdecouture.
Faufilezlalignedecouture.
2.Placelacouturesouslepiedpresseurdesorte
quelespointsdroitstombentsurlefaufilageet
lespointszig-zagsverslalisièredelacouture
2.
3.Pressezaprèsavoirfinilacoutureetrognezle
surplusdetissuafind’obtenirunelisièrede
coutureétroite.Lorsquelacouturesupportele
vêtement,nerognezpaslalisière.
3 4 51 2
e
Nemanquezpas
re
67
Page 29
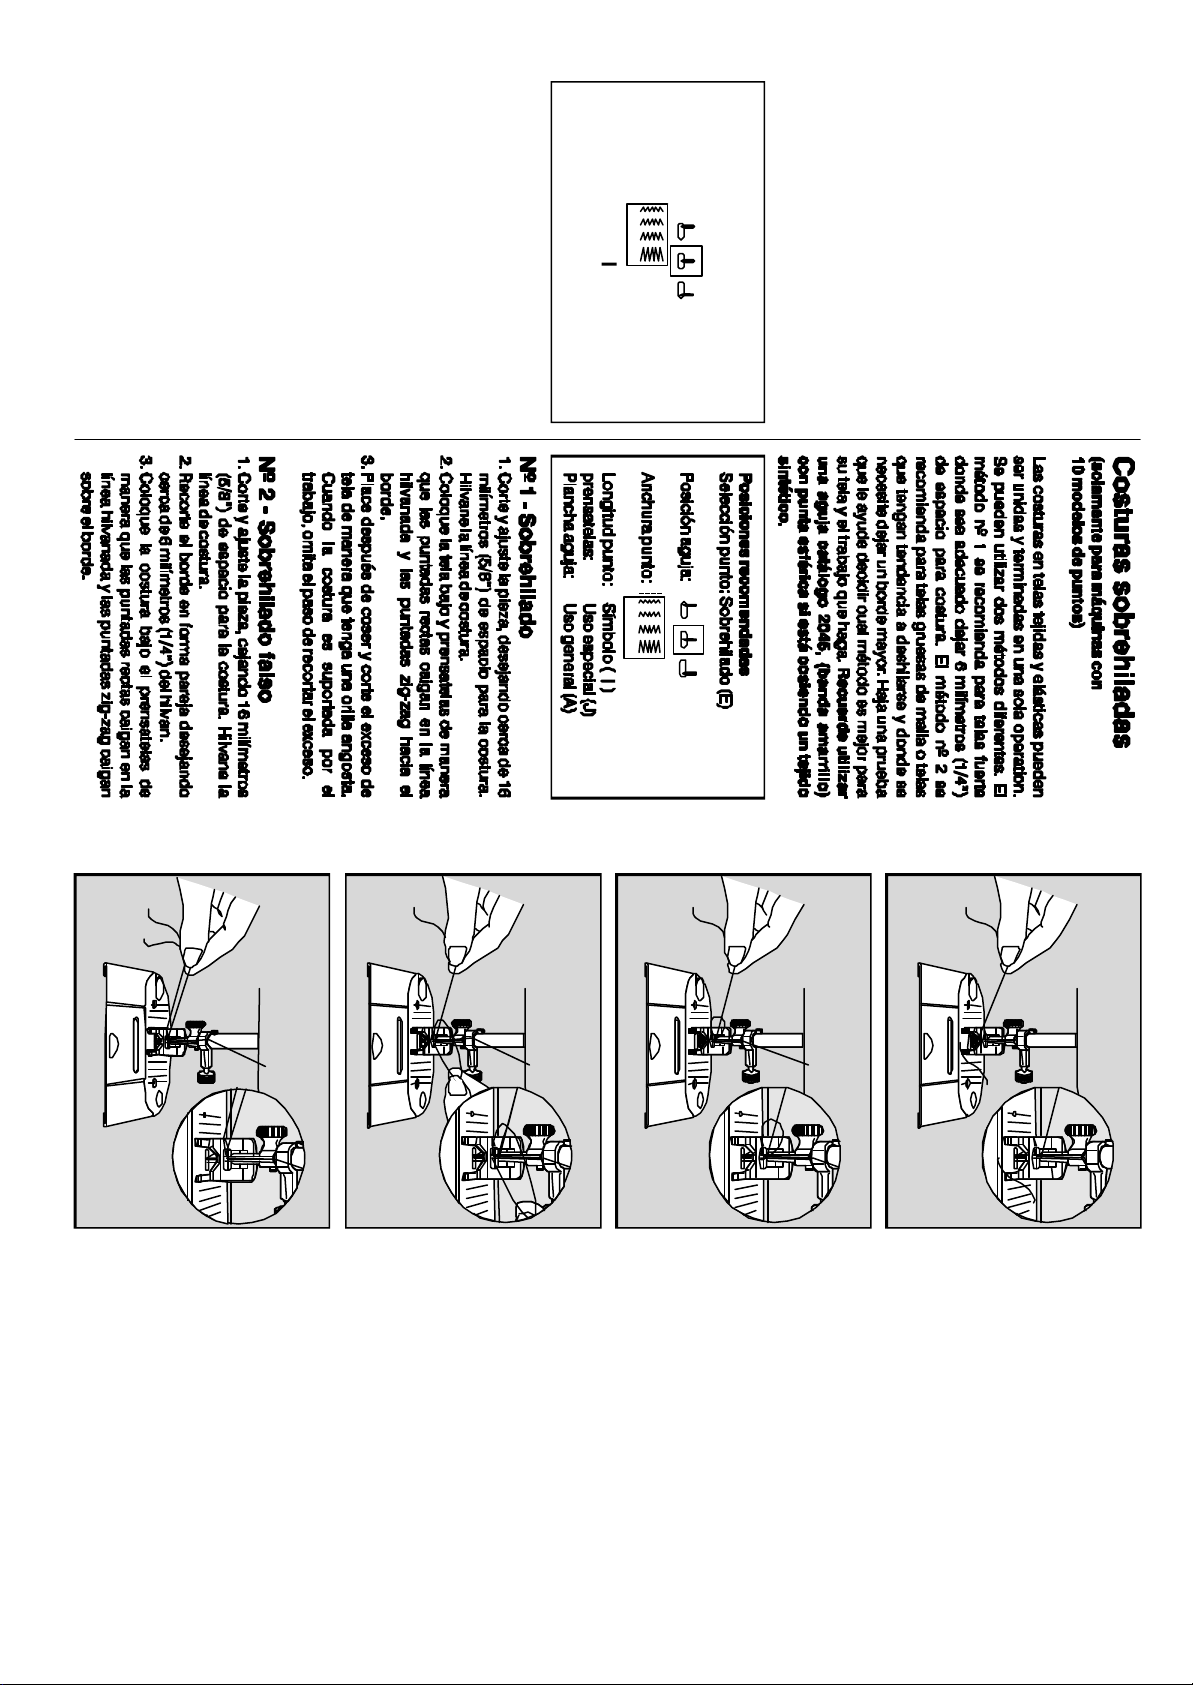
66
seamsupportsthegarment,omitthe
trimmingstep.
3.Pressafterstitchingandtrimawayexcess
straightstitchesfallonthebastedseamline
andzig-zagstitchestowardtheseamedge.
fabrictoproduceanarrowseamedge.When
MethodNº2-MockOveredging
(16mm)seamallowance.Basteseamline.
1.Cutandfitgarment,allowingfora5/8”
2.Placeseamunderpresserfootsothatthe
3.Placeseamunderthepresserfootsothatthe
straightstitchesfallonthebastedseamline
andzig-zagstitchestowardtheseamedge,
asillustrated.
1.Cutandfitthegarment,allowingfora5/8”
2.Trimseamedgeevenlytoascant1/4”(6mm)
fromseamlinebasting.
MethodNº1-Overedging
Requiredsettings
StichSelection:Overedgedseams(E)
NeedlePosition:
StitchWidth:
StitchLength:Mark()
Foot:SpecialPurpose(J)
(16mm)seamalowance.Basteseamline.
NeedlePlate:GeneralPurpose(A)
3 4 51 2
3 4 51 2
RemembertouseaCatalog2045ball-point
(yellowband)needleifyouaresewinga
syntheticknit.
Makeatestsampletohelpyoudecidewhich
methodisbestforyourfabricandgarment.
haveatendencytocurlorfray,andwherea
widerseamallowanceisneededforsupport.
methodsmaybeused.MethodNº1is
recommendedforfirmfabricswherea1/4”
(6mm)seamallowanceisadequate.MethodNº
2isrecommendedforbulkknitsandfabricsthat
(onlyformachinewith10stitches)
Seamsinknitandstretchfabriccanbejoined
andfinishedinoneoperation.Twodifferent
Overedgedseams
4
4.Passezlefildel’aiguilledanslafentegauche
•Placezlesdeuxfilsversl’arrièredelamachine.
dupiedpresseur.
3.Défaiteslaboucleaveclesdoigts.
3
•Tirelégèrementsurlefild’aiguillepourfaire
remonterlabouchedufildecanette.
2.Continuezàtournerlevolantjusqu’àceque
l’aiguilleremonteau-dessusdelaplaqueà
aiguille.
2
Lorsquel’aiguilleestenfiléeetlacanetteen
placedanssonsupport,lefildecanettedoitêtre
1.Tenezdelamaingauchelégèrementlefil
•Tournezlevolantàlamainlentementversvous
d’aiguille.
etfaitesdescendrel’aiguilledansletroudela
plaqueàaiguille.
remontéàtraveersletroudelaplaqueàaiguille.
1
Remonterlefil
decanette
27
Page 30
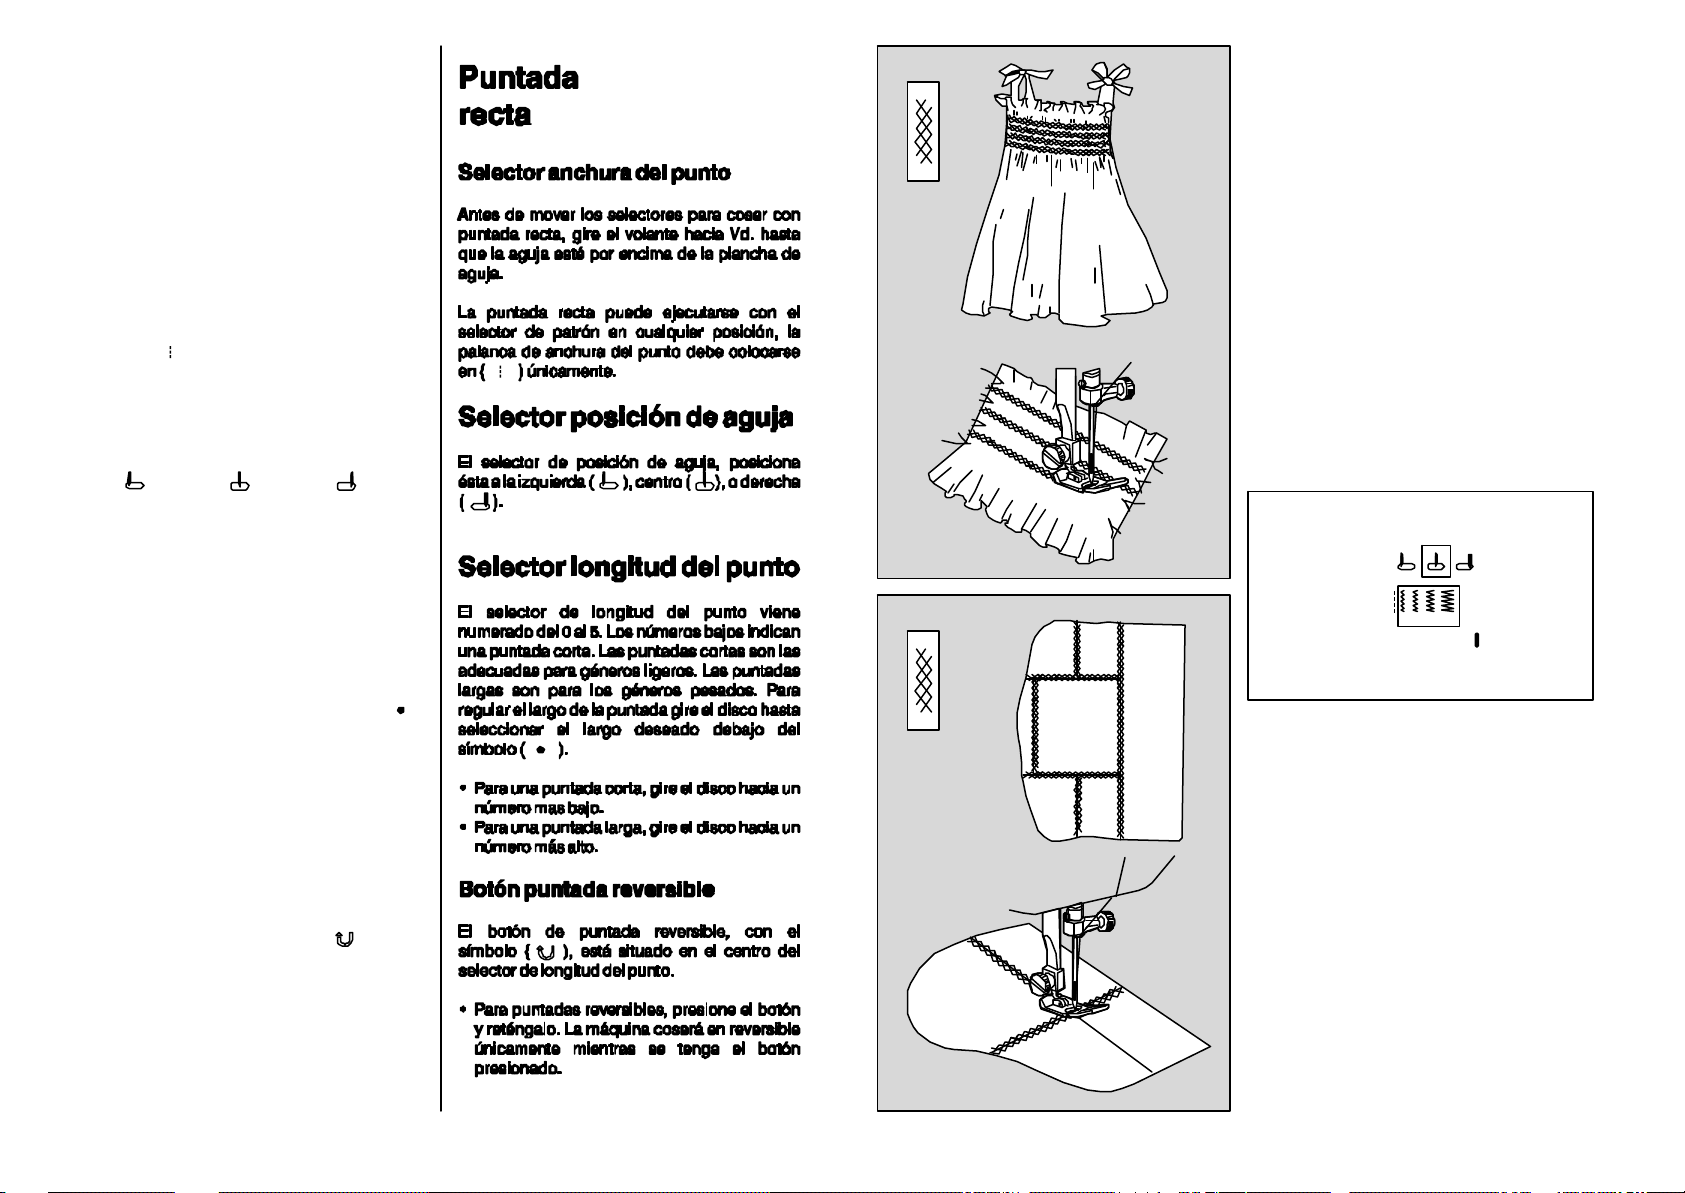
Straight
3
stitching
Stitchwidthselector
Beforeyoumovetheselectorstosetyour
machineforstraightstiching,turnthehand
wheeltowardyouuntilneedleisatitshighest
point.
Straightstitchingcanbeperformedwithpattern
selectorinanyposition;stitchwidthlevermust
besetat()only.
Needlepositionselector
Pointnidd’abeille
Utilisezcepointpourfairedessmocks,pour
coudreetréparerdestissusextensibles.Les
smockssontdespointsdécotatifsrégulièrement
espacéspourmaintenirlesfroncesd’untissu.
Pourfroncerletissu
•Surlasurfaceàfroncer,piquezdesrangéesde
pointdroitàlongueursespacéesdúnpied
presseur.
•Tirezlefilsrégulièrementpourfroncerletissu.
•Nouezlesfilsdesrangéesdefronces2par2
pourbloquercelles-ciàlabonnelargeur.
•Batissezuntissuderenfortsurl’enverssous
lesfronces.
NeedlePositionSelectorpositionstheneedlein
left(),center()orright()needle
positions.
Stitchlengthselector
Thestitchlengthindicatorisnumbered0to5.
Thelowerthenumber,theshorterthestitch.
Shorterstitchesarebestforlightweightfabrics;
longeronesforheavyfabrics.Toadjustthe
lengthofyourstitches,turnthedialsothat
desiredstitchlengthispositionedunder()
symbol.
•Toshortenstitchlength,turndialtowarda
lowernumber.
•Tolengthenstitchlength,turndialtowarda
highernumber.
Reversestitchbutton
Thereversestitchbutton,withthe()symbol,
islocatedinthecenterofthestitchlength
selector.
•Forreversestitching,pushinthebuttonand
holdinplace.Themachinewillstitchin
reverseonlyaslongasyoukeepthebutton
pushedin.
28
Pourfairelessmocks
Réglagesrecommandés
Sélecteurdepoint:Pointnidd’abeille(D)
Positiond’aiguille:
Largeurdepoint:
Longueurdepoint:Symbole()
Piedpresseur:Spécial(J)
Plaqueàaiguille:Universelle(A)
•Cousezaupointd’alvéoleentrelesrangéesde
pointsdroits.
•Aprésavoirréalisélespointsd’alvéole,retirez
lesrangéesdepointsdroits.
3 4 51 2
Patchworkmatelassé
Lepatchworkmatelassépeutêtreutilisépour
réaliserplusieursprojects...
•Coupezlescarrésdetissudelagrandeur
désirée.
•Assemblezlescarrésaupointdroit,endroit
contreendroit.
•Ouvrezlescouturesauferouaudoigt.
•Aprèsl’assemblage,coupezunepiecearrière
àlatailledel’ouvrage.
•Pourdonneruneffetdematelassé,faufilezun
molletonsurletissuderenfort.
•Piquezaupointd’abeilleles3épaisseursen
suivantlescouturesd’assemblagedescarrés.
•Fixezlesfilenlesnouants.
•Pourfinir,bordezletourdel’ouvrage.
65
Page 31
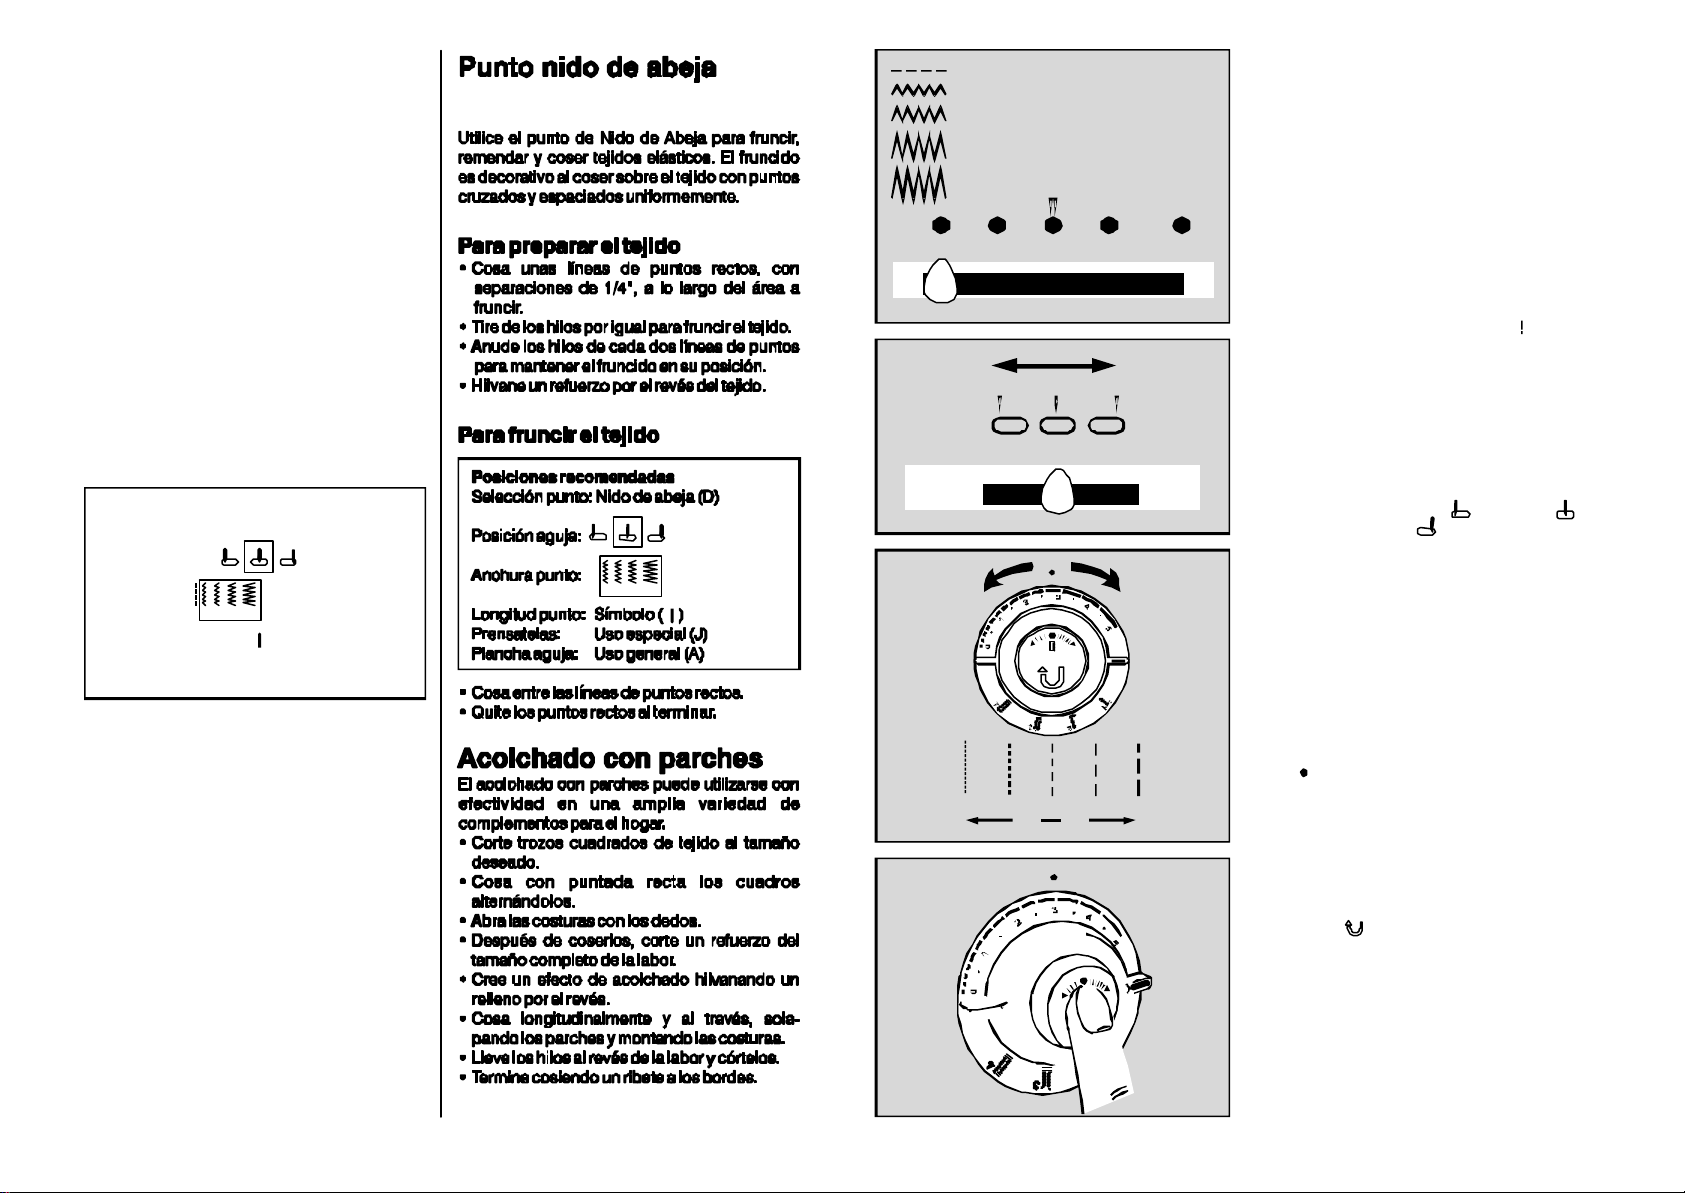
Honeycombstitch
UsetheHoneycombStitchforsmocking,
mendingandsewingstretchfabrics.Smocking
isdecorativestitchingacrossevenlyspaced
gathersoffabric.
1
2
3
4
5
Lepoint
droit
Sélecteurdelargeur
depoint
Togatherfabric
•Slightlyloosenneedlethreadtension.
•Sewrowsofstraightlong(5)stitches,1/4”
(6mm)apart,acrossareatobesmocked.
•Pullthreadsevenly,gatheringfabric.
•Tieendsofeverytworowsofstitching
togethertoholdgathersinplace.
•Basteabackingtowrongsideoffabric.
Tosmockfabric
Requiredsettings
StichSelection:Honeycombstitch(D)
NeedlePosition:
StitchWidth:
StitchLenght:Mark()
Foot:SpecialPurpose(J)
NeedlePlate:GeneralPurpose(A)
•Sewbetweenrowsofstraightstitches.
•Pulloutstraightstitcheswhencompleted.
3 4 51 2
Patchworkquilting
Patchworkquiltingcanbeusedeffectivelyona
widerangeofhouseholditems.
•Cutfabricsquarestothedesiredsize.
•Jointhealternatingsquareswiththestraight
stitch.
•Finger-pressopen.
•Afterstitching,cutabackingtothefullsizeof
thefinishedwork.
•Createaquiltedeffectbybastingalayerlayer
ofbatting.
•Stitchlengthwiseandcrosswise,overlapping
thepatchessotheseamsarestraddled.
•Pullthethreadstotheundersideofthework,
andtrim.
•Finishbysewingabindingtotheedges.
1
2 3 4 5
Avantdebougerlesélecteurpourpositionner
votremachinesurlepointdroit,tournezlevolant
pourfaireremonterl’aiguille.
Lesélecteurdelargeurdepointdevotre
machinedoitêtresurlaposition()pour
obtenirlepointdroit(quellequesoitlaposition
dusélecteurdepoint).
Sélecteurdeposition
d’aiguille
Cesélecteurvousdonnelapossibilitéde
déplacerl’aiguilleàgauche(),àdroite(),
ouenpositioncentrale().
3 4 51 2
Sélecteurdelongueur
depoint
Ceslecteurestnum
éérotéde0à5.Plusle
numéroestpetitpluslepointseracourt.Les
0 5
pointscourtssontrecommandéspourlestissus
fins,lespointslongspourlestissusépais.
sélectionnerlalongueurdepoint,tournezle
disquepouramenerlechiffredésiréfaceau
point().
•Pourunpointcourt,tournezledisqueversles
petitschiffres.
•Pourunpointlong,tournezledisqueversles
grandschiffres.
Pour
MarcheArrière
Latouche()aucentredusélecteurde
longueurdepointpermetdecoudreenmarche
arrière.
•Pourarrêterlescoutures,appuyezsurle
bouton.Tantquevouslemaintiendrezen
place,lamachinecoudraenmarchearrière.
64
29
Page 32
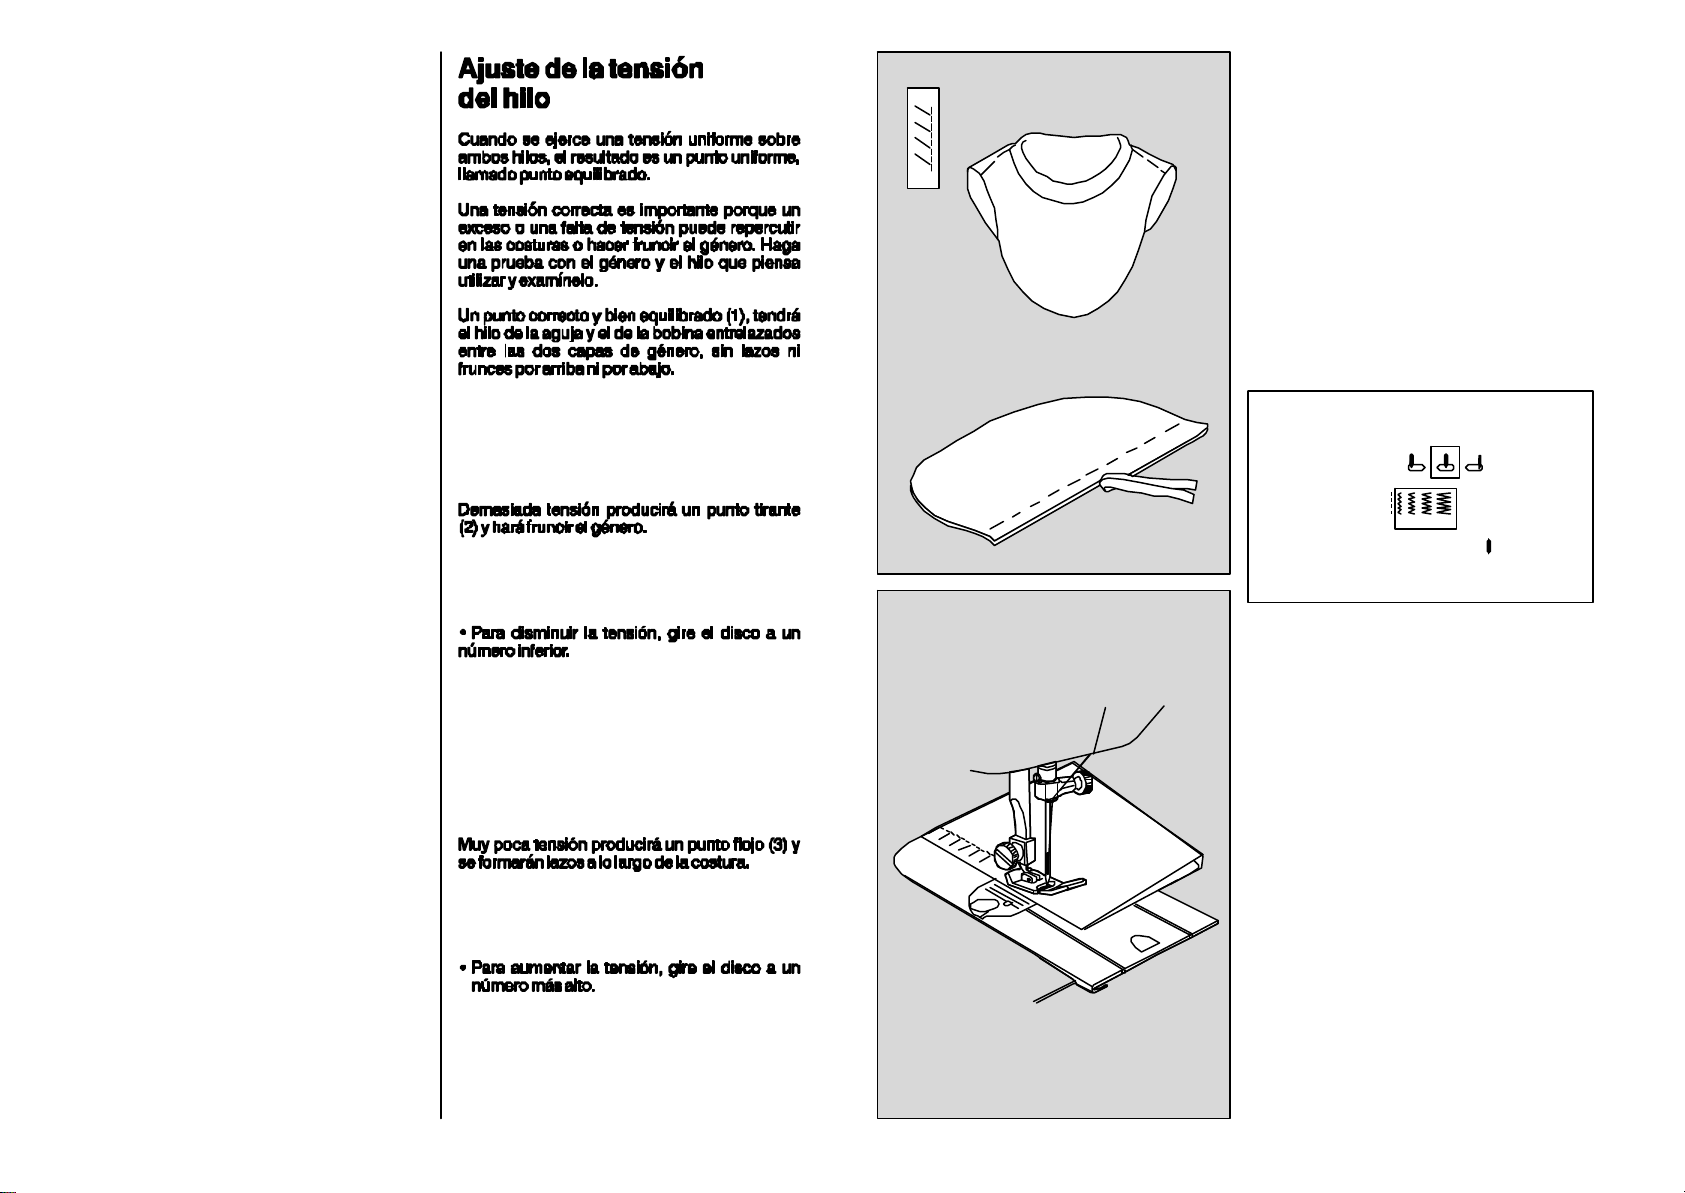
Adjustingthreadtension
Whenanevenamountoftensionisexertedon
boththreads,asmoothevenstitch,knownasa
balancedstitch,isproduced.
Correcttensionisimportantbecausetoomuch
ortoolitlewillweakenyourseamsorcauseyour
fabrictopucker.Makeatestsamplewiththe
fabricandthreadyouplantouseandexamine
it.
Aperfect,wellbalancedstitch(1)willhavethe
needleandbobbinthreadslockedbetweenthe
twolayersoffabricwithnoloopsontopor
bottomandnopuckering.
Surjet
(Machineavec10points)
Vouspouvezenuneseuleopérationcoudreet
surjeterlescouturesdestissusextensibles,
jerseysettricots.
•Batissezl’ouvragesurlalignedecoutureen
laissantunevaleurcouturede1,5cm.
Réglagesrecommandés
Sélecteurdepoint:Surjet(C)
Positiond’aiguille:
Toomuchtensionwillproduceatightstitch(2)
whichwillcausethefabrictopucker.
•Todecreasetension,turnthedialtoalowe r
number.
Toolittletensionwillproducealoosestitch(3)
whichwillcauseloopsinyourseam.
•Toincreasetension,turnthedialtoahigher
number.
Largeurdepoint:
Longueurdepoint:Symbole()
Piedpresseur:Universel(B)
Plaqueàaiguille:Universelle(A)
•Recoupezlacoutureà6mmdelalignede
piqûre.
•Placezlacouturesouslepiedpresseurpour
quelespointsdroitstombentsurlebâtidela
coutureetlespointszig-zagsurleborddela
couture.
3 4 51 2
30
63
Page 33
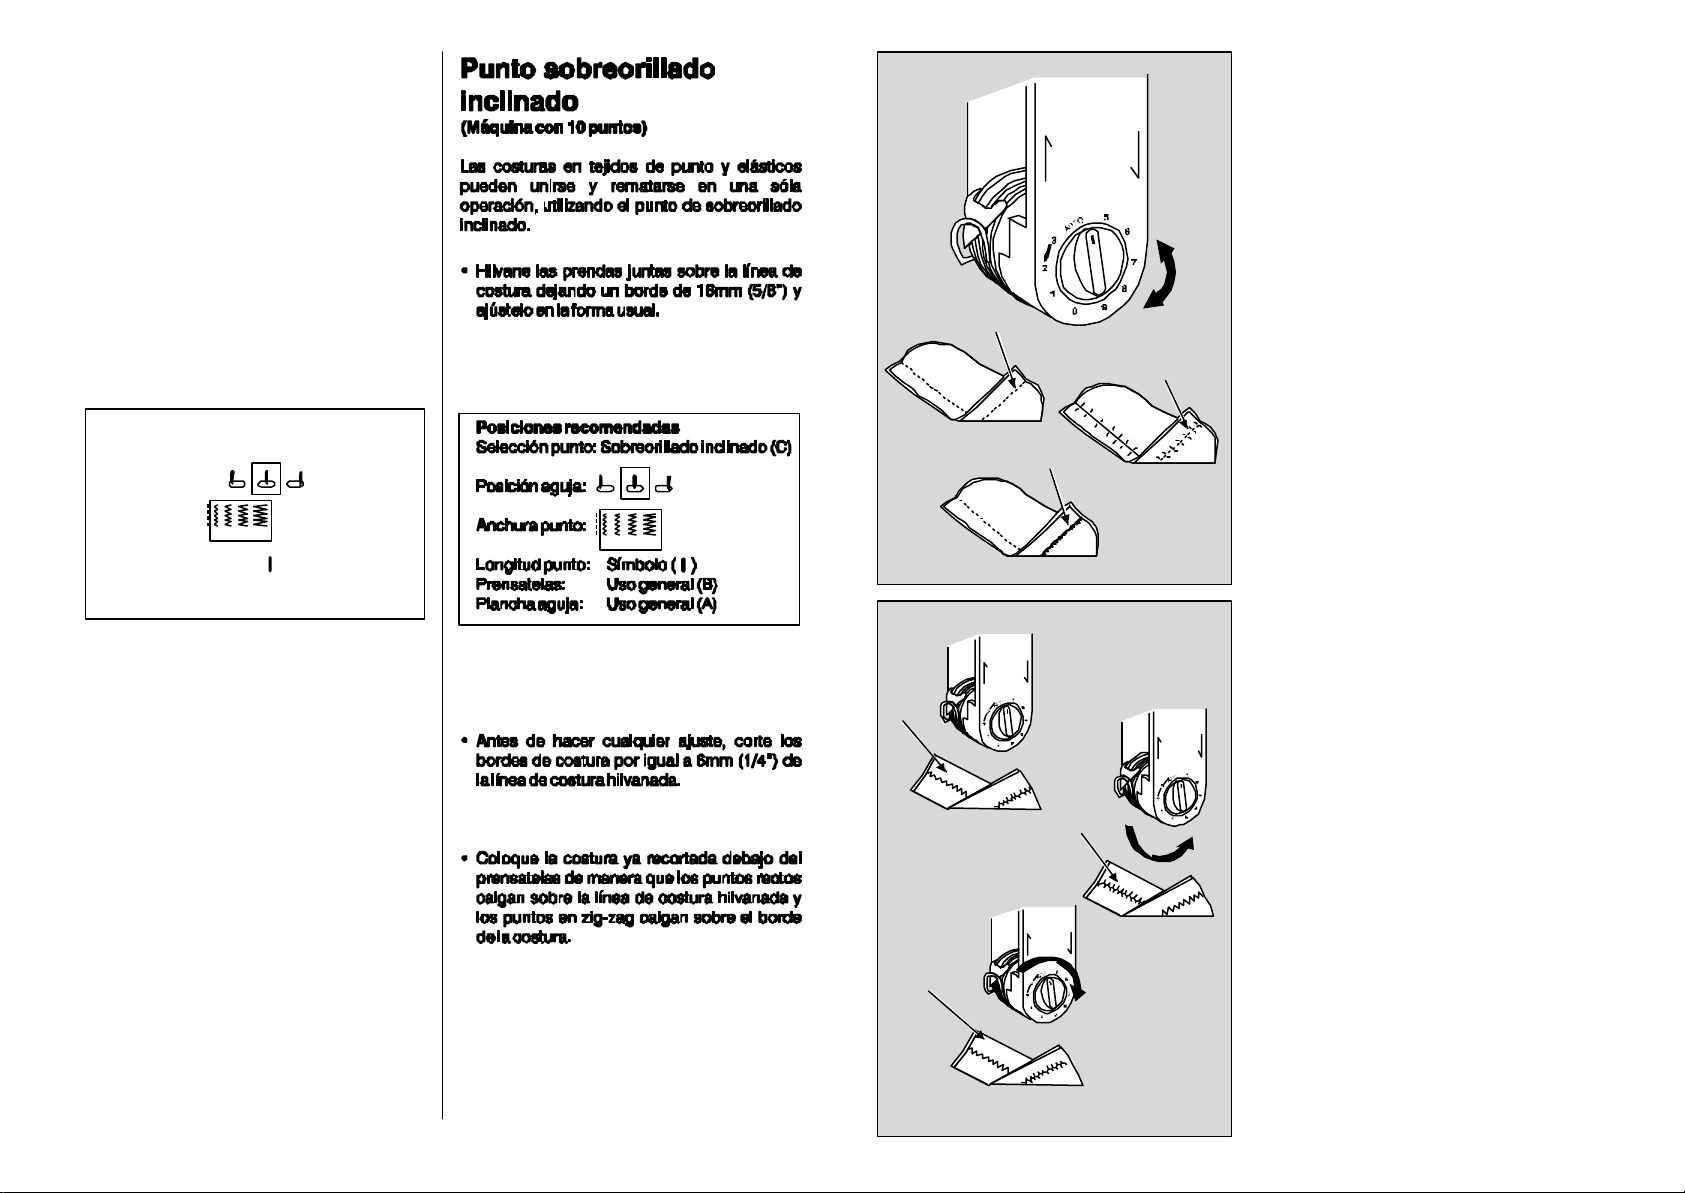
Slantoveredgestitch
(10StitchMachine)
Seamsinknittedandstretchfabricscanbe
joinedandfinishedinoneoperationwhenyou
usetheslantoveredgestitch.
•Bastethegarmenttogetherontheseamline
allowingfora5/8”seamallowanceandfitin
theusualway.
Requiredsettings
StitchSelection:Slantoveredge(C)
NeedlePosition:
StitchWidth:
StitchLength:Mark()
Foot:GeneralPurpose(B)
NeedlePlate:GeneralPurpose(A)
3 4 51 2
Réglagedelatension
Lorsquelatenréglée,lepointsenouedans
l’épaisseurdutissu.
Latensionestimporte;sielleesttroplâcheou
tropserrée,lacoutureplisseraetseramoins
solide.
Faitesunessaisurunéchantillon,endouble,du
tissuquevousallezcoudre.Contrôlezcetessai.
Pourquevotrepointsoitbienréglé(1),lefilde
l’aiguilleetceluidelacanettedoiventêtrenoués
dansl’épaisseurdutissusansbouclettesetsans
1
2
3
3 4 51 2
plisser.
Unetensiontropserréetirelepoint(2)etfait
plisserletissu.
•Pourdesserrerlatension,tournezlebouton
versunchiffremoinsélevé.
•Aftermakinganyadjustments,trimtheseam
edgeevenlytoa1/4”fromtheseamline
basting.
•Placetrimmedseamunderthefootsothatthe
straightstitchesfallonthebastedseamline
andzig-zagstitchesfallovertheseamedge.
62
1
2
3
Unetensiontroplâchedonneradespointsà
bouclettes(3).
•Pourresserrerlatension,tournezlebouton
versunchiffreplusélevé.
31
Page 34
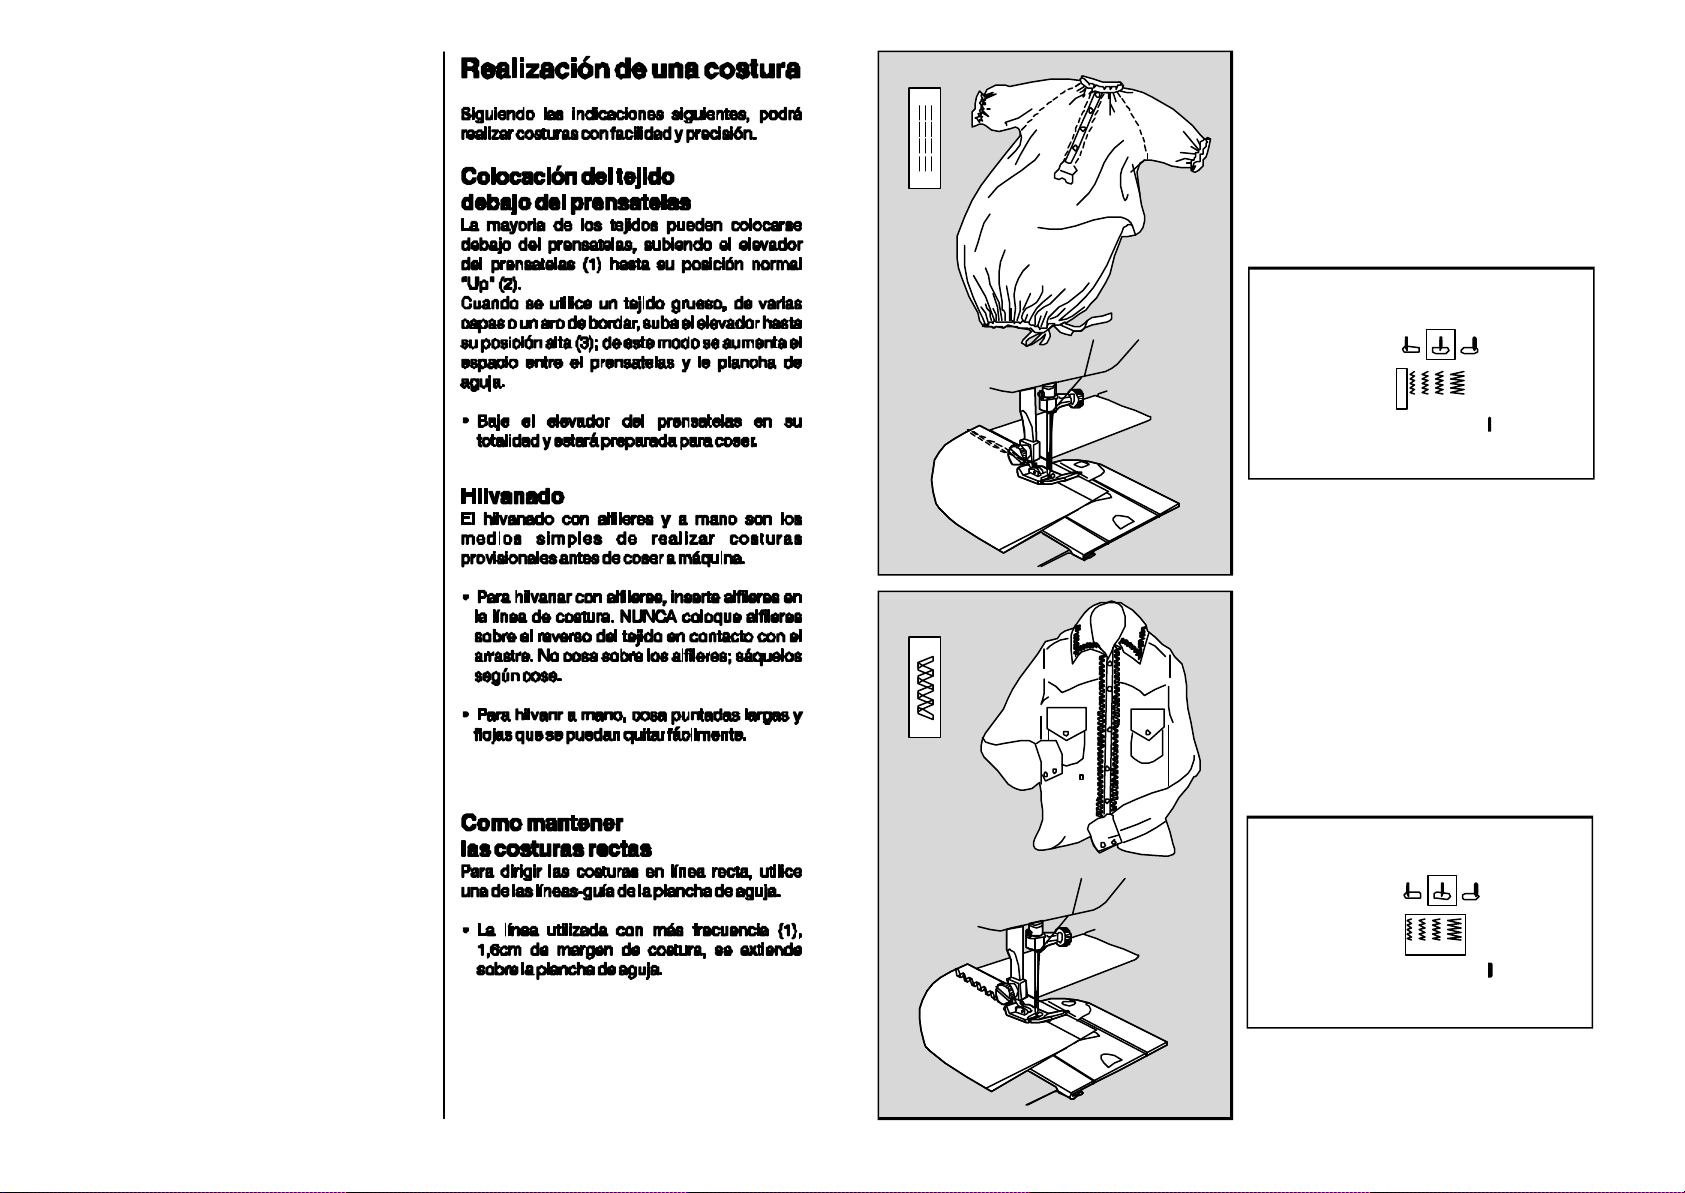
Sewingaseam
Youcansewseamseasilyandaccuratelywhen
youfollowthesuggestionsbelow.
Placingfabricunderfoot
Mostfabricscanbeplacedunderthefootby
raisingthepresserfootlifter(1)toitsnormal
“Up”position(2).
Whenusingbulkyfabric,multiplefabriclayers
oranembroideryhoop,raisetheliftertothe
highestposition(3),thusincreasingthespace
betweenthefootandtheneedleplate.
Point
droit
Extensible
(Machineave10points)
Lorsquevousutilisezletriplepointdroitextensiblepourlescouturesquisubissentdefortes
tensions(tricot,jersey,tissusextensibles),la
conceptionmêmedupointrenforcelacouture.
•Poursurpiquer,placezl’ouvragesouslepied
presseur,l’endroitduvêtementau-dessus.
Réglagesrecommandés
Sélectiondepoint:Droitextensible(A)
Positiond’aiguille:
•Lowerpresserfootlifterallthewaydownand
youarereadytosew.
Basting
Pinbastingandhandbastingareeasywaysto
maketemporaryseamsbeforemachine
sewing.
•Topinbaste,insertpinsatstitchingline.
NEVERplacepinsontheundersideoffabric
incontactwiththefeed.Donotsewoverpins;
pullthemoutasyoustitch.
•Tohandbaste,makelongstitchesthatcanbe
easilyremoved.
Keepingseamsstraight
Tokeepseamsstraight,useoneofthe
guidelinesontheneedleplate.
•Themostcommonlyusedline(1),the5/8”
(16mm)seamallowance,isextendedonto
theslideplate.
Largeurdepoint:
Longueurdepoint:Symbole()
Piedpresseur:Spécial(J)
Plaqueàaiguille:Universelle(A)
•Baissezlepiedpresseuretcommencezà
piquerentenantlesfilspendantlespremiers
points.
•Guidezlégèrementletissupendantlacouture
enlaissantàlamachinelapossibilitédefaire
sonmouvementdevaetvientavant-arrière.
•Repassezlacouture.
3 4 51 2
PointRicRac
(Machineavec10points)
C’estunpointextensibletrèssolide,àutiliser
pourlafinitiondesbords.
•Assemblezlescouturesetrepassez.
•Pourlesfinitionsdebordstubulaires,utilisez
lebras-libredelamachine.
Réglagesrecommandés
Sélectiondepoint:Ric-rac(B)
Positiond’aiguille:
Largeurdepoint:
Longueurdepoint:Symbole()
Piedpresseur:Spécial(J)
Plaqueàaiguille:Universelle(A)
3 4 51 2
32
•Placezl’endroitdutissusouslepiedpresseur.
•Piquezlentementaubord.
•Passezlesfilssurl’enversdutravail;nouez-les
etcoupez.
61
Page 35
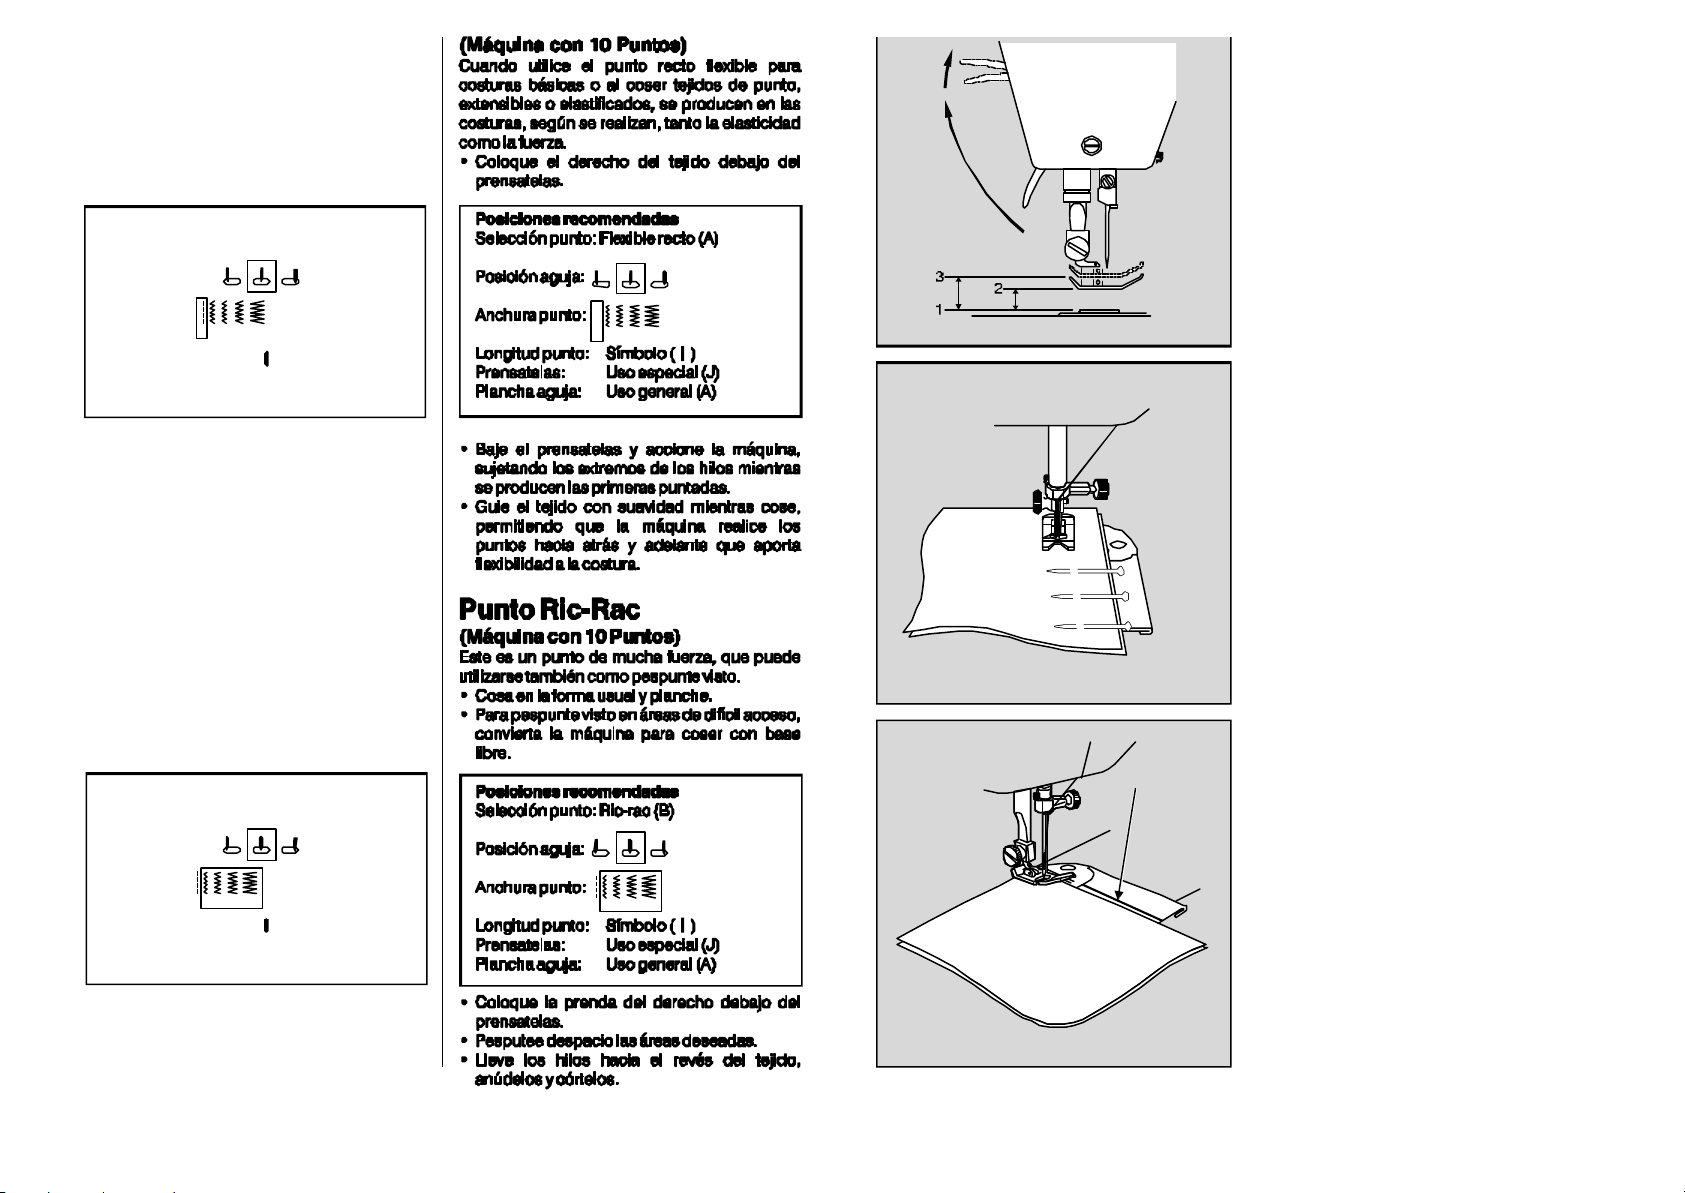
(10StitchMachine)
Whenyouusethestraightstretchstitchfor
3
stressseamsortoseamknitted,stretchand
elasticizedfabric,bothstretchandstrengthare
builtintotheseamasitisbeingsewn.
•Placegarmentrightsideup,underpresser
foot.
Requiredsettings
StichSelection:Straightstretch(A)
NeedlePosition:
StitchWidth:
StitchLength:Mark()
Foot:SpecialPurpose(J)
NeedlePlate:GeneralPurpose(A)
3 4 51 2
Pourassemblerrapidementunecouture,nous
vousconseillonslaméthodesuivante:
2
Commentpositionnerletissu
souslepiedpresseur
Laplupartdestissuspeuventêtreplacéssousle
piedpresseurensoulevantlereleveurdupied
1
3 4 51 2
presseur(1)enposition2.
Quandvouscousezdutissuépaisouplusieurs
épaisseursdetissus,ouencoreaucercleà
broder,relevezlepiedenposition3.Cette
positionaugmentel’espaceentrelepiedetla
plaqueàaiguille.
•Avantdecommenceràcoudre,baissez
toujourslepiedpresseur.
•Lowerthefootandstartmachine,holdingthe
threadendsasthefirstfewstitchesaremade.
•Guidethefabriclightlyasyousew,lettingthe
machinemakethebackwardandforward
stitchesthatgivestretchtotheseam.
•Pressseamafterstitching.
Ric-Racstitch
(10StitchMachine)
Thisisaheavy-duty,stretchstitchthatcanalso
beusedfortopstitching.
•Sewseamsinusualmannerandpress.
•Fortopstitchinghard-to-reachareas,convert
machinetofreearmsewing.
Requiredsettings
StichSelection:Ric-racstitch(B)
NeedlePosition:
StitchWidth:
StitchLength:Mark()
Foot:SpecialPurpose(J)
NeedlePlate:GeneralPurpose(A)
•Placegarmentrightsideup,underfoot.
•Slowlytopstitchdesiredareas.
•Pullthreadstowrongsideoffabric;tieand
trim.
60
3 4 51 2
Faufiler
Pourpréparerlacouture,vouspouvezbâtiràla
mainouutilisezdesépingles.
•positionnezlesépingles,commeillustré,surla
lignedepiqûre.Nelesprésentezjamaissous
lepiedpresseurducôtédelagriffe
d’entrainement.Nepiquezpassurlesépingles
retirez-lesaufuretàmesure.
•Sivousfaufilezàlamain,faites-leàlongs
pointspourpouvoirlesretirerfacilementaprès
lacouture.
Pourpiquerdroit
1
3 4 51 2
Servez-vousdeslignesguidesdelaplaqueà
aiguillepourpiquerdroit.
•Laplusutiliséedeceslignes(1)estcellequi
secontinueaussisurlaplaqueglissière.Elle
vousassureunevaleurcouturede1,6cmsi
l’aiguilleestenpositioncentrale.
33
Page 36
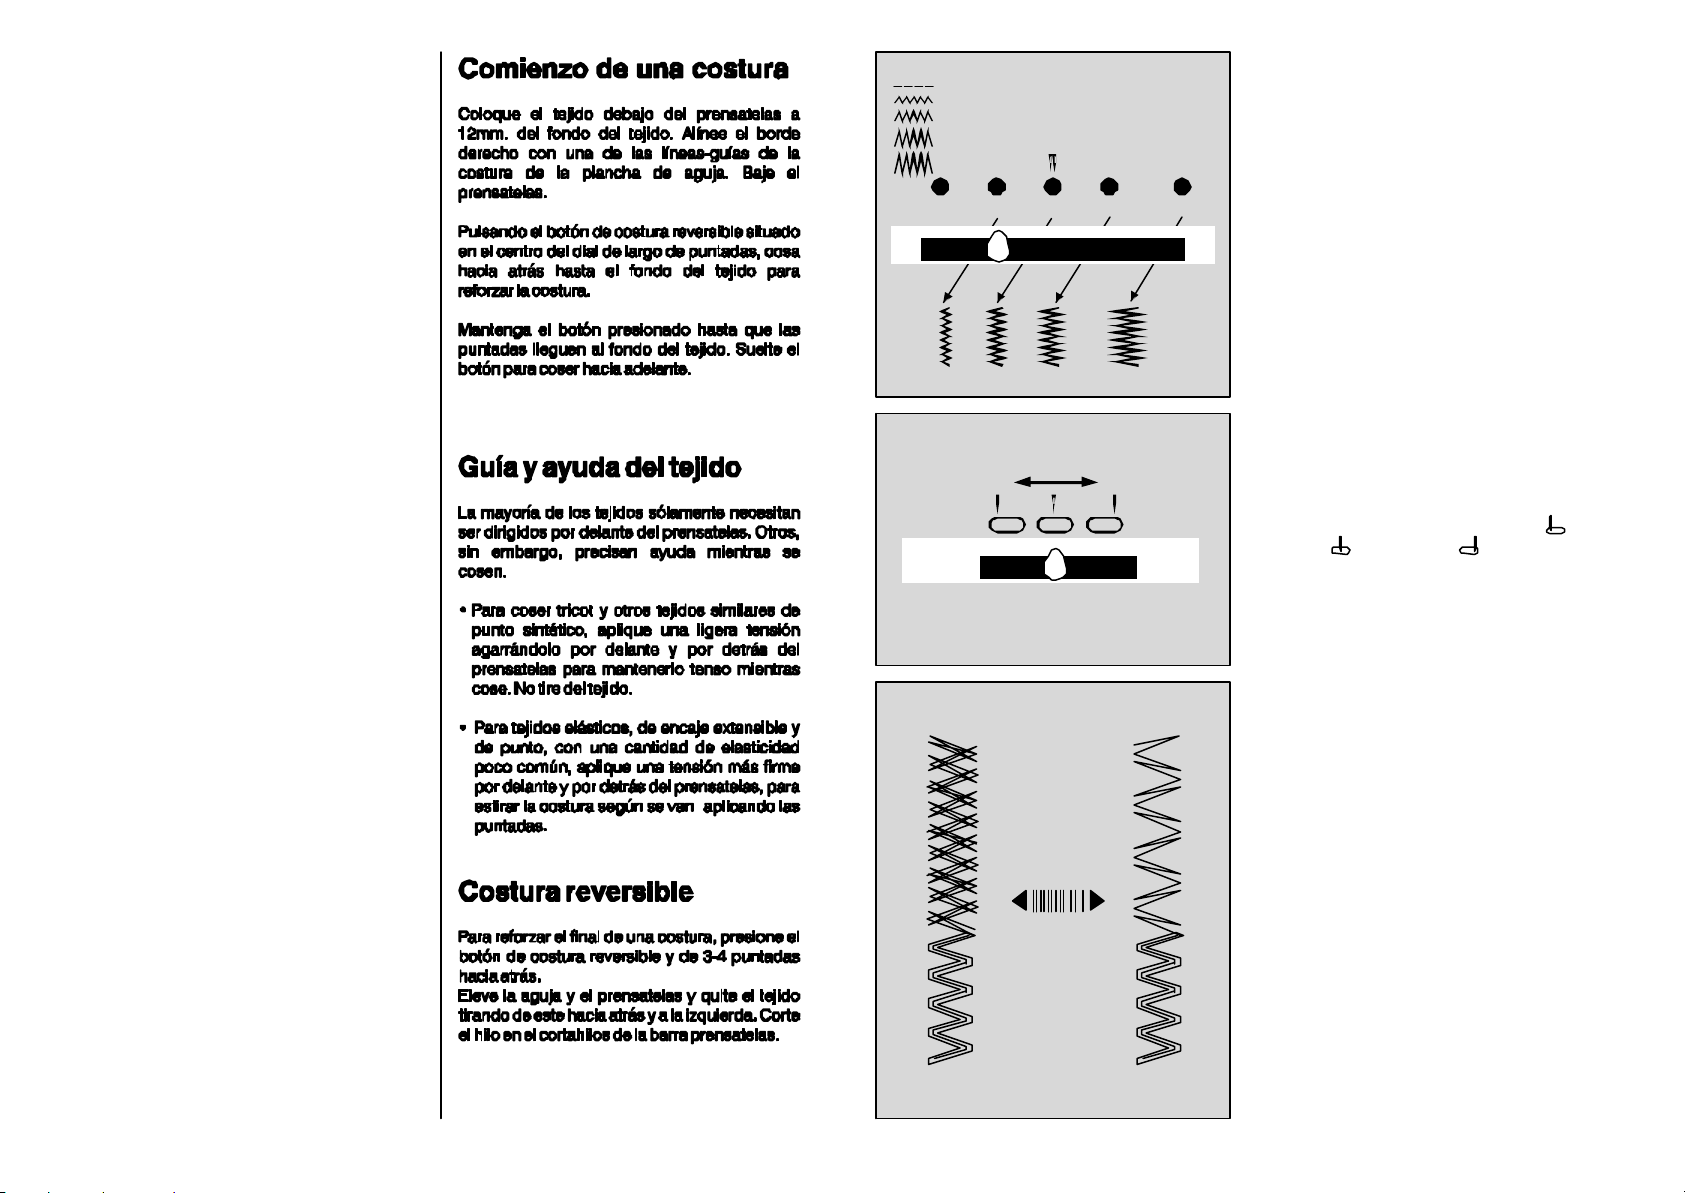
Startingaseam
Placefabricunderpresserfoot½”(12mm)from
rearoffabric.Aligntherightedgewithoneofthe
seamguidelinesontheneedleplate.Lowerthe
presserfoot.
Backstitchtotheedgeofthefabricfor
reinforcementbypushinginthereversebutton,
locatedthecenterofthestitchlengthdial.Hold
buttoninuntilstitchingreachesedgeoffabric.
Releasepushbuttonforforwardstitching.
1
2
3
4
5
1 2 3 4 5
Sélecteurde
largeurdepoint
Pourobtenirdespointsextensibles,lesélecteur
delargeurdoitêtrepositionnésurl’unedes
positionsdelargeur.Lapositionlaplusàdroite
donneralepointlepluslarge.
Guidingand
supportingfabric
Mostfabricsneedonlytobeguidedinfrontof
thepresserfoot.Somefabrics,however,require
supportwhilebeingstitched.
•Fortricot,andothersimilarsyntheticknits,
applygentletensionbyholdingthefabricat
thefrontandbackofpresserfootasyousew.
Donotpullfabric.
•Forelasticizedfabric,stretchlace,andknits
withanunusualamountofelasticity,holdthe
fabricfirmilyinfrontandbackofthepresser
foottostretchtheseamasthestitchesare
beingplaced.
Sewinginreverse
Tosecuretheendofaseam,pushinthereverse
buttonandbackstitch3-4stitches.Raiseneedle
andpresserfootandremovefabricbydrawingit
tothebackandleft.Cutthreadonthreadcutter
onpresserbar.
Sélecteurde
positiond’aiguille
Lespointsextensiblespeuventêtrecoususdans
touteslespositionsd’aiguillegauche(),
centrale()oudroit().Nousvous
recommandonscependantd’utiliserplus
particulièrementlapositioncentrale.
Equilibragedespoints
Pourobtenirunbonrésultat,ilpeutêtre
nécessaired’utiliserleboutond’équilibragepour
réglerlepoint.
Avantdedéplacerleboutond’équilibragedesa
positioncentrale,faitessurunechutedetissuen
doubleépaisseurunessaidepoint.Siunréglage
estnécessaire,déplacezleboutond’équilibrage
toutencousant.
•Déplacezleboutonversladroitepour
desserrercorrectementlespoints.
•Déplacezleboutonverslagauchepour
resserrerlespoints.
34
59
Page 37
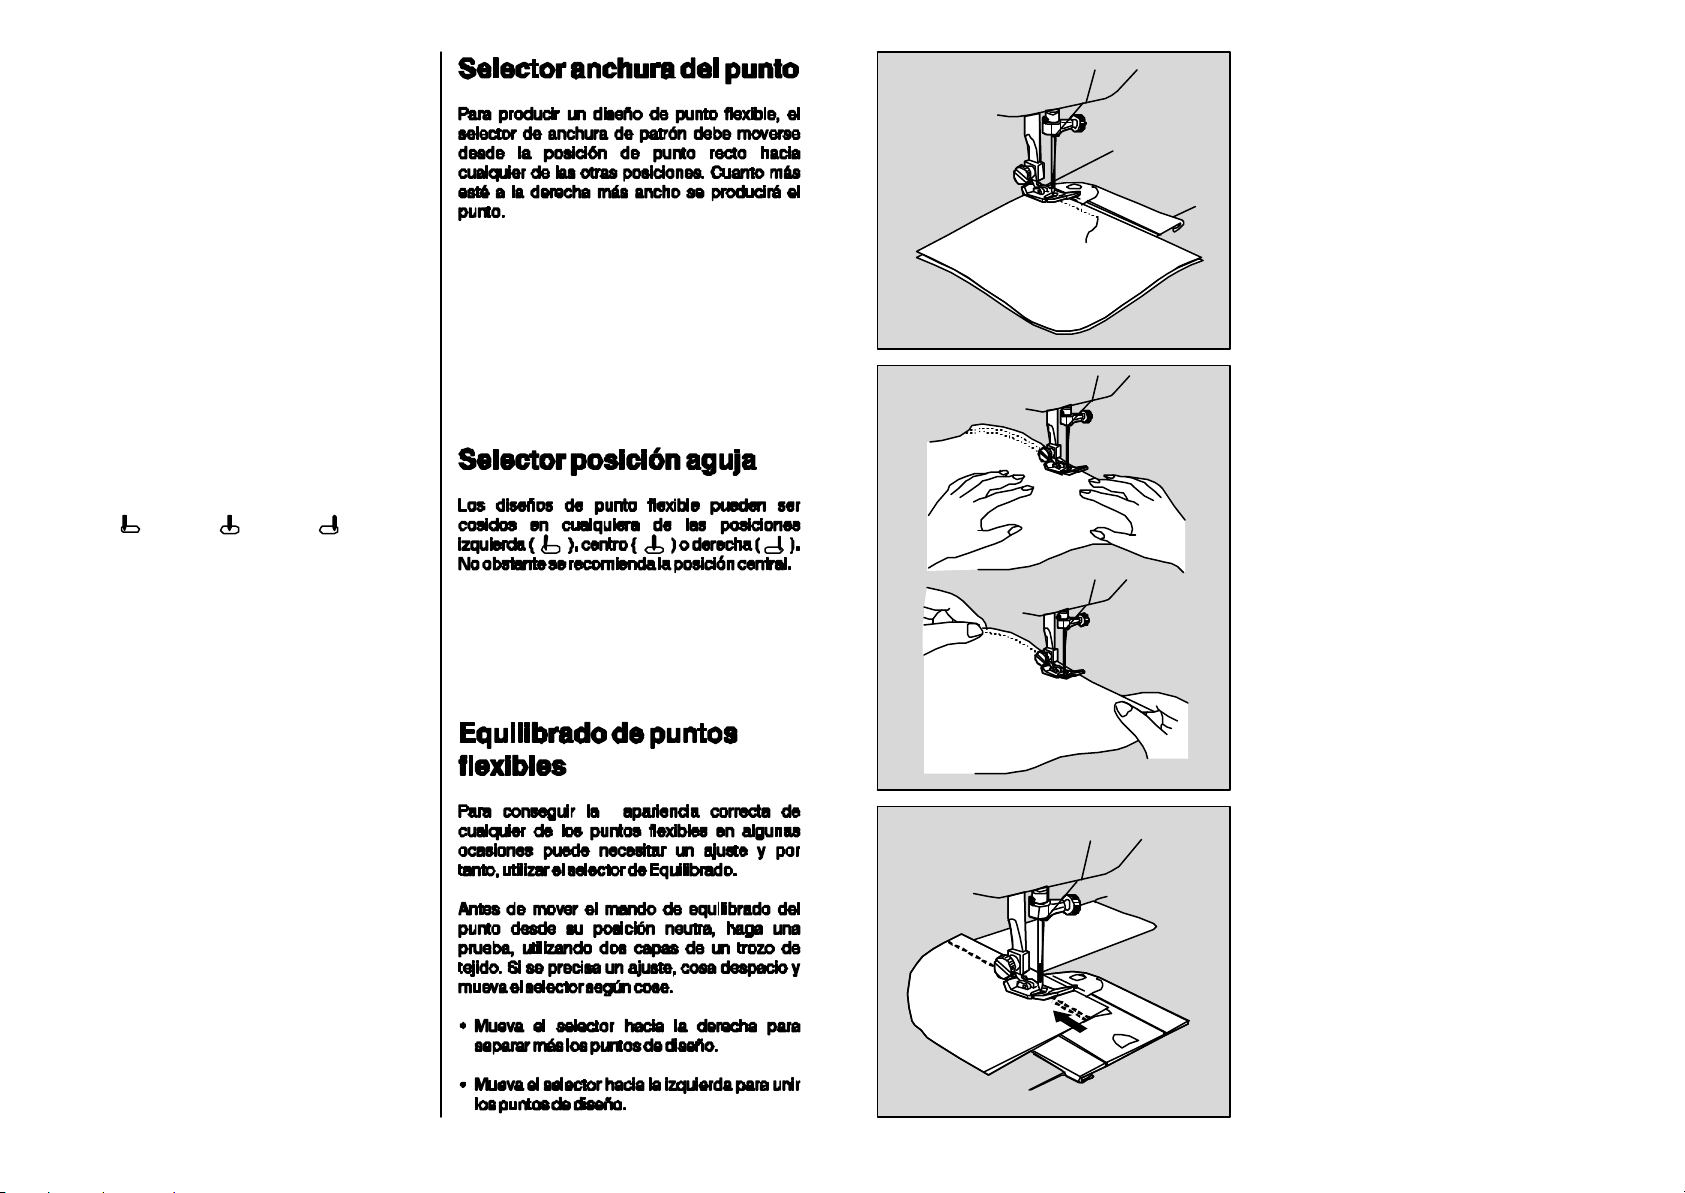
Stitchwidthselector
Débuterunecouture
ToproduceaFlexi-stitchpattern,thestitchwidth
selectormustbemovedfromstraightstitch
settingtoanyofitsotherpositions.Thefarright
positionwillproducethewideststitch.
Needlepositionselector
Flexi-stitchpatternsmaybesewnineither
left(),center()orright()positions.
Centerneedlepositionisrecommended.
Positionnezletissusouslepiedpresseur.
Alignezleborddroitlelongdelaligne-guide
choisie,baissezl’aiguilledanslalignede
piqûreà1cmdubordsupérieur.Baissezle
piedpresseur.
Appuyezsurleboutondemarchearrièresituéau
centredusélecteurdelongueurdepoint.Piquez
jusqu’auborddutissuenmarchearrièrepour
renforcerledépartdelacouture.
Relâchezleboutondemarchearrièreetpiquez
enavant.
Guideretdirigerletissu
Laplupartdestissusseguidentàl’avantdupied
presseur.Certainstissusnécessitentquelques
précautionspendantlacouture.
•Pourletricotetdestissussimilares,jerseys,
synthétiques,maintenez-lesàl’avantetà
l’arrièredupiedpresseursanstirernipousser
letissu.
•Lestissusextensiblesdoiventêtrefermement
tendusàl’avantetàl’arrièredupiedpresseur
pourdétendrelacouture.
BalancingFlexi-stitches
YoumayneedtoadjusttheFlexi-stitchBalance
selectorwhenusingaflexi-stitchpatternin
ordertoachievethecorrectpattern
appearance.
Beforeyoumovethestitchbalancedialfromits
neutralposition,makeatestsampleusingtwo
layersofscrapfabric.Ifadjustmentisrequired,
stitchslowlyandmovetheselectorasyousew.
•Moveselectortotherighttoseparatestitches
ofpattern.
•Moveselectortothelefttobringstitchesof
thepatterntogether.
58
Coutureenmarchearrière
Pourrenforcerlafindelacouture,appuyezsurle
boutondemarchearrière.Relevezl’aiguilleetle
piedpresseuretdégagezletissuenletirantvers
l’arrièresurlagauche.Coupezlefilàl’aidedu
coupe-filencastrédanslabarredupied
presseur.
35
Page 38
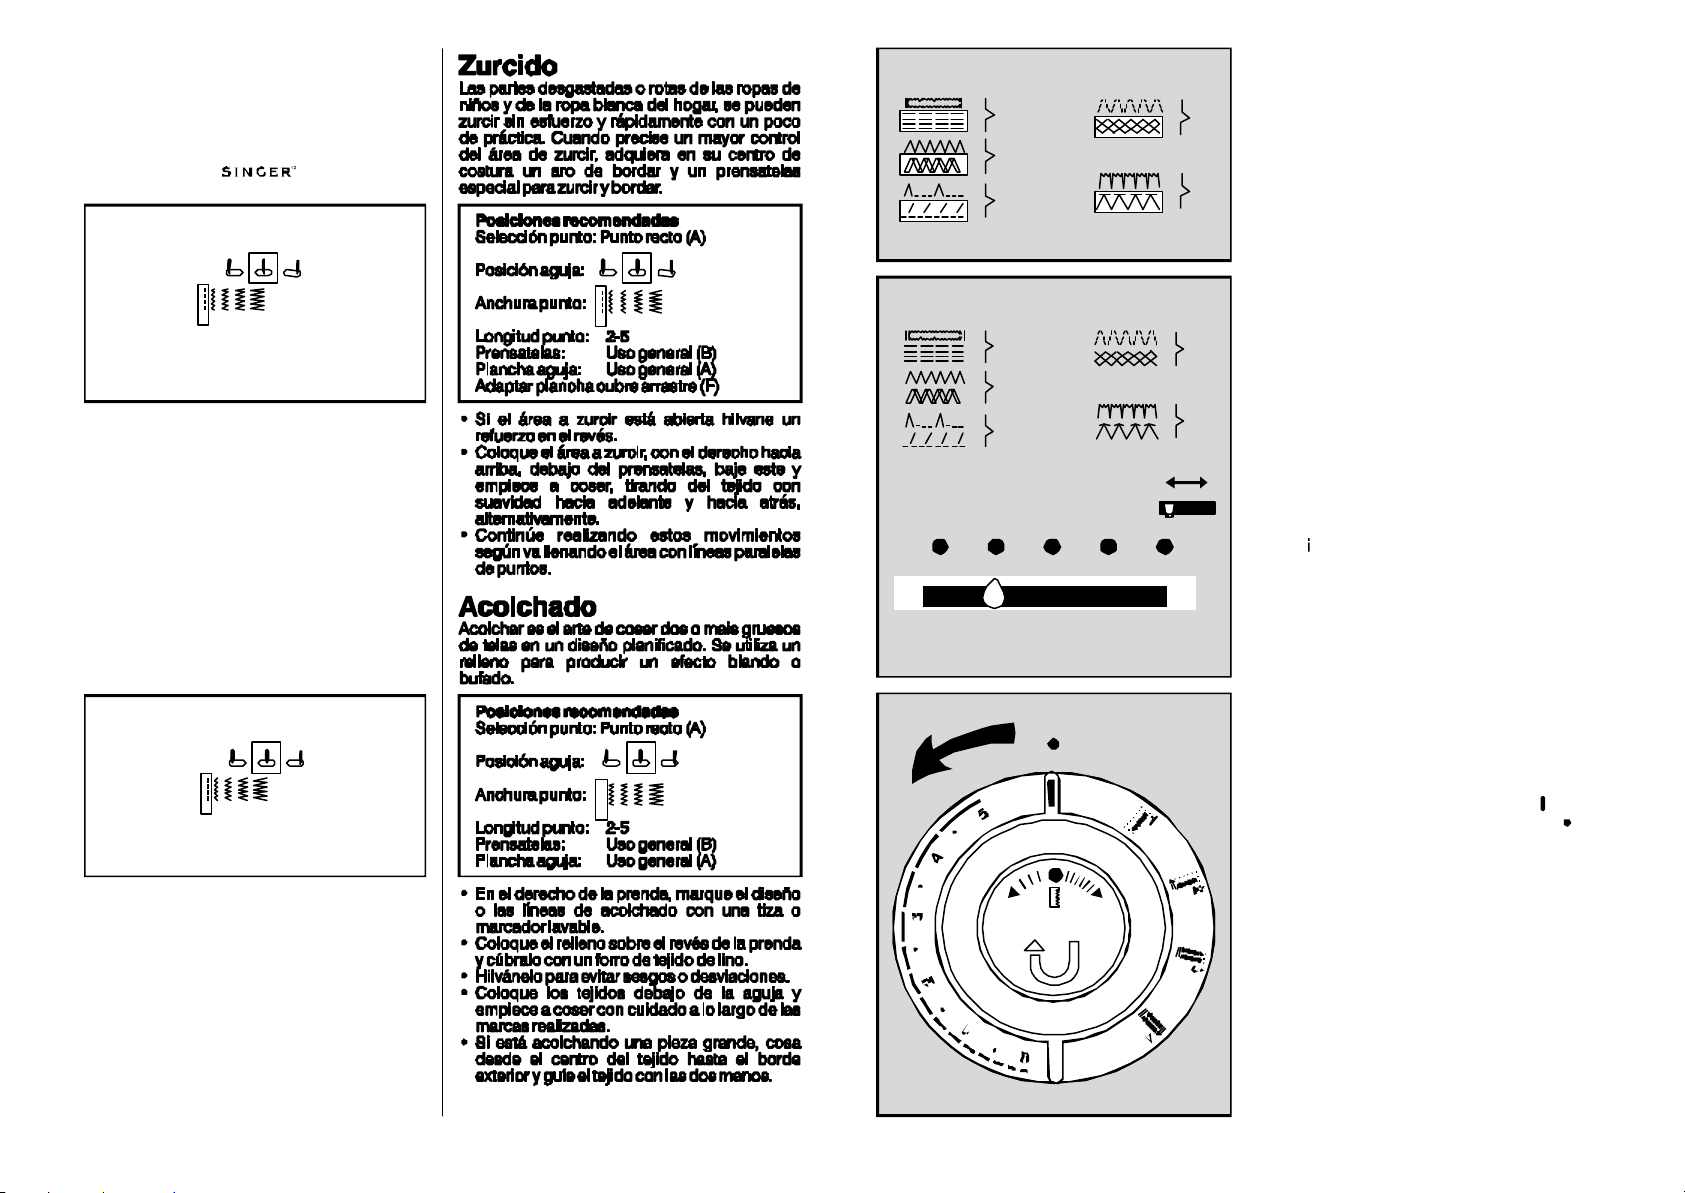
Darning
Wornortornspotsongarmentsandhousehold
linenscanbedarnedeffortlesslyandquickly
withlittlepractice.Whengreatercontrolis
needed,anembroideryhoopandaspecial
DarningandEmbroideryFoot,whichmaybe
purchasedatyourretailershouldbe
used.
Requiredsettings
StichSelection:StraightStitch(A)
NeedlePosition:
StitchWidth:
StitchLength:2-5
Foot:GeneralPurpose(B)
NeedlePlate:GeneralPurpose(A)
Attachfeedcoverplate(F)
•Iftheareatobedarnedisopen,bastea
backingontheunderside.
•Placeareatobedarned,rightsideup,under
presserfoot;lowerthefootandbegin
stitching,alternatelydrawingthefabric
towardyouandpullingitgentlyawayfrom
you.
•Continuethisforwardandbackwardmotion
asyoufilltheareainwithparallellinesof
stitching.
3 4 51 2
Quilting
Quiltingistheartofstitchingtwoormore
thicknessesoffabrictogetherinaplanned
design.Battingisusedtoproduceasoft,puffed
effect.
Requiredsettings
StichSelection:StraightStitch(A)
NeedlePosition:
StitchWidth:
StitchLenght:2-5
Foot:GeneralPurpose(B)
NeedlePlate:GeneralPurpose(A)
•Markthedesignorquiltinglineswithatailor’s
chalkorawashablemarkerontherightside
ofgarment.
•Placebatting,ontheundersideofgarment
andcoveritwithabackingorliningfabric.
•Bastetogethertopreventthelayersfrom
shifting.
•Placefabricsunderneedleandcarefully
begintosti tchalongyourmarkedpatternon
thefabric.
•Ifyouarequiltingaverylargepiece,work
fromthecenterofthefabrictotheoutside
edgeandguidefabricwithbothhands.
3 4 51 2
Points
A
B
C
3 4 51 2
A
B
C
A B C D E
3 4 51 2
extensibles
D
Enplusdupointdroitetdupointdezig-zag,votre
E
machineréaliseunevariètéd’autrespoints.
Pointsextensibles
Lespointsextensiblessontutiliséspourcoudre
tricots,jerseysetautrestissusextensibles.Ces
D
pointspeuventseréalisergrâceaumouvement
avantetarrièredelagriffed’entrainement.
E
Sélecteurdepoint
Relevezl’aiguilleenpositionhaute.
•Positionnezlesélecteurlelargeurdepoint
sur()pointdroit(lesélecteurdepointpeut
êtredéplacéfacilement).
•Glissezlesélecteurdepointaucentredu
groupedepointdésiré.
Réglagedelongueur
•Tournezlesélecteurdelongueurversla
gauchepouralignerlesymbole()du
sélecteuravecceluidelamachine()
commeillustré.
Sipourquelquesraisonslamachinene
Note:
reproduitpaslepointchoisilorsquevousavez
alignécesdeuxsymboles,appuyezsurlebouton
demarchearrière.
36
57
Page 39
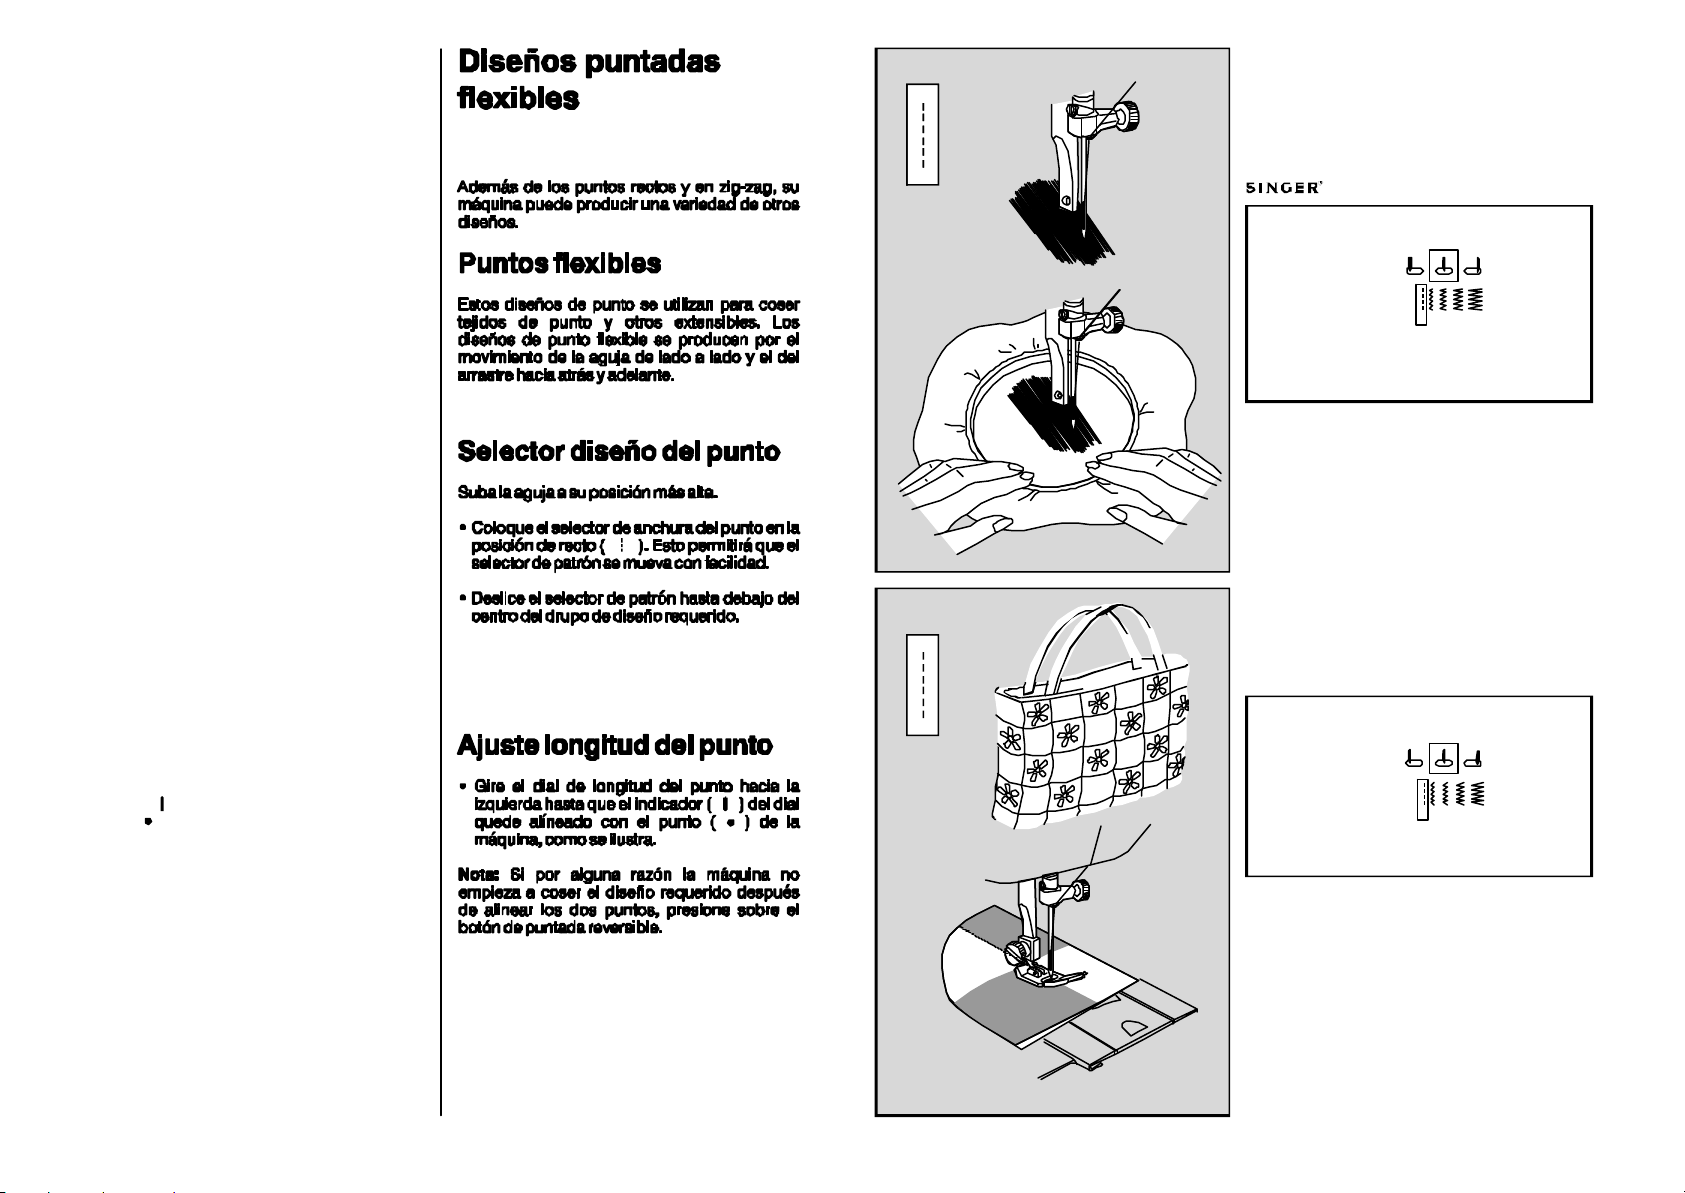
5
Flexi-stitch
patterns
Inadditiontostraightandzig-zagstitches,your
machinecanproduceavarietyofother
patterns.
Flexi-stitches
Repriser
Avecunpeudepratiquelestrousdansles
vêtementsd’enfantcommedanslelingede
maisonpeuventêtrereprisésfacilementetsans
effort.S’ils’agitdegrandesreprises,utilisezun
cerceauàbroderetlepiedpresseuràrepriser
quevouspourrezacheterdansvotremagasin
.
Réglagesrecommandés
Sélectiondepoint:Pointdroit(A)
Positiond’aiguille:
Thesestitchpatternsareusedforsewingknits
andotherstretchfabrics.Flexi-Stitchpatterns
aremadebythesidetosidemovementofthe
needlealongwiththebackwardandforward
movementofthefeed.
Stitchpatternselector
Raisetheneedletoitshighestposition.
•Setthestitchwidthselectortothestraight
position().(Thisallowsthepatternselector
tobemovedeasily).
•Slidethepatternselectortothedesired
patterngrouping.
Adjustingstitchlength
•Turnthestitchlengthdialtotheleftuntilthe
mark()onthediallinesupwiththe
dot()onthemachine,asshown.
Ifforanyreasonthemachinedoesnot
Note:
startsewingyourdesiredpatternafteraligning
thetwodotsymbols,push-inonthereverse
stitchbutton.
56
Largeurdepoint:
Longueurdepoint:2-5
Piedpresseur:Universel(B)
Plaqueàaiguille:Universelle(A)
Couvregriffe(F)
•Siletissuesttroué,faufilezuntissuderenfort
sousl’ouverture.
•Placezsouslepiedpresseurlapartieà
repriser,l’endroitdutissuau-dessus.Baissez
lepiedpresseuretcommencezàrepriseren
imprimantdélicatementautissuun
mouvementdevaetvient.
•Continuezcemouvementdevaetvientjusqu’à
cequela partieàreprisersoitrecouvertede
lignesbienparallèles.
3 4 51 2
Matelassage
Lematelassageconsisteàsurpiquer2ou
plusieursépaisseursdetissuensuivantun
dessin.Unmolletonestgénéralementutilisé
pourdonneruneffetdegonflant.
Réglagesrecommandés
Sélectiondepoint:Pointdroit(A)
Positiond’aiguille:
Largeurdepoint:
Longueurdepoint:2-5
Piedpresseur:Universel(B)
Plaqueàaiguille:Universelle(A)
•Surl’endroitdutissu,reproduisezledessin
choisiàl’aided’unecraieoud’uncrayon
lavable.
•Doublezl’enversdutissuavecunmolleton
souslequelvousplacerezégalementuntissu
légergenrebatiste.
•Batissezpouréviterleglissementdes
différentescouchesdetissu.
•Placezletissusouslepiedpresseuretpiquez
avecprécautionensuivantledessin.
•Sivousmatelassezuntrèsgrandouvrage,
commencezàtravaillerducentreversles
bordsenlissantfréquemmentletravail
pendantlapiqûre.
3 4 51 2
37
Page 40
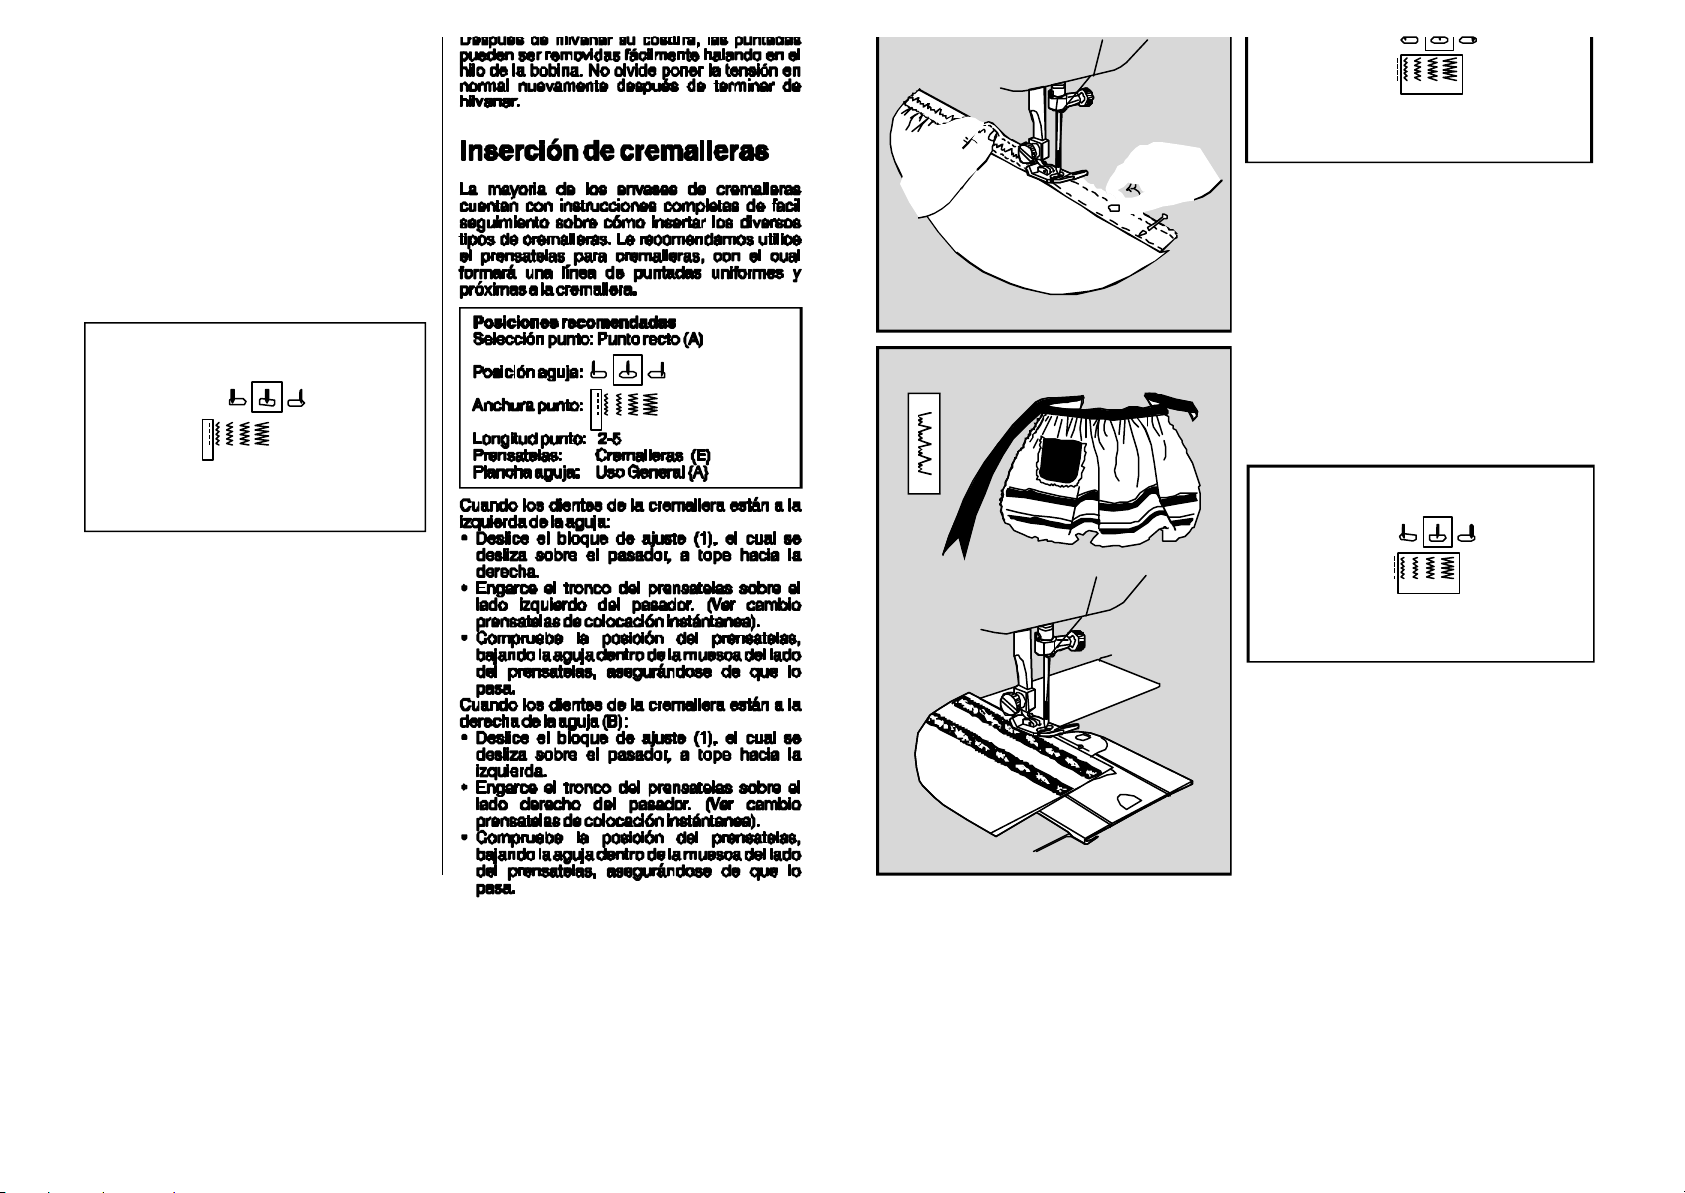
Positiond’aiguille:
SewingInstructions:
Afterbastingyourseam,stitchescanbe
removedeasilybypullingonyourbobbin
thread.Donotforgettore-setyourtensionback
toyournormalsettingafterbastingiscomplete.
Insertingazipper
WerecommendusingtheZipperFoottoform
anevenlineofstitchingclosetothezipper.
Recommendedsettings
StitchSelection:StraightStitch(A)
NeedlePosition:
StitchWidth:
StitchLength:2-5
Foot:Zipper(E)
NeedlePlate:GeneralPurpose(A)
Whenthezipperteetharetotheleftofthe
needle:
•Slidetheadjustingblock(1)whichslideson
thepin,acrosstotheright.
•Snaponthefoottotheleftsideofthepin.(See
changingsnaponpresserfeet).
•Checkthepositionofthefootbyloweringthe
needleintothenotchonthesideofthefoot,to
ensurethatitclearsthefoot.
3 4 51 2
Largeurdepoint:
3 4 51 2
Longueurdepoint:1à2
Piedpresseur:ModèleSpécial(J)
Plaqueàaiguille:Universelle(A)
•Adapterl’élastiqueauconfortdelapersonneet
ménager1pouce(25mm)derecouvrement.
Recouvrirlesdeuxextrémitésetlespiquer.
•Diviserl’élastiqueetlevêtementenquatre
partieségales.Placerl’élastiquesurletissuet
lesépinglerensemblesurcespointsenles
alignantsurlebordsupérieurduvêtement.
•Fixerl’élastiqueautissuparquelquespoints
droits.Puiscoudreentendantl’élastiqueentre
lesépinglesàl’aidedesdeuxmainspourle
tenirfermementdevantetderrièrelepied
presseur.
3 4 51 2
Insertiondentelle
Lapassementerieestcousueaprèslacoupedu
tissumaisavantlacouture.
Réglagesrecommandés
Sélectiondepoint:Pointd’ourletélastique(E)
Positiond’aiguille:
Largeurdepoint:
3 4 51 2
Longueurdepoint:½à2
Piedpresseur:ModèleSpécial(J)
Plaqueàaiguille:Universelle(A)
•Couperlapassementerieàlalongueur
désirée.
•Laplacersurl’endroitdutissuetl’eingleràsa
place.
•Placerl’ouvragesouslepiedpresseurde
façontellequelespointstombentsurlesbords
delapassementerieconformémentaudessin.
•Unefoisdesdeuxrivesdelapassementerie
cousues,retournerletissusurl’enverspuisle
coupersurlesdeuxcôtésaurasdeslignesde
couture.
38
55
Page 41
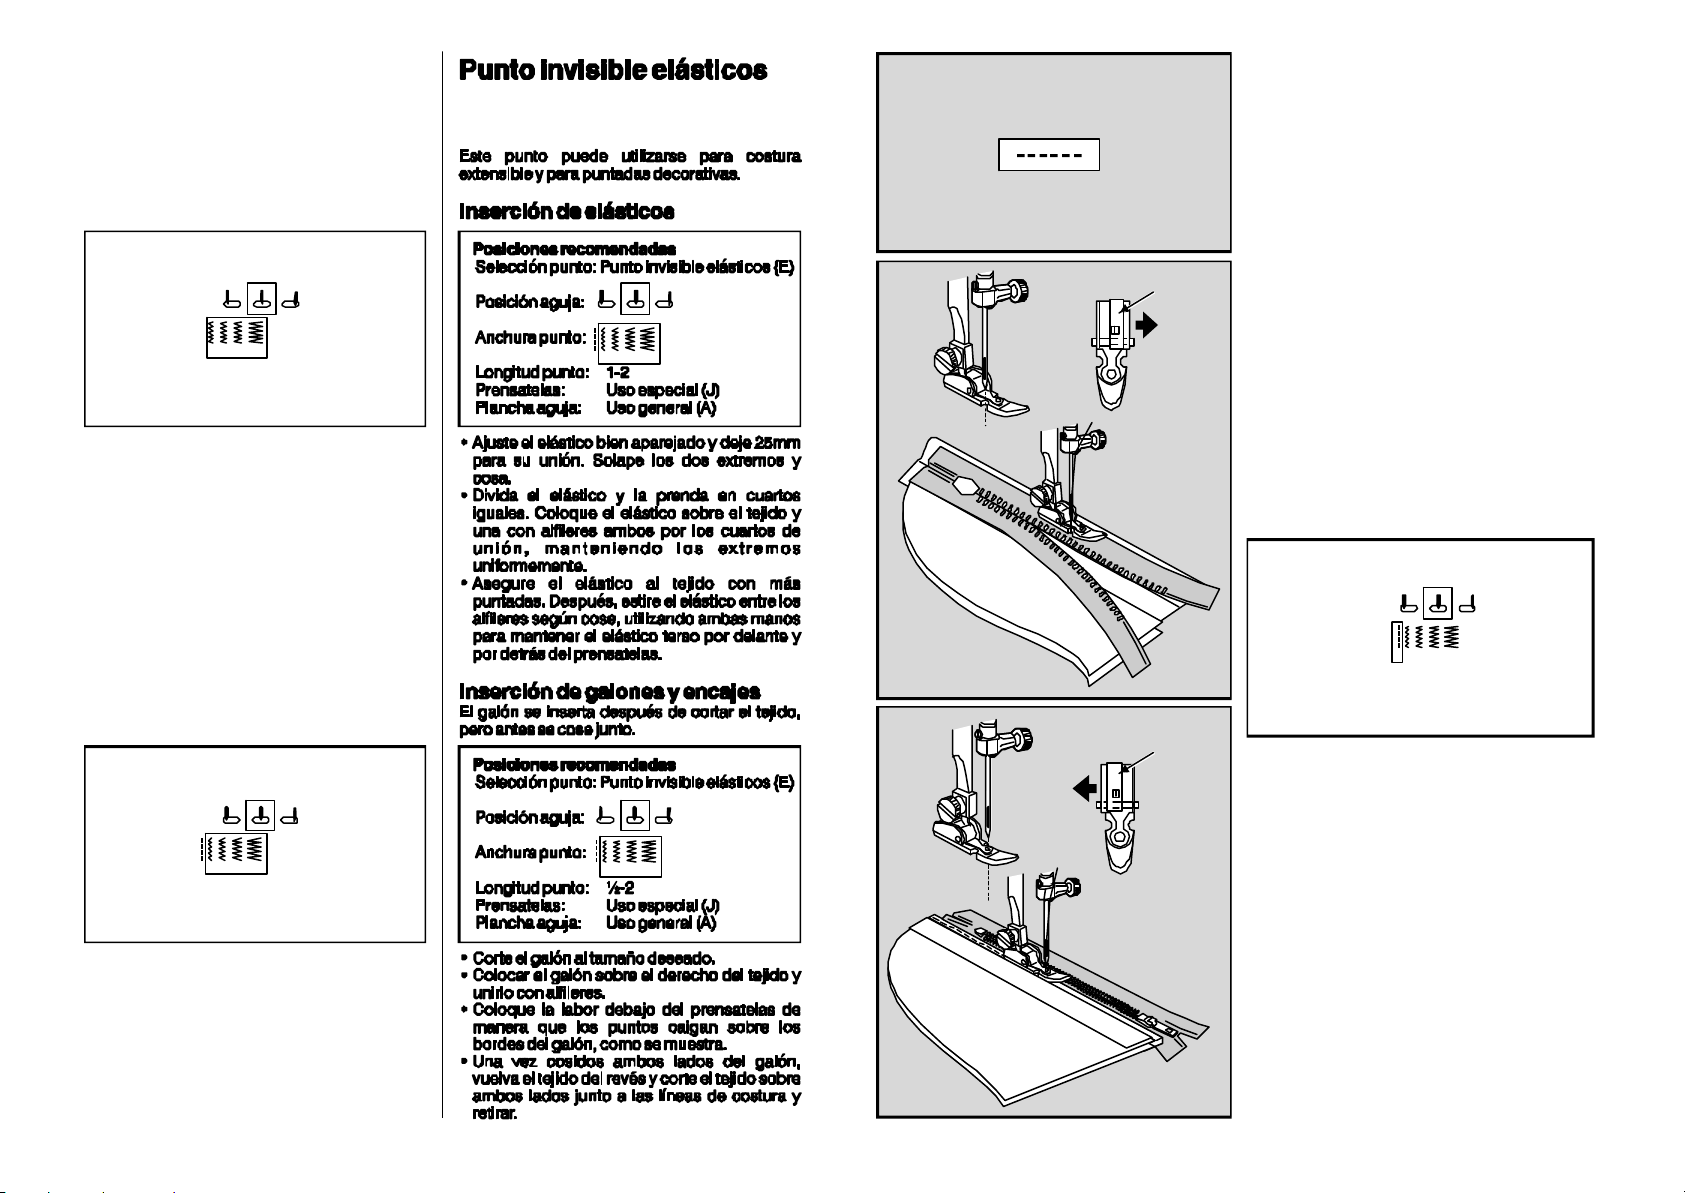
Stretchblindhem
Thisstitchcanbeusedforstretchseams,and
decorativestitching,andelasticapllication
Elasticinsertion
RecommendedSettings
StitchSelection:Stretchblindhem(E)
NeedlePosition:
StitchWidth:
StitchLength:1-2
Foot:SpecialPurpose(J)
NeedlePlate:GeneralPurpose(A)
•Fitelasticforsnugnessandallow1inch(25
mm)forjoining.Lapthetwoendsandstitch.
•Divideelasticandgarmentintoequal
quarters.Placeelasticoverthefabricandpin
thetwotogetheratthesepointskeepingtop
edgeseven.
•Anchortheelastictothefabricwithafew
stitches.Nowstretchelasticbetweenthepins
asyousew,usingbothhand stoholdelastic
firmlyinfrontandbackofpresserfoot.
3 4 51 2
Faufil
Préparationdelamachine:
!
Point:Droit
!
Largeurdepoint:Droit
!
Longueurdepoint:5.0
!
Pied:Usagegénéral
!
SélecteurdeTension:Réglerà1
ModeD :
1
3 4 51 2
Suivantlefaufilagedevotrecouture,enleverlefil
entirantsurlefildebobine.N'oubliezpasde
réglervotretensionàlasélectionnormaleaprès
votrefaufilage.
’emploie
Posed'unefermeture
glissière
Nousvousrecommandons,pourcetravail,le
piedganseurafindepiquerleplusprèspossible
desmaillesdelafermetureàglissière.
Réglagesrecommandés
Sélectiondepoint:Pointdroit(A)
Positiond’aiguille:
Laceinsertion
Laceisinsertedafterfabriciscut,butbeforeitis
sewntogether.
RecommendedSettings
StitchSelection:Stretchblindhem(E)
NeedlePosition:
StitchWidth:
StitchLength:-2
Foot:SpecialPurpose(J)
NeedlePlate:GeneralPurpose(A)
•Cutlacetodesiredsize.
•Positionlaceonrightsideoffabricandpinin
place.
•Placetheworkunderthepresserfootsothat
thestitchesfalloverthelaceedges,asshown.
•Afterbothsidesoflacearesewn,turnfabric
overtothebacksideandcutthefabricon
bothsidesclosetothestitchinglinesand
remove.
54
3 4 51 2
½
Largeurdepoint:
Longueurdepoint:2-5
Piedpresseur:Ganseur(E)
Plaqueàaiguille:Universelle(A)
2
3 4 51 2
Silesmaillesdelafermeturesontàgauchede
l'aiguille:
•Glissezlasemelledupiedganseurlelongde
lagoupilleversladroite(1).
•Enclenchezlecôtégauchedelasemellesurla
jambedupiedpresseur.(Voircomment
changerdepiedpresseur).
•Vérifiezlabonnemiseenplaceduganseuren
faisantdescendrel’aiguilledansl’encoche,
assurez-vousquecelle-cipasselibrement.
Silesmaillesdelafermeturesontàdroitede
l'aiguille:
•Glissezlasemelledupiedganseur(1)lelong
delagoupilleverslagauche.
•Enclenchezlecôtédroitdelasemellesurla
jambedupiedpresseur.
changerdepiedpresseur).
•Vérifiezlabonnemiseenplaceduganseuren
faisantdescendrel’aiguilledansl’encoche.
Assurez-vousquecelle-cipasselibrement.
3 4 51 2
(Voircomment
39
Page 42
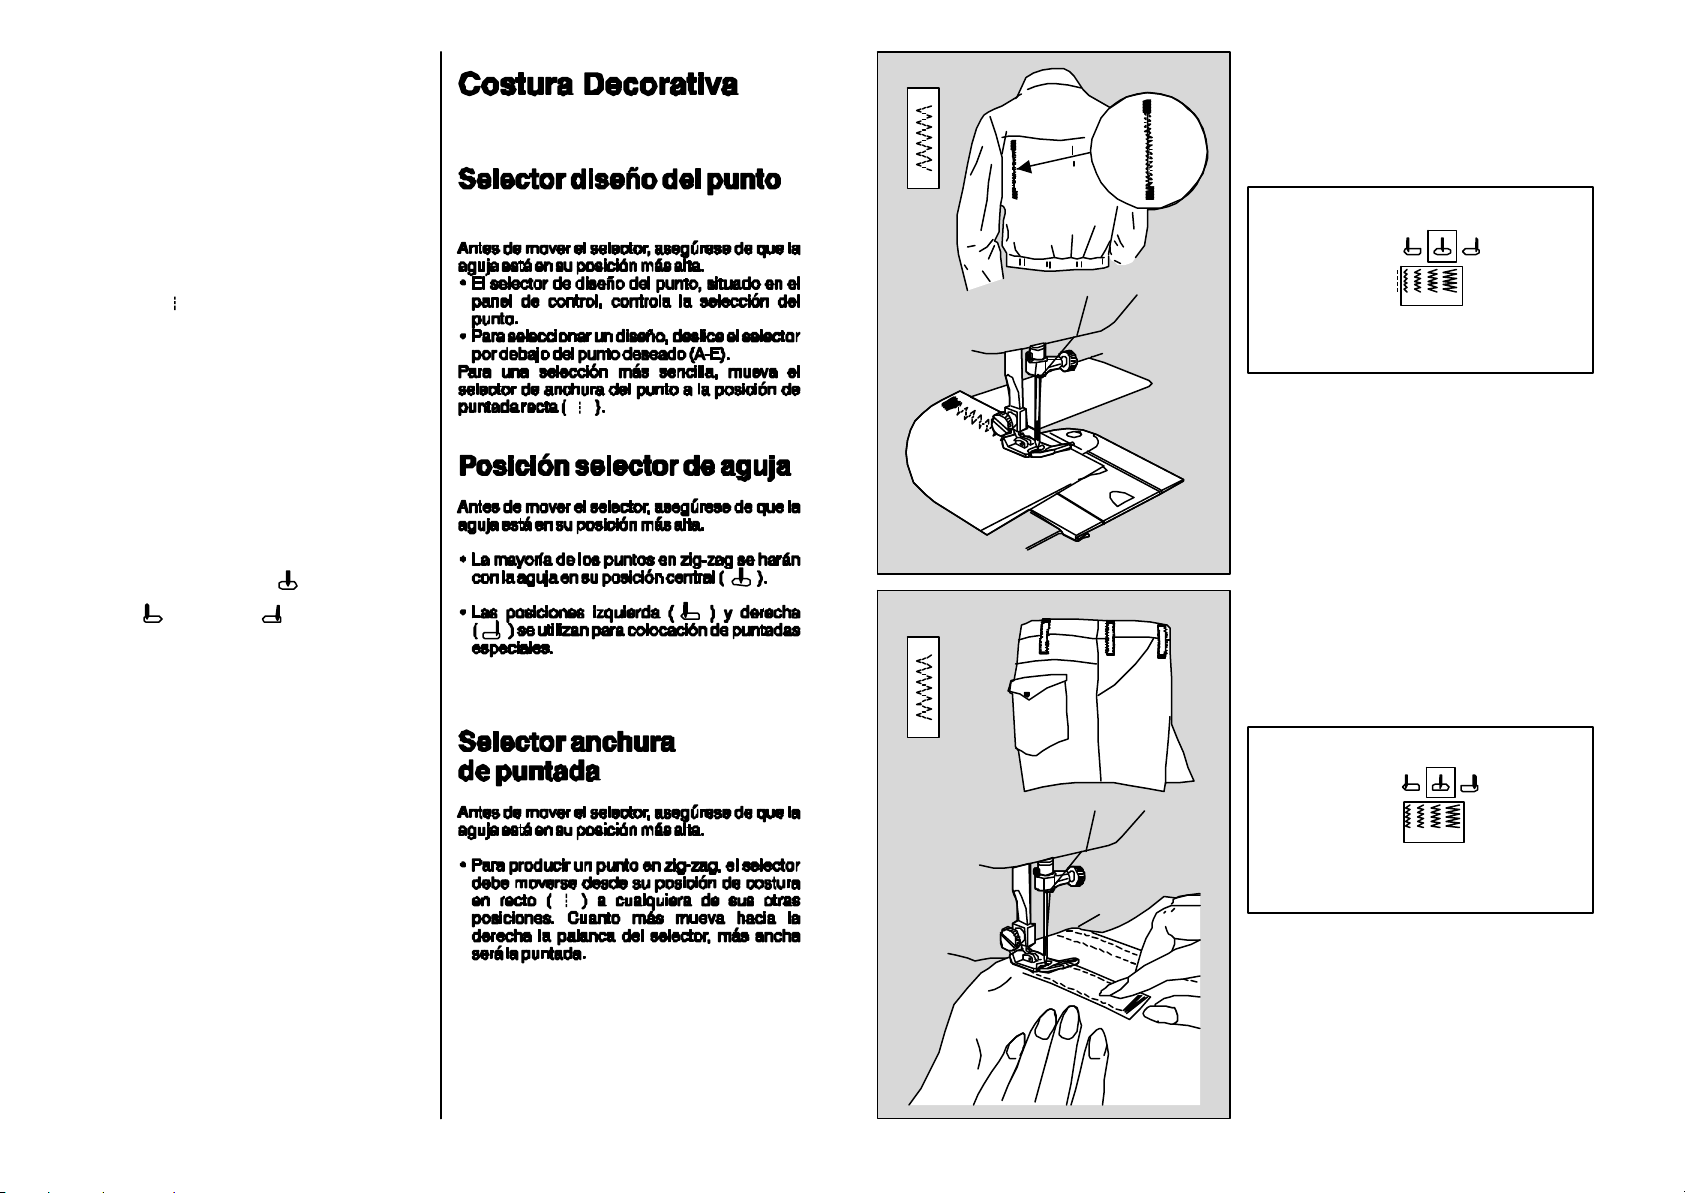
4
Decorative
stitching
Stitchpatternselector
Raisetheneedletoitshighestposition.
•Setthestitchwidthselectortothestraight
position().(Thisallowsthepatternselector
tobemovedeasily).
•Slidethepatternselectortothecenterofthe
desiredpatterngroup(A-E).
Needlepositionselector
Beforemovingselector,makesureneedleis
fullyraised.
•Mostofyourzig-zagstitchingwillbedonewith
theneedleinthecenter()position.
•Left()andright()settingsareused
forspecialstitchplacement.
Stitchwidthselector
Beforemovingselector,makesureneedleis
fullyraised.
•Toproduceanyofthezig-zagstitches,the
stitchwidthselectorismovedfromitsstraig ht
position()toanyofitsotherpositions.The
furtheryoumovetheselectorlevertowardthe
right,thewideryourstitchwillbe.
40
Zig-zagmultiple
Repriser,surjeter,renforcer,coudrebordàbord,
sontdesutilisationspossiblesdecepoint.
Réglagesrecommandés
Sélectiondepoint:Pointzig-zagmultiple(D)
Positiond’aiguille:
Largeurdepoint:
Longueurdepoint:1-2
Piedpresseur:Spécial(J)
Plaqueàaiguille:Universelle(A)
Reprised’unaccroc
•Recoupezlesbordsdel’accroc.
•Coupezunmorceaudetoilederenfort.
•Juxtaposezlesbordsdel’accrocetbatissezle
renfortsurl’enversdutissu.
•Placezl’accrocsouslepiedpresseur.
•Piquezsurladéchirureenraccourcissantla
longueurdepointauxextrémitéspourles
renforcer.
•Coupezlesfilsaurasdutissu.
•Sinécessaire,passezunedeuxièmefois.
•Coupezsurl’enverslerenfortdetoileaurasde
lapiqûre.
Arrets
Unpointdezig-zagmultiplerapprochévous
permettradefixersolidementlesbridesde
ceinture,surtoutdansdestissusépaiscommele
Jean.
Réglagesrecommandés
Sélectiondepoint:Pointzig-zagmultiple(D)
Positiond’aiguille:
Largeurdepoint:
Longueurdepoint:1-2
Piedpresseur:Spécial(J)
Plaqueàaiguille:Universelle(A)
•Marquezl’emplacementdesbridessurle
vêtement.
•Placezuncôtédelabrideendroitcontre
endroitsurlamarquedel’emplacementet
maintenez-leenplaceaupointdroit.
• Repliez-lelelongdelapiqûre.
•Surpiquezavecunarrêtzig-zagmultipleà3mm
dubordcommeillustré.
•Repliezledeuxièmecôtéetmaintenezlapliure
auferàrepasser.
•Surpiquezledeuxièmecôtéà3mmdubordau
pointdezig-zagmultiple.
3 4 51 2
3 4 51 2
53
Page 43
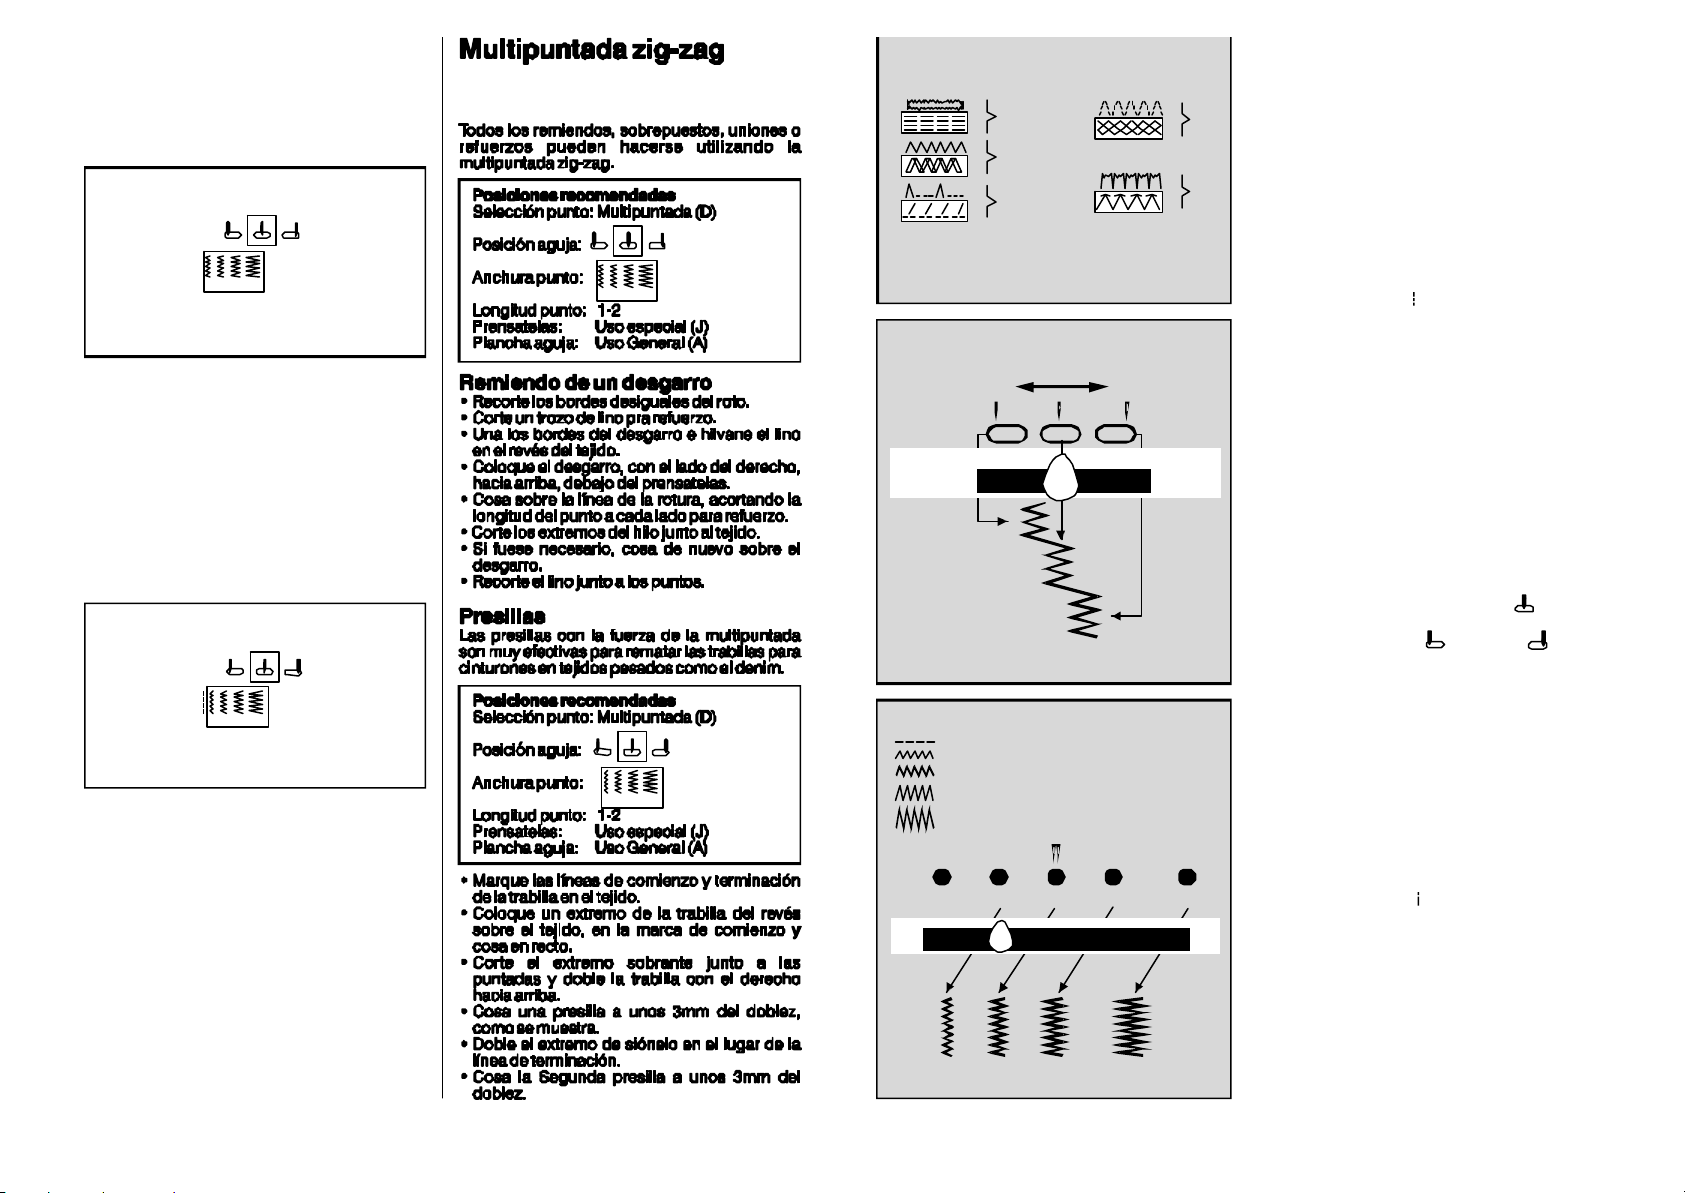
Multi-stitchzig-zag
CoutureDécoratif
Mending,overcasting,joiningorreinforcingcan
allbedoneusingtheMulti-StitchZig-Zag.
RecommendedSettings
StitchSelection:Multi-stitchzig-zag(D)
NeedlePosition:
StitchWidth:
StitchLength:1-2
Foot:SpecialPurpose(J)
NeedlePlate:GeneralPurpose(A)
3 4 51 2
Mendingatear
•Trimraggededgesoftear.
•Cutaliningforreinforcement.
•Bringtheedgesofteartogetherandbaste
liningtowrongsideoffabric.
•Placetear,rightsideup,underfoot.
•Ifnecessary,sewovertearagain.
•Trimawayliningclosetostitching.
Bartacks
Strongmulti-stitchbartacksareeffectivefor
tackingbeltloopsonheavyfabricssuchas
denim.
RecommendedSettings
StitchSelection:Multi-stitchzig-zag(D)
NeedlePosition:
StitchWidth:
StitchLength:1-2
Foot:SpecialPurpose(J)
NeedlePlate:GeneralPurpose(A)
•Markstartandfinishlinesofbeltloopon
fabric.
•Placeoneendofbeltloop,wrongsideup,on
beginningmarkonfabricandstraightstitchin
place.
•Trimrawendclosetostitchingandfoldbelt
loopover,rightsideup.
•Stitchabartackabout1/8”(3mm)fromthe
fold,asshown.
•Foldlooseendofbeltloopunderandpressit
inplaceonfinishingline.
•Stitchsecondbartackabout1/8”(3mm)from
thefold.
3 4 51 2
A
B
C
3 4 51 2
D
Sélecteurdepoint
E
Remontezl’aiguilleenpositionhaute.
•Placezlesélecteurdelargeurdepointsurla
positionpointdroit().Cettepositionpermet
ledéplacementfaciledusélecteurdepoint.
•Glissezlesélecteurdepointaucentredu
groupedepointsdésirés(A-E).
Sélecteurde
positiond’aiguille
Avantdedéplacercesélecteur,assurez-vous
quel’aiguilleestenpositionhaute.
•Laplupartdespointsdezig-zagserontréalisés
avecl’aiguilleenpositioncentrale().
•Lespositionsgauche()etdroite()sont
utiliséesdansdescasbienparticuliers.
1
2
3
3 4 51 2
4
5
1 2 3 4 5
Sélecteurde
largeurdepoint
Avantdedéplacerlesélecteur,assurez-vousque
l’aiguilleestenpositionhaute.
•Lorsquevousutilisezlespointsdezig-zagde
votremachine,cesélecteurseradéplacédela
positionpointdroit()versl’unedesautres
possibilités.Plusvouspositionnerezce
sélecteurversladroite,pluslespointsseront
larges.
52
41
Page 44
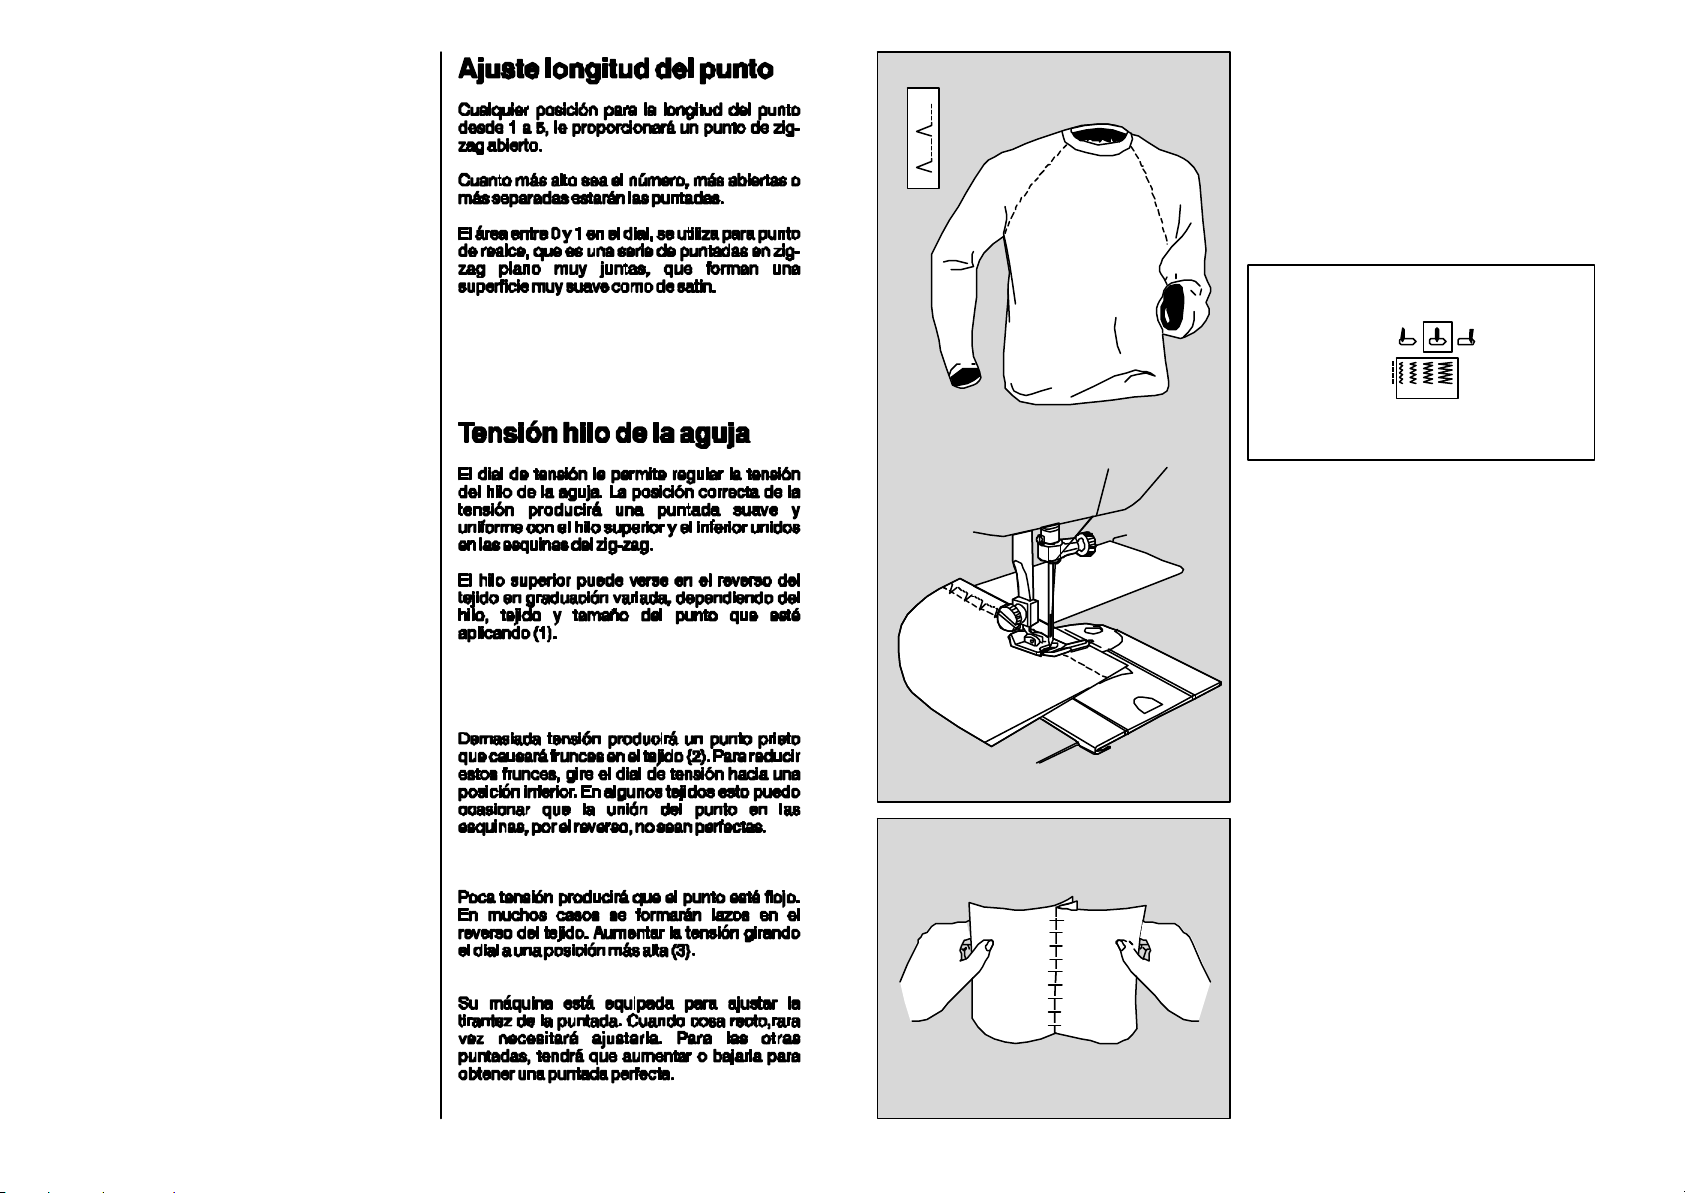
Adjustingstitchlength
Anystitchlengthsettingfrom1to5willgiveyou
anopenzig-zagstitch.
Thehigherthenumber,themoreopen,or
furtherapart,yourstitcheswillbe.
Theareabetween0and1onthedialisusedfor
satinstitching,aseriesofcloselyspacedplain
zig-zagstitchesthatformasmoothsatin-like
surface.
Coutureséchelles
Lacoutureéchelleréaliséeaveclepointcaché
estenmêmetempsfonctionnelleetdécorative.
Cettecouturepermetl’assemblagedetissus
tricotetextensiblesetlesfinitionsdesbordsde
col,encolures,pochesdanslesvêtementsde
sport.
Réglagesrecommandés
Sélectiondepoint:Pointinvisible(C)
Positiond’aiguille:
Needlethreadtension
Theneedlethreadtensiondialregulatesthe
amountoftensionontheneedlethreadandlets
youselectjusttherightsettingforyourfabric
andthread.
Thecorrecttensionsettingwillproducea
smoothevenstitch(1).
Toomuchtensionwillproduceatightstitch(2),
causingfabrictopucker. Loosentensionby
turningdialtoalowernumber.
Toolittletensionwillproducealoosestitch(3),
causingloopsinyourpattern.Tightentension
byturningdialtoahighernumber.
Largeurdepoint:
Longueurdepoint:1--
Piedpresseur:Universelle(B)
Plaqueàaiguille:Universelle(A)
•Faitesunessaipourréglerlatensionetla
longueurdepoint.Latensiondevraêtreplus
lâchequelanormale.
•Coupezenprévoyantunecouturede1,6cm.
Faufilerlalignedecouture.
•Positionnezletissudesortequelespointszigzagtombentsurlalignedecouture.
•Lorsquevousavezterminélacouture,tirezle
tissudechaquecôtédelapiqûrepourobtenir
l’effetéchelleetrepassercoutureouverte.
3 4 51 2
½à2½
Yourmachineisequippedwithautotension.
Whenstraightstitching,rarelywillthetension
needadjusting.Forallotherstitchesyoumay
needtoeitherraiseorlowerthetensiona
perfectstitch.
42
51
Page 45
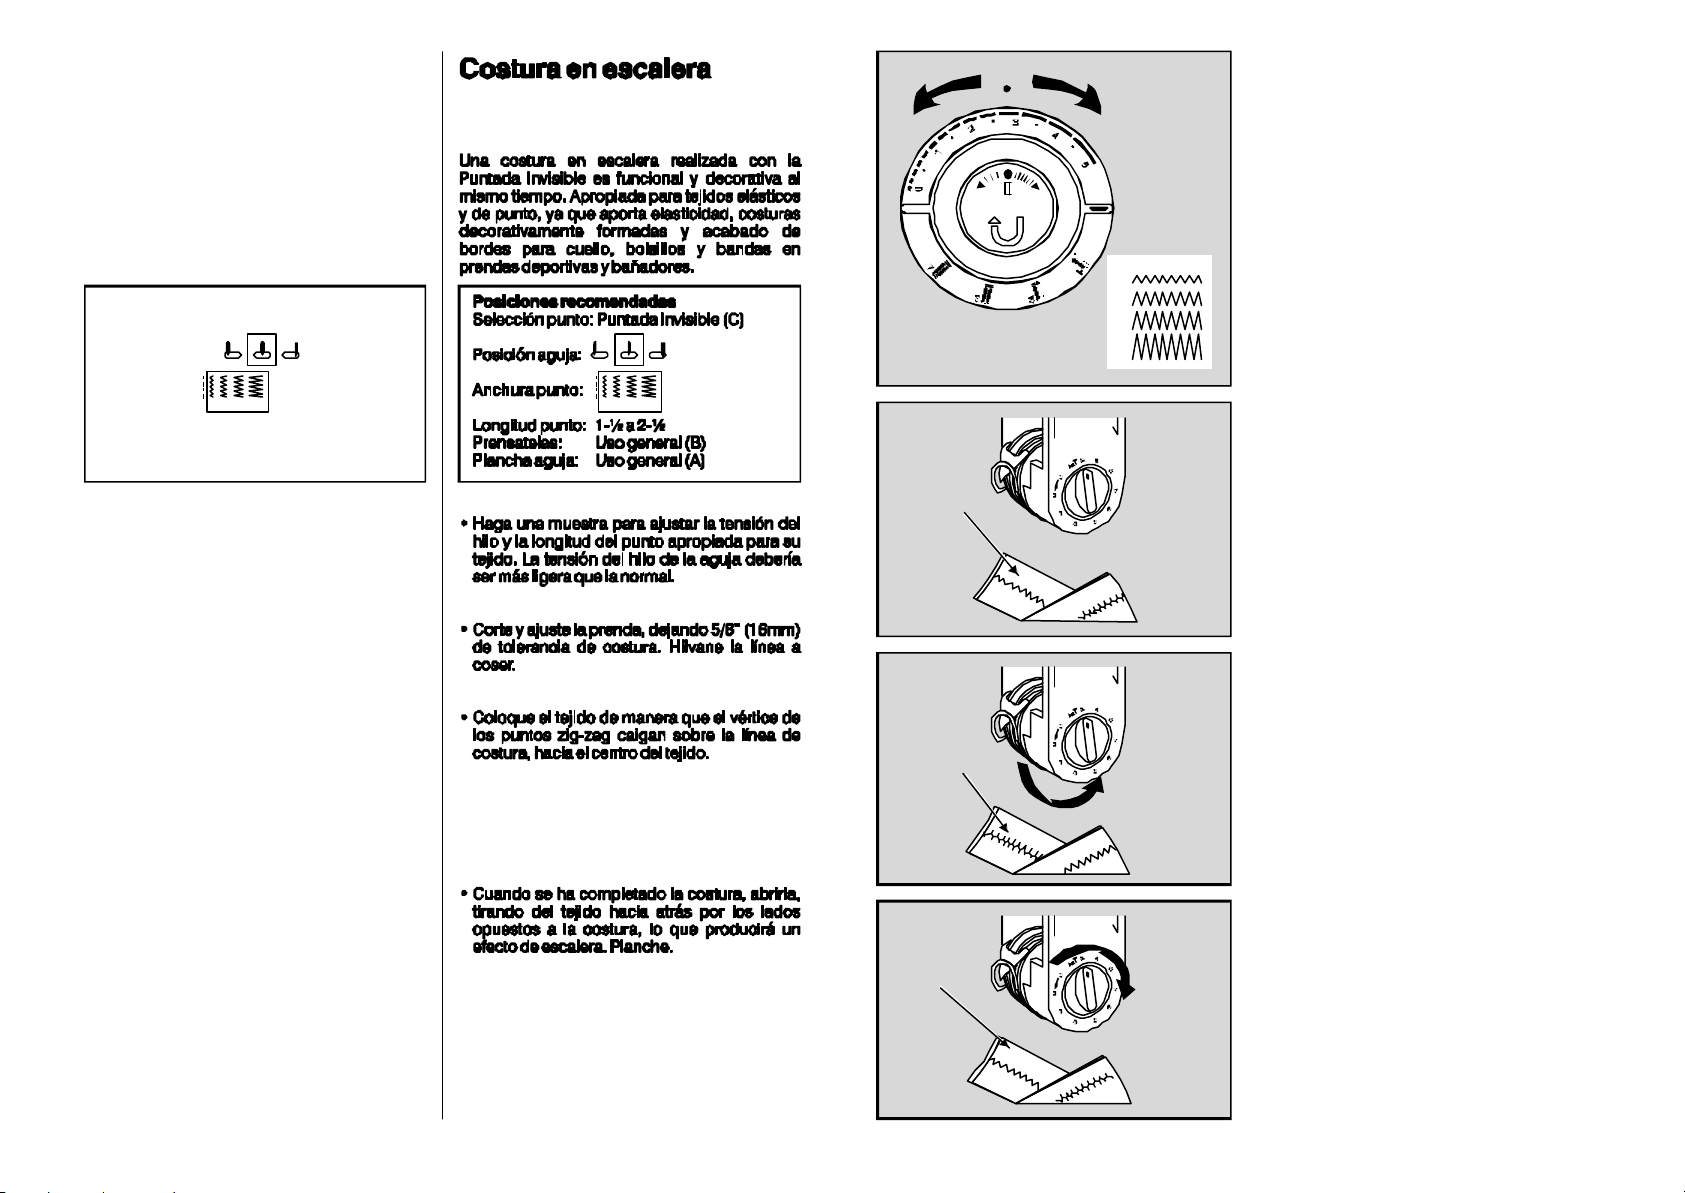
Ladderseams
Aladderseammadewithblindstitchingis
functionalanddecorativeatthesametime.
Appropriateforstretchandknittedfabrics,it
providesstretchable,decorativelyconstructed
seamsandedgefinishesforcollars,pockets
andnecklinesinsportwearandswimwear.
RecommendedSettings
StitchSelection:Blindstitch(C)
NeedlePosition:
Réglagedela
longueurdepoint
Selonlalongueurdepointchoisie,de1à5,le
zig-zagseraplusoumoinsouvert.
Lechiffreleplusélevédonneralezig-zagleplus
ouvert.
Lapositiondusélecteurentre0et1serautilisée
2
3
4
5
pourfairelepointdebourdon.Danscettezone,
lespointsdezig-zagseronttrèsrapprochéset
formerontunesurfaceunieetsatinée.
StitchWidth:
StitchLength:1--
Foot:SpecialPurpose(B)
NeedlePlate:GeneralPurpose(A)
•Makeatestsampletoadjustthreadtension
andstitchlenghttosuityourfabric.Needle
threadtensionshouldbelowerthannormal.
•Cutandfitgarment,allow5/8”(16mm)seam
allowance.Basteseamline.
•Positionfabricsothatthelargezig-zag
stitchesfallonthestitchingline,towardsthe
centerofgarment.
•Whenstitchingiscompleted,opentheseam
bypullingthefabricbackonoppositesidesof
seamtoproducealaddereffectandpress
seamallowances.
3 4 51 2 3 4 51 2
½to2½
Tensiondufild’aiguille
Lesgraduationsdubloctensionpermettent
1
2
3
d’adapterleréglagedelatensionsupérieureà
l’épaisseurdufiletdutissu.
Lorsquelatensionestbienréglée,lepointest
régulieretuniforme(1).
Silatensionesttropserrée,lepointseratendu
(2)etplisseraletissu.Desserrezlatensionen
tournantledisqueversunchiffremoinsélevé.
Silatensionesttrôplâche,vousconstaterezdes
bouclettessurl’enversdutravail(3).Pour
resserrerlatension,tournezledisqueversun
chiffreplusélevé.
Votremachineestéquipéed’unetension
automatique.Iln’estpasnécessairederégléla
tensionpourlacouturedroite.Pourtousautres
pointsilfautaugmenteroudiminuerlatension
pourunpointréussis.
50
43
Page 46
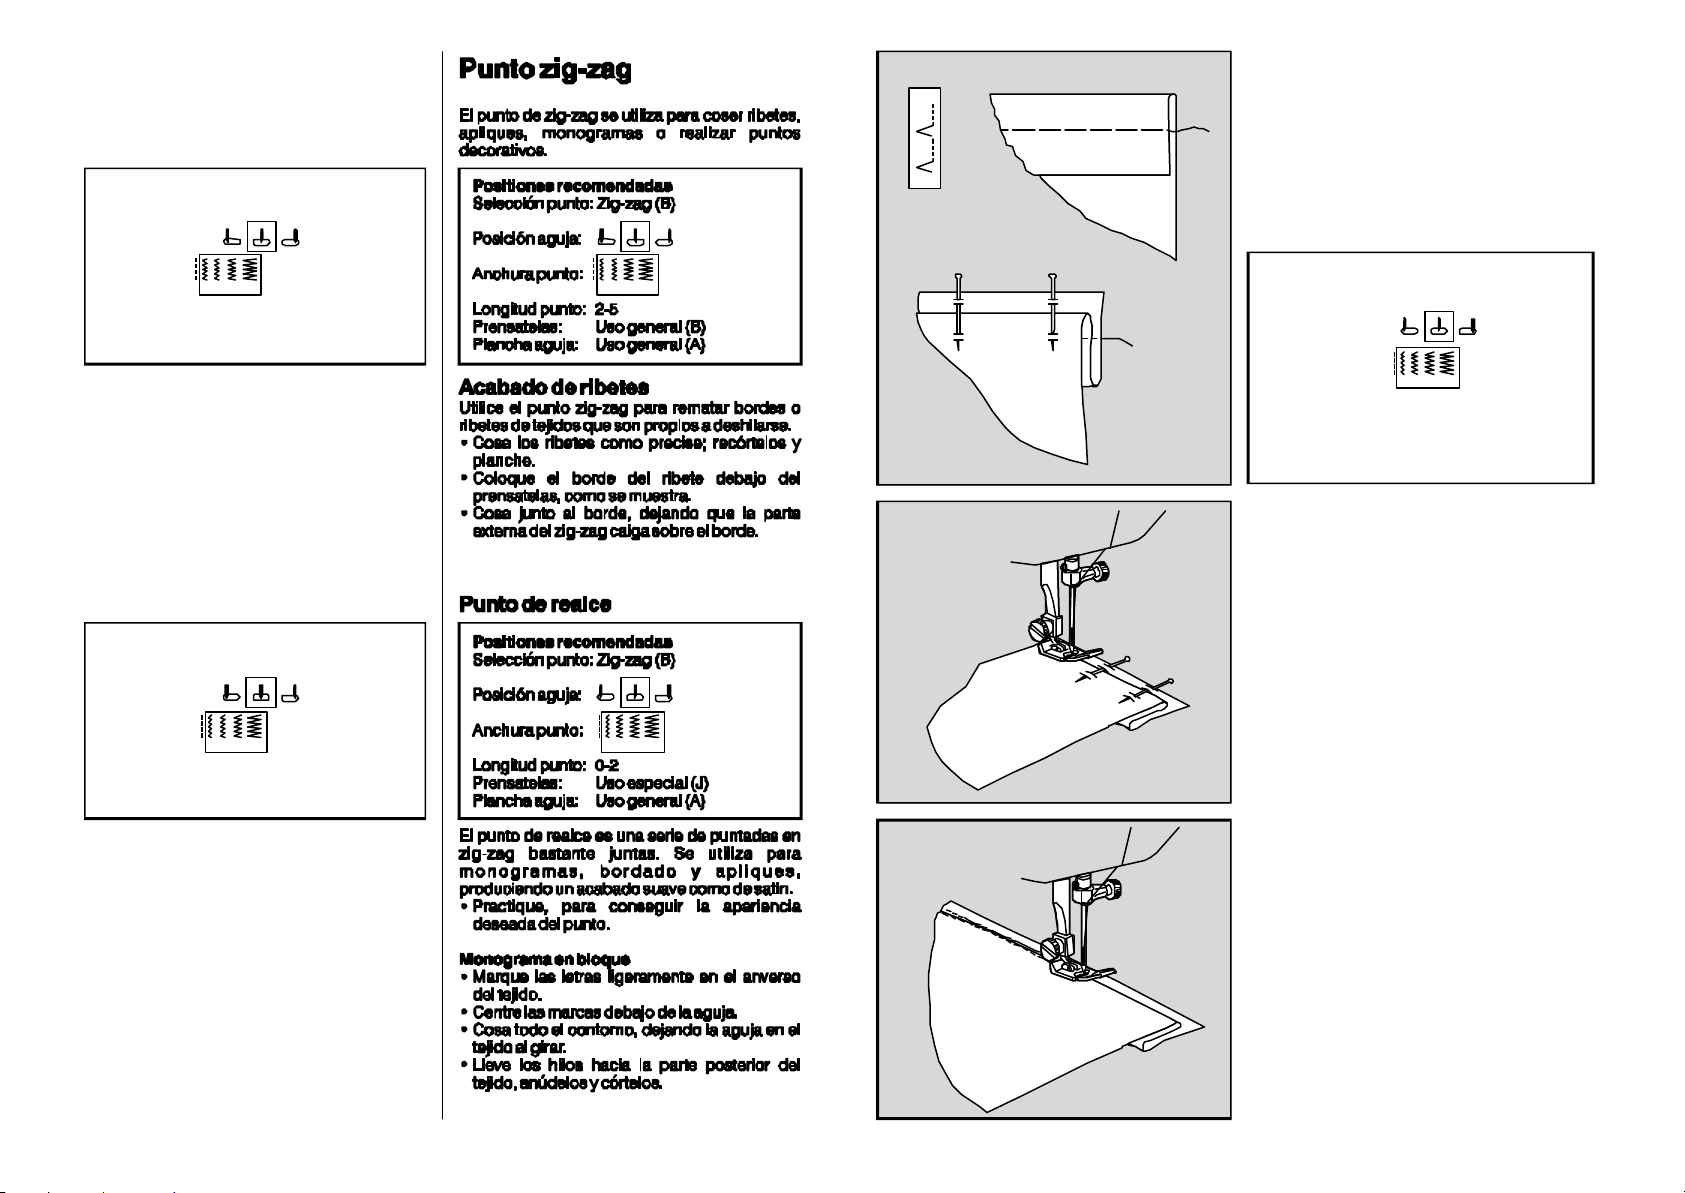
Zig-zagstitch
TheZig-ZagStitchcanbeusedwhensewing
seams,appliqueing,monogrammingorfor
decorativesewing.
RecommendedSettings
StitchSelection:Zig-zagstitch(B)
NeedlePosition:
StitchWidth:
StitchLength:2-5
Foot:GeneralPurpose(B)
NeedlePlate:GeneralPurpose(A)
Seamfinishing
Useazig-zagstitchtofinishseamedgesof
fabricsthatarelikelytofray.
•Sewseamsasdesired;trimandpressopen.
•Placeedgeofseamallowanceunderfoot,as
shown.
•Stitchclosetoedge,lettingouterzig-zagfall
overedgefabric.
3 4 51 2
Pointinvisible
Lepointcachévouspermetdecoudreles
ourletsdetissusmoyensépaisetjersey.Coudre
aupointcachérequiertunpeudepratique.
Faitesunexercice.
3 4 51 2
Réglagesrecommandés
Sélectiondepoint:Pointinvisible(C)
Positiond’aiguille:
Largeurdepoint:
Longueurdepoint:1--
3 4 51 2
½à2½
Piedpresseur:Spécialpour
pointinvisiblenº9
plaqueàaiguille:Universelle(A)
Préparezlepliagedel’ourletetrepassez
légèrement.mieuxvautbâtirl’ourletpourle
maintenirenplace(commeillustré).Cebâtidoit
sesituerà1,2cmdelapliuredel’ourlet.
Satinstitching
RecommendedSettings
StitchSelection:Zig-zagstitch(B)
NeedlePosition:
StitchWidth:
StitchLength:0-2
Foot:SpecialPurpose(J)
NeedlePlate:GeneralPurpose(A)
Satinstitchingisaseriesofcloselyspacedzigzagstitches.Satinstitchcanbeusedfor
monograms,embroideryandappliqueworkto
produceasmoothsatin-likefinish.
•Practicetogetdesiredstitchappearance.
Blockmonogramming
•Lightlytracelettersonrightsideoffabric.
•Centertracingunderneedle.
•Stitchentireoutline,leavingneedleinfabric
whenturning.
•Pullthreadstowrongsideoffabric,tieand
trim.
44
3 4 51 2
L’enversdel’ouvrageversvous,tournezl’ourlet
commeillustré,enformantunpliàenviron0,5cm
dubordcoupédel’ourlet.Epinglezlestrois
épaisseursainsirepliées.
Positionnezl’ourletsouslepiedpresseur,lepli
3 4 51 2
contrelebordduguide,commeillustré.
•Baissezlepiedpresseuretcommencezà
piquer.Lespointsdroitsdoiventsetrouversur
leborddel’ourlet,lespointszig-zagdoivent
piquerdansleplidutissu.Réglezlalargeurdu
pointafinquelespointszig-zagtranspercent
trèspeuletissu.Piquezlentementendirigeant
bienletissupliélelongdiguide.
•Sivousavezbâtivotretravailauxépingles
retirezlesépinglesaufuretàmesuredela
piqûre.
49
Page 47
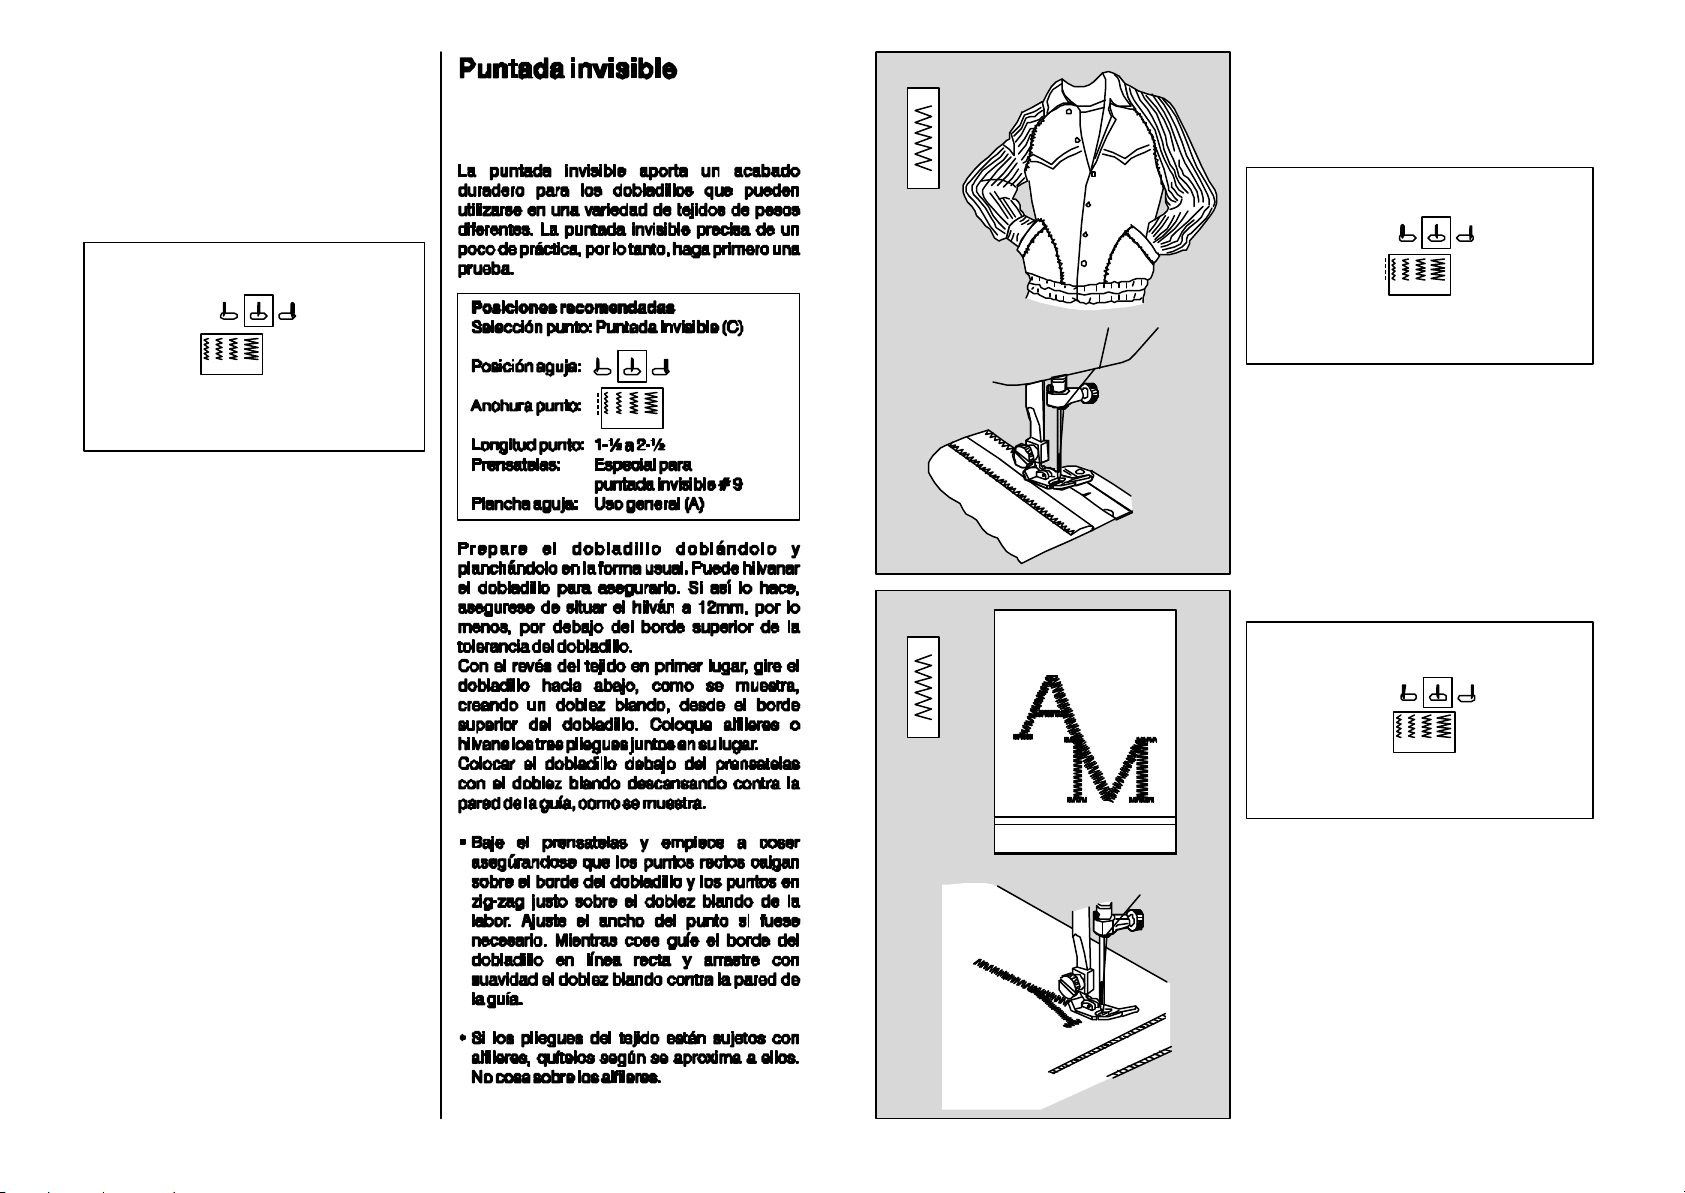
Blindstitch
Blindstitchingprovidesadurablehemfinishthat
canbeusedonavarietyofdifferentweight
fabrics.Blindstitchingtakesalittlepractice,
however,somakeatestsamplefirst.
RecommendedSettings
StitchSelection:Blindstitch(C)
NeedlePosition:
StitchWidth:
StitchLength:1--
Foot:SpecialBlindstitch#9
NeedlePlate:GeneralPurpose(A)
Preparethehembyfoldingitandpressingitin
theusualway.Youmaywanttobastethehemto
holditinplace,asshown.Ifso,besuretoplace
thebastingatleast
edgeofthehemallowance.
3 4 51 2
½to2½
½”(12mm)belowthetop
Pointzig-zag
Cepointpeutêtreutilisépoursurfiler,appliquer,
broderdesmonogrammesetautres
décorations.
Réglagesrecommandés
Sélectiondepoint:Pointzig-zag(B)
Positiond’aiguille:
Largeurdepoint:
Longueurdepoint:2à5
Piedpresseur:Universelle(B)
Plaqueàaiguille:Universelle(A)
Finitionsdescoutures
3 4 51 2
Pouréviterqueleborddescouturesne
s’effiloche,utilisezlepointdezig-zag.
•Piquezlescoutures.Recoupez-les
régulièrementetrepassezlescoutures
ouvertes.
•Placezlavaleurdelacouturesouslepied
presseurcommeillustré.
•Surfilezleborddefaçonquelepointdezig-zag
setrouveàchevalsurlebord.
3 4 51 2
Withthewrongsideoffabricuppermost,turn
thehemunder,asshown,creatingasoftfold
fromthetopedgeofhem.Pinorbasteallthree
layerstogetherinplace.
Positionthehemunderthepresserfootwiththe
softfoldrestingagainstwalloftheguide,as
shown.
•Lowerthepresserfootandbeginsewing,
makingcertainthestraightstitchesfallonthe
edgeofthehemandthezig-zagstitchesfall
ontheedgeofthehemandthezig-zag
stitchesjustpiercethesoftfoldofthework.
Adjuststitchwidthifnecessary.While
stitching,guidethehemedgeinastraightline
andfeedthesoftfoldevenlyagainsttheedge
oftheguide.
•Iflayersoffabricarepinnedtogether,remove
pinsasyoucometothem.Donotsewover
pins.
48
Pointdebourdon
Réglagesrecommandés
Sélectiondepoint:Pointzig-zag(B)
Positiond’aiguille:
Largeurdepoint:
Longueurdepoint:0à2
Piedpresseur:Spécial(J)
Plaqueàaiguille:Universelle(A)
Lepointdebourdonestunesériedepointsde
zig-zagrapprochés.Cepointpermetles
applications,lesfinitionsd’ourletsetlabroderie
demonogrammes.
•Faitesunessaipourchoisirl’apparence
désirée.
Monogrammes
•Surl’endroitdutissu,tracezlégèrementle
dessindeslettres.
•Présentezcetracésousl’aiguille.
•Brodezenrecouvrantletracé;pourtournerle
travail,laissezl’aiguilledansletissu.
•Tirezlesfilssurl’enversdutravail,nouez-leset
coupez-les.
3 4 51 2
45
Page 48
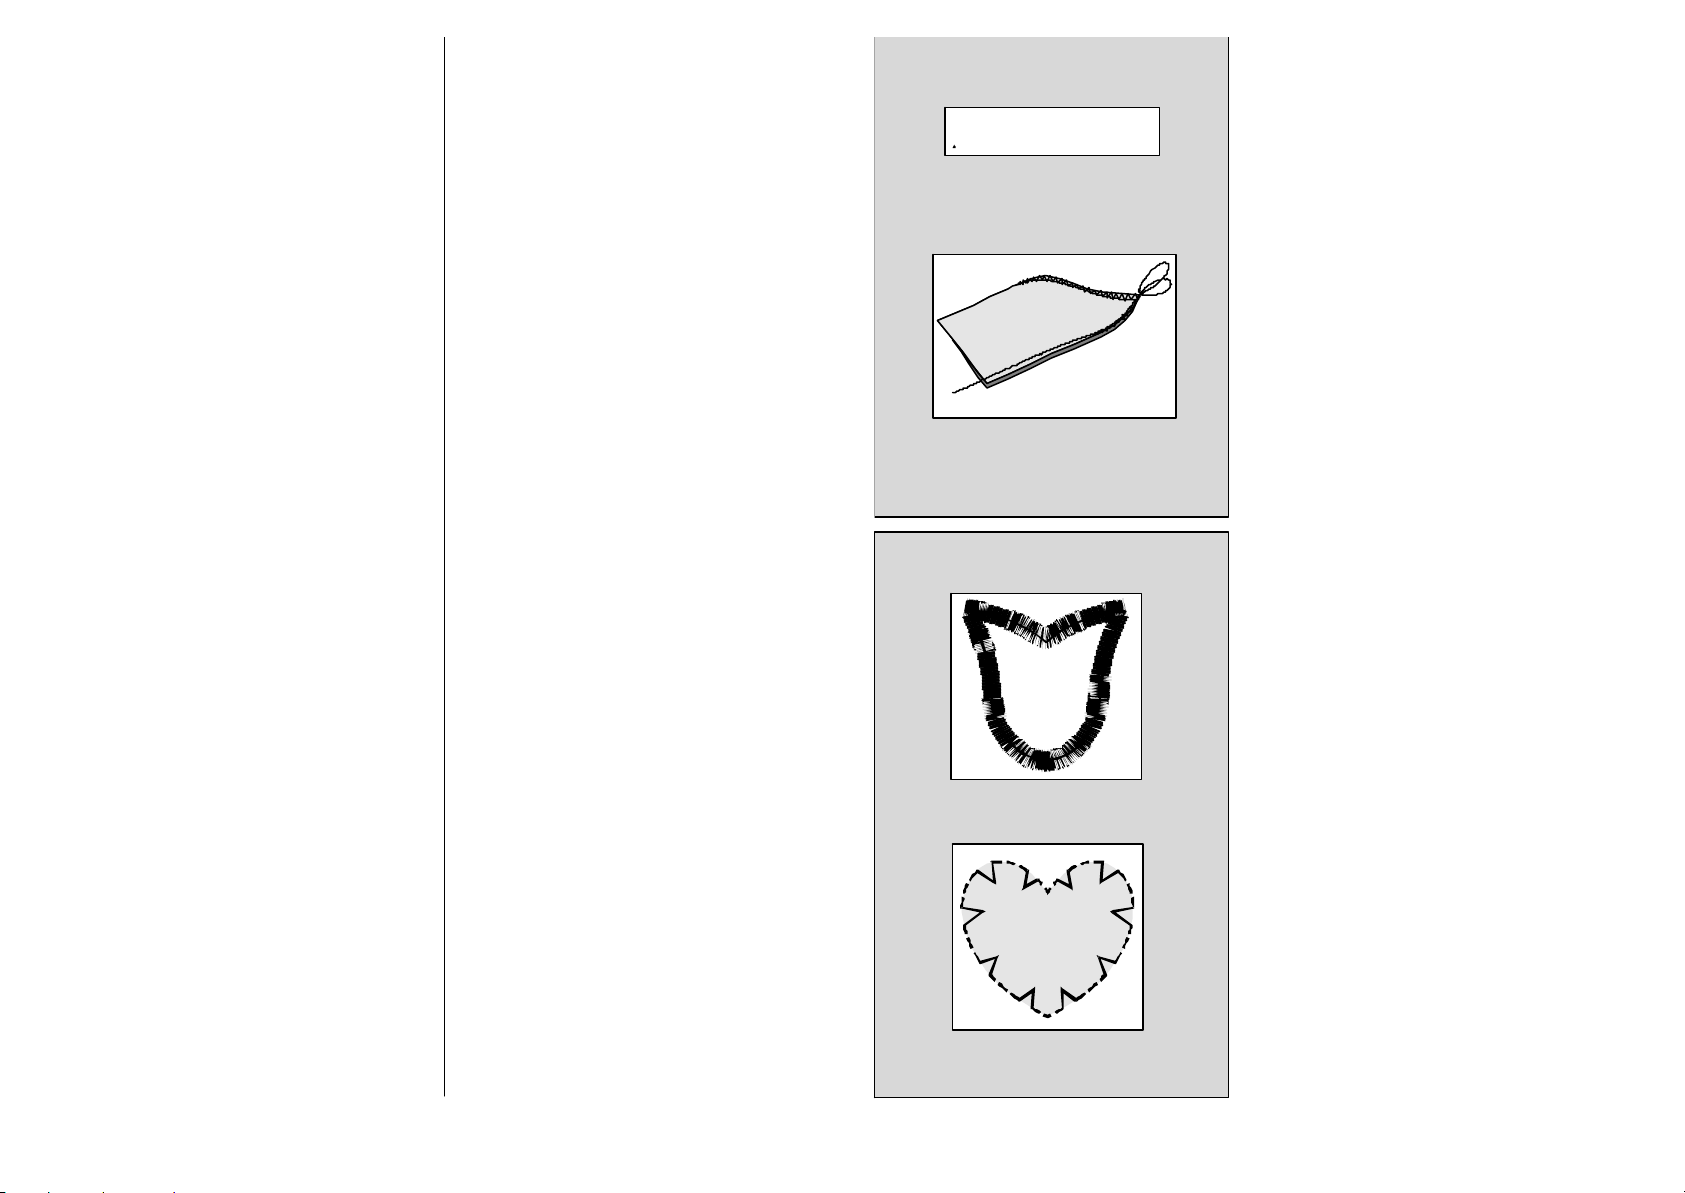
CordedSatinStitching
MachinePreparation:
AcordonadodeSatín
BourdonGalonné
!
Pattern:Zigzag
!
Stitchwidth:Variable(Setaccordingtowidth
ofcord)
!
Stitchlength:1-2
!
Foot:SpecialPurpose“J”
SewingInstructions:
CordedSatinStitchingissimplythetechnique
ofzigzaggingoverafinecord.Useasa
decorativetouchonjacketsandothersewing
projects.Withamarkingpencil,drawadesign
onyourfabric.Laythecordunderthecenter
openingofyourfootandzigzagoverthecordso
thattheneedlefallsjusttotherightandleftofthe
decorativecord.Asyousew,followthelinesof
yourdesign.
SatinStitchAppliqué&
BlindstitchAppliqué
MachinePreparation:
!
Pattern:ZigzagorBlindhem
!
StitchWidth:1.5(1/16ofaninch)
!
StitchLength:0.5-1.5forZigzag,2-3for
Blindhem
!
Foot:Blindstitch
SewingInstructions:
Positionappliquépieceonbackgroundfabric
andsecureitinplaceusingfabricglue.Align
needlesothatitpiercesbackgroundfabric
alongtheoutsideedgeoftheappliqué.Lower
presserfoot.
For,useZigzagstitch
SatinStitchAppliqué
andproceedtosewfollowingtheedgeofthe
appliqué.
ForuseBlindhemstitch
BlindstitchAppliqué
andproceedtosewfollowingtheedgeofyour
appliqué.
IfusingaBlindhemfoot,alignthelipofthe
blindhemfootguidesothatitsitsdirectyalong
theedgeoftheappliqué.
Topivotforcurvesorcorners,leaveneedle
downinfabriconoutsideedgeofappliqué,lift
footandpivot.
46
Preparacióndelamáquina:
!
Puntada:Zigzag
!
Anchodelapuntada:Variable.(De
acuerdoconelanchodelcordón).
!
Largodelapuntada:1-2
!
Pie:Zigzag-PrensatelasdeusoEspecial
“J”
Instruccionesparacoser:
Estatécnicadeacordonadodesatínes
simplementehacerZigzagsobreuncordón
fino.Usecomountoquedecorativosobre
chaquetasyotrosproyectos.Conunlápiz
dibujeundiseñosobrelatela.Pongael
cordóndebajodelaaberturacentraldesu
pieyhagazigzagsobreelcordónparaquela
agujacaigadirectamentealaderechayla
izquierdadeladorno.Amedidaquecosesiga
laslíneasdeldiseño
.
Aplicacionesconpuntada
satínyaplicacionescon
puntadainvisible
Preparacióndelamáquina:
!
Patrón:Zigzagopuntadainvisible
!
Anchopuntada:1.5(1/16deunapulgada)
!
Largopuntada:0.5-1.5paraZigzag2-3
parapuntadainvisible
!
Pie:Pieparapuntada
Instruccionesparacoser:
Coloquelaaplicaciónporencimadelatelay
asegúrelausandogomaparatela.Alineela
agujaparaquepenetrelateladeatrásalo
largodelbordedelaaplicación.Bajeel
prensatela.
Parapuntadadesatín,uselapuntadade
zigzagyprocedaacosersiguiendoelorillo
delaaplicación.
Parapuntadainvisibleuseelpiedepuntada
invisibleyprocedacosiendoporlaorilladela
aplicación.siestáusandoelpiedepuntada
invisible,alineelapuntadeguíadelpiepara
quesesientedirectamentedebajodelorillo
delaaplicación.
Paradarlelavueltaenlascurvasoesquinas,
dejelaagujaenlatelaafueradelorillodela
aplicación,levanteelpieydelavuelta.
L’appliquéaupointBourdon
L’appliquéaupointInvisible
PréparationdelaMachine:
!
Point:Zigzag
!
LargeurdePoint:Variable
(Réglezàlalargeurducordonnet)
!
Longueurdepoint:1-2
!
Pied:Piedbourdon“J”
ModeD’emploie:
LepointBourdonGalonnéesttoussimplement
latechniquedecoudreavecunpointzigzagpardessusd’uncordonnetoud’uneganse.Avecun
crayonmarqueur,tracerunmotifsurl’endroitde
votretissu.Alignezlecordonnetsouslemilieu
dupied,etfaiteslepointzigzagpar-dessusdu
cordonnetpourquel’aiguillepasseaucotédu
cordonnet.Encousantsuivezlemotifquevous
aveztracé.
AppliquéBourdonet
AppliquéInvisible
PréparationdelaMachine:
!
Point:ZigzagouInvisible
!
LargeurdePoint:1.5mm
!
LongueurdePoint:0.5-1.5pourZigzag,
2-3pourInvisible
!
Pied:PiedInvisible“J”
ModeD’emploi:
Placerl’appliquésurletissudefondetfixeravec
delacollepourtissu.Alignerl’aiguilleet
abaisser-ladansletissuauborddel’appliqué.
Abaisserlepiedpresseur.
Pourl’appliquéaupointBourdon,réglerla
machineaupointZigzagetpiquerensuivantle
borddel’appliqué.Pourl’appliquéaupoint
invisible,réglerlamachineaupointInvisibleet
piquerensuivantleborddel’appliqué.
Sivousutilisezlepiedinvisible,placerleguide
pourqu’ilsoitpositionnéauborddel’appliqué.
Pourpivoterautourdescourbesetauxcoins,
abaisserl’aiguilledansletissuaubordetà
l’extérieurdel’appliqué,leverlepiedpresseur
etpivoter.
47
 Loading...