


INSTRUCTION MANUAL
9970

INSTRUCTION MANUAL
This sewing machine is intended for household use.
This sewing machine is not intended for use by young children or infirm persons without
supervision.
IMPORTANT SAFETY INSTRUCTIONS
When using a sewing machine, basic safety precautions should always be followed,
including the following.
Read all instructions before using.
DANGER - To reduce the risk of electric shock:
Never leave unattended when plugged in. Always unplug this machine from the electric
outlet immediately after using and before cleaning.
WARNING
1. Do not allow to be used as a toy. Close attention is necessary when this sewing
machine is used by or near children.
2. Use this sewing machine only for its intended use as described in this manual. Use only
attachments recommended by the manufacturer as contained in this manual.
3. Never operate this sewing machine if it has a damaged cord or plug, if it is not working
properly, if it has been dropped or damaged, or dropped into water. Return the sewing
machine to the nearest authorized dealer or service center for examination, repair,
electrical or mechanical adjustment.
4. Never operate the sewing machine with any air openings blocked. Keep ventilation
openings of the sewing machine and foot controller free from the accumulation of lint,
dust, and loose cloth.
5. Never drop or insert any object into any opening.
6. Do not use outdoors.
7. Do not operate where aerosol (spray) products are being used or where oxygen is being
administered.
8. To disconnect, turn the power switch to the off position (symbol “O”), then remove plug
from outlet.
9. Do not unplug by pulling on cord. To unplug, grasp the plug, not the cord.
10. Keep fingers away from all moving parts. Special care is required around the sewing
machine needle.
11. Always use the proper needle plate. The wrong plate can cause the needle to break.
12. Do not use bent needles.
13. Do not pull or push fabric while stitching. It may deflect the needle causing it to break.
14. Switch the sewing machine off (symbol “O”) when making any adjustments in the
needle area, such as threading needle, changing needle, threading bobbin, or changing
presser foot.
15. Always unplug sewing machine from the electrical outlet when removing covers,
lubricating, or when making any other user servicing adjustments mentioned in the
instruction manual.
16. Handle the foot controller with care and avoid dropping it on the floor. Be sure not to
place anything on top of it.
17. Use only the handle to lift and move the machine.
18. Do not expose the machine or machine case to sunlight directly. Also, do not keep it in a
very warm or damp place.
- To reduce the risk of burns, fire, electric shock,
or injury to persons:
SAVE THESE INSTRUCTIONS
SINGER is the exclusive trademark of The Singer Company Limited S.à.r.l. or its Affiliates.
2
Servicing should be performed by an authorized service representative.
©2013 The Singer Company Limited S.à.r.l. or its Affiliates. All rights reserved.

CONTENTS
IMPORTANT SAFETY INSTRUCTIONS ............ 2
MODEL 9970 ...................................................... 4
FOR EUROPEAN AND SIMILAR TERRITORIES: ...... 4
MAIN PARTS ...................................................... 5
ACCESSORIES .................................................. 6
DUST COVER .................................................... 6
REMOVABLE EXTENSION TABLE ................... 7
A. REMOVING THE EXTENSION TABLE .................................. 7
B. OPENING THE ACCESSORY CASE ..................................... 7
CHANGING THE PRESSER FOOT ................... 7
A. CHANGING THE PRESSER FOOT ....................................... 7
B. REMOVING THE PRESSER FOOT HOLDER ....................... 7
INSERTING THE NEEDLE ................................. 8
FABRIC, THREAD AND NEEDLE TABLE .......... 8
CONNECTING THE MACHINE .......................... 9
FOOT CONTROLLER ........................................ 9
FUNCTION OF EACH PART ............................ 10
A. START/STOP BUTTON ........................................................ 10
B. REVERSE STITCH BUTTON ............................................... 10
C. NEEDLE UP-DOWN / SLOW BUTTON............................... 10
D. SPEED CONTROL BUTTON ............................................... 10
E. PRESSER FOOT LIFTER .................................................... 10
F. THREAD CUTTER BUTTON ................................................ 11
G. DROP FEED LEVER ............................................................ 11
H. THREAD CUTTER................................................................ 11
I. TOP COVER ......................................................................... 11
J. HAND WHEEL ...................................................................... 11
EXTRA WIDE TABLE ....................................... 11
CONTROL PANEL ............................................ 12
A. LCD DISPLAY ....................................................................... 12
B. LCD CONTRAST CONTROL ............................................... 12
C. PATTERN CHART ................................................................ 12
D. DIRECT STITCH SELECTION BUTTONS ........................... 12
E. UTILITY STITCH BUTTON ................................................... 12
F. DECORATIVE & LETTER STITCH BUTTON ....................... 12
G. FUNCTION BUTTONS ......................................................... 12
H. EDIT BUTTON ...................................................................... 12
I. CLEAR BUTTON .................................................................. 13
J. SCROLL BUTTONS ............................................................. 13
K. CURSOR BUTTONS ............................................................ 13
L. TACK BUTTON ..................................................................... 13
M. TWIN NEEDLE BUTTON ...................................................... 13
TO TURN OFF THE AUDIBLE BEEP ............... 13
BOBBIN SETTING ............................................ 14
A. REMOVING THE BOBBIN .................................................... 14
B. SETTING SPOOL OF THREAD ON SPOOL PIN ................ 14
C. WINDING THE BOBBIN ....................................................... 14
D. INSERTING THE BOBBIN.................................................... 15
THREADING THE MACHINE ........................... 16
A. PREPARING TO THREAD MACHINE ................................. 16
B. SETTING SPOOL OF THREAD ON SPOOL PIN ................ 16
C. THREADING THE UPPER THREAD ................................... 16
D. THREADING THE NEEDLE EYE ......................................... 17
E. DRAWING UP THE BOBBIN THREAD ................................ 17
STARTING TO SEW ......................................... 18
A. START AND END OF SEAM ................................................ 18
B. REVERSE STITCHING ........................................................ 19
C. AUTO TACK STITCH ........................................................... 19
D. TURNING CORNERS........................................................... 20
E. SEWING HEAVY FABRIC .................................................... 20
F. SEWING OVER OVERLAPPED AREAS .............................. 20
G. WIDTH OF SEAM ALLOWANCE ......................................... 20
THREAD TENSION .......................................... 21
SELECTING UTILITY STITCH PATTERN ....... 22
A. DIRECT STITCH PATTERN ................................................. 22
B. SELECTING OTHER UTILITY STITCH PATTERNS ........... 22
C. MIRROR/REVERSE STITCH ............................................... 22
D. ELONGATION ...................................................................... 23
E. SETTING STITCH WIDTH AND LENGTH ........................... 23
WHERE TO USE EACH STITCH ..................... 24
STRAIGHT STITCH SEWING .......................... 25
A. STRAIGHT STITCH .............................................................. 25
B. STRAIGHT STITCH WITH AUTO-LOCK STITCH (PATTERN
NO. 3, 4) ............................................................................... 25
BASTING .......................................................... 26
A. ATTACHING THE DARNING/ EMBROIDERY FOOT .......... 26
B. BASTING .............................................................................. 26
ELASTIC STITCH SEWING ............................. 27
QUILTING ......................................................... 27
A. JOINING THE PIECES OF FABRIC ..................................... 27
B. QUILTING ............................................................................. 27
C. HAND LOOK QUILTING STITCH (NO. 8) ............................ 27
ZIGZAG STITCH SEWING ............................... 28
MULTI-STITCH ZIGZAG ................................... 28
FREE ARM SEWING ........................................ 28
OVERCASTING-OVERLOCKING .................... 29
A. USING THE OVERCASTING FOOT .................................... 29
B. USING THE GENERAL PURPOSE FOOT ........................... 29
BLIND HEM STITCHING .................................. 30
PATCH WORK .................................................. 31
APPLIQUE ........................................................ 31
INSERTING ZIPPERS
CENTERED INSERTION .................................. 32
LAPPED INSERTION ....................................... 33
BUTTONHOLE SEWING .................................. 34
BOUND BUTTONHOLE ................................... 36
EYELET ............................................................ 37
AUTOMATIC BAR-TACK AND DARNING ....... 38
SEWING ON BUTTONS ................................... 39
A. THREAD SHANK .................................................................. 39
NARROW HEMMING ....................................... 40
CORDING ......................................................... 40
A. SINGLE CORDING ............................................................... 40
B. TRIPLE CORDING ............................................................... 40
CONTINUOUS DECORATIVE PATTERN ........ 41
A. SEWING LIGHTWEIGHT FABRICS ..................................... 41
USING THE EVEN-FEED FOOT ...................... 41
A. ATTACHING THE EVEN-FEED FOOT ................................ 41
B. SEWING ............................................................................... 41
DARNING/FREE-HAND EMBROIDERY .......... 42
A. ATTACHING THE DARNING/ EMBROIDERY FOOT .......... 42
B. DARNING ............................................................................. 42
C. FREE-HAND EMBROIDERY ................................................ 42
D. AFTER DARNING OR FREE-HAND EMBROIDERY ........... 42
OPTIONAL ACCESSORIES ............................. 43
TWIN NEEDLE SEWING .................................. 49
DECORATIVE & LETTER STITCH SEWING ... 50
A. SELECTING DECORATIVE & LETTER STITCH (selecting
mode) .................................................................................... 50
B. SHIFTING THE CURSOR .................................................... 51
C. TO CHECK SELECTED PATTERNS ................................... 51
D. INSERTING PATTERN ......................................................... 51
E. TO DELETE PATTERN ........................................................ 51
F. EDITING OF EACH PATTERN ............................................. 52
G. TO RECALL THE SELECTED PATTERNS .......................... 53
H. SEWING THE SELECTED PATTERNS ............................... 54
I. TO SEW PATTERN FROM BEGINNING ............................. 54
DECORATIVE AND LETTER STITCH CHART 55
ADJUSTING THE BALANCE OF THE STITCHES ...
55
MAINTENANCE ................................................ 56
CLEANING ........................................................ 56
HELPFUL HINTS .............................................. 57
MESSAGES ON LCD ....................................... 58
3

MODEL 9970
PREFACE
Thank you for your purchase of this sewing
machine.
This machine intended for household use will
provide you with excellent performance in sewing
from light to heavy material.
Please refer to this booklet for proper use and
optimum service. To get the most out of your
sewing machine, read the entire instruction
manual before attempting to operate the machine.
Then familiarize yourself with the machine by
following the instruction manual page by page.
To ensure that you are always provided with the
most modern sewing capabilities, the
manufacturer reserves the right to change the
appearance, design or accessories of this sewing
machine when considered necessary without
notification or obligation.
FOR EUROPEAN AND
SIMILAR TERRITORIES:
This product is suppressed for radio and television
interference with the International Electrotechnical
Commission requirements of the CISPR.
EU only
1. This appliance is not intended for use by
persons (including children) with reduced
physical, sensory or mental capabilities, or lack
of experience and knowledge, unless they have
been given supervision or instruction
concerning use or the appliance by a person
responsible for their safety.
2. Children should be supervised to ensure that
they do not play with the appliance.
The wires in this mains lead are colored in
accordance with the following code.
Blue: neutral (N) Brown: live (L)
As the colors of the wires in the mains lead of this
appliance may not correspond with the colored
markings identifying the terminals in your plug,
proceed as follows:
The wire which is colored blue must be connected
to the terminal which is marked with the letter N or
colored black. The wire which is colored brown
must be connected to the terminal which is
marked with letter L or colored red. If a 13 Amp.
(BS 1363) plug is used, a 3 Amp. Fuse must be
fitted, or if any other type of plug is used, a 5 Amp.
fuse must be fitted either in the plug or adaptor or
at the distribution board.
Neither cord is to be connected to the earth
terminal of a three-pin plug.
4
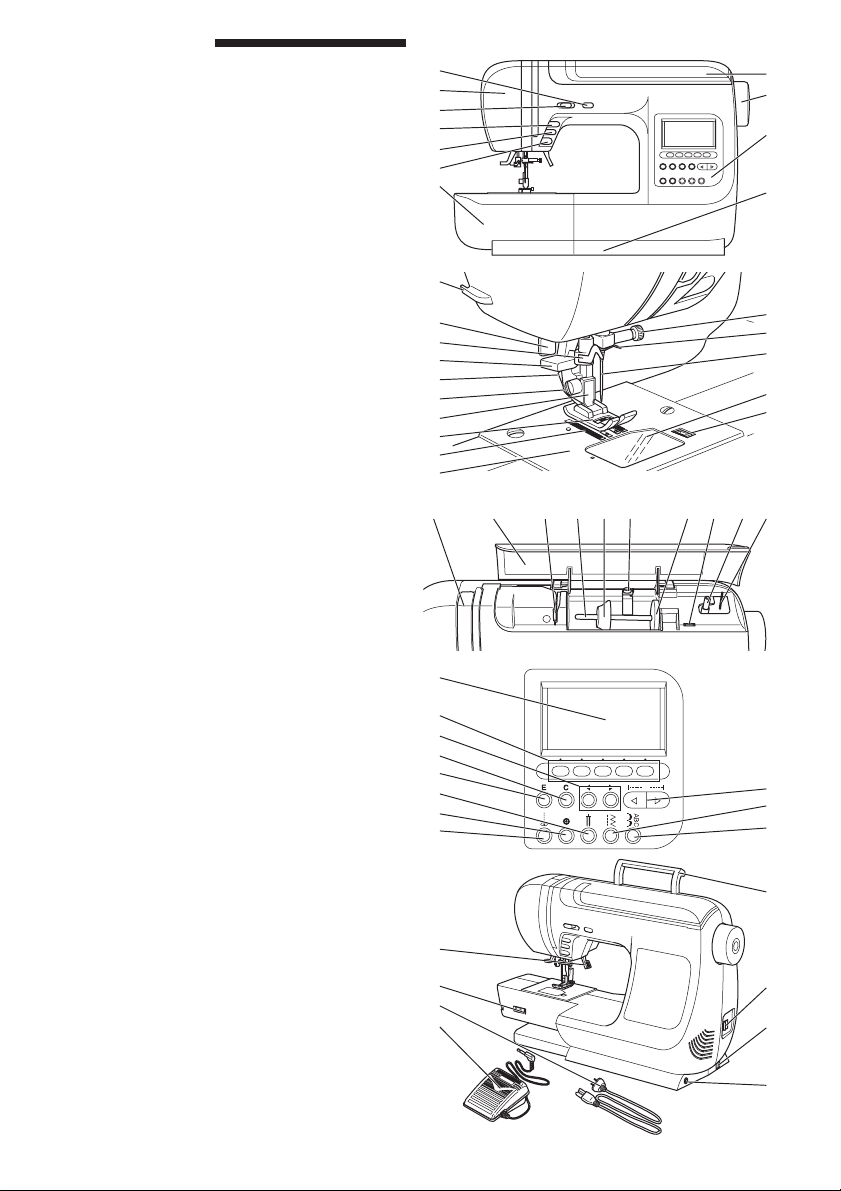
MAIN PARTS
1. Thread Cutter Button
2. Face Plate
3. Speed Control Button
4. Needle Up-Down / Slow Button
5. Reverse Button
6. Start/Stop Button
7. Removable extension table
8. Top Cover
9. Hand Wheel
10. Control Panel
11. Stitch Balance Adjusting Screw
(underneath machine)
12. Thread Cutter
13. Buttonhole Lever
14. Needle Threader
15. Needle Threader Lever
16. Presser Foot Release Lever
17. Presser Foot Thumb Screw
18. Presser Foot Holder
19. Presser Foot
20. Feed Dogs
21. Needle Plate
22. Needle Clamp Screw
23. Needle Thread Guide
24. Needle
25. Bobbin Cover
26. Bobbin Cover Latch
27. Thread Take-Up Lever (Inside)
28. Pattern Chart
29. Thread Guide Plate
30. Spool Pin
31. Spool Cap
32. Bobbin Winder Thread Guide
33. Felt Washer
34. LCD Contrast Control
35. Bobbin Winder Shaft
36. Bobbin Winder Stop
37. Liquid Crystal Display (LCD)
38. Function Buttons (F1 - F5)
39. Cursor Buttons
40. Clear Button
41. Edit Button
42. Twin Needle Button
43. Tack Button
44. Straight Stitch Button
45. Scroll Buttons
46. Utility Stitch Button
47. Decorative Stitch & Letter Button
48. Presser Foot Lifter
49. Drop Feed Lever
50. Power Line Cord
51. Foot Controller
52. Handle
53. Power Switch
54. Terminal Box
55. Controller Jack
1
2
3
4
5
6
7
12
13
14
15
16
17
18
19
20
21
27 28 29 30 31 32 33 34 35 36
37
38
39
40
41
42
43
44
48
49
50
51
8
9
10
11
22
23
24
25
26
45
46
47
52
53
54
55
5

ACCESSORIES
Accessories are provided in the accessory case.
(See next page, [REMOVABLE EXTENSION
TABLE])
1. Needle Pack
2. 4 Bobbins Class 15 (1 is in the machine)
3. Seam Ripper
4. Brush
5. Auxiliary Spool Pin with Felt Washer
6. Screw Driver
7. Driver for Needle Plate
8. Thread Cap (On the machine when delivered)
9. Small Thread Cap
10. Seam Guide and Screw
11. Overcasting Foot (C)
12. Blind Hem Foot (D)
13. Zipper Foot (E)
14. Rolled Hem Foot
15. Button Sewing Foot
16. Satin Foot (B)
17. Quilting Bar
18. Open Toe Foot
19. Cording Foot
20. Straight Stitch / Patch Quilting Foot
21. Darning Embroidery Foot
22. Even-feed Foot
23. Buttonhole Foot (F) and Under Plate
24. General Purpose Foot (On machine when
delivered) (A)
• An Extra Wide Table is provided with this
machine. (See Page 11)
12
34 5 6
10 11 12 13
14 15 16 17 18
19 20 21
7
8
9
1. Invisible Zipper Foot
2. Snap on Gathering Foot
3. Parallel Sewing Foot
4. Edge Joining Foot
5. Clear Seam Guide Foot
6. Chenille Stitching Foot
7. Non Stick Glide Foot
8. Shank w/o metal
9. Adjustable Bias Binder
10. Braiding Foot
11. Braiding Guide
12. Fancy Trim Foot
13. Stitch in the Ditch Foot/ Quilt Foot with Center Guide
14. Clearance Plate
DUST COVER
Cover the machine with dust cover when it is not
being used.
The manual may be stored in the compartment of
the dust cover.
Do not remove the styrofoam located inside of this
cover.
6
22 23 24OPTIONAL ACCESSORIES

REMOVABLE EXTENSION
TABLE
A. REMOVING THE EXTENSION TABLE
Hook your finger to the left bottom side of the
removable extension table and slide it to the
left. To attach, insert to the right.
B. OPENING THE ACCESSORY CASE
Hook your finger to the left side of accessory
case and pull toward you.
CHANGING THE PRESSER
FOOT
The presser foot must be changed according to
the stitch you sew, or work you do.
CAUTION: To prevent accidents.
Turn off the power switch before you change
the presser foot.
A. CHANGING THE PRESSER FOOT
1. Turn the hand wheel toward you until the
needle is at its highest point.
2. Raise the presser foot lifter.
3. Remove the presser foot by pushing the
presser foot release lever toward you.
4. Place desired foot with its pin directly under the
slot in presser foot holder.
5. Lower the presser foot lifting lever and the
presser foot will snap into place.
B. REMOVING THE PRESSER FOOT
HOLDER
When attaching presser feet that have their own
shank, or when cleaning the machine, you should
remove the presser foot holder.
1. Remove the presser foot.
2. Loosen the presser foot thumb screw and
remove the presser foot holder.
3. To replace the holder, pull up the holder as far
as it will go from bottom of presser bar.
4. Tighten the thumb screw.
7

INSERTING THE NEEDLE
Select a needle of the right type and size for the
fabric to be sewn.
CAUTION: To prevent accidents.
Turn off the power before removing the
needle.
1. Turn the hand wheel toward you until the
needle is at its highest point.
2. Loosen the needle clamp screw.
3. Remove the needle.
4. Insert new needle into needle clamp with the
flat side to the back and push it up as far as it
will go.
5. Tighten the needle clamp screw.
a. Do not use the bent or blunt needle. Place
needle on a flat plate to check straightness.
FABRIC, THREAD AND
NEEDLE TABLE
Select size of thread and needle in accordance
with fabric to be sewn.
Type of Fabric
Light Weight - thin georgette,
organdy, voile, taffeta, silk,
etc.
Medium Weight - gingham,
pique, linen, cotton, satin, thin
corduroy, velvet
Heavy Weight - gabardine,
tweed, denim, corduroy
Stretch - double knit, tricot,
spandex, jersey
Sweatshirt, Swim-wear,
Double Knit, Sweater Knit
Leather
SINGER brand needles are recommended for this machine.
8
Thread Size
All-purpose polyester, fine
cotton, silk
All-purpose polyester, fine
cotton, machine quilting
All-purpose polyester, heavy
duty, topstitching thread
All purpose polyester
All purpose polyester
All purpose polyester, heavy
duty, topstitching thread
Needle
Type
2000
gray shank
2000
gray shank
2000
gray shank
2001
green shank
2001
green shank
2032 Leather
Needle Size
9/70-11/80
11/80-14/90
14/90-16/100
11/80-14/90
Needle for knit and
synthetic fabric

CONNECTING THE
MACHINE
DANGER: To reduce the risk of
electric shock.
Never leave unattended when plugged in. Always
unplug this machine from the electric outlet
immediately after using and before maintenance.
WARNING: To reduce the risk of
burns, fire, electric shock, or injury
to persons.
Do not unplug by pulling on cord. To unplug, grasp
the plug, not the cord.
1. Place machine on stable table.
2. Connect the power line cord to the machine by
inserting the 2-hole plug into the terminal box.
3. Connect the power line plug to the electric outlet.
4. Turn on the power switch.
5. A lamp will light up when switch is turned on.
6. To disconnect, turn the power switch to the off
position (symbol O), then remove plug from
outlet.
FOR UNITED STATES AND CANADA USERS:
POLARIZED PLUG INFORMATION
This appliance has a polarized plug (one blade wider than the other). To reduce the risk of electric
shock, this plug is intended to fit in a polarized outlet only one way. If the plug does not fit fully in the
outlet, reverse the plug. If it still does not fit, contact a qualified electrician to install the proper outlet. Do
not modify the plug in any way.
FOOT CONTROLLER
Use of foot controller will permit control of start,
stop and speed with your foot.
When the foot controller is connected, start/stop
button will be deactivated. (See page 10)
1. Turn off the power switch. (symbol O)
2. Push foot controller plug into the jack on
machine.
3. Place foot controller at your feet.
4. Turn on the power switch.
5. A lamp will light up when switch is turned on.
6. The harder you press the foot controller, the
faster the machine will sew. The machine will
stop when foot controller is released.
WARNING: To reduce the risk of
burns, fire, electric shock, or injury
to persons.
1. Turn off the power when connecting the foot
controller to the machine.
2. Handle the foot controller with care and avoid
dropping it on the floor. Be sure not to place
anything on top of it.
3. Use only foot controller provided with this
machine. (Type 4C-337B)
9

FUNCTION OF EACH PART
A. START/STOP BUTTON
The machine will start running when start/stop
button is pressed and will stop when pressed the
second time. The machine will rotate slowly at
start of sewing.
Note:
When the foot controller is connected, start/stop
button will be deactivated.
MONITOR LAMP
Green Light “ON”
Ready to sew or bobbin winding.
Red Light “ON”
Presser foot is not in down position or buttonhole
lever is not lowered.
If the red light is on, the machine will not start even
when start/stop button is pressed.
B. REVERSE STITCH BUTTON
The machine will continue to sew in reverse at low
speed while this button is pressed and stop when
this button is released.
Note:
When the foot controller is connected, machine
will sew in reverse while this button is pressed.
When released, machine will sew forward.
C. NEEDLE UP-DOWN / SLOW BUTTON
Pressing this button when the machine is stopped,
will change the needle position from down to up or
from up to down.
While sewing, by pressing this button, machine
will sew in slow speed. Pressing this button again,
the speed will return.
D. SPEED CONTROL BUTTON
The machine will sew faster when the button is slid
to the right, and sew slower when the button is slid
to the left.
Note:
When the foot controller is connected, this button
limits the maximum speed.
E. PRESSER FOOT LIFTER
The presser foot is lifed up or down by this lever.
Note: Machine will not start when the presser foot
is lifted. (Except for bobbin winding)
10

F. THREAD CUTTER BUTTON
Press this button after sewing to cut the upper and
bobbin threads.
The machine will cut both threads automatically.
CAUTION
1. Do not press this button when there is no fabric
in the machine or no need to cut the threads.
The thread may tangle, resulting in damage.
2. Do not use this button when cutting thread
thicker than #30, nylon thread or other
speciality threads.
In this case, use the thread cutter (H).
G.DROP FEED LEVER
The feed dogs project up through the needle plate,
directly below the presser foot. Their function is to
move the fabric being sewn. The drop feed lever
controls the feed dogs.
For ordinary sewing, move the lever to the right.
This raises feed dogs to their highest position. For
most sewing, the lever should be in this position.
For darning or free motion embroidery or
whenever fabric is to be moved by hand, move the
lever to the left to lower the feed dogs.
H.THREAD CUTTER
Use this cutter if the thread cutter button is not
used.
1. Raise the presser foot and bring fabric and
threads backward after sewing.
2. Hook the threads to the thread cutter from back
to front.
3. Pull fabric and cut threads.
I. TOP COVER
To open the top cover, lift up the right side of
cover.
J. HAND WHEEL
By turning the hand wheel, the needle will raise or
lower. You should always turn hand wheel toward
you.
EXTRA WIDE TABLE
If you need wide sewing space, attach the extra
wide table as shown.
Set the machine and extra wide table on a stable
table.
1. Remove the extension table (See Page 7)
2. Stand up the two legs of extra wide table.
3. Insert wide table to the machine sliding to the
right.
11

CONTROL PANEL
When you turn on the power, machine will select
the straight stitch and indicate information of stitch
on the LCD.
A. LCD DISPLAY
Stitch information is indicated on this display.
According to the pattern or mode, information will
be changed.
B. LCD CONTRAST CONTROL
The contrast of LCD is adjusted by turning this dial.
C. PATTERN CHART
Pattern chart is located inside of the top cover.
Patterns and letters of this machine are indicated
on this chart.
They are separated: Utility stitches and Decorative
& Letter stitches.
D. STRAIGHT STITCH BUTTON
By pressing this button, you can select straight
stitch directly.
E. UTILITY STITCH BUTTON
By pressing this button, you may select a utility
stitch pattern.
FOR SELECTING AND SETTING OF UTILITY
STITCHES, SEE PAGE 22.
F. DECORATIVE & LETTER STITCH
BUTTON
By pressing this button, you can select decorative &
letter stitch patterns.
These patterns and letters are combined easily by
selecting each pattern.
FOR SELECTING AND SETTING OF
DECORATIVE & LETTER STITCH, SEE PAGE 44.
G.FUNCTION BUTTONS
Functions of these buttons are changed by selected
stitch pattern and mode.
H. EDIT BUTTON
When selecting decorative & letter stitch, you can
change the setting of each pattern by pressing this
button.
12

I. CLEAR BUTTON
UTILITY STITCH SEWING
If you changed the setting (mirror/reverse,
elongation, stitch width, length and thread tension)
of utility stitch pattern, you can return to preset
setting by pressing this button.
DECORATIVE & LETTER STITCH SEWING
By pressing this button, you can delete one
combined stitch pattern or all stitch patterns.
J. SCROLL BUTTONS
During stitch pattern selection, 5 patterns or letters
will scroll up or down by pressing these buttons.
K.CURSOR BUTTONS
When decorative & letter stitch sewing, you can
check and edit combined patterns or letters by
pressing these buttons.
L. TACK BUTTON
UTILITY STITCH SEWING
By pressing this button, you can sew a back tack
stitch at the beginning and at the end of a stitch.
(SEE PAGE 19)
DECORATIVE & LETTER STITCH SEWING
If this button is pressed at the end of a decorative
stitch pattern, machine will stop automatically at
the end of the stitch pattern and tie off the stitch
with a locking stitch.
M. TWIN NEEDLE BUTTON
If you attach the twin needle, press this button.
Machine will reduce the stitch width.
(SEE PAGE 43)
TO TURN OFF THE
AUDIBLE BEEP
You can operate the machine without the audible
beep.
1. Turn off the power switch.
2. Turn on the power switch while pressing the
EDIT button and the function F1 button.
3. This function is kept off until the machine is
turned off.
This function turns off the single beep only.
Multiple beeps will not turn off.
13

BOBBIN SETTING
Be sure to use only SINGER (Class 15) bobbins in
this machine.
A. REMOVING THE BOBBIN
1. Pull the bobbin cover latch to the right and remove
the bobbin cover.
2. Lift up the bobbin from the machine.
B. SETTING SPOOL OF THREAD ON SPOOL
PIN
1. Pull up the left end of spool pin and set the spool
of thread on spool pin so that the thread unrolls
from the front of the spool.
2. Set the spool cap on spool pin as far as it will go.
a: Reverse spool cap direction according to the
size of spool.
b. Use the small spool cap when you use cross
wound thread. Leave small opening between cap
and spool as illustration.
C. WINDING THE BOBBIN
1. Hold thread in both hands and hook thread to the
guide from rear opening.
2. Bring thread forward and pass through the thread
guide plate from right to left.
3. Bring thread to the right and pass thread to the
thread guide from under side. Pass through under
tension disc in counter-clockwise direction.
4. Insert thread through hole in bobbin and place the
bobbin on bobbin winder spindle. Push bobbin to
the right to engage bobbin winder. LCD will
indicate the bobbin winding mode.
5. Hold the end of the thread and start the machine
by pressing the start/stop button or pressing the
foot controller pedal.
6. After the bobbin winds a few turns, stop the
machine by pressing the start/stop button or
releasing the foot controller pedal. Cut the thread
near hole.
7. Start the machine again.
8. The bobbin winding will stop automatically when
bobbin is full. (Release the pedal.)
9. Push the bobbin and spindle to the left.
10Remove the bobbin from the spindle and cut the
thread.
14

D. INSERTING THE BOBBIN
1. Place bobbin into bobbin holder with the thread
unwinding counter clockwise.
2. Draw thread into notch (a) while holding the
bobbin.
3. Pull thread toward the left and along the inside
of spring (b) until it slips into notch (c) making
sure that thread does not slip out of notch (a).
4. Pull thread out about 10 cm (4 inches).
Replace the bobbin cover. Set the left tab into
the hole in needle plate and push the right side
of bobbin cover down until it clicks into place.
NOTE: Be sure to use only SINGER (Class 15)
bobbins in this machine.
15

THREADING THE MACHINE
A. PREPARING TO THREAD MACHINE
1. Raise the presser foot lifter.
2. Press the needle up/down button and set the
needle in up position.
(Keep this position until needle eye threading.)
B. SETTING SPOOL OF THREAD ON
SPOOL PIN
1. Pull up the left end of spool pin and set the spool
of thread on spool pin so that the thread unrolls
from the front of the spool.
2. Set the spool cap on spool pin as far as it will go.
a: Reverse spool cap direction according to the
size of spool.
b. Use the small spool cap when you use cross
wound thread. Leave small opening between cap
and spool as illustration.
C. THREADING THE UPPER THREAD
1. Hold thread in both hands and pass thread to the
guide from rear opening.
2. Bring thread frontward and pass through the
thread guide plate from right to left.
3. Bring thread to the left and pull thread down
toward you along the slit.
4. Pull up thread.
5. To thread the take-up lever, draw thread up and
bring thread back down again from right to left
along the slit.
6. Pull thread downward along the slit.
7. Draw thread through thread guide from right side
opening.
8. Pass through needle eye from front to back.
Refer to next page for instructions on how to use
needle threader.
16

D.THREADING THE NEEDLE EYE
CAUTION: To prevent accidents.
1. Keep fingers away from all moving parts.
Special care is required around the needle.
2. Do not lower the threader lever while machine
is operating.
Note:The needle threader is used for needle sizes
11/80, 14/90, and 16/100.
1. Lower the presser foot.
2. Check that the needle is raised.
If it is not so, raise needle by pressing needle
up/down button.
Note:
If desired, you can draw up the bobbin thread
manually, by holding the upper thread loosely,
then turning the hand wheel toward you one
complete turn.
3. Lower the threader slowly and draw thread
through thread guide (a) and pull toward the
right.
4. Lower the lever as far as it will go. The threader
will turn and the hook pin will go through the
needle eye.
5. Draw thread into the guide.
6. Hold thread loosely and release the lever.
Hook will turn and pass thread through needle
eye while making a loop.
7. Pull thread out about 10 cm (4 inches) from
needle eye.
E. DRAWING UP THE BOBBIN THREAD
1. Raise the presser foot.
2. Hold thread loosely and press needle up/down
button twice from up position.
The hand wheel will turn one complete turn.
3. Pull upper thread lightly. Bobbin thread will
come up in a loop.
4. Pull both upper and bobbin threads about 10
cm (4 inches) toward the back of presser foot.
a
17

STARTING TO SEW
The machine will be set to sew straight stitch when
power switch is turned on.
CAUTION: To prevent accidents.
While sewing, special care is required around the
needle.
Machine automatically feeds the fabric, do not pull
or push the fabric.
A. START AND END OF SEAM
1. Check the presser foot (General Purpose
Presser Foot). Refer to page 7 for changing the
presser foot.
2. Place the fabric under the presser foot and
lower the presser foot.
3. Hold back both threads and press the start/stop
button or press the foot controller pedal.
Keep holding threads after sewing a few
stitches.
Lightly guide the fabric while sewing.
You can regulate the sewing speed by sliding
the speed control button.
Also, you can reduce the sewing speed by
pressing the slow button.
4. When you reach end of seam, press the start/
stop button to stop sewing or release the foot
controller pedal.
5. Press the thread cutter button.
6. Raise the presser foot lifter and remove the
fabric.
CAUTION
1. Do not press the thread cutter button when
there is no fabric in the machine or no need to
cut the threads. The thread may tangle,
resulting in damage.
2. Do not use the thread cutter button when
cutting thread thicker than #30, nylon thread or
other speciality threads.
In this case, use the thread cutter located on
the left side of the machine. (See page 11)
NOTE
After you cut the threads by using the thread cutter
button, hold upper thread only at the next starting
of seam. (No need to draw up the bobbin thread)
18

B. REVERSE STITCHING
Reverse stitching is used for reinforcing the ends
of the seams.
1. Place the fabric in position where back stitching
is to be made and lower the presser foot.
2. Press and hold the reverse button.
Sew 4-5 reverse stitch.
3. Release the reverse button and press the start/
stop button (or press the pedal). Machine will
change to forward sewing.
4. When you reach the end of seam, press and
hold reverse button and sew 4-5 reverse
stitches.
Note:
The pattern No. 3 and No. 4 have a built-in
reverse stitch. See page 25 to sew these stitches.
C. AUTO TACK STITCH
You may sew tack stitches at the beginning and
end of the stitch.
This function can be used with all utility patterns.
1. Press the Tack button.
Tack mark “ ” will appear on the LCD.
2. Start to sew.
Machine will sew tacking stitches automatically
and then start to sew the selected pattern.
3. When you reach the end of seam, press the
reverse button once.
Machine will sew tacking stitches and stop
automatically.
4. If you want to cancel this function, press the
tack button again. Tack mark will disappear.
19

D. TURNING CORNERS
1. Stop the machine when you reach a corner.
The machine will stop the needle into the fabric.
2. Raise the presser foot.
3. Use the needle as a pivot and turn fabric.
4. Lower the presser foot and resume sewing.
E. SEWING HEAVY FABRIC
When sewing heavy fabrics, the toe end of presser
foot tends to lift up and sewing cannot be started
smoothly. In such case, set as follows.
1. Raise the presser foot.
2. Push the lock button located on the right side of
general purpose foot and lower the foot.
3. Start sewing.
As presser foot hinge is locked, fabric will be
fed smoothly.
a. The presser bar lifter can be raised one step
higher for placing heavy materials under the
presser foot easily.
F. SEWING OVER OVERLAPPED AREAS
Guide the fabric with your hand when sewing over
overlapped areas.
G.WIDTH OF SEAM ALLOWANCE
Guide lines on the needle plate indicate the
distance from the center needle positon.
To keep the width of seam allowance, guide fabric
edge aligning this guide line.
Seam Guide
Use the seam guide to guide the fabric.
Attach the seam guide and screw to the needle
plate.
20

THREAD TENSION
This machine adjusts the thread tension
automatically when pattern is selected.
However you can change the thread tension as
follows.
1. Press the fuction F5 button directly under the
tension mark.
LCD changes to the thread tension mode.
2. To increase the upper thread tension, press the
function F5 (+) button.
To decrease the upper thread tension, press the
function F4 (–) button.
Pre-set tension number is highlighted.
The mark “ ” is indicating the absolute thread
tension.
By pressing the function F3 (AUTO) or clear “C”
button, thread tension will return to pre-set.
By pressing the function F1 button, LCD return to
the previous mode (Stitch information mode).
When another stitch pattern is selected, thread
tension will return to pre-set.
You can start sewing at this mode and change
tension while sewing.
A. Preset thread tension
Upper and bobbin thread will lock approximately
in the middle of fabric.
B. When thread tension is increased.
Bobbin thread will appear on the top side of
fabric.
F5 F5F4F3F1
C. When thread tension is decreased.
Upper thread will appear on the bottom side of
fabric.
D. Thread tension except for straight
stitch
Thread tension except for straight stitch is set to a
slightly weaker tension than when sewing straight
stitch.
You will obtain a nicer stitch when upper thread
appears on bottom side of fabric.
E. Helpful Hints
1. If your sewing appears as shown on drawing,
stitches on top side of fabric are good but bottom
side looks very loopy, it could be that the upper
thread is not threaded correctly. Refer to page 16
for correct threading.
2. If after checking the top thread and the bobbin
thread is still showing on the top side, check the
bobbin to see if it is set correctly. Refer to page
15 for the correct setting.
21

SELECTING UTILITY
STITCH PATTERN
Utility stitches are indicated in the pattern chart
located inside of the top cover.
When you turn on the machine, straight stitch will
be selected automatically.
Select utility stitch pattern as follows.
A. DIRECT STITCH PATTERN
You can select basic straight stitch pattern directly
by pressing the Direct Stitch Selection Button.
B. SELECTING OTHER UTILITY STITCH
PATTERNS
1. Press the utility button. Diagram B1
First 5 patterns will be indicated on the LCD.
2. Press the right scroll button, next 5 patterns will
appear. Diagram B2
By pressing the left or right scroll button, you
can scroll up or down in increments of 5
patterns. (You can also scroll down by pressing
the utility button.)
3. To select a pattern, press the function button
directly under the desired pattern. Diagram B3
4. When pattern is selected, LCD will indicate the
information of selected pattern. Diagram B4
(Stitch information mode)
a. Stitch Number and pattern
b. Suitable presser foot
c. Function of function button
F2 Mirror/reverse
F3 Elongation
F4 Stitch Width, Length
F5 Thread Tension (See previous page)
If the function mark is not indicated, its funtion can
not be used.
C. MIRROR/REVERSE STITCH
You can set the mirror stitch, or reverse stitch or
mirror/reverse stitch.
Pressing the function button (F2) directly under the
mirror/reverse icon, stitch will flip from left to right
or from front to back.
The icon on the LCD indicates the selected stitch
as follows:
a. Regular stitch (normal stitch)
b. Mirror stitch (reverse left and right)
c. Reverse stitch (reverse front and back)
d. Mirror and Reverse stitch
If the mark is not indicated, the pattern cannot
change to mirror or reverse stitch.
When you pressed clear “C” button, machine will
return to regular stitch (also elongation will return
to regular length.)
22
abcd

D. ELONGATION
Some patterns may be elongated from the original
length. You may elongate the pattern by pressing
the function button (F3) directly under the
elongation icon.
a. Regular length
b. Elongated
A pattern cannot be elongated if the elongation
icon is not indicated.
When you pressed clear “C” button, machine will
return to regular length (also mirror/reverse will
return to regular stitch.)
E. SETTING STITCH WIDTH AND LENGTH
Machine will set the stitch width and length
suitable for the pattern.
1. You can make changes by pressing the
function button (F4) directly under the width and
length mark.
2. LCD will change to show the stitch width and
length.
For narrower width, press function button F2 (–).
For wider width, press function button F3 (+).
For shorter length, press function button F4 (–).
For longer length, press function button F5 (+).
Pre-set stitch width and length will be indicated as
a highlighted number.
When you pressed clear “C” button, machine will
return to preset stitch width and length.
When you press the return button (F1), LCD will
indicate previous mode (Stitch Information mode).
a. For straight stitch patterns (No. 1, 2, 3, 4, 6, 8),
Stitch width buttons will change the needle
position.
To shift the needle to the left, press function button
F2.
To shift the needle to the right, press funtion
button F3.
Note: When further width or length adjustments
are not possible, machine will emit multiple audible
beeps.
If the width, length or number icons are not
indicated, the pattern cannot be changed.
Adjustments to the patterns may be made while
sewing.
23

WHERE TO USE EACH STITCH
01. Straight stitch center needle positon • For top stitching, for
basic sewing, zipper sewing etc.
02. Straight stitch left needle position • For top stitching, for
basic sewing etc.
03. Straight stitch with auto-reverse stitch center needle position
04. Straight stitch with auto-reverse stitch left needle position
05. Basting
06. Straight stretch stitch • Reinforcement straight stitch
07. Stem stitch for stretch fabrics
08. Hand-look quilting stitch
09. Zigzag stitch • For overcasting, applique, patch work etc.
10. Elastic blind hem
11. Blind Hem
12. Multiple stitch zigzag • For overcasting knit fabrics, elastic
sewing, mending.
13. Button sewing
14. Decorative stitch
15. Overcasting
16. Overcasting of stretch fabric, decorative stitch
17. Ric Rac stitch
18. Double Ric Rac stitch
19. Feather stitch
20. Thorn stitch
21-100. Decorative and Functional stitches
101. Eyelet
102. Bar-tack
103. Darning
104. Bar-tack Buttonhole (Narrow)
105. Bar-tack Buttonhole (Wide)
106. Keyhole Buttonhole
107. Keyhole Buttonhole with cross bar
108. Tapered Keyhole Buttonhole
109. Round Ended Buttonhole (Narrow)
110. Round Ended Buttonhole (Wide)
111. Round Ended Buttonhole with cross bar
112. Both Round Ended Buttonhole
113. Decorative Buttonhole
114. Stretch Buttonhole
115. Heirloom Buttonhole
116. Bound Buttonhole
Description of Chart Symbols:
Mirror Stitch possible
Reverse Stitch possible
Mirror and Reverse stitches possible
X2 Elongation possible
24

STRAIGHT STITCH
SEWING
Straight stitch patterns should be selected to suit
the type of fabric being sewn.
Left needle position (No.2) is most suited for
sewing light weight fabrics.
No. 1. Center needle Position
No. 2. Left needle Position
No. 3. Center needle with built-in reverse stitch
No. 4. Left needle with built-in reverse stitch
General Purpose Foot (A)
A. Straight Stitch
1. Position the fabric under the presser foot and
lower it.
2. Hold the upper thread and bobbin thread
loosely and start sewing.
Place hand lightly on the fabric while sewing.
3. When you reach the end of seam, stop sewing.
4. Press the thread cutter button.
B. Straight Stitch With Auto-lock Stitch
(Pattern No. 3, 4)
1. Position the fabric under the presser foot and
lower it.
2. Hold the upper thread and bobbin thread
loosely and start sewing.
Machine will sew 4-5 stitches forward and sew
4-5 stitches backward and continue sewing
forward.
3. When you reach the end of seam, press the
reverse button.
Machine will sew a few stitches backward and
sew a few stitches forward and stop
automatically.
4. Press the thread cutter button.
25

BASTING
Basting is temporary stitching, used for fitting
garments, and for gathering and marking fabric.
No. 5 Basting Stitch
Darning/Embroidery Foot
A.ATTACHING THE DARNING/
EMBROIDERY FOOT
1. Lower the feed dogs by moving the drop feed
lever to the left.
2. Remove the presser foot and holder. (See page
7)
3. The arm of darning/embroidery foot should ride
onto the shaft of the needle clamp screw.
4. Slide the plastic attaching head from your left to
right so that it is fitted into the presser bar.
5. Tighten the presser foot thumb screw.
B.BASTING
When this pattern is selected, thread tension will
be reduced automatically.
1. Place the fabric under the presser foot and then
lower the presser foot lifter.
2. Hold the upper thread and bobbin thread
loosely and start to sew.
Machine will make one stitch only.
3. Pull the fabric required amount to the rear and
sew one stitch.
4. Repeat this as many times as you need to finish
the row of stitching.
5. Raise the fabric feed dogs for next regular
sewing.
Note:
To prevent the fabric layers from shifting, insert
dress pins crosswise to the basting position.
Pull the bobbin thread to remove the stitching.
CAUTION: To prevent accidents.
Be sure the needle does not hit the dress pin,
while sewing.
26

ELASTIC STITCH SEWING
Elastic stitches are strong and flexible and will give
with the fabric without breaking. Good for knit
fabrics as well as joining durable fabrics such as
denims.
No. 6 Straight Stretch Stitch
No. 7 Stem Stitch for Stretch fabrics
No.17 Ric-rac Stitch
General Purpose Foot (A)
We recommend that you use a needle for knit and
synthetic fabrics to prevent skipping stitches and
thread breakages.
a. Jacket b. Trousers
c. Bag d. Pocket
QUILTING
A quilt always consists of three layers of material.
The topper, batting, and backing fabric.
The top layer is formed by shaped pieces of fabrics
joined together, creating the quilt topper.
No. 1 Straight stitch (Center Needle Position)
No. 8 Hand look Quilting Stitch
Straight Stitch / Patch Quilting Foot
Quilting Bar
CAUTION: To prevent accidents.
Do not change the needle position. Otherwise,
needle could hit the presser foot and break.
A. Joining the pieces of fabric
Join the pieces of fabric using Pattern No. 1 with a
seam allowance of 1/4 inch (6.3 mm)
B. Quilting
Sew three layers of material (topper, batting,
backing).
Use quilting bar to sew successive rows.
Insert quilting bar into the hole of presser foot holder
and set the space as you desire.
C. Hand Look Quilting Stitch (No. 8)
Use invisible nylon sewing thread or very lightweight
thread that matches the fabric on top.
Place thread that contrasts to the color of the fabric
on the bobbin.
Set the upper tension to maximum or near
maximum.
When you sew, bobbin thread will pull to the top and
give the appearance of a traditional hand quilting
stitch.
27

ZIGZAG STITCH SEWING
Your machine can sew zigzag stitches of various
widths and lengths by changing the settings of the
stitch width and stitch length.
No. 9 Zigzag Stitch
General or Satin Foot (A, B)
Zigzag stitches are very good for applique and
decorative sewing.
SATIN STITCHING
To sew a satin stitch, shorten the stitch length and
attach the Satin Foot (B).
Refer to next page for using the zig-zag to
overcast.
MULTI-STITCH ZIGZAG
Used for sewing on elastic and overcast stitching.
No. 12 Multi-Stitch Zigzag
General Purpose Foot (A)
A. Elastic Band Sewing
Pull elastic in front and back of needle while
sewing.
B. Overcast Stitching
Used for easy to ravel and knit fabrics.
Needle should fall on extreme edge of fabric.
Refer to next page for overcasting.
FREE ARM SEWING
By simply removing the extension table, you can
access the free arm, making it easier to stitch
hard-to-reach areas like pant hems, sleeve cuffs
and children's clothing.
Note: Refer to page 7 for Removing The Extension
Table.
28

OVERCASTINGOVERLOCKING
A. USING THE OVERCASTING FOOT
No. 9 (Stitch Width 5.0)
No. 15, 16, 30 (Stitch Width 5.0-7.0)
Overcasting Foot (C)
Press fabric against the guide plate of the
overcasting foot so that needle falls near the edge
of seam.
a. No. 9 (Width=5.0) is used for preventing
raveling of fabrics.
b-d. No. 15, 16, 30 can sew overcasting and
regular stitches at the same time. Therefore it is
convenient for sewing easy to ravel and stretch
fabrics.
CAUTION: To prevent accidents.
Overcasting foot should be used for sewing
patterns 9, 15, 16, 30 only. Do not change the
stitch mode or elongation. It is possible that the
needle could hit the presser foot and break when
sewing other patterns and widths.
B. USING THE GENERAL PURPOSE FOOT
No. 9, 12
General Purpose Foot (A)
Place fabric so that needle will fall nearest to edge
of fabric when using the General Purpose Foot.
e. For narrower zigzag width (Width=2.0-4.5).
f. Use No. 12 when sewing easy to ravel or
stretch fabrics.
C. NOTE:
You can also cut off the excess material after
sewing the inside of fabric.
Be careful not to cut thread when cutting excess
fabric.
29

BLIND HEM STITCHING
The hem is sewn without stitches showing on right
side of fabric.
No. 10 Blind hemming for stretch fabric.
No. 11 Blind hem for non-stretch fabric.
Blind Hem Foot (D)
1. Fold the fabric as shown on drawing.
a. Medium, Heavy weight fabric
b. Light weight fabric
c. Wrong side of fabric
d. Overcasting
1cm
2. The guide (e) on the blind foot ensures even
feeding of the fabric when blind hem stitching.
The guide (e) is adjusted by turning the
adjusting screw (f).
3. Place fabric so that the straight stitches (or
small zigzag stitches) are on the protruding
hem edge and the large zigzag stitches just
catch one thread of the folded edge (g). Turn
the screw so that the needle barely touches the
folded edge of fabric.
4. Lower the presser foot and sew hem, guiding
fabric evenly along the guide.
5. Turn the fabric over when you have completed
sewing.
c. Wrong side of fabric
h. Right side of fabric
5mm
5mm
30

PATCH WORK
For additional decorative purposes, use different
kind of materials.
No. 19, 20
General Purpose or Satin Foot (A, B)
1. Place two pieces of fabric right sides together
and sew a long straight stitch.
2. Press the seam open.
3. Sew with the right side of the graphic facing up.
Be sure that stitches fall on both sides of the
seam.
APPLIQUE
No. 23, 24
Open Toe Foot
CAUTION: To prevent accidents.
Do not change the stitch width to wider than 5.0.
Otherwise, needle could hit the presser foot and
break.
1. Fix applique on fabric with fabric glue, fusible
web or basting stitches.
2. Sew with the right side of the stitch following the
right edge of the applique as closely as
possible.
When sewing sharp angles or curves
Bring needle to lowest position and raise the
presser foot.
Use needle as pivot and turn fabric.
Note:
Applique can also be done with a satin stitch using
the Satin Foot (p. 28).
31

INSERTING ZIPPERS
CENTERED INSERTION
No. 1 Straight Stitch (Center Needle Position)
Zipper Foot (E)
CAUTION: To prevent accidents.
Zipper foot should be used for sewing center
needle position straight stitch No. 1 only. It is
possible that needle could hit the presser foot and
break when sewing other patterns.
1. Baste the zipper opening to the seam line.
a: Straight stitch
b: End of opening
c: Basting
d: Wrong side of fabric
2. Press open the seam allowance.
Place the open zipper face down on the seam
allowance with the teeth against the seam line.
Baste the zipper tape.
3. Attach the zipper foot.
Attach the left side of the presser foot pin to the
presser foot holder when sewing the right side
of the zipper, and right side of the presser foot
pin to the holder when sewing the left side of
the zipper.
5 mm
4. Stitch left side of the zipper from bottom to top.
5. Stitch across the lower end and right side of
zipper.
Remove the basting and press.
32
7-10
mm
7-10 mm

INSERTING ZIPPERS
LAPPED INSERTION
No. 1 Straight Stitch (Center Needle Position)
Zipper Foot (E)
CAUTION: To prevent accidents.
Zipper foot should be used for sewing center
needle position straight stitch No. 1 only. It is
possible that needle could hit the presser foot and
break when sewing other patterns.
1. Baste the zipper opening to the seam line.
a: Straight stitch
b: End of opening
c: Basting
d: Wrong Side of fabric
2. Fold back to the left seam allowance.
Turn under the right seam allowance to form a
1/8" (3 mm) fold.
3. Attach the Zipper Foot.
Attach the left side of the presser foot pin to the
presser foot holder when sewing the right side
of the zipper, and right side of the presser foot
pin to the holder when sewing the left side of
the zipper.
5 mm
4. Stitch the left side of zipper from bottom to top.
5. Turn the fabric right side out stitch across the
lower end and right side of zipper.
6. Stop stitching with the needle down in the fabric
when the zipper foot reaches the zipper tab,
about 2" (5 cm) from the top of the zipper.
To stitch around the zipper tab:
(Diagram A)
1. Stop stitching before you reach the zipper tab.
2. Lower the needle into fabric.
3. Raise the presser foot and slide the zipper tab
backwards to clear the zipper foot.
4. Lower the presser foot and continue stitching.
5. Remove the basting stitches.
a. Zipper tab
7-10 mm
33

BUTTONHOLE SEWING
Select the buttonhole style you want to sew.
This machine can sew 13 types of buttonholes.
104. Bar-tack Buttonhole (Narrow) for light to
medium weight fabrics
105. Bar-tack Buttonhole (Wide) for large buttons
106. Keyhole Buttonhole for heavy weight fabrics
107. Keyhole Buttonhole with reinforced bar tack
108. Tapered Keyhole Buttonhole
109. Round Ended Buttonhole (Narrow) for light to
medium weight fabrics
110. Round Ended Buttonhole (Wide) for large
buttons
111. Round Ended Buttonhole with cross bar
112. Both Round Ended Buttonhole
113. Decorative Buttonhole
114. Stretch Buttonhole
115. Heirloom Buttonhole
116. Bound Buttonhole (See page 36)
Buttonhole Foot (F)
Note:
Density of the sides of the buttonhole may be
adjusted with stitch length control.
1. Mark position and length of buttonhole on
fabric.
2. Set button on the base.
If button does not fit on the base, adjust slide on
base to diameter of button plus thickness of
button.
a = Length of button + thickness
3. Pass upper thread through the hole of
buttonhole foot and bring upper and bobbin
threads to the left.
4. Position fabric under presser foot so that the
center line mark is in the center of the
buttonhole foot.
Lower the foot while pulling the frame of the
buttonhole foot towards you.
Note:
When sewing stretch fabrics, it is suggested that
you use interfacing on the backside of the fabric.
5. Lower the buttonhole lever completely.
Note:
Machine will not start to sew if buttonhole lever is
not lowered properly or frame of buttonhole foot is
not positioned all the way forward.
6. Hold upper thread lightly and start the machine.
34

123456
12 345
1234
12 345
1234
1234
7. Machine will sew the buttonhole in the order as
shown and stop automatically after sewing.
8. Press the thread cutter button and raise the
presser foot to remove the fabric.
To sew over same buttonhole, raise presser
foot to return to original position.
9. Cut center of buttonhole being careful not to cut
stitches on either side. Use a pin as a stopper.
123
1234
12345
12345
CAUTION: To prevent accidents.
When using seam ripper, do not put your finger in
the path of ripper.
A. Note:
For sewing buttonholes on hard-to-sew fabrics or
along the edge of multi-layered garments, install
the underplate. Place the fabric between the
underplate and buttonhole foot.
35

BOUND BUTTONHOLE
A bound buttonhole provides a professional
tailored touch to tailored garments like dresses,
suits and coats.
116. Bound Buttonhole
Buttonhole Foot (F)
1. Cut a patch of fabric 1" (2.5 cm) wide, 1/3" (1
cm) longer than the finished buttonhole.
Baste a patch so that the center line of patch
will align with the center line mark of buttonhole.
a. Right side of fabric
b. Wrong side of patch
2. Lower the buttonhole lever and sew buttonhole.
(See previous page)
Machine will sew the buttonhole in the order as
shown and stop automatically after sewing.
3. Press the thread cutter button and raise the
presser foot to remove the fabric.
4. Carefully cut through the center of buttonhole to
within 3 mm of each end. Cut diagonally to
each corner as shown.
Remove the basting.
12 3 4
5. Draw the patch through the opening to the
underside.
6. Turn the fabric and pull the patch through the
buttonhole rectangle.
Press the patch.
c. Wrong side of fabric
d. Right side of patch
7. Turn the patch and press the side seam
allowance.
8. Fold each side of the patch to form pleats that
meet at the center of the buttonhole and cover
the opening. Press the patch.
9. Turn the fabric to right side and baste along the
center of each fold.
a. Right side of fabric
36

10.Fold the fabric and stitch along the seams on
each side, just a needle width from the original
stitching line. Remove the basting.
c. Wrong side of fabric
11.Fold the fabric along the buttonhole end and
stitch triangular ends on the original stitching
line.
12.Press and trim the patch to within 3/16" (5 mm)
of the stitching.
a. Right side of fabric
c. Wrong side of fabric
NOTE:
When sewing weaker fabric, reinforce buttonhole
area. Cut a patch of fusible interfacing 1 1/4" (3
cm) wider and 3/4" (2 cm) longer than the
buttonhole. Fuse to wrong side over each
buttonhole marking.
EYELET
This stitch pattern is used for making belt holes
and other similar applications.
101 Eyelet
Satin Foot (B)
You can choose 3 sizes of eyelets by changing the
stitch length.
1. Place the fabric under the presser foot and
lower the presser foot. Start the machine.
Machine will sew the eyelet and stop
automatically.
2. Press the thread cutter button and raise the
presser foot.
3. Make a hole in the center of the eyelet.
Note:
Eyelet punch is not provided with this machine.
37

AUTOMATIC BAR-TACK
AND DARNING
You can sew automatic bar-tack and darning using
the buttonhole foot.
No. 102 Bar-tack, to reinforce areas that will be
subject to strain, such as pocket corners.
No.103 Darning, mending and other applications.
Buttonhole Foot (F)
1. Adjust slide on base according to the length of
bar-tack or darning.
a= Length of bar-tack or darning
2. Pass upper thread through the hole of
buttonhole foot and bring upper and bobbin
threads to the left.
3. Position fabric under presser foot so that the
starting point is on the thick area.
Lower the foot.
b. Sewing bar-tack on edge of thick fabric such as
pocket, place same thickness fabric or
cardboard beside the fabric.
4. Lower the buttonhole lever completely.
Note:
Machine will not start to sew if buttonhole lever
is not lowered properly or buttonhole foot is not
positioned correctly.
5. Hold upper thread lightly and start the machine.
6. Machine will sew bar-tack or darning stitch as
shown. Machine will stop automatically when
the pattern is finished.
7. Press the thread cutter button and raise the
presser foot lifter to remove the fabric.
38
1234
12

SEWING ON BUTTONS
No. 13
Button Sewing Foot
1. Lower the feed dogs by moving the drop feed
lever to the left.
2. Attach the button sewing foot. Align two holes
of the button with slot of presser foot and lower
foot to hold the button securely.
3. Adjust the stitch width so that the needle enters
the left hole of button.
4. Turn hand wheel by hand slowly so needle
enters the second hole. You may need to adjust
the stitch width again.
CAUTION: To prevent accidents.
Make sure that the needle does not hit the button
during sewing. Otherwise needle may break.
5. Sew approximately 10 stitches at slow speed.
6. Raise the foot and cut the threads remaining
about 4" (10 cm) long.
7. Pull the end of bobbin thread and pull upper
thread to the wrong side of fabric. Tie them
together.
8. After sewing, move the drop feed lever to the
right.
Note:
To sew a 4-hole button, follow the procedure
above for the first two holes. Then lift presser foot
slightly and move fabric to permit stitching the
other two holes, either parallel or criss-cross over
the first two holes.
A. Thread Shank
Buttons on coats and jackets should have a thread
shank to make them stand away from the fabric.
Insert a straight pin or sewing machine needle
under the center slit of the foot from the front. Sew
over the pin or needle.
Pull thread to back of button and wind around
stitches to form a firm shank. Tie thread ends
securely.
39

NARROW HEMMING
No. 1 Straight Stitch (Center Needle Position)
Rolled Hem Foot
1. Fold edge of fabric over about 1/8" (3 mm), then
fold it over again 1/8" (3 mm) for about 2" (5
cm) along edge of fabric.
2. Insert needle into the fold by turning the hand
wheel toward you, and lower the presser foot.
Sew several stitches and raise the presser foot.
Insert fabric fold into spiral of rolled hem foot.
Move fabric back and forth until the fold forms a
scrolled shape.
3. Lower the presser foot and start sewing slowly,
while guiding raw edge of fabric scroll evenly
into front of rolled hem foot.
CORDING
No. 9 Zigzag Stitch for Single Cording
No. 12 Multi Zigzag for Triple Cording
Cording Foot
A. SINGLE CORDING
1. Set stitch pattern to No. 9. Insert the cord in the
center groove of cording foot from the right side
opening. Pull cord about 2" (5 cm) behind the
foot.
2. Adjust the stitch width so that the stitches are
just cover the cord. Lower the foot and sew
slowly, guiding the cord.
3 mm
5 cm
B. TRIPLE CORDING
Set the stitch pattern to No. 12 and set the stitch
width to 6.0-7.0.
Insert three cords into the slots of cording foot.
40

CONTINUOUS
DECORATIVE PATTERN
Use the Satin Foot for continuous decorative stitch
patterns.
This foot has a full indentation on the underside to
easily allow closely spaced zigzag stitches and
fabric to feed freely under foot.
No. 19-100
Satin Foot (B)
To customize the continuous decorative stitch
pattern, you may adjust the length and width of
pattern.
Experiment with fabric scraps until you get the
desired length and width.
A. SEWING LIGHTWEIGHT FABRICS
When sewing lightweight fabrics, it is suggested
that you use stabilizer on the backside of the
fabric.
USING THE EVEN-FEED
FOOT
The Even-feed Foot accessory equalizes the
feeding of the upper and lower layers of fabric and
improves the matching of plaids, stripes, and
patterns. This foot helps to prevent uneven
feeding of very difficult fabrics. Use this foot also
for sewing quilts.
No. 1, 2, or 9
Even-feed Foot
A. ATTACHING THE EVEN-FEED FOOT
1. Remove the presser foot and holder. (See page
7)
2. The arm of even-feed foot should rest on the
shaft of the needle clamp screw.
3. Slide the attaching head from your left to right
so that it is fitted into the presser bar.
4. Tighten the presser foot thumb screw.
B. SEWING
Hold both thread lightly at start of sewing and sew
in slow (1/2) speed.
41

DARNING/FREE-HAND
EMBROIDERY
No. 1.Center needle Position
Darning/Embroidery Foot
A. ATTACHING THE DARNING/
EMBROIDERY FOOT
1. Lower the feed dogs by moving the drop feed
lever to the left.
2. Remove the presser foot and holder. (See page
7)
3. The arm of darning/embroidery foot should rest
on the shaft of the needle clamp screw.
4. Slide the plastic attaching head from your left to
right so that it is fitted into the presser bar.
5. Tighten the presser foot thumb screw.
B. DARNING
1. Place fabric under foot and lower the presser
foot lifter.
2. Grasp fabric firmly in front and back of area to
be stitched. Start sewing, moving fabric by hand
forward and backward with an even motion,
stitching in closely spaced rows over the hole or
worn area.
3. When the area is filled with new stitches, move
fabric from side to side in a similar manner to
weave or reinforce the stitching.
a. Note:
Reinforce open areas with an underlay; baste
underlay in place before darning.
C. FREE-HAND EMBROIDERY
1. Outline the design for embroidery on the
surface of the fabric.
2. Place design to be embroidered between the
two sections of embroidery hoop.
Note:
Embroidery hoop is not included with this
machine.
3. Set embroidery hoop under needle and lower
the foot.
4. Start the machine at medium speed, guiding
hoop carefully so needle moves along line of
the pattern.
D. After darning or free-hand embroidery
Raise the feed degs by moving the drop feed lever
to the right.
42

OPTIONAL ACCESSORIES
Shank : This is an optional accessory.
This shank is also known as a presser foot holder and should be used
when sewing with the following presser feet.
Adjustable Bias Binder, Braiding Foot, Chenille Stitching Foot, Edge
Joining Foot, Fancy Trim Foot, Gathering Foot, Non-Stick Foot, Seam
Guide Foot and Stitch in the Ditch Foot.
Machine Preparation
1. Remove the current shank (presser foot holder), by loosening the
presser foot thumbscrew.
2. Put the new shank on the presser foot bar. Tighten the presser foot
thumbscrew.
Sewing Instructions
1. Follow the instructions for Adjustable Bias Binder, Braiding Foot,
Chenille Stitching Foot, Edge Joining Foot, Fancy Trim Foot,
Gathering Foot, Non-Stick Foot, Seam Guide Foot or Stitch in the
Ditch Foot.
Adjustable Bias Binder Foot : This is an optional accessory.
The Adjustable Bias Binder Foot covers fabric edges with bias tapes.
This foot adjusts to fit bias tapes 1/4” to 3/4” in width.
1. Thread the top of the machine and bobbin with all-purpose sewing
thread.
2. Snap on the Adjustable Bias Binder Foot.
3. Use the screw on the right side of the bracket to adjust the width of
the opening to fit the bias tape.
4. Cut the end of the bias tape to a 45 degree angle. Insert the bias
tape from the outside of the bracket, into the slot that matches its
width and pull it down under the presser foot.
5. Place the edge to be bound into the groove on the left side of the
bracket.
6. Loosen the screw on top, in the back, and adjust the bracket as
needed.
7. Select a narrow ZigZag, Straight or Decorative Stitch.
8. Sew slowly, keeping the fabric to be bound snugly under the groove
as you sew.
43

Braiding Foot : This is an optional accessory.
The Braiding Foot is used to stitch trims, braids or cords for decorative
embellishment.
1. Thread the top of the machine and bobbin with all-purpose sewing
thread.
If desired, you can use a contrasting or rayon thread for a decorative
effect, or use a monofilament thread if you want only the braid to be
visible.
2. Guide trim, braid or cord from the top of the foot into the guide hole
and under the foot.
3. Stabilize the underside of the fabric as needed.
4. Select the ZigZag Stitch with a width set wide enough to stitch over
the trim, braid or cord.
5. Lower the Braiding Foot and sew.
Braiding Guide : This is an optional accessory.
The Braiding Guide ensures that trims, braids and cording are smoothly
fed into the Braiding Foot.
1. Place straight end of the Braiding Guide into the slot at the top of the
presser foot ankle.
2. Thread the trim, braid or cord into the curly-Q end of the Guide and
into the Braiding Foot.
3. As you sew, lightly support the trim, braid or cord as it enters the
Guide.
Chenille Stitching Foot : This is an optional accessory.
The Chenille Stitching Foot is used to embellish projects with chenille
effects.
1. Thread the top of the machine and bobbin with all-purpose sewing
thread.
2. Prepare a minimum of three layers of chenille strips, 5/8” (16 mm),
for best effect. Place the strips into the presser foot. You can also
use narrower strips such as 3/8” (10 mm) wide.
3. Snap on the Chenille Stitching Foot.
4. Place the foundation fabric that will be embellished under the presser
foot and strips.
5. Select a Straight Stitch.
6. Sew at a slow speed. The Chenille Stitch Foot will guide the strips
over the foundation fabric where you want to have the chenille effect.
For additional stability, use Tear Away Stabilizer underneath the
foundation fabric.
7. Add strips in rows, as desired, to finish the project.
8. Machine wash on cold cycle, dry warm to help fray the edges of the
chenille strips.
Alternative method: Spray with water, rub with stiff brush to fray strips,
dry with hair dryer.
44

Clearance Plate : This is an optional accessory.
The Clearance Plate is used to help stitch over thick seams, such as
when hemming jeans. The presser foot tilts as it sews on and off thick
seams areas. The Clearance Plate keeps the presser foot level when
stitching over thick areas, preventing the needle from hitting the
opening in the presser foot.
The Clearance Plate is also used to aid in removing or replacing
needles.
Sewing Denim Seams
1. Prepare the jeans hem and pin it in place.
2. Begin stitching the hem, but stop sewing when the presser foot starts to climb, but before the needle
reaches the seam.
3. Turn the hand wheel toward you to lower the needle into the fabric, then raise the presser foot using
the presser foot lifter.
4. From the back side of the presser foot, insert the Clearance Plate up to the seam allowance (you will
notice that the presser foot is now level). Lower the presser foot.
5. Begin sewing slowly, and continue until you have stitched across the seam. Turn the hand wheel
toward you to lower the needle into the fabric, then raise the presser foot.
6. Place the Clearance Plate now in front of the presser foot. Lower the presser foot and slowly sew a
few stitches until the back side of the presser foot has cleared the thick seam.
7. Turn the hand wheel toward you to lower the needle into the fabric, then remove the Clearance Plate.
Continue sewing.
Needle Replacement
1. Use the hole in the Clearance Plate to hold the
old needle while it is still on the machine. Slide
the Clearance Plate up onto the needle, starting
at the point of the needle and moving the tool
upward on the needle.
2. While holding the old needle with the Clearance
Plate, loosen the needle clamp screw. Remove
the needle.
3. Insert the new needle into the hole in the
Clearance Plate.
4. While holding the Clearance Plate, guide the
needle into the needle slot, making sure that the
flat side of the needle is toward the back of the
machine.
5. Tighten with a screwdriver to secure, and then
remove the Clearance Plate from the needle.
Edge Joining Foot : This is an optional accessory.
The Edge Joining Foot guides trims sewn to an edge.
1. Snap on the Edge Joining Foot.
2. Place the edge of the fabric against the left side of the Edge Joining
Foot’s guide.
3. Place the edge of the trim against the right side of the Edge Joining
Foot’s guide. Both pieces should have the right sides facing up.
4. Set the machine to ZigZag or Ladder Stitch.
5. Turn the hand wheel toward you, ensuring that the needle does not
hit the guide.
6. Sew, keeping both the fabric and the trim next to the guide to join
them together.
45

Fancy Trim Foot : This is an optional accessory.
Use the Fancy Trim Foot to decorate your projects
with sequins. This foot guides the sequins through
a groove at the front of the foot while your sewing
machine stitches them in place.
Note: Use only circle round sequins. Make sure that
the sequin trim flows freely through the opening on
the foot.
1. Thread with invisible thread on top and allpurpose sewing thread in the bobbin.
2. Snap on the Fancy Trim Foot and select a Hand
Look Appliqué Stitch. Adjust the stitch length to
2-3 and the width according to the width of the
sequins. Make sure to use Tear-Away stabilizer
underneath your fabric.
3. Slide the sequins into the groove at the front of the presser foot.
Make sure you have pulled a piece of the sequin trim under the foot
and through the back of the foot before you start to sew.
4. Test sew on a scrap of fabric.
5. Sew slowly to prevent sewing through sequins.
Gathering Foot : This is an optional accessory.
The Gathering Foot is used for gathering or shirring fabrics. It works
best with lightweight fabrics.
Gathering Fabric
1. Remove the presser foot holder and attach the Gathering Foot.
Tighten the side screw securely.
2. Place the fabric to be gathered under the presser foot.
3. Set the machine to Straight Stitch.
4. Lower the presser foot.
5. Sew a row of stitching. The pressure that is placed on the fabric from
the back of the foot will cause the fabric to gather.
6. Adjust the upper thread tension dial to help achieve the amount of
fullness desired. Less tension will result in softer gathers, more
tension will result in fuller gathers. The stitch length dial can also be
used to adjust fullness. The longer the stitch length setting, the more
fullness that is achieved.
Gathering and Attaching Fabric in One Step
1. Remove the presser foot holder and attach the Gathering Foot.
Tighten the side screw securely to ensure that the foot is properly
attached.
2. Place the fabric to be gathered under the presser foot, right side up.
3. Place the top layer of the fabric right side down in the Gathering
Foot’s slot.
4. Set the machine to Straight Stitch.
5. Sew, guiding the two layers together.
46

Invisible Zipper Foot : This is an optional accessory.
This foot provides a hidden closing on skirts, dresses and other
garments.
1. Attach the Invisible Zipper Foot. Select Straight Stitch. Verify that the
needle will line up with the opening of the foot before starting to sew.
2. Before closing the seam on your project, use a fabric marker to mark
the desired bottom end of the zipper on both sides of the zipper
opening.
3. Fold in and press the seam allowances of both opening edges and
open out the pressed edges.
4. With right sides together, place the first half of the opened zipper
along the first edge of the opening, ensuring that the teeth of the
zipper end at the creased edge.
5. Baste in place.
6. Place the fabric under the presser foot, so that the teeth of the zipper
are lined up with the groove of the zipper foot. Topstitch the zipper in
place, ensuring that the needle penetrates the tape of the zipper
close to the teeth. Continue sewing until the presser foot reaches the
zipperÅfs slider, backstitching at the end of the seam.
7. On the opposite side, close the zipper. With right sides together,
make sure the two sides of the zipper are properly aligned. Pin in
place, open the zipper and baste in place.
8. Place the fabric under the presser foot, so that the teeth of the zipper are again lined up with the
groove of the zipper foot. Topstitch the zipper in place, ensuring that the needle penetrates the tape
of the zipper as close to the teeth as possible.
9. Continue sewing the second seam until the presser foot reaches the zipper’s slider, backstitching at
the end.
10. Finally, stitch the seam below the zipper closed.
Non-Stick Foot : This is an optional accessory.
This foot is used when sewing fabrics such as
leather or vinyl.
1. Snap on the Non-Stick Foot. Select desired
stitch. Verify that the needle will line up with the
opening of the foot before starting to sew.
2. Sew slowly and guide the layers.
Tip:
Try using paper clips to hold fabric layers together.
Using pins will leave holes in leather and vinyl.
47

Parallel Sewing Foot : This is an optional accessory.
This foot is used for sewing rows of stitching in
parallel rows.
1. Snap on the Parallel Sewing Foot.
2. Sew the first row of stitching.
3. Align the first row of stitching either between or
on the red guideline markings on the foot,
depending on the desired distance from the first
row of stitching. Sew the next row of stitching,
using the red guidelines as a reference.
4. Align the two rows sewn, following the red
guideline markings on the foot, depending on the
desired distance between rows of stitching. Sew
the next row of stitching, using the red guideline
markings as a reference.
5. Continue for as many rows as desired.
Note: The first vertical guideline, to either the left or right is 1/2” from the center needle position. The
second guideline is approximately 1/4” from the first guideline on either side. There is a marking at the
center front of the foot that can also be used a reference.
Seam Guide Foot : This is an optional accessory.
This foot guides the edge of the fabric as you sew a seam. Keep the
seam allowances at the same distance from the edge throughout the
project. The edge guide and red lines provide guidelines for various
seam allowances.
1. Thread the machine with all-purpose sewing thread on the top and in
the bobbin.
2. Snap on the Seam Guide Foot.
3. Place fabric right sides together.
4. Place the fabric under the presser foot with the metallic guide at the
edge of the fabric for 5/8” seam allowance.
5. Lower the presser foot. Sew. The guide will follow the edge of the
fabric and the seam will be sewn with a perfectly straight seam
allowance.
Use the four other red marked lines on the presser foot for narrower
seam allowances.
Stitch in the Ditch Foot : This is an optional accessory.
The Stitch in the Ditch Foot assists with sewing in the finished seam of
a quilt or binding.
1. Snap on the Stitch in the Ditch Foot. Thread the top with invisible
thread or thread to match the fabric. Thread the bobbin with thread
that matches the fabric.
2. Place the fabric to be stitched under the presser foot, aligning the
center guide with the seam. The guide will automatically fall on the
low side of the seam and will stitch down the seam of your quilt or
binding.
3. To pivot 1/4” from the end, stop sewing when the front line of the foot
is even with the edge of the fabric.
48

TWIN NEEDLE SEWING
Interesting decorative stitches can be produced by
using twin needles and threading the machine
with two different colors of thread. Always make
test samples to help you determine the settings
best suited to a specific purpose.
All patterns except No. 101-116 may be sewn with
a twin needle.
General Purpose Foot or Satin Foot (A, B)
Note:
A twin needle is not provided with this machine.
Contact your authorized SINGER dealer to
purchase.
CAUTION: To prevent accidents.
a. Use only needle designed for this machine
(SINGER Style 2025). Other needles may
break.
b. The needle threader cannot be used. Thread
each needle eye manually.
1. Remove the single needle and insert twin
needle.
2. Thread the first thread as usual, following
threading route.
3. Thread the left needle eye by hand from front to
back .
4. Place the Auxiliary Spool Pin with felt washer
on bobbin winder spindle.
5. Place second spool of thread
6. Thread second thread the same as first.
7. For better sewing results, do not place the
thread into the needle bar thread guide.
Thread right needle eye by hand from front to
back.
8. Press the twin needle button. LCD will indicate
twin needle mark and the stitch width will be
reduced automatically.
CAUTION: To prevent accidents.
If you did not switch to twin needle mode, needle
may hit the needle plate and break.
9. Always test sew selected stitch.
10.
Sew project.
Twin needle mode will remain until you press the
twin needle button again or turn off the machine.
Note:
Twin needle sewing may be used with decorative
& letter stitch patterns by pressing twin needle
button. Twin needle icon will appear on the LCD.
49

DECORATIVE & LETTER
STITCH SEWING
You can combine decorative & letter stitches into a
sequence by selecting each pattern.
A. SELECTING DECORATIVE & LETTER
STITCH (selecting mode)
1. Press the decorative & letter stitch button.
First 5 patterns of decorative patterns will be
indicated on the lower line of LCD.
2. By pressing the decorative & letter stitch button,
selecting group will change as below.
a. Decorative pattern
b. Gothic letter stitch
c. Script letter stitch
d. Italic letter stitch
e. Outline letter stitch
f. Russian letter stitch
3. After you select the group, press the scroll
down button. Next 5 patterns of selected group
will appear.
By pressing the scroll up or down button, you
can scroll up or down in increments of 5
patterns.
4. To select a pattern, press the function button
directly under the indicated pattern.
Selected pattern will be indicated on the top left
side of LCD.
5. Using this same procedure, select the next
patterns.
Patterns will appear at the top of the LCD in the
order selected.
6. As selected patterns over the indicating area,
disappear from the screen, you can check them
by pressing the cursor buttons. (See next page)
NOTE:
Machine can memorize a maximum of 60
patterns. You can combine the tack stitch by
pressing the tack button. This is used for
sewing a single combination of patterns. (See
next page 48)
50

B. SHIFTING THE CURSOR
Additional patterns may be added to the end of a
string of combined patterns. Shift the “I” cursor
over to the right, following the pattern string and
then select new patterns.
By pressing the cursor buttons, cursor will shift left
or right. The cursor position will be highlighted.
a. Press the cursor left button”<“ and cursor will
shift to the left.
b. By pressing the cursor right “>” button, cursor
will shift right.
The cursor is used to check selected patterns,
insert patterns, delete patterns or editing of each
pattern as described below.
If the settings of the highlighted pattern can be
changed, it will be noted in the center line of the
LCD.
C. TO CHECK SELECTED PATTERNS
As the length of the string increases, patterns will
disappear from sight.
You can check patterns by shifting cursor to the
left.
D. INSERTING PATTERN
1. Machine will insert a pattern to the left of the
highlighted letter or pattern.
2. Using the cursor buttons, move the cursor to
highlight the pattern just before the desired
position for the new pattern. Select the pattern.
B
C
D
E. TO DELETE PATTERN
1. Shift the cursor to the pattern you want to
delete.
2. Press the clear “C” button quickly (less than 0.5
sec.).
Machine will delete the pattern and cursor will
shift to next pattern.
a. When the cursor is at furthest right side,
machine will delete just before pattern.
3. If you want to delete all patterns, press and hold
the clear “C” button (over 0.5 sec.).
Machine will delete all selected patterns.
E
51

F. EDITING OF EACH PATTERN
You can change the stitch width, length, mirror/
reverse stitch and elongation of stitch patterns.
You can also change the thread tension of
selected patterns.
1. Press the edit “E” button.
LCD will change to the editing mode.
2. As you shift the cursor, the setting of each
pattern will be indicated.
3. By pressing each function button, you can
change setting as below a-d.
4. After you have completed the editing, press the
return button (F1) or edit “E” button.
Machine will return to selecting mode.
Note:
Letter stitches cannot change settings. (except for
thread tension)
a. Mirror / Reverse stitch
Press the function button (F2) directly under
mirror/reverse icon, and the stitch will change
alternately or in rotation.
The descriptions of the mirror/reverse icons are
below.
a1. Regular stitch (normal stitch)
a2. Mirror stitch (flips from left to right)
a3. Reverse stitch (reverse front and back)
a4. Mirror and Reverse stitch, pattern will flip
from left to right and from front to back.
If symbol is not indicated, its pattern cannot
change (mirror/reverse stitch).
b. Elongation
By pressing the function button (F3) directly
under the elongation mark, stitch will elongate
five different sizes. (b1-b5)
If symbol is not indicated, its pattern cannot
elongate.
52

c. Setting the stitch width and length
Machine will pre-set the stitch width and length
suitable for the pattern.
1. You can make changes by pressing the
function button (F4) directly under the witdh and
length mark.
2. For narrower width, press function button F2(–).
For wider width, press function button F3 (+).
For shorter length, press function button F4 (–).
For longer length, press function button F5 (+).
Pre-set stitch width and length will be indicated
as a highlighted number.
You can change the width and length of other
patterns by shifting the position of the cursor.
By pressing the return button (F1), machine will
return to editing mode.
By pressing the edit “E” button, machine will
return to selecting mode.
d. Setting the thread tension
By pressing the function button (F5) directly
under the tension mark, LCD will indicate the
tension mode.
This setting will change the thread tension of all
combined patterns.
To increase the upper thread tension, press
function button F5 (+).
To decrease the upper thread tension, press
function button F4 (–).
F4
F1 F2 F3 F4 F5
F5
Pre-set tension number is highlighted.
By pressing the function F3 (AUTO) button,
thread tension will return to pre-set.
By pressing the return button (F1), machine will
return to editing mode.
By pressing the edit “E” button, machine will
return to selecting mode.
Note:
If you press the clear “C” button at editing mode,
highlighted pattern will be deleted.
G.TO RECALL THE SELECTED
PATTERNS
If you change the pattern to utility stitch,
machine will retain the combination of patterns
until the machine is turned off.
To recall these patterns, press the decorative &
letter stitch button. Machine will recall the
selected patterns.
(Thread tension will return to pre-set.)
To delete all patterns, press and hold the clear
“C” button for a long time. (See page 45)
F1 F3 F4 F5
53

H.SEWING THE SELECTED PATTERNS
a. Single sewing
You can combine the tack stitch by pressing the
tack button at selecting mode.
When you combined the tack stitch or letter
stitch at the end of pattern, machine will stop
automatically after sewing selected patterns.
b. Repeat sewing
The pattern combination will sew repeatedly
without combining the tack stitch at the end of
the pattern sequence.
SEWING
1. Attach the Satin Foot when sewing decorative &
letter stitch.
2. Machine will start sewing from highlighted
pattern. You must shift the cursor to the pattern
where you wish to start sewing.
(When the “I” mark cursor is indicated on the
right side of selected patterns, machine will
start from first pattern.)
3. Lower the presser foot and start sewing.
Machine will indicate the sewing pattern on the
top left side of LCD.
I. TO SEW PATTERN FROM BEGINNING
a. When you stop sewing at the middle of selected
patterns, LCD will indicate the setting of sewing
pattern and the arrow mark “ “ on the
second line.
This mark is meaning that sewing is interrupted.
You can continue sewing by starting the
machine again.
b. When you stopped sewing at the middle of
selected patterns, and If you have raised the
presser foot lifter, the arrow mark will change to
“ “,
In this time, when you start sewing again,
machine will sew from the beginning of
interrupted pattern.
c. If you want to sew from the beginning of all
patterns, shift the cursor by using the cursor
buttons. (Arrow icon will disappear)
54

DECORATIVE AND LETTER
STITCH CHART
The decorative patterns in bold print are one unit
of the stitch pattern.
Description of Chart Symbols:
Mirror Stitch included
Reverse Stitch included
Mirror and Reverse stitch included
X5 Elongation included
ADJUSTING THE BALANCE
OF THE STITCHES
Depending on the type of fabric you sew, it may be
necessary to adjust the balance of the stitches.
The adjustment is needed when the decorative or
letter stitch is distorted.
Turn screw which is located bottom of the machine
in either direction as may be required.
DECORATIVE STITCH PATTERN
1. If patterns are distorted as illustration (a), turn
screw in direction of symbol (+).
2. If patterns are distorted as illustration (b), turn
screw in direction of symbol (–).
LETTER STITCH PATTERN
1. If patterns are distorted as illustration (c), turn
screw in direction of symbol (+).
2. If patterns are distorted as illustration (d), turn
screw in direction of symbol (–).
55

MAINTENANCE
DANGER: To reduce the risk of
electric shock.
Disconnect the power line plug from electric outlet
before carrying out any maintenance.
CLEANING
If lint and bits of thread accumulate in the hook,
this will interfere with the smooth operation of the
machine. Check regularly and clean the stitching
mechanism when need.
A. Bobbin Holder
Remove the bobbin cover and bobbin.
Clean the bobbin holder with a brush.
B. Hook Race and Feed Dog
1. Remove the needle, presser foot and holder.
Remove the bobbin cover and bobbin. Remove
the screws holding the needle plate.
2. Remove the needle plate by lifting up the right
side of the plate.
3. Lift up the bobbin holder and remove it.
4. Clean the hook race, feed dogs and bobbin
holder with a brush. Also clean them, using a
soft, dry cloth.
5. Replace the bobbin holder into the hook race so
that the tip (a) fits to the stopper (b) as shown.
6. Replace the needle plate inserting the hook into
the machine.Replace the screws and tighten.
Note:
* An LED lamp is used to illuminate the stitching
area. It does not require replacement. In the
unlikely event it does not light, call your
authorized SINGER retailer for service.
* There is no need to lubricate this machine.
56

HELPFUL HINTS
PROBLEM
CAUSE
CORRECTION
Page
Upper thread
breaks
Lower thread
breaks
Machine skips
stitches
Fabric puckers
Machine makes
loose stitches or
loops
Stitch pattern is
distorted
Threader does
not thread
needle eye
Machine not properly threaded.
Thread entwined around bobbin.
Needle inserted incorrectly.
Thread tension too tight.
Thread of incorrect size or poor quality.
Bobbin threaded incorrectly.
Bobbin wound unevenly or too full.
Dirt or lint on the bobbin holder.
Needle inserted incorrectly.
Bent or blunt needle.
Incorrect size of needle.
(on stretch fabric)
Machine not properly threaded.
Bobbin threaded incorrectly.
Blunt needle.
Thread tension too tight.
Bobbin threaded incorrectly.
Machine not properly threaded.
Tension not adjusted properly.
Presser foot is not suited for the pattern.
Thread tension is not balanced.
Stitch is not balanced.
Needle is not raised.
Needle inserted incorrectly.
Bent needle.
Re-thread machine.
Remove entwined thread.
Re-insert needle.
Readjust thread tension.
Choose correct thread.
Re-thread the bobbin.
Rewind the bobbin.
Clean the holder.
Re-insert needle.
Insert new needle.
Choose correct size needle for
fabric.
(use stretch needle)
Re-thread machine.
Re-thread the bobbin.
Insert new needle.
Readjust thread tension.
Re-thread the bobbin.
Re-thread machine.
Readjust thread tension.
Attach correct foot.
Adjust the thread tension.
Adjust the balance of the stitches.
Raise the needle.
Re-insert needle.
Insert new needle.
16
15
8
21
8
15
14
50
8
8
8
16
15
8
21
15
16
21
25-
21
49
10
8
8
Machine does
not feed properly
Needle breaks
Machine runs
with difficulty
Machine will not
run
Feed dogs are lowered
Stitch length not suitable for fabric.
Lint and dust accumulated around feed dog.
Fabric pulled while sewing.
Needle is hitting the presser foot.
Needle inserted incorrectly.
Incorrect size needle or thread for fabric
being sewn.
Dirt or lint accumulated in the hook race and
feed dog.
Cord not plugged into electrical outlet.
Power switch is not turned on.
Bobbin winder spindle is pushed to the right.
Presser foot is not lowered.
Buttonhole Sewing Mode;
* Buttonhole lever is not lowered completely.
* Buttonhole foot is not attached.
Raise the feed dogs
Regulate stitch length.
Clean the feed dog area.
Do not pull fabric.
Select correct foot and pattern.
Re-insert needle.
Choose correct size needle and
thread.
Remove the needle plate and
bobbin holder and clean the
hook race and feed dog.
Insert plug fully into outlet.
Turn on the switch.
Push spindle to the left.
Lower the foot.
Lower the buttonhole lever.
Attach the buttonhole foot.
11
23
50
18
25-
8
8
50
9
9
14
10
34
34
57

Messages on LCD
1. Winding the bobbin.
2. Lower the buttonhole lever.
3. After sewing buttonhole, raise the presser foot
lifter and set the frame of buttonhole foot to
starting position.
4. Release the foot controller pedal.
5. Lower the presser foot.
6. Machine memory is full.
7. Select a pattern.
8. Release the reverse button.
1
2
3
4
5
6
7
8
9. Release the start/stop button.
10.Rethread the upper thread.
11.Foot controller is connected.
12.Release the needle up-down / slow button.
13.Release the thread cutter button.
14.Turn off the power switch.
58
9
10
11
12
13
14

59

9970English 34568 A3
 Loading...