

Page 1

4610 - 5910
6644-9130
9133-9432
INSTRUCTION
MANUAL
Page 2
CAUTION !
POLARIZED PLUG FOR NORTH AMERICAN TERRITORIES
To reduce the risk of electric shock, this appliance has a polarized
plug (one blade is wider than the other}. This plug will fit in a
polarized outlet only one way. If the plug does not fit fully in the
outlet, reverse the plug. If it still does not fit, contact a qualified
electrician to install the proper outlet. Do not change the plug in
any way,
Important safety instructions
For Australia only
• If the supply cord is damaged, it must be replaced by the manufacturer
or its service agent or a similarly qualified person in order fo avoid
a hazard.
• The appliance is not intended for use by young children or infirm
persons without supervision,
• Young children should be supervised to ensure that they do not play
with the appliance.
• Switch off or unplug the machine when leaving it unattended,
• Before servicing the appliance or replacing lamps, unplug the
machine.
Dear Customer;
We recommend that for future reference you record the Serial Number of
your Sewing Machine in the space provided.
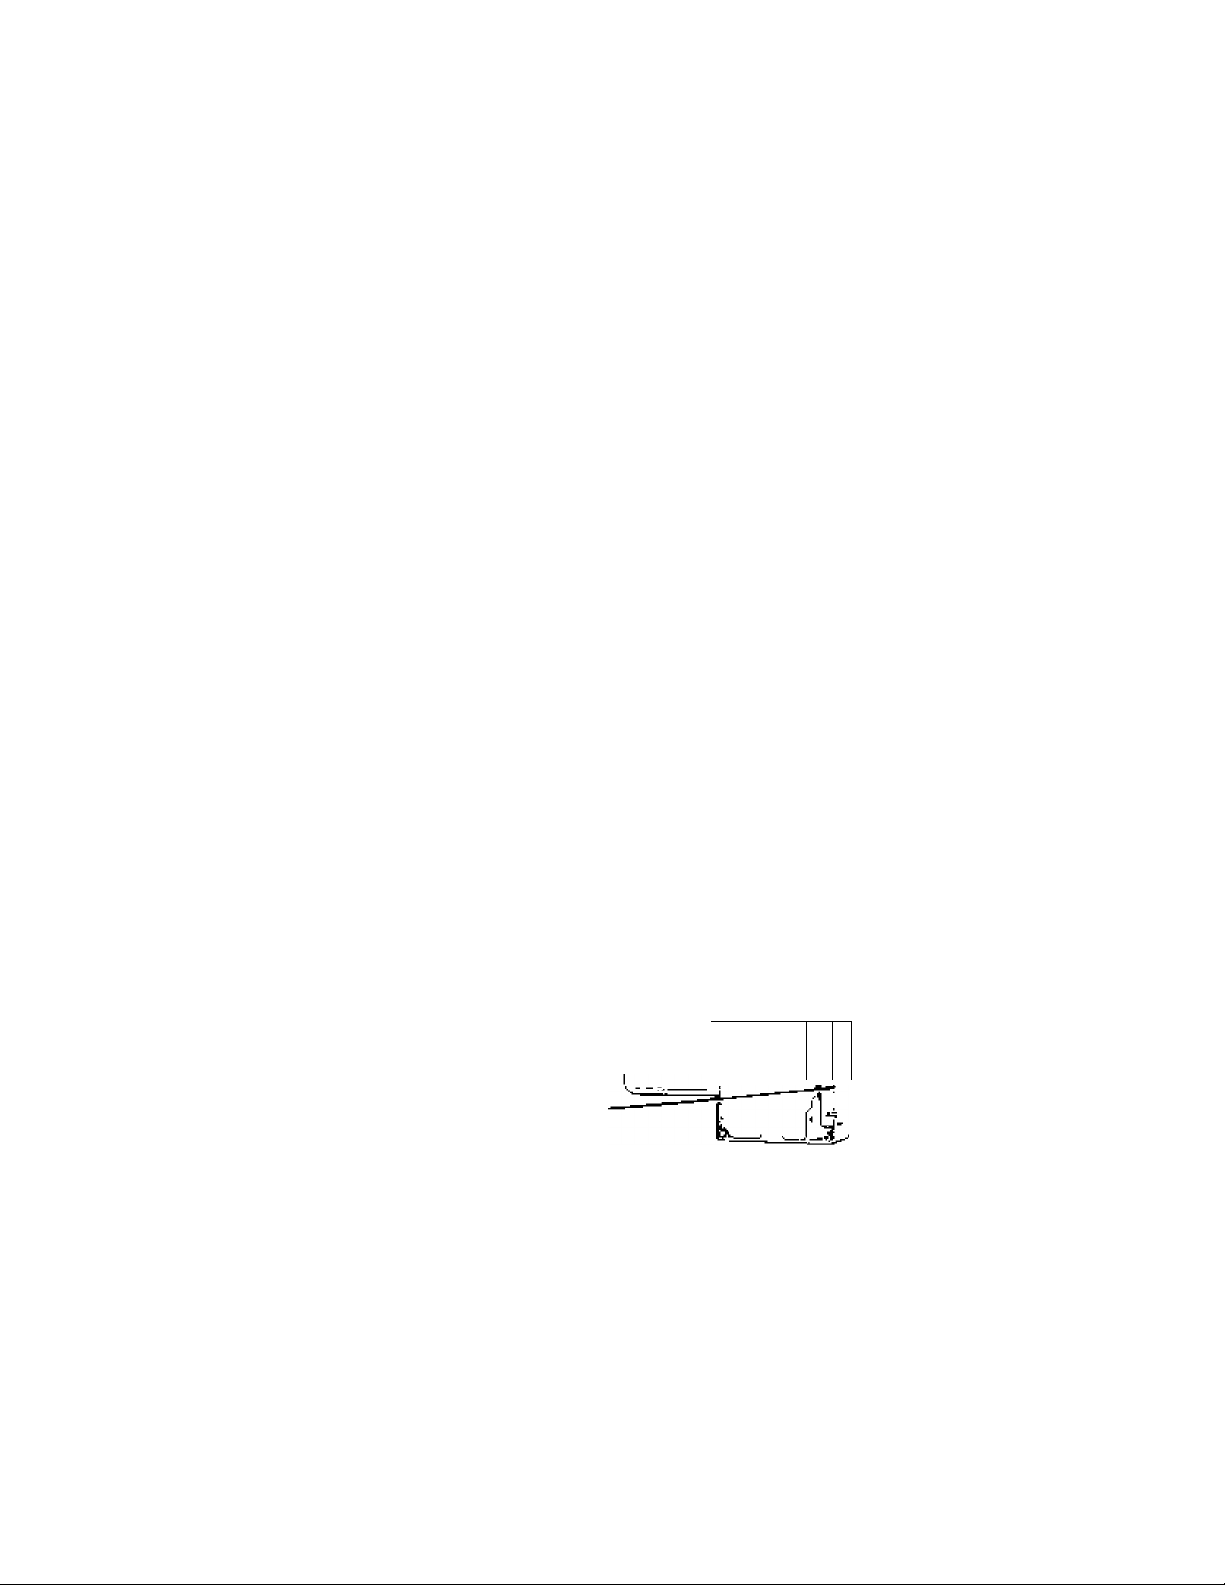
Refer to iftustrafion
at right for (ocation
of Serial Number on
your machine.
Model No.
Serial No,
Serial No,
1
Correct foot controller for this model is model no,: 4C-316B
(for North American Territories)
To ensure that you are always provided with the most modern sewing
capabilities, ihe manufacturer reserves ihe right to change the appear
ance, design or accessories of Ihis sewing machine when considered
necessary.
Page 3

TABLE OF CONTENTS
Important Safeguards
1. Getting to Know Vouir IMachine.
..................
Principal Parts..............................
Accessories..................................
2. Gettimg Ready to Sew .....................................
Connecting the Machine/Rurinling the Machine,
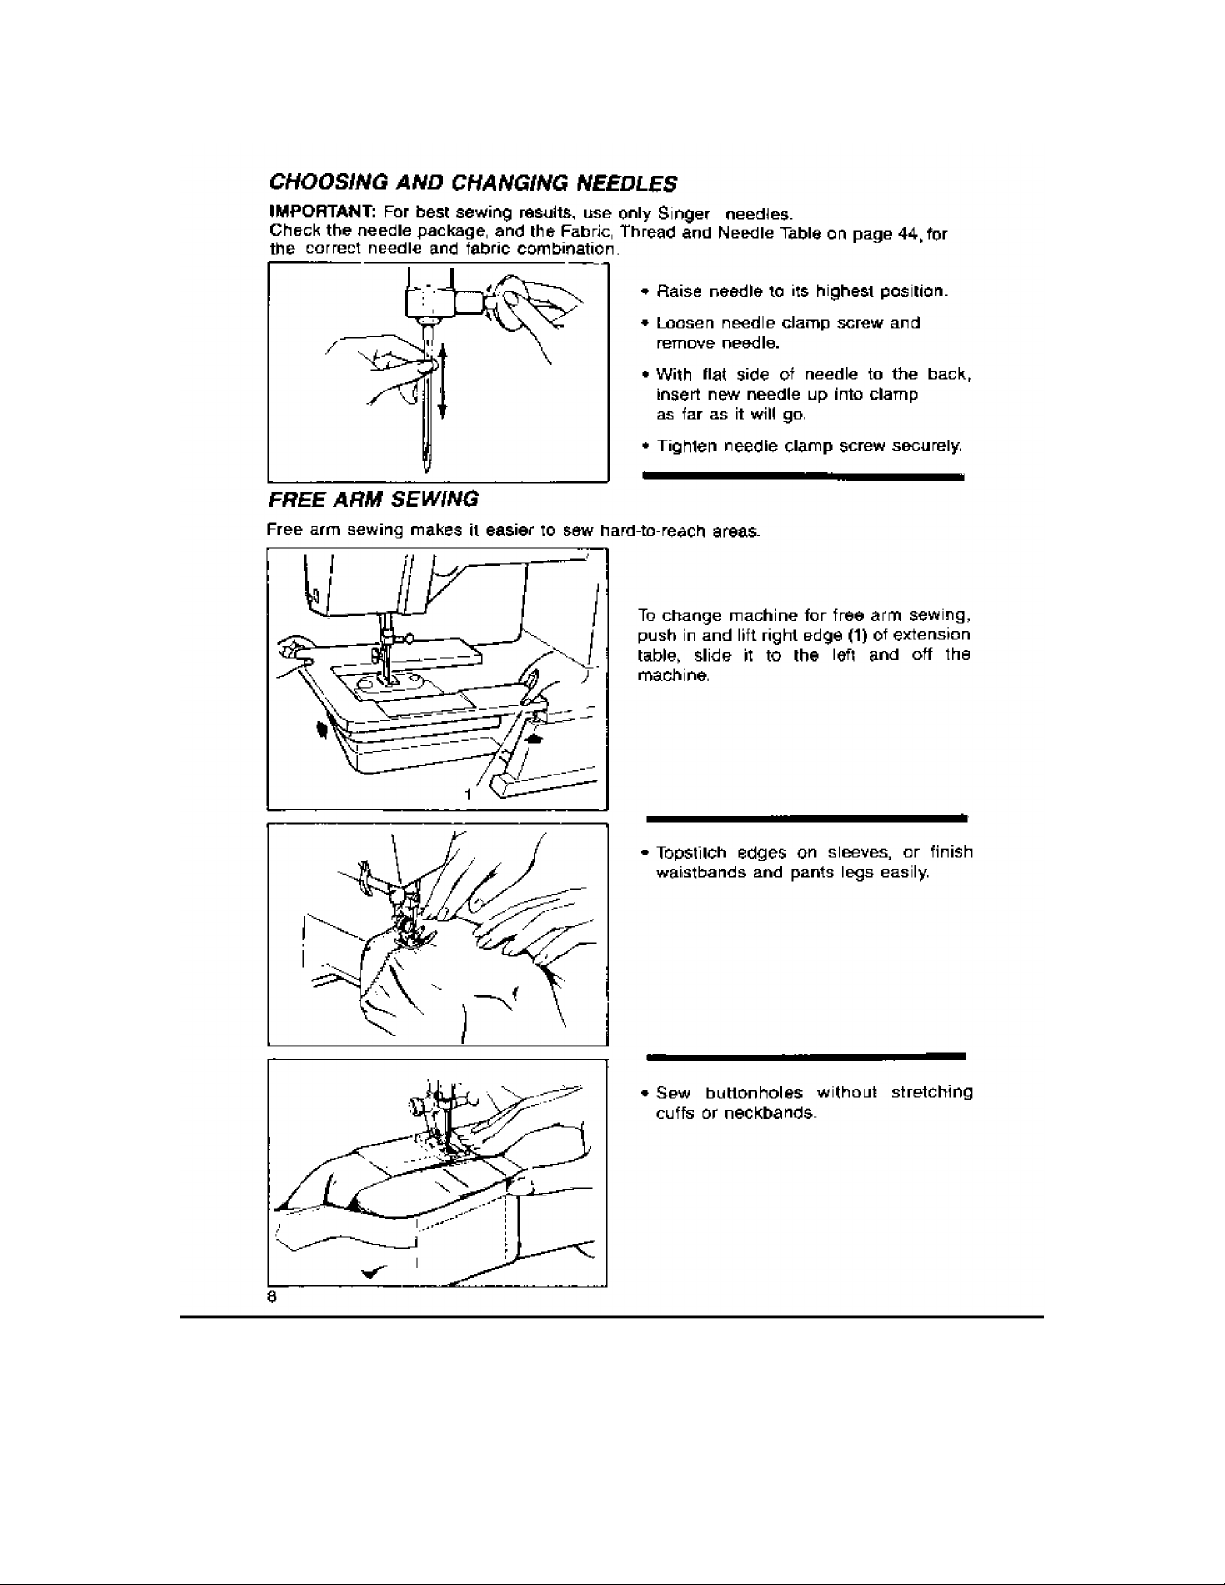
Choosing and Changing Needles
.....
Free Arrn Sewing..............................
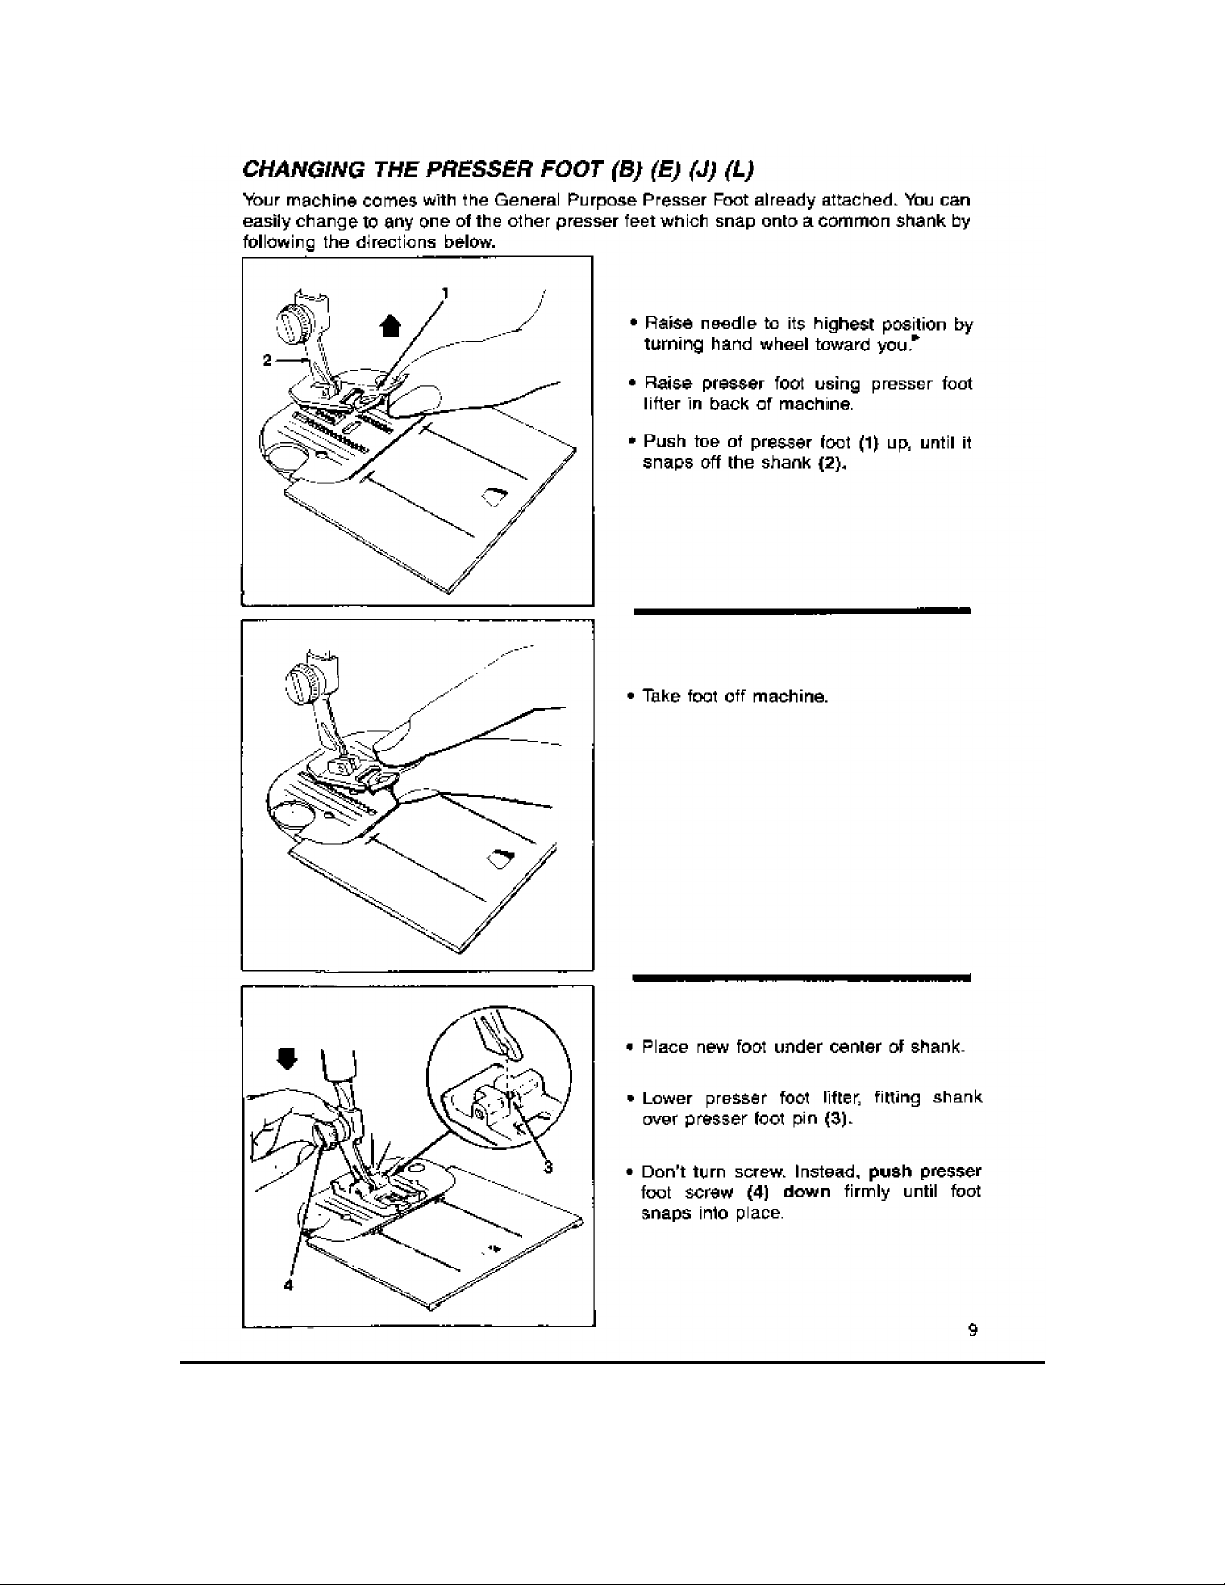
Changing Presser Foot
.....................
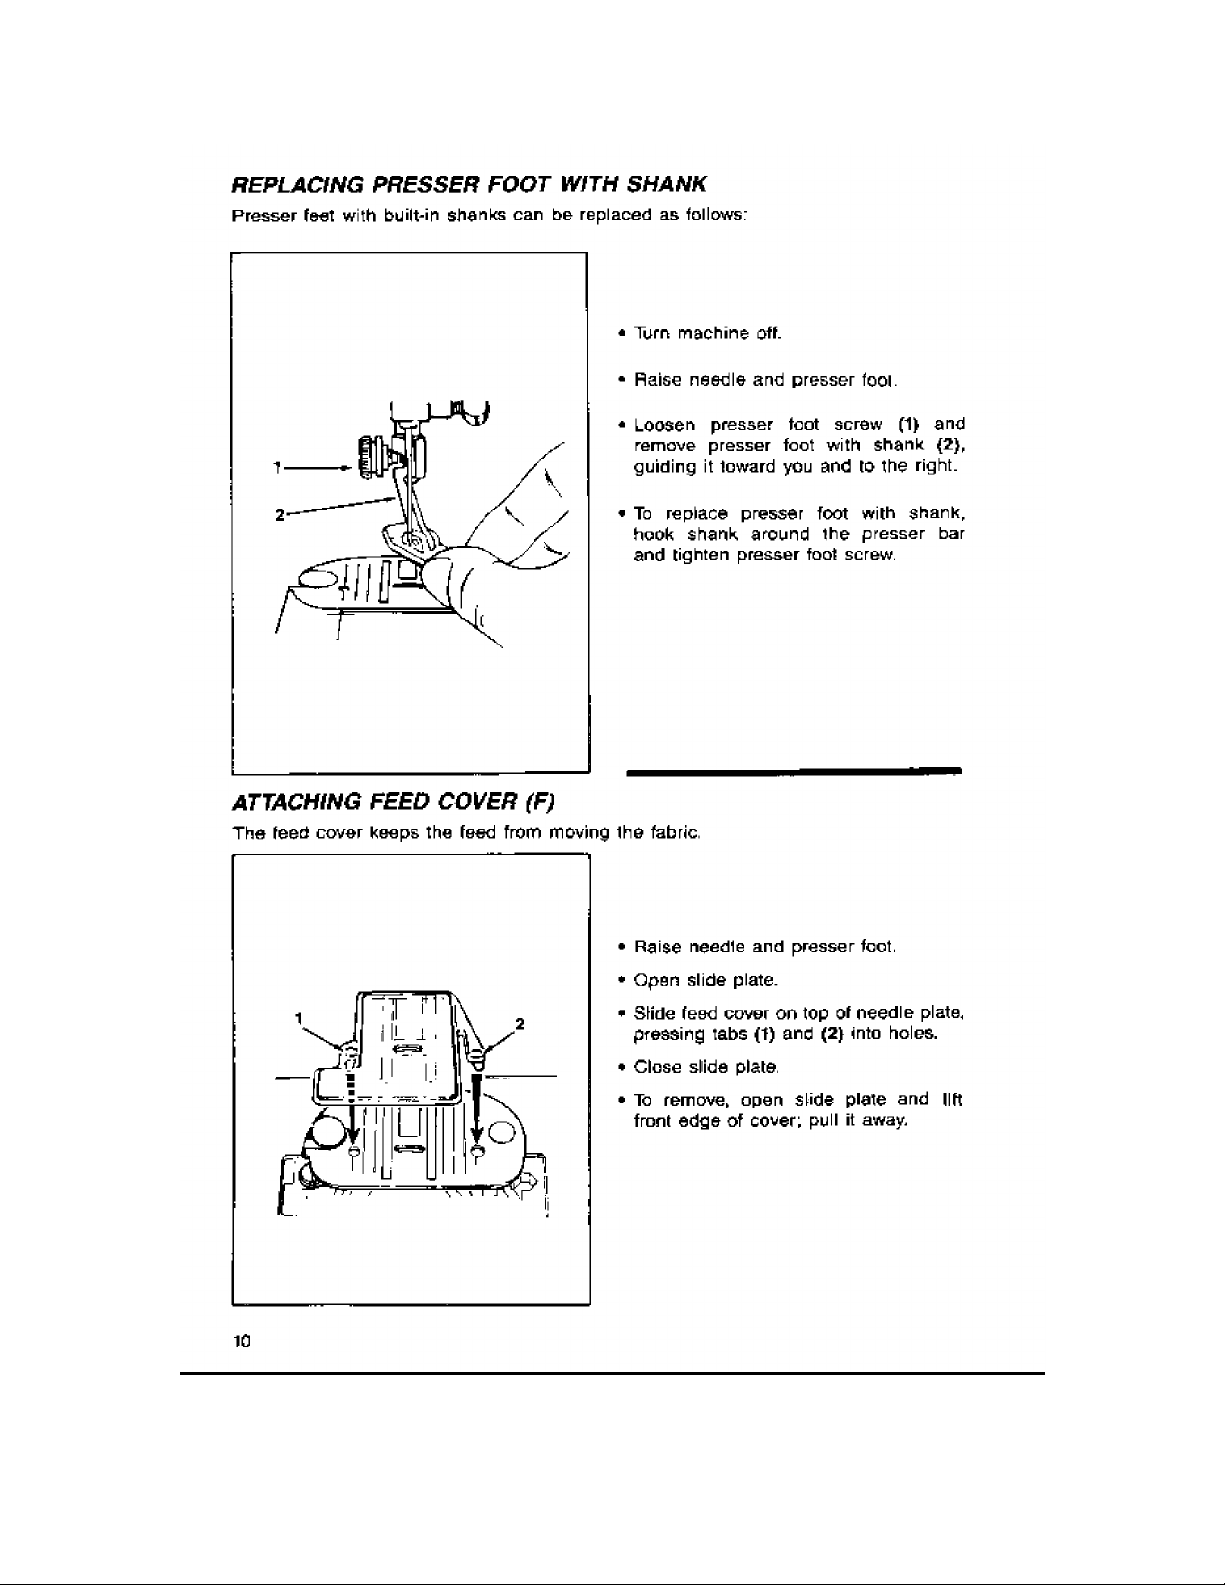
Replacing Presser Foot with Shank .
Attaching Feed Cover
......................
.
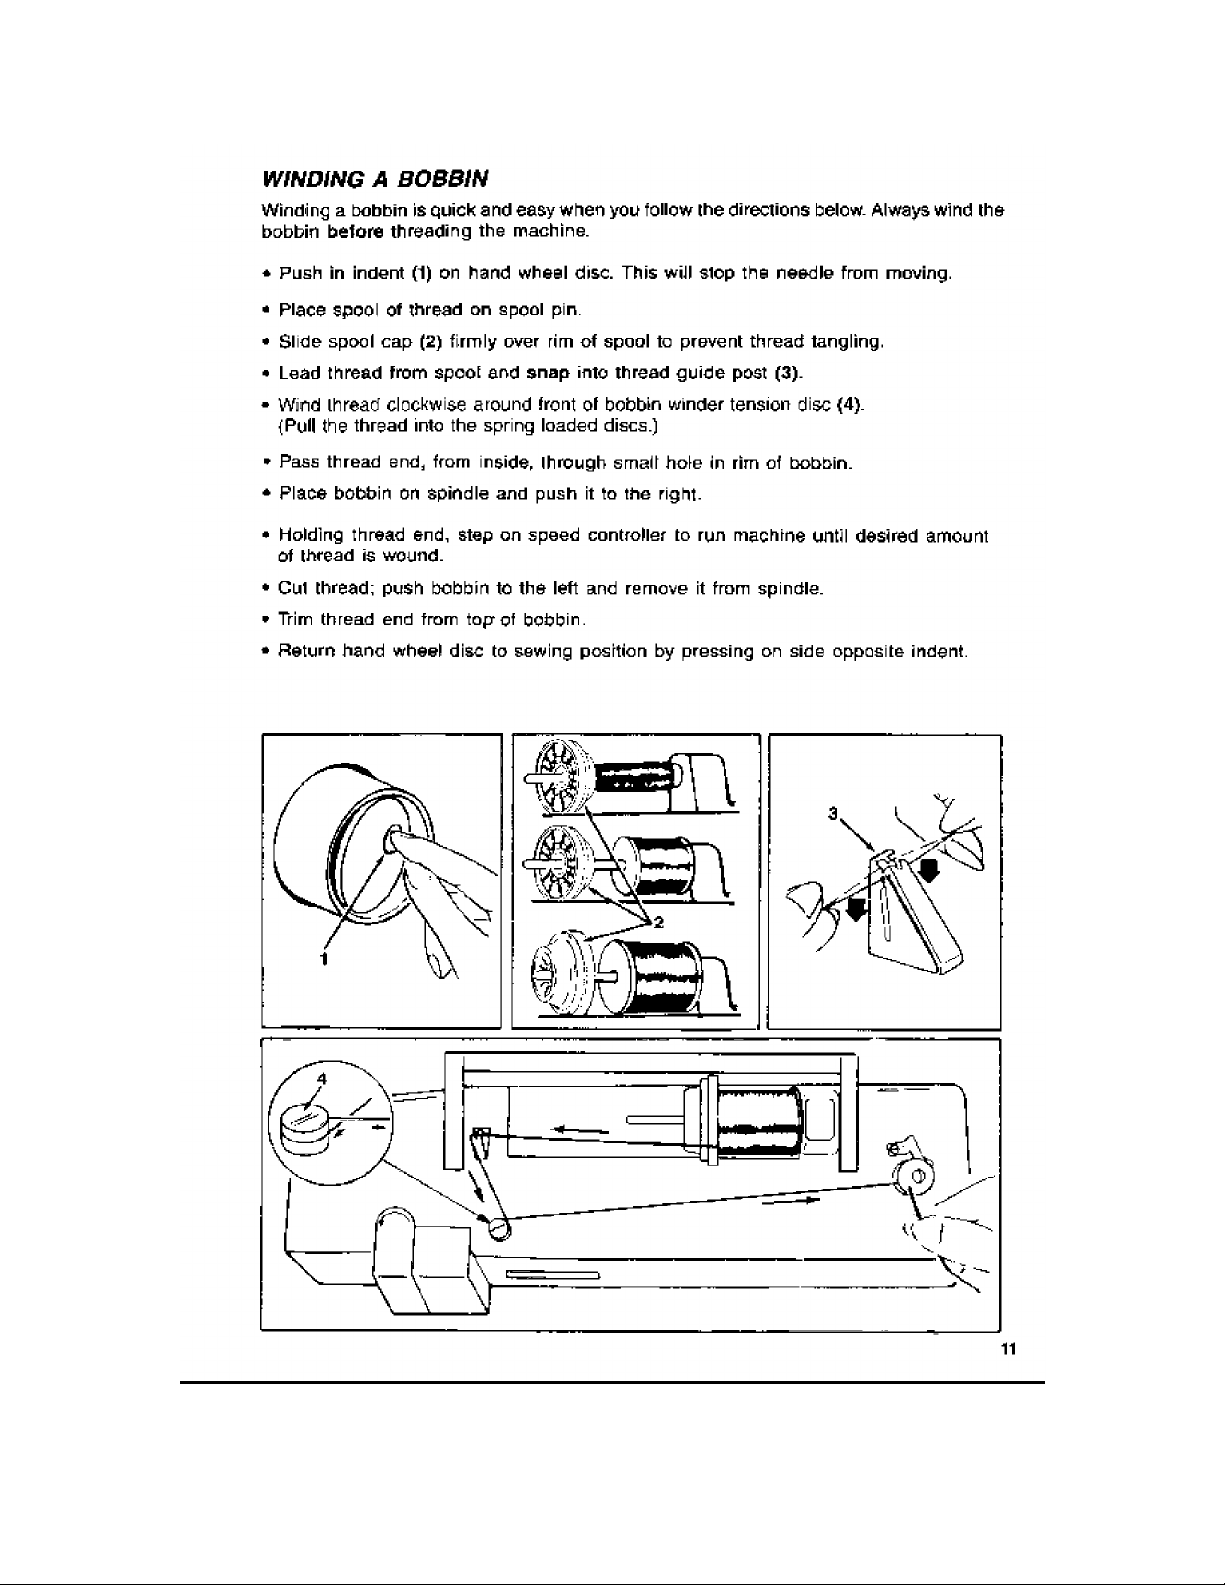
Winding a Bobbin..............................
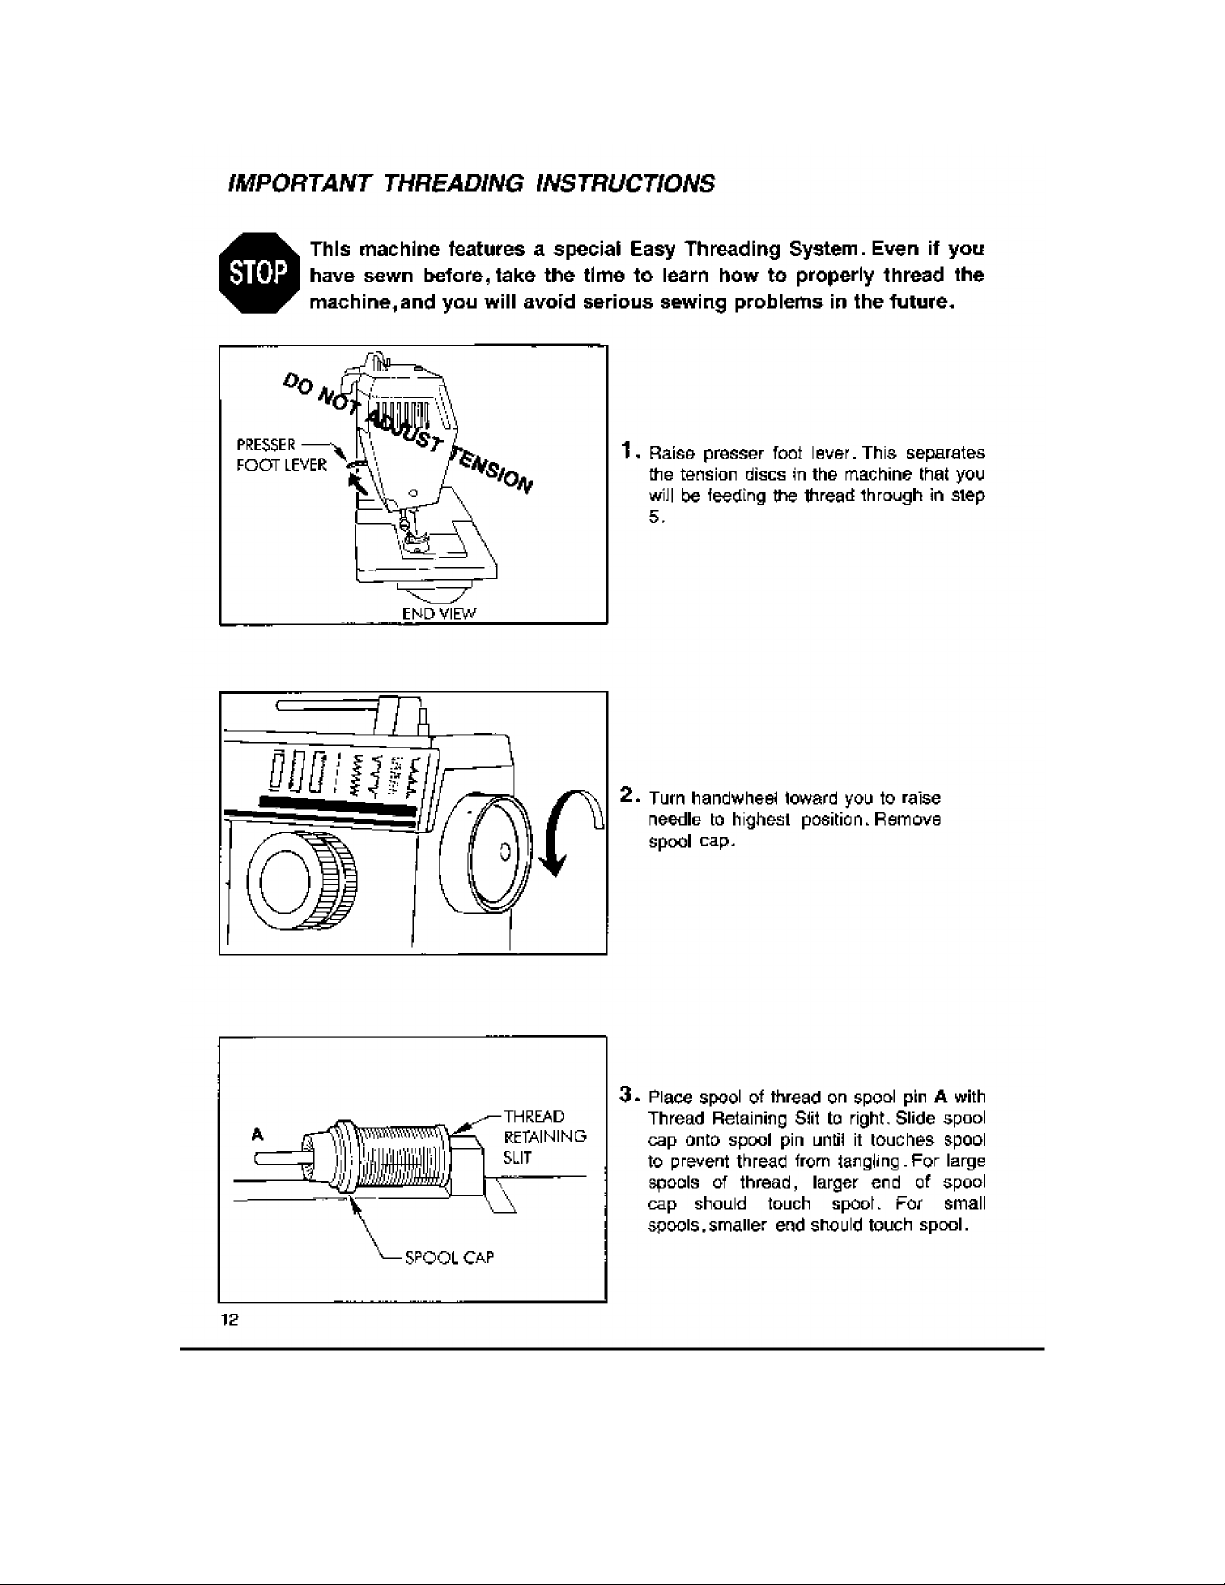
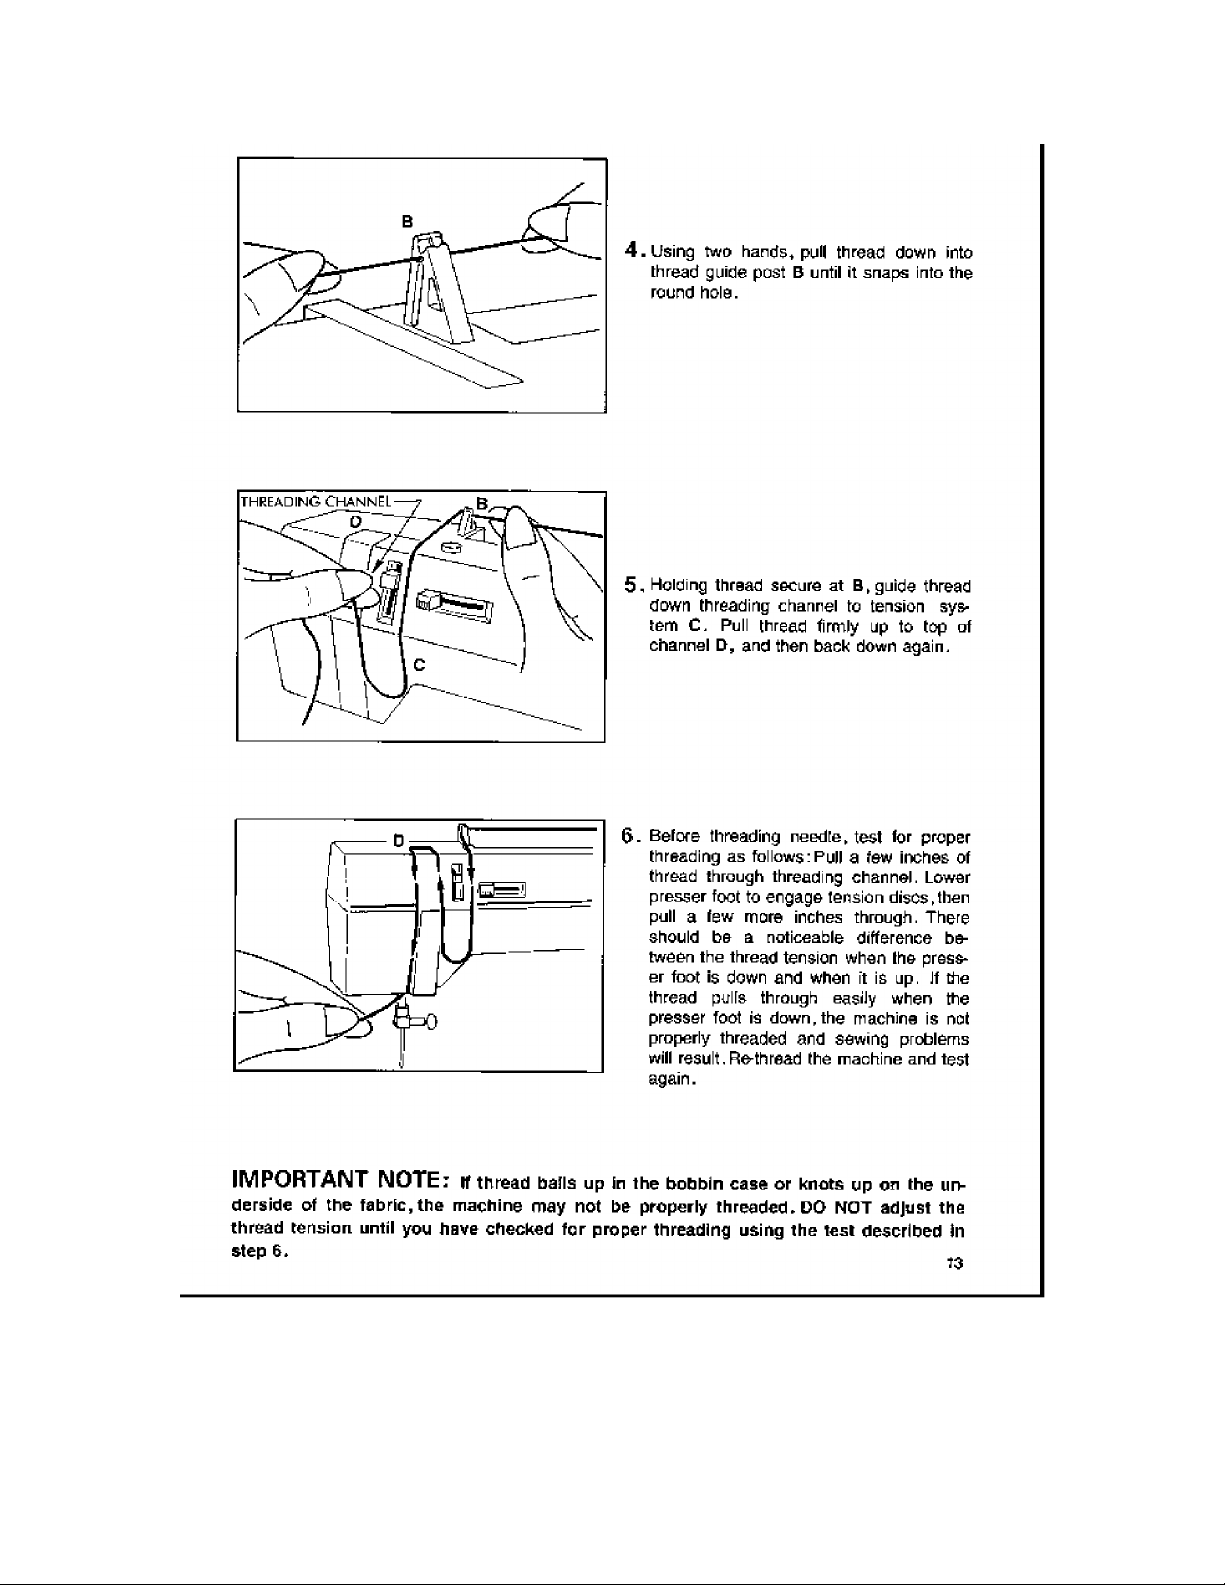
Irnportanl Threading Instructions
......
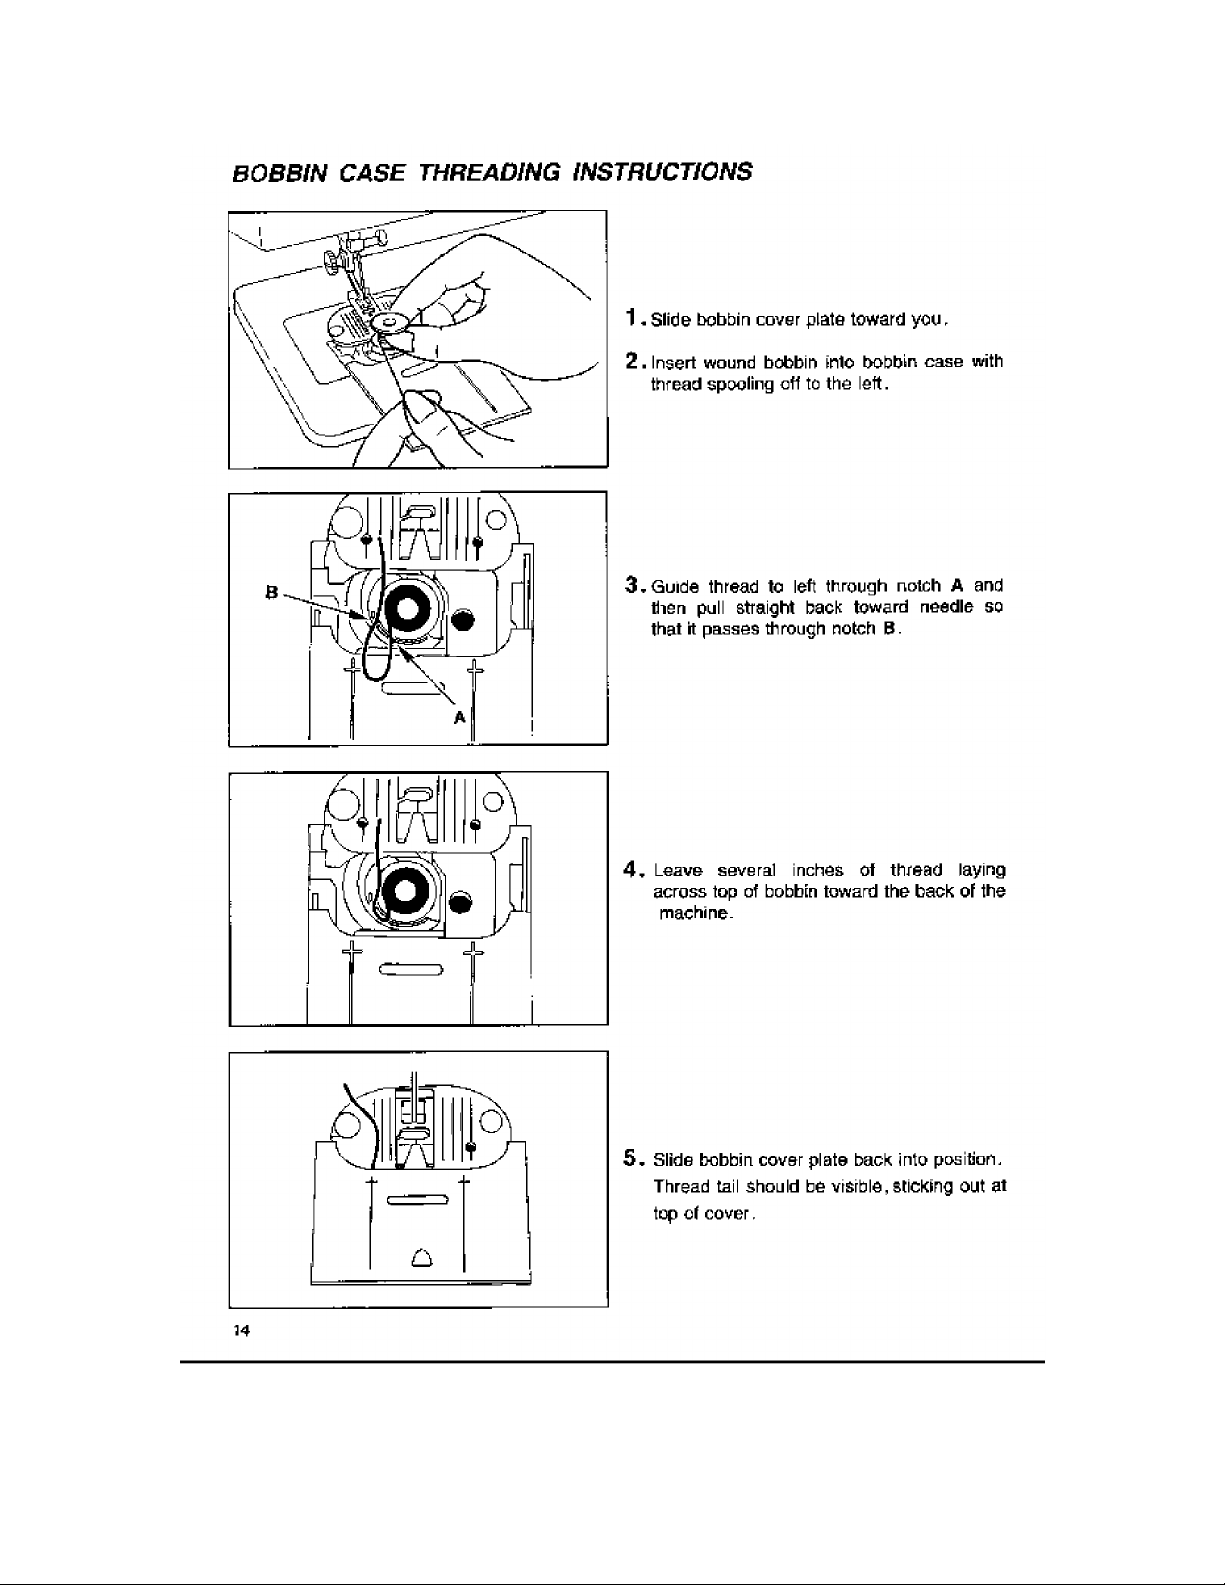
Bobbin Case Threading Instructions.
Selecting a Pattern............................
3. Straight Stitching.................................................................
Preparation..................................................................................
Sewing a Seam...................................................................
Inserting a Zipper................................................................
4. Built-In Stitch Patterns
Preparation
.................
........................................................
........................................................
Built-In Stitch Patterns Capability and Graphics Illustration
Zig-Zag Stitch.........................
Zig-Zag Blindstitch
Multi Stitch Zig-Zag
.................
................
'‘M” Stitch/Sandcastle Stitch..,
■Crescent Stitch/Chinese Dynasty Stitch/Solid Scallop Stitch
Arrow Stitch/Bunting StitctWPrivet Stitch..............................
Wizard Stitch/Random Ric-Rac Stitch
............
......................
.
.
Stretch Overedge Stitch........................................................
Ric-Rac/Straight Stretch Stitch
Road Runner/Fagoting Stitch
.................................................................
Honeycomb Stitch
Slant Overedge Stitch/Seagull Stitch .
5. Four-Step Buttonholing
6- Additional Stitch Functions
Sewing on Buttons
Darning
S^tin Stitch
..........................
.....................
...................
...............
.........
Free Motion Embroidery
Mo nogram ming
Appliques
.......................
7. Caring forVour Machine
............
......................................................................
Removing and Replacing Bobbin Case..................................................40
Removing and Replacing Light Bulb......................................................41
Cleaning the Machine.............................................................................42
Performance Checklist........................................................................... 43
Fabric, Thread and Meedle Table
.........................................................
Optional Accessories........................................................................... 45
Index in alphabetical Order.....................................................................45
.. 9
31
40
44
4
5
6
7
7
8
S
to
10
11
12
14
16
16
16
18
20
21
21
22
23
24
28
20
29
29
30
30
31
32
32
33
35
35
37
38
38
39
39
Page 4

IMPORTANT SAFETY INSTRUCTIONS
When using this machine, basic safety precautions should always be followed
including the foHowing:
Read all instructiorts before using this rn a chine.
DANGER.
To reduce the risk of eiectric shock:
■ The machine shouid never be left unattended when plugged in, Always unplug
the machine fro in the electric outlet immediately after using and before cleaning.
■ Always unplug before changing light bulb. Replace bulb with the same type
rated 15 watts. Be sure to replace the face plate which covers the light blub
before operating the machine.
WARNING.
To reduce the risk of burns, fire, electric shock or injury to persons;
■ Be sure that the electrical voltage of the socket outlet <wall receptacle) Is
the same as the rated voltage of the motor.
■ Use this machine only for its intended use as described in this Operator's
Guide. Use only attachments recommended by the manufacturer as
contained in the Operator’s Guide.
■ To disconnect, turn all controls to the off (“0“) position, then remove plug
from outlet.
■ Disconnect the power-line plug from the socket outlet or switch the machine
off when making any adjustments in the needle area, such as threading
needle, changing needle, changing needle plate or changing presser foot, etc.
■ Always unplug the machine from the electrical outlet when removing
covers, lubricating, or when making any other user servicing adjustments
mentioned in the Operator's Guide.
■ Do not attempt to adjust the motor belt. Contact your nearest Service Center
should any adjustment be required.
■ Do net unplug by pulling on cord. To unplug, grasp the plug, rot the cord
■ Handle the foot controller with care and avoid dropping it on the floor.
Be sure not to place anything on top of it.
■ Always use the proper needle plate. The wrong plate can cause the needle
to break.
■ Do not use bent needles.
■ When sewing, keep fingers away trom all moving parts. Special care is
required around the sewing machine needle.
■ Do not pull or push fabric while stitching. This may deflect the needle causing
if to break.
■ Before removing the bobbin case, remove plug from the socket outlet.
Page 5

■ For double insulated machines, when servicing, use only identical Singer
replacement parts. See SrstrLClrons for Servicing of Doubie-lnsulated
Appliances.
■ Never operate the machine if it has a damaged cord or plug, if it is not
working properly, if it has been dropped or damaged, or dropped into
water Return the machine to the nearest authorized dealer or Service Center
for examination, repair, electrical, or mechanical adjustment.
■ Never operate the machine with any air openings blocked. Keep ventilation
openings of the machine and toot controller free from the accumulation of
lint, dust, and loose cloth.
■ Never drop or insert any object into any opening.
■ Do not use outdoors,
■ Do not operate where aerosol {spray) products are being used or where
oxygen is being administered.
■ Do not allow to be used as a toy Close attention is necessary when the
machine is used by or near children.
■ SERVICING OF DOUBLE-INSULATED PRODUCTS. In a double-insulated
product, two systems of insulation are provided instead of grounding. Mo
grounding means is provided on a double-insulated product, nor should a means
for grounding be added to the product. Servicing of a double-insulated product
requires extreme care and knowledge of the system, and should be done
only by qualified service personnel. Replacement parts for a double-insulated
product must be identical to those parts in the product. A double-insulated
product is marked with the words 'DOUBLE-INSULATION" or “DOUBLE
INSULATED”,
SAVE THESE INSTRUCTIONS
Servicing should be performed by an authorized service representative.
This product is intended for household use.
FOR EUROPEAN AND SIMILAR TERRITORIES:
This product is suppressed for radio and tctevision interference with the
fnternationaf Etectrotechnicai Commission requirernents of the CiSFR.
Machines for Great Britain and some other countries having similar wiring
Standards are shipped from the factory with a plug for connection to the
mains. The wires in this mains lead are coloured in accordance with the
following code:
Blue: neutral (IM) Brown: live (L)
As the coiours of the wires in the mains lead of this appliance may not
correspond with the coloured markings identifying the terminals in your plug,
proceed as follows:
The wire which is coloured blue must be connected to the terminal which is
marked with the letter N or coloured black. The wire which is coloured brown
must be connected to the terminal which is marked with the letter L or coloured
red. If a 13 Amp. (BS 1363) plug is used, a 3 Amp. fuse must be fitted, or if
any other type of plug is used, a 5 Amp. fuse must be fitted either in the plug
or adaptor or at the distribution board. Neither cord is to be connected to the
earth terminal of a three-pin plug.
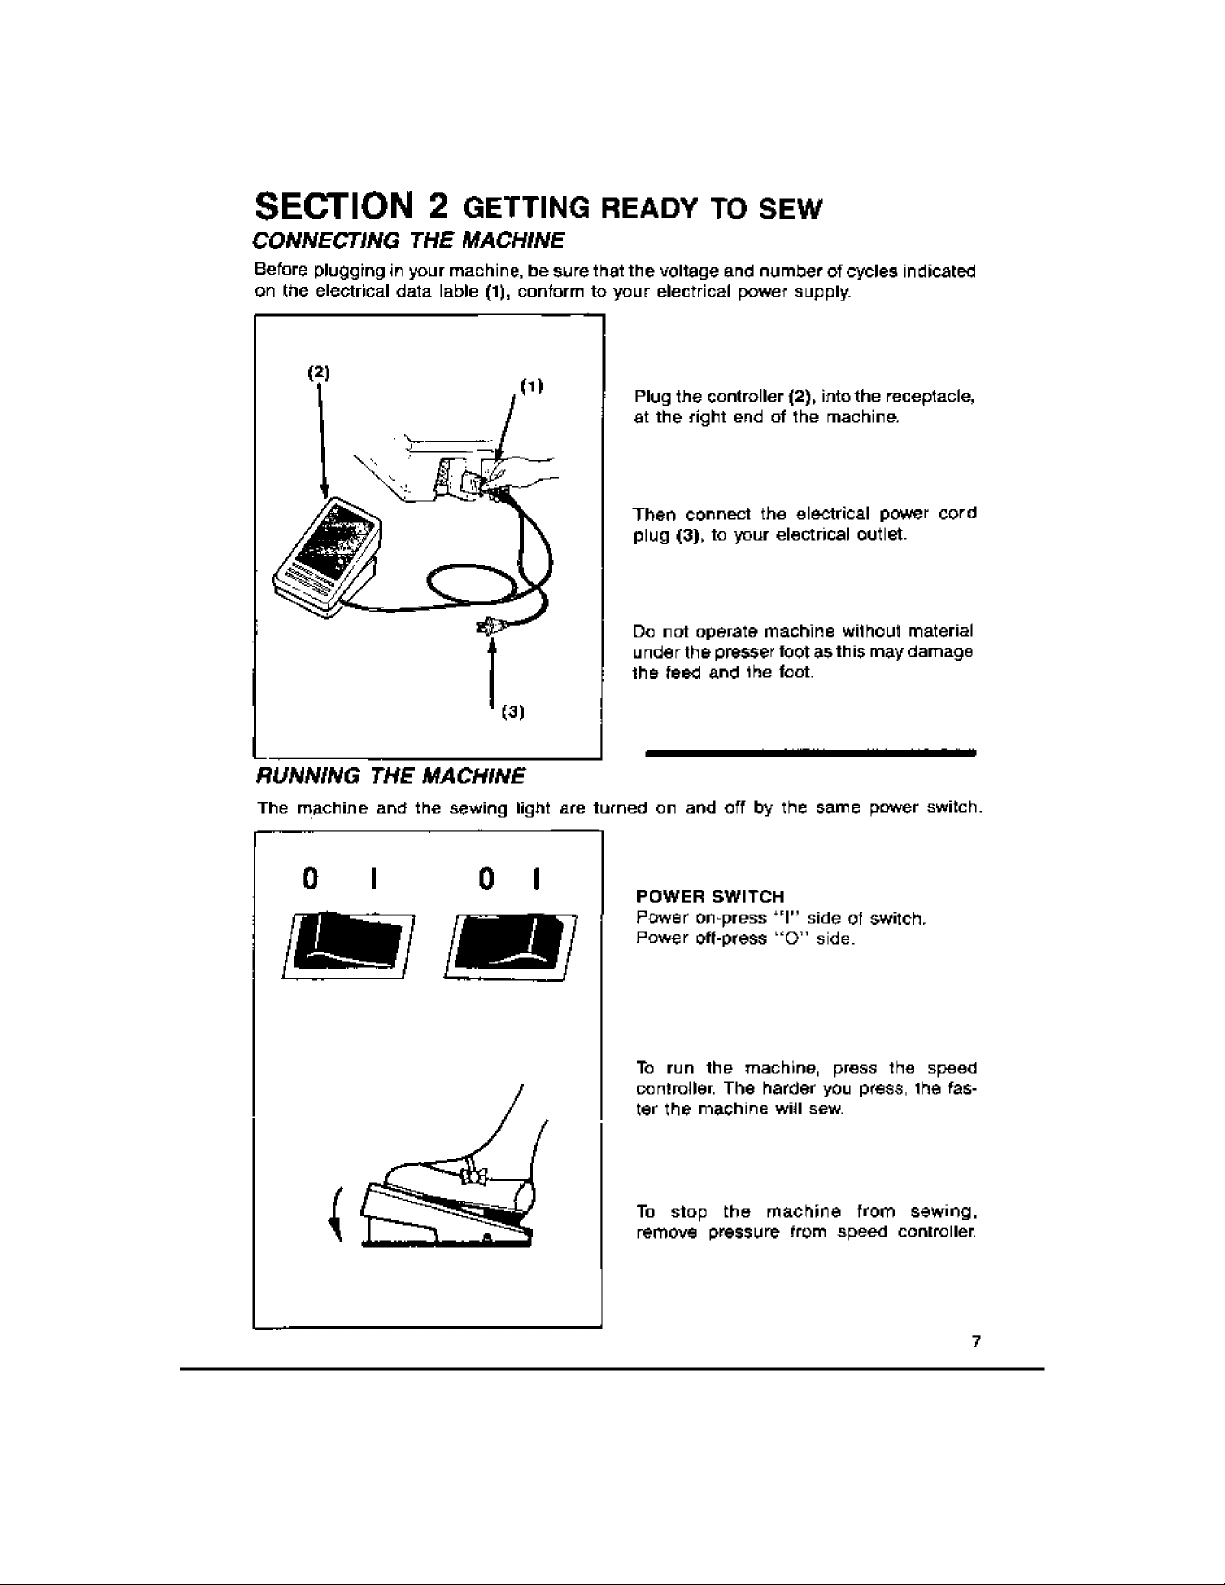
Page 6
Page 7

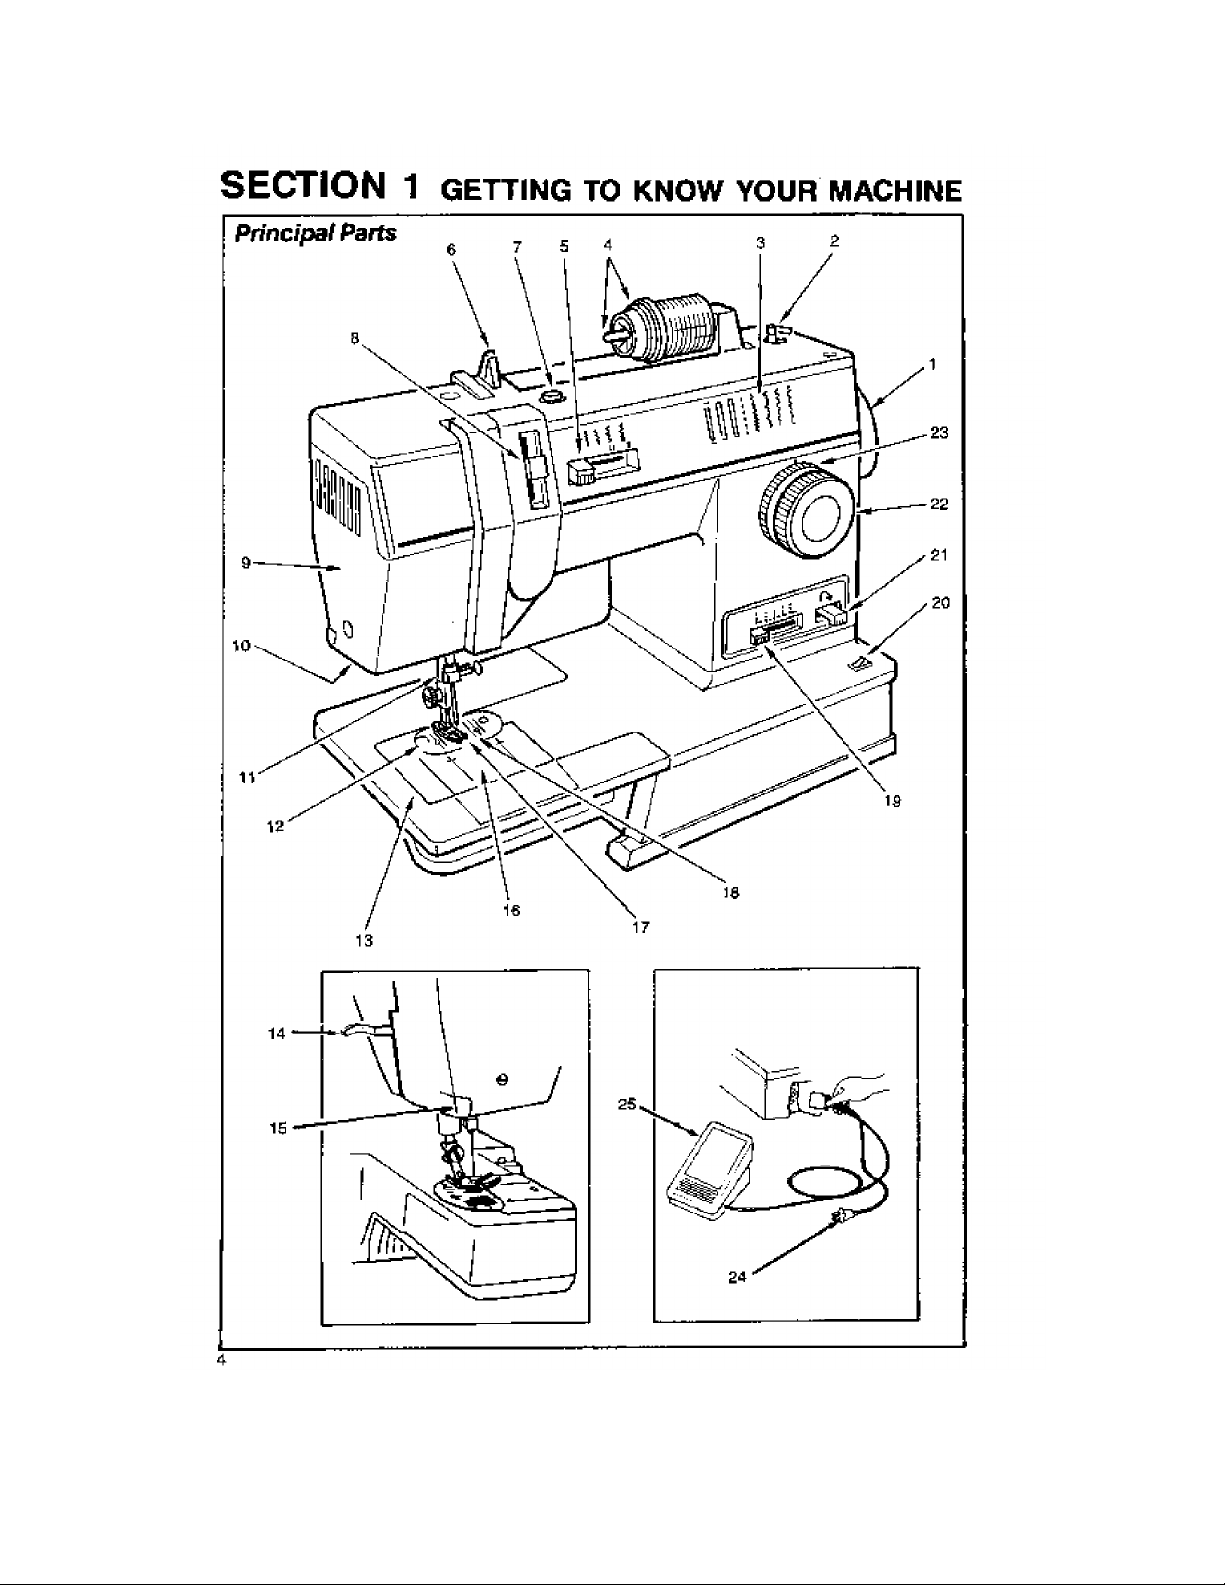
Principal Parts
1. Hand Wheel provides a means for
raising or lowering the needle.
2. Bobbin Winder lets yeu fill the bobbin
with thread quickly and easily.
3. Pattern Display Panel shows a vari
ety of patterns available for your
sewing needs.
4. Spool Pin and Cap hold the top
thread supply and allow it to unwind
smoothly as the spool does not turn.
5. StHich Width Lever controls the width
of patterns and sets the needle for
straight stitching.
14. Presser Foot Lifter, at the back of
machine, lets you raise and lower
presser foot.
15. Thread Cutter
18. Slide Plate opens for easy removal
and replacement of bobbin.
17. Feed System moves fabric under
presser foot,
18. Piessef Fdoi holds fabric against the
teed system and snaps on and off.
19. Stitch Length Lever allows for a
variety of stitch lengths.
a. Snap-In Thread Guide helps to insure 20. Power and Light Switch turns on
a smooth flow of thread from the the machine and sewing light at the
spool to the tension. same time.
7. Bobbin Winder Tension Disc pro
vides thread tension for bobbin
winding.
a: Auto Needle Thread Tension Lever
controls top thread tension,
9. Face Plate is a removable cover
protecting movable parts and sewing
light.
10. Sewing Light illuminates sewing
area.
11. Needle Clamp holds needle in
machine and prevents incorrect
insertion.
12. Needle Plate supports the fabric
during sewing.
21. Reverse Lever provides either
momentary or continuous reverse
fabric movement.
22. Pattern Selector Dial turns directly
to any of the patterns, plus button
hole. shown on the pattern display
panel.
23. Stitch Balance Ring adjusts appear
ance of Special Stitch patterns and
buttonholes.
24. Electrical Power Cord connects
machine to your electrical outlet.
25. Speed Controller regulates the sewing
machine speed.
13. Removable Extension Table lets you
change the machine bed from flat to
free arm.
Page 8
Page 9
Page 10
Page 11
Page 12
Page 13
Page 14
Page 15
Page 16
Page 17

Page 18

Page 19

Page 20

Page 21

Page 22

Page 23

Page 24

Page 25

Page 26

Page 27

Page 28

Page 29

Page 30

Page 31

Page 32

Page 33

Page 34

Page 35

Page 36

Page 37

Page 38

Page 39

Page 40

Page 41

Page 42

Page 43

Page 44

Page 45

Page 46

FabriCj Thread and Needie Tabie
* The needle and thread used tor e sewing project depends upon the fabric that is chosen.
* The table below is a practical guide to needie and thread selections for most situ at ion s.
* Refer to it before starting to sew. Be sure to use the same size and type Of thread in
both needle and bobbin. For best results, use only genuine Singer needles.
Needles
Fabric
Thread
Type Size
Delicale-hjile, cfiitton. tine lace, or^nis
üghtweigtit - batiste, organdy, jersey, woite,
taKeia. crepe, chiffon velvet, plastic film
Uediiim Weight - gingham, paresia, pipes,
linen, chintz, faille, satin, fine corduroy,
veivel, suitirrgs, knits, deep-pile fabrics,
vinyl
Medium Heavy - gabardine, Meed, sailcloth,
denim, coatings, drapery, vinyl, deep -pile
fabrics
Heavy - overcoatings, dungaree, upholstery
fabrics, canvas
Ali Weights ■ deconalive topstilEhing Butlorthole twist" Style 2020
Synthetic Knits and Stretch Fabrics -
potyester doublekril, nylon tricot, jersey,
eira, panne velvet, bonded fabrics, raschei
Fine mancerijad cotton
line synthetic thread
50 metcanEod cotton-silk
fine synthetic thread
50 mercoriBad cotion-
eo cotton
synthetic til read
Heavy-duty mercerized cotton
40 to 60 coltor-S yrtthetic thread
Heavy-duty mercerized cotton
24 to 40 cotlon-Synthetic thread
Synthetic thread-
50 marcertzed cotton
Silk
Style 2020
Style 2020
Style 2020
Style 2020 16/100
Style 2020 18/100
Style 2045
Ball Point
9/70
1V0O
14r90
167100
107100
14/90
i«ather-suede, kidskin linad laattiars
_______________________________________________________1
Use (With standard sewir>g thread in bobbin.
44
50 mercerised cotton
Synthetic th:read'Silk
_______________________________________
Style 20(32
11/SO
14/90
167100
Page 47

Page 48

INDEX
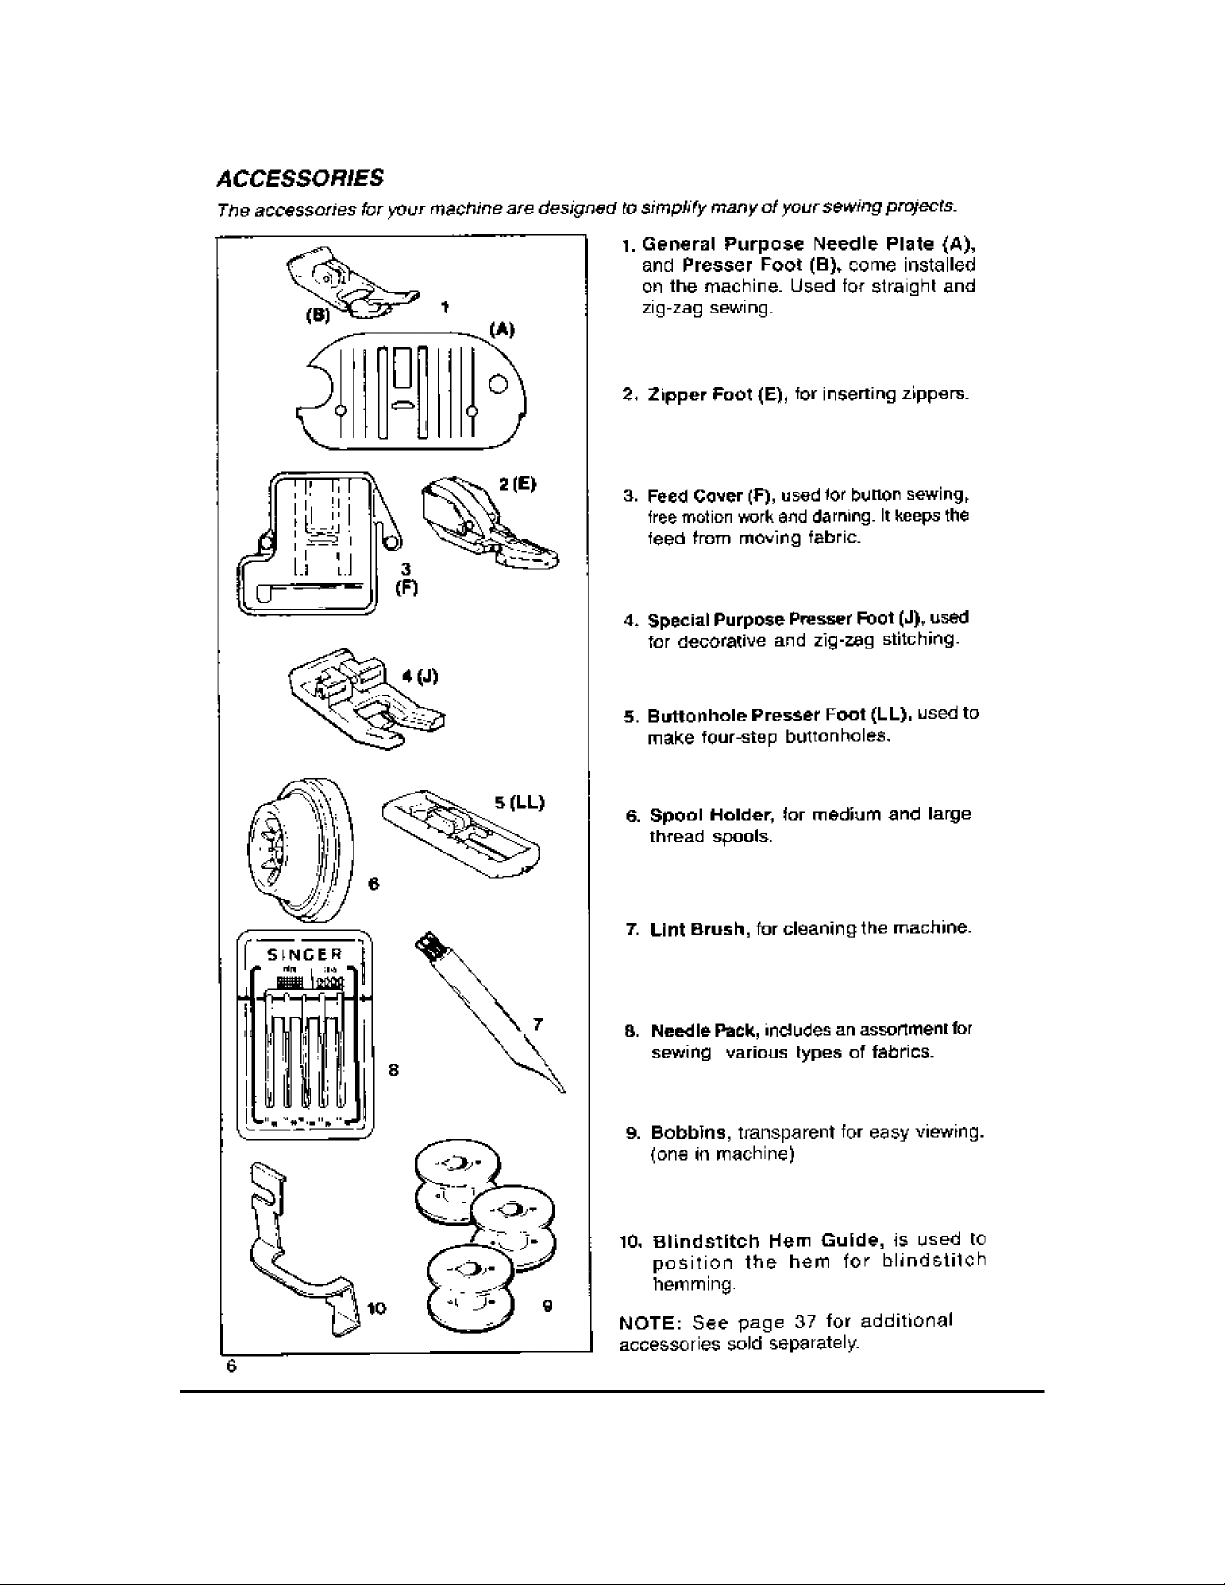
Accessories
AppSiqje
Balance.............................................21,34
Basting
Blindstitch Hems
Blindstitch Presser Foot
Bobbin
Winding A..............................
Bobbin Case
Threading
Removing..............................
Cieaning.......................................42
Border Design.................................. 29
Button, Sewing on
Button Sewing Foot.....................35,46
Buttonhole Attachment
Buttonholing, 4-step.........................33
Caring for Your Machine
Cleaning the Machine.......................42
Connecting the Machine
Corners. Turning Square
Darning ........................................... 37
Darning and Embroidery Foot
Edging
Embroidery, Free Motion
Fabrics
Placing Under Foot
Fagoting
Feed Cover
Attaching Feed Cover.................10
Free-Arm Sewing
Hemstitching................................24,30
Lace Trim ..........................................28
Light Bulb
Replacing....................................41
Lint Brush.......................................6,42
IMonogramming................................39
Needles................................................6
Selecting......................................44
Changing
Needle Plate
Changing
Straight Stitch Needle Plate.— 16,46
Needle Threader
Operating the Machine
Pattern Selecting
Performance Checklist.................... 43
Personal Notes
Presser Feet........................................6
Changing
...................................
............................................
..............................................
........................................
................................
.............
.................................
25,46
....................................11
.............................40
...............................
...............................14
..............................
.............................40
............................
................
........
40,41,42
....................
.................
....
...............................................
..............................................
.....................-......................
........................................
................................
.........................................
........
........................................
.....................................
...............................
......
.................................
............................
................
.....................
..............................
.......................
......................
9,10,37
6,46
-, 30
18
24
35
6,33
19
37,46
32
3S
44
IB
29
35
41
40
46
16
47
General Purpose.............................6
Special Purpose..............................6
Straight Stitch..............................6,i6
Presser Foot Lifter
Presser Foot With Shank....................10
Principal Parts
Reverse Stitching
6
Satin Stitching.....................................38
Seams:
Curved
..........................................
Finishes
Keeping Straight
Overedge Seam
Sewing a Seam.............................18
Seam Guide...................................20,46
Smocking............................................32
Special Stitches
Spool Caps
Stitch Patterns;
7
8
8
6
7
Arrow Stitch
Blind Stitch................................... 24
Bunting Stitch
Chinese Dynasty Stitch
Crescent Stitch
Fagoting Stitch
Honeycomb Stitch
"M" Stitch...................................
Multi-Stitch Zig-Zag
Privet Stitch...............................
Random Ric-Rao Stitch
Ric-Fac/Straighl Stretch Stitch
Road Runner Stitch.......................31
SandCastle Stitch
Seagull Stitch
Slant Overedge Stitch
Solid Scallop Stitch
Straight Stitch
Stretch Overedge Stitch................30
Wizard Stitch.................................30
Zig-Zag Stitch
Stitch Length
Stitch Width....................................... 17
Tears, Mending
Tension
Thread
Thread the Machine............................12
Tops! itching.......................................31
Zipper Foot
Zipper, Insert A
........................................
...............................................
..............................
...................................
..............................
...................................
...........................
.......................
.................................
.................................
..................................
........................
.............
..........................
......................
.....................
...................
............
........................
...............................
..................
.......................
...............................
...............................
................................
...............................
......................................
...................................
18
4,5
16
19
23,30
19
27,30
21
6,11,12
29
.
.
.
2S
32
32
29
16
23
17,21
23
17,21
44
6,20
20
29
29
29
31
32
28
28
29
30
31
46
Page 49

Page 50

Page 51

 Loading...