

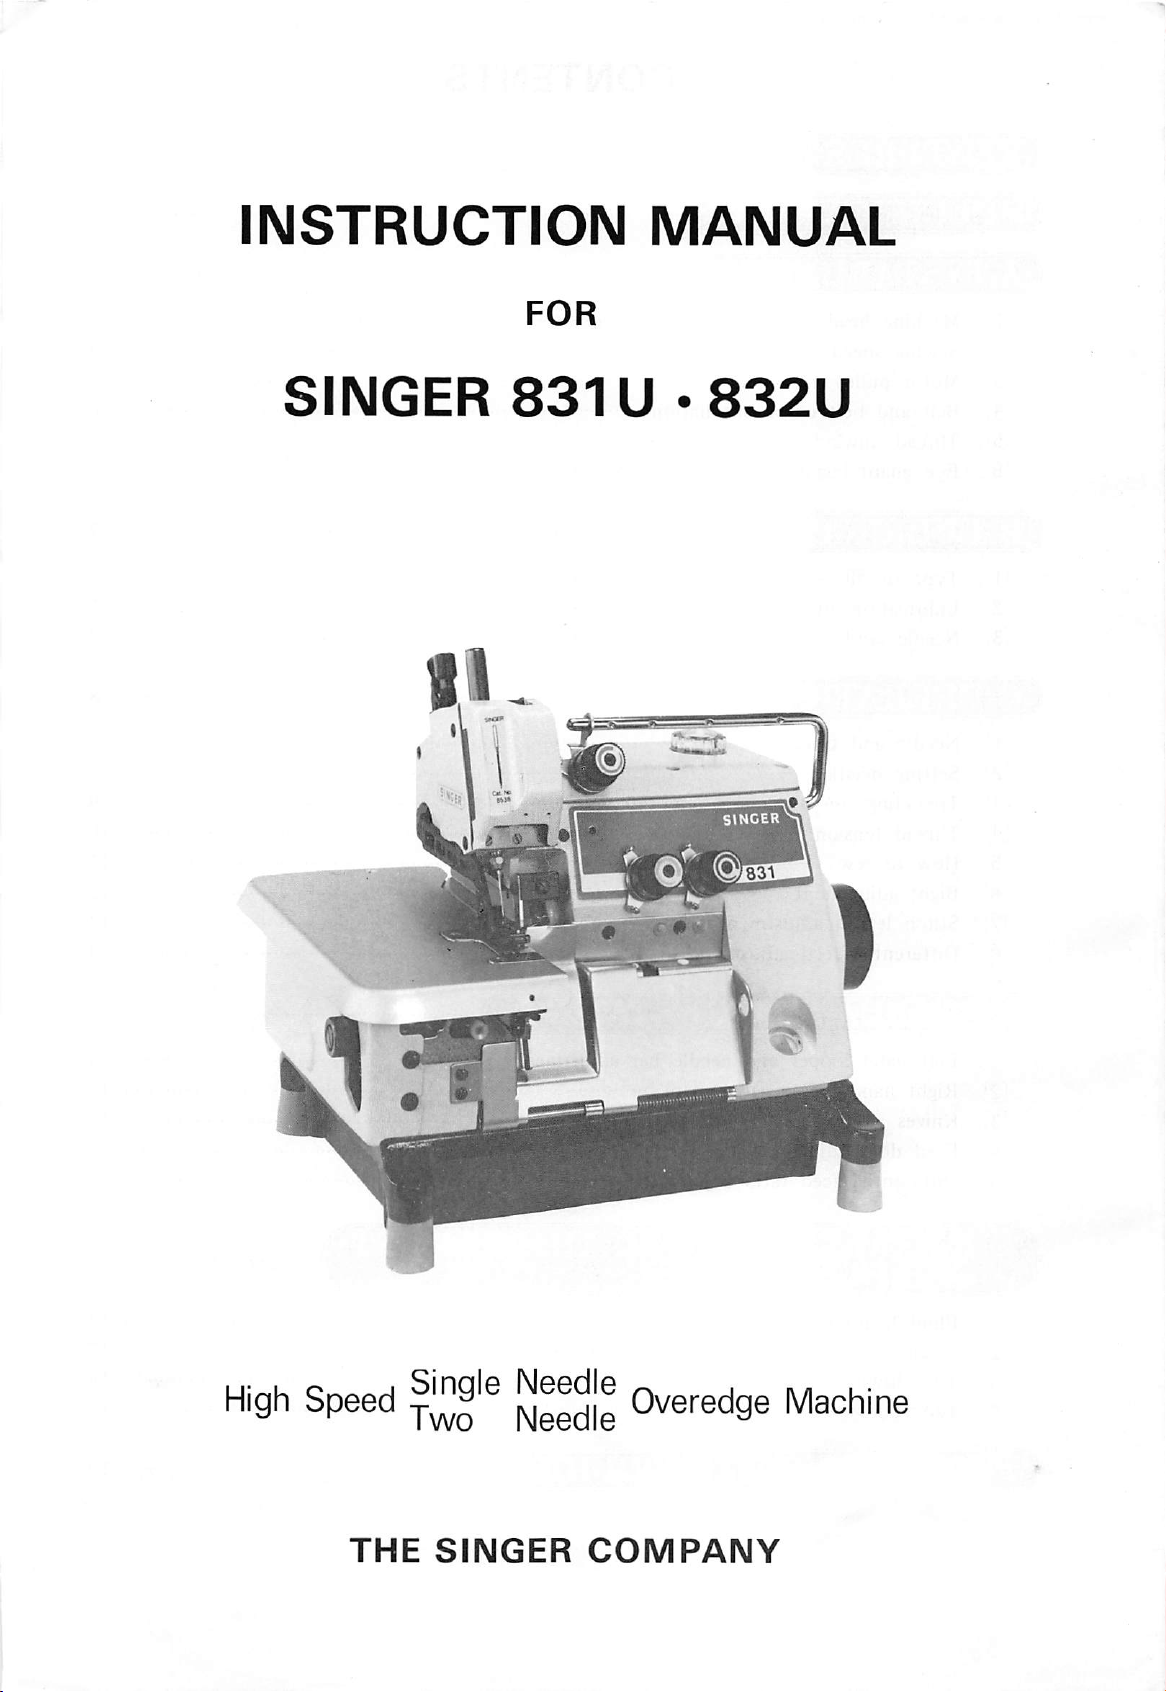
Singer 831U, 832U Instruction Manual
INSTRUCTION
FOR
MANUAL
SINGER
fl
831U
•
832U
High
Speed
THE
f^gg^jg
SINGER
Overedge
COMPANY
Machine
LA.
INSTALLATION]
CONTENTS
Machine
Sewing
Motor
Belt
Thread
Eye
speed
pulley
and
unwinder
guard
head
installation
and
belt
cover
installation
belt
installation
installation
tB.LUBRICATIONl
m.
Type
[2]. Lubrication and oil change
[31. Needle
rC.OPERATIONl
Needle
Setting
Threading
of
cooler
and
needle
Thread
How
Bight
Stitch
Differential
tension
to
adjustment
length
oil
sew
thread
adjustment
feed
adjustment
•••
9
10
12
12
13
13
Left
hand
Right
Knives
Feed
Differential
hand
adjustment
dogs
looper
adjustment
feed
looper
and
adjustment
ratio
E.INSTALLATION
OF
ATTACHMENTS
[T]. Blind hemming guide
[2]. Serging
[3]. Turn-down hemming
[4]. Taping
needle
adjustment
bar
AND
adjustment
ADJUSTMENT!
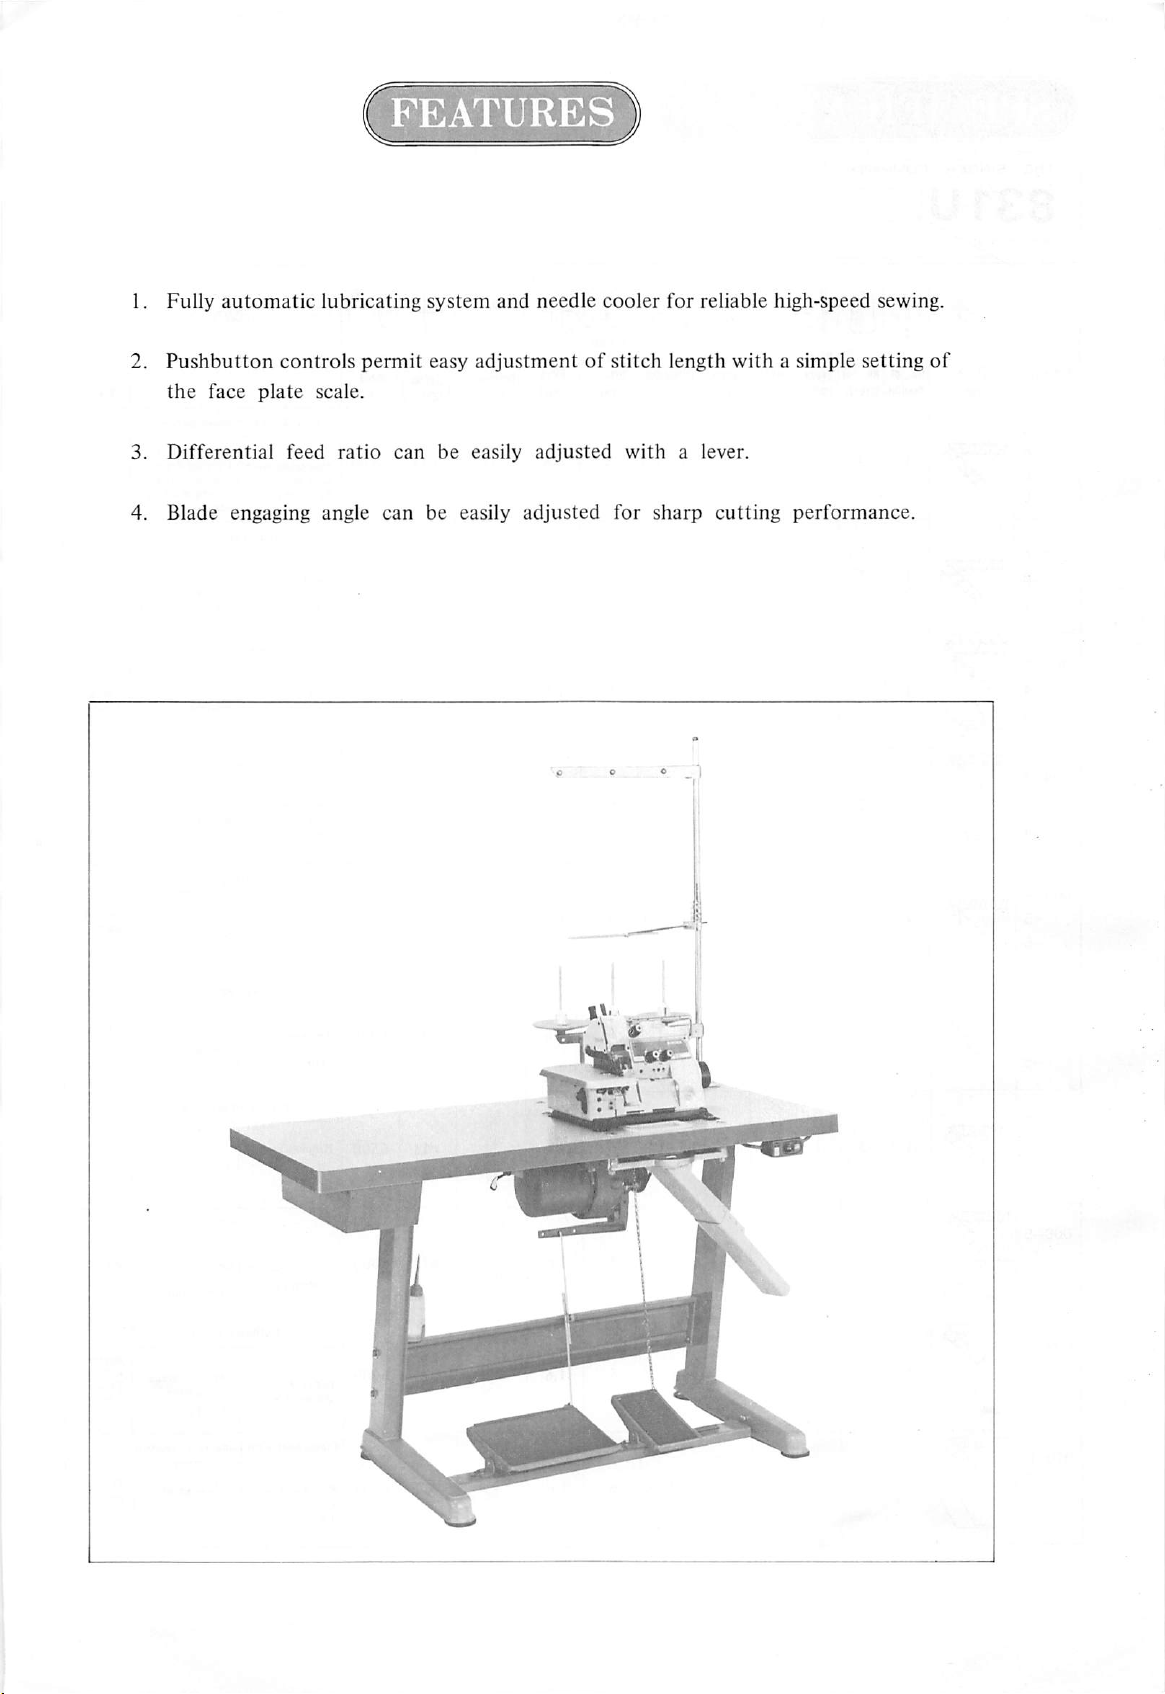
1.
Fully
2.
Pushbutton
the
automatic
face
plate
lubricating
controls
scale.
permit
system
easy
and
needle
adjustmentofstitch
cooler
for
reliable high-speed sewing.
length
with
a simple
setting
of
Differential
3.
4. Blade engaging angle can be easily
feed
ratio
can
be
easily
adjusted
adjusted
for
with
a lever.
sharp
cutting
performance.
SPECIFICATIONS
THE
SINGER
COMPANY
831
Sub class Stitch No. of No. of
No.
001-3
-4
5
6
type
Ua
Needles
threads
m
r\
^
r-'/y
OO
U..
stitch fool §
B'Eht
length
(mm] (mm)
Oiffereirtia!
ratio
' I
3.6
0.6~1.8
3.6
0.6-1.8
•==p'
:iz!=
n S
lift
(mm) (mm)
ir
Pitch
Feed
dog
(Main)
(Differential)
Type
a
Use
Light &
Knit
under
Knit
shirts
Sportswear
Sweaters
Cardigans
Bulky
sweaters
Knit
underwear
Knit
shirts
T-shirts
medium-heavy
wear
Bulky
Blind-hemming
Blind-hemming
materials
Setting
sleeves
Forming
sleeves
Joining
body
Joining
inner
i
edges
knitwear
Setting
sleeves
Forming sleeves
Joining btxly parts
Blind-hemming
r
Blind-hemming
parts
leg
Blind
hemining
005-4
Serging
-5
-6
3.6
0.6-1.8
6
0.6-1.8
#11
6500
Trousers
Skirts
Trousers
Skirts
Turn-down hemming
Handketchiefs
Scarves
Ladles'
4
children-swear
Ladies'
4 |
children's
Taping
light 4
Serging
Ruffling
wear
medium-heavy
' Serging
Serging
Setting
Setimg
Setting frills
(Piping)
Setting
Setting
,
Setting
sleeves
cuffs
sleeves
cuffs
frills
materials
Knit
Knit
T-shirts
underwear
shirts
Joining
parts
shoulder
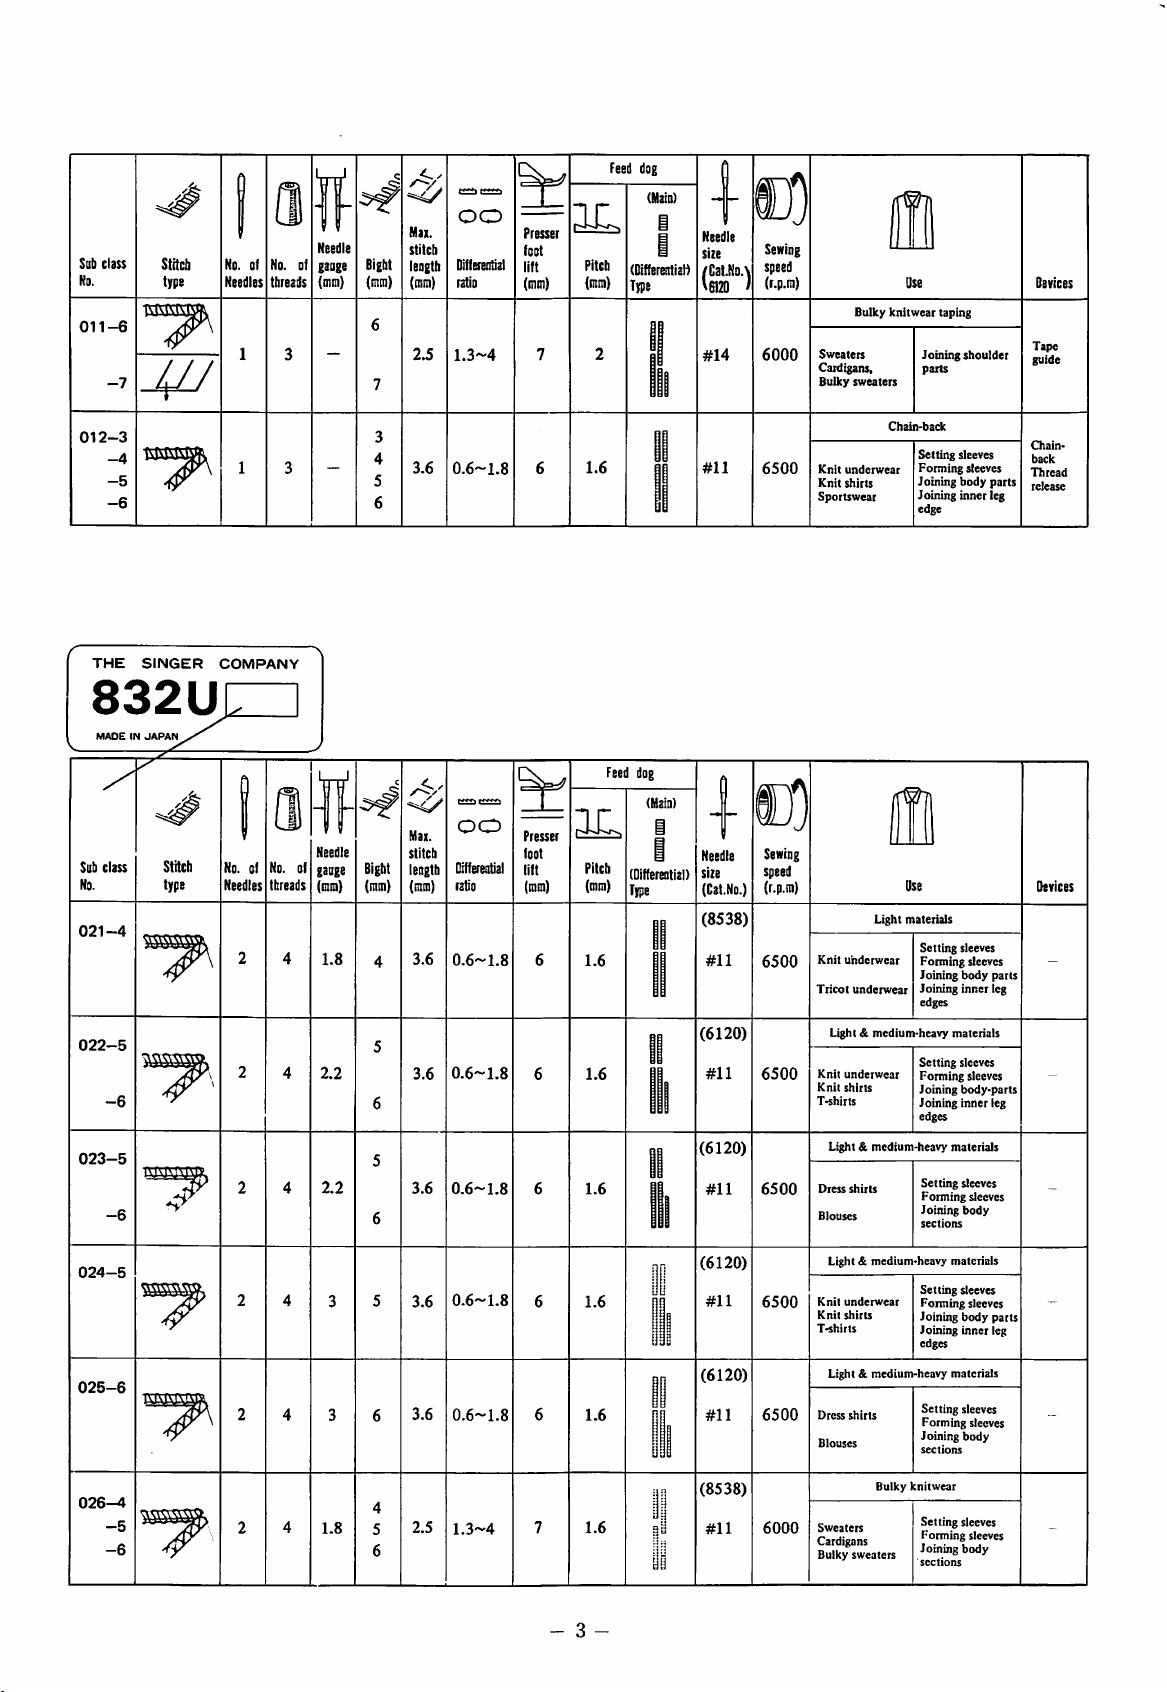
Sab
Ka.
011-6
class
-7
Stitcb
type
4Z/
No. of
Needles
No. of
threads
Needle
gauge
(mm)
Bight
(tnui)
Max.
stitcb
length
(aim)
2.5
OO
Diflereotial
ratio
1.3-4
Presser
foot
lift
(mm)
Pitch
(mm)
Feed
(Differential)
Type
dog
(Main)
Needle
size
/GatJlo.X
\G120
#14
I
Sewing
speed
(r.p.ra)
6000
Bulky
Sweaters
Cardigans,
Bulky
sweaters
Use
knitwear
taping
Joining
parts
shoulder
Devices
Tape
guide
012-3
-4
-5
-6
THE
MADEINJAPAN
Suh class
No.
021-4
022-5
-6
SINGER
Stitcb
type
COIirtPANY
No. of
No. of
threads
Needles
Needle
gauge
(mm)
1.8
2.2
Bight
(mm)
3.6
.A.
Max.
stitch
length
(mm)
3.6
3.6
0.6-1.8
OO
Differential
ratio
0.6-1.8
0.6-1.8
Presser
foot
lift
(mm)
1.6
IL
Pitch
(mm)
1.6
1.6
Feed
(Differential)
Type
dog
(Main)
#11
Needle
size
(Cat.No.)
(8538)
#11
(6120)
#11
6500
tn
Sewing
speed
(r.p.ra)
6500
6500
Chain-back
Setting sleeves
Knit
underwear
Knit
shirts
Sportswear
Knit
uhdctwear
Tricot
underwear
Light & medium-heavy materials
Knit
underwear
Knit
shirts
T-shirts
Forming sleeves
Joining body parts
Joining inner leg
edge
Light materials
Setting sleeves
Forming sleeves
Joining
Joining
edges
Setting sleeves
Forming
Joining
Joining
body
parts
inner
teg
sleeves
body-parts
inner
leg
Chainback
Thread
release
Devices
023-5
024-5
025-6
026-4
(6120)
2.2
-6
3.6
0.6-1.8
1.6
#11
6500
(6120)
3.6
0.6-1.8
1.6
#11
6500
lids
(6120)
3.6
0.6-1.8
1.6
#11
6500
(8538)
-5
-6
1.8
2.5
1.3-4
1.6
#11
6000
Light & medium-heavy materials
Dress
Blouses
Light & medium-heavy materials
Knit
Knit
T-shirts
Light &
Dress
Blouses
Sweaters
Cardigans
Bulky
- 3 -
shirts
underwear
shirts
medium-heavy
shirts
Bulky
sweaters
Setting sleeves
Forming sleeves
body
Joining
Setting
sleeves
Forming
sleeves
Joining
body
Joining inner leg
edges
materials
Setting sleeves
Forming sleeves
body
Joining
knitwear
Setting sleeves
Forming
Joining
body
sections
parts
sleeves
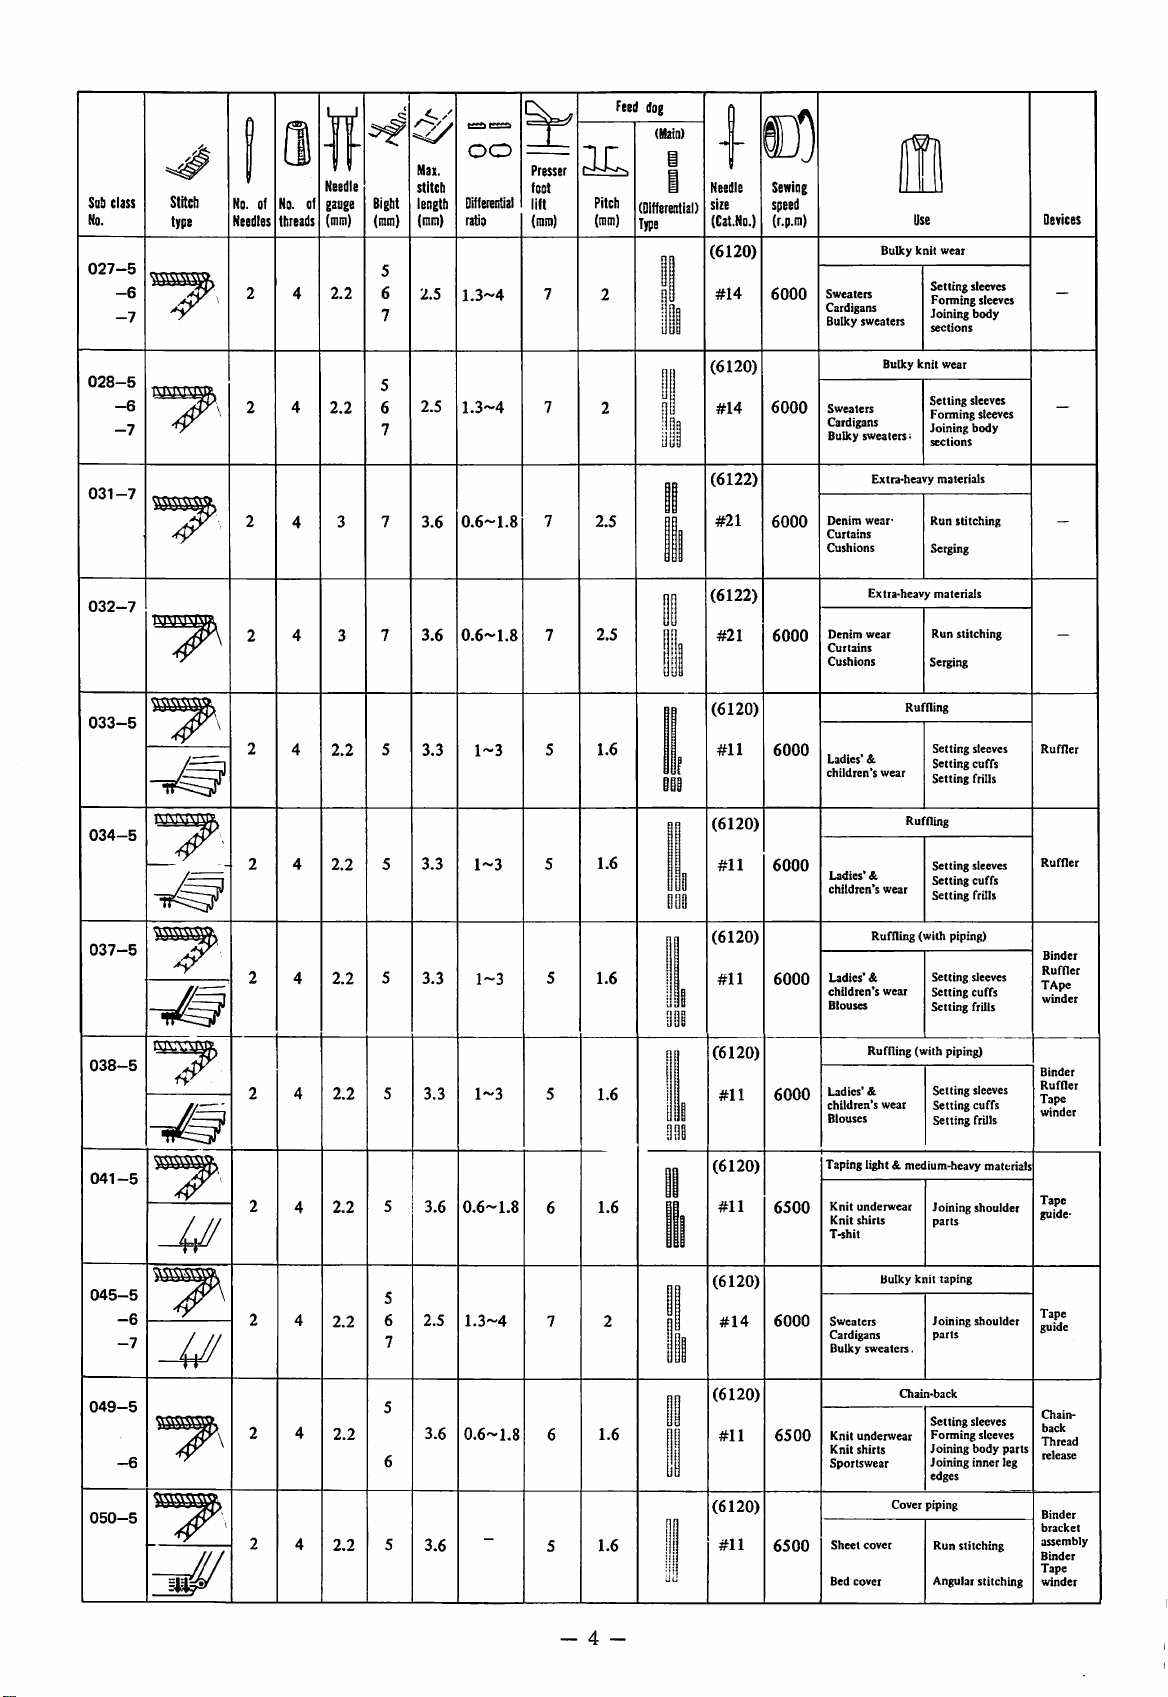
Sob class
No.
027-5
-6
-7
028-5
-6
-7
Stitch
type
No. of
Needles
Ho. of
threads
Needle
gauge
(nun)
2.2
2.2
Bight
(mm)
Max.
stitch
length
(mm)
2.5
2.5
CO
Differential
ratio
1.3-4
1.3-4
Presser
foot
lift
(mm)
Pitch
(mm)
Feed
(Differential)
Type
dog
(Main)
tiuii
Needle
size
(G3t.No.)
(6120)
#14
(6120)
#14
Sewing
speed
(r.p.ra)
6000
6000
Sweaters
Cardigans
sweaters
Bulky
Sweaters
Cardigans
Bulky
BuUcy
Bulky
sweaters
Use
knit
wear
Setting
Forming sleeves
Joining
sections
knit
wear
Setting
Forming
Joining
•
sections
sleeves
body
sleeves
sleeves
body
Devices
031-7
032-7
033-5
034-5
037-5
038-5
2.2
2.2
2.2
2.2
3.6
3.6
3.3
3.3
3.3
3.3
0.6-1.8
0.6-1.8
1-3
1-3
1-3
1-3
2.5
2.5
1.6
1.6
1.6
1.6
(6122)
#21
(6122)
#21
(6120)
#11
(6120)
#11
(6120)
#11
(6120)
#11
6000
6000
6000
6000
6000
6000
Extra-heavy
Denim
wear-
Curtains
Cushions
Extra-heavy materials
Denim
wear
Curtains
Cushions
Ladies'
&
children's
wear
Ladies'
&
children's
Ruffling
Ladies'
&
children's
Blouses
Ruffling (with piping)
Ladies'
&
children's
wear
Blouses
wear
wear
Run
Serging
Run
Serging
Ruffling
Setting
Setting
Setting
Ruffling
Setting
Setting
Setting
(with
Setting
Setting
Setting
Setting
Setting cuffs
Setting frills
materials
stitching
stitching
piping)
sleeves
cuffs
frills
sleeves
cuffs
frills
sleeves
cuffs
frills
sleeves
Ruffler
Binder
Ruffler
TApe
winder
Binder
Ruffler
Tape
winder
041-5
045-5
049-5
050-5
(6120)
2.2
3.6
0.6-1.8
1.6
#11
(6120)
-6
-7
2.2
2.5
1.3-4
#14
(6120)
2.2
-6
3.6
0.6-1.8
1.6
#11
(6120)
2.2
3.6
1.6
#11
Taping light & medium-heavy materials
Knit
6500
Knit
T-shit
Sweaters
6000
Cardigans
Bulky
Knit
6500
Knit
Sportswear
Sheet
6500
Bed
_ 4 _
underwear
shirts
sweaters.
underwear
shirts
cover
cover
Bulky
Cover
Joining shoulder
parts
knit
taping
Joining
parts
Setting
Forming
Joining
Joining inner leg
edges
piping
Run
stitching
Angular stitching
shoulder
sleeves
sleeves
body
parts
Tape
guide-
Tape
guide
Chain-
back
Thread
release
Binder
bracket
assembly
Binder
Tape
winder
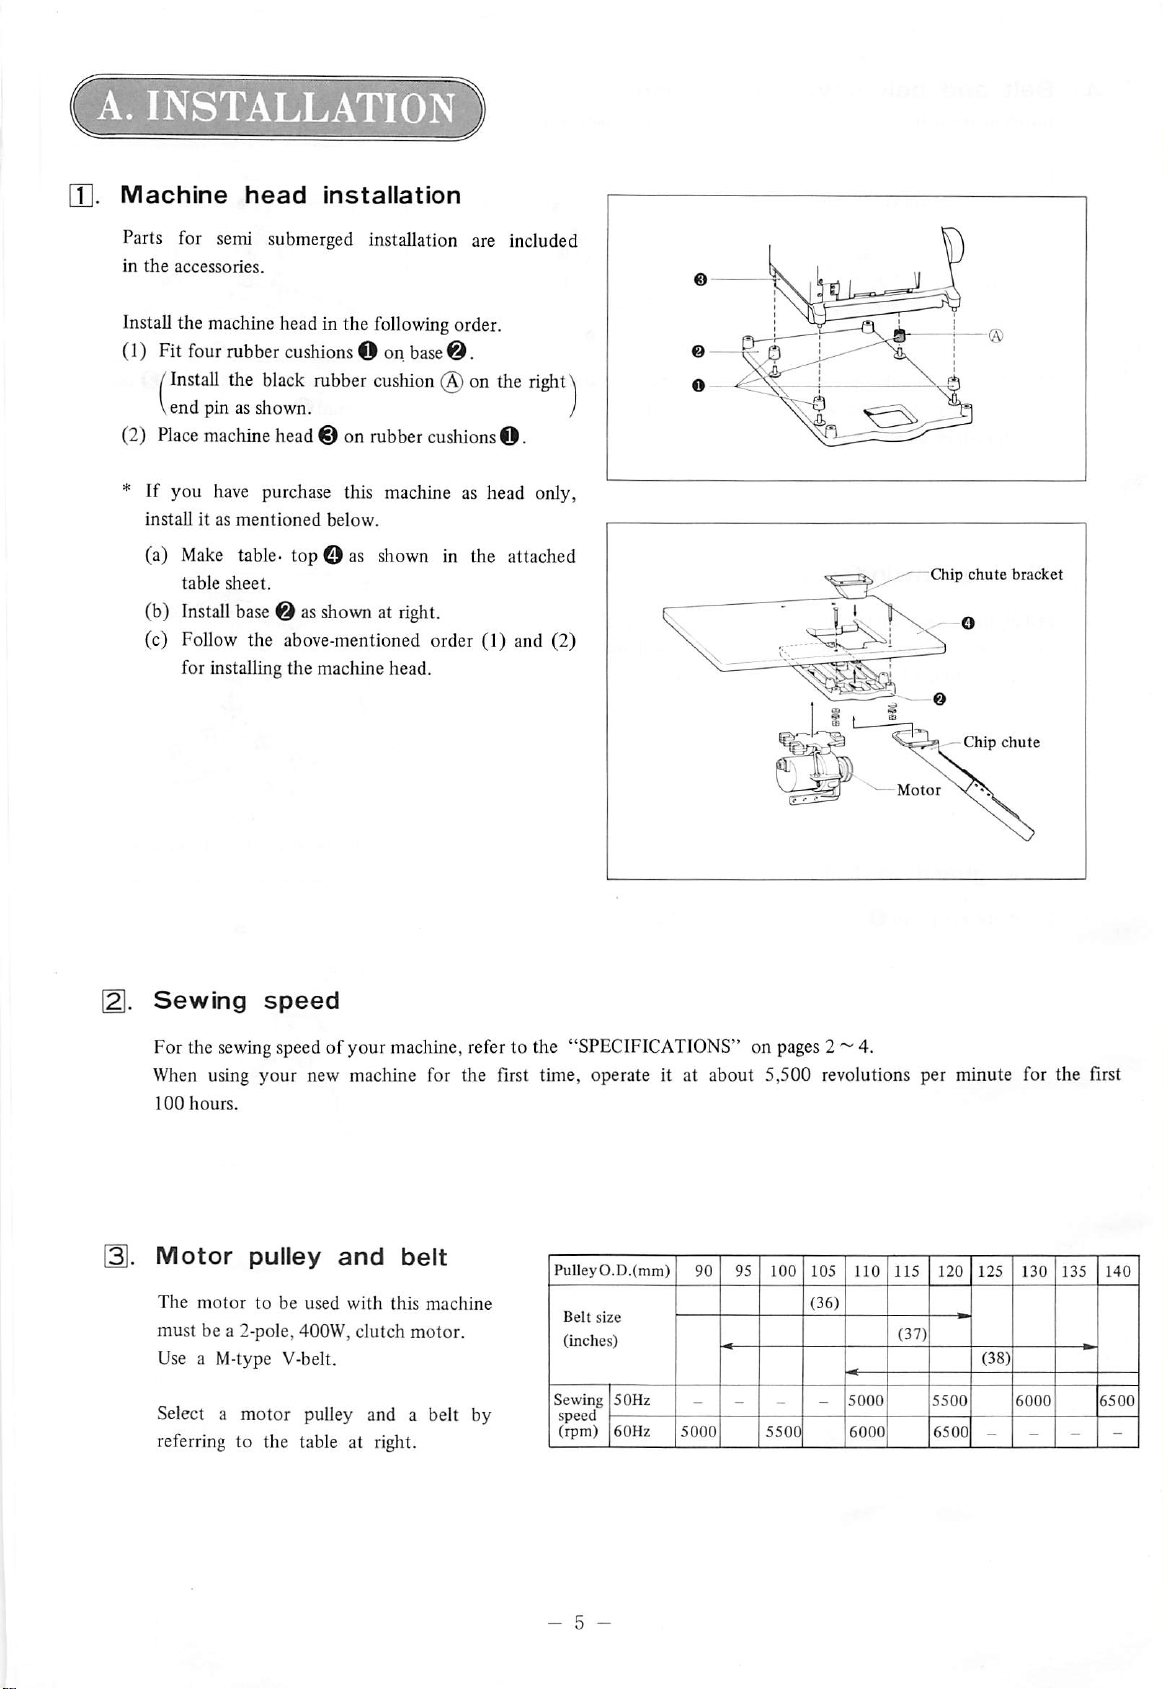
A.
INSTALLATION
[T].
Machine
head
installation
Parts for semi submerged installation are included
in
the
accessories.
Installthe
(1) Fit four rubbercushions© oil
machine
/Install the
headin the
black
rubber
following
base®.
cushion
order.
@ on the right\
Vendpin as shown. /
(2) Placemachine head ® on rubbercushionso
* If you have purchase this machine as head only,
installitas
(a)
(b)
Make
table
Install
mentioned
table, top
sheet.
base
® as
below.
©as
shown
shownatright.
in the attached
(c) Follow the above-mentioned order (1) and (2)
for installing the machine head.
Motor
Chip
Chip
x'X
chute
bracket
chute
Sewing
For the sewing speedofyour
speed
machine, refer to the "SPECIFICATIONS" on pages 2 ~ 4.
When using your new machine for the first time, operate it at about 5,500 revolutions per minute for the first
100
hours.
Motor
The
must be a 2-poIe, 400W, clutch
Use a M-type V-belt.
Select a motor pulley and a belt by
referring to the table at right.
motor
pulley
tobeused
and
with
belt
this
machine
motor.
PuUeyO.D.(mm)
Belt
size
(inches)
Sewing
50Hz
speed
(rpm)
60Hz
90
95 ICQ
I ^ I
5000
105
5000
6000
120
5500
6500
125
- 5 -
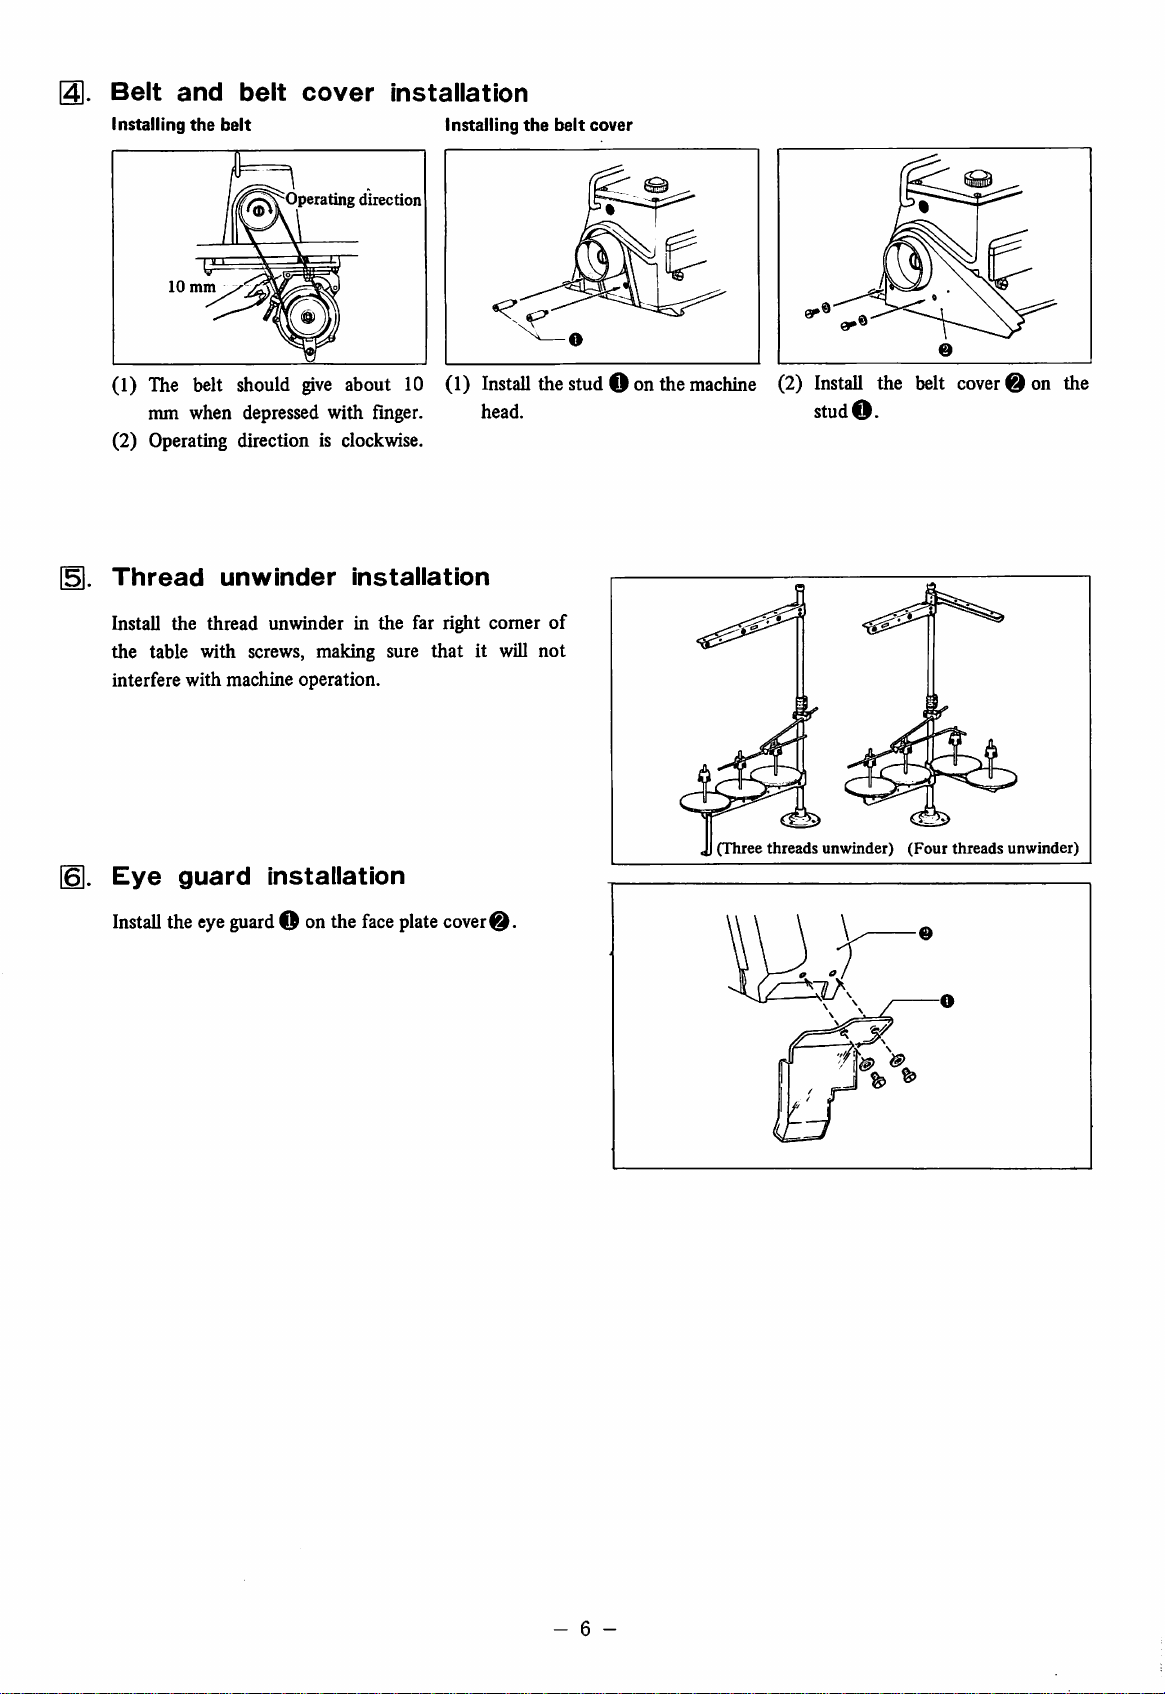
Belt
Installing
and
the
belt
belt
cover
installation
Installing
the
belt
cover
/^^^Operating
10
mm
(1)
The
belt
should
mm when depressed with finger.
(2) Operating direction is clockwise.
Thread
Install the thread unwinder in the far right
the table with screws, making sure
interfere with machine operation.
unwinder
give
direction
about
10 (1)
installation
that
Install
head.
comer
it will
thestudO onthe
of
not
machine
(2)
Install
studO.
the
belt
cover
@ on the
6].
Eye
Install
guard
theeye
installation
guard
O onthe
face
plate
cover
(Three
threads
unwmder)
(Four
threads
unwinder)
6 -
B.
LUBRICATION
Use
the oil
(viscosity
].
Lubrication
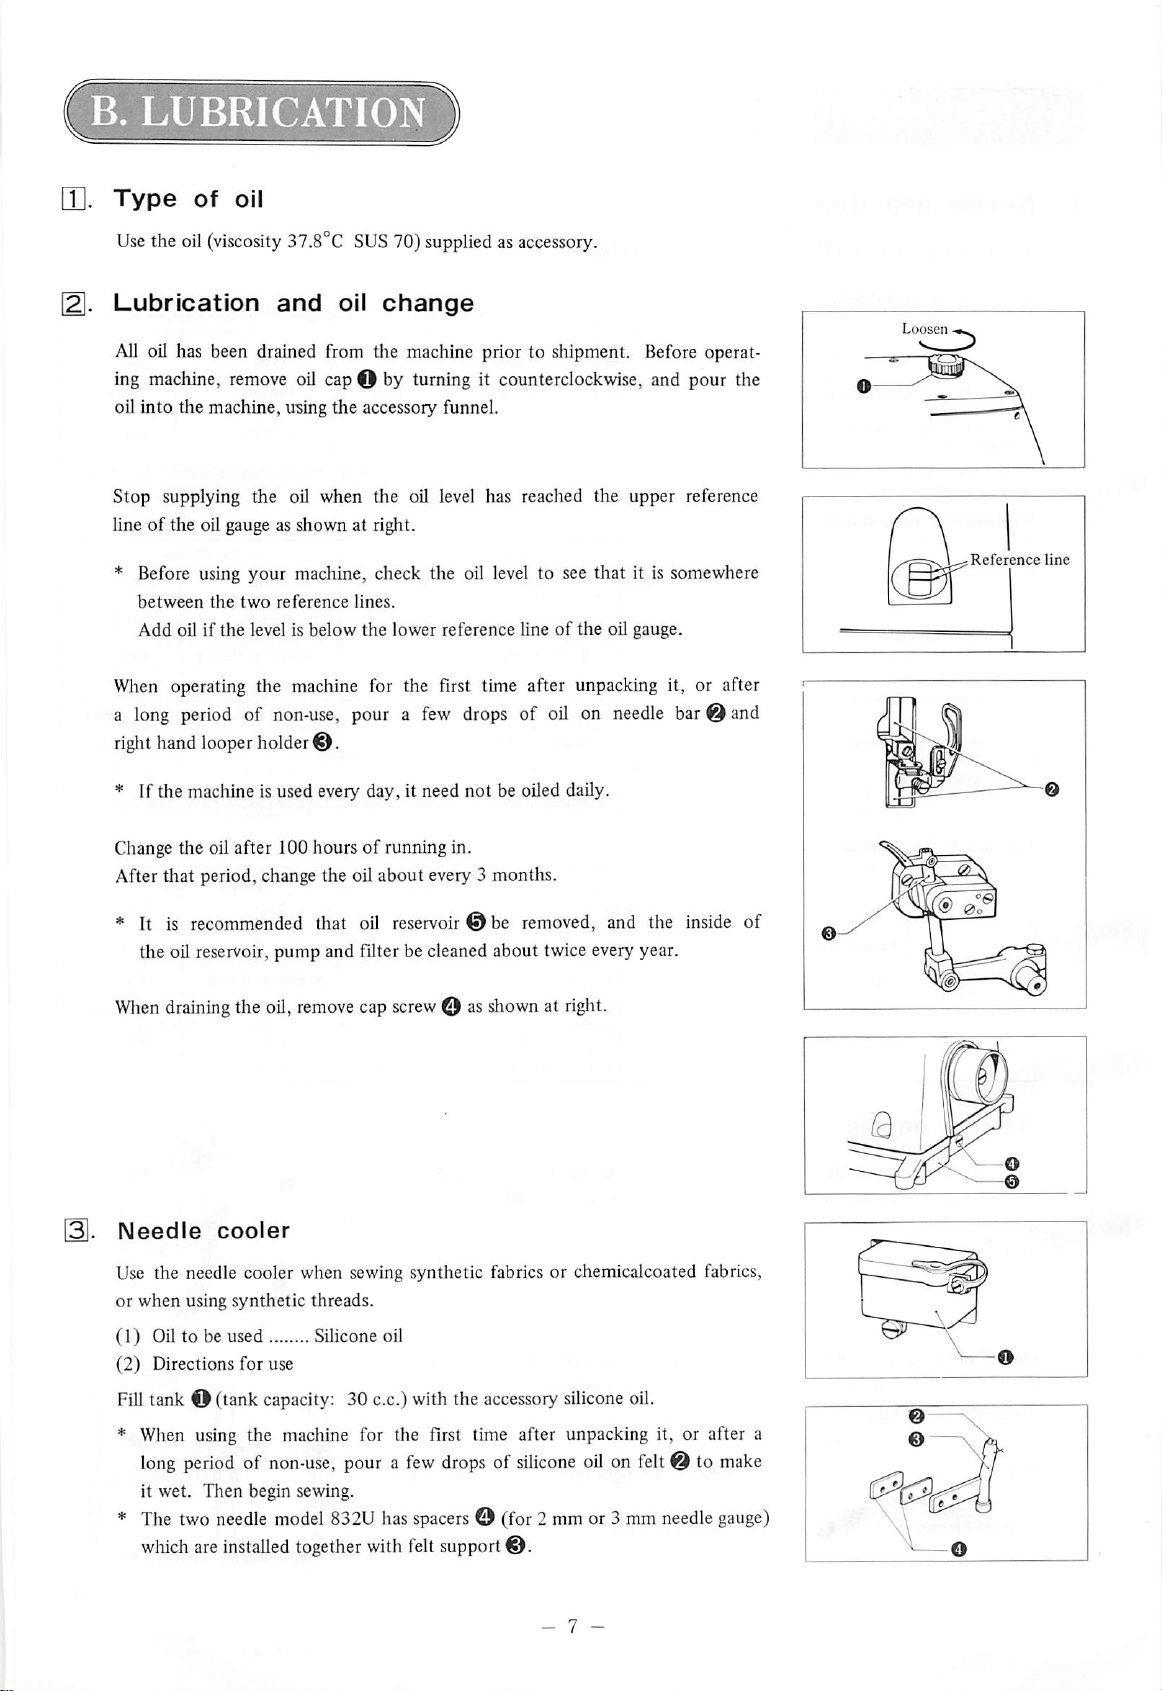
All oil has been drained from the machine prior to shipment. Before operat
ing
machine,
oil into the machine, using the accessory funnel.
Stop supplying the oil when the oil level has reached the upper reference
of
the oil gauge as shown at right.
line
* Before using your machine, check the oil level to see that it is somewhere
between
Add
When
a
long
right
the
oil if the level is below
operating the machine for the first time after unpacking it, or after
period
hand
looper
remove
two
of
holder
37.8°C
and
oil
reference
non-use,
®.
SUS
oil
capOhy
lines.
the
pour a
change
j
70)
suppliedasaccessory.
turning it counterclockwise, and pour the
lower reference lineofthe
few
drops
of oil on
oil gauge.
needle
bar@ and
Reference
line
* If the machine is used every day, it need not be oiled daily.
Change the oil after 100 hoursofrunning in.
After that period, change the oil about every 3 months.
* It is recommended that oil reservoir ® be removed, and the inside of
the oil reservoir,
When
draining
Needle
Use the needle cooler when sewing synthetic fabrics or chemicalcoated fabrics,
or
when
using
(1)
Oil to be used Silicone oil
(2) Directions for use
the oil,
cooler
synthetic
pump
and filter be cleaned about twice every year.
remove
threads.
cap
screw
0 as
shownatriglit.
Filltank O (tank capacity: 30 c.c.)with the
* When using the machine for the first lime after unpacking it, or after a
long
*
periodofnon-use,
it wet.
Then
The
two
needle
which
are
installed
begin sewing.
model
pour a
832U
has
few
spacers
together withfeltsupport®.
accessory
dropsofsilicone
0 (for2
mm
- 7 -
silicone
oil.
oil on felt® to
or3
mm
needle
make
gauge)
C.
QPERATIO^
|T|.
Needle
and
thread
Select a needle and thread by referring to the tables below.
Single-needle,
Wool,
Dacron,
Wool,
Dacron,
trouser
fabric
Knit
materials
Single-needle,
Knit
materials
Light
Heavy
Knit
materials
(Blind-hemming)
Two-needle,
two-thread
light
medium-heavy
jersey
three-thread
knit
materials
knit
materials
four-thread
Fabrics
materials,
trouser
materials,
Needle
1
Type
Size
fabric
Needle Needle
Cat.
Type
6120
No.
Size
# 9
#11
#11
Textured
#14
# 9
*9
Textured nylon yarn 110/2 denier
Cotton
Type
Cotton
Synthetic
Synthetic
Synthetic
Cotton
Type
thread
nylon
thread
Needle
thread
yarn
thread
thread
110/2
Size
#60/2
Size
#60/2
#60
#60
#50
#60/2
denier
1
Cotton
Cotton
Synthetic
Synthetic
Textured
Cotton
Textured
Type
Type
Yam
Looper
Looper
thread
thread
nylon
nylon
thread
yam
yam
thread
1
110/2
110/2
Size
#60/2
#60/2
110/2
Size
#60/2
#60
#60
Very
#60/2
denier
denier
light
denier
Needle
thread
thread
facing
thread
position,
arrow
back,
Typeofstitch
Two-needle
Four-thread
Mock
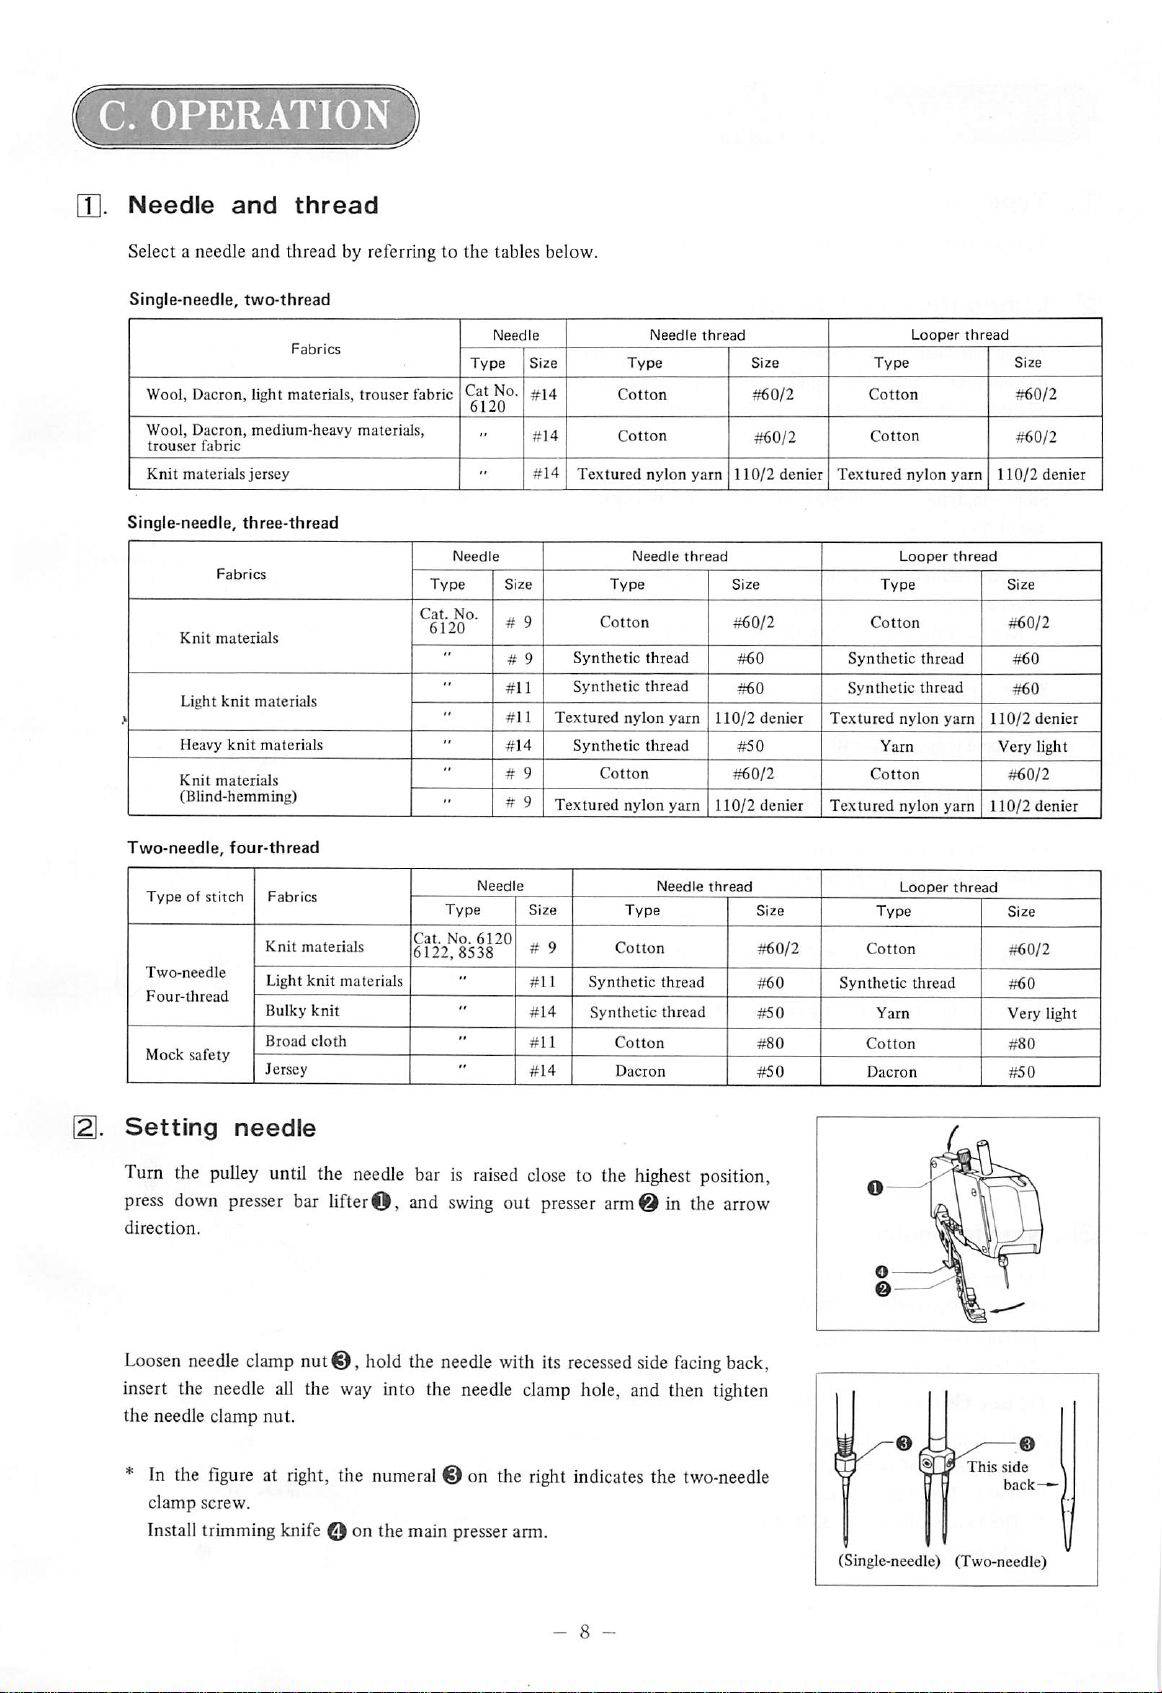
Setting
Turn the
press
down
direction.
Loosen
safety
pulley
needle
Fabrics
Knit
Light
Bulky
Broad
Jersey
needle
until the
presser
clamp
materials
knit
materials
knit
cloth
needle
bar lifterO,
nut®,
hold
Cat.
No.
6122,8538
bar is
and
swing
the
needle
6120
raised
out
with
Size
„
#9
#11
#14
close
presser
its
I
Type
Cotton
Synthetic
Synthetic
Cotton
Dacron
to the
arm® in the
recessed
highest
side
insert the needle all the way into the needle clamp hole, and then tighten
the needle clamp nut.
* In the
figureatright,
the
numeral
® on the
right
indicates
the
two-needle
clamp screw.
Installtrimming knife 0 on the main presserarm.
Looper
thread
Type
Cotton
Synthetic
(Single-needle) (Two-needle)
thread
Yarn
Cotton
Dacron
O
This
Size
#60/2
#60
Very
#80
#50
®
side
back—
light
3].
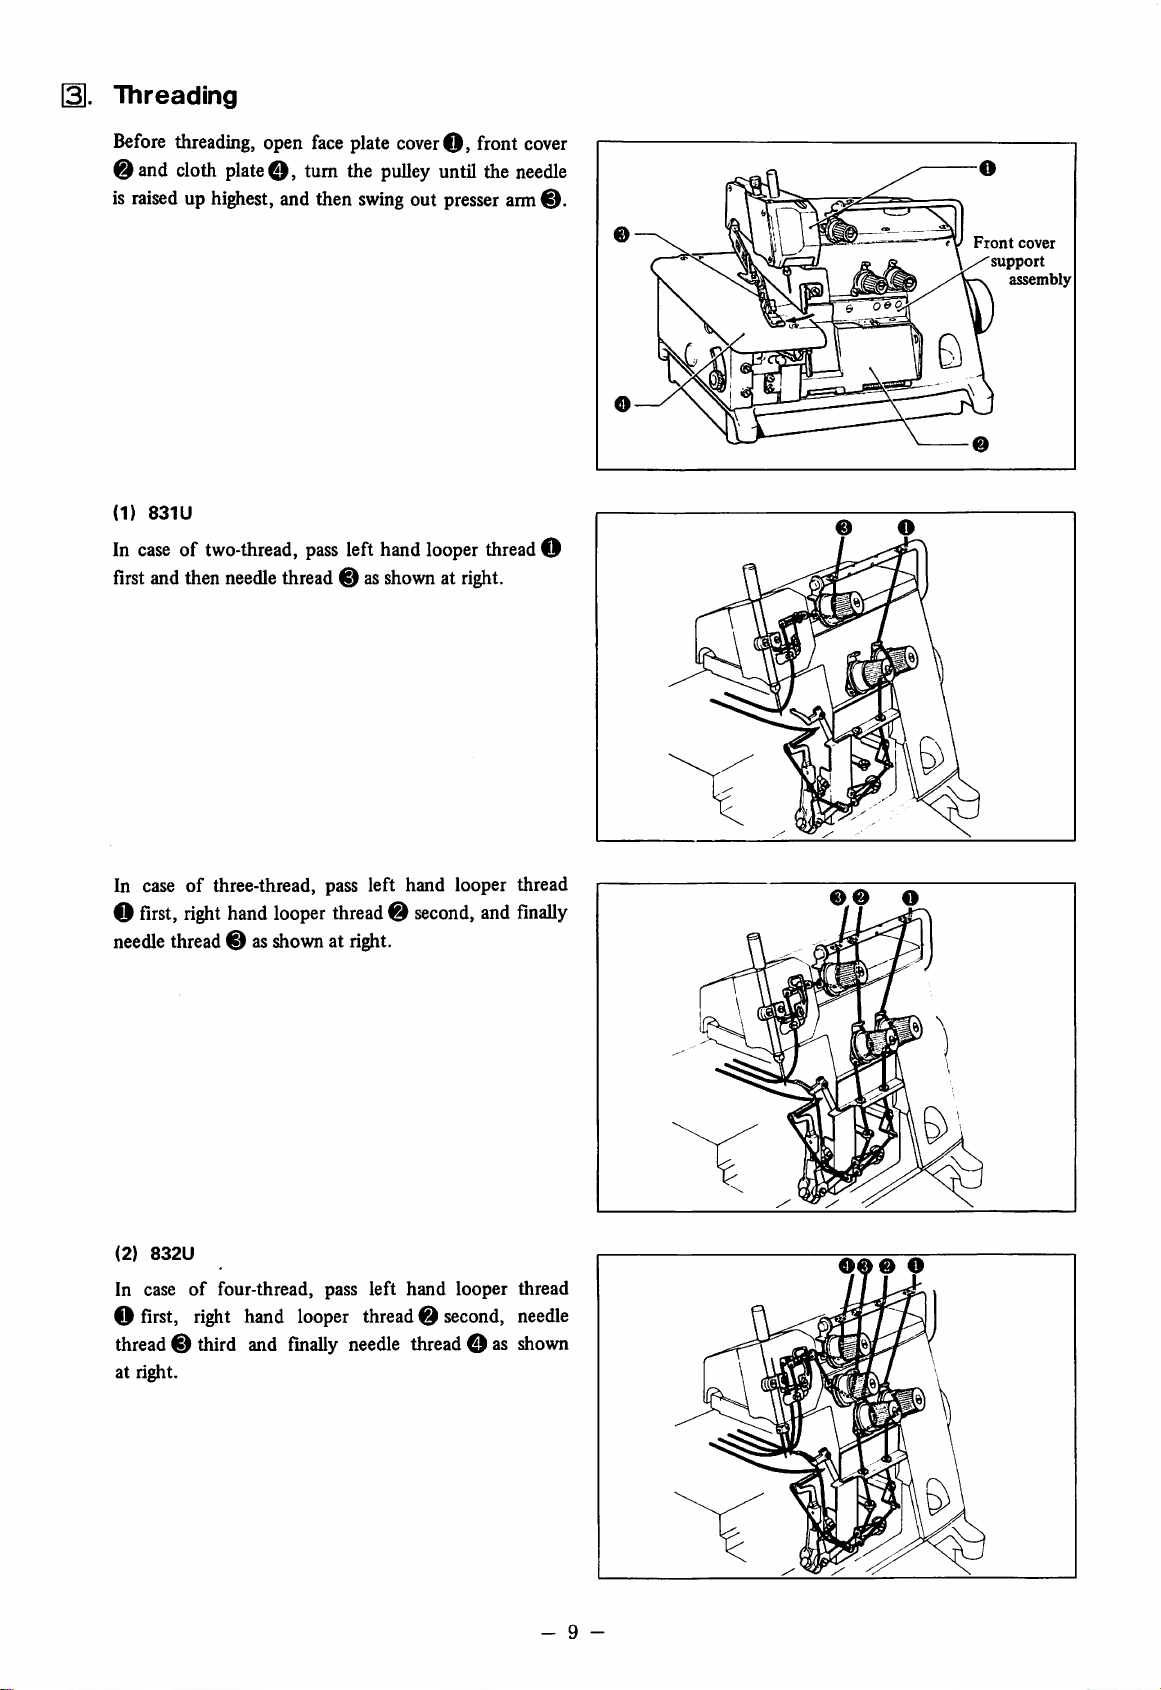
Threading
Before
@ and
is
(1)
In
firstandthen
threading, open
cloth
plate0,turn the
raiseduphighest,
831U
caseoftwo-thread,
needle
face
plate
and then
pass
swing
left
thread0 as
cover0>front
pulley
until
out
presser
hand
looper
shownatright.
the
needle
arm
thread
cover
0.
O
Front
cover
support
assembly
In caseofthree-thread, pass left hand looper thread
o
first,
right
hand
looper
needle
thread
0 as
(2)
832U
In case
O
first,
of
four-thread, pass left hand looper thread
right
hand
thread0 third and
at right.
thread0second,
shownatright.
looper
finally
thread0
needle
thread0 as
and
second,
finally
needle
shown
- 9 -
Thread
tension
Thread
tension
may
require
change
dependingonfabrics
and
threads
used,
bight,
stitch
thread take-up, and the position of the thread guides. If necessary,adjust as mentioned below.
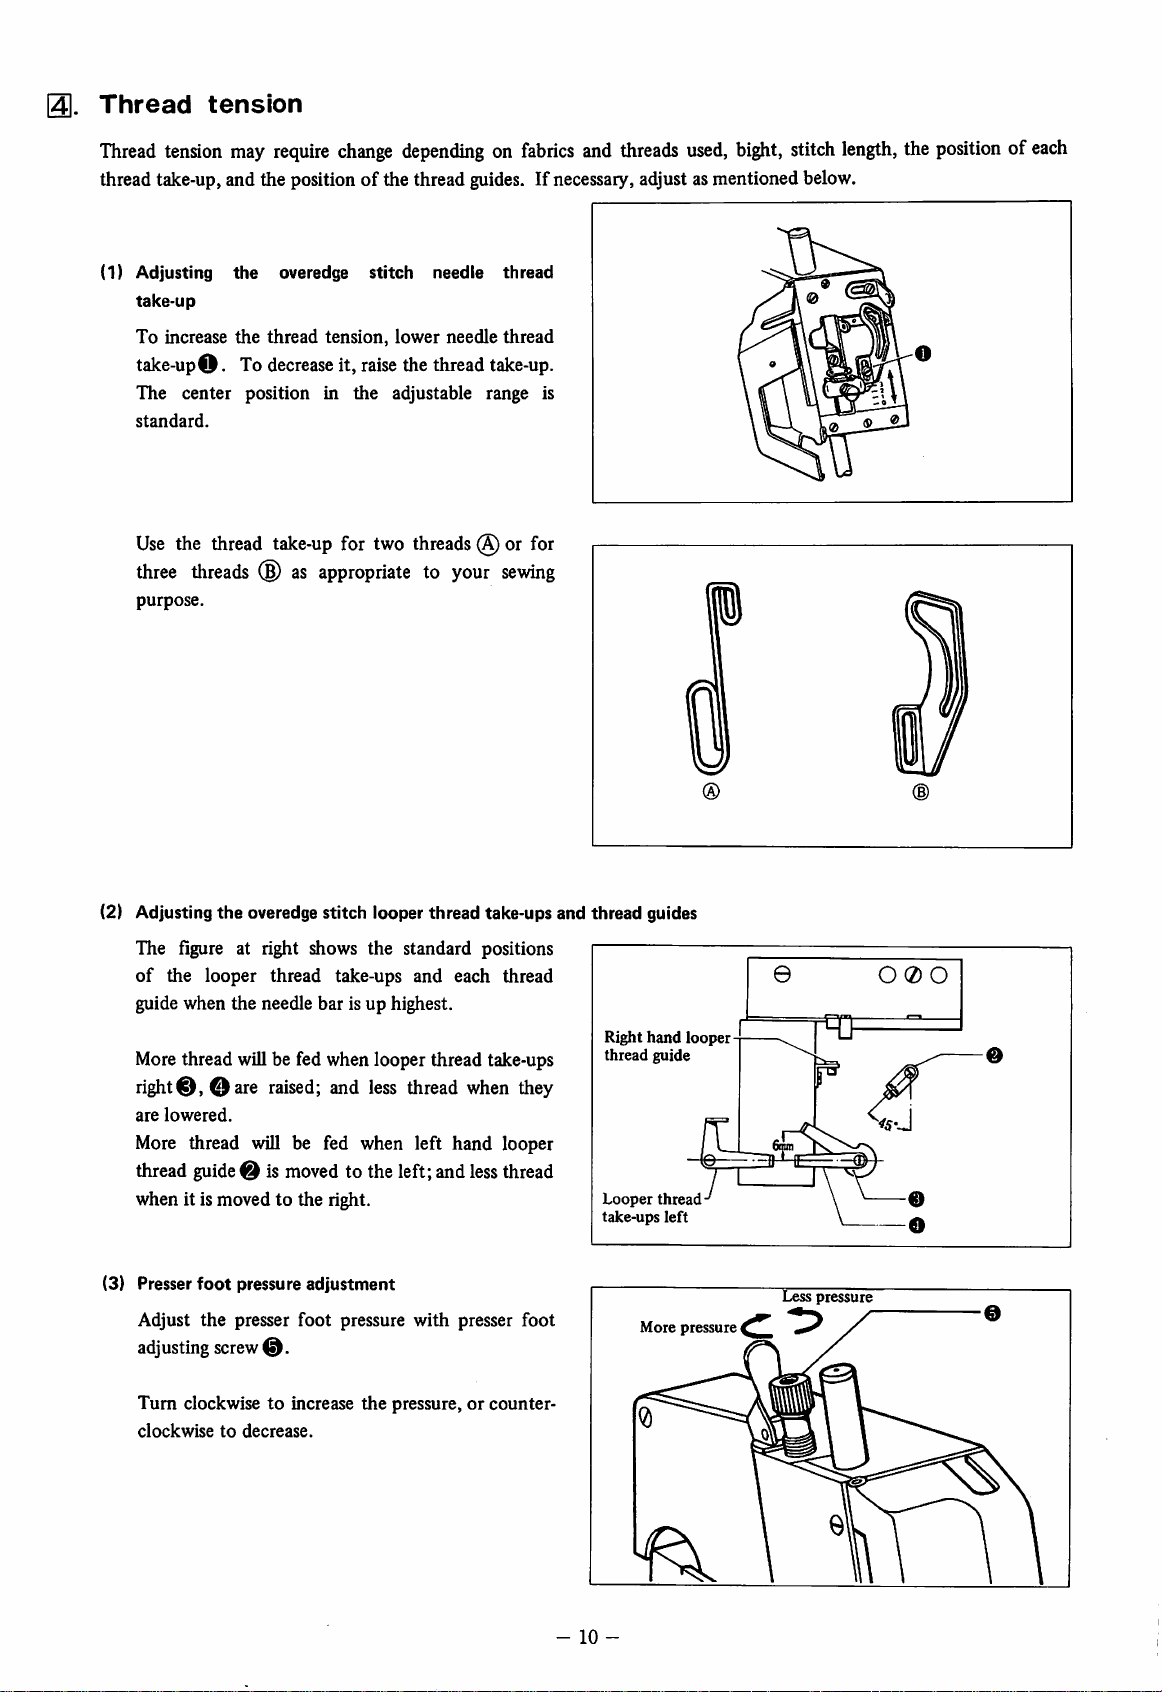
(1) Adjusting
take-up
To increase
take-upO. To
The center position in
standard.
Use
three
purpose.
the
the
overedge
thread
decrease
stitch
tension,
it,
raise
the
needle
lower
the
thread
adjustable range is
needle
thread
thread
take-up.
the thread take-up for two threads(S) or for
threads
(g) as appropriate to your
sewing
length,
the
positionofeach
(2) Adjusting the overedge stitch looper thread take-ups and thread guides
The figure at right shows the standard positions
of
the looper thread take-ups and each thread
guide when the needle bar is up highest.
Right
hand
thread
Looper
take-ups
More
guide
thread
left
More thread will be fed when looper thread take-ups
right®,
are
More thread will be fed when left hand looper
thread
when it is moved to the right.
(3) Presser
Adjust
adjusting
Turn
clockwisetodecrease.
©are
lowered.
guide
foot
the
clockwisetoincrease
raised;
© is
moved
pressure
presser foot pressure with presser foot
screw
©.
and
less
to the left; and
adjustment
the
thread
when
pressure, or
less
they
thread
counter
looper
pressure
©
Less
O0O
pressure
-
10
-
(4)
Thread
tension
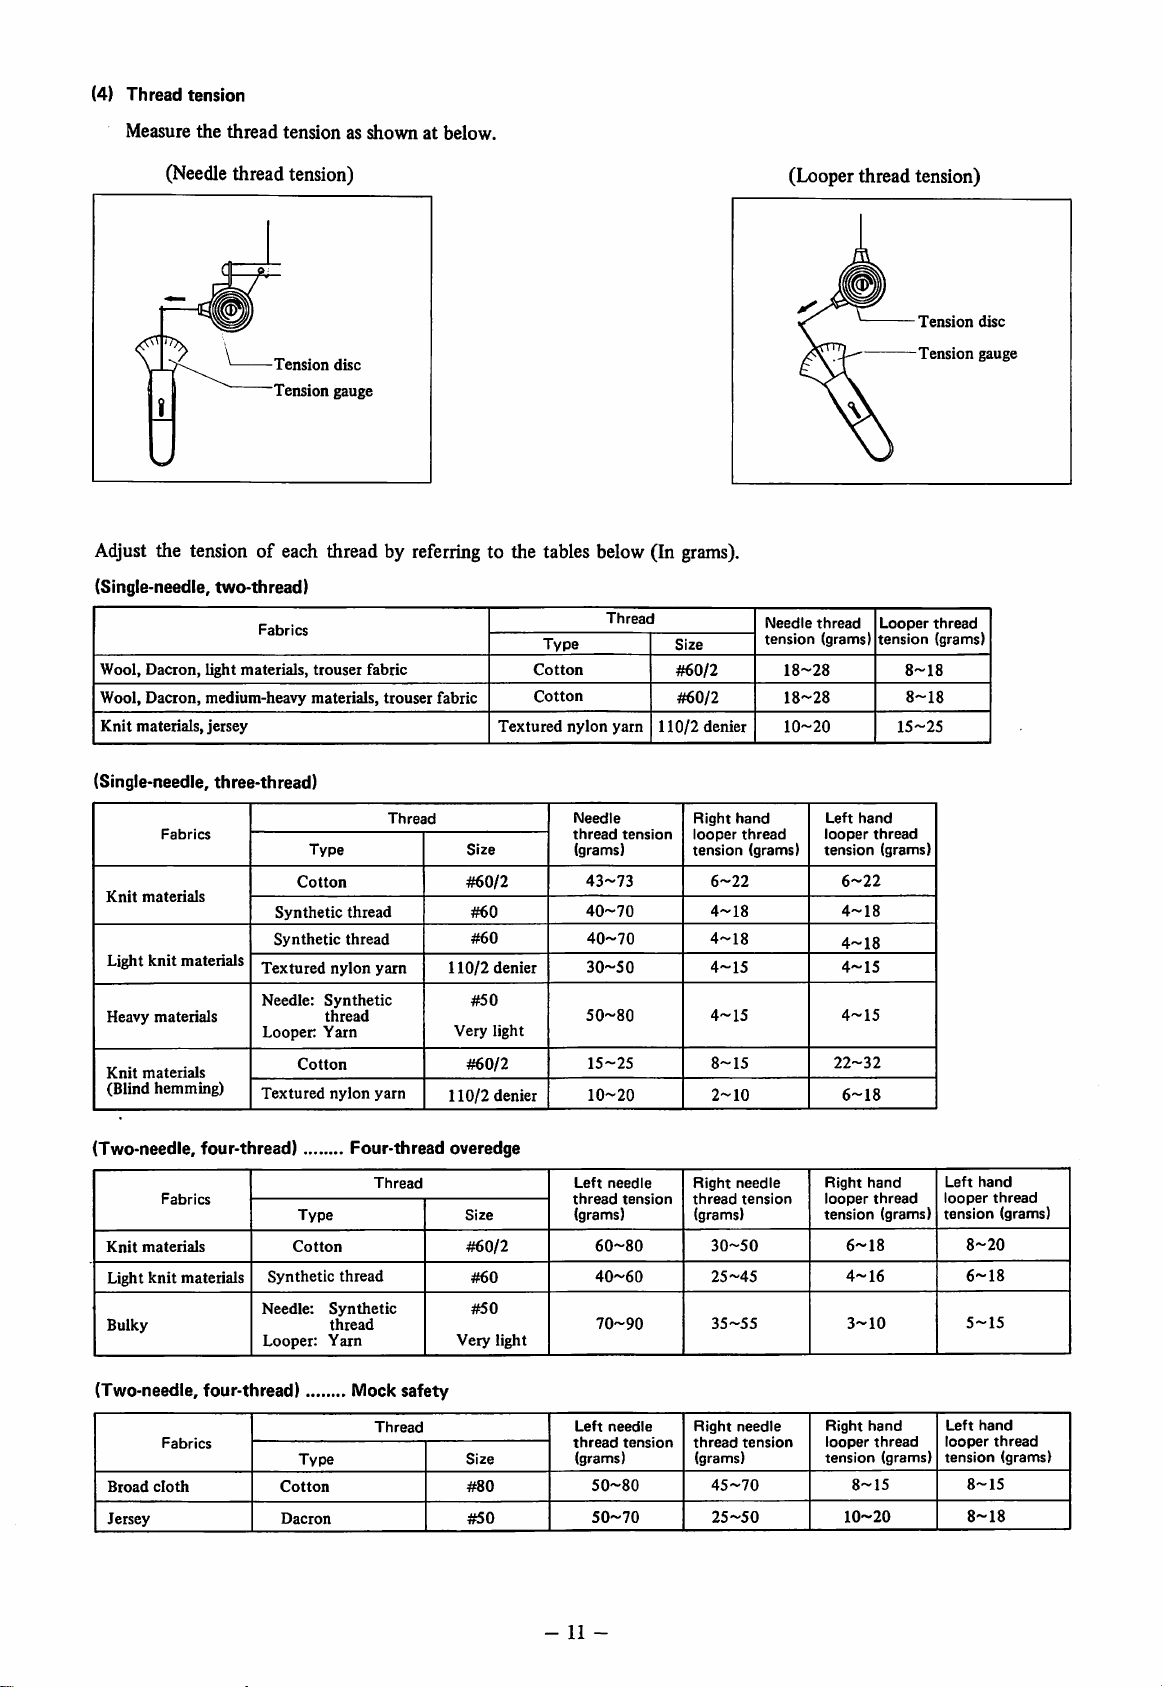
Measure
the
(Needle
thread
tensionasshownatbelow.
threadtension)
-Tension
'Tension
disc
gauge
Adjust the tension of each thread by referring to the tables below (In
(Single-needle, two-thread)
nylon
Thread
yarn
110/2
Wool,
Wool,
Knit
Dacion,
Dacron,
materials,
Fabrics
light
materials,
medium-heavy
jersey
trouser
materials,
fabric
trouser
fabric
Type
Cotton
Cotton
Textured
grams).
Size
#60/2
#60/2
denier
(Looper thread tension)
-Tension
-Tension
Needle
thread
tension (grams)
18~28
18-28
10-20
Looper
tension
8-18
8-18
15-25
thread
(grams)
disc
gauge
(Single-needle, three-thread)
Knit
Light
Heavy
Knit
(Blind
Fabrics
materials
knit
materials
materials
hemming)
materials
Cotton
Synthetic
Synthetic
Textured
Needle:
Looper:
Cotton
Textured
Type
Synthetic
thread
Yarn
thread
thread
nylon
nylon
yarn
yarn
Thread
Size
#60/2
#60
#60
110/2
#50
Very
#60/2
110/2
denier
light
denier
(Two-needle, four-thread) Four-thread overedge
thread
Synthetic
thread
Yarn
Thread
Size
#60/2
#60
#50
Very
light
Knit
Light
Bulky
Fabrics
materials
knit
materials
Type
Cotton
Synthetic
Needle:
Looper:
Needle
thread
(grams)
43-73
40-70
40-70
30-50
50-80
15-25
10-20
Left
needle
thread
(grams)
60-80
40-60
70-90
tension
tension
Right
hand
looper
thread
tension (grams)
6-22
4-18
4-18
4-15
4-15
8-15
2-10
Right
needle
thread
tension
(grams)
30-50
25-45
35-55
Left
looper
tension
6-22
4-18
4-18
4-15
4-15
22-32
6-18
Right
looper
tension
6-18
4-16
3-10
hand
hand
thread
thread
(grams)
(grams)
Left
looper
tension
8-20
6-18
5-15
hand
thread
(grams)
(Two-needle, four-thread) Mock safety
Right
looper
tension
Broad
Jersey
Fabrics
cloth
Type
Cotton
Dacron
Thread
Size
#80
#50
-
Left
thread
(grams)
50-80
50-70
11
-
needle
tension
Right
thread
(grams)
45-70
25-50
needle
tension
8-15
10-20
hand
thread
(grams)
Left
looper
tension
8-15
8-18
hand
thread
(grams)
51.
How
Press
work under the presser foot, and release the presser bar lifter pedal.
When
to
the
push
treadle
sew
button
o is
switch
depressed,
ON,
the
depress
work
presser
willbefed
barlifterpedal®,
and
sewn.
place
the
After sewing, run the machine without the work until about 5 or 6 cm
thread
yourself.
Bight
Bight
(1) To increase bight
is out, and cut the
trimming
knife
adjustment
depends
(a)
(b)
on cloth
Loosen
rightas muchasnecessary, and retighten the set
Loosen
knife pushed against the
spring, lower the
tighten the stationary knife holder set screw.
trimming
movable
stationary
widthand the width of the chain-off
knife
holder
knife
movable
set screw®,
holder
set screw®, and
movable
knife by the stationary knife holder
knife close to its lowest position and re-
® by
pulling
move
screw
the
knife
securely.
make
thread
toward
finger
holder
the stationary
of
of the throat plate
O to
(2) To decrease bight
(a)
Loosen
to left as much as necessary, and temporarily tighten the set
(b) Loosen the
until the
the set screwsecurely.
(c)
Loosen
the stationary knife is
tionary knife holder spring, lower the movable knife close to its lowest
position, and
[Caution]
1. Since bight depends on cloth trimming width and the widthofthe throat
plate's chain-off
time in caseofchanging bight by more than 1 mm.
2. If the
knife as shown at right.
The
movable
the
stationary
movable
movable
the
screw
reti^ten
finger,
knife
cutting
knifecaimotbe sharpened with an ordinarywhetstone.
knife
holder
knife holder set screw, move the knife holder
knife
contacts the stationary
temporarily
pressed
the set screwsecurely.
cloth trimming width must be changed at the same
performance
set
tightened
against
has
dropped,
screw,
in step (a),
the
movable
move
sharpen
knife
holder
knife,
and retighten
make
sure
knife by the sta
the stationary
screw.
that
®
7.94
mm
-
12
4^>5t5tx-7;uiinx[ll
Table cut-out drawing for semi-submerged installation
Vorlage zum Ausschneiden
des
Tisches fur die halbversenkte Aufstellung
Schema de decoupe de table pour installation semi-submergee
Diagrama de cortes en la
mesa
para instalacion semisumergida
SINGER
831-832-842
R17
3S2
94
SERIES
36
17
,
24
79
TTITT
40
2*7
A 1-
RI2.5
I <
I
RIS
310
120
S7
TTT
2,5
I R17
T
so
10
•
78
A-A
251
186
08.
S
B-B
801
802 812
SERIES
24
307
^^^0 '
24
«!'
jC
R12.5
Ril
2.5
40
A-A
•8.5
_JL
B-B
881
882-892
SERIES
378
-e-
R17 R17
i
15
2
-•
1
J
RI5
I •
RlSi
R17
?c
33
315
141.5
TTT
42
1
19
200
50
_L
29
57
7
R17
65
R5
120
37
37.5
.
A-A
215
«8.5
_L_
B-B
50
A
TRADE
MARK OF SINGER SEWING MACHINE COMPANY
PrintedinJapan/GedrucktinJapan/lmprimeauJapon/impreso
192640-011
8602®
en
Japon
 Loading...