

8007/8019
SINGER
/8002

Important safeguards
1. Unplug the machine at the socket when changing needles, feet, or needle plates, or when
leaving the machine unattended. This eliminates the possibility of starting the machine
by accidentally pressing the speed controller.
2. Before removing the bobbin case, unplug the machine at the socket.
3. Because of the up and down movement of the needle, you must work carefully and watch
the sewing area when operating the machine.
4. Do not pull the fabric while you are stitching as this may deflect the needle, causing it
to break.
5. Before cleaning your machine, it must be unplugged at the socket.
6. Do not attempt to adjust the motor belt. Contact your nearest Service Centre or an authorized
SINGER dealer should any adjustment be required.
7. Before changing light bulb, make sure you have removed plug from socket outlet. Be sure
to replace the face plate which covers the light bulb before operating the machine.
8. This machine is designed to use a 15-watt maximum light bulb.
This product is suppressed for radio and television interference with the International Electro
technical Commission requirements of the CISPR.
Machines for Great Britain and some other countries having similar wiring standards are
shipped from the factory without a plug for connection to the mains. The wires in this mains
lead are coloured in accordance with the following code:
Blue: neutral (N) Brown: live (L)
As the colours of the wires In the mains lead of this appliance may not correspond with
the coloured markings identifying the terminals in your plug, proceed as follows:
The wire which is coloured blue must be connected to the terminal which is marked with
the letter N or coloured black. The wire which is coloured brown must be connected to
the terminal which Is marked with letter L or coloured red. If a 13 Amp. (BS 1363) plug is
used, a 3 Amp. fuse must be fitted, or If any other type of plug is used, a 5 Amp. fuse must
be fitted either in the plug or adaptor or at the distribution board,
Neither core Is to be connected to the earth terminal of a three-pin plug.
Index
1. Getting to Know Your Machine
.................
Nncipal Parts............................................2/3
Accessories
Optional Accessories
Changing the Needle
.................................................
.................................
.................................
Changing Presser Feet...............................7
Removing and Replacing Needle Plate
Attaching Snap-in Feed Cover
2. Getting Ready to Sew
Preliminary Steps
.......................................
.................................
..................
Connecting and Operating Machine
Threading the Machine..........................9/10
Winding the Bobbin....................................11
Inserting a Bobbin
Raising the Bobbin Thread
How to Start Sewing
Fabric, Thread and Needle Table
....................................
......................
.................................
............
Setting Selectors.......................................14
Setting Stitch Width..................................14
Setting a Needle Position
........
................
Regulating Needle-Thread Tension
Setting Stitch Length................................16
Setting Pattern Group Selector
Setting Stitch Pattern Selector
3. Straight Stitching
......................................
...............
................
Sewing a Seam..........................................18
Pin Basting • Starting a Seam • Ending a
Seam • Guiding and Supporting Fabric
4. Zig-Zag Stitching
How Patterns are Produced
......................................
..................
Selecting and Adjusting
Zig-Zag Stitches
........................................
• Selecting a Pattern Group • Selecting a
Stitch Pattern
• Adjusting Width of Design • Adjusting
Stitch Placement
• Adjusting a Stitch Length • Adjusting
Needle-Thread Tension
• Adjusting a Stitch Balance
• Satin Stitching
.........
........
......
12
12
13
13
15
16
17
17
18
21
..21
22
6
5. Twin-Needle Stitching
2
Threading the Twin-Needle
4
5
Machine Settings
Decorative Twin-Needle Stitching
..............................
......................
......................................
6. Free-Motion Stitching...............................28
7
7
Preparation............................................... 28
Floral Designs...........................................29
8
7. Sewing the Professional Way..................30
8
8
Sewing Knit and Stretch Fabric
Stitch Pattern Chart • Guiding and
Supporting Fabric • Plain Stretch Seams
• Overedged Seams • Attaching Elastic
• Finishes for Hems and Facings
Handling Special Fabrics.........................35
Construction Details.............................. ..36
Zippers • Corded Seams • Blindstitch Hems
Buttons
....................................................
Buttonholes...............................................40
Four-Step Buttonholing
.........................
Adjusting Forward-Reverse Stitch
Balance..................................................... 43
Buttonholes (Manual Method)
Decorative Touches
.................................
Topstitching • Applique’
Keeping up Appearances
........................
Mending • Darning
8. Free-Arm Sewing.....................................48
9. Caring for Your Machine.........................49
Cleaning and Lubricating
........................
Removing and Replacing Bobbin Case....50
To Remove and Replace Face Plate
To Remove Top Cover and Bottom
Cover....................................................... 51
Changing the Light Bulb
..........................
Replacing the Slide Plate.........................52
Hints for Home Service
Index....................................................................1
..........
..............
.................
.........
26
26
27
27
30
39
41
43
45
46
49
51
52
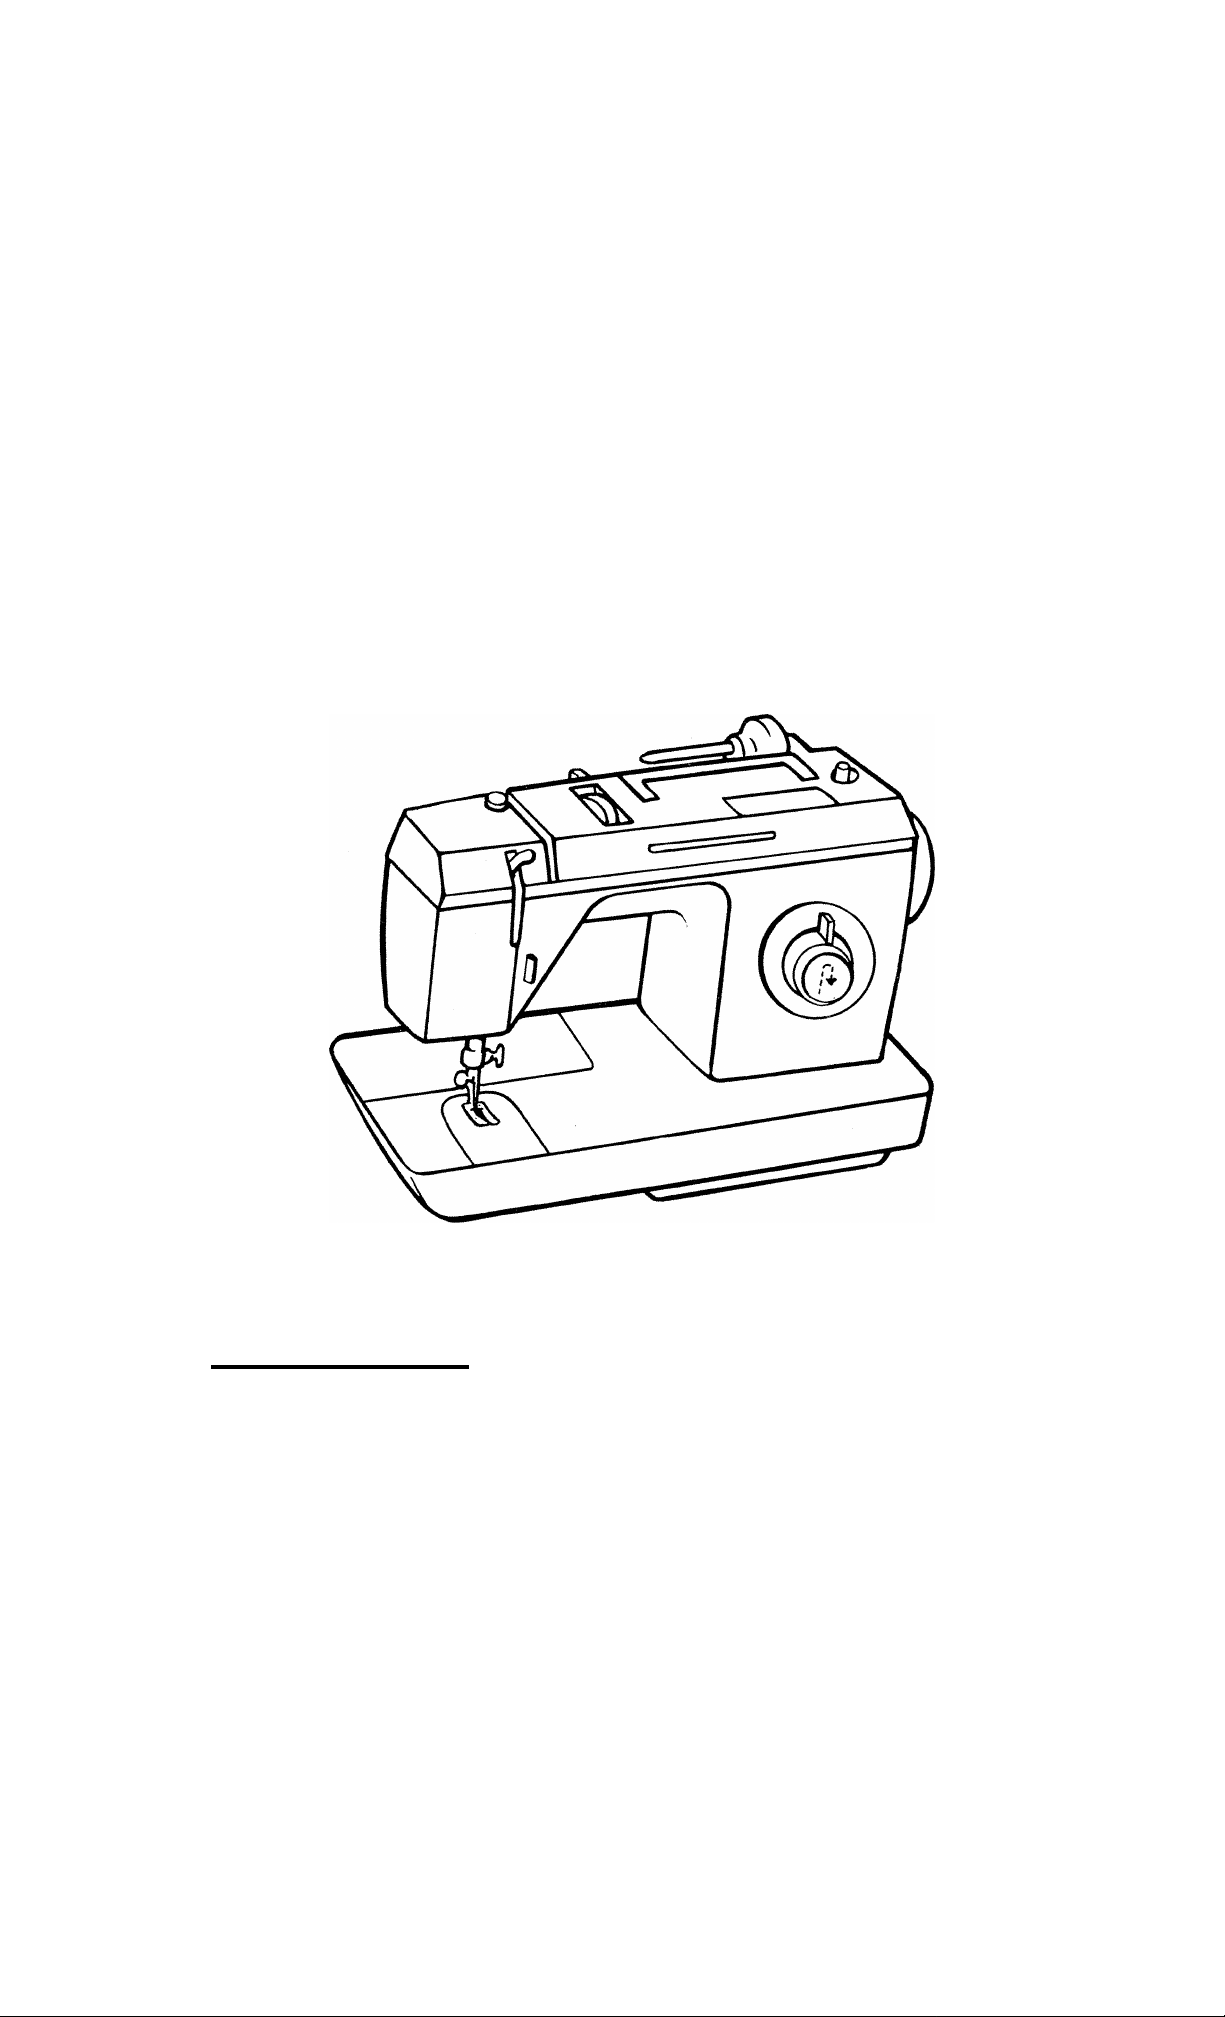
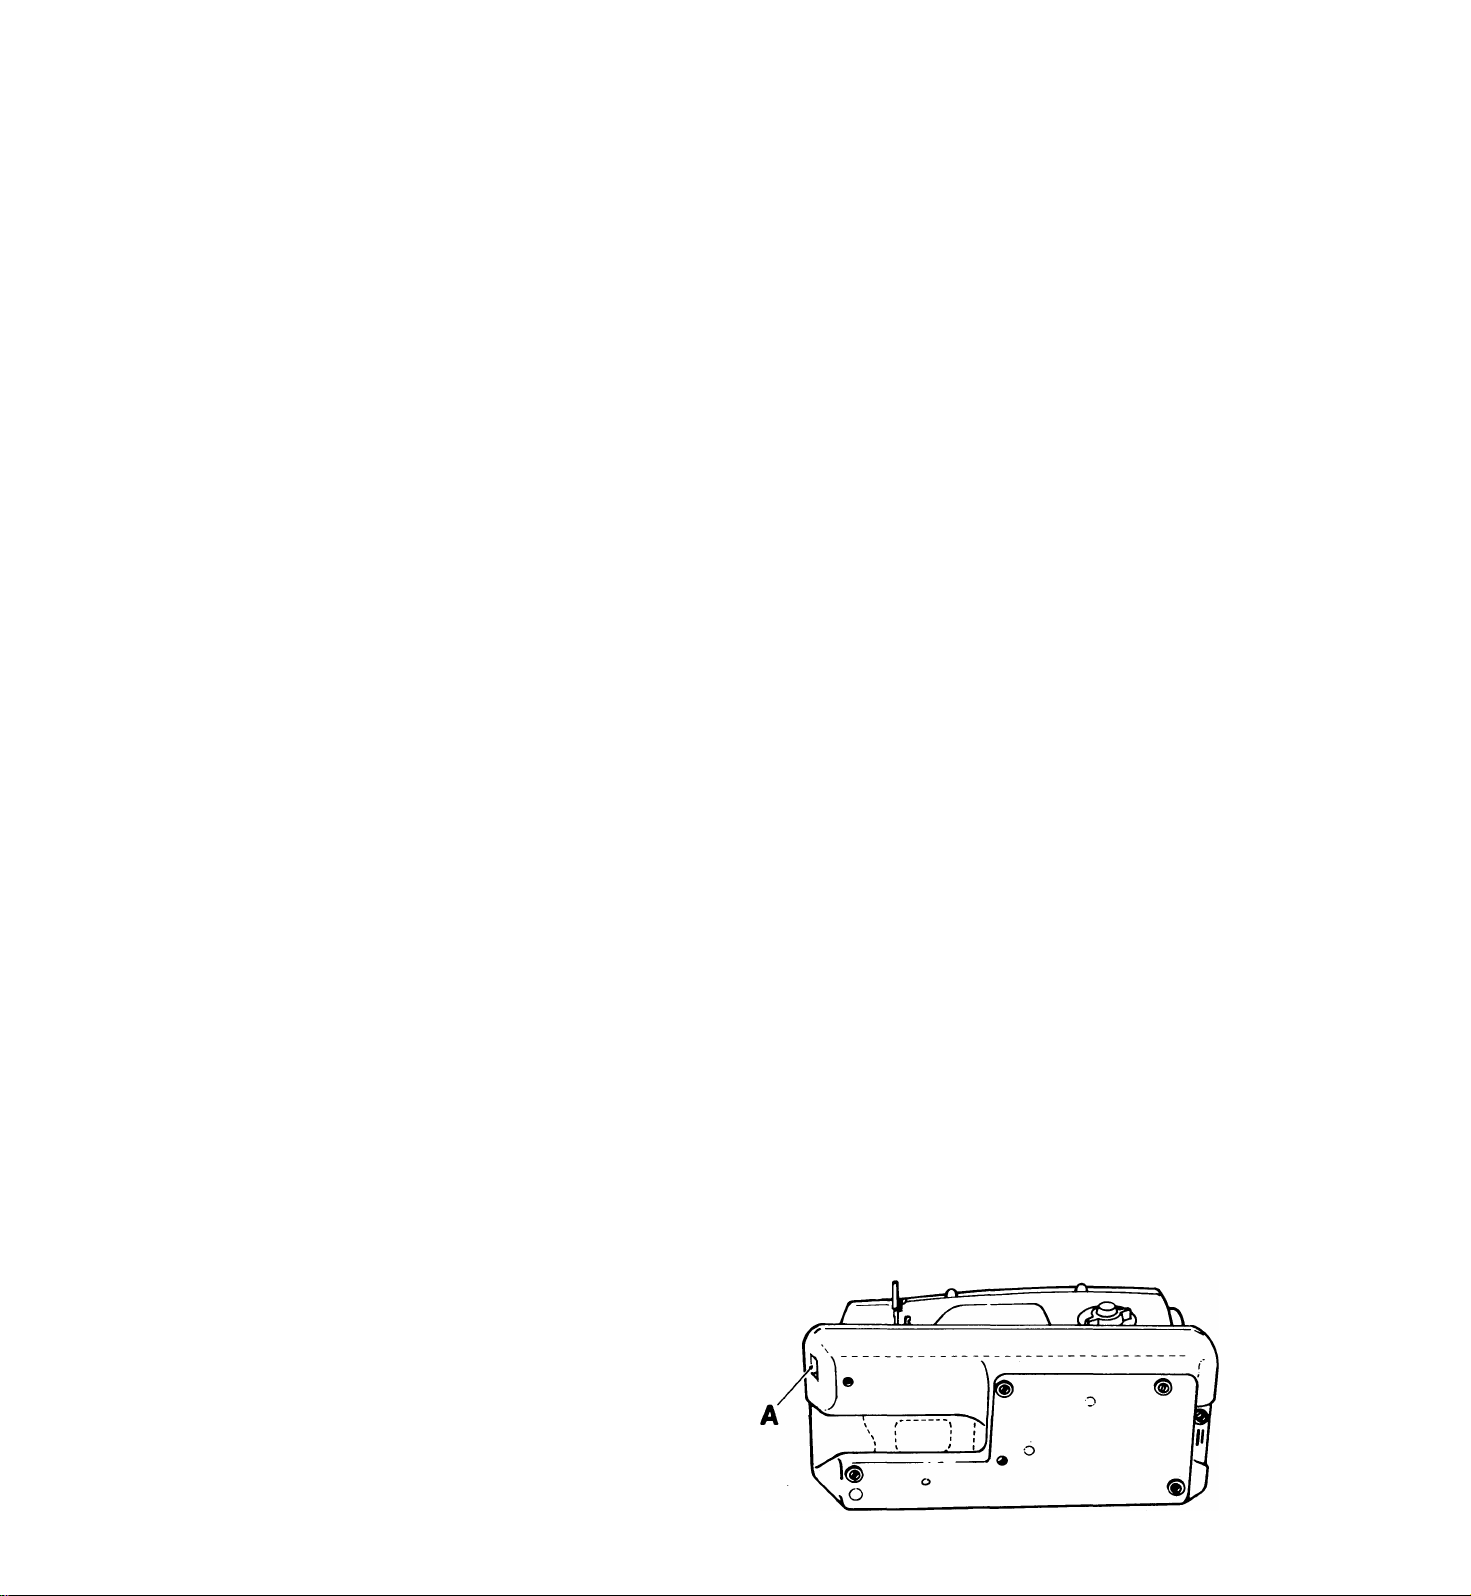
Dear Customer:
We recommend that for the future reference
you record the serial number of your Sewing
Machine in the space provided.
Refer to illustration for location of serial
number, A, on your machine.
Serial No. _______________________________
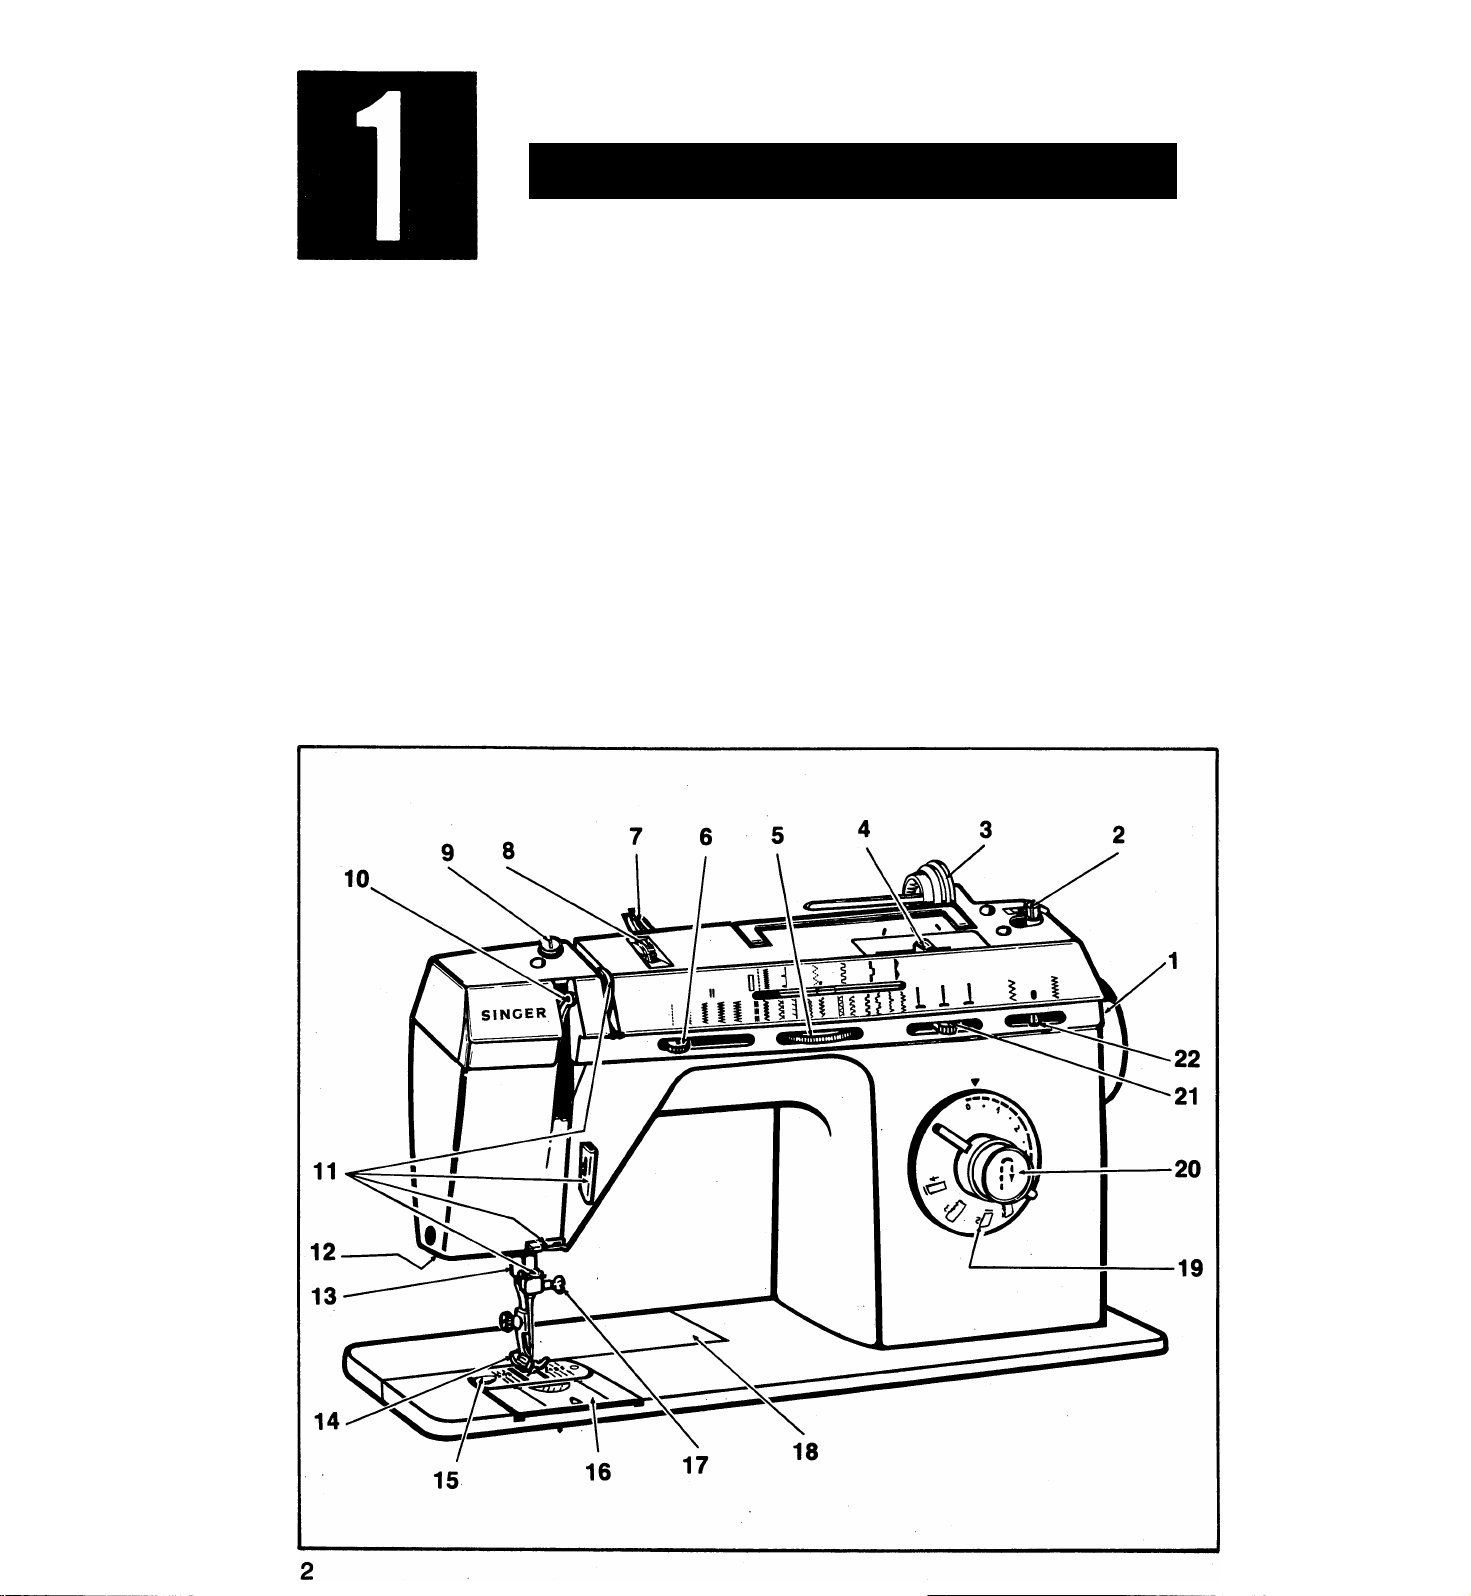
principal parts-
Getting to Know Your Machine
I.Hand Wheel
2. Bobbin Winder
3. Spool Holder
4. Stitch Pattern Selector
(only 8019)
5. Pattern Group Selector
(only 8007 and 8019)
6. Stitch Width Selector
7. Snap-in Thread Guide
8. Tension Dial
9. Bobbin Winder Tension
10. Take-up Lever
11. Thread Guides
12. Built-in Sewing Light
13. Thread Cutter
14. Presser Foot
15. Zig-Zag Needle Plate
16. Slide Plate
17. Needle Clamp
18. Flip and Sew* Panel
19. • Stitch Length Selector
• Built-in-Four-Step
Buttonhole Dial
(except 8002)
20. • Reverse-Stitch Push Button
• Buttonhole Stitch Balancing
Control (except 8002)
21. Needle Position Selector
22. Stitch Balance Control
(except 8002/8007)
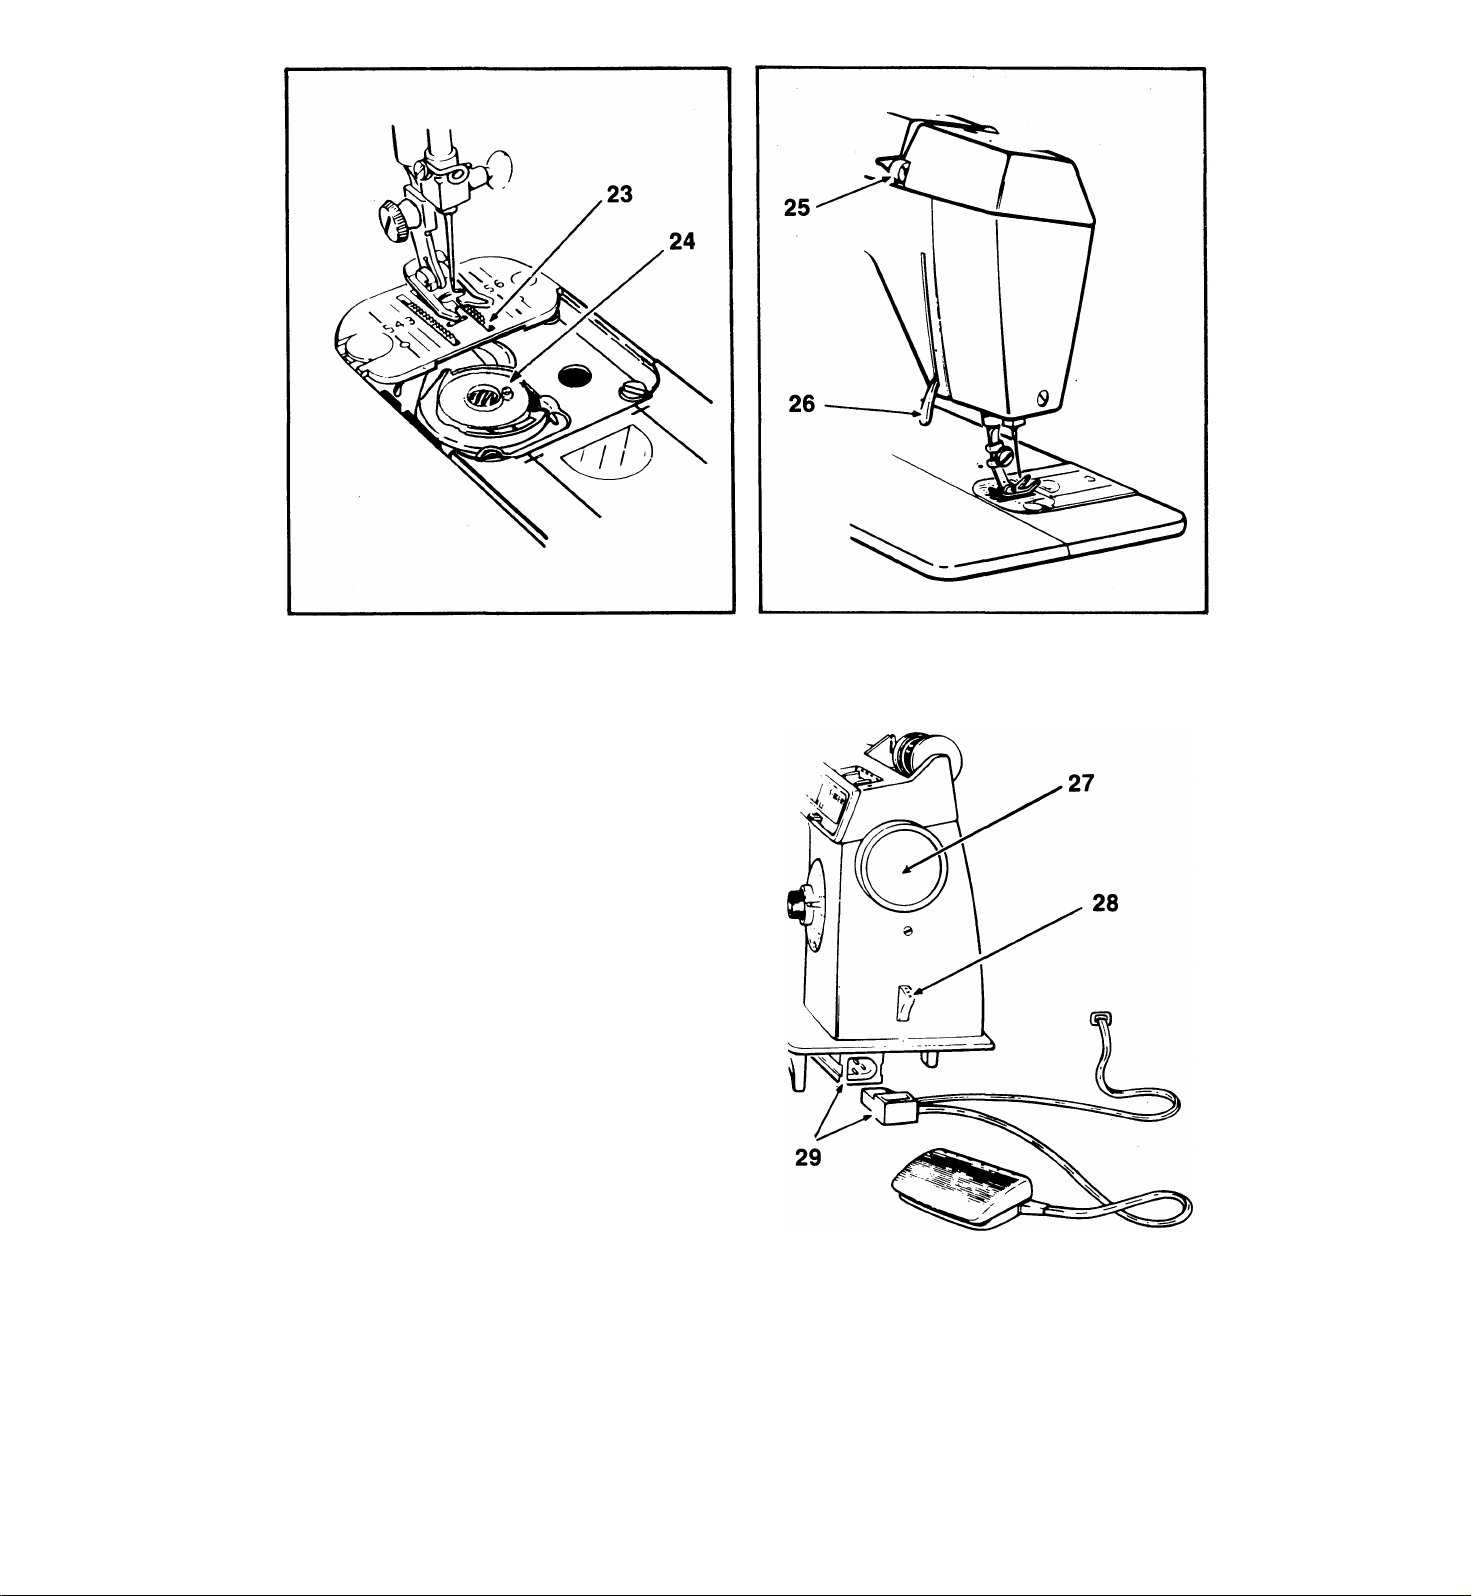
23. Feed System
24. Transparent Bobbin
25. Rear Thread Guide
26. Presser Foot Lifter
27. Bobbin Winding Indent
28. Power and Light Switch
29. Electrical Connections and
Speed Controller
To ensure that you are always pro
vided with the most modern sewing capa
bilities, the Manufacturer reserves the right
to change the appearance, design or
accessories of this sewing machine when
considered necessary.
* A Trademark of The Singer Company
Copyright © 1990 Singer Sewing Machine Company
All rights reserved throughout the world.

accessories
The accessories that come with your sewing machine will help you to sew with ease
and comfort.
Needles
IMPORTANT: Yoursewing machine has been
designed to obtain best results with SINGER*
needles. You should follow the recommenda
tions in this instruction book and on the nee
dle package for correct style and size of nee
dle for different types and weights of fabric.
• Catalog 2020 needles, for all-purpose sewing.
• Catalog 2045 needles, for sewing synthetic
knit and stretch fabrics.
Presser Feet
Additional interchangeable snap-on presser
feet:
1. The zig-zag foot on your machine.
2. Buttonhole foot to make square-end
buttonholes, (only 8007 and 8019)
3. Zipper foot for inserting zippers and
stitching corded seams.
4. Special purpose foot for all kinds of
decorative zig-zag stitching.
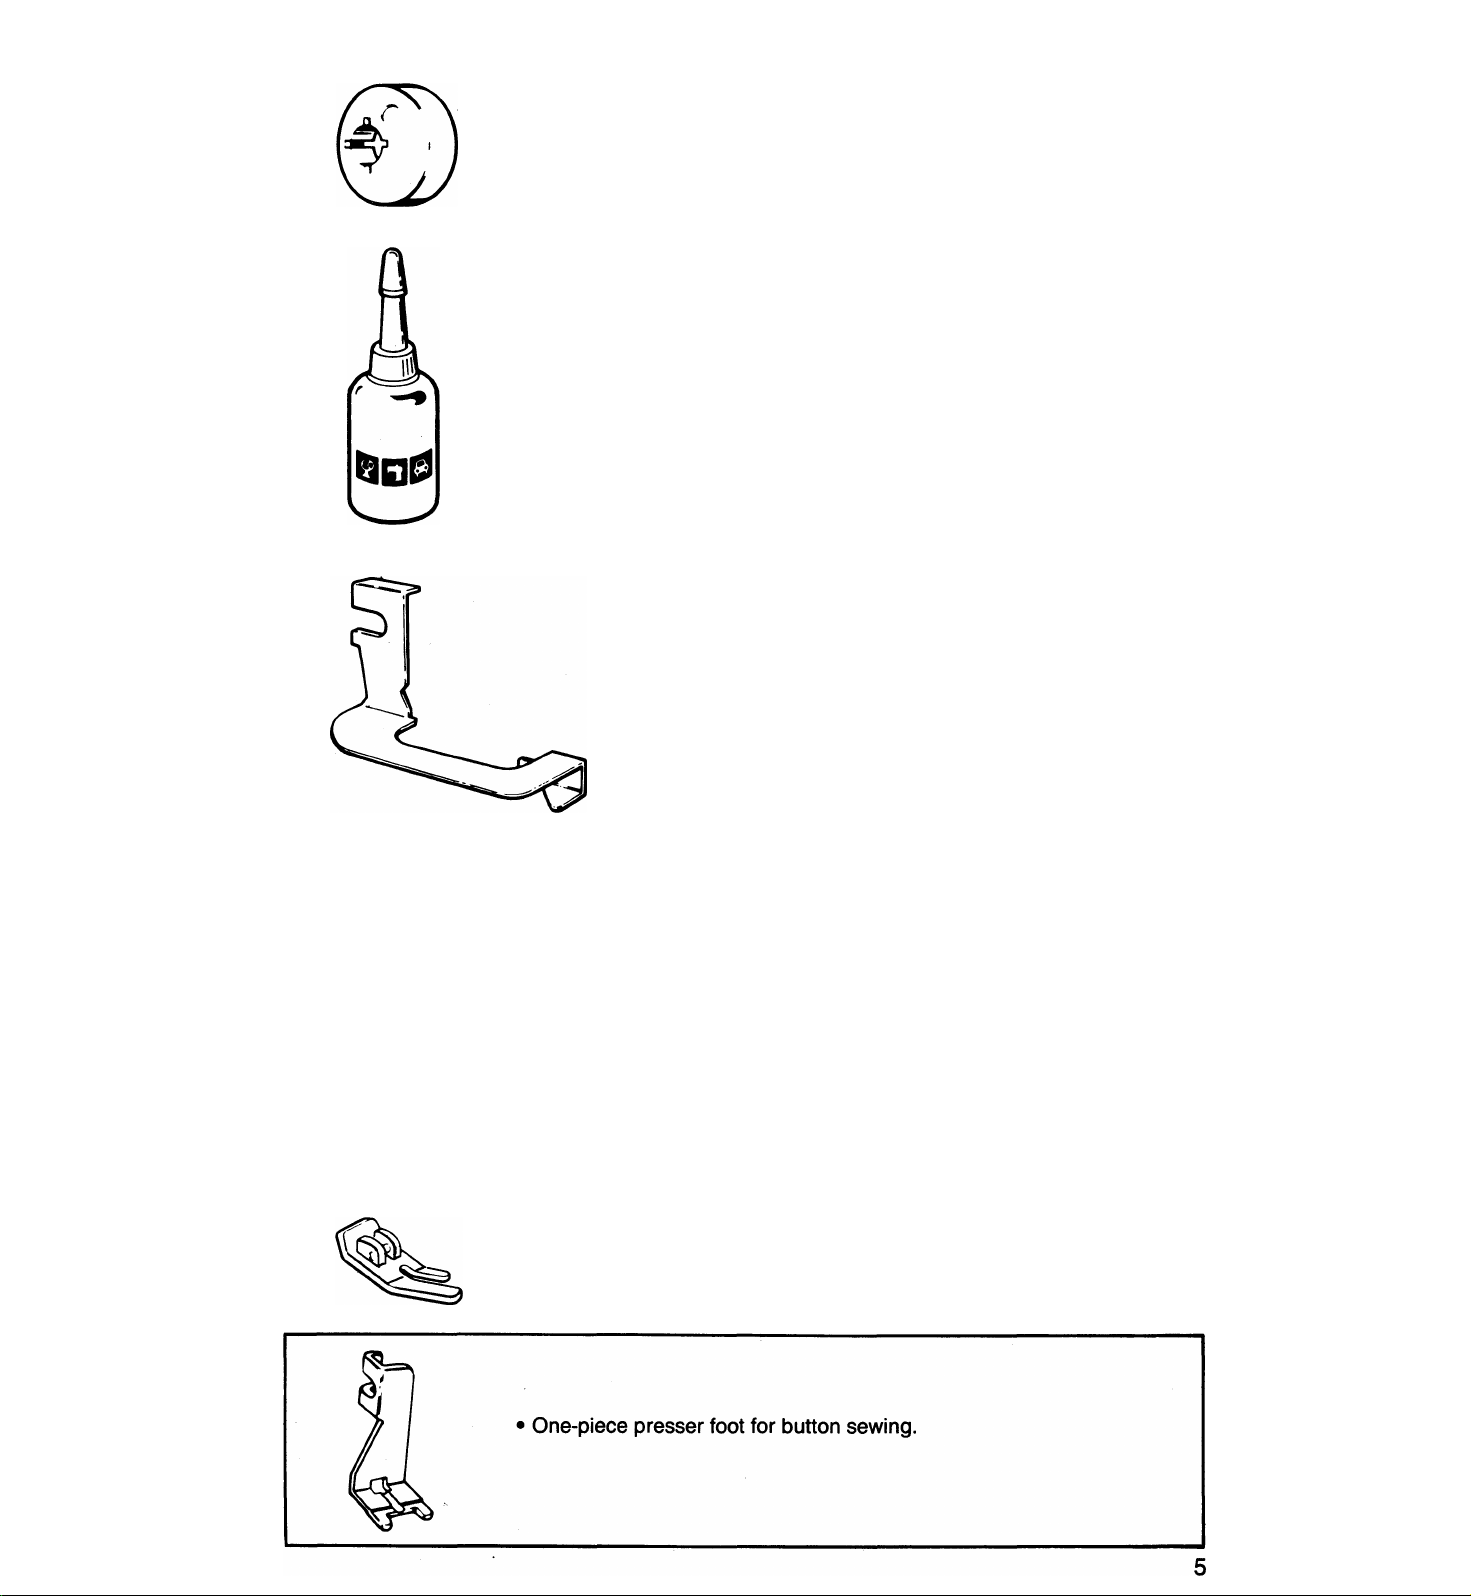
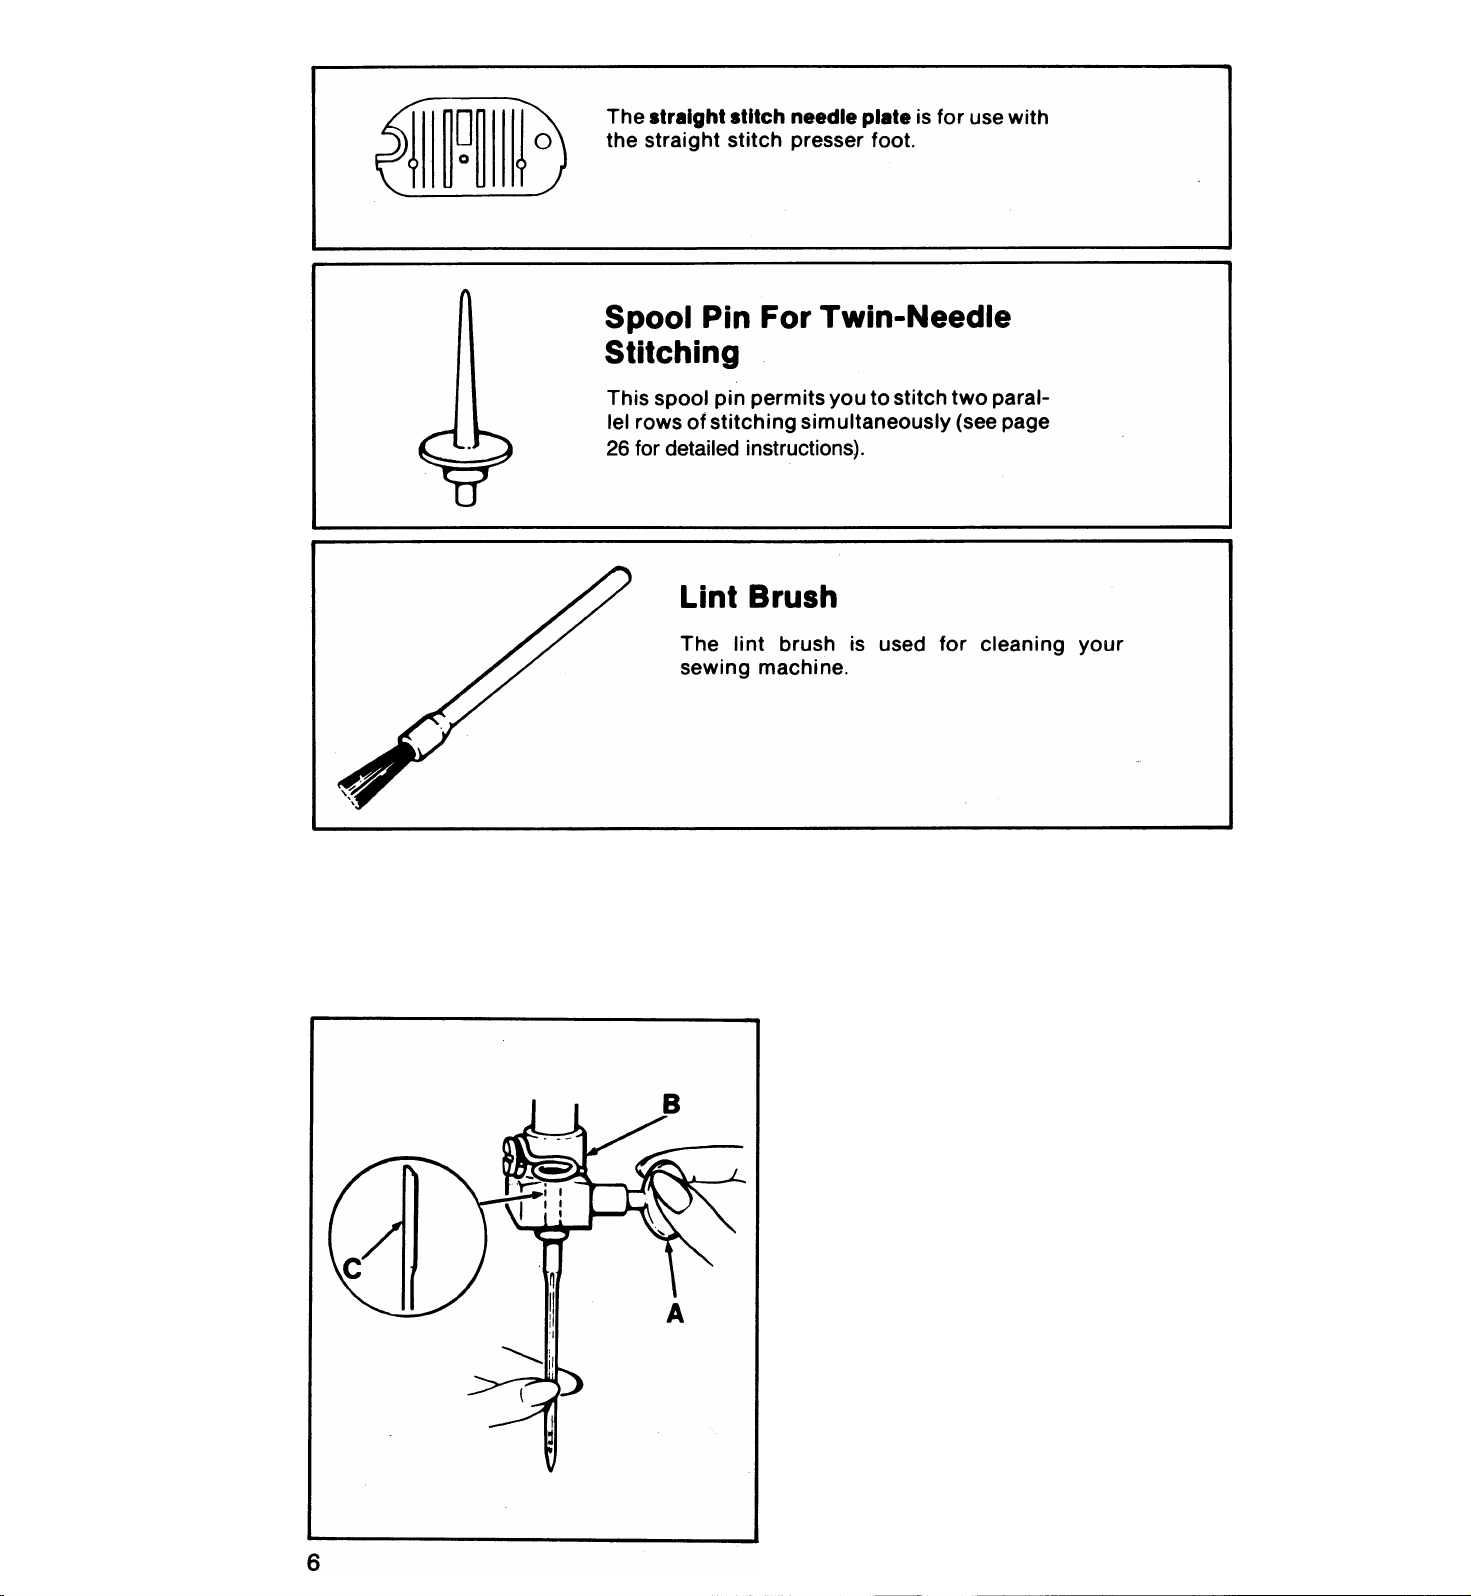
Thread Lead-Off
This lead-off holds narrow-diameter spools
of thread on the spool pin. (See page 9)
Container Of Oil
One container of oil.
Your machine will serve you perfectly for
many years if you will take a few moments to
keep it In good operating condition.
Blindstitch Hem Guide
The blindstitch hem guide, used with the
zig-zag foot, positions the hem fold in front of
the needle for blindstitch hemming. To attach
guide, loosen presser foot shank. Make sure
underside of guide ctears the slide plate and
front of foot.
Tighten presser-foot screw.
(only 8007 and 8019)
Optional Accessories
1
• Catalog 2025f needle for twin-needle work.
tCAUTION: Use this needle with the zig-zag
plate and zig-zag foot or special-purpose foot
only. Do not use any other accessories with
this needle as needle breakage will occur.
Straight stitch foot for close fabric control.
Changing The Needle
1. Raise the needle to its highest position by
turning the hand wheel toward you.
2. Loosen the needle-clamp screw A and
remove needle.
3. Insert new needle in clamp B with the flat
side C of the needle to the back; push it up
as far as it will go.
4. Tighten the needle-clamp screw.
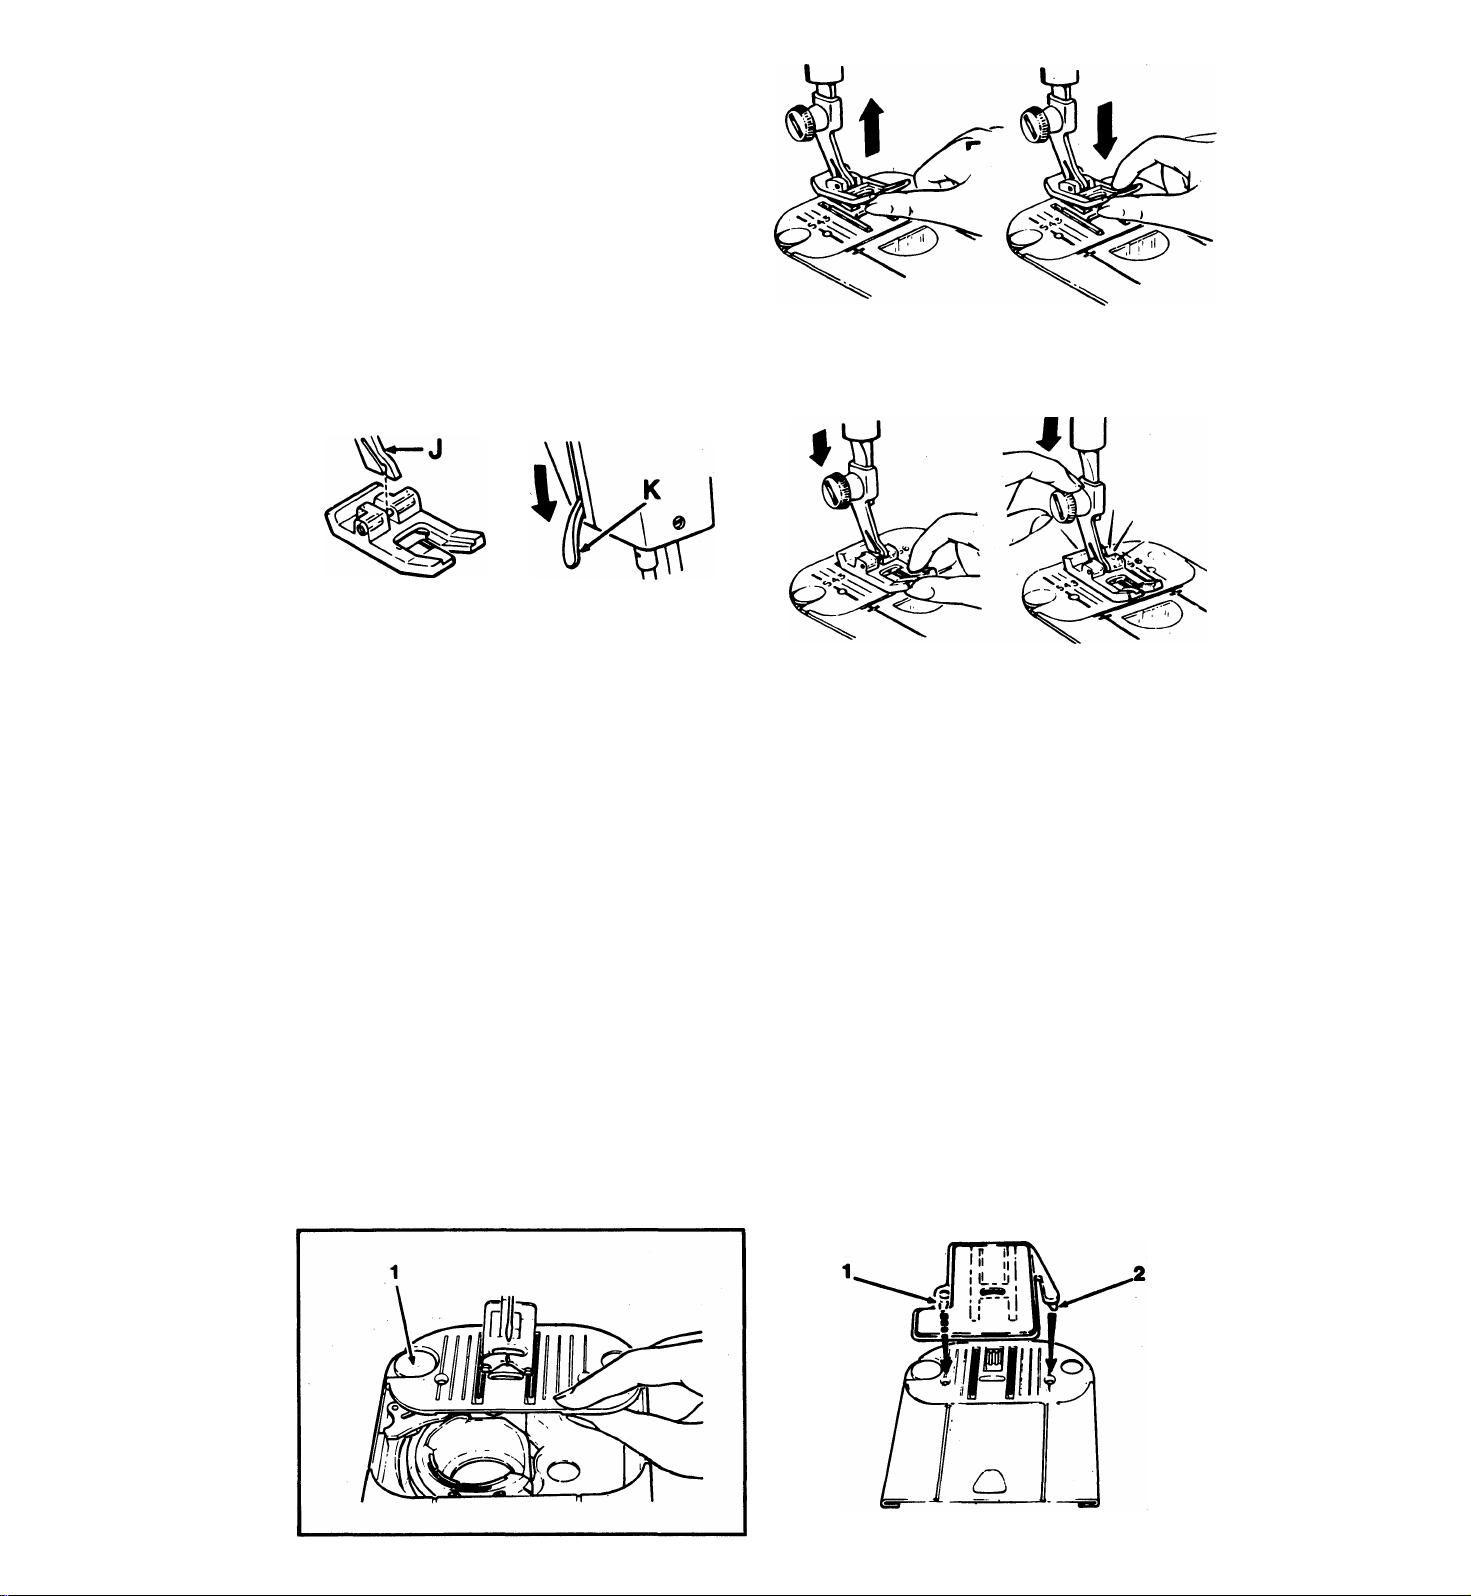
Changing Presser Feet
Most presser feet furnished with your machine
snap on and off a common shank.
e Raise needle and take-up lever to highest
position by turning hand wheel toward you.
• Raise presser foot.
To remove the complete presser foot (with
shank), of snap-on presser feet and one-
piece presser foot for button sewing, loosen
the presser foot screw and remove shank and
foot together.
2. Center the new presser foot under the
shank J.
Lower the presser foot lifter K so that the
shank fits over the presser foot pin.
1. Press toe of presser foot upward as far as it
will go. Then snap down to remove.
3. Press presser foot screw down firmly until
foot snaps into place.
Removing and Repiacing Needie Plate
e Raise presser foot.
e Turn hand wheel toward you until the needle
is in its highest position.
• Open the slide plate. Lift needle plate up and to
the right until it snaps free.
• Insert new needle plate by placing it under the
clamping pin (1) push it gently to the left and
press down until it snaps into place.
a Close slide plate.
Attaching Snap-In
Feed Cover
• Raise needle to highest position by turning
hand wheel toward you.
• Raise presser foot, open slide plate and in
sert zig-zag needle plate.
• Slide snap-in feed cover away from you over
needle plate until points (1) and (2) are positioned
directly over holes in needle plate as illustrated.
Snap in point (1). Then push (2) in toward point
(1) until it snaps into place. Close slide plate.
• To remove, open slide plate then simply lift
up front edge of feed cover, and remove.
Close slide plate.
2
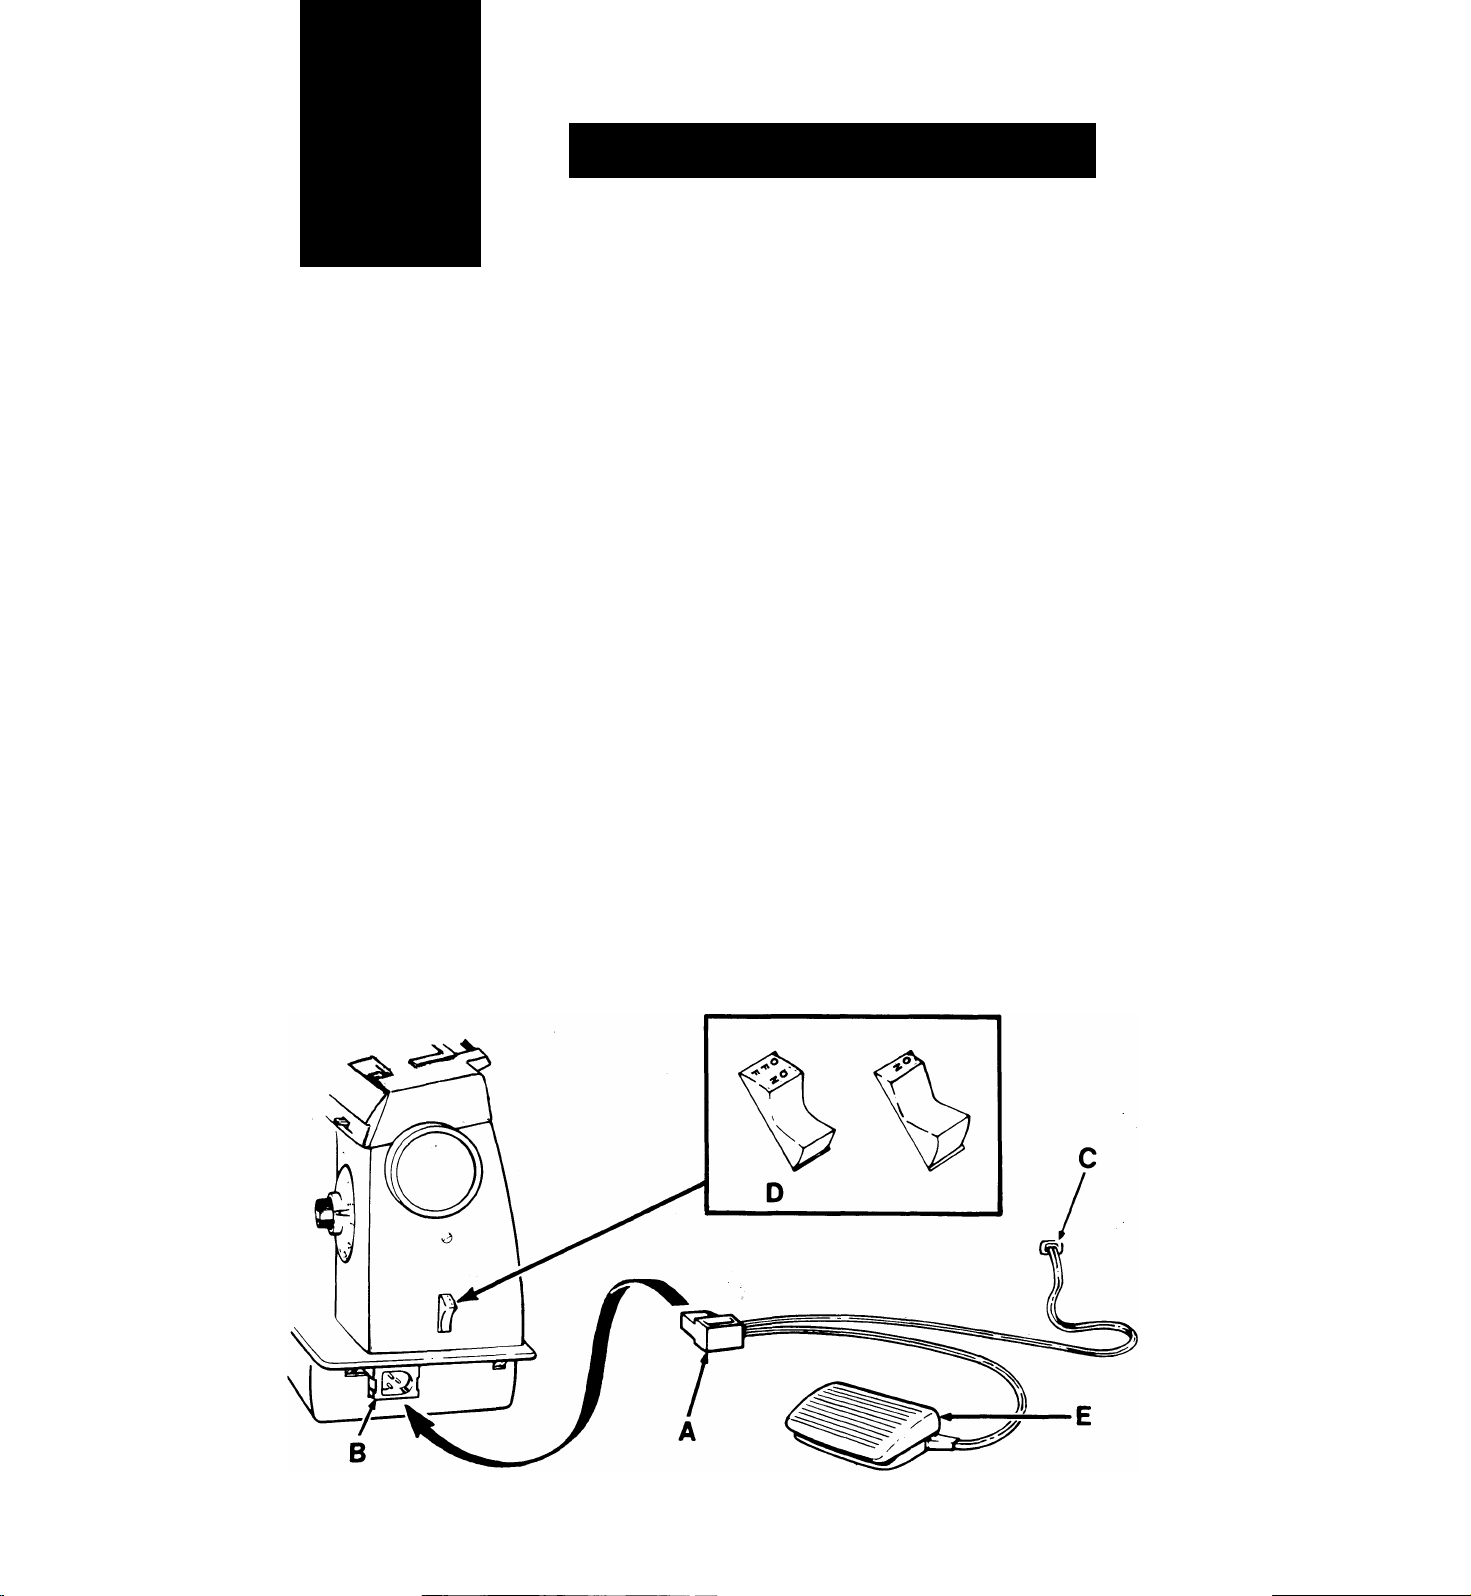
preliminary steps
Connecting Machine
Getting Ready to Sew
Before plugging in your machine, be sure that
the voltage and frequency indicated on the
right end of the machine are within the range
marked on the electric meter installed by your
power company.
Insert the machine plug A into the machine
socket B at the right end of the machine, and
connect the power-line plug C to your elec
trical outlet.
Operating Machine
To turn on the machine and sewing light, press
upper portion of power switch (D).
CAUTION: Disconnect the power-line plug
from the socket outlet when changing needle,
feet or needle plates or when leaving the
machine unattended. This eliminates the
possibility of starting the machine by acci
dentally pressing the speed controller.
To run the machine, press the speed controller
E with your foot. The harder you press, the faster
the machine will sew. To stop machine, remove
foot from controller.
CAUTION: Because of the up and down
movement of the needle, you must work care
fully and watch the sewing area when operat
ing the machine.
8
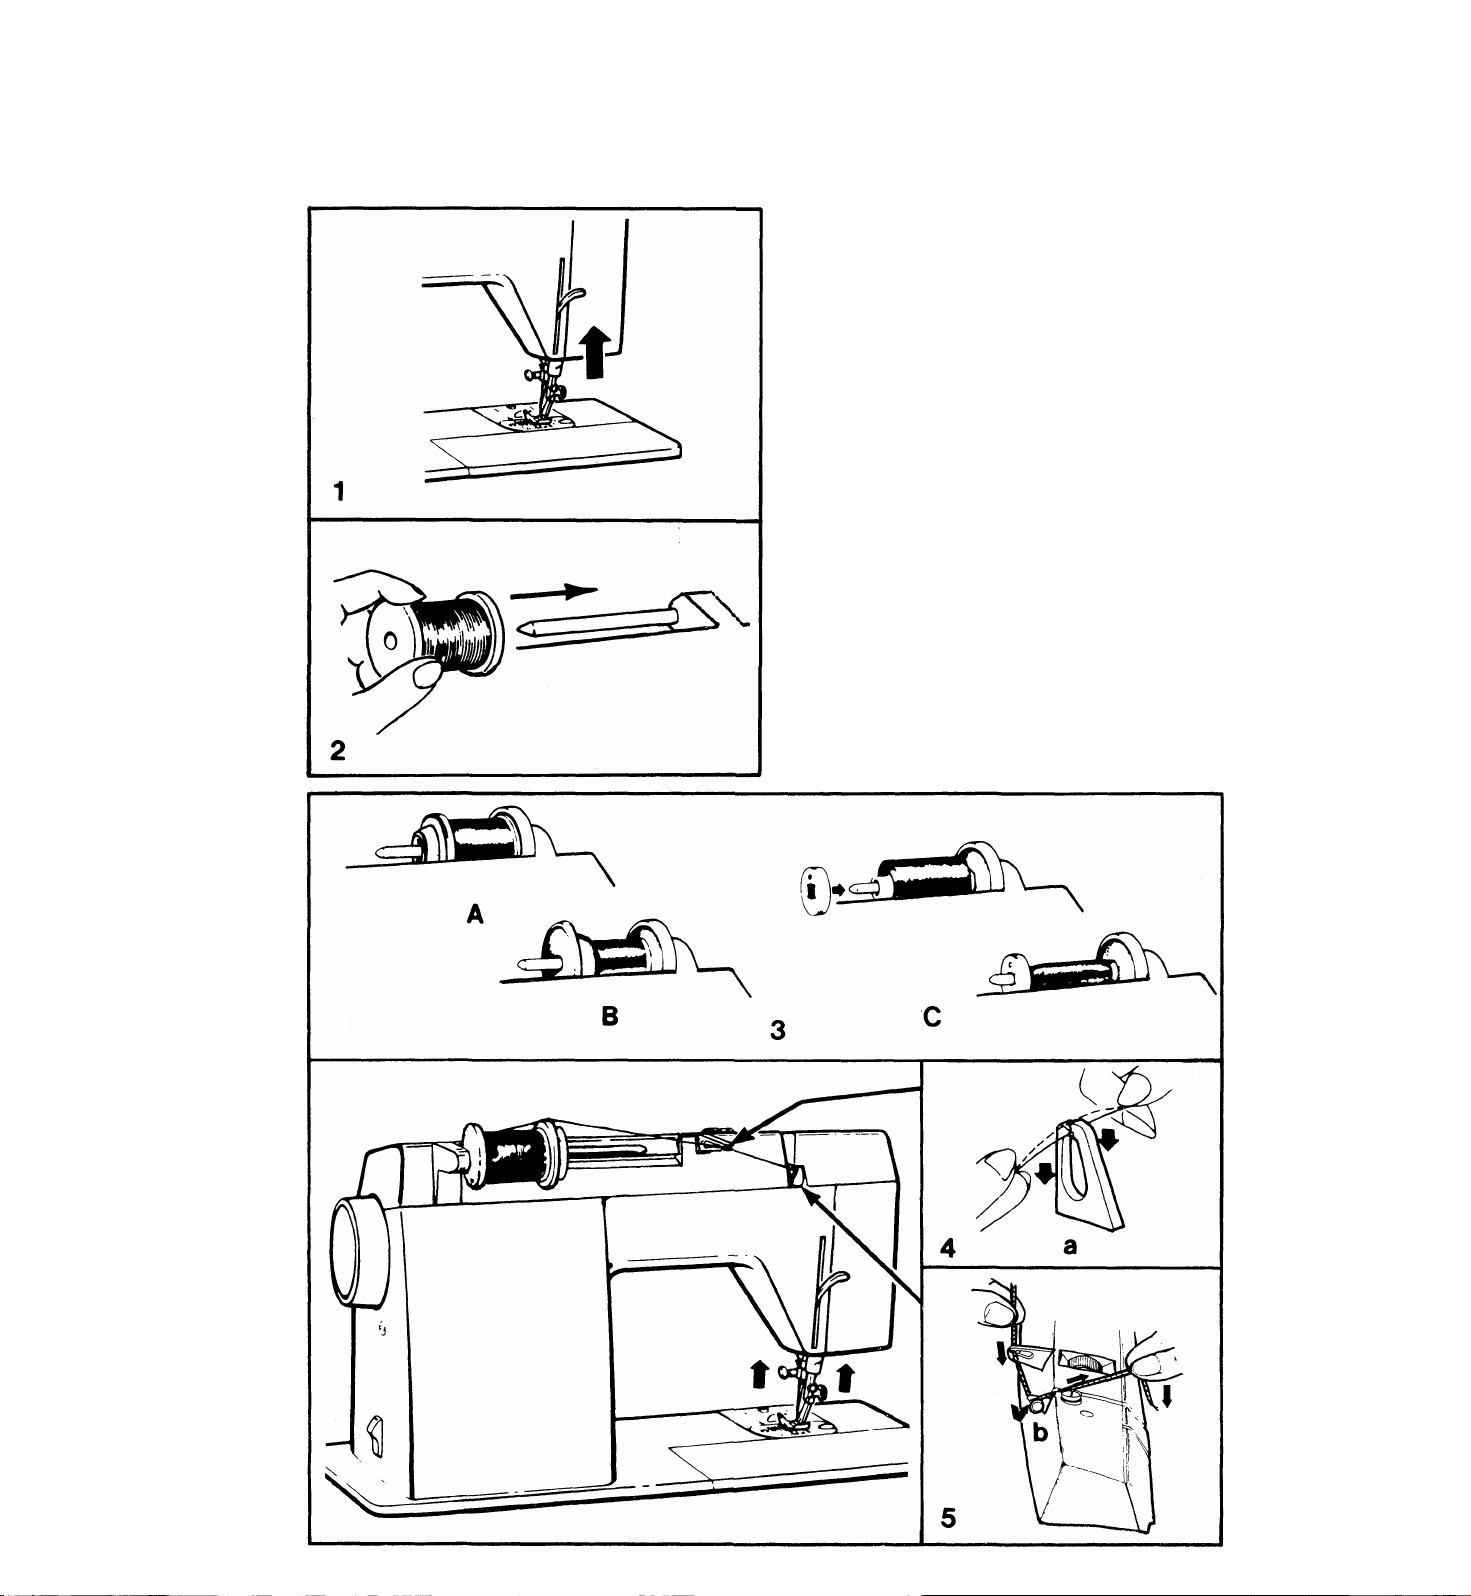
Threading The Machine
1. Raise presser foot and be sure needle is in
its highest position.
2. Place spool of thread on horizontal spool
pin. If spool being used has a retaining slit,
this should be placed to the right.
3. Press appropriate thread lead-off holder
firmly against spool.
A. For large spools of thread, use the large
holder with the wide end against the
spool.
B. For medium size spools, use the large
holder with the narrow end against the
spool.
C. For small diameters spools with either
large or small quantities of thread, use
the small lead-off which comes in your
accessory box.
4. Lead thread from spool holder and snap It
down Into guidepost eyelet a.
5. Hold thread down under finger, as illus
trated, and lead thread-under rear thread
guide b, behind pre-tension disc, and
across slot in top of machine.
6. Draw thread firmly between left tension
disc c and tension separator d, then down
around thread guide e on front of machine.
( Presser foot must be raised to allow
thread to enter discs.)
7. Thread take-up lever f by guiding thread
through slot g and into eyelet h.
8. Lead thread from take-up lever down to
lower thread guides I. as shown, and
thread needle from front to back. Draw
10cm (4") of thread through needle eye j.
10
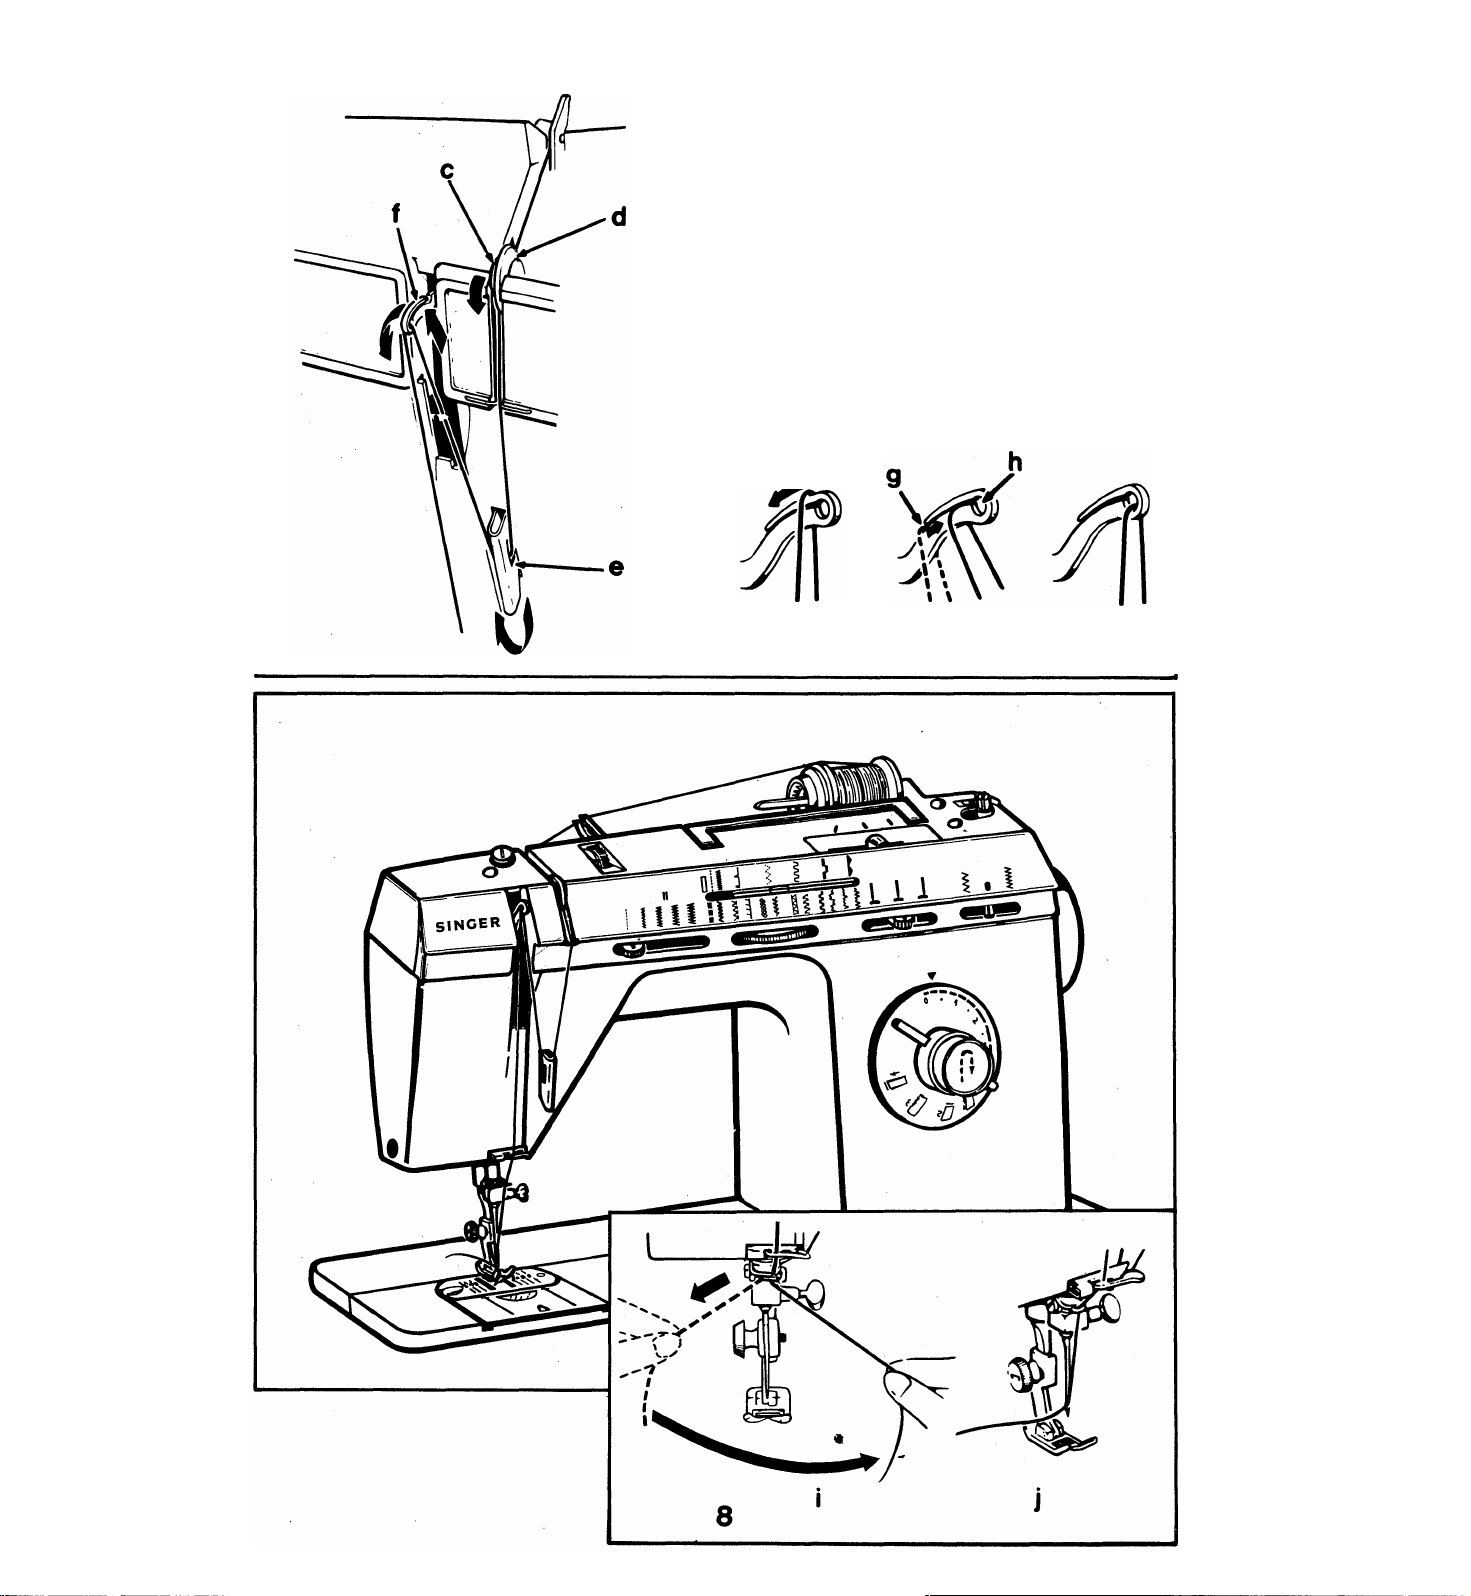
Winding a bobbin
Winding a bobbin is quick and easy when you follow the directions below. Always wind
the bobbin before threading the machine and needle.
• Push in indent (1) on hand wheel disc. This will stop the needle from moving.
• Place spool of thread on spool pin.
• Slide spool cap (2) firmly over rim of spool to prevent thread tangling.
• Lead thread from spool and snap into thread guide post (3).
• Wind thread clockwise around front of bobbin winder tension disc (4).
• Pass thread end, from inside, through small hole in rim of bobbin.
• Place bobbin on spindle and push it to the right.
• Holding thread end, step on speed controller to run machine until desired amount of thread
is wound. (Winding stops automatically onpe bobbin is full.)
• Cut thread; push bobbin to the left and remove it from spindle.
• Trim thread end from top of bobbin.
• Return hand wheel disc to sewing position by pressing on side opposite indent.

Inserting a bobbin
To insert a bobbin, follow the instructions
below:
• Raise presser foot.
• Turn hand wheel toward you until needle
is in its highest position.
• Open slide plate and remove empty bobbin.
1. Pull 4" (10cm) of thread from replacement
bobbin and insert bobbin into case, as
shown.
2. Holding bobbin in place, guide thread into
notch (1) and then down the slot to the
left and guide around into notch (2).
• Draw several inches of thread diagonally
across the bobbin toward the back of the
machine.
• While holding thread on outside, close the
slide plate, allowing thread to extend
through the slot between the slide plate
and needle plate.
• Follow directions for “Raising Bobbin Thread”
below.
Raising the Bobbin Thread
1. Hold needle thread lightly with left hand
and turn hand wheel slowly toward you
so that needle enters needle plate.
2. Continue turning hand wheel until needle
rises and brings up bobbin thread in a loop.
3. Undo the loop and place both threads
under the presser foot, drawing them to
the back of the machine. Position needle
In fabric where desired, lower the presser
foot and stitch.
12
how to start sewing
How you begin to sew after winding a bobbin
depends on whether your stitching is to start
at or away from the edge of the fabric.
To start At Fabric Edge
• Pull thread back under presser foot.
• Position needle in very edge of fabric by
pressing speed controller lightly or turning
the hand wheel.
• Lower the presser foot and stitch.
To start Away From
Fabric Edge
• Pull thread back under presser foot.
• Position needle in fabric where desired
• Lower the presser foot and stitch.
The fabrics below can be of any fiber; cotton, linen, silk, wool,
synthetic, rayon, blends. They are listed as examples of weight. NEEDLES
Fabric, thread
and needle table
The needle and thread you
choose will depend upon the
fabric being sewn.
The table is a practical
guide to needle and thread
selection.
Always refer to it before
beginning a sewing project. Be
sure to use the same size and
type of thread in both needle
and bobbin.
LightWeight
MediumWeight
MediumHeavy
Knits
tNot recommended on stretch fabrics
Fabrics Thread
Batiste
Chiffon
Crepe
Corduroy
Flannel
Gabardine
Gingham
Linen
Muslin
Wool Crepe
Bonded Wovens
Canvas
Coating
Denim
Duck
Sailcloth
Bonded Knits
Double Knit
Jersey
Tricot
Cotton-wrapped
Polyester
100% Polyester
tMercerized Size 50
Nylon
Cotton-wrapped
Polyester
100% Polyester
tMercerized Size 50
Nylon
Cotton-wrapped
Polyester
100% Polyester
tMercerized Size 40
t“Heavy Duty" 2020
Cotton-wrapped
Polyester
Polyester
Nylon
Type
2020
2020
2020
Bail-Point 2045
Size 11/80, 14/90,
16/100
Size
11/80
14/90
16/100
18/110
13

setting selectors
Needle-Thread
Tension Dial
Stitch
Width Pattern
Selector Group Selector
Stitch Pattern
Selector
Needle
Position
Seiector
Stitch
Baiance
Control
Stitch Length Selector
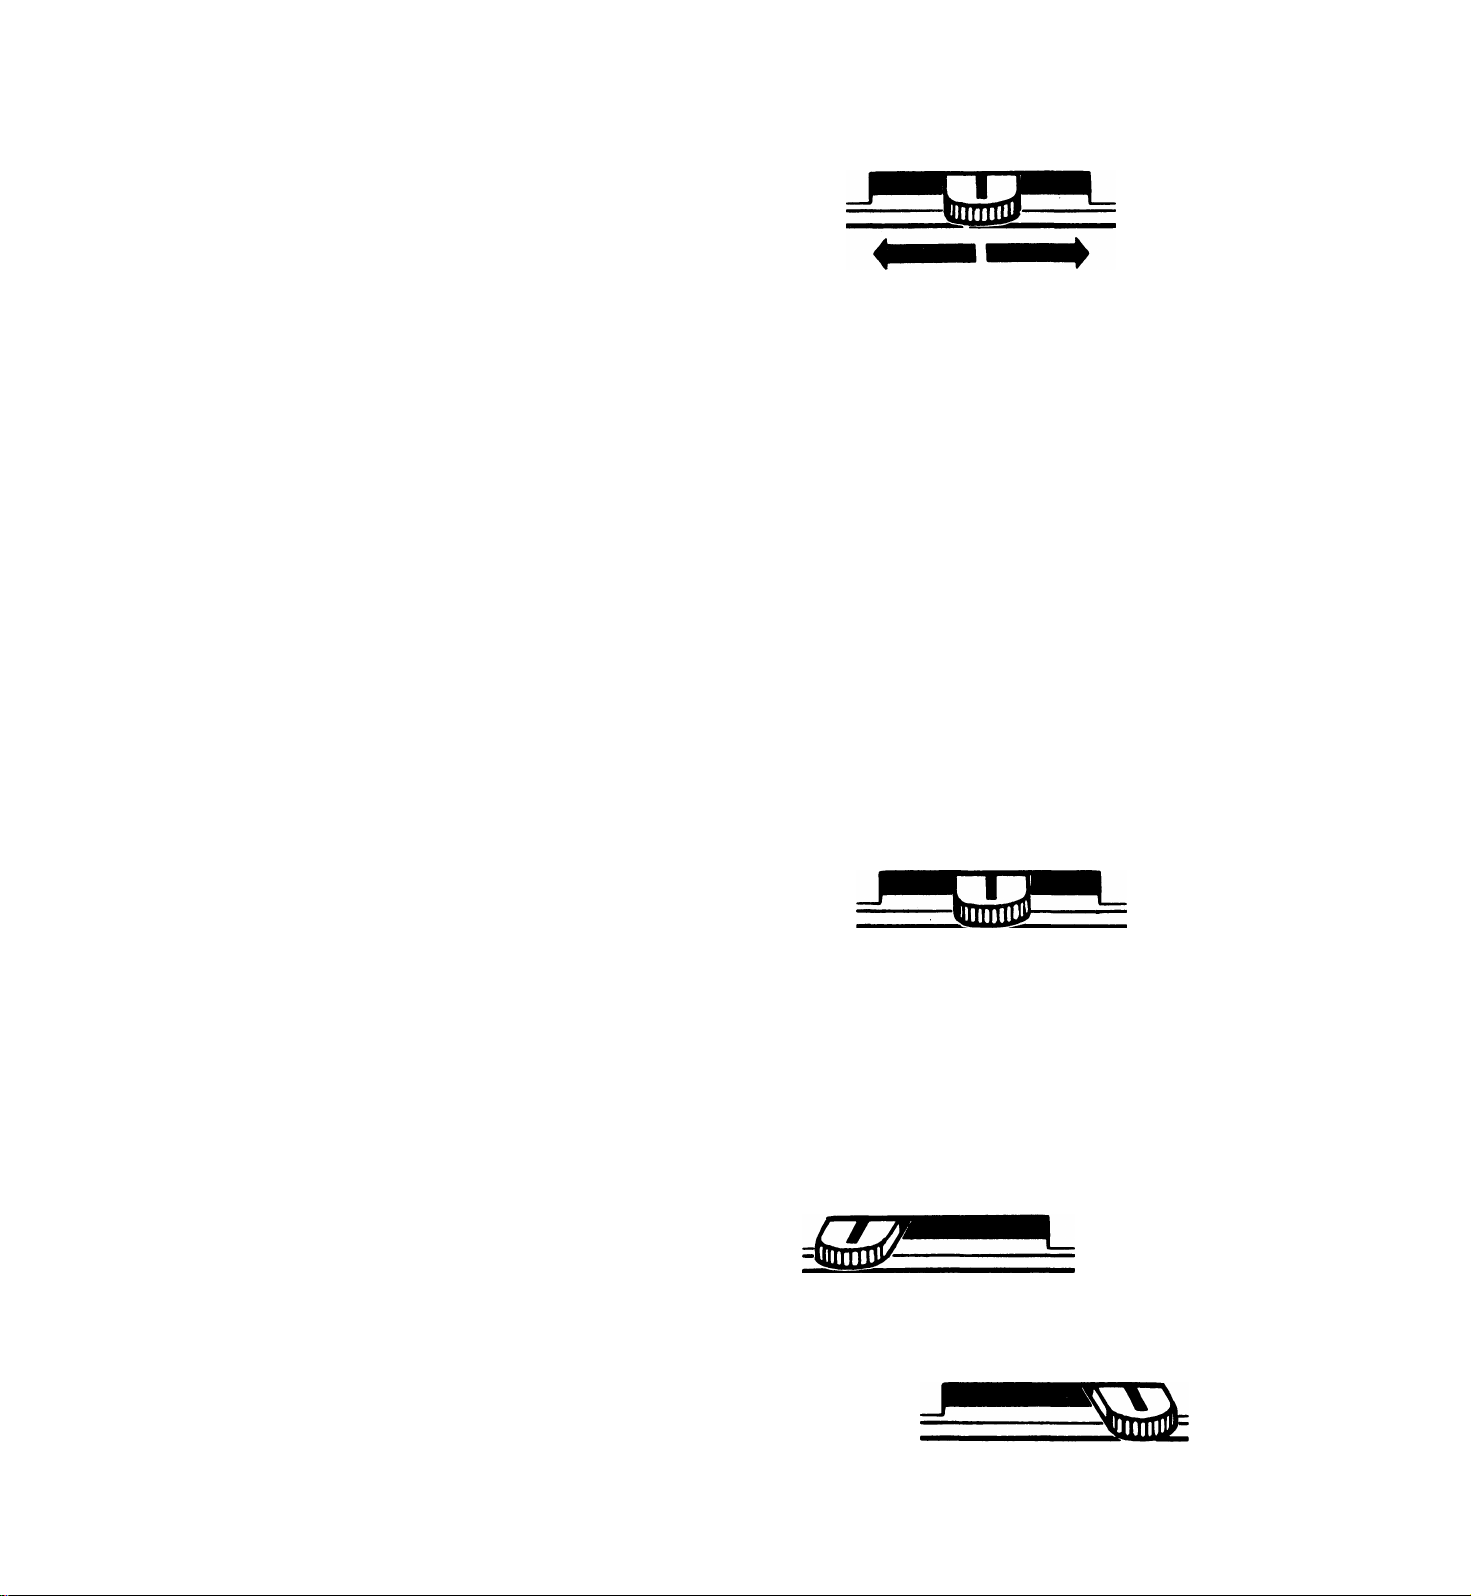
Setting Stitch Width
The Stitch width selector does two jobs: it
sets the machine for straight stitching, and
it controls the width of zig-zag stitching. Four
stitch width settings are indicated plus a
setting for straight stitching.
Before moving the selector, make sure needle
is above the fabric.
To set stitch width, slide the seiector lever
until indicator line is aligned with desired
setting.
Straight Stitching: Set the selector at
Zig-Zag Stitching: To suit sewing
application, set the selector at any zig-zag
position between | (narrow-position) and
S (wide-position).
Setting a Needle Position
The needle position selector B places the
needle in left ( ), center ( X ) or right
( X ) stitching position. You will need to set
it before you start running the machine.
Before moving the selector, always make
sure the needle is out of the fabric.
To position the needle, slide the lever to left or
right until indicator line is under desired
setting.
1 1 -L
B
Straight-Stitching: Normally you will use the
center ( X ) needle position. But if you wish
to place the stitching at left or right of center,
slide the lever to desired position. The zig-zag
needle plate and zig-zag foot must be used if
left or right needle positions are selected.
Zig-Zag Stitching: You will use center ( X )
position most often. Left ( X )
( X ) positions are for special stitch
placement. For example: A X setting is
used for button sewing. Settings X ^nd
X
are used to place narrow zig-zag
stitching to the left and right of center in
decorative work.
111
111
111
15

Regulating Needle-Thread
Tension
The needle-thread tension dial regulates the
amount of tension on the needle thread and
lets you select just the right setting for your
fabric and thread. The numbers on the dial
eliminate guesswork in duplicating settings.
Correct A tension is important because too
much or too little will weaken your seams or
mar the appearance of decorative work. To
determine the correct tension, make a test on
a sample of your fabric. If the stitches look
loose B, increase tension. If the fabric
puckers C, decrease tension.
(For instructions on adjusting zig-zag stitch tension,
see page 24.)
• To increase tension, turn to higher number.
• To decrease tension, turn to lower number.
Setting stitch Length
The stitch length selector dial controls the
length of both straight and zig-zag stitching.
The numerals from 1 to 4 represent the length
of each stitch in millimeters: the higher the
number, the longer the stitch. Generally,
shorter stitches are best for lightweight fabric,
longer ones for heavier fabric.
The area between 0 and 1 represents stitches less
than 1 mm long, and is used for closed zig-zag or
satin stitching.
• To shorten stitch iength, turn dial clockwise
A to a lower number.
• To lengthen stitch iength, turn dial coun
terclockwise B to a higher number.
For reverse stitching, depress push button C
located in center of dial, hold in until reverse
stitching is completed, then release push but
ton. Push button can be depressed while
machine is sewing.
Note: Reverse stitching cannot be done
when using a Flexi-Stitch* pattern
16

Dll i i t
A (only 8007 and 8019)
Setting Pattern Group Selector (A)
The pattern group selector A gives you a
choice of six groups each containing
three patterns.
Raise the needle to its highest position.
(only 8019)
i! L i J
• Set the stitch width selector to the
straight position ( j ). (This allows the
pattern selector to be moved easily).
• Rotate the pattern group selector to
the centre of the desired pattern group.
Select a pattern group before you set the
stitch pattern selector B.
To select a pattern group, rotate
selector until the indicator C show the
group you have selected.
Then set stitch pattern selector for the
selected pattern colour following the
directions below.
Setting Stitch Pattern Selector (B)
The Stitch pattern selector lets you choose
one of the three stitches from the pattern
group you have chosen.
17

straight Stitching
3
setting selectors
Before making any setting adjustments, raise
the needle out of the fabric.
• Pattern Group; Any Yellow Pattern
• stitch Width: 0] I fit
• Needle Position: L «L
• Stitch Length: To suit fabric
• Zig-Zag or Straight Stitch Foot
When your fabric or sewing procedure re
quires close control, you may wish to use the
straight stitch presser foot and the straight
stitch needle plate that come with your ac
cessories.
L X 1
sewing a seam
Pin Basting
Pin basting is a time saver and can be used in
place of hand basting when you are sewing
seams in easy-to-handle fabrics. When sew
ing with pins it is important to use fine pins
and to place them correctly in relation to the
stitching line.
Place pins so that:
• They are at right angles to the stitching line.
• They just nip Into the fabric at the stitching
line.
• They do not extend under both sides of the
presser foot. Never place pins on the
underside of the fabric in contact with
the feed.
•
(optional)
• Sew, pulling pins out of fabric as you stitch.
We do not recommend sewing over pins.
18

9mm (3/8")
1.3cm (1/2")
9cm (3/4")
1.6cm (5/8")
Starting a Seam
1. Set Stitch length selector for desired length
of stitch.
2. Align edge of fabric along one of the num
bered guidelines on the needle plate.
3. Position needle in fabric about 1.3cm (’/2")
from the edge.
4. Lower the presser foot. Depress and hold
reverse-stitch push button, and run the
machine at a slow speed.
• While holding reverse-stitch push button,
back-stitch to edge of fabric for reinforce
ment. (Do not sew beyond edge of fabric).
5. Release push button and stitch forward
to end of fabric, using the selected guide
line to keep seam straight.
19

Ending A Seam
1. Leave presser foot in down position.
Depress and hold reverse-stitch push but
ton and run the machine at slow speed.
• While holding reverse-stitch push button,
back-stitch about 1.3cm (1/2") in from
edge of fabric to reinforce end of seam.
2. Then release push button. With the takeup lever at its highest point, raise the
presser foot and remove the fabric by
drawing it back and to the left.
3. Cut thread ends on thread cutter at rear of
presser bar.
Guiding and Supporting Fabric
4. Most fabrics need only to be guided in
front of the presser foot.
CAUTION: Do not pull the fabric as you
apply gentle or firm tension while stitch
ing, as this may deflect the needle, causing
it to break.
Some fabrics, such as filmy sheers, knits,
5.
etc., require support in front and back of
the presser foot while being stitched.
20

Zig-Zag Stitching
4
how patterns are produced
There are two kinds of stitch patterns built into your
machine: Fashion * Stitch patterns A (only 8007
and 80T9) and Flexi-Stitch* patterns B (only
8019).
The Fashion Stitch patterns, colour-coded yellow
on your machine are produced by the side to side
movement of the needle. The Flexi-Stitch patterns,
colour-coded green and blue (identified by t in the
illustration below) are produced by both the side
to side movement of the needle and the back and
forth movement of the feed to produce multi
purpose and decorative stitch patterns.
The six groups of three stitches each that
are built into your machine are illustrated
below.
tSLOW speed setting is recommended for sewing
Flexi-Stitch patterns.
This stitch is designed for strength and performance
and cannot readily be ripped out without risk of fabric
damage.
Stitch Pattern Groups
(only 8007 and 8019 — Yellow)
\
III
t t
t t
B (only 8019 — Green and Blue)
t t
21

selecting and adjusting zig-zag stitches
Selecting a Pattern Group
(only 8007 and 8019)
When you rotate the pattern group selector C selector as required, sliding the indicator through
one of six different groups of pattern stitches the panel, until it positions one of the pattern groups
Is available to you. Rotate the pattern group you’ve chosen.
Selecting a Stitch Pattern
(only 8019)
The stitch pattern selector D lets you choose one
of the three stitches from the group you have
selected. Notice the colour of the stitch you have
chosen: green (1), yellow (2), or blue (3). To select
any pattern, slide pattern selector until it is
aligned with corresponding colour.
22

1. Adjusting Width
Of The Design
Before moving stitch width selector, always
raise needle above fabric.
To produce a zig-zag stitch, the stitch
width selector must be moved from I
toward the right. The further you move the
selector lever toward the right, the wider
your stitch will be.
2. Adjusting Stitch Piacement
Before moving needle position selector,
make sure needle is above fabric.
A needle position selector setting of
places the needle in centre stitching posi
tion. Selector settings and J[ place
the needle in left and right stitching posi
tion at stitch width settings narrower than
the maximum width.
Selector setting JL (centre) is used most
often. Settings (left) and (right) are
for special placement of stitching. For ex
ample, a (left) or setting is used for
button sewing. A (left) or (right)
setting is used to place narrow zig-zag
stitching to the left or right of centre In
decorative work.
3. Adjusting Stitch Length
When you are preparing to do zig-zag
stitching, make a test sample with the
fabric and thread you plan to use so that
you can adjust the stitch length correctly.
Any stitch length setting from 1 to 4 will give
you an open zig-zag stitch of whichever
Fashion Stitch pattern you select. The higher
the number, the more open , or farther apart,
your stitch will be.
The area between 1 and 0 of the selector is used
for the fine adjustment of zig-zag satin stitching.
For information on satin stitch length adjustment,
see page 25.
For all green or blue Flexi-Stitch patterns, stitch
length is controlled with a single setting of the stitch
length selector. Simply rotate it until the
(Green/Blue) mark A is under the triangle above
the selector.
23

4. Adjusting Needle-Thread Tension
When you are preparing to do zig-zag
stitching, make a test sample with the
fabric and thread you plan to use so that
you can adjust the needle-thread tension
correctly.
Zig-zag stitching requires less tension
than straight stitching. Notice the stitching
on your test sample. The stitchesshould lie
flat Bagainstthefabric without causingthe
fabric to pucker. If the stitches are not flat
C and thefabric is puckering, lower the ten
sion by turning the dial to a lower number.
5. Adjusting Stitch Balance
(only 8019)
When you are using a Flexi-Stitch pattern
you may need to balance your stitching in
order to achieve the correct pattern D (see
illustration).
Before you movethestitch balancecontrol
lever E from Its neutral position (lever at
center of | ),makeatest sample. If adjust
ment Is required, stitch slowly and move
the stitch balance control lever as you sew.
pattern together.
24
the pattern.

Satin Stitching
Satin Stitching is a series of closely spaced
zig-zag stitches that form a smooth satin-like
surface. It is useful for both utility and decora
tive work. Always make a test sample first so
that you can adjust the stitch length and
thread tension properly.
Soft fabrics may require a backing to ensure
firm satin stitching. Crisp organdy and lawn
are suitable for this purpose.
• Pattern Group: iiilU^ Yellow
• Stitch Width: i ii I I il
• Needle Position: J* [X] A
• Stitch Length: Between 0 and 1
• Special Purpose Presser Foot
• Zig-Zag Needle Plate
ill
Adjusting Stitch Length
1. Turn selector dial to 1 and runthe machine.
2. While running machine, gradually turn dial
toward 0 until stitches are closely spaced
and form a smooth satin stitch.
When a smooth satin stitch has been obtained,
you may run the machine at any desired speed.
Adjusting Thread Tension
Satin stitching requires less tension than
straight stitching or open zig-zag stitching.
Furthermore, the wider the stitch, the lighter
the tension on the thread must be.
Notice the stitching on your sample. If the stitching
appears to be too tight or the fabric is puckering,
lower the thread tension by turning the dial to a
lower number.
25

5
Twin-Needle Stitching
By using a twin needle, you can produce
simultaneously two parallel, closely spaced lines
of straight or zig-zag stitching. Effective for
decoration, twin-needle stitching is not
recommended for seams or for use on knits.
Your machine is not supplied with the twin needle
or spool pin. These may be obtained from your local
SINGER stockist as optional accessories.
Before inserting the twin needle, place the needle
position selector at centre and stitch width
selector at ; and, remove the single needle.
4. Pass the horizontal spool pin thread through left
5. Place vertical spool of thread on detachable
threading the twin needle
1. Thread machine with first thread from horizontal
spool pin as instructed on page 9, making certain
thread passes between tension separator and
left-hand tension disc.
2. Raise presser foot.
3. Insert twin-needle spool pin (optional) into hole
provided for it in machine top cover.
26
6. Draw both threads under the foot and back
7. Slowly lower the needle into the hole in the
8. Make sure not to use a stitch width greater than
eye of needle.
spool pin and thread machine as for one-needle
stitbhing except;
• Pass thread between tension separator and
right-hand tension disc. Continue to thread
all other threading points.
• Pass thread through right eye of needle.
along with the bobbin thread.
needle plate by turning the hand wheel toward
you to make sure the needle clears the plate.
that what is recommended when twin needle
stitching.

machine settings
Straight Stitching With a
Twin Needie
.stitch Width: [Dilli
• Needle Position: [2 ^
• Stitch Pattern: Any Yellow Pattern
• Zig-Zag Pressar Foot
• Zig-Zag Needle Plate
Zig-Zag Stitching With a Twin Needie
• Pattern Group: Any Zig-Zag Pattern
.stitchWidth:! [Ql i
Note: Do not exceed this stitch width setting.
• Needle Position: [2 Jl
• Zig-Zag Pressar Foot (open patterns or
Special Purpose Foot (satin stitching)
• Zig-Zag Needle Plate
tCAUTION: Do not use a stitch width greater than what is recommended.
A wider stitch will result In needle breakage.
27

Free-Motion Stitching
In tree-motion stitching, you sew without a
presser foot and control fabric movement by
means of an embroidery hoop. Either a
straight stitch or a plain zig-zag stitch can be
used. Because you can move the hoop in any
direction—forward or backward, from side to
side, or even diagonally — tree-motion stitch
ing is extremely useful for embroidery de
signs. On the other hand, it is equally useful
for darning.
If you are embroidering, you can vary the
length of stitches simply by moving the hoop
faster or slower under the needle. The faster
you move the hoop, the longer the stitches
will be. You can also vary the width of zig-zag
stitches from wide to narrow by controlling
the angle at which the hoop is placed and
moved under the needle.
For darning, the embroidery hoop used In
free-motion stitching enables you to hold
fabric taut — a real advantage when your
fabric is lightweight or soft and thus likely to
pucker. See page 47 for directions.
preparation
1. Have available an embroidery hoop
designed for machine use, large enough
to encompass the entire design, but small
enough so that hoop is easily managed.
2. Remove the presser foot.
3. Insert zig-zag heedle plate and snap-in
feed cover.
4. Rotate stitch length selector dial clock
wise to 0.
28

floral designs
• Pattern Group: hi
• Stitch Width:
• Needle Position: i. «L
• Stitch Length:©
• Presser Foot: None
• Snap-In Feed Cover
• Speed Range: To suit operator
With a little practice on yoursewing machine,
you will be able to embroider flowers to decor
ate table linens and other household Items, as
well as dresses and blouses. If you have de
signing skill, you will enjoy creating your own
designs. Otherwise, you can buy attractive
transfer patterns.
III
III
lili
Yellow
* •
To embroider flower designs, prepare the machine
and your fabric by following the same steps as for
free-motion stitching (page28).
On your test sample, try out different stitch
width settings to determine the one or more
best suited to your design.
When filling in outlines, place stitches in
parallel lines, shifting the hoop movement as
appropriate to the design.
• For a smooth satin stitch that will catch the
light, place the parallel stitches close to
gether, moving the hoop slowly and
steadily.
For an irregular texture, move the hoop
more rapidly, allowing some stitches to
overlap.
A series of bar tacks can be used to form
spray-like leaves or flowers.

Sewing the Professional Way
sewing knit and stretch fabric
When you sew stretch fabrics, doubleknit,
tricot and jersey, choose one of the stretch
patterns that sews stretch into the seam.
The table below will help you to select the
right stitch pattern for your fabric and sew
stitch Pattern Chart
Stitch Pattern
Pattern Group
Stitch
Length
■
Straight Stretchf
Plain Zig-Zag
[sjl t
ill
Optional
A/WWVW\
Ric-Rac Stitchf
7VVVVVV
Overedge Stretch
Stitchf
ill'“”’
j|jj^ (Green)
r M
ing job. Remember to useaSINGER*ball
point (yellow band) needle. Catalog 2045,
in your machine when you sew synthetic
knit or stretch fabric.
Where to use
Heavy-duty construction seams — Seam reinforce
ment — Dungaree seams — Crotch seams.
General-purpose stretch sewing — Lingerie seams
— Attaching stay tape — Seam finishing — Edge
finishing — Attaching stretch lace.
Heavy-duty, general-purpose sewing.
Overedge seams that stretch — Crotch seams —
Waistband and seam finishes in shorts and slacks —
Swimsuit construction.
y-VY'V
(Yellow)
Blindstitch
/77777777777
Slant Overedge
Stretch Stitchf
1 j|
1 (Green)
Honeycomb Stitchf
V A ,A A /
V V V v'
Multi-Stitch
Zig-Zag
V>V9>>y
Feather Stitchf
Straight Feather
Stitchf
tThis stitch is designed for strength and permanence and
cannot readily be ripped out without risk of fabric damage.
30
l[||l
k i
II
(Blue)
I
(Blue)
Optional
fH
Optional
M
ËÜ
Blindstitch hemming — Overcast seam finishing —
Shell hems in lingerie.
Sweater and swimsuit construction — Overcast
seams in bulky knits and stretch terry cloth —
Attaching elastic and stretch lace — Edge finishes
for seams, hems, and facings.
Attaching elastic and stretch lace — Lingerie and
girdle repair — Swimsuit construction — Edge
finishes for seams, hems and facings — Blanket
binding.
Attaching elastic and stretch lace — Lingerie and
swimsuit construction — Girdle seams — Seam
finishes — Casings and waistband finishes —
Blanket bindings.
Swimsuit seams — Attaching stretch lace —
Lingerie and girdle seams — Blanket binding
Ideal for flat-butted seams, and where extra
strength is required.

Guiding and Supporting Fabric
Most fabrics of Stretch or knit construction
need only to be guided in front of the presser
foot. Some fabrics, however, require support
while being stitched.
CAUTION: Do not pull the fabric as you apply
gentle or firm tension while stitching, as this
may deflect the needle, causing it to break.
1. For nylon tricot and similar synthetic knits,
stpply gentle tension by holding fabric in
front and back of presser foot as you sew.
31

Plain Stretch Seams
• Pattern Group: gil (Green)
• Stitch Width: [T] I I I i
• Needle Position: L [XI *1
• Stitch Length |p (Green/Blue)
• Special Purpose Presser Foot
• Zig-Zag Needle Plate
When you use the straight stretch stitch for 2.
stress seams or to seam knit stretch, and
elasticized fabric, stretch and strength are
built into the seam as it is being sewn. Be sure
to insert a bail-point (yellow band) needle,
Catalog 2045, in the machine if you are stitch
ing a synthetic knit fabric.
1. Make a test with a sample of your fabric so
that you can adjust thread tension and 3.
stitch balance correctly (see page 24).
Lingerie Seams
• Pattern Group
• stitch Width:
• Needle Position: ^
: II
Yellow
Stitch and guide the fabric as you do for
plain seams stitched with the regular
straight stitch, letting the machine make
the back-and-forth stitches that give
stretch to the seam. If the fabric has an
unusual amount of elasticity, it should be
guided and supported as instructed on
page 31.
After stitching, press seam as when using
the regular straight stitch.
• Stitch Length: To suit fabric
• Zig-Zag Presser Foot
• Zig-Zag Needle Plate
To make a lingerie seam both durable and
flexible, use a zig-zag stitch. This treatment is
particularly suitable for bias seams.
1. Straight-stitch the seam (with stitch width
selector at i ) on the wrong side.
2. Press both seam allowances In the same
direction.
3. From the right side, top-stitch with zig-zag
pattern, letting the needle alternately
enter the seam line and seam thickness.
32

Overedged Seams
Seams in knit and stretch fabric can be joined
and finished in one operation. Two different
methods may be used. Method No. 1 is
recommended for firm fabrics where a 6mm
(1/4”) seam allowance Is adequate. Method
No. 2 is' recommended for bulky knits and
fabrics that have a tendency to curl or fray
and where a wider seam allowance is needed
for support. Make a test sample to help you
decide which method is best for your fabric
and garment. Remember to use a Catalog
2045 ball-point (yellow band) needle if you
are sewing a synthetic knit.
Pattern Group:
Stitch Width:
• Needle Position: JL
. stitch Length: “ (Green/Blue)
• Special Purpose Presser Foot
• Zig-Zag Needle Plate
I:
(Green)
Method No. 1 — Overedging
1. Cut and fit the garment, allowing for a
1.6cm (5/8”) seam allowance. Baste seam
line.
2. Trim seam edge evenly to a scant 6mm
(1/4”) from seam line basting.
3. Place seam under the presser foot so that
the straight stitches fall on the basted
seam line and zig-zag stitches toward the
seam edge A, as illustrated.
Method No. 2 — Mock Overedging
1. Cut and fit garment, allowing for a 1.6cm
(5/8”) seam allowance. Baste seam line.
2. Place seam under presser foot so that the
straight stitches fall on the basted seam
line and zig-zag stitches toward the seam
edge B.
3. Press after stitching and trim away excess
fabric to produce a narrow seam edge.
When seam supports the garment, omit
the trimming step.
33

Attaching Elastic
Pattern Group:
Stitch Width:
• Needle Position: Jw
• Stitch Length: Approx. 1.5
(for Yellow pattern)
or (Green/Blue) |ji
• Zig-Zag Presser Foot and Needle Plate
(Green) (Blue) or
(Yellow)
To Attach Waistline Elastic
e Fit elastic for desired snugness at waistline,
allowing 1 inch (2.5cm) for joining. Lap
ends to form a band and straight stitch
together as shown using a ball point needle.
• Divide elastic band into four equal segments
and mark with pins. Do the same to the gar
ment. Then pin together at corresponding
points, pinning elastic over right side of
fabric, top edges even.
• Sew a few straight stitches to anchor elastic
to fabric.
• Select honeycomb.
• Then hold elastic and garment edge taut as
you stitch so that it will remain stretchable
after stitching is completed.
CAUTION: Do not pull the fabric while you
are stitching as this may deflect the needle,
causing it to break.
Finishes For Hems And Facings
» Pattern Group: ffl i (Green) or (Yellow)
• Stitch Width: : I I i
• Needle Position: J» \J^ A
• Stitch Length: to suit fabric and stitch
• Special Purpose Presser Foot
• Zig-Zag Needle Plate
• Make a test sample first.
• Place stitching about 3mm (1/8") in from
hem or facing edge.
• Press after stitching and trim away excess
fabric close to the stitching line.
* •
34

handling special fabrics
Many fabrics because of their construction or finish, demand special atten
tion in sewing. Techniques used in stitching and handling, and choice of
machine accessories, will vary with the fabric. Let the table below guide your
selection.
Fabric Handling Table
Fabric
Vinyl -
leather-look.
patent.
suede.
reptile
Pile-
velvet.
velveteen.
corduroy
Deep Pile -
fake fur
percale,
broadcloth,
shirting
Permanent
Press -
percale
broadcloth
shirting
Special Handling
Use transparent tape as a substi
tute for pins or basting—Topstitch
to hold seams and edges flat—
Avoid worked (machine button
holes. Use bound buttonholes.
Stitch in direction of nap—Use plain
seams—Zig-Zag or bind seam
edges to prevent fraying—Press
over a self-fabric cloth.
Pin rather than baste seams—Stitch
in direction of nap—Use plain seams
for short-hair furs; narrow over
edged seams for shaggy, bulky furs
—Shear pile from seam allowances
to reduce bulk.
Control seam tension manually by
holding fabric taut as it passes un
der the presser foot. Sew at mod
erate speed.
Stitch
Length-type
Long
Straight-Stitch
Medium Straight
Stitch for seams
Medium Zig-Zag or
Honeycomb stitch
for overcasting
Long Straight
Stitch for plain
seams Medium to
Short Zig-Zag
Stitch for over
edged seams
Medium
Straight Stitch
Needle
Style-Size
style 2020 Size 14
or 16 for woven
backing Style 2045
Size 14 or 16
for knit backing
Style 2020 Size 14
Style 2045 Size
14 or 16
for panne' velvet
Style 2020 Size 16
Style 2020 Size 11
or 14
Machine
Accettorlet
General Purpose Foott
General Purpose Needle plate
General Purpose Foott
(General Purpose Foot
only for overcasting)
General Purpose Needle plate
General Purpose Foott
General Purpose Needle plate
Straight Stitch Foot
and Needle Plate
Fine Knits -
tricot, jersey
Blanket
Binding •
satin face
Soft Sheer -
chiffon.
voile.
China silk
Napped
Fabric-
cashmere,
mohair,
camel hair
Use narrow overedged, double
stitched, or French seams—Hold
thread ends securely for a few
stitches at start of seam—Support
seams while stitching.
Hand-baste binding to blanket (pin
marks show) — Miter corners.
Use French seams, double stitched
—Hold ends of upper and lower
thread when you begin to stitch
—Support fabric while stitching.
Cut with nap running down—Sew
in direction of nap—Topstitch to
hold seams and edges flat.
t For best results when sewing this fabric, we recommend use of the
Medium
Straight Stitch
Medium to Short
Narrow Zig-Zag or
Narrow Overedge
Long Straight
Stitch Medium to
Long Zig-Zag
Stitch or Decora
tive Stitch
Medium to Short
Straight Stitch
Medium to Long
Straight Stitch
Style 2045
Size 11 or 14
Style 2020
Size 11 or 14
Style 2020
Size 9 or 11
Style 2020
Size 11 or 14
Straight Stitch Foot and Needle
General Purpose Foot and
stitching)
General Purpose Foott
General Purpose Needle plate
Straight Stitch Foot
and Needle Plate
Even Feed Foot, available at your Sewing Centre.
Plate (for straight stitching)
Needle Plate (for zig-zag
General Purpose Foott
General Purpose Needle plate
35

construction details
zipper Insertion
How the zipper is inserted will depend on the
type of the garment and the location of the
zipper. With the adjustable zipper foot, you
will find It easy to sew an even line of stitching
close to the zipper. For Inserting the zipper
foot on machine see pages 4 and 7.
• Pattern Group:
• Stitch Width: [71 I I I j
• Needle Position: L [X] ^
• Stitch Length: To suit fabric
• Zipper Foot
The zipper foot can be used either to the left
or right of the needle—depending on where
the bulk of the garment Is placed.
Attaching the Zipper Foot
When the zipper foot is to the right of the needle:
• Attach left side of zipper foot to shank (needle
will enter left notch in foot)—see Illustration A.
When thezipperfoot istothe left of the needle:
e Attach right side of zipper foot to shank
(needle will enter right notch in foot)—see
illustration B.
ji|j|
Any Yellow Pattern
Zipper inserted under ieft Lapped Seam
• Baste the seam line the exact length of the
garment opening and press the seam open.
e Attach the zipper foot to the right of the nee
dle (illustration A).
e Open the zipper.
e Flatten out the back seam allowance and
place the zipper face down on it, as illustrated,
with the edge of the zipper teeth following
the seam line.
• Stitch the zipper tape onto the seam
allowance.
• Adjust the foot to the left of the needle (il
lustration B).
• Close the zipper and turn it face up.
• Smooth back the seam allowance at the
edge of the zipper.
• Top stitch to the tape close to the folded
edge.
• Spread garment flat and turn zipper face
down over front seam allowance.
• Hand baste zipper to garment from wrong
side, through zipper tape, seam allowance,
and front of garment.
• Turn garment right side out.
• Adjust zipper foot to right side of needle and
stitch across the lower end of the zipper and
up to the waistline, using the basting stitches
as a guide.
• Remove bastings. Press.

Corded Seams
The corded seam is a professional treatment
for slipcovers, children’s clothes, blouses,
and lingerie. To make a corded seam, make
the welting first (or buy it ready-made), then
stitch it into the seam. For both steps, use the
following settings and accessories:
• Pattern Group: ly
. stitch Width: [J]
• Needle Position: i» H
• Stitch Length: Slightly longer than for
regular seaming
• Zipper Foot
• Zig-Zag or Straight Stitch Needle Plate
I I i I
Yellow
1. Making the welting
1. Buy cable cord (at a notions counter) of
desired size.
2. Cut bias strips of fabric (width: three times
the diameter of the cord plus 3cm (1-1/4").
3. Sew strips together on the lengthwise
grain to obtain desired length.
4. Fold resulting strip over cord with raw
edges even.
5. Attach zipper foot to the left of the needle.
(For Instructions on attaching zipper foot,
see page 36).
6. Lower the presser foot.
7. Stitch close to the cord (but do not crowd
stitching against cord), pulling gently on
the strip, both in front and in backof the
zipper foot.
2. Stitching weiting into seam
1. Attach zipper foot to the right of the
needle so that the bulk of the fabric will fall
to the left.
2. Stitch welting to the right side of a single
seam edge; guide the edge of the foot next
to the cord but do not crowd.
3. Place the attached
second seam edge,
together.
4. Place the work under the needle, with the
first stitching on top so that you can use it
as a guide.
5. Stitch, this time crowding the foot against
the cord.
welting over the
and pin or baste
37

Blindstitch Hems
(only 8007 and 8019)
Blindstitching provides a durable hem finish
that is almost invisible. It is best suited to
straight hems. Taped, bound, turned, or un
finished hem edges can be blindstitched with
equal ease. Blindstitching takes a little prac
tice, however, so make a test sample first.
• Pattern Group: Yellow
• Stitch Width: To suit fabric
• Needle Position: J* [X] «1
• Stitch Length: 1 to 2.5
• Zig-Zag Presser Foot
• Zig-Zag Needle Plate
• Blindstitch Hem Guide
1. Mark, turn, and press hem in the usual way.
2. Baste a guideline at least 1.3cm (1/2") from
the top edge of the hem so that the basting
will not be caught by theflangeof the blind
stitch hem guide.
3. Attach the blindstitch hem guide to the
presser bar (see Page 5).
4. With the work wrongsideupandthebulkof
the fabric to the left, turn the hem under,
creating a soft fold about 6mm (1/4") from
top edge of the hem.
5. Position the hem under the presser foot
with the flange on the front of the guide
resting on the 6mm (1/4") hem edge and
the soft fold against the wall of the flange.
6. Stitch so that straight stitches fall on the
hem edge and the sideward stitches pierce
the soft fold. While stitching, feed the soft
fold against thewall of theflangeand guide
the hem edge in a straight line.
38

buttons
• Pattern Group: ijjlill Yellow
• Stitch Width: To suit button
• Needle Position:
• Button Foot
• Snap-In Feed Cover
Flat buttons can be sewn on quickly and easi ly
using the plain zig-zag stitch.
The space between the holes In the button
determines stitch width settings.
• Attach snap-in feed cover to zig-zag needle
plate.
1. Set stitch width at | and needle position
selector at . Position button under foot
and lower the needle Into the center of the
left hole. Lower the foot. Turn hand wheel
toward you until needle rises out of button
and is above the foot.
III
[jJ J L
2. Move stitch width selector until needle is
over the other hole in the button. Continue
turning hand wheel until the needle is
above right hole, adjust stitch width, as
necessary, until needle enters center of
the right hole. Take six or more zig-zag
stitches and finish with the needle on the
left side.
3. To fasten stitching, adjust stitch width to
i and take three or four stitches.
I
• Remove work, draw threads to underside of
fabric, fasten, and trim.
39

buttonholes
You have a choice between two methods of
making bar-tack buttonholes; using the builtin four-step system, or manually controlling
the selectors.
On pages 41 and 43 you will find detailed
instructions for using the two methods; but you will
find the following information basic to both.
1. Always make a test buttonhole on a
sample of your fabric. Be sure to duplicate
the thickness of the garment. Include inter
facing if appropriate.
2. Use No. 50 or finer mercerized cotton
thread or embroidery thread, and reduce
needle-thread tension to slightly less than
normal.
3. Use a size 11 needle for embroidery thread
and a size 14 needle for mercerized cotton
thread.
Buttonhole Position
Accurate guidelines are essential to keep but
tonholes A at a uniform distance from the edge
of the garment, evenly spaced, and on the
grain of the material.
Mark the centre line B of the garment. This
guideline can be made by hand basting. The
space from the centre line to the finishededge
of the garment C must be from 1.9cm (3/4") to
the full diameter of the button. D With this
spacing, the button will not extend beyond the
edge when the garment is buttoned. Make
sure the centre line marking follows a
lengthwise fabric thread.
Marking the Garment
e Mark a position guideline with hand basting
for each buttonhole.
e Horizontal buttonholes 1 are placed to
extend 4mm (1/8") beyond the centre line of
the garment E, as illustrated, so that buttons
will be in the centre of the figure when the
garment is fastened. Horizontal buttonhole
guidelines should follow a crosswise fabric
thread and should be longer than the
finished length of buttonhole. Mark ends of
buttonhole vertically.
• Vertical buttonholes 2 are placed on centre
line of garment E, as illustrated. Mark ends
of buttonhole horizontally across the centre
line basting and use the centre line marking
as the buttonhole guide when stitching.
Spaces between buttonholes should be equal.
When a line of buttonholes crosses the waist
line, be sure that one buttonhole will fall ex
actly on the waistline. Then measure the
other buttonhole markings from that point.
40

Buttonhole Length
A buttonhole length should be just long
enough to allow the button to slip through the
opening without stretching. You can esti
mate the proper buttonhole length by mea
suring the width plus the thickness of the
button. To make sure the measurements is
correct, cut a slit in a scrap of fabric the
diameter of the button you intend to use.
Increase length of opening until button slips
through easily. This test Is particularly ad
visable for buttons of unusual shape or
thickness.
Cutting Button Opening
Place a pin across the cutting space at each
end of the buttonhole to protect the end
stitching. Use a pair of small sharp scissors to
cut button opening. Insert blade in center of
cutting space and cut from this point in either
direction.
Four-Step Buttonhoiing
(only 8007 and 8019)
The four dial settings for buttonholing are lo
cated on the opposite side of the stitch length
selector. As you turn the dial for each step,
your machine is automatically set for the cor
rect needle position, stitch width, and stitch
length, as well as for stitching direction for
that step. You need not turn the fabric during
buttonholing.
• Pattern Group: ¡|f Yellow
• Buttonhole Foot
• Zig-Zag Needle Plate
Procedure:
• Follow the Instructions beginning on page
40 for preparing and marking the garment.
• Raise the needle above the fabric.
• Position the work under the buttonhole foot
aligning centre marking A of buttonhole
with centre red line B on the foot.
• Align end marking C of buttonhole with the
horizontal red lines on the foot.
• Set reverse-stitch push button in neutral
position D. Adjust if necessary to equalize
difference in stitch density between left and
right side of test buttonhole. Turn to page 43
for detailed instructions.
* •
41

step 1: Side Stitching
With the needle raised above the fabric, turn
the buttonhole dial clockwise to step 1. Posi
tion needle in fabric at point A. Lower the foot
and stitch to end of buttonhole (point B). The
end marking should be aligned with the
horizontal red lines on the foot.
step 2: Bar Tack
Raise the needle above the fabric. Turn but
tonhole dial counterclockwise to step 2. Take
about six stitches to point C.
step 3: Side Stitching
Raise the needle above the fabric. Turn but
tonhole dial counterclockwise tostep3. Stitch
to within two stitches of the end of the but
tonhole (point D).
step 4: Bar Tack
Raise the needle above the fabric. Turn but
tonhole dial counterclockwise to step 4. Take
about six stitches to point E. For a smooth,
satin appearance and greater durability, stitch
around the buttonhole a second time by re
peating the four-step sequence.
Remove the work, draw threads to the under
side, tie. and trim. Cut button opening with
sharp scissors as instructed on page 41.
When buttonholes are completed, rotate dial
counterclockwise to stitch length settings to
set machine for regular stitching.
42

Adjusting
Forward-Reverse Stitch
Balance
Difference in stitch density between the left
and right sides of the buttonhole (forward
and reverse stitching) are equalized by ad
justing the reverse-stitch push button. A very
slight rotation of the button will produce a
noticeable change.
1. Make a test buttonhole with the push but
ton in neutral position (indicator dot
directly below ^ symbol on control
panel).
2. If the stitches on the left side of the button
hole are too open, rotate the push button
clockwise from Its neutral position to In
crease density of stitching.
3. If the stitches on the right side of the but
tonhole are too open, rotate the push
button counterclockwise from its neutral
position to Increase density of stitching.
t
After buttonhole stitching Is completed,
return push button to its neutral position
(Indicator dot directly below ^ symbol on
control panel).
Buttonholes (Manual Method)
Settings
. Pattern Group: ill Yellow
e Stitch Width: See Below
• Needle Position: [Q «L «1
• Stitch Length: Between 0 and 1
• Special Purpose Presser Foot
• Zig-Zag Needle Plate
Always make a test buttonhole on a sample of
your fabric. Be sure to duplicate the thick
ness of the garment and include Interfacing If
appropriate..
Follow the instructions beginning on page 40
for preparing and marking the garment.
Stitch Width Settings
You will use two stitch width settings: one for
side stitching A and one for the bar tacks B
(the closing at each end of the buttonhole).
These stitch widths may vary according to the
size of the buttonhole required. Two possible
combinations are illustrated at the right.

CB'
Procedure
Place work under needle, aligning centre
marking of buttonhole with the black line in
the center of the special purpose foot.
step 1: Side Stitching
Position needle in fabric at point A. Lower the
foot and stitch to end of marking. Leave
needle in fabric at point B. Raise foot and
pivot work on needle. Lower the foot. Take
one stitch without changing stitch width
setting, bringing work to point C.
step 2: Bar Tack
Adjust stitch width selector for bar tacks, and
take about six stitches. Stop at point D.
step 3: Side Stitching
Readjust stitch width selector for side stitch
ing. Complete work to point E. Leave needle
in fabric,
step 4: Finai Bar Tack
Adjust Stitch width selector for bar tacks, and
take about six stitches ending at point F.
step 5: Fastening Stitch
To secure stitching, move stitch width selec
tor to i and take three stitches. Remove
work, draw threads to underside, fasten, and
trim. Cut opening for button with sharp
scissors.
44

Top Stitching
A practical simple way to accent the lines of
dress or coat is to place one or more rows of
stitching along collars, lapels, facing edges,
pockets, sleeves, etc. For a tailored look, use
rows of straight stitching. For decorative in
terest. use stitch pattern.
Appiique
Applique' adds beauty and interest to clothes
and household linens. Either contrasting or
self fabric can be used effectively.
The stitch most commonly used applique'ing
is the plain zig-zag stitch (see page 25),
closely spaced to form a satin stitch. The
width of this stitch can be varied to accommo
date fabrics of different weaves and textures.
Many of the other stitch patterns can be used
to applique' with decorative stitching.
To prepare for applique'ing. make a sample
to help you decide which of the following two
methods Is more appropriate for your fabric
and design.
• Mark design on piece of fabric to be
applique'd.
• Cut out design leaving about 2cm (3/4")
margin all around.
• Position the design.
• Baste it to the fabric.
• Attach special purpose foot.
Method No. 1
1. Select a stitch patterti suitable for the
desired sewing application. Set stitch
width selector for the desired width. For
white patterns, set stitch length dial for
satin stitching between 0 and 1; for green and
blue patterns, set it on position 4 (Green/Blue).
2. Outline the entire design with applique'
stitching.
3. Trim away excess fabric on the outer
edges of the stitching. Remove basting.
Method No. 2
1. Select a stitch pattern suitable for the
desired sewing application.
2. Adjust stitch width selector for regular
straight stitching and outline the entire
design with a short stitch.
3. Trim raw edges to the stitching.
4. Adjust stitch width selector to desired width
setting for applique’ pattern, and set stitch
length selector between0and 1 (or on po
sition 4 (Green/Blue) if using one of the green
or blue Flexi-Stitch patterns.)
5. Stitch, following and covering straightstitch outline. This step will produce
smooth overedged finish with no raw
edges to be trimmed.
Top Stitching
Method No. 3
• Purchased motifs can be applique'd quickly
and easily by using a straight or decorative
stitch.
45

Keeping up appearance
Mending
Many of the zig-zag stitch patterns are just as useful
for mending as they are for creative sewing. The
multi-stitch zig-zag yellow ( ) forms a firm,
flexible bond for repairing tears and for replacing
elastic. The plain zig-zag (yellow ^ ) is useful for
making bar tacks to repair lingerie.
1. Tears
e Pattern Group: Yellow
e Stitch Width:
• Needle Position: 1 [I] 1
• Stitch Length: About 1 or to suit fabric
• Zig-Zag Presser Foot
• Zig-Zag Needle Plate
1. Trim ragged edges.
2. Place underlay on the wrong side of tear
for reinforcement. (It is best not to baste or
pin the underlay since you will be bringing
the edges of the tear together in the next
step).
3. Stitch on the right side, bringing the edges
of the tear together.
4. Shorten stitch length at ends and corners
to give extra strength.
5. Trim underlay.
46

Darning
You may choose to darn either with or with
out an embroidery hoop. When greater con
trol is needed, an embroidery hoop is usu
ally best.
Darning Without Embroidery Hoop
• Pattern Group; lllll
. Stitch Width: [T] I I
• Needle Position; i*
• Stitch Length: 1.5
• Zig-Zag Presser Foot
• Zig-Zag Needle Plate
1. If area to be darned is open, baste an un
derlay in place.
2. Place area to be darned under the presser
foot. Lower the presser foot and start
stitching, alternately drawing the fabric
toward you and gently pulling it away from
you until area is filled with parallel lines of
stitching.
3. For additional strength, cover area with
crosswise lines of stitching.
(Yellow)
1 1
Darning With an Embroidery Hoop
• Pattern Group; !ll! (Yellow)
• Stitch Width: [T] 111^
• Needle Position: 1» JL
• Stitch Length; 0
• Presser Foot: None
• Snap-In Feed Cover
1. Trim ragged edges from area to be darned
and center worn area in embroidery hoop
designed for machine use.
2. Carefully position work under needle and
lower presser bar to engage tension.
3. Hold needle thread loosely with left hand,
turn hand wheel toward you, and draw
bobbin thread up through fabric. Hold
both thread ends and lower needle into
fabric.
4. Reinforce the area to be darned with
stitching 6mm (1/4") from theedge. Stitch
across opening, moving hoop under nee
dle at a slight angle from lower left to up
per right. Keep lines of stitching closely
spaced and even in length.
5. When opening is filled, cover area with
crosswise lines of stitching.
47

Free-Arm Sewing
Fabric handling, when sewing tubular and
hard to reach garment areas, is simplified
when you convert your sewing machine to
tree-arm sewing. Some of the sewing jobs for
which you will find the free arm particularly
useful are shown on this and the following
pages. You will discover many more for your
self.
preparation
To convert to free-arm sewing, simply press
down on corner of Flip & Sew panel on sewing
machine with heel of right hand.
To raise Flip & Sew panel, place hand under
panel and lift up until it locks into place. A
click will be heard when panel is locked in
position.
applications
Buttons
Sewing buttons on a cuff or neckband is no
longer a task when the free-arm surface Is
used. Cuffs slip around the sewing surface
without being pulled out of shape, so you can
see and handle the stitching area easily.
Sleeves
Free-arm sewing takes the difficulty out of topstitching a sleeve. The armhole rotates
smoothly under the needle so that you can
place stitching accurately. The extra control
afforded by the free arm is especially helpful
for topstitching flat-fell seams.
Badges, emblems and insignias can be
attached to shirts and uniforms by slipping
sleeve or hard-to-reach area over the sewing
surface.
48

Caring for
Your Sewing Machine
cleaning and lubricating
How often you will need to clean and lubricate
the machine will depend on how often you use
It and where you keep it. The following gen
eral guidelines assume that you will be sewing
several times a week. But if you use your
machine more frequently, lubricate It more
often than the guidelines suggest.
CAUTION: Before cleaning and lubricating
your machine, disconnect the power-line
plug from your electrical outlet.
8
Every Few Weeks—
Remove lint or fluff from exposed parts.
With the lint brush, and a soft cloth, clean:
• Tension discs
• Take-up lever and thread guides
• Presser bar and needle bar
Remove needle plate, as Instructed on page 7
and clean:
• Feed and hook area
• Bobbin case. Removal of lint from groove on
outer edge of bobbin case is important. Lint
accumulation could prevent machine from
operating properly. (See next page for
removal of bobbin case.)
• All machine surfaces (if necessary, dampen
the cloth. Do not use detergents.)
49

Removing and replacing
bobbin case
Caution: Before cleaning or adjusting the
machine, remove plug from the socket outlet.
• Raise presser foot and needle.
• Open slide plate, remove bobbin and
remove needle plate (see instruction on
page 7).
To remove bobbin case
e With a small screwdriver, turn bobbin case
holder (1) to the rear as far as it will go.
e Lifting the left side of the bobbin case, slide
it out from machine.
To replace bobbin case
• Guide forked end (2) of bobbin case under
feed (3).
• Draw rim of bobbin case under position
plate (4). Be sure bobbin case is freely
seated on hook race.
e Turn bobbin case holder (1) forward as far
as it will go, locking bobbin case in place.
Note: Turn handwheel towards you to check
to make sure it is properly replaced.
• Replace needle plate (see Instruction on
page 7).
• Insert bobbin and close slide plate.
50

every few months—
Caution: Before lubricating your machine,
disconnect the power-line plug from your
electrical outlet.
Lubricate parts behind the face plate, under
the arm top cover, and bottom of machine.
• Apply a drop of oil (but no more than a drop)
to all places indicated.
To Remove Face Plate
• Lower presser-foot lifter.
• Loosen screw A.
• Remove face plate by grasping it around
the bottom edge and pulling toward the left,
then down and away from machine.
To Replace Face Plate
• Replace face plate and tighten screw A.
• Return Presser-foot lifter to up position.
To Remove Top Cover
• Loosen Screws B, C, D, and E.
• Lift top cover up and remove it from machine.
To Remove Bottom Cover
—c :
Ij
-
i
1
Remove bottom cover from machine.
y

• Apply one drop of oil all to places indi
cated.
• Occasionally apply one drop of oil to all
other rotating or moving machine connec
tions to ensure freedom of movement.
After oiling, replace face plate and arm top
cover. Sew a few lines of stitching on a scrap
of material to remove excess oil.
If Machine Is To Be Stored
Disconnect power-line plug from electric
outlet.
Clean all exposed parts and area behind
face plate.
CAUTION: Do not attempt to adjust the motor
belt. Contact your nearest Service Centre
should any adjustment be required.
Changing The Light Buib
CAUTION: Disconnect the power-line plug
from the socket outlet before changing light
bulb.
This machine is designed to use a 15 watt
maximum bayonet base bulb only.
Remove face plate, as instructed on page 51.
1. Removing Bulb: Press bulb into socket and
at the same time turn bulb in direction
shown to unlock bulb pin (do not attempt
to unscrew the light bulb).
2. Replacing Bulb: Press new bulb into soc
ket, with bulb pin entering slot of socket,
and turn it in direction shown to lock bulb
in position. Replace face plate.
Swab all exposed metal parts and parts
behind face plate with oil to protect
against rust.
Repiacing The Siide Piate
You will not have any occasion to remove the
slide plate. However, if it should accidentally
become disengaged from the machine, it is
easily replaced.
• Raise the presser foot and make sure needle
is in Its highest position.
• Place slide plate in slide way with the front
edge close to, but not covering, the retain
ing spring (as shown).
• With a small screwdriver, lift each end of the
spring A into each of the side grooves on the
underside of the plate.
• Draw the plate gently toward you and fully
engage the spring.
• Close slide plate.
52

hints for home service
If needle breaks, make sure...
• Needle is straight, correct style for machine
and proper size for thread being used.
• Needle Is correctly Inserted Into machine.
e Stitch width and needle position selectors
are correctly set for work being done.
• Stitch width setting does not exceed
: rrxil i
• Presser foot shank Is securely fastened to
presser bar.
If needle thread breaks, make sure...
• Machine is threaded properly.
• Thread Is unwinding freely from spool.
• Thread is free from Irregularities.
• Needle is correct size for thread.
e Needle-thread tension is not too light.
• Bobbin and bobbin case are properly in
serted in machine.
setting when twin needle Is used.
• Bobbin halves are evenly and securely
screwed together.
Remember to...
e Remove thread from bobbin before rewinding.
e Set combination stitch length and button
hole dial for regular stitching when not mak
ing buttonholes.

8007/8019/8002
Part Number 356712-001 ( REV. 2
English
 Loading...