

Page 1
Page 2
<iT
Deluxe Zig-Zag Sewirig Machine by SINGER
Congratulaiions...
You are about to discover the wonderfui pleasure of sewing with your new
Touch & Sew* sewing machine. The Modei 771 Flip & Sew* sewing machine
features a hinged bed lor free arm sewing. And you will also enjoy;
• the simplicity of dial controls. Now, you can simply dial a stitch length, a
stitch width, and a stitch pattern; pressure and tension settings; even
buttonhole stitching
• the versatility Oi sewing capacity that produces stitches that stretch, and
stitches that don't stretch ... permanent stitches that are firmly locked in,
and temporary stitches that pul! out easily... stitches that decorate,
embroider, mend, baste
• and, of course, the ease of the push-button bobbin, and much more!
Among the many Singer engineering and design features that ensure these
sewing pleasures are —
• buHt-in stitch patterns, which let you produce a straight stitch and a variety
of zig-zag patterns by simply turning a dial, plus Flexi-Stitch* patterns for
stitching knit and stretch fabrics and producing intricate stitch designs
• Soft-touch Fabric Feed that protects even the most delicate fabrics
• one-way needle clamp that makes it impossible to insert the needle back
wards
• stitch control dial that lets you switch from regular to s-t-r-e-t-c-h
stitching
• easy needle plate changing — needle plate secured by magnets is easy to
lift out for cleaning
• three-position presser foot lifter that lets you place bulky fabric or many
fabric layers under the presser foot
As you go through this book, you will discover how these and many other
leatures give you the ultimate in simplicity of operation and beautiful results.
sewing!
SINGEB* Service is always close at hand, if your machine should need servic
ing, call your local SINGER Sewing Center to be sure of v.'arranted SINGER
Parts and Service. You will find the address in the telephone directory under
SINGER COMPANY.
Copyright ‘ 1977 THE SiNGER COMPAN'Y
AU Rights Reserved Throughoyt the Wodd
Page 3

CONTENTS
1. Getting to Know Your Machine......................................................................
Principal Parts and What They Do..................................................................................................... 3
Accessories.......................................................................................................................................... 4
2. Getting Ready to Sew
Preliminary Steps ................................................................................................................................... 6
Choosing Needle and Thread ............................................................................................................. 7
Threading the Machine..................................................................................................................... 12
3. Straight Stitching...................................................................................................................................... 18
Preparation ..................................................................................................................................... 18
Starting to Sew.................................................................................................................................... 18
Adjusting for Your Fabric.................................................................................................................. 19
Sewing a Seam..................................................................................................................................... 21
4. Zig-Zag Stitching.................................................................................................................................... 25
Zig-Zag Stitch Patterns......................................................................................................................... 25
Adjusting Dials.................................................................................................................................... 26
Satin Stitching .................................................................................................................................... 28
5. Twin-Needle Stitching.............................................................................................................................. 29
Inserting the Needle............................................................................................................................ 29
Threading the Needle.......................................................................................................................... 30
Dial Settings ........................................................................................................................................ 31
Turning a Square Corner ..................................................................................................................... 32
.....
.......................................................................................................................... 6
.......................................
2
6. Temporary Stitching
Speed Basting ................................................................................................................................... 33
Chainstitching....................................................................................................................................... 35
7. Buttons and Buttonholes........................................................................................................................ 39
Buttons............................................................................................................................................... 39
Buttonholes....................................................................................................................................... 40
8. Free-Motion Stitching ............................................................................................................................ 46
Flower Embroidery ............................................................................................................................ 46
9. Sewing the Professional Way ............................................................................................................. 47
Construction Details......................................................................................................................... 47
Sewing Knit and Stretch Fabric .......................................................................................................
Hints on Sewing Special Fabric......................................................................................................... 58
Decorative Touches ............................................................................................................................. 60
Keeping Up Appearances................................................................................................................. 65
10. Free-Arm Sewing
11. Caring for Your Machine ................................................................................................................... 72
Cleaning the Machine ........................................................................................................................ 72
Removing Covers. Bobbin Case, and Bulb........................................................................................ 73
Performance Checklist ....................................................................................................................... 76
12. Sewing Aids
...................................................................................................................................... 78
..............
................................................................................................................................ 68
................................................................................................................ 33
52
Index................................................................................................................................................................. 80
Page 4
1. GETTING TO KNOW YOUR MACHINE
12, Spool Hol<ler
13. Handwheel
Switch
Dial
16. Stitch Width Dial
Dial
Lever
19* Suttonhoie Dial
20. Sewing Light
Page 5

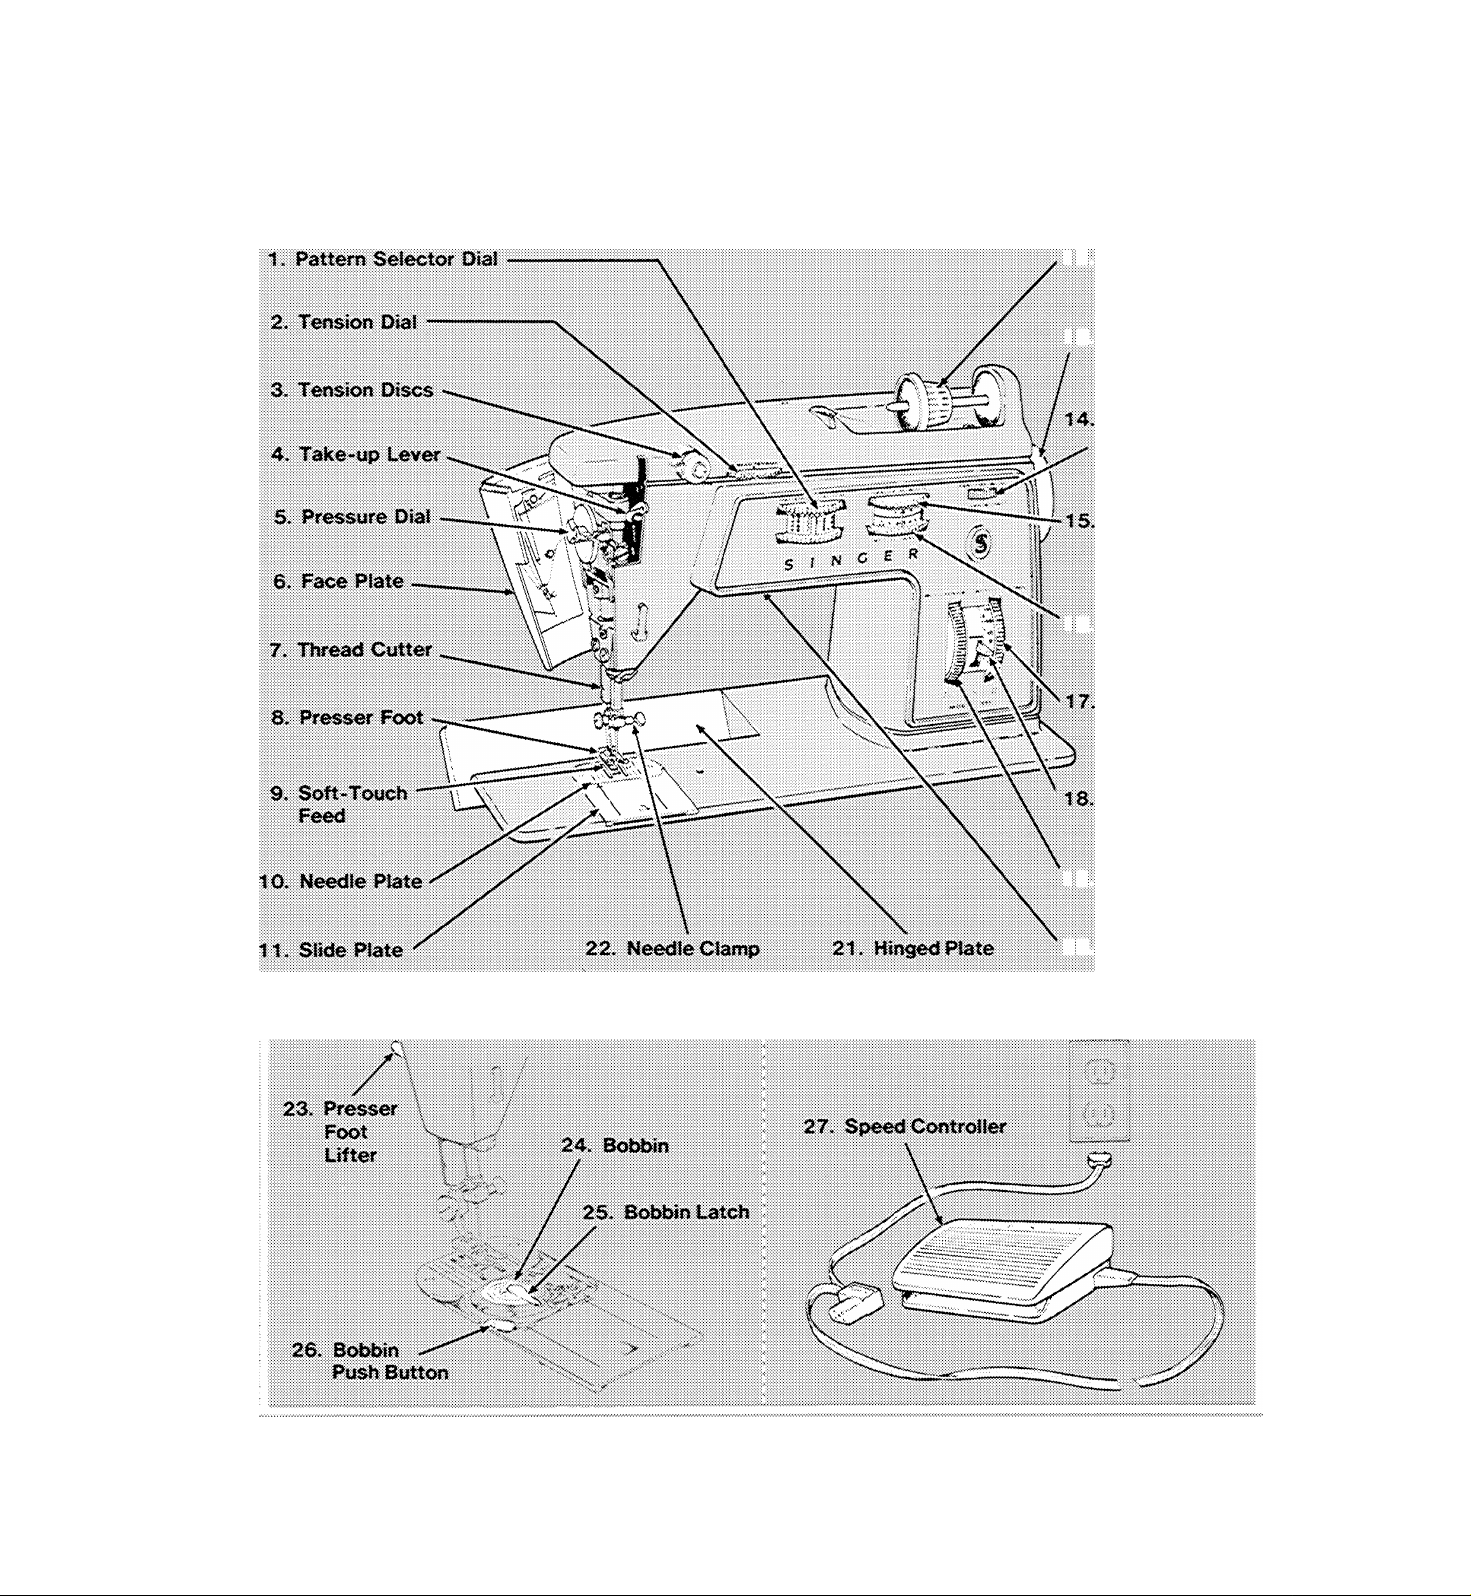
principal parts and what they do
1. Pattern Selector Dial can be set to pro
duce a straight stitch, a decorative or
practical zig-zag stitch: or speed basting.
2. Tension Dial lets you select just the right
tension for your stitch, thread, and fabric.
The numbers eliminate guesswork in
duplicating settings,
3. Tension Discs, controlled by the tension
dial, regulate the amount of tension on
your needle thread.
4. Self-Threading Take-up Lever controls
flow of needle thread.
5. Pressure Dial regulates presser-foot
pressure on fabric. It has an all-purpose
sewing setting plus settings for extra
light and extra-heavy pressure and for
darning.
6. Face Plate swings open for access to
threading chart and pressure dial.
7. Thread Cutter is built into presser bar for
safety and convenience,
8. Presser Foot holds fabric against feed.
9. Soft-Touch Feed moves fabric under
presser foot. Soft surface does not injure
fabric, even the most delicate.
10. Needle Plate, secured by magnets, lifts
out for removal. Guidelines on right and
left sides of plate help you keep seams
straight.
11. Slide Plate opens easily, lets you see
bobbin. Releases bobbin push button
from winding to sewing position when
closed. Seam guidelines (extended from
needle plate) have cross lines to help you
turn square corners.
12. Friction-Free Spool Holder with horizon
tal pin holds spools of various sizes:
holder lets thread unwind without tug or
drag. The spool does not turn.
13. Hand Wheel controls movement of takeup lever and needle. Always turn it toward
you.
14. Power and Light Switch turns on
machine and sewing light simul
taneously. FAST and SLOW speed range
settings let you choose the best sewing
speed for your work.
15. Needle Position Dial places needle in
either L (left), A (center) or R (right)
stitching position.
16. Stitch Width Dial controls the width of
zig-zag stitching and positions the nee
dle for bobbin winding and straight
stitching.
17. Stitch Control Dial allows for a variety of
stitch lengths, including FINE for zig-zag
satin stitching. Has special settings for
buttonholing and Flexi-Stitch patterns.
18. Reverse-Stitch Lever instantly reverses
stitching direction at the touch of your
finger.
19. Buttonhole Diai controls steps in sewing
round-end buttonholes. Dial must be in
OFF position when not in use,
20. Built-in Sewing Light illuminates sewing
area. Pull-down bracket makes it easy to
replace bulb.
21. Hinged Plate converts machine for free
arm sewing.
22. Needle Clamp is designed to make nee
dles self-setting and eliminate the
possibility of inserting needle back
wards.
23. Presser Foot Lifter, at back of machine,
allows you to raise and lower presser
foot. Extra-high lift position permits easy
placement of bulky fabrics.
24. Transparent Bobbin shows thread sup
ply. Two halves can be unscrewed to
гетюуе unwanted thread.
25. Bobbin Latch holds bobbin in place. Flips
up at the touch of your finger for easy
bobbin removal.
26. Bobbin Push Button allows you to switch
from sewing to bobbin winding without
rem*oving bobbin.
27. Electrical Connections and Speed Con
troller designed for convenience and
safety.
Page 6
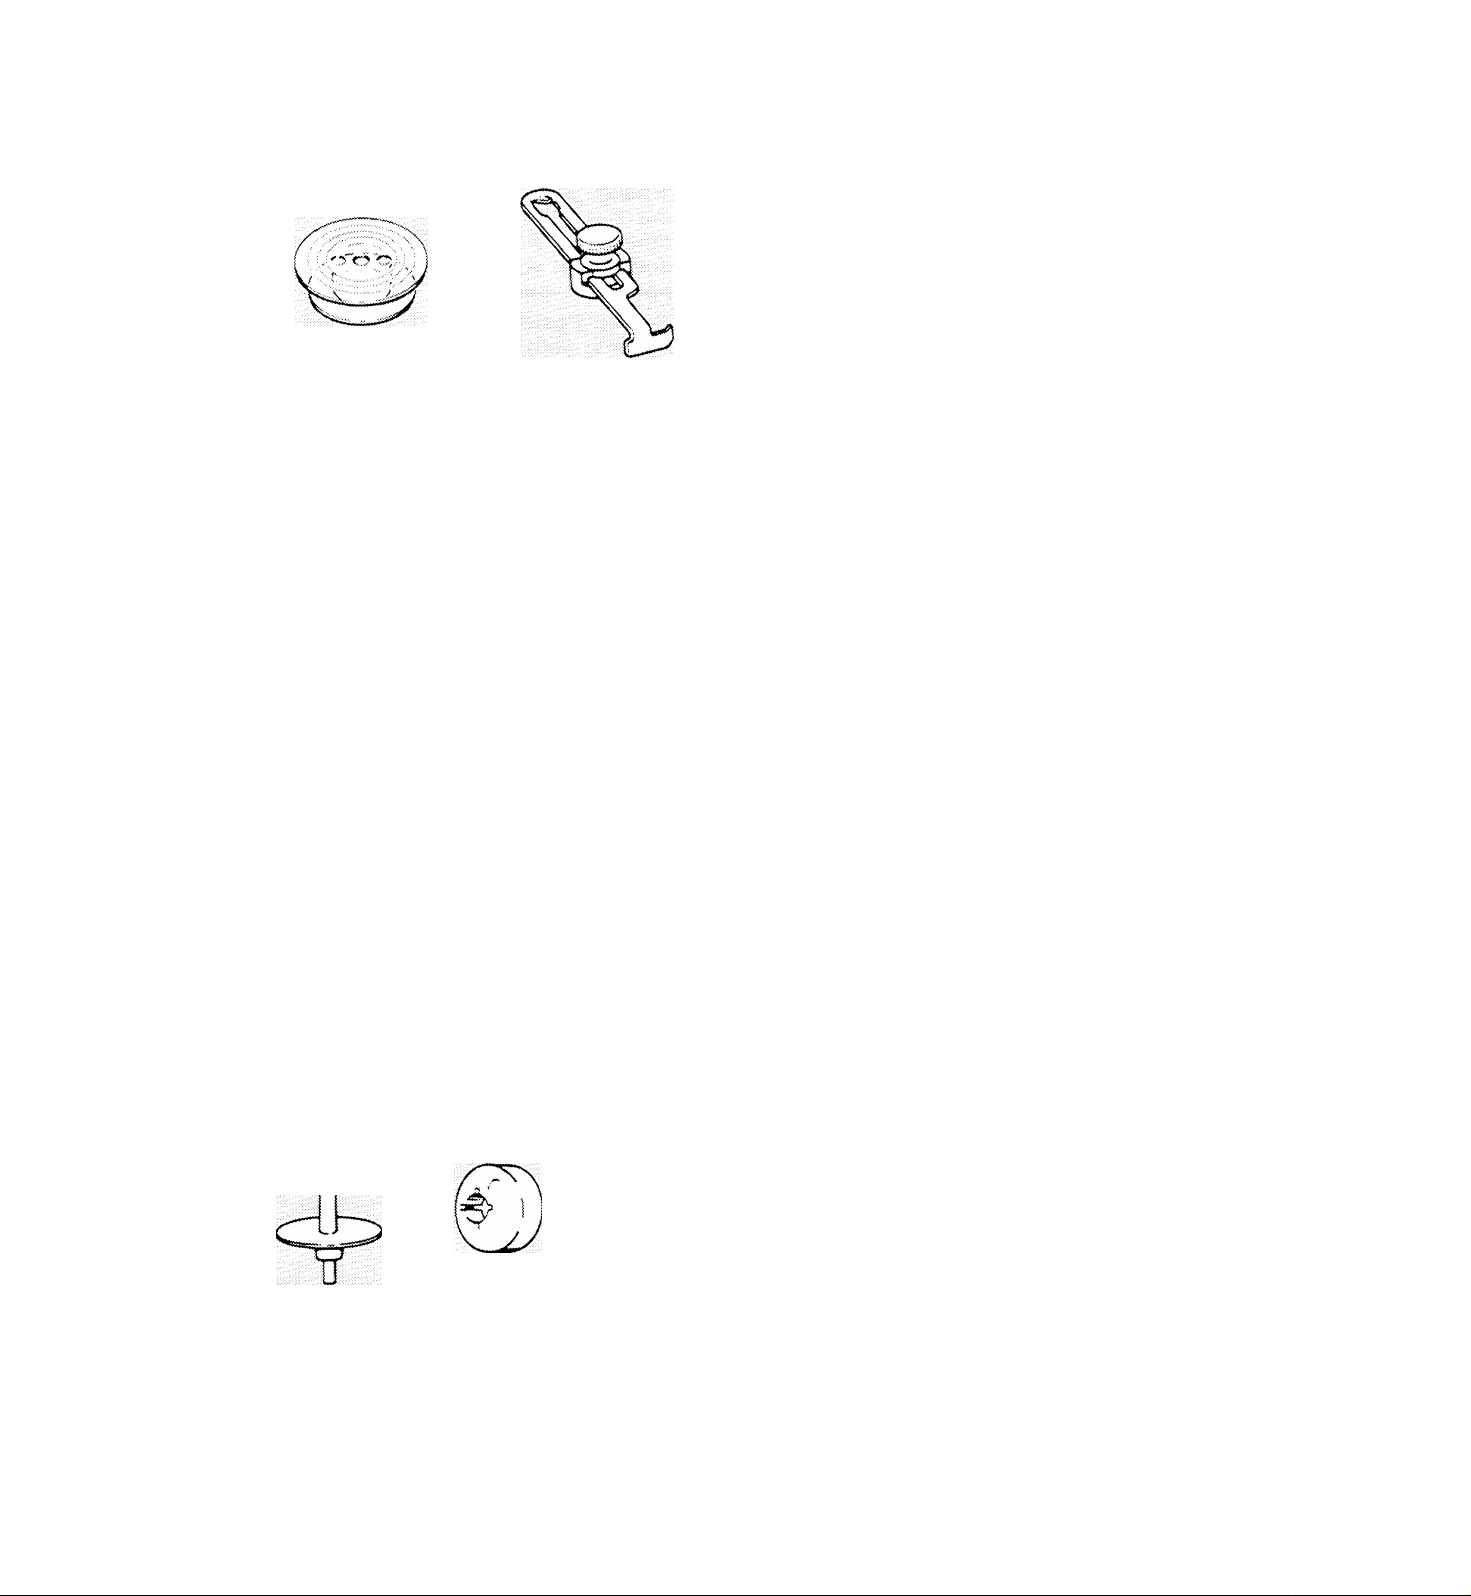
accessories
The accessories that come with your Touch &
Sew sewing machine are designed to help you
do many Kinds of sewing easily and perfectly.
To increase the versatility of your machine,
additional accessories can be purchased at
your Singer store. See page 78.
1. BOBBINS
Transparent Bobbin Seam and Biindstitch
Hem Guide
A
A
Ü
Regular Needle
Bat! Point
(Yellow Band) Needle
r
Twin Needle
• Transparent drop-in bobbin in your
machine.
• Extra transparent drop-in bobbins.
2. SEAM AND BLINDSTITCH HEM GUIDE
• Helps you stitch seams and blindstitch
hems of uniform width.
3. NEEDLES
IMPORTANT: Your SINGER sewing
machine has been designed to obtain best
results with SINGER* needles. You should
follow the recommendations in this in
struction book and on the needle package
for correct style and size of needle for
different types and weights of fabric.
• Style 2020 (15x1) needles, for all-pur
pose sewing.
• Style 2045 ball-point Yellow Band" nee
dles, for sewing synthetic knits and
stretch fabrics.
Vertical
Spool Pin
Small
Spool Holder
Lint Brush
Style 2028 needle,
decorative stitching.
4. VERTICAL SPOOL PIN
• Vertical spool pin for decorative twin-
needle stitching.
5. SMALL SPOOL HOLDER
• For use with small diameter tubes of
thread.
6. LINT BRUSH
• Lint brush for cleaning your sewing
machine.
for twin-needie
Page 7
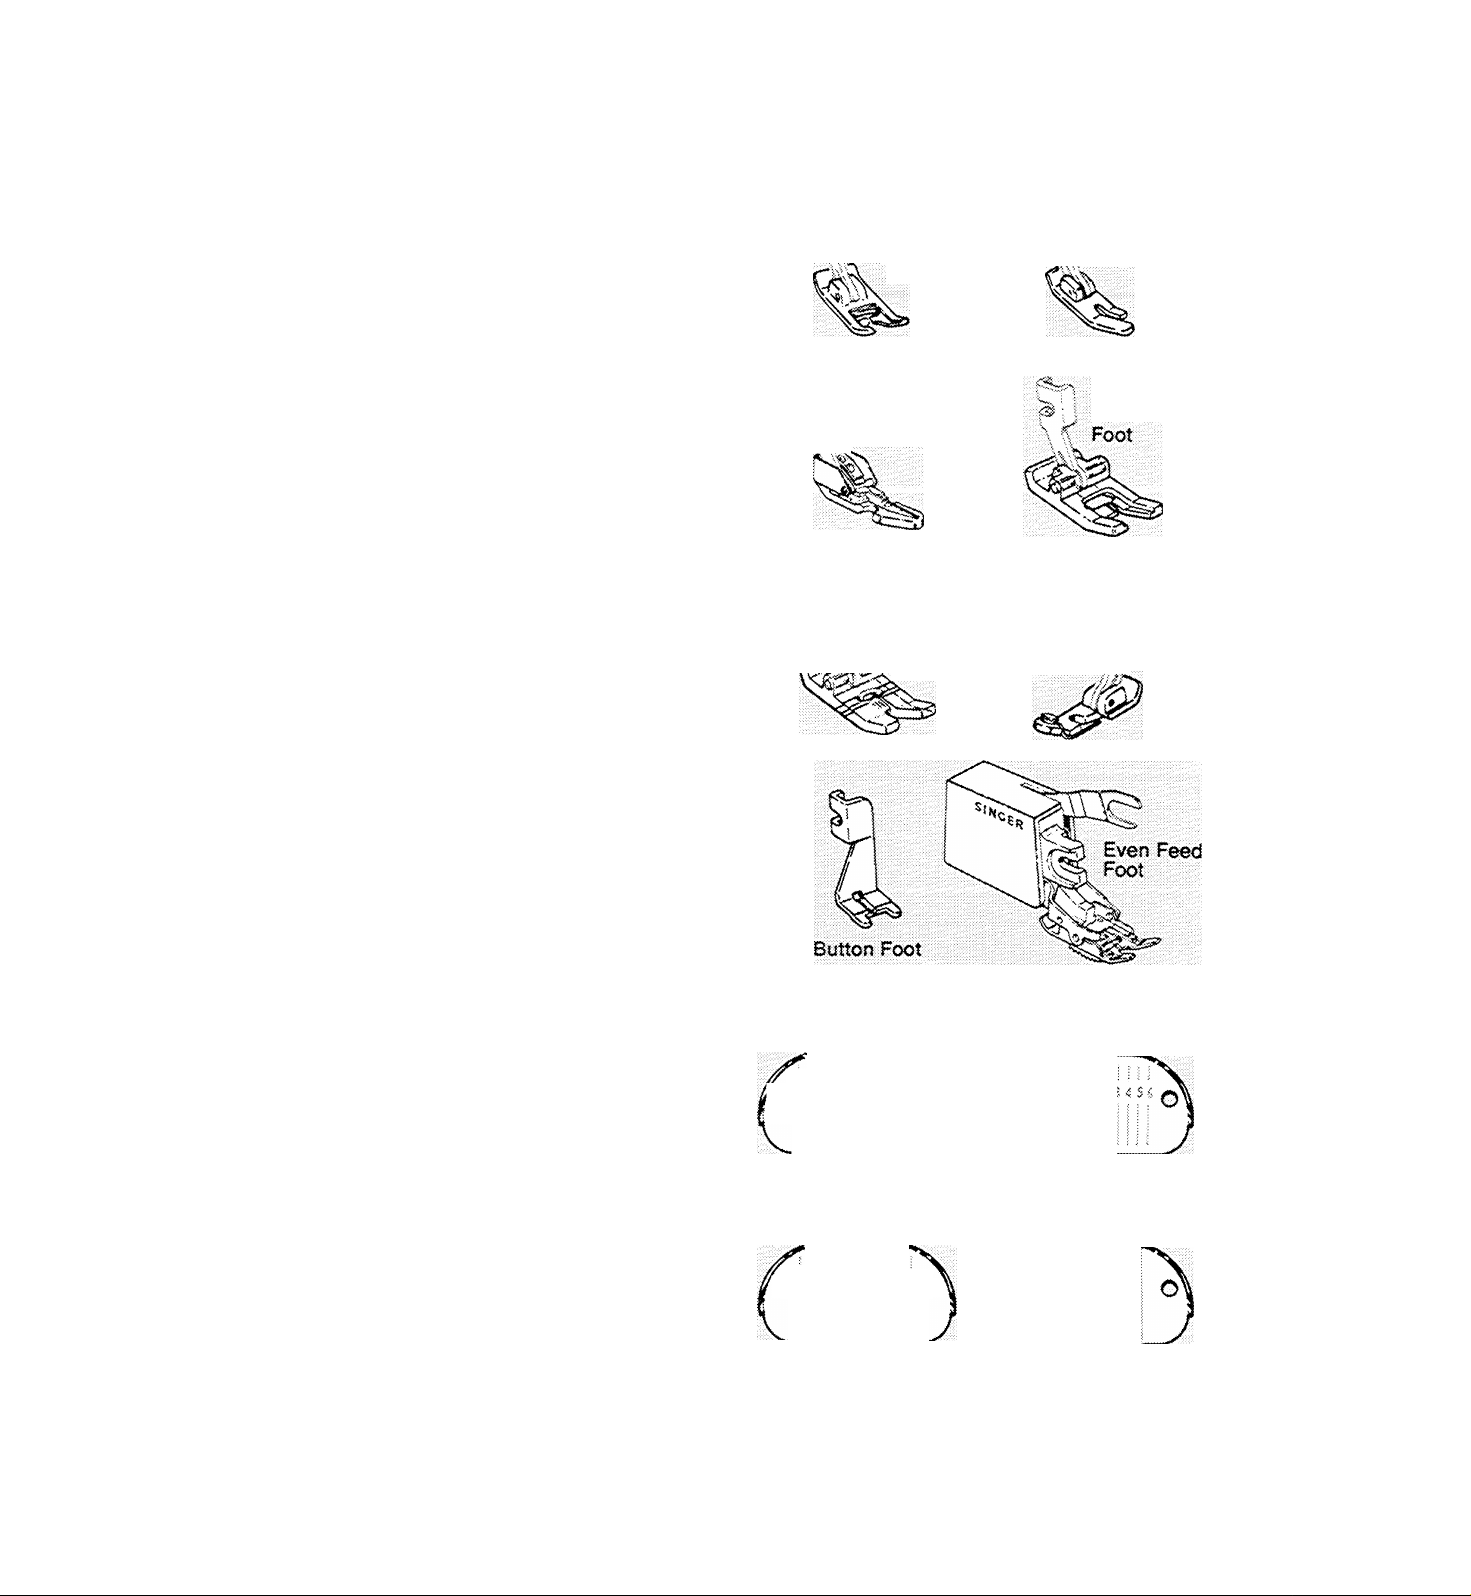
7. PRESSER FEET
• The genera! purpose foot on your
machine.
• Additionai interchangeabie snap-on
presser feet:
Straight stitch foot for close fabric
control
Zipper foot for inserting zippers and
stitching corded seams
Special purpose foot for all kinds of
decorative zig-zag stitching
Buttonhole foot to make round-end
buttonholes
Overedge foot for overedged seams in
stretch fabric
• A one-piece button foot to hold buttons
securely for stitching.
• Even Feed Foot for sewing hard-to-feed
pile, stretch, and bonded fabrics. Also
excellent for matching plaids and stripes
and for topstitching. (Cannot be used for
speed basting.)
Fresser Feet
% •: I;
. \\ General Purpose
Foot
>
P p Zipper Foot
; Buttonhole Foot
>, Straight
Stitch
Special
Purpose
ii
Overedge Foot // /
8. MEEDLE PLATES
• The general purpose needle plate in
place on your machine.
• The straight stitch needle plate for use
with the st.--aight stitch foot.
• The chainstitch needle plate for single
thread chainstitching.
• The feed-cover plate for button sewing
and free-motion work.
9. CHAINSTITCH FITTINGS
• One set of three fittings.
Thread Guide
6
Bobbin Case Cover
Needle Plate
Heedle Plates
General Purpose
Needle Plate
Straight Stitch
Needle Plate
O
ChamstiicN Fittings
Chainstitch
Needle Piate
Feed Cover
Plate
Page 8
2. GETTliyC READY TO SEW
preliminary steps
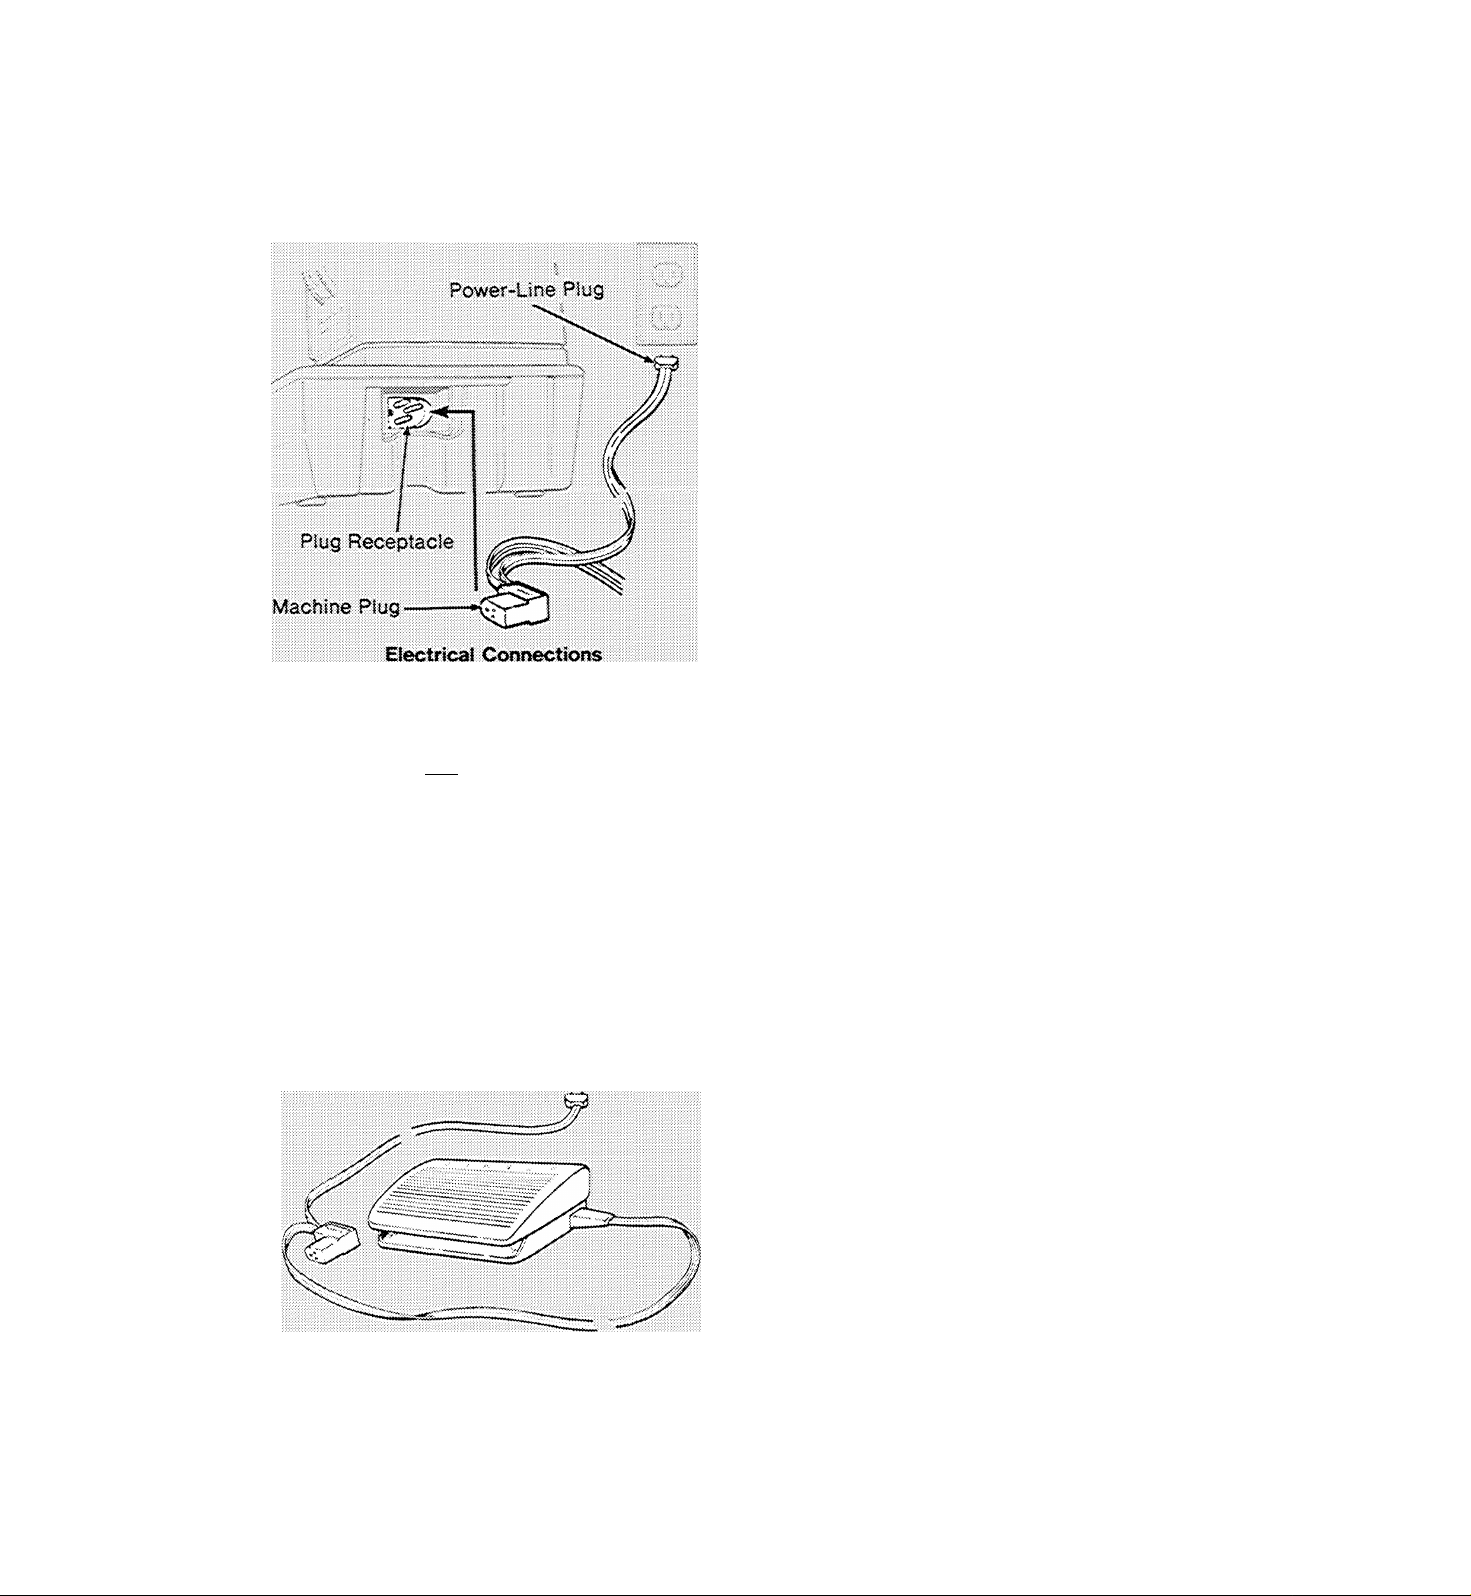
1. CONNECTING MACHINE
Before plugging in your machine, be sure that
the voltage and number of cycles indicated at
the right end of the machine or inside face
plate conform to your electrical power supply.
Push the machine plug into the machine recep
tacle. Then connect the power-line plug to
your electrical outlet
2. OPERATING MACHINE AND
CONTROLLER
To turn on both the machine and sewing light
and set speed range, slide the power and light
switch to the selected range.
F>Sv3T OFF' 3L.OW
^ i': ' T'^"rT?TTT
T¥^’T
F>OW3P^ e< L^IOMT
• The FAST setting allows for full speed ca
pacity of the machine. It is best for long,
straight seams, easy-to-handle fabrics, and
general sewing where a variety of speeds
are needed.
Power and Light Switch
Speed Controller
• The SLOW setting allows for maximum con
trol at lower sewing speeds. Use this setting
for special jobs such as button sewing, but
tonhole making, and where intricate con
struction details require close control.
CAUTION: We recommend that you turn off
the power and light switch before changing
needles, presser feet or needle plates and when
leaving the machine unattended. This elimi
nates the possibility of starting the machine by
accidentally pressing the speed controller.
To run the machine, press the speed con
troller. The harder you press, the faster the
machine will sew within the selected speed
range.
Very light pressure on the controller will oper
ate the machine very slowly, enabling you to
stop the machine with the needle In any
desired position, up or down.
Page 9

choosing needle and thread
The needle and thread you choose will depend
upon the fabric being stitched. The table below is a practical guide to needle and thread
FABRIC, THREAD AND NEEDLE TABLE t
selection. Refer to it before starting a sewing
project Be sure to use the same size and type
of thread in both needle and bobbin.
FABRIC WEIGHT AND TYPE
DELICATE — tulle, chiffon, fine lace, or
ganza, chiffon velvet
LIGHTWEIGHT - batiste, organdy, voile,
taffeta, crepe, chiffon velvet, plastic film,
satin, surah, peau de soie, shantung,
brocade
MEDIU.Vt WEIGHT - gingham, seersucker,
madras, percale, piqué, linen, chintz, faille.
fine corduroy, velveteen, suitings, vinyl,
terry doth, chains, twill
MEDIUIVI HEAVY — gabardine, tv/eed, sail
cloth. duck, denim, coatings, drapery
fabrics, vinyl, deep“pile fabrics, corduroy,
bonded fabric
HEAVY — overcoatings, upholstery fabrics,
canvas
KNITS, WOVEN STRETCH AND ELASTIC--
double knits, bonded knits, spandex, ny
lon tricot ciré tricot, jersey, panné velvet,
stretch terry
LEATHER — suede, kidskin. calf, capeskin.
buckskin, cabreita. patent, cobra, lined
leathers, simulated leathers
VINYLS (KNIT BACK)-suede, imitation
reptile, crinkle patent, patent, embossed
and printed vinyls
WOVEN FABRICS (ALL WEIGHTS) - dec
orative straight-stitch topstitchlng
LIGHT AND MEDIUM WEIGHTS (WOVEN) -
decorative twin-needle stitching
tDoes not apply to chalnstitching.
ttSize 9 needle recommended for sewing only. For
tttUse with mercerized cotton, “A” silk, or polyester
THREAD
Fine polyester, nylon,
or cotton thread
Cotton-wrapped
polyester (FINE)
100% polyester
SO mercerized cotton
’^A" nylon
‘‘A’’silk
Cotton-wrapped polyester
100% polyester
50 mercerized cotton
60 cotton
“A” silk
Cotton-wrapped polyester
100% polyester
Heavy-duty
mercerized cotton
40 to 60 cotton
Cotton-wrapped polyester
Heavy-duty
mercerized cotton
40 cotton
Cotton-wrapped polyester
100% polyester
'‘A'" nylon
50 mercerized cotton
‘‘A’' silk
Cotton-wrapped polyester
100% polyester
50 mercerized cotton
nylon
“A" silk
Cotton-wrapped polyester
100% polyester
50 mercerized cotton
nylon
Yellow Band
Yellow Band
^'A^’silk
-D'’silkttt
(Buttonhole twist)
Cotton-wrapped polyester
100% polyester
50 mercerized cotton
bobbin winding use larger size needle,
thread in bobbin.
NEEDLES
TYPE SIZE
Style 2020
(15x1)
Style 2020
,15x1)
Style 2020
(15x1)
Style 2020
(15x1)
Style 2020
(15x1)
Style 2045
Ball Polrit
Style 2032
(15x2)
Style 2045
Sail Point
Style 2020
(15x1)
Style 202$
(twin)
9tt
11
18
14
11
14
16
14
16
16
14
Page 10
Changing the Needle
NEEDLES
The needle you use should be straight to en
sure perfect stitch formation and needle
penetration through the fabric. The needle
should also be fine enough to prevent the
fabric from being marred with large
punctures, yet heavy enough to pierce the
fabric without being bent or deflected.
Remember, too, that the eye of the needle
must be large enough for the thread to pass
through freely; too fine a needle will cause the
thread to fray.
For best results use a SINGER* needle.
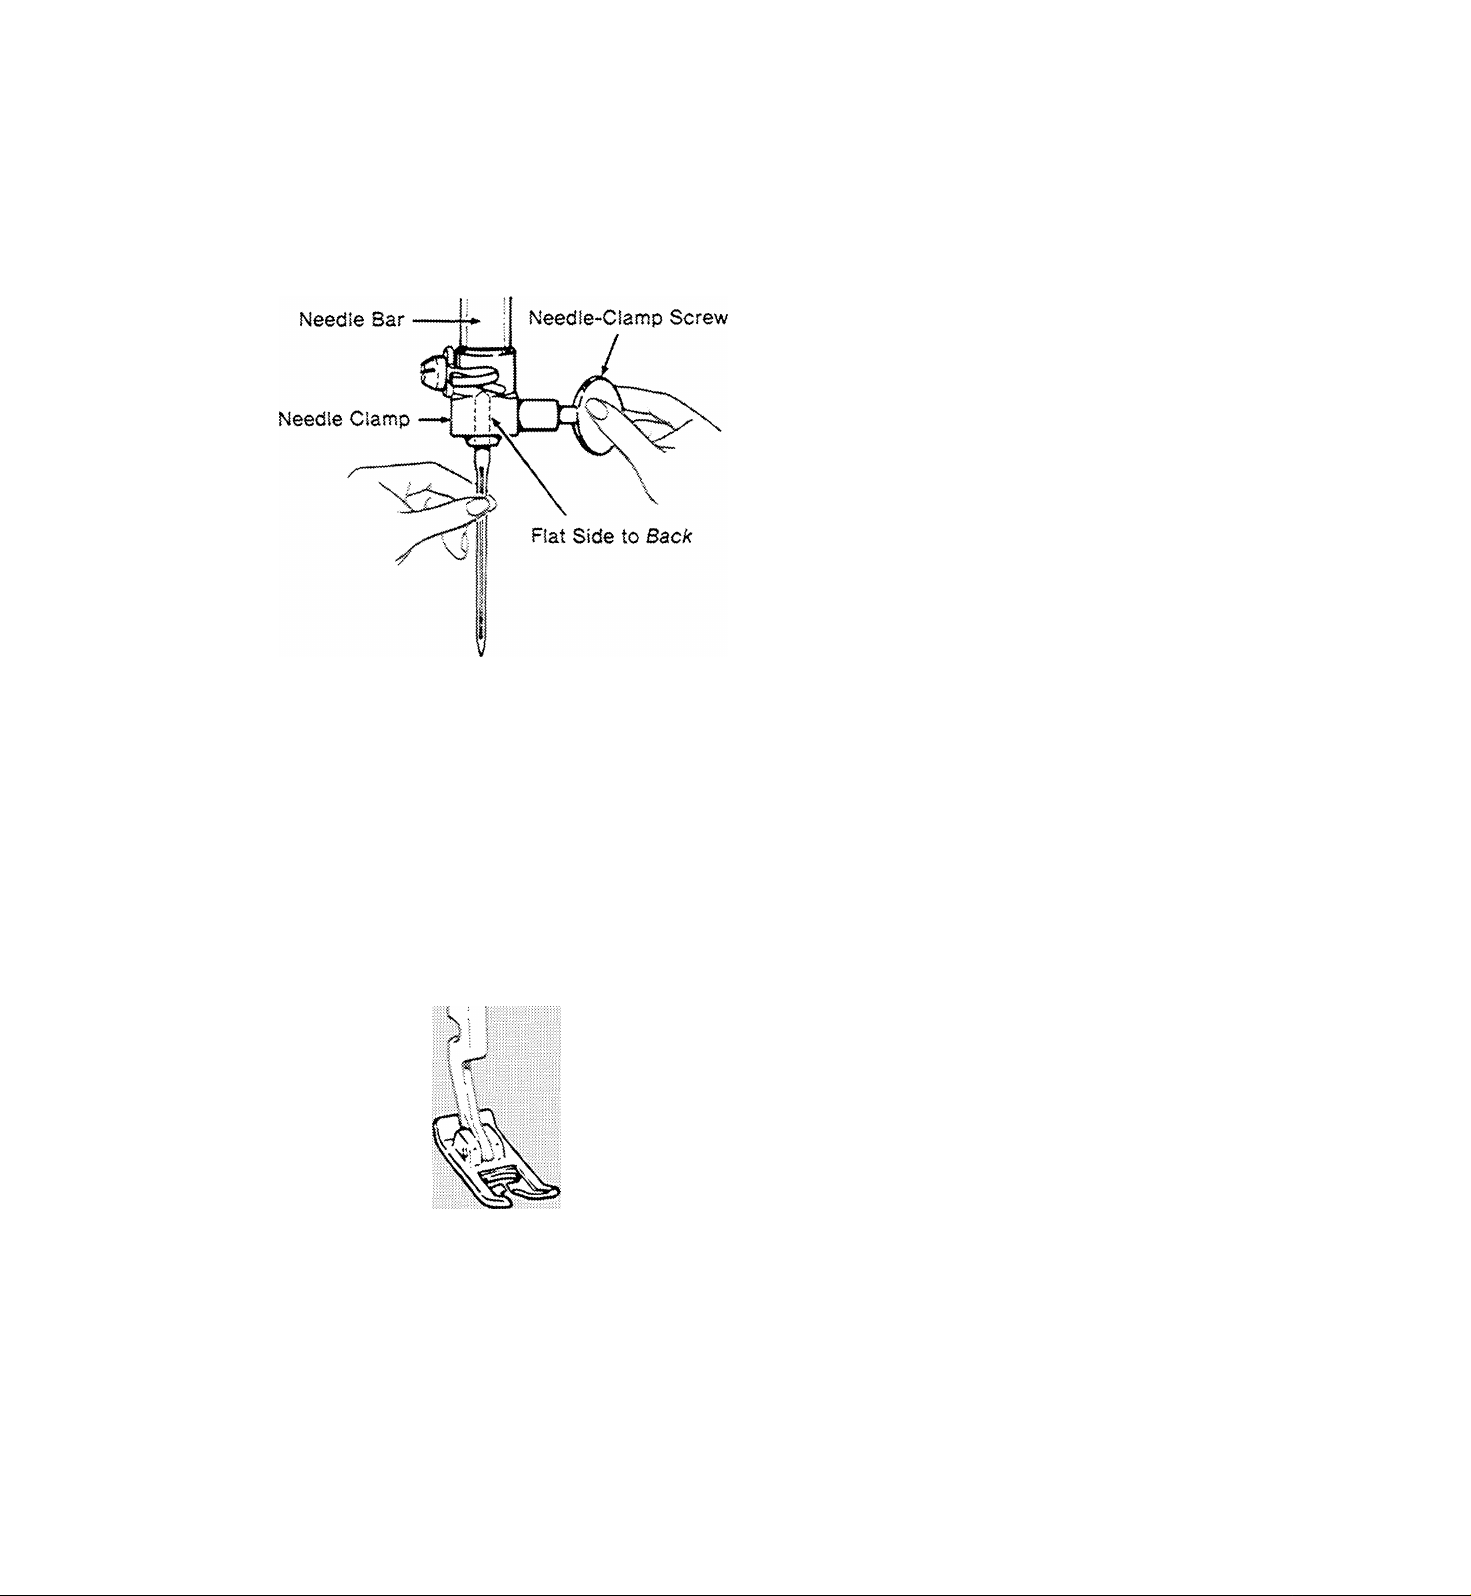
Changing the Needle
1. Raise needle bar to its highest point,
loosen needle-clamp screw, and remove
needle.
2. insert new needle in clamp, with the flat
side of the needle to the back; push it up as
far as it will go.
General Purpose Foot
3. Tighten needle-clamp screw.
choosing accessories
The type of sewing you plan to do will deter
mine which presser foot and needle plate you
should use.
PRESSER FEET
Three Most Used Presser Feet
General purpose foot is used with the general
purpose needle plate for all utility sewing and
some decorative zig-zag stitching. These
general purpose accessories ntust be used
together when alternating between straight
and zig-zag stitching.
8
Page 11
straight stitch foot Is used with the straight
stitch needle plate when your fabric or sewing
procedure requires close control Use for:
• Precision straight stitching of curved and
scalloped edges, top stitching, edge stitch
ing. etc.
• Straight stitching delicate or spongy fabrics.
Special purpose foot is used with the general
purpose needle plate for all kinds of decora
tive zig-zag stitching. The raised center sec
tion of the foot allows closely spaced zig-zag
stitching to feed freely while the toe holds
fabric firmly for straight line feeding. Use for:
• Ornamental stitching, bar-tack buttonholes.
Flexi-Stitch pattern stitching, applique, satin
stitching,
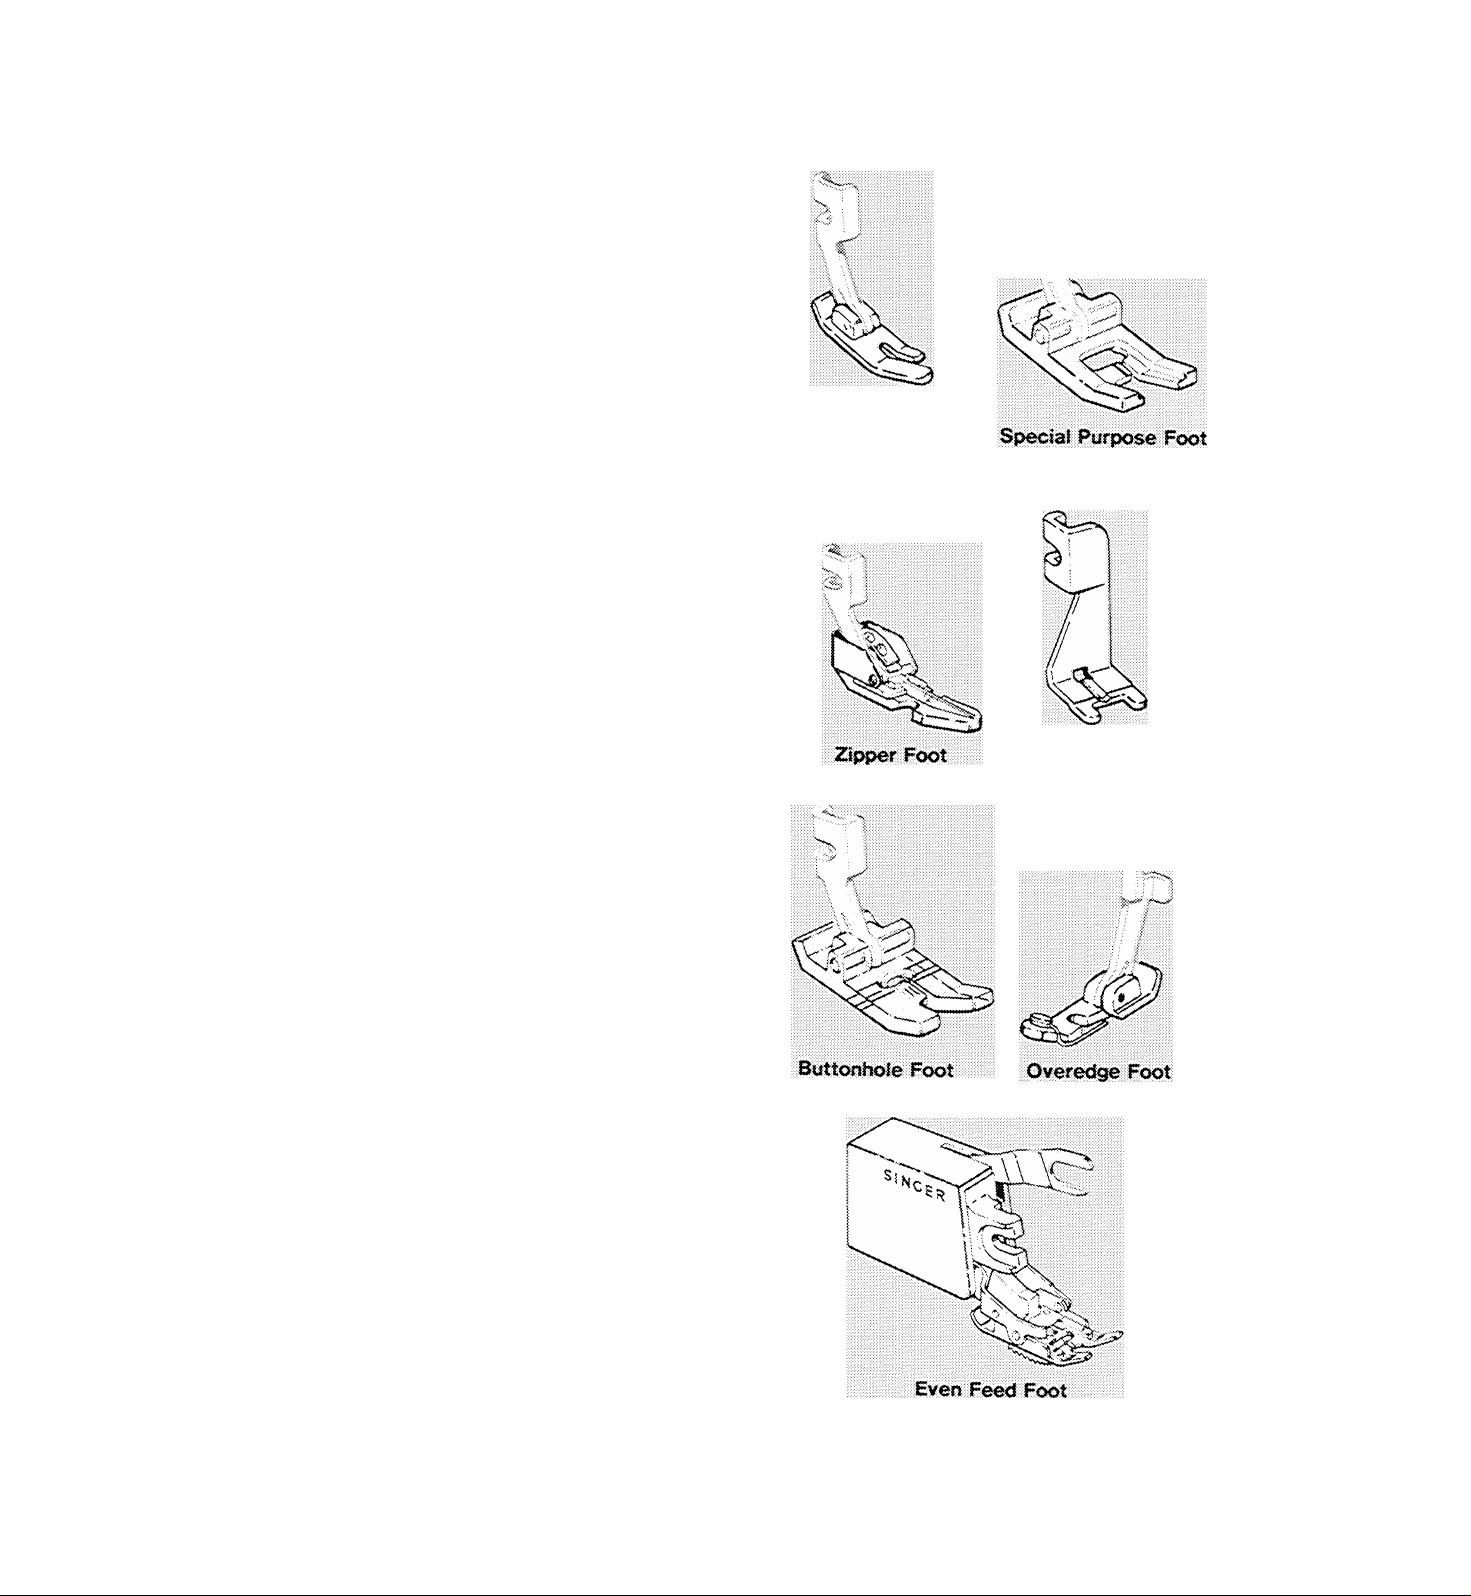
Presser Feet for Special Sewing Needs
Zipper foot is used to place stitching close to
a raised edge. Thus, it is useful for corded
seams (page 48) as well as zipper insertion
(page 47). It can be fitted to the presser foot
shank for use on either the right or left side of
the needle.
Straight Stitch Foot
Button Foot
Sutton foot holds any two-hole or four-hole
button securely for stitching. The groove in
the foot can be used to hold a needle, over
which a thread shank can be formed.
Buttonhole foot. This snap-on transparent
foot is used to make two-step, round-end but
tonholes in fabrics of light to medium weight.
The guidelines on the sole plate simplify but
tonhole placement and make it easy to gauge
buttonhole length.
Overedge foot, used with the overedge
stretch pattern (see page 54) enables you to
produce flexible overedge seams and edge
finishes. It is particularly useful in construc
tion of garments made of knit, stretch, and
elastic fabric.
Even Feed foot improves the feeding of
fabrics that tend to stick, stretch, or slip while
being sewn. The foot feeds top and bottom
fabric layers together so that seams start
even, feed evenly, and end even.
Page 12
Changing Snap^on Presser Feet
press Toe Upward
for Rerr.ovai
of New Presser Foot
under Shank
■ \, Lower Presser Bar and
Press Down on Screw
; to Secure New Foot
CHANGING PRESSER FEET
Snap-on Presser Feet
These presser feet snap on and off a common
shank.
1. Raise needle to its highest position and
raise the presser foot.
2. Press toe of presser foot upward (as far as
it will go) and then snap down to remove.
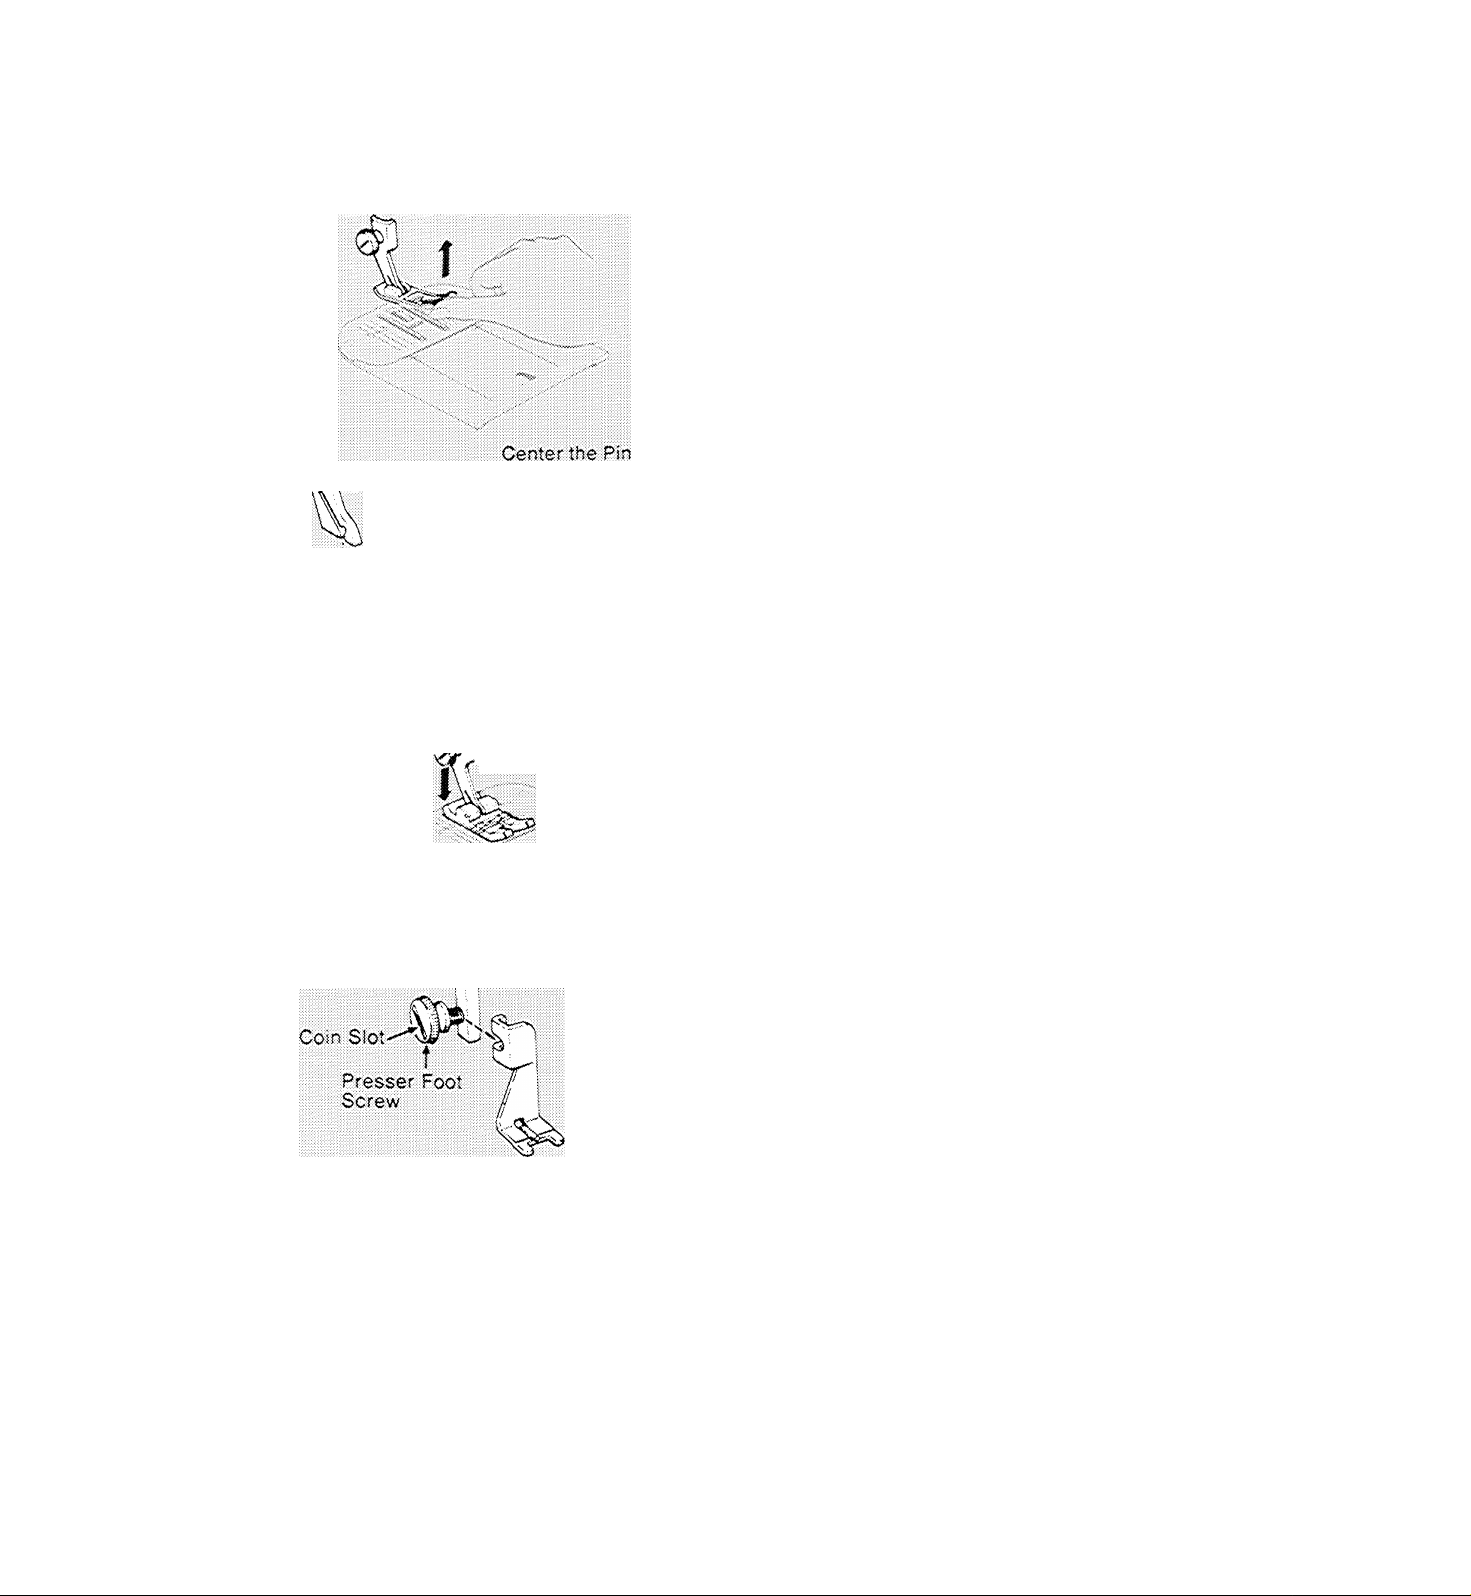
3. Center the new presser foot under the
shank and lower the presser bar so that the
shank fits over the presser foot pin.
4. Press down on presser foot screw until foot
snaps into place.
To remove and replace shank of snap-on
presser feet, follow instructions below for
one-piece presser feet.
Changing One-Piece Presser Foot
Movable Arm.
One-Piece Presser Feet
1. Raise needle to its highest position and
raise the presser foot.
2. Loosen presser foot screw and remove the
foot.
3. Hook new foot around the presser bar and
tighten presser foot screw.
NOTE: When changing one-piece presser
feet, you may insert the edge of a coin in the
slot to tighten presser foot securely.
The Even Feed Foot
• Guide Even Feed foot into position from
back of machine, making sure the movable
arm straddles the needle clamp. Tighten
presser-foot screw securely with a coin.
Needle
Clamp
10
Changing Even Feed Foot
Page 13
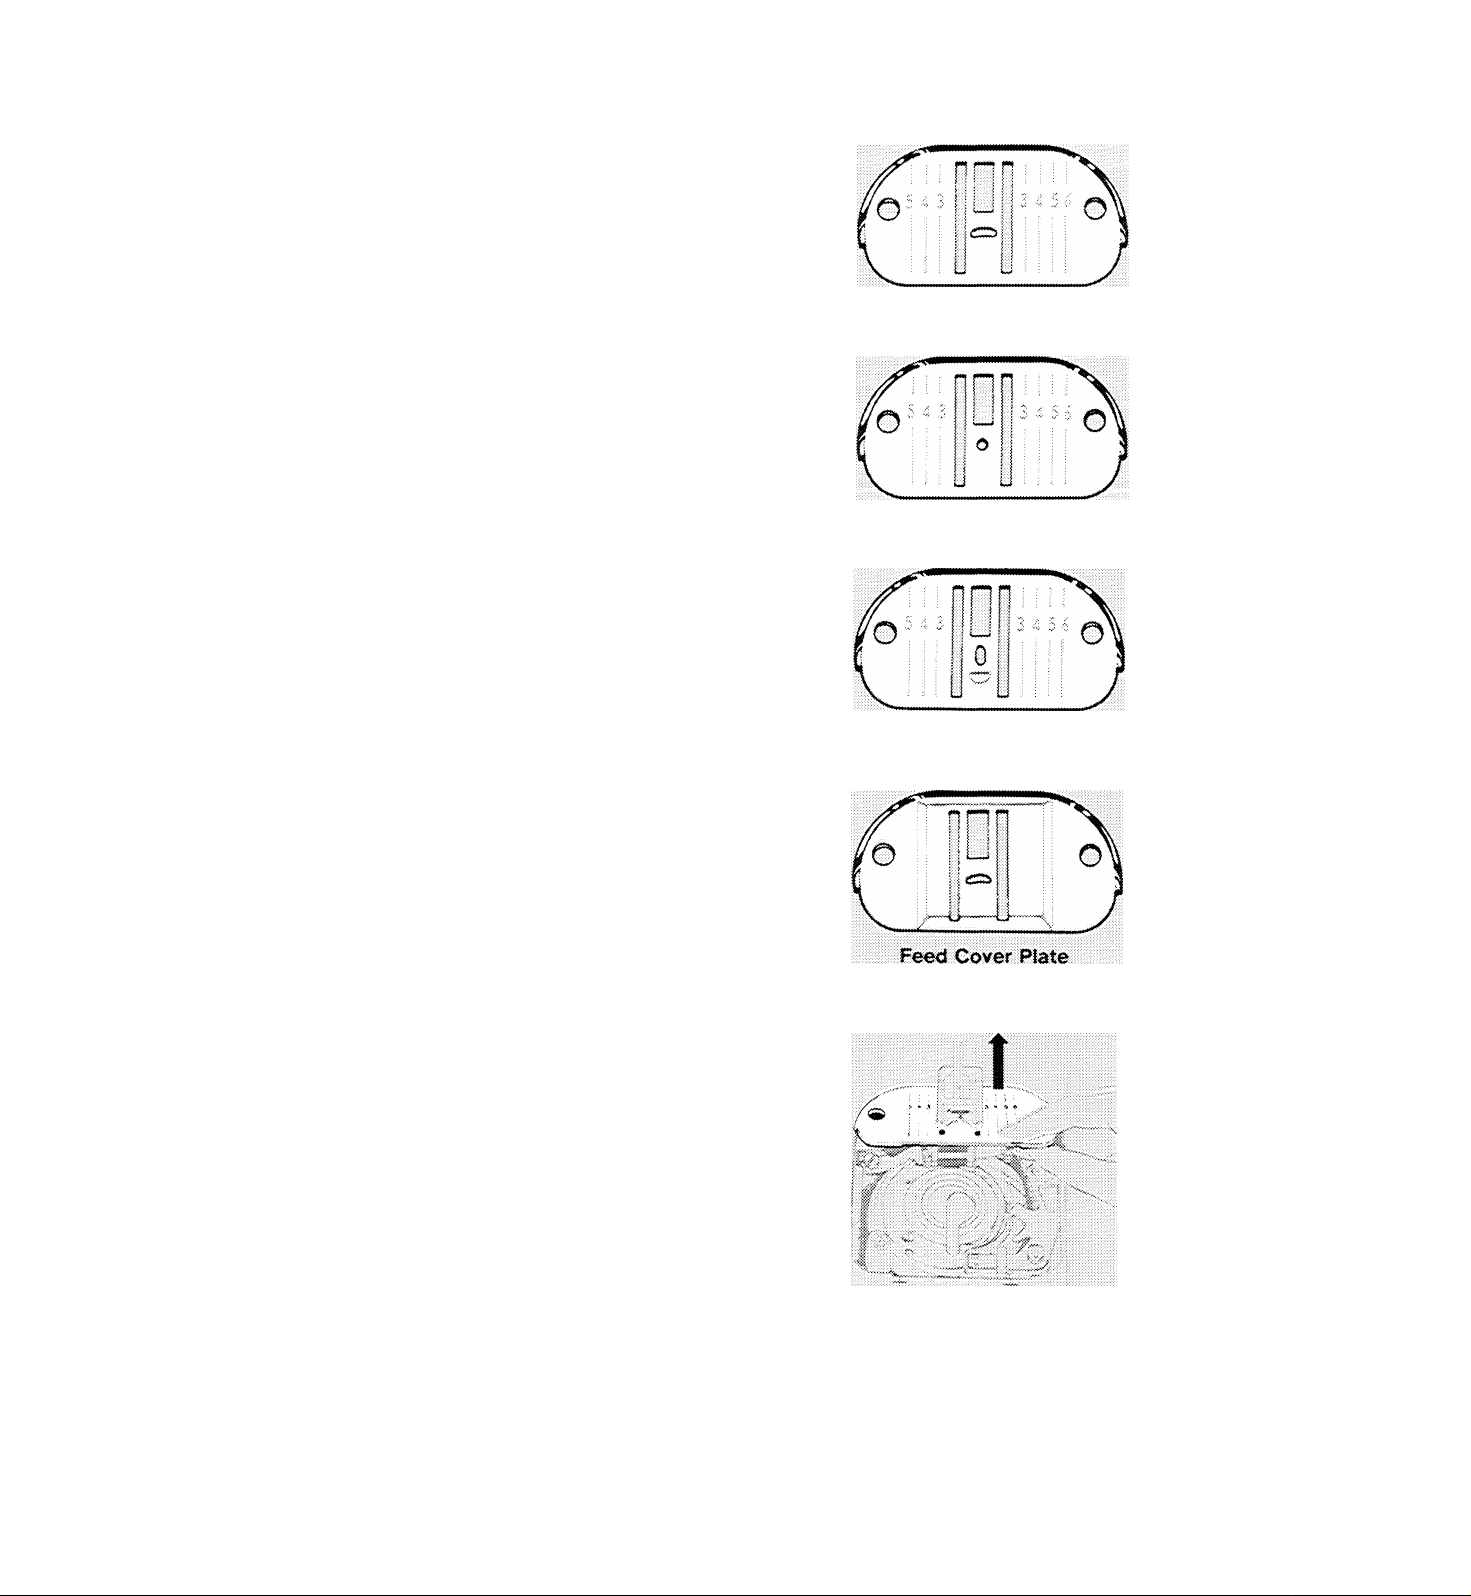
NEEDLE PLATES
General purpose needle plate, in place in
your machine, can be used with all presser
feet.
Straight stitch needle plate for use with the
straight stitch presser foot.
Chainstitch needle plate is one of three ac
cessories that must be used together for
ohainstitching. For instructions, refer to
“Chainstitching” beginning on page 35.
General Purpose Needle Plate
Feed cover plate for use when fabric feeding
is not desired.
CHANGING NEEDLE PLATE
NOTE: Remove bobbin if it contains thread in
order to prevent thread being caught when
needle plate is replaced.
1. Raise needle to its highest point and raise
presser foot.
2. Open slide plate. Remove needle plate by
placing thumb under plate and lifting it up
and out.
Straight Stitch Needle Plate
Chainstitch Needle Plate
3. Position new needle plate over the two pins
and release. (Needle plate is drawn into
position by magnets.)
4. Close slide plate.
Changing Needle Plate
11
Page 14
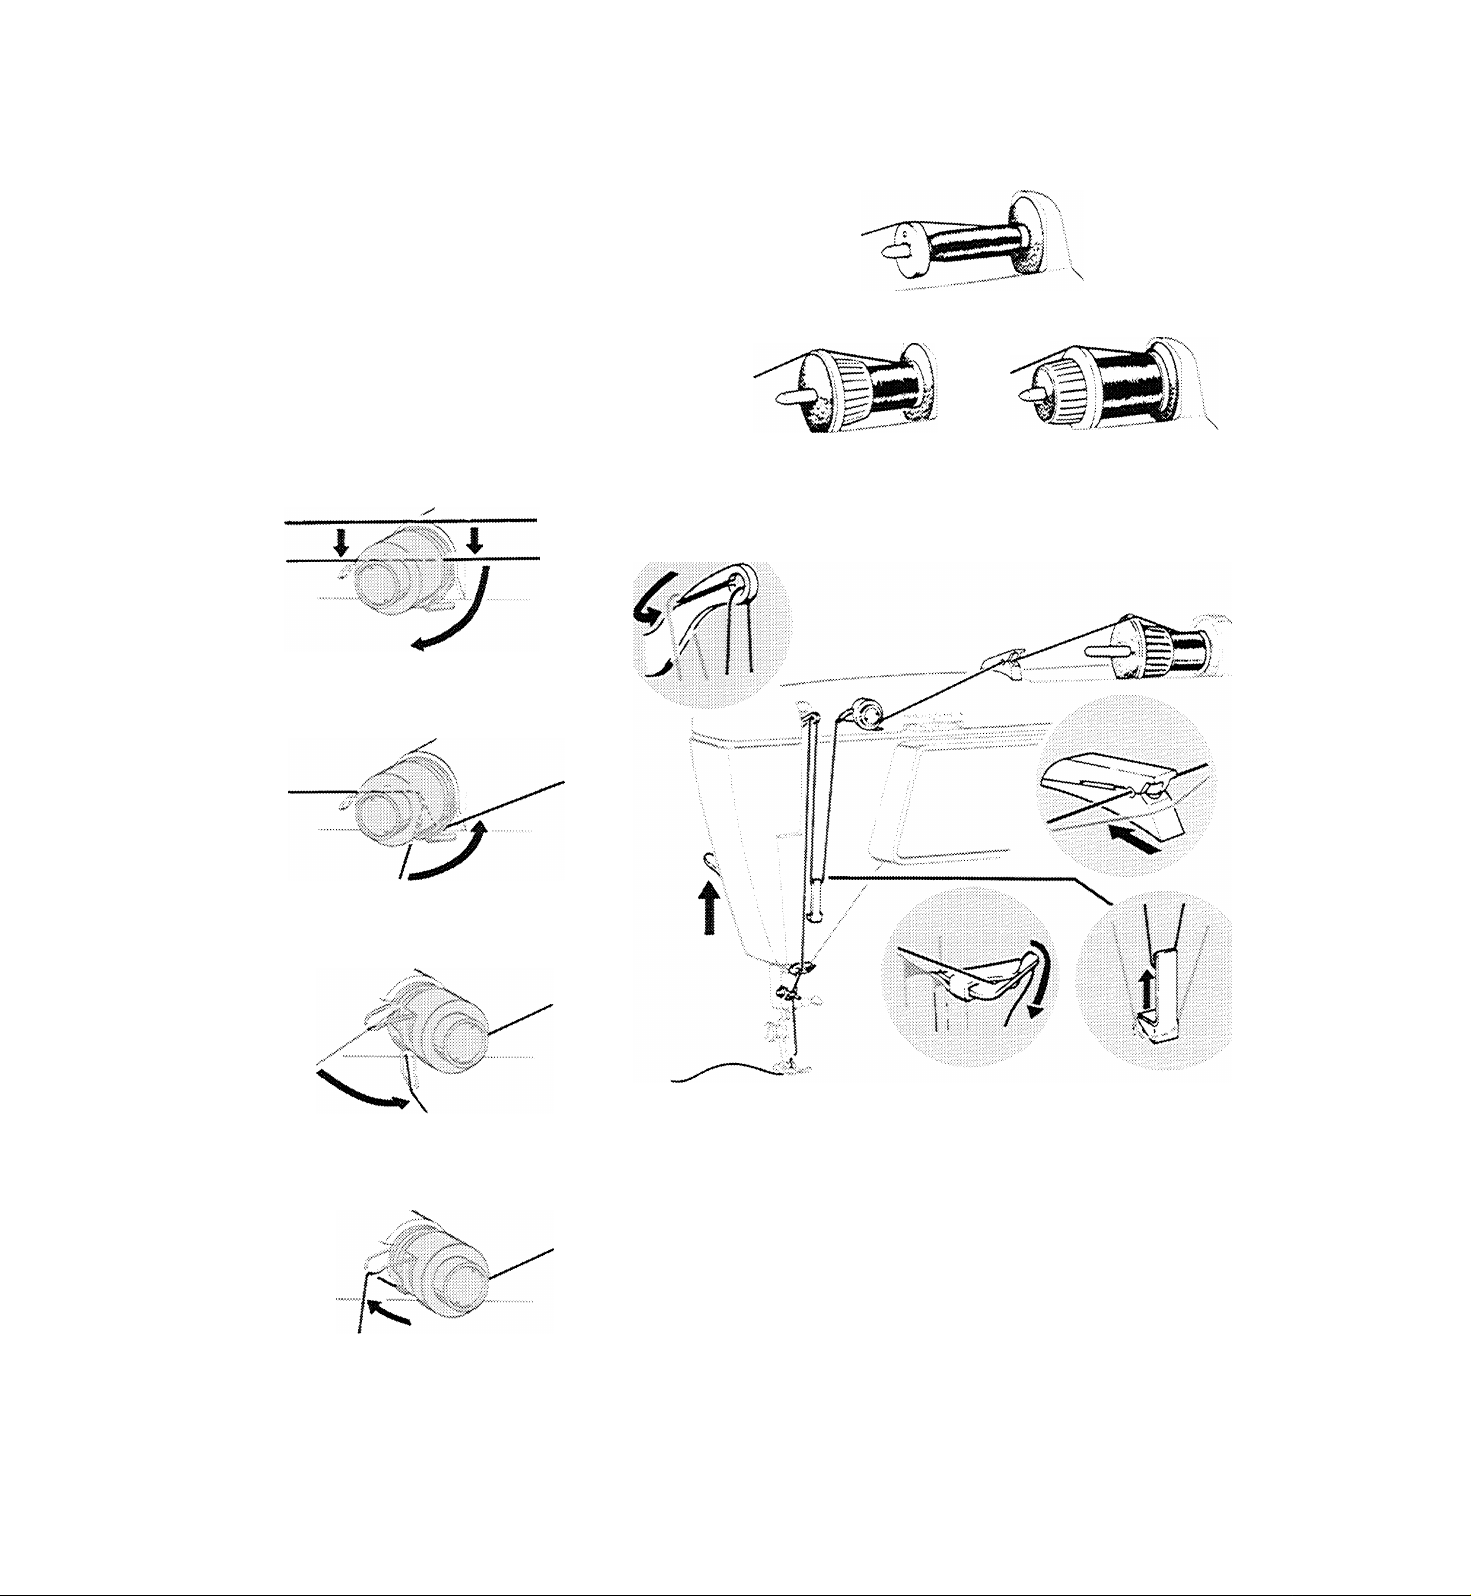
threading the machine
Place spool or tube of thread on horizontal
spool pin. If spool has a retaining slit, the slit
should be placed against the spool cushion to
the right Select correct spool holder according
to the type and diameter of spool being used.
The diameter of the end of the spool holder
should always be larger than that of the spool
itself. Press holder firmly against spool to pre
vent it from turning.
With two hands, slip thread
horizontally between ten
sion discs from the top.
ÍO Hold Small Tubes
To Hold Small Spools To Hold Large Spools
THREADIMG THE NEEDLE
With right hand, lead thread
under thread guide on right
side . . .
1
Turn hand wheel to raise take-up lever to its highest posi
... and, with left hand, lead
thread over spring and un
der guide on left side.
tion, and raise presser foot to release the tension discs.
2, Lead thread through all points as shown, making sure to:
Use both hands and snap thread horizontally into thread
guide-post, making sure it enters eyelet fine thread
should be doubled for added strength.
Thread tension discs as illustrated at left.
Thread take-up lever from back to front, guiding thread
Allow spring to return to its
normal up position and con
tinue threading the machine.
down over top of lever and then up into eyelet.
Thread needle from front to back, drawing about four in
ches (10cm) of thread through eye of needle.
Note: Dotted lines in illustrations represent thread path hidden by machine.
12
Page 15
WINDING THE BOBBIN
Push-button bobbin winding wiO make your
sewing go faster than ever before — whether
you are using a lot of one kind of thread or
small quantities of blfierent threads.
You will find a bobbin in place under the slide
plate of your machine. To open slide plate,
simply slide it gently toward you. If the bobbin
runs out of thread while you are sewing, you
can rewind it without removing it from the
machine-
Bobbin
preparation for Winding
l4 R I
r 1 Ti-i
Preparation Steps
Make sure buttonhole dial is in OFF position.
1. Use genera! purpose, special purpose, or
straight stitch presser foot.
2. Raise presser foot to release tension on
thread, and raise the needie to its highest
position. (Make sure your needle is a size
11 or larger).
3. Set needle position and stitch width dials
at straight stitch setting indicated by
A symbols.
4. Open slide piate and make sure bobbin is
empty. For removal of bobbin and thread,
see page 16.
13
Page 16
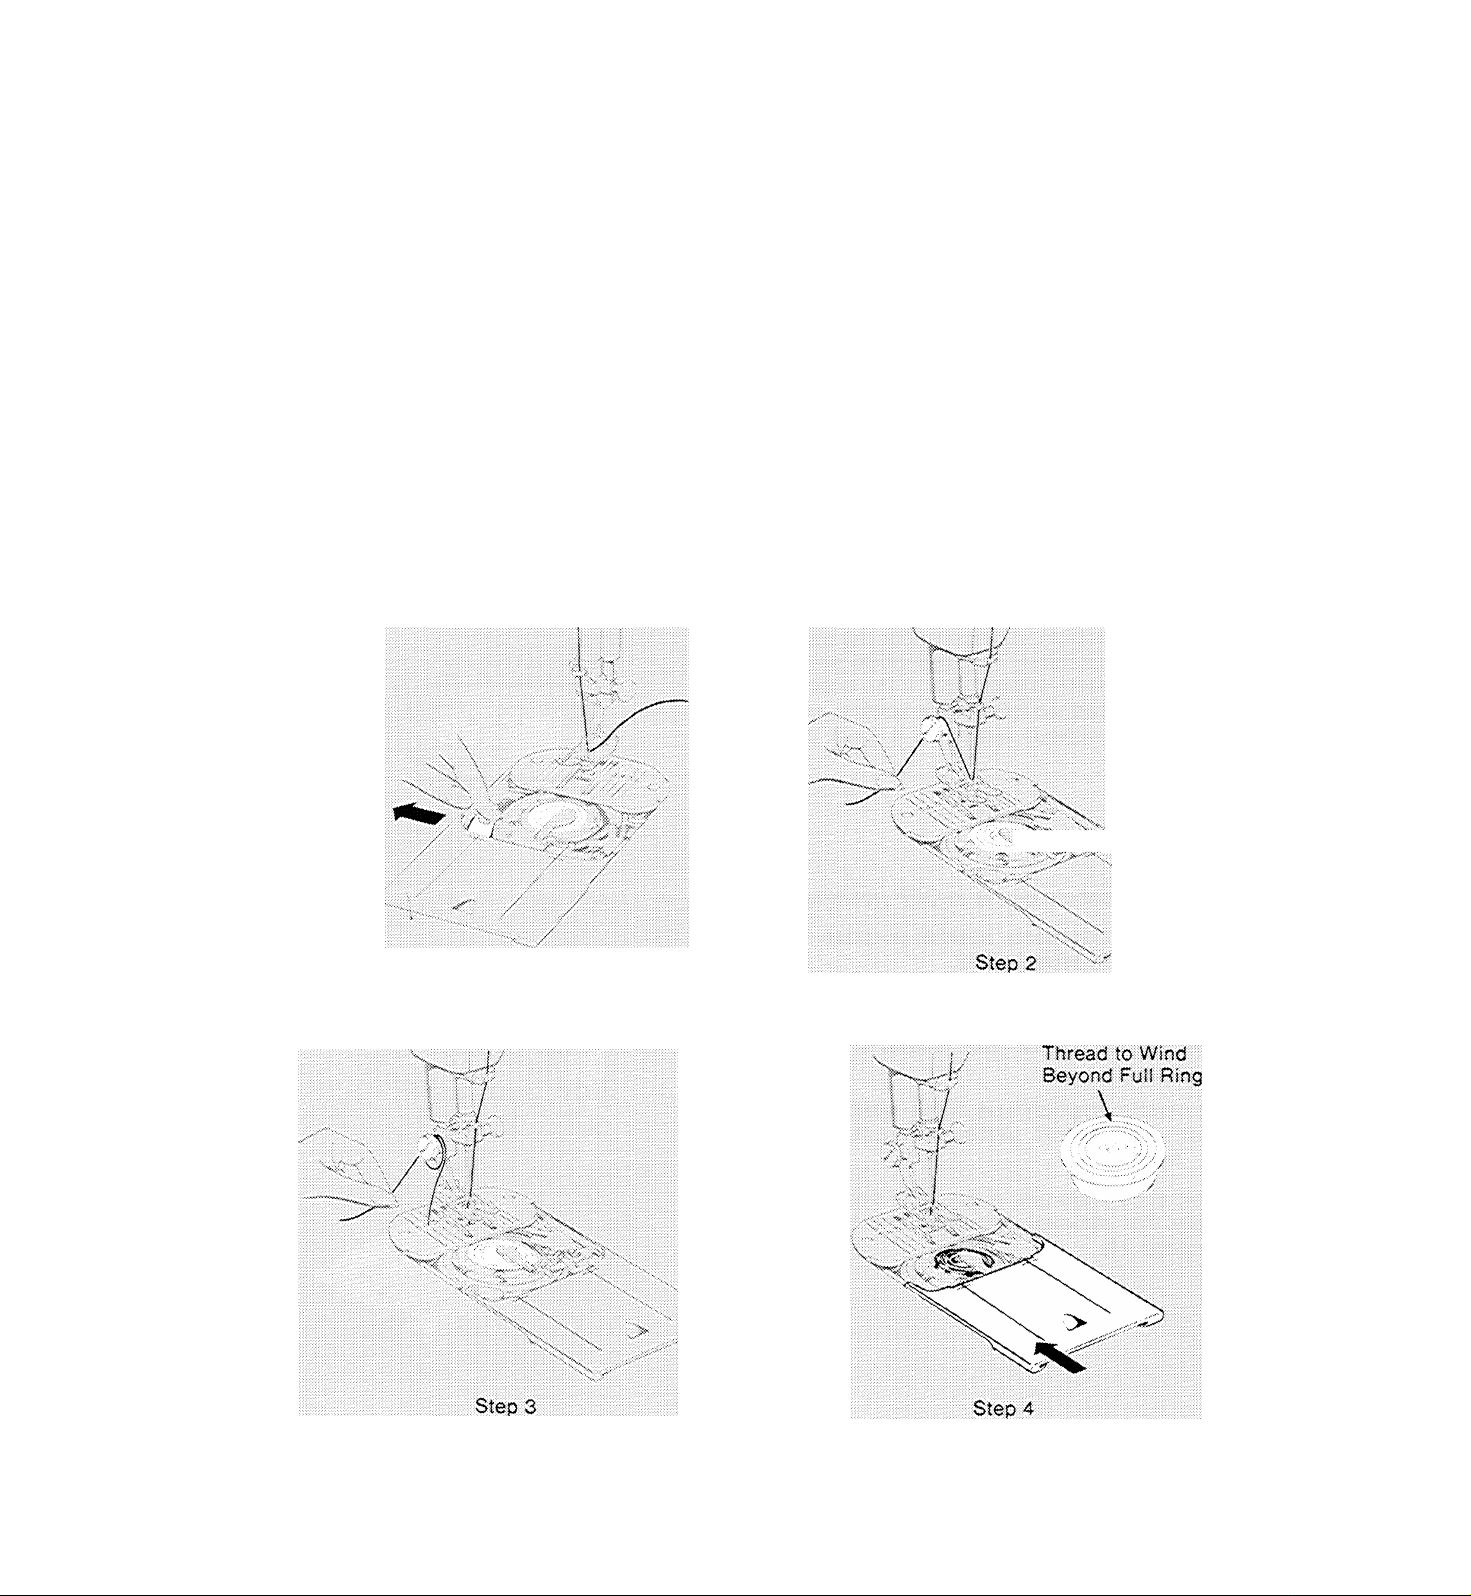
Wmdirsg Steps
1. Press bobbin push button to the left to
engage it in winding position.
2. Wrap thread around pressar foot screw,
and hold end of thread firmly.
3. Start the machine.
* Run the machine at a moderate speed.
♦ Pull thread end away after a few coils
have been wound.
• Keep your eye on the bobbin as it fills. Do
not allow thread to wind beyond the out
side FULL ring.
4. Close slide plate to release push button to
sewing position.
Turn to the next page for instructions on start
ing to sew.
Winding Steps
14
Step 1
Do Not Allow
Page 17
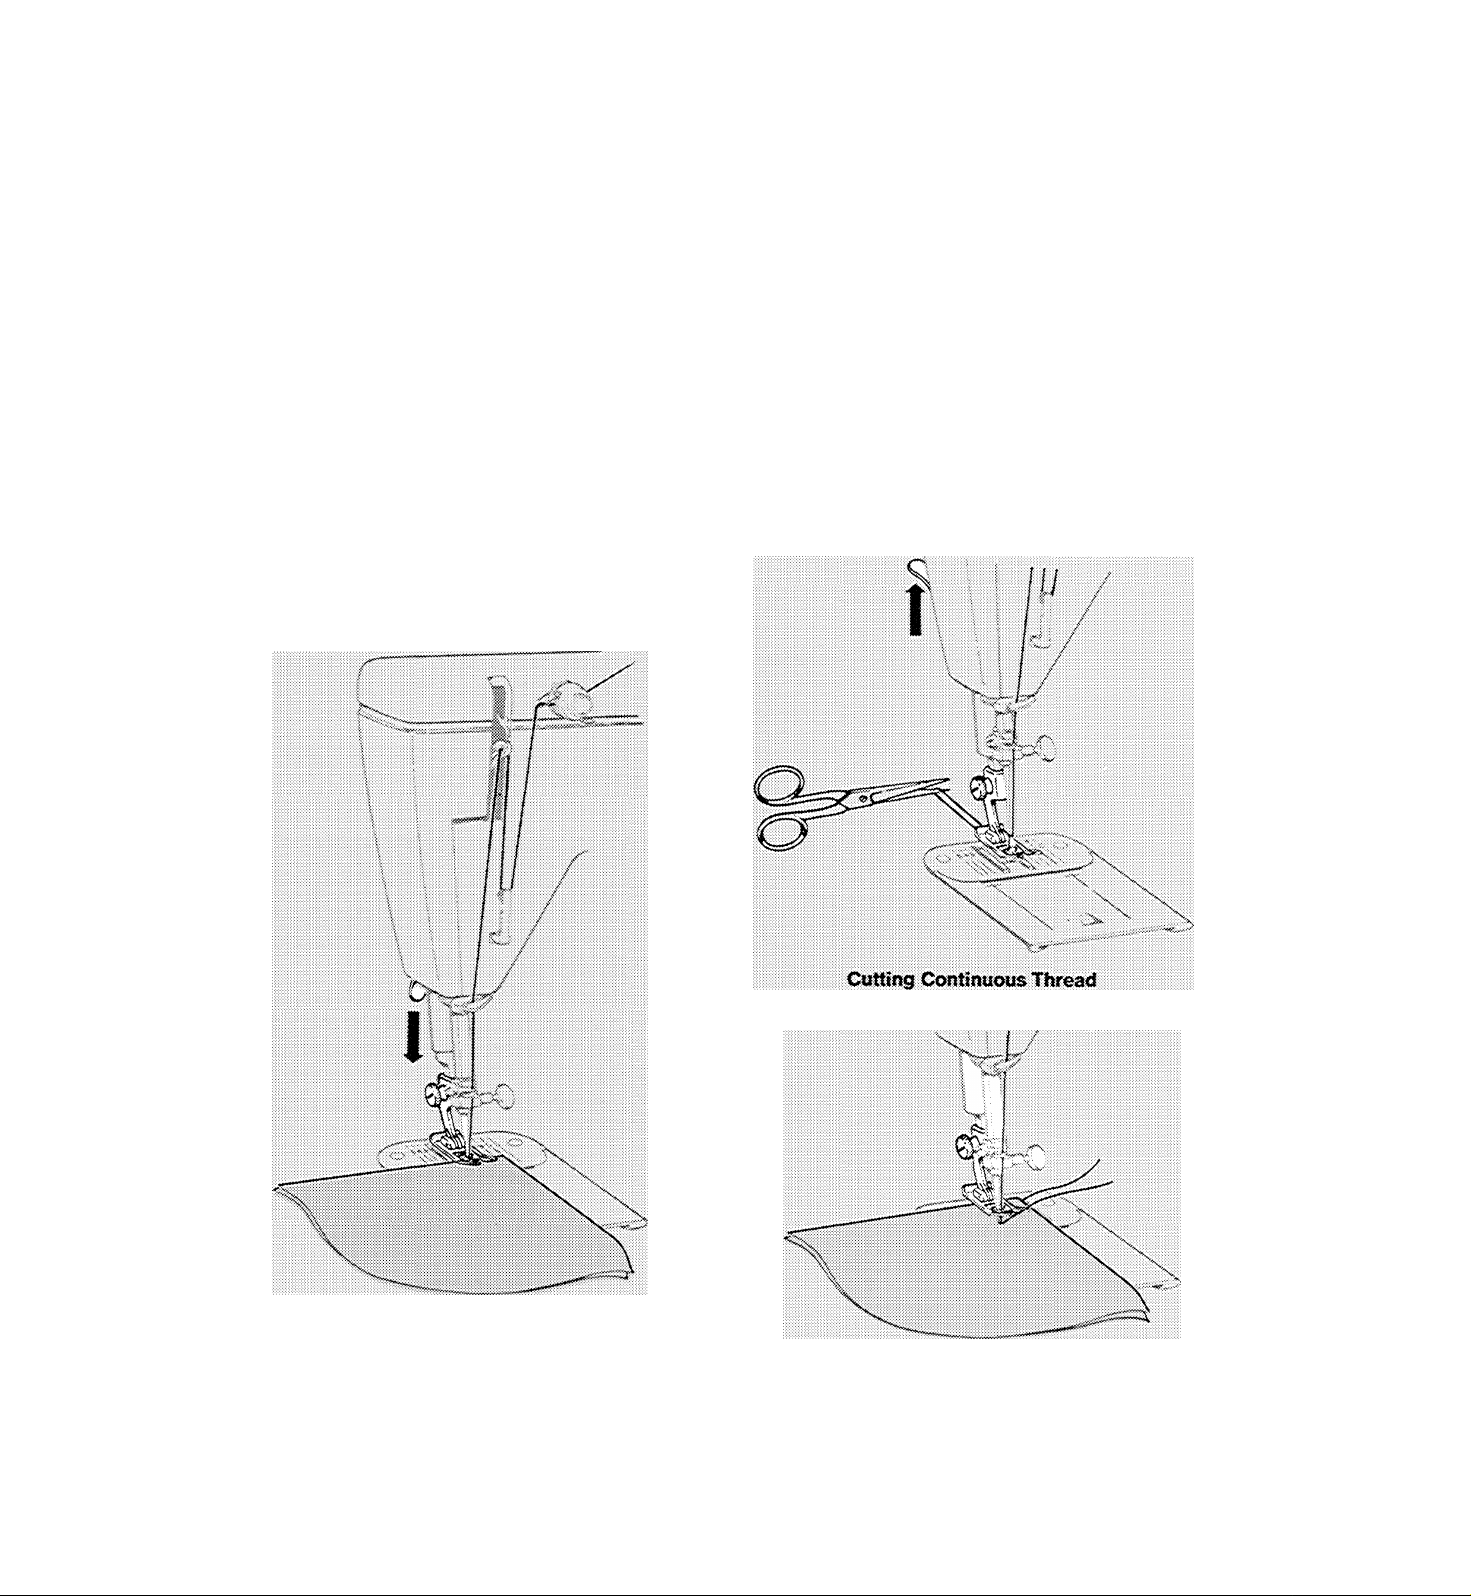
how to start sewing
How you begin to sew after winding a bobbin
depends on whether your stitching is to start
at or away from the edge of the fabric.
TO START AT FABRIC EDGE
♦ Position needle in very edge of fabric by
pressing speed controller lightly or turning
the hand wheel
• Lower the presser foot and stitch. The con
tinuous thread, leading from the needle to
the bobbin, will 'lock” over the fabric edge.
TO START AWAY FROM FABRIC EDGE
• Puli thread back under presser foot and cut.
• Position needle in fabric where desired and
stitch.
NOTE: Should the bobbin run out of thread
after you have begun a line of stitching, re
move the fabric, rewind the bobbin, and follow
the two immediately preceding steps.
Starting at Fabric Edge
with a Continuous Thread
Starting Away from Fabric Edge
15
Page 18
Removing Bobbin
changing the bobbin
REMOVING THE BOBBIN
Raise needle to its highest position.
1. Open slide plate; leave bobbin push button
in sewing position,
2. Raise bobbin latch by inserting fingernail
under end of latch at center of bobbin.
Open Slide Plate and Raise Latch
/■^ f. V ' V -X
/ / /■ ;■' ’Vf^--:-. Ч Ч
/ / / ,/
Lift Out Bobbin
Replacing Empty Bobbin
.........
.
Л
X .
V ■ ■
> У
7 ^
/
/
■:. < /
/ /
Slip Bobbin into Case
V —
.-г'-Л,
.
'' '
3. Insert fingernail under rim of bobbin im
mediately to right of latch and remove the
bobbin.
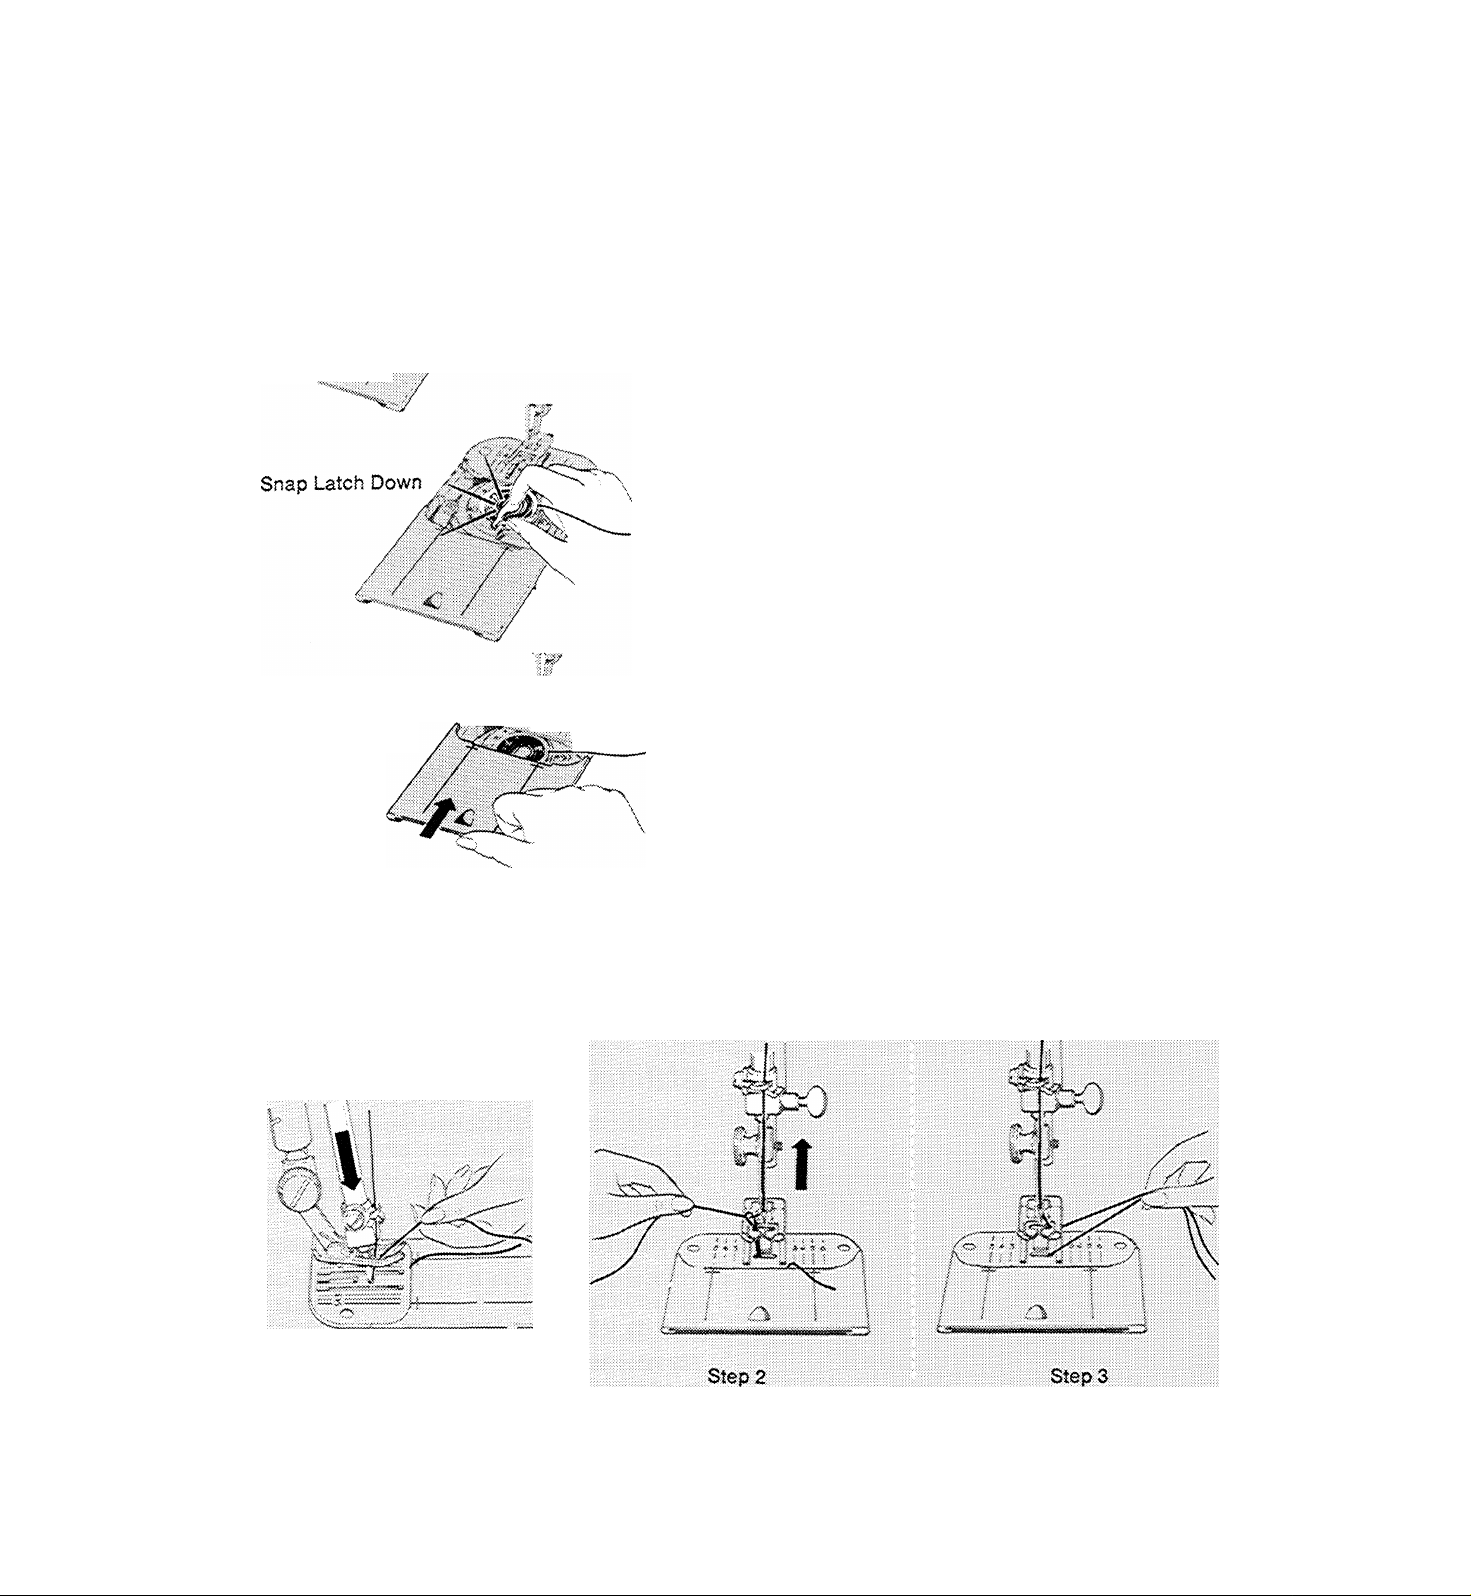
REPLACING AN EMPTY BOBBIN
1. Make sure bobbin halves are securely tight
ened.
2. With latch raised, slip bobbin (wide side
up) into bobbin case. Then snap latch down
to secure bobbin.
3. Leave the slide plate open until you have
finished winding,
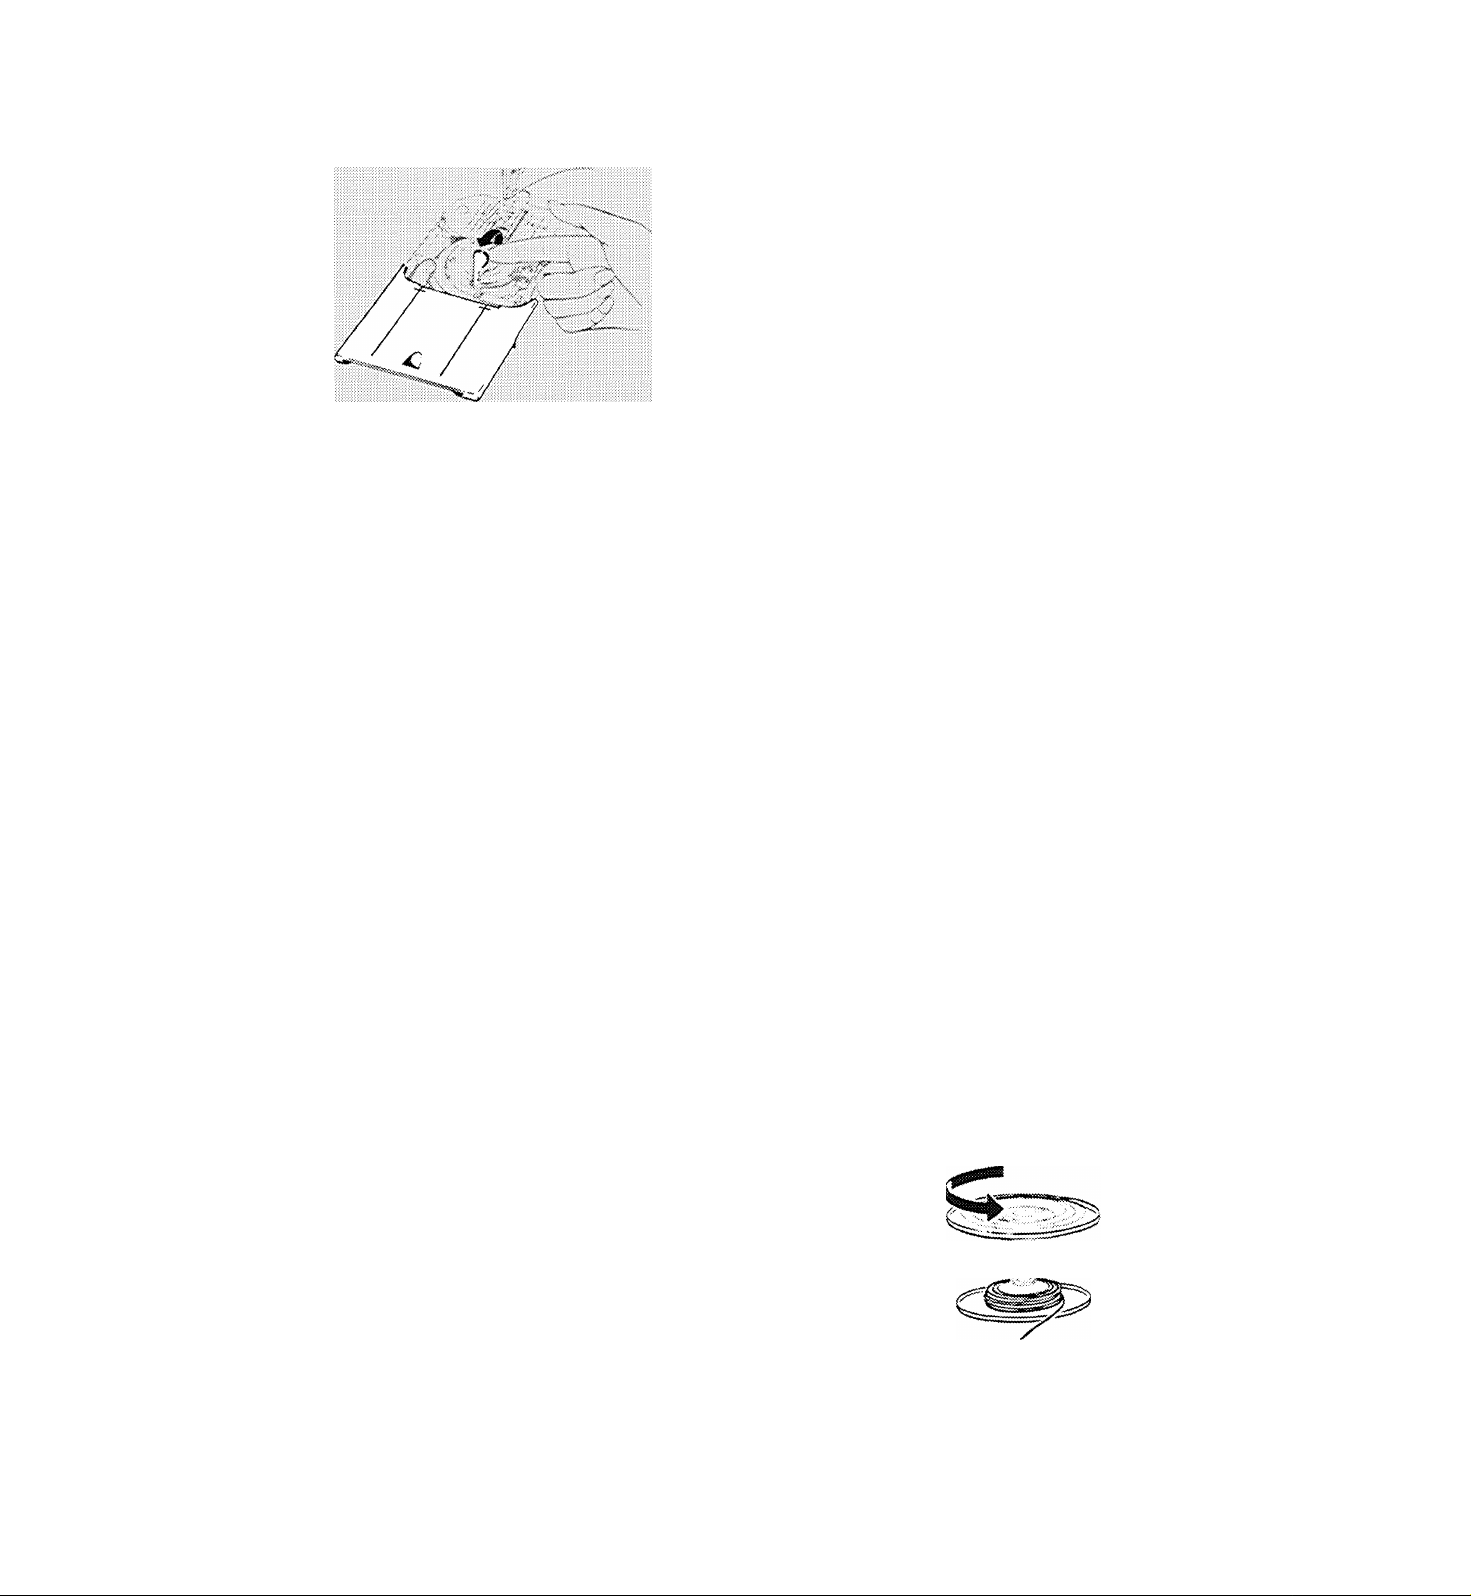
REMOVING THREAD FROM BOBBIN
■\
If there is not much thread left on the bobbin,
you do not need to remove bobbin from ma
chine— simply pull the thread end through
the needle plate.
If there is a lot of thread left and you do not
wish to reserve it by setting aside the bobbin
for future use, remove the bobbin, unscrew the
two halves, and remove all the thread at once.
Then screw the two halves together, tighten
ing securely.
16
/ /'
/
■ <, /
f/ 'x..^;-^:r v-.
\
/
Snap Latch Down
/ \...
Removing Thread from Bobbin
Page 19
REPLACING A WOUND BOBBIN
0':4K7r>
/f
VVi
/
^ / / Insert Bobbin
Close Slide Plate
Raise needle to Its highest position.
1 Open slide plate; leave bobbin push button
in sewing position.
/
2. Draw about four inches {10cm) of thread
from bobbin and place bobbin in case with
thread leading off to right side of latch.
Snap latch down to secure bobbin.
3. Close slide plate, allowing the thread to
enter the slot in the slide plate. Then raise
the bobbin thread as instructed below.
RAISING THE BOBBIN THREAD
1. Hold needle thread lightly with left hand
/■"o
and turn hand wheel slowly toward you so
that needle enters needle plate,
2. Continue turning hand wheel until needle
rises and brings up bobbin thread in a loop.
Replacing a Wound Bobbin
Stepi
3. Undo the loop and place both threads under
the presser foot, laying them diagonally to
the right Position needle in fabric where
desired, lower the presser foot and stitch.
Raising the Bobbin Thread
17
Page 20
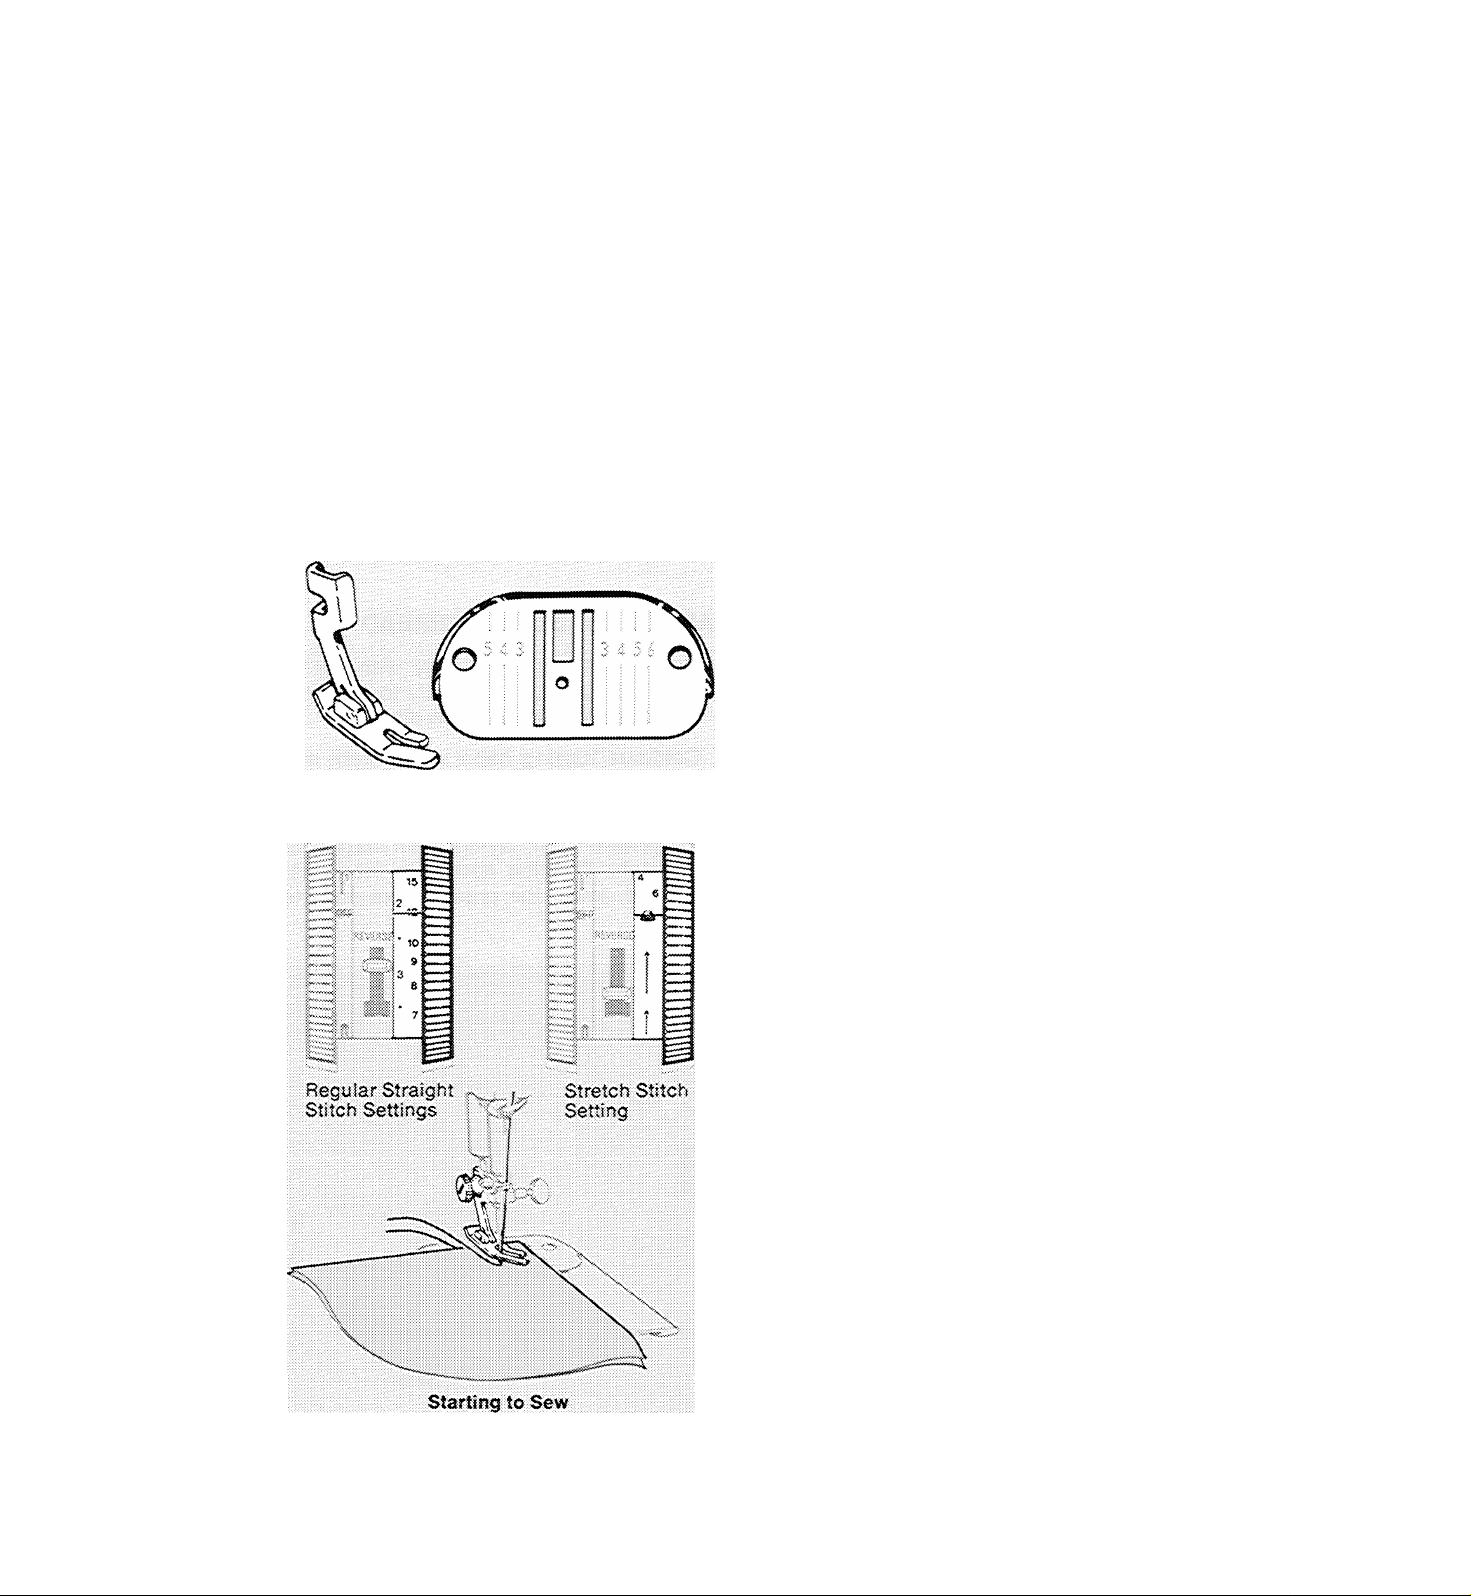
3. STRAIGHT STITCHING
Pattern: Straight Stitch
Needie Position: A
Stitch Width: A
Stitch Controi; To suit fabric
1 :... 4. ; A
Dials Set for Straight Stitching
Straight Stitch Needle Plate or
General Purpose Needle Plate
Straight Stitch Foot or
General Purpose Foot
preparation
Before you set the dials for straight stitching,
turn the handwheel toward you untiltheneedle
is above the needle plate.
Straight Stitch Foot and Needle Plate
SETTING THE IVIACHINE
1. Set pattern dial selector at .
2. Move needle position dial to A .
3. Set stitch width dial on A .
4. Set stitch control for desired stitch length.
For regular straight stitching, turn dial to
a numbered setting; for straight stretch
stitching, turn dial to
^ setting.
!
CHOOSING ACCESSORIES
Best results will be obtained if you use the
straight stitch foot and needle plate. However,
the general purpose foot and needle plate
may also be used.
starting to sew
* Place needle and bobbin threads under pres-
ser foot and draw to back of machine.
• Position the needle in the fabric where de
sired for stitching start.
18
♦ Lower the presser foot and start the machine.
To sew perfectly on a wide variety of fabrics
adjust stitch length, pressure and thread ten
sion as instructed on the following pages.
For information on straight stretch stitching, turn
to page 52.
Page 21
adjusting for your fabric
SETTING STITCH LENGTH
The stitch-controi dial regulates the length of
both straight and zig-zag stitches. The num
bers 6 to 20 represent the number of straight
stitches per inch and the numbers 1 to 4
represent stitch length in milhnneters.
Generally, shorter stitches are best for light
weight fabric; longer ones for heavy fabric.
Curved seams, bias-cut seams and scallops
require short straight stitches for elasticity
and smooth contours. Bound buttonholes
should be sewn with a short stitch for
durability and strength.
The FINE area is used for the adjustment of
zig-zag satin stitching (page 28} and speed
basting {page 33}.
The ^ setting is used for straight-stretch
stitching and Flexi-Stitch patterns. For infor
mation on Flexi-Stitch patterns and straightstretch stitching, see pages 25 and 52.
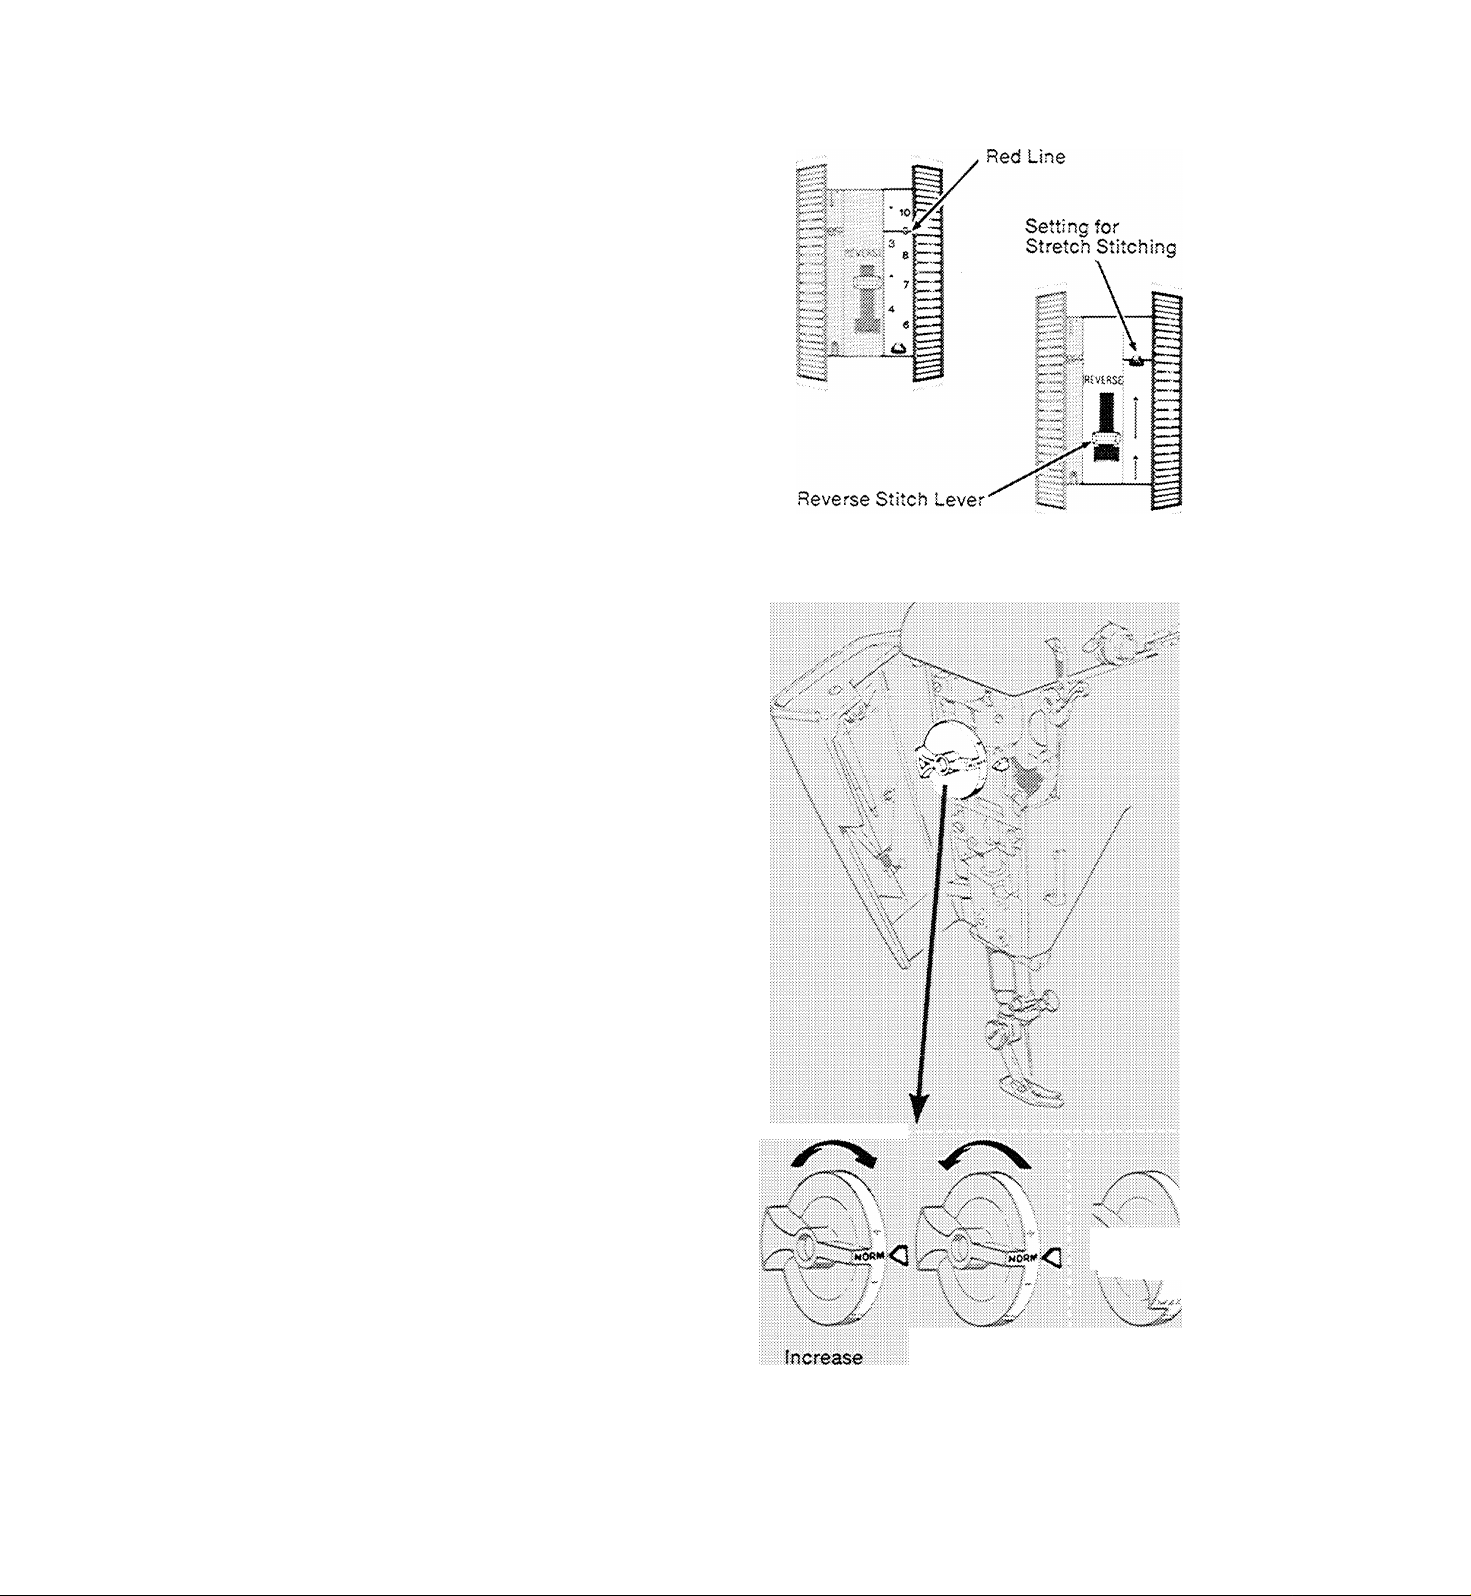
Stitch Control Dial
• To set stitch control, turn dial until setting
desired is under the red line.
For reverse stitching, simply press reversestitch lever all the way down and hold in place.
Release lever for forward stitching.
REGULATING PRESSURE
The pressure dial regulates the pressure that
the presser foot exerts on the fabric. Correct
pressure is important because it means fabric
feeds smoothly and evenly. The NORM (nor
mal} setting Is an all-purpose setting that can
be used for sewing a wide variety of fabrics
of different weights and textures. Intermediate
notched settings, above and below NORM,
are also provided. When you need extra con
trol to sew very heavy fabric, use the MAX
{maximum) setting.
Lower the presser foot before setting pressure.
♦ To increase pressure, turn dial from NORM
toward MAX.
• To decrease pressure, turn dial from NORM
toward DARN.
♦ For darniing, set dial on DARN.
Decrease
Pressure Dial
Darning
19
Page 22
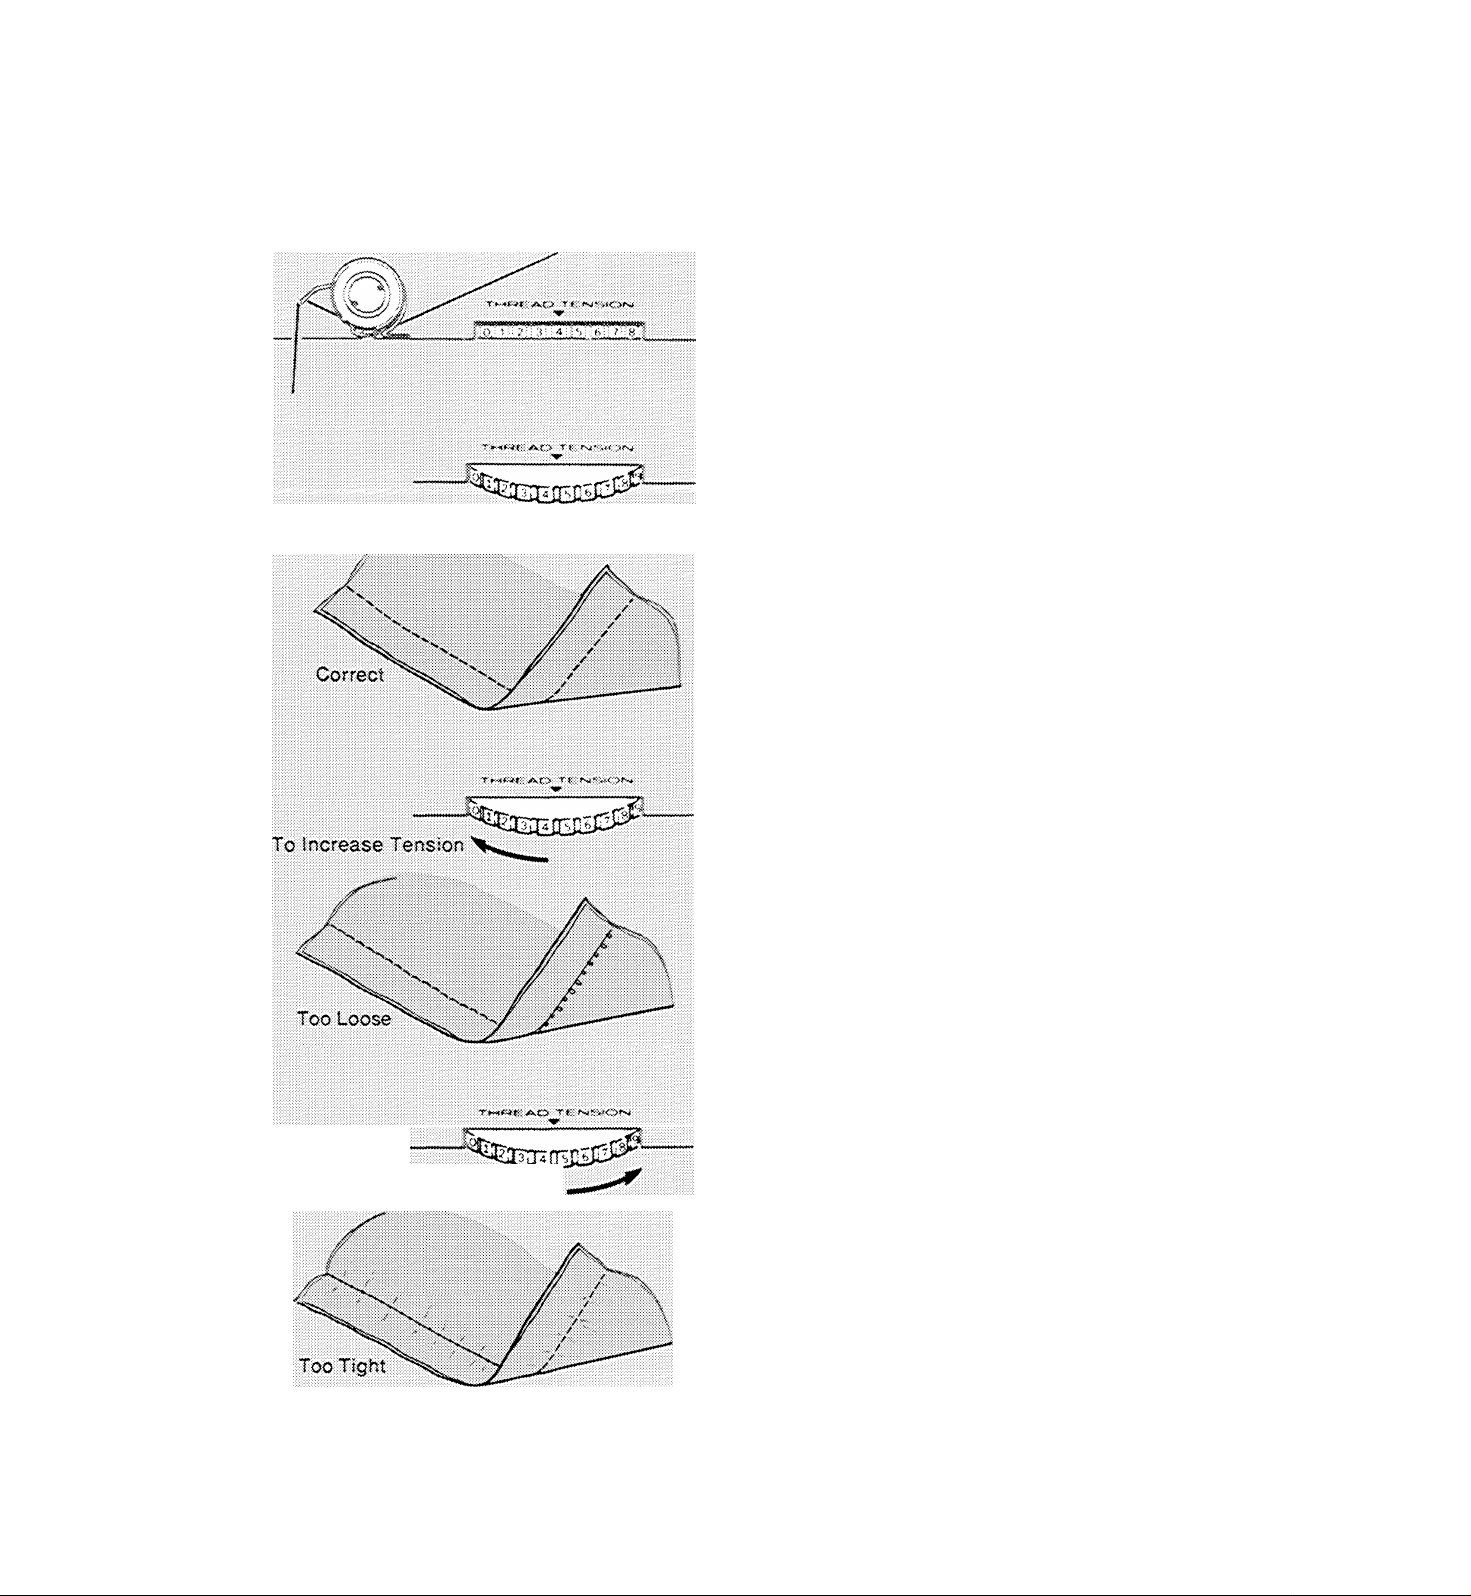
Needle-Thread Tension
REGULATING NEEDLE-THREAD TEN
SION
The tension dial regulates the degree of ten
sion on your needle thread. Set it according to
the type of thread and fabric you use. The
numbers on the dial are for reference and
eliminate guesswork in duplicating settings.
Correct tension is important because too
much or too little will weaken your seams or
cause your fabric to pucker. Be sure your
machine is threaded correctly and make a
test sample with the fabric and thread you
plan to use, and examine it.
A perfect stitch will have the needle and bob
bin threads locked between the two layers of
fabric with no loops on top or bottom and no
puckers.
To Decrease Tension
♦ If the top stitches in your test sample look
loose, increase needle-thread tension by
turning the dial to a higher number.
♦ If the fabric puckers, decrease needle-
thread tension by turning the dial to a lower
number.
20
Page 23
sewing a seam
PIN BASTING
Pin basting is a time saver and can be used In
place of hand basting when you are straight
stitching seams in easy-to-handle fabric.
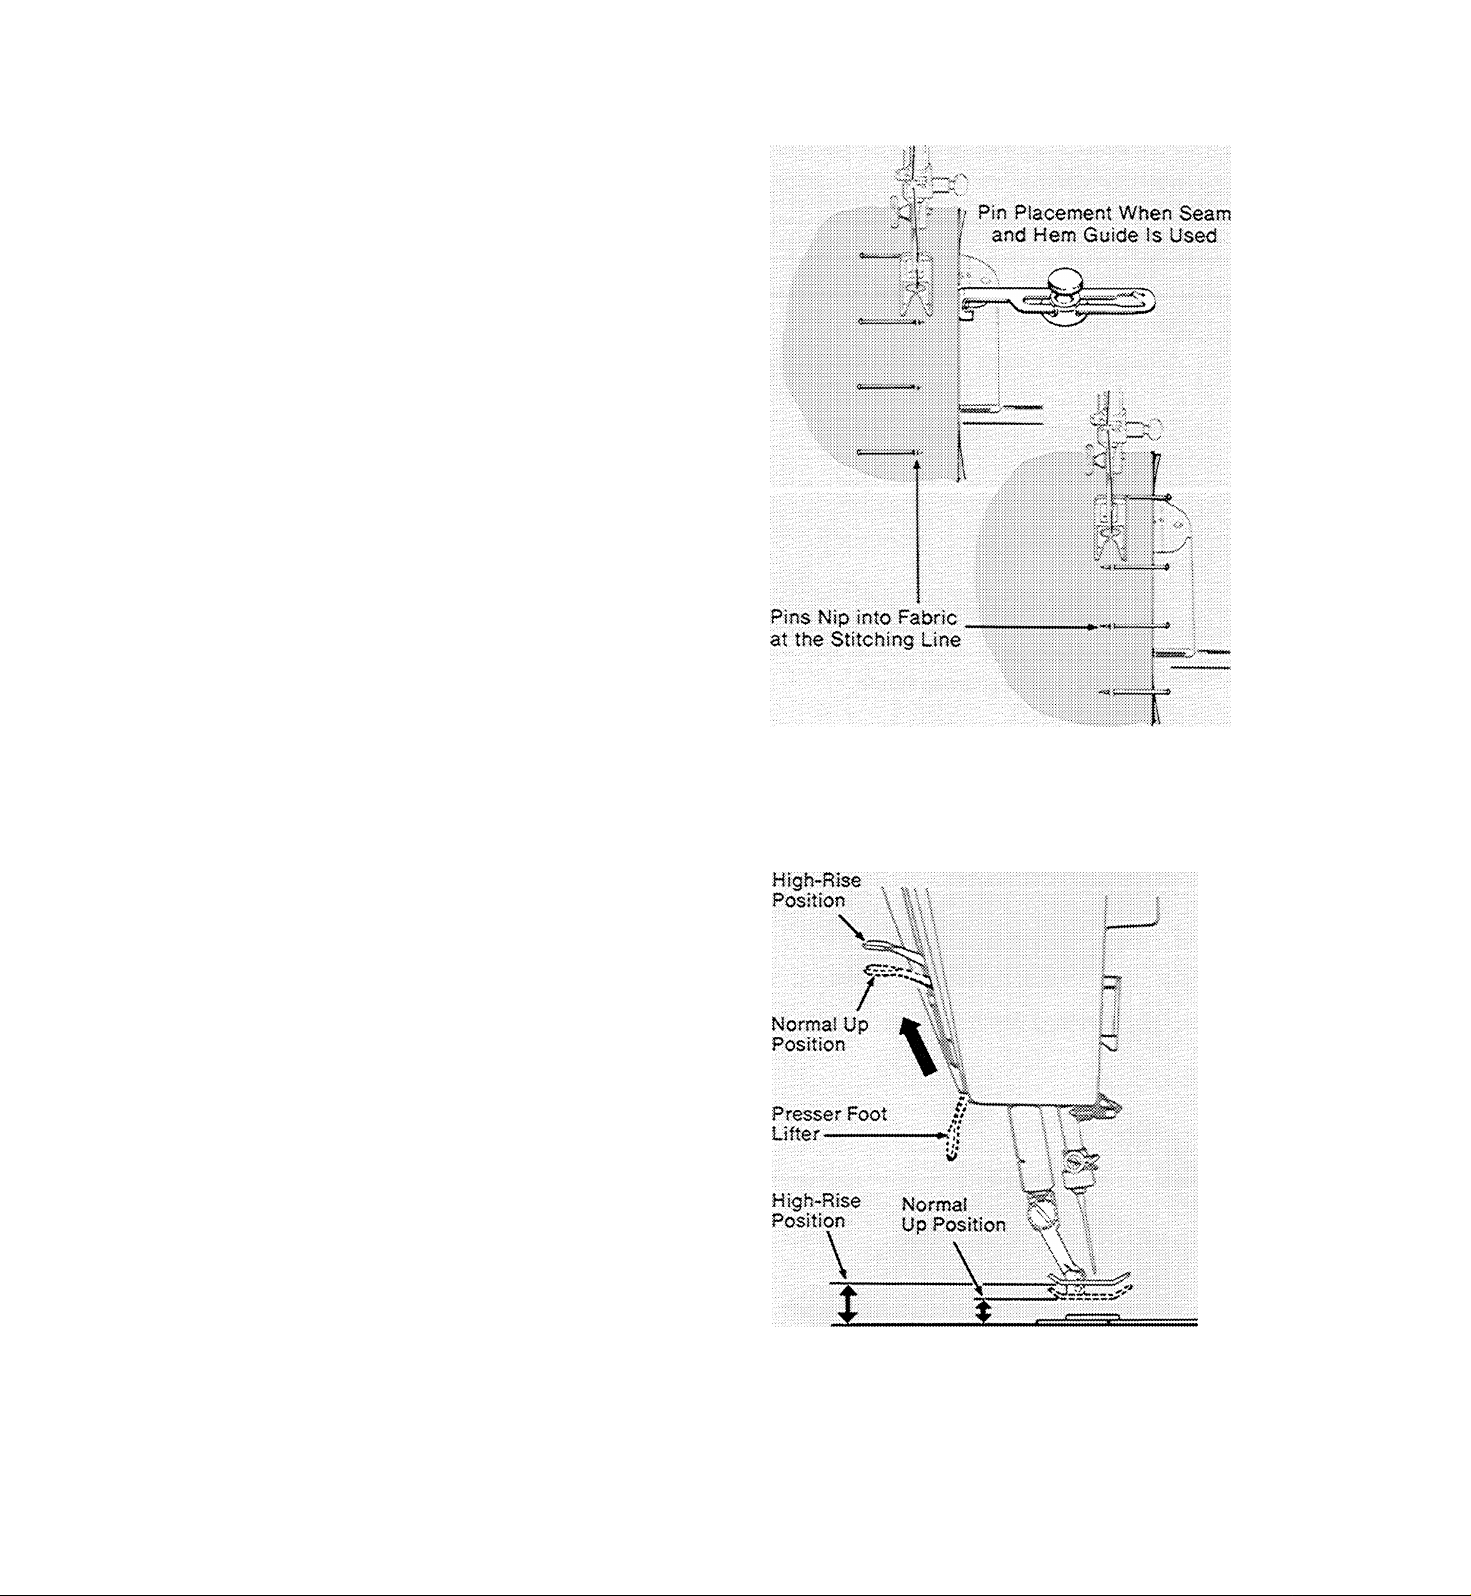
Use fine pins and place them so that:
• They are at right angles to the presser foot
and just nip into the fabric at the stitching
line.
• They do not extend under both sides of the
presser foot. Never place pins on the under
side of the fabric in contact with the feed.
Pin Placement When Seam
and Hem Guide Is Not Used
Pin Placement
PLACING FABRIC
Most fabric can be placed under the presser
foot by raising the presser-foot lifter to its
normal up position. When placing bulky fab
rics, such as coating, knit or terry cloth, or
multiple fabric layers, you will find it conven
ient to raise the presser-foot lifter to the highrise position. Hold lifter in position (since it
does not lock) while placing fabric under the
presser foot Make sure the lifter is all the way
down before starting to sew.
Presser Foot Lifter Settings
21
Page 24
starting a Seam
Stitching a Seam
Guiding and Supporting Fabric
Applying Gentle Tension
STARTING A SEAM
1. With presser foot raised, turn hand wheel
toward you to position needle in fabric about
1/2 inch (1.3cm) from starting edge.Lower
the presser foot.
2. Press reverse-stitch lever all the way down
and hold in place. Backstitch to edge of
fabric for reinforcement.
3. Release reverse-stitch lever and stitch in
forward direction.
GUIDING AND SUPPORTING FABRIC
Most fabrics need only to be guided in front of
the presser foot Some fabrics, however, re
quire support while being stitched, as shown.
These fabrics require using the straight stitch
presser foot.
CAUTION: Do not puli the fabric while you are
stitching as this may deflect the needle, caus-
ing it to break,
• For filmy sheers, knits, tricot, etc., apply
gentle tension by holding seam in front and
back of the presser foot.
22
Applying Firm Tension
♦ For stretch fabrics, apply firm tension front
and back when stitching in the same direc
tion as the stretch. For seams not on the
stretch direction, stitch in the conventional
manner, guiding fabric in front of the presser
foot.
Page 25
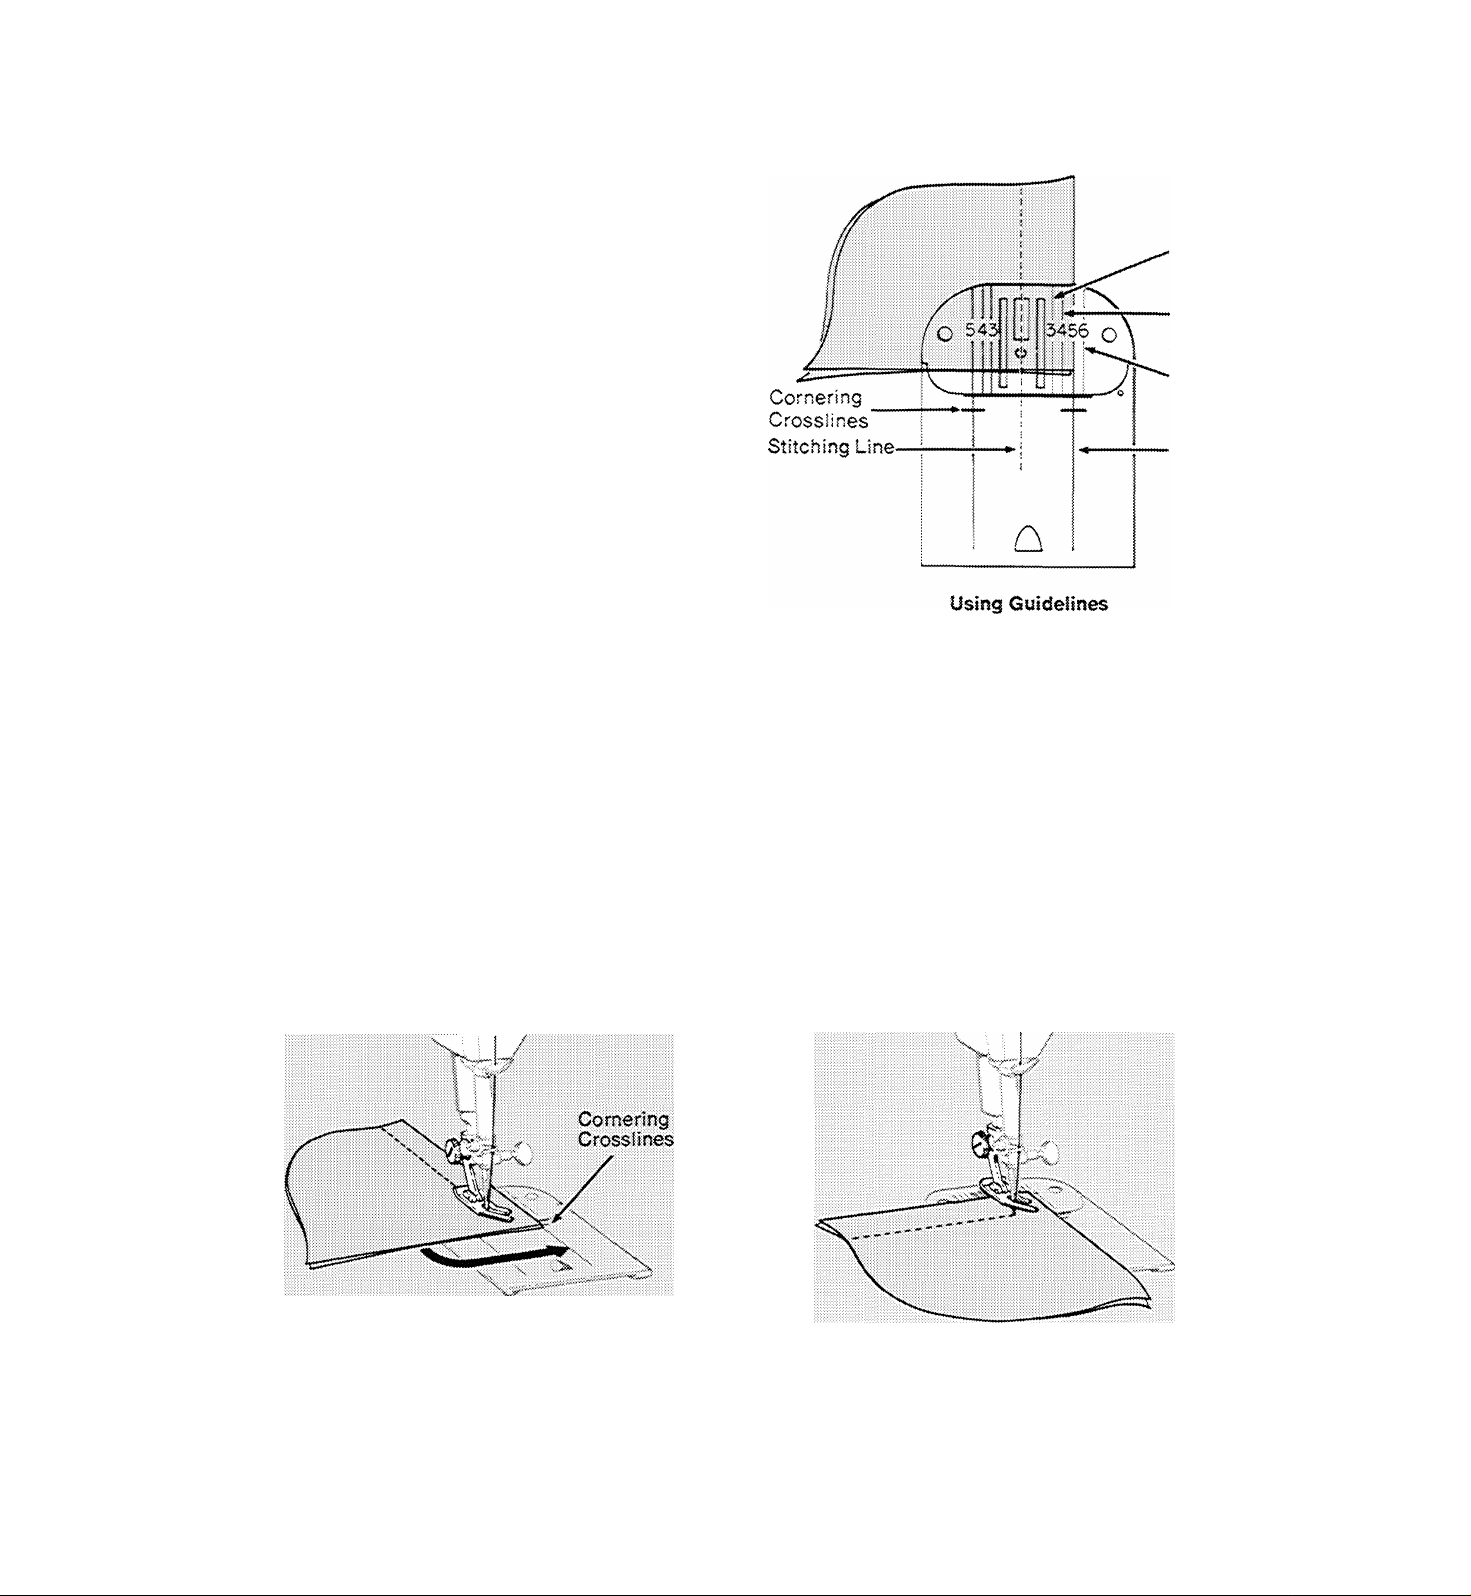
KEEPING SEAMS STRAIGHT
To keep the seam straight, use one of the
numbered guidelines on the needle plate. The
numbers indicate distance, in eighths of an
inch, from the needle. If you want a 5/8 inch
f 1.6cm) seam, for example, line up your fabric
with the number 5 guideline. Note that both
number 5 guidelines (the most commonly
used) are extended on the slide plate for your
convenience: the crosslines serve as corner
ing guides when stitching a square corner.
(9mm)
Vz"
(1.3cm)
%"
(1.9cm)
%"
(1.6cm)
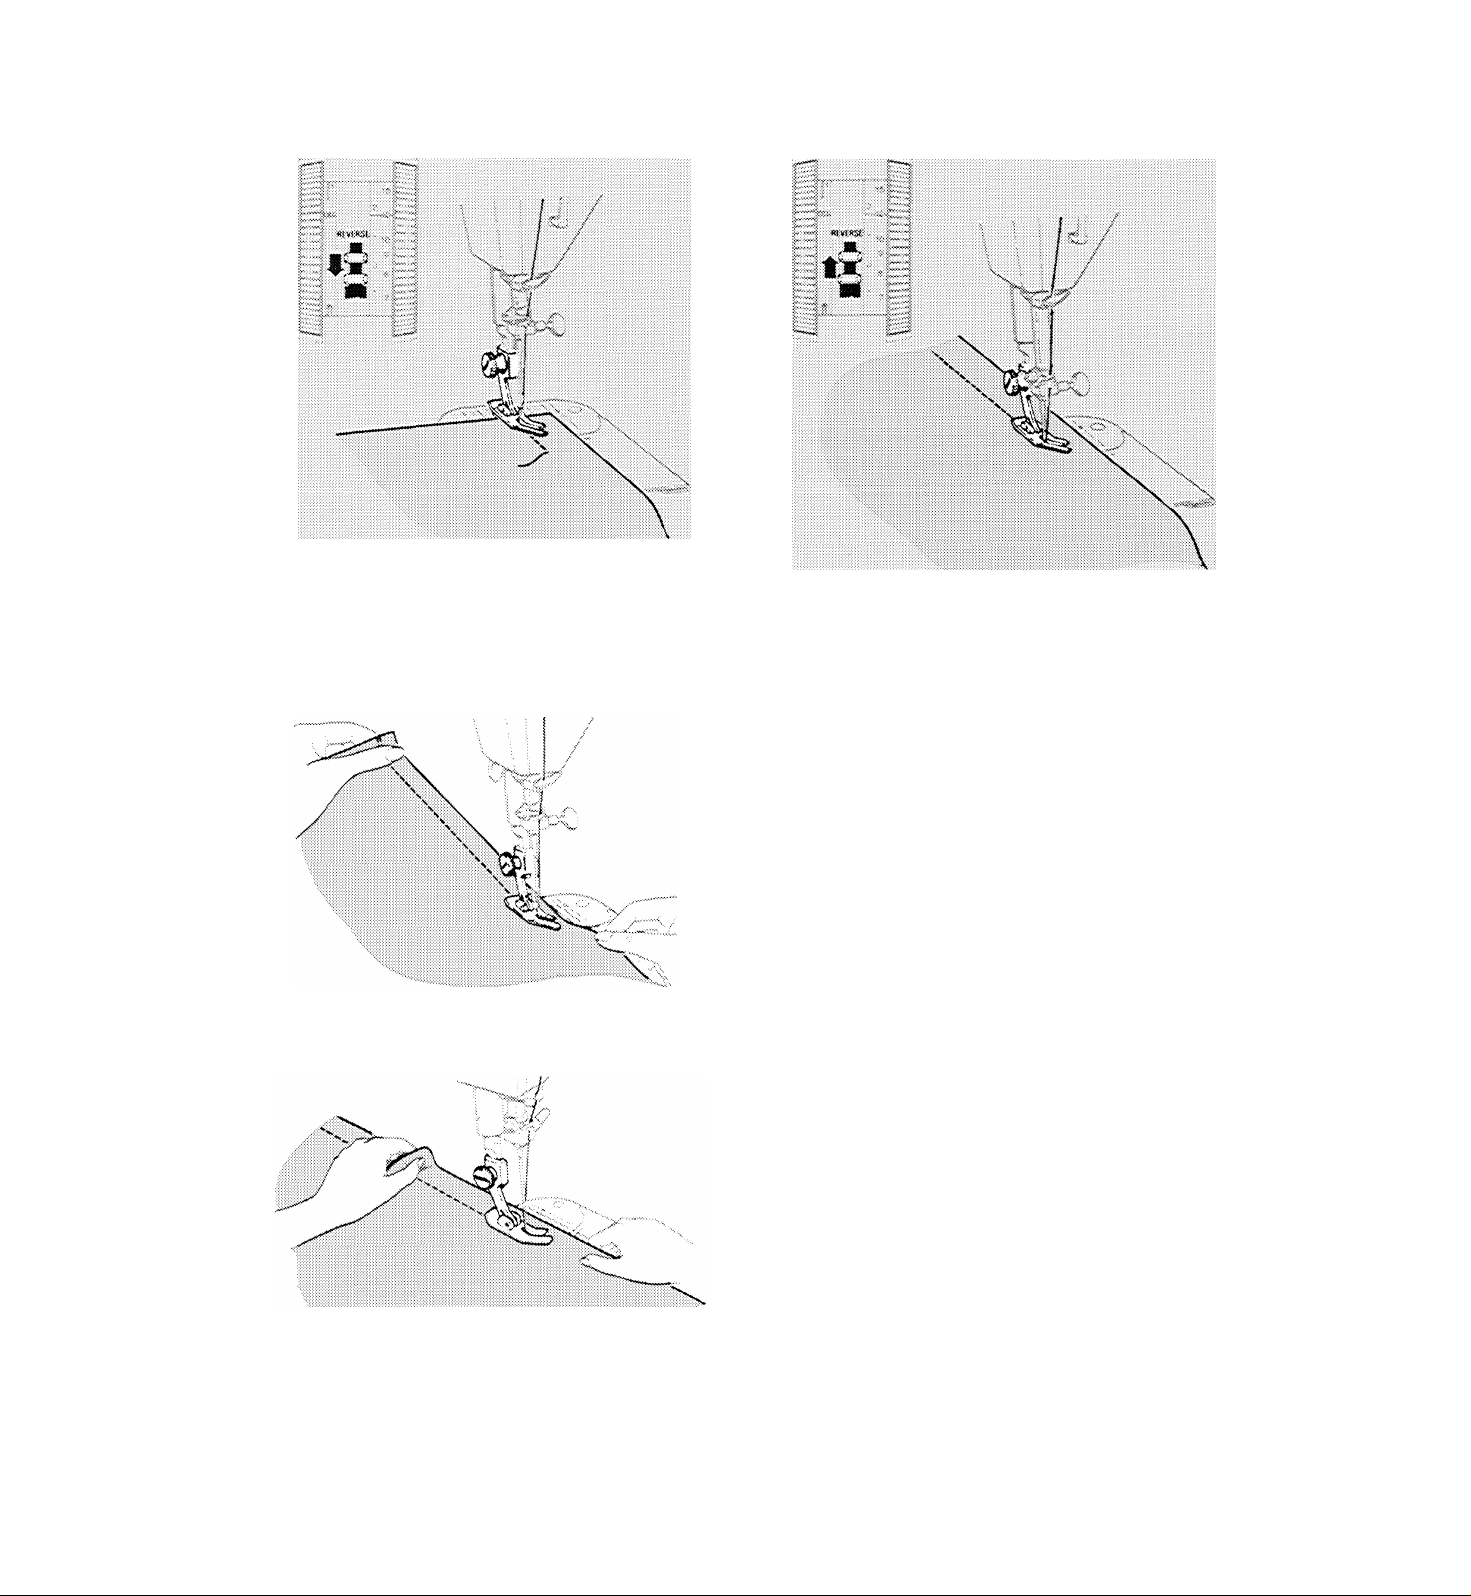
TURNING SQUARE CORNERS
To turn a square corner 6/8 inch (1.6cm)
from the fabric edge, you need not
measure or mark the seam. Simply use
the crosslines on the slide plate.
• tine up your fabric with right or left
guideline 5 on the needle plate. Stitch
seam, slowing speed as you approach
corner.
Pivoting at Corner
• Stop stitching, with the needle down,
when the bottom edge of the fabric
reaches the cornering crosslines on the
slide plate.
• Raise presser foot and turn fabric on
needle, bringing bottom edge of fabric
in line with guideline 5.
• Lower the presser foot and stitch in new
direction.
Fabric at Crosslines Fabric after Turning
23
Page 26
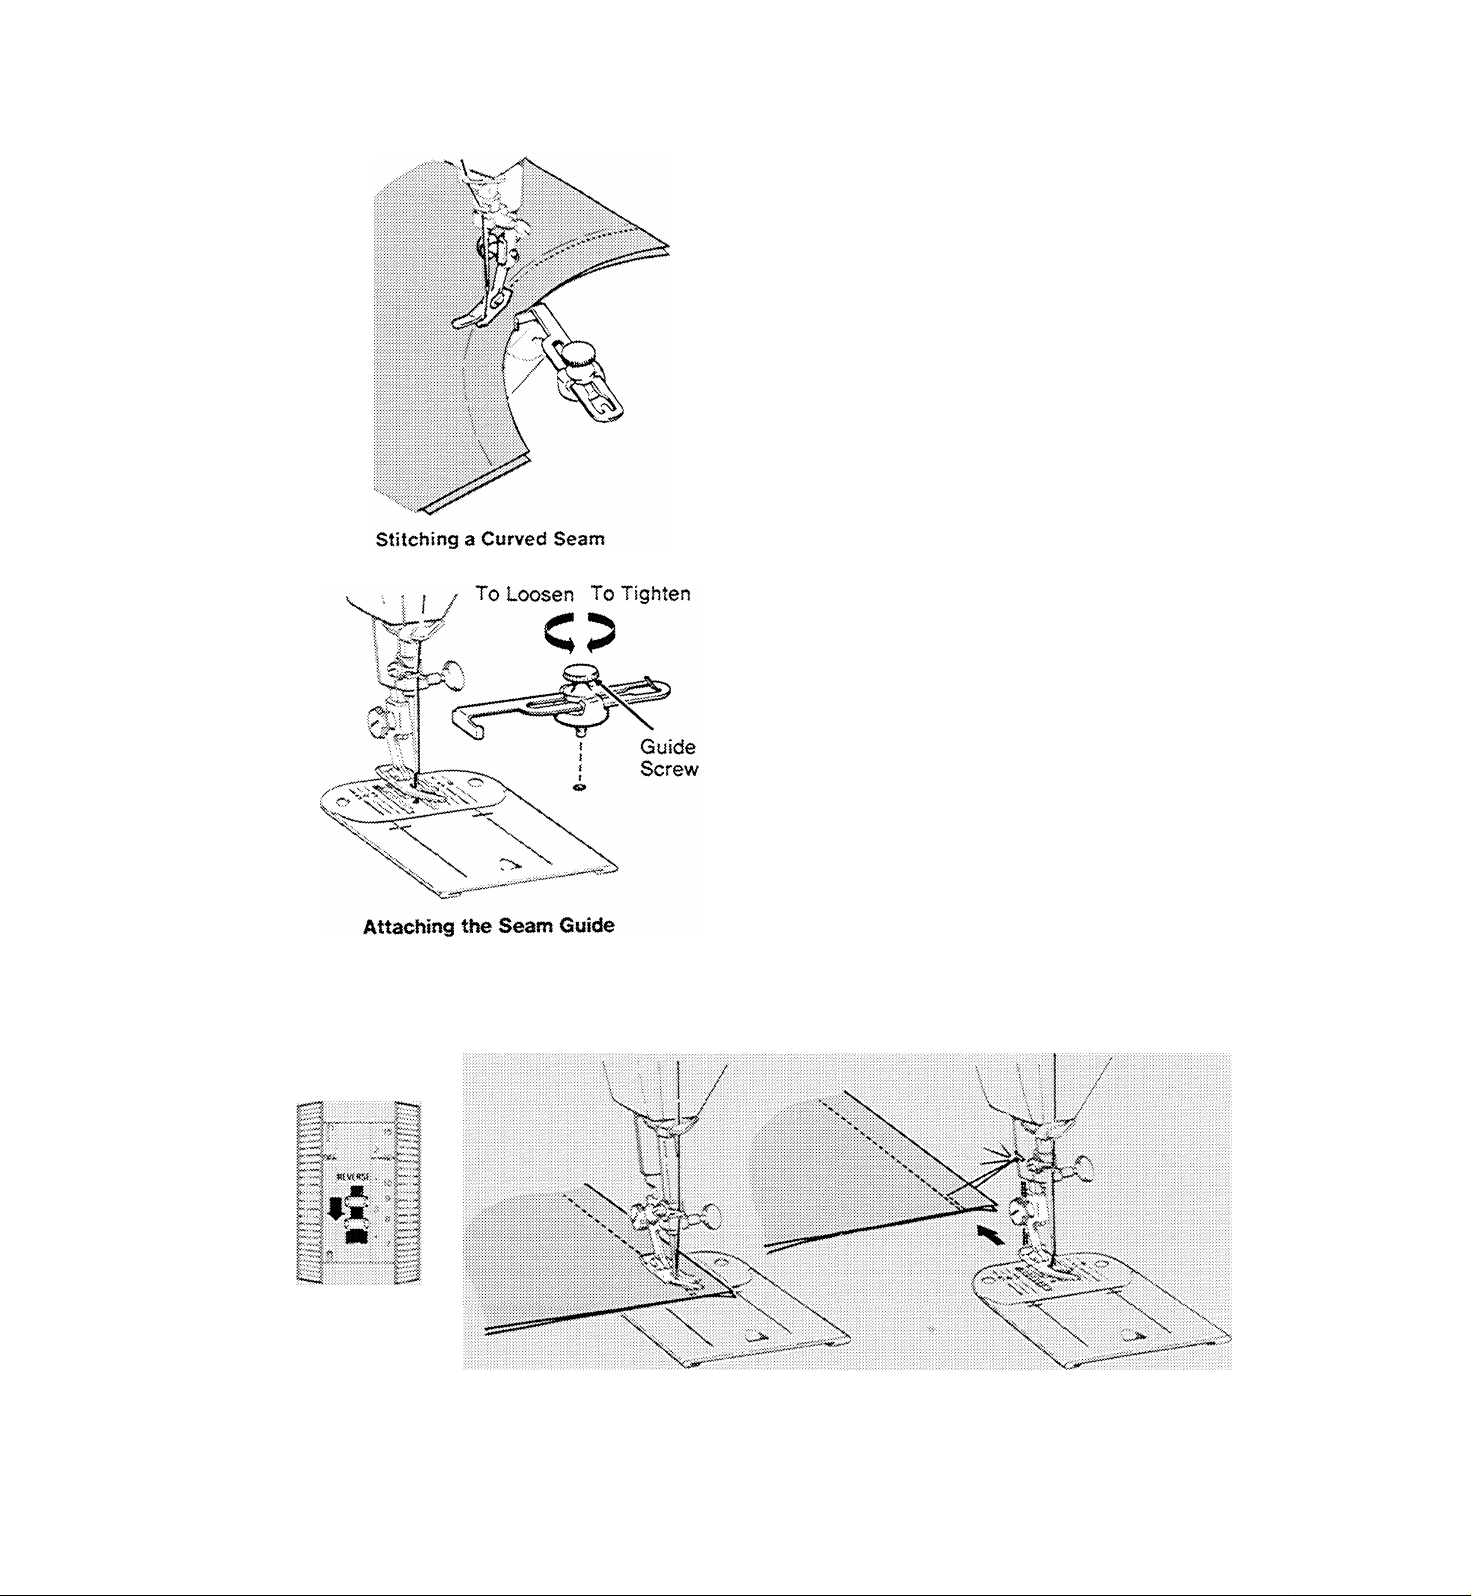
CURVED SEAMS
1. Use a fairly short stitch for elasticity and
strength. For example, if you use a medium
stitch length for straight seams, select a
slightly shorter stitch length to stitch
curved seams in the same fabric.
2, If you use the seam guide to guide stitch
ing, attach it at an angle so that the edge
that is closer to the needle acts as a guide.
TO ATTACH SEAM GUIDE
Fasten seam guide by securing guide screw
into hole provided for it in machine bed.
To adjust the seam guide, loosen the guide
screw and slide the guide to the required
seam width. Then tighten the guide screw.
REINFORCING END OF SEAM
1. Stitch to the edge of the fabric,
2. Press reverse-stitch lever all the way down
and hold in place. Backstitch approx
imately 1/2 inch (1.3 cm) to reinforce end
of seam. Release lever.
Reverse-Stitch
Lever
3. Raise needle to its highest position, raise
the presser foot, and remove the fabric by
drawing it to the back and left.
4. Cut threads on thread cutter at rear of
presser bar.
24
Ending a Seam
Cutting Threads
Page 27

4. ALL ABOUT ZIG-ZAG STITCHiiyG
two kinds of zig-zag stitches
The zig-zag stitches built into your machine
include basic zig-zag stitches and Flexi-Stitch
patterns. In addition to the obviously decora
tive uses of these stitches, some also serve
practical purposes. Under the section called
‘‘Sewing the Professional Way’' beginning on
BASIC ZIG-ZAG STITCHES AND THEIR DIAL SETTINGS
page 47, you will find instructions for both
decorative and practical uses of these stitches.
All of the basic zig-zag stitches and some of
the FiexhStitch patterns are charted below.
(When sewing Flexi-Stitch patterns, set speed
range at SLOW.)
Stitch Pattern
Tfr
Solid Pyramid Stitch
Ball Stitch
Crescent Stitch
Multi-Stitch Zig-Zag
Y'YT'YT’Y'YTY'YY
Blindstitch
mmmmmmmmmmmm
Plain Zig-Zag Stitch
FLEXl-SmCH PATTERNS AND THEIR DIAL SETTiNGS
Pattern
Otal
s
i
c
<
1
Stitch
Width
Dial
1 -s
1-5
1-5
1-5
1-5
1 -5
Needle
Position
Dial
L A H
t A R
L A R
L A R
L A R
L A R
Stitch
Control
6
thru
FINE
6
thru
FINE
e
thru
FINE
6-20
S-20
6
thru
FINE
Stitch
Width
Dial
2-5
Stitch Pattern
Semaphore Stitch
Slant Overedge Stretch Stitchtt
Pattern
Dial
<
VVWVVVVVWVVVWW
Ric-Rac Stitchtt
AAAAAAAAAAAA
Overedge Stretch Stitch t
tSîîtch width must be set at 5 when using the Overedge Foot (see page S4).
ttThis stitch is designed tor strength and permanence and cannot be readily ripped out
without risk of fabric dam^age.
i
<
R
Position
Dial
L A R
t A R
L A R
L A R
Stitch
Control
©
25
Page 28

adjusting dials
SETTING PATTERN DIAL
Before moving the dial, make sure buttonhole
dial is in OFF position and needle is above
fabric.
Push the pattern dial in and turn it until de
sired zig-zag stitch pattern is between the red
lines.
To produce a Flexi-Stitch pattern, the stitch
control dial must be turned to the ^ setting.
: X • ••y-:
»llj....
i ■: y
{
i ,,s
TTWM
........
.....
Tsffsi?
• Push in
• Rotate
• Release
........
H
Buttonhole Dial
in OFF Position
ADJUSTING STITCH PLACEMENT
Before moving needle position dial, move stitch
width dial to 5, and make sure buttonhole dial is
in OFF position and needle is above fabric.
Needle position setting A places the needle
in center stitching position. Settings t and B
place the needle in left and right stitching
positions at stitch widths less than 5.
Setting A is used most often. Settings L
and R are for special placement of stitching.
For example, an B setting is required for twostep buttonholing and an L setting for button
sewing and twin-needle work. An L or R set
ting can be used to place narrow zig-zag
stitching to the left or right of center in
decorative work.
To adjust stitch placement, turn needle posi
tion dial until desired setting is aligned with
red line.
t A «
Adjusting Stitch Piacement
i. A R
26
Left Needle Position
Center Needle Position
Right Needle Positron
Page 29

ADJUSTING WIDTH OF DESIGN
Before moving dial, make sure needle is above
the fabric.
To produce a zig-zag stitch, turn the stitch
width dial to any setting between 1 and 5. The
higher the number, the wider your stitch will
be, A stitch width setting of 2 or more is
recommended for Flexi-Stitch patterns.
Adjusims Width of Design
ADJUSTING
NEEDLE-THREAD TEN-
SION
Zig-Zag stitching usually requires less nee
dle-thread tension than straight stitching, 3e
sure your mao'mne is threaded correctly and
make a test sample with the fabric and thread
you plan to use so that you can adjust tension
to suit the stitch pattern you have chosen. The
stitches should lie fiat against the fabric with
out causing the fabric to pucker.
If the stitches are not flat and the fabric is
puckered, lower the needle-thread tension by
turning the dial to a lower num^ber.
ADJUSTING STITCH LENGTH
Any numbered stitch length setting will give
you an open zig-zag stitch of the pattern you
select except Flexi-Stitch patterns. As you
rotate the stitch control dial away from the
FINE setting (towards the numbered settings),
your stitches becomie miore open, or farther
apart. The symbol on the dial above the num
bered settings designates the FINE stitch
area and is used for the adjustment of zig-zag
satin stitching (see page 28 for specific in
structions).
To produce a Flexi-Stitch pattern (refer to
stitch pattern chart on page 25), the stitch
control dial must be set on the symbol.
Simply turn the dial downward until the sym
bol is centered under the red line. No further
adjustment is necessary.
Correct
When using the ^ setting of the stitch control,
you cannot backstitch the stitch pattern.
For instructions on using basting stitch, see
page 33.
Fiexi-Stitch
Pattern Setting
Stitch Controi Dial
27
Page 30

satin stitching
Satin stitching, a series of ciosefy spaced zig
zag stitches that form a smooth, satin-iike sur
face, is useful for both practical and decorative
work. The plain zig-zag stitch, for example, is
suitable for bar tacks and applique when
closed up to form a satin stitch. The F/ex/-
Stitch patterns, however, have a single stitch
length setting
stitched.
and cannot be satin-
Qi
Stitch Control in FINE Area
As the Dial is Rotated, Stitches Close Up
When you wish to produce a satin stitch, make
a test sample first so that you can adjust the
stitch length and thread tension properly. Soft
fabrics may require a backing to ensure firm
satin stitching. Crisp lawn or organdy is suit
able for this purpose. For best results use the
special purpose foot.
DIAL SETTINGS
Pattern: Plain Zig-Zag I
Needle Position: A *
Stitch Width: 2 to 5
Stitch Control: in FINE area
General Purpose Needle Plate
Special Purpose Foot
Adjusting Stitch Length
1. Set stitch control dial at bottom of FINE
area.
28
Adjusting Thread Tension
Correct
2. Run machine at SLOW speed.
3. Gradually turn dial downward until stitches
are closely spaced and form a sm-ooth sur
face.
Adjusting Thread Tension
Satin stitching requires less tension than
straight stitching or open zig-zag stitching.
furthermore, the wider the satin stitch, the
lighter the tension on the thread must be. No
tice the stitching on your sample, ff the fabric
is puckered, lower the needle-thread tension
by turning the tension dial to a lower number.
Page 31

5. TWiiy-iyEEDLE STITCHiiyG
By using a twin needle, you can produce two either a straight stitch or one of the decorative
parallel, closely spaced lines of decorative stitch patterns,
stitching simultaneously. You can choose
STITCH PATTERNS AND THEIR DIAL SETTINGS
To produce
patterns at right
use settings
shown below
Pattern Dial
Stitch Width Dial
Needle Position Diai
IN
Stitch Control
tThis sîiich is designed for strength and permanence and cannot de readily ripped out without risk of fabric damage.
FINE
AREA
1S-20
15-ao
inserting the twin needle
Before inserting the twin needle, place the
needle position selector at L and stitch width
selector at A •
1. Raise needle to its highest position.
2. Loosen needle-clamp screw and remove
single needle.
3. Insert twin needle into clamp with the flat
side of shank to the back.
4. Push needle up as far as it will go and
tighten needle-clamp screw.
Best twin-needle stitching
results are obtained with No.
SO mercerized cotton thread
29
Page 32

threading the needle
1, Thread as for one-needle stitching except:
♦ Pass thread between center and back
tension discs, through the thread guide
above the needle, and through right eye
of needle.
/■
2. Insert detachable vertical spool pin into
hole provided for it in top cover of machine.
3. Place spool of thread on detachable spool
pin and thread as for one-needle stitching
except:
* Pass thread between center and front
tension discs and through ¡eft eye of
needle, omitting the thread guide above
the needle.
Passing Thread
Between Tension Discs
30
Twin-needle Threading
Page 33

dial settings
STRAIGHT STITCHING WITH A
TWIN NEEDLE
♦ Pattern: Straight Stitch
♦ Stitch W\6Xh: A
♦ NeecHe Position; t or A only
♦ Stitch Control: To suit design
♦ General Purpose Needle Plate
♦ General Purpose Foot
í¿:_ -
.......
.....
m
mrnrnvfmn
i. ;k
1 r; -v.
1
3
ZIG-ZAG
STITCHING WITH A TWIN NEEDLE
♦ Pattern: Any Zig-Zag pattern t
Note: For decorative twin-needle stitching,
using a Fiexi-Stitch pattern, set stitch
control at ÚÍ, and use the SLOW
speed range.
♦ Stitch Width; 2 (Do not exceed this setting)
♦ Needle Position: Lonly
♦ Stitch Control; To suit design
♦ General Purpose Needle Plate
♦ General Purpose Foot (for open stitching)
♦ Special Purpose Foot (for satin stitching)
Í i ■ = I
tFxciuding basting stitch which cannot be produced with a twin needle.
31
Page 34

Turning a Corner with a Twin-Needle
turning a square corner
Geometric twin-needle oeslgns are easy to ac
complish with the plain zig-zag stitch and the
special purpose foot when you know how to
turn a square corner. 3e sure to practice turn
ing in right and left directions.
• Mark or baste a stitching guideline on the
fabric.
• Stitch to the corner and stop with the needle
in the fabric on the inside of the corner.
• Raise the presser foot and turn the fabric
halfway around the corner {needle in fab
ric). Lower the foot and take one stitch by
turning the hand wheel. Continue to turn the
hand wheel until needle is about to enter
fabric on the inside of the corner,
• Raise the foot again and complete the fabric
turn, positioning the work under the foot so
that the needle will enter the inside corner
needle hole a second time.
• Lower the foot and continue stitching in the
new direction.
32
Turn Fabric Halfway Around Corner
Complete Fabric Turn
Page 35

6. TEMPORARY STITCHING
speed basting
With the basting stitch that is built into your
sewing machine, you can produce basting
stitches of any length up to two inches (5cm).
Thus, you can choose just the right length for
your sewing job, considering the weight of
your fabric and how securely the pieces need
to be held together. A few of the many sewing
jobs for which you will find speed basting par
ticularly useful are:
• Joining seams for trial fittings
• Marking construction guidelines
• Basting pleats, hems and seams
DIAL SETTiNGS AND ACCESSORIES
PATTERN SELECTOR
..
Ш1,
я
|2«3 4. $
..
................
STITCH WIDTH
• Pattern: Basting Stitch |
• Stitch Width: 5 only
• Needle Position: only
• Stitch Control: Any setting thru FINE
• Speed: In SLOW range
• General Purpose Needle Plate
• General Purpose Foot
Stitch Length
The stitch-control dial regulates the length of
basting stitches, but because the basting disc
changes the interval at which the needle en
ters the fabric, the numbers on the dial no
longer represent stitches per inch or stitch
length in millimeters.
The settings of the control dial and the ap
proximate length of the basting stitches they
produce are illustrated. The very short stitches
produced in the triangle at the top of the FINE
area are used to secure the beginning and
ending of a line of basting.
Foot
Dmi Settings
STITCH CONTROL '
^ frn Щ
; :
5 43
i 1
5 i
i i
: 4
2 Ш
General Purpose
Needle Plate
■« {6ram)
----------
----------
1/2"'(1,3cm)----- 20
V'{2.5cm}
-------
1 i/2'MS.8cm)—
2" iscm)
I
i
1
‘ 10
33
Page 36

Thread Tension
Machine basting requires a light needle-
thread tension. The longer the stitch, the lighter
the tension needs to be. When tension is cor
rectly adjusted, stitches up to 1/2 inch
(1,3cm) long should He flat in firm fabrics. If
stitches are more than 1/2 inch (1.3cm) long,
place tension on the fabric by holding it in
front and back of the presser foot, as you sew,
to prevent pucker.
PREPARATION
Thread the machine and fill the bobbin in the
usual way. Select needle and thread accord
ing to your fabric: mercerized cotton threads
are particularly recommended. Choose a
thread color to contrast with your fabric so
that it can be seen easily. Make sure the
general purpose foot and general purpose nee
dle plate are on the machine and the needle is
in its highest position.
PROCEDURE
1. Set stitch control for a short stitch in the
triangle at the top of the FINE area on the
dial. Place work under the needle, lower
the presser foot, and take a few stitches to
position and secure basting start.
2. Reset stitch control dial for the length of
basting stitch desired (stitches less than 1
inch (2.5cm) long are recommended for
seam basting) and proceed as for regular
sewing. Stitch slowly, supporting the fabric
in front and back of the presser foot if
stitches are more than 1/2 inch (l.3cm)
long.
3. To secure the end of basting, turn dial
downward for a short stitch in the FINE
area and take a few stitches.
To avoid pressing marks, remove basting
stitches as soon as they have served their
purpose.
34
Page 37

chainstítching
Single-thread chainstítching looks like regular
straight stitching on top but is a series of in
terlocking loops on the underside of the fabric.
The stitches are produced by the needle
thread alone so you do not need a bobbin
thread or a bobbin. Because the stitches are
formed by a single thread, the interlocked
loops unravel easily, allowing the entire line of
stitching to be removed with just a pull on the
thread end. Also, the loop formation of the
stitches makes them less taut than regular
straight stitches. That’s what makes
chainstitching flexible.
Here are a few of the many sewing jobs for
which you will find chainstitching useful.
♦ Sewing temporary hems and tucks to extend
the life of —
Children’s clothes
Curtains and linings that might shrink
♦ Hemming curtains and draperies that may
need to be altered.
• Attaching woven and stretch hem tape.
• Making stay chains {ftench tacks) to
anchor linings or belt carriers to hold belts
in place.
• Fastening remiovable trimming —
Fur collars
White collars and cuffs
* Basting for trial fittings.
\
Insert Chainstitch Needle Plate
PREPARATION
(See page 5 for Chainstitch Fittings)
Make sure needle is at its highest point,
1. Raise presser foot, open slide plate, and
remove bobbin.
2. Remove needle plate and position chainstitch needle plate over pins from front.
3. Insert bobbin case cover in bobbin case
with flat edge toward the front as illustrated.
Snap latch down and close slide plate.
4. Open face plate and slip chainstitch thread
guide into place. Close face plate.
5. Thread your machine in the usual way
except pass thread from take-up lever
through self-threading eyelet in the chainstitch thread guide.
Select needle and thread according to your
fabric.
35
Page 38

SEWING A CHAINSTITCH SEAM
• P^XtQtn: Straight Stitch ^
• Stitch Width:
• Needle Position; A
• Stitch Control: 10 to 12 (approximately 2 to 2.5)
only
• Chainstitch Needle Plate
• Straight Stitch Foot or General Purpose Foot
• Chainstitch Thread Guide
• Bobbin Case Cover
Starting and Chaining Off
1. Turn hand wheel toward you to position
needle in very edge of fabric. Lower the
presserfoot
2. Start the machine and stitch to end of
seam. Continue stitching beyond edge of
fabric, making a chain from one to tv^o in
ches {2.5cm to 5cm) long. Do not attempt to
stitch in reverse. Chainstitching can be
sev^n in a forward direction only .
Stitch Starting Point after Chaining Off
Releasing Chain from IVIachine
3. Cut chain between fabric and presser foot.
4. Check and adjust tension, if required, as
instructed on page 38. After chaining off,
start a new line of stitching by raising the
presser foot slightly and positioning the
fabric in front of the needle. Lower the
presser foot and stitch to end of seam.
Releasing the Chain from the Machine
When you finish chainstitching, the chain can
easily be removed from the machine.
1. Raise presser foot
2. Hold end of chain with your left hand.
3; Turn hand wheel slowly toward you with
your right hand until needle is all the way
down in the needle hole.
4. Then turn hand wheel slowly away from
you, pulling gently on chain, which will un
ravel as needle rises.
36
Page 39

Ending Stitching in Fabric
Draw Loop Down to Left of Foot
Ending the Stitching in the Fabric
Occasionaily, you may need to end your stitch
ing in the fabric. Temporary hems and tucks,
for example, can be completed in this way:
• Stop stitching at desired point. Make sure
take-up Sever is in its highest position.
• Raise presser foot.
1. Puli the thread through the take-up Sever,
forming a loop between the take-up lever
and chainstitch thread guide.
2. Pass scissors under the presser foot so as
to pull the slack thread down and out to
form a loop at left of foot.
3. Hold the loop and cut the thread close to
the end of the stitching.
4. Remove fabric from machine by pulling it
straight back, away from you. The thread
end will puli through the fabric to the under
side and form a temporary lock.
• If you wish to secure this temporary lock,
fold the thread end back over the chain
and fasten with hand stitching.
37
Page 40

Too Little
ADJUSTING THREAD TENSION
Adjust thread tension. Chalnstltchlng re
quires approximately the same needle-thread
tension as regular straight stitching, provided
the same kind of thread is used. When the
tension is correctly adjusted, the chain will be
flat and smooth. Puckers in the fabric and
qlnched loops indicate too much tension; turn
tension dial to a lower number. Large, irregu
lar loops indicate too little tension; turn ten
sion dial to a higher number.
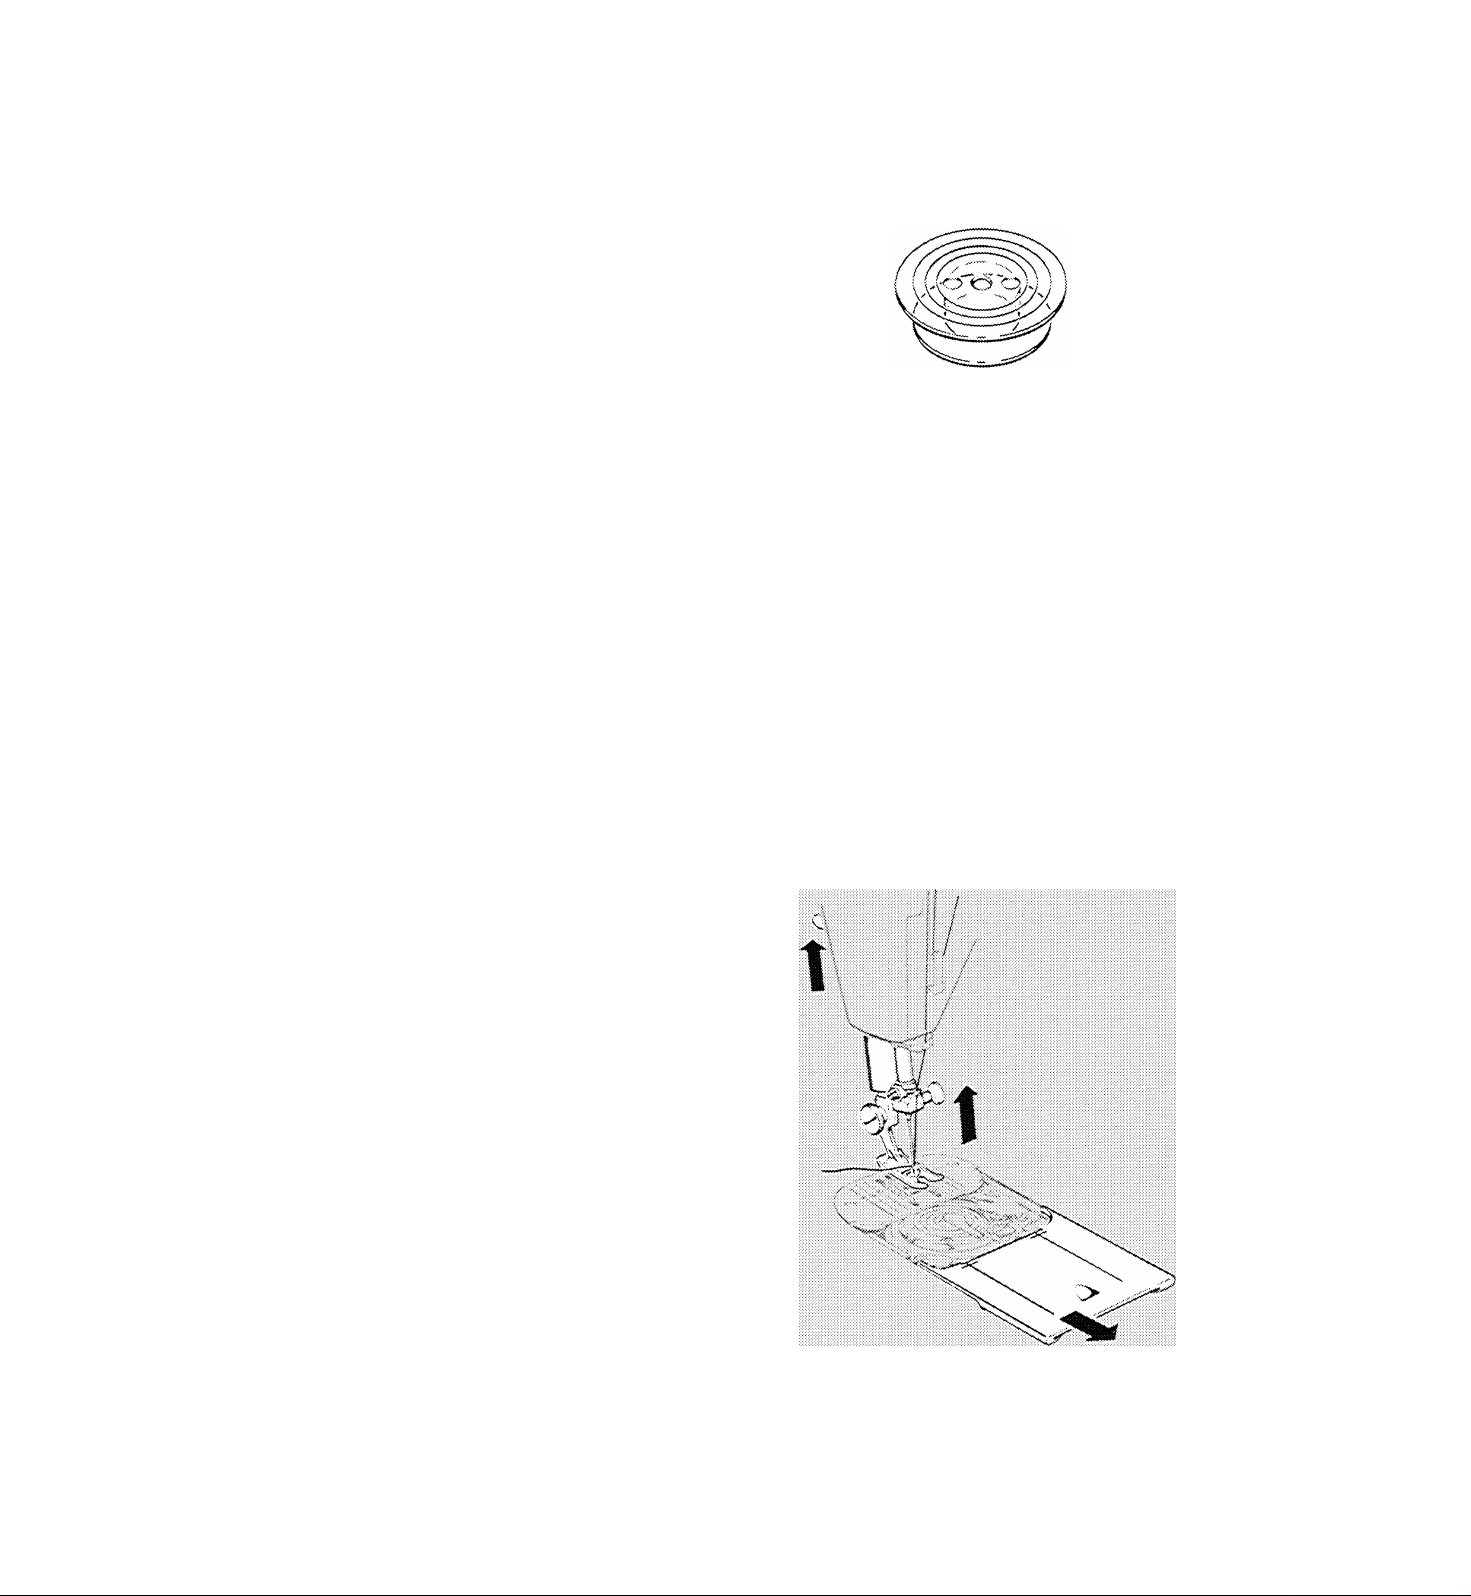
REMOVING THE STITCHING
Chainstitching can be removed smoothly and
cleanly in seconds by freeing the last stitch
formed in the fabric.
1. Simply cut the last loop formed on the un
derside of the fabric.
2. Pick up the free thread end from the top
surface of the fabric.
3. Pull the free thread end, removing entire
line of stitching,
REMOVING CHAINSTITCH ACCESSORIES
Release thread chain from machine and make
sure needle is at its highest point.
1. Open slide plate and remove bobbin case
cover.
2. Replace bobbin and snap down latch,
3. Remove needle plate by pressing up and
lifting it out toward you.
4. Replace general purpose or straight stitch
needle plate.
5. Open face plate and remove chainstitch
thread guide. Close face plate.
38
Removing Needle Plate
Page 41

7. BUTTONS AND BUTTONHOLES
buttons
decrease stitch width, if necessary, so that
• Pattern: Plain Zig-Zag |
• Stitch Width; A and 4 or to suit button
♦ Needle Position: L
# Feed Cover Plate
♦ Sutton Foot
The space between the holes in the button
determines stitch width settings. The A set
ting must always be used to position the but
ton and to fasten stitching. For buttons with
standard hole spacing, settings A and 4 are
usually satisfactory. For buttons with unusual
hole spacing, use setting A and increase or
decrease the width setting (4) as necessary.
1. Position button under button foot and lower
the needle into center of left hole. Lower
the foot. Turn hand wheel toward you until
the needle rises out of the button and is
just above the foot.
2, Set stitch width at 4. Turn hand wheel
toward you until needle is just above the
right hole of the button. Increase or
needle will enter the right hole. Take six or
more zig-zag stitches at this setting. End
on left side.
3. To fasten stitching, return to stitch width
setting A sind take about three stitches.
FORMING A THREAD SHANK
Buttons sewn on coats and jackets should
have a thread shank to make them stand away
from the fabric. To form a thread shank, sew
over the blade of a regular machine needle.
• Position button and lower button foot. Place
needle in groove of foot so that point enters
the hole in the foot. The farther in you push
the needle, the longer the shank will be.
• After stitching, remove needle from groove.
Remove work from under presser foot, cut
ting threads about six inches (I5cm) from
fabric. Pull needle-thread ends to back of
button and form a firm shank between but
ton and fabric by winding threads tightly
around attaching stitches. Tie thread ends
securely.
11
ìiàiAàiàmmtéiiÉikiéiàM
jrrrrm*
4 ■■■■■'
forming Thread Shank
Pulf Needle Threads
to Back of Button
Thread Shank
Completed
39
Page 42

buttonholes
Center Line
Hound-End Buttonhole
Bar-Tack Buttonhole
Finished Edge of Garment
Diameter of Button
Horizontal Placement
on Crosswise Grain
You have a choice between two buttonhole
styles and two buttonhole-making methods:
round-end buttonholes made with the built-in
buttonhole system of your machine and bar-
tack buttonholes with square ends made man
ually in four steps. Round-end buttonhoies can
be made in light- and medium-weight fabric;
bar-tack buttonholes are best in lightweight
fabric.
BUTTOMHOLE POSITION
Accurate guidelines are essential to keep but
tonholes at a uniform distance from the edge
of the garment, evenly spaced, and on the
grain of the material.
1. Mark the center line of the garment. This
guideline can be made by hand basting or
machine speed basting. The space from the
center line to the finished edge of the gar
ment must be at least equal to three-quar
ters the diameter of the button. With this
spacing, the button will not extend beyond
the edge when the garment is buttoned.
Make sure that the center line marking fol
lows a lengthwise fabric thread.
2. Mark a position guideline for each button
hole.
40
Vertical Placement on
Lengthwise Grain
• Horizontal buttonholes are placed to ex
tend 1/8 inch {3mm) beyond the center
line of the garment, as illustrated, so that
the buttons will be in the center of the
figure when the garment is fastened,
Horizontai buttonhole guidelines should
follow a crosswise fabric thread and be
longer than the finished length of the but
tonhole. Mark ends of each buttonhole
vertically.
• Vertical buttonholes are placed so that
the center line of the garment is in the
center of the buttonhole, as illustrated.
Mark the ends of each buttonhole hori
zontally across the center line basting
and use the center line marking as the
buttonhole guide when stitching.
Page 43

BUTTONHOLE LENGTH
A buttonhole length should be just long enough
to allow the button to slip through the opening
without stretching it. You can estimate the
proper buttonhole length by measuring the
width plus the thickness of the button. To make
sure the measurement is correct, cut a slit in
a scrap of fabric the diameter of the button
you intend to use. Increase length of opening
until button slips through easily. This test is
partioularly advisable for buttons of unusual
shape or thickness.
BUTTONHOLE INTERFACING
It is almost always wise to use an interfacing
in the buttonhole area. An interfacing holds
the fabric firmly so that a neat buttonhole may
be stitched and keeps the finished buttonhole
in shape. Interfacing is essential when the fab
ric is loosely woven or is a crepe or knit that
stretches easily.
When planning your garment, remember that
both round-end and bar-tack buttonholes are
stitched through three thicknesses of fabric
(garment, interfacing and facing) after the fac
ing has been attached.
TEST SAMPLE
Always make a test buttonhole in a sample of
your fabric to determine suitability of button
hole style, buttonholing method, and machine
settings. Be sure to duplicate the number of
fabric layers in the garment and include inter
facing if appropriate. Remember, too, that
loosely woven and medium-weight fabrics re
quire buttonholes with wider side stitching
than firmly woven or lightweight fabrics. Fin
ally, check to see that the opening for the but
ton can be cut without damaging buttonhole
stitching.
CUTTING BUTTON OPENING
Place a pin across the cutting space at each
end of the buttonhole to protect end stitching.
Use a pair of small, sharp scissors to cut the
button opening. Insert blade in center of but
tonhole cutting space and cut from this point
in either direction.
Testing Suttonhote Length
41
Page 44

ROUND-END BUTTONHOLES
To stitch a buttonhole, set ail dials on red symbols.
• Attach buttonhole foot
« Use general purpose needle plate
PATTERN SELECTOR
NEEDLE POSITION
rrvmm
STITCH WiDTH
Buttonhole Length
First, decide how long the button opening must
be. This will depend on the diameter and thick
ness of the button as explained on page 41.
Then add 1 /8 inch (3mm) for end stitching (1 /16
inch or 1.5mm for each end of the buttonhole).
This end-stitching allowance is approximate
and should be increased slightly if the but
tonhole is to be stitched twice. Fabric thick
ness and thread diameter will also vary endstitching depths, so be sure to check measure
ments by making a test buttonhole. Mark but
tonhole position and length on fabric. See page
40 for placement information.
STITCH
8UTTOHHOLE
CONTROL
Make sure buttonhoie diaf
i$ m OFF position when
you set Of reset stitch con-
trol dial on red
Buttonhole
Length Guide
Markings
42
Sutton
Opening !
Length of
Button
Opening
Buttonhole
Stitching
Buttonhole Stitch Width
The stitch width setting, designated by red
— symbol, is an approximate setting; use it
to make your test buttonhole. You may need
to increase or decrease stitch width slightly to
suit your fabric, to arrive at more pleasing but
tonhole proportions, or to change the width of
the buttonhole cutting space. When making
sUtch width adjustments, remember that as
stitch width is increased, the cutting space in
the center of the buttonhole is decreased.
Page 45

--------7-------Finished Edge
of Garment
IP^l
X
Buttonhole Position I ;
Guideline
/
Center
Une of :
iJ
End
Buttonhole
Guidelines
Garment
Starting Position
Procedure
• Place garment under buttonhole foot so that
buttonhole position marking is centered.
• Align center gauge line of buttonhole foot
with center line of garment.
• Lower the presser foot, and rotate button
hole dial downward until symbol for step 1
• is centered under red line (cuck indicates
engagement).
• Start machine and let it complete step 1 of
the buttonholing cycle; that is, stitching
across the end and down the left side of
buttonhole. Stop machine when front gauge
Une on buttonhole foot reaches end-of-buU
tonhole guideline on garment,
End of
Buttonhole ^ ^
Guidelines
I
____
____________
Step 1 Dial
Setting
Presser Foot Position
at End of Step 1
St Tr
3* ÏS .ilLce«.;
Buttonhole
Guidelines
J
Line of
Garment
• Rotate buttonhole dial downward until sym
bol for step 2 is centered under red line.
• Start machine and let it com.plete step 2 of
the buttonholing cycle: that is, stitching
across the end and up the right side of but
tonhole, Stop machine when back gauge
line on buttonhole foot is in fine with the
end-of-buttonhole guideline on garment.
Take one or two stitches if necessary to
overlap stitching at starting point. For a
smooth, satiny appearance and greater dur
ability, stitch around the buttonhole a sec
ond time by
repeating the two-step dial se
quence.
• Remove work from machine, clip thread
ends and cut button opening with sharp
scissors.
When buttonholes are completed, reset dials
for regular sewing. Make sure buttonhole dial
is in OFF position.
Step 2 Dial
Setting
r|
■
1
'“'11
Off Dial Position
at End of Step 2
Presser Foot Position
at End of Step 2
End of
Buttonhole
Guideline
”\.............
Finished
Buttonhole
Stitching
......
.
End of
Buttonhole
Guideline
Center
Line of
Garment
43
Page 46

BAR-TACK BUTTONHOLES
• Pattern; Plain Zig-Zag |
• Stitch Width: 2% and 5 or to suit fabric
• Needle Position: L
• Stitch Control: In FINE area
• General Purpose Needle Plate
• Special Purpose Foot (Only)
Marking Lines
Always make a test buttonhoie on a sample of
your fabric. Be sure to duplicate the thickness
of the garment and include interfacing if ap
propriate.
BUTTONHOLE LENGTH
First decide how long the opening needs to be.
This will depend on the diameter and thickness
of the button. To find the right length, cut a small
slit in a scrap of your fabric and gradually
enlarge it until the button slips through easily.
Then add at least 1/8 inch or 3mm (1/16 inch,
or 1.5mm for each bar tack, the closing at each
end of buttonhoie), and mark the fabric as il
lustrated. This bar-tack measurement is ap
proximate; on some buttonholes, you may need
to increase it to arrive at pleasing proportions.
STiTCH WIDTH SETTINGS
Next, determine the two stitch width settings
that you wiii need: one for side stitching and
one for bar tacks. Settings 2% and 5 are il
lustrated below, although other combinations
may be used, as long as combined widths of
side stitching does not exceed the width of
the bar tacks.
44
Length of
Cutting Space
A ^ 3 A S
Selector
BÌ2VZ
Bar Tacks and
Side Stitching
A
1 {
(2-3 A J
mrTTrm
. A R
>
............................
Tmmr
1
.X
Selector
atS
Bimsmchim
BarTacks
Page 47

PROCEDURE FOR MAKING
BAR-TACK BUTTONHOLES
With needle position dial at L, set stitch width
dial on 2% for side stitching of buttonhole.
Place work under needle, aligning center mark
ing of buttonhole with slot in the presser foot.
Side Stitching: Position needie in fabric at
point A. Lower the foot and stitch to end of
marking. Leave needle in fabric at point B.
Raise the foot and pivot work on needie. Lower
the foot. Take one stitch without changing
width setting, bring needle to point C.
Bar Tack: Adjust stitch width for bar tacks and
take at least six stitches. Stop at point D.
¡¡¡¡^
m inimiiiiE
Müiillliäiiuiaj
—
......
.....
»"■{............
j A,
B
Side Stitching
if
M-
Side Stitching: Readjust stitch width for side
stitching. Complete work to point E. Leave
needle in fabric.
Final Bar Tack: Adjust stitch width for bar
tacks, and take at least six stitches ending at
point F.
Fastening Stitch: To secure stitching, move
stitch width dial to A and take three stitches.
Remove work, draw threads to underside,
fasten and trim. Cut opening for button with
sharp scissors.
mnmmm
Bar Tack
I
4 S :■
Side Stitching
34
wrdd
33
Final Bar Tack
46
Page 48

8. FREE-MOTlOñi STITCHiiyG
fn free-motion stitching, you sew without a
presser foot and control fabric movement by
means of an embroidery hoop. Bther a straight
or a plain zig-zag stitch can be used. Because
you can move the hoop in any direction — for
ward or backward, from side to side, or even
diagonally—free-motion stitching is extremely
useful for embroidery designs. On the other
hand, it is equally useful for darning.
If you are embroidering, you can vary the
length of stitches simply by moving the hoop
faster or slower under the needle. The faster
you move the hoop, the longer the stitches will
be. You can also vary the width of zig-zag
stitches from wide to narrow by controlling the
angle at which the hoop is placed and moved
under the needle.
For darning, the embroidery hoop used in free-
miOtion stitching enables you to hold the fabric
taut — a real advantage when your fabric is
lightweight or soft and thus likely to pucker.
See page 67 for directions.
flower embroidery
Pattern: Plain Zig-Zag |
Stitch Width: 2 to 5
Needle Position: A
Feed Cover Needle Plate
No Presser Foot
PREPARATION
Trace design on right side of fabric. (If you
have designing skill, you will enjoy creating
your own patterns; otherwise, you can buy at
tractive transfer designs.) Place work in an
embroidery hoop large enough to encompass
the entire design, but small enough so that
hoop can be easily mianaged. Add an underlay
if fabric is soft. Remove presser foot (see
page 10), and replace regular needle plate
with the feed cover needle plate.
Completed Flower Cesign
PROCEDURE
1. Position work under needle and lower
presser bar to engage tension.
2. Hold needle thread loosely and turn hand
wheel toward you to bring bobbin thread up
through fabric. Hold both thread ends and
lower needle into fabric.
3. Stitch, outlining or filling in design with zig
zag stitches. For a smooth, satiny surface,
place parallel stitches close together, mov
ing hoop slowly and steadily. For an irregu
lar texture, move the hoop more rapidly,
allowing some stitches to overlap.
A series of bar-tacks can be used to form
spray-like leaves or flowers. This technique
adds variety and lightness to many designs.
Leaves and petals formed in this way may
carry the thread from one bar tack to the next
This carrying thread eliminates tying of the
thread ends.
46
Page 49

S. SEWING THE PROFESSIONAL WAY
construction details
Attaching the Zipper Foot
ZIPPERS
At the notions counter in your Singer store,
you will find many different kinds of zippers,
one of which will be just right for whatever you
wish to sew. How the zipper is inserted will
depend on the type of garment and the loca
tion of the zipper. The zipper package will con
tain easy-to-foilow instructions. And, if you use
the zipper foot, you will find it easy to form an
even line of stitching close to the zipper.
i
Pattern: Straight Stitch ^
Stitch Width: A
Needle Position: A
Stitch Control: 10 to 15 (1.5 to 2,5mm)
General Purpose or Straight Stitch Needle Plate
Zipper Foot
Attachmg the Zipper Foot
The zipper foot snaps onto the presser foot
shank in the same manner as Instructed on
page 10.
When the zipper is to the right of the needle:
• Place the zipper foot under the presser foot
shank and lower the presser bar to allow the
shank to fit over the pin on the right side of
the zipper foot, so that the needle will enter
the
right notch in the foot. Press down on
presser foot screw until foot snaps into
place.
When the zipper is to the left of the needle:
• Place the zipper foot under the presser foot
shank and lower the presser bar to allow the
shank to fit over the pin on the left side of
the zipper foot, so that the needle will enter
the left notch in the foot. Press down on
presser foot screw until foot snaps into
place.
Zipper Foot to
Bight of Needle
Right Side
of Pin
Zipper Foot to
Left of Needle
47
Page 50

ft/faking the Welting
CORDED SEAMS
The corded seam is a professional treatment
for slipcovers, children's clothes, blouses, and
lingerie. To make a corded seam, make the
welting first (or buy it ready*made at a notions
counter), then stitch it into the seam.
Making a Corded Seam
• Pattern: Straight Stitch
5
• Stitch Width: A
• Needle Position: A
• Stitch Control: Slightly longer than for regular
seaming
• General Purpose or Straight Stitch Needle Plate
• Zipper Foot
Making the Welting
1. Buy cable cord of desired size.
2. Cut bias strips of fabric to cover cord (width:
three times the diameter of the cord plus
t -1 /4 inches or 3.2cm). !f it is necessary to
sew strips together to obtain desired length,
join on lengthwise fabric grain.
3. Fold bias fabric strip over cord, raw edges
even.
4. Attach zipper foot for use on left side of
needle.
5. Lower the presser foot.
6. Stitch close to the cord (do not crowd stitch
ing against cord), pulling gently on the strip,
both in front and in back of the zipper foot.
48
Stitching Welting into Seam
1. Attach zipper foot for use on right side of
the needle so that the bulk of the fabric will
fail to left.
2. Stitch welting to the right side of a single
seam edge; guide the edge of the foot next
to the co,’'d but do not crowd.
3. Place the attached welting over the second
seam edge, and pin or baste together.
4. Place work under needle, with the first
stitching on top so that you can use it as a
guide. Stitch, crowding foot against cord.
Page 51

DARTS
Darts can be made in the usual way on your
sewing machine. Thai is, you begin stitching
at the wide end of the dart, stitch to the point,
and then fasten the two thread ends.
However, thanks to the push-button bobbin,
you can avoid the problem of fastening the
thread ends by making a “continuous-thread”
dart and stitching in the opposite direction.
This method is partioularly useful for darts in
sheer fabrics, where transparency requires a
neat, clean finish, it is also useful for darts
made on the right side of a garment as a style
detail.
Regular Darts
!
• .Pattern: Straight Stitch Á
• Stitch Width: A
• Needle Position: A
• Stitch Control: About 12 (2) or to suit fabric
• General Purpose Needle Plate
• General Purpose or Straight Stitch Foot
1. Stitch from the seam edge, tapering grad
ually to the point.
2. Stitch beyond the fabric to form a thread
chain 1 /2 (1.3cm) to 3/4 inch (1.9cm) long.
Clip thread ends about two inches (5cm)
from dart point.
3. Tie the thread ends into a single knot close
to the stitching.
Contirtuous-Thread Darts
1. Set the machine as for regular darts.
2. Wind an empty bobbin with enough thread
to make a single dart (usually less than one
yard).
3. Close slide plate, and position the needle
in the very edge of the fold, at the point of
the basted or pinned dart.
4. Lower the presser foot.
5. Stitch carefully from the point to the wide
end of the dart at the seam edge.
Remember to remove excess thread from
bobbin before rewinding.
Starting to Stitch Continuous-Thread Dart
Continuous-Thread Dart
49
Page 52

BLiNDSTlTCH HEiWS
• Pattern: Srindststch «
• Stitch Width: 2 to 5 (to suit fabric)
• Needle Position: A or R
• Stitch Gontroi: 10 to 20 (approximately 1 to 2.5)
• Genera! Purpose Needie Plate
• General Purpose Foot
• Seam and Blindstitch Hem Guide
Blindstitching provides a curable hem finish
that is aimost invisible. It is best suited to
straight or slightly curved hems. Taped, bound,
turned, or unfinished hem edges can be bundstitched with equal ease. Slindstitching takes
a nttie practice, however, so make a test sam
ple first.
1. Mark, turn, and press hem in the usual way.
2. Baste a guideline 1 /4 inch (6mm) from top of
hem edge.
3. With the work wrong side up. turn the hem
under, creating a soft fold about 1/4 inch
(6mmh from top of hem.
Blindstitch Hem
4. Place hem edge over feed of machine with
bulk of fabric to the left
5. Screw seam and hem guide into hole at
right of slide plate and adjust it over the
right toe of the presser foot so that it rests
next to the soft fold.
6. Stitch so that straight stitches fall on hem
edge and sideward stitches pierce the soft
fold. While stitching, guide the fold evenly
against edge of hem guide.
7. When stitching is completed, swing guide
out of position before raising presser foot
Remove basting stitch.
50
Basted Guideline
Blindstitchmg a Hem
Page 53

SEAMS IN FABRICS THAT RAVEL
Seam edges support the garment and should
be given a durable finish if the fabric is likely
to ravel. There are two ways of finishing
seams in such fabrics: trimming seam edge or
overedging. Make a test sample first to deter
mine whether method No. 1 or method No. 2
best suits your fabrics.
Method — Trimmed Seam Finish
• Pattern: Plain Zig-Zag I or
Multi-Stitch Zig-Zag ;>
• Stitch Width: 4 or 5
♦ Needle Position: A
♦ Stitch Control: 8 to 20 {1.3 to 3 mm) to suit
fabric
♦ General Purpose Needle Plate
* General PurposeFoot
1. Select the stitch pattern that best suits
your fabric.
2. Adjust stitch width and stitch length to give
the m;0st "open” stitch that will secure the
fabric edge; avoid harsh over-stitching.
3. Place stitching near the edge of the seam
allowance.
4. Trim seam edges evenly, as shown, after
stitching is com»pleted.
Method — Overedged Seam Finish
• Pattern: Overedge Stitch 5
• Stitch Width; 5 only f
• Needle Position: A
• Stitch Control: ^
• Speed; in SLOW range
• General Purpose Needle Plate
• Overedge Foot
1. Adjust stitch width to suit your fabric.
Trimming Edges
2. Trim seam edges evenly.
3. Place stitching over the trimmed edge of
the seam; allowance as illustrated.
f}f a narrower stitch width is desired, as for seam finishing of fine fabrics, use the general purpose foot in place of the
overedge foot.
Overedged Seam Finish
51
Page 54

sewing knit and stretch fabric
When you are sewing stretch fabrics, double-
knit, tricot or jersey, choose one of the stretch
patterns that build s-t-r-e-t-c-h into the seam.
The table below will help you make the right
selection.
STRETCH STITCH CHART
Stitch
Muiti-Stitch Zig-Zag
*
»
■i
Slant Overedge Stretch Stltchf
(See Stitch Pattern Chart on Page 25)
Blmdstitch
Remember to use a baihpoint (Yellow Sand)
needle, Style 2045. in the machine, and in
crease presser foot pressure when you are at
taching elastic or sewing a synthetic knit or
stretch fabric.
Where to Use
Attaching elastic and stretch lace — Linge
rie and swimsuit construction — Girdle seams
— Seam finishes — Casings and waistband
finishes.
Flexible biindstitch hemming — Overcast
seam finishing — Shell hems in lingerie.
Sweater and sv/imsuit construction — Over
cast seams in bulky knits and stretch terry
cloth — Attaching elastic and stretch lace —
Edge finishes for seams, hems, and facings.
All-purpose stretch sewing — Lingerie seams
Plain Zig-Zag
— Attaching stay tapes — Seam finishing —
Edge finishing Attaching stretch lace.
Rlc-Rac Stltchf
(See Stitch Pattern Chart on Page 25)
Heavy-duty, all-purpose stretch sewing
Reversible topstitch applications.
Plain seams that s-t-r-e-t-c-h (press-open or
Straight Stretchf
Straight Stitch — Stitch Width A
Stitch Control on &
closed construction) — Crotch seaming —
Sleeve and gusset insertion — Flexible top
stitching — Swim and ski suit construction
— Attaching patch pockets — Repairing and
reinforcing seams.
>
>
Overedge Stretch
Overedge seams that stretch—Crotch seams
—Waistband and seam finishes in shorts and
slacks — Ski-suit, snow-suit, and swimsuit
construction.
Chainstitch
Flexible basting
plication.
Easy-off hem tape ap~
tThis stitch is designeci for strength snd permanence and cahnot be readiiy ripped out without risk of fahric damage.
52
Page 55

GUIDING AND SUPPORTING FABRIC
Most fabrics of stretch or knit construction
need only to be guided in front of the presser
foot when you use one of the stretch stitches.
Some fabrics — nylon tricot and elasticized
fabrics, for example —do require support
while being stitched.
• For nylon tricot and similar synthetic knits,
apply gentle tension by holding the seam in
front and back of the presser foot as you
sew.
• For elasticized fabric, stretch lace, and knits
with an unusual amount of elasticity, apply
firm tension in front and back of the presser
foot to stretch the seam as the stitches are
being placed.
CAUTION: Do not pull the fabric while you are
stitching as this may deflect the needle, caus
ing it to break.
FINISHES FOR HEMS AND FACINGS
Applying Gentle Tension
Pattern; Multi>Stitch Zig-Zag
Slant Overedge Stretch
Stitch Width: 5
Needle Position: A
Stitch Control: 8 to 20 (1.3 to 3 mm.) for
Muiti-Stitch Zig-Zag or ¿ts for
Slant Overedge Stitch
General Purpose Needle Plate
General Purpose Foot
or
(see page 25)
Hem and facing edges in knit and stretch fab
rics will be less apt to press through and mark
when given a flat edge-finish. Edge finishing
with the slant overedge stitch or miuiti-stitch
zig-zag eliminates the bulk of turned-in edges
and retains fabric flexibility.
1. Make a test sample to check thread tension
and stitch length if you are using the multi
stitch zig-zag,
2. Place stitching about 1/2 inch (1.3cm) from
hem or facing edge.
3. Press after stitching and trim away excess
fabric close to the stitching line.
Applying Firm Tension
53
Page 56

OVEREDGED SEAMS MOCKOVEREDGÍNG
• Pattern: Overecge Stretch ^
• Stitch Width; 5 oniy t
• Needle Position: A
• Stitch Control: ^
• Speed; in SLOW range
• General Purpose Needle Plate
• Overedge Foot
Seams in knit and stretch fabrics can be
joined and finished in one operation when you
use the overedge stretch stitch.
Pattern: Slant Overedge di (see page 25)
Stitch Width: 5
Needle Position: A
Stitch Control:
Speed: In SLOW range
General Purpose Needle Plate
General Purpose Foot or Even Feed Foot
When it is not practical to overedge a seam
because of the construction of the fabric, a
mock overedge finish can be applied. This
finish is appropriate for bulky knits, fine tri
Procedure
cots, and fabrics that curl or ravel.
Make a test sample before beginning gar- Procedure:
ment construction to test machine settings.
Be sure to duplicate the cut of the garment
seam in your test, and use a ball-point
(yellow band) needle if you are sewing a
synthetic knit fabric.
2. Cut and fit the garment in the regular way.
1. Make a test sample to check machine ad
justments before beginning garment con
struction.
2, Cut and fit the garment, allowing for 5/8 inch
(1.6cm) seam allowance. Baste seam line.
using a 5/8 inch (1.6cm) seam allowance.
Baste seam line.
3. Place seam under the presser foot so that
3. Trim seam edge evenly to a scant 1/4 inch
(6mm) from seam-line basting.
the straight stitches fall on the seam-line
basting.
4. Place tnmmeô seam under the overedge
foot so that the straight stitches fall on the
basted seam line and zig-zag stitches fall
over the seam edge.
Overedged Seam
tif 3 narrower stiicr: width is desired, as for overedging fine fabrics, use the general purpose foot in place of the
overedge foot.
54
4. Press after stitching and trim, away fabric
to produce a narrow seam. When the seam
supports the garmient, omit the trimming
step.
Mock Overedging
Page 57

THE EVEN FEED FOOT
The Even Feed foot is a perfect aid for stitching difficu!t-to-feed fabrics such as checks and
stripes, and fabrics that have a pile or nap or
have a shiny surface. All these fabrics can be
sewn without puckering and slipping.
Use It When Stitcfiing:
♦ Knits, stretch fabrics, synthetics
• Shiny fabrics — vinyls, patents, satins
♦ Checks, stripes, patterns
• Bonded fabrics
♦ Pilefabrics —velvets, fake furs,
brusheo fabrics
• Leather and leather-look fabrics
♦ Dungaree seams, welt and slot seams
♦ Belts, waistbands, and patch pockets
• Blanket binding and pleats
Do Not Use ft When:
• Speed Basting
Preparation
Ensure that all stripes and checks are cut out
to match exactly and that the weave or grain
of the fabric is “true". The Even Feed foot will
not correct any inaccuracies in cutting or
weaving. In some cases of very long or curved
seams, it may be advisable to baste lightly by
hand before machining.
Matching Plaids and Stripes
55
Page 58

Sewing a Seam With the Even Feed Foot
* Position needle in fabric with a light touch
on the speed controUer.
Stitch: Straight 1 or Plain Zig-Zag preferred
(Do not use Speed Basting)
Stitch Width: As required
Needle Position: A
Stitch Length: To suit application
Speed: In SLOW range
General Purpose Needle Plate (Only)
Even Feed Foot
Procedure:
• Attach the Even Feed foot (see page 10) and
set machine for stitch desired,
• Line up fabric edges carefully at seam start
and secure with a pin,
• Draw needle and bobbin threads under foot
to back of machine.
• Raise presser-foct lifter to its high position
and place work so that needle hole in foot is
about 1/4 inch (6mm) in from starting edge
of fabric.
• Lower foot firmly.
♦ Hold ends of needle and bobbin thread at
back of foot when you start to stitch.
♦ After just a few stitches, release thread ends
and remove pin used to secure fabric. Guide
fabric lightly under foot. Do not over-handle.
For a reinforced sewing start, place work so
that needle hole in foot is approximately 1/2
inch (12mm) in from starting edge of fabric;
hold thread ends, as shown, and stitch in
reverse to edge of fabric. Then stitch fcrward.
Where pattern matching has to be perfect, use
a slightly shorter stitch length than usual for
the fabric.
Topstitching
When topstitching smooth, shiny fabrics such
as vinyl patent, or textured fabrics such as imi
tation skin, suede or leather, use a slightly
longer stitch length than usual.
56
Attaching Pocket Fiap
Page 59

PLAIN STRETCH SEAMS
• Pattern: Straight Stitch ;
• Stitch Width: ^
• Needle Position; A
• Stitch Control: ^
• General Purpose Needle Plate
• General Purpose Foot or Even Feed Foot
When you use the straight stretch stitch to
seam knit, stretch, and eiasticized fabric,
and strength are built in as the
seam is being sewn. Because it is equally
useful for closed or press-open seam con
struction and will not break thread under
stress, the straight stretch stitch is also good
for seams that receive an unusual amount of
strain when the garment is worn. For exam
ple: crotch seaming, sleeve insertion, and
construction seams in swimsuits.
Procedure
1. Make a test sample to determine the cor
rect thread tension. Be sure to insert a
Yellow-Band needle in the machine if you
are stitching a synthetic knit fabric.
Stitch and guide fabric as you do for plain
seams stitched with the regular straight
stitch, letting the machine make the backand-forth stitches that give s-f-r-e-f-c-h to
the seam. If fabric has an unusual amount
of elasticity, it should be stitched under
tension as instructed on page 53 (Guiding
and Supporting Fabric).
3. Press seam as when using the regular
straight stitch.
Straight Stretch Stitching
Straight Stretch Stitching
with Even Feed Foot
57
Page 60

I
hints on sewing special fabric
LEATHER^LOOK VlNYLf
Use masking tape or zipper adhesive tape
instead of pins or basting to hold seams, zip
pers and hems in place for stitching.
Stitch with a long stitch (setting of 8 to 10 or
2.5 to 3). A short stitch may cut the fabric.
Sew with a steady, even pace and stitch ac
curately. Seams cannot be ripped out with
out leaving needle marks in the fabric.
The shiny side of some vinyls tends to stick
to metal surfaces. Use a strip of tissue paper
between the fabric and metal machine sur
faces to prevent this.
Reinforce button and buttonhole areas with
interfacing. Bound buttonholes are the best
choice for vinyls with knit backing.
Topstitching holds seamis and garment edges
smooth and flat, and adds a decorative note.
For sharp points on collars and lapels, take
one or two stitches diagonally across the
point to allow enough space to enclose the
seam edge smoothly.
CIRÉ (WeMook Taffeta and Trlcot)t
• Do not use pins in any area of the garment
that will be visible when completed.
• Use masking tape or zipper adhesive tape
instead of pins or basting to hold seams, zip
pers and hems in place for stitching.
• Stitch accurately: seams cannot be ripped
out because needle marks remain in the
fabric.
• Sew seams under gentle tension by holding
fabric slightly taut at front and back of
needle.
• Stitch ciré taffeta with a long stitch {setting
of 8 to 10 or 2,6 to 3). Use an enclosed edge
finish for seams and hems.
• Stitch ciré knits with a medium-length stitch
(setting of 1 2 or approximately 2) and use a
fine ball-point needle.
• Machine-worked buttonholes, as well as
bound buttonholes can be made in ciré fab
ric. Always use an interfacing and make sure
the close zig-zag stitches do not cut the
fabric.
Turning a Sharp Corner on Leather-Look Vinyl
tlhe Even Feed Foot is designed to aid in sewing this fabric.
58
Page 61

DEEP-PILE FABRICS (Fake Fur) f
• Pin, rather than baste, seams. P!ace pins at
short Intervais at right angles to the seam
line. Pins with colored heads are easy to see
and remove.
• Sew in direction of nap.
• Stitch with a fairly long machine stitch (settings of 8 to 10 or approximately 2.5 to 3)
and use poiyester/cotton thread in a size 14
or 16 style 2020 needle.
• As seam is stitched, smooth pile away from
seam allowance with a darning needle or
upholstery pin,
• After stitching seam.s with a 5/8 inch (1,6cm)
seam allowance, use small hand scissors to
shear pile from entire seam allowance to
reduce bulk.
• Stitch 1/4 inch (6mm) preshrunk tape into
neckline and shoulder seams for stability and
reinforcem^ent, or stitch with the straight
stretch stitch (stitch control set on 5^ )
• Leather and leather-look fabrics complement
fur fabrics: use them for bound buttonholes
and easy button loops.
• Coat hems are less bulky if narrow and
finished with a 3 inch (7.6cm) fabric facing or
gros-grain ribbon.
•
• Slash through the center fold of darts and
finger-press open or stitch with a narrow zig
zag stitch and trim away excess fabric after
stitching.
VELVET AND VELVETEEN f
♦ Use a light pressure dial setting to prevent
crushing pile.
♦ Mark and baste with silk thread.
♦ Use a Style 2020, size 11 needle and a fine
thread for seaming. “A’’ silk or nylon thread
is recommended for sewing velvet and
velveteen.
♦ Always stitch in the direction of the nap.
Stitchm^ Deep-Pile
Fabrics {Fake Fur)
Pin or hanc-baste seams and sew under gen
tle tension by holding fabric slightly taut at
front and back of needle (see page 53). Ex
tra-long straight seams may be machine
basted with a long, wide zig-zag stitch.
To sew panne velvet, use a bail-point needle
(yellow banc) and a shorter-than-normal
stitch length (settings of 12 to 1 5 or approx
imately 1.5 to 2),
fThe £ven~Feed Foot is designed to aid in sewing t.nis fabric.
59
Page 62

Topstitching with Crescent Stitch
decorative touches
TOPSTITCHING
A practical, simple way to accent the lines of a
dress or coat is to place one or more rows of
stitching along coilars, iapets, facing edges,
pockets, seams, etc. For a tailored look, use
lines of regular straight stitching; sew them
with buttonhole twist for added emphasis. For
decorative interest, use a stitch pattern. To
add firmness to hems and seams in knit and
stretch garments, topstitch with the crescent
stitch, {stitch control at any numbered setting
through FINE, and stitch width at 1-5). The
seam and hem guide will help you place the
rows of stitching accurately.
Shell Edging with the Blindstitoh
SHELL EDGING
Pattern: Blindstitch -«
Stitch \A/icith: 3 to 5
Needle Position: A
Stitch Control. 12 to 20 (1.3 to 2 mm)
General Purpose Needle Plate
General Purpose Foot
On soft, fine fabrics, shell edging makes an
attractive finish for narrow hems and bias
folds.
1, Make a test on a sample of your fabric to
find the right thread tension, stitch length.
and stitch width,
2. Place folded hem or bias fold (basted, if
necessary) under presser foot with hem or
fold toward the left.
3, Stitch slowly, guiding fabric so that the
sideward stitches do not pierce the folded
edge.
60
Page 63

MONOGRAMS AND MOTIFS
Many decorative stitch patterns can be used
for moncgrams and motifs — to add a personal
touch to a blouse collar, for example, or for
initialing household linens. You can buy de
signs or create them yourself to suit the stitch
pattern you wish to use.
Very simple straight-Fme monograms can be
made with the plain zig-zag stitch, or you can
create a motif by arranging individual pattern
units to form a design. (Detailed information
on zig-zag stitch patterns and dial settings
begins on page 25.)
When you use a decorative stitch pattern to
form a motif, you will want to start at the
beginning of the pyramid, ball, or whatever
pattern you have selected.
Finding Beginning of Pattern Unit
1. On a scrap of material, stitch until you
come to the end of a complete pattern unit.
Now you are ready to start stitching at the
beginning of the next unit.
Monogram in Plain Zig-Zag and Ball Stitch
2. Raise presser foot and remove scrap.
3. Position motif under needle, lower the
presser foot, and stitch.
Beginning of
Pattern Unit
Pyramid
^
jL
Line Monogram in Plain Zig-Zag Stitch
Pyramid Pattern Used in Motif
initial in Plain Zig-Zag and Bail Stitch
Page 64

BORDER DESIGNS
Border designs that add a decorative touch to
wearing apparel and household Items can be
created by combining different types of
straight stitching and zig-zag stitching. Simple
or elaborate, delicate or bold, they can be var
ied to suit the application. Use them as you
would a braid or to simulate horizontal, vertical
or bias stripes on plain fabric.
Procedure
Mark or crease fabric for the center line of first
row of stitching. If spacing between rows is not
greater than 1 /2 inch (1,3cm), gauge additional
rows with the presser foot. If spacing is wider,
m
mark for each line of stitching. Use a backing of
crisp lawn, organdy or organza and be sure to
make a test sample on a swatch of your fabric
to check stitch settings and thread tension.
APPLIQUE
Applique adds beauty and interest to clothing
and household linens. You can create your
own design, trace a simple outline from a col
oring book, or use a motif cut from a printed
fabric. Fabrics of like or different texture com
bine equally well.
Use a closely spaced, fairly narrow zig-zag
stitch. Although you may vary stitch width to
accommodate fabric weave or texture, never
allow the stitch to be too wide.
When appliqueing, make a test sample to help
you decide which of the following meXhode is
more appropriate for your fabric and design.
Preparation
♦ Baste applique design to fabric.
• Outline design with straight stitching (use a
short stitch).
Border Design
ШХЬой #1—Trimming alter Stitching
♦ Remove basting and press.
• Attach special purpose foot and general
purpose needle plate.
Method #1
1. Set stitch width dial. Adjust stitch length in
the FINE area of the stitch control.
2. Outline the entire design with applique
stitching.
3. Cut away the fabric on the outer edges of
the stitching with embroidery scissors.
Method #2
1. Trim outside edges close to straight stitch
outline of design.
2. Set stitch width dial. Adjust stitch length in
the FINE area of the stitch control
3. Overedge the design with satin stitching.
This step will produce a smooth, lustrous
finish that requires no additional trimming.
62
Page 65

SMOCKING
Smocking is a youthful decorative detail that
is particularly charming when used for a yoke,
insert or band on baby clothes, little girls’
dresses, or lingerie.
When worked by hand, smocking is a time-
consuming process. However, the heavystitched look, typical of hand work, can be
stitched quickly and easily with your machine
when you use Fiexi-Stitch patterns.
Procedure:
1. Space rows of straight stitching, 1/4 inch
(6 mm) apart, on the crosswise fabric grain.
2. Pull up evenly for the amount of fullness
desired.
3. Baste a strip of fabric directly under the
lines of gathering.
4. Stitch over and between rows of shirring
with decorative stitching. Create your own
design or adapt the one illustrated. Use
thread
fabric, depending on the effect desired,
that contrasts with or matches your
A test sample is always advisable to check
stitch settings. Be sure to use the same fabric
and degree of fullness you plan for your gar
ment.
./■hi и
Smocked Band Accented
with Cording
Smocked Band Completed
63
Page 66

Drawn^Thread Work
DRAWN-THREAD WORK
Pattern: SHndstitch
Stitch Width: 2 to 3
Needie Position: A
Stitch Control 15 to 20 (1.3 to 1.5 mm)
General Purpose Needle Plate
General Purpose Foot or Special Purpose Foot
Drav^n-thread work is a simple decorative
treatment that can be used to add interest to
table linens, dresses, and blouses. It is accom
plished by drawing threads from plain-weave
kbrics to form open-work bands and accent
ing the band edges with blindstitching.
Choose a linen or linen-like fabric from which
threads can be easily, withdrawn.
Procedure:
1. Draw one (or more) threads from the fabric
to mark edges of open-work bands.
Drawn-Thread Channels
}. A. A ,\t * i A A A A A ^ A A ' A A A A A.A A < A a A A A ^ A
V V V V y yv V y if '< y y V t y y » y V y i y y V y A y V y
' *A A A A ^ A. A A f >, A A A A.A.A.A » A A.A A A A A.A a A A A A
'v> V y-y ¥ •< Wy ¥ A y y < y » V ¥ ¥ V > ¥ y V > ¥ ¥ y y V V ¥ y ¥ Y ?
“A ^ A A 4 A A A A A .* A A A * A A-A A A A A A A A A A A A A ^ A A A a A A A A 4A A A
2. Stitch, in drawn-thread channels, placing
the fabric so that the straight stitches of
the blindstitch pattern are made in the
thread channel and the sideward stitches
(or points) in the solid body of the fabric.
If the fabric is soft, stitch through an under
lay of tissue paper.
3. After stitching is completed, draw remain
ing threads from* the fabric to form the open
work between rows of stitching. Whenever
stitching crosses threads that are to be
drawn, cut threads close to stitching be
fore drawing them out.
To form a fringe, draw a thread to mark irlnge
depth. Stitch in drawn-thread channel (with
fabric edge to the right). Ravel threads be
tween stitching and fabric edge.
64
Drawn-Work Detail with Fringed Edge
Page 67

keeping up appearances
Many zig-zag stitch patterns are just as useful
for mending as they are for creative sewing.
The nnufti-stitch zig-zag forms a firnn, flexible
bond that is ideal for repairing tears.
ATEAR
• Pattern: Multi-Stitch Zig-Zag >
• Needle Position: A
• Stitch Width: 2 to 5
• Stitch Control: About 20 (1.3 mm)
• General Purpose Needle Plate
• General Purpose Foot
1. Trim ragged edges.
2. Place unaerlay on the wrong side of tear for
reinforoement. (It is best not to baste or pin
the underlay, since you will be bringing the
edges together in the next step.)
3. Stitch on the right side, bringing the edges
of the tear together. Shorten stitch length at
ends and corners to give extra strength.
4. Trim underlay.
Tear Mended with Mwltl-Stitcti Zig-Zag
BLANKET BINDING
Often you can make an old blanket look almost
new by replacing the binding.A zig-zag stitch
pattern such as the plain zig-zag or multistitch zig-zag or the semaphore Flexi-Stitch
pattern may be used.
♦ Pattern: Desired zig-zag stitch (see above)
♦ Stitch Width: 5
♦ Needle Position: A
• Stitch Control: ^ for r/ex/-Si/';ch pattern or 15
to 20 (1.3 to 1.5 mm)
• Pressure: NORM or less
* General Purpose Needle Plate
• Even Feed Foot
1. Make a sample to determine correct dial
settings. Reduce pressure on fabric and
increase stitch length, if necessary, so that
blanket feeds freely.
2. Remove worn binding and baste new bind
ing securely in place.
3. Stitch, and remove basting.
Blanket Binding
65
Page 68

REPAIRING SEAMS
Breaks in pre$s~open garment seams can be
repaired quickly and easiiy when you use the
straight stretch stitch (stitch pattern i , stitch
width A and stitch control on ^ setting).
This reinforced stitch is both strong and flex
ible. It is idea! for knit and stretch fabrics and
particularly useful for repairing or strengthen
ing curved seams or seams that will receive
strain when worn.
1. Make a test sample to check dial settings.
2. Remove loose thread along the break and
press the seam edges together.
3. Re-stitch along original seam line, guiding
seam under presser foot without stretching
fabric, letting the machine move the fabric
to make the back-and-forth stitches that
give s~t-r~e-t-c-h to the seam. Overlap
stitching one inch (2.5 cm) at each end.
Press seam open.
Seam Repair
Stretch Garment Repair
REPAIRING STRETCH GARMENTS
* Pattern: Plain Zig-Zag |
♦ Needle Position: A
• Stitch Width: 3 to 5
♦ Stitch Control: 20 (1.3 mm) or to suit fabric
• General Purpose Needle Plate
* General Purpose Foot
Seams and hems in stretch and elasticized
garments retain their elasticity when stitched
with the plain zig-zag stitch. This stitch is par
ticularly effective when used in topstitch ap
plications (as shown) or to overedge. Make a
test sample to check dial settings.
Bar Tacks
Bar tacks, to reinforce points of strain, are
made with the plain zig-zag stitch at satin
stitch length. Use them at pocket corners, to
attach garters, secure shoulder straps, belt
loops and zipper openings.
66
Page 69

DARNING
Worn or torn spots on children's clothes, knits,
and household linens can be darned effort
lessly and quickly with little practice. You may
choose to darn either with or without an e*m-
broidery hoop. When greater control is needed,
an embroidery hoop is usually best.
Without Embroidery Hoop
With Embroidery Hoop
• Pattern: Straight Stitch I
• Needle Position: A
♦ Stitch Width: A
♦ Stitch Control: in FINE area
• Feed Cover Needle Plate
* No Presser Foot — Presser Bar: Lowered
Pattern: Straight Stitch
Needle Position: A
Stitch Width; A
• Stitch Control: 10 to 15 (1.5 to 2.5 mm]
• Pressure: DARN
• General Purpose Needle Plate
• General Purpose Foot
1. If area to be darned is open, baste an under
lay in place.
2. Place area to be darned under presser foot;
lower presser foot and start stitching, al
ternately drawing fabric toward you and
pulling it gently away from you.
Continue this forward and backward motion
o.
as you fill the area with parallel lines of
stitching. For additional strength, cover
area with crosswise lines of stitching.
1. Trim ragged edges from area to be darned.
2. Center worn section in embroidery hoop.
3. Position work under needle over feed cover
plate and lov/er presser bar to engage ten
sion.
4. Hold needle thread loosely with left hand,
turn hand wheel over and draw bobbin
threab up through fabric. Hold both threab
ends and lower needle into fabric.
5. Outline area to be darned with running
stitches for reinforcement.
6. Stitch across opening, moving hoop under
needle at a slight angle from lower left to
upper right Keep lines of stitching closely
spaced and even in length.
7. When opening is filled, cover area with
crosswise lines of stitching.
N s,, i
Darning without Embroidery Hoop
Darning with Embroidery Hoop
67
Page 70

iO. FREE-ARM SEWING
Fabric handling, when sewing tubular and
hard to reach garment areas, is simplified
when you convert your Mode! 771 to free-arm
sewing. A few of the sewing Jobs for which you
wifi find the free arm particularly useful are
shown below and on pages 69 through 71.
You will discover many more for yourself.
To convert your machine for free-arm sewing,
simply press down on the corner of the hinged
plate as illustrated.
To convert your machine back to flat-surface
sewing, raise the hinged plate of the machine
until it snaps into fiat-surface position.
Press Down on Corner of Hinged Piate
BUTTONHOLES AND BUTTONS
Stitching buttonholes on a cuff or neckband is no longer a task when the free-arm
surface is used. Cuffs slip around the sewing surface without being pulled out of
shape, so you can see and handle the stitching area easily.
For buttonholing, follow the instructions that start on page 40.
68
Page 71

SLEEVES
f tee-arm sewing takes the difficulty out of topstitching a sleeve. The armhole rotates
smoothly under the needle so that you can place stitching accurately. The extra con
trol afforded by the free-arm is especially helpful for topstitching flat-fell seams.
Badges, emblems and insignia of all sizes and shapes can be quickly attached to
shirts and uniforms by slipping sleeve or hard-to-reach area over the sewing surface.
69
Page 72

EDGE FINISHES
70
The free-arm surface makes it easy to finish sleeves, pant legs and waistlines.
These circular garment areas rotate smoothly around the sewing surface, giving
you full visibility and control as you blindstitch hems, attach elastic, or topstitch
cuffs.
Page 73

DARNING AND MENDING
Knees, elbows and other areas of wear in children’s clothes, sweaters, jackets and
shorts become readily accessible for darning, mending or patching when the freearm surface is used. The sewing surface fits inside the enclosed sleeve and leg
areas, making it unnecessary to open seams or roll the garment. For darning, follow
the instructions on радев? and refer to page65for mending information.
BAR TACKS
Bar tacks reinforce areas of strain and can be applied to ready-made garments, as
well as to those sewn at home. Use the free-arm surface to avoid fabric bulk around
the needle when you apply this detail to pockets, plackets, and waistlines.
71
Page 74

11. CARING FOR YOUR MACHINE
cleaning the machine
Your machine will serve you perfectly for
many years if you take a few moments of your
time to keep it clean. How often you will need
to clean the machine will depend on how often
you use it,
CAUTiON: Before cleaning your machine, dis
connect power-line plug from electrical supply.
Remove lint or fluff from exposed parts. With a
soft cloth, clean:
♦ Tension discs, presser ban and needle bar
♦ Take-up lever and thread guides
♦ Bobbin case (If there is a lot of lint in the
area, remove bobbin case for cleaning. See
page 74 for instructions).
♦ Machine surface (If necessary, dampen the
cloth and use a mild soap.)
Open the face plate and clean area behind it
with a brush.
Remove needle plate as instructed on page
11 and, using a brush, clean the rotating hook
area under the needle plate and slide plate.
After cleaning, apply only SINGER* oil at
points indicated below. Sew a few lines of
stitching on a scrap of material to remove ex
cess oil. SINGER oil is specially prepared and
does not contain harmful deposits that can in
terfere with the smooth action of precision
parts.
Approximately once every year, remove top
and bottom covers as instructed on page 73,
and clean and lubricate all moving or rotating
machine connections to ensure freedom of
movement and to protect metal parts from ex
cessive wear. To determine which connec
tions are moving or rotating, turn hand wheel
slowly (by hand) while covers are removed.
Clean
72
and Oil
Page 75

removing covers,
bobbin case, and bulb
CAUTION: Before removing covers, bobbin
case, and light bulb, disconnect power-line
plug from your electrical supply.
REMOVING AND REPLACING
TOP COVER
Move take-up lever to a low point and lower the
presser foot.
1. Loosen screw A completely, lift up right
end of top cover, and slide cover toward
left and off machine.
2, Replace cover by positioning it on top of
arm with a slight overhang on left side;
slide cover to the right until it locks in
place. Replace and tighten screw A.
Removing and Replacing Cover
REMOVING AND REPLACING BOTTOM COVER
1. Disconnect machine plug from electrical
receptacle at right end of machine.
2. Tilt machine back and remove four screws
shown at right. A rubber cushion will be
removed with one of the screws. Pull cover
toward you to remove.
3. Replace bottom cover by aligning screw
holes in cover with screw holes in machine.
Push cover against machine to snap it into
place. Replace and tighten four screws.
Screws
Removing and Replacing Bottom Cover
73
Page 76

REMOVING THE BOBBIN CASE
Make sure needle is at its highest position.
1. Open slide plate and remove needle plate
(see page 11 for instructions),
2. Remove bobbin. Keep bobbin push button
in sewing position,
3. Swing position bracket latch toward you.
Lift bracket and slide it to the right,
4. To remove bobbin case, twist case as
shown, and lift out.
REPLACING THE BOBBIN CASE
Make sure needle is at its highest position,
1, Keep bobbin push button in sewing posi
tion. Hold bobbin case by latch and, with
latch to right of needle, slip case in position
so that the groove engages hook channel,
2, Twist bobbin case as shown, until latch is
in center.
74
Push Position Bracket
to Left
■■ BracketLatch
Replacing Bobbin Case
Swing Position
Away From You
3. Push position bracket to left until it snaps
down, locking bobbin case in place,
4, Swing position bracket latch away from you
to lock bracket in place,
5. Replace bobbin and snap latch down,
6. Replace needle plateand close slide plate.
Page 77

REPLACING THE SLIDE PLATE
You will not have any occasion to remove the
slide plate. However, if it should accidentally
become disengaged from the machine, it is
easily replaced.
• Raise the presser foot and make sure needle
is in its highest position.
• Place slide plate in slide way with the front
edge close to, but not covering, the retain
ing spring (as shown).
• With a small screwdriver, lift each end of the
spring into each of the side grooves on the
underside of the plate.
• Draw the plate gently toward you and fully
engage the spring.
Lift Retaining Spring ''
into Slide Plate Grooves
• Close slide plate.
CHANGING THE LIGHT BULB
Caution: Before chmging fight bulb make
sure you have discorrnected power-fine
plug from electrical outlet
Removing Bulb. With thumb of right
hand, push in and down on tab of light
lens and lower the light bracket Oo not
attempt to unscrew the bulb. Press it up
into the socket and at the same time turn
bulb over in direction shown to unlock the
bulb pin.
Replacing the Slide Plate
Caution: Be sure to use a 15 watt bulb
only.
Replacing Bulb. Press new bulb into
socket, with bulb pin entering slot of
socket, and turn it over in direction shown
to lock bulb in position. Push entire as
sembly up until it snaps in position.
75
Page 78

performance checklist
REMEMBER TO
• Turn on pov/er and light switch.
• Turn buttonhole dial to OFF position be
fore setting pattern dial needle position
dial, or stitch width dial for any purpose^
• Remove all thread from bobbin before
rewinding.
• Fill empty bobbin
... in center needle position A .
.., before attaching accessories.
... before inserting twin needle.
• Close slide plate after winding bobbin,
• Make sure needle is out of fabric or
IF THREAD
♦ Is the machine properly threaded?
♦ Is spool holder pressed firmly against
thread spool?
♦ Is the needle securely tightened in the
needle clamp?
♦ Is the needle stmlghV>
above needle plate before turning dials.
Make sure stitch width does not exceed
the number 2 setting when a twin needle
is used.
Use a ball point Yellow Band needle to
attach elastic and sew nylon tricot, syn
thetic doubleknits, and spandex.
Use high-lift presser bar setting to place
heavy fabric under presser foot.
Sew at a moderate speed {SLOW speed
setting) when using the straight stretch
stitch or Flex!-Stitch patterns.
BREAKS
♦ 1$ the needle-thread tension too tight?
♦ Is presser foot raised forbobbln winding?
♦ 1$ a moderate speed used for bobbin
winding?
♦ Are the bobbin halves evenly and se
curely screwed together?
♦ Is the thread suitable for the size of
needle and free of irregularities?
♦ Is the thread unwinding freely from the
spool?
if you have any questions, please write to:
Consumer Affairs Department
76
♦ Is the bobbin properly seated and se
cured by the latch In the bobbin case?
♦ 1$ the bobbin-case area free of lint and
loose thread ends?
Enjoy Sewing!
The Singer Company
321 First Street
Elizabeth, NJ. 07207
Page 79

your personal measurements
This chart will enable you to keep a record of your
measurements. For perfect accuracy, ask a friend to
take your measurements,
1, Chest, entire (Take above bust and straight across back)...........................
2, Bust (Take over fullest part of bustline and straight across back)
3, Shoulder length (right)
4, Shoulder to shoulder (back) (Take from armhole to armhole at shoulder seam)
5, Back width (Take 3"-7cm-to 4''«*l0cm>*below shoulder seam at back armhole)
6, Backwalst length (Take from neckline to waistline, center)
7, Shoulder to bust, apex
8, Shoulder to waist, over apex...................................................................
9, Front chest (Take 3" -7cm- down from shoulder at armhole, and from armhole
to armhole)..................................................................................................
10. Waistline (Around natural waistline)............................................................
lla. Hipline (Entire, 7" -17cm- from waistline) ...............................................
llb. Hipline (Entire, 9" -22cm- from waistline)
.....................................................................
.................
.................................................................................
..................................................
...............
............
....
.
.
10
11a
11b
77
Page 80

12. SEWING AIDS
special accessories for special jobs
Sewing Aids have been designed to increase
the versatility of your sewing machine and en
able you to give your sewing that extra pro
fessional touch* The ones described below are
just a few of the complete selection available
at your local Singer Sewing Center.
Darning and Embroidery Foot
Gathering Foot
The gathering foot can be used for evenly
spaced shirring as well as for a single fine of
gathering* This foot is used for straight stitch
ing only.
Darning and Embroidery Foot No. 161875
This foot is recommended for all types of free
motion work. It is ideal for embroidery* monogramming, and decorative designs because
the transparent toe fully reveals the line of the
design to be followed.
No. 161169
78
Professional* Buttonhoier
The Professional Buttonhoier sews six kinds of
buttonholes, plus eyelets* in a wide variety of
fabrics. You choose the style and length and
make perfect buttonholes every time.
N0*381116
Page 81

Quilting Foot
No. 160691
The quilting foot is especially well adapted to
stitching lightly padded fabrics, it is excellent
for the placement of straight stitching in block,
floral, or scroll designs. This short, open foot
permits following curved lines with ease and
accuracy.
Ruffler
No. 161561
This accessory offers a simple, effective way to
make gathered and pleated ruffles. The ruffler
is used for straight stitching only.
Binder Foot
No. 81200
The binder foot is used to apply ready-made
bias tape or unfolded bias binding to an unfin
ished edge. It can also be useful for binding
seam edges that might ravel.
Tucker
No, 161226
Tucks up to one inch can be stitched and
marked in one operation by using the tucker.
Two adjustable scales are provided to gauge
tuck width and spacing.
Tucker
79
Page 82

INDEX
Accessories...................................................... 4
Adjusting Machine to Fabric
Appliqué
........................................................
.............................
7
62
Basting...................................................... 21,33
Pin
..............................................................
Speed Basting by Machine
Blindstitch Hems
........................................
...
....................
21
33
SO
Bobbin ........................................................... 13
Raising Bobbin Thread
.........
.....................
17
Removing Bobbin...................................... 16
Removing Thread
............ —
...
................. . 16
Replacing an Empty Bobbin..................... 16
Replacing a Wound Bobbin
Winding
Bobbin Case
......................................................
.................................................
........................
17
14
74
Built-in Disc Patterns ..................................... 25
Buttonhole Dial............................................. 3> 43
Buttonholes
...................................................
40
Bar-Tack...................................................... 44
Round-End ............................................... 42
Buttons .......................................................... 39
Caring for your Sewing Machine
......
............
72
Chainstitching............................................... 35
Choosing Fittings ...........................................
Choosing Needle and Thread
.........................
8
7
Darning ......................................................... . 67
Darts............................................................... 49
Fabric, Thread, and Needle Table
Fashion AÌÓS
Floral Designs
Free-Arm Sewing
Free-Motion Stitching
.................................................
................................................
..........................................
.....................................
Guiding and Supporting Fabric
Hints on Sewing Special Fabric ....................
...................
.....................
7
78
46
68
46
53
58
Ciré (Wet-Look Taffeta and Tricot).............. 58
Deep-Pile Fabrics (Fake Fur)
Leather-Look Vinyl
Velvet and Velveteen
.....................................
..................................
How to Start Sewing ....................................
Light Bulb
Mending
Monograms and Motifs
Needle —...
Position
.....................................................
........
...........
.................................. 65
..................................
.................................................
............................................
.....................
3, 25, 26
59
58
59
15
75
61
4, 8
Replacement ................................................. 8
Threading ................................................... 12
Needle Plates
...............................................
5, 11
Chainstitch......................................... 5, 11,35
Changing Needle Plate
..............................
11
Feed Cover Plate ........................ 5, 11,39, 46
Straight Stitch
General Purpose
Performance Checklist
............................................
.......................................
............
.....................
5, 11
5, 11
76
Power and Light Switch
Presser Feet
.................................................
Button Foot...............................
Buttonhole Foot
Changing Presser Feet
Even Feed Foot
..................................
...........
...................................
..............................
.............................
5, 9, 54, 55
6
5, 8
5. 9, 39
5, 9, 42
10
Overedge Foot............................... 5, 9, 51,54
Special Purpose Foot
Straight Stitch Foot
General Purpose Foot
Zipper Foot
.........................................
...............................
.....................................
................................
5, 9, 47
5, 9
5. 9
5, 8
Pressure Adjustm^ent ................................. 3, 19
Principal Parts.................................................. 3
Reverse Stitching ........................................ 3, 24
Satin Stitching
Seam and Hem Guide
Seams — .....................................................
Chainstitch
Corded
................................................
.................................
................................................
......................................................
28
4. 24
21
36
48
Curved......................................................... 24
In Fabrics that Ravel
Plain Stretch
..........................................
..................................
57
51
Straight ..................................................... 22
Sewing Knit and Stretch Fabric...................... 52
Shell Edging................................................... 60
Slide Plate...................................................... 75
Spool Pin ..................................................... 4, 30
Stitch Control Dial
Stitch Pattern Dial
..........................
3, 19, 27, 28
.................................
3, 25, 26
Stitch Width Dial ........................................ 3,27
Straight Stitching
Curved Seams
Straight Seams
Turning a Square Corner
With a Twin Needle
Temporary Stitching
Chainstitching
.........................................
.........................................
...........................................
............................
....................................
......................................
.............................................
18
24
22
23
31
33
35
Speed Basting............................................. 33
Tension Adjustment
For Zig-Zag Satin Stitching
Top Stitching
..................................................
Twin-Needle Stitching
Decorative Stitching
Straight Stitching
Threading the Needle
Turning a Square Corner
Zig-Zag Stitching
Your Personal Measurements
Zig-Zag Stitching
Zig-Zag Disc Patterns
Flexi-Stitch Disc Patterns
With, a Twin Needle
Zipper Insertion
...............................
3, 20, 27
.........................
....................................
...................................
........................................
.................................
............................
.......................................
..........
...........
.........................................
................................
............................
.................................
..............................................
28
60
29
29
31
30
32
31
77
25
25
25
31
47
80
Form 21771 (Rev. 578)
Part No. 173235
Page 83

Dear Customer:
We recommend that for future reference you record the
seria! number of your Sewing Machine in the space provided.
Refer to illustration
at right for location
of serial number on
your machine.
Serial No........
.
C
Serial No:
♦ K ♦ «r 1« ^
J i ' i
Here, there, everywhere
‘A TracemafH of THE SiNGSR COMPANY
SINGER
Enjoy Sewing!
If you have any questions, please write to:
The Singer Company
Consumer Affairs Department
321 First Street
Elizabeth. N.J. 07207
Printed in U.S>
Page 84

s 8 8
Makes great vacuum cleaners, too!
A good vacuum cleaner is like a good sewing machine. You use it day in, day out. It works
hard. You expect years of dependable service.
You already know we make great sewing machines. But did you know we also make great
vacuum cleaners? And v/e’ve been making them for over 46 years, with the same pride that
goes into every Singer product.
For carpets, there’s our Golden Powermasîer* upright Model Ü-69; it has our twin-fan suc
tion system that distributes suction power evenly over the entire nozzle. (Fact: Only Singer
makes a two fan system.) Plus one of the largest disposable dust bags in the industry. The
high performance vibrator brush (approx. 4000 rpms) first shakes dirt free, then sweeps,
then air-washes your carpet—that’s triple action cleaning power!
For floors and above-the-floor jobs, we have powerful can
ister cleaners...like our Golden Glide* canister Model C-17...
which offers a two stage motor with 3.3 peak horsepower!
Pius a pair of “pop-up” indicators. One tells you when your
bag should be changed; the other (an exclusive to Singer)
lets you know if you’ve accidently clogged your cleaner with
socks, matchbooks, etc...That’s fail-safe cleaning! Plus an
air-power control console that lets you adjust the suction
power to 6 different cleaning jobs...including carpets. The
C-17 has a separate motor-driven powerhead (for carpet
cleaning) which adjusts to 4 different carpet pile heights!
And, there are other upright and canister models to choose
from. Come in and see them today.
The first name in sewing,
the last word in cleaning
aiemarK o! THE SiNGER COMPANY
C-17
 Loading...