

Singer 7640 Instruction Manual
INSTRUCTION MANUAL
7640
INTRODUCTION
2
Welcome
Welcome to the SINGER® family and CONGRATULATIONS on purchasing a
®
brand new SINGER
sewing machine!
The SINGER
design our machines for sewists of all skill levels so that the joy of sewing,
creating, do-it-yourself, crafting and more can be enjoyed by all. It is important
to us that you have the easiest and most successful sewing experience, so
we have provided a wide array of helpful resources:
1. An instruction manual with easy-to-understand graphics and
step-by-step instructions.
2. Assistance on the web at www.singerco.com
3. Personal assistance via email: talktous@singerco.com
4. Live, one-on-one help from one of our SINGER
at 1-800-474-6437. (North America Only)
We’re ready to help and hope that you enjoy your SINGER
Happy Sewing!
®
brand has stood for quality in sewing for over 160 years. We
®
Sewing Assistants,
®
sewing machine.
2

INTRODUCTION
Important Safety Instructions
This household sewing machine is designed to comply with IEC/EN 60335-2-28
and UL1594.
IMPORTANT SAFETY INSTRUCTIONS
When using an electrical appliance, basic safety precautions should always be
followed, including the following:
Read all instructions before using this household sewing machine. Keep the
instructions in a suitable place close to the machine. Make sure to hand them
over if the machine is given to a third party.
DANGER - To reduce the risk of electric shock :
- A sewing machine should never be left unattended when plugged in. Always
unplug this sewing machine from the electric outlet immediately after using
and before cleaning, removing covers, lubricating or when making any other
user servicing adjustments mentioned in the instruction manual.
WARNING 7RUHGXFHWKHULVNRIEXUQV¿UHHOHFWULF
shock, or injury to person :
- Do not allow to be used as a toy. Close attention is necessary when this
sewing machine is used by or near children.
- Use this sewing machine only for its intended use as described in this
manual. Use only attachments recommended by the manufacturer as
contained in this manual.
- Never operate this sewing machine if it has a damaged cord or plug, if it is not
working properly, if it has been dropped or damaged, or dropped into water.
Return the sewing machine to the nearest authorized dealer or service center
for examination, repair, electrical or mechanical adjustment.
- Never operate the sewing machine with any air openings blocked. Keep
ventilation openings of the sewing machine and foot control free from the
accumulation of lint, dust, and loose cloth.
- Keep ¿ngers away from all moving parts. Special care is required around the
sewing machine needle.
- Always use the proper needle plate. The wrong plate can cause the needle to
break.
- Do not use bent needles.
- Do not pull or push fabric while stitching. It may deÀect the needle causing it
to break.
- Wear safety glasses.
- Switch the sewing machine off (“O”) when making any adjustment in the
needle area, such as threading needle, changing needle, threading bobbin, or
changing presser foot, etc.
- Never drop or insert any object into any opening.
- Do not use outdoors.
- Do not operate where aerosol (spray) products are being used or where
3

INTRODUCTION
2
Important Safety Instructions
oxygen is being administrated.
- To disconnect, turn all controls to the off (“O”) position, then remove plug from
outlet.
- Do not unplug by pulling on cord. To unplug, grasp the plug, not the cord.
- The foot control is used to operate the machine. Avoid placing other objects
on the foot control.
- Do not use the machine if it is wet.
- If the LED lamp is damaged or broken, it must be replaced by the
manufacturer or its service agent or a similarly quali¿ed person, in order to
avoid a hazard.
- If the supply cord connected with the foot control is damaged, it must be
replaced by the manufacturer or its service agent or a similarly quali¿ed
person, in order to avoid a hazard.
- This sewing machine is provided with double insulation. Use only identical
replacement parts. See instructions for Servicing of Double-Insulated
Appliances.
SAVE THESE INSTRUCTIONS
For Europe only :
This appliance can be used by children aged from 8 years and above and
persons with reduced physical, sensory or mental capabilities or lack of
experience
concerning use of the appliance in a safe way and understand the hazards
involved. Children shall not play with the appliance. Cleaning and user
maintenance shall not be made by children without supervision.
The noise level under normal operating conditions is less than 75dB(A).
The machine must only be used with foot control of type C-8000 manufactured
by ZENG HSING TAIWAN, LTD.
and knowledge if they have been given supervision or instruction
For outside Europe :
This sewing machine is not intended for use by persons (including children)
with reduced physical, sensory or mental capabilities, or lack of experience and
knowledge, unless they have been given supervision or instruction concerning
use of the sewing machine by a person responsible for their safety. Children
should be supervised to ensure that they do not play with the sewing machine.
The noise level under normal operating conditions is less than 75dB(A).
The machine must only be used with foot control of type C-8000 manufactured
by ZENG HSING TAIWAN, LTD.
SERVICING OF DOUBLE INSULATED
PRODUCTS
In a double-insulated product, two systems of insulation are provided instead
of grounding. No ground means is provided on a double-insulated product, nor
should a means for grounding be added to the product. Servicing of a double-
4

INTRODUCTION
Important Safety Instructions
insulated product requires extreme care and knowledge of the system and
should be done only by quali¿ed service personnel. Replacement parts for
a double-insulated product must be identical to those parts in the product. A
double-insulated product is marked with the words “DOUBLE INSULATION” or
“DOUBLE INSULATED”.
5

INTRODUCTION
2
Table of Contents
INTRODUCTION .............................................................................................................2-6
Welcome .........................................................................................................................................2
Important Safety Instructions .......................................................................................................3-5
Table of Contents ............................................................................................................................6
1. ABOUT YOUR MACHINE ......................................................................................... 7-11
Main Parts of the Machine Front ..................................................................................................... 7
Main Parts of the Machine Back .....................................................................................................8
Needle and Presser Foot Area ........................................................................................................ 9
Removable Storage Compartment and Accessories ............................................................... 10-11
2. GETTING READY TO SEW ....................................................................................12-17
Powering Your Machine ................................................................................................................12
Winding the Bobbin ....................................................................................................................... 13
Inserting the Bobbin ......................................................................................................................14
Threading the Upper Thread ......................................................................................................... 15
Automatic Needle Threader .......................................................................................................... 16
Drawing Up the Bobbin Thread ..................................................................................................... 17
3. START SEWING .....................................................................................................18-31
Before You Start Sewing ...............................................................................................................18
Stitch Formation ............................................................................................................................ 19
Operation Buttons and Function Buttons ...................................................................................... 20
LCD Screen................................................................................................................................... 20
Combining Characters into Memory.............................................................................................. 21
Stitch Selection ............................................................................................................................. 22
Sewing a Straight Stitch ................................................................................................................ 23
Sewing a Decorative Stitch ........................................................................................................... 24
Sewing a Stretch Stitch ................................................................................................................. 25
Sewing a 1-Step Buttonhole.......................................................................................................... 26
Sewing a Button ............................................................................................................................ 27
Inserting and Changing Needles ................................................................................................... 28
Changing the Presser Foot and Presser Foot Lift ......................................................................... 29
Two-Step Extra Presser Foot Lift .................................................................................................. 29
Presser Feet.............................................................................................................................30-31
4. TROUBLESHOOTING AND MAINTENANCE ........................................................32-37
Troubleshooting .......................................................................................................................32-36
Maintenance.................................................................................................................................. 37
5. APPENDIX - GLOSSARY ............................................................................................ 38
Glossary of Key Sewing Terms ..................................................................................................... 38
Explanation key to notations in this manual:
= Helpful information
⚠ = Could cause harm
= Impacts sewing results
¤
To ensure that you are always provided with the most modern sewing capabilities, the manufacturer reserves the right to change
SINGER
appearance, design or accessories of this sewing machine when considered necessary.
®
& Singer is Sewing Made Easy is a registered trademark of The SINGER® Company Limited or its af¿liates.
© 2016 The SINGER
6
®
Company Limited or its af¿liates. All rights reserved.
ABOUT YOUR MACHINE
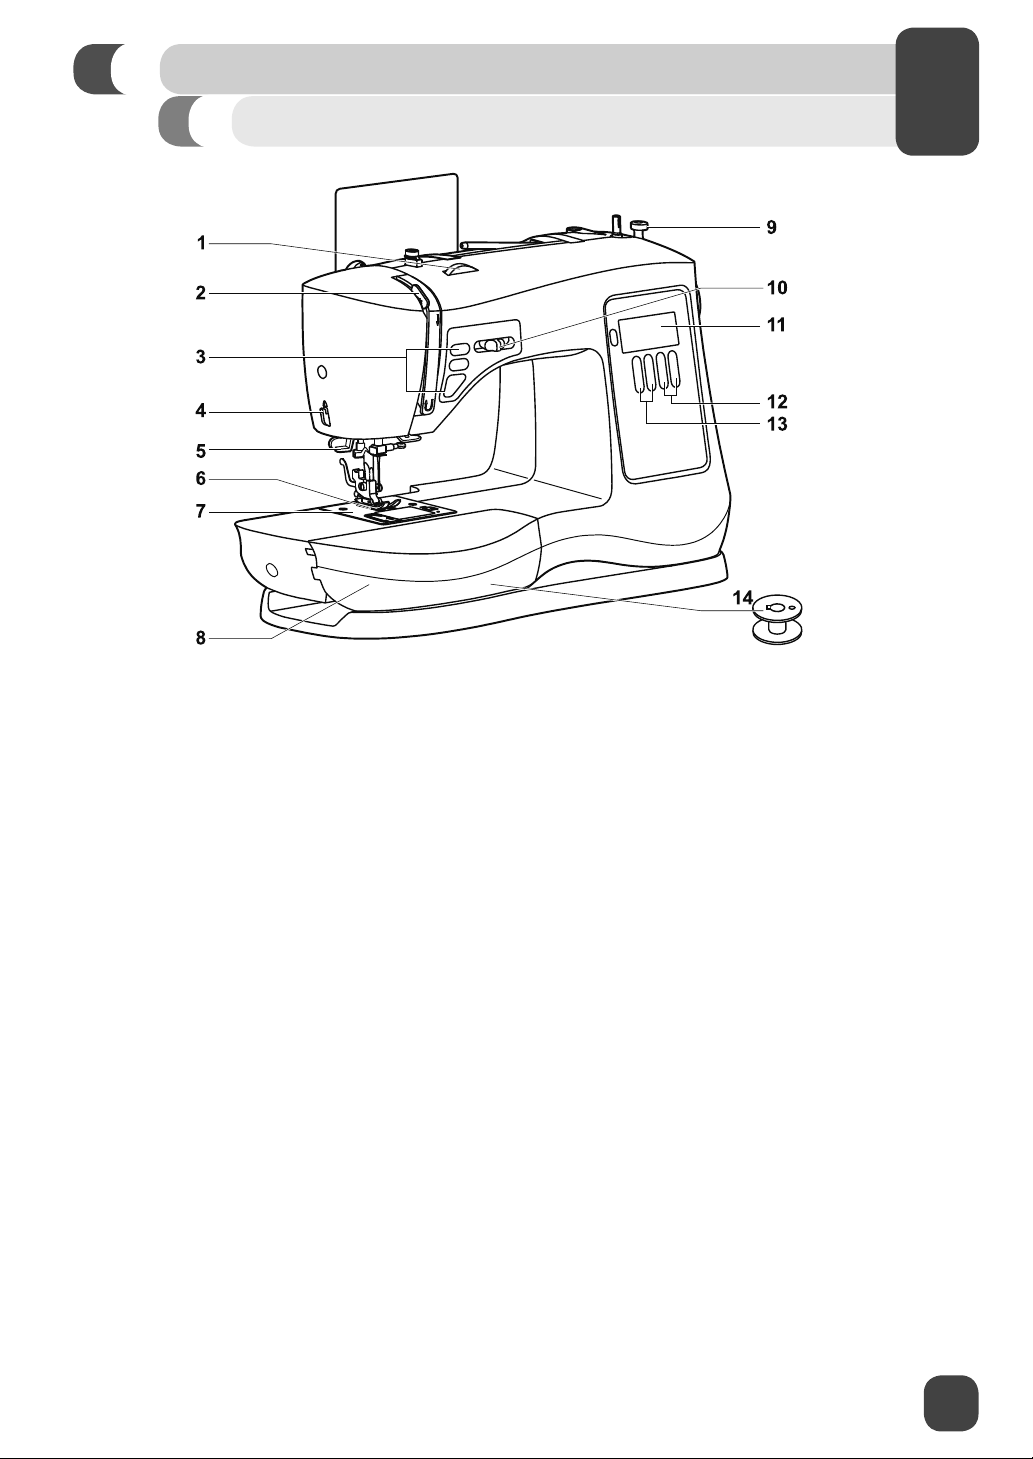
Main Parts of the Machine Front
1
1. THREAD TENSION DIAL allows you to select just the right tension for your stitch, thread and
fabric. (See Page 19)
2. THREAD TAKE-UP LEVER controls the Àow of the upper thread while sewing. (See Page 15)
3. OPERATION BUTTONS control the needle up/down and Start/Stop functions, as well as the
reverse function. (See Page 20)
4. THREAD CUTTER is conveniently located for trimming thread ends at the end of sewing.
5. NEEDLE THREADER LEVER is used to engage the automatic needle threader. (See Page 16)
6. PRESSER FOOT holds fabric against feed teeth, drawing fabric under the foot for you as you sew.
(See Page 29)
7. NEEDLE PLATE has guidelines to help you keep seams straight. (See Page 9)
8. REMOVABLE STORAGE COMPARTMENT provides Àat surface for sewing, storage for
accessories, and provides access to the free arm. (See Page 10)
9. BOBBIN WINDING STOPPER determines when bobbin is full and disengages automatically. (See
Page 13)
10. SPEED CONTROL ADJUSTMENT LEVER controls the speed at which the machine sews when
using the Foot Control or the manual Start/Stop Button. (See Page 20)
11. LCD SCREEN visually displays the stitch number, the stitch length or the stitch width depending
on what Mode you have selected (See Page 20)
12. FUNCTION BUTTONS control the stitch width and the stitch length, as well as the pattern memory
for alpha and numerical stitches. (See Page 21 and 22)
13. PATTERN ADJUSTMENT BUTTONS control the selection of the stitch patterns. The left button
controls the left digit and the right button controls the right digit. (See Page 20 and 22)
14. BOBBIN holds the thread that forms the stitching that appears on the bottom side of the fabric.
(See Page 14)
7
2
1
ABOUT YOUR MACHINE
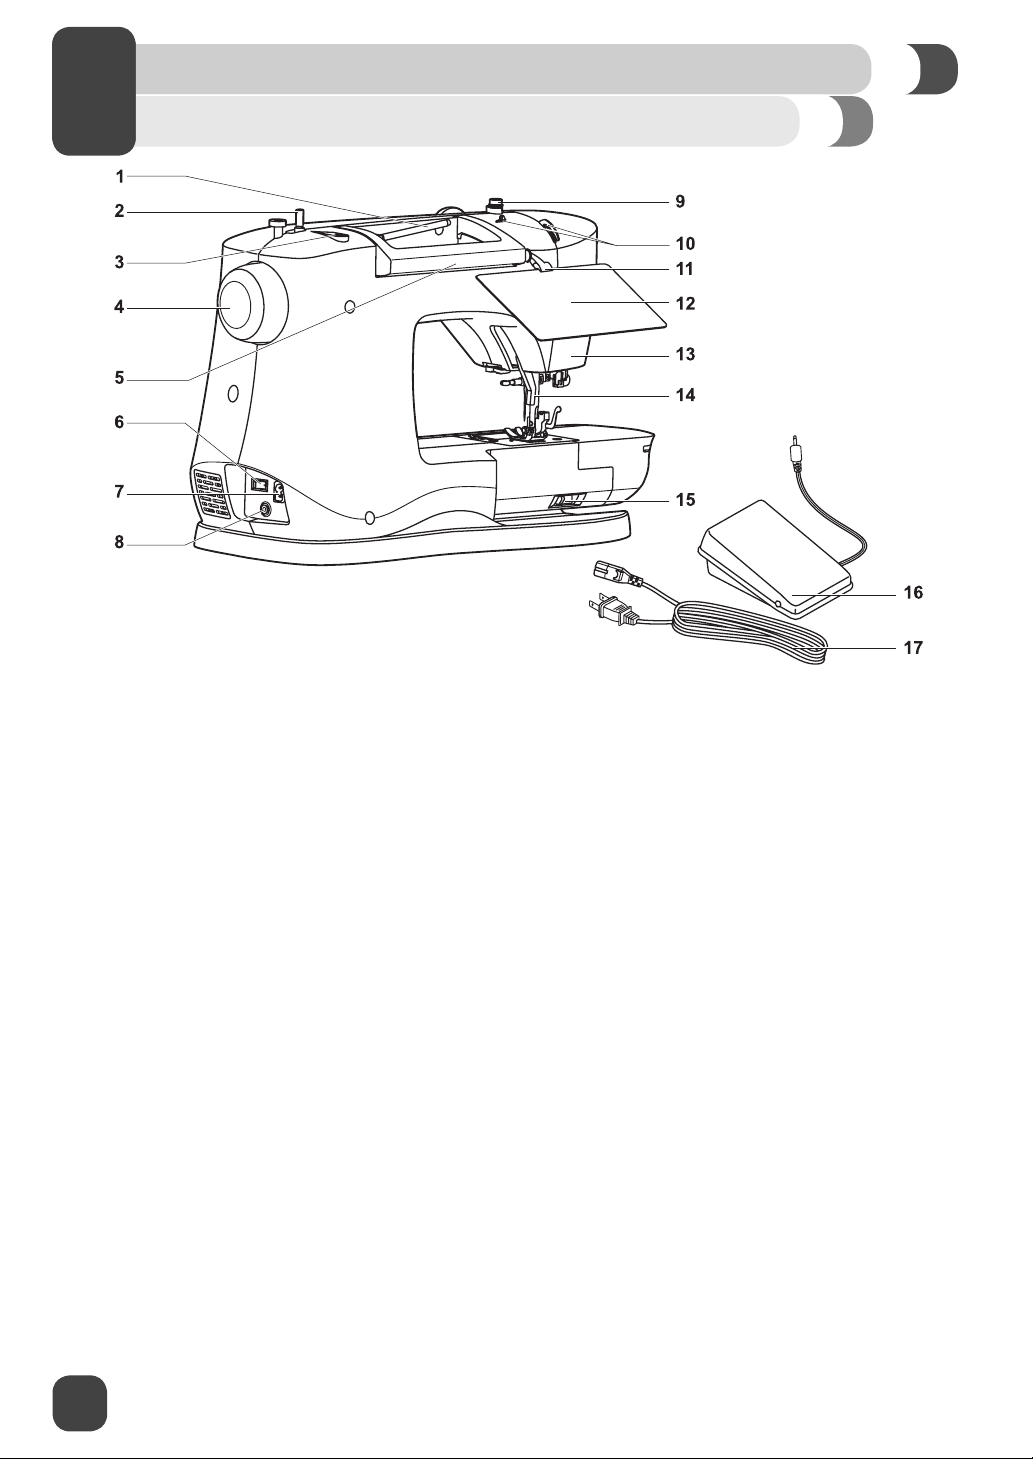
Main Parts of the Machine Back
1. HORIZONTAL SPOOL PIN holds the thread spool and spool cap for the upper thread.
2. BOBBIN WINDING SPINDLE holds bobbin as it winds. (See Page 13)
3. HOLE FOR SECOND SPOOL PIN is used to hold an additional spool pin, for thread spools to be
used in upright position or for using two spools at once for twin needle sewing.
HANDWHEEL (ALWAYS TURN IT TOWARD YOU)
4.
thread take-up lever
5. HANDLE is used for lifting and transporting the machine.
6.
POWER AND LIGHT SWITCH turns on machine and sewing light simultaneously. (See Page 12)
7.
MAIN PLUG SOCKET is used to connect the power cord. (See Page 12)
8.
FOOT CONTROL CONNECTOR is where the foot control connects to the machine. (See Page 12)
9.
BOBBIN WINDING TENSION DISK
bobbin winding. (See Page 13)
10. PRE-TENSION THREAD GUIDES help maintain the Àow of the thread during sewing. (See Page
15)
STITCH CHART HOLDER is inserted into the left side of the handle to hold the Pattern Stitch Chart.
11.
STITCH PATTERN CHART
12.
to view the stitches. This chart is located in the bag where the instruction manual is stored.
13. F
ACE PLATE houses and protects the interior mechanisms of the machine.
PRESSER FOOT LIFTER
14.
threading and down for sewing. (See Page 29)
DROP FEED LEVER
15.
button. (See Page 27)
16. FOOT
17. POWER
CONTROL controls sewing speed by the amount of pressure applied by user. (See Page 12)
CORD connects the machine to the power source. (See Page 12)
.
holds the thread snuggly to help ensure smooth and even
shows all available stitches for easy selection. Flip it toward you in order
raises and lowers presser foot. It should be placed up for machine
controls whether the feed teeth are up for sewing or down for attaching a
, controls movement of the needle and the
8
ABOUT YOUR MACHINE
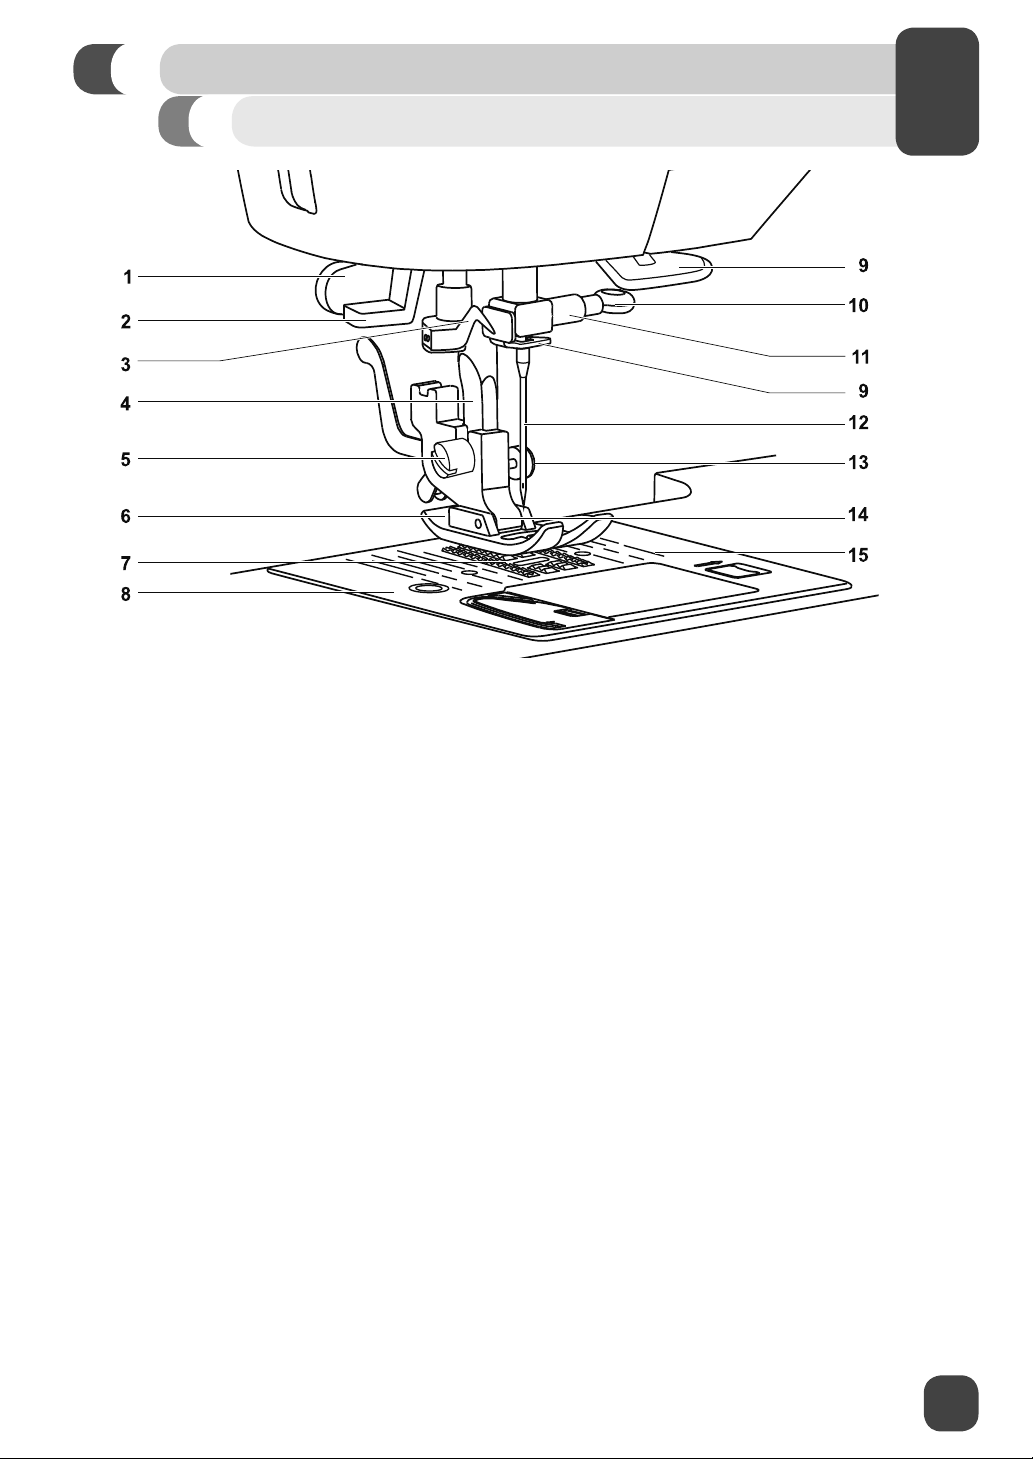
Needle and Presser Foot Area
1
1. ONE STEP BUTTONHOLE LEVER automatically determines the length of the buttonhole when
lowered. (See Page 26)
2. NEEDLE THREADER LEVER is used to engage the automatic needle threader mechanism.
3. NEEDLE THREADER GUIDE holds thread securely before placing it in hook pin.
4. PRESSER BAR accommodates the presser foot holder.
5. PRESSER FOOT SCREW secures the presser foot holder (shank) onto the presser bar.
6. PRESSER FOOT holds fabric against the feed teeth while sewing. Various optional presser feet
are available, depending on fabric sewn and sewing techniques. (See Page 11)
7. FEED TEETH (OR FEED DOGS), which look like rows of teeth under the presser foot, control the
movement of the fabric under the presser foot.
8. NEEDLE PLATE covers the bobbin area and provides Àat area around presser foot for sewing.
9. THREAD GUIDE controls movement of upper thread.
10. NEEDLE CLAMP SCREW secures the needle when placed in needle clamp.
11. NEEDLE CLAMP holds the machine’s needle in position.
12. NEEDLE holds thread during stitch formation.
13. LOCK IN PLACE BUTTON helps with even feeding over extra thick seams.
14. PRESSER FOOT HOLDER (OR SHANK) holds presser foot.
15. STITCHING GUIDELINES are used as a visual reference for guiding fabric straight while sewing.
The ¿rst line is 3/8” (10mm) from center needle position. The most popular seam allowance
measurements are 1/2” (13mm) and 5/8” (16mm). The 1/2” seam allowance is the 2nd line, and
the 5/8” seam allowance is the 3rd line from center needle position.
9
ABOUT YOUR MACHINE
2
1
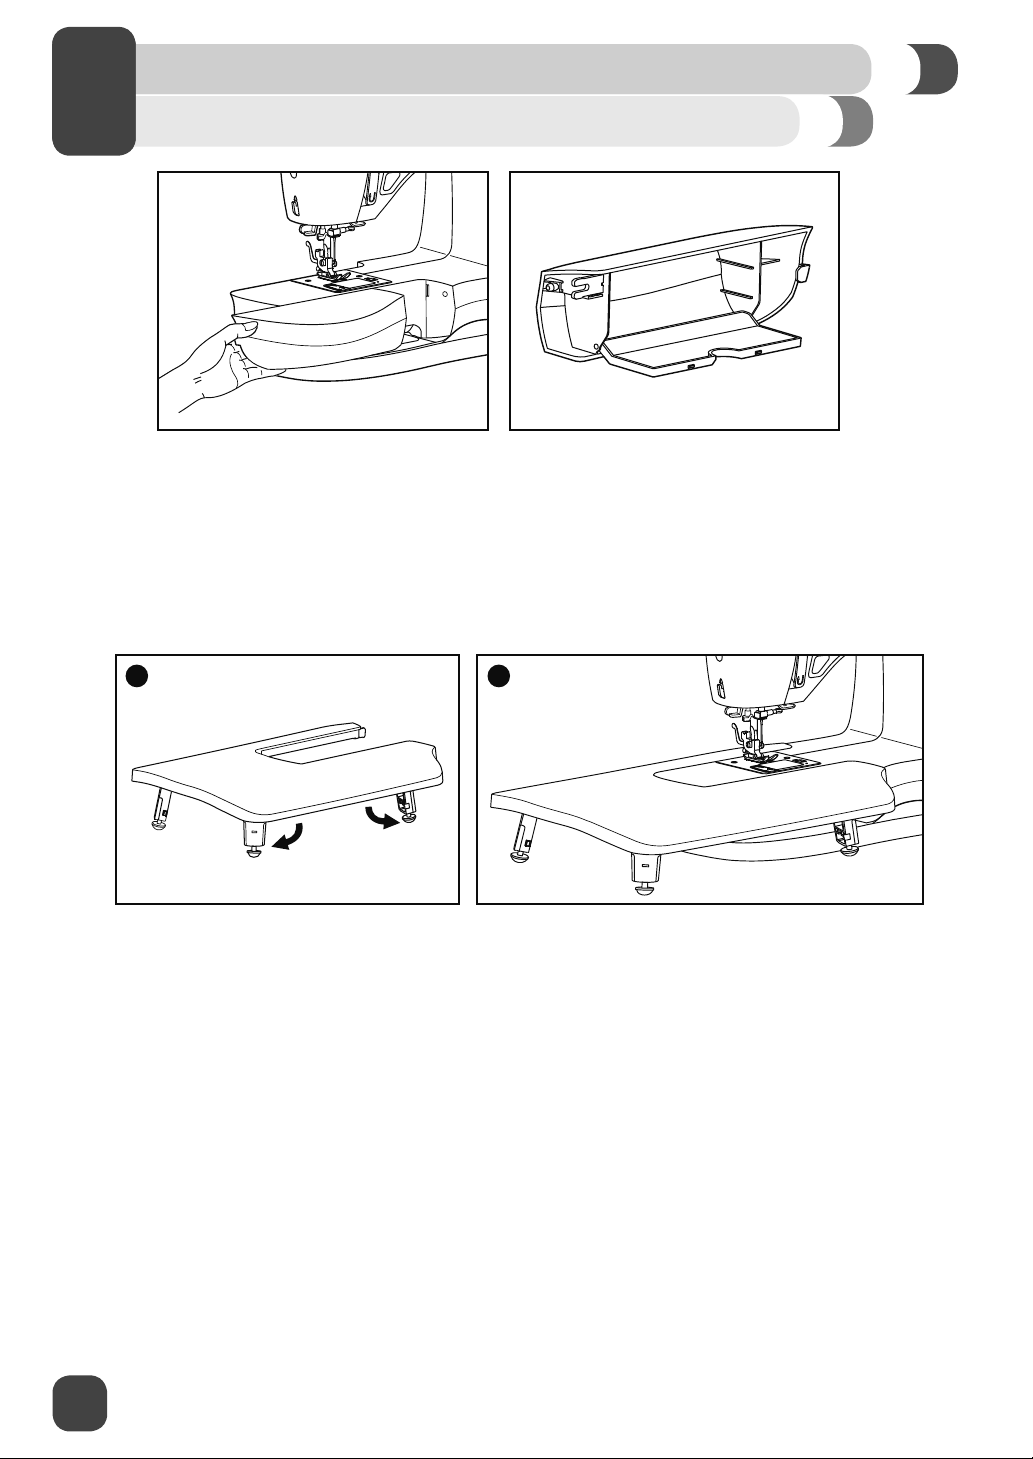
Removable Storage Compartment and Accessories
Hold the Removable Storage Compartment horizontally, then pull toward the left to remove it from the
machine. Doing this, you will have access to the free arm, which makes it easy to sew tubular projects
like pant hems or sleeves. Additionally, you will ¿nd the machine’s accessories stored here (See Page
11).
To replace the Removable Storage Compartment, hold it as shown in the illustration, and then push it
to the right.
A B
The extension table provides additional sewing space when sewing bulky items.
To install, extend the legs as indicated in photo (A).
Remove the storage compartment and slip the table onto the free arm (B).
Extension table rubber feet can be adjusted by turning left or right to ensure that the table is level for
the surface on which you are sewing.
10
ABOUT YOUR MACHINE
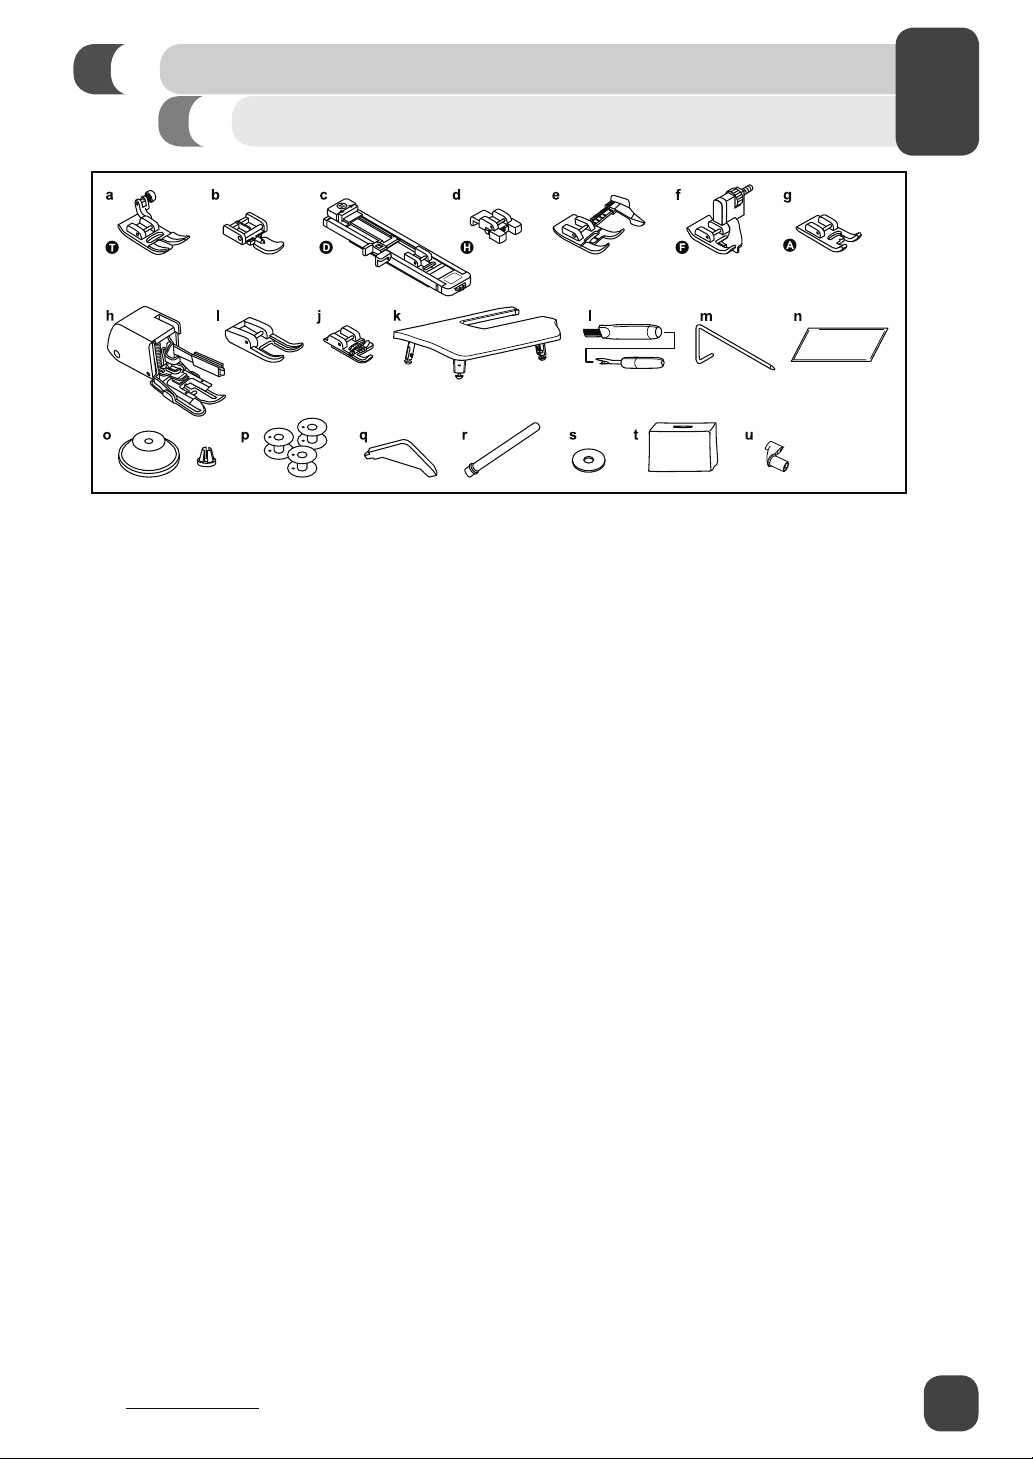
Accessories
This machine comes with a standard assortment of presser feet and accessories.
Most accessories are located in the storage compartment. The Even Feed Foot can be found in the
Styrofoam that holds the Extension Table.
Standard Accessories Included:
a. All Purpose Foot (for general sewing)
b. Zipper Foot (for inserting a zipper)
c. Buttonhole Foot (for making buttonholes)
d. Button Sewing Foot (for attaching buttons) (* This foot may be optional with machines sold in
some areas)
e. Sew Easy Foot (for sewing accurate seams) (* This foot may be optional with machines sold in
some areas)
f. Blind Hem Foot (for sewing a blind hem)
g. Satin Stitch Foot (for satin stitches and other decorative stitches)
h. Even Feed Foot (for even feeding of plaid, velvet and other napped fabrics) (* This foot may be
optional with machines sold in some areas)
i. Open Toe Foot (for satin stitches and other embellishments) (* This foot may be optional with
machines sold in some areas)
j. Cording Foot (for decorative cord application) (* This foot may be optional with machines sold
in some areas)
k. Extension Table (provides a larger level sewing surface). Remove the storage compartment to
connect the table to the machine.
l. Seam Ripper/Brush (remove stitches/brush out lint)
m. Edge/Quilting guide (for straight & accurate quilting) (* This guide may be optional with
machines sold in some areas)
n. Pack of Needles (replacement needles)
o. Spool Holders (2 sizes for various thread spool styles)
p. Bobbins (Class 15 transparent bobbins)
q. L-Screwdriver (to remove needle plate for cleaning)
r. Second Spool Pin (for sewing with an optional twin needle)
s. Spool Pin Felt (to cushion the spool of thread when using the second spool pin)
t. Soft Cover (to protect your machine from dust and lint while not in use)
u. Stitch Chart Holder (holds the Stitch Pattern Chart for easy viewing)
Optional Accessories:
Some of the presser feet listed above may not be included with machines sold in certain areas. If these presser feet
were not included with your machine, they may be purchased separately. See the Optional Accessories information
below.
1
For information about additional presser feet, attachments and accessories that may be available for your machine,
visit www.singerco.com.
11
GETTING READY TO SEW
2
2
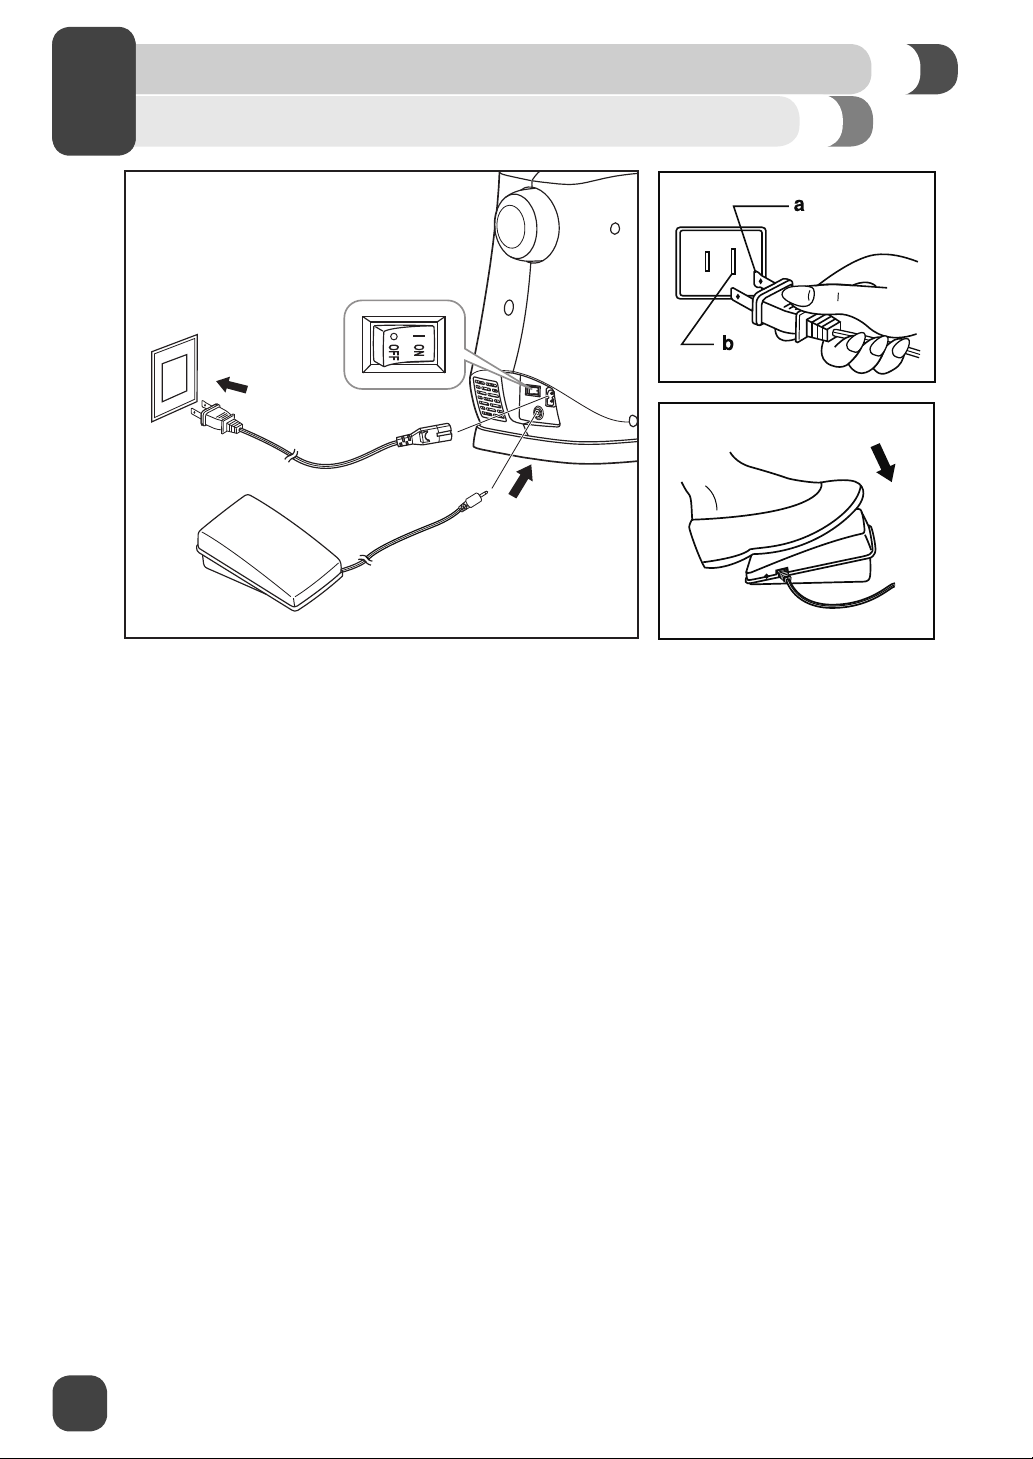
Powering Your Machine
Connect the machine to a power source as illustrated. This machine is equipped with a polarized plug
which must be used with the appropriate polarized outlet. (a and b)
⚠ Unplug power cord when machine is not in use.
Foot Control
The foot control regulates the sewing speed. When foot control is disconnected, use the Start/Stop
Button to operate the machine.
Sewing Light
Press main switch from OFF(o) to ON (-) for power and light.
⚠ For machine with a polarized plug (one blade is wider than the other). To reduce the risk of
electric shock, this plug is intended to ¿t in a polarized outlet only one way
outlet, reverse the plug. If it still does not ¿t, contact a quali¿ed electrician to install the proper outlet.
Do not modify the plug in any way
⚠ Your SINGER
Extreme hot and cold temperatures can affect the sewing results.
®
machine is adjusted to provide the best stitch results at normal room temperature.
.
. If it does not ¿
t fully in the
⚠After switching off, residual power may still remain in the machine. This may cause the light to
stay on for a few seconds while the power is consumed.
appliance.
This is normal behavior for an energy ef¿
cient
12
GETTING READY TO SEW
Winding the Bobbin
¤
This machine uses Class 15 transparent bobbins.
Use only this style of bobbin when purchasing additional bobbins for your machine. Do not substitute
with metal bobbins.
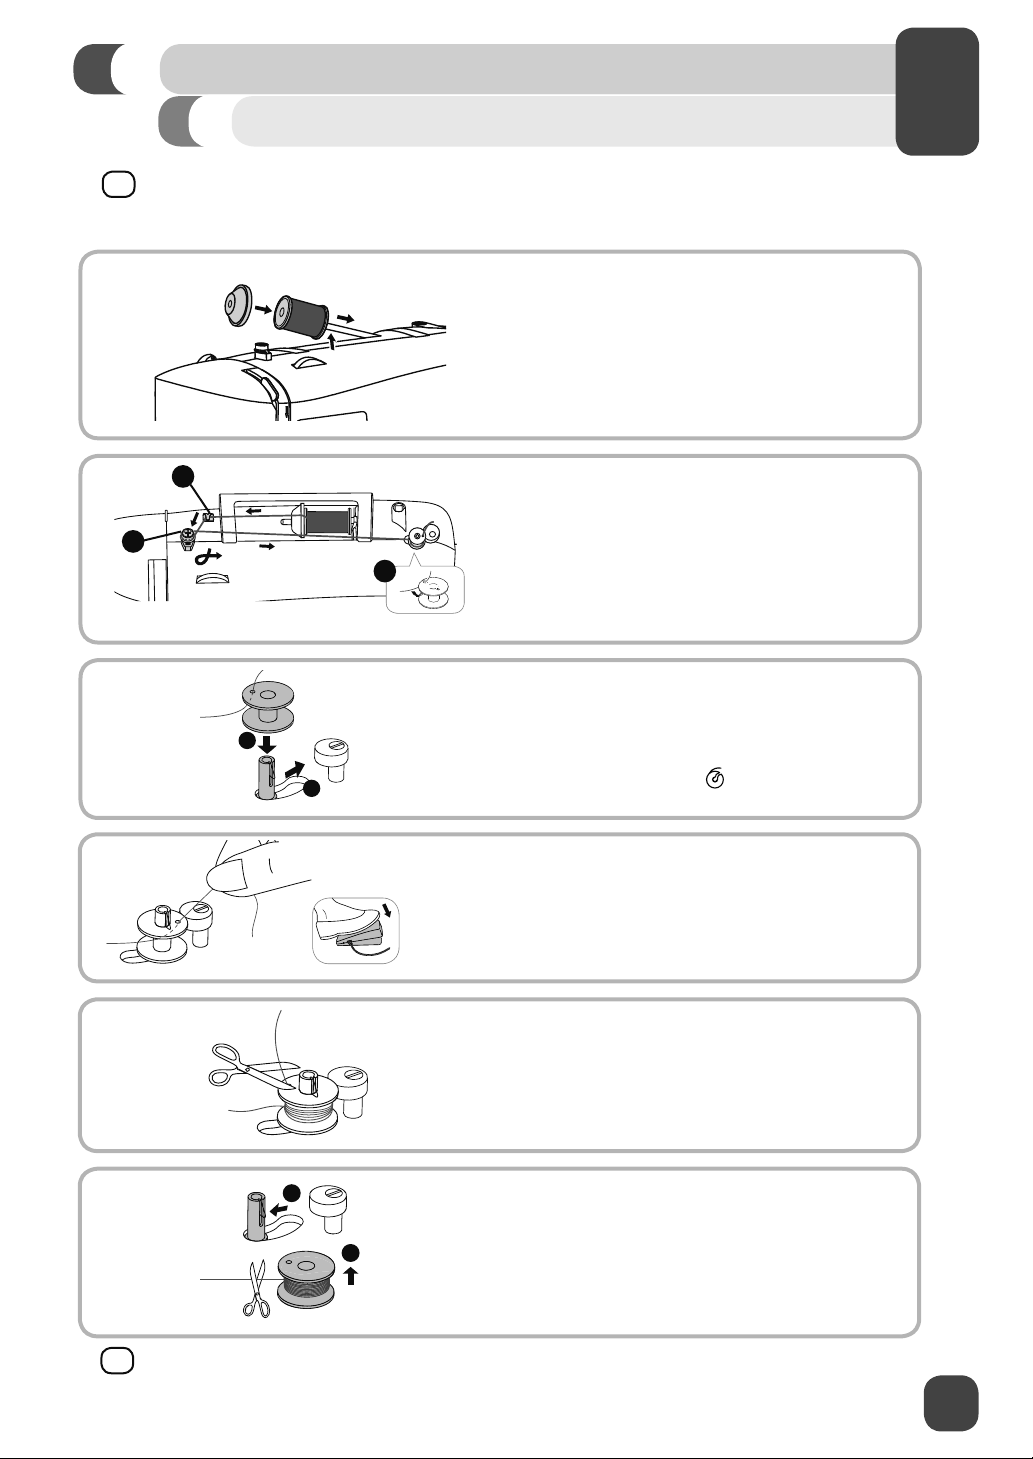
1. Place thread spool and corresponding size
spool holder onto spool pin. Spool holder
should be large enough to cover the end of the
thread spool so thread unreels smoothly. For
smaller, narrower spools, use the small spool
cap, which can be found in the removable
storage compartment.
2
A
B
C
A
B
7
2. (A) Snap thread into guide at top of machine.
(B) Place thread snuggly around bobbin
winding tension disk to ensure that thread
winds onto bobbin smoothly and consistently.
(C) Thread bobbin as shown, then place it onto
the bobbin winding spindle.
3. Check that bobbin is pushed down ¿rmly (A).
If it is not, the thread could begin winding
under the bobbin. Push the bobbin and spindle
¿rmly to the right (B).
When the bobbin winding spindle is pushed to
the right, the symbol “
screen.
4. Hold the thread end to get ready to wind.
Step on the foot control gently or press the
Start/Stop Button as you hold the thread end.
Allow it to wind a few revolutions slowly, then
remove your foot from the foot control or press
the Start/Stop Button to stop.
5. Trim the thread end close to the top of the
bobbin, then resume winding by stepping on
the foot control or pressing the Start/Stop
Button.
“ appears on the LCD
A
B
¤
When the bobbin winding spindle is pushed to the right, the machine will NOT sew. Make sure
to push the bobbin winding spindle back to the left once bobbin winding is complete.
6. The bobbin will stop winding when it is full. Lift
your foot off the foot control or press the Start/
Stop Button. Push the bobbin to the left (A),
then trim the thread and remove the bobbin
from the spindle (B).
13
GETTING READY TO SEW
2
2
Inserting the Bobbin
⚠ Turn power switch off before inserting or removing the bobbin.
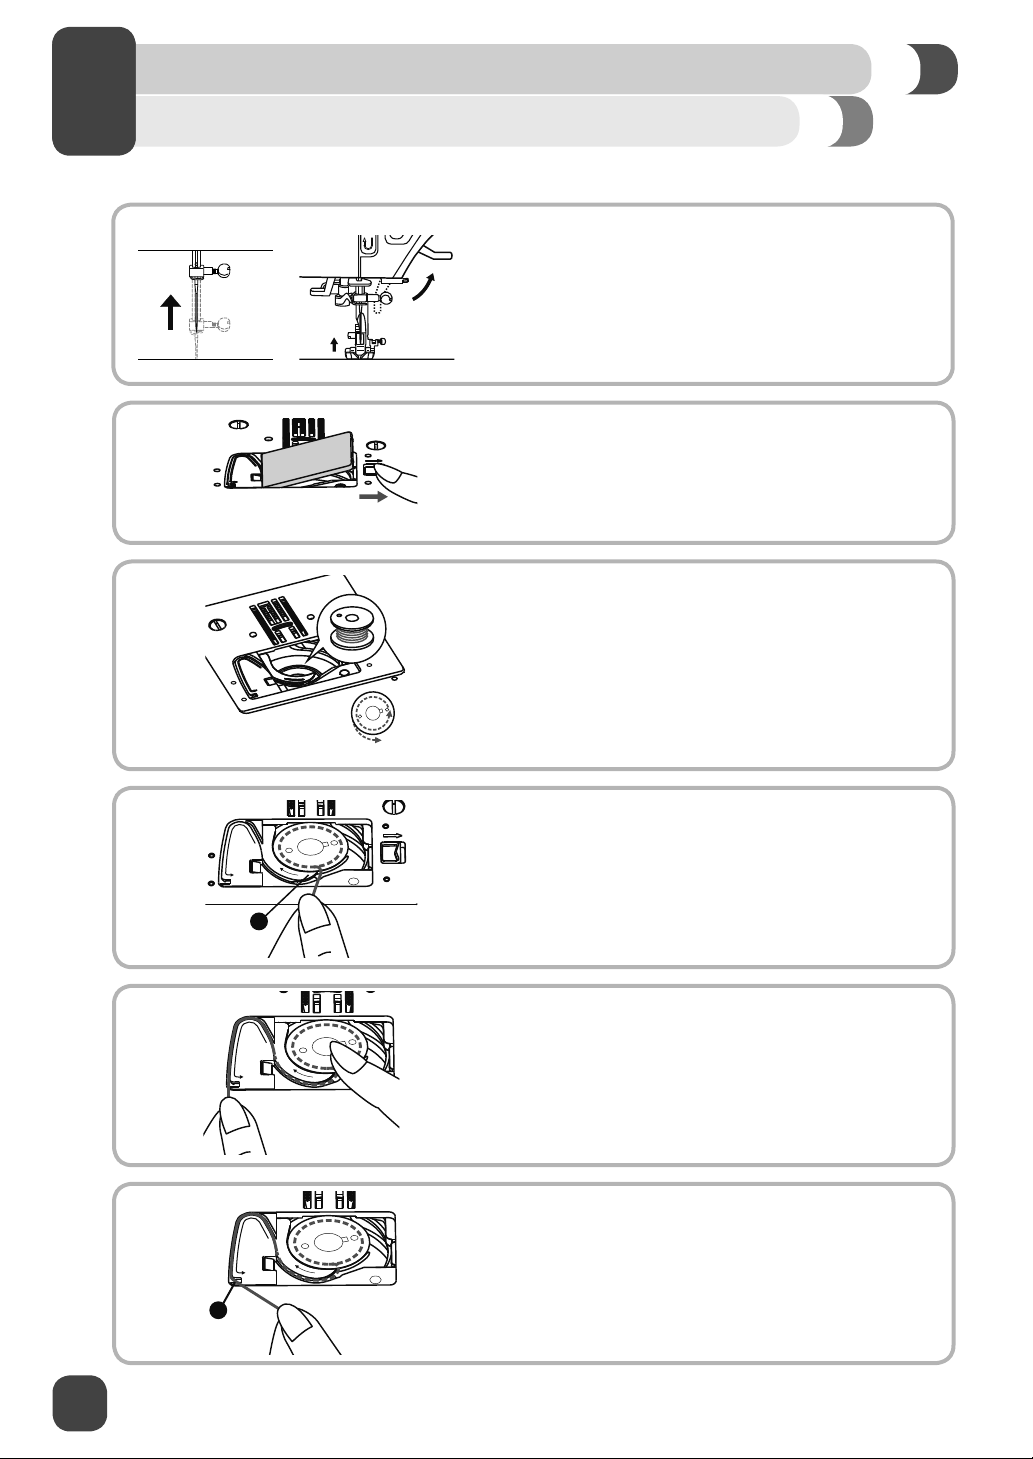
1. When inserting or removing the bobbin, the needle and
presser foot must be fully raised.
2. Push the bobbin cover release button to remove the
bobbin cover plate. Remove the empty bobbin.
3. Insert the wound bobbin in the bobbin case with the
thread running in a counterclockwise direction (arrow).
14
4. Pull the thread through the slit (A).
A
5. With a ¿nger held gently on top of the bobbin, place
thread ¿rmly into guides as shown.
6. To cut off excess thread pull it toward you to cut it with
the cutter at point (B). Replace the bobbin cover plate.
B
GETTING READY TO SEW
Threading the Upper Thread
⚠ For safety, turn off the power before threading the machine.
2
A B C
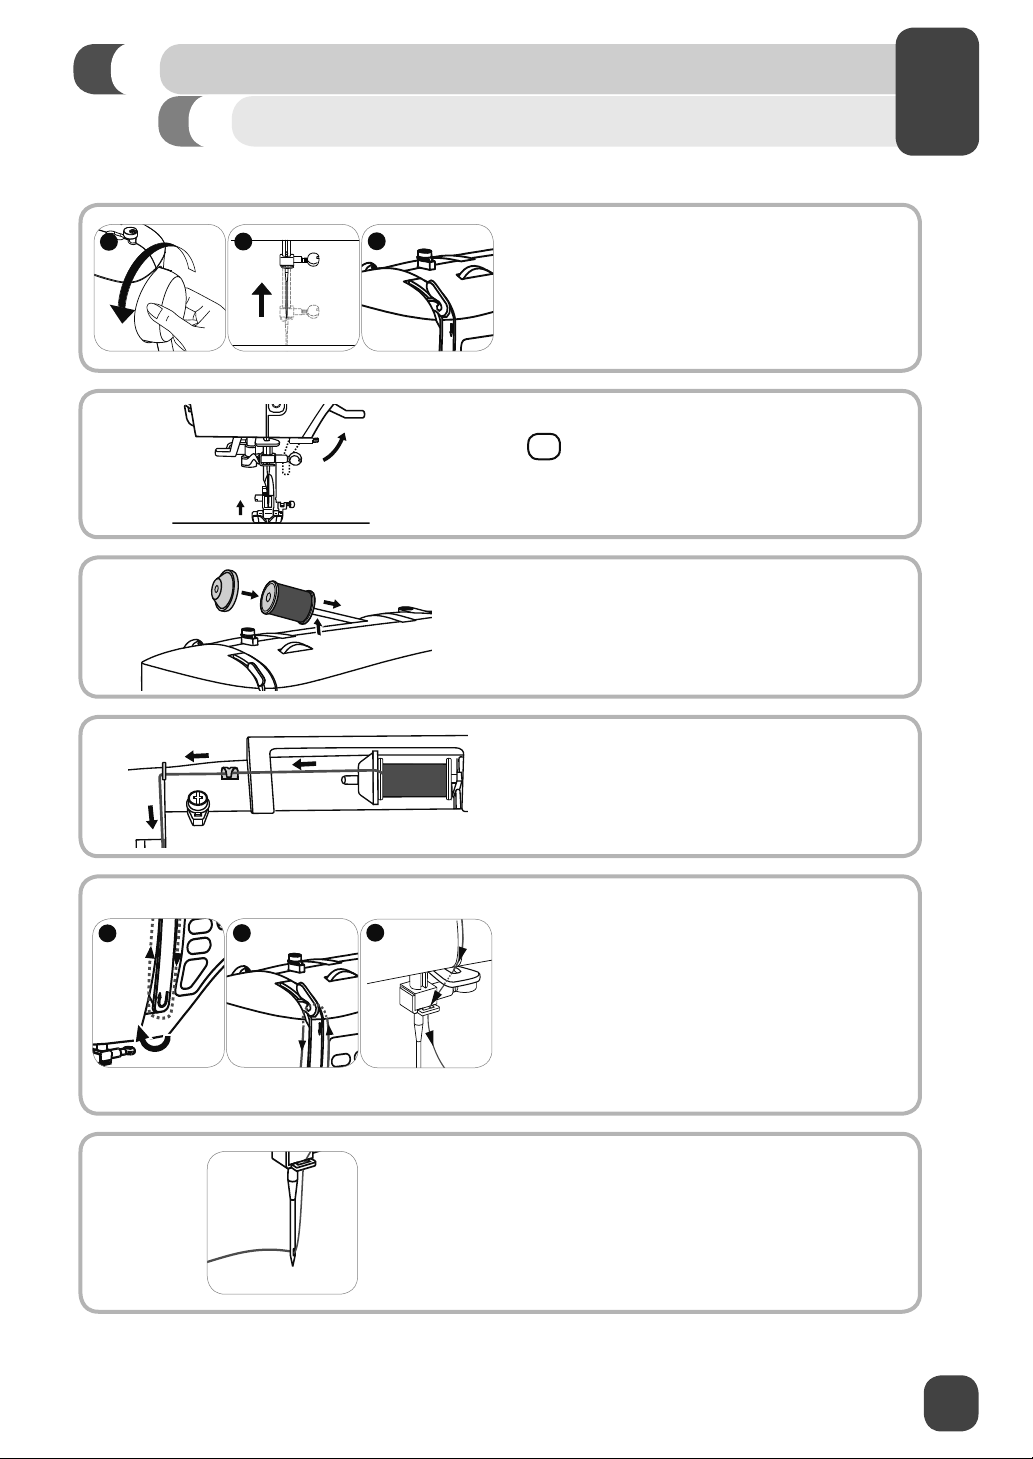
1. Start by turning the handwheel (A) toward you
to raise the needle (B) and the thread take up
lever (C).
lever
¤
2.
necessary in order for the machine to be
threaded correctly
3. Place the thread spool and spool cap onto the
spool holder
4.
Draw thread from the spool through the two pretension guides at the top of the machine (see
page 8). Hold the thread with both hands and
pull it into each of the guides.
ou should be able to see the take up
Y
.
Raise the presser foot lifter. This is
.
.
A B C
5. (A) Bring the thread down the right channel,
around the U-turn, and up the left channel.
(B) At the top of the left channel, slip the thread
from back to front through the slotted eye of the
thread take-up lever. If the thread does not pass
into the eye of the take-up lever, the machine
will jam when you start to sew. After threading
the take-up lever, bring the thread downward
again. (C) Pass the thread behind the metal
thread guides and then down to the needle.
6.
If you want to thread the needle manually
thread it from front to back. Pull about 6-8
inches of thread to the back beyond the needle
eye.
Alternatively
needle threader to thread the eye of the needle.
(see page 16)
, you can use the automatic
,
15
GETTING READY TO SEW
2
2
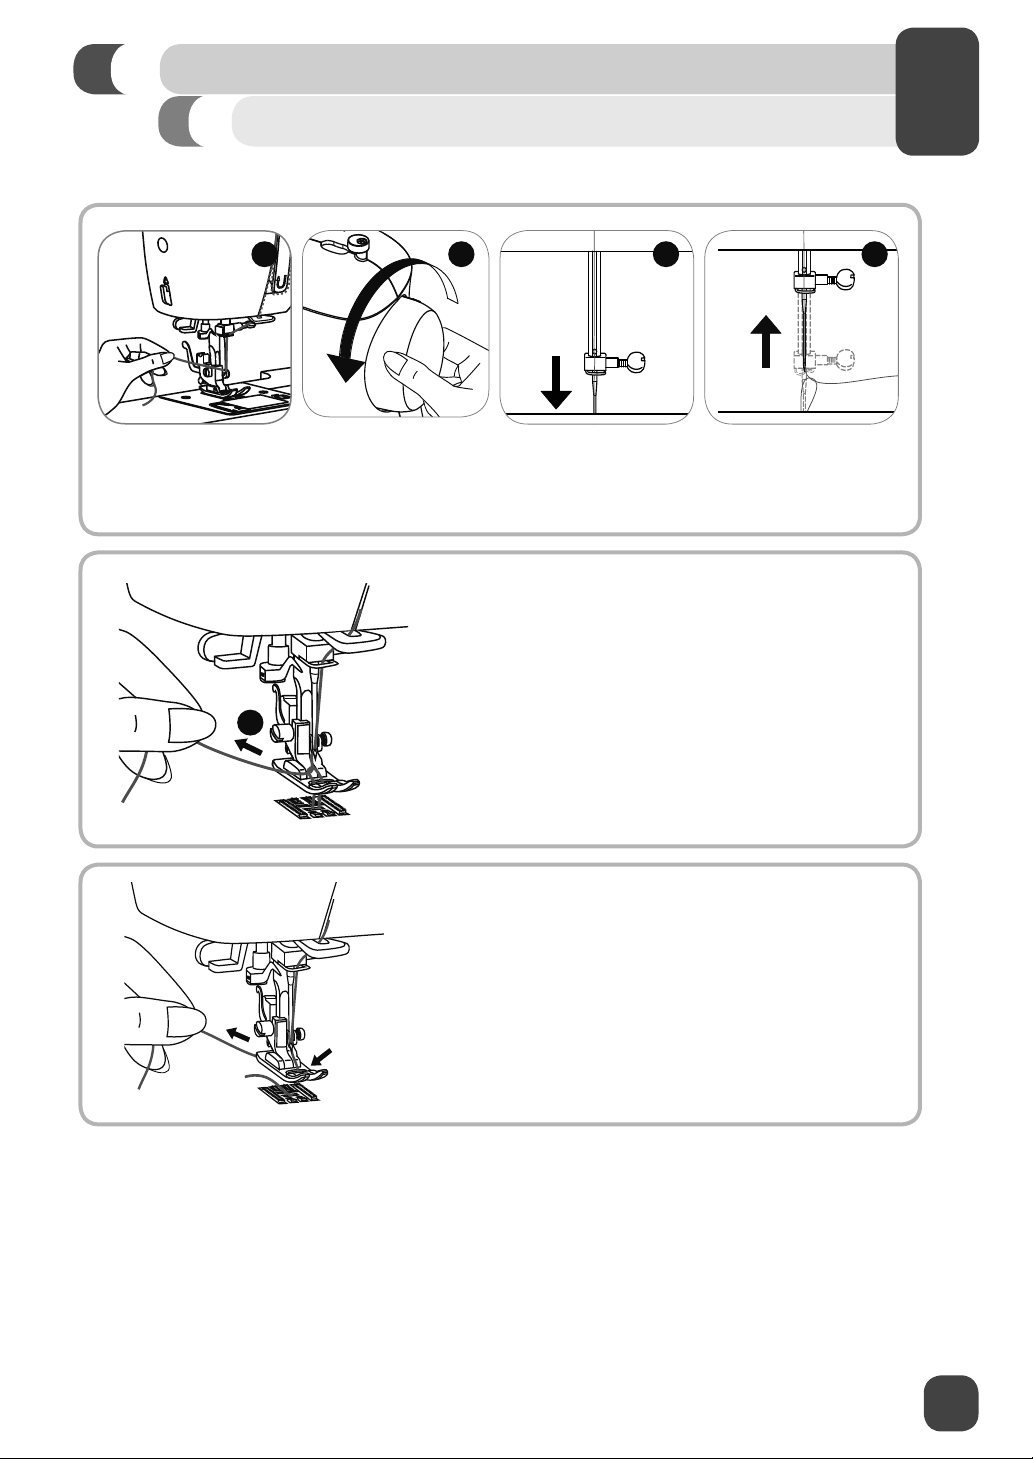
Automatic Needle Threader
⚠ For safety, turn off the power before using the automatic needle threader.
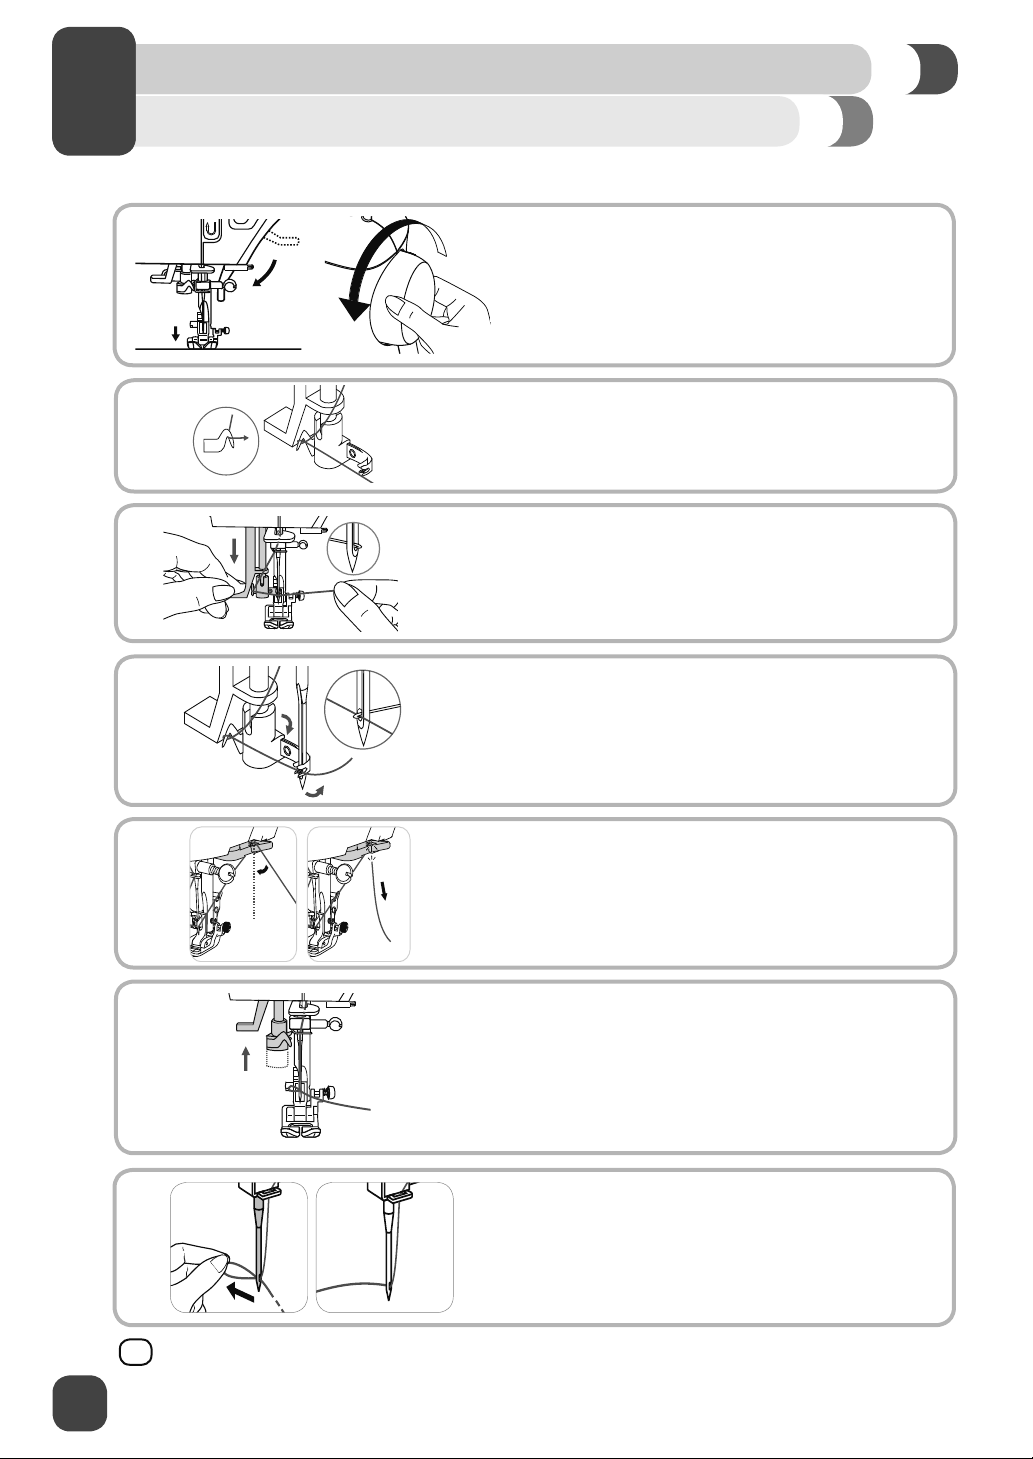
1. Lower the presser foot lifter. Raise the
needle to its highest position by turning
the handwheel toward you. If you turn the
handwheel backward, the machine will jam
when you start to sew.
2. Pass thread around thread guide.
3. Press lever down as far as it will go. The
threader automatically swings to the threading
position.
4. Pass the thread in front of the needle and under
the hook.
5. To cut the excess thread, take thread tail and
gently slip it over the thread cutter located to the
right of the needle.
6. Release the lever & the thread tail at the same
time, this will form a loop at the back of the
needle.
7. Pull the thread through the needle eye. While
holding the thread, raise the presser foot lifter
and pull the thread under the foot toward the
back.
¤
Pull about 6-8” of thread to the back beyond the eye of the needle. This will help prevent the needle
from becoming unthreaded when you start to sew.
16
GETTING READY TO SEW
Drawing Up the Bobbin Thread
⚠ For safety, turn off the power before threading the machine.
B C DA
1. Hold the upper thread tail with the left hand (A). Turn the handwheel toward you (B), ¿rst lowering
(C) and then raising the needle (D).
2. As you turn the handwheel, gently pull the upper
thread, which will bring a loop of the bobbin thread
up through the hole of the needle plate (E). If a
loop doesn’t pull up, turn the handwheel toward
E
you one more time. If it still doesn’t come up,
check that the bobbin thread is not trapped by the
bobbin cover.
2
3. Bring the upper thread under the presser foot and
toward the back of the machine.
17
START SEWING
2
3
Before You Start Sewing
Now that your machine is threaded, we will show how to set up the machine for basic sewing
techniques such as: sewing a straight stitch, sewing a decorative stitch, sewing a stretch stitch,
sewing a buttonhole and sewing a button. With each technique, you have the opportunity to sew
along.
For more information about the various stitches on your machine and how to use them, refer to the
Stitch Reference Guide by visiting www.singerco.com.
Here are a few other tips that you may ¿nd helpful before you begin:
When unpacking the machine, you may have noticed some small traces of oil around the needle plate
or presser foot area. If so, wipe off any excess oil with a soft, dry cloth before you start sewing. It is
also recommended that you sew on a piece of scrap fabric to remove excess oil.
The Speed Control Adjustment Lever is used to control the speed of your machine. This is the
case whether you are using the Foot Control or the Start/Stop Button to start sewing. To increase
the sewing speed slide the lever to the right, to reduce the speed slide the lever to the left. When
you remove your foot from the foot control or you press the Start/Stop Button the machine will stop
sewing.
Needles are an important part of sewing. Using old, damaged or incorrect needles for your projects
can affect sewing results. For information about which needle to use for your project, refer to the
Stitch Reference Guide at www.singerco.com. For information on how to change the needle, see
page 28.
Depending on the sewing technique you want to do, it may be necessary to change to a different
presser foot. For information on how to do this, see page 29.
Review the page about Stitch Formation (See Page 19). This will help you understand what the
stitching should look like when you sew.
Use the thread cutter on the machine (See Page 7) to trim thread tails when ¿nished sewing. This
is helpful because thread tails are left long enough so that the needle does not become unthreaded
when you start sewing again.
18
START SEWING
Stitch Formation
3
Reverse
side
Upper thread
Bobbin thread
Reverse
side
Upper thread
Bobbin thread
Reverse
side
Upper thread
Bobbin thread
Surface
Surface
Surface
1. How Stitches Form
Stitches are formed when the upper thread
and the bobbin thread interlock between the
fabric layers. Stitching is well balanced when
the needle thread appears on the top and the
bobbin thread appears on the bottom.
2. Thread Tension Dial
The Thread Tension Dial has a range of
settings between 0 and 9. Most of your sewing
will be done with your Thread Tension Dial set
between 3 and 5. It can be adjusted to a higher
number for more tension on the upper thread,
if the upper thread seems too loose. It can be
adjusted to a lower number for less tension on
the upper thread, if the bobbin thread seems to
be showing on the top side of the fabric.
Adjusting Tension
Thread tension can also be adjusted for
various sewing techniques. For basting (see
Appendix), you can loosen it to a lower number
so that the stitches can easily be removed. For
gathering, you can turn it to a higher number.
¤
3.
When you sew, if you see large loops
on the underside of the fabric, this is actually
an indication that the upper thread was
not threaded correctly, as it has no tension
controlling it. For information on how to correct
this, see the Troubleshooting and Maintenance
section of this manual.
19
START SEWING
2
3
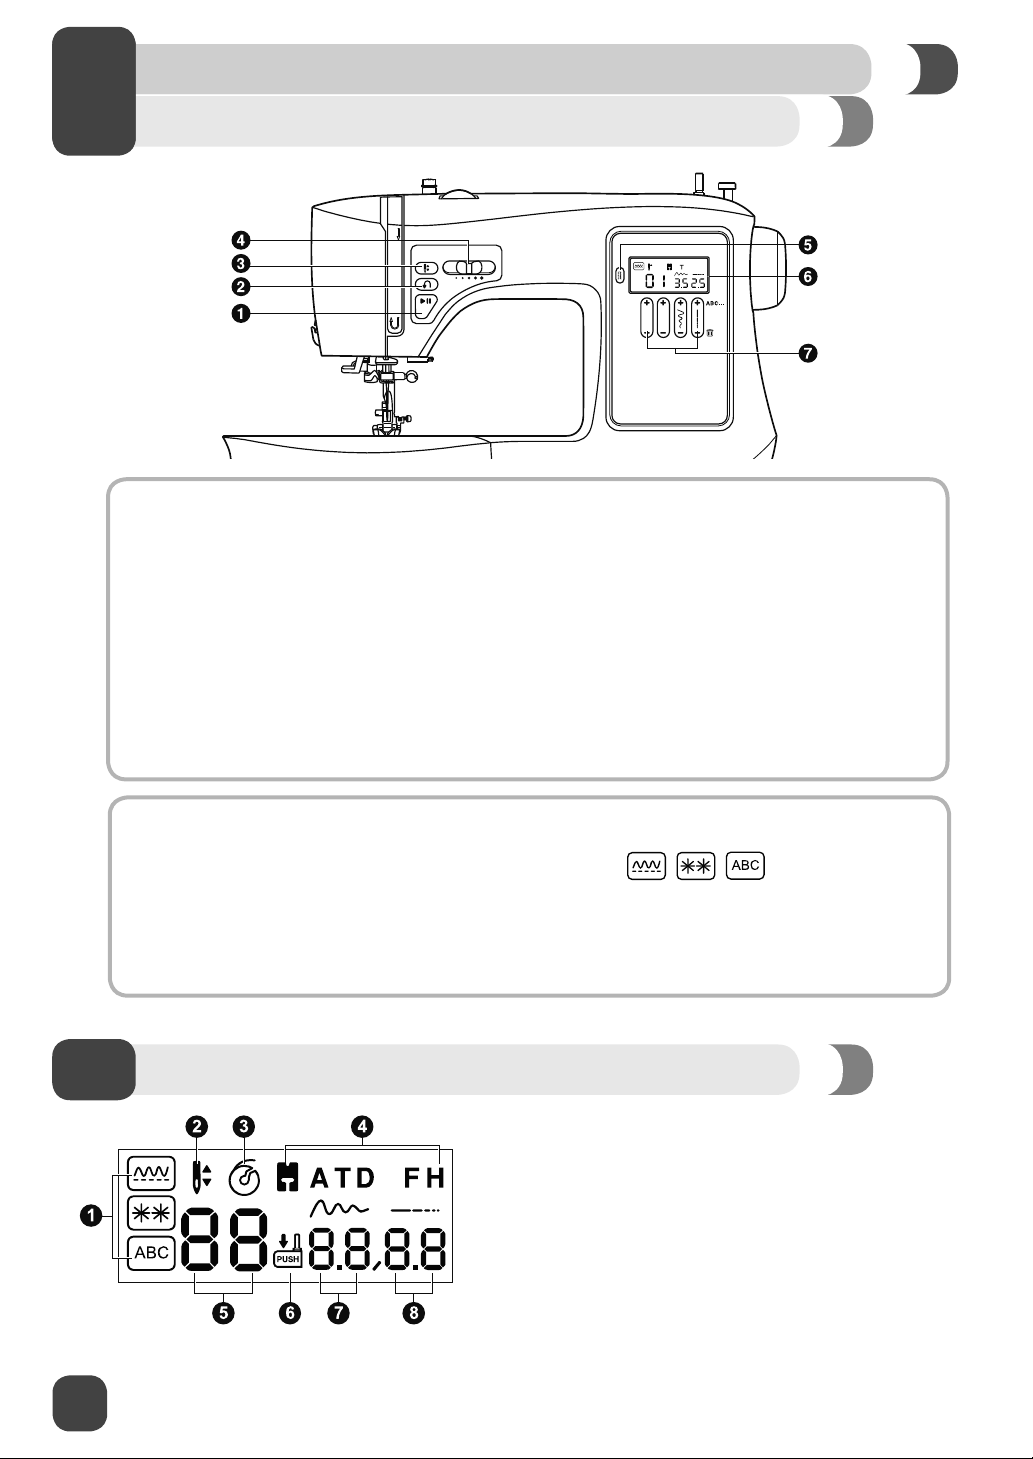
Operation Buttons and Function Buttons
A. Operation Buttons
1. Start/Stop Button
Press this button to start or to stop the machine when the foot control is not being used.
2. Reverse Button
Hold down this button to sew stitches in reverse at the start and at the end of a seam, as well
as most stitch patterns. The Reverse Button is also used for saving characters from the ABC
Mode. (See Page 21)
3. Needle Up/ Needle Down Position Button
Press this button to move the needle to either the up or the down position. Needle will be
programmed to stop in selected position until the button is pressed again.
4. Speed Control Adjustment Lever
Slide this lever to the left to slow the machine and to the right to increase the speed of the
machine.
B. Function Buttons
5. Mode Button
Allows you to toggle between the three mode selections:
6. LCD Screen
Displays instructions pertaining to the stitch you have selected.
7. Function Buttons
Control stitch number selection, as well as the width and the length of the stitches.
, , .
LCD Screen
1. Mode indicator
2. Needle up/down
3. Bobbin winding indicator
4. Presser foot indicator
5. Stitch number
6. Buttonhole lever indicator
7. Stitch width
8. Stitch length
20
START SEWING
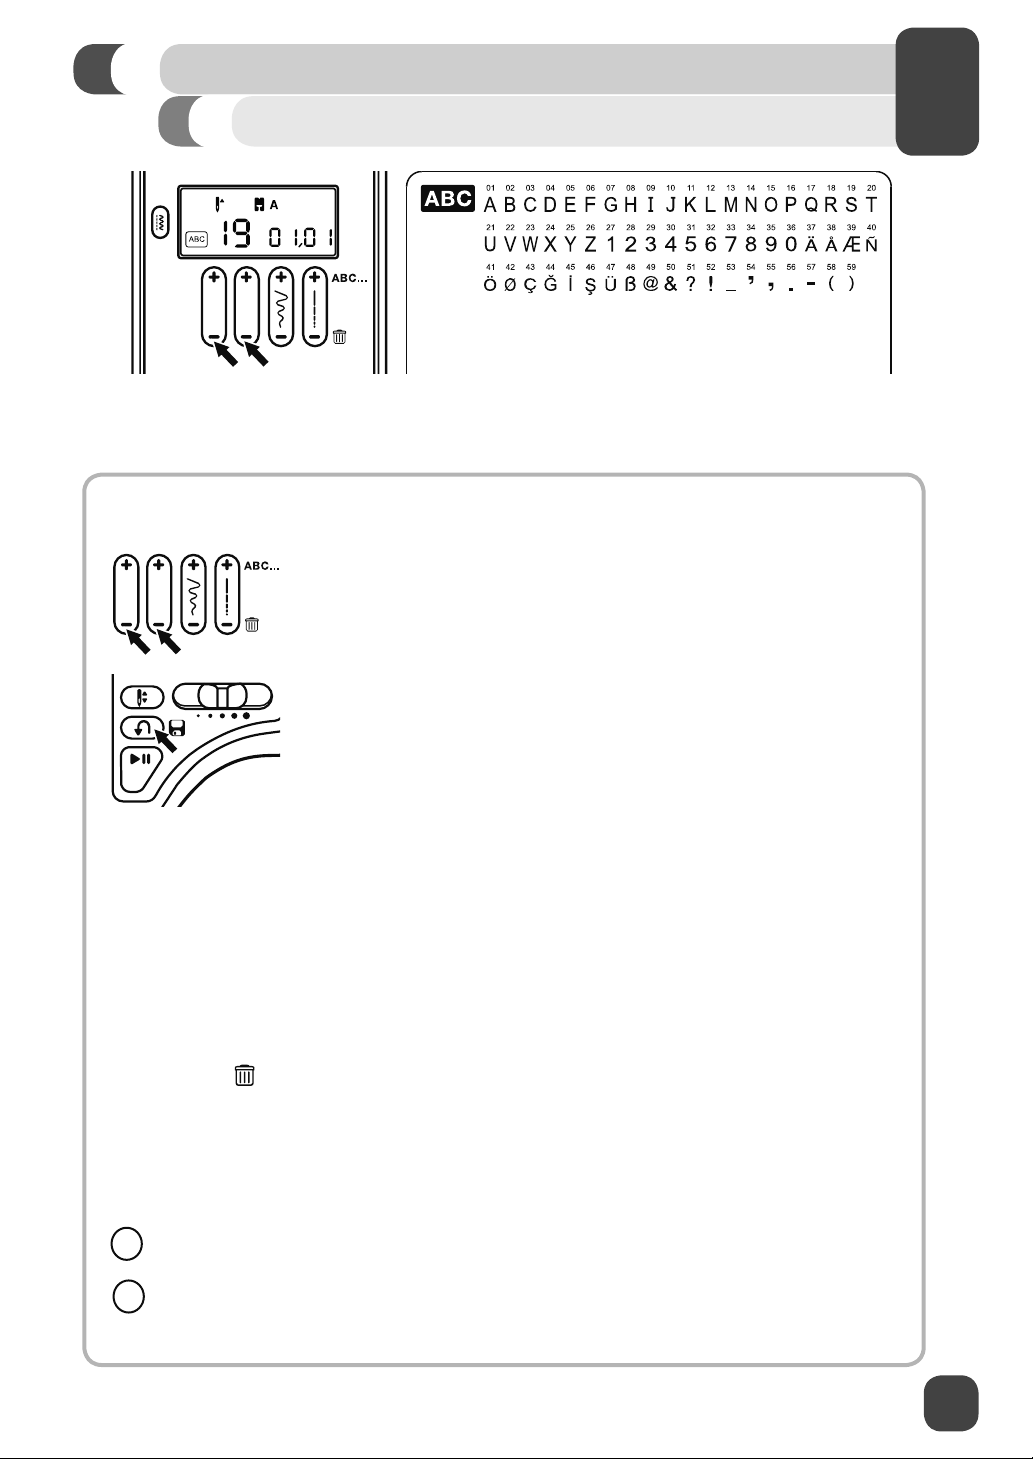
Combining Characters into Memory
Your machine has the capability of combining characters from the ABC. Up to 40 alpha or
numerical stitches from the ABC mode can be combined.
Combining Stitches:
Example – SINGER – Combining stitch numbers 19, 09, 14, 07, 05, 18
1. Letters are selected by pressing the + and - of the two Function
Buttons located on the left. After selecting each letter press the + side
of the ABC Function Button located all the way to the right.
2. After all letters are selected, save the letter sequence by pressing the
Reverse Button.
3
3. You are now ready to sew out the word SINGER. It will stitch the
letter sequence that was saved and will stop when the sequence is
completed. In order to repeat the sequence, press the Foot Control or
the Start/Stop Button.
Inserting a Stitch:
1. When an error is made, for example you leave out the “E” in SINGR.
2. Using the +/- Stitch Width Function Button scroll to the 4th letter of the 5 stitches entered
(04/05). (These numbers are displayed under the width and length icons on the LCD screen)
3. Using the +/- side of the Pattern Adjustment Buttons, scroll to letter E, number 05. Press the +
side of the ABC Button to enter the letter.
4. Save the new spelling of the word by pressing the Reverse Button. You are now ready to sew
out the word SINGER
Delete a stitch:
1. Using the +/- Stitch Width Function Button scroll to the position of the stitch you want to delete.
2. Press the –
3. Save the edited sequence by pressing the Reverse Button.
Clear the Memory:
1. Press and hold the – side of the ABC Function Button until all programmed stitches are gone.
2. Save by pressing the Reverse Button.
When the Mode or the Function Buttons are touched, the machine will sound one warning
beep.
The machine will emit 3 short beeps to alert you if a function has been selected in error or if
the machine is jammed as a result of incorrect threading or the bobbin winding shaft is in the
winding position.
®
.
side of the ABC Function Button.
21
START SEWING
2
3
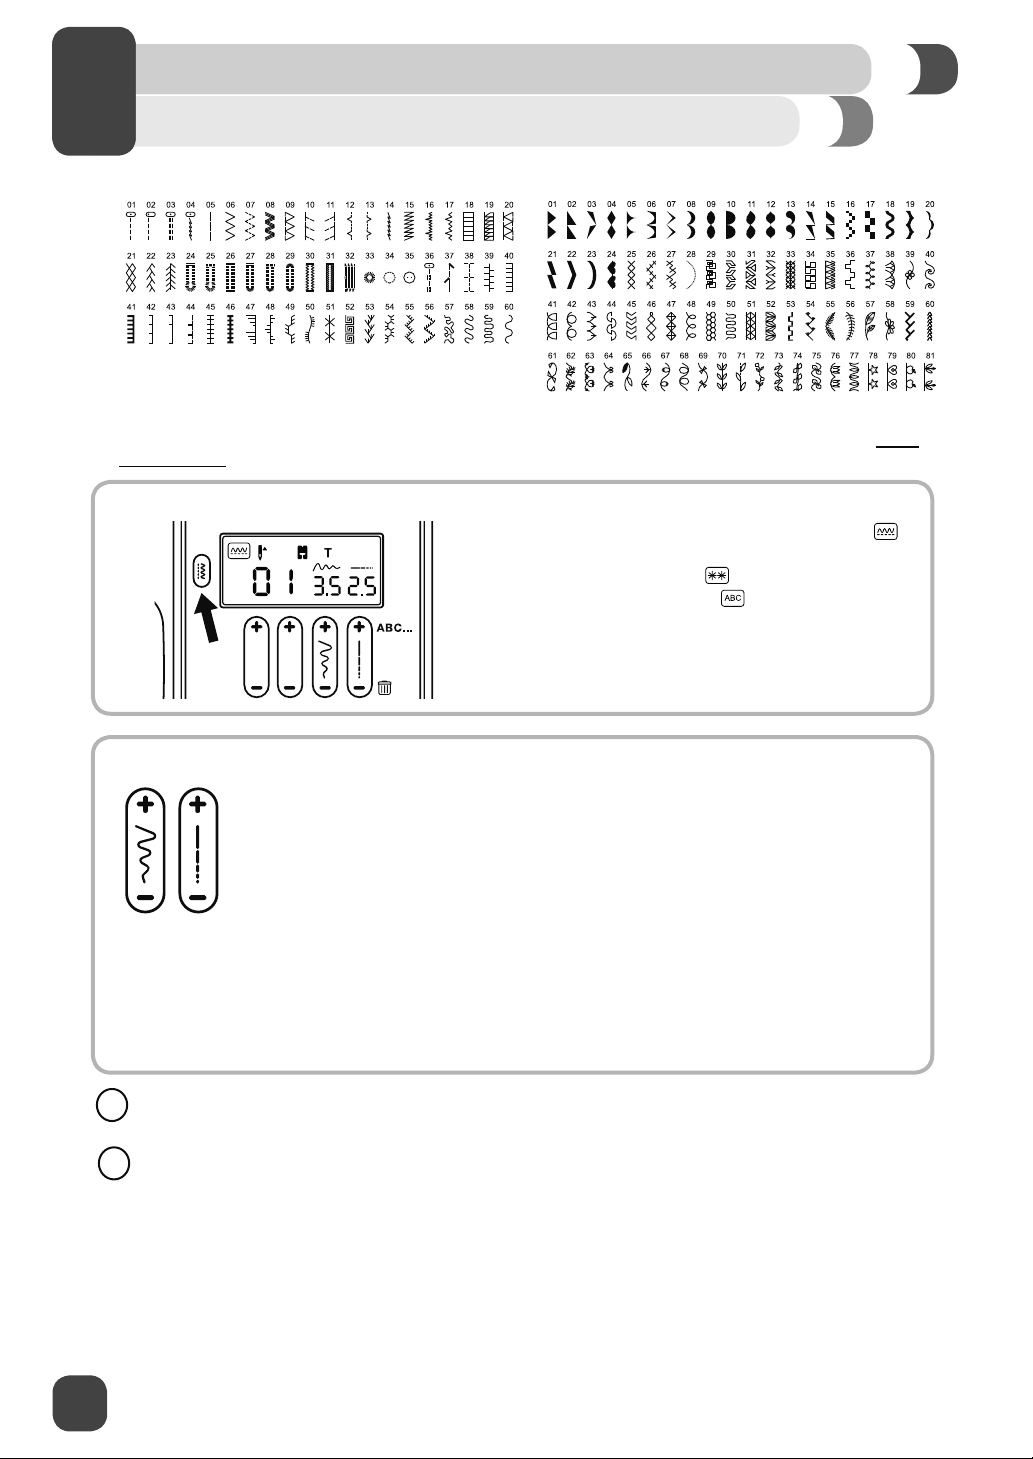
Stitch Selection
A. Utility Stitch Patterns B. Decorative Stitch Patterns
For examples of other stitch patterns and further instruction, see the Stitch Reference Guide at www.
singerco.com.
Choosing Utility and Decorative Stitch Patterns:
The machine will automatically default to the
Pattern Mode and Straight Stitch when turned on.
You can also select the
decorative stitches or the
Numeric Stitch Patterns.
Choose the mode and then press the two left + or
- Pattern Adjustment Buttons to select the number
of the stitch that you desire.
mode for additional
mode for Alpha-
Adjusting the Width or the Length of the Stitch:
The machine will automatically default to a preset stitch width and stitch length for
optimum results. These settings are displayed on the LCD screen.
You can adjust the width or the length of most stitches by toggling between the
Stitch Width and the Stitch Length Buttons. The button on the left controls the width
and the button on the right controls the length.
1. To increase the width of the stitch press the + button, and to decrease the
width of the stitch, press the – button. When Utility Stitch Patterns 01 to 05 are
selected, the needle position is regulated by the Stitch Width Adjustment Button.
Pressing – will move the needle to the left and pressing + will move the needle
to the right. On 3.5 the needle is positioned in the center for straight stitch.
2. To increase the length of the stitch press the + button and to decrease the length
of the stitch, press the – button.
The stitch width can be adjusted to 7.0 for most stitches. Some stitches have a limited stitch
width.
The stitch length can be adjusted from 0.0 to 4.5 for most stitches. Some stitches have a limited
stitch length.
22
START SEWING
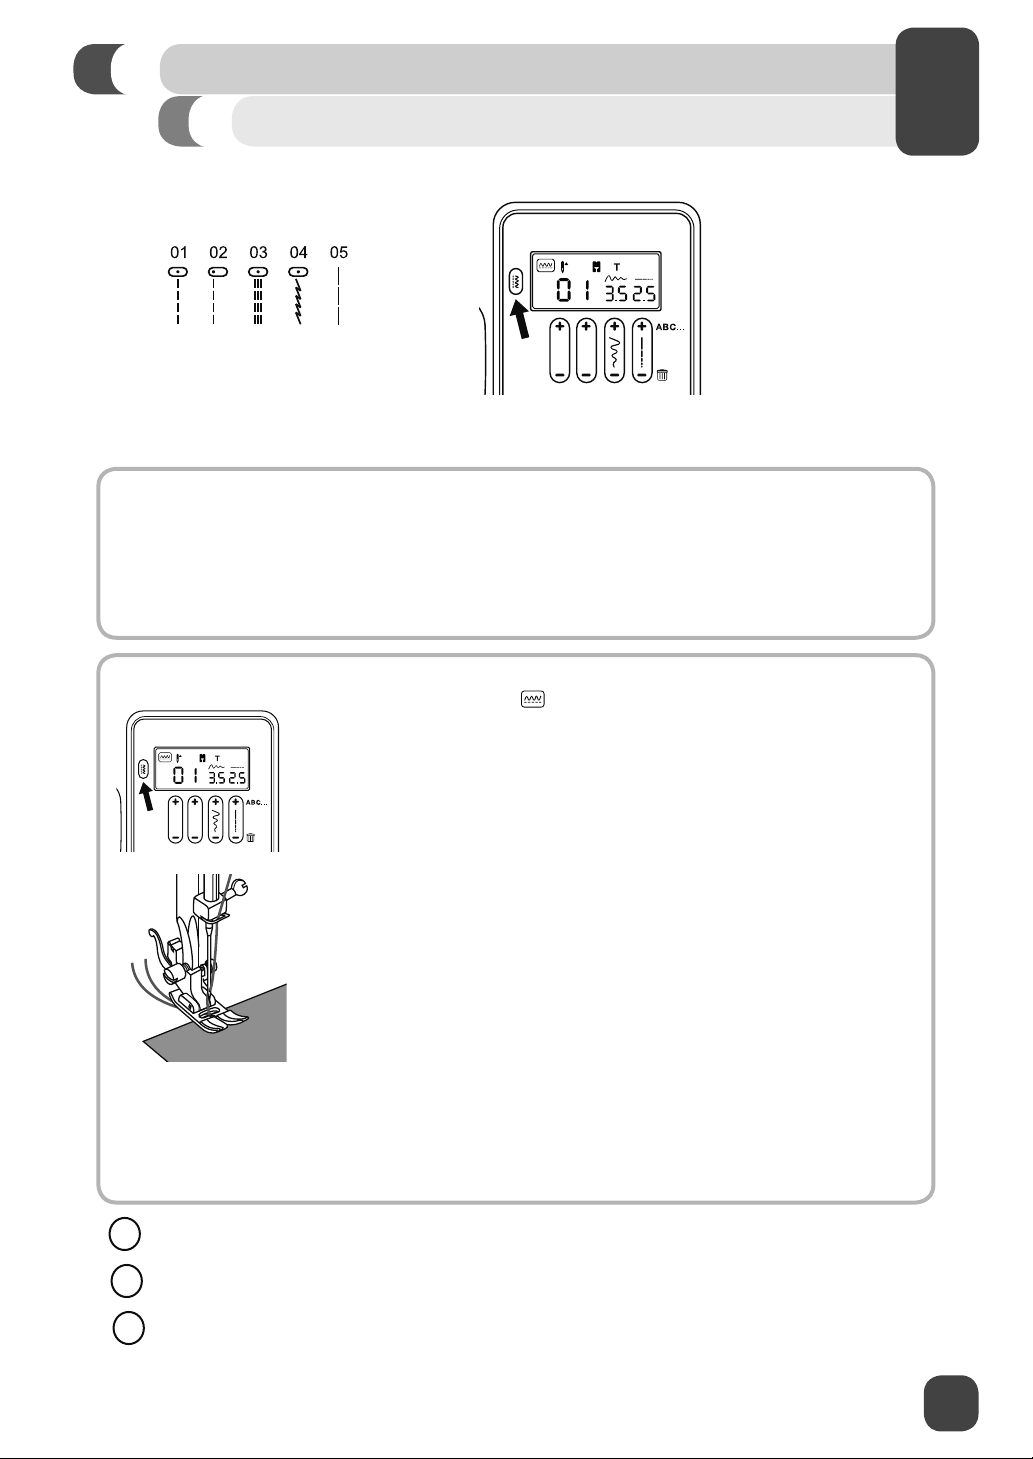
Sewing a Straight Stitch
Mode Button and Function Buttons
A straight stitch is used for sewing seams and topstitching.
HOW TO:
1. Set the machine to Straight stitch. The machine will automatically default to straight stitch when it
is turned on. (See Page 22)
2. The Stitch Length can be set at the stitch length that you desire. (See Page 22)
3. The Stitch Width can be set at either 0.0 or 3.5 depending on the needle position. (See Page 22)
3
SEW ALONG:
Use a slightly shorter stitch length for lightweight fabrics, ¿ner threads and needles. Use a longer
stitch length such as 3 or 4 for heavy weight fabrics.
It may be helpful to gently hold the thread tails with your left hand for the ¿rst few stitches, as this
will help guide the fabric under the foot as you begin to sew.
For sewing heavy weight fabrics, use the Lock In Place Button on the presser foot. (See Page
30)
1. Set Mode Button to
machine will automatically default to stitch 01 when you power it on.
2. Set the Stitch Length to 2.5. This is an average stitch length setting
for regular sewing. Your machine will automatically default to a stitch
length of 2.5, you can shorten or lengthen the stitch if you desire using
the Stitch Length Function Button.
3. Set the Stitch Width to 3.5. Your machine will automatically default to a
Stitch Width of 3.5 when you power it on. This will position the needle
in the center. Use the Stitch Width Button to move the position of the
needle.
4. Place the fabric under the All Purpose Foot or the Sew Easy Foot
(See Page 30) with the right-hand edge of the fabric lined up with the
desired seam guide line on the right side of the needle plate. Lower
the presser foot, then step on the Foot Control or press the Start/Stop
Button to begin sewing. Always make sure that the presser foot is
lowered before you begin to sew. If you fail to do so, the machine will
jam as you begin to sew. Start your seam by sewing 2 to 3 stitches.
Press and hold the Reverse Button to sew backwards 2 to 3 stitches,
which will lock the end of the seam so the stitches don’t come undone.
Release the Reverse Button to sew forward again. Continue sewing
the length of the seam. Press and hold the Reverse Button at the end
of the seam and sew backwards 2 to 3 stitches. Release the Reverse
Button to sew forward again to ¿nish.
and choose Straight Stitch number 01. Your
23
START SEWING
2
3
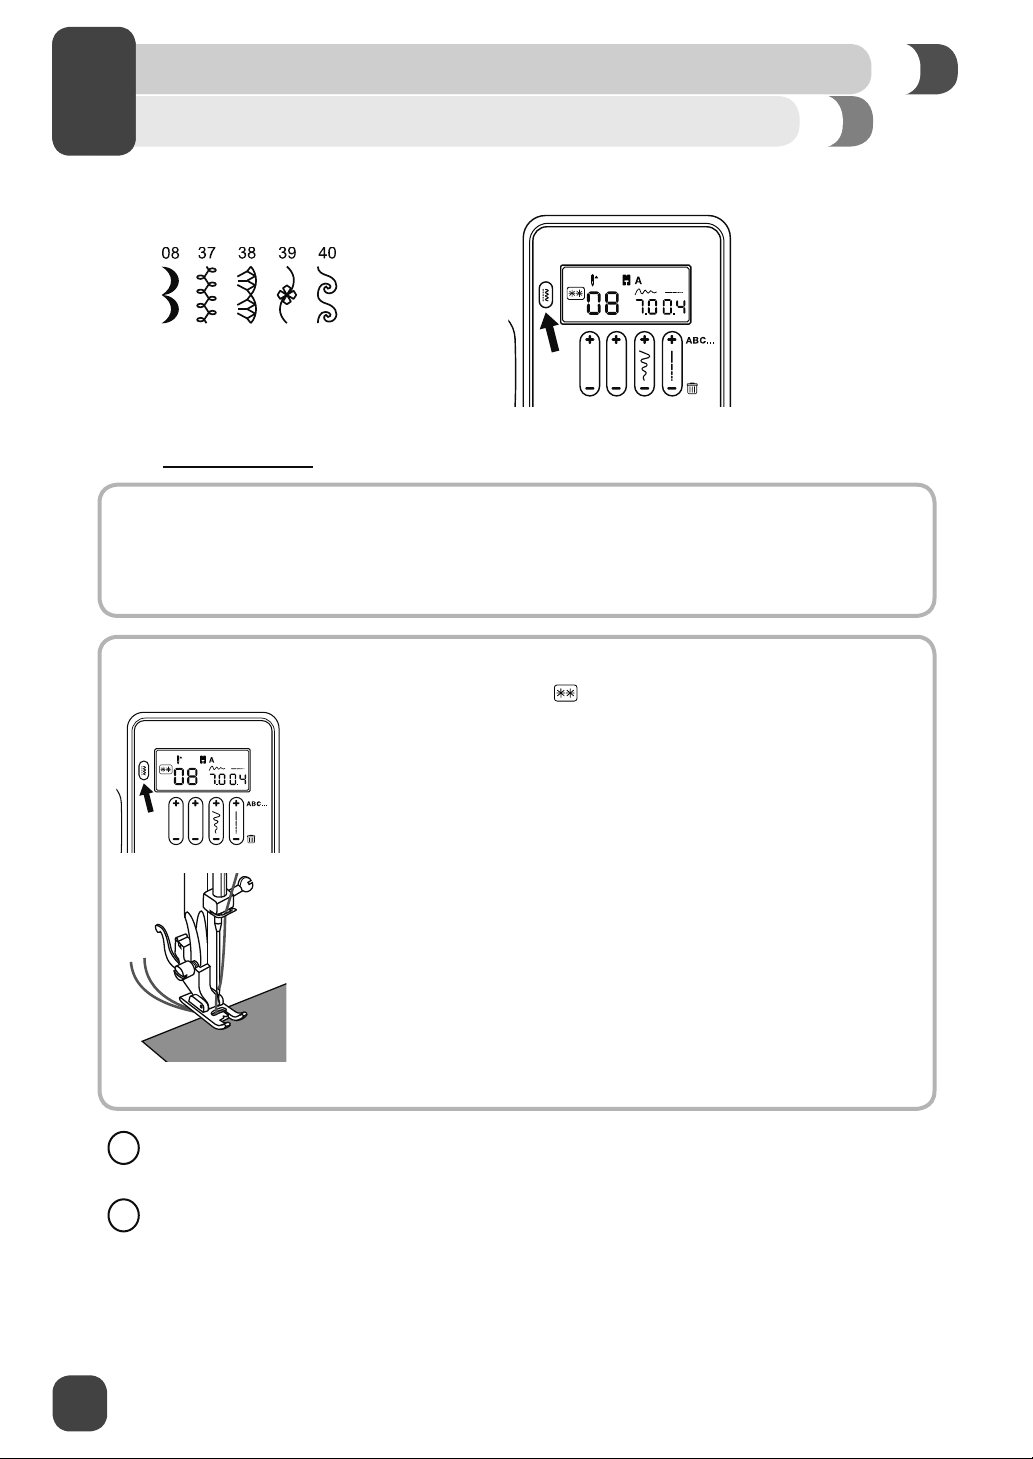
Sewing a Decorative Stitch
Mode Button and Function Buttons
A decorative stitch is used for embellishing and adding Àair to your sewing projects.
(Go to www.singerco.com to view other decorative stitches that can be used).
HOW TO:
1. Set the machine to the desired stitch by entering the number of the desired stitch. (See Page 22)
2.
Set the Stitch Length between 0.4 and 1.0. (See Page 22)
3.
Set the Stitch Width between 2.0 and 7.0. (See Page 22)
SEW ALONG: Scallop Stitch
1. Set the Mode Button to
2. The LCD screen on your machine displays the foot that is
recommended for the stitch selected. Remove the All Purpose Foot
and attach the Satin Foot (A). (See Page 29)
Set the Stitch Length to number 0.4. Y
3.
default to a stitch length of 0.4 when you select stitch # 08.
4.
Set the Stitch Width to 7.0. Yo
stitch width 7.0 when you select stitch # 08.
5. Place the fabric under the presser foot with the right-hand edge of the
fabric lined up with the desired seam guide line on the right side of the
needle plate. Lower the presser foot, then step on the Foot Control or
press the Start/Stop Button to begin sewing. Sew 2 to 3 stitches and
then backstitch (See Page 23) to reinforce the seam.
Use a stabilizer (see Appendix) on the underside of the fabric if there is gathering or puckering as
you sew. Decorative stitching can be used almost anywhere on your project!
It may be helpful to decrease the upper tension by 1 or 2 numbers when sewing decorative
stitches. This will help prevent the bobbin thread from possibly showing on the top when sewing
denser stitches.
and select stitch number 08.
our machine will automatically
ur machine will automatically default to
24
START SEWING
Sewing a Stretch Stitch
Mode Button and Function Buttons
A stretch stitch is used for stretch knit fabrics. This type of seam will stretch with the fabric.
(Go to www.singerco.com to view other stretch stitches that can be used).
HOW TO:
1. Set the machine to the desired stitch by entering the number of the desired stitch. (See Page 22)
2. Set the Stitch Length between 0.5 and 4.5. (See Page22)
3. Set the Stitch Width between 0.0 and 7.0. (See Page 22)
3
SEW ALONG: Overedge Stitch
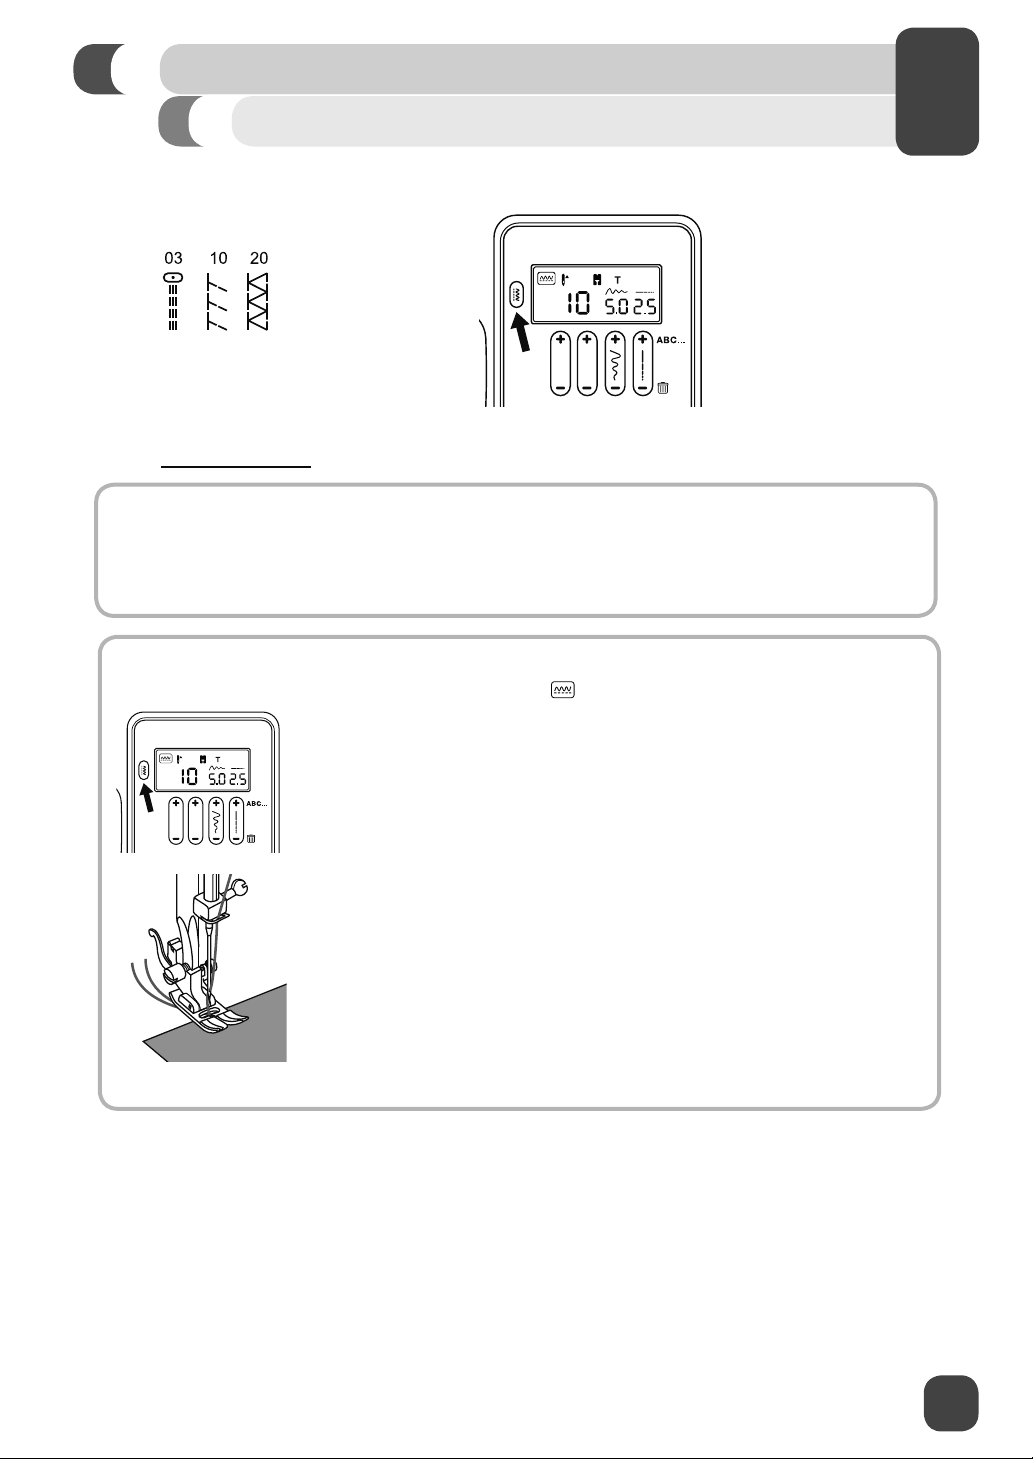
1. Set the Mode Button to
2. Set the Stitch Length to number 2.5. Your machine will automatically
3. Set the Stitch Width to 5.0. Your machine will automatically default to
4. Place the fabric under the All Purpose Foot with the right-hand edge of
and select stitch number 10.
default to stitch length 2.5 when you select stitch # 10.
stitch width 5.0 when you select stitch # 10.
the fabric lined up with the desired seam guide line on the right side of
the needle plate. Lower the presser foot, then step on the Foot Control
or press the Start/Stop Button to begin sewing.
25
START SEWING
2
3
Sewing a 1-Step Buttonhole
Mode Button and Function Buttons
This machine has built-in buttonholes, allowing you to sew buttonholes in one easy step. The
buttonhole stitches are numbered 24 to 31.
HOW TO:
1. Set the machine to the desired stitch by entering the number of the desired buttonhole stitch. (See
Page 22)
The Stitch Length is automatically selected by the machine for optimum results. (See Page 22)
2.
The Stitch Width is automatically selected by the machine for optimum results. (See Page 22)
3.
SEW ALONG: Buttonhole Stitch
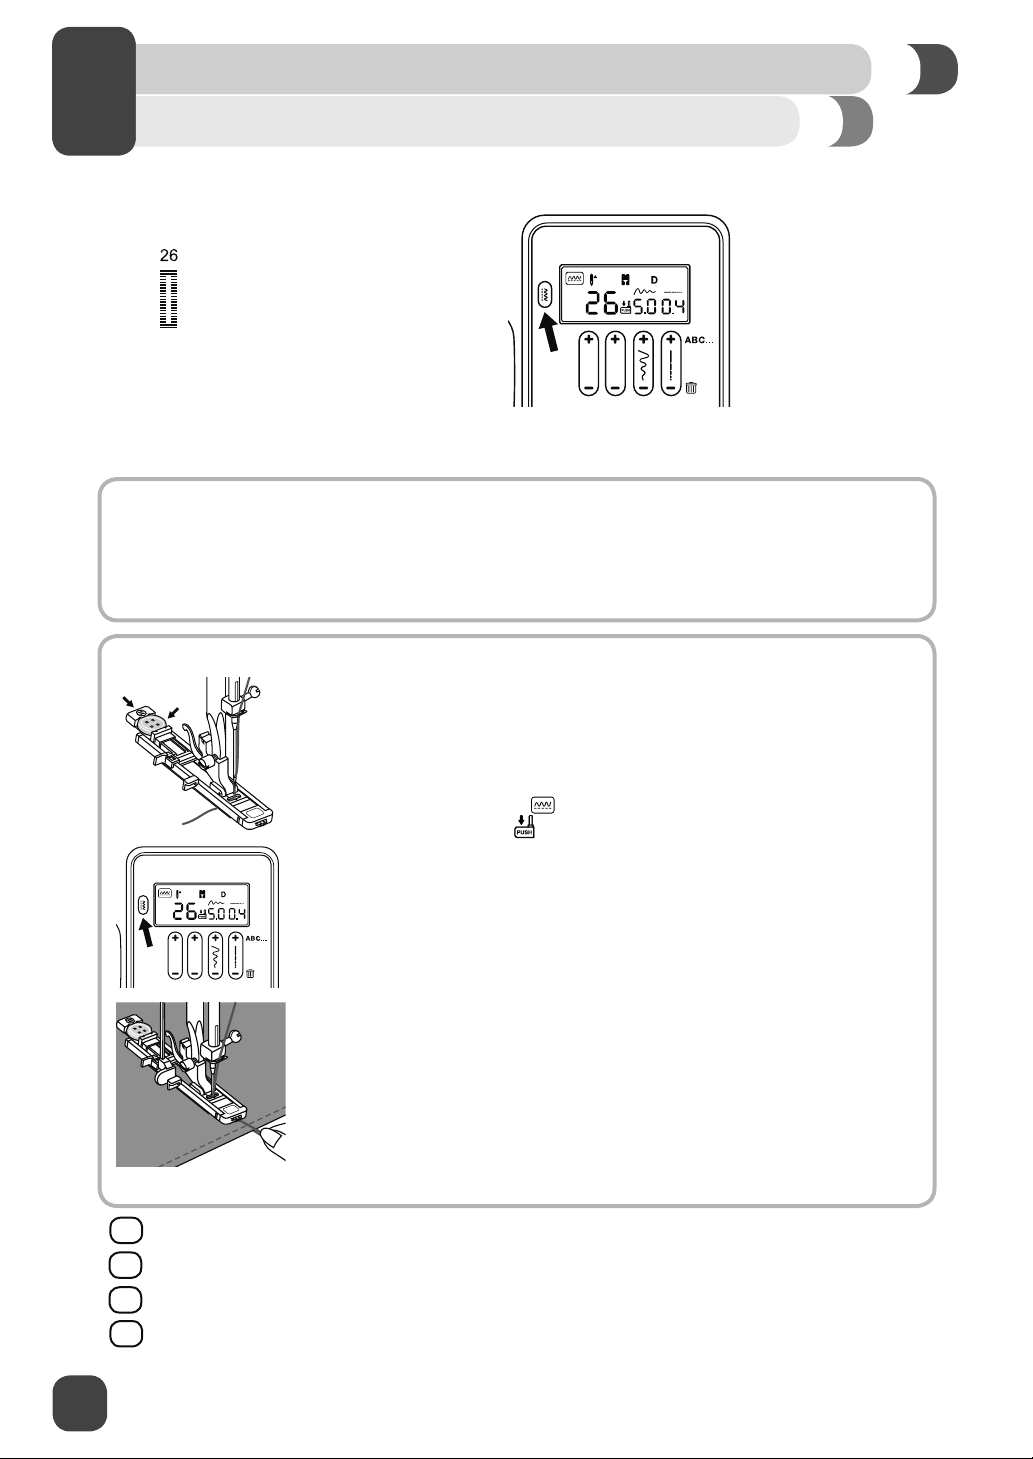
Place the button at the back of the buttonhole foot. Mark position and
1.
length of buttonhole on the fabric.
Remove the All Purpose Foot and attach the Buttonhole Foot (See
2.
2
9). Pass upper thread through the hole of the foot and bring thread to
the left.
3. Set the Mode Button to
will display the ¿gure
Set the Stitch Length to number 0.4. Your machine will automatically
4.
default to stitch length 0.4 when you select stitch # 26.
5.
Set the Stitch Width to 5.0. Your machine will automatically default to stitch
width 5.0 when you select stitch # 26.
6.
Place the fabric under the foot so that the center line mark on your fabric
is aligned with the center of the Buttonhole Foot and that the cross line
mark on the fabric aligns with the center hole of the Buttonhole Foot.
Lower the presser foot.
Pull the Buttonhole Lever all the way down and then carefully push it back.
7.
The Buttonhole Lever must sit behind the bracket located on the left of the
Buttonhole Foot.
Hold upper thread slightly and start to sew until the buttonhole is
8.
completed.
Return the Buttonhole Lever to its original position once all buttonholes
9.
are completed.
¤
Use a stabilizer to support the stitches.
¤
Slightly reducing your upper tension by 1 or 2 numbers will improve results.
¤
Always test sew on a scrap piece of your fabric.
¤
The density of the buttonhole can be adjusted by using the Stitch Length Adjustment Button.
and select stitch number 26, the LCD screen
, to remind you to lower the Buttonhole Lever.
Page
26
START SEWING
Sewing a Button
Mode Button and Function Buttons
This machine includes a Button Sewing Foot, allowing you to attach buttons to your projects easily and
quickly.
HOW TO:
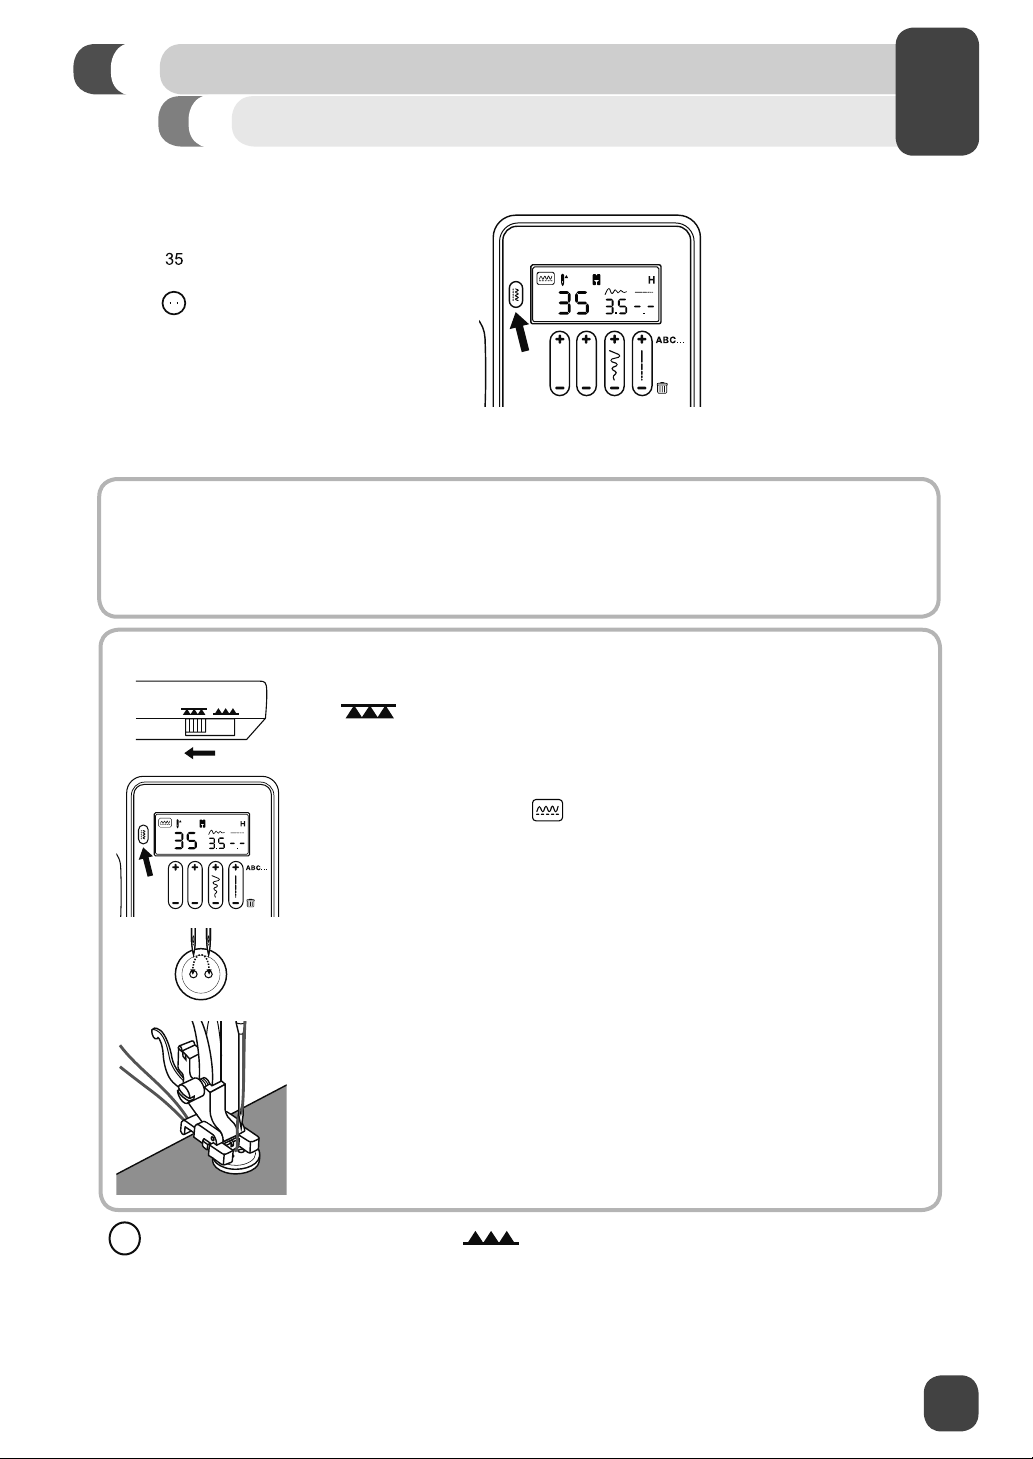
1. Set the machine to Straight Stitch by entering the stitch number 35. (See Page 22)
2. Set the Stitch Width to 3.5. Your machine will automatically default to stitch width 3.5 when you
select stitch # 35. (See Page 22)
SEW ALONG: Attaching a Button
3
1. Disengage (drop) the feed teeth by moving the Drop Feed Lever to the
setting. (See Page 8)
2. Remove the All Purpose Foot and attach the Button Sewing Foot. (See
Page 29).
3. Set the Mode Button to
4. It may be necessary to adjust the stitch width between 2.5 and 4.5
according to the distance between the two holes of the button. Adjust
the width by pressing the + or the - side of the Stitch Width Button.
5. Place the fabric and the button under the Button Sewing Foot and lower
the presser foot. Turn the handwheel slowly to check that the needle
goes cleanly into the left and right holes of the button. Adjust the Stitch
Width if necessary.
6. Start to sew at low speed. The sewing machine automatically stops after
sewing reinforcement stitches. To add stability to the button stitching
repeat step 6 as necessary.
7. Pull the upper thread at the end of the stitching to the wrong side of the
fabric using a hand sewing needle, and then tie off loose threads at the
back of the fabric.
Slide the Drop Feed Lever back to the position when button sewing is completed. Turn
the handwheel toward you to raise the feed teeth.
and select stitch number 35.
27

START SEWING
2
3
Inserting and Changing Needles
⚠ Turn the machine off before changing the needle.
Change the needle regularly, especially if it is showing signs of wear resulting in sewing problems.
Needles can show signs of wear when you see snags in the fabric or hear a slight popping sound
as you are sewing. If the needle becomes bent (A), the point becomes damaged (B) or the needle
becomes dull (C), you should replace it with a new needle and discard the old one.
Generally, the needle should be replaced after every 4 projects or approximately every 16 hours of
sewing time.
It is also important to use the right needle for the fabric you are sewing. (Go to www.singerco.com to
view the Stitch Reference Guide) For best results, use SINGER
sewing machine.
Loosen the needle clamp screw (A) by turning the screw toward you. Remove and discard the old
needle.
Insert the new needle, making sure that the Àat side of the top part of the needle is facing the back of
the machine (B).
Insert the new needle as far up as it will go (C and D).
Tighten the needle clamp screw (A) securely by turning it toward the back.
®
branded needles in your SINGER®
28
START SEWING
Changing the Presser Foot
⚠ For safety, turn off the power before changing the presser foot.
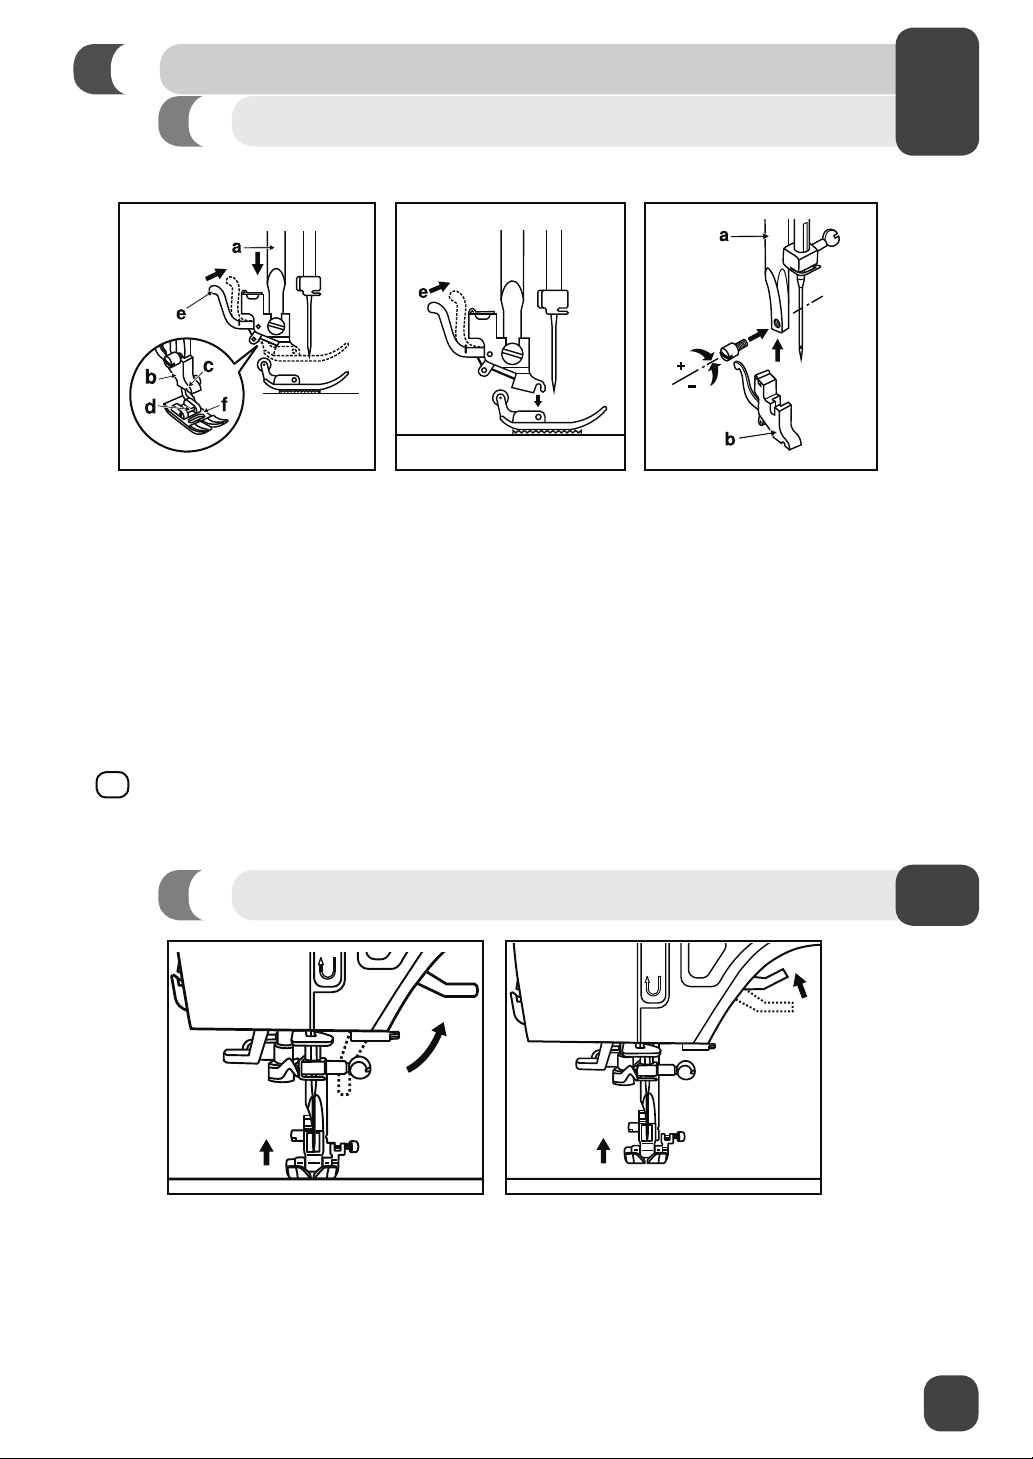
Before changing the presser foot, raise the presser foot lifter.
The presser foot holder (b) is attached to the presser bar (a). The presser foot (f) has a presser foot
pin (d) that connects to the presser foot holder, sometimes called a shank (b). The shank has a groove
(c) on its underside, which connects it to the presser foot.
To remove a presser foot from the shank, press the lever (e) at the back of the shank. The foot will
release. To attach a presser foot, line up the presser foot pin (d) underneath the groove (c) on the
shank (b). Lower the presser foot lifter, bringing the shank’s groove down over the pin. The foot will
snap on.
3
Some optional presser feet require you to remove the shank from the machine. To remove the shank
from the machine (see above) loosen and remove the screw that holds the presser foot onto the
presser bar (a), then remove the shank (b). To replace the shank, set the shank onto the presser bar,
then replace the screw.
¤
This machine has a low shank with snap-on presser feet. When shopping for optional presser feet
and attachments for your machine, look for low-shank, snap-on style.
Two-Step Extra Presser Foot Lift
Your machine is equipped with a two-step presser foot lifter.
1. The Presser Foot Lifter raises and lowers the presser foot.
2. When sewing several layers of fabric or heavy fabric, the presser foot can be raised to a second
level for easier positioning of the fabric.
3. When raised to the ¿rst level, the clearance is 1/4 inch (6 mm), when raised to level 2, the
clearance is 5/8 inch (9 mm).
29
2
3
START SEWING
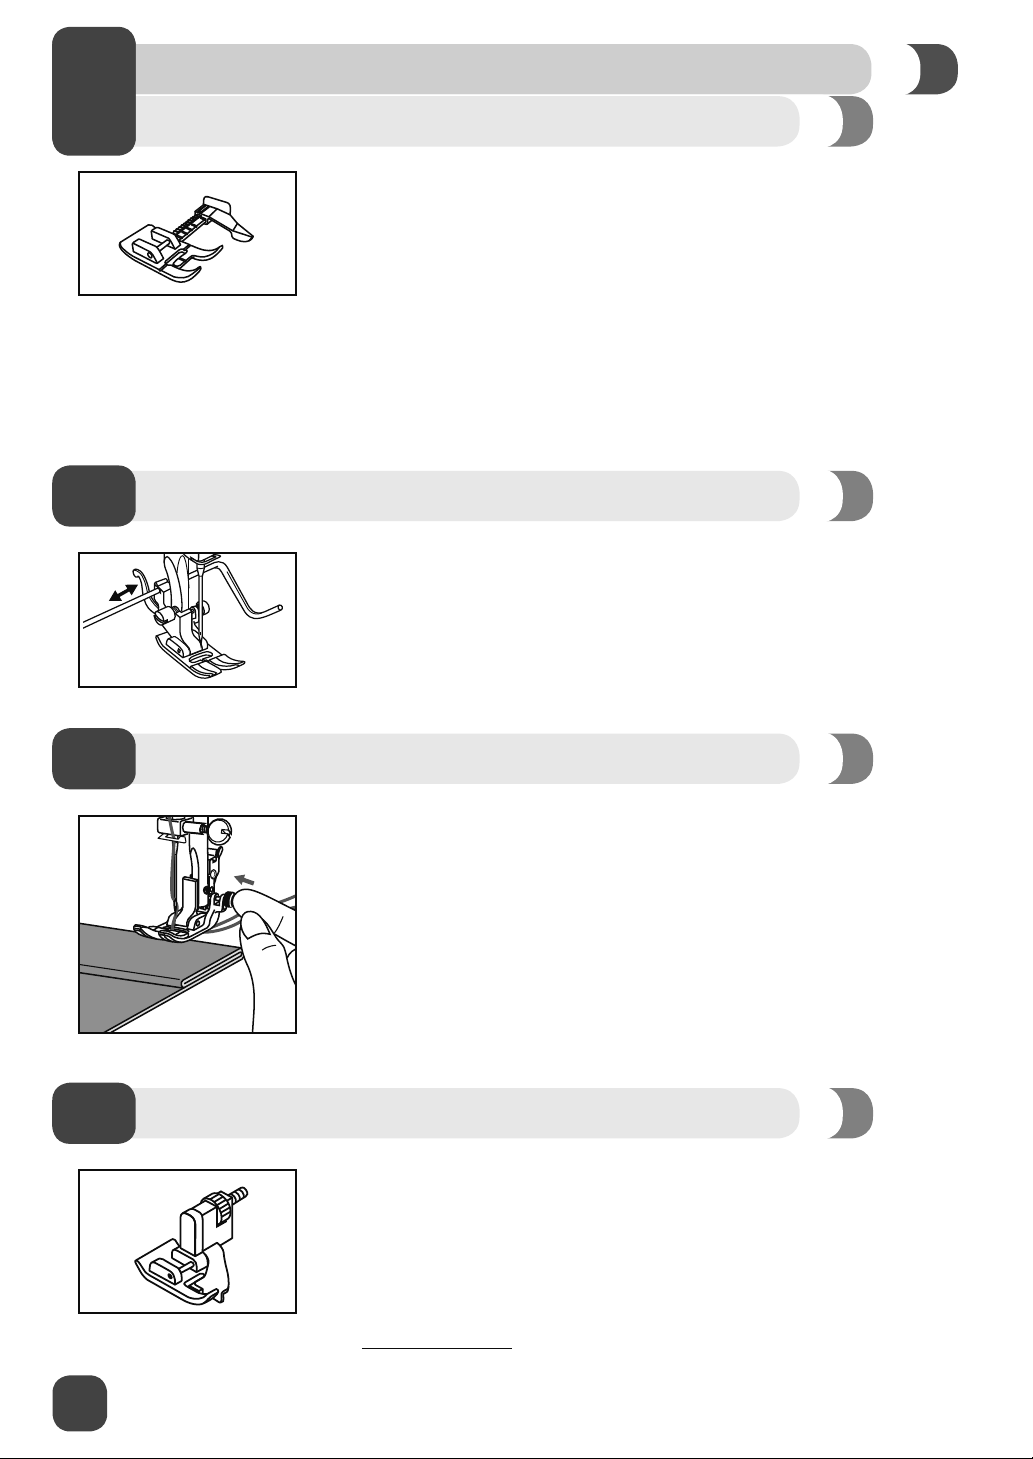
Sew Easy Foot
Your machine may include the Sew Easy Foot.
The Sew Easy Foot has a guide to help you sew the most accurate seams
every time. The foot has an extension marked with the most popular seam
allowances and a movable fabric guide that can be set wherever you want for
the project you are making.
1. Attach the Sew Easy Foot.
2. Select Straight Stitch.
With your needle set in the center position, use the guide to select 3/8”, 1/2”,
3.
5/8”, 3/4”, and even 1” seam allowances.
4.
Place your fabric under the foot, lining up the raw edges with the guide on the
foot. Lower the presser foot lifter
Edge/Quilting Guide
Your machine may be equipped with an Edge/Quilting Guide.
To attach the guide slip it into the slot as illustrated. Adjust the position
depending on the technique you are doing.
, then sew.
Lock in Place Button
For even feeding when sewing over thicker seams, push in the black button
located on the right hand side of the All Purpose Foot (T).
As you approach the thicker seam and the front of the presser foot begins
to raise over the thickness, lower the needle into the fabric by turning the
handwheel toward you.
Raise the presser foot, and push in the black button as you lower the presser
foot, this will lock the foot in a horizontal position.
The black button will release automatically after you sew a few stitches over the
seam.
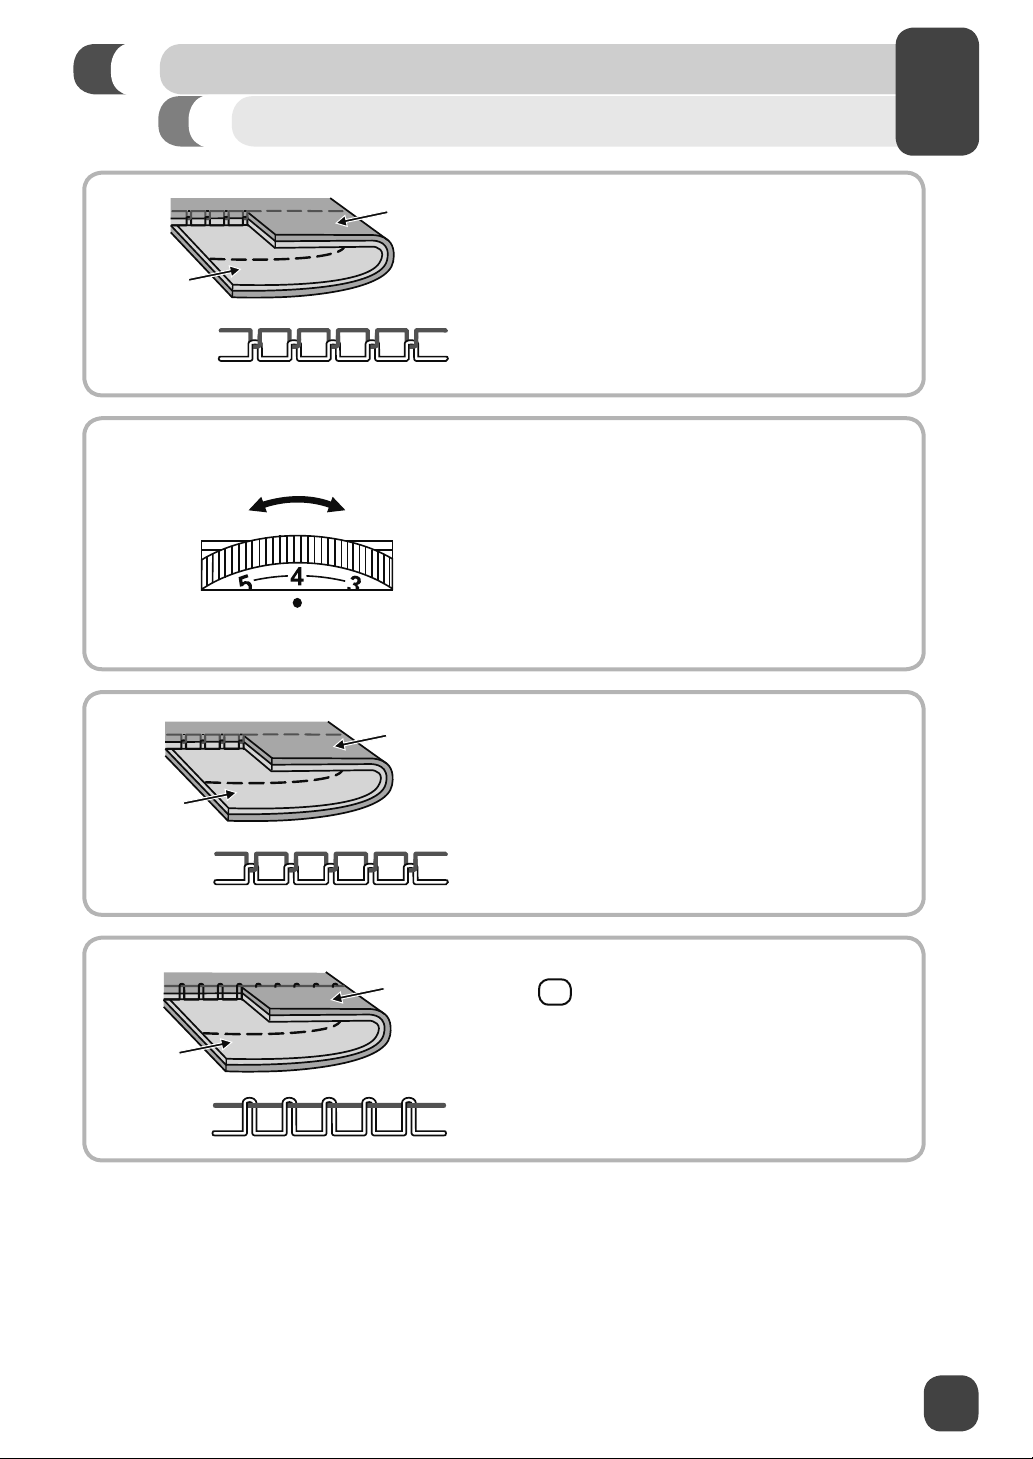
Blind Hem Foot
To sew a Blind Hem select Utility Stitch number 12 for woven fabrics and Utility
Stitch number 17 for stretch fabrics.
1.
Attach the Blind Hem Foot (F).
2. Select the Blind Hem Stitch.
3. Place your folded hem under the foot and sew the seam.
Go to www
.singerco.com
for more information on sewing a Blind hem.
30
 Loading...