

Page 1
ОШ / £P16
iiaoNis
Page 2
CONGRATULATIONS
You have entered into a new age of sewing. Your machine features many
breakthroughs in sewing technology that are advanced and very easy to
use. You have purchased the finest and most advanced sewing machine
available on the market today.
The enhancements are:
• The LCD Sew and Tell window that gives you detailed sewing information
at a fingertip.
• An LCD clock conveniently placed on the machine’s face.
• A new light bulb engineered to provide maximum illumination to the
sewing area.
The LCD Sew and Tell window contains everything you need to know about
all 25 stitches.
Turn the pattern select knob, and the name of the stitch appears in the window.
Press the button once and the information Window appears. This window
suggests the stitch length and stitch width settings for each and every
pattern. The same window tells you which presser foot to use and the
number of the pattern. This number matches the graphics of the selected
pattern that is shown just to the right of the window.
Press the button again and the Special Instruction Window appears in this
window, suggestions scroll across the window providing detailed information
about every stitch.
There is no need to search the instruction book, it’s all right here in front
of you.
The following information tells you about the special features on your new
sewing machine. Take a few moments to learn how to operate and care for
these new additions, and you will see how sewing has been made easier
and more exciting than ever!
Dear Customer:
We recommend that for future reference you record the Serial Number of
your Sewing Machine in the space provided
sF
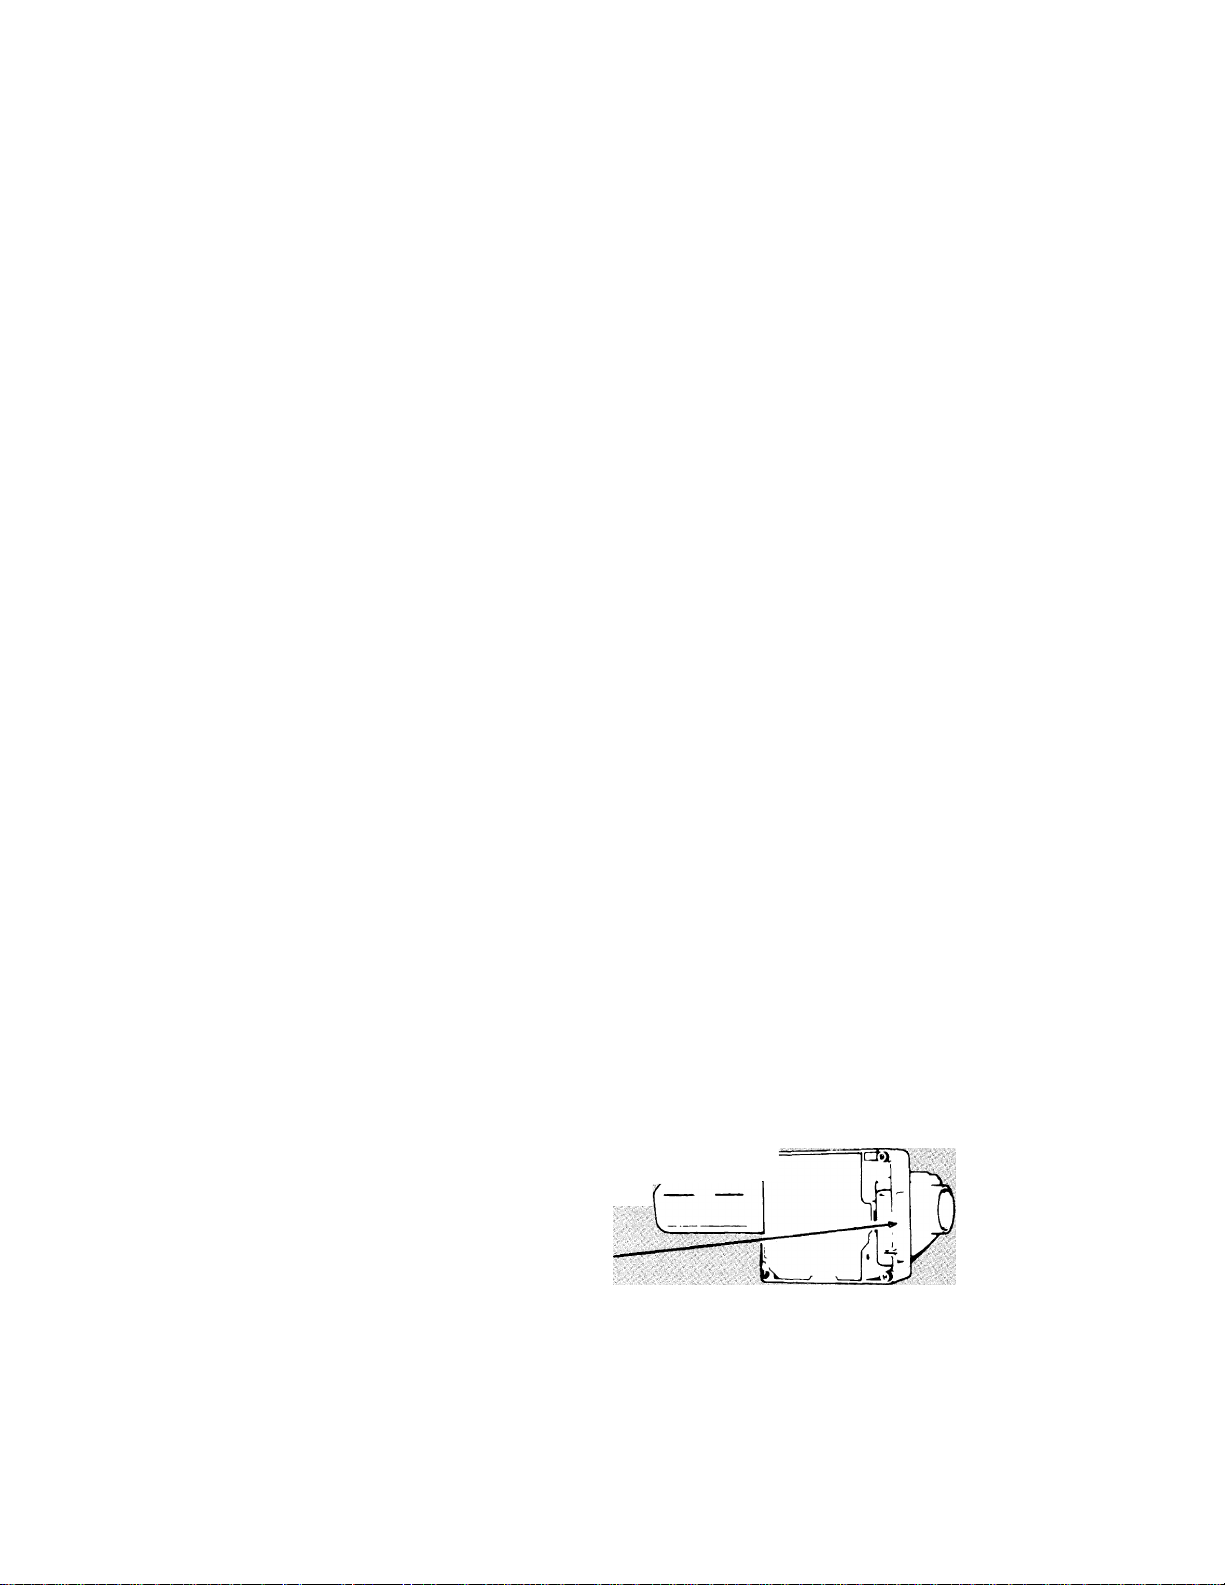
Refer to illustration
at right for location
of Serial Number on Serial No.
your machine.
Model No.
Serial No.
To ensure that you are always provided with thp most modern sewing
capabilities, the manufacturer reserves the right to change the appear
ance, design or accessories of this sewing machine when considered
necessary.
PART NO. 137570-001 *A Trademark of The Singer Company Printed in Taiwan
Page 3

TABLE OF CONTENTS_______________________________
1. Getting to Know Vbur Machine..........................................................
Principal Parts............................................................................................................ 2
Built-in Accessory Storage.......................................................................................... 4
Accessories................................................................................................................ 4
Important Safeguards
Connecting the Machine/Running the Machine
2. Getting Ready to Sew..................................................................................................9
Fabric, Thread and Needle Table................................................................................. 9
Handle Storage.......................................................................................................... 9
Choosing and Changing Needles............................................................................. 10
Free Arm Sewing................................................................................................... 10
Changing the Presser Foot....................................................................................... 11
Replacing Presser Foot with Shank.........................................................*.
Attaching Darning and Embroidery Foot
Attaching Feed Cover................................................................................................ 12
Changing the Needle Plate...................................................................................... ...12
Threading the Machine............................................................................................. 13
Using the Needle Threader
Winding a Bobbin..................................................................................................... 15
Inserting a Wound Bobbin.........................................................................................17
Raising the Bobbin Thread....................................................................................... .18
LCD Pattern Selection ............................................................................................ 19
3. Straight Stitching..................................................................................................... 20
Preparation............................................................................................................... 20
Sewing a Seam........................................................................................................ 22
Darning.....................................................................................................................24
Free Motion Embroidery
Inserting a Zipper...................................................................................................... 25
4. Special Stitches....................................................................................................... 26
Preparation............................................................................................................... 26
Zig-Zag Stitch......................................................................................................... 28
Zig-Zag Blindstitch.................................................................................................... 29
Multi Stitch Zig-Zag....................................................................................................30
“M” Stitch...................;......................................................................................... ;....30
Crescent Stitch/Chinese Dynasty Stitch/Kite Tail Stitch.............................................. 31
Arrow Stitch/Bunting Stitch....................................................................................... 32
Decorative Stitches................................................................................................ 32
Turkish Stitch............................................................................................................34
Stretch Overedge Stitch.............................................................................................34
Ric-Rac/Straight Stretch Stitch.....
Crown/Fagoting Stitch
Honeycomb Stitch.................................................................................................... 36
Straight Featherstitch............................................................................................... 36
5. Buttonholes and Buttons.......................................................................................... 37
One-Step Buttonholing............................................................................................ 37
Attaching a Buitton.....................................................................................^............
6. Caring for Vbur Machine.......................................................................................... 41
Removing and Replacing Bobbin Case.................................................................... 41
Removing and Replacing Light Bulb ....................................................................... 42
LCD Clock Operation Instructions..............................................................................43
Cleaning the Machine.............................................................................................. 44
Performance Checklist........................................................................................... 45
Additional Accessories........................................................................................... 46
Personal Notes...................................................................................................... 47
index
...
..............................................................................................................
............................•..................................................................
...........................................................
..................................................................
.......................................................................................
..........................................................................................
...........................................................................
.................
........................................................................ 35
..........................
.................
12
24
35
.
2
6
8
12
14
39
Page 4
SECTION 1 GETTING TO KNOW YOUR MACHINE
Page 5

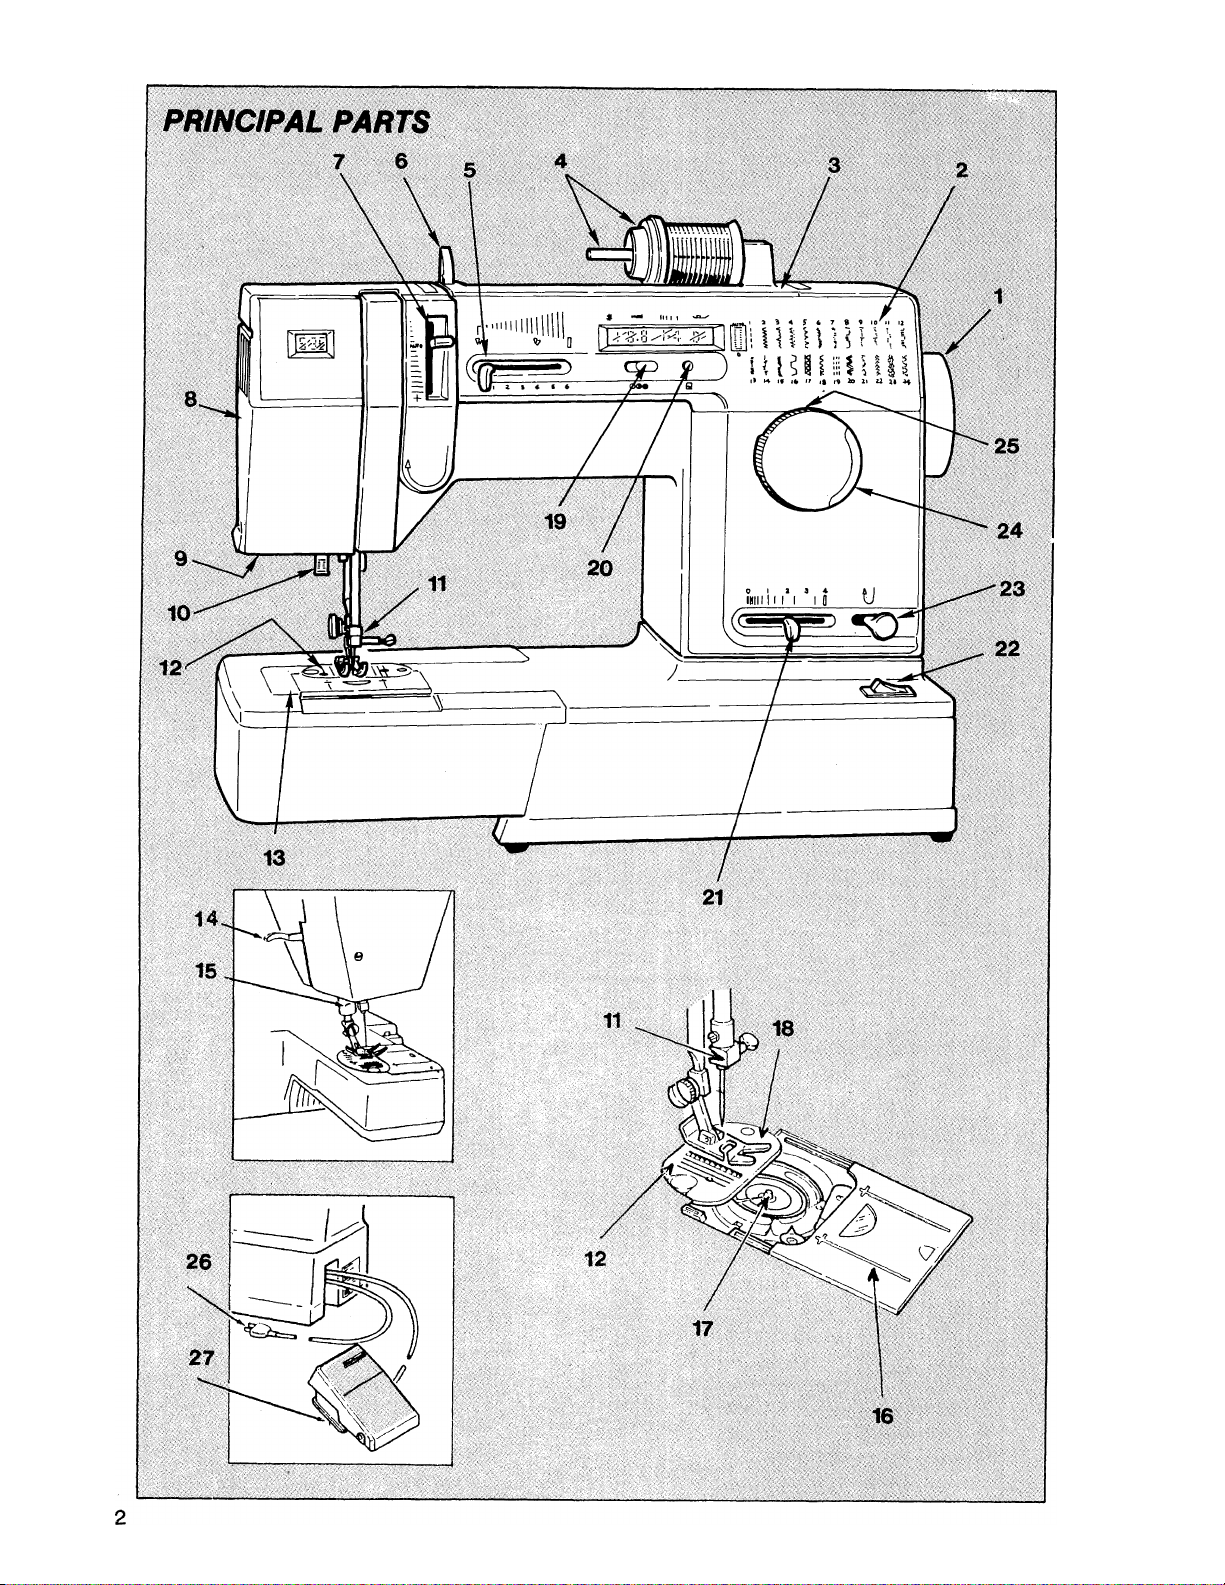
Principal Parts
1. Hand Wheel provides a means for
raising or lowering the needle.
2. Pattern Display shows a variety of
patterns available for your sewing
needs. Pattern ' indicator appears
under the pattern you select by
turning Pattern Selector Dial, #24.
3. Built-In Accessory Storage, under
top cover of machine, provides a
neat and convenient area to keep
accessories.
4. Spool Pin and Cap hold the top
thread supply and allow it to unwind
smoothly as the spool does not turn.
5. Stitch Width Lever controls the width
Of patterns and sets the needle for
straight stitching.
e. Thread Guide helps to insure a
smooth flow of thread from the spool
to the tension.
15. Thread Cutter
16. Slide Plate, with window to see bob
bin thread supply, opens for easy
removal and replacement of bobbin,
it also activates the bobbin winder
17. Bobbin Winder is built into machine
' and aliows you to switch from
sewing to bobbin winding without
removing bobbin.
18. Presser Foot holds fabric against the
feed system and snaps on and off.
19. Screen Contrast
20. Stitch information Button
21. Stitch Length Lever allows for a
variety of stitch lengths.
7. Thread Tension Lever controls top
thread tension.
8. Face Plate is a removable cover
protecting movable parts and sew
ing light.
9. Sewing Light illuminates sewing
area.
10. Buttonhole Lever activates the one-
step buttonholer.
11. Needle Clamp holds needle in
machine and prevents incorrect
insertion.
12. Needle Plate supports the fabric
during sewing.
13. Removable Extension Table lets you
change the machine bed from flat to
free arm.
14. Presser Foot Lifter, at the back of
machine, lets you raise and lower
presser foot.
22. Power and Light Switch turns on
the machine and sewing light at the
same time.
23. Reverse Lever provides either
momentary or continuous reverse
fabric movement.
24. Pattern Selector Dial lets you move
the pattern indicator to any of the
patterns, plus buttonhole, shown on
the pattern display panel.
25. Balance Control adjusts appearance
of Special Stitch patterns and
buttonholes.
26. Electricai Power Cord connects
machine to your electrical outlet.
27. Speed Controller, designed for safety
and convenience, regulates the
electronic solid state speed con
trol.
Page 6
BUtLT-INACCESSORY STORAGE
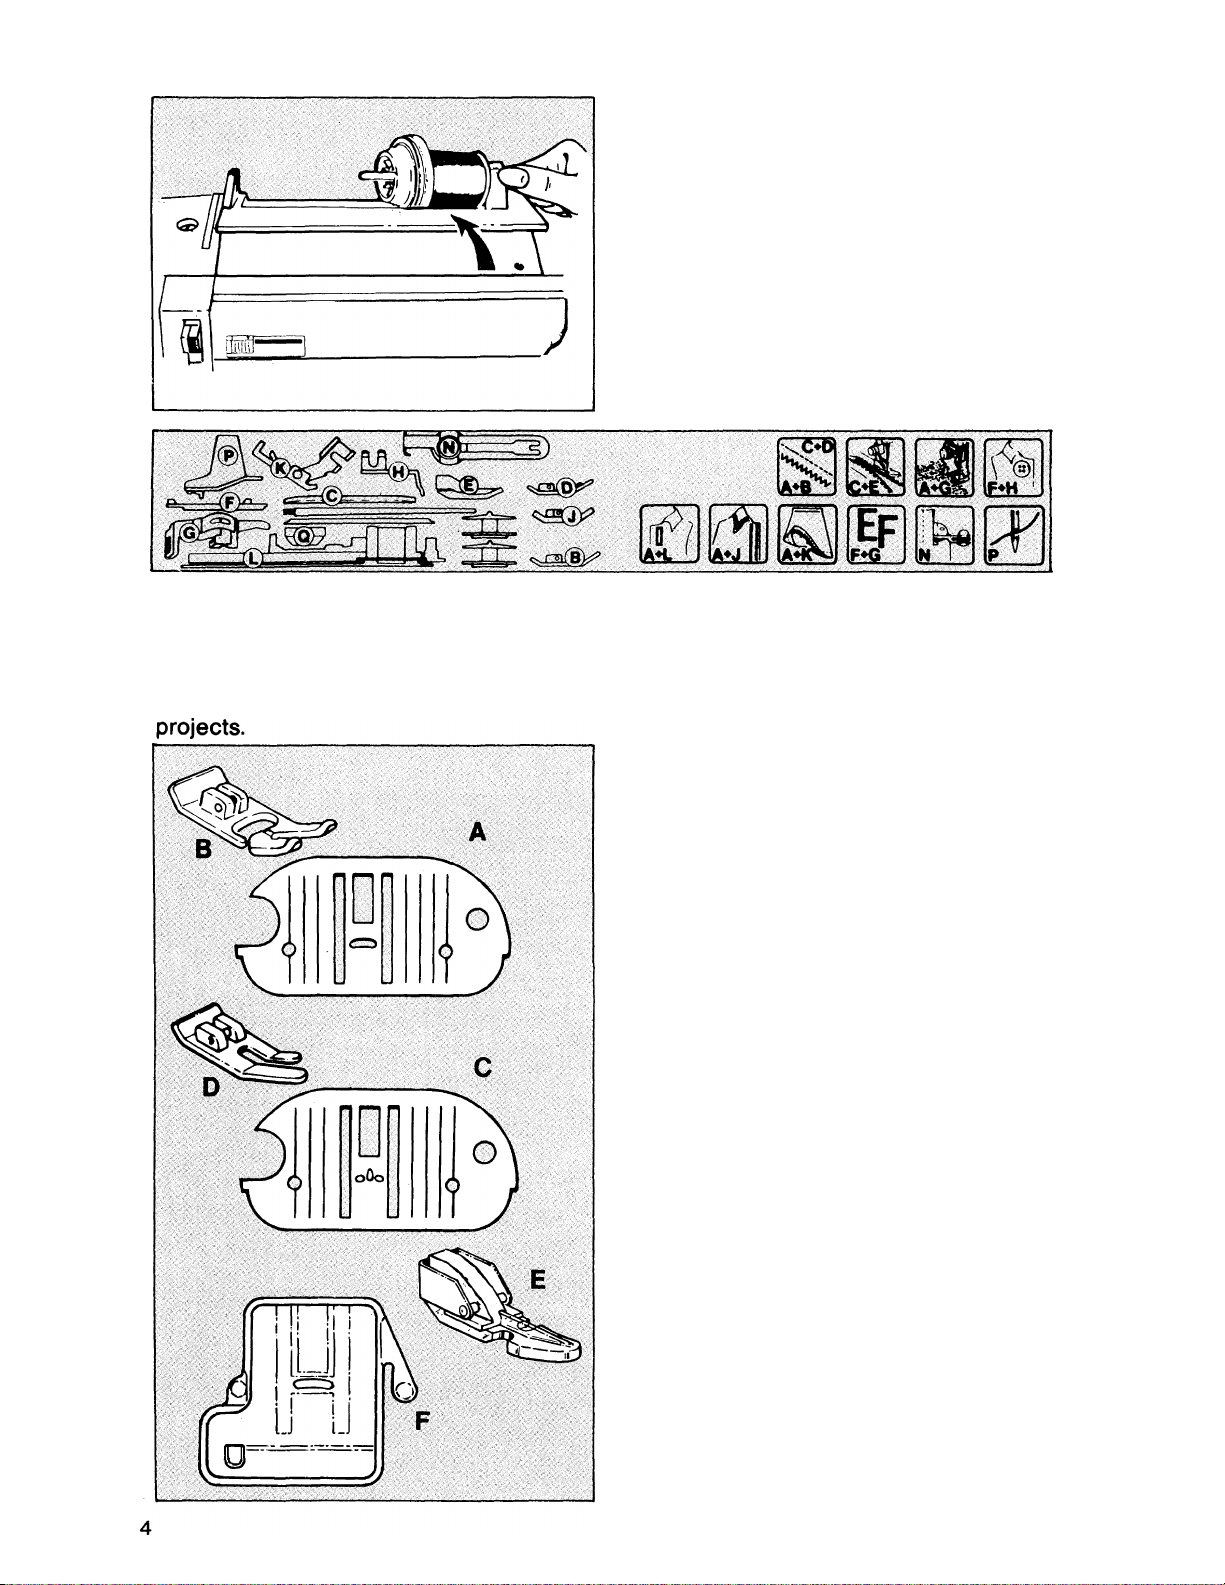
The letter-coded accessories accom
panying your machine are conveniently
kept in the built-in accessory storage
under the top lid of the machine. The
chart on the left side of the lid identifies the
location of the accessories. The chart on
the right side gives the accessory com
binations for the illustrated applications.
For example, to sew a button, use the
feed cover (F) with the button sewing foot
(H).
NOTE: This chart gives only a sampling of applications. Additional applications may be
found in other sections of this manual. Lint brush can be used to aid removal of
accessories.
ACCESSORIES
The accessories for your machine are designed to simplify many of your sewing
General Purpose Needle Plate (A), and
Presser Foot (B), are standard on the
machine. Used for straight and zig-zag
stitching.
Straight Stitch Needle Plate (C), and Presser
Foot (D), used when straight stitching
the feed from moving fabric.
Zipper Foot (E), for inserting zippers.
Feed Cover (F), used for button sewing,
free motion work and darning. It keeps
the feed from moving fabric.
Page 7
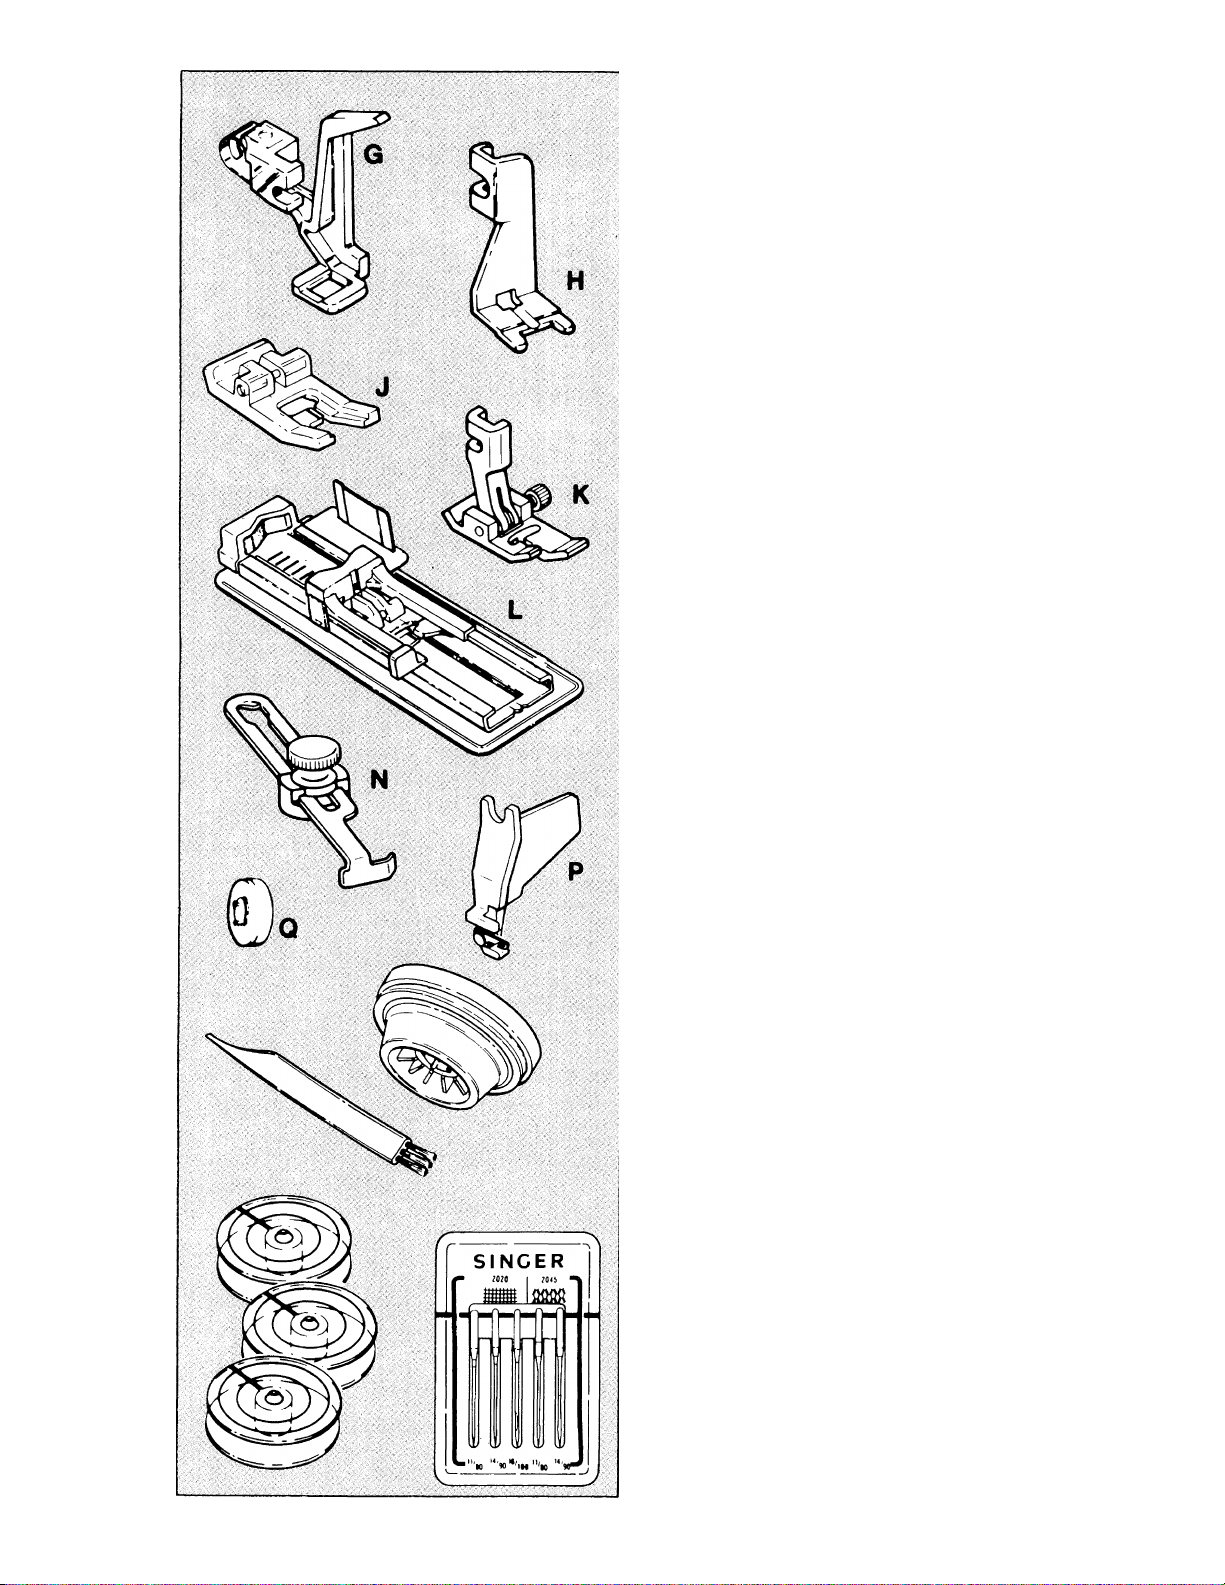
Darning and Embroidery Foot (G) is
recommended for free motion work, such
as embroidery, monogramming and decora
tive designs.
Button Sewing Foot (H) hold buttons
securely for fastening.
Special Purpose Presser Foot (J), used
for decorative and zig-zag sewing.
Blindstitch Presser Foot (K) helps guide
fabric for nearly invisible blindstitch hems.
One-Step Buttonhole Attachment (L),
used to stitch a complete buttonhole in
one single step.
Seam Guide (N) helps keep seam allow
ances even.
Needle Threader (P) assists in threading
machine needle.
Small Thread Spool Cap (Q) for use with
small diameter spools of thread.
Thread Spool Cap for medium and
large thread spools.
Lint Brush, for cleaning the machine.
Bobbins, transparent for easy viewing of
thread supply.
Needle Pack includes an assortment for
sewing various types of fabrics.
Page 8

IMPORTANT SAFETY INSTRUCTIONS
When using this machine, basic safety precautions should always be followed
including the ifollowing:
Read all instructions before using this machine.
DANGER.
To reduce the risk of electric shock:
■ The machine should never be left unattended when plugged in. Always unplug
the machine from the electric outlet immediately after using and before cleaning.
■ Always unplug before changing light bulb. Replace bulb with the same type
rated 12 volts, 5 watts. Be sure to replace the face plate which covers the light
blub before operating the machine.
WARNING.
To reduce the risk of burns, fire, electric shock or injury to persons:
■ Be sure that the electrical voltage of the socket outlet (wall receptacle) is
the same as the rated voltage of the motor.
■ Use this machine only for its intended use as described in this Operator’s
Guide. Use only attachments recommended by the manufacturer as
contained in the Operator’s Guide.
■ To disconnect, turn all controls to the off (“0”) position, then remove plug
from outlet.
■ Disconnect the power-line plug from the socket outlet or switch the machine
off when making any adjustments in the needle area, such as threading
needle, changing needle, changing needle plate or changing presser foot, etc.
■ Always unplug the machine from the electrical outlet when removing
covers, lubricating, or when making any other user servicing adjustments
mentioned in the Operator’s Guide.
■ Do not attempt to adjust the motor belt. Contact your nearest Service Center
should any adjustment be required.
■ Do not unplug by pulling on cord. To unplug, grasp the plug, not the cord.
■ Handle the foot controller with care and avoid dropping it on the floor.
Be sure not to place anything on top of it.
■ Always use the proper needle plate. The wrong plate can cause the needle
to break.
■ Do not use bent needles.
■ When sewing, keep fingers away from all moving parts. Special care is
required around the sewing machine needle.
Page 9

I
Do not pull or push fabric while stitching. This may deflect the needle causing
it to break.
I Before removing the bobbin case, remove plug from the socket outlet.
I For double insulated machines, when servicing, use only identical Singer
replacement parts. See instructions for Servicing of Double-Insulated
Appliances.
■ Never operate the machine if it has a damaged cord or plug, if it is not
working properly, if It has been dropped or damaged, or dropped into
water. Return the machine to the nearest authorized dealer or Service Center
for examination, repair, electrical, or mechanical adjustment.
■ Never operate the machine with any air openings blocked. Keep ventilation
openings of the machine and foot controller free from the accumulation of
lint, dust, and loose cloth.
■ Never drop or insert any object into any opening.
■ Do not use outdoors.
■ Do not operate where aerosol (spray) products are being used or where
oxygen is being administered.
■ Do not allow to be used as a toy. Close attention is necessary when the
machine is used by or near children.
■ SERVICING OF DOUBLE-INSULATED PRODUCTS. In a double-insulated
product, two systems of insulation are provided instead of grounding. No
grounding means Is provided on a double-insulated product, nor should a means
for grounding be added to the product. Servicing of a double-insulated product
requires extreme care and knowledge of the system, and should be done
only by qualified service personnel. Replacement parts for a double-insulated
product must be identical to those parts in the product. A double-insulated
product is marked with the words “DOUBLE-INSULATION” or “DOUBLE
INSULATED”.
SAVE THESE INSTRUCTIONS
Servicing should be performed by an authorized service representative.
This product is intended for household use.
FOR EUROPEAN AND SIMILAR TERRITORIES:
This product is suppressed for radio and television interference with the
International Electrotechnical Commission requirements of the CISPR.
Mchines for Great Britain and some other countries having similar wiring
standards are shipped from the factory without a plug for connection to the
mains. The wires in this mains lead are coloured in accordance with the
following codé:
Blue: neutral (N) Brown: live (L)
As the colours of the wires in the mains lead of this appliance may not
correspond with the coloured markings identifying the terminals in your plug,
proceed as follows:
The wire which is coloured blue must be connected to the terminal which is
marked with the letter N or coloured black. The wire which is coloured brown
must be connected to the terminal which is marked with the letter L or coloured
red. If a 13 Amp. (BS 1363) plug is used, a 3 Amp. fuse must be fitted, or if
any other type of plug is used, a 5 Amp. fuse must be fitted either in the plug
or adaptor or at the distribution board. Neither cord is to be connected to the
earth terminal of a three-pin plug.
Page 10
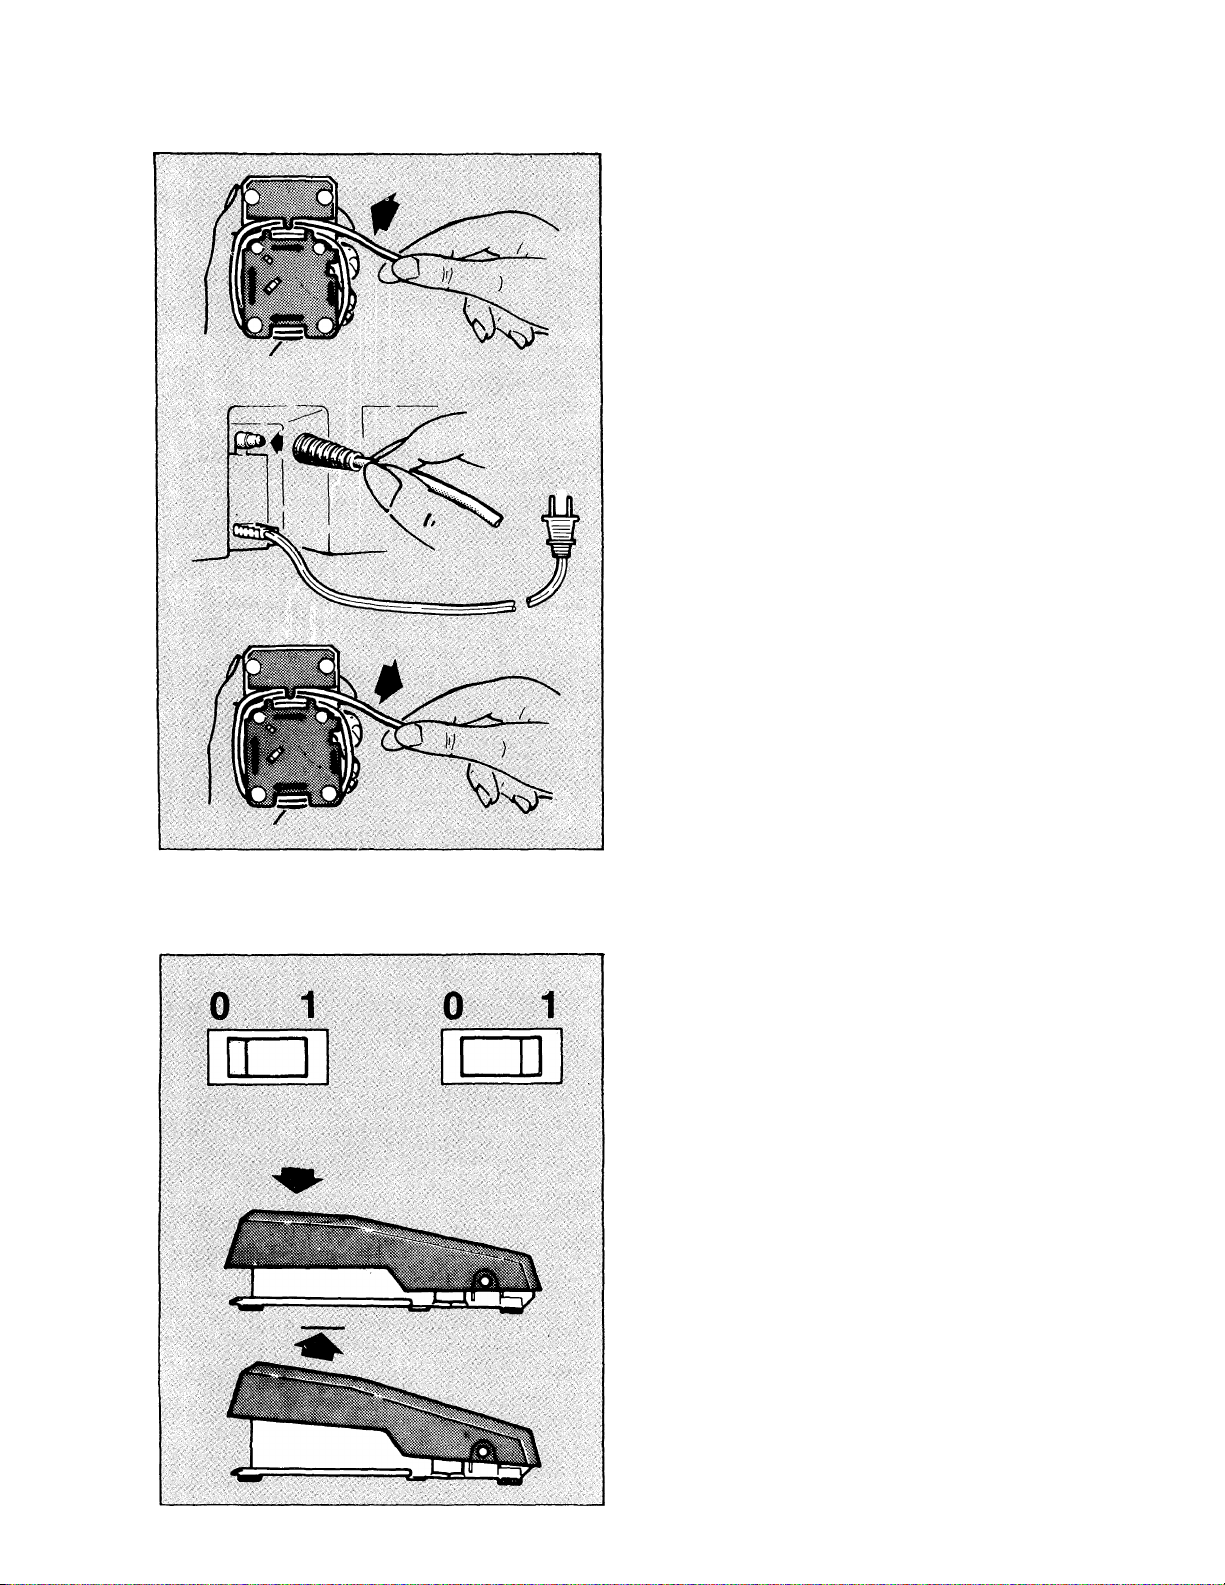
CONNECTING THE MACHINE
The solid state system assures constant speed as you maintain the same pressure
on the controller when sewing through various fabric thicknesses.
Unwind the air control hose from foot
operated speed controller.
Always be sure air hose is not blocked.
Pressing on the controller, you should
feel a slight air flow from the hose.
Plug this air hose onto the receptacle
above power cord, at the right end of the
machine.
Then connect the electrical power cord
plug to your electrical outlet.
NOTE: When not using the machine,
rewind air hose around speed controller
for storage, as shown.
Do not operate machine without material
under the presser foot as this may damage
the feed and the foot.
RUNNING THE MACHINE
The machine and the sewing light are turned on and off by the same power switch.
POWER SWITCH
To turn on machine and sewing light, press
power switch down at right side. To turn
off machine and light, press power switch
down at left side.
To run the machine, press the speed
controller. The harder you press, the faster
the machine will sew.
To stop the machine from sewing, remove
pressure from speed controller.
Page 11
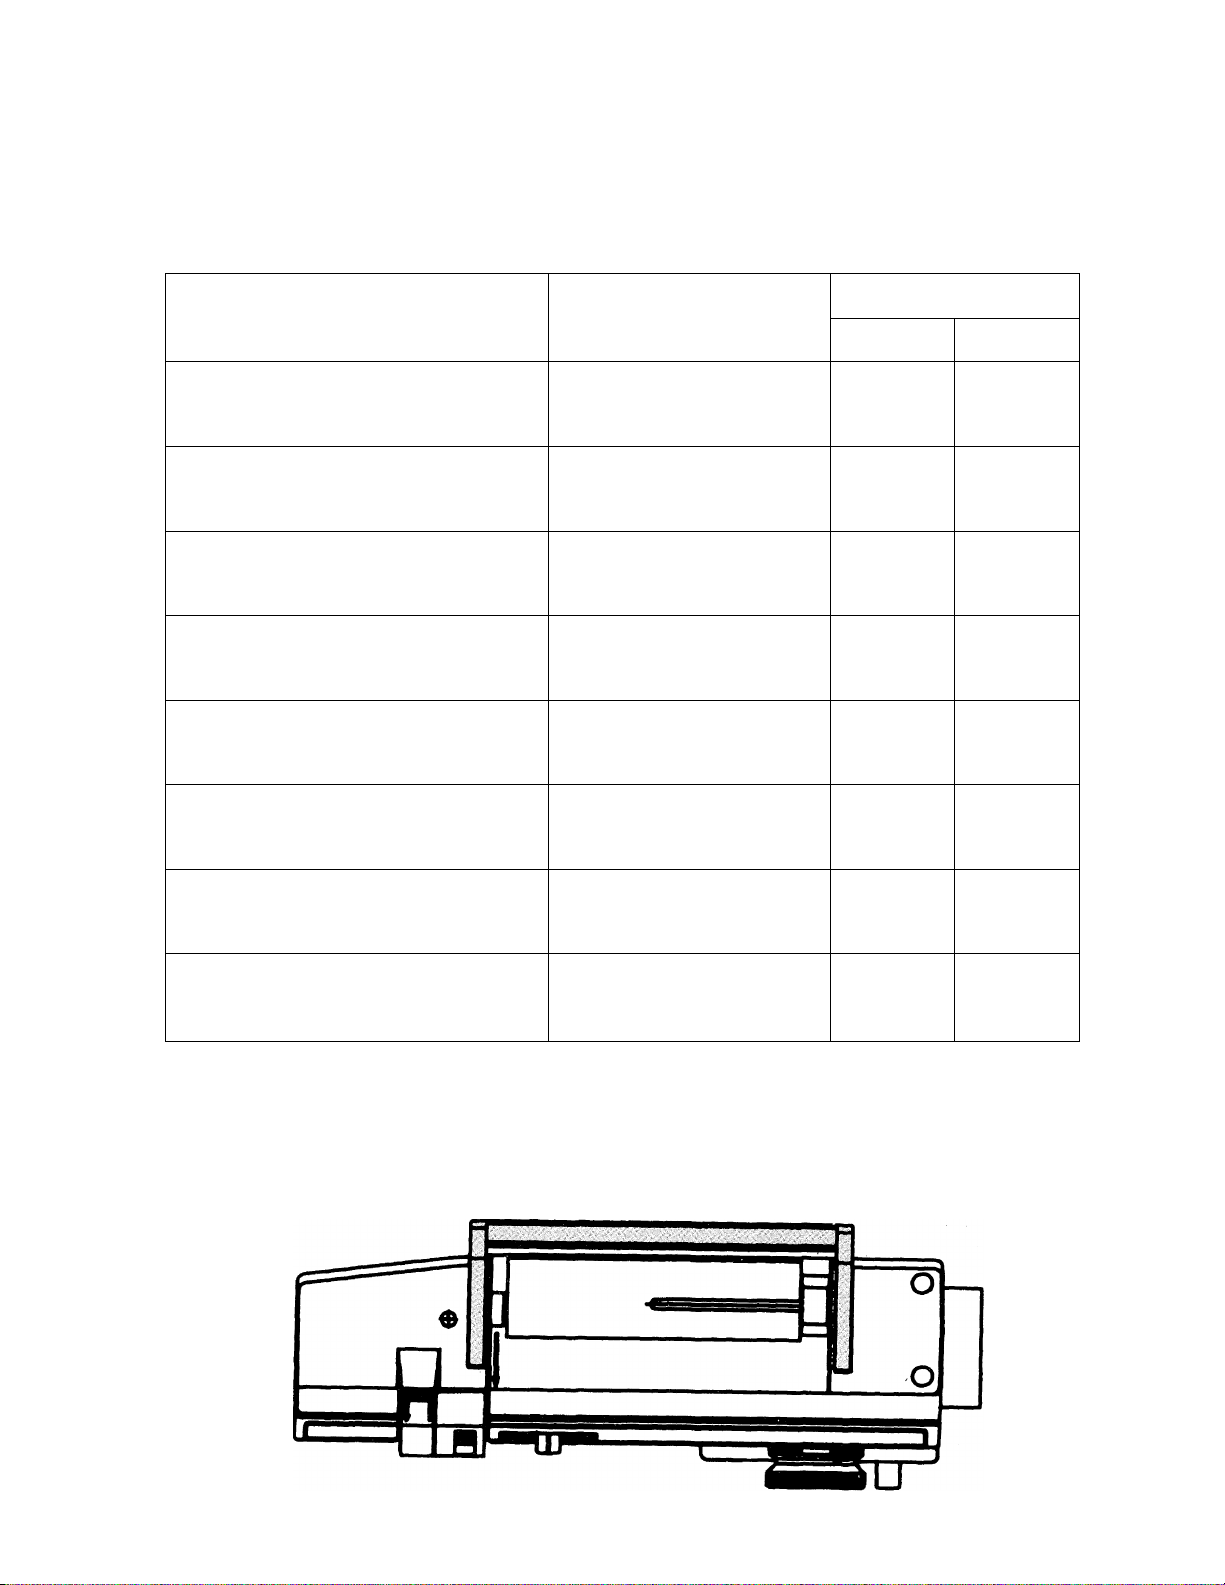
SECTION 2 Getting Ready to Sew
Fabric, Thread and Needle Table
• The needle and thread used for a sewing project depends upon the fabric that is chosen.
• The table below is a practical guide to needle and thread selections for most situations.
• Refer to it before starting to sew. Be sure to use the same size and type of thread in
both needle and bobbin. For best results, use only genuine Singer* needles.
Needles
Fabric
Thread
Type Stee
Delicate - tulle chiffon, fine lace, organza
Lightweight - batiste, organdy, jersey, voile, taffeta,
crepe, chiffon velvet, plastic film
Medium Weight - gingham, percale, pique, linen,
chintz, faille, satin, fine corduroy, velvet,
suitings, knits, deep-pile fabrics, vinyl
Medium Heavy - gabardine, tweed, sailcloth, denim,
coatings, drapei^, vinyl, deep-pile fabrics
Heavy * overcoatings, dungaree, upholstery fabrics,
canvas
All Weights - decorative topstitching
Synthetic Knits and Stretch Fabrics - polyester
doubleknit, nylon tricot, jersey, ciré, panne
velvet, bonded fabrics, raschei
leather - suede, kidskin, lined leathers
Fine mercerized cotton
Fine synthetic thread
50 mercerized cotton - silk
Fine synthetic thread
50 mercerized cotton -
60 cotton
Synthetic thread
Heavy-duty mercerized cotton
40 to 60 cotton - Synthetic thread
Heavy-duty mercerized cotton
24 to 40 cotton - Synthetic thread
Buttonhole twist**
Synthetic thread-
50 mercerized cotton -
Silk
50 mercerized cotton
Synthetic thread - Silk
Style 2020
style 2020
Style 2020
Style 2020
Style 2020
Style 2020
Style 2045
Ball Point
Style 2032
9/70
11/80
14/90
16/100
18/100
16/100
18/100
14/90
11/80
14/90
16/100
* A Trademark of The Singer Company.
** Use with standard sewing thread in bobbin.
Handle Storage
Push into recessed position before sewing or winding.
Page 12
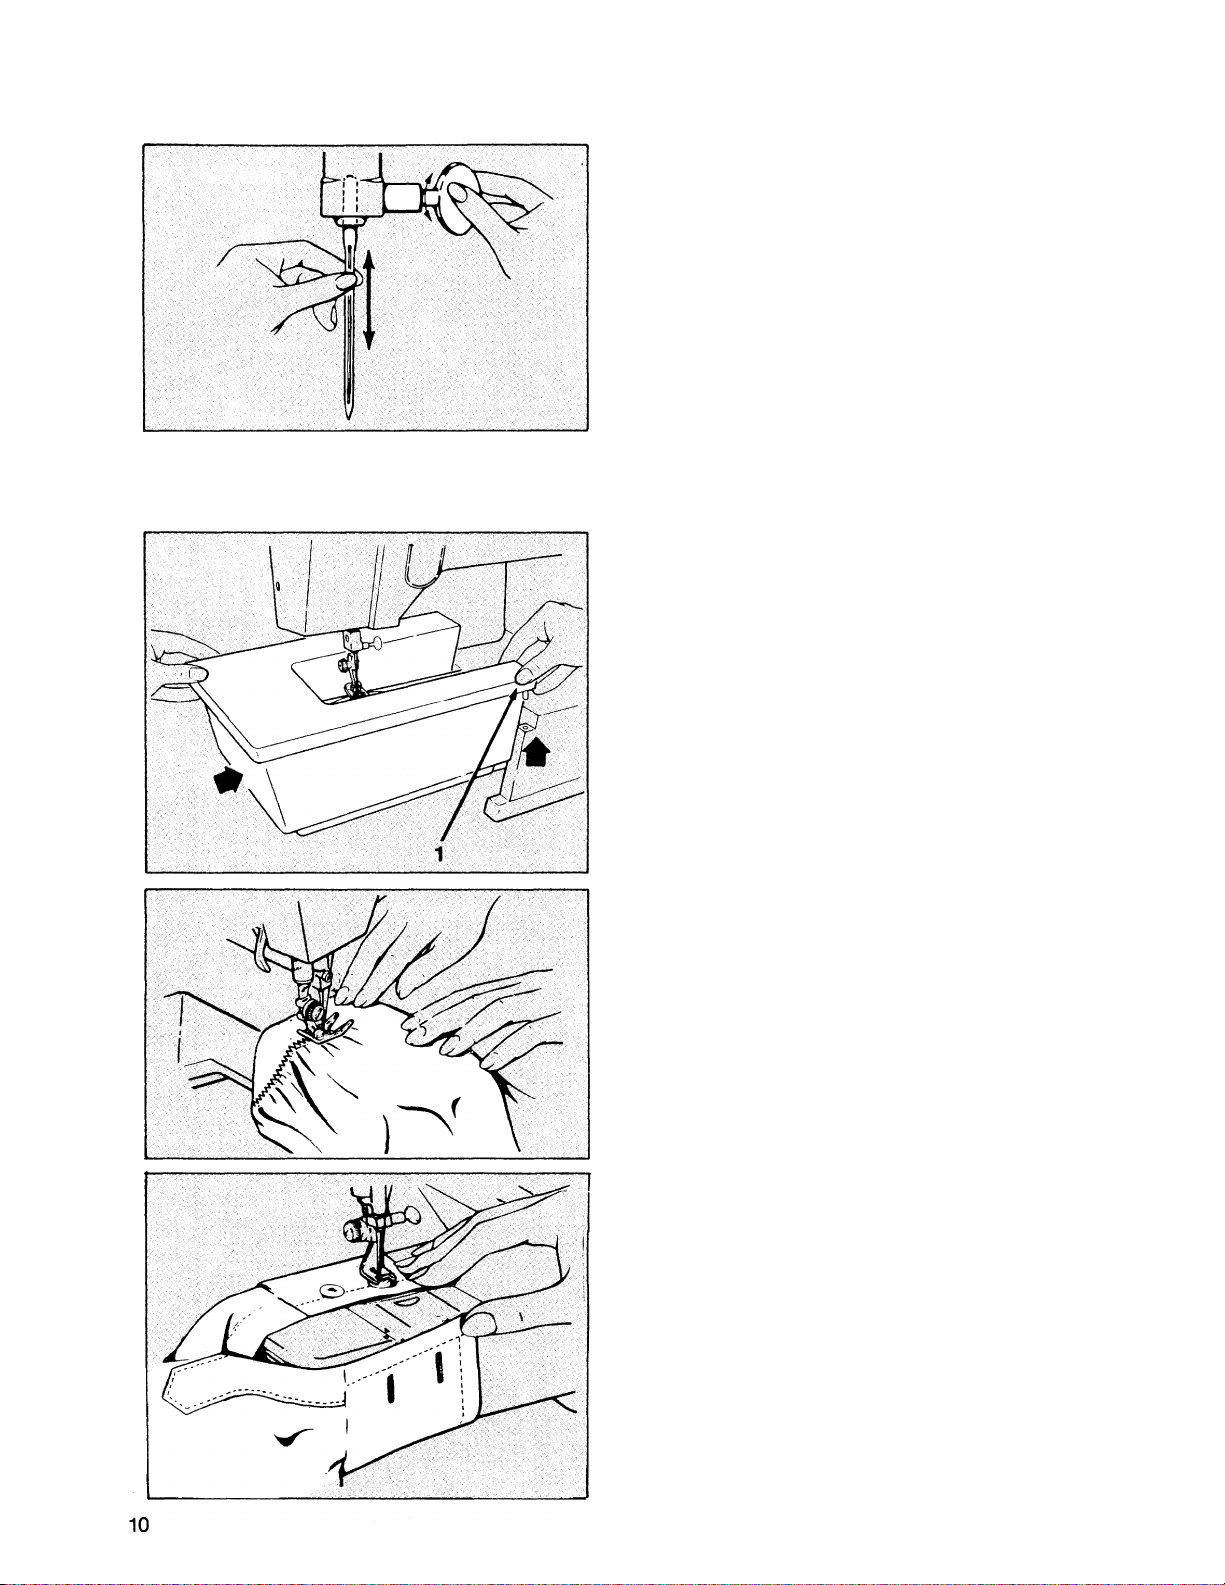
CHOOSING AND CHANGING NEEDLES
IMPORTANT: For best sewing results, use only Singer* needles.
Check the needle package, and the Fabric, Thread and Needle Table on page 9 for the
correct needle and fabric combination.
• Raise needle to its highest position.
• Loosen needle clamp screw and
remove needle.
• With flat side of needle to the back,
insert new needle up into clamp
as far as it will go.
• Tighten needle clamp screw securely.
FREE ARM SEWING
Free arm sewing makes it easier to sew hard-to-reach areas.
To change machine for free arm sewing,
push in and lift right edge (1), of extension
table, slide it to the left and off the
machine.
• Topstitch edges on sleeves, or finish
waistbands and pants legs easily.
Attach buttons without stretching cuffs
and neckbands.
Page 13
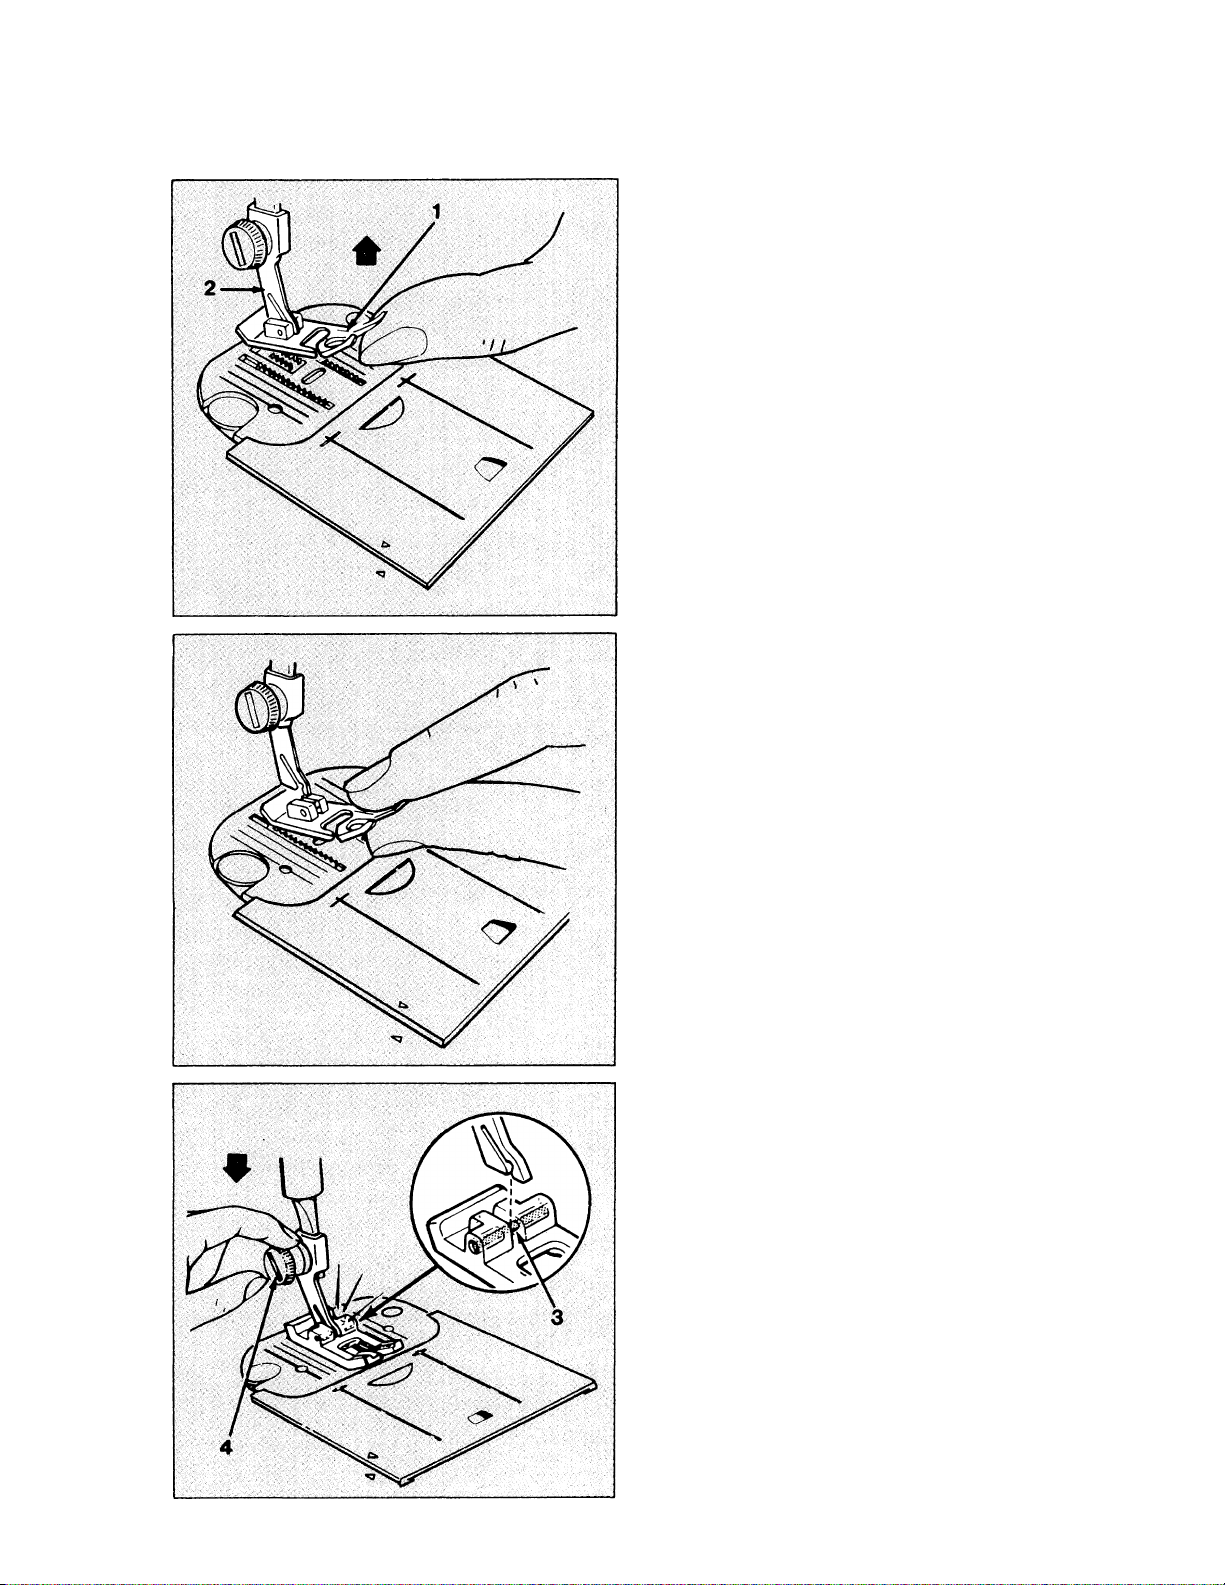
CHANGING THE PRESSER FOOT (B) (D) (E) (J) (L)
Your machine comes with the Generai Purpose Presser Foot (B) aiready attached. You
can easiiy change to any one of the other presser feet which snap onto a common shank
by following the directions below.
• Raise needle to its highest position by
turning hand wheel toward you.
• Raise presser foot using presser foot
lifter in back of machine.
• Push toe of presser foot (1) up, until it
snaps off the shank (2).
• Take foot off machine.
• Place new foot under center of shank.
• Lower presser foot lifter, fitting shank
over presser foot pin (3).
•
• Don’t turn screw. Instead, push presser
foot screw (4) down firmly until foot
snaps into place.
11
Page 14
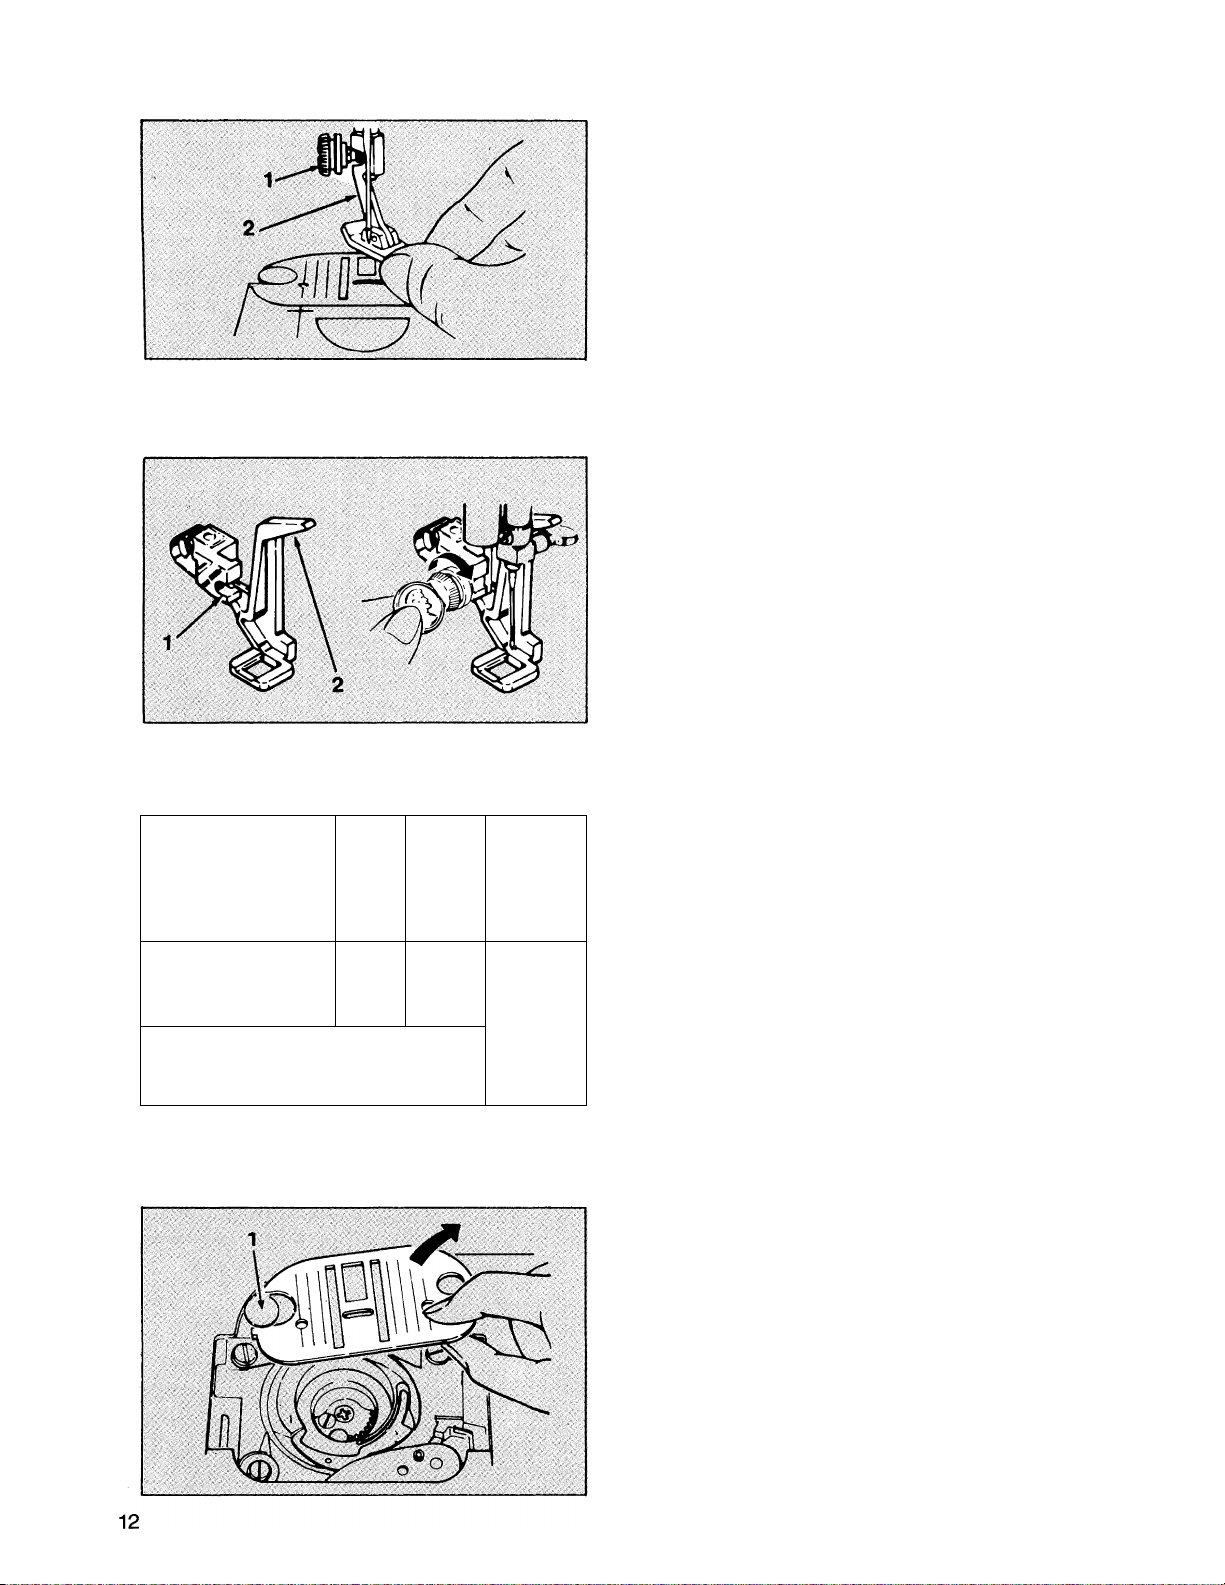
REPLACING PRESSER FOOT WITH SHANK (H) (K)
Presser feet with built-in shanks can be replaced as follows:
• Turn machine off.
• Raise needle and presser foot.
• Loosen presser foot screw (1) and
remove presser foot with shank (2),
guiding it toward you and to the right.
• To replace presser foot with shank,
hook shank around thé presser bar
and tighten presser foot screw.
ATTACHING DARNING AND EMBROIDERY FOOT (G)
This foot permits better control of fabric when doing free motion work.
• Raise needle.
Remove presser foot with shank.
Guide Darning and Embroidery Foot
from back of needle, with holding fork (1)
around presser foot screw, and lifting
finger (2) above needle clamp.
Tighten presser foot screw with coin.
To remove, loosen screw; guide foot
back.
ATTACHING FEED COVER (F)
The feed cover keeps the feed from moving the fabric.
• Raise needle and presser foot.
• Open slide plate.
• Slide feed cover on top of needle plate,
pressing tabs (1) and (2) into holes.
• Close slide plate.
• To remove, open slide plate and lift
front edge of cover; pull it away.
-I
n£jrl,
iW
ij^ii
u
ij Li
t
k
b ^
CHANGING THE NEEDLE PLATE (A) (C)
Your machine comes wih the General Purpose Needle Plate (A) attached. To attach the
Straight Stitch Needle Plate (C):
Raise needle and presser foot.
Open slide plate.
Lift up needle plate from right corner
and slide out from under foot.
To replace needle plate, slide it under
pin (1) and push it firmly to the left.
Press down until it snaps into place.
Page 15
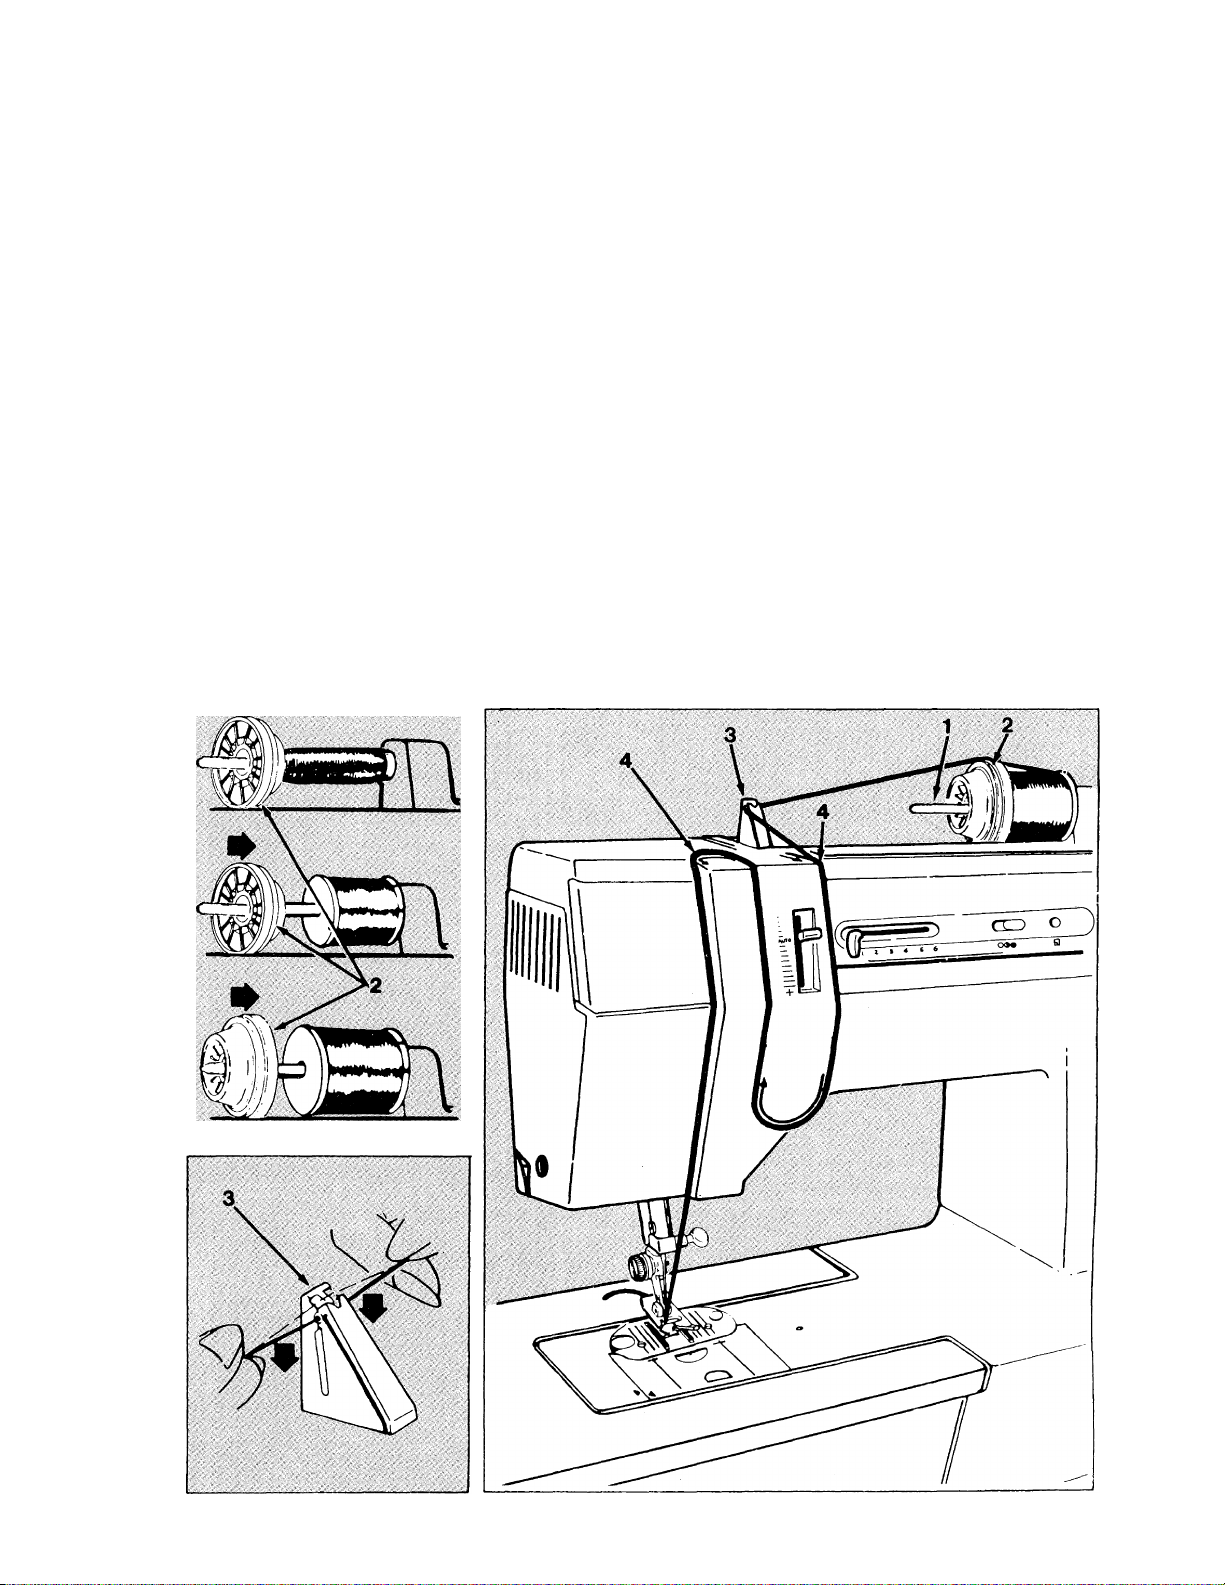
THREADING THE MACHINE
Your sewing machine is easily threaded. Tension discs, thread guides and take-up
lever have been designed as internal parts, eliminating many extra threading steps. The
clear threading path helps you avoid threading errors.
To thread your machine correctly, simply follow the steps below:
• Raise presser foot lifter.
• Raise needle to its highest position by turning hand wheel toward
you.
• Place spool of thread on spool pin (1).
• Slide spool cap (2) firmly over the rim of the spool to prevent thread
tangling.
• Snap thread into thread guide post (3).
• Following arrows, guide thread into auto tension channel (4) down to needle and
firmly pull thread.
• Thread needle from front to back.
13
Page 16
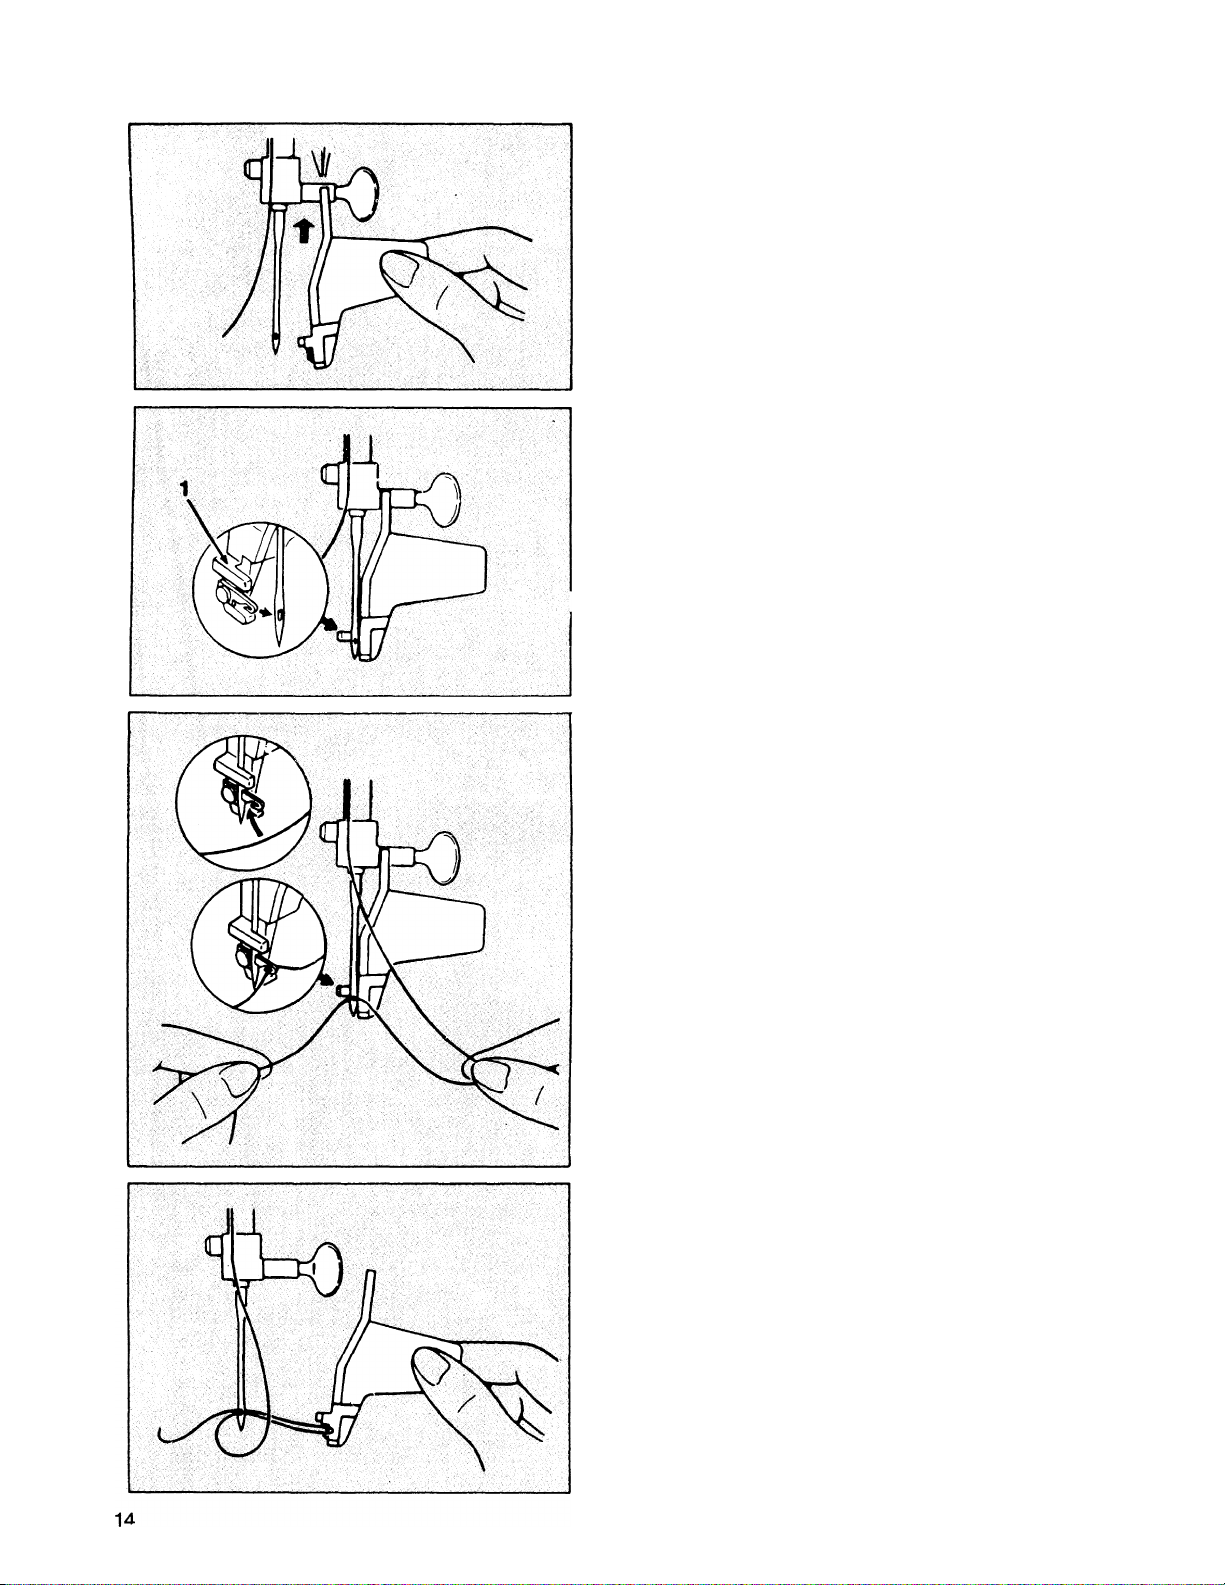
USING THE NEEDLE THREADER (P)
To help in threading the machine needle, use the needle threader as follows:
• Thread machine and draw 4" (10 cm)
of thread down to the needle.
• Lower presser foot lifter.
• Holding needle threader as shown with
your right hand, position U-shaped part
of threader under bar of needle clamp.
• Snap threader up onto bar.
• Swing threader back just far enough to clear
the needle.
• Slide threader as far to the left as it will
go.
• Be sure guide (1) is against the left side
of the needle.
• Bring metal hook of threader forward,
through the eye of the needle.
• Holding 3" (7.5 cm) of thread between
your fingers, guide thread into metal
hook. Release thread.
• Holding threader with right hand, draw
metal hook and thread backwards
through eye of the needle.
• To remove needle threader, slide it to
the right, and off bar of needle clamp.
• Carefully unhook thread from needle
threader.
Page 17
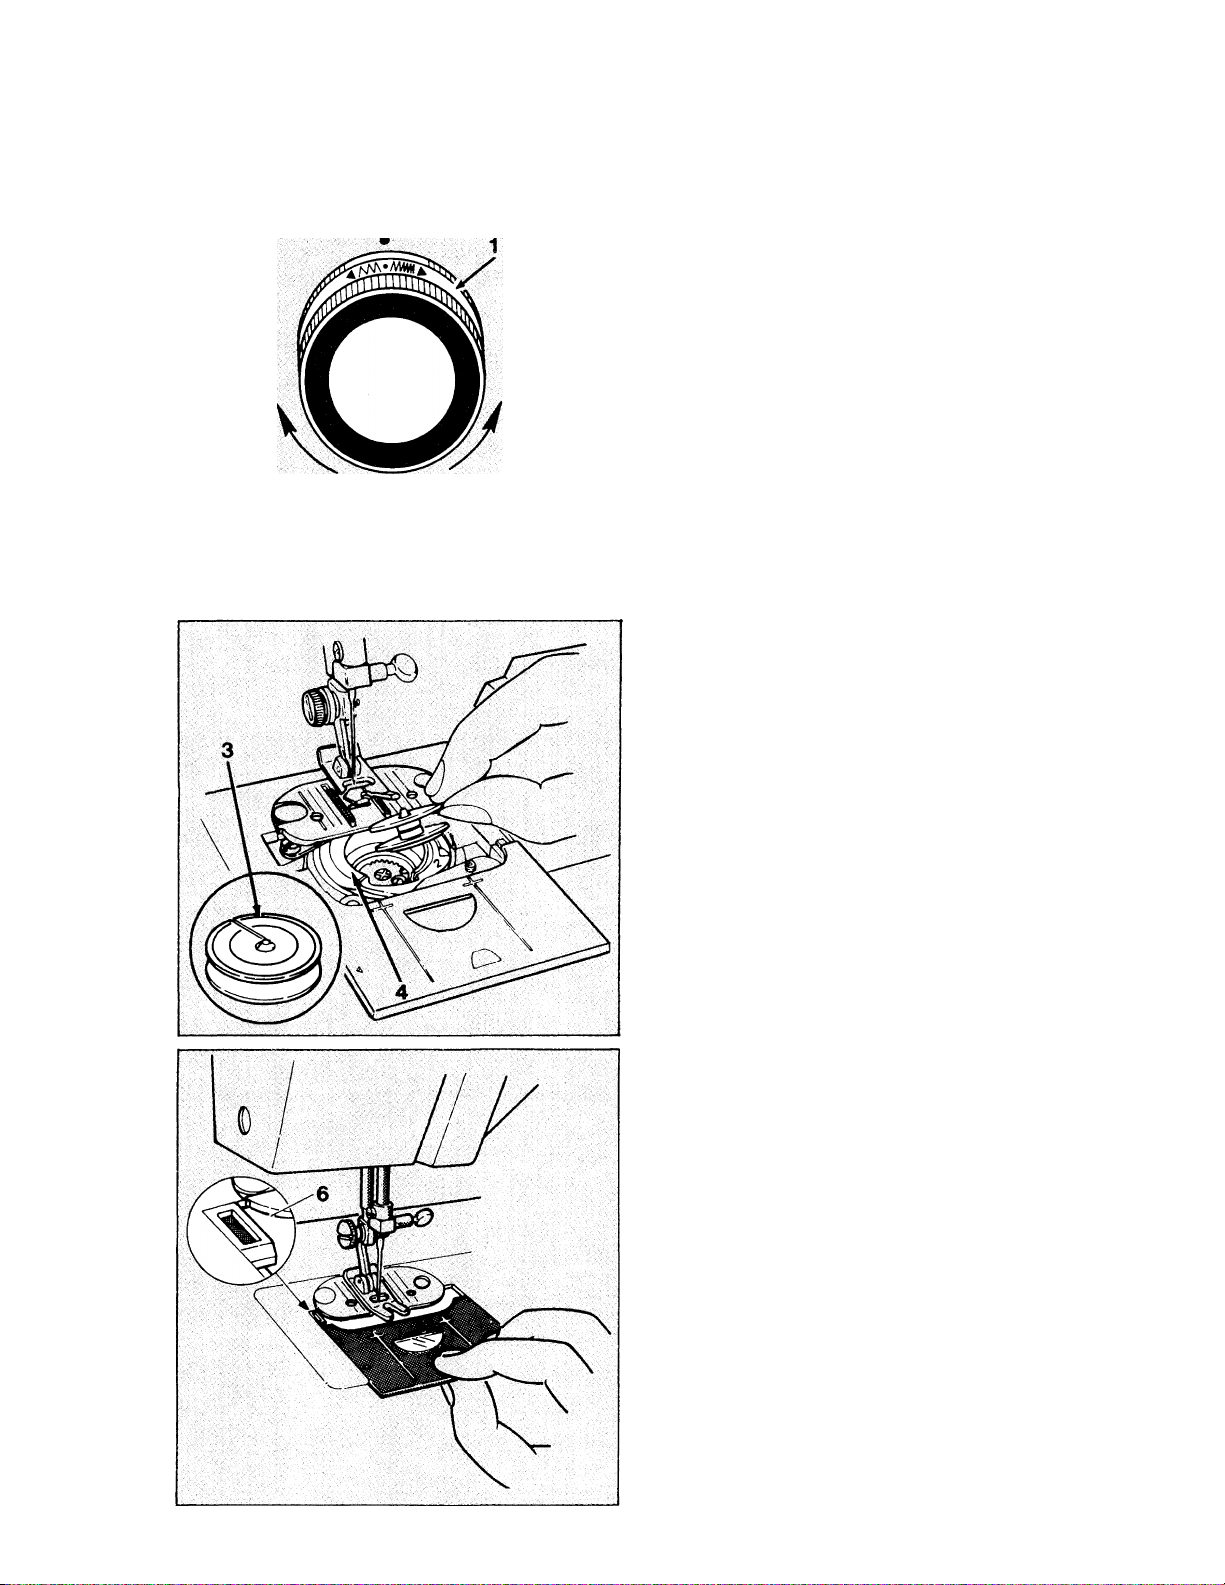
WINDING A BOBBIN
The wind-in-place bobbin winds quickly and easily while it’s in the machine.
• Raise needle to highest position by
turning hand wheel toward you.
• Raise presser foot.
• Open slide plate.
• Turn pattern selector dial (1) to select
Straight Stitch/Bobbin Winding, (Details
on “Selecting a Pattern’’ are on page 19.)
• Put an empty bobbin, with black rings
(3) facing up, into bobbin case (4).
• Close slide plate until it stops against
button (6). This will automatically
engage bobbin winder.
15
Page 18
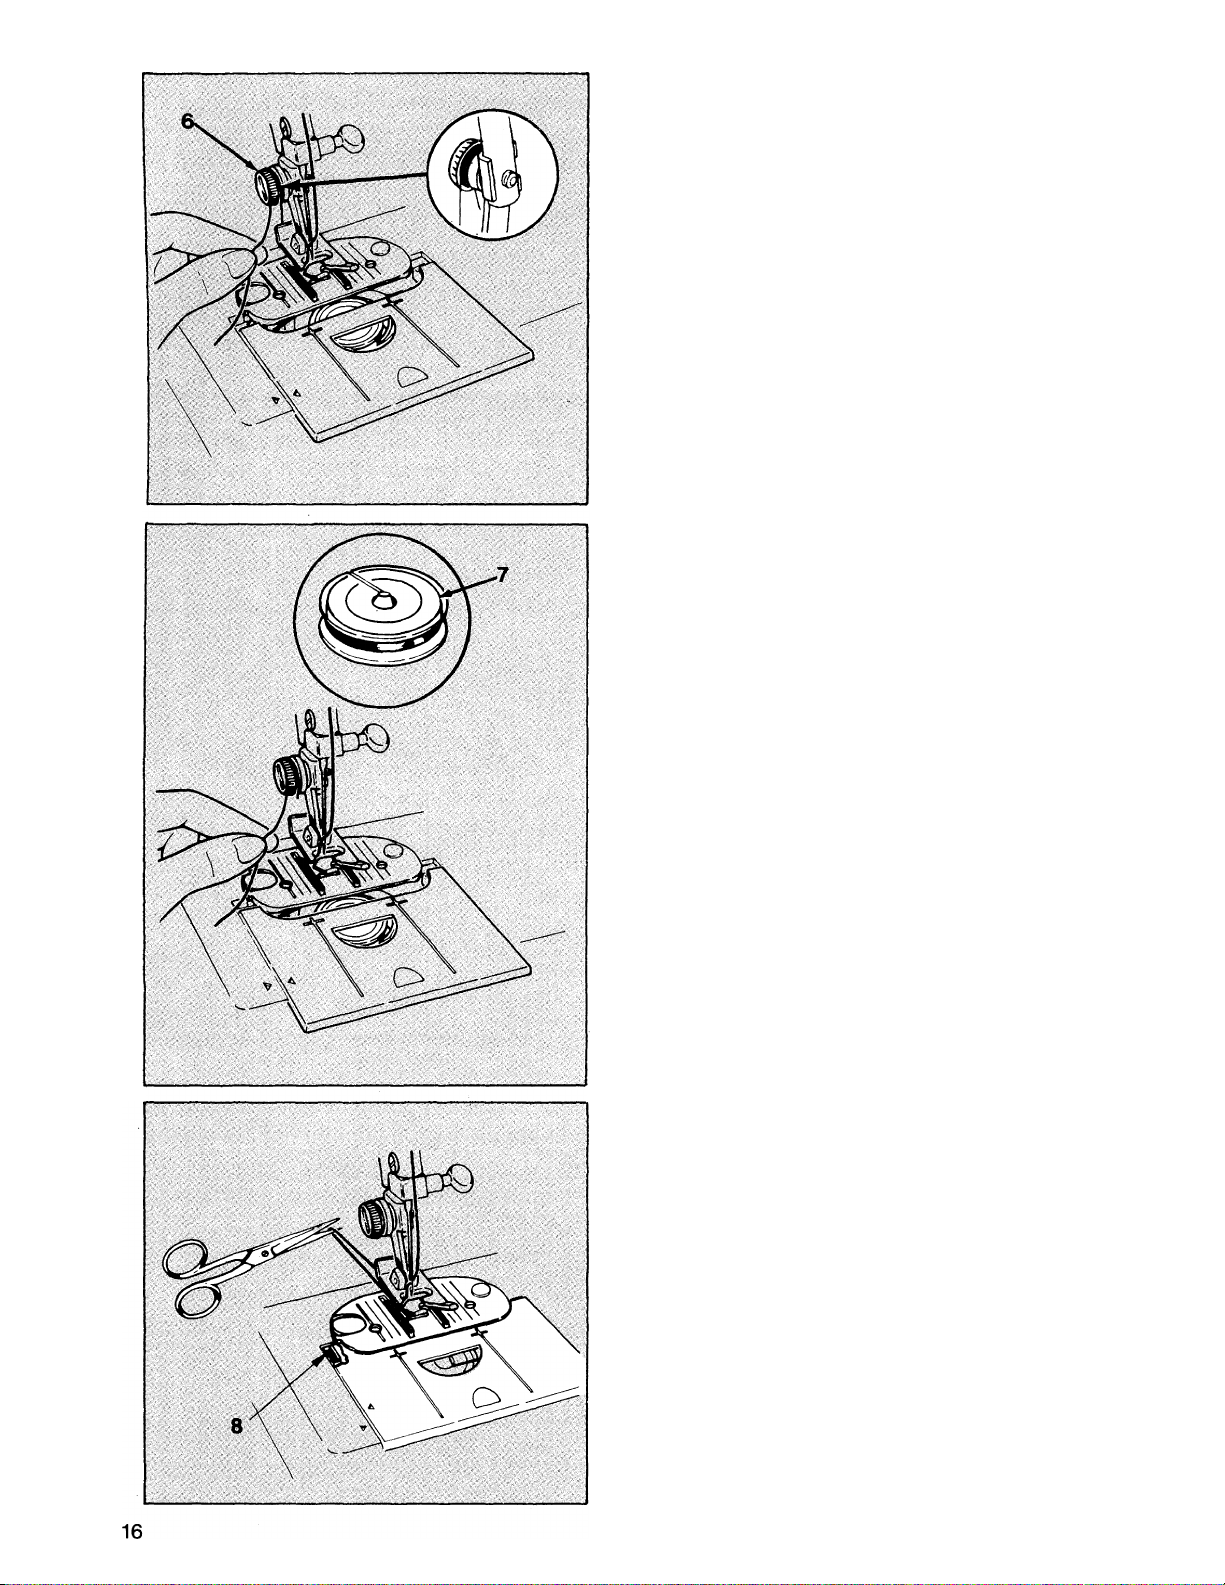
Bring thread from needle, under presser
foot and wind it one turn in any direction,
around presser foot screw (6) pulling it
into groove as shown.
• Begin running machine at a moderate
speed.
• The window in the slide plate lets you
watch the bobbin winding.
• When desired amount of thread has
been wound, stop machine. DO NOT
ALLOW THREAD TO WIND BEYOND
THE OUTSIDE “FULL” RING (7).
• Remove thread from presser foot screw.
• Push button (8) down with your finger
while closing slide plate.
• Raise needle to its highest position.
• Pull 4" (10cm) of thread under foot
toward back of machine, and cut.
• To begin sewing, position needle in
fabric where desired, lower presser
foot and start machine.
Page 19
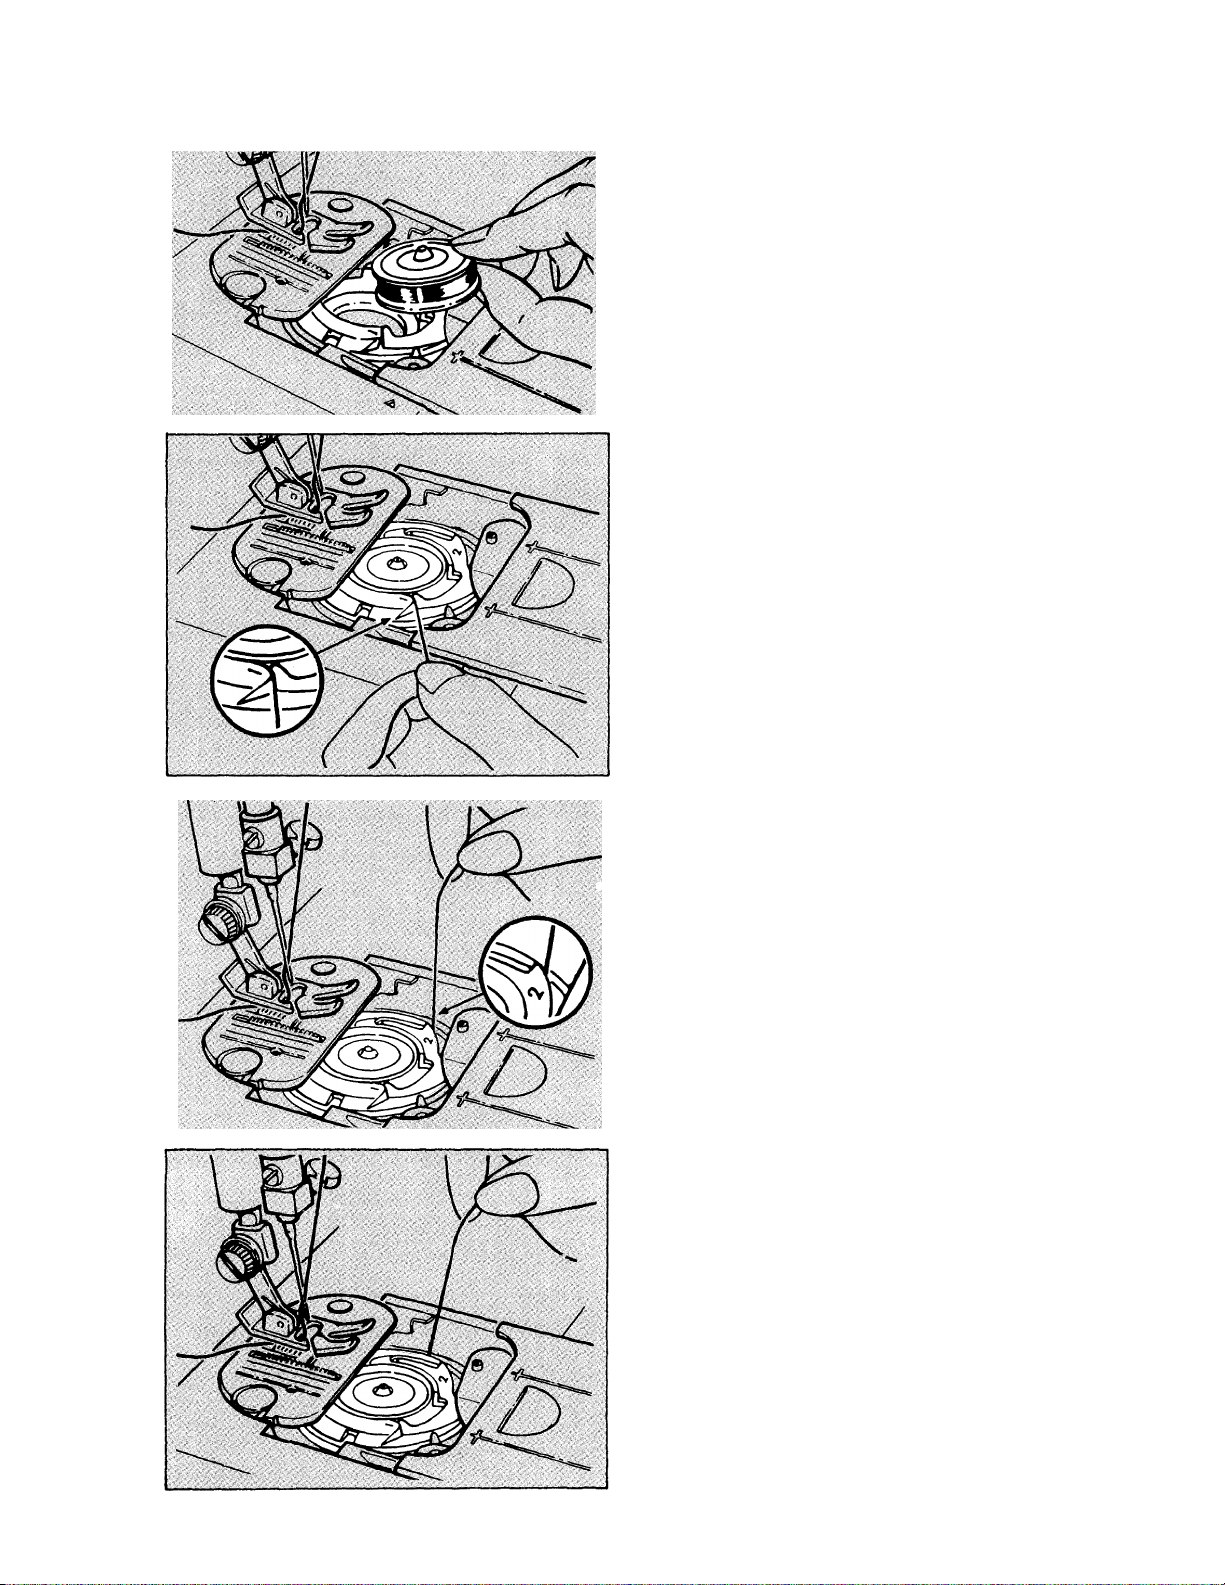
INSERTING A WOUND BOBBIN
When you want to sew with a bobbin that is already wound, insert it following the
instructions below.
• Raise presser foot.
• Turn hand wheel toward you until
needle is in its highest position.
a Open slide plate completely, and
remove bobbin.
1. Pull 4" (10cm) of thread from replace
ment bobbin and insert bobbin, with
rings facing up, into case.
2. Holding bobbin in place, guide thread
into notch (1).
3. Bring thread around and past point #2.
4. Holding bobbin thread on outside, leave
slide plate open.
• Follow directions for “Raising Bobbin
Thread”, on page 18.
17
Page 20
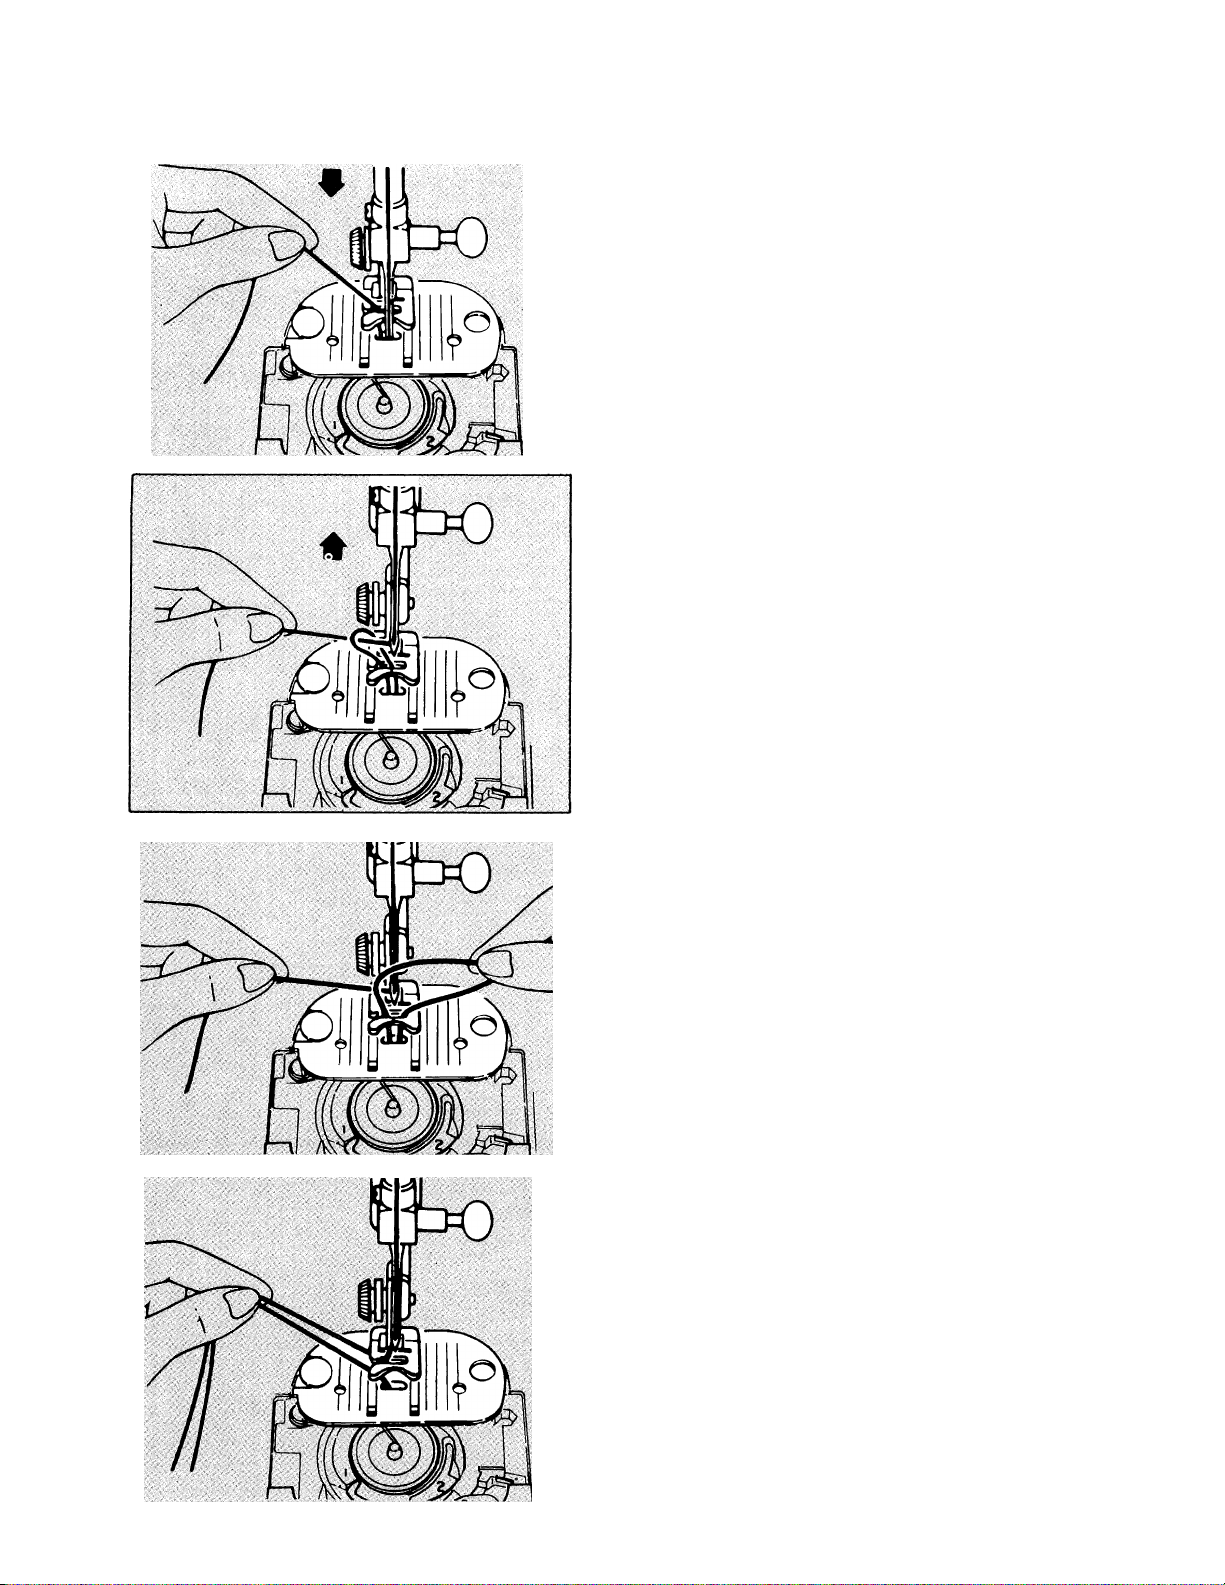
RAISING THE BOBBIN THREAD
Once the needle has been threaded and the bobbin placed in the bobbin case, the
bobbin thread must be brought up through the hole in the needle plate.
• Be sure slide plate is fully open.
1. Hold needle thread with left hand.
• Turn hand wheel slowly toward you,
lowering needle into hole in plate.
2. Continue to do this until needle rises
above needle plate.
• Pull gently on needle thread and bring
up bobbin thread in a loop.
3. Open loop with fingers to find end of
bobbin thread.
4. Draw needle thread through left side
opening in presser foot.
• Pull both threads to back of machine.
• Completely close slide plate once
bobbin thread has been brought up.
18
Page 21
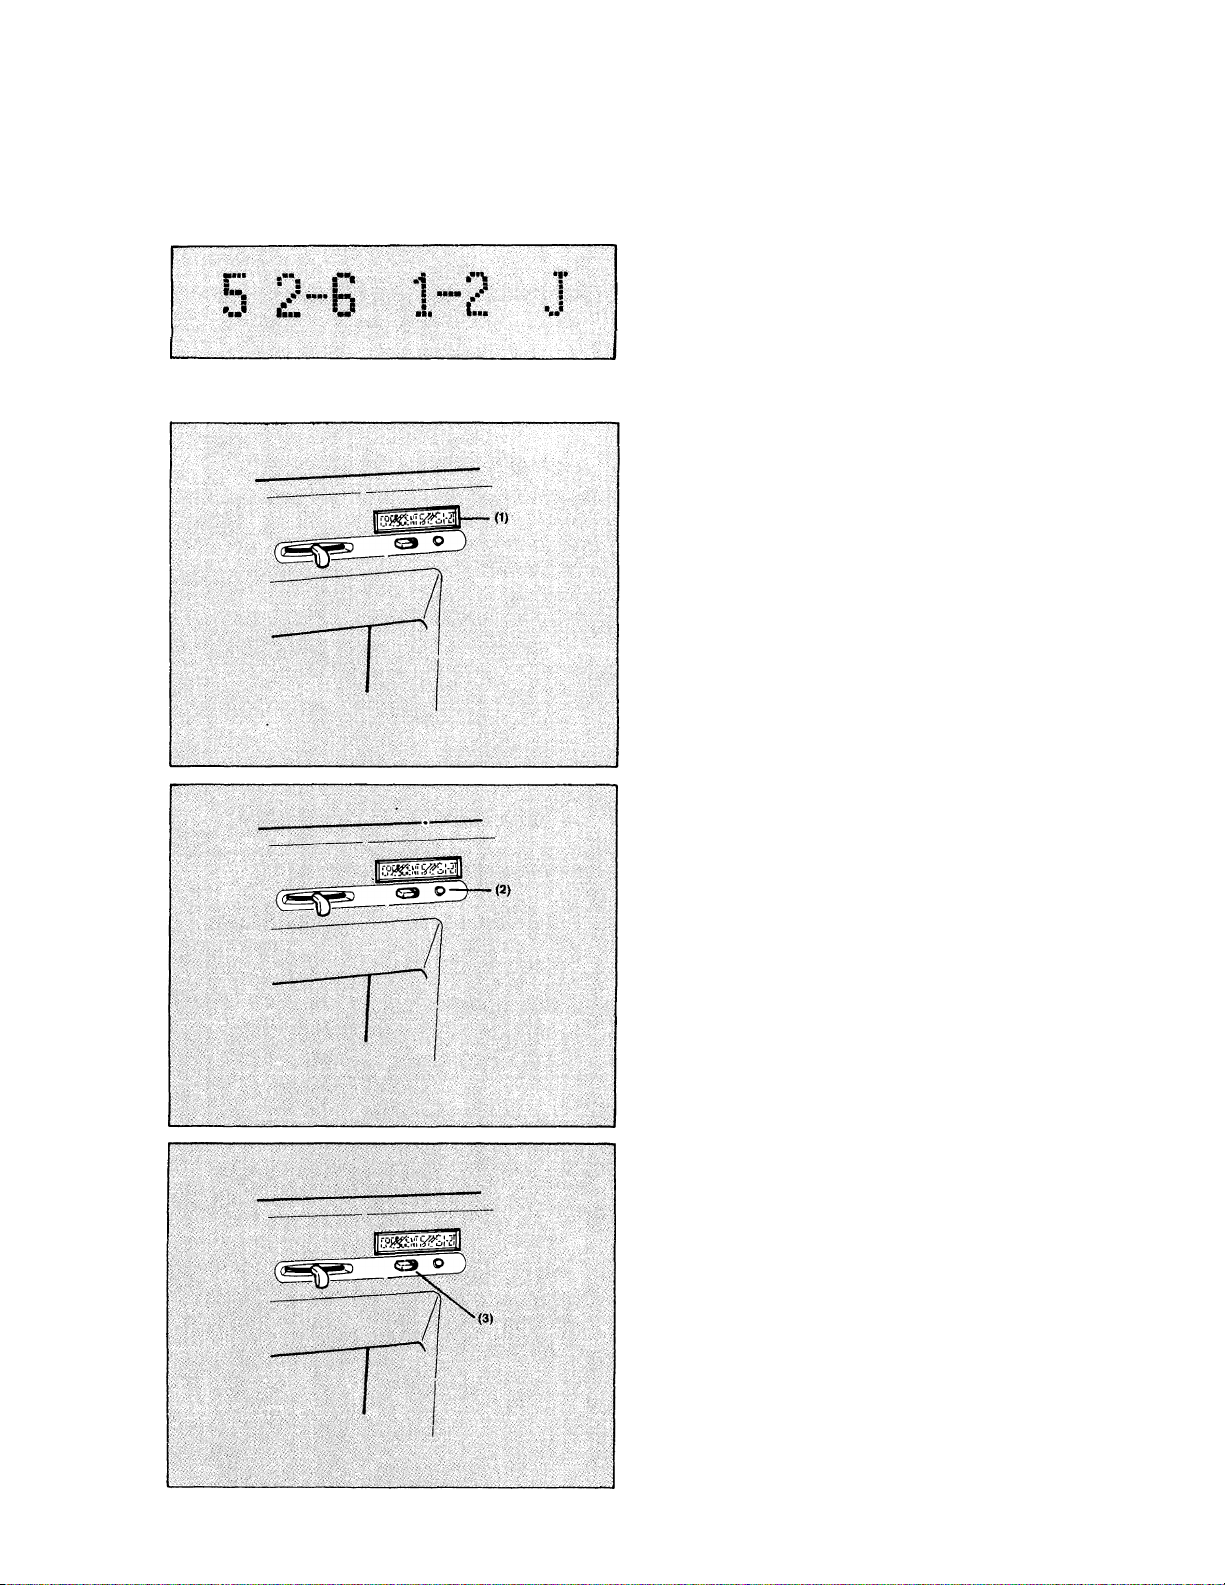
LCD PATTERN SELECTION
Your sewing machine has a unique pattern display which clearly indicates your
selected pattern.
LCD Window
As you turn the pattern selector dial, the
pattern you selected, will comes out in liquid
crystal display (LCD) window (1).
What’s The Message in The Window
• First, # is pattern sequence number. You
can select any pattern from 0 through 24.
• Second. is stitch width setting.
• Third, III 11 I is stitch length setting.
• Forth, is presser foot required.
Getting More Information
If you want more information, you can push
the button (2) once or twice.
The details about stitch will scroll on the
window.
Screen Contrast
(If your machine has this button).
You can adjust the screen contrast, by moving
the contrast control lever (3).
19
Page 22
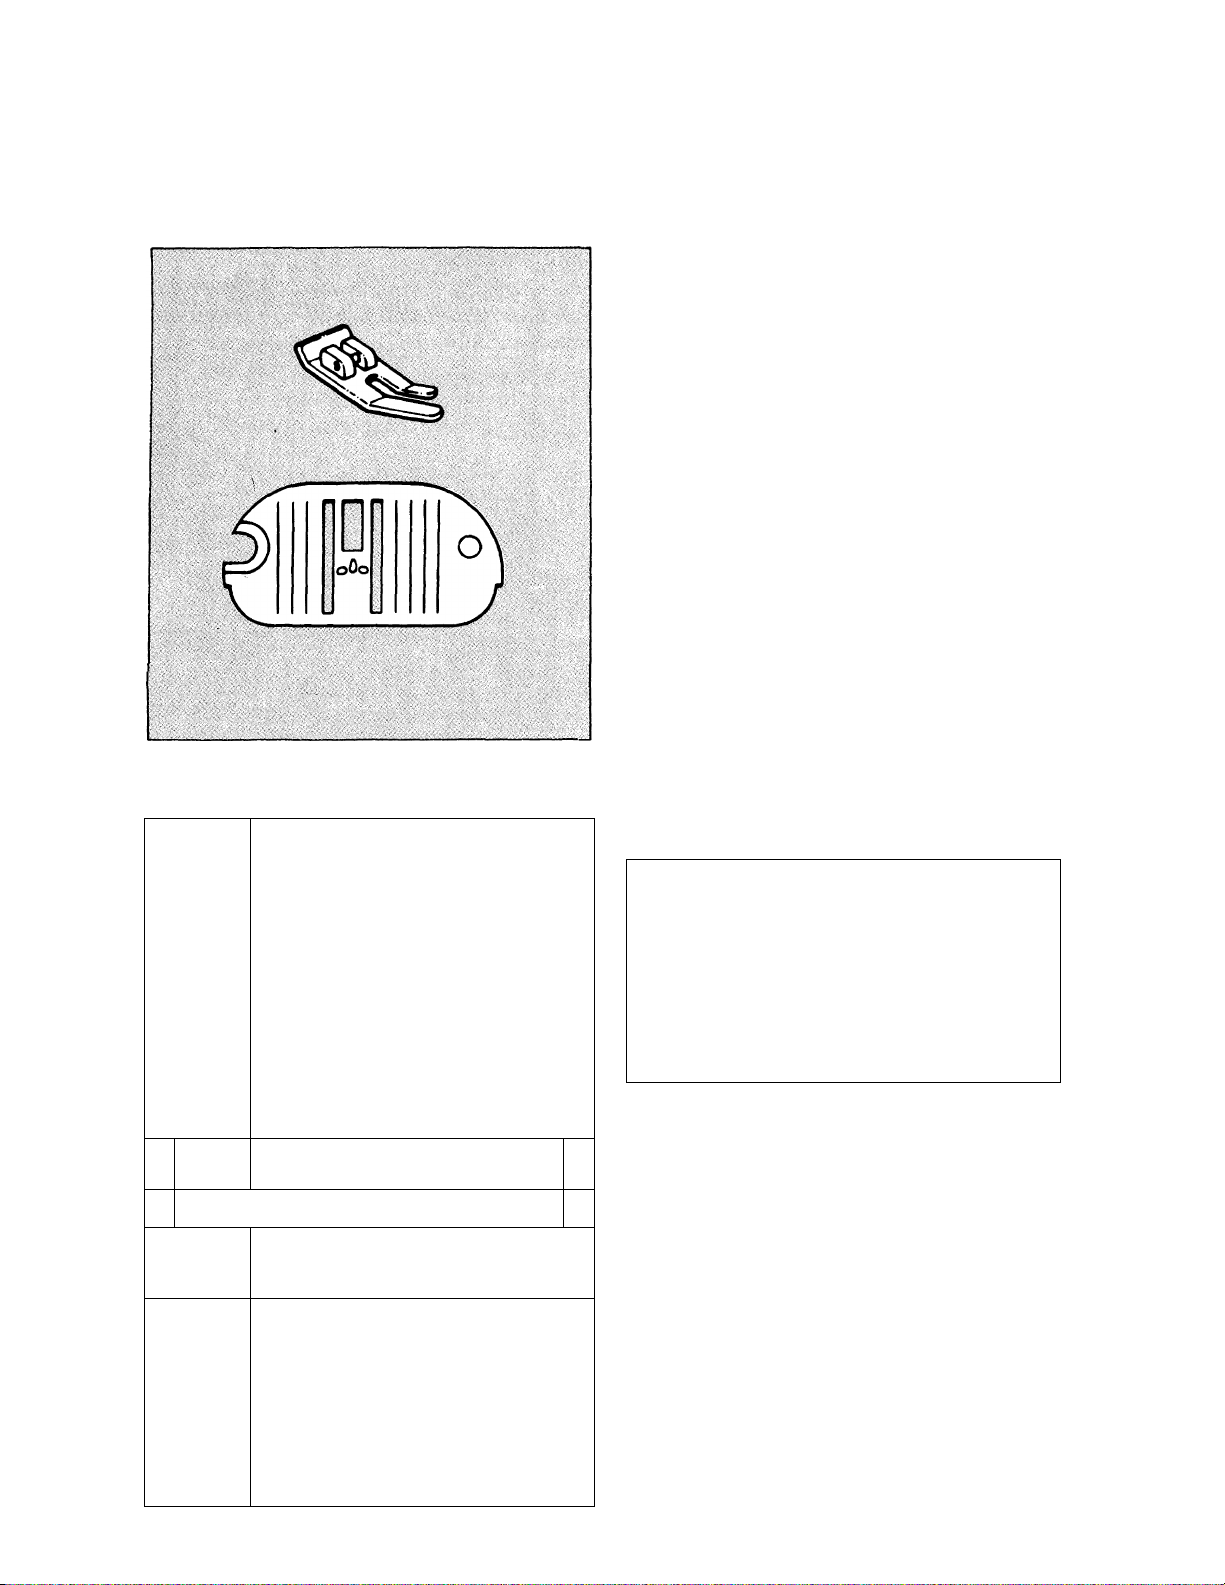
SECTION 3 STRAIGHT STITCHING
The Straight Stitch Needle Plate (C) and Presser Foot (D) help prevent skipped stitches
and control fabric when straight stitching around a curve or close to the fabric edge.
CAUTION: Straight Stitch Needle Plate and
Presser Foot should be used for straight
stitch sewing only.
Always change back to the appropriate
needle plate and presser foot when not
straight stitching.
Mil
ill!
4
'IJL
0
■
" 1111111111 ll 1 Id O
ifflirillll
.........
— ' 11 ,.
RECOMMENDED SETTINGS
Stitch Selection: Straight Stitch
Stitch Width:
Stitch Length: 1 1/2 to 4
Foot:
Needle Plate:
ADJUSTING STITCH LENGTH
The stitch length indicator is numbered 0 -
4. The lower numbers are shorter stitches.
Shorter stitches are best for light-weight
fabrics; longer ones for heavy fabrics. To
adjust the length of your stitches, slide the
stitch length lever to the left or right.
D ii
Straight Stitch (D)
Straight Stitch (C)
20
Page 23
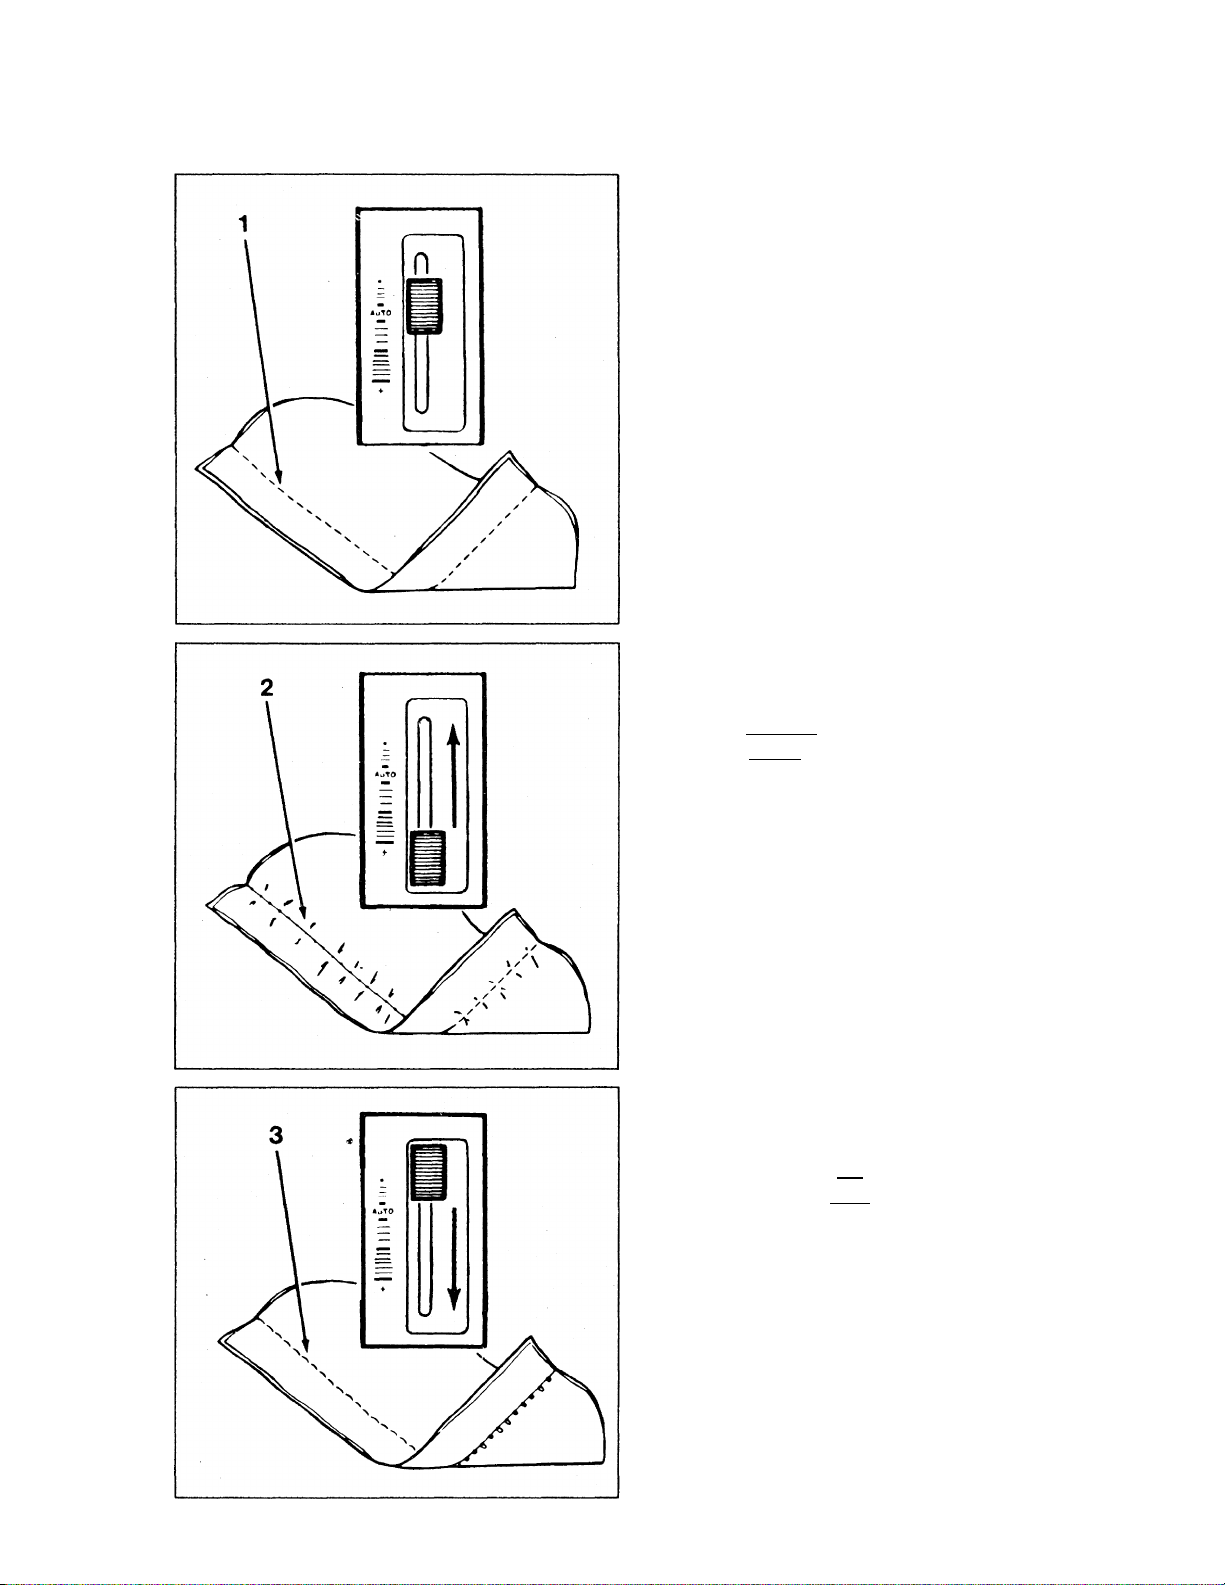
ADJUSTING THREAD TENSION
The thread tension of your sewing machine has been pre-set in the auto position to suit
most sewing applications. This auto tension feature eliminates the need for you to
adjust the tension lever for the majority of your sewing projects.
Proper tension will produce identical
stitches on both the front and back of
your fabric (1).
Too much tension will produce a tight
stitch, causing a puckered seam (2).
Adjust tension by moving lever up toward
a looserF^^^setting.
Too iittle tension will produce a loose
stitch, causing loops in your seams (3).
Adjust tension by moving lever down
toward a tighterP^^setting.
21
Page 24
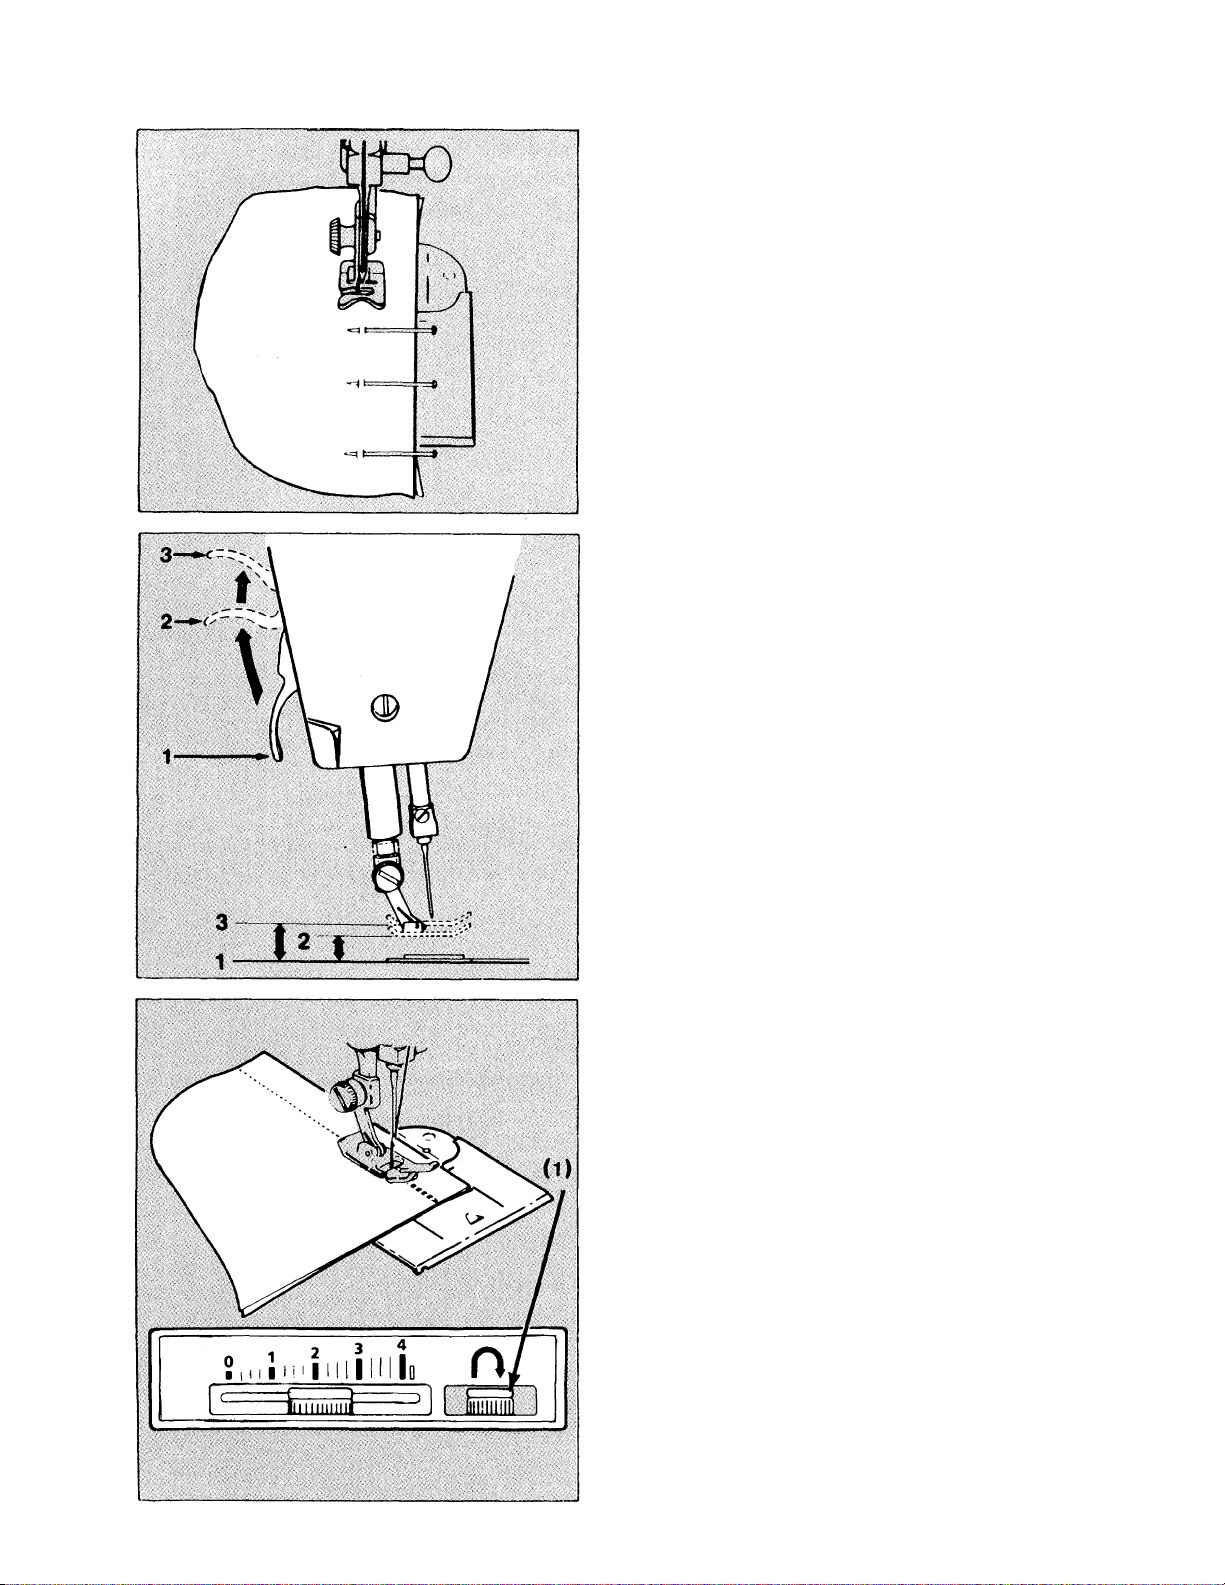
SEWING A SEAM
You can sew seams easily and accurately when you follow the suggestions below.
BASTING
Pin basting and hand basting are easy
ways to make temporary seams before
machine sewing.
• To pin baste, insert pins at stitching
line. NEVER place pins on the under
side of fabric in contact with the feed.
Do not sew over pins; pull them out as
you stitch.
• To hand baste, make long, loose
stitches that can be easily removed.
PLACING FABRIC UNDER PRESSER FOOT
• To place fabric under presser foot, raise
presser foot lifter (1) to its “up” position
(2), where it locks in place.
• The lifter can be raised and held in the
“extra high” position (3) for bulky fabrics.
STITCHING IN REVERSE
• To reinforce beginnings or ends of
seams, push in reverse lever (1). Machine
will straight stitch in reverse for as long
as you hold the lever in.
• For continuous reverse stitching, push
lever in and slide it to the left to lock.
Unlock reverse lever by sliding it back
to the right and letting it return to its
normal position.
22
Page 25
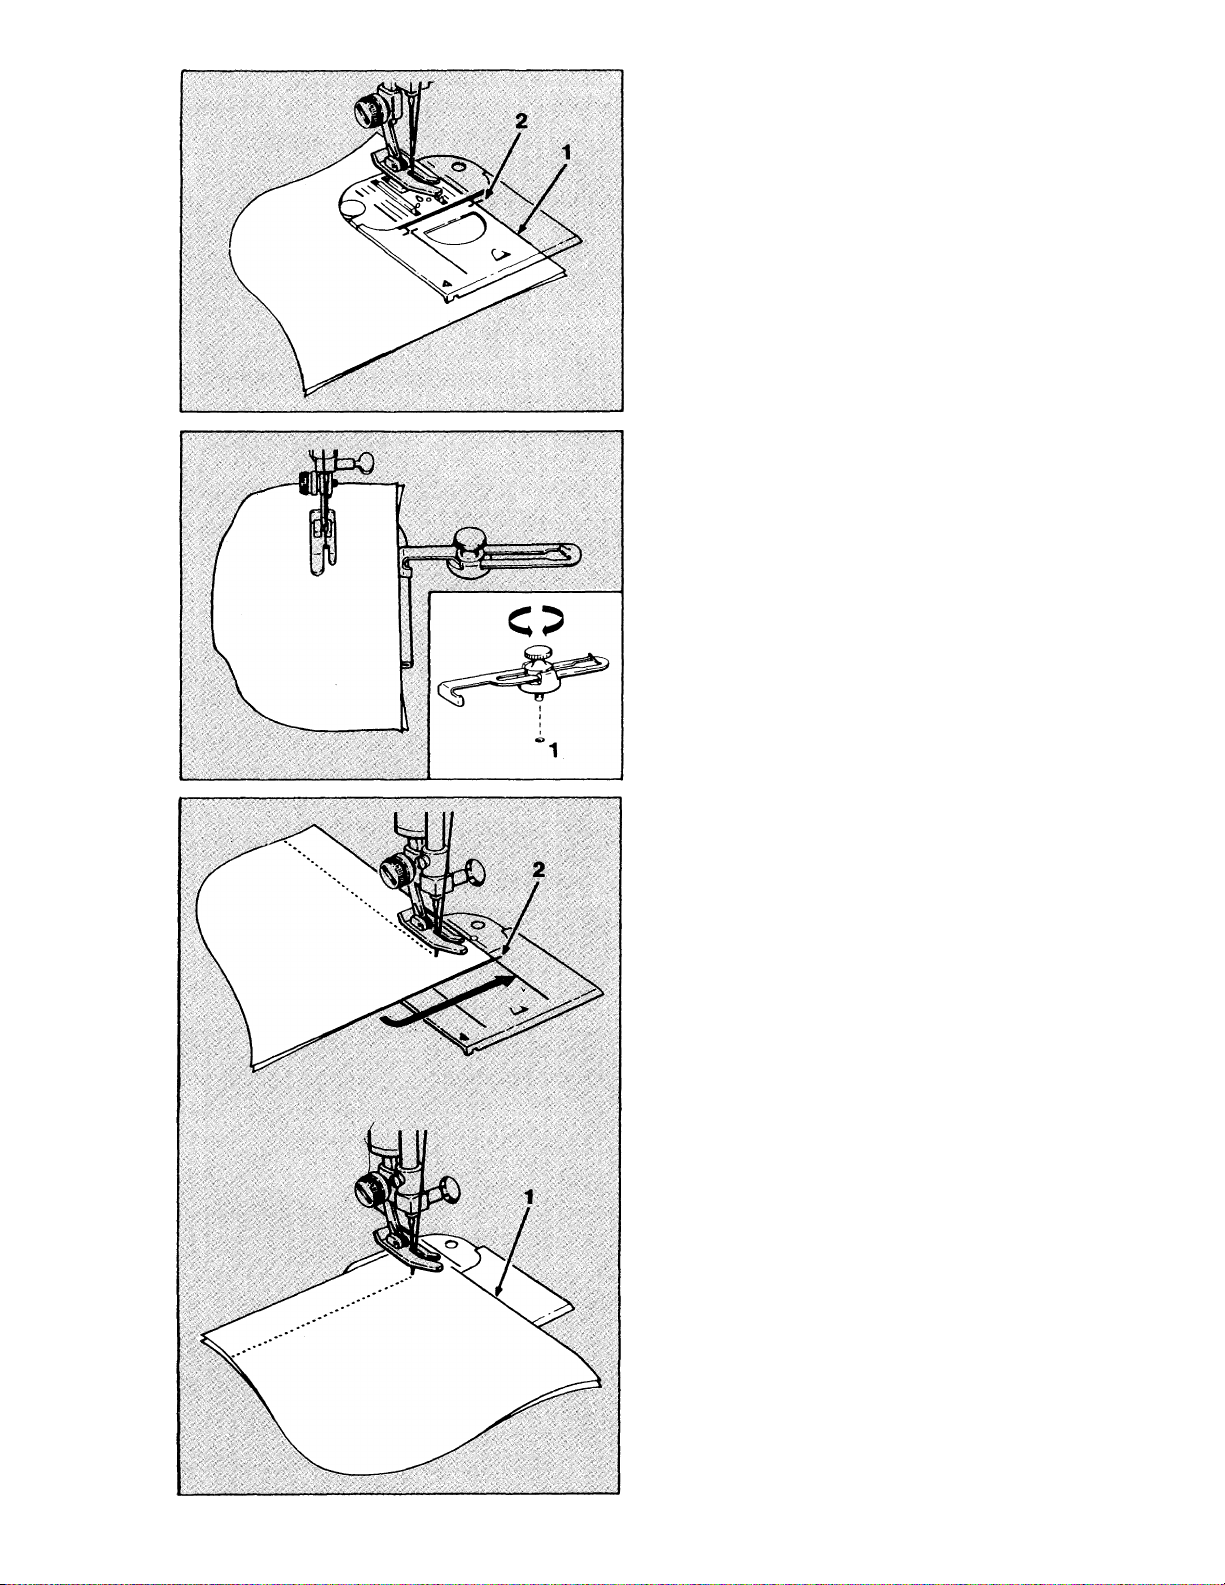
KEEPING SEAMS STRAIGHT
To keep seams straight, use one of the
guidelines on the needle plate. The most
commonly used line (1) is extended onto
the slide plate. The crosslines (2) serve
as guides when stitching square corners.
USING THE SEAM GUIDE (N)
For extra help in keeping seams straight,
particularly for very narrow or very wide
seams, use the seam guide which comes
with your machine.
To attach the seam guide, place screw of
seam guide into the hole in the bed of the
machine, on the right side of slide plate
(1)
Line up the straight edge of the guide
with the needle plate guideline for desired
seam width and tighten .screw.
TURNING SQUARE CORNERS
To turn a square corner, use crosslines
on slide plate.
• Line up fabric with extended guidelines
on needle plate and stitch seam, slow
ing speed as you approach corner.
When bottom edge of fabric reaches
cornering crosslines (2) on slide plate,
stop stitching.
Be sure needle is down in fabric.
Raise presser foot slightly. Turn fabric,
bringing bottom edge in line with guide
line (1).
Continue stitching seam.
23
Page 26
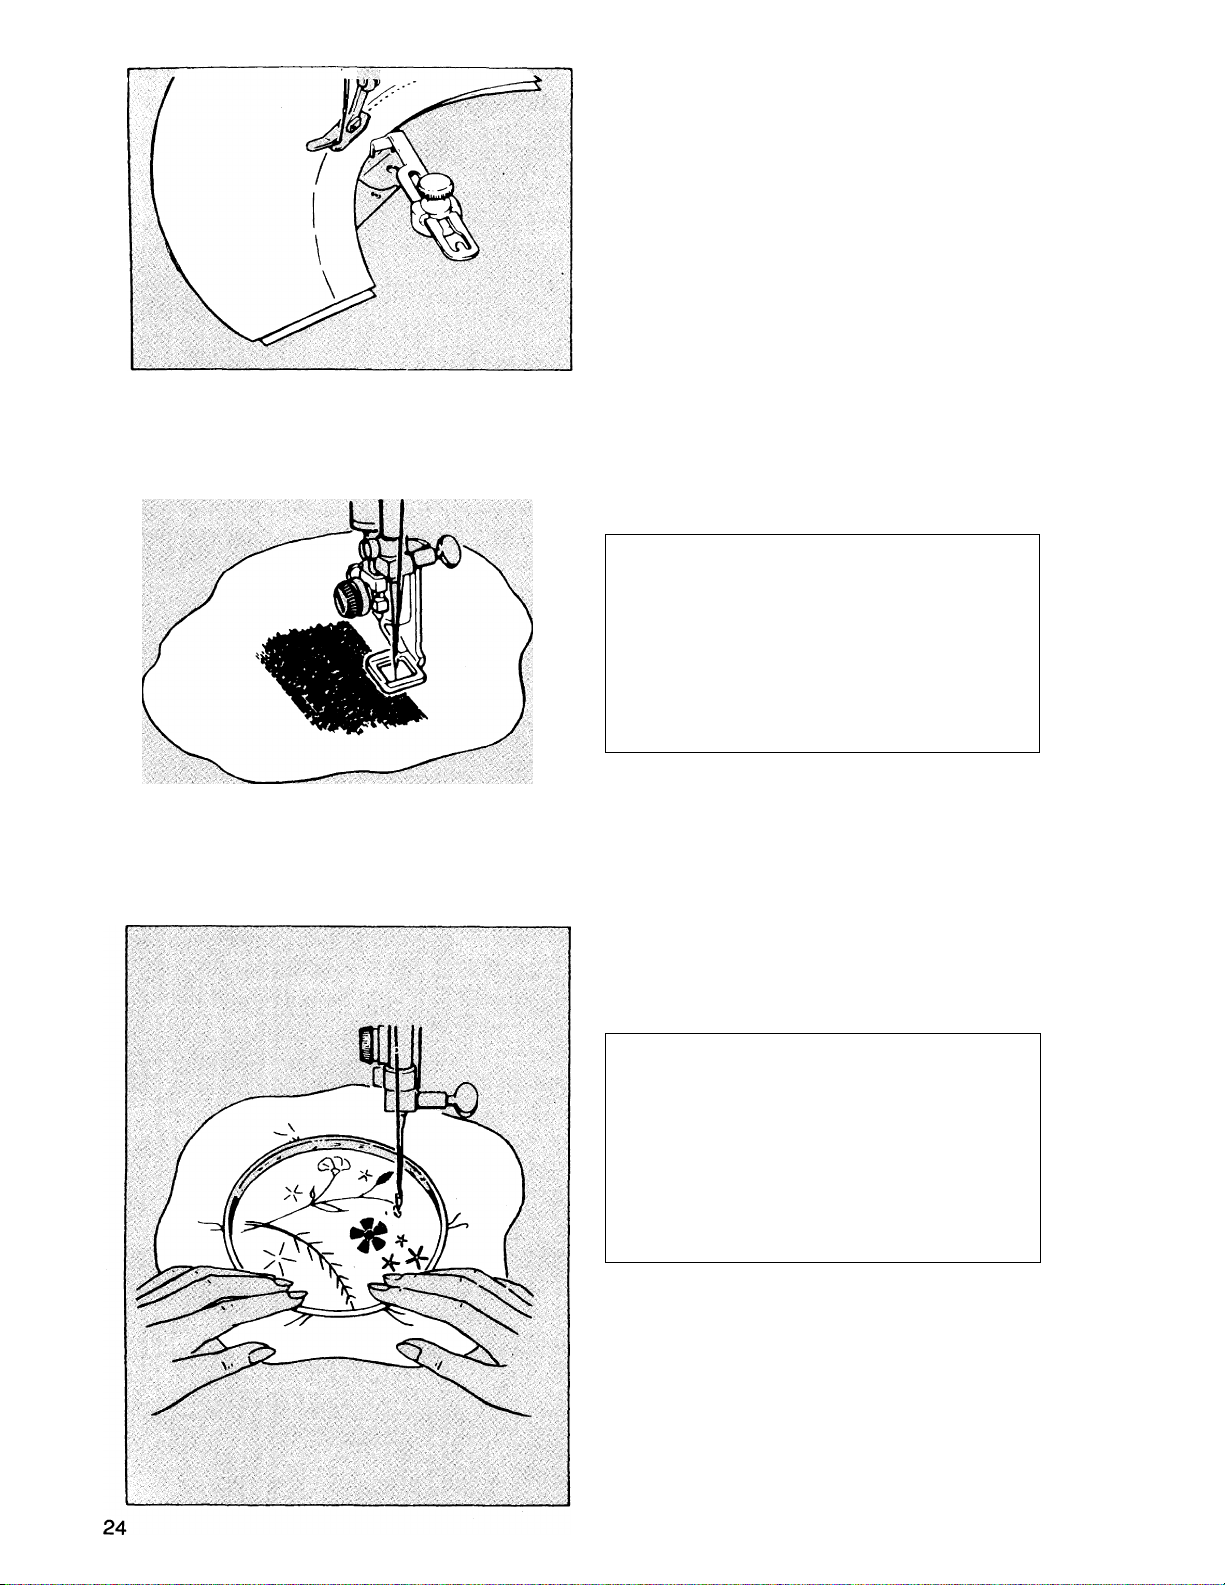
SEWING CURVED SEAMS
• Baste seam line.
• Use a short stitch for elasticity and
strength.
• Guide fabric to follow curve.
• The seam guide may also be used
when sewing curved seams. Attach
seam guide at an angle so that the
edge closer to the needle acts as a
guide.
DARNING
Mend worn or torn areas using the
Darning and Embroidery Foot.
• Trim ragged edges and baste a backing
on wrong side of tear.
RECOMMENDED SETTINGS
Stitch Selection:
Straight Stitch
Stitch Width:
Stitch Length:
Foot: Darning and Embroidery (G)
Needle Plate:
• Attach Feed Cover (F).
• Place area to be darned, right side up,
under presser foot; lower foot.
• Stitch, guiding fabric back and forth,
until entire area is filled in.
--
...
. H
0
General Purpose (A)
FREE MOTION EMBROIDERY
In free motion embroidery, you sew without
a presser foot, and control the fabric with
an embroidery hoop.
RECOMMENDED SETTINGS
Stitch Selection:
Stitch Width:
Stitch Length:
Foot: Remove foot with shank
Needle Plate:
Straight Stitch or
Zig-Zag
- --wwwwwyVlA
0 It
0
General Purpose (A)
• Attach Feed Cover (F).
• Be sure to lower presser foot lifter.
• When embroidering, as shown, use
straight stitches for stems, and zig-zag
stitches, at varying widths, for leaves
and petals. Lengthen stitches by mov
ing the hoop faster or slower.
NOTE: The Darning and Embroidery Foot
(G) may be used to help control fabric.
Page 27
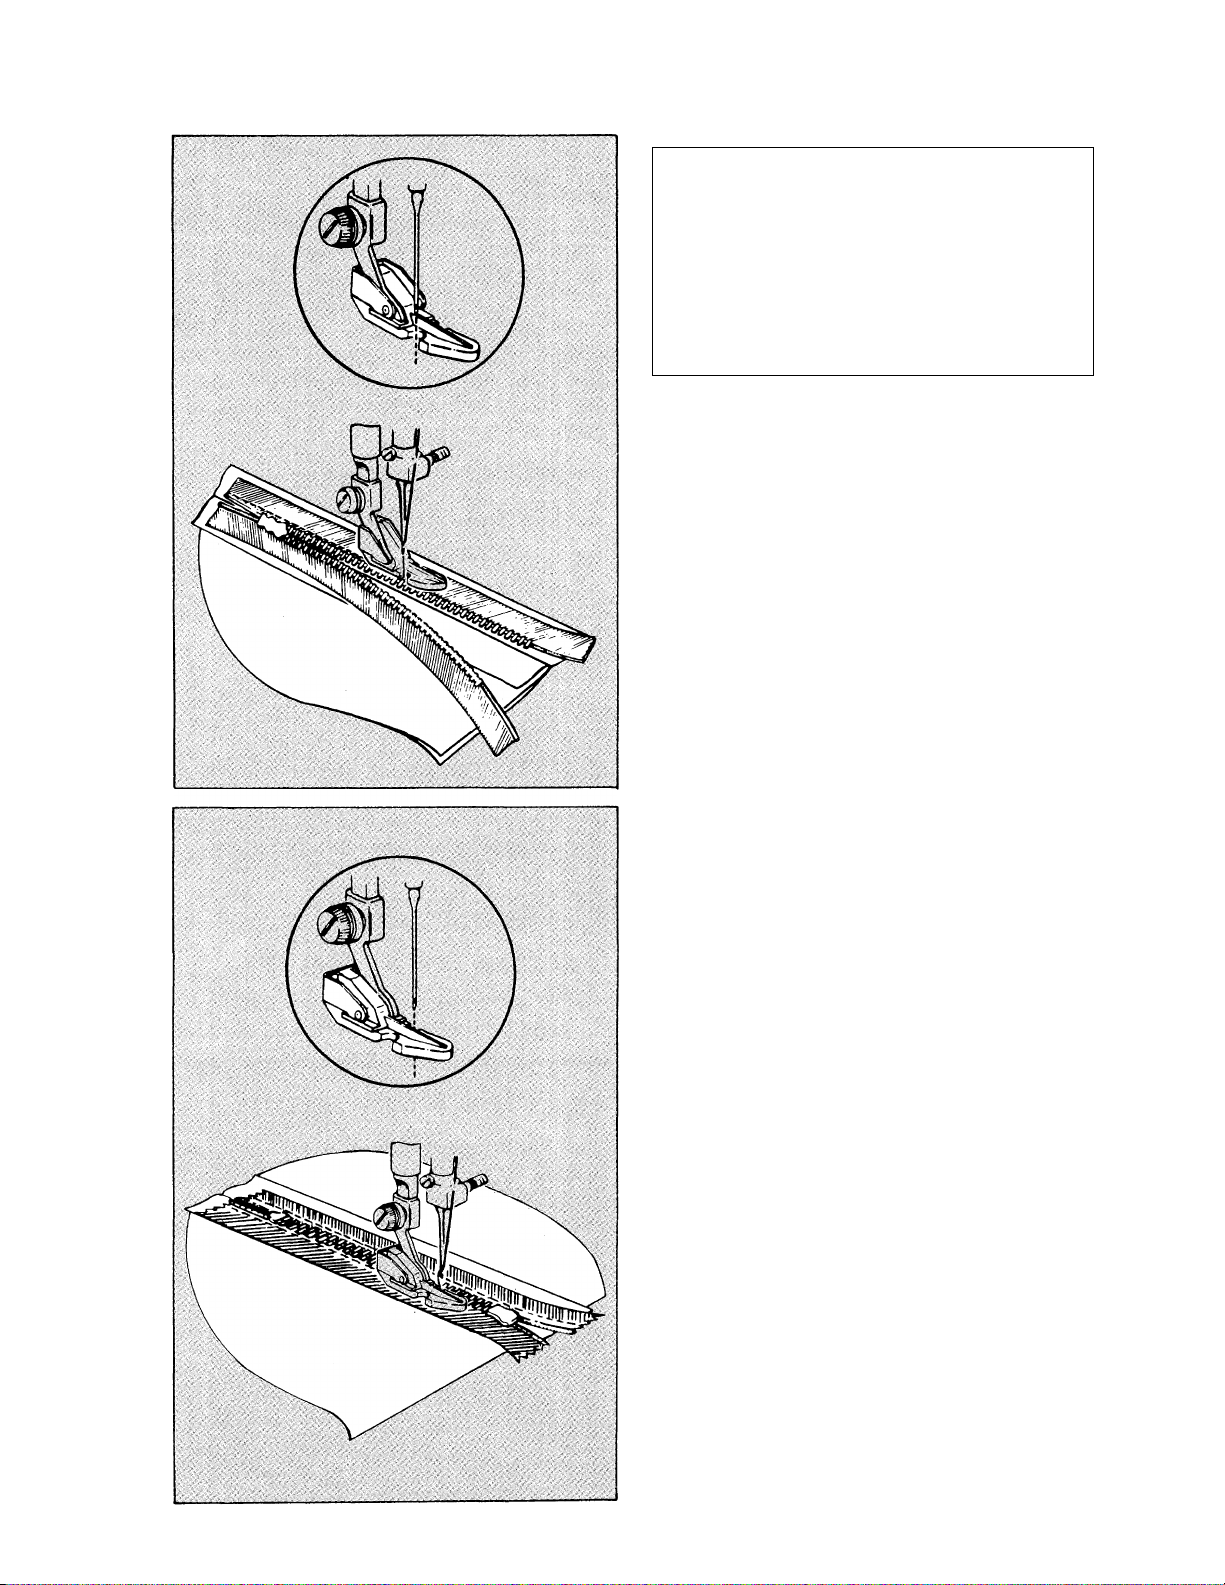
INSERTING A ZIPPER
The zipper package will provide complete instructions for inserting zippers.
RECOMMENDED SETTINGS
Stitch Selection:
Stitch Width:
Stitch Length:
Foot:
Needle Plate:
When zipper is to the left of needle,
attach left side of zipper foot to shank.
The needle will enter left notch of foot,
sewing close along zipper teeth.
Straight Stitch
u SC
1-1/2 to 4
Zipper (E)
General Purpose (A)
Attach right side of zipper foot to shank
when a zipper is to the right side of the
needle. The needle will enter right notch
of foot, sewing close along zipper teeth.
25
Page 28
SECTION 4 SPECIAL STITCHES
The Special Stitches on your machine have a variety of practical and decorative uses.
In this section are recommended applications for each stitch. However, these stitches
can be used for many other sewing projects.
Before beginning a sewing project, check
the Fabric, Thread and Needle Table on
page 9 for the best needle and thread
combination for your fabric.
With each application, recommended
settings have been given. These have
been highlighted for easy identification.
You can adjust each setting, however, as
desired.
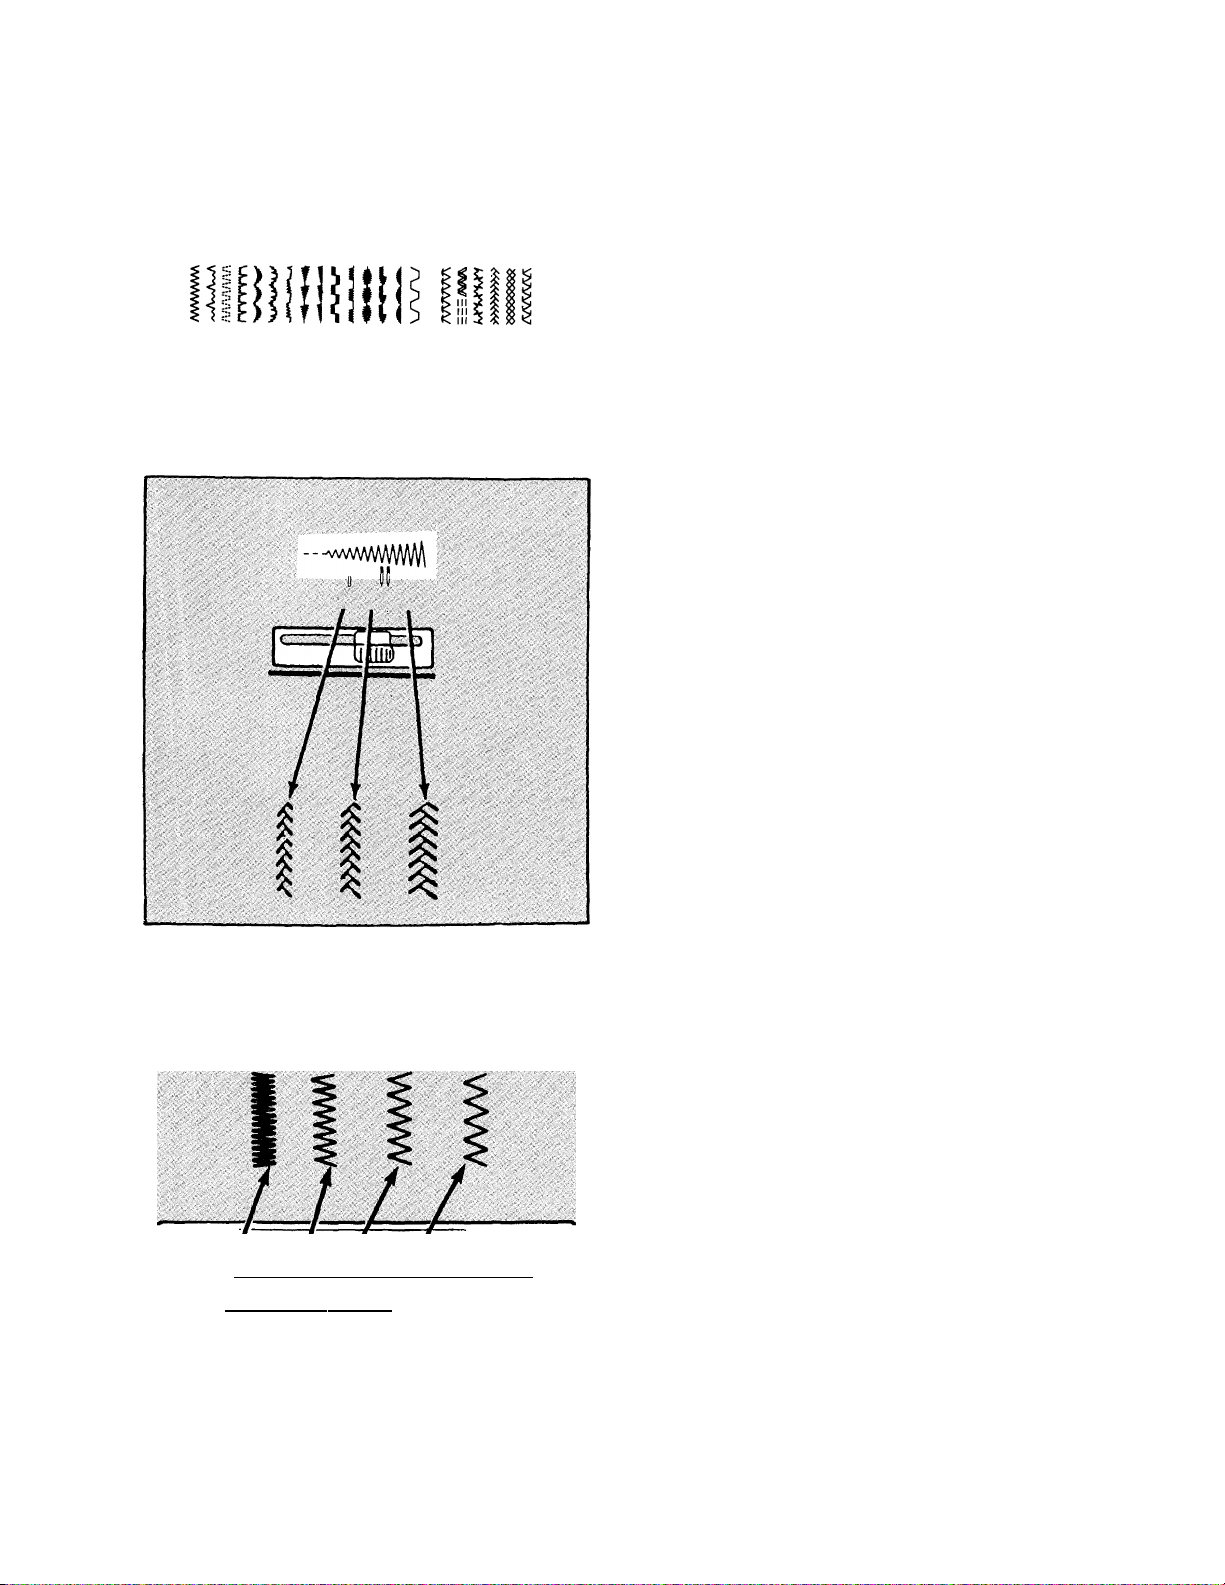
ADJUSTING STITCH WIDTH
To widen or narrow a Special Stitch
pattern, move the stitch width lever off
Straight Stitch, [[] , toward any other
width setting at the right.
/ / ^ t
■ 111 i 111111 il 111 O
* - — i i i i i n n i i ^ ) f ¡ S
NOTE: The double patterns on your stitch
width indicator are for twin needle sew
ing. Attachments for this special feature
are available from your sewing center.
ADJUSTING STITCH LENGTH
The stitch length indicator is numbered
0 to 4. The area between 0 and 1 will
produce very dense stitching. For more
open stitching, slide the stitch length lever
anywhere from 2 to 4. When sewing
special color coded stitches. The length
MUST be set in the 3-1/2 to 4 area.
26
Page 29
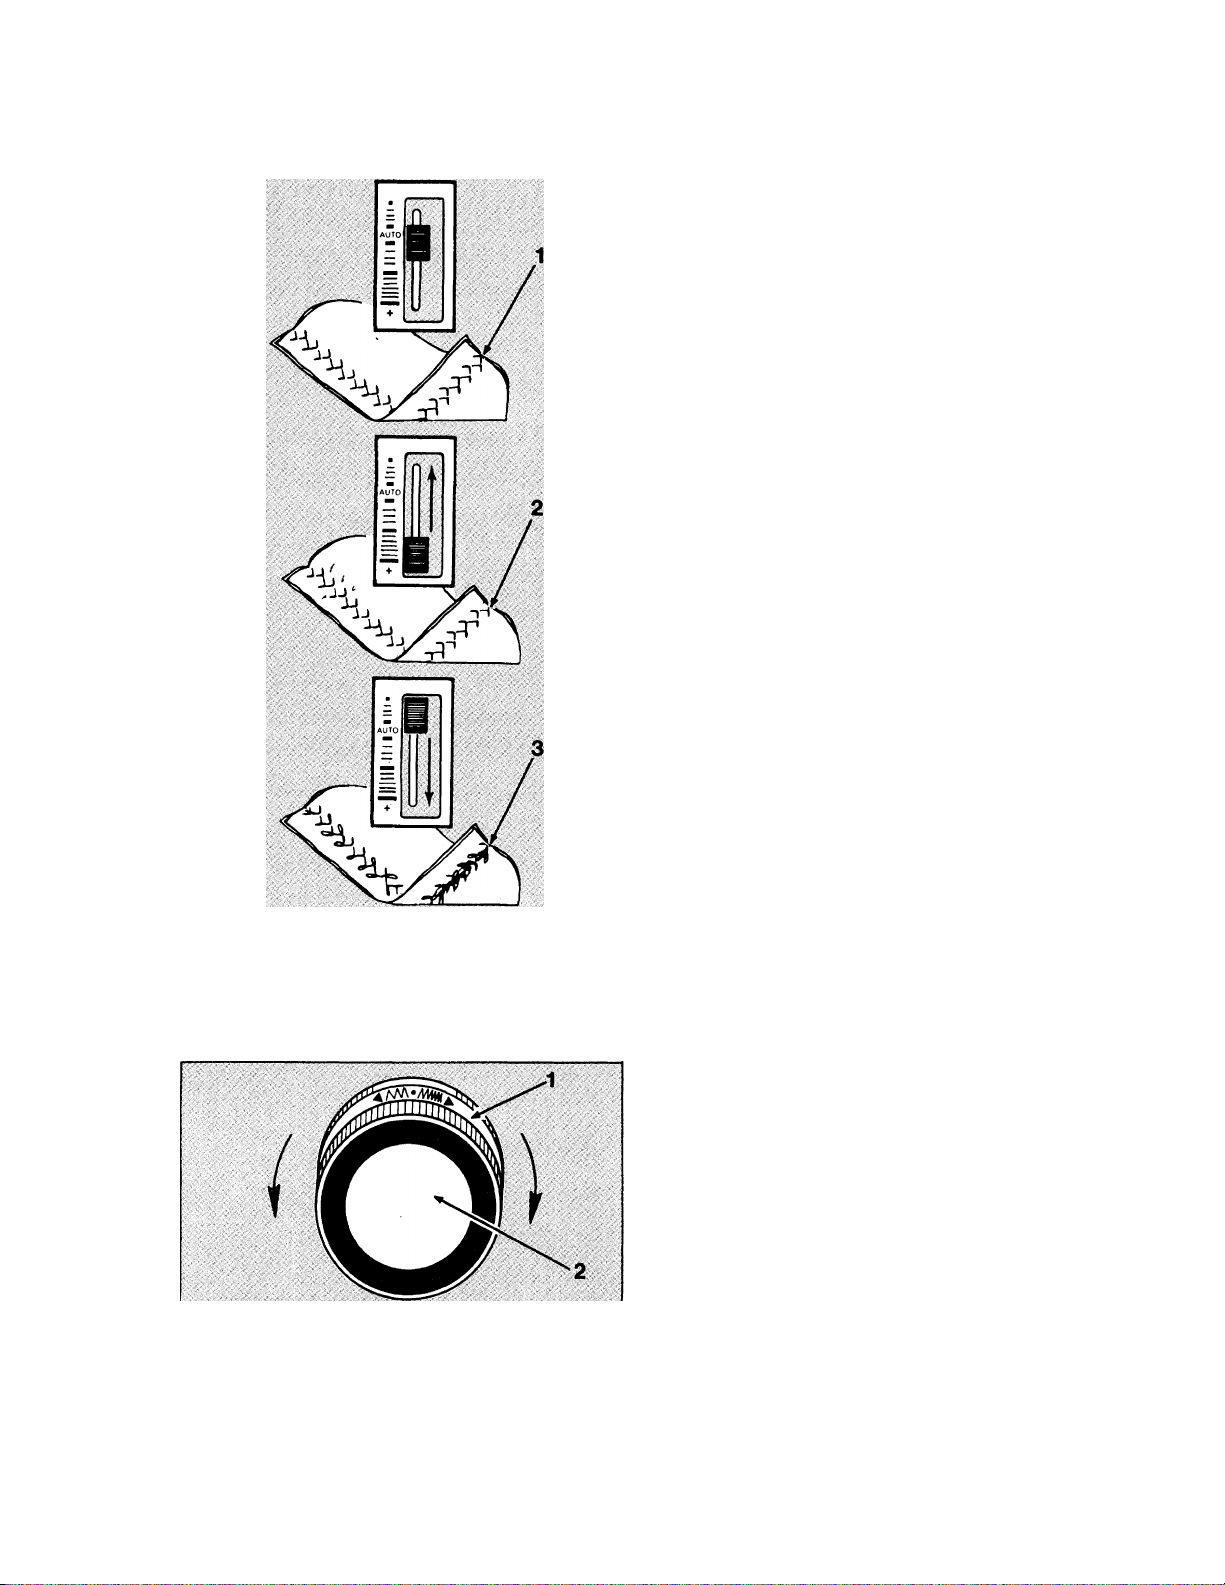
ADJUSTING THREAD TENSION
Some Special Stitch patterns may require looser thread tension than others. To find the
proper tension for your application, make a test sample with the thread and fabric you
will be using.
Proper tension produces a smooth, even
stitch (i).
Too much tension will produce a tight
stitch (2), causing fabric to pucker.
Adjust tension by moving lever up toward
a looser setting.
Too little tension will produce a loose
stitch (3), causing loops in your pattern.
Adjust tension by moving lever down
toward a tighter “ + ” setting.
ADJUSTING STITCH BALANCE
You can adjust the appearance of special color coded stitch patterns on the display
panel, by turning the Stitch balance ring (1) behind the pattern selector dial (2).
A correctly balanced Fagoting Stitch
should appear as illustrated (3).
When stitches are too ciose together (4),
separate them by turning the stitch
balance ring to the right.
>xVvVV> w 5
When stitches are too far apart (5), bring
them closer together by turning the
stitch balance ring to the left.
27
Page 30
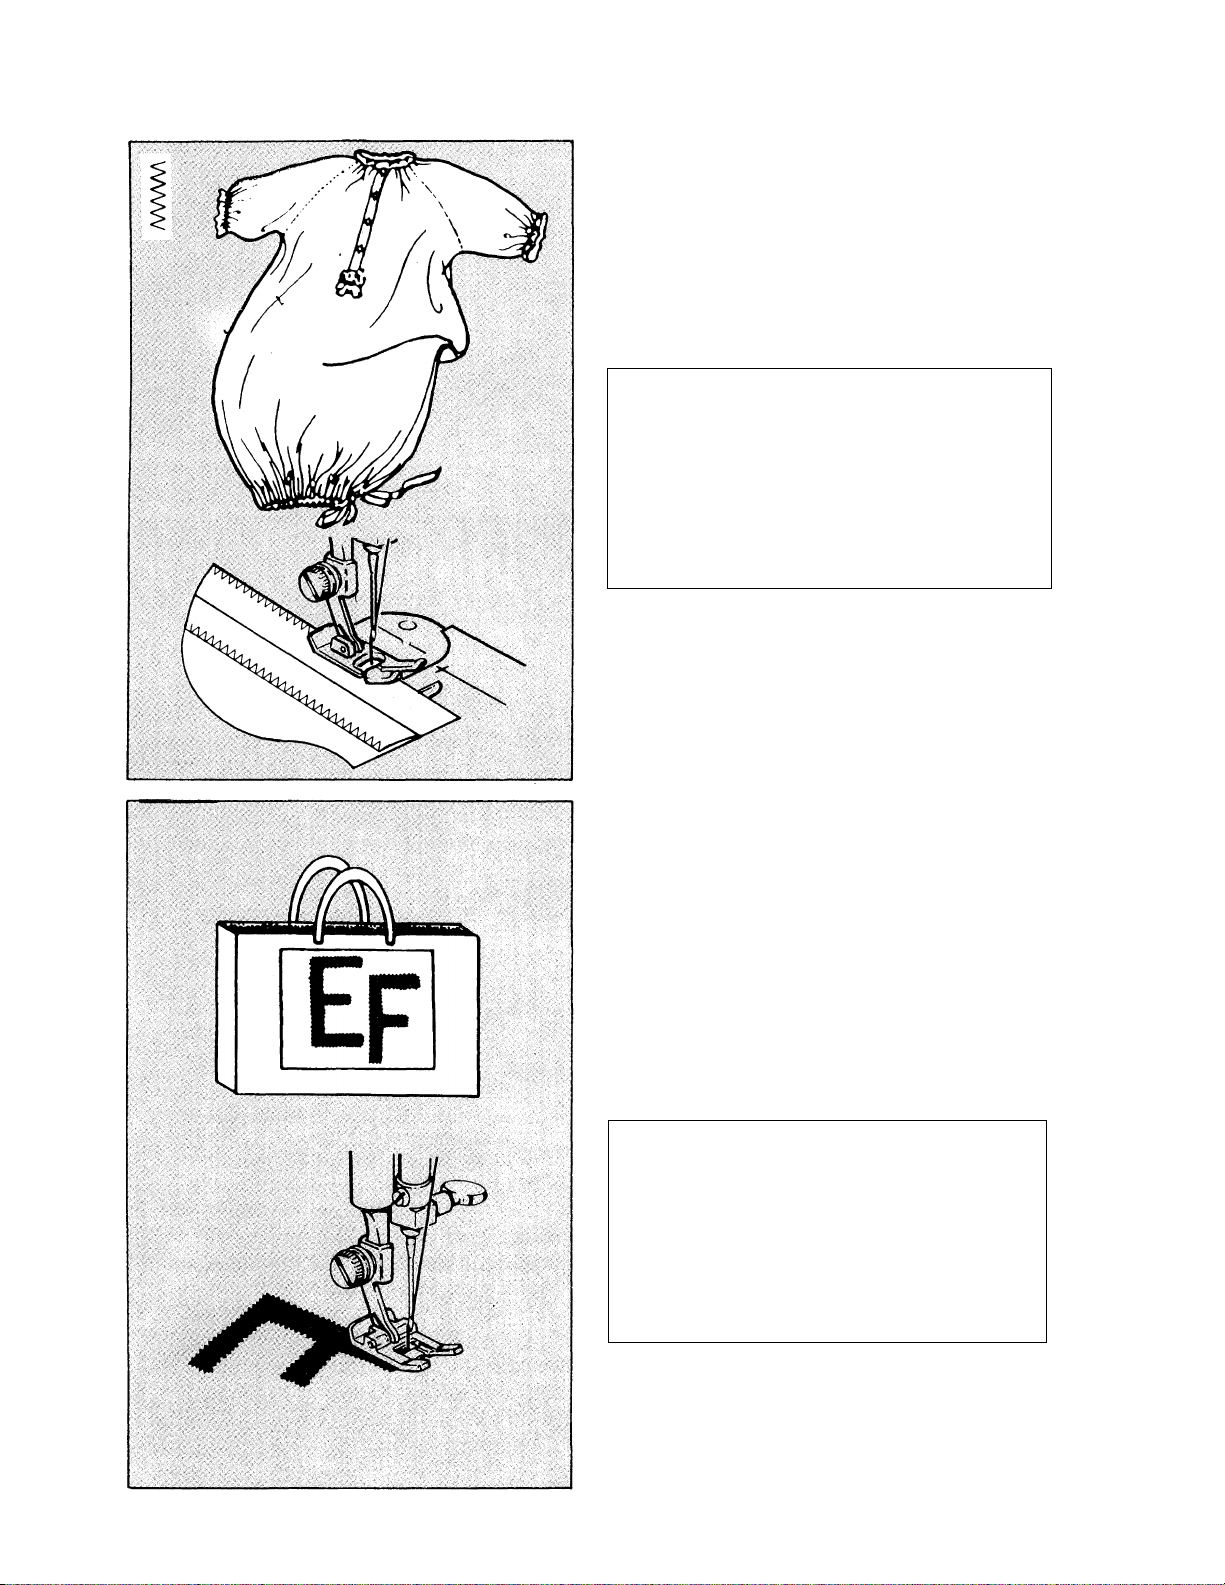
ZIG-ZAG STITCH
The Zig-Zag Stitch can be used when sewing seams, appiiqueing, monogramming or
decorating.
SEAM FINISHING
Use a zig-zag stitch to finish seam edges
of fabrics that are iikeiy to unrayei.
• Sew seams as desired; trim and press
open.
RECOMMENDED SETTINGS
Stitch Selection: Zig-Zag Stitch
Stitch Width:
y li
Stitch Length: 1 to 4
Foot:
Needle Plate:
• Piace edge of seam aiiowance under
foot, as shown.
• Stitch ciose to edge, letting outer zig
zag fall over edge.
General Purpose (B)
General Purpose (A)
SATIN STITCHING
Satin stitching is a series of closely
spaced zig-zag stitches. Satin stitch
monograms, embroidery and appliques for
a smooth, satin-like finish.
• Practice to get desired stitch appear
ance.
Block Monogramming
• Lightly trace letters on right side of
fabric.
28
RECOMMENDED SETTINGS
Stitch Selection: Zig-Zag Stitch
Stitch Width:
Stitch Length:
Foot:
Needle Plate:
• Center tracing under needle.
• Stitch entire outline, leaving needle in
fabric when turning.
• Pull threads to wrong side of fabric; tie
and trim.
0 11
1 or lower
Special Purpose (J)
General Purpose (A)
Page 31
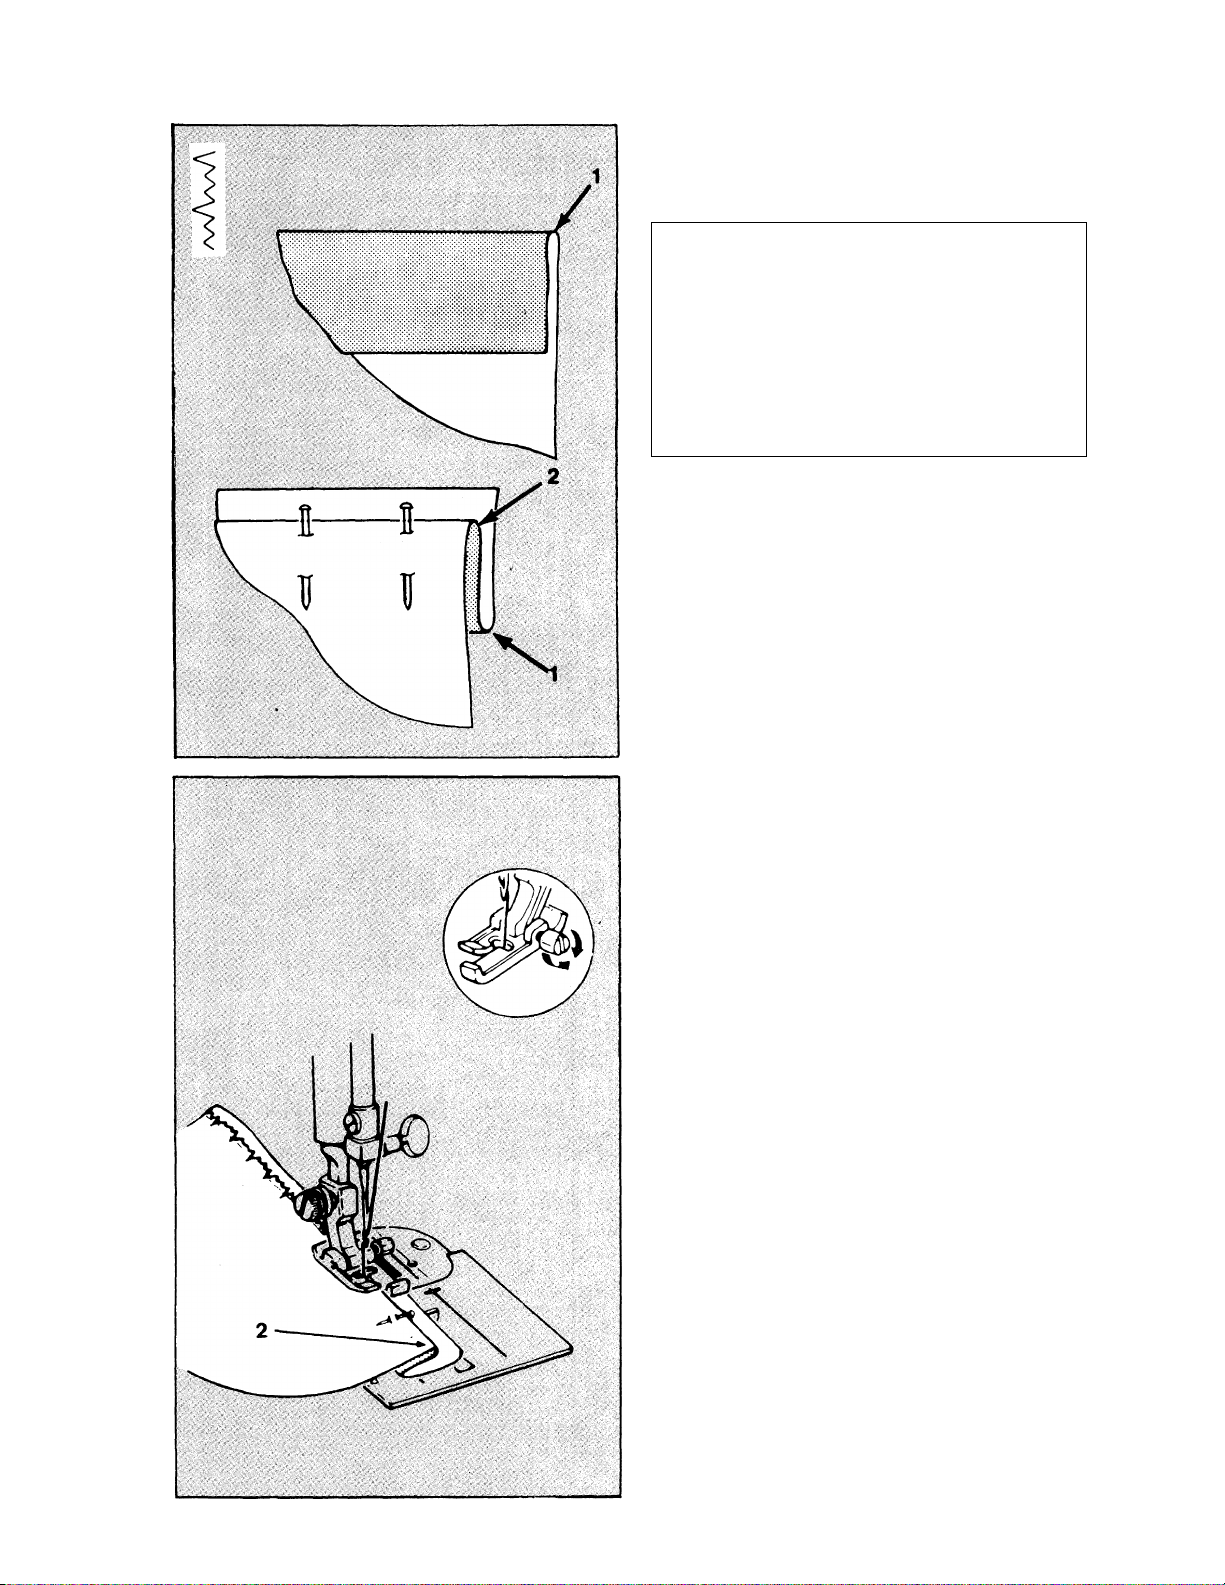
ZIG-ZAG BLINDSTITCH
Use this Blindstitch when sewing hems and seams, or attaching lace and elastic.
BLINDSTITCH HEMMING
• Practice first on a scrap of material,
carefully following each step.
RECOMMENDED
Stitch Selection:
Stitch Width:
Stitch Length:
Foot: Adjustable
Needle Plate:
• With garment inside out, mark, fold
and press hemline (1).
• Turn hem (1) back against inside of
garment, leaving Vs" of hem beyond fold
(2), as shown.
• Pin or baste all layers in place.
SETTINGS
Zig-Zag Blindstitch
0 if
2 to 4
Blindstitch (K)
General Purpose (A)
• Raise presser foot.
• Place folded edge (2) directly under
presser foot.
• Be sure bulk of garment is to the left of
needle.
• Lower presser foot.
• Begin sewing slowly, making sure the
wide zig-zag stitch enters only the very
edge of the fold area (2). The narrow
zig-zag should fall in the hem area. If
this is not happening, adjust the position
of the foot.
• Remove pins as you come to them.
2£
Page 32
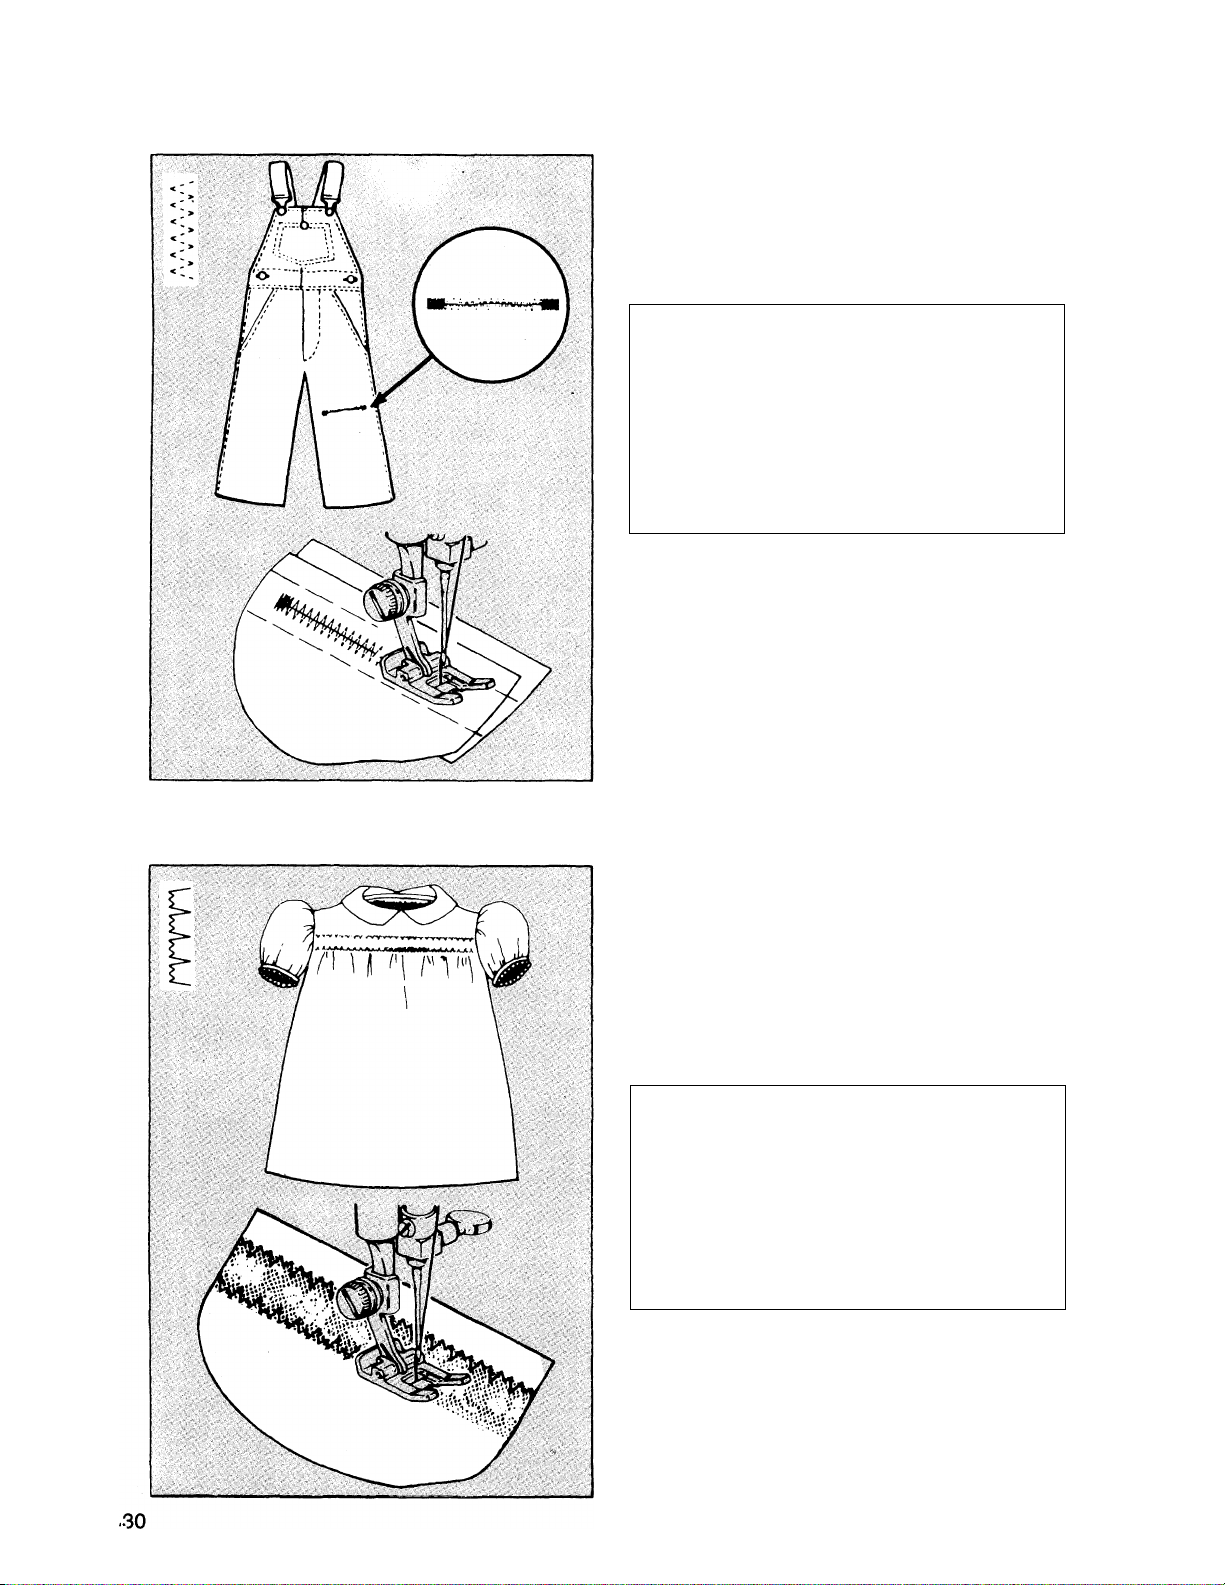
MULTI-STITCH ZIG-ZAG
Mending, overcasting, joining or reinforcing can ali be done using the Multi-Stitch
Zig-Zag.
MENDING A TEAR
• Trim ragged edges of tear.
• Cut a lining of fabric for reinforcement.
• Bring the edges of tear together and
baste lining to wrong side of fabric.
RECOMMENDED SETTINGS
Stitch Selection:
Multi-Stitch
Zig-Zag
Stitch Width:
Stitch Length:
Foot: Special Purpose (J)
Needle Plate: General Purpose (A)
• Place tear, right side up, under presser
foot.
• Stitch over the line of the tear, short
ening stitch length at each end for
reinforcement.
• Trim thread ends close to fabric.
• If needed, sew over tear again.
• Trim away lining close to stitching.
“M” STITCH
This stitch can be used for stretch seams and decorative stitching
LACE TRIM
Lace trim may be added to blouses, lin
gerie and children’s wear.
• Cut lace to desired size.
• Pin lace to right side of fabric where
desired.
H
1 or lower
RECOMMENDED SETTINGS
Stitch Selection:
Stitch Width:
Stitch Length:
Foot:
Needle Plate:
• Carefully stitch along both edges of
lace, as shown.
• Trim away the fabric under the lace
near stitching lines.
“M” Stitch
D
II
2 or lower
Special Purpose (J)
General Purpose (A)
Page 33
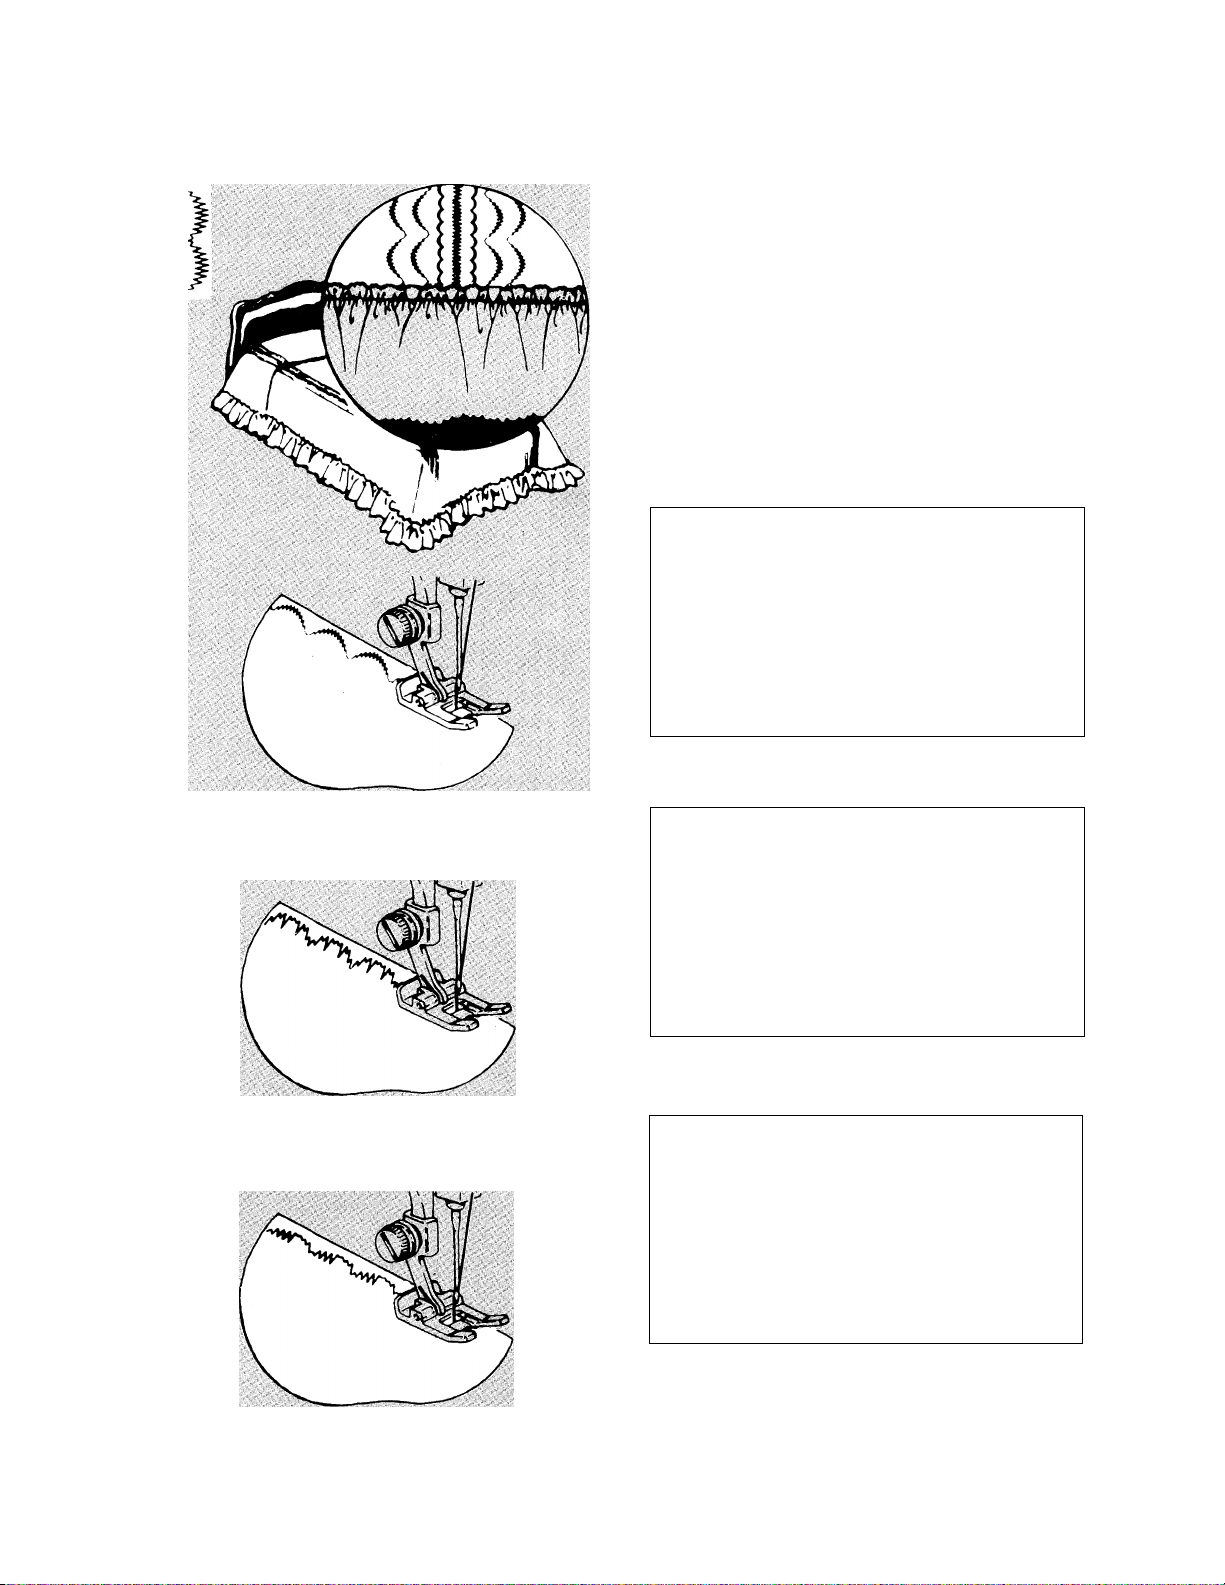
CRESCENT STITCH/CHINESE DYNASTY STITCH/KITE TAIL STITCH
These stitches are ideal for borders, edges, smocking and embroidering
BORDER DESIGN
Border designs decorate clothing and many
household items.
• Sew Seams in usual manner and press.
• Mark stitching lines of fabric where
desired.
RECOMMENDED SETTINGS
Stitch Selection:
Stitch Width:
Stitch Length:
Foot:
Needle Plate:
Crescent Stitch
0
1 or lower
Special Purpose (J)
General Purpose (A)
RECOMMENDED SETTINGS
Chinese Dynasty
Stitch Selection:
Stitch Width:
Stitch Length:
Foot:
Needle Plate:
--^vMAWwwWVS
Stitch
o 11
1 or lower
Special Purpose (J)
General Purpose (A)
RECOMMENDED SETTINGS
Stitch Selection:
Stitch Width:
Stitch Length:
Fbot:
Needle Plate:
• Center marked line under presser foot
and stitch.
• Pull threads to wrong side of fabric; tie
and trim.
Kite Tail Stitch
---wwwVWWlM
« 11
1 or lower
Special Purpose (J)
General Purpose (A)
31
Page 34
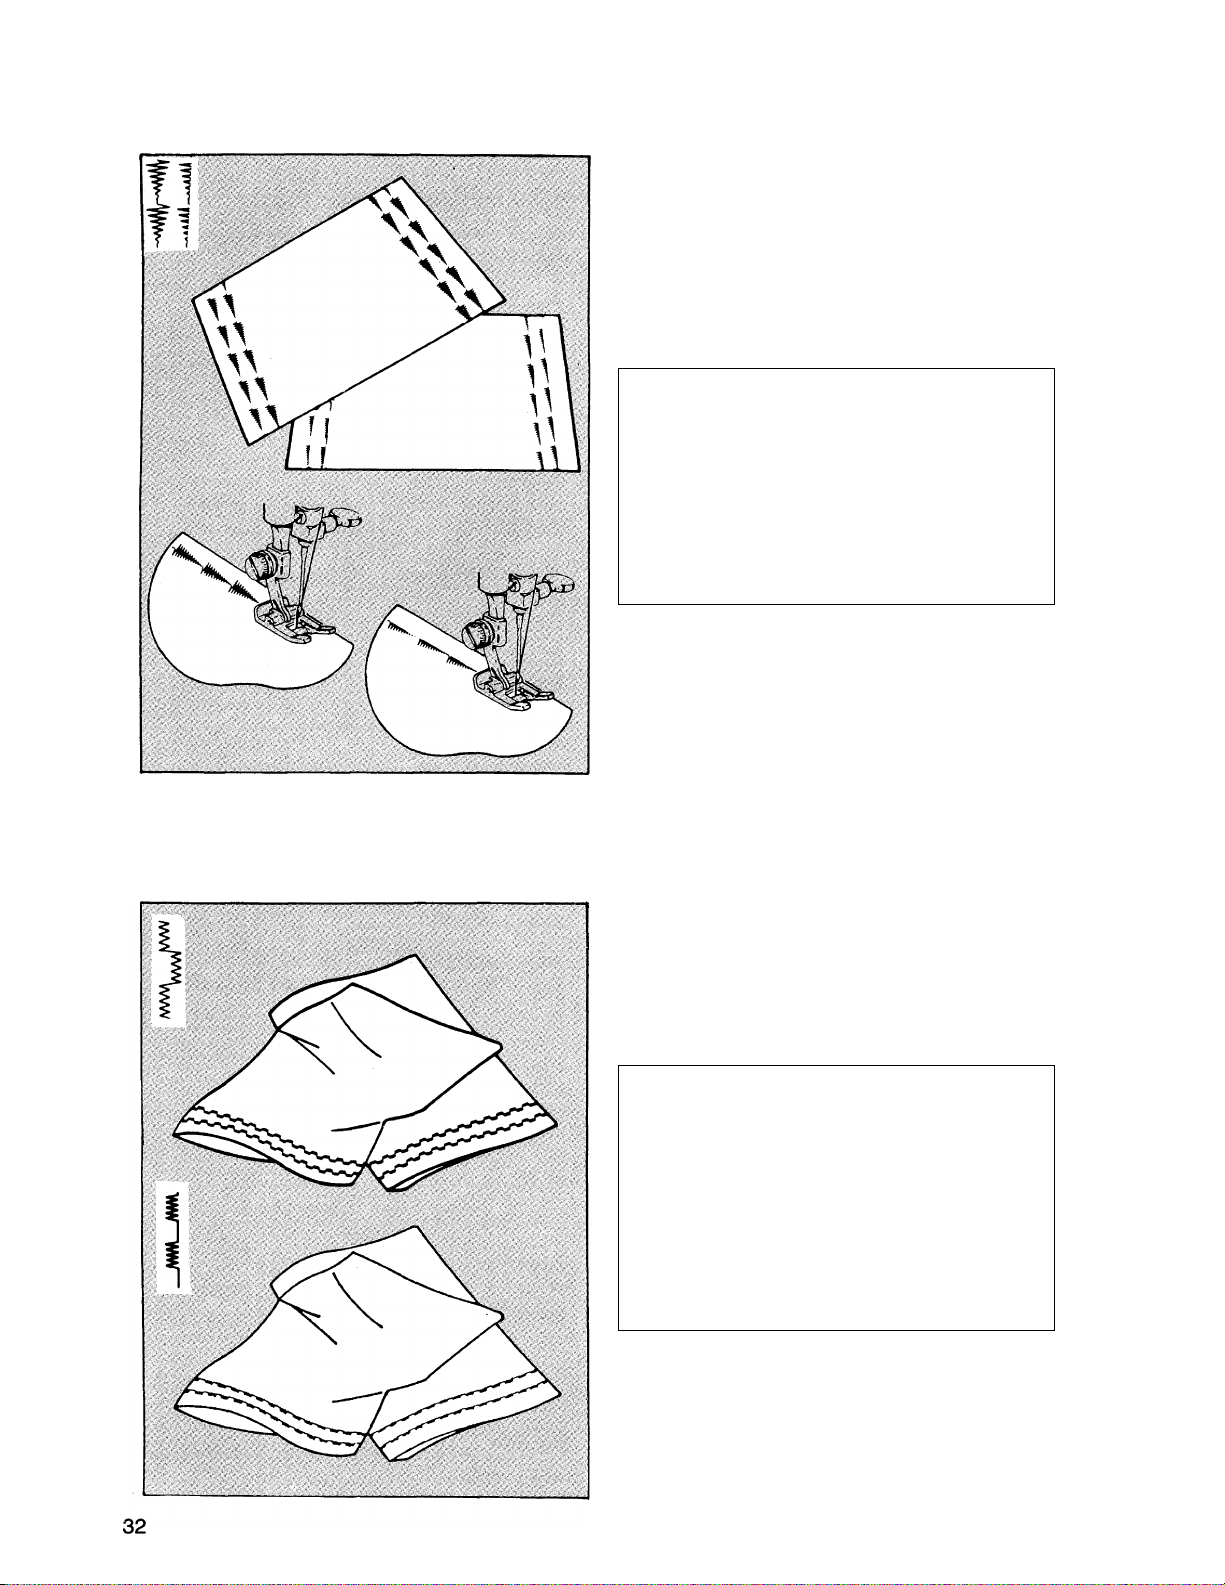
ARROW SriTCH/BUNTING STITCH
These stitches are decorative and secure finish to seams, pleats and pockets it can also
be used as a border design.
BORDER DESIGN
• Sew seams in usual manner and press.
• Mark stitching lines on fabric where
desired.
RECOMMENDED SETTINGS
Arrow Stitch
Stitch Selection;
Bunting Stitch
Stitch Width:
Stitch Length:
Foot:
Needie Piate:
• Center stitching line under presser foot
and sew.
• Trim thread ends close to fabric.
—vwvwwvyyyi^
II 1!
1 or lower
Special Purpose (J)
General Purpose (A)
DECORATIVE STITCHES
Your machine can sew several stitches which are solely decorative. These stitches let
you create unique, personalized garments and household items.
Use the DOMINO STITCH/FLAG STITCH
to form a lively border along the edges
of a pair of pillow cases.
RECOMMENDED
Stitch Seiection:
Stitch Width:
Stitch Length:
Foot:
Needle Plate:
SETTINGS
Domino Stitch
Flag Stitch
D i l
1 or lower
Special Purpose (J)
General Purpose (A)
Page 35
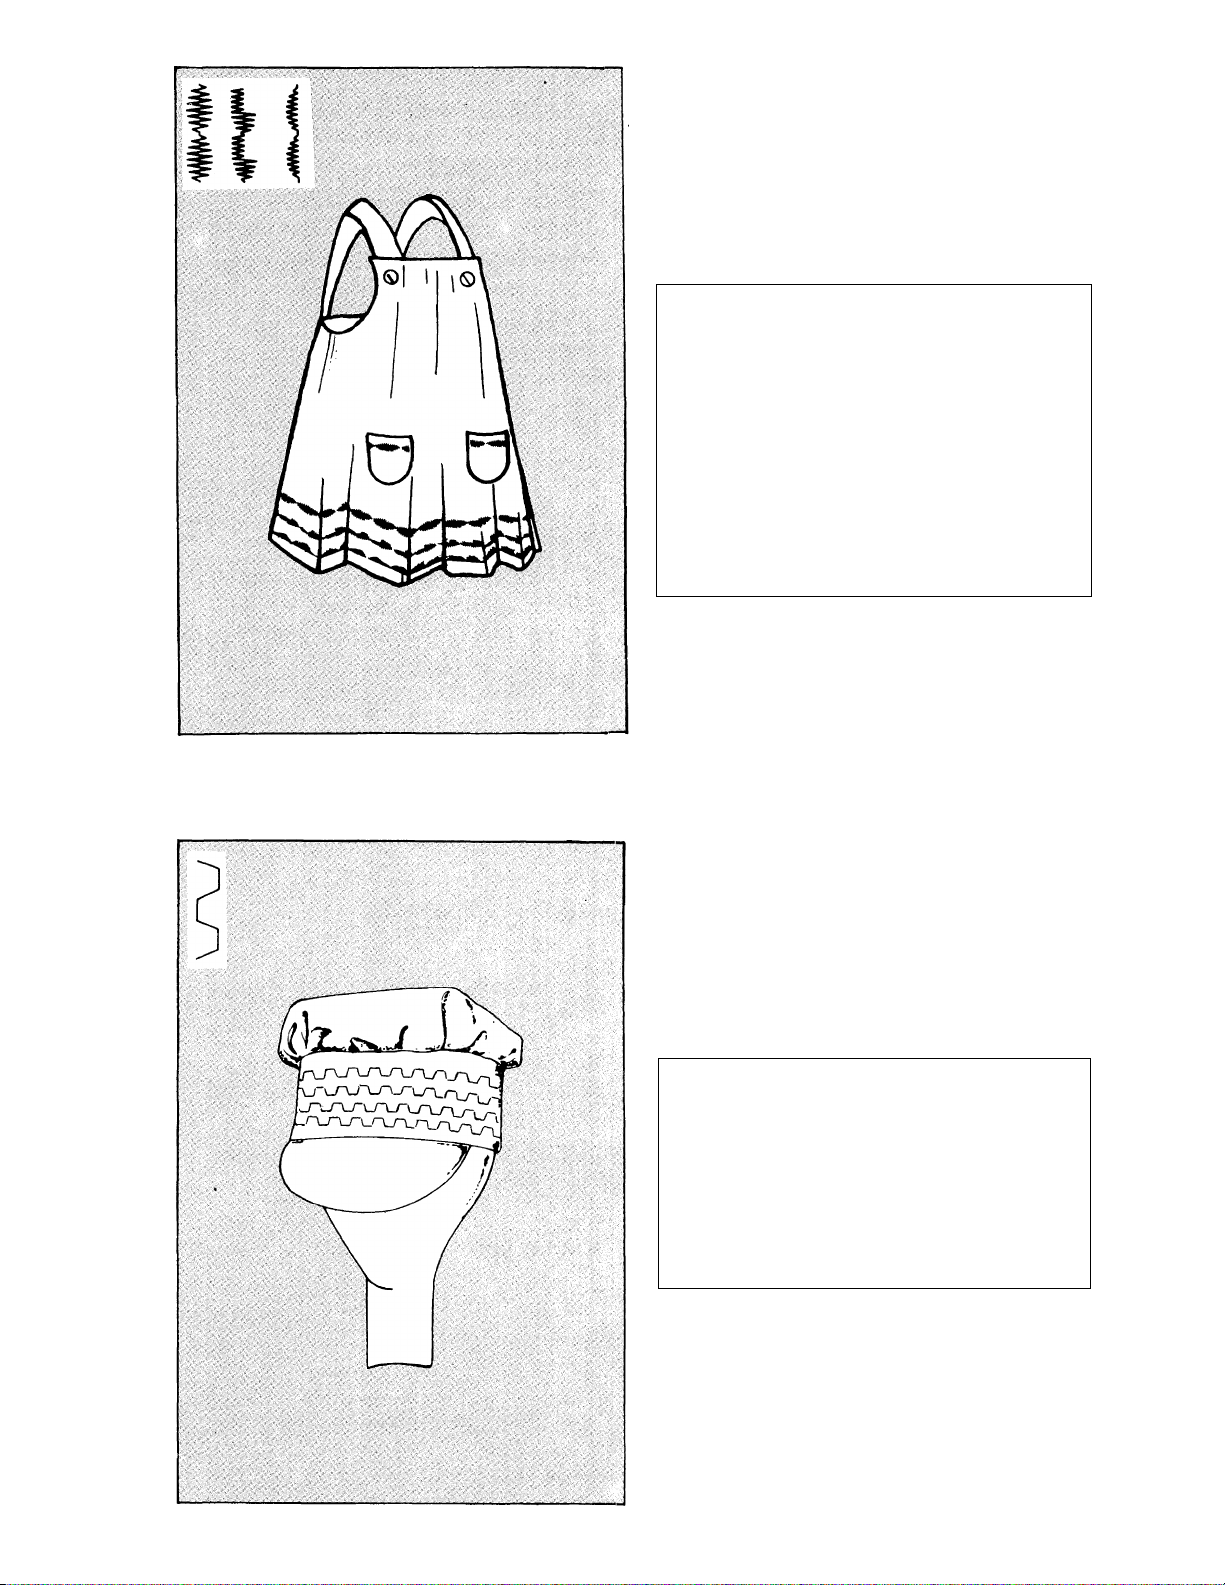
• Brighten up a ptein dress with the SATIN
BEAD STITCH/BOOMERANG STITCH/
LADY BUG STITCH
RECOMMENDED SETTINGS
Stitch Selection:
Satin Bead Stitch
Boomerang Stitch
Lady Bug Stitch
--^^wWVWWiM
D
Stitch Width:
Stitch Length:
Foot:
Needle Plate:
11
1 or lower
Special Purpose (J)
General Purpose (A)
• The RAMPART STITCH can be used to
decorate a boy’s cap.
RECOMMENDED SETTINGS
Stitch Selection:
Stitch Width:
Stitch Length:
Foot:
Needle Plate:
Rampart Stitch
g it
1 or lower
Special Purpose (J)
General Purpose (A)
33
Page 36
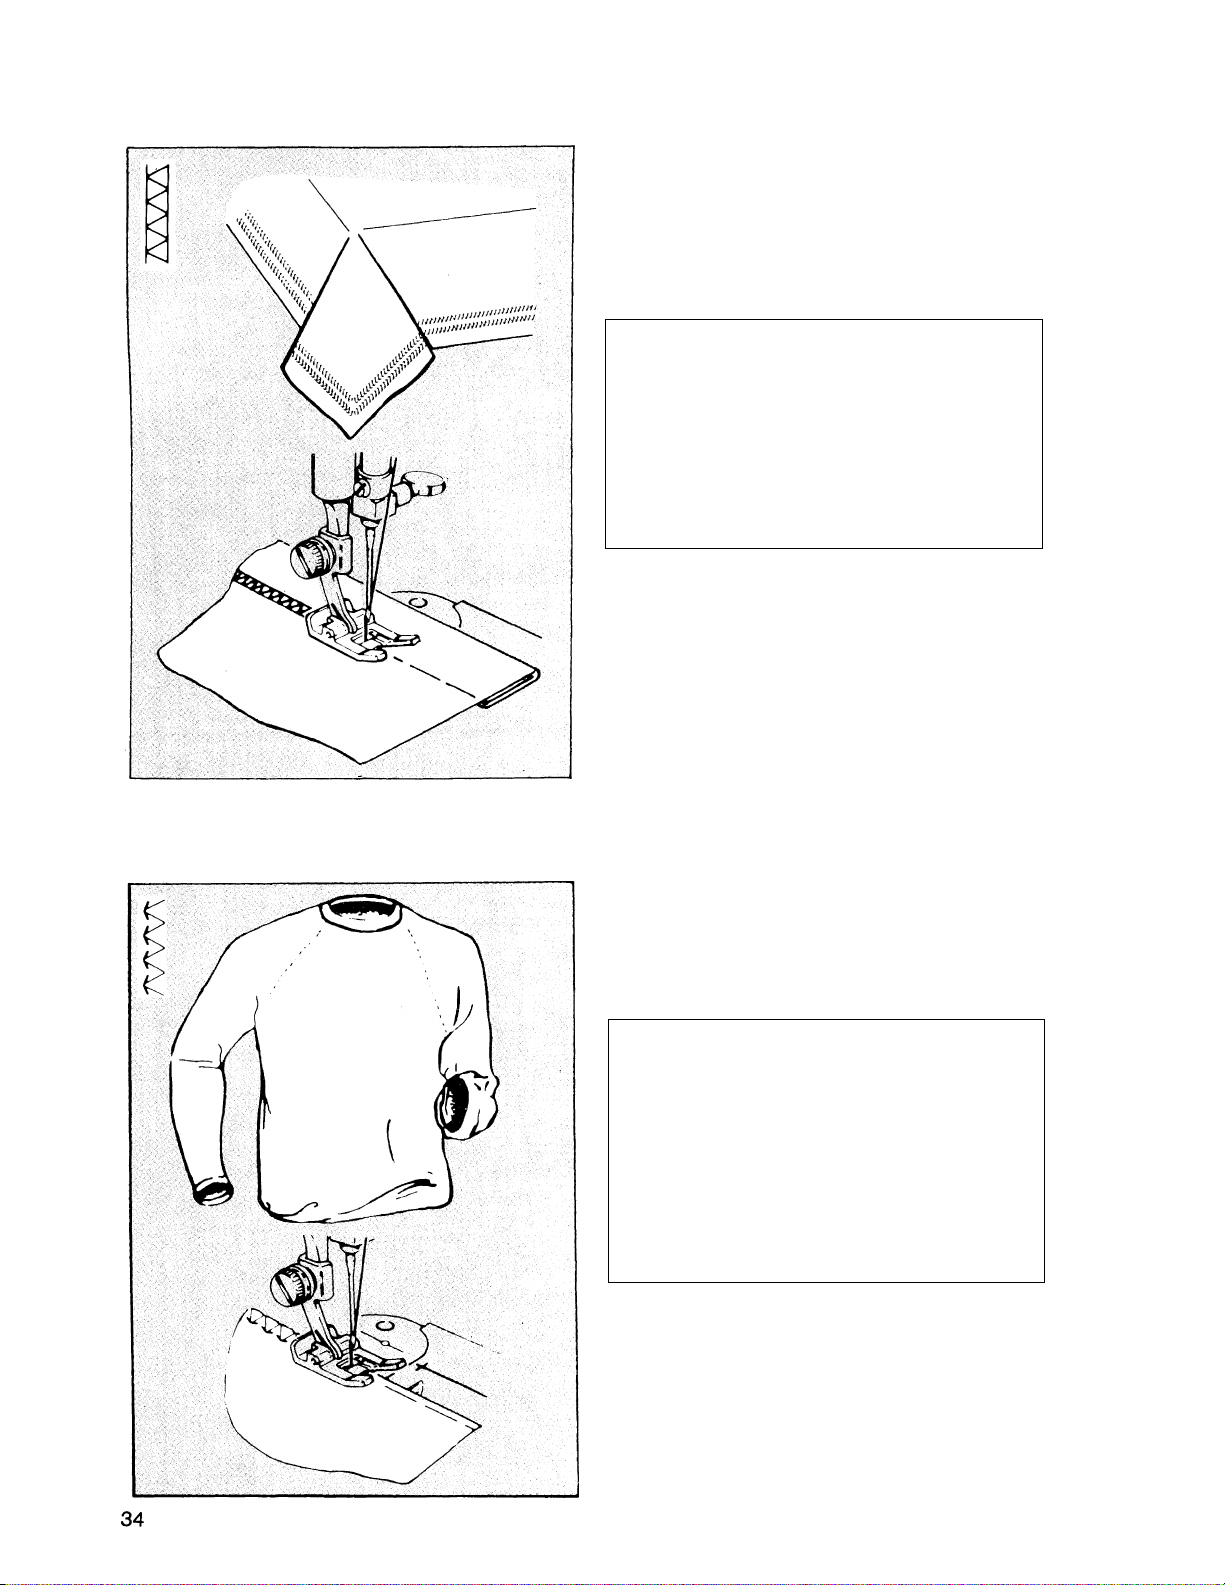
TURKISH STITCH
The Turkish Stitch can be used for appliqueing, joining patchwork or forming decorative
hems on bed and table linens.
HEMSTITCHING
• Fold a double hem of desired width and
baste.
• Mark a guideline for hemstitching on
right side of fabric just above top of hem
edge.
RECOMMENDED SETTINGS
Stitch Selection: Turkish Stitch
Stitch Width:
Stitch Length: 3-1/2 to 4
Foot: Special Purpose (J)
Needle Plate: General Purpose (A)
Adjust balance,if necessary
• Place work, right side up with hem
facing right, under presser foot.
• Lower presser foot and stitch along
guideline.
• Be sure stitches on left side of line fall
over hem edge (into single thickness of
fabric) and stitches on right side fall
into double fold of hem.
0 il
STRETCH OVEREDGE STITCH
With this stitch you can stitch and finish a seam in one step. It is also ideal for finishing
seams, hems and facings requiring stretch.
OVEREDGE SEAM
• Baste seams.
• Trim seam edge 1/4" (6mm) from basting
line.
RECOMMENDED SETTINGS
Stitch Selection:
Stitch Width:
Stitch Length:
Foot:
Needle Plate:
Adjust balance, if
Position trimmed seam under presser
foot, as shown.
Stitch along basting line.
Straight stitches should fall on basting
line; zig-zag stitches should fall over
seam edge.
Remove basting stitches and press.
Stretch Overedge
Stitch
1 H
3-1/2 to 4
Special Purpose (J)
General Purpose (A)
necessary
Page 37
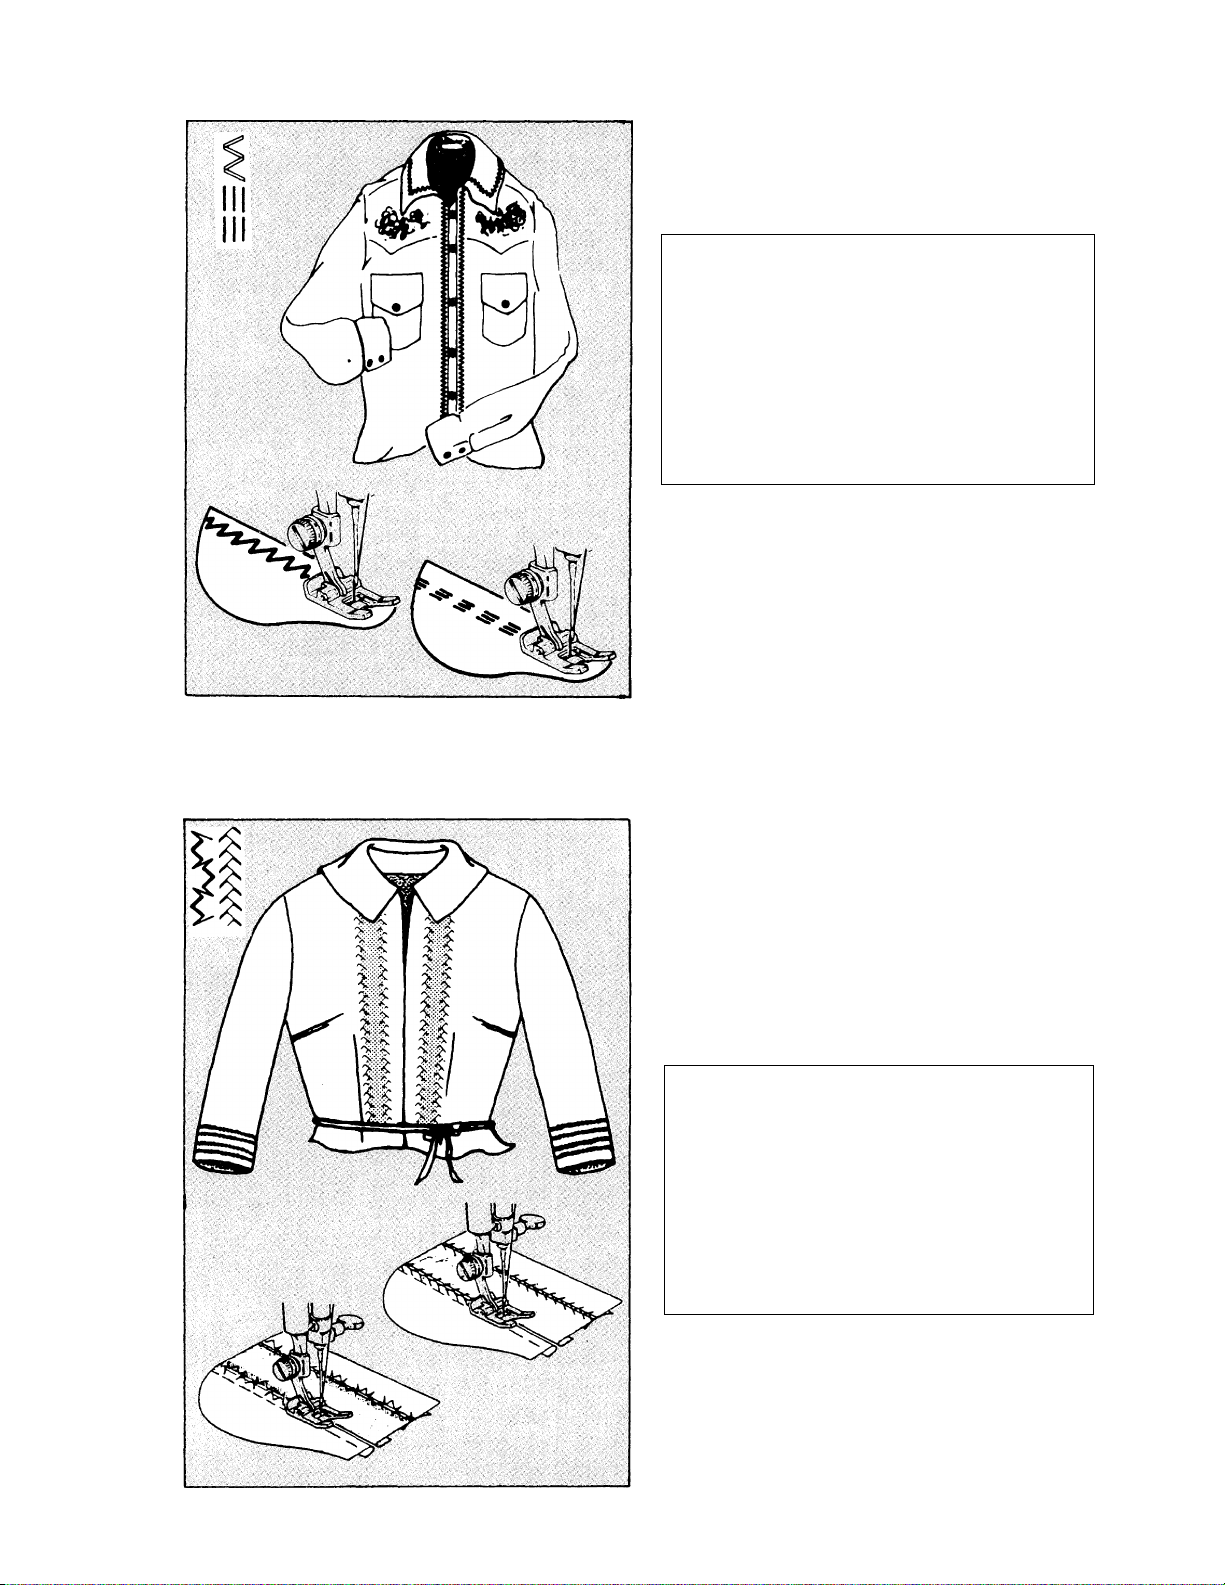
RIC-RAC/STRAiGHT STRETCH STITCH
This is a heavy-duty, stretch stitch that can also be used for topstitching.
TOPSTITCHING
• Sew seams in usual manner and press.
• For topstitching hard-to-reach areas,
convert machine to free arm sewing.
RECOMMENDED
Stitch Selection:
Stitch Width:
Stitch Length:
Fbot:
Needle Plate:
Adjust balance, if necessary
Place garment right side up, under foot.
Slowly topstitch desired areas.
Pull threads to wrong side of fabric; tie
and trim.
To create a straight stretch stitch, set
stitch width to the left and stitch length
to #4.
SETTINGS
Ric-Rac/Straight
Stretch Stitch
II It
....
3-1/2 to 4
Special Purpose (J)
General Purpose (A)
CROWN STITCH/FAGOTING STITCH
Use these stitches fagoting, embroidery, patchwork or strengthening seams.
FAGOTING
This is an open, lacy stitch used to join
two pieces of fabric.
• Fold under edges to be joined and press.
• Baste the edges 1/8" (3mm) apart onto
a sheet of tissue paper for support.
• Position center of work under center of
presser foot.
RECOMMENDED SETTINGS
Stitch Selection: Crown Stitch
Fagoting Stitch
Stitch Width:
Stitch Length: 3-1/2 to 4
Foot:
Needie Piate:
Adjust balance, if
As you sew, the needle should make a
stitch first in one fabric strip, and then
in the other.
After stitching is completed, remove
tissue and basting.
- --wv\M/wyWV\l
D
it
Special Purpose (J)
General Purpose (A)
necessary
35
Page 38
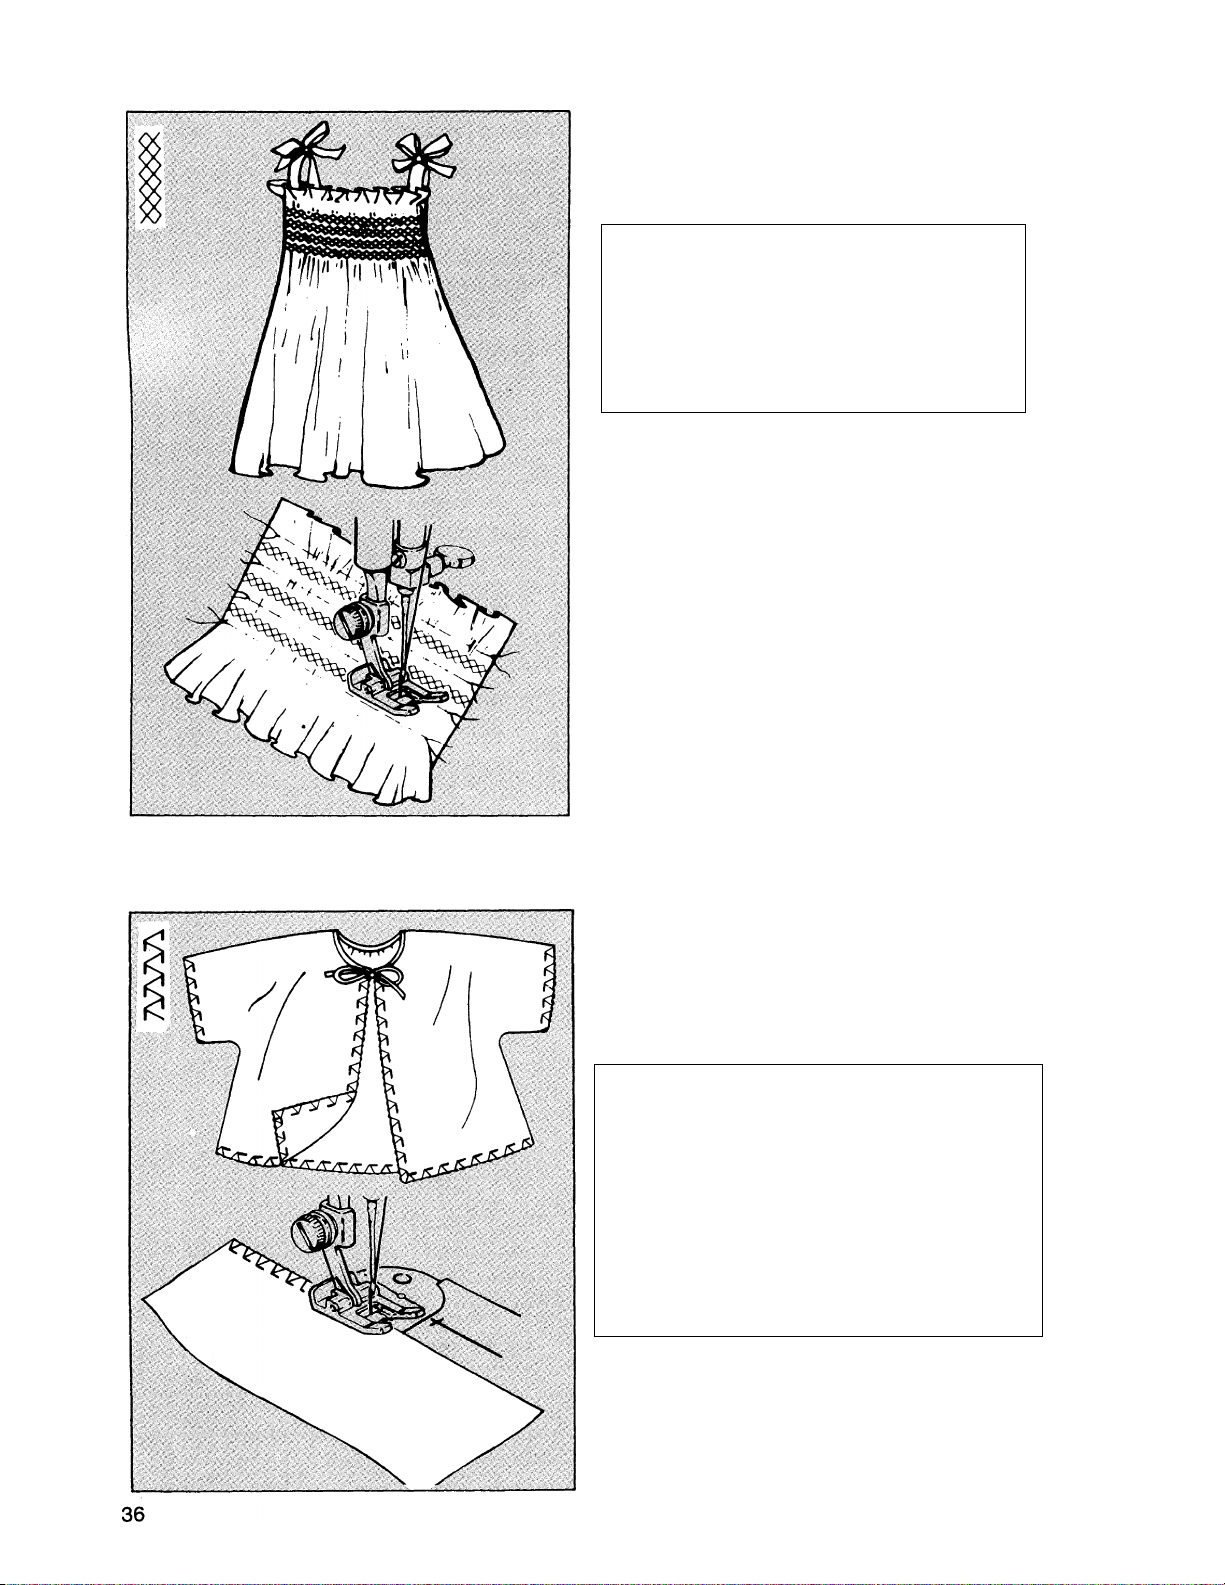
HONEYCOMB STITCH
Use the Honeycomb Stitch for smocking, mending and sewing stretch fabrics.
SMOCKING
Smocking is decorative stitching across
evenly spaced gathers of fabric.
To Gather Fabric:
RECOMMENDED SETTINGS
SWch Selection: Straight Stitch
StHch Width:
Stitch Length:
Foot:
Needle Plate:
• Sew rows of straight stitches, 1 /4" apart,
across area to be smocked.
• Pull thread evenly, gathering fabric.
• Tie ends of every two rows of stitching
together to hold gathers in place.
• Baste a backing to wrong side of fabric.
0 I t
4
Special Purpose (J)
General Purpose (A)
To Smock Fabric:
RECOMMENDED SETTiNGS
Stitch Selection: Honeycomb Stitch
Stitch Width:
Stitch Length: 3-1/2 to 4
Adjust balance, if necessary
• Sew between rows of straight stitches.
• Pull out straight stitches when completed.
STRAIGHT FEATHERSTITCH
With the Straight Featherstitch you can stitch and finish a seam in one step. It is also
ideal for edging and appliqueing.
EDGING
Add a delicate touch to your sewing while
finishing and reinforcing your edges.
• Sew seams in usual manner and press.
RECOMMENDED SETTINGS
Stitch Selection:
Stitch Width:
Stitch Length:
Foot:
Straight
Featherstitch
--^vwwWV|/vy|^
1 ’ ti
3-1/2 to 4
Special Purpose (J)
Needle Plate: General Purpose (A)
Adjust balance, if necessary
• Place edge of garment, right side up,
under presser foot.
• Bulk of garment should be to the left.
• As you stitch, needle should go over
right edge of fabric, as shown.
Page 39
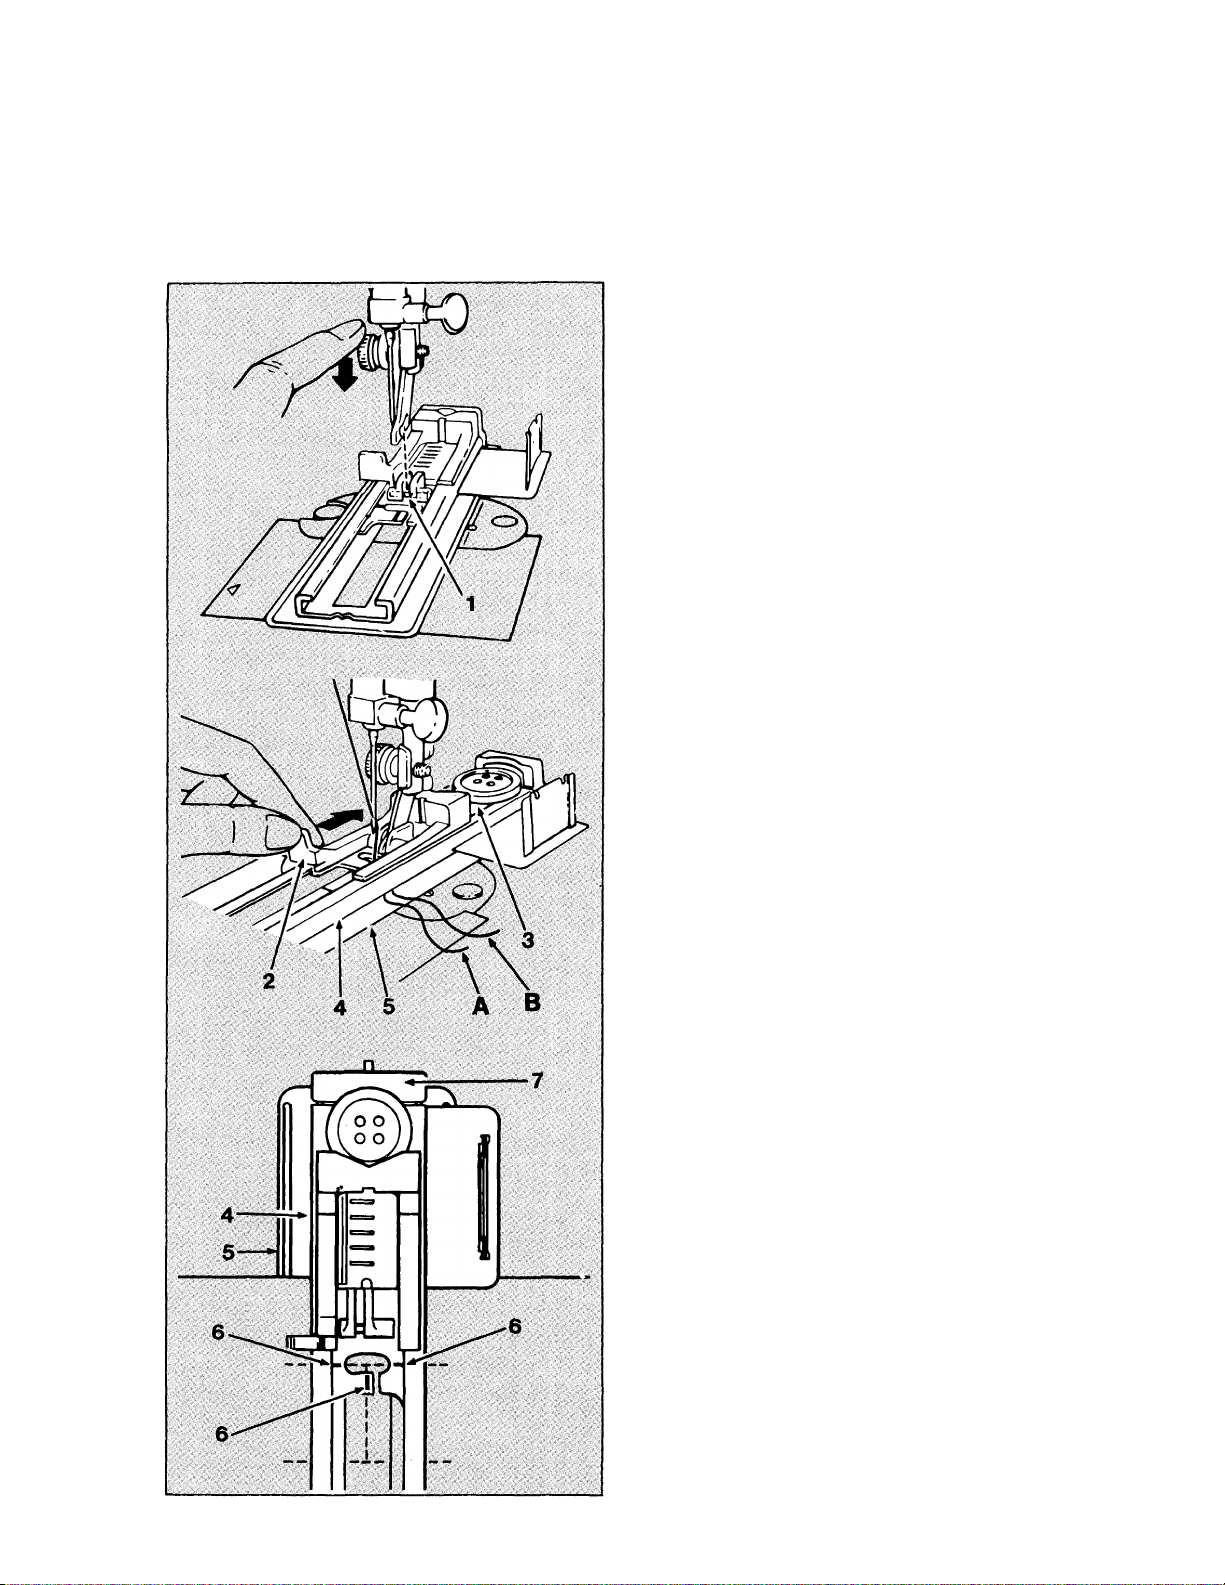
SECTION 5 ONE-STEP BUTTONHOLING
• Your machine automatically makes a buttonhole to the size of your button in one, easy
step. You never need to move the fabric or reposition the needle.
• Always make a practice buttonhole on a
sample of your fabric.
• Be sure bobbin contains enough thread.
• When making buttonholes on hard-to-
reach areas, convert machine bed to
free arm sewing.
• Mark buttonhole position on fabric as
indicated in pattern.
RECOMMENDED SETTINGS
Stitch Selection: Buttonhole Stitch
Stitch Width:
Stitch Length: 4
Foot: Buttonhole Attachment (L)
Needle Plate: General Purpose (A)
Fastening the Buttonhole Attachment
• Remove presser foot from shank.
• Place buttonhole attachment behind
shank and guide it forward.
• Center pin (1) in attachment under
shank, and lower presser foot lifter.
• Press presser foot screw down firmly
until shank snaps into place.
Setting the LengOt of Buttonhole
• Open button clamp (2) and place but
ton on carrier (3).
• Slide clamp (2) back to hold button in
place.
• Raise foot lifter and draw needle thread
(A) and bobbin thread (B) between upper
(4)and lower (5) plates of button attach
ment, and to the back of machine.
• Place fabric between upper and lower
plates.
• Center 3 red guidelines (6) of attach
ment around beginning line of button
hole.
• Lower presser foot lifter.
• Push foot from back of button carrier
(7), toward you to i nsure proper button
hole length.
37
Page 40
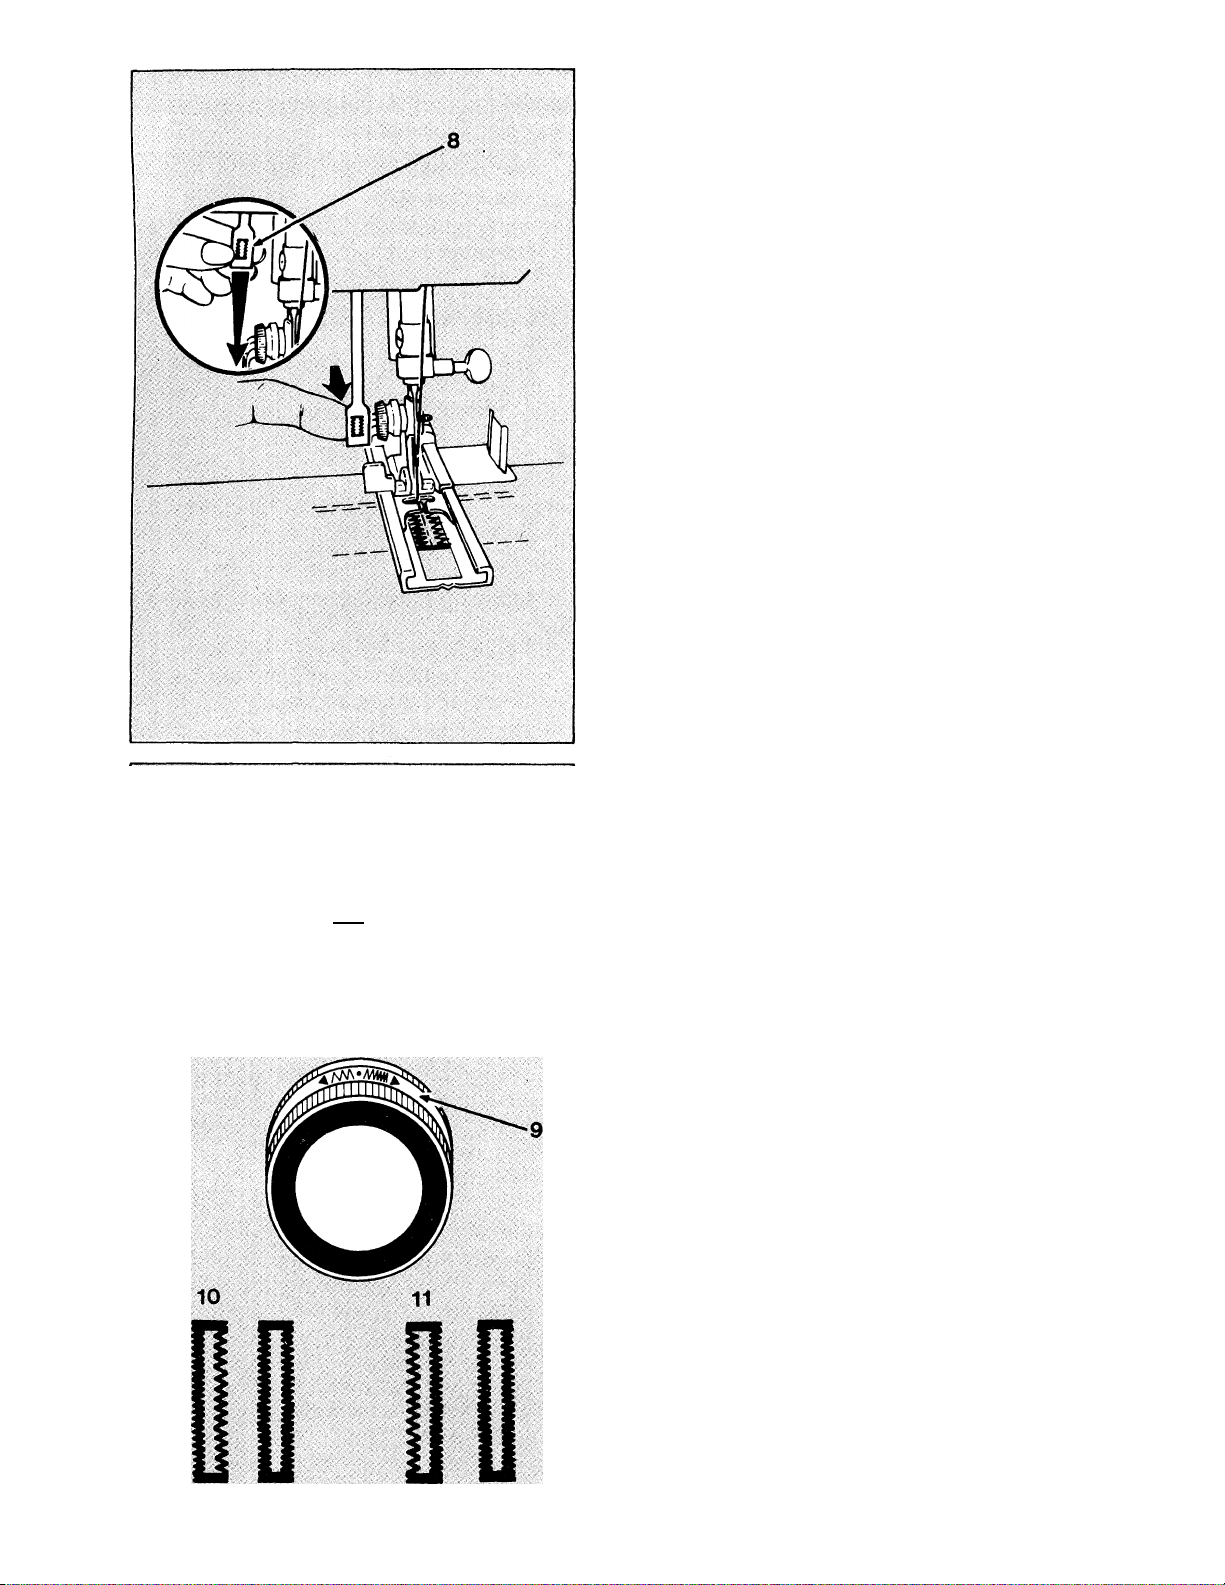
Pull buttonhole lever (8), located under
sewing light, straight down as far as it
will go.
Press it toward you.
Start running the machine.
The entire buttonhole will be stitched
in one operation.
Stop sewing when machine begins over
lapping starting stitches.
Raise foot lifter and remove work from
machine; clip thread ends; cut button
hole opening with scissors or seam
ripper.
(Adjust width and balance of test
buttonhole, if necessary.)
Press buttonhole lever toward you for
each buttonhole to be sewn.
When all buttonholes are completed,
push buttonhole lever (8) back up into
machine.
To remove buttonhole attachment, raise
presser foot lifter and press down on
both sides of button carrier near shank,
and slide off machine.
Mli
WIDTH
ADJUSTING WIDTH OF
BUTTONHOLE OPENING
If the width of the buttonhole opening is
too narrow or too wide, it can be adjusted
by the stitch width lever.
• Widen the buttonhole opening by mov
ing the stitch width lever slightly left.
• Narrow the buttonhole opening by mov
ing the stitch width lever slightly right.
ADJUSTING BALANCE OF
BUTTONHOLE
If the two stitching sides of your button
hole are unequal, turn stitch balance ring
(9) behind pattern selector dial.
• If the right side of stitching is too open
(10), turn stitch balance ring slightly left.
• If the left side of stitching is too open
(11), turn stitch balance ring slightly
right.
38
Page 41
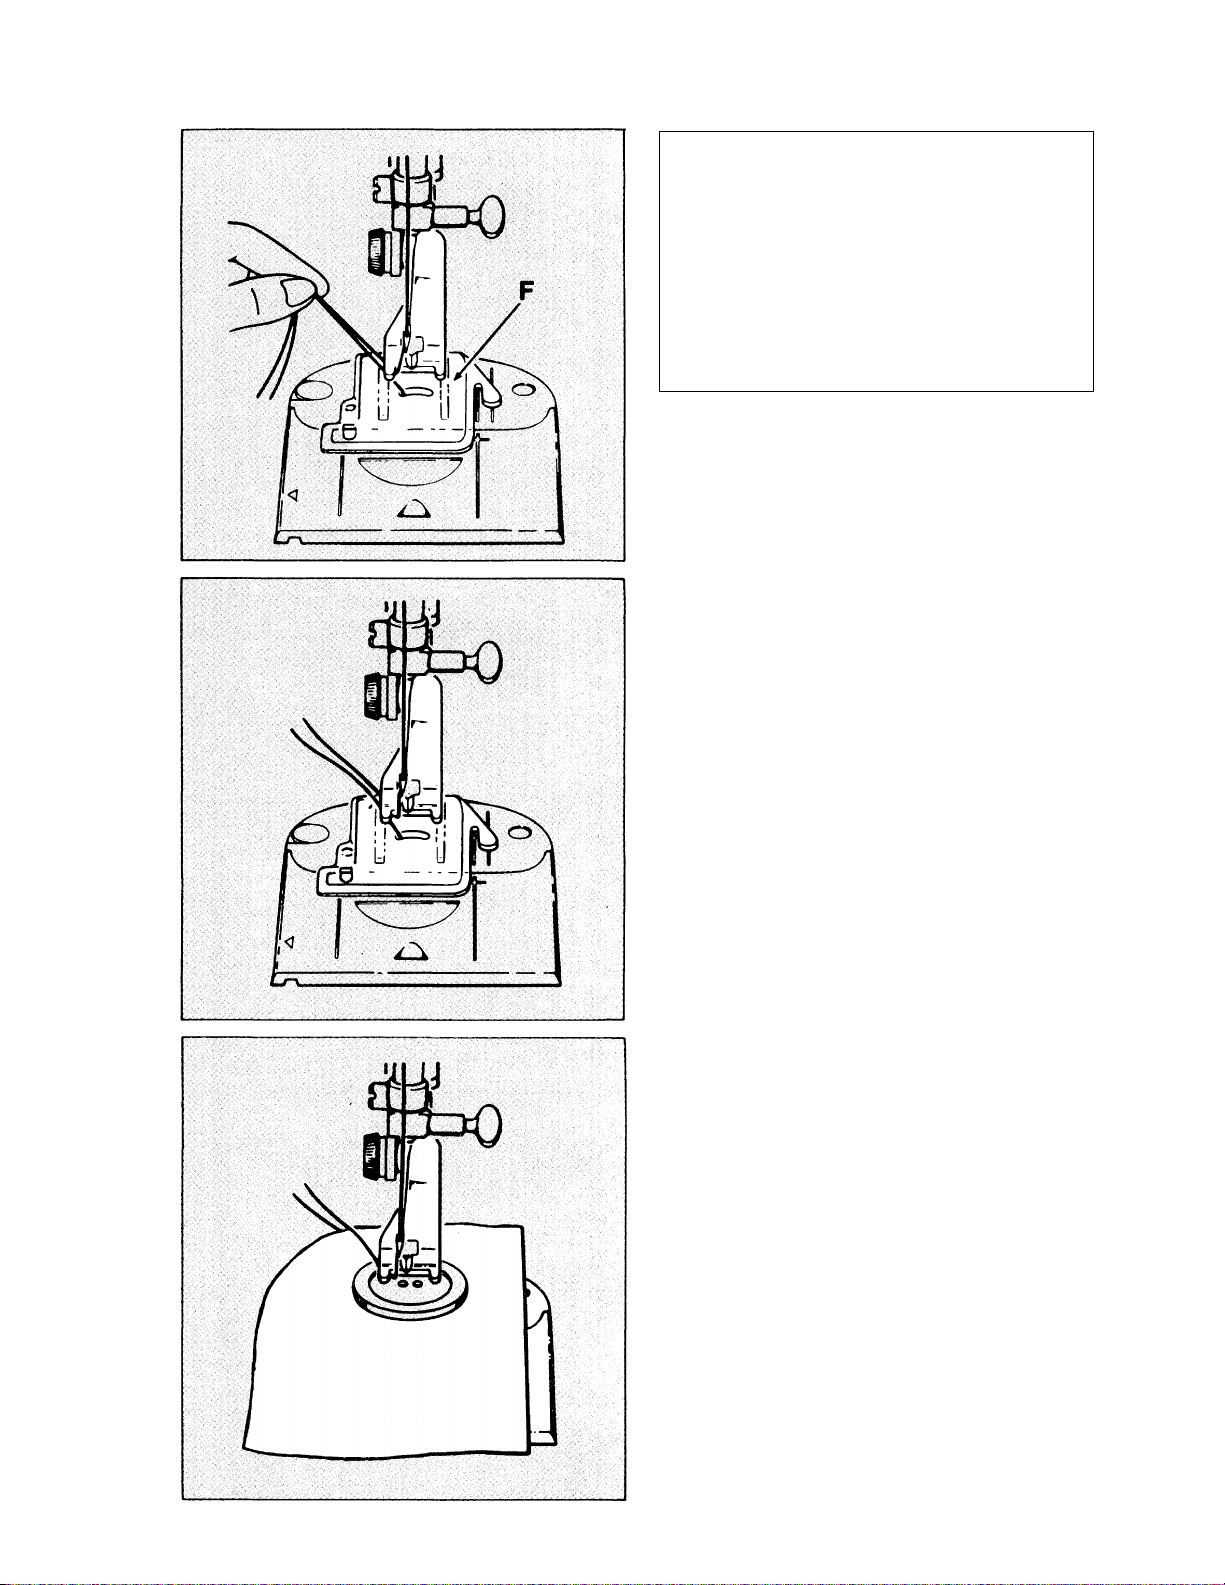
ATTACHING A BUTTON
Flat buttons can be sewn on quickly and easily using the plain zig-zag stitch
RECOMMENDED SETTINGS
Stitch Selection:
Stitch Width:
Stitch Length:
Foot:
Needle Plate:
Attach Feed Cover (F)
The space between the holes in the
button determines stitch width setting.
Before you can attach a button, the
bobbin thread must be brought up
through the hole in the feed cover (F).
• Raise foot lifter.
• Position both threads under button foot
toward rear of machine.
• Hold needle thread while lowering
needle into hole in feed cover. Raise
needle and gently pull needle thread,
undo loop of bobbin thread that comes
up with the needle. Details on “Raising
the Bobbin Thread” are on page 17.
Zig-Zag Stitch
—''WvwwWlM
1 II
0
Button Sewing (H)
General Purpose (A)
1. Place garment under button foot.
• Position button on garment making
sure the holes in the button are between
the toes of the button foot.
• Lower foot lifter.
39
Page 42
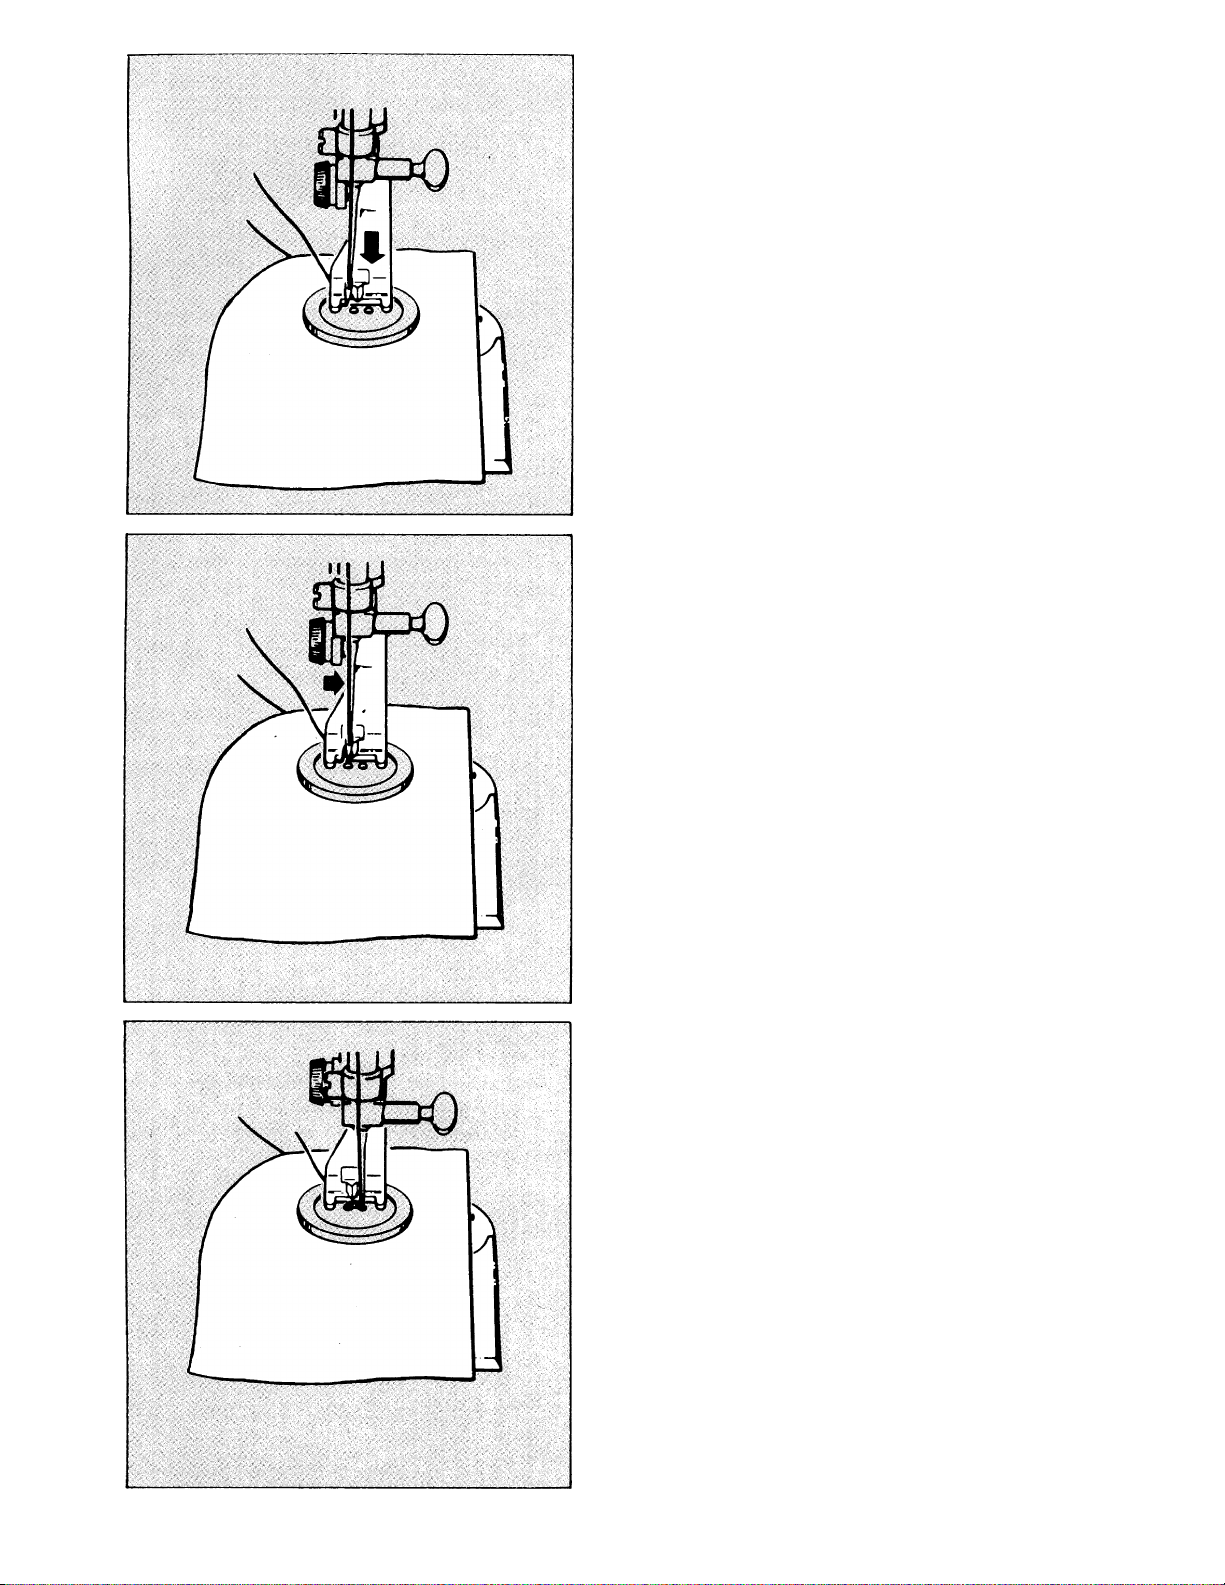
2. Turn hand wheel toward you, lowering
needle into either hole of button.
3. Continue turning hand wheel until
needle rises and moves over the other
hole of button. Adjust width if neces
sary.
40
4. Lower needle into hole.
Run machine slowly making 6 or more
stitches .to attach button.
Remove work from machine, leaving 4"
(10cm) of thread.
To secure stitching, pull thread ends to
inside of garment and knot close to
fabric.
Page 43
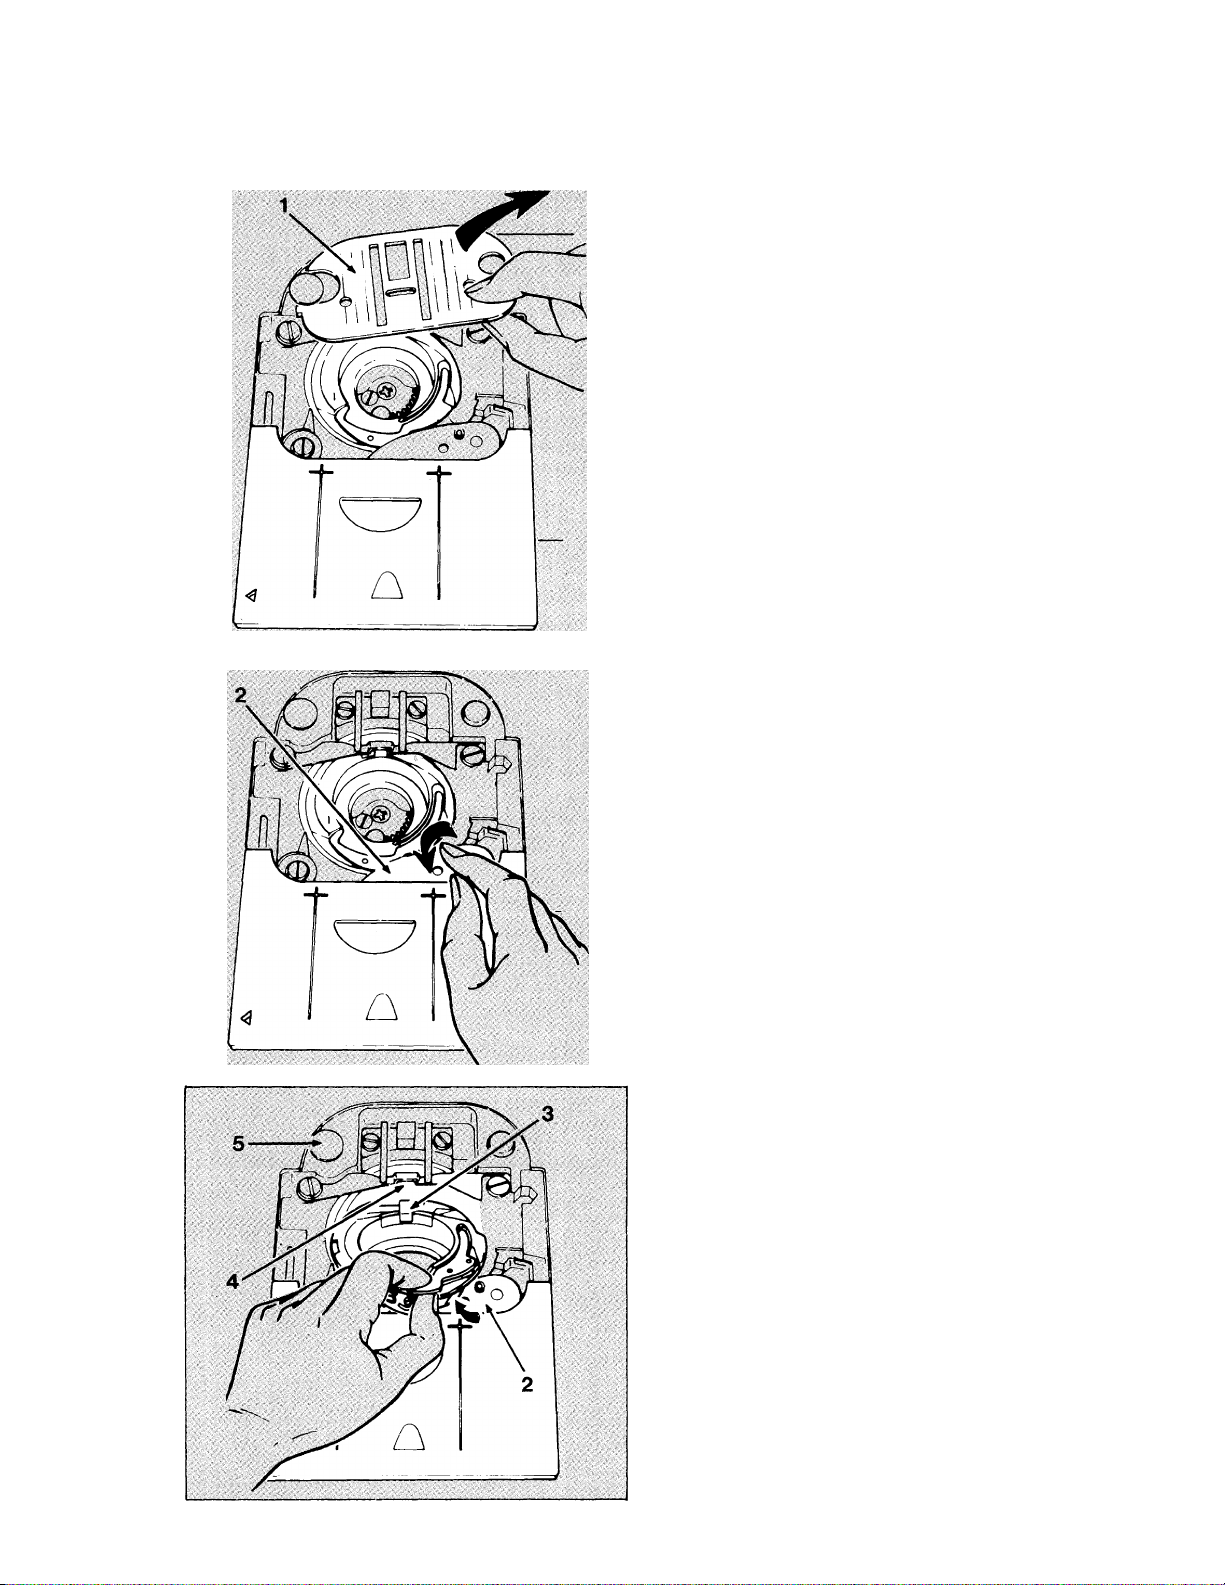
SECTION 6 CARING FOR YOUR MACHINE
REMO VINO AND REPLA CING BOBBIN CASE
CAUTION: Before cleaning or adjusting
the machine, remove plug from the socket
outlet.
• Raise presser foot and needle.
• Open slide plate and remove bobbin.
To remove the bobbin case, the needle
plate must be removed first.
• Lift needle plate (1) from right corner
and slide out from under foot.
TO REMOVE BOBBIN CASE
• Push lever (2) toward you until it stops,
and hold in this position.
• Lift bobbin case up and guide it out
toward you, as shown.
TO REPLACE BOBBIN CASE
• Push lever (2) toward you until it stops,
and hold in this position.
• Guide bobbin case into place, making
sure block (3) is all the way under metal
bracket (4).
• Return lever (2) to locking position over
top of bobbin case.
NOTE: After locking case in place, be
sure it is not tight, but can move slightly.
• To replace needle plate, slide it
under pin (5) and push it to the left.
• Press needle plate down in place.
• Insert bobbin and close slide plate.
41
Page 44
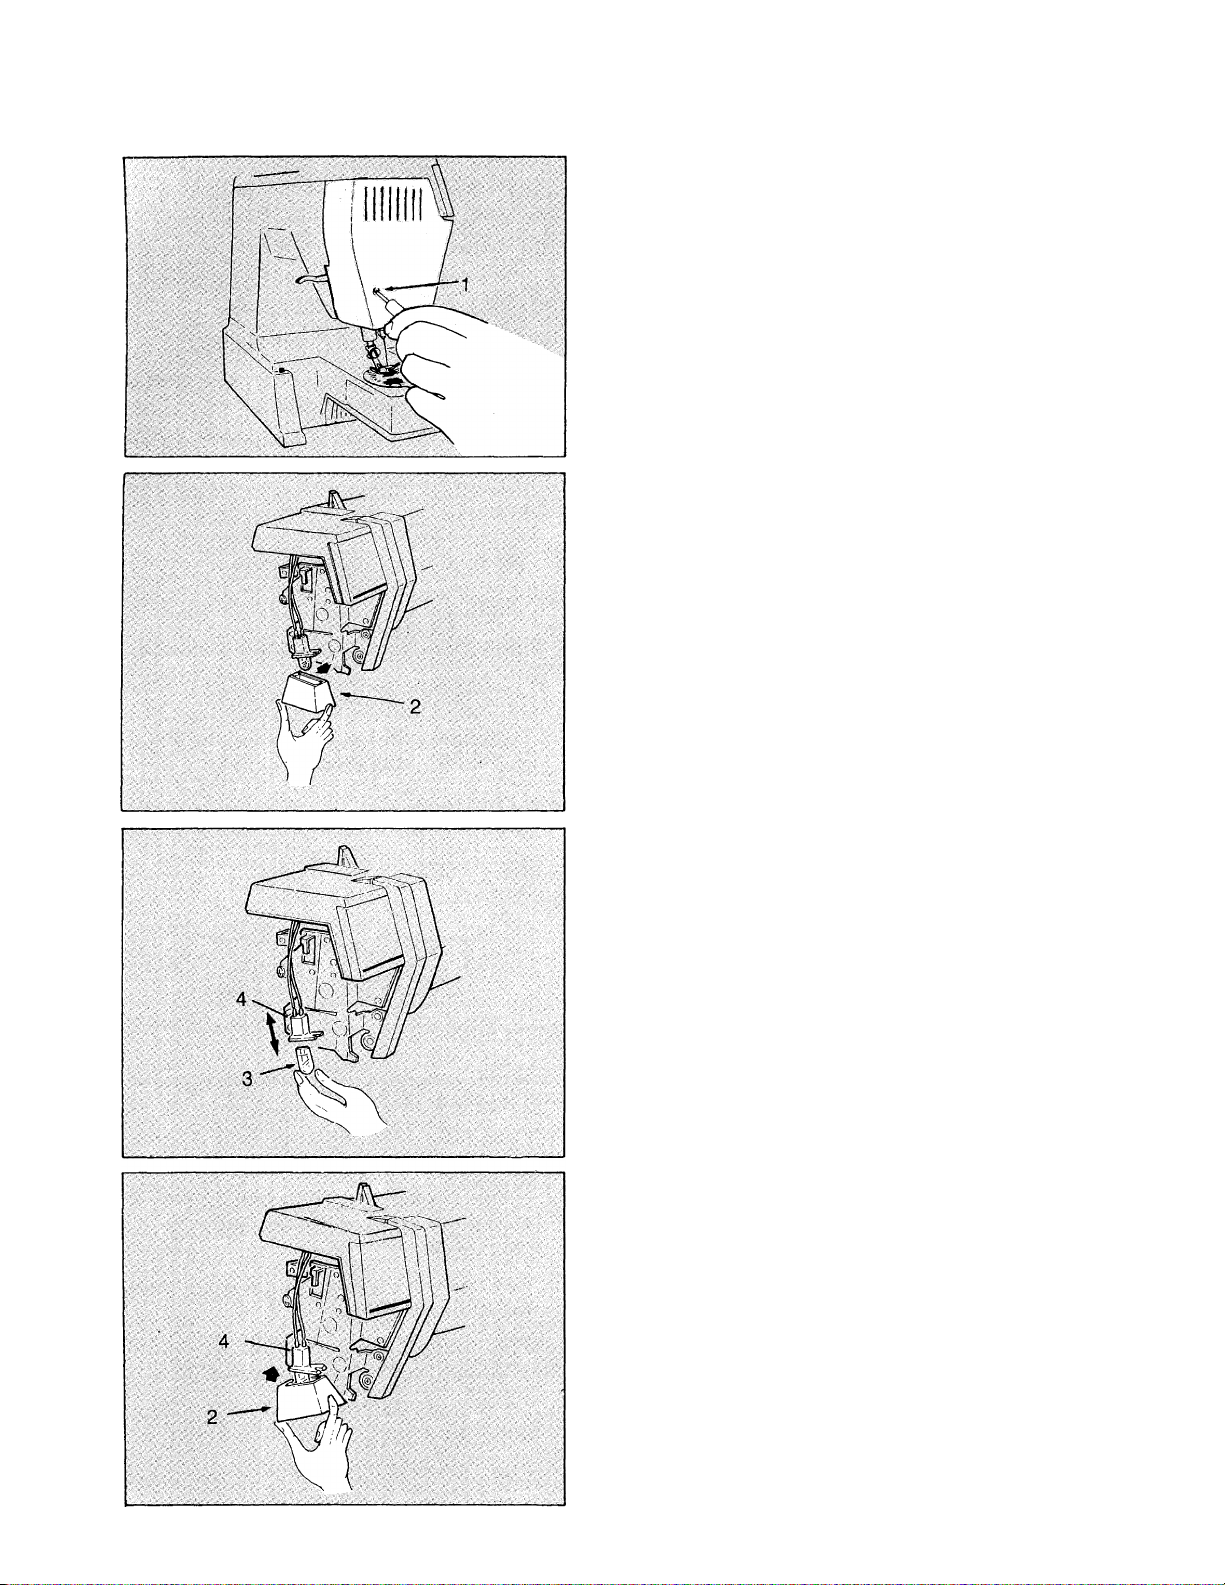
REMOVING AND REPLACING THE LOW VOLTAGE LIGHT BULB
CAUTION:
Before changing light bulb, make sure you
have removed plug from socket outlet. Be
sure to replace the face plate which covers
the light bulb before operating the machine.
Your LCD machine is designed to use a
5-watt/13-volt light bulb.
• To change the light bulb, the face plate
must first be removed.
• Loosen and remove screw (1).
• Slide face palte down and away from
machine.
To remove the light bulb
• Pull down on the light reflector (2).
• Pull down and wiggle the low voltage light
bulb until the light bulb is free from the
socket (3).
To replace the light bulb
• Push the new low voltage light bulb (3) into
the light socket (4). The orientation of the
light bulb makes no difference.
• Push the light reflector (2) into plape. Make
sure the small end of the light reflector is
aligned with the small end of the light
socket (4).
42
Page 45
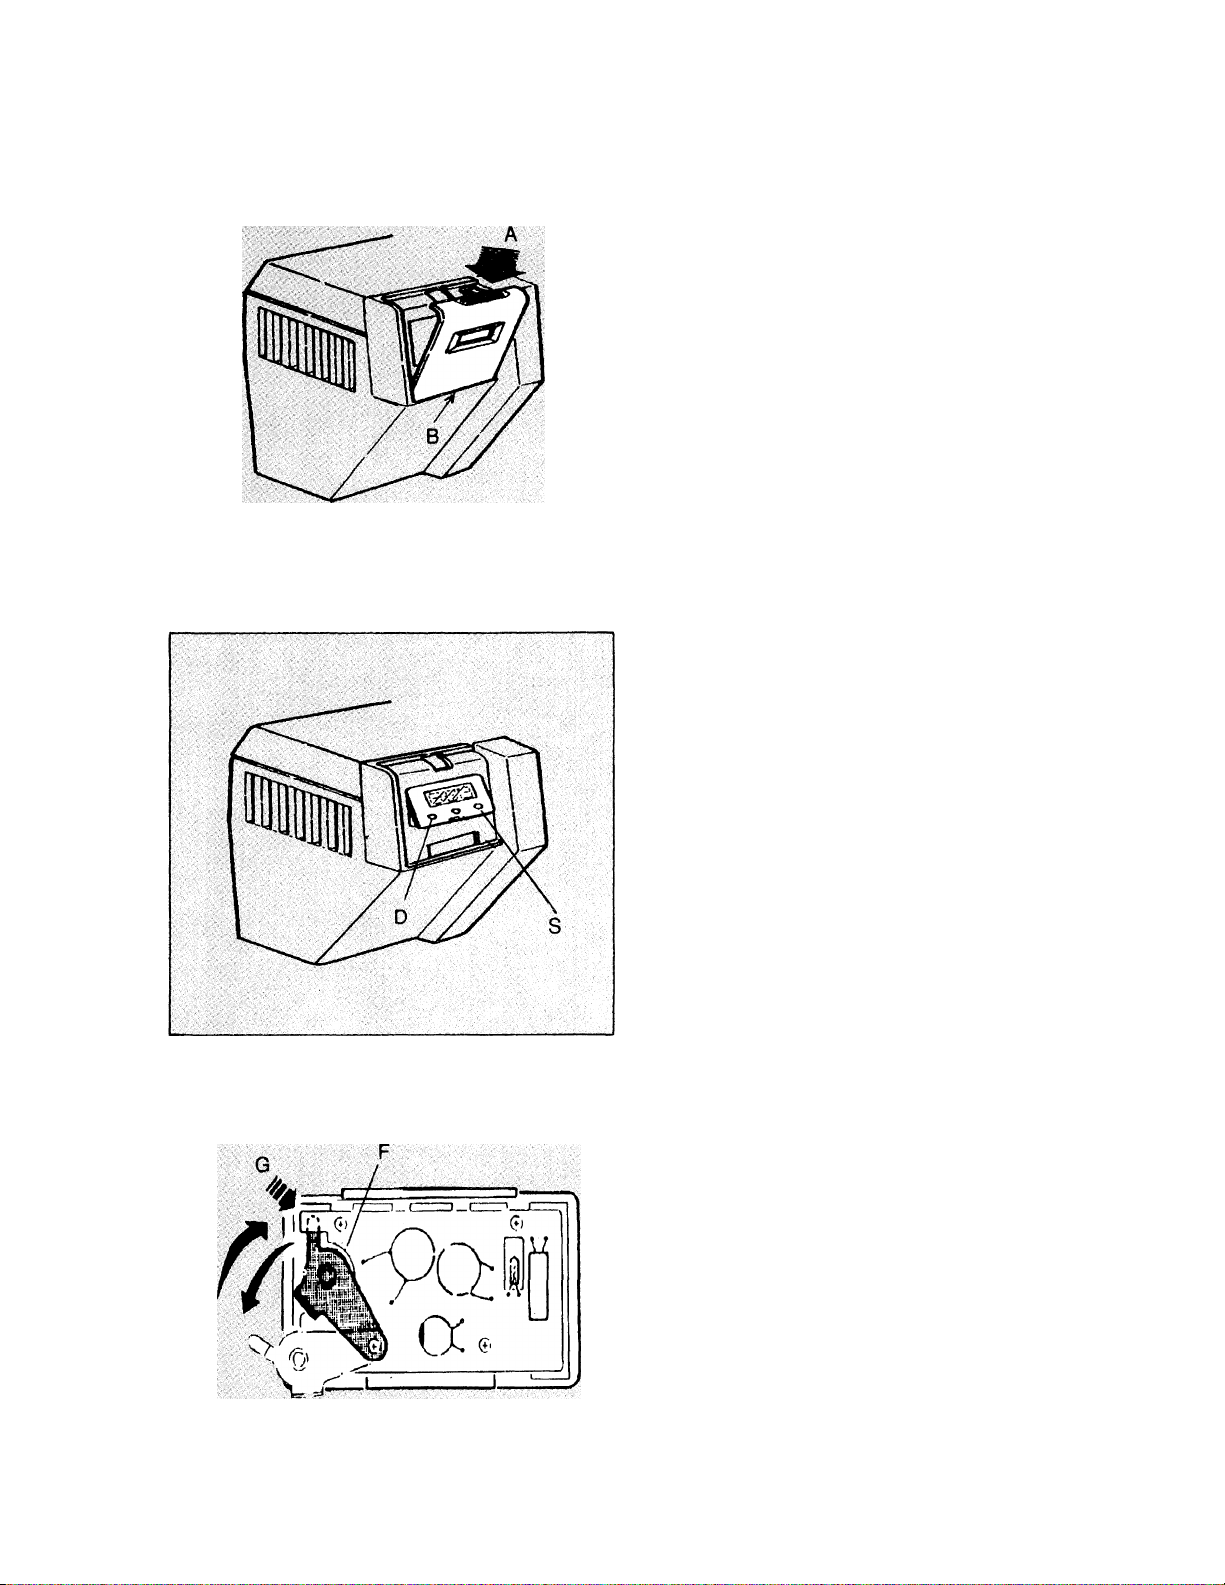
LCD CLOCK OPERATING INSTRUCTIONS
IMPORTANT:
Disconnect the machine power before you
remove the clock cover.
REMOVING AND REPLACING THE
COVER:
Removal: Press down at point “A” on
the clock cover and pull
towards you.
Replacement: Fit the clock cover into place
by putting the tab at “B” into
place and then pushing the
tab at ‘A” into place.
READING THE TIME:
Hours and minutes are displayed with blinking
colons.
SETTING THE TIME:
Hour: Press the “S” button three times.
The hour followed by either an
“A” for AM or a “P” for PM will
appear. Press the “D” button to
advance the time.
Minute: Press the “S” button once again.
A stationary colon followed by the
minutes will appear. Press the
“D” button to advance the
minutes.
Important: Press the “S” button once more
and then press the “D” button to
start the colons blinking and the
clock running.
CHANGING THE BATTERY:
Removal: • Slide the battery retainer
down to remove the battery.
Replacement: • Place the battery in area
“F”. Make sure the “+”
side of the battery is facing
you.
• Slide the battery retainer
up to position “G”.
• Make sure the notch on the
battery retainer is under the
dotted position of the
diagram.
Battery: Use a 1.5V 23-115 battery or
its equivalent. (LR-44 or A76)
43
Page 46
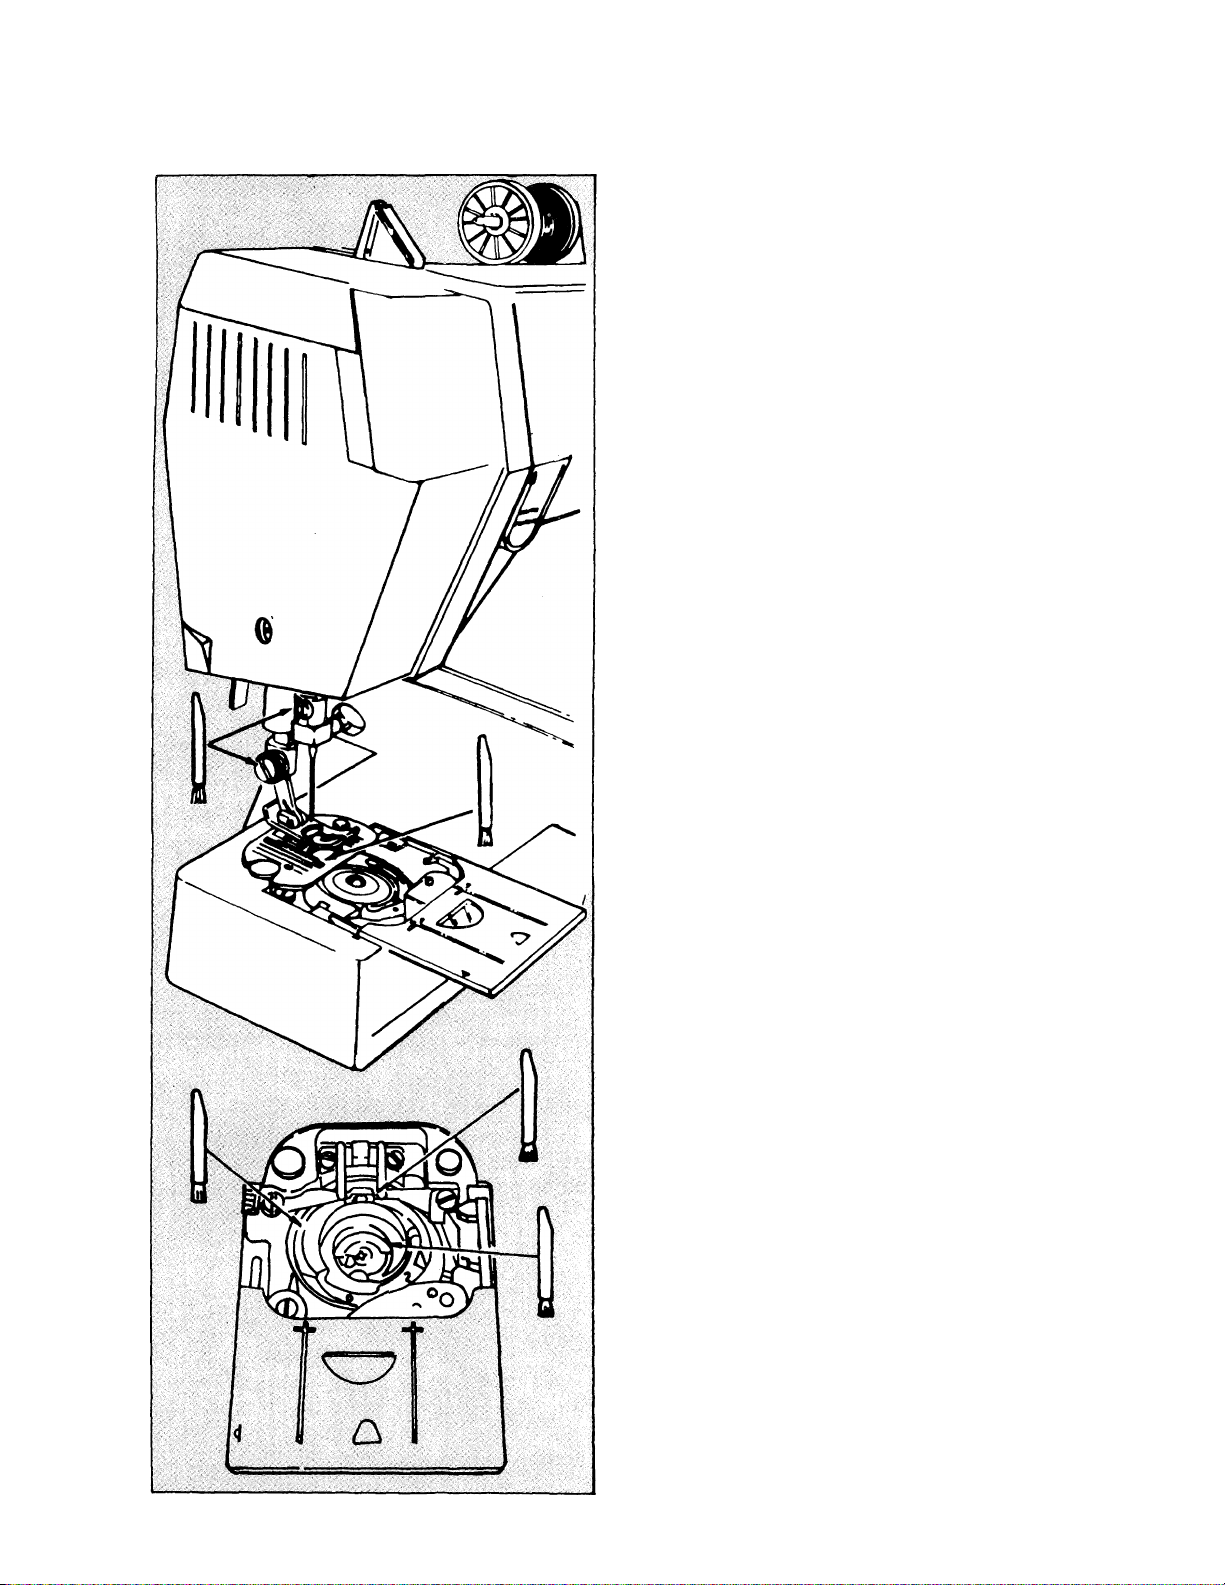
CLEANING THE MACHINE
Your machine is designed to give you many years of dependable service. To ensure this
reliability, take a few minutes to keep the machine clean. How often you clean it depends
on how often you use it.
• Using the lint brush, remove lint or dust
from:
presser bar
needle bar
machine surface (if necessary,
dampen a soft cloth and use a
mild soap to clean the surface)
44
Remove needle plate as instructed and
clean exposed area with a lint brush.
- bobbin case (if there is a lot of lint
in this area, remove the bobbin
case for cleaning)
Page 47

PERFORMANCE CHECKLIST
When sewing difficulties occur, look back through this manual to make sure you
are correctly following the instructions. If you still have a problem, the reminders below
may help you to correct it.
NeediB Does Not Move
Is machine connected to electrical supply?
Is the power and light switch on?
Is controller connected?
Is air supply from controller clear?
Needle Moves But Stitch Is Not Formed
Is needle defective?
Is needle fully inserted into needle clamp?
Are bobbin and needle correctly threaded?
Is bobbin correctly inserted into bobbin
case?
Needle Breaks
Is needle straight and sharp?
Is needle correct size?
Is needle fully inserted into needle clamp?
Are controls properly set?
Are accessories correct for application?
Lower Thread Breaks
Is bobbin correctly wound?
Is bobbin correctly inserted into bobbin
case?
Is bobbin case correctly threaded?
Skipped Stitches
Is machine properly threaded?
Is fabric firmly held down?
Is needle correct style and size?
Is needle straight and sharp?
Fabric Does Not Move Properly
Under Presser Foot
Is presser foot correctly attached to
machine?
Is presser foot lowered?
Is stitch lertgth correctly set?
Bobbin Winding Difficulties
Is thread unwinding freely from spool?
Is bobbin winder engaged?
Is thread end securely held at start of wind?
Upper Thread Breaks
Is machine properly threaded?
Is thread freely unwinding from spool?
Is proper spool cap being used?
Is needle correct size for thread?
Is upper thread tension too tight?
Is bobbin case properly inserted?
Is bobbin rim free of nicks?
45
Page 48
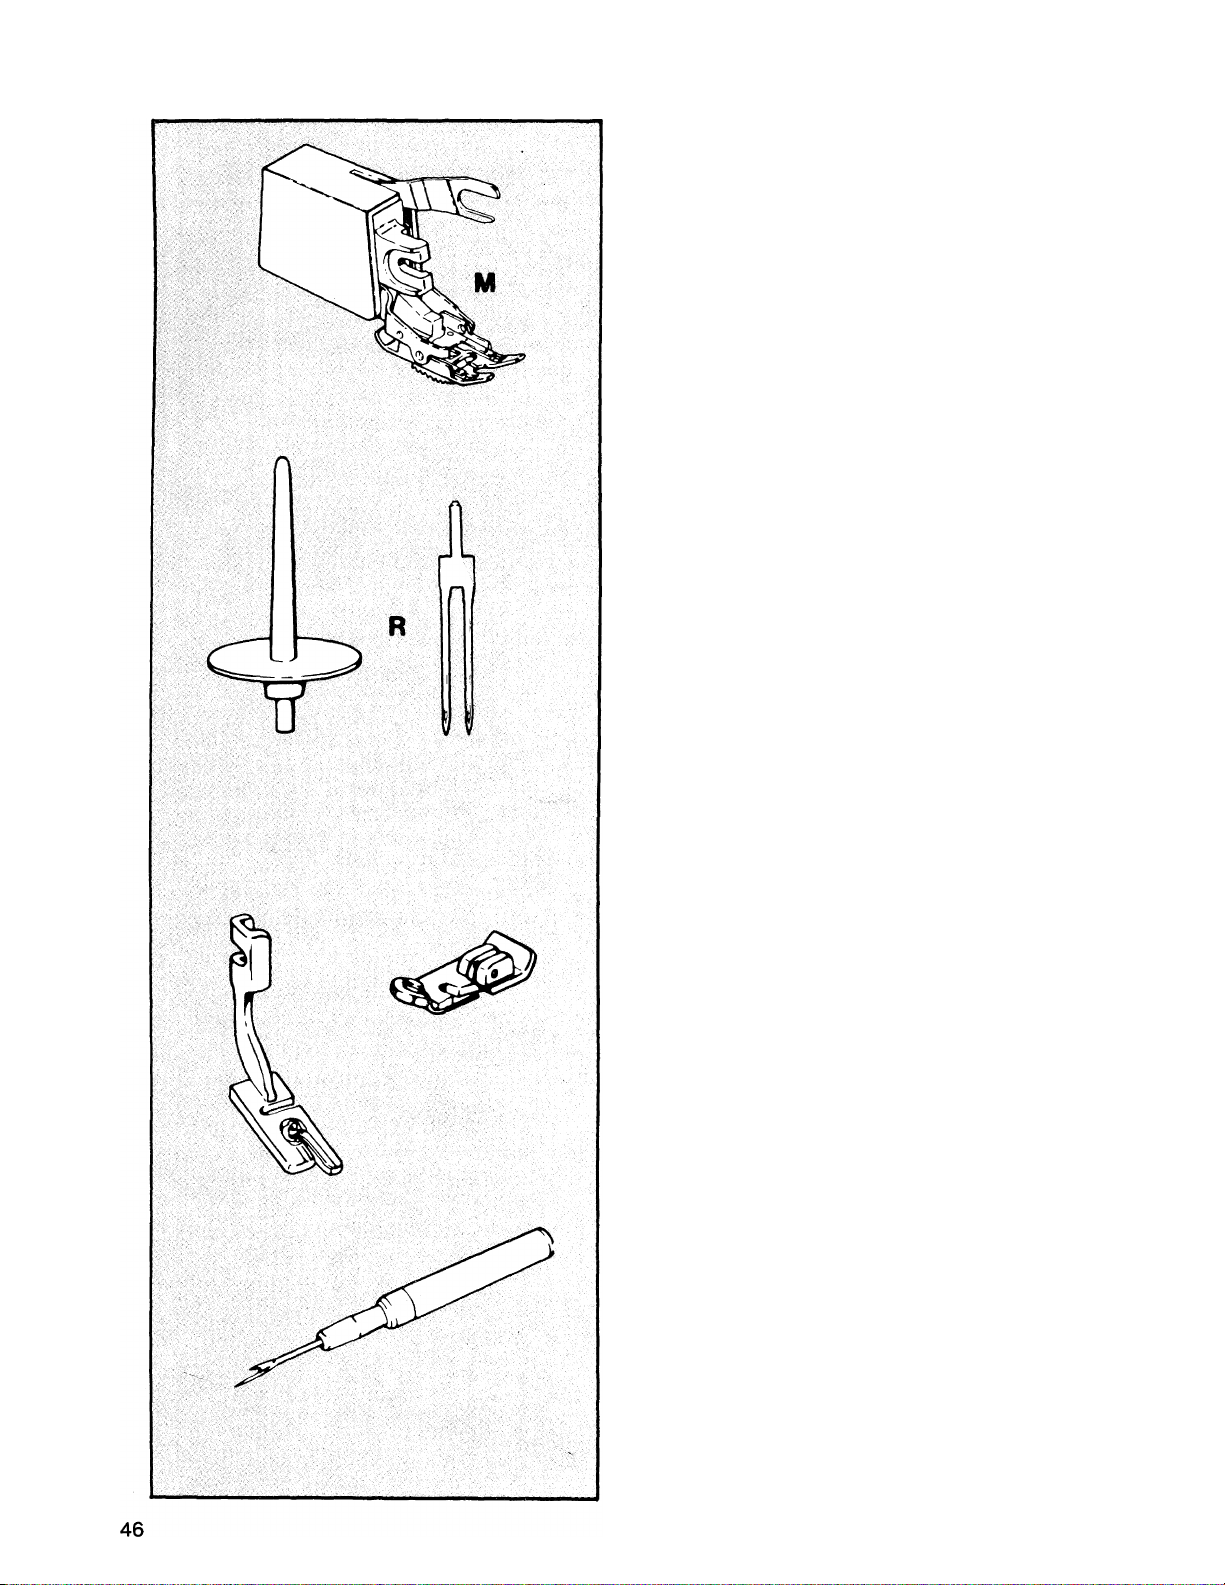
ADDITIONAL ACCESSORIES
Additional Accessories for your sewing machine are available at your sewing center.
Even Feed Foot (M) is used for sewing
hard-to-feed pile, stretch and bonded
fabrics. Also excellent for plaids, stripes
and topstitching.
Twin Needle and Spool (R) are used for
decorative twin needle (2 threads) stitch
ing on woven and knit fabrics.
Overedge Foot, use with Overedge Stretch
Stitch for seams in stretch fabrics.
Narrow Hemmer Foot is used to stitch
a narrow hem in a single operation.
Seam Ripper, use to pick and cut threads
quickly and neatly.
Page 49
PERSONAL NOTES
47
Page 50
PERSONAL NOTES
Page 51

r
INDEX
Accessories
...................................
4,5,46
Accessory Storage, Built-In.................. 4
Balance............................................... 27
Basting
Blindstitch Hems
Blindstitch Presser Foot
................................................
.......... ......................
................
22
29
5,29
Bobbin.................................................. 5
Winding A
Inserting A
Bobbin Case
................ ...................
......................................
.......................................
15,16
17
41
Removing.......................................41
Cleaning..........................................44
Bobbin Thread, Raising.....
Border Design
............................
...................
32,33,36
18
Button, Attaching A..........................39,40
Button Sewing Foot
Buttonhole Attachment
...........................
.....................
’
4^37
Buttonholing, One-Step.....................3738
Caring for Your Machine
...................
41,42
Cleaning The Machine.......................... 44
Connecting The Machine
.......................
Corners, Turning Square..................... 23
Darning............................................... 24
Darning and Embroidery Foot
Attaching Foot
Decorative Stitches
Edging
.................................................36
.................................
..............................
Embroidery, Free Motion
Fabrics
Face Plate
Fagoting
Feed Cover
................................................
Placing Under Foot
..........................
............................................
.............................................
........................................
Attaching Feed Cover
............
......................
......................
5,24
12
32
24
9
22
42
35
4,39
12
Free-Arm Sewing..............................10,24
Handle Storage....
Hemstitching
Lace Trim
.............................................
Light Bulb....
Replacing
Lint Brush,
........................................
..................................
...................................
.......
.................................
........................................
29,34
30
42
42
4,44
Monogramming....................................28
Needles.............................................—■ 5
Selecting
Changing
Needle Plate...
..........................................
.....
...................................
.......................................
10
Changing....................................... 41
Straight Stitch Needle Plate
Needle Threader
Attaching
....................................
........................................
Operating The Machine
Pattern Selecting....
..........
Performance Checklist
.........................
.........................
..........
5,20
.....................
14
Personal Notes.....................................47
8
g
9
4
8
19
45
Presser Feet........................................4,5
Changing
General Purpose
Special Purpose
.....................................
..............................
..............................
11,12
4
5
Straight Stitch...............................4,20
Presser Foot Lifter
Presser Foot With Shank
Changing
...............................
......................
........................................
22
5
12
Principal Parts.....................................2,3
Reverse Stitching.................................22
Satin Stitching
.....................................
28
Seams:
Curved
............................................
24
Finishes......................................28,34
Keeping Straight
Overedge Seam
Sewing A Seam
Seam Guide
Smocking.....
....................................
........................................
Special Stitches...
.............................
............................
...............................
23,24
.................................
23
33
22
36
26
Spool Caps........................................5,13
Stitch Patterns:
Arrow Stitch.....................................32
Blind Stitch
......................................
29
Boomerang Stitch............................33
Bunting Stitch..................................32
Chinese Dynasty Stitch
Crescent Stitch
.............................
..................
31
31
Crown Stitch....................................35
Domino Stitch
Fagoting Stitch
Flag Stitch
Honeycomb Stitch
Kite Tail Stitch
Lady Bug Stitch
“M” Stitch.
Multi-Stitch Zig-Zag
Rampart Stitch
Ric-Rac/Straight Stretch Stitch
................................
.......
.........................
........
.........;....................
...........................
................................
...............................
.......................................
.........................
.............................
.........
32
35
32
36
31
33
30
30
33
35
Satin Bead...................................... 23
Straight Featherstitch
Straight Stitch
..................................
Stretch Overedge Stitch
Turkish Stitch
..................................
.....................
..................
36
20
33
34
Zig-Zag Stitch.................................. 28
Stitch Length.............................. 20,26,37
Stitch Width
.....................................
26,38
Tears, Mending.....................................30
5
Tension...
......................................
21,27
Thread.................................................. 9
Threading The Machine
Topstitching
Zipper Foot
......i.................................
.......................................
Zipper, Inserting A
.......................
...............................
13
35
4,’25
25
49
 Loading...