

Page 1

Instructions for Using
SINGER“
Sewing Machine Model 631
\ \
'I'iio SINGFH Conveifibio
CHAIN ST1TC:H ieature
. . . n'jiK‘siTitK Ilio ultimali; in scwimj madii!i(> pmfurmanco. With thi*
purduiso OÍ Uk; nrw Si,AN'l'-0-.MA') 1C, you ( <in iako pride i n ovrninij
the llnc.st sev.'iiig inadhiU' cvm built. You'll imüvt'! <it its almost unbeliovablo case of opmation . . . the remai kabh' seivici's it imtfoims.
You'll deiUjht in Us ¡Kuti'ct, beautilul sütrliiiU!. In adililion to its
numerous outslandiiH! .u!v.itil<i(|es tlu’ maddne umv imoipoiatr's a
new and unique h'ature in that look stitihinq and diain sfituiiiuj can
hi' seleetivoly produeeil on tlu> s.ime maihiue.
® Only SINCFR proiiui es an .uitomafie m.uhini' that in ailtiilion (o
the fonventionat totk sUtdt also sews a single 1!iiea<i diain sliti:li
wiikli tan be nsoit ior basUiH) sinims thus replathig liaint-bastintj.
This feature will release, you fioni iiine-tonsuminij work and if
reve<ils new <t,s()ec:ls so far nnri-i;xistenl in tlie overall picture of
the applications of the modmii family sewinrj maihine, (iYu deiaited
insiructions conceininq operation and application, .see page 20.)
# SINGTR lias WOHl.D’S FIR.ST Am'OMA'nc with slant neciile ami
gear drive. Seeing is easim, sewing s!niM.)UH'St evi»r. No slipjring
i>r stallimj
O.'Jl tniiy KMmuknblf «UKÌiiiio with
Form 30-047G íRev. 176)
® SINGllR has WORI.D'S FIRST Al,iTOMAT!C
threading. Has built-in lliroading tliarl, haiuiy
f I o n t of neoiilc!
« SlNGIiR lias WORI.D'S ITRST At.iTOMA'nC wiih a buill-in eye-
level slitth diait, with push bulton seleelion lor wliatever lam y
stitch you want!
V\ Tradeitiark ol THE SINGER COMl>ANY
Copyright 1965 THE SINGER COMPANY
All Rights Reserved Throughout the World
wiih ilouble-easy
’drop-irr' bobbin in
Printed in U.S.A,
Page 2

OTHHR OUTSTANDING FJiATURliS ARE:
• CYLINDER BED simplifies sewing of articles of
a curved or cylirrdrical nature
bed with the push of a button.
• PERFECT STITCHING ... straight and zigzag.
® NEEDLE CLAMP holds one or two regular
needles
two needle stitdiing.
• NEW TYPE SPOOL HOLDER ensures a smooth
flow of the needle thread.
® THROAT PLATE with .seam guide markings.
Meld with magnets for easy removal and replace
ment.
® SUPERFINE CONTROL of stitch length ensures
perfect satin stitching.
• PRESSURE OF PHESSER FOOT can easily be
adjusted according to regulator.
TO GET THE MOST ENJOYMENT
FROM YOUR SINGER 631
Take advantage of the free sewing lessons to which you are entitled!
Skilled, SlNGER-trained teachers will give you personal guidance and
assist you in learning the iundamcntals ot home sewing.
.....
same or different .sizes for exciting
.......
converts to flat
HINGED FACE PLATE, houses threading drart
and swings open for easy access to oiling points.
BUILT-IN MOTOR with worm wheel drive, no
belts required, excellent penetrating power when
.sewing heaviest materials without.manual assis
tance.
BUILT-IN LIGHT focu.sed on sewing area, which
swings down for easy bulb replacement.
ALL MECHANISM completely enclosed.
SPECIAL PURPOSE FOOT.
FLEXIBLE SEAM GUIDE.
HINGED BED EXTENSION for increased work
area,
COMPARTMENT for attachments and accesso
ries built into dctadrable cloth plate.
SINGER SERVICE
Wherever y'ou go you will find expert, dependable SINGER' Service
close at hand, SINGER is interested in helping you keep your SINGER
Sewing Machine in top running condition. That is why you should
always call your SINGER SEWING CENTRE if your machine over
requires adjustment or repair. Only from your SINGER SEWING
CENTRE can you obtain the services of a trained SINGER repair man
and warranted SINGER* ports.
EVERYTHING FOR THE WOMAN WHO SEWS
The answer to your sewing needs is at your SINGER SEWING
CENTRE. There you will find a wide choice of sewing aids, notions,
serving instructions and services. Look for the famous red "S" and
SINGER trademarks on your SINCIER .SEWING CENTRE and the ever
ready SINGER Service car. See j)hone book for address nearest you.
Page 3
TO RliMOVn AND KI-PI-ACK DliTACHAni.E CLOTH PLATE
To dctadi cloth plate from machine, press button on machine bed and withdraw plate.
Replace cloth plate in same manner, locating two pins in plate with corre.si)ondincj holes in rnatiiinc
bed. Push cloth plate to tight until it snaps in locked position.
See pages 88 to 93 for applications of c>dinder bod feature.
NEEDLE AND THREAD SELECTION
The selection of thread should be based on the fabric to be stitched. The thread should blend with
the fabric in colour, fibre and size.
Silk and wool fabrics should be stitched with silk thread; cotton fabrics should be stitched with cotton
or cotton inorceriscd thread, etc. The thread must be of a size that will imbed itself into the texture of the
fabric. Thread that is too heavy for the fabric will remain on the surface and become weakened by fric
tion and abrasion.
The selection of the needle .should be basen on both the fabric and thread being used. The eye of the
needle must be large enough for the thread to pass freely through it. The blade of the needle must be fine
enough not to mar the fabric with too large a puncture, yet heavy enough to pierce the fabric v/ithout
binding or deflecting.
You will obtain best stitching results from your Sewing Machine if it is fitted with a SINGER* Needle.
Page 4
NEEDOiS ANJ> THREAD
This madiine uses needles
Catalogue 2020 (15X1),
Sizes 9, 11, 14, 16 and 18,
For perfect stitdiiiig, select correct needle
and thread to correspond with fabric (see
page 6),
Be sure to use similar threads for both
needle and bobbin.
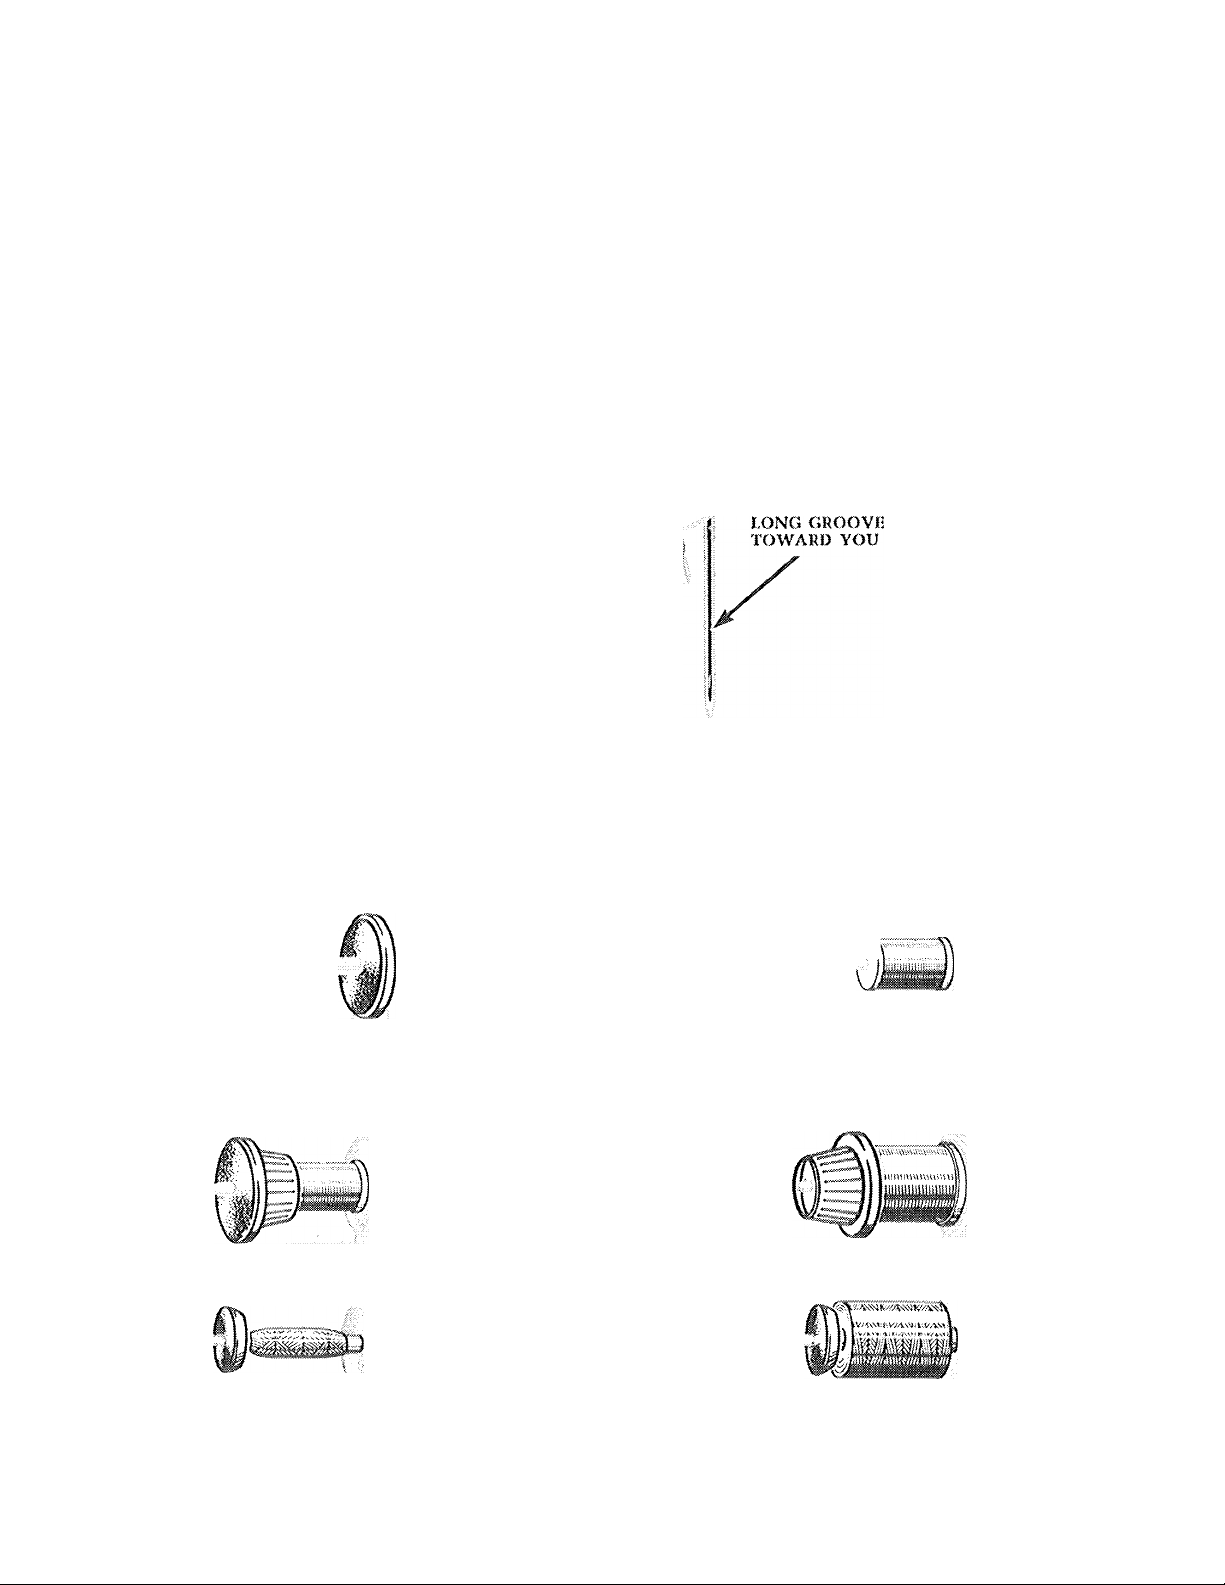
NEEDI,E INSERTION
Raise the needle bar to highest point by
turning the hand wheel toward you. Loosen
the needle clamp .screw. Insert needle upv.'ard into clamp as far as it will go, with the
flat side of the needle to the back and the
long groove toward you. Tighten needle
clamp screw.
1, Slij) spool sea! on to s])!ndle (Cushion
side i<u;ing spool of thread).
SPOOL HOLDER
n
2. Slip s])ool of thread on lo spindle.
3. Press Ihtr'ad lead-off against spool of thread. Select threarl lead-off according to the si/.e of tliread
sjroo! used, as shown.
Page 5

UPPfiR THRI-AOING-SINCU; NliKDIJi
Raise tako-up lever lo highest point. Phiee thread
on spool holder and load Ihrouyh threading points
shov.ii. Thread needle irorn front to back. Drav/
snffieient IliKidd through eye of needle v.’iUi which
to start sevring.
WIND THE BOBBIN
Release hand wheel, turn slop motion screw with right hand in direction shov/n by arrow. Slip bobbin
on to bobbin winder .spindle.
10
Page 6
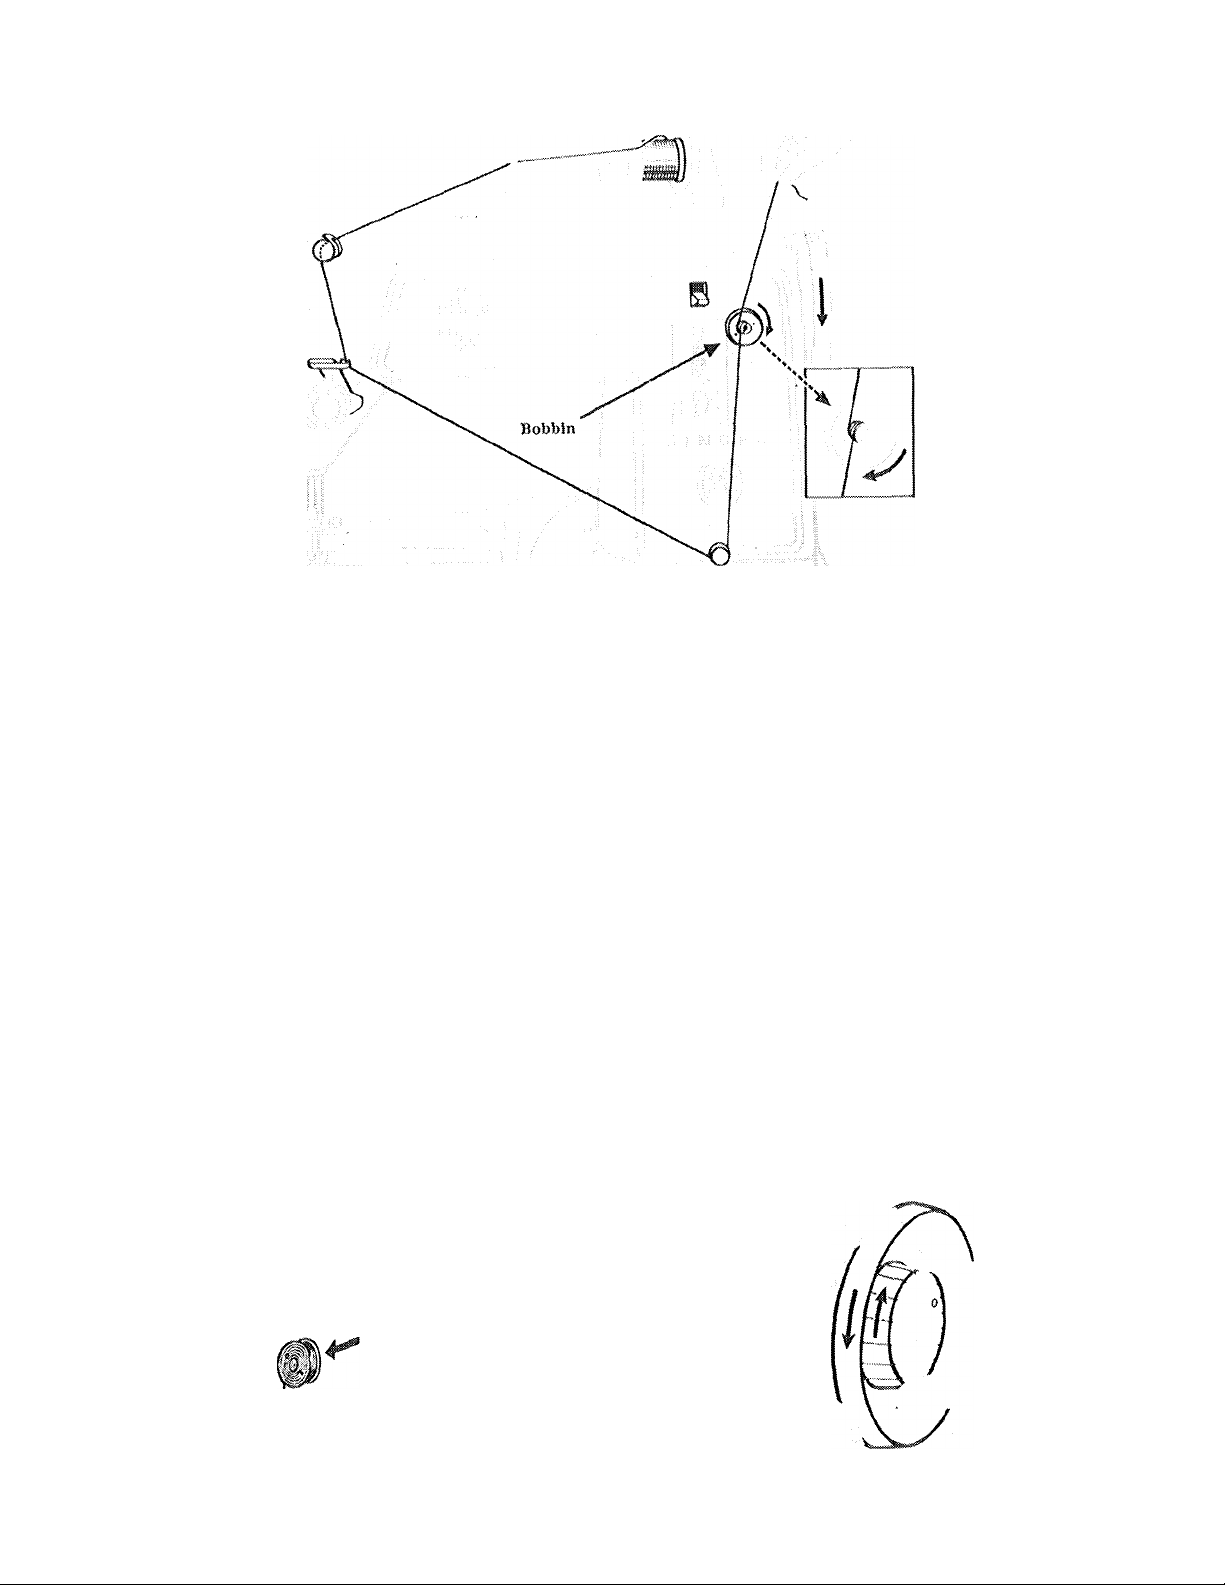
WIND THE BOBBIN (Conftl.)
'i hreiui the madiiiie as shown. ,
Wind several coils of thread around tlie bobbin and depress bobbin winder engaging lever.
WIND THE BOBBIN (Conf'd.}
Do not wind loo riuidi thread, otherwise there
would be no free run of the bobbin in the bobbin
case.
Stop rnacliine, raise bobbin winder engaging lever
and retnove bobbin from bobbin winder .spindle.
Tighten .stop motion .screw with right hand in
direction sliown by arrow.
11
12
Page 7

REMOVE THE BOBBIN
Open slide plate and remove bobbin.
13
THREADING THE BOBBIN CASE
...
\
Hold bobbin so that thread biads off in direction shown. Place bobbin in case. Guide thread into slot
and under spriny. , .
Draw thread into notch at end of s))riny, pulling off about 3 inches of thread across the bobbin.
Closer sHd(; platci allowing thread to enter notch.
M
Page 8
3 Piessci P'ool Screw
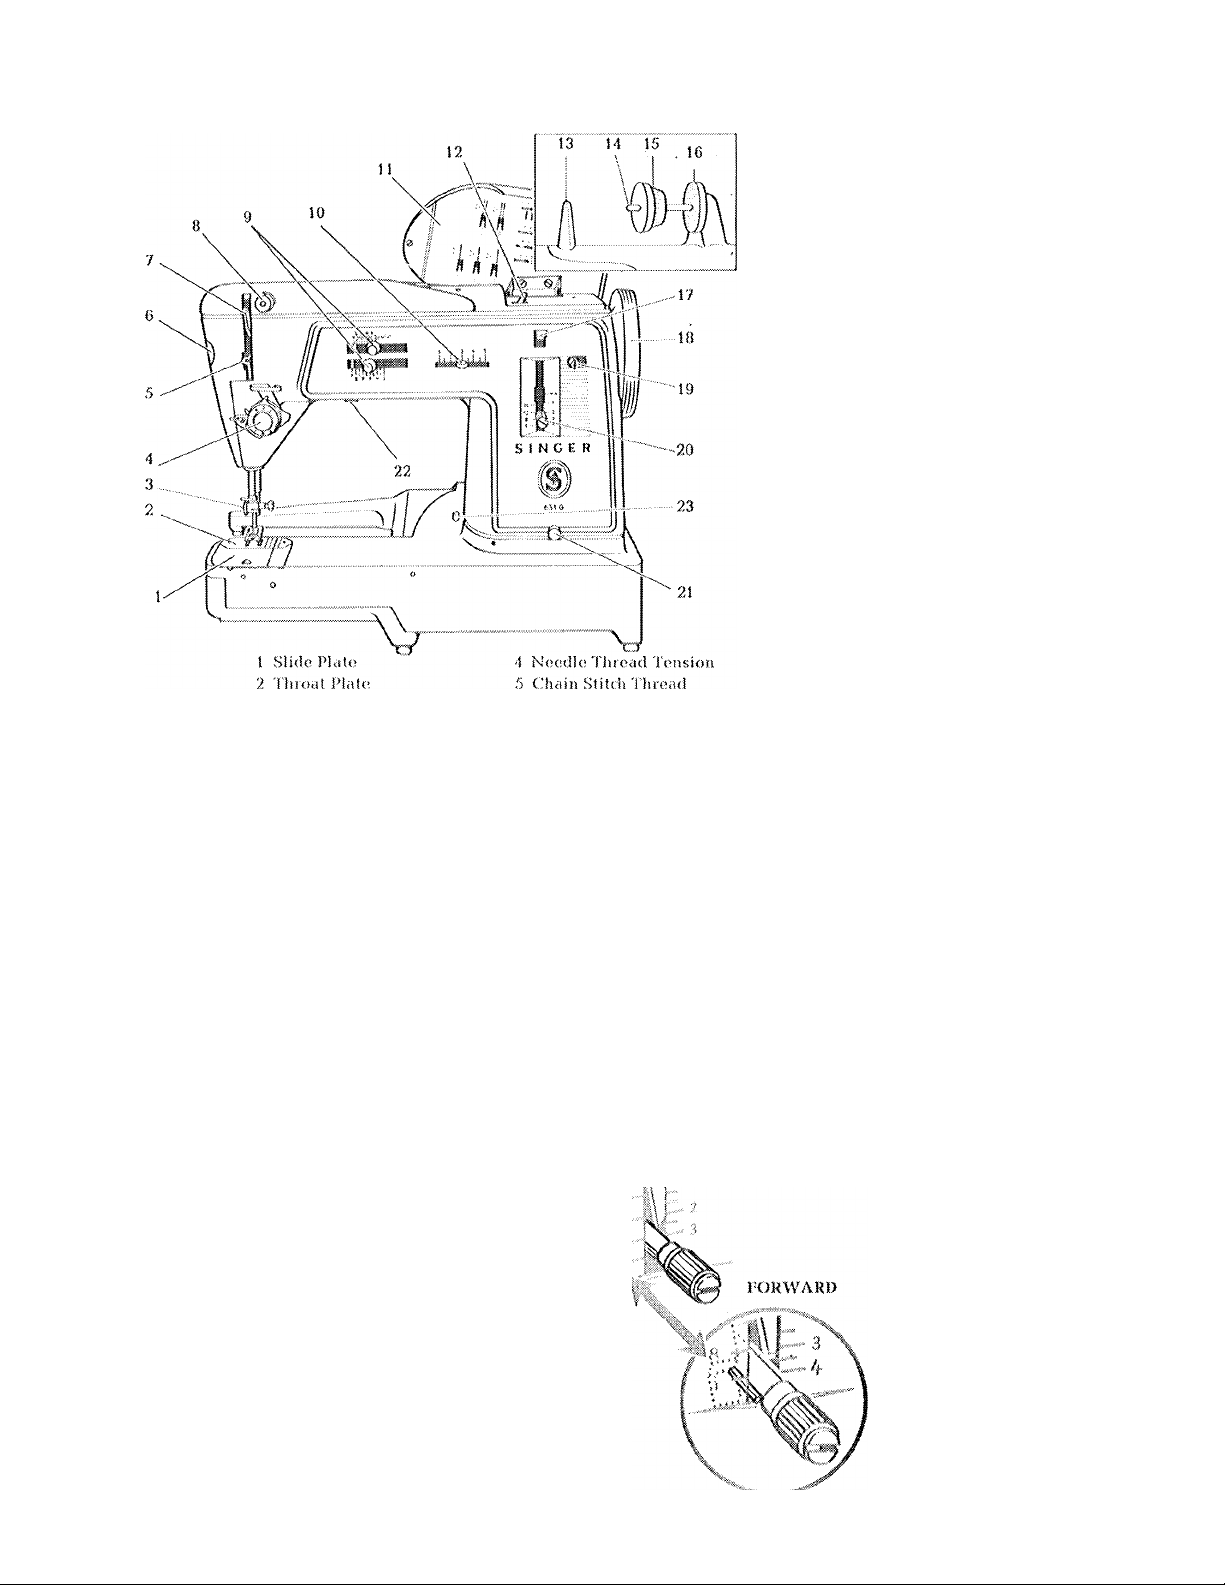
PKINCIPAL PARTS OP MACHINE 031
6 Pressui'« Reloiise
BuUoi)
y TJnoad T<ike-itp
I.over
8 Pre-te(!sion
9 Patteni Selector
Builoes
iO Stitch Width Lever
H Stitch Chart
12 Liyht Switch
13 Thread Guide
14 Spool Spiiuile
15 Thread Lead-off
10 Spool Stiat
17 Bobbin Winder
HngagiiKj Lever
18 Hiiud Wheel
19 Bobbin Winder
Spindle
20 Stilch Length
Regulator
21 Bobbin Winder
Pre-tension
22 Bulb Replaccnrent
Lever
23 Cloth Plate
Disenyagiiiii Ihrllon
15
STITCH U;NGTH INDICATOR
Numerals on the left sidci of the indicartor repre
sent the mimbcu' of stitches pcrr inch. Numerals on
the right side represent stitch length in millimelcr.s,
A supertinc control can be made in case ot stitch
huKjths less than 1 mm or stitches per inch {2,0).
The greatest stitch Icmglh ol 4 nun or 0 stitches per
inch can be locked in place when slitdiing folds,
phrats or muiUph; layers of heavy fabric.
To set stitch length; Loosen by liiming tluimb nvd
to the left as shown, Position lover for desired stilch
length. Tkjlden by lutning thumb mit to the liglit.
By raising the stitch length regulator to the hig
hest point, reverse sUtdung is accomplished at the
same stitch length as forward. When in locked posi
tion, 4 inrn or stilches ¡rer inch (G) cannot be rever
sed. If reviuso stitching is ch'sired with thi.s stilch
length position, turn thumb mil to the left unlil the
stitch length regulator can bo adjusted to its highest
point al revcr.so stitching.
16
::-W )
■ IH
LJNLOCK.S
KLVliRSH
It
LOCKS
Page 9

Srn'C:H WIDTH AND NliEDI.H POSITION SEU-Cn'OR
1 2 3 4 S
I I I I,!.I I I I
A Stitdi widlh or needle position settiny is necessary for both straight and zig/.ag stitching.
When used with a straight stitdi setting, the lever ¡ilaces stitching in left, centre or right needle position
{see pages 26 and 27).
When used with a decorative stitdi settinci, the lever controls width of primaiy patterns and produces
variations of combination ¡patterns (see pages 41 and 43).
To position, depress lever and slide it left or right to desired setting. Numerals indicate five positions
but intermediate settings may also be used.
PATTERN Slil.liCTOR
Please note.': Do not make selector adjustments while the needle is in the fabric.
When make Patletn selection set stitch width lever at 3,
3
To Select Rettuired Pattern
1. Depress Push Button A and keep
depressed until selection is com
pleted.
2. ihish Pattern Selector Buttons.
,3, Select lequired Pattern.
4. Release Pattern Selector Buttons.
5. Release Push Button A.
PATT'ERN .SEUiC'I'OR
I, N P R
K|M|0|q| Special
M I I I I I I I
A 1 C I E j G I f
B D F H J
VI
Settings from K through Special are
made by the upper button.
Settings from A through J are made by
the knver buttou.
13
Page 10
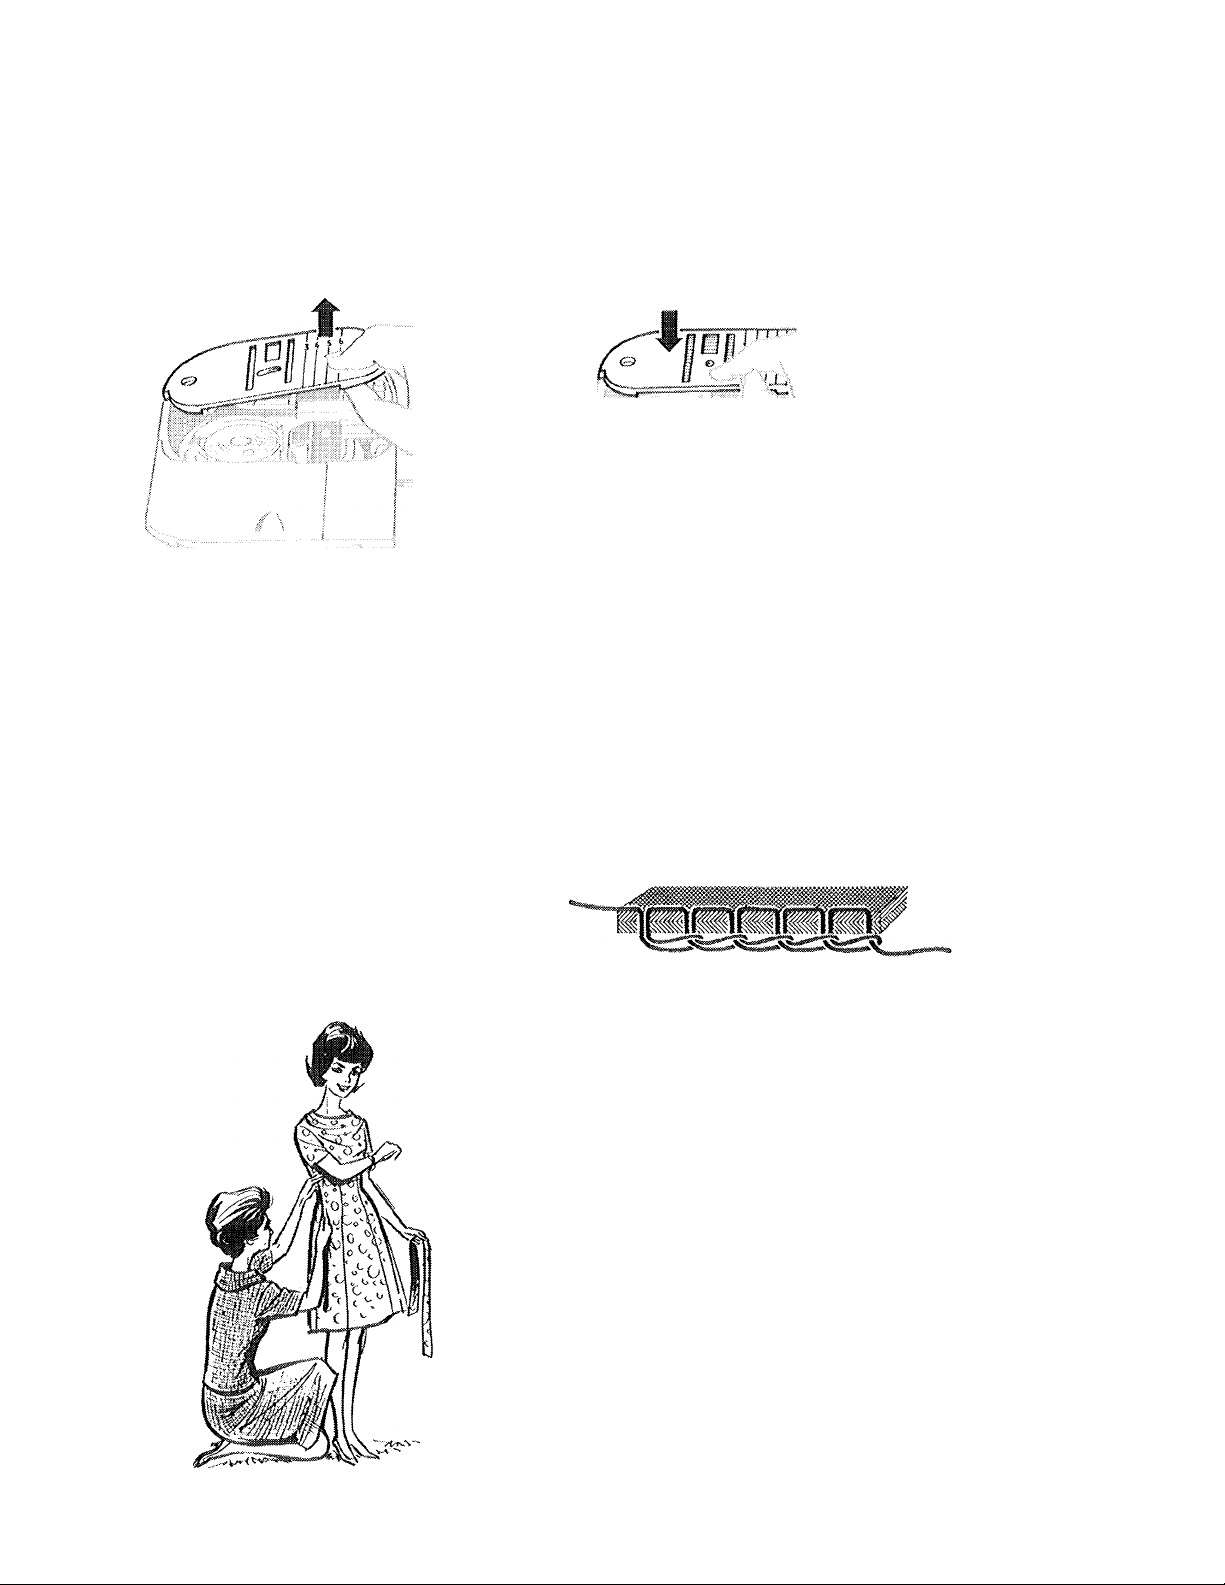
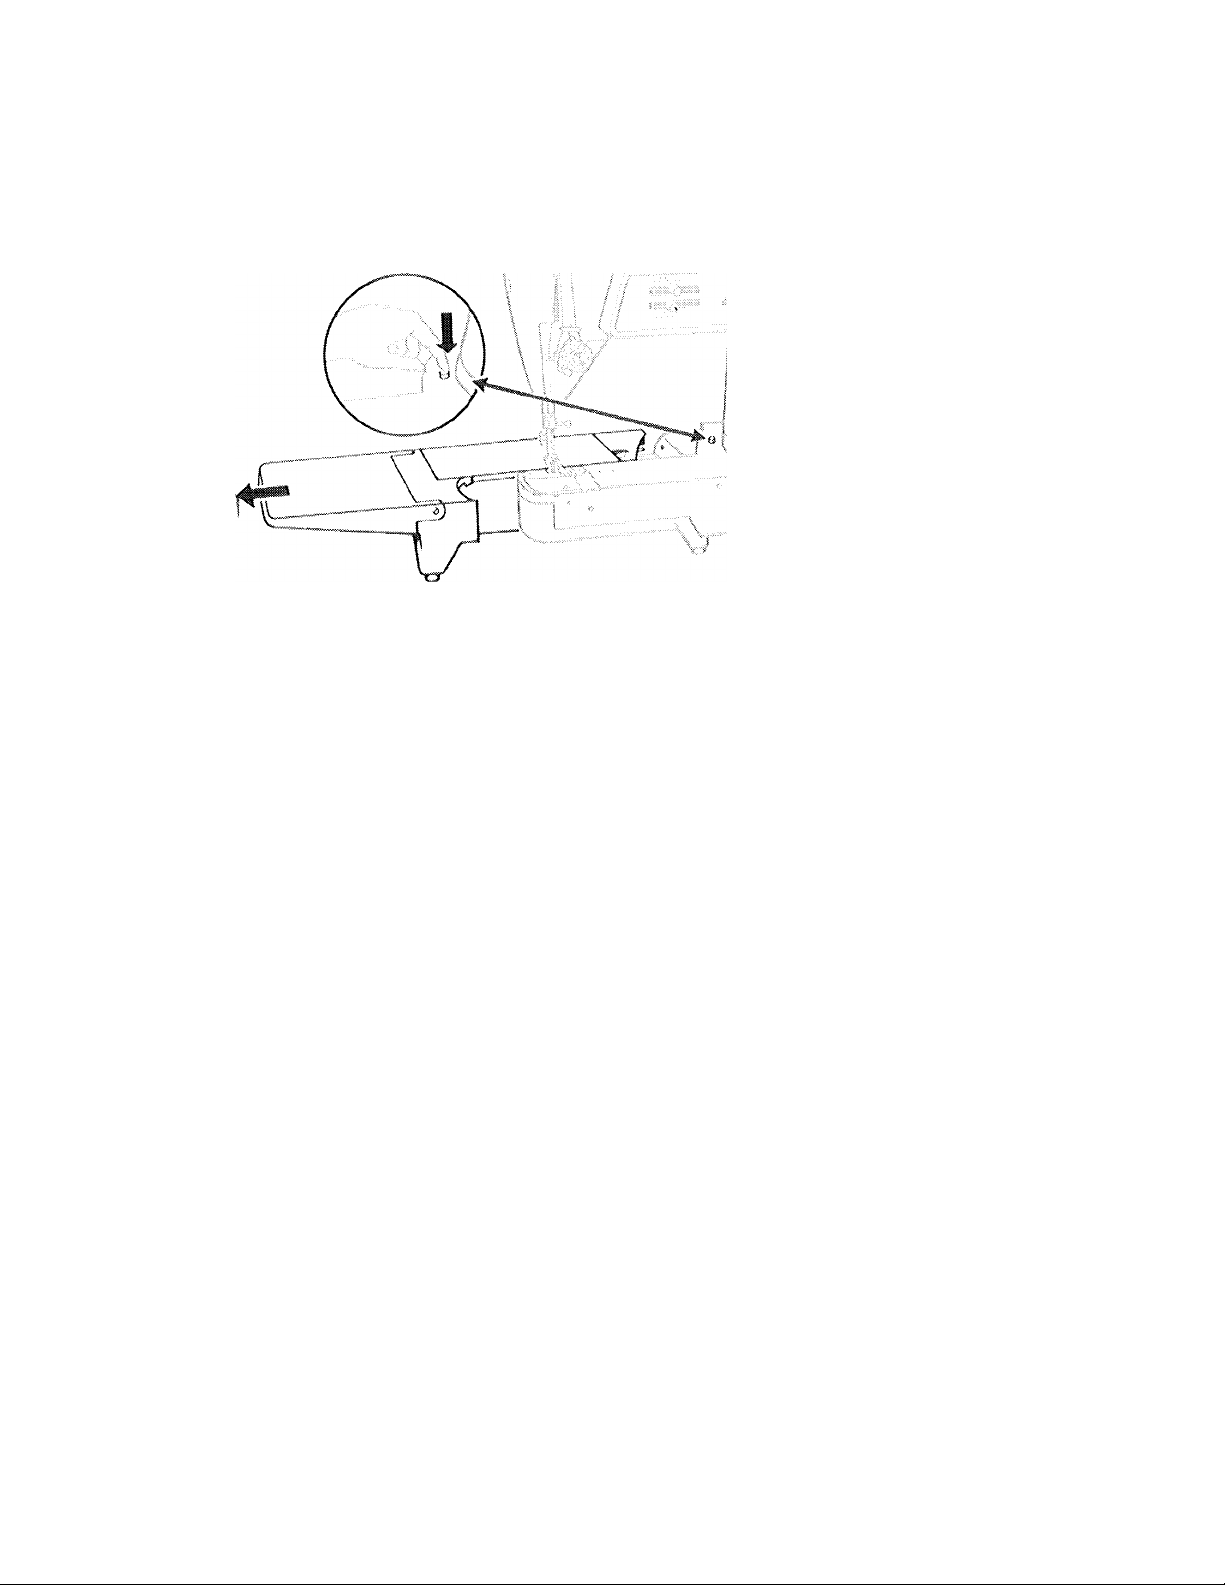
THROAT RI.ATH
RliMOVAI. AND RliPLACRMENr
Removal of throat plate
Raise pressor bar. Turn hand wheel to raise needle
to its highest jjosition. (i)pen slide plate. Place thumb pins and then close slicic jriate.
under front end of throat plate and lilt plate from
machine.
Replacement of tiiroat plate
Place throat plate in position over two clampincj
19
20
CHAIN STITCH
More than any other sewing machine the new SiNGKR 631 will
eliminate a considerable amount of limc-consumincj and burden
some work previously done by hand, 'i'his machine has the unicpic feature of being capable of producing not only CMrnventional
lock stildiing but selectively single thread chain stitdung.
The main advantage of this lype of stildi is tliat the single thread
chain stildi can easily and cpiickly be removed by a single pull
on the chain stitch seam. By means of the chain stitch the, neces
sary tacking and basting operations indispensable for sewing
perfectly fitted dresses or other garments can now be produced
on a maduiie. liven a section of a chain stitch scam can be remov
ed without any effort as is frecpiently recpiired wlion fitting the
dross or garment (side and waist seam.s). Once the dress or gar
ment fits, the tinal lock stildi is stilchcd in a close parallel line
to the diain stitch. Tlien the temporary scam is removed by a
single pull without leaving remains of the thread in tlio fabric.
Thus sewing-in of the basting .seam is very unlikeiy. For basting,
regular thread or darning thread may be used.
The single thread drain stitch has a wide range of applications
and can be erniiloyed (or a variety of operations, for instance:
Page 11

Hdge basting on jackets, coats and costumes
serting — attadring collars
Basting canvasses to the fronts of costumes and jackets in
stead of sewing them with zigzag stitdres;
Sewing shrinking tucks on garments as shirts, pyjamas etc.
as well as on ready made clothes and curtains made from
fabrics which arc likely to shrink. The temporary stitdiing of
the curtains and also the final stitching can be performed on
the same madiine. Stitdiing growth tucks whidi can be open
ed on clothes for growing driklren, as desired;
Re-sev,'ing waist and leg horns on ladies' and men's under
wear of tricot or interlock fabrics wdien replacing elastics;
• Adjusting length and width of ladie.s' slips (shortening for
short persons, taking-in widtli (or slim persons) particularly
to matdi fashions when dresses have a certain degree of
transparency making a slip essential.
Another most distinctive feature of the diain stitch \cdiidi will
certainly be appreciated by the homeworker for artisan type
production is that the chain stitch is formed exclusively by the
needle thread thus freeing the operator from bobbin winding.
This, in turn, is a time saving factor. In addition to the above
mentioned applications tlie artisan worker wilt use the drain
stitdiing tor - -
l•irst contour stitdiing on shirt collars - - sewing on labels -
lieinming operations on neckties and umbrellas
all operations where the chain stitch proves to be advanta
geous with respect to convenience, C}uality and time.
...........
in .short,
.........
hems on skirts, blouses etc.;
............
- sleeve in
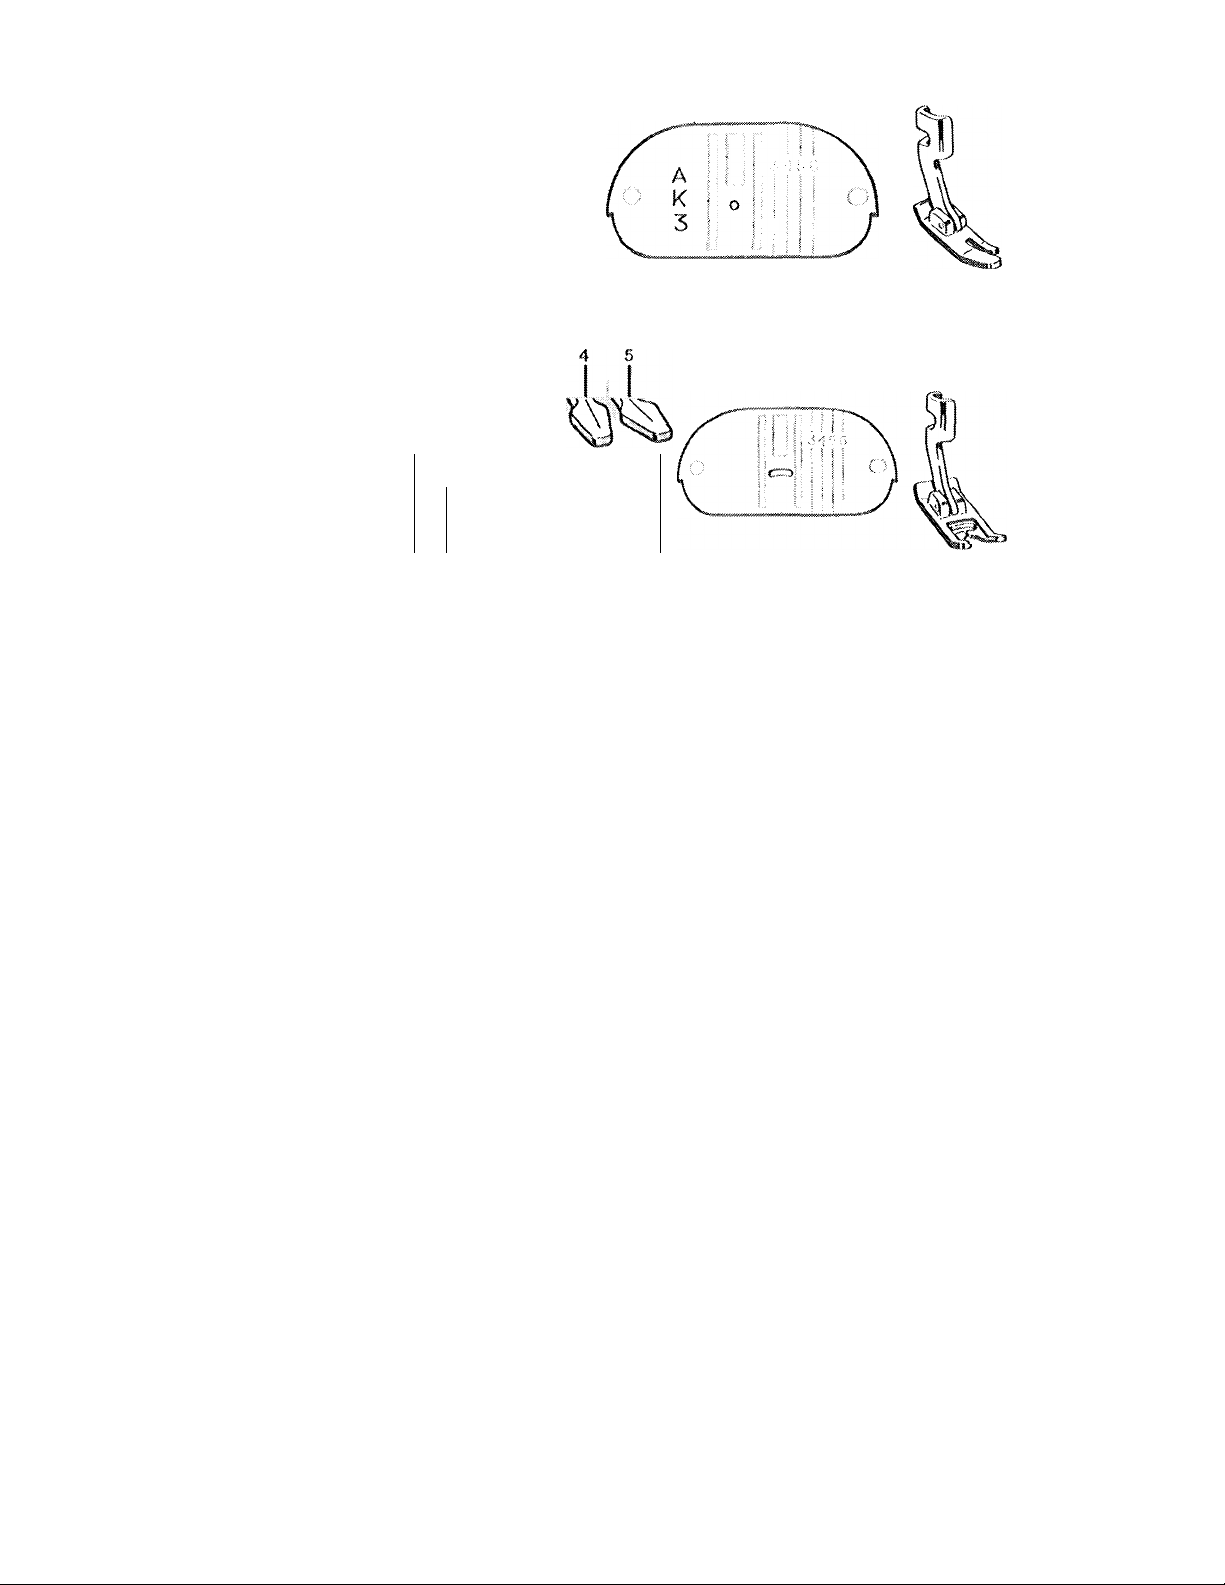
TO PUKPARE THE MACinNE EOll CHAIN STITCH SEWING
Set .Selectors at AK and stitdi width iever at .3
Idr.st remove regular throat plate and bobbin.
lii.sert chain stitdi looj) retainer into bobbin case
(lHustr<iticm 1)
Tilt latch {Illustration 2) and turn to the left against
stop (Illustration 3).
Insert chain stitdi throat plate.
22
Page 12
t!u> lu-udic thread in tlie ciiaiu stiUli Diroad yrude
lu lUldUioti io noniuil iliicudiiHj, pSuce
with llui iace ])!ale oiu-ti.
Stiktv leiiyllt; Nounallv' set for maximum lenrjth,
approx. 0 stildiirs to tiu; indi |4 mm) (ieit. tow of
mmitiers on llie sUitri indieatm jrl.ite), Лиу stiUh
ii'iMitti i)('twe(4i h and \'J. .sfitsiu's to Ih«' iu(i! {?. mm)
may ire used.
Upper fhnuHi ieiisiou: Noimiilly set between 2 and
.'i. Siiijlit adjustment ntay be lecjuittrd depemtrmt on
Itur sUtih ieufjtli and ilie iiiateiiai used.
CHAIN STirCHING
A dt<iin stiidi strain lias the, same appearauetr as a
lod; stildi .straru <)u the toj) side of the fabric,
f towevi'v, the knottimj of the slitdi doe.s not occur
in Uitr matetial as trii a propiuly ItalaiKrt'd ккк stitch
seam; instead thi> thread forms loops on tlu' imdersido of the fabiie widdi iesembh:> small arrowlteads,
Tiie.se anov.’htmds peculiar to the thaiu stitt.h poiu!
tov.xmis Uie betpunintj of the seam.
When stattintj make sute that the taktr-up lever is
in its highest ptrsiiion, ritis will prevent the needte
thread from pultintj triif of the needle И the thread
has been eut too short. Sew forward only! If the
matt'iiri! is pivoted at the needle for ojmrations
where corneitng is retpdred, m<ike certain Umt the
needle is on its upv.-artt movement (apptox, 1 cm
above its lowest iroint) to avoid skijrped .stiichos.
then cottlinne to sew,
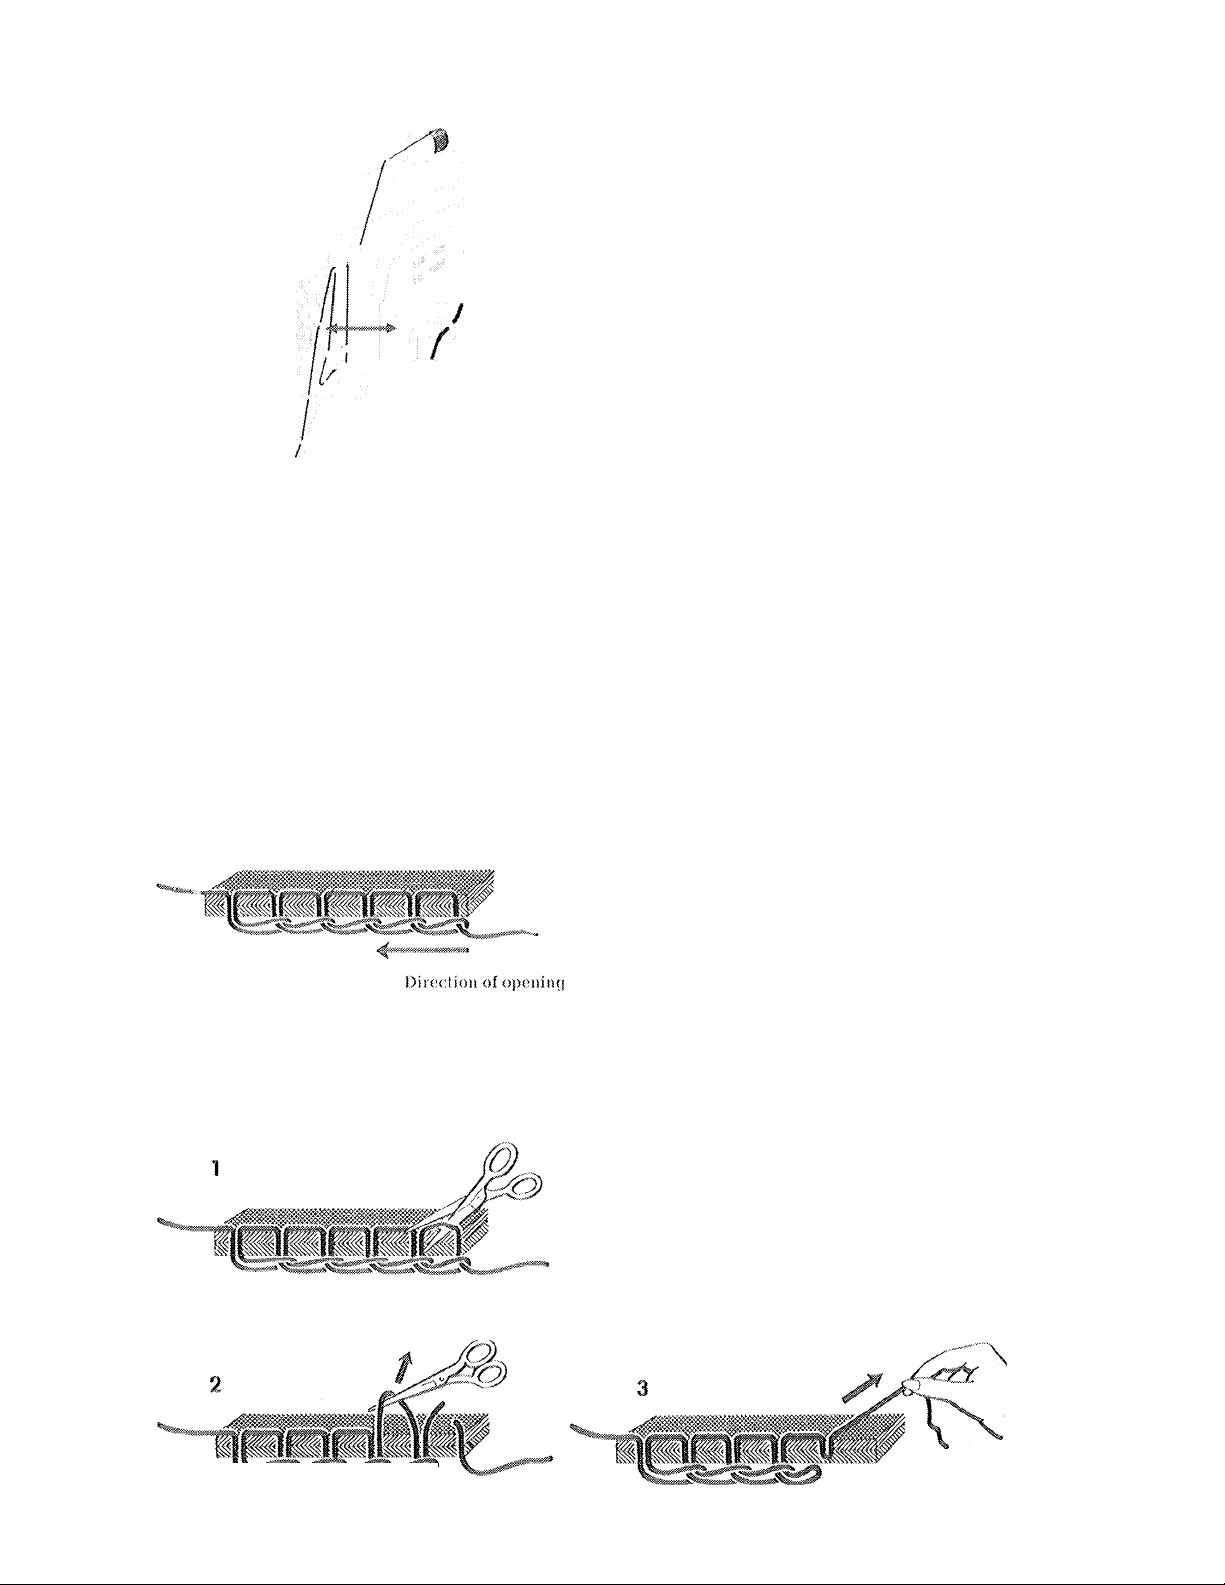
TO KHMOVJ- 'ГПК млтешль TIIOM M'NIÎATH
тип l'IHrSSliR TOOT
'Hie easiest way of retnovinrj tlio materia! is to sew
off lilt! edge of the fabric wtiito slightly ptdiiny on
the mattnial, lliis produces a diaiir whidi sliould
ire rtU sonu' distance away ftotn the fabiic, Howev(u, if tinr scant is ended Ixrfore llu' ectge of lire
fairric, Irriug tile takc-up lever fir its liighesf posi
tion, Hum lit! (he ¡rn'ssiu loot am! pull somr; thread
thmW)li the take-UJ) lever from tllC spool pin. Nov,'
drciW the loose thread Iretv lam the pressm foot and
liie m.dtuial to tlie riglit vith the scissors <ind ttien
cni lh<> thieati. By removing the niutiuTii liie free
end of thc‘ thiead is automatically pulh'd to the
underside of the niaterial and Ifie s<Min is securely
Iruked,
2,2
TO OPEN THI; SHAM
'i'he, diain stitdi seam can be opened in one direc
tion only, from tfio end of the seam toward.s the
start of the seam, The opening direction is distin
guished by Ihti arrov.dieads on the underside of the
fabiic which ¡roint towards fire ireginning of the
To open the seam, cut the last stitch on the top side
of the faluic and thmi pull up (he ]>ieeeding stüfi».
With ttiis free thiead end the .seam can bo removed
by a single pnil. In the same manner the scam may
bo opened and removed at any dosiroii place by
pulling the thread emt in arrowhead direction. The
remaining section to the end of the scam will be
inaiiitained.
24
Page 13

Section to ionu'tin
Section to be; opened
Section to lernain
Mowever, if the section towards tlie
beginning oi the seam is to remain and
the segment towards the end of the
seam is to be rcmoveci, cither partly
or completely, the remaining section
mnst bo locked first, inrr this purpose,
cut the scam at the desired place on
the top side and pull the loop out'of
the fabric on the uiuierddc of same.
Ttieii the desired segnrinii of the scam
can be. removed as staled above.
TO CIlANGl: PROM CHAIN STITCHING TO LOCK STirCHING
Clranging to lork stildiiirg requires only unthreading of the drain stildi llu<;ad guide (see page 2,1), repla
cing tire bobbin and inserting the desired zigzag or straight .stitch tliroat plate,
2.5
bOCK stitch
STRAIGiir SmCHING
A K 1
A
Sel Sodector at AK.
.Stitdi widlh lever al 1 To lotsile slitdiing in central position.
General purpo.se throat plate and presser foot.
lise general puiiiose throat phiie and presser foot for ali ulilify sewing, long stiaight seams, etc,, ami
wliere there is occasion to alimiiate Ixdwm'n straight and /igzag slitdiing.
25
..
Page 14
STUAICniT STITCH THROAT I’l ATii AND
PRTSSliR TOOT
Use the stiaic|hi stildi tliroal plate and ¡)rcsscr
foot where fabric anct sewing procedure require
close control. . . for precision stitching of curved
am! scalloped edges, top stitching, edge stitching,
etc.
J-'or best results, this equipment should he used
wlion stitching sheer and iiliiiy fabrics, knits and
tricots (particularly synthetics) and ail soil sirongy
materials.
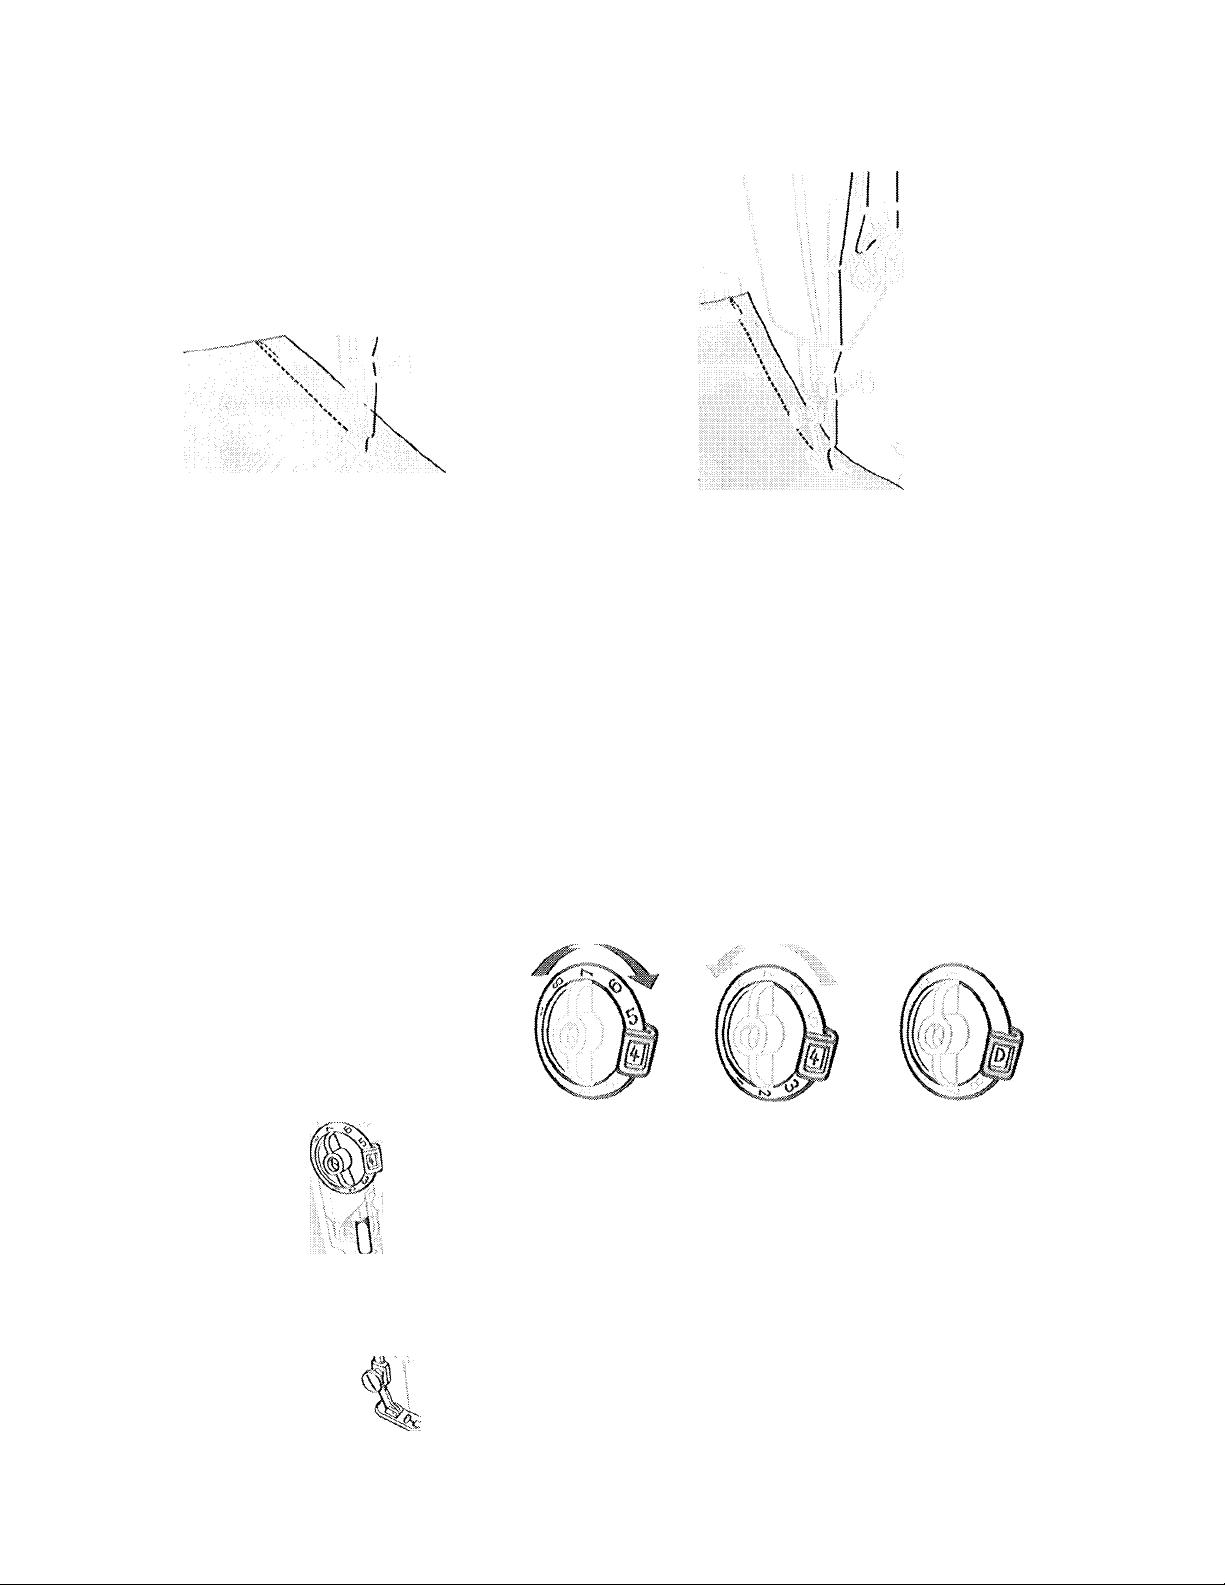
STRAiGHT STTTCTHNG WITH U:TT AND RIGHT NliT.DU; ROSmON
^ i ' ! : r ; ? 1
A
1
: 1
1
^ 1 ;
: i ;
)
1
i >
i 'It
1 i 1
1 i (
* I
i j : 1
• 1
i i
i { > :■ i
Set Selector at AK.
Stitch width lever at 1, 2, 4 or S.
General purpose throat pJnte and pressor loot.
Do not make stitch width lever adjustmcnls while the needle is in the fabric.
To meet specdal recjuhemenls a line of stitching may be placed to the right or left of cenlrc.
Stitch width lever settings 1 and 2 locale siitching to the loft. Settings 4 and 5 place it to the right.
Inlcnmediote settings may also be. used,
27
PRTRARl: TO STW
V ft 1
f '/H ra
V/ \ ..
/
^ .. ]
Hold needle Ihroaci lightly with left hand. Turn hand wheel .so that needle entens plate and brings
up bobbin thread. . ,, ,, ,,
l\ ■ ' I
(U
/.
5^
/
Pull end of bobbin thread through plate and place both needle and bobbin threads diagonally under
presser foot.
28
Page 15

SHWING A SHAM
U
Sot stitch rogulator for stitch Icnytli dcsirecl. Position noocilc into fabric alront V; inch from ocicje and
lower pressor foot. Raise; stitch rccjulator to reverse.
Back stitch to c;(5c(<; of fabric for reinfmeernent, l.ov.’er reyuiator for forward slitchiny of sc;am. Raise
stitch rc(|ulalor,
4
-i
29
Back stitch to reinforce end of seam, and lower reyuiator to forward .stitching position.
With take-up lever at higJiest point, raise presser foot and remove fabric.
30
Page 16
CUiniNC AND SUPPORTING PABRIC
Most iabrics iioed only to 1)(; (juiiiod in froiit of 11k; piessei loot.
i'abiirs of umisual tt'xtuie and woavo, filmy sIkkos, CK'pos, kniis, tikots, otr., !iK|uiie supj)oit whilo
being sUldieii.
For Mich fabrics, use 11k! straight .stitch throat plate' and ¡HCSSf't foot, and ajtply gontlc tensiou to trie
seam by hoiriing tfie fabric in fioni and in b.ick of the prossei foot as iliustrated.
\
Pin-SSUiO; AOJUSTMP.N'I'S
Increase
Pressure, is tlie force tlie picsser foot exerts on fabiic
while it is Ixnng stitdred.
The presser foot inrist bo lowered prior to adjustments.
Sniootli, even haridiing of .several thicknesses of (abtic
result.s when pr<;ss«r<; is correctly regulated. Heavy pres
sure is for thick fabiic and tigiit ¡rrcssure is for thin fabric,
'I'oo light a pressure will result in itregtilar feeding which
affects both (|nality of slildi and evenness of scams.
Too heavy a pressure not crnly affects stitch and sciarn
(¡uality tnil will also rnar smooth surfaces and pile fabrics.
Surface finish, as well as the wrnghl and texture of the
fabric-, must be eousidcred iir determining the anrottnt of
prcKisurc; ncieded.
32
Decrease Position for darniric)
and cmlH'oidcny
operation.s
Page 17

NI-I-DU; THRHAB THNSION
STRAIGHT STITCHING
Needle thread tension too tight
...........
correct by setting dial to lower mimbor.
1!
'/t W//>, V/Mt Wf/it Mf/
Needle thread tension too tooso ■ ■
correct by setting dial to higher mimber.
A perfectly locked stitch results with upper and lower tensions balanced so that needle arid bobbin
threads are drawn ecjually into fabric,
33
y. y.
A perfectly locked stitch results vrilli the upper and lower tensions balanced sO that ireodio and boirbin
threads are drawn ccjually into fabric,
34
Page 18

ZIGZAG STITCHING lìQUIPMIiNT
General purpose presser fool.
STITCH I.IiNGTH ADJUSTMENT POR SATIN STTICHING
mn
Special purpose presser loot.
The upper indented area behind (he stitch indicator provides a means
of gradually shortening the stitch lengtli.
As tlie regulator knob is turned, the pointer rides deeper into this
indentation until a closed satin stitdi is obtained.
The exact stitch s(>tlin<j will vary with the texture of the fabric.
It is advisalrle to make a t<;st on a scrap of self tabric, using the
Special Purpose 1-oot, before proceeding with actual work.
30
Page 19

SATIN STJTCH
TlìNSION ADJUSTMENT
Satin stitching letjuircs a lighter needle thread
tension than straight stitching or open designs. The
wider the satin stitching the lighter the tension
reguired.
Wide satin stitching, Stitch Width at 5, requires
the least amount of tension. For narrower satin
stiIdling slightly more tension should be used.
To detonnine eoiicet tension setting, a test
sample should be made on self fabric using the
Special Purpose Foot, A properly balanced satin
stitch should lie flat across the material. Any tautncss or puckering indicates too high a needle
thread tension.
Some soft fabrics may rccpiiie the addition of a
hadcing to insure good stitching results. Crisp
organdy and lawn arc suitable for this purpose.
tension
\
LI
Correct needle thread
temsion
37
PRIMARY PATTERNS -- BUJI/MN THE MACHINE
See pages 17 and 18 for operation of stitdr width lec'cr and selector.
U N P R
I mIoI Qj Special
The operation of the upper selector button between L and Special controls the function of the primary
patterns shown below.
The setting of the lower selector button at B places the stitching in the central needle position.
The stitch width lever controls the width of primary patterns.
Do not make stitdr width lever or selector settings while the needle is in the fabric.
L
Q
s
<
s
p
38
Page 20

PRIMARY PATTERNS
SPECIAL DISCS
Those five interdiancjcable Special Discs, classified as Piimaty Patterns, are included with the ma
drine. Eadr produces an individual design.
Circled numbers {for example @) book indicate Special Disc numbers.
PRIMARY PATTERNS
REPLACEMENT OE SPECIAL DISCS
P
L N P R
kImIoIqI
A
ilihlil
39
Special
To replace any of these discs, move pointer of the upper Selector off Special.
Raise the stitch chart at top of the machine. Remove disc and place another disc onto spindle, pushing
downward untli disc .snaps in place.
Sot pointer of the upper Selector on Special to engage the. disc.
40
Page 21

PRIMARY PATTERNS
STiTCn WIDTH TEVER CONTROL OT' WIDTH
2 3
L N P R
MlOiQl Special
The width of Primary Patlcins is controlled by the stitch width lever. Settings range from a maximum
of 5 to a minimum of 2.
41
PRIMARY PATTERNS
NEEDLE POSTITONS
Selector setting of B places stitdiing in central
needle po.sition. Selector settings A and C place the
stitching in left and right needle positions at widths
less than 5,
LEFI'
CENTER B
RIGHT
Selector setting B is preferred. Settings A and C
are only used when special placement of stitching
is desired. For example: Buttonholes, button sewing.
42
L N P R
ImIoIq] Special
1- N P R
i|M|0|Q| Special
L N P
I mIoIqI Special
A I C I f. I j !
B D i- H <i
Page 22

COMBINATION PATT'ERNS AND VARIATIONS
1. ■ : r
J L 2
J I 4
J L3
A great variety of additional stitdi patterns can be created by combining any lower Selector setting
from D through J with any upper Selector setting from L through Special.
A stitch width lever setting of 3 results in a Combination Pattern. Settings of 2 and 4 produce Varia
tions.
TWO needi.es
43
The needle clamp accommodates two Cat.
2020 {ISXlj needles, generally of the same
size. However, where special effects are
desired, needles of different sizes may be
used together, with corre.sponding threads.
Loo.sen the thumb screw and insert the addi
tional needle from the right, (See page 7
for procedure.)
44
li li
Page 23

TWO NEfiDUiS
UPPI-R THREADING
Thre<id as for sinylc needle first (see parje 9).
Open top cover, insert auxiliary spool holder
(wliidi is furnished with the machine) into the hole
provided (see illustration). Slip second spool of
thread on to the auxiliary spool holder and thread
second needle as shown.
Make certain that threads are separated by tire centre truision disc. Cany only one thread through the
last guide at the needle clamp.
TWO NflEDUlS
STRAIGHT STITCHING AK 2
i I
Selector selling; AK.
Sfltdi width lever: 2 only.
General purpose loot and throal plate.
45
46
Page 24

1. N P R
¡m|0|0| Special
Seleclor setting: A - -L through speeiat
Stitch width lever: 2 or 3 maximum.
General purpose throat plate.
General purpose foot or special purpose foot
TWO NKEDtES
PRIMARY PATTKRNS
2 3
CM
Instructions for using ATTACHMENTS...
47
NO'iH: Tlio attachmemts which are not regularly furnished with your machine are avnilahie
for separate purchase at your local SINGER SEWING CliNTRE,
•18
Page 25

This liylU, il(!xibk! foot
is dosiyuod for satin-stitdiing. If provides iiuixiinuin
visibility and iiiatunivcrability while allowing
closely spaced zigzag
stitdrcs to feed freely.
It is ideal for accurate placement of satin stitdiing in buttonholes, rnonoyrains, motifs and applique
work.
The eyelet on the left side of the foot accommod
ates a filler cord.
ATPI-ICATIONS
Buttonholes
Applique
Monograms
Decorative Stitching
Cloudiing
Motifs
BUTTONIIOUiS
Selector; AL
Stitch width lever: See below
Throat plafe; General purpo.se
Special purpose foot
SUldt length; Tine
To establish the correct stitdi setting and length
of buttonhole, a sample must first be made,
'f hicc Stitch Width settings are available, b’abric
weight and buttonhole size will determine the
s(!lection,
3 5
2 3
1 1
49
BUTTON! iOUiS
Marking
lines
l.eugtli of
culting siane
Bar lacks and
.side .stildriug
The length of cutting space, the opening through whidi the button passes, is measured by the width
and thickness of the button.
The length of the finished buttonhole will bo the cutting space plus Vs inch for bar lacks
Work a sample buttonhole in the same fabric as the garment. Use a double fold, duplicating a facing,
and include interfacing if this has been used.
50
Page 26

BUTTON» tOI.ES
da)
StiUiiing Procedure. Set Selector and stitdi width lev'er. Place work under the needle, aligning the
center marking of buttonhole with center .score line of foot.
To form side stitching, turn hand wdieel toward you so the needle enters fabric at point A. Tower foot
and stitch to end of marking. I.eave needle in fabric at point B, Uaiso foot, pivot work on needle. Toever
foot. Take one stitch w'itliout changing stitch width lever setting, bringing work to point C. Adjust to
stitdi width lever setting for bar tacks and take no less than six stitches. Stop at point O. Readjust to
stitdi widtli lever setting for side stitching. Complete to point P. Move to stitdi width lever setting for bar
tacks and duplicate tack previously made, ending at point V,
ГЛ
BUTTONUOUiS
To secure stildiing move stitdi width lever to
No. 1 setting and take three stitches. Remove work,
draw thread.s to the underside, fasten and trim.
Raised or Corded Buttonholes. Both No. 8 pearl
cotton and buttonhole twist make suitable filler
cords for raised buttonholes.
Place the spool of filier cord on the second spool
pill. Cany tiie cord througli tlio first thread guide',
straight down between tlie center and back tension
discs, into the large tliread guide and then tlirough
the eyelet on tlie Special Purpose Foot. Draw tlie
cord under and in back of the foot and proceed as
for regular buttonholes.
With sharp eiiibroiciery scissors cut opening for
button.
52
Page 27

APPMQUl;
Applique iwUls beauty and iiitoresl to wearing
apparel, linens and fabric furnishings.
liither contrasting or self fabric may be u.scd
effeclively. The mo.st versatile stitch in appliqueing is a closely sid zigzag stitch (Primary Pattern
BL). The width of this stitch may be vnrioti to
accommodate weaves and textures of fabrics.
Combination Patterns and Variations present many
interesting ways to «ppligne with decorative
stitching.
Prerparation. There are two methods by which
applique work may bo done. The appropriate
method is determined by the fabric being used,
and a test sample is advisable.
Position the design properly and baste it to the
fabric. Attach the Special Purpose Foot to the pres
ser bar.
Method No. 1. Sot Selector and lever for the
desired stitch pattern, P’otlowing the shape of the
design, outline it entirely with applique stitching.
Any excess fabric on the outer edges is trimmed
away after the stitching has been completed.
53
APPLIQUI;
Method No. 2. Set Selector and Lever to AK 3
for straight stitching. Outline the entire design with
a short stitch. Trim the raw edges down to the
stitching.
Set Selector and Lever to the stitch pattern
desired, and overedge the design with this stitch
ing. A smooth, lustrous finish results, whidi requires
no additional trimming.
Corded Appli<iue. The Special Purpose Foot,
which provides for a filler cord, is perfect for cord
ed applicjiic work. Gimp, crochet thread or button
hole twist are generally used.
See page 52 for threading.
hither method of appliqueing may bo used when
cording is desired. The only change in procedure is
tl>c introduction of the cord, ov'cr which the appli
que stitching is formed.
This stitching technique results in a raised,
dimensional effect, and is an idea! finish for lace
applique.
5«i
Page 28

MONOGRAMS AND MOTIFS
Any of the many stitch patterns are perfect for
monograms and motifs.
Select a design from the many transfer patterns
available or sketch one to suit your purpose.
Some fabrics may require a badcing of lawn or
organdy.
Position the design on the right side of the
material. Trim backing away when stitdiing is
completed, if necessary.
To reproduce a specific portion of a stitdr pat
tern, first .stitdr on a scrap of material until the
desired point in the design is reached.
Remove the material from under the presser foot,
Now position motif or monogram under the needle.
Lower pres.ser foot and stitdr.
This procedure is recoirtmended for all precise
design placement. Leaves, and flower petals, for
example are created in this way.
55
SEAMING SHEERS
Selector: BL
Stitch Width: 2
Throat plate: General Purpose
Special purpo.se foot
Stitdr length: Fine (above 20)
A dainty hair-line finish is particularly desirable for tiro irrside seams of sheer collar.s, facings and
yokes. Seam allowances that ordinarily slrow tbiougir are eliminated,
Botlr heavy duty thread attd tatting thread rnak suitable filler cords (see page 52 for threading).
f-ollov.' ilu; seam outline covering the cord. Cut av.>ay seam allowance dose to line of slitdiing.
Turn and press.
Page 29

Novel effects «re obtained by concbim:) gimp,
yarn or braid with stitch patterns.
Spaced patterns are the most appropriate as
.they allow the decorative cords to show as part
of the de.sign.
COUCHING
The Sjrecial Purpose l-'oof is ideally suited to
this work (see page 52 for threading).
I,ACl:i IÌDGING AND INSIiUTION
Delicate, yet durable zigzag stitdiing is espe
cially appropriate for the application of lace
edgings and insertioiis.
Many decorative stitch patterns can bo used
effectively setving as both finish and trim.
BUTTON SEWING FOOT
A..i';A..4A .v
.57
This short, open foot
accommodates any
.size sew-through
button, and holds it
securely for sUtdring. The groove in
the foot allows for
insertion of a madrine needle, over
which a thread
shank may be form
ed.
The foot is used in connection with the Genera!
Purpose I’eed Cover Plate.
Selector setting: AT
Stitch width lever: I and 4
Feed Cover Plate
Button sewing foot
Stltdi length: above 20
Space between holes in button determines stitch width le\'er setlings. Numbers t and 4 generally
apply to standard buttons. Number 1 setting is constant, but 4 can bn increased or decreased to accom
modate buttons with unusual spacing.
Set Selector at AL and stitch width lever at 1. Attach feed cover plate to machine in place of regular
throat plate in same manner as instructed on page 19.
Position button under foot so that needle will enter into loft hole. Lower foot. Turn hand w'hcel toward
you until needle rises out of fabric and is just above fool.
58
X
Page 30

BUTTON SKWING FOOT
Sat Lavcv at 4. The needle should then enter into
the right hole ot the button. Take approximately
six zigzag stitches in this position. End at the left
side.
To fasten stitching, adjust to number 1 Stitch
Width setting and take approximately three stitciios.
THREAD SHANK
In order to form a shank, stitching is done over
a regular machine needle. Position button and lower
button foot. Place needle in the groove of the foot
so the point enters the hole.
A larger shank results when the heavy end of
the needio is utiiiitcd.
ITsed with the getiora! purpo.se throat plate this
foot provides a wide noodle slot which accommo
dates all stitch settings and cais be used for most
sewing operations.
59
a V o i? 0 9 ti » 0 o ^ o a * o » s> i t' J < s> o V -
SEAMS
ONGFRIf! SHAMS
Dainty lingerie seams are made durable! ami rij)proof witli zigzag stitching (Bh 2’/i), After straight
stitching the fitted seam on the wrong side, press
both seam ailowances in the same direction. Frocn
liie right side, top stitch wiiii a fine zigzag setting,
kitting llic! needle enter the seam line and then the
seam tiiickness. Particularly good evhere flat bias
scams are desired.
APPHICATfONS
Seams and Darts Automatic Scalloping
Mending and Maintenance Scam Ihnishes
60
Page 31

rr,AT SPAMS
Zigy.ag stitcliiug gives strength and durability to
flat felled scams.
Form the seam to the right side of the fabric,
taking full seam allowance, using a zigzag stitch
(Bl. 3).
Press the seam opeir, then fold and press the. two
edges together, keeiring the right side of the zig
zag stitch uppermost.
Trim away half the under seam edge.
Fold the upper seanr edge evenly over the trim
med seam, and top stitch.
SHAMS
KNIT TAimiC SHAMS
A fine zigzag stitch (BL V/i) is ideal for seaming
knit fabrics. Particularly desirable for underarm
seams and otluu' seams where elasticity and give
an? needed.
For neckline and waistline seams, wliero a stay
is needed to prevent undue stretching, this same
stitch can be nsert to <g)ply seam tape. To insure
a flat, smooth finish, position flie seam tape with
the edge exactly on tin; seam line, If seam is curv(;d, pre-shape tape to fit by .steaming, and Irastc
in place.
Stitch, allowing the needle alternately to enter
the seam tape and seam line.
SHAM ITNISFIHS
Seam edges support the garment and should be givxm a durable finish where fabrics have a tendency
to fray.
The zigzag slitch BL is ideal for such finishing. Place the stitching near the edge of the scam allowance,
and then trim away excess fabric.
For an overedged seam, the blind stitch BO makes a durable bulklcss finish. Good for straight grain,
lengthwise scams.
Seam edges should be trimmed evenly, and the stitch then iormed over the raw edge.
61
6?.
Page 32

»ARTS
Darts provide fit and contoru in a garmetit and
sliould bo accurately stitdied.
A straight stitch dart (AK 3) is usually formed
by stitching from the seam edge, tapering gradually
to the point, where the last 3 or 4 stitdies parallel
the fold. Stitch beyond the fabric to form a thread
chain Vr to V< inch in length. Tic the thread ends
into a single knot close to the stitdiing.
SINGLE THREAD DARTS
Darts add styling and interest when stitched with
the fold to the outside of ganneut. Thread ends
at tire point of the dart are ediminated when the
single thread principle is employed.
Unthread the needle. Use the thread leading off
the bobbin and rethread the needle from back
to front. Tie. bobbin anct upper threacLs together.
Draw bobbin thre.ad up through, threading points,
winding enough on the spool to complete a single
dart. I.osver the needle into the very edge of the
fold at thei point of tlie dart. Take any slack out of
the Ihrcacl by turning the spool. Lower the presser
foot and stitch carcfulfy toward the seam edge.
This method is also ideal for inside darts in sheer
fabrics as thread ends are eliminated at the point
of the dart. —
DARTS IN INTERLACING
Non-woven iiiterfacings c:an be shaped without
bulk v/ith '/.igzag stitching. Selector setting M. or
BQ may be us<;d.
Cut out the dart allowance on the stitdiing lino
and bring the raw edges together. Pin, over a
muslin stay, and stitch. Back stitch at both ends.
BLANKET BINDING
:j
r . i
i» «
4 i-'»« 1
ез
-
.....
<•
Л
It
<
Ч-
, II
The multiple .stitch zigzag (BQ) is an excellent
stitch for applying blanket bindings and afford,s
both a decorative and durable finish, Remove worn
binding. Baste new' binding securely in place and
stitch. Adjust pressure if necessary, to accommo
date the thickness of the blanket.
64
Page 33

MliNDING
Zigzag stitdiing is well suited for all typos of
liouschoid metsding. Selector setting BQ provides
a firm, flexible bond for the repair of rents and
tears, and is ideal lor the reinforcement and ai)))!!cation of elastie. Stitch length and width are rrigulaled according to need,
Uenl or Tear. Trim aw’ay ragged edges. Place
<m underlay to the wrong side of the tear for
n'inforcomont. Using the multiple stitch zigzag
(BQj follow the, line of the tear bringing the edges
together. Shorten the siitdi length at end.s ami
corners to give extra strength.
^(í,'^<yyyyVvrAaív^/vJtWvaгyV>ZvS'■
Application of lilastic.
Elastic, such as used in
waist bands, must be
strelrhed as it is applied,
to insure fullness requir
ed in, the garment.
65
SCAI.I.OPING
Dainty scalloped edges are used extensively as self trimming on blouses, dresses, lingerie and child
ren's wear.
Perfectly formed and evenly spaced scallops are produced automatically at Selector Settings 15R and
BS
BR results in a 12-stitdr scallop.
BS <D, a 2'1-stitdi scallop.
Stitch regulator and lever settings vary the length and depth of the scallop.
After stitdiing, trim seam allowance to less than ’A" and clip info the points between scallops.
Some fabrics may also need notching, for a smooth, evenly turned edge.
Turn, gently roll out scallops between the fingers and press.
When scalloping a shaped or bias edge it i.s best to use an interfacing.
Wlien forming scalloped tmRs, add an extra ’A" to tuck allowance for seaming.
Page 34

'!'he seam guide aids in
attaining uniformity of
seam width, it provides
for stitching to be spaced at any distance between
V»" to l'/<" from the edge of the fabric.
■ SHAMS
To guide seam stitdiing straight and iraratlel to
the edge of the fabric, adjust the attachment for
proper .seam width. Align the gnide with the pres
ser foot. {.Set Selector at AK, lover at 3.)
Pin seam edges and baste if necessary. Hand
basting can be eliminated on oasy-to-handle fabrics.
Place pins with the points toward the seam edge
•so itiey ni]) info the fabric at the stitching lino.
The tiinged presser foot will ride freely over the
points. Guide the fabric edges lightly against the
guide while stitching.
Seams Blind Stifdiing
APPLICATIONS
Top Stitching Decorative Stitching
Tlie attachment is used in connection with a
presser foot.
It is secured to the bed of the machine in either
of the threaded holes to the right of the needle.
SHAMS (Cont'd.)
Curved scams require additional treatment in
handling. A shorter stitch will provide greater
elasticity and strengtii. Set the attachment at an
angle so that the end closcist to the needle acts
as a guide.
67
TOP STITCHfNG
A simple and practical way to accent the lines
of a garment and at the same time give additional
firmness.
Hither single or multiple rows of slitching can
be ccxpcitly placed along lapels and facing edges,
around coilar.s and podccts and as a hem linish,
A subtle effect may be achieved by using straight
stitching, or a decorative touch may be added by
using any of the attractive stitch patterns accom
plished with this machine.
68
I
Page 35

m.IND STITCIIHD HHMS
Selecior: BO
Stitch width tever: 2 -5
Stitch length: 10 20
Presser foot: O'etierii! puipose
Throat piate: Geheral purpose
Scam guide
Blind stitching provides a duralrle hem finish
that is almost invisibie, and comparable to liand
sewing. It is egually suited to straight as v.'eli ns
ciicular hems. Taped, bound, tunred or unfinished
hem edges can all be blind slitchod with equal case.
Mark, (urn and ¡>rcss (lie hem in tlte usual evay.
Place a basting guide line approximately ’A" from
top horn edge.
.Set Selector at BC). 'I'his setting produces four
straight stitches, separated by a single sideward
stitch fo the left.
Stitch width level setting for width of stitch is
deteirnined by tlie v.'cigiu and texture of the fabric
used.
Place the hem edge over llie feed of the machine,
turn back the bulk of the fabric to llio lino of bast
ing, creating a soft foid.
Position the work so that tlic straiglil stitches are
made on tiie hem edge aiui the sideward stitches
piorco the fold.
The stitch length v.'ill regulate the distance bet
ween the blind stitches (10 to 20 stitches per inch).
Adjust the seam guide over the right toe of the
. foot until it rests next to the soft fold. Wliilo
stitching, fec.ti the fold against the flat of the guide.
A test sample in self fabric sliould be made to
determine correct settings.
69
THE CORDING TOOT
This foot is designed to facilitate the placing of stitdiing dose to a
raised edge. The hinged feature of tliis foot ensures even feeding over
pinS: heavy layers of fabric or cross seams. It is attached to the machtuo
in |)lace of the regular presser foot, and may be adjusted to cither the
right or left side of tlic needle. Straight stitch or zigzag settings may
be used.
APPI.ICATIONS
Zip Fastener Insertions
Corded Seams
Preparation. Secure the cording foot fo (he pres
ser bar a.s you would the regular presser foot. Set
Selector and Lover. Adjustment to the right or left
of the needle is made by loosening the thumb screw
70
ÍÍ .a a *! .> 0 o ^ <i 0 s ñ -ii 0 :■ r- >
Tubular Cording
Slip Cover Piping
at the back. Check tiie position of fhe foot by
lowering the needle into the side notch, making .sure
it dears tlie foot. Lock it into position by tightening
the thumb screw.
Page 36

ZIP FASTENlìR INSERTiON
Sfraight stiliii setting; AK 3
Throat plate; General purpose
Cording Soot
Many difforont types of zips are available for
cvoiythiiig you s(>w. Tliorc aro sovtual satisfactory
methods for insci tion. Detailed sewing instructions
aro included it! zip packet. For any method «sod,
the Cording Foot onabics you to form an even lino
of stitching close to the zip.
When the zip is to the. right of th<> needle .............-
® .A.djust the Cording Fool to the left of the needle.
When the zip is io the left of the needle
...................
0 Adjust the Cording Foot to the right of the
needle.
m.lND STITCHR» ZIP FASTflNïiR INSERTION
Selector setting: HO
Stitch Widtii: 2'A or 3
Tiiroat plate: General purpose
Stitch length: 12
Cording foot
Blind stitching the final step of a zip insertion
results in a fine linish that is almost invisible and
comjMiable to hand sewing. Parlicularly suitable
for chiffons, sheers, velvels and all delicate fabrics
where to)) stitching would be too harsh.
Allow a Vs" seam allowance. Start the insertion
in Iho regular way but omit linal .step.
VI
Work from the right side of the garment and pin
the front of the zij) tape into position.
Roll the work over finger to ease fabric and pin
through all thicknesses. Baste about Vs" from sca;n
line to provide guide for blind .stitching. Remove
pins.
Set sfildi and adjust cording foot to the right
.side ot the needle.
Turn garment inside out. Place zip tape over
feed of madiine and turn back the front section of
garment to line of basting, creating a soft fold.
Position work so that the straight line of stitching
is made through front seam allowance and zip tape,
and the sideways stitch pierces a few threads of the
fold. Lower pressor bar and stitch slowly. Remove
bastings. Press.
Page 37

C:OUl)KD PIPING
Str«i(|ht stitch setting: AK 3
riiroat plate; General purpose or straight stitch
Cording foot
Piping cord comes in a variety of sizes and, whem covered with a firmiy woven fabric, makes a piping
dial is an exeeiient seam finisli.
This piping is prepared in advance and then stitctiod into the seam. Cut a true bias strip I'A inches
wide, plus ihree limes tlio widtii of the cord, of eitliei self or contrasting fabric. Sew strips together on
the k'iigtiiwise grain to obtain desired lenytii.
Adjust corditvg foot to the iefl si(!c of the needie. Encase, (he, cord in the bias strip, raw edges even,
i.ower piosser i>ar. Stitch clo.se to the cord, applying gentle tension to bias strip in front and back of (he
cording foot. Use a stitch length sligiitly longer tlian tor regular seaming. Do not crowd (he stitching
against the, cord.
CORDED SEAMS
Straight stitch setting; AK 3
Throat plate: General purpose, or straiglit stitch
Cording foot
The corcied scam is a profe.ssional treatment for
slip covers, children's ciotiics, blou.ses and lingerie.
When cording a seam tlic cording ioot is usiudly
adjusted to the right of tire needle so that the bulk
of the work will fall to the, left.
Attach the piping to tlio rigid side of a single
scarn edge, witli the same stitch lengtl) used to
make the. piping (page ?3). Guide the edge of tlie
foot next to tire cord, but do not crowd.
Place tile attadied piping over the second seam
(>dge, and pin or baste togetlier.
Keep tlu' first stitching uppermost as a guide and
position tlu' seam under needie. Stifcii, this time,
crowding tire foot against tlie cord.
This meliiod prociuces evenly joined seam edges
and ligliUy set welting.
Curved seams are cordeci as easily as straigid
seams, e.xcept that a shorter slitcii length is used.
Since the sc-am allowance of the welting is bias,
it is not diiiicult to shape it to the seam.
Page 38

THK NARROW HEMMER
The Jiarrow hemmer forms
and stiUhes a perfc'ctiy turn
ed hem without basting or
pressing. It is attached to the
machine in place of the
regular presscr foot.
APPLICATIONS
Fine hems
Edging ruffles
Hemmed scams
Hemming with lace
Lingerie finishes
Stratghf sUfth setting: AK 3
Throat piate: Stratglil stitch
Narrow hemmer
IIEMMINO
Crease a double Vs“ fold for about 2 indies along
the edge of the fabric to be hemmed. Draw tire
Irobbin and noodle thrcad.s under the licrnmcr. Place
the fabric under the foot and stitch the creased fold
for several stitches. Hold the thread ends in the left
hand and guide the raw edge in front of the hem
mer evenly into the .scroll. .Sow .slowly, still holding
thread ends until the hem is well started.
Soft fabrics will enter the scroll best with the foot
down; firm, crisp materials v/ith the foot raised.
Even feeding is essential to good hemming. The
same width of fabric must be kept in the scroll of
the hemmer at all times, A little praclice will result
in perfectly formed hems.
75
HEMMED SEAMS
Straight sUtch setting; AK 3
Throat plate: Straight stitch
Narrow hemmer
A hemmed seam is applied where a tine narrow
seam is appropriate. Allow a scant */<" scam allo
wance. With both sides of fabric together, place
upper layer Vs" to left of lower layer. Itrserf two
fabric edges into hemmer and proceed as for plain
hem.
DECORATIVE HEMS
Selector: All settings
Stitch Widfti; 2 to 4
Throat plate: General purpose
Narrow hemmer
Narrow hem edges can ho tunred and decorated
in one operation usijig the narrow hemmer and a
stitch pattern. This time-saving fini.sh is especially
suited to ruffle edges and aprons.
76
Page 39

HfSMMlNG WITH LACK
Selector sotting: III.
Stitch Width: 3
Throat ptatc: Genera! purpose
Narrow hcminer
Lncc edgings can be applied with the Narrow
Mcmmer to trim lingerie hems, children's clothes,
etc.
I.acc Applied Over Hem. l-old and start the hem
in the usual way. Starting atront 1" down from the
end of the lace, place the selvage under the needle
and lower needle to hold lacc firmly. Raise the foot
slightly and slip the lacc under the back portion
of the foot, without disturbing the position of the
fabric. Stitch slow’ly, guiding the fabric with the
right hand, the lacc with the left. Take care not to
stretch, the lacc.
I.acc Applied Under Hem. When using lacc
underneath the fold of a hem, the procedure is the
same as when making a hemmed seam. Slip the
lace in from the left as you would the second piece
of fabric. This method is used where a neat finish
is desired on both sides of the material.
I ^
Scroll for
unfolded
binding
Selector .sotlings: All
Throat plate: General purpose
The multi-slotted binder is used to apply com
mercial binding as well as self-fabric bias to an nniini.shed edge. 'J'hi.s colourfid trimming is aUraefive
when applied to diildron's wear, aprons and house
hold linens. It is a practical Ihiish for seam edges
that fray and for making bound seams.
V8
Commercial single fold bias tape is inserted from
the rigid ink) the slot <it the wide end of the scroll,
l.infolded bias ’Vu" wide is inserted into the open
ing at the end of the scroll.
Cut binding diagonally and pnll through the
scroll until evenly loldod edges are under the
needle, I’reo length of binding is held between the
guide pins.
Insert Ihc edge to bo bound into the centre of
the scroll. Position stitrhing by moving the scroll
portion of tlx; binder to the right or left by means
of the arljusting hxj.
Page 40

MUI,Tl-SI,OTnn:) »INDEU (Cont'd.)
Cmv(!d edges require slightly different fubiie huudliug from straight edgr^s. Inside curves are straigh
tened as they are fed into the binder. If fabric is soft and has a tendency to stretch, reinforce the edge
with a single row of stitching before binding.
Outside cuivos tend to loarl away from the centre slot of the scroll and .should be guided so that a full
scam width is taken at the needle point. Do not attempt to pull or straigliten fabric into the lull length
of the scroll.
THb RUFEillR
Pork
Adjusllng
i.ever
AdjusUng
ringer
Screw
This alfadmiGiit offers a simple and effective way
to make gathered and pleated ruffles. Ruffles may
b(! made .sorparalely or made and applied at the
.same time. The ruffier i.s attached to the machine
in place of the regular presser foot and is used
with a straight slitdt setting only.
ao
ii C * is • ■ S ;s s> SS S: S t> *
Straight stitch setting: AK 3
Throat plate; Straight slitch
Ruffier
Adjusting Points
The adjusting lever sets the. niffler for gathers or
pleats. The number 1 space setting is for gathers
and plates fullness al every stitch. Numbers 6 and
12 are space settings for pleats, .spacing them 6 or
12 stitche.s apart. The star is for straight stitdiiiuj
<i!id is used when grouping gathers or pleats.
The adjusting Hnger is used only for pleating
and affects the width of the pleat. It is thrown out
of action by bringing it out of contact with the
adjusting scre,w.
The adjusting screw' regulates the fuUne.ss of
gatlters or pleats. When turned inward to its limit
with liie adjusting finger in place, tlie attadiment
is set for its deepest pleat. When turned outward
to its limit, witli file adjusting finger out of action,
¡he ruffier gives only a hint of fuliness.
Page 41

mi! RUl-I'I.ER (C:on{‘fl.)
Aftivatiiifi Parts
The ruiiliiKj blade and tlie separator blade are
of blue stool and hold the material to bo (jathered
betwoon thorn. The rnlflittg blade forms Uie yathers
or pleat.s by canyiny the fabric to the needle
according to the spacing and fullness to which the
luffler i.s ad)«sied. The separator guide is slotted to
guide .sctam edges evenly and to separate the mffle
strip from the material to which the ruffle is
attached.
Preparation
# Raise needle to it.s highest point.
0 Locale ruffler on presser bar wdlli fork, arm over
needfe clamp screw. Securely -tighten both
presser bar and needle clamp screws.
Gathering
0 Sot adjusting lover on Number I selting and
throw adjusting linger out of action.
0 Turn adjusting screw for amount of fullness
desired and sot .stitdi length to sitace fullness.
Turn screw ill for more fulluess; turn out for
less fullness.
THl; RUPTI.liR {Cont'd.)
I.cnglh of sewing machine stifdi also affects rulflo
fuliiu'ss. Since a given attadimcid setting pnls an
equal amount of fullness into each stitch legardle.ss
of its length, shortening the stitch {more stitches to
tile indi) makes ruffle fuller; lengthening the stitch
(fewer slitches to the inch) makes it less full, l-or
line, closely spaced galheving, use a .short stitch
aiui an outward adjustment of adjtisling screw, iati
deepiU', less closely spaced gathering, turn adjust
ing screw inward and use a medium stitch lengtli.
•
Materia!
• Insert material to be galhcrod between blue
blades and tbrough first separator guide.
• Draw' material to bade of needle.
0 Lower presser bar and stitch.
1-abric texttire influences peiformaiico of litfllci
as well as results. Soft tabrics, cut ou crosswise;
grain, are best adaptcul for gaiiH;re.d fulls. Always
test stitdi length and ruffler seiling on a scrap of
self-fabric before proceeding with tire aclual work.
82
AUaching fhdls
Garment
• Place strip to be gatbered between tw'o blue
bhides and tluough first separator guide,
• Idace material to which full is to bo attadied
between separator blade and feed of madiine,
• Proceeri as for plain gathering.
Right sides of fabric are placed together wdieii
the scam is to fall to the inside.
Page 42

THK UUt‘PlJ;R (Cont'd.)
PleatiiMj
# Move adjustiag lever to desired space settinej
for pleats either 6 or 12 stitches apart.
# Sot stitch length.
For deepest pleat; set adjusting finger and turn
adjustiirg screv/ inward to its maximum setting. For
smaller pioat.s, turn acijusting screw outward.
A short stitch places pleats more closely together;
a long stitch soiraratcs the pleats for a greater
distance,
® Insert fabric to be pleated between blue blades
and into first sceparator guide,
® Lower pi'csser bar and stitch.
Crisp fabrics cut on the crosswise grain form the
sharpest pleats. Glazed fabrics handle best if the
glazed side is downward and the soft backing is
next to the ruffier blade.
Group pleating
By using the star setting {straight stitching) alter
nately with 6 or 12 space .sotting, pleats are formed
in groups, Kven spacing between groui>s is accomp
lished by counting the mtmbor of stitches.
DARNING AND RMHUOlDf-RY FOOT
This attachment is an aid to
all who desire perfectioii in free
motion darning and embroidery
work.
The foot firmly holds the fabric
as lh(! necKlle enters and rises
from the work, while fully re
vealing the lin<! of design to be
followed.
Free motion evork darning
Straight stitch selling: AK 3
Jmed cover plate
Darning and embroidery foot
Stitch length: Above 20
Trim ragged cdge.s from area to be darned,
(.amtre worn section in embroidery hoops.
Attach feed cover plate to machine bed in place
of regular throat plate.
Locate darning and embroidery foot ois pressor
bar with lifting finger over needle clamp screw.
»4
• Position work underr needle and lower pressor
bar. Mold needle thread loosely with left hand,
turn hand wheel over and draw bobbin Ihrcad
up throngli fabric. Mold both thread ends and
lower needle iirto fabric,
• Outline opening with running stitches Vc" from
edge for reinfarcomont.
• Stitch across opening, moving hoops under noodfe at a slight angle, from lower left to upper right,
Keej) lines of stitching closely and evenly spaced.
® When opening is filled, turn w’ork 90'^ and con
tinue slitdiing until darn is completed.
® Run inadiine at moderate speed and control
hoops with a steady continuous movement. Slow
movement of hoops will produce a short stitch;
more rapid movement lengthens the stitch,
l-airly long stitches are best for knit and tricot
fabric.s; short stitches are l)esf for cottons and
linens a.s they appro.ximalc weave of fabric.
Page 43

FKEI; MOTION WORK
MONOGRAMS
Selector selling; )5I,
Slilth Width; 2 — 5
Peed cover plate
Darning and embroidery foot
Stitch length; Above 20
Script monograms and embroidery can bo offoc-
tively accomplished with the zigzag stitdi wlion the
free motion jHinciple is employed.
....
I;MBUOU)I:UY
• rraco or mark design on right side of fabric.
• Phice work in embroidery troops largo enougii
to encorrrpass entire desigir. Be sure fabric is
hrdd taut.
• Attach food cover plate to machine her! in place
of regular throat piate.
• Locate darning and gmbroidery foot on presser
bar with lifting finger over needie clamp senrw.
• Position work under nemilc and lower pressor
Irar. Bring bobbin ftiread up Urrough fabric at
start of desigir. Hold both thread ends to start
stitching.
DECORATIVH STITCH PAmiRNS
Examples of Stitch Patterns and their Selector SeUings
# Move haojrs slowly, following outline of design.
Maintain an rrven rate of speed so that stitdies
are uniioiiirfy irUtced.
Slow movement of hoops produces a close satin
stitch; more rapid movement lengtlrcns the stitch
and results in an open effect.
Shading stitches from wide to narrow is controll
ed by lire angle at which work is placed and moved
under needle.
A tc.st samirle should always be made before
proceding with tire actual work to determine, stitch
setting and spacing. Some fabrics may requite
(iddition of un underlay of crisp lawn or organdie.
n/ijmrmnnfirmnimimrumimrymn^^
DP4
m
DS (5) 2
DS (D 3
I;P2
F02
FR2
PS (D 3
86
Page 44

Di-COKATIVE STITCH PATTERNS
Examples of StUdfi Patterns and their Selector Settings
GM 4
Ia.^ VAwV Ia..>/ Va..,A 1a~v/ Va™v/ \y<y^ U\..A Ia™X \a>w</ Va~>¥ Va~^‘ Va-»
lJUUт^WнJAi.E'%^UJljlJUuJX^JJM)lAM^)%MAI>UJljiJUiMjXuiMi>^4Ji>.UliJ^.U/MaiuMJUM^^
^•yA...A_ ^^'i'.>Aw ■s-.Atv'-Ak ^.yN,.A- *s^vv.^fc ^oAvvA^
GP 4
GS @ 2
GS (3) 4
HS (D 4
^/SAAA/vAAA/v■SAAAA/■u-\/\A/''\AAAУ^Ar^u\/\AA.Ay'^A/vAAAA/\A7\A/
11.2
IS d) 4
8';
APPLICATIONS
OP THE
CYLINDER BED
FEATURE
1
1
t/"
I
i
/;
■ sC
llirti'^'
14 ill
\ '4 I ii.
I ;M i\S’-
it:
» „-1
/4
Page 45

89
Page 46

ч Ц ¡ù
' Í '•••I'
91
IЛ
/ /
\ »
'■ 'Л '
92
Page 47

Clean amt
93
TO CI.EAN THE MACHINE
Your sewing machine was built to exacting stand
ards of precision and workmanship. Its performance
depends on the care and treatment it rccc!vc.s when
in use and before storing it away.
When in regular use, the machine should bo
doaued periodically to remove the lint and fUiif
which may have accumulated round the working
parts. To clean the bobbin case area, see instruc
tions (or removing and replacing bobbin case on
page.s 95 and 90. Oil the machine after each clean
ing as instructed on pages 9?, 98 and 99.
If Uic machine is to be stored away for an inde-
, finite period of time, a thorough brush-cleaning
to remove all traces of lint and fluff, followed by
swabbing of all exposed parts with a lint-frcc brush
saturated with SINGER* Oil, is necessary to protect
the machine against rust damage. The areas that
should be cleaned and covered witli a protective
coat of oil arc shown in the iihisfration at tlte left.
94
Clean amt Oil
Page 48

TO RiiMOVIi AND REPLACK BOBBIN CASE
; '■
To dean hook raceway, remove bobbin case as
foliows;
1. Remove throat plate (see page 19) and open
slide plate (see page 13).
2. Unlock bobbin ease by lifting and pnlling
holder to right as shown.
3. Remove bobbin case from madiine.
4. Remove all lint, fluff, loose thread ends or any
other foreign matter which might clog the machine.
TO REMOVE AND REPLACE BOBBIN CASE
POSITIONING
STUD
95
5. Replace bobbin case so that groove under tension spring fits on hook raceway and fork of case
straddles positioning stud,
6. Push bobbin case holder to loft as shown until it .snaps down info lock position,
y. Close bod slide and replace throat plate.
96
Page 49

то LUBRICATI; TUB MACHtNB
Use SIN'GKK Oil aixl SlNGl-R Lubricant!
Both are extra quality products especially pre
pared for sewing machines, and siiould always be
used in tlu! сак; of your 631.
Clean fho machine pruiodicnlly as insinreted on
page 91,
ti Pi
У
Apply a dro)) of oil to each place indicated.
Remove screw' A and lift arm top cover slightly
and slide off toward loft and away from inacbine.
The thread take-up lover must be in its lowest
position.
Apply a small amount of lubricant to the gears
as shown.
A tube of this lubricant can be purchased at your
Singer Sewing Centre,
Never apply Oil to these gear.s.
9?
Swing face plate to left and oil flic places indi
cated.
Open slick! plate and apply a drop of oil to the
hook racciway as indicated.
Close slide plate, replace arm top cover and
close, face plate.
98
Page 50

TO UJURICATK THH MACHINE (CoiU’fl.)
Tilt machine back and remove thumb nut from screw li, being careful not to lose felt washer, and
remove cover from underside of machine.
Remove .screw C and remove cylinder cover.
Clean hook and gear area, oil each of the places indicated, and occa.sionally apply a small guantily of
lubricant lo teeth of gears as shown.
Replace bottom cover and cylinder cover.
The motor requires no lubrication.
99
ELECTRICAL INFORMATION
The SINGER* Electric Motor in the electric ma
chine is furnished for operation on an ailernathrg
or direct current. Orders must state the catalogue
number of the motor, or the voltage, and in the
case of alternating current, the number of cycles.
Before Inserting Electric Plug A, be sure, that
voltage and cycles .stamped on electrical name
plate B arc within range marked on your electric
meter installed by your power company.
Electrical Connections for Madtine. Push 3-pin
terminal plug C on 3-pin terminal block at right of
machine and connect plug A at other end of cord
to electric oullel.
Speed Controller. The speed of machine is regu
lated by amount of pressure on the pedal of the
foot controller D.
100
Page 51

SINGER LIGHT
To replace Singer Bulb.
Disconnect plug from clccliical outlet before ma- ,
king bulb replacement.
With thumb of right hand push in and down on
tab of light lens (see Illustration).
LOCKS
J-
/ li
■ /m
Do. not attempt to unscrew bulb, press it into
socket and at same time turn bulb o%'or in direction
shown to unlock bulb pin G, then withdraw’ bulb.
)-
Press new bull) into socket with bulb pin G enter
ing slot of socket and turn it over in direction shown
to lock bulb pin G in proper position.
The light is turned "on“ or "off' by the switch F.
lot
Applications of Cylinder Bed Feature
Apjrliquc ....
Attachments
Button Sewing Foot .
Darning and Embroidery Foot
Narrow Herntmu' .
General Purpose 1-oot
Multi-slotted Binder ,
Ruffle.r.................................
Seam Guide ....
Special Purpose I’oot .
Cording Foot ....
Basting......................................
Binding
Blanket Binding, Replacing of
Bobbin
Bobbin Case
Buttonholes ....
Cleaning the Machine .
Corded Ap¡)liciué .
....................................
Blind Stitching
Hems
....................................
Zip Insertion ....
Freiparing for Stitching .
Removing ....
Thread Tension ,
Winding...............................
Removal and Replacement
Tltreadiirg
Corded ....
Button Sewing .
Chain Stitch Fittings
Combination Patterns and Vari<
Illustrations .
at ions
102
INDEX
88
....
93 Corded Buttonholes
53
....
;H Cording
Scams
58 -59 Welting
84 85 Cording Foot , , , .
75 -77 Piping and Corded .Seanrs
CO 66 Zip insertion ....
78
....
79 Couching
80 -83 Cylinder Bed, Applications
67
....
69 Darning and Embroidery Foot
49 57 Darning, Free Motion \Vork
70..-74 Darts......................................
20 -25 interfacing
78
....
79 Single Thread
64 Decorative Herns
Decorative Stitch Patterns
69 Designs and MotiLs ,
72 Detachable Cloth Plate .
Elastic, Applicrations
28 Eiectrica! Information .
13 Light . . . , .
.34 Motor ....
10..12 Embroidery, Free Motion Work
95
49 52 Button Sewing
58 -59 F'ilhu' Cord, Tlireading .
20
94 96 Gathering ....
86 87 Guiding and Supporting l-abric
Features
....
96 Principal Parts of Machine
14 Feed Cover Plate
52 Free Motion Work
....
25 Ihee Motion Work .
43 Genera! Purpose Foot, Applications
54 Henuiied Seams ....
...................................
.........................................
..................................
...................................
52
74
73
70 ................-74
73
.......
57
.......
84
.......
64
63
76
55
5
65
101
100
85
15
52
.......
.......
31
76
74
93
-64
...
59
82
66
71 ................72
88
84 85
63
86 87
fOO.101
2-3
5884 85
84 85
81
60
Page 52

Hemming \vith Lace
Hems
Blind Stitched
Decorative
Knit l-'abiic Seams .
Lacc
Applicji-ic ....
Odging and ln.serlion .
Length of Stitch, Regulating
Light Bulb, Replacrcment
Lubricating ....
Mcmding ....
Monograms and Motifs .
1-ree Motion Work
Motor
................................
Multi-slotted Binder
Narrow lleminor
Decorative Hems .
Hemmed Seams .
Hemming with Lace .
Needle and Thread Selection
Needle and Thread ,
Needle Inserlion
Needle Position and Stitch
Needle Positions
Needle Thread Tension
Satin Stitching
Straight Stitching .
Needle Threading
Single ....
Two................................
Oiling
................................
Overcasting
Pattern Selector .
Piping................................
Pleating
.............................
Prepare to Sev/ .
Width electo
Pressure Adjustments .
77
Primary Patterns ....
Control of Width , , , .
69
Needle Positions ....
70
61 Special Discs...............................
Stitch Width and Stitch Pattern
Principal Parts of Machine .
54
Reverse Stitching
57
Application
10
101
97 99 Ruffler
Regulation
Attaching Ruffle , , , .
65
55 Gatherinej
Pleating
85
Satin Stiichinej
78
7,')
100
■ 77
Stitch I.englh Adjustment
79
Temsion Adjustment .
Scallopinc)......................................
76
Seam Finishes.................................
76
................................
..................................
............................................
..................................
......................................
Selector.s 38
77 Seam Guide*...................................
6
Blind Stitched Homs .
7
7 and 44
Seams .........................................
Top Stitching..............................
1 /
Seams
43
Corded........................................
Flat L’elled..................................
Guiding and Supporting .
45
97- •99
62
..
18
17
73
83
Lingerie
Sheer Idlbrics ....
9
Straight
SINGER Service ....
Special Discs
Removal and Replacement .
Special Purpose Toot, Applications
......................................
.......................................
Prhnary Patterns ....
28 103
32
A2
38
41
42
-40
39
15
29 30
16
80 83
82
■ 82
81-
83
36
37
66
62
67- 09
69
67- 68
68
74
61
31
60
50
-30
29
39
40
■ 57
49
4
Spool Holder .
...........
........................................
Stitch Length
Rciqulator.......................................................
Satin Stitdr Adjiistmeut
.................................
Stitch Pattern Selector, Operation ,
Stitch Patterns
Combinations and Variations
Illustrations....................................................
Special Discs...................................................
86
39 -40 Insertion.....................................
Stitch Width and Needle Position Selector
Combinations and Variations . 43
Control of Width........................................... 4!
Operation
.......................................................
Straight Stitching
Eciuipment anci Settings............................... 26
Seams.............................................................. 29
Secondary Positions.......................................
Two Needles................................................... 46
Tension Adjustments
Bobbin Ttiread
...............................................
Needle Thread................................................ 33
Satin Stitching................................................
Threading
Bobbin Case....................................................
Filter Cord......................................................
8 ■ Single Needle ....
8
Two Needles...............................
16 Throat Plate
36
Removal and Rcrplacement .
18
43
To() Stitching
■ 87
Two Needles
Straight Stitch ....
Zigzag Stitch
..............................
.................................
26
Primary Patterns . . , ,
Straicjht Stitchinc} ....
ThrcadiiK)
17
Variations and Combination Patterns . 43
Illustrations
Winding a Bobbin ....
..................................
................................
10 -12
46
86 87
-31 Zigzag Stitching
27 C'ombinations and Variations
Equipment..................................
Needle Positions .... 42
34 Primary Patterns .... 38
37
Special Discs...............................
Stitch Length Adjustment
39--40
Stitch Width Selector: Control of Width 41
14
Tension Adjustment .
52
Two Needles...............................
45
19
35
68
44
47
45
43
35
36
37
47
104
 Loading...