

Page 1
Page 2
The Touch & Sew <&) Special Zig-Zag
Sewing Machine by SIN G E R*
You are about to enter the enchanted world of custom sewing. Now you can
create the elegant effects endlessly sought after by the world’s most sophisticated
women. And, it’s so easy with all of the exclusive SINGER features. Each one
is meticulously designed with ease of sewing in mind.
• Exclusive Push'Button Bobbin lets you wind and rewind your bobbin while
it stays right in the machine.
• Exclusive Set'A'Pattern makes it easy to select either straight or decorative
stitches. You can create numerous variations of patterns and designs with
one or two needles ... all without ever changing a disc.
• Exclusive Built'in Threading Chart keeps an easy-toYollow diagram at your
fingertips.
• Exclusive Friction'Free Spool Holder with horizontal pin holds spools stationary so the thread flows freely to the needle without tug or drag.
• Exclusive Singk'Thread Chainstitching holds firmly or pulls out in seconds
as needed, does away with most hand basting so you save lots of precious
time. It’s ideal for any sort of temporary stitching.
Your SINGER sewing machine is the key to your sewing success when used
properly. To achieve professional results, SINGER suggests you sit down at
your machine before you start to sew and go through this book step by step.
You’ll discover all the many advantages of sewing with your Touch & Sew
sewing machine.
SINGER* Service is always close at hand. If your sewing machine should need
servicing, call your local SINGER CENTER to be sure of warranted SINGER
Parts and Service. You will find the address under THE SINGER COMPANY
in the telephone directory.
A Trademark of The Singer Company
Form 21626 (966)
Copyright © 1966 by The Singer Company
Printed in U.S.A.
Page 3

CONTENTS
Page
1. Getting to Know Your SINGER Sewing Machine........................................................................... 2
Principal Parts — What They Are Called.................................................................................... 3
Principal Parts — How They Are Used............................................................................................ 4
To Connect Machine © To Turn On Machine and Light; Control Speed; Turn Off
Machine and Light © To Set Stitch Patterns © To Set Stitch Width © To Set Needle Posi
tion © To Set Stitch Length © To Regulate Pressure © Needle-Thread Tension © To
Thread the Needle © To Wind the Bobbin © To Position Throat Plate
Accessories ..................................................................................................................................... 13
2. Straight Stitching ................................................................................................................................ 17
Preparation ..................................................................................................................................... 17
How to Sew a Seam........................................................................................................................ 20
3» Zig-Zag Stitching................................................................................................................................ 24
To Set Pattern Selector © How to Adjust the Width of the Design © How to Adjust Stitch
Placement ® How to Adjust Stitch Length and Needle-Thread Tension
4. Two-Needle Stitching......................................................................................................................... 26
Preparation © To Thread the Needles............................................................................................ 26
Straight Stitching with Two Needles.............................................................................................. 27
Zig-Zag Stitching with Two Needles.............................................................................................. 27
Decorative Two-Needle Stitching................................................................................................... 28
5= ChainstStching ................................................................................................................................... 29
Where to Use Chainstitching © Preparation © To Sew a Chainstitch Seam © To Remove the
Stitching © To Remove the Fittings ® Garment Fitting and Construction Guides with
Chainstitching
Free-Motion Stitching ........................................................................................................................ 36
Preparation .................................................................................................................................... 36
7o Clothes and Home Decorations............................................................................................................ 37
Seams .............................................................................................................................................. 37
Lingerie Seams © Inside Seams of Sheer Collars, etc. ® Seams in Knit Fabric © Flat
Felled Seams © Seam Finishes
Darts................................................................................................................................................. 40
Regular Darts © Continuous-Thread Darts © Darts in interfacing
Hems ............................................................................................................................................... 41
Buttons ............................................................................................................................................ 42
Buttonholes ..................................................................................................................................... 43
Buttonhole Length © Stitch Width Settings © Procedure
8. Finishing Touches................................................................................................................................. 45
Top Stitching................................................................................................................................... 45
Shell Edging ................................................................................................................................... 45
Applique ........................................................................................................................................ 46
Monograms, Motifs, Script............................................................................................................. 47
Flower Embroidery ........................................................................................................................ 48
Keeping Up Appearances.................................................................................................................... 49
Mending ......................................................................................................................................... 49
Tears ® Elastic © Bar Tacks
Blanket Binding............................................................................................................................... 50
Darning .......................................................................................................................................... 51
Without Embroidery Hoop © With Embroidery Hoop
10, How to Take Care of Your Machine.....................................................................................
...........
52
Cleaning, Oiling, Lubricating ® To Remove Bobbin Case © To Replace Bobbin Case © To
Change Light Bulb © To Replace Slide Plate
11, Fashion Aids........................................................................................................................................ 58
Index ......................................................................................................................................................... bO
Page 4
1. GETTIIMG TO KNOW YOURSINGER
21. Foot Controller
Page 5

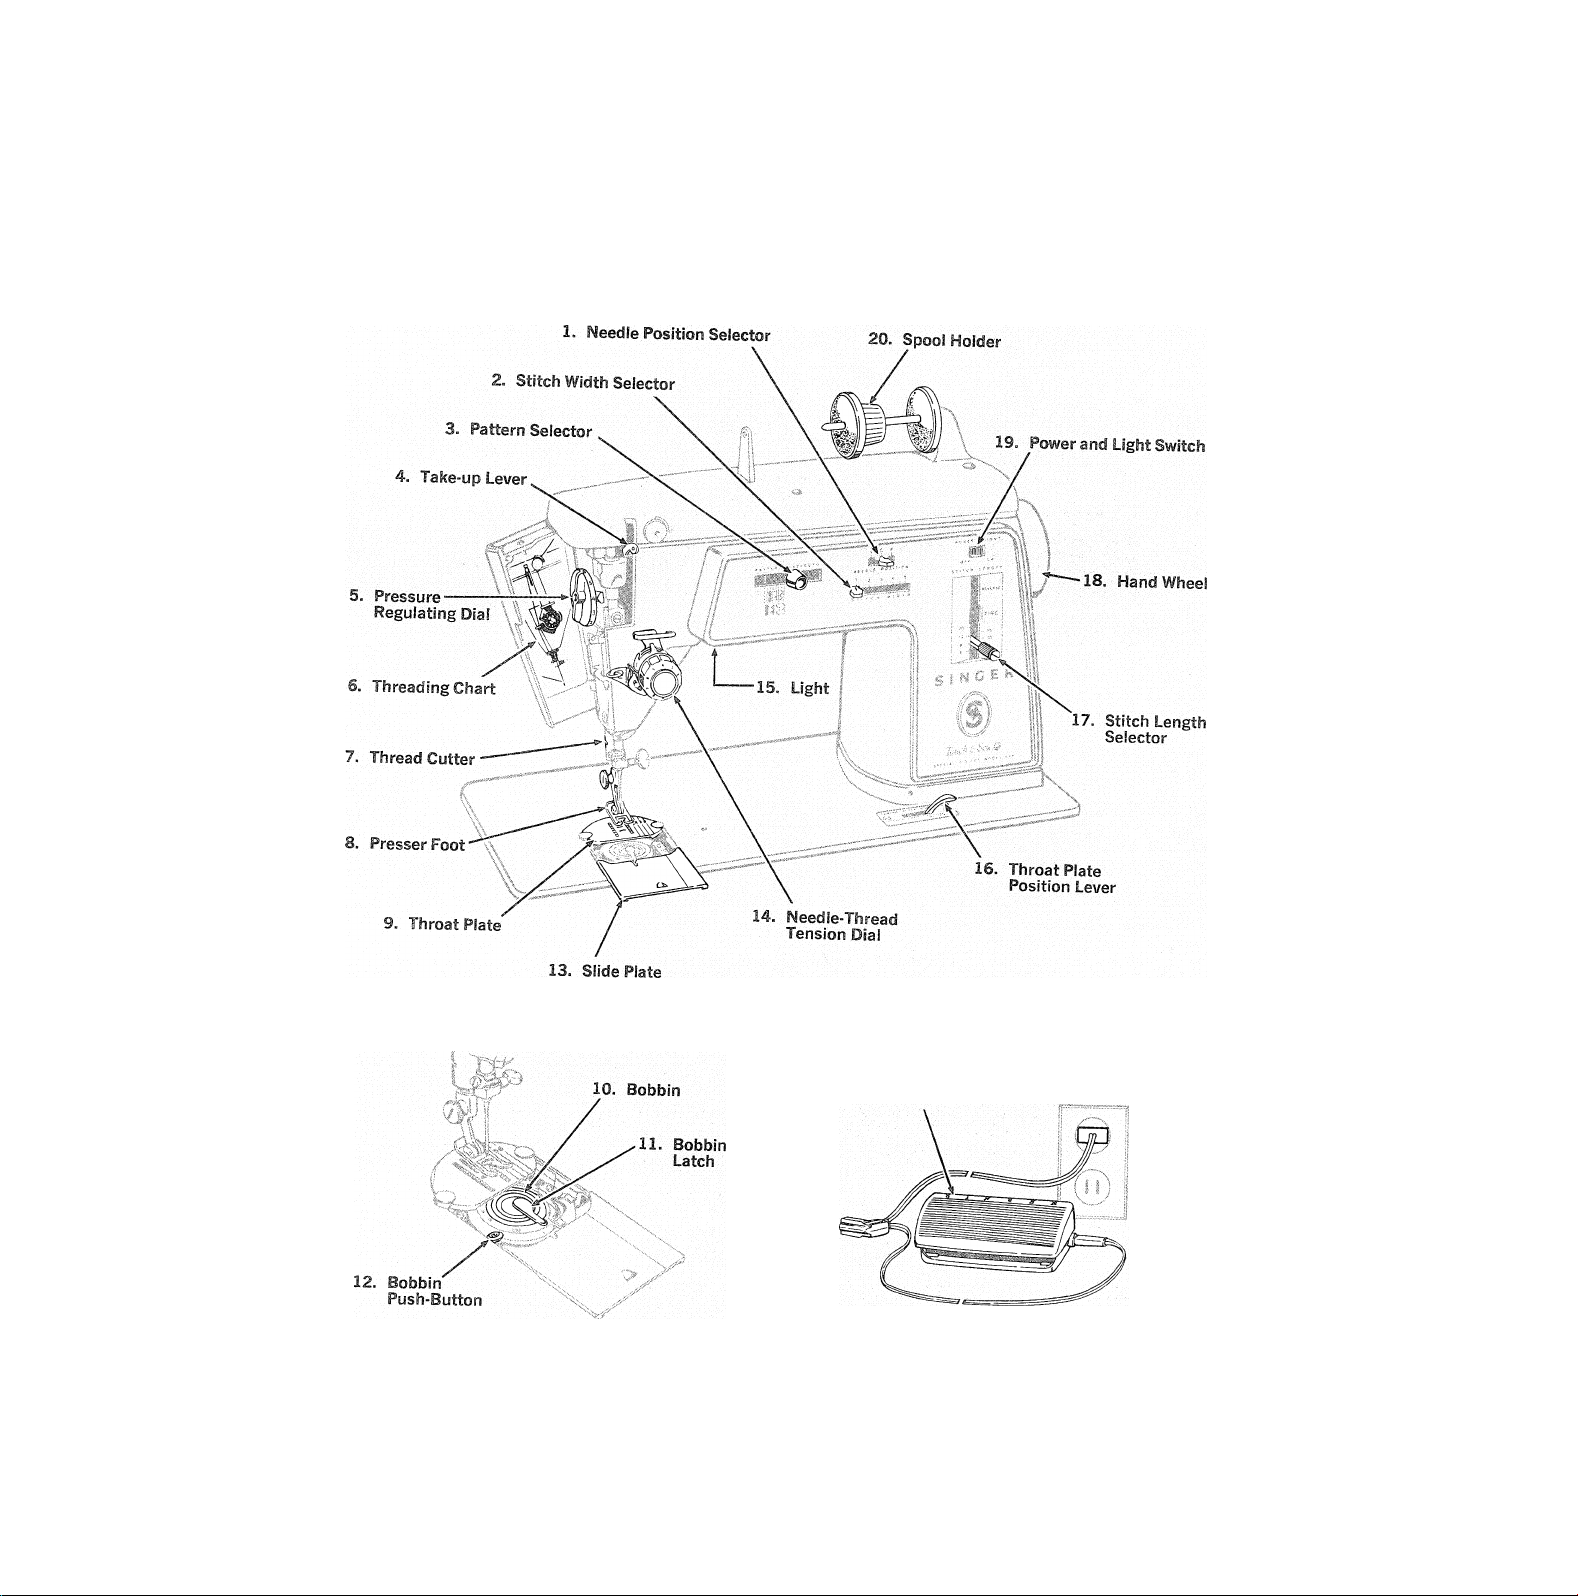
principa! parís—what they are called
1. Needle Position Selector allows for placement
of both straight and zig-zag stitching in either
left, center, or right needle position.
2. Stitch Width Selector allows for variety of stitch
widths, as well as straight stitching.
3. Pattern Selector with illustrated settings allows
for easy selection of seven decorative stitches,
and straight stitching.
4. Take-up Lever.
5. Pressure Regulating Dial has eight numbered
settings (from low for light pressure to high for
heavy) and special setting for darning.
6. Threading Chart on swing-open face plate is
convenient, easy to read.
7. Thread Cutler built into presser bar is designed
for safety, convenience.
8. Presser Foot holds fabric against feed dog.
(Presser Foot Lifter at back of machine, not
shown, allows you to raise and lower Presser
Foot.)
9. Elevator-Type Throat Plate is easily placed in
any of three sewing positions: REGULAR,
FINE, DARN; and UNLOCK position for easy
removal.
10. Transparent Bobbin shows thread supply. Two
halves can be unscrewed to remove unwanted
thread.
11. Bobbin Latch flips up at a touch of your finger.
12. Bobbin Push-Button allows you to switch from
sewing to bobbin winding without removing
bobbin.
13. Slide Plate opens easily, lets you see bobbin.
Automatically releases bobbin push-button
from winding to sewing position when closed.
14. Needle-Thread Tension Dial allows for exact
settings.
15. Built-in Sewing Light pours light on sewing
area.
16. Throat Plate Position Lever.
17. Stitch Length Selector allows for variety of
stitch lengths including FINE for zig-zag satin
stitching.
18. Hand Wheel controls take-up lever. Always turn
it toward you.
19. Power and Light Switch turns on machine and
sewing light simultaneously.
20. Friction-Free Spool Holder. Horizontal pin
holds spools of various sizes; holders let thread
unwind without tug or drag. The spool does not
turn.
21. Electrical Connections and Foot Controller are
designed for your convenience and safety.
Page 6
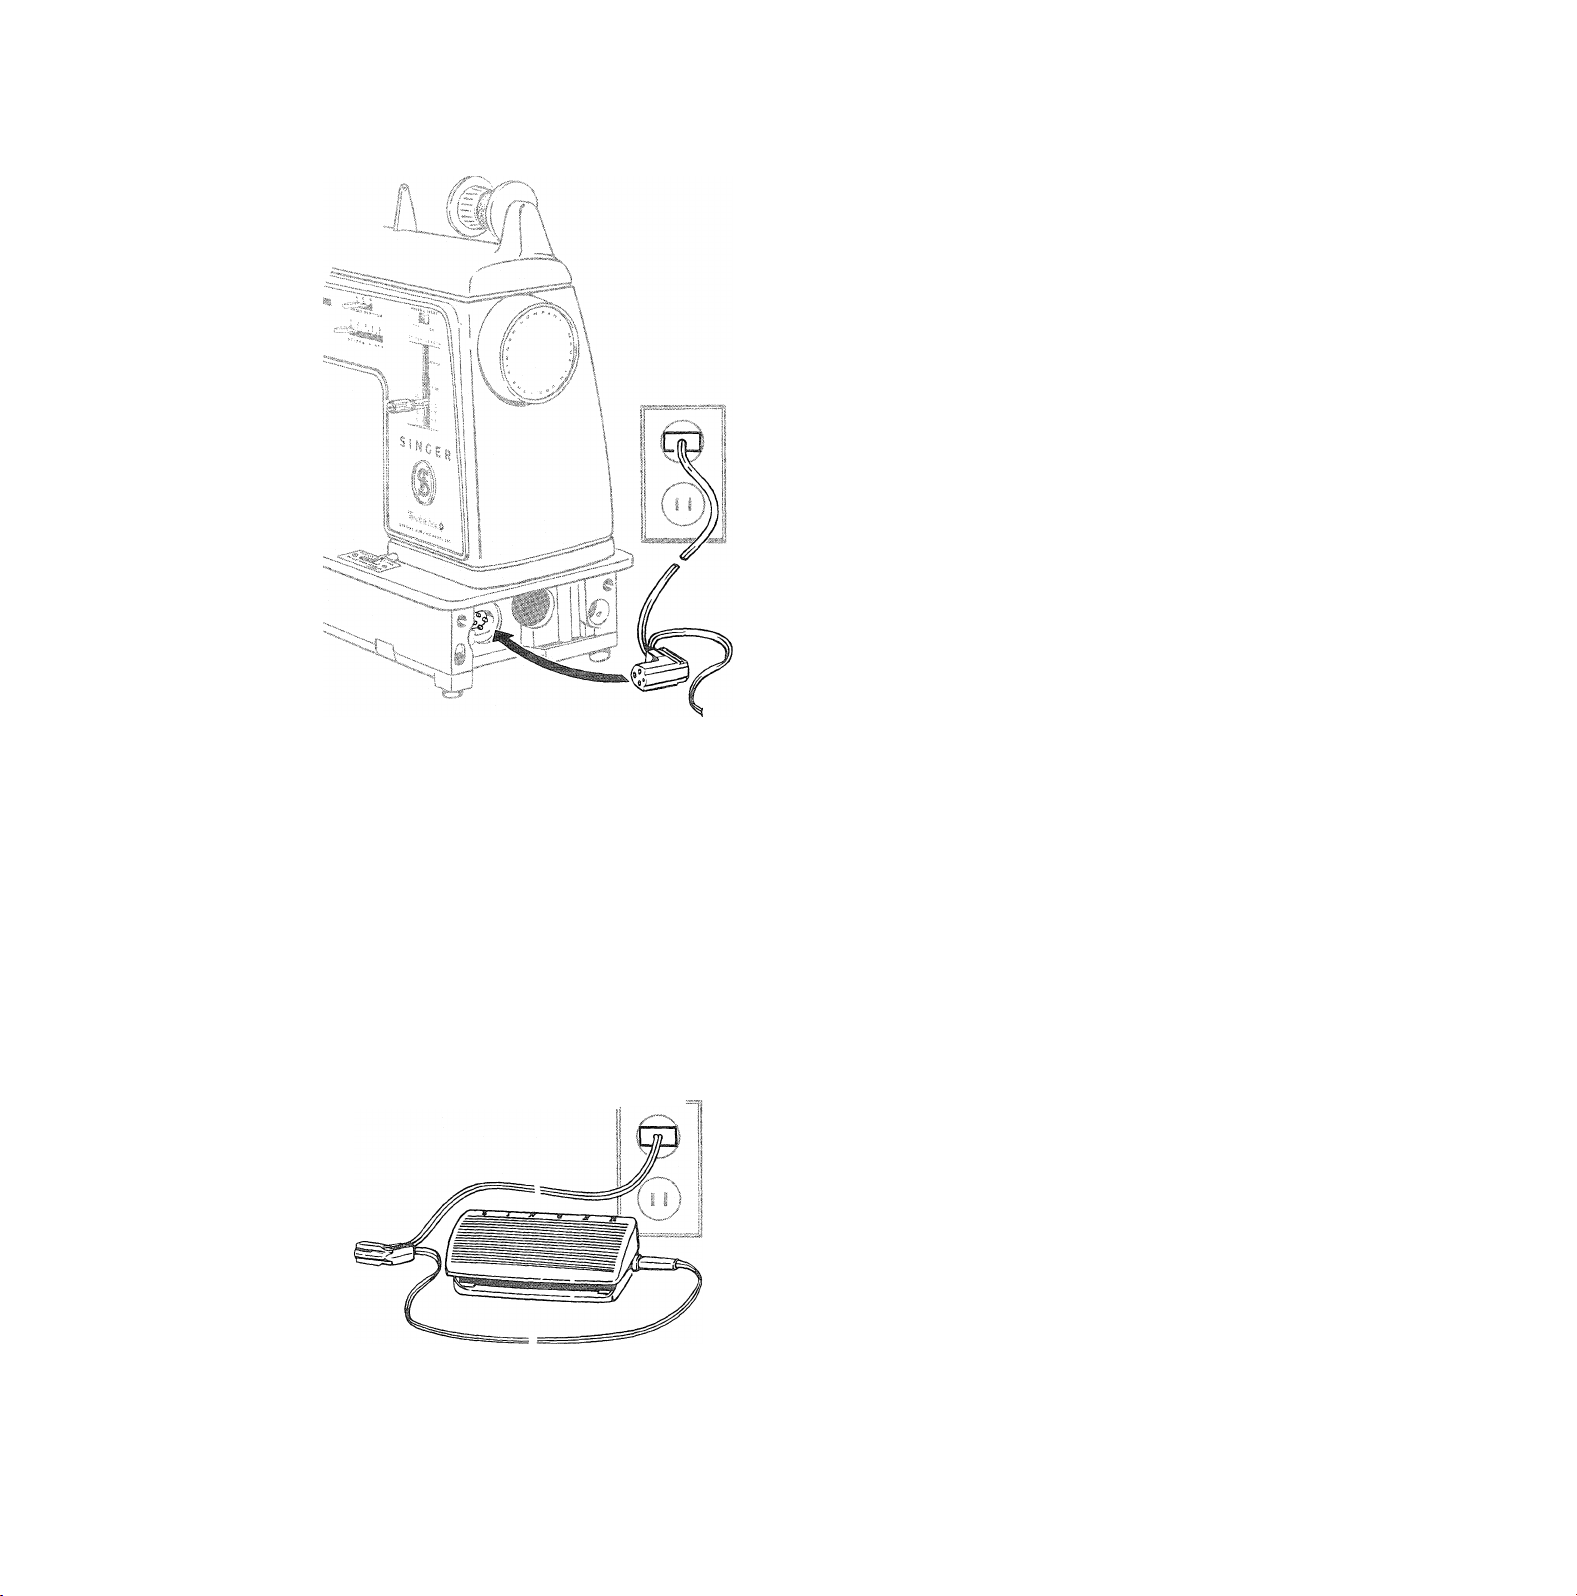
1. TO CONNECT MACHINE
Before plugging in your machine, be sure that the
voltage and number of cycles stamped on the fourpin receptacle are within the range marked on the
electric meter installed by your power company.
Push the four-hole plug onto the four pins at the
right end of the machine. Then connect the two-pin
plug to your electrical outlet.
Electrical Connections
POWER & LIGHT
OFF
Power and Light Switch
O N
rO TURN ON M
IL SPEED; TURN
OFF MACHINE
LIGHT; CC
AND LIGl
To turn on both the machine and the sewing light,
slide the Power and Light Switch to ON position.
To run the machine and control speed, press the
foot controller (or knee lever) The harder you press,
the faster the machine will sew.
To turn off both the machine and the light, return
the Power and Light Switch to the OFF position.
This unique electrical system offers several advan
tages : you see at a glance when the machine is ON
or OFF by means of the light; you can turn off the
power with the convenient switch instead of having
to unplug the machine; and since the Power and
Light Switch must be turned on before the machine
will start, there is less chance of “little hands or feet”
accidentally pressing the Foot Controller (or Knee
Lever) and starting the machine.
Foot Controller
Page 7
stitch Patterns
Straight Stitch
Zig-Zag
Bali
Pyramid
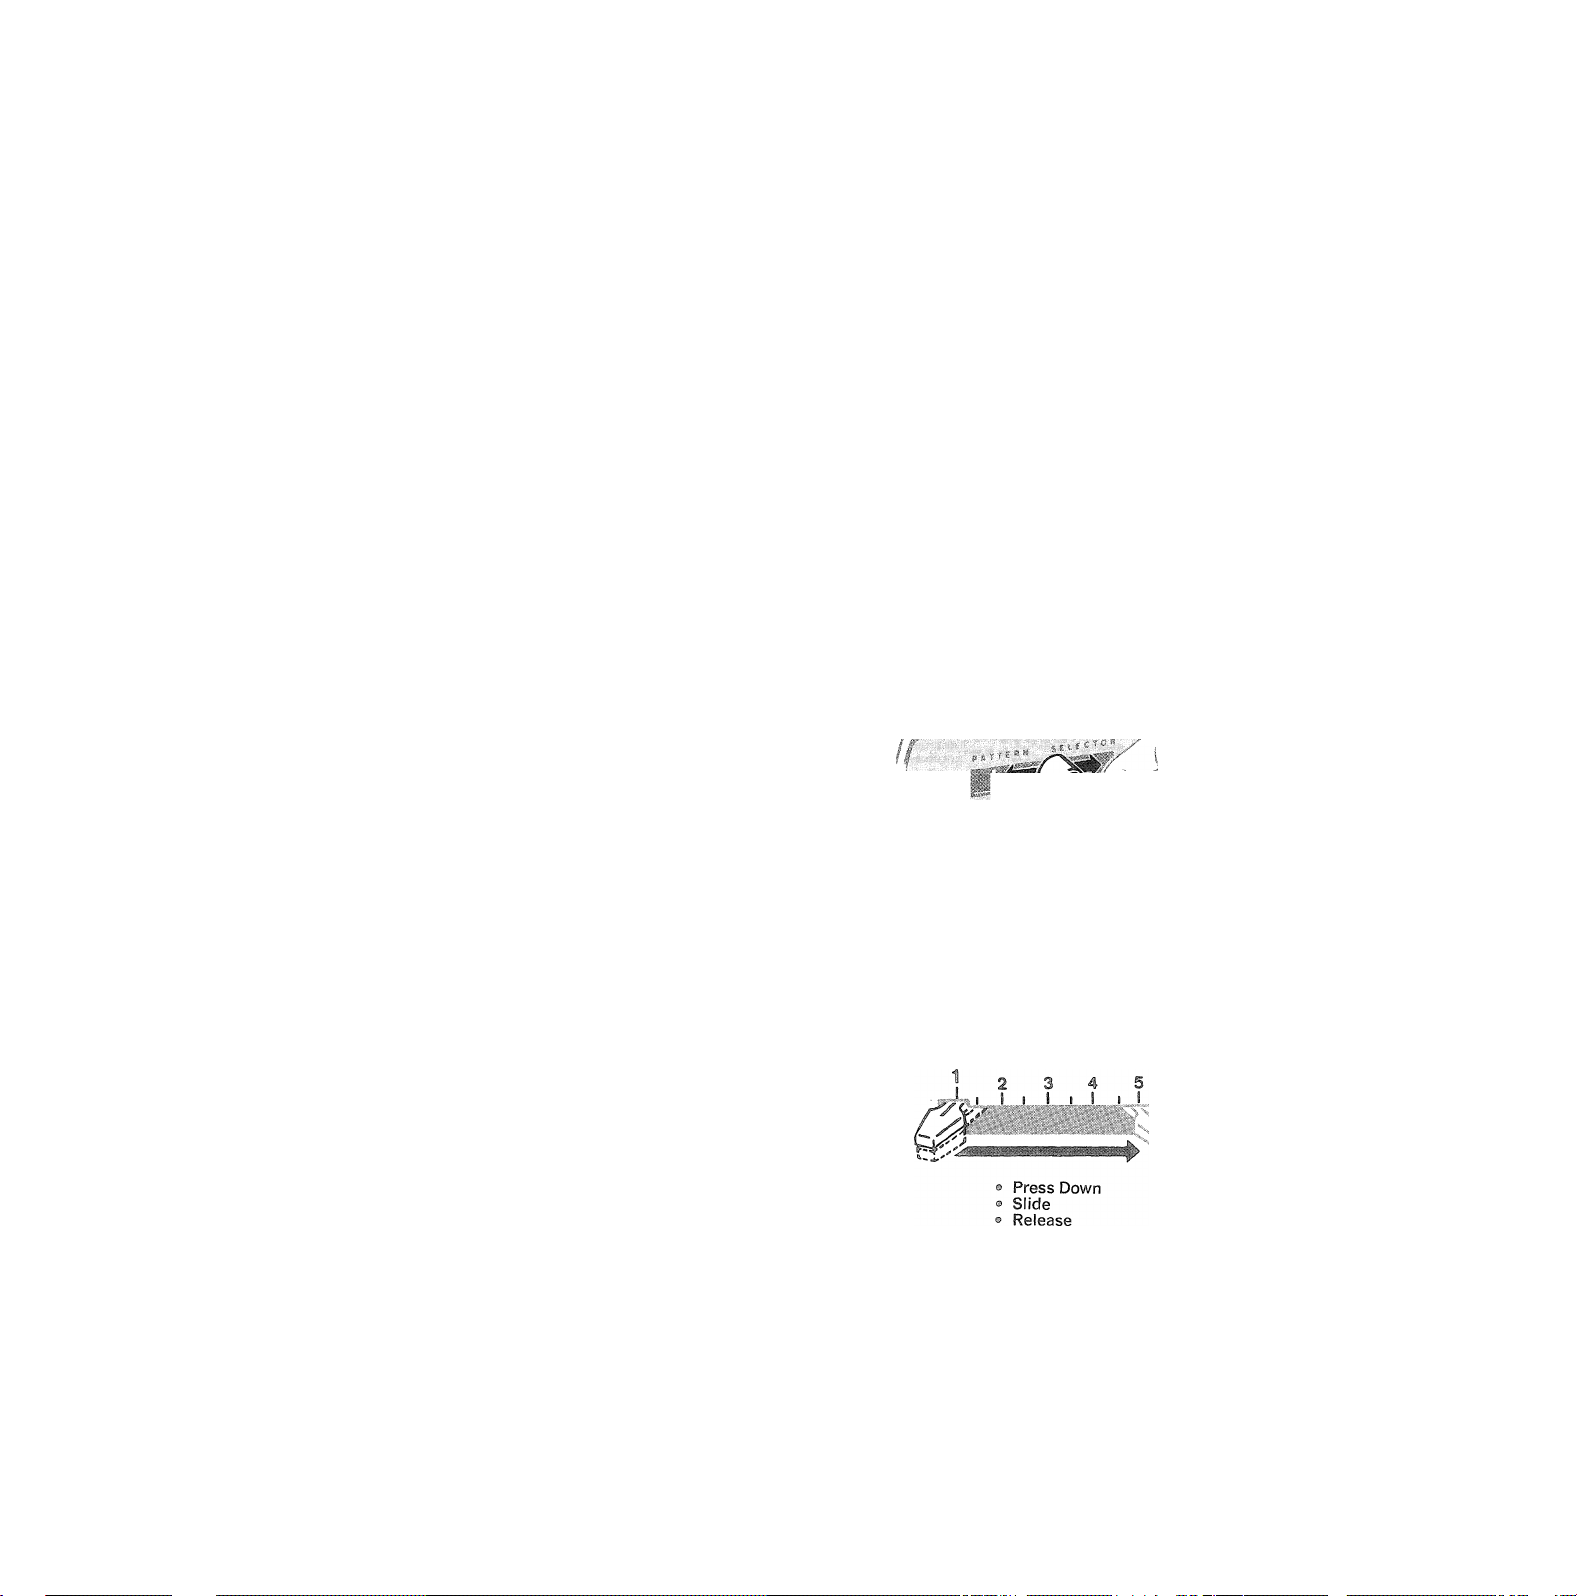
3. TO SET STITCH PATTERNS
The Pattern Selector offers you a choice among
seven decorative and practical stitch patterns in
addition to the straight stitch.
To select a pattern, push selector button in and slide
either left or right to bring indicator line to desired
setting. Release button.
4. TO SET STITCH WIDTH
The Stitch Width Selector does two jobs: it sets the
machine for bobbin winding and straight stitching,
and it controls the stitch width in zig-zag stitching.
Blindstitch
\..............1
AAAAAAAAAAA/
/\ / \ /\
/ \ / \/ \ / \ / \ / \ / \ / \ / \ / S / \ /
'VVVVVVVVVVV
...........1.............1...........1.............1...........
Box Stitch
/ \ / \ / \ / \
/ \ / \ / \ / \ /
Multi-Stitch Zig-Zag
1
V V V ? If V ? V V
Scallop
/ /1
/ ........
.....................
I i lÈMm:mrnWm
i WV?I I
.
I mmm§Mrn^
i ilmmÈimmiS
'K I ¡ ;
® Push !n
® Slide
© Release
Stitch Patterri Selector
© Straight Stitch Setting: 1
© Zig-Zag Width Setting; 2 to 5
Bobbin Winding and Straight Stitching: Set selector
at straight stitch position 1.
Zig“Zag Stitching: First be sure you set the Pattern
Selector (see instructions above). Then set selector
at any position between 2 (narrow) and 5 (wide).
Stitch Width Selector
Page 8
Meedle PosBtion Selector
Press Down
Slide
Release
Stitch Length Selector
5.
' SET N EEC
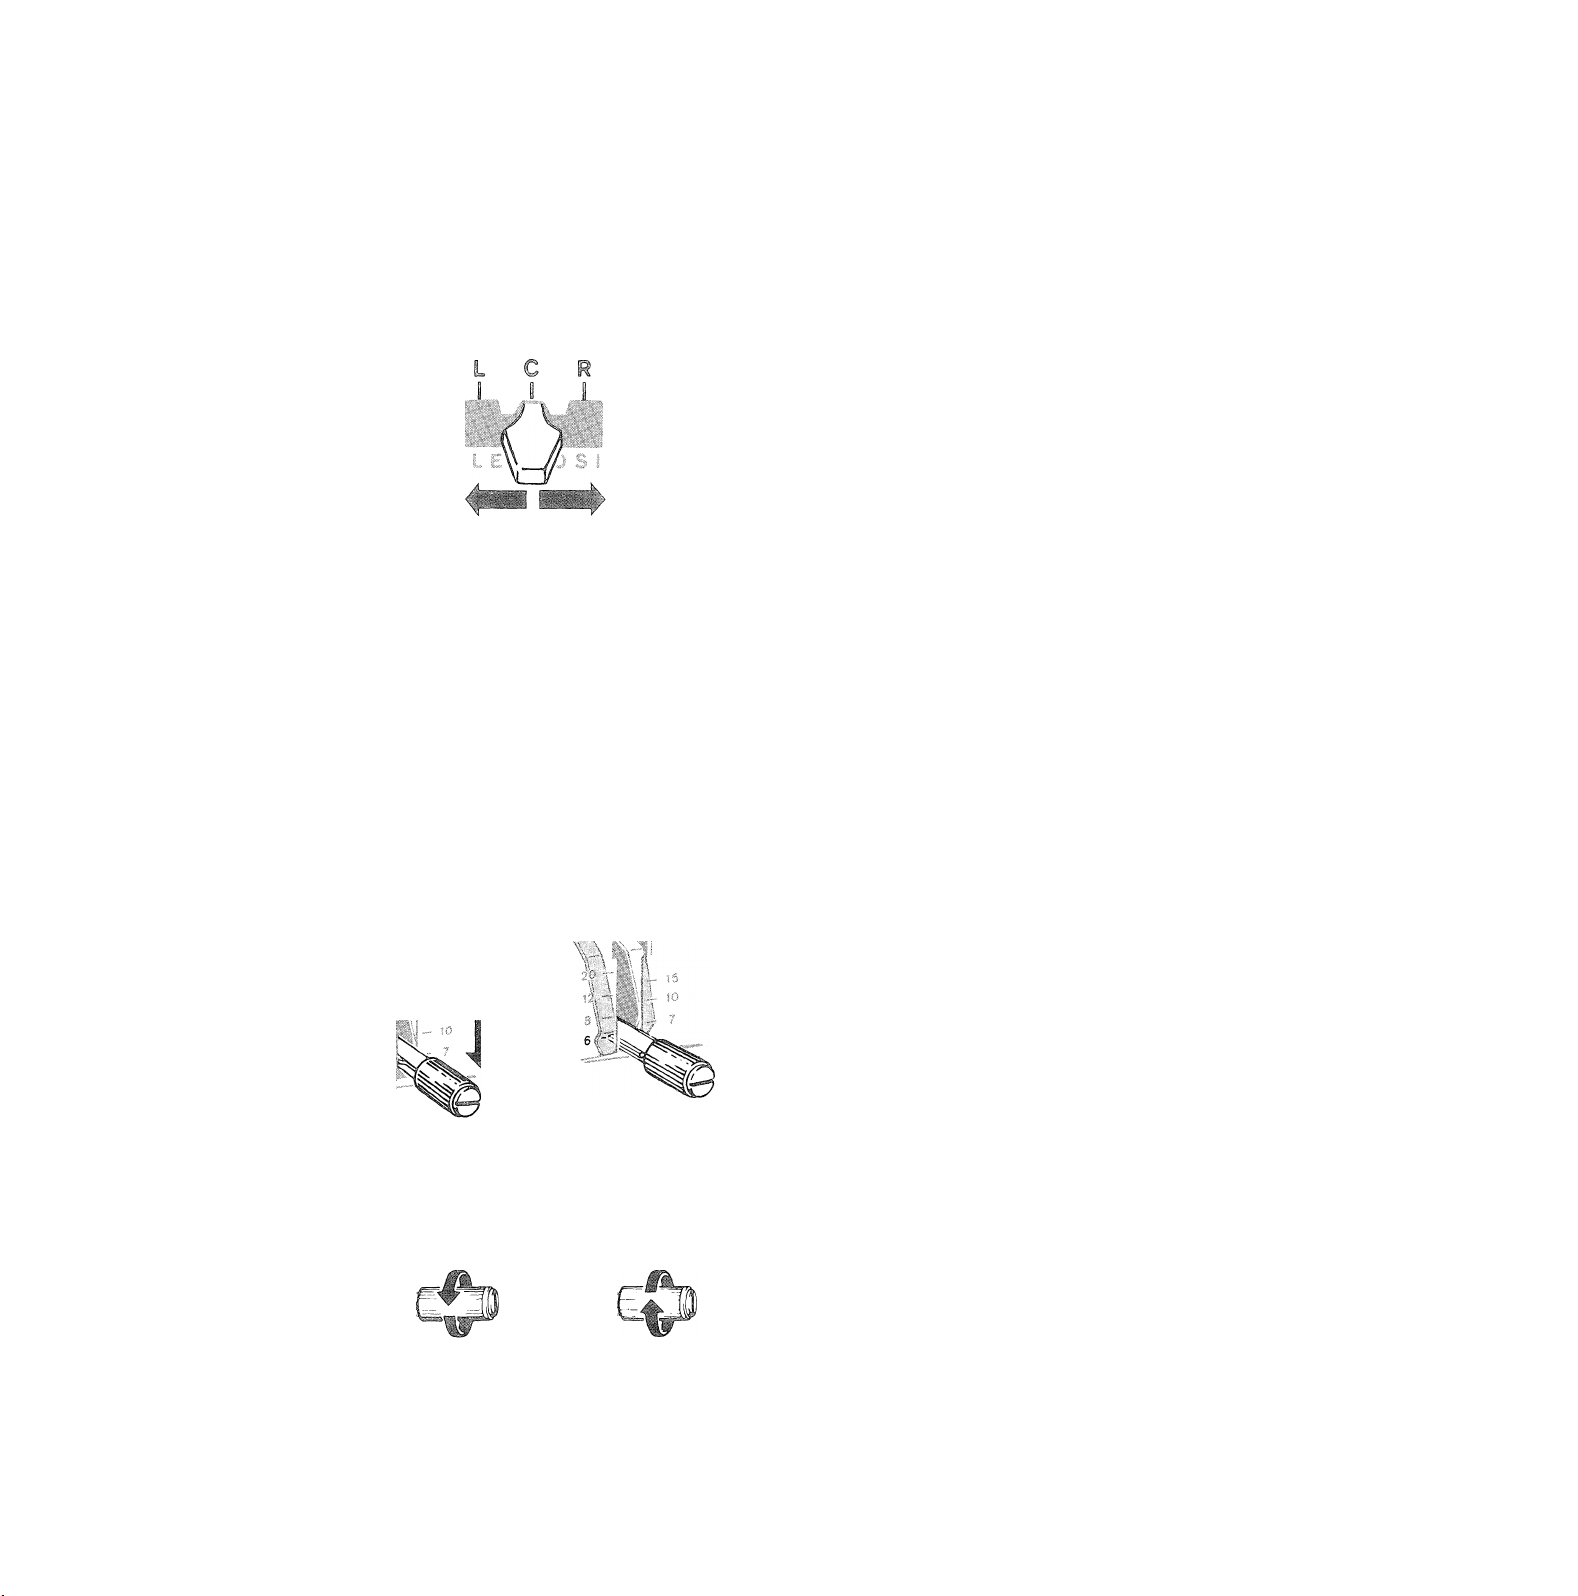
The Needle Position Selector places the needle in
either left, center, or right stitching position. Yon
will need to set it for bobbin winding as well as for
straight or zig-zag stitching.
Before moving selector, be sure that needle is out of
the fabric.
Always set selector at C.
: Set selector at C.
Zig-Zag Stitchirig: You will use C position most
often; L and R settings are for special stitch place
ment. For example: L setting is required for button
holes, button sewing, and two-needle work. L or R
setting is used to place narrow zig-zag stitching to the
left or right of center in decorative work.
Reverse
Locked Setting
Forward
Thumb Nut
To Loosen To Tighten
6. TO SET STITCH LENGTH
The Stitch Length Selector does two jobs, which in
this case are common to both straight and zig-zag
stitching: it controls the length of stitches and the
direction of stitching (either forward or reverse).
The numbers on either side of the lever represent the
number of stitches per inch: the higher the number,
the shorter the stitch. Generally, shorter stitches are
best for lightweight fabric; longer ones for heavy
fabric. The FINE area, which represents over 20
stitches per inch, is used for zig-zag stitching.
To Set Selector
® Loosen thumb nut by turning to left.
® Position lever for desired stitch length.
® Tighten thumb nut by turning to right.
For reverse stitching, simply raise lever as far as it
will go. Do not loosen the thumb nut to reverse
unless you are using the No. 6 setting, in the very
bottom position.
Page 9
1. TO REGULATE PRESSURE
The Pressure Regulating Dial regulates the pressure
that the presser foot exerts on the fabric. Correct
pressure is important because it means fabric feeds
smoothly, evenly, without being marred. Generally,
heavy fabric requires a high number setting; light
weight fabric requires a low number setting. But
fabric texture must also be considered; soft fabrics,
for example, require less pressure than crisp fabrics.
Lower the presser foot before setting.
® T© increase pressure, turn dial to higher number.
® To decrease pressure, turn dial to lower number.
® For darning, turn dial to DARN, which releases
pressure and permits darning without an embroid
ery hoop.
c8. TO REGULATE NEEDLtTHREAD TENSION
To Lower
Presser Foot
Increase
i
Pressure Dial
Decrease
Darning
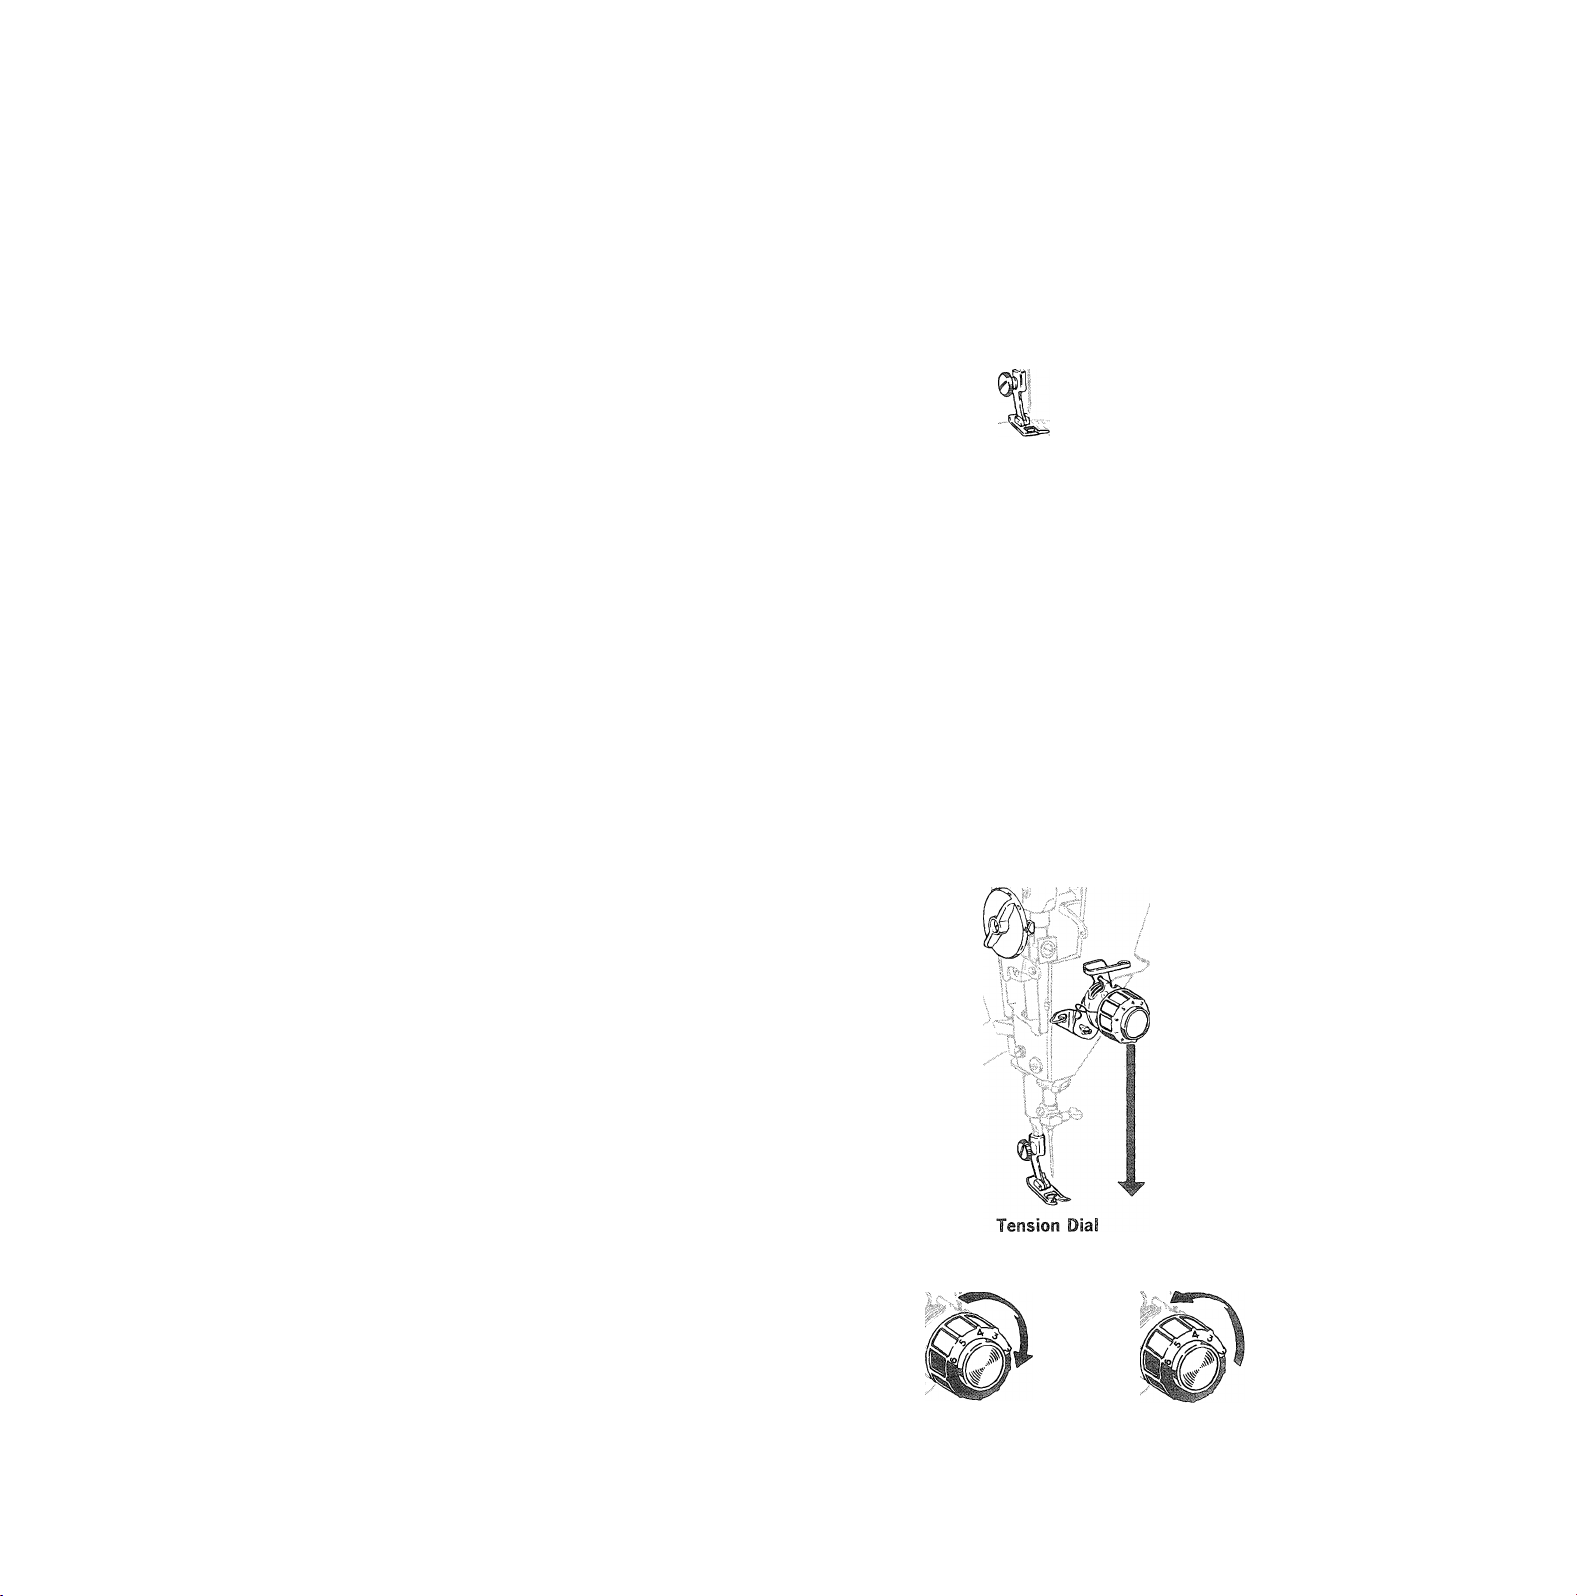
The Needle-Thread Tension Dial regulates the de
gree of tension on your needle thread and lets you
select just the right setting for your stitch pattern,
thread, and fabric. The numbers eliminate guess
work in duplicating settings.
Correct tension is important because too much or
too little will weaken your seams or mar the appear
ance of decorative work. To determine correct ten
sion setting, make a test on a sample of your fabric.
If the fabric puckers, decrease tension. If the stitches
look loose, increase tension. (For detailed instruc
tions on adjusting zig-zag stitch tension, see page 25.)
® To increase tension, turn to higher number.
® To decrease tension, turn to lower number.
Note: This dial governs needle-thread tension only.
Bobbin-thread tension has been correctly set at the
factory, and you do not need to adjust it.
Increase
Decrease
Page 10
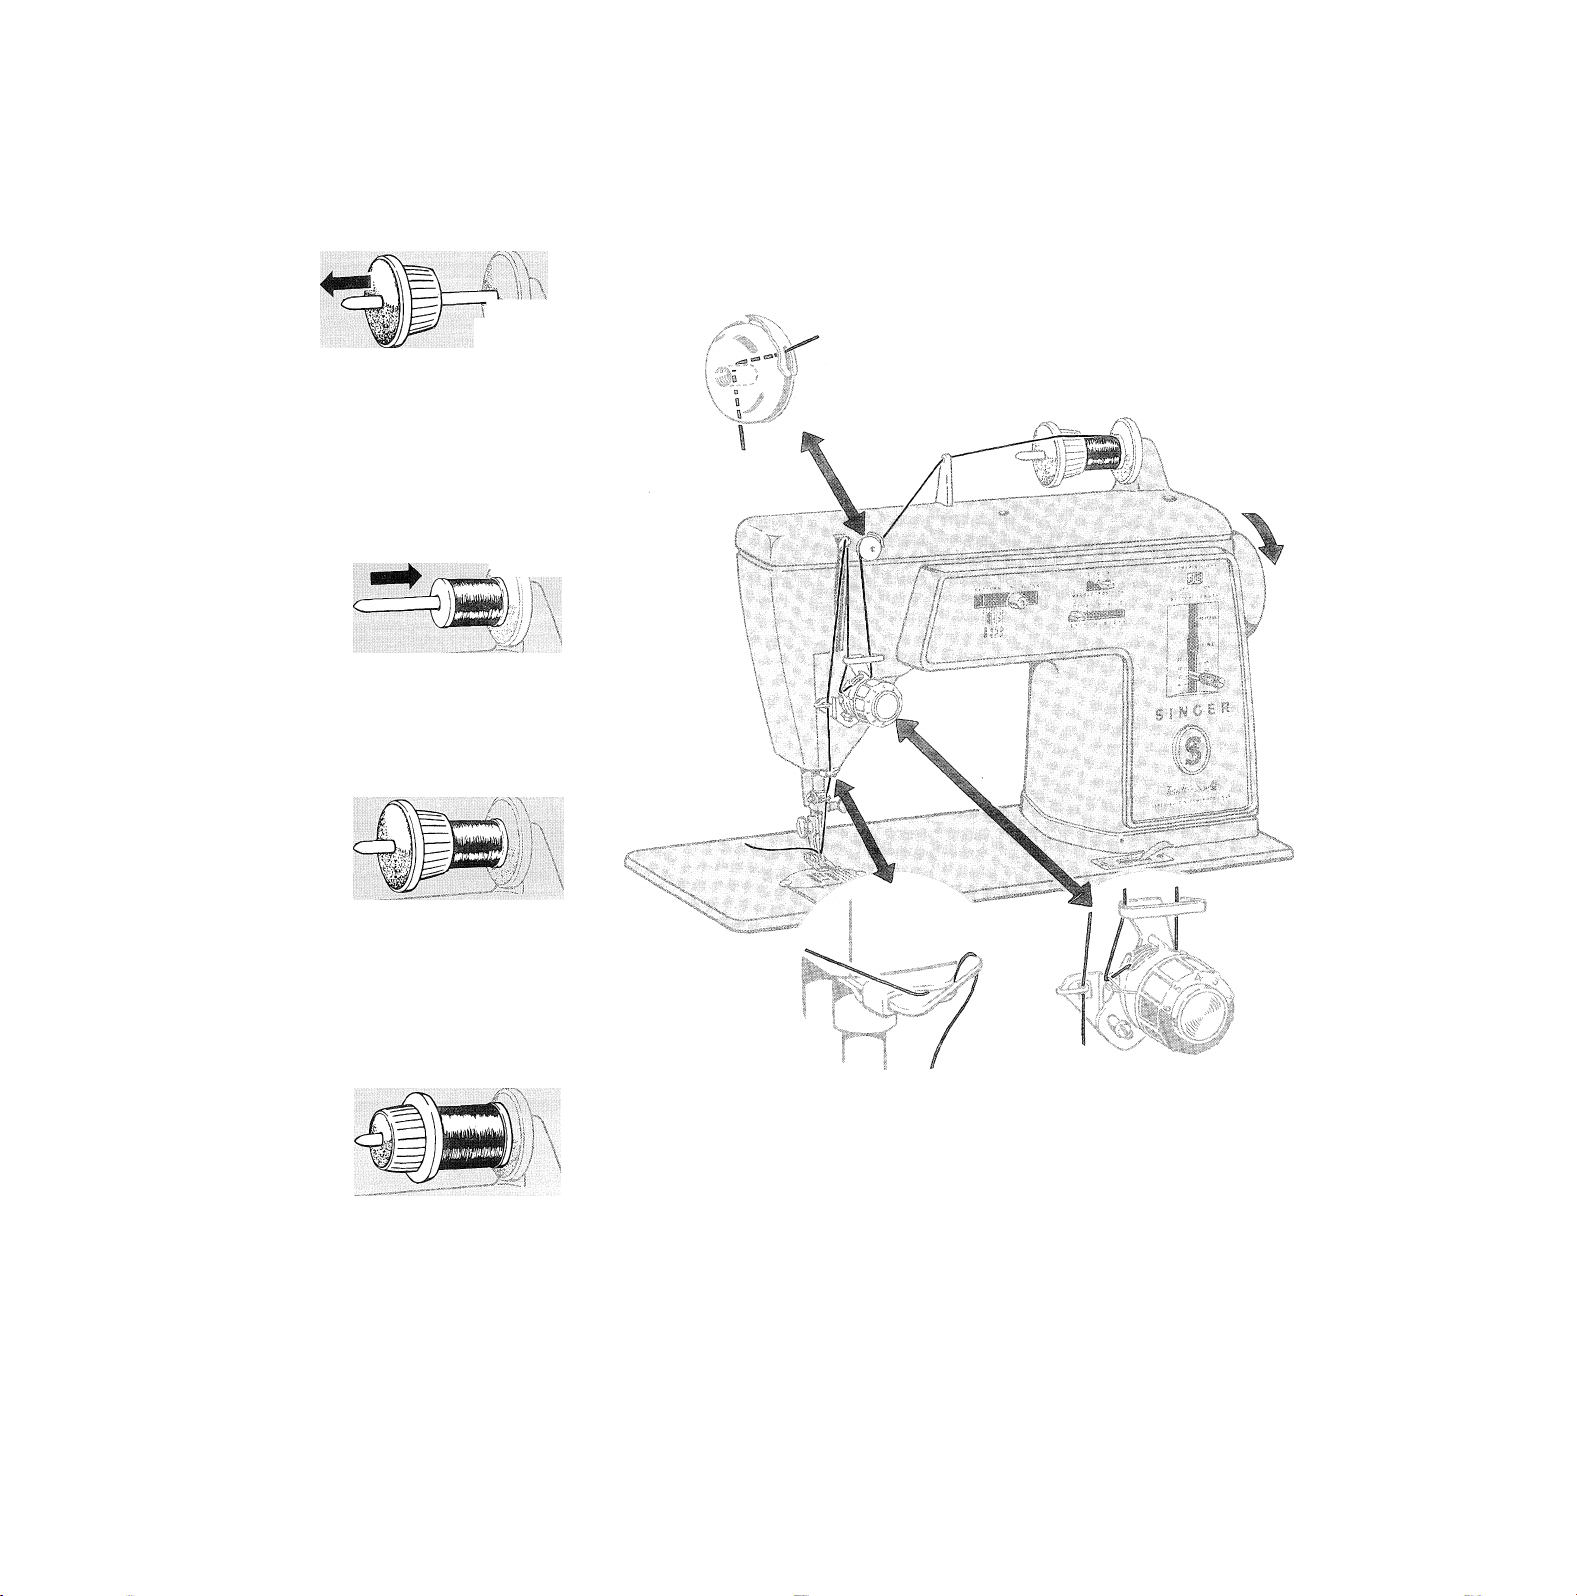
W'5v'
Remove spool holder
from spindle by sliding
it to the left.
rti
Slip spool of thread onto
spindle.
To hold small spools —
Turn small end of spool
holder to the right and
slide onto spindle. Press
spool holder firmly
against spool.
To hold large spools —
Turn wide end of spool
holder to the right and
slide onto spindle. Press
spool holder firmly
against spool.
1. Turn hand wheel to raise take-up lever to its highest
position.
2. Raise the presser foot.
3. Lead thread through all threading points as shown.
4. Thread needle from front to back, drawing about four
inches of thread through eye of needle.
Page 11
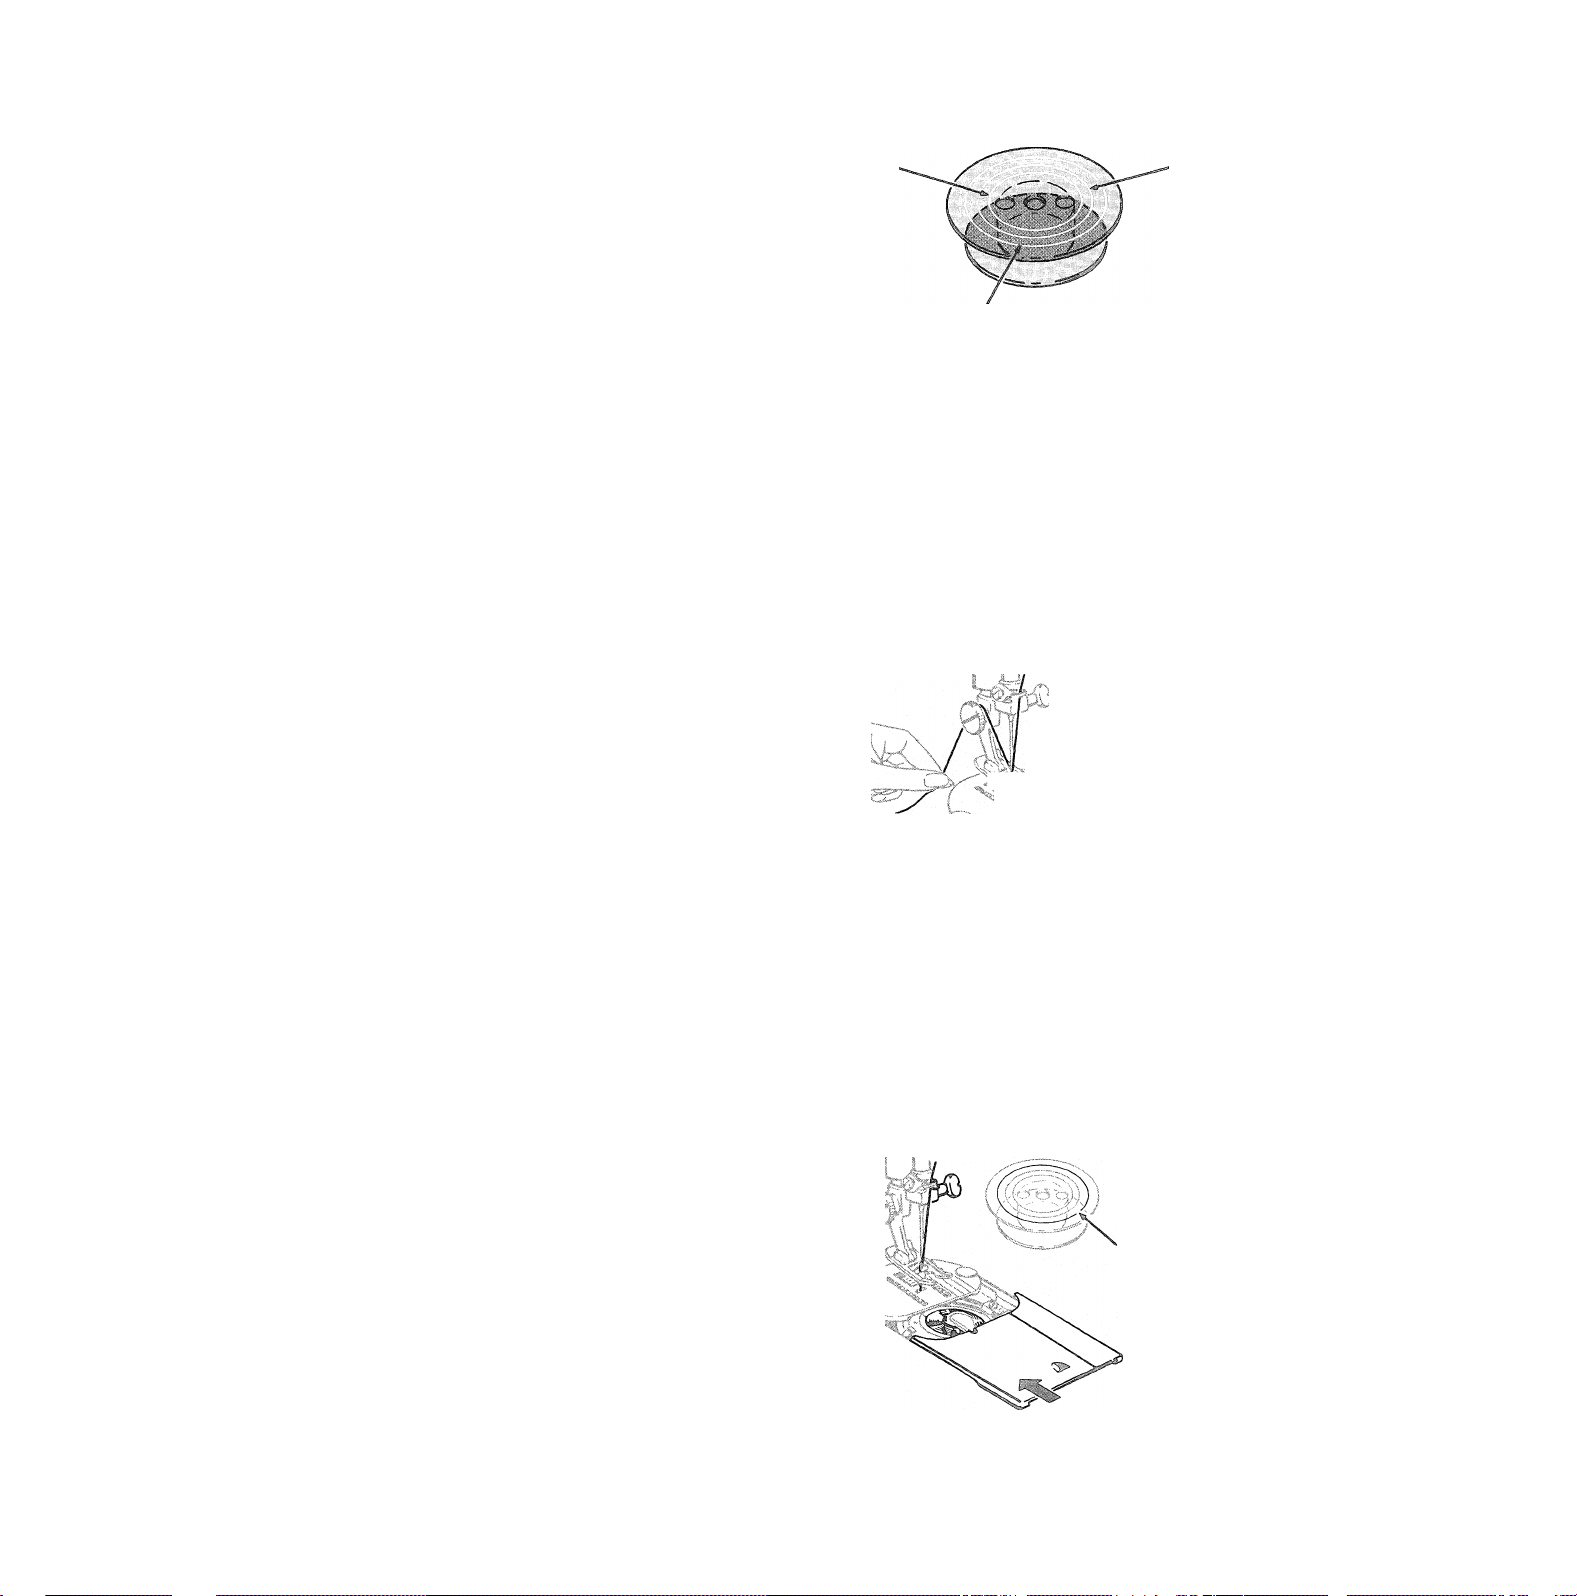
THE BOBBIN
The Push-Button Bobbin will make your sewing go
faster than ever before — whether you are using a
lot of one kind of thread or small quantities of dif
ferent threads, as you are likely to do when mending
or darning.
You will find a bobbin already in place in your ma
chine, located under the slide plate. (To open slide
plate, simply slide it gently toward you.) Notice the
white rings on the bobbin. Each ring represents an
approximate yardage of No. 50 Mercerized cotton
thread. The third, or outer ring, marks the full limit
of the bobbin and you should never wind beyond that
ring. If you are using fine thread, yardage on the
bobbin will be greater. If you use thread heavier than
No. 50, the yardage will, of course, be less.
2 Yards
Full Bobbin (approximately 20 yards)
Winding Steps
nmx
.................
10 Yards
vs
■ A .
The bobbin is ready for winding as you find it in the
machine. If the bobbin runs out of thread while you
are sewing, you can rewind it without removing it
from the machine.
Preparation Steps
1. Use General Purpose or Straight Stitch Presser
Foot. The General Purpose Foot is in place when
the machine is delivered to you.
2. Raise presser foot to release tension on thread.
3. Turn hand wheel toward you to raise take-up
lever to highest point.
4. Open slide plate.
5. Make sure bobbin is empty. (For instructions on
removing bobbin and thread, see next page.)
6. Set Pattern Selector at Straight Stitch, Stitch
Width Selector at 1, and Needle Position at C.
Winding Steps
1. Press bobbin push-button toward you.
2. Wrap thread around presser foot screw, and hold
end of thread firmly.
3. Start the machine.
® Run the machine at a moderate speed.
® Pull thread end away after a few coils have been
wound.
® Keep your eye on the bobbin and fill with desired
quantity of thread. Do not allow thread to wind
beyond FULL ring,
4. Close slide plate to release push-button, (For in
structions on starting to sew with a nev/ly wound
bobbin, see page 19.)
/ /
" step 1
/U.
/ y
Step 2
Step 3
Do Not Allow
Thread to Wind
Beyond Full Ring
Step 4
Page 12
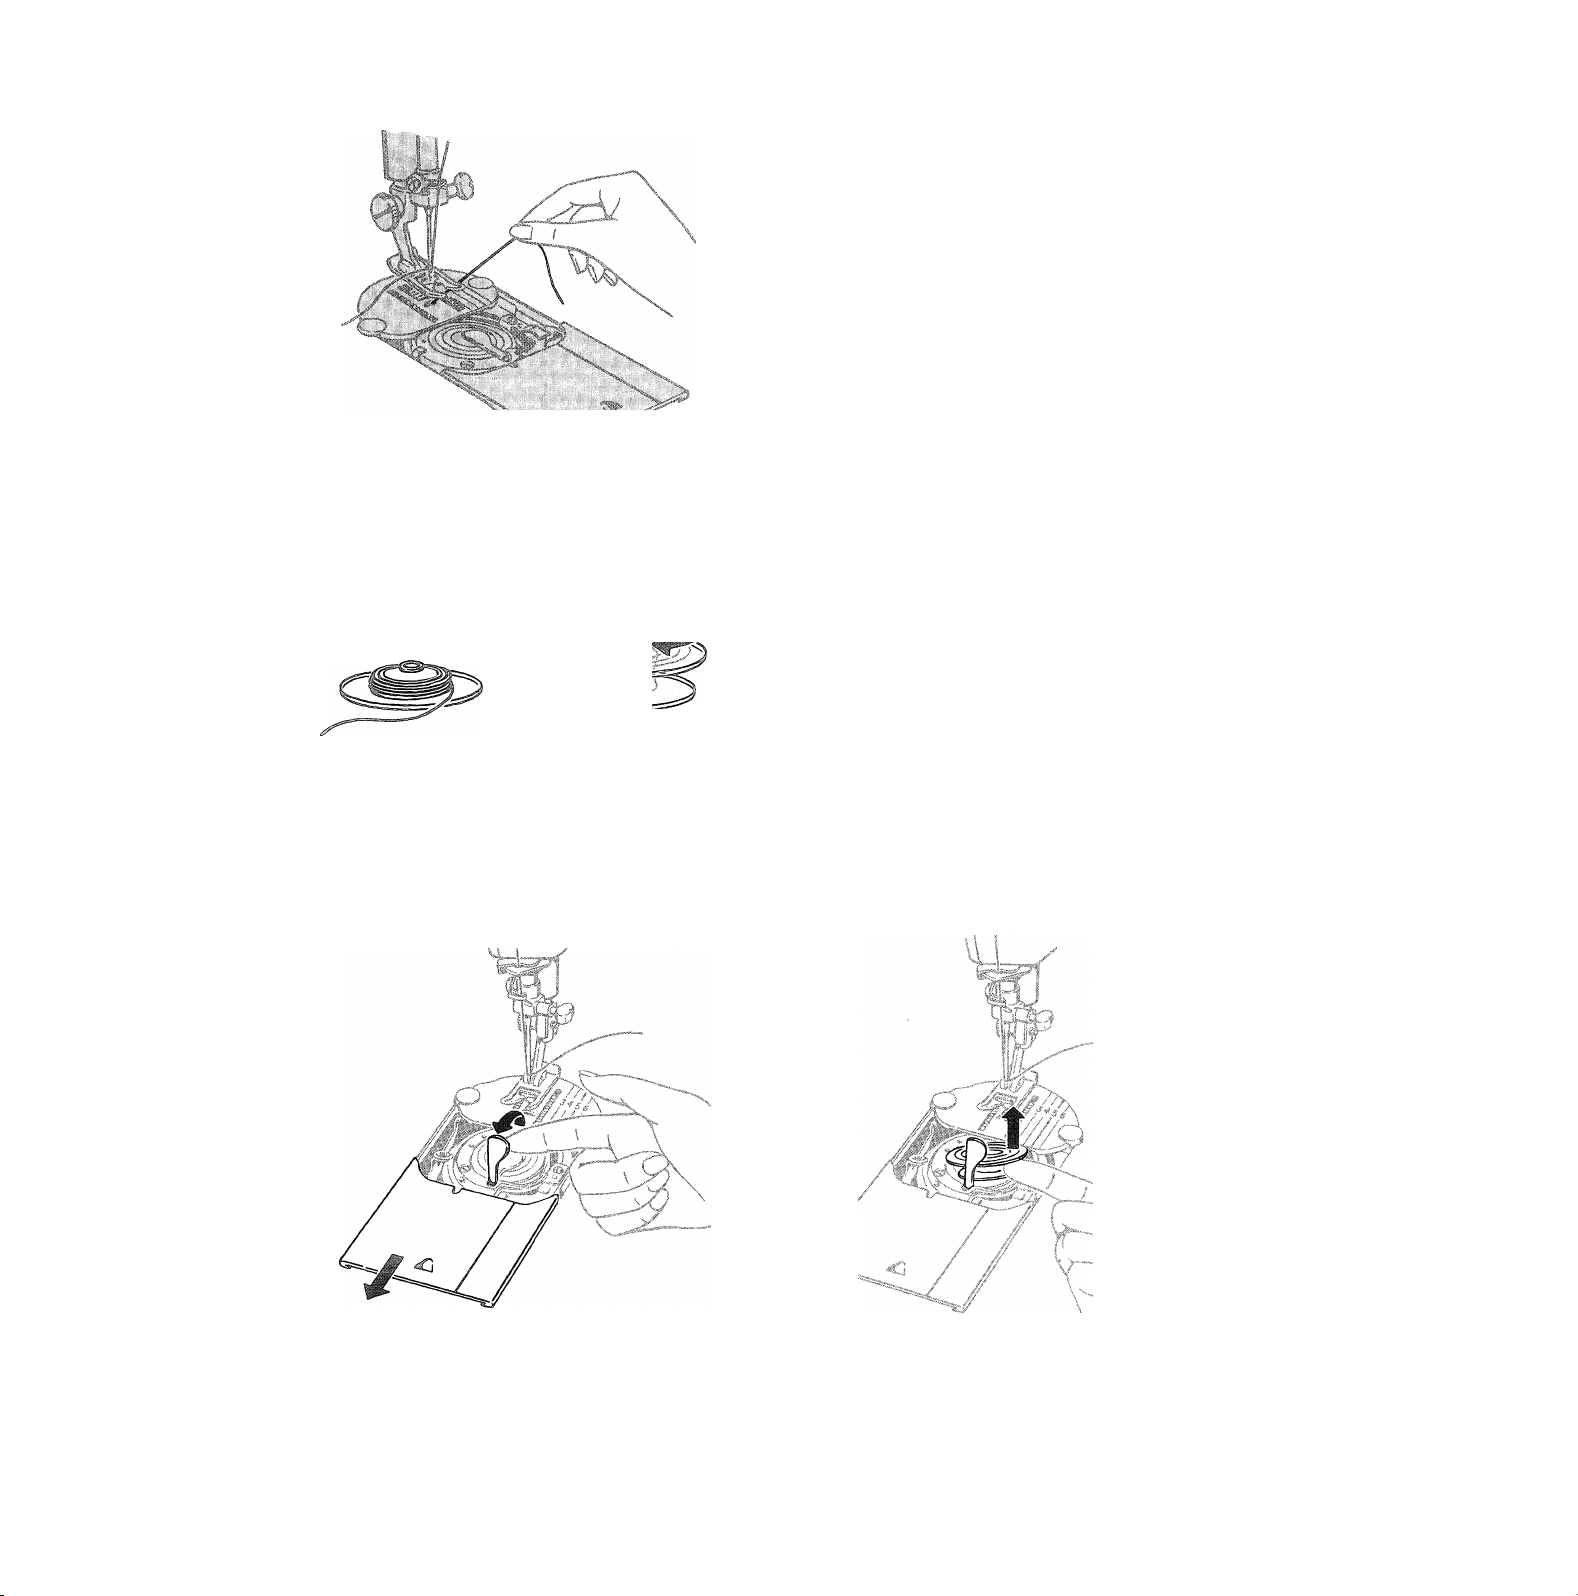
TO WtND THE BOBBIN (Continued)
To Rem©¥e Short Thread, Pull Through Throat Plate
^3-*
O
To Remove Thread
Thread can be removed from the bobbin in either of
two ways. If there is not much thread left on the bob
bin, simply pull the thread end through the throat
plate.
If there is a lot of thread left, remove the bobbin (as
illustrated below), unscrew the two halves, and re
move all the thread at once.
To Remove Bobbin
1. Turn hand wheel to raise take-up lever to its
highest position.
2. Open slide plate; leave bobbin push-button in
sewing position.
To Remove Long Thread, Unscrew Two Halves of Bobbin
U
3. Raise bobbin latch by inserting fingernail under
end of latch at center of bobbin.
4. Insert fingernail under rim of bobbin immediately
to right of latch and remove bobbin.
To Remove Bobbin
X
10
Open Slide Plate and Raise Latch
Lift Out Bobbin
Page 13
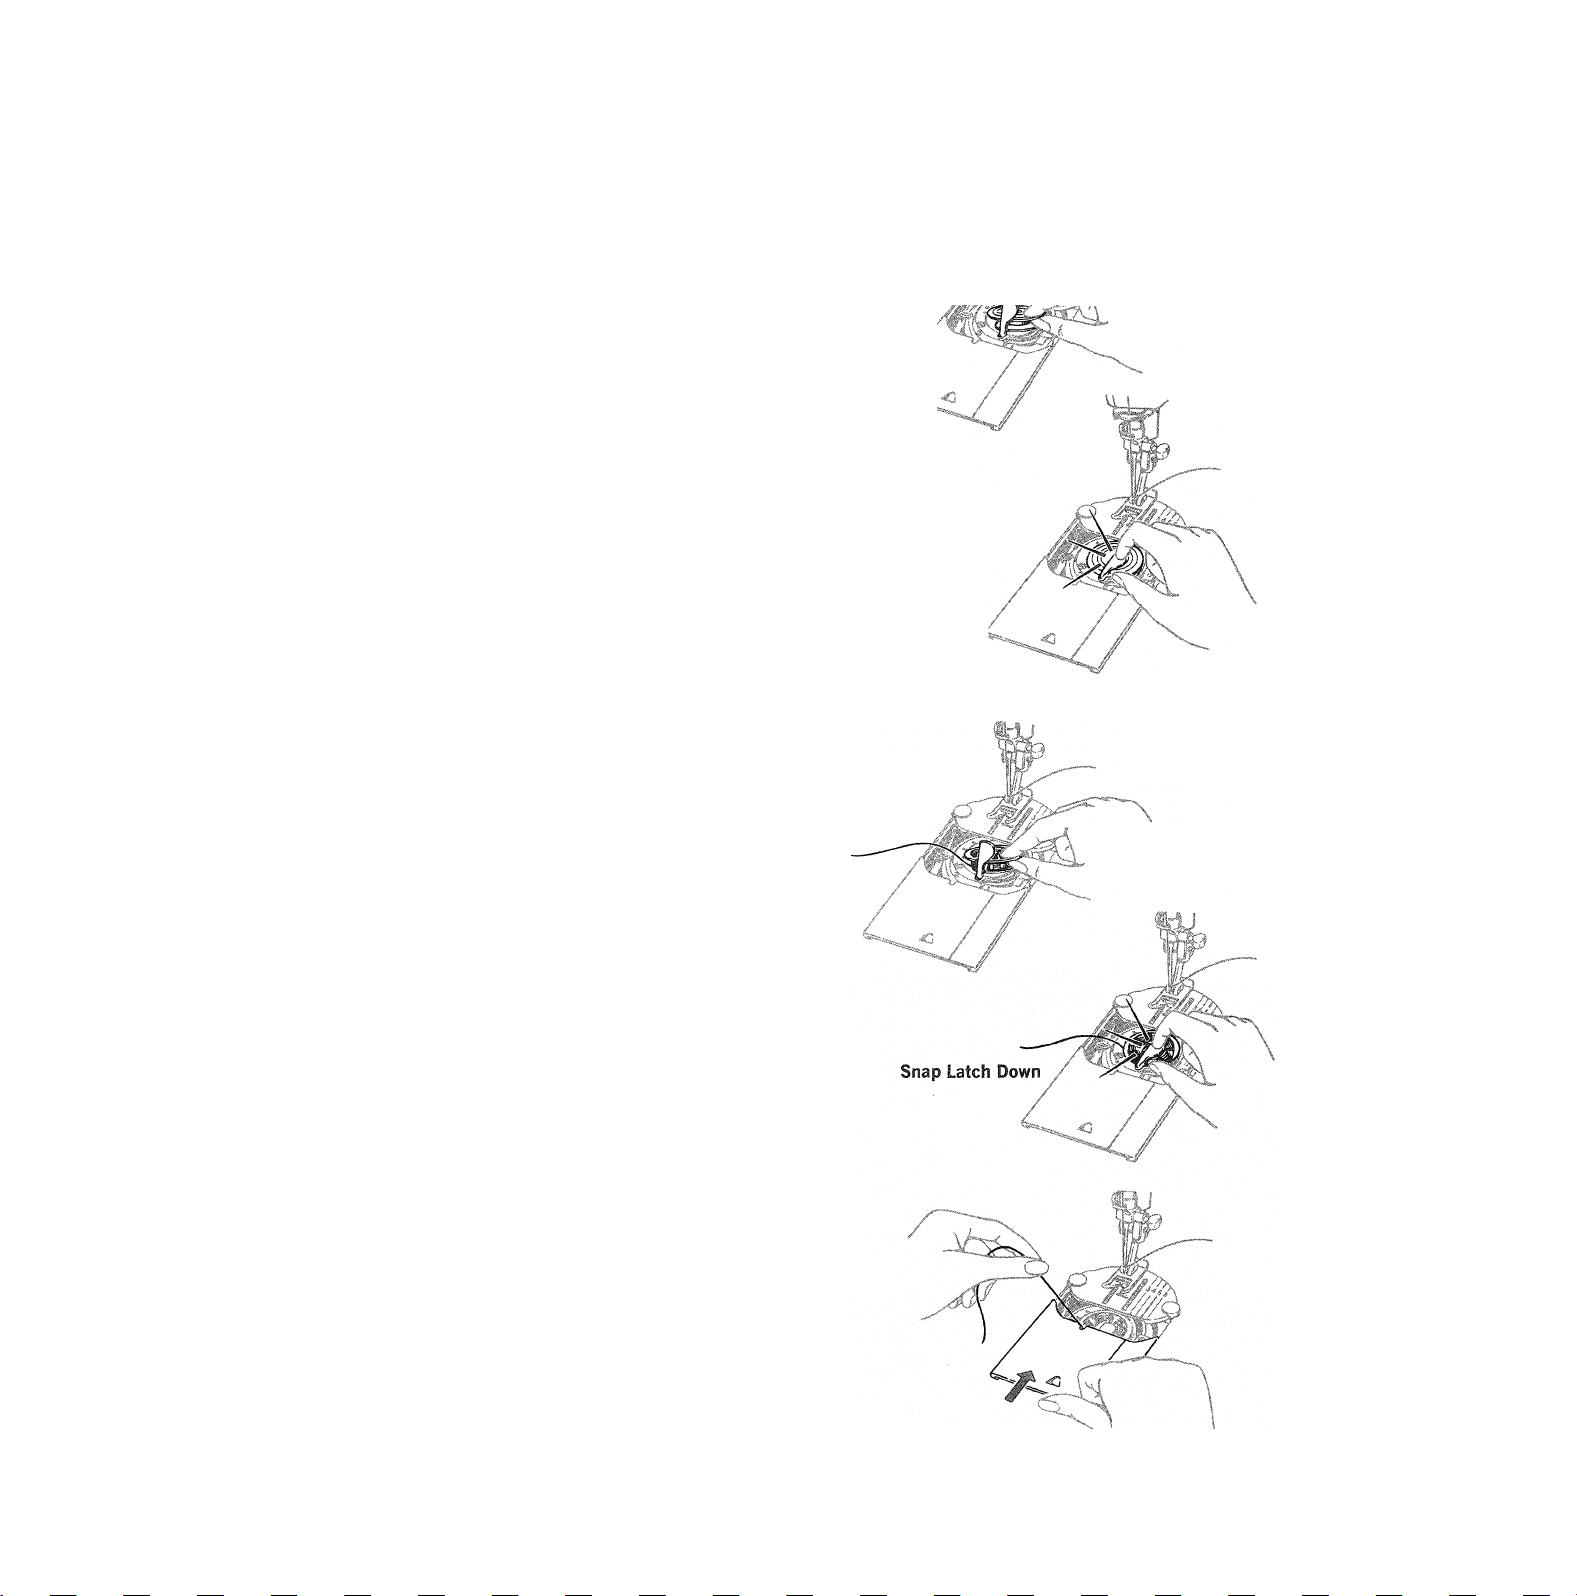
To Replace an Empty Bobbin
1. Tighten bobbin halves securely.
2. With latch raised, slip bobbin (wide side up)
into bobbin case.
3. Snap latch down to secure bobbin.
4. Leave the slide plate open until you have finished
winding.
•m,
Snap Latch Down
Slip Bobbin into Case
vr
Insert Bobbin
To insert a Previously Wound Bobbin
1. Open slide plate; leave bobbin push-button in
sewing position.
2. Turn hand wheel to raise take-up lever to its
highest position.
3. Draw three or four inches of thread from bobbin
and place bobbin in case with thread leading off
to left side of latch.
4. Snap latch down to secure bobbin.
5. Close slide plate, allowing the thread to enter the
notch. (For instructions on starting to sew with
a previously wound bobbin, see page 19.)
Close Slide Plate
11
Page 14
jgim
ig|!iT
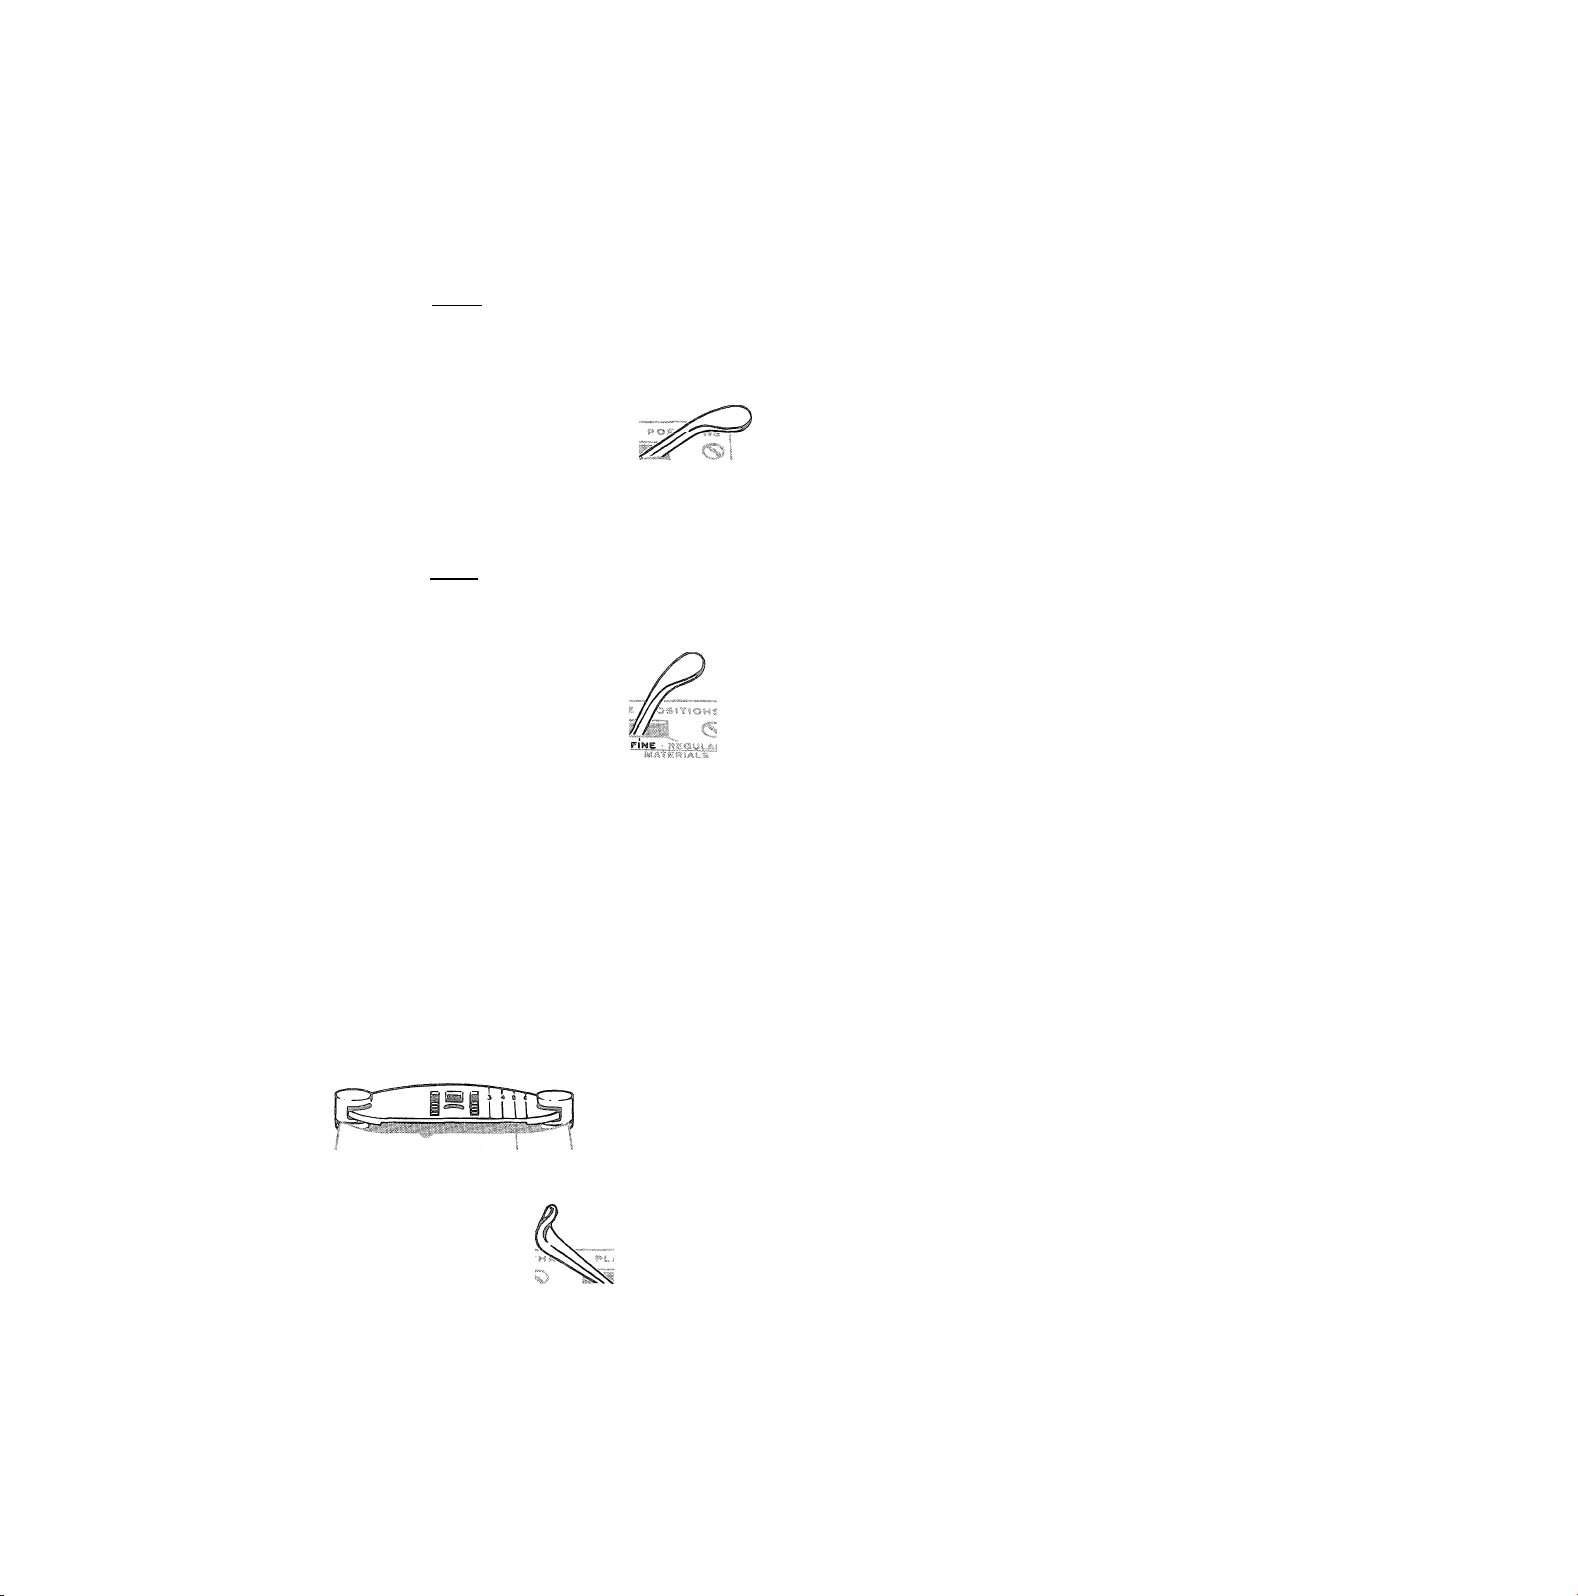
11. TO POSITION THROAT PLATE
The Throat Plate may be placed in any one of
its four positions — REGULAR, FINE, DARN,
UNLOCK — by gently moving the Throat Plate
Position Lever into place above the appropriate
designation. When each position is reached, you will
feel a slight resistance to the movement of the lever.
Throat Plate in REGULAR position for sewing on
most fabrics and for all chainstitching, no matter
what kind of fabric is used.
Throat Plate in FINE position for sewing (other than
chainstitching) on delicate or lightweight fabrics such
as silk, batiste, crepe or organdy; and on fabrics that
may mark easily.
3 4
Throat Plate in DARN position for free-motion darn
ing, embroidery and button sewing.
Throat Plate in UNLOCK position for removal and
replacement, (See page 15 for instructions on chang
ing the throat plate.
12
Page 15
'accessories
The following accessories come with your machine.
And to increase the versatility of your sewing ma
chine still further, a number of additional accessories
such as a Special Purpose Presser Foot, a Binder Foot
and a Ruffler are available at your local SINGER
CENTER. (Some of these accessories are described
at the end of this instruction book.)
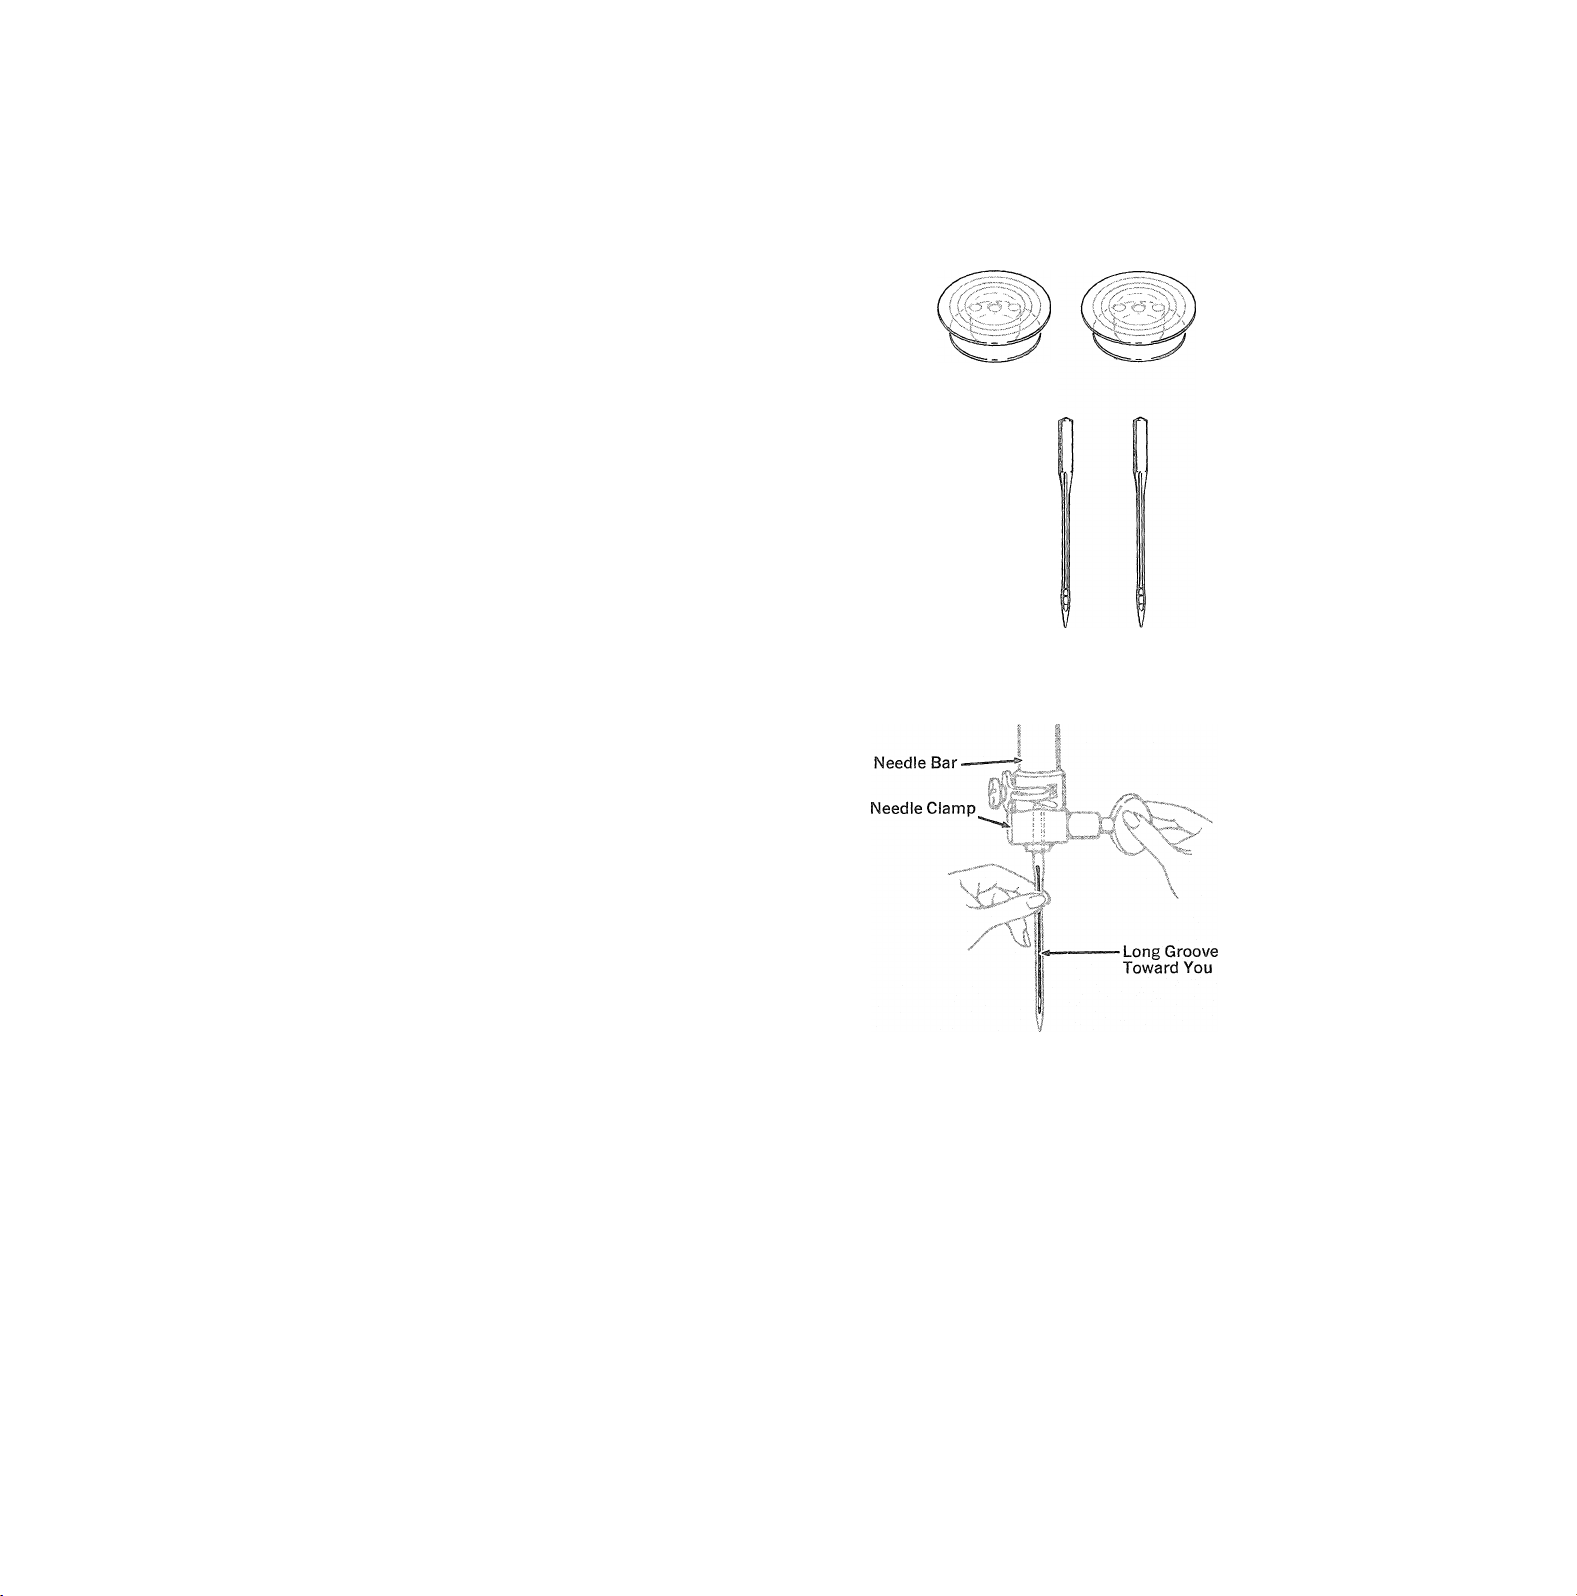
BOBBINS
® One Transparent Drop-in Bobbin in place in your
machine.
® Two extra Transparent Drop-in Bobbins,
NEEDLES
® One Needle, Catalog 2020 (15x1) Size 14, in
place in your machine.
® Three extra Needles of the same size.
To Change the Needle
1. Raise needle bar to highest position by turning
hand wheel toward you.
2. Loosen the needle-clamp screw and remove the
needle.
3. Insert new needle in clamp, with the flat side
of the needle to the back and the long groove
toward you; push it up as far as it will go.
4. Tighten needle-clamp screw.
This machiiie oses needles
Catalog 2020 (15X1)
Sizes 9p 11, 14, 16 and 18,
® One Vertical Spool Pin
The Vertical Spool Pin is used for two-needle stitch
ing (see page 26 for detailed instructions).
Vertical Spool Pin
\n
13
Page 16
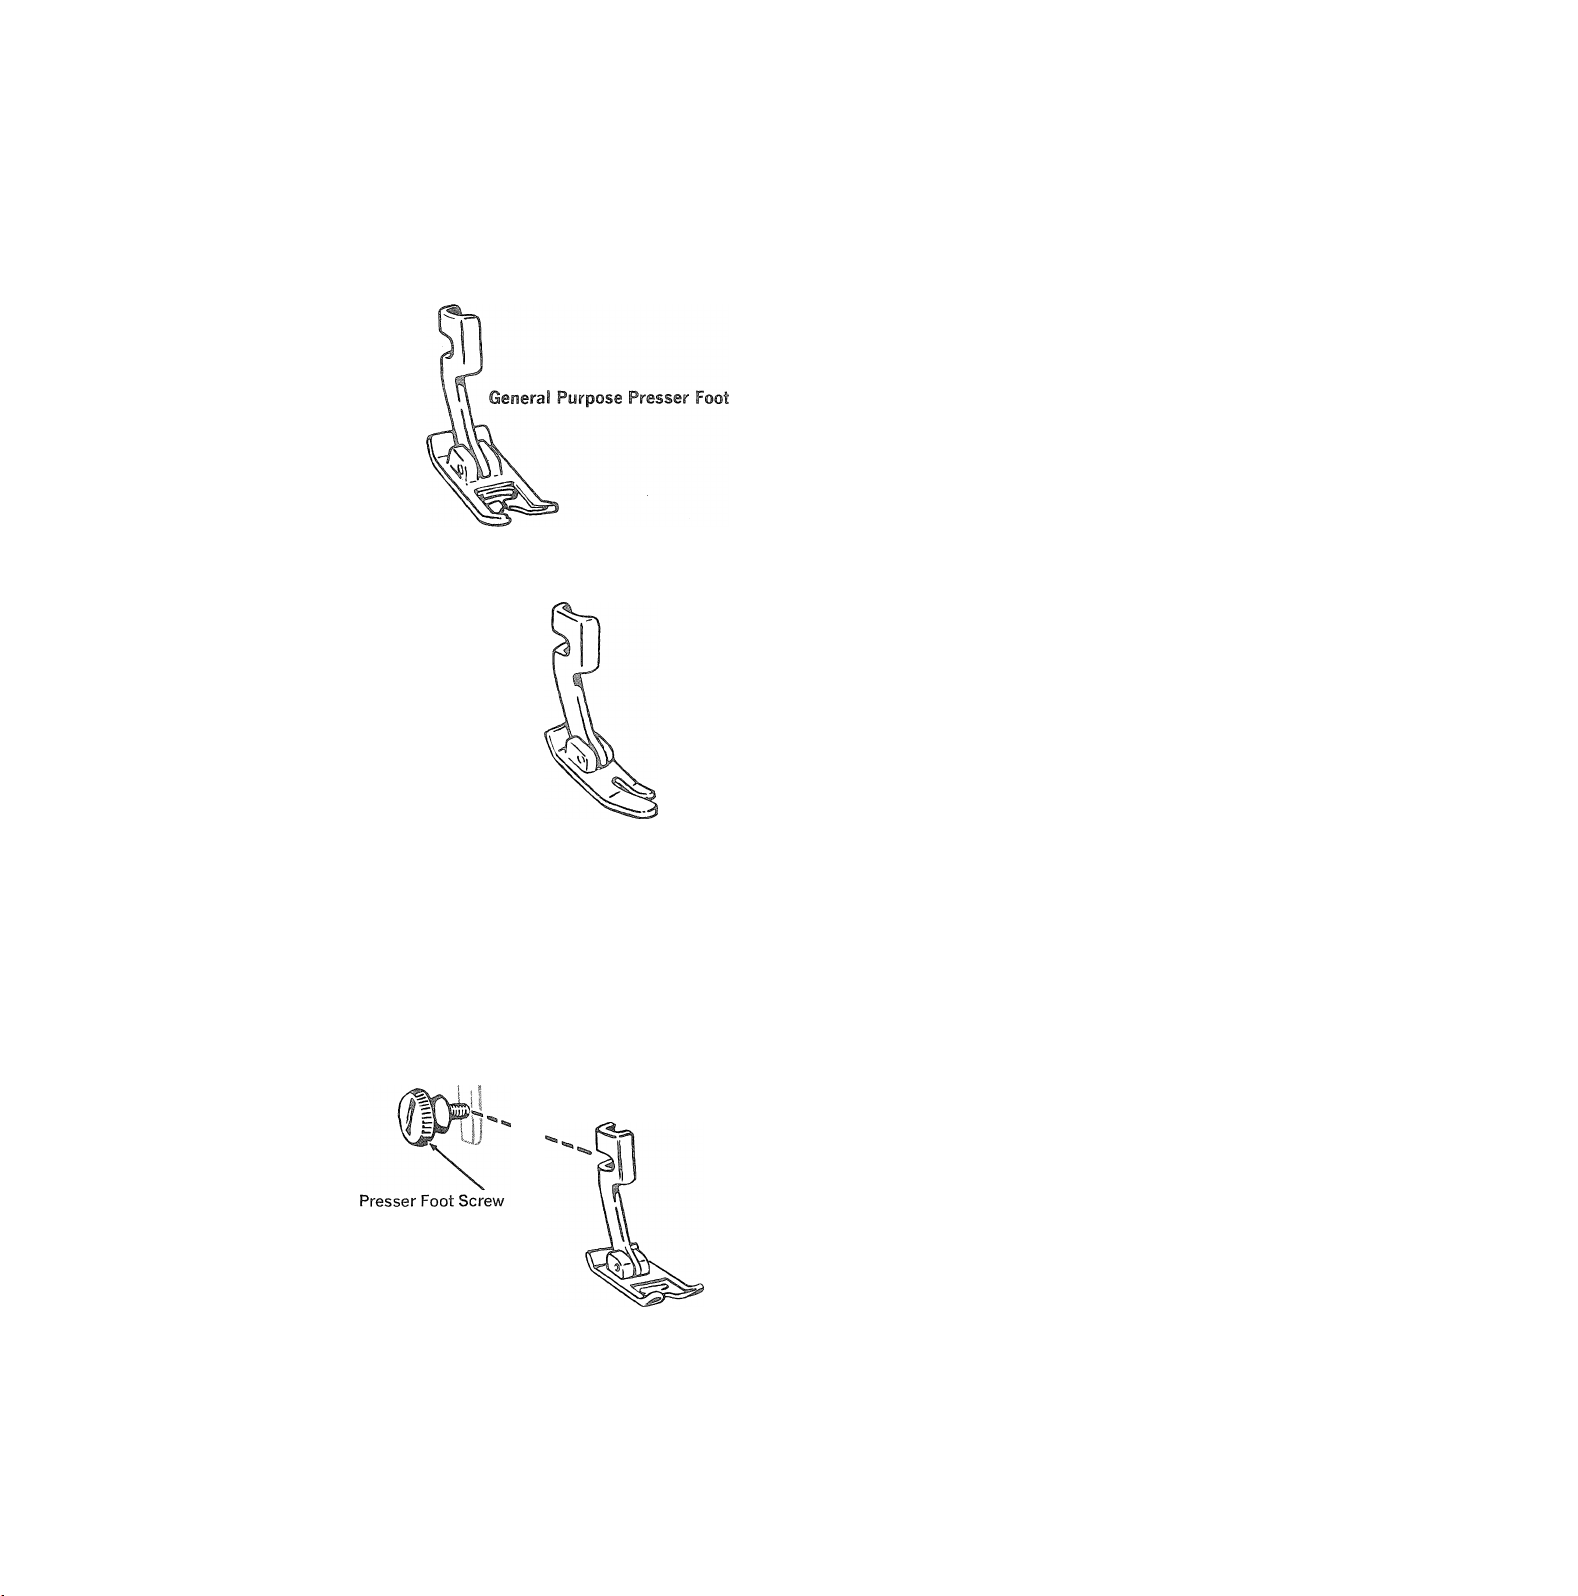
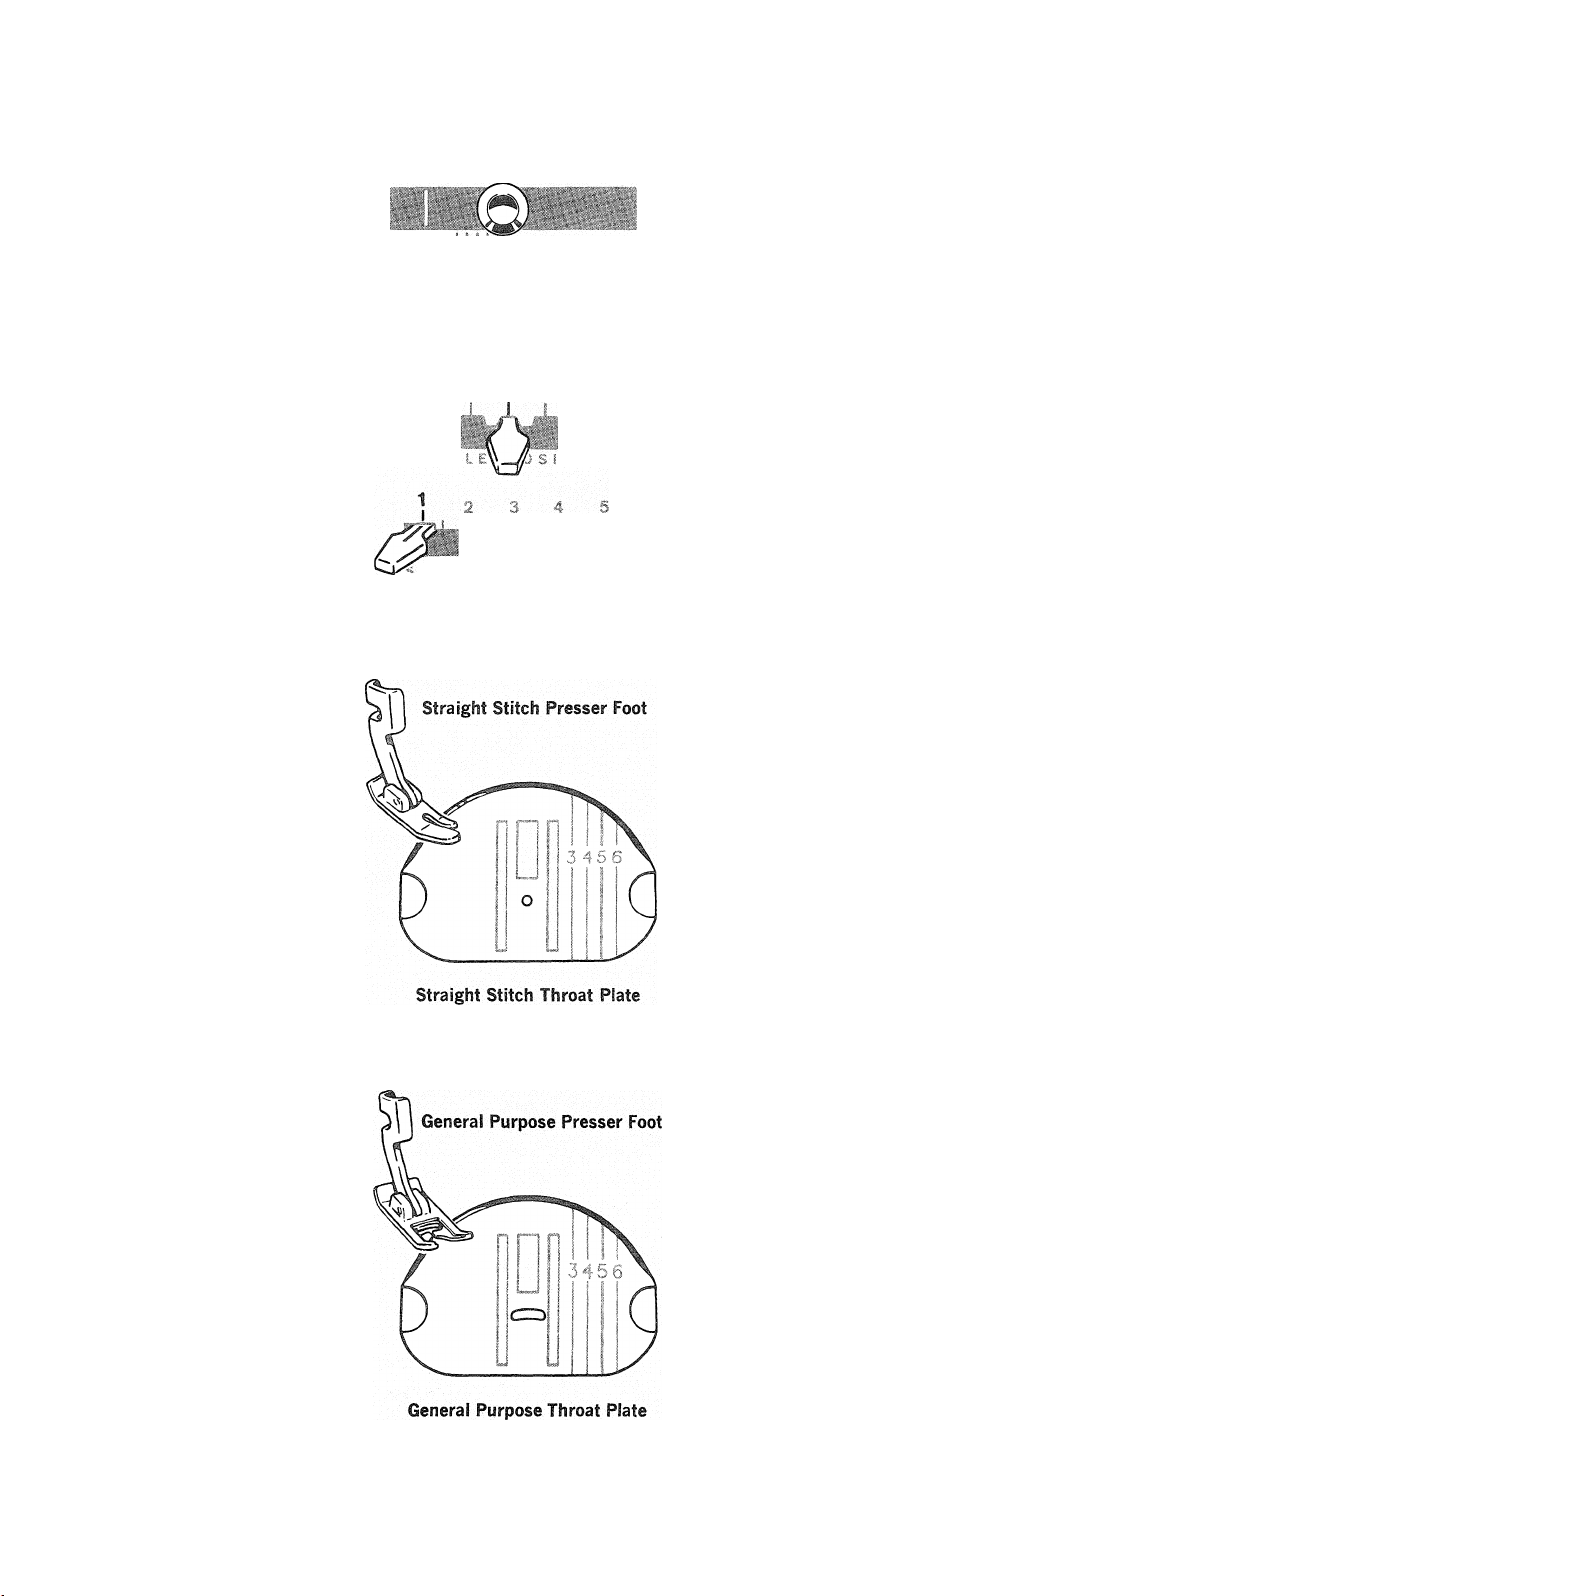
straight Stitch Presser Foot
PRESSER FEET
® General Purpose Presser Foot on your machine.
Use the General Purpose Presser Foot with the
Genera! Purpose Throat Plate for all utility sew
ing. These general purpose fittings must be used
when alternating between straight and zig-zag
stitching. (For discussion of throat plates, see page
15.)
® Straight Stitch Presser Foot,
Use the Straight Stitch Presser Foot with the
Straight Stitch Throat Plate, and pattern selector
set for straight stitching in center needle position,
when your fabric or sewing procedure requires
close control. This narrow, hinged foot rides over
pins and allows you to control the fabric easily
when stitching in a curve or close to the fabric
edge. The narrow slot prevents fabric from rising
with the needle. Use these fittings for:
® Precision stitching of curved and scalloped
edges, top stitching, edge stitching, etc.
® Stitching on delicate or spongy fabrics, synthet
ics, and knits, particularly tricot.
14
To Change Any Presser Foot
1, Raise presser foot.
2, Loosen presser foot screw. (You do not need to
remove the screw. )
3, Remove presser foot.
4, Hook new presser foot around presser bar.
5, Tighten presser foot screw.
Page 17
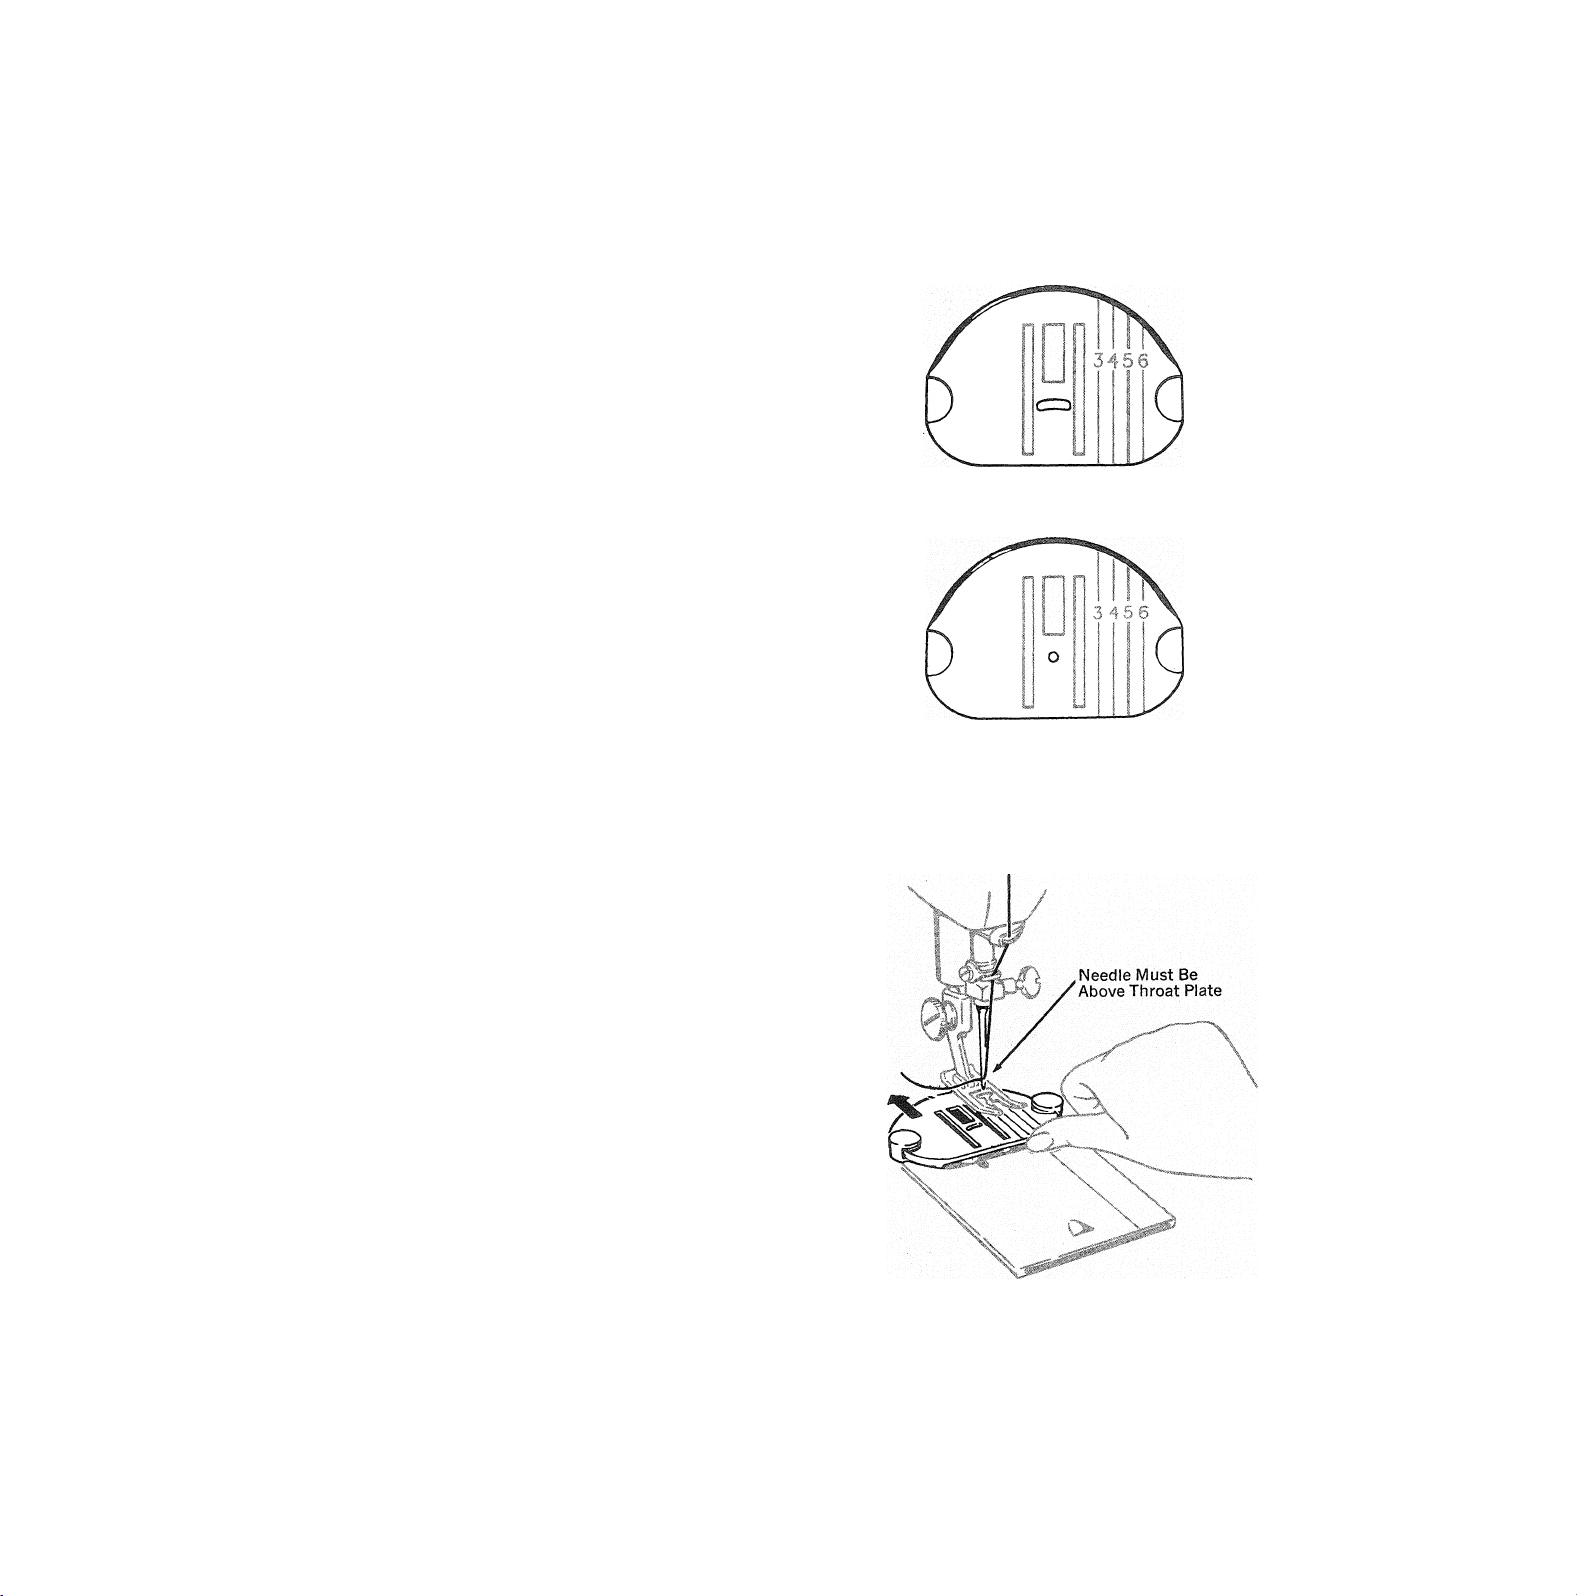
THROAT PLATES
® General Purpose Throat Plate in place on your
machine. (For use with General Purpose Presser
Foot.)
Two additional Throat Plates;
® Straight Stitch Throat Plate. (For use with Straight
Stitch Presser Foot.)
* Chainstitch Throat Plate. (This throat plate is one
of three chainstitch fittings that must be used to
gether and is discussed under the heading, “Chain
stitch Fittings” on page 16.)
To Interchange Straight Stitch and General Pur
pose Throat Plates
(For instructions on attaching and removing Chain
stitch Throat Plate, see “Chainstitching” beginning
on page 29.)
(Note: Remove bobbin if it contains thread.)
1. Raise presser foot. (You do not need to remove
the presser foot.)
2. Turn hand wheel to bring needle above throat
plate.
General Purpose Throat Plate
Straight Stitch Throat Plate
3. Move throat plate lever to UNLOCK position.
4. Remove throat plate by sliding it out.
5. Insert new throat plate by sliding it into place
between the slots in the pins.
6. Move throat plate lever toward right to lock
throat plate in place.
15
Page 18
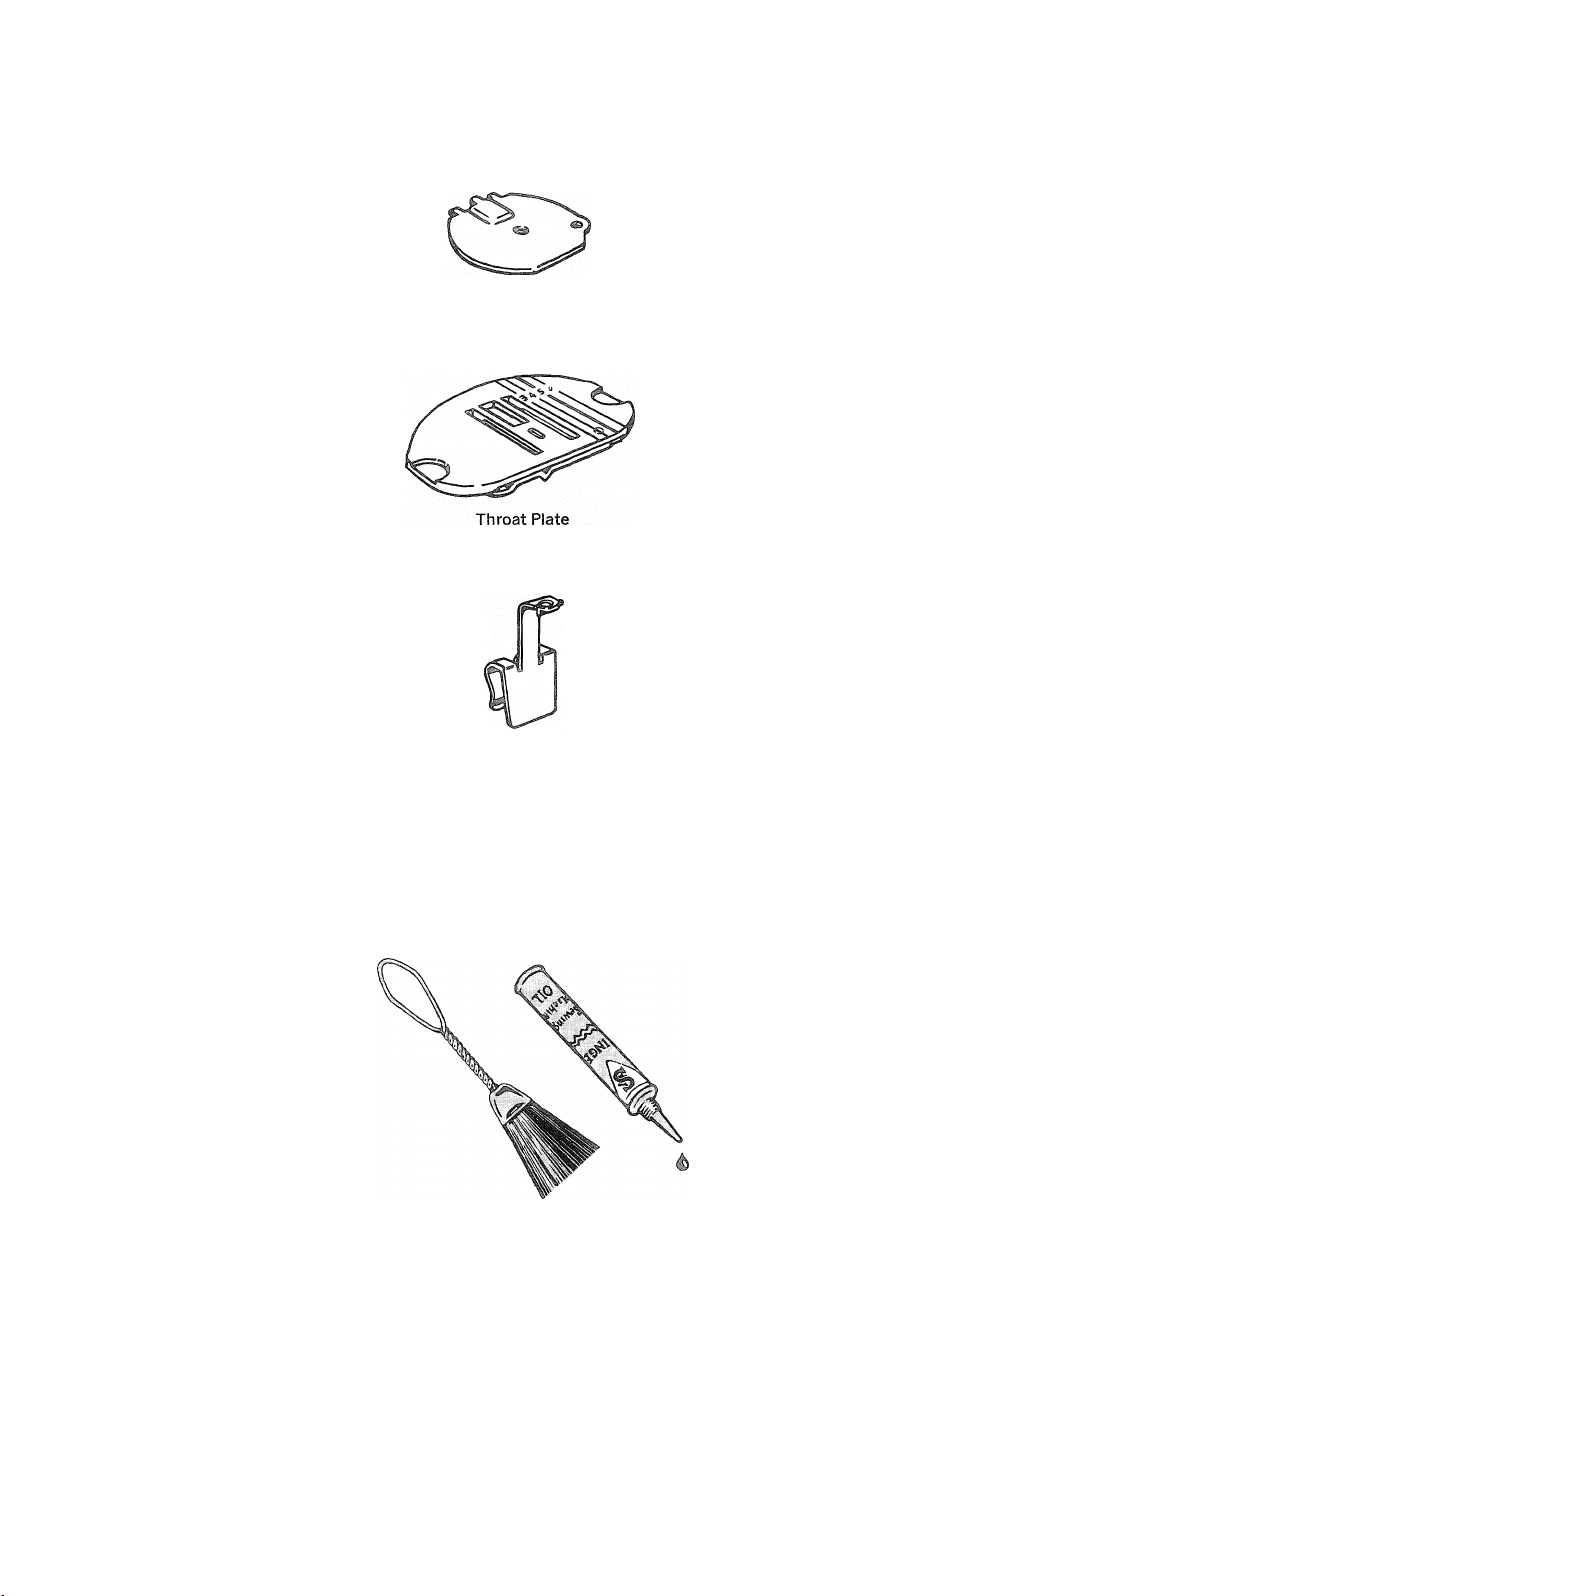
Bobbin Case Cover
Thread Guide
Chainstitch Fittings
CHAINSTiTCH FITTINGS
One Set of three fittings;
® Bobbin Case Cover
® Throat Plate
® Thread Guide
Chainstitching has many decorative as well as prac
tical uses. (See section called “Chainstitching” be
ginning on page 29 for detailed instructions on
chainstitch applications. )
16
CLEANING AND OILING TOOLS
® One Lint Brush
® One Tube SINGER* Sewing Machine Oil
Your sewing machine is a fine yet sturdy precision
instrument, and it will serve you perfectly for many
years if you take a few simple steps to keep it in good
working condition. Instructions on at-home care of
your sewing machine begin on page 52.
Page 19

Z. STMIOHT STITCHIIMG
preparation
FABRIC, THREAD, NEEDLE, AND STITCH LENGTH TABLE ^
FABRICS
DELICATE—tulle, chiffon, fine
lace, silk, organdy, fine tricot
LIGHTWEIGHT—batiste, organdy,
jersey, voile, taffeta, silk,
crepe, chiffon velvet, plastic film
MEDIUM WEIGHT—gingham,
percale, pique, linen, chintz,
faille, satin, fine corduroy, velvet,
suitings, stretch fabric
THREAD
SIZES
Fine Mercerized
100 to 150 Cotton
Synthetic Thread
50 Mercerized
80 to 100 Cotton
“A” Silk
Synthetic Thread
50 Mercerized
60 to 80 Cotton
“A” Silk
Synthetic Thread
NEEDLE
SIZES
■ 9^ 15 to 20
11
14
STITCH LENGTH
SETTING
12 to 15
(8 to 10 for plastic)
12 to 15
MEDIUM HEAVY—gabardine,
tweed, sailcloth, denim,
coatings, drapery fabrics
HEAVY—overcoatings, dungaree,
upholstery fabrics, canvas
fDoes not apply to chainstitching.
tfSIze 9 needle recommended for sewing only. For bobbin winding, use larger size needle.
Heavy Duty
Mercerized
40 to 60 Cotton
Heavy Duty
Mercerized
20 to 40 Cotton
16
18
10 to 12
6 to 10
17
Page 20
P T' T r£ n M € L J C "s i/ >
I I I
I
I
L C FI
U T I O
T I, T C H w. I 0 T H
straight Stitch Selector Settings
MACHINE SETTINGS AND ACCESSORIES
Before making any setting adjustments, turn hand
wheel until needle is out of fabric.
Your choice of accessories will depend on the fabric
and stitching requirements.
® Stitch Pattern Selector: Straight Stitch (--------------------® Stitch Width Selector: 1
® Needle Position: C
® Stitch Length: To suit fabric
® Throat Plate: Straight Stitch or General Purpose
® Presser Foot: Straight Stitch or General Purpose
18
Use the Straight Stitch Presser Foot with the
Straight Stitch Throat Plate when your fabric or
sewing procedure requires close control. This nar
row, hinged foot rides over pins and allows you to
control the fabric easily when stitching in a curve
or close to the fabric edge. The narrow slot prevents
fabric from rising with the needle.
Use the General Purpose Presser Foot with the
General Purpose Throat Plate for all utility sewing.
These general purpose fittings must be used when
alternating between straight and zig-zag stitching.
Page 21

NEEDLE AND BOBBIN THREADS
How you begin stitching depends on whether you are
using a newly wound or a previously wound bobbin.
When you have just wound a bobbin, you will have
one continuous thread leading from the needle into
the bobbin.
When you have just inserted a bobbin that was pre
viously wound, you will have two separate threads:
the upper or needle thread and the lower or bobbin
thread. Before you can start to stitch you must bring
the bobbin thread up through the throat plate needle
hole.
Instructions for both conditions are given below.
(These instructions also apply to zig-zag stitching.)
With a Newly Wound Bobbin
If you are starting to stitch at the fabric edge:
® Close Slide Plate
® Position needle in very edge of fabric
® Lower presser foot and stitch. Thread v/ill “lock”
over fabric edge.
If you are starting to stitch in from fabric edge:
® Close Slide Plate
® Pull thread back under presser foot and cut
® Position needle in from fabric edge where desired
and stitch.
NOTE: Should the bobbin run out of thread after
you have already begun a line of stitching, remove
the fabric, rewind the bobbin and follow the three
immediately preceding steps.
With a Previously Wound Bobbin
Hold needle thread
lightly with left hand
and turn hand wheel
slowly toward you so
that needle enters
throat plate.
Continue turning hand
wheel until needle
rises and brings up
bobbin thread in a
loop.
Undo the loop with
your finger.
Place both needle and
bobbin threads under
presser foot and lay
them diagonally to the
right. Position needle in
fabric where desired
and stitch.
19
Page 22

Pin Placement
Pins Nip into Fabric
at the Stitching Line
Pin basting is a time saver and can be used in place of
hand basting when you are straight stitching seams
in easy-iO"handle fabrics. The Straight Stitch Presser
Foot is recommended, but the General Purpose
Presser Foot may also be used. When sewing over
pins with either foot it is important to use fine pins
and to place them correctly in relation to the stitching
line.
Place pins so that:
® They are at right angles to the stitching line,
® They just nip into the fabric at the stitching line.
® There is minimum pin extension beyond the stitch
ing line. Pins should not extend under both sides of
the presser foot and should never be placed on the
underside of the fabric in contact with the feed dog.
STRAIGHT SEAMS
© Pattern Selector: Straight Stitch (------------------------)
® Stitch Width Selector: 1
© Needle Position: C
® Stitch Length: 6 to 20 depending on fabric
® Throat Plate: Straight Stitch or General Purpose
© Presser Foot: Straight Stitch or General Purpose
20
Starting a Seam
1. With presser foot up, position needle in fabric
about Vi inch from edge.
2. Lower presser foot and raise Stitch Length Selec
tor to RE¥ERSEo Backstitch to edge of material
for reinforcement.
3. Lower Stitch Length Selector for forward stitch
ing, and stitch.
Page 23

Gyiding and Supporting Fabric
Most fabrics need to be guided in front of the presser
foot only, as illustrated.
Some fabrics, however, require support while being
stitched. These fabrics require using the Straight
Stitch Presser Foot, as shown.
® For filmy sheers, knits, tricots, etc., apply gentle
tension by holding seam in front and back of the
presser foot.
® For stretch fabrics, apply firm tension front and
back when stitching in the same direction as the
stretch. For seams not on the stretch direction
stitch in conventional manner, guiding fabric in
front of presser foot.
To keep the seam straight as you stitch, use one of the
numbered guide lines on the throat plate. Numbers
indicate distance, in eighths of an inch, from the
needle. If you want a % inch seam, for example, line
up your fabric with line 5. Note that line 5, the one
most commonly used, is extended on the slide plate
for your convenience.
For additional guidance, you may wish to purchase
the Seam Guide. (See page 59.)
21
Page 24

Ending a Seam
1. Raise Stitch Length Selector and backstitch to re
inforce end of seam.
22
2. With take-up lever at highest, point, raise presser
foot and remove fabric.
Page 25

3. Cut threads on thread cutter at rear of presser bar.
Reset Stitch Length Selector down for forward
stitching.
Follow the same steps as for straight seams except:
1. Use a short stitch length for elasticity and strength.
For example, if you use 12 stitches per inch for
straight seams, select 15 to 20 per inch to stitch
curved seams in the same fabric.
2. Use the Straight Stitch Presser Foot for greatest
accuracy.
3. If you use the Seam Guide, attach it at an angle so
that the edge that is closer to the needle acts as a
guide. Seam Guides are available for purchase at
your local SINGER CENTER.
23
Page 26

3. ZIG-ZAG STITCHING
The seven stitch patterns that are built into your ma
chine will do a variety of jobs with a minimum of ef
fort. Some you will use for practical purposes —
buttonholes and button sewing; seaming, seam finish
ing, and blindstitching; and even mending. Others are
Q Push !n
® Slide
© Release
2 3
I s 1 a I
purely decorative and will give an individual touch to
your clothes and home. Illustrations of all seven pat
terns are shown on page 5.
The plain zig-zag (WVWWVMMM)? which is placed sec
ond from the left on your Selector, is especially useful
for many steps in sewing.
push selector button in
and slide it to right or left until indicator line is
aligned with the stitch pattern you choose. Then re
lease button.
To produce a zig-zag stitch, the Stitch Width Selector
must be moved from straight-stitch position 1 to any
setting between 2 and 5- The higher the number you
select, the wider your stitch will be.
Raise needle above fabric before moving selector.
how to adjust stitch placement
A Needle Position Selector setting of C places the
needle in center stitching position. Selector settings
L and R place the needle in left and right stitching
positions at widths less than 5.
Selector setting C is used most often. Settings L and
U are for special placement of stitching. For example,
Q
an L setting is required for buttonholes and button
sewing. An L or R setting is used to place narrow zig
zag stitching to the left or right of center In decora
tive work.
Raise needle above fabric before moving selector.
0
24
Left Needle Position
Center Needle Position
Right Needle Position
Page 27

how to adjust stitch lengi
When you are preparing to do zig-zag stitching, make
a test sample with the fabric and thread you plan to
use so that you can adjust the stitch length and needlethread tension properly. If you need to adjust pres
sure, see page 7.
For open zig-zag stitching, choose any stitch length
from 6 to 20j depending on how open you wish the
stitches to be. If you wish a closely packed zig-zag
stitch:
1, Move Stitch Length Selector to bottom of FINE
a^ea.
2, Run machine at slow speed,
3, Gradually tighten thumb nut by turning it to right,
until stitches are closely spaced and form a smooth
surface.
r :
NEEDLETHREAD TENSION
All zig-zag stitching requires less tension than straight
stitching; and closed zig-zag stitching requires even
less tension than open zig-zag stitching. Furthermore,
the wider the stitch, the lighter the tension on the
thread must be. Thus, stitch width 5 requires the least
tension; narrower stitching requires somewhat more.
Notice the stitching on your sample. If the stitching
looks too taut, or if the fabric is puckering, lower the
needle-thread tension by turning the Tension Dial to
a lower number.
As the Selector is Raised, Stitches Close Up
Tension Adlystment for Closed
Zig-Zag Stitching
Correct
Incorrect
25
Page 28

4. TWO-IMEEDLE STITCHING
By using two needles at once, you can produce two
parallel, closely spaced, decorative lines of stitching
simultaneously. You can use either one or two colors
of thread; and you can choose either a straight-stitch
or any of the seven stitch patterns built into your ma
chine.
Some of the attractive designs you can create are
shown on page 28.
1. Fill bobbin with enough thread to complete stitch
ing. (Since the bobbin cannot be filled after the
two needles are inserted, it is often wise to keep an
extra wound bobbin at hand for replacement.)
2. Close slide plate.
3. Pull out a loop of thread between the needle and
the throat plate.
4. Cut thread 4 inches from needle hole, and un
thread the machine.
5. Loosen thumb screw on needle clamp and insert
two needles, as illustrated. The two needles must
be the same size. (If the needle you used to fill
the bobbin is the correct size, simply loosen the
thumb screw and insert a second needle into the
clamp from the right.)
Note: When inserting a previously wound bobbin,
follow the instructions on page 11.
1. Place spool of thread on horizontal spool spindle.
Thread as for one-needle stitching except:
® Pass thread betvreen center and back tension
discs.
® Pass thread through eye of right needle.
2. Insert detachable spool pin into hole provided for
it, as shown below.
3. Place spool of thread on vertical spool pin. Thread
as for one-needle stitching except:
® Do not attempt to pass thread through guide
behind the spool pin.
® Pass thread between center and front tension
discs.
® Pass thread through eye of left needle.
26
Page 29

straight stitching
with two needles
® Pattern Selector: Straight Stitch (-
® Stitch Width Selector: 1
® Needle Position: C or L only
® Throat Plate: General Purpose
® Presser Foot: Genera! Purpose
I '
I
I
i 6
I i
i I
I I
i i
I
e
General Purpose Presser Foot
Pattern Selector: Any pattern
Stitch Width Selector: 2 or 3 maximum
Needle Position: L only
Throat Plate: General Purpose
Presser Foot: General Purpose
2 3
General Purpose Throat Plate
General Purpose Presser Foot
27
Page 30

Zig-Zag
Ball
Pyramid
V-“-T''T"’V‘"‘V""V"‘T’‘T'’T“'Y"'r'Y"T‘“Y‘‘T’'T'“'V"'T‘“T’'T''T”T-r"V"“V"Y‘“V"T”T"V"“V”"V-y”V
Blindstitch
28
■"\
........./..........\............/..........\............/..........\............
/.........\
............
Box
Multi-Stitch Zig-Zag
Scallop
/.........\
............
/.........\„
J
....
""1.
Page 31

i f'ii
"i£s!
Single-thread chainstitching looks like regular
straight stitching on top, but is a series of interlocking
loops on the underside of the fabric. The stitches are
produced by the needle thread alone — so you do
not need a bobbin thread or a bobbin. Because the
stitches are formed by a single thread, the interlocked
loops unravel easily. The entire line of stitching can
be removed with just a pull on the thread end. Also,
the loop formation of the stitches makes them less
taut than regular straight stitches. That’s what makes
chainstitching flexible.
Here are a few of the many sewing jobs for which you
will find chainstitching useful. Pages 34 and 35 show
you how chainstitching can save you time and work.
® Basting —
Trial seams for fitting
Construction guidelines
Zipper openings, linings and interfacings.
® Stay-stitching to preserve garment shape during
assembly
® Fastening removable trimming —
Fur collars
White collars and cuffs
® Hemming curtains and draperies that may need to
be altered
® Sewing temporary tucks to extend the life of —
Children’s clothes
Curtains and linings that might shrink
® Making welting for corded seams, tubular cording
for trimming and button loops
® Attaching hem tape
Thread Guide
Bobbin Case Cover
® Making stay chains to anchor linings, or to hold
belts or shoulder pads in place
Chainstitch Throat Plate
29
Page 32

irisert Throat Plate
Position the Bobbin Case Cover
in
1. Attach Chainstitch fittings.
® Turn hand wheel toward you to raise take-up
lever to its highest point.
® Raise presser foot, open slide plate, and remove
bobbin,
® Unlock throat plate and remove.
® Slide chainstitch throat plate into place from
front. Lock it in REGULAR position.
® Insert bobbin-case cover in bobbin case. The
finger-lift tab goes to the right. Close slide plate,
® Open face plate and slip chainstitch thread
guide into place. Close face plate.
2. Thread your machine in the usual way except
pass thread from take-up lever through self
threading eyelet in the chainstitch thread guide.
Soft, pliable threads of light and medium weight
are most suitable for chainstitching. No. 50
Mercerized cotton and “A’’ silk are recom
mended. Use these threads in a Size 14 needle.
3. Adjust thread tension. Chainstitching requires
approximately the same needle-thread tension as
regular straight stitching, provided the same kind
of thread is used. When the tension is correctly
adjusted, the chain will be flat and smooth. Puck
ers in the fabric and pinched loops indicate too
much tension; turn dial to a lower number. Large,
irregular loops indicate too little tension; turn
dial to a higher number.
30
Too Much Tension
Correct Tension
Page 33

Pattern Selector: Straight Stitch (
Stitch Width Selector: 1
Needle Position: C
Stitch Length: 8 to 12 only
Presser Foot: Straight Stitch or General Purpose
-----------------------
)
1, Be sure that throat plate is in REGULAR position,
then place needle in very edge of fabric and lower
presser foot.
2. Start the machine and stitch to end of seam. Con
tinue stitching beyond edge of fabric, making a
chain from one to two inches long,
3, Cut chain between fabric and presser foot.
4. After chaining off, start a new line of stitching by
raising the presser foot slightly and positioning
the fabric in front of needle. Lower presser foot
and stitch to end of seam,
TO RELEASE THE CHAIN FROM THE MACHINE
When you finish chainstitching, the chain can be
easily removed from the machine,
1. Raise presser foot.
2, Hold end of chain with your left hand.
3, Turn hand wheel slowly toward you with your
right hand until needle is all the way down in the
needle hole,
4. Then turn hand wheel slowly away from you,
pulling gently on chain, which will unravel as
needle raises.
7
¿A/-''A
Stitch Starting Point after Chaining Off
To Release Chain
31
Page 34

TO EWD THE STITCH I THE FABRIC
Occasionally you may need to end your stitching in
the fabric. Basted hems and temporary tucks, for ex
ample, as well as partially stitched-down pleats can
be completed in this way:
1. Stop stitching at desired point, with take-up lever
in its highest position.
2. Raise presser foot.
3. With your finger, pull the thread through the
take-up lever, forming a loop between the take-up
lever and chainstitch thread guide.
4. Pass scissors under presser foot so as to draw the
loop down to the left of the foot.
5. Hold the loop and cut the thread close to the end
of the stitching.
6. Remove fabric from machine by pulling it
straight back, away from you. This will cause the
thread end to pull through the fabric to the un
derside and form a temporary lock.
7. If you wish to secure this temporary lock, fold the
thread end back over the chain and fasten with
hand stitching.
Page 35

5
Chainstitching can be removed smoothly and cleanly
in seconds by freeing the last stitch formed in the
fabric.
1. Simply cut the last loop formed on the underside
of the fabric.
2. Then pick up the free thread end from top sur
face of fabric.
3. Pull the free thread end, removing entire line of
stitching.
1. Release chain from machine.
2. Position take-up lever at its highest point.
3. Open slide plate.
4. Remove bobbin-case cover.
5. Snap down latch.
6. Unlock throat plate and remove by sliding it
toward you.
7. Remove chainstitch thread guide.
33
Page 36

^ 3 ^ ^ a
Here are several ways in which you will find chain-
stitching preferable to either regular straight stitch
ing or hand basting.
Time and energy can be saved when chainstitching
is used to baste garment sections or muslin shells for
trial fittings. The firmness of the stitch ensures accu
racy in fitting, yet the stitching can be ripped out in
seconds if adjustments are necessary.
In many instances, construction guide lines for pock
ets, buttonholes, and other details can be advan
tageously marked with chainstitch basting. The
stitching will give a clearly defined line marking. Yet,
unlike chalk or pins, it will not rub off or become
lost as the fabric is handled. This method lends itself
particularly to use on wools and other fabrics that
do not retain needle penetrations.
STAY STITCHING
Chainstitching can be used to stay-stitch necklines,
shoulderlines, and waistlines before garment assem
bly. Flexible, yet firm, this stitching will hold the
original shape of these areas and prevent stretching.
34
Page 37

GROWTH AND SHRINKAGE TUCKS
Tucks are frequently put into curtains, linings, and
children's clothes to allow for the child's growth or
fabric shrinkage. “Letting down" is no longer a chore
when tucks are chainstitched. Simply unlock the last
loop of the chain formed on the underside of the tuck
and pull out the stitching.
Stay chains (sometimes called French tacks) and belt
loops, normally time-consuming hand-worked detail
finishes, can now be quickly chainstitched. To pro
duce a chain, place the first stitch in the fabric. Stitch
off fabric and continue stitching until a sufficient
length of chain is produced. Thread chain through an
embroidery or darning needle and tack to garment or
lining. A No. 12 stitch length setting is recommended.
Growth and Shrinkage Tucks
Belt Carriers and Stay Chains
35
Page 38

6. FREE-MOTIOIM STITCHING
In free-motion stitching, you sew without a presser
foot and instead control fabric movement (and hence
stitch length) yourself, by means of an embroidery
hoop. Either a straight or a zig-zag stitch setting can
be used. Because you can move the hoop in any di
rection — forward or backward, from side to side,
and even diagonally — free-motion stitching is ex
tremely useful for intricate embroidery designs. On
the other hand, it is equally useful for that most
humdrum but necessary task, darning.
Throat Plate ifi DARN Position
Stitch Length Selector in FINE Area
If you are embroideriiig, you can vary the length
of stitches simply by moving the hoop faster or
slower. The faster you move it, the more open the
stitches will be. A slow hoop movement will produce
closely packed stitches. You can also vary the width
of zig-zag stitches, from a hairline to the full width
of whatever stitch width setting you have chosen,
simply by moving the hoop. If you move it sideways
and stitch in a horizontal line, you will get a hairline,
if you move it forward or backward and stitch in a
vertical line, you will get a full stitch width. Thus
you can produce a ribbon-like effect in script lettering
or create delicate flower designs. This takes practice,
but you can achieve some lovely effects that look
much like hand embroidery. See pages 47 and 48
for specific directions.
For darning, the embroidery hoop used in freemotion stitching enables you to hold the fabric taut
— a real advantage when your fabric is lightweight
or soft and thus is likely to pucker. See page 51 for
directions.
36
1. Have available an embroidery hoop large enough
to encompass the entire design or area to be
darned,
2. Remove presser foot.
3. Raise throat plate to DARN position.
4. Raise Stitch Length Selector to FINE area.
Page 39

and home decorations
seams
© Pattern Selector: Zig-Zag (VW\/WW/^WAM)
® Stitch Width Selector: 2%
® Needle Position: C
® Stitch Length: 15 to 20 dependingon fabric
® Throat Plate: General Purpose
® Presser Foot: General Purpose
To make a lingerie seam both durable and flexible,
use a zig-zag stitch. This seam treatment is particu
larly suitable for bias seams.
1. Straight-stitch the seam (with Stitch Width Se
lector at 1) on wrong side.
2. Press both seam allowances in the same direction.
3. From the right side, top-stitch with zig-zag pattern
(with Stitch Width Selector at 2V2), letting the
needle alternately enter the seam line and seam
thickness.
Lingerie Seam
iSIDE SEAMS OF SHEER
® Pattern Selector: Zig-Zag (
® Stitch Width Selector: 2
® Needle Position: C
© Stitch Length: FINE (above 20)
© Throat Plate: General Purpose
© Presser Foot: General Purpose
With a delicate hairline finish, seam allowances that
ordinarily show through can be eliminated.
1. Stitch along seam outline,
2. Trim seam allowance close to line of stitching,
3. Turn and press.
inside Seam of Sheer Collar
37
Page 40

^ Pattern Selector: Zig-Zag (
® Stitch Width Selector; 2
® Needle Position: C
Stitch Length: About 20
® Throat Plate: General Purpose
® Presser Foot: Genera! Purpose
A narrow, closely spaced, zig-zag stitch is ideal for
seaming knit fabrics. It is particularly desirable
for underarm seams where elasticity and give are
needed. Stitch and press seams as when using a
straight stitch.
Where a stay is needed to prevent stretching, at neck
line and shoulder seams for example, this same fine
zig-zag stitch can be used to apply seam tape. For a
flat, smooth stayed finish:
1. If seam is curved, pre-shape tape to fit by steam
pressing.
2. Baste tape in place.
Corved Seam with Tape Stay
3. Stitch, allov/ing needle to enter seam tape and
seam allowance alternately.
® Pattern Selector: Zig-Zag (VWWWWWWWl)
® Stitch Width Selector: 3
© Needle Position: C
© Stitch Length: 15 to 20 depending on fabric
© Throat Plate: General Purpose
© Presser Foot: General Purpose
Zig-zag stitching gives strength and durability to flat
felled seams.
1. Stitch the seam on the right side of the fabric, tak
ing full seam allowance.
2. Press the seam allowance to one side, keeping the
right side of the stitch on top.
3. Trim the under seam allowance to one-half its
width.
38
Fiat Felled Seam
4. Turn the upper seam allowance edge evenly over
the trimmed edge, and top-stitch.
Page 41

SEAM FINISHES
® Pattern Selector: Zig'Zag (VWWVWMWVWA)
Biindstitch (V'”'V V ), or
Multi-Stitch Zig-Zag (/VV\A)
© Stitch Width Selector: 4 or 5
© Needle Position: C
© Stitch Length: 8 to 20, depending on choice of stitch and
fabric
® Throat Plate: General Purpose
® Presser Foot: General Purpose
Seam edges support the garment and should be given
a durable finish if the fabric is likely to raveh
1. Make a test sample first to determine whether zig
zag stitch (V\WWMWVWl)? biindstitch (
or multi-stitch zig-zag (/\^A/\y\ ) best suits your
fabric.
2. Adjust stitch length and stitch width settings to
suit fabric. Choose the setting that will give you
the most ''open” stitch that will secure the fabric
edges; avoid harsh, over-stitched edges.
3. Place stitching near the edge of the seam allow
ance or over the raw edge as illustrated.
Overedged Seam Finish
4. If stitching is placed near the edge of the seam
allowance, trim edges evenly.
39
Page 42

Darts can, of course, be made in the usual way on
your sewing machine. That is, you can begin stitch^
ing at the wide end of the dart, stitch to the point,
and then fasten the two thread ends. However,
thanks to the Push-Button Bobbin, you can avoid
the problem of fastening the thread ends by making
a “continuous-thread” dart and stitching in the op
posite direction. This method is particularly useful
for darts in sheer fabrics, where transparency re
quires a neat, clean finish. It is also useful for darts
made on the right side of a garment as a style detail.
Pattern Selector: Straight Stitch (
Stitch Width Selector: 1
Needle Position: C
Stitch Length: About 12 or to suit fabric
Throat Plate: General Purpose
Presser Foot: General Purpose
---------------
1. Stitch from the seam edge, tapering gradually to
the point.
2. Stitch beyond the fabric to form a thread chain
Ti to ^/4 inch long.
3. Tie the thread ends into a single knot close to the
stitching.
Regular Darts
Continuous-Thread Dart
CONTINUOUS^THREAD DARTS
Pattern Selector: Straight Stitch (Stitch Width Selector: 1
Needle Position: C
Throat Plate: General Purpose
Presser Foot: General Purpose
1. Wind an empty bobbin with enough thread to
make a single dart (usually less than 1 yard).
2. Close slide plate.
3. Position the needle in the very edge of the fold, at
the point of the basted or pinned dart.
4. Lower the presser foot,
5. Stitch carefully toward the wide end of the dart.
40
Page 43

DARTS IN INTERFACING
Pattern Selector: Zig-Zag (WWWWWWvVA)
or Multi-Stitch Zig-Zag (/vV\)
Stitch Width Selector: 5
Needle Position: C
Throat Plate: General Purpose
Presser Foot: General Purpose
With zig-zag stitching, interfacings can be shaped
without bulk.
1. Cut out the dart allowance on the stitching line.
2. Bring raw edges together and pin over a muslin
stay.
3. Stitch, backstitching at both ends.
BLINDSTITCH HEMS
Steps In Making a Dart in Interfacing
Pattern Selector: Blindstitch( V
Stitch Width Selector: 2 to 5
Needle Position: C
Stitch Length: 10 to 20
Throat Plate: General Purpose
Presser Foot: General Purpose
Y"T")
Blindstitching provides a durable hem finish that is
invisible and is comparable to hand sewing. It is best
suited to straight and slightly curved hems. Taped,
bound, turned, or unfinished hem edges can be blindstitched with equal ease. Blindstitching takes a little
practice, however, so make a test sample first.
1. Mark, turn, and press hem in the usual way.
2. Baste a guide line inch from the top of the hem
edge.
3. Place hem edge over the feed of the machine,
turning bulk of fabric to the left and thus creating
a soft fold.
4. Stitch so that straight stitches fall on hem edge
and sideward stitches pierce the soft fold.
Blindstitcli Hein
41
Page 44

2 a S
2 " : 3 . 4 . 5
Pattern Selector: Zig-Zag (W\WWWWWVV\)
Stitch Width Selector: 1 and 4
Needle Position: L
Throat Plate: General Purpose (DARN position)
Presser Foot: General Purpose
The space between the holes in the button determines
the stitch width settings. The 1 setting must always be
used to position the needle over the left hole and
fasten stitching. For buttons with standard hole spac
ing, use settings 1 and 4. For buttons with unusual
hole spacing, use setting 1 and increase or decrease
the width setting (4) as necessary.
S T I T C H
2 ■ 5
^ T I T ;C : h; .. :w .1: X 'X
To sew on two- or four-hole buttons, approximately
one inch in diameter or larger:
1. Set stitch width at 1 „ Position button under foot so
that the needle will enter the left hole. Lower foot.
Turn hand wheel toward you until needle rises out
of button and is just above the foot.
2. Set stitch width at 4= Then, when you begin to
stitch, the needle should enter the right hole of the
button. Take approximately six zig-zag stitches in
this position, ending on the left side.
3. To fasten stitching, return to stitch width 1 and
take approximately three stitches.
For best results with buttons smaller than one inch in
diameter, it is recommended that the Button Sewing
Presser Foot (available for separate purchase) be
used. See page 58.
42
Page 45

® Pattern Selector: Zig-Zag (WWWVWWWVl)
® Stitch Width Selector: See below
® Needle Position: L
® Stitch Length: FINE (above 20)
® Throat Plate: General Purpose
® Presser Foot: General Purpose
Always make a test buttonhole on a sample of your
fabric. Be sure to duplicate the thickness of the gar
ment and include interfacing if appropriate.
BUTTONHOLE LENGTH
First decide how long the opening needs to be. This
will depend on the diameter and thickness of the
button. To find the right length, cut a small slit in
a scrap of your fabric and gradually enlarge it until
the button slips through easily. Then add at least 1 /8
inch (1/16 inch for each bar tack), and mark the
fabric as illustrated. This bar-tack measurement is
approximate; on some buttonholes, you may need to
increase it to arrive at pleasing proportions.
STITCH WIDTH SETTINGS
Next, determine the two stitch width settings that you
will need: one for side stitching and one for the bar
tacks (closings at the ends of buttonhole). The three
possible combinations are shown below.
i
Len^h of
Cyttiiig Space
Marking Lines
Bar Tacks and
Side Stitching
1 2 3 4 5
' 1 ' ' '
Selector at 3
for Side Stitching
Selector at 5
for Bar Tacks
Selector at 2V^
for Side Stitching
Selector at 4
for Bar Tacks
Selector at 2
for Side Stitching
Selector at 3
for Bar Tacks
43
Page 46

CB
2 3
I
; '2 3
;2\
With Needle Position Selector at L, place Stitch Width
Selector on setting desired for side stitching of button
hole. Place work under needle, aligning center mark
ing of buttonhole with slot in the presser foot.
Side Stitching: Position needle in fabric at point A.
Lower foot and stitch to end of marking. Leave
needle in fabric at point B. Raise foot and pivot work
on needle. Lower foot. Take one stitch without
changing width setting, bringing work to point C.
c®
D®
Bar Tack: Adjust Stitch Width Selector for bar tacks
and take at least six stitches. Stop at point D.
I
Side Stitching: Readjust Stitch Width Selector for
side stitching. Complete work to point E. Leave
needle in fabric.
44
1 n
1 , T .. T . t
,Ul.J .
22V
5
■
Final Bar Tack: Adjust Stitch Width Selector for bar
tacks, and take at least six stitches in reverse, ending
at point F.
■2i,v
's&:
:TVvv;
'1
cVK'W
.T lv;
Fastening Stitch; To secure stitching, move Selector
to 1 and take three stitches. Remove work, draw
threads to underside, fasten and trim. Cut opening
for button with sharp scissors.
Page 47

S. FINISHING TOUCHES
top st/tciimg
A practical, simple way to accent the lines of a dress
or coat is to place one or more rows of stitching along
collars, lapels, facing edges, pockets, sleeves, etc.
For a tailored look, use lines of straight stitching.
For decorative interest, use decorative stitching.
she// edging
On soft, fine fabrics, shell edging makes an attractive
finish for narrow hems or bias folds.
® Pattern Selector: Blindstitch (V V V )
® Needle Position: C
® Throat Plate: Genera! Purpose
© Presser Foot: General Purpose
1. Make a test sample on your fabric to find the right
thread tension, stitch length, and stitch width.
2. Place folded hem (basted, if necessary) or bias
fold under presser foot, with hem or fold toward
the left.
3. Stitch slowly, guiding fabric by hand so that the
sideward stitches do not pierce the folded edge.
scalloping
Scalloping adds interest to blouses, dresses, lingerie,
and children’s clothes. Scallops will be perfect in form
and evenly spaced when you use the Scallop stitch.
® Pattern Selector: Scallop (/ V V ',)
® Stitch Width Selector: 3 to 5
© Needle Position: C
© Stitch Length: 10 to 15
® Throat Plate: General Purpose
© Presser Foot: General Purpose
1. Place right sides of fabric together. (Shaped or
bias edges should be interfaced.) Stitch scallops.
2. After stitching, and before turning, trim seam al
lowance to Vs inch or less.
3. With scissors, clip points of scallops and, if neces
sary to make fabric lie flat, clip along curves.
4. Turn and press.
Cut
Notch
45
Page 48

Applique adds beauty and interest to clothes and
household linens. Either contrasting or self fabric can
be used effectively.
The stitch most commonly used in appliqueing is a
closely spaced, plain zig-zag stitch. The width of this
stitch can be varied to accommodate fabrics of differ
ent weaves and textures. Many of the other stitch
patterns can also be used to applique with decorative
stitching.
To prepare for appliqueing, make a sample to help
you decide which of the following two methods is the
more appropriate for your fabric and design,
® Position the design.
® Baste it to the fabric.
® Attach General Purpose Presser Foot
(and General Purpose Throat Plate)
METHOD#!
Method #1 ™ Trimming after Stitching
1. Set Pattern Selector for the desired applique stitch
pattern. Set Stitch Width Selector for the desired
width, and set Stitch Length on FINE (above 20).
2. Outline the design with applique stitching.
3. Trim any excess fabric on the outer edges of
the stitching. Remove basting.
METHOD #2
1. Adjust selectors for straight stitching.
Pattern Selector: Straight Stitch (Stitch Width Selector: 1
Needle Position: C
2. Outline the entire design with a short stitch.
3. Trim raw fabric edges to the stitching.
4. Set Pattern Selector for the desired applique stitch.
5. Adjust Stitch Width Selector to desired width set
ting for applique pattern. Set Stitch Length Se
lector on FINE.
46
Method #2 — Stitching after Trimming
6. Stitch, following the straight stitch outline. This
step will produce a smooth overedged finish, with
no raw edges to be trimmed. Remove basting.
Page 49

Many of the decorative stitch patterns can be used
for monograms or motifs — for adding a personal
touch to a blouse collar, for example, or for initialing
household linens. You can buy designs — or create
them yourself.
MONOGRAMS AND MOTIFS
® Pattern Selector: for zig-zag stitching (WVWVWWVWV\)
See page 5 for decorative stitches
® Stitch Width Selector: 2 through 5
© Needle Position: C
® Stitch Length: FINE (above 20)
® Throat Plate: General Purpose
® Presser Foot: General Purpose
1. Make a sample first, to determine suitability of
stitch pattern and find the right stitch length and
width, thread tension, and pressure.
2. Transfer the design (by tracing, usually) to the
right side of the fabric.
3. If the fabric is soft or loosely woven, baste a back
ing of lawn or organdy onto the wrong side.
4. After stitching, trim the backing close to the
stitching.
To Find the Beginning of the Pattern
When you use decorative stitch patterns in a motif,
always start stitching at the beginning of a pattern
unit — that is, at the beginning of the pyramid, ball,
or whatever pattern you are using. To find the be
ginning:
1. On a scrap of material, stitch until you come to
the end of a complete pattern unit. Now you are
ready to start stitching at the beginning of the
next unit.
2. Raise presser foot and remove scrap.
3. Position motif under needle; lower presser foot;
and stitch.
SCRIPT LETTERING
® Pattern Selector: Zig-Zag (WWMWVWVW\)
® Stitch Width Selector: 2 through 5
© Needle Position: C
® Stitch Length: FINE (above 20)
® Throat Plate: General Purpose (DARN position)
® Presser Foot: None
If you wish to embroider a whole name — on a
child's dress or shirt, for example — you can do so
by free-motion stitching.
1. Always make a sample first, to find the right stitch
settings and spacing.
2. Trace or mark lettering on right side of fabric.
3. If the fabric is soft or loosely woven, add an under
lay of crisp lawn or organdy.
4. Place work in embroidery hoop large enough to
encompass the entire work design. Be sure fabric
is held taut.
5. Position work under needle and lower presser
bar to engage tension.
6. Turn hand wheel toward you to bring bobbin
thread up through fabric at start of design and
hold both threads to start stitching.
7. Stitch, following outline of lettering. Maintain an
even rate of speed so that stitches are uniformly
spaced.
To produce a close stitch, move the hoop slowly; to
produce an open stitch, move hoop more rapidly.
To shade the lettering, from wide to narrow stitching,
turn the work slightly so that you will be moving it at
an angle as you stitch.
Monogram in
Zig-Zag and
Bai! Stitch
Beginning of
Pattern Unit-
Pyramid
Pyramid Pattern
Used in Motif
47
Page 50

Flower Motif
Whether you have artistic ability or not, with your
Touch & Sew sewing machine and a little practice
you will be able to embroider flowers on table linens,
pillow covers, and other home decorations, as well as
on dresses and blouses. If you have designing skill,
you will enjoy creating your own patterns. Otherwise,
you can buy attractive transfer patterns.
Pattern Selector; Zig-Zag (WWVMWWWW)
Stitch Width Selector: 2 through 5
Needle Position: C
Stitch Length: FINE (above 20)
Throat Plate: General Purpose (DARN position)
Presser Foot: None
Prepare the machine and your fabric in the same
way as for free-motion script lettering (page 47). On
your test sample, try out different stitch width set
tings to determine the one or more best suited to your
design.
When Ailing in outlines, place stitches in parallel
lines, shifting the direction of the hoop movement as
appropriate to the design. For a smooth satin stitch
that will catch the light, place the parallel stitches
close together, moving the hoop slowly and steadily.
For an irregular texture, move the hoop more rapidly,
allowing some stitches to overlap.
48
Bar-Tack Design
A series of bar tacks can be used to form spray-like
leaves or flowers. This technique adds variety and
lightness to many designs. Leaves and petals formed
in this way may carry the thread from one bar tack
to the next. The carrying thread eliminates tying of
thread ends.
Flower, Leaf arid Bud Design
Page 51

3. ICiEPIMS yp APPEARANCES
mending
Many of the zig-zag stitch settings are just as useful
for mending as they are for creative sewing. The
multi-stitch zig-zag () forms a firm, flexi
ble bond for repairing tears, for reinforcing or for
replacing elastic. The plain zig-zag (W\WMWWW\) is
useful for making bar tacks to repair lingerie.
TEARS
® Pattern Selector: Multi-Stitch Zig-Zag (/v\r\A )
® Stitch Width Selector: 2 through 5
® Needle Position: C
3 Throat Plate: General Purpose
® Presser Foot: General Purpose
1. Trim ragged edges.
2. Place underlay on the wrong side of tear for rein
forcement. (It is best not to baste or pin the
underlay, since you will be bringing the edges
of the tear together in the next step.)
3. Stitch on the right side, bringing the edges of the
tear together.
4. Shorten stitch length at ends and corners to give
extra strength.
5. Trim underlay.
ELASTIC
1. Use the same selector settings and fittings as for
“Tears”, above.
2. Hold the elastic taut as you stitch so that it will re
main stretchable after stitching is completed.
A Tear Mended with Multi-Stitch Zig-Zag
Replacing Elastic with Multi-Stitch Zig-Zag
49
Page 52

BAR TACKS
Use a closed zig-zag (WWWWW\MWi) stitch to bar-tack
garters, pockets, zippers, shoulder straps, etc.
Bar Tack
Blanket Binding
blanket binding
Often you can make an old blanket look almost new
by replacing the binding.
® Pattern Selector: Multi-Stitch Zig-Zag (/\'\'\A)
© Stitch Width Selector: 5
© Needle Position: C
© Throat Plate: General Purpose
© Presser Foot: General Purpose
L Remove worn binding.
2. Baste new binding securely.
3. Reduce pressure (on Pressure Dial) and increase
stitch length if necessary, so that blanket feeds
freely.
4. Stitch, and remove basting.
50
Page 53

Worn or torn spots on children’s clothes, knits and
household linens can be darned effortlessly and
quickly with little practice. You may choose to darn
either with or without an embroidery hoop. When
greater control is needed, free-motion stitching, with
an embroidery hoop, is usually best.
DARNING WITHOUT EMBROIDERY HOOP
® Pattern Selector: Straight Stitch (
® Stitch Width Selector; 1
® Needle Position: C
© Stitch Length; 10 to 15
© Throat Plate: Genera! Purpose
© Presser Foot: General Purpose
© Pressure Dial: DARN
------------------------
)
1. If area to be darned is open, baste an underlay in
place,
2. Place area to be darned under presser foot.
3. Lower presser foot and start stitching, alter
nately drawing fabric toward you and pulling it
gently away from you.
4. Continue this forward and backward motion as
you fill the area with parallel lines of stitching.
5. For additional strength, cover area with crosswise
lines of stitching.
DARNING WITH EMBROIDERY HOOP
® Pattern Selector: Straight Stitch (
© Stitch Width Selector: 1
© Needle Position: C
© Stitch Length: FINE (above 20)
© Throat Plate: Straight Stitch (DARN position)
© Presser Foot: None
------------------------
)
1. Trim ragged edges from area to be darned.
2. Center worn section in embroidery hoop,
3. Position work under needle and lower presser
bar to engage tension.
4. Hold needle thread loosely with left hand, turn
hand wheel over and draw bobbin thread up
through fabric. Hold both thread ends and lower
needle into fabric,
5. Outline area to be darned with running stitches
for reinforcement.
6. Stitch across opening, moving hoop under needle
at a slight angle from lower left to upper right.
Keep lines of stitching closely spaced and even in
length.
7. When opening is filled, cover area with cross
wise lines of stitching.
Darning witfiout Embroidery Hoop
Darning with Embroidery Hoop
51
Page 54

10. HOW TO TAKE CARE OF YOUR MACHINE
Your sewing machine is a fine yet sturdy precision in
strument, and it will serve you perfectly for many
years if you take a few simple steps to keep it in good
working condition.
How often you will need to clean, oil, and lubricate
the machine will depend on how often you use it and
where you keep it. The following general guidelines
assume that you will be sewing two or three times a
week. But if you use the machine continuously, clean
and oil it daily. Or, if you keep it in a very warm or
damp place, oil and lubricate it more frequently than
the guidelines suggest.
EVERY WEEK OR SO™
Remove lint or fluff from exposed parts. (As a matter
of fact, you will be able to see the lint and fluff gather
ing on these parts, and we recommend that you re
move them immediately.)
With a soft cloth, clean:
Clean and Oil
Brush
Brush and Oil
® Tension discs
® Take-up lever and thread guides
© Presser bar and needle bar
® Bobbin case (for instructions on removal, see next
page)
® Machine arm and bed
If necessary, dampen the cloth to clean the machine
surface. Do not use detergents.
With the lint brush that comes with your machine,
clean:
® Feed dog
® Rotating hook (area under throat plate and slide
plate)
After each cleaning, apply a drop (but no more than a
drop) of SINGER"^ Oil to the areas indicated. Then
sew a line of stitching on a scrap of material to re
move excess oil.
52
Page 55

To Remove the Bobbin Case
1. Open slide plate and remove throat plate (see page
15 for instructions).
2. Turn hand wheel to raise take-up lever to its high
est point.
3. Remove bobbin. Keep bobbin push-button in sew
ing position.
4. To unlock bobbin case, lift position bracket (at
right of case) and slide to right.
5. To remove bobbin case, hold latch, twist case to
right, and lift it out.
c,v>, >
: l i Lift and Slide Position Bracket
A A' !i
r
1. Turn hand wheel to raise take-up lever to its high
est point. Keep bobbin push-button in sewing posi
tion.
2. Hold bobbin case by latch and, with latch to right
of needle, slip case in position so that the groove
engages hook channel.
3. Twist bobbin case to left until latch is in center.
4. Push position bracket to left until it snaps down,
locking bobbin case in place.
5. Replace bobbin and snap latch down.
6. Replace throat plate and close slide plate.
Soap Laidi Down
Remove Bobbin Case
Push Position
Bracket to Left
53
Page 56

area
You will find this easier to do if you remove the
top cover first, as described below.
of
Oi l
in the hole behind throat plate
Oil and lobricate top of machine as shown on next
page.
® After oiling, always sew a few lines of stitching on
a scrap of material to remove excess oil.
® SINGER’' Lubricant, as well as Oil, is available
for purchase at your SINGER CENTER.
To Remove and Replace Top Cover
Apply a Drop of Oil to Each Spot Shown
3. Replace cover by positioning it on top of the
arm with a slight overhang on the left side;
slide cover to the right until it locks in place.
4. Replace and tighten screw A.
54
Page 57

IF THE MACHINE IS TO BE STORED
1. Disconnect plug from electrical outlet.
2. Tilt machine back and loosen screws from the four
corners of the machine bed to remove bottom
cover.
3. Apply SINGER Oil and SINGER Lubricant as
shown.
4. Replace bottom cover.
1. Disconnect electrical controller from machine
and wall outlet.
2. Clean all exposed parts and area behind
plate.
3. Swab all exposed metal parts and parts behind
face plate with lint brush saturated with i
Oil, to protect against rust.
55
Page 58

Unlocks Locks
TO CHANGE THE LIGHT BULB
Be sure that Power and Light Switch is in OFF
position.
To remove bulb: With thumb of right hand, push in
and down on tab of light lens and lower the light
bracket. Do not attempt to unscrew the bulb. Press
it up into the socket and at the same time turn bulb
over in direction shown to unlock bulb pin.
To replace bulb: Press new bulb into socket, with
bulb pin entering slot of socket, and turn it over in
direction shown to lock bulb in position. Push entire
assembly up until it snaps in position.
TO REPLACE THE SLIDE PLATE
You will not have any occasion to remove the slide
plate. However, if it should accidentally become dis
engaged from the machine, it is easily replaced.
56
® Raise the presser foot and the needle.
® Place slide plate in slide way with the front edge
close to, but not covering, the retaining spring (as
shown).
® With a small screwdriver, lift each end of the spring
into each of the side grooves on the underside of
the plate.
® Draw the plate gently toward you and fully en
gage the spring.
® Close slide plate.
Page 59

PERFORMANCE CHECK LIST
Remember to
® Be sure Power and Light Switch is on
® Remove all thread from bobbin before rewinding
® Fill empty bobbin
. . . in center needle position with Stitch Width Selector on 1
. . . before fitting accessories to machine
. . . before inserting additional needle for two-needle work
® Close slide plate after winding bobbin
® Position needle out of fabric when making stitch width and stitch pattern adjustments
® Clear your machine of lint and fluff periodically and apply oil
® Use your Instruction Book. It was written to explain the most efficient way to operate
and use this remarkable new machine
If threads breaks
® Is the machine properly threaded?
• Is the thread spool secured by the spool holder?
• Is the spool holder positioned correctly?
® Is a Catalog 2020 (15X1) needle correctly inserted and securely tightened in the
needle clamp?
® Is the needle straight and sharp?
o Is the thread suitable for the size of the needle?
• Is the thread free of slubs and knots?
® Is the thread unwinding freely from the spool?
• Is the needle-thread tension too tight?
® Is the presser foot raised for bobbin winding?
® Is a moderate speed used for bobbin winding?
e Are the bobbin halves evenly and securely screwed together?
• Is the bobbin properly seated and secured by the latch in the bobbin case?
® Is the bobbin-case area free of lint and loose thread ends?
® Are the thread guides and tension discs also lint-free?
If you have any questions, please write to:
Department of Sewing Education
The Singer Company
30 Rockefeller Plaza, New York, N. Y. 10020
57
Page 60

1i. FASHION aid:
iccessom
These Fashion'^ Aids have been especially designed to in
crease the versatility of your Touch & Sew sewing machine
and enable you to give your sewing that extra professional
touch. The ones described below are just a few of the com
plete selection available at your local SINGER CENTER.
No. 163483
This light, flexible foot has a raised center section,
which allows closely spaced zig-zag stitches to feed
evenly. The small holes in the front hold a filler cord
when that is desired. It is useful for ornamental stitch
ing, making buttonholes, and for applique work.
HEP
FC
No. 151780
The Hemmer Foot forms a perfectly turned narrow
hem without basting or pressing.
No. 161166
This foot makes it easy to place stitching close to a
raised edge. Thus it is useful for corded seams as well
as zipper insertion. It can be adjusted to either the
right or left side of the needle; and the hinge allows it
to ride over pins, heavy layers of fabric, or cross
seams.
No. 81200
The Binder Foot is used to apply ready-made bias
tape or unfolded bias binding to an unfinished edge.
Such a trim can form a colorful finish to children’s
clothes, aprons, and household linens. It can also be
useful for binding seam edges that might ravel.
58
No. 161168
This short, open foot holds any two-hole or four-hole
button securely for stitching. The groove in the foot
can be used to hold a needle, over which a thread
shank can be formed.
Page 61

SEAM GUIDE
No. 161170
The Seam Guide helps keep seam width uniform
when extra control is needed, especially on unusually
wide or narrow seams.
No. 160691
The Quilter is excellent for the placement of straight
stitching in block, floral, or scroll designs and is espe
cially well adapted to stitching lightly padded ma
terials. The short, open foot permits following curved
lines with ease and accuracy; the adjustable space
guide, placed to the right or left of the needle, keeps
rows of stitching parallel.
No. 161169
Designed to lock fullness into each stitch, the Gather
ing Foot can be used for shirring as well as for a single
line of gathering. For evenly spaced shirring, simply
keep the same stitch length and tension setting for all
lines of stitching. This foot is used for straight stitch
ing only.
TUCKER
No. 161226
Since the beauty of tucking lies in perfect accuracy,
the Tucker will contribute greatly to the attractive
ness of this work. Tucks up to one inch can be stitched
and marked in one operation. Two adjustable scales
are provided to gauge tuck width and spacing. Either
a straight or decorative stitch setting may be used.
RUFFLER
No. 161561
This accessory offers a simple, effective way to make
gathered and pleated ruffles. Ruffles can be made
separately or made and applied at the same time. The
Ruffler is used for straight stitching only.
Gathering Foot
Rüffler
59
Page 62

INDEX
Page
Accessories ........................................................................................ 13
Applique.............................................................................................. 46
Basting.................................................................................... 20, 29
Binder Foot ........................................................................................ 58
Blanket Binding................................................................................. 50
Bobbin ................................................................................................... 9
Removal ........................................................................................ 10
Replacement of Empty Bobbin
Replacement of Wound Bobbin
Sewing from a Newly Wound Bobbin
Sewing from a Previously Wound Bobbin................................ 19
Winding ............................................................................................ 9
Bobbin Case....................................................................................... 53
Button Foot
Buttonholes ........................................................................... 43, 44
Chainstitching ................................................................................... 29
Check List
Cleaning the Machine....................................................................... 52
Darning 51
Darts ................................................................................................... 40
Electrical Connections
Fabric, Thread, Needle and Stitch Length Table .... 17
Fashion Aids...................................................................................... 58
Flower Embroidery............................................................................ 48
Free-Motion Stitching
Gathering Foot................................................................................... 59
General Purpose Presser Foot
General Purpose Throat Plate......................................................... 15
Guiding and Supporting Fabric....................................................... 21
Hand Wheel ......................................................................................... 3
Hemmer Foot..................................................................................... 58
Hems .................................................................................................. 41
Blindstitch
Light Bulb............................................................................................ 56
Lubrication.............................................................................. 52,54,55
Mending.............................................................................................. 49
Monograms ...................................................................................... 47
Motifs................................................................................................... 47
Needle
Position
Replacement ................................................................................ 13
Threading.......................................................................................... 8
Power and Light Switch...................................................................... 4
Presser Feet....................................................................................... 14
Changing the Presser Feet
Pressure Adjustment ......................................................................... 7
Principal Parts ..................................................................................... 2
How They Are Used......................................................................... 4
What They Are Called..................................................................... 3
.......................................................................................
...........................................................................................
.......................................................................
.......................................................................
....................................................................................
.............................................................................
.............................................
.............................................
.......................................
........................................................
6, 18, 24
.........................................................
11
11
19
58
57
36
14
41
14
Page
Quilter ................................................................................................. 59
Reverse Stitching
Ruffler ................................................................................................. 59
Script Lettering
Scalloping............................................................................................ 45
Seam Guide ....................................................................................... 59
Seams ......................................................................................20, 31, 37
Chainstitch .................................................................................... 31
Curved ............................................................................................ 23
Finishes ......................................................................................... 39
Flat Felled ...................................................................................... 38
Inside.............................................................................................. 37
Knit Fabric...................................................................................... 38
Lingerie .......................................................................................... 37
Straight .......................................................................................... 20
Shell Edging........................................................................................ 45
Slide Plate .......................................................................................... 56
Special Purpose Presser Foot
Spool Pin ............................................................................................... 3
For Two-Needle Stitching
4
Stitch Length Selector......................................................................... 6
Stitch Pattern Selector
Stitch Width Selector..................................................................... 5, 18, 24
Straight Stitch Presser Foot............................................................. 14
Straight Stitch Throat Plate
Straight Stitching............................................................................... 17
Straight Seams.............................................................................. 20
Curved Seams ............................................................................ 23
With Two Needles......................................................................... 27
Take-up Lever ....................................................................................... 3
Tension Adjustment............................................................................. 7
For Zig-Zag Stitching................................................................... 25
Thread ................................................................................................. 17
Thread Cutter........................................................................................ 3
Threading Chart.................................................................................... 3
Threading the Needle.......................................................................... 8
Throat Plates ..................................................................................... 15
Changing the Throat Plates
Positions ........................................................................................ 12
Top Stitching....................................................................................... 45
Tucker
.................................................................................................
Two-Needle Stitching
Decorative Stitching..................................................................... 28
Straight Stitching.......................................................................... 27
Threading the Needles................................................................. 26
Zig-Zag Stitching .......................................................................... 27
Zig-Zag Stitching ............................................................................... 24
With Two Needles......................................................................... 27
Zipper Foot.......................................................................................... 58
...........................................................................
................
.................................................................. 47
.........................................................
............................................................
..................................................................
.............................................................
........................................................
.......................................................................
6, 20, 22
58
26
5, 18, 24
15
15
59
26
60
Page 63

SINGER
GUARANTEE
WE GUARANTEE that each SINGER* sewing machine
has been carefully manufactured and is in perfect operating
condition on delivery. When subject to normal family use and
care, any parts requiring replacement at any time owing to defects
in material or workmanship will be replaced without charge.
THIS GUARANTEE does not apply to parts requiring replace^
ment owing to natural wear or to abuse or negligence of the user
or in the event the machine is serviced by other than a SINGER
representative or Approved Dealer or with parts other than
those supplied by The Singer Company.
IN ADDITION to the above guarantee of parts, each machine
will be inspected and adjusted whenever necessary without
charge for labor for a period of one year from date of purchase.
THIS GUARANTEE is effective only with respect to the
person making the purchase from The Singer Company or one
of its Approved Dealers. The original Sales Agreement, or
Cash Receipt, must be presented to obtain the benefits of the
guarantee.
AGREEMENTS inconsistent with the foregoing shall be void
and of no effect.
THE SINGER COMPANY
Page 64

Exciting products
from SINGER
At your local SINGER CENTER yOU will find
An outstanding selection of home entertainment products,
including transistor radios, TV sets, stereo phonographs,
and records. Shown here is a frequency contoured*
compact stereo phonograph by singer. Two balanced
speakers give rich, true tone. Fully transistori2;ed. In
beautiful oiled-walnut finish.
A full line of floor-care products, including upright and
hand models, as well as rug-cleaner/floor-polishers. The
Power Master Canister by singer is shown here. With
this deluxe cleaner, you simply step on a toe switch to
rewind the cord or turn the cleaner on or off. Just lift
cover to select cleaning attachment or replace huge dust
bag. Stands on end for stair-cleaning or storage.
A wide variety of typewriters, ranging from extremely
lightweight student models to the finest of portable
electrics for the home. This Electric Portable Typewriter
by singer features a touch selector, for adjusting the
machine to the user’s personal touch; an impression-
control dial for producing multiple copies; and repeat
action keys for easy underlining and crossing out. Snap-on
Type for producing scientific or foreign-language symbols
is also available.
---------
Everything you need to make your sewing easy and
enjoyable. Many singer centers carry fine fabrics as well
as dress rorms and a complete line of notions. The children
in your family will enjoy sewing, too, with this Child’s
Sewing Machine by singer. Battery-operated, it can be
used anywhere—or, with an adapter, it can be operated
electrically. It has a real bobbin and produces a true
lockstitch.
THE SINGER COMPANY
Sewing Machines
Fabrics
Stereo Phonographs
TV Sets
Typewriters
Fioor-Care Products
*ATrademarkof THESINGER COMPANY
 Loading...