

Page 1
Page 2

"V ’I T
Cl о i
/Ч A. A
• %*>Ч "• V ■ ■ •
ro
> < > vV;>045 G :12-¿'6; <;ì:’ì(':. Pruìii-c: G Wûsiôrr ОйГм'^огу
Ï» w Á.
t T
' wi
Í Ï
Wi.
•Í T^. /Nr
illy
A Trccìc-mork or THE SiNG£2 COMPANY
Page 3
the best sewing machine ever built by SINGER
Page 4
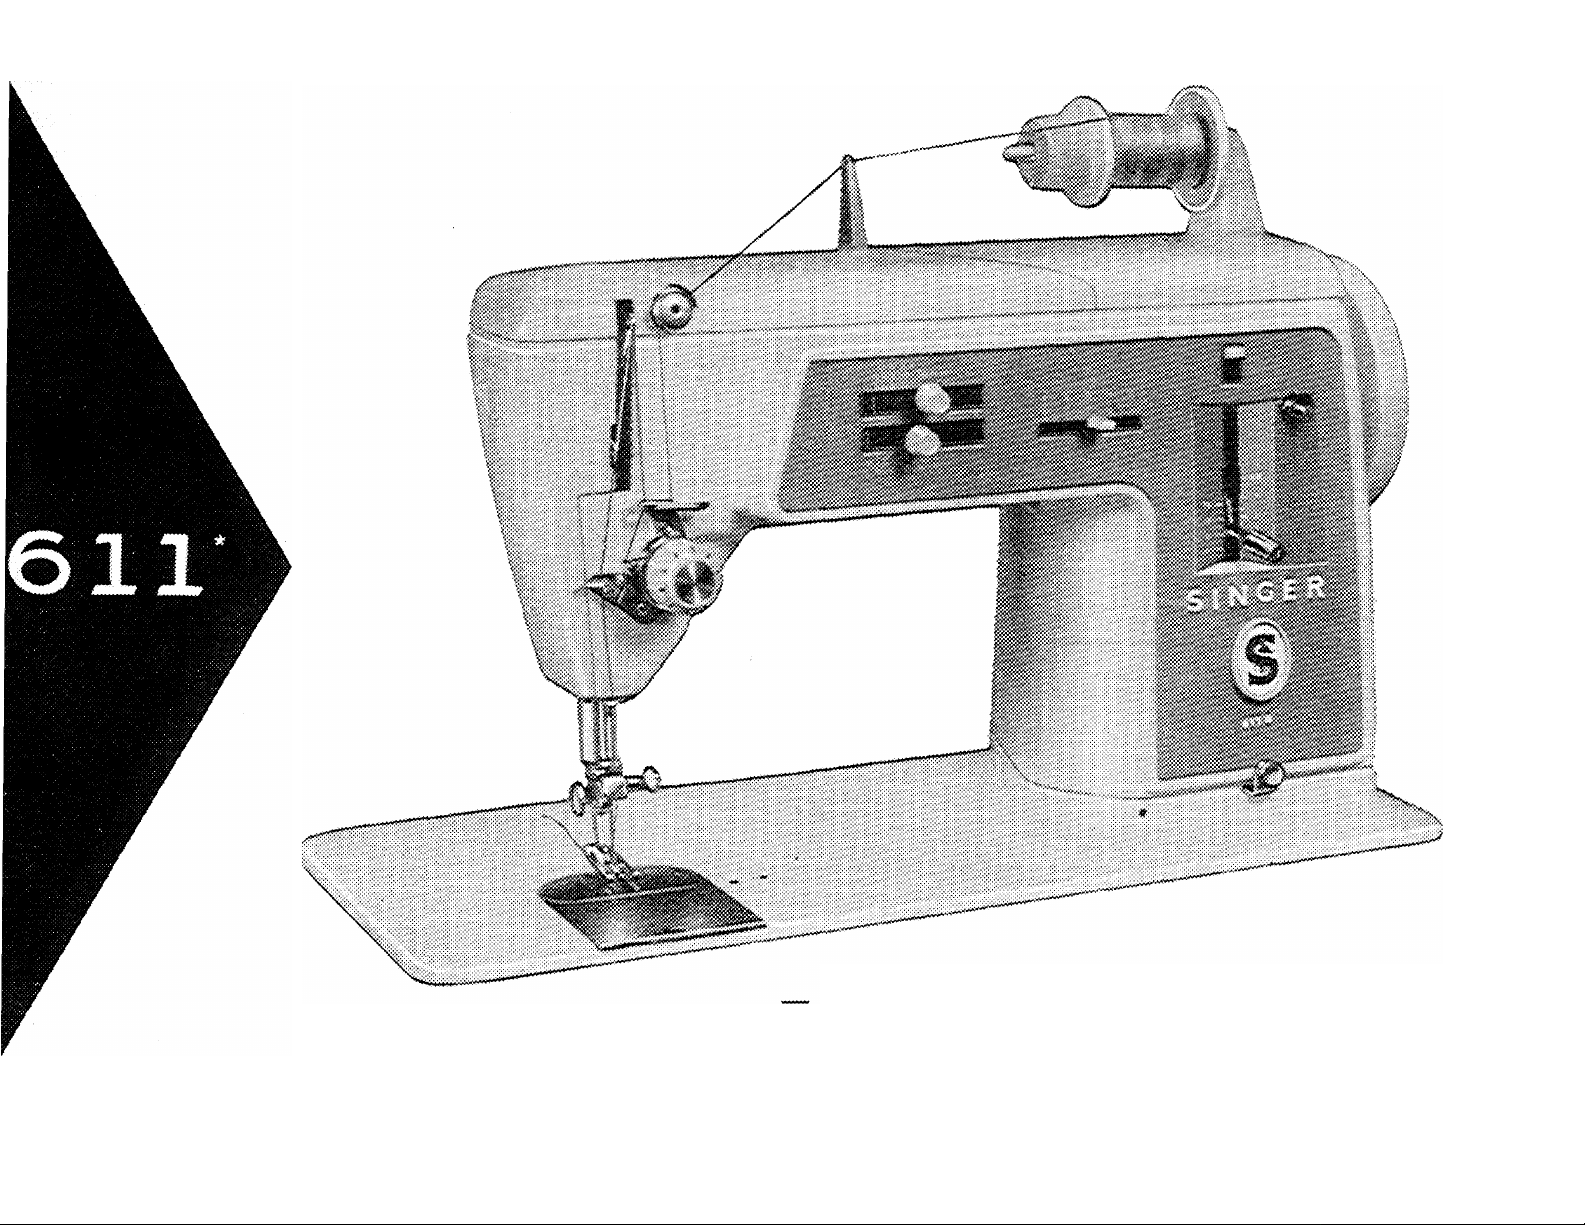
Th.6 SIMGER 611 truly remarkable macbine with CHAIN STITCH feature
The SINGER 51! represents the truly universal sewing machine that
will crreatlv contribute to nerfect domestic dressmakincn In addition
to its numerous outstanding advantages the machine now incorporates
a new and unique feature in that lock stitching and chain stitching can
be selectively produced on the same madiine.
^ Only SINGER produces an automatic machine that in addition to
the conventional lock stitch also sews a single thread chain stitch
which can be used for basting seams thus replacing hand-basting.
This feature 'whll release you from time-consuming work and
it
reveals new aspects so far non-existent in the overall picture of
the applications of the modern family sewing machine. (For detailed
instructions concerning operation and application, see page 22.)
♦ SINGER has WORLD'S FIRST AUTOMATIC with slant needle and
gear drive. Seeing is easier, sewing smoothest ever. No slipping
or stalling,
^ SINGER has WORLD'S FIRST AUTOMATIC w i t h do u b 1 e - ea s y
threading. Has built-in threading chart, handy "dropAn** bobbin in
f r o n t of needle!
♦ SINGER has WORLD'S FIRST AUTOMATIC with a built-in eye-
ievel stitch chart, with push button selection for whatever fancy
stitch you want!
0
Copyright 1965 by The Singer Compcny
Page 5

OTHER OUTSTANDING FEATURES ARE:
^ SUPERFINE CONTROL of stitdr length ensures
perfect satin stitching.
® PERFECT STITCHING ... straight and zigzag.
Ф NHBDLE CLAMP holds one or two regular need
ing — same or diiierent sizes for exciting twin
needle stitcliing*
# THItOAT FLATH with seam guide markings.
Held with magnets for easy removal and replace
ment.
# PRESSURE OF PRESSER FOOT can easily be
adjusted according to regulator.
# NEW TYPE SPOOL HOLDER ensures a smooth
how of the needle thread.
^ HINGED face plate swings open for easy access
to oiling and clc<ming points.
MOTOR with worm wheel drive, no
belts required, excellent penetrating power when
sewing heaviest materials without manual assis
tance (electric drive).
# BUILT-IN LIGHT focused on sewing area, which
swings down for easy bulb replacement.
# ALL MECHANISM completely enclosed.
# SPECIAL PURPOSE FOOT.
# FLEXIBLE SEAM GUIDE.
TO GET THE MOST ENJOYMENT
FROM YOUR SINGER 611
Take advantage of the free sewing lessons to which you are entitledl
Skilled, SINGER-trained teachers will give you personal guidance and
assist you in learning the fundamentals of home sewing.
Page 6
SINGER SERVICE
Wherever you go you will find expert, dependable SINGER* Service
close at hand. SINGER is interested in helping you keep your SINGER
Sewing Machine in top running condition. That i.s why you should
always call your SINGER SEWING CENTRE if your madrine ever
requires adjustment or repair. Only from your SINGER SEWING
CENTRE can you obtain the services of a trained SINGER repair man
and warranted SINGER'*' parts.
Пк1©Шй
risa Гб)
ШШ&
4(8У-^г==У@)
..Амм^Кмммммак. ^
EVERYTHING FOR THE WOMAN WHO SEWS
The answer to your sewing needs is at your SINGER SEWING
CENTRE. There you will find a wide choice of sewing aids, notions,
sewing instructions and services. Look for the famous red "S" and
SINGER trademarks on your SINGER SEWING CENTRE and the ever
readv SINGER Service Car. See phone book for address nearest vou.
Page 7

NEEDLE AND THREAD SELECTION
The selection of thread should be based on the fabric to be stitched,
The thread should blend with
the fabric in colour, fibre and size.
Silk and wool fabrics should be stitched with silk thread; cotton fabrics $br)uld be stitcied with cotton
or cotton mercerised thread, etc. The thread must be of a size that will imbed itself into the texture of the
fabric. Thread that is too heavy for the fabric will remain on the surface and become weakened by fric
tion and abrasion.
The selection of the needle should be based on both the fabric and thread being used. The eye of the
needle must be large enough for the thread to pass freely through it. The blade of the needle must be fine
enough not to mar the fabric with too large a puncture, yet heavy enough to pierce the fabric without
binding or deflecting.
You will obtain best stitching results from your Sewhng Machine if it is fitted wuth a SINGER* Needle.
Page 8

NBEDLHS AN0 THREAD
"his machine uses a Cat 2020 (15X1)
needle. Sizes 9, 11, 14, 16 and 1$.
For perfect stitching, select correct needle
and thread to correspond with fabric {see
page 5).
Be sure to use like threads for both needle
and bobbin.
NBHDIE INSERTION
Raise the needle bar to highest point by
turning the hand wheel toward you. Loosen
the needle clamp screw. Insert needle up
ward into clamp as far as it wull go, with the
flat side of the needle to the back and the
long groove toward you. Tigh.ten needle
clamp screw.
6
LOiNG GROOVE
TOWARD YOU
Page 9
TO OFERATB MACHINE
Place material under the presser foot and
lower foot. Connect plug to electric outlet
(see page 97). Start machine by pressing con
troller.
fEIectric Drive)
The speed of the machine depends entirely
on the amount of pressure applied to the
controller.
Practice operating the machine (without
thread) until you become accustomed to
guiding material and regulating machine
sneed.
Page 10
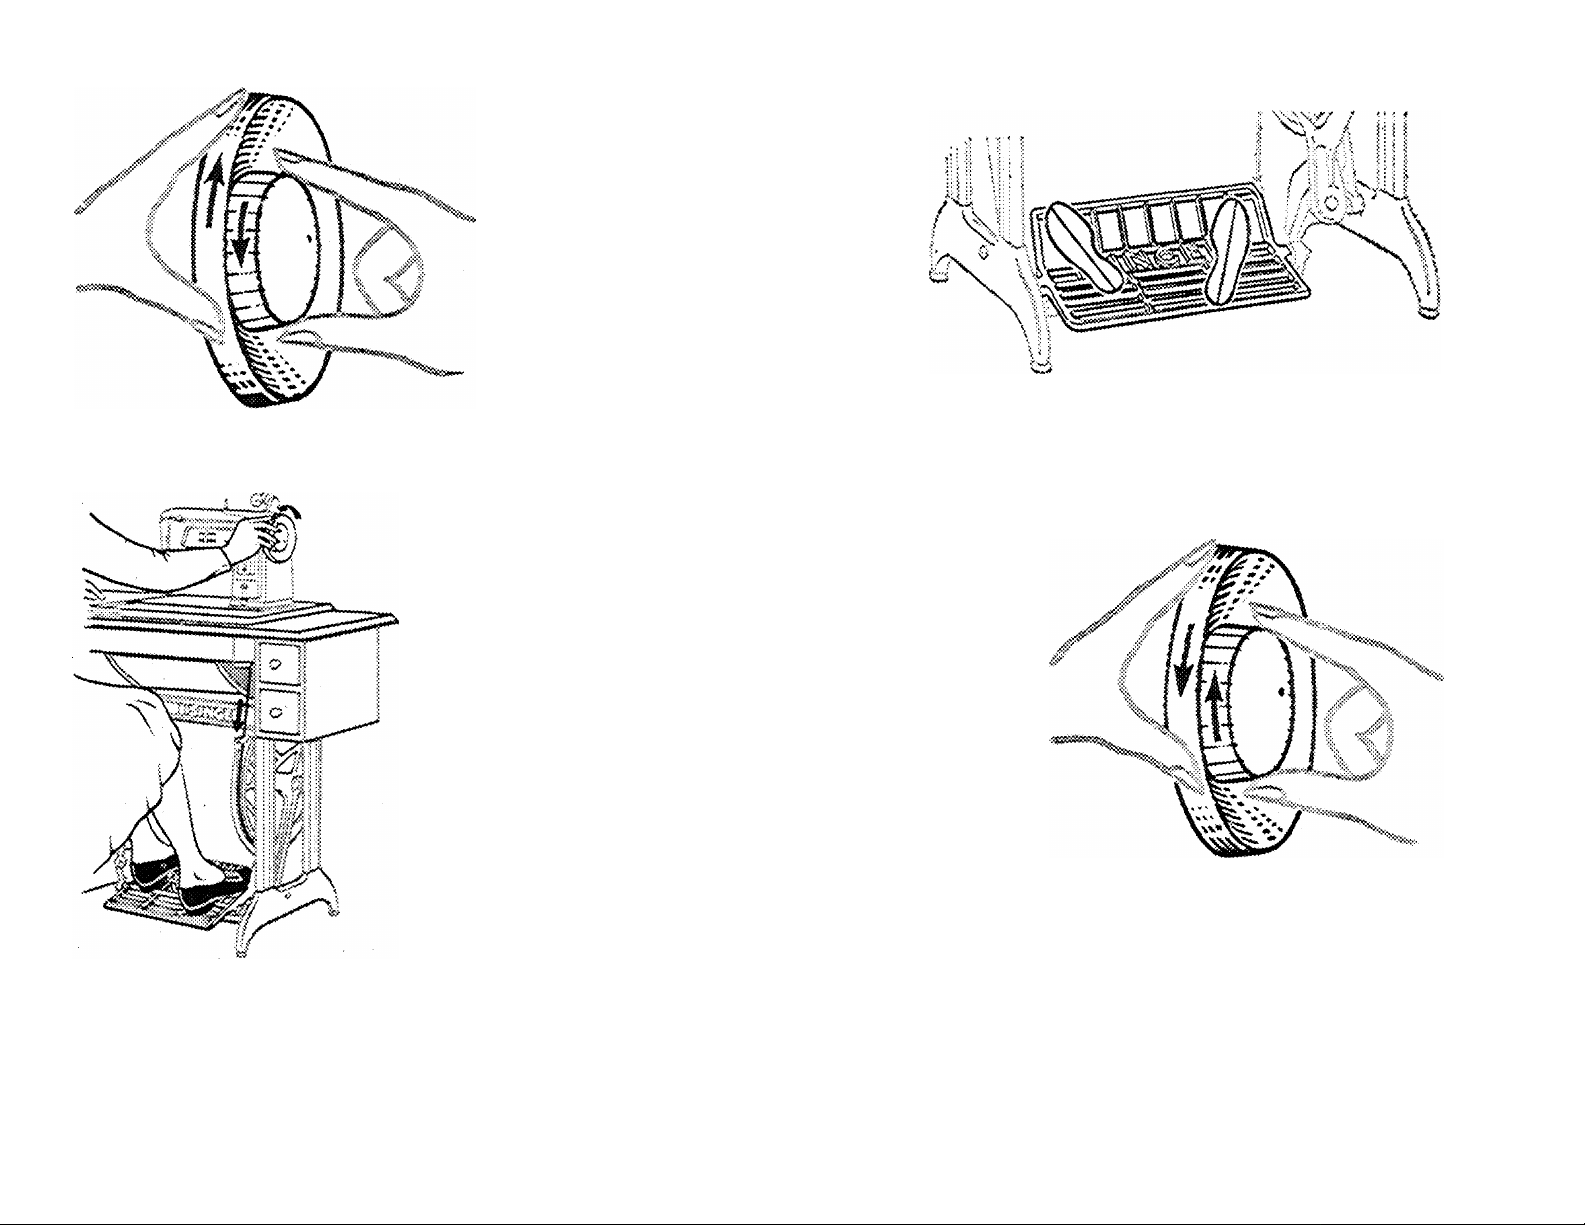
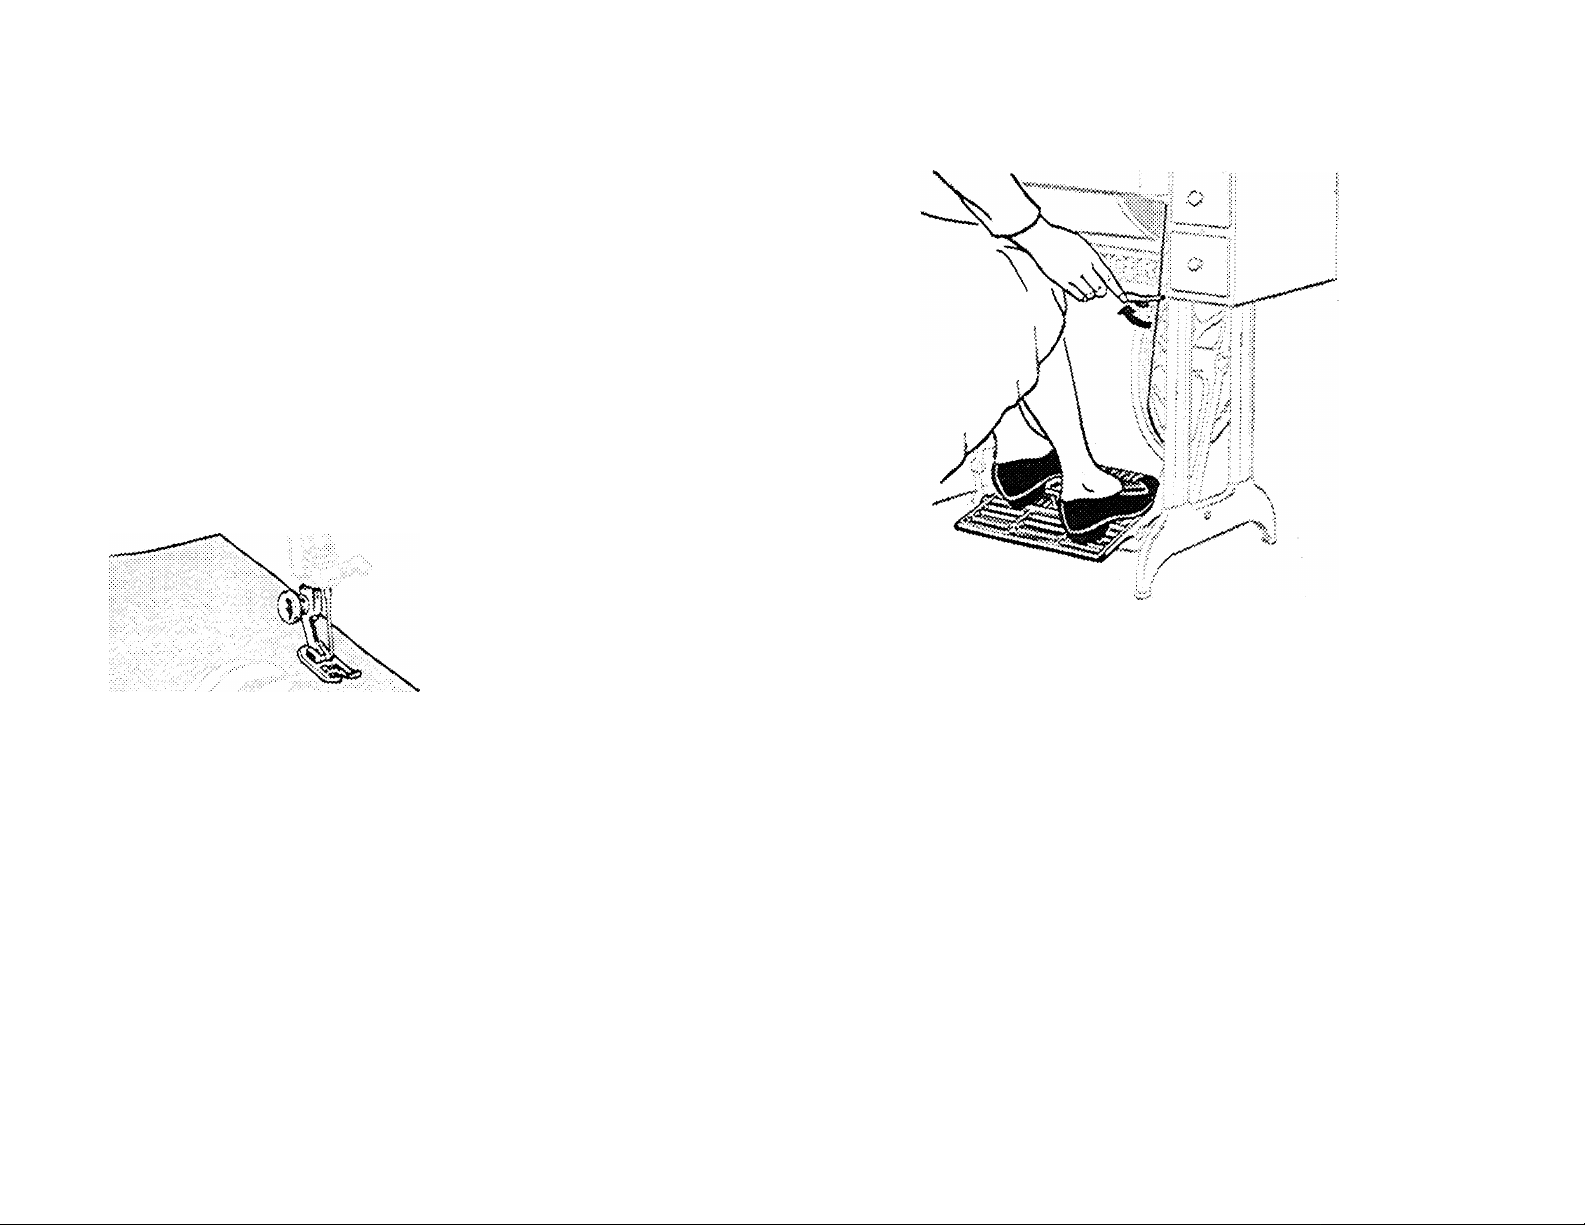
TO OPERATE THE ?
(Treadle Drive}
Loosen stop motion screw and place both feet on treadle.
Turn hand wheel over toward you, allowing feet to move freely and lightly with motion of treadle.
Practice this motion until vou are able to re-start machine with hand wheel turning over toward you. Then
tighten stop motion screw.
8
Page 11
1RFTT «vHTFTFI?
To throw off the belt, work the treadle and move
belt shifter to position shown.
To replace belt, release belt shifter and work
Place material under presser foot and lower the
foot.
Operate machine {without thread) until you be
come accustomed to guiding the material.
treadle slowly with band wheel turning over to
ward you. One or two revolutions of band wheel
will bring belt back into place.
Note: Tension on belt should be only heavy en
ough to keep belt from slipping.
9
Page 12
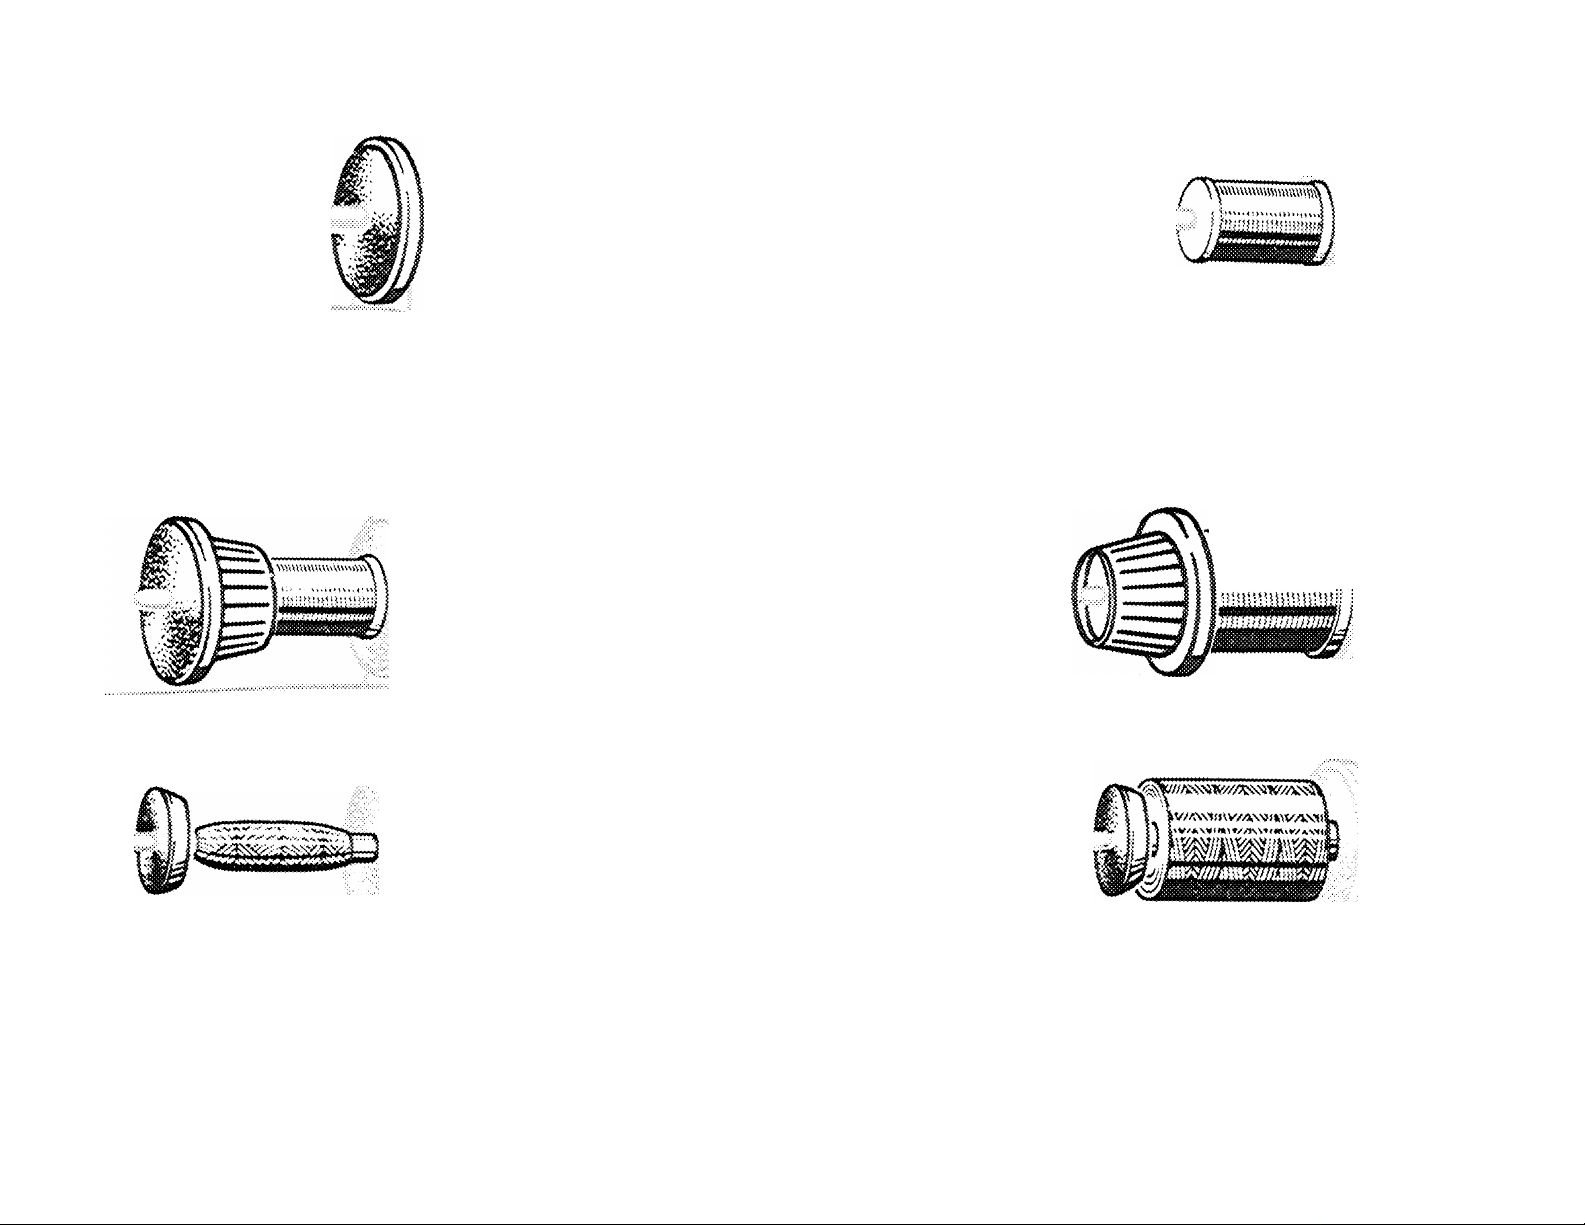
spoot HOiPia
1. Slip spool seat on to spindle (Cushion
side facing spool of thread).
2, Slip spool of thread on to spindle-
3. Press thread lead-off against spool of thread. Select thread lead-off according to the size of thread
spool used^ as shown.
10
Page 13
UPPER THREADING-SINGLE NEEDLE
Raise take-up lever to highest point. Place thread
on spool holder and lead through threading points
shown. Thread needle from front to back. Draw
sufficient thread throuch eve of needle with which
to start sewing.
n
Page 14
...
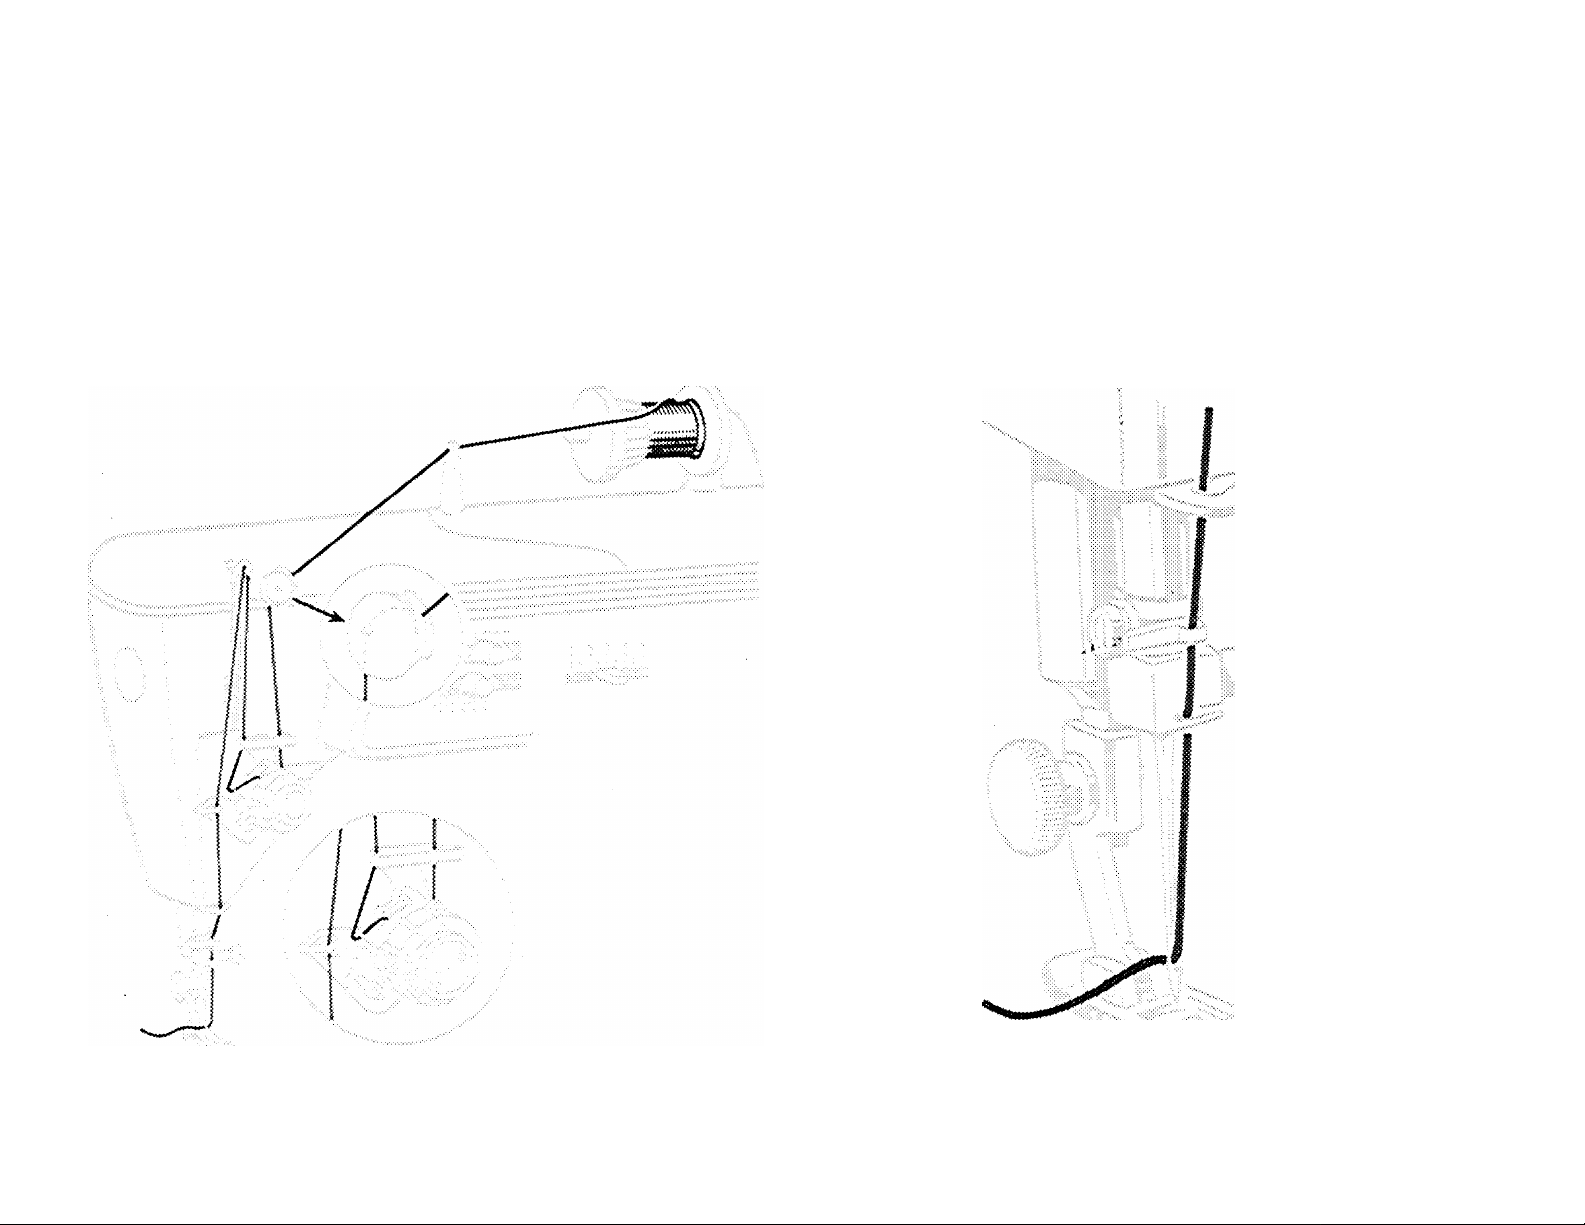
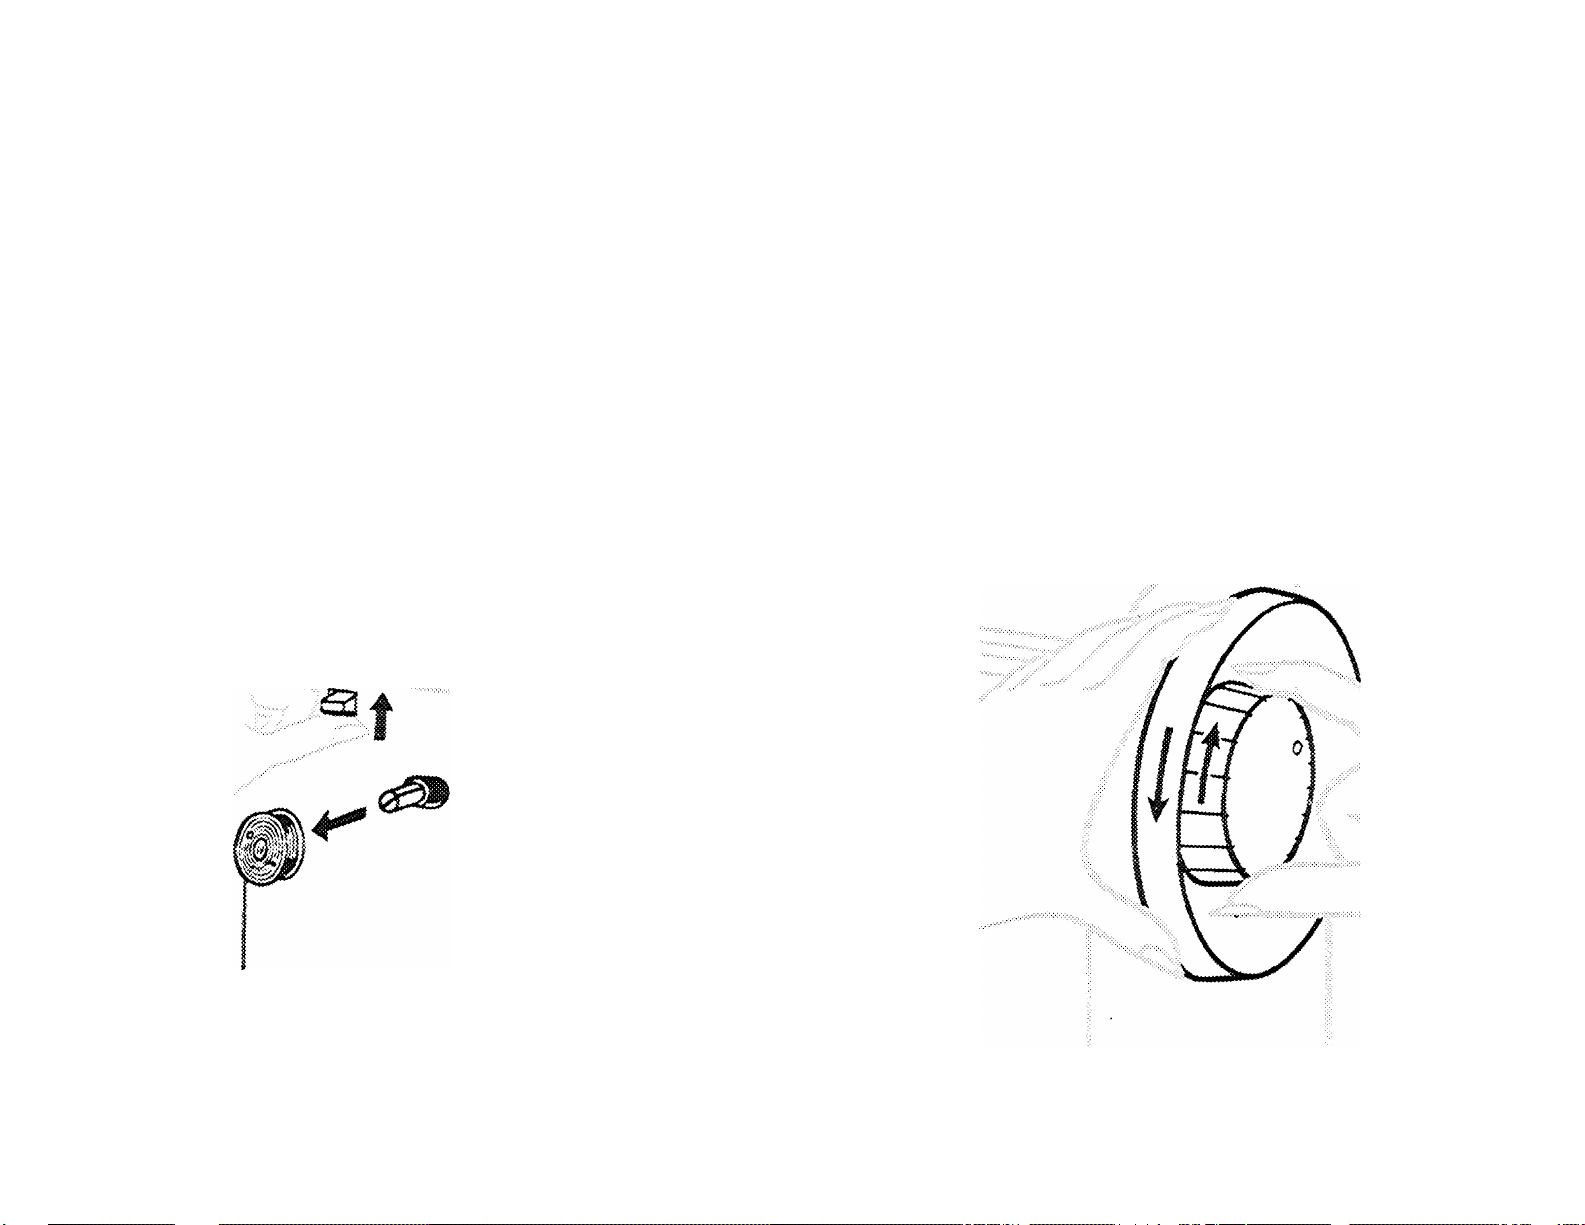
WIND THE BOBBIN
y-".
Release hand wheel turn stop motion screw with right hand in direction shown by arrow. Slip bobbin
on to bobbin winder spindle»
12
Page 15
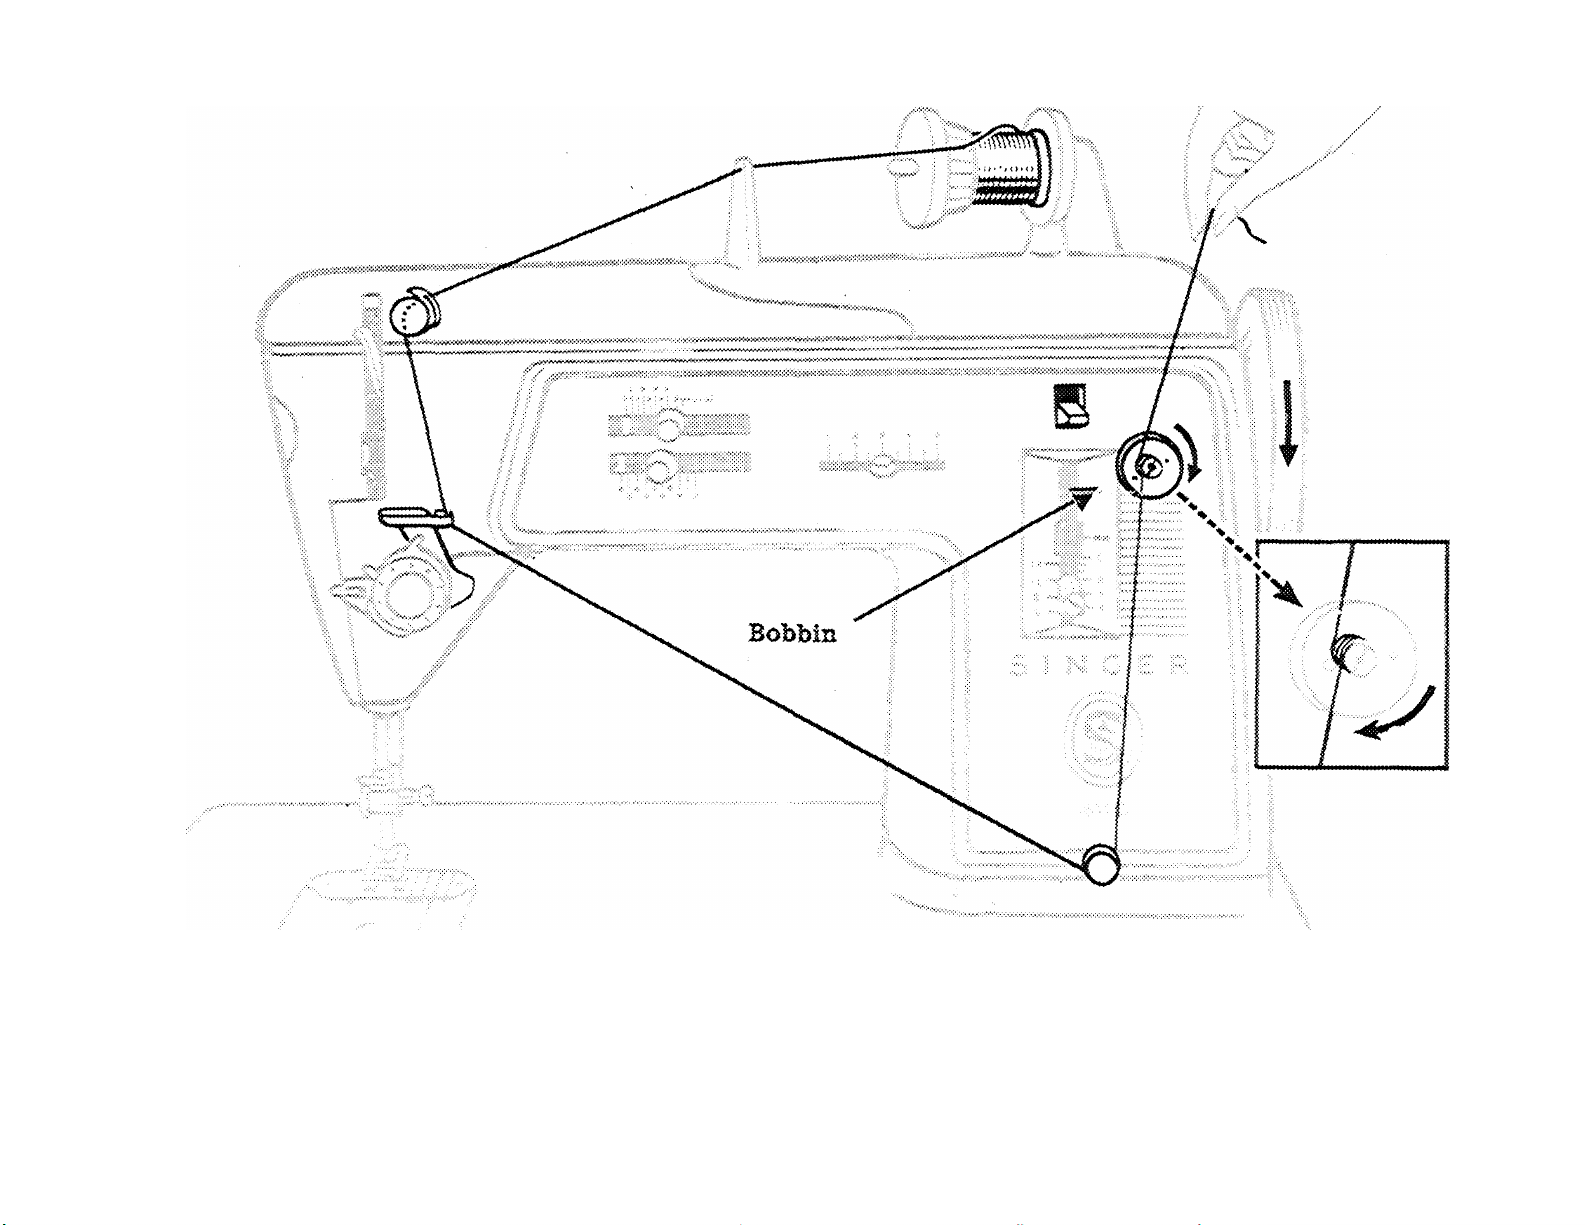
WIND TFH BOBBIN fCoai^a.|
Thread the machine as shown.
Wind several coils of thread around the bobbin and depress bobbin winder engaging lever.
13
Page 16
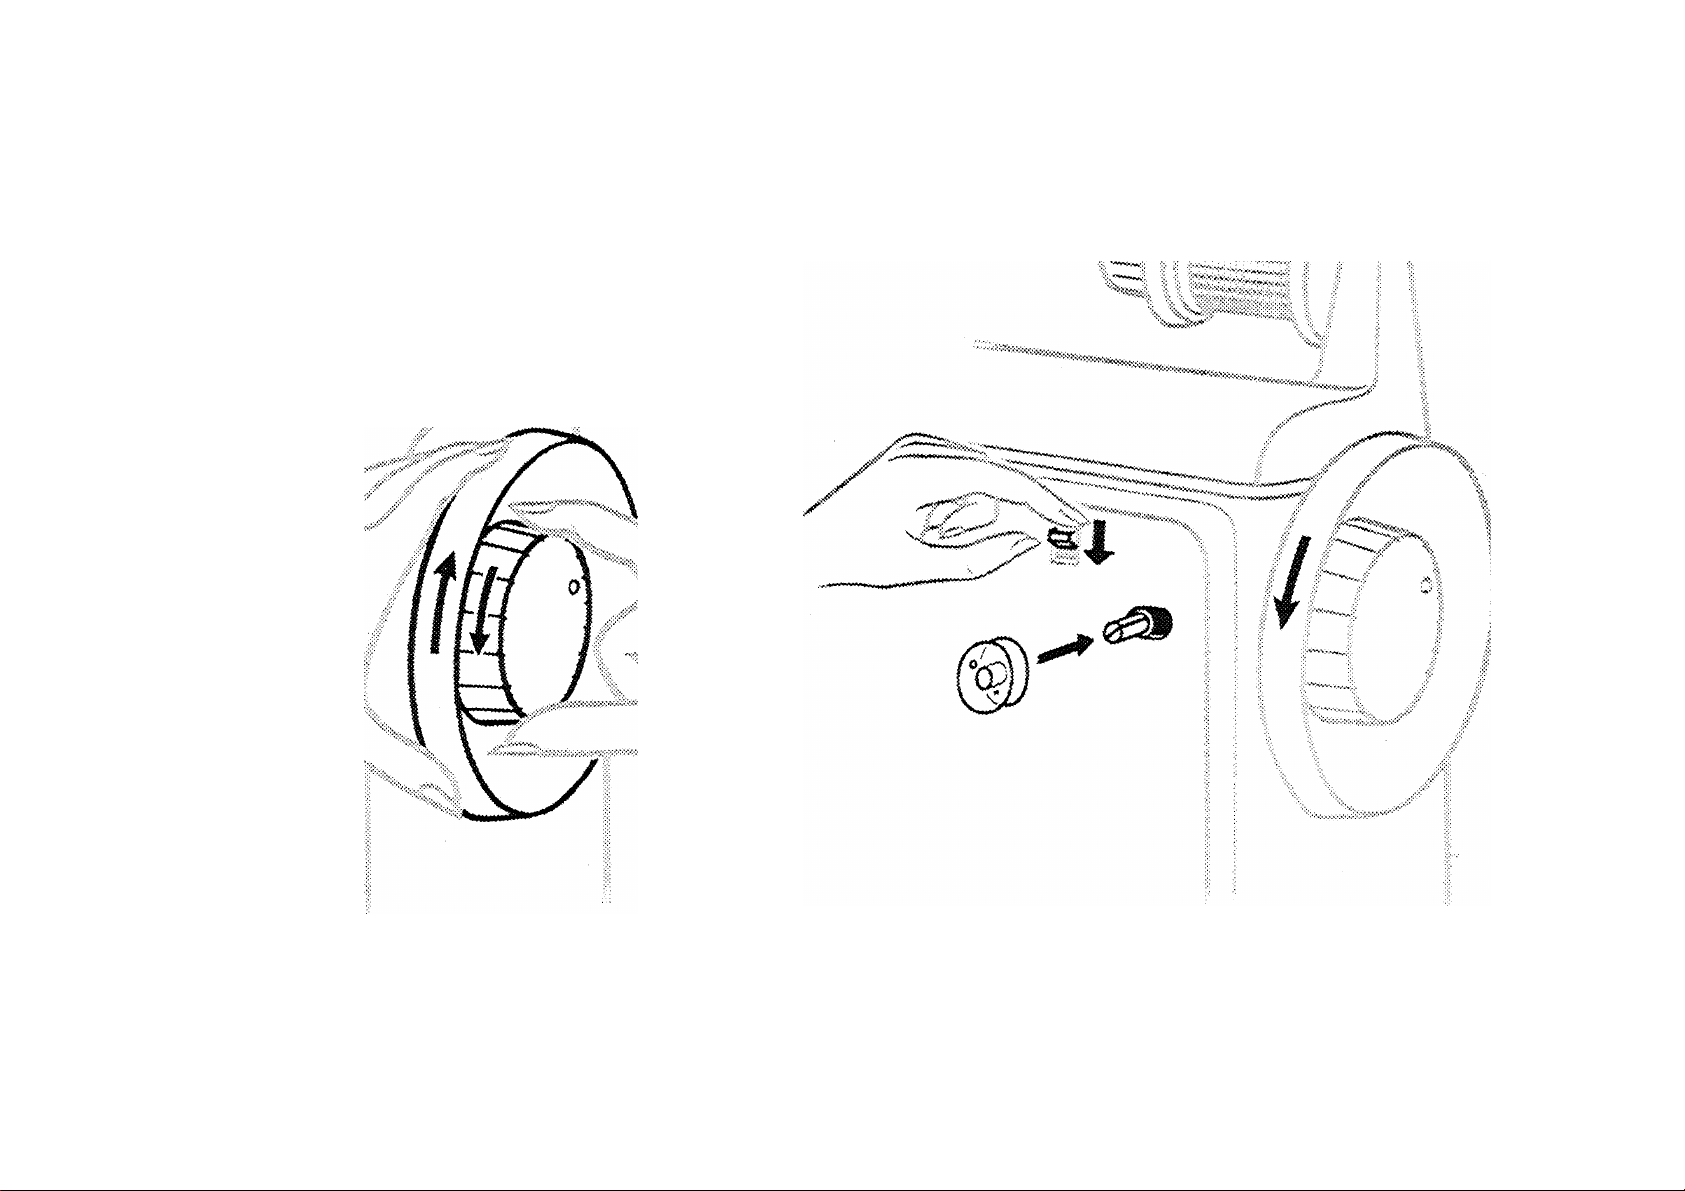
WIND THB BOBBIN {ConVd,}
Do not wind too much thread, otherwise there
would be no free run of the bobbin in the bobbin
case.
Stop machine, raise bobbin winder engaging lever
and remove bobbin from bobbin winder spindle.
Tighten stop motion screw with right hand in
direction shown bv arrow.
14
Page 17
/ /■
O^ea
sU-
r0^'
! \àe
\5
Page 18
THSEA0ING THE BOBBIN CASE
'0
T-‘*s^2^*^^; v:y.‘^y.-
Hold bobbin so that thread leads off in direction shown. Place bobbin in case. Lead thread into slot
and under spring.
Draw thread into notch at end of spring, pulling off about 3 inches of thread across the bobbin.
Close slide plate allowing thread to enter notch.
16
Page 19
6 Pressure Release
Button.
Thread Take-up
Lever
Pre-tension
Pattern Selector
Buttons
Hngaging Lever
Hand Wheel
Bobbin Winder
Spindle
Stitdi Length
Regulator
Bobbin Winder
Pre-tension
Bulb Replacenre:
Lever
I?
Page 20
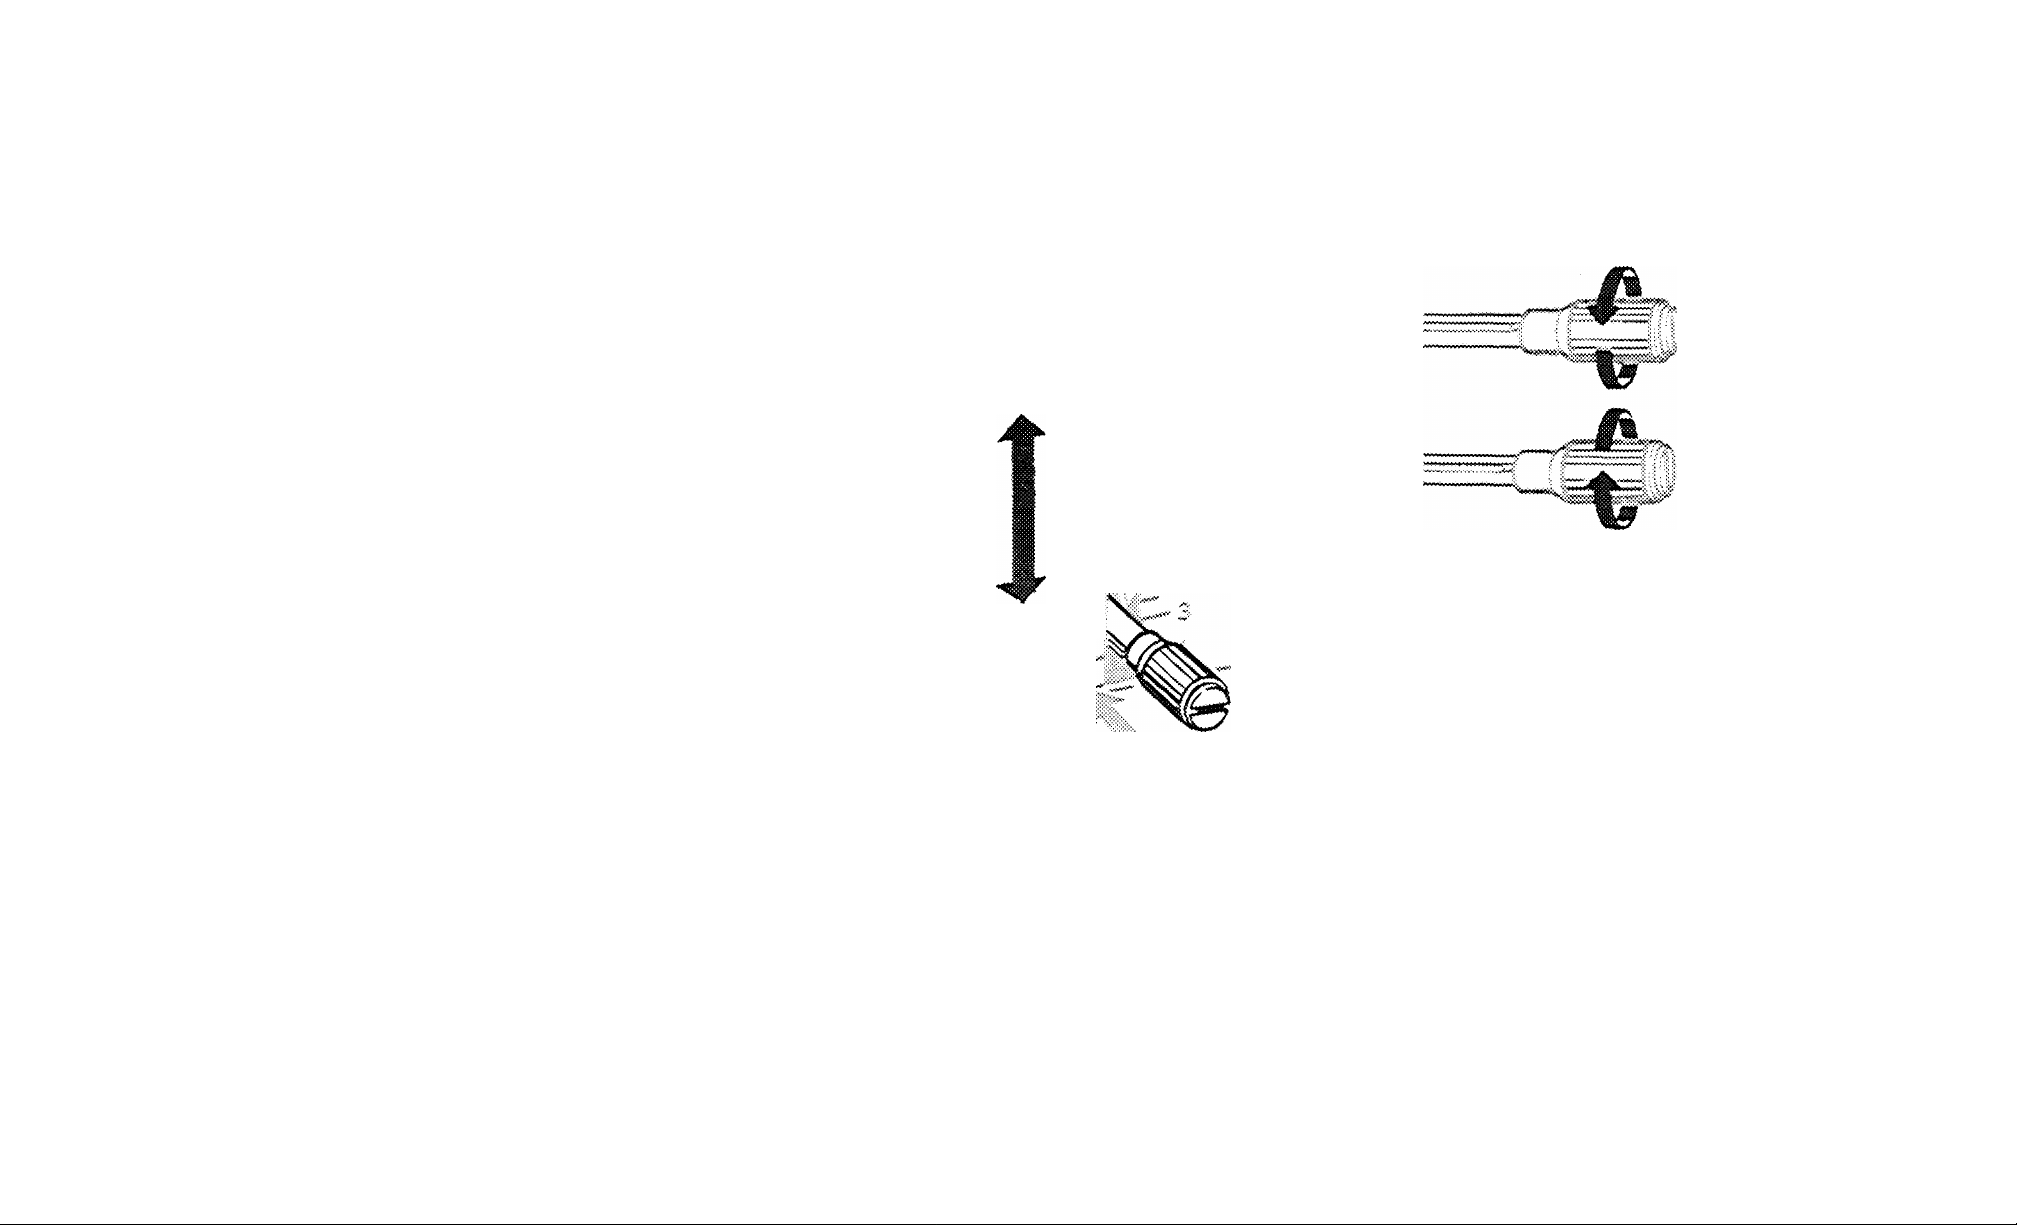
STITCH LENGTH INDICATOR
Numerals on the left side of the indicator repre
sent the number of stitches per inch. Numerals on
the right side represent stitch length in millimeters.
A superfine control cam be made in case of siitdx
lengths less than 1 mm or stitches per inch {20),
The greatest stitch length of 4 mm or 6 stitches
per inch can be locked in place when stitching folds,
pleats or multiple layers of heavy fabric.
To set stitch length: Loosen by turning thumb nut
to the left as shown. Position lever for desired stitch
length. Tighten by turning thumb nut to the right.
By raising the stitch length regulator to the hig
hest point, reverse stitching is accomplished at the
UNLOCKS
REVERSE
LOCKS
FORWARD
'Nv
.2'
\
same stitch length as forward. When in locked
position, 4 mm or stitches per inch (6) cannot be
reversed. If reverse stitching is desired with this
stitch length position, turn thumb nut to the left
until the stitch
length regulator can be adjusted to
its highest point at reverse stitching.
18
V
Page 21

STITCH WIDTH IBYER
4
■:•:•:•♦ , s
.-f*
The stitch width lever is used for both straight and zigzag stitching. Numerals indicate five positions
but intermediate settings may also be used. To position, depress stitch width lever and slide it left or
right to desired setting.
Do not set stitch width lever while the needle is in the fabric.
PATTEHN SEIHCTOR
Please note: Do not make selector adjustments while the needle is in the fabric.
When make Pattern selection set stitch width lever at 3.
3
19
Page 22
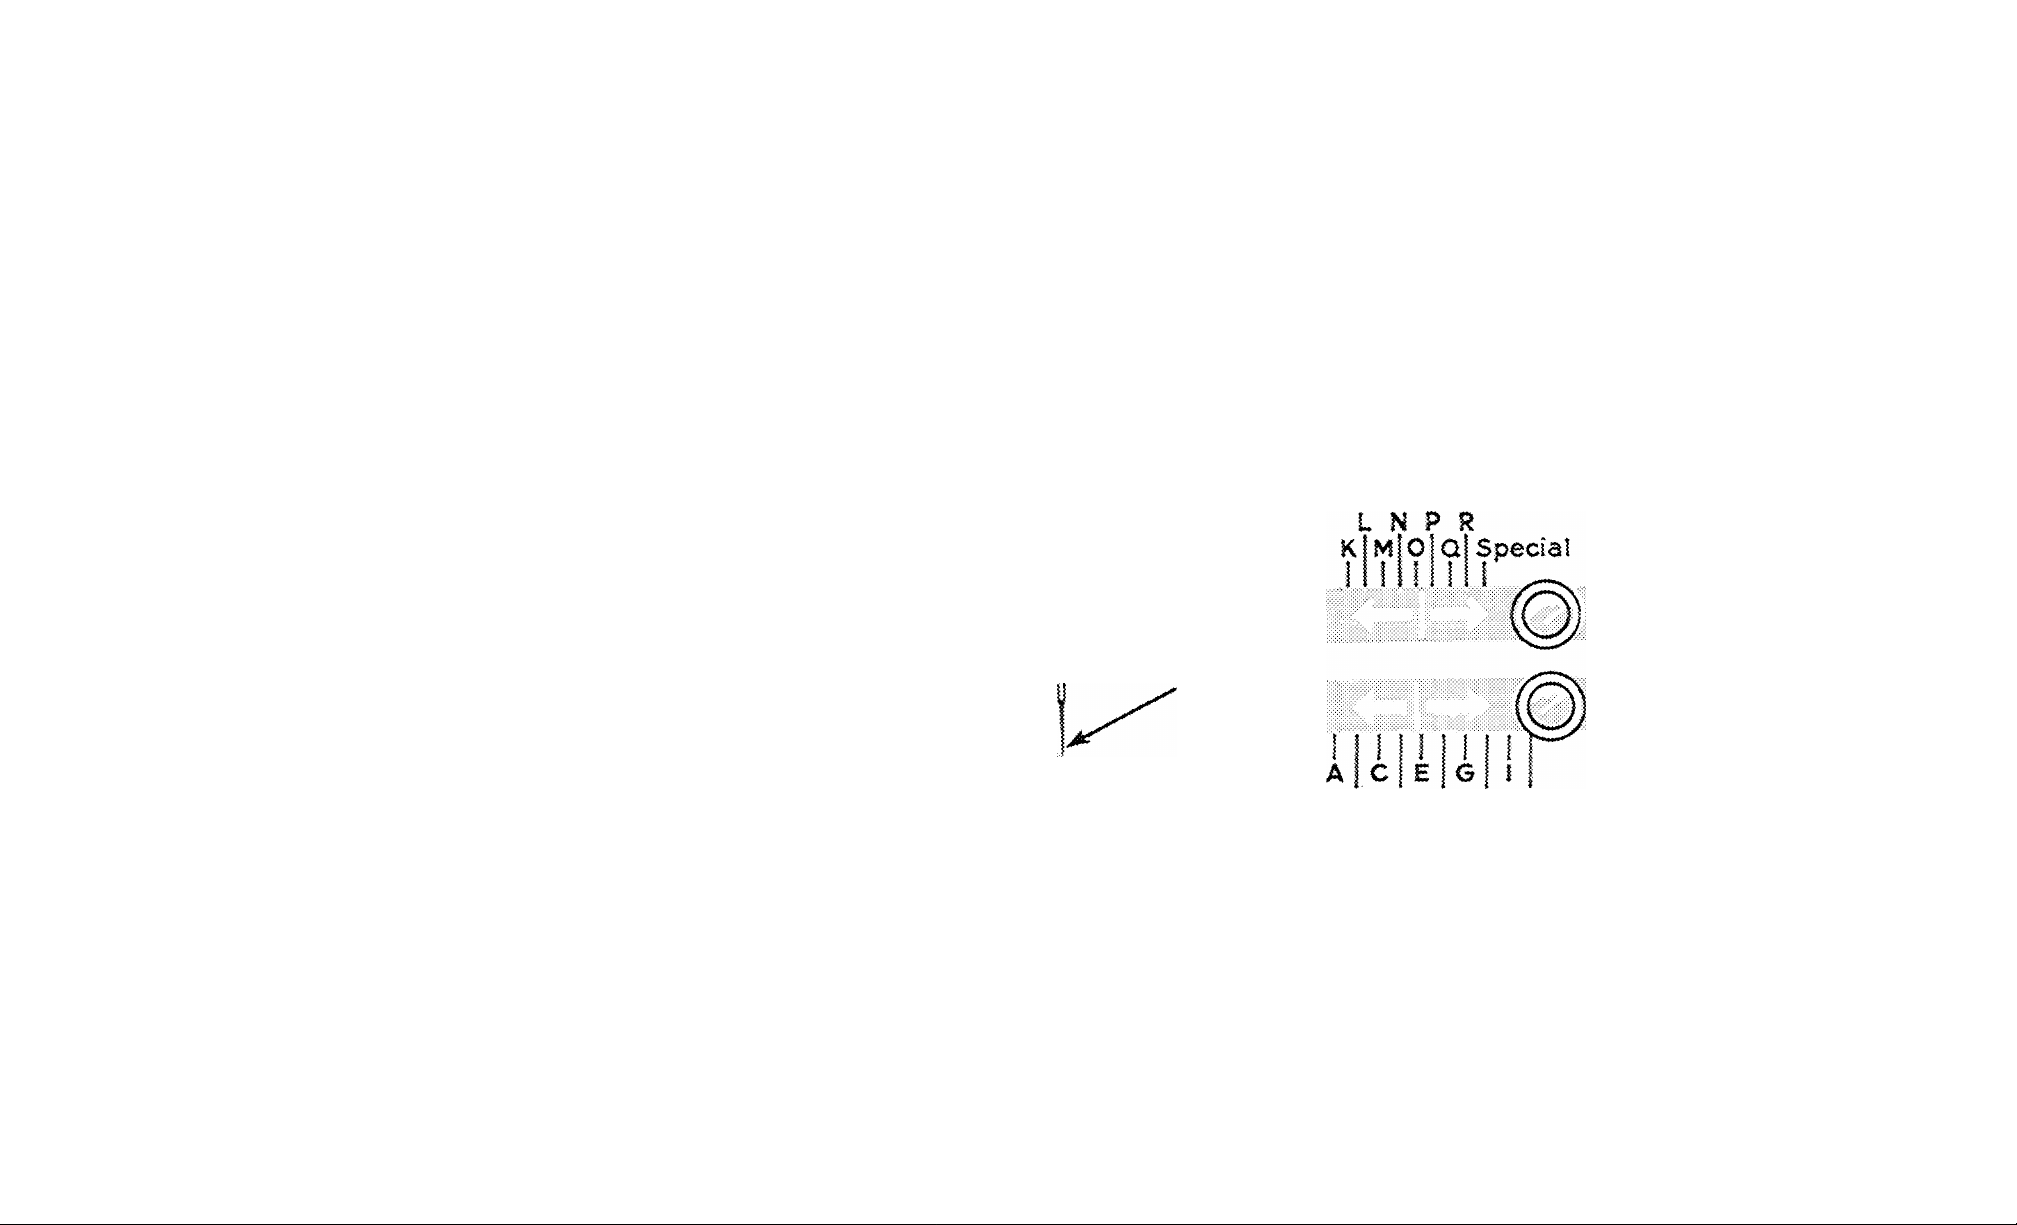
PATTmN SELECTOR
JStok
To Select Required Pattern
1. Depress Push Button A and keep
depressed until selection is com
pleted.
2. Push Pattern Selector Buttons.
3. Select required Pattern.
4. Release Pattern Selector Buttons.
5. Release Push Button A.
20
B D f H J
Settings from K through Special are
made by the upper button.
Settings from A through J are made by
the lower button
Page 23
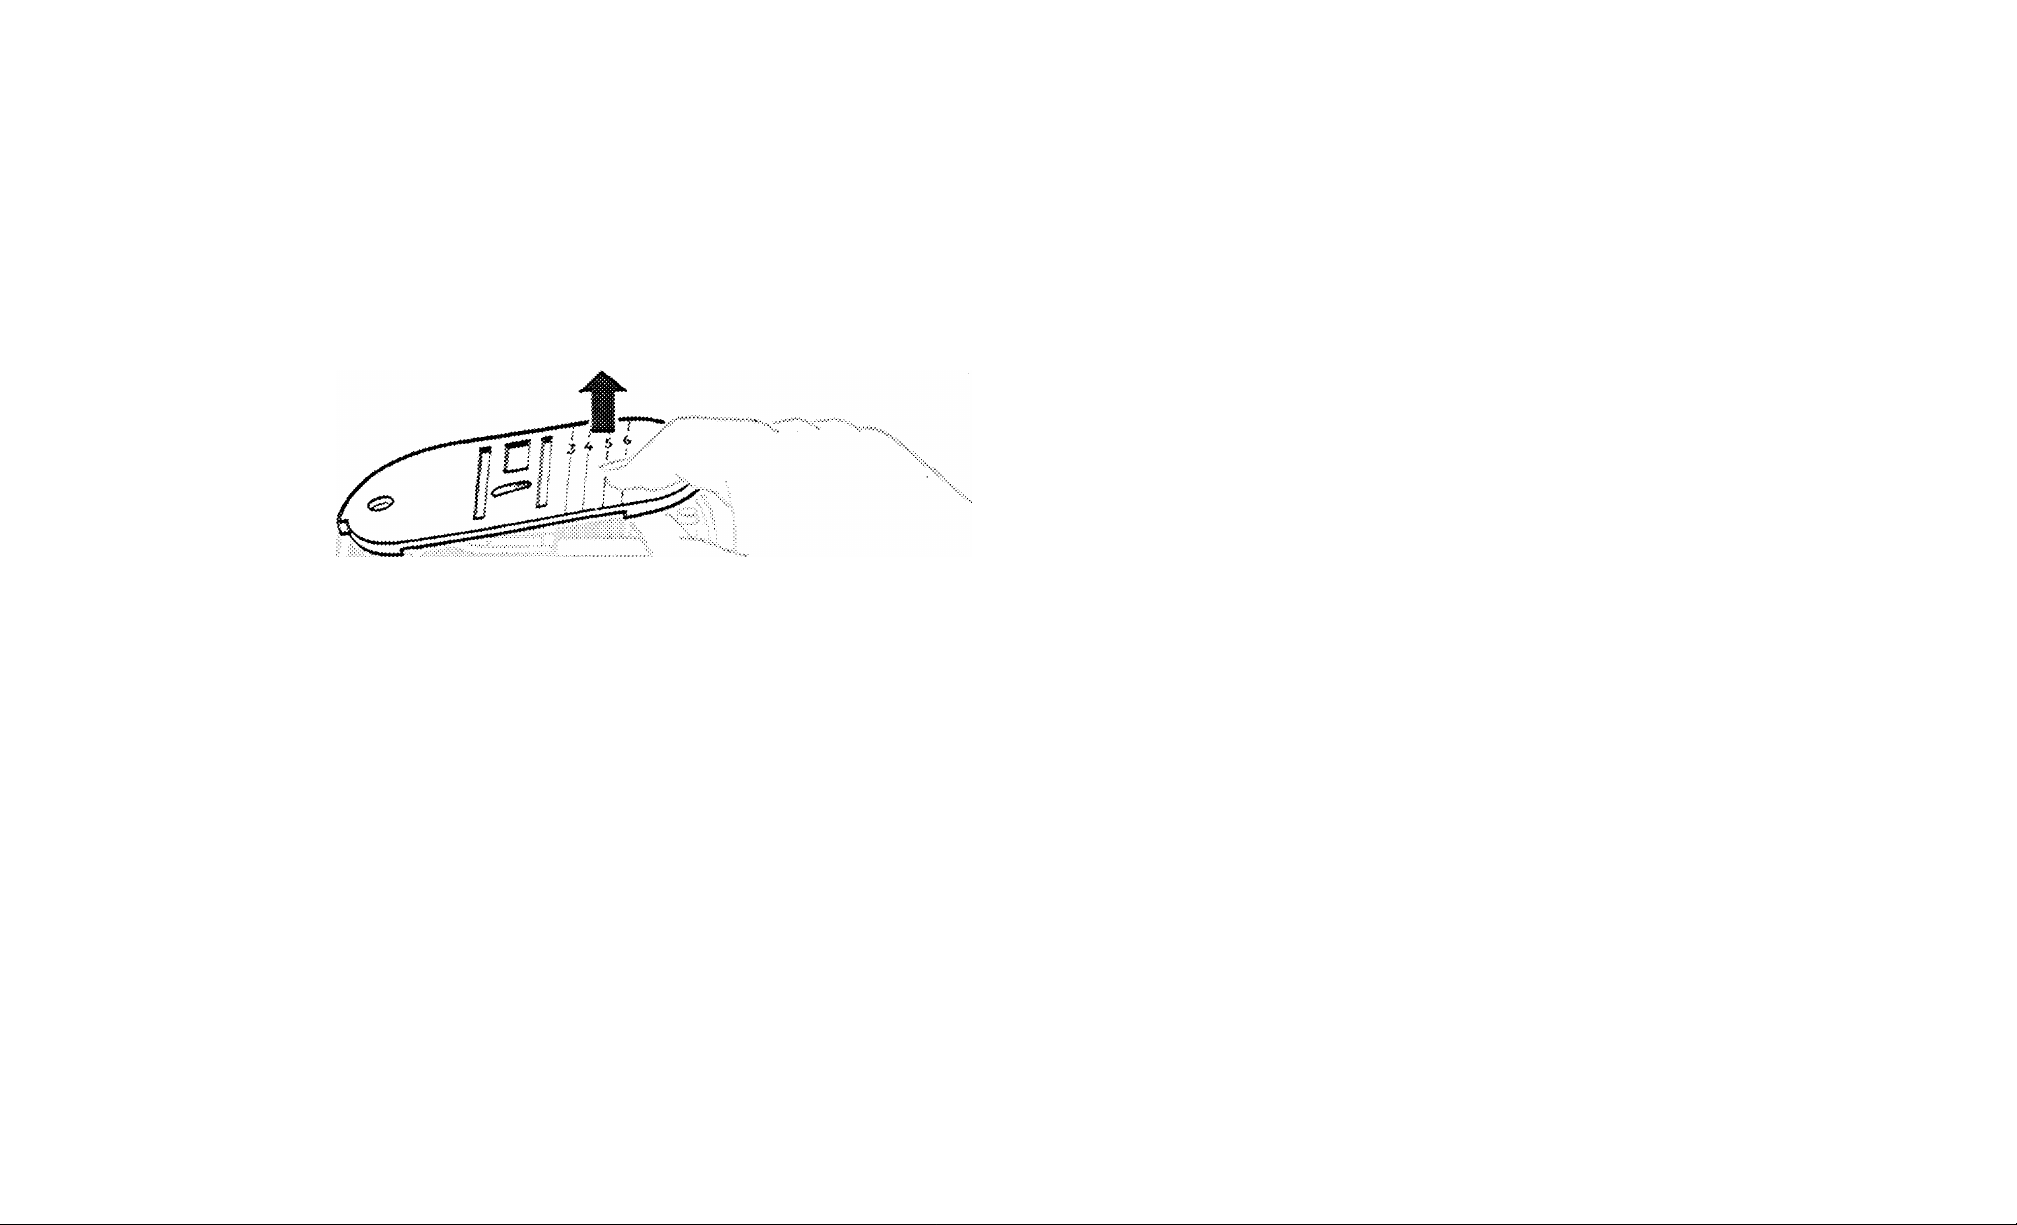
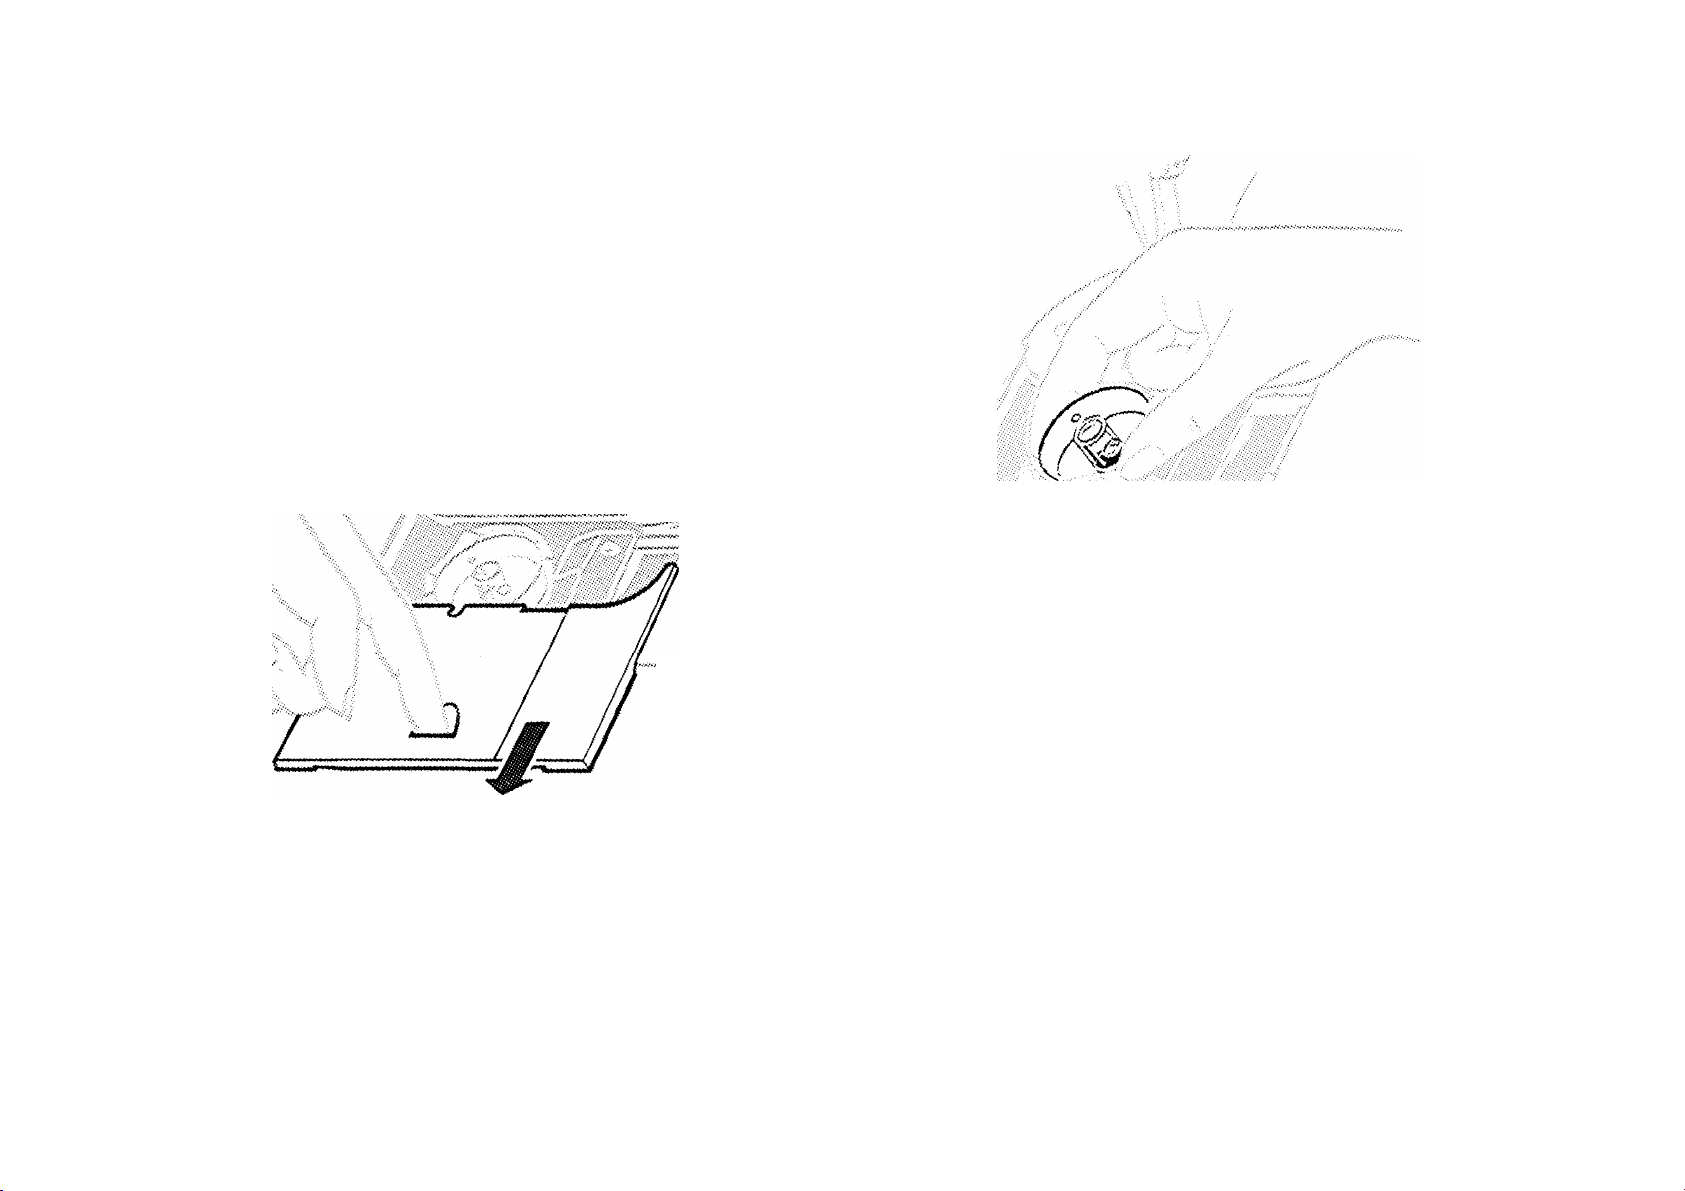
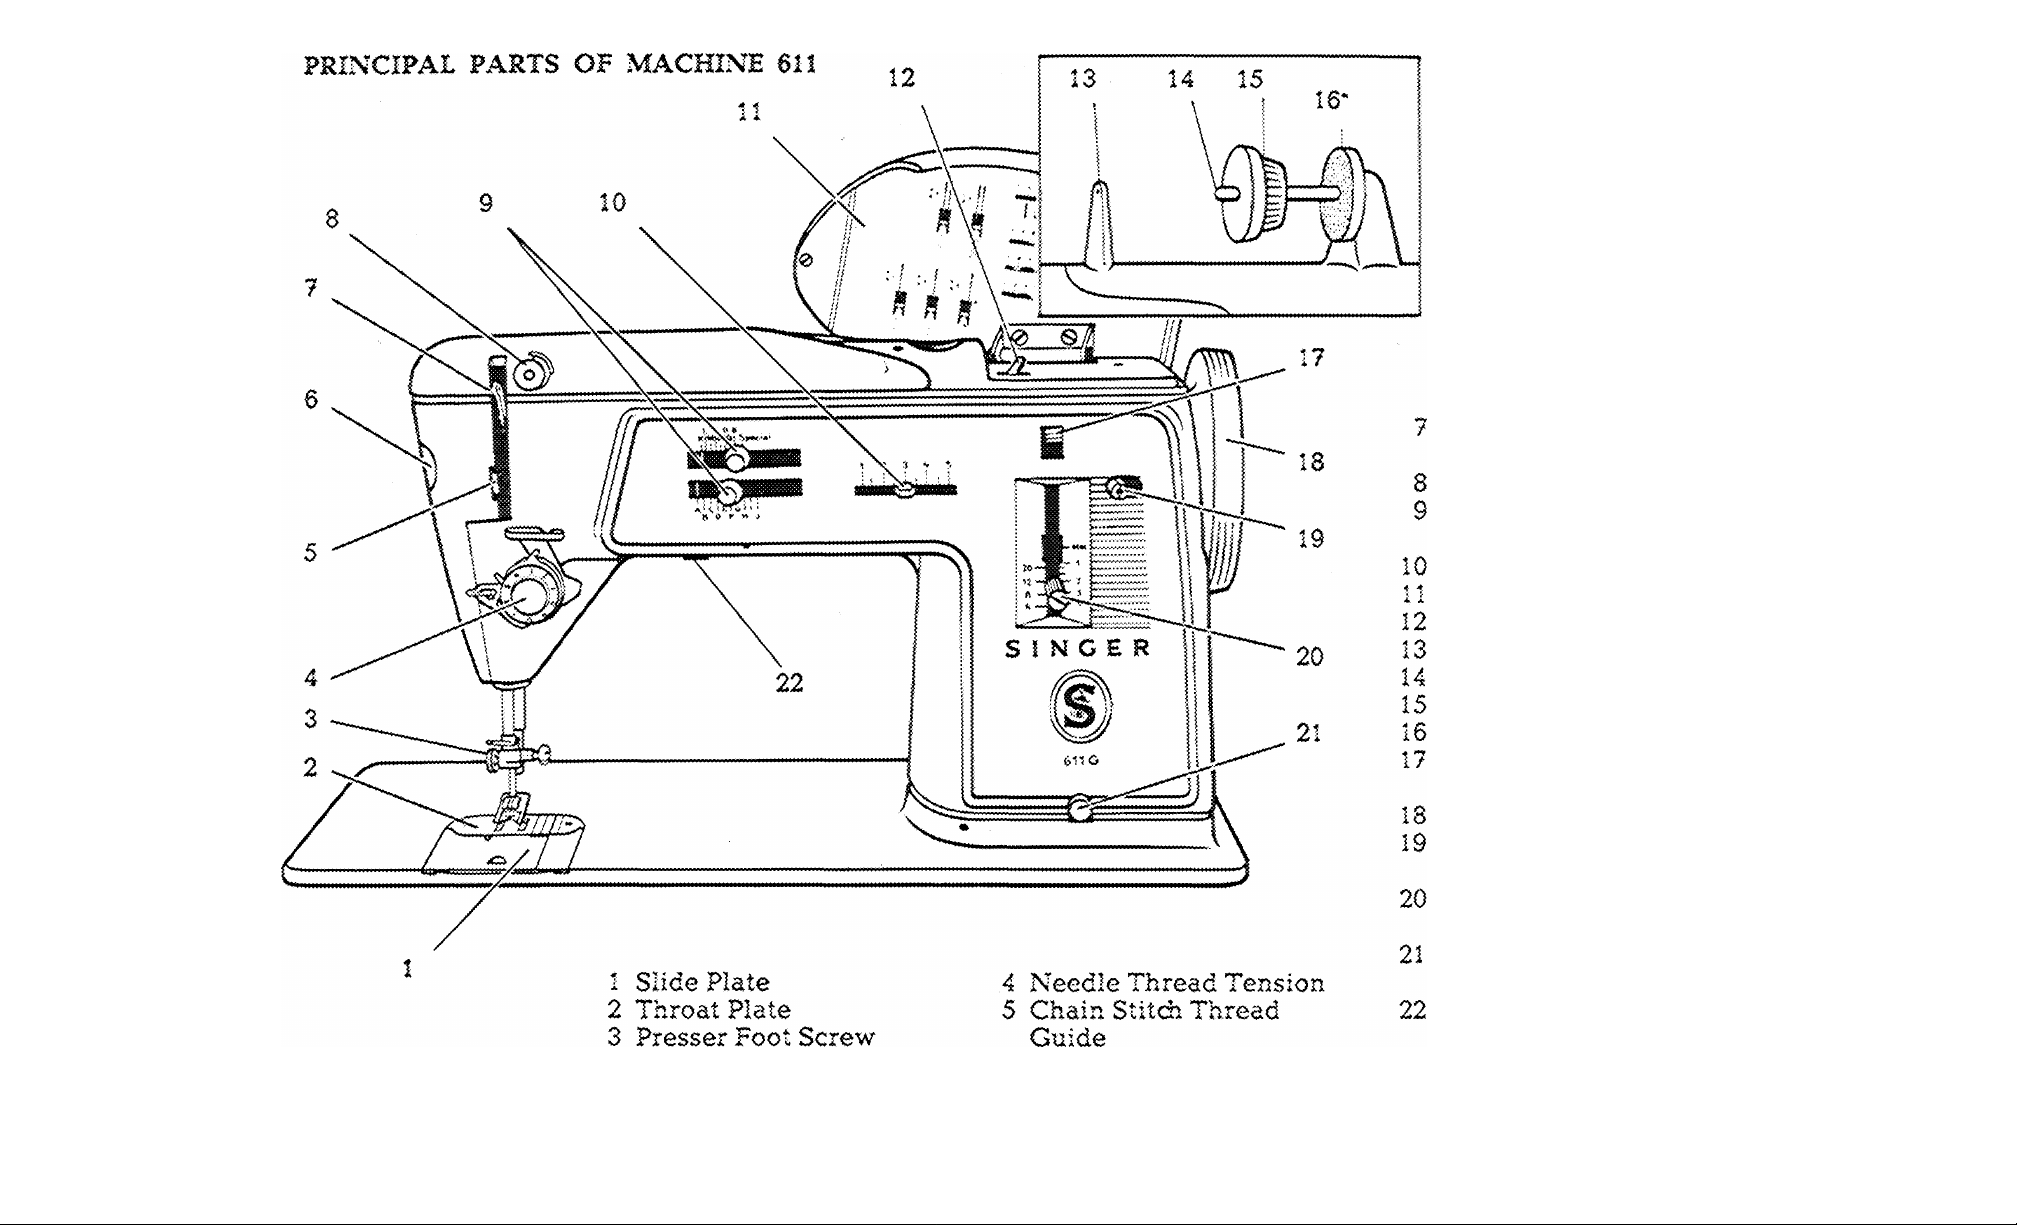
THROAT PLATE
REMOVAL AND REPLACEMENT
Removal of throat plate
Replacement oi throat plate
i ! I J:
#1
©
Raise presser bar. Turn hand wheel to raise needle
to its highest position. Open slide plate. Place thumb
under front end of throat plate and lift plate from
machine.
Place throat plate in position over two clamping
pins and then close slide plate.
21
Page 24
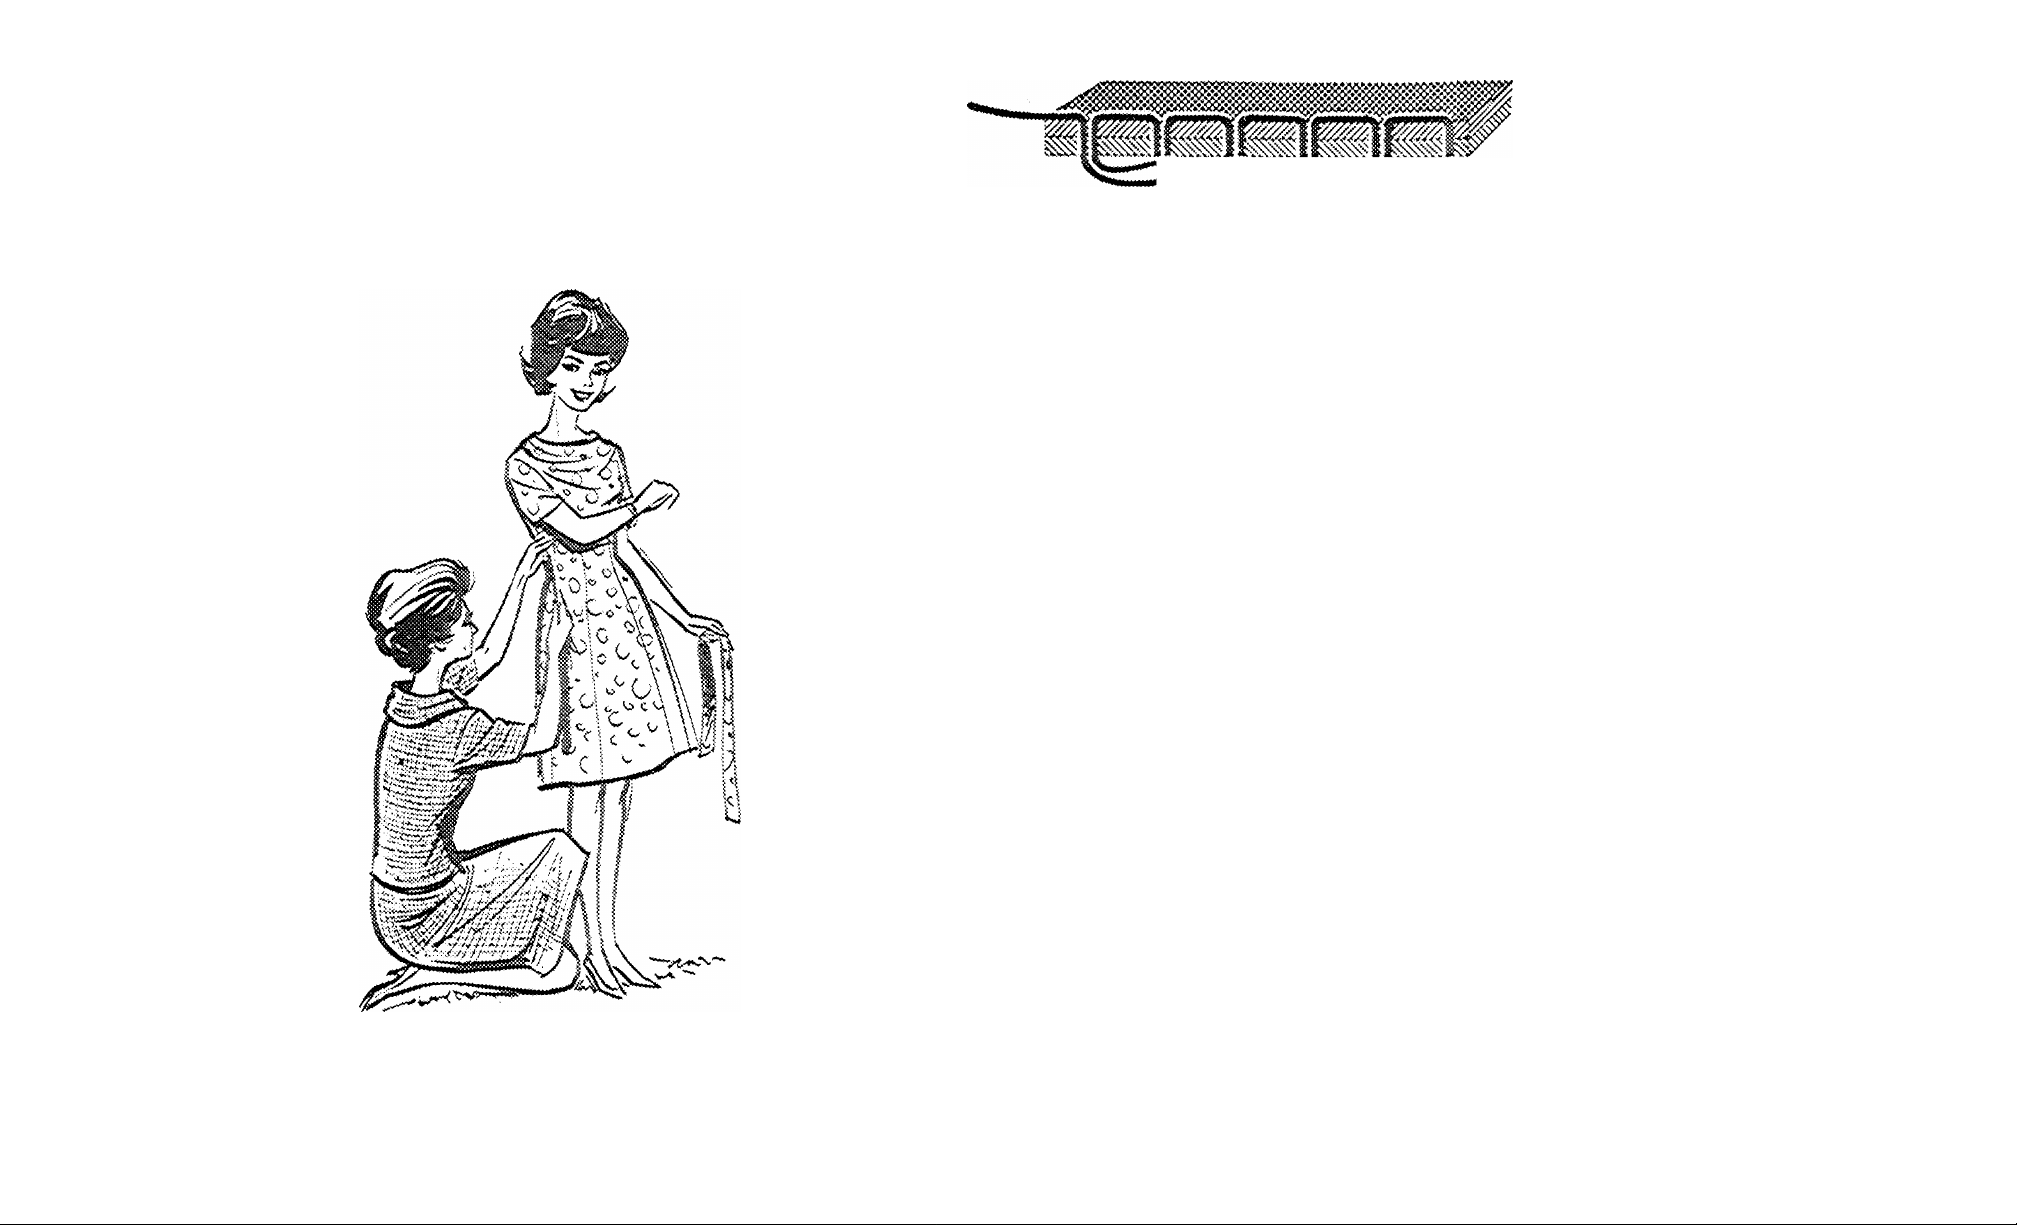
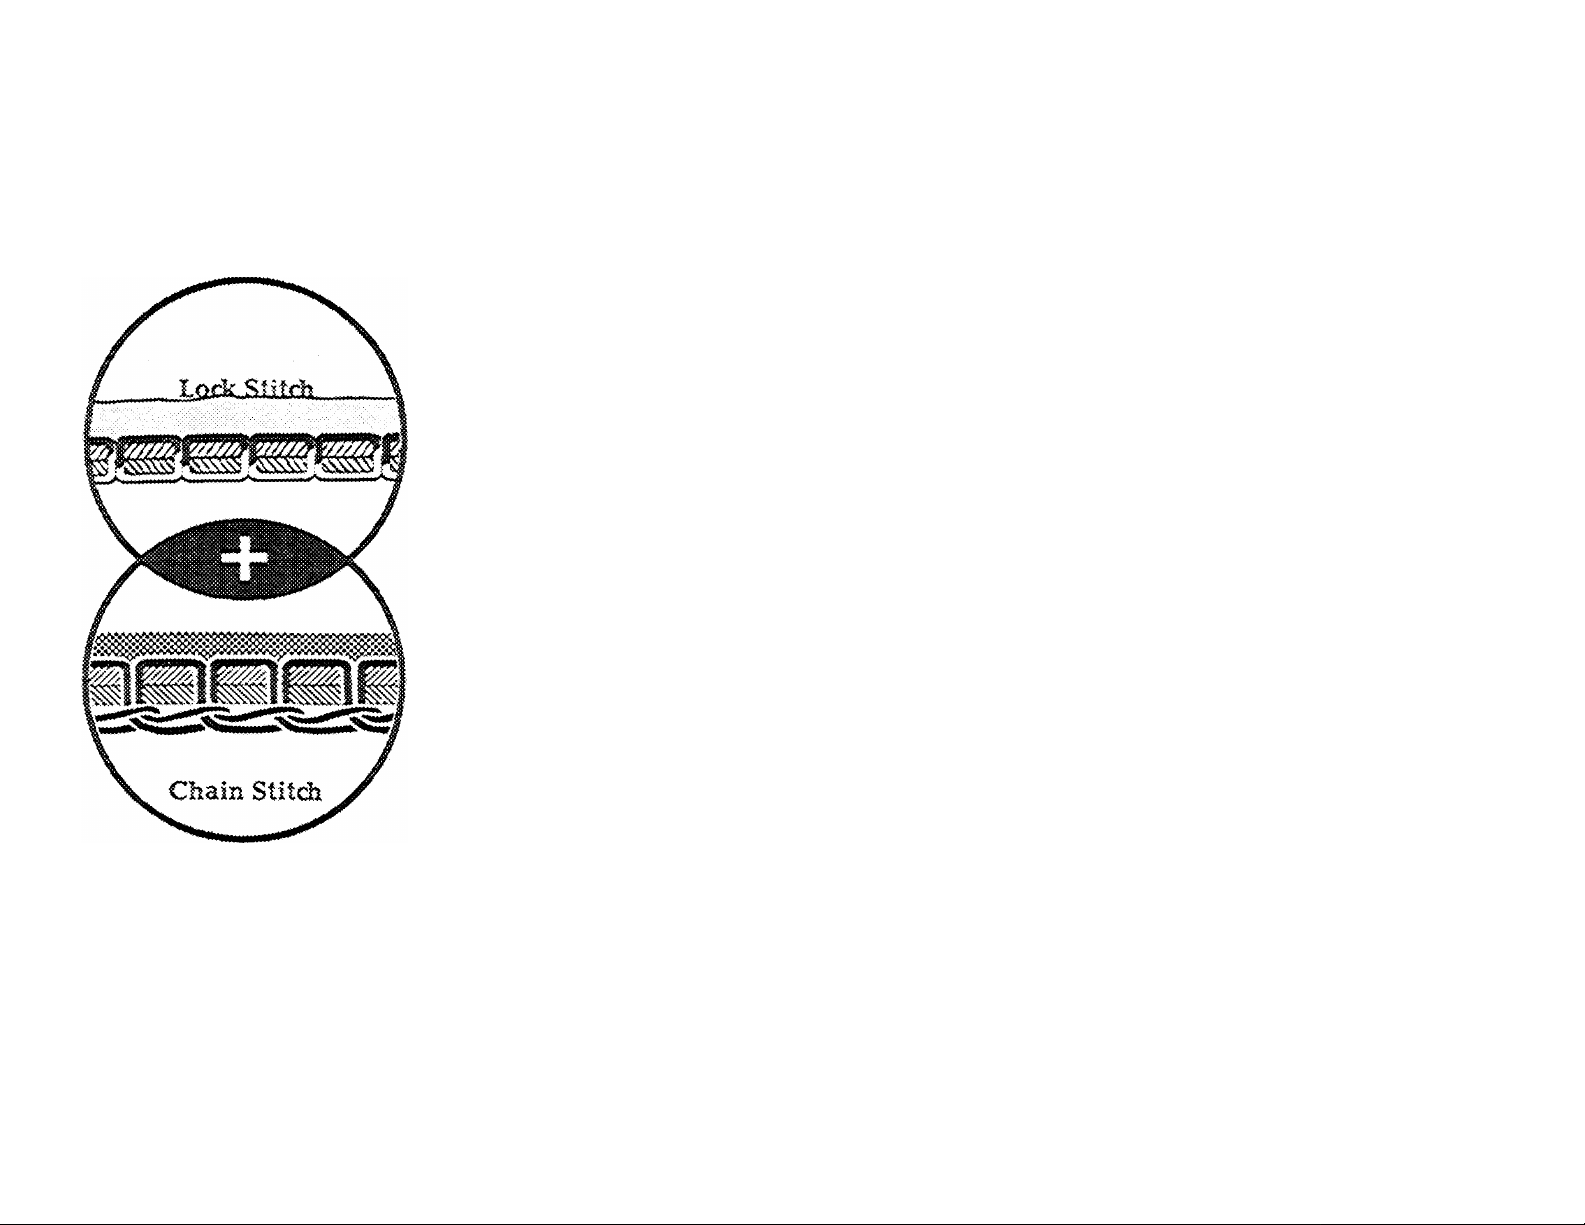
CHAIN STITCH
More than any other sewing machine the new SINGE'R 611 will
eliminate a comidetahie amount of time-consuming and burden
some work previously done‘by hand. This machine has the uni
que feature of being capable of producing not only conventional
lock stitching but selectively single thread chain stitching,
The main advantage of this type of stitch is that the single thread
chain stitch can easily and quickly be removed by a single pull
on the dmln stitch seam. By means of the chain stitch the neces
sary tacking and basting operations indispensable for sewing
perfectly fitted cresses or other garments can now be produced
on a mmchine. Even a section of a chain stitch seam can be remov
2'>
if^
ed without any effort as is frequently required when fitting the
dress or gàTxaent (side and waist seamm). Once the dress or gar
ment fits, the final lock stitch is stitched in a close parallel line
to the chain stitch. Then the temporary seam is remioved by a
single pull without leaving remains of the thread in the fabric.
Thus sewing-in of the basting seam is very unlikely. For basting,
regular thread or darning thread may be used.
The single thread chain stitch has a wide range of applications
and can be employed for a variety of operations, for instance:
Page 25
Edge basting on jackets, coats and costumes — sleeve in
serting — attaching collars — hems on skirts, blouses etc.;
Basting canvasses to the fronts of costumes and jackets in
stead of sewing them. with, zig/^ag stitches;
Sewing shrinking tucks on garments as shirts, pyjamas etc.
as well as on ready made clothes and curtains made from
fabrics which are likely to shrink. The temporary stitching of
the curtains and also the final stit<±ing can be performed on
the same machine. Stitching growth tucks which can be open
ed on clothes for growing children, as desired;
Re-sewing waist and leg hems on ladies' and men's under
wear of tricot or interlock fabrics when replacing elastics;
# Adjusting length and width of ladies' slips (shortening for
short persons, taking-in width for slim persons) particularly
to match fashions
transparency making a slip essential.
when dresses have a certain degree of
Another most distinctive feature of the chain stitch which will
certainly be appreciated by the homeworker for artisan type
production is that the chain stitdr is formed exclusively by the
needle thread thus freeing the operator from bobbin winding.
This, in turn, is a time saving factor. In addition to the above
mentioned applications the artisan worker will use the chain
stitching for —
# First contour stitching on shirt collars — sewing on labels —
hemming operations on neckties and umbrellas — in short,
all operations where the chain stitch proves to be advanta
geous wuth respect to convenience, quality and time.
Page 26
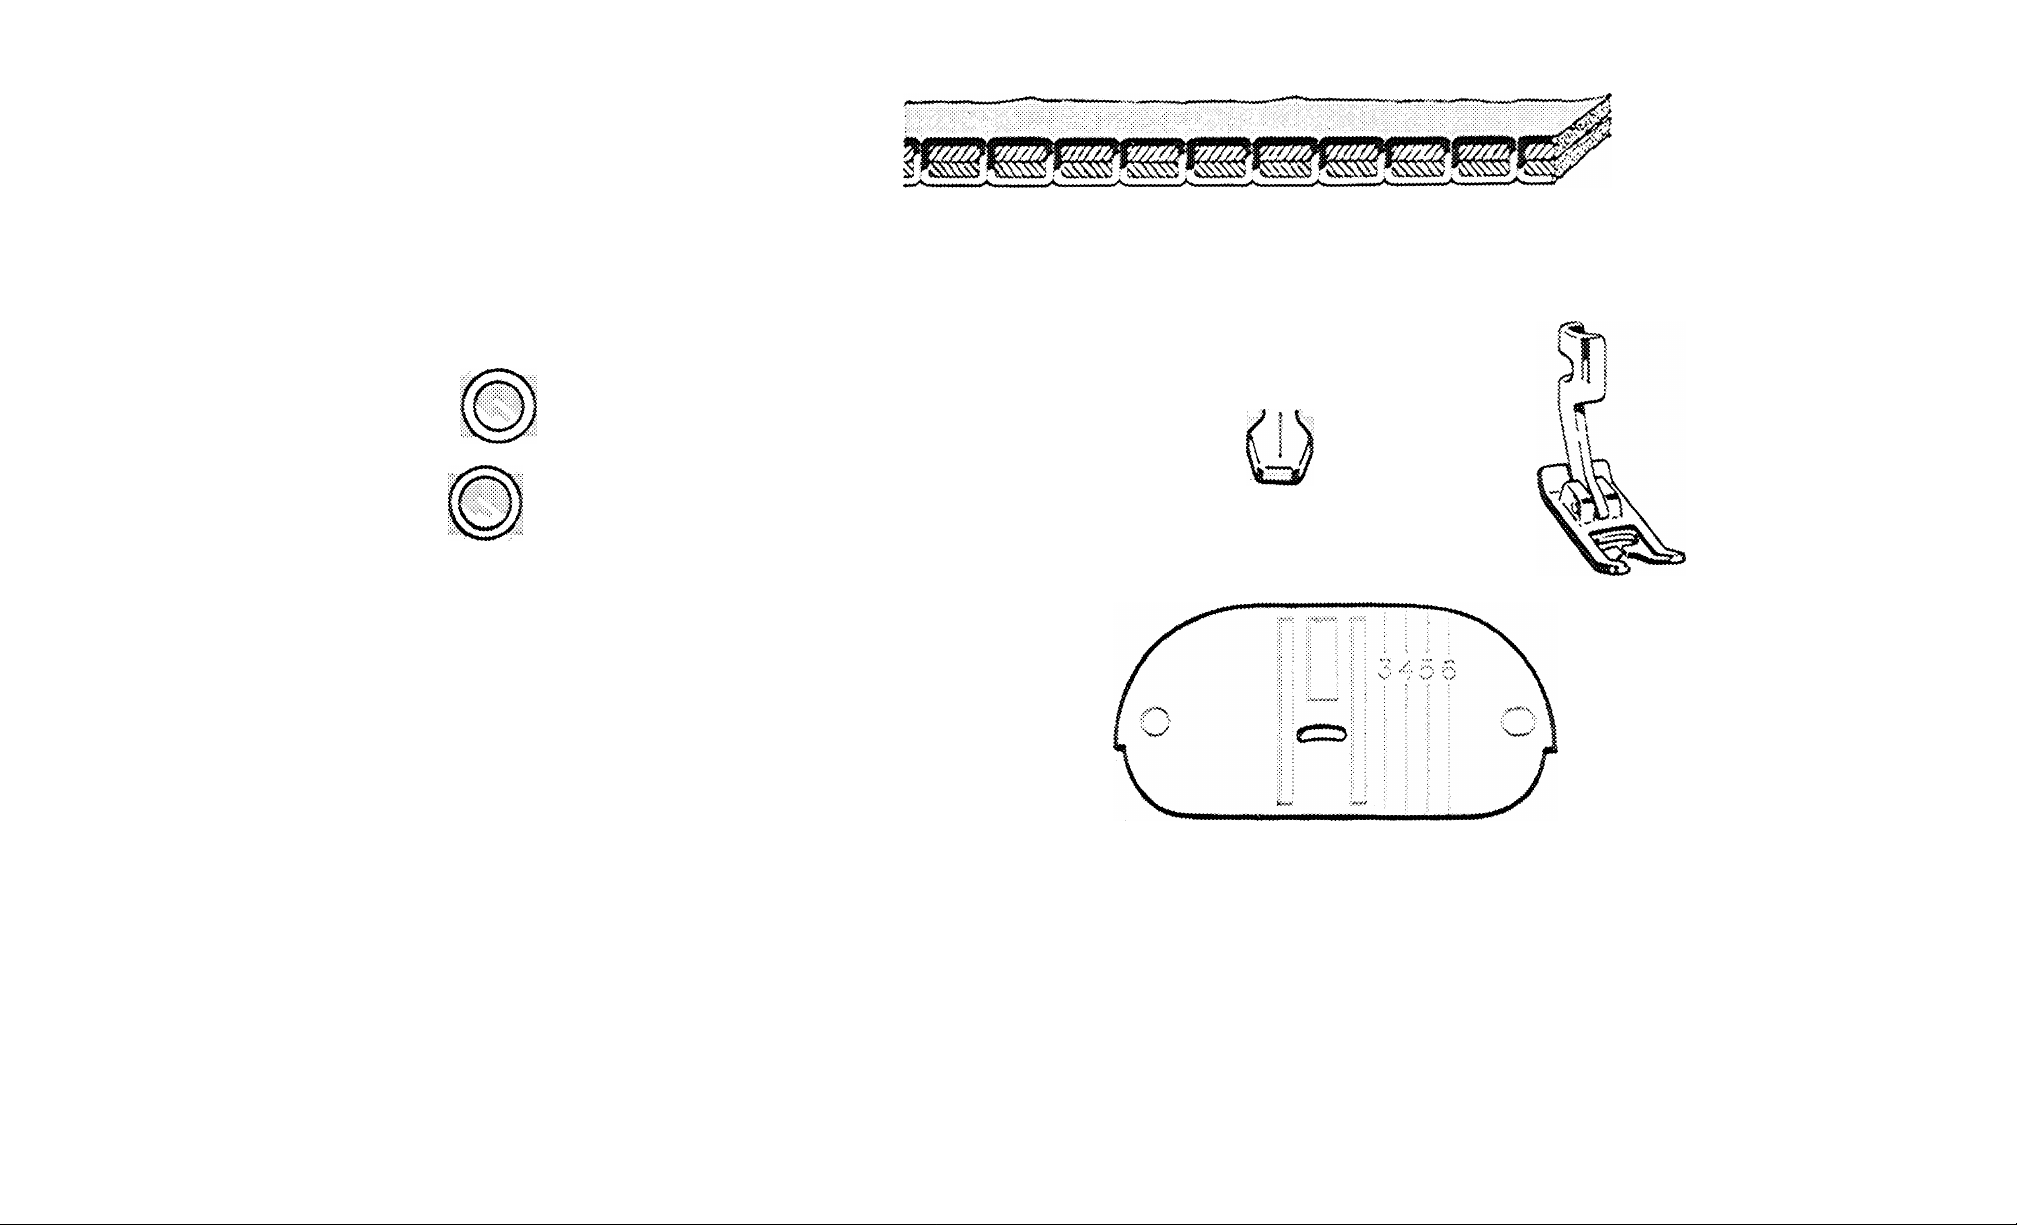
K
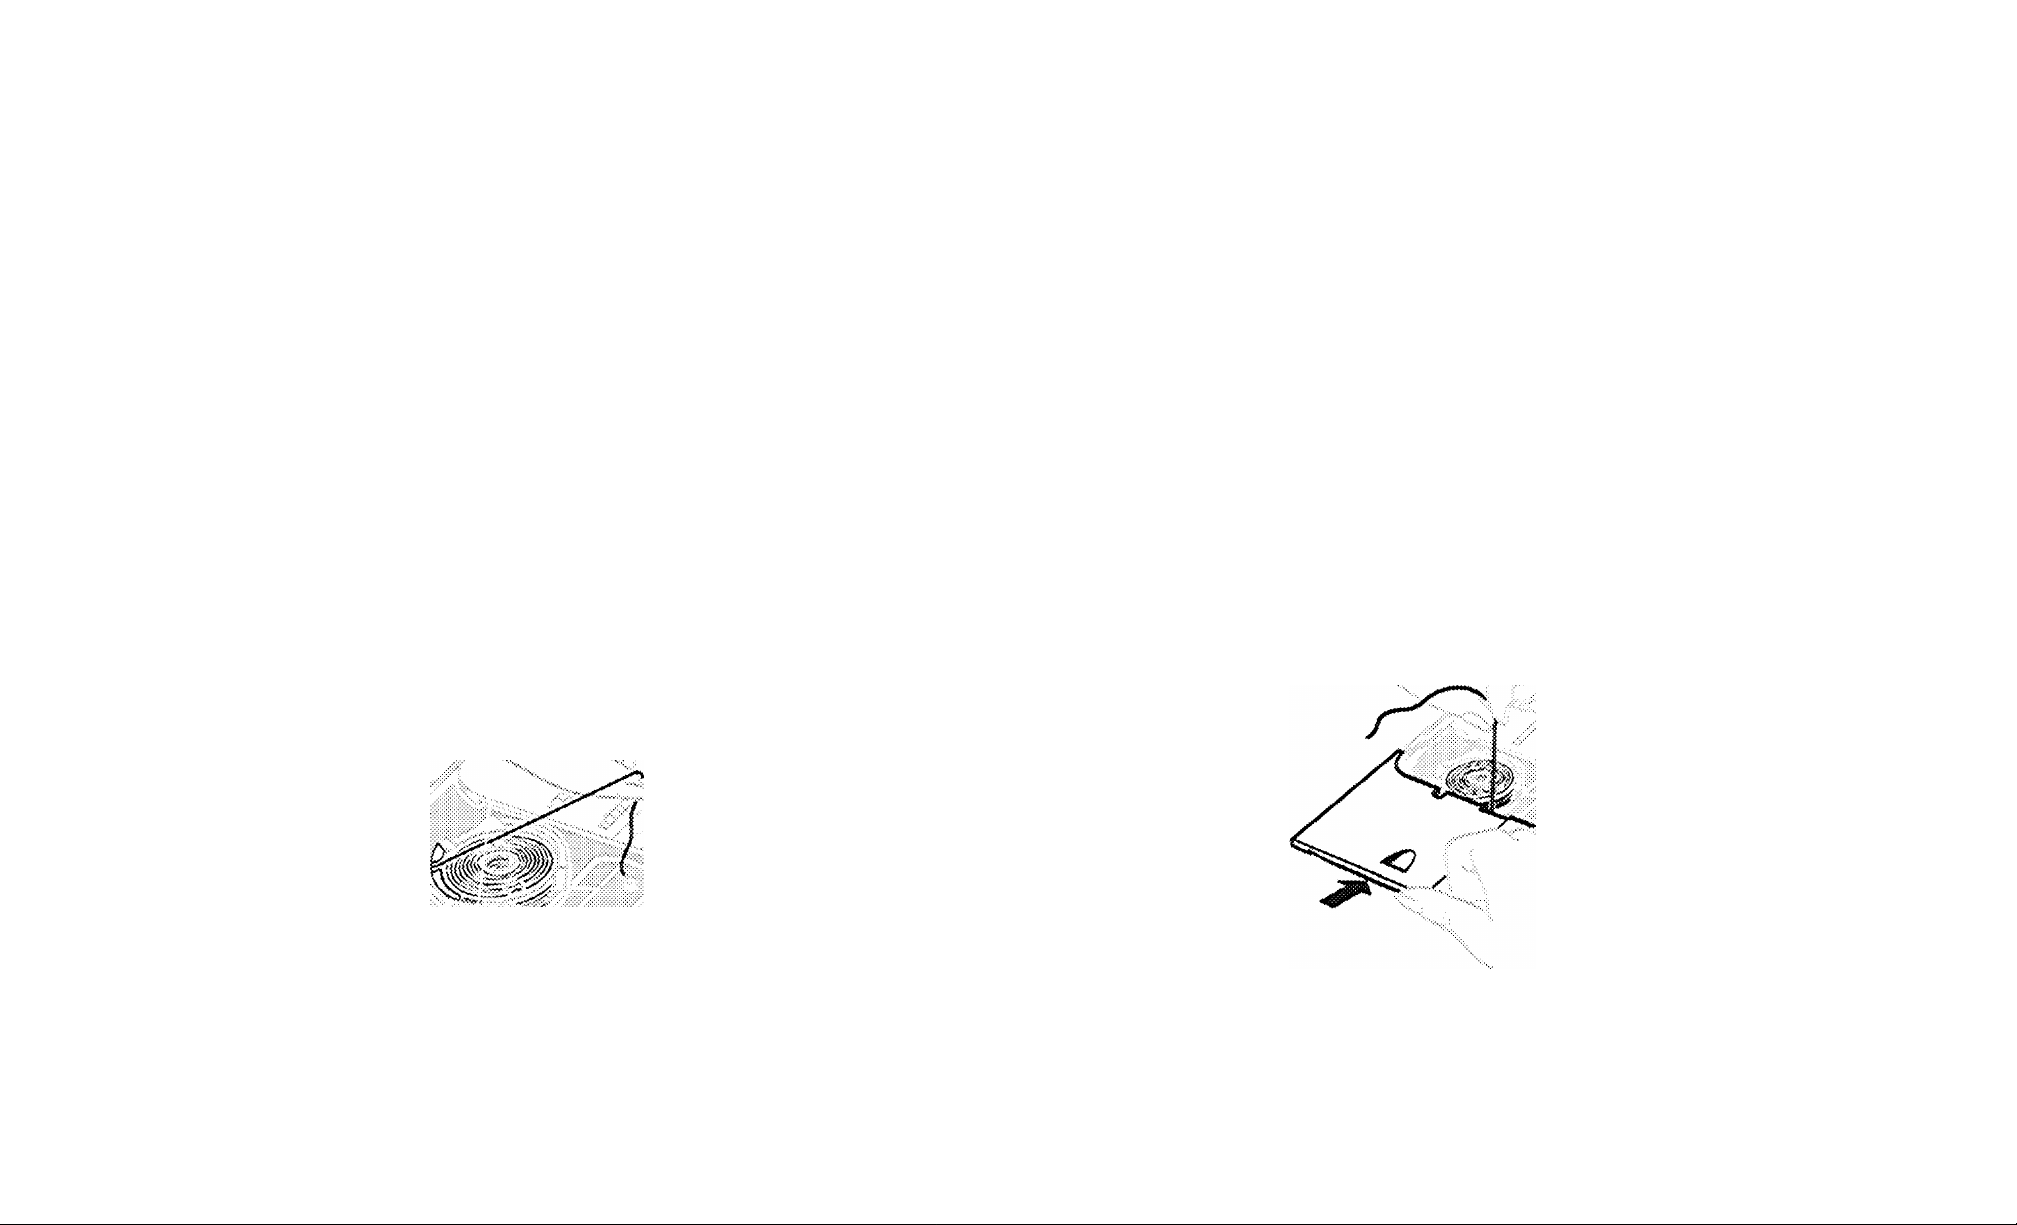
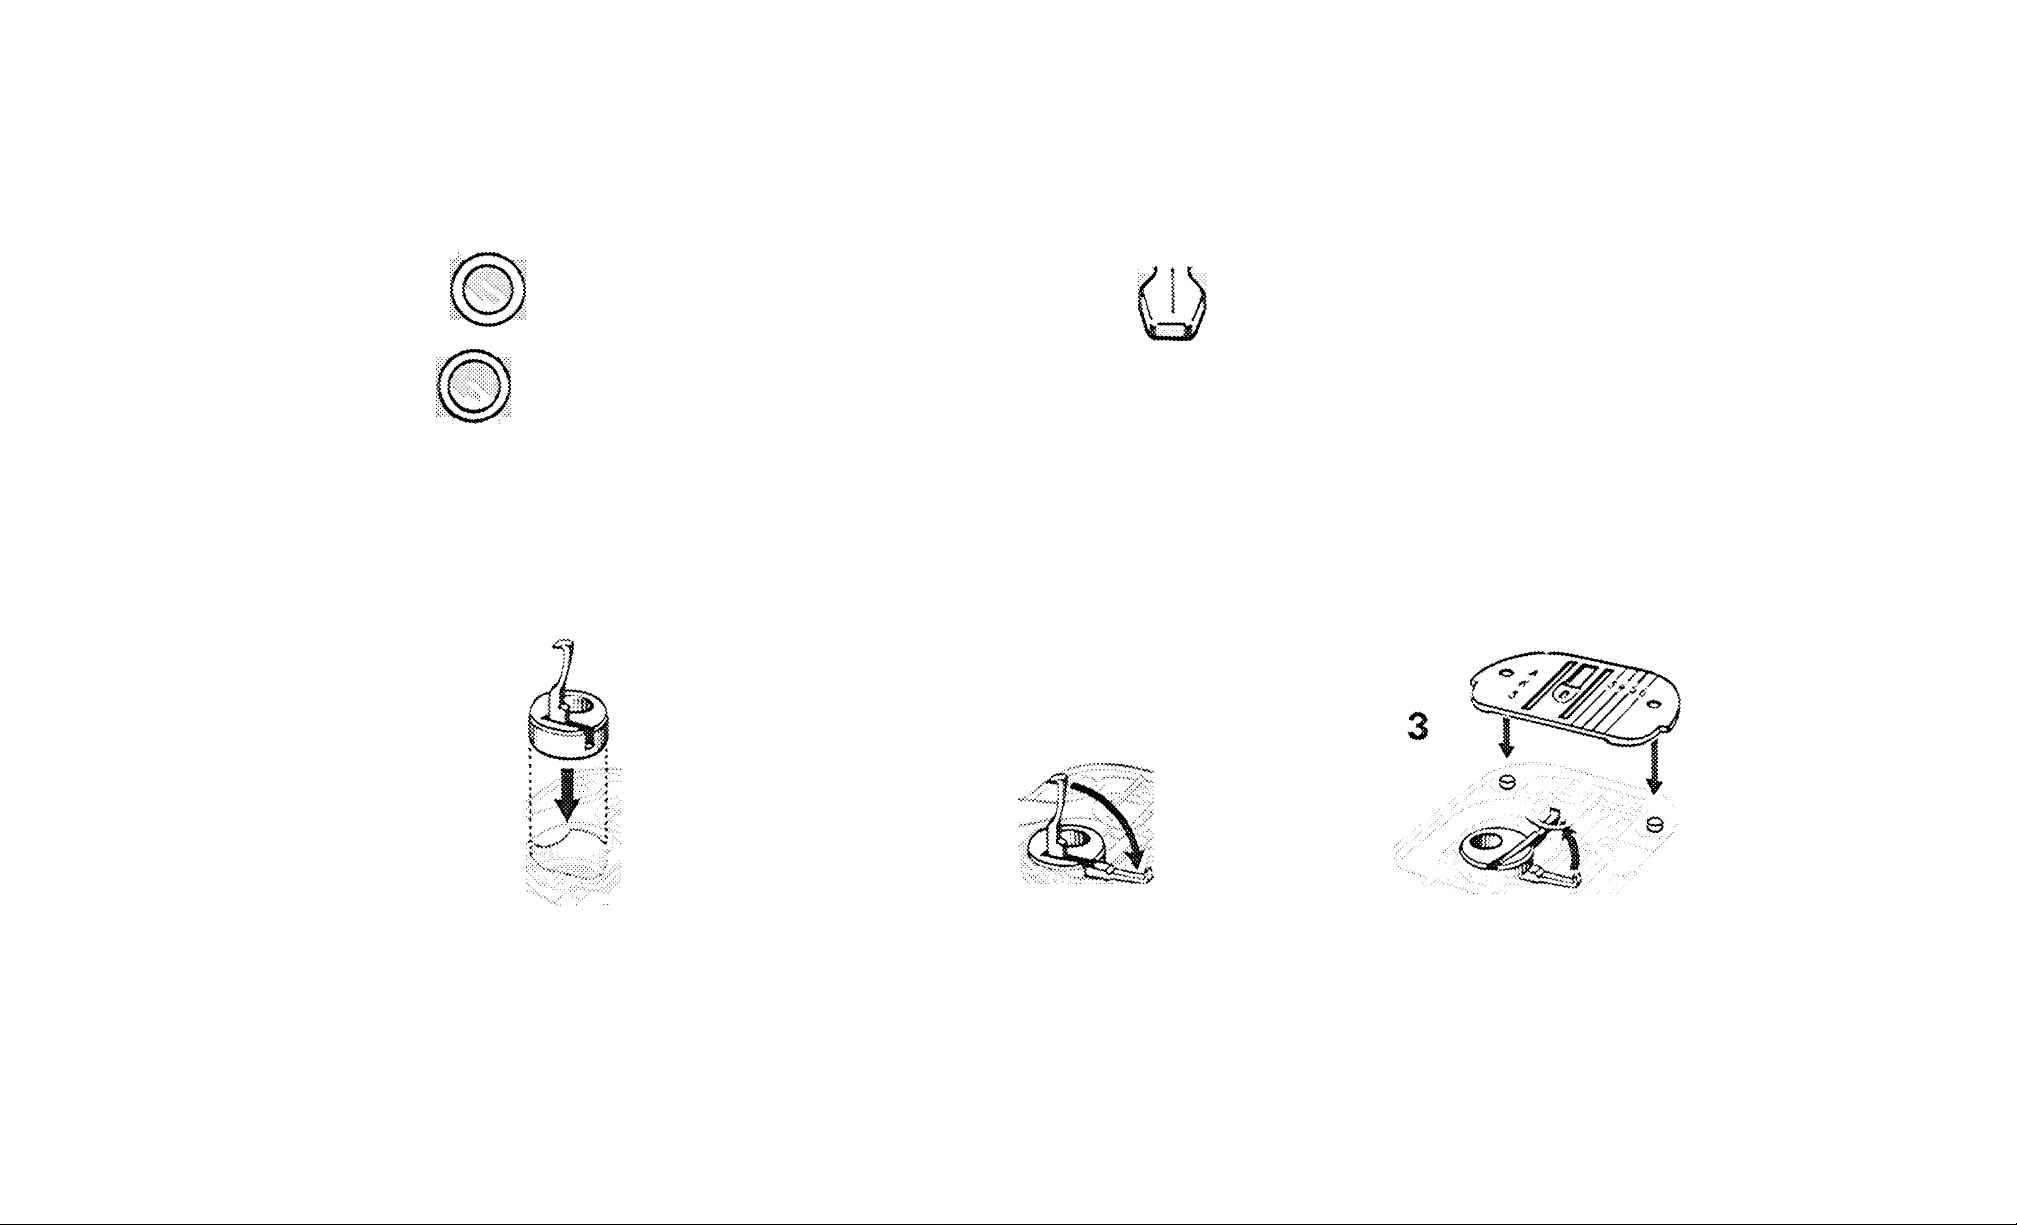
TO PREPARE THE MACHINE FOR CHAIN STITCH SEWING
Set Selectors at AK and stitch width lever at 3
First remove regular throat plate and bobbin.
A
Insert chain stitch loop retainer into bobbin, case
(Illustration 1)
Depress latch (Illustration 2) and turn to the left
against stop (Illustration 3).
Insert chain stitch throat olaie.
2
24
Page 27
J-
/
CHAIN STITCHING
A chain stitch seam has the same appearance as a
lock stitch seam on the top side of the fabric.
How^ever, the knotting of the stitch does not occur
in the m*aterial as on a nronerlv balanced lode stitch
A A A’
seam^; instead the thread forms loops on the under*
side of the fabric which resemble small arrowheads.
These arrowheads peculiar to the chain stitch point
tow^ards the beginning of the seam.
When starting make sure that the take-up lever is
in its highest position. This will prevent the needle
thread from pulling out of the needle if the thteed
has been cut too.short. Sew forward only! If the
material is
pivoted at the needle for operations
where cornering is required, make certain that the
needle is on its upward movement (approx. 1 cm
above its lowest poinX] to avoid skipped stitches.
Then continue to sew.
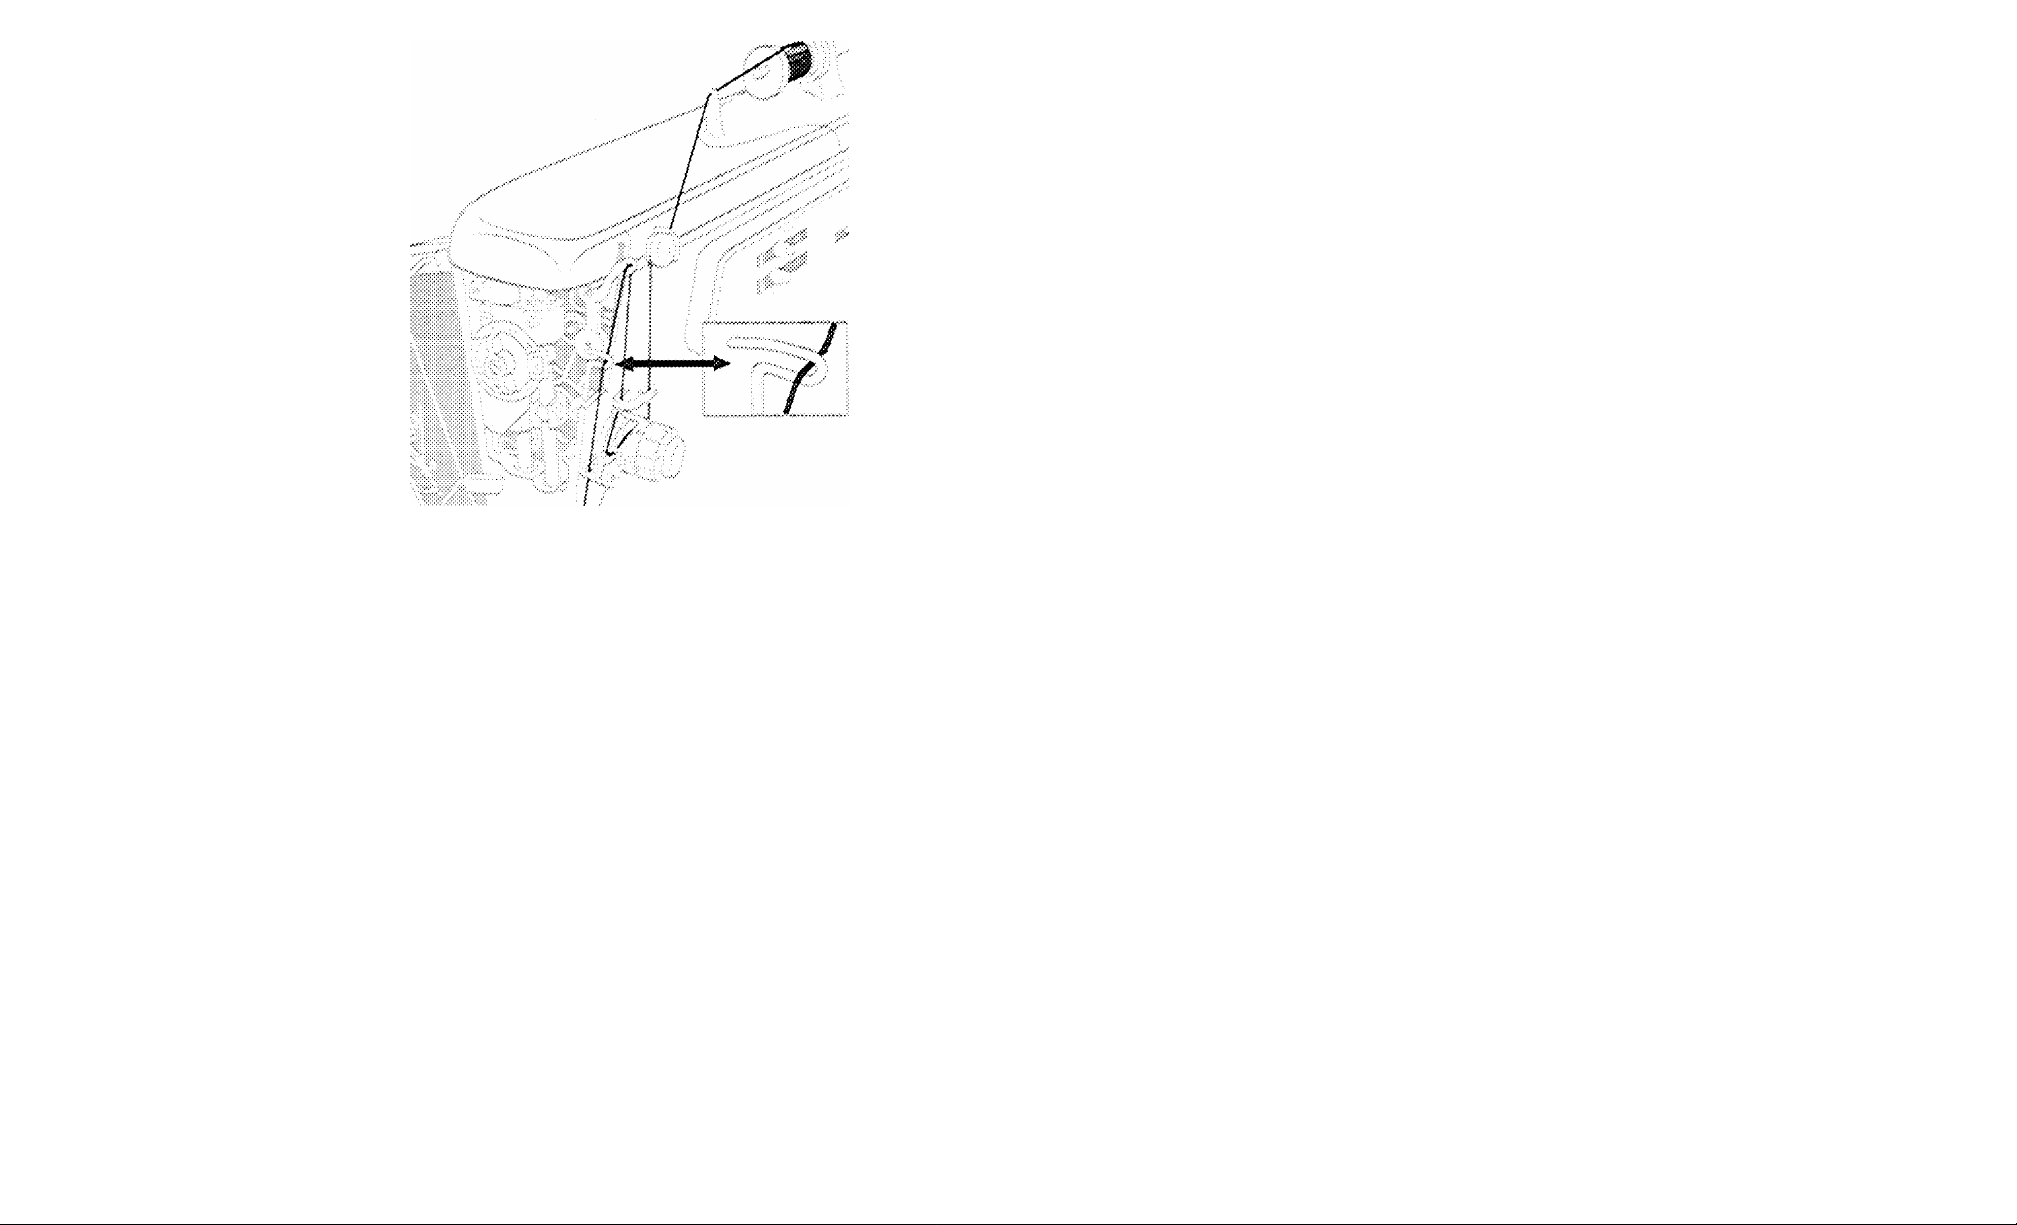
TO REMOVE THE MATERIAL FROM BENEATH
THE PRESSER FOOT
Threading: In addition to normal threading, place
the needle thread in the chain stitch thread guide
with the face plate open.
Stitch length: Normally set for mxaximum length,
approx. 6 stitches to the inch (4 mm] (left row of
numbers on the stitch indicator plate). Any stitch
length between 6 and 12 stitches to the inch (2 mm)
may be used.
Upper thread tension: Norm^ally set between 2 and
3. Slight adjustnaent may be required dependent on
the thread size and the material used.
The easiest way of removing the material is to sew
off the edge of the fabric while slightly pulling on
the material. This produces a chain which should
be cut some distance away from the fabric. How
ever, if the seam is ended before the edge of the
fabric, bring the take-up lever to its highest posi
tion, then lift the presser foot and pull some thread
through the take-up lever from the spool pin. Now
draw the loose thread between the presser foot and
the material to the right with the scissors and then
cut the thread. By removing the m^aterial the free
end of the thread is automatically pulled to the
underside of the material and the seam is securely
locked.
2o
Page 28
mmmmmmmm
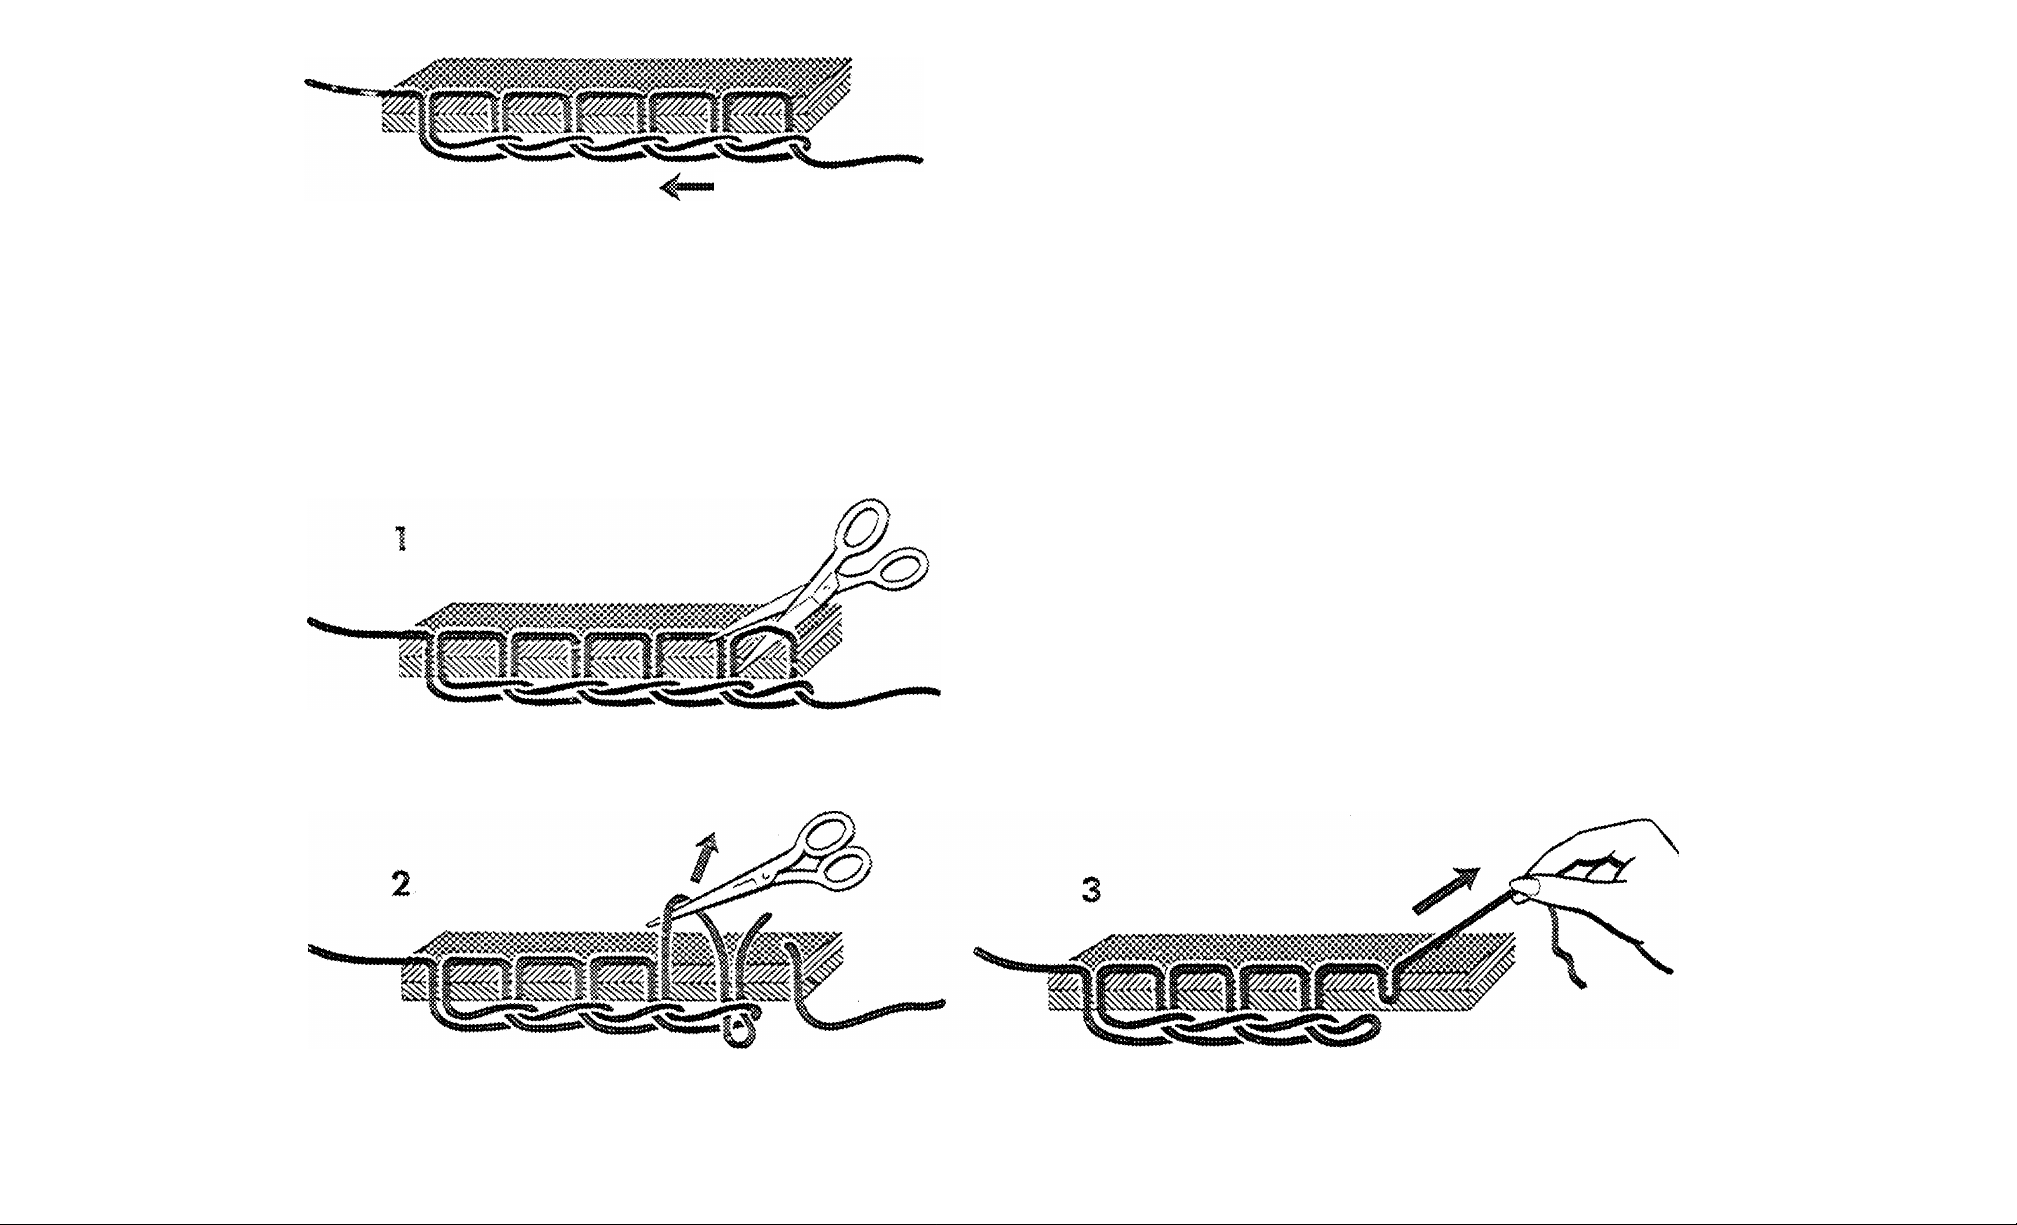
TO OPEN THE SEAM
The chain stitch seam can be opened in one direc
tion only, from the end of the seam towards the
start of the seam, The opening direction is distin-
Difeciion of oDer.incT
giiished by the arrowheads on the underside of the
fabric which point towards the beginning of the
seam.
To open the seam, cut the last stitch on the top side
of the fabric and then pull up the preceding stitch.
With this free thread end the seam can be removed
by a singie pull. In the same manner the seam may
be opened and removed at any desired place by
pulling the thread end in arrowhead direction. The
remaining section to the end of the seam will be
maintained.
28
Page 29
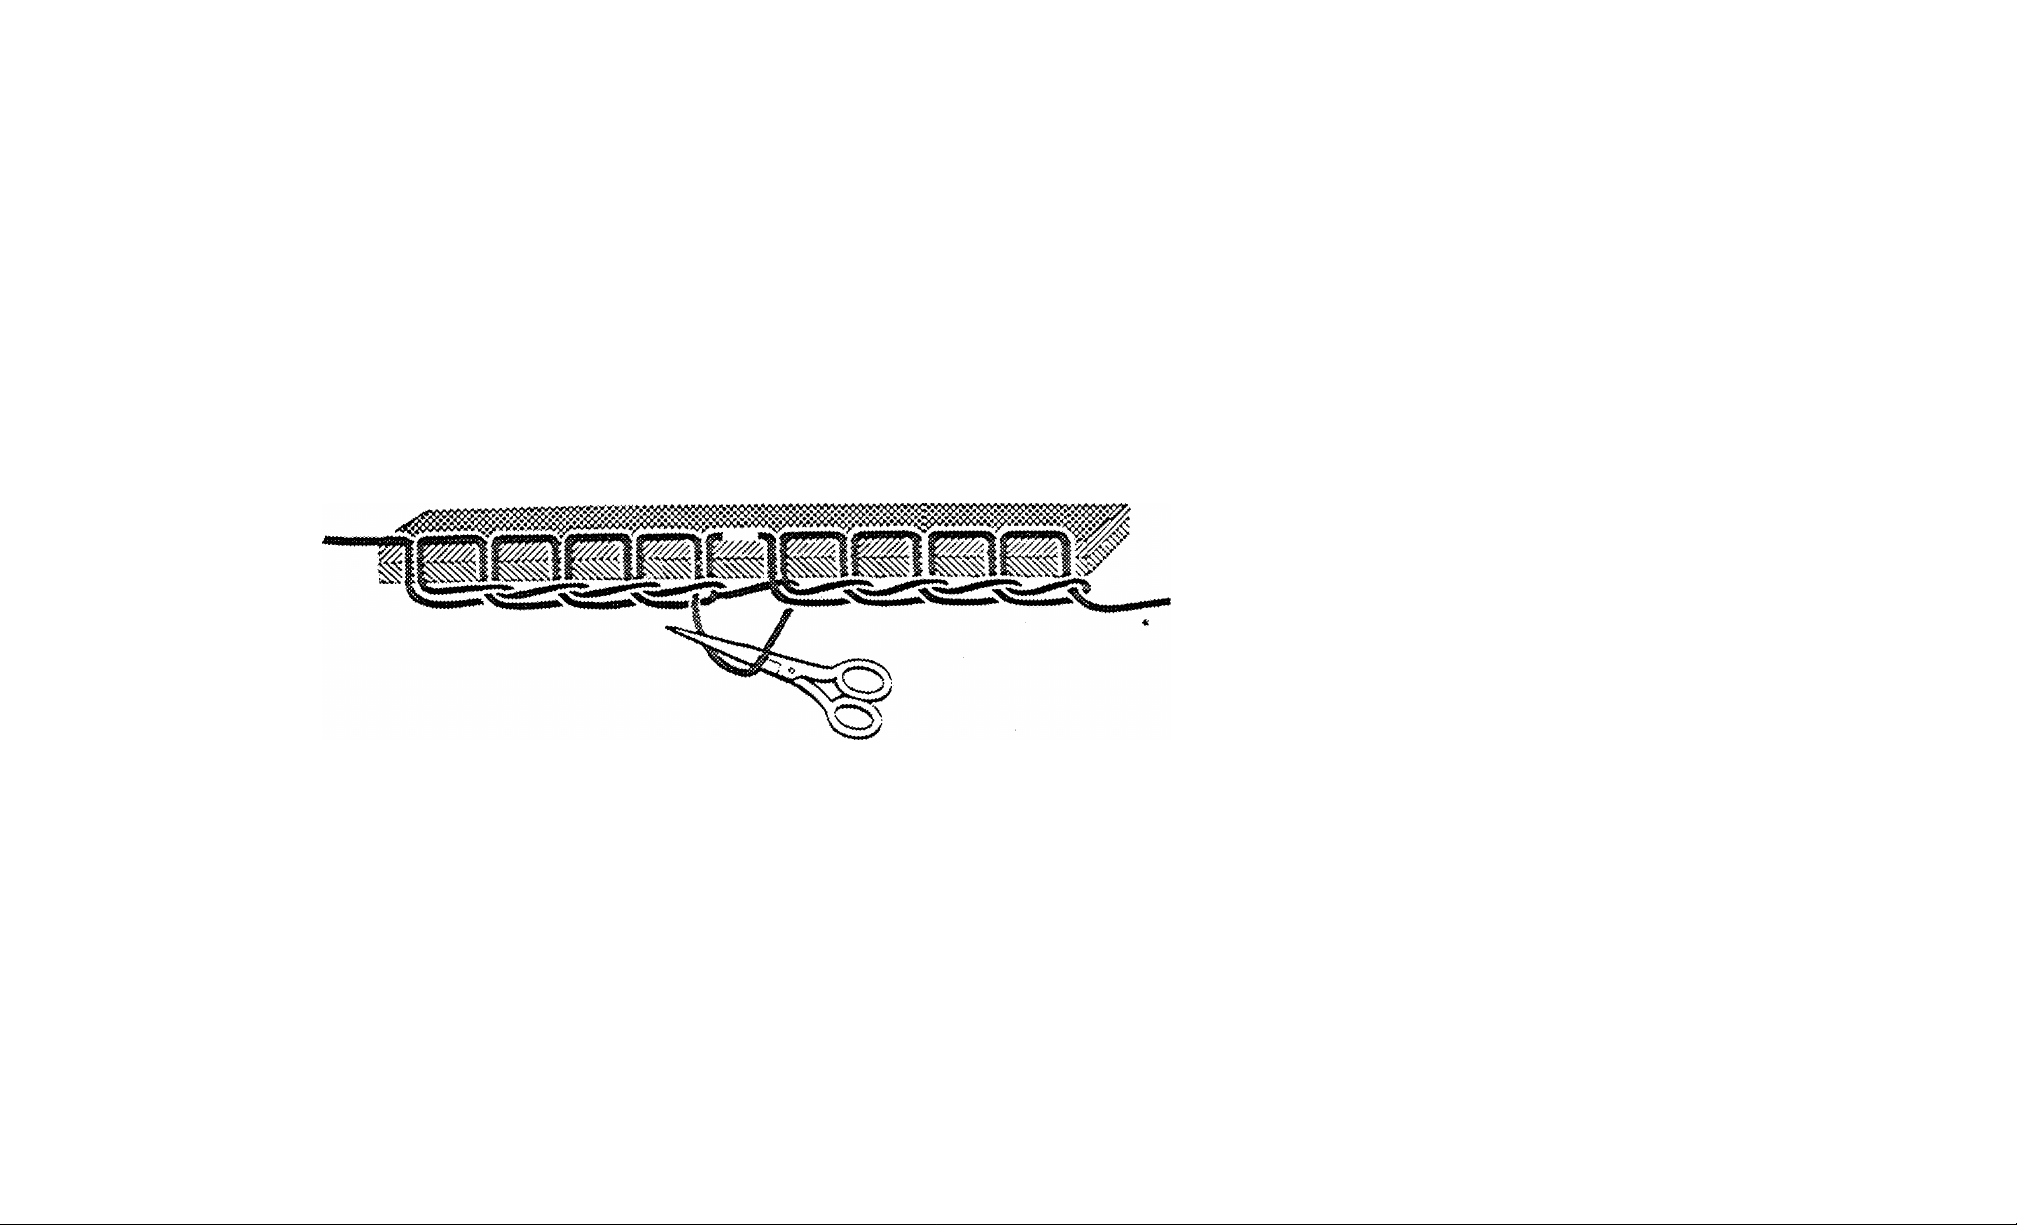
Section to remain
Section to remain
Section to be onened
>
However, if the section towards the
beginning of the seam is to remain and
the segment towards the end of the
seam is to be removed, either partly
or completely, the remaining section
must be locked nrst. For this purpose,
cut the seam at the desired place on
the top side and pull the loop out of
the fabric on the underside of same.
Then the desired segment of the seam
can be removed as stated above.
TO CHANGE FROM CHAIN STITCHING TO LOCK STITCHING
Cimnging to lock stitching requires only unthreading of the diain stitch thread guide (see page 25), repla
cing the bobbin and inserting the desired zigzag or straight stitch throat plate.
27
Page 30
A
LOCK STITCH
STRAIGHT STITCHING
AK 3
K
Set Selector at AK.
Stitdi width lever at 3 — To locate stitching in central position.
General purpose throat plate and presser foot.
Use general purpose throat plate and presser foot for all utility sewing, long straight seams, etc., and
where there is occasion to alternate between straight and zigzag stitching.
26
Page 31

STIiAIGHT STITCH ТНШАТ PLATE AND
PRESSER FOOT
т г.
Jse the straight stitch throat plate and presser
Ui
foot where fabric and sewing procedure require
close control.. Лог precision stitching of curved
and scalloped edges, top stitching, edge stitching,
etc.
For best results, this equipment should be used
when stitching sheer and hlmy fabrics, knits and
tricots (particularly synthetics) and all soft spongy
materials.
STRAIGHT STITCHING WITH LEFT AND RIGHT NEEDLE POSITION
12 4 5
A
Set Selector at AK.
Stitch width lever at I, 2, 4 or 5*
General purpose throat plate and presser foot.
Do not make stitch width lever adjustments while the needle is in the fabric.
To meet special requirements a line of stitching may be placed to the right or left of centre.
Stitch lever settings 1 and 2 locate stitching to the left. Settings 4 and 5 place it to the
Intermediate settings may also be used.
right.
29
Page 32

PREPASE TO SEW
Hold needle thread lightly with left hand. Turn hand wheel so that needle enters plate and brings
up bobbin thread.
-I V
i
/
Pull end of bobbin thread through plate and place both needle and bobbin threads diagonally under
presser foot.
30
Page 33

SHWING A SEAM
i ■
/
IL ‘
w
lower oresser foot. Raise stitch regulator to reverse.
/4.
U/’
i
i '
Back stitdi to
of fabric for reinforcement. Lower regulator for forward stitching of seam. Raise
stitch regulator.
from edge
anc
31
Page 34

Back stitch to reinforce end of seam, and lower regulator to forward stitching position,
With take-up lever at highest point, raise presser foot and remove fabric.
32
Page 35

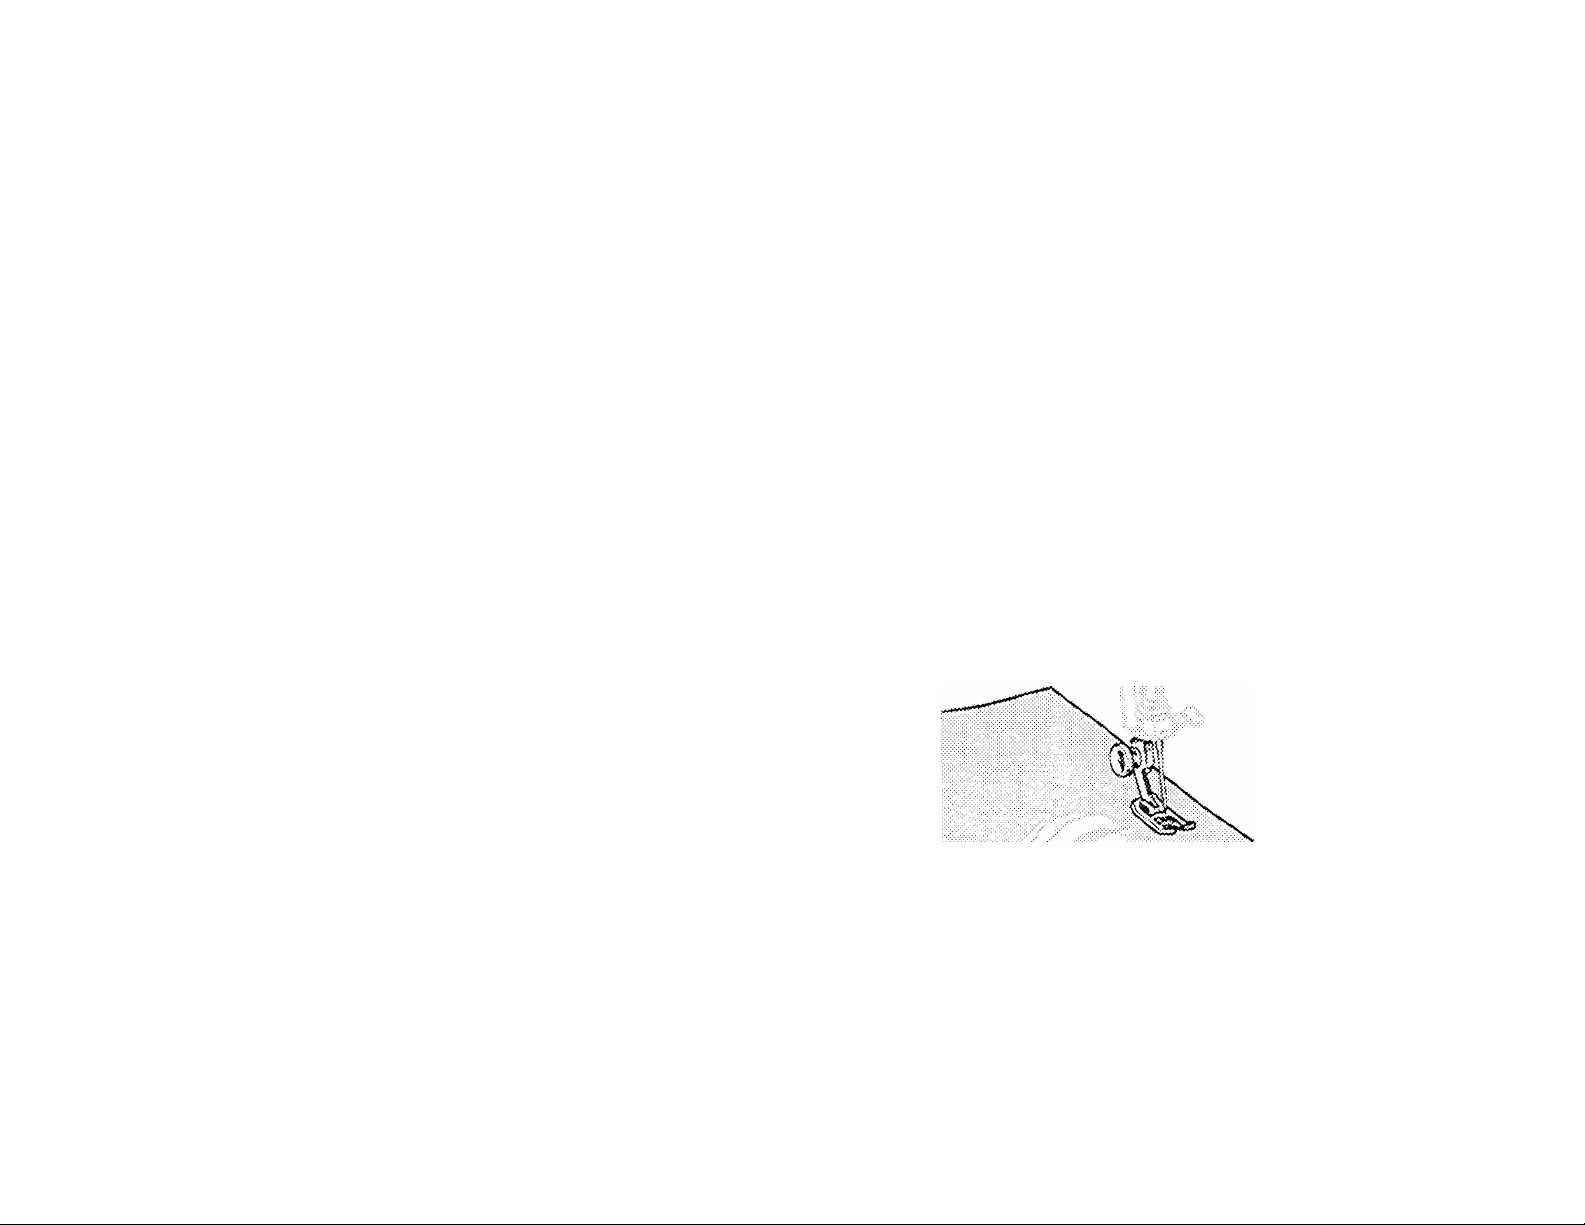
GUIDING AND SUFPOETING FABRIC
Most fabrics need only to be guided in front of the presser foot.
Fabrics of unusual texture and weave, filmy sheers, crepes, knits, tricots, etc., require support while
being stitched.
For such fabrics, use the straight stitch throat plate and presser foot, and apply gentle tension to the
seara by holding the fabric in front and in back of the presser foot as illustrated.
33
Page 36

PRESSURE ADJUSTMENTS
U
Increase
Pressure is the force the presso;
while it is being stitched.
The presser foot must be lowered prior to adjustments.
Smooth, even hdj:\Qling of several thicknesses of fabric
results when pressure is correctly regulated. Heavy pressure is for thick fabric and light pressure is for thin fabric.
Too light a pressure will result in irregular feeding which
affects both quality of stitch and evenness of seams.
Too heavy a pressure not only affects stitch and seam
quality but will also mar smooth surfaces and pile fabrics.
Surface finish, as well as the weight and texture of the
fabric, must be considered in determining the amount of
oressure needed.
Position for darning
and embroidery
operations
Xy .
■oot exerts on fabric
34
Page 37

NEEDLE THREAD TENSION
STRAIGHT STITCHING
Needle thread tension too tight —
correct by setting dial to lower num
ber.
issKsse
Needle thread tension too loose
correct by setting dial to higher nm
ber.
A perfectly locked stitch results with upper and lower tensions balanced so that needle and bobbin
breads are drawn equally into fabric.
35
Page 38

BOBBIN THREAD TENSION
STRAIGHT STITCHING
Bobbin thread tension too tight —
correct by turning screw in direction
indicated.
Bobbin thread tension too loose —
correct by turning scre\v in directiO;
indicated.
A perfectly locked stitch results with the upper and lower tensions balanced so that needle and bobbin
threads are drawn equally into fabric.
36
Page 39

ZIGZAG STITCHING BQUIFMHNT
General purpose presser loot
Special purpose presser foot
37
Page 40

STITCH LENGTH ADJUSTMENT FOli SATIN STITCHING
0^
m
mSSS^H
The upper indented area behind the stitch indicator provides a means
of gradually shortening the stitch length*
As the regulator knob is turned, the pointer rides deeper into this
indentation until a closed satin stitch is obtained.
The exact stitch setting will vary with the texture of the fabric.
It is advisable to make a test on a scrap of self fabric, using the
Special Purpose Foot, before proceeding with actual work.
Page 41

SATIN STITCH
TENSION ADJUSTMENT
Satin stitdaing requires a lighter needle thread
tension than straight stit<hing or open designs. The
wider the satin stitching the lighter the tension
required.
Wide satin stitching, stitdi width lever at 5, requi
res the least amount of tension. For narrower satin
stitching slightly more tension should be used.
To determine correct tension setting, a test
sample should be made on self fabric using the
Special Purpose Foot. A properly balanced satin
stitch should lie hat across the material. Any taut
ness or puckering indicates too high a needle
thread tension.
Some soft fabrics may require the addition of a
backing to insure good stitching results. Crisp
organdy and lawn are suitable for this purpose.
Tight needle thread
tension
Correct needle
tension
Page 42

PRIMARY PATTBRNS — BUILT-IN THH MACHINH
See pages 19 and 20 for operation of stitch width lever and selector.
L N P R
S Mid 0| Special
i M h ^ ^
I i J. i 1 i.
5
The operation of the upper selector button between L and Special controls the function of the primary
patterns shown below.
The setting of the lower selector button at 3 places the stitching in the central needle position.
The stitch width lever controls the width of primary patterns.
Do not make stitch width lever or selector settings while the needle is in the fabric.
L
u
H
0
p
u
*
i
1
ylll
i
1
i
40
Q
R
'N
J
S
S
P
E
C
1
A
L
Page 43

PRIMARY PATTERNS
SPECIAL DISCS
These five interchangeable Special Discs, classihed as Primary Patterns, are included with the ma
chine. Each produces an individual design.
Circled numbers (for example in this book indicate Special Disc numbers.
41
Page 44

L N P R
: : i
M'OiOi
PltlMARY PATTERNS
REPLACEMENT OF SPECIAL DISCS
Special
To replace any of these discs, move pointer of the upper Selector off Special.
Raise the stitch chart at top of the machine. Remove disc and place another disc onto spindle, pushing
:r>vnward until disc snaps in place.
Set pointer of the upper Selector on Special to engage the disc.
Page 45

PRIMARY PATTERNS
SXrrCH WIDTH LEVER CONTROL OF WIDTH
•J*»'
58E
m|0|CI| Special
The width of Primary Patterns is controlled by the stitch width lever. Settings range from a maxi
of 0 to a minimum of 2.
Page 46

PRIMAItY PATTERNS
NEEDLE POSITIONS
Selector setting of B places stitching in central
needle position. Selector settings A and C place the
stitching in left and right needle positions at widths
less than 5.
LEFT
CENTER
L N P R
I mIoI o! Special
i i i
RIGHT
Selector setting B is preferred. Settings A and C
are only used when special placement of stitching
1$ desired. For example: Buttonholes, button sew
ing.
44
B
L N P R
¡MjO|Q| Special
\ i I
Page 47

COMBINATION PATTBRNS AND VARIATIONS
-w»
J
4
A great variety of additional stitch patterns can be created by combining any lower Selector setting
from D through J with any upper Selector setting from L through Special.
A stitch width lever setting of 3 results in a Combination Pattern. Settings of 2 and 4 produce Varia
tions.
45
Page 48

The needle clamp accommodates two Cat.
2020 (15X1) needles, generally of the same
size. However, where special effects are
desired, needles of different sizes may be
TWO NEEDLES
used together, with corresponding threads.
Loosen the thumb screw and insert the addi
tional needle from the right, (See page 6 for
procedure.)
46
Page 49

TWO NEEDLES
UFPES: THREADING
Thread as for single needle first (see page U). provided (see illustration). Slip second spool of
Open top cover, insert auxiliary spool holder thread on to the auxiliary spool holder and thread
(which is furnished with the machine) into the hole second needle as shown.
Make certain that threads are separated by the centre tension disc. Carry only one thread through last
guide at the needle clamp.
47
Page 50

A
TWO NEEDiES
STRAIGHT STITCHING AK 2
Selector setting: AK.
Siitdi width lever: 2 only.
General purpose loot and throat
4$
I I
Page 51

L N P R
. I mIoI OI Soecia’
Selector setting: A — L through special
Stitch width lever: 2 or 3 maximum.
General purpose throat plate.
General purpose foot or special purpose loot
TWO NEEDLES
miUARY PATTBItNS
40
Page 52

T A A. • ♦ A nr^ nn A T T Iftk *IW T O
mstmctions for using ATTACHMENTS..
50
NOTE: The attachments which are not regularly furnished with your machine are available
lor separate purchase at your local SINGER SHWLNG CENTRE.
Page 53

SPECIAL PURPOSE FOOT
^ •*.5' ^
BUTTONHOLES
Selector: AL
Stitch width lever: See below
Throat plate: Genera! purpose
This light, flexible foot
is designed for satin-stitching. It provides maximum
visibility and maneuver
ability while allowing
closely spaced zigzag
stitches to feed freelv.
It is ideal for accurate placement of satin stitch
ing in buttonholes, monograms, motifs and applique
work.
The eyelet on the left side of the foot accommod
ates a Mller cord.
APPLICATIONS
Special purpose foot
Stitch length: Fine
To establish the correct stitch setting and length
of buttonhole, a sample must ñrst be made.
Three stitch width lever settings are available.
Fabric weight will determine the selection.
Buttonholes
Applique
Monograms
Decorative Stitching
Couching
Motifs
51
Page 54

BUTTONHOtHS
Marking
lines
length of
cutting space
Bar tacks anci
side stitching
The length of cutting space, the opening through which the button passes, is measured by the wndth
and thickness of the hxxtton.
The length of the finished buttonhole will be the cutting space plus Vs indi for bar tacks.
Work a sample buttonhole in the same fabric as the garment. Use a double fold, duplicating a facing,
and include interfacing if this has been used.
52
Page 55

BUTTONHOLBS
Stltcbiag Procediire. Set Seiector and stitdi width lever. Place work under the needle, aligning the
center marking of buttonhole with center score line of foot.
To form side stitching, turn hand wheel toward you so the needle enters fabric at point A. Lower foot
and stitch to end of marking. Leave needle in fabric at point B. Raise foot, pivot work on needle. Lower
foot. Take one stitch without changing stitch width lever setting, bringing work to poird C. Adjust to
stitch width lever setting for bar tadcs and take no less than six stitches. Stop at point D. Readjust to
stitch width lever setting for side stitching. Complete to point B. Move to stitch width lever setting for bar
tacks and duplicate tack previously made, ending at point F.
53
Page 56

BUTTONHOIBS
Raised or Corded Buttonholes. Both No. 8 pearl
cotton and buttonhole, twist make suitable Eller
cords for raised buttonholes.
Place the spool of filler cord on the second spool
pin. Carry the cord through the first thread guide,
straight down between the center and back tension
discs, into the large thread guide and then through
the eyelet on the Special Purpose Foot. Draw the
cord under and in back of the foot and proceed as
for regular buttonholes.
To secure stitdiing move stitch width lever to
No. 1 setting and take three stitches. Remove work,
draw threads to the underside, fasten and trim.
With sharp embroidery scissors cut opening for
button.
54
Page 57

APPLIOUB
Applique adds beauty and interest to wearing
apparel, linens and fabric furnishings.
Either contrasting or self fabric may be used
effectively. The most versatile stitch in appliqueing is a closely set zigzag stitch (Primary Pattern
BL). The width of this stitch may be varied to
accommodate weaves and textures of fabrics,
Comibination Patterns and Variations present many
interesting ways to applique with decorative
stitching.
Preparation. There are two methods by which
applique work m.ay be done. The appropriate
Method No. 1. Set Selector and stitch width lever
for the desired stitch pattern. Following the shape
of the design, outline it entirely with applique stit
ching. Any excess fabric on the outer edges is
trimmed away after the stitching has been comple
ted.
method is determined by the fabric being used,
and a test sample is advisable.
Position the design properly and baste it to the
fabric. Attach the Special Purpose Foot to the pres
ser bar.
55
Page 58

APPLIQUB
Method No. 2, Set Selector and stitch width lever
to AK 3 for straight stitching. Outline the entire
design with a short stitch. Trim
le raw eages
down to the stitching.
Set Selector and stitch width lever to the stitch
pattern desired, and overedge the design with this
stitching. A
smooth, lustrous finish results, which
requires no additional trimming.
Corded Applique. The Special Purpose Foot,
which provides for a filler cord, is perfect for corded applique work. Gimp, crochet thread or button
hole twist are generally used.
See page 54 for threading.
Hither method of appliqueing may be used when
cording is desired. The only change in procedure is
the introduction of the cord, over which the appli
que stitching is formed.
This stitching technique results in a raised,
dimensional effect, and is an ideal finish for lace
applique.
56
Page 59

MONOGRAMS AND MOTIFS
Any of the many stitch patterns are perfect for
monograms and motifs.
Select a design from the mmny transfer patterns
available or sketch one to suit yoixr purpose.
Some fabrics may require a backing of lawn or
organdy.
Position the design on the right side of the
material. Trim backing away when stitching is
completed, if necessary.
To reproduce a specific portion of a stitch pattern, first stitch on a scrap of material until the
desired point in the design is reached.
Remove the material from under the presser foot.
Now position motif or monogram under the needle.
Lower presser foot and stitch.
This procedure is recommended for all precise
design placement. Leaves, and flower petals, for
example are created in this way.
57
Page 60

SEAMING SHEERS
Selector: BL
Stitdi widtE lever: 2
Throat plate: General Purpose
Special purpose foot
Stitch length: Fine (above 20)
A dainty hair-line finish is particularly desirable for the inside seams of sheer collars, facings and
yokes. Seam allowances that ordinarily show through are eliminated.
Both heavy duty thread and tatting thread make suitable filler cords (see page 54 for threading).
Follow the seam outline covering the cord. Cut away seam allowance close to line of stitdiing.
Turn and press.
Page 61

COUCHING
Novel effects are obtained by couching gimp,
yarn or braid with stiidi patterns.
Spaced patterns are the most appropriate as
they allow the decorative cords to show as part
of the design.
The Special Purpose Foot is ideally suited to
this work.
lACB EDGING AND INSERTION
Delicate and durable zigzag stitching is espe
cially appropriate for the application of lace
edgings and insertions.
Many decorative stitch patterns can be used
effectively serving as both finish and trim.
» S • /MM«,
, 'A
\
riti.
%rr ".■■■ -i
^ -
'A
' ''
V ■
• '
59
Page 62

ed.
The foot is used in connection with the Generel
Purpose reed Cover Plate.
Selector setting: AI.
Stitch width lever: 1 and 4
Feed Cover Plate
Button sewing foot
Stitdh length: above 20
Space between holes in button determines stitch width lever settings. Numbers I and 4 generally
anniv to standard buttons. Number 1 setting is constant, but 4 can be increased or decreased to accom*-
modate buttons with unusual spacing.
Set Selector at Ai and stitdi width, lever at I. Attach feed cover plate to machine in place of regular
throat plate in same manner as instmcted on page 21.
Position button under foot so that needle will enter into left hole. Lower foot. Turn hand wheel toward
you until needle rises out of fabric and is just above foot.
60
Page 63

BUTTON SEWING FOOT
Set stitch width lever at 4. The needle should then
enter into the right hole of the button. Take appro
ximately six zigzag stitches in this position. End on
the left side.
To fasten stitching, adjust to number one stitch
width lever setting and take approximately three
stitches.
THREAD SHANK
In order to form a shank, stitching is done ovpr
a regular machine needle. Position button and lower
button foot. Place needle in the groove of the foot
so the point enters the hole,
A larger shank results when the heavy end of
the needle is utilized.
61
Page 64

GENERAL PURPOSE FOOT
Used with the general purpose throat plate this
foot provides a wide needle slot which accommo
C -3 -a a it O *3 <i- ^ ■■■i ii ix ii y>
SBAMS
ONGBRIE SBAMS
Dainty lingerie seams are made durable and rip-
proof with zigzag stitching (BL 2V2), After straight
stitching the fitted seam on the wrong side, press
both seam allowances in the same direction. From
the right side, top stitch with a fine zigzag setting,
letting the needle enter the seam line and then the
seam thickness. Particularly good where fiat bias
seams are desired.
dates all stitch settings and can be used for most
sewing operations.
APPLICATIONS
Seams and Darts
Mending and Maintenance
Mi
Automatic Scalloping
Seam Finishes
62
%
%
%
%
Page 65

SBAMS
FLAT FSIIED SHAMS
Zigzag stitching gives strength and durability to
flat felled seams.
Form the seam to the right side of the fabric,
taking full seam allowance, using a zigzag stitch
(BL 3).
Press the seam open, then fold and press the two
edges together, keeping the right side of the zig
zag stitch uppermost.
Trim a wav half the under seam edge.
•A V*
Fold the upper seam edge evenly over the trim
med seam, and top stitch.
KNIT FABRIC SHAMS
A fine zigzag stitch (BL iVi) is ideal for seaming
knit fabrics. Particularly desirable for underarm
seams and other seams where elasticity and give
are needed.
For neckline and waistline seams, where a stav
is needed to prevent undue stretching, this same
stitch can be used to apply seam tape. To insure
a flat, smooth finish, position the seam tape with
the edge exactly on the seam line. If seam is cur
ved, pre-shape tape to fit by steamhng, and baste
in place.
Stitch, allowing the needle alternately to enter
the seam tape and seam line.
Page 66

SEAM FINISHES
Seam edges support the garment and should be given a durable finish where fabrics have a tendency
to ravel.
The zig/cag stitch BL is ideal for sucn finishing. Place the stitching near the edge of the seam allowance,
and then trim away excess fabric.
For an overedged seam, the blind stitch 30 makes a durable bulkless finish. Good for straight grain,
lengthwise seams.
Seam edges should be trimmed evenly, and the stitch then form^ed over the raw' edge.
Page 67

0ARTS
Darts provide fit and contour in a garment and
should be accurately stitched.
A straight stitch dart (AK 3) is usually formed
by stitching from the seam edge, tapering gradually
to the point, where the last 3 or 4 stitches parallel
the fold. Stitch beyond'the fabric to form a thread
chain V2 to V-4 inch in length. Tie the thread ends
into a single knot close to the stitching.
SINGIB THREAD DARTS ,
Darts add styling and interest when stitched with
the fold to the outside of garment. Thread ends
at the point of the dart are eliminated when the
single thread principle is employed.
Unthread the needle, use the thread leading off
the bobbin and rethread the needle from back
to front. Tie bobbin and upper threads together.
Draw bobbin thread up through, threading points,
winding enough on the spool to complete a single
dart. Lower the needle into the very edge of the
fold at the point of the dart. Take any slack out of
the thread by turning the spool. Lower the presser
foot and stitch carefullv toward the seam edae.
* V
This method is also ideal for inside darts in sheer
fabrics as thread ends are eliminated at the point
of the dart.
f 'j
h
65
Page 68

DARTS IN INTERFACING
Non-woven interfacings can be shaped withoat
bulk with гigгag stitching. Selector setting BL or
BQ may be used.
Cut out the dart allo'wance on the stitching line
and bring the raw edges together. Pin, over a
muslin stay, and stitch. Back stitch at both ends.
BLANKET BINDING
T
The multiple stitdi zigzag (BQ) is an excellent
stitch for applying blanket bindings and affords
both a decorative and durable hnish. Rem.ove worn
binding. Baste new binding securely in place and
stitch. Adjust pressure if necessary, to accommo
date the thickness <of the blanket.
66
I I »1 ■ Hw 11 i|i I in ■ I
Page 69

MINDING
Zigzag stitching is well suited for all types of
household mending. Selector setting 30 provides
a firm, flexible bond for the repair of rents and
tears, and is ideal for the reinforcement and appH*
cation of elastic. Stitch length and are regu
lated according to need.
Rent or Tear. Trim* away ragged edges. Place
an underlay to the wrong side of the tear for
reinforcement. Using the multiple stitch zigzag
(BQ) follow the line of the tear bringing the edges
together. Shorten the stitch length at ends and
corners to give extra strength.
vV\AA/>/v^AVv'^/vVVvVvWVv\A,V\A
I I
'v
i/ f
\—f
J'
r*v
W'
Application of Ilastic.
Elastic, such as used in
waist bands, must be
stretched as it is applied,
to insure fullness required in the garment.
^ 'V ■
X.
•• • ' 's •
^ -'■v'
67
Page 70

SCAIiOPING
Dainty scalloped edges are used extensively as self trimming on blouses, cresses, lingerie and child
ren’s wear.
Perfectly formed and evenly spaced scallops are produced automatically at Selector Settings BE and
BS ®
BR results in a I2-stit<m scallop.
BS a 24-stitch scallop.
Stitch regulator and stitdr width lever settings vary the length and depth of the scallop.
After stitching, trim seam allowance to less than Vs" and clip into the points between scallops.
Some fabrics may also need notching, for a smooth, evenly turned edge.
Turn, gently roll out scallops between the hngers and press.
When scalloping a shaped or bias edge it is best to use an interfacing.
When forming scalloped tucks, add an extra to tuck allowance for seaming.
Page 71

THB SHAM GUIDE
The seam guide aids in
attaining uniformity of
seam width. It provides
for stitching to be spaced at any distance between
Vs'' to IV4" from the edge of the fabric.
SEAMS
To guide seam stitching straight and parallel to
the edge of the fabric, adjust the attachment for
proper seam width. Align the guide with the pres
sor foot. (Set Selector at AK, stitch width lever at 3.)
Pin seam edges and baste if necessary. Hand
basting can be eliminated on easy-io-handle fabrics.
Place pins with the points toward the seam edge
so they nip into the fabric at the stitching line.
The hinged presser foot will ride freely over the
points. Guide the fabric edges lightly against the
guide while stitching.
APPOCATIONS
Seams
Top Stitching
Decorative Stitching
Blind Stitching
The attachment is used in connection with a
presser foot.
It is secured to the bed of the machine in either
of the threaded holes to the right of the needle.
b
i ..=i
69
Page 72

CURVED SHAMS
TOR STITCHING
Curved seams require additional treatment in
handling. A shorter stitch will provide greater
elasticity and strength. Set the attachment at an
angle so that the end closest to the needle acts
as a guide.
A simple and practical way to accent the lines
of a garment and at the same time give additional
firmness.
Hither single or multiple rows of stitching can
be expertly placed along lapels and facing e<
around collars and pockets and as a hem finish.
A subtle enect may oe acmevec oy using straight
stitching, or a decorative touch may be added by
using any of the attractive stitch patterns accom
plished with this machine.
70
Page 73

BLIND STITCHBD HBMS
Selector: BO
Stitdi width lever: 2—5
Stitch length: 10—20
Presser foot: General purpose
Throat plate: General purpose
Seam guide
Blind stitching provides a durable hem finish
that is almost invisible, and comparable to hand
sewing. It is equally suited to straight as well as
circular hems. Taped, bound, turned or unfinished
hem edges can all be blind stitched with equal ease,
Mark, turn and press the hem in the usnal way.
Place a basting guide line approximately from
top hem edge.
Set Selector at BO. This setting produces four
straight stitches, separated by a single sideward
stitch to the left.
Stitch width lever setting for width of stitch is
determined by the weight and texture of the fabric
used.
Place the hem edge over the feed of the macrine,
turn back the bulk of the fabric to the line of bast
ing, creating a soft fold.
Position the work so that the straight stitches are
made on the hem edge and the sideward stitches
pierce the fold.
The stitch length will regulate the distance bet
ween the blind stitches (10 to 20 stitches per inch).
Adjust the seam guide over the right toe of the
foot until it rests next to the soft fold. While
stitching, feed the fold against the flat of the guide.
A test sample in self fabric should be made to
determine correct settings.
Page 74

THE ZIPFER FOOT
©
^ <5
iS 1S iS
This foot is designed to facilitate the placement of stitching close
to a raised edge. The hinged feature of this foot insures even feeding
over oins, heavy lavers of fabric or cross seams. It is attached to the
machine in place of the regular presser foot, and may be adjusted to
either the right or left side of the needle. Straight stitch or zigzag
settings mav be used.
^ A
APPLICATIONS
Zipper Insertions Tabular Coidmg
Corded Seams
Preparation. Secure the zipper foot to the presser
bar as you would the regular presser foot. Set Selec
tor and stitch width lever. Adjustment to the right
or left of the needle is made by loosening the
72
Slip Cover Welting
thumb screw at the bach. Check the position of the
foot bv lowering the needle into the side notch,
making sure it clears the foot. Lock it into position
by tightening the thumb screw.
Page 75

ZIPPER INSERTION
Selector: AK
Stitch width lever: 3
Throat plate: General purpose
Zipper foot
Skirt Zipper. Machine baste the placket opening
of the skirt and press this seam open. Attach the
zipper foot to the machine and position it to the
right of the needle. Open the zipper. Place the
zipner face down on the seam allowance with the
edge of the teeth at the seam line. Turn the back
seam allowance away from the body of the skirt.
Stitch the zipper tape to the seam allowance.
Page 76

ZlWm INSERTION
Move the foot to the left. Close the zipper and
turn it face up. Smooth back the seam allowance
at the edge of the zipper. Top stitch it to the tape
close to the folded edce.
Tarn zipper face down. Turn work to right side
and pin in place. Baste. Move the foot to the right.
Stitch across the lower end of the zipper and up
to the waistline. Remove basting.
Page 77

BLIND STITCHED ZIP FASTBNBH INSERTION
Selector setting: BO
Stitch width lever: 2V2 or 3
Throat plate: General purpose
Stitch length: 12
Cording foot
Blind stitching the final step of a zip insertion
results in a fine finish that is almost invisible and
comparable to hand sewing. Particularly suitable
for chiffons, sheers, velvets and all delicate fabrics
where top stitching would be too harsh.
Allow a Vs" seam allowance. Start the insertion
in the regular way but omit final step.
Work from the right side of the garment and pin
the front of the zip tape into position.
Roll the work over hnger to ease fabric and nin
V A-
through ail thicknesses. Baste about Vs" from seam
line to provide guide for blind stitching. Remove
Dins.
Set stitch and adjust cording foot to the right
side of the needle.
Turn garment inside out. Place zip tape over
feed of machine and turn back the front section of
garm>ent to line of basting, creating a soft fold.
Position work so that the straight line of stitering
is made through front seam allowance and zip tape,
and the sicewmys stitdi pierces a few threads of the
fold. Lowmi presser bar and stitch slowly. Remove
bastings. Press.
75
Page 78

CORDED WELTING
Selector: AK
Stitdi width lever; 3
Throat plate: General purpose or
Straight stitdi
Zipper foot
Cable cord comes in a variety of sizes and when covered with a hrmly woven fabric makes a corded
welting that is an excellent seam finish.
This welting is prepared in advance and then stitched into the seam. Cut a true bias strip iV« indres
wide, plus three times the width of the cord of either self or contrasting fabric. Sew strips together on
the lengthwise grain to obtain desired length.
Set Selector. Adjust zipper foot to the left side of the needle. Encase the cord in the bias strip, raw
edges even. Lower pressar bar. Stitci close to the cord, using a stitch length slightly longer than for
seaming the weight of fabric being used. Do not crowd the stitching against ^he cord.
/6
Page 79

COR0BD SHAMS
Selector: AK
Stitdi width lever: 3
Throat plate: Genera! purpose or
Straight stitch
Zipper foot
The corded seam is a typical treatment for slip
covers, children's clothes, blouses and lingerie»
When cording a seam the zipper foot is usually
adjusted to the right of the needle so that the bulk
of the work will fall to the left.
Set Selector and stitch width lever. Attach the
corded welting to the right side of a single seam
edge, with the same stitch length used to make the
welting (page 76). Guide the edge of the foot next
to the cord, but do not crowd.
Place the attached corded welting over the
second seam edge, and pin or baste together.
Keep the Mrst stitching uppermost as a guide and
position the seam under needle. Stitch, this time
crowding the foot against the cord.
This method produces evenly joined seam edges
and tightly set welting.
Curved seams are corded as easily as straight
seams, except that a shorter stitch length is used.
Since the seam allowance of the welting is bias,
it is not difficult to shape it to the seam.
Page 80

TH£ FOOT HHMMBH
threads under the hemmer. Place the fabric under
the foot and stitch through the creased fold for seve
Fine hems
Edging ruffles
Sheer seams
Throat plate: General purpose
Foot Hemmer
The narrow hemmmr forms
and stitches a perfectly turn
ed hem without, basting or
pressing. It is attached to the
machine in place of the
regular presser foot.
APPIICATIONS
Selector: AK
Stitch width lever: 5
Hemming with lace
Lace insertion
Lingerie hnishes
ral stitches. Hold the thread ends in the left hand
and guide the raw edge in front of the hem.mer
evenly into the scroll. Sew slowly, still holding
thread ends until the hem is well started.
Soft fabrics will enter the scroll best with the foot
down; firm^, crisp materials with the foot raised.
Even feeding is essential to good hemming. The
same width of fabric must be kept in the scroll of
the hemmer at all times. A little practice will result
in perfectly formted hems.
HEMMING
Set Selector and stitdi width lever. At the very
edge of the fabric form a double Vs" fold. Crease
this fold for about 2". Draw the bobbin and needle
78
Page 81

HEMMING WITH LACB
Selector: Bi
Stitch width lever: 3
Throat plate: Genera! purpose
Foot Hemmer
Most of the popular kinds of lace edging and
insertion can be applied with the Foot Hemmer. It
is an excellent way to trim children's clothes and
to finish lingene hems,
lace Applied Over Hem. Fold and start the hem
in the msual wav. Starting about 1" dowm from the
end of the lace, place the selvage under the needle
and lower needle to hold lace firmly. Raise the foot
slightly and slip the lace under the back portion
of the foot, without disturbing the position of the
fabric. Stitch slowly, guiding the fabric with the
right hand, the lace with the left. Take care not to
stretch the lace,
lace Applied Under Hem. When using lace
underneath the fold of a hem, the procedure is the
$am*e as when making a hemmed seam. Slip the
lace in from the left as you w'ould the second piece
of fabric. This method is used where a neat finish
is desired on both sides of the material.
Page 82

DBCORATIVH HEMS
Selector: AH settings
Throat plate: Genera! purpose
Stitch width lever: 2 thru $
Foot Hemmer
Narrow hem edges can be turned and decorated
in one operation using the foot hemmer and a
stitch pattern.
This time-saving finish is especially suited to
fie edges and aprons.
Lingerie and most delicate fabrics can be attrac
tively finished with a soft shell edge. This effect
is obtained by hemming with Selector set at BO
or BQ and stitch width lever at 4.
l*‘^l
................
.........
,,|,||T> i<*n
_______
<*fwMIIII^ ^l|
..........
eo
YVry-'
V .>» y
\ V j I . i ■•■ V \ i:i VU' I ; V, '. /. iii ■' V V:'^ \ i ■ /' '■ ■' ■ ''• ^ ^ ''■■''i'’ '■ ■ \ t ■'
I-Xi!' \ I ^1 W
M i ' '■ «' . I \ ' V
Page 83

Mum-SIOTTEB BLNBBH
Slot for
folded
Adjusting
lug
bias tape
Guide
pins
Scroll for
unfolded
binding
Selector: All settings
Stitch width lever: 2 thru 5
Throat plate: General purpose
Multi-slotted binder
The multi-slotted binder is used to apply com
mercial binding as well as self fabric bias to an
unfinished edge.
Cut binding diagonally to form a long point.
Commercial binding 1$ inserted from the right into
the appropriate slot in the scroll. Unfolded bias
of an inch wide is inserted into the opening at the
end of the scroll.
Pull binding through scroll until the evenly
folded edges are under the needle. The free length
of the binding is held between the guide pins.
Set Selector and stitch width lever for either
straight or zigzag stitching.
Insert the edge to be bound into the centre of
the scroll. The stitching is positioned dose to the
edge of the binding by moving the scroll portion
of the attachment to the right or left by means of
the adjusting lug.
This colourful trim is attractive when applied to
children's wear, aprons and fabric furnishings. It is
a practical finish for seam edges that ravel and for
making bound seams.
The attadiment will accommodate both straight
and zigzag siitcfeing.
8
Page 84

MULT!>SIÒTTED BINDER
Lower the pressor bar. Allow the attachment to do the work, merely guiding the fabric into the centre
of the scroll as you stitch.
Curved edges require slightly different fabric handling than straight edges.
Inside curves are straightened as they are fed into the binder. If the fabric is soft and has a tendency
to stretdi, reinforce tlie edge with a single row of stitching before binding.
Outside curves tend to lead awmy from the centre slot of the scroll and should he guided so that a full
seam width is taken at the needle point. Do not attempt to pull or straighten fabric into the full length
of the scroll.
82
Page 85

THE RUFFLBH
Fork
Arm
presser
Bar
Separator
Blade
^uiflixig
Blade
Separator
Guide
Adjusling
Lever
Adjusting
Finger
Adjusting
Screw
Selector: AK
Stitch width lever: 3
Throat plate: Straight stitch
Ruffler
Adjusting Points. 1. The adjusting lever sets the
ruiiler lor gathers or pleats. The Number 1 space
setting Is for gathers, and places fullness at every
stitch. Numbers 6 and 12 are soace settings for
pleats, spacing them either 6 or 12 stitches apart.
The star is for straight stitching, and is used when
grouping gathers or pleats.
2. The adjusting finger is used only lor pleating
and affects the width of the pleat. It is thrown out
of action by bringing it out of contact with the
adjusting screw.
This attachment offers a simple and effective way
to make gathered and pleated raffles. Ruffles may
be made separately or mace and applied at the
same time. The ruffler is attached to the machine
m place ot tne regular presser foot anci is used
with a straight stitch setting only.
3. The adjusting screw regulates the fullness of
gathers or pleats. When turned in to its limit with
the adjusting finger in place, the attachment is set
for its deepest pleat. When turned outward to its
limit and the adjusting finger out of action, the
ruffler gives only a hint of fullness.
$3
Page 86

THE WV¥Lm
Activating Parts* The rufiling Made and the
separator blade are of blue steel and hold the
material to be gathered between them. The rnillmg
Made forms the gathers or pleats by carrying the
fabric to the needle according to the spacing and
fullness to which the rufOer is adjusted. The sepa
rator guide is slotted to guide seam edges evenly
and to separate the ruffle strip from the material to
which the ruffle is attached*
Gathering. Set the adjusting lever of the attach
ment on Number 1 setting, and throw the adjusting
hnger out of action. Turn the adjusting screw for
the amount of fullness desired and set the stitch
length to space the fullness. The attachment is
adjusted for maximum fullness by turning the
adjusting screw all the way inj for less fullness
turn it outward.
Preparation* Raise the needle to its highest point.
Locate the attachment on the machine in place
of the regular pressor foot, at the sarnie time fit the
fork arm over the needle clamp screw. Make sure
both the presser bar screw and the needle clamp
screw are tightened securely.
84
Page 87

THE RÜFFLER
The length of the sowing machine stitch also
affects ruffle fullness. Since a given attachment
setting puts an equal amount of fullness into each
stitch regardless of its length, shortening the stitch
(more studies to the inch) makes the ruffle more
full, lengthening the stitdi (few stitches to the inch)
makes it less full For fine, closely spaced gathering
use a short stitdi and an outward adjustment of
the adjusting screw. For deeper, less closely spaced
gathering, turn the adjusting screw inward and use
a medium length stitch.
Material
Attaching Ruffle. To form and attach a ruffle in
one operation, place the ruffle strip between the
two blue blades and through the first separator
guide, and the material to which it is to be attached
Ruffling
Materia!
Ganneut
between the separator blade and the feed of the
machine. Proceed as for plain gathering. Right sides
of the fabric are placed together when the seam
is to fall to the inside.
Insert the material to be gathered between thé
blue blades and through the first separator guide.
Draw to the back of the needle. Lower the presser
bar and stitch. The texture of the fabric influences
the performance of the ruffler as well as the results.
Soft fabrics, cut on the crosswise grain, are best
adapted for gathered ruffles. Always test stitch
length and ruffler setting on a scrap of self fabric
before proceeding with the actual work.
Page 88

THE RUFFIER
Pleating. Move the adjusting lever of the ruffler
to the space setting desired for pleats either 6 or
12 stitches apart.
For the deepest pleat, activate the adjusting
finger and turn the adjusting screw inward to its
maximum setting. For smaller pleats turn the
adjusting screw outward.
Set stitch length. A short stitch places the pleats
more closely together? a long stitch separates the
pleats for a greater distance.
Insert the fabric to be pleated between the blue
blades and into the first separator guide. Lower
oresser bar and stitch.
Crisp fabrics cut on the crosswise grain formA the
sharpest pleats. Glazed fabrics handle besi
if
the
glazed side is downward and the soft backing is
lext to the rum
Diaae.
Group Pleating. By using the star setting (straight
stitdiing) alternately with the 6 or 12 stitch setting,
pleats are formed in groups. Even spacing betweeli
groups is accomplished by counting the number of
stitches.
86
Page 89

DARNING AND EMBROIDERY FOOT
This attachment is an aid to
all who desire perfection in free
motion darning and embroidery
work.
The foot hrmly holds the fabric
as the needle enters and rises
from the work, while fully revealing the line of design to be
followed.
Free motion work darning
Straight stitch setting: AK 3
\
# Position work under needle and lower presser
bar. Hold needle thread loosely with left hand,
turn hand wheel over and draw bobbin thread
up through fabric. Hold both thread ends and
lower needle into fabric.
# Outline opening with running stitches Va'* from
edge for remtorcement.
Feed cover plate
Darning and embroidery foot
Stitch length: Approximately 20
Trim ragged edges from area to be darned.
Centre worn section in embroidery hoops.
Attach feed cover plate to machine bed in place
of regular throat plate.
Locate darning and embroidery foot on presser
bar with lifting finger over needle clamp screw.
# Stitch across opening, moving hoops under need
le at a slight angle, from lower left to upper right.
Keep lines of stitching closely and evenly spaced.
# When opening is hlled, turn work 90^' and con
tinue stitching until darn is completed.
# Run machine at moderate speed and control
hoops with a steady continuous movement Slow
movement of hoops will produce a short stitch;
more rapid movement lengthens the stitdi.
Fairly long stitches are best for knit and tricot
fabrics; short stitches are best for cottons and
linens as they approximate weave of fabric,
$7
Page 90

FREE MOTION WORK
Selector: BL
Stitdi width lever: 2—5
Feed cover plate
Presser Foot: None
Script monoarams, satin stitdied scalloPS and ■■ • A. л/* \ ^ '
v.4,^ ЧЛ V. с1>цста the effect of a narrower stitch
When scalloping is used as an edge finish, allow
sufficient margin of fabric beyond the desired edge
to fit the hoop. To maintain parallel stitches, scab
lops are followed without turning, the work
remaining in line with the feed at all times. The
points of the scallops are formed by lightly moving
the work to the right or left, automaticallv pro**
embroidery can be e^ectively accomplished with
the 2ig%ag stitch when the free vaoiion principle is
em* ployed.
Trace or mark the design on the right side of
the fabric. Place the work in embroidery hoops,
keeping the fabric taut.
Some fabrics may require the addition of an
underlay of crisp muslin or organdy. The darning
and embroidery foot (available separately) will
also contribute to the smmoth handling of difficult
m^aterials as it provides a close control of both
St ltd anc tannc.
Remove the pressor foot an attach feed cover
plate to machine bed in place of regular throat
plate. Set Selector at BL and stitch width lever at
desired setting.
Position the work under the needle and lower
the presser bar to activate the tension. Bring the
bobbin thread up through the fabric. Hold both
thread ends and start stitdiing after positioning
needle in fabric.
Move the hoops slowly following the outline of
the design. Maintain an even rate of speed so that
the stitches are uniformly placed. Shading the
stitches from wide to narrow is controlled by the
angle at which the work is placed and moved under
the needle.
ea
Page 91

DECORATIVE STITCH PATTERNS
Examples of Stitch Patterns and their Selector Settings
f*®? ,
«E Im» te w
DS (5) 2
DS (D 3
EP2
F02
W№r jBK
1^ w'Li
FR2
FS (D 3
Page 92

DECORATIVE STITCH PATTERNS
Examples of Stitch Patterns and their Selector Settings
GM 4
XyAwMPiP^ LpA«w*^ i*>V..wA W\p»*-.pV v*
^**A**»Afc Z**^*"'**^
GP 4
GS (2) 2
GS (3) 4
HS (3) 4
112
90
IS (D 4
Page 93

TO CLEAN THE MACHINE
Your sewing macnine was built to exacting stand
ards of precision and workmanship. Its performance
Clean and
Oil
Clean between
tension discs
depends on the care and treatment it receives when
in use and before storing it away.
When in regular use the machine should be
cleaned periodically to remove the lint and fluff
which may have accumulated around the working
parts. To clean the bobbin case area, see instruc
tions for removing and replacing bobbin case on
pages 92 and 93. Oil the machine after each cleaning
as instructed on pages 94, 95 and 95.
If the machine is to be stored away for an inde
finite period of time, a thorough brush-cleaning
to remove all traces of lint and fluff, followed by
swabbing of all exposed parts with a lint-free brush
saturated with SINGER’^ Oil, is necessary to protect
the machine against rust damage. The areas that
should be cleaned and covered with a protective
Clean and Oil
coat of oil are shown in the illustration at the left.
91
Page 94

TO RBMOVH AN0 REPLACE BOBBIN CASE
To clean hook raceway, remove bobbin case as
follows:
1. Remove throat plate (see page 21] and open
slide plate (see page 15).
2. Unlock bobbin case by lifting and pulling
holder to right as shown,
3. Remove bobbin case from machine.
4- Remove all lint, fluff, loose thread ends or any
other foreign matter which might clog the miachine.
92
Page 95

POSITIONING
STUD
TO REMOVE AND REPLACE BOBBIN CASE
5. Replace bobbin case so that groove under tension spring fits on hook raceway and
straddles positioning stud.
6. Push bobbin case holder to left as shown until it snaps down into lock position.
7. Close bed slide and replace throat plate.
ot case
93
Page 96

TO tVmiCATE THE MACHINE
Use SINGER Oil and SINGER Lubricant!
Both are extra quality products especially pre
pared for sewing machines, and should always be
used in the care of vour 611.
ean the macnine periodically as instructed on
page 91.
94
!>rti
Apply a drop of oil to each place indicated.
Remove screw A and lift arm top cover slightly
and slide off toward left and away from machine.
The thread take-up lever must be in its lowest
position.
Apply a small amount of lubricant to the gears
as shown.
A tube of this lubricant can be purchased at your
Singer Sewing Centre.
Never apply Oil to these gears.
Page 97

open slide plate and apply a drop of oil to the
hook raceway as indicated.
Close slide plate, replace arm top cover and
close face plate.
95
Page 98

Oil each of places indicated by arrows and occasionally apply a small quantity of lubricant to teeth
of gears as shown.
Replace bottom cover.
THE MOTOR REQUIRES NO LUBRICATION.
96
Page 99

HIHCTRICAL INFORMATION
The SINGER* Electric Motor in the electric ma
chine is furnished for operation on an alternating
or dire« corree., Orderi =.oe. ete.e .de c.elogo’
number of the motor, or the voltage, and in the
case of alternating current, the number of cycles.
Before Inserting Electric Plug A, be sure that
voltage and cvcles stamned on electrical nameplate B are within range marked on your electric
m.eter installed by your power company.
Electrical Connections for Machine. Push 3-pin
terminal plug C on 3-pin terminal block at right of
machine and connect plug A at other end of cord
to electric outlet.
Speed Controller. The speed of machine is regu
lated by amount of pressure on the pedal of the
foot controller D.
9?
Page 100

To replace Singer Bnlb.
Disconnect plug from electrical outlet before ma
king bulb replacement.
SINGHR IIGHT
With thumb of right hand push in and down on
tab of light lens (see Illustration).
LOCKS
BULB
UNLOCKS
: :
U* :
Hi
Do not attempt to unscrew bulb, press it into
socket and at same time turn bulb over in direction
shown to unlock bulb pin G, then withdraw bulb.
Press new bulb into socket with bulb pin G enter
ing slot of socket and turn it over in direction shown
to lock bulb pin G in proper position.
The light is turned ''on" or "off" by the switch F,
 Loading...