

Page 1
Instructions for Using
SINGER
DELUXE ZIGZAG
Sewing Machine
6I0U
* A Trademark of THE SINGER COMPANY '
Page 2

Form U 1 53
Rev. (969)
^ THE SINGER COMPANY 1969
Page 3

CONTENTS
Page
PRINCIPAL PARTS ......................................................................................................................... 2
ELEVEN CONTROLS ...................................................................................................................... 3
Electrical Controller • Sewing Light • Stitch Pattern Selectors • Stitch Width
Selector • Stitch Length Regulator ■ Feed Throw-out Lever ■ Pressure Regulat
ing Dial • Thread Tension Dial • Bobbin Thread Tension • Buttonhole Stitch
Selecting Dial • Stitch Density Control Dial
NEEDLES AND THREAD............................................................................................................... 6
To Change the Needle • To Hold Spools on Horizontal Pin • Small Spool
Holder • Vertical Spool Pin • How to Thread your Sewing Machine • Fabric,
Thread, Needle and Stitch Length Table
BOBBIN............................................................................................................................................. 8
To Wind the Bobbin • When Bobbin is Full • Threading the Bobbin Case
ATTACHMENTS ............................................................................................................................ 10
To Change Throat Plate • To Replace Slide Plate
STRAIGHT STITCHING ................................................................................................................ 12
Preparing to Sew • Sewing a Seam • To Stitch with Cloth Guide
ZIGZAG STITCHING .................................................................................................................... 14
Basic Patterns—Built-in Discs—Special Discs ■ Combination Patterns • Magic
Patterns • Satin Stitching • Blind Stitching
TWO-NEEDLE STITCHING ......................................................................................................... 22
CHAIN STITCHING....................................................................................................................... 24
FREE-MOTION STITCHING ...................................................................................................... 27
APPLIQUE ...................................................................................................................................... 28
MONOGRAMS • MOTIFS ............................................................................................................. 29
HEMS .............................................................................................................................................. 29
ZIPPERS .......................................................................................................................................... 30
BUTTONHOLES ............................................................................................................................ 31
BUTTONS ....................................................................................................................................... 35
HOW TO USE THE EDGE-STITCHER ........................................................................................ 30
CARING FOR YOUR SEWING MACHINE
Cleaning • Oiling • To Remove and Replace the Bobbin Case ■ Performance
Check List
................................................................................
33
Page 4

Presser Foot
Bobbin Winder
Actuating Slide
Light Switch
Hand Wheel
Stitch Width Selector
Buttonhole Stitch
Selecting Dial
Stitch Length Regulator
Throat Plate
Bobbin
Bobbin Case
Feed Throw-out Lever
Stitch Density Control Dial
Stitch Pattern Selectors
Slide Plate
Page 5

T. iLi€TRÍ^AI. CONTROLLER
Plug in the machine as shown at right. Before plug
ging in your machine, be sure that the voltage and
number of cycles stamped on the controller nameplate
are within the range marked on the electric meter in
stalled by your power company.
To start the machine, press the pedal of the foot
controller.
2. SEWING LIGHT
The built-in sewing light located beneath the control
panel pours light on the sewing area.
The light is turned on or off by means of the light
switch A.
To change the bulb, pull down on tab a of light
socket and lower the light bracket. Then, unscrew the
bulb by turning it counterclockwise.
3^ STITCH PATTERN SELECTORS
These buttons control the pattern of your stitches
and must be set before starting the machine.
When moving these selectors, be sure to follow the
instructions below.
(1) Raise needle to its highest point.
(2) Move disc follower releasing lever as far to the
Tight as it will go, and adjust stitch pattern selec
tor to desired position.
4. STITCH WIDTH SELECTORS
(1) This selector positions your needle for straight
stitching. Normally, you will use setting 3. But
if you wish to stitch at left or right of center, press
down on the lever and slide it to the left (1 or 2)
or right (4 or 5).
(2) This selector controls stitch width in zigzag stitch
ing. For wide stitches, slide lever to right of center
(3’/2 to 3). For narrow, slide to left (2'/3 or 2 only).
(3) This selector varies the design in combination pat
terns, (See page 16)
Page 6
ELEVEN CONTROLS (Continued)
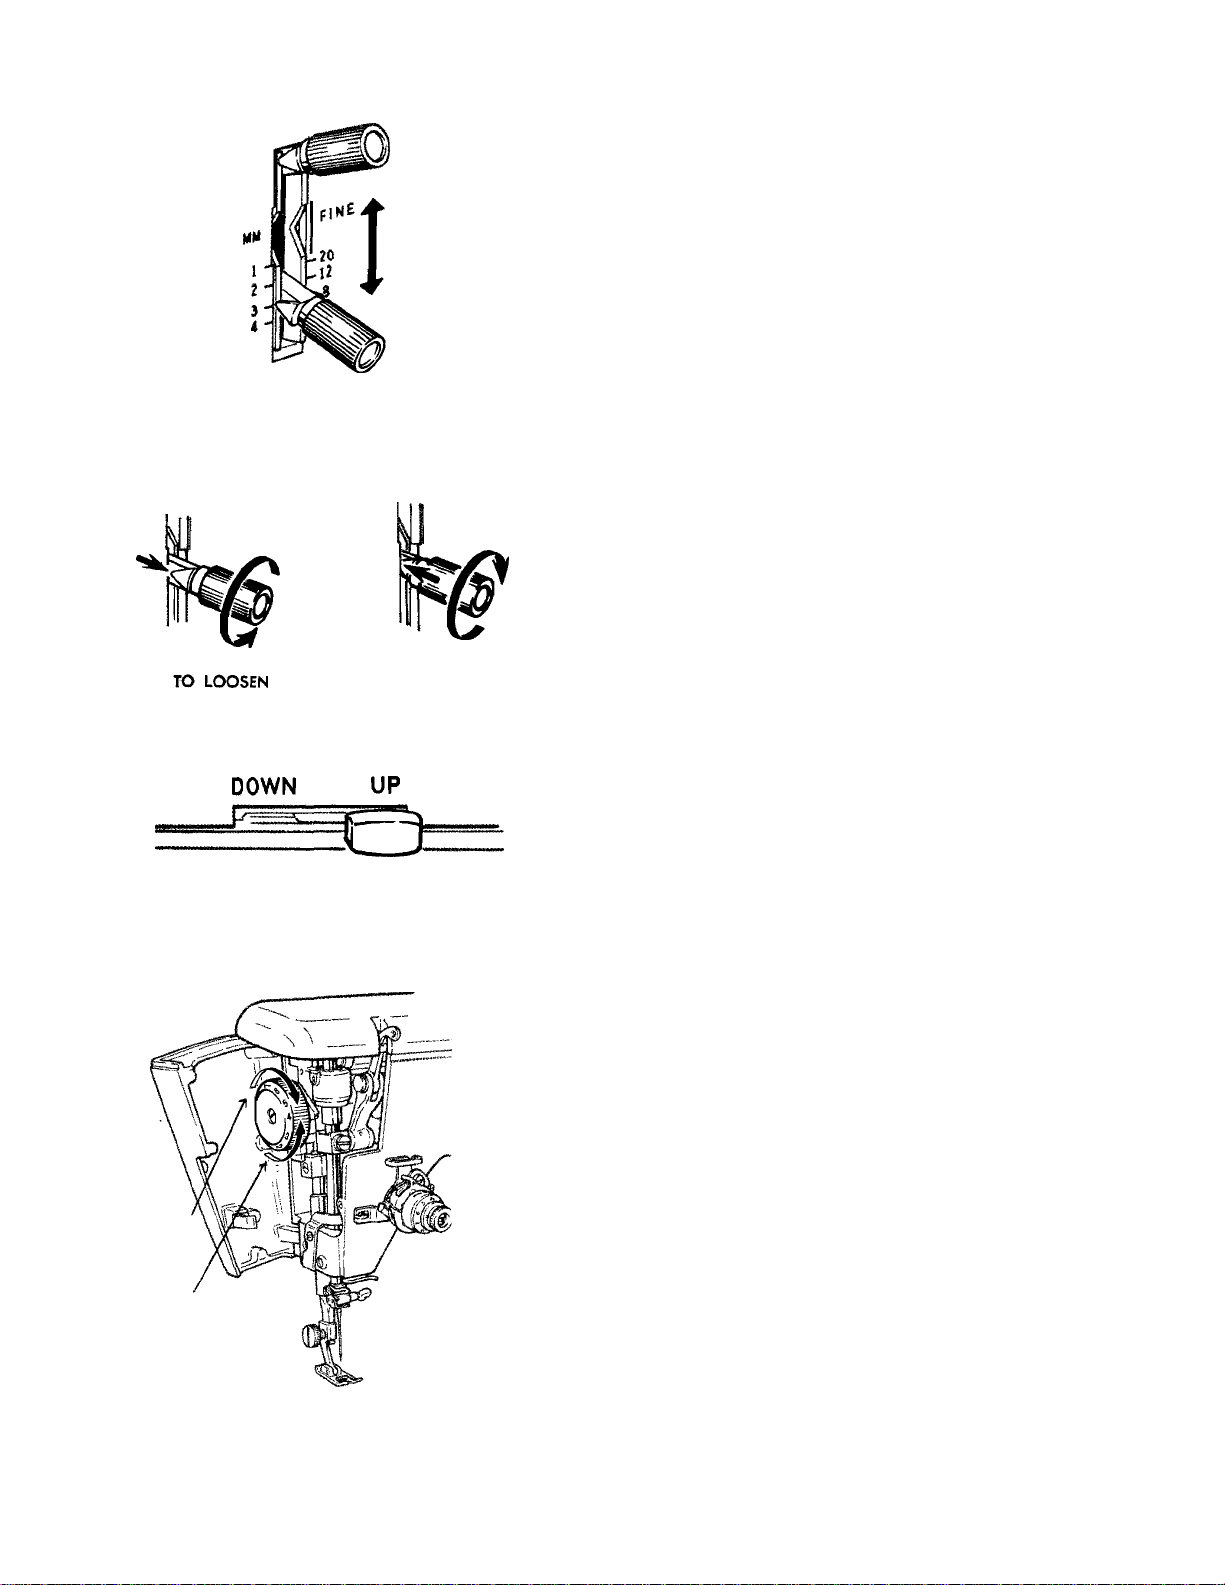
5. STITCH LENGTH REGULATOR
REVERSE
FORWARD
THUMB NUT
(1) This lever controls the number of stitches per inch.
Numerals on left side of the lever represent stitch
length in millimeters.
Numerals on right side represent number of stitches
per inch.
The FINE area, which represents over 20 stitches
per inch, is used for satin stitching (closely spaced
zigzag stitching).
To set stitch length
a. Loosen thumb nut by turning to left and posi
tion lever for desired stitch length.
b. Tighten thumb nut by turning to right.
(2) This lever controls the direction of stitching (either
forward or reverse).
For reverse stitching, raise lever as far as it will go.
Hold lever in this position by hand while stitching.
TO TIGHTEN
TO INCREASE
TO DECREASE
6. FEED THROW-OUT LEVER
Set feed throw-out lever to “UP” position at right for
normal stitching. Set feed throw-out lever to “DOWN”
position at left for embroidery, mending and button
sewing. This will lower the feed dog below throat
plate surface and will not feed the material.
7. PRESSURE REGULATING DIAL
This dial regulates the pressure that the presser foot
exerts on the fabric. Correct pressure is important
because it means fabric feeds smoothly, evenly, without
being marred. Generally, heavy fabric requires a high
number setting; lightweight fabric requires a low num
ber setting.
• To increase pressure, turn dial to higher number.
• To decrease pressure, turn dial to lower number.
• For darning, turn dial to D, vvhich releases pres
sure and permits darning without an embroidery
hoop.
Page 7
ELEVEN CONTROLS (Continued)
8. THREAD TENSION DIAL
This dial regulates the degree of tension on your
needle thread and lets you select just the right setting
for your stitch pattern, thread, and fabric.
To determine correct tension setting, make a test on
a sample of your fabric. If the fabric puckers, decrease
tension. If the stitches look loose, increase tension.
• To decrease tension, turn to lower number.
• To Increase tension, turn to higher number.
9. BOBBIN THREAD TENSION
Bobbin thread tension too tight—correct by turning
screw counterclockwise.
Bobbin thread tension too loose—correct by turning
screw clockwise.
A perfectly locked stitch results with upper and lower
tensions balanced so that needle and bobbin threads are
drawn equally into fabric.
10. BUTTONHOLE STITCH SELECTING DIAL
This dial is used when stitching buttonholes and magic
patterns.
• For buttonhole, set dial to “Bl” and “B2”.
• For magic patterns, set dial to “MAGIC”.
• For regular stitching, set dial to “OFF”.
Always push disc follower releasing lever to the right
before moving this selecting dial.
11. STITCH DENSITY CONTROL DIAL
This dial controls stitch density when making button
holes.
• For closely spaced stitches, turn dial upward.
• For open stitches, turn dial downward.
• For regular stitching, set dial to
r—«№*1
twit»!!ianii!J3agiiiiiiri
t
Page 8
^ :
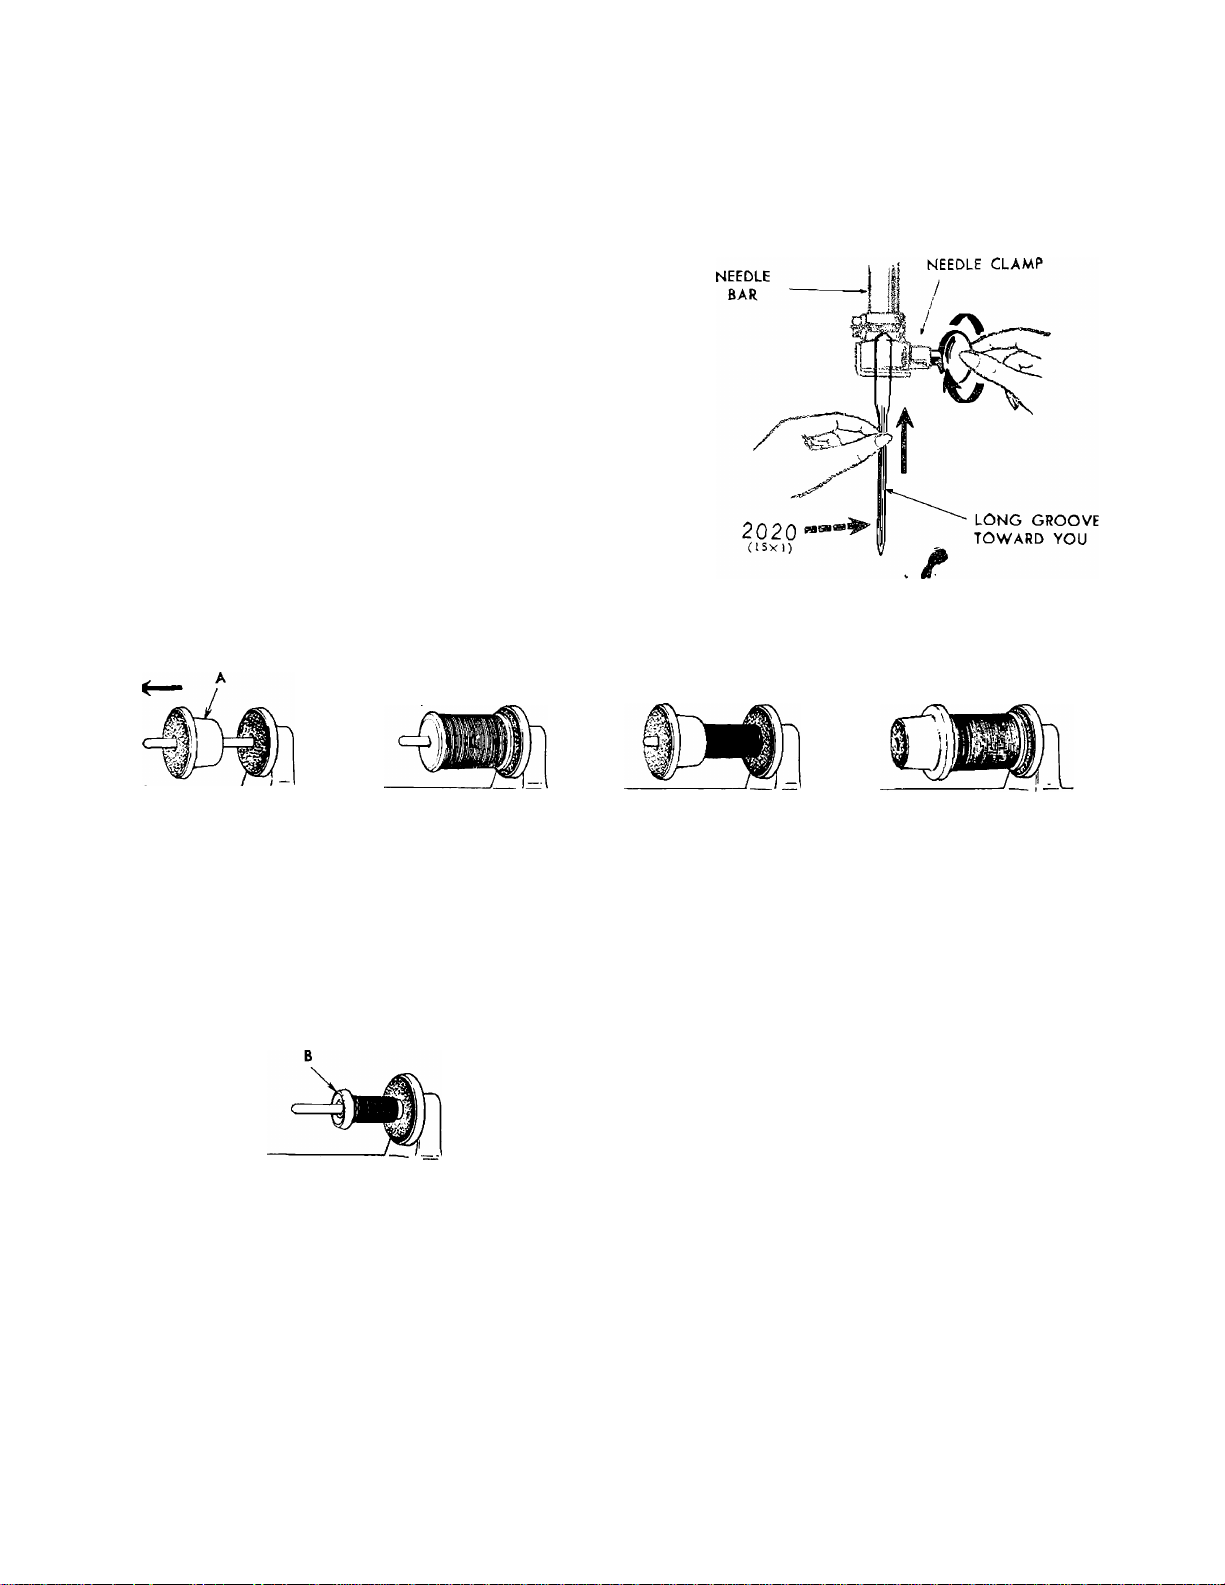
TO CHANGE THE NEEDLE
1. Raise needle bar to highest position by turning hand
wheel toward you.
2. Loosen the needle-clamp screw and remove the
needle.
3. Insert new needle in clamp, with the flat side of
the needle to the back and the long gfsova toward
you; push it up as far as it will go.
4. Tighten needle-clamp screw.
This machine uses needles
Catalog 2020 (15X 1)
Sizes 9, n, 14, 16 and 18.
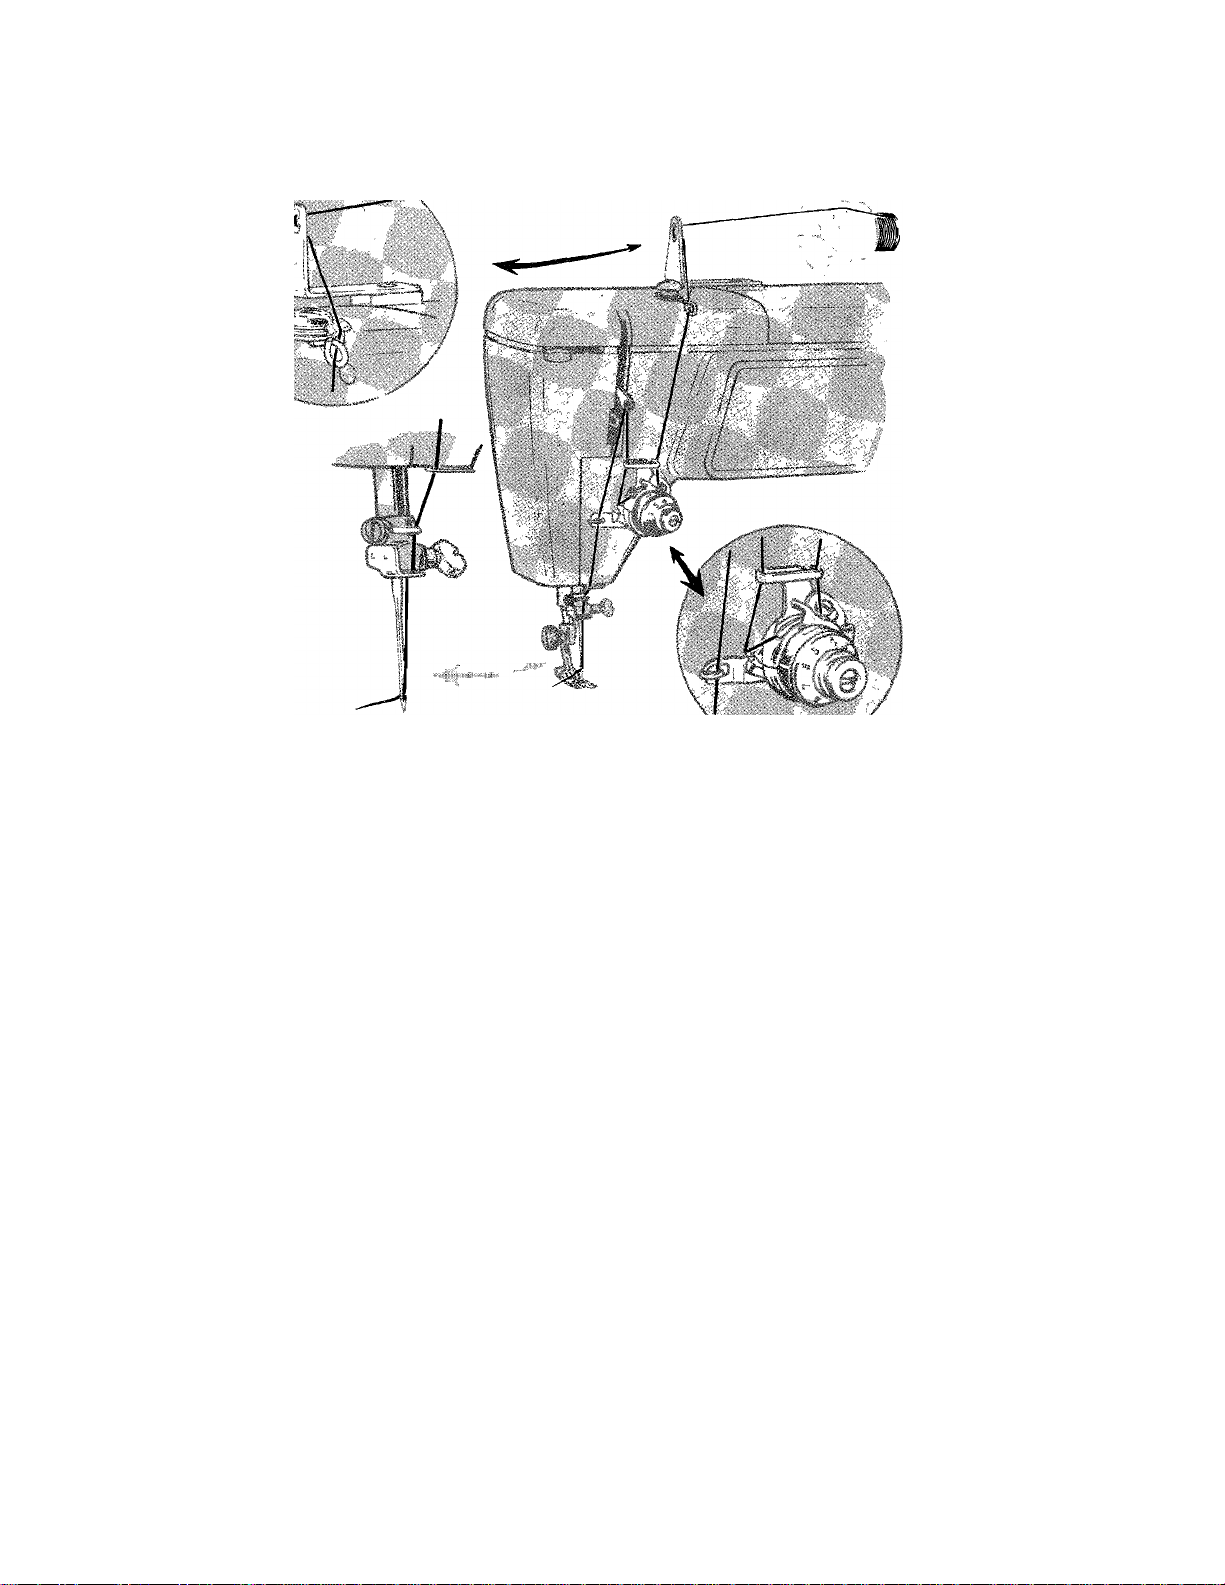
TO HOLD SPOOLS ON HORBZONTAL SPOOL PIN
Remove spool holder A
from spindle by sliding
in to the left.
VERTICAL SPOOL
Slip spool
onto spindle.
This spool pin is used when two-needle stitching is
desired. For instructions, see page 22,
of thread
To hold small spools—
Turn small end of spool
holder to the right and
slide onto spindle. Press
spool holder firmly against
spool.
To hold large spools—
Turn wide end of spool
holder to the right and
slide onto spindle. Press
spool holder firmly against
spool.
SMALL SPOOL HOLDER
A small size spool holder S is furnished with the
machine. This spool holder lets thread unwind smoothly
when very small spools wound with embroidery thread,
etc. are retained on the spool pin.
Page 9
HOW TO THREAD YOUR SEWING MACHINE
1. Turn hand wheel to raise take-up lever to its highest
position.
2. Raise the presser foot.
3. Lead thread through all threading points shown.
4. Thread needle from front to back.
5. Draw about four inches of thread through eye of
needle.
FABRIC, THREAD, NEEDLE, AND STITCH LENGTH TABLE
FABRICS
DELICATE—tulle, chiffon, fine lace,
silk, organdy, fine tricot
LIGHTWEIGHT—batiste, organdy,
jersey, voile, taffeta, silk, crepe,
plastic film
MEDIUM WEIGHT—gingham,
percale, pique, linen, chintz,
faille, satin, fine corduroy,
suitings
MEDIUM HEAVY—gabardine,
tweed, sailcloth, denim,
coatings, drapery fabrics
THREAD
SIZES
Fine Mercerized
80~120 Cotton
Synthetic Thread
50 Mercerized
60~80 Cotton
“A" Silk
Synthetic Thread
50 Mercerized
50~60 Cotton
“A" Silk
Synthetic Thread
Heavy Duty
Mercerized
40 to 50 Cotton
NEEDLE STRAIGHT STITCHES
SIZES PER INCH
15 to 20
9~11
11~14
1Ó
12 to 15
(8 to TO for plastic]
12 to 15
10 to 12
HEAVY—overcoatings, dungaree,
upholstery fabrics, canvas
Heavy Duty
Mercerized
30 to 40 Cotton
18
8 to 10
Page 10
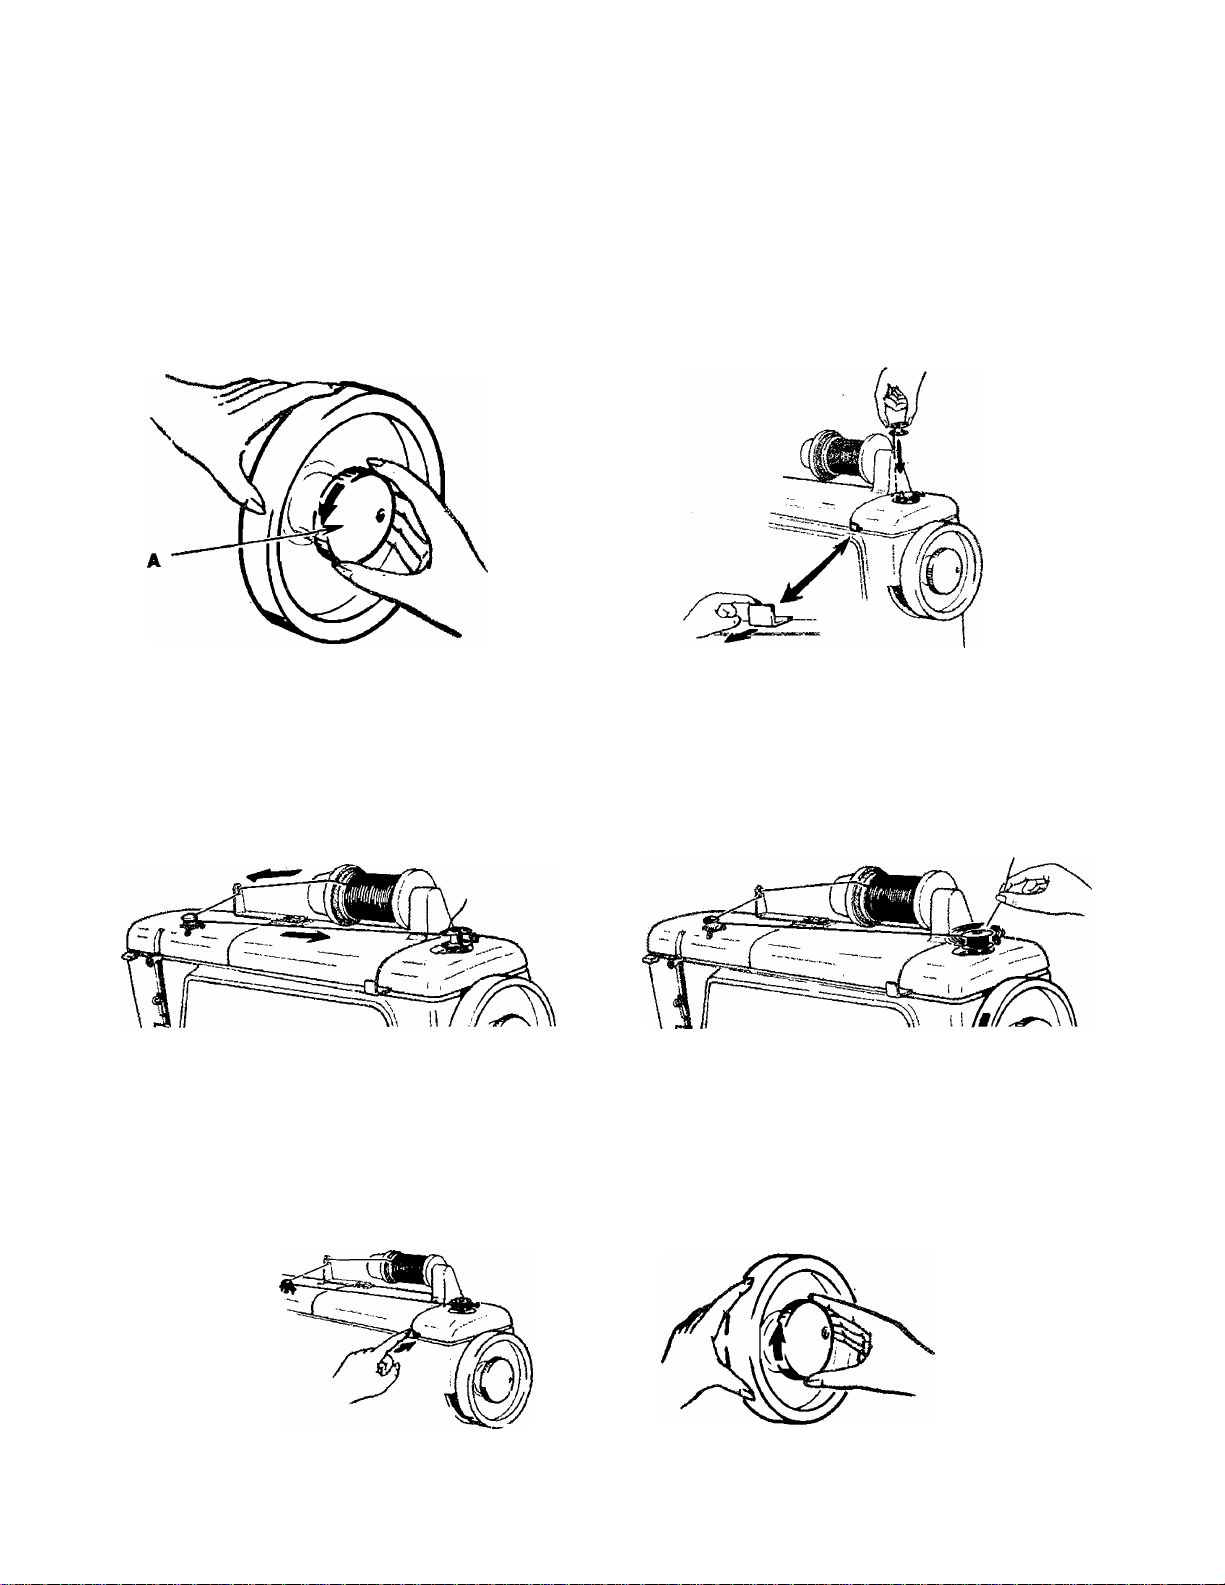
TO WIND THE BOBBIN
1. Loosen stop motion screw A with right hand in
direction shown by arrow.
Place spool of thread on Horizontal Spool Pin.
Carry the thread through the thread guide on the
arm top cover lid, between bobbin winder tension
discs and then through the hole in upper side of
bobbin as shown below.
2. Place empty bobbin on spindle with pin of spindle
entering small hole in lower side of bobbin and pull
bobbin winder actuating slide.
4, Hold end of thread until a few coils are wound and
then break off the end of thread.
L Push bobbin winder
actuating slide end
remove bobbin.
WHEN BOBBIN IS FULL
2. Tighten stop motion
screw.
Page 11
If bobbin does not
wind evenly—
Loosen screw which holds
tension brocket in posi
tion. Move bracket up
if bobbin winds towards
bottom.
Move bracket down if
bobbin winds towards
top.
THREADING THE BOBBIN CASE
1. Hold bobbin so that thread leads
off in direction shown.
3. Draw thread into notch at end
of spring ; pull about 3 inches of
thread across bobbin.
2. Place bobbin in case.
Lead thread into slot and under
spring.
4. Close slide plate allowing thread
to enter notch.
Page 12
AHACHMENTS
The attachments that come with your sewing machine are designed to help you do every kind of
sewing easily and perfectly
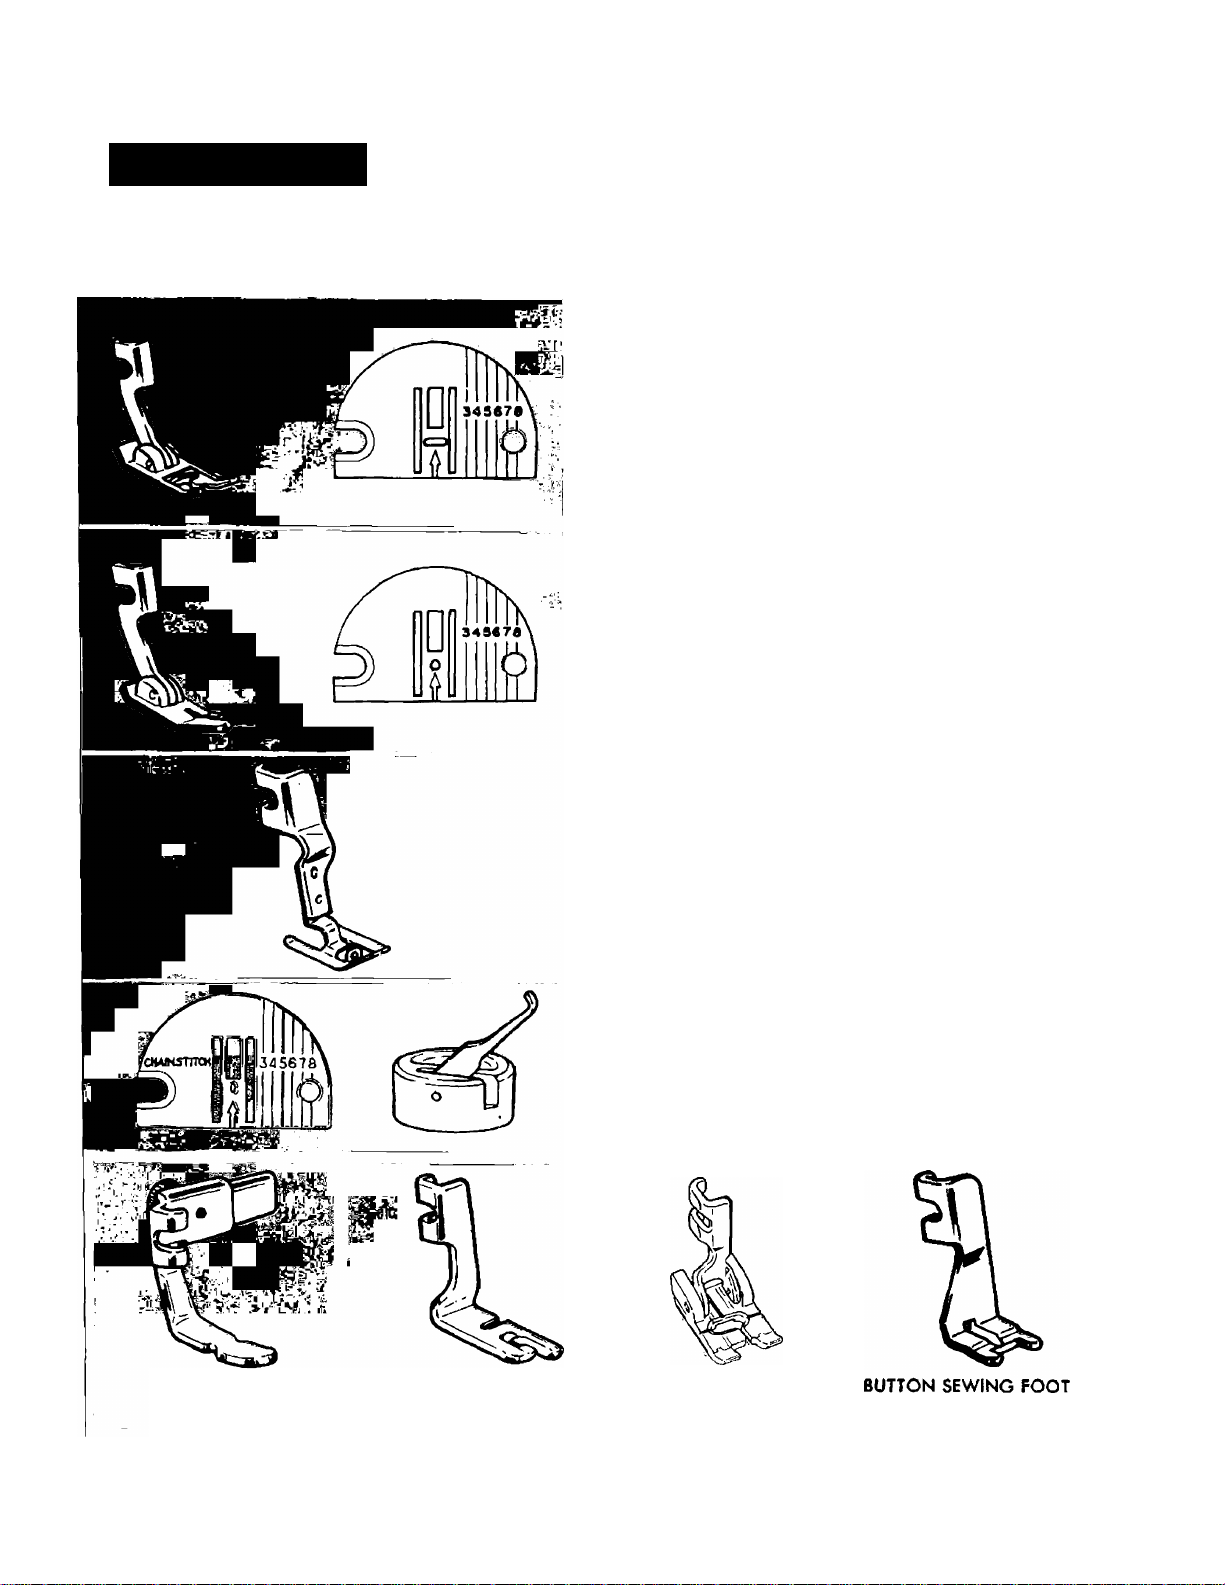
GENERAL PURPOSE PRESSER FOOT AND GENERAL
PURPOSE THROAT PLATE
These attachments can be used for zigzag and straight
stitching.
These are used for almost all utility sewing.
STRAIGHT STITCH PRESSER FOOT AND STRAIGHT
STITCH THROAT PLATE
These attachments are used for straight stitching only,
and particularly when stitching delicate or spongy
fabrics, synthetics, etc.
SPECIAL PURPOSE PRESSER FOOT
This foot is designed especially for satin stitching
(closely spaced zigzag stitches).
APPLICATIONS :
Ornamental stitching. Monograms, Applique work,
Motifs.
CHAIN STITCH THROAT PLATE AND LOOPER
These fittings are used for chain stitching.
For instructions, see page 24.
ZIPPER FOOT
(See page 30}
HEMMER FOOT
(See page 29)
BUTTONHOLE FOOT
(See page 32)
10
(See page 35)
Page 13
ATTACHMENTS (Continued)
EDGE-STITCHER
(See page 36)
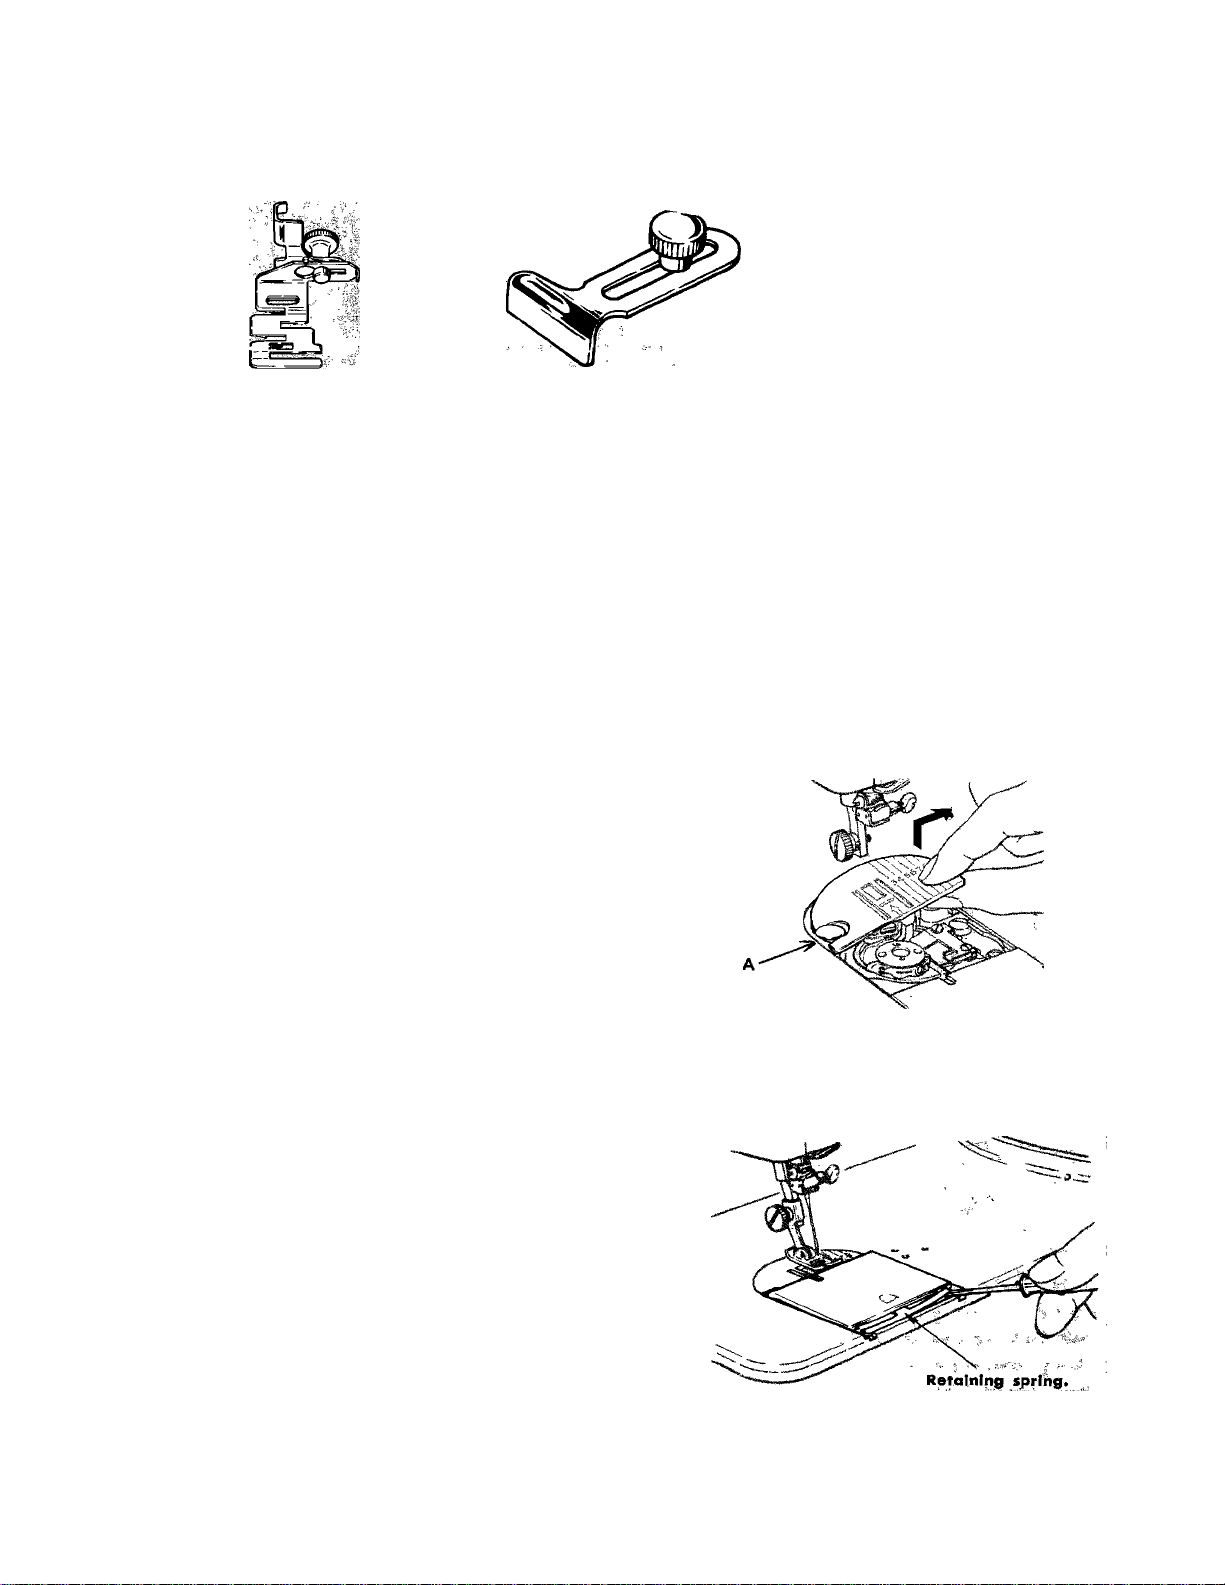
CLOTH GUIDE
(See page 1 3)
The ripper will help you to cut
opening for the button after a button
hole is completed.
It is also useful for removing seams.
In addition to the aforementioned fittings, needles, bobbins, screwdrivers, oil container and lint brush,
etc. are furnished with the machine.
TO CHANGE THROAT PLATE
1. Raise needle bar and presser foot.
2. Open slide plate.
3. Place thumb under right front end of throat plate
and raise until clamping pin A lifts up.
4. Draw throat plate toward right to disengage.
When replacing the throat plate, fit it in the reverse
order.
NOTE: When changing the throat plate, set feed
throw-out lever to “DOWN” position.
RIPPER
TO REPLACE SLIDE PLATE
1. Raise the presser foot and the needle.
2. Place slide plate in slide way with the front edge
close to, but not covering, the retaining spring.
3. With a small screwdriver, lift each end of the spring
into each of the side grooves on the underside of
the slide plate.
4. Draw the slide plate gently toward you and fully
engage the spring.
5. Close slide plate.
11
Page 14

CENTER NEEDLE POSITION
• Stitch Pattern Selectors i AN
• Stitch Width Selector ; 3
• Throat Plate : Straight Stitch or General
Purpose
• Presser Foot; Straight Stitch or General
Purpose
J L W
1 kIm
Speci
'
2 3 4 5
- /
LEFT AND RIGHT NEEDLE POSITIONS
• Stitch Pattern Selectors: AN
• Stitch Width Selector i 1 or 2 (left)
4 or 5 (right)
• Throat Plate i General Purpose
• Presser Foot: General Purpose
J L fj
PREPARING TO SEW
3 4-5
a, i I i
12 3
4
5
Hold needle thread
lightly with left hand
and turn hand wheel
slowly toward you so
that needle enters
throat plate.
Continue turning hand
wheel until needle rises
and brings up bobbin
thread in a loop.
Undo the loop with
your finger.
12
Place both needle and
bobbin threads under
presser foot and lay
them towards the back.
Page 15

SEWING A SEAM
1. Lower presser foot.
Raise stitch regulator to reverse.
3. Lower stitch regulator.
Stitch to end of seam.
2. Back-stitch to edge of fabric for re
inforcement.
4. Raise stitch regulator.
Back-stitch to reinforce end of seam.
5. With take-up lever at highest point,
raise presser foot and remove fabric.
6. Cut threads on thread cutter at rear of
presser bar.
TO STITCH WITH CLOTH GUIDE
The cloth guide aids in attaining uniformity of seam
width.
The guide is secured to the bed of the machine in
either of the threaded holes to the right of the slide
plate. To guide seam stitching straight and parallel to
the edge of the fabric, guide the fabric edges lightly
against the guide while stitching.
13
Page 16

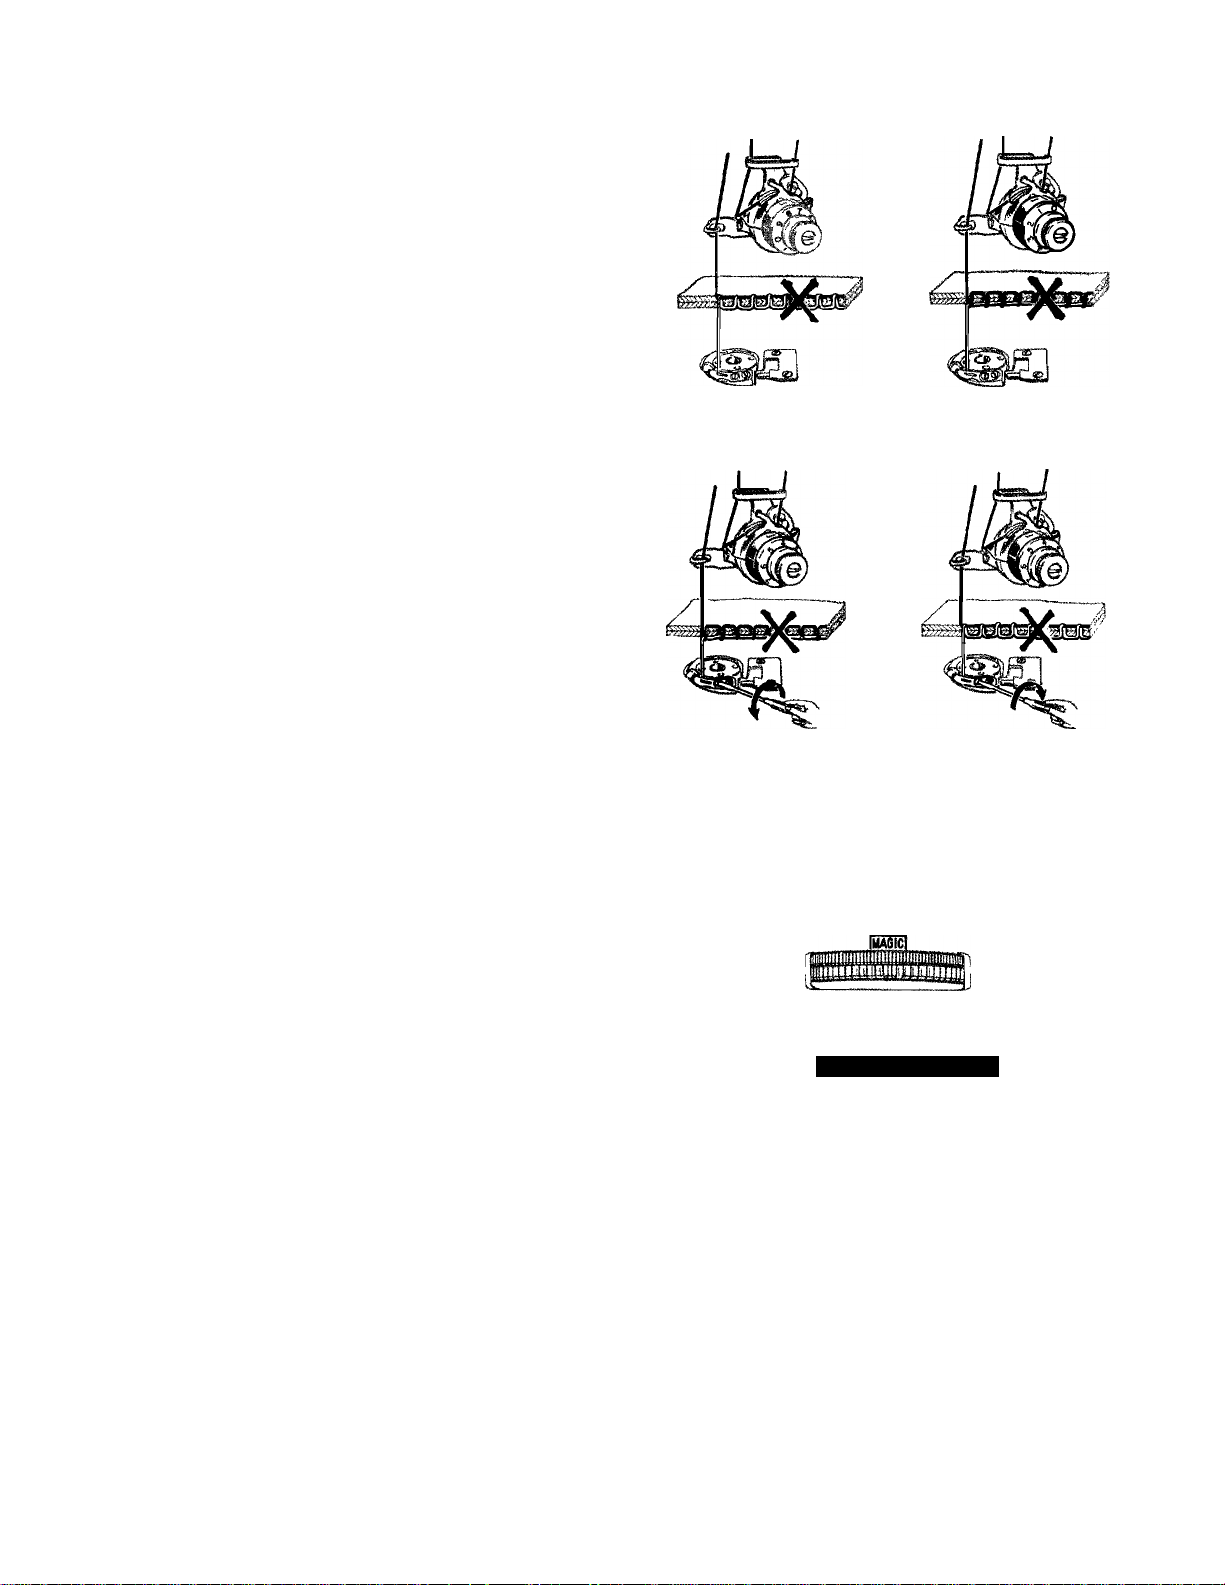
A WORD ABOUT HOW THE PATTERNS ARE PRODUCED
The zigzag features of your sewing machine give you an almost unlimited choice of stitch patterns. All
patterns are produced from discs. The four basic patterns as shown below come from discs that are built
into the machine. To use these, you need no special attachments—simply adjust the pattern selectors.
Also, supplied with the machine is a “Buttonhole Cam" which can easily be removed. In addition, 12
Special Discs (See page 16) and 4 Magic Cams (See page 17) are contained in the attachment box.
You can combine two basic patterns to produce a third, which will be different from either one alone.
Thus, you have an almost infinite variety of combination patterns from which to choose.
BASIC PATTERNS
BUILT-IN DISCS
Upper Stitch Pattern Selector:
Lower Stitch Pattern Selector;
B (Ord inary stitching, Buttonholes, etc.)
A (Button sewing, Two-needle stitching, etc.)
C (Occasionally)
Stitch Width Selector s
Throat Plate: General Purpose
Presser Foot: General Purpose or Special Purpose
As shown at right, the four built-in discs are re
presented by the letters J through M. If you move the
upper selector to one of these letters, and keep the
lower selector on A, B or C, you will get one of the
basic patterns.
In addition, you can use two needles if you wish
when using a basic pattern. (See page 22)
J L N
Upper Stitch Pattern Selector
K L
3
H
3
!
H
M
<
<
14
Page 17

Lower Stitch Pattern Selector
J L N
K| Sli special
J U. N
■J k ^ ■
I -_Oa
«El
B 0 F H
Left
AJ 3
BJ 3
In basic patterns, the Lower Stitch Pattern Selector controls stitch placement. Selector setting of B
places stitching in center needle position. Selector settings A and C place the stitching in left and right
needle positions at stitch widths less than 5. Selector setting B is preferred for ordinary stitching.
Control of Stitch Width Selector
A I C I E I G I
B 0 F H
Right
CJ 3
Upper Stitch Pattern Selector: Special
Lower Stitch Pattern Selector : A, B, C
Stitch Width Selector: 2—^5
Throat Plate : General Purpose
Presser Foot: General Purpose or Special Purpose
Width of zigzag stitch is controlled by the stitch width
selector. As the selector is moved to the right, the
width of zigzag stitch is increased.
To avoid damage to needle and fabric, raise needle
above fabric before moving the selector.
SPECIAL DISCS
B O F H
vJ L N
Special
15
Page 18

SPECIAL DISCS (Continued)
The interchangeable Special Discs that come with your
machine can be used to produce still other stitch patterns.
To Change Special Disc
1. Raise needle to its highest point.
2. Push disc follower releasing lever to the right and
set buttonhole stitch selecting dial to “OFF”.
3. Raise top cover lid, remove buttonhole cam and put
another disc you desire on holder; push down until
disc snaps in place.
Special Disc Patterns
®
r
• Upper Stitch Pattern Selector: J, K, L, M, Special
• Lower Stitch Pattern Selector : D through H
• Stitch Width Selector: 2 through 4
• Throat Plate : General Purpose
• Presser Foot: Special Purpose
In Combination Patterns, the Stitch Width Selector Varies the Design.
When the lower stitch pattern selector is not on A, B or C, the stitch width selector no longer controls
width.
¥
®
ww ®
COMBINATION PATTERNS
You can combine two patterns either by using two
built-in discs or by using one Special and one built-in
disc.
If you choose a setting of J, K, L, M and Special on
the upper row, and another D through H on the lower
row, you will be combining the patterns of two discs.
Thus you will have an almost infinite variety of com
bination patterns.
IUI|liyi yyuyuu /
J L N
Special
Example of Combination Pattern Varied by Stitch Width Selector
8 4
JG2
1 2 3 4 5
JG3
16
3 4
JG4
Page 19

MAGIC PATTERNS
Magic patterns are produced from magic cams sup
plied with the machine. By using these cams together
with the built-in cams, you will have an almost un
limited variety of combination patterns. Some of which
are shown below.
Magic cam is fitted to the machine in the same
method as Special Disc. (See page 16.)
Basic and Combination Patterns (Magic Cam)
BASIC PATTERN
Upper Stitch Pattern Selector;
Lower Stitch Pattern Selector:
Stitch Width Selector: 2'—5
Buttonhole Stitch Selecting Dial: MAGIC
Stitch Density Control Dial: Set dial at
Stitch Length Regulator: 6
Throat Plate : General Purpose
Presser Foot: General Purpose
* In basic patterns, selector setting at “B • Special 5” is
preferred. (See following examples.)
* Two-needle stitching can be produced if desired. (See
page 22.)
* Best Magic Patterns can be obtained by using sizes 9
or 11 needles.
No.101 No.102
Special
A, B or C
No.103
No.104
COMBINATION PATTERN
Upper Stitch Pattern Selector:
Lower Stitch Pattern Selector:
Stitch Width Selector: 2'—^5
Buttonhole Stitch Selecting Dial:
Stitch Density Control Dial: Set dial at
Stitch Length Regulator : 6
Throat Plate : General Purpose
Presser Foot: General Purpose
* The following examples show stitch patterns produced
by setting stitch width selector at 3.
* Combination patterns can not be used with two needies.
No.101
LE 3 MGS
No. 103
l~N
9~H
MAGIC
No.102
H S 3 GM 3
No.104
No. indicates Magic Cam number.
No. indicates Magic Cam number.
MGS FL 3
17
J F 3
LG 3
Page 20

MAGIC PATTERNS (Continued)
Varied Stitch Patterns
Basic patterns shown on page 17 can be produced by
setting the stitch pattern selectors at “B • Special”, the
stitch width selector at “5” and the stitch density con
trol dial at “a”. These patterns, however, can be varied
in the following manner if desired.
Patterns varied by stitch density control dial.
(A) When stitch density control dial is turned up
ward, stitch patterns will become closely spaced.
(See Fig. 1)
(B) The patterns will become compact and perfectly
balanced by making the stitch width smaller while
turning stitch density control dial upward. (See
Fig. 2)
i 4^
Fig. 1
Fig. 2
2. Patterns varied by magic pattern stitch adjusting
lever.
Magic patterns can be varied by moving the magic
pattern stitch adjusting lever toward you or away
from you. (See Fig. 3)
3. When using Magic Cam, the feed dog of the ma
chine moves forward or backward. By making the
best use of this feature, the following stitches can be
made.
(A) Threefold straight stitches can be produced by
using cam No. 101 with the selectors set at “AN3”.
(See Fig. 4) This type of stitch is most suited for
sewing crotch seams on trousers and also edge-
stitching pockets, etc. where durability is needed.
Magic Pattern Stitch
Adjusting Lever
ц
Î
0
I
u
Magic Cam No. 103 used
Fig. 3
Fig. 4
(B) Threefold zigzag stitches can also be made by
using cam No. 101 with the stitch pattern selectors
set at “BJ” and the stitch width selector at 2 through
5. (See Fig. 5)
Adjust magic pattern stitch adjusting lever when
uniform threefold stitches can not be obtained.
Fig. 5
18
Page 21

SATIN STITCHING
Satin stitching, aseries of closely spaced zigzag stitches
that form a smooth, satin-like surface, is useful for both
utility and decorative vvork.
When you wish to produce a satin stitch, make a
test sample first so that you can adjust the stitch length
and thread tension properly.
Soft fabric may require a backing to ensure firm
satin stitching. Crisp organdy or lawn is suitable for
this purpose.
Adjusting Stitch Length For Satin Stitching
1, Move Stitch Length Regulator to bottom of FINE
area.
2. Gradually tighten thumb nut by turning it to right,
until stiiches are closely spaced and form a smooth
surface.
Adjusting Tension For Satin Stitching
Satin stitching requires less tension than straight
stitching or open zigzag designs. Furthermore, the
wider the satin stitch, the lighter the tension on the
thread must be. Thus, stitch width 5 requires the least
tension; narrower satin stitching requires somewhat
more.
LINGERIE SEAMS
‘ Stitch Pattern Selectors : BJ
• Stitch Width Selector: 2^/i
• Stitch Length: 12 to 20 depending on fabric
• Throat Plate : General Purpose
• Presser Foot: General Purpose
To make a lingerie seam both durable and flexible,
use a zigzag stitch. This seam treatment is particularly
suitable for bias seams.
1. Straight-stitch the seam (with selectors at AN 3) on
wrong side.
2. Press both seam allowances in the same direction.
3. From the right side, top-stitch with zigzag setting
BJ 2V2, letting the needle alternately enter the seam
line and seam thickness.
LINGERIE SEAM
19
Page 22

FLAT FELLED SEAMS
• Stitch Pattern Selectors : BJ
• Stitch Width Selector : 3
• Stitch Length: 12 to 20 depending on fabric
• Throat Plate: General Purpose
• Presser Foot: General Purpose
Zigzag stitching gives strength and durability to flat
felled seams.
1. Stitch the seam on the right side of the fabric taking
full seam allowance.
2. Press the seam allowance to one side, keeping the
right side of the stitch on top.
3. Trim the under seam allowance to one-half its
width.
4. Turn the upper seam allowance edge evenly over
the trimmed edge, and top-stitch.
SEAMS IN KNIT FABRICS
CURVED SEAM WITH TAPE STAY
•Stitch Pattern Selectors: BM
•Stitch '^idth Selector: 2'—5’
• Throdt Plate : General Purpose
• Presser ,Foot: General Purpose
• Stitch Pattern Selectors: BJ
• Stitch Width Selector: 2
• Stitch Length : About 20
• Throat Plate: General Purpose
•.Presser Foot: General Purpose
This fine zigzag stitch is ideal for seaming knit fabrics.
It is particularly desirable for underarm seams where
elasticity and give are needed.
For neckline and waistline seams, where a stay is
needed to prevent undue stretching, this same stitch can
be used to apply seam tape. For a flat, smooth finish:
1. If seam is curved, pre-shape tape to fit by steam
pressing.
2. Baste tape in place.
3. Stitch, allowing needle to enter seam tape and seam
allowance alternately.
TEARS
1.
Trim ragged edges.
2.
Place underlay on the wrong side of tear for rein
forcement. (It is best not to baste or pin the under
lay, since you will be bringing the edges of the tear
together in the next step.)
3.
Stitch on the right side, bringing the edges of the
tear together.
4.
Shorten stitch length at ends and corners to give
extra strength.
5.
Trim underlay.
20
Page 23

BLIND STITCHING
Stitch Pattern Selectors : BK
Stitch Width Selector: 2 or 3
Throat Plate : General Purpose
Presser Foot: General Purpose
Blind stitching provides a durable hem finish that is
invisible and is best suited for curtains, draperies, table
linens and skirts, etc.
Blind Stitch Hems
1. Fold and press material as shown in sketches.
2. Place folded hem edge over the feed of the machine,
turning bulk of fabric to the left and thus creating
a soft fold.
3. Position needle into folded edge of hem at least
’/4 inch from upper fold, and stitch so that straight
stitches fall on hem edge and sideward stitches
pierce the soft fold.
Overedged Seam
For an overedged seam, the Blind Stitch makes a
durable, bulkless finish. It is particularly suitable for
lengthwise seams.
Seam edges should be trimmed evenly, and the stitch
then formed over the raw edge.
21
Page 24

By using two needles at once, you can produce two
parallel, closely spaced, decorative lines of stitching
simultaneously. You can choose either a straight-stitch
setting or decorative stitching (basic patterns). Com
bination patterns can not be used for two-needle work.
Some of the attractive designs you can create are
shown on page 23.
To Prepore for Two-Needte Stitching
1. Fill bobbin with enough thread to complete stitching.
2. Loosen thumb screw on needle clamp and insert
two needles, as illustrated.
To Thread the Machine
1. Place spool of thread on horizontal spool pin. Thread
as for one-needle stitching except:
• Pass thread between center and back tension discs.
• Pass thread through eye of left needle.
2. Raise top cover lid A and insert vertical spool pin
B into hole C provided for it, as shown below.
3. Place spool of thread on vertical spool pin. Thread
as for one-needle stitching except:
• Pass thread between center and front tension discs.
• Pass thread through eye of right needle.
• Do not attempt to pass thread through guide on
top cover lid.
Make certain that only thread from horizontal spool pin
is carried through last guide D on the needle clamp.
22
Page 25

STRAIGHT STITCHING WITH TWO NEEDLES
■ Sfitch Paitern Selectors : AN
* Stitch Width Selector : 2 (only)
♦ Throat Plate ; General Purpose
• Prosser Foot; Generol Purpose
BASIC PATTERN STITCHING WITH TWO NEEDLES
Upper Stitch Pattern Selector; J, K, L, M, Special
Lower Stitch Pattern Selector ; A
Stitch Width Selector ; 2 or 3
Throat Plate : General Purpose
Presser Foot; General Purpose (open patterns)
Special Purpose (satin stitching)
J L N
MAGIC PATTERN STITCHING WITH TWO NEEDLES
• Upper Stitch Pattern Selector ; Special
• Lower Stitch Pattern Selector t A
• Stitch Width Selector: 2 or 3
• Buttonhole Stitch Selecting Dial : MAGIC
• Throat Plate : General Purpose
• Presser Foot: General Purpose
DECORATIVE TWO-NEEDLE STITCHING
Stitch Patterns and Their Selector Settings
a
AK3 n am 3 as®s as®3
AL3
_____
____I-____
--------
___
J A— AS(i)3 ’ AS(|)3
«%SS4&
A S 3
6m)
12 3 4 6
^ A S3 “ ^
^ ¿—A l
----
X (i^
O Removable Cam Numbers
23
Page 26

A WORD ABOUT CHAIN STITCHING
This machine has the unique feature of being capable
of producing not only conventional lock stitching but also
selectively single thread chain stitching. By means of
the chain stitch, the necessary tacking and basting opera
tions indispensable for sewing prefectly fitted dresses
or other garments can now be produced.
This single thread chain stitching looks like regular
straight stitching on top, but is a series of interlocking
loops on the underside of the fabric. (See Fig, 1) The
stitches are produced by the needle thread alone, so you
do not need a bobbin thread or a bobbin.
For chain stitching, fine threads and soft fabrics are
most suitable.
WHERE TO USE CHAIN STITCHING
Here are a few of the many sewing jobs for which
you will find chain stitching useful.
- Edge basting on jackets, coat, and costumes—sleeve
inserting—attaching collars—hems on skirt, blouses etc.
“ Trial seams for fitting.
* Fastening removable trimming—
Fur collars.
White collar and cuffs.
• Hemming curtains and draperies that may need to be
altered.
• Sewing temporary tucks to extend the life of—
Children's clothes.
Curtains and linings that might shrink. (See Fig. 2)
* Sewing knit, jersey and tricot.
Fig, 2
Set feed throw-out lever to
“DOWN” position. Remove re
gular throat plate and bobbin,
and insert chain stitch loop re
tainer A into bobbin case.
TO PREPARE THE MACHINE FOR CHAIN STITCHING
Set feed throw-out lever to “UP”
position. Depress loop retainer
latch S as shown above.
24
Turn the latch to the left until
it is positioned under the feed
dog. Insert chain stitch throat
Plate C.
Page 27

CHAIN STITCHING (Continued)
TO THREAD THE MACHINE
Thread your machine in the usual way, except pass
needle thread from take-up lever through chain stitch
thread guide D with the face plate open. (See Fig. 6)
NEEDLE THREAD TENSION
Normally set between 2 and 4 on the Tension Dial,
however, slight adjustment may be required dependent
on the thread size and the material used.
When the tension is correctly adjusted, the chain will
be flat and smooth. (See Fig. 1)
Puckers in the fabric and pinched loops indicate too
much tension—turn dial to a lower number.
Large, irregular loops indicate too little tension—turn
dial to a higher number.
- T' .''1
^ t .
TO SEW AND CHAIN-OFF
• Stitch Pattern Selectors :
• Stitch Width Selector:
•Stitch Length: 6'—12
• Throat Plate:
• Presser Foot:
Chain Stitch Throat Plate
Straight Stitch or General Purpose
(When sewing soft fabric with fine
thread)
Special Purpose
(When sewing crisp fabric such as
calico with #50 cotton)
AN
3
1. Position needle in very edge of fabric and lower the
presser foot.
2.
Start the machine and stitch to end of seam. Con
tinue stitching beyond edge of fabric, making a chain
from one to two inches long.
Cut chain between fabric and presser foot. (See Fig. 9)
After chaining off, start a new line of stitching by
raising the presser foot slightly and positioning the
fabric in front of needle. Lower presser foot and
stitch to end of seam. (See Fig. 10)
Fig.
Fig. 10
25
Page 28

CHAIN STITCHING (Continued)
f
Fig. 12
TO RELEASE CHAIN FROM THE MACHINE
When you finish chain stitching, the chain can easily
be
removed from the machine.
r
1.
Raise presser foot.
2.
Hold end of chain with your left hand.
3.
Turn hand wheel slowly toward you with your right
hand until needle is all the way down in the needle
1
t
hole.
4.
Then turn hand wheel slowly away from you, pull
ing gently on chain, which will unravel as needle
rises. (See Fig. 11)
TO END THE STITCHING IN THE FABRIC
Stop stitching at desired point, with take-up lever
in its highest position.
Raise presser foot.
With your finger, pull the thread through the takeup lever, forming a loop between the take-up lever
and chain stitch thread guide. (See Fig. 12)
4.
Pass scissors under presser foot so as to' draw the
loop down to the left of the foot. (See Fig. 13)
5.
Hold the loop and cut the thread close to the end
of the stitching. (See Fig. 14)
6.
Remove fabric from the machine by pulling it straight
back, away from you. This will cause the thread
end to pull through the fabric to the underside and
form a temporary lock. (See Fig. 15)
TO REMOVE THE STITCHING
1. Cut the last loop formed on the underside
of the fabric. (See Fig. 16)
2. Pick up free thread end from top surface
of fabric.
3. Pull the free thread end, removing entire
line of stitching. (See Fig. 17)
26
Page 29

FREE-MOTION STITCHING
In. free-motion stitching, you sew without a prass»r foot and instead control fabric movement
(and hence stitch length) yourself, by means of an ombroldory hoop. Either a straight or a zigzag
stitch setting can be used. Because you can move the hoop in any direction—forward or backward,
from side to side, and even diagonally—free-motion stitching is extremely useful for intricate em
broidery designs,
SCRIPT LETTERING
1. Transfer the design (by tracing, usually) to the right
side of fabric.
2. If the fabric is soft or loosely woven, baste a back
ing of lawn or organdy onto the wrong side.
3. Place work in embroidery hoop. Be sure fabric is
held taut.
4. Position work under needle and lower presser bar
to engage tension.
5. Turn hand wheel toward you to bring bobbin thread
up through fabric at start of design and hold both
threads as you start stitching,
6. Stitch, following the outline of the lettering. Move
the hoop slowly and maintain an even rate of speed
so that stitches are uniformly spaced.
7. After stitching, trim the backing close to the
stitching.
Darning With Embroidery Hoop
♦ Stitch Pattern Selectors; AN
♦ Stitch Width
♦ Stitch Length ; FINE (above 20)
♦ Throat Plate i
* Presser Foot: None
♦ Pressure Dial t D
• Feed Throw-out Lever; DOWN
Selector: 3
Straight Stitch
ZlgTog
Stitching
BJ
* Stitch Pattern Selectors; AN
♦ Stitch Width Selector) 3
♦ Throat Plate; General Purpose
• Presser Foot: None
* Pressure Dial> D
* Feed Throw-out Lever; DOWN
Trim ragged edges from area to be darned.
1.
Center worn section in embroidery hoop.
2.
Position work under needle and lower pres;
3.
Straight
Stitchirg
to engage tension.
4.
wheel over and draw bobbin thread up through
fabric. Hold both thread ends and lower needle into
fabric.
5. Outline area to be darned with running stitches for
reinforcement.
6. Stitch across opening, moving hoop under needle at
a slight angle from lower left to upper right. Keep
lines of stitching closely spaced and even in length.
7. When opening is filled, cover area with crosswise
lines of stitching.
27
Page 30

Applique adds beauty and interest to clothes and
household linens. Either contrasting or self fabric can
be used effectively.
The stitch most commonly used in appliqueing is
basic pattern J closely spaced to form a satin stitch.
The width of this and other basic patterns can be
varied to accommodate fabrics of different weaves and
textures. Combination patterns and variations can also
be used to applique with decorative stitching.
To prepare for appliqueing, make a sample to help
you decide which of the following two methods is the
more appropriate for your fabric and design.
• Position the design.
• Baste it to the fabric.
• Attach Special Purpose Presser Foot
(and General Purpose Throat Plate).
Method
1. Set Stitch Pattern and Stitch Width Selectors for
desired applique stitch. Set Stitch Length Regula
tor on FINE (above 20).
2. Stitch, outlining the design with applique stitching.
3. Trim any excess fabric on the outer edges of the
stitching. Remove basting.
Method ^2
1. Adjust selectors for straight stitching (AN 3).
2. Outline the entire design with a short stitch.
3. Trim raw edges to the stitching.
4. Readjust selectors for stitch pattern and width desired,
and set Stitch Length Regulator on FINE.
5. Stitch, following the straight-stitch outline. This
step will produce a smooth overedged finish, with
no raw edges to be trimmed. Rernove basting.
CORDED APPLIQUE
The Special Purpose Foot, which provides for a filler
cord is most suited for corded applique work. Gimp,
crochet thread, etc. are generally used for filler cord.
Follow either Method #1 or #2, described above.
The only difference in corded applique is the introduc
tion of the cord, over which the applique stitching is
formed.
To Threod Filler Cord
1. Place the spool of filler cord on the table, floor, or
in your lap.
2. Unw’ind a suflicient amount to avoid tension or
strain on the cord.
3. Lead the end of the cord through the eyelet in front
center of the Special Purpose Foot.
4. Draw the cord under and in back of the foot.
5. Proceed with stitching as for regular applique stitch.
28
Page 31

Many of the decorative stitch patterns can be used for monograms or motifs for adding a personal
touch to a blouse collar, for example, or for initialing household linens. You can buy designs or
create them yourself.
To Stitch a Monogrom or Motif
Stitch Pattern Selectors: BJ for zigzag satin
stitching
See stitch chart for
decorative stitches
Stitch Width Selector; 2*^5 (2-^4 tor
Combination Patterns)
Stitch Length ; FINE (above 20)
Throat Plate : General Purpose
Presser Foot: Special Purpose
1. Make a sample first, to determine suitability of
stitch pattern and find the right stitch length and
width, thread tension, and pressure.
2. Transfer the design (by tracing, usually) to the
right side of the fabric, and stitch.
Hemmer Foot
Stroight Stitching
Stitch Pattern Selectors : AN
Stitch Width Selector t 3
Stitch Length: 10^20
Throat Plate: Straight Stitch
Presser Foot: Hemmer Foot
You can turn and stitch a narrow hem in a single
operation if you use the Hemmer Foot. Thus, you can
eliminate basting or pinning whenever you are making
ruffle edges, lingerie finishes, and the like.
Decorotive Stitching
• Upper Pottern Selector: Any basic pattern
» Lower Pattern Selector: B
‘ Stitch Width Selector : 3
• Throat Plate: General Purpose
‘ Presser Foot; Hemmer Foot
29
Page 32

HEMS (Continued)
GUIDING FABRIC EDGE INTO SCROLL OF FOOT
PLAIN NARROW HEM
1. Draw the bobbin and needle threads under the
Hemmer Foot.
2. Crease a double '/s ii^c-h fold for about 2 inches along
the edge of the fabric.
3. Place the creased fold under the Hemmer Foot.
4. Lower the foot and start the hem by taking two or
three stitches through the double fold.
5. Hold thread ends with the left hand and guide the
raw fabric edge in front pf the hemmer into the
scroll.
6. Sew slowly, guiding raw edge in front of Hemmer
Foot. Hold threads until hem is well started. Even
feeding is essential, so keep the same width of
fabric in the scroll of the hemmer at all times.
DECORATIVE NARROW HEM
If you use the Hemmer Foot and choose a zigzag
stitch pattern, you can turn and deearate a narrow
hem in a single operation.
DECORATIVE NARROW HEM
Stitch Pattern Selectors : AN
Stitch Width Selector : 3
Stitch Length: 10^15
Presser Foot; Zipper Foot
Throat Plate ; General Purpose or
Stroight Stitch
ZIPPER INSERTION
When the zipper is to the right of needle:
1. Loosen the thumb screw at the back of the foot
and slide the foot to the left of the needle.
2. Check the position of the foot by lowering the needle
into the right tide outer notch A of the foot, making
sure it clears the foot.
3. Lock the foot into position by tightening the thumb
screw, and the machine is ready to sew.
When the zipper is to the left of the needle, adjust
the foot to the right of the needle in the same way.
This foot makes it easy to place
stitching close to a raised edge.
Thus, it is useful for corded seams
as well as zipper insertion.
It can be adjusted to either the
right or the left side of the needle.
30
Page 33

ZIPPERS (Continued)
CORDED SEAMS
The corded seam is a professional treatment for slip
covers, children's clothes, blouses, and lingerie. To make
a corded seam, make the welting first, then stitch it
into the seam.
To make the welting
1. Cut bias strips of fabric (width: three times the
diameter of the cord plus P/< inches).
2. Sew strips together on the lengthwise grain to
obtain desired length.
3. Fold resulting strip over cord, raw edges even.
4. Adjust Zipper Foot to the left side of the needle.
5. Lower Zipper Foot.
6. Stitch close to the cord (but do not crowd stitching
against cord), pulling gently on the strip, both in
front and in back of the Zipper Foot,
To stitch welting into seam
1. Place the welting between the two fabrics.
2. Stitch, this time crowding the foot against the cord.
BUTTONHOLES
BUTTONHOLE CAM
Buttonholes can be made with the Buttonhole Cam
fitted to the machine. This cam can be easily replaced
with other interchangeable cams.
To replace the buttonhole com
1. Align slot B with hole A of the cam and place the
cam onto spindle, pushing downward until it snaps
in place.
2. Turn the cam clockwise until white mark on
the cam is aligned with red mark on top cover.
(See Fig. 1)
Viewed from underside
To remove the buttonhole cam, push disc follower re
leasing lever to the right and set buttonlmle stitch
selecting dial to "OFF”.
Fig. 1
31
Page 34

BUTTONHOLES (Continued)
Upper Stitch Pattern Selector: Special
Lower Stitch Pattern Selector : B
Stitch Width Selector: 3~5
Stitch Length Regulator :
Presser Foot: Buttonhole Foot
Pressure Regulating Dial: 2~3
Throat Plate : General Purpose
6
J L M
Special
PREPARATION
• Position buttonhole cam correctly in place as described
above.
• Attach Buttonhole Foot.
• First, decide how long the opening needs to be. This
will depend on the diameter and thickness of the
button. Then, add approximately Vb inch (about Vie
inch for each bar-tack) and mark the fabric as shown
in Fig. 2.
• Decide stitch width and stitch density according to
thickness of fabric and button. (See Fig. 3)
Always make a test buttonhole on a sample of your fabric. Be sure to duplicate the thickness of the
garment and include interfacing if appropriate.
Stitch Width and Stitch Density Table
Closely Packed Stitches
Medium Spaced Stitches
Cutting
length
1
Fig. 2
Open Stitches
Fig. 3
32
Page 35

BUTTONHOLES (Continued]
1 2 3 4. 5
PROCEDURE
1. Push disc follower releasing lever to the right and
set buttonhole stitch selecting dial to “Bl”. Posi
tion needle in fabric at point A. Lower presser
foot and stitch to point B. Stop the machine and
raise needle from fabric. (See Fig. 4)
Fig. 4
2. Push disc follower releasing lever to the right and
set buttonhole stitch selecting dial to “B2”. Start
stitching at point B and stop at point C. Raise
needle from fabric. (See Fig. 5)
Fig. 5
3. To secure stitching, move stitch width selector to
“ 1 ” and take approximately three stitches to point
D. Then, cut opening for the button with the rip
per supplied with the machine.
Fig. 6
CORDED BUTTONHOLES
Heavy cotton or buttonhole twist makes suitable filler
cords for raised buttonholes.
1. Place filler cord on the material, leaving sufficient
amount of cord for right side. (See Fig. 7)
2. Lower the foot, bringing the cord under the left
groove on the bottom side of the foot. Then, pro
ceed with stitching in the same method as stated
above except;
(1) After setting buttonhole stitch selecting dial to
“B2”, position needle in fabric at point E and
raise the foot.
(2) Lead end of cord at farther end to the right
around the needle as shown in Fig. 8.
(3) Lower the foot and continue to stitch.
3. Trim cord ends after a buttonhole is completed.
(See Fig. 9)
Leave Position
sufficient needle
amount of at point
cord* E.
Fig. 7
Fig. 8
Fig. 9
Cut cord
end.
33
Page 36

BUTTONHOLES (Continued)
To make buttonhole stitches stronger, sew over the
entire buttonholes once again. (See Fig. 10)
CAUTION
1. In case right side stitch density is not uniform with
the left side stitch density when making a test but
tonhole, move the magic pattern stitch adjusting
lever toward you or away from you as required.
• If the lever is moved toward you, stitches will
become closely spaced.
• If the lever is moved away from you, stitches will
become open. (See Fig. 11)
2. With a little practice, you will be able to sew button
holes continuously without stopping the machine as
instructed in page 33.
3. When you stop half way through the buttonhole and
wish to start over again, be sure to follow the in
structions below.
(a) Push disc follower releasing lever to the right
(b) Turn buttonhole cam clockwise and align white
(c) Set buttonhole stitch selecting dial to “Bl” and
4. Needle thread tension should be made slightly stronger
when making buttonholes. This will give neatly
finished buttonholes.
DOUBLE BUTTONHOLE STITCHES
and set buttonhole stitch selecting dial to “OFF”.
mark “0” with red mark “0” on the top cover.
continue to stitch.
Fig. 10
Open
Q stitches
t
0
Q Closely
spaced
stitches
34
Page 37

BUTTON SEWING FOOT
I
• Stitch Pattern Selectors: AJ
• Stitch Width Selector! 1 and about 4
• Throat Plate t General Purpose
• Presser Foot: Button Sewing Foot
• Lower Feed
The space between the holes in the button deter
mines the stitch width settings. The number 1 setting
must always be used to position the needle and fasten
stitching. For buttons with standard hole spacing, use
settings 1 and 4. For buttons with unusual hole spacing,
use setting 1 and increase or decrease the width setting
(4) as necessary.
'i
.
.............
Si
I ..
’ 'S
!-S; ■ S "
Set selectors at AJ and stitch width
at 1. Lower feed. Position button ;
under foot so that needle will
enter left hole. Lower foot. Turn
hand wheel toward you until
needle rises out of fabric and is
just above the foot.
Set stitch width at about 4. The
needle should then enter into the
right hole of the button. Take ap
proximately six zigzag stitches in
this position. End on the left side.
THREAD SHANK
In order to form a shank, stitch over a regular ma
chine needle. Position button and lower Button Sewing
Foot. Place needle in the groove of the foot so the
point enters the hole.
To form a long shank, stitch over the heavy end of
the needle.
%
To fasten stitching, adjust to num
ber 1 stitch width setting and
take opproximately three stitches.
35
Page 38

This attachment is fastened to machine in place of
regular presser foot, and will be found an indispensable
aid whenever stitching must be kept accurately on ex
treme edge of a piece of material.
The slots numbered from 1 to 5 in the sketch at left
serve as guides for sewing together laces, insertions
and embroideries, sewing in position hemmed or folded
edges, piping or sewing flat braid to a garment.
• Stitch Pattern Selectors : AN
• Stitch Width Selector; 3
• Stitch Length:
• Presser Foot: Edge-stitcher
• Throat Plate : Straight Stitch or
General Purpose
TO INSERT LACE OR RIBBON
terial in slots is regulated by moving thumb screw A
to the right or left.
1. Fold edge of material to which lace or ribbon is to
be sewn and insert it in slot 1 of edge-stitcher.
2. Insert lace or ribbon in slot 4 and proceed to sew.
3. Cut away surplus folded material close to stitching.
Lace or ribbon insertion can also be done with zigzag
stitching. In this case, use General Purpose Throat
Plate and set Stitch Pattern and Stitch Width Selectors
Bt BJ 2 or BJ 3.
TO ADJUST THE EDGE-STITCHER
The distance from line of stitching to edge of ma
TO PIPE WITH EDGE-STITCHER
1. Cut piping bias and twice width of slot 3 so that it
can be folded once.
2. Insert piping with its folded edge to left in slot 3
and edge to be piped in slot 4.
As in the above case, piping can be done with zigzag
stitching,
36
Page 39

HOW TO USE THE EDGE-STITCHER IContinoed)
TO MAKE A FRENCH SEAM
1. To make a French seam of uniform width, insert
two edges to be joined, wrong sides together, in slot
1 or 2, and stitch close to edge.
2. Fold both right sides together and insert back of
seam in slot 1, as shown in sketch at left and stitch,
allowing just enough margin to conceal raw edges.
TO TUCK WITH EDGE-STITCHER
1. Fold and crease material for desired width of tuck,
2. For succeeding lucks, fold material the desired dis
tance from previous tuck, running the fold length
wise over a straight edge, then crease folds.
3. Insert creased folds in slot T and 2 and adjust edgestitcher to right or left for the desired width of
tuck. Use a light tension, short stitch and fine
thread and needle.
OVERLAP SEAM
1. Fold edge of a piece of material and insert it in
slot 1.
2. Insert another piece of material in slot 5.
3. Set stitch pattern selectors at "BJ” and stitch width
selector at 2 or 3, and proceed to stitch.
37
Page 40

-i fy
Your sewing machine is a fine yet sturdy precision
instrument, and it will serve you perfectly for many
years if you take a few simple steps to keep it in
good working condition.
How often you will need to clean, oil, and lubricate
the machine will depend on how often you use it and
where you keep it.
When in regular use, the machine should be cleaned
periodically to remove lint and fluff which may have
accumulated around working parts.
With a soft doth, clean:
• Tension discs
• Take-up lever and thread guides
• Presser bar and needle bar
• Bobbin case (for instructions on removal, see page 39)
» Machine arm and bed
If necessary, dampen the cloth to clean the machine
surface. Do not use detergents.
With a lint brush, dean:
• Feed dog
• Rotating hook (area under throat plate and slide plate)
After each cleaning, apply a drop {but no more than
a drop) of SINGER oil to the areas indicated. Then
sew a line of stitching on a scrap of material to remove
excess oil.
APPLY A DROP OF OIL TO EACH SPOT SHOWN
38
Page 41

CARING FOR YOUR SEWING MACHINE (Continued)
Oil bottom of machine;
1. Disconnect plug from electrical outlet.
2. Tilt machine back and loosen screw from the center
of the machine bed to remove bottom cover.
3. Apply SINGER oil as shown.
A 6
\
If the machine is to be stored away for an indefinite period, a thorough brush-cleaning to remove all traces of
lint and fluff, followed by swabbing of all exposed parts with SINGER oil is necessary to protect the machine
against rust damage.
TO REMOVE AND REPLACE THE BOBBIN CASE
1. Remove throat plate and open slide plate.
2. -Remove the bobbin.
3. -Unlbck bobbin .ease, by lifting and twisting
bolder A to right as shown.
4. Remove bobbin case from machine.
5. Remove all lint, fluff, loose thread ends or any other
foreign matter which might clog the machine.
/
6. Replace bobbin case so that groove under tension 7_ Push bobbin case holder to left until it snaps down
spring fits on hook raceway and fork B of case into lock position.
straddles positioning stud C.
39
Close bed slide and replace throat plate.
Page 42

PERFORMANCE CHECK LIST
remember to
• Be sure to follow the instructions on page 3 when
using pattern selectors.
• Position needle out of fabric when making stitch width
and stitch pattern adjustments.
• Clear your machine of lint and fluff periodically and
apply oil.
• Use your Instruction Book. It was written to explain
the most efficient way to operate and use this remark
able new machine.
if thread breaks
• Is the machine properly threaded ?
• Is a Catalog 2020 (15 X 1) needle correctly inserted and
securely tightened in the needle clamp ?
• Is the needle straight and sharp ?
• Is the thread suitable for the size of the needle ?
• Is the thread free of twists and knots ?
• Is the thread unwinding freely from the spool?
•Is the needle-thread tension too tight?
• Is the bobbin-case area free of lint and loose thread
ends ?
• Are the thread guides and tension discs also lint-free ?
40
Page 43

FOR YOUR PROTECTION
Always look for the famous Red "S" and SINGER
tradenrark for authorized sales and service.
When your machine needs servicing, call your SINGER
SEWING CENTER and be sure of warranted SINGER
parts and service.
See address in classified telephone directory listed only
under
SINGER SEWING MACHINE COMPANY
 Loading...