

Page 1

OWNER’S MANUAL
SINGER
SEWING MACHINE
MODEL 484.1544180
Built by Singer... Backed by Sears
Page 2

CONGRATULATIONS
— on the purchase of this new Singer^ sewing machine. To achieve the most
enjoyment and satisfaction from this product, it is recommended that the instruction
manual be read through step by step while seated in front of the machine. This will
help the operator get to know all of its parts and capabilities.
OWNER’S MANUAL
SINGER * MODEL 484.1544180
The manufacturer reserves the right to change the appearance, design, or
accessories of this sewing machine as considered necessary without any notification
or obligation.
* A trademark of The Singer Company
Copyright 1987, Singer Sewing Machine Company
All rights reserved throughout the world
Page 3

TABLE OF CONTENTS
1. GETTING TO KNOW YOUR MACHINE
Principal Parts..........................................................................................................3
Accessories..............................................................................................................4
Important Safeguards.............................................................................................. 5
2. GETTING READY TO SEW............................................................................................6
Connecting the Controller
Running the Machine...............................................................................................6
Changing Snap-on Presser Feet...............................................................................7
Changing Screw-on Presser Feet.............................................................................7
Changing Needles....................................................................................................8
Removing Needle Plate
Replacing Needle Plate.......................................................................................... 8
Attaching Feed Cover..............................................................................................9
Attaching Blindstitch Guide....................................................................................9
Winding the Bobbin.............................................................................................. 10
Threading the Bobbin Case...................................................................................11
Threading the Machine......................................................................................... 12
Raising the Bobbin Thread....................................................................................13
Adjusting Needle Thread Tension.........................................................................14
Cloth Plate Removal and Replacement.................................................................15
3. STITCH SELECTION.....................................................................................................16
Adjusting Stitch Width..........................................................................................16
Adjusting Stitch Length....................................................................................... 16
Adjusting Stitch Balance.......................................................................................17
Reverse Stitching...................................................................................................17
Pattern Selection....................................................................................................17
Description of Stitches
.......................................................................................
.................................................................................
..........................................................................................
......................................................................
...8
18
2
6
4. SEWING TIPS AND APPLICATIONS..........................................................................19
Fabric, Thread, and Needle Table
Sewing a Seam.......................................................................................................20
Guiding Fabric...................................................................................................... 21
Basting...................................................................................................................21
Blindstitching.........................................................................................................22
Inserting a Zipper.................................................................................................. 23
Four-Step Buttonhole.............................................................................................24
Twin Needle Sewing..............................................................................................26
Personal Measurements.........................................................................................27
Performance Checklist...........................................................................................28
5. CLEANING AND CARING FOR THE MACHINE......................................................29
Removing Face Plate.............................................................................................29
Cleaning the Machine............................................................................................29
Removing and Replacing Bobbin Case.................................................................30
Replacing Slide Plate.............................................................................................30
Removing and Replacing Light Bulb..
6. QUICK REFERENCE SETTING GUIDE......................................................................32
7. WARRANTY..................................................................................................................33
.........................................................................
................................................................
19
31
Page 4
1. GETTING TO KNOW YOUR MACHINE
23 24
I I I < < J
•t J 4 S t } « t »* M I)
I
N,
umiLLii^J
Page 5

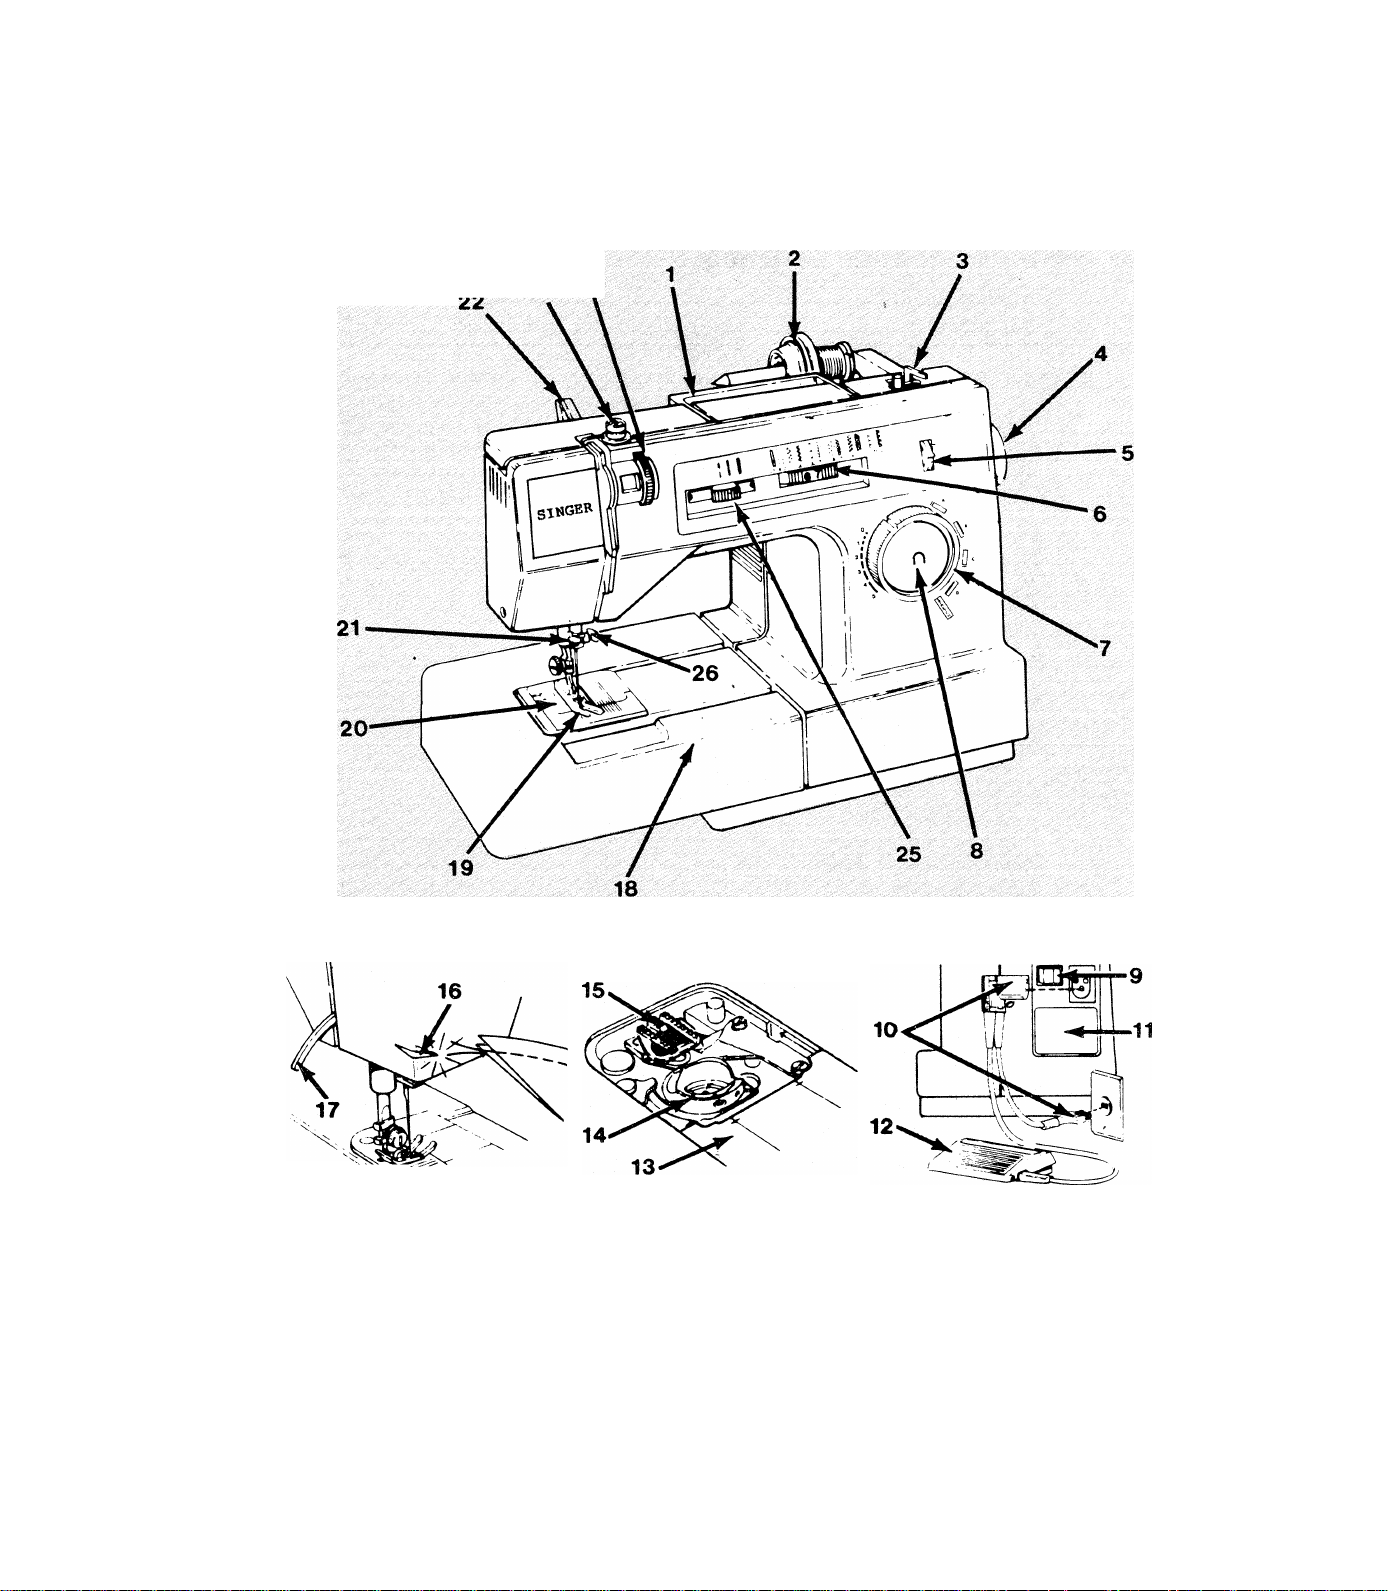
Principal Parts
1. Carrying Handle
2. Spool Holder
3. Bobbin Winder
4. Hand Wheel
5. Stitch Balance Dial
6. Stitch Pattern Selector
7. Stitch Length Control
8. Reverse Stitching Button
9. Power and Light Switch
10. Electrical Connections
11. Electrical Rating Label
12. Speed Controller
13. Slide Plate
14. Bobbin Case
15. Fabric Feed (Feed Dog)
16. Thread Cutter
17. Presser Foot Lifter
18. Cloth Plate
19. Presser Foot
20. Needle Plate
21. Thread Guide
22. Snap-in Thread Guide
23. Bobbin Winder Tension
24. Top Thread Tension
25. Stitch Width Control
26. Needle Clamp
Page 6
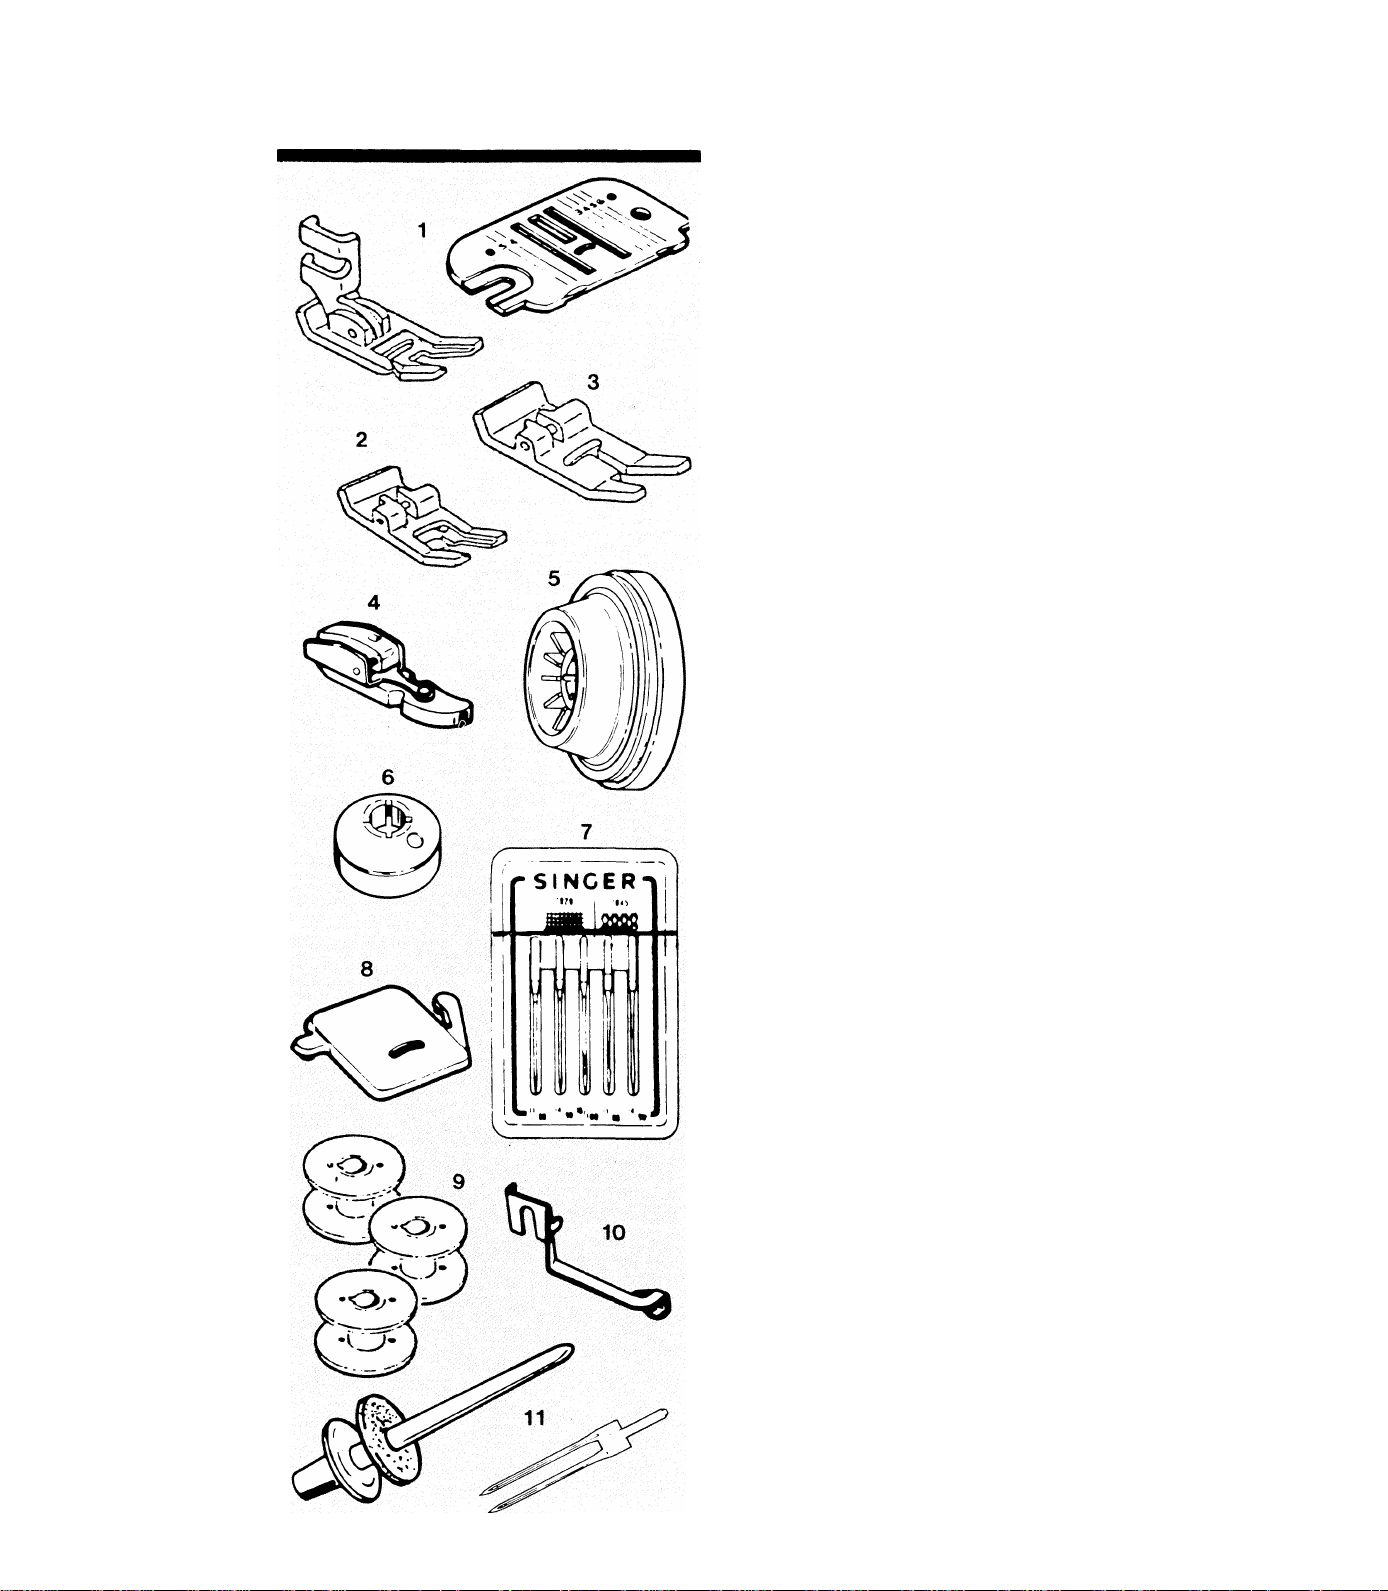
Accessories
The following accessories are furnished with
this sewing machines:
1. General Purpose Presser Foot (447808) and
Needle Plate (447580) are on the machine
when delivered. Use together for most sewing
projects.
2. Special Purpose Presser Foot (446492-451) for
decorative stitching.
3. Buttonhole Presser Foot (161927-001)
4. Zipper Foot (507836)
5. Spool Holder (179967-451) for medium and
large thread spools.
6. Small Spool Holder (507664-459) for small
thread spools.
7. Needle Pack includes an assortment of types
and sizes.
8. Feed Cover (381459-001) for darning or
embroidery.
9. Extra Bobbins (172336)
10. Blind Stitch Hem Guide (381213)
11. Twin Needle (2025) and Extra Spool Pin
(422250-451) with Felt Washer (8879-451) for
decorative stitching.
Page 7

Important Safeguards
1. Disconnect the powerline plug from the electrical outlet when changing needles,
feet, or needle plates, or when leaving machine unattended. This eliminates the possibili
ty of starting the machine by accidently pressing the speed controller.
2. Before removing the bobbin case, disconnect the powerline plug from the electrical
outlet.
3. Because of the up and down movement of the needle, work carefully and watch
the sewing area when operating the machine.
4. Do not pull the fabric while stitching as this may deflect the needle, causing it to
break.
5. Before cleaning the machine, disconnect the powerline plug from the electrical outlet.
6. Do not attempt to adjust the motor belt. Contact a Sears service center should
any adjustment be required.
7. Before changing the light bulb, make sure the powerline plug is disconnected from
the electrical outlet. Be sure to replace the face plate which covers the light bulb before
operating the machine.
8. This machine is designed to use a 15 watt maximum light bulb (#20-6797) only.
This product is suppressed for radio and television interference with the International
Electro-technical Commission requirements of the CISPR.
Page 8
2. GETTING READY TO SEW
To really enjoy sewing, get to know the machine well. This chapter will be valuable in
doing just that.
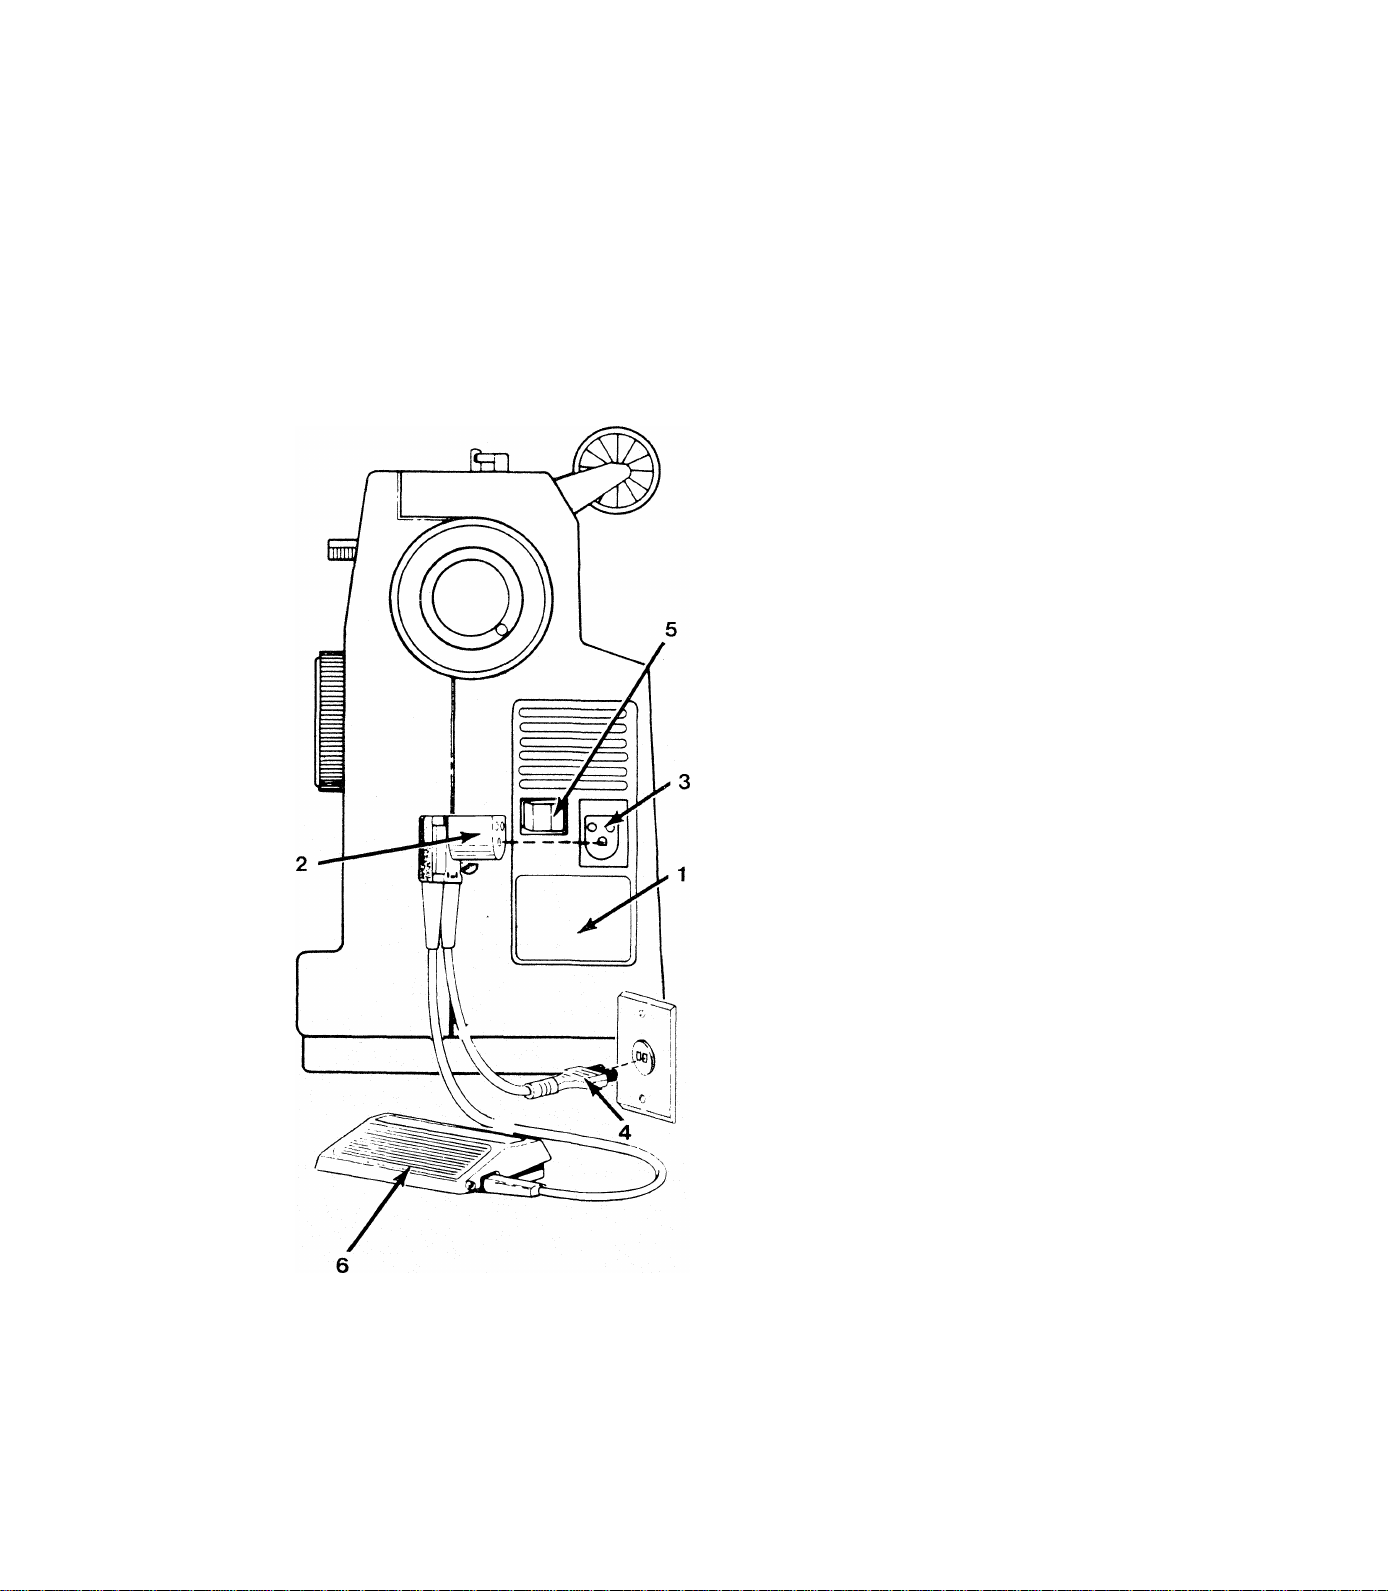
Connecting the Machine
Connecting the Controller
NOTE: Before plugging in the machine, be sure
the electrical information on the label (1) below
the handwheel agrees with the local electrical
supply.
Push plug (2) into the receptacle (3) at the right
end of the machine. Then, connect plug (4) to
an electrical outlet.
Running the Machine
To turn on machine and sewing light, press rear
portion of power switch (5). To turn off machine
and light, press front portion “0” of power
switch.
To run the machine and control speed, press the
speed controller (6) with foot. The harder it is
pressed, the faster the machine will sew. To stop
machine, remove foot from the controller.
NOTE: Do not operate machine without fabric
under the presser foot as this may
damage the feed and the presser foot.
Page 9
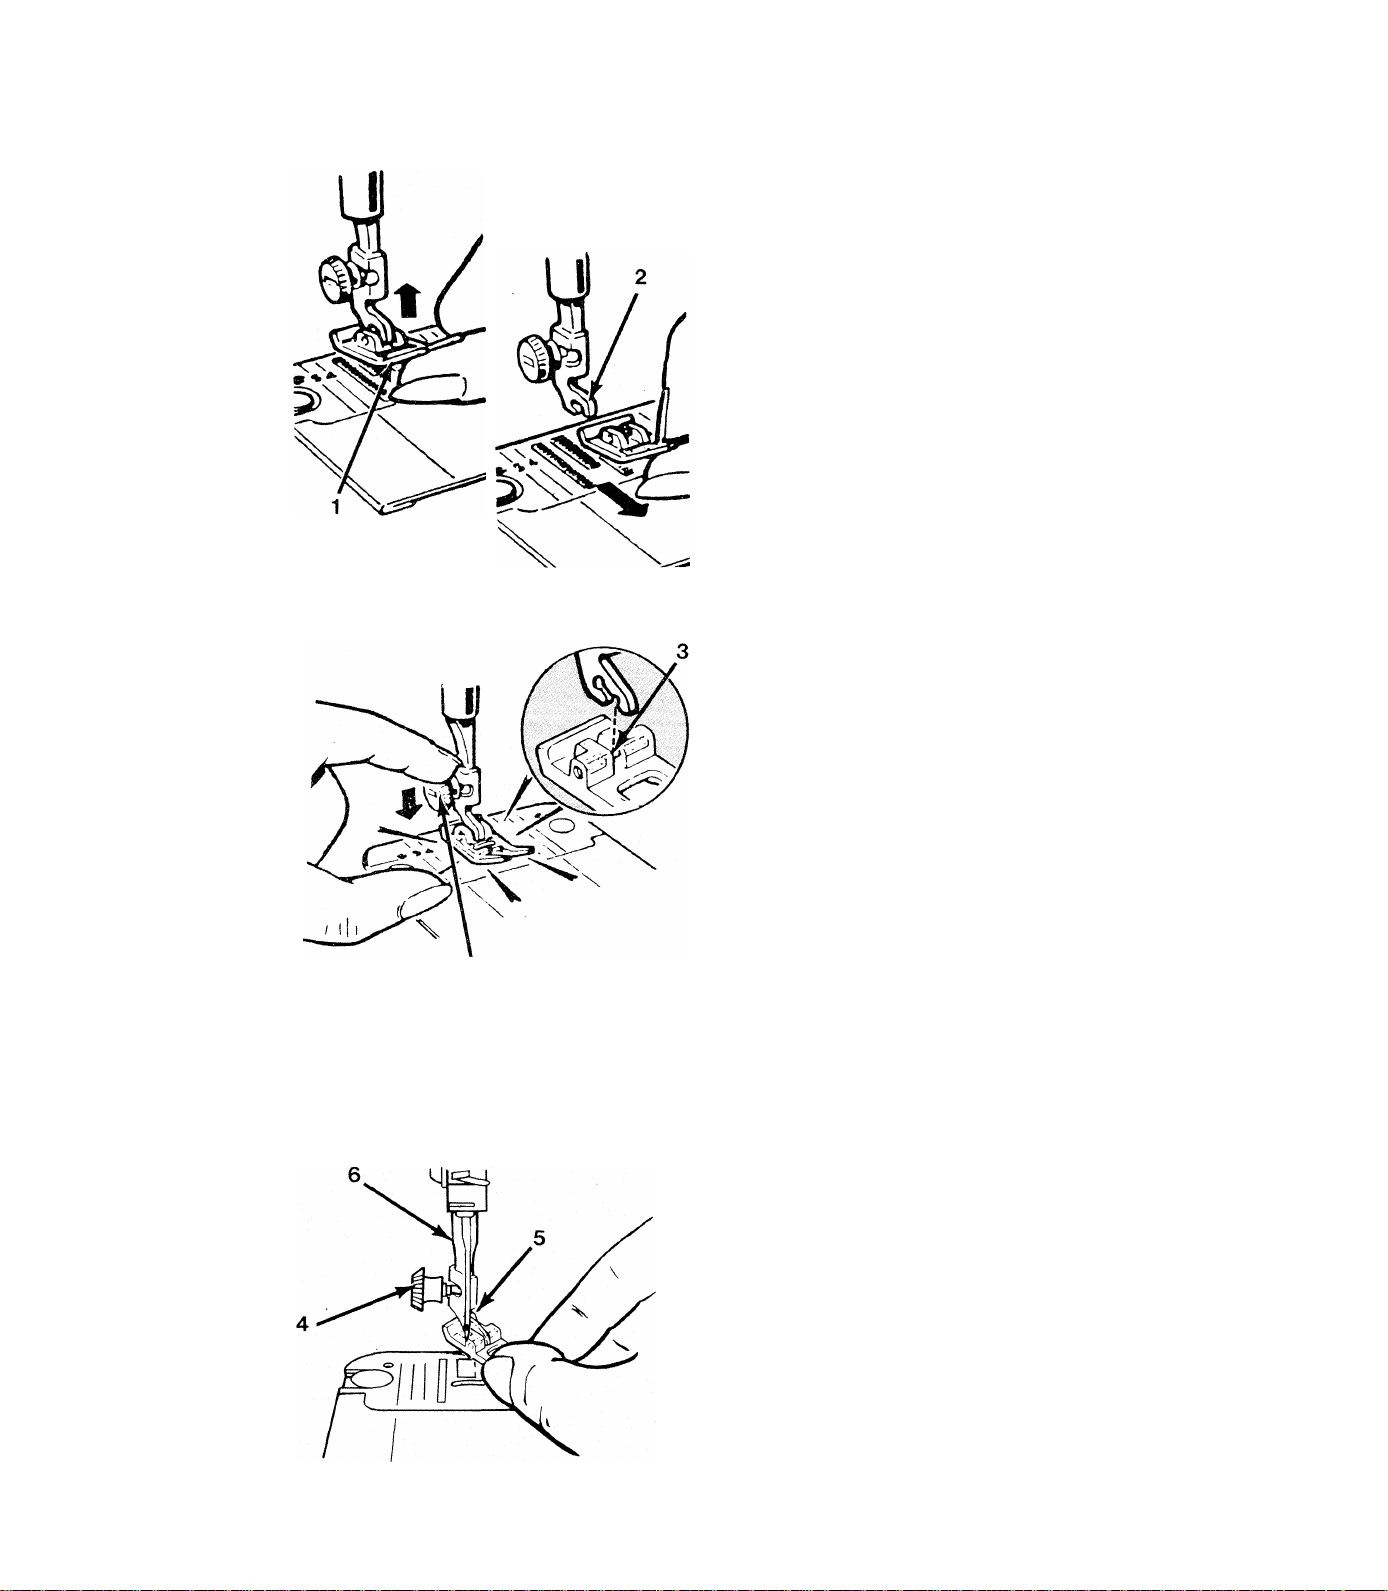
Changing Snap-on Presser Feet
The accessory feet supplied with the machine fit
onto a common shank and are attached easily
as follows:
^ Raise needle to highest point by turning the
handwheel towards the operator.
^ Raise presser foot using lever on rear of
machine.
^ Push up on toe of presser foot (1) until it
snaps off shank (2) and remove foot.
^ Place new foot on needle plate with pin (3)
under center of shank.
^ Using presser foot lifter, lower shank onto pin
(3) and push down firmly on presser foot screw
(4) until foot snaps into place onto shank.
Changing Screw-on Presser Feet
Special feet which have built-in shanks are
replaced as follows:
Raise needle and presser foot.
Loosen presser foot screw (4) with a coin and
remove presser foot with shank (5) guiding it
towards the operator and to the right.
^ To replace foot, hook it around presser bar
(6) and screw (4). Tighten screw with a coin.
Page 10
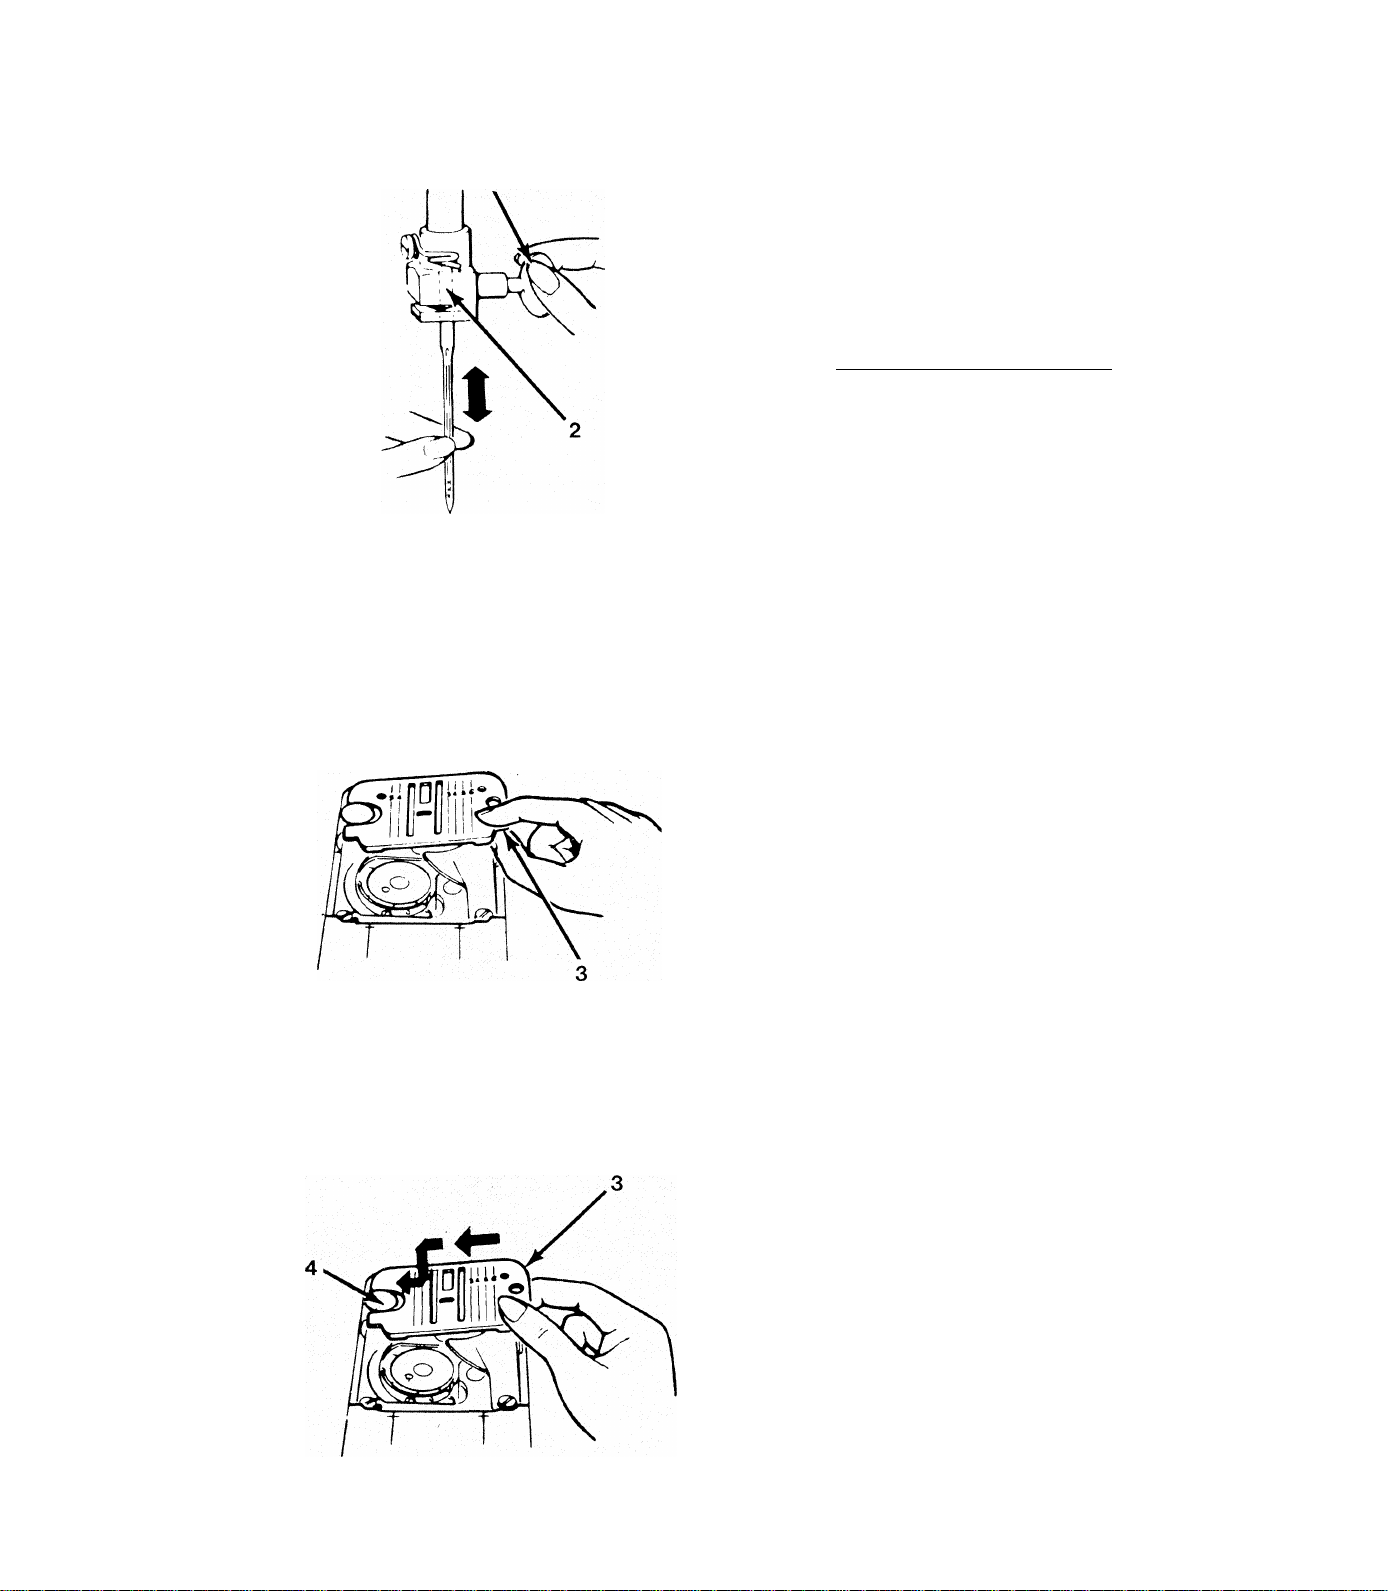
Changing Needles
Removing Needleplate
^ Raise needle to highest position by turning
handwheel towards the operator.
^ Loosen needle clamp screw (1) and remove
needle.
^ With flat side of needle to the back, insert new
needle into clamp (2) as far as it will go.
^ Tighten needle clamp screw (1) securely.
Check the Fabric, Thread and Needle Chart in
this book for correct needle and fabric
combinations.
For best results always use genuine singer^
needles.
For either cleaning or use of the optional straight
stitch plate (423134), available from Sears parts
department, do the following:
Replacing Needleplate
Raise needle and presser foot to their
highest positions.
^ Open slide plate and place thumb under right
side of needle plate (3).
^ Lift up and pull plate to the right to
remove it from the machine.
^ Holding needle plate as shown, slide it to the
left under the head of clamping pin (4).
^ Press down on right side at (3) until it fits se
curely in place.
Page 11
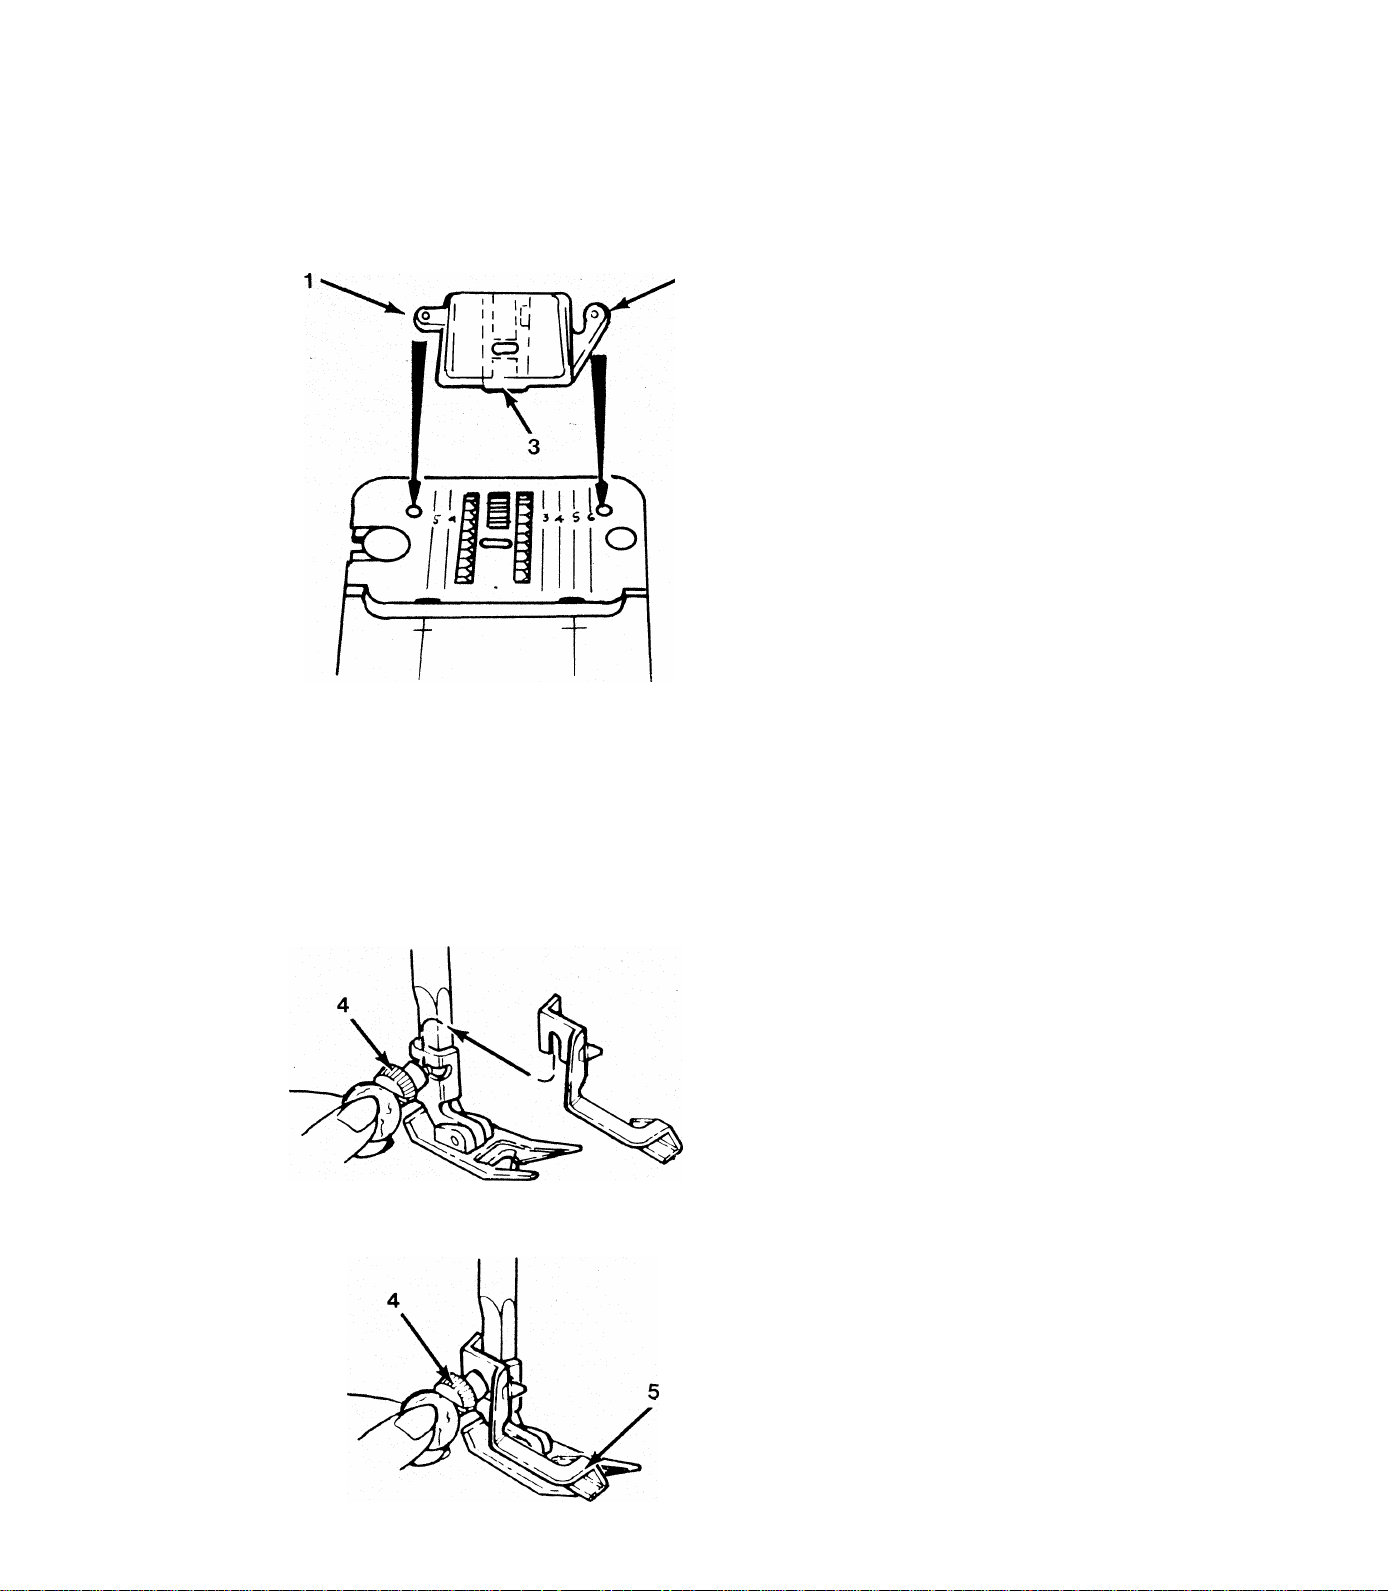
Attaching Feed Cover
For darning and free-motion embroidery, the
feed cover prevents the feed from moving the
material. Attach it as follows:
^ Raise needle and presser foot, and open slide
plate.
^ Slide feed cover on top of needle plate, press
ing tabs (1) and (2) into holes in needle plate.
Then, close slide plate.
^ To remove, open slide plate. Lift front edge
of cover (3) and pull it away.
The optional darning and embroidery foot
(381459-001), available from Sears parts depart
ment, may be used.
If operator prefers to do these operations by
removing presser foot and shank entirely from
machine, be sure presser bar is lowered to main
tain proper thread tension.
Attaching Blindstitch Guide
^ Raise presser foot and loosen presser foot
screw with a coin.
^ Slip blindstitch hem guide between screw
and presser foot shank.
^ Be sure underside of the guide (5) clears the
slide plate and front of foot.
^ Tighten screw (4) with the coin.
Page 12

Winding the Bobbin
Winding of the bobbin is done before threading machine:
^ Place spool of thread on spool pin (1). If spool being used has a thread retaining slit
(A), It should be placed against the spool seat to the right.
^ Choose size of spool holder (2) to fit spool. Slide it onto pin snugly against spool to
keep spool from turning.
^ Lead thread into top thread guide (3) by snapping it down into top of guide with two
hands.
^ Proceed to thread tension (4) wrapping thread once around in a clockwise direction.
^ Guide end of thread through small hole in top of bobbin (5) and place bobbin onto
bobbin winder (6).
^ Push bobbin winder to the right to engage the drive system and to disengage sewing
mechanism for winding.
^ Hold thread end coming through hole in bobbin and start motor. Wind slowly. Stop
after a few turns to trim end, then continue winding to desired fullness.
Note: Bobbin will stop turning by itself when full, but sewing mechanism must be reset
by the operator.
^ Release speed controller and push winder to the left to re-engage sewing mechanism.
10
tf
\ J
J
- - -
<I
"^1
1
' iL
^ AD
'A'-
Page 13
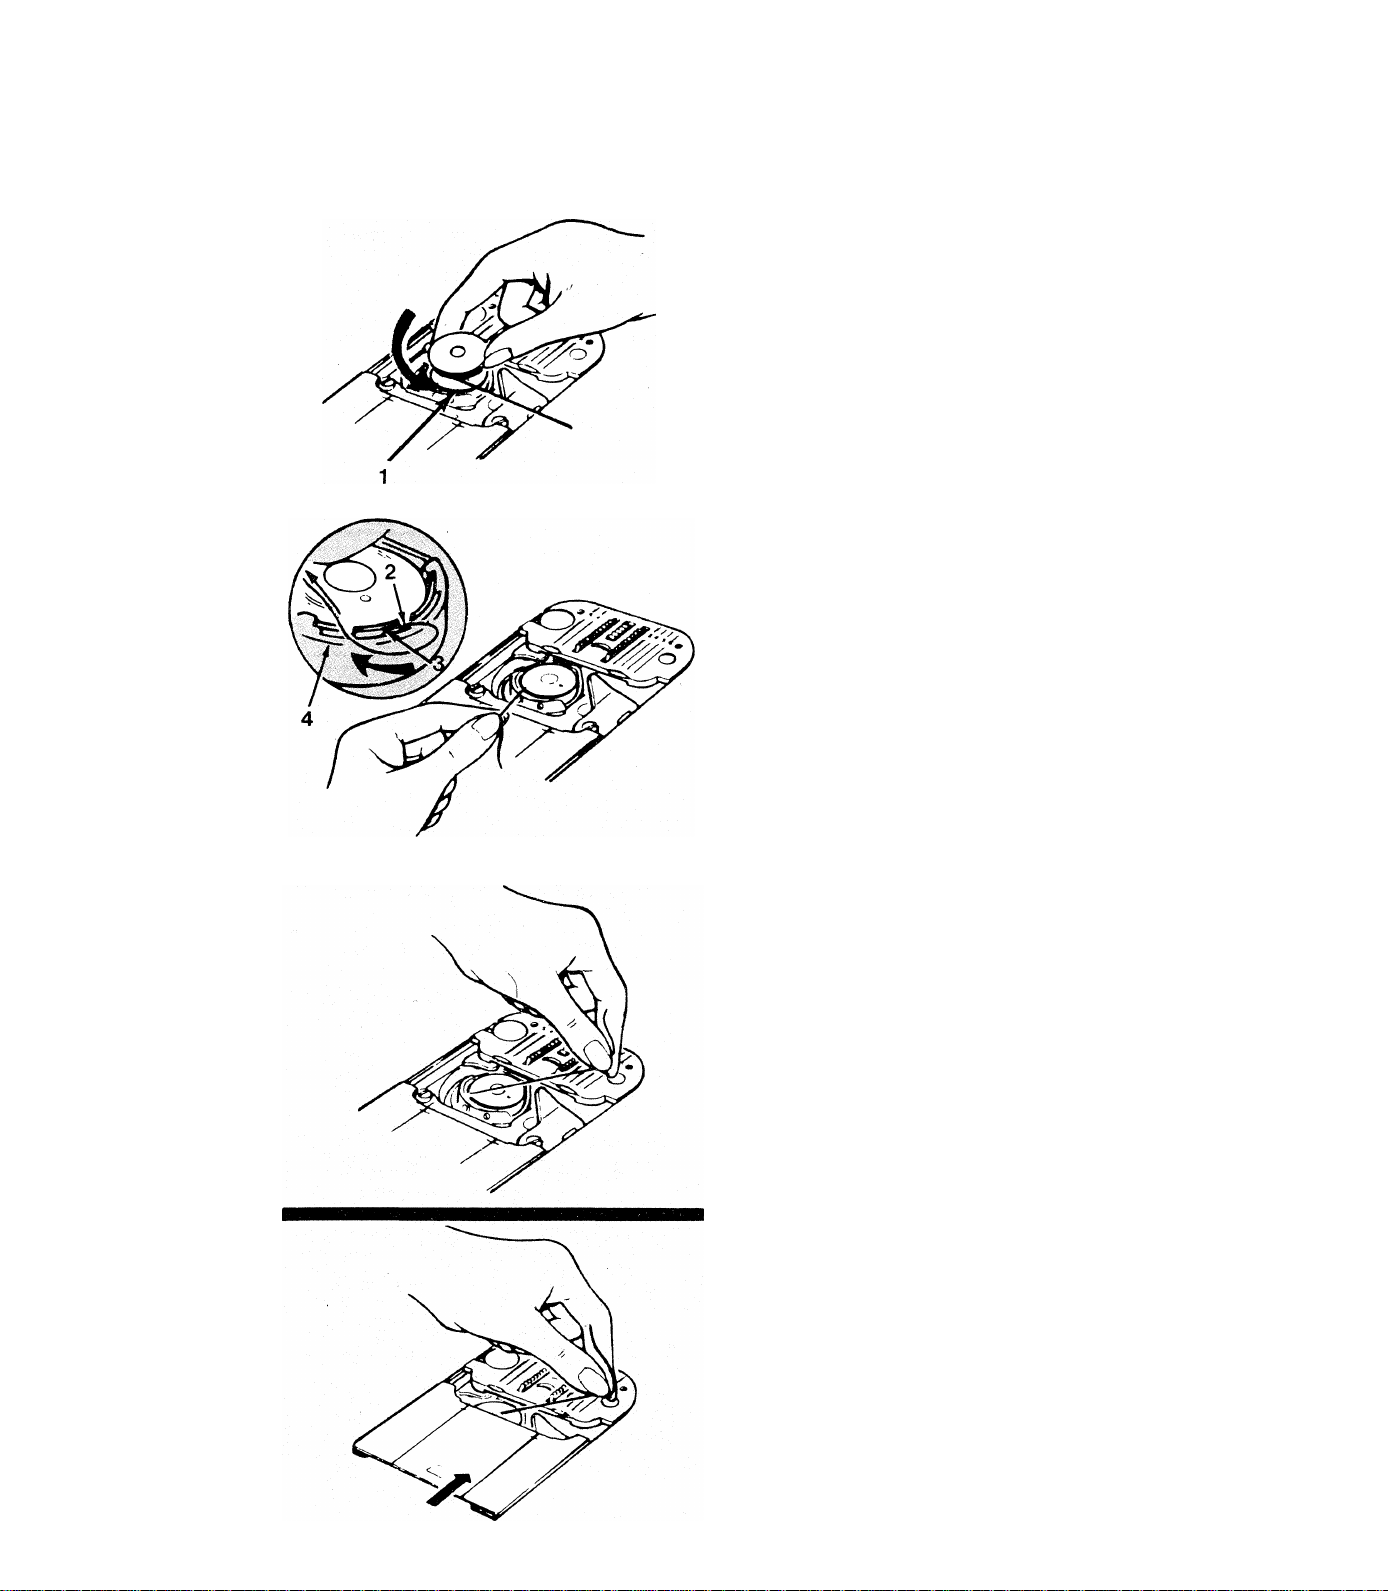
Threading the Bobbin Case
^ Hold bobbin so that thread unwinds in a
counter-clockwise direction, as shown, and place
bobbin in bobbin case (1).
5k Pull thread into notch (2), draw it back
under the tension spring (3), and back into
slot (4).
5k Draw approximately 4 inches (10 cm.) of
thread across the bobbin.
5k Close slide plate allowing the thread to enter
the slot between the needle plate and slide plate.
11
Page 14
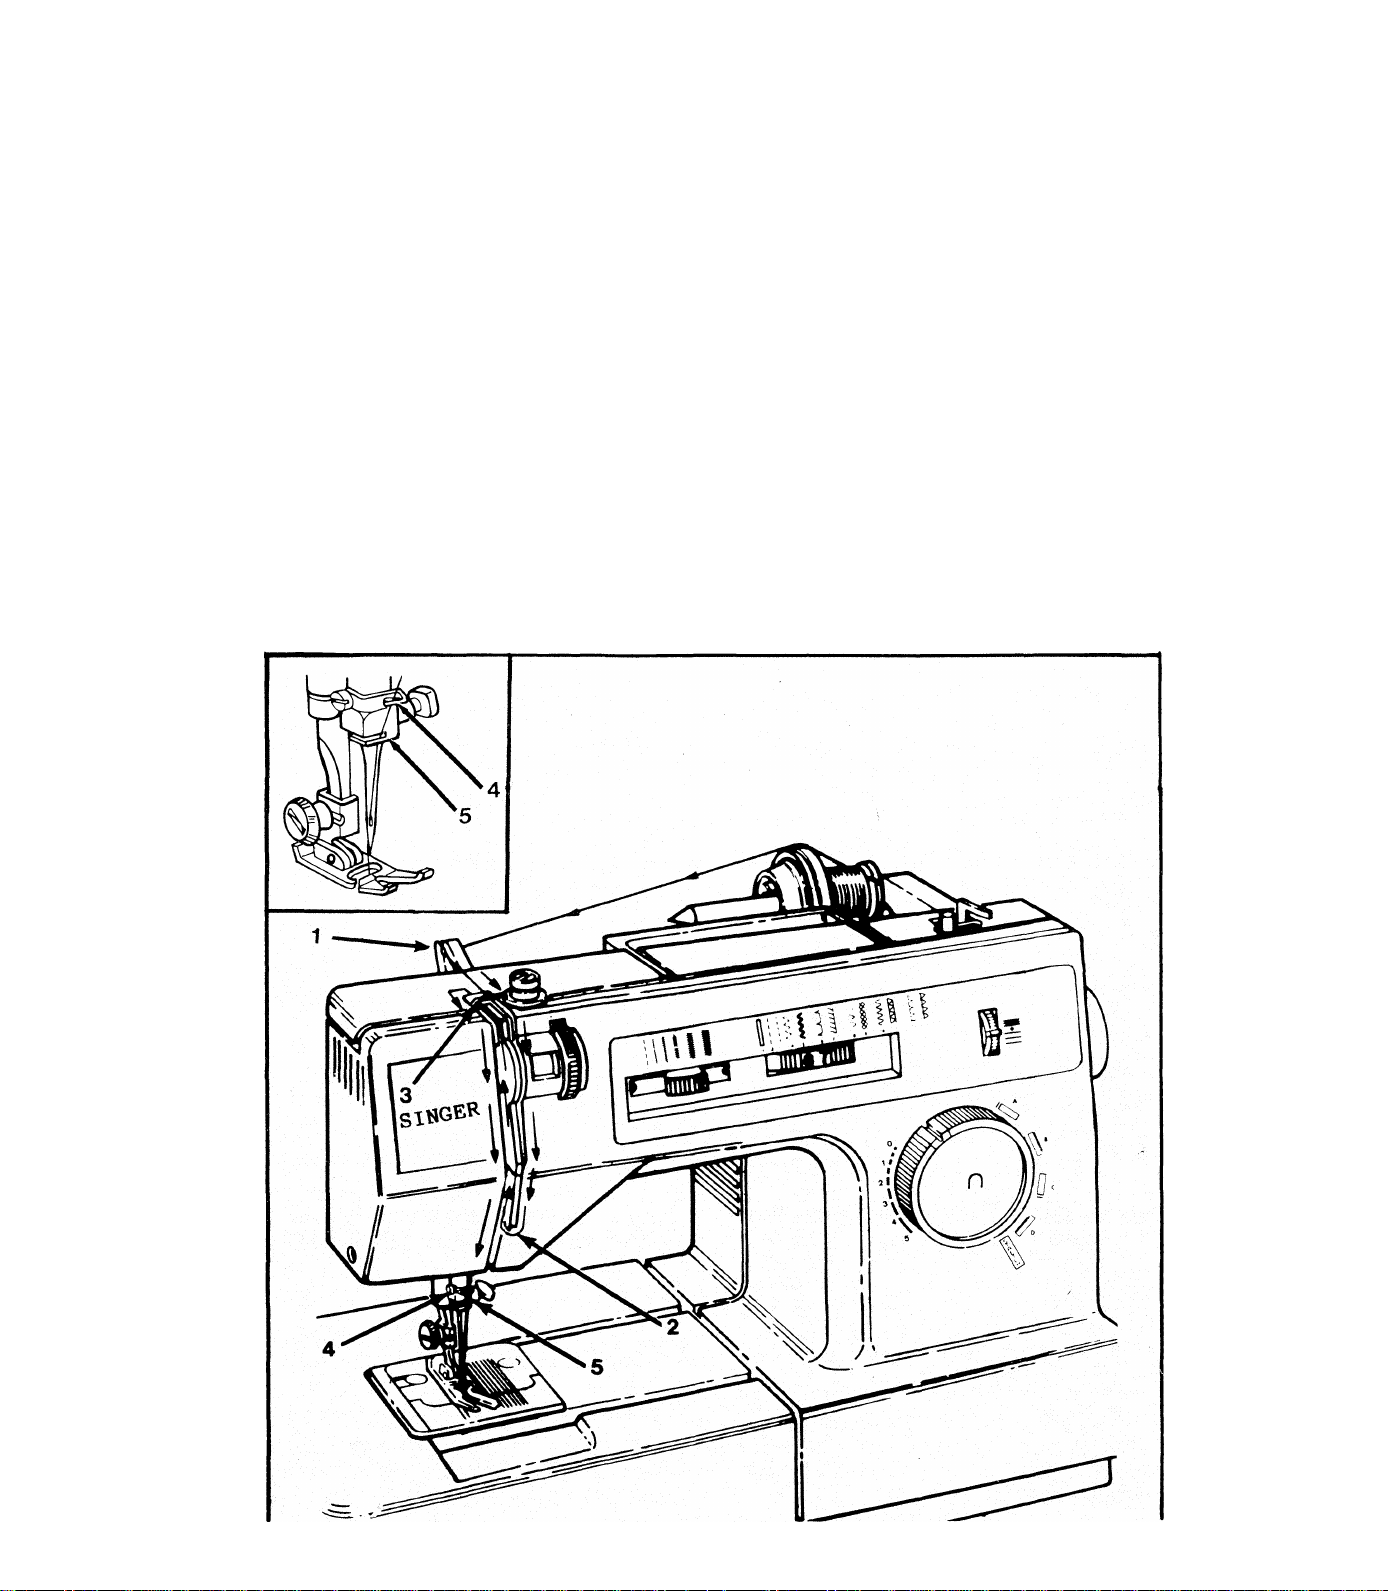
Threading the Machine
The top thread is now ready to be threaded into the machine. Proceed as follows:
>!' Raise needle and presser foot to their highest positions.
Lead thread from spool on spool pin and snap into top thread guide (1) by grasping
thread with two hands and snapping it down into top of guide.
Following arrows in illustration, guide thread across top of machine, down the right
hand channel through the tension discs, under the bottom of the channel separator (2),
and up the left hand channel.
^ At the top (3) of the left thread channel, pull the thread to the left into the self-threading
take-up lever and then down to the needle going through BOTH guides (4) and (5) on
needle clamp.
NOTE: Do not thread lower guide (5) if you are using heavy thread.
Lower the presser foot and thread the needle from front to back drawing about 4 inches
(10 cm) through the eye of the needle.
12
Page 15
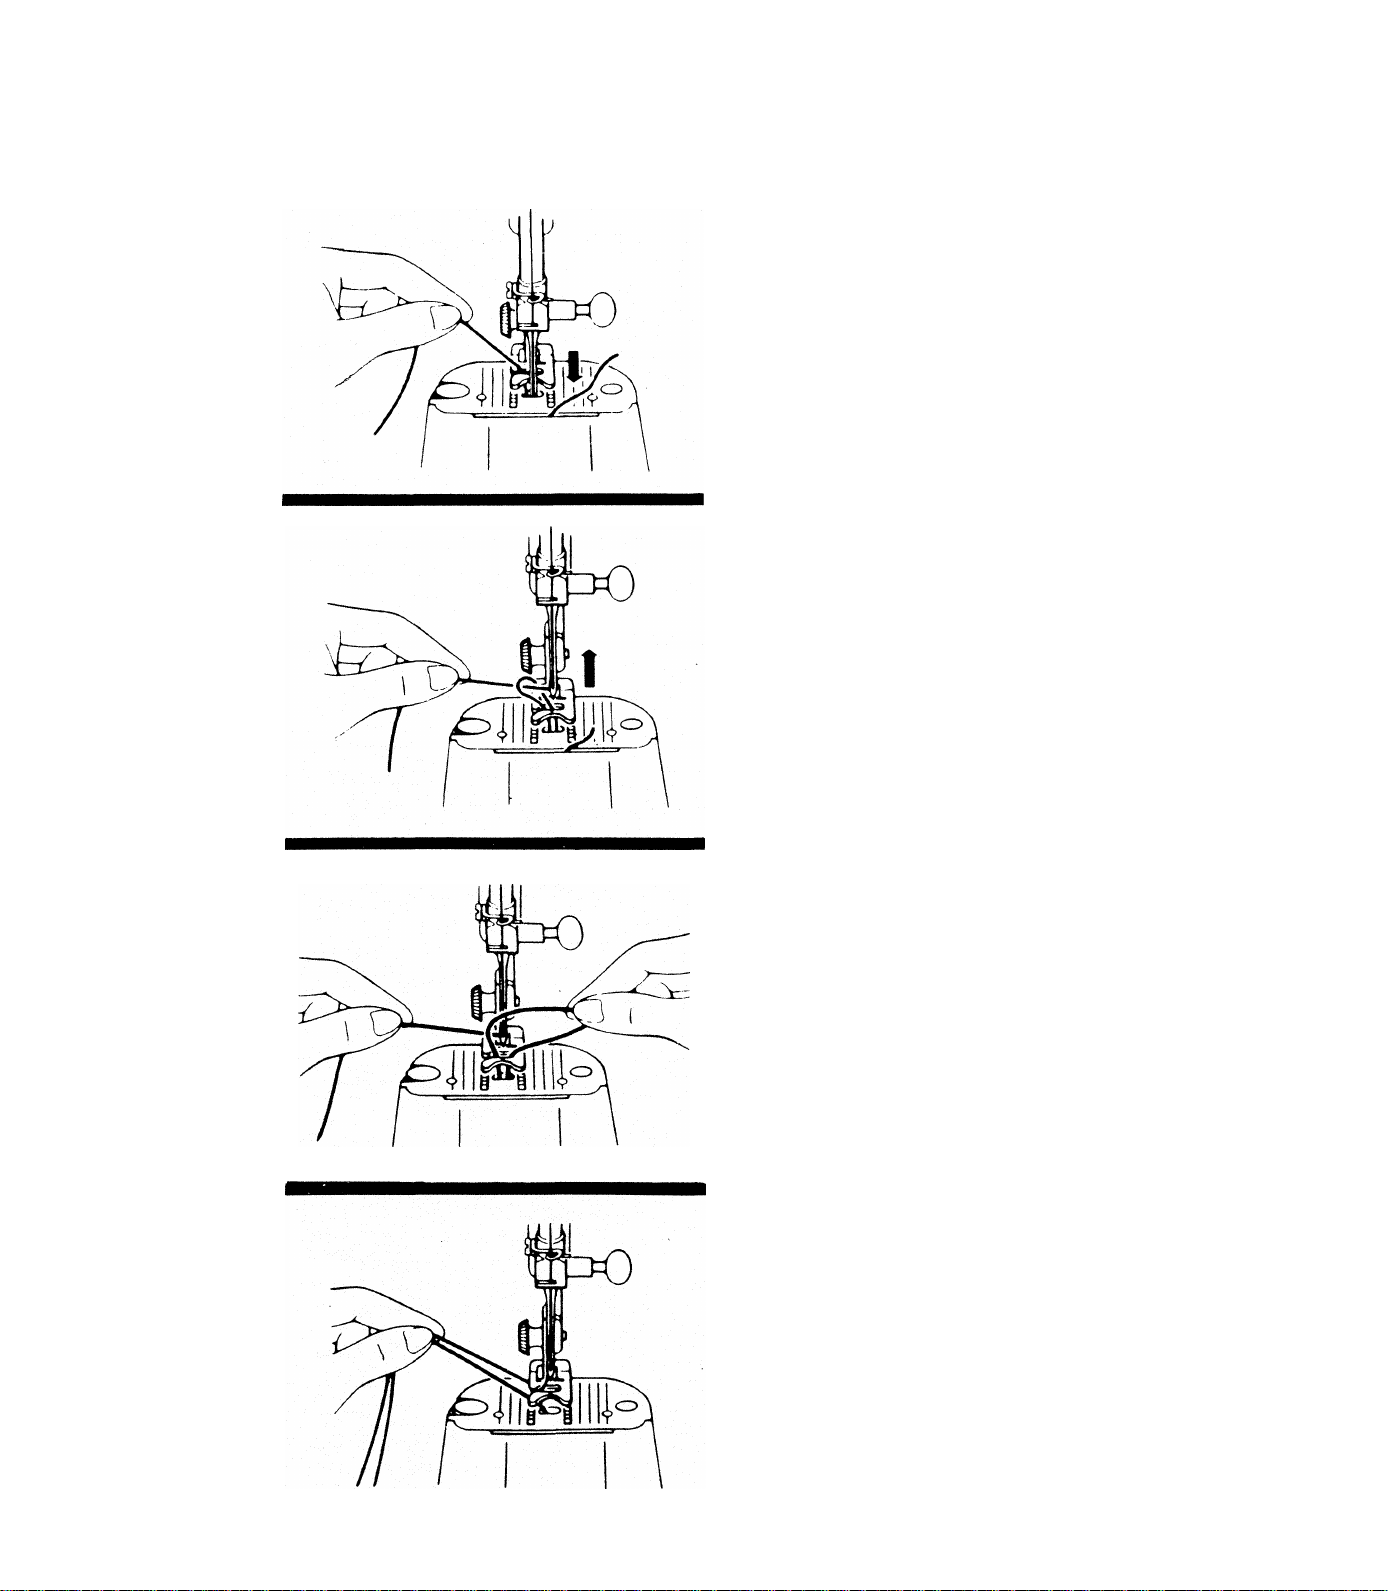
Raising the Bobbin Thread
The last step in threading the machine is to raise
the bobbin thread. Proceed as follows:
^ Raise presser foot.
^ Hold needle thread lightly with the left hand
and turn handwheel counterclockwise (towards
you) one complete revolution by hand.
^ As the needle rises from the needle plate, the
bobbin thread will be drawn up in a loop.
^ Grip loop with fingers and pull up to free end
of bobbin thread.
^ Place both needle and bobbin threads under
the foot and draw them to the back of the
machine.
13
Page 16
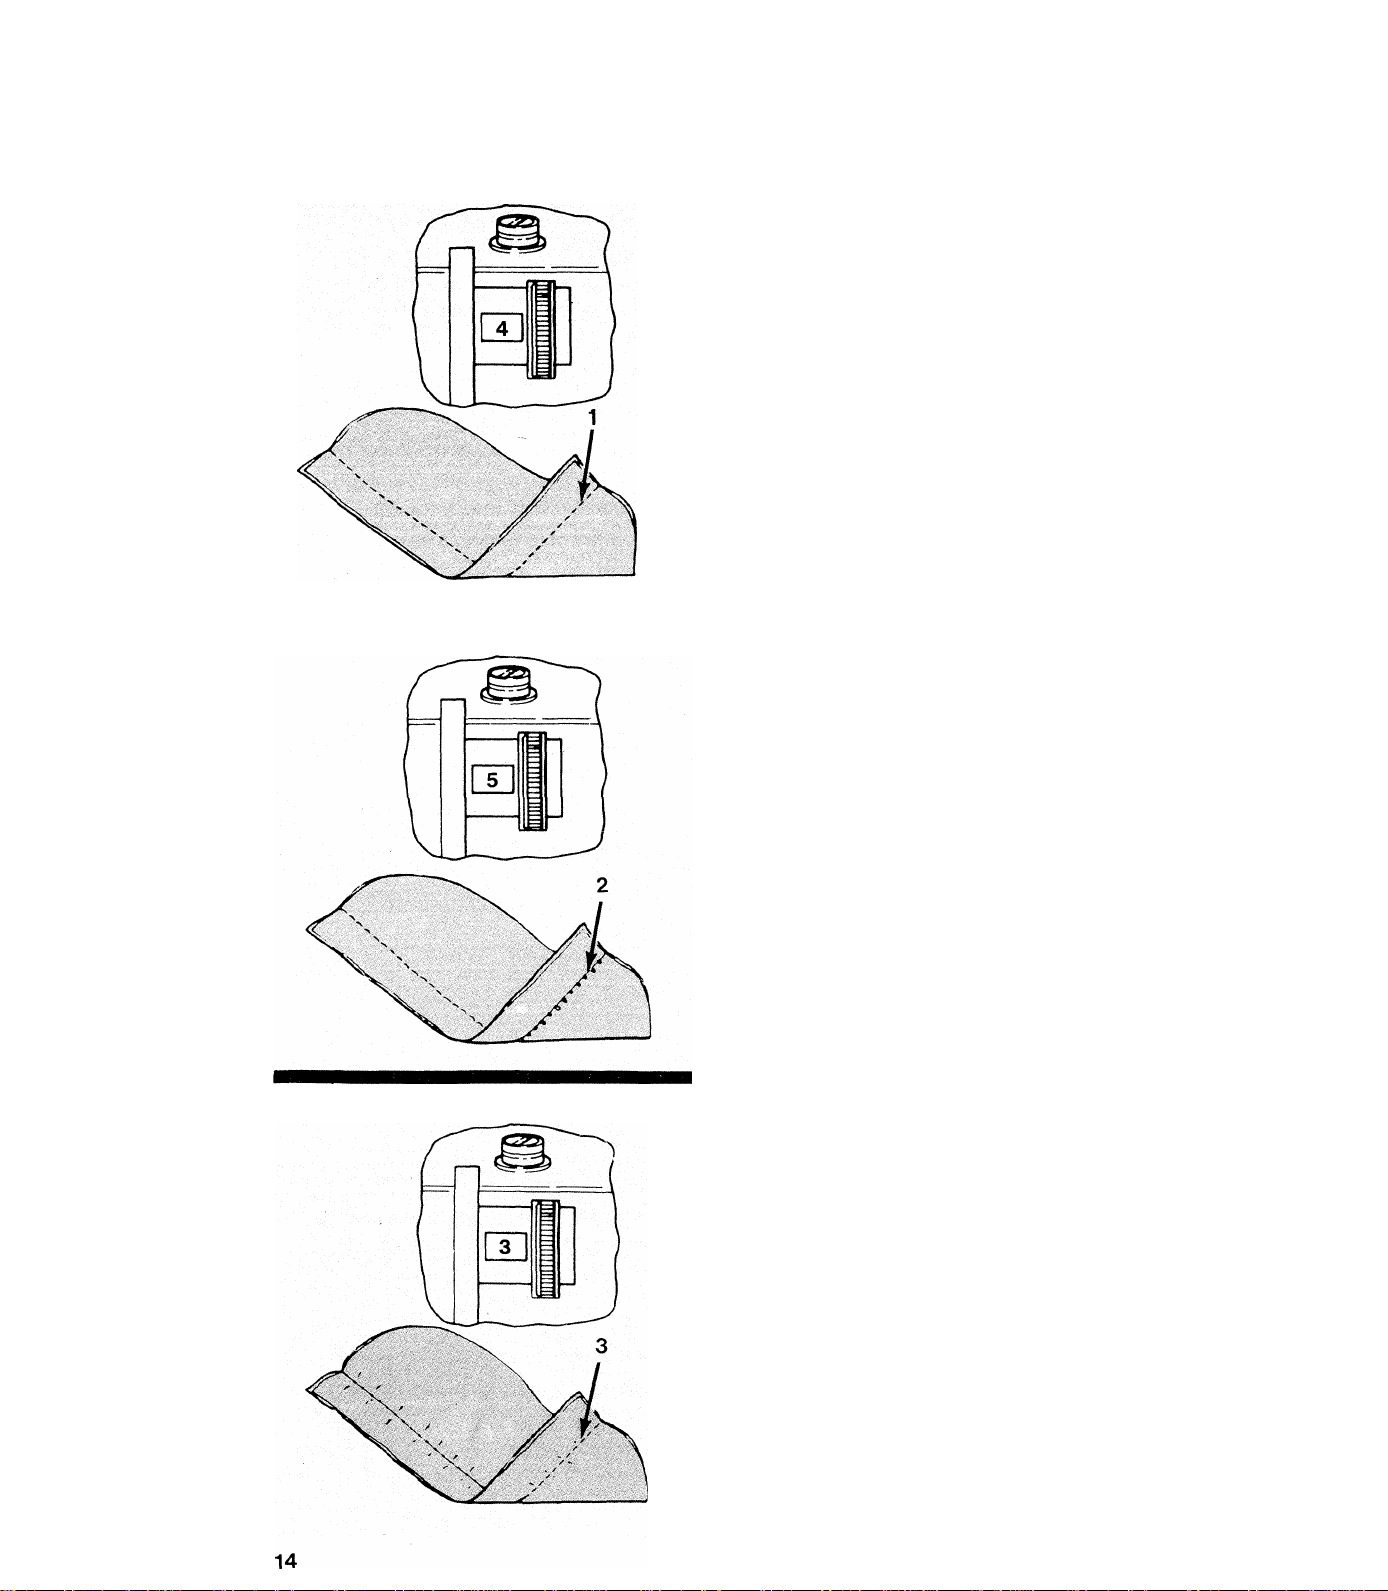
Adjusting Needle Thread Tension
Bobbin thread tension is preset by factory but
the top thread tension can be adjusted to suit
different sewing situations.
^ For most stitching, setting the tension from
3 to 5 should produce satisfactory results.
^ If stitching appears loose or small loops are
visible on the bottom of the seam, the tension
should be increased.
^ Turn dial upwards towards the higher numbers
until stitching is acceptable.
^ If stitching appears tight and fabric puckers,
the tension should be decreased.
^ Turn dial downwards towards the lower numbers
until stitching is acceptable.
Page 17
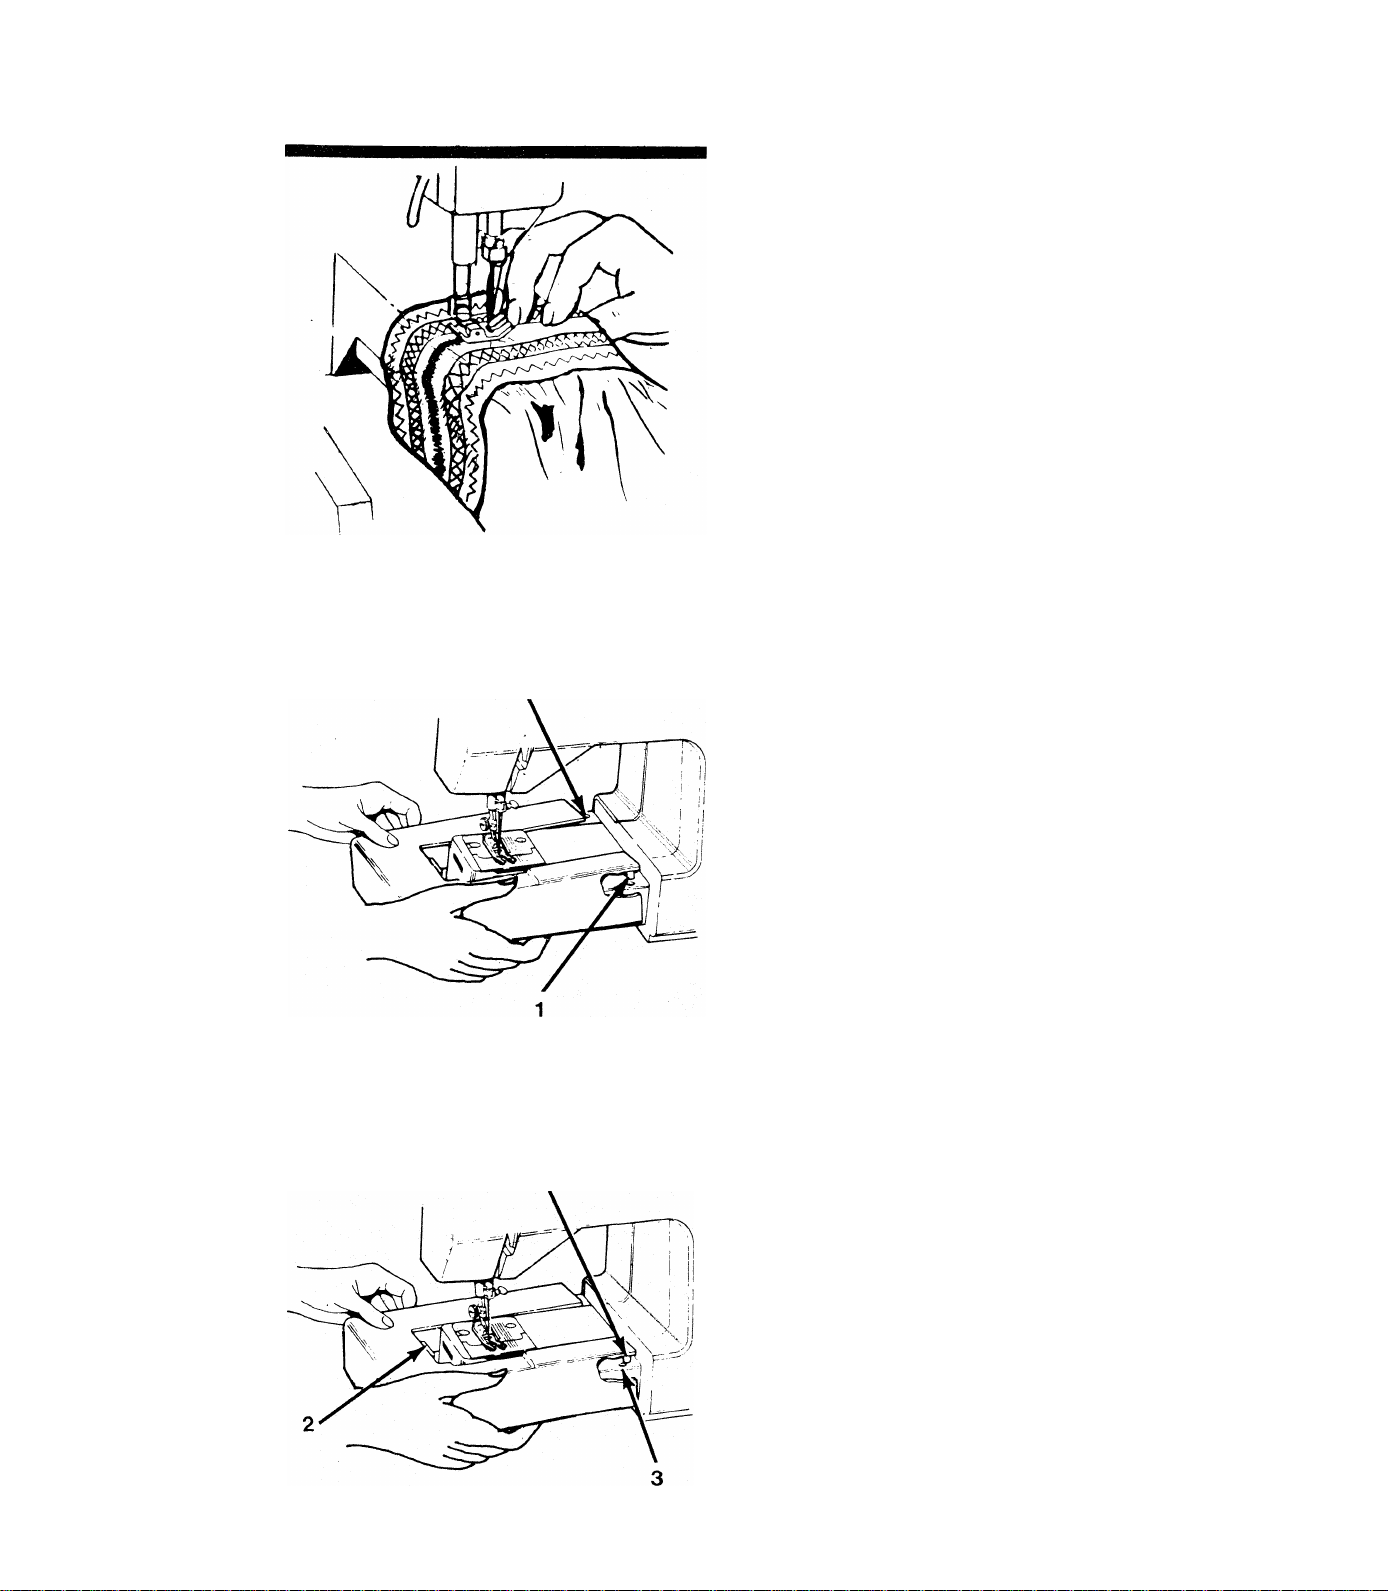
Cloth Plate
Removal
The cloth plate provides a large surface to help
support and guide the garment during sewing
operations. The majority of applications are best
performed with the cloth plate in place.
For professional finishing of cuffs, sleeves and
trouser legs, the cloth plate can be removed to
allow the garment to be placed around the
tubular bed of the machine.
* Flip up at right hand end to release the lock
ing pins (1).
Replacement
^ Slide cloth plaie away to the left.
* Slide cloth plate into place from left to right
at a slight angle, making sure that the plate is
level with bed surface at the left hand edge to
engage tab (2).
^ Press down at right hand side to lock cloth
plate pins (1) into holes (3) in machine.
15
Page 18
3. STITCH SELECTION
Select the right stitch for each sewing project along with proper length, width and balance.
A test sample using the chosen fabric and thread is recommended.
Adjusting Stitch Width
Before moving any controls, make sure needle is
out of the fabric.
^ Movement of the stitch width control towards
the right from its straight stitch position at the
extreme left will produce progressively wider
stitch patterns.
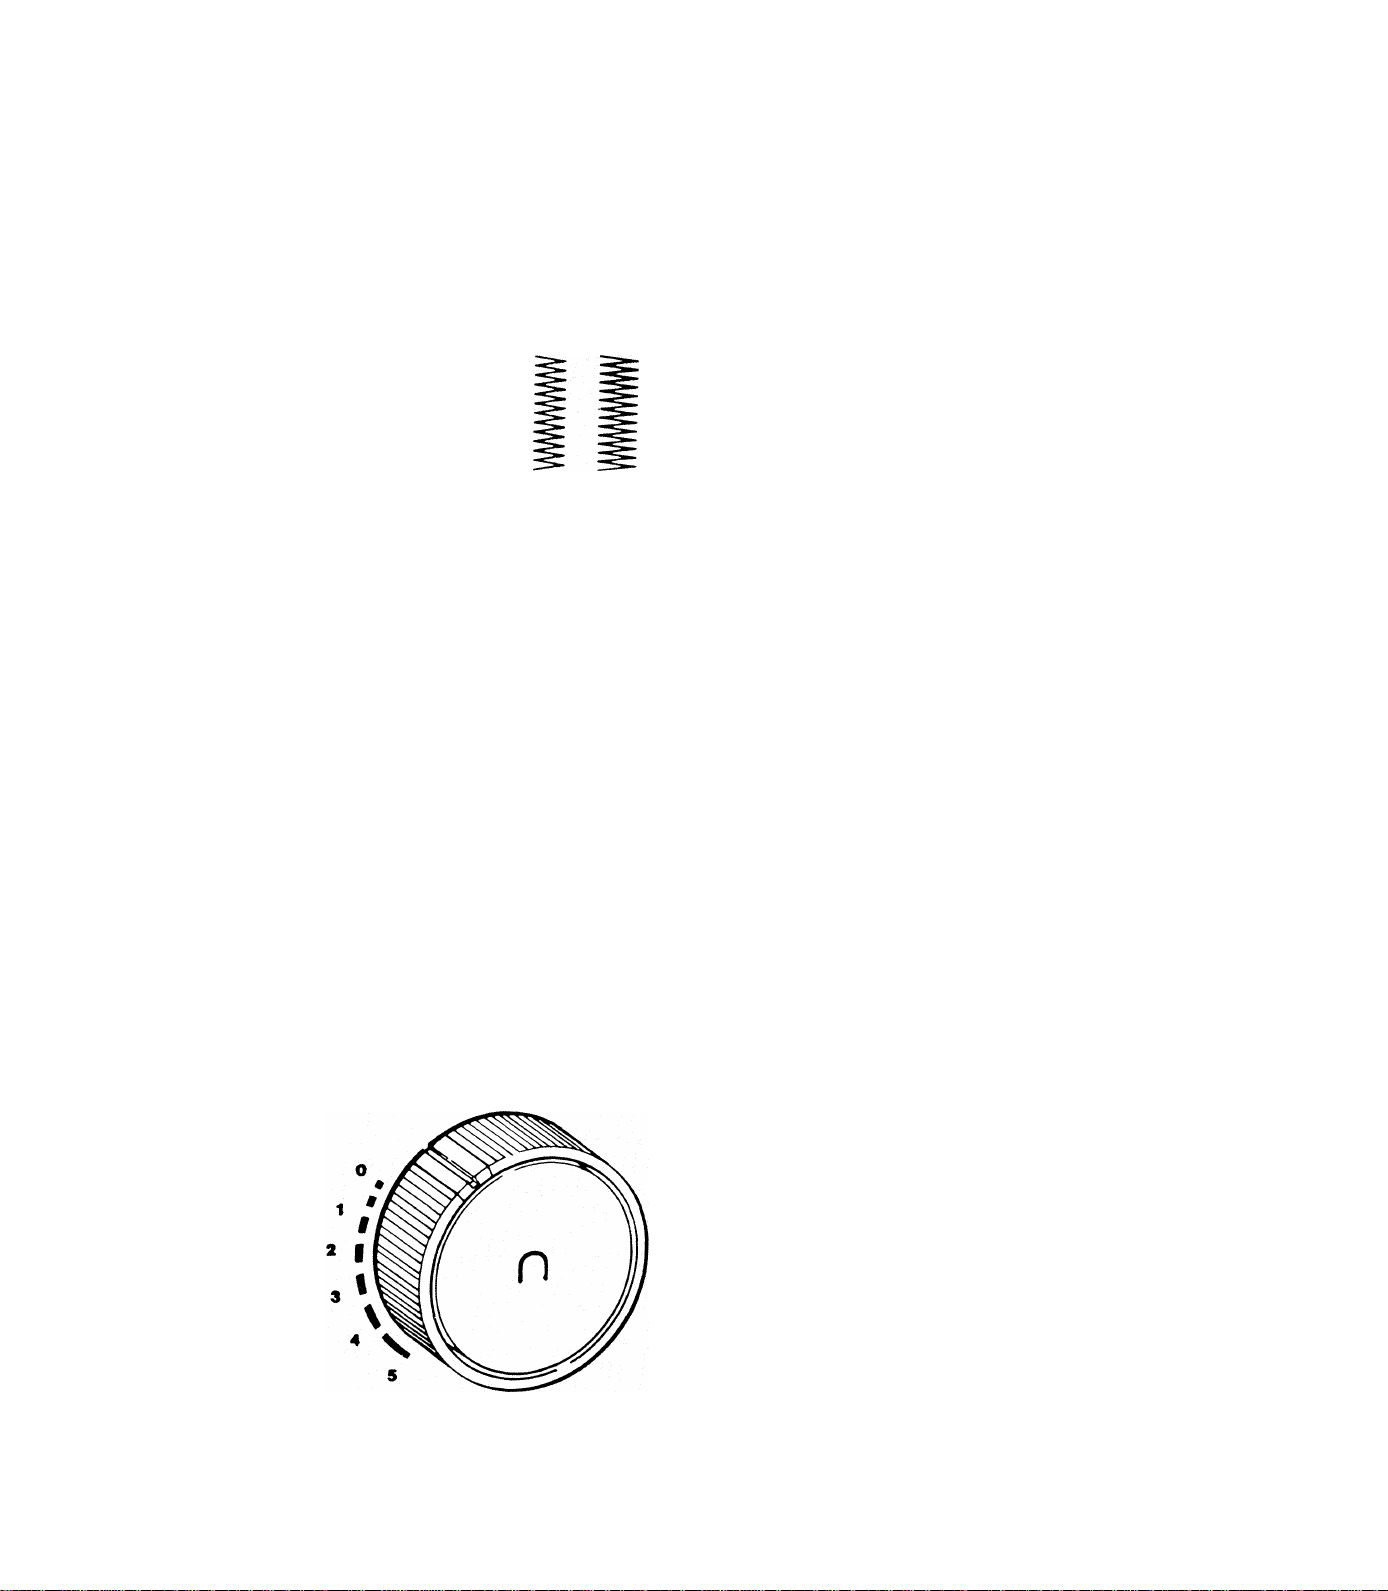
Adjusting Stitch Length
^ By turning the dial on the front of machine,
the length of the stitch can be varied.
^ For most stitching the line on the dial should
be set between 1 and 5 with 5 producing the
longest stitch.
^ For very short stitches, fine adjustment should
be made by setting mark on dial between 0
and 1.
The numbers on this control are for reference
only and do not relate directly to the actual
length of stitch being sewn.
16
Page 19
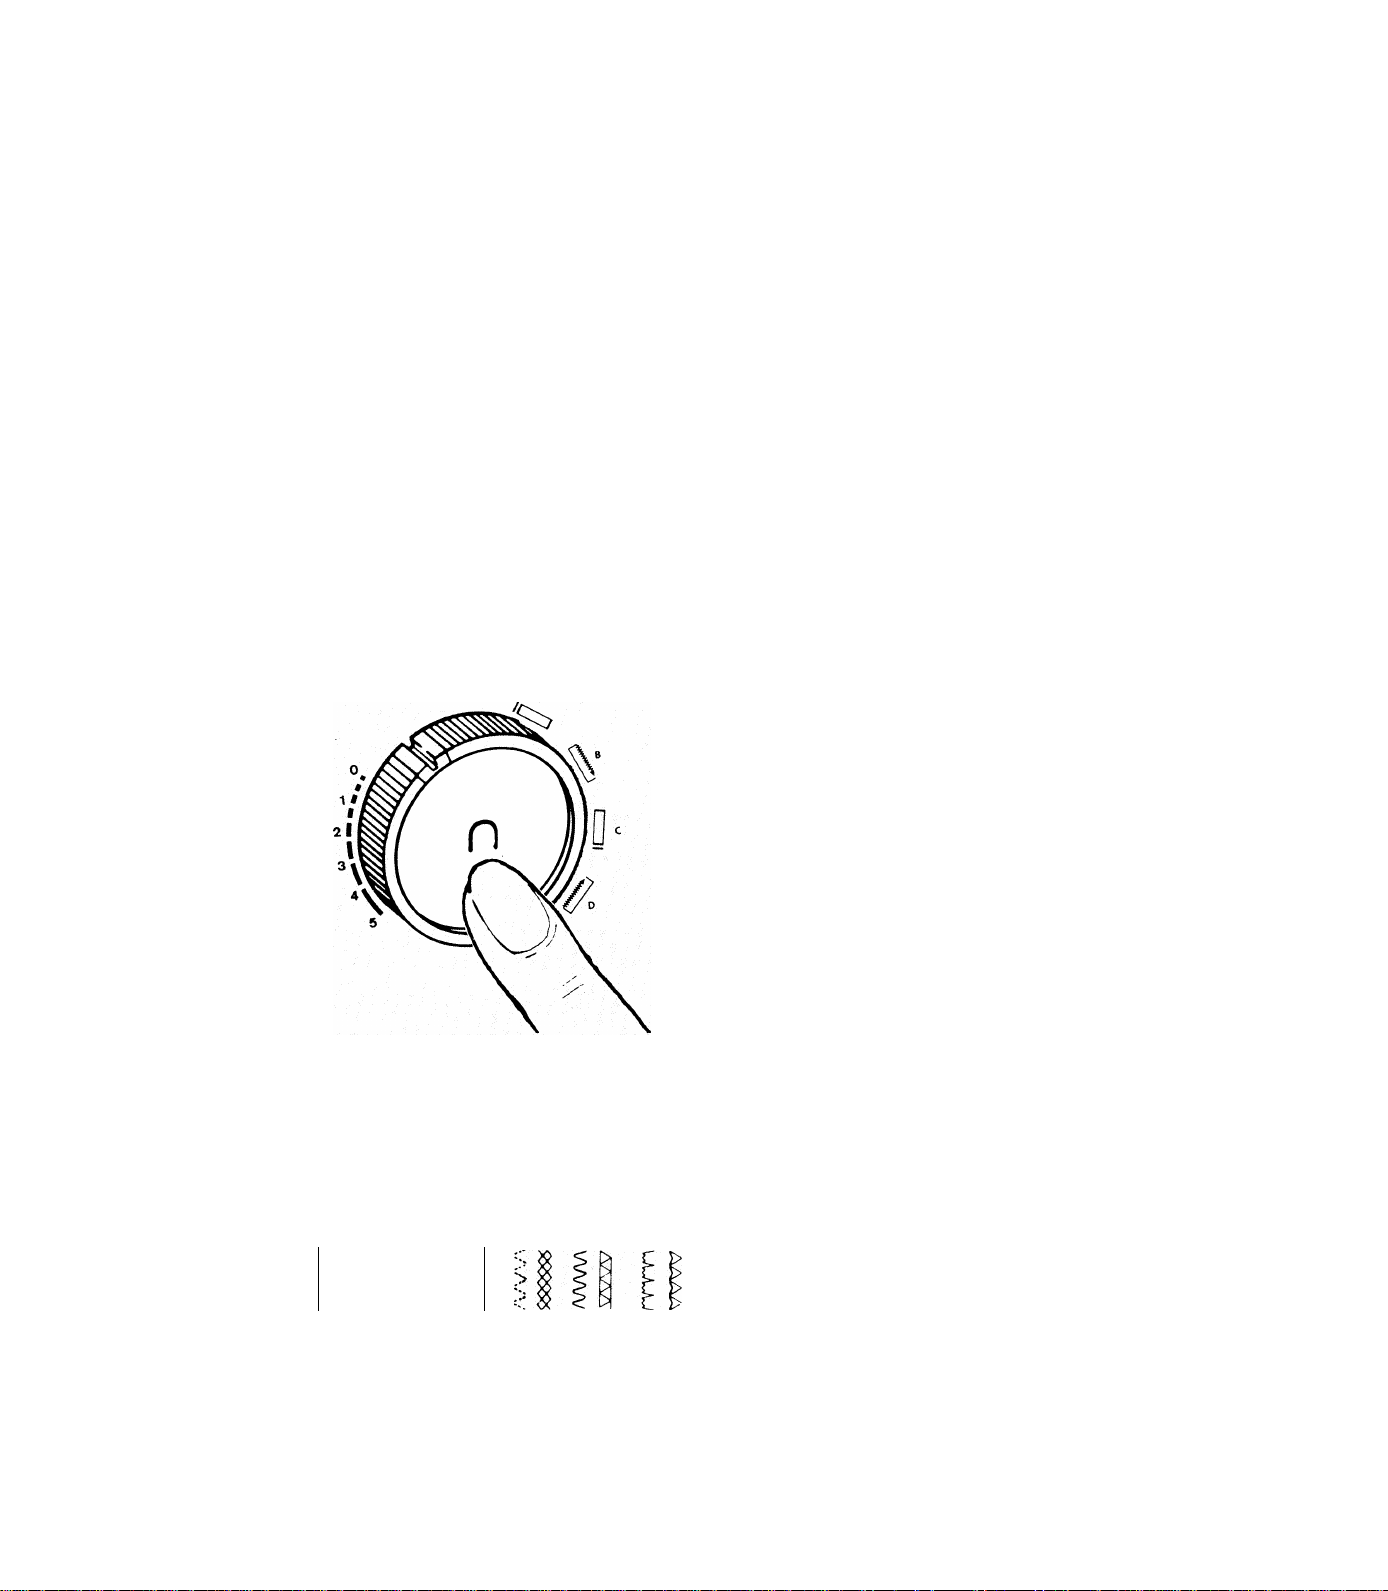
Adjusting Stitch Balance
i
t
v/v\Av/v mmmm
Reverse Stitching
when sewing stretch stitch patterns or button
holes, it may be necessary to adjust this control
for proper stitch appearance.
^ Turn dial downwards (1) to bring stitches of
the pattern together.
^ Turn dial upwards (2) to separate stitches of
the pattern.
Always return dial to its center position after
sewing stretch stitch patterns.
For best results, balance and sew stretch stitch
patterns and buttonholes at a moderate speed.
To lock a seam or for miscellaneous applications,
reverse stitching may be required. To sew in
reverse, proceed as follows:
Depress button in center of stitch length dial
and hold depressed until reverse stitching is
completed.
^ Button may be pushed while machine is
sewing.
Pattern Selection
N
11 I $ 1
1 <r ^
li f 1 ^ ^
1 2 3 4 $ t / t 9 10 11 12 11
1 'N
I 'N
■s V
■n
'nJ
^ Set stitch width control to its extreme left-hand
position, then turn pattern selector dial to choose
group of numbers containing number of desired
stitch.
For a regular pattern, set stitch width, stitch
length, and tension in normal manner. Button
hole selection is discussed later in this book.
For stretch pattern (yellow), turn stitch length
dial counterclockwise so indicator notch on
dial lines up with the word “stretch” on machine.
Set width, balance and tension to get proper
appearance.
17
Page 20
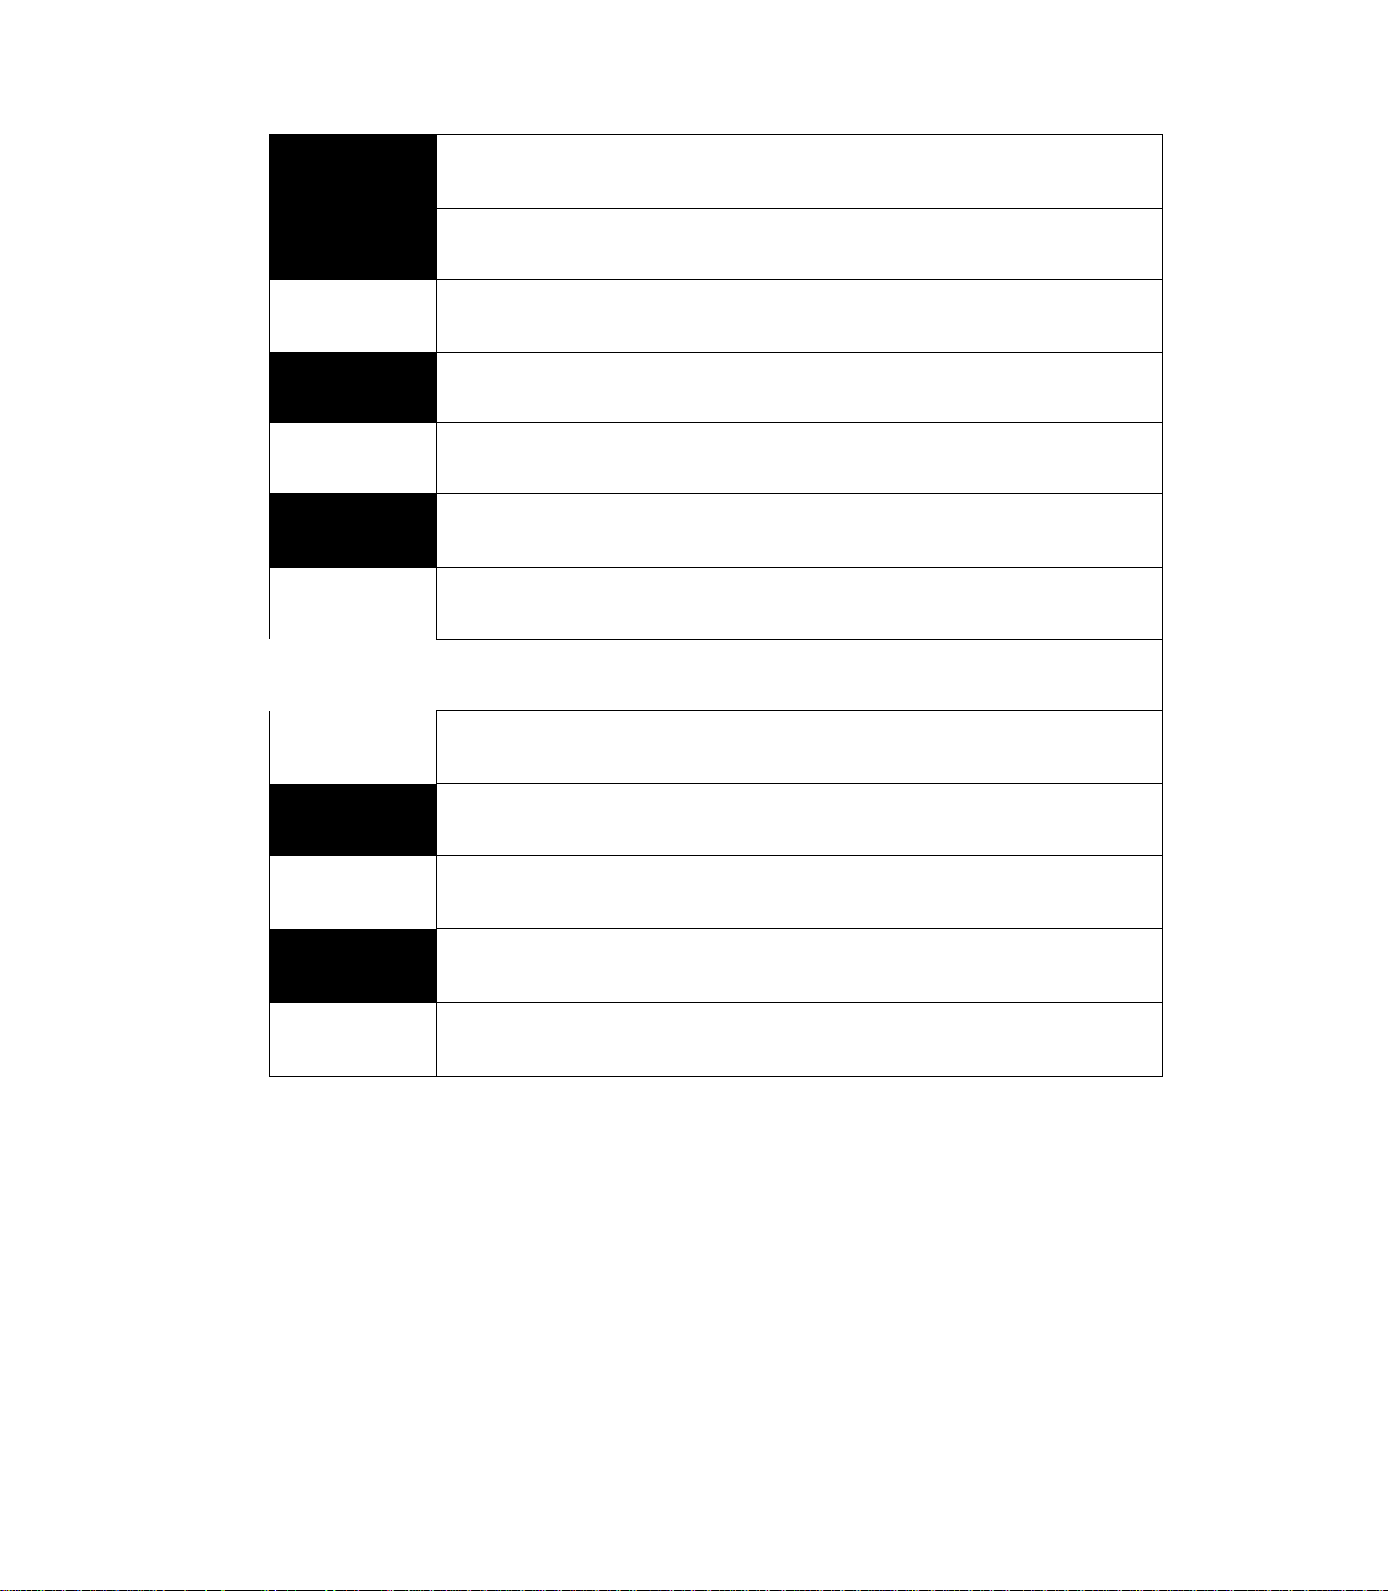
Description of Stitches
1. Buttonhole (Special)
2. Straight Stitch (Regular) - Lock stitch used for most general sewing
tasks.
*3.Straight Stretch (Stretch) - Use for reinforced seams and for decorative
top stitching.
ww
A_JL_A
//////
AAAAA
/V^/V\
pmn
4. Zig-Zag (Regular) - Use for sewing seams, appliqueing,
monogramming, or decorating.
*5. Ric-Rac (Stretch) - A heavy-duty stretch stitch that can also be used for
top stitching.
6. Blind Stitch (Regular) - Use for hem finishing.
*7. Slant Overedge (Stretch) - Use for joining and finishing seams in one
step on knit fabrics.
8. Multi-stitch Zig-Zag (Regular) - Use for mending, joining, and
reinforcing.
*9. Honeycomb (Stretch) - Use for smocking, quilting, and decoration.
10. Rampart Stitch (Regular) - Use for borders and smocking.
*11. Turkish Hem Stitch (Stretch) - Traditionally used for hemstitching.
12. “M” Stitch (Regular) - Use for ornamental seams and seams in
stretch fabrics.
18
rvw
*13. Stretch Overedge (Stretch) - Use to finish stretch seams, hems,
and facings.
* Sewing of these patterns should be performed at SLOW SPEED.
Page 21

4. SEWING TIPS AND APPLICATIONS
Fabric, Thread, and Needle Table
Your fabric will determine the choice of a needle and thread.
A practical guide to needle and thread selection. Always refer to it before a new sewing project.
And be sure to use the same size and type of thread in the bobbin as in the top thread supply.
Fabrics
The fabrics below can be of any fiber: Cotton, linen,
silk, wool, synthetic, rayon, blends. They are listed
as examples of weight.
Very Lightweight : Batista, Chiffon, Organza,
Voile.
Lightweight: Challis, Chambray, Charmeuse, Crepe Cotton-wrapped polyester 2002 11/80
de China, Gauze, Handkerchief Linen, Silk,
Taffeta, Tissue faille.
Medium-Weight : Broadcloth, Brocades, Chino,
Chintz, Corduroy, Flannel, Linen, Poplin, SSatin,
Synthetic Seudes, Taffeta, Terry, Velvet
Medium to Heavy-Weight: Coating, Damask, Denim, Cotton-wrapped polyester 2020 16/100
Drapery Fabric, Fake Fur, Gabardine, Ticking,
Woolens
Heavy Weight : Canvas, Duck, Sailcloth,
Upholstery Fabric
Leather
Knits : Jersey, Tricot, Single Knit
Sweatshirt : Double Knit Swimwear, Sweater Knit
Cocton-Wrapped polyester
core (extra fine)
Long fiber, polyester (extra fine) shank band
core (all purpose)
Long fiber, polyester (two opun)
Cotton-wrapped polyester 2020 14/90
core (all purpose)
Long fiber, polyester (two spun)
core (all purpose)
Long fiber, polyester (two spun)
Cotton-wrapped polyester
core (all purpose)
Long fiber, polyester (two spun)
Cotton-wrapped polyester 2045 11/80
core (all purpose)
Long fiber, polyester (two spun)
Failure to use a singer brand
needle may result in skipped
stitches or poor sewing performance
Needles
туре
2020
red
red orange
shank
red blue
shank band
red
shank band
2020
red
shank
2032
leather
yellow
shank band
Size
9/70 or 11/80
orange
band
purple
18/160
orange
14/90
blue
band
Use with standard sewing thread in bobbin.
19
Page 22
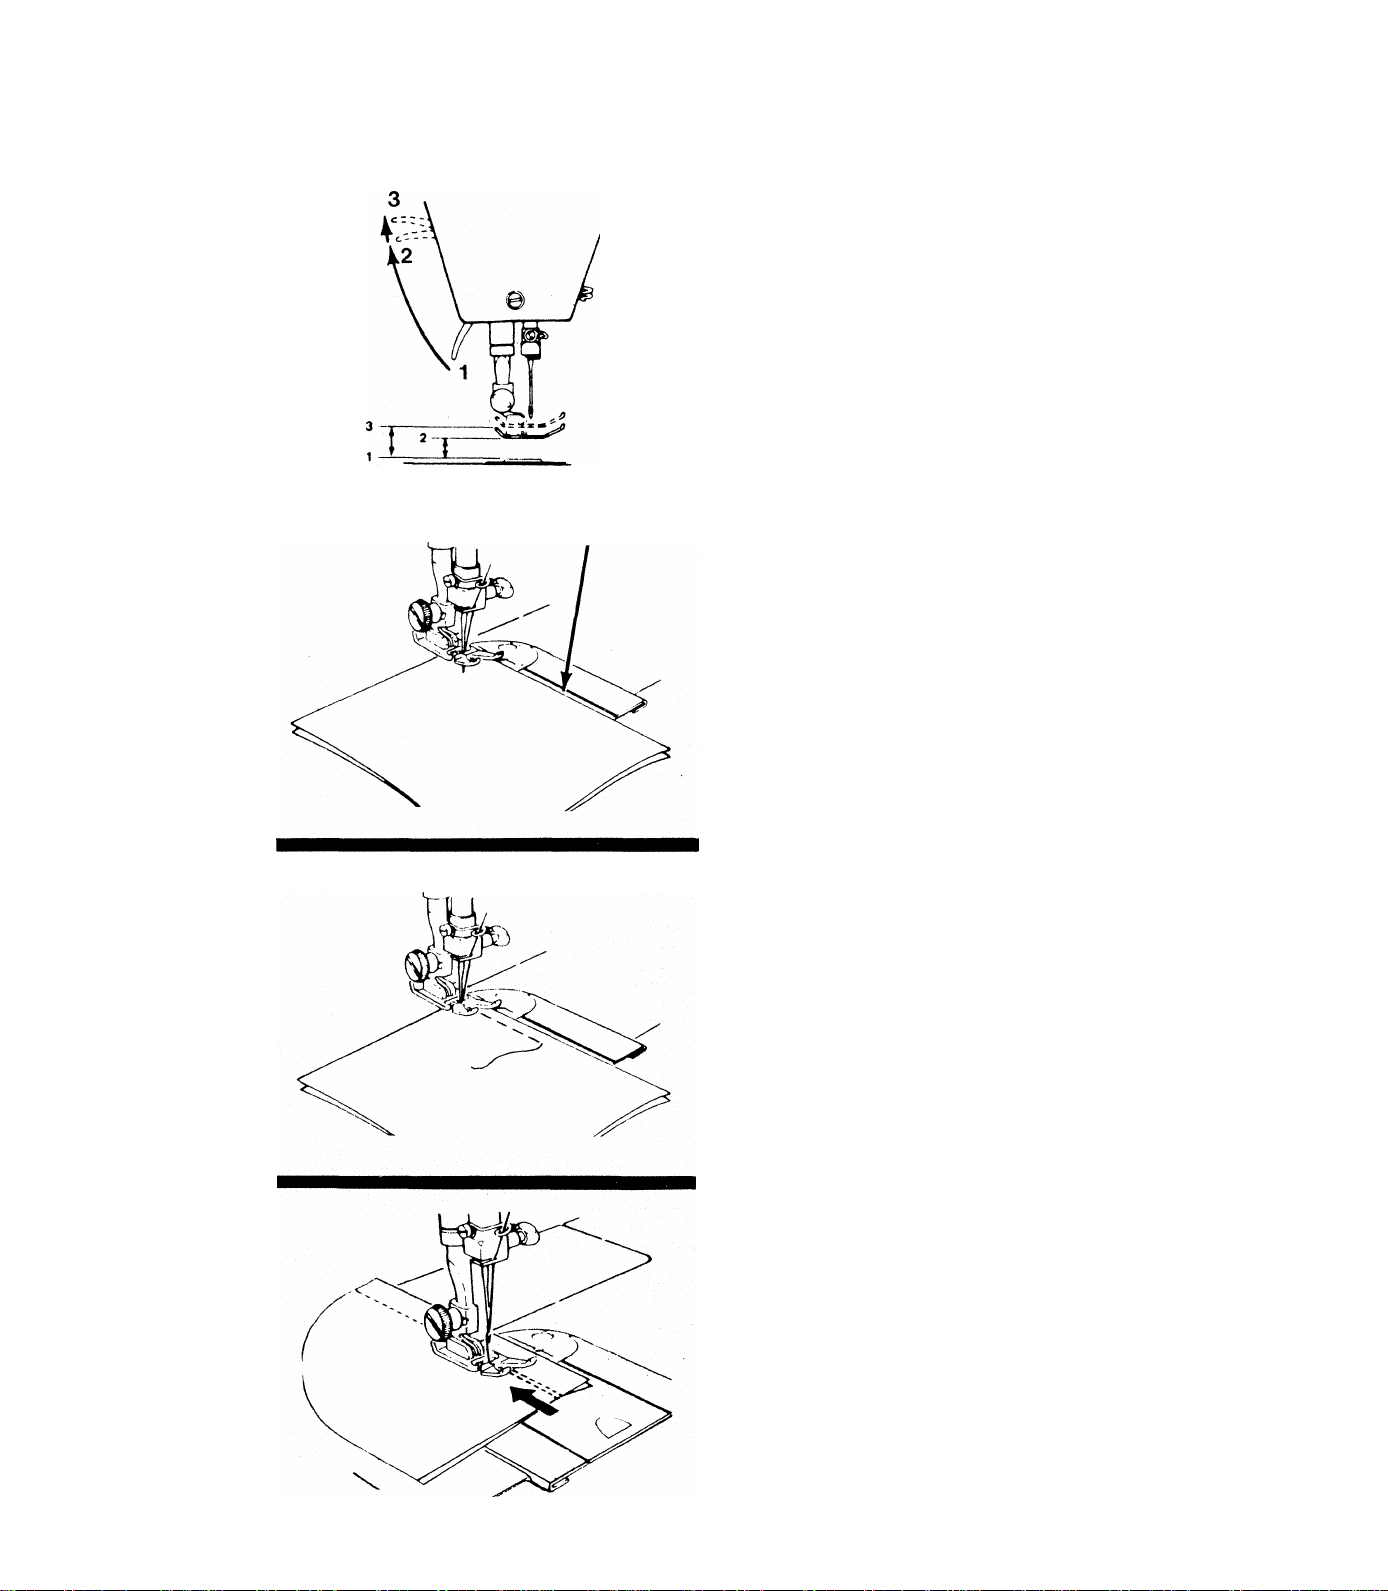
Sewing a Seam
Most fabrics can be placed under the foot by
raising the presser foot lifter (1) to its normal
“up” position (2) where it locks in place. When
using bulky fabric, multiple fabric layers, or an
embroidery hoop, raise the lifter to the highrise
position (3), thus increasing the space between
the foot and the needle plate.
^ Lower presser foot lifter all the way down
and the machine is ready to sew.
^ To keep seams straight, use one of the guide
lines on the needle plate.
^ The most commonly used line (1) for a 5/8
inch (1.8 cm.) seam allowance is extended onto
the slide plate.
^ To start a seam, place fabric under presser
foot so needle will first penetrate 1/2 inch (1.2
cm) from starting edge of fabric. Align the right
edge with one of the guidelines on the throat
plate. Lower the presser foot.
^ Reverse-stitch using reverse button to the edge
of fabric then release button for forward
stitching.
When seam is completed, hold in reverse button
and stitch for 3-4 stitches to lock seam.
^ Raise needle and presser foot to remove
fabric from machine. Cut thread using thread*
cutter on face plate.
20
Page 23
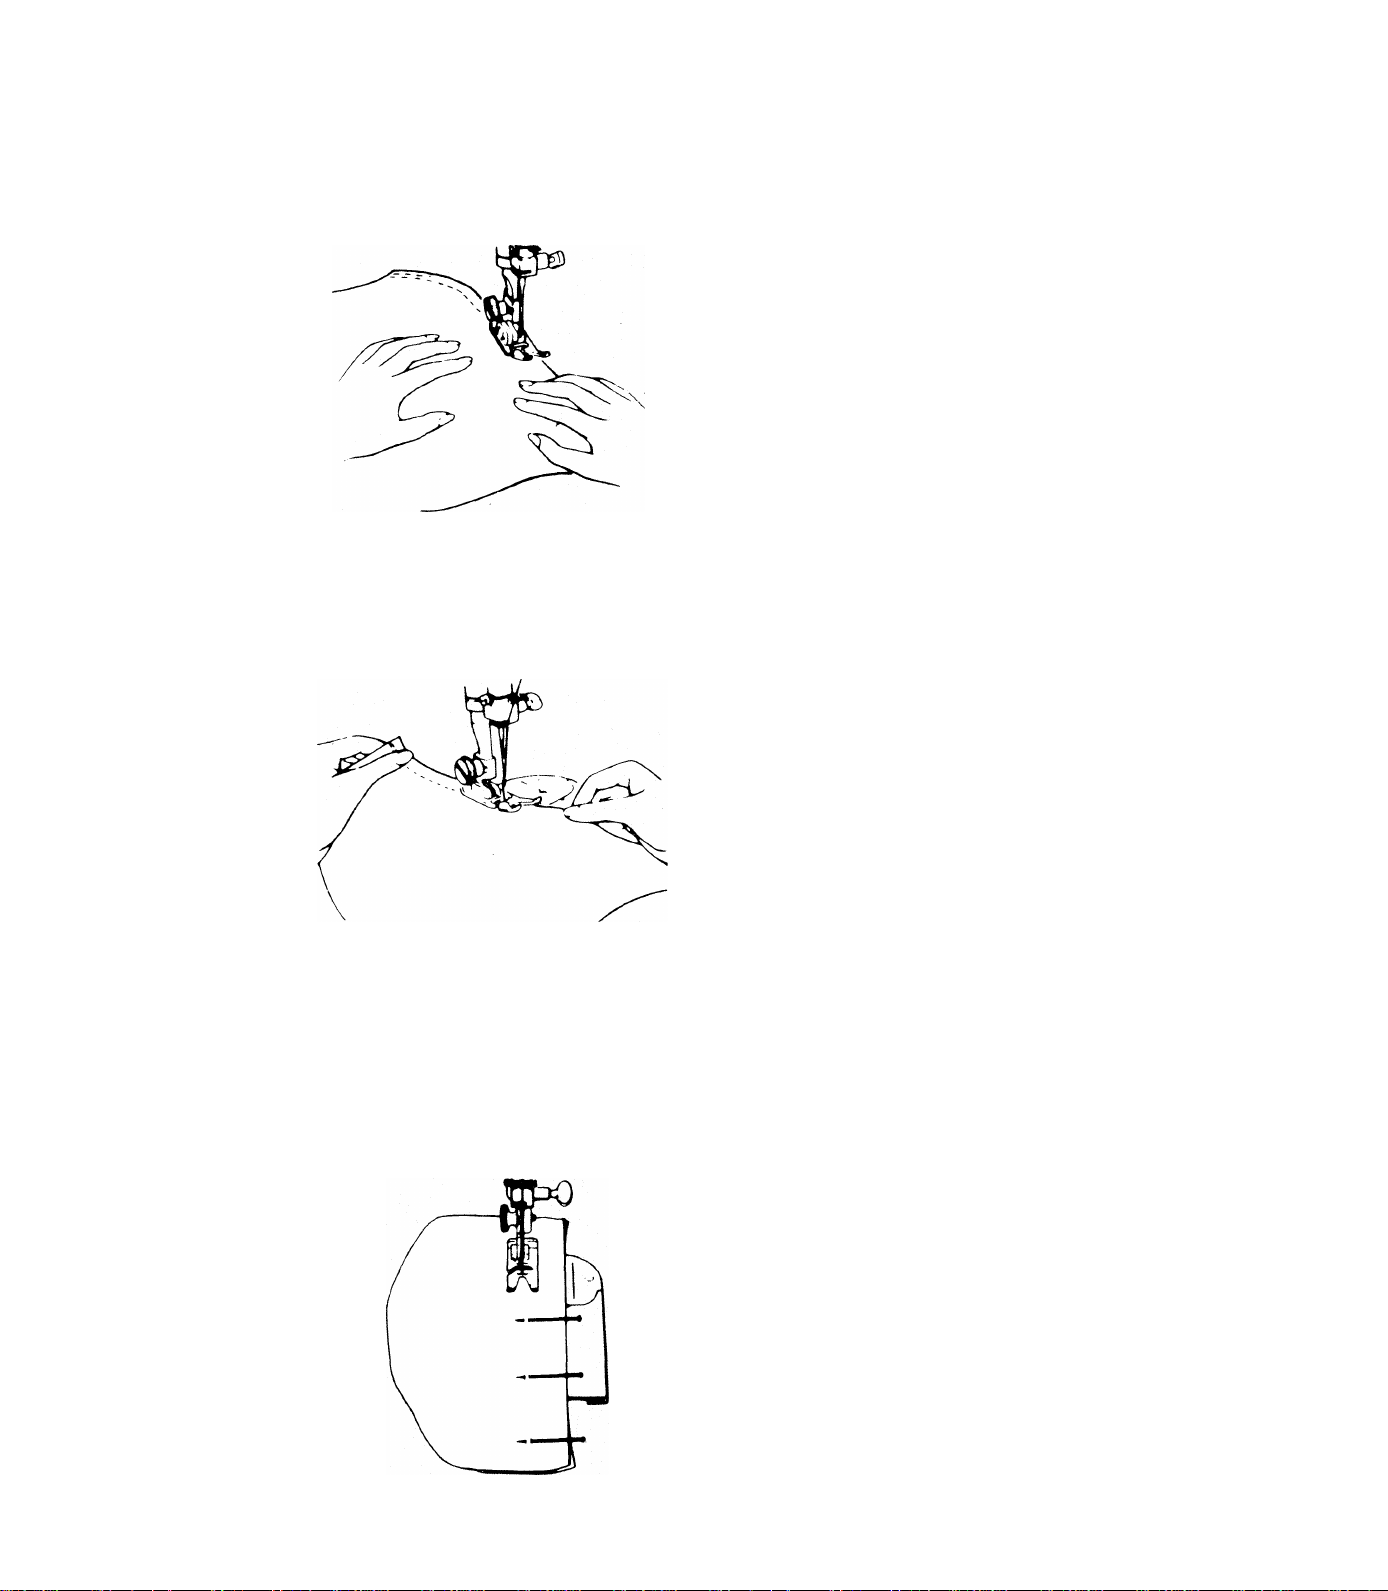
Guiding Fabric
Most fabrics need only to be guided in front
of the presser foot. Some fabrics, however,
require support while being stitched.,
^ For tricot and other similar synthetic knits,
apply gentle tension by holding fabric tight in
front and back of presser foot during sewing. DO
NOT pull fabric or needle may break!
Basting
For elasticized fabric, stretch lace, and knits
with an unusual amount of elasticity, hold as
with tricot but apply firm tension in front and
back of presser foot to stretch the seam as the
stitches are being sewn.
Pin basting and hand basting are easy ways to
make temporary seams before machine sewing.
^ To pin baste, insert pins at stitching line.
NEVER place pins on the underside of fabric in
contact with the feed. DO NOT sew over pins;
remove them immediately before stitching.
21
Page 24
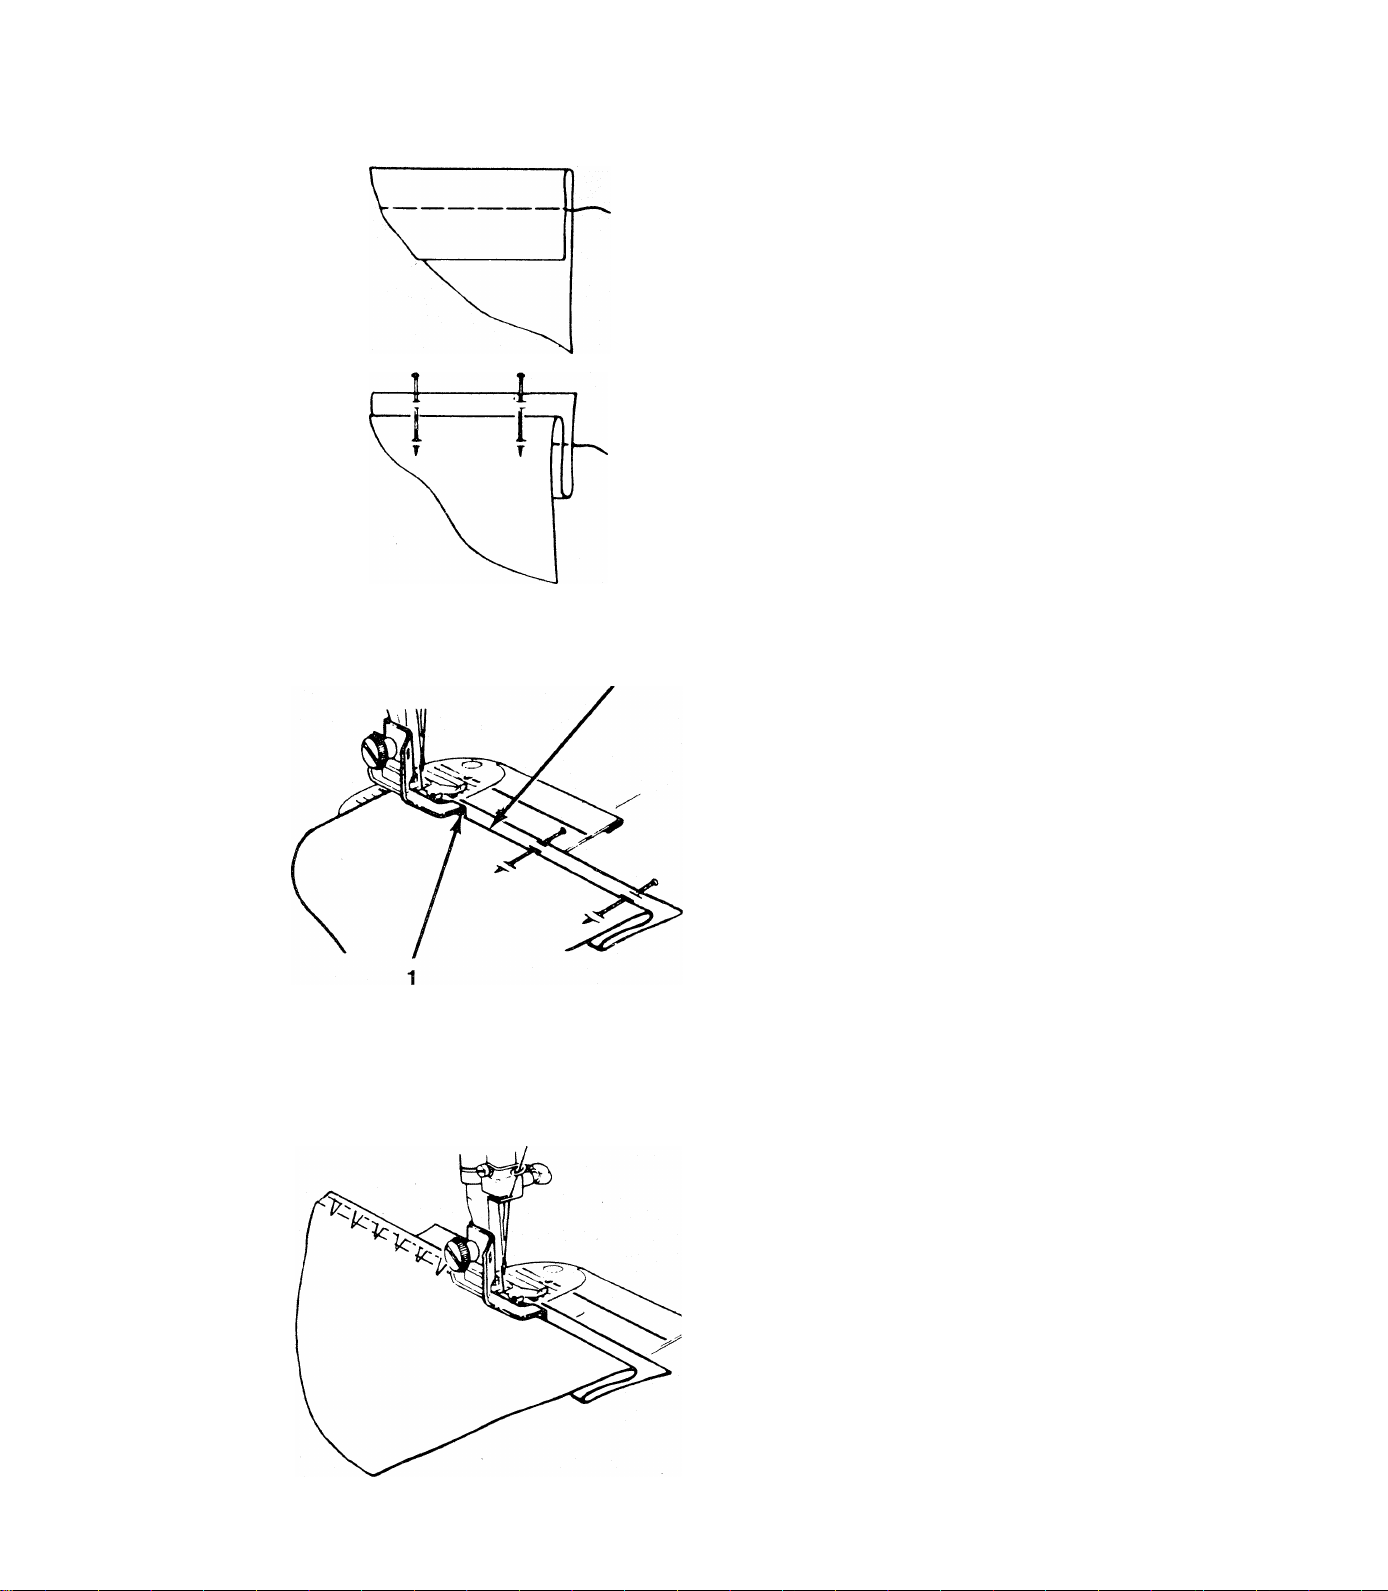
Blindstitching
Blindstitching provides a durable way to finish
a hem. It takes practice, however, so a test sam
ple is suggested.
^ Prepare the hem by folding and pressing as
usual. If the hem is basted to hold it in place,
as shown, be sure to place the basting at least
1/2 inch (1.2cm.) below the top edge of the hem
allowance.
^ With the wrong side of fabric up, turn the
hem under, creating a soft fold from the top
edge of hem. Pin or baste all three layers
together.
^ Attach blindstitch hem guide to machine as
in Chapter 2.
^ Position the hem under the presser foot with
the soft fold resting against the wall of the
guide. Be sure the flange (1) of the guide is
between the soft fold (2) and the top of the
hem, as shown.
^ Lower the presser foot and begin sewing,
adjusting' the stitch width to make sure the
straight stitches fall on the edge of the hem
and the zig-zag stitches just pierce the soft fold.
Guide the hem edge in a. straight line and feed
the soft fold evenly against the wall of the
guide.
^ If pins were used, remove them immediately
before stitching. DO NOT sew over pins!
22
Page 25
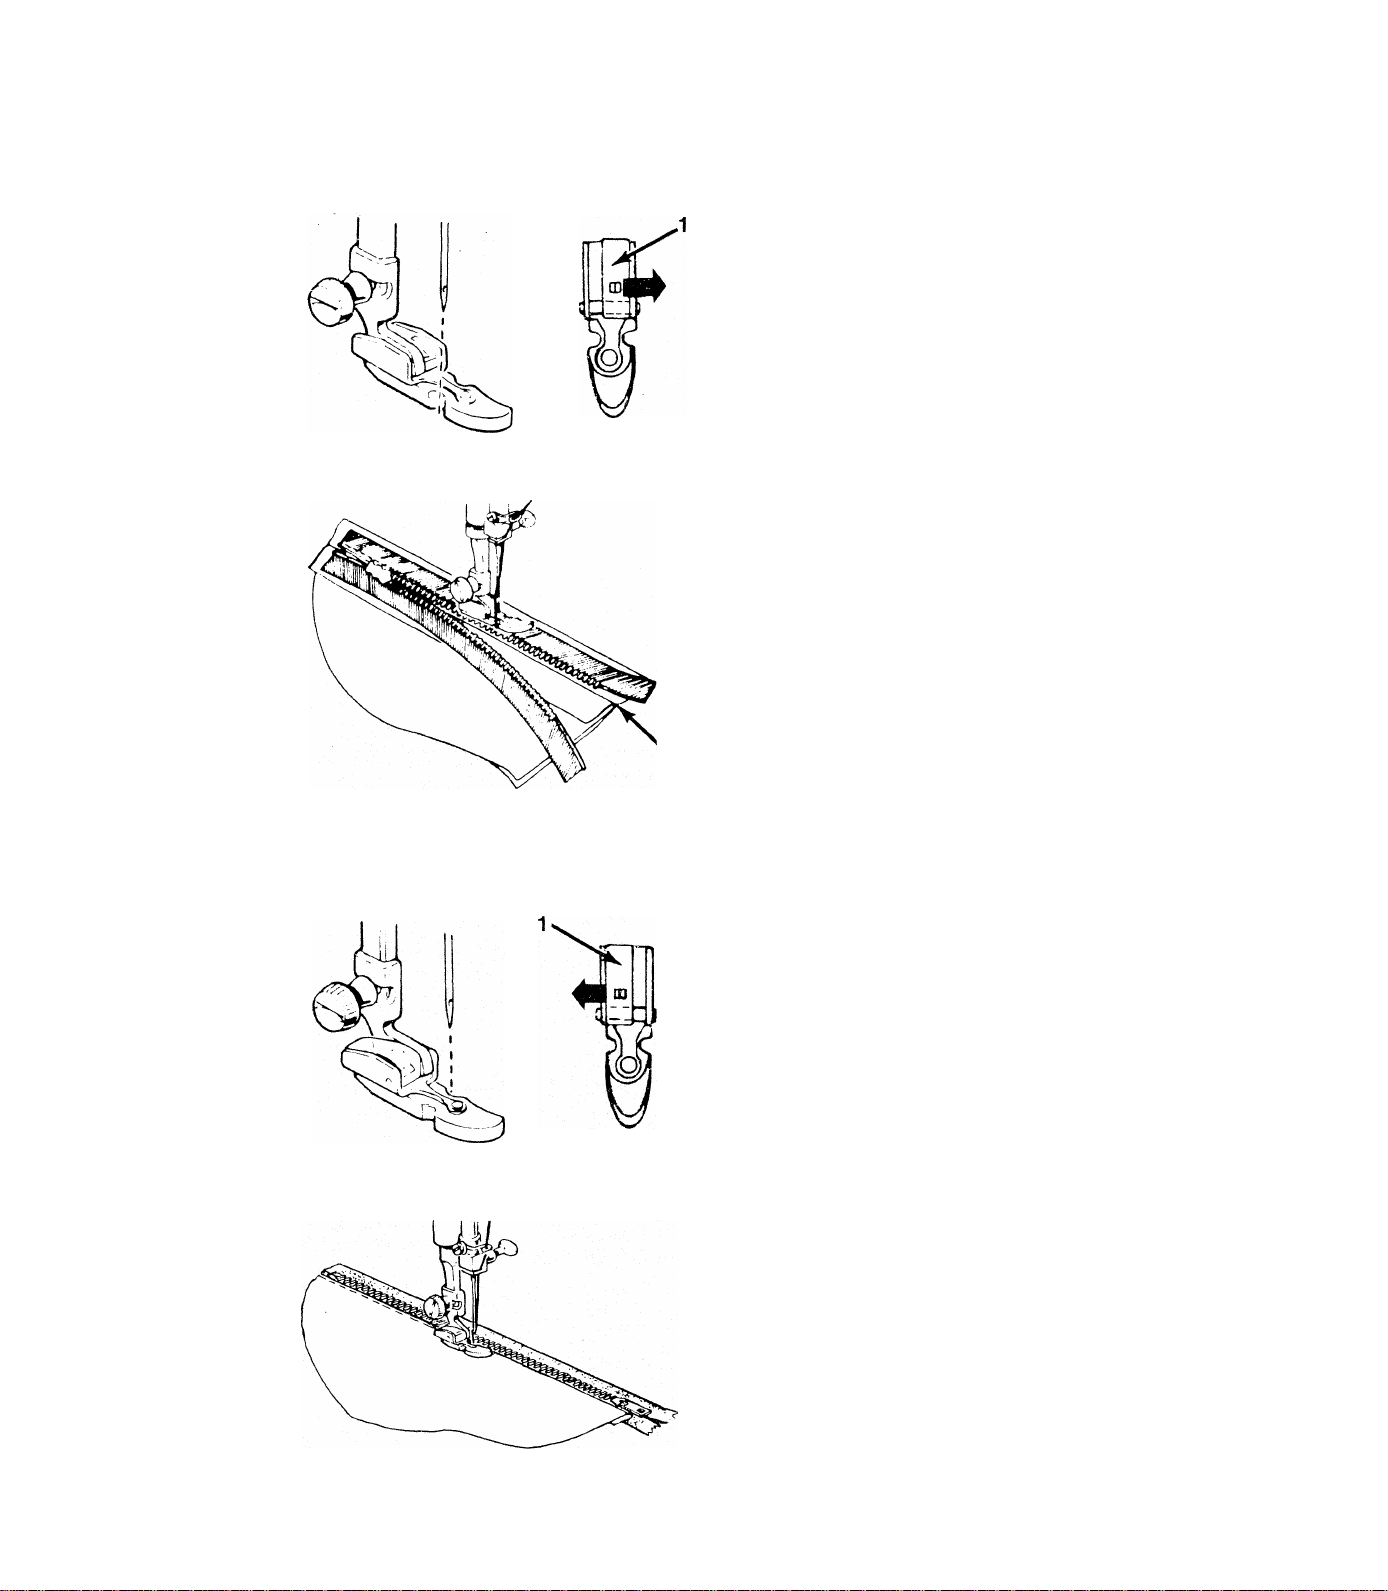
Inserting a Zipper
To get stitching even and close to the zipper teeth,
use the special zipper foot.
^ When zipper teeth are to the left of the nee
dle, slide the adjusting block (1), which slides
on the pin of the foot, all the way to the right.
^ Snap on foot with shank to the left side of
pin. (See “Changing Snap-on Presser Feet”)
^ Hand-baste the zipper opening to the seam
line (2), and press open the seam allowance.
^ Place open zipper face down on the seam
allowance with the teeth against the seam line.
^ Stitch the zipper to the seam allowance from
bottom to top on one side.
To stitch the other side of zipper (teeth to the
right of needle):
^ Snap off foot and slide the adjusting block
(1) all the way to the left. Then, snap right
side of pin onto shank as above.
^ Sew other side of zipper to seam allowance.
^ Baste through the zipper tapes, seam
allowances, and garment exterior.
^ Turn the garment right side up and topstitch
it to the zipper, sewing through all layers.
It is suggested more in-depth instructions be
consulted since there are many ways to use
zippers in garments.
23
Page 26
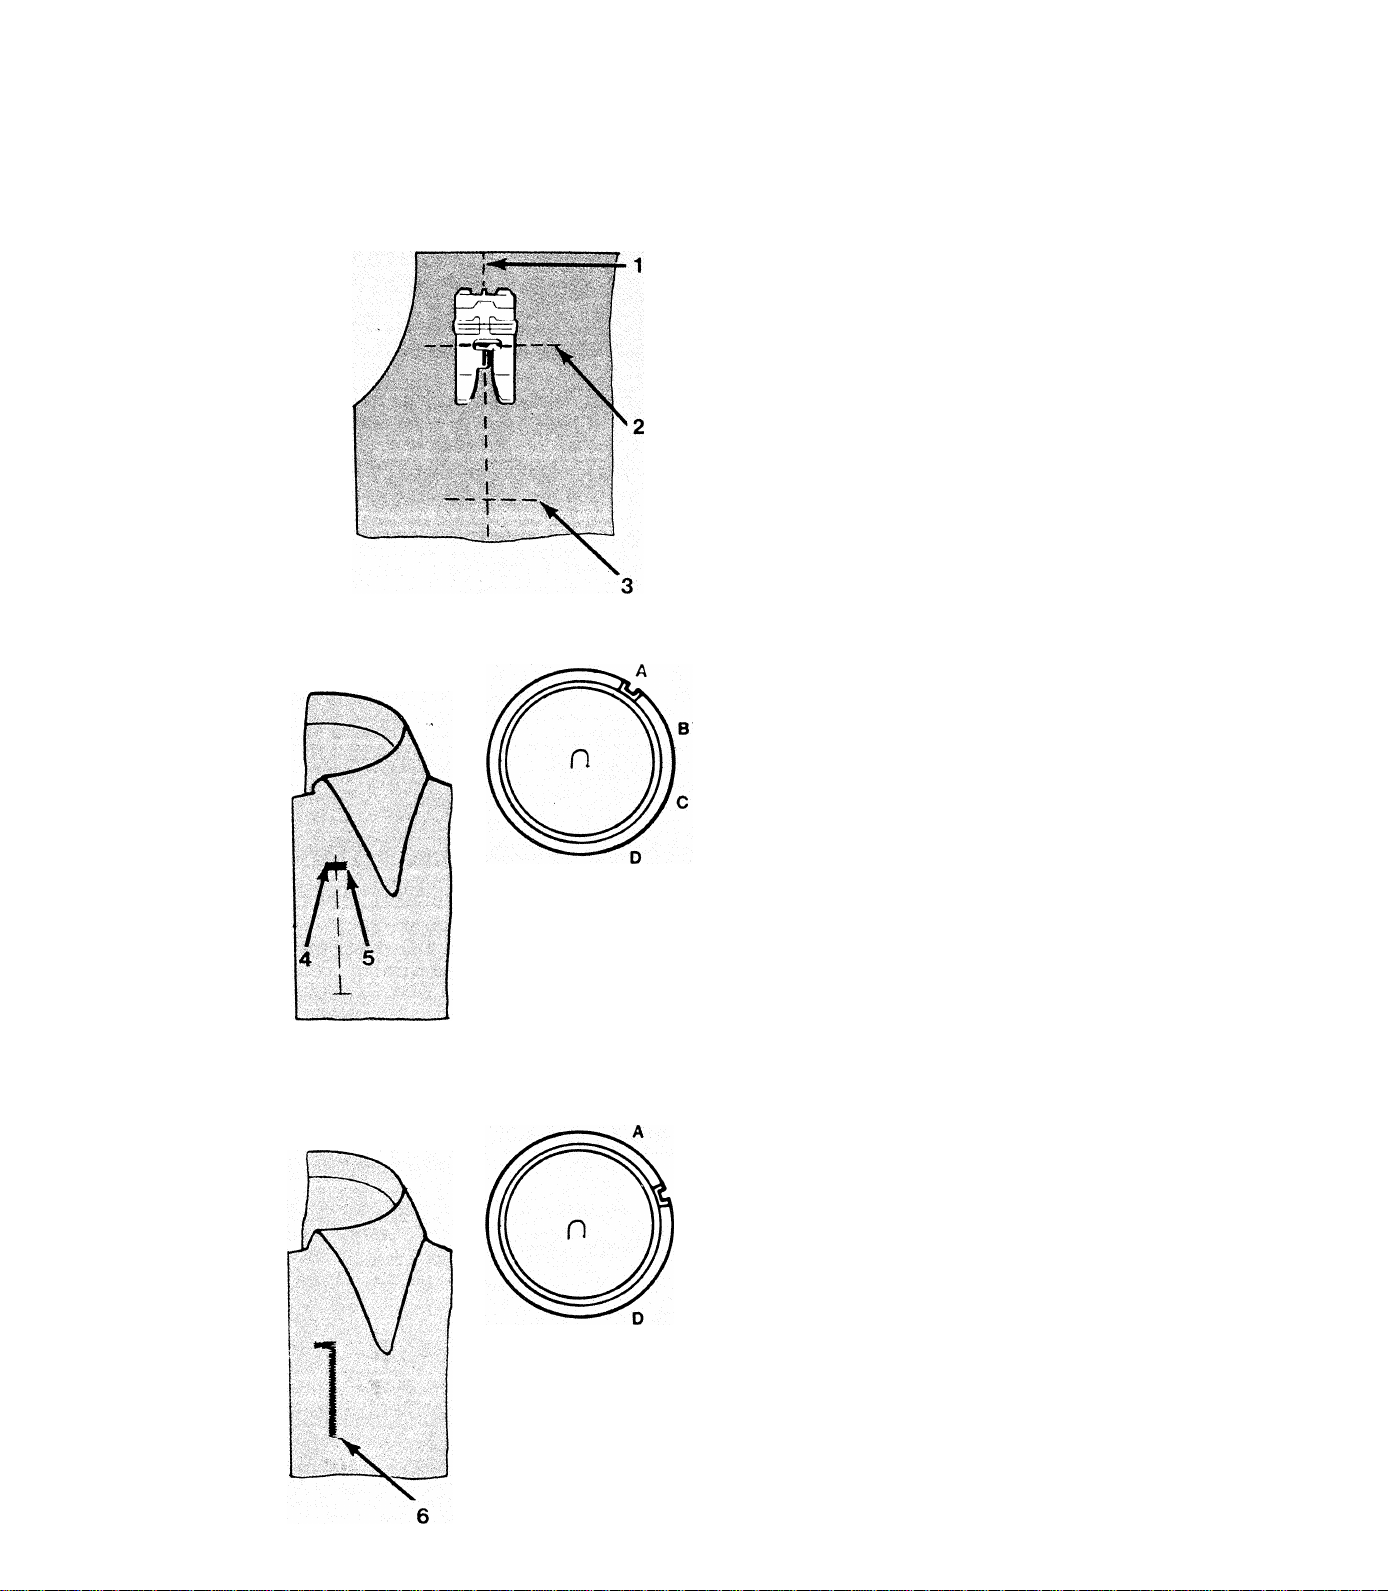
Four-Step Buttonholes
This machine makes buttonholes of any length
in only four, easy steps. Always make a test
buttonhole on a sample of fabric first before
buttonholing on the garment.
* Mark the centerline (1), top (2), and bottom
(3) of button hole on fabric.
5k Using buttonhole snap-on foot, line up red
crossed lines of foot at intersection of centerline
and top marks on fabric, then lower foot.
Step A: Rear Bartack
5k Making sure needle is out of fabric, select
buttonhole pattern with pattern selection lever.
Then, turn stitch-length dial clockwise until line
on dial lines up with the letter ‘A”.
BCD
5k Using handwheel, lower needle into fabric at
(4).
5k Sew bartack using four stitches ending at (5).
Step B: Right Side Stitching
5k Raise needle out of fabric.
5k Turn stitch-length dial to “B”
5k Sew right side of buttonhole up to bottom
mark on fabric (6)
24
□
A B C D
Page 27
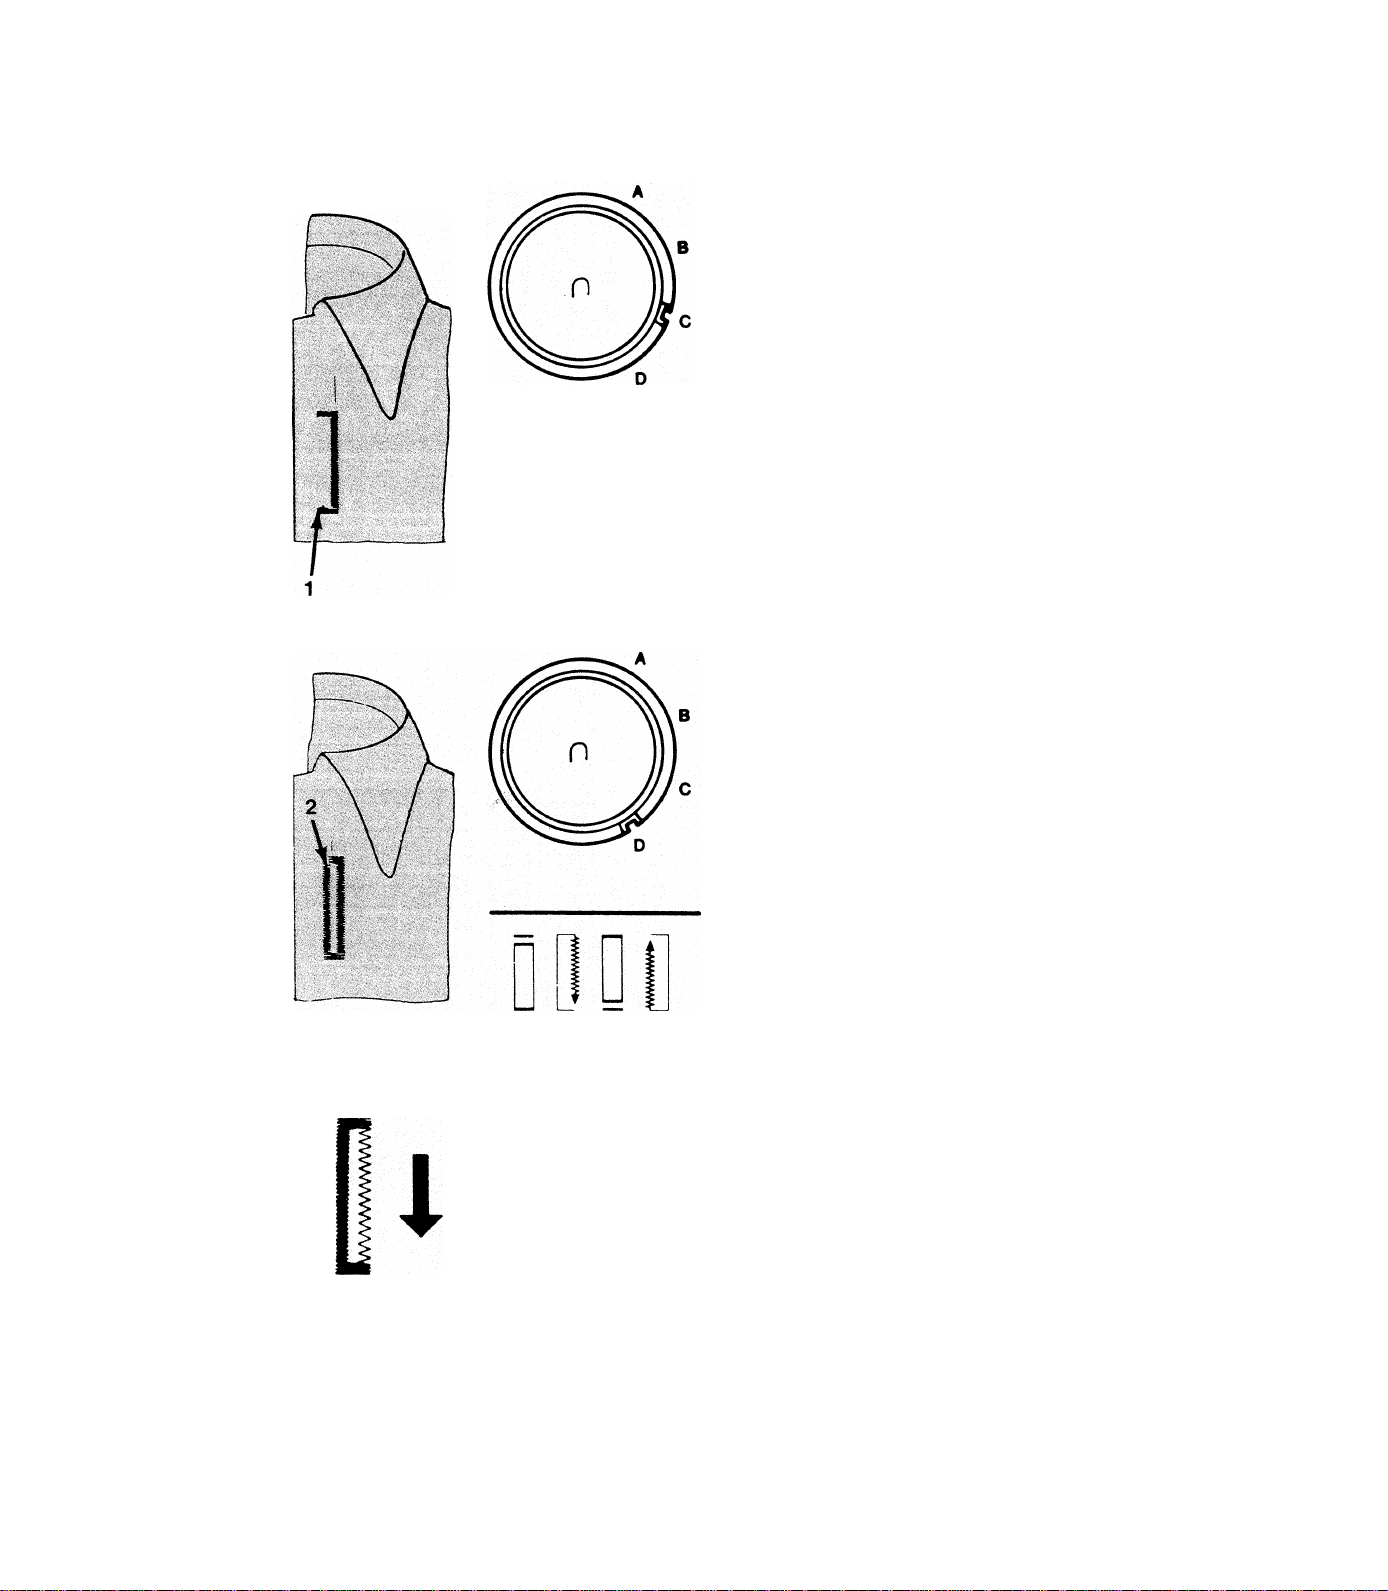
Four-Step Buttonholes (Cont’d.)
A B C D
Step C: Front Bartack
* Raise needle out of fabric.
* Turn stitch-length dial to “C”.
^ Sew four stitches ending at point (1).
Step D: Left Side Stitching
* Raise needle out of fabric.
BCD
* Turn stitch-length dial to “D”.
^ Sew side stitching until it meets rear bariack
at (2). The buttonhole is now complete.
Changing Stitch Density
To obtain a similar stitch density on both sides
of the buttonhole, the balance control may need
adjustment as follows:
* With balance control centered, make a test
buttonhole.
* If stitches on right side are too far apart,
move control downward.
t
* If stitches on right side are too close, move
control upward.
Re-center control after all buttonhole sewing is
complete.
25
Page 28
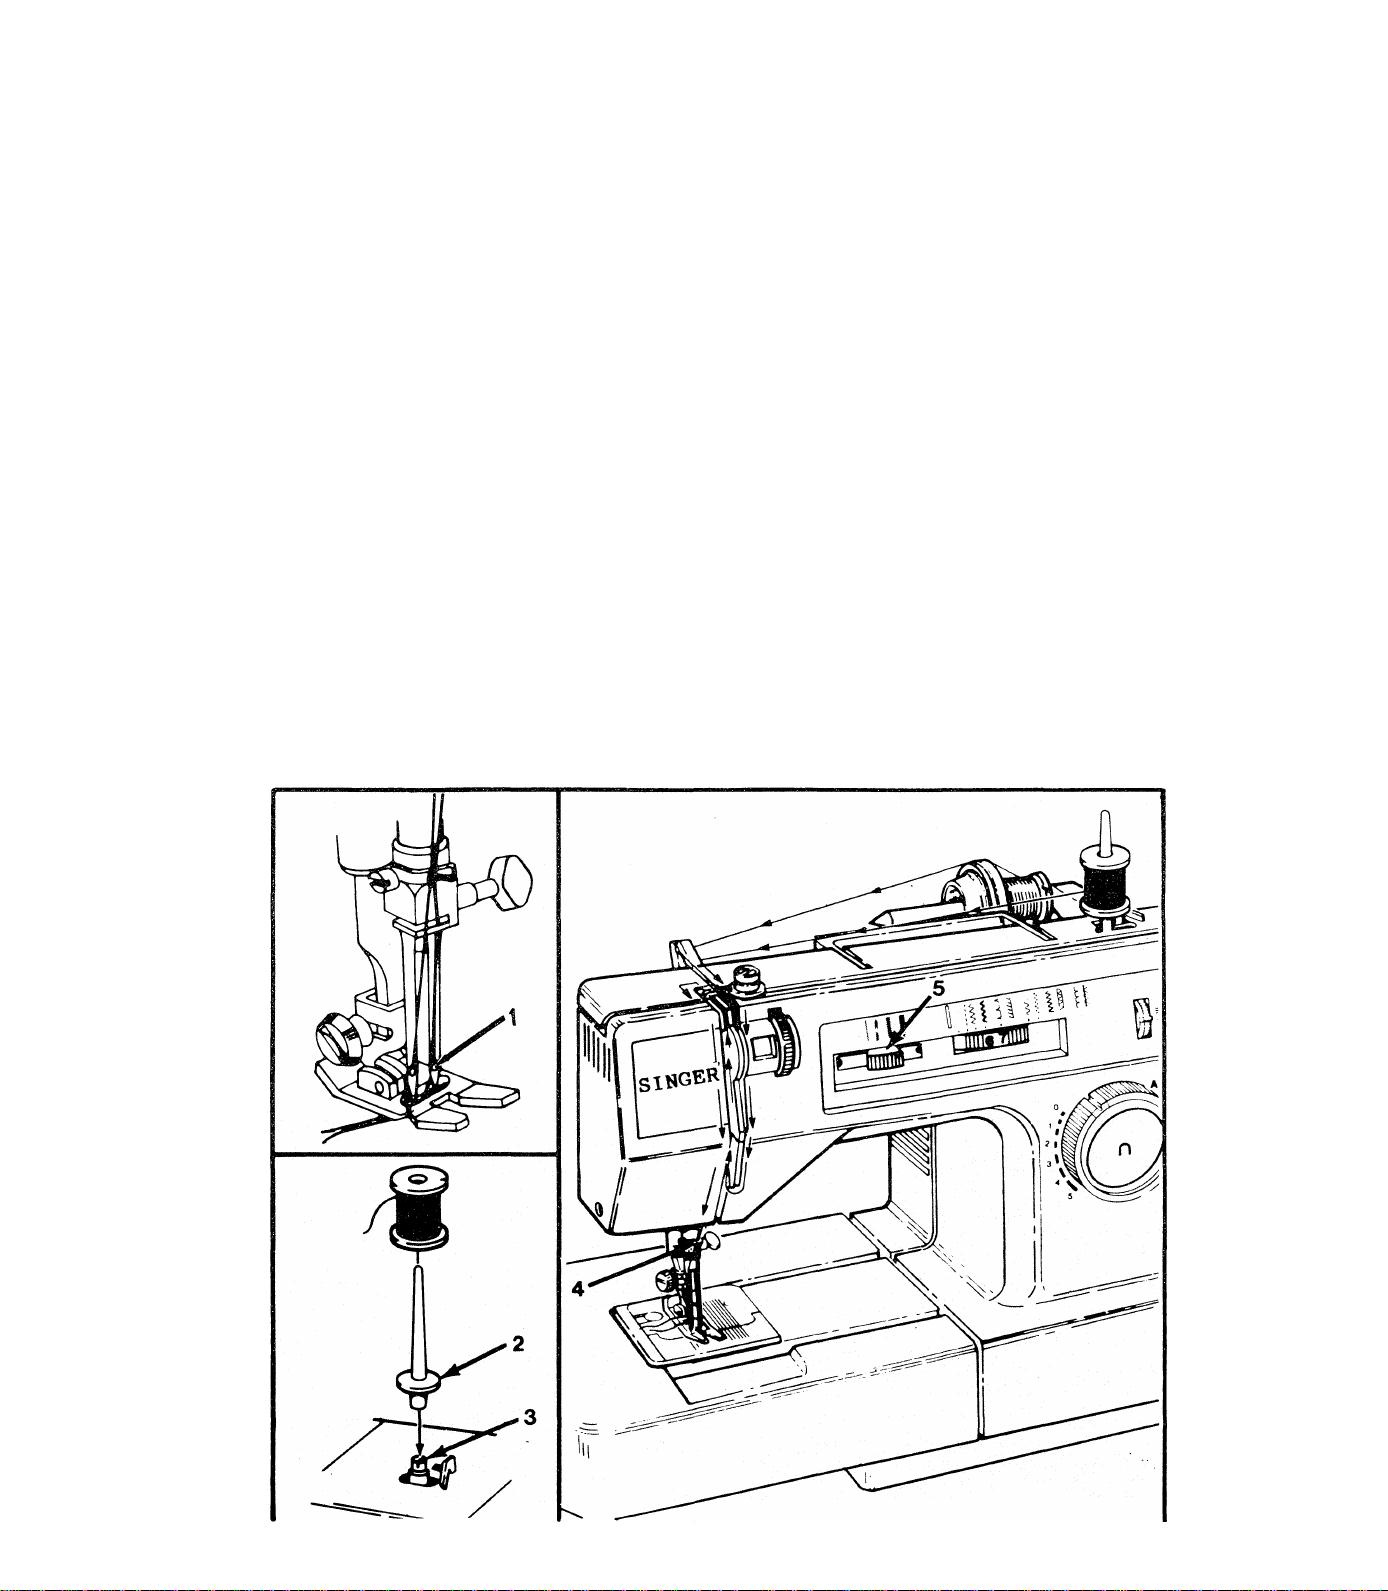
Twin Needle Sewing
Twin needle sewing produces two parallel lines of closely-spaced, decorative stitching.
^ With machine turned off, insert twin needle into needle clamp and thread machine as
for single-needle sewing and through right needle eye (1).
^ Attach extra spool pin with felt washer (2), to bobbin winder spindle (3); place second
spool of thread on it; and, again, thread machine as usual except omit thread guide (4)
immediately above needle. Pass second thread through eye of left hand needle.
Set stitch width control to desired width between straight stitch and the twin needle
mark (5).
CAUTION,: DO NOT use a stitch width greater than that indicated by twin needle mark
on stitch width control or needle breakage will result. Rotate handwheel slowly by hand to
visually check for adequate needle clearance before pressing foot controller.
26
Page 29
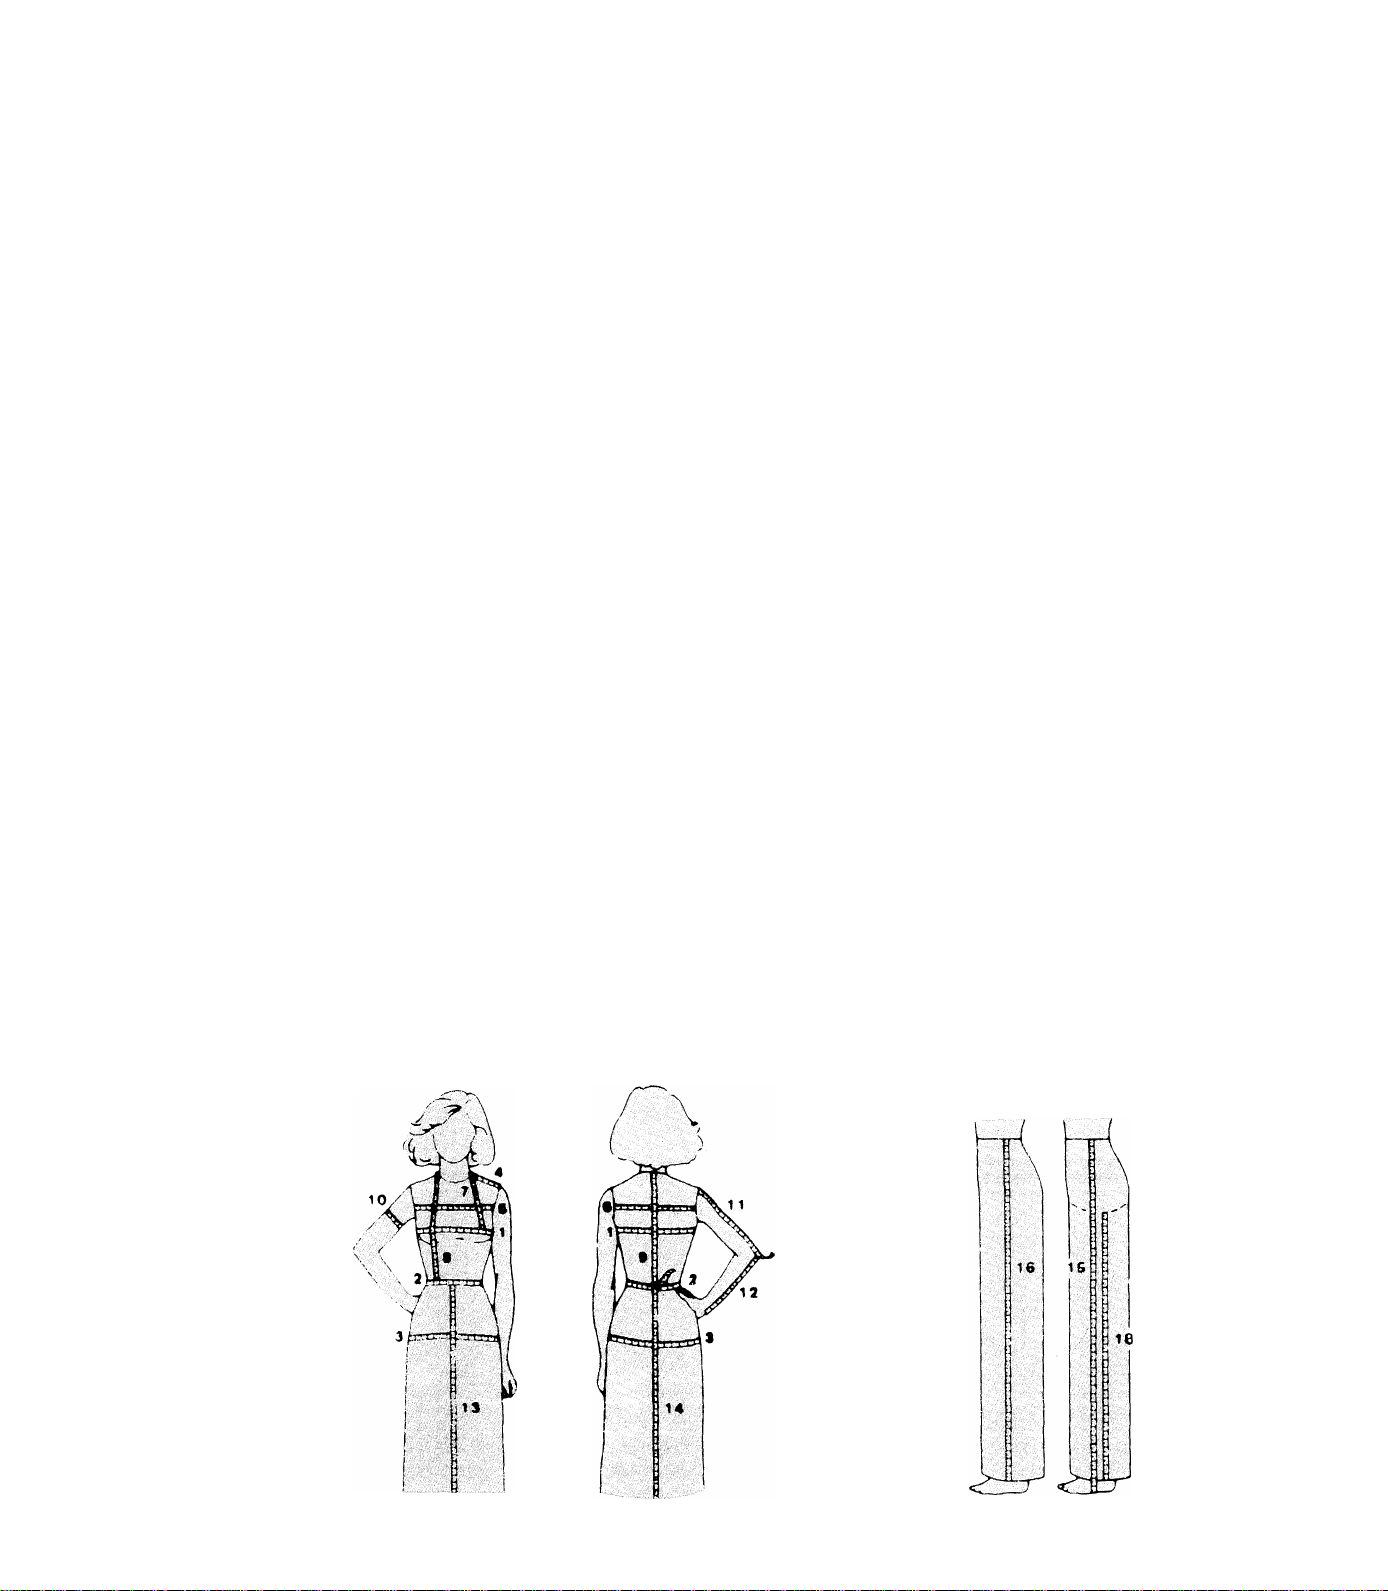
Your Personal Measurements
This chart is useful for keeping a record of personal measurements. The assistance of
a second person is helpful in taking the measurements with an accurate tape measure.
The illustrations show where a tape measure should be placed when taking each
measurement.
As a reference point, use a ribbon firmly but comfortably tied at the waist before
taking measurements.
inches (cm)
1. Bust—Fullest part—slightly higher in back ...............................
2. Waist—Around natural waistline ...............................
3. Hip —Inches (cm) below natural waistline (fullest part) ...............................
4. Shoulder—From base of neck to top of arm ...............................
5. Front Bodice Width—From arm hole to arm hole 5 inches ............................................
(13cm) down from center shoulder
6. Back Bodice Width—From arm hole to arm hole 4 inches .............................................
(10cm) down from center shoulder
7. Shoulder to Bust—From neck base at shoulder to point ...............................
of bust
8. Front Waist Length—From neck base at shoulder over fullest
part of bust to waistline
9. Back Waist Length—From the prominent bone at base of
neck to natural waistline
10. Sleeve Width—^Around arm at upper edge of underarm seam
11. Sleeve Length—Shoulder to elbow ...............................
12. Sleeve Length—Elbow to wrist ...............................
13. Front Skirt Length—Down center waistline to hem ...............................
14. Back Skirt Length—Down center from waistline to hem ...............................
......................................
.............................................
.......................................
PANTS MEASUREMENT CHART
15. Full Length—Waist to floor at side seam ...............................
16. Pant Length—Waist to ankle ...............................
17. Crotch Depth (seated)—Waist to chair at side seam ...............................
18. Crotch Seam (standing)—Crotch depth 17 to be deducted
from pant length 16
............................................
1 7
27
Page 30

Performance Checklist
When sewing difficulties occur, make sure the instructions are correctly followed. If
a problem still exists, the reminders below may help solve it.
Needle Does Not Move
Is machine connected to electrical supply?
Is power and light switch on?
Is controller connected?
Is bobbin winder disengaged?
Needle Moves But Stitch Is Not Formed
Is needle defective?
Is needle fully inserted into needle clamp?
Are bobbin and needle correctly
threaded?
Is bobbin correctly inserted into bobbin
case?
Needle Breaks
Is needle correct size?
Is needle fully inserted in needle clamp?
Are controls properly set?
Are accessories correct for application?
Bobbin Winding Difficulties
Is threading correct?
Is thread unwinding freely from spool?
Is bobbin winder engaged?
Is thread end securely held at start of
wind?
Upper Thread Breaks
Is machine properly threaded?
Is thread freely unwinding from spool?
Is proper size spool holder being used?
Is upper thread tension too tight?
Is bobbin case properly inserted?
Is bobbin rim free of nicks?
Lower Thread Breaks
Is bobbin correctly wound?
Is bobbin case correctly inserted into
bobbin case?
Is bobbin case threaded correctly?
Skipped Stitches
Is machine properly threaded?
Is fabric firmly held down?
Is needle correct size and style?
Is needle straight and sharp?
Fabric Does Not Move Properly Under
Presser Foot
Is presser foot correctly attached to
machine?
Is presser foot lowered?
Is stitch length correctly set?
28
Page 31
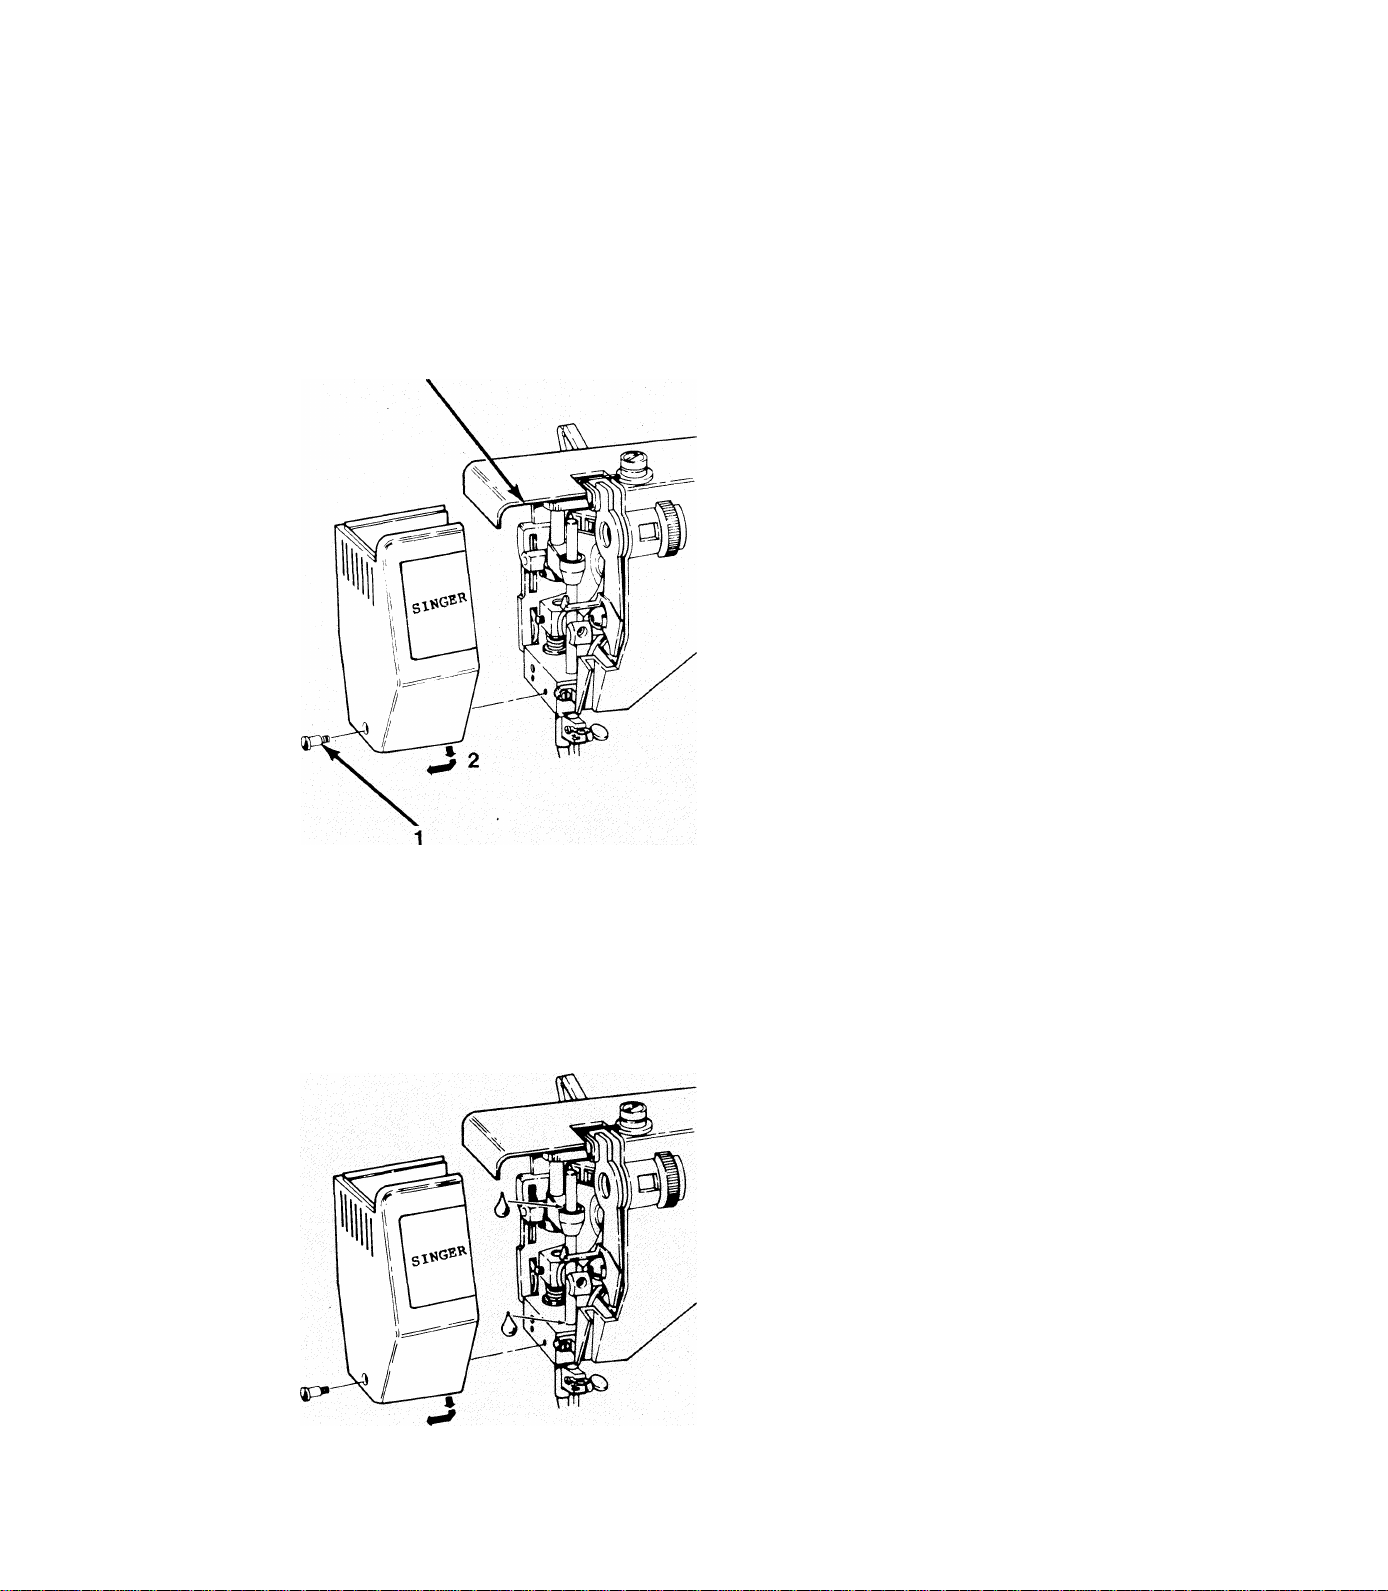
5. CLEANING AND CARING FOR THE MACHINE
To ensure reliability, regularly clean and lubricate machine. Periodic check-ups by a Sears
service center are recommended depending upon frequency of use.
Removing Face Plate
CAUTION: Before attempting any procedures
in this chapter, disconnect powerline plug from
electrical outlet!
Only remove the face plate of the machine for
cleaning, lubricating, and light bulb replacement.
Keep securely fastened at all other times.
^ Loosen and remove screw (1).
^ Remove face plate by drawing it slightly
towards the operator and then to the left (2)
and down.
^ Replace face plate by sliding it to the right
under top edge of arm top cover (3) and
push up.
Cleaning the Machine
^ When snugly seated, replace and tighten
screw (1).
^ For normal external cleaning, use a soft dry
cloth. Stubborn stains may be removed with a
mild soap and water solution.
^ Using a soft brush, remove all lint from
exposed mechanical parts under face plate as
well as thread path and needle, feed, and bob
bin areas.
^ Periodically, apply a drop of oil to areas
shown. DO NOT over oil! *
29
Page 32
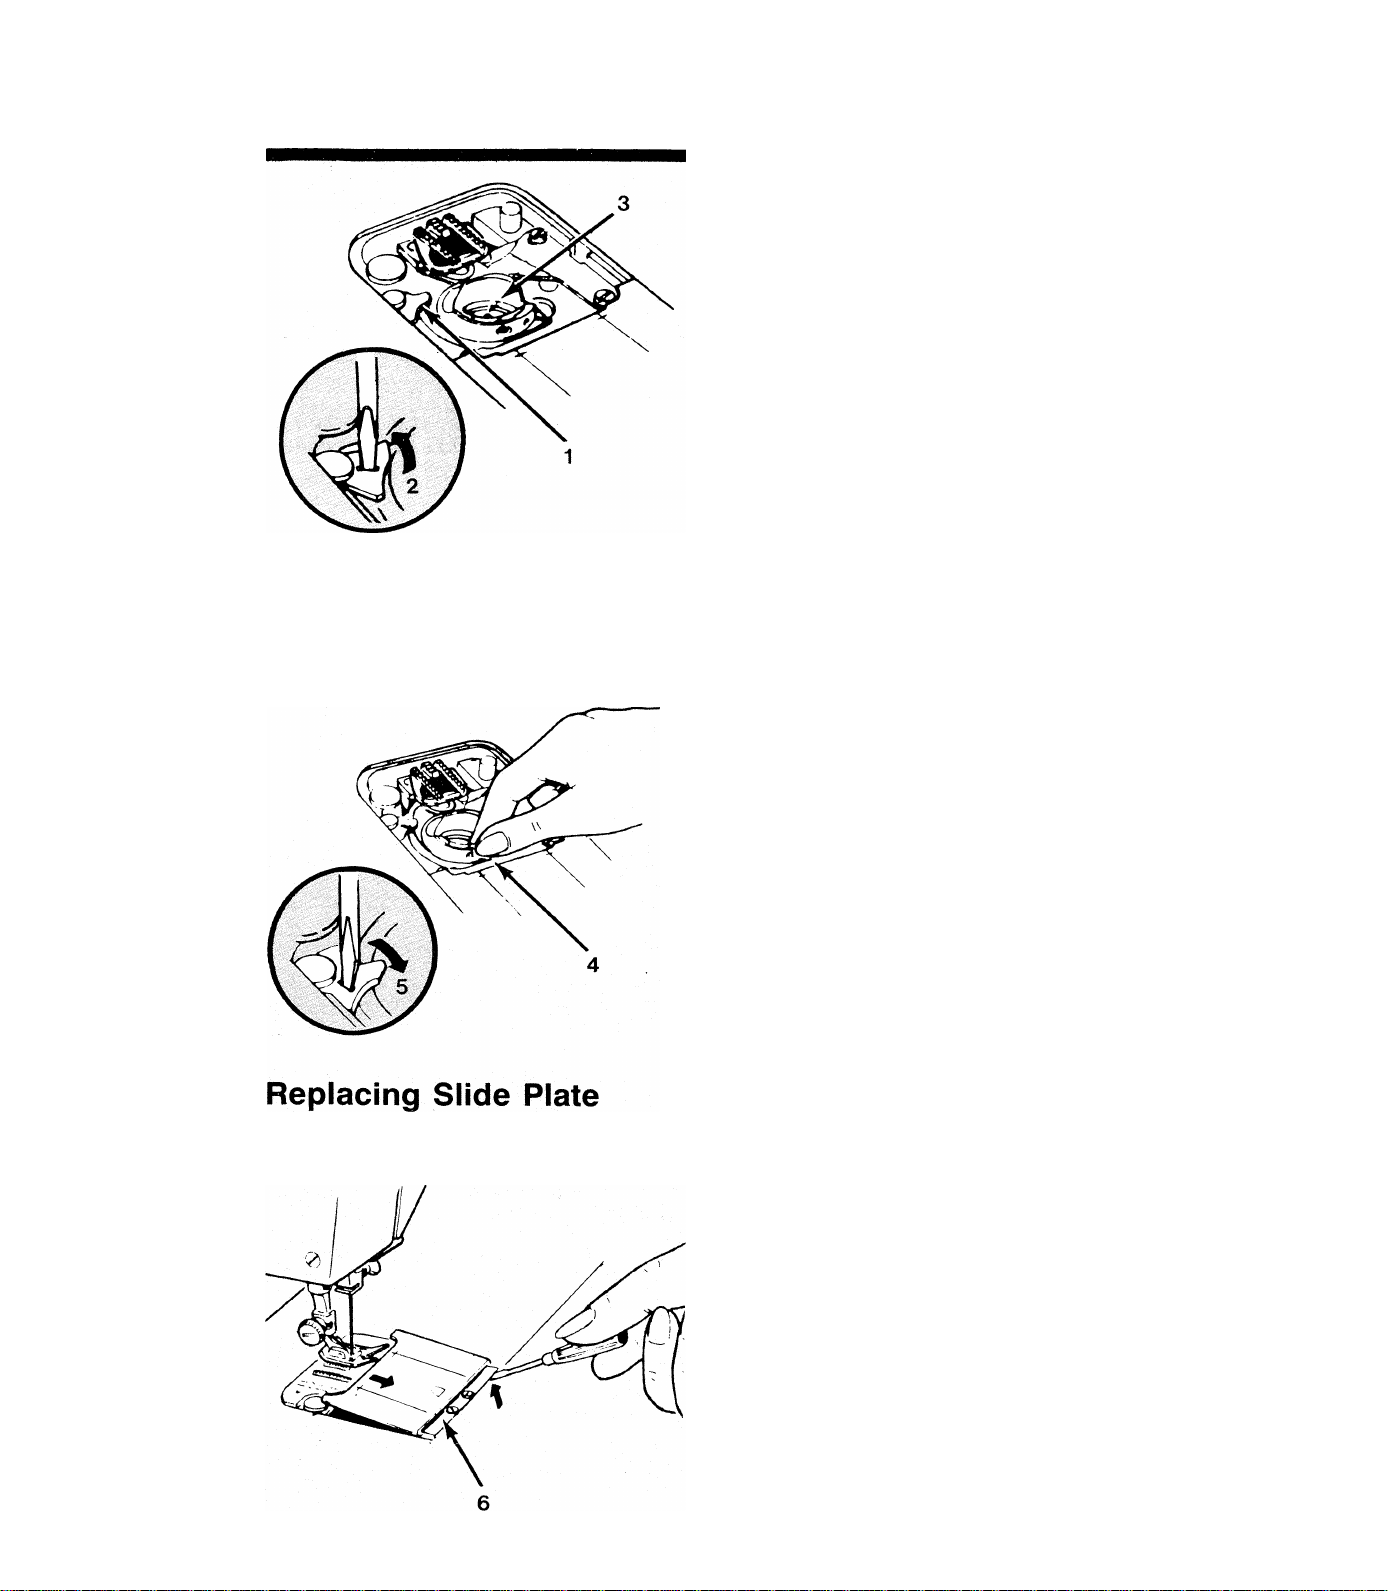
Removing Bobbin Case
Repiacing Bobbin Case
^ Remove needle and needle plate.
^ Open slide plate and lift out bobbin.
^ Using small screwdriver, turn bobbin case
retainer (1) in direction of arrow (2) as far as it
will go.
^ Lift out bobbin case (3).
Using soft brush, brush lint from case and other
mechanical parts in the bobbin area.
^ Insert case with a back and forth motion
so front of case lies under position plate (4).
^ With small screwdriver, turn bobbin case
retainer in direction of arrow (5) to lock case
in place.
^ Reinsert needle, needle plate, and bobbin and
close slide plate.
Should slide plate become detached, replace as
follows:
^ Place slide plate in slide way with the front
edge close to, but not covering, the retaining
spring (6).
30
^ With a screwdriver, lift each end of spring
into the side grooves on the underside of the
plate.
Draw plate gently towards you to engage
spring. Then, close plate.
Page 33
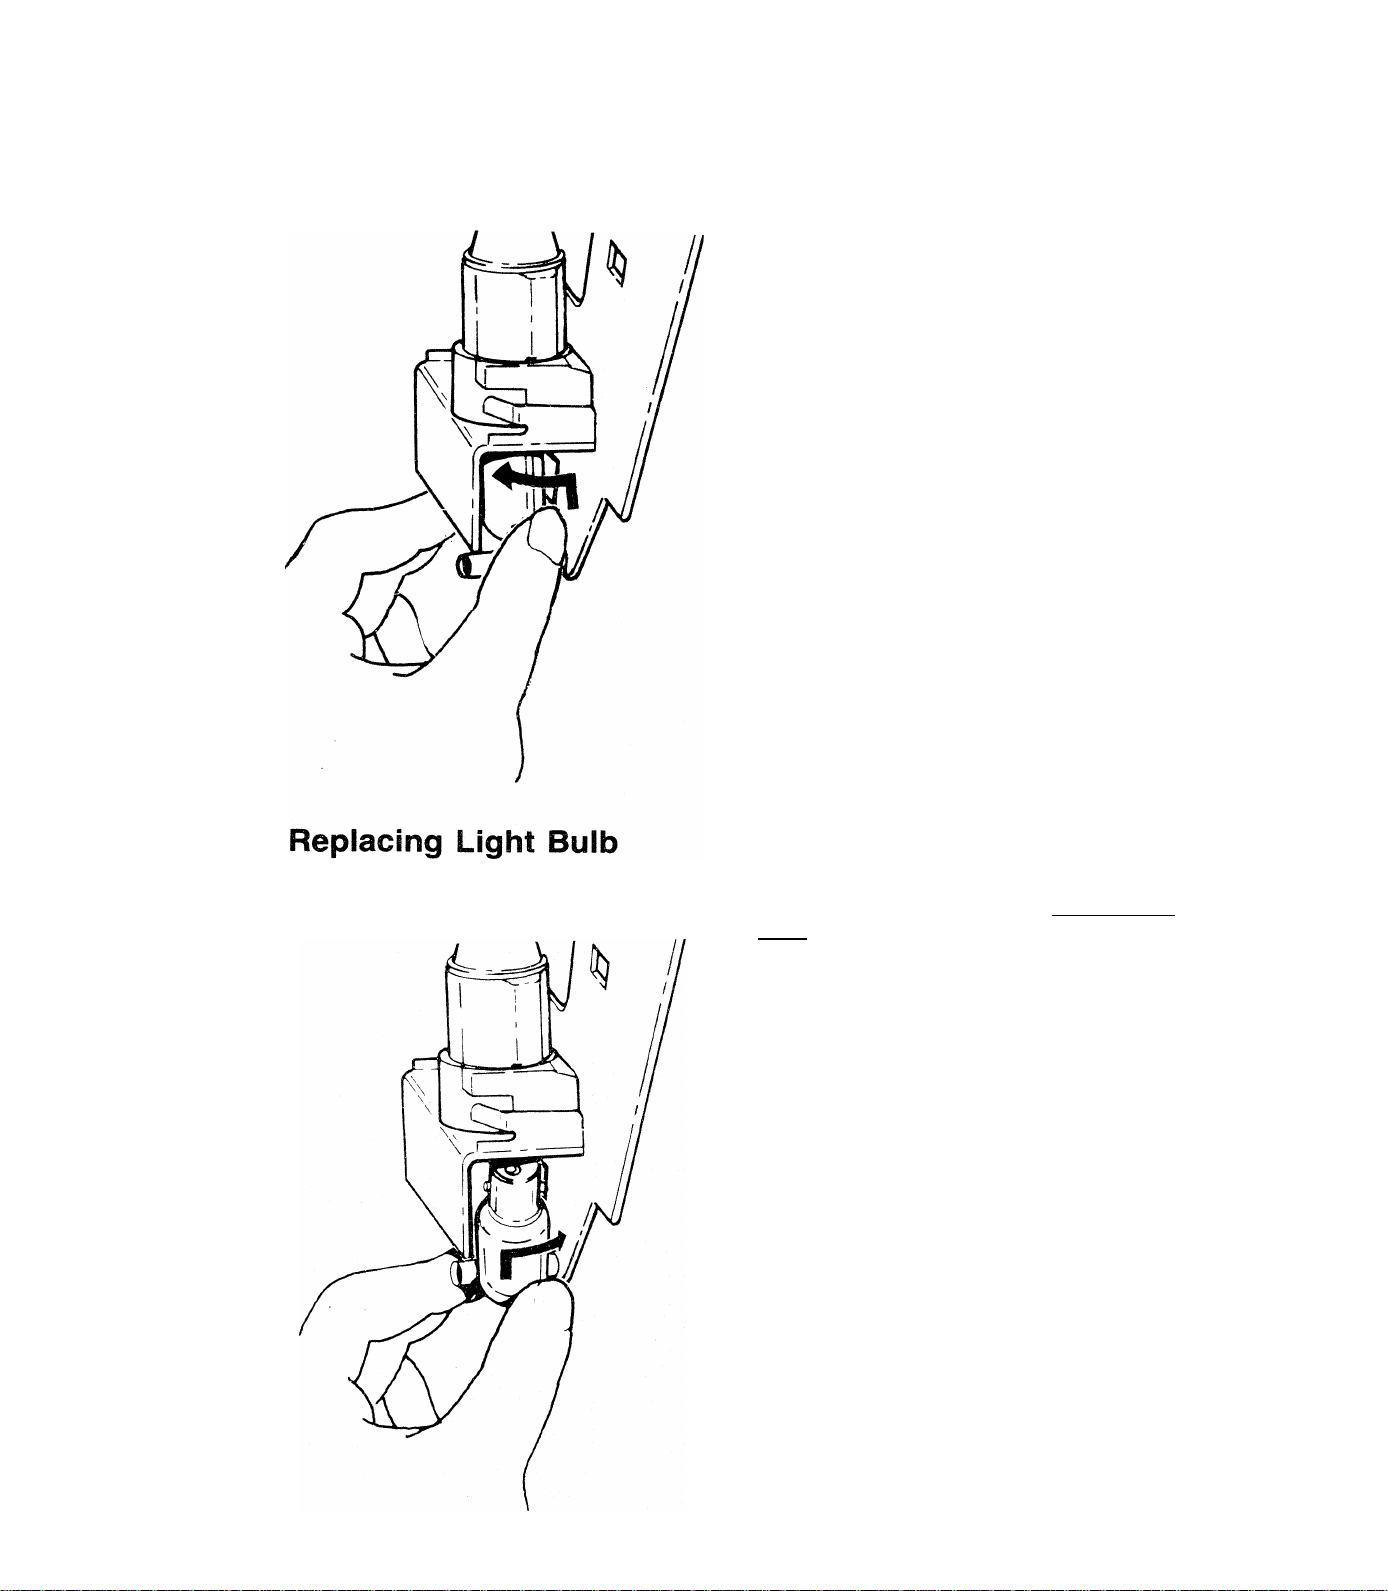
Removing Light Buib
^ Remove face plate.
^ DO NOT attempt to unscrew bulb.
^ Press bulb into socket and turn in a counter
clockwise direction to unlock pins.
^ Guide bulb out of socket.
This machine is designed to use a 15 watt maxi
mum, bayonet-base bulb. (#20-6797)
^ Line up pins on bulb with slots in socket
and press upwards on bulb.
Turn bulb in a clockwise direction to lock
in place.
^ Replace face plate.
31
Page 34
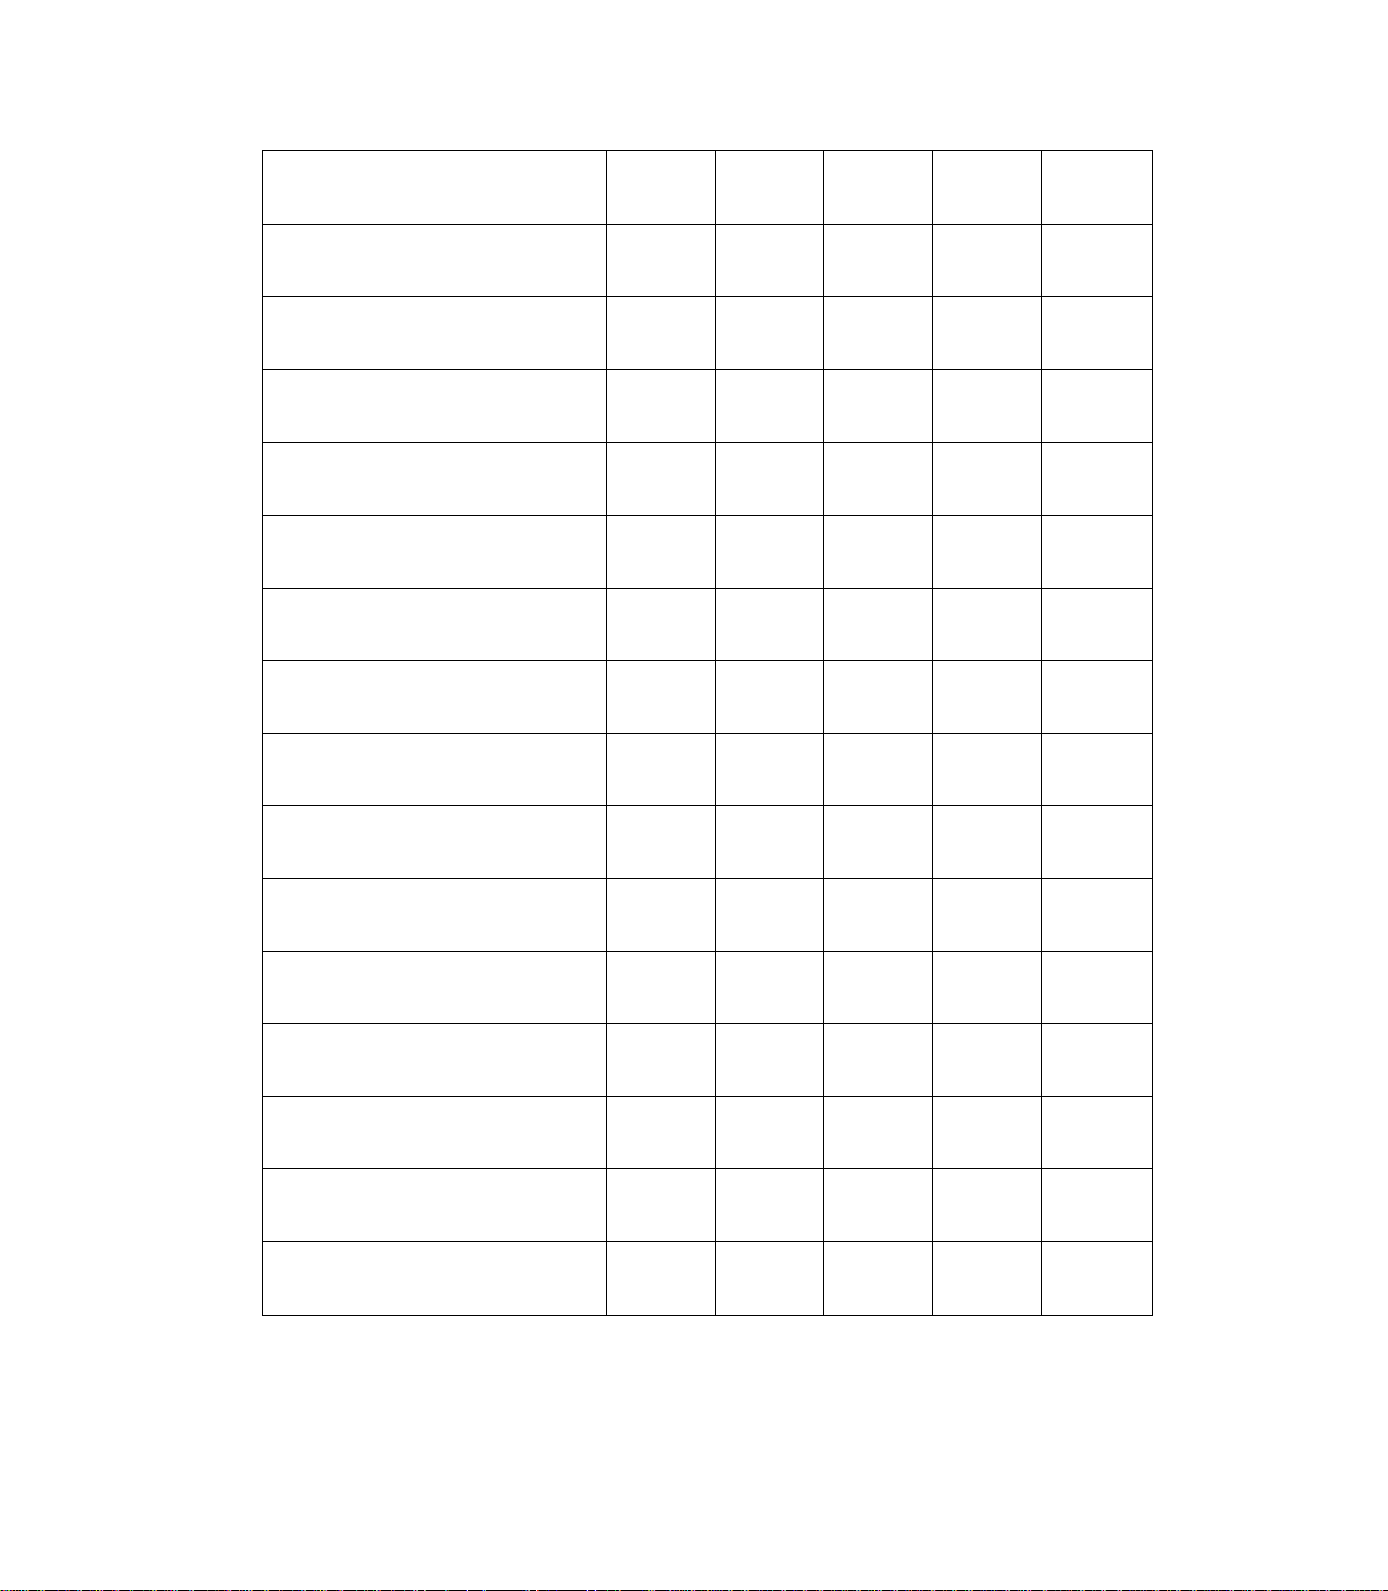
Quick Reference Setting Guide
STITCH
Straight Stitch
(Lightweight Fabrics)
Straight Stitch
(Heavyweight Fabrics)
Zig-Zag Stitch /X/WX
Satin Stitch mmm
Buttonhole
Ric-Rac
____________________
PATTERN
GROUP
1. 2. 3. 4. 5
1. 2. 3. 4. 5
1. 2. 3. 4. 5 3 to 5
1. 2. 3. 4. 5
1. 2. 3. 4. 5
1. 2. 3. 4. 5
1. 2. 3. 4. 5 2 to 4 Max
THREAD
TENSION
3 to 4 Straight 2 to 4
4 to 5 Straight 3 to 5
1 to 3
2 to 4
3 to 5 Straight
STITCH
WIDTH
Med to Max
Med to Max 0.5 to 1
— —
STITCH
LENGTH
2 to 5
Stretch
Stretch
PRESSER
FOOT
General
Purpose
General
Purpose
General
Purpose
Special
Purpose
Buttonhole
General
Purpose
Special
Purpose
Blind Hem AAA 6. 7 3 to 5 Med to Max 1 to 3
Slant Overedee //////
Multi-Stitch , ,, ,
Zig-Zag
Honeycomb
Rampart AAAAA
Turkish Hem
“M” Stitch mm
Stretch Overedge \7\7\7\7
A A. A A
6. 7
8. 9 3 to 5
8. 9
10. 11 3 to 5
10. 11 3 to 5 Max Stretch
12. 13
12. 13 3 to 5 Max Stretch
3 to 5 Max
Max
2 to 4 Max Stretch
Max
3 to 5
Max
Stretch
0.5 to 1
1 to 3
2 to 4
General
Purpose
Special
Purpose
General
Purpose
Special
Purpose
Special
Purpose
Special
Purpose
General
Purpose
Special
Purpose
The above settings are listed as a useful guide for the best sewing performance. It is recommended
you perform sewing tests to determine the optimum settings for your sewing machine with selected
fabrics and for specific sewing applications.
32
Page 35

WARRANTY
FULI. 25-YEAR WARRANTY ON SEWING MACHINE HEAD
For 25 years from the date of purchase. Sears will, free of charge, repair defects
in material or workmanship which appear in the mechanical components of the
sewing machine head.
FULL TWO YEAR WARRANTY ON ELECTRICAL EQUIPMENT OF
SEWING MACHINE
For two years from the date of purchase. Sears will, free of charge, repair defects
in material or workmanship which appear in the electrical equipment of the
sewing machine, including electronic components, motor, wiring, switch and
speed control.
FULL 90-DAY WARRANTY ON ALL PARTS AND MECHANICAL
ADJUSTMENTS
For 90 days from date of purchase. Sears will, free of charge, replace any parts
and provide mechanical service necessary for proper operation of the sewing
machine, except for normal maintenance.
WARRANTY SERVICE IS AVAILABLE BY RETURNING THE SEWING
MACHINE TO THE NEAREST SEARS SERVICE CENTER/DEPARTMENT
IN THE UNITED STATES.
This warranty gives you specific legal rights, and you may also have other rights
which vary from state to state.
SEARS, ROEBUCK AND CO., Dept. 698/731A, Sears Tower, Chicago. IL 60684
Page 36

SEWING MACHINE
Now that you have purchased your Singer Sewing Machine, should a need
ever exist for repair parts or service, simply contact any Sears Service
Center and most Sears, Roebuck and Co. Stores. Be sure to provide all
pertinent facts when you call or visit.
The model number of your Sewing Machine will be shown on your nomen
clature label on the side of your Sewing Machine. See page 6 for location.
WHEN ORDERING REPAIR PARTS, ALWAYS GIVE THE FOLLOWING
INFORMATION:
♦MODEL NUMBER ♦NAME OF ITEM
If the parts you need are not stocked locally, your order will be electronically
transmitted to a Sears Repair Parts Distribution Center for handling.
SEARS, ROEBUCK AND CO., Chicago, IL 60684 U.S.A.
Printed in Taiwan
Part No. 119735 (R;01)
♦PART DESCRIPTION
Eng
 Loading...