

Page 1
Inspiration
6/12
Stitches /
Points /
Sewing Machine
Machine à coudre
Máquina de Coser
4206 / 4212
TO
U
A
Puntos
Instruction BookInstruction BookInstruction Book
Manuel d'Instructions
Manual de Instrucciones
Page 2

® A registered trademark of The Singer Company Ltd. or its affiliates.
® Une marque déposée de The Singer Company Ltd. ou ses affiliés.
® Una marca registrada de The Singer Company Ltd. o sus afiliados.
Copyright © 2007 Singer Sewing Machine Co., Ltd.
Copyright © 2007.
Copyright ©2007.
01
Page 3

Table of Contents
Table des matières
1. Important Safety Instructions .................................................................
2. Getting to Know Your Machine ................................................................
3. Learning How to Set the Machine for the Different Stitches .............................
4. Lifting the Carrying Handle ....................................................................
5. Connecting the Machine ........................................................................
6. Machine Basics ...................................................................................
Changing Needles
Removing Snap-on Presser Feet
Attaching Snap-on Presser Feet
Changing Screw-on Presser Feet/ Shank
Extension Table
Covering the Feed Dogs
Thread Tension
Needle Types
7. Threading the Machine...........................................................................
Winding the Bobbin
Inserting the Bobbin and Removing the Bobbin
Threading the Needle Thread
Automatic Needle Threader
Picking Up the Bobbin Thread
8. Straight Stitching ................................................................................
9. Basting ............................................................................................
10. Zig-zag Stitching ................................................................................
11. One Step Buttonholes ..........................................................................
12. Overedging .......................................................................................
13. Stretch Stitches (only found on model 4212)................................................
14. Blindhem Stitching ..............................................................................
15. Twin Needle Sewing..............................................................................
16. Machine Maintenance. ..........................................................................
Cleaning the Machine
Removing the Bobbin Case
Lubricating the Machine
Performance Checklist
Page 05
Page 09
Page 14
Page 20
Page 20
Page 22
Page 30
Page 41
Page 43
Page 45
Page 47
Page 50
Page 52
Page 55
Page 57
Page 64
1. Consignes de sécurité importantes ...................................................
2. Faites connaissance avec votre machine ............................................
3. Comment régler la machine pour les différents points ...........................
4. Relever la poignée pour transporter la machine ...................................
5. Branchement de la machine .............................................................
6. Généralités .................................................................................
Changement d'aiguille
Retirer le pied presseur à enclenche
Mettre en place le pied presseur à enclenche
Changer le pied presseur sur talon visser
Retirer et remettre en place le bras libre
Plaque couvre griffes
Tension du fil
Tableau des tissus, fils et aiguilles
7. Enfilage de la machine ...................................................................
Remplissage de la canette
Mettre en place et retirer la canette
Enfiler le fil d'aiguille
Enfile-aiguille automatique
Remonter le fil de canette
8. Points droits ................................................................................
9. Bâtir ..........................................................................................
10. Points zigzags ..............................................................................
11. Boutonnière 1 étape......................................................................
12. Surjeter une couture ou un bord .......................................................
13. Points extensibles (4212 uniquement) ................................................
14. Point invisible ..............................................................................
15. Couture à l'aiguille jumellée optionnelle ...............................................
16. Entretien ....................................................................................
Nettoyage de la machine
Retirer le boîtier de canette
Lubrification
Liste de performance
page
05
page 09
page 16
page 20
page 20
page 22
page 30
page 41
page 43
page 45
page 47
page 50
page 52
page 55
page 57
page 6
4
02
03
Page 4
Índice
Important Safety Instructions
Consignes de sécurité importantes
Instrucciones importantes de seguridad
1
1. Instrucciones importantes de seguridad ...................................................
2. Conociendo su máquina .......................................................................
3. Aprendiendo cómo ajustar la máquina para las distintas puntadas ...................
4. Levantando el asa .............................................................................
5. Conectando la máquina .......................................................................
6. Aspectos básicos de la máquina .............................................................
Cambiando las agujas
Quitando el prensatelas de acoplamiento rápido
Colocando el prensatelas instantáneo
Cambiando el prensatelas
Mesa de extensión
Cubriendo el impelente
Tensión del hilo
Tipos de agujas
7. Devanando la bobina ..........................................................................
Insertando y quitando la bobina
Ensartando la máquina
Ensartando el hilo de la aguja
Ensartador automático de aguja
Tomando el hilo de la bobina
8. Puntada recta ..................................................................................
9.Hilvanado ........................................................................................
10. Puntada Zigzag ................................................................................
11. Ojales en un paso .............................................................................
12. Orillado .........................................................................................
13. Puntadas flexibles (solo para 4212) ........................................................
14. Puntada invisible ..............................................................................
15. Costura con aguja doble .....................................................................
16. Mantenimiento de la máquina ..............................................................
Limpieza de la máquina
Quitando la caja bobina
Lubricando la máquina
Listado de puntos de revisión
04
Pag. 05
Pag. 09
Pag. 14
Pag. 20
Pag. 20
Pag. 22
Pag. 30
Pag. 41
Pag. 43
Pag. 45
Pag. 47
Pag. 50
Pag. 52
Pag. 55
Pag. 57
Pag. 64
Check the voltage.
Vérifiez la tension.
Verifique el voltaje.
110-127V
or/ou /o
220-240V
For domestic use.
Pour usage domestique
Para uso Doméstico
For European Territories:
This Singer Sewing Machine was tested according to European norms and meets the requirements
regarding electrical safety, radio interference and electromagnetic immunity. The conformity is
documented with the mark .
(*) Tested in 220-240V condition.
Pour les territoires européens :
Cette machine à coudre Singer a été testée conformément aux normes européennes et répond
aux directives de sécurité électrique, d'interférence radio et d'immunité électromagnétique.
L'identification confirme la conformité aux normes.
(*) Testé dans les conditions 220-240 V.
Para los Territorios Europeos:
Esta máquina de coser Singer fue evaluada de acuerdo con las normas Europeas y aporta
los requerimientos relativos a seguridad eléctrica, interferencias de radio e inmunidad
electromagnética. La conformidad está documentada con la marca .
(*) Probada en 220-240V condición.
Dear Customer: We recommend that for future reference you record the serial number of your sewing
machine in the space provided (below).
Cher client, pour référence, nous vous conseillons d'inscrire le numéro de série de votre machine
à coudre dans l'espace prévu à cet effet ci-dessous.
Estimado Cliente: Recomendamos que para su futura referencia registre el número de serie de su
máquina de coser en el lugar asignado para ello (abajo).
05
Page 5
1
11
Important Safety Instructions
Consignes de sécurité importantes
1
HOW TO REDUCE RISK OF FIRE, ELECTRIC SHOCK OR PERSONAL DAMAGE.
WHEN USING AN ELECTRICAL APPLIANCE, BASIC SAFETY PRECAUTIONS SHOULD ALWAYS
BE FOLLOWED, INCLUDING THE FOLLOWING:
READ ALL INSTRUCTIONS BEFORE USING THIS APPLIANCE.
This machine has been designed for domestic
use.
This machine should never be plugged in
while NOT in use. Always unplug the
machine from the electric outlet before
cleaning or after using it.
Before switching on the machine, make
sure that the electric voltage of the socket
outlet is the same as the ratedvoltage.
Use this machine only for its intended use as
described in this Instruction Book. Use only
attachments specifically recommended for
the machine.
Disconnect the power-line plug from the
socket outlet or switch the machine off when
making any adjustments in the needle area,
such as threading a needle, changing a
needle, changing the needle plate, changing
presser foot or removing bobbin case, etc.
Always unplug the machine from the
electrical outlet before removing covers,
lubricating or when making any other
adjustments mentioned in this Instruction
Book.
Do not unplug by pulling on cord. To unplug,
grasp the plug, not the cord.
Do not attempt to adjust the motor belt.
Contact your nearest authorized SINGER
Service Center should any adjustment be
required.
If the LED Luminaire is damaged, it must be
replaced by the manufacturer or its service
agent or a similarly qualified person in
order to avoid a hazard.
When sewing, keep fingers away from
all moving parts. Special care is
required to avoid accidents with
needle while in movement.
Do not pull or push fabric firmly while
stitching. It may deflect the needle
causing it to break.
Never operate the machine with any
air openings blocked. Keep
ventilation openings of the machine
and foot control pedal free from the
accumulation of lint and dust.
Do not operate where aerosol (spray)
products are being used or where
oxygen is being administered.
The appliance is not intended for use
by young children or infirmed persons
without supervision.
If the supply cord is damaged, it must
be replaced by the manufacturer or
its service agent or a similarly
qualified person in order to avoid a
hazard.
Do not use outdoors.
Do not use bent needle.
Always use the proper needle plate.
The wrong plate, can cause the
needle breaks.
Switch off or unplug the appliance
when leaving it unattended.
SAVETHESE INSTRUCTIONS.
06
COMMENT RÉDUIRE LES RISQUES D'INCENDIE, DE DÉCHARGE ÉLECTRIQUE ET DE BLESSURES
CORPORELLES :
LORS DE L'UTILISATION DE TOUT APPAREIL ÉLECTRIQUE ; IL EST IMPORTANT D'OBSERVER
DES PRÉCAUTIONS DE SÉCURITÉ ÉLÉMENTAIRES, ET NOTAMMENT CELLES QUI SUIVENT :
VEUILLEZ LIRE L'ENSEMBLE DES CONSIGNES AVANT D'UTILISER CET APPAREIL :
Cette machine a été conçue pour un
usage domestique.
Cette machine ne doit jamais été
branchée quand elle n'est PAS utilisée.
Retirez toujours la fiche de la machine
de la prise murale avant le nettoyage et
après l'usage.
Avant d'allumer la machine, assurezvous que la tension électrique de la prise
murale correspond bien à la tension
recommandée.
N'utilisez la machine que pour l'usage
prescrit dans le présent manuel
d'utilisation. N'utilisez que les pièces
explicitement conseillées pour la
machine.
Débranchez toujours la fiche électrique
de la prise murale ou éteignez la
machine avant d'effectuer tout
ajustement dans la zone de l'aiguille,
par exemple pour enfiler l'aiguille,
changer d'aiguille, changer la plaque à
aiguille, le pied presseur, retirer le
boîtier de canette, etc.
Débranchez toujours la machine de la
prise murale avant de retirer des
couvercles, de lubrifier la machine et
d'effectuer tout ajustement mentionné
dans le présent manuel d'utilisation.
Ne débranchez pas la machine en tirant
sur le câble. Pour débrancher, saisissez
la fiche, et non le câble.
N'essayez pas d'ajuster la courroie du
moteur. Si un ajustement est nécessaire,
adressez-vous au centre SINGER autorisé
le plus proche.
Si la lampe LED est endommagée, elle
doit être remplacée par le constructeur,
par un agent du service après-vente, ou
par une personne qualifiée de façon
similaire afin d'éviter tout danger.
Pendant la couture, ne placez pas vos
doigts près des parties en mouvement. Il
est nécessaire de faire particulièrement
attention dans la zone de l'aiguille
quand celle-ci est en mouvement.
Ne tirez pas et ne poussez pas le tissu
avec fermeté pendant la couture. Ceci
pourrait tordre l'aiguille et la casser.
N'utilisez jamais la machine si une aire
d'aération est obstruée. Veillez à ce que
les ouvertures destinées à la ventilation
de la machine ainsi que la pédale restent
dégagées de peluches et de poussière.
N'utilisez pas la machine dans les lieux
où des aérosols sont utilisés ou de
l'oxygène administré.
La machine n'est pas destinée à être
utilisée sans surveillance par des enfants
ni par des personnes handicapées.
Si le câble d'alimentation est
endommagé, il doit être remplacé par le
constructeur, par un agent du service
après-vente ou par une personne
qualifiée de façon similaire afin d'éviter
tout danger.
N'utilisez pas la machine en plein air.
N'utilisez pas d'aiguilles tordues.
N'utilisez que la plaque à aiguille
correcte. Une autre plaque à aiguille
pourrait casser l'aiguille.
Éteignez ou débranchez l'appareil quand
vous le laissez sans surveillance.
CONSERVEZ CES CONSIGNES.
07
Page 6
1
Instrucciones importantes de seguridad
ANTES DE USAR UN APARATO ELÉCTRICO, SIEMPRE DEBEN SEGUIRSE LAS INSTRUCCIONES DE
SEGURIDAD, INCLUYENDO LO SIGUIENTE:
LEA TODAS LAS INSTRUCCIONES ANTES DE USAR ESTE APARATO.
COMO REDUCIR EL RIESGO DE INCENDIO, DESCARGA ELÉCTRICA O DAÑOS PERSONALES:
Esta máquina ha sido desarrollada para
uso doméstico.
La máquina nunca debe estar conectada
a la clavija cuando no se encuentre en
uso. Antes de limpiarla o después de
usarla, no olvide desconectarla de la
clavija.
Asegúrese de que el voltaje de la clavija
sea el mismo de la máquina antes de
usarla.
Use la máquina según este manual. Utilice
solamente los accesorios recomendados
especificamente para ella.
Desconecte el cable de la clavija o apague
la máquina cuando tenga que realizar algún
ajuste en el área de la aguja, tales como:
enhebrar la aguja, cambiar la aguja, el
aislante de los dientes, el prensatelas,
remover la caja bobina, etc.
No deje de desconectar el cable de la
clavija antes de remover las tapas, lubricar
o hacer cualquier ajuste mencionado en
este Manual.
No trate de ajustar la correa del motor.
Siempre que sea necesario algún ajuste,
solicite apoyo de algún técnico de la Red
de Servicio Autorizado de Singer.
No descibecte jalando el cable, desconecte
de la clavija, nunca del cable.
Si el Led de Iluminación (brillante) se
encuentra dañado debe reemplazarse por
el fabricante, su agente de servicio de
Singer o una persona debidamente
Cuando cosa, mantenga los dedos alejados
de todas las piezas en movimiento. Se
requiere de un especial cuidado para
evitar accidentes mientras la aguja está en
movimiento.
No tire o empuje demasiado el tejido
mientras la máquina está cosiendo. Esto
puede doblar la aguja y en consecuencia,
podrá quebrarla.
Nunca maneje la máquina con las
aberturas de aire bloqueadas. Mantenga
las aberturas de ventilación de la máquina
y del control de velocidad libres de
acumulaciones de hebras y polvo.
No opere la máquina cuando alguien esté
utilizando productos en aerosol (spray) u
oxígeno en los alrededores.
El aparato no debe ser utilizado por niños
o personas incapacitadas, sin vigilancia.
Si el cable se encuentra dañado, debe
reemplazarse por el fabricante su agente
de servicio, o una persona calificada.
No se use en exteriores.
No use la máquina con la aguja doblada.
Utilice siempre la placa aguja adecuada,
una placa aguja errónea puede romper la
aguja.
Apague o desconecte el aparato cuando se
deje de utilizar o sin atención.
GUARDE ESTAS INSTRUCCIONES
calificada para evitar riesgos.
08
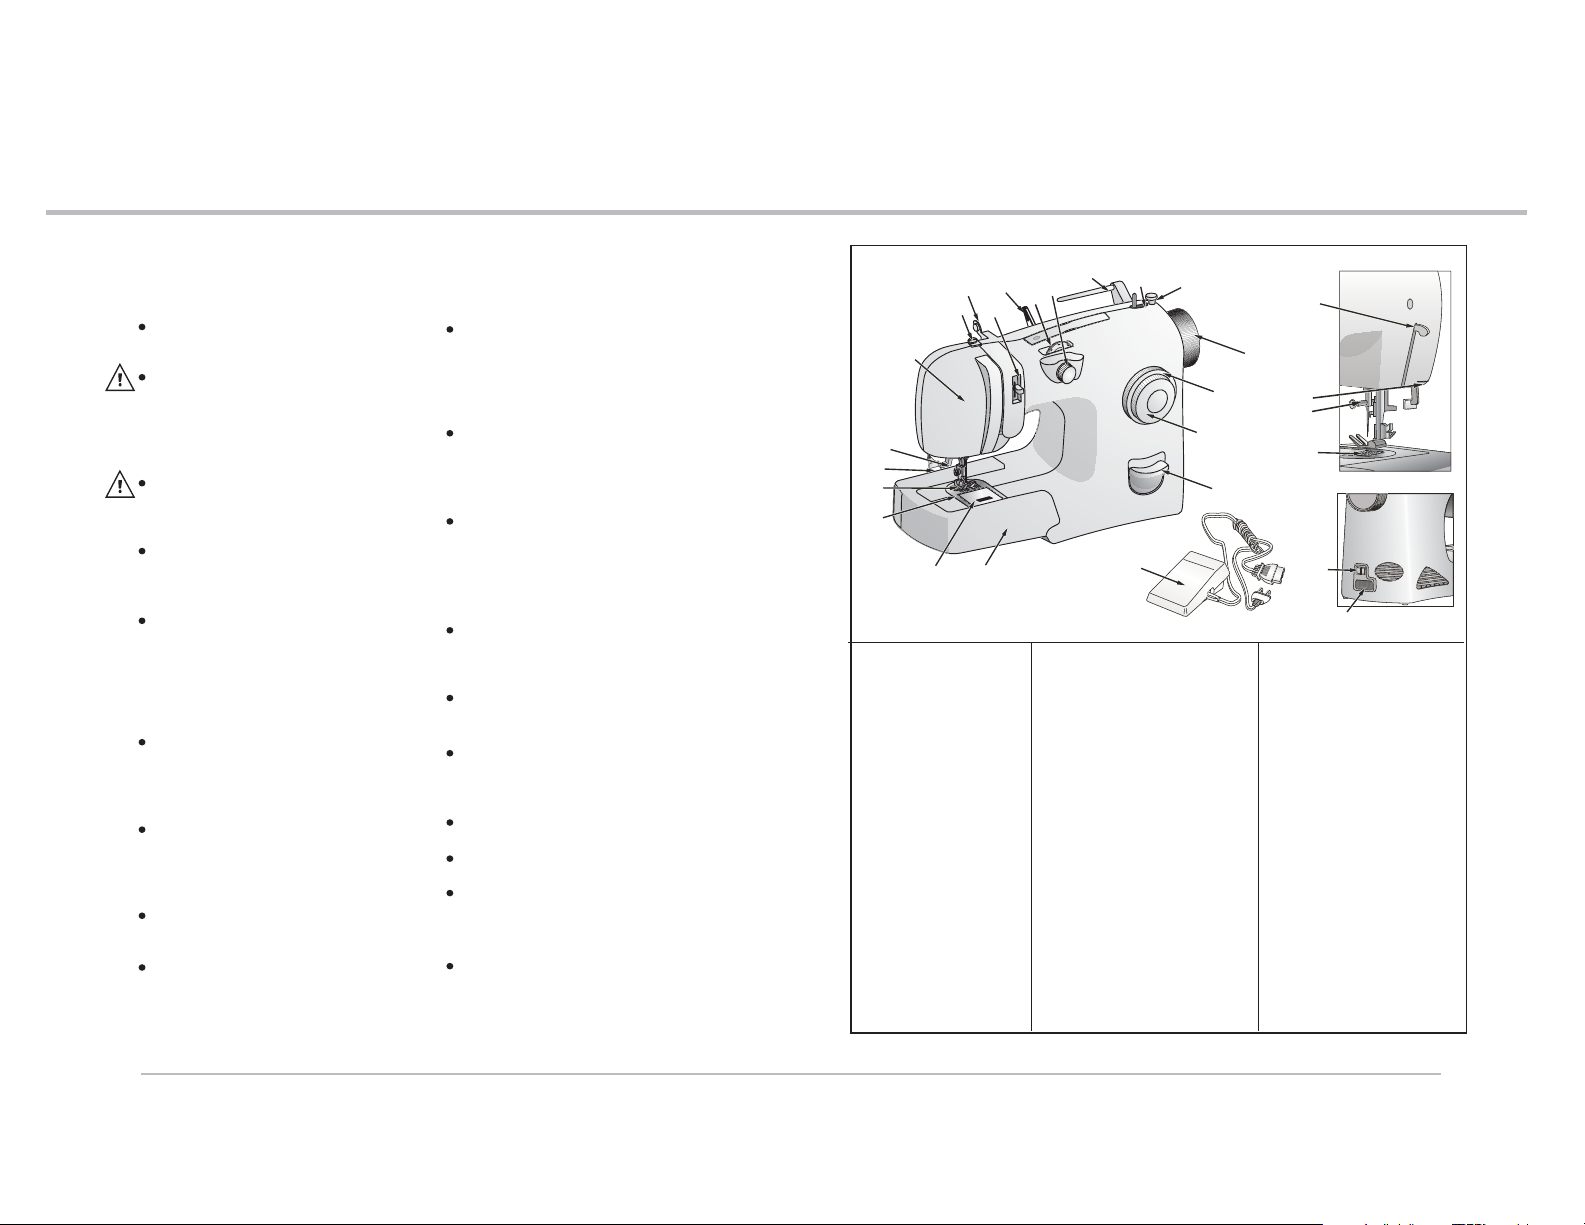
Parts / Pièces / Partes
7
7
6
8
9
10
11
12
13
15
14
1. Bobbin winder stop
2. Bobbin winder pin
3. Horizontal spool pin
4. Stitch width dial
5. Needle position selector
6. Needle thread tension lever
7. Thread guides
8. Bobbin winder tension disc
9. Face plate
10. Automatic needle threader
11. Buttonholer engaging lever
12. General purpose presser foot
13. Needle plate
14. Bobbin visor slide plate
15. Removable extension table
16. Reverse button
17. Pattern selector dial
18. Stitch length dial
19. Hand wheel
20. Presser foot lifter
21. Thread cutter
22. Needle clamp
23. Feed dogs
24. Power and light switch
25. Machine plug
26. Foot controller
Getting to know your machine
Faites connaissance avec votre machine
Conocimiento de su máquina
3
2
4
5
26
P/N: 362286
359102
1. Arrêt du dévidoir
2. Tige du dévidoir
3. Porte-bobine horizontal
4. Cadran de largeur du point
5. Sélecteur de la position de l'aiguille
6. Manette de tension du fil d'aiguille
7. Guide-fils
8. Disque de tension du dévidoir
9. Plaque frontale
10. Enfile-aiguille automatique
11. Manette de boutonnière
12. Pied presseur universel
13. Plaque à aiguille
14. Couvercle du compartiment à
canette
15. Bras libre
16. Bouton de marche arrière
17. Sélecteur de point
18. Cadran de longueur du point
19. Volant
20. Releveur du pied presseur
21. Coupe-fil
22. Pince-aiguille
23. Griffes
24. Interrupteur lampe et marche/arrêt
25. Prise du câble
26. Rhéostat
1
18
20
19
21
22
17
23
16
24
25
1. Limitador de la cantidad de hilo
de la bobina
2. Eje del devanador de la bobina
3. Porta carretes horizontal
4. Selector de ancho de la puntada
5. Selector de la posición de la aguja
6.Selector de tensión del hilo
7. Guía hilo
8. Tensor devanador de la bobina
9. Tapa lateral
10. Enhebrador automático del hilo
11. Palanca de encaje de la ojaladora
12. Prensatelas de uso general
13. Placa aguja
14. Visor de la bobina (placa
corrediza)
15. Extensión removible del brazo
16. Botón de retroceso
17. Selector de bordados
18. Selector del largo de la puntada
19. Volante
20. Palanca alza prensatela
21. Corta hilo
22. Tornillo prendedor de la aguja
23. Dientes impelentes
24. Interruptor de encendido
25. Entrada del cable de fuerza
26. Controlador velocidad
2
09
Page 7
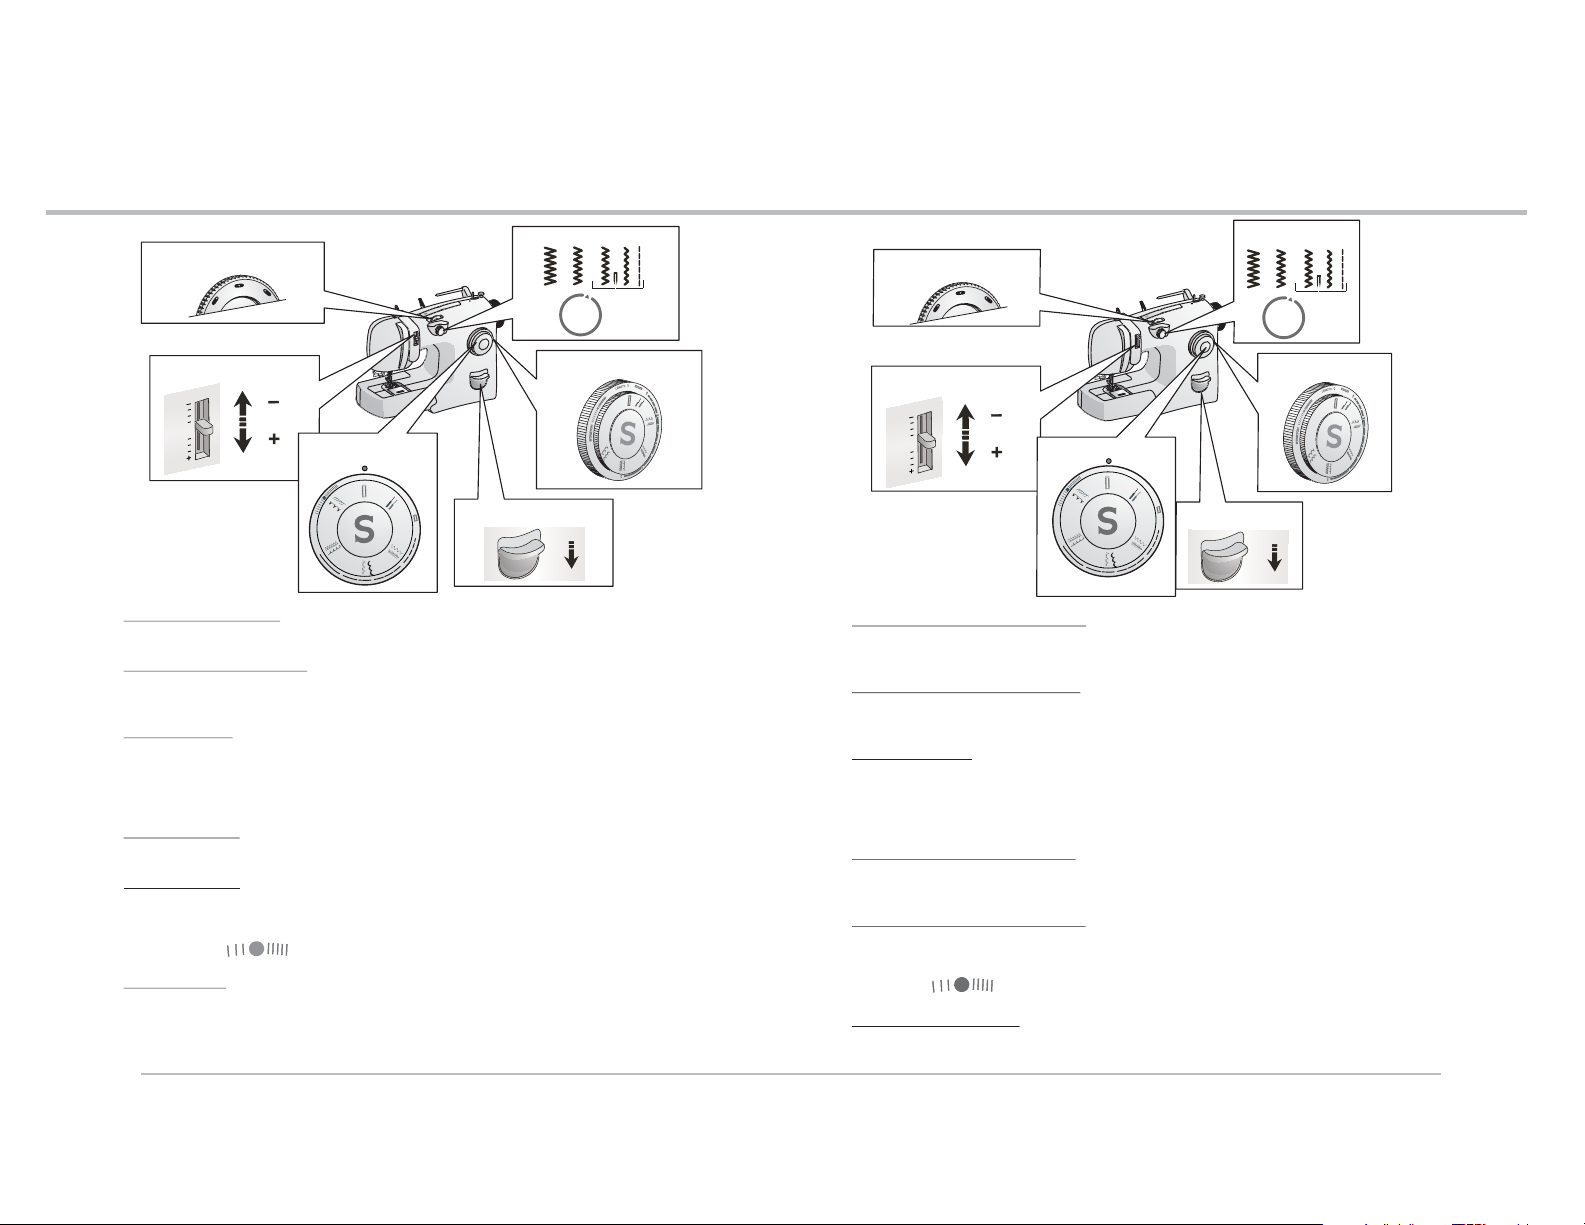
Getting to know your machine
Getting to know your machine
2
Needle position selector dial
Stitch width dial
Sélecteur de la position de
l'aiguille
Faites connaissance avec votre machine
Bouton rotatif de
largeur du point
2
Needle thread tension
AUTO
Stitch length selector dial
Pattern selector Dial
H
C
T
E
R
T
S
5
4
0
1
2
3
Reverse button
Needle position selector: The needle can be moved from the center position to either the right
or left position. This is helpful when inserting zippers or cording, and when topstitching.
Needle thread tension knob: This control determines the amount of pressure on the needle
thread as it passes through the machine. It is normally positioned at AUTO. It may be necessary
to increase or decrease the tension for decorative stitches.
Pattern selector: Turn this dial to select a stitch pattern, such as a Straight Stitch. Turn the dial
until the desired stitch is aligned with the small red dot on the machine. The stitches are in
groups of two. The Pattern selector dial will turn easier when the Stitch width dial is set at
straight stitch. Always be sure the needle is in the highest position when turning the Pattern
selector dial.
Stitch width dial: This controls the width of a stitch. Turning the dial to the left makes a stitch
wider. When the dial is turned to the right it has no width, creating a straight stitch.
Stitch length dial: This controls how close the stitches are to one another or how far apart one
stitch is from the previous stitch. A stitch length of “5” means the stitches are farther apart.
As the number becomes smaller the stitches become closer together. When the Stitch length is
“0” the stitches are on top of one another. For the model 4212, the dial must be set at the
stretch setting when sewing any STRETCH stitches.
Reverse button: At the beginning and end of every seam, it is advised to press the reverse
button to reinforce the seam with backstitching.
10
Bouton rotatif de
Manette de tension du fil
d'aiguille
AUTO
Sélecteur de point
H
C
T
E
R
T
S
5
4
3
0
Bouton de marche
1
2
longueur du point
arrière
Sélecteur de la position de l'aiguille : l'aiguille peut être déplacée de sa position centrale
vers la droite ou vers la gauche. Cette manœuvre est pratique pour insérer des fermetures à
glissière, des cordonnets et pour surpiquer.
Manette de tension du fil d'aiguille : cette commande détermine la pression exercée sur le fil
d'aiguille quand il passe dans la machine. Normalement, il est en position « AUTO ». Il sera
peut-étre nécéssaire d’augmenter ou diminuer la tension pour les points décoratifs.
Sélecteur de point : tournez ce bouton pour sélectionner un point, tel qu'un point droit ou un
point de feston. Tournez le bouton jusqu'à ce que le point désiré soit dans l'alignement du
petit point rouge sur la machine. Les points sont groupés par deux. Le bouton du sélecteur
de point tourne plus facilement quand le bouton de largeur du point est réglé sur la couture
droite.
Bouton rotatif de largeur du point : il règle la largeur d'un point. Quand on tourne le bouton
vers la gauche, le point s'élargit. Quand il est positionné à droite, le point n'a pas de largeur
et forme ainsi un point droit.
Bouton rotatif de longueur du point : il règle la proximité entre les points ou la distance d'un
point au point suivant. Une longueur de point de « 5 » indique que les points sont très
éloignés les uns des autres. Quand la longueur du point est réglée sur « 0 », les points sont
superposés. Pour le modèle 4212, réglez la longueur de point sur la position « coutures
extensibles pour la couture de tout point EXTENSIBLE.
Bouton de marche arrière : au début et à la fin de chaque couture, il est conseillé d'appuyer
sur le bouton de marche arrière pour renforcer la couture par des points en arrière.
11
Page 8
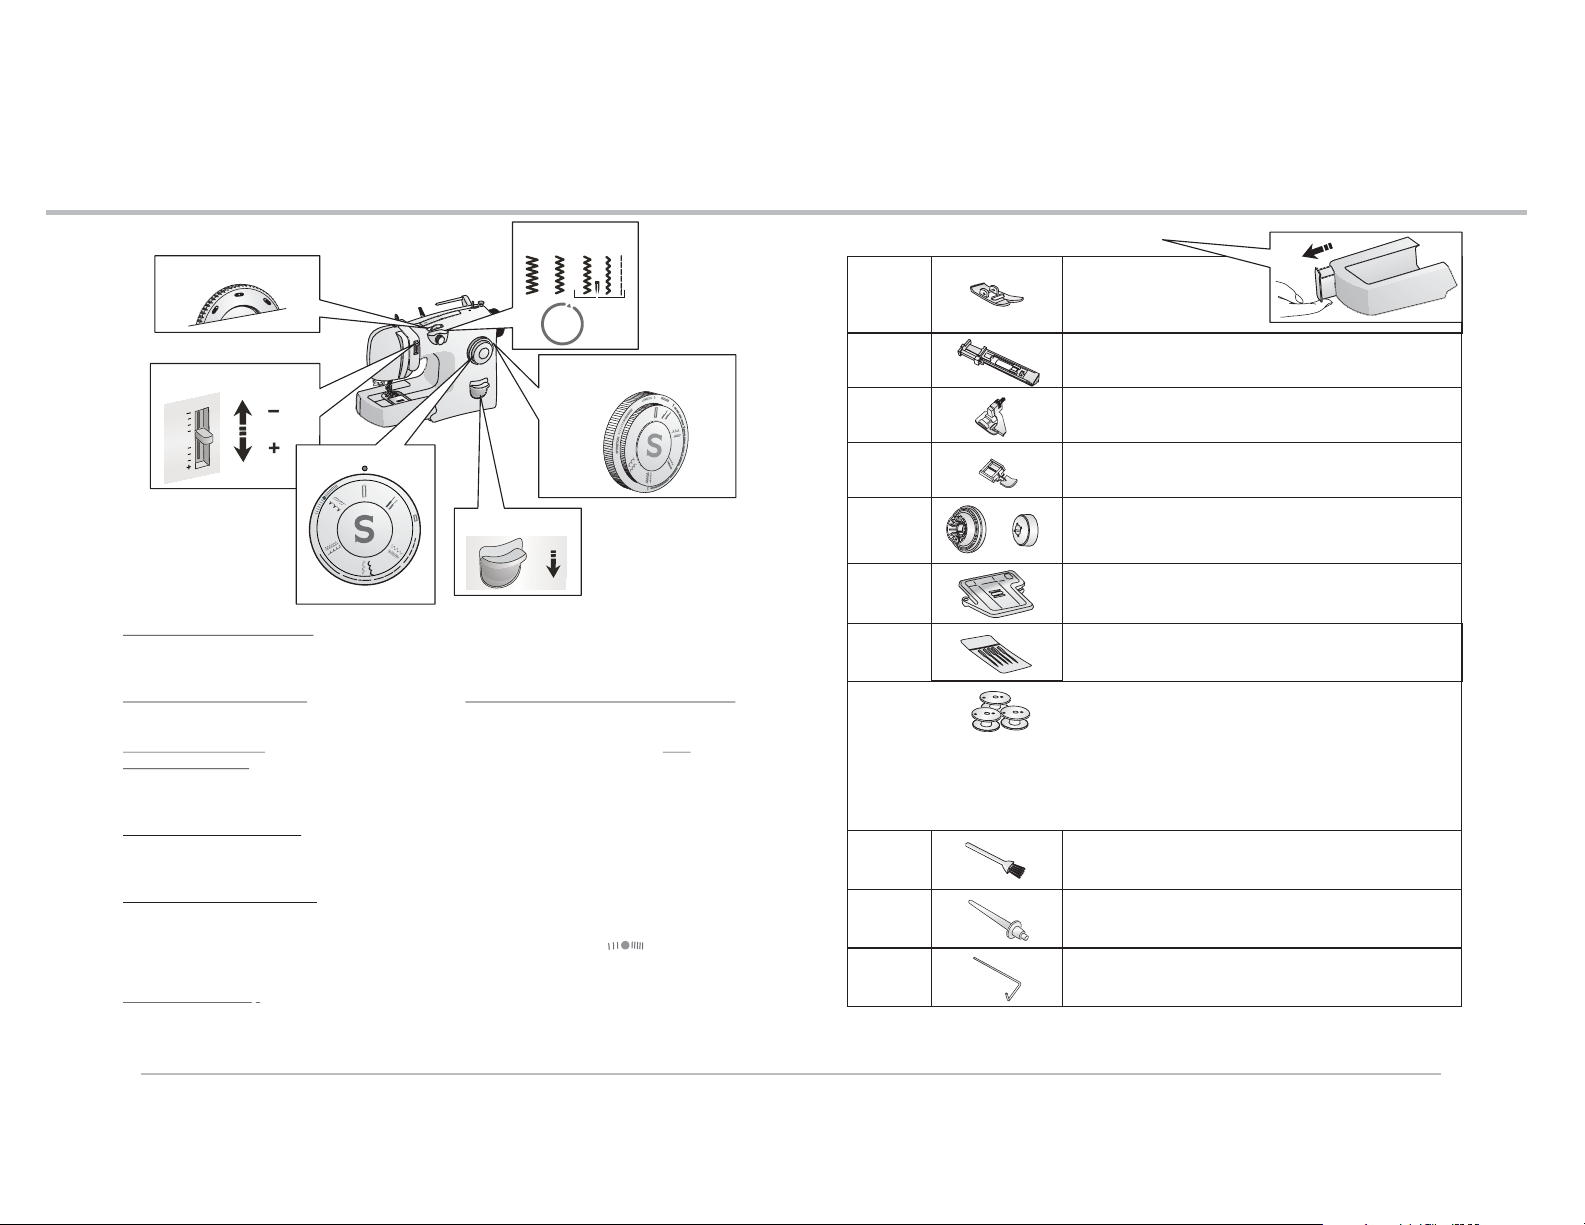
Conocimiendo su máquina
2
Getting to know your machine
Faites connaissance avec votre machine
Conocimiento de su máquina
2
Selectores
Selector de posición
de la aguja
Selector de tensión del hilo
AUTO
Selector de puntadas
H
C
T
E
R
T
S
5
4
0
2
3
1
Selector de ancho
de puntada
Selector de largo de puntada.
Selector detrás del selector de
puntada
Botón de retroceso
Selector de posición de aguja: Este selector permite que la aguja pueda moverse de la
posición central o a la izquierda o derecha. Esto es útil cuando se pegan cierres o se cosen
cordones y cuando se hace puntada de pespunte.
Selector de tensión del hilo: Este control determina cantidad de tensión en el hilo de la aguja
cuando pasa por la máquina. Normalmente está en AUTO.
Selector de puntadas: Gire esta perilla para seleccionar desde una puntada recta o una
puntada decorativa. Gire el selector hasta que la puntada deseada esté alineada con el punto
rojo en la máquina. Las puntadas están en grupos de dos. El selector de puntadas gira más
fácil cuando el selector de ancho de puntada está en puntada recta.
Selector ancho de puntada: Este controla el ancho de la puntada. Al girar el selector de ancho
a la izquierda la puntada es más ancha. Cuando el selector esta a la izquierda no tiene ancho,
creando una puntada recta.
Selector de largo de puntada: Este selector regula la distancia de las puntadas. Un largo de
puntada «5» significa que las puntadas están separadas. Conforme el número disminuye las
puntadas están más juntas. Cuando el largo de puntada es de «0» las puntadas se enciman una
con otra. Para el modelo 4212, el selector debe estar en puntada flexible cuando cose
con puntadas ROJO / FLEXIBLES.
Botón de retroceso: Al inicio y fin de cada costura, se aconseja presionar el botón de
retroceso para reforzar la costura.
12
Accessories //Accessoires Accessorios
General sewing presser foot
(Found on machine)
600028
358120
357990
357992
(Large)
(Grand)
179967
(Grande)
(Small)
507664
(Petit)
(Pequeño)
313117
353364
359838900
IMPORTANT:
This machine uses only the special bobbin (359838900) by Singer. These bobbins are Sure Fit™ insertion.
IMPORTANT :
Seules les canettes spéciales Sure Fit™ (359838900) de Singer sont à utiliser sur cette machine.
L'insertion de ces canettes s'effectue dans un seul sens.
IMPORTANTE:
Esta máquina usa solamente las bobinas-Sure Fit™ (359838900) por Singer. Las bobinas se instalan
en una sola dirección.
546358
444813
360137
Note: To acquire optional accessories check with a Singer retailer.
Remarque : pour acquérir des accessoires supplémentaires, adressez-vous à votre détaillant Singer.
Nota: Para adquirir accesórios adicionales, un Centrode Atención Singer.
Pied universel
(en place sur la machine)
Prensatelas general
Buttonhole presser foot
Pied boutonnière
Prensatelas para ojales
Blind hem presser foot
Pied pour point invisible
Prensatelas para puntada invisible
Zipper presser foot
Pied fermeture à glissière
Prensatelas para cremalleras
Spool pin holders
Etrier de bobines
Sujetador de portacarrete
Feed cover plate
Plaque couvre griffes
Cubierta de impelentes
Needle pack
Assortiment d'aiguilles
Paquete de agujas
Bobbin (3 units) (*)
Canettes (3 unités)
Lint brush for cleaning
Brosse pour le nettoyage
Escobilla para limpieza
Vertical Spool pin
Porte-bobine vertical
Porta carrete
Fabric guide
Guide de tissu
Guía de tela para acolchado
Bobinas (3 unidades)
13
Page 9
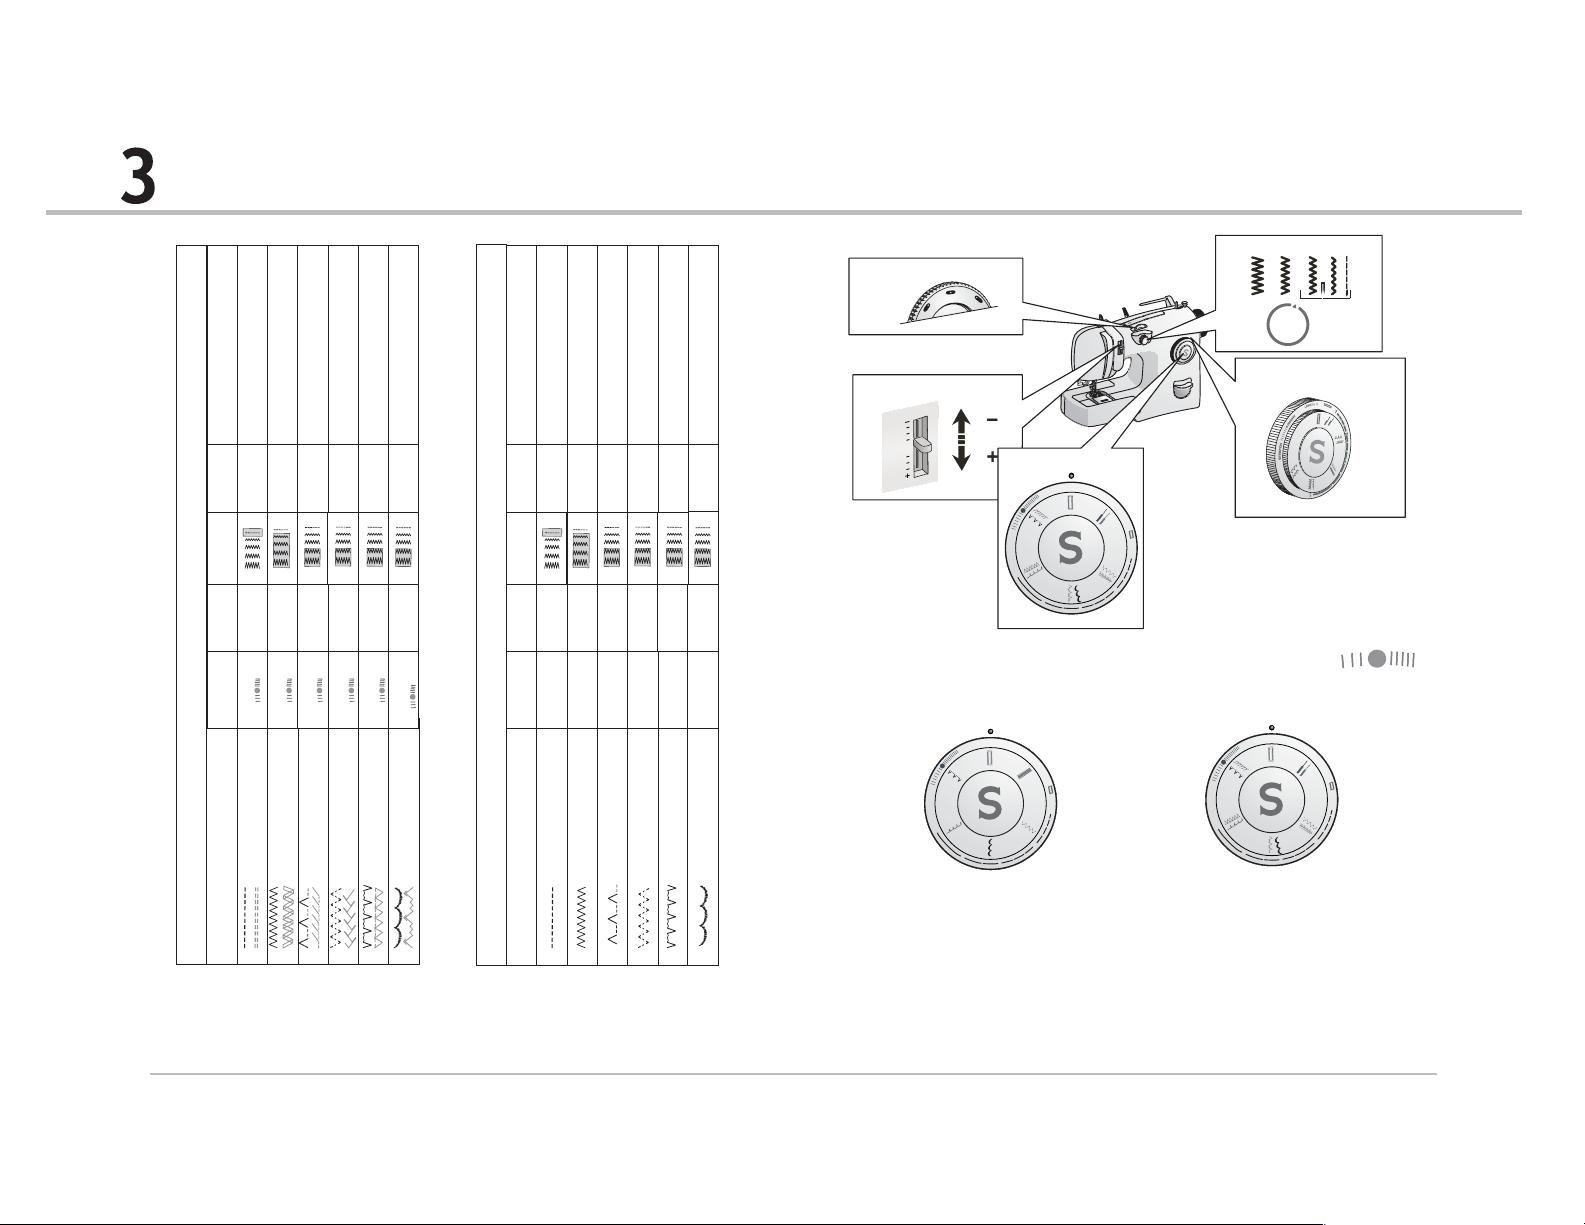
Learning how to set the machine for the different stitches
Learning how to set the machine for the different stitches
3
Stitch width dial
Needle position selector dial
12
odel 42
M
Application
General sewing
Foot
General
Presser
width
Stitch
sion
Te n
à5.0
Stitch
length
0.5
PATTERN
Straight stitch
Seams that stretch
General
Auto
Straight stretch stitch
Decorative stitching
Decorative stitching
General
General
Auto
à5.0
0.5
Zig-zag stitch
Ric-Rac stitch
Finishing hems
Seams in knit and stretch fabrics
Mending; elastic insertion
Decorative sewing; elastic insertion
General
General
General
General
Auto
Auto
2.5
à5.0
0.5
1.5 à
Reverse slant overedge stitch
Multi zig-zag stitch
Feather stitch
Blind hem stitch
Decorative stitching
Seams and seam finishes
General
General
Auto
à5.0
0.5
Overedge (shell) stitch
Overedge stretch stitch
Decorative stitching
Decorative stitching
General
General
Auto
à5.0
0.5
Crescent stitch
Mountain stitch
6
Model 420
Application
Foot
Presser
width
Stitch
Te ns i on
Stitch
length
PATTERN
General sewing
General
Auto
à5.0
0.5
Straight stitch
Decorative stitching
General
Auto
à5.0
0.5
Zig-zag stitch
Finishing hems
General
Auto
.5 à2.5
1
Blind hem stitch
Decorative stiching
Mending; elastic insertion
General
General
Auto
Auto
5.0
à5.0
0.5 à
0.5
Overedge (shell) stitch
Multi zig-zag stitch
Decorative stitching
General
Auto
à5.0
0.5
Crescent stitch
Needle thread tension lever
AUTO
Pattern selector dial
H
C
T
E
R
T
S
5
4
2
3
0
1
Stitch length Selector dial
IMPORTANT: For machine model 4212, always set the Stitch Length to for all
STRETCH stitches to ensure the stitch forms properly.
0
0
H
H
C
C
T
T
E
E
R
R
T
T
S
S
5
5
4
4
0
1
1
2
2
3
3
H
H
C
C
T
T
E
E
R
R
T
T
S
S
5
5
4
4
Stitch Selectors for the model 4206. Stitch Selectors for the model 4212.
0
1
1
2
2
3
3
14
IMPORTANT: It is easier to turn the pattern selector dial, if the Stitch width dial is in the
Straight Stitch position and the needle is in highest position.
15
Page 10
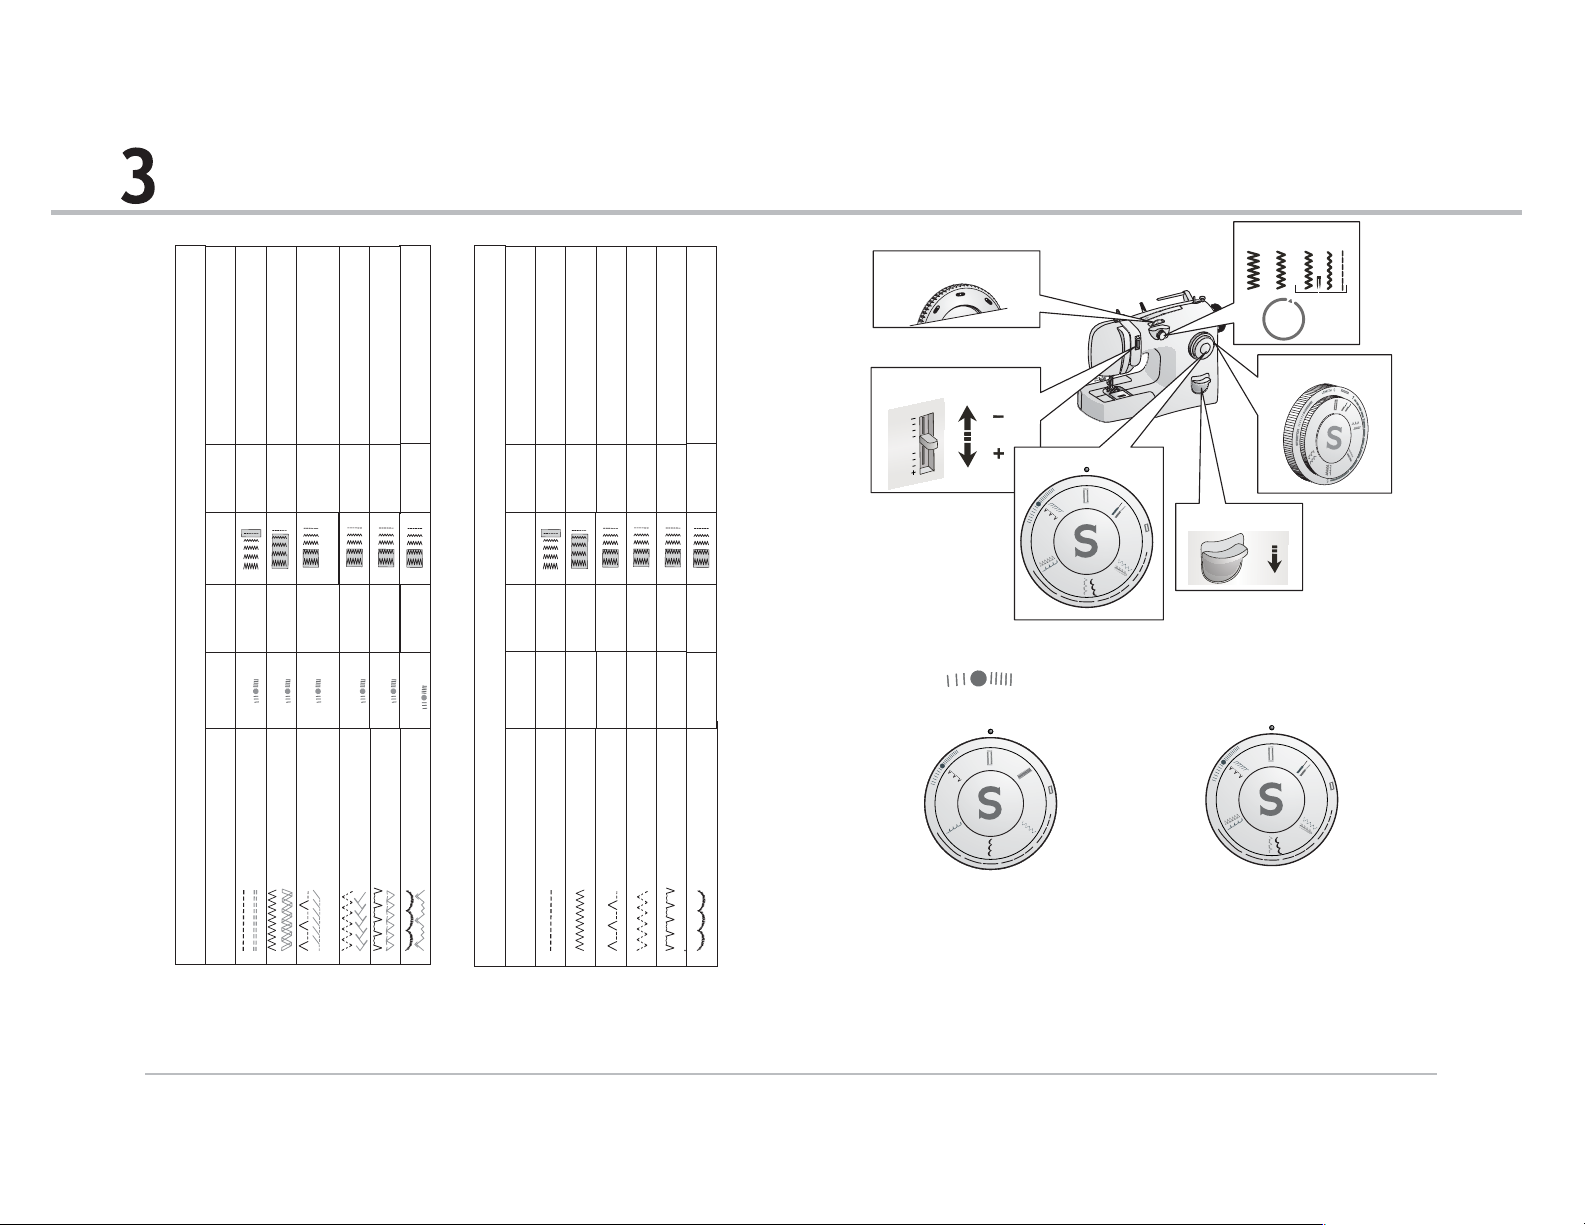
Comment régler la machine pour les différents points
stante
212
Modèle 4
on
Applicati
Pied
presseur
Largeur
de point
du fil
Tension
à5.0
de point
Longueur
0.5
POINT
tiques
rdinaires
s élas
s ordinaire
e
Coutur
Travaux de couture o
Pied
universel
Auto
astique
Point droit
Point droit él
très rési
e
ture élastique
Couture décorativ
Cou
ied
P
universel
Auto
à5.0
0.5
ac
gzag
tRicR
Poin
Point zi
tricotées et
let
ndel'our
initio
F
Couture sur matières
Pied
universel
Auto
1.5 à2.5
e
gauch
et ouvert à
isible
nv
surj
oint i
Point
P
sage
smocks
trepri
es et
Bordur
Arrêt e
extensibles
Pied
universel
Auto
5.0
à
0.5
e
ltipl
me
u
l
p
Point zigzag mu
Point
rative
co
blage et surjet
Assem
Coutures décoratives
Couture dé
ied
Pied
P
universel
Auto
à5.0
0.5
e
u
q
sti
e
rjet
rjet éla
n
Point su
Point lu
Point su
ve
rati
Couture déco
universel
Auto
à5.0
0.5
ontagne
Point m
Modèle 4206
Application
ied
P
Pied
presseur
Largeur
de point
du fil
Tension
de point
Longueur
INT
PO
dinaires
Tra v au x de couture or
Pied
universel
Auto
à5.0
0.5
roit
Point d
rative
Couture déco
l
universe
Auto
à5.0
0.5
g
Point zigza
ndel'ourlet
initio
F
ied
P
universel
Auto
.5 à2.5
1
nvisible
nt i
i
o
P
prisage
e
r
et
Arrêt
ied
P
universel
o
Aut
à5.0
0.5
e
ultipl
gm
Point zigza
surjet
emblage et
Ass
Pied
Auto
à5.0
0.5
et
urj
Point s
rsel
unive
rative
uture déco
Co
Pied
universel
Auto
à5.0
0.5
ne
Point lu
Comment régler la machine pour les différents points
Cadran de
Sélecteur de la position de
l'aiguille
Manette de tension du fil
d'aiguille
AUTO
Sélecteur de point
H
C
T
E
R
T
S
5
4
3
0
1
2
Bouton de marche
largeur du point
arrière
Bouton rotatif de
longueur du point
IMPORTANT:
pour le modèle 4212, réglez la longueur de point sur la position « coutures
extensibles » pour la couture de tout point EXTENSIBLE, afin de vous
assurer que les points seront formés correctement.
0
H
H
C
C
T
T
E
E
R
R
T
T
S
S
5
5
4
4
0
1
1
2
2
3
3
Sélecteur de point du modèle 4206
H
C
T
E
R
T
S
5
4
Sélecteur de point du modèle 4212
0
1
2
3
3
16
IMPORTANT :
il est plus facile de tourner le sélecteur de point si le cadran de largeur du
point est réglé en position « point droit ».
17
Page 11
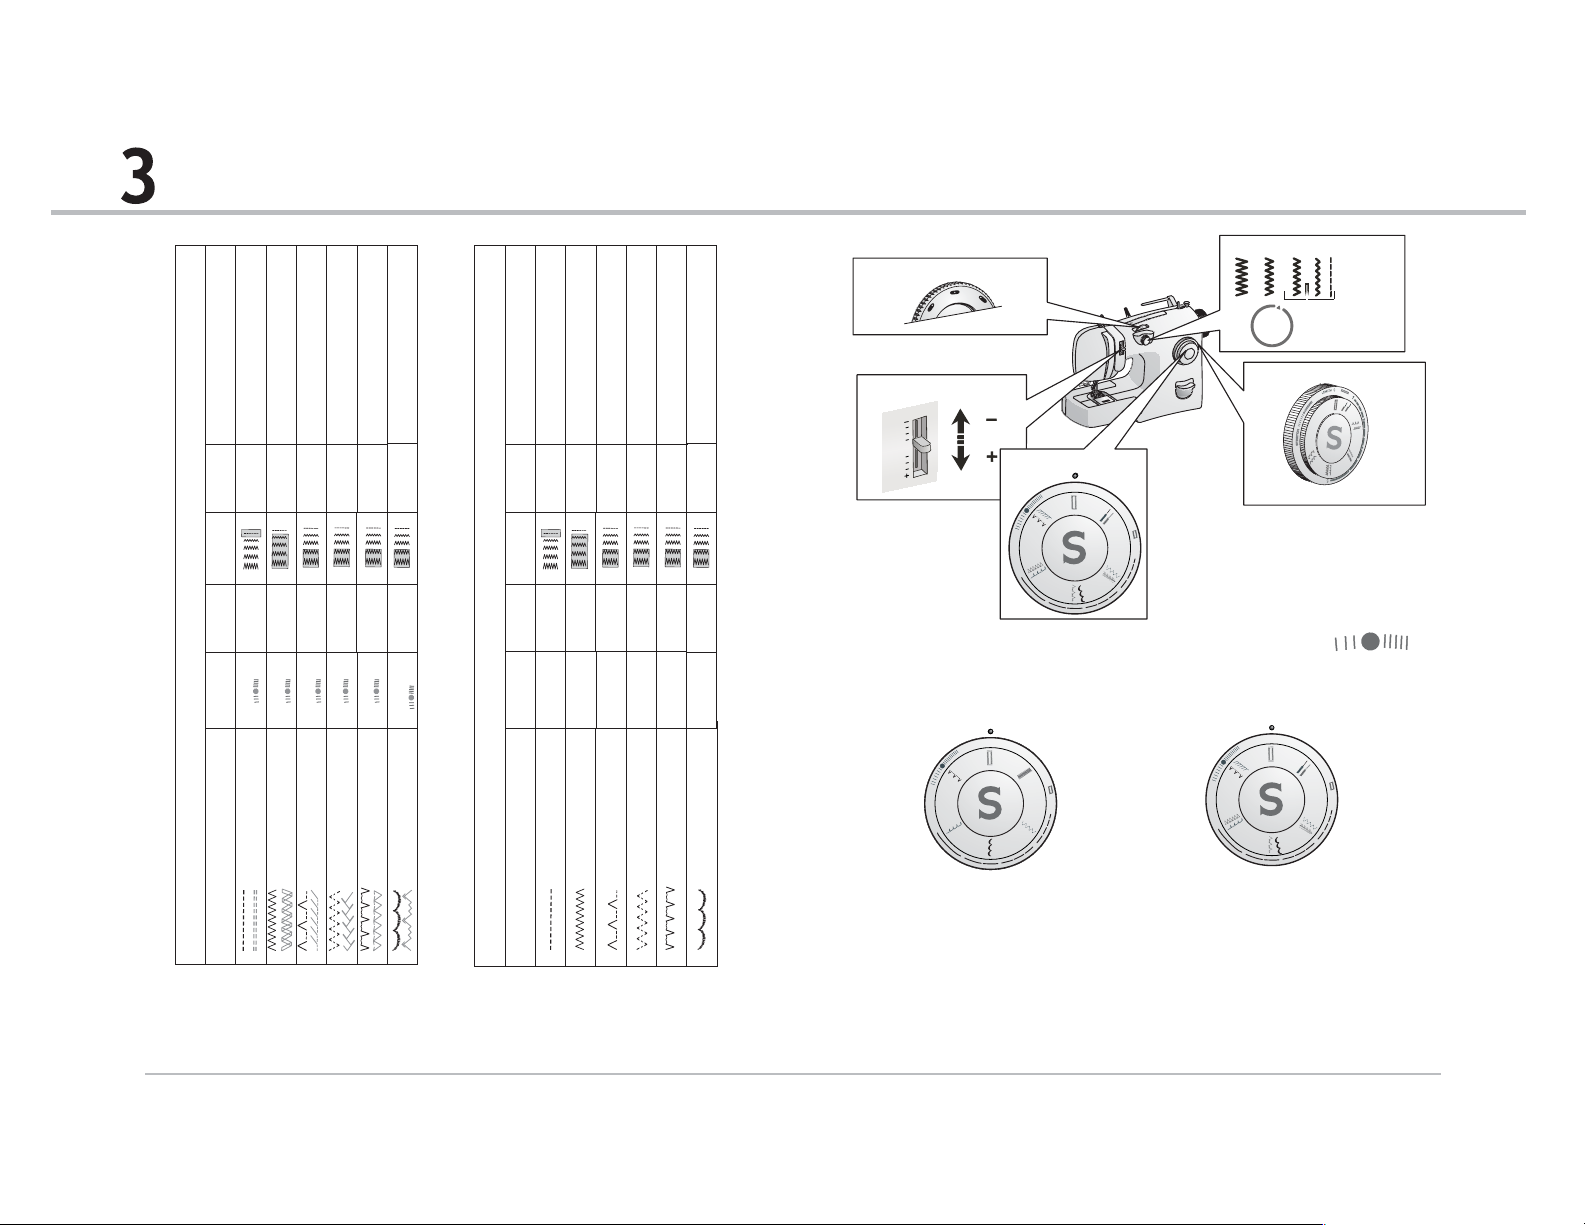
Aprendiendo como ajustar la máquina (para distintas puntadas)
a
c
ón bási
caci
plicación básica
A
i
Apl
Aprendiendo a Configurar su Máquina para las Distintas Puntadas
Selector de ancho de puntada
Selector de posición de la aguja
Selector de tensión del hilo
Selector de largo de puntada
3
12
42
Modelo
telas
Prensa-
ada
Punt
Ancho de
Te nsión
e
untada
Largo d
p
PAT RO N
Costuraenelástico
Costura general
General
General
Auto
à5.0
0.5
Puntada recta
Puntada recta elástica
Uso reforzado yextremo
Puntada decorativa
General
General
Auto
à5.0
0.5
Puntada dobladillo invisible
Puntada Zigzag
Puntada ric-rac
Acabado de dobladillos
Cose en telasde punto y elásticas
Costura en telasde punto y elásticas
General
General
General
Auto
5.0
à
0.5
1.5 à2.5
Puntada Zigzag múltiple
Puntada tipo Overlock
inclinado (izquierda)
Costuras de unióny empalmadas
Bordes decorativas
General
General
Auto
Auto
à5.0
0.5
Puntada de pluma
Puntada tipo Overlock
Puntada decorativa
Puntada decorativa
Puntada decorativa
General
General
General
Auto
5.0
à
0.5
Puntada tipo Overlockelástico
Puntada de medialuna
Puntada de montaña
Modelo 4206
telas
Prensa-
Puntada
Ancho de
Tensión
Largo de
puntada
PAT RO N
Costura general
General
Auto
à5.0
0.5
Puntada recta
Puntada decorativa
General
Auto
à5.0
0.5
Puntada Zigzag
Acabado de dobladillos
Cose en telasde punto y elásticas
General
General
Auto
Auto
à5.0
.5 à2.5
0.5
1
Puntada dobladillo invisible
Puntada Zigzag múltiple
General Bordes decorativas
General Puntada decorativa
Auto
Auto
à5.0
à5.0
0.5
0.5
Puntada tipo Overlock
Puntada de medialuna
AUTO
Selector de puntadas
H
C
T
E
R
T
S
5
4
2
3
0
1
IMPORTANTE: Para el modelo 4212, ajuste siempre el largo de puntada a
para todas las puntadas FLEXIBLES para asegurar que la puntada se
forme correctamente.
0
H
H
C
C
T
T
E
E
R
R
T
T
S
S
5
5
4
4
0
1
1
2
2
3
3
Selector de puntadas del modelo 4206
H
C
T
E
R
T
S
5
4
Selector de puntadas del modelo 4212
0
1
2
3
IMPORTANTE: Es más fácil girar el selector de puntada, si la perilla de ancho de
puntada está en puntada recta.
18
19
Page 12
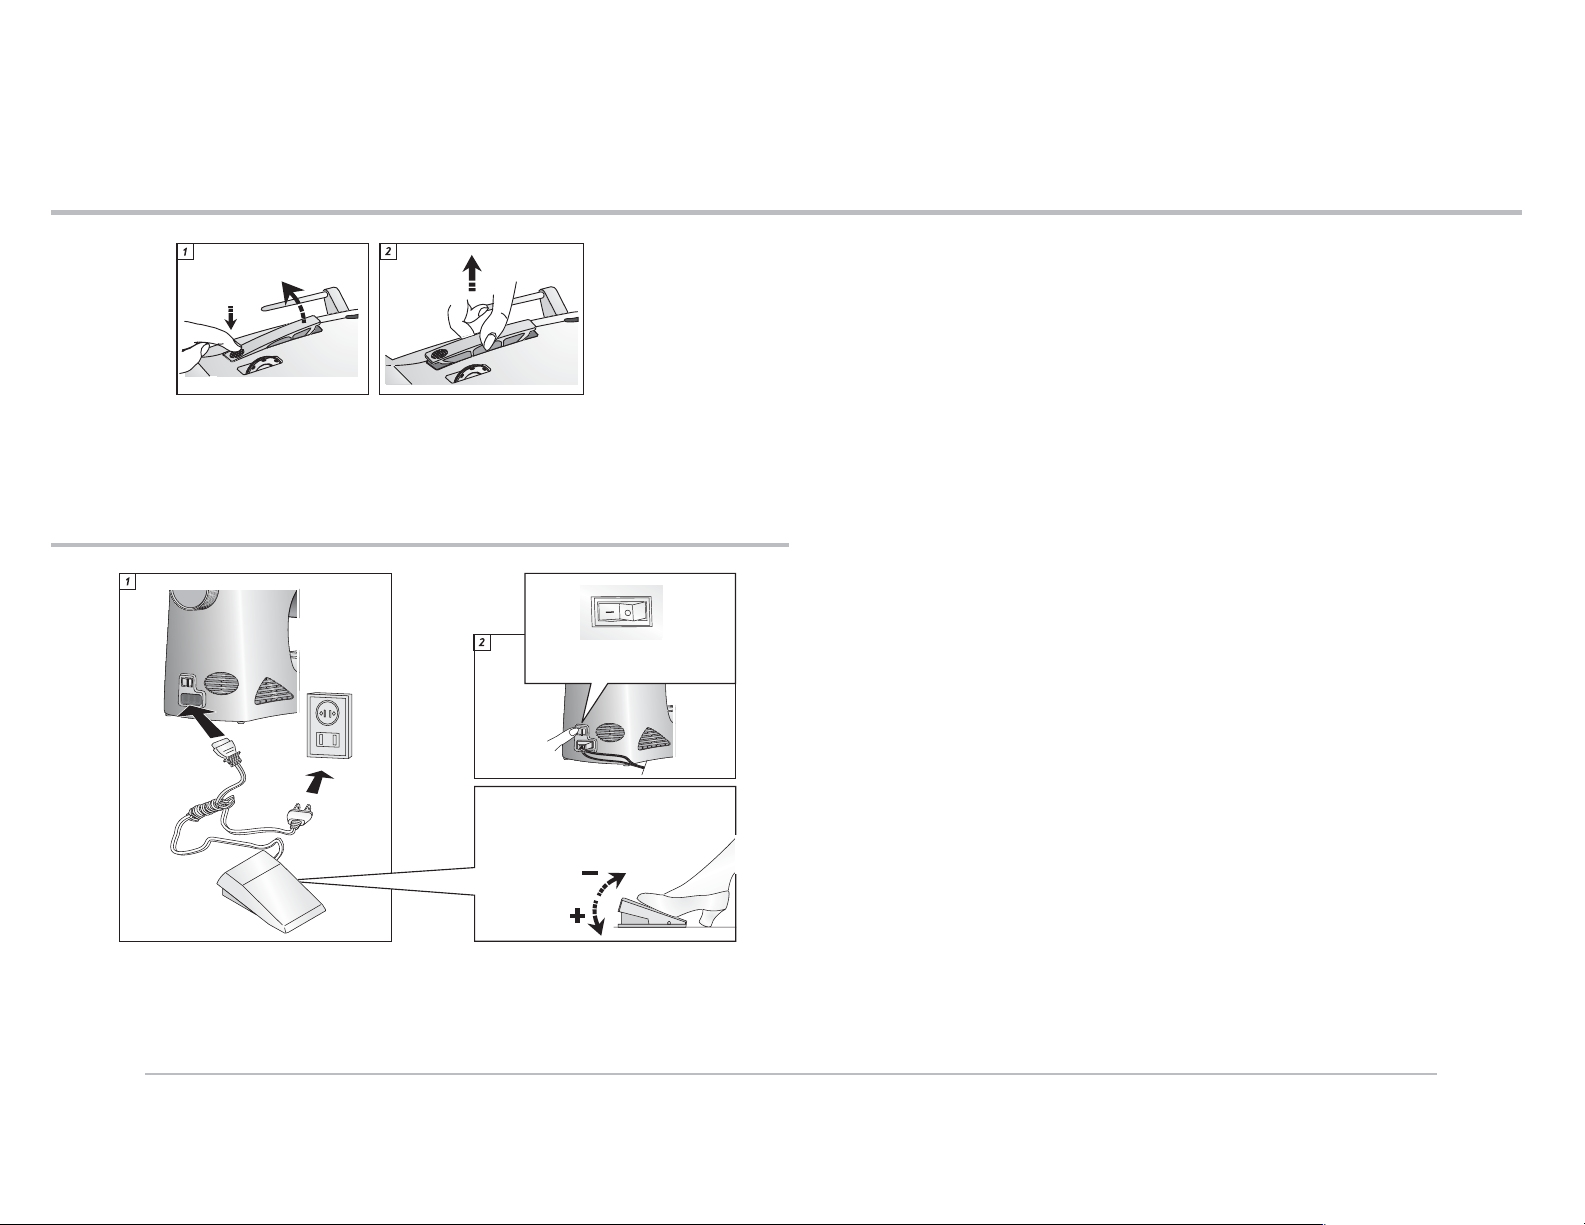
Lifting the Carrying Handle
Relever la poignée pour transporter la machine
Levantando la asa
4
Connecting the machine
Branchement de la machine
5
Conectando la máquina
Connecting the machine
Branchement de la machine
Conectando la Máquina
For North America
“This appliance has a polarized (one blade wider than the other) plug. To reduce the risk of
electric shock, this plug is intended to fit in a polarized outlet only one way. If the plug does
not fit fully in the outlet, reversethe plug. If it still does notfit, contact a qualified electrician
to install the proper outlet. Do not modify the plug in any way”.
Pour L’Amérique du Nord
“Cet appareil a une prise polarisée (une lame plus large que l’autre). Afin de réduire le
risque de décharge électrique, cette prise est conçue pour ne pouvoir être branchée que
dans le bon sens avec des connecteurs muraux polarisés. Si la prise ne peut être insérée
complètement dans le connecteur mural, inversez la. Si leproblème persiste,vous devez
consulter un electricien qualifié qui vous installera le support mural adapté. En aucun
cas vous nedevez modifier la prise".
ParaAmerica delNorte
5
20
On
Marche
Encendido
1
2
Foot controller
Rhéostat
Controlador de velocidad
Speed
Vitesse
Velocidad
Off
Arrêt
Apagado
“Este aparato tiene una polarización (una hoja más ancha que la otra). Para reducir el riesgo
de electrocución, este clavija está preparado para alojarse, en una toma de corriente
polarizada sólo de una forma. Si la clavija no se ajusta completamente en la toma de
corriente, dela vuelta a la clavija. Si aún así continúasin entrar, contacte con un electricista
la clavija para instalar la toma de corriente adecuada. No modifique de ninguna manera la
clavija”.
21
Page 13
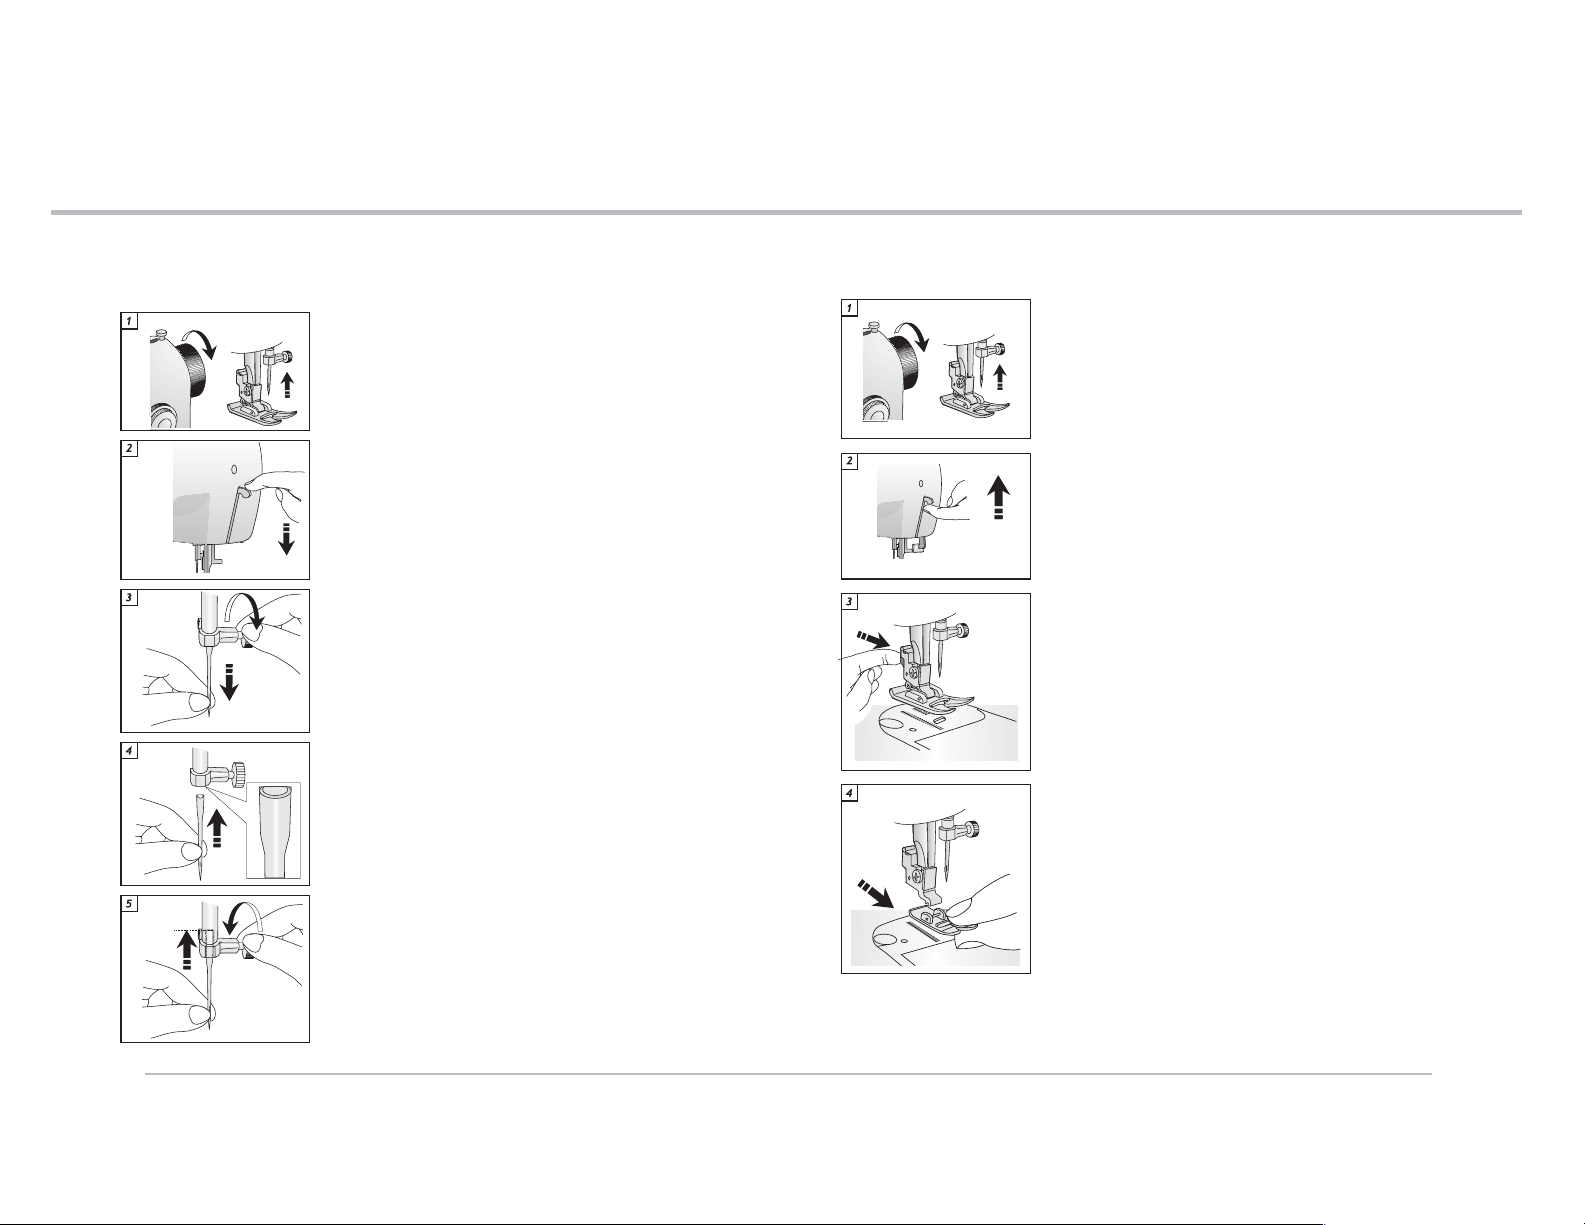
Machine basics
Généralités
Aspectos básicos de la máquina
6
Machine basics
Généralités
Aspectos básicos de la máquina
6
Changing needles / Changement d'aiguille / Cambiando agujas
Use only SINGER needles
Utilisez des aiguilles SINGER uniquement
Utilice solamente agujas Singer
Turn handwheel counter clockwise until the needle is in the
highest position.
Tournez le volant vers vous jusqu'à ce que l'aiguille soit
dans la position la plus haute.
Gire el volante hacia usted hasta que la aguja esté en su
posición más alta.
Lower presser foot.
Abaissez le pied presseur.
Baje la palanca del prensatelas.
Loosen thumb screw and remove needle.
Desserrez la vis du pince-aiguille et retirez l'aiguille.
Afloje el tornillo y quite la aguja.
To replace the needle, place flat side of the needle to the
back, and push needle all the way up.
Pour remplacer l'aiguille, insérez l'aiguille en positionnant
le côté plat de l'aiguille vers l'arrière, puis poussez
l'aiguille vers le haut le plus loin possible.
Para cambiar la aguja, coloque el lado plano de la aguja
hacia atrás y empuje la aguja al fondo.
Changing snap-on presser foot
Changer les pieds à enclenchement direct
Cambiando el prensatelas de colocación instantánea
Turn handwheel counter clockwise until the needle is in the
highest position.
Tournez le volant vers vous jusqu'à ce que l'aiguille soit
dans la position la plus haute.
Gire el volante hacia usted hasta que la aguja esté en la
posición más alta.
Raise presser foot.
Relevez le pied presseur.
Levante la palanca del prensatelas.
Press the release button at the back of the shank.
Appuyez sur le bouton de dégagement du pied presseur et
le pied se dégage.
Presione el liberador del prensatelas para que se suelte.
Remove foot.
Retirez le pied.
Retire el prensatelas.
22
Tighten thumb screw.
Resserrez la vis du pince-aiguille.
Apriete el tornillo.
23
Page 14
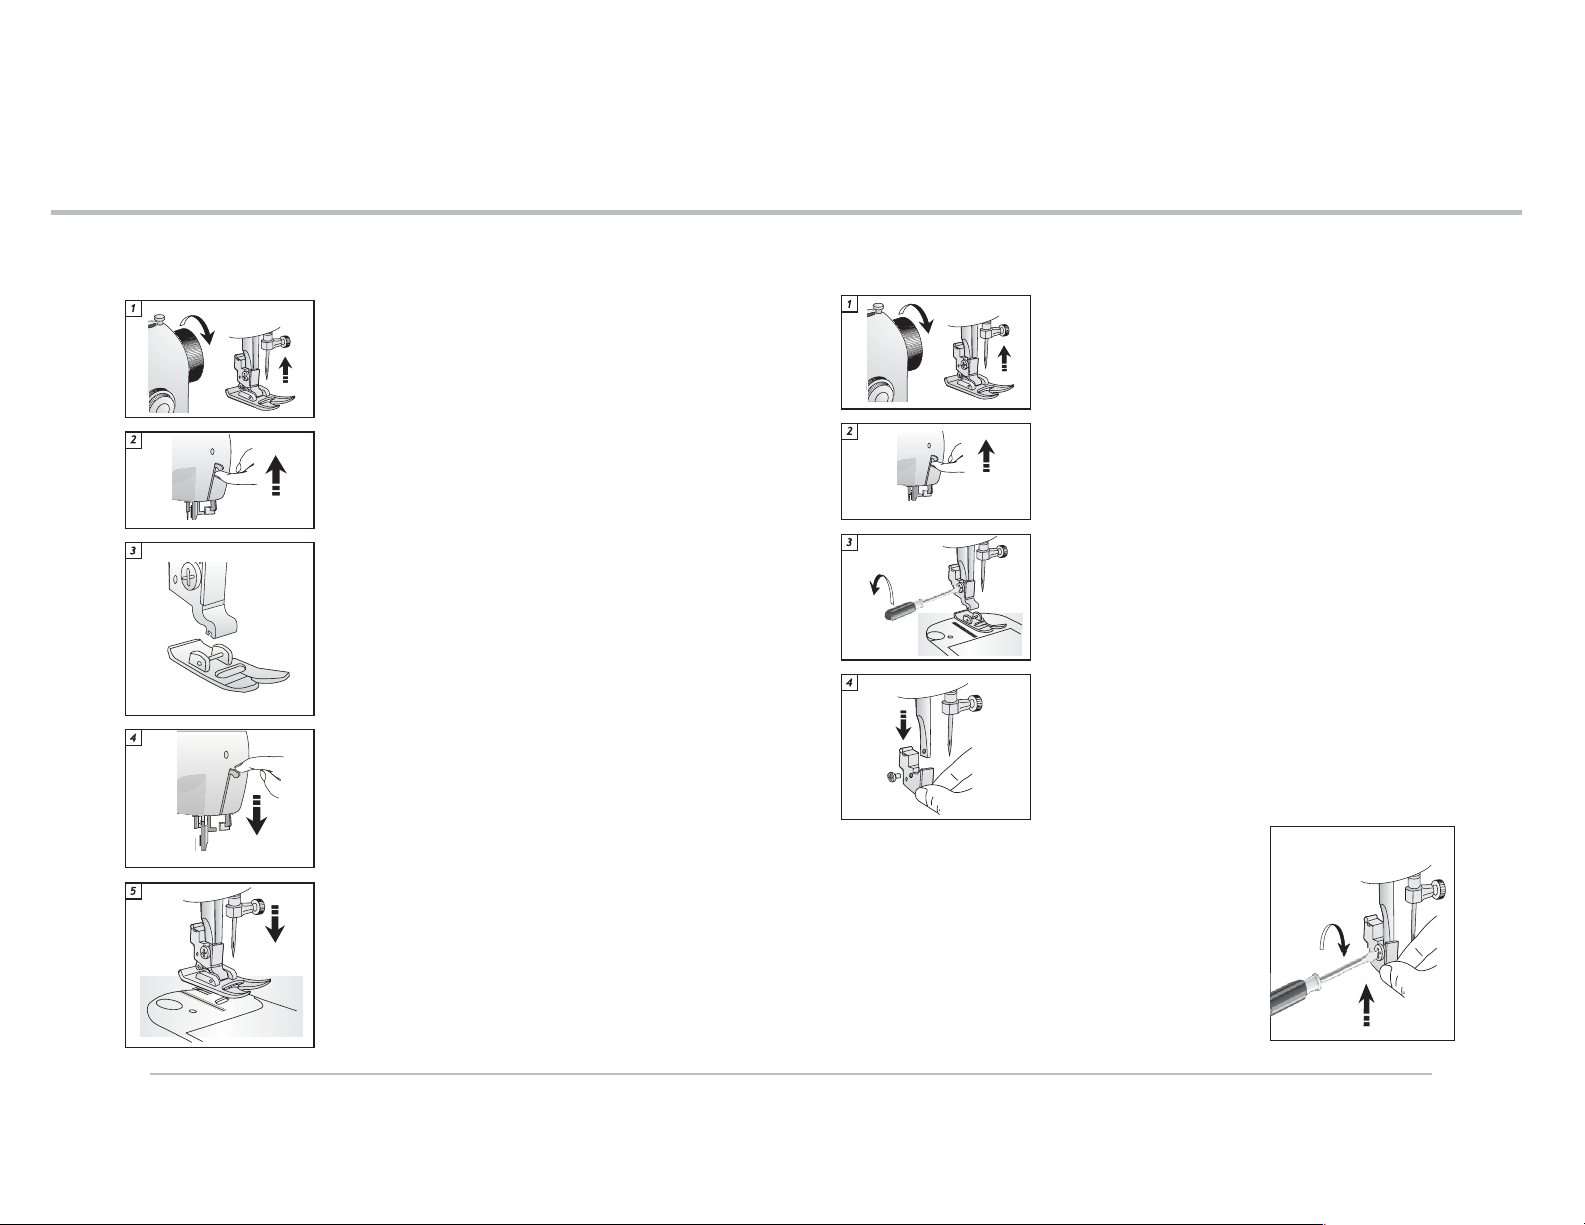
Machine basics
Généralités
Aspectos básicos de la máquina
6
Machine basics
Généralités
Aspectos básicos de la máquina
6
Attaching snap-on presser feet
Mettre en place le pied presseur à enclenche
Colocando el prensatelas de colocación instantánea
Turn handwheel counter clockwise until the needle is in the
highest position.
Tournez le volant vers vous jusqu'à ce que l'aiguille soit
dans la position la plus haute.
Gire el volante hacia usted hasta que la aguja esté en la
posición más alta.
Raise presser foot lifter.
Relevez le pied presseur.
Levante la palanca del prensatelas.
Align the foot under the presser foot holder/shank.
Alignez le pied sous le support de pied presseur.
Alinee el pie prensatelas debajo del zanco (sujeta
prensatelas)
Lower presser foot lifter.
Abaissez le pied presseur.
Baje la palanca del prensatelas.
Changing screw-on presser feet or shank
Changer le pied presseur sur talon visser
Cambio del prensatelas a tornillo
Turn handwheel counter clockwise until the needle is in the
highest position.
Tournez le volant vers vous jusqu'à ce que l'aiguille soit
dans la position la plus haute.
Gire el volante hacia usted hasta que la aguja esté en la
posición más alta.
Raise presser foot lifter.
Relevez le pied presseur.
Levante la palanca del prensatelas.
Using the screwdriver, turn the screw counter-clockwise to loosen
presser foot screw.
À l'aide du tournevis, dévissez dans le sens inverse des
aiguilles d'une montre pour desserrer la vis du pied
presseur.
Usando el destornillador, gire el tornillo en sentido
contrario a la manecillas del reloj para aflojar el sujeta
prensatelas / zanco.
Remove presser foot screw, presser foot and foot holder/shank.
Retirer la vis du pied presseur, le pied presseur et le
talon de pied presseur.
Quite el tornillo, el sujeta prensatelas / zanco y el
prensatelas.
24
Presser foot will snap into place.
Le pied presseur s'enclenche.
Presione hacia abajo el tornillo para que el prensatelas encaje
en su lugar.
To attach a screw-on presser foot or shank:
Align the presser foot holder and presser foot screw with the
opening in the presser bar. Tighten the screw clockwise.
Pour mettre en place un pied presseur à talon visser:
Alignez le talon de pied presseur et la vis du pied presseur
avec le trou de la tige du pied. Serrez la vis dans le sens des
aiguilles d'une montre.
Para colocar el sujeta prensatelas / zanco, apriete el
tornillo en la abertura de la barra presionadora en sentido
de las manecillas del reloj. “Oj”.
25
Page 15
Machine basics
Généralités
Aspectos básicos de la máquina
6
Machine basics
Généralités
Aspectos básicos de la máquina
6
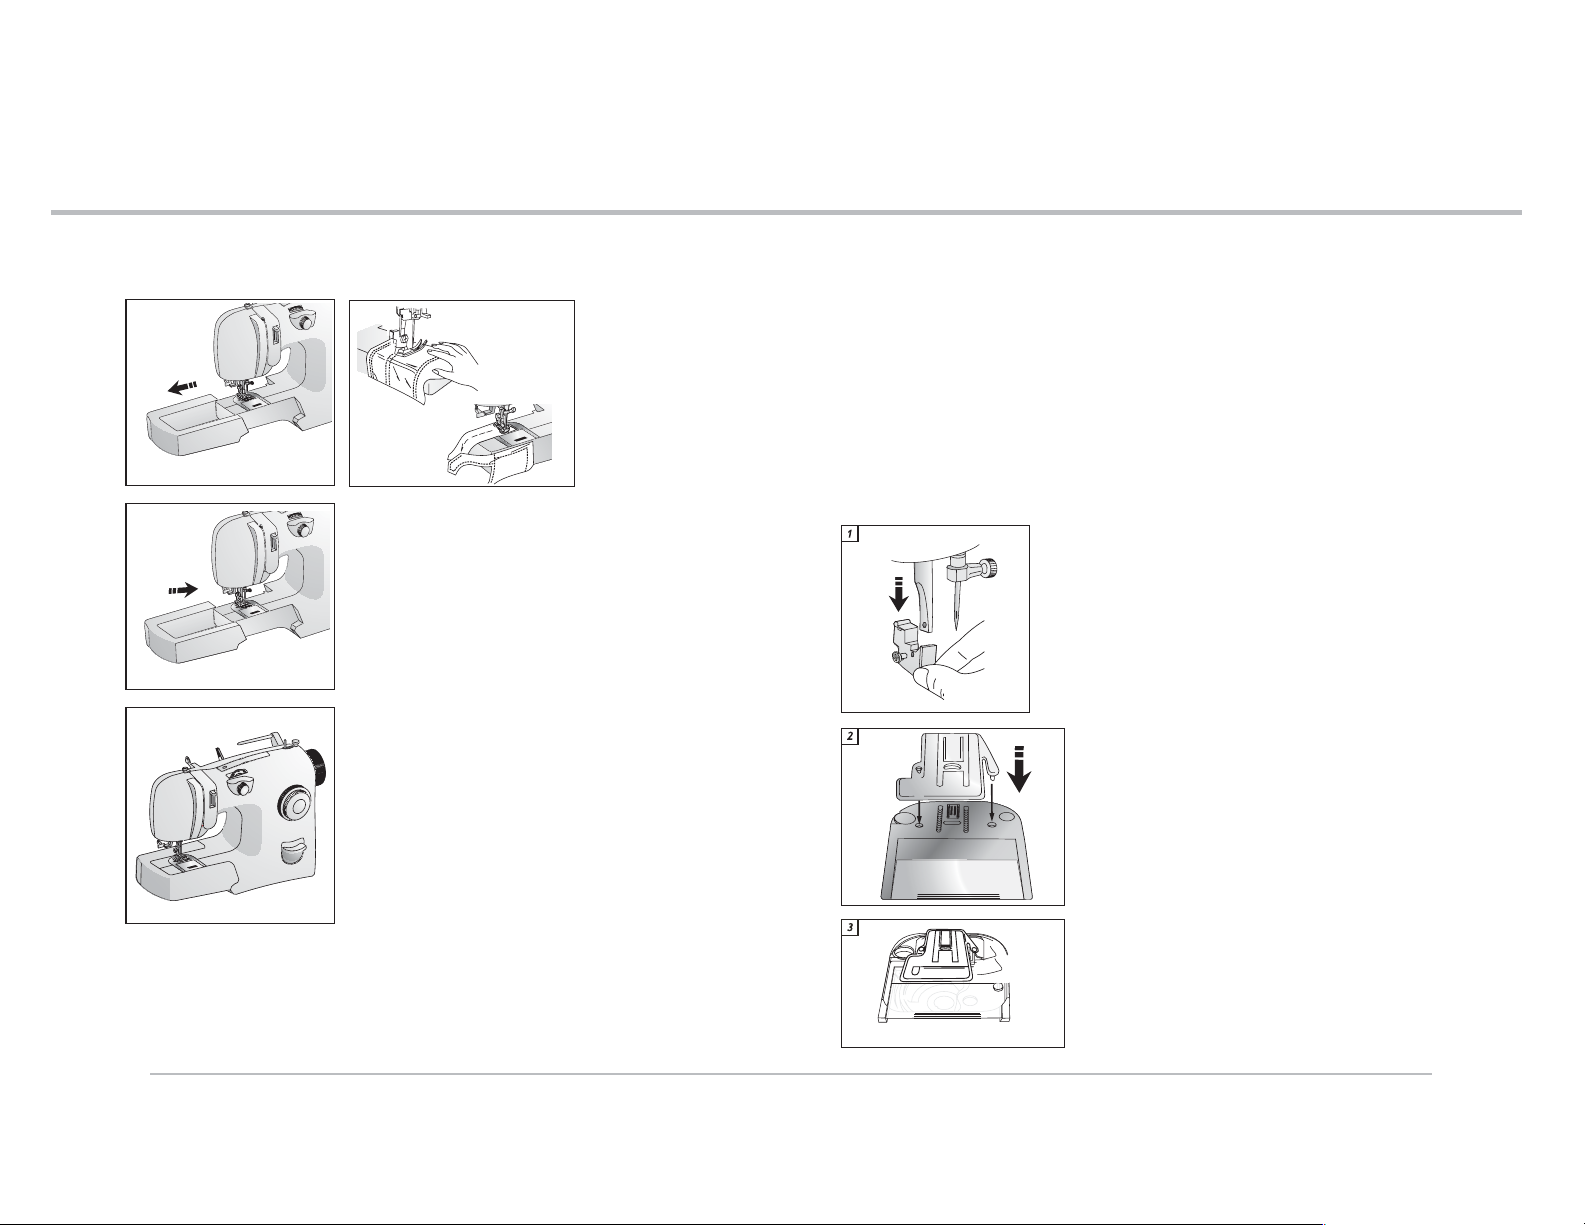
Removing and replacing the extension table
Retirer et remettre en place le bras libre
Colocación y extracción de la cubierta removible
To attach, slide extension table to the right.
Pour le mettre en place, faites glisser le bras libre vers
la droite.
Para colocar, deslice la cubierta a la derecha.
Press down, locking into place.
Appuyez pour qu'il se fixe à sa place.
Presione hacia abajo, para asegurar en su sitio.
Applications
Applications
Aplicaciones
To remove, pull
extension
table to the left.
Pour le retirer, tirez
le bras libre vers la
gauche.
Para retirar, deslice la
cubierta removible a la
izquierda.
Covering the feed dogs /
The feed dogs control the movement of the fabric that is being sewn. They should be uncovered
for all general sewing purposes and covered for darning, embroidery and monogramming. When
the feed dogs are covered, you must manually move the fabric. The feed dogs are located under
the presser foot.
Les griffes d'entraînement servent à transporter automatiquement le tissu. Pour la
plupart des travaux de couture, la plaque qui couvre les griffes n'est pas utilisée. Pour
certains ouvrages, tels que le reprisage, la broderie ou l'application de
monogrammes, les griffes doivent être couvertes. Quand les griffes sont couvertes, le
tissu doit être guidé à la main. Les griffes sont situées sous le pied presseur.
Los dientes impelentes controlan el movimiento de la tela que se está cosiendo. Deben
levantarse para todo tipo de costura y bajarse bordado, zurcido y monogramas. Cuando se
baja el control de dientes impelentes, debe mover manualmente la tela. Los dientes
impelentes están ubicados debajo del prensatelas.
Plaque couvre griffes /
Unscrew the presser foot shank, and remove it along with
the foot. It is easier to attach and remove the feed cover
plate when the foot and shank are removed.
Dévissez le talon du pied presseur et retirez-le avec le
pied presseur. Il est plus facile de mettre en place et de
retirer la plaque couvre griffes quand le pied presseur et
son talon sont démontés.
Quite el prensatelas. Es más fácil colocar y retirar la
cubierta de los dientes cuando el presatelas se ha retirado.
Cover the feed dogs with the clear feed cover plate
by aligning the cover with the openings on the bobbin
visor. Press in place.
Placez la plaque couvre griffes sur la plaque à aiguille
en l'alignant avec les trous du couvercle du
compartiment à canette et enclenchez-la en appuyant
dessus.
Cubra el impelente con la placa aguja, presionando los
botones en los dos orificios.
Bajando los dientes impelentes
26
To remove the feed cover plate, slide finger nail
under the cover and push up.
Pour la retirer, saisissez la plaque couvre griffes par
dessous avec l’ongle et soulevez-la.
Para quitar la cubierta de los dientes impelentes, deslice
la uña debajo de la cubierta y empuje hacia arriba.
27
Page 16
Machine basics
Généralités
Aspectos básicos de la máquina
6
Machine basics
Généralités
Aspectos básicos de la máquina
6
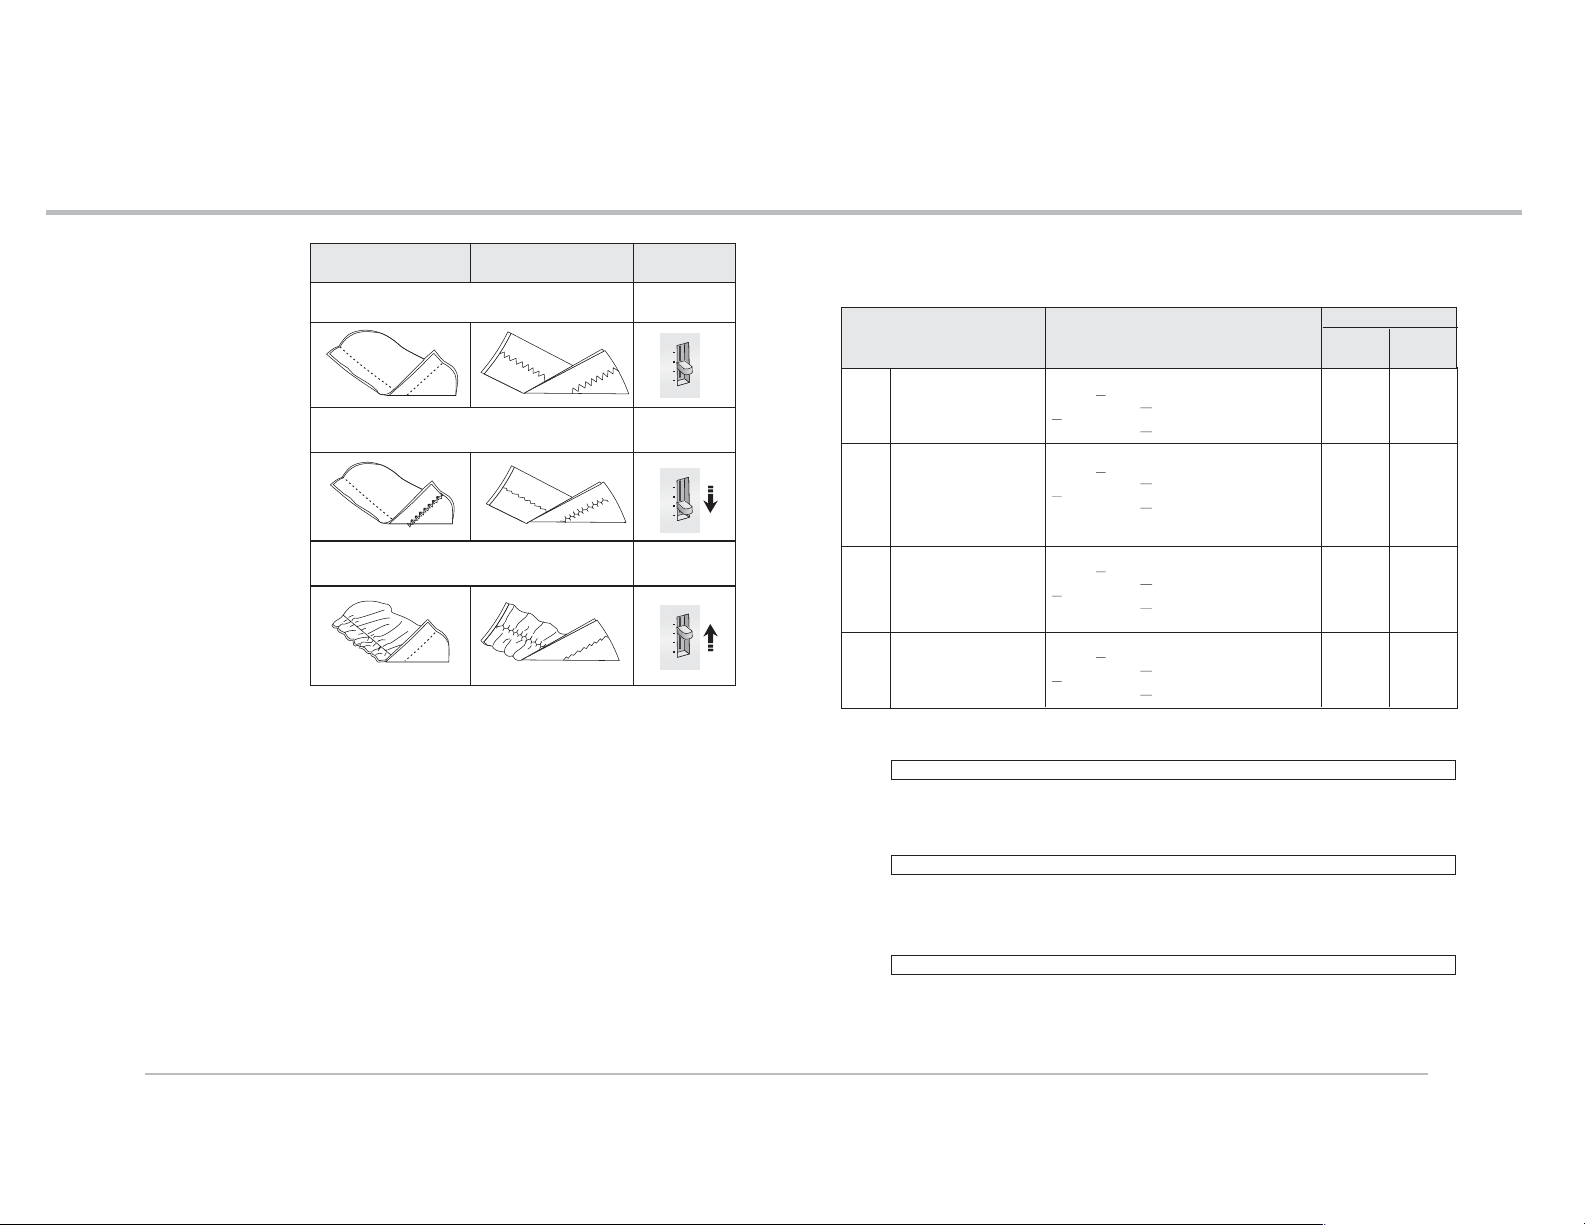
Adjusting thread
tension
Tension du fil
Ajuste de la
tensión del hilo
Straight stitch
Point droit
Costura recta Zig-zag Tensión
Balanced stitch
Point régulier
Puntada balanceada
Not enough tension: loose stitch
Tension insuffisante : points lâches
Tensión insuficiente: puntadas sueltas
Too much tension: puckered
Tension trop forte : fronces
Demasiada tensión: fruncido
Zig-zag
Point zigzag
Tension
Tension
AUTO
Correction
Correction
Corrección
AUTO
Correction
Correction
Corrección
AUTO
For basic sewing with standard thread, the tension lever will
normally remain at the AUTO setting. However, the tension can
be tightened or loosened to compensate for decorative stitches,
decorative threads, speciality fabrics or certain sewing techniques.
Pour une couture de base avec un fil standard, la manette de
tension doit normalement être réglée sur AUTO. Cependant,
la tension peut être augmentée ou diminuée pour compenser
l'effet de fils décoratifs, points décoratifs, de tissus spéciaux
ou de certaines techniques de couture.
Para costura básica con hilo común, la palanca de tensión
normalmente permanece en AUTO. Sin embargo, la tensión
puede aumentarse o disminuirse para balancear las
puntadas, especialmente en diferentes tipos de telas o tejidos
o bien en algunas técnicas de costura.
Fabric, thread and
needle table
Use only original Singer
needles
Fabric (according to the weight)
Tissu (selon son poids)
Tela (conforme su peso)
batiste,
Lightweight
Léger
Liviano
Mediumweight
Moyen
Mediano
Medium
Heavy
Épais
Mediano
pesado
Knits
Mailles
De
punto
chiffon,
crepe,
silk
linen,
percale,
piqué,
muslin,
velvet,
microfiber
gabardine,
tweed,
canvas,
duck,
denim,
gingham
single
knits,
double
knits,
jersey,
tricot
batista
mousseline
de soie,
crêpe
soie
lin
percale
piqué
mousseline
velours
microfibres
gabardine
tweed
toile
lourde,
jean,
guingan
laine
tricoteé,
laine
epaiseé
jersey
tricot
Tableau des tissus, fils et
aiguilles
Employez seulement les aiguilles
originales Singer.
batista,
chiffon,
crepe,
seda
lino,
percal,
piqué,
musselina,
tana,
satén
gabardina,
tweed,
brin,
sarga,
cotelé
puntos
cerrados,
puntos
dobles,
tricot
Coton-wrapped
poliester or
100% poliester
or mercerized
# 60*
Coton-wrapped
poliester or
100% poliester
or mercerized
# 50*
Coton-wrapped
poliester or
100% poliester
or mercerized
# 40*
Coton-wrapped
poliester or
100% poliester
or nylon
* Not recommended on stretch fabrics.
* Déconseillé sur les tissus extensibles
* No se recomienda para telas elásticas.
Coton mélangé
polyester
ou
100% Polyester
ou
Mercerisé 60*
Coton mélangé
polyester
ou
100% Polyester
ou
Mercerisé 50*
Coton mélangé
polyester
ou
100% Polyester
ou
Mercerisé 40*
Coton mélangé
polyester
ou
100% Polyester
ou Nylon
Thread
Fil
Hilo
Tabla de telas, hilos
y agujas
Utilice solamente agujas
originales Singer.
Algodón retorcido
con poliéster, o
100 % Polyester o
mercerizada 60*
Algodón retorcido
con poliéster, o
100 % Polyester o
mercerizada 50*
Algodón retorcido
con poliéster, o
100 % Polyester o
mercerizada 40*
Algodón retorcido
con poliéster, o
100 % Polyester o
nylon
Needles
Catégorie
Ball point
Point balle
Esférica
Always use SINGER needles for best results.
Change the needle regularly (approximately after sewing two to three projects).
Damaged fabric and poorly formed stitches are usually caused by a bent, blunt or
burred needle. The above chart will assist in finding the correct needle for the type
and weight of your fabric.
Pour de meilleurs résultats, utilisez toujours des aiguilles SINGER.
Remplacez l'aiguille régulièrement (après avoir cousu deux ou trois projets
environ). L'endommagement des tissus et la mauvaise formation des points sont
souvent dus à des aiguilles tordues, émoussées ou rugueuses. Le tableau ci-dessus
vous aidera à trouver l'aiguille idéale pour le type et l'épaisseur de votre tissu.
Siempre utilice agujas SINGER para mejores resultados.
Cambie regularmente las agujas (aproximadamente después de coser dos o tres
trabajos de costura).Tejidos mal formados o de baja calidad son normalmente
causados por una aguja dañada. La tabla de telas, hilos y agujas le ayudará a encontrar la aguja correcta para cada tipo de tela.
Typ e
Tipo
2020
2020
2020
Punta
2045
AgujasAiguille
Size
Grosseur
Tamaño
11/80
14/90
16/100
11/80
14/90
16/100
18/110
28
29
Page 17
Threading the machine
Enfilage de la machine
Ensartando la Máquina
7
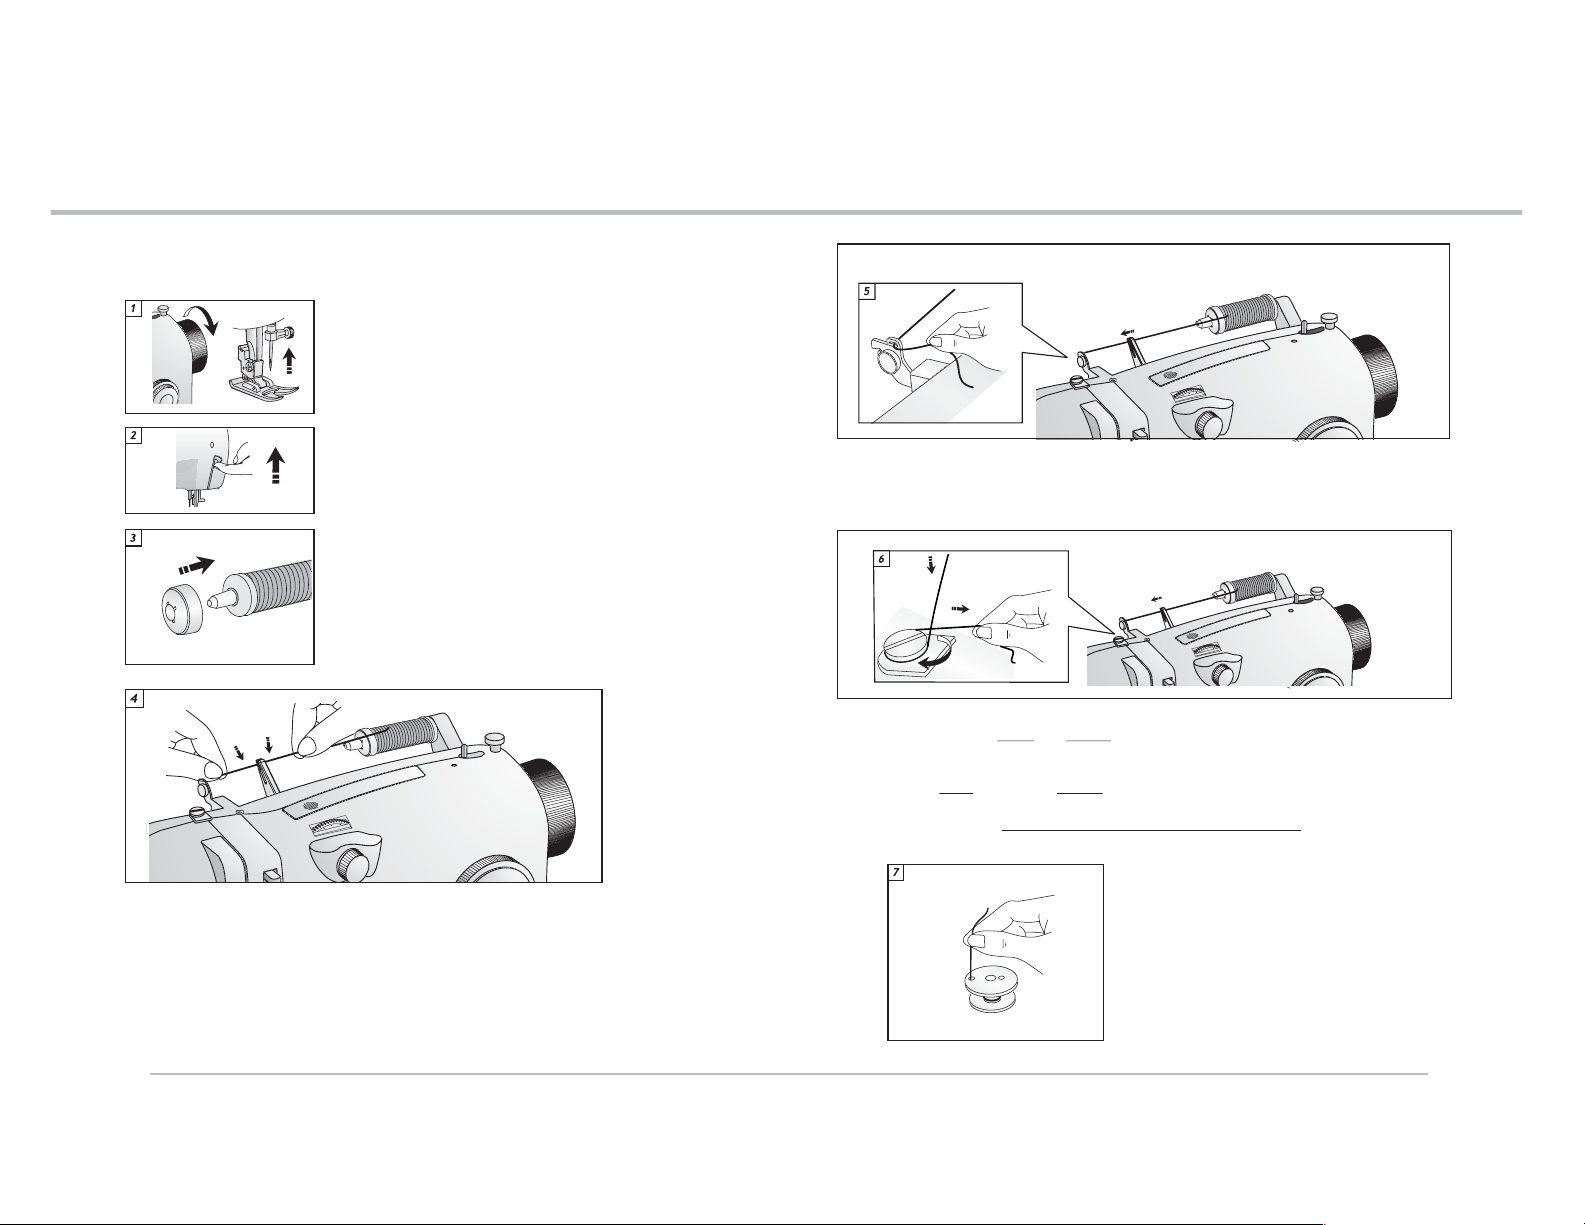
Winding the bobbin
Remplissage de la canette
Devanando la bobina
Pull the thread from the spool, hold firmly over the first thread
guide. Then push the thread down, snapping it into the thread guide.
Tirez le fil de la bobine. Maintenez-le fermement au-dessus du
premier guide-fil. Ensuite, tirez le fil vers le bas pour l'introduire
dans le guide-fil.
Jale el hilo del carrete, sostengalo con firmeza sobre el primer guía hilos.
Posteriormente, jale el hilo hacia adentro del guía hilos.
Turn handwheel toward you until the needle is in the highest
position.
Tournez le volant vers vous jusqu'à ce que l'aiguille soit
dans la position la plus haute.
Gire el volante hacia usted hasta que la aguja esté en la
posición más alta.
Raise presser foot lifter.
Relevez le pied presseur.
Levante la palanca del prensatelas.
Slide thread onto horizontal spool pin. Secure thread in place
with either the large or small spool pin holder, depending on the
size of your thread spool.
Placez la bobine de fil sur le porte-bobine horizontal. Fixez
le fil dans la bonne position avec le grand ou le petit
capuchon de bobine, suivant la taille de votre bobine de fil.
Deslice el hilo en el portacarrete horizontal. Asegure la hebra
en su sitio con el sujetador grande o pequeño, dependiendo
del tamaño del carrete de hilo.
Threading the machine
Enfilage de la machine
Ensartando la Máquina
Pull thread out from the spool through the second thread guide.
Tirez le fil de la bobine et faites-le passer par le deuxième guide-fil.
Jale la hebra del carrete hacia el segunda guiá hilos.
Place the thread to the right of the Bobbin winder disc, then swing the bobbin thread
to the left going under and around the disc, pulling the thread toward the Bobbin
winder.
Placez le fil à droite du disque de tension du dévidoir, puis faites-le passer à
gauche sous le disque et autour du disque, en tirant le fil vers le dévidoir de
canette.
Coloque el hilo a la derecha del tensor, d vuelta a la izquierda como se muestra en
la imagen, jale el hilo hacia el devanador de bobina.
Pull the thread through the hole in the
bobbin as shown, leaving a 4” tail.
Faites passer le fil par un des trous de
la canette conformément à
l'illustration en laissant dépasser un
bout de fil de 10 cm.
Pase el hilo por uno de los orificios de
adentro hacia afuera de la bobina
como se muestra, dejando una hebra de
4 centimetros aproximadamente.
7
30
3131
Page 18
Threading the machine
Enfilage de la machine
Ensartando la Máquina
7
Threading the machine
Enfilage de la machine
Ensartando la Máquina
7
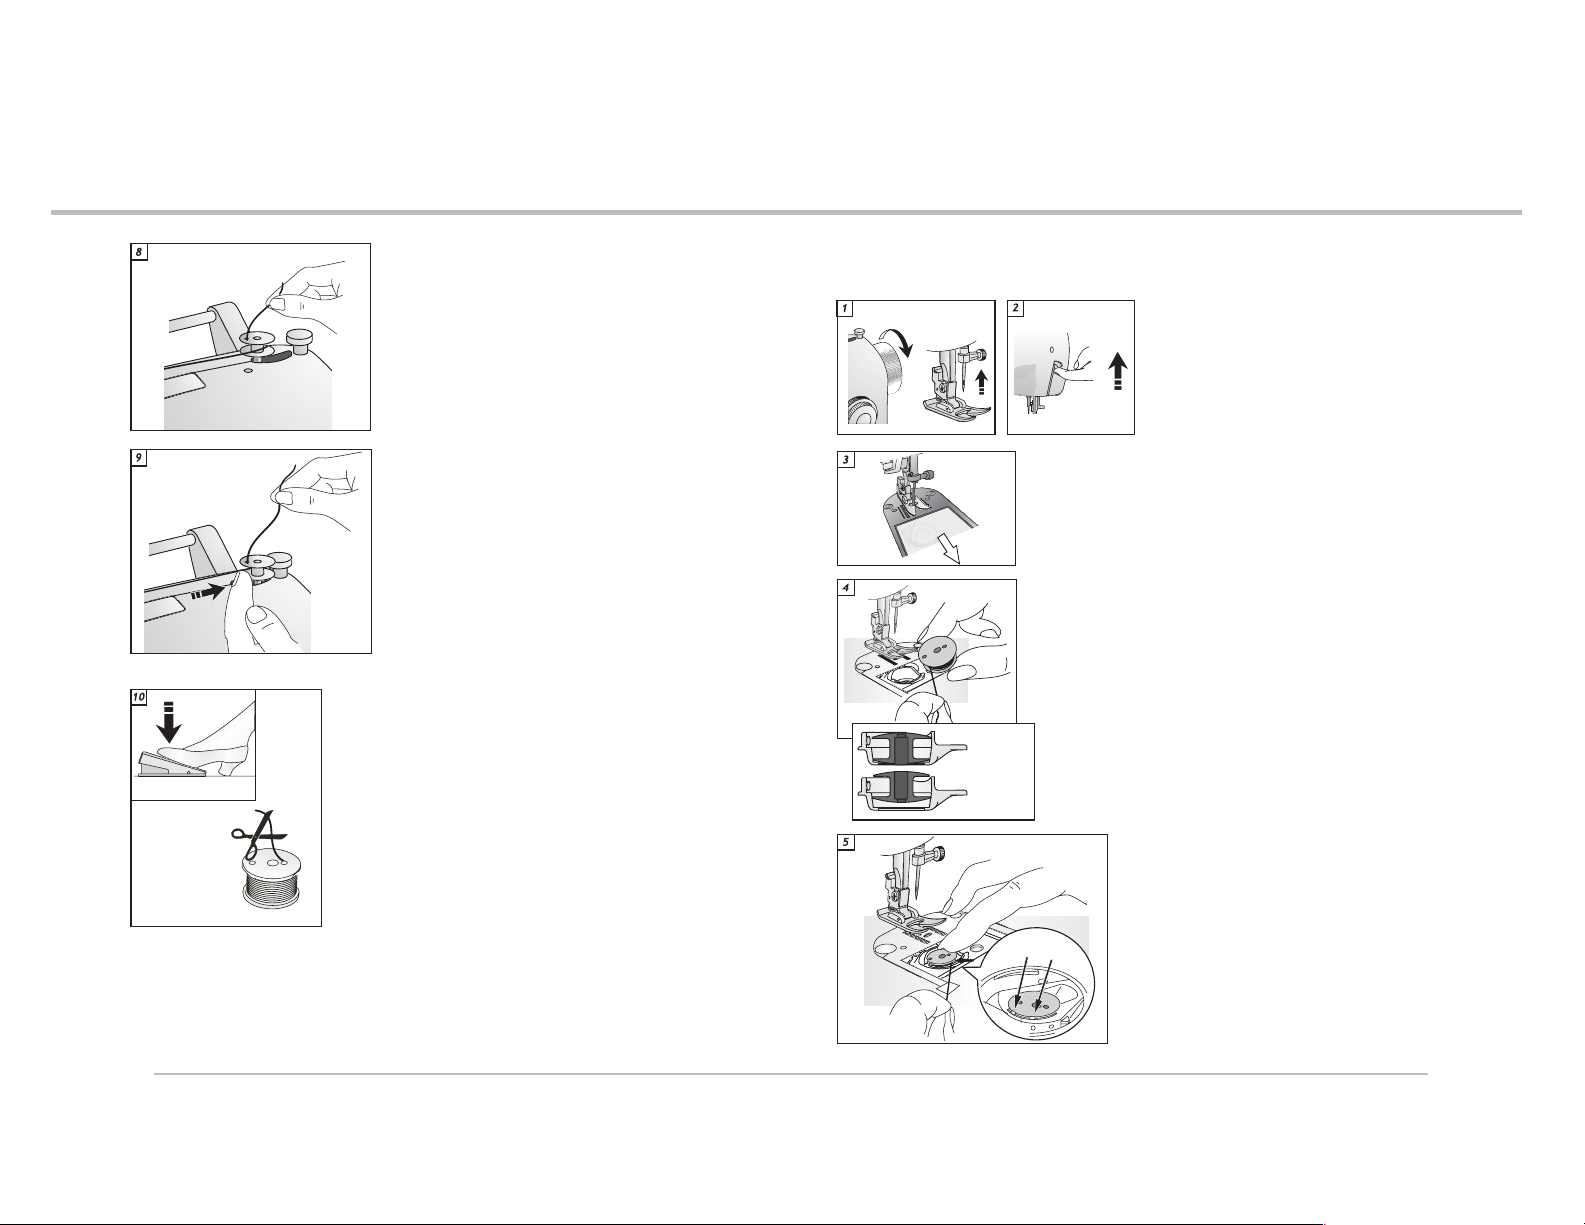
Push the bobbin on to the Bobbin winder pin.
Poussez la canette sur la tige du dévidoir de
canette.
Empuje la bobina en el poste del devanador de
bobina.
Push the bobbin winder pin to the far right position.
Poussez la tige du dévidoir complètement vers la
droite.
Empuje el poste del devanador de bobina hacia la
derecha.
Hold the thread tail and step on the foot controller. The
needle will not move but the Bobbin winder will turn, winding
the bobbin. After the thread has wound around the bobbin 10
times, cut the thread tail. Then continue winding the bobbin
until it is full.
Tenez l'extrémité du fil et appuyez sur le rhéostat.
L'aiguille ne bouge pas mais le dévidoir de canette tourne
et remplit ainsi la canette. Une fois que le fil a été
enroulé une dizaine de fois autour de la canette, coupez
l'extrémité du fil. Ensuite, continuez le remplissage
jusqu'à ce que la canette soit pleine.
Sostenga la hebra de hilo y comience a coser. La aguja no
se moverá pero el devanador de bobina girará. Después de
que el hilo se haya enrollado en la bobina 10 veces, corte
la hebra del hilo. Luego continúe devanando hasta que la
bobina esté llena.
Inserting the bobbin and removing the bobbin (Use only SINGER #359838900 bobbins)
Mettre en place et retirer la canette
(Utilisez des canettes SINGER #359838900 uniquement)
Colocando y quitando la bobina (Utilice sólo en bobinas SINGER #359838900)
Turn handwheel counter cloclwise until the needle
is in the highest position.
Raise presser foot lifter.
Tournez le volant vers vous jusqu'à ce que
l'aiguille soit dans la position la plus haute.
Relevez le releveur de pied presseur.
Gire el volante hacia usted hasta que la aguja
esté en la posición más alta.
Levante la palanca del prensatelas.
Pull the bobbin visor slide plate forward to open bobbin area.
Tirez vers l'avant le couvercle transparent du compartiment
à canette.
Jale la placa transparente hacia delante para dejar
descubierta el área de la bobina.
IMPORTANT: Place bobbin into case with the two holes on the
bobbin facing up. The bobbin thread should rotate counterclockwise as it comes off the bobbin. The bobbin should lay flush
within the bobbin case.
IMPORTANT : placez la canette dans son logement en
veillant à ce que les deux trous de la canette soient situés
sur le dessus. Le fil de canette doit tourner dans le sens
contraire des aiguilles d'une montre quand il se déroule de
la canette. Le haut de la canette doit être au même niveau
Correct
Correct
Correcto
Incorrect
Incorrect
Incorrecto
que le boîtier de canette.
IMPORTANTE: Coloque la bobina en la caja con los dos orificios
de la bobina hacia arriba. El hilo de la bobina debe girar en
sentido contrario a las manecillas del reloj cuando sale de la
bobina. La bobina debe estar nivelada dentro de la caja bobina.
Pull thread into groove (1) of the bobbin case. Then
swing thread to the back pulling it over the groove
(2), then pull the thread to the back of the machine.
Tirez le fil dans la rainure (1) du boîtier de
canette. Ensuite, faites passer le fil vers
l'arrière en le tirant par dessus la rainure (2), puis
2º
1º
tirez le fil vers l'arrière de la machine.
Jale el hilo de la ranura (1) de la caja de bobina.
Luego, dé vuelta al hilo hacia atrás jalándolo por
la ranura (2), luego jale el hilo hacia atrás de la
máquina.
32
33
Page 19
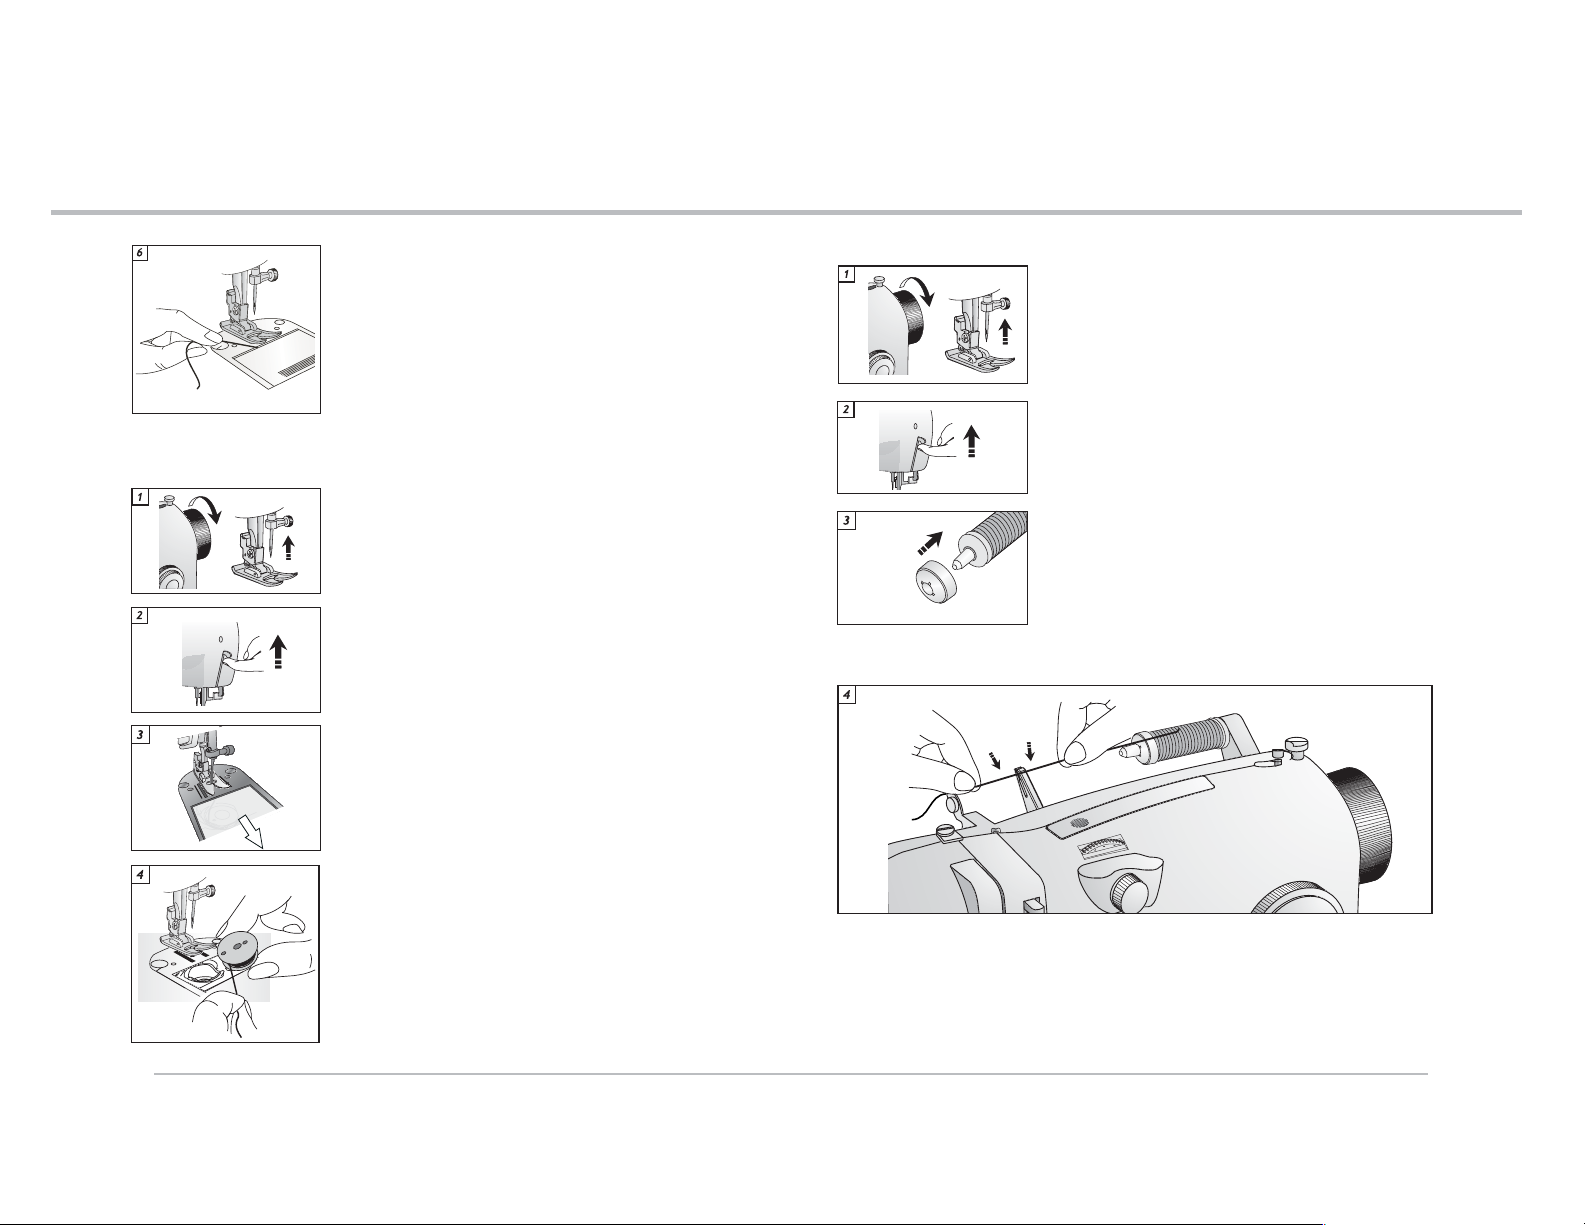
Threading the machine
Enfilage de la machine
Ensartando la Máquina
7
Threading the machine
Enfilage de la machine
Ensartando la Máquina
7
Close bobbin visor slide plate, leaving a 6” thread tail.
Fermez la plaque transparente du compartiment à canette
en laissant dépasser un bout de fil de 15 cm.
Cierre la placa transparente, dejando una hebra de
6 centimetros.
Removing the bobbin / Retirer la canette / Retirando la bobbina
Turn handwheel counter clockwise until the needle is in the
highest position.
Tournez le volant vers vous jusqu’ à ce que l’aiguille soit
dans la position la plus haute.
Gire el volante hacia usted hasta que la aguja esté en la
posición más alta.
Raise presser foot lifter.
Relevez le pied presseur.
Levante la palanca del prensatelas
Pull the clear bobbin slide plate forward to open bobbin area.
Tirez la plaque transparente vers vous.
Jale la placa transparente hacia delante para dejar al
descubierto el área de la bobina.
Threading the needle /
Enfiler le fil d'aiguille / Enhebrado de la aguja
Turn handwheel counter clockwise until the needle is in the
highest position.
Tournez le volant vers vous jusqu'à ce que l'aiguille soit
dans la position la plus haute.
Gire el volante hacia usted hasta que la aguja
esté en la posición más alta.
Raise presser foot lifter.
Relevez le pied presseur.
Levante la palanca del prensatelas.
Slide thread onto horizontal spool pin. Secure thread in place
with either the large or small spool pin holder, depending on the
size of your thread spool.
Placez la bobine de fil sur le porte-bobine horizontal. Fixez
le fil dans la bonne position avec le grand ou le petit
etrier de bobine, suivant la taille de votre bobine de fil.
Deslice el hilo en el portacarrete horizontal. Asegure el hilo en
su sitio con el sujetador de carrete pequeño o grande,
dependiendo del tamaño del carrete de hilo.
34
Using your fingernail, remove bobbin from bobbin case.
Retirez la canette avel le bout du doigt.
Usando las uñas, quite la bobina de la caja bobina.
Pull the thread from the spool, hold firmly over the first thread guide. Then push the
thread down, snapping it into the thread guide.
Tirez le fil de la bobine. Maintenez-le fermement au-dessus du premier guide-fil.
Ensuite, tirez les fils vers le bas pour les introduire dans le guide-fil.
Jale el hilo del carrete, sostenga con firmeza sobre el primer guía hilos.
Luego bájelo, enganchándolo en guía hilos.
35
Page 20
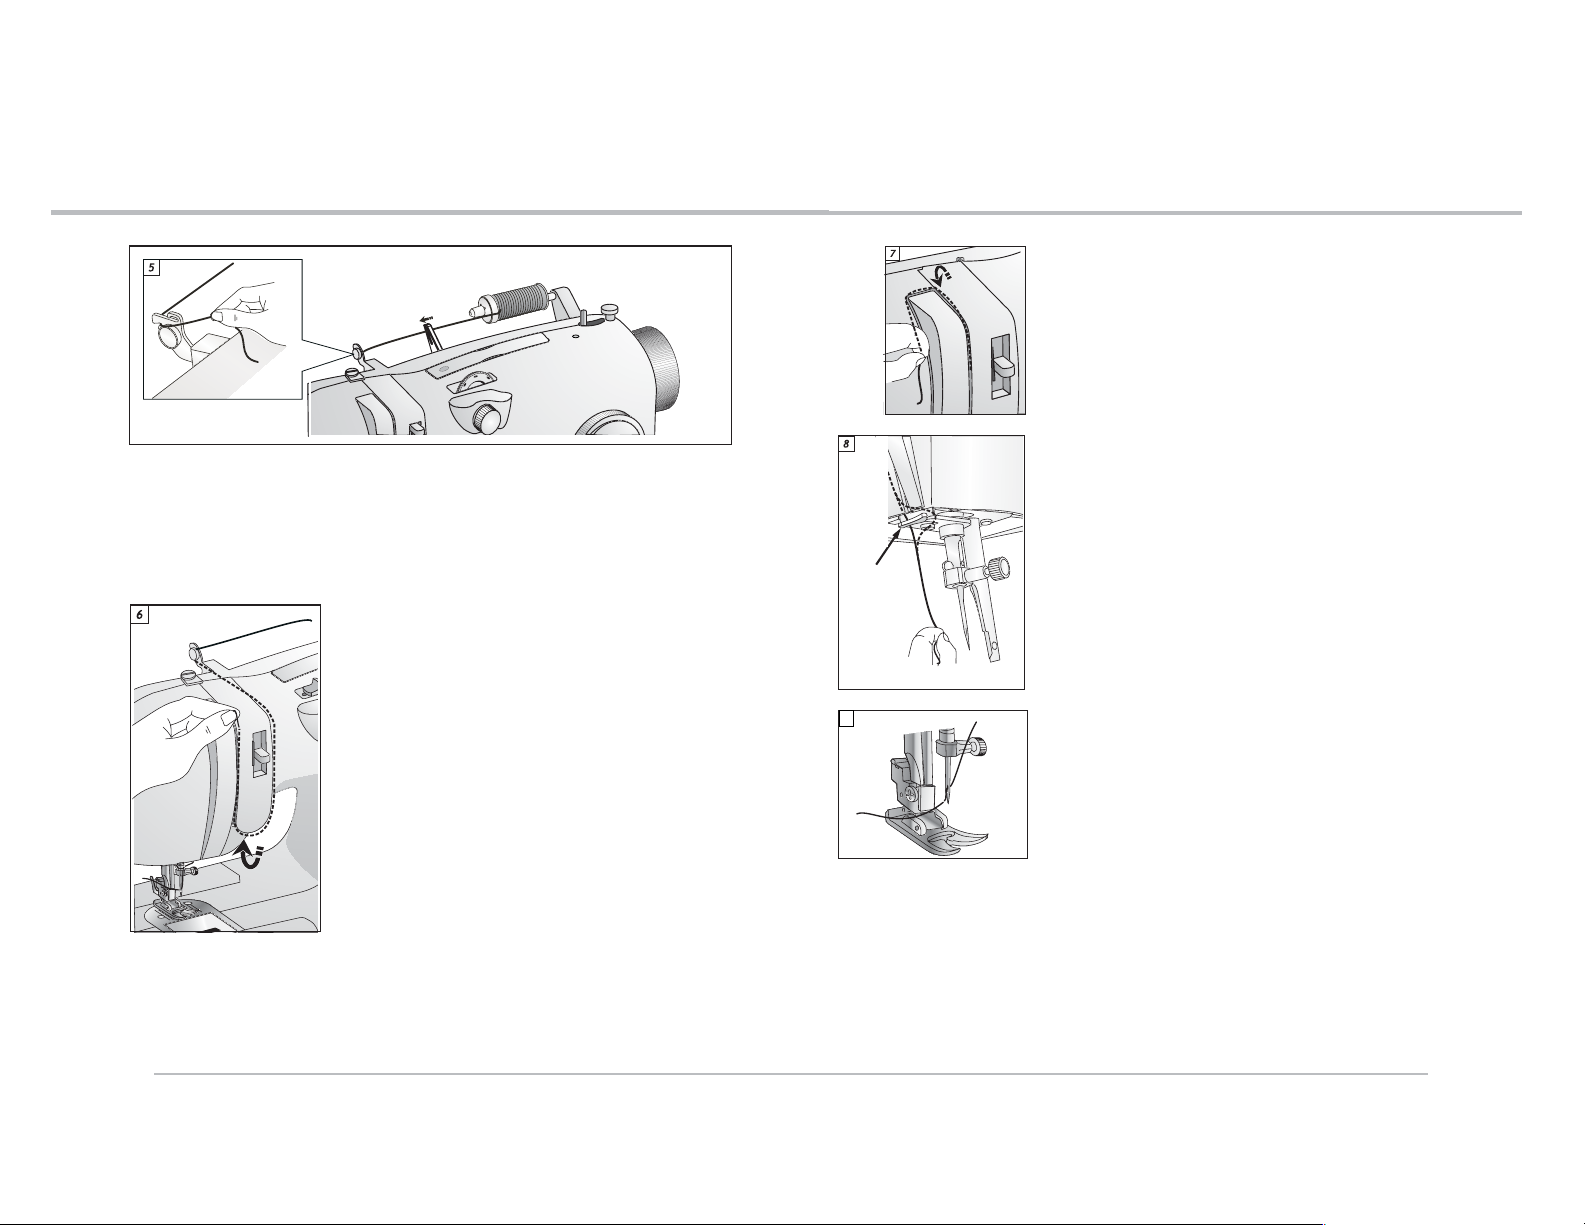
Threading the machine
Enfilage de la machine
Ensartando la Máquina
7
Pull thread out from the spool through the second thread
guide.
Tirez le fil de la bobine et faites-le passer dans le
deuxième guide-fil.
Jale el hilo de la carrete por el segundo guía hilo.
Firmly hold the thread close to the spool with your right hand.
Then holding the thread-end in your left hand, follow the
thread guides. The thread should be taut as it goes through
the guides.
Tenez fermement le fil près de la bobine de la main droite,
puis en tenant l'extrémité du fil de la main gauche, faitesle passer en suivant les guide-fil. Le fil doit être bien
tendu quand il passe dans les guide-fil.
Sostenga firmemente el hilo cerca al carrete con la mano
derecha, luego el extremo del hilo con la mano izquierda,
siga el guía hilos. El hilo debe estar tenso en las guías.
Threading the machine
Enfilage de la machine
Ensartando la Máquina
Continue to hold the thread firmly, as you thread the machine.
Continuez à tenir le fil bien fermement pendant que vous
enfilez la machine.
Continúe sosteniendo el hilo con firmeza, mientras ensarta
la máquina
Slide the thread behind the metal thread guide.
Faites passer le fil derrière le guide-fil métallique.
Deslice el hilo detrás del guía hilos metálico.
9
Pass the thread through the eye of the needle from
front to back.
Faites passer le fil dans le chas de l'aiguille de l'avant
vers l'arrière.
Pase el hilo por el ojo de la aguja desde el frente hacia atrás.
7
36
37
Page 21
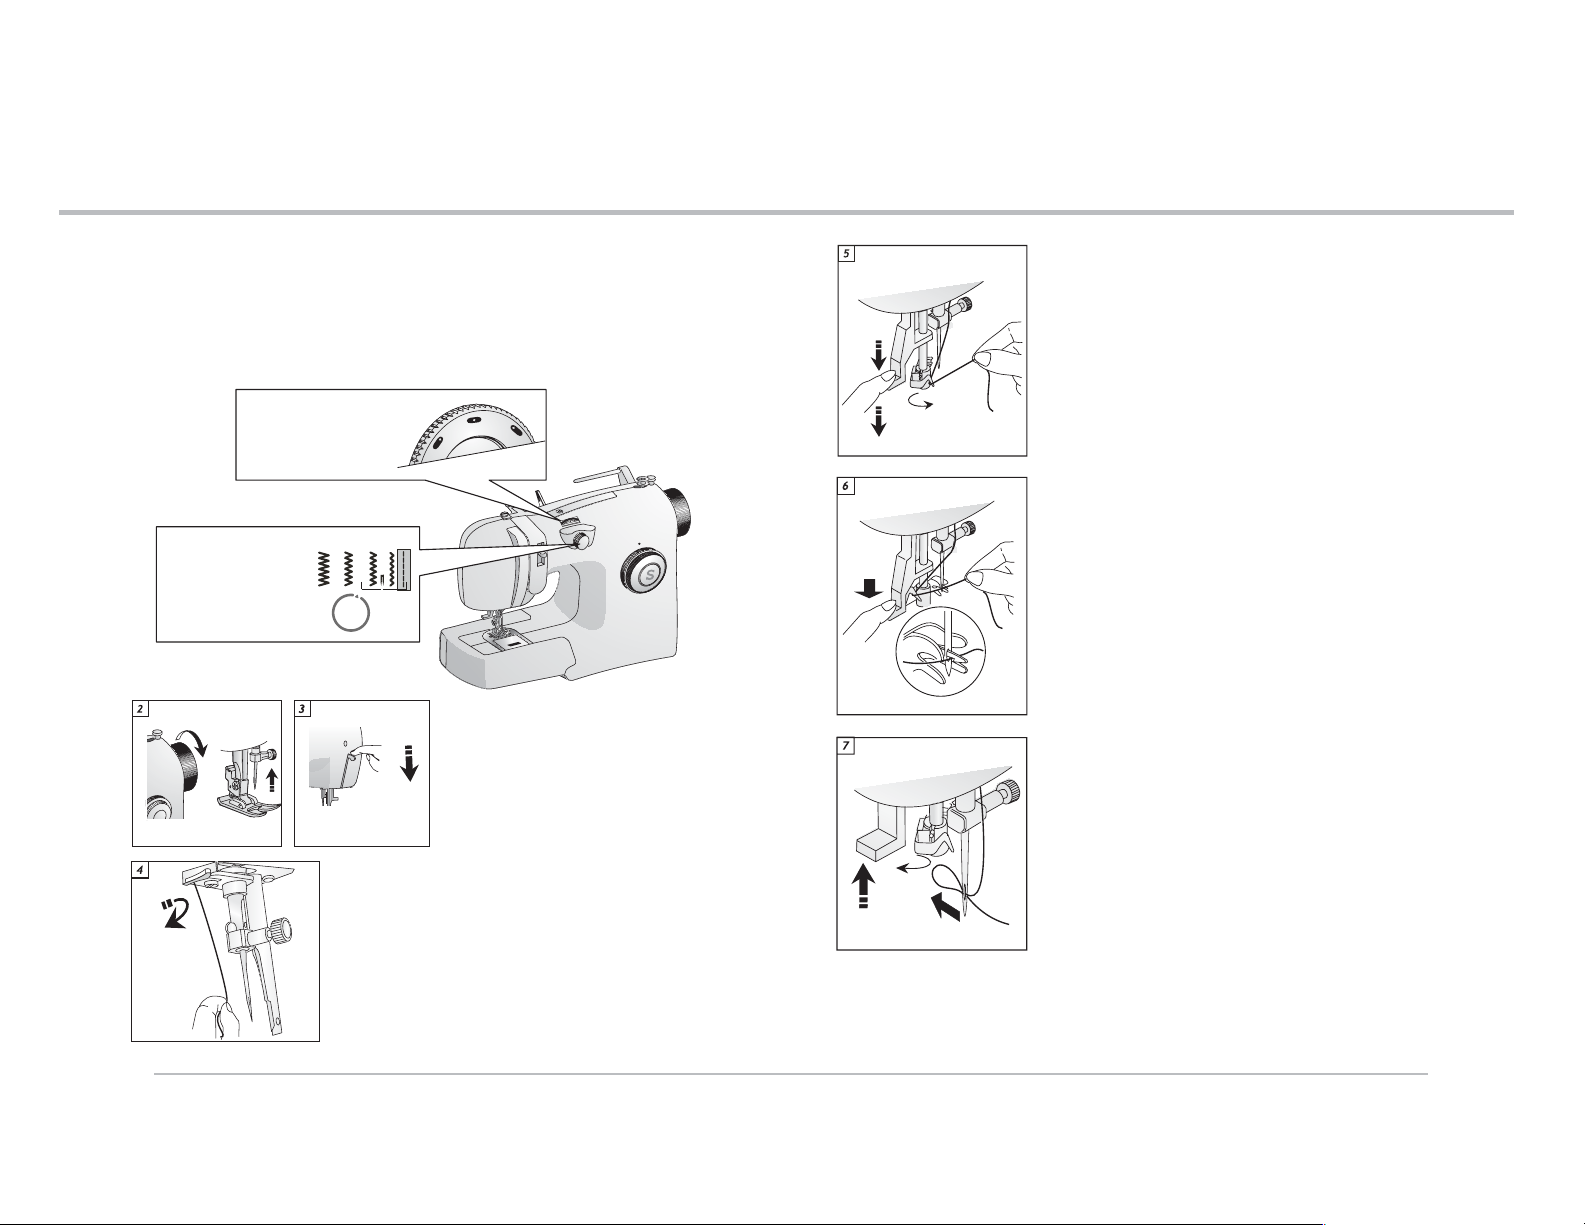
Threading the machine
Enfilage de la machine
Ensartando la Máquina
7
Threading the machine
Enfilage de la machine
Ensartando la Máquina
7
Automatic Needle Threader
Enfile-aiguille automatique
Ensartando la máquina
To use the Automatic needle threader; thread the machine, stopping at the needle, and set
the machine as follows:
Pour utiliser l'enfile-aiguille automatique, enfilez la machine en vous arrêtant à l'aiguille,
puis réglez la machine de la façon suivante:
Para usar el ensartador automático de aguja, ensarte la máquina, y deténgase en la aguja,
luego ajuste la máquina como sigue:
Needle position: Center
Position de l'aiguille:
Posición de aguja:
Stitch width:
Largeur du point:
Ancho de la puntada:
Straight
point droit
Recta
centrale
Centro
Turn handwheel counter clockwise until the
needle is in the highest position.
Lower the presser foot lifter.
Tournez le volant vers vous jusqu'à ce que
l'aiguille soit dans la position la plus haute.
Abaissez le pied presseur.
Gire el volante hacia usted hasta que la aguja
esté en la posición más alta.
Baje la palanca del prensatelas
Pull the Automatic needle threader lever down, and place the
thread as illustrated.
Poussez la manette de l'enfile-aiguille automatique vers
le bas et positionnez le fil conformément à l'illustration.
Jale la palanca del ensartador automático de aguja hacia
abajo y coloque el hilo como muestra la imágen.
Pull the automatic needle threader down until the wire hook
passes through the needle’s eye. Guide the thread into hooked
end and pull the thread upward.
Abaissez la manette de l'enfile-aiguille automatique
jusqu'à ce que le crochet métallique passe dans le chas de
l'aiguille. Faites passer le fil dans l'extrémité crochetée,
puis tirez vers le haut.
Jale hacia abajo el ensartador automático hasta que el gancho
de alambre pase por el ojo de la aguja. Guíe el hilo por el
extremo del gancho y jale el hilo hacia arriba.
Release the threader lever and thread simultaneously, and
needle will be threaded automatically.
Relâchez en même temps la manette de l'enfile-aiguille et
le fil. L'aiguille est alors enfilée.
Libere la palanca del ensartador y el hilo al mismo tiempo,
así la aguja se ensartará de forma automática.
38
Pull thread to the left.
Tirez le fil vers la gauche.
Jale el hilo a la izquierda.
39
Page 22
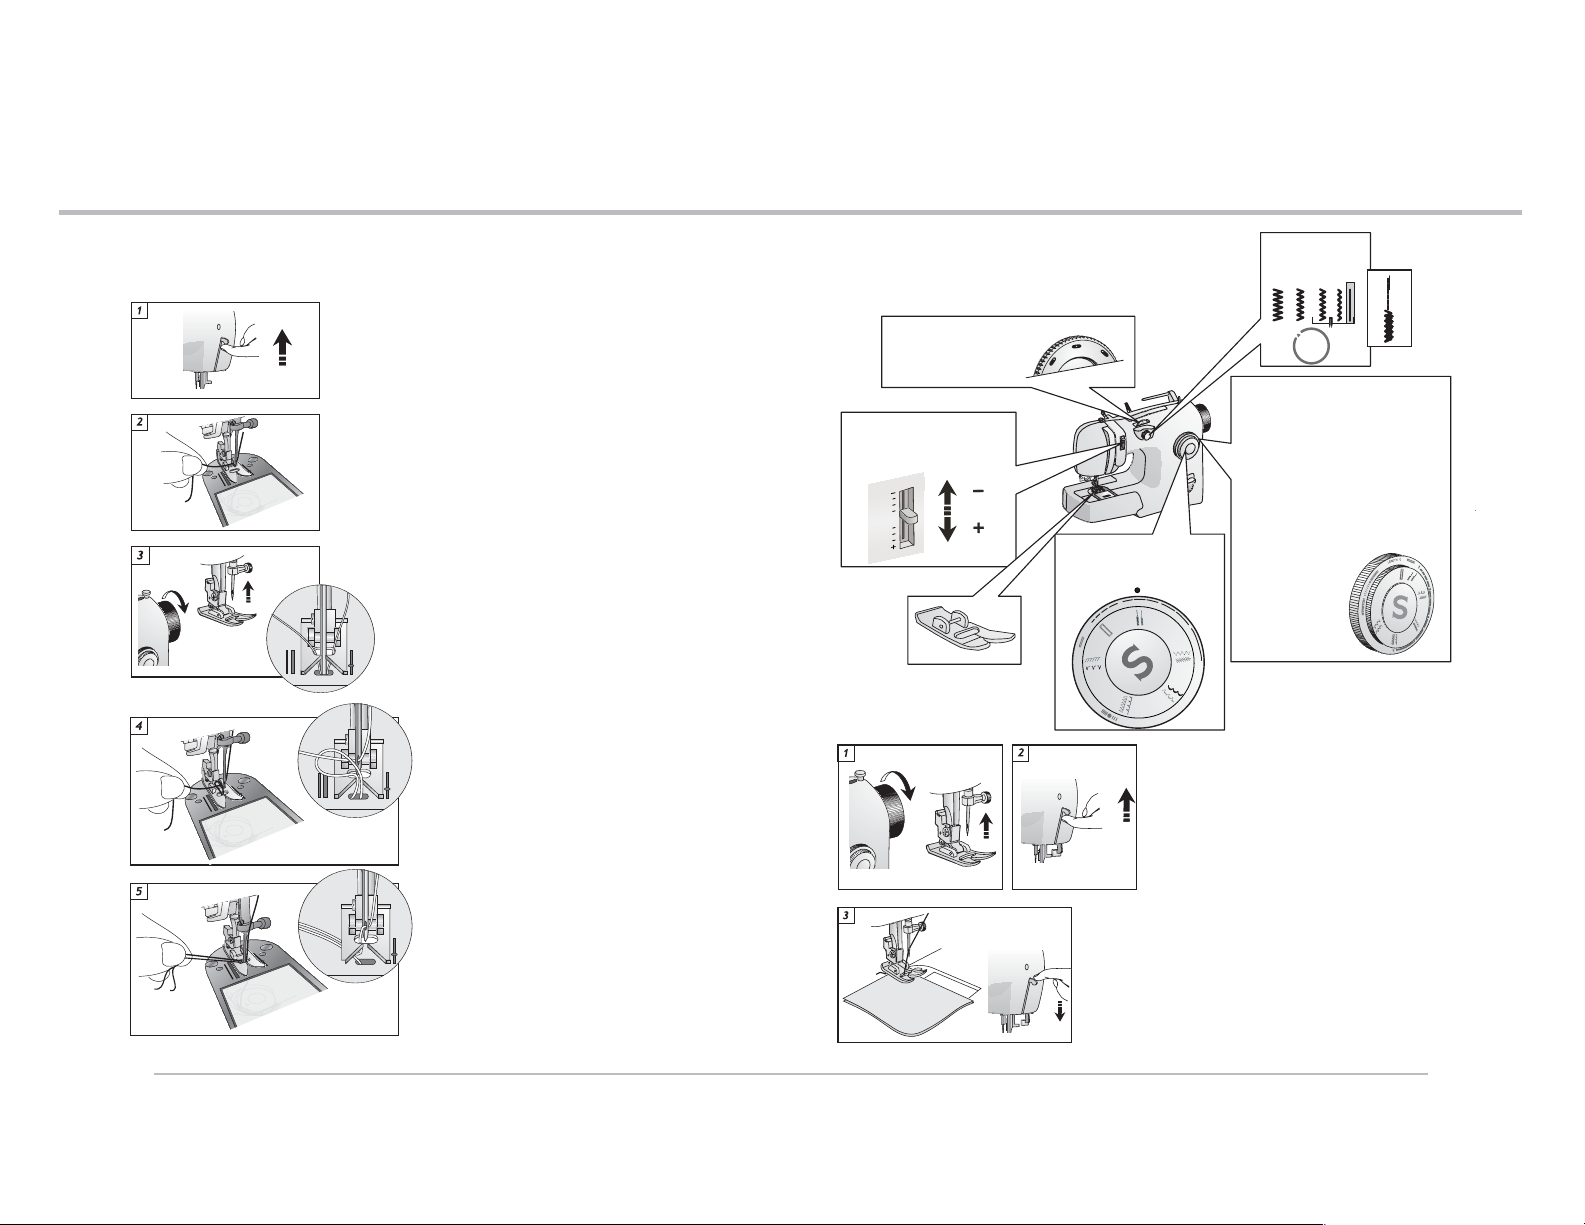
Threading the machine
Enfilage de la machine
Ensartando la Máquina
7
Straight Stitching
Points droits
Puntada Recta
8
Raising the bobbin thread
Remonter le fil de canette
Sacando el hilo de la bobina
Raise presser foot lifter.
Relevez le pied presseur.
Levante la palanca del prensatelas.
Hold needle thread loosely with your left hand. Turn the
handwheel toward you with your right hand, first lowering
the needle and continuing until the needle comes to its
highest position.
Retenez le fil d'aiguille de façon lâche avec la main
gauche. Tournez le volant vers vous de la main droite pour
abaisser l'aiguille et continuez jusqu'à ce que l'aiguille
soit dans la position la plus haute.
Sostenga el hilo de la aguja holgado con la mano
izquierda. Gire el volante hacia usted con la mano
derecha, bajando primero la aguja y continuando
hasta que la aguja llegue a su posición más alta.
Lightly pull up the needle thread, and pick up
the bobbin thread which will appear through
the needle plate slot. Then pull both threads
to the back of the machine, leaving a 6” thread
tail.
Tirez légèrement le fil d'aiguille et saisissez le
fil de canette qui apparaît dans la fente de la
plaque à aiguille. Ensuite, tirez les deux fils
vers l'arrière de la machine et laissez
dépasser des bouts de fil de 15 cm.
Jale ligeramente hacia arriba el hilo de la aguja
y tome el hilo de la bobina que aparece por la
ranura de la placa aguja. Entonces jale ambas
hebras hacia atrás de la máquina, dejando un
extremo de 6 centimetros.
Needle position
Position de l'aiguille
Posición de la aguja
Start with the Needle thread
tension in the Auto position
Tension du fil d'aiguille
Tensión de hilo
AUTO
For a very close stitch, set the Stitch
Length dial at a smaller number, such
as “2”. For a longer stitch, set at a
higher number, such as “5”.
Pour coudre des points très serrés,
réglez la longueur du point sur un petit
nombre, par ex. sur «2». Pour obtenir
un point plus long, réglez sur un
nombre plus grand, par ex. sur «5».
Para una puntada muy cerrada, ajuste el
selector de Largo de Puntada a un número
más pequeño como «2». Para una puntada
más larga, ajuste a un número más alto,
4
5
como «5».
Stitch length dial
Selector del largo
Pattern selector dial
Sélecteur de point
Selector de puntadas
3
2
1
0
Turn handwheel counter clockwise until the
needle is in the highest position.
Raise presser foot lifter and slide fabric under
the presser foot.
Tournez le volant vers vous jusqu'à ce que
l'aiguille soit dans la position la plus haute.
Relevez le pied presseur et mettez le tissu
sous le pied presseur.
Gire el volante hacia usted hasta que la aguja
esté en la posición más alta.
Lower the presser foot.
Abaissez le pied presseur.
Baje la palanca del prensatelas
Stitch width
Largeur du point
Ancho de puntada
Longueur du
point
de puntada
40
41
Page 23
Straight Stitching
Points droits
Puntada Recta
8
Basting
Bâtir
Hilvanado
9
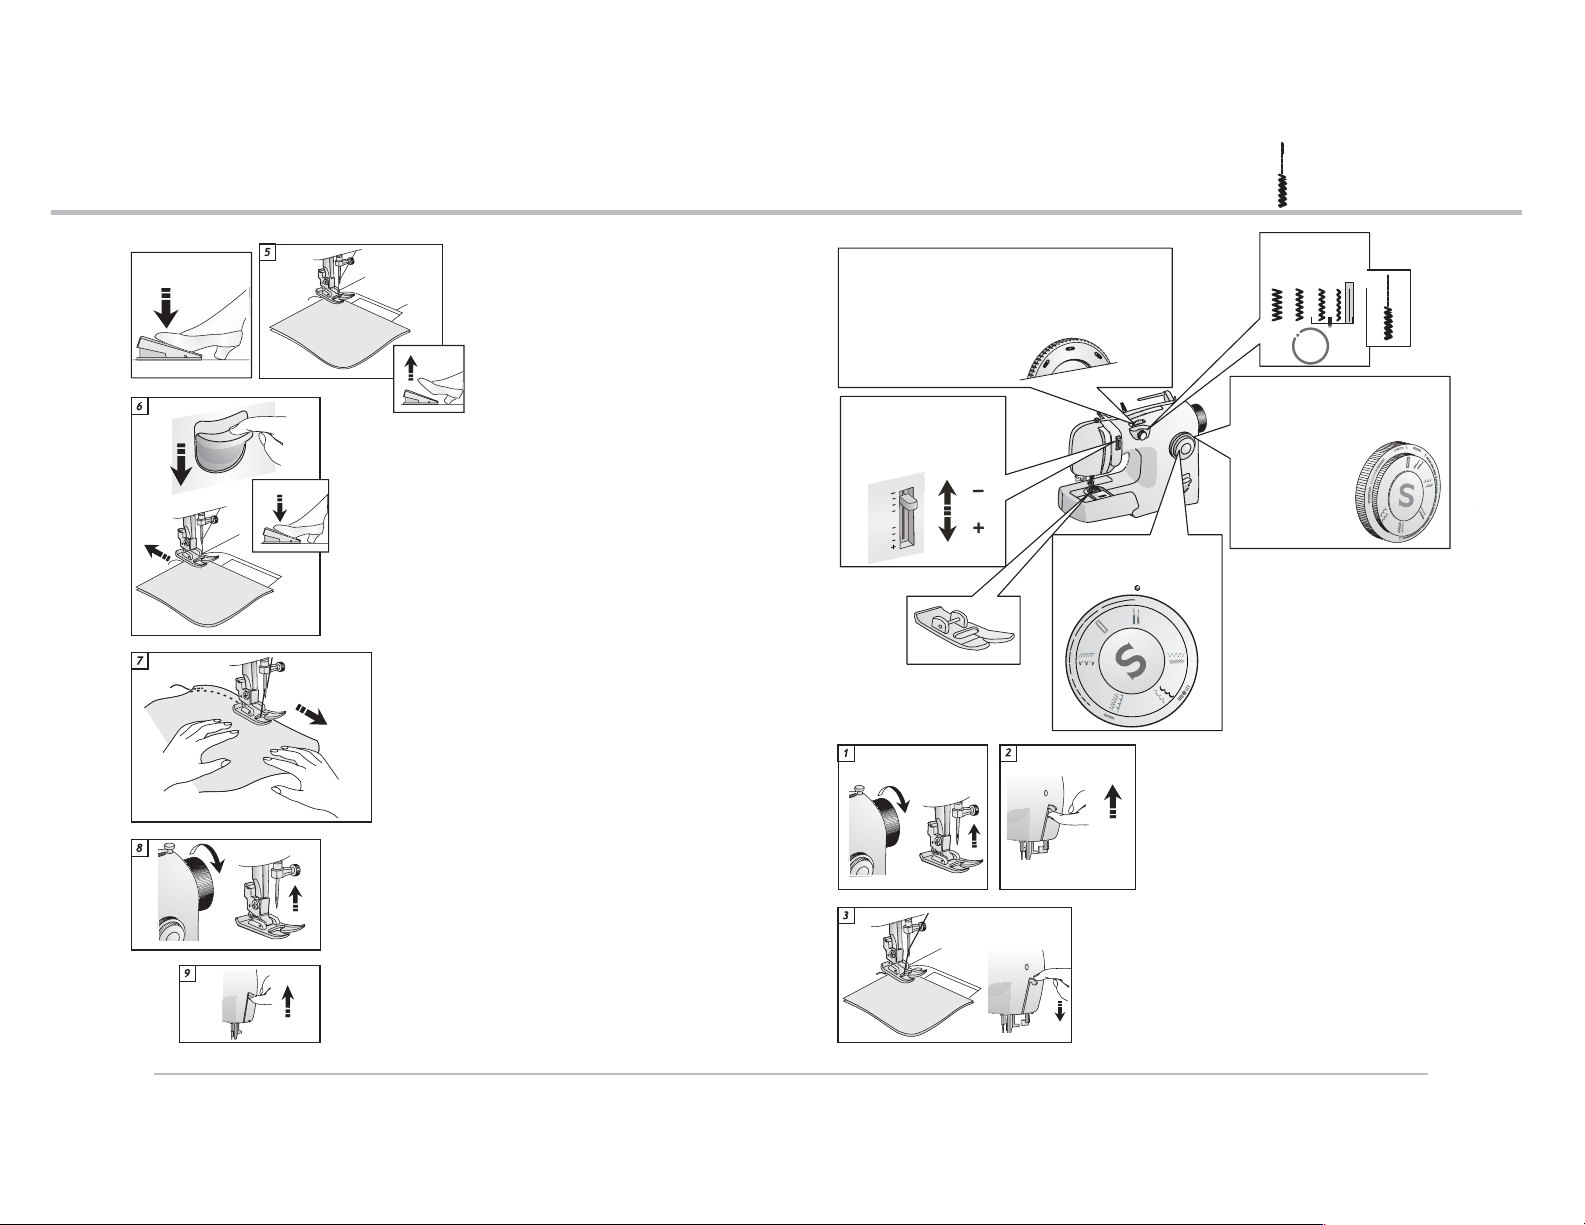
Begin sewing.
Sew 5-6 stitches, then stop.
Commencer la couture.
Cousez cinq ou six points, puis arrêtez.
Comience a coser.
Cosa 5-6 puntadas, luego deténgase.
Hold the reverse button down, and sew.
The machine will sew in reverse, reinforcing the
stitching. Sew 5-6 stitches then release the reverse
button.
Appuyez sur le bouton de marche arrière et maintenez-le
ainsi. Cousez. La machine coud alors en marche arrière,
renforçant ainsi la couture. Piquez cinq ou six points, puis
relâchez le bouton de marche arrière.
Mantenga presionado el botón de retroceso, y cosa.
La maquina coserá en reversa, reforzando la puntada. Cosa
5-6 puntadas luego libere el botón de retroceso.
Continue sewing. At the end, reinforce the stitching
by pushing the reverse dial again.
Continuez la couture. À la fin, renforcez la couture
en appuyant à nouveau sur le bouton de marche
arrière.
Continúe cosiendo. Al final, refuerce la puntada
presionando de nuevo el botón de retroceso.
Turn handwheel counter clockwise until the needle is in the
highest position, raise the presser foot lifter and slide fabric
from under the presser foot.
Tournez le volant vers vous jusqu'à ce que l'aiguille soit
dans la position la plus haute. Relevez le releveur de pied
presseur et retirez le tissu en le faisant glisser sous le
pied presseur.
Gire el volante hacia usted hasta que la aguja esté
en la posición más alta, levante la palanca del
prensatelas y retire la tela debajo del prensatelas.
Note: Any of the three needle positions can be selected when
sewing a straight stitch.
Remarque : n'importe laquelle des trois positions d'aiguille
peut être sélectionnée pour la couture au point droit.
Nota: Cualquiera de las tres posiciones de la aguja puede
seleccionarse cuando se cose con puntada recta.
Needle position
Position de l'aiguille
Posición de la aguja
Needle thread tension
Push to Negative (-)
Tension du fil d'aiguille:
poussez vers le signe (-)
Tensión de hilo
Presione a negativo(-)
AUTO
Pattern selector Dial
Sélecteur de point
Selector de puntadas
5
4
3
2
1
0
Turn handwheel counter clockwise until the
needle is in the highest position.
Raise presser foot lifter and slide fabric under
the presser foot.
Tournez le volant vers vous jusqu'à ce que
l'aiguille soit dans la position la plus haute.
Relevez le pied presseur et
mettez le tissu sous le pied presseur.
Gire el volante hacia usted hasta que la aguja
esté en la posición más alta.
Levante la palanca del prensatelas.
Lower the presser foot.
Abaissez le pied presseur.
Baje la palanca del prensatelas.
Stitch width
Largeur du point
Ancho de puntada
For Basting set Stitch length to “5”.
Pour bâtir, régler la longueur de point
sur « 5 ».
Para hilvanar ajuste el largo de puntada
a "5".
Stitch length Dial
Longueur du
Selector del largo
point
de puntada
42
43
Page 24
9
Basting
Bâtir
Hilvanado
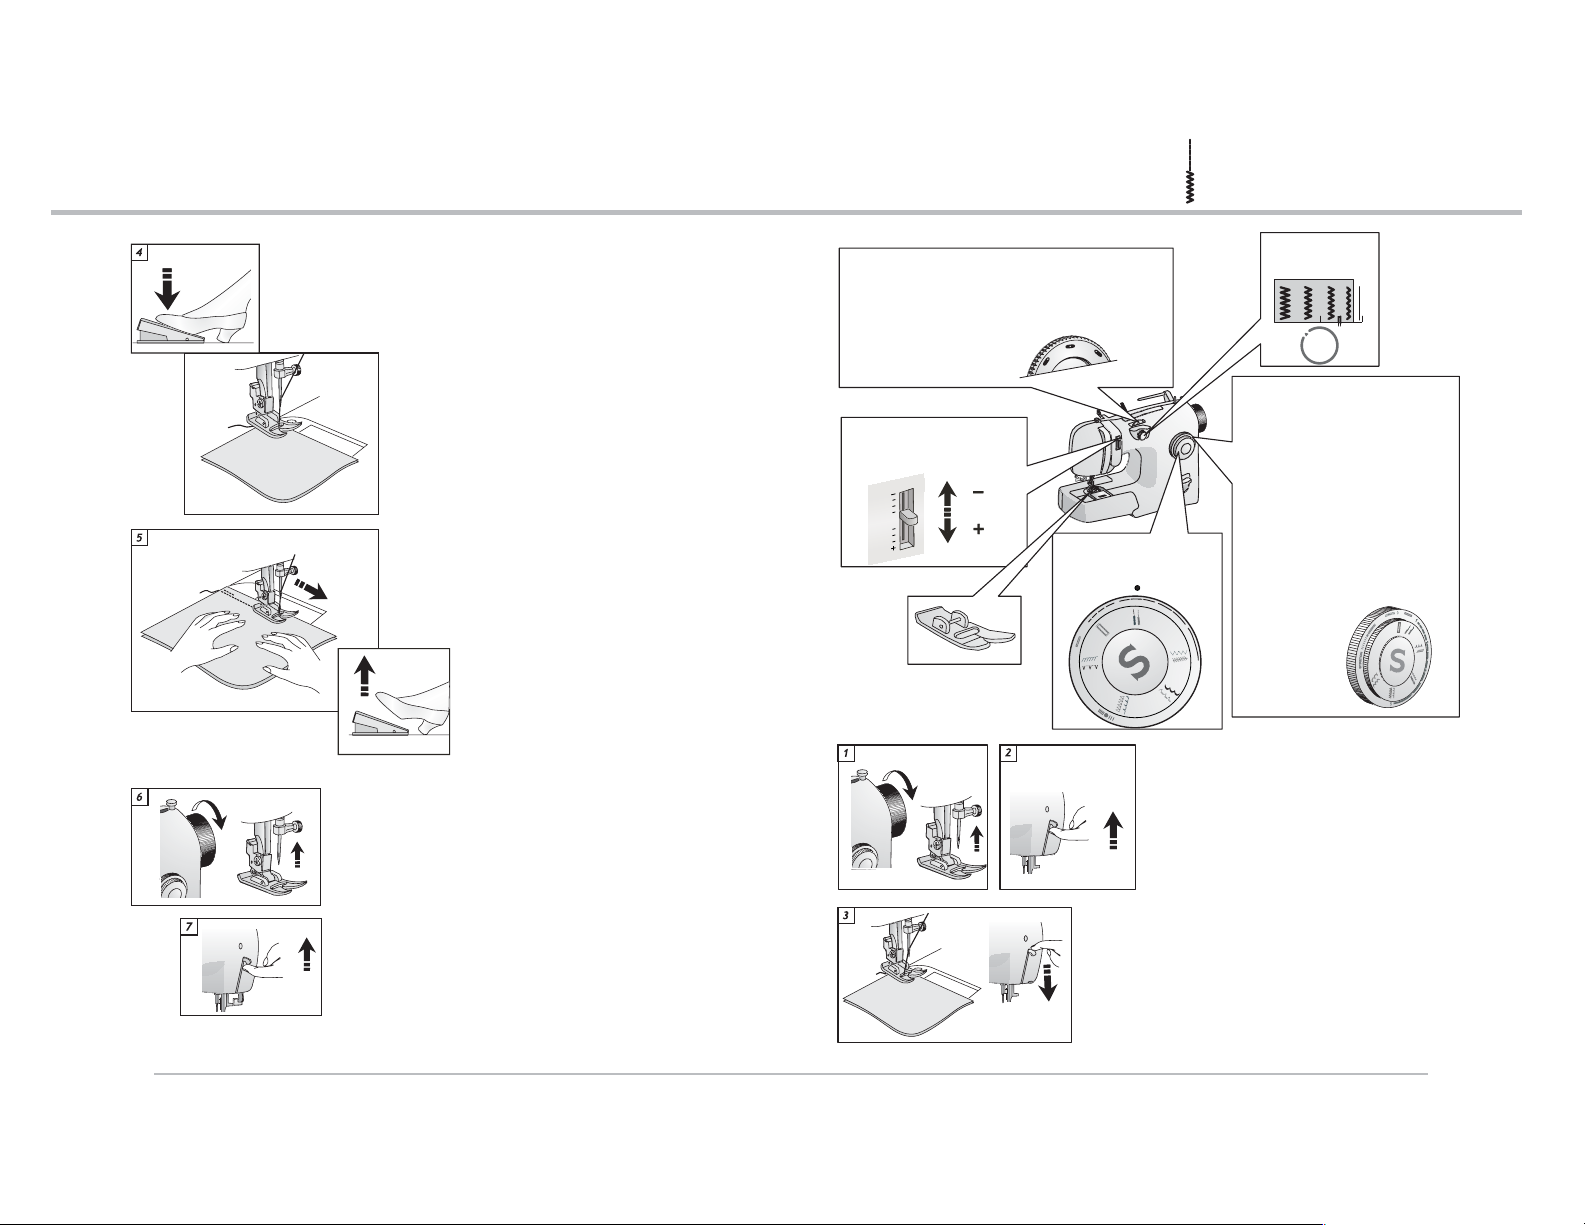
Sew
Cousez
Comience a coser.
Continue sewing until finished.
Continuez la couture jusqu'à la fin.
Continúe cosiendo hasta terminar la costura.
Zig-zag Stitching
Note: Any of the needle positions can be selected.
Remarque : n'importe laquelle des trois positions d'aiguille
peut être sélectionnée pour la couture au point droit.
Nota: Cualquiera de las tres posiciones de la aguja puede
seleccionarse cuando se cose con puntada recta.
Needle position
Position de l'aiguille
Posición de la aguja
Start with the Needle thread
tension in the Auto position
Tension du fil d'aiguille
Tensión de hilo
AUTO
Pattern selector dial
Sélecteur de point
Selector de puntadas
2
1
0
Puntada Zigzag
3
4
5
Points zigzags
10
Stitch width
Stitch width
Largeur du point
Ancho de puntada
For a very close stitch, set the Stitch
Length dial at a smaller number, such as
“2”. For appliqueing set “0.5” or below.
For a longer stitch, set at a higher
number, such as “5”.
Pour coudre des points très serrés,
réglez la longueur du point sur un petit
nombre, par ex. sur « 2 ». Pour appliqués
régler sur « 0,5 » ou moins. Pour
obtenir un point plus long, réglez sur un
nombre plus grand, par ex. sur « 5 ».
Para una puntada muy cerrada, ajuste el
largo de puntada a un número inferior,
como “2”. Para aplicaciones ajuste a
“5” o menos. Para una puntada más larga
ajuste a un número mayor, como “5”.
Stitch length dial
Longueur du
Selector del largo
point
de puntada
44
Turn handwheel counter clockwise until the needle is in the
highest position.
Tournez le volant vers vous jusqu'à ce que l'aiguille soit
dans la position la plus haute.
Gire el volante hacia usted hasta que la aguja
esté en la posición más alta.
Raise presser foot lifter and slide fabric from under the presser
foot. The stitch is very loose and can easily be pulled out.
Relevez le releveur de pied presseur et retirez le tissu en le
faisant glisser sous le pied presseur. La couture est très
lâche et peut être facilement retirée.
Levante la palanca del prensatelas y retire la tela debajo
del prensatelas.
Turn handwheel counter clockwise until the
needle is in the highest position.
Raise presser foot lifter and slide fabric under
the presser foot.
Tournez le volant vers vous jusqu'à ce que
l'aiguille soit dans la position la plus haute.
Relevez le pied presseur et
mettez le tissu sous le pied presseur.
Gire el volante hacia usted hasta que la aguja
esté en la posición más alta.
Levante la palanca del prensatelas y coloque
la tela debajo del prensatelas.
Lower the presser foot.
Abaissez le pied presseur.
Baje la palanca del prensatelas
45
Page 25
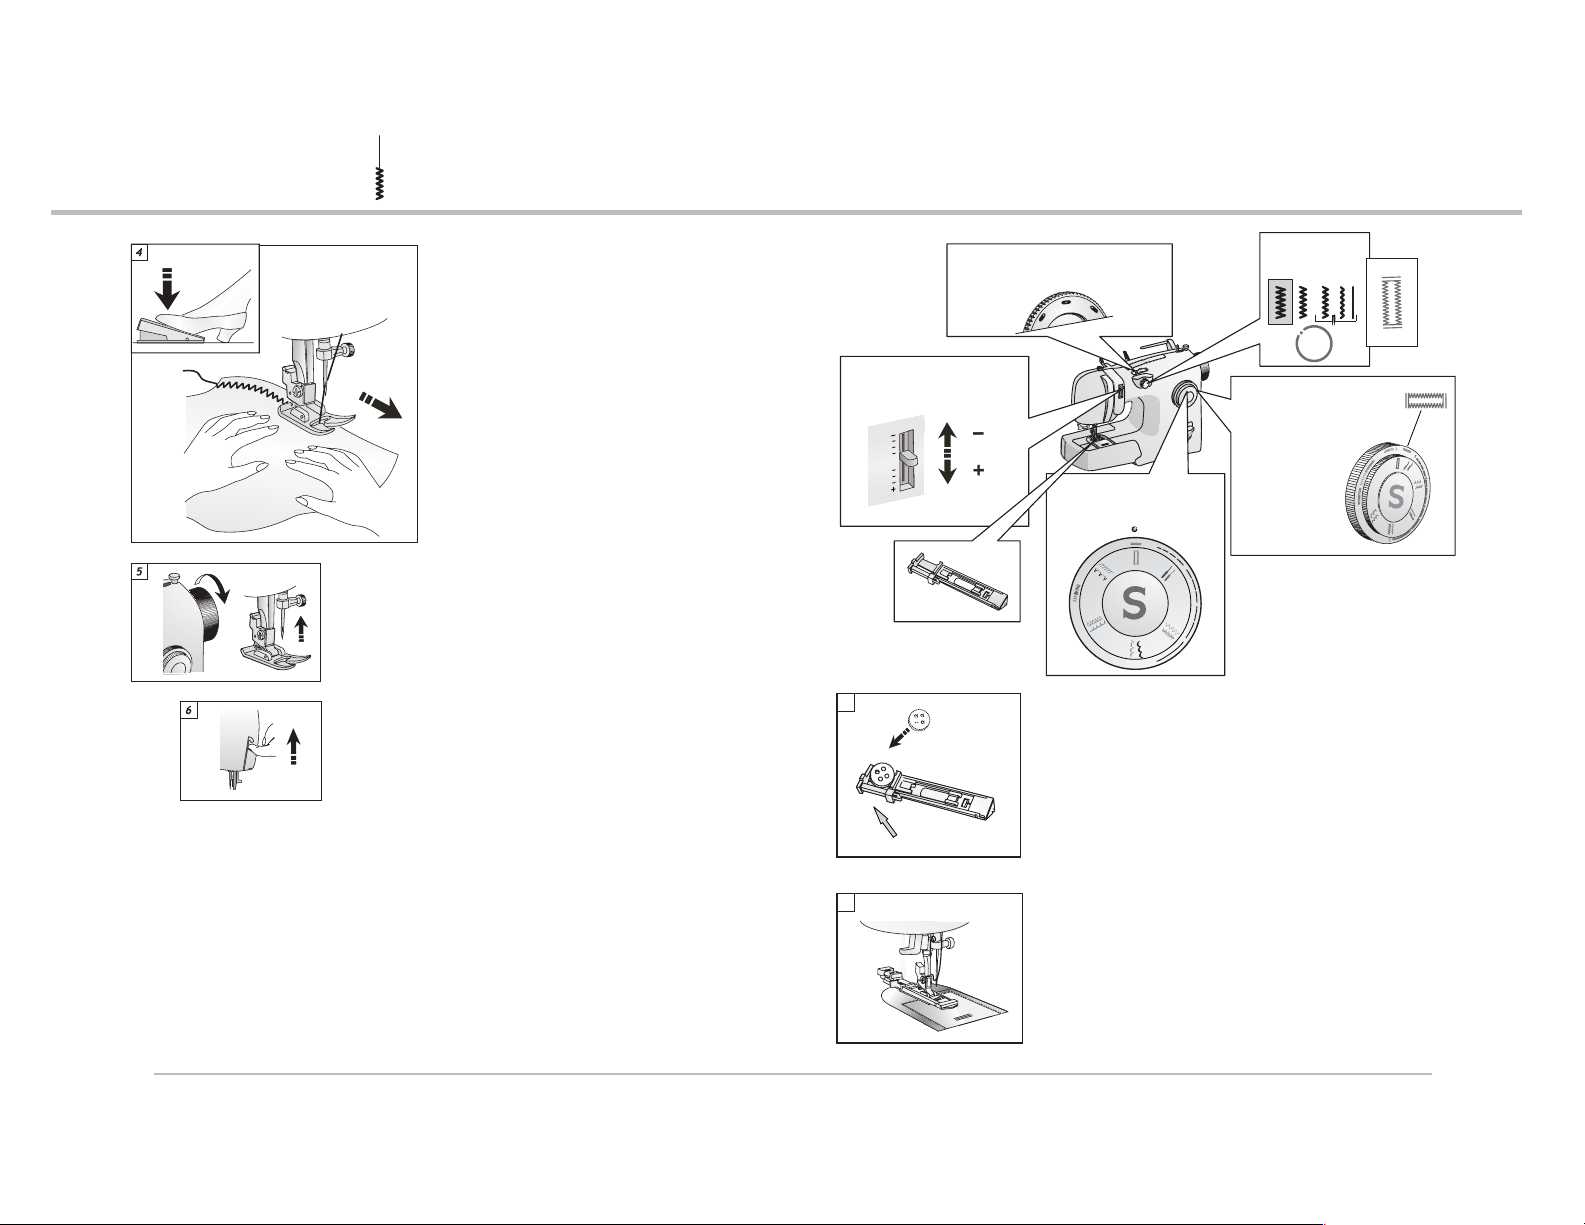
Zig-zag Stitching
Points zigzags
10
Puntada Zigzag
Buttonholes one-step
Boutonnière 1 Étape
Ojales en un paso
11
Sew.
Cousez.
Comience a coser.
When finished, turn handwheel toward you until the needle
is in the highest position.
Une fois la couture terminée, tournez le volant vers vous
jusqu'à ce que l'aiguille soit dans la position la plus haute.
Cuando termine, gire el volante hacia usted hasta que la
aguja esté en la posición más alta.
Raise presser foot lifter and slide fabric from under the
presser foot.
Relevez le pied presseur et retirez le tissu en
le faisant glisser sous le pied presseur.
Levante la palanca del prensatelas y retire la tela
debajo del prensatelas.
Needle position: Center
Position de l'aiguille: centrale
Posición de aguja: Centro
Start with the Needle thread
tension in the Auto position
Tension du fil d'aiguille
Tensión de hilo
AUTO
1
Stitch width dial
Largeur du point
Ancho de puntada
Select the buttonhole icon
Sélectionnez le symbole:
Seleccione el icono ojal.
Stitch length dial
Longueur du
Pattern selector Dial
Sélecteur de point
Selector de puntadas
1
0
5
Slide buttonholer open and insert the button.
The buttonhole cutting space will be sewn to match the
size of the button.
Ouvrez le pied boutonnière en le faisant glisser et insérez le
bouton. La boutonnière sera cousue d'une longueur
correspondant aux dimensions du bouton.
Abra el ojalador e inserte el botón. El espacio de corte del ojal
será cosido a la medida del botón.
Selector del largo
2
3
4
point
de puntada
46
2
Snap on the buttonhole foot with end holding the button
to the back. Slide fabric under foot and lower presser foot.
Enclenchez le pied boutonnière. L'extrémité qui contient le
bouton doit être placée vers l'arrière. Glisser le tissu sous le
pied, et abaisser le pied presseur.
Colque el prensatelas para ojal en el extremo sosteniendo el
botón atrás.
47
Page 26
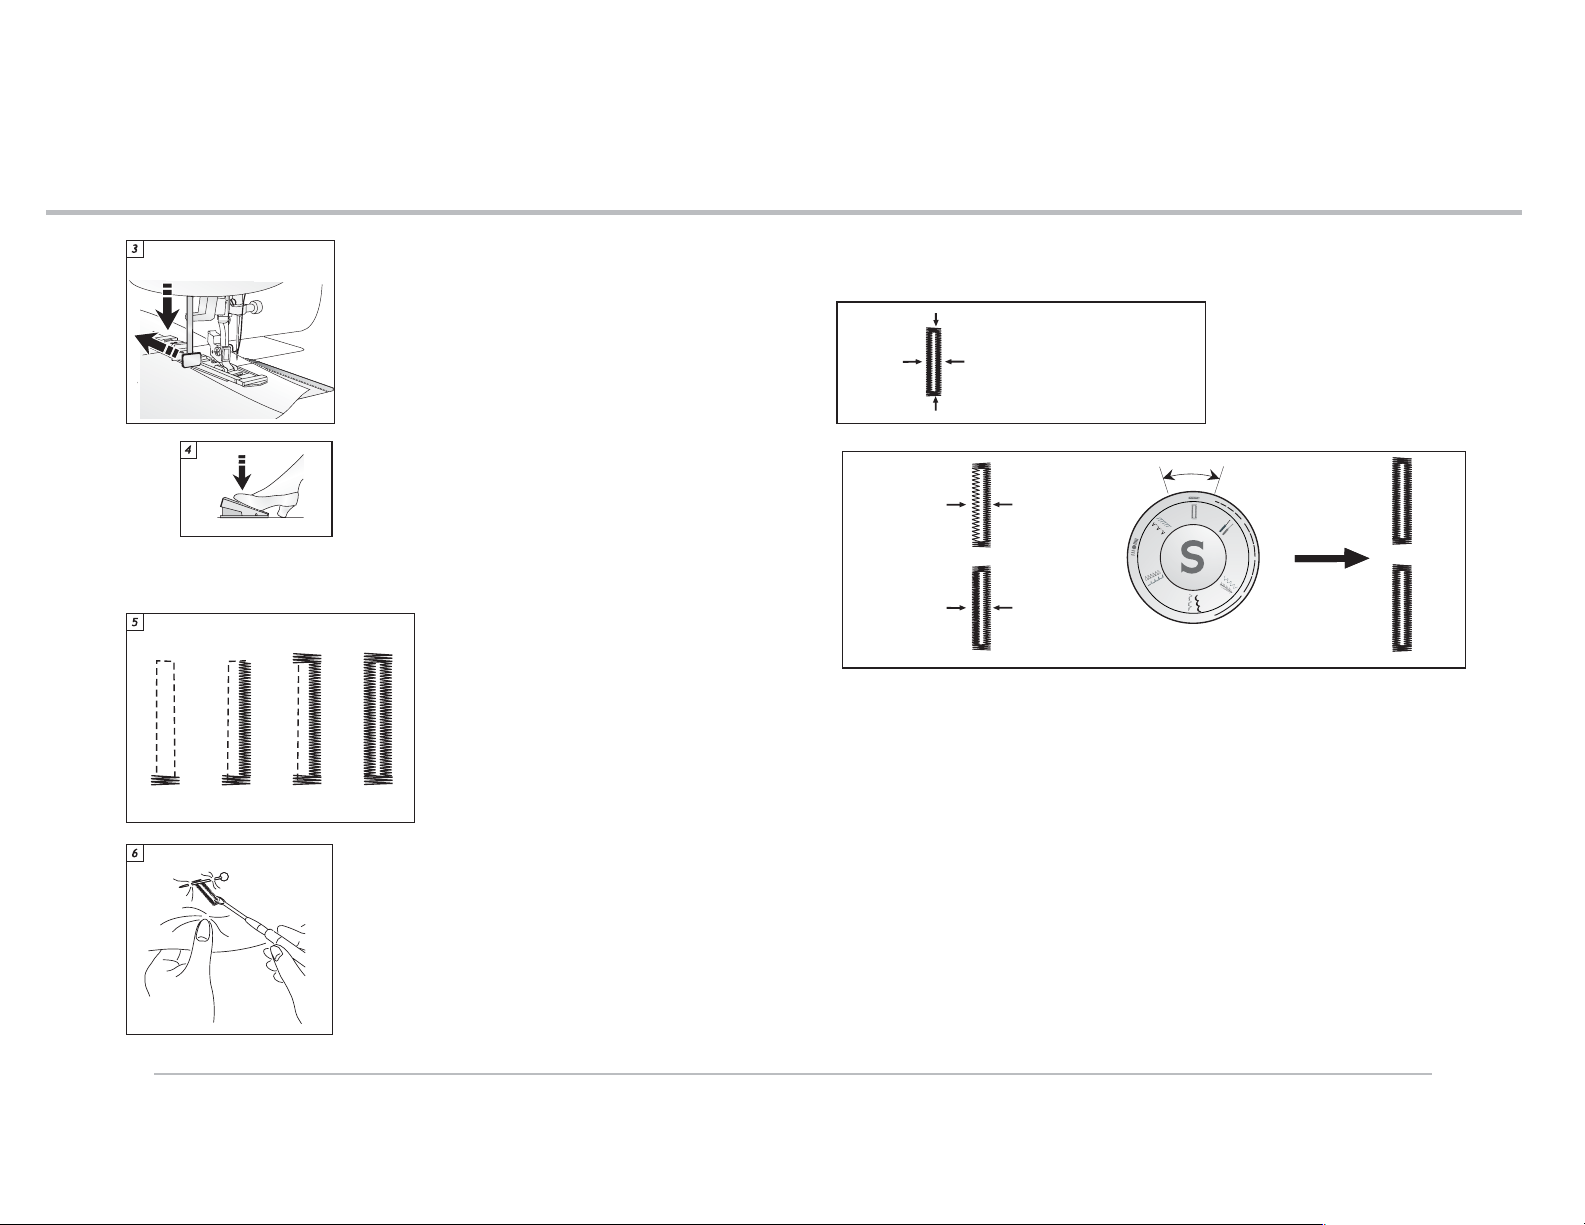
11
Buttonholes one-step
Boutonnière 1 Étape
Ojales en un paso
Buttonholes one-step
Boutonnière 1 temps
Ojales en un paso
11
Gently pull the buttonhole engaging lever down and push it
to the back.
Abaissez délicatement la manette de boutonnière, puis
poussez la vers l'arrière.
Jale con cuidado la palanca del ojal y empuje hacia
atrás.
Make a practice buttonhole on a scrap of the fabric you are
using. Use an interfacing or stabilizer between the two
fabric layers.
Sew.
Réalisez une boutonnière d'essai sur un morceau du tissu
que vous utilisez. Utilisez un entoilage ou un
stabilisateur entre les épaisseurs du tissu. Cousez.
Realice un ojal de práctica en un pedazo de tela .
Utilice entretela o estabilizador entre dos capas de tela.
Comience a coser.
The buttonhole will be sewn in this order. Take
3
2
4
1
your foot off of the foot controller and stop
sewing after the step #4 (left side of the
buttonhole) is completed.
La boutonnière sera cousue selon les étapes
illustrées. Retirez votre pied du rhéostat et
arrêtez de coudre une fois l'étape #4 est
exécutée (côté gauche de la boutonnière).
El ojal se cose en este orden. Quite el pie del
pedal de control de velocidad y deje de coser
después del paso No. 4 (se completa el lado
izquierdo del ojal).
Balancing the buttonhole
Équilibrage de la boutonnière
Regulación del ojal
3
4
Too open
Trop éloignés
Muy abiertas
Too close
Trop proches
Muy cerradas
A perfect, well balanced buttonhole.
2
Une boutonnière parfaite et équilibrée.
Un ojal perfecto, bien regulado.
1
Standard
density
Densité
standard
Densidad
adecuada
Standard
density
Densité
standard
Densidad
adecuada
1
0
2
3
4
5
48
Open the buttonhole.
Coupez l'ouverture de la boutonnière.
Abra el ojal.
49
Page 27
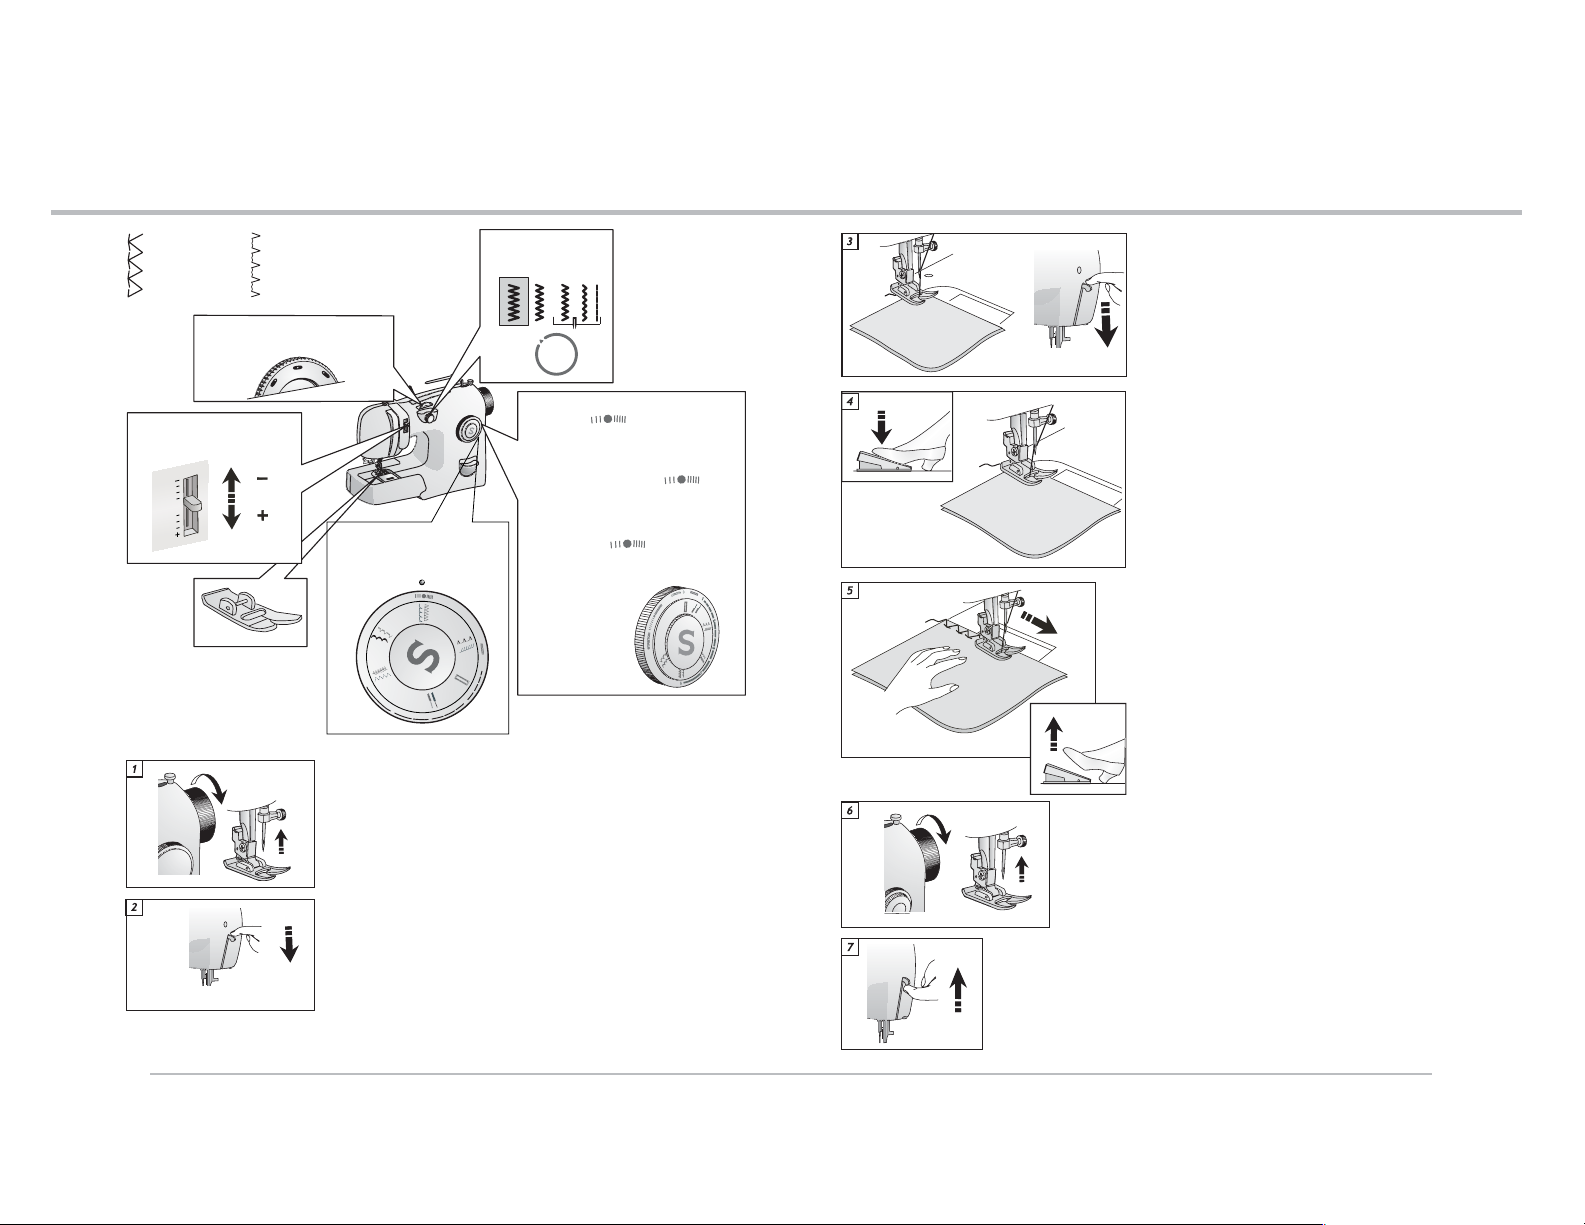
12
Overedging a seam or edge
Surjeter une couture ou un bord
Puntada tipo Overlock
Overedging a seam or edge
Surjeter une couture ou un bord
Puntada tipo Overlock
12
Model 4212
Modèle 4212
Modelo 4212
Position de l'aiguille: centrale
Start with the Needle thread
tension in the Auto position
Tension du fil d'aiguille
Tensión de hilo
AUTO
Model 4206/ 4212
Modèle 4206 / 4212
Modelo 4206/ 4212
Needle position: Center
Posición aguja: Centro
Stitch width
Largeur du point
Largo puntada
For model 4212, set the Stitch
Length to
for model 4206 set the Stitch
Length to “1”.
Pour le modèle 4212, réglez la
longueur de point sur .
Pour le modèle 4206, réglez la
longueur de point sur "1”
Pattern selector dial
Sélecteur de point
Selector de puntadas
5
4
Turn handwheel counter clockwise until the needle is in the
highest position.
Tournez le volant vers vous jusqu'à ce que l'aiguille soit
dans la position la plus haute.
Gire el volante hacia usted hasta que la aguja esté en la
posición más alta.
Raise presser foot lifter and slide fabric under the presser foot.
Relevez le pied presseur et mettez le tissu sous
le pied presseur.
Levante la palanca del prensatelas y coloque la tela
debajo del prensatelas.
2
3
Para modelo 4212 ajuste el Largo
de Puntada a
Para el modelo 4206 ajuste el Largo
de Puntada a “1”.
Stitch length dial
0
1
Longueur du
Selector del largo
point
de puntada
Lower the presser foot.
Abaissez le pied presseur.
Baje la palanca del prensatelas.
Sew, guiding the fabric so that the stitch forms
on the edge of the fabric.
Cousez en guidant le tissu de façon à ce que
le point se forme sur le bord du tissu.
Comience a coser, guiando la tela de modo que
la puntada se forme en el borde de la tela.
Continue sewing until finished.
Continuez la couture jusqu'à la fin.
Continúe cosiendo hasta que termine.
Turn handwheel counter clockwise until the needle is in the highest
position.
Tournez le volant vers vous jusqu'à ce que l'aiguille soit
dans la position la plus haute.
Gire el volante hacia usted hasta que la aguja esté en
la posición más alta.
Raise presser foot lifter and slide fabric from under the presser foot.
Relevez le pied presseur et retirez le tissu en le
faisant glisser sous le pied presseur.
Levante la palanca del prensatelas y retire la tela
debajo del prensatelas.
50
51
Page 28
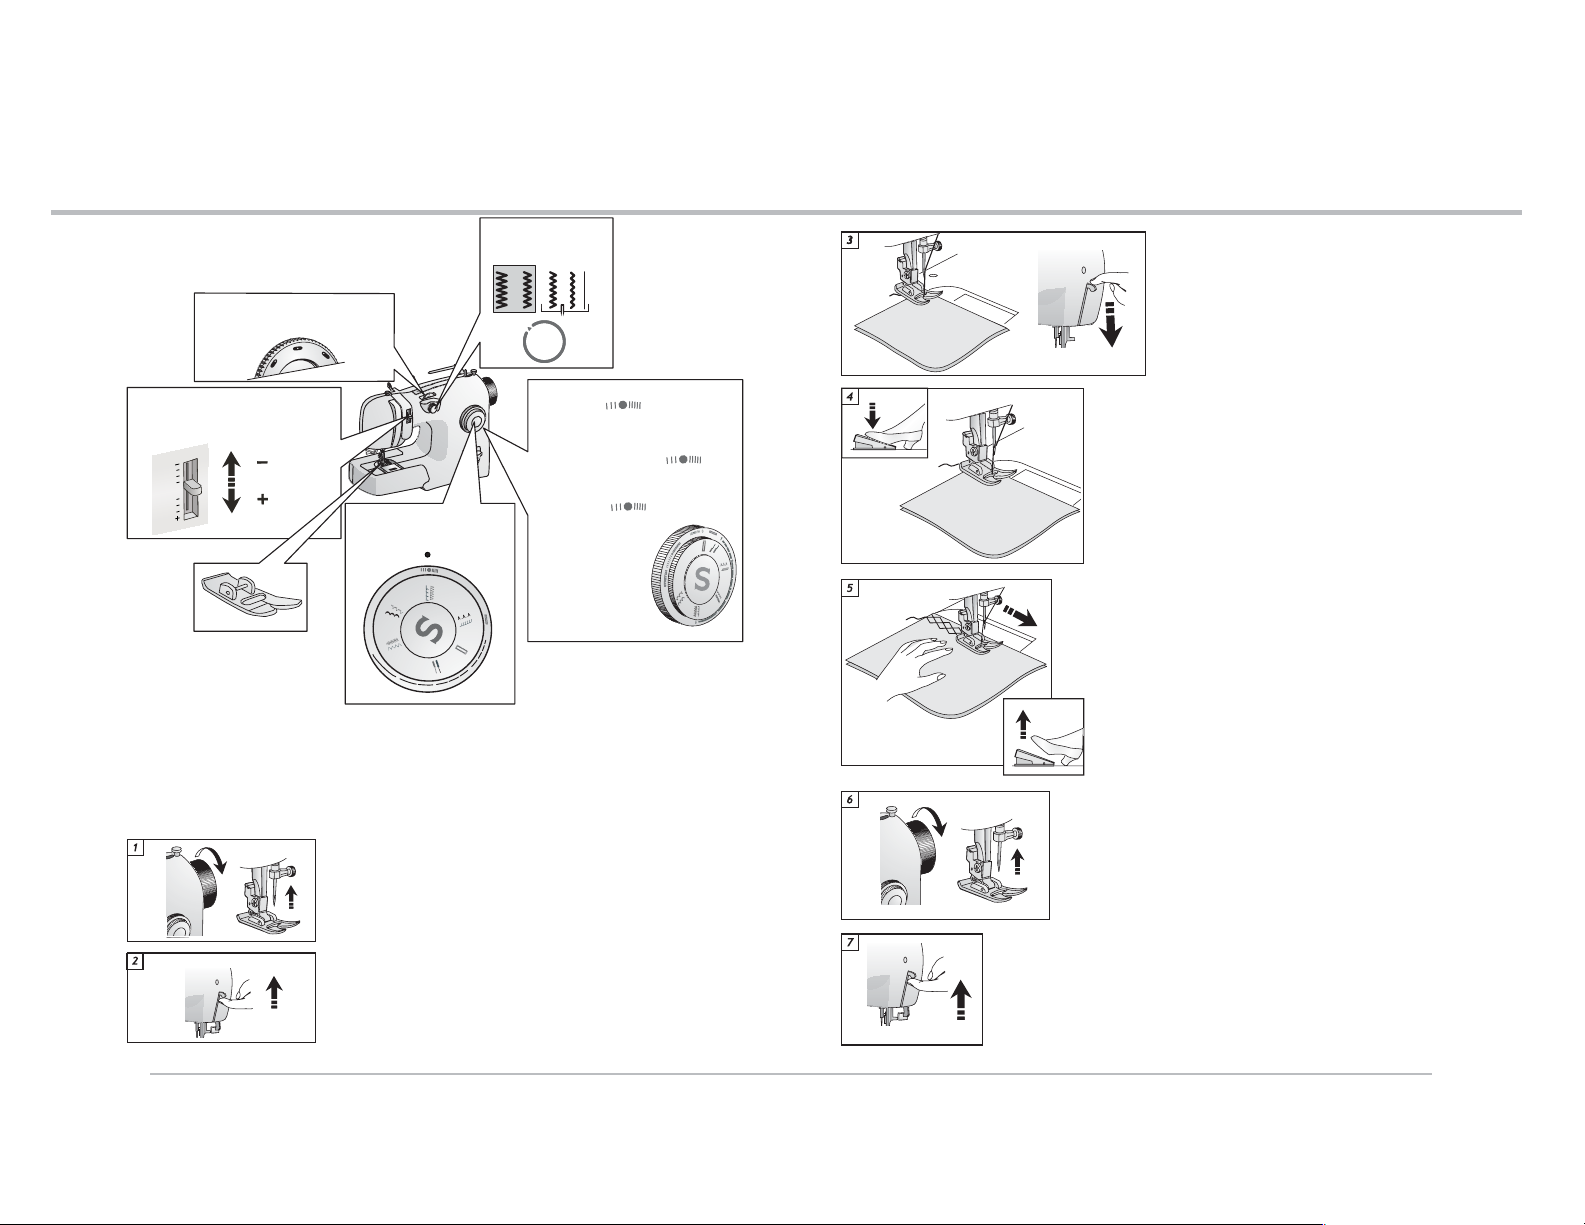
13
Stretch Stitches (only found on model 4212)
Points extensibles (4212 uniquement)
Puntadas Flexibles (sólo en modelo 4212)
Stitch width
Largeur du point
Largo puntada
Needle position: Center
Position de l'aiguille: centrale
Posición aguja: Centro
Stretch Stitches
Points extensibles
Puntadas Flexibles
Lower the presser foot.
Abaissez le pied presseur.
Baje la palanca del prensatelas.
13
Start with the Needle thread tension
in the Auto position
Tension du fil d'aiguille
Tensión de hilo
AUTO
Pattern selector dial
Sélecteur de point
Selector de puntadas
5
S
T
R
4
E
T
C
3
2
5
1
4
H
0
3
0
2
For model 4212, set the Stitch
Length to
Pour le modèle 4212, réglez la
longueur de point sur
Para modelo 4212 ajuste el Largo
de Puntada a
Stitch length dial
Longueur du
point
Selector del largo
1
de puntada
The RED/Stretch stitches on the pattern selector dial are stretch stitches. They can be sewn
on fabrics that have stretch, or can be used as decorative stitch on almost any type of fabric.
Les points ROUGES/extensibles sur le sélecteur de point sont des points extensibles. Ils
peuvent être cousus sur des tissus extensibles ou être utilisés comme points décoratifs sur
presque tous les types de tissus.
Las puntadas flexibles en ROJO dentro del selector de puntadas son las que puede coser
telas elásticas. Con ellas puede realizar una puntada decorativa en casi cualquier tipo de
tela.
Turn handwheel counter clockwise until the needle is in the highest
position.
Tournez le volant vers vous jusqu'à ce que l'aiguille soit
dans la position la plus haute.
Gire el volante hacia usted hasta que la aguja esté en la
posición más alta.
Raise presser foot lifter and slide fabric under the presser foot.
Relevez le pied presseur et mettez le tissu sous
le pied presseur.
Levante la palanca del prensatelas y coloque tela
debajo del prensatelas.
Sew, allowing the machine to feed the fabric.
Stretch stitches have a forward/backward motion.
Cousez en laissant la machine faire avancer le tissu.
Les points extensibles sont formés par un mouvement
vers l'avant et un mouvement vers l'arrière.
Comience a coser, permitiendo que la máquina
avance la tela. Las puntadas flexibles tienen un
movimiento adelante/atrás.
Continue sewing until finished.
Continuez la couture jusqu'à la fin.
Continúe cosiendo hasta que termine.
Turn handwheel counter clockwise until the needle is in the
highest position.
Tournez le volant vers vous jusqu'à ce que l'aiguille soit
dans la position la plus haute.
Gire el volante hacia usted hasta que la aguja esté en
la posición más alta.
Raise presser foot lifter and slide fabric under the presser foot.
Relevez le pied presseur et retirez le tissu en le
faisant glisser sous le pied presseur.
Levante la palanca del prensatelas y retire la tela
debajo del prensatelas.
52
53
Page 29
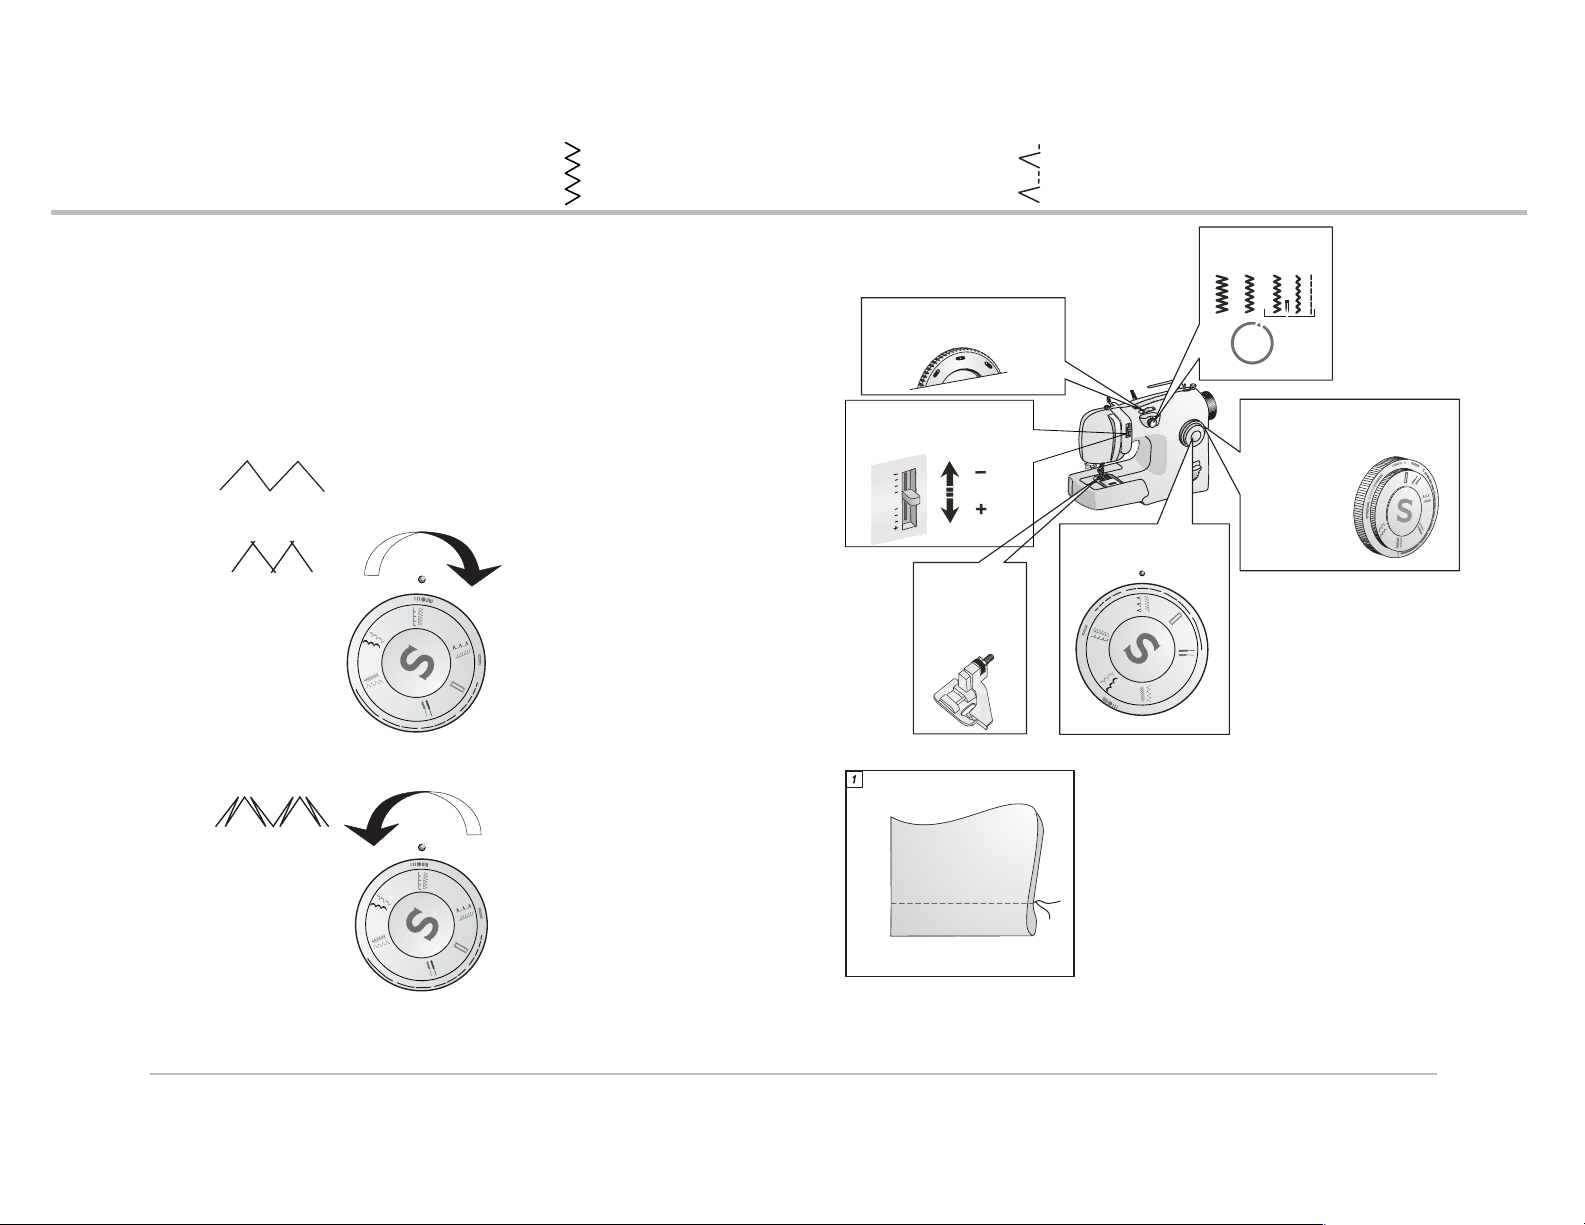
13
Adjusting Stretch Stitches
Réglage pour les points extensibles
Ajustando las puntadas flexibles
Blind hem stitch
Point invisible
Puntada para dobladillo invisible
14
Stretch stitches are stitches with a forward and reverse motion. For best results place a
stabilizer under the fabric to assist in proper stitch formation. Always sew a test on a scrap
of the fabric that you are using.
Les points extensibles sont des points formés par un mouvement en avant et un
mouvement en arrière. Pour de meilleurs résultats, placez sous le tissu un entoilage
qui vous aidera à obtenir des points correctement formés. Effectuez toujours une couture
d'essai sur un morceau du tissu que vous utilisez.
Las puntadas flexibles son puntadas con un movimiento adelante y atrás. Para mejores resultados coloque un estabilizador debajo de la tela para ayudar en una adecuada formación de
la puntada. Cosa siempre una prueba en un pedazo de tela que no este utilizando.
Correct
Correct
Correcto
Too close
Trop serré
Muy cerrado
Correct by turning the Stitch length
selector dial to the right.
Corrigez en tournant le cadran de
longueur du point vers la droite.
Correcto girando el selector de largo
de puntada a la derecha.
0
5
4
Too open
Trop ouvert
Muy abierto
1
2
3
Correct by turning the Stitch length
selector dial to the left.
Corrigez en tournant le cadran de
longueur du point vers la gauche.
Correcto girando el selector de largo
de puntada a la izquierda.
0
1
5
4
2
3
Needle position: Center
Position de l'aiguille: centrale
Posición de aguja: Centro
Start with the needle thread
tension in the Auto position
Tension du fil d'aiguille
Tensión de hilo
AUTO
Blind hem foot
Pied pour
point invisible
Prensatelas para
costura de
dobladillo
Stitch width dial
Largeur du point
Ancho de puntada
Stitch length: from 1,5 to 2,5
Longueur de point: de 1,5 à 2.5
Largo de puntada: 1,5 a 2,5
Stitch length dial
5
Longueur du
pointl
Selector de
largo de puntada
Pattern selector
Sélecteur de point
Selector de puntadas
2
3
1
0
4
If desired first finish the raw edge, then turn the hem
up to the required depth. Stitch in place with a basting
stitch.
Si vous souhaitez surjeter le bord coupé, pliez
l'ourlet de la profondeur désirée.
Fixez-le au point de bâti.
Si lo desea primero determine el borde de la tela,
luego gire el dobladillo al ancho deseado. Asegure con
una puntada de refuerzo.
54
55
Page 30
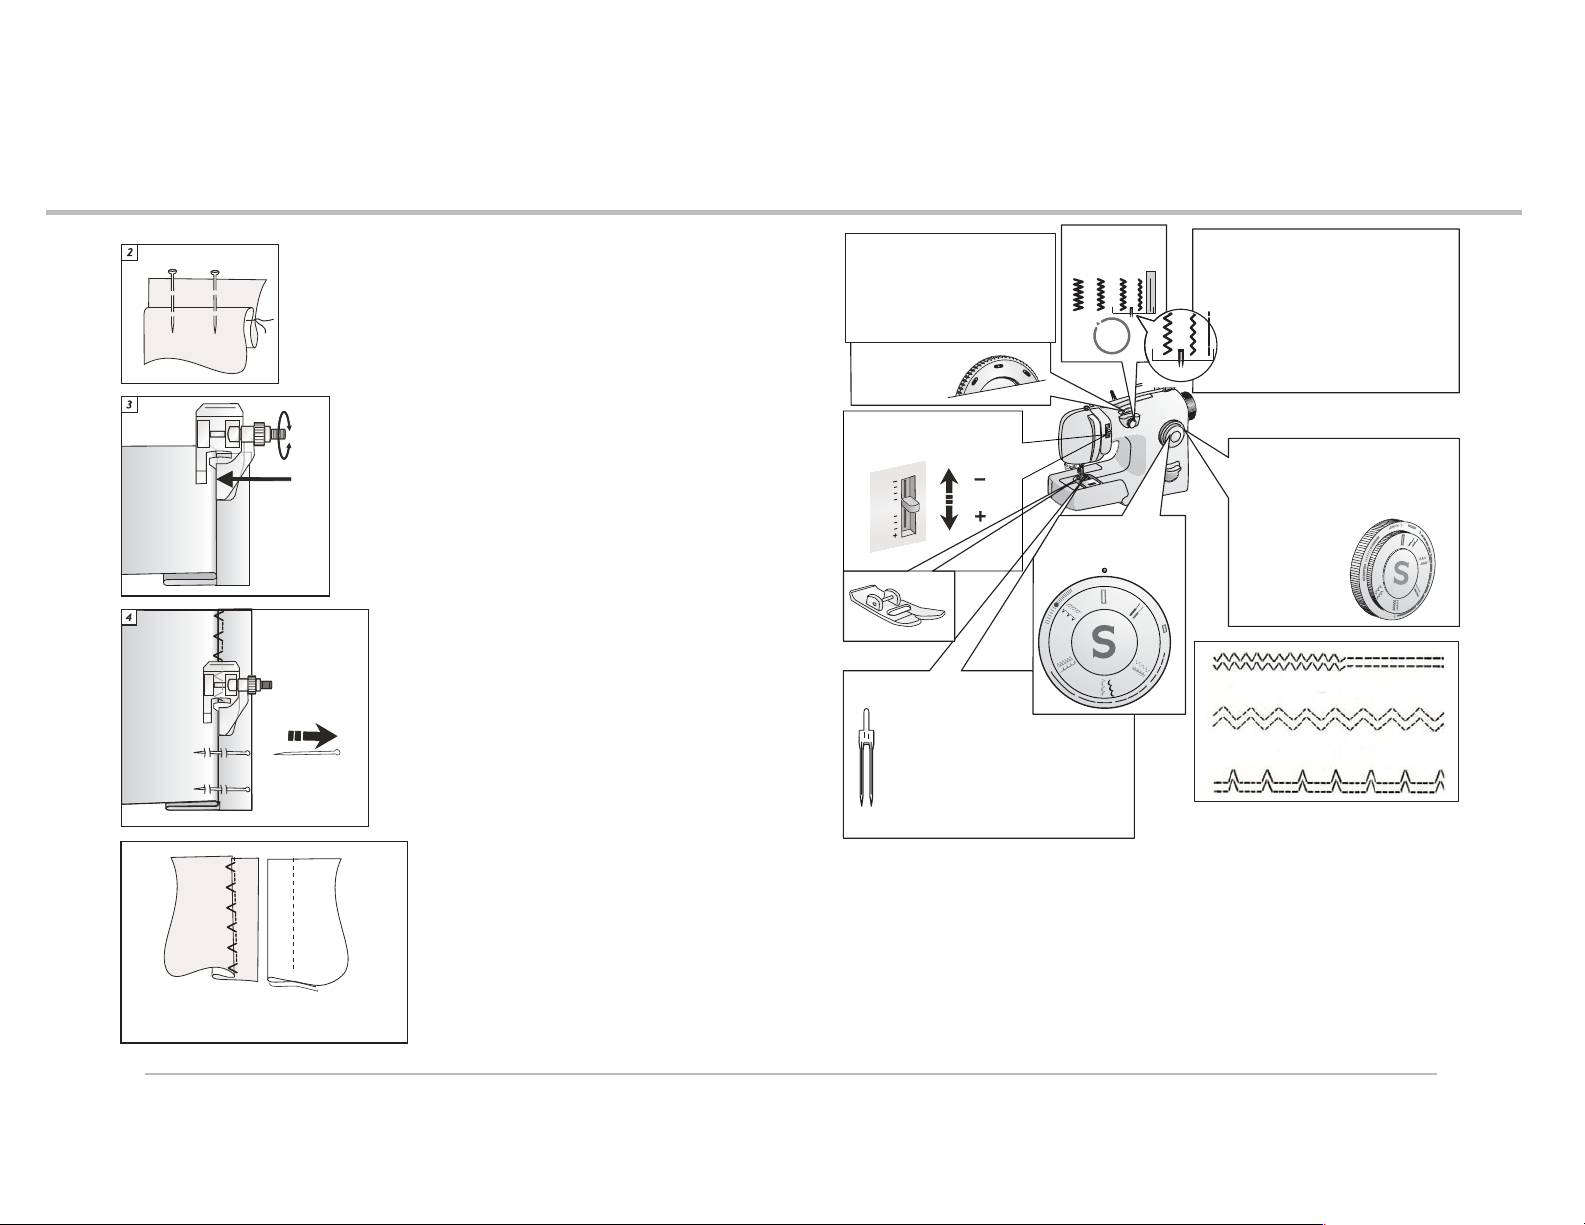
14
Blind hem stitch
Point invisible
Puntada para dobladillo invisible
Twin Needle Sewing with Optional Twin Needle
Couture à l'aiguille optionnellejumellée
Coser con Aguja Doble (opcional)
15
Fold and pin fabric as shown.
Pliez et épinglez le tissu conformément à l'illustration.
Doble y coloque alfileres en la tela como se muestra.
Place the fabric under the blind hem presser foot with
the fold of the fabric positioned so that the needle just
pierces the fold when the needle swings to the left.
Placez le tissu sous le pied pour point invisible, le pli
du tissu doit être positionné de façon à ce que l'aiguille
ne pique le pli que quand l'aiguille pique du côté
gauche.
Coloque la tela debajo del prensatelas para dobladillos
con el doblez de la tela colocado de modo que la aguja
apenas tome el doblez cuando la aguja se mueva a la
izquierda.
Use the stitch width control to fine tune the exact
position of the needle as it pierces the fabric fold.
Utilisez le cadran de largeur du point pour
régler avec précision la position exacte de
l'aiguille quand elle pique le pli de tissu.
Use el control de ancho de puntada para ajustar la
posición exacta de la aguja.
IMPORTANT:
Only the Center Needle position can
be selected when using a twin needle.
IMPORTANT: seule la position centrale de
l'aiguille peut être sélectionnée avec
l'aiguille double.
IMPORTANTE: Sólo puede seleccionarse la
posición alcentro de la aguja cuando se usa
aguja doble.
Needle position
Position de
l'aiguille
Posición de aguja
Start with needle thread tension
in Auto position
Tension du fil d'aiguille
Tensión de hilo
AUTO
Optional twin needle
Use Singer twin needles Style #2025.
See your Singer retailer
Aiguille jumellée en option
N'utilisez que des aiguilles Singer
Type d'aiguille: #2025,
Disponible dans votre magasin Singer
Aguja doble opcional. Use agujas Singer
#2025. Consulte a su vendedor Singer.
Stitch width
Largeur du point
Ancho de puntada
Pattern selector
Sélecteur de point
Selector de puntadas
H
C
T
E
R
T
S
5
4
2
3
IMPORTANT: The Stitch width must be set within
the twin needle range. The needle will hit the foot
and break if the width is set outside of the range.
IMPORTANT: la largeur du point doit être réglée en
fonction de la largeur de l'aiguille. Si la largeur de
point réglée ne correspond pas à la largeur de
l'aiguille, l'aiguille piquera dans le pied et
se cassera.
IMPORTANTE: El ancho de puntada debe
ajustarse dentro del rango de la aguja doble.
La aguja golpeará el pie y la romperá si el
ancho está fuera del rango.
For twin needle sewing it is recommend to set
Stitch length between “2” and “4”.
Pour la couture à l'aiguille jumellée, réglez la
longueur du point entre «2» et «4».
Para costura con aguja doble, ajuste
el largo de puntada entre “2” y “4”
Stitch length
Longueur du
point
Largo de
puntada
0
1
56
Underside
Envers
Anverso
Topside
Endroit
Derecho
When finished, the thread is almost invisible
on the right side of the fabric, especially
when using matching thread color.
Une fois la couture terminée, le fil est
presque invisible sur l'endroit du tissu,
surtout si vous utilisez un fil de la même
couleur.
Cuando termine, el hilo será casi invisible en
el lado derecho de la tela, especialmente
cuando se usa hilo de color de la tela.
Twin needle sewing produces two rows of parallel lines of stitching. When selecting a Straight stitch and
inserting a twin needle you can create a sporty cover hem, or a sophisticated top-stitch. Select a Zig-zag
stitch or a decorative stitch, and insert the twin needle to create a double row of stitch embellishment.
Try threading each eye of the needle with a different color of thread for an unique effect.
La couture à l'aiguille jumellée produit deux lignes de coutures parallèles. En sélectionnant un point
droit et en insérant une aiguille jumellée, vous pouvez créer un ourlet surpiqué sport ou une lisière
sophistiquée. Sélectionnez un point zigzag ou un point décoratif et insérez l'aiguille jumellée pour
créer une double rangée de coutures ornementales. Essayez d'enfiler chacun des chas d'une couleur
différente pour obtenir un effet exceptionnel.
La costura con aguja doble produce dos hileras de líneas paralelas. Cuando se selecciona una puntada
recta e inserta una aguja doble puede crear un dobladillo deportivo o un pespunte sofisticado.
Seleccione una puntada Zigzag o una puntada decorativa e inserte la aguja doble para crear una hilera
doble de una puntada decorativa. Intente ensartar cada ojo de la aguja con un hilo de color distinto
para obtener un efecto único.
57
Page 31
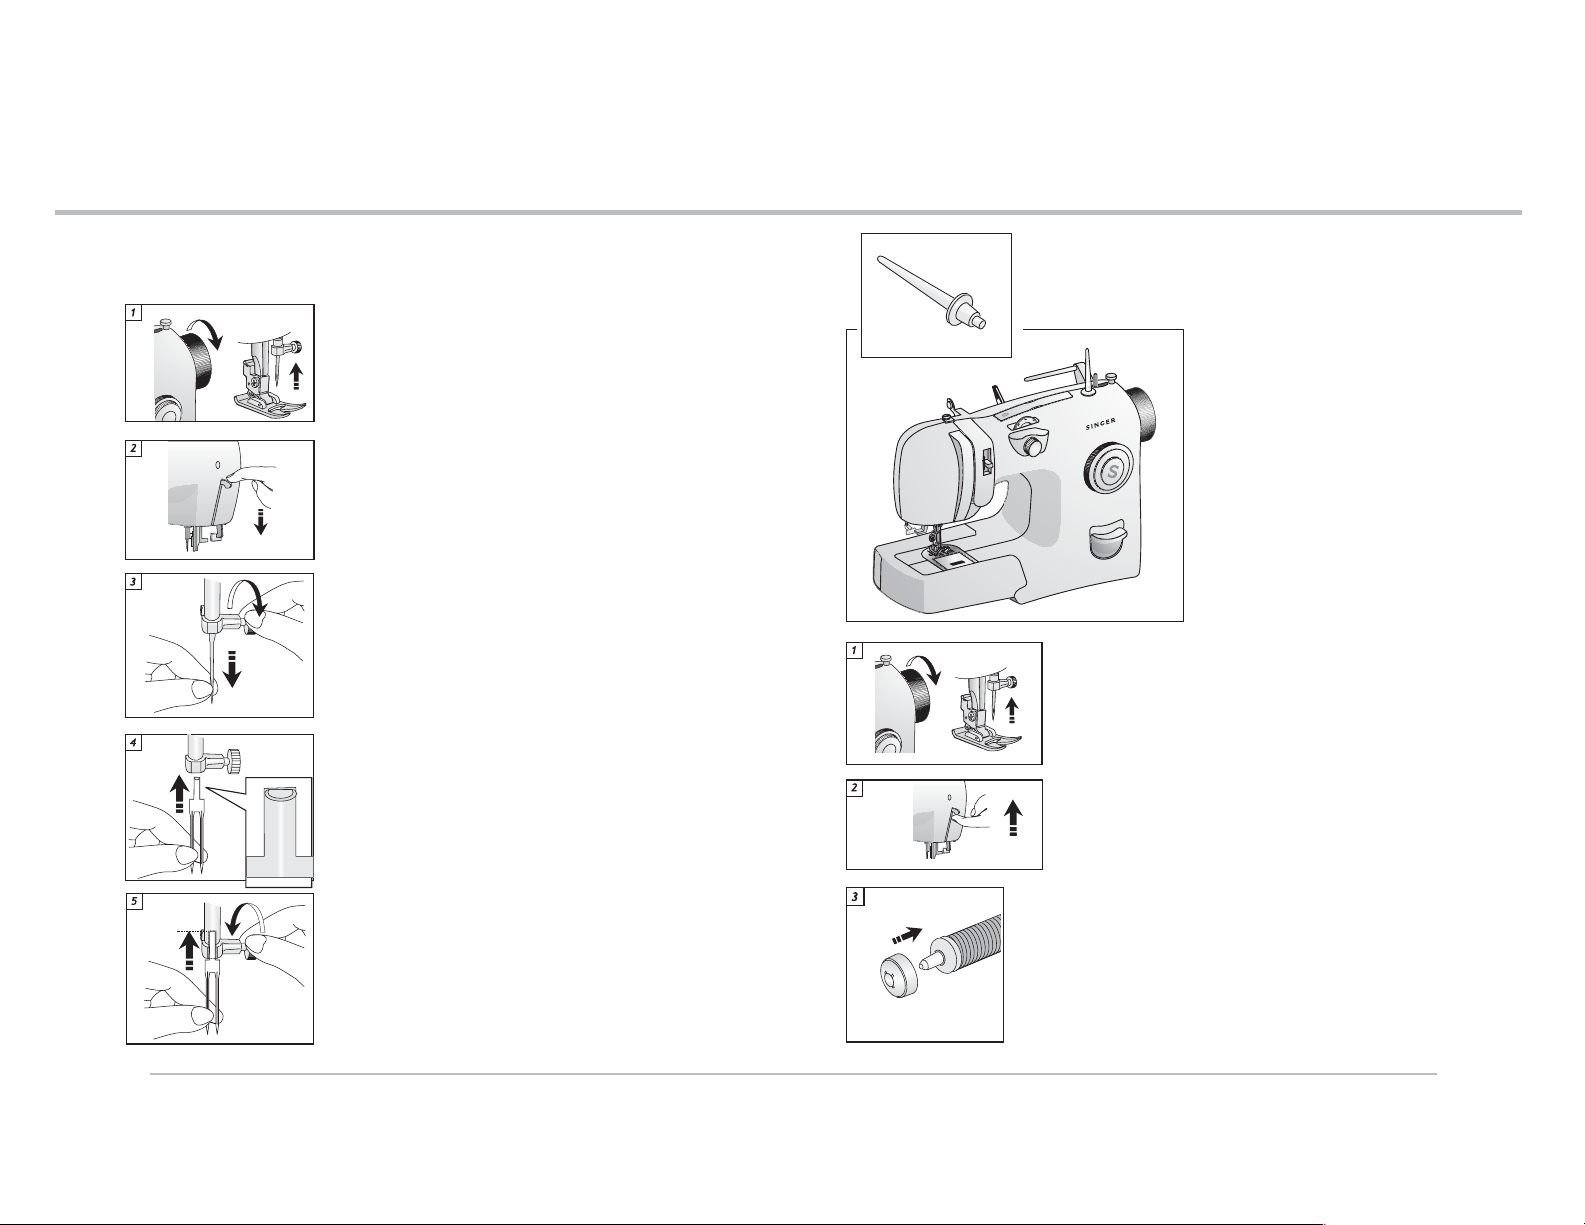
15
Twin Needle Sewing with Optional Twin Needle
Couture à l'aiguille optionnellejumellée
Coser con Aguja Doble (opcional)
Twin Needle Sewing with Optional Twin Needle
Couture à l'aiguille optionnellejumellée
Coser con Aguja Doble (opcional)
15
Change to the twin needle.
Mettre en place l'aiguille jumellée
Cambie a la aguja doble.
Turn handwheel counter clockwise until the needle is in the
highest position.
Tournez le volant vers vous jusqu'à ce que l'aiguille soit
dans la position la plus haute.
Gire el volante hacia usted hasta que la aguja esté en su
posición más alta.
Lower presser foot.
Abaissez le pied presseur.
Baje la palanca del prensatelas.
Loosen thumb screw and remove needle.
Desserrez la vis du pince-aiguille et retirez l'aiguille.
Afloje el tornillo y quite la aguja.
Insert the twin needle, placing the flat side of the needle to
the back, and push needle all the way up.
Insérez l'aiguille jumellée en positionnant le côté plat de
l'aiguille vers l'arrière, puis poussez l'aiguille vers le haut
le plus loin possible.
Inserte la aguja doble, colocando el lado plano de la aguja
hacia atrás y empuje la aguja hacia arriba.
Threading for twin needle sewing
Enfilage de la machine avec l'aiguille jumellée
Ensartando para costura con aguja doble
Insert the vertical spool pin into the
opening to the left of the bobbin winder.
Insérez le porte-bobine vertical dans
l’ouverture situé à gauche du dévidoir
de la canette
Inserte el porta carrete en la abertura
a la izquierda del devanador de bobina.
Turn handwheel counter clockwise you until the needle is in the highest
position.
Tournez le volant vers vous jusqu'à ce que l'aiguille soit
dans la position la plus haute.
Gire el volante hacia usted hasta que la aguja esté en la
posición más alta.
Raise presser foot lifter.
Relevez le pied presseur.
Levante la palanca del prensatelas.
58
Tighten thumb screw.
Resserrez la vis du pince-aiguille.
Apriete el tornillo.
Slide thread onto horizontal spool pin. Secure thread in
place with either the large or small spool pin holder,
depending on the size of your thread spool.
Placez la bobine de fil sur le porte-bobine horizontal.
Fixez le fil dans la bonne position avec le grand ou le petit
etrier de bobine, suivant la taille de votre bobine de fil.
Deslice el hilo en el porta carrete. Asegure el hilo en su sitio
con el sujetadorpara porta carrete grande o pequeño,
dependiendo del tamaño del sur carrete de hilo.
59
Page 32
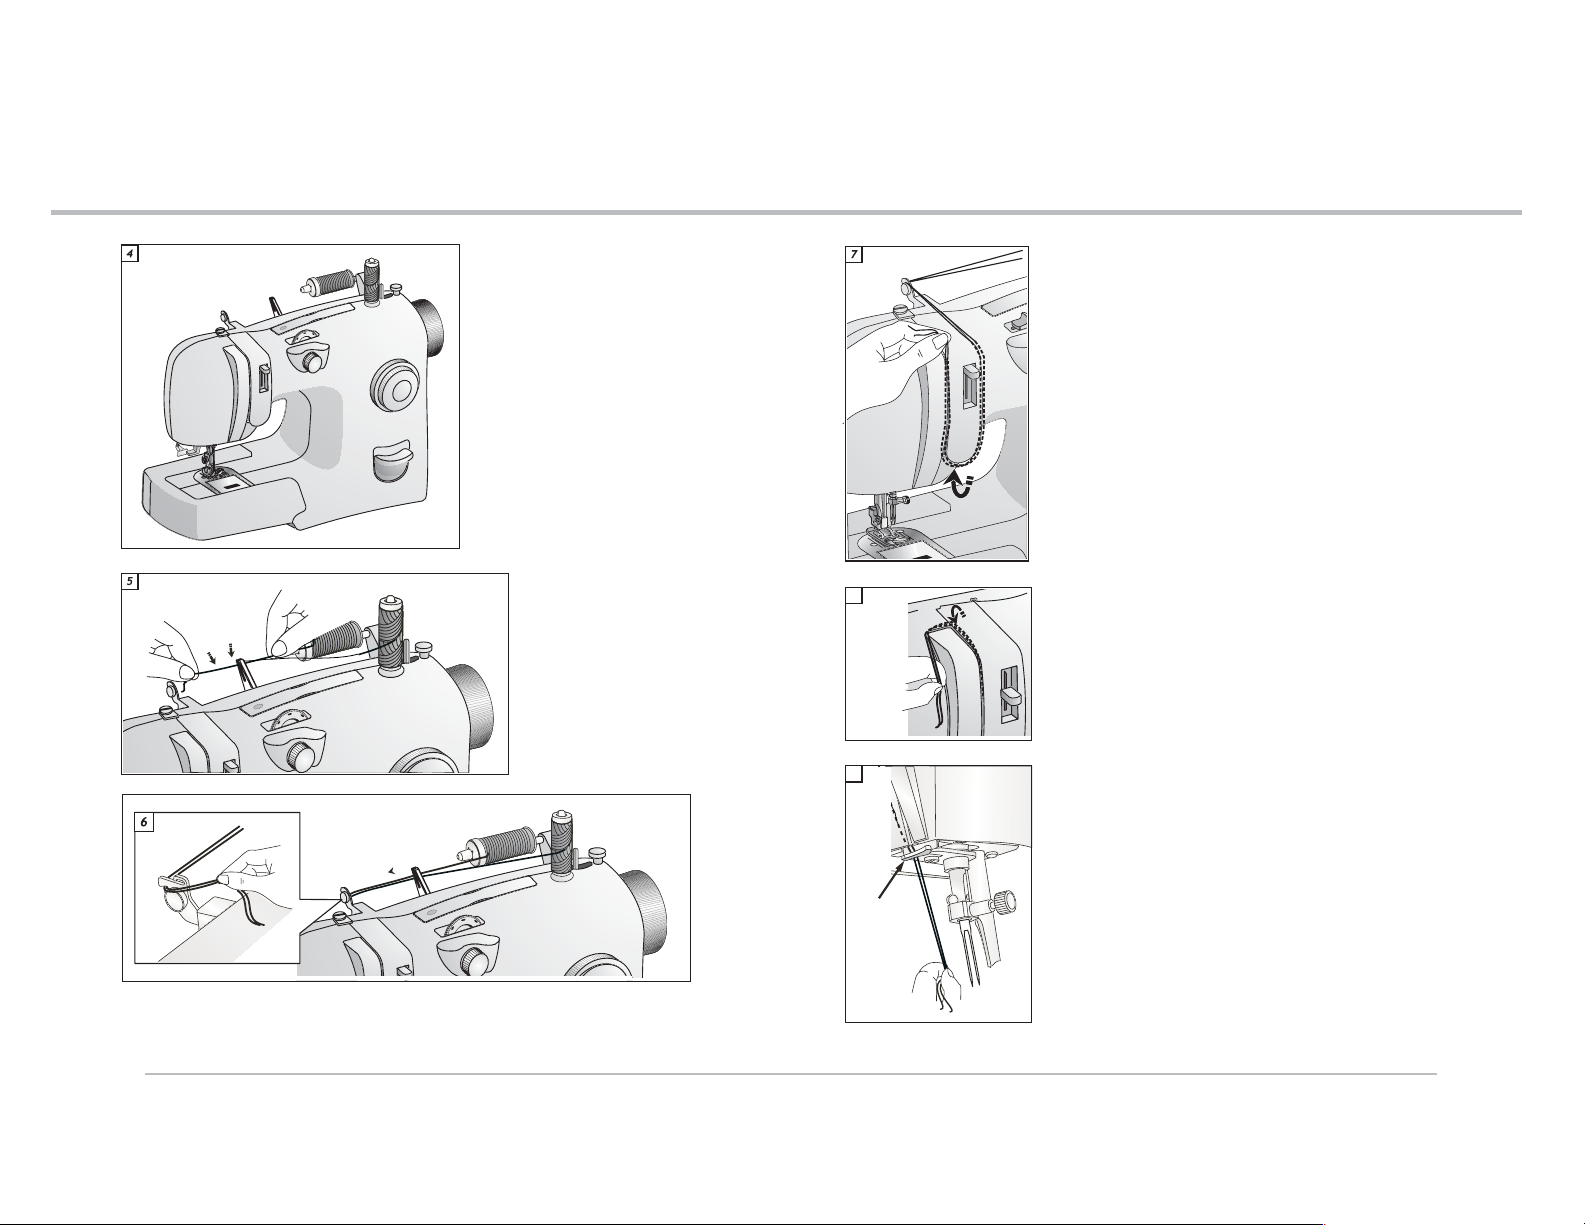
15
Twin Needle Sewing with Optional Twin Needle
Couture à l'aiguille optionnelle jumellée
Coser con Aguja Doble (opc ional)
Twin Needle Sewing with Optional Twin Needle
Couture à l'aiguille jumellée optionnelle
Coser con Aguja Doble (opcional)
15
Place one spool of thread on the
vertical spool pin and other on the
horizontal spool pin.
Placez une bobine de fil sur le portebobine vertical et une sur le portebobine horizontal.
Coloque un carrete de hilo en el porta
carrete vertical. Coloque el otro carrete
de hilo en el porta carrete horizontal.
Pull thread from both spools, hold
firmly over the first thread guide.
Then push the threads down,
snapping them into the thread
guide.
Tirez le fil des deux bobines et
maintenez-les fermement audessus du premier guide-fil.
Ensuite, tirez les fils vers le
bas pour les introduire dans le
guide-fil.
Jale el hilo de ambos carretes,
sostenga con firmeza sobre el
primer guía hilos. Luego baje las
hebras, enganchándolas en el
guía hilos.
Firmly hold both threads close to the spool with your right hand,
then holding the thread-ends in your left hand, follow the thread
guides. The threads should be taut as they go through the guides.
Tenez fermement les deux fils près de la bobine avec la main
droite, puis en tenant les extrémités des fils de la main
gauche, faites-les passer en suivant les guide-fil. Les fils
doivent être tendus quand ils passent dans les guide-fil.
Sostenga con firmeza ambas hebras cerca del carrete con
la mano derecha, luego sostenga los extremos de los guía
hilos con la mano izquierda, siga las guías hilo. Los hilos
deben estar tensos cuando pasen por las guías.
8
9
Continue to hold the threads firmly, as you thread the machine.
Continuez à tenir les fils bien tendus pendant l'enfilage de
la machine.
Siga sosteniendo los hilos con firmeza mientras ensarta la
máquina.
Place both threads behind the metal thread guide.
Placez les deux fils derrière le guide-fil métallique.
Coloque ambos hilos detrás del guía hilos metálico.
60
Pull both threads through the second thread guide.
Faites passer les deux fils dans le deuxième guide-fil.
Jale ambas hebras por el segundo guía hilos.
61
Page 33
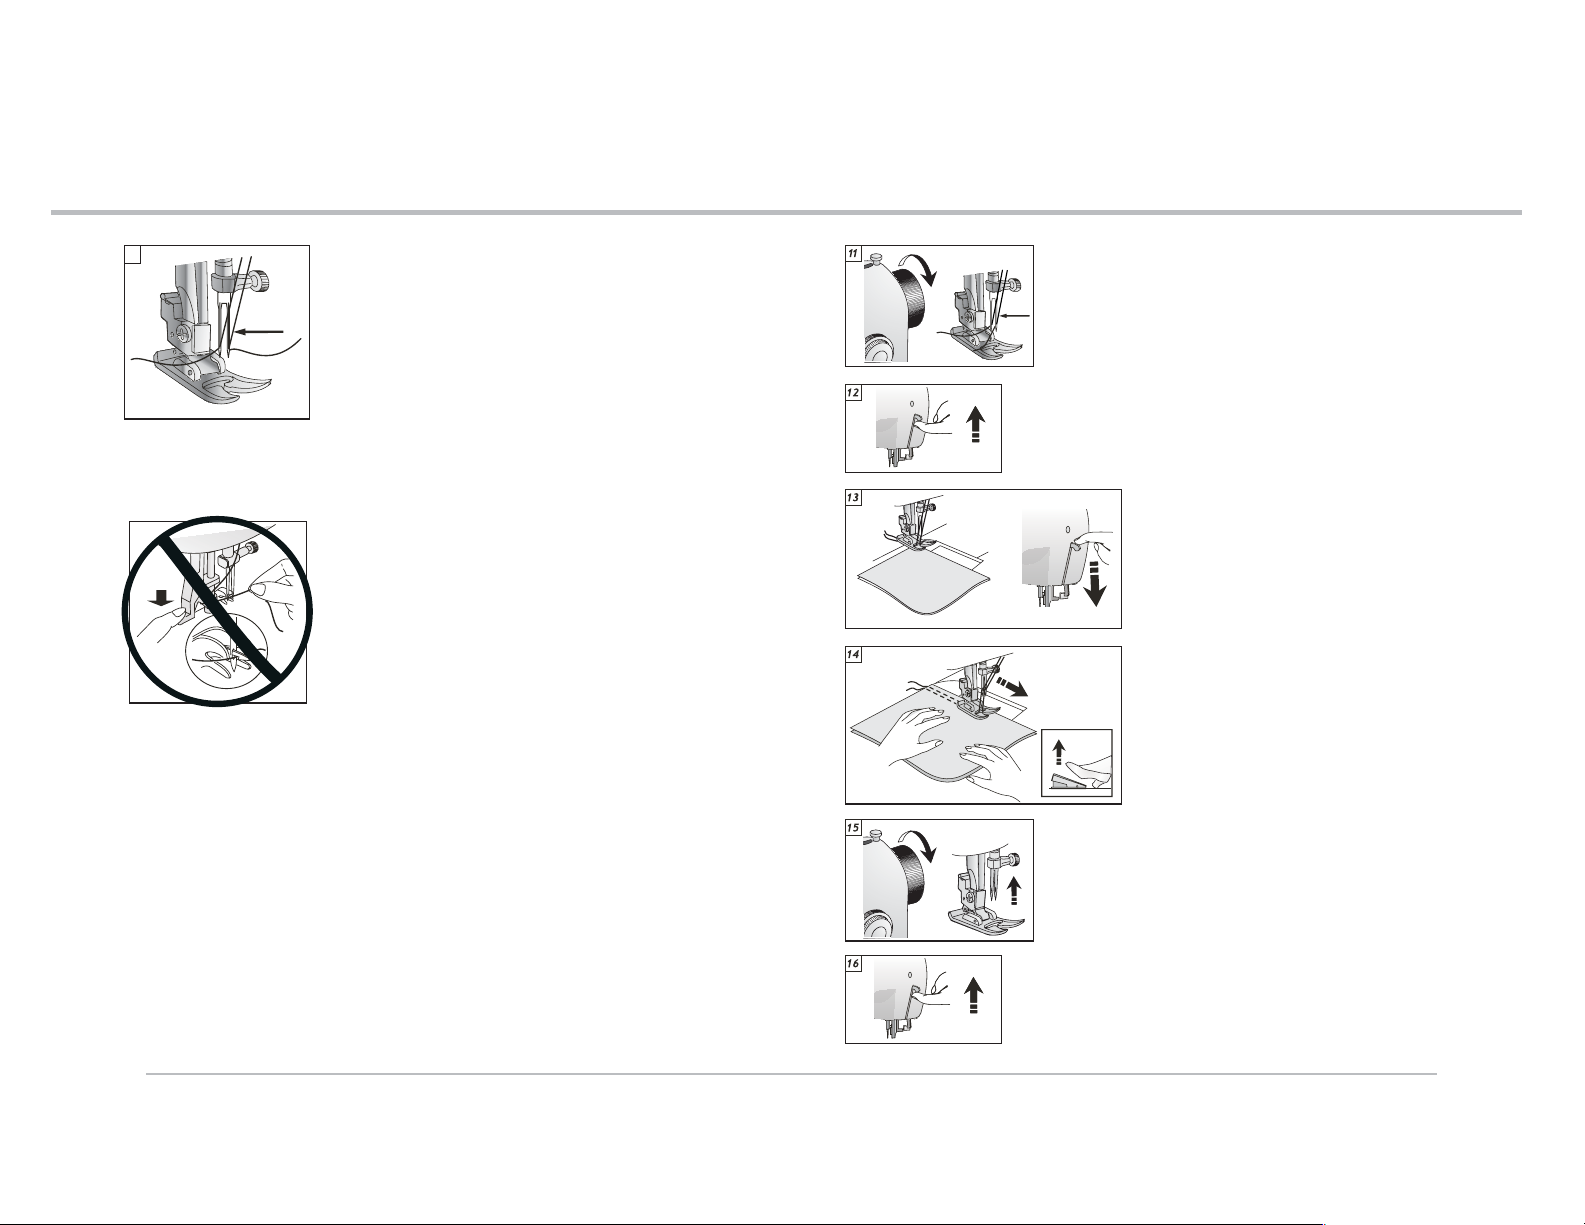
15
Twin Needle Sewing with Optional Twin Needle
Couture à l'aiguille optionnellejumellée
Coser con Aguja Doble (opc ional)
Twin Needle Sewing with Optional Twin Needle
Couture à l'aiguille optionnelle jumellée
Coser con Aguja Doble (opcional)
15
10
Pass one thread through the eye of the right needle,
and then pass the second thread through the eye of
the left needle. Pull 6” of both threads under the presser
foot, and to the back of the machine.
Faites passer un fil dans le chas de l'aiguille droite,
puis faites passer l'autre fil dans le chas de l'aiguille
gauche. Tirez chaque fil de 15 cm, faites-les passer
sous le pied presseur, puis vers l'arrière de la machine.
Pase un hilo por el ojo derecho de la aguja, y luego pase el
segundo hilo por el ojo izquierdo de la aguja. Jale 6
centímetros aproximadamente de ambos hilos bajo el
prensatelas y hacia atrás de la máquina.
Important : Never use the Automatic needle threader
with a twin needle.
Important : n'utiliser jamais l'enfile-aiguille
automatique avec une aiguille jumellée.
Importante: Nunca use el ensartador automático
con una aguja doble.
Turn handwheel counter clockwise you until the needle is in the
highest position.
Tournez le volant vers vous jusqu'à ce que l'aiguille soit
dans la position la plus haute.
Gire el volante hacia usted hasta que la aguja esté en la
posición más alta.
Raise presser foot lifter.
Relevez le pied presseur.
Levante la palanca del prensatelas.
Slide fabric under the presser foot and
lower the presser foot lifter.
Mettez le tissu sous le pied, puis abaissez le
pied presseur.
Coloque la tela debajo del prensatelas y baje
la palanca del prensatelas
Sew.
Note: Do not use the Reverse button with the Twin
needle.
Cousez.
Remarque: n'utilisez pas le bouton de marche
arrière avec l'aiguille jumellée.
Comience a coser.
Nota: No use el botón de retroceso con la aguja
doble.
62
Turn handwheel counter clockwise you until the needle is in
the highest position.
Tournez le volant vers vous jusqu'à ce que l'aiguille soit
dans la position la plus haute.
Gire el volante hacia usted hasta que la aguja esté en la
posición más alta.
Raise presser foot lifter and slide fabric from under the presser
foot.
Relevez ledu pied presseur et retirez le tissu de sous
le pied presseur.
Levante la palanca del prensatelas y retire la tela debajo
del prensatelas.
63
Page 34
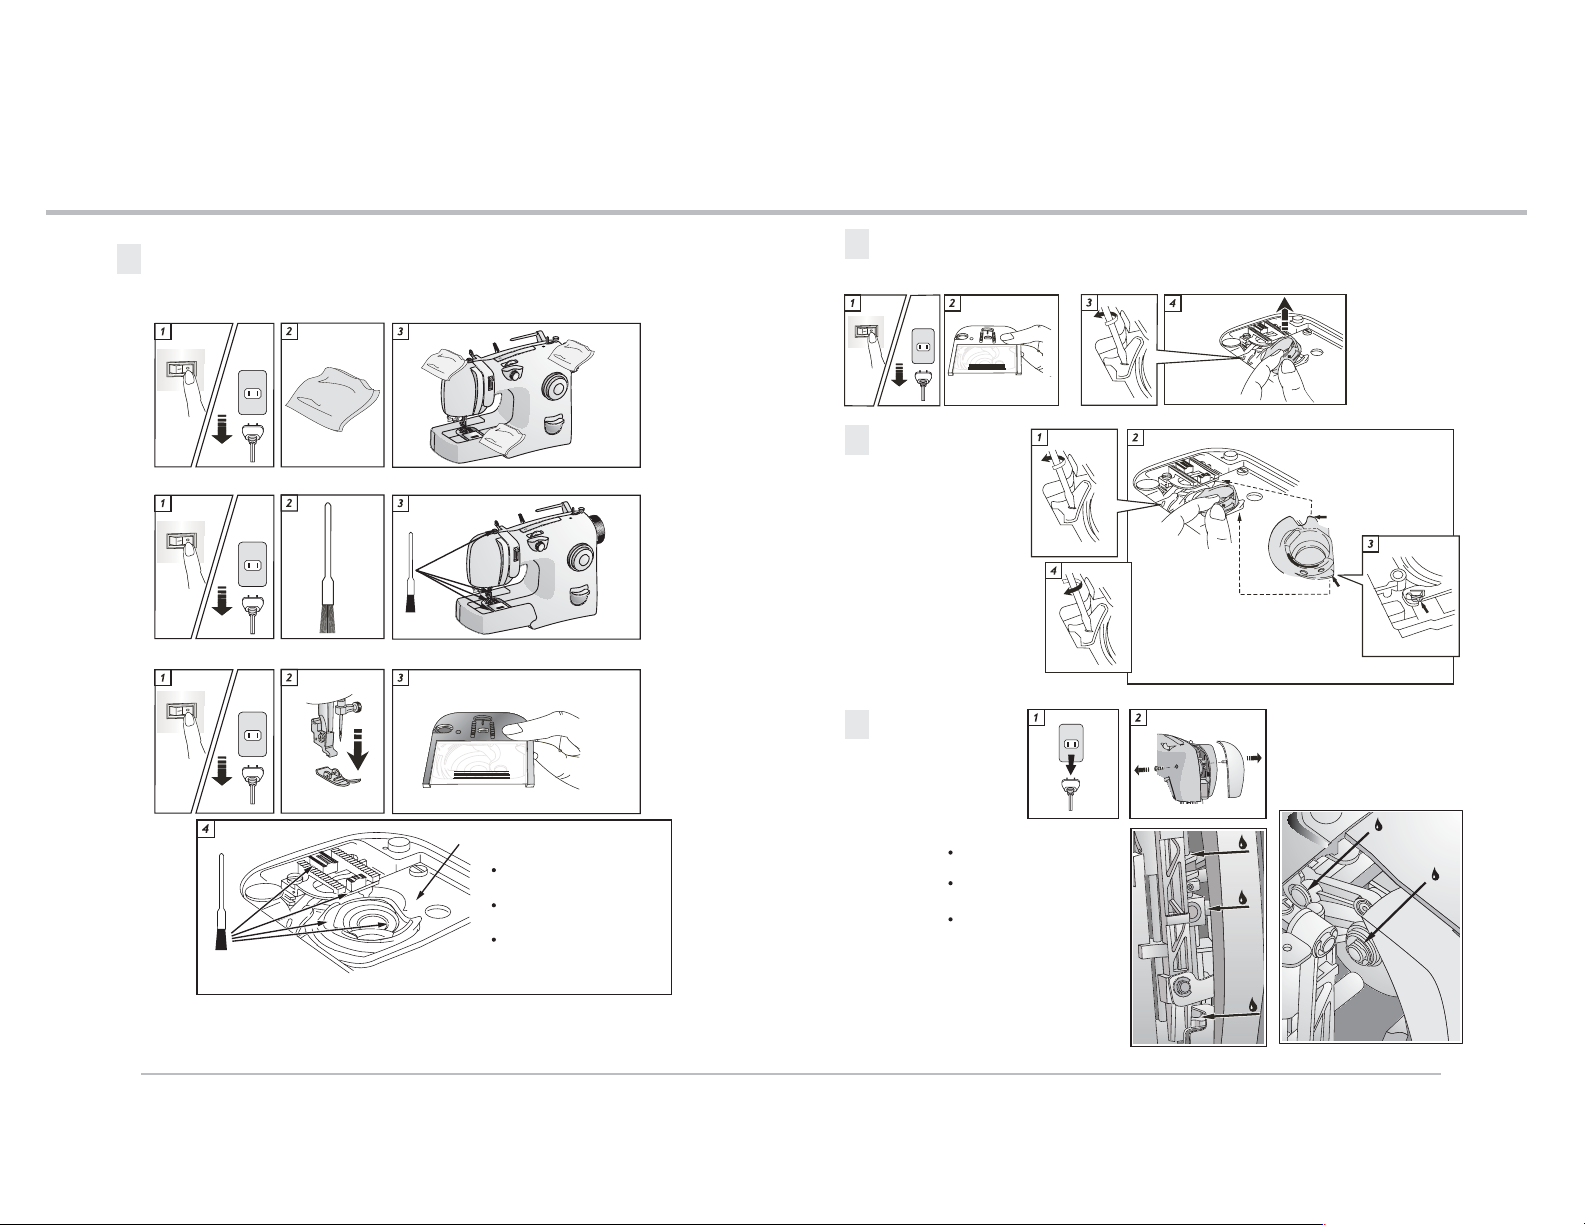
16
Maintenance
Entretien
Mantenimiento
Maintenance
Entretien
Mantenimiento
16
Cleaning the machine
Nettoyage de la machine
Limpieza de la máquina
Removing bobbin case
Retirer le boîtier de canette
Retirar la caja bobina
Replacing bobbin
case
Remettre
le boîtier de
canette en place
Colocar la caja
bobina
Lubrication
Lubrification
Lubricación
“A” under the feed dog
"A" sous les griffes
"A" abajo de los dientes
A
"B" sous la plaquette de positionnement
"B" under the position plate
"B" abajo de la placa posicionadora
B
B
64
A
DO NOT re move the
positioning plate (A).
Ne retirez PAS la plaquette
de positionnement (A).
NUNCA remueva la placa
de posición (A).
Lubricate the moving
parts.
Lubrifiez les pièces
à mouvement.
Lubricar las piezas
que se muevan.
65
Page 35
16
16
Maintenance
Maintenance
Maintenance
Maintenance
Mantenimiento
Mantenimiento
Entretien
16
Performance checklist
Thread balls up on
the underside of
the fabric
Needle does
not move
Needle moves
but stitch is not
formed
Needle breaks
Bobbin winding
difficulties
Lower thread
breaks
Upper thread
breaks
Skipped stitches
Fabric does not
move properly
under presser foot
66
66
Lift presser foot and re-thread the
machine, holding thread firmly.
Lower presser foot prior to sewing
Is machine connected to electrical supply?
Is the power and light switched on?
Is speed control pedal connected?
Is the bobbin winder spindle pushed to the right?
Is needle bent?
Is Stitch Selector fully engaged?
Is needle fully inserted into needle clamp?
Are bobbin and needle correctly threaded?
Is needle correct size for fabric?
Is needle fully inserted into needle clamp?
Are controls properly set?
Are accessories correct for sewing?
Is thread unwinding freely from spool?
Is bobbin winder disc at the correct height?
Is thread hanging up on the slit on the thread spool?
Is the bobbin winder spindle pushed to the right?
Is thread end securely held at start of winding?
Is bobbin correctly wound?
Is bobbin correctly inserted into bobbin case?
Is machine properly threaded?
Is thread freely unwinding from spool?
Is upper thread tension too tight?
Is bobbin case properly inserted?
Is bobbin rim free of nicks?
Is machine properly threaded?
Is fabric firmly held down?
Is needle correct style and size for fabric?
Is needle straight?
Is presser foot correctly attached to machine?
Is presser foot lowered?
Is stitch length correctly set?
Liste de performance
Le fil s'emmêle
sous le tissu
L'aiguille ne bouge
pas
L'aiguille bouge
mais le point ne se
forme pas
L'aiguille casse
Difficultés pour
remplir la canette
Le fil de canette
casse
Le fil d'aiguille
casse
La machine saute
des points
Le tissu n'est pas
entraîné
correctement sous
le pied presseur
Relevez le pied presseur et enfilez la machine à nouveau en
tenant fermement le fil.
Abaissez le pied presseur avant de coudre.
La machine est-elle connectée à la prise électrique ?
La machine et la lampe sont-elles allumées ?
Le rhéostat est-il connectée à la machine ?
La tige du dévidoir de canette est-elle déplacée vers la droite ?
L'aiguille est-elle tordue ?
L'aiguille est-elle insérée complètement dans le pince-aiguille?
Les fils de la bobine et de la canette sont-ils correctement
enfilés ?
La grosseur de l'aiguille est-elle adaptée au tissu ?
L'aiguille est-elle insérée complètement dans le pince-aiguille ?
Les réglages sont-ils corrects ?
Les accessoires en place conviennent-ils à l'ouvrage ?
Le fil se dévide-t-il correctement de la bobine ?
Le fil est-il coincé dans la fente de la bobine ?
La tige du dévidoir de canette est-elle déplacée vers la droite ?
L'extrémité du fil est-elle retenue fermement au début du
bobinage ?
La canette est-elle bobinée correctement ?
La canette est-elle insérée correctement dans le boîtier de
canette ?
La machine est-elle enfilée correctement ?
Le fil se déroule-t-il correctement de la bobine ?
La tension du fil d'aiguille est-elle trop forte ?
Le boîtier de canette est-il correctement inséré ?
Le bord de la canette n'est-il pas ébréché ?
La machine est-elle enfilée correctement ?
Le tissu est-il fermement maintenu à plat ?
Le type d'aiguille et la grosseur de l'aiguille sont-ils adaptés au
tissu ?
L'aiguille est-elle droite ?
Le pied presseur est-il mis en place correctement ?
Le pied presseur est-il abaissé ?
La longueur de point est-elle réglée correctement ?
67
Page 36
Maintenance
Entretien
16
Mantenimiento
Guía de solución de problemas
La aguja no se mueve
La aguja se mueve pero
la puntada no se forma
La aguja se quiebra
Dificultades para
devanar la bobina?
El hilo inferior se
corta
El hilo superior se
corta
Falla en las puntadas
¿Está el cable conectado a la clavija?
¿Está el interruptor encendido?
¿Está el controlador conectado?
¿Está el eje devanador a la derecha?
¿Tiene algún defecto la aguja?
¿Está la aguja colocada correctamente en el prendedor?
¿Están la aguja y la bobina enhebradas correctamente?
¿Está la aguja enhebrada correctamente?
¿Es el tamaño de la aguja apropiado para la tela?
¿Está la aguja colocada correctamente?
¿Están los controladores ajustados correctamente?
¿Se desenrolla el hilo libremente del carrete?
¿Está el eje devanador de la bobina a la derecha?
¿Sujetó la punta del hilo al comienzo del devanado?
¿Se engancha el hilo en el carrete?
¿Se enrolló el hilo de la bobina correctamente?
¿Está la bobina instalada en la caja bobina correctamente?
¿Está la máquina enhebrada correctamente?
¿Se desenrolla el hilo del carrete libremente?
¿Es el tamaño correcto de la aguja para el hilo?
¿Está la tensión superior del hilo muy alta?
¿Está instalada la caja bobina correctamente?
¿Tienen las puntas de la bobina alguna rebaba?
¿Está correcto el enhebrado de la aguja?
¿Está la tela presionada por el prensatelas firmemente?
¿Están correctos el tipo y el tamaño de la aguja para la tela?
¿Está la aguja torcida?
La tela no se mueve
correctamente bajo el
prensatelas
68
¿Está el prensatelas instalado correctamente en la máquina?
¿Está el largo de la puntada ajustado correctamente?
¿Está el prensatelas abajo?
69
Page 37
7170737275
Page 38
Page 39
74
Page 40
Printed in Brazil
Printed in Brazil
Imprimé au Brésil
Impreso en Brasil
Eng./ Fren./ Spa.
76
Part Number / Pieza Nº.Pièce Nº. /
360101-020
 Loading...