

Page 1
SINGER
15k 66k 201k 99k 185k 327k 328k 329k 404k
A Manual of
Family
ng
ines
Page 2

PREFACE
HE great aim in education is to equip the scholar for his or her future
T
instruct her in the care and use of the family Sewing Machine so that she can
use it to the best advantage.
ability to plan and make smart, attractive clothes for herself and for her
family as well as being able to furnish her home with curtains, chair covers
and all kinds of beautiful accessories, will provide her with great satisfaction
and pleasure.
use of the modern Sewing Machine and its various attachments. Garments
can be made with a professional finish for about half the cost of a similar
ready-made garment. There are many excellent paper patterns available
featuring up-to-date styles for every age, some are specially designed for the
beginner and others fulfil the requirements of the more experienced home
dressmaker. Glossy magazines print a steady flow of ideas for making the
home beautiful, many of which are suitable for machine sewing.
career. To the girl interested in household economics the Sewing
Machine offers wonderful possibilities. The job of this booklet is to
A large part of the family income is usually spent by the woman, and her
Successful home sewing is in the reach of anyone making the fullest possible
With the introduction of the Slant-O-Matic, Zig-Zag Stitch and Automatic
Embroidery, a whole new vista of sewing skills emerge, it is not surprising,
therefore, that the woman of today is becoming interested in home sewing.
The modern electric sewing machine makes needlework a pleasure and by
using the attachments supplied, fascinating trimmings can be achieved in a
fraction of the time previously required.
The instruction contained in this booklet shows you how to use your
sewing machine and to take proper care of it, so that you may obtain the
greatest benefit.
Page 3
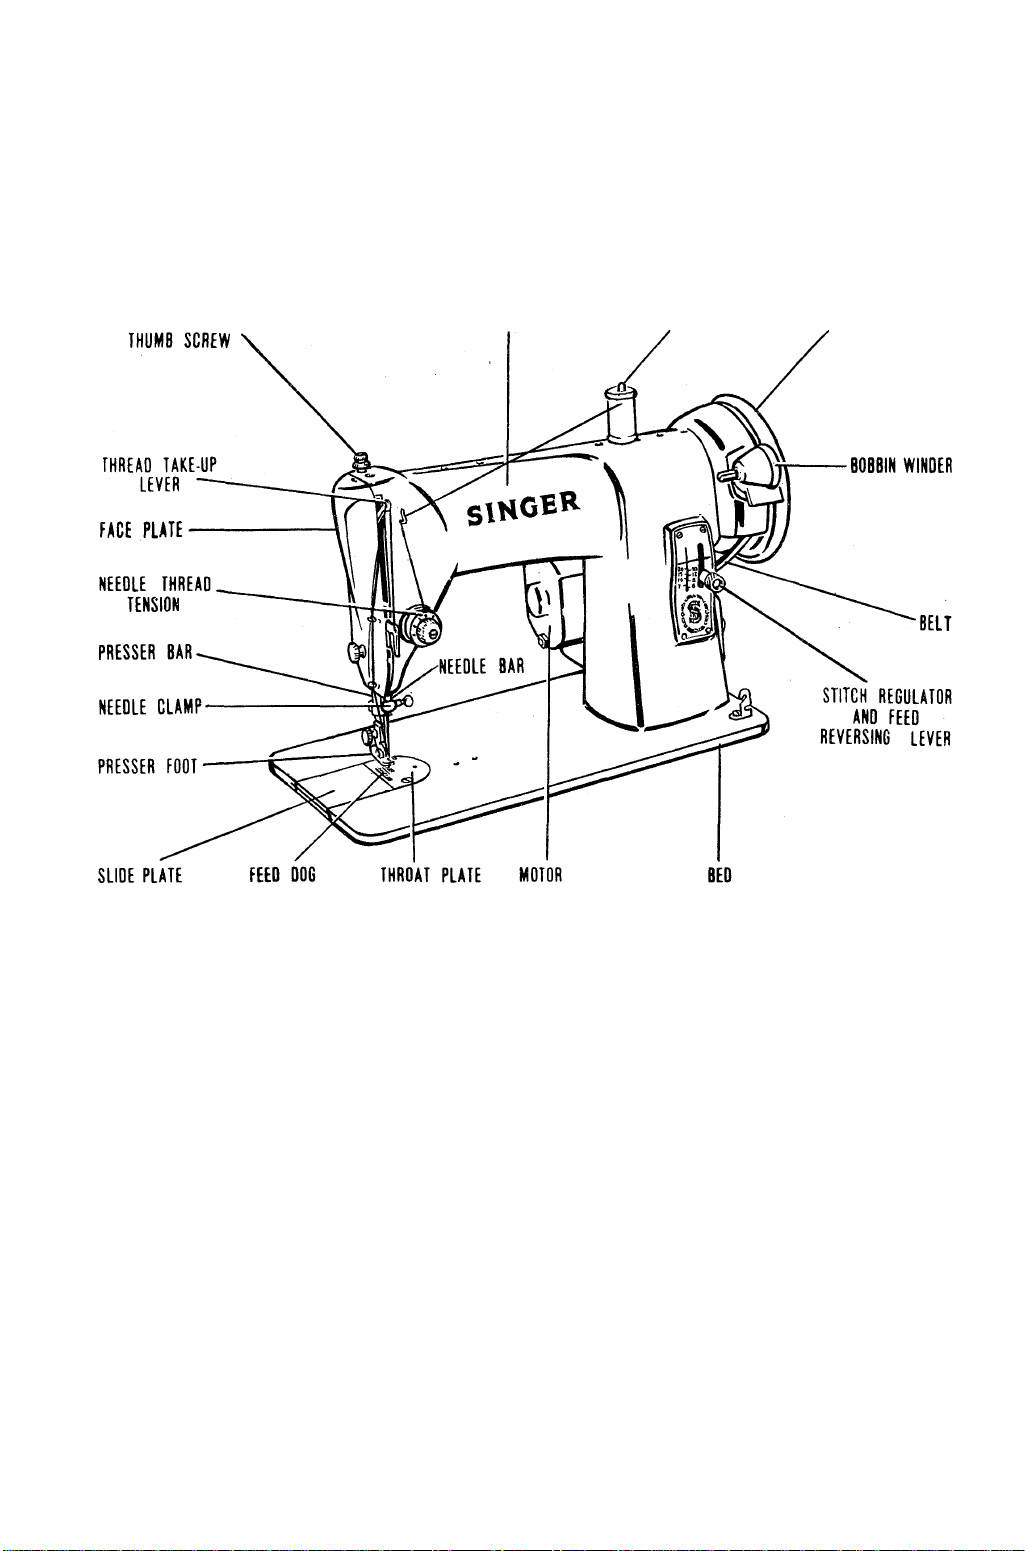
GENERAL INSTRUCTIONS FOR THE CARE AND OPERATION OF FAMILY SEWING MACHINES
The Principal Parts of Lock Stitch Sewing Machines
and Their Uses.
PRESSURE REGULATING
ARM
SPOOL PIN
HAND WHEEL
Fig. 1. Prinxipal Parts of the Head.
Head—the part above the table (Fig. 1) containing the stitching mechanism.
Arm—the curved part of the head containing the mechanism for driving the
needle and handling the upper thread.
Bed—the flat portion of the head, under which is mounted the feeding mechan
ism and that for controlling the lower thread.
Hand Wheel—the wheel at the right of the head driven by the belt.
Bobbin Winder—the mechanism for automatically winding bobbins.
Stitch Regulator—the device which controls the length of the stitch.
Upper Tension—the means for controlling the delivery of the upper thread
from the spool.
Thread Take-up Lever—the part which pulls up the slack thread and locks
the stitch.
Needle Bar—the vertical bar in the lower end of which the needle is inserted.
Presser Bar—the vertical bar to which the presser foot is attached.
Face Plate—the vertical plate on the left of the arm, which may be removed
to give access to the needle bar, presser bar and take-up.
Page 4
Throat Plate—the plate in the bed directly below the presser foot through
which the needle passes and the feed dog moves.
Feed Dog—the toothed part which projects upward through slots in the
throat plate, carrying the fabric from the operator at each stitch. The
movement of the feed dog is controlled by the stitch regulator which
determines the desired length of stitch.
Bed Slide—the flat plate or plates at the left of the bed, which may be
opened to give access to the shuttle or bobbin case and other parts of
the lower stitch-forming mechanism.
Bobbin—the spool on which thread is wound to furnish the lower or shuttle
thread supply.
Shuttle or Bobbin Case—the container in which the bobbin is placed and
around which the loop of the needle thread is passed in forming the
lock stitch.
Rotary or Oscillating Hook—the part which enters the loop of needle
thread and carries it around the bobbin case. In the long-bobbin
machine (Singer No. 128) this function is performed by the shuttle,
which also acts as a bobbin case.
Lower Tension—the spring on the shuttle or bobbin case, which controls the
tension on the thread from the bobbin.
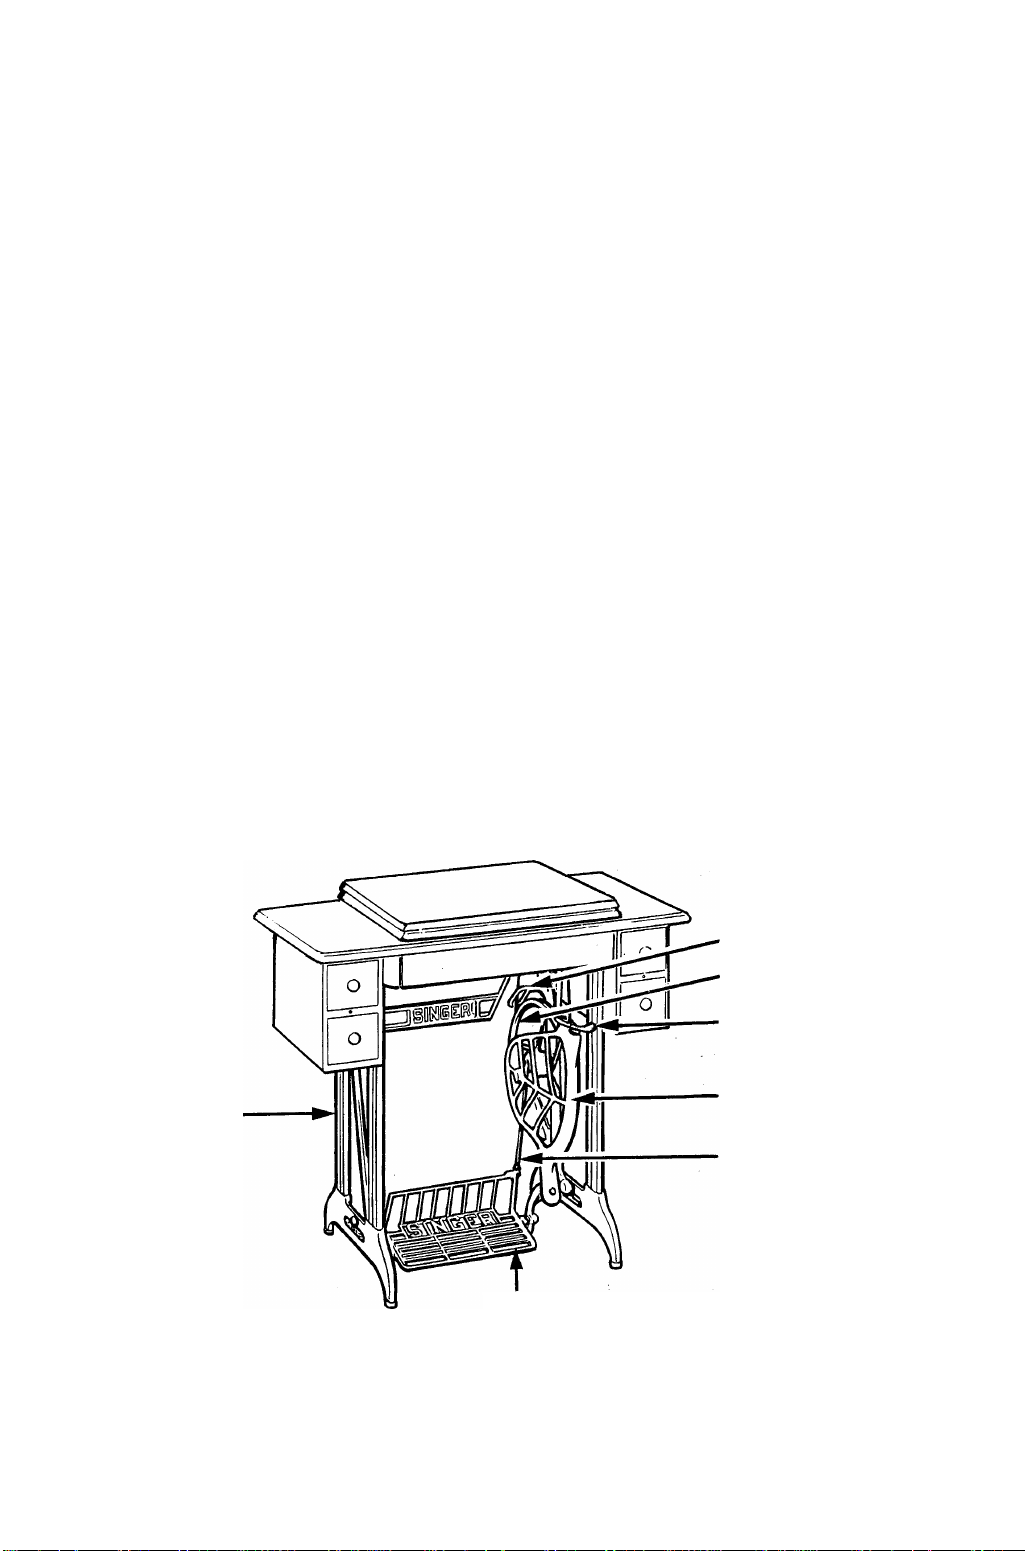
Cabinet Work—all the wood parts.
Stand—the supports and driving parts on which the cabinet work is mounted.
Treadle—the platform rocked up and down with the feet to operate the
machine.
Pitman—the rod connecting the treadle and the band wheel.
LEG
BELT GUIDE
BAND
WHEEL
BELT
SHIFTER
DRESS
GUARD
PITMAN
TREADLE
Fig. 2. Principal Parts of the Cabinet Table Stand.
4
Page 5
Band Wheel—the large wheel with a groove in which the belt runs, mounted
on the band wheel crank and rotated by the up and down motion of
the pitman.
Belt Shifter—the lever at the front of the band wheel, which may be turned
to the left to throw the belt off the wheel. The belt may be replaced
automatically by treadling, this action being accomplished by a pro
jection on the side of the band wheel, assisted by the belt guide in
the rear.
Legs—the upright members which support the table.
Dress Guard—the shield in front of the band wheel protecting the operator’s
clothing.
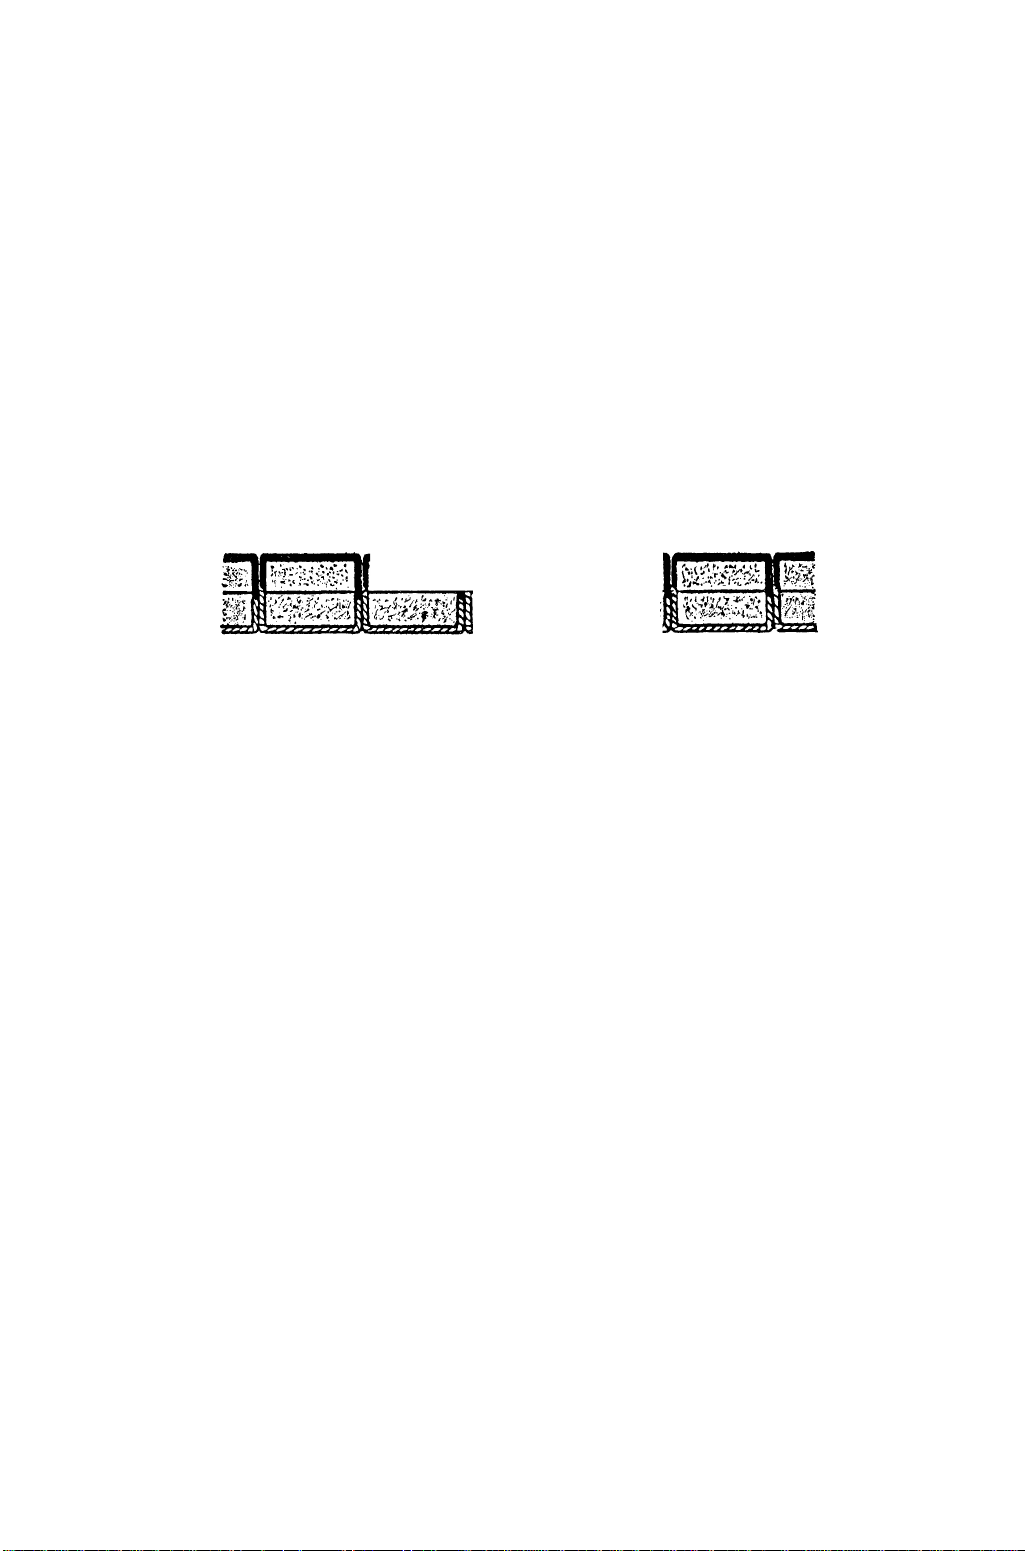
Formation of the Lock Stitch.
The lock stitch made by sewing machines consists of an upper or needle
thread and an under or bobbin thread locked together in the material which is
being stitched, the lock being formed by passing the upper around the lower
thread and tightening them together in the middle of the fabric.
^sxBBXzrea
Fig. 3.
When a stitch has been completed and before each succeeding stitch is
commenced, the fabric being stitched is carried from the needle by the feeding
mechanism, and upon the length of its movement depends the length of the
stitch.
The presser foot rests upon the fabric, prevents it from rising with the
needle and holds it in contact with the feed dog while the feeding takes place.
The section of the foot which presses on the cloth is slotted so that the view
of the stitching may not be obstructed.
PRACTICE for BEGINNERS
The beginner should acquire a knowledge of the various parts of the
sewing machine and the purpose of each, in order to give the machine proper
care and to obtain the best results from it. It is essential that practice
precede actual sewing on the machine. For this practice the upper thread and
bobbin should be removed from the machine and the presser foot raised. The
operator should be equipped with a chair high enough to allow her to sit
comfortably and squarely in front of the machine directly in line with the
needle.
Whether the machine is electric or treadle controlled it is essential that the
operator should continue practising until she is able to start smoothly and
have an easy control at varying speeds.
Electric Machine. See that the foot control is placed in such a position
on the floor that the foot can rest comfortably on it. Press lightly on the
control knob with the toe to test the amount of pressure needed for varying
speeds before threading up and starting to sew.
Treadle Machine. The operator should sit squarely in front of the
machine with the feet placed comfortably on the treadle. The right foot
should be placed forward and the left backward so that the pressure on the
treadle is with the ball of the foot.
Page 6
Practice for Beginners—(Continued)
The hand wheel should receive a start with the right hand at the same
time as pressure is applied to the treadle. In the case of family sewing
machines of the lock-stitch type, the hand wheel should turn from the top
towards the operator.
This practice should be continued until an easy method of treadling is
acquired and the operator is able to start the machine and keep it running
smoothly.
Note. During this practice and whenever a sewing machine is run with
out sewing, the needle should be unthreaded and the presser foot raised so
that it is not in contact with the feed.
Practise Straight Stitching with Paper.
It is well to practise straight stitching with paper and without thread
until the operator can follow a line with ease before actually sewing, as crooked
Fig. 4. S.^mples of Stitching.
F'ig. 5- Pr.^ctice on Paper.
stitching will ruin a garment. Provide a few sheets of pad paper measuring
about six by nine inches, and with a pencil and ruler draw lines thereon
lengthwise about a quarter of an inch apart. Practise following these lines
with stitching until perfect results are obtained. See Fig. 4.
The next practice should be with a sheet of paper of the same size. Begin
by stitching along one edge, keeping the edge of the paper even with the
right-hand edge of the presser foot. When near the corner, stop the machine
with the needle in the paper, raise the presser bar and turn thè paper ready
to stitch along the next side ; continue along the two remaining sides of the
paper and then use the first line of stitching as a guide, making a similar
pattern to that shown in Fig. 5. This gives practice in turning corners, as
well as in making a straight line of stitching by using the edge of the presser
foot as a guide. A medium length of stitch should be used for this practice.
By following these suggestions the beginner will acquire a sufficient
knowledge of speed and control of the machine to enable her to proceed with
actual stitching.
6
Page 7
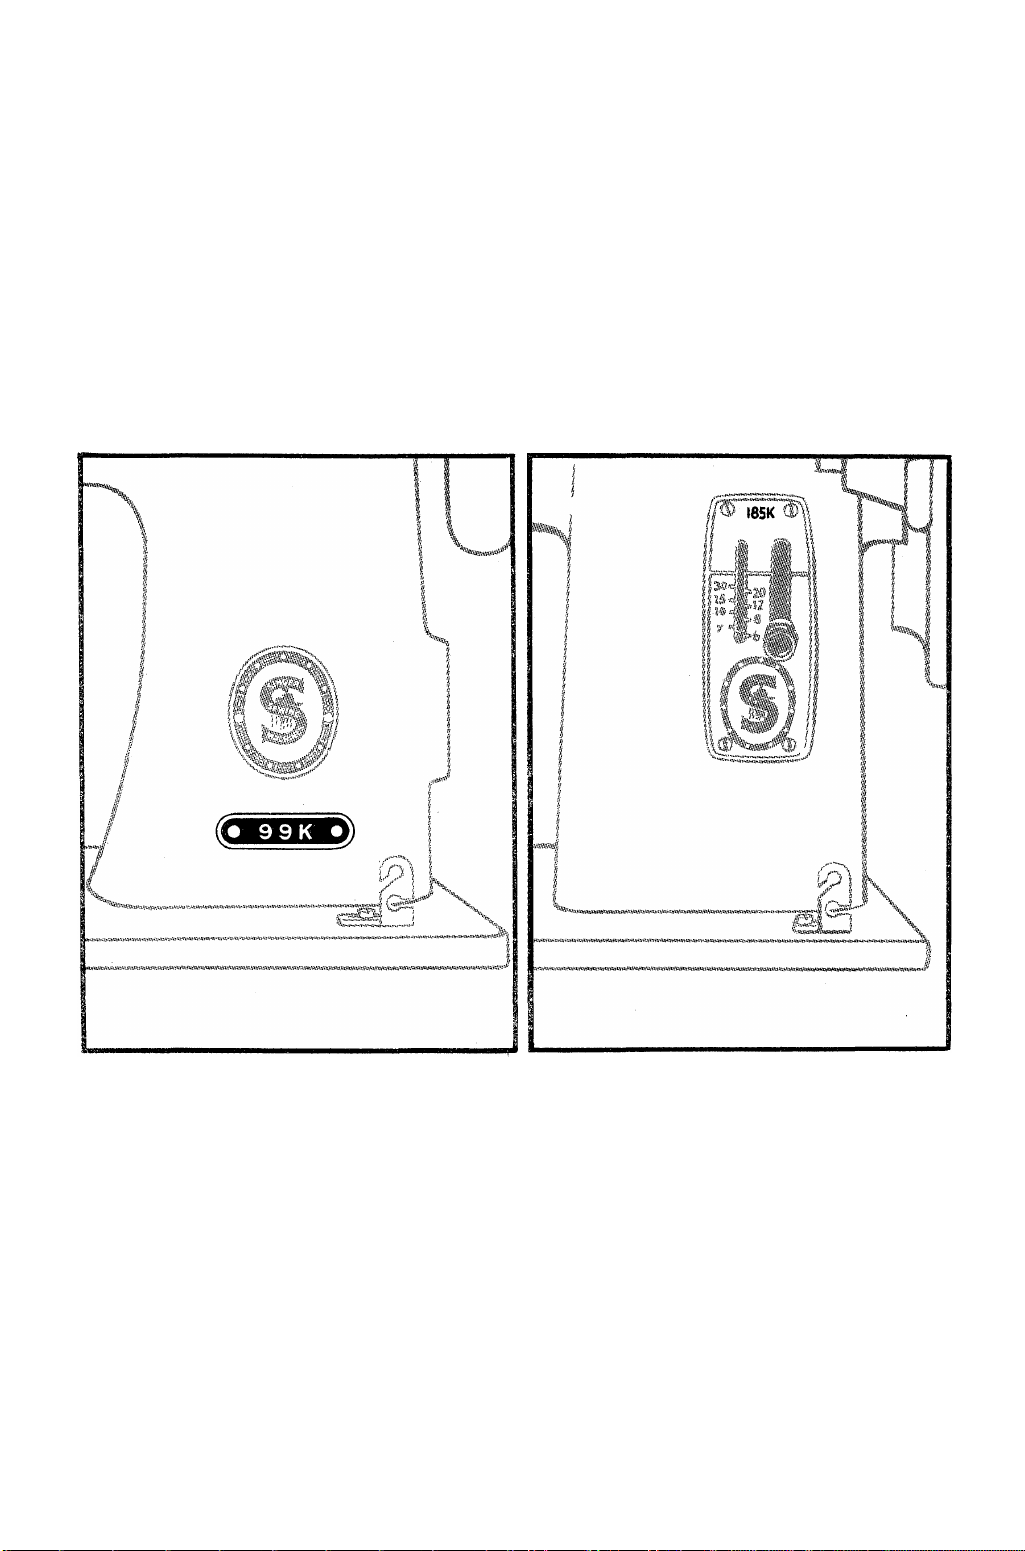
Know the Model Number of Your Machine.
To make full use of the instruction contained in this book, it will be to
your advantage to know the model number of the Sewing Machine you are
using. On all except the oldest Singer Machines, the model number will be
found printed on a small plate near the Singer trademark to the right hand
side of the machine head.
Fig. 6. Machin e Model Numbers.
Page 8
PREPARING THE MACHINE
FOR SEWING
Adjusting the Stop Motion Screw for
Winding Bobbins.
In preparing to sew with the machine,
first see that the bobbin is wound with
thread of suitable size for the material to
be sewn (see page 11).
It is necessary to understand the stop
motion of the machine by which the hand
wheel can be released when winding bobbins,
thus permitting the winder to operate with
Fig. 7. Releasing the Stop Motion.
wheel and turn the stop motion screw over towards you, as shown in Fig. 7.
out running the stitching mechanism. To
release the stop motion, hold the hand
To Wind the Bobbin—Machines 15K80, 15K110 and 201K.
Loosen stop motion screw.
Place empty bobbin on
spindle.
Place spool of thread on spool
pin.
Thread machine as shown in
Fig. 8.
Hold end of thread and start
machine.
Break off end of thread after a
few coils have been wound on
bobbin and restart machine
until bobbin is filled when
winder will stop automatical-
ly-
To Increase Pressure of
Rubber Ring against hand
wheel—
# Press down winder until latch
(4) drops down and holds it.
Then loosen screw (5).
# Push back upper end of
slotted plate (see inset, Fig. 8)
as far as it will go and at same
time press winder against
hand wheel.
• Tighten screw (5).
• Raise latch to release winder.
Fig. 8.
Page 9
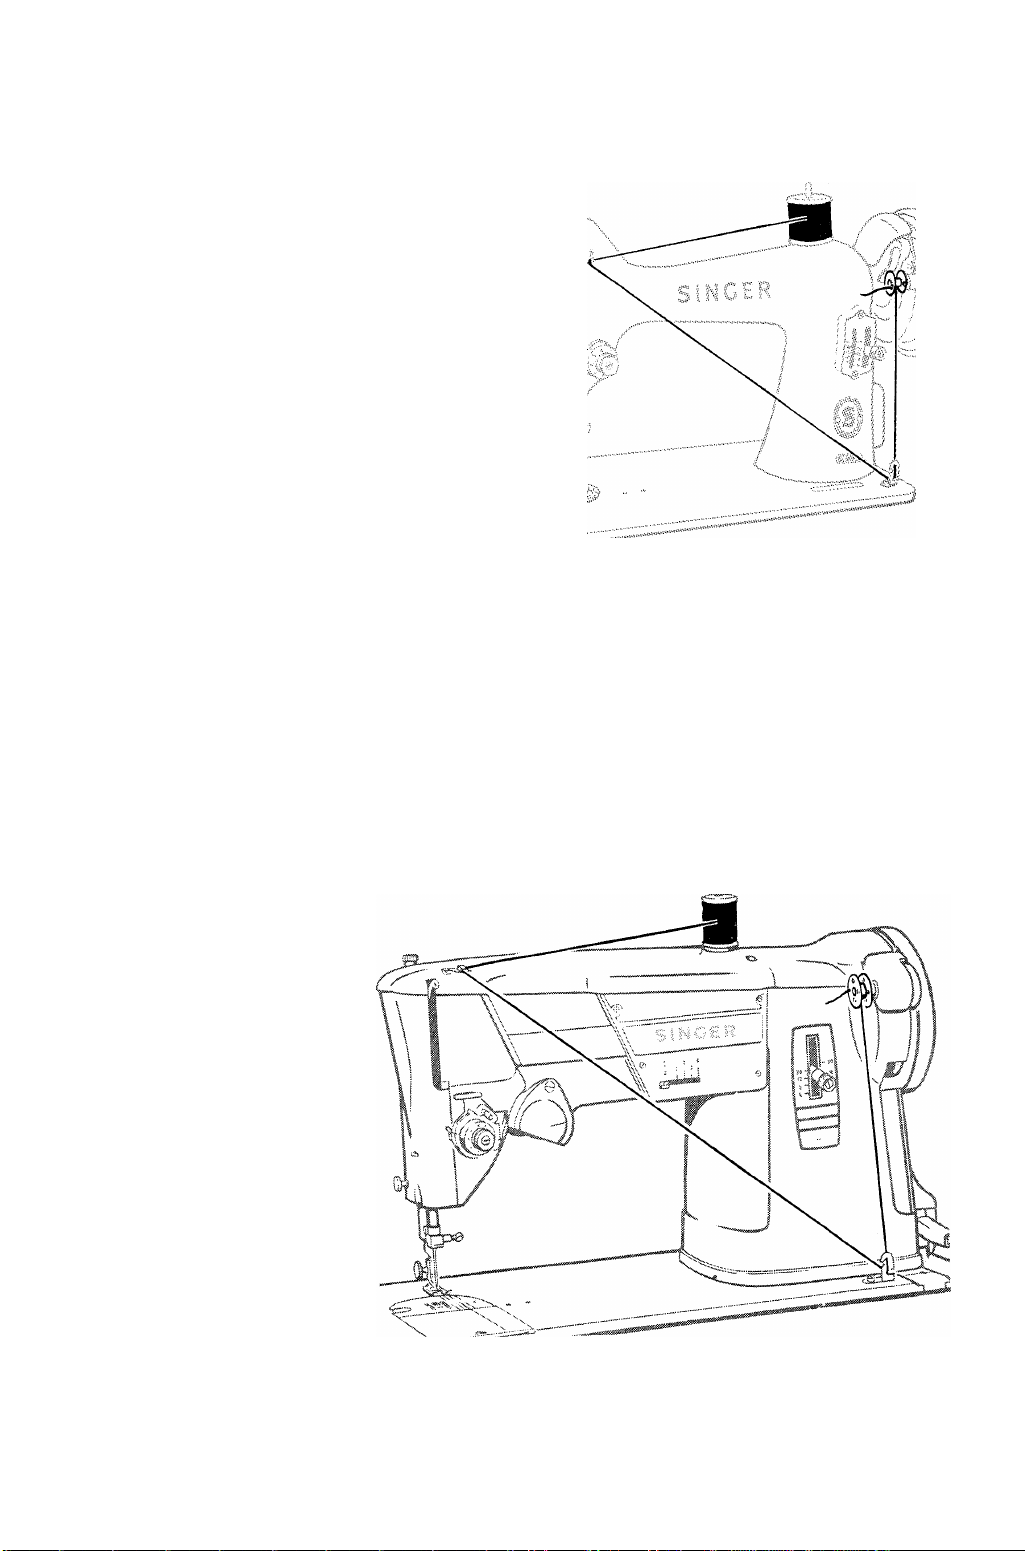
To Wind the Bobbin—Machine 99K (New Style),
Loosen stop motion screw.
Place empty bobbin on winder
spindle.
Turn bobbin until hole in
right side engages pin in
spindle.
Press winder down until latch
engages.
Place spool of thread on spool
pin.
I Thread machine as shown in
Fig. 9.
) Hold end of thread and start
machine. (End of thread will
break off after a few coils have
been wound on bobbin).
) When bobbin is full, winder
will stop automatically.
► Remove bobbin and retighten
stop motion screw.
Fig. 9.
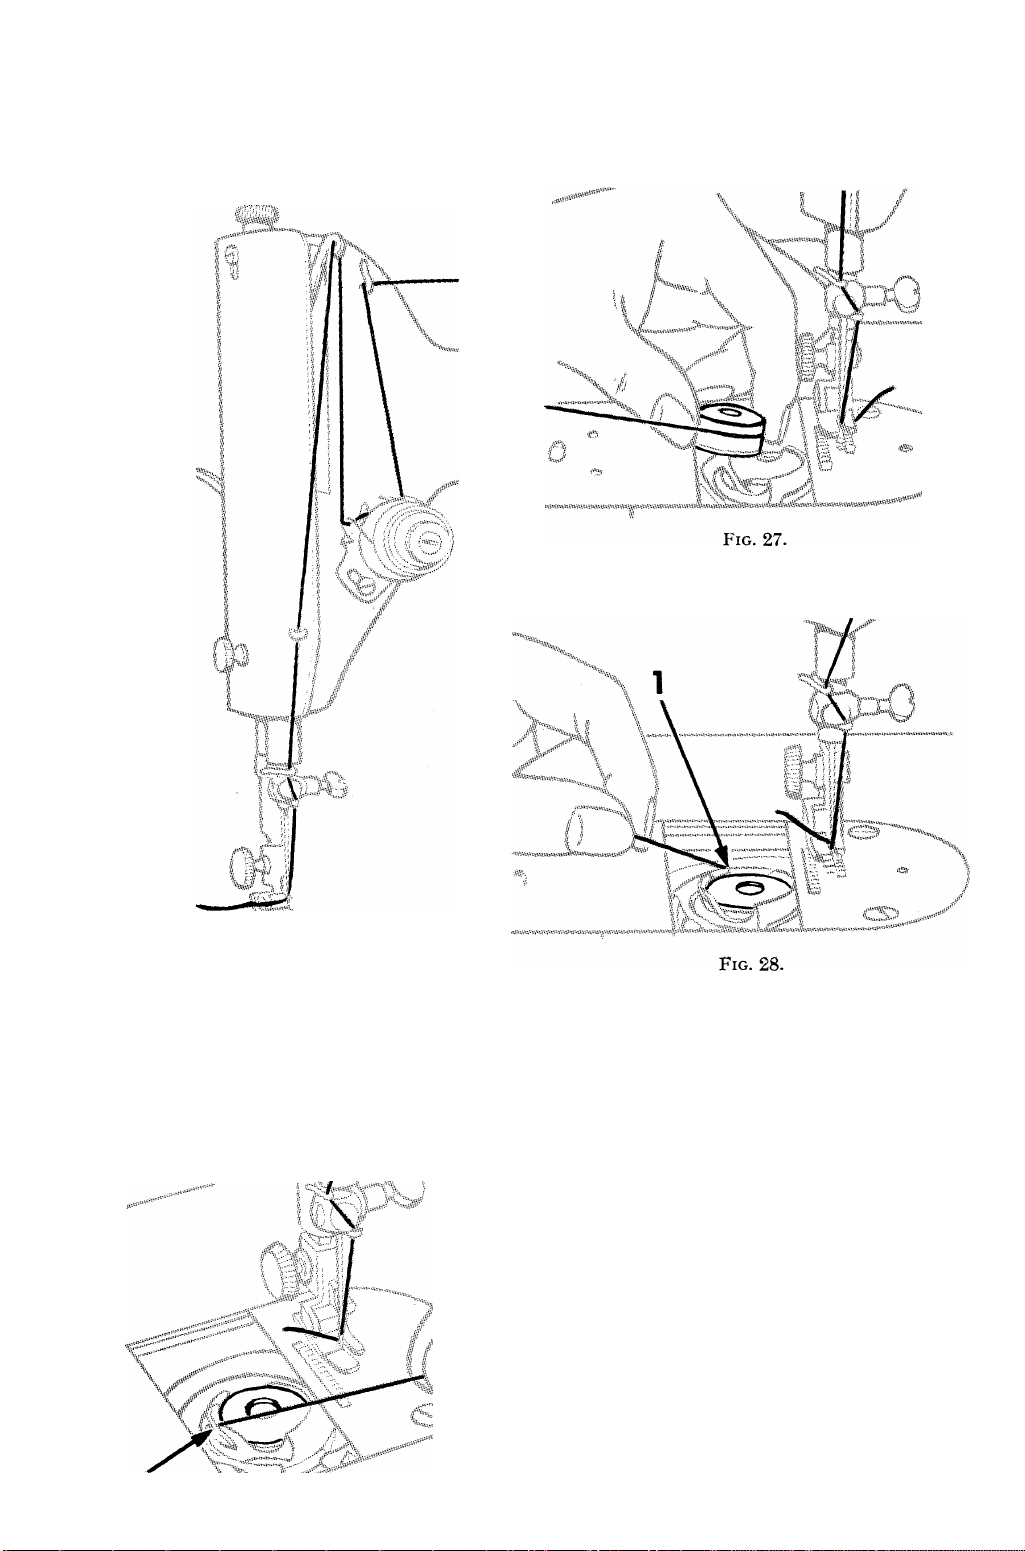
To Wind the Bobbin—Machines 185K and 327K
• Loosen stop motion
screw.
• Place empty bobbin on
spindle.
• Press bobbin winder
down against hand
wheel.
• Thread machine as
shown in Fig. 10.
• Hold thread end and
start machine.
• When bobbin is full,
stop machine.
• Lift bobbin winder
away from hand wheel
and remove bobbin.
• Tighten stop motion
screw.
Fig. 10.
Page 10

To Wind the Bobbin—Machines 328K and 329K.
• Loosen stop motion screw.
• Place empty bobbin on
spindle.
• Press bobbin winder down
against hand wheel.
• Place spool of thread on
spool pin.
• Thread between tension discs
and through bobbin as shown
in Fig. 11.
• Hold end of thread and start
machine. (End of thread will
break off after a few coils have
been wound on bobbin).
When Bobbin is Full
• Stop machine.
• Lift bobbin winder away
from hand wheel and remove
bobbin.
• Tighten stop motion screw. Fig. ij.
""""""""
To Wind the Bobbin—Machine 404.
• Loosen stop motion
screw.
• Place bobbin on
spindle.
• Pull out bobbin
winder engaging
slide as shown in
Fig. 12.
.
Fig. ]2.
• Place spool of thread
on spool pin and
thread machine as
shown in Fig. 13.
Page 11

Wind the Bobbins Evenly.
Bobbins must be wound evenly in order that they may work properly in
the machine. In winding them, see that the thread is placed smoothly and
evenly. A correctly wound bobbin will insure the thread running smoothly
from the shuttle and prevent uneven stitching, which may occur if the bobbin
is not properly wound.
15K80,15K110, 99K (New Style), 185K, 201K, 327K, 328K and 329K.
If the thread does not wind evenly on the bobbin, loosen the screw which holds
the bobbin winder tension bracket (see 2, Fig. 8) on the machine bed and
slide the bracket to the right or left as may be required, then tighten the screw.
Always have a sufficient quantity of bobbins on hand and never wind
thread on a partly wound bobbin containing thread of another colour.
Bobbins so wound are usually uneven and cause trouble in the bobbin case.
When a rubber ring becomes worn or oil has come in contact with it, the
ring will not grip the wheel and will slip when winding a bobbin. A worn or
oily ring should be replaced.
Relative Sizes of Needles and Threads.
Needles used. Catalogue 2020 (15 x 1
Types of Fabrics Thr ead Sizes
Filmy Materials
Comparable to Net—
100 Cotton
Marquisette —Chiffon—
Silk—Chiffon Velvet—
Ninon—Nylon Sheers
Sheer Materials
Comparable to Lawn—
80 to 100 Cotton
Organdie—Dimity—Batiste
—Pure Silks—Paper Taffeta
—Silk—Synthetic Tricots—
Synthetic Sheers
Lightw eight Materials
Comparable. to Gingham—
50 to 80 Cotton
Chambray Sheers—Wool
Crêpe—Taffeta—Synthetic
V el ve ts—Satin—Synthe tic
or Wool Jersey
Medium Lightweight
Materials
Comparable to Poplin—
Pique—Percale—Cretonne
50 Mercerised
60 to 80 Cotton
—Chintz—F aille—Bengaline
—Wool Flannel—Crêpe—
Lightweight Suitings
Medium Heavy Materials
Comparable to Cotton
Heavy-Duty Mercer
Vel ve teen—Corduroy—
Gabardine—Rep—Coatings
40 to 50 Cotton
and Heavy Suitings
Heavy Materials
Comparable to Sailcloth—
Heavy-Duty Mercer
Denim—T icking—
Overcoatings
Ver y Heavy Materials
Comparable to Canvas—
30-40 Cotton
40 to 60 Linen
20-24 Cotton
Duck
Plastic Materials
Nylon or
Mercerised Cotton
A Silk
Nylon
A Silk
Nylon
A Silk
Nylon
A Silk
Nylon
ised
A Silk
ised
A Silk
Machin e
Needle
Sizes
0
11 12-15 15-20
14
14
Machin e Stit ches per Inch
Inside Seams
Top Stitching
15-20 20-30
12
12
16 10
16-18
8
18-19 6
9-11
10
Hand
Needle
10
16
16 7-8
12
10
4-5
8
12
9-11
9
8
6
o
O
11
Page 12
The Importance of using Correct Needles and Thread.
A perfect stitch can be obtained only when the thread is selected to suit
the material to be stitched and the needle is of the correct size for the thread.
If the needle is too fine for the thread and material, it is likely to break when
crossing a seam. If a coarse needle is used on fine material, the perforations
made will show in the finished work. A table of correct needles for the various
sizes of silk and cotton is given on page 11. This table should be carefully follow
ed when ordering needles and wiien changing them for various classes of work.
NOTE : It is essential for good work that the needle be perfectly straight
and have a sharp point. Only SINGER needles should be used in SINGER
machines.
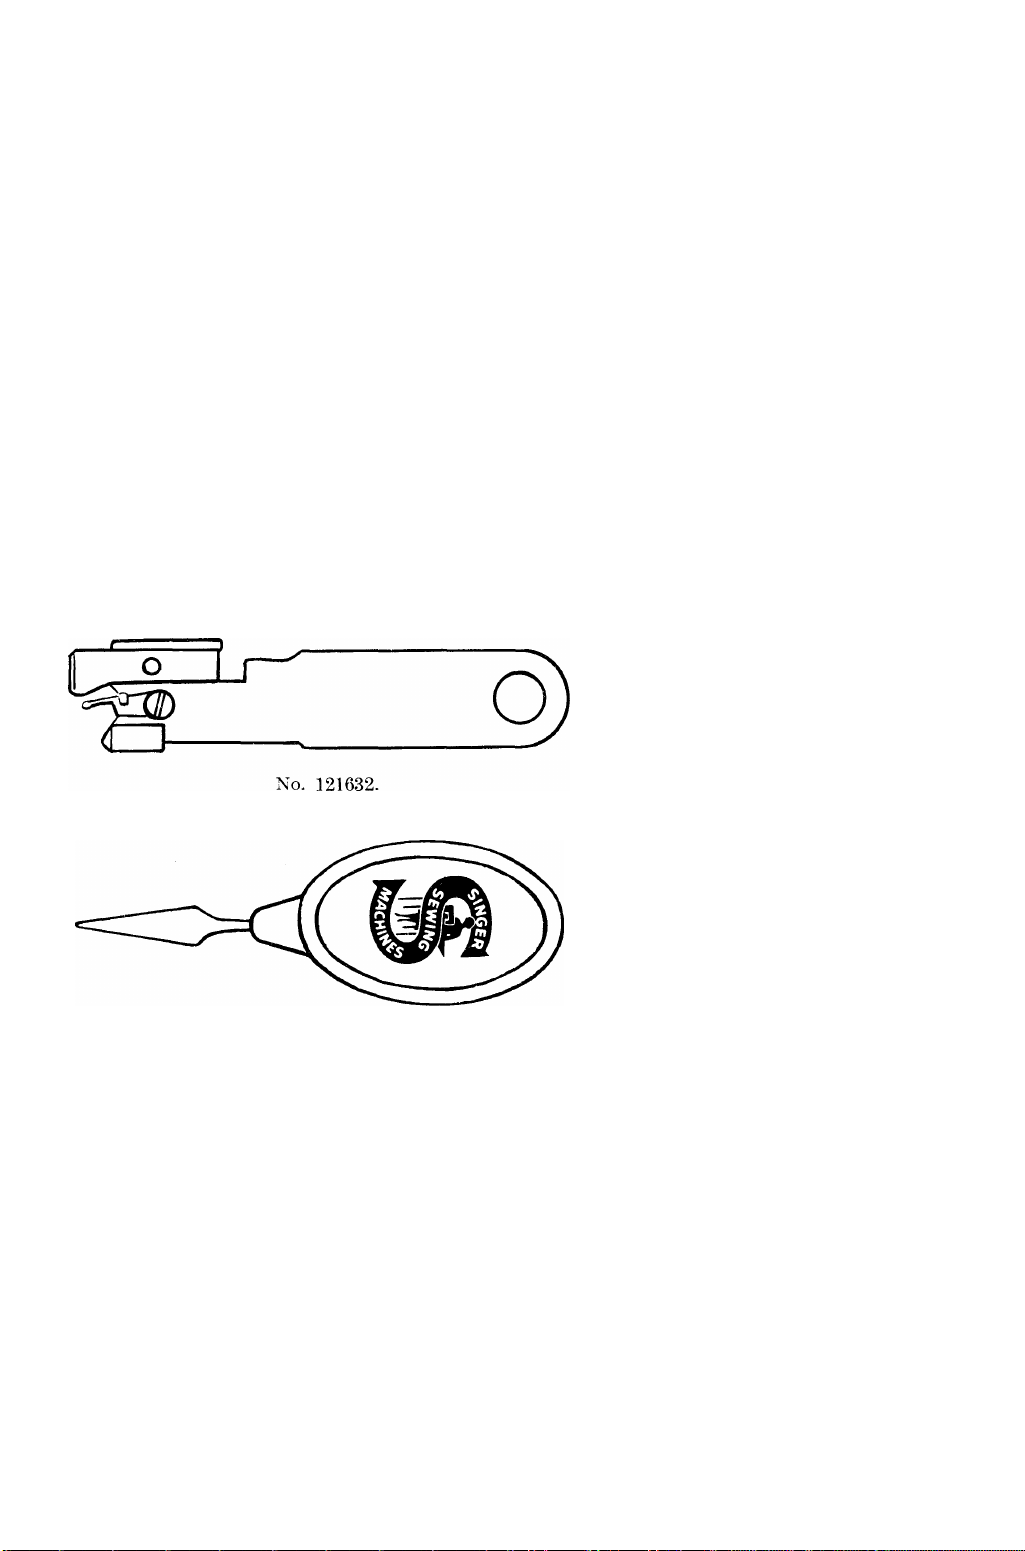
Needle Threaders.
No. 161307.
Fig. 14. Singer Needle Th readers.
The Singer Needle Thread
ers save time, are inexpen
sive, simple to use and
indispensable to all. They
can be used for threading
hand sewing needles as well
as sewing machine needles.
12
Page 13
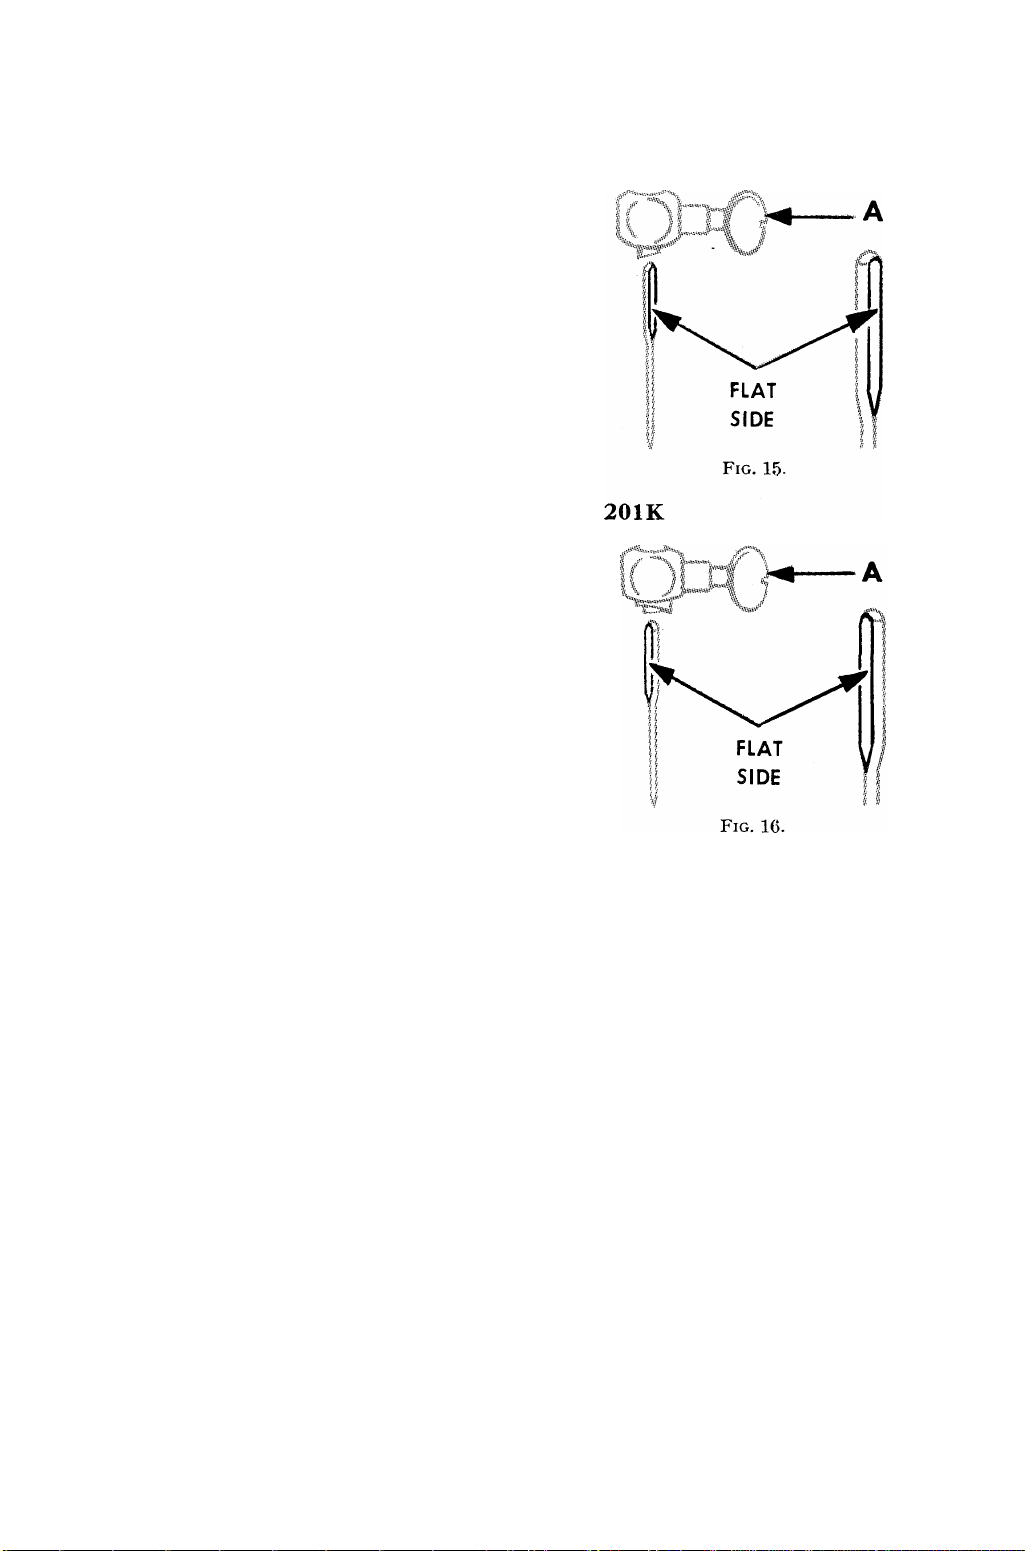
To Set the Needle in Machines 15K, 66K, 99K and
(See Fig. 15).
Raise needle bar to its highest point
by turning hand wheel toward you.
Loosen clamp screw A.
Insert needle (flat side to the right)
up into needle clamp as far as it will
go.
Tighten clamp screw A.
(See Fig. 16).
Raise needle bar to its highest point
by turning hand wheel toward you.
Loosen clamp screw A.
Insert needle (flat side to the left)
up into needle clamp as far as it will
go.
Tighten clamp screw A.
185K
To Set the Needle in Machines 327K, 328K, 329K and 404
(See Fig. 17).
Raise needle bar to highest
point by turning hand wheel
toward you.
Loosen needle clamp screw.
Insert needle upward into
clamp as far as it will go,
3?| f\ 1
f""'" 1 r“'i
MM
■L.f:!i■/
...
i
H" \j'
t\
with flat side of needle to
back and long groove to
ward you.
Tighten needle clamp screw.
f f I. 'i ]
,■0"^ i / \'|
,#'• ■ ?/■ >/ /
Fig. 17.
LONG GROOVE
TOWARD YOU
N.B.—You will note that the side of the needle with the flat on the
shank has a short groove at the eye while the other side has a long
groove. The thread must pass down this long groove when sewing. If the
needle is not placed correctly in the machine it will not sew.
Particular attention is drawn to the fact that in Machine 201K the needle is
set with the flat side of the shank to the left; on 327K, 328K and 329K Machines
the flat side is to the hack, while in the other Singer family machines referred to in
this hook the flat side must he to the right.
13
Page 14
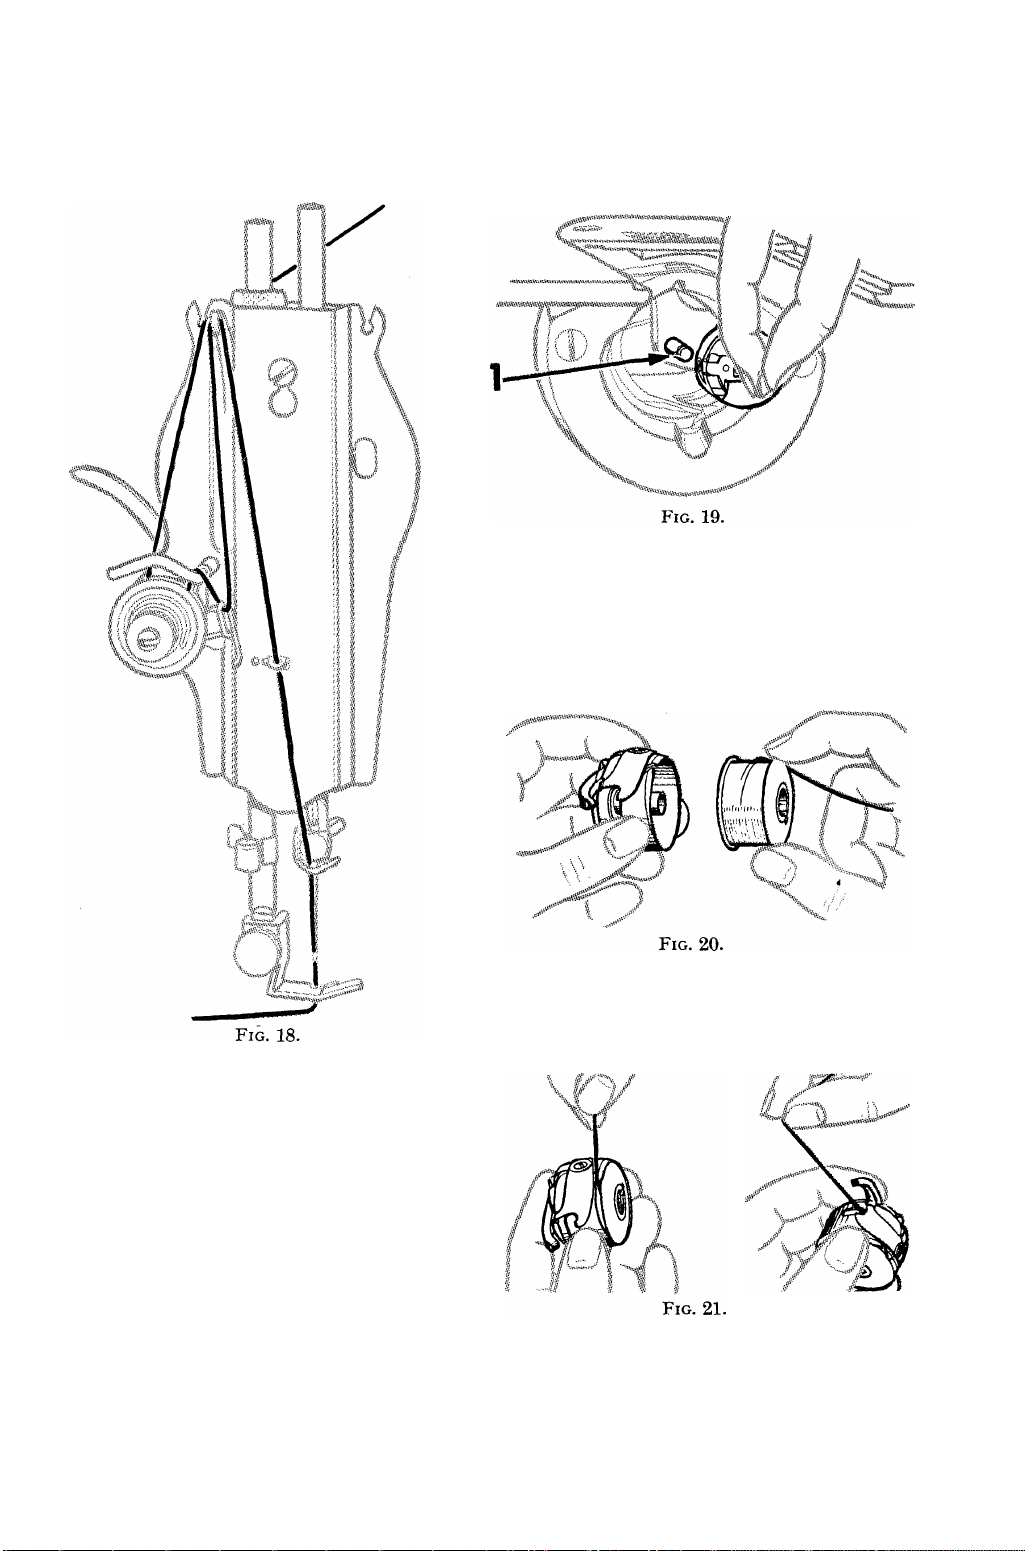
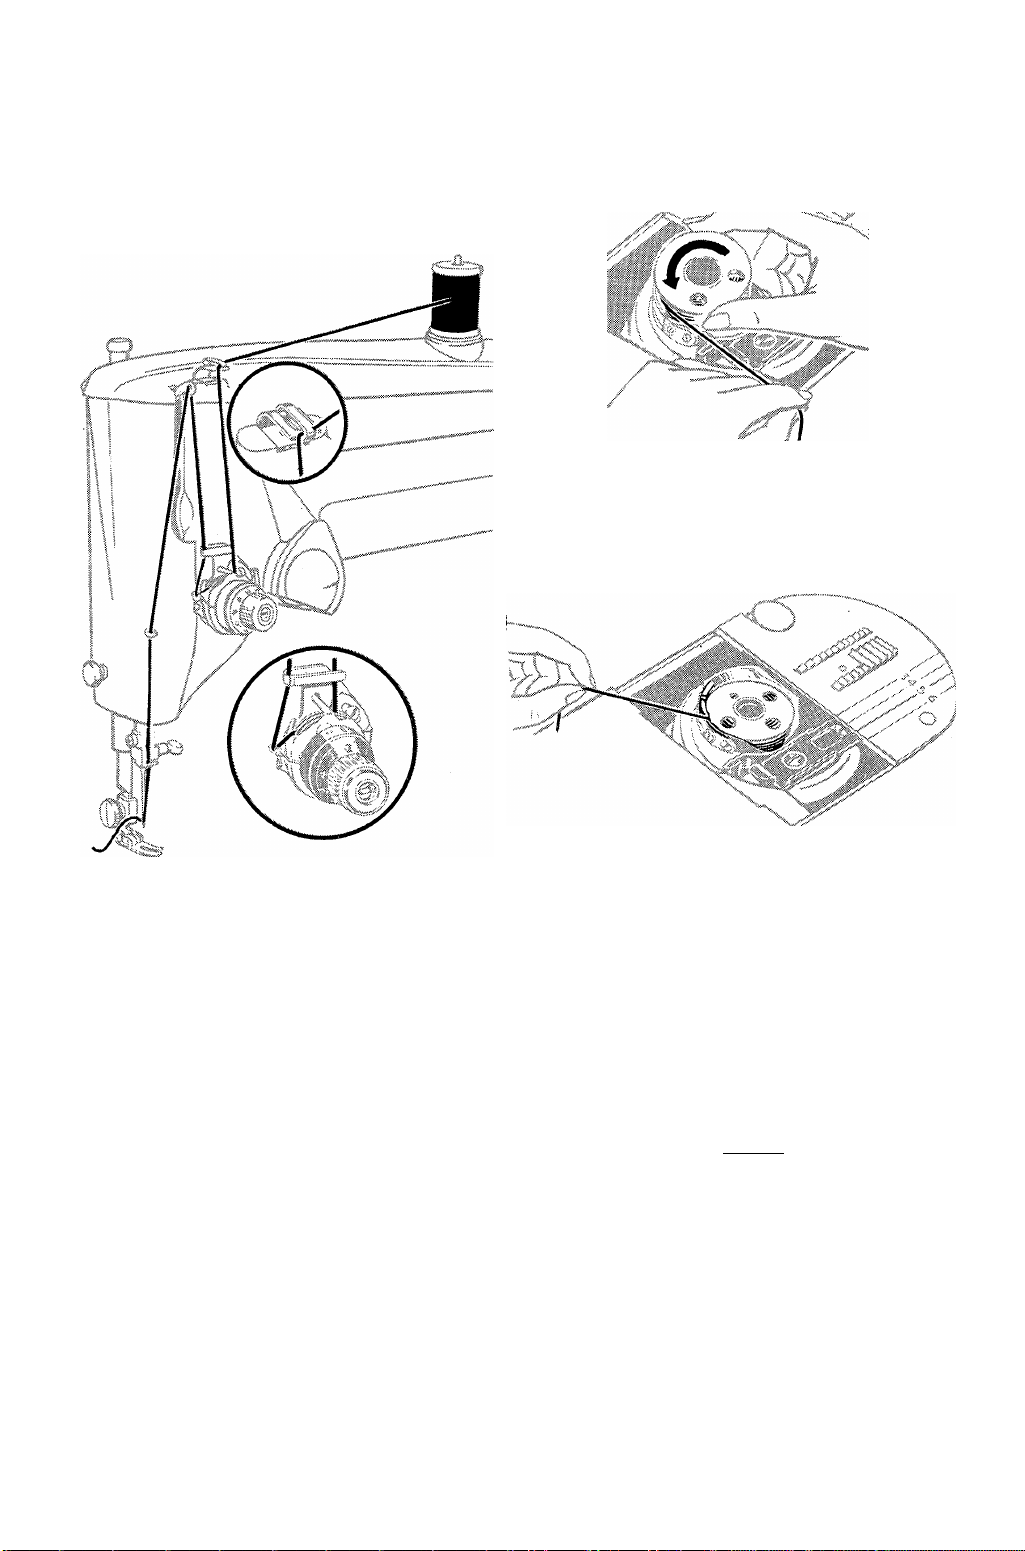
Threading Central Bobbin Machine No. 15K.
UPPER THREADING UNDER THREADING
Open bed slide.
Open bobbin case latch as shown in
Fig. 19 and withdraw bobbin.
Release the latch, turn the bobbin
case downward and bobbin will
drop out.
Raise take-up lever to its highest
point.
Place spool of thread on spool
pin.
Thread machine as shown in
Fig. 18.
Thread needle from left to right.
Hold bobbin case with slot in edge
at the top and wound bobbin with
thread leading on top towards the
right, as shown in Fig. 20.
Pull thread into slot as shown in
left hand illustration. Fig. 21.
Draw the thread down, under the
tension spring, and to the left into
the delivery eye at its end, as shown
in right hand illustration. Fig. 21.
14
Page 15
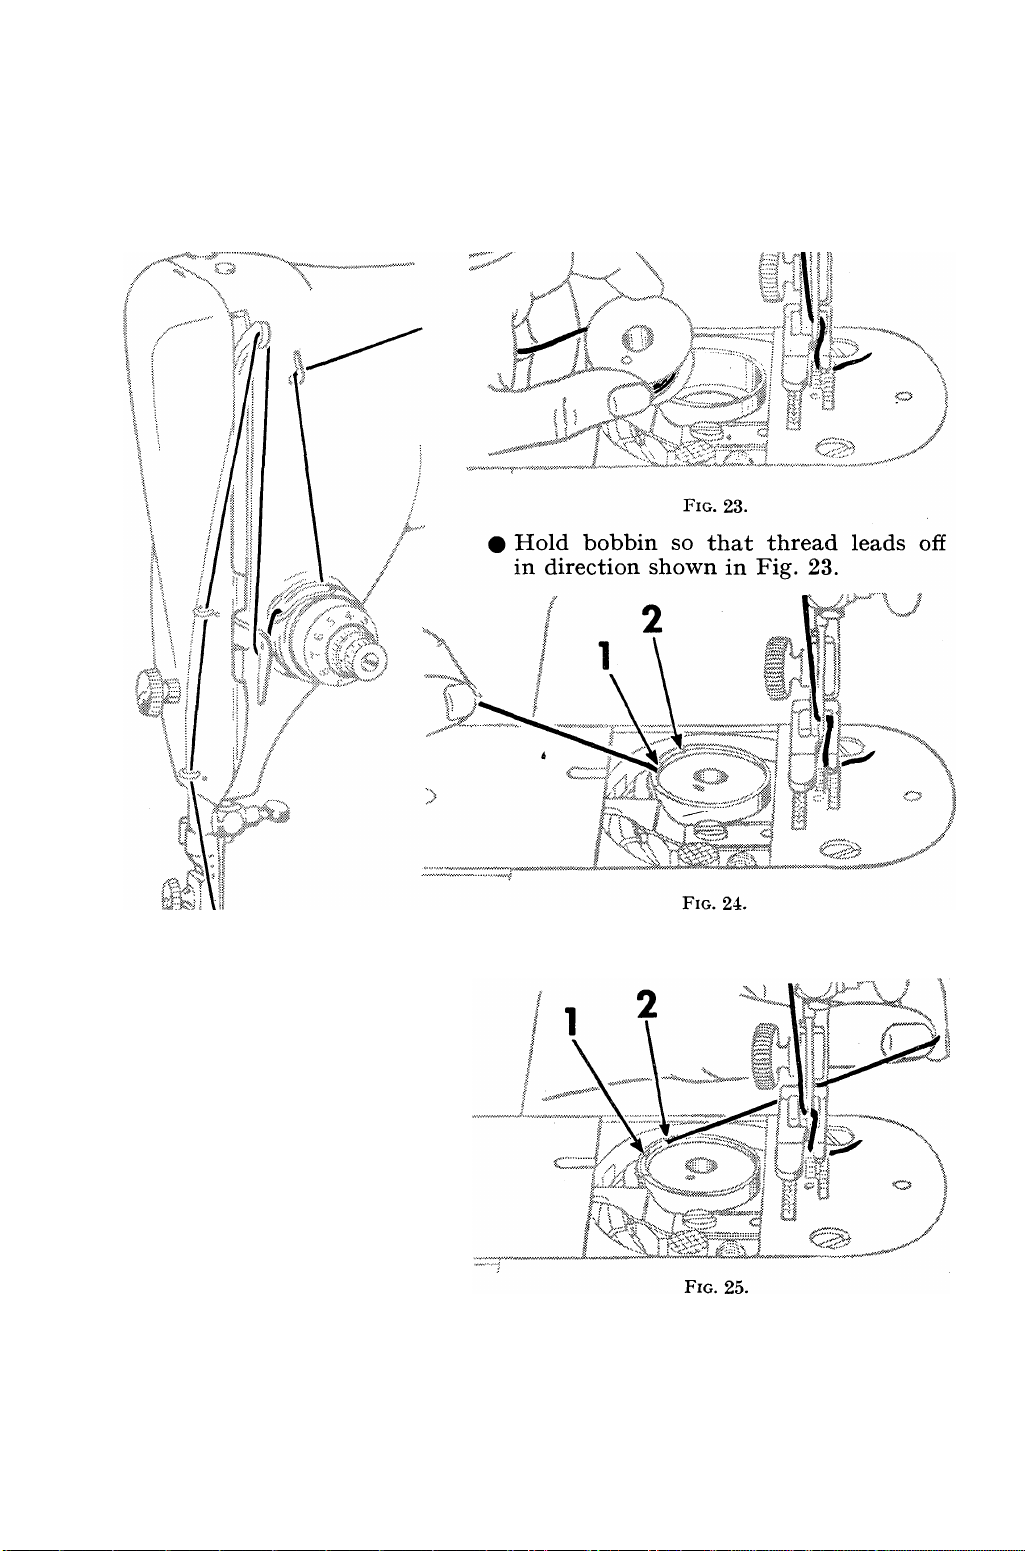
Threading Oscillating Hook Machines Nos. 66K, 99K and 185K
UPPER THREADING UNDER THREADING
Fig. 22.
# Raise take-up lever to its
highest point.
# Place spool of thread on
spool pin.
# Thread machine as shown in
Fig. 22.
# Thread needle from left to
right.
Place bobbin in case and draw thread
into slot 1, Fig. 24.
Draw thread between case and tension
spring until it reaches notch 2, Fig. 25.
Pull about 3 inches of thread across
bobbin.
Close slide plate, allowing thread to
enter notch in slide plate.
15
Page 16
Threading Rotary Hook Machine No. 20IK.
UPPER THREADING UNDER THREADING
Hold bobbin so that thread leads
off in direction shown in Fig. 27.
/
Fig. 26.
Raise take-up lever to its highest
point.
Place spool of thread on spool
pin.
Thread machine as shown in
Fig. 26.
Thread needle from right to left.
ii'l
11
II
%■ %
Place bobbin in case and draw
thread into slot 1, Fig. 28.
Draw thread between bobbin case
and tension spring until it reaches
notch 2, Fig. 29.
Pull about 3 inches of thread
across bobbin.
Close slide plate.
Fig. 29.
16
Page 17
Threading Oscillating Hook Machines Nos. 327K, 328K, 329K and 404
UPPER THREADING UNDER THREADING
Fig. 31.
Open slide plate. Insert bobbin
with thread leading oil as shown in
Fig. 31.
"I
X,
Fig. 30.
Raise take-up lever to its highest
point.
Place spool of thread on spool
pin.
Thread machine as shown in
Fig. 30.
Thread needle from front to back.
Fig. 32.
Place bobbin in case.
Lead thread into slot and under
spring as shown in Fig. 32.
'X
I / %
/■
___
^ O /
Fig. 33.
Draw thread into notch at end of
spring ; pull about 3 inches of
thread across bobbin as shown in
Fig. 33.
Close slide plate.
17
Page 18

The Necessity for Proper Tensions.
The tensions on the sewing machine must be adjusted to suit various
materials. There are two tensions, the upper and the lower. The upper
tension controls the thread from the needle, while the lower tension controls
the thread from the shuttle or bobbin case.
The definition of the word tension as given in the dictionary is : “stress
by pulling.” It is the pulling of the threads together that completes a stitch
made by the sewing machine. After the needle thread passes around the
shuttle, the upper thread is pulled by the take-up lever to take up the slack
and complete the stitch by locking both threads together. If both threads
are under proper tension, the lock occurs in the centre of the material and a
perfect stitch is formed, as in Fig. 34.
To Regulate the Tensions.
Fig. 34. Co rrect Stitch.
For ordinary stitching, the tension
on the upper and under threads should
be equal and just sufficiently strong to
lock both threads in the centre of the
work as shown in Fig. 34.
If either tension is stronger than the
other, imperfect stitching will be the
result. (See Figs. 35 and 36).
Fig. 35. Needle Thread Tension.
TOO Stro ng.
~V "• V~
Fig. 36. Needle Thread Tension
TOO Weak.
A correct stitch can usually be obtained by
varying the tensions on the upper or needle
thread (see Fig. 37)—To increase the tension on
the upper thread, turn the thumb nut to the right ;
to lessen the tension turn the nut to the left.
The tension on the under thread is regulated
by the small screw holding the spring under which
the thread passes on the long shuttle or the round
bobbin case, but as all machines are correctly adjusted
before leaving the factory, it is seldom necessary to
alter this under tension. Should it become necessary,
however, to do so, tighten the tension spring screw to
Thu mb Nut
Fig. 37.
increase the tension and loosen the screw slightly to
lessen the tension, using the small screwdriver provided
for the purpose.
The tension on the upper thread should be adjusted only when
the presser foot is down, and the amount of tension should be so that
the pull on both the upper and the under threads is as nearly as
possible equal.
18
Page 19
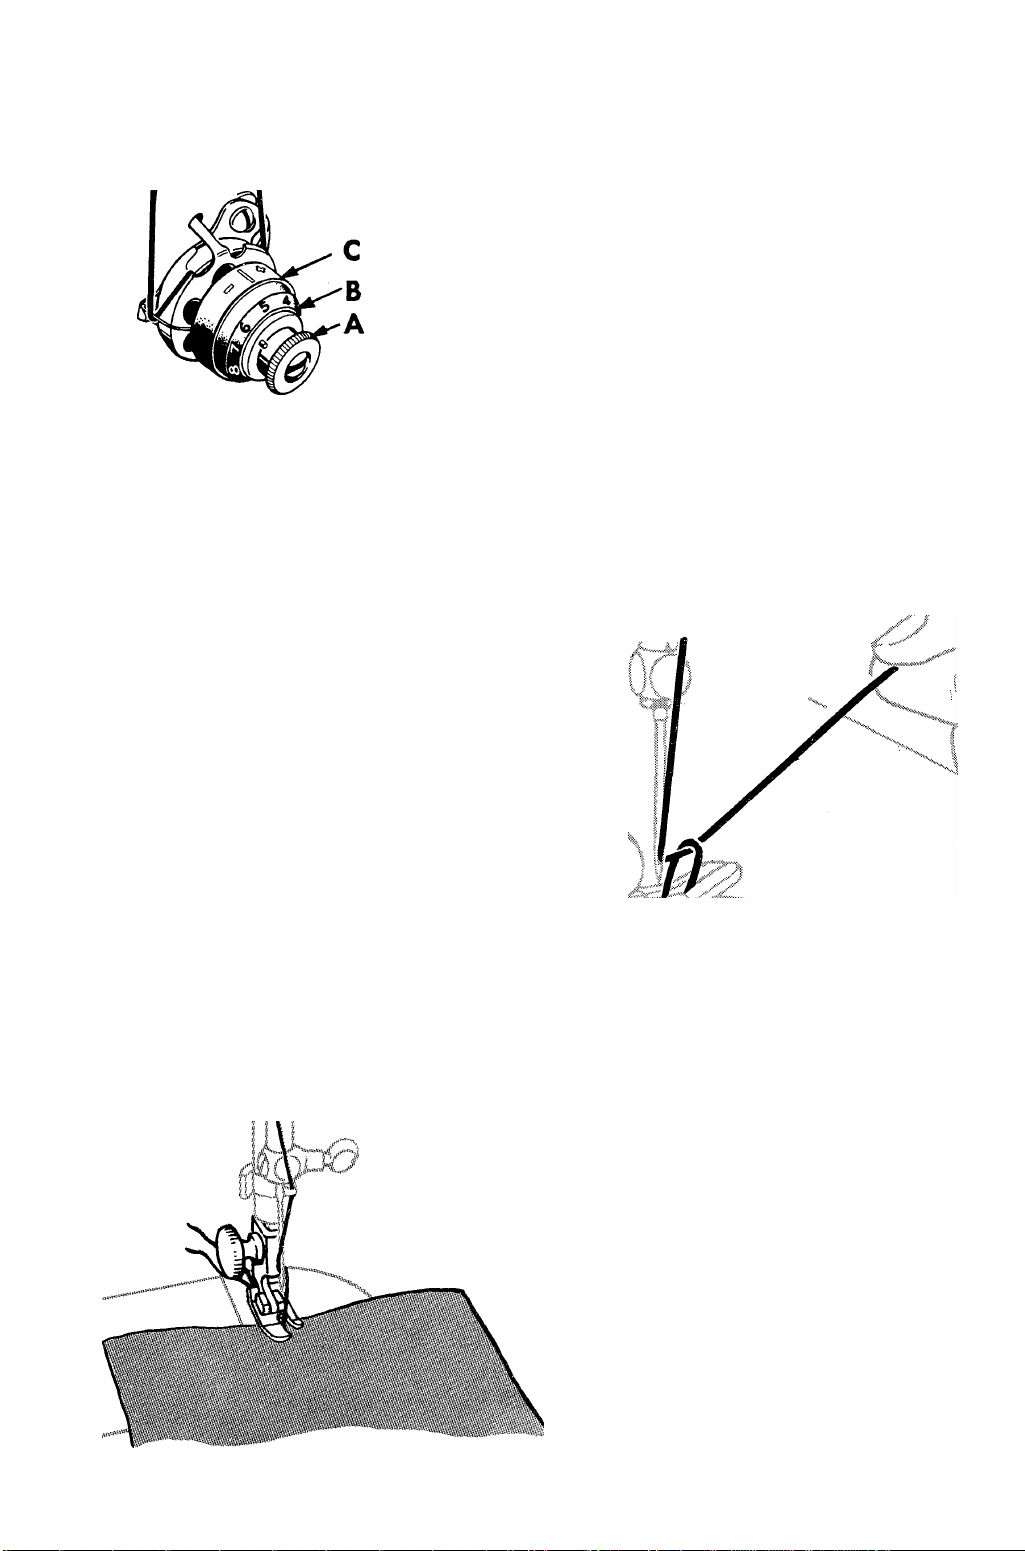
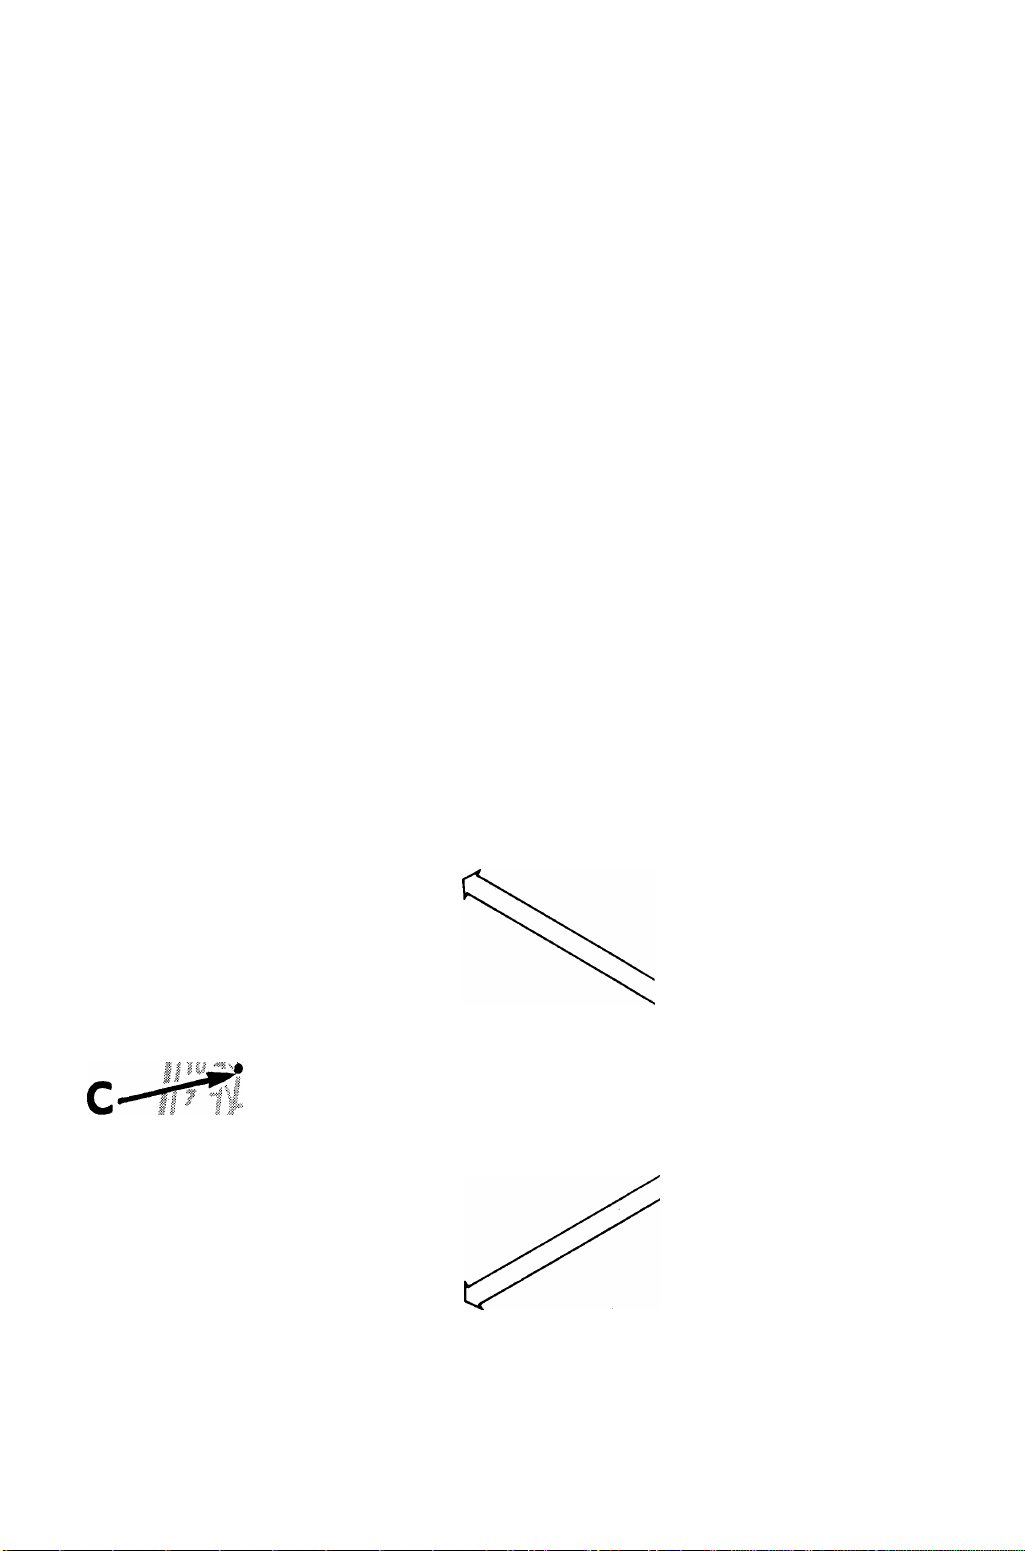
Machines 99K, 185K, 201K, 327K, 328K and 329K are furnished with a
tension indicator and flange (C and B, Fig. 38). The index flange (B) is
marked with numbers 0 to 9 indicating the
different degrees of tension that can be produced.
By noting a particular number opposite the
white line when set for a satisfactory tension on
work being stitched, this number can be readily
reverted to when changing from one class of
material to another. The higher numbers
denote increased tension and the lower numbers
less tension. Notice also that the tension
indicator (C) is marked with the signs + and —
which indicate the direction to turn the thumb
Fig. 38.
nut (A) for more or less tension.
To Prepare for Sewing.
Pull sufficient thread through the needle and with the left hand hold the
end, leaving it slack from the hand to the needle. Turn the hand wheel
towards you until the needle moves
down and up again, thus catching
the under thread ; then, when the
take-up lever is at its highest point,
pull the end of the needle thread
you are holding and the under
thread will be brought up with it
through the needle hole in the
throat plate, as shown in Fig. 39.
Lay both ends of thread under and
to the back of the presser foot, and
having inserted the material to be
stitched, lower the presser bar lifter
and commence to sew by turning
the hand wheel toward you.
1/
NOTE.—Do not try to help
the feeding of the work by pulling
\
the material, as this may deflect
the needle and cause it to break.
The machine feeds without any
Fig. 39. Pulling Up Under Thread.
assistance.
The edge of the garment to
be stitched should be placed just
far enough under the presser foot
to allow the first stitch to be taken
in the material. Never place the
material so that the first stitch
will not be taken in it, as this
would cause the thread to become
entangled in the lower mechanism.
Always lower the presser foot
before starting to sew. See Fig. 40
for the proper starting of material
under the presser foot.
Fig. 40. Beginning a Seam.
19
Page 20
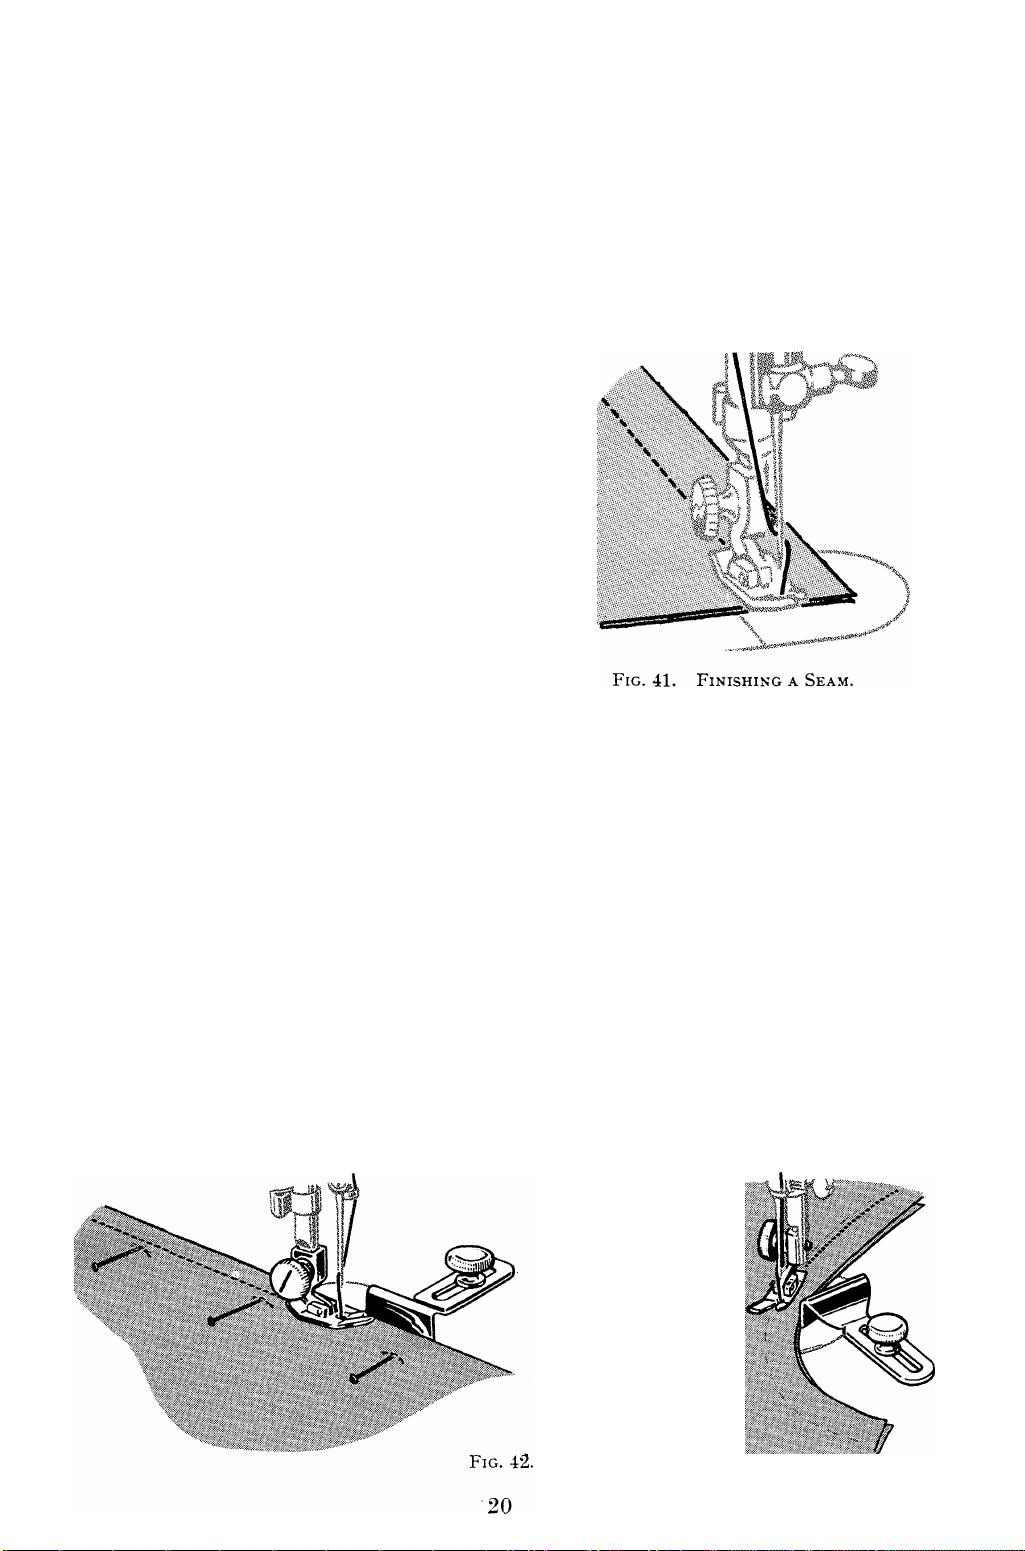
Finishing a Seam.
When finishing a seanx, never sew beyond the end of the material. Stop
the machine by placing the hand on the hand wheel shortly before the end
of the seam is reached. (See Fig. 41). This will prevent the thread from
becoming entangled in the lower mechanism.
Do not attempt to release the material from the machine until the takeup lever is at the highest point. When the take-up is in this position and the
presser foot is raised, the upper tension is released.
Always remove the material from
the machine by pulling it back and to
the left, and sever the threads by pass
ing them over the thread cutter. Hold
thread with both hands and cut with a
quick downward motion.
Always leave 3 or 4 inches of thread
to prevent it being pulled through the
needle when commencing to sew the
next seam.
On machines equipped with rever
sible feed seams can be reinforced at
the beginning and the end by back
tacking.
Hints for Sewing Various Seams.
Always keep the bulk of the material to the left of the presser foot. This
allows greater freedom of feeding than when the garment is allowed to pass
under the arm of the machine.
Stitch bias seams with the bias instead of against it. For example, when
sewing two bias seams on a skirt, start at the bottom of the garment and
stitch up. This prevents the seams from stretching. The tensions should be
sufficiently loose to prevent puckering of the seams.
When sewing a straight edge to a bias edge, place the bias piece against
the feed. This allows the feed to take care of the possible stretching of the
bias and permits the operator to guide the stitching from the warp or length
wise threads of the material.
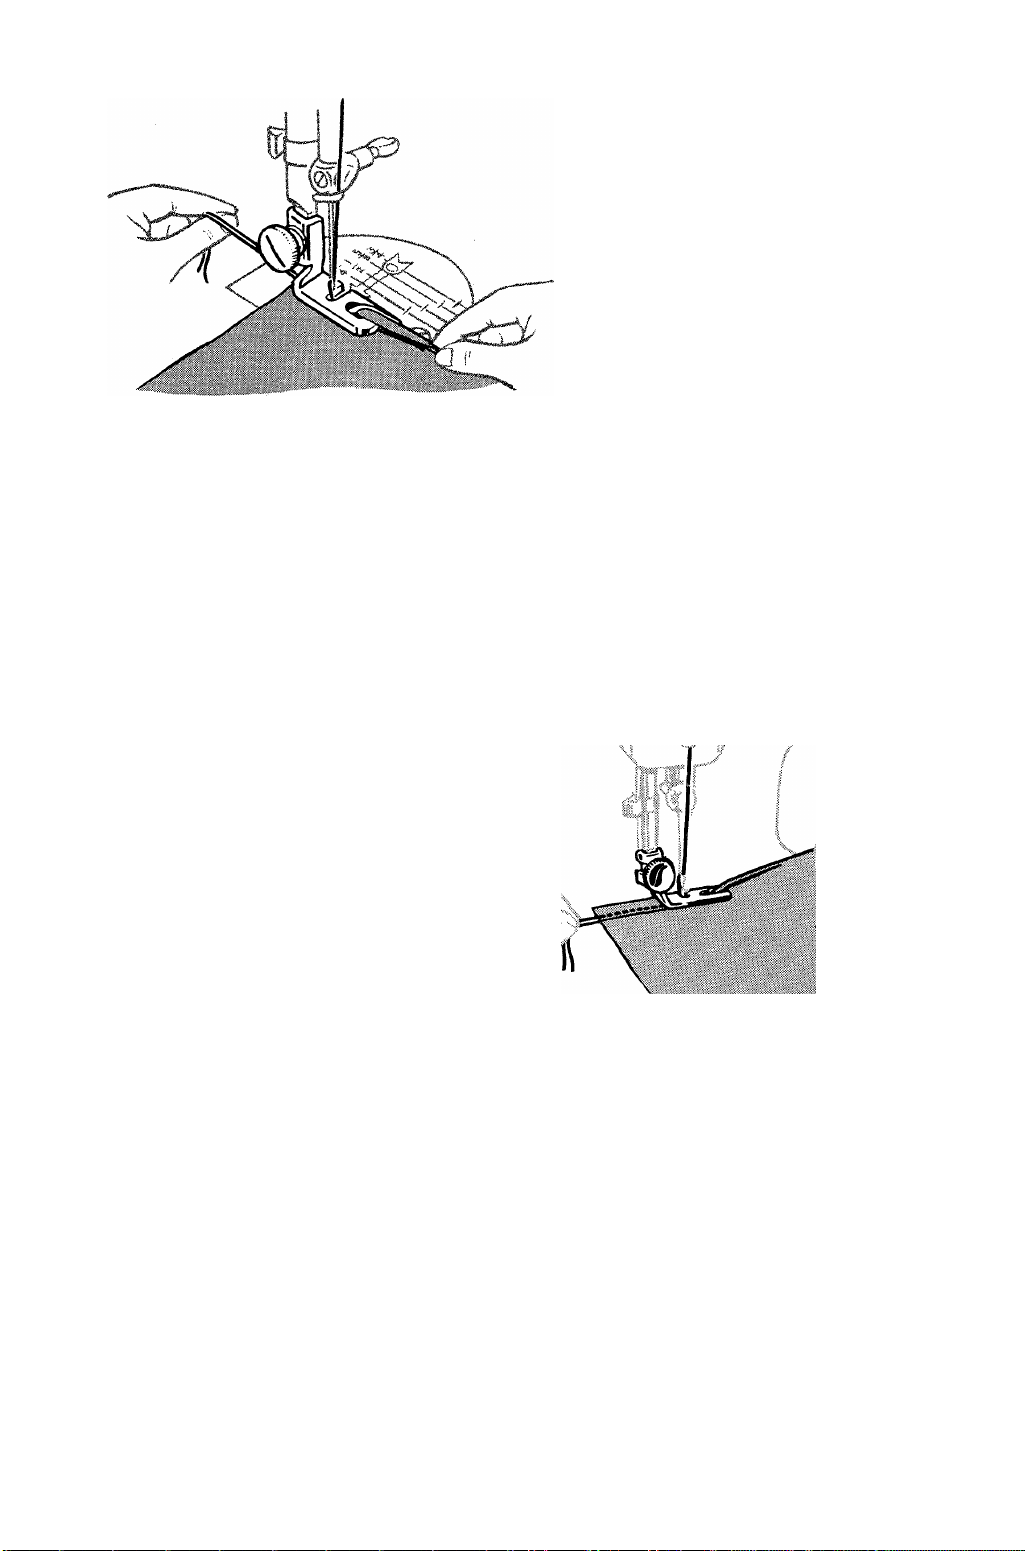
The Cloth Guide.
The cloth guide is an aid to straight stitching, and is fastened to the
machine by means of the thumb screw, as shown in Fig. 42. It can be
adjusted to various distances from the needle, as desired.
Page 21
To Regulate the Length of Stitch.
When stitching fine material use a fine needle, fine thread, and a short
stitch. Heavy material requires a coarse needle and thread and a longer
stitch. (See chart on page 11).
The stitch on the 15K26 machine is regu
lated by the thumb screw in the slot on the
arm (see Fig. 43). To lengthen the stitch on
this machine, loosen the thumb screw and ;;
move it downwards. To shorten the stitch fV'
move the screw upwards. When the desired s , ,
length of stitch is obtained tighten the thumb
screw. The stitch on the 15K80 is regulated |
in the same way except that the thumb screw
is moved upwards to lengthen and down
wards to shorten.
About 18 stitches to the inch makes a
suitable seam for ordinary sewing. Sew on a
double thickness of material, measure off one
inch and count the stitches.
wmimirnmiimim
>:
....
! r~>vr->\
.--x MHjH
qn
I
Fig. 43. Stitch
Regulating Screw on
Singer 15K26 and 15K80
Machin es.
To Regulate the Length of Stitch and Direction of Feed on
Machines 99K (New Style) and 185K. (See Fig. 44).
Numerals on the indi
cator plate represent the
approximate number of
r
stitches per inch.
The “red dot” C indi
cates the stitch setting.
To set stitch length —
# Turn thumb nut to the
left.
# Move lever until “red
dot” C is at desired
stitch setting.
# Turn thumb nut to the
right until it rests
against indicator plate.
Once thumb nut is
against indicator plate,
JJJ
/
I
C
reverse stitching is ac
complished by raising
lever to its highest posi
tion.
Fig. 44.
21
Page 22
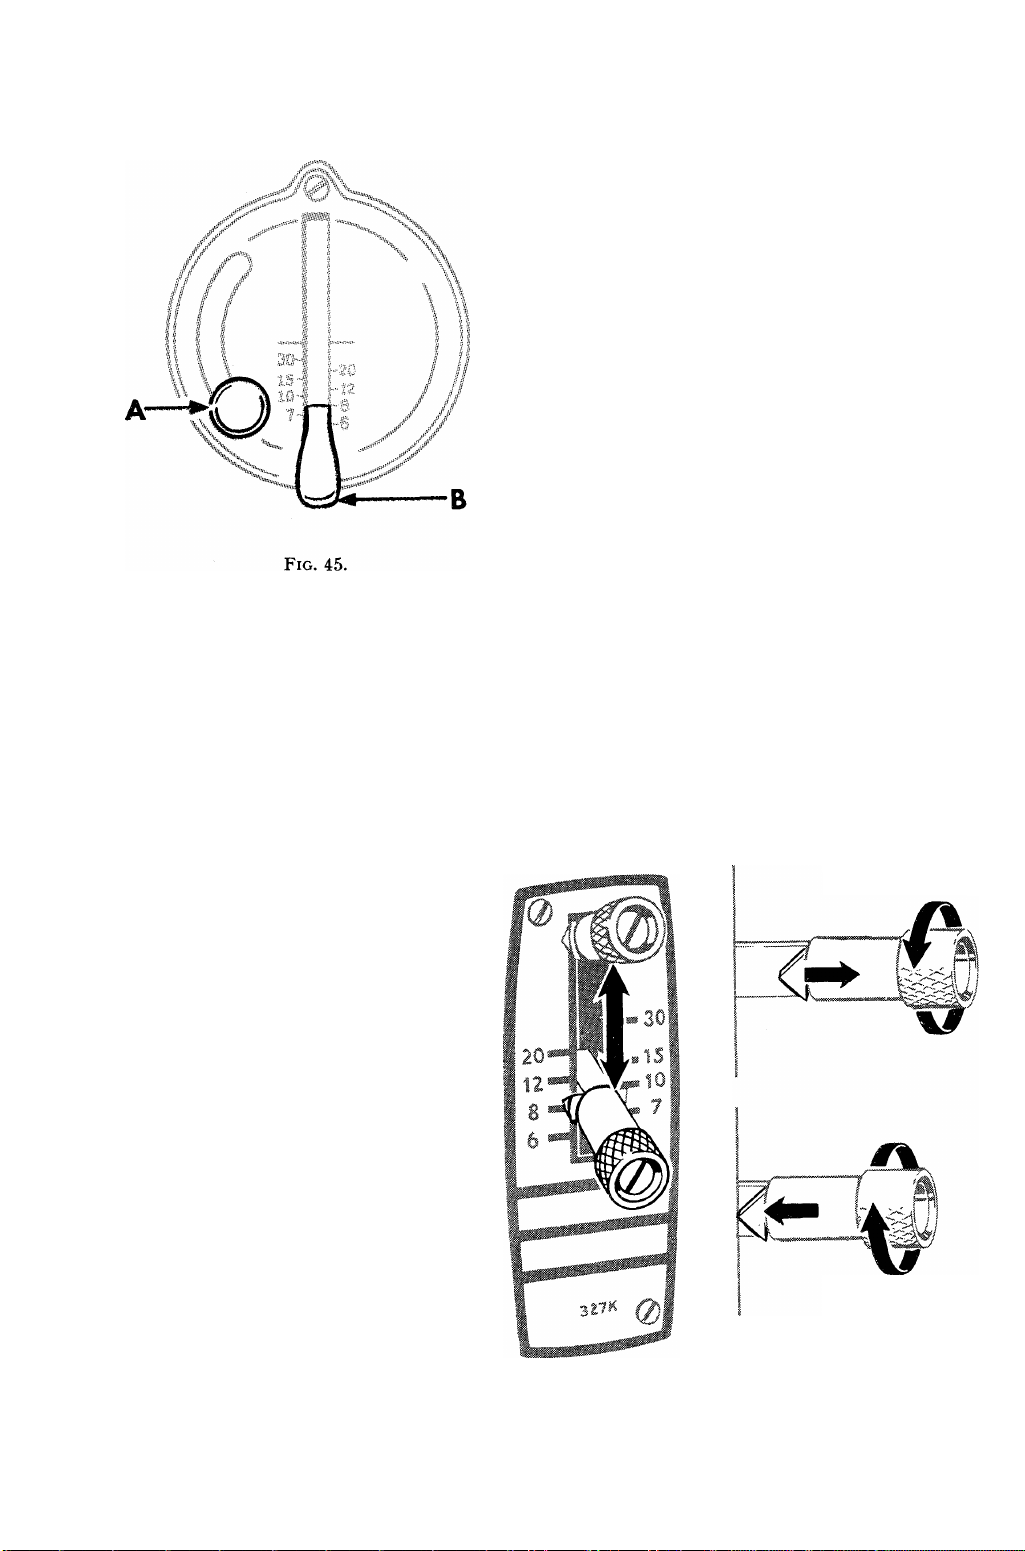
To Regulate the Length of Stitch and the Direction of Feed on
Machine 201K
(See Fig. 45).
Numerals on the indicator plate
represent approximate number of stitches
per inch.
To set stitch length—
• Loosen thumb screw A and lower to
bottom of slot.
• Move lever B until its top edge is level
with desired stitch setting.
• Raise screw A as far as it will go and
tighten. Machine will now make the
desired number of stitches forward.
To reverse stitching—
• Set as above then raise lever B as far
as it will go.
To Regulate the Length of Stitch and Direction of Feed on
The numerals on the indi
cator represent the number of
stitches per inch.
To set stitch length—
• Release pointer by turning
thumb nut to the left.
• Position lever for desired
stitch length (the higher the
number, the shorter the
stitch length).
• Tighten pointer against indi
cator plate by turning thumb
nut to the right.
Once the pointer has been
tightened against the plate,
reverse stitching
plished by raising the lever to
its highest point.
is accom
Machine 327K
(See Fig. 46).
TO RELEASE
TO TIGHTEN
Fig. 4G.
22
Page 23
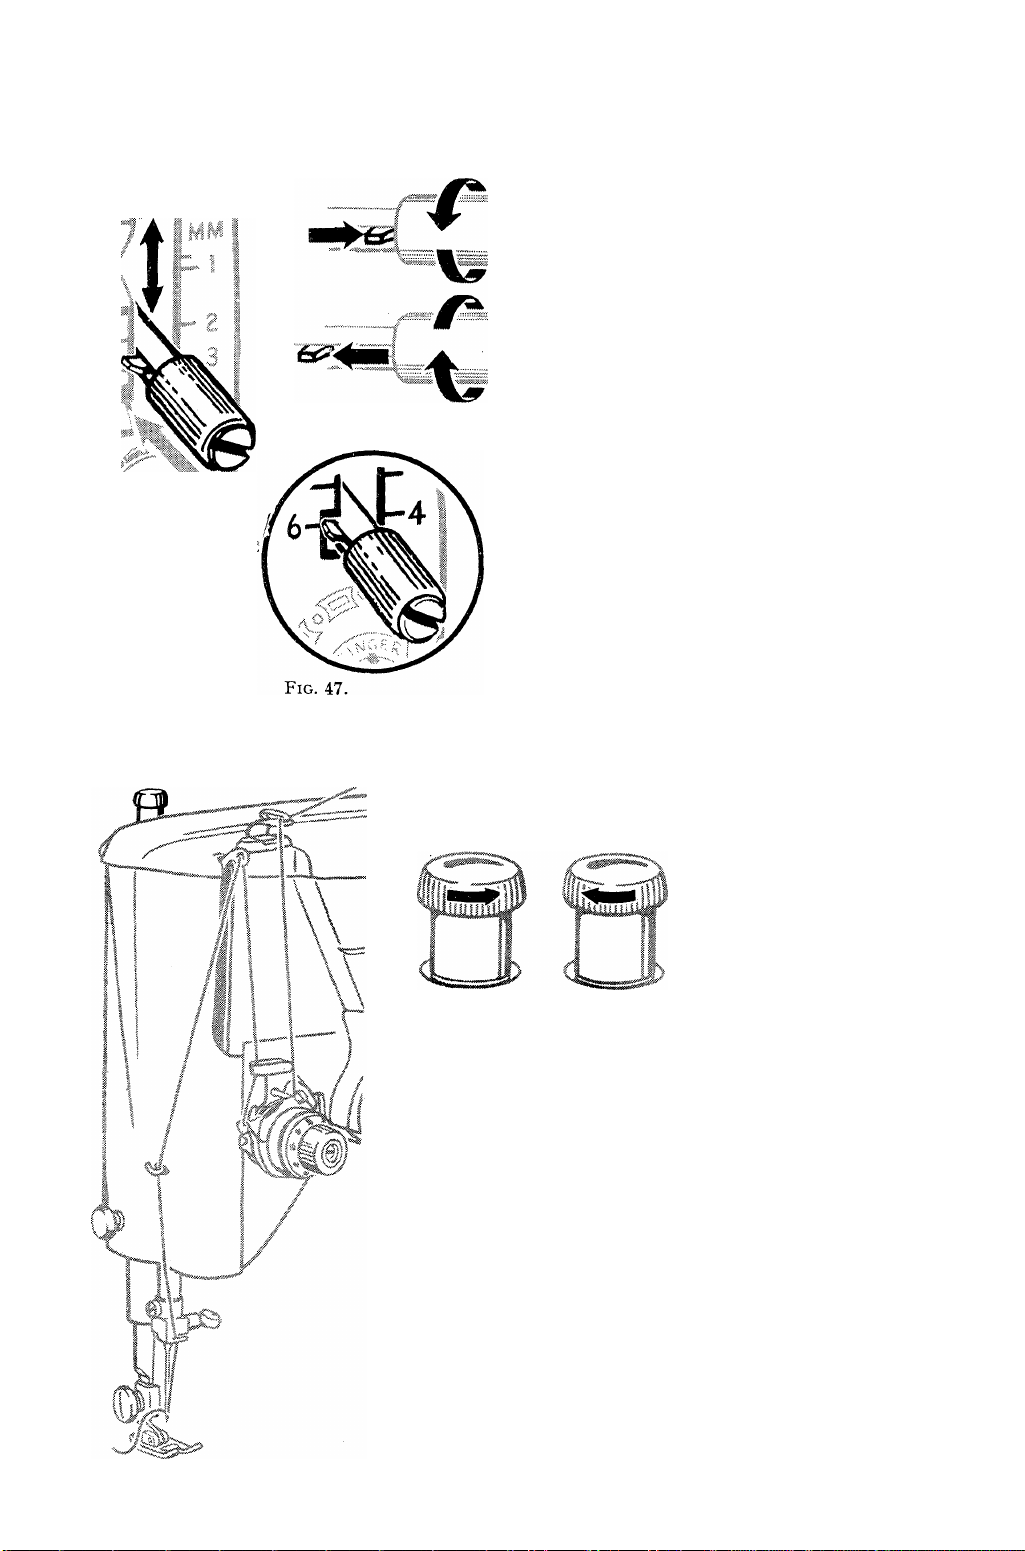
To Regulate the Length of Stitch and the Direction of Feed on
, / Machines 328K, 329K and 404. (See Fig. 47).
: i TO RELEASE
Numerals on left side of indi
cator represent number of stitches
per inch.
Numerals on right side represent
stitch length in millimeters.
Upper inclined area of the regu
lator represents stitch lengths above
20.
Lower inclined area of the regu
lator allows the No. 6 stitch length
TO TIGHTEN
setting to be “locked” in place when
stitching folds, pleats or multiple
layers of heavy fabric.
To set stitch length—
• Releasepointer by turning thumb
nut to the left.
• Position lever for desired stitch
length.
• Tighten pointer against plate by
turning thumb nut to the right.
Once the pointer has been positioned, reverse stitching is accomplished
by raising the lever to its highest point. The No. 6 “locked” position must be
unlocked for reverse stitching.
PRESSURE ADJUSTMENTS
To decrease press
ure, turn thumb
screw upward.
To increase press
ure, turn thumb
screw downward.
Decrease Increase
Smooth, even handling of several thicknesses
of fabric results when pressure is correctly
regulated.
Surface finish, as well as the weight and
texture of the fabric, must be considered in
determining the amount of pressure needed.
Adjustment of the thumb screw regulates the
amount of pressure exerted on the material while
it is being stitched.
Too light a pressure will result in irregular
feeding which affects both quality of stitch and
evenness of seams.
Too heavy a pressure not only affects stitch
and seam quality but will mar smooth surfaces
and pile fabrics.
Fig. 48. Pressure Adjustments.
23
Page 24
Gleaning and Oiling.
Sewing Machines require oiling and cleaning daily if they are used continu
ously. If used moderately—a few hours per day—it is sufficient to oil and
clean once or twice a week.
Like all other machinery, a sewing machine will not give satisfaction
if its working parts are allowed to become dry or gummed with a poor grade
of oil. A sewing machine that has not received proper care runs hard and
considerable energy will be wasted by using it in such a condition, besides
shortening the life of the machine. Before oiling any part of the machine or
stand, always remove all dust, lint, threads, etc., especially in and around
the Shuttle Race.
A cleaning and oiling lesson is of great value to students as emphasising
the necessity of keeping their machines in perfect running order.
The equip-
ment necessary for
thoroughly clean
ing the machine
6 6
_____
,1
C"
'"i\
I /""■ fe
i '
\\ I
V> /f!
II ;S
!i' / i
SI / I
« ¥T
■i i S /'
\
..................
.A
\
Fig. 48a.
Cleaning and Oiling the Head. working parts and
W. I
;'lt
....
I
%
1
1
1
1
\
,, ‘ffi
necessitate a complete overhaul of the machine by a competent mechanic.
Household oils are not suitable for sewing machine use. For Singer
machines use only Singer
oil, which is specially
prepared for sewing
machines and is supplied
in tins bearing the wellknown Singer Red “S."
When making a
thorough cleaning and
oiling, remove the upper
thread, slide plate, bob
bin, needle and presser
foot. Take out the screws
in the throat plate. Fig.
48b, and remove the
plate. This will enable
you to clean and oil the
shuttle race and remove
any collection of fluff.
consists of a duster
or piece of soft
material, a lint
brush, a large screw
driver and a small
screw driver.
Care should be
taken to use high-
grade machine oil
and one drop should
be applied to each
bearing or point
where there is fric
tion. It is poor
economy to use oil
of doubtful quality,
as it may gum the
Fig. 48b. Oiling Points in Head of Machine 201 K.
24
Page 25

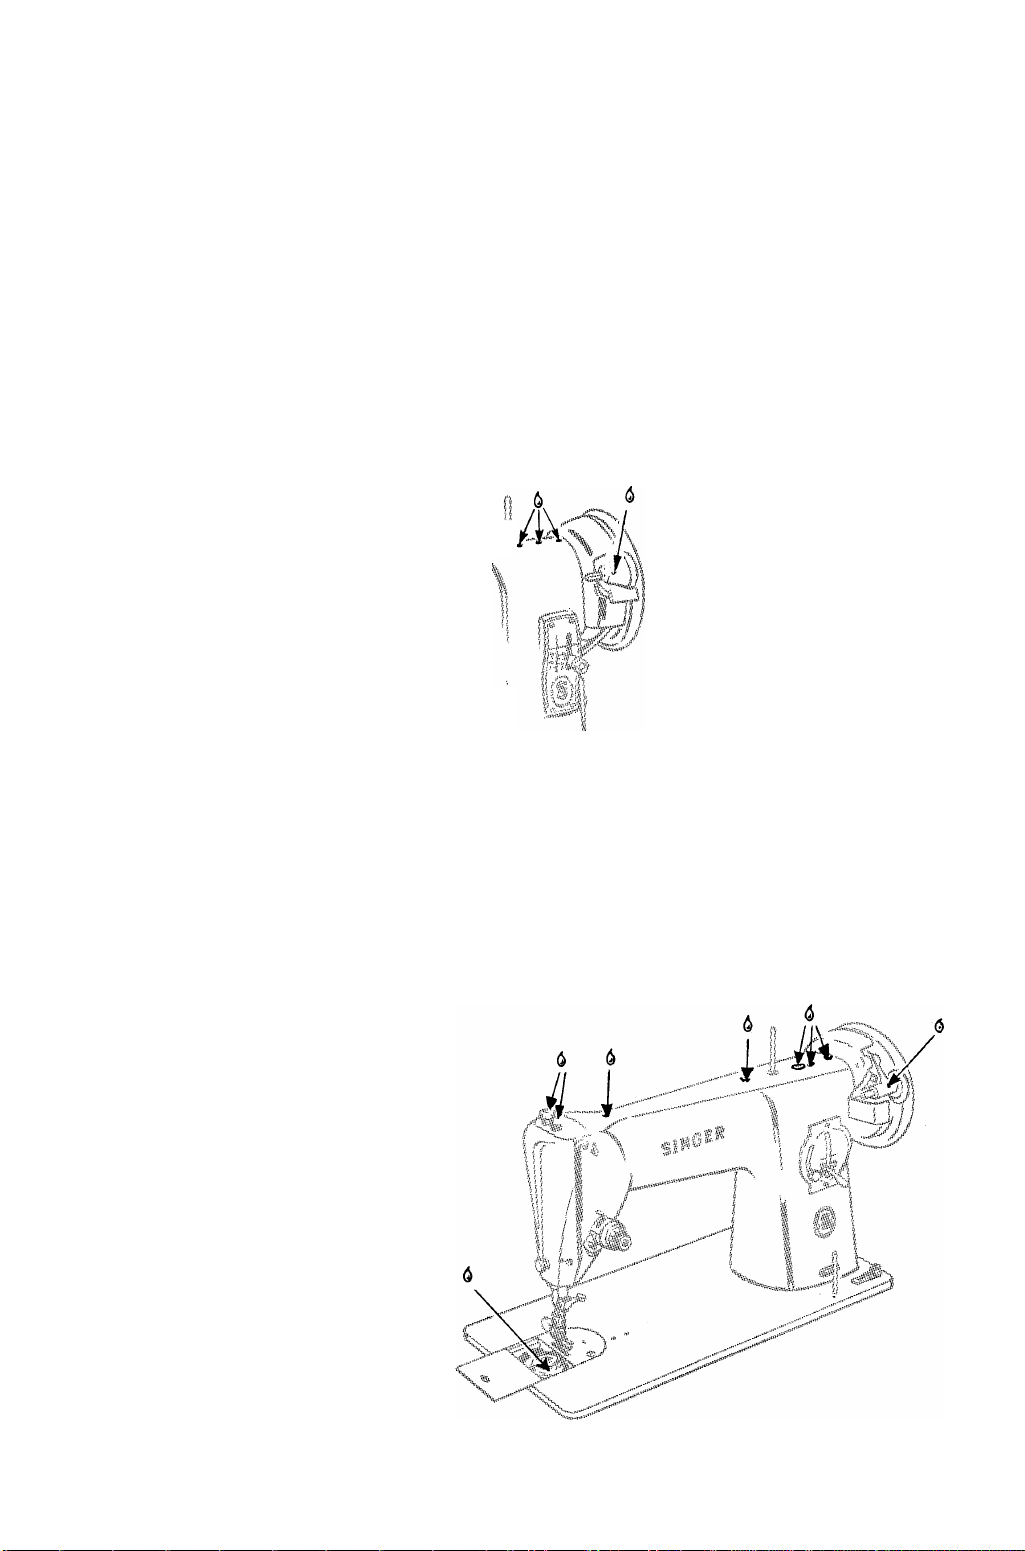
Gleaning and Oiling—(Continued)
The face plate should also be removed
to give access to the oiling points on the
needle bar, presser bar and thread take-up.
Apply a drop of oil to each oil hole and joint.
Release the belt from the band wheel
by moving the lever of the belt shifter, Fig.
49, to the left while the machine is running.
To replace the belt, work the treadle slowly
with the band wheel turning towards you.
The belt will then be automatically brought
back into place. Do not throw the belt off
to the left side of the band wheel, as it is
difficult to replace it from that side.
Fig. 50. Oiling Points below Bed o f Machine 201K.
machine into sewing position and oil each point on top. Wipe away surplus
oil and run the machine rapidly for a few minutes so that the oil may penetrate
to the bearings. The
machine should then
be threaded and a few
stitches made in a
waste piece of material
so that any excess oil
may be removed.-
Fig. 49. The Belt Shifter.
After releasing the
^ A I belt, turn the head of
Li I the machine back on
I?
its hinges in order to
reach the oiling points
on its under side. By
it /1
turning the hand
wheel slowly you will
be able to observe all
working parts. It is
sufficient to apply a
drop of oil only at each
point of contact. After
oiling all points on the
under side, lower the
When a machine
is used and cleaned
frequently, it is not
necessary to remove
the throat plate, slide
and bobbin each time,
but this should be
done occasionally in
in order to remove
lint and dust.
'SHUilti-lIHUriiUliiliiirJttUi
Fig. 51. Oiling Points below Bed o f Machine 66K.
25
Page 26

Gleaning and Oiling—(continued)
To Glean the Stitch-Forming Mechanism
of Machines 66K, 99K and 185K.
If the stitch-forming mechanism should
become clogged with lint and interfere with the
perfect operation of the machine, remove the
bobbin case, as described in the following in
structions, and dislodge the lint accumulated in
the machine.
To Remove Bobbin Gase.
SINGER Lint Brush
Raise needle and presser foot.
Draw slide plate to the left.
• Remove bobbin from case.
• Lift edge of slide plate and draw
it to the right until it is dis
engaged from spring E, Fig. 53.
• Lift and move latch F, Fig. 54, to
position shown.
• Grasp bobbin case as shown.
• Tilt case to the left to raise the
forked end above bracket G.
• Turn forked end toward you, then
lift out bobbin case.
Fig. 54.
To Replace Bobbin Gase.
Replace bobbin case with its fork
straddling bracket G, Fig. 55.
Twist case to. the left, then gently
press down and back until edge of
sewing hook engages groove under
rim of bobbin case.
Return latch F to its original
position.
26
Page 27

Gleaning and Oiling—(Continued)
To Clean Stitch-Forming Mechanism of Machine 20IK
(See Fig. 56)
To Remove Bobbin Case
Raise needle and presser foot.
Draw slide plate to the left.
Remove bobbin from case.
Turn hand wheel over toward
you until end of hook ring E is
toward the front of machine, as
shown.
Insert blade of screwdriver into
slot C between the ring and the
edge of spring.
Press down and at same time
give screwdriver one half turn
so that it will drop into the slot
and unlock the spring.
Hold hand wheel with right
hand.
With left hand, place screw
driver against the edge of the slot
in the ring and push it around
in the opposite direction to hook
rotation until cut-out B is oppo
site spring D.
To Replace Bobbin Case
Place bobbin case in position with
finger A in the opening in the plate
under the feed dog, as shown.
Turn bobbin case back and forth
slightly to ensure proper seating.
Place ring E in position with cut-out
B opposite spring D.
Press ring into place and turn it in
direction of hook rotation until
spring locks it in position.
Replace bobbin.
Lift out ring and bobbin case.
27
Page 28

Gleaning and Oiling—(Continued).
To Glean the Stitch-Forming Mechanism on Machines 327K,
328K, 329K and 404.
To Remove the Bobbin Gase
• Raise needle bar and presser bar.
• Open slide plate.
• Remove bobbin from bobbin
case.
Remove throat plate as follows
Fig. 57.
Place thumb under right front
end of throat plate and raise
until clamping pin lifts up.
Draw toward right to disengage.
To Replace the Bobbin Gase.
POSITIONING /
STUD
Replace bobbin case so that groove
under tension spring fits on hook
raceway and fork of case straddles
positioning stud.
Push bobbin case holder to left un"
til it snaps down into lock position-
Fig. 58.
Unlock bobbin case by lifting
and pulling holder to right as
shown in Fig. 58.
Fig. 59.
Remove
bobbin
case from
machine.
Fig. 61.
Position fork of throat plate under
clamping pin as shown in Fig. 61.
Push to left and press down until
plate snaps into position.
Close slide plate.
28
Page 29

Cleaning and Oiling—(Continued).
To Oil the Bobbin Winder.
To ensure smooth running of the Bobbin
Winder, a drop of oil should be applied to its oiling
points. Care should also be taken not to allow
oil to come in contact with the rubber ring on
the Bobbin Winder, as this causes deterioration of
the rubber and also causes the ring to slip on the
hub of the hand wheel. In this case, the only
remedy is to replace the ring.
OILING THE STAND
To oil stand, apply a drop of oil to the points indicated.
Fig. 62.
Bobbin
Oiling the
Winder.
NOTE.
-The cleaning and oiling instructions given in
this manual apply in general to all Singer
sewing machines. You may find, however,
that the oiling points on your machine differ
from those illustrated. Detailed information
on cleaning and oiling each type of machine is
contained in the instruction book supplied with
the machine.
29
Page 30

To Remove Gummed Oil.
If the machine should run hard after it has been idle for some time, this
is probably due to the oil in its bearings having become gummed. A little
paraffin should then be applied at each oiling point and the machine run
rapidly for a few minutes so as to dissolve the old oil, after which the machine
should be thoroughly wiped with a duster or a piece of waste material. Singer
Oil should afterwards be applied to all working parts. Whenever paraffin
has been used, it is advisable to oil the machine a second time after a few
hours’ use.
If a machine should not run freely after treatment in this way, it should
be examined by a skilled sewing machine mechanic.
COMMON CAUSES OF MACHINE TROUBLES.
Causes of Upper Thread Breaking.
Machine incorrectly threaded. (See instruction book).
Tensions too tight. (See pages 18-19).
Needle bent or having blunt point.
Needle too fine for size of thread and material to be sewn. (See needle
table on page 11).
Burr on needle hole in throat plate (caused by needle striking the plate).
Burr on slot in presser foot (caused by sewing over pins or breaking
needle).
Needle incorrectly set. (See page 13).
Take-up spring bent or broken.
Tension discs worn so that thread works in a groove.
Causes of Lower Thread Breaking.
Tension too tight. (See pages 18-19).
Thread wound unevenly on bobbin or bobbin wound too full. (See
pages 8-10).
Spring on bobbin case or shuttle being worn.
To Avoid Breaking Needles.
Do not sew heavy seams with too fine a needle.
Use correct size of needle for thread and material to be sewn. (See
needle table on page 11).
See that the presser foot or attachments are securely fastened to the
presser bar and that the needle in its descent is central in the hole of the
attachment and throat plate.
Do not attempt to pull or remove the material until the needle is above
the work ; otherwise the needle may become bent and strike the throat plate
when re-starting to sew.
Do not use a needle of any other make. Use only Singer needles, which
are specially made for Singer Machines.
Do not leave pins in the material after basting.
Missing Stitches.
Needle not accurately set in the needle bar or being blunt or bent.
Needle too fine for thread used.
30
Page 31

Stitches Looping.
Looped stitches are usually caused by the tension being too loose. See
pages 18-19 for the regulation of tensions.
See that both the upper and lower threading are correct, that the thread
is of good quality and the correct size for the needle.
Test both tensions and stitch on a piece of the material to be sewn.
Loop stitches are sometimes caused by the placing of the bobbin in the
bobbin case or shuttle so that the thread pulls from the wrong side of the
bobbin, or by the bobbin being wound too full.
Machine Not Feeding Correctly.
This is often caused by the pressure on the work being too light for the
material. (See page 23).
The tensions may be too tight. (See pages 18-19).
The feed dog may be worn. This may be determined by running a
finger over the teeth. If they are not sharp, the feed dog should be replaced
by a competent mechanic.
The stitch regulator screw may have been adjusted too far, thus making
the feed inoperative.
Puckered Seams.
Stitch too long for material being sewn, especially on fine material.
Tension too tight.
Machine Working Heavily.
If the machine works hard after standing it is probably gummed and
needs a general cleaning. (See pages 24 to 29).
The belt may be too tight thus putting excessive pressure on the bearings.
The belt should be just long enough to grip the hand wheel without slipping.
The bobbin winder may have been inadvertently snapped down into
operative position, thus putting pressure on the hand wheel. In such case
release the winder by pressing the lever located behind the bobbin spindle.
Noisy Treadle.
If the treadle is noisy, the screws on which it is pivoted need tightening.
Release one of the screws by giving the nut one or two turns with a wrench.
Then place a screw driver in the slot of the screw and advance the screw
toward the treadle just enough to take up the play. Tighten the nut and
test the treadle. If still noisy, repeat the operation at the other side.
BINDING WITHOUT BASTING.
Bindings of various materials may be applied with the Binder attachment
supplied with Singer Family Sewing Machines. This attachment folds and
guides the binding and, by a simple adjustment, the stitching can be regulated
to come close to the edge of the binding.
The following pages give directions for using this time-saving attachment
and suggest many ways in which binding may be applied to curves with
perfect results.
31
Page 32

How to Cut Material for Use with the Binder.
{Material used for binding must he cut on the bias).
The bias cutting gauge, shown in Fig. 64, is very useful for cutting bias
strips to be used with the Binder attachment. Binding must be cut Y wide
if the material contains dressing, and
about I" wide for soft material. The
letter F shows the position at which to set
the blue spring or indicator for Facings,
B for Binding, and C for Cording or Piping.
The blue spring A when set at B will cut
material about Y wide. The gauge has
to be fitted to the pointed end of the
scissors, as shown in Fig. 65, and the
material is inserted up to the blue spring
when cutting, as shown in Fig. 66.
Joining Bias Strips.
One yard of material 36 inches wide is sufficient for about 30 yards of
bias strips Y wide. It is usually an economy to purchase this quantity and
to save the surplus for future use.
E 4402B
Fig. 67. The -Right Way to Join* Strips.
E4402A
Fig. 68. The Wrong Way to Join Strips.
32
Page 33

Cut the strips, lay the two diagonal ends as shown in Fig. 67, and stitch
them together. The stitching should be as close to the edge as possible so
that the seam passes through the Binder freely. When the strips are straight
ened out, as shown in Fig. 67, the edges are exactly even. Do not join the
strips as shown in Fig. 68, as the edges would be uneven when straightened
out. It is advisable to press the seams open with an iron, and if the strips
are not to be used immediately they should be wound on a piece of cardboard
to keep them from stretching.
To Attach the Binder to the
Machine.
ADJUSTING
SCREW
SLOT FOR
FOLDED BIAS
TAPE
SCROLL FOR
UNFOLDED
BINDING
highest point and remove the
presser foot from the machine by
loosening the thumb screw which
holds it in position. Then fit the
binder, Fig. 69, in its place and
turn the hand wheel slowly towards
you to make sure that the Binder is
correctly attached to the presser
bar ; also see that the needle passes
through the centre of the needle
Fig. 69. The Binder.
hole in the attachment.
To Insert the Binding in the Binder.
Fold "the binding in the centre and cut to a
point, as shown in Fig. 67. Insert the pointed end
into the binder scroll (see Fig. 71), until it comes
out at the lower end.
Raise the needle bar to the
Fig. 71. Inserting Binding
IN Binder.
Fig. 70. Cutting
Point on Binding.
Now place the edge of the material to be
bound between the scroll of the binder and
pass it and the binding under the presser foot
of the binder, then lower the presser bar and
start to sew. You will notice that as the
binding passes through the scroll of the
binder the edges are turned in.
33
Page 34

Bias binding in a variety
of colours, cut and folded
ready for use with the
Binder, may be purchased
at Singer Shops.
Fig. 72. Inserting Folded Binding in Outside Slot.
Folded binding should be inserted in the outside slot of the Binder, as
shown in Fig. 72. The Binder is adjusted and operated in the same manner
as when using unfolded binding. One-half inch braid or ribbon, having a
finished edge, may also be used in the same manner, because binding passing
through the outer slot is turned only once by the attachment.
The Adjustment and Operation of the Binder.
The edge of the material to be bound should be held well within the
centre slot of the scroll. If the material is allowed to slip away from the
scroll when near the needle, the edge will not be caught in the binding. With
a little practice it is quite easy to hold the edge in the scroll.
Various materials and conditions require different adjustments of the
Binder to bring the stitching close to the edge. A whder adjustment of the
Binder is required when binding curves than is necessary when binding a
straight edge.
Fig. 73. Adjusting the Binder.
To adjust the Binder, for the stitching to be at the desired distance from
the edge of the binding, loosen screw, as shown in Fig. 73, and move the scroll
to the right for a narrower adjustment and to the left for a wider adjustment.
Care should be taken to see that the screw is well tightened after making an
adju.stment. To become perfectly familiar with the adjustment of the Binder,
practice is necessary.
34
Page 35

Binding Outside Curves.
Practice is required to
bind a curved edge prop
erly. The edge to be
bound must be held well
within the scroll of the
Binder in order to make
a strong seam and so that
the edge will not pull out.
Fig. 72. Binding an Outside Curve.
Turn the material only as fast as the machine sews. It is not possible
to hold the material in the entire length of the scroll when binding a small
curve.
Do not push the material in too fast, as the edge will then become pucker
ed, and do not stretch the material or the curve will not be the proper shape
when finished. If the stitching does not catch the edge of the binding the
scroll should be adjusted a trifle to the left.
Never pull the binding as it feeds through the Binder, as bias material
is very easily stretched and will be too narrow when it reaches the needle.
When this occurs the edges will not be turned.
Binding Inside Curves.
It will be necessary to practise
binding an inside curve on various
kinds of material, as this curve is
found on nearly all garments which
may be finished with a bound edge.
When binding an inside curve
with the Binder, straighten out the
edge as it is being fed into the
attachment. When doing this,
care should be taken not to stretch
the edge of the material.
If the material is soft, like ba
tiste or crepe de chine, add a row
of machine stitching close to the
edge of the curve before binding.
Fig. 73. Sample of Inside Curve.
35
Page 36

A French fold
is applied by
placing the ma
terial under the
attachment and
stitching the
binding in posi
tion, as shown
in Fig. 74. A
line made by
basting or with
chalk or pencil
may be used as
a guide in apply
ing rows where
wanted.
Applying a French Fold to a Curve.
Fig. 74. Applying French Folds.
Binding a Square Corner.
To bind a square corner, apply the binding along one side to within
of the edge of the material, stopping the machine with the needle and
take-up at the highest point. Then draw the material back away from
the needle far enough to pull about two inches of the binding through the
Binder. Fold and crease the binding to a square mitred corner, turn the
Fig. 7.'). Turning .a. Square Corner, Fig. 76, Sample of Square
Corner.
material and draw it back into the Binder, bringing the needle down through
the binding close to the corner, as shown in Fig. 75. Draw the slack thread
back through the needle and tension. Be sure the new edge of the material
is properly placed in the scroll of the Binder and begin stitching slowly until
you are sure the material is feeding properly. The loop of the thread on the
underside at the corner may be tied or cut off without fear of ravelling, as the
stitch is locked.
36
Page 37

Binding Plackets.
To bind a placket, first fold the material in a straight line, as shown in
Fig. 74, placing the fullness in a flat fold on the under side of the material.
Insert the edge of the placket in the Binder and stitch the binding on as
usual. Run the machine slowly as the point is reached and take care that
Fig. 74. Binding a Placket. Fig. 75. Sample of Bound Placket
A
too much material is not allowed to feed into the Binder. As soon as you
have reached the point of the placket, fold the material to the other side of
the slit and bind to the end.
For practice, cut a slit about 5 inches deep in muslin and learn to fold
it in a straight line before starting to bind. When you have mastered the
placket you will find it quite easy to bind scallops.
Bound Scallops.
The point at the top of the scallop is bound in
exactly the same manner as the placket. Practice
the binding of a small single scallop first before
attempting to bind a row of scallops.
If the material is soft and liable to stretch, add
a row of machine stitching close to the edge of the
scallop before starting to bind the edge.
Applying Military Braid with
the Binder.
Military braid in width may be used in the
Binder by inserting it in the outside slot of the
scroll. (See directions for using folded binding
on pages 33 and 34).
Fig. 7f). Sample of Bound
Scallops.
37
Page 38

This braid makes
a suitable trimming
for serge or other
woollen material
and, when applied
with the Binder,
has a neat tailored
appearance im
possible to obtain
by hand sewing.
Both inside and
outside curves may
be bound with per
fect ease after the
Binder has been
properly adjusted.
Fig. 77. Binding with Military Braid.
Making Button Loops with the Binder.
To make button loops, first stitch together a piece of binding of the
desired material and length by using the Binder. You will then have
a quarter-inch
fold with the
edges stitched
together. Cut a
strip of binding
long enough to
make a loop of
the desired size
and fold it to a
point, as shown
in Fig. 78. Fast
en the loop at
the point with
a hand sewing
needle.
These loops
are most at
tractive when made of silk material or military braid and may be applied
in various ways to the frock or blouse.
Bound Buttonholes Made with the Binder.
Take a strip of material as wide as you wish to make your buttonholes
apart and bind each side. For example, if you wish to make your buttonholes
38
Page 39

two inches apart, take a two-
1 t:
rr*
1
t
»
1
t
1
t
1
1
1
1
1
t
<
I
♦
1
t
t
1
t
1
1
1
1
B
i
t
1
1
1
t
1
1
1
i
1
t
1
I
t
» ^
t
»
f
1
1
t
t
t
i
1
1
L.
inch strip of material, as shown
in Fig. 79, at A, and bind each
side, as shown at B.
Measure the diameter of the
button you wish to use and cut
the bound strip into pieces one-
half inch greater than the width
of the button. (See Figs. 79-B
and 80). After the strip is cut
into sections, bind them to
gether so that the bound edges
just meet, as shown in Fig. 80.
Having bound one edge, as
shown in Fig. 80, proceed to
bind the other edge, first placing
the edge of the garment even
with the strip of buttonholes, so
that both are bound at one
Fig. 79. Starting Bound Buttonholes.
stitching. (See Fig. 81). Then
open out the strip of button
holes beyond the material and
stitch down the upstanding edge of the binding to the garment.
If an extra-strong buttonhole is desired, a linen tape may be used for the
binding
This must, howev^Ki'^be one-half inch in width and be used in the
outside slot of the Binder.
39
Page 40

Making Cut-in Buttonholes with the Binder.
The cut-in buttonhole is
made in the same way as the
placket. Cut a slot in the
edge of the material to the
depth you wish to make the
buttonhole and shape it, as
shown in Fig. 82 at A. Fold
the material in the same manner
as in binding a placket. (See
Fig. 74). Trim off the edge of
the binding, as shown in Fig. 82
at B, and bind the edge with the
Binder, as shown at C.
Fig. 82. Cu t-in Buttonholes.
Fig. 83. The Blind Stitcher.
THE BLIND STITCHER.
This useful SINGER attach
ment produces invisible hem
ming with perfect blind stitches
on an almost unlimited variety
of work such as skirts, dresses,
lingerie, children's clothes,
towels, curtains, sheets, table
cloths and many other articles.
It is quickly attached to
your sewing machine in place of
the presser foot. It is easy to
use and will enable you to
accomplish superior invisible
hemming much faster and with
less effort than is possible by
hand.
40
Page 41

THE BUTTONHOLER
Fig. 84. The Buttonholer.
This attachment produces
neat and durable buttonholes
in a great variety of fabrics
without any special skill on the
part of the operator. The
buttonholes are produced in a
fraction of the time required for
hand work and they are firmer
and more even than those made
by hand.
Fig. 85.
THE FOOT HEMMER AND THE ADJUSTABLE HEMMER.
The Foot Hemmer.
Raise the needle bar to the highest point and
loosen the thumb screw which clamps the presser
foot to the presser bar. Remove the presser
foot and substitute the hemmer foot, taking
care to tighten the screw firmly so that the
Hemmer will not become loose when the machine
is running. Turn the hand wheel slowly
toward you to make sure that the needle goes
through the centre of the needle hole and that
Fig. 86. The Foot the lower thread is properly pulled up.
Hemmer.
How to Start the Hem at the Very Edge.
How to start the hem at the very edge of the material is of great im
portance in learning to use the Hemmer. If the hem is not started at the edge,
and the material is pulled bias, a perfect hem cannot be made.
There are several ways of starting the hem at the edge, but the most
practical one is as follows :
1. Fold over about of the edge of the material at the starting point
for a distance of about one inch.
41
Page 42
Fig, 87. Starting a Hem at the Edg e.
Making a Hem with the Foot Hemmer.
2. Place the material in the
Hemmer at a point just
beyond the fold, as shown in
Fig. 87.
3. Draw the material to
wards you through the Hem
mer, at the same time making
the second fold at the very
edge. Continue to draw the
material through the Hem
mer until the edge is just
under the needle. Place the
upper and lower threads
together under the Hemmer
foot and assist the starting of
the hem by slightly pulling
the threads from the back
after the first stitch has been
made.
The same width of ma
terial must be kept in the
Hemmer at all times. Guide
the material with the thumb
and forefinger of the right
hand, so that the edge lies
flat over the top of the Hem
mer, and proceed to sew,
taking care to keep the Hem
mer curl just full. Should
the edge begin to run out,
move the hand to the left ;
should too much material run
in, move to the right. (See
Fig. 88).
Fig. 88. Making a Hem with the Foot Hem mer.
Making a Hemmed Seam with the Foot Hemmer.
The hemmed seam is very practical to use on underwear, or in fact on
any garment where a straight seam is used and where a small double seam
would be suitable.
42
Page 43

When using this seam the garment must be first fitted and the edge of
the material trimmed, allowing for about one-eighth inch seam. The two
edges are placed together and in
serted in the Hemmer in the same
manner as a single hem. If the
material is bulky, the edge of the
upper piece of material may be
placed about one-eighth inch in
from the edge of the lower piece.
(See Fig.89).
The free edge of a hemmed
seam may be stitched flat to the
garment, if desired. First open
the work out flat, then place the
hem in the scroll of the Hemmer,
which acts as a guide, holding the
edge of the hem in position while
it is being stitched.
If the seam is stitched flat to
the garment one row of stitching
Fig. 8C. Making a Hemmed Seam .
is visible on the right side.
The hemmed seam may be used on muslin, lawn, organdie, or other
fine materials where a narrow seam is desirable.
Hemming and Sewing On Lace at One Operation.
Start the hem in the usual way and, with the needle holding the hem in
position, raise the piresser bar sufficiently to allow the edge of the lace to be
slipped in under the Foot Hemmer, at the same time bringing it up through
the slot at the right of the Hemmer. (See Fig. 90). Lower the bar, turn
the hand wheel and- catch the edge of the lace with the needle. Guide
the hem with the right hand and the lace with the left. Care should be taken
not to stretch the lace as it is being fed into the Hemmer.
It is not practical to sew
gathered lace on with the Foot
Hemmer, as the fulled lace
catches in the Hemmer slot.
A very attractive way of
applying lace so that the stitch
ing of the hem is not visible is
to start the hem in the usual
way, slipping the lace in from
the left as you would the
second piece of material when
making a hemmed seam.
Fig. 90. Hemm ing and Sew ing On Lace.
43
Page 44

Hemming Fine Materials with the Foot Hemmer.
When hemming fine materials, such as georgette or crepe de chine, with
the Foot Hemmer, the material will not feed through properly and the stitch
will be very much shorter than when sewing with the presser foot on the same
material.
To overcome this difficulty, and to assist in holding soft materials so that
they will be turned properly with the Foot Hemmer, insert a piece of paper
under the material between the feed and. the foot of the Hemmer and allow
it to feed through with the material. Strips of thin paper or the edges of
newspapers are very convenient for stitching. Never use tissue paper as
this will be very difficult to pull away from the material.
Hemming a Curved or Bias Edge.
A curved or bias edge may be hemmed with the Foot Hemmer by inserting
paper under the Hemmer. The paper takes up the fullness in the material
and with a little care in guiding, a curve, such as would be used on men’s
shirts or the edge of an apron, may be perfectly hemmed.
The Adjustable Hemmer.
The Adjustable Hemmer (Fig. 91) will
make a hem of any desired width up to
one inch. For making wider hems see page
46.
Remove the presser foot and attach the
Hemmer to the presser bar, taking care that
the needle descends in the centre of the
needle hole after you tighten the thumb
screw.
Fig. 91. The Adjustable Hemmer.
How to Adjust the Hemmer for Hems of Various Widths.
To adjust the Hemmer, loosen the screw and you will then be able to
move the hemmer guide to the right or to the left. Note the pointer (A, Fig.
91) which is used with the scale of figures on the Adjustable Hemmer.
The Hemmer may be adjusted as follows :
Pointer set at :
1—for Y' hem (approximate)
2— n
3— u
4— n
i"
4
8
¥'
( " ) 6— II I" II ( II )
( n ) 7—11 r " ( I, )
( II ) 8— II 1" It ( II )
After setting the Hemmer, care should be taken to see that the adjusting
screw is well tightened before starting to sew.
-for f" hem (approximate)
44
Page 45

How to Insert the Material in the Adjustable Hemmer,
Fold over the edge
at the end of the ma
terial to be hemmed,
as instructed for start
ing a hem with the
Foot Hemmer. Place
the material in the
Hemmer under the
scale and draw it back
wards and forwards
until the hem is formed.
You will then be
able to determine the
width and to fold over
the end of the hem for
the second turning.
Draw the material
back until the end
comes directly under
the needle.
Lower the presser bar and sew, guiding sufficient material in the Hemmer
to turn the hem properly. (See Fig. 92).
If the hem is not started at the edge it will run bias and not come out
even at the other end.
It is well to practise the use of this attachment with striped material.
When you are able to match each stripe exactly you are prepared to hem a
garment properly.
Fig.. 92. Hemming w ith th e Adjustable Hem mer.
Hemming Soft Material.
When hemming soft material liable to stretch, it is well to slip a piece
of paper under the Hemmer next to the feed. This will prevent the material
from stretching and assist in turning the hem.
How to Prepare a Hem on Table Linen.
Much time is spent in turning the hem of table linen to make it ready
for hand sewing. The Hemmer is very valuable for this operation. Set the
Hemmer for the desired
width of hem, take the
thread from the needle, and
run the linen through the
Hemmer.
You will find that the hem
has been evenly turned,
ready for the hand sewing
and the holes made by the
machine needle have softened
the linen, making it quite
easy to do the hand work.
(See Fig. 93).
Table linen or other ma
Fig. 93. Preparing a Hem on Table Linen.
terial may be prepared for
hemstitching in this manner.
45
Page 46

Making a Wide Hem with the Adjustable Hemmer.
To make a hem more than 1" wide, loosen the thumb screw and draw
the slide to the right as far as it will go, then turn this part towards you, as
shown in Fig. 94.
Fold and crease
down a hem of the
desired width, pass
the fold under the ex
tension at the right of
the hemmer, insert the
edge of the material
into the folder, as
shown, and proceed
to stitch.
The hemmer will
turn the edge and
stitch it flat, but the
operator must keep
the crease for the
width of the hem even
as the machine sews.
Hems may be applied
to sheets or other simi
Fig. 94. Hemm er Adjusted for Wide Hemmin g.
lar articles in this
manner.
THE PRACTICAL USE OF THE TUCKER.
Tucking is the natural trimming for fine materials, such as lawn, organdie,
batiste, etc., and, when using the Singer Tucker, may be made in any width,
without basting, from a fine pin tuck to one inch wide. The Tucker gauges
the width of the tuck and, while one tuck is being stitched, it marks the
material for the next tuck to be made.
Tucks are made so easily in this way that it is a joy to make garments
with this fascinating trimming. Then, too, such trimmings may be made
without extra cost. The fashion magazines give numerous suggestions for
tucking various garments. The following pages will explain the adjusting
and operating of this time-saving attachment.
Note the names and
uses of the various
parts of the Tucker,
Fig. 95, as follows :
The Parts of the Tucker and Their Uses.
TUCK
GUIDE
TUCK SCALE
AND
SMOOTHER
BLADES
TUCK GUIDE
ADJUSTING SCREW
SRACE
SCALE
GROOVED
BLADE
SPACE SCALE
ADJUSTING SCREW
Fig. 95. The Tucker and its Working Parts.
46
Page 47

The Tuck Guide, which is adjustable and may be set for any desired width
of tuck.
The Tuck Scale, containing figures which indicate different widths of tucks.
The tuck scale also acts as a smoothing blade, keeping the tucks of
uniform width.
The Tuck Guide Adjusting Screw, by means of which the tuck guide may
be set at any point on the tuck scale.
The Spacing Scale, contains figures on the upper blade which indicate the
width of the space between tucks. The middle or grooved blade
contains a groove into which the material is pressed by the spur at the
end of the lower or spur blade, thus marking the goods for the folding
of the next tuck.
The Spacing Scale Adjusting Screw, by means of which the space scale
may be set at any desired point.
The Marking Lever, which presses on the grooved blade, marks the material
as it passes between the grooved and spur blades.
A careful study of the Tucker parts, and their relation to each other,
before using this attachment, will make its operations quite clear.
To Attach the Tucker to the Machine.
Raise the needle bar to the highest point, remove the presser foot from
the machine and attach the Tucker in its place. Care should be taken to see
that the Tucker is securely fastened to the presser bar and that the needle
goes through the centre of the needle hole. Note the position of the marking
lever, making sure that it is in the lower position and that the needle clamp
works on it as the machine sews.
How to Adjust the Scales on the Tucker.
The width of the tucks and the space between them is determined by the
adjustment of the scales. Adjustment for width of tuck is made by loosening
the tuck guide adjusting screw, which allows you to move the tuck guide to
the desired figure on the tuck scale. The tuck guide should be set just over
the figure you wish to use. The adjusting screw should always be well
tightened.
The figures on the tuck scale indicate the width of tuck in eighths of an
inch, the marks between figures are sixteenths.
47
Page 48

To adjust for the width of space between the tucks, loosen the space
scale adjusting screw and move the space scale until the desired figure is
directly in line with the centre of the needle hole. You will find a line front
and back of the needle hole to indicate the centre.
Before starting to sew, tighten the screw well to prevent the scale shifting
when the Tucker is in operation.
The marks on the space scale are double the width of those on the tuck
scale, so that when both scales are set at the same figure, blind tucks without
spaces between them are made.
To make space between tucks, first set the tuck scale, then move the
space scale to the same number and as much further to the left as you wish
to have space. Each number on the space scale represents one-quarter of
an inch and each mark between numbers one-eighth of an inch.
Use the table below to assist you in setting the Tucker.
Tuck Guide Space Sca?e
1"
tucks with
8
1 "
8
1 "
4
1 "
4
\"
2”
1 "
Y
I I I t
I I
I I
11
I I I I
I I
I f
I f
I I
I I
no space
1"
8 "
no
I I
I "
4 "
no
I I
1"
t "
no
I I
1
1
2
2
4
4
8
Note Fig. 96, showing Tucker set at a pin tuck and 2 for space.
1
u
o
o
O
4
0
8
Where to Insert the Material to be Tucked.
Fold and crease
the first tuck for its
entire length by hand,
insert it in the Tucker
from the left, placing
it between the grooved
blade and the spur
blade of the space
scale, and between the
two blades of the tuck
scale. (See Fig. 97).
Care should be
taken to see that the
material is placed far
enough in the Tucker
to feed against the
tuck guide. Draw the
Fig. 97. Pr oper Position of Material in Tucker.
Lower the presser bar and sew.
You will note that the Tucker is now making
a mark for the next tuck.
Fold the material at the crease and, with its plain side uppermost, proceed
as before. When making the last tuck, raise the marking lever so that it does
not press on the double flat spring ; while it is in this position no crease for a
succeeding tuck can be made in the material.
material towards you
until the edge is di
rectly under the needle.
48
Page 49

How to Tuck Silk or Chiffon.
It is possible to tuck silks, such as taffeta, quite as easily as cotton
material. Soft materials such as crepe de chine and georgette, are harder to
crease, but may be tucked successfullly if a piece of paper is slipped under the
Tucker. It is very necessary that the tensions be properly adjusted before
starting to tuck fine materials, as a tight tension will pucker the material and
cause the thread to break when the tuck is pressed.
How to Make Fine Tucks and Gross Tucking.
When making fine tucks it is necessary to use thread of the proper size
to suit the material to
be tucked. A fine
needle, fine thread and
a short stitch are the
secrets of attractive
tucking. Some ready
made garments trim
med with tucking are
unattractive because
the thread and stitches
are too coarse.
Always test your
tensions on a piece of
the material you wish
to tuck, and be sure
they are properly ad
justed before tucking a garment.
When making cross tucking, first decide on the combination of tuck and
space you wish to use, and set the Tucker accordingly. Tuck the entire
piece of material lengthwise, then crosswise over the tucks. (See Fig. 98).
Care should be taken to see that the tucks lie in the proper direction before
starting to cross the tucks. To prevent the material from becoming bias as
it is tucked, it is well to press the tucks with an iron before the cross tucks
are made..
Attractive cross tucking may also be made by first tucking the material
lengthwise and then bias across the tucks.
Fig. 98. Cross Tucking.
THE MANY PRACTICAL USES OF THE RUFFLER.
For centuries past ruffling has played an important part in trimming
garments, but the modern way to make and apply these trimmings is quite
different from the methods used in earlier days. The Singer Rufiier for
Singer Family Sewing Machines will make ruffles of any desired fullness at a
speed of ten yards in ten minutes, and by a simple adjustment the ruffles may
be changed to dainty plaits. This attachment is a wonderful time saver
when making trimmings, and is so simple to use that by carefully following
the directions given in this book, perfect results may be obtained.
49
Page 50

The Parts of the Ruffler and Their Uses.
It is necessary to become familiar with the Ruffler before it can be used
successfully. Take the Ruffler from the set of attachm mts and compare it
with Fig. 99. Note the names and uses of the principal parts, as under :
The Ruffler can be used on all Straight Needle domestic sewing
machines and is attached in place of the presser foot. The needle is
threaded in the manner described in the instruction book supplied
with the machine.
FORK
ARM V
ADJUSTING
LEVER
ADJUSTING
FINGER
ADJUSTING
5 SCREW
SEPARATOR RUFFLING ^SEPARATOR
BLADE BLADE GUIDE
Fig. 99. The Ruffler and its Parts.
Note : If your Ruffler is not exactly like Fig. 99, you will find the working
parts quite similar. Any difference in the adjustments is explained in the
instruction book.
The Foot—the part by which the Ruffler is attached to the presser bar.
The Fork Arm—the section which must be placed astride the needle clamp.
The Adjusting Screw—the screw which adjusts the fullness of the gather.
The Adjusting Lever—the lever which sets the Ruffler for plain gathering or
plaiting.
The Ruffling Blade —the upper blue steel blade with teeth at the end to
push the material in plaits up to the needle.
The Separator Blade—the lower blue steel blade without teeth, which
prevents the teeth of the ruffling blade from coming into contact with
the teeth on the feed dog.
The Separator Guide—the guide on the under side of the Ruffler, containing
several slots into which the edge of the material is slipped to keep the
heading of the ruffle even.
Lines 1, 2, 3, 4 and 5 (Fig. 99) indicate where the material is to be placed
for various operations, as follows :
Line 1—the proper position for the material to which the ruffle is applied.
Line 2—the material to be gathered.
Line 3—the facing for the ruffle.
Line 4—the strip of piping material.
Line 5—the edge to be piped.
Refer to this illustration when inserting the material in the Ruffler.
50
Page 51

Oiling the Rüffler.
The Rüffler requires
an occasional oiling of
all working parts to pre
vent them from sticking.
A drop of oil at each
point indicated in Fig.
100 is sufficient. If
possible sew on a waste
piece of material after
oiling to prevent your
work from becoming
soiled. If the Ruffler
does not plait evenly, a
drop of oil may remedy
the trouble.
Fig. 100. Oiling Points on Ruffler.
To Attach the Ruffler to the Machine.
Raise the needle bar to the highest point and remove the presser foot.
Attach the ruffler foot to the bar, at the same time placing the fork-arm
astride the needle clamp. Turn the hand wheel slowly by hand to see that
the needle comes down in the centre of the needle hole.
How to Adjust the Ruffler for a Plain Gather.
To adjust the Ruffler for a plain gather the projection must be placed in
the slot marked 1 on the adjusting lever (Fig. 101). If it is placed in the slot
marked 5 the Ruffler will then be adjusted for plaiting.
Inserting the Material,
in the Ruffler and
Making a Plain Gather.
Insert the material in the
Ruffler between the two blue
blades following line 2, Fig.
99. Pull the edge of the
material to be gathered for
ward until it is slightly past
the needle, lower the presser
bar and sew. (See Fig. 101).
The fullness of the ruffle is
determined by the position
of the adjusting screw. To
lessen the fullness turn the
screw out. To increase'the
Fig. 101. Making a Plain Gather.
fullness turn the screw in.
51
Page 52

Fig. 102. Making a Ruffle and Sewing it
TO THE Garm ent.
Making a Ruffle and
Sewing it to the Gar
ment at One Operation.
After having tested and
adjusted the Rufiier for full
ness, place the material to
be ruffled in the Ruffler be
tween the two blue blades
and insert the garment to
which it is to be attached
under the separator blade
following line 1, Ing. 99.
Proceed as for plain gather
ing, guiding the material
lightly so that it will not
feed away from the heading
guide. (See Fig. 102).
A Facing May be Added while the Ruffle is being Made.
First insert the material for the ruffle in the Ruffler between the two
blades and the garment under the separator blade, as directed for sewing the
ruffle to the garment
in one operation. Place
the material for the
facing in the Ruffler,
following line 3, Fig.
99. The facing may
be of straight or bias
material. If the fac
ing is to be on the right
side of the garment,
place the garment and
the ruffle so that their
wrong sides are to
gether. If the facing
is to be on the wrong
side, place the right
sides of the garment
and the ruffle together.
(See Fig. 103).
Fig. 103. Adding a Facing a.s the Ruffle is being Made.
52
Page 53

To Apply Rows of Ruffles.
Rows of ruffles
may be stitched to
the work in hand
while they are being
made, by placing the
work under the Ruffler
and the material for
the ruffle between the
blades, as shown in
Fig. 104. The position
on the work for the
ruffles may be indicated
by a basting thread or
a chalk mark.
If the heading on
the ruffle is to be more
than one-quarter of an
inch wide, do not place
the material in the
guide when following
line 2 (Fig. 99) but
place the edge of the ruffle between the blades and to the right of the needle
the desired distance, up to one inch, and guide it as the machine sews.
The edges of the ruffles may be hemmed with the foot hemmer, ot picotcdged on a special attachment or on a special hemstitching machine. The
addition of a narrow lace edge is often attractive.
Fig. lO-l. Applying Row s of Ruffles to a Garment.
To Adjust the Ruffler for Plaiting.
The Ruffler may be adjusted for plaiting by placing the projection in the
slot marked 5 in the adjusting lever. The adjusting screw on the Ruffler
must be turned down as
far as it will go when
making plaiting. The
Ruffler will make a plait
about one-eighth of an
inch wide. To make the
plaits further apart,
lengthen the stitch on
the sewing machine. To
make them closer to
gether, shorten the stitch.
Any material with
dressing, such as lawn,
organdie or taffeta, may
be successfully plaited
with the Ruffler. Softer
materials may be plaited,
Fig. 105. The Ruffler Adjusted
FOR Plaiting.
but the plaits will not lie
flat unless they are very
well pressed.
Plaiting may be applied to the garment while it is being made, following
the directions on page 52. A facing may also be applied, as illustrated on
page 52.
53
Page 54

Group Plaiting and Gathering.
The Ruffler may be adjusted for group plaiting by lifting the adjusting
lever and placing it on top of the projection at the point indicated by the
star on the adjusting lever. This should be done at the points where you
wish to make the spaces between the plaits.
The Ruffler will then stop
and plain stitching will be made
until the lever is again adjusted
so that the projection comes up
through the slot 5. The sewing
machine must be run slowly and
the plaits counted. For ex
ample, when making plaits in
groups of five with one-inch
spaces between the groups, run
machine until the fifth plait has
b6en made, then adjust the
Ruffler to stop plaiting and
stitch plain for one inch.
Fig. 106. Group Plaiting.
Shirring.
When rows of flat stitching at a distance from the edge of the material
are required, the Shirring Plate must be used in conjunction with the Ruffler.
To Attach the Shirring Plate to Machines 15K, 66K,
99K, 185K and 201K.
Insert the downwardly projecting hook of the Shirring Plate into the hole
in the throat plate, at the right of the feed dog. Then place the thumb screw,
which is in the slot of the attachment, into the hole in the bed plate of the
machine. The shirring plate must be firmly secured by tightening the screw.
54
Page 55

To Shirr.
Remove from the ruffler the lower blue blade by loosening the small
screw at the side of the ruffler ; then attach the latter to the presser bar, as
already instructed.
Place the material between the blue blade and the Shirring Plate, lower
the Presser Bar Lifter and proceed as in ruffling.
Shirring may be done with a loose upper tension when it is desired to
slide the gathers on the thread to ñt a certain space.
Embroidery Silk may be used in the bobbin and a very ornamental
stitch will be visible along the rows of shirring. Fancy hand sewing stitches
are also sometimes used effectively over the rows of shirring.
The Quilter.
The Quilter is attached to the machine in place of the regular Presser
Foot, as shown in Fig. 108.
The Quilter Guide can be used at either the right or left of the needle,
and the distance of the Guide from the needle determines the width between
the rows of stitching. Slide the wire into the holder prepared for it on the
foot and set it to the width desired ; then lower the foot on to the material.
Fig. 108.
To Quilt. For the first row of stitching, let the Quilter Guide follow
the edge of the material, a straight crease, or a line, as preferred. The succeed
ing rows are made straight and at a uniform distance by keeping the previous
row of stitching steadily under the Guide, as shown.
The Quilter may be used for other purposes, such as a guide when
applying rows of ornamental stitching, and the Quilter Foot without the
movable bar is used with the Underbraider, and also for Ornamental Stitching
described on page 58.
55
Page 56

The Underbraider.
Raise the needle and, in place of the ordinary presser foot, fit the Quilter
Foot, without the movable bar. But if it is desired to apply braid in parallel
rows, the bar may be left on to act as a guide.
Fig. 109.
Attach the Underbraider as instructed for the Shirring Plates on page
54. In the case of Machines 15K, 66K, 99K, 185K and 201K the attachment
has to be secured by means of the thumb screw.
Any braid that will fit the Underbraider tube and be stitched through
the centre may be used in the Underbraider. It is sometimes necessary to
force the Braid under the spring by pulling it, or to lift the spring with the
screwdriver. The braid should be well under the foot before starting to sew.
How to Perforate Braiding Designs.
A
braiding design
may
be copied with
the sewing machine
by pinning it to several
sheets of paper, as
shown in Fig. 110.
Attach the quilter
foot and, without
threading the machine,
follow the design with
the needle.
You will be able to
make several copies
of the design in this
way. The perforated
pattern is then pinned
to the material to be
braided and torn away
when the braiding is
finished.
56
Page 57

How to Braifl.
The design to be braided must be applied to the wrong side of the garment
For most braiding, a medium length of stitch should be used, but when
braiding small curves it is sometimes necessary to use a shorter stitch and to
run the machine slowly in order to follow the curves.
A braiding design should always be started where it is convenient to pull
the braid through to the under side. A good starting point is usually an
inside one or at the end of a scroll, but this can be determined best from the
de«=ign you wish to braid.
The braid should pull freely from the roll. It requires no guiding except
to see that it does not turn over as it enters the braider tube.
When braiding a square corner, sew until the corner is reached, then stop
the machine with the needle in the braid, raise the presser bar and turn the
material, using the needle as a pivot. Lower the presser bar and proceed
to sew.
How to Fasten the Ends of Braid.
When you have finished braiding, make a small hole with a stiletto, or
with scissors, at each end of the design and pull the ends of braid through
to the underside of the material. Fasten the ends with a hand sewing needle.
To Braid on Net or Fine Material.
To braid on net or fine material it is necessary to have the design stamped
on paper, and if the material is difficult to stitch when using a single thickness,
it is well to slip a piece of paper under the quilter foot also.
67
Page 58

Ornamental Stitching.
Requiring no special attachment or skill, this effective form of ornamental
stitching deserves attention from those who like to explore the many novel
stitching processes open to the Singer machinist.
Very attractive decorations may be made by winding the bobbin with
heavy embroidery silk and using plain sewing silk in the needle. The under
tension is entirely released. (See page 17). The silk should pull perfectly
free from the bobbin. The stitching is then done as for plain sewing, with
the right side of the material down. If desired, a silk of contrasting colour
may be used on top to show between the stitches. (See Fig. Ill), Thread
the machine in the usual way and pull up the under thread before starting
to stitch. The length of stitch will vary the effect of this trimming and the
upper tension may also be adjusted slightly to make the stitches stand up and
appear loose. About ten stitches to the inch makes an attractive decoration
for woollen materia].
A novel trimming may be made by stamping a design on the wrong
side of the garment and following the line with the needle. If the design
is small, it may be necessary to run the machine slowly and to raise the bar
occasionally to adjust the material properly at the curves. It will also be
found easier to stitch over the design if the Quilting Foot (see page 55) is
Fig. 111. Ornamental Stitching
WITH THE Presser Foot.
used, as it allows a clearer view of the lines to be followed. When the design
is ffnished, the end of the silk may be threaded into a hand sewing needle and
pulled through to the under side for fastening.
This stitching will add smartness to frocks and other garments, and
can be employed most attractively upon children’s dresses. Various furnish
ings are also suitable for treatment, while, by substituting ñne wool on the
bobbin, instead of the silk mentioned above, quite artistic but inexpensive
cushion covers, etc., in coarse linen, crash or similar material, can be decorated
with suitable designs.
58
Page 59

THE ZIPPER FOOT
The zipper foot is designed for accurate place
ment of stitches close to a raised edge. The hinged
feature of this foot insures even feeding over pins,
heavy layers of fabric or cross seams. It is attached
to the machine in place of the presser foot, and may
be adjusted to either side of the needle.
Applications.
Zipper insertions
Corded seams
P'lG. 112. The Zipper
Foot.
Tubular cording
Slip cover welting
Preparation
• Attach zipper foot to machine in
place of presser foot.
• Loosen zipper foot thumb screw
and adjust foot to right or left of
needle, as desired.
• Align the notch in the toe with
the needle hole in the throat plate.
Check adjustment by lowering needle
into side notch, making sure it
clears the foot.
Lock foot in position by tightening
thumb screw.
Skirt Zipper.
• Machine baste placket opening of skirt and press this seam open.
• Attach zipper foot to machine in place of presser foot.
^ Position zipper
foot to right of
needle.
• Open zipper.
• Place zipper face
down on seam
allowance with
edge of teeth at
seam line.
• Turn the back
seam allowance
away from body
of skirt.
• Stitch zipper tape
to the seam al
lowance.
59
Fig. 113.
Page 60

Move foot to the left of needle.
Close zipper and turn it face up.
Smooth back the seam allowance
at the edge of the zipper.
Top stitch the seam allowance to
the tape close to the folded edge.
• Turn skirt to right side.
• Fold zipper to front of skirt.
• Pin in place from right side.
• Base.
• Move foot to right of needle.
• Stitch across lower end of zipper and
up to waistline.
• Remove basting.
Fig. 114.
Fig. 115.
Corded Welting.
Cable cord comes in a variety of sizes and when covered with a firmly
woven fabric makes a corded welting that is an excellent seam finish.
This welting is prepared in advance and then stitched into the seam. Cut
a true bias strip 1|- inches wide, plus three times the width of the cord of either
self or contrasting fabric. Sew strips together on the lengthwise grain to
obtain desired length.
• Adjust zipper foot to left side of
needle.
• Encase cord in bias strip, raw
edges even.
% Lower presser bar.
9 Stitch close to cord, using a stitch
length slightly longer than for
plain seaming of same fabric.
• Do not crowd stitching against
cord.
Fig. 117.
Fig. 116.
60
Page 61

Corded Seams.
The corded seam is a typical
treatment for slip covers, children’s
clothes, blouses and lingerie.
When cording a seam the zipper
foot is usually adjusted to the right
of the needle so that the bulk of the
work will fall to the left.
• Attach corded welting to right
side of a single seam edge, using
same length stitch as used for
welting (page 60). Guide edge
of foot next to cord, but do not
crowd.
• Place attached corded welting over
second seam edge, and pin or baste
together.
• Keep the first stitching uppermost
as a guide and position the seam
under the needle.
• Stitch, this time crowding the foot
against the cord.
This method produces evenly joined
seam edges and tightly set welting.
Curved seams are corded as easily
as straight seams, except that a shorter
stitch is used. Since the seam allow
ance of the welting is bias, it is easy to
shape it to the seam.
61
Fig. Hi).
Page 62

THE GATHERING FOOT
Single or mul
tiple rows of
shirring can be
quickly and ex
pertly placed
with the gather
ing foot. Evenly
spaced shirring
is insured as this
foot is designed
to lock fullness
Fig. 120. The
Gathering Foot.
into every stitch.
Applications.
Plain shirring Waffle shirrini
Elastic shirring
Machine smock-
Shirring
Shirring is usually done on the
crosswise grain of the fabric. Soft
fabrics lend themselves to shirring
better than firm fabrics.
The amount of fullness is very
simply controlled by stitch length
and degree of tension.
A long stitch produces more fullnevSS than a short stitch. Balanced
tensions are always required, but
heavy tensions, both upper and
lower, produce more fullness than
light tensions.
Fig. 121.
Many lovely effects are accomplished
with simple roAvs of evenly spaced
shirring. A yoke section, insert or
trimming band of self-fabric affords
an interesting contrast of texture Avhen
stitched with the gathering foot in
rows apart.
62
Page 63

THE EDGE-STITCHER
A COMBINED EDGE-STITCHING, LACE-JOINING
AND PIPING ATTACHMENT.
This useful attachment is fastened to the
machine in place of the presser foot, and is an
indispensable aid whenever stitching must be
kept accurately on the extreme edge of the
material. The slots numbered 1 to 5 in Fig. 123
serve as guides for sewing together laces, insertions
and embroideries, sewing in position hemmed or
folded edges, piping or sewing flat braid to a
garment.
Fig . 123.
Adjusting the Edge-Stitcher.
After attaching the edge-stitcher to the machine, turn the hand wheel
slowly by hand to see that the needle goes through the centre of the needle
hole. The distance of the line of stitching from the edge of the material in
the slots can be regulated by pushing the lug (A) to the right or left. If it
moves hard, put a drop of oil under the blue spring, then wipe it dry.
Sewing Lace Together with the Edge-Stitcher.
It is difficult to sew two lace edges together even after basting, but the
edge-stitcher makes it possible to stitch on the very edge. Place one edge
in slot 1 and the other in slot 4, and adjust lug (A) until both edges are caught
63
Page 64

by the stitching. Hold the two pieces slightly overlapped to keep them
against the ends of the slots. The thread tensions should be loose to avoid
puckering of fine lace.
Fig. 125. Setting in Lace Insertion.
Lace and ribbon or other insertions can be set in by using the same slots
(1 and 4). The material may be folded over before placing it in the slot so
that a double thickness is stitched and will not pull out. The surplus material
is trimmed away clo.se to the stitching as shown in Fig. 125.
Piping with the Edge-Stitcher.
Piping is very attractive if the correct contrasting colour is chosen for
the piping material. Place the piping, with its finished edge to the left, in
slot 3. Place the edge to be piped in slot 4, as shown in Fig. 126.
Piping should preferably be cut bias, and should be cut to twice the
width of the slot (3) in the edge-stitcher so that it can be folded once.
Applying Bias Folds with the Edge-Stitcher.
Folded bias tape or military braid, used for neat and colourful trimming,
may be sewn on by placing the garment under the edge-stitcher, the same as
Fig. 126. Piping with the Edge-Stitcher.
64
Page 65

under a presser foot, and placing the tape in slot 1 or 4. To make a square
corner, sew until the turning point is reached, then remove the tape from the
attachment and form the corner by hand, replace it in the slot and continue
stitching, as shown in Fig. 127. To space two or more parallel rows, a guide
line such as a crease, chalk or basting thread should be used.
Fig. 127. Applying Bias Folds with the Edge-Stitcher.
Stitching a Wide Hem with the Edge-Stitcher.
A wide hem on sheets, pillow slips, etc., may be stitched evenly with
the edge-stitcher after the hem has been measured and the edge turned.
Fig. 128. Making a Wide Hem.
Insert the edge in slot 5 as shown in Fig. 128 and adjust to stitch as close to
the edge as desired.
G5
Page 66

Making a French Seam.
An even French seam may be made by inserting
the two edges to be joined, wrong sides together,
in slot 1 or 2 and stitching close to the edge ; then
folding both right sides together and inserting the
back of the seam into slot 1 again and stitching
with just enough margin to conceal the raw edges.
See Fig. 129.
Tucking with the Edge-Stitcher.
Dainty narrow tucking may be produced on the edge-stitcher by inserting
creased folds in slot 1 as shown in Fig. 130, and adjusting the edge-stitcher
Fig. ]30. Tucking with the Edge-Stitcher.
to right or left for the desired width of tuck, up to ^ inch. Successive tucks
may be easily creased by folding the material at the desired distance from the
previous tuck, and then running the length of the fold over a straight edge
such as the edge of the sewing machine cabinet. The secret of good tucking
lies in a light tension, short stitch, and fine thread and needle.
68
Page 67

THE SEAM GUIDE
The seam guide
aids in attaining
uniformity of seam
Fig. 131. width. It provides
for stitching to be
placed at any distance between ^
to 11" from edge of fabric.
Application
Seams Blind Stitching
Top Stitching Decorative Stitching
Attachment is used in connection
with a presser foot. It is secured
to bed of machine in either of
threaded holes to right of needle.
SEAMS
For straight seams. Align guide
with presser foot. Adjust machine for
straight stitching. Pin seam edges and
baste if necessary. Guide fabric edges
lightly against guide while stitching.
For curved seams : Set attach
ment at an angle so that end closest to
needle acts as a guide. Shorten stitch
length for greater elasticity and
strength.
Attachments supplied with 401 and 404 Slant Needle
Machines :—
Zipper
Foot
Seam Guide
Page 65
Page 59
Multi-slotted
Binder
Page 33
A
Ruffler
Page 50
Fig. 133.
67
Foot
Hemmer
Page 41
Gathering
Foot
Page 61
Page 68

Darning.
Anyone who can use a sewing machine can make darns in household
napery in a fraction of the time required for hand darning, and these will
be infinitely superior in appearance and will wear and wash better.
The only special fittings required for the work—all of which may be had
for the outlay of a few shillings—are a Darning or Embroidery Hoop, a small
plate to cover the feed, and a little Spring Presser to hold the material in
position while the needle is on its upward course.
To Prepare Singer 327K,
328K and 329K Machines
First remove the presser
foot and the screw which fastens
it to the presser bar. Throat
Plate Raising Plate should then
be inserted under the Throat
Plate, as shown in Fig. 135.
For detailed information re
garding this and the darning
foot for these machines, see
instruction books.
Fig. 134.
%
\ ""
%
'i
1
1
§
1
1
- C -■•c, '' ‘.i c
Fig. 135.
To Prepare Singer 66K, 99K and 185K Machines for Darning.
First remove the presser foot and the screw which fastens it to the presser
bar. Then remove the needle clamp and in its place fix the Spring Darning
Presser No. 86496, or 121094. Before fixing to the needle bar, pass the needle
up through the centre of the small disc at the bottom of the Spring Presser.
Take care that the fiat side of the needle shank is towards the hand wheel,
and push it up into the clamp as far as it will go before finally tightening the
clamp screw.
68
Page 69

Pull out the shuttle cover slide far
enough to allow the feed cover plate
to be clipped over the needle plate, as
shown in Fig. 137 ; close the slide again
and make sure that the needle comes
down through the centre of the hole in
the feed cover plate and needle plate.
\
!
Pig. 136. Threading for
Darning on 66K, 99K and
135K Machines.
Fig. 137.
When threading the 66K, 99K and 185K Machines for darning, care
must be taken that the thread is passed through the hole in the slack thread
regulator, as shown in Fig. 133. All other machines are threaded in the usual
way.
Attaching Embroidery Hoop Guide on 404 Machine for Darning.
Fig. 138.
Procedure—
• Remove presser foot.
• Elevate throat plate by setting
lever in centre (darning) position.
• Open slide plate.
Position hoop guide over throat
plate with two extensions under
throat plate, as shown above.
Slide hoop guide into place.
Close slide plate.
To Prepare Singer 15K110 and 201K Machines for Darning.
With Singer 15K110 and 201K Machines Spring Darning Foot No. 121094
should be used, but no Feed Cover Plate is required, as . an ingenious
arrangement provides for making the Feed inactive—see Instruction Book.
69
Page 70

The following instructions for manipulating the work apply to
darning on all Singer Domestic Sewing Machines.
Darning Table Linen, Towels, etc.
To ensure a soft, smooth finish, it is essential that a fine needle and fine
mercerised cotton should be used, which can be obtained from Singer Shops.
Ordinary cotton, however fine, results in a rather stifier, heavier darn.
As the feed of the Machine has been covered by the feed cover plate
(or lowered in the case of 15K110 and 201K Machine) it will be understood
that the movement of the work and the length of stitch must be controlled by
the operator moving the darning hoop. A slow movement of the hand will
give a short stitch and a quick movement a longer one.
Trim ragged edges from area to be darned and centre worn section in
embroidery hoops. Position work under needle and lower presser bar to
engage tension. Hold needle thread loosely with left hand, turn hand wheel
over and draw bobbin thread up through fabric. Hold both thread ends and
lower needle into fabric. Outline area to be darned with running stitches for
reinforcement. Place stitches from edge of open area.
Hold the hoop with both hands, and with a steady, continuous
movement, work backwards and forwards across the hole, keeping
the lines of stitching an equal distance apart and running about beyond
the edge of the hole and working in the same direction as the weft or fine
threads of the material.
After the stitching has been completed one way turn the hoop round
and continue in a similar manner across the first lines of stitching. These
second lines of stitching should be closer together and run parallel with the
warp or thicker threads of the material. Take this stitching about beyond
the hole, thus covering the first lines of thread entirely. This will strengthen
the material round the hole without giving a heavy darn.
When finished, the darn should be either round or oval in shape, thus
avoiding too much strain on one. thread. The darn should match as nearly
as possible the texture of the material. If the material is sheer, weave a
loose darn by moving the hoop far enough to make a long stitch. If a firmer
darn is required, move the hoop a short distance so that shorter stitches are
made.
70
Page 71

l\'
Fig. 139. Darning on Section of Table Cloth in Process and Completed.
If the stitches are loose on the under side, either the presser bar is not
down or the tensions are not properly adjusted.
Rug Making, etc.
With the aid of an
inexpensive device called
a “Singercraft Guide”
excellent rugs can be pro
duced using ordinary rug
wool, rag strips, damaged
silk stockings cut spiral,
or on the bias in strips,
and other similar material.
The work is pleasant and
fascinating, while the re
sult is equal to the slow,
tedious hand methods
and uses considerably less
wool.
An almost endless variety of other articles in wool, etc., is possible to the
artistic worker with a Singercraft Guide, and those interested should ask for
further particulars at any Singer Shop.
71
Page 72

SINGER
AUTOMATIC ZIGZAGGER
Fig. 141.
ZiGZAGGER FOR 15K AND 201K
Machines.
This wonderful SINGER fashion aid will enable you to produce an infinite
variety of attractive ornamental designs merely through the interchange of
the different Stitch Patterns and the adjustment of the bight and stitch
length. Such decorative effects as applique, scalloped edges, border designs,
as well as blind stitched hems and simple mending can be produced with this
attachment on women’s and children’s clothing, lingerie, linens, draperies
and an unlimited array of other garments and household items.
With the flick of a lever, plain sewing may be done without removing the
zigzagger from the sewing machine.
vVVWWW\AAAAAAAAAAAAAAAAAAAAAAA/V
ZiGZAGGER FOR 99K, 185K AND 329K
Fig. 142.
Machines.
72
\/
\/
Page 73

THE ELECTRIC SEWING MACHINE.
In this electrical age there are few household appliances more valuable
than the electric sewing machine. Sewing then becomes a positive pleasure ;
you just plug into a lamp socket or wall plug, and switch on. Both hands
are free to guide the work, and the speed of the machine, which is regulated
by gentle pressure on the speed controller, may be varied at will to suit the
work in hand. For example, the machine may be controlled to run at a low
speed when sewing a short length of seam, or where great care must be taken
in guiding the material. On long seams the speed of the electric machine is
much greater than is possible when working by hand or foot treadle.
It is not necessary to touch the wheel, as the machine will always start
in the right direction.
The following illustrate the various types of electric machines most
commonly used :—
Types of Electric Sewing Machines.
Electric Sewing Machines are of four principal types : the treadle machine
with a motor attached, the portable machine, the electric cabinet machine,
and the electric desk cabinet machine.
One form (the Treadle machine) is shown in Fig. 143. The motor is
attached to the machine by a bracket fixed with a single screw to the arm of
the machine below the hand wheel. The regular treadle belt is removed
73
Page 74

and substituted by the small motor belt connecting the hand wheel of the
machine with the pulley of the motor. The speed controller is attached to
the brace of the stand and then connected to the treadle of the machine
by means of the Pitman Rod, which has first been unscrewed from the driving
crank of the band wheel. An ordinary treadle machine can thus become an
electric one. The conversion takes only a few minutes and can be done by
anyone without electrical or mechanical skill. When it is desired to operate
the machine, the motor flex is plugged into a lamp socket or wall plug and
gentle pressure on the treadle sets the machine in motion. The speed of the
machine is varied according to the amount of pressure applied.
The Portable Electric Machine.
Another model is the Portable Electric Machine, shown in Fig. 144. The
illustration shows the equipment supplied with this type of machine which
enjoys great popularity because of its compactness and usefulness.
Fig, 144.
The Electric Desk Cabinet Machine.
The third model is the Desk Cabinet machine. (See Fig. 145). In this
case the machine is mounted on an elegant table. The motor is attached to
the machine, as already described, and the controller is located on the floor.
VvTen not in use the machine head is lowered beneath the table top, and the
wooden extension leaf of the table folded over. The table then becomes an
elegant article of furniture which can be used for any purpose to which a
small fancy table can be put.
Page 75

The Electric Cabinet Machine.
(See Fig. 146).
The fourth model is the Electric Cabinet Machine. Here the machine is
mounted on an elegant cabinet. The motor is attached to the machine as
previously described, and the controller is located on the floor. When not
in use the machine is lowered beneath the cabinet top, the hinged leaf is
folded over and the door closed to give a handsome piece of furniture which
will enhance any room.
Fig. 146.
75
Page 76

The Singer Light.
For all machines,
whether hand, treadle, or
electric, the Singer Light
is recommended, if electric
current is available. This
little light is attached to
the arm of the machine
and projects its light on to
the material just where it
is being stitched. It great
ly adds to the comfort of
the operator as it prevents
eyestrain and makes the
threading of the needle
easy. No machine is com
plete without a Singer
Light.
Fig. 147.
Conversion of Ordinary Singer Machines to Electric Machines.
An ordinary Singer
Machine may be con
verted at a compar- ri
atively small cost, and
without trouble, into
an electric one.
In the case of a
hand machine, the foot
controller, as illustra
ted in Fig. 148, is fur
nished with the motor
so that it is unnecessary
to exchange the wood
en base and cover. The
speed of the machine is
controlled by pressure
on the foot pedal.
Fig. 148. Portable Machine with Foot Control.
76
Page 77

SWING NEEDLE MACHINES.
The modern trend in sewing machines is towards the zig-zag or swing
needle machines. In this class, there are three Singer models, the Singer
Slant-O-Matic, the Singer 328K and the Singer 327K. The Singer Swing
Needle Machine is an example of modern engineering precision, with it you
will have at your finger tips the means for making garments beautifully
decorated and articles of real value for your home, and at the same time,
without fuss or bother, you have a machine emanently excellent for all regular
sewing work. These machines have almost unlimited possibilities in sewing,
from beautiful straight stitches to magical embroidery. In addition, they
provide the practical time saving seam and hem finishing and mending that
anv home maker has to do.
77
Page 78

EXAMPLES OF AUTOMATIC STITCH PATTERNS.
Decorative designs need not be limited to those done automatically, for
the possibility of creative designs are endless.
1 1
1 i
1 1
1 1
1 1
11
1 1
1 1
1 1
1 t
1 I
! 1
1 1
.»
>>
s>
>>
>>
1
< i
\\
/ ✓
ss
\ \
N \
/ /
/ /
'>>
✓ ✓
\ V
\ \
/ /
N \
/ /
S \
S \
✓ y
/ /
w
✓ /
✓ ✓
\ \
/ /
/ /
/ /
\ V
/ /
/S
«
ss
<s
I i
1 i
) 1
t 1
<<
1 1
i i
1 i
1 1
1 1
1 i
i 1
1 (
1 1
1 1
1 1
1^1
t t
\ \
j /
; ;
w
» t
> f
]]
<
SWING NEEDLE TRANSFERS.
Examples of successful blending of automatic, embroidery stitches are
contained in a series of 12 specially designed Swing Needle Transfers. These
give ideas of sohie of the many ways in which Swing Needle stitchery can be
made to add extra beauty to the things that you make.
More precise information on Swing Needle stitching can be obtained from
the instruction books.
78
 Loading...