

Page 1
3323 Instruction Manual
Page 2

IMPORTANT SAFETY INSTRUCTIONS
When using an electrical appliance, basic safety should always be
followed, including the following:
Read all instructions before using this sewing machine.
DANGER
1. An appliance should never be left unattended when plugged in.
2. Always unplug this appliance from the electric outlet immediately
after using and before cleaning.
3. Always unplug before re-lamping. Replace bulb with same type
rated 10 watts
- To reduce the risk of electric shock:
(110-120V area) or 15 watts (220-240V area).
WARNING - To reduce the risk of burns, fire,
electric shock, or injury to persons:
1. Do not allow to be used as a toy. Close attention is necessary
when this appliance is used by or near children.
2. Use this appliance only for its intended use as described in this
manual. Use only attachments recommended by the
manufacturer as contained in this manual.
3. Never operate this appliance if it has a damaged cord or plug, if
it is not working properly, if it has been dropped or damaged, or
dropped into water. Return the appliance to the nearest
authorized dealer or service center for examination, repair,
electrical or mechanical adjustment.
4. Never operate the appliance with any air openings blocked. Keep
ventilation openings of the sewing machine and foot controller
free from accumulation of lint, dust, and loose cloth.
5. Keep fingers away from all moving parts. Special care is required
around the sewing machine needle.
6. Always use the proper needle plate. The wrong plate can cause
the needle to break.
7. Do not use bent needles.
8. Do not pull or push fabric while stitching. It may deflect the
needle causing it to break.
9. Switch the sewing machine off ("O") when making any adjustments
in the needle area, such as threading needle, changing needle,
threading bobbin, or changing presser foot, and the like.
10. Always unplug sewing machine from the electrical outlet when
removing covers, lubricating, or when making any other user
servicing adjustments mentioned in the instruction manual.
11. Never drop or insert any object into any opening.
12. Do not use outdoors.
13. Do not operate where aerosol spray products are being used or
where oxygen is being administered.
14. To disconnect, turn all controls to the off ("O") position, then
remove plug from outlet.
15. Do not unplug by pulling on cord. To unplug, grasp the plug, not
the cord.
16. The sound pressure level under normal operating conditions is
75dB(A).
Please turn off the machine or unplug when the machine is not
17.
operating properly.
18. Never place anything on the foot controller.
19. If the supply cord that is fixed with foot controller is damaged, it
must be replaced by the manufacturer or its service agent or a
similar qualified person in order to avoid a hazard.
20. This appliance is not intended for use by persons (including
children) with reduced physical, sensory or mental capabilities, or
lack of experience and knowledge, unless they have been given
supervision or instruction concerning use of the appliance by a
person responsible for their safety.
21. Children should be supervised to ensure that they do not play
with the appliance.
SAVE THESE INSTRUCTIONS
This sewing machine is intended for household use only.
Page 3

Congratulations
As the owner of a new Singer sewing machine, you are about to begin an exciting adventure in
creativity. From the moment you first use your machine, you will know you are sewing on one
of the easiest to use sewing machines ever made.
May we recommend that, before you start to use your sewing machine, you discover the many
features and the ease of operation by going through this instruction book, step by step, seated
at your machine.
To ensure that you are always provided with the most modern sewing capabilities, the
manufacturer reserves the right to change the appearance, design or accessories of this
sewing machine when considered necessary.
SINGER is a registered trademark of The Singer Company Limited or its affiliates.
© 2010 The Singer Company Limited or its affiliates. All rights reserved.
Page 4

List of Contents
Machine Basics
Principle Parts of the Machine..............................................................................................................................................2/3
Connecting Machine to Power Source ....................................................................................................................................4
Two Step Presser Foot Lifter...................................................................................................................................................5
Accessories .............................................................................................................................................................................6
Threading the Machine
Winding the Bobbin .................................................................................................................................................................7
Inserting the Bobbin ................................................................................................................................................................8
Threading the Upper Thread ...................................................................................................................................................9
Automatic Needle Threader ..................................................................................................................................................10
Raising the Bobbin Thread ....................................................................................................................................................11
Thread Tension......................................................................................................................................................................12
Sewing
How to Choose Your Pattern .................................................................................................................................................13
Stitch Width Dial &
Sewing Straight Stitch ...........................................................................................................................................................15
Reverse Sewing/ .....................................................................................................16
Choosing Stretch Stitch Patterns ..........................................................................................................................................17
Blind Hem..............................................................................................................................................................................18
Sew 1-step Buttonholes
Sewing on Buttons ................................................................................................................................................................20
Gathering...............................................................................................................................................................................21
Free Motion Darning, Stippling..............................................................................................................................................22
The Even Feed Foot Accessory ...........................................................................................................................23(Optional)
General Information
Installing the Removable Extension Table.............................................................................................................................25
Attaching the Presser Foot Shank.........................................................................................................................................26
Needle/Fabric/Thread Chart..................................................................................................................................................27
Darning Plate.........................................................................................................................................................................28
Maintenance and Troubleshooting
Inserting & Changing Needle ................................................................................................................................................29
Changing the Bulb.................................................................................................................................................................30
Troubleshooting Guide ..........................................................................................................................................................31
Stitch Length Dial ...................................................................................................................................14
Removing the Work/Cutting the Thread
........................................................................................................................................................19
(Optional)Side Cutter ............................................................................................................................................................24
Page 5
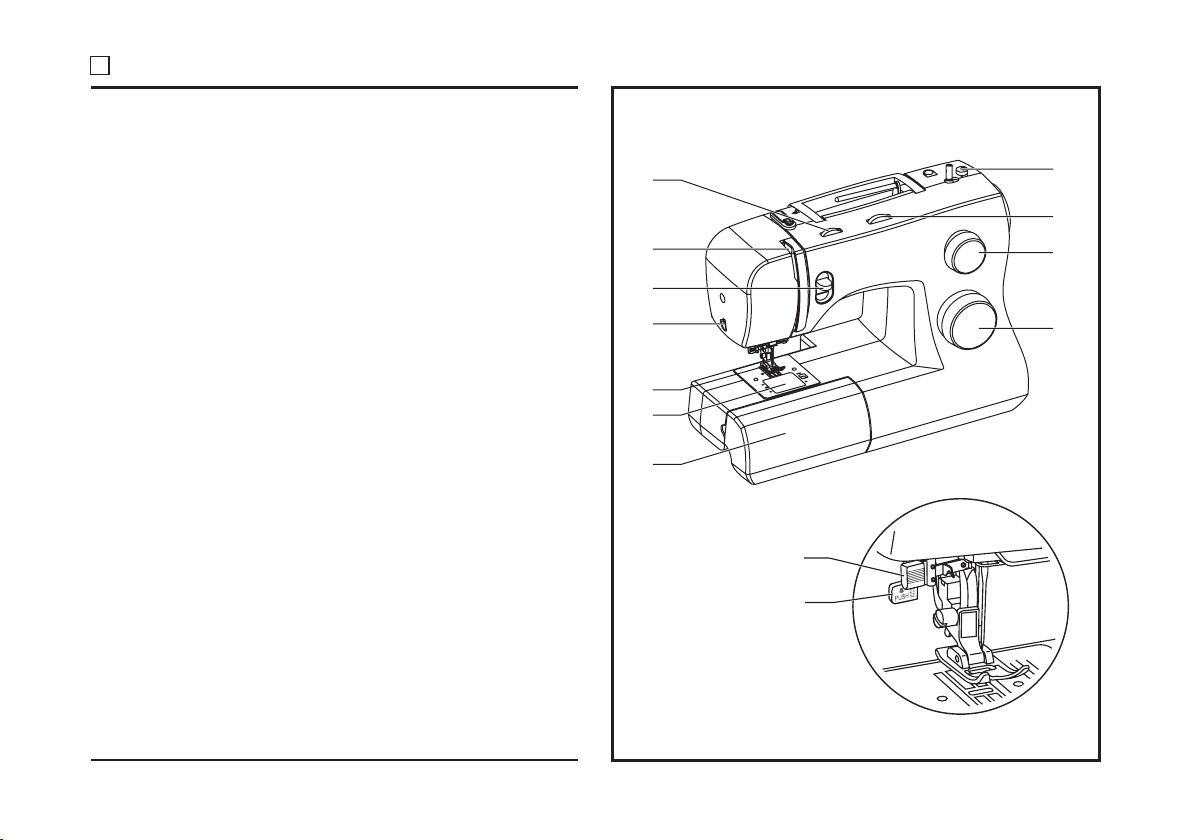
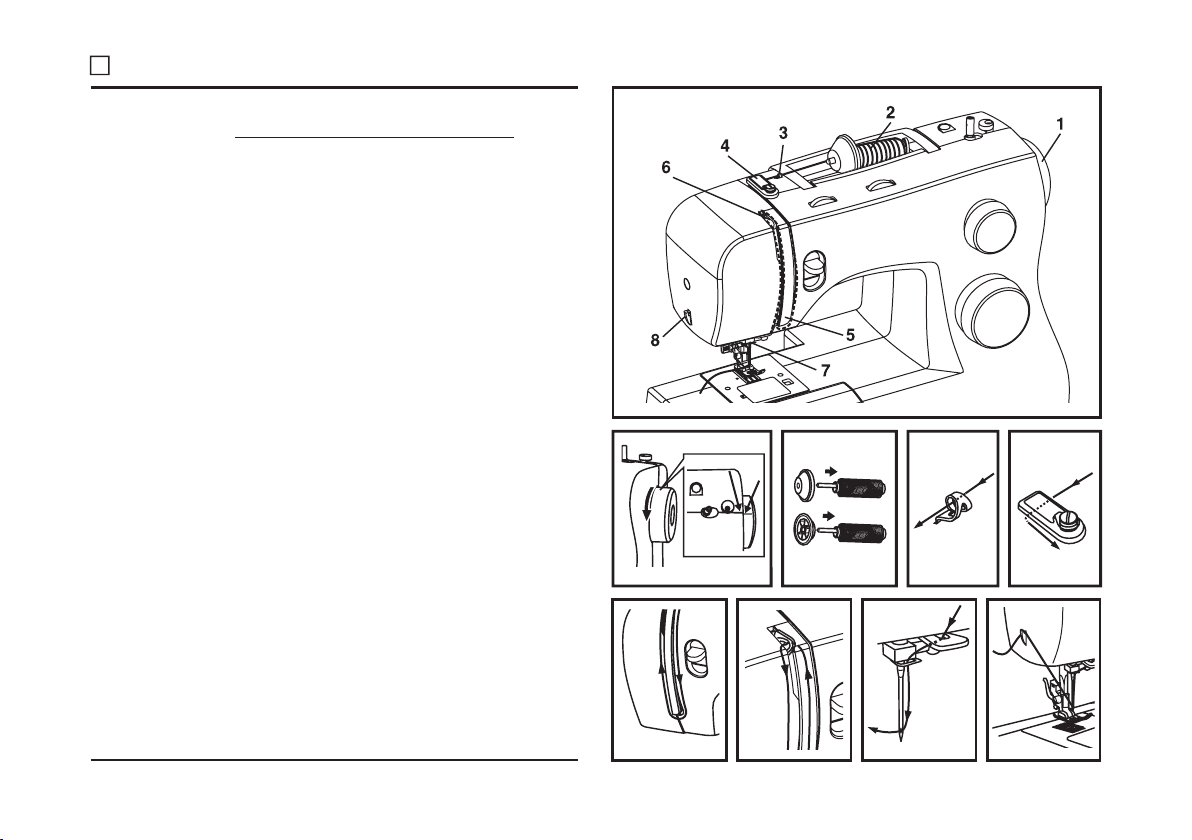
Principal Parts of the Machine
1. Thread tension dial
2. Thread take-up lever
3. Reverse sewing lever
4. Thread cutter
5. Presser foot
6. Needle plate cover
7. Removable extension table/ accessory storage
8. Bobbin stopper
9. Stitch dial
10. length
11. Pattern selector dial
12. Automatic threader
13.
width
Stitch dial
One step buttonhole lever
1
2
3
4
5
6
7
12
13
8
9
10
11
2
Page 6
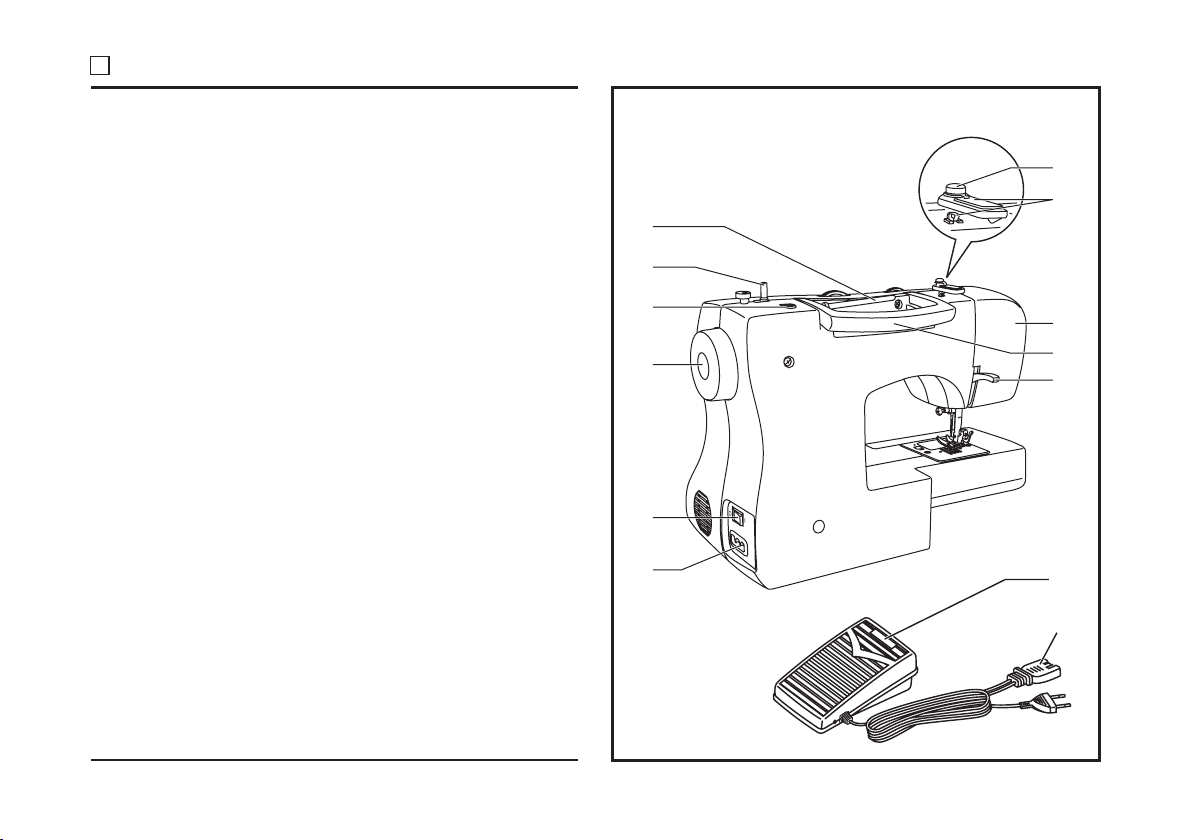
Principal Parts of the Machine
14. Horizontal spool pin
Bobbin winding spindle
15.
16. Hole for a
17. Handwheel
18. Power and light switch
19. Main plug socket
20. Bobbin thread guide
21. Upper thread guide
22. Face plate
23. Handle
Presser foot lifter
24.
25. Foot speed control
26. Power cord
uxiliary spool pin
14
15
16
17
18
20
21
22
23
24
19
3
25
26
Page 7
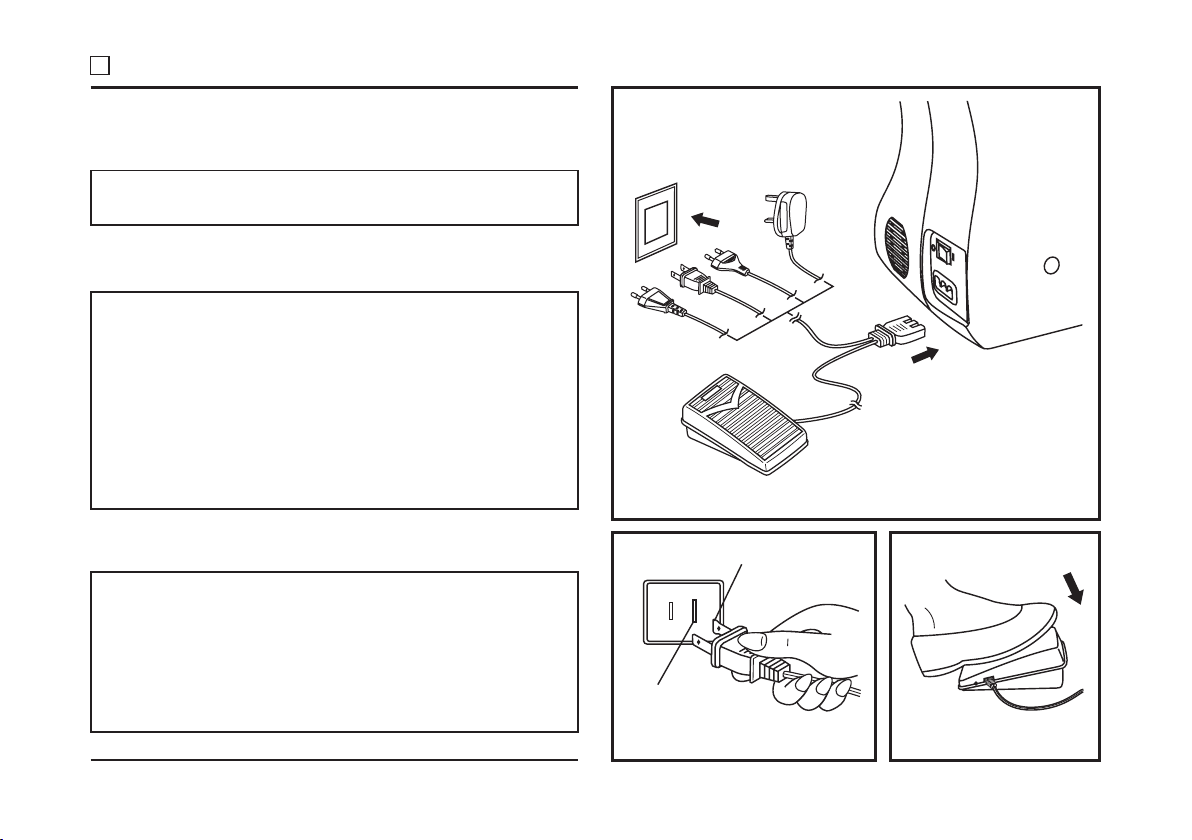
Connecting Machine to Power Source
Connect the machine to a power source as illustrated. (1)
This appliance is equipped with a polarized plug which must
be used with the appropriate polarized outlet. (2)
Attention:
Unplug power cord when machine is not in use.
Foot control
The foot control pedal regulates the sewing speed. (3)
Attention:
Consult a qualified electrician if in doubt of how to connect
machine to power source.
Unplug power cord when machine is not in use.
The foot control must be used with the appliance by KD1902 (110-120V area)/ KD-2902 (220-240V area)
manufactured by ZHEJIANG FOUNDER MOTOR
CORPORATION LTD. (China)
4C-326G(230V area) manufactured by Wakaho Electric
Ind. Co., Ltd. (Vietnam)
Sewing light
Press main switch (A) to"l"forpower and light.
IMPORTANT NOTICE
For appliance with a polarized plug (one blade is wider
than the other). To reduce the risk of electric shock, this
plug is intended to fit in a polarized outlet only one way. If
it does not fit fully in the outlet, reverse the plug. If it still
does not fit, contact a qualified electrician to install the
proper outlet. Do not modify the plug in any way.
A
1
Polarized attachment plug
Conductor intended
to be grounded
23
4
Page 8
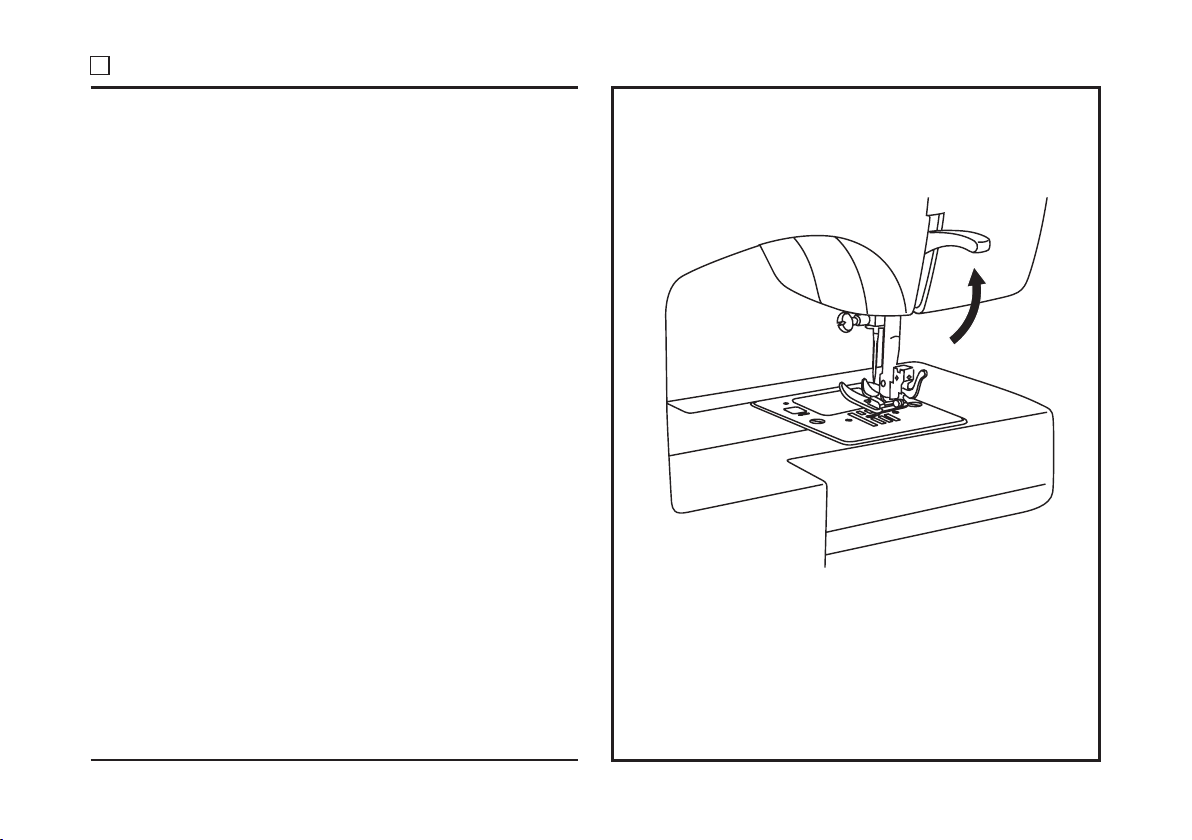
Two Step Presser Foot Lifter
A
When sewing several layers or thick fabrics, the presser foot
can be raised for easy positioning of the
work. (A)
to a higher position
5
Page 9
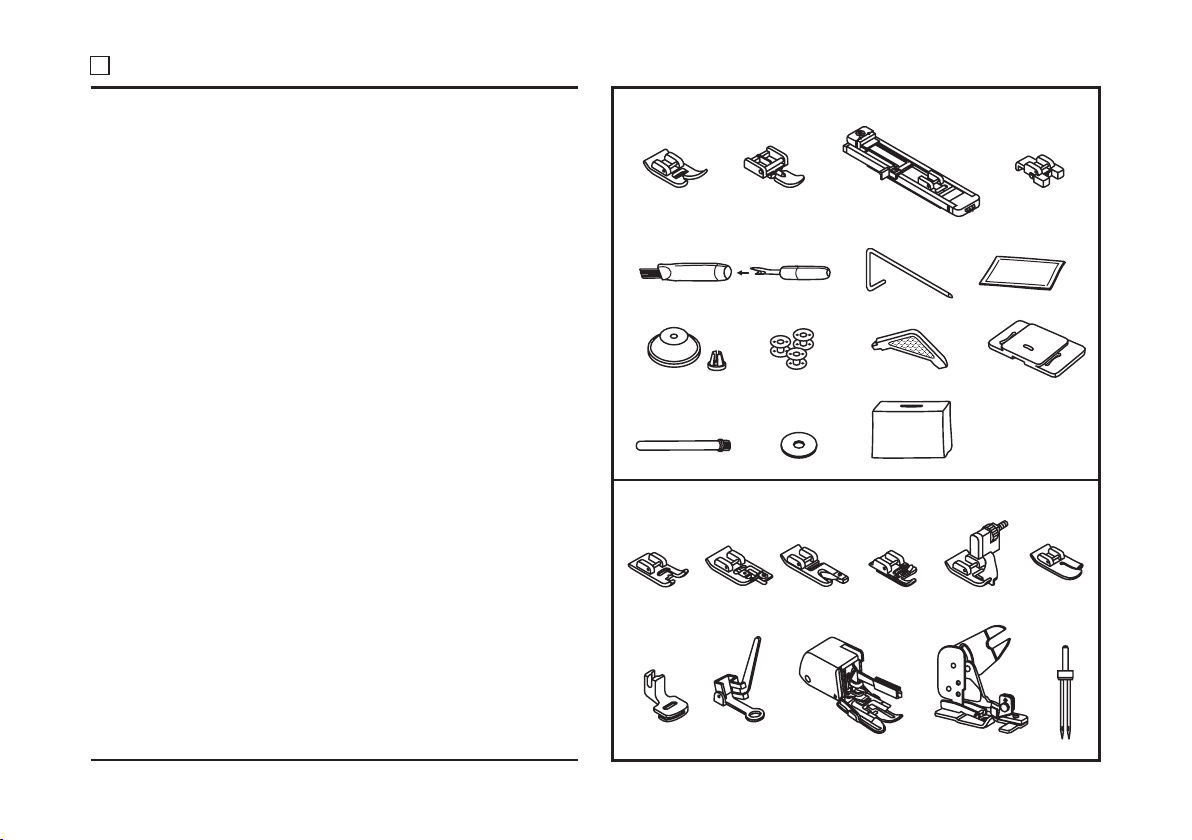
Accessories
Standard accessories (1)
a. All purpose foot
b. Zipper foot
c. Buttonhole foot
d. Button sewing foot
e. Seam ripper/ brush
f. Edge/ quilting guide
g. Pack of needles
h. Spool holders
i. Bobbin (3x)
j. L-screwdriver
k. Darning plate
l. Auxiliary Spool Pin
m. Spool pin felt
n. Soft cover
Optional accessories (2)
(These 11 accessories are not supplied with this machine; they
are, however, available for purchase from your authorized
retailer.)
o. Satin stitch foot
p. Overcasting foot
q. Hemmer foot
r. Cording foot
s. Blind hem foot
t. Quilting/ straight stitch foot
u. Gathering foot
v. Darning/ embroidery foot
w. Even Feed foot
x. Side cutter
y. Twin needle
1 Standard accessories
ab c
006918008
e
h
l
006905008 006914008
i
m
006Q6A0150
f
j
n
2 Optional accessories
po
u
vw
006016008006917008 0061850081
qrs t
006813008
006904008006172008 006907008 006900008
x
U2-0071
d
g
k
006916008
y
6
Page 10
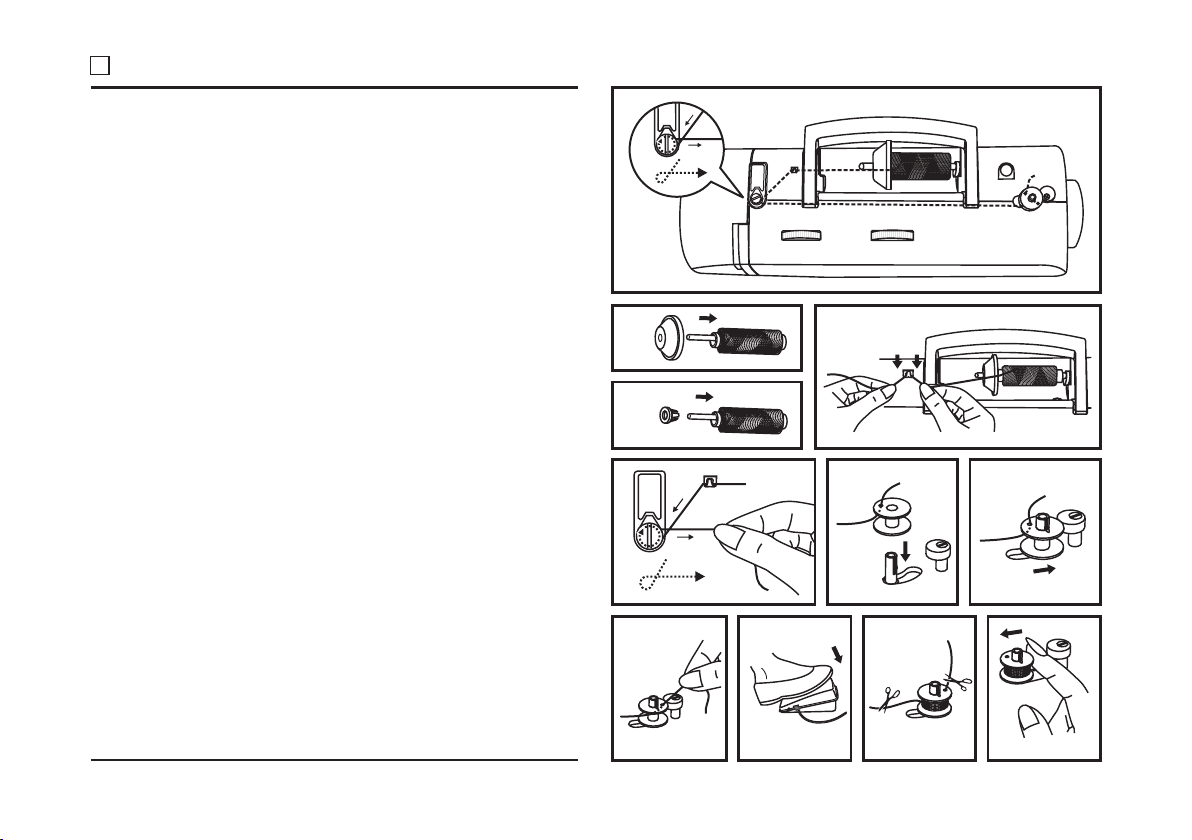
Winding the Bobbin
Place thread and spool holder on to spool
- corresponding
pin
. (1/2)
- Snap thread into thread guide. (3)
- Wind thread clockwise around bobbin winder tension discs. (4)
- Thread bobbin as illustrated and place on spindle. (5)
- Push bobbin spindle to right. (6)
- Hold thread end. (7)
- Step on foot control pedal. (8)
- Cut thread. (9)
- Push bobbin spindle to left (10) and remove.
Please Note:
When the bobbin winder spindle is in "bobbin winding"
position, the machine will not sew and the hand wheel will
not turn. To start sewing, push the bobbin winder spindle to
the left (sewing position).
1
2
4
3
5
6
7
7
8
9
10
Page 11
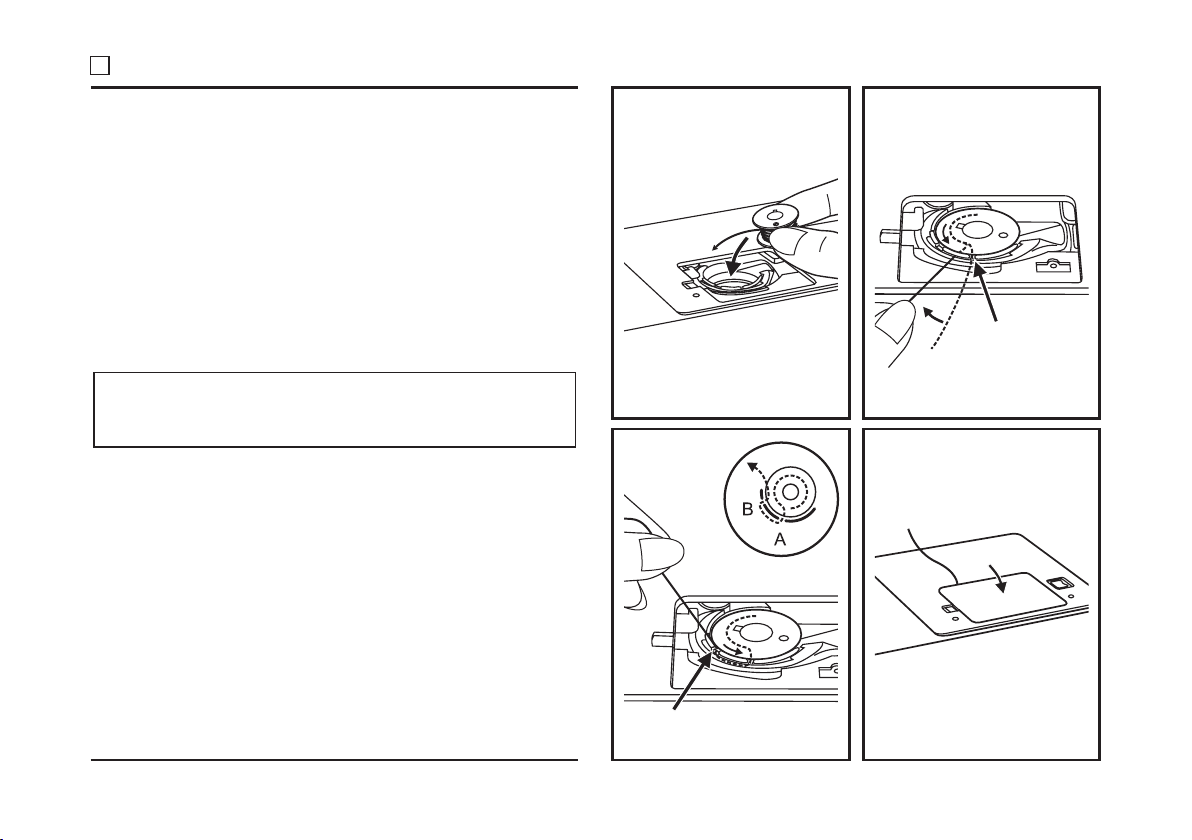
Inserting the Bobbin
When inserting or removing the bobbin, the needle must
be fully raised.
1. Insert the bobbin in the bobbin case with the thread
running counterclockwise direction (arrow).
2. Pull the thread through the slit (A).
3. Draw the thread clockwise until it slips into the notch (B).
4. Pull out about 15 cm (6 inches) of thread and attach the
bobbin cover plate. (C)
A
Attention:
Turn power switch to off ("O") before inserting or
removing the bobbin.
1
B
3
8
2
C
4
Page 12
Threading the Upper Thread
This is a simple operation but it is important to carry out correctly
as by not doing so .
- Start by raising the needle to its highest point (1), and
continue turning the handwheel counterclockwise until the
needle just slightly begins to descend. Raise the presser
foot to release the tension discs.
For safety, it is strongly suggested you turn off the
Note:
power before threading.
- Lift up the spool pin. Place the spool of thread on the
holder with the thread coming off the spool as shown. For
small thread spools, place small side of spool holder next
to spool. (2)
- Draw thread from spool through the upper thread guide (3)
and pulling thread through pre-tension spring as illustrated.
(4)
- Thread tension module by leading thread down right
channel and up left channel. (5) During this process it is
helpful to hold the thread between the spool and thread
guide.
- At the top of this movement pass thread from right to left
through the slotted eye of the take-up lever and then
downwards again. (6)
Now pass the thread behind the horizontal thread guide,
and then behind the thin wire needle clamp guide (7) and
then down to the needle which should be threaded from
front to back.
- Pull about 6-8 inches of thread to the rear beyond the needle
eye. Trim thread to length with built in thread cutter. (8)
several sewing problems could result
1
5
9
2
6
3
7
4
8
Page 13
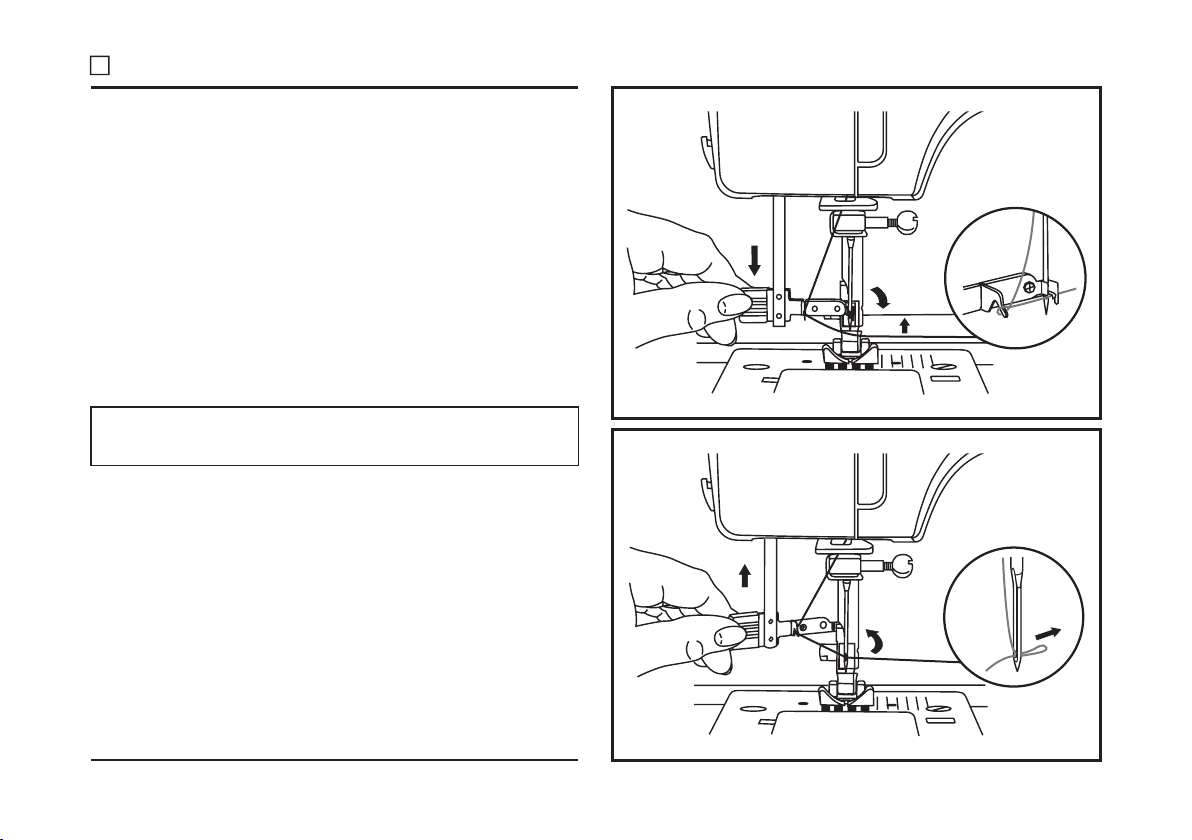
Automatic Needle Threader
- Raise the needle to its highest position.
- Press lever (A) down as far as it will go.
- The threader automatically swings to the threading position
(B).
- Pass thread around thread guide (C).
- Pass the thread in front of the needle around the hook (D)
from bottom to top.
- Release lever (A).
- Pull the thread through the needle eye.
Attention:
Turn power switch to off ("O")!
10
A
B
C
1
A
2
D
Page 14
Raising the Bobbin Thread
Hold the upper thread with the left hand. Turn the handwheel
(1) towards you (counterclockwise) lowering, then raising
needle.
Note:
If it is difficult to raise the bobbin thread, check to make sure
the thread is not trapped by the hinged cover or the
Removable Extension Table.
Gently pull on the upper thread to bring the bobbin thread up
through the needle plate hole. (2)
Lay both threads to the back under the presser foot. (3)
1
2
11
3
Page 15
Thread Tension
Upper thread tension
Basic thread tension setting: "4". (1)
To increase the tension, turn the dial to the next number up.
To reduce the tension, turn the dial to the next number down.
A. Normal thread tension for straight stitch sewing.
B. Thread tension too loose for straight stitch sewing. Turn
dial to higher number.
C. Thread tension too tight for straight stitch sewing. Turn
dial to lower number.
D. Normal thread tension for zig zag and decorative sewing.
Correct thread tension is when a small amount of the
upper thread appears on the bottom side of fabric.
Lower thread tension
The bobbin tension has been set correctly at the factory, so
you do not need to adjust it.
Please note:
- Proper setting of tension is important to good sewing.
- There is no single tension setting appropriate for all stitch
functions, thread or fabric.
- A balanced tension (identical stitches both top and bottom) is
usually only desirable for straight stitch construction sewing.
- 90% of all sewing will be between "3" and "5".
- For zig zag and decorative sewing stitch functions, thread
tension should generally be less than for straight stitch
sewing.
- For all decorative sewing you will always obtain a nicer
stitch and less fabric puckering when the upper thread
appears on the bottom side of your fabric.
1
BA
12
C
D
Page 16

How to Choose Your Pattern
The diagram on this page display the stitch patterns available
on the machine.
Stitches in the top of the diagram are indicated on the
Pattern Selector Dial in g . To select the patterns indicated
with the g color, turn the Pattern Selector Dial. (d) Use the
Stitch Length Dial (c) to adjust the stitch length as desired for
the project. Use the Stitch Width Dial (b) to adjust the width
of the stitch as desired.
ray
ray
ab
c
Stitches in the bottom row of the diagram are indicated on
the Pattern Selector Dial in blue. The blue indicates that the
stitch is a stretch stitch pattern, and information on how to
sew these stretch patterns is on page 17.
The Pattern Selector Dial may be turned in either direction.
a. Reverse Sewing Lever
b. Stitch Width Dial
c. Stitch Length Dial
d. Pattern Selector Dial
d
13
Page 17
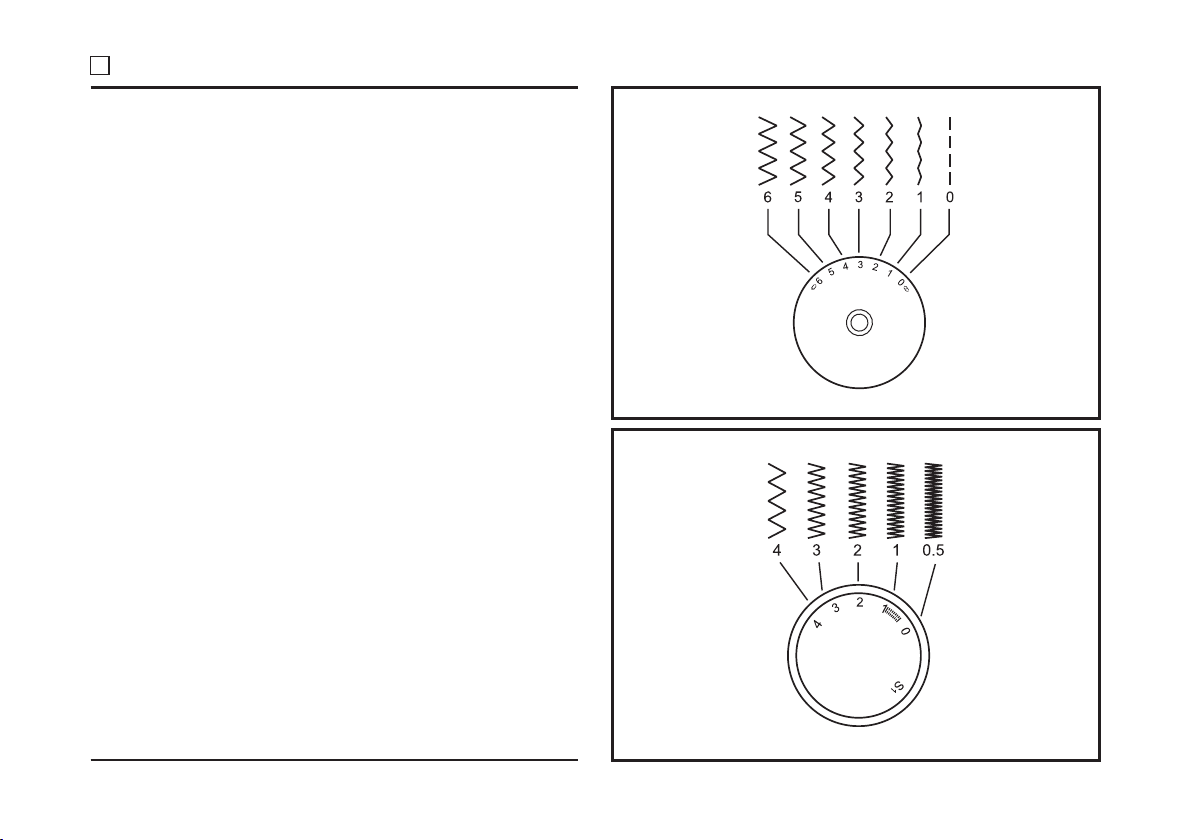
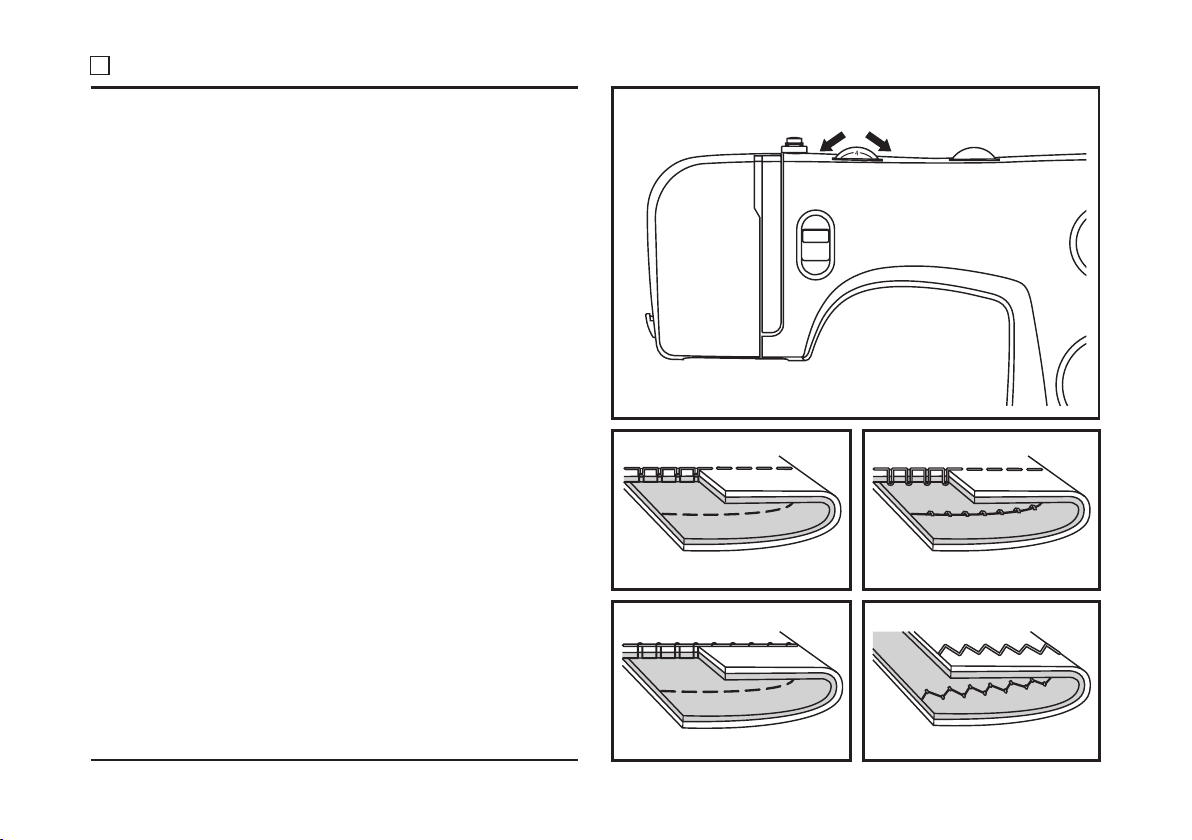
Stitch Width Dial & Stitch Length Dial
Function of stitch width dial
The maximum zigzag stitch width for zigzag stitching is 6mm;
however, the width can be reduced on any patterns. The
width increases as you move zigzag dial from "0" - "6". (1)
The Stitch Width Dial is also the control for the straight stitch
infinite needle position. "0" is center needle position, "6" is
full left.
Function of stitch length dial while zig-zag stitching
Set the Pattern Selector Dial to zig-zag.
The density of zig-zag stitches increase as the setting of stitch
length dial approaches "0".
Neat zig-zag stitches are usually achieved at "3" or below. (2)
Dense zig-zag stitches are called satin stitches. (2)
Function of stitch length dial for when straight stitching
For straight stitch sewing, turn the Pattern Selector Dial to
the straight stitch setting. Turn the Stitch Length Dial, and the
length of the individual stitches will decrease as the dial
approached "0". The length of the individual stitches will
increase as the dial approaches "4". Generally speaking, use
a longer stitch length when sewing heavier weight fabrics or
when using a thicker needle or thread. Use a shorter stitch
length when sewing lighter weight fabrics or when using a
finer needle or thread.
1
14
2
Page 18
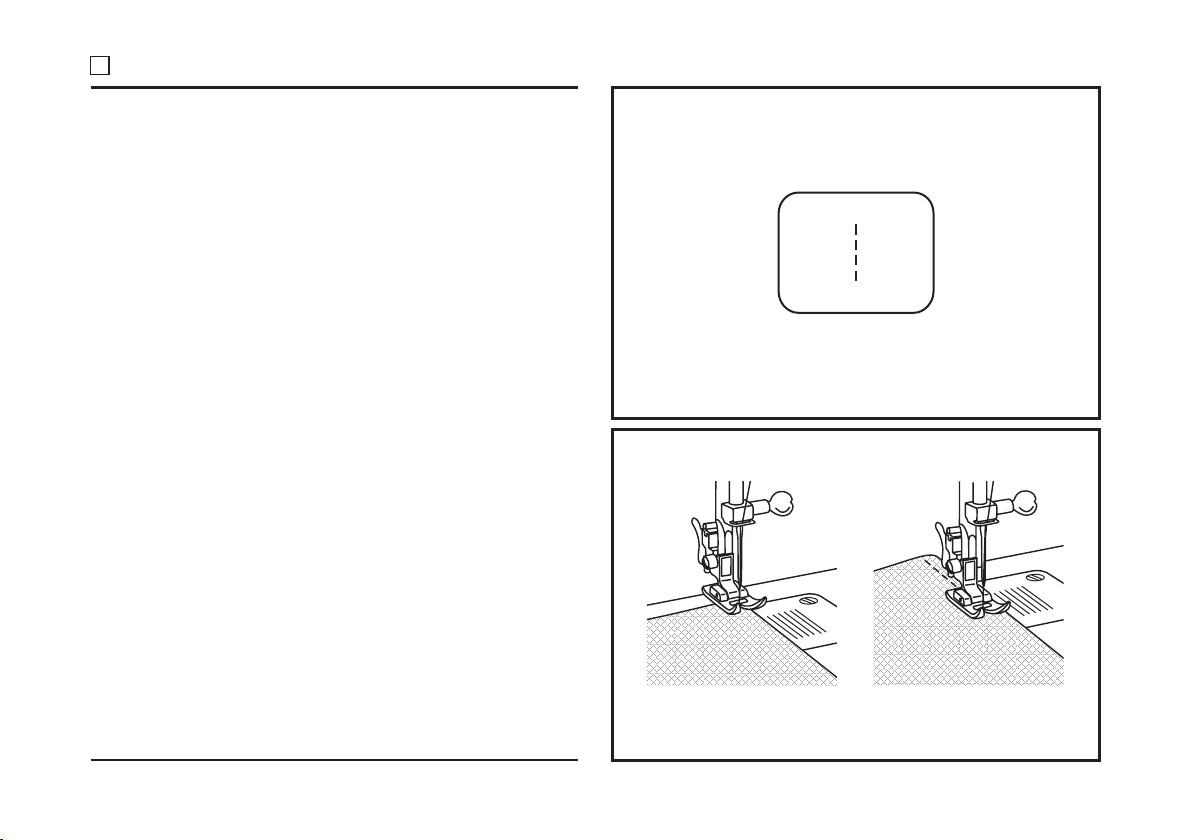
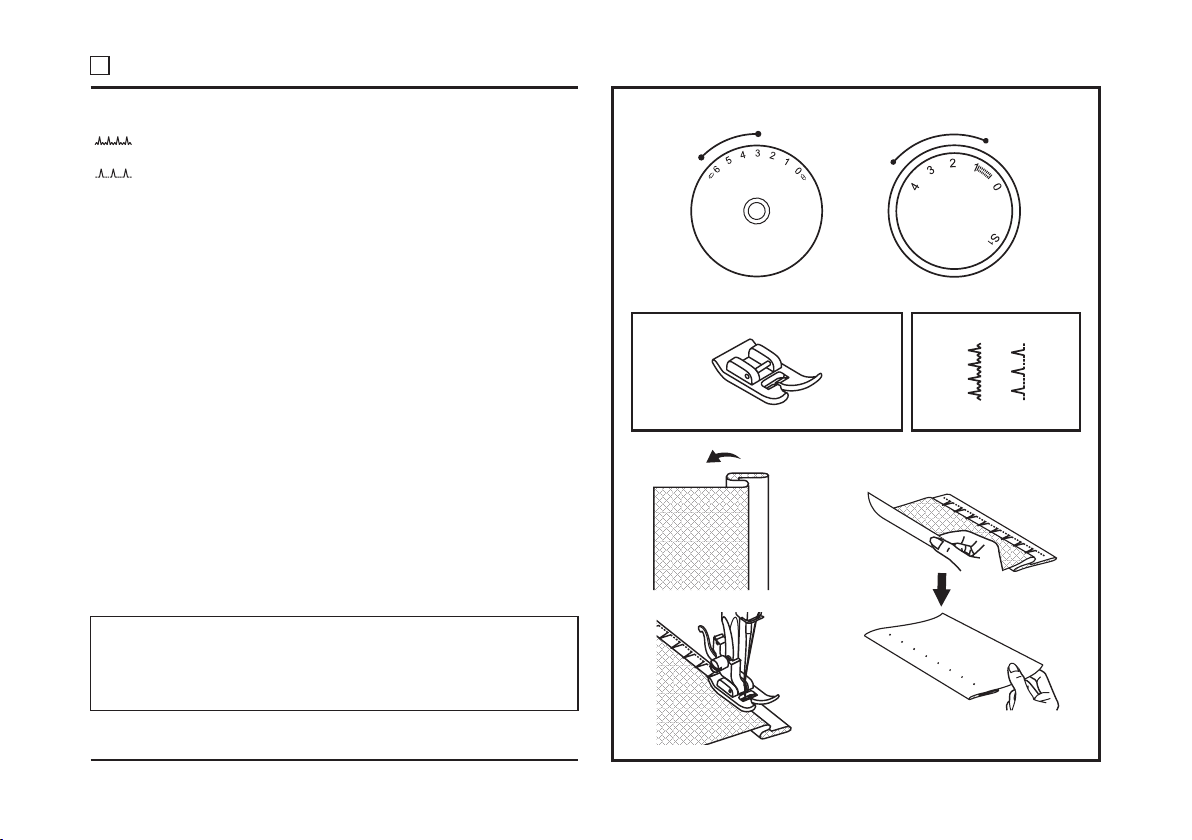
Sewing Straight Stitch
To begin sewing, set the machine for straight stitch. (1)
Place the fabric under the presser foot with the fabric edge
lined up with the desired seam guide line on the needle plate.
(2)
Lower the presser foot lifter, and then step on the foot
controller to start sewing. (3)
1
15
2
3
Page 19
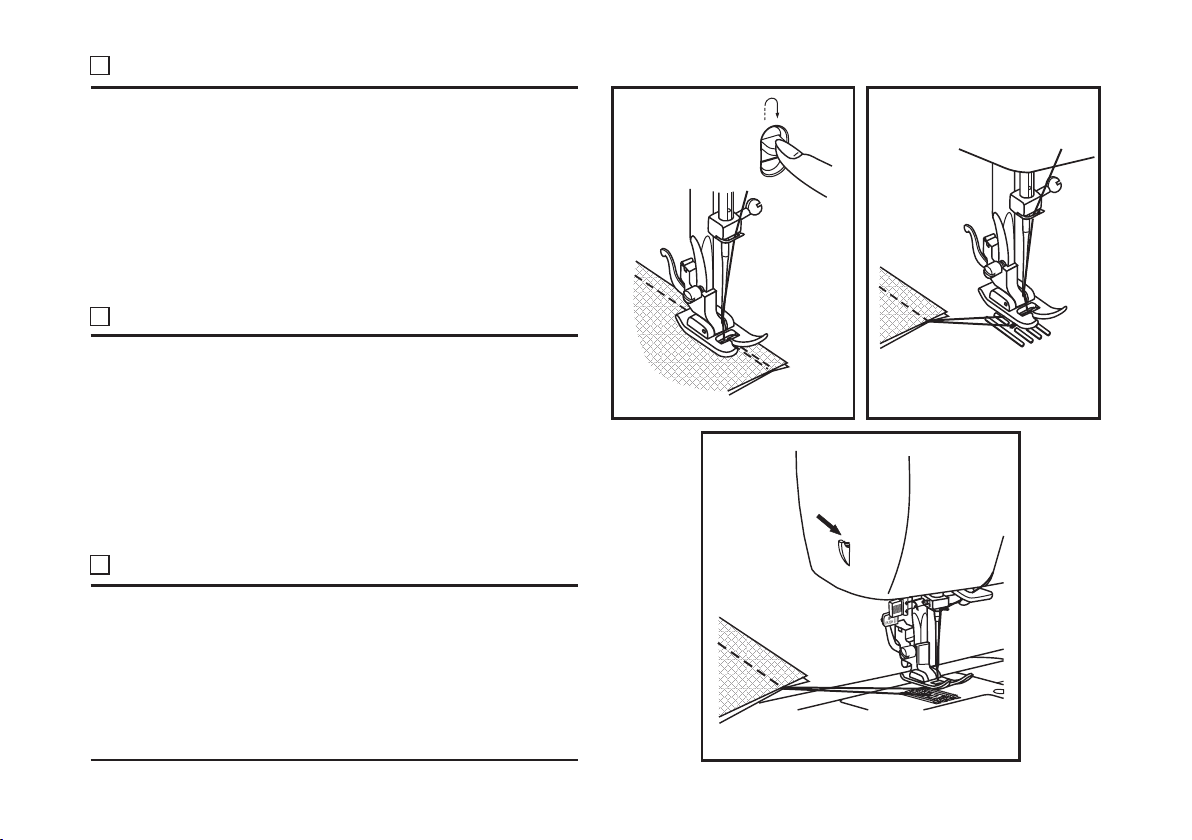
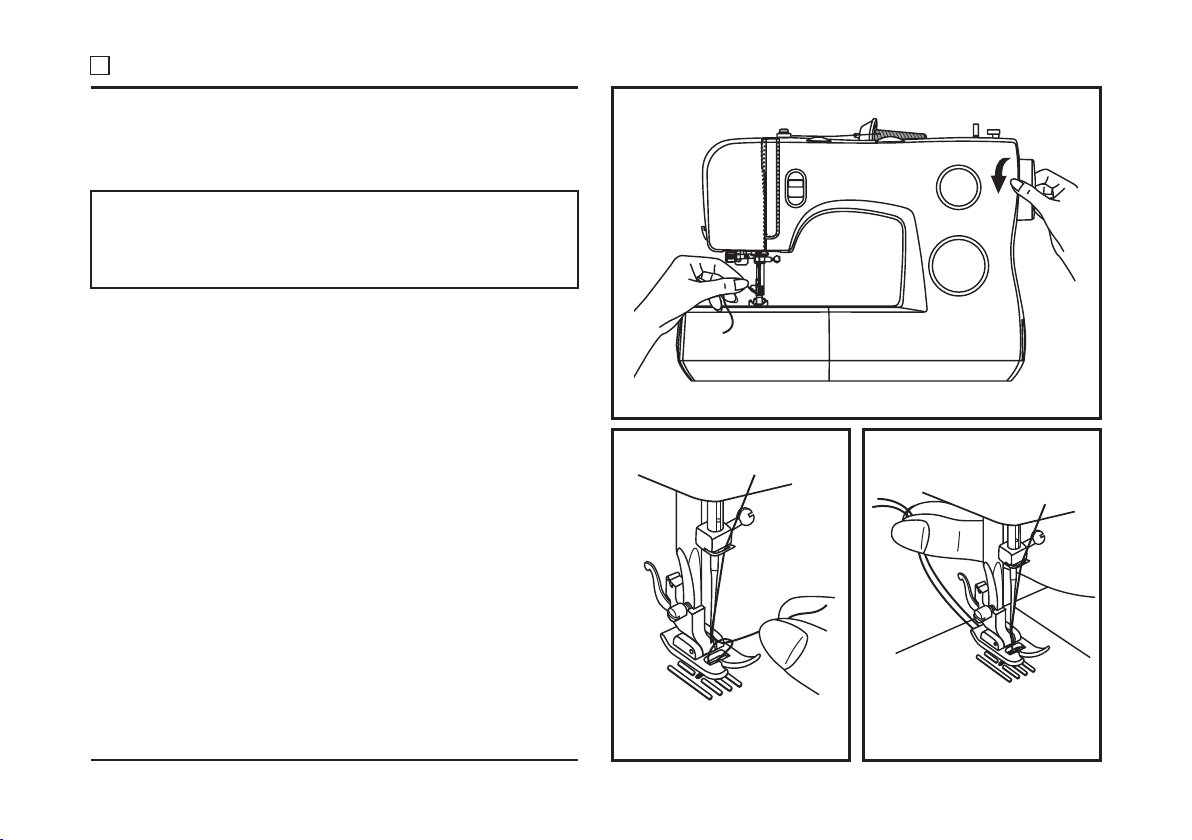
Reverse Sewing
To secure the beginning and the end of a seam, press down
the reverse sewing lever (A). Sew a few reverse stitches.
Release the lever and the machine will sew forward again. (1)
Removing the Work
Turn the handwheel toward you (counterclockwise) to bring
the thread take up lever to its highest position, raise the
presser foot and remove work behind
(2)
foot.
the needle and presser
Cutting the Thread
Pull the threads under and behind the presser foot. Guide
the threads to the side of the face plate and into thread cutter
(B). Pull threads down to cut. (3)
A
1
B
2
16
3
Page 20
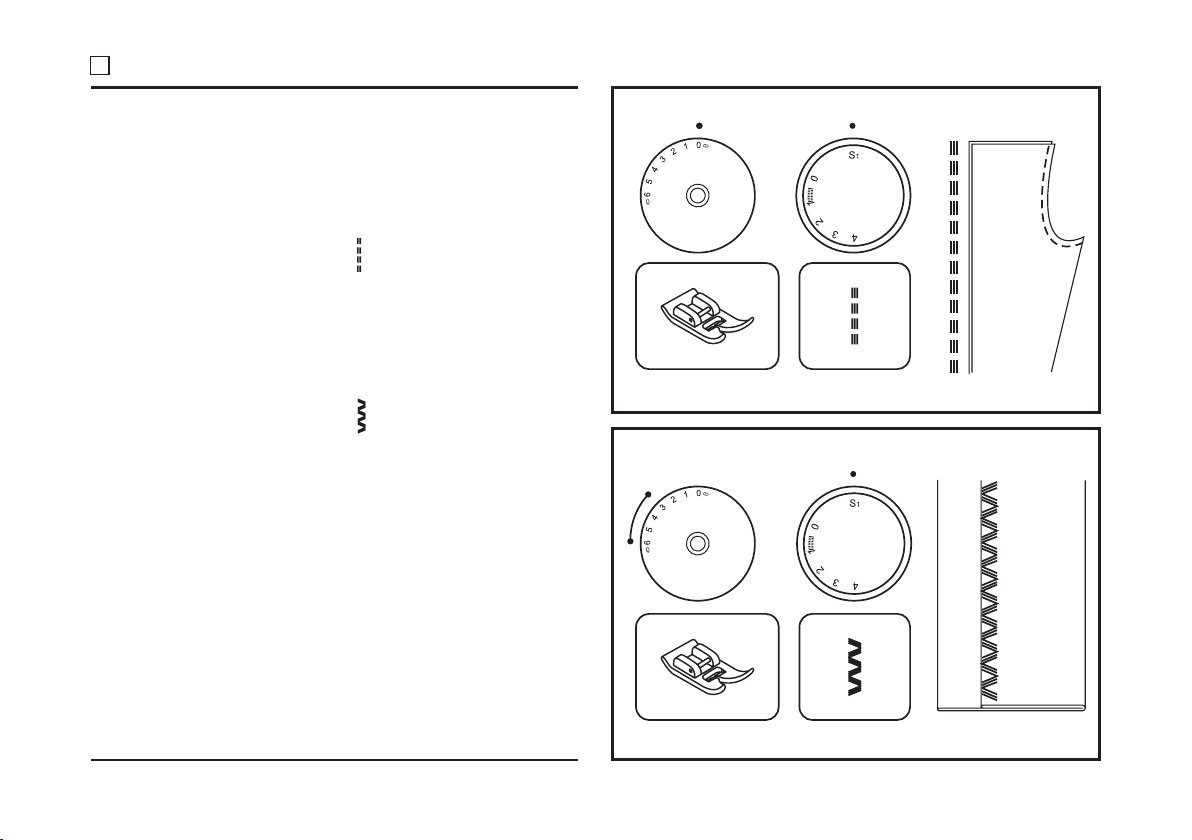
Choosing Stretch Stitch Patterns
The Stretch Stitch Patterns are indicated with a blue color on
the
Pattern Selector Dial. To select these stitches, turn the
Pattern Selector Dial to the desired pattern. Then, turn the
Stitch Length Dial to the indicator marked "S1". Though there
are several stretch patterns, here are two examples:
Straight Stretch Stitch (1)
Set the Pattern Selector Dial to " ".
Used to add triple reinforcement to stretch and hardwearing
seams.
The machine sews two stitches forward and one stitch
backwards.
Ric Rac (2)
Set the Pattern Selector Dial to " ".
Adjust the Stitch Width Dial to between "3" and "6".
Ric Rac Stitch is suitable for firm fabrics like denim, corduroy,
poplin, duck, etc.
1
2
17
Page 21
Blind Hem
For hems on curtains, trousers, skirts, etc.
Blind hem for stretch fabrics.
Blind hem for firm fabrics.
Set the Stitch Length Dial with the range shown on the
diagram at the right. Blind hems, however, are normally sewn
with a longer stitch length setting.
a setting appropriate for the weight/type of fabric being sewn,
within the range shown in the diagram on the right of the
page. Generally, a narrower stitch is used for lighter weight
fabrics, and a wider stitch is used for heavier weight fabrics.
Sew a test first to make sure the machine settings are
appropriate for the fabric.
Blind Hem:
Turn up the hem to the desired width and press. Fold back
(as shown in Fig. 1) against the right side of the fabric with
the top edge of the hem extending about 7 mm (1/4") to the
right side of the folded fabric.
Start to sew slowly on the fold, making sure the needle
touches slightly the folded top to catch one or two fabric
threads. (2)
Unfold the fabric when hemming is completed and press.
Set the Stitch Width Dial at
1
Note:
To make blind hem sewing even easier, use a blind hem
foot, available from your SINGER retailer. (See page 6
®
for part number)
2
18
Page 22

Sew 1-step Buttonholes
Buttonhole sewing is a simple process that provides reliable
results. However, it is strongly suggested to always make a
practice buttonhole on a sample of your fabric and stabilizer.
Making a Buttonhole
1. Using tailor's chalk, mark the position of the buttonhole on the
fabric.
2. Attach the buttonhole foot and set the Pattern Selector Dial to " ".
Set stitch length dial to " ". Set the stitch width at "6". The
width however may need to be adjusted according to the
project. Sew a test first to determine this.
3. Lower the presser foot aligning the marks on foot with the
marks on the fabric (A). (The front bar tack will be sewn first.)
(Align the mark on the fabric (a) with the mark on the foot (b).)
4. Open the button plate and insert the button (B).
5. Lower the buttonhole lever and gently push it back (C).
6. While lightly holding the upper thread, start the machine.
7. Buttonhole stitching is done in the order (D).
8. Stop the machine when the buttonhole cycle has completed.
Making a Buttonhole on Stretch Fabrics (E)
When sewing buttonholes on stretch fabric, hook heavy thread or
cord under the buttonhole foot. When the buttonhole is sewn the
legs will overcast the cord.
1. Mark the position of the buttonhole on the fabric with the
tailor's chalk, attach the buttonhole foot, and set the pattern
selector dial to " ". Set stitch length dial to " ".
2. Hook the heavy thread onto the back end of the buttonhole foot,
then bring the two heavy thread ends to the front of the foot,
insert them into the grooves and temporarily tie them there.
3. Lower the presser foot and start sewing.
*Set the stitch width to match the diameter of the gimp thread.
4. Once sewing is completed, gently pull the heavy thread to
remove any slack, then trim off the excess.
3
4
a
E
b
A
B
C
2
1
D
19
Page 23

Sewing on Buttons
Install the darning plate. (1)
Change the all purpose foot to the button sewing foot. (2)
Set the stitch length to "0".
Place the button and fabric under the Button Sewing foot, as
illustrated in (3).
Set the machine for zig-zag stitch, then set the width to
number "3" - "6". Turn the handwheel to check that the
needle goes cleanly into the left and right holes of the button.
Adjust the stitch width, as needed, according to the distance
between the holes of the button. Slowly sew on the button
with about 10 stitches.
Raise the needle out of the fabric. Set the machine for straight
stitch again, then sew a few securing stitches to finish.
If a shank is required, place a darning needle on top of the
button and sew. For buttons with 4 holes, sew through the
front two holes first, push the work forward and then sew
through the back two holes.
1 2
3
20
4
Page 24

Gathering
* The foot is an optional accessory not included
gathering
with your machine. (1)
- Remove the presser foot shank. (2)
- Attach the gathering foot.
- Sew a single row or multiple rows of straight stitches.
- If more gathering is required, loosen the upper thread
tension to below 2 so that the lower thread lies on the
under side of the material. Setting stitch length to a longer
setting will help produce more gathers as well.
- Pull the lower thread to gather more of the material. (3)
Note:
Presser foot shown is the optional gathering foot which
does not come with your machine. If you have not
purchased this foot substitute the all purpose foot and
gather fabric by hand by lowering the tension setting to
below 2 and pulling the lower thread to gather the material.
1
21
2
3
Page 25

Free Motion Darning, Stippling
* The darning/ embroidery foot is an optional accessory not
included with your machine. (1)
Darning:
Install the darning plate. (2)
Remove the presser foot shank. (3)
Attach the darning/ embroidery foot to the presser foot bar.
The lever (a) should be behind the needle clamp screw (b).
Press the darning/ embroidery foot on firmly from behind with
your index finger and tighten the screw (c). (4)
For darning, first sew around the edge of the hole (to secure
the threads). (5)
First row: Always work from left to right. Turn work by 90° and
sew over previous stitching. A darning hoop is recommended
for easier sewing and better results.
1 2
Note:
Free motion darning is accomplished without the sewing
machine internal feed system. Movement of the fabric is
controlled by the operator. It is necessary to coordinate
sewing speed and movement of fabric.
Stippling:
Set the machine for straight stitch.
embroidery foot will help guide you as you sew, in a
meandering fashion to create small curving lines to hold
layers of fabric and batting together.
Using the optional darning/
a
b
c
5
3
4
22
Page 26

The Even Feed Foot Accessory (Optional)
Always try to sew first without the Even Feed Foot accessory
which should be used only when necessary.
It is easier to guide the fabric and you have a better view of
the seam when using the standard, regular foot on your
machine. Your sewing machine offers excellent stitch quality
on a wide range of fabrics from delicate chiffons to multiple
layers of denim.
The Even Feed Foot accessory equalizes the feeding of the
upper and lower layers of fabric and improves the matching
of plaids, stripes and patterns. It also helps to prevent
uneven feeding of very difficult fabrics.
1. Lift the presser foot lifter to raise the presser foot bar (a).
2. Remove the presser foot shank by unscrewing (counterclockwise) the presser bar attaching screw (b).
3. Attach the Even Feed Foot to the machine as follows:
i) The arm (c) should fit into above the needle screw
and clamp (d).
ii) Slide the plastic attaching head (e) from your left to
right so that it is fitted into the presser foot bar.
iii) Lower the presser foot bar (a).
iv) Replace and tighten (clockwise) the presser bar
attaching screw (b).
4. Make sure both the needle screw (d) and the presser bar
attaching screw (b) are tightly secured.
5. Draw the bobbin thread up and place both the bobbin
thread and the needle thread behind the Even Feed Foot
attachment.
Attaching head (e)
Arm (c)
Needle
bar
Needle screw & clamp (d)
Arm (c)
presser foot bar (a)
Presser bar attaching screw (b)
23
Page 27

Side Cutter (Optional)
2~3 cm
Lift the presser foot lifter (a) to raise the presser foot bar. (1)
Remove the presser foot. ( )
Attach the Side Cutter to the machine as follows (2):
-
Insert the arm (b) to the needle clamp (c).
-
Lower the presser foot lifter while making sure the pin (d) of
the side cutter fits the presser shank (e) and is secured in
place.
Cut an edge of fabric about 2~3 cm. (3)
Put fabric on guide plate (f) and push left side of the fabric to
go below presser foot (g). (2/4)
Thread the needle and pull back upper and lower threads
under presser foot and put them to the direction of feeding.
Run machine slowly and start sewing from the below of the
needle.
Adjust the stitch width and the stitch length according to
stitch selected.
For very thin fabric, loosen the tension of upper threads as
well as the pressure of presser foot shank. Guide the fabric
by your finger not to slide aside.
Note:
The side cutter can only be used with the regular zigzag
stitch or the overlock stitches.
See page 26
b
a
c
d
g
12
e
f
24
3
4
Page 28

Installing the Removable Extension Table
Hold the removable extension table horizontally, and push it
in the direction of the arrow. (1)
To remove the extension table, pull it toward the left.
The inside of the removable extension table can be utilized
as an accessory box.
To open, flip cover down as shown. (2)
1
2
25
Page 29

Attaching the Presser Foot Shank
Raise the
Attach the presser foot shank (b) as illustrated. (1)
Attaching the presser foot
Lower the presser foot shank (b) using the presser foot lifter,
until the cut-out (c) is directly above the pin (d). (2) The
presser foot (f) will engage automatically.
Removing the presser foot
Raise the presser foot using the presser foot lifter. (3)
Raise the lever (e) and the foot disengages.
Attaching the e guide
Attach the e guide (g) in the slot as illustrated.
Adjust as needed for hems, pleats, quilting, etc. (4)
Attention:
Turn power switch to off ("O") when carrying out any of
the above operations!
presser foot bar (a) with the presser foot lifter.
dge/ quilting
dge/ quilting
a
a
e
b
d
b
12
e
c
f
g
26
3
4
Page 30

N Charteedle/ Fabric/ Thread
NEEDLE, FABRIC, THREAD SELECTION GUIDE
NEEDLE SIZE
Lightweight fabrics-thin cottons, voile, silk, muslin, interlocks,
9-11 (70-80)
cotton knits, tricots, jerseys, crepes, woven polyester, shirt
& blouse fabrics.
11-14 (80-90)
14 (90)
16 (100)
18 (110)
Medium weight fabrics-cotton, satin, kettlecloth, sailcloth,
double knits, lightweight woolens.
Medium weight fabrics-cotton duck, woolen, heavier knits,
terrycloth, denims.
Heavyweight fabrics-canvas, woolens, outdoor tent and
quilted fabrics, denims, upholstery material (light to medium).
Heavy woolen, overcoat fabrics, upholstery fabrics, some
leathers and vinyls.
IMPORTANT: Match needle size to thread size and weight of fabric.
NEEDLE, FABRIC SELECTION
NEEDLES TYPE OF FABRIC
SINGER
®
Standard sharp needles. Sizes range
2020
EXPLANATION
thin to large. 9 (70) to 18 (110).
SINGER
®
Semi-ball point needle, scarfed.
2045
9 (70) to 18 (110).
SINGER
®
Leather needles. 12 (80) to 18 (110).
2032
FABRICS
Light-duty thread in cotton, nylon, polyester or
cotton wrapped polyester.
Most threads sold are medium size and suitable
for these fabrics and needle sizes.
Use polyester threads on synthetic materials
and cotton on natural woven fabrics for best
results.
Always use the same thread on top and bottom.
Heavy duty thread, carpet thread.
Natural woven fabrics-wool, cotton, silk, etc.
Not recommended for double knits.
Natural and synthetic woven fabrics, polyester blends.
Knits-polyesters, interlocks, tricot, single and double knits.
Also sweater knits, Lycra , swimsuit fabric, elastic.
®
Leather, vinyl, upholstery. (Leaves smaller hole than standard
large needle.)
THREAD
Note :
1. For best sewing results always use genuine SINGER needles.
®
2. Replace needle often (approximately every other garment ) and/ or at first thread breakage or skipped stitches.
27
Page 31

Darning Plate
For certain types of work, (e.g. darning or free-hand embroidery),
the darning plate must be used.
Install the darning plate as illustrated.
For normal sewing, remove the darning plate.
For free-motion sewing it is recommended to use a
darning/embroidery foot, available as an optional accessory
from SINGER retailers. (See page 6 for part number of
darning/embroidery foot )
®
28
Page 32

Inserting & Changing Needles
Change the needle regularly, especially if it is showing signs
of wear and causing problems. For best sewing results
always use SINGER Brand Needles.
Insert the needle
®
as illustrated as follows:
A. Loosen the needle clamp screw and tighten again after
inserting the new needle. (1)
B. The flat side of the shaft should be towards the back.
C/D.Insert the needle as far up as it will go.
Attention:
Turn power switch to off ("O") before inserting or removing
the needle.
Needles must be in perfect condition. (2)
Problems can occur with:
A. Bent needles
B. Damaged points
C. Blunt needles
D
A
B
C
1
B
A
C
29
2
Page 33

Changing the Bulb
Disconnect the machine from the power supply by removing
the plug from the main socket!
Replace bulb with same type rated 10 watts (110-120V area)
or 15 watts (220-240V area).
- Loosen screw (A) as illustrated. (1)
- Remove the face plate (B).
- Unscrew the bulb and install a new one (C). (2)
- Replace the face plate and tighten screw.
Should there be any problem, consult your
SINGER retailer.
®
B
A
authorized
1
C
2
30
Page 34

Troubleshooting Guide
Problem Cause Correction
Upper thread
breaks
Lower thread
breaks
Skipped stitches
Needle breaks
Loose stitches
Seams gather or
pucker
Uneven stitches,
uneven feed
The machine is
noisy
The machine
jams
1. The machine is not threaded correctly.
2. The thread tension is too tight.
3. The thread is too thick for the needle.
4. The needle is not inserted correctly.
5. The thread is wound around the spool holder pin.
6. The needle is damaged.
1. The bobbin case is not inserted correctly.
2. The bobbin case is threaded wrong.
3. The lower thread tension is too tight.
1. The needle is not inserted correctly.
2. The needle is damaged.
3. The wrong size needle has been used.
4. The foot is not attached correctly.
1. The needle is damaged.
2. The needle is not correctly inserted.
3. Wrong needle size for the fabric.
4. The wrong foot is attached.
1.The machine is not correctly threaded.
2. The bobbin case is not correctly threaded.
3. Needle/ fabric/ thread combination is wrong.
4. Thread tension wrong.
1.The needle is too thick for the fabric.
2. The stitch length is wrong adjusted.
3. The thread tension is too tight.
1. Poor quality thread.
2. The bobbin case is wrong threaded.
3. Fabric has been pulled.
1. Lint or oil have collected on the hook or needle bar.
2. The needle is damaged.
Thread is caught in the hook.
31
1. Rethread the machine.
2. Reduce the thread tension. (lower number)
3. Select a larger needle.
4. Remove and reinsert the needle. (flat side towards the back)
5. Remove the reel and wind thread onto reel.
6. Replace the needle.
1. Remove and reinsert the bobbin case and pull on the thread.
The thread should pull easily.
2. Check both bobbin and bobbin case.
3. Loosen lower thread tension as described.
1. Remove and reinsert needle. (flat side towards the back)
2. Insert a new needle.
3. Choose a needle to suit the thread and fabric.
4. Check and attach correctly.
1. Insert a new needle.
2. Insert the needle correctly. (flat side towards the back)
3. Choose a needle to suit the thread and fabric.
4. Select the correct foot.
1. Check the threading.
2. Thread the bobbin case as illustrated.
3. The needle size must suit the fabric and thread.
4. Correct the thread tension.
1. Select a finer needle.
2. Readjust the stitch length.
3. Loosen the thread tension.
1. Select a better quality thread.
2. Remove bobbin case, thread and insert correctly.
3. Do not pull on the fabric while sewing, let it be taken up by the
machine.
1. Clean the hook and feed dog as described.
2. Replace the needle.
Remove the upper thread and bobbin case, turn the handwheel
backwards and forwards by hand and remove the thread.
Page 35

Please note that on disposal, this product must be safely recycled in accordance with relevant National legislation
relating to electrical/electronic products. If in doubt please contact your retailer for guidance.
Page 36

При подключении этого продукта необходимо внимательно ознакомиться с правилами по технике
безопасности, в соответствии с действующим законодательством в вашей стране. Пожалуйста,
учтите, что по окончании срока службы этот продукт должен быть утилизирован в соответствии с
действующим Национальным законодательством, установленным для электрических приборов.
Page 37

Неполадки и их устранение
Проблема Причина Устранение
Обрыв верхней
нити
Обрыв нижней
нити
Нечеткий шов
Поломка иглы
Пропуск стежков
Швы стягиваются
или
сморщиваются
Неровные стежки,
неравномерное
продвижение
Машина шумно
работает
Тяжелый ход
машины
1. Нить неправильно заправлена
2. Очень сильное натяжение верхней нити
3. Нить слишком толстая для иглы
4. Игла установлена неверно
5. Нить обмоталась вокруг держателя катушки
6. Повреждена игла
1. Шпулька установлена неправильно
2. Неправильно заправлена нижняя нить
3. Слишком сильное натяжение нижней нити
1. Неправильно установлена игла
2. Игла повреждена
3. Несоответствующий размер иглы
4. Установлена неподходящая лапка
1. Тянете ткань во время шитья
2. Неправильно установлена игла
3. Несоответствующий размер иглы
4. Установлена неподходящая лапка
1. Верхняя нить неправильно заправлена
2. Нижняя нить неправильно заправлена
3. Несоответствующий размер иглы
4. Неправильное натяжение нити
1. Игла слишком толстая для выбранной ткани
2. Длина стежка выбрана неверно
3. Очень сильное натяжение нити
1. Плохое качество ниток
2. Неправильно заправлена нижняя нить
3. Тянете ткань во время шитья
1. В челночном механизме скопилось много ворса и
пыли
2. Повреждена игла
Запутывание нити в челноке
1. Заново заправьте нить
2. Ослабьте натяжение верхней нити
3. Установите иглу большего размера
4. Правильно установите иглу (плоской стороной назад)
5. Размотайте нить
6. Замените иглу на новую
1. Достаньте и снова установите шпульку, заправьте нить
нить должна легко тянуться.
2. Заправьте нижнюю нить
3. Ослабьте натяжение нижней нити
1. Правильно установите иглу плоской стороной назад
2. Установите новую иглу
3. Установите иглу, соответствующую типу ткани и нити
4. Установите подходящую лапку
1. Нельзя тянуть или подталкивать ткань во время шитья
2. Правильно установите иглу плоской стороной назад
3. Установите иглу, соответствующую типу ткани и нити
4. Установите подходящую лапку
1. Правильно заправьте верхнюю нить
2. Правильно заправьте нижнюю нить
3. Установите иглу, соответствующую типу ткани и нити
4. Установите правильное натяжение
1. Установите тонкую иглу
2. Измените длину стежка
3. Ослабьте натяжение нити
1. Используйте нити хорошего качества
2. Выньте и заново установите шпульку, заправив нижнюю
нить
3. Нельзя тянуть или подталкивать ткань во время шитья,
машина продвигает ткань самостоятельно
1. Прочистите челночный механизм и зубцы транспортера
как описано.
2. Замените иглу
Удалите верхнюю нить и достаньте шпульку. Поверните
вручную маховое колесо на себя и от себя, достаньте
остатки ниток и ворса.
31
Page 38

Замена лампочки
Отключите машину от сети электропитания, вынув сетевой
шнуризрозетки!
Используйте лампочки такого же типа 10W (110-120V) или
15W (220-240V).
- Выкрутите винт (А) как показано на рисунке (1).
- Снимите крышку корпуса (В).
- Выкрутите лампочку и вставь т е новую (С). (2)
- Поставьтекрышкукорпусанаместоивкрутитевинт.
В случае возникновения проблем, обращайтесь в местный
сервисный центр.
B
A
1
C
2
30
Page 39

Установка и смена иглы
Меняйте иглы регулярно после шитья каждого проекта
или при возникновении каких-либо проблем.
Используйте иглы SINGER для лучшего качества шитья.
®
Вставьте иглу, как показано на рисунке.
A. Ослабьте винт иглы и затем затяните его снова, после
того, как вставите новую иглу (1).
B. Плоская сторона иглы должна быть направлена от
âàñ.
C/D.Вставляйте иглу вверх до упора.
Внимание:
Всегда выключайте машину "О" перед заменой иглы.
Иглы должны быть в исправном состоянии (2).
Неисправности иглы:
Игла изогнута
A.
Повреждено острие
B.
Игла затупилась
C.
D
A
B
C
1
B
A
C
29
2
Page 40

Штопальная пластина
Для некоторых видов работ (например, штопка или
шитье в технике "свободного передвижения")
штопальная пластина должна быть установлена.
Установите штопальную пластину как указано на рисунке.
Для шитья в обычном режиме, снимите штопальную
пластину.
Для шитья в технике "свободного передвижения"
рекомендуется использовать прижимную лапку для
штопки/вышивания, которая приобретается отдельно у
дилера машин SINGER . (смотрите артикул на стр. 6)
®
28
Page 41

Таблица соответствия типов Иглы/Ткани/Нитей
Руководство по выбору ткани, нитей, игл
Размер иглы
9-11 (70-80)
Легкие ткани- хлопок, вуаль, саржа, шелк, муслин, органза,
легкий трикотаж, джерси, креп, полиэстр, блузочные ткани.
11-14 (80-90)
Ткани средней плотности - хлопок, сатин, парусина,
двойной трикотаж, махровая ткань, джинса.
14 (90)
Ткани средней плотности - хлопковое грубое полотно,
парусина, шерсть, плотная вязаная ткань, махровая ткань,
джинса.
16 (100)
Среднеплотные ткани - брезент, шерсть, стеганые изде лия,
джинса, обивочные ткани (легкие и средние).
18 (110)
Плотная шерсть, ткань для пальто, обивочные ткани,
некоторые виды кожи и винил.
ВАЖНО: Соотношение размера иглы к размеру нити и плотности ткани.
ВЫБОР ТКАНИ И ИГЛЫ
Èãëû
SINGER 2020
SINGER 2045
SINGER 2032
®
®
®
Стандартные острые иглы. Размерный
рядоттонкихктолстым.9(70)до18(110).
Иглы с закругленным острием 9 (70) до
18 (110).
Двойные иглы. Иглы для кожи 12 (80) до
18(110)
Пояснение
Ткани
Натуральные ткани - шерсть, хлопок, шелк и т.д.
Не рекомендуется для трикотажа двойной вязки.
Натуральные и синтетические ткани, полиэстр, одинарные и
двойные трикотажи.
А также лайкра, ткань для купальных костюмов, эластичные
ткани.
Кожа, винил, обивочные ткани. (Следы проколов на ткани
меньше, чем после использования стандартных игл).
Íèòè
Тонкая нить - хлопковая, нейлоновая,
полиэстровая или армированный хлопком
полиэстр.
Большинство продаваемых типов нитей
применимы для этих видов тканей и игл.
Используйте полиэстровые или инте тические
нити и нити х/б для тканей натурального
плетения для получения наилучшего
результата.
Всегда используйте верхнюю и нижнюю нити
одного размера и качества.
Плотная нить, штопальная нить.
Вид ткани
Важно:
1. Для получения наилучших результатов всегда используйте подлинные иглы SINGER .
®
2. Часто меняйте иглы (примерно после каждого сшитого проекта) или при обрыве нитей и пропуске стежков).
27
Page 42

Установка держателя лапки
Поднимите держате ль лапки (а).
Надень те держатель прижимной лапки (b), как показано на
рисунке (1).
Установка прижимной лапки
Опустите держатель прижимной лапки (b), пока выемка (с)
не с овпадет с осью (d). (2) Опустите держатель
прижимной лапки и лапка (f) автоматически присоединится.
Снятие прижимной лапки
Поднимите прижимную лапку (3).
Поднимите рычаг (е) и лапка отсоединится.
Подсоединение направляющей линейки для
краеобметочног о/стегальног о шва
Введите направляющую линейку для краеобметочного/
стегального шва (g) в отверстие, как показано на рисунке
(4).
Настройте в соотве т ствии с кромкой, каймой, складками
или др.
Внимание:
Пожалуйста, выключайте машину ("О") во время
выполнения вышеуказанных операций!
a
a
e
b
d
b
12
e
c
f
g
26
3
4
Page 43

Установка съемной рабочей поверхности
Держите съемную рабочую поверхность
задвинь те ее по направлению стрелок (1).
Внутренняя часть съемной рабочей поверхности может
использоваться для хранения аксессуаров.
Откройте крышку съемного как показано на рисунке
(2).
отсека
горизонтально и
1
25
2
Page 44

2~3 cm
Насадка для обрезания края ткани (не входит в базовую комплектацию машины)
Поднимите прижимную лапку (1).
Отсоедините прижимную лапку (см. стр. 26).
Присоедините насадку для обрезания края ткани как
описано ниже (2):
- Разъем (b) должен обхватить основание крепежного
винтаиглы(с).
- Осторожно опускайте стойку лапки, контролируя, чтобы
выступ на лапке (d) совпал с выемкой на стойке лапки
(е)иплотноснейсцепился.
Надрежьте край ткани на 2-3см (3).
Заведите ткань в направитель (f) и разместите левую
часть ткани так, чтобы она шла под лапкой (g). (2/4)
Заправь т е нить в иглу, вытяните нижнюю и верхнюю нити
за иглу.
Медленно начинайте шить.
Настройте длину и ширину стежка.
Для очень тонких тканей, рекомендуется ослаблять
натяжение верхней нити, так же как и давление
прижимной лапки. Аккуратно придерживайте ткань, не
уводите ее в сторону от намеченной траектории.
Важно:
Насадка для обрезания края ткани может
использоваться только для строчек зиг-заг или других
краеобметочных строчек.
12
a
d
g
b
c
e
f
24
3
4
Page 45

Лапка с верхним транспортером (не входит в базовый комплект машины)
Попробуйте сначала прошить без лапки с верхним
транспортером, которая используется только в случае
необходимости.
Ïð ä ì ë âècoe èíÿe aÿ ão o êa (e)
Вам легче направлять ткань и вид строчки будет лучше
при использовании стандартной универсальной лапки.
Строчки, сделанные на вашей машине, будут выглядеть
аккуратно на любом виде ткани, от тонкого шифона до
нескольких слоев плотной джинсы.
Лапка с верхним транспортером обеспечивает
равномерную подачу верхнего и нижнего слоев ткани, а
также обеспечивае т более точное совпадение рисунков
при сшивании. Благодаря этой лапке предотвращается
риск неравномерной подачи тк ани, и устраняются
сложности при работе с объемными и капризными
тканями.
1. Поднимите рычаг прижимной лапки (а).
2. Отсоедините держатель лапки, открутив (против
часовойстрелки)крепежныйвинт(b).
3. Присоедините лапку с верхним транспортером как
описано ниже:
i) рычаг лапки (с) должен лечь поверх крепежного
винтаиглы(d).
ii) присоедините лапку слева направо так, чтобы паз
(е)совпалсстойкойлапки.
iii) опустите стойку лапки (а).
iv) закрепите установленную лапку винтом (d),
поворачивая его по часовой стрелке.
4. Убедитесь, что крепежный винт иглы (d) и крепежный
винт лапки (b) прочно закручены.
5. Поднимите нижнюю нить. Расположите нижнюю и
верхнюю нити за прижимной лапкой.
Âèíò èãëû (d)è Ôèêñaòop
Стержень (a)
Bинт Фиксaции лапки (b)
Рычаг (c)
Còåðæeíü
èãëû
Рычаг (c)
23
Page 46

Штопка в технике "свободного передвижения", Простегивание
* Лапка для штопки не входит в базовую комплектацию
вашей машины (1).
Штопка:
Установите штопальную пластину (2).
Отсоедините держатель лапки (3).
Присоедините лапку для штопки. Рычаг лапки (а) должен
быть позади крепежного винта иглы (b). Прижмите лапку
для штопки сзади указательным пальцем и крепко
затяните винт (с). (4)
При штопке, сначала прошейте по краю дырки на ткани
(чтобы предупредить дальнейшее распускание ткани). (5)
Первый ряд: Всегда шейте слева направо. Поверните
изделие на 90° и прострочите поверх предыдущих
стежков. Рекомендуется пользоваться специальными
пяльцами для штопки для вашего удобства и достижения
наилучшего результата.
Важно:
Штопка в технике (свободного передвижения)
осуществляется без передвижения ткани зубцами
транспортера. Вы сами контролируете движение
ткани. Поэтому так важно координировать скорость
шитья и передвижение ткани.
1 2
a
b
c
5
Простегивание:
Установите прямую строчку. Использование лапки для
штопки поможет вам проложить оригинальные изогнутые
строчки, простегивая ткань и ватин (синтепон) вместе.
3
4
22
Page 47

Создание сборок
* Лапка для создания сборок не входит в базовую
комплектацию вашей машины (1).
- Отсоедините держатель лапки (2).
- Присоедините лапку для сборок.
- Прошейте один или несколько рядов прямой строчкой.
- Если вам требуется сделать складки более пышными,
ослабьте натяжение нижней нити до "2". Установите
наибольшую длину стежка, это также поможет сделать
более пышную сборку.
- Потяните за нижнюю нить, чтобы сделать сборки на
ткани (3).
Важно:
Лапка для создания сборок не входит в базовую
комплектацию вашей машины. Если вы не приобрели
такую лапку, используйте универсальную лапку и
затем сделайте сборки руками, предварительно
ослабив натяжение нити до "2". Потяните за нижнюю
нить, чтобы смоделировать сборки на ткани.
1
21
2
3
Page 48

Пришивание пуговицы
Уст ановит е штопальную пластину (1).
Смените универсальную лапку на лапку для пришивания
пуговицы (2).
Уст ановит е длину стежка "0".
Расположите пуговицу и ткань под лапкой для
пришивания пуговиц как показано на рисунке (3).
Переключите машину на строчку зиг-заг, затем установите
ширину строчки "3" - "6". Поверните маховое колесо на
себя, чтобы проверить, насколько то чно игла входит в
отверстия на пуговице. Если необходимо, настройте
ширину стежка, ориентируясь на расстояние между
отверстиями на пуговице. Медленно сделайте 10 стежков.
Поднимите иглу, чтобы она вышла из ткани. Переключите
машину на прямую строчку, установите длину стежка "0" и
сделайте несколько стежков для закрепки.
Если вы хотите сделать пуговиц на «ножке», положите
штопальную толстую иглу поверх пуговицы. Для пуговиц с
четырьмя отверстиями, пришейте сначала пуговицу через
два отверстия, затем сдвиньте изделие и пришейте через
оставшиеся.
1 2
3
20
4
Page 49

Выметывание автоматической петли
С помощью функции выметывания одношаговой петли вы
добьетесь прекрасных результат ов. Рекомендуется потренироваться
на отдельном отрезке ткани, укрепленной стабилизатором.
Выметывание петли
1. С помощью мелка отметьт е положение будущей пет ли на ткани.
2. Присоедините лапку для выметывания петли и установите регулятор
выбора строчек в положение " ". Переведите регулятор длины
стежка в положение " ". Установит е ширину стежка "6". Возможно,
потребуе т ся настроить ширину стежка в процессе выметывания петли,
поэтому рекомендуется предварите льно сделать пробную петлю на
отрезке ткани.
3. Опустите лапку так, чтобы отметки на ткани совпали с отметками на
лапке (А). (Сначала будет выметано нижнее основание). Убедитесь,
чтоотметканаткани(а)совпадаетсотметкойналапке(b).
4. Установите пуговицу в специальную секцию (В).
5. Опустите рычаг включения механизма выметывания петли и
аккуратноотведитеегоназад(С).
6. Придерживая верхнюю нить, начинайте шить.
7. Выме тывание петли происходит в указном порядке (D).
8. Остановите машину , когда цикл будет завершен.
Выметывание петель на эластичных тканях (Е)
Если вы собираетесь выметать петлю на эластичной ткани, протяните под
прижимной лапкой толстую нить или шнур. Когда машина будет
выметывать петлю, стежки будут обметывать шнур.
1. С помощью мелка отметьте положение будущей петли на ткани.
Присоедините лапку для выметывания петли и установите регулятор
выбора строчек в положение " ". Переведите регулятор длины
стежка в положение " ". Установите ширину стежка "6". Возможно,
потребуе т ся настроить ширину стежка в процессе выметывания петли,
поэтому рекомендуется предварите льно сделать пробную петлю на
отрезке ткани.
2. Зацепите плотную нить за выступ на дальнем крае лапки, два конца
нити проведите под лапкой так, чтобы они попали в специальные
углубления, и свяжите их вместе.
3. Опустите прижимную лапку и начинайте шить.
*Установите такую ширину стежка, чтобы стежок полностью
обхватывал шнур.
4. Закончив выметывание петли, аккуратно расправь т е ткань и петлю,
обрежьт е остатки нити.
3
4
a
b
A
B
C
2
1
D
E
19
Page 50

Потайная подрубочная строчка
Потайная подрубочная строчка идеально подходит для
обработки края на шторах, брюках, юбках и т.д.
Потайная подрубочная строчка для стандартных
тканей
Потайная подрубочная строчка для эластичных
тканей
Поверните Регулятор длины стежка вправо. Для такого вида
строчек необходимо устанавливать большую длину стежка.
Принимая во внимание тип и плотность выбранной ткани,
установите ширину стежка так, как это показано на рисунке.
Обычно для тонких тканей необходимо устанавливать
меньшую ширину стежка, чем для пл отных тканей.
Рекомендуется сначала потренироваться на отрезке такой
же ткани, чтобы убедиться, что настройки подходят
выбранной ткани.
Потайная подрубочная строчка:
Подогните край на желаемую ширину и прижмите. Теперь
подверните ск ладку еще раз (как показано на рисунке 1) так,
чтобы кромка выступала приблизительно на 7мм справа от
сложенной ткани.
Медленно начинайте шить, убедитесь, что игла захватывает
несколько нитей верхней складки (2).
Закончив шить, разверните ткань и прогладьте.
Важно:
Для получения лучшего результата используйте
Прижимную лапку для потайной подрубочной строчки,
которую Вы можете приобрести у дилера машин
SINGER
®
. (Смотрите артикул на стр. 6)
1
2
18
Page 51

Эластичные строчки
Эластичные строчки изображены синим цветом на
регуляторе выбора строчек. Чтобы выбрать одну из
эластичных строчек, переведите регулятор к изображению
выбранной строчки. Затем переведите регулятор длины
стежка к изображению "S1". Ниже описаны несколько
видов эластичных строчек:
Прямая эластичная строчка (1)
С помощью регулятора выбора строчек установите
программу " ".
Применяется для эластичных тканей и швов,
нуждающихся в укреплении. Машина делает два стежка
впередиодинназад.
Усил енный зиг-заг (2)
С помощью регулятора выбора строчек установите
программу " ".
Уст ановит е ширину стежка между "3" и "6". Усиленный зигзаг применяется для таких плотных тканей как: джинса,
вельве т, поплин, парусина и т.д.
1
17
2
Page 52

Режим шитья в обратном направлении
Для закрепления шва в начале и конце строчки, нажимайте
на рычаг шитья в обратном направлении (А).
Сделайте несколько стежков в обратном направлении.
Отпустите рычаг, и машина снова будет шить вперед (1).
Окончание шитья
Поверните маховое колесо против часовой стрелки для
того, чтобы привести рычаг-нитепритягиватель в самое
верхнее положение.
Поднимите прижимную лапку и вытяните изделие назад за
область иглы (2).
A
1
2
Обрезание нитей
Вытяните обе нити назад за прижимную лапку. Заведите
нити за специальный нож для обрезания нитей,
расположенный на корпусе машины (В). Потяните за нити
вниз, чтобы их отрезать (3).
B
3
16
Page 53

Прямая строчка
Для начала, установите Регулятор выбора строчек на
прямую строчку (1).
Разместите ткань под прижимной лапкой так, чтобы край
ткани совпадал с одной из выбранных отметок на
игольной пластине (2).
Опустите прижимную лапку, нажмите на педаль
управления, чтобы начать шить (3).
1
15
2
3
Page 54

Регулятор ширины стежка и Регулятор длины стежка
Использование регулятора ширины стежка
Максимальная ширина стежка для строчки зиг-заг 6мм;
для многих строчек ширина стежка может быть
уменьшена. Ширина стежка увеличивается, когда вы
поворачивае т е регулятор от "0" до "6" (1).
С помощью регулятора ширины стежка вы можете
настраивать положение иглы. "0" - это центральное
положение иглы, "6" - крайнее левое положение иглы.
Использование регулятор длины стежка для строчки
зиг-заг
Переведите регулятор выбора строчки в режим строчки зигзаг. Плотность застила строчки зиг-заг будет увеличиваться
с уменьшением показателя длины стежка "0".
Аккуратный вид строчки зиг-заг обычно достигается при
длине стежка "3.0" или меньше. (2)
Плотная строчка зиг-заг называется гладьевой (2).
Использование регулятора длины стежка для прямой
строчки
Уст ановит е прямую строчку. Поверните регулятор длины
стежка в сторону отметки "0", при этом длина стежка
уменьшится. Длина стежка будет увеличиваться по мере
вращения регулятора в сторону отметки "4".
Рекомендуе т ся использовать большую длину стежка для
плотных тканей, толстых нитей и игл. Для тонких тканей,
тонких нитей и игл, рекомендуется устанавливать
меньшую длину стежка.
1
14
2
Page 55

Выбор строчки
На рисунке вы увидите изображения всех видов строчек,
которые доступны на вашей машине.
Строчки, изображенные в верхнем ряду на рисунке, на
регуляторе выбора строчек изображены серым цветом.
Вращая регулятор, вы можете выбрать одну из строчек,
изображенных в сером цвете. С помощью регулятор
длины стежка (с) вы можете настроить длину стежка. С
помощью регулятора ширины стежка (b) вы можете
настроить ширину стежка.
ab
c
Строчки, которые изображены в нижнем ряду на рисунке,
на регуляторе выбора строчек изображены синим цветом.
Синий цвет обозначает, что это эластичные строчки;
информацию об их применении вы найдете на стр. 17.
Регулятор выбора строчек можно вращать в любую
сторону.
a. Рычаг режима шитья в обратном направлении
b. Регулятор ширины стежка
c. Регулятор длины стежка
d. Регулятор выбора строчек
d
13
Page 56

Натяжение нити
Натяжение верхней нити
Стандартное натяжение нити - положение: "4". (1)
Для увеличения натяжения нити поверните регулятор на
большее значение. Для уменьшения натяжения переведите
регулятор на меньшее значение.
А. Нормальное натяжение нити для прямой строчки.
В. Недостаточное натяжение нити для прямой строчки.
Переведите регулятор на следующую позицию вверх.
С. Слишком сильное натяжение нити для прямой строчки.
Переведите регулятор на меньшее значение.
D. Нормальное натяжение для зигзагообразной и
декоративной строчек. Регулируйте натяжение нити в
случае, когда некоторое количество верхней нити
появляется на обратной стороне ткани.
Натяжение нижней нити
Правильное натяжение нижней нити было отрегулировано
на заводе-изготовителе, вам не нужно его менять.
Важно:
- Правильная настройка натяжения нити очень важна для
качественного шитья.
- Нет определенной степени натяжения нити, пригодного
для всех видов строчек, нитей и тканей.
- Сбалансированное натяжение нити (соединение верхней
и нижней нитей происходит между двух слоев ткани)
рекомендуется только для прямой строчки.
- 90% всех работ будет производиться при натяжении нити
от "3" до "5".
- Для зигзагообразных и декоративных строчек натяжение
нити должно быть меньше, чем для прямой строчки.
- Все декоративные строчки будут иметь аккуратный вид,
если переплетение нижней и верхней нитей будет
происходить на изнаночной стороне изделия.
12
1
BA
C
D
Page 57

Подъем нижней нити
Придерживайте верхнюю нить левой рукой. Поверните
маховое колесо (1) на себя (против часовой стрелки),
опуститеизатемподнимитеиглу.
Важно:
Если возникли сложности с поднятием нижней нити,
проверь те, возмо жно, она застряла в съемной рабочей
поверхности.
Мягко потяните за верхнюю нить и достань те нижнюю нить,
которая появится через отверстие в игольной пластине (2).
Затемпроведитеобенитиназадзаприжимнуюлапку(3).
1
2
11
3
Page 58

Автоматический нитевдеватель
- Поднимите иглу в наивысшее положение.
- Опустите рычаг (А) вниз до конца.
- Автоматический нитевдеватель встанет в положение (В).
- Зацепите нить за крючок (С).
- Проведите нить перед иглой вокруг крючка (D) снизу
вверх.
- Отпустите рычаг (А).
- Протяните нить через игольное ушко.
A
B
C
D
Важно:
При использовании автоматического нитевдевателя
выключайте машину.
1
A
2
10
Page 59

Заправка верхней нити
Это простая операция, но очень важно выполнить ее
правильно, чтобы избежать появления проблем при шитье.
- Поднимите иглу в наивысшее положением (1) и
продолжайтеповорачиватьмаховоеколесонасебя,против
часовой стрелки, пока игла слегка не опустится. Поднимите
прижимную лапку, чтобы диск регулирующий натяжение
нити освободился.
Важно:
машину , прежде чем начинать заправлять нить.
- Поднимите держате ль для катушки. Разместите катушку
ниток на держателе, так чтобы нить разматывалась, как это
показано на рисунке. Для маленьких катушек
рекомендуется надевать малую катушечную пластину после
катушки (2).
- Протяните нить от катушки через верхний нитенаправитель
(3) и через диск натяжения, как показано на рисунке (4).
- Пропустите нить вниз через правый канал и вверх через
левый (5). Во время заправки нити рекомендуется
придерживать нить между катушкой и нитенаправителем.
Для вашей безопасности рекомендуется выключить
- Заведите нить в глазок металлического рычаганитепритягивате ля справа налево и опустите нить вниз (6).
- Теперь пропустите нить за металлическим нитенаправителем
и за тонкой металлической скобкой над иглой (7), затем
заправь те нить в игольное ушко, проведя нить спереди назад.
- Вытяните примерно 15см нити через ушко иглы и обрежьт е
с помощью встроенного ножа (8).
1
5
9
2
6
3
7
4
8
Page 60

Установка шпульки
При установке или изъятии шпульки игла должна
находиться в наивысшем положении.
1. Установите шпульку в шпульное гнез до, так чтобы нить
разматывалась против часовой стрелки.
2. Протяните нить через прорезь (А).
3. Потяните нить в направлении по ходу часовой стрелки
пока она не попадет в выемку (В).
4. Вытяните примерно 15см нити и установите крышку на
место (С).
Внимание:
Всегда выключайте машину ("О") перед установкой или
изъятием шпульки.
A
1
B
3
8
2
C
4
Page 61

Намотка нити на шпульку
- Наденьте катушку на горизонтальный держатель и
закрепите при помощи большой или малой катушечной
пластины (1/2).
- Проведите нить в нитенаправитель (3).
- Обведите нить вокруг диска регулирующего натяжение
нити по часовой стрелке (4).
- Заправьте нить в шпульку и установите шпульку на
рычаге (5).
- Отведите рычаг вправо (6).
- Придерживайте конец нити (7).
- Надавите на педаль (8).
- Обрежьте нить (9).
- Отведите рычаг влево (10) и снимите шпульку.
Пожалуйста, запомните:
Когда рычаг намотки шпульки находится в положении
"намотка шпульки", машина не будет шить, и маховое
колесо не будет вращаться. Для того чтобы шить,
отведите рычаг в крайнее левое положение.
1
2
4
7
7
8
3
5
9
6
10
Page 62

Аксессуары
Стандартные аксессуары (1)
a. Универсальная лапка
b. Лапка для вшивания молнии
c. Лапка для выметывания петли
d. Лапка для пришивания пуговиц
e. Распарыватель/кисточка
f. Направляющая линейка для краеобмето чного/ст егальног о
шва
g. Набор игл
h. Катушечные пластины
i. Шпульки (3шт.)
j. Отвертка
k. Штопальная пластина
l. Дополнительные держатель катушки
m. Фетровая подкладка
n. Мягкий чехол
Дополнительные аксессуары (2)
(Этих 11 аксессуаров нет в комплектации машины, вы
можете приобрести их у дилера).
o. Лапка для гладьевых строчек
p. Оверлочная лапка
q. Лапка для роликового шва
r. Лапка для вшивания шнура
s. Лапка для невидимой подгибки
t. Лапка для квилтинга/прямой строчки
u. Лапка для многослойного сшивания
v. Лапка для штопки/вышивания
w. Лапка с верхним транспортером
x. Насадка для обрезания края ткани
y. Двойная игла
1
Стандартные аксессуары
ab c
006918008
e
h
l
Дополнительные аксессуары
2
u
006905008 006914008
i
m
po
vw
006016008006917008 0061850081
006Q6A0150
f
j
n
qrs t
006813008
006904008006172008 006907008 006900008
x
U2-0071
d
g
k
006916008
y
6
Page 63

A
подъем лапкиДвух-шаговый
При шитье многослойных или объемных тканей
прижимная лапка должна быть поднята в самое верхнее
положение для облегчения прохождения ткани под
прижимной лапкой (А).
5
Page 64

Подключение машины к электросети
Подключите машину к электросети, как показано на рисунке
(1).
Вставьте вилку в розетку (2).
Внимание:
Отключайте машину от сети, если не используете ее
длительное время.
Педаль управления
При помощи ножной педали вы регулируете скорость
машины (3).
Внимание:
Проконсультируйтесь со специалистом, если вы
сомневаетесь относительно напряжения в сети.
Отсоединяйте сетевой шнур, если не используете
машину. Тип педали в соответствии с напряжением
KD-2902 (220-240V).
A
1
Освещение
Нажмите на главный выключатель (А) для включения
машины и лампочки "I".
Вилка
Розетка должна
быть заземлена
23
4
Page 65

Основные части машины
14. Горизонтальный держатель для катушки
15. Рычаг намотки шпульной нити
16. Отверстие для второго держателя катушки
17. Маховое колесо
18. Включение машины и освещения
19. Главный разъем для шнура
20. Нитенаправитель шпульной нити
21. Нитенаправитель верхней нити
22. Боковая панель
23. Ручка
24. Рычаг подъема прижимной лапки
25. Педаль управления
26. Øíóð
14
15
16
17
18
20
21
22
23
24
19
3
25
26
Page 66

Основные части машины
1. Регулятор натяжения верхней нити
2. Рычаг-нитепритягиватель
3. Рычаг шитья в обратном направлении
4. Нож для обрезания нити
5. Прижимная лапка
6. Задвижная крышка шпульного отсека
7. Съемный отсек для хранения аксессуаров
8. Ограничитель для намотки шпульной нити
9. Регулятор ширины стежка
10. Регулятор длины стежка
11. Регулятор выбора строчки
12. Автоматический нитевдеватель
13. Рычаг выметывания одношаговой петли
1
2
3
4
5
6
7
12
13
8
9
10
11
2
Page 67

Оглавление
ЗНАКОМСТВО С МАШИНОЙ
Подключение машины к электросети...................................................................................................................................4
Двух-шаговый подъем лапки ................................................................................................................................................5
Аксессуары.............................................................................................................................................................................6
Заправка верхней нити
Намотка нити на шпульку......................................................................................................................................................7
Установка ................................................................................................................................................................8
Заправка верхней нити .........................................................................................................................................................9
Автоматический нитевдеватель .........................................................................................................................................10
Подъем нижней нити ...........................................................................................................................................................11
Натяжение нити ...................................................................................................................................................................12
Шитье
Выбор строчки......................................................................................................................................................................13
Регулятор ширины стежка и Регулятор длины стежка .....................................................................................................14
Прямая строчка....................................................................................................................................................................15
Режим шитья в обратном направлении/Окончание шитья/Обрезание нитей ................................................................16
Эластичные строчки ............................................................................................................................................................17
Потайная подрубочная строчка ..........................................................................................................................................18
Выметывание автоматической петли.................................................................................................................................19
Пришивание пуговицы.........................................................................................................................................................20
Создание сборок..................................................................................................................................................................21
Штопка в технике "свободного передвижения", Простегивание ......................................................................................22
Лапка с верхним транспортером (не входит в базовый комплект машины) ...................................................................23
Насадка для обрезания края ткани (не входит в базовую комплектацию машины) ......................................................24
Основная информация
Установка съемной рабочей поверхности .........................................................................................................................25
Установка держателя лапки................................................................................................................................................26
Таблица соответствия типов Иглы/Ткани/Нитей ...............................................................................................................27
Штопальная пластина .........................................................................................................................................................28
Уход за машиной и выявление неполадок
Установка и смена иглы ......................................................................................................................................................29
Замена лампочки.................................................................................................................................................................30
Неполадки и их устранение ................................................................................................................................................31
шпульки
...................................................................................................................................................2/3Основные части машины
Page 68

Поздравляем
Вы стали обладателем новой швейной машины и теперь можете начать открывать новые
пути в творчестве.
С этого момента вы узнаете насколько легко и удобно можно шить на современной
швейной машине.
Пожалуйста, внимательно прочитайте инструкцию по эксплуатации машины - это самый
легкий путь для исследования творческого потенциала вашей машины.
Будьте уверены, что ваша машина обладает самыми современными швейными
возможностями, так как производитель постоянно работает над усовершенствованием
модификации, дизайна и принадлежностей своих швейных машин.
SINGER является зарегистрированной торговой маркой Singer Company Ltd. и ее филиалов.
© 2010 Singer Company Ltd. или ее филиалов.
Все права защищены по всему миру.
Page 69

Правила техники безопасности
Прежде
следующие рекомендации:
ОПАСНО
1. Нельзя оставлять включенную машину без присмотра.
2. Необходимо отключать машину от электросети, если
3. Всегда выключайте машину перед заменой лампочки.
ВНИМАНИЕ
шока или увечья:
1. Не польз уйт есь машиной как игрушкой. Будьте особенно
2. Работайте на машине только в соответствии с инструкцией.
3. Нельзя включать машину, если поврежден шнур или штепсель,
4. Нельзя работать вентиляционные отверстия
5. Не дотрагивайтесь пальцами до движущихся частей машины.
6. Всегда устанавливайте только подходящую игольную пластину .
7. Регулярно меняйте иглы, так как они со временем становятся
8. Не тяните и не подталкив айте ткань во время шитья. Это
чем включить швейную машину, внимательно прочитайте
- во избежание электрического шока:
собираетесь ее чистить.
Лампочка должна быть мощностью 15 W (220-240V).
- Во избежание электрического
внимательны, если рядом находятся дети.
Используйте принадлежности и запасные части, указанные в
инструкции и рекомендованные фирмой-производителем.
если машина работает с перебоями, если произошло падение
машины и намокание. Не пытайтесь ремонтировать машину
самостоятельно, необходимо сразу обратиться в указанный в
гарантийном талоне Сервисный Центр.
заблокированы. Всегда следите за состоянием швейной
машины Необходимо регулярно их
чистить от грязи, ворса и пыли.
Во время работы особенно будьте внимательны в области иглы.
Несоответств ующая игольная пластина может привести к
поломке иглы.
тупыми, появляются заусе н и ц ы , что приводит к некачественной
строчке.
может привести к поломке или искривлению иглы.
на машине, если
и педали управления.
возгорания,
9. Выключайте машину в положение "О", когда производите к а к и е либо действия в области иглы.
10. Всегда отключайте машину от электросети, когда одеваете
на нее чехол, проводите смазку или какие-либо т е х н иче ские
действия, описанные в инструкции.
11. Нельзя вставлять посторонние предметы в отверстия машины.
12. Не используйте машину вне помещений.
13. Не допускается работа машины в местах использования
аэрозолей, спреев и т.д.
14. Для отключения необходимо перевести переключатель в
положение "Выключено-О" и затем извлечь штепсе ль из
.
розетки
15. При извлечении из розетки нельзя тянуть за сетевой шнур,
беритесь за штепсель.
16.
При нормальных условиях для работы уровень шума швейной
машины 75дБ.
17. При обнаружении неисправностей в работе швейной машины,
пожалуйста, выключите ее или отсоедините от сети питания.
18. Запрещается ставить какие-либо предметы на педаль
управления.
19. В случае, если соединительный шнур педали управления
поврежден, он должен быть заменен производителем или
авторизованным сервис центром во избежание поражения
электрическим током.
20. Этот электроприбор не предназначае т ся для использования
людьми (в том числе и детьми) с ограниченными физическими,
нервными или психическими возможностями, или недостатком
опыта и осведомленности, за исключением случаев, когда
потребителю были даны соответствующие инструкции или
эксплуатация прибора происходит под наблю дением лица,
ответств енног о за их безопасность.
21. Дети могут работать со швейной машиной только под
присмотром, чтобы исключить игру со швейной машиной.
БЕРЕЖНО ХР АНИТЕ ИНСТРУКЦИЮ
Эта швейная машина предназначена лишь для домашнего
использования.
Page 70

3323 Инструкция по эксплуатации
021Q5A010
SINGER 3323(Q50A)
7( / ) Apr/10
 Loading...