

SINGER 3214 User Manual
ъвотв
pizmozz |эро|Л|

TABLE OF CONTENTS
1. NAME AND PARTS OF THE MACHINE................................................................... 1
2. ACCESSORIES
3. BEFORE SEWING................................................................................................... 3
Detachable Extension Table (Accessory Box)
Connecting Foot Controller and Power Cord............................................................. 4
Power Switch........................................................................................................... 4
Open Stitch Panel Cover............................................................................................4
4. STARTING TO SEW................................................................................................. 5
Bobbin Winding...........................................................................................................5
Inserting Bobbin......................................................................................................... 7
Threading Upper Thread................. 8
Drawing Up Lower Thread
Pattern Selection Dial........................................................................................... ..11
Stitctv Length Dial.................................................................................................... 12
Width Control.......................................................................................................... 12
Reverse Sewing Button......................................................................................... ..13
Presser Foot Lever
Feed Dog Lever.................................................................................................... 14
Changing Presser Foot............................................................................................ 15
Changing Needle.................................................................................................... 16
Fabric Thread and Needle Table..............................................................................17
5. APPLICATIONS AND METHODS............................................................................18
Straight Sewing.........................................................................................................18
Adjusting Thread Tension.........................................................................................18
Zigzag Sewing......................................................................................................... 18
Biind Hem Stitch.......................................................................................................19
Overcasting..............................................................................................................21
Sheii Stitch.............................................................................................................. 21
Rampart Stitch..........................................................................................................22
Couching
Overiocking...............................................................................................................23
Stretch Stitching........................................................................................................24
Adjusting Stretch Stitch Baiance...............................................................................24
Ric-Rac/Straight Stretch Stitch.................................................................................25
Turkish Stitch............................................................................................................25
Buttonholes...............................................................................................................26
Sewing Buttons On...................................................................................................29
Mending....................................................................................................................30
Sewing Zippers.........................................................................................................31
Roii Hemming...........................................................................................................32
Twin Needie........................................................................................................... 33
Decorative Tucks.................................................................................................... 33
Pin Tucking...............................................................................................................34
Quiiting......................................................................................................................35
Smocking..................................................................................................................36
Appiique Work...........................................................................................................37
Embroidery.............................................................................................................. 38
6. MAiNTENANCE.
Cleaning................................................................................................................. 39
Oiling.........................................................................................................................39
Cleaning Shuttle Case..............................................................................................40
Changing Light Bulb................................................................................................. 40
Lower Tension Adjustment.......................................................................................41
7. TROUBLE CHART....................................................................................................43
.........
............................................................................................... 2
...........................................................
..............
..................................................................................................
........
.......................................................................................................... 22
....
..................................................................................................39
.........................................................................10
14
3

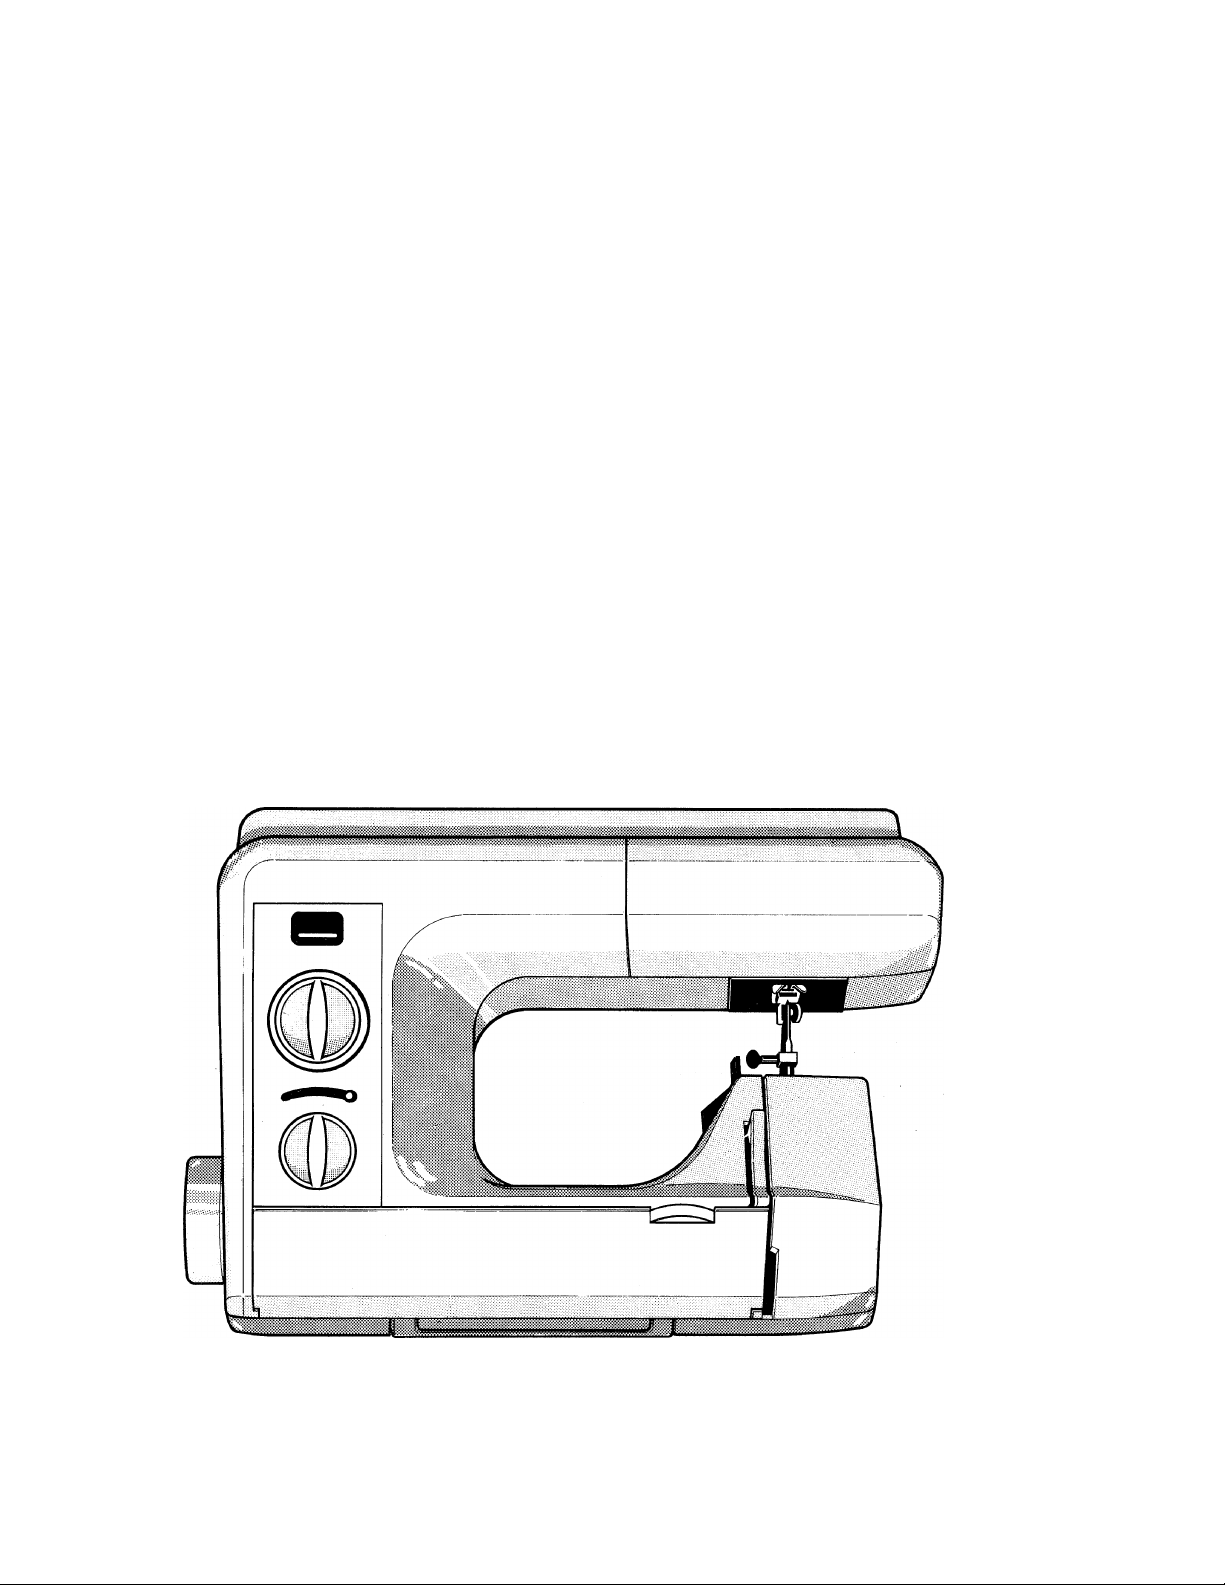
1. NAMES AND PARTS OF THE MACHINE
1. Handle
2. Take-up lever 15.
3. Thread guide for bobbin winding 16.
4. Spool pin
5. Face cover
6. Upper thread tension dial
7. Thread guide for upper threading
8. Presser foot thumb screw 21.
9. Presser foot
10. Drop feed lever
11. Feed dog
12. Needle plate
13. Free arm 26.
14.
17.
18.
19.
20.
22.
23.
24.
25.
27.
28.
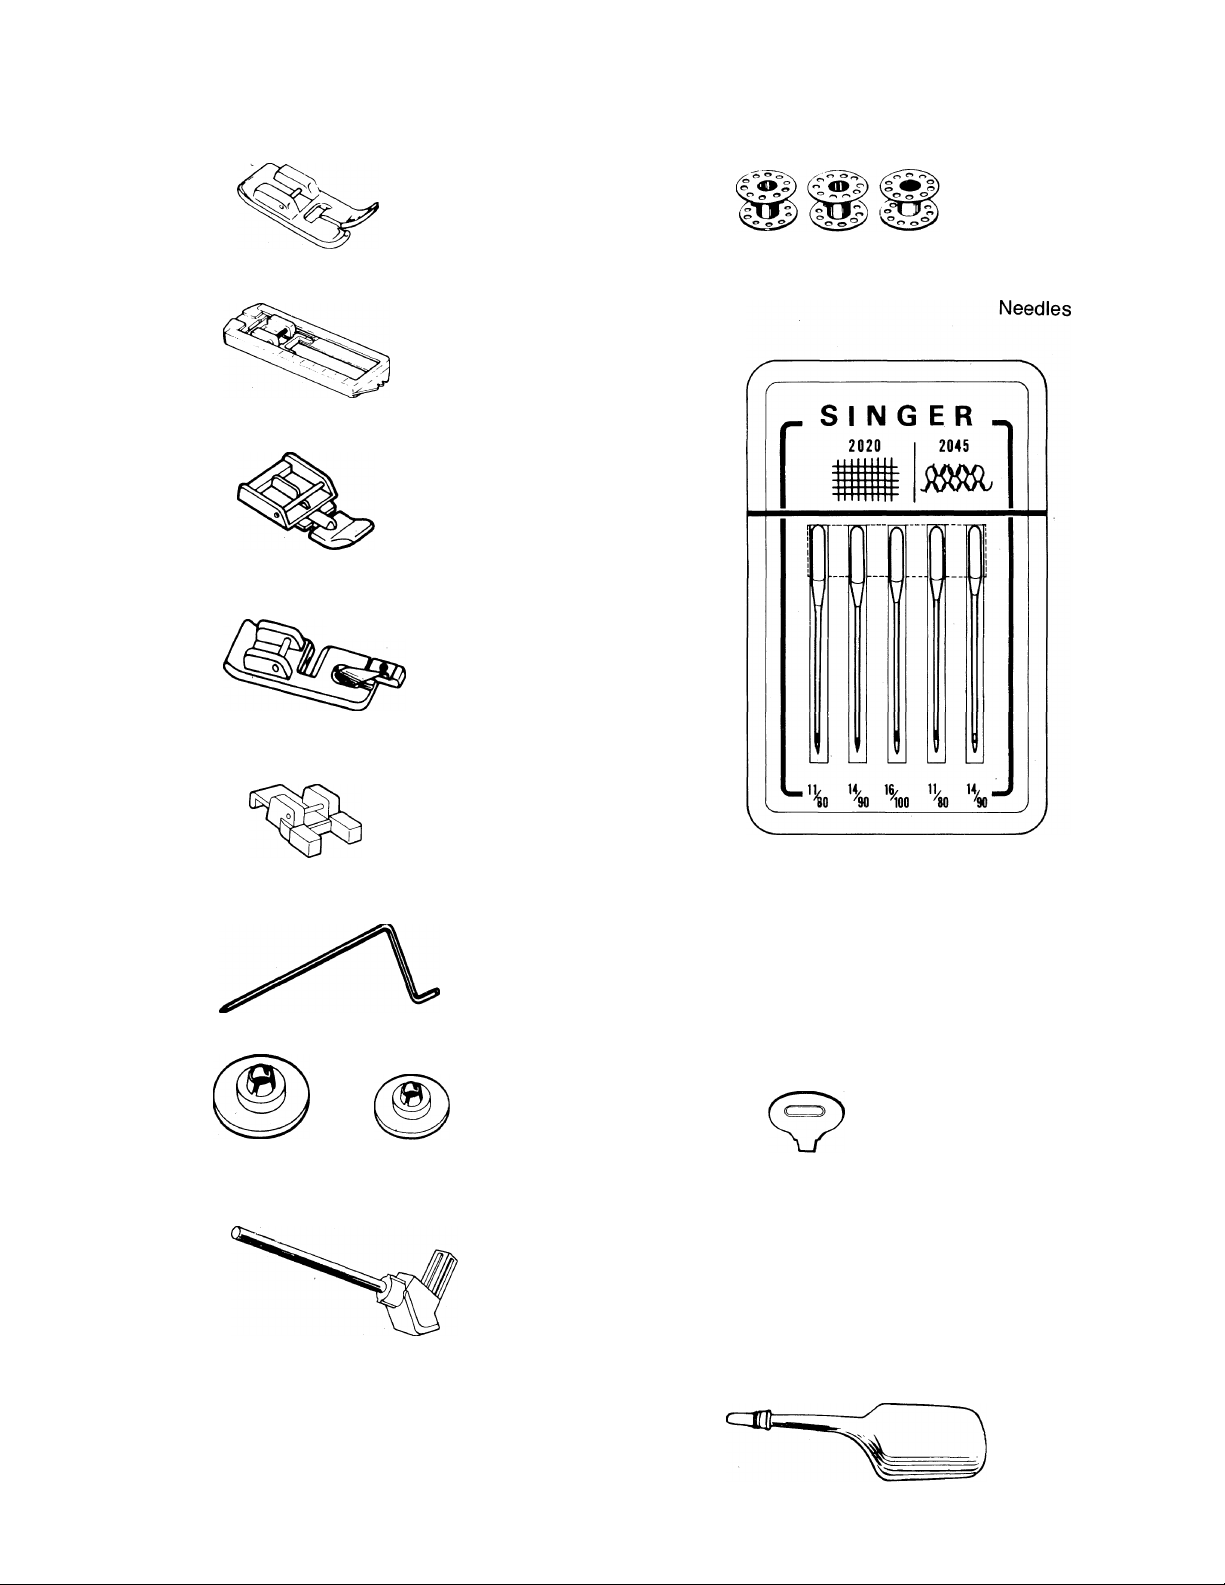
2. ACCESSORIES
Zigzag foot
(on machine)
Buttonhole Foot
Zipper foot
^ Optional accessory (Model 3207 only)
Roll hemming foot
Bobbins
(3 pcs.)
(large)
Button sewing foot
Quilting guide
Spool cover
(small)
Extra spool pin
(second)
^ Optional Accessory
Twin needle
Needle plate driver
Screw drivers
(small)
(large)
Buttonhole cutter
Oiler
-2-
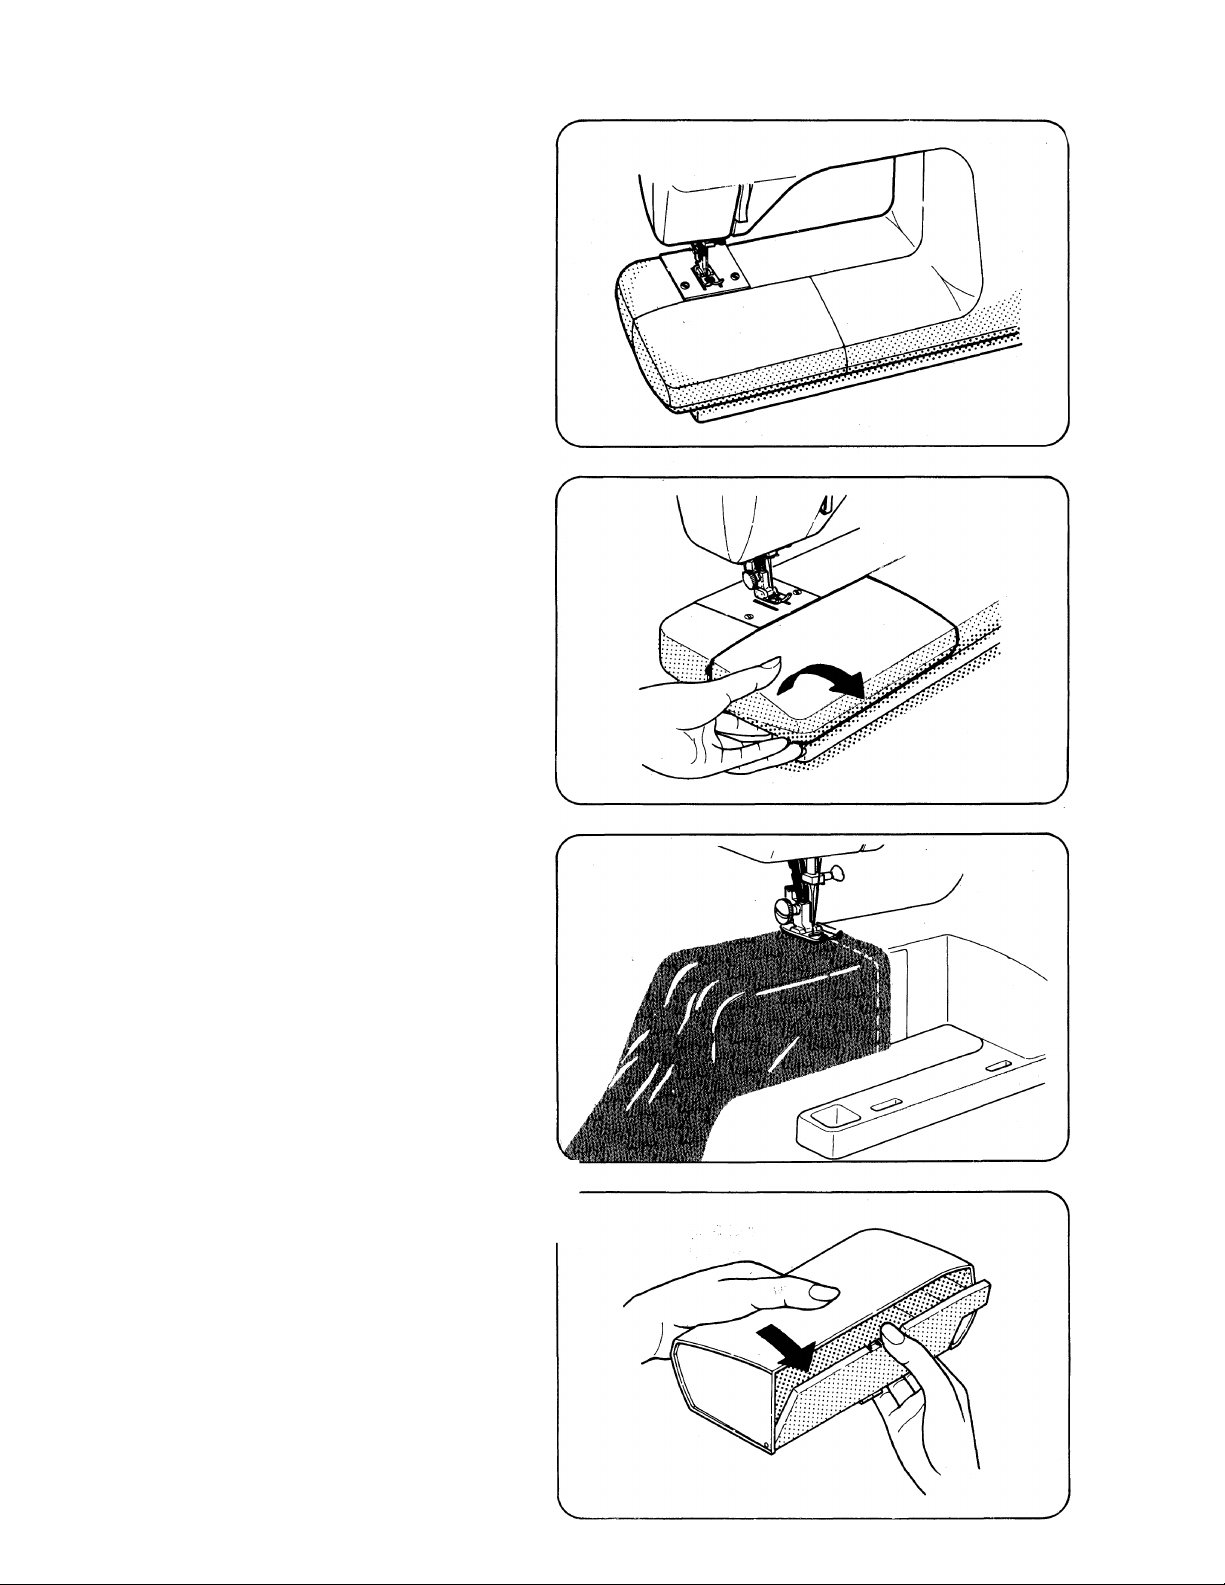
3. BEFORE SEWING
The machine is stored in flat-bed style which
makes sewing easier.
Detachable Extension Table
By removing the accessory box from the machine,
the machine can be used as a free-arm machine.
To remove, simply lift box straight up and away
from machine.
Sewing sleeves of T-shirts and blouse or cuffs
of trousers is easier with the free-arm.
Reverse procedure to attach extension table, and
snap into place.
To open lid of accessory box pull it open, as
illustrated.
-3-
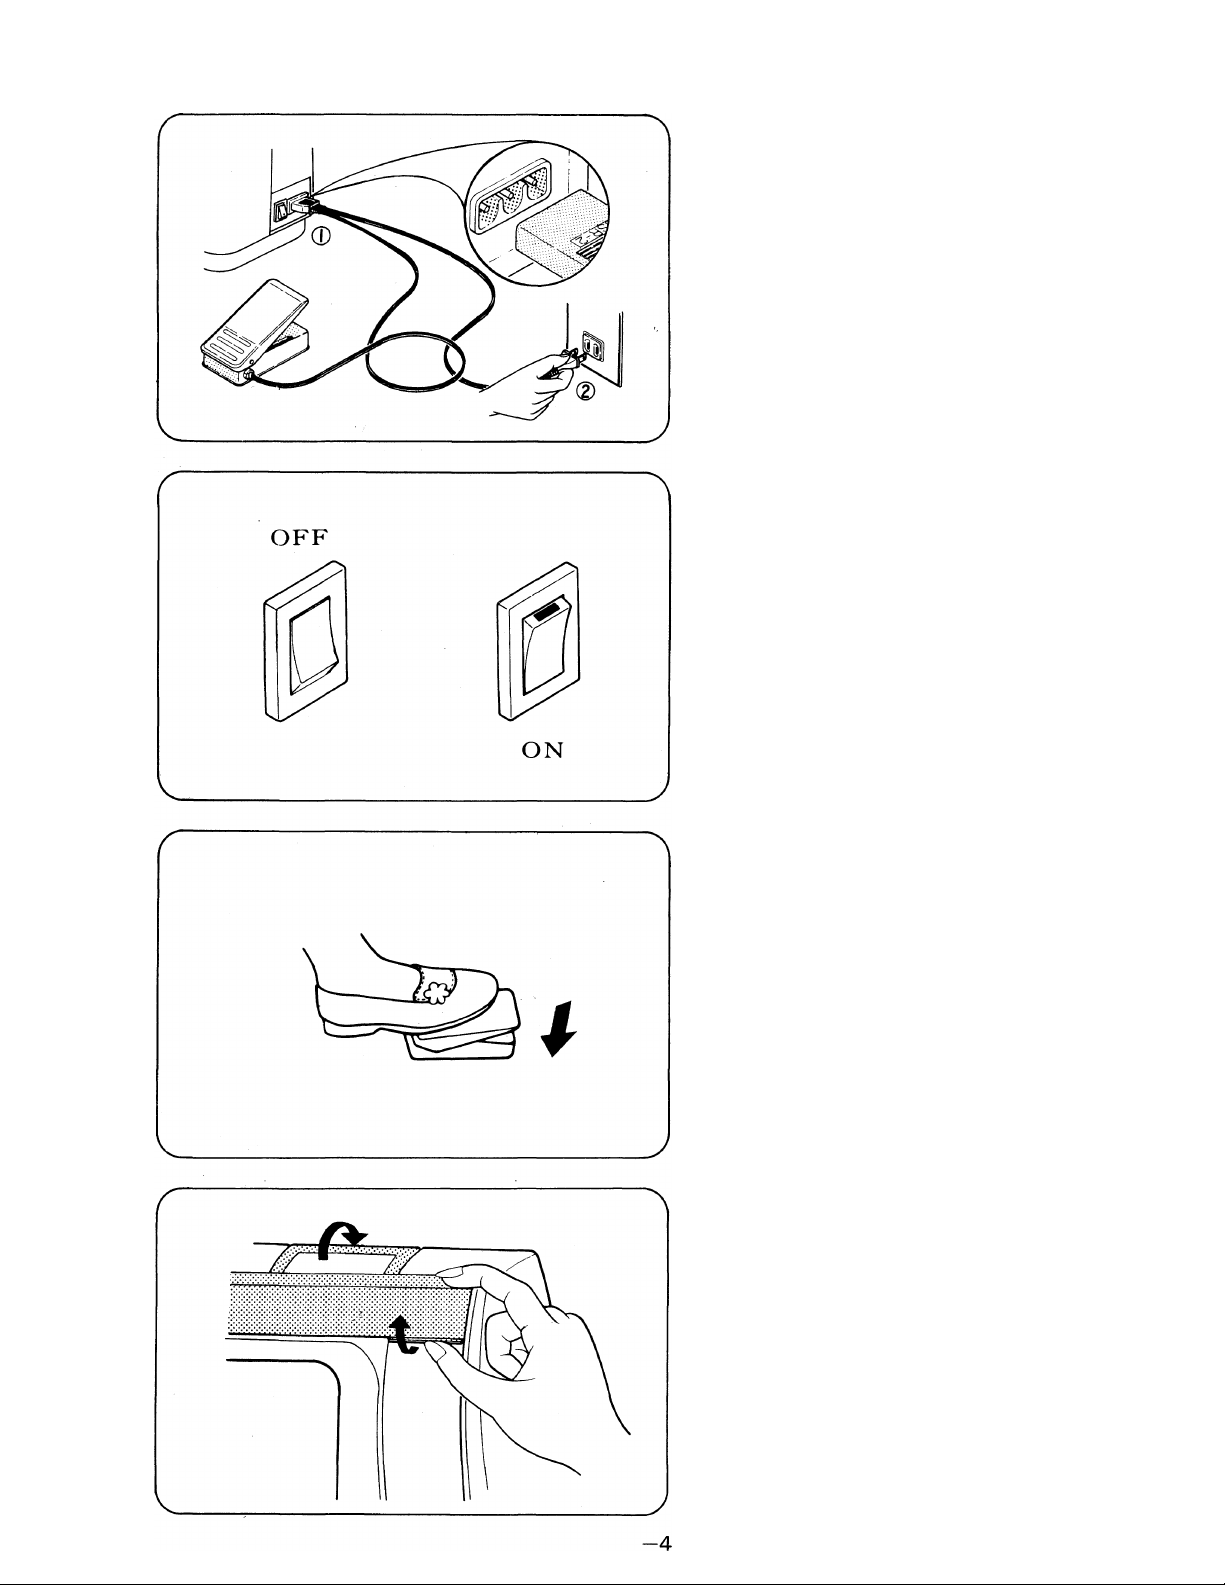
Connecting Foot Controller and Power
Cord
Connect foot controller and power cord ©
Before plugging in your machine, be sure that the
voltage is the same as your machine (written on
a plate at back of machine).
Power Switch
Switch on, turns the power and the sewing light
on.
Switch off, turns the power and the sewing light
off.
The more you press foot controller, the faster the
machine runs.
To Open Stitch Panel Cover
Press cover on top with index finger. Lift cover
with thumb and flip open to full extended position.
Lower carrying handle if necessary.
4. STARTING TO SEW
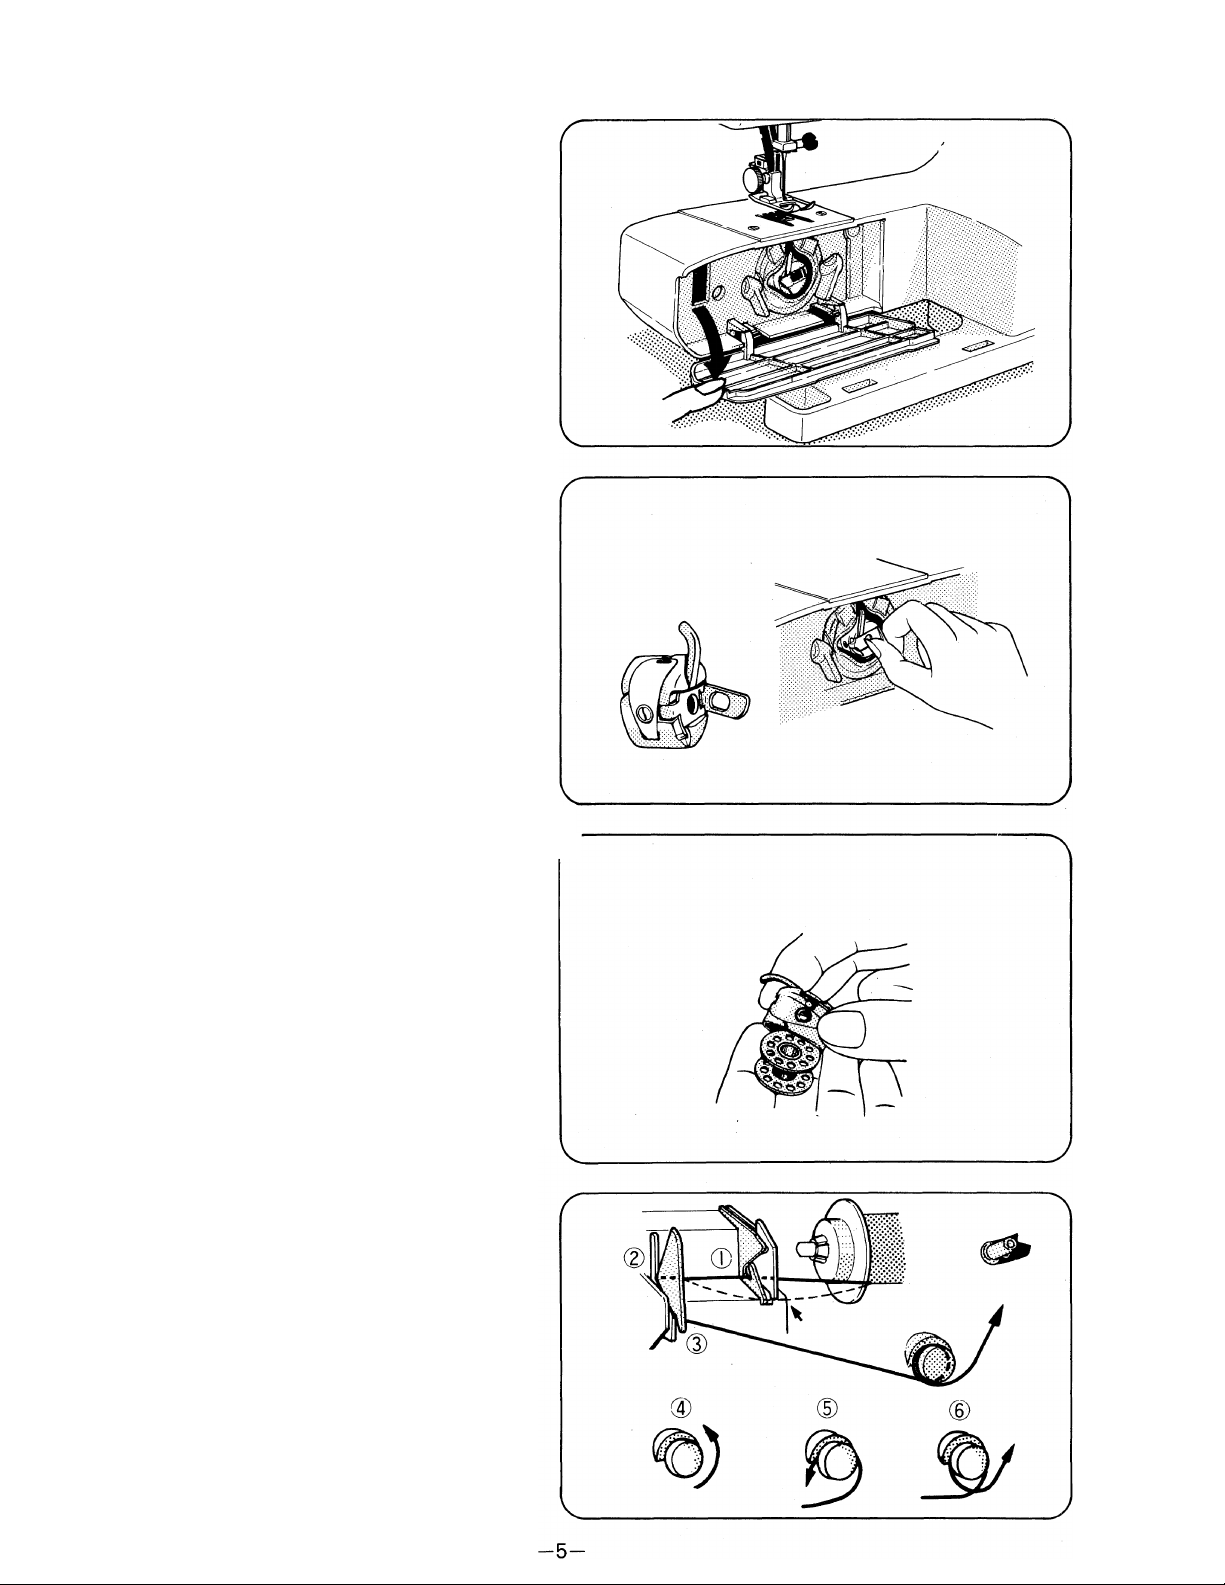
Bobbin Winding
Set needle in the highest position by turning
handwheel towards you.
Remove accessory box to locate bobbin case.
Open shuttle cover.
Open latch of bobbin case and remove case.
Close latch of bobbin case and bobbin comes out ^
easily.
Put thread on spool pin. (See page 8) Draw thread
from spool pin through thread guide and preten
sion device, following numbers ®, © and ®.
Wind thread clockwise around bobbin several
times.
Place bobbin on bobbin winding spindle.
Move the declutch button on handwheel into the
® direction.
(a) Push bobbin to right and press down on foot
controller.
Machine stops automatically when bobbin is
full.
©Push bobbin to left, to disengage from wheel.
Take the bobbin off the spindle and cut thread.
Move the declutch button on handwheel into
the^) direction.
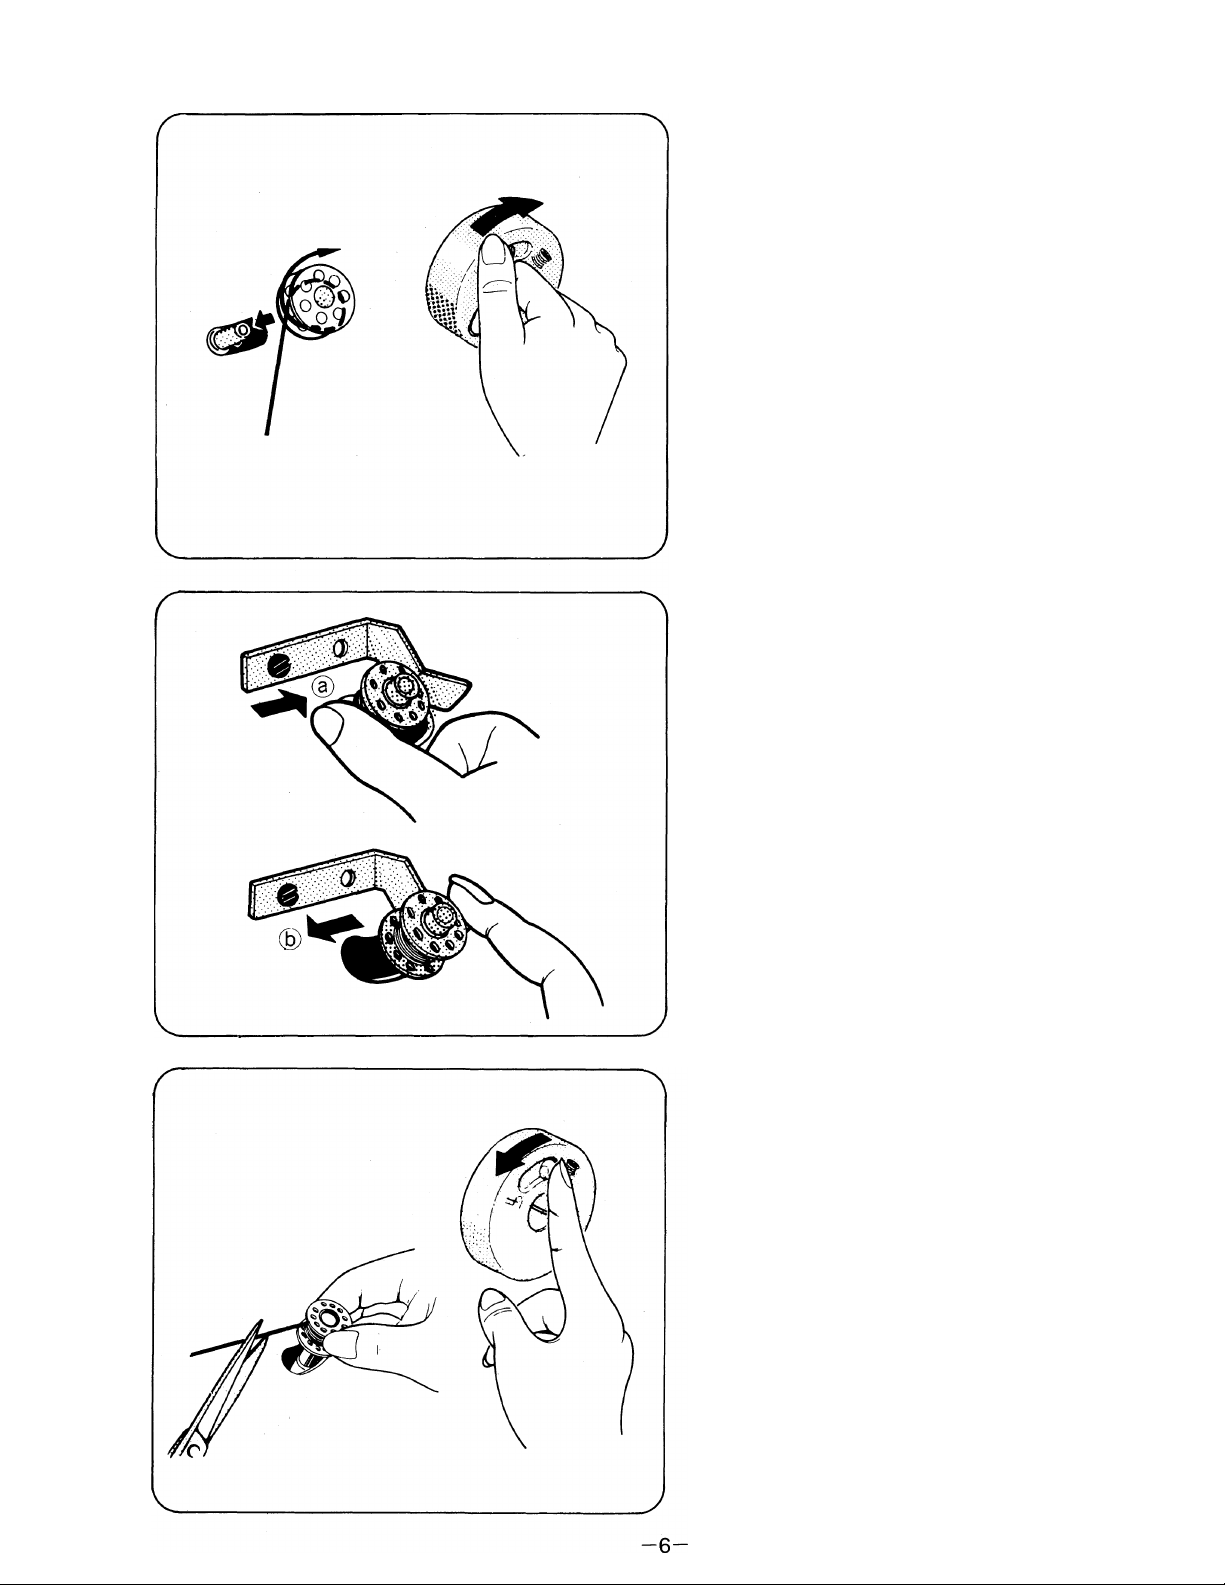
Inserting Bobbin
Place bobbin in its case with thread running
clockwise.
Guide thread into slot @ of bobbin case.
Pulling thread to left, bring it under tension spring ^
then to delivery eye (B).
Raise needle to the highest position.
Leave end of thread about 10 cm (4") from bobbin
case.
Take hold of latch and push bobbin case into
shuttle. Release latch when bobbin case is fully
inserted.
-7-
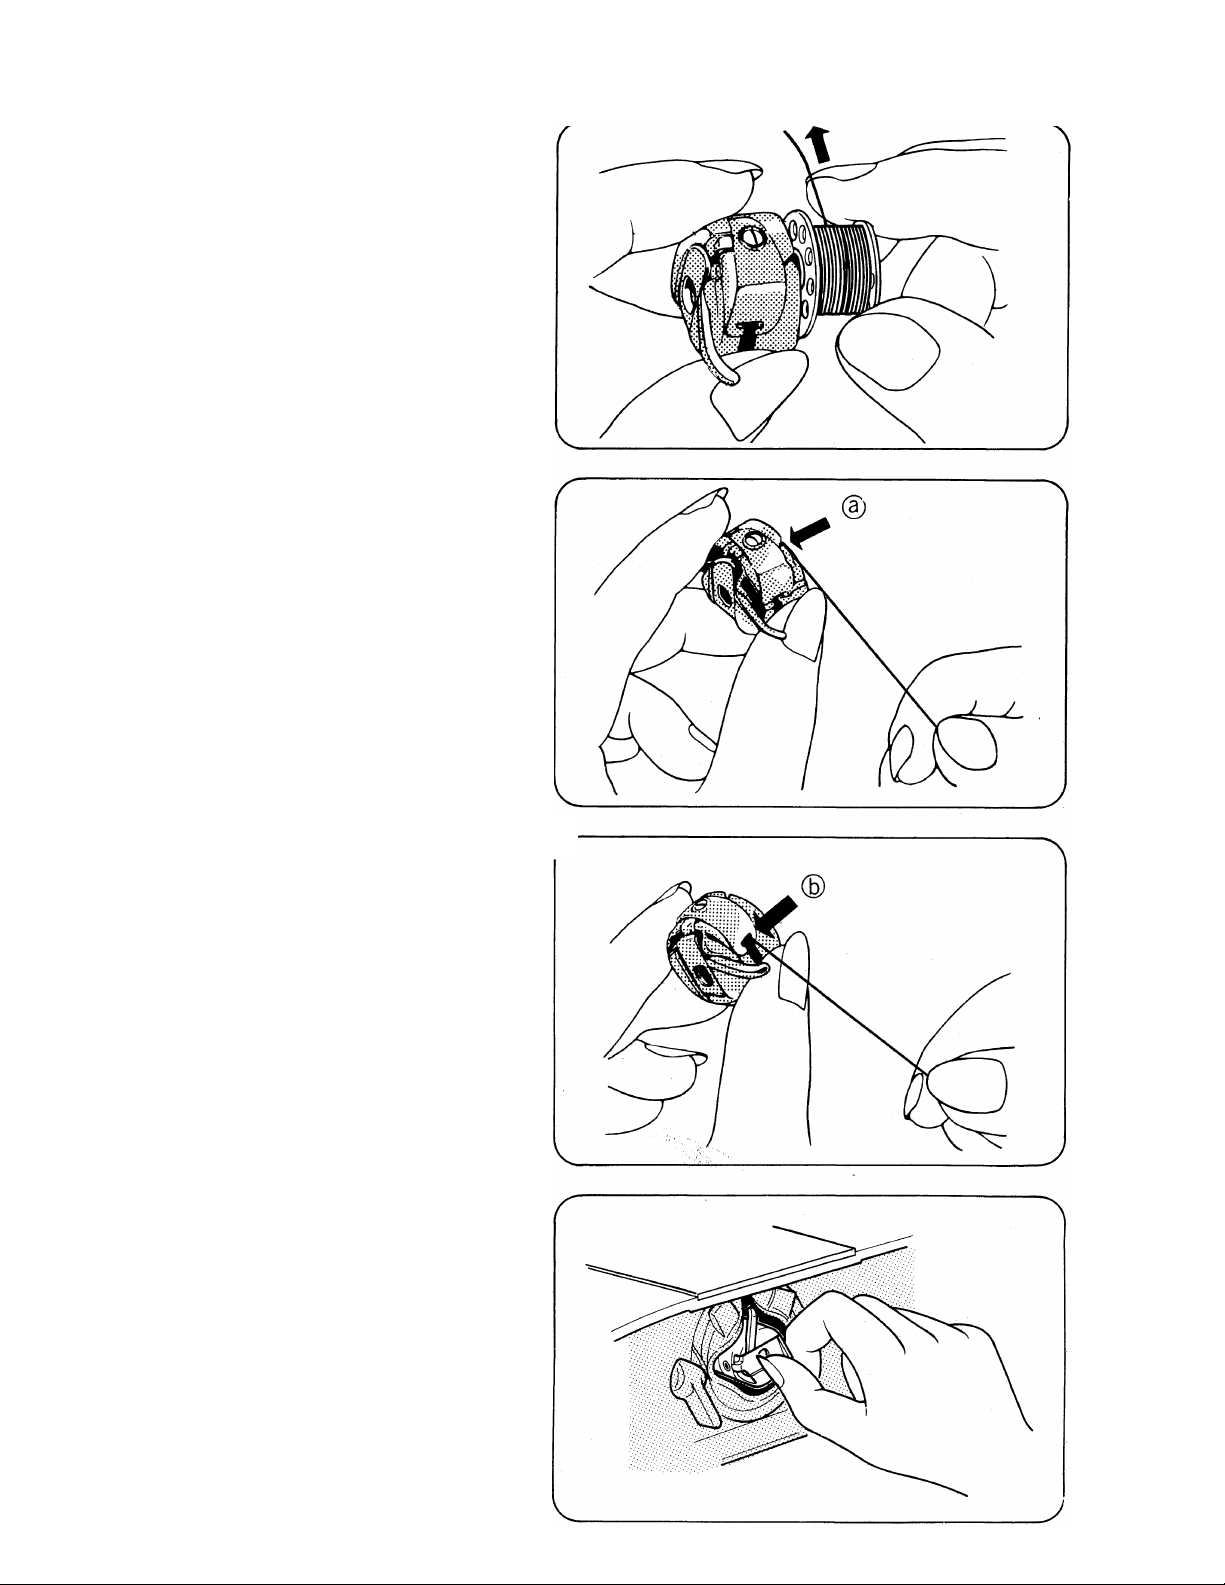
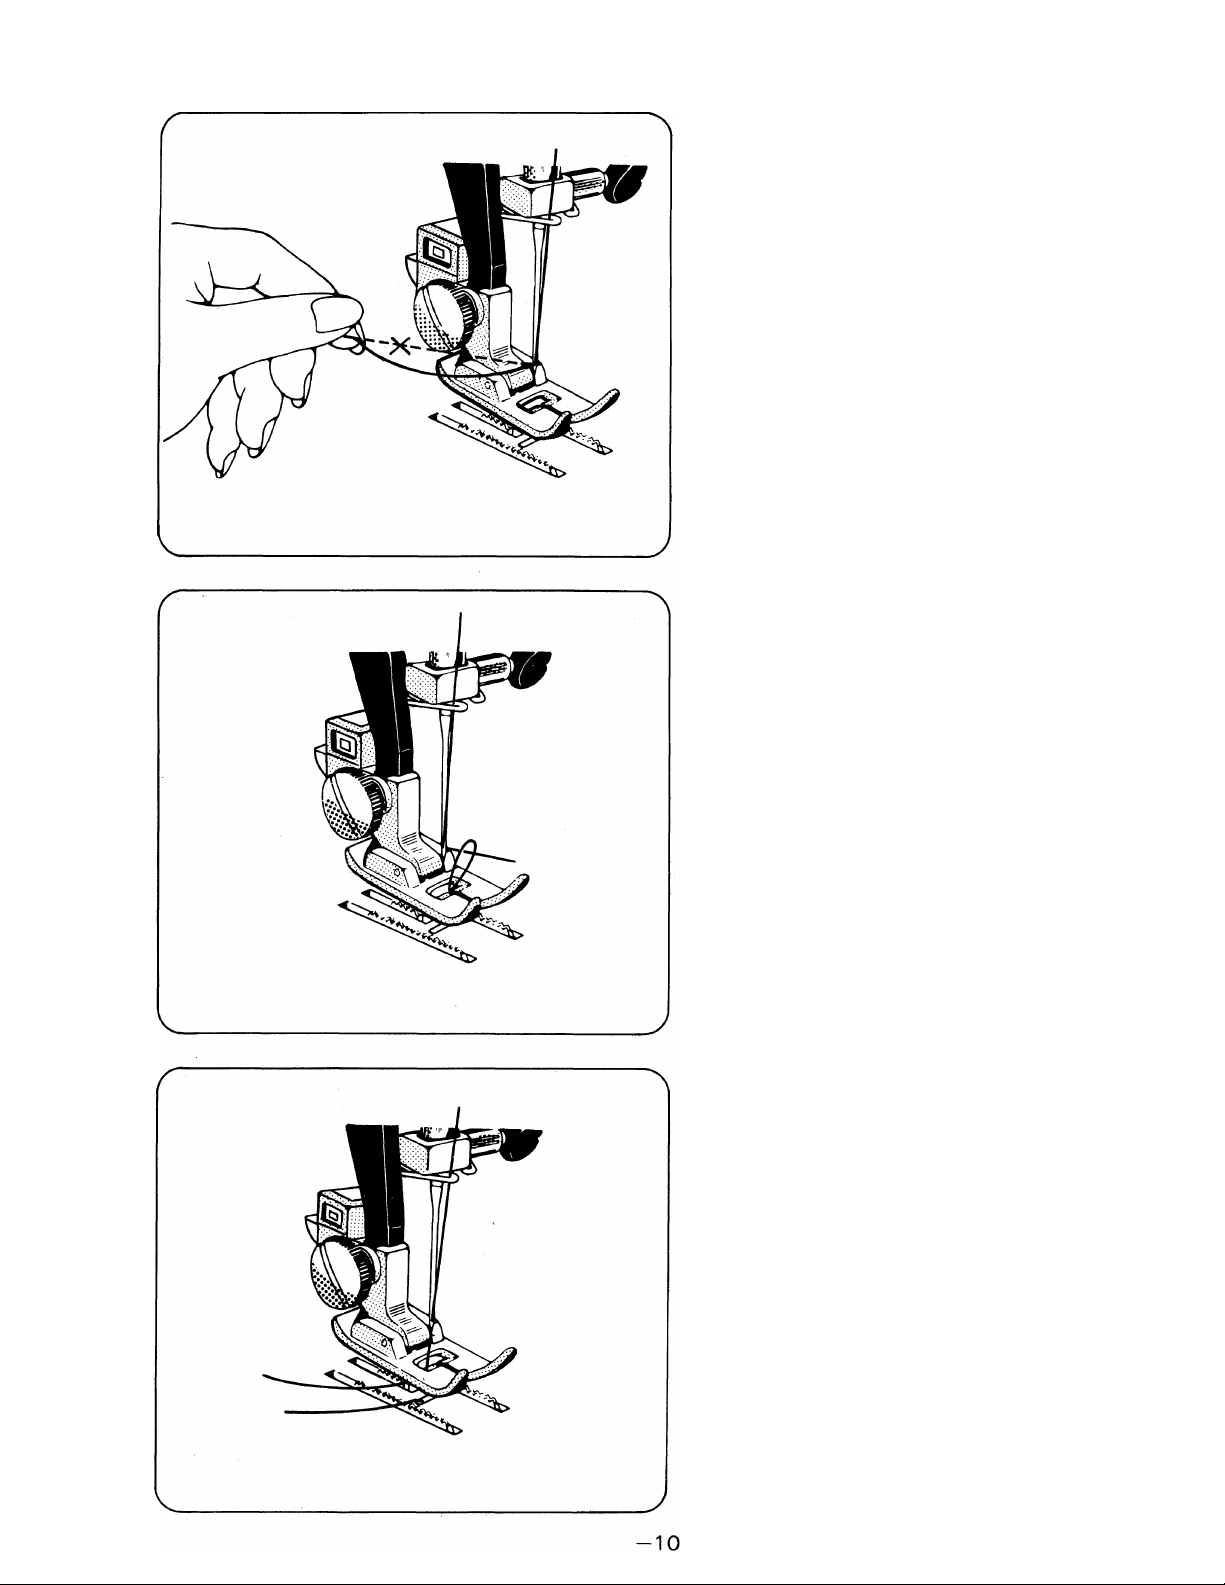
Threading Upper Thread
1. Raise presser foot.
2. Set take-up lever to the highest position by
turning handwheel towards you.
3. To locate spool pin, open stitch panel over. Lift
cover with thumb and flip open to full extended
position.
Lower carrying handle if necessary.
4. Pull spool pin towards you and place a spool of
thread on pin.
5. Slide spool cover onto spool pin, as illustrated
and replace to original position.
Use the large spool cover for larger spools and
use the small cover for smaller spools.
* If you use small spool cover for bigger spool,
upper tension may be unbalanced and, some
times, will cause skipping or thread breakage.
-8-
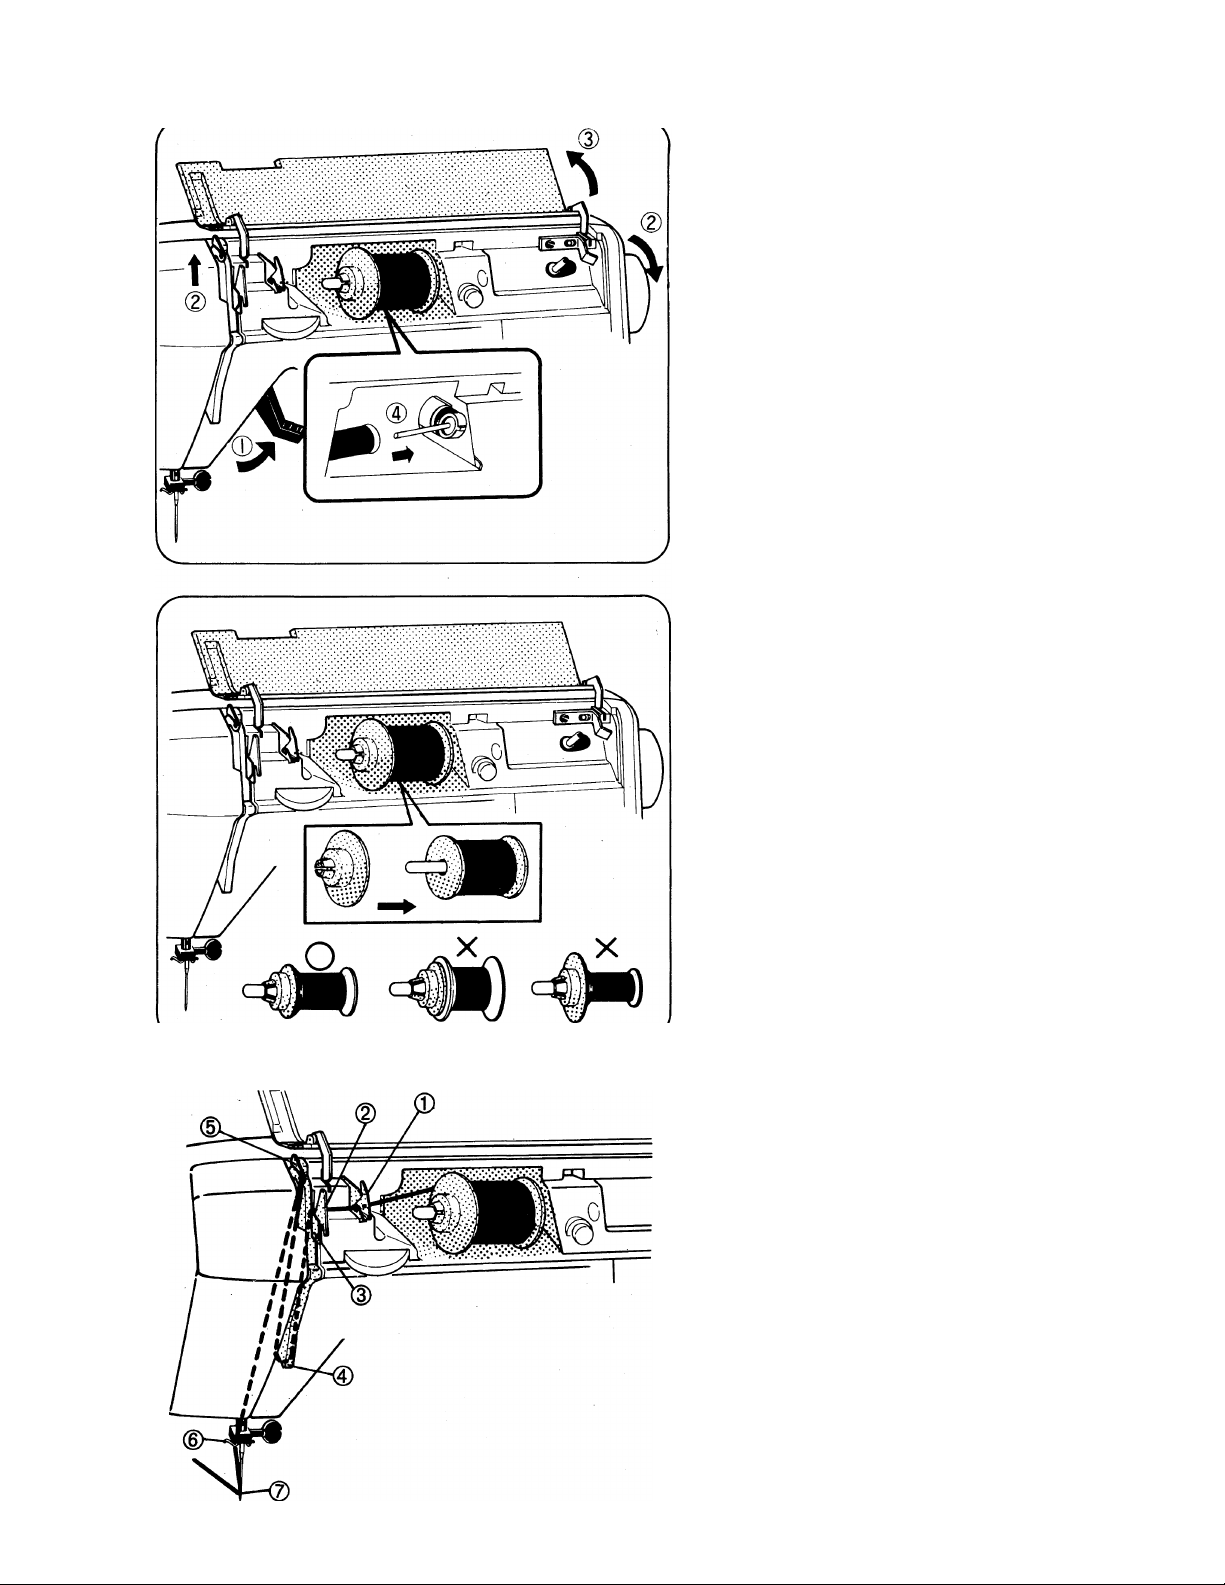
Thread, machine in accordance with instructions
on next page, following steps © ~ ©.
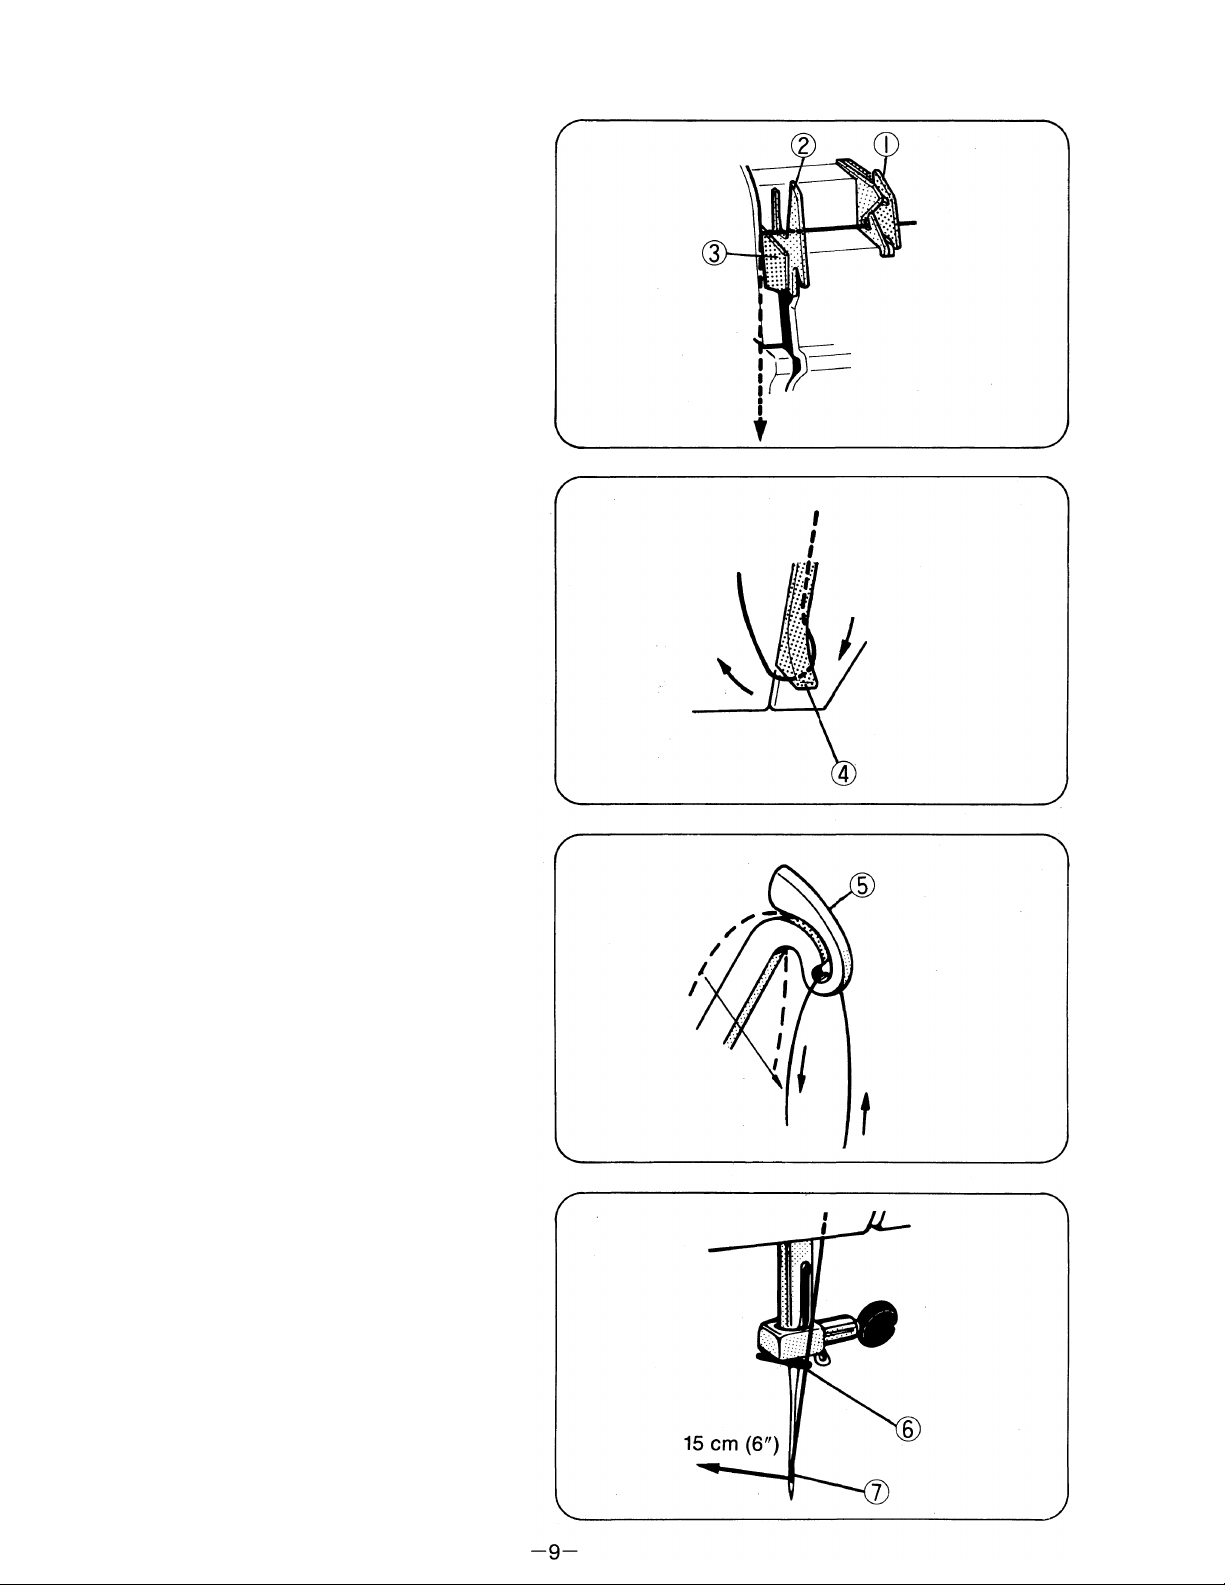
Pass thread through lower guide © to (D.
Lead thread through either side of tension plate
Pulling thread down, pass thread around lower
guide © from right to left.
Continue pulling thread up and slide thread through
take-up lever ®.
Pass thread to needle guide ® (use left one) then
to needle eye ® and thread from front to back.
Allow afcK>ut 15cm (6") of extra thread.
Drawing Up Lower Thread
Hold end of upper thread with left hand as
illustrated.
Turn handwheel slowly towards you until needle
moves down and up again to its highest position.
Pull upper thread slowly and lower thread will be
brought up in a loop.
Pull both threads out about 15 cm (6") and place
them together under presser foot on left.
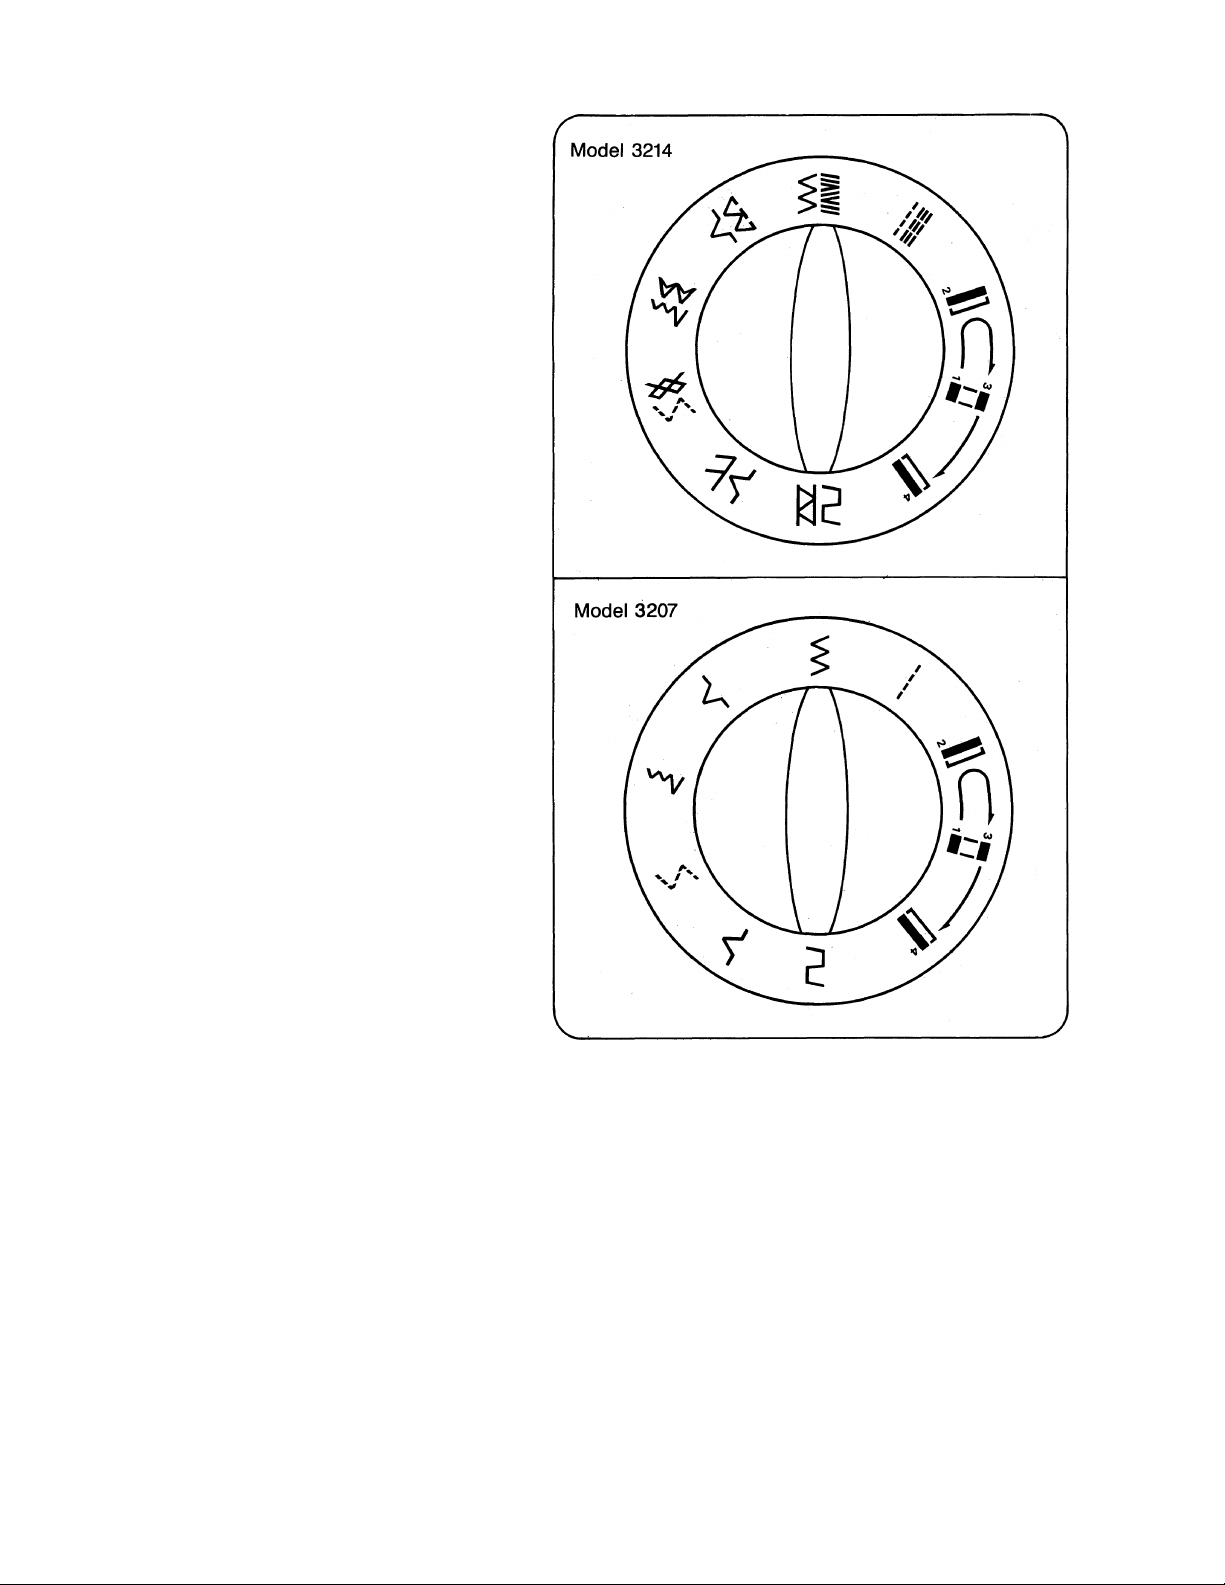
Pattern Sefection Dial
The desired stitch will be obtained by turning the
stitch selector dial. It can be turned either to the
right or to the left.
Note: When operating selector, make sure needle
is in the highest position.
The stitches are as shown on the dial.
* Always make sure needle is in the highest
position when operating dial.
-11
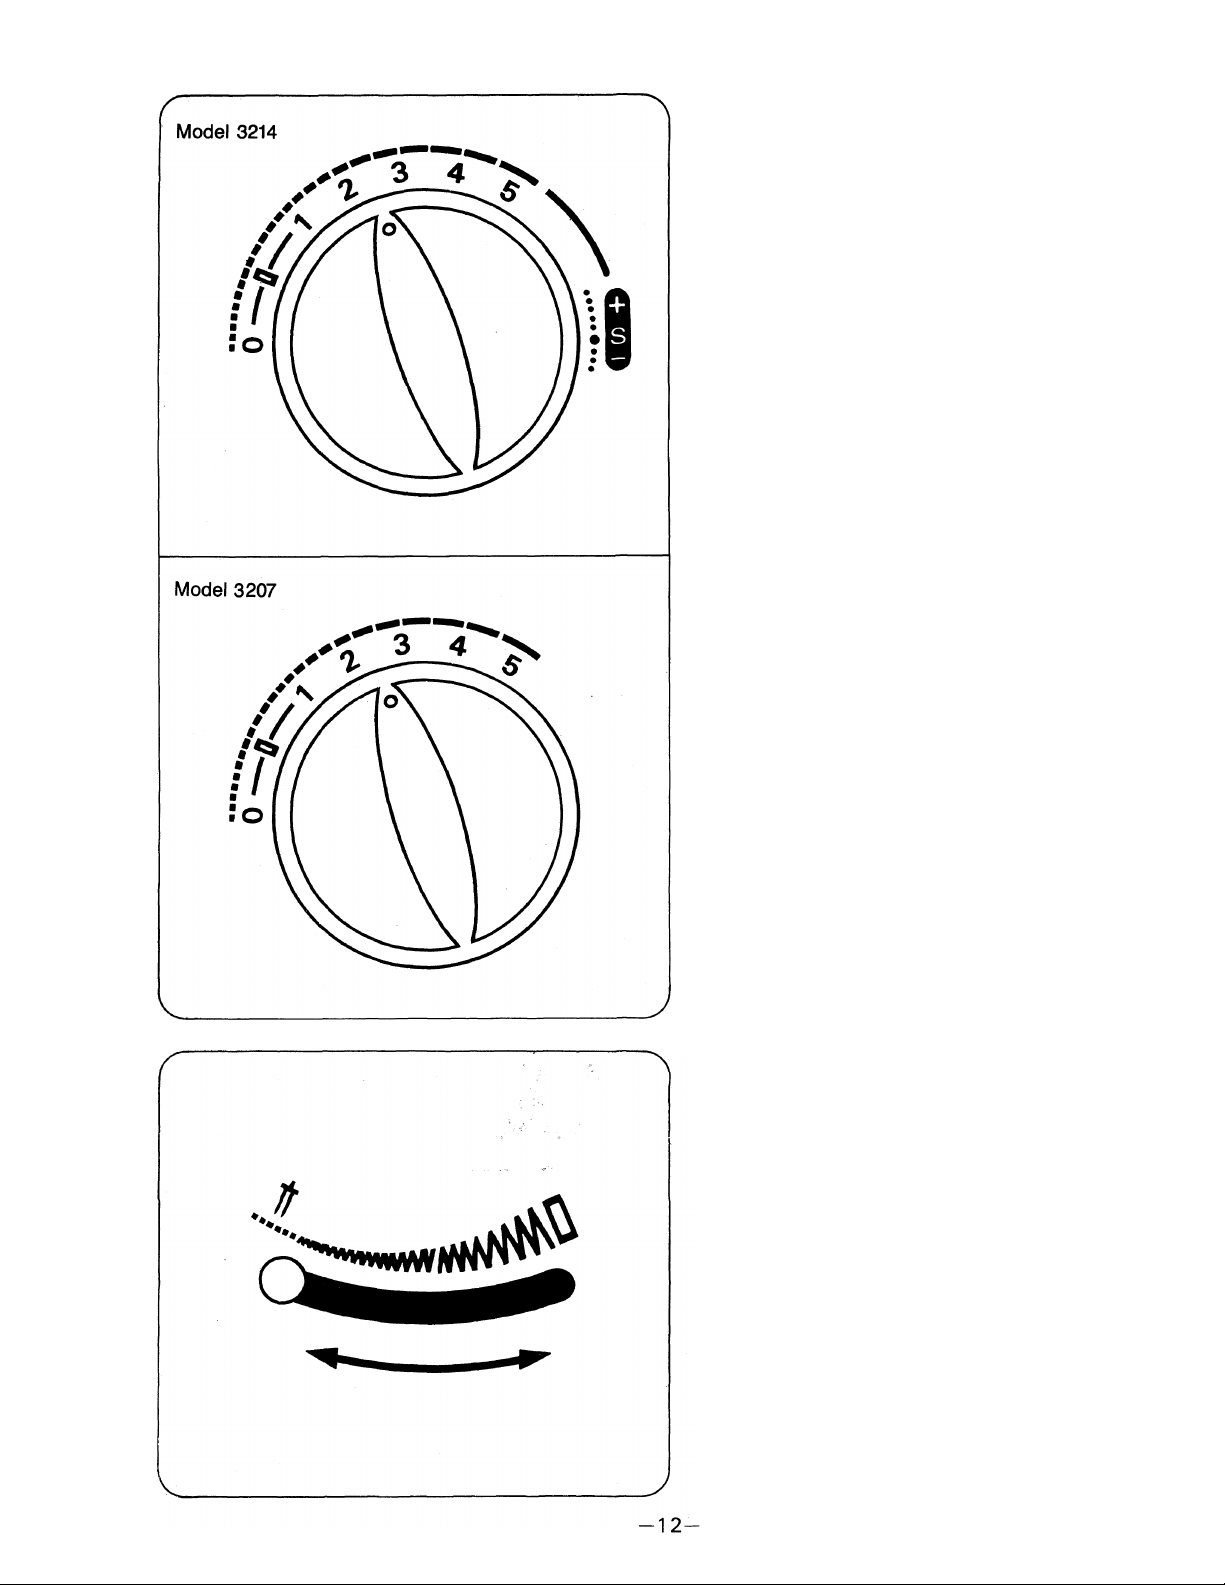
StitQfi Length Dial
For a longer stitch, turn dial to right, For a shorter
stitch, turn it to left.
For normal sewing it is set between 2 and 3.
Width Control
To set control at required stitch width, slide lever
to the right. Continue to move lever to the right for
maximum stitch width.
Slide lever to the left for straight stitching.
Make sure needle is in the highest position when
you set control.
 Loading...