

Page 1

SINGER
THE SINGER COMPANY
Page 2

Instru-ctioiis for \xsiiig-
SINGER'
221
Page 3
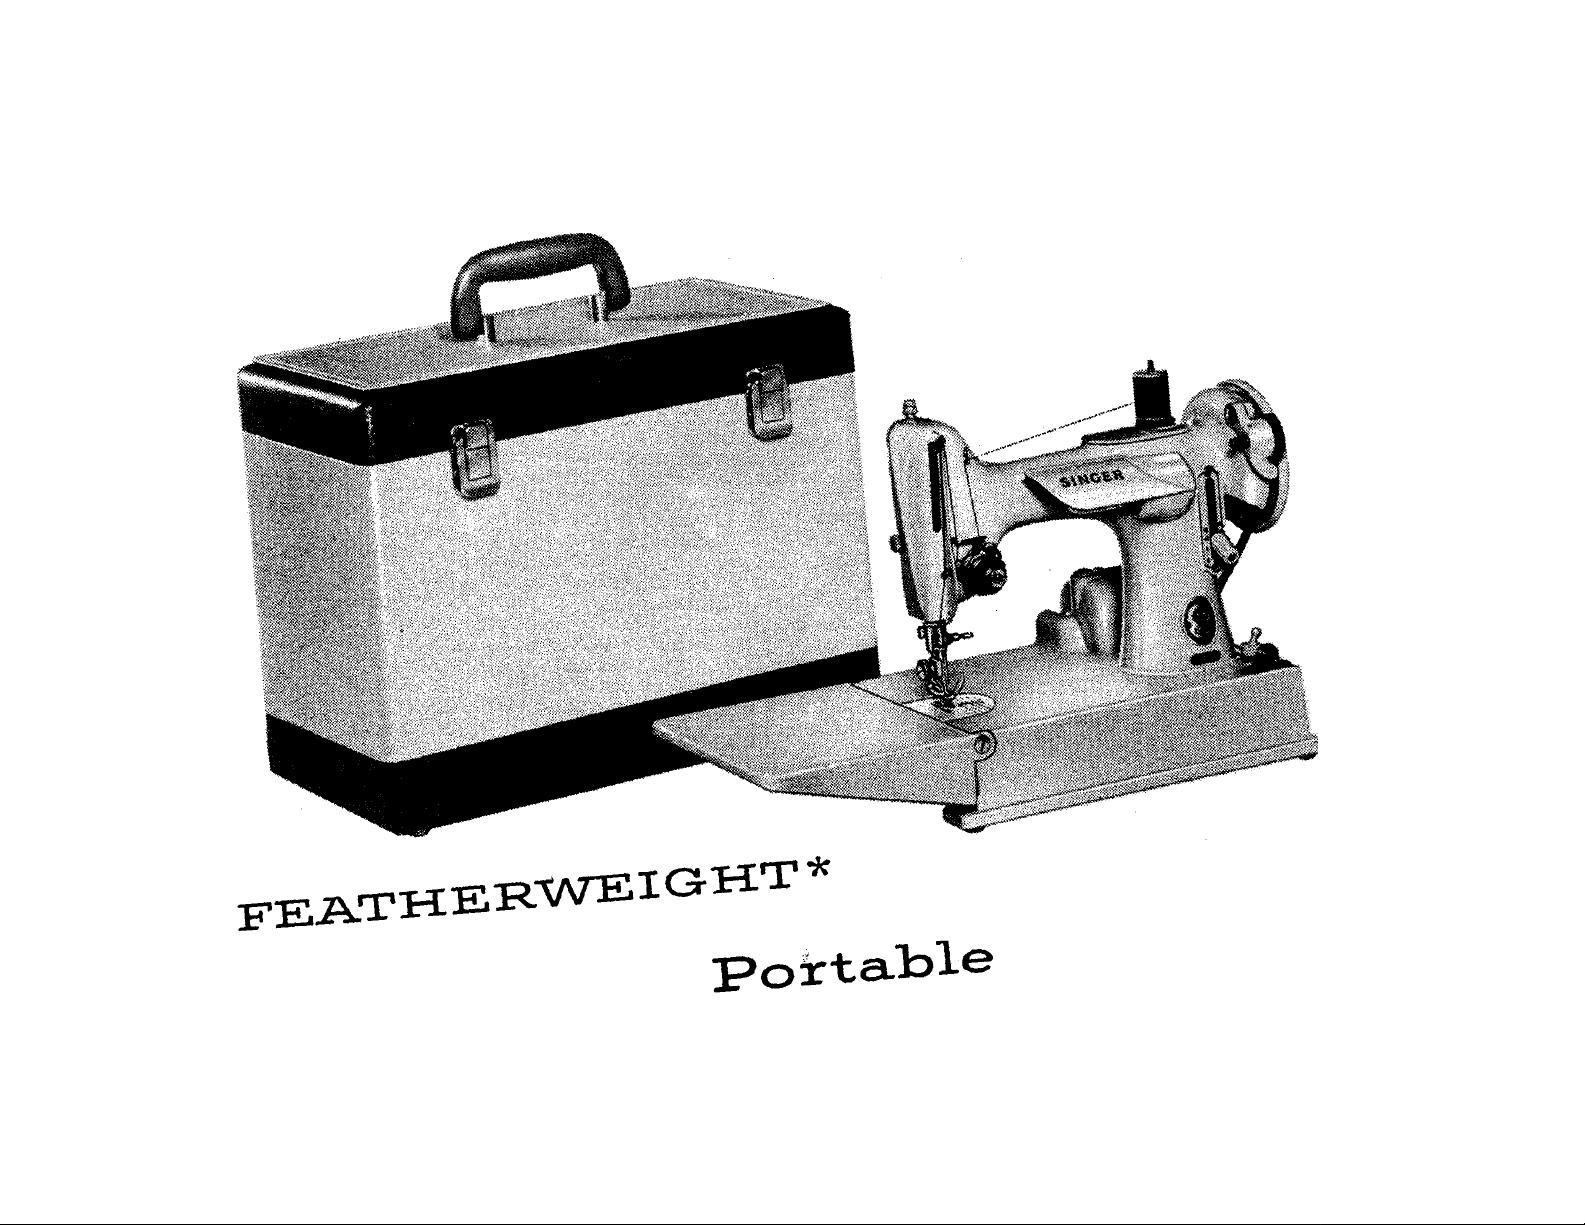
Electric
Sewing Machine
Page 4

AS THE OWNER OF THE SINGER 221
You have a machine with a tradition of superior crafts
manship—a tradition you will recognize in the smooth,
efficient operation of this lightweight machine. Distinc
tive clothing for yourself and your family and numerous
items for the home—^can be yours at a fraction of their
ready-made cost.
SINGER SERVICE
T^^herever you go you will find expert, dependable
SINGER* SERVICE close at hand. SINGER is in
terested in helping you keep your SINGER SEWING
MACHINE in top running condition. That is why you
should always call your SINGER SEWING CENTER if
your machine ever requires adjustment or repair. Only
from your SINGER SEWING CENTER can you obtain
the services of a trained SINGER repair man and
warranted SINGER* parts.
EVERYTHING FOR THE WOMAN WHO SEWS
The answer to your sewing needs is at your SINGER
SEWING CENTER. There you will find a wide choice of
sewing aids, notions, sewing information and services.
Look for the famous red “S” and SINGER trademarks on
vour SINGER SEWING CENTER and the ever-ready
SINGER SERVICE CAR. Look under SINGER
COMPANY, in phone book, for address nearest you.
*A Trademark of THE SINGER COMPANY Copyright Under International Copyright Union
Page 5
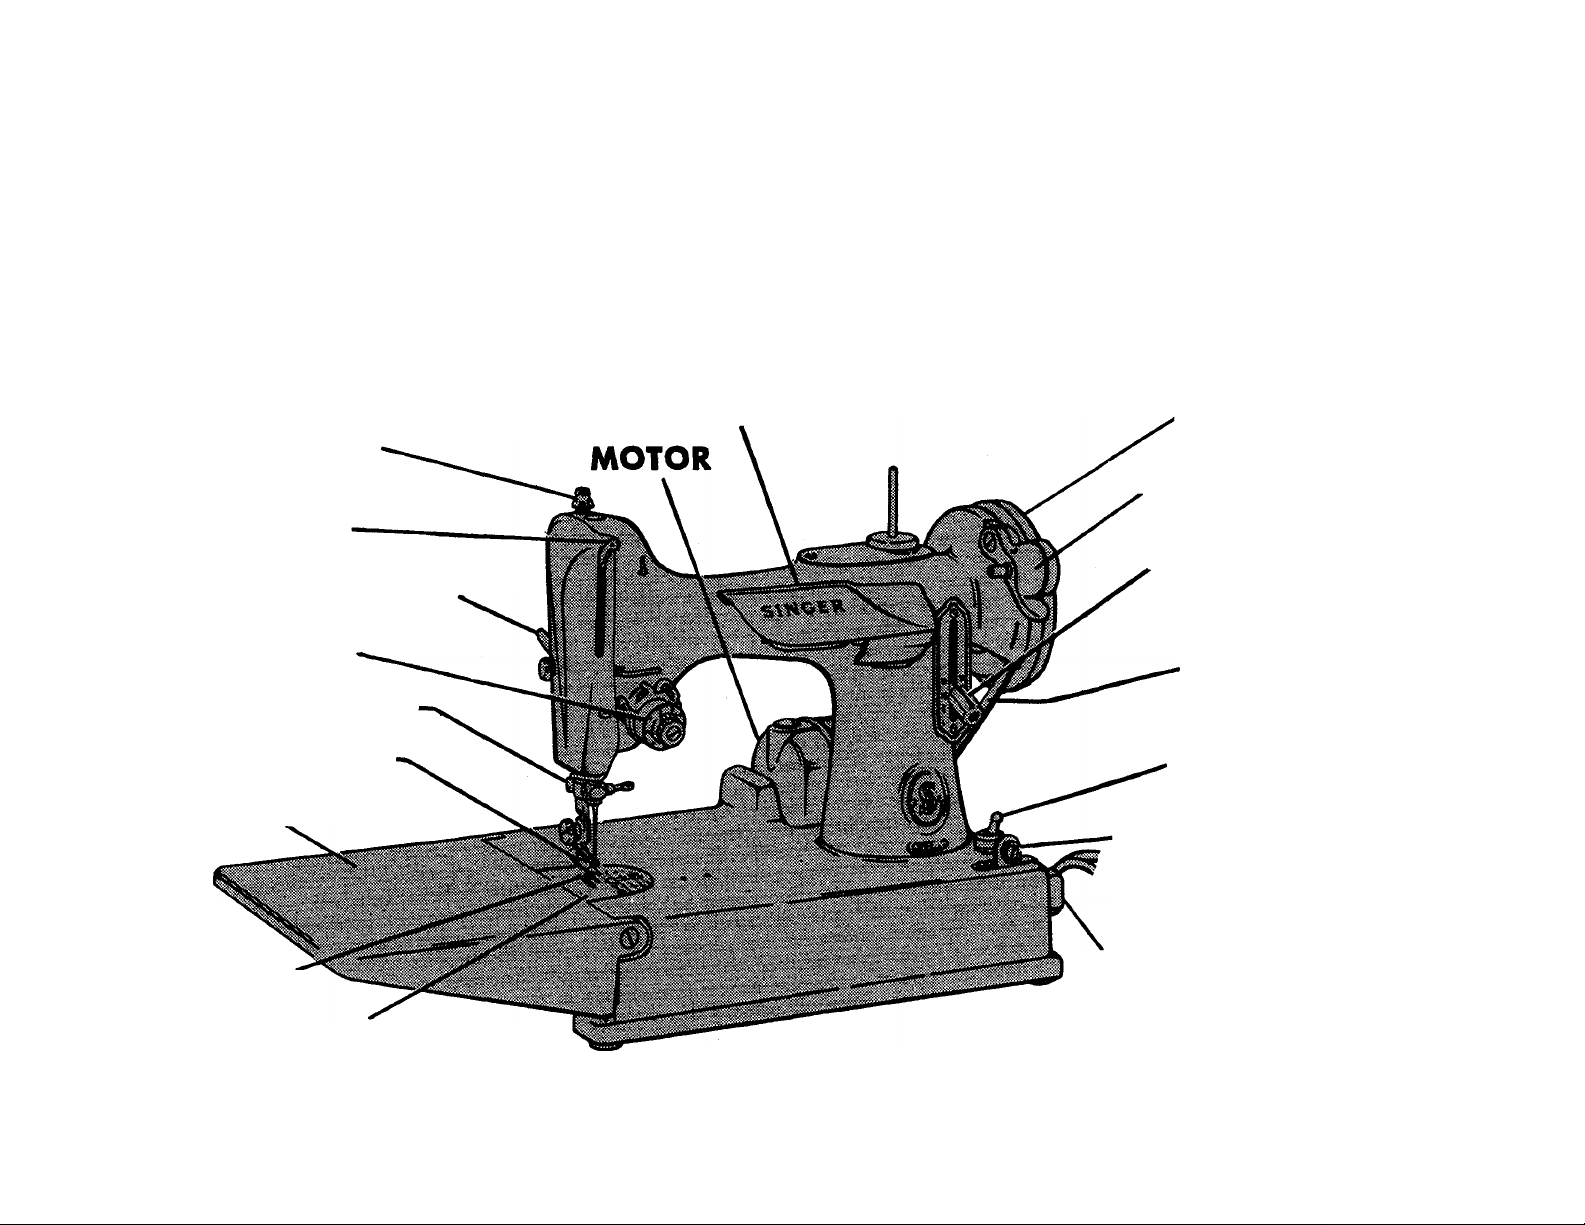
PRINCIPAL PARTS OF MACHINE 221
PRESSURE REGULATING
SCREW
THREAD TAKE-UP
LEVER
PRESSER BAR LIFTER
NEEDLE THREAD
TENSION
THREAD CUTTER
PRESSER FOOT
BED EXTENSION
FEED DOG
LIGHT
HAND WHEEL
BOBBIN WINDER
STITCH LENGTH
REGULATOR
MOTOR BELT
LIGHT SWITCH
BOBBIN WINDER
THREAD TENSION
CORD CONNECTION
THROAT PLATE
Page 6

FABRIC, THREAD, NEEDLE AND STITCH LENGTH CHART
FABRICS
DELICATE—tulle, chiffon, fine lace,
silk organdy, fine tricot
LIGHTWEIGHT—batiste, organdy, jersey,
voile, taffeta, silk crepe, plastic film
MEDIUM WEIGHT—gingham, percale, pique,
linen, chintz, faille, satin, fine corduroy,
suitings
MEDIUM HEAVY—gabardine, tweed, sail
cloth, denim, coatings, drapery fabrics
THREAD
SIZES
Fine Mercerized
100 to 150 Cotton
Synthetic Thread
50 Mercerized
80 to 100 Cotton
A Silk
Synthetic Thread
50 Mercerized
60 to 80 Cotton
A Silk
Synthetic Thread
Heavy Duty Merc.
40 to 60 Cotton
NEEDLE
SIZES
9 15 to 20
11
14
16
MACHINE STITCHES
(8 to 10 for plastic)
PER INCH
12 to 15
12 to 15
10 to 12
HEAVY—overcoatings, dungaree, upholstery
fabrics, canvas
Heavy Duty Merc.
24 to 40 Cotton
18
8 to 10
Page 7
NEEDLES AND THREAD
This machine uses needle
Catalog No. 2020 (15x 1 ).
Sizes 9j llj 14, 16 and 18.
For perfect stitching, choose needle and
thread which correspond to the fabric accord
ing to the chart on page 4. Be sure to use like
threads for both needle and bobbin.
NEEDLE INSERTION
• Raise needle bar to its highest point.
• Loosen needle clamp screw A.
• Insert needle (flat side to the left) up into
needle clamp as far as it will go.
• Tighten clamp screw.
K
FLAT
SIDE
Page 8

ELECTRICAL INFORMATION
The SINGER* Electric Motor at back of ma
chine is furnished for operation on an alter
nating current of 110-120 volts, 25 to 75
cycles, or on 110-120 volts direct current.
Special motors can be provided through your
SINGER SEWING CENTER for direct or
alternating current for any voltage between 50
and 145, and for 32 volts direct current.
Before Inserting Electric Plug be sure that
voltage and number of cycles stamped on
motor nameplate are within range marked on
your electric meter installed by your power
company.
Electrical Connection. Push 3-pin terminal
plug on 3-pin terminal block at right of
machine and connect plug at other end of
cord to electrical outlet.
Speed Controller. The speed of machine is
regulated by amount of pressure on foot
controller.
Page 9
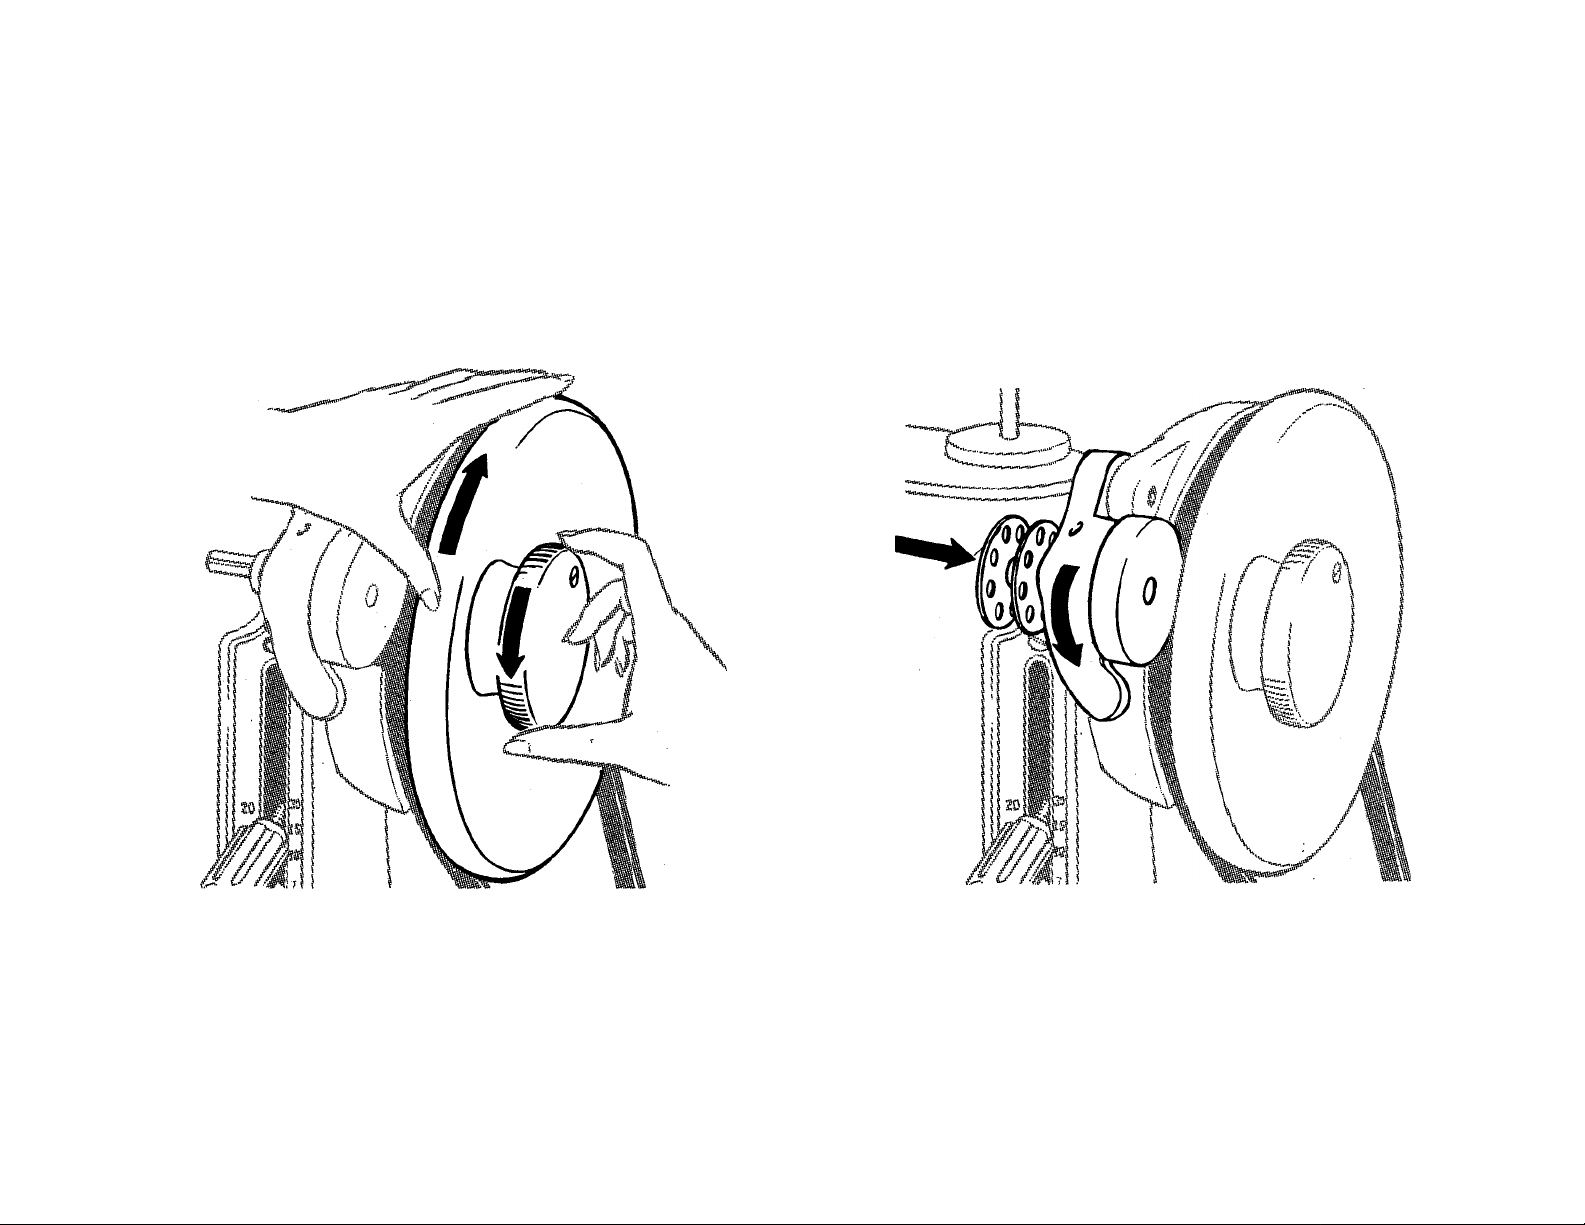
TO REMOVE BOBBIN CASE AND BOBBIN
Raise thread take-up lever to its highest position.
Raise bed extension.
Grasp bobbin case latch and withdraw bobbin case.
Release latch and bobbin will drop out.
LATCH
BED EXTENSION
Page 10
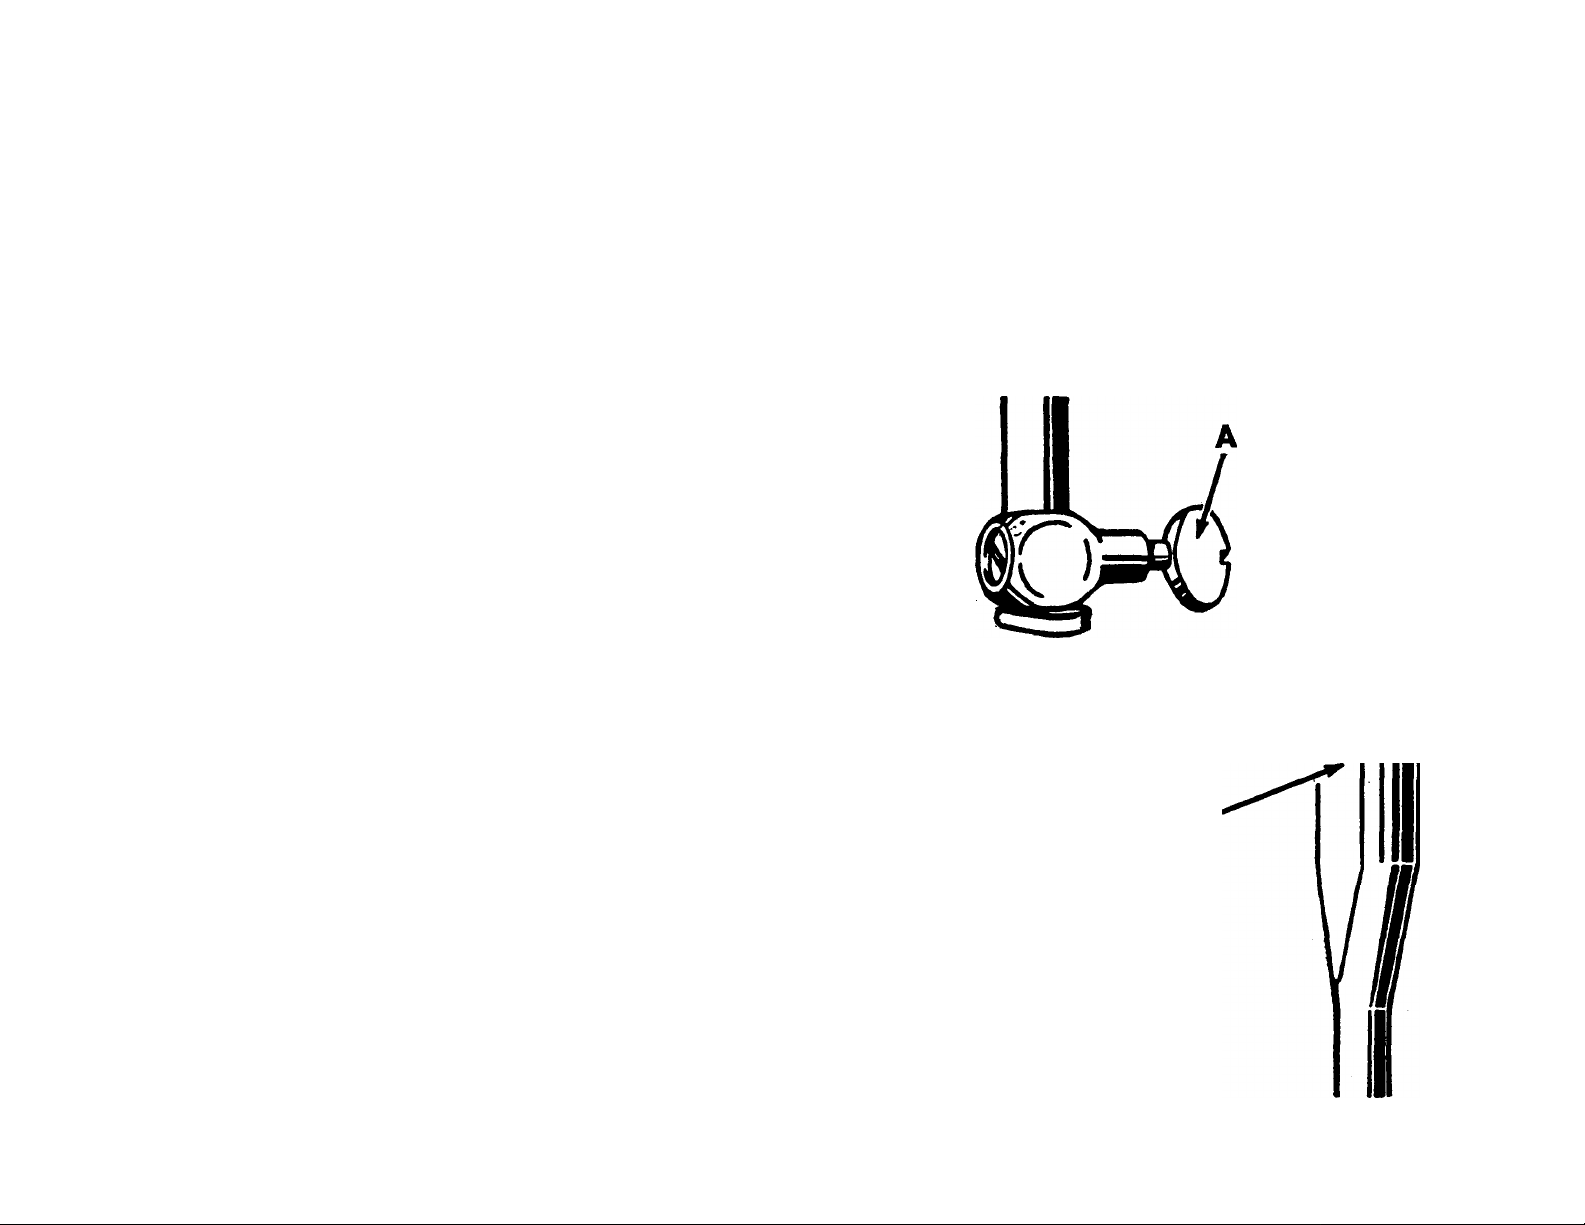
8
TO WIND BOBBIN
Loosen stop motion screw
with right hand.
Place empty bobbin on spindle.
Press bobbin winder down against
belt.
Page 11

TO WIND BOBBIN—Continued
If thread doesn’t wind e^venly
on bobbin—
• Loosen screw which holds bobbin
winder tension bracket to bed of
machine.
• Move bracket to left if bobbin
winds high on right.
• Move bracket to right if bobbin
winds high on left.
• Tighten tension bracket screw.
When bobbin is full—
• Stop machine.
• Lift bobbin
Place spool of thread on spool pin.
Thread machine as shown above.
Hold end of thread and start ma
chine. (End of thread will break
oflf after a few coils have been
wound on bobbin.)
winder away
from belt.
• Remove bob
bin.
• Tighten stop
motion screw.
Page 12

10
TO THREAD BOBBIN CASE
1. Hold bobbin case
and bobbin so
that thread leads
off in direction
shown above.
2. Place bobbin into
bobbin case. Pull
thread into slot 1.
3. Pull thread under
tension spring 2
and into slot 3 at
end of spring, as
shown.
Page 13

NOTCH
POSITION FINGER
STUD
11
TO REPLACE BOBBIN CASE
AmwMwiBttmAaittHunmHUiw.
nuoMUtiMUtiHsUtiimiuiuiiiMnnttxunton«
Hold bobbin case by latch and place it
on stud, having thread draw from top of
bobbin case.
Release latch apd press bobbin case
back until latch enters groove in stud.
Allow. about three inches of thread to
hang free from bobbin case and turn down
bed extension.
CAUTION: If throat plate is removed
for cleaning stitch forming mechanism,
etc., make certain, when replacing throat
plate, that position finger of bobbin case
base enters notch of position plate at
tached to underside of throat plate, as
shown above.
Page 14

12
UPPER THREADING
• Raise take-up lever to its highest point.
• Place spool of thread on spool pin.
• Lead thread through threading points shown,
• Thread needle from right to left.
• Draw sufficient thread
through eye of needle
with which to start
sewing.
Page 15
13
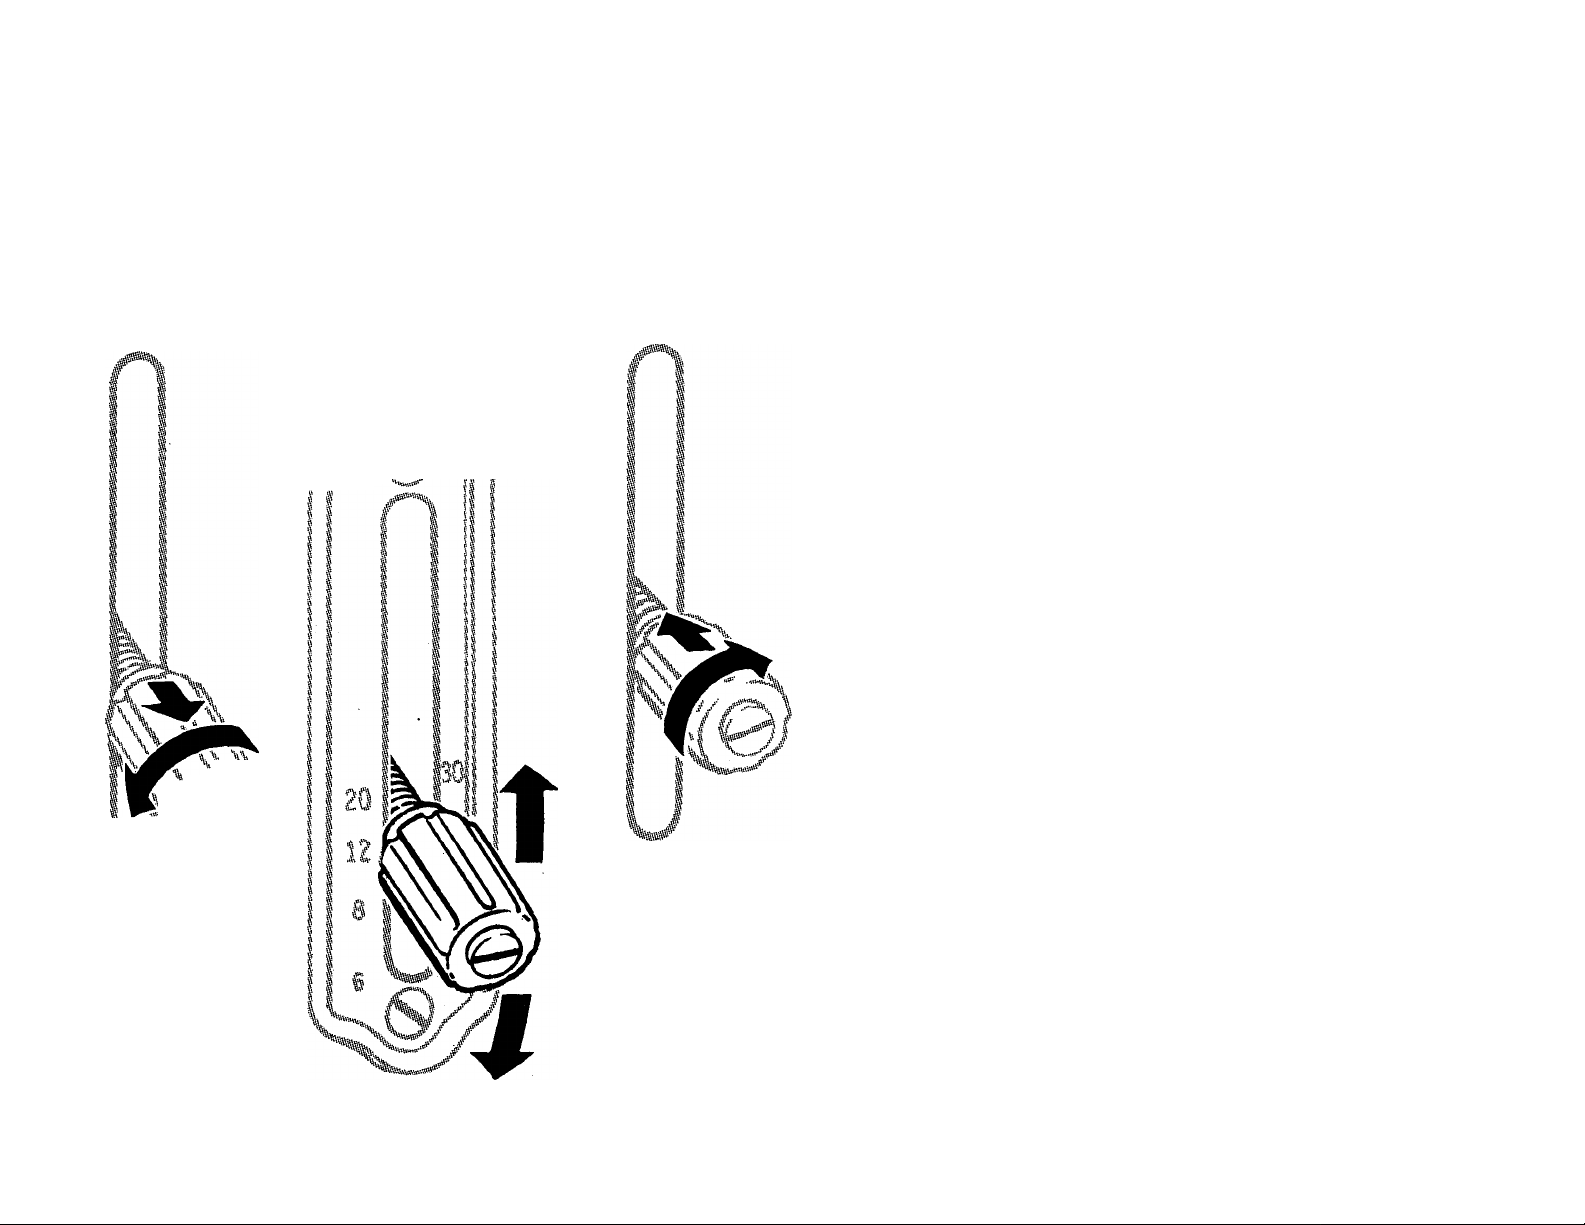
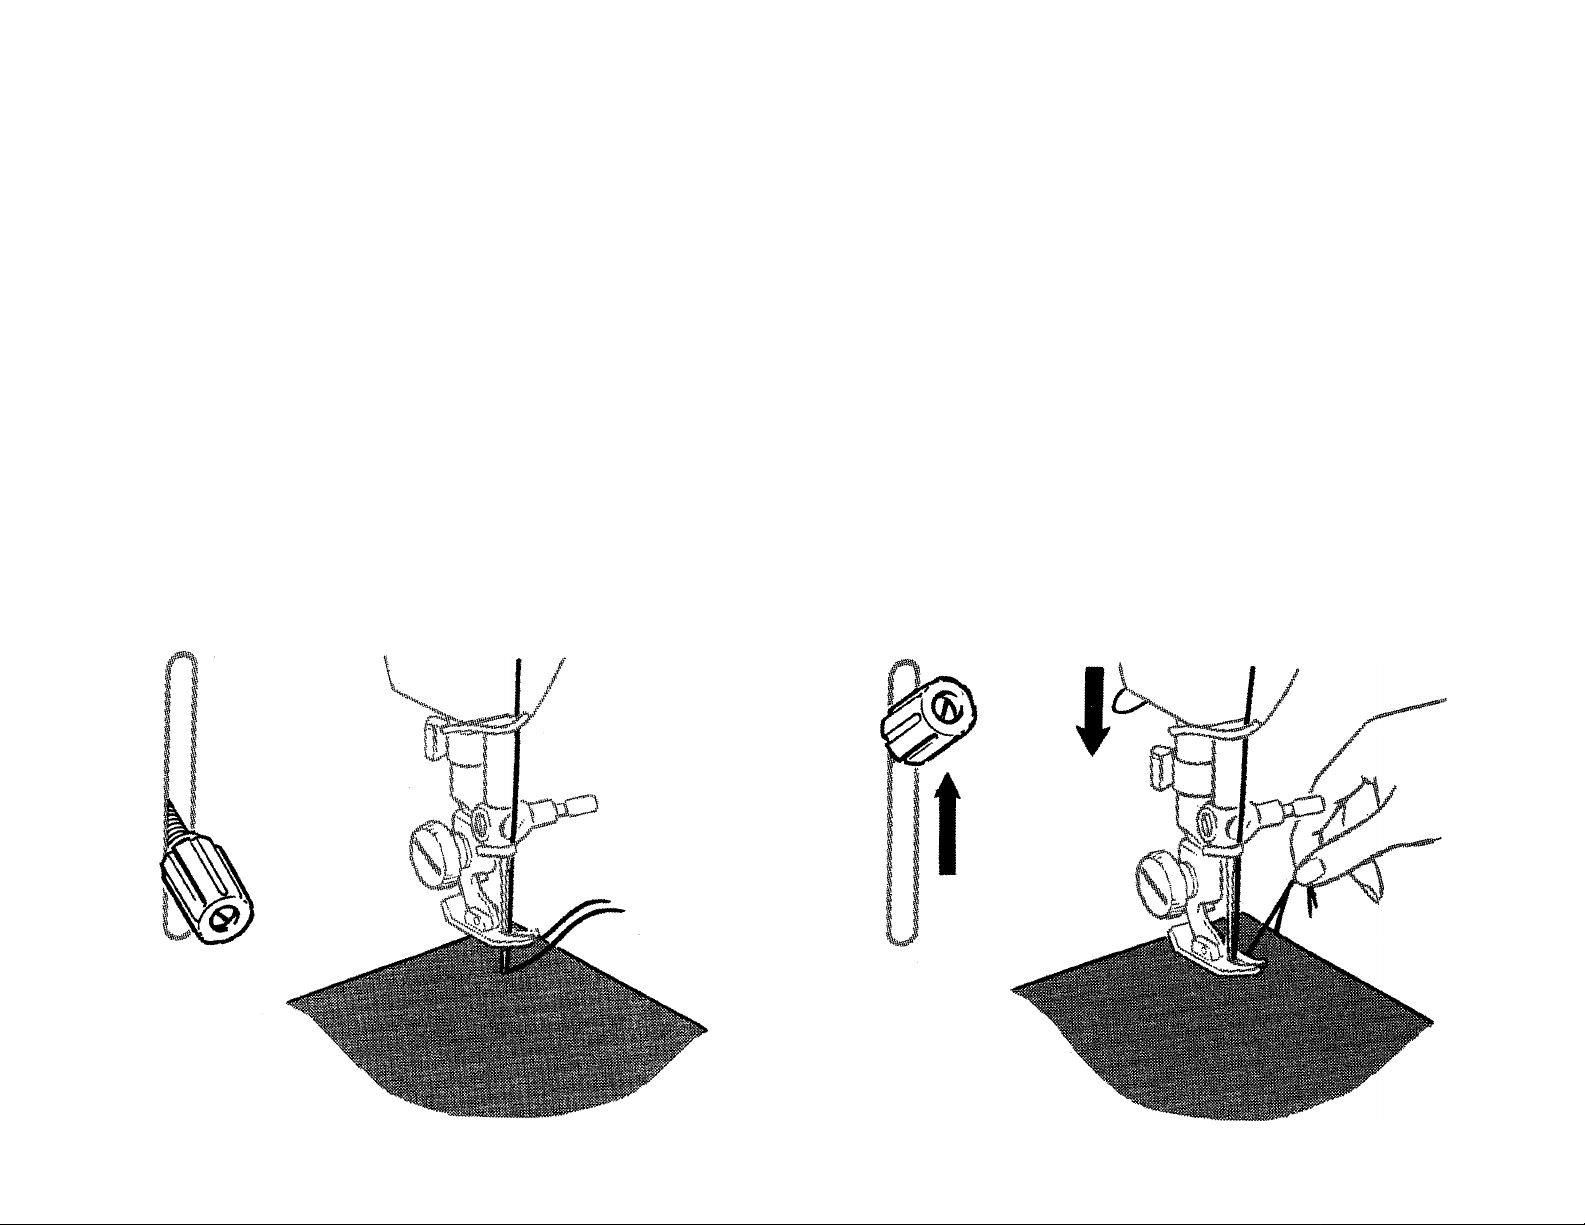
STiTCH LENGTH REGULATOR
Numerals on the indicator plate
IK K-'^x ^
>1 ia
fc.,\
represent approximate number of
stitches per inch.
I
To set stitch length—
• Turn thumb nut to the left.
• Set lever at desired stitch setting.
• Turn thumb nut to the right until
it rests against indicator plate.
Once the thumb nut has been
tightened, reverse stitching is accom
plished by raising the lever to its
highest point.
Page 16
14
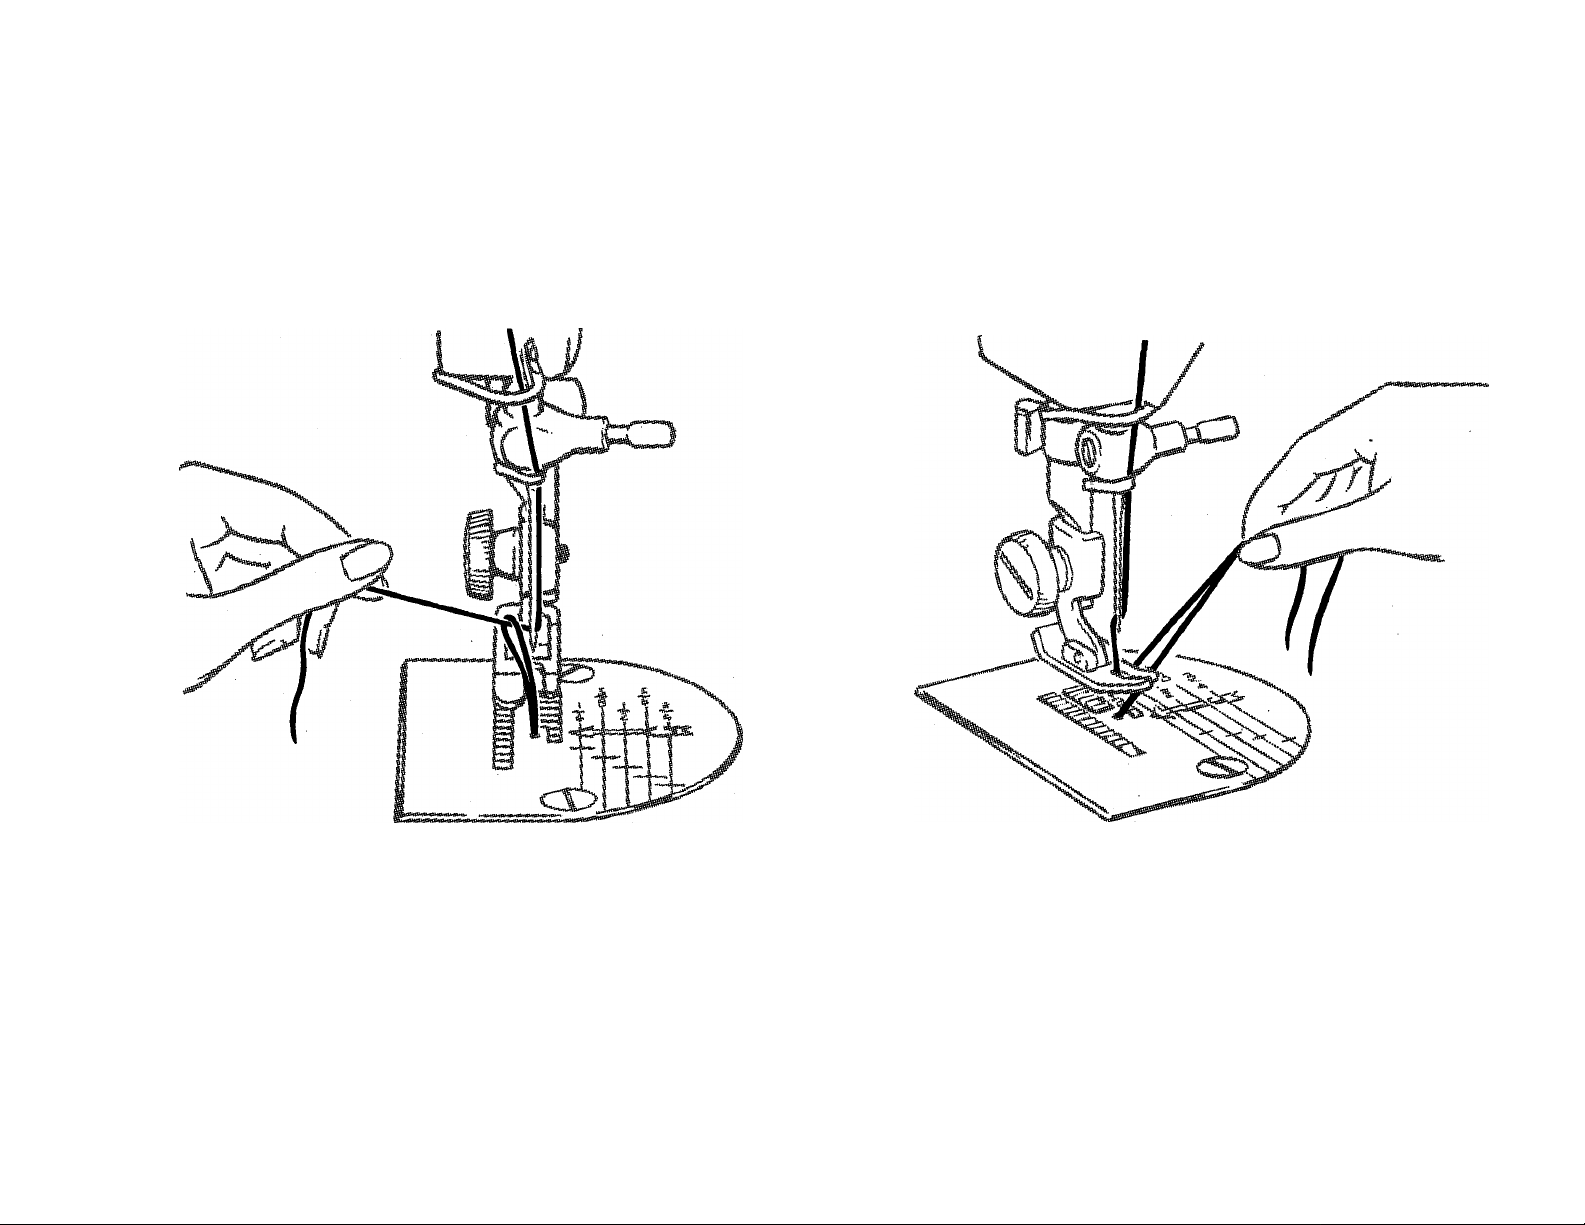
PREPARING TO SEW
Have take-up lever at its highest
point.
Hold needle thread lightly with
left hand.
Turn hand wheel so that needle
enters plate and brings up bobbin
thread.
Pull end of bobbin thread up
through oeedle hole in plate.
Lay both threads diagonally under
presser foot.
Page 17
SEWING A SEAM
Set stitch regulator for desired
stitch length.
15
Position needle in fabric about
y% inch from edge.
Raise stitch regulator to reverse.
Lower presser foot.
Page 18

76
в
act
stitch
to
of ^•з^J
^«А/и.
Co
mi,
ued
fo.
^®eao,. °^^or/o
'^^агс/
Page 19

SEWING A SEAM-^Continued
Raise stitch regulator and back
stitch to reinforce end of seam.
17
With take-up lever at its highest
point, raise presser foot, draw
fabric back and cut threads on
thread cutter.
Page 20

18
GUIDING AND SUPPORTING FABRICS
Most fabrics need to be guided only in front of the presser foot.
Fabrics of unusual texture and weave, filmy sheers, crepes, knits,
tricots, etc., require support while being stitched.
For such fabrics apply gentle tension on the seam by holding
fabric in front and in back of the presser foot.
Page 21

V PRESSURE
19
PRESSURE ADJUSTMENTS
y regulating
SCREW
i /1 I 'V
//f
/1/
To decrease pressure, turn thumb
screw up.
To increase pressure, turn thumb
screw down.
Pressure is the force the presser foot exerts on
the fabric.
Too light a pressure will cause irregular feed
ing, which affects both quality of stitch and
evenness of seams.
Too heavy a pressure not only affects stitch and
seam quality, but will mar smooth surfaces and
pile fabrics.
Surface finish, as well as weight and texture of
the fabric, must be considered when determining
the amount of pressure needed.
Page 22

20
NEEDLE THREAD TENSION
Needle thread tension too
tight—correct by setting
dial to lower number.
Needle thread tension too
loose—correct by setting
dial to higher number.
I
A perfectly locked stitch results with upper and lower tensions balanced
so that needle and bobbin threads are drawn equally into fabric.
Page 23

21
BOBBIN THREAD TENSION
Bobbin thread tension
too tight—correct by turn
ing screw counterclock
Bobbin thread tension
too loose—correct by turn
ing screw clockwise.
wise.
A perfectly locked stitch results with upper and lower tensions balanced
so that needle and bobbin threads are drawn equally into fabric.
Page 24

DARNING
Worn or torn areas on household
textiles and clothing can be darned
effortlessly and quickly with little
practice. Adjust Stitch Length Reg
ulator for desired stitch length and
decrease pressure by turning thumb
screw up (see page 19). The pressure
should be lighter than for normal
sewing but not too light to prevent
work from feeding smoothly.
22
Place portion to be darned under
the presser foot. Lower presser bar
and start stitching, alternately allow
ing fabric to feed normally away
from you and then gently pulling
fabric toward you. Continue this for
ward and backward motion until area
to be darned is filled with parallel
lines of stitching. For reinforcement
or additional strength, cover area with
cross-side lines of stitching. Open
areas require an underlay. Basté
underlay in place before darning.
Page 25

23
Instructions for using
ATTACHMENTS
Those attachments which are not furnished with your machine are
available for purchase at your local SINGER SEWING CENTER.
• • •
Page 26

24
THE FOOT HEMMER
The foot hemmer
forms and stitches
a perfectly turned
hem without bast
ing or pressing. It
is attached to the
machine in place of
the presser foot.
Applications
Fine hems Hemming with lace
Edging ruffles Lace insertion
Hemmed seams Lingerie finishes
• Place the creased hem edge under
the foot and take several stitches
through the fold.
• Grasp the thread ends and the
single fold in front of the hemmer
and lift the single fold into the
hemmer scroll.
Soft fabrics will enter the scroll
best with the foot down, firm crisp
fabrics with the foot raised.
Hemming
• Form a double fold at the very
edge of the fabric.
• Crease this fold for about 2".
• Draw the needle and bobbin
threads under the hemmer.
Page 27

25
FOOT HEMMER (Confd)
• Stitch slowly for several inches until
hem is well started. Hold thread ends in
back of foot with the left hand and
guide the raw fabric edge into the mouth
of the scroll with the right hand.
Even feeding is essential to good hem
ming. The same width of fabric must be
kept in the scroll of the hemiher at all
times.
Hemmed Seams
Hemmed seams are often substituted for
French seams where a fine narrow seam is
appropriate.
• Allow a scant seam allowance.
• With right sides of the fabric together,
place the upper layer a scant to the
left of the lower layer.
• Insert the two fabric edges into the
hemmer and proceed as for a plain hem.
Page 28

FOOT HEMMER (Cont*d)
Hemming With Lace
Lace edgings can be applied with the
Foot Hemmer to trim lingerie hems, chil
dren’s clothes, etc.
Lace Applied Over Hern
• Fold and start hem in usual way.
• Starting about 1 inch down from end of
lace, place selvage under the needle,
then lower the needle to hold lace
firmly.
• Raise hemmer foot slightly and slip lace
under back part of foot.
• Stitch slowly, guiding fabric with right
hand and lace with left hand. Take care
not to stretch the lace.
26
Lace Applied Under Hem
When using lace underneath the fold of
a hem, the procedure is the same as when
making a hemmed seam (page 25). Slip
the lace in from the left as you would the
second piece of fabric.
This method is used where a neat finish
is desired on both sides of the material.'
Page 29

THE SEAM GUIDE
The seam guide is
adjustable for spac
ing stitching at any
distance between
Ys " and 1% " from a
fabric edge.
Applications
Seams Stay stitching
Top stitching—single and multiple rows
• Attach the guide to the machine with the
thumb screw in either of the threaded
holes at the right of the needle.
• Adjust for width desired.
• For straight edges, align guide with the
presser foot.
• For curved edges, set the guide at an
angle so that the end closest to the
needle acts as a guide.
• For pinned seams, place the pins with
the points toward the seam edge so that
they nip into the fabric at the stitching
line. The hinged foot will then ride
freely over the points.
•
27
Page 30

28
THE BINDER
The binder is used to apply commercial
binding as well as self-fabric bias to an
unfinished edge.
This colorful trim is attractive when
applied to children’s wear, aprons and
household textiles. It is a practical finish
for seam edges that ravel and for making
bound seams.
Inserting the Binding
Pre-folded commercial bias tape is
inserted from the right into slot of the
binder scroll.
• Cut the binding diagonally to form a
long point.
• Insert pointed end
into slot and pull
through scroll.
Self-fabric binding
should be cut
wide on the true
bias.
• Insert unfolded binding
directly into opening at end
of scroll and
pull through.
As binding passes through scroll raw
edges are turned in.
Page 31

29
BINDER-(Cont’d)
Adjustment and Operation
of the Binder
The edge to be bound is guided
into center of scroll. Stitching is
positioned close to edge of binding
by adjusting scroll portion of at
tachment.
• Loosen adjusting screw. Move
scroll to the right or left as neces
sary.
Be sure that screw is well tight
ened after making an adjustment.
Never pull binding as it feeds
through scroll. Allow attachment to
do the work. Merely guide edge to
be bound well into center of scroll
as you stitch.
Page 32

30
BINDER (Conrd)
Binding Curved Edges
Curved edges can be bound as
easily as straight edges, but require
slightly different fabric handling.
Inside Curves
Inside curves are straightened as
they are fed into the binder. If the
fabric is soft and has a tendency to
stretch, reinforce the edge with a
single row of stitching before
binding.
Outside Curves
Outside curves tend to lead away
from the center slot of the scroll and
should be guided so that a full seam
width is taken at the needle point.
Do not attempt to pull or straighten
the fabric into the full length of the
Page 33

THE ZIPPER FOOT
31
The zipper foot is designed for accurate placement of
stitches close to a raised edge. The hinged feature of this
foot insures even feeding over pins, heavy layers of
fabric or cross seams. It is attached to the machine in
place of the presser foot, and may be adjusted^ to either
side of the needle.
Applications
Zipper insertions Tubular cording
Corded seams Slip cover welting
Preparation
• Attach zipper foot to machine in
place of presser foot.
• Loosen zipper foot thumb screw
and adjust foot to right or left of
needle, as desired.
Align the notch in the toe with the
needle hole in the throat plate.
Check adjustment by lowering
needle into side notch, making
sure it clears the foot.
Lock foot in position by tighten
ing thumb screw.
Page 34

THE ZIPPER FOOT (Cont’d)
Zipper Insertion
Many diflferent types of
zippers are available for
everything you sew. There
are several satisfactory meth
ods for insertion. Detailed
sewing instructions are in
cluded in zipper packaging.
For any method used, the
Zipper Foot enables you to
form an even line of stitch
ing close to the zipper.
32
When the zipper is to the
right of the needle—
• Adjust the Zipper Foot to
the left of the needle.
When the zipper is to the
left of the needle—
• Adjust the Zipper Foot to
the right of the needle.
Page 35

THE ZIPPER FOOT (ConI’d)
Corded Welting
Cable cord comes in a variety of
sizes and when covered with a firmly
woven fabric makes a welting that is
an excellent seam finish.
This welting is prepared in advance
and then stitched into the seam. Cut a
true bias strip 1^4 inches wide, plus
three times the width of the cord of
either self or contrasting fabric. Sew
strips together on the lengthwise grain
to obtain desired length.
33
Adjust zipper foot to left side of
needle.
Encase cord in bias
strip, raw
edges even.
Lower presser bar.
Stitch close to cord, using a stitch
length slightly longer than for
regular seaming.
Do not crowd stitching against
cord.
Page 36

34
Corded Seams
The corded seam is a typical treat
ment for slip covers, children’s clothes,
blouses and lingerie.
When cording a seam the zipper foot
is usually adjusted to the right of the
needle so that the bulk of the work
will fall to the left.
• Attach corded welting to right
side of a single seam edge, using
same stitch length as used for welt-
ing (page 33). Guide edge of foot
next to cord, but do not crowd.
• Place attached corded welting over
second seam edge, and pin or baste
together.
• Keep the first stitching uppermost as
a guide and position the seam under
the needle.
• Stitch, this time crowding the foot
against the cord.
This method produces evenly joined
seam edges and tightly set welting.
Curved seams are corded as easily as
straight seams, except that a shorter
stitch is used. Since the seam allow
ance of the welting is bias, it is easy to
shape it to the seam.
Page 37

35
THE RÜFFLER
Adjusting Points
FORK
ARM>^,
SEPARATOR RUFFLING ^SEPARATOR
BLADE BLADE GUIDE
This attachment offers a simple and
effective way to make gathered and
pleated ruffles. Ruffles may be made
separately or made and applied at the
same time.
ADJUSTING
LEVER
ADJUSTING
FINGER
ADJUSTING
SCREW
1. Adjusting lever sets ruffler for gathers
or pleats. Number 1 space setting is for
gathers and places fullness at every
stitch. Numbers 6 and 12 are space
settings for pleats, spacing them 6 or
12 stitches apart. Star is for plain
stitching and is used when grouping
gathers or pleats.
2. Adjusting finger is used only for
pleating and affects width of pleat. It
is disengaged by bringing it out of
contact with adjusting screw.
3. Adjusting screw regulates fullness of
gathers or pleats. When turned in to its
limit with adjusting finger in place,
attachment is set for its deepest pleat.
When turned outward to its limit, with
adjusting finger out of action, rufiler
gives only a hint of fullness.
Page 38

36
THE RÜFFLER (Cont’d)
Activating Parts. Ruffling blade and
separator blade are of blue steel and
hold material to be gathered between
them. Ruffling blade forms gathers or
pleats by carrying fabric to needle
according to spacing and fullness to
which ruffler is adjusted. Separator
guide is slotted to guide seam edges
evenly and to separate ruffled strip
from material to which ruffle is at
tached.
Preparation
• Raise needle to highest point.
Gathering
• Set adjusting lever on Number 1
setting and throw adjusting finger
out of action.
• Turn adjusting screw for amount of
fullness desired and set stitch length
to space fullness. Turn screw in for
more fullness; turn out for less
fullness.
• Locate ruffler on presser bar with
fork arm over needle clamp screw.
Securely tighten both presser bar
and needle clamp screws.
Page 39

THE RÜFFLER (Confd)
Length of sewing machine stitch
also affects ruffle fullness. Since a given
attachment setting puts an equal
amount of fullness into each stitch
regardless of its length, shortening the
37
stitch (more stitches to inch) makes
ruffle fuller; lengthening the stitch
(fewer stitches to inch) makes it less
full. For fine, closely spaced gathering,
use a short stitch and an outward
adjustment of adjusting screw. For
deeper, less closely spaced gathering,
turn adjusting screw inward and use a
medium length stitch.
Insert material to be gathered be
tween blue blades and through first
separator guide.
MATERIAL
Draw to back of needle.
Lower presser bar and stitch.
Fabric texture influences perform
ance of ruffler as well as results. Soft
fabrics, cut on crosswise grain, are
best adapted for gathering ruffles.
Always test stitch length and ruffler
setting on a scrap of self-fabric before
proceeding with the actual work.
Page 40

THE RÜFFLER (Cont*d)
Attaching ruffle
• Place ruffle strip between two
blue blades and through first
separator guide.
• Place material to which ruffle
38
RUFFLING
MATERIAL
GARMENT
is to be attached between
separator blade and feed of
machine.
• Proceed as for plain gathering.
Right sides of fabrics are
placed together when the seam
is to fall to the inside.
Page 41

Pieciting
39
THE RÜFFLER (Confd)
• Move adjusting lever of ruffler to
desired space setting for pleats
either 6 or 12 stitches apart.
• Set stitch length.
For deepest pleat, activate adjusting
finger and turn adjusting screw inward
to its maximum setting. For smaller
pleats turn adjusting screw outward.
A short stitch places pleats more
closely together; a long stitch sepa
rates the pleats for a greater distance.
• Insert fabric to be pleated between
blue blades and into first separator
guide.
• Lower presser bar and stitch.
Page 42

40
THE RÜFFLER (Cont’d)
Crisp fabrics cut on the crosswise grain form the sharpest pleats. Glazed
fabrics handle best if the glazed side is downward and the soft backing is
next to the ruffler blade.
Group Pleating
By using star setting (plain
stitching) alternately with 6 or
12 stitch setting, pleats are
formed in groups. Even spacing
between groups is accom
plished by counting the number
of stitches.
_
______________________
Page 43

AUTOMATIC
ZIGZAGGER
41
FASHION* AIDS
Decorative stitch patterns for bor
der designs, lace applications and
applique are accomplished automat
ically with the SINGER* Zigzagger.
This time-saving attachment will
also blindstitch hems, mend rips and
tears, reinforce seams, overedge
seam edges and stitch scallop edges
easily and quickly.
Page 44

BUTTONHOLER
42
FASHION AIDS (Confd)
Beautiful, evenly stitched button
holes are quickly and easily made
with the SINGER* Buttonholer.
The attachment makes both
straight and eyelet-end styles, auto
matically guiding them to the size
and shape selected.
Nine different lengths, ranging
from to 13^", are available.
Page 45

43
FASHION AIDS (Cont’d.)
THE EDGE STITCHER
This attachment provides a series of slotted guides which
regulate the placement of stitching in relation to a fabric edge.
Among its many decorative and practical applications are
the joining and insertion of lace, tucking from pin width to
1^", French seaming, seam piping, facing and seam finishing.
THE GATHERING FOOT
Single or multiple
rows of shirring can be
quickly and expertly
placed with the gather
ing foot. Evenly spaced
shirring is insured as
this foot is designed to
lock fullness into every
Applications stitch.
Plain shirring Waffle shirring
Elastic shirring Machine smocking
Page 46

TUCKER
44
FASHION AIDS (Cont’d)
9 0
Since the beauty of tucking lies in
its explicit accuracy, use of the
Tucker will contribute greatly to the
attractiveness of the work.
With this time-saving attachment,
tucks up to one inch may be stitched
and marked in one operation.
Two adjustable scales are pro
vided to gauge tuck width and
spacing.
Page 47

X
CLEAN
BETWEEN
TENSION
DISCS
45
TO CLEAN THE MACHINE
When in regular use—
The machine should be cleaned
periodically to remove the lint and
fluff which may have accumulated
around the working parts.
To remove face plate, turn hand wheel
until take-up lever reaches its highest
point, then remove face plate thumb
screw, raise face plate and carefully pass it
toward you over end of take-up lever.
Clean the area inside. Remove bobbin
case and throat plate and clean stitch-
forming mechanism.
After each cleaning, oil the machine
as instructed on pages 46 and 47.
If the machine is to be stored for an
indefinite period, brush away all traces
of lint and fluff, then swab all exposed
CLEAN
parts with a lint free brush saturated
with SINGER* oil to protect against
rust damage.
The area in head of machine that should be cleaned
and covered with a protective coat of oil is shown at left.
Also clean stitch-forming mechanism and cover
exposed parts with a coat of oil.
Page 48

46
TO OIL THE MACHINE
To keep your machine in top condition, use SINGER Oil and SINGER*
Lubricant.
Both are quality products especially prepared for sewing machines, and
should always be used in the care of your 221.
Clean the machine periodically as
instructed on page 45.
Apply a drop of oil to each place
indicated.
Page 49

47
TO OIL THE MACHINE —(Confd)
Remove thumb nut, felt washer and cover
plate from underside of machine. Apply oil to
each place indicated below.
Apply a small amount of SINGER Motor
Lubricant to the gears.
Replace bottom cover.
NEVER APPLY OIL TO THE GEARS.
Page 50

TO LUBRICATE THE MOTOR
NEVER USE OIL OR
ORDINARY GREASE ON
THE MOTOR. FOR BEST
RESULTS, USE SINGER
MOTOR LUBRICANT fur
48
nished with the machine.
When the machine is shipped
from the factory, the two
grease tubes, indicated by
arrows, are filled with
enough lubricant for approx
imately six months’ use.
Refill grease tubes at least
once each six months by in
serting tip of lubricant con
tainer into grease tubes and
squee2ing enough lubricant
into each tube to fill it.
Page 51

49
LIGHT
The light is turned “on” or “off” by the
switch located on bed of machine at the
right.
LOCKS
▼
ammmmmm^
t
LIGHT SWITCH
%\\ft&WrAWW\iv\W»\№VS ft fli
Ir-'-'-'M
III
S '
\wAttmiHlWUlW\nWtt\vUW\i
li 8
To Remove Bulb. Press bulb into socket
and turn it in “unlock” direction, as shown,
and withdraw.
To Replace Bulb. Press bulb into socket
with bulb pin in slot and turn it in “lock”
direction, as shown.
UNLOCKS
«\AV.A\\AUV.ttWAWVAWAi\i^^.
j / i If i
|firtjwiwSK\w.MV |
^WAAHUhUH>HAb!AlWmUA»A%l
BULB PIN
Page 52

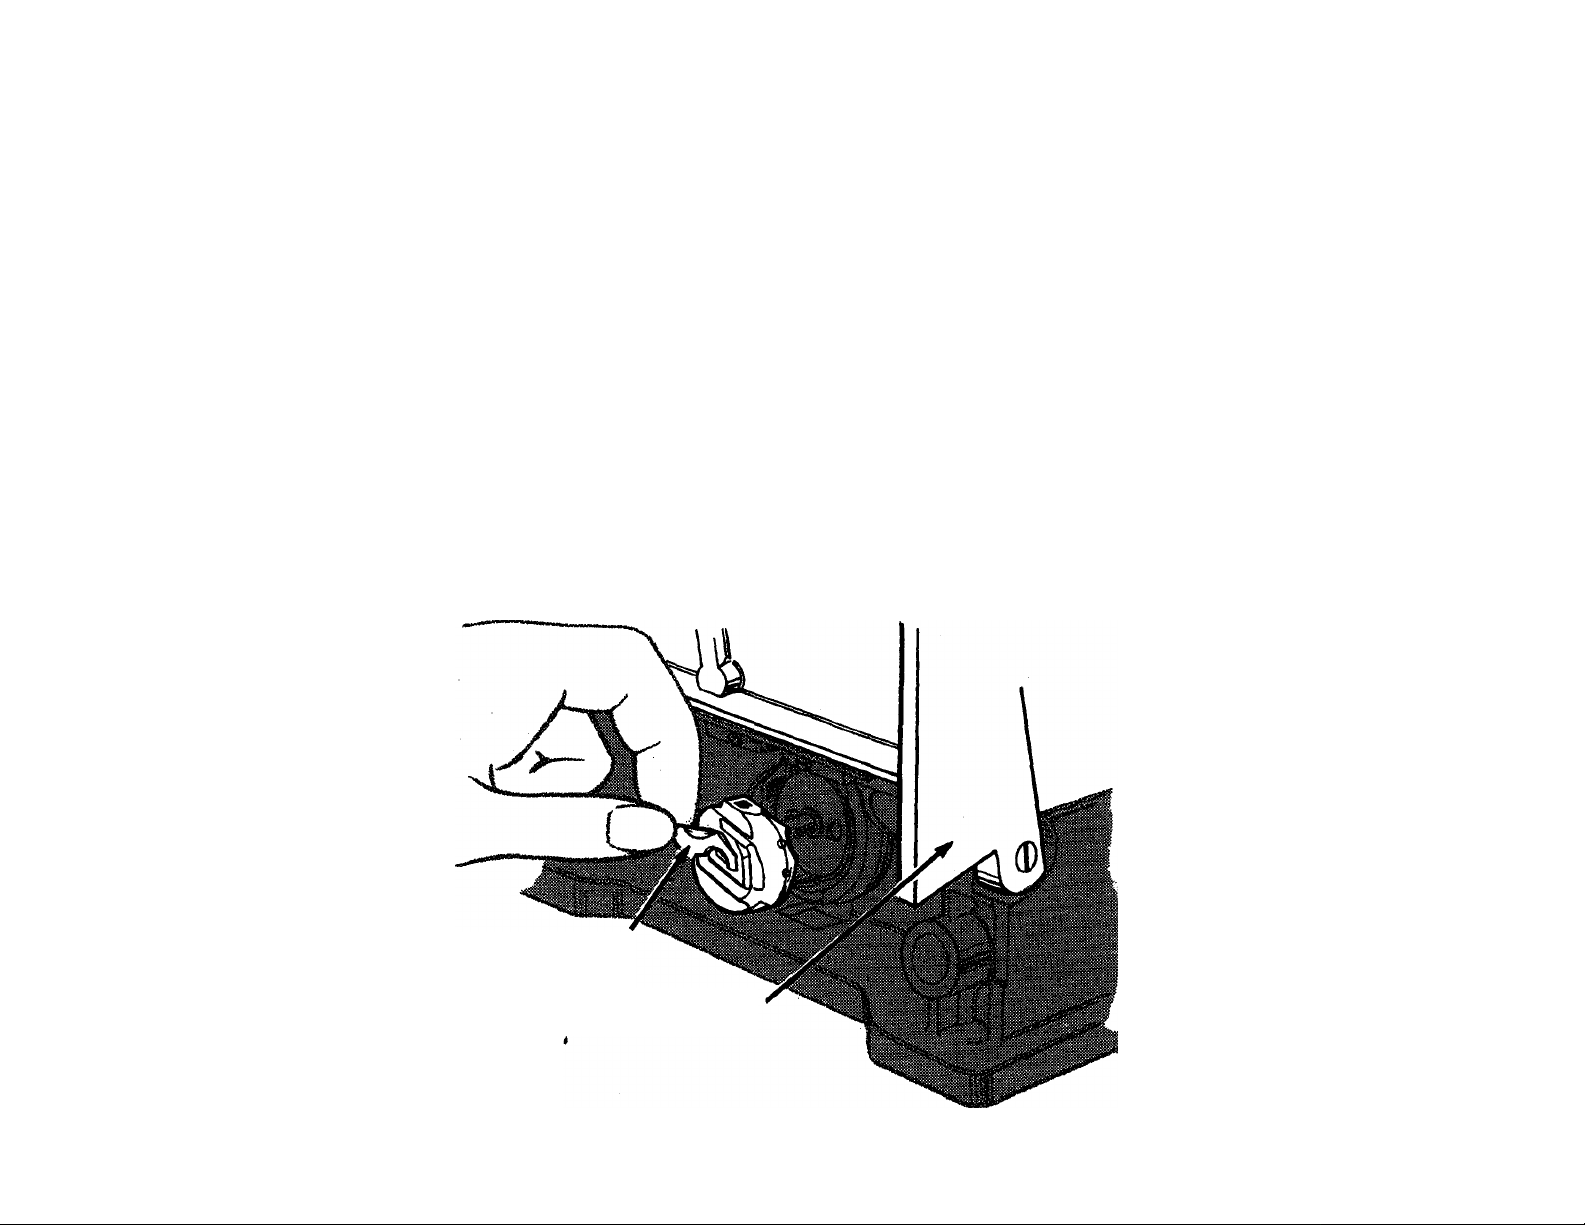
50
BELT TENSION
Tension on the belt should be only heavy
enough to keep the belt from slipping.
To adjust—
• Loosen bracket screw (A) a full turn.
• Allow weight of motor to supply correct
belt tension.
• Tighten bracket screw.
Page 53

TO PACK MACHINE
Place attachment box in its com
partment at left of carrying case, as
shown below. Turn up machine bed
extension and place machine in case
with hand wheel at right and base of
machine at right of wooden strip at
bottom of case.
51
Slide controller from right to left
into its holder in lid of case and place
electric cord at rear of machine, as
shown above.
Page 54

52
INDEX
PAGE
Attachments............................................
Foot Hemmer
Binder
Ruffler.................................................. 35-40
Seam Guide
Zipper Foot
Belt
To Regulate Belt Tension. ...... 50
Bobbin
Removing.................................................... 7
Winding
Bobbin Case
Removing
Replacing.................................................. 11
Threading
Carrying Case
To Pack Machine in Case........................ 51
Chart for Fabric, Thread, Needle
and Stitch Length....................................... 4
Darning......................................................... 22
Electrical Information
Light.....
Motor.........................................................
FASHION Aids
...................................................
...................................................
....................................................
......................................
..............................................
..........................................
.............
.................................................
......................................
23-40
24-26
28-30
27
31-34
8-9
7
10
49
6
Buttonholer............................................. 42
PAGE
Edge Stitcher
Gathering Foot
Tucker............................................... 44
Zigzagger, Automatic
Principal Parts of Machine 221. ,.. 3
Maintenance of the Machine
Oiling and Lubrication
To Clean the Machine
Needles and Thread
Needle Insertion
Pressure Adjustment
Sewing
Guiding and Supporting Fabric. . 18
Prepare to Sew
Sewing a Seam
To Regulate Length of Stitch. ... 13
SINGER Service
Threading
Bobbin Case
Needle................................................ 12
Thread Tensions
Bobbin Thread
Needle Thread
....................................
.........................................
......................
.................
.....................
.....
.................................
....................................
...................................
....
.....................................
.....................................
...................................
.....................................
........................................
..........................................
46-48
43
43
41
45
5
5
19
14
15-17
2
10
21
20
Page 55

To all whom it may concern:
The improper placing or renewal of the trademark "SINGER" or
any other of the trademarks of The Singer Company (all of which are duly
Registered Trademarks) on any machine that has been repaired, rebuilt,
reconditioned, or altered in any way whatsoever outside a SINGER factory
or an authorised SINGER agency is forbidden.
Form K6436
(364)
Printed in Great Britain
Page 56

For your protection
SINGER Sewing Machines are sold and serviced wherever you
see the famous SINGER and Red "S” Trademarks. When your
machine needs servicing call your SINGER SEWING CENTER to be
sure of warranted SINGER parts and service. See address in the
classified telephone directory.
THE
NGER COMPANY
 Loading...