

Page 1

SINGER
COMPACT FREE-ARM SEWING MACHINE
MODEL 212
INSTRUCTION
MANUAL
Page 2
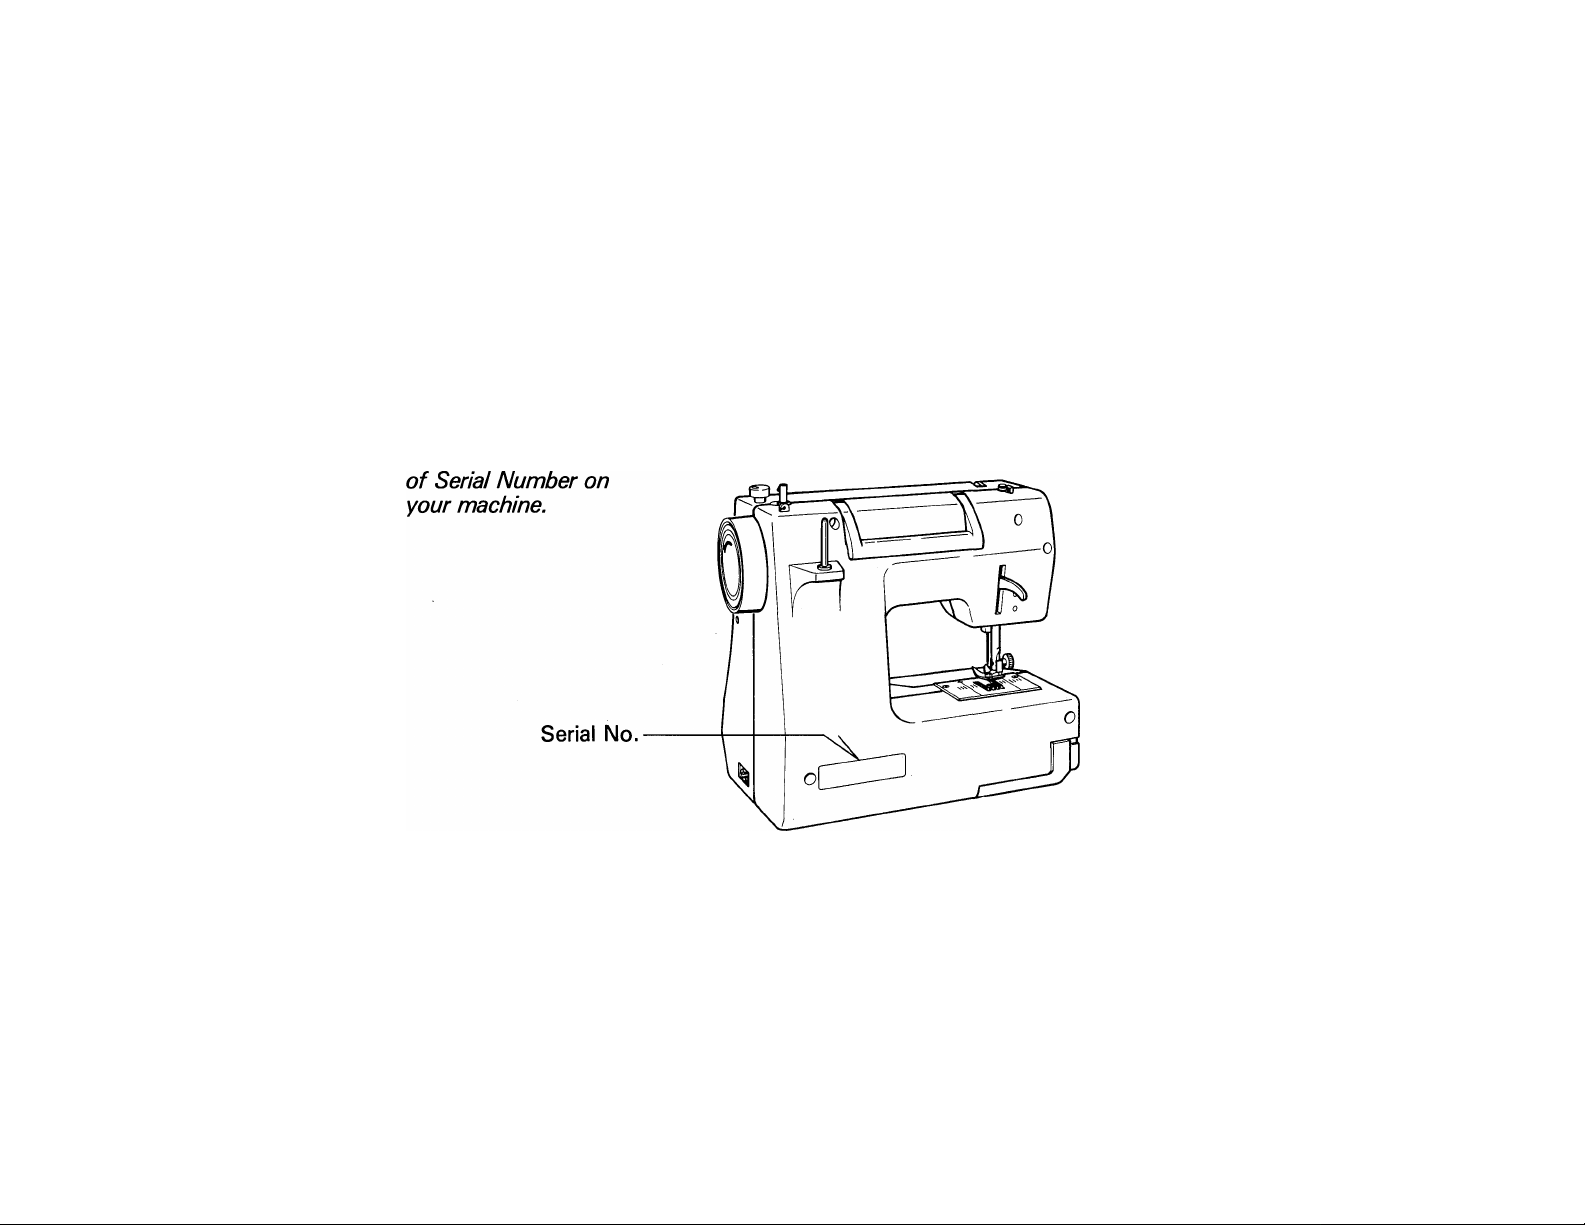
Dear Customer:
We recommend that for future reference you record the Serial Number of your
Sewing Machine in the space provided.
Refer to illustration
at right for location
Serial No.
Page 3

Know your machine ...,.*.2-3
Set up your machine.................................,......*......................4
Remov?n9 the extension table/accessory box
Prepare the bobbin
Remove the bobbin case from the machine . *
Wind the bobbin...
I nsert the bobbin into the bobbin casé.*.................................... 8
Insertthebobbin case into the shuttle........................... 8
Thread the top thread
Pick up the bobbin thread
Strai^htsdtch..................
Fas^ning seams...............
Keeping seam line straight....
Turning a square corner S/8 inch (16 mm} from the
fabric edge..
Adjusting thread tension............................................ ..........1$
Needle, thread and fabric chart........................................................14
Changing needie...................................................................... .........14
.........................................
....
..................................................................... 9
....
...............................................................
...................................................................
..........................................................
...........................................................
....
....................................................................... ...........12
.................................... S
........................ 6
..................................
7
10
...11
.......12
12
Zigzagstitch
Free-armsewing
.............................................
....
.......................
.
Overcasting.....................................
Mendiinga tear.................................
Attaching zippers, cording..................
Blind hem .....______............................
Buttonholemaking............................
Button sewing
Appliqu^.
Embroidery...,.
.............
.
...............................
............
.
.
Caring for your machine .....................
Check chan for performance problems...
.
.15
.16
.17
.17
.18
.19
.20
.21
.22
.22
.23
.24
Page 4
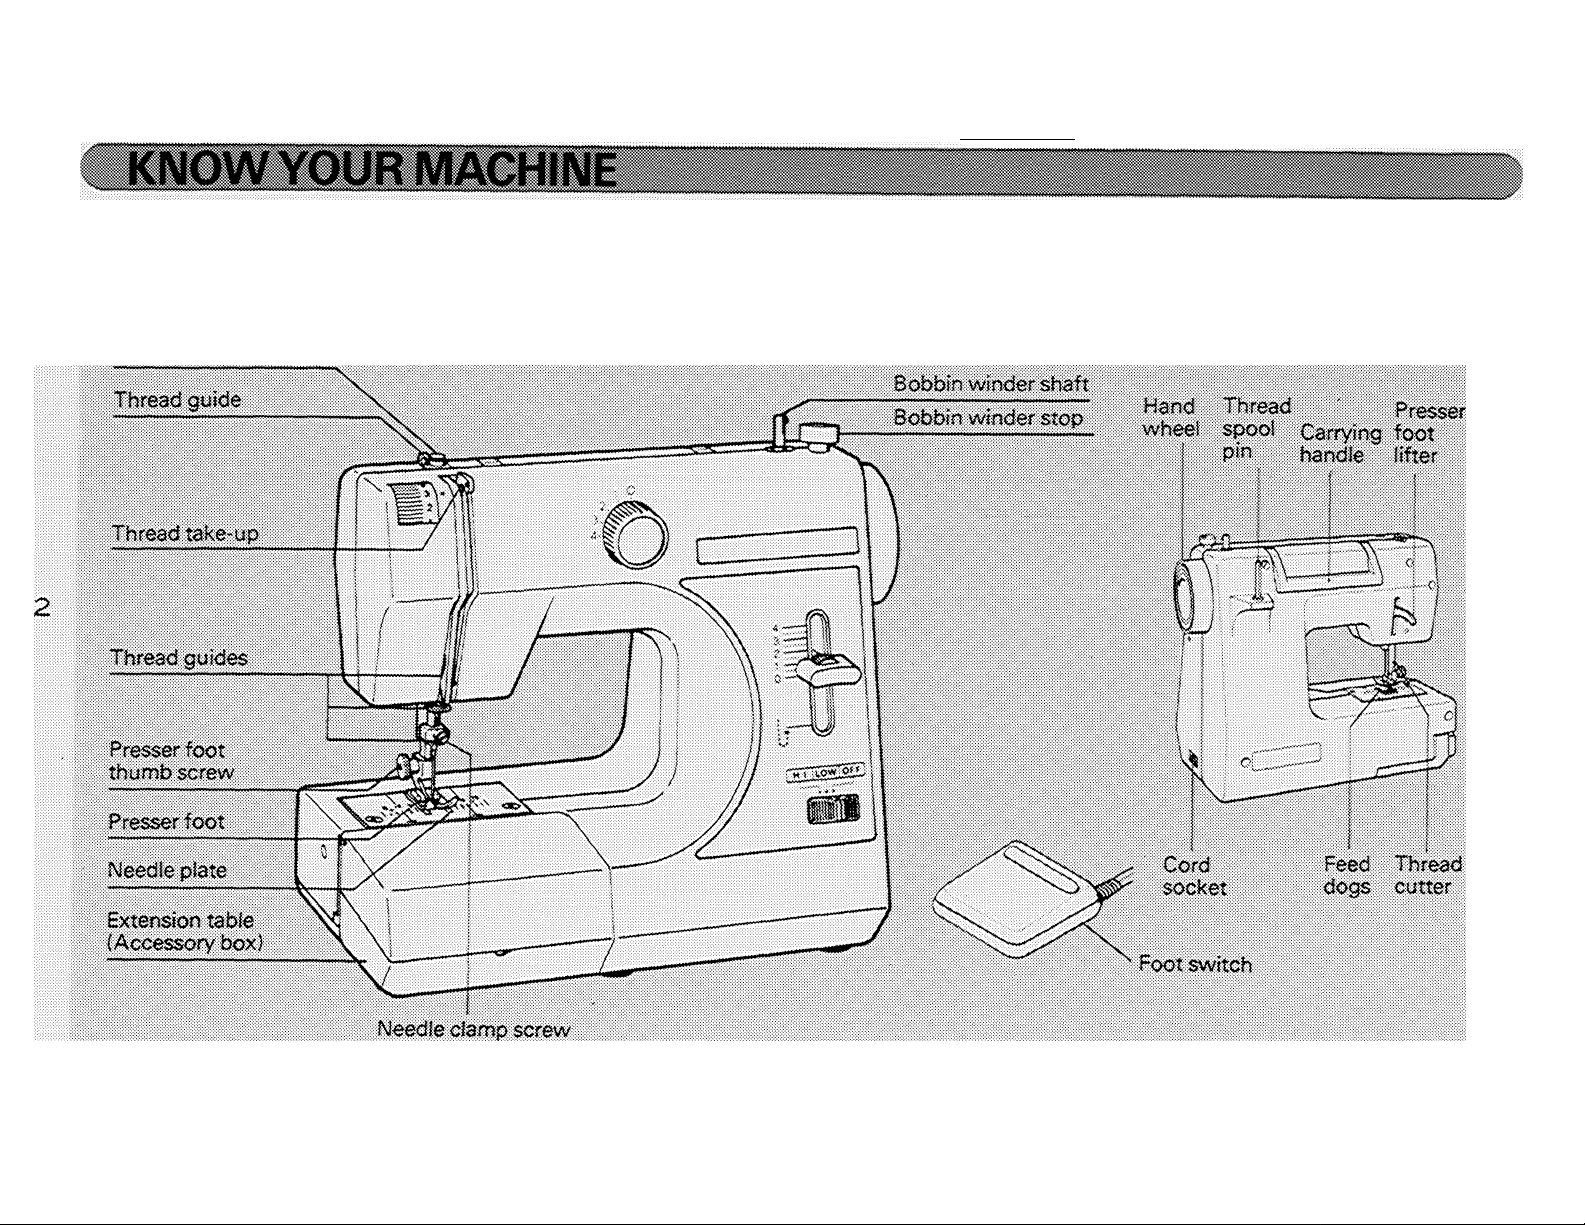
Principa! parts of your machine
Bobbin winder
tension disc
iS¡MiiiassMi!ai8MiMwwmwww^^
Page 5
::^S^^^gS333SSSSSS8SSSS88S3S8iiiiiaiiiiSiiiiiiiii^^
Top thread tension control
Decrease or Increase the tension of the
top thread by using this controL The
higher the number, the tighter the
tension<
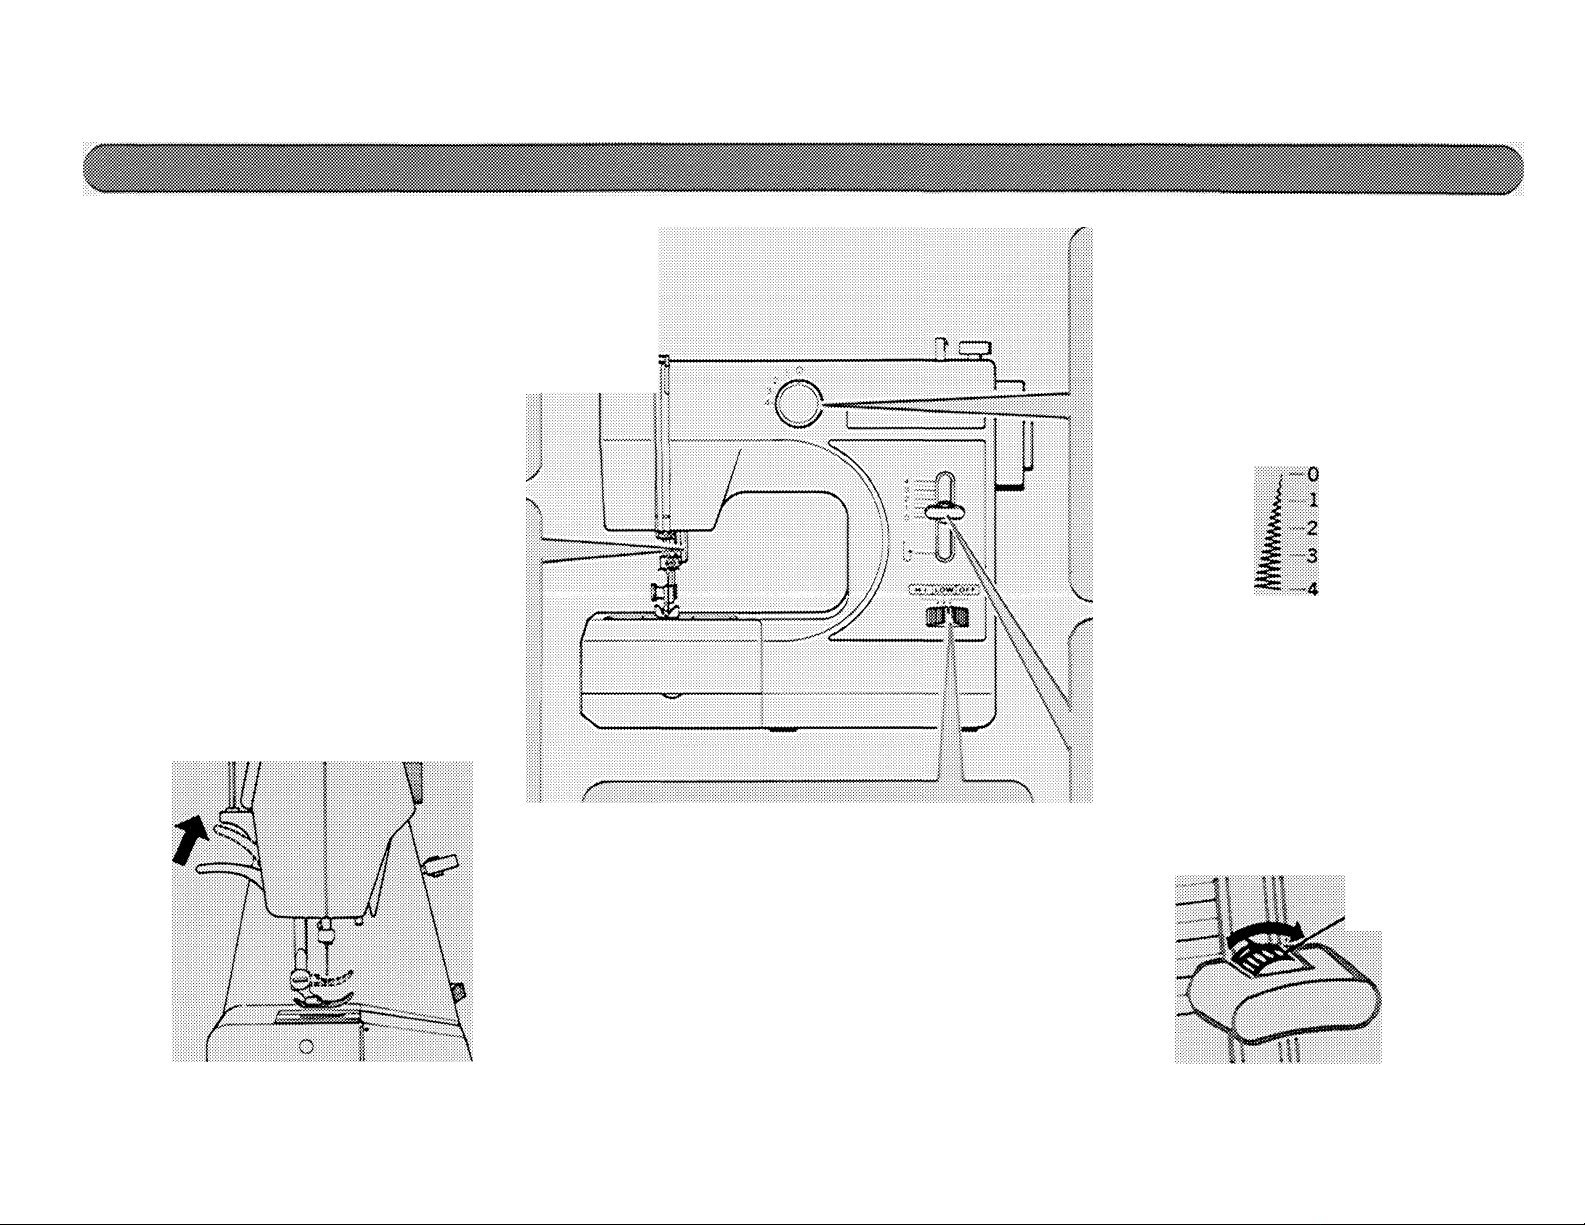
Presser foot lifter
There are three positions for your
presser foot>
1 * Lower the presser foot to sewv
2. Raise the lifter to the middle position
to insert or remove fabric.
3. Lift it to its highest positioii to
change the presser foot or to remove
thick fabric*
Power/speed range switch
Your machine has two ranges of speeda low range for slower, intricate work
and a high one for faster, general work*
Stitch width dial
This dial regulates the stitch vyidth
when zigzag stitching* The higher the
number, the wider the stitch*
Set it at ''0'' when straight stitching
and the needle bar will be firmly locked
to achieve uniform stitches*
Stitch length/reverse stitch lever
Loosen the knob in the center by
turning it counter clockwise* Move the
lever between 4 and 0 and retighten the
knob< The lower the number, the
shorter the stitch <
Lower the lever below "'0"' to stitch in
reverse for back tacking*
Knob
Page 6
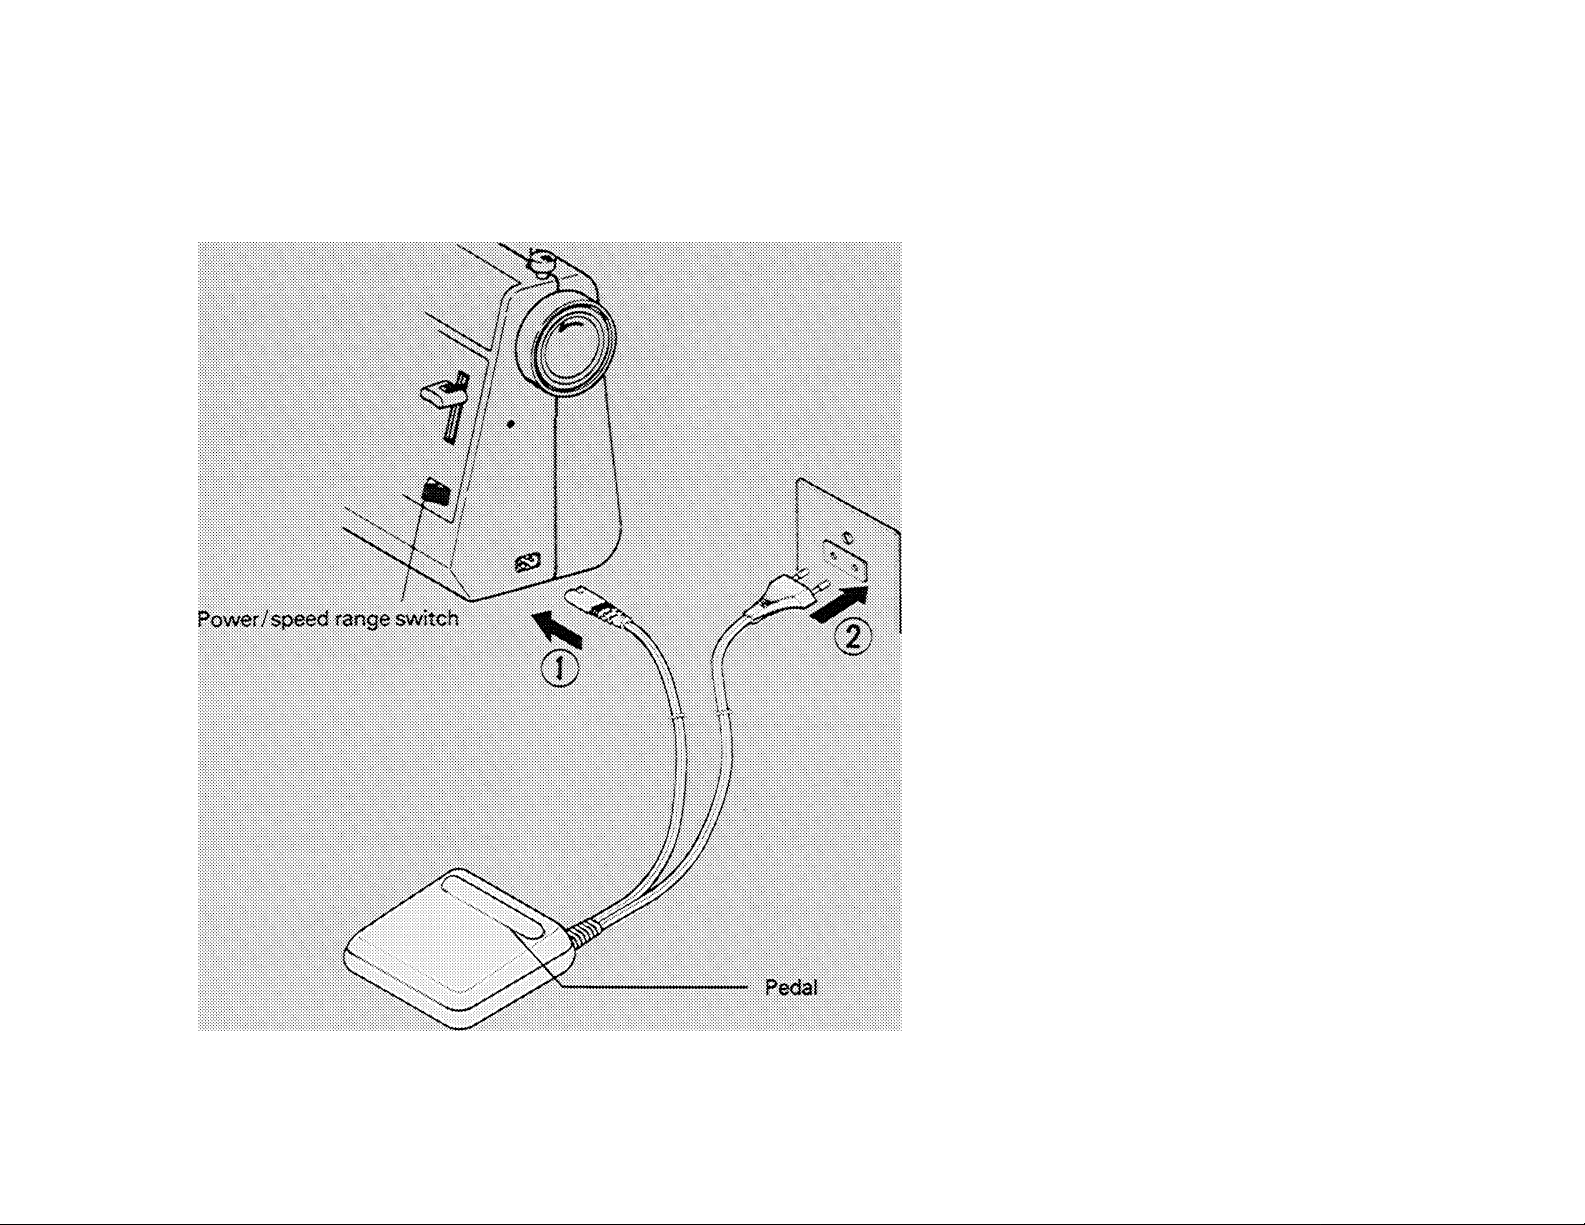
(t) How to set Foot Switch
MAKE SURE THAT THE POWER/SPEED
RANGE SWITCH IS AT POSITION
8EFORE CONNECTING FOOT SWITCH.
Connect the plugs of the foot switch Into
the machine socket i^} and your wall
outlet (2) as Illustrated,
(2} How to operate
T Set the power/speed range switch at
'XOW^^ or ^^HIGH'^ position.
2. Depress the pedal of the foot switch
with your foot to run the machine.
Remove your foot from the pedal to
stop.
4
CAUTION:
If you are Interrupted, or stop sewing or leave
the machine unattended, the plug {2) must be
removed from the outlet.
*THIS FOOT SWITCH has only ON--OFF
function, not for speed control.
Page 7
mmmm
o
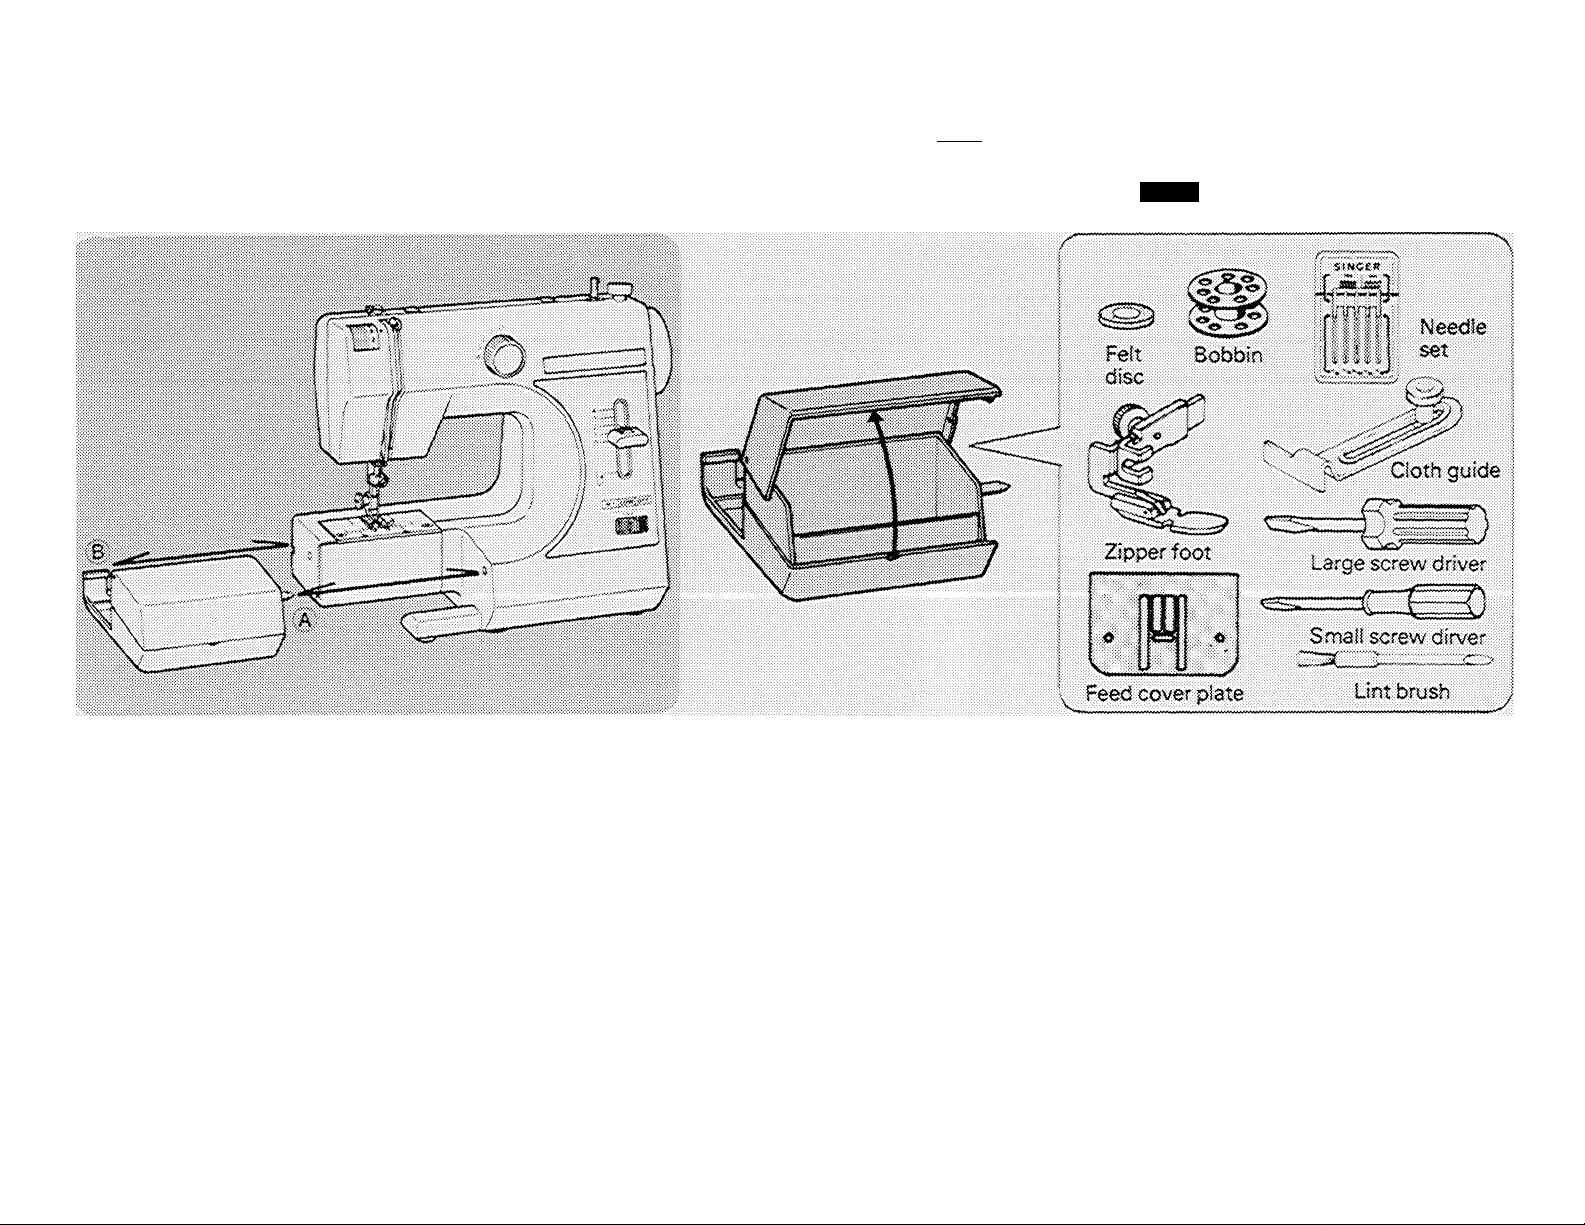
Remove the extension table by pulling it to the left.
To attach, slide the table back to position until the pins
(A and S) fit into the holes on the machine.
Open the accessory box by lifting the lid up
and backward and you will find a variety of
accessories inside.
Page 8
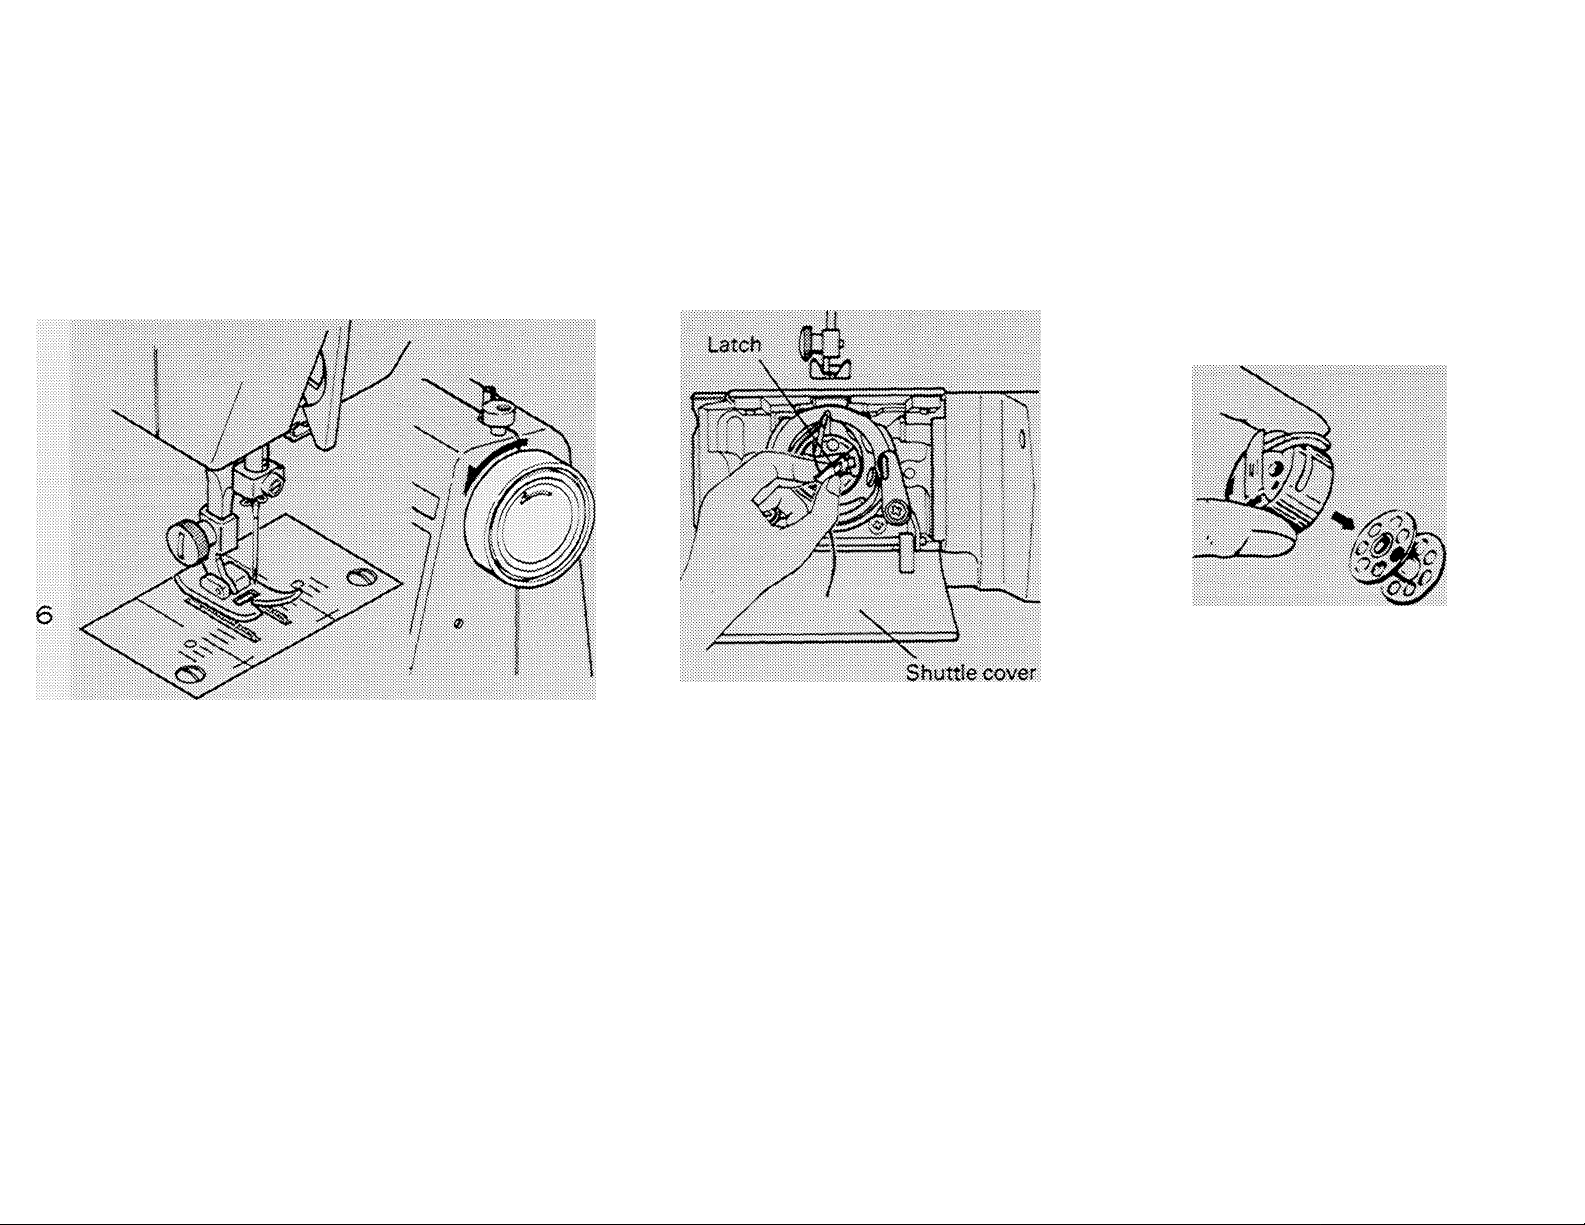
Remove the Bobbin Case from the Machine
1* Raise the needle to its highest position by turning
the hand wheel toward you.
2. Locate the notch at the left end and
open the shuttle cover by pulling
forward and down*
3. Use your forefinger and thumb to pull
open the latch on the bobbin case.
4. Pull the bobbin case straight out.
5. Release the latch and the bobbin will
drop out of the case.
Page 9

Wind the Bobbin
7
1, Fit the felt disc over the spool pm and put a spool of thread on the
spool pin.
2. Draw the thread through from the spool through the bobbin
winder tension disc.
3. a. Pull the end of the thread through the hole in the bobbin,
b. Place the bobbin onto the bobbin winder shaft with the end of
the thread coming from the top of the bobbin.
4, a. Push the bobbin winder shaft to the right until it clicks.
b. Hold onto the end of the thread.
c> Start the machine by shifting the power switch to ''LOW" or
"HIGH" position. After several rotations of the bobbin release
the thread.
NOTE: Keep away from the needle while the machine is running.
5, a. Turn off the powerswitch when the bobbin stops turning with
the thread filled.
b. Push the shaft to the left to remove the bobbin.
Page 10

Insert the Bobbin into the Bobbin Case
8
Insert the Bobbin Case into the Shuttie
1. Hold the bobbm in your right hand with the thread ruîinirjg clockwise.
2. insert the bobbin into the case with about 4 inchs (10 cm} of thread showing outside
the case.
3. Puli the thread through the slit in the case and then underneath the flat tension spring.
It will click when it is in place.
1, Hold the latch open, with the locating pin straight
up.
2, Slide the bobbin case onto the center spindle of the
shuttle, keeping the thread toward you.
NOTE: Be sure the locating pin fits into the locating
groove at the top of the shuttle.
3, Release the latch to lock the bobbin case in place.
Page 11

Rarse the presser foot lever to allow the
thread to pass between the tension control
discs.
* Raise the thread take-up lever to its highest
position by rotating the hand wheel toward
you.
Holding the thread taut with your right
hand, draw the thread through the thread
guides as illustrated.
* Thread the take-up lever from left to right,
* Thread the needle from front to back,
drawing 4 inches (10 cm) of thread through
the eve of the needle.
9
Page 12

1, Raise the presser foot lifter,
2* a. Hold the top thread loosely in your left hand.
b. With your right hand, rotate the hand wheel
toward you until the take-up lever has come to
the top again,
MOTE: When the needle passes beneath the needle
plate, it will pick up the thread from the
bobbin.
3, a. Raise the bobbin thread by pulling
the top thread with your left hand,
b. Pull the bobbin thread until the end
comes through the opening of the
needle plate.
4. Pull the both threads under and to the
back of the presser foot, leaving 4
inches no cm) clear.
NOW YOU'RE READY TO START TO
SEW WITH YOUR SEWING MACHINE,
PLEASE TURN TO THE NEXT PAGE,
Page 13

Straight stitch is the most frequently used for every aspect of sewing. Learn the correct use of your machine following the steps below.
Top thread
I.SETTiNGS
Thread tension - 3
Raise the take-up lever to its
highest position oy turning the
hand wheel toward you*
5* a* Start to sew shifting the power
switch to the ''LOW or
"HIGH" position.
b. Guide the fabric gently with
your hand*
c* When you reach the end of the
fabric, stop the machine turn
ing off the power switch*
11
2* Pull both threads under the
presser foot toward the back of
the machine*
3> Place the fabric under the presser
foot and lower the presser foot
lifter*
4. Turn the hand wheel toward you
until the needle enters the fabric.
6* a* Turn the hand wheel to raise
the needle.
'iiii
b. Raise the presser foot by
pushing the lifter up.
c. Use the thread cutter above
the presser foot to cut off
excess threads*
d. Puli the both thread under and
to the back of the presser foot,
leaving 4 inches (10 cm) clear*
Page 14

Fastening seams
12
Keeping seam fine straight
Turning a square corner 5/8 inch (16 mm) from the fabric edge
Cornerintg
guid^
Secure your seams by taking the first few
stitches in reverse- Then allow the
machine to go forward- This is called
back tacking. Reverse the machine at the
end of your seams as well-
Lower the stitch length lever below
for back tacking.
1- Using the seam guide lines
The needle plate is rn3rke3’'With seam
guide lines to help you stitch straight
seams- The standard 5/8 inch (16 mm}
lines are emphasized for your
convenience.
2. Using the cloth guide
Secure the cloth guide in the screw
hole to the right of the foot adjusting
to the width of your seams.
1 - Stop stitching with the needle piercing the fabric,
when you reach the cornering guide-
2. Raise the presser foot.
3. Turn the fabric and the new stitching line will align
with 5/S inch 06 mm) seam guide line.
4. Lower the presser foot and begin stitching in the
new direction.
Page 15

Adjusting thread tension
STRAIGHT STITCHINCi
Top
thread
Bobbin thread
Weil balanced
Top stitch too tight
Top stitch too loose
Under
side
The good looking apperance of your stitching rs largely
determined by the balanced tension of both top and
bobbin threa6s. The tension is well balanced when
these two threads lock' in the middle of layers of the
fabric you are sewing.
Decrease tension
Threads lock on
the top side.
Increase tension
Threads lock on
the under side.
^
.....
Bobbin thread tension
S088IN THREAD TEMSION REQUIRES
ADJUSTMENT LESS FREQUENTLY THAN
THE TOP THREAD TENSION.
If the tension is well balanced, but the fabric
puckers badly, both top and bobbin thread
tensions may be too tight and have to be
adjusted.
When adjusting the tension on the bobbin
case, make slight adjustments with the screw
13
To test that the tension is correct suspend
the bobbin case by the thread {No. 50) and
jerk it once, if the tension is correct, the
thread will unwind an Inch or two (3 to 5 cm).
If too loose it will unwind continuously. If too
tight the thread will not unwind at all.
1=^
5
u.
Page 16

Needle, Thread and Fabric Chart
Changing needie
Your fabric will determine the choice of a
needle and thread. The following table is a
practical guide to needle ard thread selection.
Always refer to it before a new sewing
FABHICS
The fabrics below can be of any
fiber: cotton, linen, silk, wool,
synthetic, rayon, blends. They
are listed as examples of weight
light
weight
14
MediumWeight
|iМММММММММММММiММММММММiilММPММppМММММММiiММММММ::iММММММММММii
i
--
w -
----------
i Medium- ; Bonded Wovens
Heavy
I
I
Knits
Batiste
Chiffon
Crepe
Corduroy
Flannel
Gabardine
Gingham
Linen
.....
....
....
....
......
....................:..
I
Canvas Polyester
i Coating
i Denim
I
Duck
I Sailcloth
Bonded Knits
Double Knit Polyester
! Jersey
I Tricot j Nylon
project. And be sure to use the same size and
type of thread In the bobbin as In the top
thread supply.
THREAD
Cotton-wrapped
Polyester
100% Polyester
■’‘■Mercerized Size 60
Cotton-wrapped
Polyester
100% Polyester
* Mercerized Size SO
My Ion
................................. Í 5
Cotton-wrapped
i 100% Polyester
\ * Mercerized Size 40
i
^^^Heavy Duty^'
Cotton-wrapped
j
Polyester
NEEDLES
TYPE
2020
2020
< :■ •
I 2020 ( 18/110 I
I Ba!i-Poim 2045
Size 11/80, 14/90,
16/100
SIZE
11/80
14/90
2020 J 16/100
i
T Raise the needle bar to Its highest position
by turning the hand wheel toward you.
2. Loosen the needle clamp screw with the
screw driver.
3. Remove the needle by pulling it downward.
I
4. Insert the new needle into the needle clamp
with the flat side away from you.
5. Push the needie up as far as it can go.
6. Tighten the needle clamp screw firmly with
the screw driver.
* Do not use on stretch fabrics.
Page 17

MACHINE SETTiMGS
Satin stitch
Closely spaced zigzag stitch
5S called sation stitch. This
Is an attractive stitch which
is used for embroidery and
applique.
Set stitch length between
0,5 and 1,
Turn the stitch width dial
from 0-4-0 and decorative
patterns will be achieved <
fffffi
0—4—0—^
■4.0-
Stop the machine at
this point arid turn the
dial back to "0".
‘4—>
15
I
Page 18

Your machíne has a free arm for sewing sleeves, pants legs etc.
For free-arm sewing, remove the extension table by pulling it to the
left. Just slip the sleeve or pants leg onto the free arm.
Page 19

.
.
Si:::;:;:;:::;:;:;:::;:;:;:;:;:::;:;:;:;:;:::;:;:;:;:;:::;:;:;:;:;:::
17
SETTiNGS
Zigzag Width-* 3to4
Stitch length - 3to4
Overcasting Is simply finishing the raw edges of fabric to prevent
fraying. Place material under the presser foot so that the needle
pierces it just short of the outside edge.
SETTI IMG$
Zigzag width - 3 to 4
Stitch length * 1 to 2
Place the fabric with the beginning of the tear under the center of the
presser foot and sew ensuring stitches catch either side of tear.
When repairing a three-cornered tear, stitch down each side to the
center.
Page 20

18
lililí
|;|||||||||||||||||:;
1. а. Raise the presser foot Hfter.
b. Loosen the presser foot thumb screw,
NOTE: Use the screw driver if it is difficult to loosen
the screw with your hand,
2. Attach the zipper foot
NOTE: loosen the screw at the back of the foot and
it can be slided to sew to the right or left side
of the needle,
SETTINGS
Zigzag width - 0 (straight stitch)
Stitch length - 1 to 3
3, To sew the right side of the zipper,
slide the foot to the right so that the
needle passes through the small
opening on the left side of the foot.
To sew the left side, position the foot
to the left of the needle.
To make a cording for slipcovers, lingerie
etc,, cover a length of cord with a bias
strip of fabric.
Position the foot to the left of the needle
so that needle passes through the
opening on the right side of the foot.
Page 21

19
1, First finish the raw edge. Do
this by turning, it up on fine
fabrics and overcasting it on
medium to heavyweight ones.
Then turn the hem up the
required depth and press,
SETTiMGS
Zigzag width ~ 3 to 4
Stitch length - 4
Speed range - LOW
2, Now fold the fabric as
iilustratec.
3. With the wrong side up, place
the fabric under the foot.
Lower the presser foot. Stitch
so that the needle just pierces
the fold when the needle
swings to the left.
4, When completed, the stitch
ing is almost invisible on the
right side of the fabric.
Page 22

20
SETTINGS
Sxkch length- 0.5îo1
Speed range - LOW
Carefully mark the buttonhole
length on your garment and
insert it under the foot
Set zigzag width at
Stitch to the end of the
marking* Stop with the
needle in the fabric at
point A*
* Always make a practice buttonhole on a scrap of the
fabric you plan to use. Then try the buttonhoie with the
selected button*
* Use interfacing between the two layers of fabric>
BA
Set zigzag width at Z and
take one stitch to the left
(point SL
the presser foot and
turn the fabric with the
needle in it* Lower the presser
foot and take one stitch to
the right {point CK
Set zigzag width at 4 and
bartack at least four stitches*
Stop at point D.
Set zigzag width at t>í and
stitch to the end of marking
(point £)*
bartack at least four stitches*
Stop at point F*
Set zigzag width at 0 and
take a few stitches in reverse.
Remove the fabric and cut
the hole open.
Page 23

21
1. Insert the two pins on the feed cover plate
into the two holes on the fabric feed area.
The curved corners will be toward you
when it is in place>
2, a. Set zigzag width at 0.
b. Place the button on the fabric with two
holes centrally situated ur^der the slot In
the presser foot.
a. Pierce the fabric through the hole on the
right side of the button*
b, lower the presser foot.
4. a. Turn the hand wheel toward you until
the needle is just above the button*
b* Adjust the stitch width control so that
the needle enters the left hole of the
button.
5. Set the speed range at LOW position and
make six or more stitches ending on the
right side*
6. a. Set the zigzag width at 0*
b. Take about three stitches for fastening
off.
Page 24

lili
mmmmmmmmmsi
D
SETTING
Stitch length - 0.5 toi
To appliqué a design on a sewing project or garment:
1, Pin or tack the appliqué to the top of your fabric.
2. Then use the satin stitch to attach permarjentiy. You may want to
use a contrasting color thread.
NOTE: For best results, be sure your sation stitch covers the bottom
fabric and the top fabric.
SETTINGS
Zigzag width - 2
Stitch length - tto2
Satin stitch can be used to produce many different designs and
patterns.
A. Turn the stitch width control from 0^4-0 at a certain speed.
3. Turn the dial faster from 0 to 4 than 4 to 0.
C> Return it faster from 4 to 0 than 0 to 4.
D. Take a several stitches with zigzag width at 4 and return the dial
to 0 quickly.
Pattern A
Pattern 8
Satin stitch with
zigzag width at 1.
Combination of patterns
8 and C
Page 25

To ensure the best possible operation of your machine, it is necessary
to keep the essential parts clean at ali times.
Always disconnect the machine from power supply by removing the
plug from the socket-outlet.
Cleaning the outer surface of the machine
1. Remove the lint from
the thread guides with
the lint brush as in
dicated by the arrows,
2. Clean the outer surface
with a cloth. Dampen
the cloth with a mild
soap if necessary.
Never use thinner or
benzine.
Cleaning the feed dogs and shuttle area
23
1, Raise the needle to its highest position.
2, a. Remove the bobbin case from the shuttle,
b. Push aside the two shuttle keepers,
c. Remove the shuttle race cover and shuttle.
3, Clean the feed dogs and shuttle area with the lint brush.
NOTE: Put 3 drop of sewing machine oil on the center pin of the
shuttle and shuttle race as indicated by the arrows,
4, a. Be sure the shuttle race forms a half moon on the left side of the
machine,
b. Holding the shuttle by its center pin, replace it so as to form a
half moon on the right side.
c. Slide the shuttle race cover back into position,
d. Snap the shuttle keepers back into position.
Page 26

G£l\i£BAL PROBimS
Machine does not sew,
“Power line cord is not connected. — See
page 4.
^Power switch is turned off, — Set it at LOW
or HIGH position.
^Thread is caught in shuttle. — Clean shuttle
(see page 23)>
■^Needle is damaged. — Replace needle (see
page 14).
Fabric does not move.
^Presser foSt is riot lowered — Lower presser
foot.
^Stitch iefigth is set at 0> — Set it at 1 to 4.
* Feed cover plate Is attached. — Remove feed
cover plate.
STiTCHílNíG PROBLEMS
Machine skips stitches.
* Needle is not all the way up into needle
clamp, - See page 14.
■“^Needle is bent or blunt. — Replace needle
(see page 14),
■^Machine is rtot threaded correctly, — See
page 9.
^Thread Is caught in shuttle, — Clean shuttle
(see page 231.
^Fabric is a certain knit or synthetic. — Use
blue shank needle (see page 14).
Stitches are Irregular.
* Needle size is not correct for threed and
fabric, — See page 14,
^Machine is not threaded correctly. — See
page 9.
*Top thread tension is too loose. — See
page 13.
*Febfic is being pulled or pushed against
machine feeding action. ~ Guide it gently.
^Bobbin has rtot been wound evenly. —
Rewind bobbin.
■“Fabric is being pulled or pushed against
machine feeding action. — Guide it gently.
* Needle size is not correct for thread and
fabric. — See page 14,
■^Needle is not all the way up into the needle
clamp (see page 14).
THREAD PROBLEMS
Thread bunches.
^Top and bobbin threads are not drawn back
under presser foot before starting seam.
— Draw both threads back under presser
foot about 4 inches (10 cm) and hold until a
few stitches are formed.
Needle thread breaks.
■^Machine is not threaded correctly,
page 9.
*Top thread tension is too tight. — See
page 13,
^Needle is bent. — Replace needle (see
page 14).
*^Needle size is not correct for thread and
fabric, — See page 14.
Bobbin thread breaks.
Bobbin case is not threaded correctly. See
page $.
*Lint accumulates in bobbin case or shuttle.
— Remove lint (see page 23).
'"Top and bobbin thread tensionsare too tight,
— Adjust thread tensions (see page 13).
“"Stitch length is too long for sheer or soft
fabric. — S.horten stitch length.
See
 Loading...