

Page 1

SINGER
Sewing nVCacliine
201k
Page 2

SINGER
Form K6053
(1266)
All Rights Reserved
Printed in Great Britain
Page 3
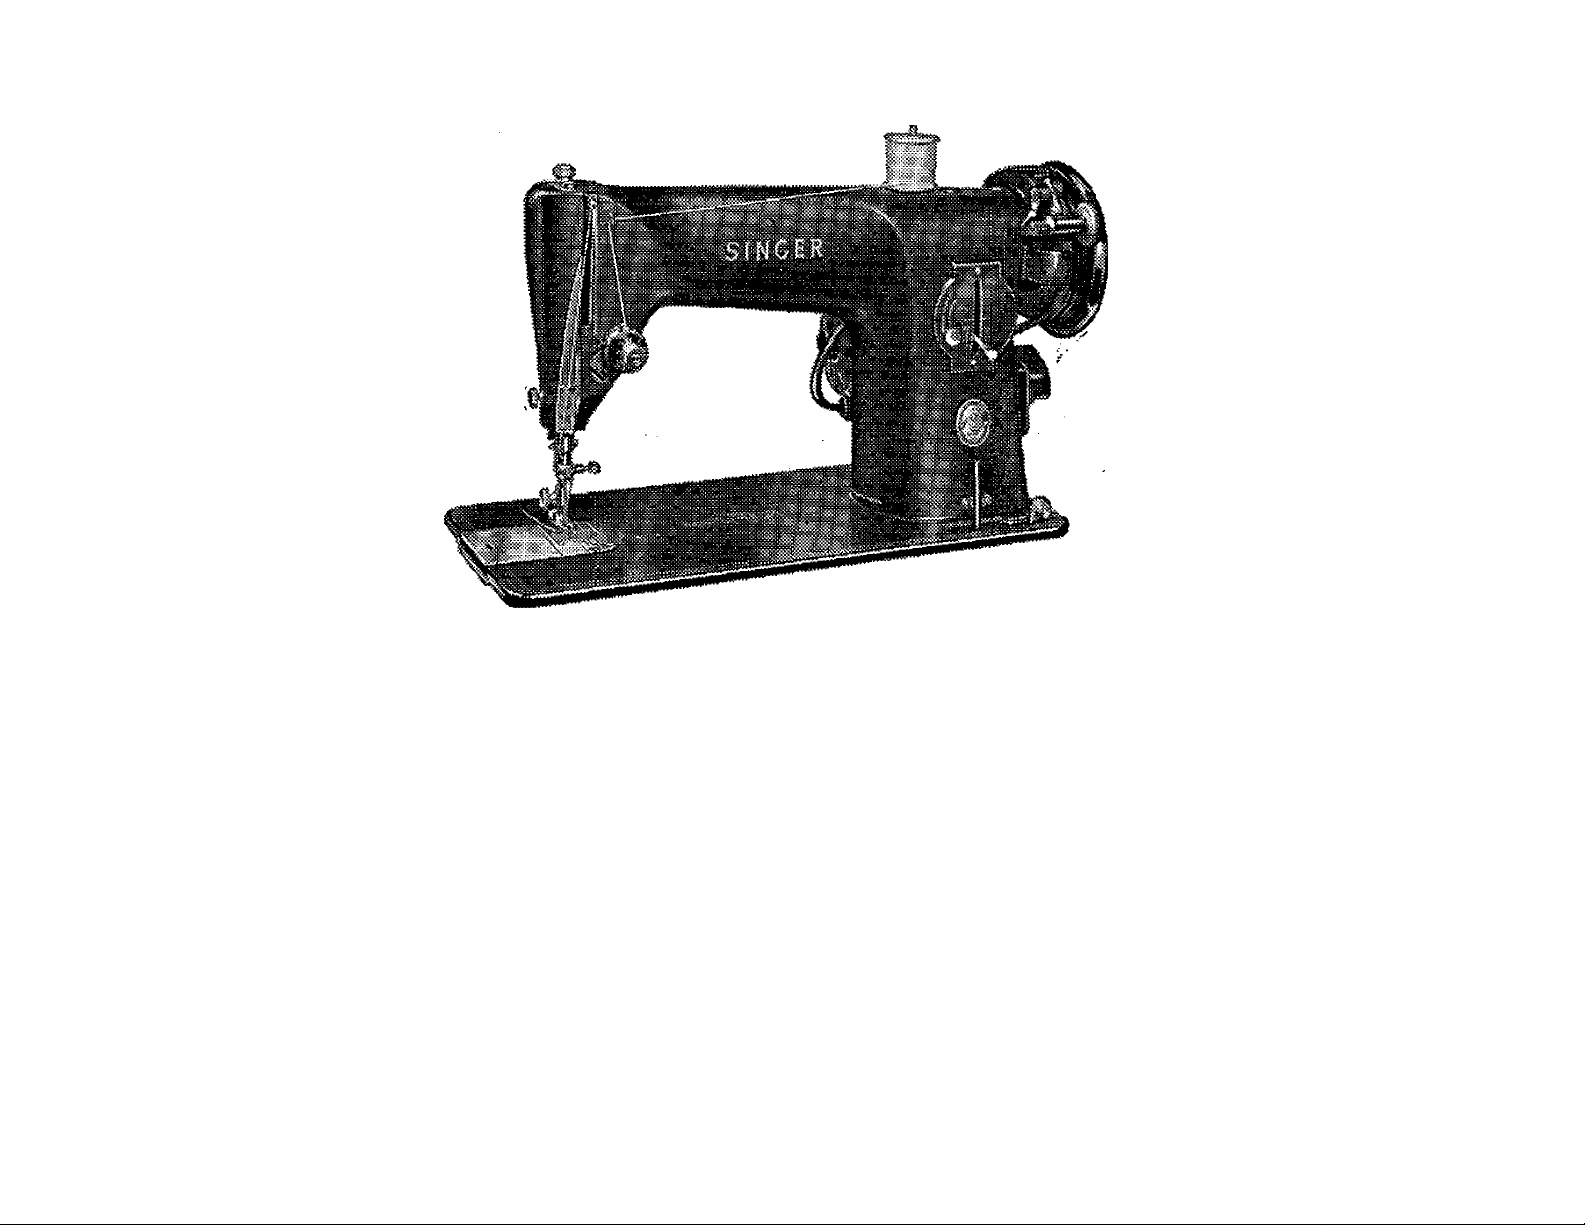
Sewing Machine 2 OIK
The SINGER 201K is another in a long line of products
resulting from the skill and ability of SINGER
craftsmen.
*A Trademark of THE SINGER COMPANY
K4d$8
Page 4
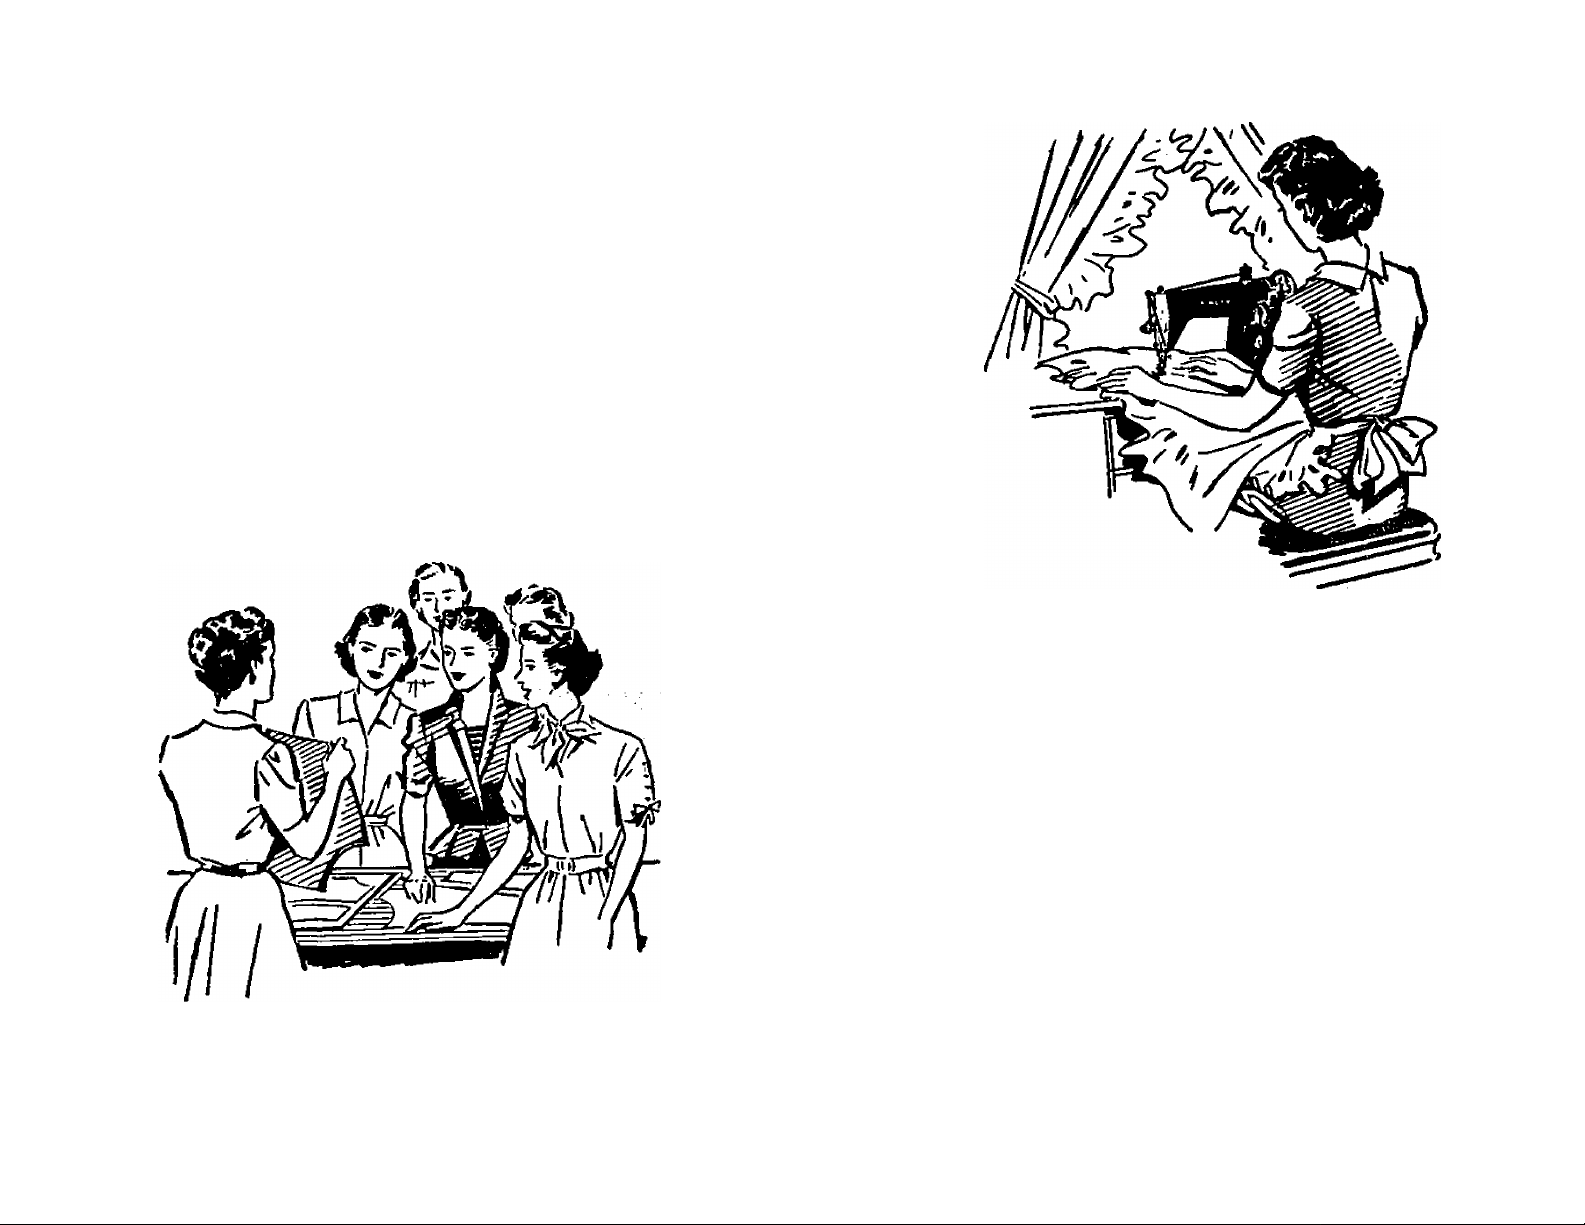
WHEN YOU OWN A SINGER 201K MACHINE
you have a beautifully styled, smooth running
machine which offers you a new world of sewing
enjoyment. Exclusive dresses for yourself, clothing
for your family, and numerous items for the home—
all will be yours at a fraction of their ready-made cost.
TO GET THE MOST ENJOYMENT FROM YOUR
You are entitled to sewing lessons when you
SINGER
become the owner of a new SINGER. A skilled,
SINGER-trained teacher personally guides you
and assists you in learning the fundamentals of
home sewing. Other courses embracing all phases
of home sewing are available at low cost.
2
Page 5
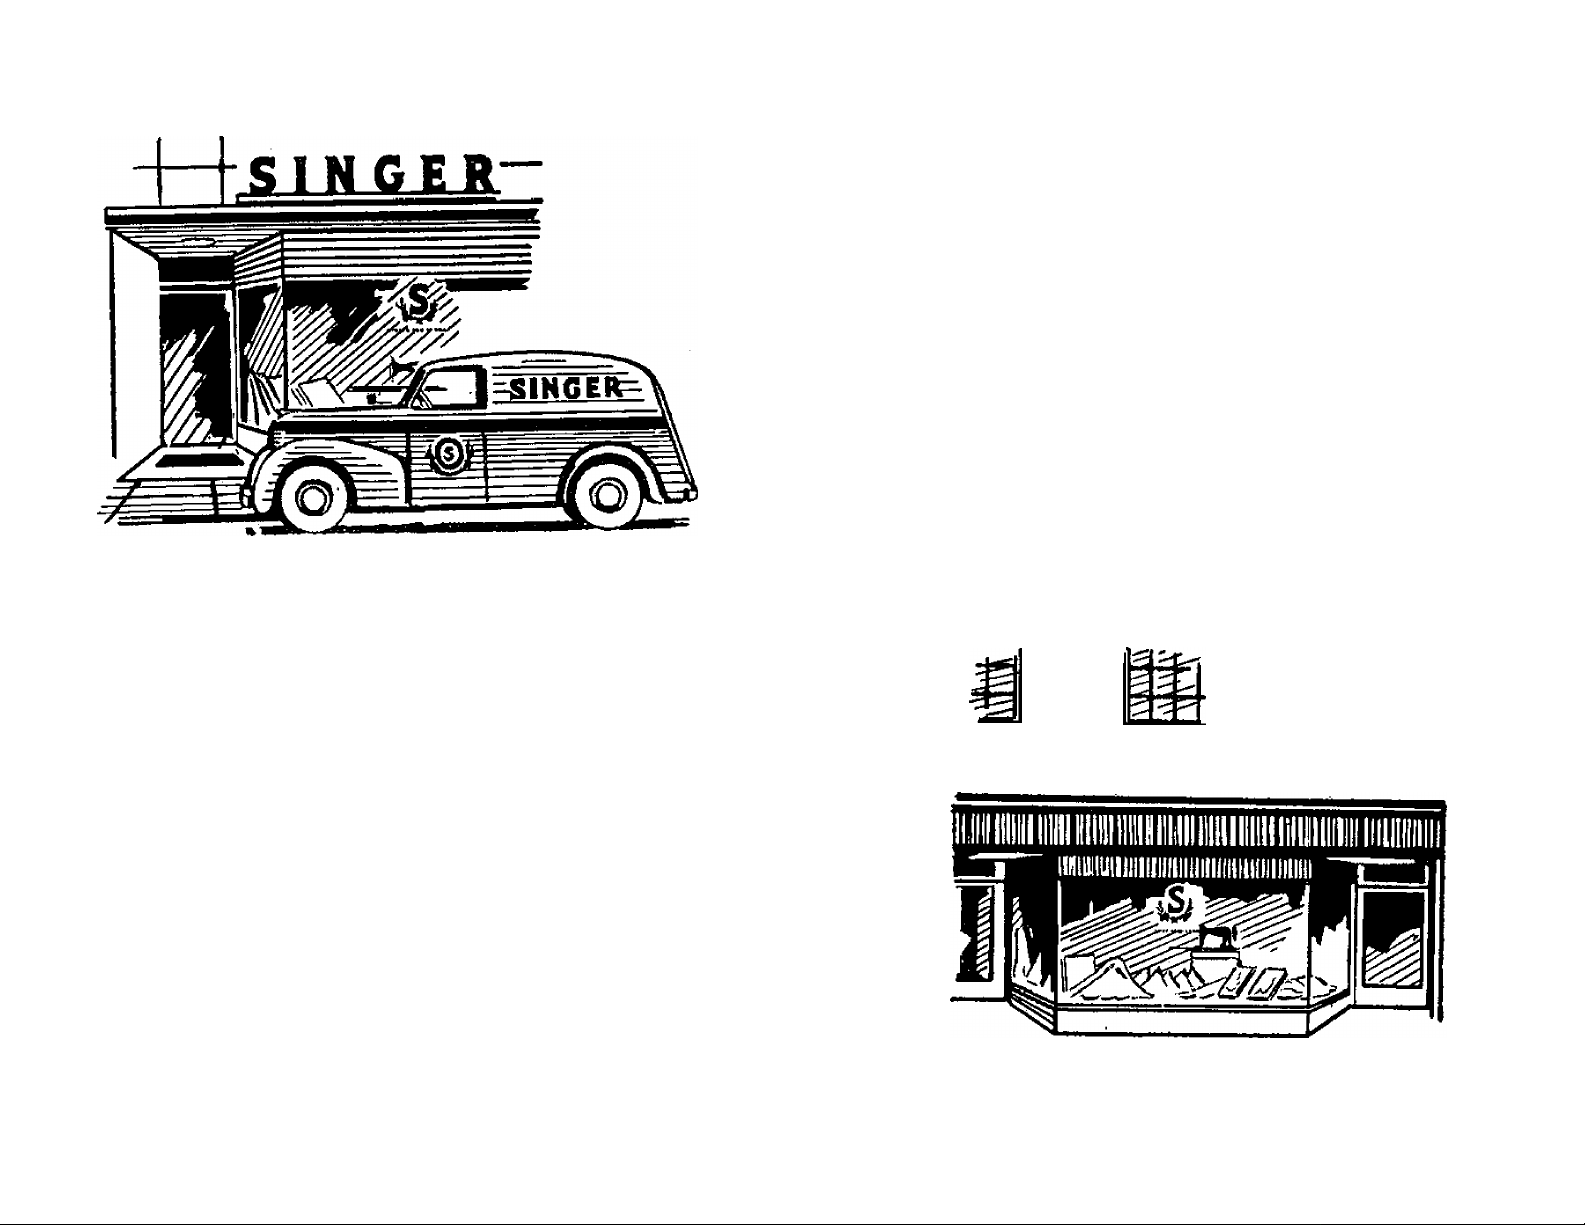
SINGER SERVICE
WHerever you go you will find expert, depend
able SINGER* Service nearby. SINGER is
interested in helping you keep your SINGER
Sewing Machine in top condition. That is why
you should always call your SINGER SEWING
CENTRE if your machine ever requires adjust
ment or repair. When you call your SINGER
SEWING CENTRE you can be sure of obtain
ing the service of a trained SINGER repair man
and can be assured of warranted SINGER* parts
when needed ! Look for the familiar red “S” Trade Mark on your SINGER SEWING
CENTRE and the ever ready SINGER Service Car.
EVERYTHING FOR THE WOMAN WHO SEWS
The answer to your sewing needs is at your SINGER
SEWING CENTRE. There you will find a wide
choice of sewing necessities and notions, sewing
instructions and guidance and services for covering
buttons, hemstitching, making belts and buckles, to
mention a few. Look in your telephone directory
under SINGER SEWING MACHINE COMPANY
for the SINGER SEWING CENTRE nearest you.
3
SINGER
Page 6

ELECTRICAL INFORMATION
The SINGER* Electric Motor
is located at the back of the machine,
and can be supplied for operation on
alternating or direct current. Orders
must state the catalogue number of the
motor, or the voltage, and in the case of
alternating current, the number of cycles.
Before Inserting Electric Plug—
be sure that voltage and number of
cycles stamped on motor nameplate
are within range marked on electric
meter installed by electric power company.
Electrical Connections for Machine
Push three-pin safety plug into three-
pin terminal block at right of machine
and connect plug at othei end of cord
to electric supply point.
Speed Controller
The speed of machine is regulated by
amount of pressure on foot controller
or knee controller.
CAUTION
When you have finished your sewing always dis
connect the plug from the electric supply point.
■fe
Page 7

r-
LIGHT
To Turn Light ‘Sn” or “off.”
To turn on light, reach over
machine arm and turn switch
B, Fig. 1 clockwise. To exting
uish light turn switch anti
clockwise.
Fig, 1. Light,
Fig, 2, Removing and replacing bulb,
5
Page 8

To Remoye Bulb
Grasp light socket so that thumb extends
over switch B. Press shade with thumb
at A to release shade from two catches,
and slide it halfway out of shade holder
C. Press bulb into socket and at same
time turn bulb over from machine as far
as it will go to unlock pin D (see Figs* 3
and 4). Withdraw the bulb.
To Insert New Bulb
Press bulb into socket and turn it over
toward machine until pin D enters notch
in socket (see Fig. 3). Return shade to
its normal position as shown in Fig. 1.
Fig. 5. Locking or unlocking hutb pin.
j..
“““VESSKS»,
K.465i
Fig. 4. Inserting bulb in socket.
Page 9
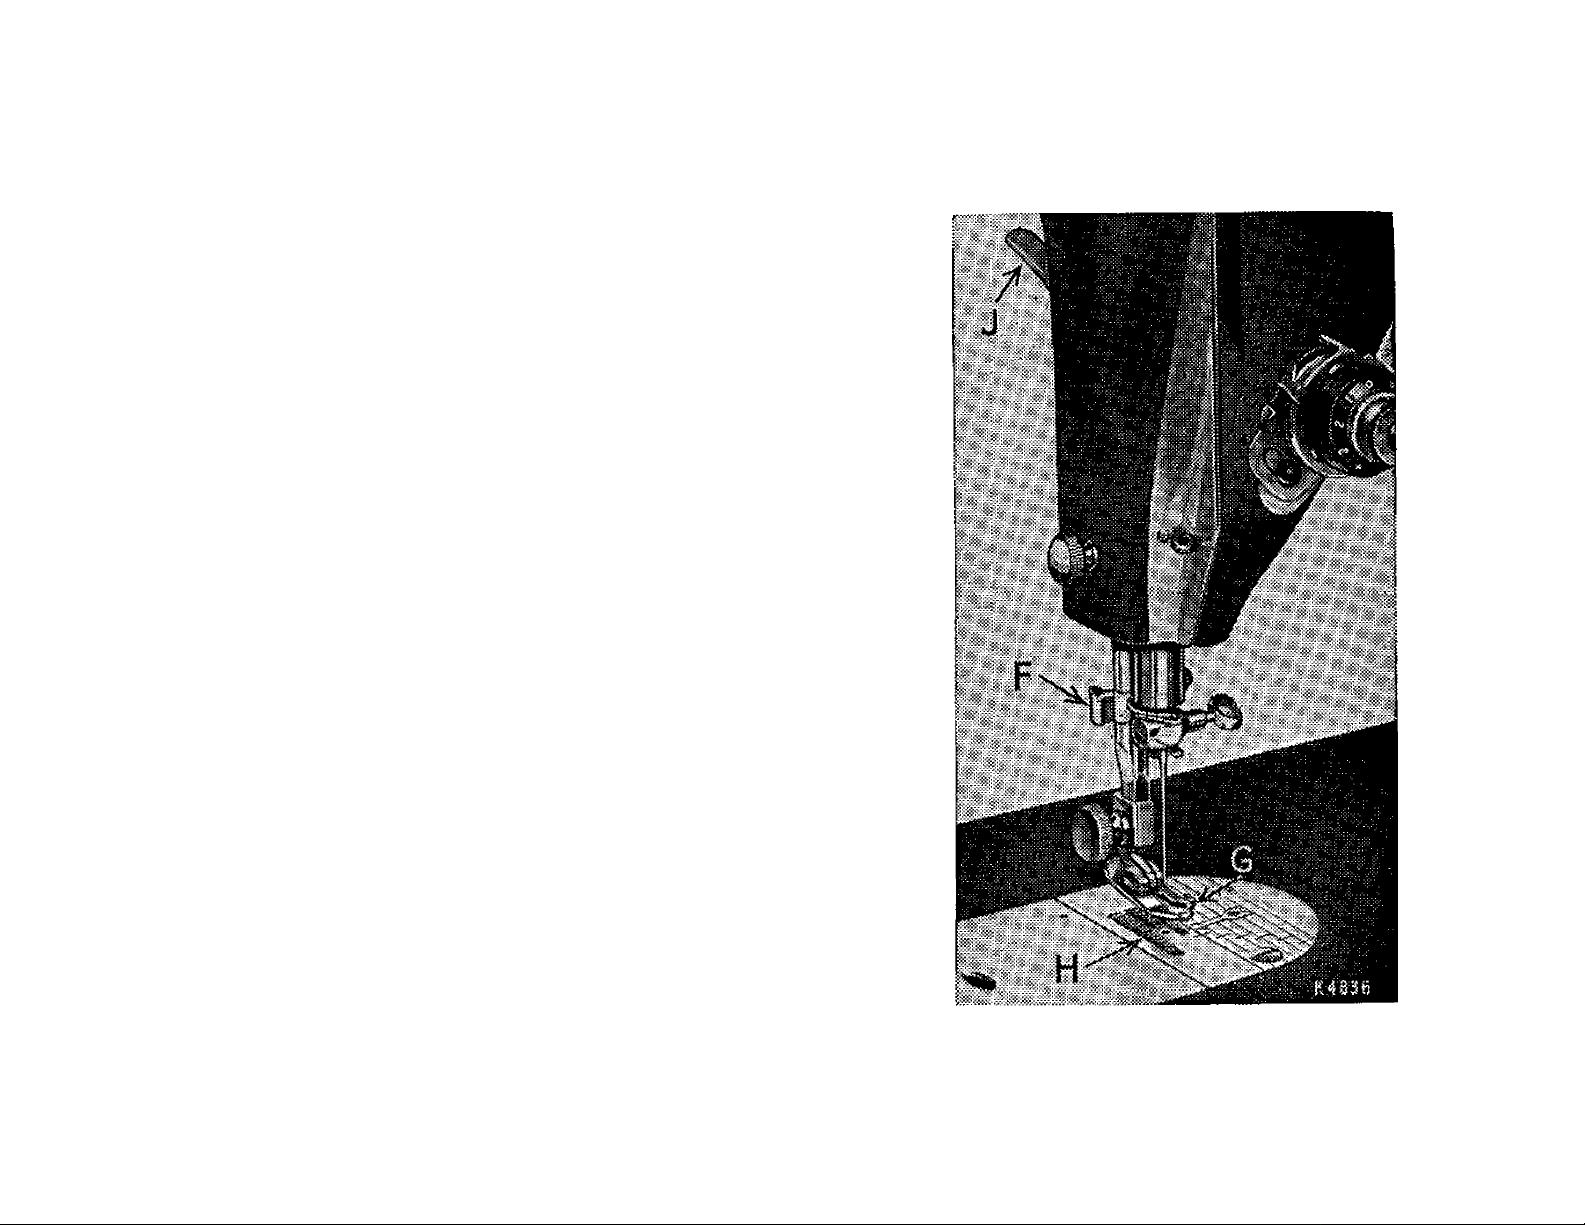
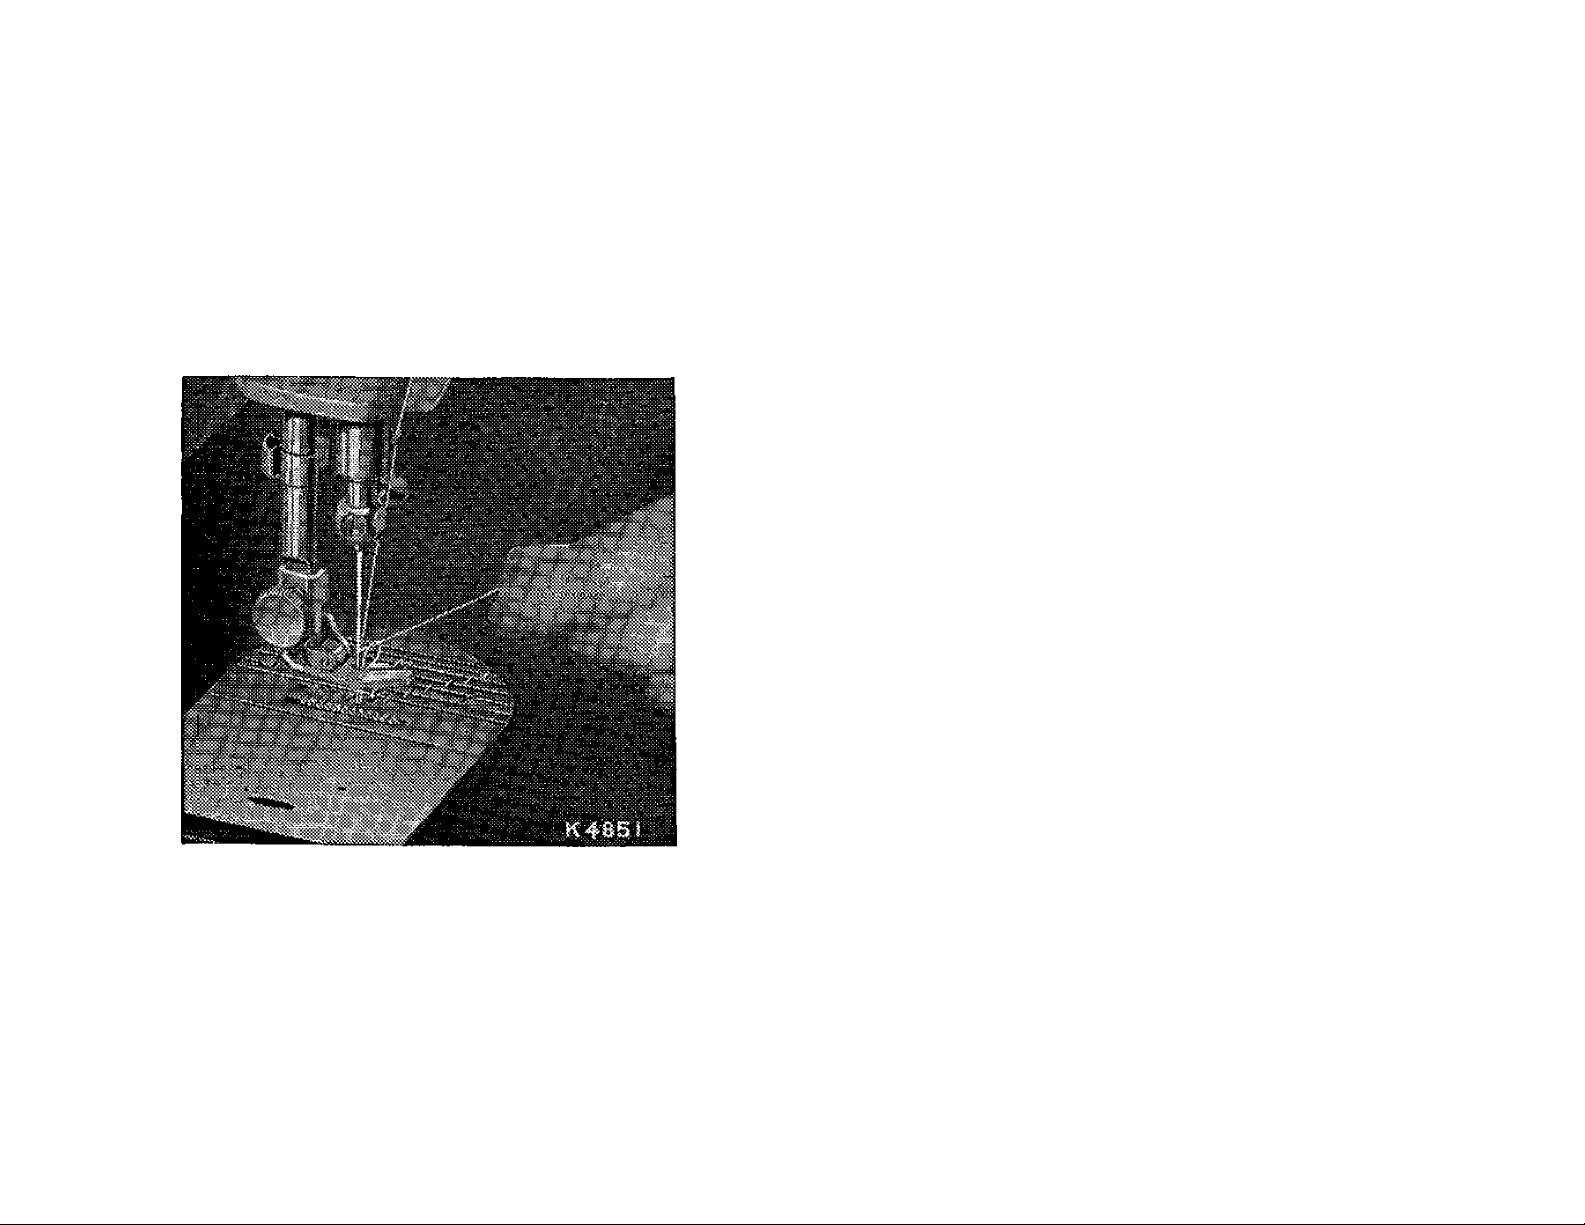
IF MACHINE IS ELECTRICALLY
OPERATED
Raise presser foot G by means of presser bar
lifter J to prevent injury to the foot G and
feed H.
Place a piece of material under presser foot
and let the foot down upon it. Turn on
electric current and, if the combination knee
and foot controller is installed as a knee con
troller, press knee lever to the right. If
controller is placed on the floor to be used as
a foot controller, press down oh pedal of
controller. The speed of the machine is
controlled entirely by the amount of pressure
applied to the controller. Operate machine
in this way, without being threaded, until
you have become accustomed to guiding the
material and operating the controller.
Fig, 5, Front view of machine.
Page 10
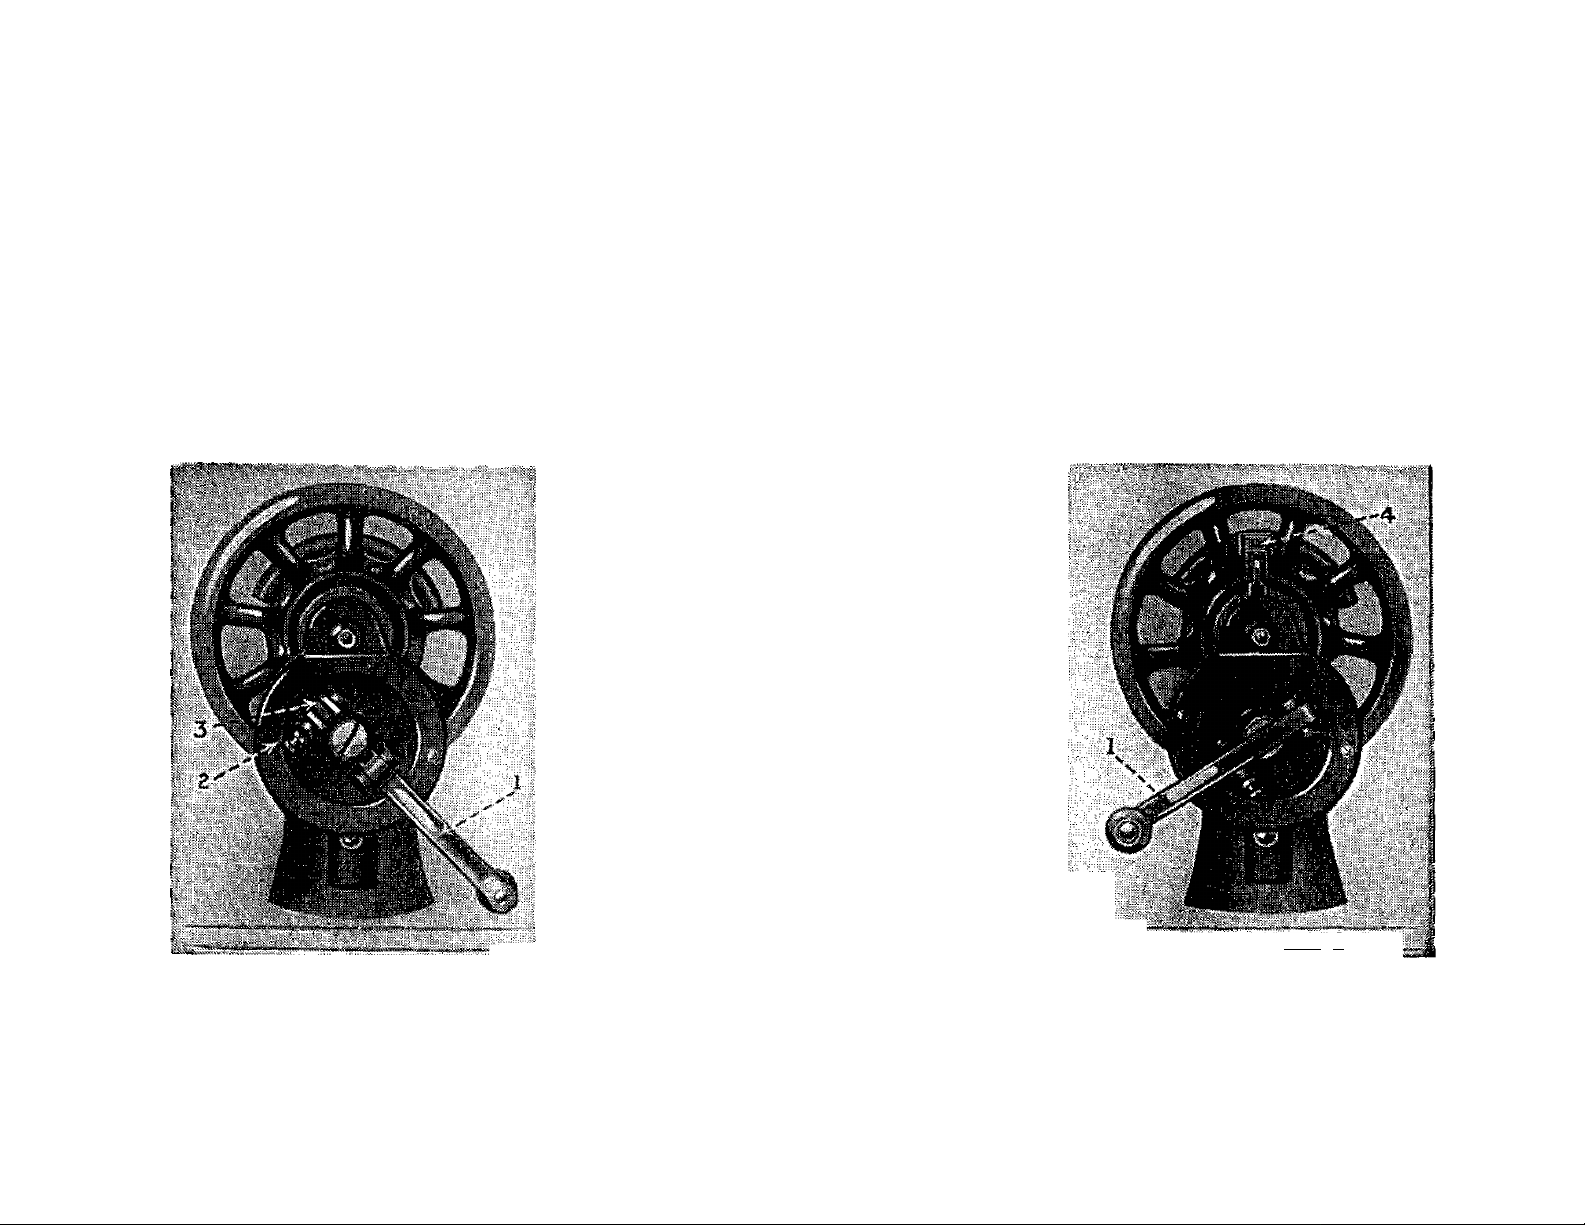
IF MACHINE IS HAND OPERATED
When the machine is uncovered, the hand attachment will be found to be out of working
position as shown in Fig. 6, Pull the small spring stud 2, and turn the handle back
until the lever 1, enters the socket 3. Press back the hinged finger 4, Fig. 7 between the
spokes of the wheel. The machine is now ready for working, as shown in Fig. 7.
NOTE. Before replacing the
cover or the machine in its
case, the lever should be dis
engaged and the handle placed
in the position shown in Fig. 6.
TO OPERATE THE HAND
MACHINE
Place a piece of material under
the presser foot G, Fig. 5, and
lower the latter by means of
the lifter J.
Now turn the handle over
from you to work the machine,
without being threaded, until
you are accustomed to guiding
g the material with the left hand. Fig. 7
... K3975
8
Page 11
IF MACHINE IS TREADLE OPERATED
BELT SHIFTER
Loosen the hand wheel by turning stop
motion screw 17, Fig. 12, oyer toward you,
place both feet upon the treadle and turn
the hand wheel over toward you, at the
same time allowing the feet to move
freely and lightly with the motion of the
treadle. Continue to do this until a
regular and easy movement is acquired
and you are able to work the treadle so
that you can re-start the machine with
the wheel turning toward you,
When familiar with the working move
ment, tighten the hand wheel by turning
the stop motion screw over from you, and
place a piece of material under the presser
foot G, Fig. 5. Lower the latter by means
This device simplifies throwing off and
replacing the belt. To throw off the
belt, move the belt shifter to the left
(see Fig, 8), working the treadle at the
same time. To replace the belt, work
the treadle slowly with the band wheel
turning toward you, when a revolution
or two of the wheel will bring the belt back
into its place.
of the lifter and again work the machine,
without being threaded, until you are
accustomed to guiding the material.
The belt should be only just tight enough
not to slip. If too loose, shorten and
rejoin.
Fig. 8.
Page 12
NEEDLES AND THREAD
This machine uses a 15x1 Needle—available
in sizes 9, 11, 14, 16, 18, 19 and 21.
For perfect stitching, the thread should be selected
according to the fabric to be stitched and the
needle must be of the correct size for the thread
which must pass freely through eye of needle.
Select the correct needle according to the chart
on page 11. Be sure that the needle is not blunt
or bent.
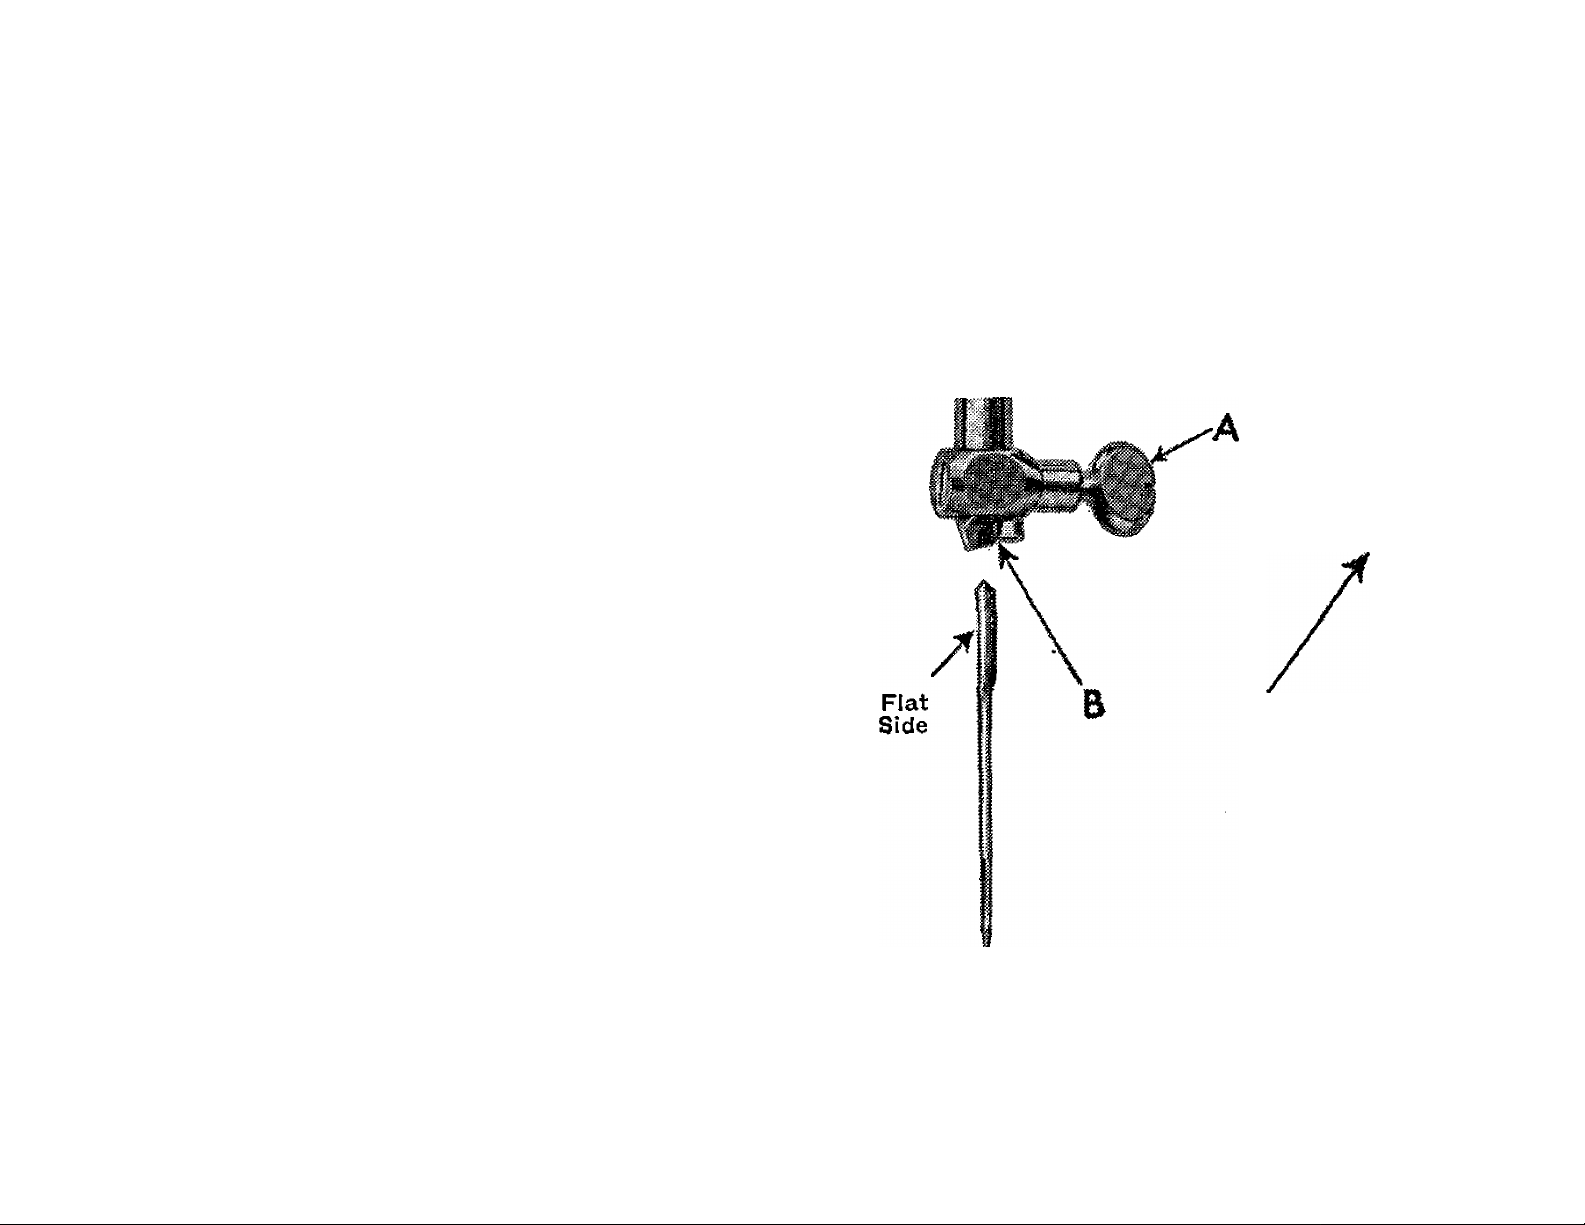
TO SET THE NEEDLE
Raise needle bar to its highest position and loosen
thumb screw A in needle clamp. Insert needle
with its flat side to the left up into the needle
clamp B as far as it will go, then tighten thumb
screw A.
10
Flat
Side
Fig, 9, Setting the Needle,
Page 13

CHART SHOWING THE RELATIONSHIP OF TYPES OF FABRICS, THREAD
AND NEEDLE SIZES AND MACHINE STITCHES TO THE INCH
Types of Fabrics
Very thin Silk, Muslin, Cambric, Light
weight Delicate Fabrics, etc.
Fine Calicoes, Linens, Shirtings, Fine
Silk Goods, etc.
Plastic Materials 50 to 80
Shirtings, Sheetings, Bleached Calicoes,
Silk and General Domestic Goods,
Light Woollen Goods and all classes
of general work
All kinds of heavy Calicoes, Drill, Wool
len Goods, etc.
Tickings, Heavy Woollens, Trousers,
Boys’ Clothing, Corsets, Cloaks,
Mantles, Heavy Coats, and Heavy
Clothing generally
Thread Sizes
100 to 150 Cotton,
50 Silk,
80 Mercerised
Darning Cotton
80 to 100 Cotton,
50 Silk,
50 Mercerised
Darning Cotton
Mercerised Cotton
60 to 80 Cotton,
50 Silk,
50 Syifko
40 to 60 Cotton 16
24 to 40 Cotton,
60 to 80 Linen
Needle
Sizes
9
11
11
14
18 or 19
Machine Stitches per Inch
Inside Seams
20
16
10
12
10
8
Top Stitching
25 to 30
20
12
18
12
10
Bags, Coarse Cloths, Canvas, Duck,
Heavy Goods of any texture
When ordering needles,^always specify *'Class and Variety 15x1 ’* and state the size and quantity required.
You will obtain the best stitching results from your Sewing Machine if it is fitted with t SINGER* Needle.
40 to 60 Linen, or
very coarse cotton
19 OP 21
6
8
11
Page 14
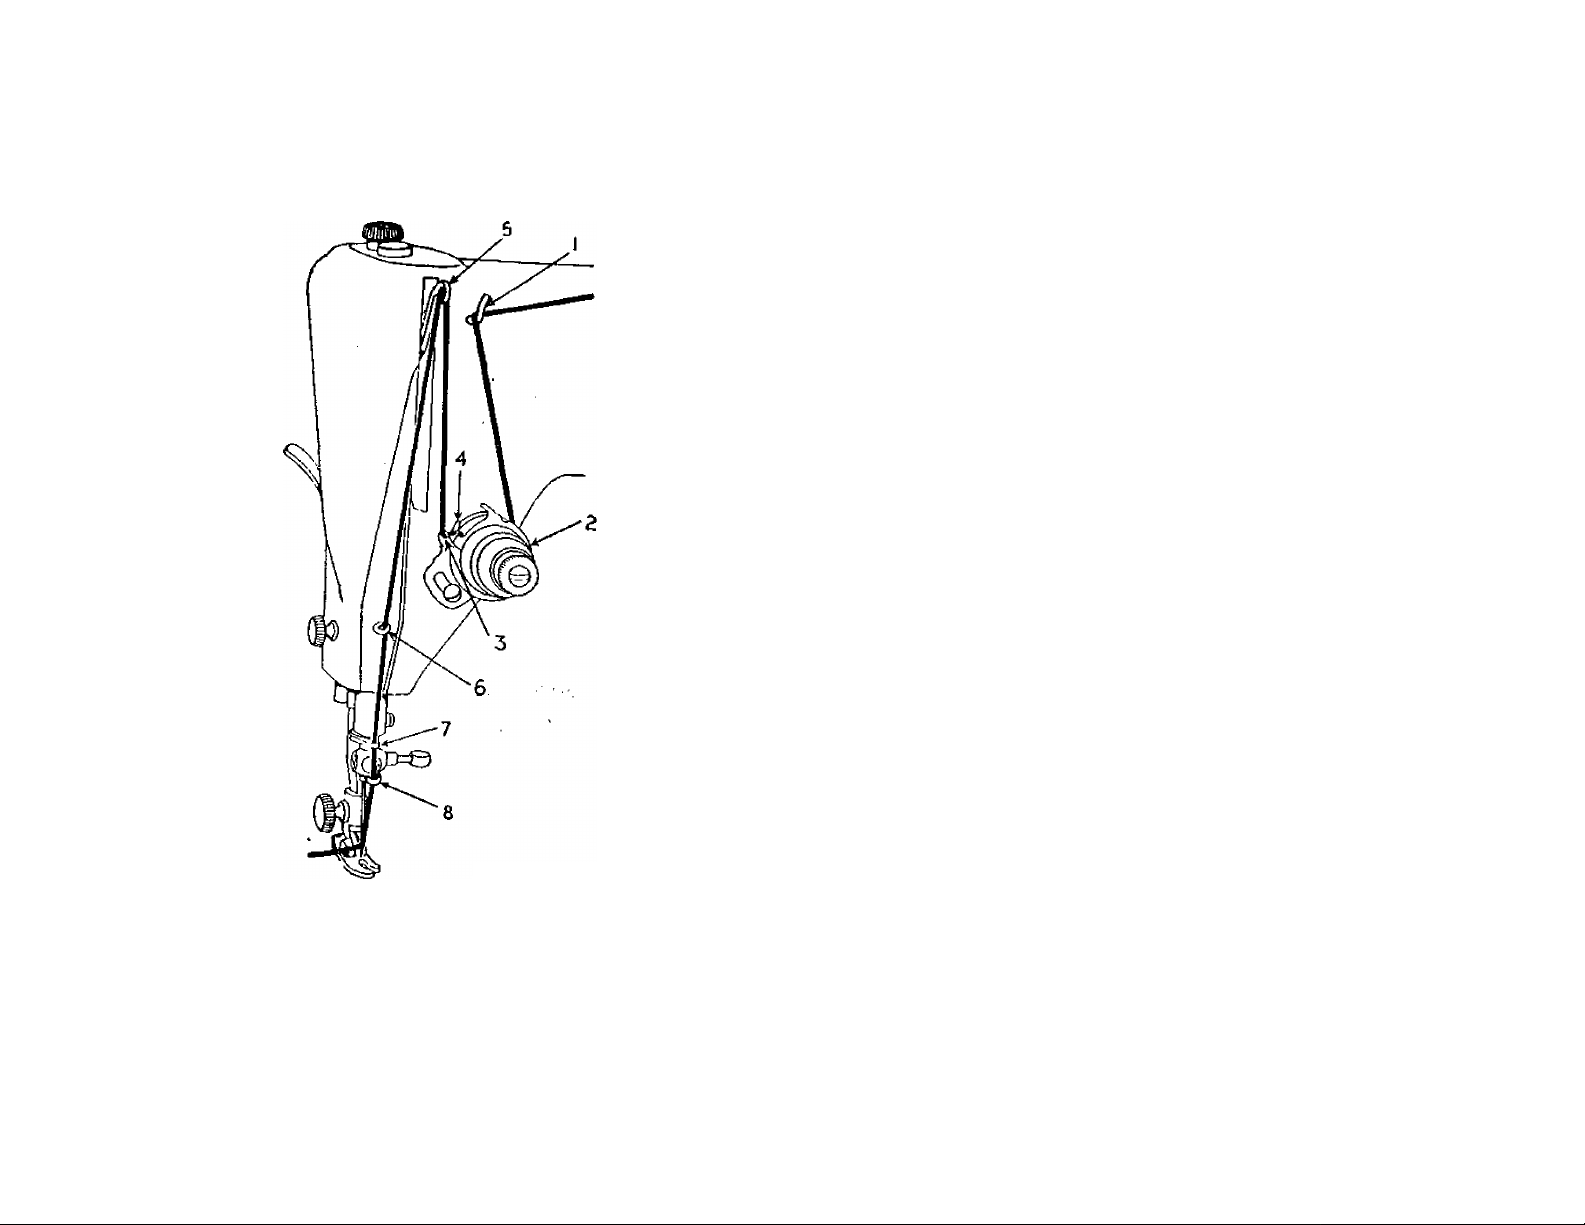
UPPER THREADING
See Fig. 10.
Raise take-up lever 5 to its highest point.
Place spool of thread on spool pin.
Lead thread into thread guide 1.
Down and from right to left between
tension discs 2.
Into the loop of the take-up spring 3 and
to the right until it enters the fork 4.
Up and from right to left through hole
in take-up lever 5.
Down through guide 6 on face plate.
Down through guide 7 into guide 8.
From right to left through the eye of the
Fig. 10.
K4SQ6
needle.
Draw about two inches of thread through
the eye of the needle with which to
begin sewing.
12
Page 15
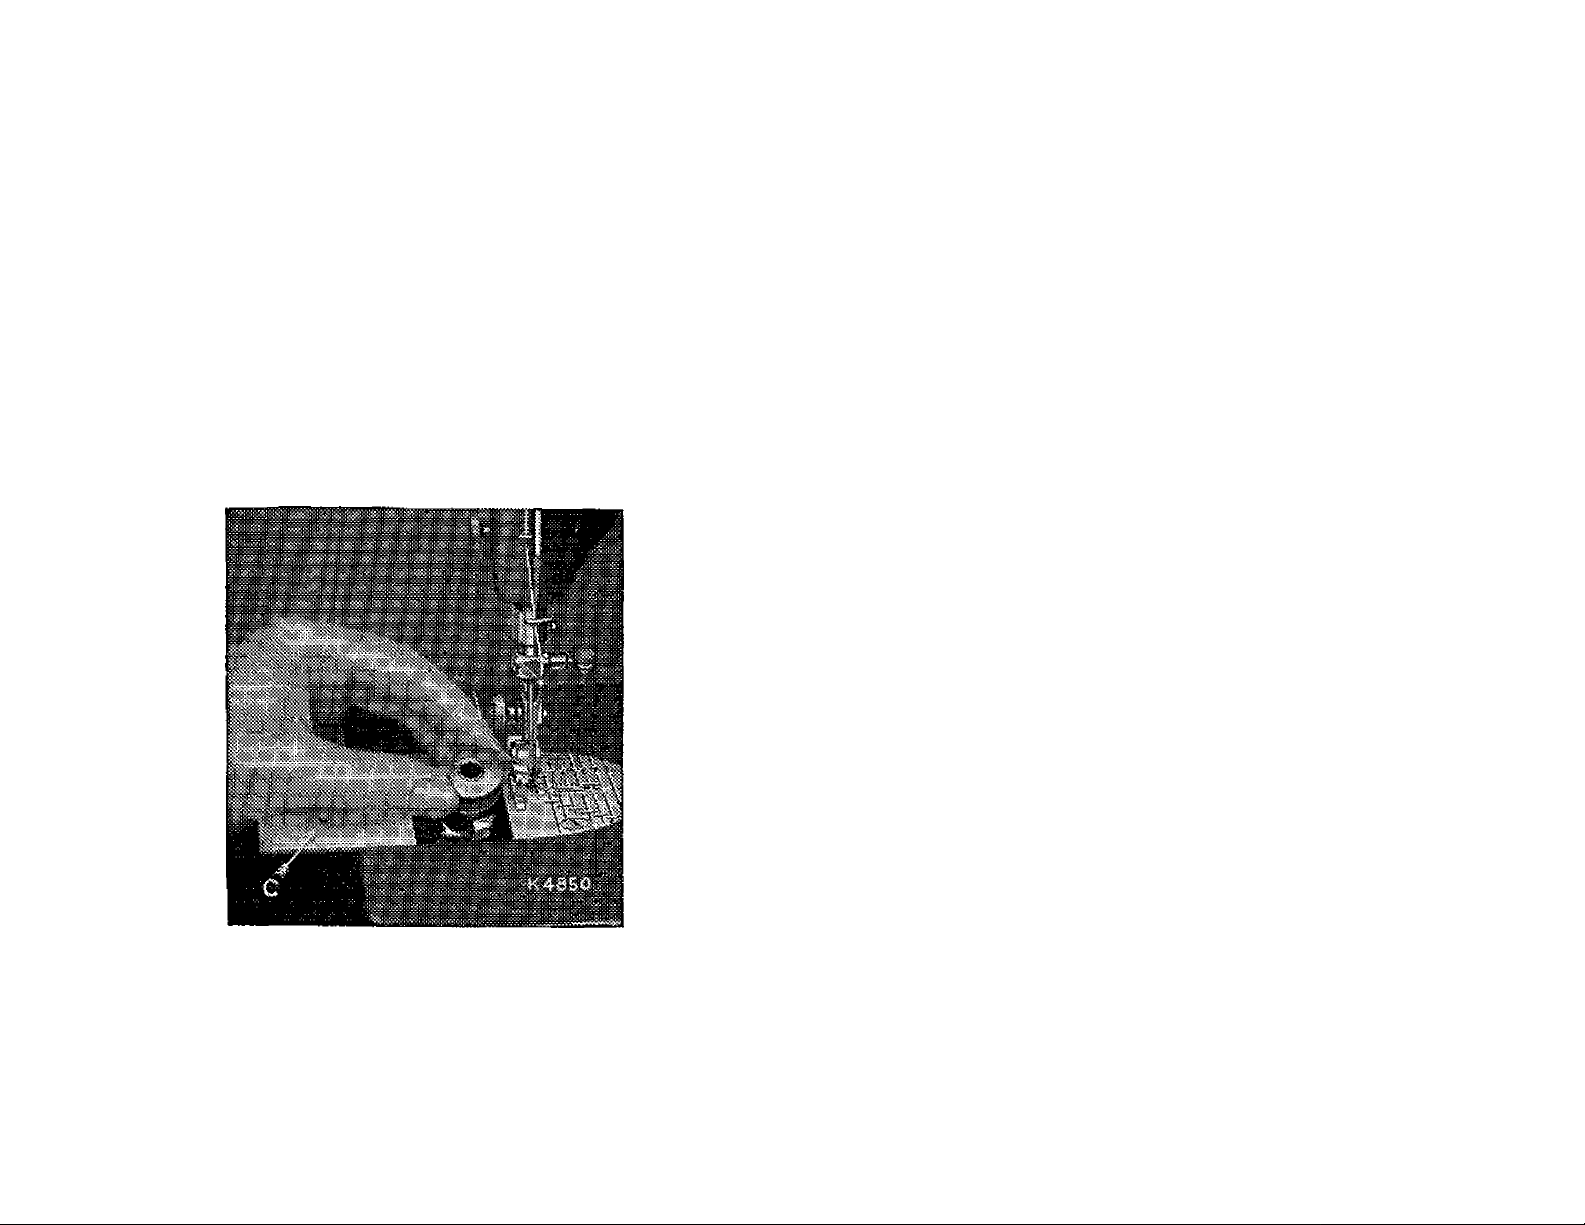
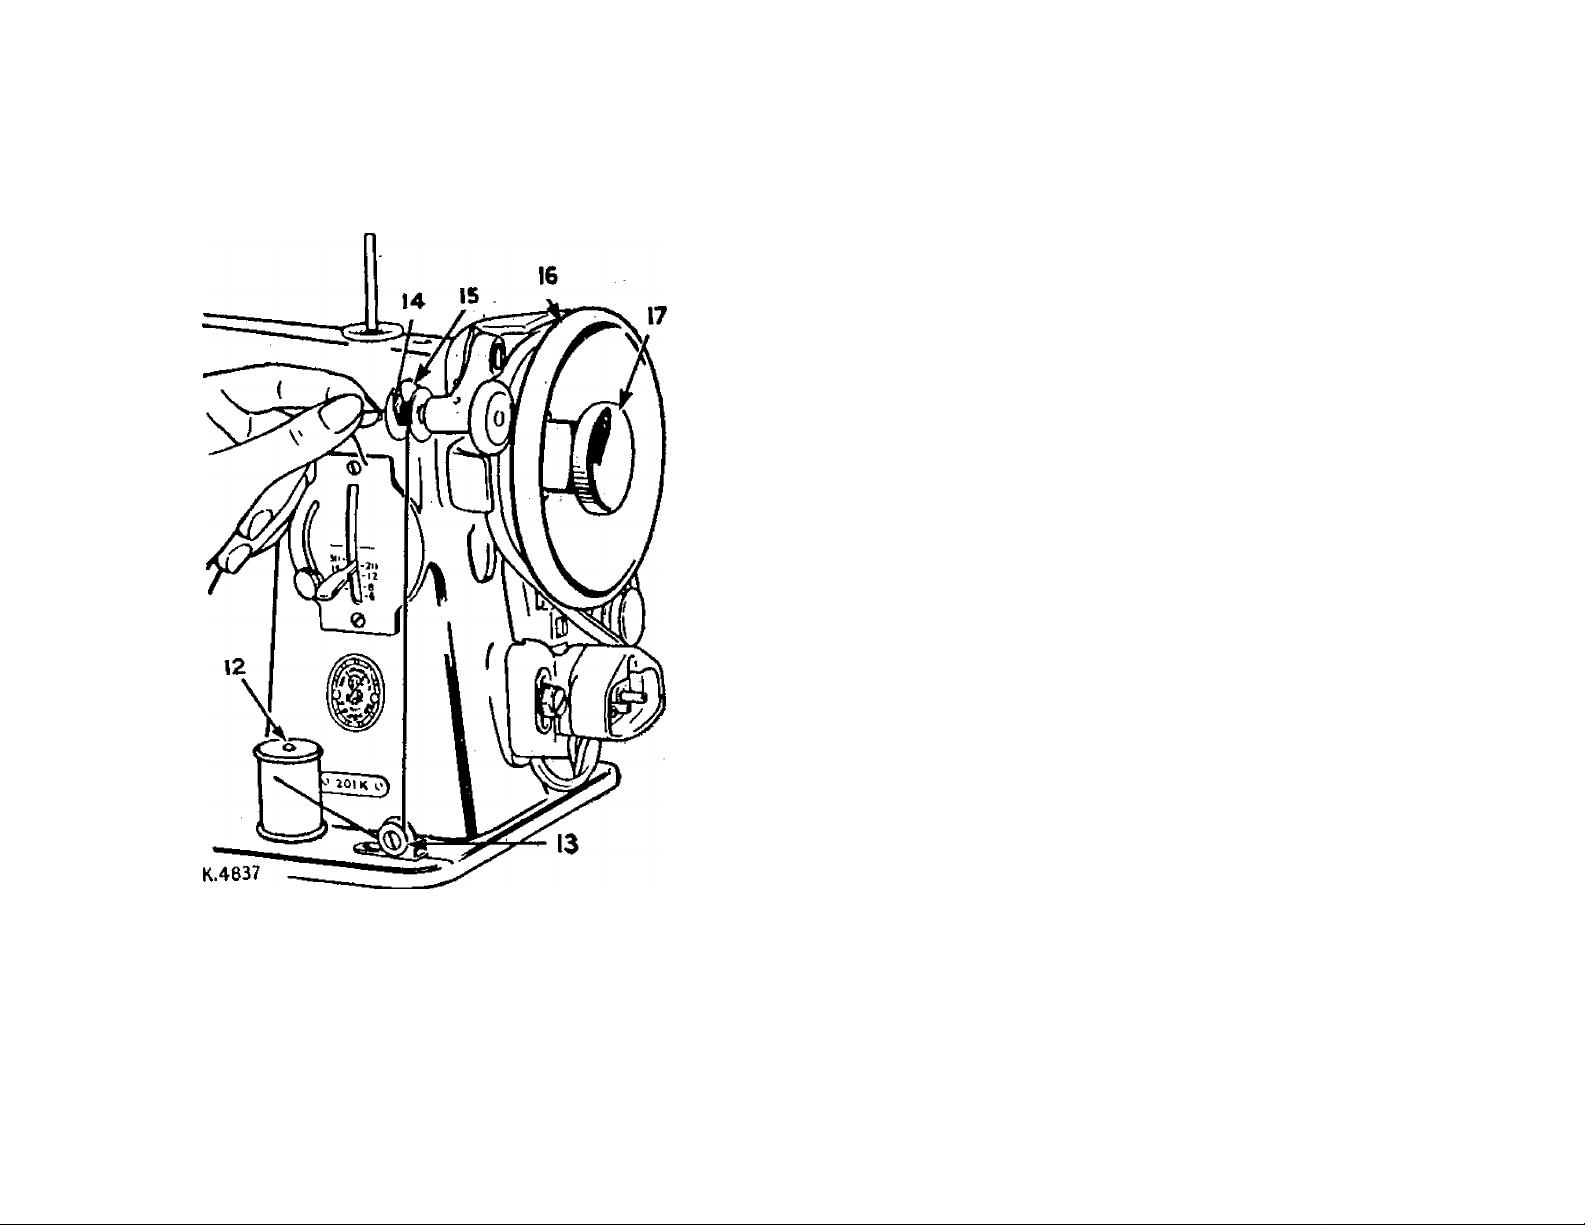
TO REMOVE BOBBIN
TO WIND BOBBIN. Fig. 12.
Raise the needle to its highest point.
Draw to the left the slide (C) in the bed
of the machine and remove the bobbin
with the thumb and forefinger of the
left hand, as shown in Fig. 11.
1. Place bobbin on spindle with pin of
spindle entering hole in right side of
bobbin.
2. Lock bobbin in place by pressing bob
bin winder down until latch 15, Fig. 12
engages.
3. Place spool of thread on spool pin 12.
Draw thread under and between
tension discs 13. Lead thread up
through hole in bobbin 14 from the
inside.
4. Hold hand wheel 16 and loosen
knurled screw 17 by turning it over
toward you.
5. Hold end of thread and operate
machine as for sewing. Continue to
Fig. 11. Removing the Bobbin,
hold end of thread until it breaks off.
Allow tension discs to control flow of
thread. Do not guide or hold thread
when winding bobbin.
The bobbin winder will stop automatically
when the bobbin is filled.
13
Page 16
Remove bobbin from spindle and tighten
knurled screw 17.
If pressure of bobbin winder pulley
against bub of hand wheel is insufficient
for winding the bobbin, press down bobbin
winder until latch 15, Fig. 13 drops and
holds it in position. Loosen adjusting
screw 18, Fig. 13. With forefinger, push
back upper end of slotted plate 19 as far
as it will go, as shown in Fig. 13, and at
the same time, press bobbin winder
pulley against hub of hand wheel. Tight
en adjusting screw 18. If thread does
not wind evenly on bobbin, loosen screw
which holds tension bracket 13, Fig. 12
in position. Move bracket to the left if
Fig. 12* Winding the Bobbin.
bobbin winds high on right; move
bracket to the right if bobbin winds high
on left. When bracket is properly
centred, thread will wind evenly across
bobbin.
Bobbins can be wound while machine is
sewing. Follow instructions on page 13
omitting item 4.
14
Page 17
TO REPLACE BOBBIN
Hold the bob
bin between
the thumb and
forefinger of
the left band,
Fig, 13, Adjustment of Bobbin Windet,
Fig, 14, Replacing the Bobbin,
the
drawing from
right to left, as
shown in Fig.
14.
Place the bob
bin into the
bobbin case
and draw the
thread into the
slot 1, Fig. 15
in the bobbin
case, as shown.
Draw the
threadback-
thread
15
ward between
Fig, 15. Threading the
Bobbin Case.
Page 18
the bobbin case and the tension spring
until it reaches the notch 2, Fig, 16, then
pull the thread toward the right, as shown
in Fig. 16. Close the slide, as shown in
Fig. 17.
Fig. 16, Bobbin Case Threaded^
Fig, 17m Under Threading Completed,
16
Page 19
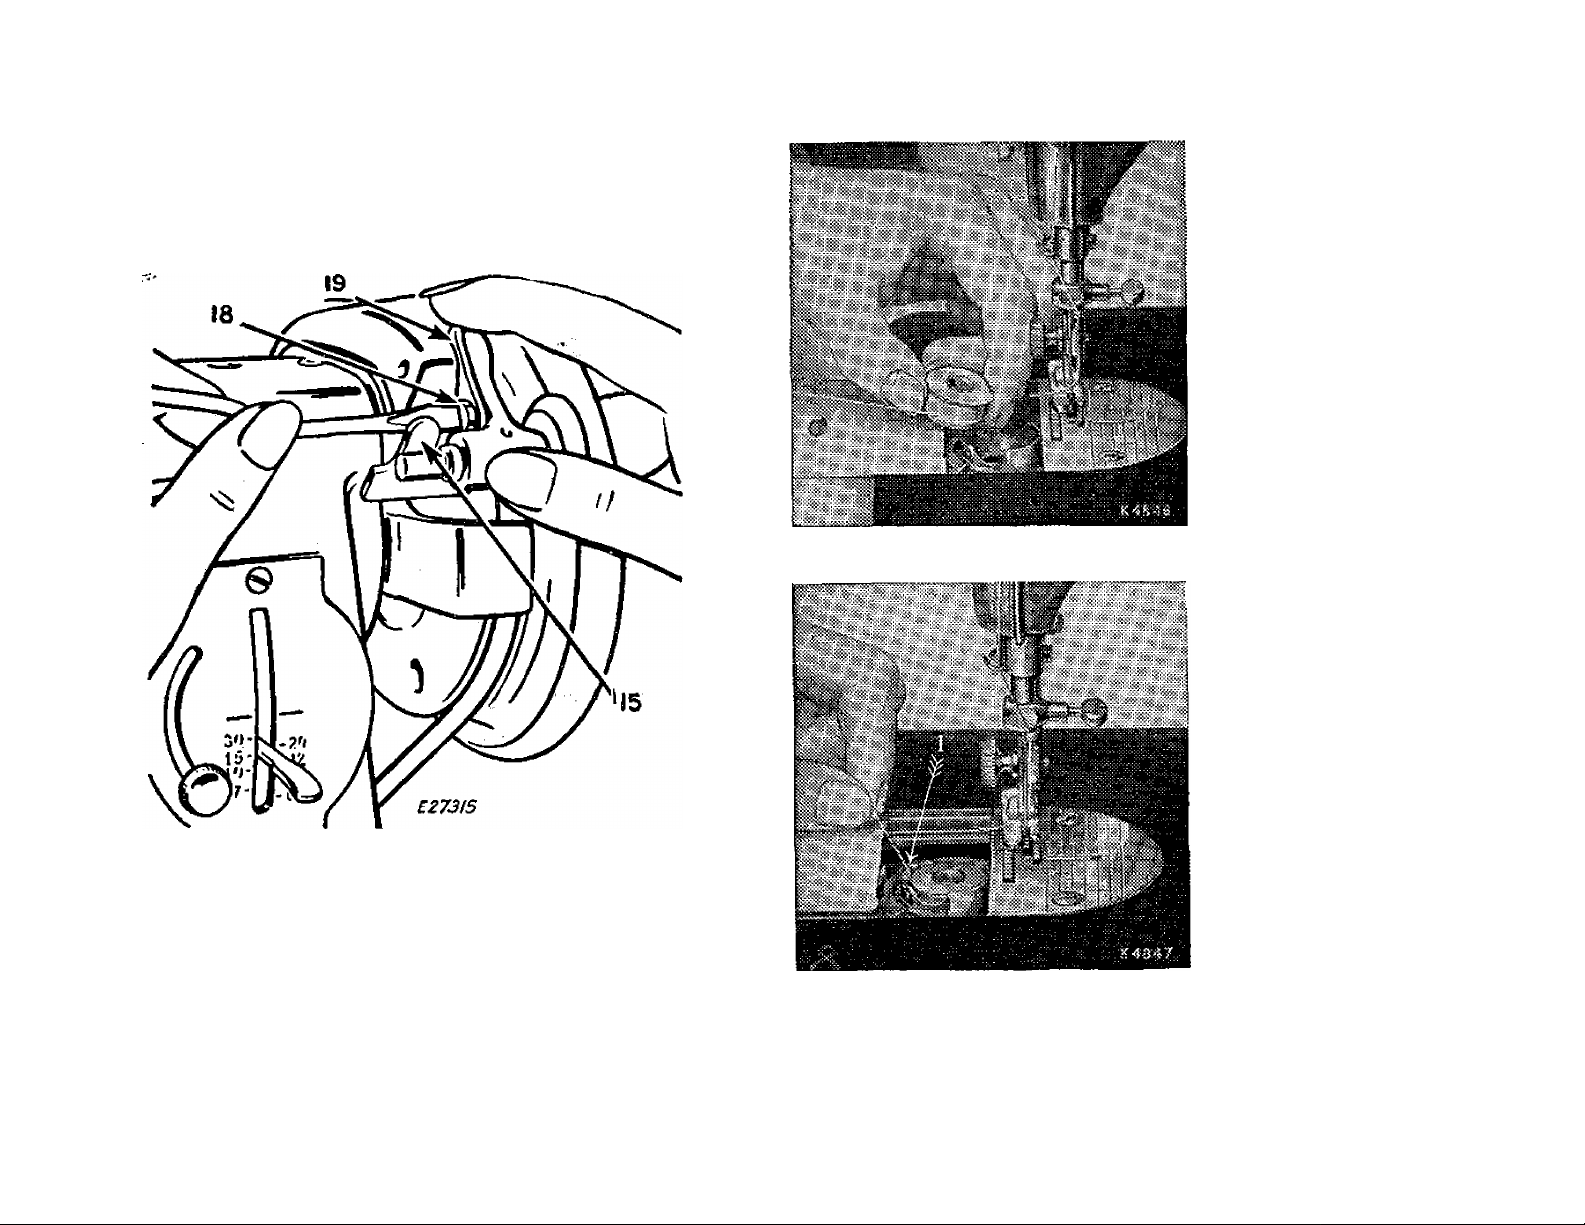
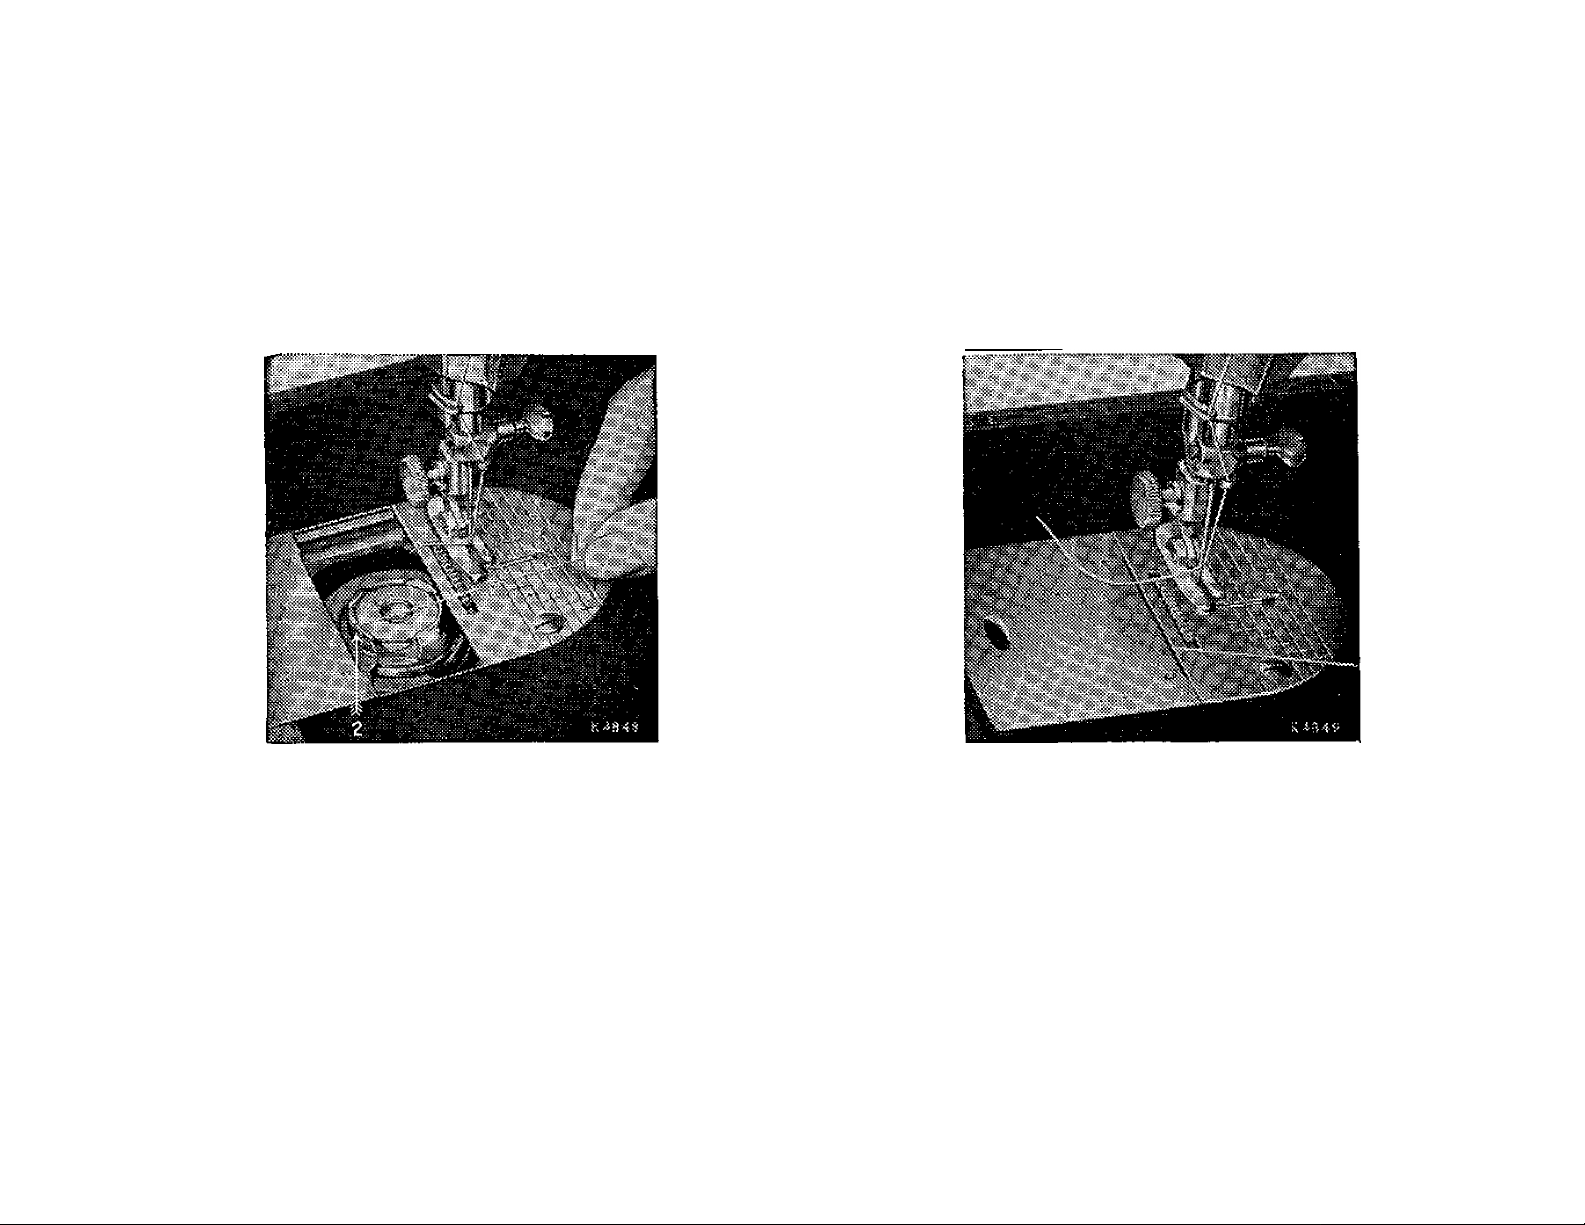
TO PREPARE FOR SEWING
Have the thread take-up lever at its
highest position, then, with the left
hand, hold the end of the needle thread,
leaving it slack from the hand to the
needle. Turn the hand wheel over
toward you until the needle moves down
and up again to its highest position, thus
catching the bobbin thread. Draw up
the needle thread and the bobbin thread
will come up with it through the hole in
the throat plate as shown in Fig. 18.
Lay both threads back under the presser
foot diagonally across the feed, to the
right or left, depending upon which side
of the needle the material is to be located
so that when the presser foot is lowered,
the threads will be firmly held between
Fig. 18. Drawing Up the Under Thread.
the feed and the presser foot, *
17
Page 20
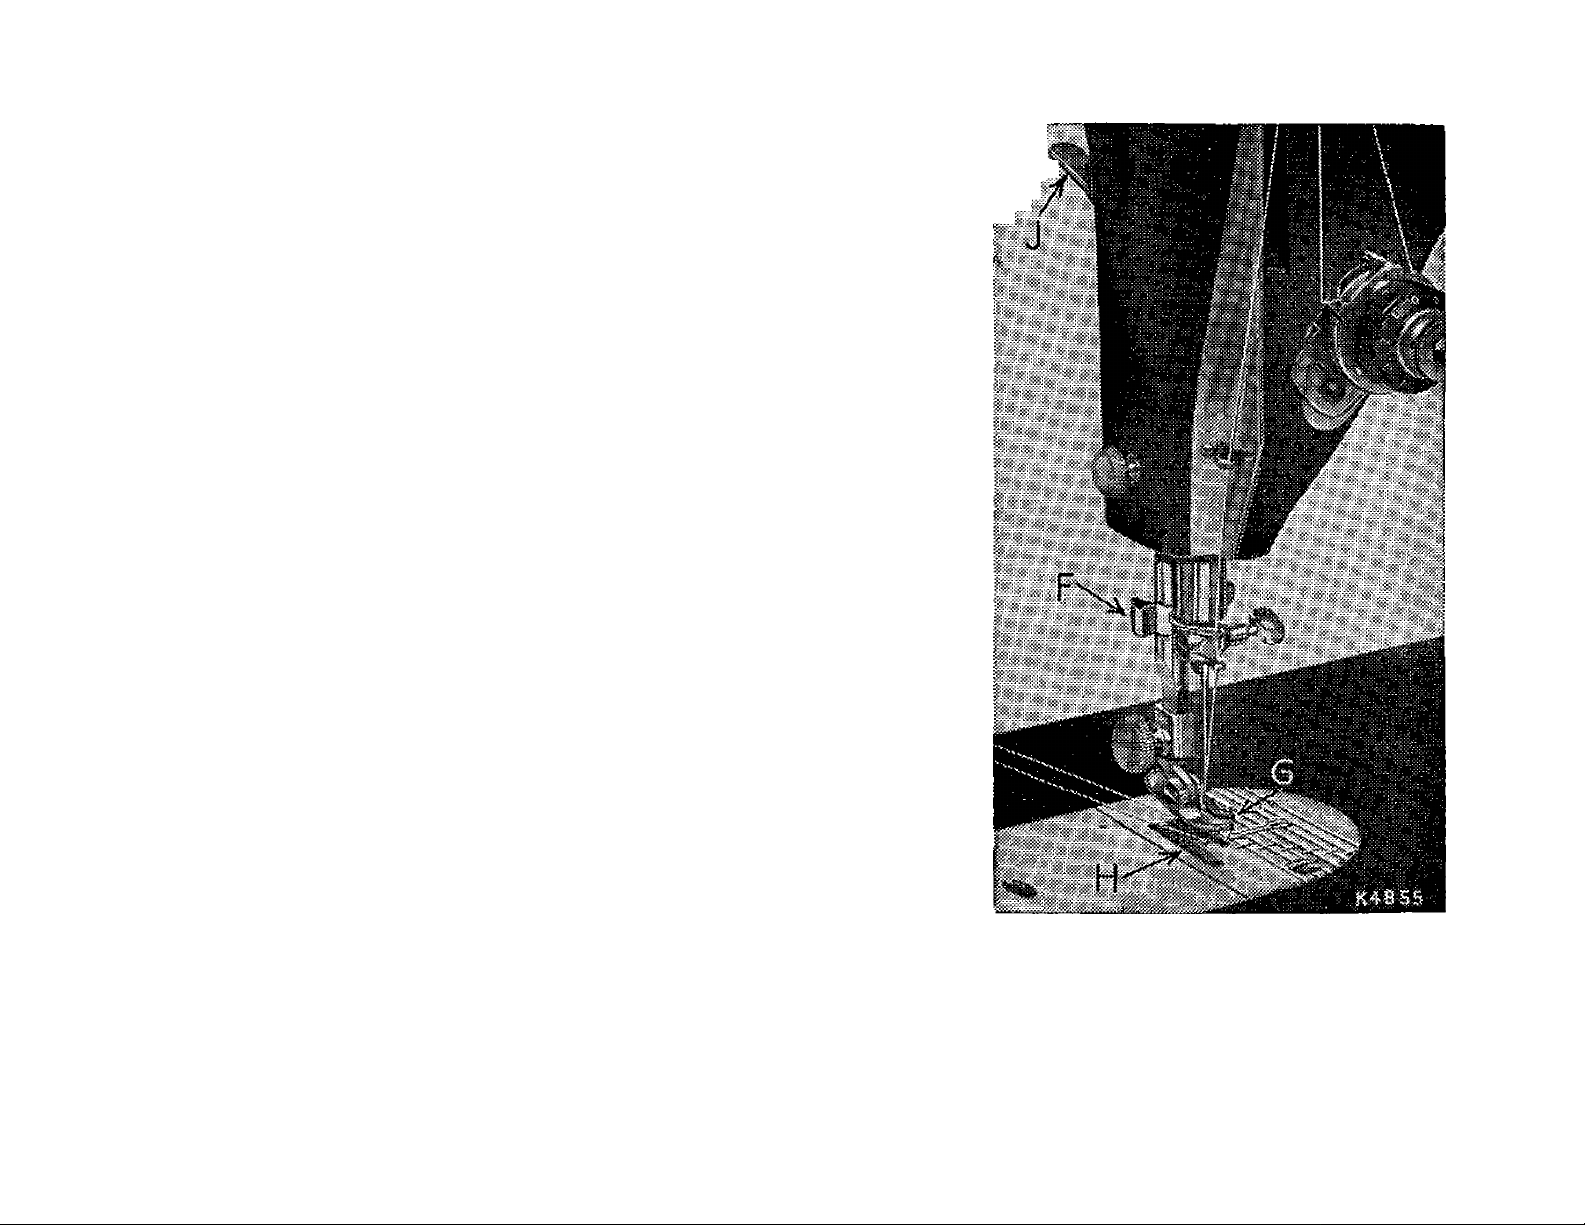
TO START SEWING
See Fig. 19.
Be sure to have thread take-up lever 5, Fig. 10 in
its highest position.
The throat plate has guide lines for seam width gauged
from centre of needle hole, and cross lines for gauging
square corners.
Pla ce material beneath the presser foot G, turn the
hand wheel to bring the point of the needle into the
material, then lower the presser foot by means of
presser bar lifter J, and start to sew.
Some materials, such as soft finished sheers, nylons,
jerseys, tricots and other elastic and spongy textiles,
require a slight amount of assistance in feeding during
sewing operations.
I*'"'
1^: "
However, too much pull will stretch the seam, create
irregular stitching and bend the needle. Most
materials require only guiding for best sewing results,
«
Fig. 19. To Start Sewing.
18
Page 21

TO TURN A CORNER
TO SEW BIAS SEAMS
Stop the machine when the needle eye,
making its upward stroke, is still in the
fabric. Raise the presser foot and turn
the work as desired, using the needle as
a pivot, then lower the presser foot.
BASTING
The longest stitch, No. 6 on the stitch
indicator, is satisfactory for basting and
is easily removed by clipping every sixth
stitch and withdrawing the long continuous
thread.
Use a short stitch and as light a tension
as possible on the needle thread so that
the thread is loose enough in the seam
to allow the goods, to stretch if necessary.
Machine basting is firmer ^ and more
even than that done by hand in addition
to being much quicker.
Fig. 20. To Regulate Stitch Length.
19
Page 22

TO REMOVE THE WORK
TO REGULATE LENGTH OF
STITCH AND DIRECTION OF
Stop the machine with the thread takeup lever 5, Fig, 10 at its highest point.
Raise the presser foot by means of presser
bar lifter J, Fig. 19, draw the fabric back
and to the left and sever the threads on
thread cutter F, Fig, 19. Place ends of
threads under presser foot.
CAUTION :
FEED. See Fig. 20.
The machine can be adjusted to make
from 6 to 30 stitches to the inch, as
indicated by the numerals on the stitch
indicator plate.
Loosen screw A and lower it to the
bottom of the slot, then move lever B
until its top edge is level with the figure
denoting the number of stitches desired
per inch. Raise screw A as far as possible,
and tighten it. Thus set, the machine
will make the indicated number of
stitches in a forward direction. If it is
desired to reverse the direction of the
When the machine is not in use, raise
the presser foot by means of presser bar
lifter J to prevent injury to the presser
foot G and the feed H, Fig. 19,
stitching, raise lever B as far as possible,
and the machine will make the same
number of stitches in a backward
direction.
20
Page 23

TO REGULATE PRESSURE ON
MATERIAL
For ordinary sewing, the pressure of
the presser foot on the material seldom
requires changing. Heavy materials re
quire more pressure than light weight
materials. The pressure should be only
heavy enough to prevent the material
from rising with the needle and to enable
the feed to move the work along evenly^
To increase the pressure, turn the thumb
screw W, Fig. 21 clockwise or downward.
To lighten the pressure, turn the thumb
screw upward.
THREAD TENSIONS
For perfect stitching, the tension on
the needle and bobbin threads must
be heavy enough to pull the threads
to the centre of the thickness of the
material and make a firm stitch, as
shown in Fig, 22.
Fig, Thumb Screw for Regulating
Pressure on Presser Foot,
E754
Fig. 22. Perfect Stitching.
If the needle thread lies straight along
the top side of the material, the tension
21
Page 24

Y?
---
{?-
Fig. 23. Imperfect Stitching.
TO REGULATE NEEDLE
THREAD TENSION
E U3fa
See Fig. 25.
on the needle thread is too heavy or the
tension on the bobbin thread is too light,
as shown in Fig. 23.
If the bobbin thread lies straight along
the underside of the material, the tension
on the needle thread is too light or the
tension on the bobbin thread is too
heavy, as shown in Fig. 24.
V
VP77PPPP/
____
^
Fig. 24, Imperfect Stitching,
£1/319
The tension on the needle thread can
be tested only when the presser foot is
down.
The numerals “0” to on dial B,
indicate the different degrees of tension
that can be obtained.
When the tension has been correctly
set note the number at the indicator
line C, so that this setting may be regained
should the tension be altered for special
work.
To increase tension, turn the thumb nut
A gradually to the right (clockwise)
until the required tension is obtained.
Each higher number denotes increased
tension.
22
Page 25

decrease tension, turn the thumb
xxiit A gradually to the left (counter
clockwise) until the required tension
TO REGULATE BOBBIN
THREAD TENSION
is obtained. Each lower number denotes
less tension.
The tension indicator C is marked with
the signs + and —which indicate the
direction in which to turn the thumb nut
A for more or less tension.
The tension on the bobbin thread is
regulated by screw F, Fig. 32, which is
nearest the centre of the tension spring
on the outside of the bobbin case. To
increase the tension, turn screw F over
to the right. To decrease the tension,
turn this screw to the left.
When the tension on the bobbin thread
has been once properly adjusted, it is
seldom necessary to change it, as a
correct stitch can usually be obtained by
varying the tension on the needle thread.
Fig, 25. To Regulate Needle
Thread Tension.
23
Page 26

DARNING (See Fig. 26).
Raise needle to its highest point, turn machine
back on its hinges, unscrew knurled screw A,
as far as it will go, and move crank B down so
that the screw A will enter the upper hole C.
The screw should then be securely tightened. The
feed is now inactive and wOl not impede free
movement of the work. Restore machine to its
working position and raise the presser bar. Remove
the presser foot and fit Spring Darning Foot No.
121094, but do not tighten the thumb screw.
Stretch tightly the article to be repaired in an
embroidery hoop and place below the needle by
tilting the edge of the hoop. Then lower the presser
bar by means of its lifter, and adjust the height of
the darning foot to allow just sufficient space for the
free movement of the work in hand. After ad
justment, tighten the thumb screw securely. Now
move the hoop backward and forward by the hands
until the hole or damaged part is completely
covered with stitching in one direction. Then
turn the work and stitch across to complete the
darn. After darning, reinsert and firmly tighten
the screw A in the lower hole, and replace the
presser foot for ordinary sewing.
Fig. 26.
EMBROIDERY
For surface embroidery, remove the
presser foot to give a clear view of the
stitching. For lace embroidery, i.e.
open work, remove the ordinary
presser foot and fit Spring Foot No,
121094. For embroidery the feed
should be lowered and the work
handled as advised in the preceding
paragraph.
24
Page 27

SEWING SUGGESTIONS
Breaking of needles might be caused by
1. Improper size of needle for thread
and material—See page 11*
2. Bent needle.
3. Pulling ©f material when stitching.
4. Needle striking improperly fastened
presser foot or attachment.
5. Crossing thick seams with too small a
needle.
Breaking of needle thread might be caused
by ;
1. A knot in thread.
2. Improper threading—See page 12.
7. Roughened hole in throat plate,
8. Improper arrangement of threads to
start sewing—See page 18,
Breaking of bobbin thread might be
caused by :
1. Improper threading of bobbin case—
See page 15.
2. Bobbin thread tension too tight—See
page 23.
3. Bobbin wound unevenly.
Skipping of stitches might be caused by :
3. Upper tension too tight—See pages 22
and 23.
4. Needle set incorrectly—See page 10.
5. Needle blunt or bent,
6. Thread too coarse for needle—^See
page 11,
1, Improper setting of needle—See page
10.
2, Needle blunt or bent.
3. Needle too small for thread—See
page 11.
4. Needle rubbing presser foot.
25
Page 28

PROTECTION AGAINST RUST DAMAGE
Lint and fluff, if not removed prior to storage will, during humid periods, absorb and
hold moisture, and thus accelerate rust damage to highly polished thread handling and
other exposed parts. The extent of rust damage would depend upon the length of time
the machine remained in idle storage where there is no ventilation. Sudden drops in
temperature will cause moisture to form on parts which, if not protected by a film of oil,
would rust and damage while in storage.
Proper storage care suggests thorough brush-cleaning to remove all traces of lint and
fluff, followed by swabbing of all the exposed parts in Figs. 28 and 29 with a lint-free
brush saturated with SINGER Oil.
SINGER Lint Brush may he purchased at
your local SINGER SEWING CENTRE,
26
Page 29

TO OIL MACHINE and STAND
The Arm Spool Pin C is screwed for
insertion in the left plugged hole and it
is also provided with a screw driver slot.
If the machine is used continuously, it
should be oiled daily. If moderately
used, an occasional oiling is sufficient.
Apply one drop of oil to each of the
places indicated in Figs. 27, 28, 29, 30 and
31 and carefully clean the machin e to
insure smooth and satisfactory perform
ance. Oil holes are provided in the
machine for bearings which cannot be
Fig, 27, Front View, Showing
Oiling Points,
K4S3d
27
directly reached.
Remove face plate A, Fig. 27, by taking
out screw B and slipping plate over screw
D, Fig. 28. After oiling replace face plate.
Draw to the left the slide in the bed of the
machine, as shown in Fig. 27, while the
Page 30

thread take-up lever (5, Fig, 10) is at its
highest position, and, after removing the
lint and dust which may have accumu
lated (see instructions on page 26), apply
one drop of oil to the sewing hook race
in the bobbin case, as indicated by arrow
in Fig, 29, and a few drops to the
oil hole in Fig. 29, Then close the
slide.
Fi^. 28. Face Plate Removed,
Showing Oiling Points.
B A
Fig. 29. Oiling the Sewing Hook,
28
Page 31

Fig* 30* Oiling Points in Bed of Machine.
Fig. 31.
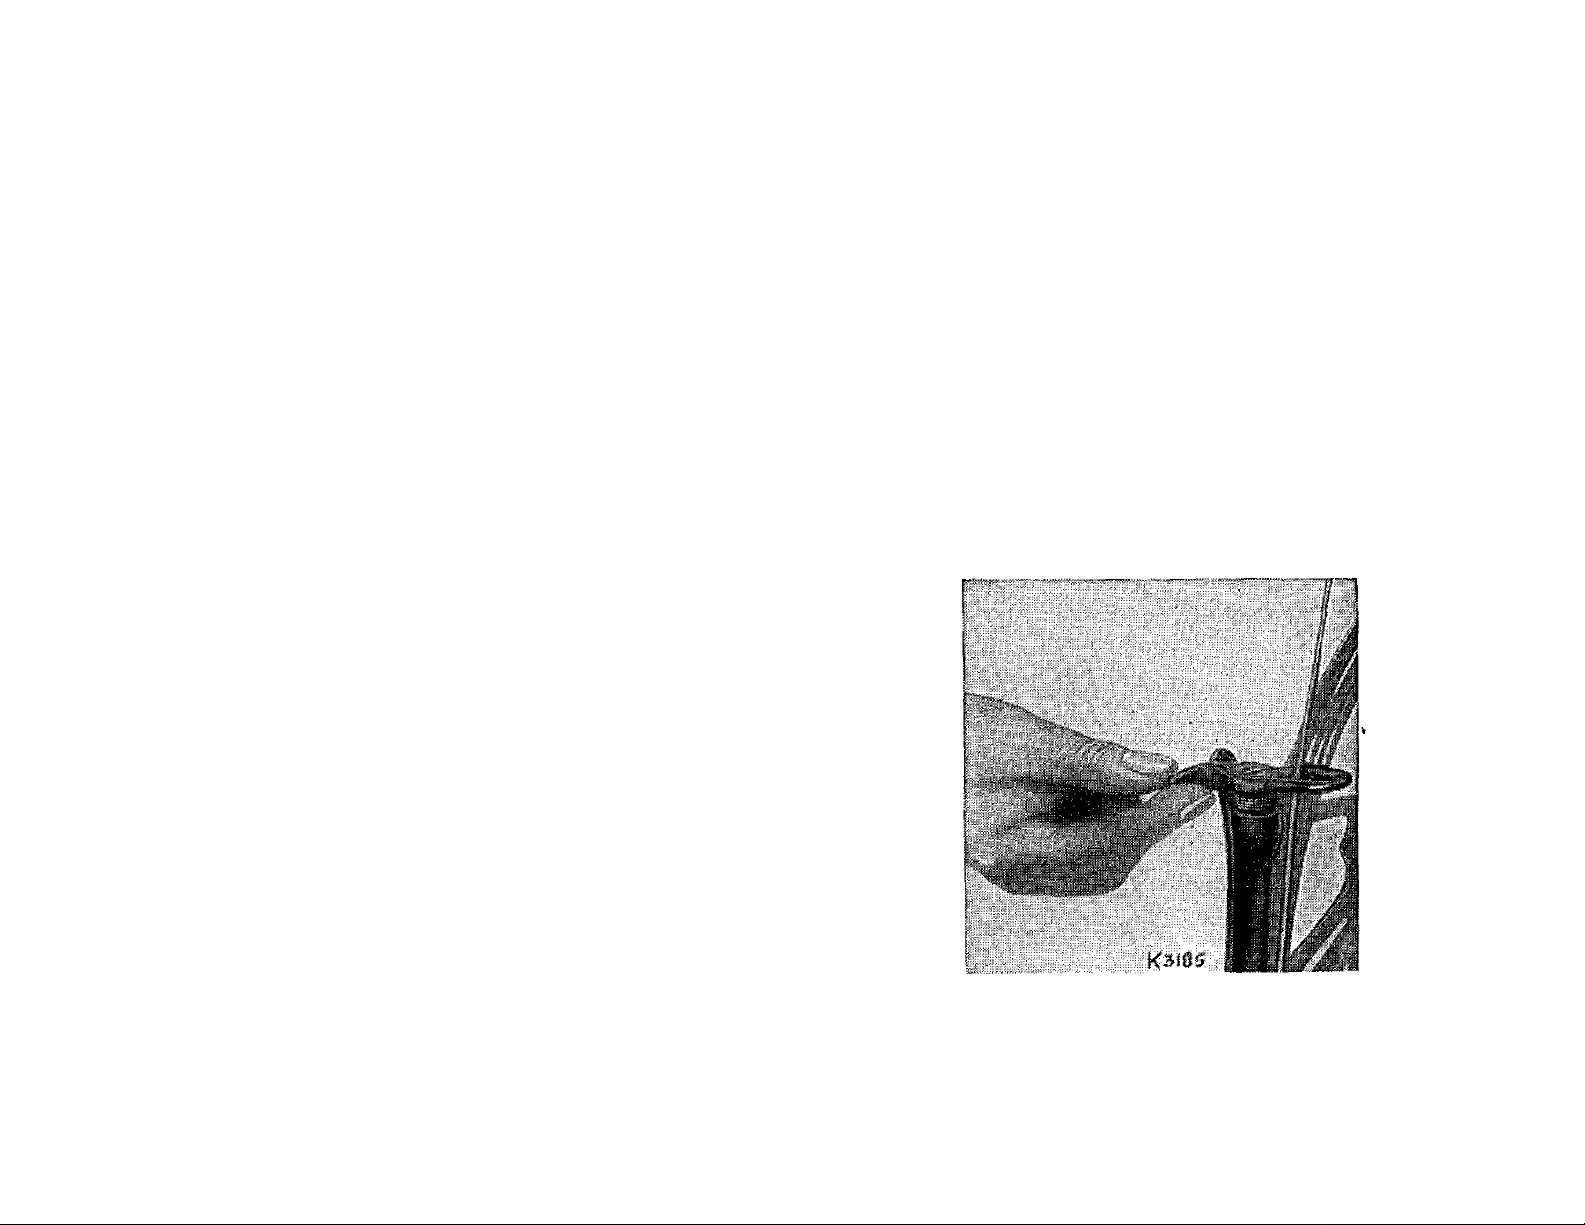
To oil the parts underneath the bed of the machine, turn the machine back on its hinges and
apply oil to the oil holes and bearings indicated in Fig* 30* The gears concealed by the gear
cover (E2, Fig. 30) are oiled through the oil hole (E, Fig. 27), The gears concealed by gear cover
(D, Fig* 30) are oiled through the space just above this cover, as indicated hy arrow (D2, Fig. 31).
After oiling at D2, rotate the hand wheel toward you to distribute the oil on these gears. To
oil the stand, apply a drop of oil to the centres upon which the treadle works, and to the lower
end of the pitman rod. Run the machine rapidly for a few minutes so that the oU may reach
the bearings. Neglect to oil the machine will shorten its life and cause you trouble and annoyance.
Always use SINGER* oil. Inferior oil clogs the bearings, prevents efficient working, and causes
rapid wear of the mechanism.
29
Page 32

TO CLEAN STITCH
FORMING MECHANISM
After considerable use, the stitch forming
mechanism may become clogged with
lint and this may interfere with the perfect
operation of the machine.
Occasionally remove the bobbin case
according to the following instructions,
and remove any lint, etc., which has
accumulated.
TO REMOVE BOBBIN CASE
See Fig» 32.
The bobbin case may be easily removed
without taking off the throat plate,
Fig. 32. Bobbin Case in Position.
{Throat Plate broken away to show correct
location of Finger A).
although for the purpose of illustration
the throat plate and feed dog are shown
broken away.
Remove bobbin from the bobbin case.
Turn hand wheel over toward you until
the end of hook ring E is toward the
front of machine, as shown. Insert the
blade of the small screw driver into slot
C between the ring and the edge of spring,
as shown. With a downward pressure.
30
Page 33

dve the screwdriver one half turn to the
right so that it will drop into the slot and
unlock the spring.
TO REPLACE BOBBIN CASE
See Fig, 32.
With the right hand hold the hand
wheel to prevent its turning and» with
the left, place the screwdriver against
the edge of the slot in the ring and push
it around in the direction opposite to the
hook rotation until the circular cut-out
B is opposite the spring D. The ring and
bobbin case may then be lifted out.
Free instruction for using the machine is gladly given at any
When replacing the parts, first place
the bobbin case into position with
the finger A in the opening in the plate
under the feed dog, as shown. Turn the
bobbin case back and forth slightly to
make sure that it is properly seated, then
place the hook ring E in position with the
cut-out B opposite the spring D. Press
the ring into place and turn it in the
direction of hook rotation until the
spring locks it in position. Then replace
the bobbin.
SINGER SEWING CENTRE
31
Page 34

Page 35

33
Page 36

THE FOOT HEMMER
• Place the creased hem edge under the
foot and take several stitches through
The foot hemmer
forms and stitches a
perfectly turned hem
without basting or
pressing. It is at
tached to the ma
chine in place of the
presser foot.
Applications
Fine hems Hemming with lace
Edging ruffles Lace insertion
Sheer seams Lingerie finishes
Hemming
the fold.
• Grasp the thread ends and the single
fold in front of the hemmer and lift
the single fold into the hemmer
scroll.
Soft fabrics will enter the scroll best
with the foot down, firm crisp fabrics
with the foot raised.
• Form a double Yq" fold at the very edge
of the fabric.
• Crease this fold for about
0 Draw the needle and bobbin threads
under the hemmer.
34
Page 37

# Stitch slowly for several inches until
hem is well started. Hold thread
Hemmed Seams
Hemmed seams are often substituted
ends in back of foot with the left hand
and guide the raw fabric edge into
the mouth of the scroll with the right
hand.
Even feeding is essential to good
hemming. The same width of fabric
must be kept in the scroll of the hemmer
at all times.
for French seams where a fine narrow
seam is appropriate.
• Allow a scant seam allowance.
• With right sides of the fabric together,
place the upper layer a scant
the left of the lower layer.
• Insert the two fabric edges into the
hemmer and proceed as for a plain
hem.
Page 38

Hemming With Lace
Most of the popular kinds of lace edging
and insertion can be applied with the foot
hemmer. It is an excellent way to trim
children’s clothes and to finish lingerie
hems.
Lace Applied Over Hem
• Fold and start hem in usual way.
• Starting about 1 inch down from end of
lace, place selvage under the needle,
then lower the needle to hold lace
firmly,
• Raise hemmer foot slightly and slip lace
under back part of foot.
• Stitch slowly, guiding fabric with right
hand and lace with left hand. Take
care not to stretch the lace.
Lace Applied Under Hem
When using lace underneath the fold
of a hem, the procedure is the same as
when making a hemmed seam (page 39).
Slip the lace in from the left as you would
the second piece of fabric.
This method is used where a neat finish
is desired on both sides of the material.
36
Page 39

THE BINDER
Inserting the Binding
Pre-folded commercial bias binding is
inserted from the right into the outside
slot of the binder scroll,
• Cut the binding diagonally to
ADIUSTING
SCREW
BINDER
SCROLL
OUTSIDE
SLOT OF
SCROLL
CENTRE
SLOT
The binder is used to apply commercial
binding as well as self-fabric bias to an
unfinished edge.
form a long point.
• Insert the pointed
end into the slot
and pull through
the scroll until
the evenly fold
ed edges are
under the needle.
Self-fabric bias binding should be cut
wide on the true bias.
• Insert the unfolded
binding directly
into the two
folds at the end
of the scroll and
draw it back
This colourful trim is attractive when
applied to children’s wear, aprons and
fabric furnishings. It is a practical finish
for seam edges that ravel and for making
bound seams.
37
under the needle.
As the binding
passes through the
scroll the raw edges
are turned in.
Page 40

Adjustment and Operation of the Binder
The edge to be bound is guided into the
centre of the scroll. Stitching is positioned
close to the edge of the binding by adjust
ing the scroll portion of the attachment,
• Loosen the adjusting screw and move
the scroll to the right to bring the
stitching closer to the binding edge.
For a wider adjustment, move the
scroll to the left.
Be sure that the screw is well tightened
after making an adjustment.
Never pull the binding as it feeds
through the scroll. Allow the attachment
to do the work. Merely guide thé edge to
be bound well into the centre of the scroll
as you stitch.
38
Page 41

Binding Curved Edges
Curved edges can be bound as easily as
straight edges, but require slightly differ
ent fabric handling.
Outside Curves^
Outside curves tend to lead away from
the centre slot of the scroll and should be
guided so that a full seam width is taken
Inside Curves
Inside curves are straightened as they
are fed into the binder. If the fabric is
soft and has a tendency to stretch rein
force the edge with a single row of
stitching before binding.
at the needle point. Do not attempt to
pull or straighten the fabric into the full
length of the scroll.
Page 42

THE GATHERING FOOT
rows of shirring can
be quickly and ex
pertly placed with
the gathering foot.
Evenly spaced shirr
ing is insured as this
foot is designed to
Single or multiple
lock fullness into
every stitch.
Applications
Plain shirring Waffle shirring
Elastic shirring Machine smocking
Slurring
Shirring is usually done on the crosswise
grain of the fabric. Soft fabrics lend them
selves to shirring better than firm fabrics.
The amount of fullness is very simply
controlled by stitch length and degree of
tension.
A long stitch produces more fullness
than a short stitch. Balanced tensions are
always required, but heavy tensions, hoth
upper and lower, produce more fullness
Many lovely effects are accomplished
with simple rows of evenly spaced shirr
ing. A yoke section, insert or trimming
band of self-fabric affords an interesting
contrast of texture when stitched with
the gathering foot in rows apart.
than light tensions.
40
Page 43
THE RÜFFLER
Adjusting Points
Occasionally apply a drop of oil to parts
in movable contact.
DRIVING
LEVER
ADJUSTING FINGER
SEPARATOR RUFFLING
BLADE BLADE
SEPARATOR
GUIDE
ADJUSTING
LEVER
ADJUSTING
SCREW
This attachment offers a simple and
effective way to make gathered and
pleated ruffles.
Ruffles may be made separately or
made and applied at the same time.
The ruffler is attached to the machine
in place of the presser foot.
1. The adjusting lever sets the ruffler for
gathers or pleats. The number 1 space
setting is for gathers, and places fullness
at every stitch. Numbers 6 and 12 are
space settings for pleats, spacing them
either 6 or 12 stitches apart. The star is
for plain stitching, and is used when
grouping gathers or pleats.
2. The adjusting finger is used only for
pleating and affects the width of the pleat.
It is thrown out of action by bringing it
out of contact with the adjusting screw
located at the right of the ruffler,
3. The adjusting screw regulates the
fullness of gathers or pleats. When turned
in (clockwise) to its limit with jhe adjust
ing finger in place, the attachment is set
for its deepest pleat. When turned out
(anti-clockwise) to its limit and the
adjusting finger out of action, the ruffler
gives only a hint of fullness.
Activating Parts
The ruffling blade and the separator
blade are of blue steel and hold the
material to be gathered between them.
41
Page 44

The ruffling blade forms the gathers or
pleats by carrying the fabric to the needle
according to the spacing and fullness to
which the ruffler is adjusted. The separa
tor guide is slotted to guide seam edges
evenly and to separate the ruffle strip
from the material to which the ruffle is
attached.
0
Set stitch length to space the fullness.
A short stitch gives more fullness than
a long stitch.
MATeRtAL
Preparation
Raise the needle to its highest point.
Locate the attachment on the machine
in place of the regular presser foot, and at
the same time fit the fork of the driving
lever over the needle clamp screw. Make
sure both the presser bar screw and the
needle clamp screw are tightened securely.
Gathering
0 Set adjusting lever on No. 1 setting,
• Throw adjusting finger out of action.
0 Turn adjusting screw for amount of
fullness desired.
The attachment is set for maximum
fullness by turning adjusting screw in
(clockwise) as far as possible ; for less
fullness, turn adjusting screw out (anti
clockwise).
Insert material to be gathered between
the blue blades and through the first
separator guide.
Lower presser bar and stitch. Always
test the stitch length and ruffler
setting on a scrap of self fabric before
proceeding with the actual work.
42
Page 45

Forming and Attaching a Ruffle in one
operation—
• Place ruffle strip between the two blue
blades and through the first separator
guide.
• Place fabric to which ruffle is to be
attached between the separator blade
and the feed of the machine.
Right sides of the fabric are placed
together when the seam is to fall to the
inside.
• Proceed as for plain gathering.
Pleating
• Move adjusting lever to space setting
desired for pleats of either 6 or 12
stitches apart.
• Activate adjusting finger.
• For deepest pleat, turn adjusting screw
in (clockwise) to its maximum. For
shallower pleats, turn adjusting
screw out (anti-clockwise).
• Set stitch length. A short stitch places
pleats close together, A longer stitch
separates the pleats for a greater
distance.
43
• Insert fabric to be pleated between the
blue blades and through the separa
tor guide.
# Lower presser bar and stitch.
Group Pleating
By using the star setting (plain stitch
ing) alternately with the 6 or 12 setting,
pleats are formed in groups. Even spacing
between groups is easily accomplished by
counting the number of stitches^
Page 46

THE SEAM GUIDE
For pinned seams, place the pins with
the points toward the seam edge so
The seam guide is
adjustable for spacing
stitching at any dis
tance between and
lYs" from a fabric
edge. It is used in
connection with the
presser foot.
Applications
Seams Stay stitching
Top stitching—single and multiple rows
• Attach the guide to the machine with
the thumb screw in either of the
threaded holes at the right of the
needle.
• Adjust for width desired.
that they nip into the fabric at the
stitching line. The hinged foot will
then ride freely over the points.
• For straight edges, align guide with the
presser foot.
• For curved edges, set the guide at an
angle so that the end closest to the
needle acts as a guide.
44
Page 47

HE ZIPPER FOOT
The zipper foot is designed for accurate placement of
stitches close to a raised edge. The hinged feature of this
foot insures even feeding over pins, heavy layers of fabric
or cross seams. It is attached to the machine in place of
the presser foot, and may be adjusted to either side of the
needle.
Applications
Zipper insertions
Corded seams
Preparation
• Attach zipper foot to machine in place
of presser foot.
0 Loosen zipper foot thumb screw and
adjust foot to right or left of needle,
as desired.
Tubular cording
Slip cover welting
Align the notch in the toe with the
needle hole in the throat plate.
Check adjustment by lowering needle
into side notch, making sure it clears
the foot.
Lock foot in position by tightening
thumb screw.
45
Page 48

Skirt Zipper
Machine baste placket
opening of skirt and press
this seam open-
Attach zipper foot to ma
chine in place of presser
foot.
Position zipper foot to
right of needle.
Open zipper.
Place zipper face down on
seam allowance with edge
of teeth at seam line.
Turn the back seam allow
ance away from body of
skirt.
Stitch zipper tape to the
seam allowance.
46
Page 49

Move foot to the left of needle.
Turn skirt to right side.
Close zipper and turn it face up.
Smooth back the seam allowance at the
edge of the zipper.
Top stitch the seam allowance to the
tape close to the folded edge.
Fold zipper to front of skirt.
Pin in place from right side.
Baste.
Move foot to right of needle.
Stitch across lower end of zipper and up
to waistline.
Remove basting.
47
Page 50

Corded Welting
Cable cord comes in a variety of sizes and wben covered with a firmly woven fabric
makes a corded welting that is an excellent seam finish.
This welting is prepared in advance and then stitched into the seam. Cut a true bias
strip 154 inches wide, plus three times the width of the cord of either self or contrasting
fabric. Sew strips together on the lengthwise grain to obtain desired length.
^-Adjust zipper foot to left side of needle. .
Encase cord in bias strip,
raw edges
even.
Lower presser bar.
Stitch close to cord, using a stitch
length slightly longer than for plain
seaming of same fabric.
Do not crowd stitching against cord.
48
Page 51

Corded Seams
• Place attached corded welting over
The corded seam is a typical treatment
for slip covers, children’s clothes, blouses
and lingerie.
When cording a seam the zipper foot is
usually adjusted to the right of the needle
so that the bulk of the work will fall to the
left.
• Attach corded welting to right side of a
single seam edge, using same length
stitch as used for welting (page 40).
Guide edge of foot next to cord, but
do not crowd.
second seam edge, and pin or baste
together,
0 Keep the first stitching uppermost as a
guide and position the seam under
the needle.
• Stitch, this time crowding the foot
against the cord.
This method produces evenly joined
seam edges and tightly set welting.
Curved seams are corded as easily as
straight seams, except that a shorter
stitch is used. Since the seam allowance
of the welting is bias, it is easy to shape
it to the seam.
49
Page 52

available for separate purchase at your local SINGER SEWING CENTRE.
THE BUTTONHOLER
FASHION AIDS
This attachment produces neat
and durable buttonholes in a great
variety of fabrics without any
special skill on the part of the oper
ator. The buttonholes are produced
in a fraction of the time required for
hand work and they are firmer and
more even than those made by hand.
50
Page 53

THE BLIND STITCHER
This useful SINGER attach
ment produces invisible hemming
with perfect blind stitches on an
almost unlimited variety of work
such as skirts, dresses, lingerie,
children’s clothes, towels, curtains,
sheets, table cloths and many other
articles.
It is quickly attached to your
sewing machine in place of the
presser foot. It is easy to use and
K 4430
will enable you to accomplish
superior invisible hemming much
faster and with less effort than is
possible by hand.
51
Page 54

THE ZIGZAGGER
^/VV^/S^V'^X\|'VSíy«V*V''v^VV\í
Some of the designs made by SINGER Zigzagger
This wonderful SINGER fashion aid will enable you to produce an infinite variety of
attractive ornamental designs merely through the interchange of the different Stitch
Patterns and the adjustment of the bight and stitch length. Such decorative effects as
applique, scalloped edges, border designs, as well as blind stitched hems and simple
mending can be produced with this attachment on women’s and children’s clothing,
lingerie, linens, draperies and an unlimited array of other garments and household items.
With the flick of a lever, plain sewing may be done without removing the zigzagger
from the sewing machine.
52
Page 55

THE BIAS GAUGE
The Bias Gauge is very useful (especial
ly in the case of soft materials) when
THE EDGE-STITCHER
The edge stitcher pro
cutting bias strips from inch to 1%
inches in width. This is done by placing
the bias gauge upon the point of the
scissors and setting the blued indicator
to the width desired. The line F is the
point at which to set the blued indicator
for facings, the line B for binding, and the
line C for cording or piping.
vides a series of slotted
guides which regulate
the placement of stitches
in relation to a fabric
edge.
It is attached to the machine in place
of the presser foot.
Applications
Joining lace and insertion, French seams.
Tucking with lace. Straight and pin tucks.
Facing and seam finishes. Seam piping.
Joining Lace and Insertion
Lovely lingerie detail is simple to
accomplish with the edge stitcher by
Insert the material in the gauge with
the edge against the blued indicator, and
hold as shown above.
Bias binding should be cut -Jl inch wide,
and to do this the indicator should be set
midway between the lines F and B.
joining lace insertion or alternate bands
of fabric and lace. Slots 1 and 4 are used
for this work. Since slot 1 overlaps
slot 4, the edge inserted into slot 1 will be
the top stitched edge,
• Place the first band (the fabric band
53
where used) into slot 1.
Page 56

Adjust lug A to position tlie stitcMng
French Seams
close to the edge of this baud.
Place the second band (lace) into slot 4.
Adjust pressure to correct degree of
lightness for even feeding.
Use a short stitch length and balanced
tensions.
Hold both band edges against the ends
of the slots while stitching.
The edge stitcher makes very fine
French seams, so well adapted to sheer
fabrics where raw seam edges must be
concealed.
• Trim away seam allowances to
• Lay seam edges together, right sides of
fabric outward, and insert into slot 1.
0 Move lug A to the left to position stitch
ing Yq" from the edge.
0 Stitch and press,
0 Fold with right sides of fabric together
and insert into slot 1,
• Move lug A to extreme left, allowing
just enough margin to conceal raw
edges.
• Stitch,
Tucking
Dainty tucks from “pin” width to Y^"
may be produced with the edge stitcher.
Tucks are usually made on the lengthwise
grain of the fabric.
O Draw a single thread from the fabric,
or measure from the selvage to locate
the first tuck on the straight grain of
54
the fabric.
Page 57

# For succeeding tucks, crease fabric or
THE QUIETER
draw a thread at distance desired
from previous tuck.
• Press tuck folds before stitching,
# To make “pin” tucks, insert the tuck
fold in slot 1 and adjust lug A to
locate stitching a pin width from the
fold.
• To make tucks, insert the tuck fold
into slot 5, and move lug A to its
extreme left position.
Use a short stitch length and perfectly
balanced tensions.
The Quilter, designed with a short, open
foot and an adjustable and removable
space guide, is especially well adapted to
stitching lightly padded materials. The
light padding is basted to the underside
of the fabric and may be of outing flannel,
canton flannel, sheet wadding or light
wool interlining.
Replace the presser foot with the
Quilter, Adjust the space guide for the
width between stitching lines. The space
guide may be used to the right or left of
55
the needle.
Page 58

THE ADJUSTABLE HEMMER
To Make Hems
from 3/16 to 15/16 Inch Wide
1. Attach adjustable hemmer to presser
bar in place of presser foot,
2. Pull up bobbin thread as instructed
on page 19.
3. Loosen thumb screw on hemmer and
move scale until pointer registers
with number of desired width of hem.
(No. 1 indicates the narrowest hem
and No. 8, the widest.) Then tighten
thumb screw.
4. Place cloth in hemmer and draw it
back and forth until hem is formed
as shown.
5. Draw end of hem back under needle,
lower presser bar and start to sew.
6. Guide sufficient cloth into hemmer ta>
turn hem properly.
56
Page 59

THE ADJUSTABLE HEMMER
WIDE HEMMING
To make a hem more than ^ inch wide,
loo&en thumb screw in hemmer and move
scale to right as far as it will go, then
swing it toward you as shown and tighten
thumb screw. Fold and crease down a
hem of the desired width, pass fold under
extension at right of hemmer, and the
edge into folder as shown and proceed to
atitch the hem.
57
Page 60

THE TUCKER
The Tucker is a time-saver for
making tucks up to one inch in
width. Two adjustable scales are
provided, the smaller near the
needle is numbered from 1 to 8, ex
pressing in eighths of an inch the
width of the tuck. The larger scale
expresses in quarter inches the
spacing between tucks.
Set the tuck scale first for the
width of tuck. The space scale is
then adjusted using the needle as an
indicator for the spacing between
tucks. When both scales are set at the same number, blind tucks result. That is, the
fold of one tuck just touches the stitching line of the next. When additional space
between tucks is desired, adjust the space scale to a point beyond the tuck scale reading
equal to the spacing desired, expressed in quarters of an inch. Thus half-inch tucks spaced
a half inch apart require a tuck scale setting of 4, and a space scale setting of 6,
58
Page 61

IND
EX
Page
Attachments
Binder..................................................37
Foot Hemmer......................................34
Gathering Foot ...................................40
Ruffler
Seam Guide
Zipper Foot
Belt Shifter ............................................ 9
Bobbin
Removing ...........................................13
Replacing
Winding
Bobbin Case
Removing
...........................................
............................................—41
........................................
........................................
...........................................
..........................................
...........................................
33
44
45
15
13
30
Page
Fashion Aids ...........................................50
Bias Gauge
Blind Stitcher......................................51
Buttonholer
Edge Stitcher ......................................53
Hemmer, Adjustable ..........................56
Quilter ................................................55
Tucker
Zigzagger, Automatic
Hand Attachment ................................... 8
Light ....................................................... 5
Lubrication
To Oil the Machine and Stand
To Oil the Sewing Hook
...........................................
........................................
................................................
........................
..........
....................
53
50
58
52
27
28
Replacing
Threading ...........................................15
Bobbin Winder
Darning and Embroidery
Electrical Information
...........................................
......................................
......................
............................
31
13
24
4
59
Needles and Thread
Needle Setting
Presser Foot, to Regulate Pressure
Rust damage, prevention of.................26
Service, SINGER ...................................... 3
........................................
...............................
.........
11
10
21
Page 62

INDEX— continued.
Sewing
To Operate Electric Machine
To Operate Hand Machine
To Operate Treadle Machine
To Prepare for Sewing
To Start Sewing
To Turn a Corner
..................................
...............................
.......................
.............
...............
.............
Basting ................................................19
To Sew Bias Seams
To Remove the Work
.............................
........................
To Regulate Length of Stitch and
Direction of Feed
............................
Sewing Suggestions.............................25
Page
7
8
9
17
18
19
19
20
20
Stitch Forming Mechanism
Cleaning
..........................
Stop Motion
Threading
Upper Threading
...........
Bobbin Case Threading
Thread Tensions
..................
Bobbin Thread Tension,
to Regulate ...................
Needle Thread Tension,
to Regulate ...................
Page
....30
.... 9
12
15
21
23
22
60
Page 63

Page 64

For your protection
SINGER Sewing Machines are sold and serviced wherever you
see the famous SINGER and Red “S” Trademarks. When your
machine needs servicing call your SINGER SEWING CENTRE to be
sure of warranted SINGER parts and service. See address in the
classified telephone directory.
SINGE
SEWING
MACHINE
COMPANY
 Loading...