

Page 1
Page 2

Congratulations!
As the owner of a Fashion Mate* Sewing
Machine/Model 237 by Singer, you are
about to enter a wonderful new world of
sewing! From the moment you begin to
sew on your Fashion Mate sewing
machine, you will be delighted with its
easy dependable operation.
May we recommend that before you begin
to sew you discover all the many
advantages of your Fashion Mate machine by going through this instruction
book step by step while seated at your
machine.
SINGER* service is always close at hand.
If your sewing machine should need
servicing, call your local SINGER
CENTER to be sure of warranted
SINGER parts and service. You will find
the address under THE SINGER
COMPANY in the telephone directory.
*A Trademark of THE SINGER COMPANY Copyright © 1968 The Singer Company
Form 680 (9/69) All rights reserved Printed in Italy
Page 3

Contents
GETTING TO KNOW YOUR SINGER SEWING MACHINE
Principal Parts……………………………………………………………. 2
Accessories………………………………………………………………. 4
THREADING THE MACHINE
The Bobbin Thread………………………………………………………. 5
The Needle Thread………………………………………………………. 9
Raising Bobbin Thread…………………………………………………… 10
STRAIGHT STITCHING
Positioning the Needle…………………………………………………… 11
Regulating the Machine for Your Fabric………………………………… 12
Fabric, needle, thread, and stitch length chart…………………... 13
Stitch length……………………………………………………… 14
Thread tension…………………………………………………… 15
Pressure………………………………………………………….. 17
Feed Height……………………………………………………… 17
Sewing a Seam…………………………………………………………… 18
Pin Basting……………………………………………………………….. 20
Sewing Darts……………………………………………………………… 21
Darning without Embroidery Hoop……………………………………… 22
ZIG-ZAG STITCHING
Stitch Width………………………………………………………………. 23
Needle Position…………………………………………………………… 23
Stitch Length……………………………………………………………… 24
Open zig-zag stitching…………………………………………… 24
Satin stitching……………………………………………………. 24
Needle-Thread Tension……………………………………………………24
Seams……………………………………………………………………... 25
Darts in Interfacing……………………………………………………….. 26
Mending………………………………………………………………….. 27
Applique………………………………………………………………….. 28
Buttonholes………………………………………………………………. 29
FREE-MOTION STITCHING
Preparation……………………………………………………………….. 32
Darning with Embroidery Hoop…………………………………………..33
Script Lettering…………………………………………………………… 34
Embroidery………………………………………………………………..35
CARING FOR YOUR SEWING MACHINE
Cleaning………………………………………………………………….. 36
Oiling and Lubricating…………………………………………………….37
Adjusting Belt Tension…………………………………………………… 39
Changing Light Bulb……………………………………………………... 39
INDEX ……………………………………………………………………………. 40
1
Page 4
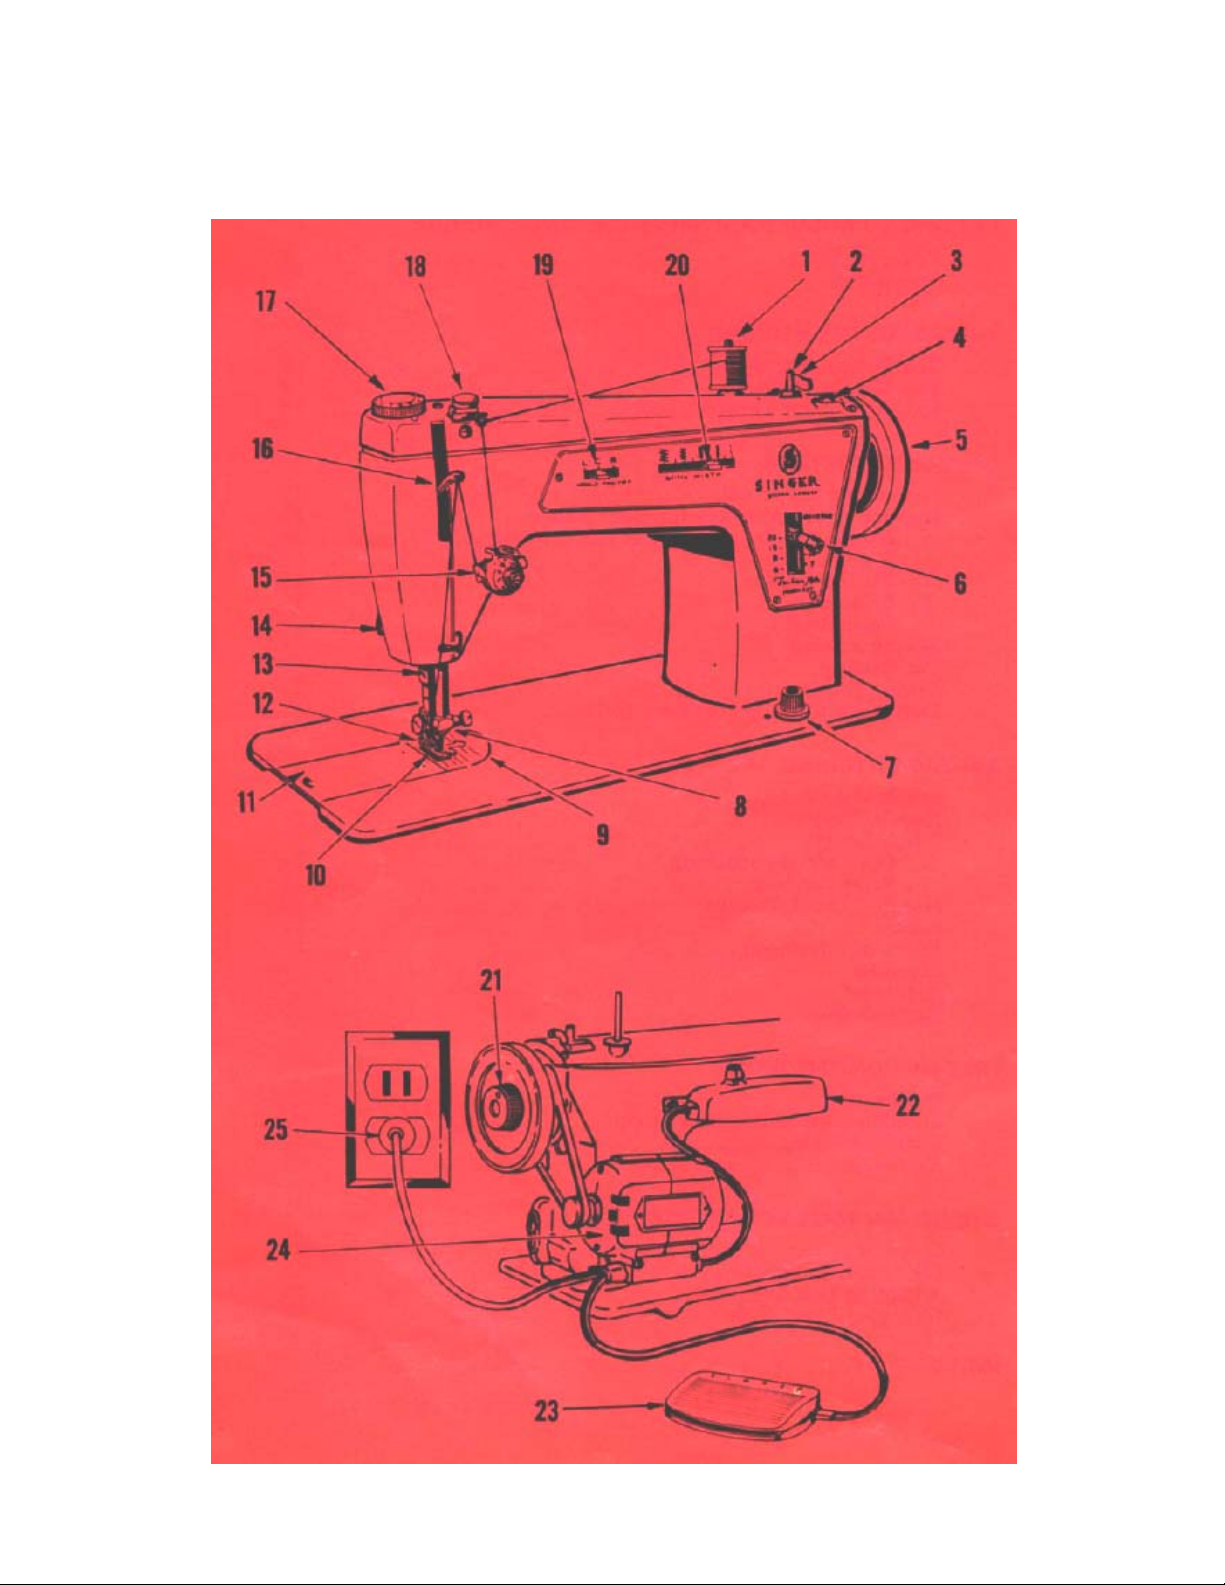
Getting to know your SINGER
principal parts
2
Page 5

sewing machine
……and what they do
SPOOL PIN AND FELT – Pin holds thread spools of various sizes and felt helps
1
thread unwind smoothly.
2
BOBBIN WINDER SPINDLE – Holds bobbin for winding.
3 BOBBIN WINDER STOP – Controls amount of thread on bobbin.
4 BOBBIN WINDER LEVER – Move to right to wind bobbin.
5 HAND WHEEL – Controls movement of take-up lever and needle.
Always turn it toward you.
6 STITCH LENGTH SELECTOR – Lets your stitch forward and in reverse.
Numbers indicate number of stitches per inch.
FEED REGULATING KNOB – Controls feed dog height for sewing and darning.
7
8
NEEDLE CLAMP – Holds needle in place.
9 THROAT PLATE – Numbered guidelines help you keep seams straight.
FEED DOG – Feed fabric as it is being stitched.
10
11
SLIDE PLATE – Opens easily for removal and replacement of bobbin.
12 PRESSER FOOT – Holds fabric against feed dog.
13 THREAD CUTTER – Cuts thread conveniently and safely.
14 PRESSER FOOT LIFTER – At back of machine, it raises and lowers presser
foot.
15 NEEDLE-THREAD TENSION REGULATOR – Numbers allow for exact, easy
–to-duplicate tension settings.
16 TAKE-UP LEVER – Controls needle thread.
17 PRESSURE REGULATING DIAL – Regulates degree of pressure exerted on
fabric by presser foot. Has special setting for darning.
18 BOBBIN WINDER TENSION BRACKET AND THREAD GUIDE – Disc
regulates thread tension for bobbin winding and eyelet guides thread from
spool to tension regulator for sewing.
NEEDLE POSITION SELECTOR – Allows choice of three different positions.
19
20 STITCH WIDTH SELECTOR – Allows four settings for zig-zag stitching and
one for straight stitching.
21 STOP-MOTION SCREW – Directs power to the needle. Loosen the screw for
bobbin winding.
22
SEWING-LIGHT – Located at back of machine, it pours light on sewing area.
23 ELECTRICAL SPEED CONTROLLER – Controls speed of the machine; the
harder you press, the faster it will sew.
24 ELECTRIC MOTOR – Located at back of machine.
25 PLUG – Before plugging in the machine, be sure that the voltage and number
of cycles stamped on the plate under the hand wheel are within the range
marked on your electric meter.
Page 6
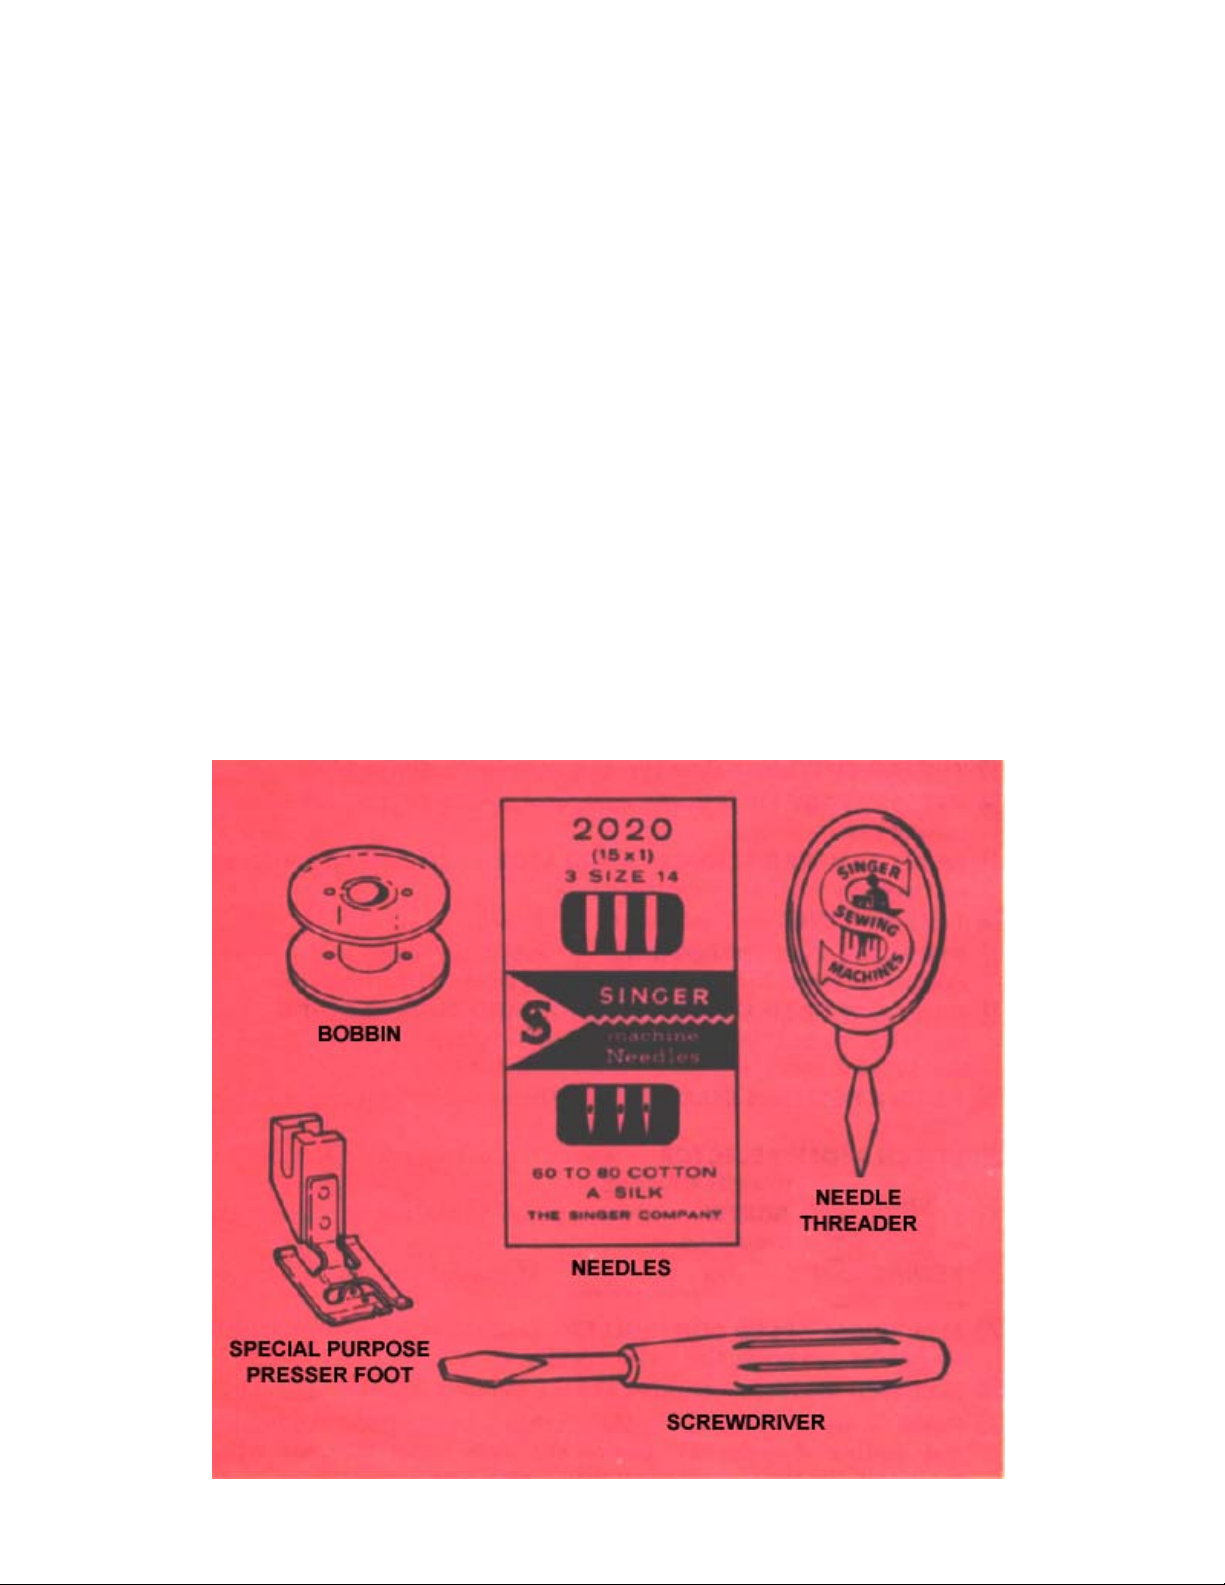
GETTING TO KNOW YOUR SINGER SEWING MACHINE (continued)
Accessories ….. and their uses
In the envelope accompanying your sewing machine you will fins the following
accessories:
Three bobbins – these extra bobbins allow you to have various color threads ready
to use.
Three needles – catalog 2020 (15 x 1) size 14, are replacements for the needle in
your machine.
One needle threader – make threading the sewing machine needle simpler.
One small screwdriver – use to turn screw in bobbin case to regulate bobbin
tension.
One Special Purpose Presser Foot – designed for zigzag satin stitching,
ornamental stitching, buttonholing, and applique work. This light, flexible foot
has a raised center section that allows closely spaced zig-zag stitches to feed
evenly. The small eyelets at the front of the foot hold a filler cord when desired.
4
Page 7
Threading the machine
Like all sewing machine that produce what is called a “lockstitch,” your sewing
machine sews with two threads. The upper thread comes from the spool and is
threaded through the eye of the needle. The lower thread comes from the bobbin,
which is simply a small spool that you wind yourself, using the machine. On the
Fashion Mate machine it is best to wind the bobbin before threading the needle.
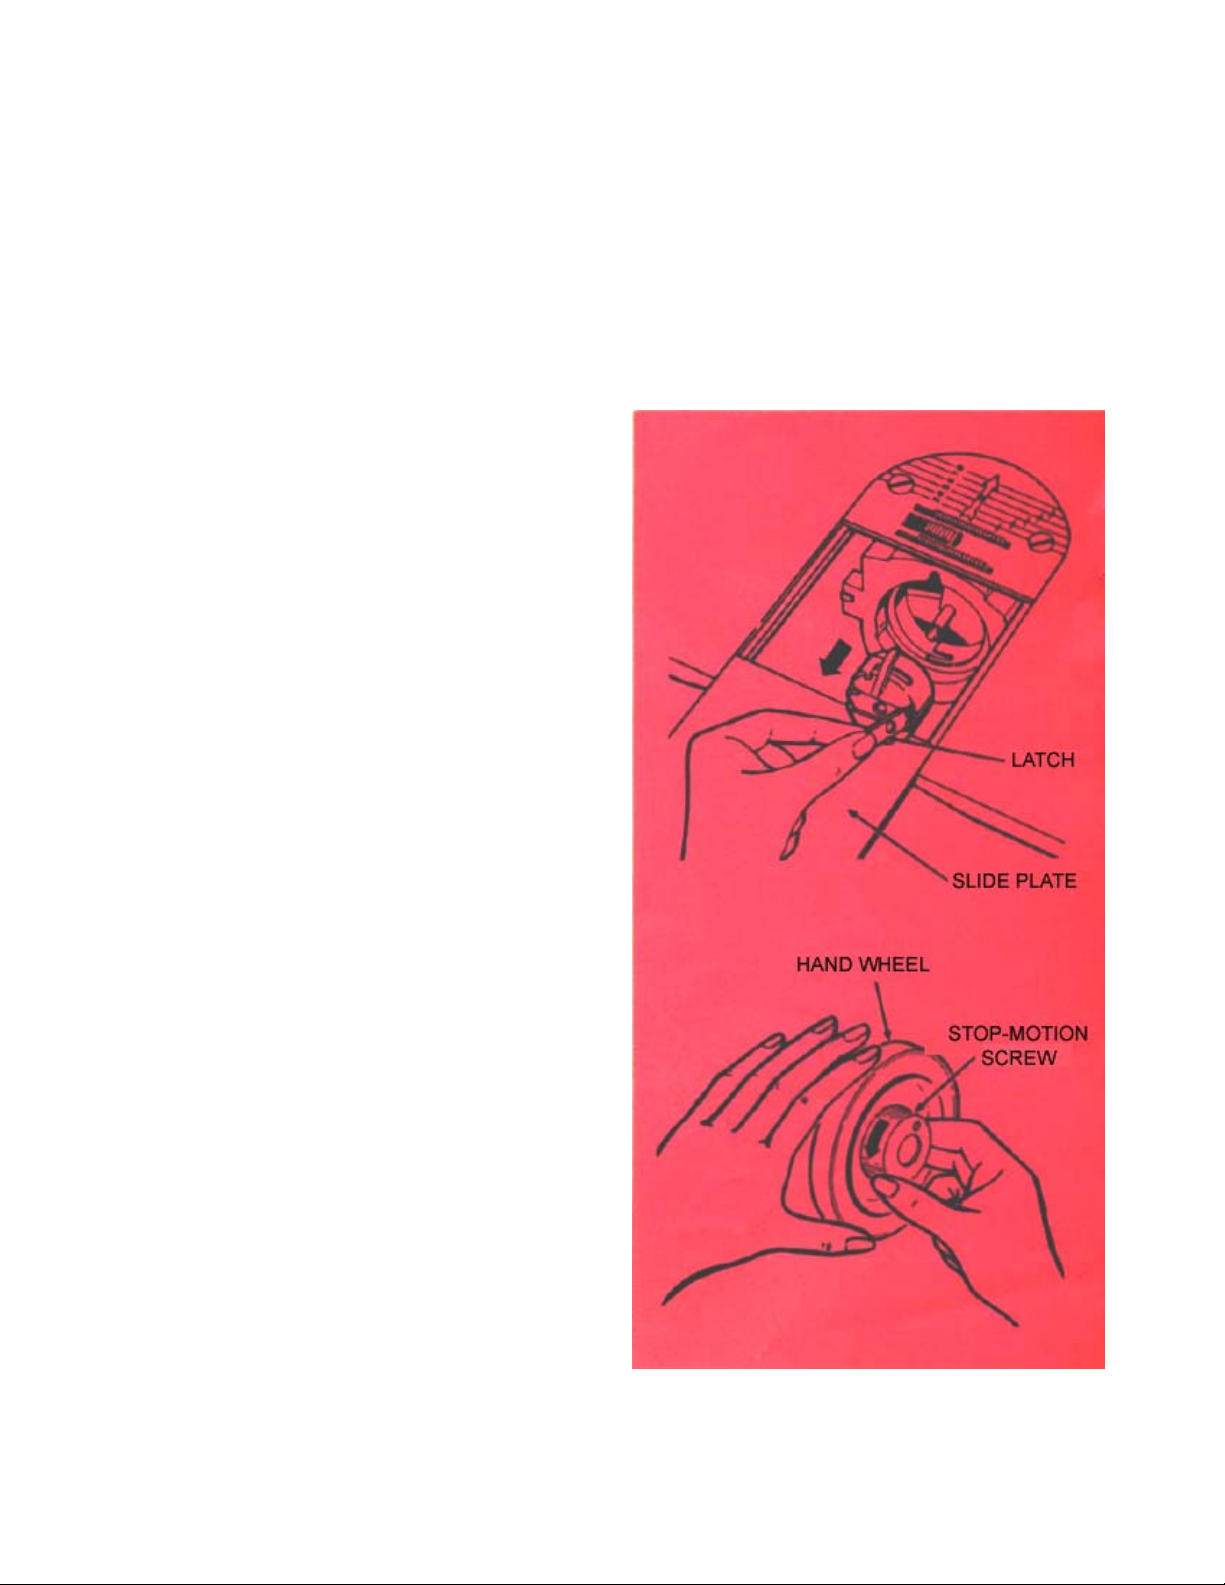
the bobbin thread
REMOVING THE BOBBIN
1 Turn hand wheel toward you until
needle is at its highest position.
2 Open slide plate.
3 Reach down with left hand, open
bobbin case latch, and lift out
bobbin case.
4 Release latch and remove bobbin
from bobbin case.
WINDING THE BOBBIN
1 Stop motion of needle by loose-
ning stop-motion screw. Hold
hand wheel with left hand while
turning stop-motion screw toward
you with right hand.
5
Page 8
THREADING THE MACHINE (continued)
6
WINDING THE BOBBIN
(continued)
2 Place empty bobbin on spindle.
3 Move bobbin winder lever to the
right.
4 Place spool of thread on spool pin
over the spool pin felt and pass
thread around bobbin winder tension bracket disc.
5 Draw thread, from the inside,
through a hole in the top side of
the bobbin.
6 Hold thread end as shown and start
the machine. Thread end will
break off after a few coils have
been wound.
7 Do not guide or hold thread while
winding bobbin – let the machine
do the work. Winding will stop
when bobbin is full.
Page 9

8 Stop machine and move bobbin winder lever to the left.
9 Cut connecting thread about three inches from bobbin and remove bobbin from
spindle.
10 Tighten stop-motion screw with right hand while holding handwheel with left
hand.
IF THREAD DOES NOT WIND EVENLY
1 Loosen tension bracket screw.
2 Lower bracket if too much thread
is wound on top of bobbin.
3 Raise bracket if too much thread is
wound on bottom of bobbin.
4 Tighten tension bracket screw.
TO CONTROL AMOUNT OF THREAD ON
BOBBIN
1 Loosen stop latch screw.
2 Move stop latch to left for less
thread on bobbin.
3 Move stop latch to right for more
thread on bobbin.
4 Tighten stop latch screw.
7
Page 10
8
THREADING THE MACHINE (continued)
REPLACING THE BOBBIN
1 Hold bobbin so that thread unwind
in the direction shown, and put
bobbin in bobbin case.
2 Pull thread into notch; draw it
under tension spring and into slot.
Allow about three inches of thread
to hand freely from bobbin case.
3 Raise take-up lever to highest
point.
4 Hold bobbin case by open latch
and place it on spindle of shuttle
body so that position finger enters
notch at top of shuttle.
5 Thread should draw from top of
bobbin case, as shown.
6 Release latch and press bobbin
case until it clicks into place.
7 Close slide plate.
Page 11
the needle thread
1 Turn hand wheel toward you to
raise needle to its highest position.
2 Make sure spool pin felt is on
spool pin.
3 Place spool of thread on spool
pin and lead thread through
threading points shown. Thread
the needle from left to right. The
arrow on the throat plate shows
the correct threading direction.
4 Draw about three inches of
thread through eye of needle.
9
Page 12
THREADING THE MACHINE (continued)
raising the
bobbin thread
Now that you have wound the
bobbin and threaded the needle, you
will need to raise the bobbin thread
through the hole in the throat plate.
1 Hold needle thread lightly with left
hand and turn hand wheel slowly
toward you so that needle enters
throat plate.
2 Continue turning hand wheel and
holding needle thread until needle
rises and brings up bobbin thread
in a loop.
3 Undo the loop with your finger.
4 Place both needle and bobbin
threads under presser foot and lay
them diagonally to the right.
10
… you are now
ready to sew
Page 13
Straight stitching
positioning
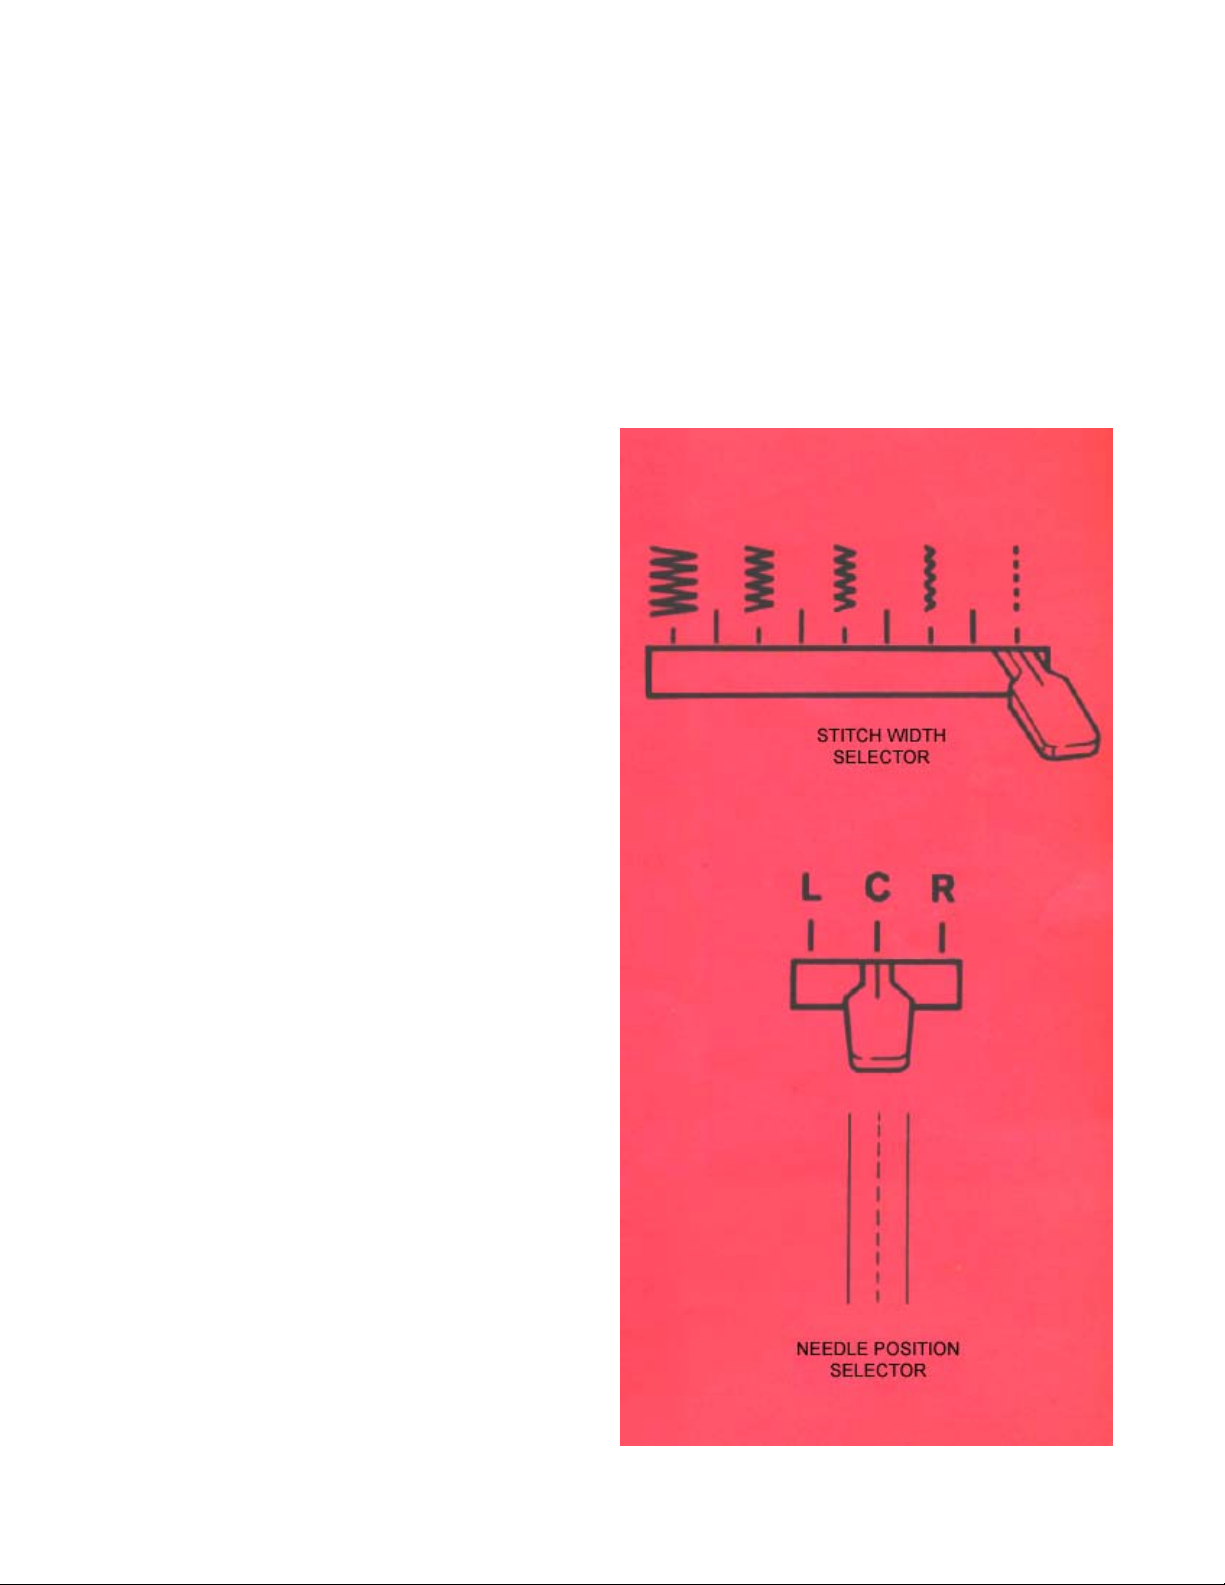
the needle
Before your set your Fashion Mate
sewing machine for any kind of
stitching, turn the hand wheel toward
you until the needle is above the
throat plate.
THE STITCH WIDTH SELECTOR
To set for straight stitching, press
down on the Stitch Width Selector
and move it to the far right.
THE NEEDLE POSITION
SELECTOR
Press down on the Needle Position
Selector and move it to center (C)
position. this setting locates the
needle hole in the throat plate.
For instructions on setting the Stitch
Width Selector and the Needle
Position Selector in other position,
see page 23.
11
Page 14
THREADING THE MACHINE (continued)
regulating
the machine for
your fabric
As you get ready to sew, take advantage of the flexibility of your
sewing machine. With a choice of
needle sizes and four easy-to use
selectors for stitch length, pressure,
feed height, and needle-thread tension, you can adjust the machine to
sew perfectly on a wide variety of
fabrics. The table on page 13 will
guide you in selecting correct thread,
needle sizes, and stitch length according to the weight of your fabric. Be
sure to use like threads for both
needle and bobbin.
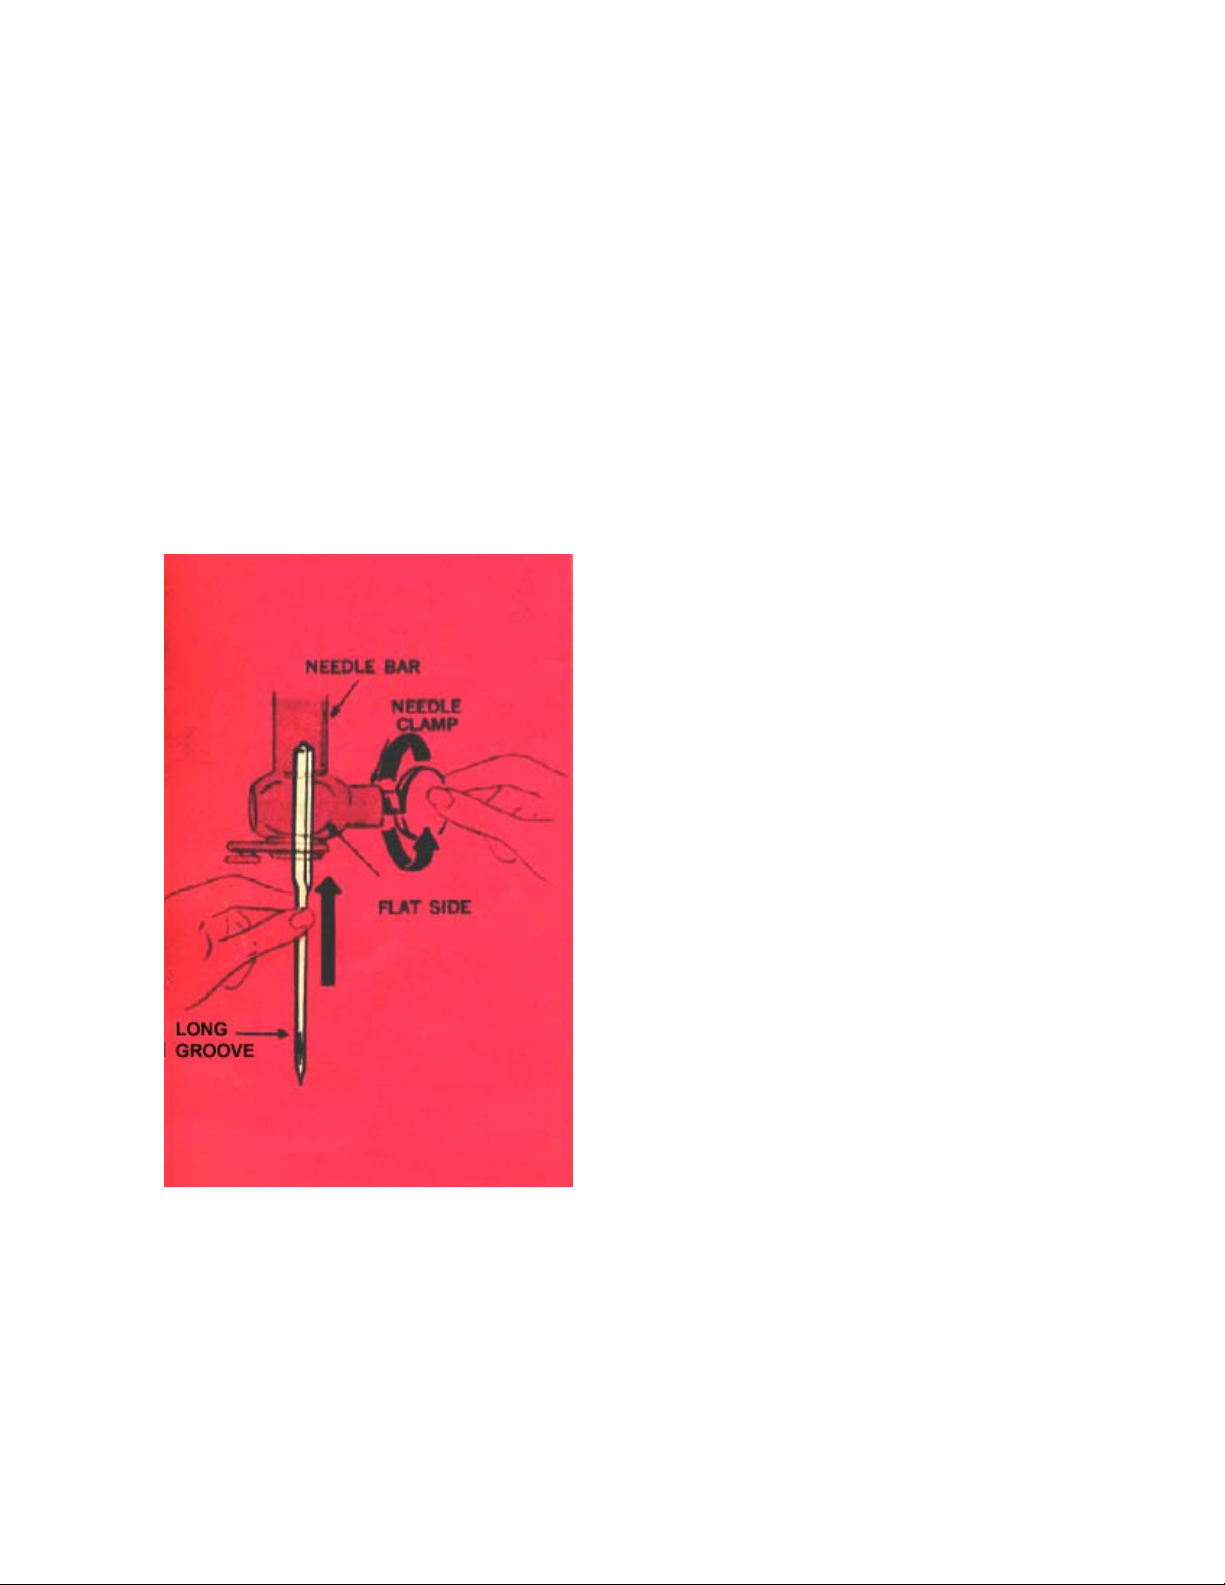
CHANGING THE NEEDLE
1 Turn hand wheel over toward you
until needle is at highest position.
2 Loosen needle-clamp screw and
remove needle.
3 Insert new needle into clamp with
the flat side of the needle to the
right and the long groove to the
left; push it up as far as it will go.
4 Tighten needle-clamp screw.
This machine uses needle Catalog
2020 (15x1), available in sizes 9,
11, 14, 16, and 18.
12
Page 15

FABRIC, NEEDLE, THREAD, AND STITCH LENGTH TABLE
Fabrics
Delicate – tulle, chiffon, fine
lace, silk, organdy
Lightweight – batiste, organdy, jersey, voile, tafetta,
silk, crepe, chiffon velvet,
plastic film
Medium weight – gingham,
percale, pique, linen, chintz,
faille, satin, corduroy, velvet,
suitings, stretch fabric, knits
Medium heavy – gabardine,
tweed, sailcloth, denim, coattings, drapery fabrics
Heavy - overcoatings, dungaree, upholstery fabrics,
canvas
Thread
Sizes
Fine mercerized
cotton
Fine synthetic
thread
50 mercerized
cotton
“A” silk thread
Synthetic thread
50 mercerized
cotton
60 cotton
“A” silk thread
Synthetic thread
Heavy duty
Mercerized cotton
40 to 60 cotton
Synthetic thread
Heavy duty
Mercerized cotton
24 to 40 cotton
Needle
Sizes
9 15 to 20
11
14 12 to 15
16 10 to 12
18 6 to 10
Stitch Length
Setting
12 to 15
(8 to 10 for
plastic)
All weights – decorative top
stitching
† Use with 50 mercerized cotton or “A” silk thread in bobbin.
“D” silk †
(Buttonhole twist)
18 6 to 12
13
Page 16

STRAIGHT STITCHING (continued)
REGULATING STITCH LENGTH
The Stitch Length Selector does two
jobs: it controls the number of
stitches per inch, and it lets you sew
either forward or in reverse.
The numbers on either side of the
selector represent the number of
stitches per inch: the higher the
number, the shorter the stitch. As the
Stitch Length Selector is moved up
into the FINE area, stitch length
diminishes to the vanishing point.
The FINE area is used only for
closed zig-zag stitching. Generally,
shorter stitches are best for lightweight fabric; longer ones for heavy
fabric.
SETTING STITCH LENGTH
1 Loosen thumb nut by turning to
left.
2 Position lever for desired stitch
length.
3 Tighten thumb nut by turning to
right.
For reverse stitching, simply raise
the selector as far as it will go.
For detailed instructions on setting.
Stitch Length Selector for zig-zag
stitching, see page 24.
14
Page 17

REGULATING NEEDLE-THREAD TENSION
The Tension Dial regulates the degree of tension on your needle thread and lets
you select just the right setting for your fabric and thread. The numbers eliminate
guesswork in duplicating settings. Correct tension is important because too much
or too little will weaken your seams. To determine the correct tension, make a test
on a small sample of your fabric.
If the fabric puckers, decrease
needle-thread tension. If the stitches
look looser, increase tension.
● To increase tension, turn dial to
higher number.
● To decrease tension, turn dial to
lower number.
A locked stitch results with upper
and lower tensions balanced so that
needle and bobbin threads are drawn
equally into fabric. For detailed
instructions on regulating tension for
zig-zag stitching, see page 24.
15
Page 18

16
STRAIGHT STITCHING (continued)
REGULATING BOBBIN-THREAD
TENSION
You will seldom need to adjust
bobbin-thread tension. Usually it
possible to obtain a balanced
stitch by adjusting the needlethread tension alone. Should it be
necessary to regulate bobbin
thread tension, you can do so by
turning the screw on the bobbin
case. A very slight turn of the
screw will produce a noticeable
change in bobbin-thread tension.
● To increase tension, turn screw
clockwise.
● To decrease tension, turn screw
counterclockwise.
Use the small screwdriver supplied
with your machine to make adjustments.
Page 19

REGULATING PRESSURE
The pressure dial regulates the
pressure that the presser foot exerts
on the fabric.
Correct pressure is important because it means that the fabric feeds
smoothly, evenly, without being
marred.
Generally, heavy fabric requires
heavy pressure: lightweight fabric,
light pressure. But fabric texture
must also be considered. Soft fabrics,
for example, require less pressure
than crisp fabrics in order to feed
smoothly. If the fabric is spongy or
has pile (velvet, for example), use
fairly light pressure to prevent
crushing. When darning without an
embroidery hoop, set the dial at D.
Lower the presser foot before setting
pressure.
● To increase pressure, turn dial to a
higher number.
● To decrease pressure, turn dial to a
lower number.
REGULATING FEED HEIGHT
The feed dog can be placed in either
of two position, R or D, by rotating
the feed regulating knob.
R (Regular) is used for sewing. The
feed is raised above the throat
plate and moves fabric.
D (Darn) is used for darning, free-
motion embroidery , and button
sewing. The feed is lowered below
the throat plate and does not move
the fabric.
Raise the presser foot before setting
knob.
● To drop the feed rotate dial
clockwise to D.
● To raise the feed rotate dial
counter-clockwise to R.
17
Page 20

STRAIGHT STITCHING (continued)
sewing a seam
STARTING A SEAM
1 Set Stitch Length Selector for
desired number of stitches per
inch.
2 With pressure foot up, align, fabric
with appropriate seam guideline
on throat plate (as described on the
following page). Position needle
in fabric about ½ inch from the
back edge.
3 Lower presser foot and raise Stitch
Length Selector to reverse.
4 Backstitch to edge of material for
reinforcement.
5 Lower Stitch Length Selection for
forward stitching and stitch.
18
Page 21

GUIDING AND SUPPORTING FABRIC
Most fabric fabrics need only to be
guided in front of the presser foot as
shown at right. some fabrics,
however, require support while being
stitched.
● For filmy sheers, knits, etc., apply
gentle tension by holding seam in
front and back of the presser foot.
● For stretch fabrics, apply firm
tension front and back of the
presser foot.
● For stretch fabrics, apply firm
tension front and back when
stitching in the same direction as
the stretch. For seams not on the
stretch direction, stitch in
conventional manner, guiding
fabric in front of presser foot.
KEEPING THE SEAM STRAIGHT
Use one of the numbered lines on the
throat plate as a guide to keep the
seam straight. Numbers indicate
distance, in 8ths of an inch, from the
needle. If you want a 5/8-inch seam,
for example, line your fabric with
line 5. Crosslines serve as guides
when turning square corners.
Page 22

STRAIGHT STITCHING (continued)
ENDING A SEAM
1 Stitch to the fabric edge. Raise
Stitch Length Selector as far as it
will go, and backstitch to reinforce
end of seam.
2 Turn hand wheel to bring take-up
lever to its highest point.
3 Raise presser foot and remove
fabric.
4 Cut threads on thread cutter at rear
of presser bar. Lower Stitch
Length Selector for forward
stitching.
20
pin basting
Pin basting is a time a saver and can
used in place of hand basting when
you are straight stitching seams in
easy to-to-handle fabrics. When
sewing over pins, use fine pins and
place them so that:
● They are at right angles to the
stitching line.
● They just nip into the fabric at the
stitching line.
● There is minimum pin extension
beyond the stitching line. Pins
should not extend under both sides
of the presser foot and should
never be placed on the underside
of the fabric in contact with the
feed dog.
Page 23

sewing darts
Darts can be made by either of two
methods: “regular” or “continuousthread.”
REGULAR DARTS
1 Stitch from the seam edge,
tapering gradually to the point.
2 Stitch beyond the fabric to form a
thread chain ¾ inch to 1 inch
long.
3 Tie the thread ends into a single
knot close to the stitching.
CONTINUE-THREAD DARTS
The continuous-thread method is
particularly useful for darts in sheer
fabrics, where transparency requires
a neat, clean finish. It is also useful
for darts made on the outside of a
garment as a styling detail.
1 Raise the presser foot and unthread
the needle. Pull up the bobbin
thread and draw it through the
needle from right to left (in the
opposite direction from usual
threading).
2 Tie bobbin and upper threads
together, and draw knot through
threading points toward spool until
enough of the bobbin thread has
passed the thread guide nearest the
spool to complete stitching the full
length of the dart. Make sure that
there is no slack thread between
spool and bobbin.
3 Stitch from point of toward edge of
garment, backstitch to reinforce.
21
Page 24

STRAIGHT STITCHING (continued)
22
darning without
embroidery hoop
You may choose to darn either with
or without an embroidery hoop.
When greater control is needed, freemotion stitching with an embroidery
hoop is usually best. For directions
on darning with an embroidery hoop,
see page 33.
1Set Pressure Regulating Dial on D
and rotate Feed Regulating Knob
from R to D setting and set Stitch
Length Regulator in FINE area.
2If area to be darned is open, baste
an underlay in place.
3Place area to be darned under
presser foot.
4Lower presser foot and start
stitching, alternately drawing the
fabric gently toward you and
pulling it gently away from you.
5Continue this forward and
backward motion as you fill the
area with parallel lines of stitching.
6For additional strength, turn the
fabric and cover area with
crosswise lines of stitching.
Page 25

Zig-Zag stitching
setting stitch width
and needle position
STITCH WIDTH SELECTOR
To produce a zig-zag stitch, the Stitch
Width Selector must be moved from its
straight stitch position to any setting on
the left. Your stitch will be wider as you
move the Selector to the left.
To set your stitch width, push down
on the Selector, slide to desired
position, and release.
NEEDLE POSITION SELECTOR
Most of your zig-zag stitching will
be done in center (C) needle
position. Left (L) and right (R)
settings are used for special stitch
placement, such as buttonholing.
To set needle position, push down on
the Selector, slide to desired
position, and release.
Be sure to raise the needle above the
throat plate and fabric before
changing the stitch width and needle
position.
23
Page 26

ZIG-ZAG STITCHING (continued)
When you are preparing to do zigzag
stitching, make a test sample with
the fabric and thread you plan to use
so that you can adjust your stitch
length and needle-thread tension
properly.
For best results when doing satin
stitching, use the Special Purpose
Presser Foot.
regulating
stitch length
OPEN ZIG-ZAG STITCHING
Choose any stitch length from 6
through the bottom of the FINE area,
depending on how open you wish the
stitches to be.
SATIN STITCHING
1 Move Stitch Length Selector to
bottom of FINE area.
2 Run machine at slow speed.
3 Gradually tighten thumbnut by
turning it to right, until stitches
are closely spaced and form a
smooth surface.
24
regulating needle
thread tension
All zigzag stitching requires less
tension than straight stitching; and
satin stitching requires even less than
open zigzag stitching. Furthermore,
the wider the satin stitch, the lighter
the tension on the thread must be.
Thus, the widest stitch requires the
least tension; narrower satin stitching
requires somewhat more.
Notice the stitching on your sample.
If the stitching looks too taut, or if
the fabric is puckering, lower the
needle-thread tension by turning the
Tension Dial to a lower number.
Page 27

sewing seams
LINGERIE SEAMS
Dainty lingerie seams can be made
durable with plain zigzag stitching.
1 After straight-stitching seam on the
wrong side, press both seam
allowances in the same direction.
2 Set Stitch Width Selector in the
middle and the stitch Length
Selector at 12 or 15.
3 From the right side, topstitch,
letting the needle alternately enter
the seam line and the seam
thickness.
SEAM FINISHES
Seam edges support the garment
andshould be given a durable finish
if the fabric is likely to ravel.
1Set Stitch Width Selector to the left
and the Stitch Length Selector at
12 or 15.
2 Place stitching near the edge of the
seam allowance.
3Trim seam edges evenly, as
illustrated.
FLAT-FELLED
Zigzag stitching gives strength and
durability to flat-felled seams.
1Set Stitch Width Selector in middle.
2Form the seam on right side of
fabric, taking full seam allowance.
3Press the seam to one side, keeping
the right side of the zigzag stitch
uppermost.
4Trim half the under-seam
allowance. Then turn the upper
seam edge evenly over the trimmed
seam, and topstitch.
25
Page 28

ZIGZAG STITCHING (continued)
KNIT FABRIC SEAMS
A fine zigzag stitch is ideal for
seaming knit fabrics. It is particularly
desirable for underarm seams where
elasticity and give are needed.
For neckline and waistline seams,
where a stay is needed to prevent
undue stretching, this same stitch can
be used to apply seam tape. To stay a
knit seam:
1Set Stitch Width Selector in middle.
2 Set Stitch Length Selector at about
20.
3 If seam is curved, pre-shape tape
to fit by steam pressing.
4 Baste tape in place.
5 Stitch, allowing needle to enter
seam tape and seam allowance
alternately.
26
darts in interfacing
With zigzag stitching, interfacings
can be shaped without bulk.
1 Select the widest stitch width and a
short stitch length (about 20).
2 Cut out the dark allowance on the
stitching line.
3 Bring raw edges together and pin
over a muslin stay.
4 Stitch, backstitching at both ends.
Page 29

mending
The zigzag stitch is just as useful for
mending as it is for creative sewing.
The zigzag stitch forms a firm,
flexible bond for repairing tears and
for reinforcing elastic. Set Stitch
Width Selector at the widest width
(the far left).
TEARS
1 Set Stitch Length Selector in FINE
area.
2 Trim ragged edges.
3 Place underlay on the wrong side
of tear for reinforcement. Do not
baste.
4 Stitch on the right side, bringing
the edges of the tear together.
5 Shorten stitch length at ends and
corners to give extra strength.
6 Trim underlay.
ELASTIC
1 Set Stitch Length Selector at 12 or
15.
2 Fit elastic for desired snugness at
waistline, allowing one inch for
joining. Lap the ends one inch, turn
the ends under, and join with
zigzag stitching.
3 Divide the elastic band and
garment waistline into quarters.
Lap the elastic over the fabric and
pin the two together at these
intervals.
4 Hold the elastic taut as you stitch
so that it will remain stretchable
after stitching is completed.
27
Page 30

ZIGZAG STITCHING (continued)
appliqué
The stitch most commonly used in appliquéing is a closed zigzag stitch. The
width of this stitch can be varied to accommodate fabrics of different weaves and
textures.
There are two methods of appliquéing: trimming after stitching or stitching after
trimming. To decide which method you wish to use, make sample to see which is
most appropriate for your fabric and design:
• Position the design
• Baste it to the fabric
• Attach the Special Purpose Presser
Foot
METHOD #1
1 Set Stitch Width Selector at
desired setting, and set Stitch
Length Selector on FINE (above
20).
2 Stitch, outlining the design with
appliqué stitching.
3 Trim any excess fabric on the
outer edges of the stitching.
Remove basting.
METHOD #2
1 Outline the entire design with a
short straight stitch.
2 Trim raw edges to the stitching.
3 Adjust Stitch Width Selector to
desired width setting for appliqué
pattern. Set Stitch Length
Selector on FINE.
4 Stitch, following and covering the
straight-stitch outline. This step
will produce a smooth over
edged finish, with no raw edges
to be trimmed. Remove basting.
28
Page 31

buttonholes
Always make a test buttonhole on a
sample of your fabric. Be sure to
duplicate the thickness of the
garment and include interfacing if
appropriate.
STITCH WIDTH SETTINGS
You will use two stitch width
settings: for side stitching, a medium
stitch width and for the bar tacks (the
closings at each end of the
buttonhole), a wide stitch width.
BUTTONHOLE LENGTH
How long the opening needs to be
will depend on the diameter and
thickness of the button. To find the
right length:
1 Cut a small hole in a scrap of your
fabric and gradually enlarge it until
the button slips through easily.
2 Add at least 1/8 inch (1/16 inch for
each bar tack), and mark the fabric
as shown.
This bar-tack measurement is approximate; on some buttonholes, you
may need to increase it to arrive at
pleasing proportions.
STITCH LENGTH SETTING
Set Stitch Length Selector in FINE
area (see Satin Stitching, page 24).
29
Page 32

BUTTONHOLES (continued)
PROCEDURE
Attach the Special Purpose Presser
Foot. Set Needle Position Selector at
far left (L) and Stitch Width Selector
in the middle. Place work under
needle, aligning center marking of
buttonhole with the notch in the
center of the Special Purpose Presser
Foot.
SIDE STITCHING
Position needle in fabric at point A.
Lower foot and stitch to end of
marking. Leave needle in fabric at
point B. Raise foot and pivot work
on needle. Lower foot. Take one
stitch without changing width
setting, bringing work to point C.
BAR TACK
Adjust Stitch Width Selector to far
left for back tacks and take at least
six stitches. Stop at point D.
SIDE STITCHING
Readjust Stitch Width Selector in the
middle for side stitching. Complete
work to point E. Leave needle in
fabric.
30
Page 33

FINAL BAR TACK
Adjust Stitch Width Selector to far left
for bar tacks, and take at least six
stitches ending at point F.
FASTENING STITCH
To secure stitching, move Selector to far
right and take three stitches. Remove
work, draw threads to underside, fasten
and trim. Cut opening for button with
sharp scissors.
CORDED BUTTONHOLES
Soft threads used for embroidery and
crocheting make suitable filler cords
for corded buttonholes. A fine pearl
cotton (size 8) or silk buttonhole
twist is generally used.
1 Unwind sufficient filler cord to
avoid tension or strain on the
cord.
2 Lead the end of the cord through
the raised eyelet on the Special
Purpose Presser Foot. Draw the
cord under and behind the foot.
3 Proceed with stitching as for
regular buttonholes.
4 Just before making the final bar
tack, cut the filler cord close to
the eyelet guide. Complete the
bar tack and fasten buttonhole
stitching as usual.
5 Carefully trim cord ends.
31
Page 34

Free-motion stitching
For free-motion, you sew without the presser foot and control the fabric movement
yourself by means of an embroidery hoop. Either straight or zigzag stitch settings can be
used. With removal of the presser foot and the setting of the Feed Regulating Knob on D
to prevent the feed-dog from moving the fabric, your Fashion Mate sewing machine is
ready to do free-motion darning and embroidery.
preparation
REMOVING PRESSER FOOT
1 Raise the presser foot.
2 Loosen the presser foot screw.
3 Remove the presser foot.
To replace the presser foot, hook it
around the presser bar and tighten
the presser foot screw.
SETTING SELECTORS
1 Raise the presser foot and set Feed
regulator on D.
2 Set Stitch Length Regulator in
Fine area.
When finished doing free-motion
stitching, rotate Feed Regulating
Knob to R setting to reset feed dog
for regular sewing.
32
Page 35

darning with
embroidery hoop
1. Trim ragged edges from area to
be darned.
2. Center worn section in
embroidery hoop.
3. Set Stitch Width Selector at far
right (straight stitch); the Needle
Position Selector in center (C)
position; and the Stitch Length
Selector in FINE area.
4. Position work under needle and
lower presser bar to engage
tension.
5. Hold needle thread loosely with
left hand, turn hand wheel toward
you, and draw bobbin thread up
through fabric. Hold both thread
ends and lower needle into
fabric.
6. Outline area to be darned with
running stitches for
reinforcement. Place stitches ¼
inch form edge of open area.
7. Stitch back and forth across
opening, moving hoop under
needle with a steady, continuous
motion. Keep lines of stitching
closely spaced and even length.
8. When opening is filled, turn
work and cover area with
crosswise lines of stitching.
Run machine at moderate speed. Slow movement of hoop will produce a short
stitch; more rapid movement lengthens the stitch.
33
Page 36

FREE-MOTION (continued)
script lettering
If you wish to embroider a whole
name-on a child’s dress or shirt, for
example- you can do so by freemotion stitching.
1. Always make a sample first to
find the right stitch settings and
spacing. Set the Stitch Width
Selector at FINE, and the Needle
Position Selector in center (C)
position.
2. Trace or mark lettering on right
side of fabric.
3. If the fabric is soft or loosely
woven, add and underlay of crisp
lawn or organdy.
4. Place work in embroidery hoop
large enough to encompass the
entire design. Be sure fabric is
held taut.
5. Position work under needle and
lower presser bar to engage
tension.
6. Turn hand wheel toward you to
bring bobbin thread up through
fabric at start of design. Hold
both thread ends and lower the
needle into fabric.
7. Stitch, following outline of
lettering. Maintain an even rate
of speed so that stitches are
uniformly spaced.
8. To produce a close satin stitch,
move hoop slowly; to produce an
open stitch, move hoop more
rapidly.
34
Page 37

embroidery
Decorative designs of many kinds can be effectively
accomplished with zig-zag stitching when the free-motion
principle is used.
The design is placed in an embroidery hoop to hold the fabric
taut; the hoop is moved slowly so that the needle follows the
outline of the design.
Stitches can be shaded from wide to narrow row by controlling
the angle at which the work is placed and moved under the
needle.
35
Page 38

Caring for your sewing machine
Your sewing machine is a fine yet sturdy precision instrument, and it will serve
you perfectly for many years if you take a few simple steps to keep it in good
condition. How often you will need to clean, oil, and lubricate the machine will
depend on how often you use it and where you keep it. The following general
guidelines assume that you will be sewing two or three times a week. But, if you
use the machine continuously, clean and oil it daily. Or, if you keep it in very
warm or damp place, oil and lubricate it more frequently than the guidelines
suggest.
every week or so: clean
Remove lint and fluff from exposed
parts. (As a matter of fact, you will
be able to see the lint and fluff
gathering on these parts, and we
recommend that you remove them as
they accumulate.)
With a soft cloth, clean:
● Tension disc
● Take-up lever and thread guides.
● Presser bar and needle bar
● Machine surface (arm and bed)
● If necessary, dampen the cloth to
clean the machine surface. Do not
use detergents.
With a lint brush, clean:
●Behind face plate (Disconnect
machine from electricity supply
before unscrewing covers and
plates.)
● Bobbin area
● Shuttle (Remove bobbin case and
throat plate, release latch, open
shuttle race gate, and clean
shuttle.)
36
Page 39

every week
or so: oil
● Remove face plate and top
cover and oil in places
indicated at right.
● Remove throat plate and apply
one drop of oil to shuttle race.
● Replace covers and plates.
● After each oiling, sew a few
lines of stitching on a scrap of
fabric to remove excess oil.
37
Page 40

CARING FOR YOUR MACHINE (continue)
every month or so:
oil and lubricate
● Clean and oil machine as indicated
in weekly instructions.
● Apply a small amount of
SINGER* lubricant to gears as
shown. NEVER APPLY OIL TO
GEARS.
● Tilt machine back.
● Apply one drop of oil to bottom of
machine at each of the places
indicated.
38
motor requires no lubrication
IF THE MACHINE IS TO BE STORED, it is necessary to protect if from
rust damage. Before storing, give the machine a thorough brush cleaning
to remove all traces of lint and fluff. Follow by swabbing all exposed parts
with a lint brush saturated with SINGER* oil.
Page 41

adjusting
belt tension
on rare occasions, you may find it
necessary to adjust the tension on the
motor belt. Tension on the belt
should be just strong enough to keep
the belt from slipping. If the belt is
too tight, the machine will run
slowly. This will overload and
possibly damage the motor.
1 Loosen bracket screw (A) a full
turn.
2 Allow weight of motor to supply
correct belt tension.
3 Tighten bracket screw.
changing light bulb
be sure you have disconnected the
plug from the electrical outlet.
REMOVING BULB
Hold light cover with right hand.
Bring left hand up under machine
arm. Press bulb into socket and at
same time turn bulb over in direction
shown to unlock bulb pin. Withdraw
bulb.
REPLACING BULB
Press new SINGER* bulb (bay-onettype) into socket, with bulb pin
entering slot of socket. Turn it over
in direction shown to lock bulb into
position.
39
Page 42

index
Page
Accessories 4
Applique 28
Belt Tension 39
Bobbin 5
Removing 5
Winding 5
Replacing 8
Bobbin Case 8
Buttonholes 29
Cleaning 36
Darning 22,
Darts 21, 26
Elastic 27
Electrical Speed Controller 3
Embroidery 35
Fabric, Needle, Thread and
Stitch Length Table 13
Feed Dog 3
Regulating Height 17
Feed Regulating Knob 3
Free- Motion Stitching 32
Guiding and Supporting
Fabric 19
Hand Wheel 3, 5
Light Bulb 39
Lubrication 38
Mending 27
Needle 12
Replacement 12
Threading 9
Needle Position Selector 11, 23
Oiling 37, 38
Pin Basting 20
40
Enjoy sewing! If you have any questions please write to:
Department of Sewing Education
The Singer Company
30 Rockefeller Plaza, New York, N.Y. 10020
Page
Presser Foot 3
Removing 32
Presser Foot Lifter 3
Pressure Adjustment 17
Principal Parts 3
Reverse Stitching 14
Satin Stitching 24
Script Lettering 34
Seams, How to Sew 18
Finishes 25
Flat-Felled 25
Knit Fabric 26
Lingerie 25
Straight 18
Slide Plate 3
Spool Pin 3
Stitch Length 14, 24
Stitch Length Selector 3, 14, 24
Stitch Width 11, 23
Stitch Width Selector 3, 11, 23
Stop-Motion Screw 3, 5
Straight Stitching 11
Adjusting for Fabric 12
Needle Position 11
Take-up Lever 3
Tension Adjustment 15, 16, 24
For Straight Stitching 15, 16
For Zig-Zag Stitching 24
Thread 13
Thread Cutter 3
Threading the Machine 5
Zig-Zag Stitching 23
Needle Position 23
Stitch Width 23
Page 43

SINGER
GUARANTEE
WE GUARANTEE that each SINGER* sewing machine has been carefully manufactured
and is in perfect operating condition on delivery. When subject to normal family use and
care, any parts requiring replacement at any
time owing to defects in material or workmanship will be replaced without charge.
THIS GUARANTEE does not apply to parts
requiring replacement owing to natural wear or
to abuse or negligence of the user or in the
event the machine is serviced by other than a
SINGER representative or Approved Dealer or
with parts other than those supplied by The
Singer Company.
IN ADDITION to the above guarantee of
parts, each machine will be inspected and adjusted whenever necessary without charge for
labor for a period of one year from date of
purchase.
THIS GUARANTEE is effectively only with
respect to the person making the purchase from
The Singer Company or one of its Approved
Dealers. The original Sales Agreement, or
Cash Receipt, must be presented to obtain the
benefits of the guarantee.
AGREEMENTS inconsistent with the foregoing shall be void and of no effect.
THE SINGER COMPANY
Page 44

 Loading...