

Page 1
SWM 6308 ÇAMAfiIR MAK‹NASI
KULLANMA KILAVUZU
TR
EN
FR
NL
DE
ES
RU
AR
HR
Page 2
TÜRKÇE
De¤erli Müflterimiz,
Ürün seçiminde S‹NBO'yu tercih etti¤iniz için teflekkür ederiz.
Uzun ve verimli bir kullan›m için cihaz› kullanmadan önce bu k›lavuzu özellikle güvenlik
talimatlar›na dikkat ederek okuman›z› ve devaml› suretle saklaman›z› tavsiye ederiz.
Sayg›lar›m›zla,
Sinbo Küçük Ev Aletleri
Cihazla oynamamalarını güvenceye almak için çocuklar gözetim altında tutulmalıdır.
Bu ürün (çocuklar dahil ) fiziksel hassasiyeti az, zihinsel olarak yetersiz, deneyimsiz ve yeterli bilgiye
sahip olmadan yada kendilerinin güvenli¤inden sorumlu olan kifliler tarafından bu ürünü kullanmak
için gerekli talimatlar verilmemifl kiflilerin kullanımına uygun de¤ildir.
Children being supervised not to play with the appliance.
This appliance is not intended for use by persons (including children) with reduced physical, sensory
or mental capabilities, or lack of experience and knowledge, unless they have been given supervision
or instruction concerning use of the appliances by a person responsible for their safety. Children
should be supervised to ensure that they do not play with the appliance.
- 1 -
Page 3
ÖNEML‹ GÜVENL‹K UYARILARI
• Bakım, Onarım ve Kullanımda Uyulması Gereken Kurallar
1. Bu makinenin güç kablosu özel olarak ba¤lant›lanm›flt›r. Kabloyu kendi bafl›n›za aç›p kutuya
ba¤lamay›n›z. Uzman teknisyenlerden veya en yak›n servisten yard›m al›n›z.
2. Herhangi bir anormal ses veya titreflim söz konusu ise, makineyi durdurarak nerede olufltu¤unu
kontrol edin (sorunlar ve çözüm önerileri bölümüne bak›n›z).
3. Y›kama zaman ayar›n› artan düzende (örne¤in 0 ila 5 aras›nda), saat yönünün tersine döndürmemeye
özen göstererek ayarlay›n›z.
4. Hazneye 550C’den daha s›cak su koymay›n›z, titreflim mekanizmas› (Pulsatör) gibi plastik aksam
deforme olabilir.
5. Çal›flt›rmaya bafllamadan önce haznenin içinde hiçbir fley olmad›¤›ndan emin olunuz.
6. Çamafl›rlar›, önerilen y›kama süresinden uzun y›kamay›n›z.
7. Makine kapa¤› üzerine a¤›r ve s›cak nesneler koymay›n›z.
8. Y›kama s›ras›nda kuvvetli asit, alkalin ve di¤er organik bileflenler kullanmay›n›z.
9. Çamafl›r makinesinin alt penceresi kullan›m s›ras›nda hiçbir flekilde kapat›lmamal›d›r.
10. Y›kama esnas›nda, ellerinizi y›kama haznesine sokmay›n›z.
11. Y›kama öncesi renkli ve beyaz çamafl›rlar› birbirinden ay›r›n›z.
12. Bu cihaz, denetim alt›nda tutulmaks›z›n veya söz konusu kiflilerin güvenli¤inden sorumlu kifli
taraf›ndan, nas›l kullan›laca¤›na iliflkin bilgi verilmeksizin (çocuklar da dâhil) fiziksel, alg›sal veya zihin
kapasitesi düflük kifliler veya bilgi ve deneyim eksikli¤i olan kifliler taraf›ndan kullan›lmamal›d›r.
13. Çocuklar, cihazla oynamad›klar›ndan emin olunacak flekilde gözetim alt›nda tutulmal›d›r.
14. Güç kablosunun hasar görmüfl olmas› halinde, herhangi bir riskten kaç›nmak için, kablo üretici,
üreticinin yetkili servisleri veya benzer flekilde uzman bir teknisyen taraf›ndan yenilenmelidir.
TEKN‹K ÖZELL‹KLER
Voltaj: AC230V, 50Hz
Girifl gücü: 200W
Ç›k›fl gücü: 80W
Kapasite: 3 kg
D‹KKAT!!
Ürünün üzerinde bulunan iflaretlemelerde veya ürünle verilen di¤er bas›l› dökümanlarda beyan edilen de¤erler,
ilgili standartlara göre laboratuar ortam›nda elde edilen de¤erlerdir. Bu de¤erler, ürünün kullan›m ve ortam
flartlar›na göre de¤iflebilir.
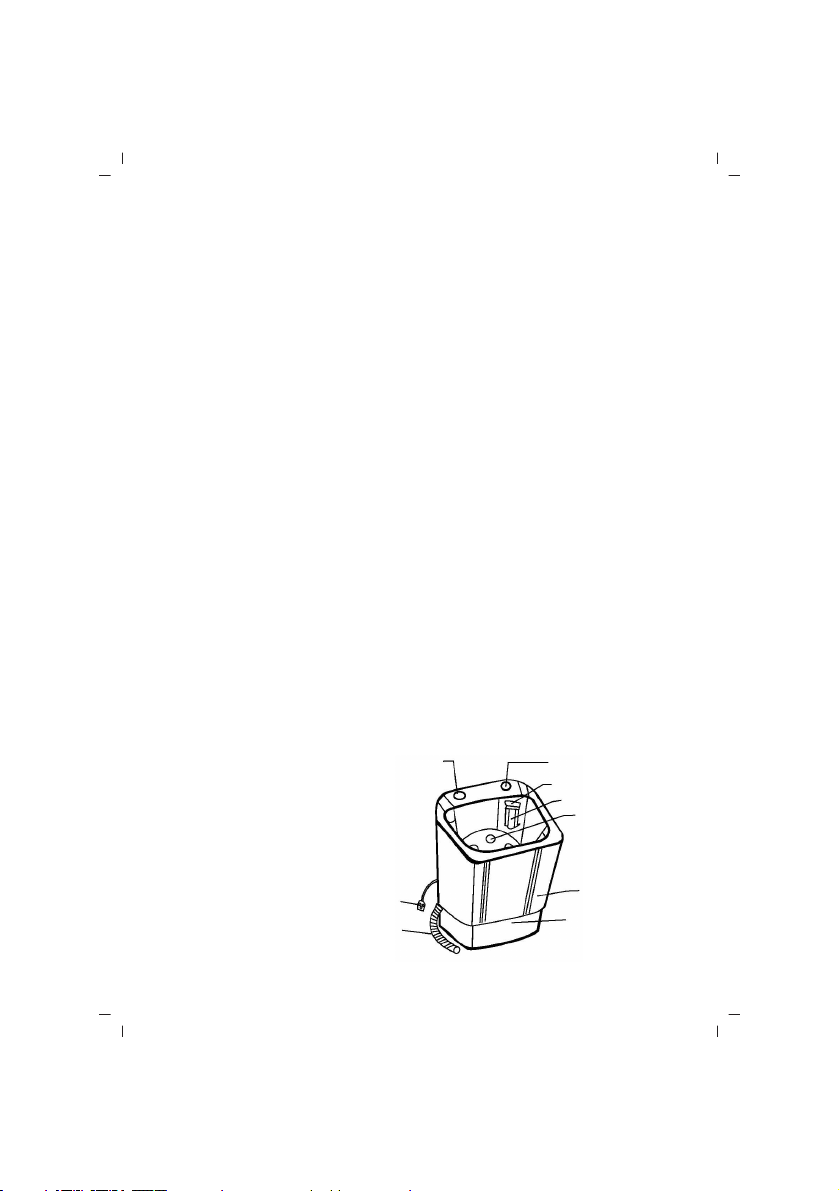
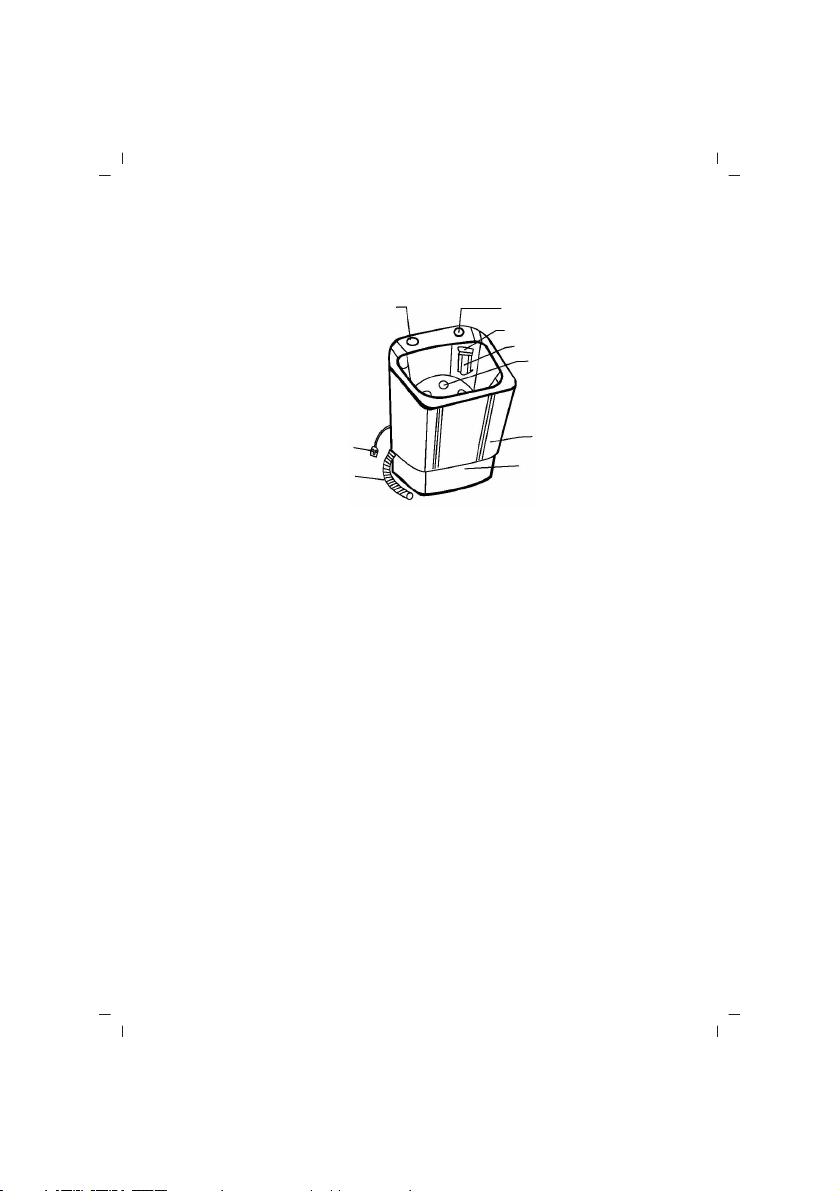
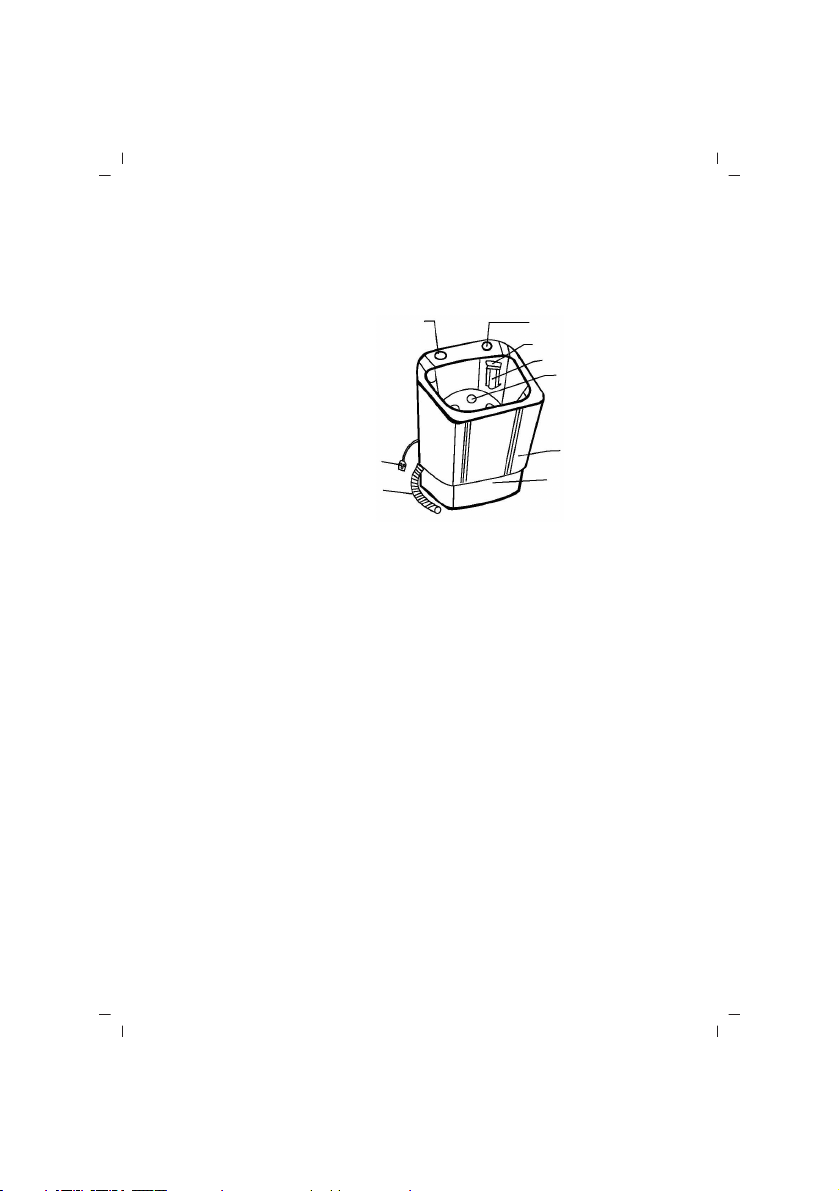
PARÇA ADLARI:
1. Su girifli
2. Kablo
3. Tahliye hortumu
4. Y›kama zaman ayarlay›c›
5. Taflma tahliye ç›k›fl›
6. Filtre
7. Titreflim mekanizmas› (Pulsatör)
8. Kabin
9. Taban
2
3
- 2 -
1
4
5
6
7
8
9
Page 4

C‹HAZIN KULLANIMI
• Ba¤lantı veya Montajın Nasıl Yapılaca¤ını Gösterir fiema ile Ba¤lantı veya Montajın Kimin Tarafından
Yapılaca¤ına (tüketici, yetkili servis) iliflkin bilgiler
Olası bir arıza durumunda cihazın içini açmayınız. En yak›n yetkili servise baflvurunuz.
EKLENT‹LER‹N B‹RLEfiT‹R‹LMES‹
Helezon yay› tahliye hortumunun ucuna tak›n ard›ndan tahliye hortumunu çamafl›r makinesinin taban›nda
yer alan yuvaya yerlefltirin ve helezonu s›k›ca sabitleyin.
KULLANIM ÖNCES‹ HAZIRLIK
1. Makineyi düz ve dengeli bir Alana yerlefltirin.
2. Dolum hortumunu su girifline ve muslu¤a ba¤lay›n.
3. Tahliye hortumunu, a¤z› tahliye deli¤ine gelecek flekilde yerlefltirin.
4. Kabloyu prize tak›n, (Prizin uygun flekilde topraklanm›fl olmas› gerekmektedir, elektrik çarpmas›na
karfl› bunu kontrol edin.)
5. Açma dü¤mesini aç›n.
YIKAMA ‹fiLEM‹
1. Y›kama seçimini ('wash selector') ‘y›kama-durulama’ya ('wash-rinse') ayarlay›n.
2. Y›kanacak çamafl›rlar› hazneye yerlefltirin. Y›kanacak giysilerin miktar› ve malzemenin cinsine uyun
flekilde su seviyesini seçin.
3. Y›kama haznesine uygun miktarda deterjan koyun.
4. Kumafl tipine ve giysilerin kirlili¤ine uygun y›kama süresini seçin (Bak›n›z Madde 3). Zaman ayar
dü¤mesini döndürerek ayarlay›n ve devir seçene¤ine (“Cycle selector”) bas›n.
5. Y›kama bitti¤inde, giysileri y›kama haznesinden ç›kart›n› ve y›kama seçeneklerinden ‘TAHL‹YE’yi
('DRAIN') seçin.
1. YIKAMA:
2 .YIKAMA ÖNER‹LER‹
1. Fazla kirli, lekeli pamuklu veya keten çamafl›rlar› y›karken, önce temiz sade su ile y›kay›n›z. Ard›ndan
deterjanl› su ile y›kay›n›z. Bu flekilde hem daha az deterjan kullanm›fl hem y›kama etkisini art›rm›fl
olursunuz.
2. Gömleklerin kol a¤z›, yakalar› ve fazla kirli alanlara az miktarda deterjan döküp elle çitileyin veya
f›rçalay›n.
3. Daha az köpük oluflumu için, s›v› sabun veya yüksek kaliteli deterjan kullan›n›z.
4. S›cak su kullan›m› y›kamadan elde edilecek sonucu iyilefltirebilir.
3. YIKAMA SEÇENE⁄‹ VE YIKAMA ZAMAN AYARI
Kumafl Tipi ‹pek, Yün Pamuklu, Keten Pamuklu & keten
Kati konum seviyesi Hafif Hafif Hafif
Y›kama süresi (Min) 2-5 5-10 10-15
Durulama süresi (Min) 2-3 3-5 5-8
KULLANIM HATALARINA ‹L‹fiK‹N B‹LG‹LER
Cihazınızı, beyan edilen voltaj ile çal›flt›r›n›z. Bulundu¤unuz yerin voltaj›n›n uygun olup
olmad›¤›n› kontrol ediniz.
Güç kablosunun ar›zalanmas› durumunda tehlikelerin önlenmesi için kablo üretici, servis merkezi ya
da benzer bir ehliyetli kifli taraf›ndan de¤ifltirilmelidir. Ar›za durumunda cihaz› kendiniz sökmeye
kalk›flmay›n›z, bak›m merkezimiz ya da sat›fl sonras› hizmet merkezimiz ile ba¤lant›ya geçiniz.
Cihaz› kendiniz onarmaya kalk›flmay›n›z. Meydana gelebilecek ar›zalardan firmam›z kesinlikle sorumlu
de¤ildir, ve cihaz›n›z garanti kapsam› d›fl›nda ifllem görecektir.
- 3 -
Page 5

TAfiIMA VE NAKL‹YE ESNASINDA
• Ürünü düflürmeyiniz,
• Darbelere maruz kalmamas›n› sa¤lay›n›z,
• S›k›flmamas›n›, ezilmemesini sa¤lay›n›z,
• Ambalaj üzerindeki iflaretlemelere uyunuz.
• Orjinal ambalajıyla taflımaya özen gösteriniz.
ÇEVRE VE ‹NSAN SA⁄LI⁄I
Bu iflaret AB bünyesinde bu ürünün di¤er ev at›klar› gibi elden ç›kar›lmamas› gerekti¤ini ifade
etmektedir. Kontrol d›fl› at›klardan dolay› çevreye veya insan sa¤l›¤›na gelebilecek herhangi
bir zarar› engellemek için, malzeme kaynaklar›n›n yeniden kullan›m›n›n sürdürülebilirli¤ine
katk›da bulunmak üzere sorumlu bir flekilde geri dönüflümünü sa¤lay›n. Kullan›lm›fl cihazlar›n›z› geri
dönüflüme sokmak için, lütfen geri dönüflüm toplama sistemlerini kullan›n veya cihaz› sat›n ald›¤›n›z
sat›fl merkezi ile görüflün. Çevre aç›s›ndan güvenli geri dönüflüm için ürünü sizden iade alabilirler.
TEM‹ZL‹K VE BAKIM
• Tüketicinin Kendi Yapabilece¤i Bakım, Onarım veya Ürünün Temizli¤ine ‹liflkin Bilgiler
1. Temizlemeden önce daima cihaz› kapat›p, prizden çekiniz.
2. Boyal› d›fl yüzeyi nemli bir bezle silerek temizleyiniz. Wax veya parlat›c› kullanmay›n›z. Is› alt›nda
boya ile tepkimeye girerek renk de¤iflimine neden olabilir.
BAKIM
• Periyodik Bakım Gerektirmesi Durumunda, Periyodik Bakımın Yapılaca¤ı Zaman Aralıkları ile Kimin
Tarafından Yapılması Gerekti¤ine ‹liflkin Bilgiler
Cihaz periyodik bak›m gerektirmemektedir.
Düzenli temizli¤inin yap›lmas›nda fayda vard›r
SATIfi SONRASI H‹ZMETLER‹
Bu cihaz kullan›c› taraf›ndan de¤ifltirilebilen parçalara sahip de¤ildir. Ünitenin çal›flmamas› durumunda
flu ad›mlar› izleyin.
1. Talimatlar›n do¤ru biçimde izlendi¤ini denetleyin.
2. Ana kayna¤›nda ifllevselli¤ini denetleyin.
Cihaz hâlâ çal›flm›yorsa, sat›n ald›¤›n›z yere geri götürün.
Güç kablosu hasar görmüflse, tehlikeleri önlemek için, cihaz üreticisine iade edilmelidir.
Kendi kendinize tamir etmeye KALKIfiMAYIN.
fiu talimatlar› izleyin:
1. Dikkatlice, tercihen orijinal kutusuna paketleyin.
Ünitenin temiz oldu¤undan emin olun.
2. Tüm yaz›flmalarda, ad›n›z›, adresinizi ve ürünün model numaras›n› belirtin.
3. ‹ade etme nedeninizi belirtin.
4. Garanti kapsam›ndaysa, nereden, ne zaman al›nd›¤›n› belirtin ve sat›n alma kan›t›n› ekleyin (örn.
kasa fifli).
- 4 -
Page 6

SORUN G‹DERME
* Titreflim mekanizmas› çal›flmay› durdurdu
Güç gelmiyor veya kablo prizden ç›km›fl
Fifli prize s›k›ca yerlefltiriniz
V-kay›fl çal›flm›yor
V-Kay›fl› düzgün flekilde yerine yerlefltirin
Disk gevflemifl
Diskin vidas›n› s›k›flt›r›n
Titreflim mekanizmas›na yabanc› madde s›k›flm›fl
Yabanc› maddeyi temizleyin.
* Normal olmayan ses ve titreflim
Titreflim mekanizmas› ile y›kama haznesi aras›nda çatlak veya ayr›lma
Aradaki ayr›lmay› kapat›n›z
Titreflim mekanizmas›na yabanc› madde s›k›flm›fl
Yabanc› maddeyi temizleyin.
V-Kay›fl fazla s›k›
Uygun flekilde ayarlay›n›z
* Titreflim mekanizmas› düflük h›zda çal›fl›yor
V-Kay›fl› gevfletin
Uygun flekilde ayarlay›n›z veya viday› yenileyiniz
Motor sabitleme vidas› gevflek
V-Kay›fl› ve viday› s›k›flt›r›n
- 5 -
Page 7
ENGLISH
SINBO SWM 6308 SEMI-AUTO WASHING MACHINE
INSTRUCTION MANUAL
We suggest that you carefully read this manual to ensure correct use of the machine and your security as well.
TECHNICAL SPECIFICATION
Voltage: AC230V, 50Hz
Input Power: 200W
Output Power: 80W
Capacity: 3 kg
PARTS NAME
1. Water Inlet
2. Cord
3. Drain Hose
4. Wash Timer
5. Overflow Port
6. Filter
7. Pulsator
8. Cabinet
9. Base
HOW TO FIX ACCESSORIES
Put the spring coil into the end of drain hose then connect the drain hose to base of washing machine and clamp
the spring coil tightly.
PREPARATION BEFORE USE
1. Set the machine evenly.
2. Connect the filler hose to supply port and faucet.
3. Lay down the drain hose with its port towards the drainage way.
4. Connect the ground terminal to earth.(Please make sure the ground terminal has been properly earthed to
avoid electric shock.)
5. Switch the power.
NOTICE
1. The power cord of this machine is specially connected. Don not open the wire and connect to box by yourself
.Refer servicing to qualified technicians or to the nearest service center.
2. If there is any abnormal noise and vibration, stop the machine to check where it occurred. (see the troubles
and repairs)
3. Turn the wash timer in ascending manner only(example 0 to 5)avoiding turning it in a counterclockwise
direction.
4. Don not put water over 55 into tub, otherwise plastic areas such as pulsator may deform.
5. Make sure there are no things in washing tub before starting.
6. Do not wash clothes more than its suggested washing time.
7. Do not put heavy and hot things on the lid of the machine.
8. Do not use heavy acid, alkaline and other organic compound when washing.
9. The bottom window of washing machine can not be blocked went use it.
10. During the washing, don't put your hands into the wash tub
11. Before washing, operator must separate light color clothes and faded color clothes.
12. This appliance is not intended for use by persons(including children) with reduced physical, sensory or mental
capabilities or lack of experience and knowledge, unless they have been given supervision or instruction concerning
use of the appliance by a person responsible for their safety.
13. Children should be supervised to ensure that They do not play with the appliance.
14. If the supply cord is damaged ,it mist be replaced by the manufacturer ,its service agent or similarly qualified
persons in order to avoid a hazard.
1
2
3
4
5
6
7
8
9
- 6 -
Page 8

WASHING PROCEDURE
1. Set the 'wash selector' to 'wash-rinse'.
2. Put the clothes to be washed into the wash tub. Select the water level according to the weight and material
of clothes.
3. Put suitable amount of detergent into the wash tub.
4. Select the washing time according to fabric type and dirtiness of clothes (see ITEM.3) Turn the wash timer
knob and press the 'Cycle selector'.
5. Wash the washing is finished, remove clothes from the wash tube and select 'DRAIN' from the wash selector.
1. WASH:
2 .WASH SUGGESTION
1. When washing heavily soiled cotton or linen fabric, wash them first in clean water away. Then wash them in
water with detergent so as to reduce the consumption of detergent and improve the wash effect.
2. Add a small amount of detergent on shirt cuffs, collars and other heavily soiled area. Rub them by hands or
brush.
3. Use liquid soap or high class detergent with less foam.
4. Use warm water may improve the washing effect.
3. WASH MODE AND WASH TIMER
Fabric Type Silk, Wool Cotton, Linen Cotton & Hemp
Level of solid mode Light Light Light
Wash Timer (Min) 2-5 5-10 10-15
Rinse Timer (Min) 2-3 3-5 5-8
TROUBLES AND REPAIRS
* Pulsator ceased running
Power failure or plug dropped off
Insert plug well
V-Belt dropped off
Put on V-Belt properly.
Pulley loosened
Tighten pulley screw.
Foreign matter jammed pulsator
Remove foreign matter
* Abnormal noise and vibration
Fraction between pulsator and wash tub
Adjust the gap between them
Foreign matter jammed pulsator
Remove the foreign matter
Over tighten V-Belt
Adjust properly
* Pulsator runs at low speed
Slacken V-Belt
Adjust properly or replace with a new screw
Motor fixing screws loosened Tighten V-Belt and screw
- 7 -
Page 9
FRANÇAIS
SINBO SWM 6308 MACHINE À LAVER SEMI-AUTOMATIQUE
MODE D’EMPLOI
Nous vous conseillons de lire attentivement ce mode d’emploi pour un usage correct de la machine et pour votre
sécurité.
SPÉCIFICATIONS TECHNIQUES
Voltage: AC230V, 50Hz
Puissance d’entrée: 200W
Puissance de sortie: 80W
Capacité: 3 kg
NOMS DES PIÈCES
1. Entrée d’eau
2. Cordon
3. Tuyau d’évacuation
4. Chronomètre de lavage
5. Sortie d’évacuation de regorgement
6. Filtre
7. Mécanisme de vibration (Pulsateur)
8. Cabinet
9. Semelle
ASSEMBLEMENT DES ACCESSOIRES
Montez le ressort en spiral au bout du tuyau, installez ensuite le tuyau d’évacuation dans la rainure se trouvant
sur la semelle de la machine à laver et fixez fermement le spiral.
PRÉPARATION AVANT USAGE
1. Placez la machine sur une surface plate et équilibrée.
2. Attachez le tuyau de remplissage à l’entrée d’eau et au robinet.
3. Installez le tuyau d’évacuation de façon à ce que l’orifice coïncide le trou d’évacuation.
4. Branchez le cordon sur la prise, (La prise doit être correctement mise à la terre, vérifiez cela contre tout choc
électrique)
5. Allumez le bouton de Marche.
AVERTISSEMENTS
1. Le cordon d’alimentation de cette machine est raccordé d’une façon spéciale. Ne raccordez pas le cordon à
la boîte en l’ouvrant vous-même. Demandez de l’aide à des techniciens professionnels ou au service le plus
proche.
2. En cas de tout bruit anormal ou toute vibration, vérifiez d’où cela provient en arrêtant la machine (veuillez
vous référer au chapitre de problèmes et conseils de solutions).
3. Réglez le chronomètre de lavage dans l’ordre croissant (par exemple entre 0 et 5), en veillant à ne pas faire
tourner dans le sens antihoraire.
4. Ne mettez pas d’eau plus chaude que 550C dans le réservoir, les pièces en plastique telles que le mécanisme
de vibration (Pulsateur) peuvent se déformer.
5. Assurez-vous qu’il ne se trouve rien dans le réservoir avant de ne mettre en marche.
6. Ne lavez pas les linges pendant plus longtemps que la durée de lavage conseillée.
7. Ne mettez pas d’objets lourds ou chauds sur le couvercle de la machine.
8. N’utilisez pas d’acide fort, de l’alcaline ou d’autre composé organique lors du nettoyage.
9. La fenêtre inférieure de la machine à laver ne doit jamais être fermée lors de l’usage.
10. N’introduisez pas vos mains dans le réservoir de lavage lors du lavage.
11. Séparez les linges blancs et les linges noirs avant le lavage.
12. Cet appareil n’est pas prévu pour être utilisé par des personnes (y compris les enfants) dont les capacités
physiques, sensorielles ou mentales sont réduites, ou des personnes dénuées d’expérience ou de connaissance,
sauf si elles ont pu bénéficier, par l’intermédiaire d’une personne responsable de leur sécurité, d’une surveillance
ou d’instructions préalables concernant l’utilisation de l’appareil.
1
2
3
4
5
6
7
8
9
- 8 -
Page 10

AVERTISSEMENTS
13. Il convient de bien surveiller les enfants pour s’assurer qu’ils ne jouent pas avec l’appareil.
14. Dans le cas où le cordon d’alimentation est endommagé, en vue d’éviter tout risque, le cordon doit être
remplacé par le fabricant, les services agréés du fabricant ou par des techniciens similairement qualifiés.
L’OPÉRATION DE LAVAGE
1. Réglez le sélecteur de Lavage ('wash selector') sur ‘lave-rince’ ('wash-rinse').
2. Installez vos linges à laver dans le réservoir. Choisissez le niveau d’eau qui correspond à la quantité des linges
à laver et au genre du matériel.
3. Mettez du détergent à une quantité adéquate dans le réservoir de lavage.
4. Choisissez la durée de lavage qui correspond au type de textile et à la saleté des vêtements. (Voir Article 3).
Réglez en faisant tourner le bouton de réglage de temps et appuyez sur le sélecteur de cycle (“Cycle selector”).
5. Une fois que le lavage sera terminé, retirez les vêtements du réservoir de lavage et sélectionnez « ÉVACUATION »
('DRAIN') parmi les choix de lavage.
1. LAVAGE:
2 .CONSEILS DE LAVAGE
1. Lorsque vous lavez des linges en coton ou lin trop sales, tachés, lavez d’abord avec de l’eau sobre propre.
Lavez après avec de l’eau détersive. De cette façon, non seulement vous utiliserez moins de détergent, mais
vous augmenterez aussi l’effet du lavage.
2. Versez un peu de détergent sur les bracelets, les cols et les surfaces trop sales, frottez à la main ou brossez.
3. Pour moins de formation de mousse, utilisez du savon liquide du détergent de haute qualité.
4. L’usage d’eau chaude peut améliorer le résultat obtenu du lavage.
3. MODE DE LAVAGE ET RÉGLAGE DE TEMPS DE LAVAGE
Type de textile Soie, Laine Coton, Lin Coton & Lin
Niveau de Mode Solide Léger Léger Léger
Durée de Lavage (Min) 2-5 5-10 10-15
Durée de Rinçage (Min) 2-3 3-5 5-8
PROBLÈMES ET CONSEILS DE SOLUTIONS
* Le mécanisme de vibration a arrêté le fonctionnement
L’alimentation ne passe pas ou le cordon est débranché de la prise de courant
Branchez fermement la fiche électrique dans la prise
La ceinture en V ne fonctionne pas
Installez correctement la ceinture en V à sa place
Le disque est relâché
Resserrez la vis du disque
Une substance allogène est coincée dans le mécanisme de vibration
Nettoyez la substance allogène.
* Bruit et vibration anormaux
Fissure ou écart entre le mécanisme de vibration et le réservoir de lavage
Fermez l’écart qui se trouve entre
Une substance allogène est coincée dans le mécanisme de vibration
Nettoyez la substance allogène.
La ceinture en V est trop tendue
Réglez d’une façon convenable
*Le mécanisme de vibration fonctionne à basse vitesse
Détendez la ceinture en V
Réglez d’une façon convenable ou renouvelez la vis
La vis de fixation est relâchée
Resserrez la vis et la ceinture en V
- 9 -
Page 11

NEDERLANDS
SINBO SWM 6308 HALF AUTOMATISCHE WASMACHINE
GEBRUIKSHANDLEIDING
Om uw apparaat op correcte en veilige wijze te kunnen gebruiken verzoeken wij u deze gebruikshandleiding
aandachtig door te nemen.
TECHNISCHE SPECIFICATIES
Stroomspanning: AC230V, 50Hz
Ingangsvermogen: 200W
Uitgangsvermogen: 80W
Inhoudscapaciteit: 3 kg
ONDERDELEN
1. Waterinlaat
2. Snoer
3. Afvoerslang
4. Timer
5. Overloopafvoer
6. Filter
7. Pulseerder
8. Wastrommel
9. Voet
BIJHORENDE ONDERDELEN MONTEREN
Bevestig de spiraalveer aan het uiteinde van de afvoerslang, plaats de slang in de daarvoor bestemde opening
aan de voet van de wasmachine en maak de spiraalveer stevig vast.
GEBRUIKSVOORBEREIDINGEN
1. Installeer het apparaat op een vlakke en stabiele bodem.
2. Verbind de waterslang met de kraan en met de waterinlaat van het apparaat.
3. Bevestig de afvoerslang in de afvoeropening.
4. Steek de stekker in het stopcontact. Controleer of het stopcontact (de stekker) degelijk geaard is om het
gevaar van elektrische schok te voorkomen. 5. Zet de schakelkop aan.
VEILIGHEIDSINSTRUCTIES
1. Het snoer van dit apparaat is voorzien van een speciaal beveiligde aansluiting; maak ze niet op eigen houtje
los om er iets aan te wijzigen. Roep de hulp in van een bevoegde Service of geschoold vakman.
2. Schakel het apparaat dadelijk uit ingeval van ongewone vibratie of geluid tijdens het functioneren; controleer
vanwaar het afkomstig is en volg de aanwijzingen onder “Problemen Verhelpen”
3. Draai de timerknop niet tegen de klok in, altijd met de klok mee bij het regelen van de wastijd. (bv. 0 - 5 ).
4. Doe in de wasbak geen water boven de 550C, hogere temperaturen kunnen vervorming van plastic onderdelen
(bv. pulseerder) veroorzaken.
5. Controleer of er geen vreemde voorwerpen in de wastrommel zitten voordat u het apparaat inschakelt.
6. Was niet langer dan voor het wasgoed is aanbevolen.
7. Plaats geen zware of hete voorwerpen op de wasmachine.
8. Gebruik geen sterke zuren, alkaline of andere organische preparaten om te wassen.
9. Sluit nooit het venstertje onderaan terwijl u de wasmachine gebruikt.
10. Stop uw handen niet in de wastrommel tijdens het wassen.
11. Sorteer wit en gekleurd goed voor u begint te wassen.
12. Dit apparaat mag niet gebruikt worden door kinderen en personen met lichamelijke, zintuiglijke of geestelijke
handicap of met gebrek aan kennis en ervaring tenzij onder toezicht en leiding van een persoon die verantwoordelijk
is voor het veilig gebruik
13. Houd voldoende toezicht om te beletten dat kinderen met het apparaat gaan spelen.
14. Ingeval het snoer beschadigd is, moet het om gevaar te voorkomen.
vervangen worden door de fabrikant, een bevoegde service of geschoold vakman
1
2
3
4
5
6
7
8
9
- 10 -
Page 12

GEBRUIK
1. Zet de keuzeschakelaar op ‘wassen - spoelen”
2. Doe het wasgoed in de trommel en regel het waterpeil in functie van de hoeveelheid en de aard van het
wasgoed.
3. Voeg de nodige hoeveelheid wasmiddel toe.
4. Regel de wastijd volgens de aard van het weefsel en de graad van bevuiling (Zie tabel -3) Regel de timerknop
in de gewenste stand en druk op de schakelaar om het wasproces te starten.
5. Haal het wasgoed uit de trommel als u klaar bent met wassen en selecteer “AFVOER” (DRAIN).
1. WASSEN:
2 .NUTTIGE WENKEN BIJ HET WASSEN
1. Was erg bevuilde katoenen of linnen stoffen eerst met zuiver water. Was daarna met water waaraan een
wasmiddel is toegevoegd. Op deze wijze bespaart u detergent en bekomt u een beter wasresultaat.
2. Laat erg bevuilde kragen, manchetten of vlekken op kledingstukken vooraf weken in water en detergent en
maak schoon met een borsteltje.
3. Gebruik een vloeibaar detergent of een wasmiddel van goede kwaliteit dat niet te veel schuimt.
4. Met warm water bekomt u een beter resultaat.
3. WASKEUZE EN WASTIJDEN
Weefseltype Zijde, Wol Katoen, Linnen Katoen, Linnen
Vaste stand Licht Licht Licht
Wastijd (Min) 2-5 5-10 10-15
Spoeltijd (Min) 2-3 3-5 5-8
PROBLEMEN VERHELPEN
* De pulseerder functioneert niet
Er is geen stroomtoevoer of de stekker zit niet/niet goed in het stopcontact
Steek de stekker degelijk in het stopcontact.
V-riem functioneert niet
Breng de V-riem aan zoals het hoort
De katrolschijf is losgekomen
Draai de schroef van de katrolschijf aan
Er zit een vreemd voorwerp onder de pulseerder
Verwijder het vreemd voorwerp
* Ongewoon geluid of vibratie
De pulseerder is gebarsten of verschoven
Regel de afstand tussen de pulseerder en de wastrommel
Er zit een vreemd voorwerp onder de Pulseerder
Verwijder het voorwerp
De V-riem is te fel aanspannen
Stel de V-riem goed af
* Het systeem werkt op lage snelheid
De V-riem is te weinig aangespannen
Regel de V-riem op de juiste spanning
Losse bevestigingsschroef van de motor
Span de V-riem aan/ draai de schroef aan of vervang ze.
- 11 -
Page 13

SINBO SWM 6308 MINI-WASCHMASCHINE
DEUTSCH
BEDIENUNGSANLEITUNG
Wir empfehlen für Ihre Sicherheit diese Bedienungsanleitung aufmerksam durchzulesen.
Technische Daten
Netzspannung: AC230V, 50 Hz
Leistungsaufnahme: 200 W
Leistung: 80 W
Waschkapazität: 3 Kg
Gerätebeschreibung
1. Anschluss Wasserzulauf
3. Netzkabel
2. Ablaufschlauch
4. Schaltuhr
5. Überlauffilter
6. Filter
7. Agitator
8. Gerätegehäuse
9. Unterbau
Zusammenbau
Verbinden Sie die Spirale mit dem Ablaufschlauch und schliessen Sie den Schlauch an die Unterseite des Gerätes
an. Montieren Sie die Spirale anschliessend.
Vor dem ersten Gebrauch
1. Stellen Sie die Waschmaschine auf einer geraden und ebenen und Fläche auf.
2. Verbinden Sie den Wasserzulaufschlauch mit einem Wasserhahn. Das andere Ende
stecken Sie auf den Anschluss des Wasserzulaufes auf.
3. Legen Sie den Ablaufschlauch in einen entsprechenden Ablauf.
4. Stecken Sie den Stecker des Gerätes in die Steckdose. (Dieses Gerät muss an einer geerdeten Steckdose
angeschlossen werden).
5. Schalten Sie das Gerät ein.
Hinweise
1. Das Netzkabel und der Netzstecker dieses Gerätes sind speziell hergestellt worden. Reparieren Sie das Gerät
nicht selbst, sondern suchen Sie bitte einen autorisierten Fachmann auf.
2. Falls Sie einen aussergewöhnlichen Geräusch oder eine Vibration feststellen, schalten Sie das Gerät sofort
aus überprüfen Sie es. (Siehe Kapitel “Probleme und Abhilfe”).
3. Drehen Sie den Zeitregler (0 bis 5) niemals gegen den Uhrzeigersinn.
4. Um Schaden zu vermeiden, darf die Waschwassertemperatur 55°C nicht
überschreiten.
5. Stellen Sie sicher, dass die Waschtrommel vor der Benutzung vollständig entleert ist.
6. Die Waschzeit soll die Richtwerte nicht überschreiten.
7. Stellen Sie keine schweren Gegenstände auf der Waschmaschine ab.
8. Verwenden Sie niemals lösemittelhaltige/chemische Reinigungsmittel.
9. Das untere Sichtfenster soll beim Gebrauch keinesfalls abgedeckt werden.
10. Halten Sie Ihre Hände von der Waschtrommel fern, wenn das Gerät in Betrieb gesetzt ist.
11. Sortieren Sie vor dem Waschen Ihre Kleidungsstücke nach Farben.
12. Das Gerät ist nicht dafür bestimmt, durch Personen (einschliesslich Kinder) mit eingeschränkten physischen,
sensorischen oder geistigen Fähigkeiten oder mangels Erfahrung und/oder mangels Wissen benutzt zu werden,
es sei denn, sie werden durch eine für ihre Sicherheit zuständige Person beaufsichtigt oder erhielten von ihr
Anweisungen, wie das Gerät zu benutzen ist.
1
2
3
4
5
6
7
8
9
- 12 -
Page 14

13. Kinder sollten beaufsichtigt werden, um sicherzustellen, dass Sie nicht mit dem Gerät spielen.
HINWEISE
14. Ein beschädigtes Netzkabel darf nur vom Hersteller, einer von ihm beauftragten Werkstatt oder einer ähnlich
qualifizierten Person ersetzt werden, um Gefährdungen zu vermeiden.
Waschvorgang
1. Stellen Sie den Wahlschalter (wash selector) auf Position “Waschen-Spülen” (wash-rinse) ein.
2. Legen Sie die Wäsche ein. Füllen Sie das Wasser entsprechend der Wäsche und Wäschemenge ein.
3. Geben Sie Waschmittel entsprechend der Wassermenge ein.
4. Bestimmen Sie die Waschdauer nach den Pflegehinweisen und dem Grad der Verschmutzung. Drehen Sie
dazu den Zeitregler im Uhrzeigersinn und drücken Sie die Drehzahltaste “cycle selector”.
5. Nach Ende des Waschvorgangs entnehmen Sie die Wäsche und stellen Sie die Wahlschalter auf Position
“leeren” (DRAIN).
1. Waschen:
2. Empfehlungen
1. Waschen Sie die stark verschmutzte Kleider und Kleidungsstücke zuerst ohne Waschmittel und danach mit
Waschmittel. Dadurch sparen Sie Waschmittel und Ihre Wäsche wird effektiv gewaschen.
2. Bürsten Sie die Schmutzrände der Kleider mit etwas Waschmittel.
3. Um geringe Schaumproduktion, verwenden Sie nur hochwertige Waschmittel oder Flüssigseife.
4. Durch warmes Wasser kann die Waschqualität erhöht werden.
3. Waschmodus und Wasch›/Spüldauer
Einstellung Seide, Wolle Baumwolle Baumwolle, Leinen
Verschmutzung Leicht Leicht Leicht
Waschzeit(min) 2/5 5/10 10/15
Spülzeit(min) 2/3 3/5 5/8
Probleme und Lösungsvorschläge
* Vibration funktioniert nicht.
Netzausfall oder Netzstecker nicht angeschlossen
Netzstecker in Steckdose stecken
Keilriemen lose
Keilriemen spannen
Riemenscheibe lose
Riemenscheibe festschrauben
Agitator mit Fremdkörpern verstopft
Agitator reinigen
* Geräuschentwicklung oder Vibration
Reibung zwischen Agitator und Bottich
Abstand zwischen Agitator und Bottich einstellen
Agitator mit Fremdkörpern verstopft
Agitator reinigen
Keilriemen zu stramm
Keilriemen neu einstellen
* Agitator läuft zu langsam
Keilriemen lose/Motoraufhängung lose
Keilriemen spannen oder austauschen
- 13 -
Page 15

ESPANOL
SINBO SWM 6308 LAVADORA SEMIAUTOMÁTICA
GUÍA DEL USO
Recomendamos leer este guía cuidadamente para el uso correcto de su máquina y su seguridad.
DATOS TÉCNICOS
Voltaje: AC230V, 50Hz
Energía de entrada: 200W
Energía de salida: 80W
Capacidad: 3 kg
NOMBRES DE PIEZAS
1. Entrada de agua
2. Cable
3. Manguera de drenaje
4. Configurador de tiempo de lavamiento
5. Salida de drenaje de desbordamiento
6. Filtro
7. Mecanismo de vibración (Pulsador)
8. Cabina
9. Base
MONTAR LOS ADITIVOS
Monte el muelle espiral y luego, fije la manguera de drenaje al encaje en la base de lavadora y fije el espiral
estrechamente.
PREPARACIÓN ANTES DEL USO
1. Fije la máquina en una superficie recta y equilibrada.
2. Monte la manguera de llenar a la entrada de agua y al grifo.
3. Fije la manguera de drenaje como su boca se fije al hueco de drenaje.
4. Enchufe el cable (La toma se deber tener el alambre de tierra, controle este cosa contra choque de electricidad.)
5. Abre el botón de funcionar.
ADVERTENCIAS
1. El cable de energía de esta máquina se ha conectado especialmente. No abre el cable y no conecta a la caja
usted mismo. Consulte a los técnicos o servicio cercano.
2. Si hay una vibración o sonido anormal, hace parar la máquina y controla donde se ocurre (mire el apartado
de problemas y recomendaciones de solución).
3. Configure el tiempo de lavamiento en la forma ascendente (por ejemplo desde 0 hasta 5) por girar hacia la
dirección contraria del reloj.
4. No llene la cisterna por agua de más de 55oC, las partes plásticas como el mecanismo de vibración (pulsador)
se pueden deformar.
5. Antes de hacer funcionar, controle que no hay nada dentro de la cisterna.
6. No lave las ropas por un tiempo más del tiempo recomendado.
7. No haga situar las cosas pesadas y calientes encima de la máquina.
8. No utilice acides fuertes, alcalinos y los otros componentes orgánicos.
9. La ventana inferior de la lavadora no se debe cerrar nunca durante el lavamiento.
10. Durante el lavamiento, no mete sus manos en la cisterna de lavamiento.
11. Separe las ropas colorados y blancos antes de lavamiento.
12. Esta máquina no se debe utilizar sin la vigilancia de una persona responsable por las personas minusválidos
físicamente, sentimentalmente, mentalmente (incluso los niños), las personas que no tienen información y
experiencia suficiente.
13. Los niños se deben estar bajo de vigilancia para asegurarse de que no juegan con la máquina.
14. Si el cable de energía se avería, para evitar los riesgos, el cable se debe cambiar por el fabricante, servicio
autorizado del fabricante o un técnico experto.
1
2
3
4
5
6
7
8
9
- 14 -
Page 16

PROCEDIMIENTO DE LAVAMIENTO
1. Configure la elección de lavamiento (wash selector) a “lavar-aclarar” (wash-rinse).
2. Fije las ropas en la cisterna. Elige el nivel de agua según la cantidad de las ropas y tipo de material.
3. Ponga el detergente de cantidad adecuada a la cisterna de lavamiento.
4. Elige el tiempo de lavamiento según el tipo de tela y la suciedad de las ropas. (mire articulo 3). Configure por
girar el botón de la configuración de tiempo y pulse la elección de ciclo (Cycle selector).
5. Cuando se finaliza el lavamiento, retire las ropas desde la cisterna de lavamiento y elige “DRENAJE” (DRAIN)
de las selecciones de lavamiento.
1. LAVAMIENTO
2. RECOMENDACIONES DE LAVAMIENTO
1. Cuando está lavando las ropas muy sucias, de algodón o de lino, primero lave por agua limpio solo. Luego,
lave por agua con detergente. Por este modo, se utiliza menos detergente y también se aumenta el efecto de
lavamiento.
2. Ponga un poco detergente y lave por su mano o cepille la boca de brazo y los cuellos de las camisas y las
zonas muy sucias.
3. Para menos espuma, utilice el jabón líquido o detergente de alta calidad.
4. Uso de agua caliente puede mejorar el resultado obtenido.
3. SELECCIÓN DE LAVAMIENTO Y CONFIGURACIÓN DEL TIEMPO DE LAVAMIENTO
Tipo de Tela Seda, lana Algodón, lino Algodón y lino
Nivel de posición fija Ligera Ligera Ligera
Duración de lavamiento (min) 2-5 5-10 10-15
Duración de aclaración (min) 2-3 3-5 5-8
LOS PROBLEMAS Y LAS RECOMENDACIONES DE SOLUCIONAR
*El mecanismo de vibración se para su funcionamiento.
No hay energía o el cable se ha desenchufado.
Enchufe estrechamente.
La cinta V no se funciona.
Fije la cinta V correctamente a su lugar.
El disco se afloja.
Aprieta el tornillo del disco.
Un objeto extranjero se ha atascado en el mecanismo de vibración.
Limpie el objeto extranjero.
*Vibración y sonido anormal
La separación entre el mecanismo de vibración y la cisterna de lavamiento.
Cierre la separación.
Un objeto extranjero se ha atascado en el mecanismo de vibración.
Limpie el objeto extranjero.
La cinta V es muy estrecho.
Ajuste adecuadamente.
*El mecanismo de vibración se funciona en baja velocidad.
Afloje la cinta V.
Ajuste adecuadamente o cambie el tornillo.
El tornillo de fijar el motor está aflojado.
Aprieta la cinta V y el tornillo.
- 15 -
Page 17

1
4
5
6
7
2
3
8
9
- 16 -
Page 18

- 17 -
Page 19

- 18 -
Page 20

- 19 -
Page 21

1
4
5
6
7
.1
.2
.3
2
3
8
9
.4
.5
.6
.7
.8
.9
- 20 -
Page 22

- 21 -
Page 23

SINBO SWM 6308 POLUAUTOMATSKA PERILICA RUBLJA
HRVATSKI
UPUTSTVO ZA UPORABU
Za pravilno koriˇstenje perilice i vaˇsu sigurnost preporuˇcujemo vam da prije poˇcetka uporabe temeljno proˇcitate
ovo uputstvo za uporabu.
TEHNIˇCKE KARAKTERISTIKE
Napon: AC230V, 50Hz
Ulazna snaga: 200W
Izlazna snaga: 80W
Kapacitet: 3 kg
NAZIV DIJELOVA
1. Ulaz za vodu
2. Kabel
3. Odvodno crijevo
4. Timer za pranje
5. Izlaz za odvod (prelijevanje)
6. Filter
7. Mehanizam za vibracije (Pulzator)
8. Kabina
9. Baza
SPAJANJE DODATAKA
Spiralnu oprugu stavite na odvodno crijevo a nakon toga odvodno crijevo umetnite u utor na bazi perilice za rublje
i ˇcvrsto fiksirajte spiralu.
PRIPREMA PRIJE UPORABE
1. Perilicu stavite na ravnu i stabilnu povrˇsinu.
2. Crijevo za dovod vode prikljuˇcite na izvor vode i slavinu.
3. Odvodno crijevo umetnite u otvor za odvod.
4. Umetnite kabel u utiˇcnicu. (Utiˇcnica treba da bude ispravno uzemljena, provjerite kako ne bi doˇslo do strujnog
udara).
5. Pritisnite gumb za ukljuˇciti.
UPOZORENJA
1. Kabel za napajanje ovog stroja je specijalno spojen. Ne pokuˇsavajte sami otvoriti kabel i spojiti sa kutijom.
Zatraˇzite pomo´c od struˇcnog tehniˇcara i/ili servisnog centra.
2. U sluˇcaju da primjetite bilo kakav anormalni zvuk ili vibriranje, zaustavite stroj i provjerite odakle dolazi (
pogledaj poglavlje problemi i rjeˇsenja).
3. Podesite timer za pranje u rastu´cem redosljedu (na primjer izmed¯u 0 i 5) vode´ci raˇcuna da timer ne okre´cete
u smjeru suprotnom smjeru kazaljke na satu.
4. U spremnik ne usipajte vodu topliju od 550C jer moˇze do´ci do deformiranja plastiˇcnih dijelova kao ˇsto je
mehanizma vibriranja (Pulzator).
5. Prije pokretanja stroja uvjerite se da je spremnik prazan.
6. Rublje ne perite duˇze od predloˇzenog vremena pranja.
7. Ne stavljajte tekˇse i tople objekte na poklopac stroja.
8. U vrijeme pranja ne koristite jake kiseline, alkanla i druga organska jedinjenja.
9. Donji prozor perilice za rublje nipoˇsto ne treba zatvarati tijekom uporabe.
10. Tijekom pranja rublja ne ume´cite ruke u spremnik.
11. Prije poˇcetka pranja odvojite ˇsareno od bijelog rublja.
12. Ovaj ured¯aj ne treba da rabe osobe s fiziˇckim, psihiˇckim i mentalnim invaliditetom (ukljuˇcuju´ci i djecu) bez
nadzora osobe koja moˇze snositi odgovornost za sigurnu uporabu ured¯aja. Isto tako stroj ne treba da koriste
neiskusne i osobe koje nisu dovoljno upu´cene u naˇci njegove uporabe.
1
2
3
4
5
6
7
8
9
- 22 -
Page 24

13. Djecu uvijek drˇzite pod nadzorom i zabranite im da se igraju s ovim strojem.
UPOZORENJA
14. Za izbjegavanje svake vrste rizika ne koristite stroj s oˇste´cenim kabelom. Oˇste´ceni kabel treba da zamjeni
proizvod¯aˇc kabela, servisni centar ili struˇcni elektriˇcni tehniˇcar.
FUNKCIJA PRANJA
1. Odaberite opciju pranje ('wash selector') ili opciju pranje-ispiranje ('wash-rinse').
2. U spremnik umetnite rublje za pranje. Prema koliˇcini i vrsti rublja za pranje izaberite odgovaraju´cu razinu
vode.
3. U spremnik za pranje uspite odgovaraju´cu koliˇcinu deterdˇzenta.
4. Odaberite pogodno vrijeme pranja prema vsrti tkanine i zaprljanosti odje´ce (Vidi toˇcku 3). Gumb za podeˇsavanje
vremena okrenite i podesite i pritisnite na opciju obrtaji (“Cycle selector”).
5. Po zavrˇsetku pranja izvadite odje´cu iz spremnika za pranje i odaberite opciju ‘ISPUˇSTANJE’ ('DRAIN').
1. PRANJE:
2 .SAVJETI ZA PRANJE
1. Kada perete dosta zaprljanju odje´cu, pamuˇcnu ili lanenu odje´cu sa mrljama, prvo operite samo u vodi bez
deterdˇzenta. Nakon toga operite u vodi sa deterdˇzentom. Na taj naˇcin uˇstedje´cete i deterdˇzent i pove´cati uˇcinak
pranja.
2. Manˇzetne na koˇsuljama, ovratnike i zaprljane dijelove prije ubacivanja u stroj istrljajte s malo deterdˇzenta ili
isˇcetkajte.
3. Za formiranje manje pjene koristite kvalitetan teku´ci sapun ili deterdˇzent.
4. Koriˇstenje tople vode poboljˇsa´ce rezultat pranja.
3. IZBOR PROGRAMA PRANJA I PODEˇSAVANJE VREMENA
Vrsta Tkanine Svila, Vuna Pamuk,Lan Pamuk & lan
Razina Blago Blago Blago
Vrijeme pranja (Min) 2-5 5-10 10-15
Vrijeme ispiranja(Min) 2-3 3-5 5-8
PROBLEMI I SAVJETI ZA RJEˇSENJA
* Mehanizam vibracije zaustavio rad
Nema snage ili je kabel izvuˇcen iz utiˇcnice
ˇ
Cvrsto umetnite utikaˇc u utiˇcnicu
V-remen ne radi
V-remen postavite pravilno
Disk je opuˇsten
Uˇcvrstite vijak diska
Strana tvar se zaglavila u mehanizam vibracija.
Uklonite stranu tvar.
* Anormalan zvuk i vibracija
Izmed¯u mehanizma vibracije i spremnika za pranje postoji racjep ili pukotina
Zatvorite rascjep koji postoji med¯u njima.
Strana tvar se zaglavila u mehanizam vibracija.
Uklonite stranu tvar.
V-remen je previˇse stegnut
Podesite ga na odgovaraju´ci naˇcin.
* Mehanizam vibracije radi sporo
Opustite V-Remen
Podesite ga na odgovaraju´ci naˇcin ili zamjenite vijak
Vijak za fiksiranje motora je opuˇsten
Stegnite V-remen i vijak
- 23 -
Page 25

ADANA-SEYHAN-DORUK SO⁄UTMA -REfiATBEY MAH. AV. MEHMET ERO⁄LU CAD. NO:8-TEL.:0322 458 55 14 ADANA-KOZAN-DURAN
YETK‹L‹ SERV‹SLER L‹STES‹
SO⁄UTMA-CUMHUR‹YET MH. DEDEO⁄LU SK. S‹S. APT.- TEL.:0322 516 57 78 ADANA-SEYHAN-DÜZOVA ELEKTR‹K - KÜÇÜK SAAT
MEYDANI HILAL HAN IS MRK NO 32 - TEL.:0322 363 67 87 ADANA-SEYHAN-ÖZER ELEKTRON‹K - OBALAR CAD. SAL‹H ZEK‹ BUGAY ‹fi
HANI NO:11 - TEL.:0322 352 25 75 ADANA-SEYHAN-SER‹N ELEKTRON‹K - MAHFESI⁄MAZ MH. KENAN EVREN BULV. 21.SK. KAROL S‹T.
E BLOK NO:2/A - TEL.:0322 233 74 84 ADANA-CEYHAN-URANYUM ELEKTRON‹K - ‹NÖNÜ BULVARI NO: 172 - TEL.:0322 611 29 95
ADANA-CEYHAN-CEYHAN ELEKTRON‹K - BÜYÜKKIRIM MH. MEHMET fiER‹F Y‹⁄‹T CD. 4.SK. NO:3/B TEL. : 0322 613 45 96 ADIYAMANYILDIRIM SERV‹S - BAHÇEL‹EVLER MH. 177 SK. NO:2 - TEL.:0416 214 40 83 ADIYAMAN-KAHTA-ELK. EV ALET. TAM‹RC‹S‹-FAT‹H MH.
ZAFER CD. NO:20 - TEL.:0416 725 99 89 ADIYAMAN-ÜNAL ELEKTRON‹K-BAHÇEL‹EVLER MAH. ESK‹ KAHTA CAD. NO:11/A-TEL.:0416
216 75 56 ADIYAMAN-BEYAZ EfiYA TAM‹R‹-ÇATI MH. BADEM SK. NO:11 BESN‹ TEL.: 0416 318 32 00 AFYON-EM‹N ELEKTRON‹K-ENST‹TÜ
CAD. NO:19-TEL.:0272 215 43 32 AFYON-D‹NAR-GÖKÇEO⁄LU ELEKTR‹K-EMN‹YET MH. YEN‹YOL CD. 146 BLOK NO:4-TEL.: 0272 353 53
44 A⁄RI-PATNOS-ACELE PEfi‹N ELEKTRON‹K-BUHARA SOK. NO:12-TEL.:0472 616 46 08 A⁄RI-ÖZPAK ELEKTRONIK-ESKI VAN CAD
NO: 341 Ömer Hamam Yan›-TEL.:0472 216 53 14 AKSARAY-‹T‹NA ELEKTR‹K-TAfi PAZARI MH. fiEH‹T HAT‹P UÇKUN SK. ESK‹ TERM‹NAL
ÇIKIfiI NO:9/A-TEL.:0382 212 63 99 AMASYA-KUTUP TEKN‹K SO⁄UTMA-GÖKMEDRESE MAH. M.K.P. CAD. HAM‹TBATIR APT. NO:115/ATEL.:0358 212 61 66 AMASYA-SULUOVA-ÇALIfiKAN ELEKTRON‹K-ÖZEL ‹DARE ‹fi HANI NO:121-TEL.:0358 417 18 64 AMASYA-FLAfi
ELEKTRON‹K-YÜZEVLER MAH.TORUMTAY SOK. NO:25 DEM‹RD‹fi APT. ALTI-TEL.:0358 212 33 71 ANKARA-PURSAKLAR-DEM‹R TEKN‹K-
MERKEZ MH. MEL‹KfiAH CD.NO:11/A-TEL.:0312 328 1122 ANKARA-YEN‹MAHALLE-ERDO⁄DU SO⁄UTMA-ÇARfiI MH. DAMLADOL SK.
NO:74/C-TEL.:0312 315 60 25 ANKARA-KEÇ‹ÖREN-VEFA ELEKTRON‹K-PINARBAfiI MH. AfiIK PAfiA CD. NO: 67/C-TEL.:0312 380 42 30
ANKARA-MAMAK-YÜCEL ELEKTRON‹K-ASIM GÜNDÜZ CD. 20/D-TEL.:0312 365 14 14 ANKARA-ÇANKAYA-GÖKSEL ELEKTRON‹K-21.CD.
KARTAL KAYA APT. NO:29/A KIRKKONAKLAR-TEL.:0312 496 42 53 ANKARA-ÇANKAYA-ATC ‹LET‹fi‹M-SELAN‹K CAD. NO: 31/3-TEL.:
0312 419 82 70 ANKARA-GÖLBAfiI-BEKS SERV‹S H‹ZMETLER‹-SE⁄MENLER MAH. CEMAL GÜRSEL CAD. NO:51/A-TEL.:0312 484 21 19
ANKARA-BEYPAZARI-DO⁄AN TEKN‹K-KAYHAN GÜVEN CD. NO:22/C-TEL.:0312 762 89 19 ANKARA-S‹NCAN-Y‹⁄‹T TEKN‹K ONARIM-
M.Ç.M. 12. CADDE GÜLSUYU SK. NO:5/21-TEL.:0312 264 10 31ANKARA-KEÇ‹ÖREN-MERT TEKN‹K SERV‹S-ÖZYURT CD. NO:27/A AKTEPETEL.: 0312 380 00 22 ANKARA-ERYAMAN-ARSLANLAR ELEKTRON‹K-GÜZELKENT MAH.ÇARfiI ARYA 511 SK. NO:40-TEL.:0312 279 16
41 ANTALYA-KUMLUCA-AKGÜL TEKN‹K SERV‹S H‹ZMETLER‹-ADNAN MENDERES BULV.KAVAKLI KUYU CAD. YED‹TEPELER KAR.SULAR
APT.NO:9-TEL.:0242 887 53 80 ANTALYA-CANKALP ELEKTRON‹K-TUZCULAR MAH. ‹MARET SOK. FARAÇLAR PASJ.NO:11-TEL.:0242
242 31 35 ANTALYA-MANAVGAT-ÖNAL ‹LET‹fi‹M-AfiA⁄I PAZARCI MH. ‹BRAH‹M SÖZEN CD. fiELALE PSJ.NO: 18 1006 SK. TEL.:0242 742
35 36 ANTALYA-ALANYA-Ç‹NTAfi ELEKTRON‹K-SARAY MH. ATATÜRK CD. HACI HAMD‹ O⁄LU SK.NO: 20/A-TEL.:0242 513 88 85 ANTALYA-
MERKEZ-BÜYÜKGEB‹Z ELEKTROMEKAN‹K GÜVENL‹K-MUSTAFA GÖKSU-KIZILSARAY MH. DOLAPLIDERE CD. 80 SK. ÇAKMAK ‹fi HANI
NO: 8/5-6 TEL. :0242 243 33 90 ARDAHAN-YILDIRIM ELEKTR‹K-ATATÜRK CAD.NO:69-TEL.:0478 211 28 58 ARTV‹N-ARTV‹N ELEKTR‹K-
HALKEVI CADDESI NO: 12-TEL.: 0466 212 10 82 AYDIN-YILMAZ ELEKTRON‹K-KURTULUS MH. GARAJ CD. NO:5/B-TEL.:0256 212 00 35
AYDIN-SÖKE-ÖZLEM ELEKTRON‹K-YEN‹ CAM‹ MH. SEK‹LER CD. NO: 47-TEL.:0256 518 26 40 AYDIN-NAZ‹LL‹-BARIN ELEKTRON‹K-
ALTINTAfi MH. HÜRR‹YET CD. NO:161 B-TEL.: 0256 315 43 21 BALIKES‹R-BANDIRMA-ANIL SO⁄UTMA-GÜNAYDIN MAH. 2.OKUL
CAD.NO:16/A-TEL.:0266 713 56 78 BALIKES‹R-EDREM‹T-ÖZER TEKN‹K-CAM‹ VASAT MH. PARK CD. NO:12/A-TEL.:0266 373 12 44
BALIKES‹R-BURHAN‹YE-U⁄UR TEKN‹K SO⁄UTMA-MAHKEME MH. M‹THATPAfiA CD. NO: 68-TEL.:0266 412 86 89 BALIKES‹R-KILIÇ
ELEKTRON‹K-YEN‹ ÇARfiI BASIN SOK. NO: 4/B-TEL.:0266-241 87 54 BALIKES‹R-GÖNEN-GÜRSES ELEKTRON‹K-MALKOÇ MAH.MÜFTÜ
fiEVKET CAD. 76.SOK. NO:2/B-TEL.:0266 762 01 28 BALIKES‹R-BANDIRMA-D‹J‹TAL ELEKTRON‹K-17 EYLÜL MAH.HAVUZLU BAHÇE
SK.NO:8/A-TEL.:0266 715 16 46 BALIKES‹R-ERDEK-MERT TEKN‹K-YALI MH. HÜKÜMET CD. NO:55-TEL.:0266 845 61 10-97 BARTIN-
MARTI ELEKTRON‹K-HENDEKYANI CAD. ORTA MAH.101/B - BARTIN-TEL.:0378 228 34 22 BATMAN-fiAH‹NLER ELEKTRON‹K-CUMHUR‹YET
CD. NO:20 2000 ‹fi MERKEZ‹ KARfiISI-TEL.:0488 213 17 02 B‹LEC‹K-EDEBAL‹ TEKN‹K-‹ST‹KLAL MH V.REF‹K A ÖZTÜRK CD NO: 1/ATEL.:0228 212 46 80 B‹NGÖL-KARLIOVA-MEHMET KARTAL - KARTAL ELEKTRON‹K-CUMHUR‹YET CD. NO:8-TEL.:0426 511 26 39 B‹NGÖL-
S‹MGE ELEKTRON‹K- YEN‹fiEH‹R MH. YEfi‹M SK. BO⁄ATEK‹N APT ALTI NO:14/C-TEL.:0426 213 77 56 B‹TL‹S-AHLAT-U⁄UR SO⁄UTMA-
TOK‹ KONUTLARI YUKARI ÇARfiI-TEL.:0434 412 41 72 B‹TL‹S-D‹ZAYN ELEKTR‹K-NUR CAD. EREM CENTER ‹fi MERKEZ‹KAT:2 NO:5TEL.:0434 226 74 43 BOLU-BEST ELEKTRON‹K-TABAKLAR MAH.CUMHUR‹YET CAD.NO:28/B-TEL.:0374 218 12 25 BURSA-OSMANGAZ‹-
AKYÜZ ELEKTRON‹K-ÇIRPAN MH. UYSAL SK. NO:13/B-TEL.:0224 254 60 76 BURSA-GEML‹K-AC‹L TV TAM‹R SERV‹S‹-DEM‹R SUBAfiI
MH. FIRIN SK. NO:7-TEL.:0224 514 71 20 BURSA-MUDANYA-ER T‹CARET-ÖMERBEY MH. CAM‹ SK. SU APT. NO:30-TEL.:0224 544 86 16
BURSA-MUSTAFAKEMALPAfi-AGUfi ELEKTR‹K-HAMZABEY MAHALLESI PAZARYERI SOKAK NO: 2/A-TEL.:0224 613 19 99 BURSA‹NEGÖL-S.B.S ELEKTRON‹K-OSMAN‹YE MH.DERE SK. N:25/D-TEL.:0224 715 48 94 BURSA-KARACABEY-GÜRKAN T‹CARET-RUNGUÇPAfiA
MH. 14. SK. NO:11-TEL.: 0224 676 66 80 BURSA-N‹LÜFER-ÖZME TEKN‹K-KARAMAN MH. BAYINDIR SK. NO:4/B CARREFOUR KARfiISITEL.: 0224 249 12 48 ÇANAKKALE-ÇAN-TÜRKER ELEKTRON‹K-CUMHUR‹YET MAH. ÇANAKKALE CAD.NO:41-TEL.:0286 416 13 89
ÇANAKKALE-GEL‹BOLU-GÜVEN ELEKTRON‹K-YAZICIZADE MAH. M‹RALAY fiEF‹K AKER CAD. 2. SOK NO:4 / A TEL.:0286 566 90 70
ÇANAKKALE-MERKEZ-SAM ELEKTRON‹K-‹SMETPAfiA MH. ARSLANCA SK.-TEL.:0286 212 35 59 ÇANKIRI-B‹LG‹ÇLER ELEKTRON‹K-
BUGDAY PAZARI MH. A.TALAT ONAY BULVARI SAIM A⁄A S‹T. B/BLOK TEL.:0376 213 48 19 ÇORUM-H‹T‹T SO⁄UTMA-YEN‹YOL MH. MÜFTÜ
AHMET GÖKEfiME SK. NO: 5 / I-TEL.:0364 225 70 58 ÇORUM-U⁄UR ELEKTRON‹K-ÜÇTUTLAR MAH. FAT‹H CAD. 5.SOK.EYÜP SULTAN
APT. NO:1/C-TEL.:0364 227 44 91 ÇORUM-ÖMÜR ELEKTRON‹K-CENG‹ZTOPEL CAD. NO:2/F-TEL.:0364 224 68 09 ÇORUM-ALACA-EROL
ELEKTRON‹K-AYHAN MH. ANKARA CD. NO:18-TEL.:0364 411 42 03 ÇORUM-GÜNDÜZ BEYAZ EfiYA SERV‹S‹-SUNGURLU-SUNGURO⁄LU
MH. ÇANKIRI CD. NO: 46-TEL.:0364 311 31 13 DEN‹ZL‹-KARDELEN SO⁄UTMA-EMEK CD. NO: 30-TEL.:0258 241 67 31 DEN‹ZL‹-ÖZ
ELEKTRON‹K-ÇAYBAfiI CD. ÜNAL APT. NO: 28-TEL.:0258 261 29 25 DEN‹ZL‹-MERKEZ-ÇA⁄LAYAN SO⁄UTMA-TOPRAKLIK MH. TURAN
GÜNEfi CD.NO:34 TEL. : 0258 242 85 86 D‹YARBAKIR-B‹SM‹L-fiIK ELEKTR‹K-KURTULUfi MH. AHMET AR‹F BULVARI NO: 19/F-TEL.:0412
415 05 94 D‹YARBAKIR-‹LKADIM T‹CARET-BATIKENT S‹T. A/5 BLOK ALTI NO:1 SA⁄LIK OCA⁄I YANIBA⁄LAR-TEL.:0412 235 70 89
D‹YARBAKIR-AZ‹Z ELEKTRON‹K-HATBOYU CD. 469. SK. GÜNEfi 2 APT. NO:3/B-TEL.:0412 223 33 46 D‹YARBAKIR-S‹LVAN-DIGITAL
ELEKTRONIC-KALE MH. SAM‹ SEÇK‹N CD. NO:9/B-TEL.:0412 711 44 14 D‹YARBAKIR-JAPON RECEP-YENI MAH 19 MAYIS CAD NO74-
- 24 -
Page 26

TEL.:0412 511 24 10 D‹YARBAKIR-BA⁄LAR-AZ‹Z ELEKTRON‹K-HATBOYU CD. 469 SK. NO:3/B-TEL.: 0412 236 81 10 DÜZCE-ENSAR TEK
YETK‹L‹ SERV‹SLER L‹STES‹
SU S‹STEMLER‹-AZM‹N‹LL‹ MH. AYDINPINAR CD. SERHAT SK.NO:1/B-TEL.:0380 514 34 12 DÜZCE-BULUfi ELEKTRON‹K-CED‹D‹YE
MAH. M‹MAR S‹NAN CAD.-TEL.: 0380 514 66 81 ED‹RNE-UZUNKÖPRÜ-GÜVEN TEKN‹K-GAZ‹ CAD. YUSUF SOK. YURDACAN PASAJI NO:7TEL.:0284 513 89 66 ED‹RNE-YILDIZ SO⁄UTMA-1.MURAT MH. GÜNGÖR MAZLUM CAD. SERHAT S‹TES‹ B/BLOK 35/A-TEL.:0284 235 37
63 ED‹RNE-KEfiAN-MUTLU TEKN‹K-YUKARI ZAFER‹YE MH. ‹LYASBEY CD. NO:32/B-TEL.:0284 715 22 71ELAZI⁄-ÖZDEV TEKN‹K -
‹ZZETPAfiA MAH.KAZIM BAYER CAD.NO:24/A-TEL.:0424 238 51 67 ELAZI⁄-YILMAZ BOB‹NAJ-YEN‹ MAH. KEMAL fiEDELE CAD. NO: 12/ETEL.:0424 212 08 96 ELAZI⁄-GÜNEfi ELEKTRON‹K-KÜLTÜR MAH. VAL‹ FAHR‹BEY CAD.NO:113/D-TEL.:0424 233 10 18 ERZ‹NCAN-
AYDINLAR ELEKTR‹K-‹NÖNÜ MAH. MERKEZ ÇARfiISI 15.SK NO:5 -TEL.:0446 223 59 76 ERZ‹NCAN-REFAH‹YE-B‹LG‹N ELEKTRON‹K-
ERZ‹NCAN CAD. BELED‹YE ‹fi HANI-TEL.:0446 611 26 10 ERZURUM-OLTU-GÜVEN ELEKTRON‹K-Z‹YABEY CAD. BELED‹YE PSJ. NO:6TEL.:0442 816 42 23 ERZURUM-AT‹LAY ELEKTRON‹K-KONGRE CAD. HASIRHAN PASJ. NO:87-TEL.:0442 213 30 60 ERZURUM-‹SP‹R-
YILMAZ ELEKTRON‹K-Z‹YAPAfiA CD. AfiA⁄I MH. NO:186-TEL.:0442 451 40 95 ESK‹fiEH‹R-ARZU ELEKTRON‹K-DEL‹KL‹TAfi MH. GÜRMAN
SOK. NO:37/B-TEL.:0222 234 87 15 ESK‹fiEH‹R-S‹VR‹H‹SAR-DERMAN ELEKTRON‹K-CAM‹KEB‹R MH. YUNUSEMRE CD. NO:7-TEL.:0222
711 22 60 GAZ‹ANTEP-ELEKTR‹KL‹ EV ALETLER‹ TAM‹RC‹S‹-MÜTERC‹M ASIM CAD. KÖRÜKÇÜ SOK. NO:8/A-TEL.:0342 231 00 73
GAZ‹ANTEP-ISLAH‹YE-YILMAZ SO⁄UTMA-AYDINLIK MH. GÖZ CAD.ÜNLÜ S‹TES‹ NO: 2-TEL.:0342 862 12 20 GAZ‹ANTEP-‹K‹ZO⁄LU
ELEKTRON‹K-BEY MAH. EBLEHAN ÇARfiISI NO:12/A-TEL.:0342 230 71 00 GAZ‹ANTEP-N‹Z‹P-ÇAPAN TEKN‹K-CUMHUR‹YET MAH.
MERMER SOK. NO:10-TEL.:0342 517 51 66 G‹RESUN-BULANCAK-YÜKSEL SO⁄UTMA-‹HSAN‹YE MH. CEMAL GÜRSEL. CD. NO: 257TEL.:0454 318 17 28 G‹RESUN-U⁄UR ELEKTRON‹K-HACI HÜSEY‹N MH. GAZ‹ CD. NO: 185 / 1-TEL.:0454 212 00 90 GÜMÜfiHANE-
GÜMÜfiHANE SERV‹S‹-HASANBEY MH. HASANBEY CD.NO:17/A-TEL.:0456 213 51 54 HATAY-SAMANDA⁄-GÜNEfi ELEKTR‹K-ATATÜRK
MAH. ‹SKELE CAD. HAYÜK PSJ NO:38-TEL.:0326 512 71 04 HATAY-KIRIKHAN-SEREN MAK‹NA-BARBAROS MAH. BOZTEPE CAD. NO:23/BTEL.:0326 344 32 49 HATAY-ANTAKYA-SER‹ SO⁄UTMA-KURTULUfi CD. NO:51/C-TEL.:0326 213 28 32 HATAY-ERZ‹N-YEL‹Z BOB‹NAJ-
MUSTAFAL‹ MH. ‹STASYON CD. NO: 143-TEL.:0326 68148 32 HATAY-REYHANLI-BAfi TEKN‹K SO⁄UTMA-ATATÜRK CD. DÖ⁄ÜCÜLER
‹fiHANI NO:1 -TEL.:0326 413 44 04 HATAY-REYHANLI-ÖZ ‹fi SO⁄UTMA-CUMHUR‹YET MH. TAYFUR SÖKMEN CD. NO:26/B TEL. : 0326
413 21 22 HATAY-DÖRTYOL-FAT‹H ELEKTRON‹K-SANAY‹ MH. EVREN CD. YEN‹ S‹NEMA KARfiISI NO:15 - TEL.:0326 712 86 46 HATAY-
‹SKENDERUN-GÜL‹STAN ELEKTRON‹K-KURTULUfi MH. fi.O⁄UZ YENER CD. NO:64/C-TEL.:0326 613 50 64 I⁄DIR-PARLAK TEKN‹K-
TOPÇULAR CD. NO:34-TEL.:0476 227 47 51 ISPARTA-ÖZSOYLAR SO⁄UTMA-YAYLA MAH. ‹SMETPAfiA CAD. NO: 60 fi‹FA TIP MERKEZ‹
ALTI-TEL.:0246 223 13 61 ‹ÇEL-ERDEML‹-ESEN ELEKTR‹K-MERKEZ MAH. ATATÜRK CAD. NO:11-TEL.:0324 515 68 87 ‹ÇEL-MEZ‹TL‹-
AKN‹SAN SO⁄UTMA&ELEKTRON‹K-GMK.BUL. FAT‹H MH. 18 SK.ÖZÜDO⁄RU S‹T. 3/A-TEL.:0324 359 64 34 ‹ÇEL-PINAR ELEKTRON‹K-
MAHMUD‹YE MH. 108. CD. NO:32/B-TEL.:0324 336 82 98 ‹ÇEL-TARSUS-MERT ELEKTRON‹K-GAZ‹LER MAH. ATATÜRK BULV. NO:119TEL.:0324 626 83 98 ‹ÇEL-TARSUS-TEKN‹K ‹fi ELEKTR‹K T‹C.-ATATÜRK CAD. U⁄UR ‹fi HANI NO:1-TEL.:0324 6242797 ‹ÇEL-ANAMUR-
ÇEL‹K ELEKTRON‹K-BAHÇE MH. ORMAN ‹fiLETMES‹ ALTI NO:61/B-TEL.:0324 814 85 90 ‹ÇEL-HAKAN ELEKTRON‹K-BAHÇEL‹EVLER
MH. 1809 SK. D‹NL‹ APT.ALTI NO:3/B-TEL.:0324 328 03 25 ‹ÇEL-S‹L‹FKE-SADIK ELEKTR‹K-GÖKSU MAH. O⁄UZKAAN CAD. DERYALAR
APT.NO:22/B-TEL.:0324 714 05 54 ‹STANBUL-ATAfiEH‹R-VURAL ELEKTRON‹K-KARAMAN Ç‹FTL‹K YOLU NO:12(ESK‹ PTT HAST. KARfiISI)
‹ÇERENKÖY TEL. : 0216 575 63 35 ‹STANBUL-fi‹fiL‹-YILKA T‹CARET-SEYMEN SOK. NO:27/A KURTULUfi-TEL.:0212-233 80 53 ‹STANBUL-
KÜÇÜKÇEKMECE-ÇA⁄DAfi SERV‹S-CENNET MAH.Y.KEMAL BEYATLI CAD.NO:14/D-TEL.:0212 579 35 30 ‹STANBUL-ZEYT‹NBURNUKARDEfiLER SO⁄UTMA-SEY‹T N‹ZAM MAH. fiEH‹T ERKAN ALYANAK SOK.NO:11-TEL.:0212 546 57 36 ‹STANBUL-ESENLER-YILDIRIM
ELEKTRON‹K-KAZIM KARABEK‹R MAH. 2.SOK. NO:10 -TEL.:0212 611 10 76 ‹STANBUL-EM‹NÖNÜ-IRMAK DIfi T‹CARET-TAHTAKALE CD.
TAHTAKALE T‹CARET MERKEZ‹ NO:34 2.BODRUM NO:204 -TEL.:0212 520 55 80 ‹STANBUL-ÜMRAN‹YE-GÜL-SER TEKN‹K SERV‹S-
NAMIK KEMAL MH. SÜTCÜ ‹MAM CD. SÜTÇÜ ÇIKMAZI NO:6/1- TEL.:0216 335 60 19 ‹STANBUL-ÜMRAN‹YE-GÖZDE ELEKTRON‹K-
ATATÜRK MH. ALEMDA⁄ CD. YILDIZ SK. NO:12/A-TEL.: 0216 329 57 03 ‹STANBUL-MALTEPE-GÜR TEKN‹K SERV‹S-BA⁄DAT CD. BOLAYIR
SK. NO:3/A-TEL.:0216 352 25 20 ‹STANBUL-BEYL‹KDÜZÜ-SC ELEKTRON‹K-GÜZELYURT MH. M‹MAR S‹NAN CD. NO:71-TEL.:0212 852
34 45 ‹STANBUL-GAZ‹OSMANPAfiA-DEDEO⁄LU ELEKTR‹K-2124 SOK NO:4 SULTANÇ‹FTL‹⁄‹-TEL.:0212 594 50 91 ‹STANBUL-TUZLA-
AKIN ISI TEKN‹K SERV‹S-YAYLA MH. F.ÇAKMAK CD. ‹SMA‹L A⁄A SK. NO:11 TEL.:0216 395 66 62 ‹STANBUL-SARIYER-H‹SAR SERV‹S
1-NUR‹PAfiA CD NO\48A BA⁄LAR MEVK‹ YEN‹KÖY-TEL.:0212 223 27 96 ‹STANBUL-SARIYER-H‹LAL SO⁄UTMA-KAPTAN SK. NO:2-
TEL.:0212 218 45 61 ‹STANBUL-BÜYÜKÇEKMECE-AYGÜL DEKORASYON-19 MAYIS MH. OSMAN GAZ‹ CD. NO: 7-TEL.:0212 881 33 18
‹STANBUL-GAZ‹OSMANPAfiA-ÇAM TEKN‹K-ISLAMBEY MAH NECIP FAZIL CAD 257 SK NO:25-TEL.:0212 597 86 62 ‹STANBULKÜÇÜKÇEKMECE-YILDIZ ELEKTR‹K SO⁄UTMA-HALKALI CD. ANADOLU PSJ. NO: 185-TEL.:0212 580 76 02 ‹STANBUL-KÜÇÜKÇEKMECEBATI TEKN‹K-GÜLTEPE MH. DEL‹ORMAN CD. NO:75 SEFAKÖY-TEL.:0212 599 36 79 ‹STANBUL-BAYRAMPAfiA-ÖZKAN ELEKTRON‹K-
KARTALTEPE MH. B‹LGEHAN CD. NO:36-TEL.:0212 564 33 46 ‹STANBUL-GAZ‹OSMANPAfiA-TOROS ELEKTRON‹K-MERKEZ MH. BA⁄LAR
CD. NO:77-TEL.:0212 563 50 38 ‹STANBUL-fi‹fiL‹-CHIP ELEKTRON‹K-BOZKURT CAD.NO: 235-TEL.:0212 231 65 43 ‹STANBUL-GÜNGÖREN-
YÜKSEL ELEKTRON‹K-M.FEVZ‹ ÇAKMAK MAH.‹NÖNÜ CAD.NO: 138-TEL.:0212-504 61 42 ‹STANBUL-BEYO⁄LU-TOLGA ELEKTRON‹K-
CAM‹ KEB‹R MH. DEREBOYU CAD. NO:28 KASIMPAfiA-TEL.:0212 235 65 34 ‹STANBUL-AVCILAR-NUR ELEKTRON‹K-DEN‹ZKÖfiKLER
MAH.DERYA SOK. NO:36/1-TEL.:0212 694 12 82 ‹STANBUL-BA⁄CILAR-ÇA⁄LAYAN ELEKTRON‹K-‹STOÇ 25.ADA NO.:109-TEL.:0212 659
92 49 ‹STANBUL-KADIKÖY-UMUT ELEKTRON‹K-HAL‹TA⁄A CAD. CELAL MUHTAR SOK. NO:20/2-TEL.:0216 346 39 78 ‹STANBUL-
ZEYT‹NBURNU-UZMAN ELEKTRON‹K-YEN‹DO⁄AN MH. 42.SK NO:50-TEL.:0212 582 36 37 ‹STANBUL-KADIKÖY-MICROSYSTEM
ELEKTRON‹K-1. ORTA SK. NO:18/1 GÖZTEPE-TEL.:0216 411 91 50 ‹STANBUL-MALTEPE-BEYDA⁄I TEKN‹K ELEKTRON‹K-BA⁄LARBAfiI
MAH. ‹NÖNÜ CAD.-TEL.:0216 457 63 34 ‹STANBUL-BA⁄CILAR-KUMRU ELEKTRON‹K-KEMALPAfiA MAH. NAMIK KEMAL CAD. NO: 126TEL.:0212 429 34 19 ‹STANBUL-BAKIRKÖY-‹K‹ZLER ELEKTRON‹K-SAKIZA⁄A MH. BERR‹NC‹N‹ SK. NO:16/A-TEL.:0212 543 85 83
‹STANBUL-ÜSKÜDAR-KÖYLÜBAY ELEKTRON‹K-ALBAY HÜSAMETT‹N ERTÜRK SK. NO:7/A ÇENGELKÖY TEL.:0216 318 35 13 ‹STANBULÜSKÜDAR-AKÇEL‹K T‹CARET-M‹MAR S‹NAN MH. ‹SMA‹L DÜMBÜLLÜ SK. NO:9/A TEL.:0216 342 99 22 ‹STANBUL-KADIKÖY-TELV‹D
ELEKTRON‹K-MAZHAR OSMAN SOK FERAH APT NO:24/A FENERYOLU-TEL.:0216 414 66 00 ‹STANBUL-‹K‹TELL‹-BARIfi TEKN‹K-ATATÜRK
MH. ‹K‹TELL‹ CD. DURAK SK. NO:18 TEL. : 0212 471 04 76 ‹STANBUL-K.ÇEKMECE-ENG‹N ELEKTRON‹K-TEVF‹K BEY MH. MERKEZ CD.
- 25 -
Page 27

ORK‹DE SOK. NO: 3 /1-TEL.:0212 598 44 76 ‹STANBUL-BAHÇEL‹EVLER-SEV-CAN DAYANIKLI TÜK.MALLARI.-YILDIRIM BEYAZIT CD
YETK‹L‹ SERV‹SLER L‹STES‹
.ZAFER MH. TÜRKBEY‹ SK. NO:6/2-3-TEL.:0212 552 45 87 ‹STANBUL-fi‹fiL‹-IfiIK ELEKTRON‹K-AYAZA⁄A MASLAK ATATÜRK CD NO: 25TEL.:0212 289 76 94 ‹STANBUL-PEND‹K-GÖKHAK ELEKTRON‹K-BATI MH. SABR‹ TAfiKIN CD. SEB‹L SK. NO:4/1 TEL. : 0216 354 07 00
‹STANBUL-G.O.PAfiA-ATILIM ELEKTRON‹K-CEBEC‹ MAH. 2472 SOK: NO:14/A SULTANÇ‹FTL‹⁄‹- TEL.:0212 475 85 62 ‹STANBULGÜNGÖREN-NUR ELEKTR‹K ELEKTRON‹K-MERKEZ MH. ASALET CD. NO: 22/D-TEL.:0212 641 42 09 ‹STANBUL-BEYKOZ-ULUDO⁄AN
ELEKTRON‹K-KAYABAfiI ÇIKMAZI NO: 4/B PAfiABAHÇE-TEL.:0216 322 85 85 ‹STANBUL-KARTAL-ÖZO⁄LU ELEKTRON‹K-KIZILAY BULVARI
CD. BAHADIR SK. 4/A-TEL.:0216 387 18 87 ‹STANBUL-FAT‹H-SOYLU TEKN‹K-HIRKA‹ fiER‹F CAM‹ ARKASI ESK‹ AL‹PAfiA CD. NO: 26TEL.:0212 631 85 88 ‹STANBUL-FAT‹H-IRMAK DIfi T‹CARET-HACI KADIN CD. NO:15 K.M. PAfiA TEL.: 0212 589 75 27 ‹STANBUL-S‹L‹VR‹-
PDS ELEKTRON‹K-P.M. PAfiA MH. HACI PERVANE CD. NO:35/B -TEL.:0212 728 76 75 ‹STANBUL-GÜLTEPE-B‹L‹M ELEKTRON‹K-
HARMANTEPE MH. ABD‹ ‹PEKÇ‹ CD. NO:14/D -TEL.:0212 278 72 27 ‹ZM‹R-KARfiIYAKA-AYSER ELEKTR‹KL‹ EV ALETLER‹-ZÜBEYDE
HANIM CADDES‹ NO:87/A-TEL.:0232 366 19 19 ‹ZM‹R-BERGAMA-GEZG‹N SERV‹S-K.KEMALBEY CAD. NO:82-84-TEL.:0232 633 35 15
‹ZM‹R-KONAK-TUNCA ELEKTR‹K-76 SK 10/A GÜZELYALI-TEL.:0232 246 40 62 ‹ZM‹R-ÇAMD‹B‹-KUDRET ELEKTRON‹K-BURAK RE‹S
CAD. NO: 239/A-TEL.:0232 435 81 36 ‹ZM‹R-MENEMEN-AY ELEKTRON‹K-DR. SELAHATT‹N ÖZKURT CD. NO:22/B-TEL.:0232 832 02 31
‹ZM‹R-KONAK-S‹STEM ELEKTRON‹K-2416 SK. NO:10 GÜLTEPE-TEL.:0232 469 72 69 ‹ZM‹R-KARfiIYAKA-LEVENT ELEKTR‹K
LABORATUVARI-1710 SK. NO:70/B ESHOT SOKA⁄I-TEL.:0232 381 14 42 ‹ZM‹R-KARfiIYAKA-ASMERKEZ T‹CARET-ESK‹ TRAMVAY CD.
1675. SK. NO:78/1B ALAYBEY-TEL.:0232 364 33 73 ‹ZM‹R-BORNOVA-ACEM ELEKTRON‹K-552/2 SK. NO: 4/A-TEL.:0232 339 73 31 ‹ZM‹RKONAK-KILIÇ ELEKTRON‹K-BARBAROS HAYRETT‹N PAfiA CD. NO:62/1 LEVENT-TEL.:0232 433 15 19 ‹ZM‹R-URLA-‹LTER ELEKTRON‹K‹ZM‹R 75. YILl CADDES‹NO:81/C-D-TEL.:0232 754 44 44 ‹ZM‹R-BUCA-ÇA⁄LAR ELEKTRON‹K-670/1 SK. NO:57/B-TEL.:0232 276 27 77
‹ZM‹R-YEfi‹LYURT-UMUT ELEKTR‹K & ELEKTRON‹K-YILDIZ CAD. NO: 152/A-TEL.:0232 244 65 77 ‹ZM‹R-ÖDEM‹fi-MURAT ELEKTRON‹K-
UMURBEY MH. SANAY‹ S‹T. 9.SK NO: 10 -TEL.:0232 544 41 98 KAHRAMANMARAfi-AKSUNGUR ELEKTR‹K-UZUNOLUK CAD. 20.SOKAK
NO:20/A-TEL.:0344 212 77 50 KAHRAMANMARAfi-KALE ELEKTRON‹K-FEVZ‹PAfiA MH. UZUNLUK CD.-TEL.: 0344 225 07 94 KARABÜK-
SAFRANBOLU-MEHMET SA⁄LAM - GÖKAY TEKN‹K-‹NÖNÜ MH. ESK‹ BA⁄LAR SK. NO:13-TEL.:0370 712 24 97 KARABÜK-ACAR
ELEKTRON‹K-VAKIF ‹fi HANI KAT:2 EMN‹YET MÜDÜRLÜ⁄Ü YANI-TEL.:0370 424 32 00 KARAMAN-ÖZ AS SO⁄UTMA-ABBAS MH. MUT
CD. NO: 82/A TEL. : 0338 214 56 74 KARS-AYDIN ELEKTRON‹K-KAZIM KARABEK‹R ‹fiHANI KAT:2 NO: 125 -TEL.:0474 212 87 82
KASTAMONU-TAfiKÖPRÜ-DE⁄‹fi‹M ELEKTR‹K-TABAKHANE MH. ATATÜRK CD. NO:55/A-TEL.:0366 417 42 04 KASTAMONU-TOSYADO⁄Ufi ELEKTRON‹K-VAKIF SK. 15/A-TEL.:0366 313 42 59 KASTAMONU-HARUN TELEKOMÜN‹KASYON-‹NÖNÜ MAHALLES‹ AFfi‹NBEY
SOKAK NO:8/B-TEL.:0366 212 33 66 KAYSER‹-MEL‹KGAZ‹-AKTÜRK BEYAZ EfiYA SERV‹S‹-AYDINLIKEVLER MH.FIRAT CD.KR‹STAL APT.AB NO.17 TEL.:0352 332 08 25 KAYSER‹-MEL‹KGAZ‹-AKIfi ELEKTRON‹K-ÇORAKÇILAR MH. CENG‹Z TOPEL CD.NO:20/B-TEL.:0352 320
14 00 KAYSER‹-DEVEL‹-U⁄UR SO⁄UTMA-HARMAN MAHALLES‹ BELED‹YE PASAJ‹ ÜZER‹ NO: 15-TEL.:0352 621 56 31 KAYSER‹-SÖNMEZ
ELEKTRON‹K-CAM‹ KEB‹R MAH. BASMANE SOK. NO:16/A-TEL.:0352 231 69 62 KAYSER‹-ZERO COMPUTER-SAHAB‹YE MH. METE CD.
fiAH‹R SATO⁄LU SK. SATO⁄LU AP D: 1-TEL.:0352 232 15 34 KIRIKKALE-MERKEZ-BULUT ELEKTR‹K B‹LG‹SAYAR-B.HAYRETT‹N CAD.
NO:9/C-TEL.:0318 212 31 73 KIRKLAREL‹-MERKEZ-BUSE ELEKTRON‹K-KARACA ‹BRAH‹M MH. KAPAN CAM‹ SK. ACUN PSJ. NO:23TEL.:0288 212 73 57 KIRKLAREL‹-LÜLEBURGAZ-BUSE ELEKTRON‹K-YILMAZ MH. ESK‹ KIRKLAREL‹ CD. EFSANE DÜ⁄ÜN SALONU YANI
NO:36/A TEL.: 0288 412 88 92 KIRfiEH‹R-GARANT‹ ELEKTRON‹K-ANKARA CD. C‹NGÖZ BEBE ARKASI YA⁄MUR ‹fiHANI NO:9/B-TEL.:0386
214 02 18 K‹L‹S-FLAfi ELEKTRON‹K-fiEH‹TLER PARKI KARfiISI NO:63/1-TEL.: 0348 814 55 28 KOCAEL‹-DORUK TEKN‹K H‹Z. -KARABAfi
MH. CENG‹Z TOPEL CD. MÜNECC‹M AR‹F SK. NO:6/A -TEL.:0262 331 11 66 KOCAEL‹-KARAMÜRSEL-KILINÇ ELEKTRON‹K-‹NÖNÜ CD.
M.YASEF SK. NO:10/M-TEL.:0262 452 55 55 KOCAEL‹-D‹LOVASI-SAMET ELEKTRON‹K-BA⁄DAT CAD NO: 42/2-TEL.:0262 754 79 86
KOCAEL‹-DARICA-KARDEfiLER ELEKTRON‹K-KAZIM KARABEK‹R MH. MEVALANA CAD. NO: 1/A-TEL.:0262 656 27 88 KOCAEL‹-GEBZEYILDIRIM ELEKTRON‹K-H. HAL‹L MH. 1209 SK. NO:13/C-TEL.:0262 641 35 88KONYA-BEYfiEH‹R-SELV‹ SO⁄UTMA-HACI ARMA⁄AN MH.
ANTALYA CD. NO:108/F-TEL.:0332 512 40 10 KONYA-SELÇUKLU-SAF‹R SO⁄UTMA-FER‹T PAfiA MH. GÜNEY SK. NO:3/F KULE S‹TE
C‹VARI-TEL.:0332 236 36 75 KONYA-ERKAM SO⁄UTMA-KARAKURT MH. FURKAN DEDE CD.ASBAfiKAN SK. NO:13/B-TEL.:0332 350 00
32 KONYA-ÖZCAN SO⁄UTMA VE ISITMA LTD fiT‹-N‹fiANTAfiIMH. HULUS‹ BAYBAL CD. NO:36/A-TEL.:0332 236 33 37 KONYA-SELÇUKLU-
KONSEY SOGUTMA VE ISITMA-KÜÇÜK ‹HSAN‹YE MH. fiA‹R GUBAR‹ SK.B‹NSA S‹TES‹ ALTI NO : 15 TEL.:0332 321 21 22 KONYA-AKfiEH‹REROL ELEKTRON‹K-MEYDAN MAH. ÇOCUK PARKI KOD NO:38-TEL.:0332 812 61 12 KONYA-MERAM-GÜRKAN TEKN‹K-‹HT‹YARETT‹N
MH.SIRÇALI MEDRESE CAD.‹BN‹B‹B‹ SK. NO:1/B-TEL.:0332-351 02 03 KONYA-SEYD‹fiEH‹R-TUNCER ELEKTRON‹K-KIBRIS CD. NO:26TEL.:0332 582 93 92 KONYA-DURMAZLAR ELEKTR‹K-ANKARA-KONYA CAD. NO:67-TEL.:0332 673 28 48 KONYA-ERE⁄L‹-ERDEM‹R
TEKN‹K-ÜÇ GÖZ MH. KIBRIS CD.EL‹T APT. NO:3 TEL.: 0332 713 02 53 KÜTAHYA-EL‹FO⁄LU ELEKTR‹K-FAT‹H SULTAN MEHMET BULVARI
DUAGÜR CAM‹‹ ALTI 43/B-TEL.:0274 226 32 80 MALATYA-YUVAM ELEKTRON‹K-‹ST‹KLAL MH. FUZUL‹ CD.‹MAMO⁄LU SK. NO:1-TEL.:0422
322 52 88 MALATYA-HAL‹M ELEKTRON‹K-SARAY MH. DEVECEL SK. NO:3-TEL.:0422 321 86 08MAN‹SA-SOMA-GÜRMAK TEKN‹K-
KURTULUfi MH. ‹DMAN SK. NO:47/A-TEL.:0236 613 66 56 MAN‹SA-SAL‹HL‹-AYKAR SO⁄UTMA- BEfiEYLÜL MH. BELED‹YE CD. NO:TEL.:2430236 714 88 68 MAN‹SA-AY ELEKTRON‹K MAN‹SA fiB.-YARHASANLAR MAH. ESK‹ HASA⁄A 2306 SOK.NO: 18/A-TEL.:0236 237 30 62-63
MAN‹SA-BURCU ELEKTRON‹K-TUNCA MAH. KURTULUfi CAD. NO:54-TEL.:0236-234 57 42 MAN‹SA-TURGUTLU-EM‹N ELEKTRON‹K-
ALTAY MH. SEV‹NÇ SK. NO:25-TEL.:0236 313 28 35 MAN‹SA-SARUHANLI-fiEN SO⁄UTMA-ATATÜRK MH. 7 EYLÜL CD. NO: 21/B-TEL.:0236
357 12 00 MAN‹SA-KULA-ERDAL KARAHAN-TERMO D‹NAM‹K-CAM‹‹ CED‹T MH. 62 SK. NO:67-TEL.:0236 816 70 99 MARD‹N-M‹DYAT-
SA⁄LAM ELEKTRON‹K-ESNAF SANATKARLAR KRED‹ KOOP. KARfiISI 2.CD.NO:56-TEL.:0482 462 33 90 MARD‹N-KIZILTEPE-‹BRAH‹MO⁄LU
ISITMA-fiANLIURFA CAD. ECE PASAJI NO:7-TEL.:0482 312 55 99 MARD‹N-DER‹K-UZAY ELEKTRON‹K-BELED‹YE MEYDANI NO:36-
TEL.:0482 251 34 35 MARD‹N-YEN‹fiEH‹R-MERKEZ TEKN‹K-KARAYOLLARI ARKASI BARIfi CAD GÜNAYDIN APT ALTI-TEL.:0482 212 83
06 MARD‹N-NUSAYB‹N-BÜDÜN ELEKTRON‹K-ZEYNEL AB‹D‹N MH. Ç‹LEK SK NO: 1/B-TEL.:0482 415 61 98 MU⁄LA-FETH‹YE-ANADOLU
TEKN‹K SERV‹S-ÖLÜDEN‹Z YOLU ÜZER‹ BAHA fiIKMAN CD.NO:157-TEL.:0252 611 39 12 MU⁄LA-M‹LAS-AFfi‹N YILDIRIM - TEKN‹K
SO⁄UTMA-HACI ‹LYAS MAH. PAZAR SOK.NO:14-TEL.:0252 512 14 45 MU⁄LA-YATA⁄AN-ASTEKN‹K ISITMA SO⁄UTMA SERV‹S‹-YEN‹ MH.
152. SK. NO:8-TEL.:0252 572 56 31 MU⁄LA-DALAMAN-ÖZKAN TEKN‹K SO⁄UTMA-MERKEZ MAHALLES‹ ATATÜRK CD.NO:56-TEL.:0252
- 26 -
Page 28

692 25 25 MU⁄LA-ELBO ELEKTR‹K ELEKTRON‹K-ORHAN‹YE MH. HÜRR‹YET CAD. NO:1/6-TEL.:0252 214 18 84 MU⁄LA-DATÇA-MEL‹H
YETK‹L‹ SERV‹SLER L‹STES‹
ELEKTRON‹K-‹SKELE MH. AMBARCA CD. NO:17-TEL.:0252 712 02 30 MU⁄LA-MARMAR‹S-‹LKSEL ELEKTRON‹K-YEN‹ YOL CD. N0:51/9-
TEL.:0252 412 62 60 MU⁄LA-URLA-STAR ELEKTRON‹K-‹N‹fiD‹B‹ CAD NO 1/C AKYAKA BELDES‹-TEL.:0252 243 40 42 MUfi-HAfi‹MO⁄LU
EK‹C‹ ELEKTRON‹K-HAfi‹MO⁄ULLARI EK‹C‹ ‹fi HANI BELED‹YE CD.NO:20/A-TEL.:0436 212 38 80 N‹⁄DE-HUZUR ELEKTR‹K-ILHANLI
MAH ÖZKUL MARKET KARSISI ÖZKILIÇ AP ALTI NO: 43-TEL.:0388 233 54 05 ORDU-TEK ISITMA SO⁄UTMA-SAKARYA MAH YENI KUMRU
CAD NO: 111-TEL.:0452 423 84 49 ORDU-HAZAR SO⁄UTMA-YEN‹ MAH. 26.SOK NO:17-TEL.:0452 214 04 49 ORDU-ÜNYE-STAR TEKN‹K-
KALEDERE MH. 20TEMMUZ CD. NO:16-TEL.:0452 324 82 51 ORDU-MERKEZ-M‹KRO ELEKTRON‹K-YEN‹ MH. 319 SK. NO:18 -TEL.: 0452
223 13 49 OSMAN‹YE-MODERN ELEKTRON‹K-ORTAOKUL CD. K‹fi‹O⁄LU ÇARfiISI NO:15-TEL.:0328 812 82 84 R‹ZE-ÇAYEL‹-ÖZER TEKN‹K-
MAKSUT ÖZER-EMNIYET MÜD.KARfiISI fiA‹RLER YOLU ÜZERI NO:3/2B-TEL.:0464 532 63 81 R‹ZE-CEVAH‹R ELEKTRON‹K-TOPHANE
MAH. ATATÜRK CAD. ‹fi PASAJI-TEL.:0464 213 16 17 SAKARYA-ADAPAZARI-ÇINAR ELEKTRON‹K-KÖMÜR PAZARI CAD. NO: 15 ATEL.:0264 271 39 12 SAMSUN-ÇARfiAMBA-ÖZKAN SO⁄UTMA-ORTA MH. TUNCAY KOCABAfi SK. NO:85-TEL.:0362 832 28 90 SAMSUN-
BAFRA-KARATAfi T‹CARET-KIZILIRMAK MH. F.ÇAKMAK SK. NO:18/A-TEL.: 0362 543 04 91 SAMSUN-GÜLTEK‹N SERV‹S-ATATÜRK
BULVARI NO.285-TEL.:0362 437 33 82 SAMSUN-DEN‹Z ELEKTRON‹K-KADIKÖY MH. OSMAN‹YE CD. NO: 68-TEL.:0362 432 44 80 S‹‹RT-
ERYILMAZ ELEKTRON‹K-CUMHUR‹YET CAD. NO:25 ULUCAM‹ KARfiISI-TEL.:0484 224 03 92 S‹NOP-ADA EV ALETLER‹-CAM‹ KEB‹R MH.
TÜTÜNCÜ SK. NO: 16-TEL.:0368 260 12 64 S‹NOP-AYANCIK-YILKAY SO⁄UTMA-YALI MH. DR.AZM‹ HAMZAO⁄LU CD. NO:46-TEL.:0368
613 52 12 S‹NOP-BOYABAT-ÖZTÜRK BEYAZ EfiYA BAKIM SERV‹S-GÖKDERE MH.YUSUF KEMAL BEY CD.NO:24-TEL.:0368 315 61 21
S‹VAS-EKOL ELEKTRON‹K-H‹KMET IfiIK CD.NALBANTLAR BAfiI KAVfiA⁄I NO:1/D-TEL.:0346 223 44 96 fiANLIURFA-SURUÇ-IfiIK SO⁄UTMA
TEKN‹KERL‹⁄‹-D‹K‹L‹ MH. Z‹YARET CD. NO:10-TEL.:0414 612 17 25 fiANLIURFA-AKTAfi ELEKTRON‹K-ASFALT CD. N0.22/F-TEL.:0414
217 14 87 fiANLIURFA-B‹REC‹K-YARAfiIR SO⁄UTMA-MEYDAN MAH 10 TEMMUZ CAD KÖPRÜ ÇIKIfiI NO : 9-TEL.:0414 652 36 38 fiIRNAKS‹LOP‹-ABAY ELEKTRON‹K-2. CADDE S‹EMENS BAY‹‹ KARfiISI-TEL.:0486 518 50 99 fiIRNAK-ULUDERE-ÜRÜN ELEKTRON‹K-CUMHUR‹YET
CD. PTT YANI-TEL.:0486 351 28 22 TEK‹RDA⁄-HAYRABOLU-POYRAZ TEKN‹K-H‹SAR MAH. ADELET SK. NO:24-TEL.:0282 315 55 48
TEK‹RDA⁄-SARAY-BATI TEKN‹K-YEN‹ MH. TAKS‹M CD. NO:9 TEL.:0282 768 69 34 TEK‹RDA⁄-MURATLI-AKAN ELEKTRON‹K-MURAD‹YE
MH. NAZIM SAV CD. NO:30/A-TEL.:0282 361 28 17 TEK‹RDA⁄-ÇORLU-FULL TEKN‹K-MUH‹TT‹N MH. F‹K‹R SK. NO:12/B-TEL.:0282 652
28 68 TEK‹RDA⁄-ARI ELEKTRON‹K-AYDO⁄DU MH. fiEH‹TLER CD. NO: 33/A-TEL.:0282 263 40 61 TEK‹RDA⁄-MALKARA-KER‹MO⁄ULLARI
T‹CARET-YEN‹MAHALLE GÜLDESTE SOK. NO: 4/B-TEL.:0282 427 16 61 TEK‹RDA⁄-ÇERKEZKÖY-ÇA⁄RI ELEKTRON‹K-G.O. PAfiA MH.
SAYAR SK. KARDEfiLER APT. NO:5 -TEL.:0282 726 02 66 TOKAT-ERBAA-H‹DRO ELEKT‹R‹K-CUMHUR‹YET MH. GAZ‹ BULVARI NO:144TEL.:0356 715 56 01 TOKAT-C‹HAN ELEKTRON‹K-G.O.PAfiA BULVARI S‹VAS CAD. NO:290/A- TEL.:0356 214 00 74 TOKAT-TURHAL-GÜÇLÜ
SO⁄UTMA-CELAL MH. TUNA SK. NO:11-TEL.: 0356 276 39 66 TOKAT-CEM TEKN‹K SO⁄UTMA-SO⁄UKPINAR MH. GOP BULVARI 241/A
GÖKÇE PASAJI NO:14-TEL.:0356 212 37 57 TRABZON-ÇIRAK TEKN‹K-FAT‹H MH. AYASOFYA CD. NO: 57 MÜZE KARfiISI-TEL.:0462 229
66 44 TRABZON-AKÇAABAT-ATOM ELEKTR‹K-ORTA MH. ERENLER SK. NO:5 -TEL.:0462 228 12 58 TRABZON-YET-SAN ELEKTRON‹K-
FAT‹H MH. FAT‹H CD. COfiKUNER PASAJI NO:2/B-TEL.:0462 223 15 04 TRABZON-ARAKLI-fiENGÜL TEKN‹K-BA⁄KUR ÇARfiISI NO: 10 /
A-TEL.:0462 721 74 11 UfiAK-MERKEZ-KOÇ SO⁄UTMA- ‹fiL‹CE MH. ADAfi SK. NO:29/E -TEL.:0284 513 89 66 VAN-ERC‹fi-ÖZKANAT
TAM‹RAT-EMN‹YET KARAKOL ARKASI NO:3-TEL.:0432 351 95 40 VAN-EB‹NÇ TEKN‹K-SIHKE CAD ATEfi SOK. NO 10-TEL.:0432 214 31
37 VAN-BURHAN AYDIN - ÖZ USTA TAM‹RAT-KÜLTÜR MERKEZ‹ C‹VARI DEM‹RC‹LER 1. SK. NO:1/C-TEL.:0432 216 34 58 YALOVA-
ALTINOVA-DO⁄AN TEKN‹K SO⁄UTMA-CUMHUR‹YET MH.MERKEZ DURAK KARfiISI NO:29A-TEL.:0226 461 26 21 YALOVA-TINAZTEPE
ELEKTR‹K-‹STANBUL CD. BORA SK. NO: 14-TEL.:0226 812 01 60 YOZGAT-AKDA⁄MADEN‹-AYDIN SO⁄UTMA-AHISHAVI MH. 2. HANLAR
SK. NO :10-TEL.:0354 314 64 12 YOZGAT-ÖNDER ELEKTRON‹K-UN PAZARI NO:14-TEL.:0354 212 79 67 YOZGAT-SORGUN-KARDEfiLER
ELEKTRON‹K-CUMHUR‹YET CD. NO:29 1/C-TEL.:0354 415 45 79 ZONGULDAK-KRD ERE⁄L‹-UZMAN ELEKTRON‹K-ERDEM‹R CAD NO:130-
TEL.:0372 316 31 28 ZONGULDAK-MERKEZ-EMEK ELEKTRON‹K-PAP‹LA ‹fi HANI ZEM‹N KAT NO:9 SO⁄UKSU-TEL.:0372 251 67 31
- 27 -
Page 29

MÜfiTER‹ H‹ZMETLER‹
De¤erli Müflterimiz,
En uygun fiyata en iyi ürünü vermenin yan› s›ra; en iyi hizmeti vermenin de
önemli oldu¤una inan›yoruz. Bu nedenle siz bilinçli tüketicilere daha yak›n
olabilmek için, internet adresimizdeki eriflim formlar›n›n yan› s›ra, tüketici
dan›flma hatlar›m›z› da hizmetinize açm›fl durumday›z.
TÜKET‹C‹
DANIfiMA HATTI
444 66 86
MERKEZ
TEKN‹K SERV‹S
(0212) 422 94 94
www.sinbo.com.tr
Dan›flma Hatlar›m›z›,
- Hafta içi her gün 08.30-18.00 saatleri aras›nda arayabilir; istek, öneri ve
flikayetlerinizi firmam›za iletebilirsiniz.
Tüketicinin Dikkatine:
Ürünlerimizle ilgili hizmetleri tam olarak alabilmek için afla¤›daki önerilere
uyman›z› rica ederiz:
1. Ürünü ald›¤›n›zda Garanti Belgesini mutlaka yetkili sat›c›n›za onaylatt›r›n›z.
2. Ürünü kullanma k›lavuzu esaslar›na göre kullan›n›z.
3. Ürününüzle ilgili hizmet talebiniz oldu¤unda yukar›daki telefon
numaralar›ndan, Tüketici ‹liflkileri Merkezi'ne baflvurunuz.
4. Ürünü promosyon arac›l›¤› ile edinmiflseniz, ürüne ait garanti belgesini en
yak›n yetkili servisimize giderek onaylatt›r›n›z.
5. Teknik servisteki ifliniz bitti¤inde "Hizmet Fifli" almay› unutmay›n›z.
Alaca¤›n›z bu fifl, ileride ürününüzde meydana gelebilecek herhangi bir
sorunda size yarar sa¤layacakt›r.
6. Cihaz›n›z ilk çal›flt›rmada çal›flm›yor veya ar›zal› ise, size en yak›n S‹NBO
Yetkili Servisine baflvurabilir veya S‹NBO Dan›flma Hatlar›ndan yard›m
alabilirsiniz.
- 28 -
Page 30

- GARANT‹ fiARTLARI -
1. Garanti süresi, mal›n teslim tarihinden itibaren bafllar ve 2 y›ld›r.
2. Mal›n bütün parçalar› dahil(kullan›m hatalar›ndan kaynaklanan k›r›lmalar hariç) olmak üzere tamam› firmam›z›n
garantisi kapsam›ndad›r.
3. Mal›n garanti süresi içerisinde ar›zalanmas› durumunda, tamirde geçen süre garanti süresine eklenir. Mal›n tamir
süresi en fazla 30 ifl günüdür. Bu süre, mala iliflkin ar›zan›n servis istasyonuna servis istasyonunun olmamas›
durumunda, mal›n sat›c›s›, bayii, acentas›,temsilcili¤i, ithalatç›s› veya imalatç›s›-üreticisinden birisine bildirim tarihinden
itibaren bafllar. Mal›n ar›zas›n›n 15 ifl günü içerisinde giderilmemesi halinde, imalatç›-üretici veya ithalatç›; mal›n
tamiri tamamlan›ncaya kadar, benzer özelliklere sahip baflka mal› tüketicinin kullan›m›na tahsis etmek zorundad›r.
4. Mal›n garanti süresi içerisinde, gerek malzeme ve iflçilik, gerekse montaj hatalar›ndan dolay› ar›zalanmas› halinde,
iflçilik masraf›, de¤ifltirilen parça bedeli ya da baflka herhangi bir ad alt›nda hiçbir ücret talep etmeksizin tamiri
yap›lacakt›r.
5. Tüketicinin onar›m hakk›n› kullanmas›na ra¤men mal›n;
-Tüketiciye teslim edildi¤i tarihten itibaren, belirlenen garanti süresi içinde kalmak kayd›yla,bir y›l içerisinde; ayn›
ar›zan›n ikiden fazla tekrarlanmas› veya farkl› ar›zalar›n dörtten fazla meydan gelmesi veya belirlenen garanti süresi
içerisinde farkl› ar›zalar›n toplam›n›n alt›ndan fazla olması unsurlar›n›n yan›s›ra, bu ar›zalar›n maldan yararlanamamay›
sürekli k›lmas›,
-Tamiri için gereken azami sürenin afl›lmas›,
-Firman›n servis istasyonunun, servis istasyonunun mevcut olmamas› halinde s›rayla sat›c›s›, bayii, acentesi temsilcili¤i,
ithalatç›s› veya imalatç› - üreticisinden birisine düzenleyece¤i raporla ar›zan›n tamirine mümkün bulunmad›¤›n›n
belirlenmesi,durumlar›nda, tüketici mal›n ücretsiz de¤ifltirilmesini, bedel iadesi veya ay›p oran›nda bedel indirimi
talep edebilir.
6. Mal›n kullanma k›lavuzunda yer alan hususlara ayk›r› kullan›lmas›ndan kaynaklanan ar›zalar garanti kapsam›
d›fl›ndad›r.
7. Garanti Belgesi ile ilgili olarak ç›kabilecek sorunlar için Sanayi ve Ticaret Bakanl›¤› Tüketicinin ve Rekabetin
Korunmas› Genel Müdürlü¤ü’ne baflvurulabilir.
‹THALATÇI F‹RMA
DE‹MA ELEKTROMEKAN‹K ÜRÜNLER ‹NfiAAT SPOR MALZEMELER‹ ‹MALAT SAN. VE T‹C. A.fi.
Cihangir Mh. Güvercin Cd. No:4 Haramidere Mevkii Avcılar - ‹stanbul - Türkiye
Tel : (0212) 422 94 94 & Fax : (0212) 422 03 49
www.sinbo.com.tr - info@sinbo.com.tr
- 29 -
Page 31

SWM 6308 ÇAMAfiIR MAK‹NASI
- GARANT‹ BELGES‹ -
Garanti Belge No : 78804
SSHY Belge No : 25551
‹THALATÇI F‹RMA
Ünvanı : DE‹MA ELEKTROMEKAN‹K ÜRÜNLER‹ ‹Nfi. SPOR MALZ.
‹MALAT SAN. ve T‹C. A.fi.
Adresi : Cihangir Mah. Güvercin Cad. No:4 Haramidere Mevkii
Avc›lar / ‹STANBUL
Tel. : 0212 422 94 94 & Fax: 0212 422 03 49
Yetkili Kifli :
Yönetim Kurulu Baflkan›
Ürünün Cinsi : ÇAMAfiIR MAK‹NASI
Markası : S‹NBO
Modeli : SWM 6308
Alt Modeli : Bandrol ve Seri No :
Teslim Tarihi ve Yeri :
Garanti Süresi : 2 Yıldır
Azami Tamir Süresi : 30 ‹fl Günü
Kullanım Ömrü : Bakanl›kça belirlenen ve ilan edilen kullan›m ömrü 7 y›ld›r.
(Ürünün fonksiyonlar›n› yerine getirebilmesi için gereken yedek parça temin süresi)
SATICI F‹RMA
Ünvanı :
Adresi :
Tel.Fax :
Fatura Tarihi ve No :
Teslim Tarihi ve Yeri :
‹mza ve Kafle :
Bu bölüm, ürünü sat›n ald›¤›n›z Yetkili Sat›c› taraf›ndan imzalanacak ve kaflelenecektir.
Bu belgenin kullan›lmas›na; 4077 say›l› Tüketicinin Korunması Hakkında Kanun ve bu Kanun’a dayan›larak yürürlü¤e konulan Garanti Belgesi
Uygulama Esaslar›na Dair Yönetmelik uyar›nca, TC Sanayi ve Ticaret Bakanl›¤› Tüketicinin ve Rekabetin Korunmas› Genel Müdürlü¤ü tarafından
izin verilmifltir.
Garanti Belge Onay Tarihi : 10/02/2010
SSHY Belge Onay Tarihi : 30/03/2010
- 30 -
Page 32

Made in P.R.C.
‹mal Y›l› : 2011
- TEDAR‹KÇ‹ F‹RMA / EXPORTER United Favour Development Limited
Unit B, 10/F Lee May Building 788-790
Nathan Road, Mongkok, Kowloon, HK.
- UYGUNLUK BEYANI / CE Most Compliance Laboratory Ltd.
No.5, 2nd Langshan Road, North District
Hi-Tech Industrial Park, Nanshan
Shenzhen, Guangdong, China
MTS/JYZ/7070327
EEE Yönetmeli¤ine uygundur.
 Loading...