

SVC 3464 ELEKTR‹KL‹ SÜPÜRGE
EN

Children being supervised not to play with the appliance.
This appliance is not intended for use by persons (including children) with reduced physical, sensory
or mental capabilities, or lack of experience and knowledge, unless they have been given supervision
or instruction concerning use of the appliances by a person responsible for their safety. Children
should be supervised to ensure that they do not play with the appliance.
- 1 -

ENGLISH
SINBO SVC 3464 BAGLESS CONVERTIBLE STICK VACUUM CLEANER
INSTRUCTION MANUAL
IMPORTANT SAFETY INSTRUCTIONS
When using your BAGLESS CONVERTIBLE STICK VACUUM basic safety precautions should always be
observed, including the following:
Read all instructions before using your BAGLESS CONVERTIBLE STICK VACUUM
WARNING - To reduce the risk of fire, electric shock, or injury:
1. Use the system only for its intended use.
2. To protect against a risk of electric shock, do not immerse any part of the system in water or other
liquids.
3. Never yank cord to disconnect from outlet; instead, grasp plug and pull to disconnect.
4. Do not allow cord to touch hot surfaces.
5. Do not run appliance over cord.
6. Do not operate the system with a damaged cord or plug, or if the appliance or any other part of the
system has been dropped or damaged. To avoid the risk of electric shock, do not disassemble or attempt
to repair the BAGLESS CONVERTIBLE STICK VACUUM. Return the unit for examination and repair.
Incorrect re-assembly or repair can cause a risk of electrical shock or injury to persons when the
BAGLESS CONVERTIBLE STICK VACUUM is used.
7. Close supervision is necessary for any appliance being used by or near children. Do not leave the
system unattended while connected.
8. Keep hair, loose clothing, fingers and all parts of body away from opening and moving parts.
9. Do not use to pick up flammable or combustible liquids such as gasoline or use in areas where they
may be present.
10. Do not pick up anything that is burning or smoking such as cigarettes, matches or hot ashes.
11. Use extra care when cleaning on stairs.
12. Do not use the vacuum without the dust cup filter in place.
13. This appliance is intended only for household use. Follow all user instructions in this manual.
14. Do not leave the BAGLESS CONVERTIBLE STICK VACUUM plugged in when un-attended. Unplug
the electrical cord when not in use and before servicing.
• Do not allow to be used as a toy. Close attention is necessary when used by or near children, pets or
plants.
• Use only as described in this manual. Use only manufacturer’s recommended accessories.
• Do not pull cord, use cord as a handle, close a door on cord, or pull cord around sharp edges or
corners. Do not run vacuum cleaner over cord. Keep cord away from heated surfaces.
• If use extension cords, care should be taken to arrange the cord so that the cord cannot be pulled
or tripped over.
• Turn off all controls as applicable before unplugging from electrical outlet.
• Do not unplug by pulling on cord. To unplug, grasp the plug, not the cord.
• Do not handle plug or vacuum with wet hands or operate without shoes.
• Do not put any objects into openings. Do not use with any opening blocked. Keep free of dust, lint, hair
and anything else that may reduce air flow.
• Store your appliance indoors in a cool, dry area.
• Keep your work area well lit.
• Do not immerse the vacuum into water or other liquids.
• Keep end of hose, wands and other openings away from your face and body.
• Use only on dry surfaces.
• Using improper voltage may result in damage to the motor and possible injury to the user. Correct
voltage is listed on rating label.
SAVE THESE INSTRUCTIONS
For Household Use Only
- 8 -
WARNING
- To reduce the risk of injury from moving parts – Unplug before servicing.
- To reduce the risk of injury of electric shock – Unplug before cleaning or servicing.
- To reduce the risk of electric shock – Do not use outdoors or on wet surfaces.
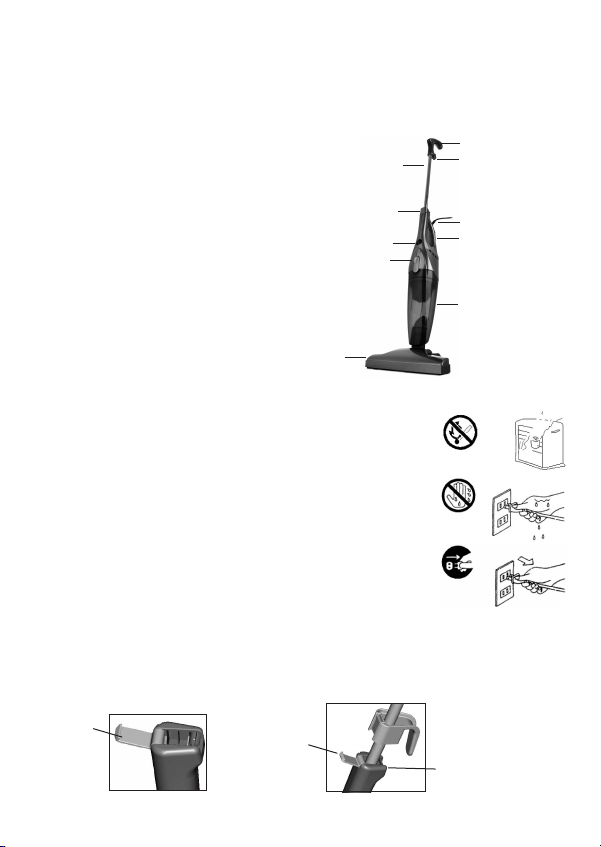
GETTING TO KNOW YOUR BAGLESS CONVERTIBLE STICK VACUUM
Extension Tube Handle
1.
2. Quick Release Cord Hook
3. Extension Tube
4. Locking Clip
5. Hand Vacuum Handle
6. Power Cord (not shown fully)
7. On/Off Power Switch
8. Dust Cup Container Release
9. Dust Cup Container
10. Floor Brush
11. Crevice Tool (not shown)
12. Dust Cup Filter (not shown)
Note: Illustrations may differ from actual product.
3
4
7
8
1
2
5
6
9
TECHNICAL SPECIFICATION
Voltage: AC230V, 50Hz, 600W
PRECAUTIONARY MEASURES
Important:
If the suction opening in the unit or the hose is blocked, switch off the vacuum
cleaner and remove the blocking substance before you start the unit again.
1. Do not operate the vacuum cleaner too close to heaters, radiators or
cigarette butts.
2. Before inserting the power plug into the wall outlet, make sure that your
hands are dry.
3. Before you start vacuuming, make sure to remove large or sharp objects
that might damage the dust cup filter.
4. When pulling out the power plug from the wall outlet, pull the plug not
the power cord.
5. Do not pick up anything that is burning or smoking such as cigarettes,
matches or hot ashes.
6. Do not use without dust cup filter in place
OPERATING INSTRUCTIONS
Note: Always remove the power plug from the wall outlet before assembling or removing accessories.
Inserting the Metal Handle Into the Main Body
• On the hand vacuum handle, pull open the handle port (Fig.1) and insert the extension tube until the
locking clip is sitting firmly on the handle. (Fig.2)
Handle Port
Fig.1
Locking Clip
10
Push firmly into handle
Fig.2
- 9 -

OPERATING INSTRUCTIONS
• Push the handle port closed so that it snaps shut. (Fig. 3 & 4)
Fig. 4
Push handle port so
that it snaps shut.
Fig. 3
Attaching the Crevice Tool and the Floor Brush to the Main Body
• Push the crevice tool or floor brush into the suction hole opening. (Fig. 5)
Fig. 5
• The following are recommendations for accessory usage:
Crevice Tool
For radiators, crevices, corners, base-boards and between cushions.
Floor Brush
For all kinds of flooring, including carpeted and tiled floors.
Winding & Unwinding the Power Cord
This vacuum cleaner is equipped with a convenient cord storage feature. This unit also has a quick
release cord hook
• Wind power cord around the quick release cord hook and the cord winding hook. (Fig. 6) To unwind
the power cord, simply twist the quick release cord hook to the left or right.
Fig. 6
Quick Release Cord Hook
Cord Winding Hook
Power switch
• The On/Off power switch has two different positions. (Fig. 7)
• Push on the "I" side to turn the vacuum ON.
• Push on the "O" side to turn the vacuum OFF.
Caution: The suction hole opening must be
open and free of any obstructions at all times.
Otherwise, the motor will overheat and could
become damaged.
- 10 -
Fig. 7
On Position
Off Position

USING THE UNIT AS AN UPRIGHT
• Unwind the power cord and plug into the 230V~ outlet.
• Insert the extension tube into the hand vac.
• Choose the appropriate accessory (crevice tool or floor brush) and attach it to suction hole opening
on the hand vacuum.
Note: You may choose not to attach the crevice tool or floor brush when operating as an upright.
• Press the “1” position on the On/Off power switch turn the unit on. When finished using the unit, press
the “0” position on the On/Off power switch to turn the unit off.
• When finished using the unit, wind the power cord around the cord winding hooks for easy storage.
Using the Unit as a Hand Vacuum
• Disconnect the extension tube from the hand vac by releasing the handle port from the locking clip
and removing the extension tube from the hand vac handle. Once the extension tube is removed, snap
the handle port shut.
Note: You may choose to leave the crevice tool or floor brush attached to the hand vac when operating
as such.
• Press the “1” position on the On/Off power switch to turn the unit on. When finished using the unit,
press the “0” position on the On/Off power switch to turn the unit off.
CLEANING & CHANGING THE DUST CUP FILTER
Changing and Cleaning the Dust Cup Filter
In order to achieve the best performance, empty the dust cup container and clean the dust cup filter
after each use.
1. To remove the dust cup container, press down on the dust cup container release button (Fig. 8) and
separate the dust cup container from the main unit. (Fig. 9)
Fig. 8
Press down on the dust
cup container release
button
2. Pull out the dust cup filter. (Fig. 10)
Fig.10
3. Empty the dust from the dust cup container.
4. Rinse the dust cup filter in cold water, and then let it air dry for 24 hours before replacing it back in
the dust cup container.
Dust cup container
Dust cup filter
Separate the dust cup
container from the main
body.
Fig. 9
- 11 -

CLEANING & CHANGING THE DUST CUP FILTER
Important Note: DO NOT use a washing machine to clean the dust cup filter. Do not use a hair dryer
to dry it. AIR DRY ONLY.
5. Replace the dust cup filter carefully into the dust cup compartment.
NEVER operate the stick vacuum without the dust cup filter in place.
6. Attach the dust cup container to the main body of the unit.
Note: It is recommended that the dust cup filter be replaced every three (3) months (depending on
usage) to ensure peak performance of the unit.
TROUBLESHOOTING
VACUUM WILL NOT OPERATE
No power in electrical outlet supplying transformer.
Check fuse or breaker. Replace fuse/reset breaker.
VACUUM WILL NOT PICK-UP OR SUCTION POWER IS WEAK
1. Dust cup container is full.
2. Dust cup filter needs cleaning or replacement.
1. Empty dust cup container
2. Remove dust cup filter and check for object(s) in air duct and remove.
Clean or replace dust cup filter.
DUST ESCAPING FROM VACUUM
1. Dust cup container is full.
2. Dust cup filter is not installed correctly.
3. Puncture/hole is dust cup filter.
1. Empty dust cup container.
2. Review dust cup filter installation instructions.
3. Replace dust cup filter.
Ordering Replacement Dust Cup Filters
Please Note: The Dust Cup Filter is washable. It should, however, be replaced every three (3) months
(depending on usage) to ensure peak performance of your vacuum.
Important: Make sure that ALL filters are completely dry before re-installing back in the vacuum.
CORRECT DISPOSAL OF THIS PRODUCT
This marking indicates that this product should not be disposed with other household wastes throughout
the EU. To prevent possible harm to the environment or human health from uncontrolled waste disposal,
recycle it responsibly to promote the sustainable reuse of material resources. To return your used
device, please use the return and collection systems or contact the retailer where the product was
purchased. They can take this product for environmental safe recycling.
- 12 -

- GARANT‹ fiARTLARI -
1) Garanti süresi,mal›n teslim tarihinden itibaren bafllar ve 2 y›ld›r.
2)
Mal›n bütün parçalar› dahil olmak üzere tamam› Firmam›z›n garanti kapsam›ndad›r.
3) Mal›n garanti süresi içerisinde ar›zalanmas› durumunda, tamirde geçen süre garanti
süresine eklenir. Mal›n tamir süresi, 20 iflgününü geçemez. Bu süre mala iliflkin ar›zan›n
servis istasyonuna, servis istasyonunun olmamas› durumunda, mal›n sat›c›s›, bayii,
acentesi, temsilcili¤i, ithalatç›s› veya imalatç›s›-üreticisinden birine bildirim tarihinden
itibaren bafllar. Tüketicinin ar›za bildirimini; telefon, faks, e-posta, iadeli taahhütlü mektup
veya benzeri bir yolla yapmas› mümkündür. Ancak, uyuflmazl›k halinde ispat yükümlülü¤ü
tüketiciye aittir. Mal›n ar›zas›n›n 10 ifl günü içerisinde giderilememesi halinde, imalatç›üretici veya ithalatç›; mal›n tamiri tamamlan›ncaya kadar, benzer özelliklere sahip baflka
bir mal› tüketicinin kullan›m›na tahsis etmek zorundad›r.
4) Mal›n garanti süresi içerisinde gerek malzeme ve iflçilik, gerekse montaj hatalar›ndan
dolay› ar›zalanmas› halinde, iflçilik masraf›, de¤ifltirilen parça bedeli ya da baflka herhangi
bir ad alt›nda hiçbir ücret talep etmeksizin tamiri yap›lacakt›r.
5) Tüketicinin onar›m hakk›n› kullanmas›na ra¤men mal›n;
• Tüketiciye teslim edildi¤i tarihten itibaren, garanti süresi içinde kalmak kayd›yla, bir y›l
içerisinde en az dört defa veya imalatç›-üretici ve/veya ithalatç› taraf›ndan belirlenen
garanti süresi içerisinde alt› defa ar›zalanmas›n›n yan› s›ra, bu ar›zalar›n maldan
yararlanamamay› sürekli k›lmas›,
• Tamiri için gereken azami süresinin afl›lmas› ,
• Firman›n servis istasyonunun, servis istasyonunun mevcut olmamas› halinde s›rayla
sat›c›s›, bayii, acentesi temsilcili¤i ithalatç›s› veya imalatç›-üreticisinden birisinin
düzenleyece¤i raporla ar›zan›n tamirini mümkün bulunmad›¤›n›n belirlenmesi, durumlar›nda
tüketici mal›n ücretsiz de¤ifltirilmesini, bedel iadesi veya ay›p oranda bedel indirimi talep
edebilir.
6 ) Mal›n kullanma k›lavuzunda yer alan hususlara ayk›r› kullan›lmas›ndan kaynaklanan
ar›zalar garanti kapsam› d›fl›ndad›r.
7 ) Garanti Belgesi ile ilgili olarak ç›kabilecek sorunlar için Gümrük ve Ticaret Bakanl›¤›
Tüketicinin Korunmas› ve Piyasa Gözetimi Genel Müdürlü¤ü’ne baflvurabilir.
‹THALATÇI F‹RMA
DE‹MA ELEKTROMEKAN‹K ÜRÜNLER ‹NfiAAT SPOR MALZEMELER‹ ‹MALAT SAN. VE T‹C. A.fi.
Cihangir Mh. Güvercin Cd. No:4 Haramidere Mevkii Avcılar - ‹stanbul - Türkiye
Ça¤rı Merkezi: 444 66 86
www.sinbo.com.tr - info@sinbo.com.tr
- 62 -

- SVC 3464 ELEKTR‹KL‹ SÜPÜRGE -
- GARANT‹ BELGES‹ -
Garanti Belge No : 78352
SSHY Belge No : 35274
‹THALATÇI F‹RMA
Ünvanı : DE‹MA ELEKTROMEKAN‹K ÜRÜNLER‹ ‹Nfi. SPOR MALZ.
‹MALAT SAN. ve T‹C. A.fi.
Adresi : Cihangir Mah. Güvercin Cad. No:4 Haramidere Mevkii
Avc›lar / ‹STANBUL
Tel. : Ça¤rı Merkezi: 444 66 86
Yetkili Kifli :
Yönetim Kurulu Baflkan›
Ürünün Cinsi : ELEKTR‹KL‹ SÜPÜRGE
Markası : S‹NBO
Modeli : SVC 3464
Alt Modeli : Bandrol ve Seri No :
Teslim Tarihi ve Yeri :
Garanti Süresi : 2 Yıldır
Azami Tamir Süresi : 20 ‹fl Günü
Kullanım Ömrü : Bakanl›kça belirlenen ve ilan edilen kullan›m ömrü 10 y›ld›r.
(Ürünün fonksiyonlar›n› yerine getirebilmesi için gereken yedek parça temin süresi)
SATICI F‹RMA
Ünvanı :
Adresi :
Tel.Fax :
Fatura Tarihi ve No :
Teslim Tarihi ve Yeri :
‹mza ve Kafle :
Bu bölüm, ürünü sat›n ald›¤›n›z Yetkili Sat›c› taraf›ndan imzalanacak ve kaflelenecektir.
Bu belgenin kullan›lmas›na; 4077 say›l› Tüketicinin Korunması Hakkında Kanun ve bu Kanun’a dayan›larak yürürlü¤e konulan Garanti Belgesi
Uygulama Esaslar›na Dair Yönetmelik uyar›nca, TC Gümrük ve Ticaret Bakanlı¤ı, Tüketicinin Korunması ve Piyasa Gözetimi Genel Müdürlü¤ü
tarafından izin verilmifltir.
Garanti Belge Onay Tarihi : 28/01/2010
Garanti Belge Vize Tarihi: 18/01/2012
SSHY Belge Onay Tarihi : 04/04/2012
- 63 -

MÜfiTER‹ H‹ZMETLER‹
De¤erli Müflterimiz,
En uygun fiyata en iyi ürünü vermenin yan› s›ra; en iyi hizmeti vermenin de
önemli oldu¤una inan›yoruz. Bu nedenle siz bilinçli tüketicilere daha yak›n
olabilmek için, internet adresimizdeki eriflim formlar›n›n yan› s›ra, tüketici
dan›flma hattımızı da hizmetinize açm›fl durumday›z.
TÜKET‹C‹
DANIfiMA HATTI
444 66 86
Tüketici Dan›flma Hattımızı,
- Hafta içi her gün 08.00-18.00 saatleri aras›nda arayabilir; istek, öneri ve
flikayetlerinizi firmam›za iletebilirsiniz.
Tüketicinin Dikkatine:
Ürünlerimizle ilgili hizmetleri tam olarak alabilmek için afla¤›daki önerilere
uyman›z› rica ederiz:
1. Ürünü ald›¤›n›zda Garanti Belgesini mutlaka yetkili sat›c›n›za onaylatt›r›n›z.
2. Ürünü kullanma k›lavuzunda belirtilen hususlara göre kullan›n›z.
3. Ürününüzle ilgili hizmet talebiniz oldu¤unda yukar›daki telefon
numaralar›ndan, Tüketici Danıflma Hattına baflvurunuz.
4. Ürünü promosyon arac›l›¤› ile edinmiflseniz, ürüne ait garanti belgesini en
yak›n yetkili servisimize giderek onaylatt›r›n›z.
5. Teknik servisteki ifliniz bitti¤inde "Yetkili Servis Hizmet Fifli" almay›
unutmay›n›z. Alaca¤›n›z bu Hizmet Fifli, ileride ürününüzde meydana
gelebilecek herhangi bir sorunda size yarar sa¤layacakt›r.
www.sinbo.com.tr
0800 211 50 21
KAPIDAN KAPIYA
ÜCRETS‹Z
SERV‹S
Kap›dan Kap›ya Ücretsiz Servis Kampanyam›z dâhilinde Yurtiçi Kargo Firmas› ile iflbirli¤i içerindeyiz. Tüketicimiz
taraf›ndan sat›n al›nan ürünün fiyat› ne olursa olsun, Tüketicimiz ürün ile ilgili garanti kapsam›na giren herhangi
bir problem yaflad›¤›nda, 444 66 86 numaral› Tüketici Danıflma Hattımızı aramas› ve kay›t b›rakmas› yeterlidir.
Bu süreçten sonra Tüketicimizin ürünü ücretsiz olarak Yurtiçi Kargo taraf›ndan Tüketicimizin bulundu¤u adresten
al›n›p, 10* ifl günü içerisinde ürün çal›fl›r bir vaziyette, yine Tüketicimize Yurtiçi Kargo arac›l›¤› ile adresine teslim
edilmektedir. 10 ifl günü içerisinde sorunu çözülemeyen ürünler ise, yenisi ve/veya bir üst modeli ile de¤ifltirilmektedir.
Tüm bu süreçte Tüketicilerimizden hiçbir ücret talep edilmemektedir.
(*Ürünün servis garanti süresi, Yurtiçi Kargo ürünü Sinbo Fabrikas›’na teslim ettikten sonra bafllar.)
- 64 -
10 GÜNDE
TESL‹MAT
GARANT‹S‹
(*)

- TEDAR‹KÇ‹ F‹RMA / EXPORTER United Favour Development Limited
Unit B, 10/F Lee May Building 788-790
Nathan Road, Mongkok, Kowloon, HK.
- UYGUNLUK BEYANI / CE Intertek Testing Services Shanghai
Bldg. No.86, 1198 Qinzhou Rd. (North)
Caohejing Development Zone, Shanghai
China
EEE Yönetmeli¤ine uygundur.
AEEE Yönetmeli¤ine uygundur.
Made in P.R.C.
‹mal Y›l› : 2014
 Loading...