

Page 1

SK 2396 ELEKTR‹KL‹ TERMOS
KULLANMA KILAVUZU
TR
EN
FR
NL
ES
RU
HR
AR
Page 2

De¤erli Müflterimiz,
Ürün seçiminde S‹NBO'yu tercih etti¤iniz için teflekkür ederiz.
Uzun ve verimli bir kullan›m için cihaz› kullanmadan önce bu k›lavuzu özellikle güvenlik
talimatlar›na dikkat ederek okuman›z› ve devaml› suretle saklaman›z› tavsiye ederiz.
Sayg›lar›m›zla,
Sinbo Küçük Ev Aletleri
SINBO SK 2396 ELEKTR‹KL‹ TERMOS
KULLANIM TAL‹MATI
Cihaz›n›zdan en iyi flekilde yararlanabilmek için cihaz› ilk defa kullanmaya bafllamadan
önce bu kullan›m talimat›n› dikkatli bir flekilde okuyunuz. Bu talimat› cihaz›n ifllevlerine
iliflkin bilgileri hat›rlamak amac›yla bir baflvuru kayna¤› olarak muhafaza etmenizi tavsiye
ederiz.
This appliance is not intended for use by persons (including children) with reduced physical,
sensory or mental capabilities, or lack of experience and knowledge, unless they have
been given supervision or instruction concerning use of the appliances by a person
responsible for their safety. Children should be supervised to ensure that they do not play
with the appliance.
This appliance is intended to be used in household and similar applications such as:
- staff kitchen areas in shops, offices and other working environments;
- farm houses;
- by clients in hotels, motels and other residential type environments;
- bed and breakfast type environments.
Bu ürün (çocuklar dahil ) fiziksel hassasiyeti az, zihinsel olarak yetersiz, deneyimsiz ve
yeterli bilgiye sahip olmadan yada kendilerinin güvenli¤inden sorumlu olan kifliler tarafından
bu ürünü kullanmak için gerekli talimatlar verilmemifl kiflilerin kullanımına uygun de¤ildir.
- 1 -
Page 3

ÖNEML‹ UYARILAR
• Bakım, Onarım ve Kullanımda Uyulması Gereken Kurallar
1. Cihaz› kullanmaya bafllamadan önce bu talimat› dikkatle okuyunuz ve baflvuru kayna¤›
olarak saklay›n›z.
2. Cihaz› prize takmadan önce cihaz›n etiketinde yazan voltaj düzeyinin flebeke voltaj
düzeyiyle ayn› oldu¤undan emin olunuz.
3. Güç kablosunu dikkatli bir flekilde kullan›n›z. Kabloyu bükmeyiniz ya da çekifltirmeyiniz.
Cihaz› kullanmad›¤›n›z zamanlarda fiflini çekiniz.
4. Sebili daima dik konumda kullan›n›z.
5. Sebili temizlemeden önce so¤umas›n› bekleyiniz.
6. Sebil ›s›ya maruz b›rak›ld›¤›nda ya da dengeli olmayan ortamlarda (afl›r› su ya da nem)
kullan›ld›¤›nda deforme olabilir ya da ar›zalanabilir.
7. Sebilin içinde su olmaks›z›n kaynatma yap›lmas› cihaz›n ar›zalanmas›na neden olur.
8. Sebil çal›fl›yorken cihaz›n d›fl gövdesine temas etmeyiniz. Cihazla temas etmeden önce
so¤umas›n› bekleyiniz.
9. Güç kablosunu y›kamaya kalk›flmay›n›z sebili suya ya da baflka bir s›v›ya sokmay›n›z.
10. Sebil çocuklar taraf›ndan ya da çocuklar›n yak›n›nda kullan›l›yorken çok dikkatli
olunuz. Cihaz›n bafl›ndan kesinlikle ayr›lmay›n›z.
11. Kablosu ya da fifli ar›zalanm›fl olan, normal flekilde çal›flmayan, ar›zal› ya da hasarl›
cihaz› kullanmaya kalk›flmay›n›z.
12. Sebil kendi bafl›n›za onarmaya kalk›flmay›n›z, cihaz›n onar›m› için özel aletlere ihtiyaç
duyuldu¤undan onar›m ifllemi için cihaz› yetkili servis merkezine götürünüz.
13. Tehlikeli durumlara neden olmamak için üretici taraf›ndan tavsiye edilmeyen
aksesuarlar› kullanmay›n›z.
14. Cihaz d›fl mekanlarda ya da nemli ortamlarda kullan›lmak üzere tasarlanmam›flt›r
ve yaln›zca evde kullan›ma yöneliktir.
15. Güç kablosu dü¤üm olmamal›, s›cak yüzeyler üzerine b›rak›lmamal› ya da tezgah
kenarlar›ndan sarkmamal›d›r.
16. Sebilin her taraf›nda yeterli hava dolafl›m› sa¤lanacak flekilde boflluk b›rak›lmal›d›r.
S›cakl›¤›n sorunlara neden olabilece¤i yüzeyler için ›s› izolasyonu kullan›lmas› tavsiye
edilir.
17. Cihaz› tasarlanm›fl kullan›m amac› d›fl›nda kullanmay›n›z.
18. Kapa¤›n alt›nda s›cak buhar oldu¤unu unutmay›n›z.
19. Kapa¤›n buhar deli¤ini güç dü¤meleri ve mobilyalardan uzak tutunuz.
20. Sebilin yak›n›na yan›c› malzemeler b›rakmay›n›z.
21. Güç kablosunu dikkatli bir flekilde kullan›n›z, kablo yere düflürüldü¤ü takdirde
ar›zalanabilir.
22. Cihaz›n ilk kullan›m› s›ras›nda bir miktar koku ve duman ç›kmas› normal bir durumdur,
bu durum k›sa bir süre sonra ortadan kalkacakt›r.
23. ‹çerisinde s›cak su bulunan sebili hareket ettirirken dikkatli olunuz.
24. Cihaz› azami su seviyesinin üstüne ç›kacak flekilde doldurmay›n›z.
25. Buhar deli¤ini bez ya da baflka cisimlerle örtmeyiniz.
26. Sebilin kapa¤›n›n düzgün bir flekilde kapat›lm›fl oldu¤undan emin olunuz.
27. Sebili tafl›rken tutacak k›sm›n› kullan›n›z.
- 2 -
Page 4
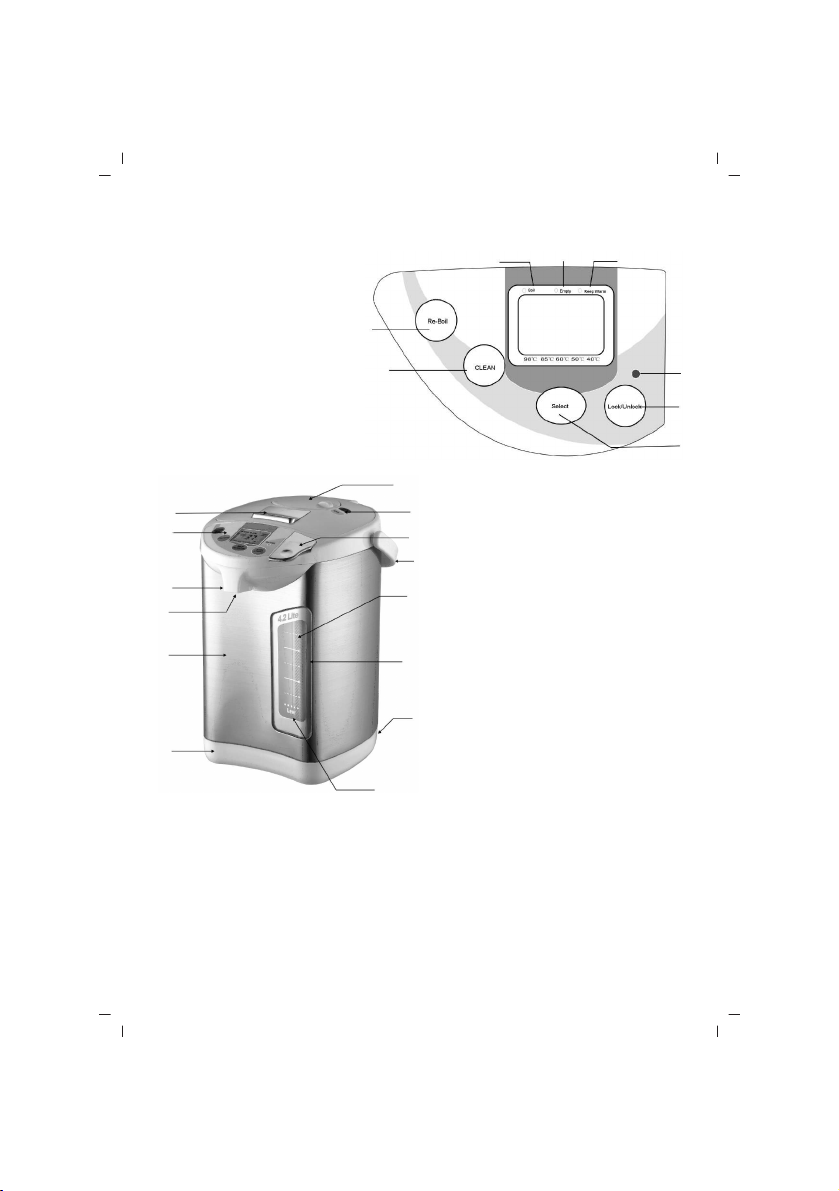
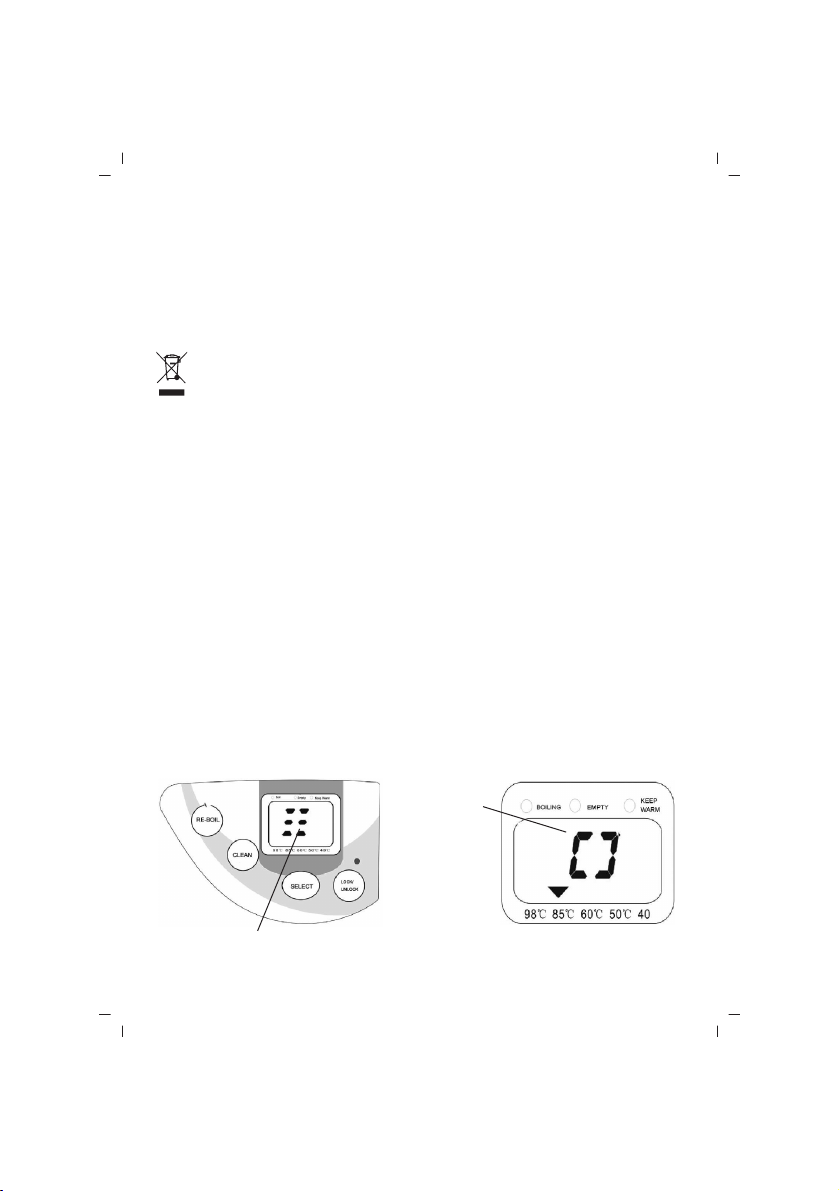
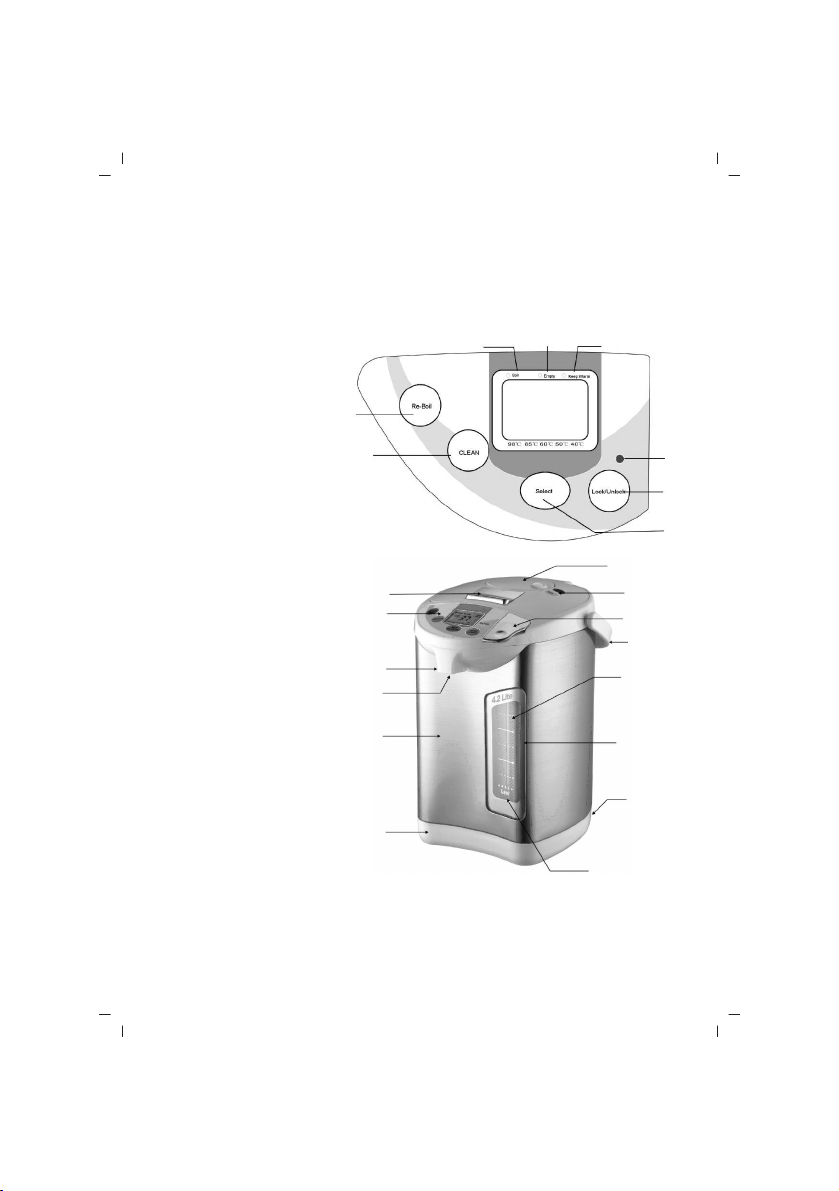
Kontrol panosu
1. Kaynama göstergesi
2. Yeniden kaynatma dü¤mesi
3. Temizleme dü¤mesi
4. Seçme dü¤mesi
5. Kilitleme-Kilit Açma dü¤mesi
6. Kilit açma göstergesi
7. S›cak tutma göstergesi
8. Cihaz bofl göstergesi
1
2
3
4
5
6
C‹HAZIN TANITIMI
2
3
7
8
9
10
11
12
13
14
1
1. Açma/kapama dü¤mesi
2. Kontrol panosu
3. Bardak anahtar›
4. Su ç›k›fl›
5. D›fl gövde
6. Taban
7. Su pompas› kapa¤›
8. Pompa kilidi
9. Dökme dü¤mesi
10. Tutacak
11. Cam hazne
12. Su seviye göstergesi
13. Cihaz güç girifli
14. Düflük su seviyesi iflareti
8
7
6
5
4
TEKN‹K ÖZELL‹KLER
Model: SK 2396
Voltaj: 230V~, 50HzHz
Güç: 680W
Kapasite: 3,5L
TASARIM VE TEKN‹K ÖZELL‹KLERDE ÖNCEDEN B‹LD‹R‹M YAPILMAKSIZIN DE⁄‹fi‹KL‹⁄E
G‹D‹LEB‹L‹R!
- 3 -
Page 5
C‹HAZIN KULLANIMI
• Ba¤lantı veya Montajın Nasıl Yapılaca¤ını Gösterir fiema ile Ba¤lantı veya Montajın
Kimin Tarafından Yapılaca¤ına (tüketici, yetkili servis) iliflkin bilgiler
SEB‹L‹N ÇALIfiTIRILMASI
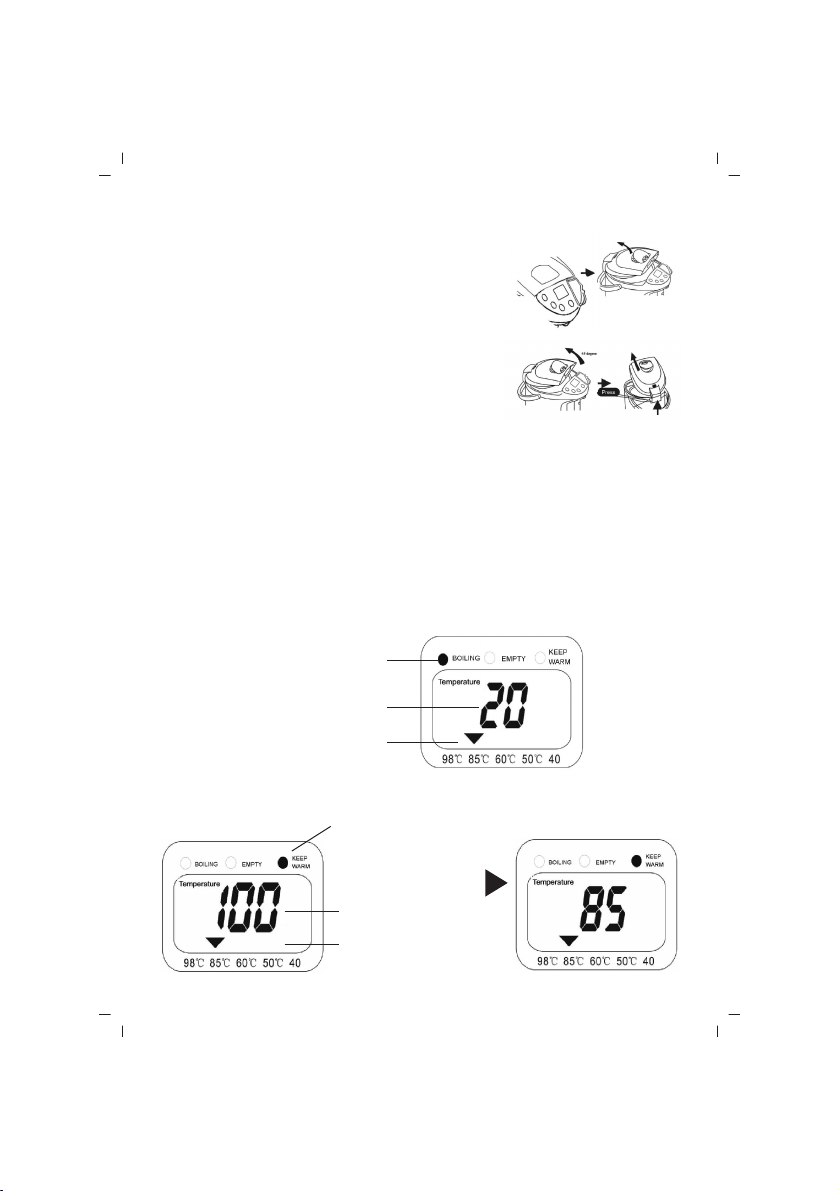
ÜST KAPA⁄IN AÇILMASI
Kapakta bulunan ÜST KAPAK K‹L‹T KANATÇI⁄I’n›n ön
kenar›n› afla¤› do¤ru bast›r›n›z. Üst kapa¤› açmak için
yukar› do¤ru çekerek kald›r›n›z.
Cihaz içerindeki su halen s›cak olabilir ve d›flar›ya s›cak
buhar ç›kabilir.
ÜST KAPA⁄IN ÇIKARILMASI
Üst kapa¤› yaklafl›k 45° aç›yla kald›r›n›z, üst kapa¤›n
arkas›nda bulunan K‹L‹T AÇMA dü¤mesine bas›p 45° aç›yla
yukar› do¤ru çekiniz.
DOLDURMA VE ‹LAVE YAPMA
1. Üst Kapa¤› yukar›daki talimata göre aç›n›z, baflka bir kap kullanarak iç hazneye AZAM‹
iflaretine ulafl›lana kadar su doldurunuz.
Kaynayan su d›flar› s›çrayabilece¤i için cihaz› afl›r› miktarda doldurmay›n›z.
2. Üst kapa¤› kapat›n›z, kapa¤›n yerine “klik” sesi ç›kararak tam olarak oturdu¤undan
emin olunuz.
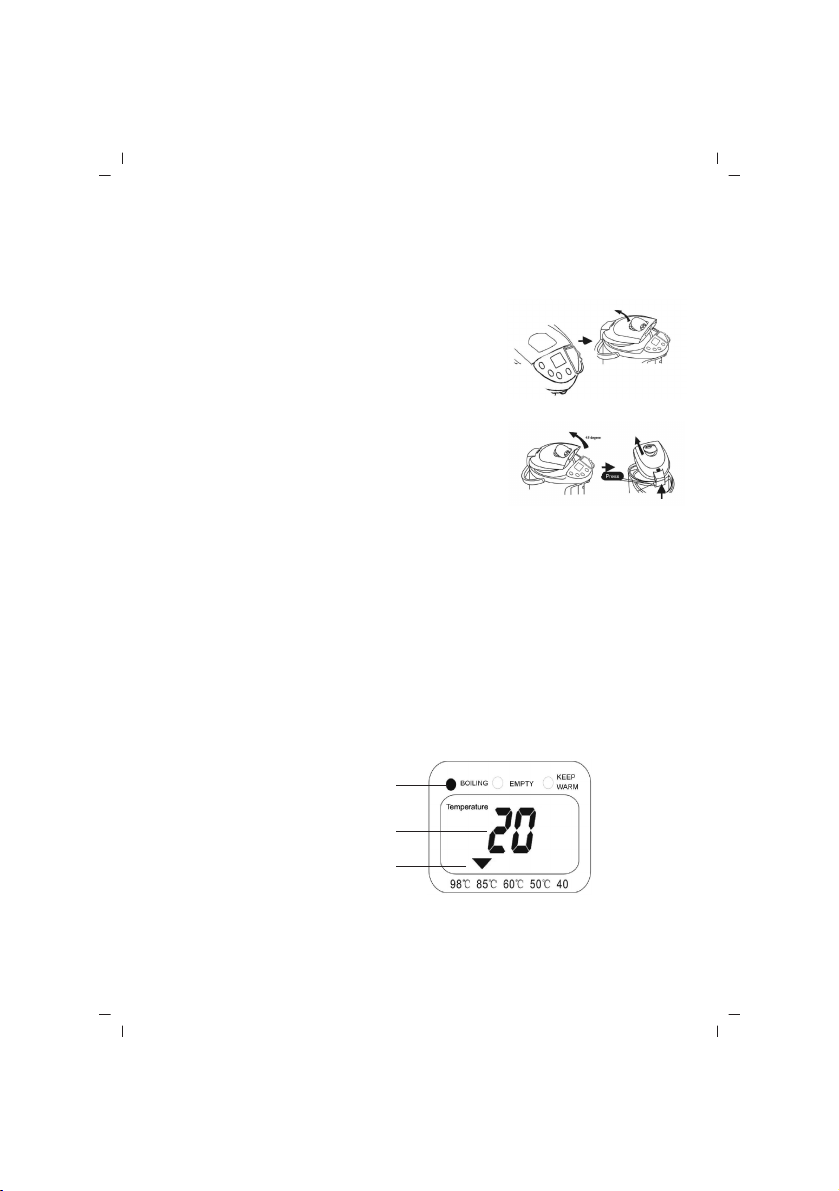
SU KAYNATMA
1. Güç aç›ld›ktan sonra su hemen kaynamaya bafllayacakt›r.
* Su kayn›yorken üst kapa¤› açmay›n›z.
* Cihazda su kayn›yorken su ilavesi yapmay›n›z.
* Üst kapakta bulunan buhar deli¤ini kapatmay›n›z.
Kaynama LED'i yan›yor
LCD ekranda su
s›cakl›¤› gösteriliyor
S›cak tutma
s›cakl›¤› seçimi
- 4 -
Page 6
C‹HAZIN KULLANIMI
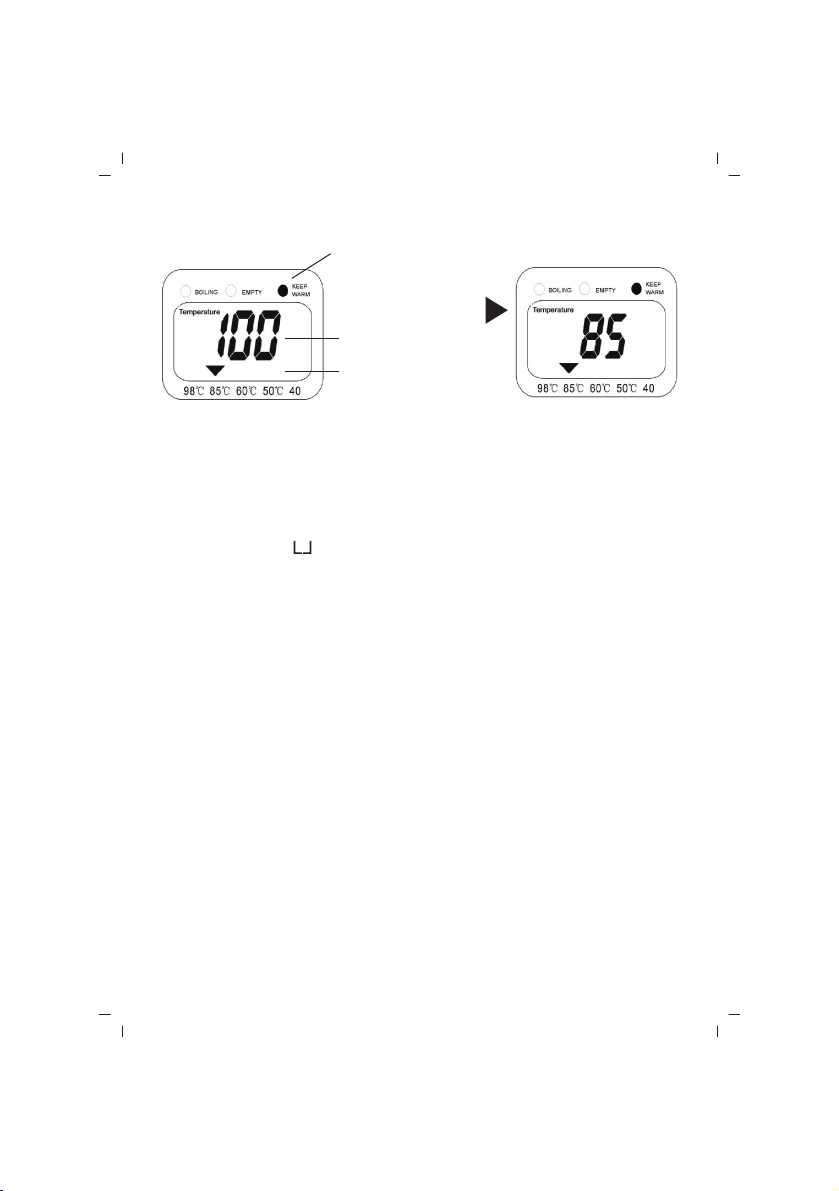
SICAK TUTMA
* Su kaynad›ktan sonra 5 kez sesli uyar› iflitilir. S›cak tutma LED’i yanar.
Eklenen su miktar› cihaz›n kaynatma ifllemini otomatik olarak bafllatmas› için yeterli
de¤ilse YEN‹DEN KAYNATMA dü¤mesine bas›n›z.
OTOMAT‹K KAPANMA
Cihaz›n içinde su kalmamas› durumunda sebilin otomatik KAPANMA özelli¤i devreye
girecektir. Güç kayna¤› KAPALI duruma geçecektir. Ayr›ca bir sesli uyar› iflitilecek ve
LCD ekran üzerinde “
bafllayacakt›r.
OTOMAT‹K KAPANMA nedenleri
* Cihaz›n gücü aç›k ama içerisinde su yok.
* Su seviyesi su ilave göstergesinin alt›nda ve su hala kayn›yor.
* Su tüketildikten sonra hiç su ilavesi yap›lmam›fl.
* Üst kapak yerine düzgün flekilde tak›lmam›fl.
* Güç ba¤lant›s› yap›ld›ktan sonra s›cak su ilavesi yap›lm›fl.
Çözüm
* Cihaz›n so¤umas›n› bekleyiniz, su ekleyiniz, güç kayna¤›n› kapat›p yeniden aç›n›z.
YEN‹DEN KAYNATMA ÖZELL‹⁄‹
1. “YEN‹DEN KAYNATMA” dü¤mesine bir kez bas›n›z. Yeniden kaynatma gösterge lambas›
yanacakt›r.
2. YEN‹DEN KAYNATMA tamamland›ktan sonra SICAK TUTMA gösterge lambas› yanacakt›r.
* Cihaz›n içinde yeterli miktarda su yoksa yeniden kaynatma özelli¤i çal›flmayacakt›r.
Su yeni kaynad›¤›nda zaten 100°C'de oldu¤u için bu durumda YEN‹DEN KAYNATMA
dü¤mesine bas›lmas› hiçbir etkiye sahip olmayacakt›r.
S›cak tutma
LED'i yan›yor
LCD ekranda su
s›cakl›¤› gösteriliyor
S›cak tutma
s›cakl›¤› seçimi
” simgesi görüntülenecektir. “SU ‹LAVES‹” LED'i yanmaya
SUYU KULLANMA
1. HAVA POMPALI SU ÇIKIfiI
Barda¤› su ç›k›fl›na yerlefltiriniz ve su pompas› kapa¤›n› < itiniz.
(Güç kayna¤›na gerek yok)
- 5 -
Page 7
C‹HAZIN KULLANIMI
2. OTOMAT‹K POMPALI SU ÇIKIfiI
a) “K‹L‹T AÇMA” dü¤mesine B‹R KEZ bas›n›z. “K‹L‹T AÇMA” gösterge lambas› yanacakt›r.
b) S›cak su pompalamak için “OTOMAT‹K POMPALAMA” dü¤mesine bas›n›z.
3. BARDAK ÇIKIfiI
a) “K‹L‹T AÇMA” dü¤mesine B‹R KEZ bas›n›z. “K‹L‹T AÇMA” gösterge lambas› yanacakt›r.
b) Su ç›k›fl›ndaki bardak a¤z› parças›n› <bardak dü¤mesi> kullan›n›z.
* K‹L‹T AÇMA dü¤mesine bas›ld›ktan sonra 10 saniye içerisinde dökme dü¤mesine
bas›lmad›¤› takdirde cihaz otomatik olarak K‹L‹T konumuna geri döner.
Elektrikli sebil prize tak›l› de¤ilken ve Güç AÇIK de¤ilken dökme ifllevi ÇALIfiMAYACAKTIR.
SICAK TUTMA SICAKLI⁄I AYARI
‹deal s›cakl›¤› seçmek için “SEÇME” dü¤mesine bas›n›z.
S›cakl›¤› de¤ifltirmek için “SEÇME” dü¤mesine bas›n›z.
98°C 85°C 60°C 50°C 40°C
Bafllang›ç ayar› 85°C
* S›cak tutma ayarlar› 98°C ,85°C ,60°C ,50°C ,40°C olarak ayarland›¤›nda s›cak tutma
LED’i kaynama sonras›nda yanmaya bafllayacakt›r. Su s›cakl›¤› seçili ayarlar›n alt›nda
oldu¤unda su yeniden kaynat›lacak ve kaynama LED'i yanacakt›r.
* S›cak tutma s›ras›nda s›cakl›k s›f›rlanabilir. (Cihaz farkl› su s›cakl›¤›na göre otomatik
olarak YEN‹DEN KAYNATMA yapacakt›r.
98˚C: Haz›r yemek piflirmek ve s›cak çikolata gibi s›cak içecekleri haz›rlamak için
uygundur. (kulland›ktan sonra ayar› mutlaka 85˚C’ye getiriniz.)
85˚C: Ekonomik s›cakl›kta çay ve kahve haz›rlamak için idealdir.
50˚C/60˚C: Haz›r süt kar›fl›mlar› ve ilaç kullanmak için uygundur.
40˚C: S›cak su
KULLANIM HATALARINA ‹L‹fiK‹N B‹LG‹LER
Cihazınızı, beyan edilen voltaj ile çal›flt›r›n›z.Bulundu¤unuz yerin voltaj›n›n uygun olup
olmad›¤›n› kontrol ediniz.
Güç kablosunun ar›zalanmas› durumunda tehlikelerin önlenmesi için kablo üretici, servis
merkezi ya da benzer bir ehliyetli kifli taraf›ndan de¤ifltirilmelidir. Ar›za durumunda cihaz›
kendiniz sökmeye kalk›flmay›n›z, bak›m merkezimiz ya da sat›fl sonras› hizmet merkezimiz
ile ba¤lant›ya geçiniz.
Cihaz› kendiniz onarmaya kalk›flmay›n›z. Meydana gelebilecek ar›zalardan firmam›z
kesinlikle sorumlu de¤ildir, ve cihaz›n›z garanti kapsam› d›fl›nda ifllem görecektir.
- 6 -
Page 8
TAfiIMA VE NAKL‹YE ESNASINDA
• Ürünü düflürmeyiniz,
• Darbelere maruz kalmamas›n› sa¤lay›n›z,
• S›k›flmamas›n›, ezilmemesini sa¤lay›n›z,
• Ambalaj üzerindeki iflaretlemelere uyunuz.
• Orjinal ambalajıyla taflımaya özen gösteriniz.
ÇEVRE VE ‹NSAN SA⁄LI⁄I
Çevre korumas›na siz de katk›da bulunabilirsiniz!
Lütfen yerel düzenlemelere uymay› unutmay›n: Çal›flmayan
elektrikli cihazlar›, uygun elden ç›karma merkezlerine götürün.
Kullanım sırasında insan ve çevre sa¤lı¤ına tehlikeli veya zararlı olabilecek bir durum
söz konusu de¤ildir.
TEM‹ZL‹K VE BAKIM
• Tüketicinin Kendi Yapabilece¤i Bakım, Onarım veya Ürünün Temizli¤ine ‹liflkin Bilgiler
Temizlik ifllemine bafllamadan önce cihaz›n fiflinin çekili oldu¤undan cihaz›n içinde kalan
suyun döküldü¤ünden ve cihaz›n yeterince so¤umufl oldu¤undan emin olunuz.
‹ç hazne ve ‹ç kapak
Cihaz› yumuflak bir süngerle temizleyip suyla y›kay›n›z.
Haznenin kireci ayda bir ila üç ayda bir sitrik asit kullan›larak temizlenmelidir.
‹ç hazne soyulabilece¤i için kesinlikle metal cisimler, naylon f›rçalar ya da difl f›rçalar›
vb. cisimlerle temizlenmemelidir.
UYARI:
* Kapa¤›n alt›nda s›cak buhar bulundu¤u için kapa¤a fazla yaklaflmay›n›z.
* ‹ç su haznesi boflken dökme dü¤mesine basmay›n›z. (Aksi takdirde ar›zala meydana
gelebilir.)
Cihaz›n fifli tak›l› de¤ilken Otomatik Dökme dü¤mesini ya da Bardak Dü¤mesini kullanarak
s›cak su alamazs›n›z.
Sitrik asit ile temizlik
LCD yan›p
sönmeyi
durdurur
100°C’de kaynad›¤›nda
LED yan›p söner 70 dak.
1 saat 10 Dakika sonra
- 7 -
Page 9

TEM‹ZL‹K VE BAKIM
* ‹Ç HAZNEY‹ yumuflak nemli bir bezle temizleyiniz.
* Elektrikli sebili temizlemek için kesinlikle kimyasal ya da afl›nd›r›c› çözeltiler ya da
temizlik malzemeleri kullanmay›n›z.
* Cihaz›n d›fl yüzeylerini de yaln›zca yumuflak nemli bir bezle silerek temizleyiniz. Hiçbir
kimyasal maddeye ihtiyaç duyulmamaktad›r.
* Cihaz› suya sokmay›n›z ya da kontrol panosunun ›slanmas›na izin vermeyiniz.
* Cihaz› kurutmak için bafl afla¤› çevirmeyiniz.
NOT: Kullan›lan su kireçli oldu¤unda iç haznede kireç lekeleri kalabilir. Düzenli olarak
temizlik yap›lmal›d›r. Sürekli kullan›m bu lekelerin ç›kmas›n› zorlaflt›rabilir.
AfiA⁄IDAK‹ MALZEMELER‹ KULLANMAYINIZ:
* Uçucu ya¤ ya da tiner.
* Afl›nd›r›c› temizlik tozlar›, naylon f›rçalar vb.
Elektrikli sebil haznesi bulafl›k makinesinde y›kanmaya uygun DE⁄‹LD‹R.
SAKLAMA:
Uzun süre saklamadan önce iyice kurulay›n›z.
BAKIM
• Periyodik Bakım Gerektirmesi Durumunda, Periyodik Bakımın Yapılaca¤ı Zaman
Aralıkları ile Kimin Tarafından Yapılması Gerekti¤ine ‹liflkin Bilgiler
Cihaz periyodik bak›m gerektirmez.
Bu cihaz fazla bak›m gerektirmemektedir ve kullan›c› taraf›ndan onar›labilecek hiçbir
parças› bulunmamaktad›r. Cihaz› kendiniz onarmaya kalk›flmay›n›z. Servis ifllemi yaln›zca
ehliyetli servis sorumlular› taraf›ndan gerçeklefltirilmelidir.
SATIfi SONRASI H‹ZMETLER‹
Bu cihaz kullan›c› taraf›ndan de¤ifltirilebilen parçalara sahip de¤ildir. Ünitenin çal›flmamas›
durumunda flu ad›mlar› izleyin.
1. Talimatlar›n do¤ru biçimde izlendi¤ini denetleyin.
2. Ana kayna¤›nda ifllevselli¤ini denetleyin.
Cihaz hâlâ çal›flm›yorsa, sat›n ald›¤›n›z yere geri götürün.
Güç kablosu hasar görmüflse, tehlikeleri önlemek için, cihaz üreticisine iade edilmelidir.
Kendi kendinize tamir etmeye KALKIfiMAYIN.
fiu talimatlar› izleyin:
1. Dikkatlice, tercihen orijinal kutusuna paketleyin.
Ünitenin temiz oldu¤undan emin olun.
2. Tüm yaz›flmalarda, ad›n›z›, adresinizi ve ürünün model numaras›n› belirtin.
3. ‹ade etme nedeninizi belirtin.
4. Garanti kapsam›ndaysa, nereden, ne zaman al›nd›¤›n› belirtin ve sat›n alma kan›t›n›
ekleyin (örn. kasa fifli).
- 8 -
Page 10
ÖNEML‹ UYARILAR
Kablonun uzun olmas› nedeniyle meydana gelebilecek dolanma ve tak›lma gibi tehlikeleri
önlemek için güç kablosu k›sa tutulmufltur.
Daha uzun uzatma kablolar› d›flar›dan sat›n al›nabilir, ancak kullan›m s›ras›nda çok
dikkatli olunmal›d›r. Uzatma kablosu 1) en az cihaz›n etiketinde belirtilen elektriksel
de¤erlere sahip olmal›d›r, 2)toprak ba¤lant›l› ve üç telli kablodan oluflmal›d›r ve 3) tak›lma
ya da üstüne bas›lmas›n›n önlenmesi için tezgah ya da masa kenar›ndan sarkmamal›d›r.
UYARI: C‹HAZIN TOPRAKLANMASI GEREKMEKTED‹R
Prizdeki tellerin afla¤›daki koda göre renklendirilmifl oldu¤undan emin olunuz:
Yeflil ve sar› : Toprak
Mavi : Nötr
Kahverengi : Ak›m
Yukar›daki renkler prizdeki terminallerle eflleflmiyorsa afla¤›daki flekilde ba¤lant› yap›n›z:
Yeflil ve sar› renkli kablo “E” iflaretli ya da toprak iflaretli ya da yeflil ya da yeflil ve sar›
renkli terminale ba¤lanmal›d›r.
Mavi renkli tel N olarak iflaretlenmifl ya da siyah renkteki terminale ba¤lanmal›d›r.
Kahverengi renkli tel L olarak iflaretlenmifl ya da k›rm›z› renkteki terminale ba¤lanmal›d›r.
(Prizdeki terminaller iflaretli de¤ilse ya da durumdan emin de¤ilseniz lütfen ehliyetli bir
elektrikçiye baflvurunuz)
Bu ürünü do¤ru flekilde elden ç›kar›n›z
Bu iflaret, ürünün ülke genelinde di¤er ev at›klar›yla birlikte elden ç›kar›lmamas›
gerekti¤ini göstermektedir. Çevre ve insan sa¤l›¤›n›n kontrolsüz flekilde elden
ç›kar›lm›fl olan at›klar nedeniyle zarar görmesini önlemek amac›yla, malzeme
kaynaklar›n›n sürdürülebilir yeniden kullan›m›n› sa¤lamak için cihaz›n geri dönüflümünü
sa¤lay›n›z. Kullan›lm›fl cihazlar›n›z› lütfen iade ve toplama merkezlerine ulaflt›r›n›z ya da
ürünün sat›n al›nd›¤› ma¤azayla ba¤lant›ya geçiniz. Bu yerler ürünü teslim al›p çevreye
duyarl› bir flekilde geri dönüflümlerini sa¤layabilirler.
- 9 -
Page 11
ENGLISH
SINBO SK 2396
ELECTRIC AIR POT
INSTRUCTION MANUAL
Before operating this appliance, please read these instructions completely.
Thank you for choosing SINBO appliances. May you have an enjoyable experience using
our products.
Parts Introduction
Function panel
1. Boil indicator
2. Re-boil button
3. Clean button
4. Select button
5. Lock-Unlock button
6. Unlock indicator
7. Keep warm indicator
8. Empty indicator
1. Switch
2. Function panel
3. Cup switch
4. Water outlet
5. Outer body
6. Base
7. Water pump lid
8. Pump lock
9. Dispense Key-press
10. Handle
11. Glass tube
12. Water level indicator
13. Appliance power inlet
14. Low water level
Technical Specifications
Model: SK 2396
Voltage: 230V~50HzHz
Power: 680W
Capacity: 3.5L
1
2
3
1
2
3
4
5
6
8
7
6
5
4
7
8
9
10
11
12
13
14
* Specifications are subject to change without prior notice with the development of
technology.
- 10 -
Page 12

BEFORE USING
1. Please read these instructions carefully before using and keep them for future
reference.
2. Check your local main voltage whether it is the same as stated on the appliance.
3. Handle power cord carefully. Do not bend or pull cord. Unplug from wall socket when
not in use.
4. Always use Air pot in a vertical upright position.
5. Allow Air pot to cool before cleaning.
6. Air pot may be deformed or damaged when exposed to heat or used in unstable
surroundings(excess water or humidity.)
7. Boiling without any contents in the Air pot would damage the unit.
8. Avoid touching outer body of this Air pot during operation. Always allow unit to cool
before handling.
9. Do not wash power cord or immerse Air pot in any water or liquid.
10. Close supervision is necessary when Air pot is used by or near to children. Never
leave appliance unattended.
11. Do not operate any appliance with a damaged cord or plug or malfunctions or has
been damaged in any manner.
12. Do not attempt to repair the Air pot, always return to service agent for rectification,
as special tools may be required.
13. The use of unnecessary attachments is not recommended by the manufacturer as
it may result in hazards.
14. The appliance is not in ended for outdoor use or in damp areas, it is for household
use only.
15. Power cord should not be knotted, left on hot surfaces or left hanging over table
edges.
16. Air pot should be given ample air circulation on all sides. An insulated hot pad is
recommended on surfaces where heat may cause problems.
17. Do not use appliance for other then its intended usage.
18. Beware of hidden steam under lid.
19. Place Steam vent of lid away from power point switch and furniture.
20. Do not place flammable material near Air pot.
21. Handle power cord carefully, cord may malfunction if dropped.
22. It is normal for smoke and smell to emitted during first use, Be cautions it will stop
after a short period of usage.
23. When moving Air pot filled with hot liquids.
24. Do not fill device exceeding the “Full” water indicator scale.
25. Do not cover steam vent with cloth or any material.
26. Always ensure that Air pot lid is closed properly.
27. Make full use of handle when moving Air pot around.
- 11 -
Page 13
HOW TO OPERATE AIR POT
OPENING TOP LID
Push down front edge of TOP COVER LOCK FLAP located
at the lid. Lift up back by potion pulling upwards to open
the top cover.
Water may still be hot and hot vapor may escape.
REMOVING TOP LID
Lift top lid to about 45˚ angle, press the UNLOCK button
located at the rear of the top cover
and pull upwards at 45˚.
FILLING & REFILLING
1. Open the Top Cover as the above instruction ,Using another container ,fill water into
the Inner pot until the FULL mark is reached. Do not over fill as hot water may splash
out During boiling.
2. Close top cover, ensure lid is secured by pressing firmly down till “click” sound is
heard.
BOIL WATER
1. After power is switched ON, water will start to boil immediately.
* Do not open top cover when water is boiling.
* Do not add water when appliance is still boiling.
* Do not obstruct the top lid steam vent.
Boiling LED is lit
LCD indicates water
temperature
Keep warm
temperature
selection
KEEP WARM
Keep warm LED lit
LCD indicates water
temperature
Keep warm temperature
selection
- 12 -
Page 14

HOW TO OPERATE AIR POT
* Beeper will sound 5 times when water is boiled. keep warm LED will be lit.
Press RE-BOIL button if added water is not sufficient to allow unit to boil automatically.
AUTO CUT-OFF
In the event that the water runs dry, the auto CUT-OFF function of this electric air pot
would be activated. The power source would be CUT-OFF. At the same time, the beeper
sounds and a “
Causes of AUTO CUT-OFF
* Power on,but water not filled.
* Water level below add water indicator but water is still boiling.
* No water is added when water is used up.
* Top cover not secured properly.
* Hot water added after power is connected.
Solution
* Allow unit to cool, add water and switch off power supply, and turn on again.
RE-BOIL FUNCTION
1. Press “RE-BOIL” button once. Re-boiling indicator light will come ON.
2. After RE-BOIL is completed, the KEEP WARM indicator light will turn on.
* Re-boil will not function if there is insufficient water inside.
Press the RE-BOIL button immediately after the water had just reached boiling level will
have no effect as the water is already at 100?.
DISPENSING WATER
1. AIR PUMP WATER OUTLET
Put the cup near water outlet, Push< the water pump lid.
(No need power)
2. AUTO DISPENSE WATER OUTLET
a) Press the “UNLOCK” button ONCE. The “UNLOCK” indicator light will come on.
b) Push the “AUTO DISPENSE ”button to dispense hot water.
“ sign is displayed on LCD panel. The “REFILL”LED will also be lit.
3. CUP WATER OUTLET
a) Press the “UNLOCK” button ONCE. The “UNLOCK” indicator light will come on.
b) Use cup mouth touch<cup switch>water outlet at once.
* If the dispense button is not selected within 10 seconds after selecting the UNLOCK
button, the appliance will automatically revert back to the LOCK position.
The dispensing function will NOT operate if the electric air pot is not connected to the
main switch and Power switched ON.
- 13 -
Page 15
USING THE KEEP WARM TEMP SET
Press the “SELECT” button to select your ideal temperature.
Press “SELECT” button once to change temperature.
* When the keep warm settings are set
at 98˚C ,85˚C ,60˚C ,50˚C ,40˚C Keep warm LED with be lit after boiling. If the water
temperature is below the selected settings, water will be boiled again and boiling LED
will be it.
* Temperature can be reset during warm keeping.(The device will RE-BOIL automatically
according to different hot water temperature.
98˚C: Suitable for cooking hot instant food and for hot beverages such as chocolate
drinks.
(always return setting to 85˚C after used.)
85˚C: Suitable for tea or coffee preparation at economical temperature.
50˚C/60˚C: Suitable for instant milk formulas and taking medication.
40˚C: Warm water
CLEANING AND MAINTENANCE
Before cleaning, ensure that power cord is pulled out, residue water is poured out and
device is cooled.
Inner pot & Inner cover
Clean device with a soft sponge and wash it with water.
Boiler scale should be cleaned every one month to three months with citric acid.
Do not scrub inner bottle with any metal objects, nylon brush or toothbrush etc or the
inner pot may peel off.
CAUTION:
* Always keep the lid away from you as there is hot steam trapped under the lid.
* Do not press the dispensing button when the inner water reservoir is empty.(Doing so
can cause damage.)
You cannot dispense hot water by Auto Dispense button or the Cup Switch if the pot is
unplugged.
98˚C 85˚C 60˚C 50˚C 40˚C
Primary setting at 85˚C
-14 -
Page 16

Cleaning with citric acid
CLEANING AND MAINTENANCE
LCD stops
flashing
LED flashes boiling to 100C
70 mins.
* Clean the INNER POT with soft damp cloth.
* Never use any chemical or abrasive solution or cleaning materials to clean your electric
air pot.
* The exterior surfaces should also be cleaned with a soft damp cloth. No chemicals are
needed.
* Do not immerge unit in water or wet the operation panel.
* Do not place the unit upside down to dry it.
NOTE:If alkaline water is used, lime stain may stick to the inner pot. Cleaning must be
done regularly. Continued usage may result in the stain becoming difficult to remove.
DO NOT USED THE FOLLOWING ITEMS:
* Volatile oil or thinner.
* Abrasive cleaning powder, nylon brushes etc.
The electric air pot is NOT dishwasher safe.
STORAGE:
Dry it thoroughly before prolonged storage.
IMPORTANT GUIDELINES
A short power cord is provided to minimize the hazards involved with tripping over longer
cords.
Longer extension cords can be easily purchased, however one should exercise care
during use. The extension cord should have 1) a minimum acceptable marked electrical
rating similar to that kind of appliance 2)should be a grounding-type three-wire cord and
3)should be arranged so that it will not drape over counter top or table top where it can
be easily pulled or tripped.
WARNING:THIS APPLIANCE MUST BE EARTHED
Ihr 10 Mins later
-15 -
Page 17

IMPORTANT GUIDELINES
The wires in this main are colored in accordance with the following code:
Green and yellow : Earth
Blue : Neutral
Brown : Live
If the colors above do not match those terminals identified in your plug, connect as follow:
The wire colored green and yellow must be connected to the terminal marked “E” or by
the earth symbol or colored green or green and yellow:
The wire colored blue must be connected to terminal marked N or colored black.
The wire colored brown must be connected to terminal marked L or colored red.
(If terminals of plug are unmarked or in any doubt, kindly consult a qualified electrician)
Correct Disposal of this product
This marking indicates that this product should not be disposed with other
household wastes throughout the nation. To prevent possible harm to the
environment or human health from uncontrolled waste disposal, recycle if
responsibly to promote the sustainable reuse of material resources. To return your used
device, please use the return and collection systems or contact the retailer where the
product was purchased. They can take this product for environmental safe recycling.
-16 -
Page 18
FRANÇAIS
SINBO SK 2396
FONTAINE À EAU ÉLECTRIQUE
MODE D'EMPLOI
Lisez ce manuel en entier avant de commencer à utiliser l’appareil.
Merci d’avoir choisi SINBO. Nous espérons que vous utiliserez notre produit avec plaisir.
DESCRIPTION DES PIÈCES
Panneau de contrôle
1. Indicateur d’ébullition
2. Bouton d’ébullition à nouveau
3. Bouton de nettoyage
4. Bouton de sélection
5. Bouton de verrouillage-
déverrouillage
6. Indicateur de déverrouillage
7. Indicateur de maintien au chaud
8. Indicateur d’appareil vide
1. Bouton de Marche/Arrêt
2. Panneau de contrôle
3. Verrou de verre
4. Sortie d’eau
5. Corps extérieur
6. Semelle
7. Couvercle de pompe à eau
8. Verrou de pompe
9. Bouton d’écoulement
10. Poignée
11. Réservoir en verre
12. Indicateur de niveau d’eau
13. Entrée d’alimentation d’appareil
14. Signe de bas niveau d’eau
Spécifications Techniques
Modèle: SK 2396
Voltage : 230V~50HzHz
Puissance : 680W
Capacité : 3,5L
1
2
3
1
2
3
4
5
6
8
7
7
8
9
10
11
12
13
14
6
5
4
* Nous nous réservons le droit de modifier les spécifications techniques sans préavis
pour des raisons de développement technologiques.
- 17 -
Page 19

AVANT L’UTILISATION
1. Avant de commencer à utiliser l’appareil, lisez ce manuel en entier et conservez-le
pour vous y référer ultérieurement.
2. Avant de brancher l’appareil à la prise de courant, assurez-vous que le niveau de
voltage indiqué sur l’étiquette de l’appareil soit identique au niveau de voltage du réseau.
3. Utilisez le cordon d’alimentation avec attention. Ne tordez pas le cordon ou ne le
tiraillez pas. Débranchez la fiche électrique lorsque vous n’utilisez pas l’appareil.
4. Utilisez toujours la fontaine à eau en position perpendiculaire.
5. Attendez que la fontaine à eau refroidisse avant de la nettoyer.
6. La fontaine à eau peut se déformer ou tomber en panne lorsqu’elle subit une chaleur
ou dans des milieux non-équilibrés (de l'eau ou de l'humidité excessive).
7. L'ébullition sans eau dans la fontaine causera une panne d’appareil.
8. Ne contactez pas le corps extérieur de l’appareil pendant que la fontaine à eau est en
état de fonctionnement. Avant de contacter l’appareil, attendez qu’il refroidisse.
9. Ne tentez pas de laver le cordon d’alimentation, n’immergez pas la fontaine à eau
dans l’eau ou dans tout autre liquide.
10. Soyez très prudent lorsque l’appareil est utilisé par ou près des enfants. Ne vous
absentez jamais du lieu ou se trouve l’appareil.
11. Ne tentez pas d'utiliser un appareil dont le cordon ou la fiche électrique est détériorée,
un appareil qui ne fonctionne pas normalement, qui est en panne ou endommagé.
12. Ne tentez pas de réparer la fontaine à eau vous-même, étant donné que la réparation
de l’appareil nécessite des outils particuliers, portez l’appareil au centre de service agréé
pour l’opération de réparation.
13. Afin d’éviter de donner lieu à des situations dangereuses, n’utilisez pas les accessoires
qui ne sont pas conseillés par le fabricant.
14. L’appareil n’est pas conçu pour être utilisé dans des milieux de plein air ou des
milieux humides mais il est destiné uniquement à l’usage domestique.
15. Le cordon d’alimentation ne doit pas s’emmêler, être laissé sur des surfaces chaudes
ou pendre des bords d’établis.
16. Une espace doit être laissée partout autour de la fontaine à eau pour assurer une
circulation d’air suffisante. Pour les surfaces aux quelles la chaleur peut créer des
problèmes, il est conseillé d'utiliser une isolation thermique.
17. N’utilisez pas l’appareil à des fins autres que celles pour les quelles il est conçu.
18. N’oubliez pas qu’il se trouve de la vapeur chaude au dessous du couvercle.
19. Tenez l’orifice de vapeur du couvercle à distance des boutons d'alimentation et des
meubles.
20. Ne laissez pas de matériaux combustibles à proximité de la fontaine à eau.
21. Utilisez le cordon d’alimentation avec attention, le cordon peut faire panne s’il tombe
parterre.
22. II est normal qu'une certaine odeur et qu'une fumée se dégage de l'appareil lors de
la première utilisation, cette situation disparaîtra après une courte durée.
23. Soyez prudent lorsque vous déplacez la fontaine pendant qu’elle contient de l’eau
chaude.
-18 -
Page 20
AVANT UTILISATION
24. Ne remplissez pas l’appareil de façon à dépasser le signe de maximum niveau d’eau.
25. Ne couvrez pas l’orifice de vapeur avec un tissu ou avec d’autres objets.
26. Assurez-vous d’avoir correctement fermé le couvercle de la fontaine à eau.
Servez-vous de la partie de poignée lorsque vous transportez la fontaine à eau.
27. Saisissez la fontaine à eau de la poignée lorsque vous le portez.
MISE EN MARCHE DE LA FONTAINE À EAU
OUVERTURE DU COUVERCLE SUPÉRIEUR
Appuyez vers le bas le bord frontal de l’AILETTE DE
VERROUILLAGE DU COUVERCLE SUPÉRIEUR qui se
trouve sur le couvercle. Pour ouvrir le couvercle supérieur,
soulevez en tirant vers le haut.
L’eau qui est à l’intérieur de l’appareil peut être encore
chaude et de la vapeur chaude peut sortir à l’extérieur.
DÉMONTAGE DU COUVERCLE SUPÉRIEUR
Soulevez le couvercle supérieur avec un angle d’environ
45°, appuyez sur le bouton de DÉVERROUILLAGE qui se
trouve derrière le couvercle supérieur, et tirez vers le
haut avec un angle de 45°.
REMPLISSAGE ET RAJOUT
1. Ouvrez le couvercle supérieur selon les instructions ci-dessus, remplissez de l’eau
dans le réservoir intérieur jusqu’à ce que vous arriviez au signe de MAXIMUM, en utilisant
un autre récipient.
2. Étant donné que l’eau qui bout peut gicler à l’extérieur, ne remplissez pas l’appareil
excessivement.
3. Fermez le couvercle supérieur, assurez-vous que le couvercle soit bien installé à sa
place en faisant le son de « clique ».
FAIRE BOUILLIR DE L’EAU
1. L’eau commencera à bouillir tout de suite après la mise en marche de l’alimentation.
* N’ouvrez pas le couvercle supérieur lorsque l’eau bout.
* Ne faites pas de rajout d’eau lorsque de l’eau bout dans l’appareil.
* Ne couvrez pas l’orifice de vapeur qui se trouve sur le couvercle supérieur.
Le LED de bouillonnement
est allumé
La température de
l’eau est affichée sur
L’écran à
cristaux liquides.
- 19 -
Page 21
MAINTIEN AU CHAUD
Le LED de maintien au chaud est allumé
La température de
l’eau est affichée sur
l’écran à cristaux liquides.
* Une fois que l’eau a bouilli, vous entendrez une sommation sonore 5 fois. Le LED de
maintien au chaud s’allumera.
Si la quantité d'eau rajoutée n'est pas suffisante pour faire démarrer l’opération d’ébullition
automatique de l’appareil, appuyez sur le bouton d’ÉBULLITION À NOUVEAU.
ARRÊT AUTOMATIQUE
Dans le cas où il ne reste plus d’eau dans l’appareil, la fonction d’ARRÊT automatique
de la fontaine à eau s’activera. La source d’alimentation passera en position d’ARRÊT.
Par ailleurs, une sommation sonore retentira et l’icône de “
à cristaux liquides. Le LED de “RAJOUT D’EAU” commencera à s’allumer.
Les causes d’ARRÊT AUTOMATIQUE
* L’alimentation de l’appareil est en marche mais il n’y a pas d’eau à l’intérieur.
* Le niveau d’eau est au-dessous de l’indicateur de rajout d’eau mais l’eau bout encore.
* Aucun rajout d’eau n’a été effectué après la consommation de l’eau.
* Le couvercle supérieur n’est pas installé correctement à sa place.
* Après avoir fait la connexion d’alimentation, un rajout d’eau chaude a été effectué.
Solution
* Attendez que l’appareil refroidisse, rajoutez de l’eau, arrêtez la source d'alimentation
et remettez en marche.
FONCTION D'ÉBULLITION À NOUVEAU
1. Appuyez une fois sur le bouton de “ÉBULLITION À NOUVEAU”. La lampe indicatrice
d’ébullition à nouveau s’allumera.
2. Une fois que l’ÉBULLITION À NOUVEU sera terminée la lampe indicatrice de MAINTIEN
AU CHAUD s’allumera.
* S’il ne se trouve pas assez d’eau dans l’appareil, la fonction d’ébullition à nouveau ne
marchera pas.
Étant donné que l’eau est de toute façon à 100°C lorsqu’elle vient de bouillir, le fait
d'appuyer sur le bouton d’ÉBULLITION À NOUVEAU n’aura aucun effet dans ce cas.
” s'affichera sur l'écran
- 20 -
Page 22

USAGE DE L’EAU
1. SORTIE D’EAU À POMPE D’AIR
Installez le verre à la sortie d'eau et poussez le couvercle de pompe d’eau.
(Il n'y a pas besoin de source d’alimentation)
2. SORTIE D'EAU À POMPE AUTOMATIQUE
a) Appuyez UNE FOIS sur le bouton de “DÉVERROUILLAGE”. La lampe indicatrice de
“DÉVERROUILLAGE” s’allumera.
b) Appuyez sur le bouton de "POMPAGE AUTOMATIQUE" pour pomper de l'eau chaude.
3. SORTIE DE VERRE
a) Appuyez UNE FOIS sur le bouton de “DÉVERROUILLAGE”. La lampe indicatrice de
“DÉVERROUILLAGE” s’allumera.
b) Utilisez la pièce d’orifice de verre (bouton de verre) qui se trouve à la sortie d’eau.
* Si vous ne pressez pas sur le bouton d'écoulement dans 10 secondes après avoir appuyé
sur le bouton de DÉVERROUILLAGE, l’appareil retournera automatiquement en position
de VERROU.
La fonction d’écoulement NE MARCHERA PAS tant que la fontaine à eau électrique n’est
pas branchée à la prise et que l’alimentation n’est pas en MARCHE.
RÉGLAGE DE TEMPÉRATURE DE MAINTIEN AU CHAUD
Pour choisir la température idéale appuyez sur le bouton de “SÉLECTION”.
Pour changer la température appuyez sur le bouton de
“SÉLECTION”.
98°C 85°C 60°C 50°C 40°C
Réglage initial 85°C
* Lorsque les réglages de maintien au chaud seront réglés tels que 98°C ,85°C ,60°C
,50°C ,40°C le LED de maintien au chaud commencera à s’allumer après le bouillonnement.
Lorsque la température de l’eau est au dessous des réglages sélectionnés l’eau sera
bouillie à nouveau et le LED de bouillonnement s’allumera.
* La température peut se réinitialiser lors du maintien au chaud. (L’appareil effectuera
automatiquement une ÉBULLITION À NOUVEAU selon les différentes températures
d’eau).
98˚C: Convenable pour faire cuire des repas prêts et pour préparer des boissons chaudes
comme les chocolats chauds.
(Faites absolument descendre le niveau à 85? après avoir utilisé).
85˚C: Idéal pour préparer du thé et du café à la température économique.
50˚C/60˚C: Convenable pour utiliser les mélanges de lait prêts et les médicaments.
40˚C: Eau chaude
-21 -
Page 23

NETTOYAGE ET ENTRETIEN
Assurez-vous que la fiche électrique de l’appareil soit débranchée, que l’eau restante
dans l’appareil soit déversée et que l’appareil ait assez refroidi avant de commencer à
l'opération de nettoyage.
Réservoir intérieur et couvercle intérieur
Nettoyez l'appareil avec une éponge douce et rincez.
Le calcaire du réservoir doit être nettoyé une à trois fois par mois en utilisant de l’acide
citrique. Étant donné que le réservoir intérieur peut se peler, n’utilisez jamais d’objets
en métal, ou d’objets tels que les brosses en nylon ou les brosses à dents, etc.
Avertissement:
* Étant donné qu'il se trouve de la vapeur chaude au dessous du couvercle, ne vous
approchez pas beaucoup du couvercle.
* N’appuyez pas sur le bouton d’écoulement pendant que le réservoir intérieur d’eau est
vide. (Sinon une panne peut se produire.)
Vous ne pouvez pas avoir d’eau chaude en utilisant le Bouton d’Écoulement Automatique
ou le Bouton de Verre lorsque la fiche électrique de l’appareil n’est pas branchée.
Nettoyage avec de l’acide citrique.
Arrête le
clignotement
du l’écran à
cristaux liquides.
Le LED clignotera lorsque bout à 100°C.
70 min.
* Nettoyez le RÉSERVOIR INTÉRIEUR avec un chiffon doux et humide.
* N’utilisez jamais de solutions chimiques ou de produits nettoyants abrasifs pour nettoyer
la fontaine à eau électrique.
* Nettoyez les surfaces extérieures de l’appareil aussi seulement en essuyant avec un
chiffon doux et humide. Il n'y a besoin d'aucun produit chimique.
* N’immergez pas l’appareil dans l’eau ou ne permettez pas le panneau de contrôle se
mouiller.
* Ne tournez pas l’appareil à l’envers pour l’assécher.
REMARQUE:
Lorsque l’eau utilisée est calcaire il se peut que des taches de calcaire restent dans le
réservoir intérieur. Un nettoyage régulier doit être réalisé. Un usage continuel peut
rendre difficile la suppression de ces taches.
Après 1 heure et 10 minutes
- 22 -
Page 24

N’UTILISEZ PAS LES MATÉRIELS C‹-DESSOUS
* Huile volatile ou diluant.
* Poudres nettoyants abrasifs, brosses en nylon etc.
Le réservoir de la fontaine à eau N'EST PAS CONVENABLE pour lavage au lave-vaisselle.
STOCKAGE:
Asséchez bien avant de préserver pour une longue durée.
Avertissements importants
Le cordon d’alimentation est tenu court en vue d’éviter les dangers d'emmêlement et
de trébuchement provenant du fait que le cordon soit long.
Des cordons d’extension plus longs peuvent être achetés de l’extérieur, par contre il
convient d’être très prudent lors de l’utilisation. Le cordon d’extension doit 1) posséder
au moins les valeurs électriques indiquées sur l’étiquette de l’appareil, 2) être de
connexion de terre et être constitué de cordon de trois fils et 3) ne pas pendre des bords
des tables ou des établis pour éviter de marcher dessus ou de trébucher.
AVERTISSEMENT: L’APPAREIL DOIT ÊTRE LIÉ À UNE SOURCE DE TERRE
Assurez-vous que les fils de la prise soient colorés selon le code ci-dessous:
Vert et jaune : Terre
Bleu : Neutre
Marron : Courant
Si les couleurs ci-dessus ne s’accouplent pas avec les terminales de la prise, effectuer
la connexion telle que décrite ci-dessous:
Le cordon de couleur Verte et Jaune doit être lié au terminal indiqué avec le signe de
“E” ou avec le signe de terre ou au terminal de couleur Verte ou de couleur Verte et
Jaune.
Le cordon de couleur Bleue doit être lié au terminal indiqué avec le signe de N ou au
terminal de couleur Noire.
Le cordon de couleur Marron doit être lié au terminal indiqué avec le signe de L ou au
terminal de couleur Rouge.
(Si les terminaux de la prise ne sont pas marqués ou si vous n’êtes pas sûr de la situation
veuillez consulter un électricien qualifié).
ÉLIMINEZ CE PRODUIT DE FAÇON CORRECTE
Ce signe signifie partout dans l’UE que le produit ne doit pas être jeté ensemble
avec les autres ordures ménagères. Pour éviter que l’environnement et la santé
publique s’endommagent à cause des déchets jetés de façon incontrôlée, assurez
le recyclage de l’appareil pour permettre la réutilisation continue des sources de
matériels. Veuillez remettre vos appareils utilisés aux centres de rétrocession et de
collectes ou mettez-vous en contact avec le magasin d’où le produit a été acheté. Ces
endroits peuvent réceptionner le produit et assurer leur recyclage de façon respectueuse
envers l’environnement.
- 23 -
Page 25

NEDERLANDS
SINBO SK 2396
ELEKTRISCHE WATERDISPENSER
GEBRUIKSHANDLEIDING
Neem deze handleiding aandachtig door voordat u het apparaat in gebruik neemt.
Wij danken u voor het verkiezen van dit S‹NBO product. Wij zijn ervan overtuigd dat het
u veel gebruiksgenot zal verschaffen.
ONDERDELEN
Bedieningspaneel
1. Kook indicatielampje
2. Herkook knop
3. Reinigingsknop
4. Keuzeknop
5. Vergrendel /Ontgrendel knop
6. Ontgrendel indicatie
7. Warmhoud indicatielampje
8. “Leeg reservoir” indicatie
1. Aan/Uit schakelknop
2. Bedieningspaneel
3. Bekerknop
4. Schenktuit
5. Behuizing Romp
6. Onderstel
7. Waterpomp deksel
8. Pompvergrendeling
9. Schenkknop
10. Handvat
11. Glazen waterreservoir
12. Waterpeilglas
13. Stroomingang
14. Minimum waterpeil
Technische Specificaties
Model: SK 2396
Spanning: 230V~50Hz
Vermogen: 680W
Inhoudscapaciteit: 3,5L
* De technische specificaties kunnen in het kader van technologische ontwikkelingen
zonder voorafgaande kennisgeving worden gewijzigd.
2
3
1
2
3
4
5
6
1
- 24 -
8
7
7
8
9
10
11
12
13
14
6
5
4
Page 26

VOOR HET IN GEBRUIK NEMEN
1. Lees deze handleiding aandachtig en bewaar ze zorgvuldig als naslagbron.
2. Controleer of de voltage vermeld op het typeplaatje overeenkomt met de plaatselijke
netspanning vooraleer u het apparaat op het stroomnet aansluit.
3. Hanteer het snoer voorzichtig, knik het niet of trek er niet aan. Neem altijd de stekker
uit het stopcontact als het apparaat niet wordt gebruikt.
4. Gebruik de waterdispenser altijd in rechtopstaande positie.
5. Blootstelling aan hitte, overdreven vocht of water kan vervorming van het apparaat of
defecten tot gevolg hebben.
6. Koken zonder water in het reservoir veroorzaakt defecten.
7. Raak de buitenzijde van het apparaat niet aan terwijl het functioneert, wacht tot het
is afgekoeld.
8. Was het snoer niet en dompel de dispenser niet in water of een andere vloeistof.
9. Let bijzonder goed op en verwijder u niet van het apparaat als het gebruikt wordt door
of in aanwezigheid van kinderen.
10. Gebruik de waterdispenser niet als het snoer, de stekker of het apparaat zelf defect
of beschadigd is.
11. Tracht nooit op eigen houtje herstellingen aan het apparaat uit te voeren want hiervoor
is speciaal gereedschap vereist; breng het apparaat naar een bevoegde Service voor
nazicht en reparaties.
12. Gebruik geen accessoires die niet door de fabrikant zijn aanbevolen om gevaarlijke
toestanden te vermijden.
13. Dit apparaat is niet ontworpen om buitenhuis of in een vochtig milieu te worden
gebruikt en het is uitsluitend bedoeld voor huishoudelijk gebruik.
14. Het snoer mag niet worden geknikt of geknoopt en mag niet in aanraking komen met
hete oppervlakken of over de rand van het aanrecht hangen.
15. Zorg dat er omheen de dispenser voldoende vrije ruimte is om een behoorlijke
luchtcirculatie toe te laten. Maak gebruik van warmte isolatie voor nabije oppervlakken
die niet bestand zijn tegen hitte.
16. Gebruik het apparaat uitsluitend voor het bestemde doel.
17. Vergeet nooit dat er hete stoom onder het deksel zit.
18. Zorg dat de uit het deksel ontsnappende stoom niet op stroomschakelaars, meubelen
of delicate oppervlakken is gericht.
19. Houd ontvlambare stoffen op veilige afstand van de dispenser.
20. Hanteer het snoer voorzichtig en laat het niet vallen om defecten te vermijden.
21. Bij het eerste gebruik kan er een weinig geur- en rookvorming voorkomen. Dit is
een normaal verschijnsel dat vlug zal ophouden.
22. Wees voorzichtig bij het verplaatsen als de waterdispenser warm water bevat.
23. Vul het apparaat niet boven het maximum peilstreepje.
24. Bedek de stoomopening niet met een doek of enig ander voorwerp.
25. Controleer altijd of het deksel goed gesloten is.
26. Draag de waterdispenser uitsluitend aan het handvat.
-25 -
Page 27

GEBRUIK VAN DE WATERDISPENSER
HET BOVENDEKSEL OPENEN
Als u vooraan op het vergrendelklepje drukt dat zich
boven op het deksel bevindt kunt u het deksel openen.
Let op voor ontsnappende hete dampen ingeval er nog
warm water in het reservoir zit.
HET BOVENDEKSEL VERWIJDEREN
Open het deksel tot een hoek van ongeveer 45°, druk op
de ONTGRENDELKNOP achter het bovendeksel en licht
het deksel schuin naar boven (in een hoek van 45°) uit
het apparaat.
VULLEN EN BIJVULLEN
1. Open het bovendeksel zoals hierboven uiteengezet en vul het reservoir maar let erop
het MAX. peilstreepje niet te overschrijden.
Als u teveel water in het reservoir doet zou het kokend water uit het apparaat kunnen
spatten.
2. Sluit het deksel en druk aan tot u het hoort vastklikken zodat u zeker weet dat het
degelijk gesloten is.
WATER KOKEN
1. Het kookproces start zodra het apparaat wordt ingeschakeld.
* Open nooit het bovendeksel gedurende het kookproces.
* Voeg geen water toe in de loop van het kookproces.
* Laat de stoomuitlaat opening in het bovendeksel onbedekt.
Kook indicatie LED licht op
LCD scherm toont
watertemperatuur
Warm houden - temperatuur keuze
WARM HOUDEN
Warm houd indicatie LED licht op
LCD scherm toont
watertemperatuur
Warm houd
temperatuurkeuze
- 26 -
Page 28

WARM HOUDEN
* Zodra het water kookt wordt u 5 x gewaarschuwd door een geluidssignaal. De warm
houd indicatie LED licht op.
Druk op de HERKOOK knop ingeval het toegevoegde water niet voldoende is om het
kookproces automatisch te starten.
AUTOMATISCHE UITSCHAKELING
Als er geen water meer in het reservoir is wordt het apparaat AUTOMATISCH
UITGESCHAKELD. Bovendien wordt u gewaarschuwd door een geluidssignaal terwijl
het symbool “
LED oplicht.
Oorzaken van AUTOMATISCHE UITSCHAKELING
* Het apparaat is op het stroomnet aangesloten maar het reservoir is leeg.
* Het waterniveau is tot onder het minimum peil gedaald en het water kookt nog.
* Er is geen water toegevoegd na verbruik.
* Het bovendeksel is niet degelijk aangebracht.
* Er is heet water toegevoegd na inschakeling van het apparaat.
Oplossing
* Wacht tot het apparaat is afgekoeld, voeg water toe, zet het apparaat even uit voordat
u het opnieuw inschakelt.
HERKOOK FUNCTIE
1. Druk 1 x op de “HERKOOK” knop. Het herkook indicatielampje gaat aan.
2. Nadat het HERKOOK proces voltooid is gaat het WARMHOUD indicatielampje aan.
* Als er onvoldoende water in het reservoir is zal de herkook functie niet werken.
Ook als het water pas gekookt is en nog een temperatuur bezit van bijna 100°C kunt u
door op de “HERKOOK” knop te drukken deze functie niet activeren.
WATER GEBRUIKEN
1. WATER AFTAPPEN DOOR MIDDEL VAN LUCHTPOMP
Plaats de beker onder de tap en druk op de waterpompklep
(Hiervoor is geen elektrische stroom vereist)
” op het LCD scherm verschijnt en de “WATER TOEVOEGEN” indicatie
2. WATER SCHENKEN DOOR MIDDEL VAN AUTOMATISCHE POMP
a) Druk EEN KEER op de “ONTGRENDEL” knop. Het “ONTGRENDEL” indicatielampje
gaat aan.
b) Druk op de “AUTOMATISCHE POMP” knop om heet water uit te schenken.
3. BEKER AANVOER
a) Druk EEN KEER op de “ONTGRENDEL” knop. Het “ONTGRENDEL” indicatielampje
gaat aan.
- 27 -
Page 29

WATER GEBRUIKEN
b) Druk op de <bekerknop> aan de schenktuit.
* Als er binnen de 10 seconden na het indrukken van de “ONTGRENDEL” knop niet op
de schenkknop wordt gedrukt zal het apparaat automatisch opnieuw worden vergrendeld.
Als de elektrische waterdispenser niet op het stroomnet is aangesloten zal de schenkfunctie
NIET WERKEN.
TEMPERATUURREGELING VOOR HET WARM HOUDEN
Druk op de “KEUZE” knop om de gewenste temperatuur in te stellen.
Druk op de “KEUZE” knop om de temperatuur te wijzigen.
98°C 85°C 60°C 50°C 40°C
Voorgeregelde temp. 85°C
* Als de warm houd temperatuur op 98°C ,85°C ,60°C ,50°C ,40°C geregeld is zal na het
koken de warm houd indicatie LED oplichten. Als de temperatuur onder de ingestelde
warmtegraad daalt zal het water opnieuw verwarmd worden terwijl de kookindicatie LED
oplicht.
* Tijdens het warm houden kan de temperatuur naar de nulstand herzet worden. (Het
apparaat zal het water automatisch opnieuw verwarmen volgens de ingestelde
temperatuur.)
98°C:
Geschikt om voorgekookte gerechten en warme chocolademelk of andere warme dranken
te bereiden.
(Zet na gebruik altijd op 85°C.)
85°C:Ideale temperatuur voor economische bereiding van thee en koffie.
50˚C/60°C:Geschikt voor voorgekookte melkgerechten en geneesmiddelen.
40°C:Warm water
REINIGING EN ONDERHOUD
Controleer of de stekker uit het stopcontact is gehaald, het resterende water weggegoten
en het apparaat afgekoeld is voordat u het gaat reinigen.
Binnenzijde van reservoir en deksel
Was het reservoir uit met water en een zachte spons.
Het apparaat moet naargelang de hardheid van het water een tot drie maal per maand
ontkalkt worden met citroenzuur.
Maak bij het reinigen geen gebruik van metalen voorwerpen, plastic borstels,
tandenborstels e.d. zaken die het binnenoppervlak van het reservoir zouden kunnen
beschadigen.
-28 -
Page 30

REINIGING EN ONDERHOUD
OPGELET:
* Vergeet nooit dat er hete stoom onder het deksel kan zitten, blijf op veilige afstand.
* Druk niet op de schenkknop als het reservoir leeg is om defecten te vermijden.
* Als het apparaat niet op het stroomnet is aangesloten kunt u de automatische schenknop
of de bekerknop niet gebruiken om warm water te schenken.
Reiniging met citroenzuur (ontkalken).
LCD stopt
met pinken
Als het water op 100°C kookt begint de
LED te pinken 70 min.
* Reinig de binnenzijde van het RESERVOIR met een zachte vochtige doek.
* Gebruik nooit chemische producten, oplosmiddelen of schurende reinigingsmiddelen
om de elektrische waterdispenser schoon te maken.
* Wrijf de buitenzijde van het apparaat schoon met een zachte vochtige doek. Er is geen
behoefte aan chemische reinigingsproducten.
* Dompel het apparaat niet in water en zorg dat het bedieningspaneel niet nat wordt.
* Zet het apparaat ondersteboven om het te laten drogen.
OPMERKING:
Hard water kan kalkvlekken nalaten op de binnenwand van het reservoir. Door regelmatige
reiniging kan dit gemakkelijk verholpen worden. Na lang en frequent gebruik wordt het
moeilijk om vlekken te verwijderen.
MAAK NOOIT GEBRUIK VAN VOLGENDE PRODUCTEN:
* Vluchtige olie of thinner.
* Schuurpoeder, plastic borstel e.d.
Het reservoir mag NIET in de vaatwasser worden gereinigd.
OPBERGEN:
Droog het apparaat zorgvuldig voordat u het voor lange tijd opbergt.
na 1uur 10 minuten
- 29 -
Page 31

BELANGRIJKE WAARSCHUWINGEN
Het snoer is kort gehouden om het gevaar erin verward te raken, erover te struikelen
en dergelijke problemen die eigen zijn aan een lang snoer te vermijden.
Verlengsnoeren kunt u zo nodig afzonderlijk aankopen maar u moet dan wel bijzonder
goed opletten bij het gebruik. Het verlengsnoer 1) moet minstens de elektrische waarden
bezitten die vermeld zijn op het typeplaatje van het apparaat, 2) moet voorzien zijn van
een aardaansluiting en uit drie draden bestaan, 3) mag niet over de rand van tafel of
aanrecht blijven hangen om te voorkomen dat er over gelopen of gestruikeld wordt.
OPGELET: DIT APPARAAT MOET OP EEN DEGELIJK GEAARD STOPCONTACT WORDEN
AANGESLOTEN.
Controleer of de bedrading van het snoer is gekleurd volgens onderstaand codesysteem:
Groen en geel : Aarde
Blauw : Neutraal
Bruin : Stroom
Ingeval bovenvermelde kleuren niet overeenstemmen met de kleuraanduidingen voor
de aansluitklemmen in uw stekker, doe als volgt:
Sluit de groen en gele draad van het snoer aan op de aansluitklem die gemerkt is met
“E” (aarde) of geel en groen gekleurd is.
Sluit de blauwe draad aan op de aansluitklem die gemerkt is met de letter N (neutraal)
of zwart gekleurd is.
Sluit de bruine draad aan op de aansluitklem die gemerkt is met de letter L of rood
gekleurd is
(als de aansluitklemmen niet gemarkeerd zijn of als u aan iets twijfelt roep dan de hulp
in van een geschoold elektricien).
Ontdoe u van dit product op de correcte wijze
Dit symbool wijst erop dat het product binnen de grenzen van het land, niet met
het gewoon huisafval mag worden verwijderd. Om schade aan milieu en menselijke
gezondheid door ongecontroleerde afvoer te voorkomen, dient u ervoor te zorgen
dat het product of de materialen opnieuw kunnen worden gebruikt of verwerkt. Gelieve
toestellen die u niet meer gebruikt, in te leveren bij uw leverancier of op de plaatsen
voor inzameling van elektrische en elektronische apparatuur, die door de plaatselijke
overheid zijn aangewezen. Van daaruit zal er voor milieuvriendelijke afvoer of recycling
van uw apparaat worden gezorgd.
- 30 -
Page 32

ESPANOL
SINBO SK 2396
DISPENSADOR ELÉCTRICO
INSTRUCCIÓN DEL USO
Antes de empezar a utilizar la máquina lee esta instrucción hasta su final.
Gracias por elegir SINBO. Creamos que utilice nuestro producto con satisfecho.
DESCRIPCIÓN DE LAS PIEZAS
Tabla de Control
1. Indicador de ebullición
2. Botón de hervir otra vez
3. Botón de limpiar
4. Botón de elegir
5. Botón de cerrar-abrir
6. Indicador de abrir la cerradura
7. Indicador de guardar la temperatura
8. Indicador de la máquina vacía
1. Botón de abrir/apagar
2. Tabla de control
3. Llave del vaso
4. Salida de agua
5. Cuerpo exterior
6. Suelo
7. Tapa de la bomba de agua
8. Cerradura de bomba
9. Botón de verter
10. Mango
11. Cisterna de vidrio
12. Indicador del nivel de agua
13. Entrada de la energía de máquina
14. Indicador de nivel bajo de agua
Datos Técnicos
Modelo: SK 2396
Voltaje: 230V~50HzHz
Energía: 680W
Capacidad: 3,5L
2
1
3
1
2
3
4
5
6
8
7
14
6
5
4
7
8
9
10
11
12
13
* Puede cambiar las características técnicas para desarrollar el producto sin avisar
previamente.
- 31 -
Page 33

ANTES DEL USO
1. Antes de empezar a utilizar la máquina lee esta instrucción y guarde para consultar.
2. Antes de enchufar la máquina comprueba que el voltaje de la máquina y de casa son
los mismos.
3. Utilice el cable de energía cuidadamente. No haga doblar el cable o no tire. Desenchufe
la máquina cuando no se utiliza la máquina.
4. Utilice el dispensador siempre en la posición vertical.
5. Antes de limpiar el dispensador espere que se enfría.
6. Cuando el dispensador se somete a calor o en los lugares no equilibrados (agua o
húmedo excesivo) se puede deformar o averiar.
7. Sin agua dentro de agua hacer hervirse se causa a los averíos de la máquina.
8. Cuando el dispensador se funciona no toque al cuerpo exterior. Antes de tocar la
máquina espere que se enfría.
9. No intente lavar el cable de energía, no mete el dispensador en agua u otro líquido.
10. Tenga mucho cuidado cerca de los niños o por los niños. No deje la máquina sola.
11. No intenta utilizar la máquina si su cable o enchufe está averiado o la máquina no
se funciona correctamente o tiene avería o daño.
12. No intente reparar la máquina usted mismo, para el proceso de reparación lleve la
máquina al centro autorizado del servicio porque se necesita los equipos especiales.
13. Para no causar a los casos peligrosos no utilice los accesorios no recomendados por
el fabricante.
14. La máquina no se ha diseñado para utilizar en la fuera o lugares húmedos y es solo
para el uso domestico.
15. El cable de energía no se debe doblar, no se debe dejar encima de las superficies
calientes o no se debe colgar de los bordes de encimera.
16. Se debe dejar intervalos como se suministra la circulación de aire suficiente en todos
lados del dispensador. Se recomienda utilizar el aislamiento de calor para las superficies
que se puede causar a los problemas de la temperatura.
17. No utilice la máquina por un objeto excepto el objeto de su diseño.
18. No olvide que hay vapor caliente debajo de la tapa.
19. Guarde el hueco del vapor de la tapa fuera de los botones de energía y muebles.
20. No deje los materiales inflamables cerca del dispensador.
21. Utilice el cable de energía cuidadamente. Si el cable se cae se puede averiar.
22. Durante el primer uso de la máquina es normal que se sale un poco de humo y olor,
este caso se elimina en poco tiempo.
23. Cuando está moviéndose el dispensador llenado por agua caliente, tenga mucho
cuidado.
24. No llene la máquina más del nivel máximo de agua.
25. No cierre el hueco del vapor por paño u otro material.
26. Tenga en cuenta que la tapa del dispensador se cierre correctamente.
27. Cuando está llevando el dispensador utilice la parte de mango.
-32 -
Page 34

HACER FUNCIONAR EL DISPENSADOR
ABRIR LA TAPA SUPERIOR
Empuje el borde delantera de la CERRADURA DE LA TAPA
SUPERIOR hacia abajo. Para abrir la tapa superior levante
por tirar hacia arriba.
El agua dentro de máquina se puede ser caliente y se
puede salir agua caliente a la fuera.
DESMONTAR LA TAPA SUPERIOR
Levante la tapa superior con ángulo de 45˚, pulse el boton
de ABRIR CERRADURA que está atrás de la tapa superior
y tire hacia arriba con el ángulo de 45˚.
LLENAR Y AÑADIR
1. Abre la tapa superior según la instrucción arriba indicada, por utilizar otra vajilla llene
la cisterna interior hasta el signo del nivel MAXIMO.
Porque el agua herviendo se puede saltar, no llena la máquina por agua excesivo.
2. Cierre la tapa superior, tenga en cuenta que la tapa se fija a su lugar por un sonido
de click.
HERVIR AGUA
1. Después de abrir la energía el agua empieza a hervirse.
* Cuando el agua está herviendo no abre la tapa superior.
* No añade agua cuando agua está herviendo en la máquina.
* No cierre el hueco de vapor que está en la tapa superior.
LED de Ebullición se ilumina
En LCD se muestra
la temperatura de
Agua
Elección de temperatura de guardar
GUARDAR LA TEMPERATURA
LED de guardar la temperatura se ilumina
Se muestra temperatura
de agua en LCD
Elección de la
temperatura de guardar
- 33 -
Page 35

GUARDAR LA TEMPERATURA
* Después de hervir el agua se sale sonido de aviso 5 veces. LED de guardar la temperatura
se ilumina. Si el agua añadido no es suficiente para empezar automático del proceso de
hervirse, pulsa el botón de HERVIR OTRA VEZ.
APAGAR AUTOMÁTICAMENTE
Si no se queda agua dentro de la máquina, se funciona la propiedad de apagar
automáticamente del dispensador. La fuente de energía se pasa a la posición de APAGADA.
Además se sale un sonido de aviso y en la pantalla de LCD se muestra el signo de “
” LED de AÑADIR AGUA empieza a iluminarse.
Causas de APAGAR AUTOMÁTICAMENTE
* La energía de máquina está abierta pero no hay agua dentro de máquina.
* El nivel de agua es menos del nivel de añadir agua y agua está herviendo aun.
* Después de finalizar el agua no se ha añadido agua.
* La tapa superior no se ha montato correctamente.
* Después de hacer la conexión de energía no se ha añadido agua.
Solución
* Espere que la máquina se enfríe, añade agua, abre la fuente de energía otra vez.
PROPIEDAD DE HERVIR OTRA VEZ
1. Pulse el botón de HERVIR OTRA VEZ una vez. La luz indicador de hervir otra vez se
iluminará.
2. Después de finalizar HERVIR OTRA VEZ, la luz indicador de GUARDAR TEMPERATURA
se iluminará.
* Si no hay agua suficiente dentro de la máquina, la función de hervir otra vez no se
funciona.
Porque el agua hervido está en 100˚C, pulsar el botón de HERVIR OTRA VEZ no tiene
ningún efecto.
USO DEL AGUA
1. SALIDA DE AGUA CON LA BOMBA DE AIRE
Fije el vaso a la salida de agua y empuje la tapa de la bomba de agua.
(No se necesita fuente de energía)
2. SALIDA DE AGUA CON BOMBA AUTOMÁTICA
a) Pulse el botón de ABRIR LA CERRADURA una vez. La luz indicador de ABRIR LA
CERRADURA se ilumina.
b) Para bombear agua caliente pulse el botón de BOMBA AUTOMÁTICA.
3. SALIDA DE VASO
a) Pulse el botón de ABRIR LA CERRADURA una vez. La luz indicador de ABRIR LA
CERRADURA se ilumina.
b) Para la salida de agua, pulse el botón de vaso.
- 34 -
Page 36

USO DEL AGUA
* Después de pulsar el botón de en 10 segundos si no se pulsa el botón de verter la
máquina se vuelve a la posición de CERRADURA automáticamente.
Si el dispensador no está enchufado y la energía no está abierto, la función de verter no
se funciona.
CONFIGURACIÓN DE LA TEMPERATURA DE GUARDAR
Para elegir la temperatura ideal pulse el botón de ELECCIÓN.
Para cambiar la temperatura pulse el botón de
* Cuando se configura la configuración de guardar la temperatura como 98˚C, 85˚C,
60˚C, 50˚C, 40˚C, LED de guardar la temperatura empieza a iluminarse después de
hervirse. Cuando la temperatura es menos de la temperatura configurada, se hierve el
agua y LED de ebullición se ilumina.
* Durante guardar la temperatura, la temperatura se puede volver a cero. (La máquina
se hace HERVIR OTRA VEZ según la temperatura distinta de agua)
98˚C: Es ideal para cocer la comida rápida y las bebidas calientes como chocolate
caliente. (Después de utilizar lleve la configuración a 85C absolutamente.)
85˚C: Es ideal para preparar té y café en la temperatura economica.
50˚C/60˚C: Es ideal para las mezclas de lecha y utilizar medicamentos.
40˚C: Agua caliente
LIMPIEZA Y MANTENIMIENTO
Antes de empezar el proceso de limpieza tenga en cuenta que la máquina está
desenchufado, agua está vertido y la máquina está enfriado suficientemente.
Cisterna interior y Tapa interior
Limpie la máquina por una esponja suave y lava por agua.
El cal de la cisterna se debe limpiar por ácido cítrico cada tres meses.
Para evitar la deformación de la cisterna interior no se debe limpiar por los materiales
metales, cepillos plásticos o cepillo de diente.
ELECCIÓN.
98˚C 85˚C 60˚C 50˚C 40˚C
Temperatura de inicio 85˚C
AVISO:
* Porque hay vapor caliente debajo de la tapa no cercar a tapa.
* No pulse el botón de verter cuando la cisterna interior de agua está vacía. (Si no, se
puede ocurrir las averías)
Si la máquina no está enchufado, no puede tener agua caliente por utilizar el botón de
Verter Automático o Botón de Vaso.
-35 -
Page 37

LIMPIEZA y MANTENIMIENTO
Limpieza con ácido cítrico.
LCD se para
abrir y apagar
LED se abre y apaga cuando se
hierve en 100˚C 70 minutos.
* Limpie la CISTERNA INTERIOR por un paño húmedo y suave.
* Para limpiar el dispensador eléctrico no utiliza materiales disolventes, abrasivos o
materiales de limpieza.
* Limpie las superficies exteriores de la máquina solo por un paño húmedo y suave. No
se necesita ningún material quimico.
* No mete la máquina en agua o no permite que la tabla de control se moja.
* No gire la máquina para secar.
NOTA:
Si el agua usado tiene cal, se puede quedar residuos de cal dentro de la cisterna interior.
Se debe limpiar regularmente. Uso continio se puede complicar la limpieza de estos
residuos.
NO UTILIZAR LOS MATERIALES SIGUIENTES:
* Aceite inflamable o disolvente.
* Polvos abrasivos de limpieza, cepillos plásticos etc.
La cisterna del dispensador eléctrico no es conveniente para lavar en lavavajillas.
GUARDAR:
Antes de guardar por un tiempo largo, seca bien.
AVISOS IMPORTANTES
El cable es corto para evitar los peligros como obturarse o enrollarse.
Puede comprar más largos cables de extensión, pero durante el uso tiene que tener
mucho cuidado. Cable de extensión 1) se debe tener por lo mínimo los valores de la
etiqueta, 2) se debe tener tres alambres y alambre de tierra y 3) para evitar obturarse
o doblarse no se debe colgar fuera de encimera o mesa.
AVISO: LA MÁQUINA SE DEBE TENER ALAMBRE DE TIERRA.
1 Después de 1 hora 10 minutos
- 36 -
Page 38

AVISOS IMPORTANTES
Tiene que estar seguro que los alambres de toma están colorados como los códigos
siguientes:
Verde y amarillo : Tierra
Azul : Neutro
Marrón : Corriente
Si los colores no son mismos haga la conexión como la siguiente forma:
El cable de color verde y amarillo se debe conectar al terminal del signo E o tierra o
verde o verde y amarillo.
Alambre del color azul se debe conectar al terminal signado por N o del color negro.
Alambre del color marrón se debe conectar al terminal signado por L o del color rojo.
(Si los terminales de toma no están signados o no está seguro del estado por favor
consulte un técnico)
Tirar este producto correctamente
Este signo muestra que este producto no se debe tirar con los residuos domésticos.
Para evitar los daños a la sanidad humana y de medioambiente y para suministrar
el continuo de las fuentes de los materiales suministra el reciclaje de la máquina.
Lleve las máquinas usadas a los centros de acumular o devolver o consulte a la tienda
de que se ha comprado la máquina. Estos lugares pueden suministrar el reciclaje del
producto.
- 37 -
Page 39

1
2
8
7
3
6
5
4
7
1
2
8
9
10
3
11
4
5
12
13
6
14
- 38 -
Page 40

-40 -
Page 41

- 40 -
Page 42

- 41 -
Page 43

-42 -
Page 44

- 43 -
Page 45

- 44 -
Page 46

- 45 -
Page 47

HRVATSKI
SINBO SK 2396
ELEKTRIˇCNI APARAT ZA VODU
UPUTSTVO ZA UPORABU
Prije poˇcetka uporabe ured¯aja temeljno proˇcitajte ovo uputstvo za uporabu.
Zahvaljujemo vam na odabiru SINBO proizvoda. Vjerujemo da ´cete naˇs ured¯aj koristiti
sa zadovoljstvom.
OPIS URED¯AJA
Komandna ploˇca
1. Indikator vreliˇsta
2. Indikator ponovnog kljuˇcanja
3. Gumb za ˇciˇs´cenje
4. Gumb za odabir
5. Gumb za zakljuˇcavanje-
otkljuˇcavanje
6. Indikator otkljuˇcavanja
7. Indikator odrˇzavanja topline
8. Indikator praznog ured¯aja
1. Gumb za ukljuˇciti/iskljuˇciti
2. Komandna ploˇca
3. Gumb za ˇcaˇsu
4. Otvor za izlaz vode
5. Vanjsko ku´ciˇste
6. Baza
7. Poklopac pumpe za vodu
8. Zapor za pumpu
9. Gumb za sipanje
10. Ruˇcka
11. Stakleni spremnik
12. Indikator razine vode
13. Prikljuˇcak za napajanje
14. Oznaka za nisku razinu vode
Tehniˇcke specifikacije
Model: SK 2396
Napon: 230V~50HzHz
Snaga: 680W
Kapacitet: 3,5L
* U cilju tehnoloˇskog usavrˇsavanja proizvoda mogu´ce je izvrˇsiti promjene tehniˇckih
specifikacija bez prethodne najave.
2
3
1
2
3
4
5
6
1
- 46 -
8
7
7
8
9
10
11
12
13
14
6
5
4
Page 48

PRIJE POˇCETKA UPORABE
1. Prije poˇcetka uporabe ured¯aja temeljno proˇcitajte ovo uputstvo za uporabu i saˇcuvajte
za budu´ce potrebe.
2. Prije nego prikljuˇcite ured¯aj u utiˇcnicu provjerite da li vrijednost napona na informacijskoj
naljepnici ured¯aja odgovara vrijednostima napona u vaˇsoj strujnoj mreˇzi.
3. Kabel za napajanje koristite oprezno. Kabel ne savijajte i ne vucite. Kada ured¯aj ne
koristite izvucite kabel iz utiˇcnice.
4. Aparat za vodu uvijek koristite u okomitom poloˇzaju.
5. Prije ˇciˇs´cenja aparata za vodu saˇcekajte da se ohladi.
6. Moˇze do´ci do deformacije ili kvara aparata koji je dugo vremena bio izloˇzen toplini ili
se nalazio u neuravnoteˇzenim uvjetima(jako toploj ili jako vlaˇznoj sredini).
7. Ako pritisnete na gumb za prokuhavanje vode a u aparatu nema vode moˇze do´ci do
njegovog kvara.
8. Kada aparat radi ne dodirujte njegovu vanjsku povrˇsinu. Prije kontakta s ured¯ajem
saˇcekajte da se ohladi.
9. Ne pokuˇsavajte prati pod vodom kabel za napajanje i aparat za vodu ne uranjajte u
vodu ili neku drugu teku´cinu.
10. Uporaba ured¯aja od strane djece ili u njihovoj blizini zahtjeva veliki oprez. Nipoˇsto se
ne odvajajte od ured¯aja koji radi.
11. Ne pokuˇsavajte koristiti ured¯aj s oˇste´cenim kabelom ili utikaˇcem, ured¯aj koji
nenormalno radi, oˇste´ceni ili ured¯aj s bilo kakvom vrstom kvara.
12. Ne pokuˇsavajte sami opraviti ured¯aj. Za opravku ured¯aja potreban je specijalni alat.
Ured¯aj koji zahtjeva opravku odnesite u ovlaˇsteni servisni centar.
13. Za izbjegavanje opasnih situacija ne koristite dijelove koje ne preporuˇcuje proizvod¯aˇc.
14. Ured¯aj nije dizajniran za rad na vanjskih povrˇsinama ili u vlaˇznim sredinama. On je
namjenjen samo za ku´cansku uporabu.
15. Kabel za napajanje ne smije biti svezan u ˇcvor. Zaˇstitite kabel od kontakta s vru´cim
povrˇsinama. Kabel ne smije visiti preko rubova radne povrˇsine ili stola.
16. Aparat za vodu treba postaviti tako da se oko njega nalazi dovoljno praznog prostora
za kruˇzenje zraka. Preporuˇcujemo vam da na povrˇsinama osjetljivim na toplinu, izvrˇsite
toplotnu izolaciju.
17. Ured¯aj ne koristite u neke druge svrhe osim u svrhu za koju je dizajniran.
18. Ne zaboravite da se ispod poklopca nalazi topla para.
19. Otvore za paru na poklopcu drˇzite dalje od namjeˇstaja i prekidaˇca.
20. U blizini ured¯aja ne stavljajte zapaljive materijale.
21. Kabel za napajanje koristite oprezno. Ako kabel oborite na pod moˇze do´ci do njegovog
kvara.
22. Kod prve uporabe ured¯aja iz njega moˇze iza´ci malo dima i mirisa ˇsto je sasvim
normalno. To stanje ´ce nestati nakon kra´ceg vremena.
23. Budite jako oprezni kod pomjeranja ured¯aja u kom se nalazi topla voda.
24. Ured¯aj ne punite vodom iznad oznake za maksimalnu razinu vode.
25. Ne prekrivajte otvor za paru krpom ili nekim drugim objektom.
26. Uvjerite se da je poklopac aparata za vodu pravilno zatvoren.
27. Za noˇsenje aparata za vodu koristite ruˇcku.
-47 -
Page 49

POKRETANJE APARATA ZA VODU
OTVARANJE GORNJEG POKLOPCA
Prednji rub KRILCA ZA ZAKLJUˇCAVENJE GORNJEG
POKLOPCA ,koje se nalazi na poklopc, pritisnite ka dolje.
Za otvaranje gornjeg poklopca povucite ka gore i podignite.
Voda unutar ured¯aja joˇs uvijek moˇze biti topla i iz ured¯aja
moˇze iza´ci topla para.
ODVAJANJE GORNJEG POKLOPCA
Gornji poklopac podignite pod kutom od 45°, pritisnite
na gumb za ODKLJUˇCAVANJE (LOCK ON) i podignite pod
kutom od 45°.
Gumb
PUNJENJE SPREMNIKA I DOSIPANJE VODE
1. Gornji poklopac podignite prema gornjim uputama. Uz pomo´c neke posude uspite vodu
u unutarnji spremnik do razine za MAX.oznaku.
2. Pazite da spremni ne prepunite vodom jer ´ce voda, nakon ˇsto dostigne toˇcku vreliˇsta,
poˇceti da prska iz ured¯aja.
3. Zatvorite gornji poklopac. Da biste se uvjerili da je poklopac pravilno postavljen treba
da ˇcujete zvuk “klik”.
KLJUˇCANJE VODE
1. Nakon ˇsto uklju´cite ured¯aj voda ´ce odmah poˇceti da kljuˇca.
* U vrijeme kljuˇcanja vode nipoˇsto ne otvarajte gornji poklopac.
* U vrijeme kljuˇcanja vode ne dodajite vodu.
* Ne prekrivajte otvor za izlaz pare koji se nalazi na gornjem poklopcu.
Upali´ce se LED
kljuˇcanja vode
Na LCD zaslonu pokazana
je temperatura vode
Odabir temperature za
odrˇzavanje topline
- 48 -
Page 50

ODRˇZAVANJE TOPLINE
Upaljen je LED za odrˇzavanje topline
Na LCD zaslonu prikazana
je temperatura vode
Odabir temperature za
odrˇzavanje topline
* Nakon ˇsto voda dostigne toˇcku vreliˇsta 5 puta ´ce se oglasiti zvuˇcni upozoravaju´ci signal.
Ako dodata koliˇcina vode nije dovoljna za automatski poˇcetak funkcije kljuˇcanja pritisnite
na gumb PONOVNO KLJUˇCANJE.
AUTOMATSKO ISKLJUˇCENJE
Ako u ured¯aju nestane vode on ´ce se automatski ISKLJUˇCITI. Do´ci ´ce do ISKLJUˇCENJA
napajanja. Osim toga oglasi´ce se zvuˇcni upozoravaju´ci signal i na LCD zaslonu ´ce se
pojaviti symbol “
Uzroci AUTOMATSKOG ISKLJUˇCENJA
* Ured¯aj je ukljuˇcen ali u spremniku nema vode.
* Razina vode je ispod oznake za dodavanje vode i voda joˇs uvijek kljuˇca.
* Nakon nestanka vode nije dodato nimalo vode.
* Gornji poklopac nije pravilno zatvoren ili postavljen.
* Nakon ˇsto je ured¯aj ukljuˇcen dodata je topla voda.
Rjeˇsenje
* Saˇcekajte da se ured¯aj ohladi, dodajte vodu, iskljuˇcite i ponovno ukljuˇcite ured¯aj.
FUNKCIJA PONOVNOG KLJUˇCANJA
1. Pritisnite jedanput na gumb za “PONOVNO KLJUˇCANJE”. Upali´ce se indikator ponovnog
kljuˇcanja vode.
2. Nakon zavrˇsetka funkcije PONOVNO KLJUˇCANJE upali´ce se indikator ODRˇZAVANJA
TOPLINE.
* Ako se u ured¯aju ne nalazi dovoljna koliˇcina vode funkcija ponovnog kljuˇcanja ne´ce
raditi.
Poˇsto je temperatura kljuˇcale vode 100°C u tom sluˇcaju pritisak na gumb PONOVNO
KLJUˇCANJE ne´ce imati nikakvog efekta.
“. Upali´ce se LED lampica za “DODAVANJE VODE”.
- 49 -
Page 51

FUNKCIJA PONOVNOG KLJUˇCANJA
1. IZLAZ ZA VODU SA ZRAˇCNOM PUMPOM
Postavite ˇcaˇsu ispod otvora za izlaz vode i gurnite poklopac pumpe za vodu.
(Nema potrebe za napajanjem)
2. IZLAZ ZA VODU SA AUTOMATSKOM PUMPOM
a) Pritisnite JEDANPUT na gumb “OTKLJUˇCAVANJE” . Upali´ce se indikator “OTKLJUˇCANO”
(LOCK ON).
b) Za pumpanje tople vode pritisnite na gumb za “AUTOMATSKO PUMPANJE” .
3. IZLAZ ZA ˇCAˇSU
a) JEDANPUT pritisnite na gumb za “OTLJUˇCAVANJE”. Upali´ce se indikator “OTKLJUˇCANO”
(LOCK ON).
b) Koristite gumb za ˇcaˇsu koji se nalazi u blizi otvora za izlaz za vode.
* Ako, nakon ˇsto ste pritisnuli na gumb OTKLJUˇCANO za 10 sekundi ne pritisnete na
gumb za sipanje vode ured¯aj ´ce automatski pre´ci u poziciju ZAKLJUˇCANO.
* Ako aparat za vodu nije ukljuˇcen u utiˇcnicu i ako se gumb za ukljuˇciti/iskljuˇciti ne nalazi
u poziciji UKLJUˇCENO funkcija sipanja vode NE´CE RADITI.
PODEˇSAVANJE TEMPERATURE ZA ODRˇZAVANJE TOPLINE
Za odabir idealne temperature pritisnite na gumb za “ODABIR”(SELECT).
Za promjenu temperature pritisnite na gumb za
“ODABIR”(SELECT)
98°C 85°C 60°C 50°C 40°C
Poˇcetna postavka 85°C
* Nakon podeˇsavanja postavke za odrˇzavanje topline na 98°C ,85°C ,60°C ,50°C ,40°C
LED indikator odrˇzavanja topline poˇce´ce da svijetli nakon ˇsto voda prokljuˇca. Ako se
temperatura vode spusti ispod podeˇsene temperature voda ´ce poˇceti ponovno da se
zagrijava i upali´ce se LED lampica kljuˇcanja.
* U vrijeme odrˇzavanja topline moˇze do´ci do resetiranja temperature.(Ured¯aj ´ce u
zavisnosti od razliˇcite temperature vode automatski odpoˇceti PONOVNO KLJUˇCANJE.
98˚C:Pogodna za kuhanje gotovog jela i pripremanje toplih napitaka kao ˇsto je topla
ˇcokolada. (nakon uporabe postavku obavezno podesite na 85˚C.)
85˚C:Ekonomiˇcna temperatura idealna za pripremu ˇcaja i kave.
50˚C/60˚C: Pogodna za pripremu gotovih mlijeˇcnih smjesa i uporabu lijekova.
40˚C: Topla voda
-50 -
Page 52

ˇCIˇS´
CENJE I ODRˇZAVANJE
Prije poˇcetka ˇciˇs´cenja uvjerite se da je utikaˇc izvuˇcen iz utiˇcnice, da je iz ured¯aja prosut
ostatak vode i da je ured¯aj dovoljno ohlad¯en.
Unutarnji spremnik i unutarnji poklopac
Ured¯aj oˇcistite mekom spuˇzvom i operite vodom.
Kamenac unutar spremnika treba oˇcistiti jedanput mjeseˇcno ili jedanput u tri mjeseca
uporabom limunske kiseline.
Za ˇciˇs´cenje unutarnjeg spremnika nipoˇsto ne koristite metalne predmete, plastiˇcne
ˇcetkice ili ˇcetkice za zube i sl. jer moˇze do´ci ljuˇstenja povrˇsine unutarnjeg spremnika.
UPOZORENJE:
* Ne pribliˇzavajte se mnogo poklopcu jer se ispod njega nalazi topla para.
* Ako je unutarnji spremnik za vodu prazan ne pritiskajte na gumb za sipanje vode. (U
suprotnom moˇze do´ci do kvara.)
Ako nije umetnut utikaˇc toplu vodu ne moˇzete uzeti uporabom gumba za Automatsko
Sipanje ili Gumba za ˇCaˇsu.
ˇ
Ciˇs´cenje s limunskom kiselinom.
LCD prestaje
da trepti
Kada voda prokljuˇca na 100°C LED
poˇcinje da trepti 70 min.
* UNUTARNJI SPREMNIK oˇcistite mekom vlaˇznom krpom.
* Za ˇciˇs´cenje elektriˇcnog aparata za vodu nipoˇsto ne koristite kemijska ili abrazivna
otapala ili sredstva za ˇciˇs´cenje.
* Vanjsku povrˇsinu ured¯aja oˇcistite samo vlaˇznom krpom. Nema potrebe za uporabom
bilo kakvog kemijskog sredstva.
* Ured¯aj ne uranjajte u vodu i ne dozvolite da se komandna ploˇca ovlaˇzi.
* Za suˇsenje ured¯aj okrenite naopako.
NAPOMENA:
Ako u vodi koju koristite ima kamenca u unutarnjem spremniku se mogu formirati mrlje.
Treba vrˇsiti redovito ˇciˇs´cenje. Stalna uporaba ured¯aja moˇze oteˇzati uklanjanje ovih mrlja.
Nakon 1 sata i10 minuta
- 51 -
Page 53

NE KORISTITE SLJEDE´CA SREDSTVA
* Eteriˇcna ulja ili razrjed¯ivaˇc.
* Abrazivna sredstva za ˇciˇs´cenje u prahu, plastiˇcne ˇcetkice i sl.
Elektriˇcni aparat za vodu NIJE POGODAN za pranje u stroju za pranje posud¯a.
ODLAGANJE:
Prije odlaganja dobro posuˇsite.
Bitna Upozorenja
Kabel za napajanje je urad¯en kratak kako bi se izbjegle opasnosti od zapinjanja za dugi
kabel. Mogu´ce je po potrebi koristiti produˇzni kabel ali pri tom je potrebno biti jako
oprezan. Produˇzni kabel: 1) mora posjedovati elektriˇcne vrijednosti koje su naznaˇcene
na ured¯aju, 2) mora biti s uzemljenjem i troˇziˇcan, 3) ne smije visiti preko rubova stola ili
radne povrˇsine kako bi se sprijeˇcilo zapinjanje za njega ili gaˇzenje po njemu.
UPOZORENJE: URED–AJ JE POTREBNO UZEMLJITI
Uvjerite se da boje ˇzica u utiˇcnici odgovaraju sljede´cem kodu:
Zelena i ˇzuta : Zemlja
Plava : Neutralna
Smed¯a : Struja
Ako se gornje boje ne podudaraju sa stanicama/terminalima/ u utiˇcnici onda spajanje
izvrˇsite na sljede´ci naˇcin:
ˇ
Zicu zelene i ˇzute boje spojite na terminal sa oznakom “E” ili sa oznakom zemlja ili na
zeleni ili na zeleni i ˇzuti terminal.
ˇ
Zicu plave boje spojite na terminal oznaˇcen slovom “N” ili na terminal crne boje.
ˇ
Zicu smed¯e boje spojite na terminal oznaˇcen slovom “L”ili na terminal crvene boje.
(Ako terminali na utiˇcnici nisu oznaˇceni ili ako niste sigurni o kakvom je stanju rijeˇc
molimo vas da kontaktirate struˇcnog elektriˇcara).
Pravilno zbrinjavanje ured¯aja
Ovaj simbol, pokazuje da se ured¯aj ne smije zbrinjavati s ostalim ku´canskim
otpadom u cijeloj zemlji. U cilju sprijeˇcavanja zagad¯enja okoliˇsa i zdravlja ljudi
usljed nekontroliranog zbrinjavanja starih elektriˇcnih i elektronskih ured¯aja,
omogu´cite recikliranje ured¯aja i njegovo ponovno iskoriˇstavanje u neke druge svrhe.
Molimo vas da dotrajale ured¯aje vratite ili predate u sabirne centre ili stupite u kontakt
s prodavnicom u kojoj je proizvod kupljen. Ova mjesta ´ce preuzeti proizvod i omogu´citi
njegovo recikliranje vode´ci raˇcuna o zaˇstiti ˇzivotnog okoliˇsa.
- 52 -
Page 54

1
8
7
.1
.2
2
3
6
5
4
7
1
2
8
9
10
3
11
4
.3
.4
.5
.6
.7
.8
.1
.2
.3
.4
.5
.6
.7
.8
.9
.10
.11
.12
5
12
.13
.14
13
6
14
- 53 -
Page 55

-54 -
Page 56

- 55 -
Page 57

- 56 -
Page 58

-57 -
Page 59

- 58 -
Page 60

ADANA-SEYHAN-DORUK SO⁄UTMA -REfiATBEY MAH. AV. MEHMET ERO⁄LU CAD. NO:8-TEL.:0322 458 55 14 ADANA-KOZAN-DURAN
YETK‹L‹ SERV‹SLER L‹STES‹
SO⁄UTMA-CUMHUR‹YET MH. DEDEO⁄LU SK. S‹S. APT.- TEL.:0322 516 57 78 ADANA-SEYHAN-DÜZOVA ELEKTR‹K - KÜÇÜK SAAT
MEYDANI HILAL HAN IS MRK NO 32 - TEL.:0322 363 67 87 ADANA-SEYHAN-ÖZER ELEKTRON‹K - OBALAR CAD. SAL‹H ZEK‹ BUGAY ‹fi
HANI NO:11 - TEL.:0322 352 25 75 ADANA-SEYHAN-SER‹N ELEKTRON‹K - MAHFESI⁄MAZ MH. KENAN EVREN BULV. 21.SK. KAROL S‹T.
E BLOK NO:2/A - TEL.:0322 233 74 84 ADANA-CEYHAN-URANYUM ELEKTRON‹K - ‹NÖNÜ BULVARI NO: 172 - TEL.:0322 611 29 95
ADANA-CEYHAN-CEYHAN ELEKTRON‹K - BÜYÜKKIRIM MH. MEHMET fiER‹F Y‹⁄‹T CD. 4.SK. NO:3/B TEL. : 0322 613 45 96 ADIYAMANYILDIRIM SERV‹S - BAHÇEL‹EVLER MH. 177 SK. NO:2 - TEL.:0416 214 40 83 ADIYAMAN-KAHTA-ELK. EV ALET. TAM‹RC‹S‹-FAT‹H MH.
ZAFER CD. NO:20 - TEL.:0416 725 99 89 ADIYAMAN-ÜNAL ELEKTRON‹K-BAHÇEL‹EVLER MAH. ESK‹ KAHTA CAD. NO:11/A-TEL.:0416
216 75 56 ADIYAMAN-BEYAZ EfiYA TAM‹R‹-ÇATI MH. BADEM SK. NO:11 BESN‹ TEL.: 0416 318 32 00 AFYON-EM‹N ELEKTRON‹K-ENST‹TÜ
CAD. NO:19-TEL.:0272 215 43 32 AFYON-D‹NAR-GÖKÇEO⁄LU ELEKTR‹K-EMN‹YET MH. YEN‹YOL CD. 146 BLOK NO:4-TEL.: 0272 353 53
44 A⁄RI-PATNOS-ACELE PEfi‹N ELEKTRON‹K-BUHARA SOK. NO:12-TEL.:0472 616 46 08 A⁄RI-ÖZPAK ELEKTRONIK-ESKI VAN CAD
NO: 341 Ömer Hamam Yan›-TEL.:0472 216 53 14 AKSARAY-‹T‹NA ELEKTR‹K-TAfi PAZARI MH. fiEH‹T HAT‹P UÇKUN SK. ESK‹ TERM‹NAL
ÇIKIfiI NO:9/A-TEL.:0382 212 63 99 AMASYA-KUTUP TEKN‹K SO⁄UTMA-GÖKMEDRESE MAH. M.K.P. CAD. HAM‹TBATIR APT. NO:115/ATEL.:0358 212 61 66 AMASYA-SULUOVA-ÇALIfiKAN ELEKTRON‹K-ÖZEL ‹DARE ‹fi HANI NO:121-TEL.:0358 417 18 64 AMASYA-FLAfi
ELEKTRON‹K-YÜZEVLER MAH.TORUMTAY SOK. NO:25 DEM‹RD‹fi APT. ALTI-TEL.:0358 212 33 71 ANKARA-PURSAKLAR-DEM‹R TEKN‹K-
MERKEZ MH. MEL‹KfiAH CD.NO:11/A-TEL.:0312 328 1122 ANKARA-YEN‹MAHALLE-ERDO⁄DU SO⁄UTMA-ÇARfiI MH. DAMLADOL SK.
NO:74/C-TEL.:0312 315 60 25 ANKARA-KEÇ‹ÖREN-VEFA ELEKTRON‹K-PINARBAfiI MH. AfiIK PAfiA CD. NO: 67/C-TEL.:0312 380 42 30
ANKARA-MAMAK-YÜCEL ELEKTRON‹K-ASIM GÜNDÜZ CD. 20/D-TEL.:0312 365 14 14 ANKARA-ÇANKAYA-GÖKSEL ELEKTRON‹K-21.CD.
KARTAL KAYA APT. NO:29/A KIRKKONAKLAR-TEL.:0312 496 42 53 ANKARA-ÇANKAYA-ATC ‹LET‹fi‹M-SELAN‹K CAD. NO: 31/3-TEL.:
0312 419 82 70 ANKARA-GÖLBAfiI-BEKS SERV‹S H‹ZMETLER‹-SE⁄MENLER MAH. CEMAL GÜRSEL CAD. NO:51/A-TEL.:0312 484 21 19
ANKARA-BEYPAZARI-DO⁄AN TEKN‹K-KAYHAN GÜVEN CD. NO:22/C-TEL.:0312 762 89 19 ANKARA-S‹NCAN-Y‹⁄‹T TEKN‹K ONARIM-
M.Ç.M. 12. CADDE GÜLSUYU SK. NO:5/21-TEL.:0312 264 10 31ANKARA-KEÇ‹ÖREN-MERT TEKN‹K SERV‹S-ÖZYURT CD. NO:27/A AKTEPETEL.: 0312 380 00 22 ANKARA-ERYAMAN-ARSLANLAR ELEKTRON‹K-GÜZELKENT MAH.ÇARfiI ARYA 511 SK. NO:40-TEL.:0312 279 16
41 ANTALYA-KUMLUCA-AKGÜL TEKN‹K SERV‹S H‹ZMETLER‹-ADNAN MENDERES BULV.KAVAKLI KUYU CAD. YED‹TEPELER KAR.SULAR
APT.NO:9-TEL.:0242 887 53 80 ANTALYA-CANKALP ELEKTRON‹K-TUZCULAR MAH. ‹MARET SOK. FARAÇLAR PASJ.NO:11-TEL.:0242
242 31 35 ANTALYA-MANAVGAT-ÖNAL ‹LET‹fi‹M-AfiA⁄I PAZARCI MH. ‹BRAH‹M SÖZEN CD. fiELALE PSJ.NO: 18 1006 SK. TEL.:0242 742
35 36 ANTALYA-ALANYA-Ç‹NTAfi ELEKTRON‹K-SARAY MH. ATATÜRK CD. HACI HAMD‹ O⁄LU SK.NO: 20/A-TEL.:0242 513 88 85 ANTALYA-
MERKEZ-BÜYÜKGEB‹Z ELEKTROMEKAN‹K GÜVENL‹K-MUSTAFA GÖKSU-KIZILSARAY MH. DOLAPLIDERE CD. 80 SK. ÇAKMAK ‹fi HANI
NO: 8/5-6 TEL. :0242 243 33 90 ARDAHAN-YILDIRIM ELEKTR‹K-ATATÜRK CAD.NO:69-TEL.:0478 211 28 58 ARTV‹N-ARTV‹N ELEKTR‹K-
HALKEVI CADDESI NO: 12-TEL.: 0466 212 10 82 AYDIN-YILMAZ ELEKTRON‹K-KURTULUS MH. GARAJ CD. NO:5/B-TEL.:0256 212 00 35
AYDIN-SÖKE-ÖZLEM ELEKTRON‹K-YEN‹ CAM‹ MH. SEK‹LER CD. NO: 47-TEL.:0256 518 26 40 AYDIN-NAZ‹LL‹-BARIN ELEKTRON‹K-
ALTINTAfi MH. HÜRR‹YET CD. NO:161 B-TEL.: 0256 315 43 21 BALIKES‹R-BANDIRMA-ANIL SO⁄UTMA-GÜNAYDIN MAH. 2.OKUL
CAD.NO:16/A-TEL.:0266 713 56 78 BALIKES‹R-EDREM‹T-ÖZER TEKN‹K-CAM‹ VASAT MH. PARK CD. NO:12/A-TEL.:0266 373 12 44
BALIKES‹R-BURHAN‹YE-U⁄UR TEKN‹K SO⁄UTMA-MAHKEME MH. M‹THATPAfiA CD. NO: 68-TEL.:0266 412 86 89 BALIKES‹R-KILIÇ
ELEKTRON‹K-YEN‹ ÇARfiI BASIN SOK. NO: 4/B-TEL.:0266-241 87 54 BALIKES‹R-GÖNEN-GÜRSES ELEKTRON‹K-MALKOÇ MAH.MÜFTÜ
fiEVKET CAD. 76.SOK. NO:2/B-TEL.:0266 762 01 28 BALIKES‹R-BANDIRMA-D‹J‹TAL ELEKTRON‹K-17 EYLÜL MAH.HAVUZLU BAHÇE
SK.NO:8/A-TEL.:0266 715 16 46 BALIKES‹R-ERDEK-MERT TEKN‹K-YALI MH. HÜKÜMET CD. NO:55-TEL.:0266 845 61 10-97 BARTIN-
MARTI ELEKTRON‹K-HENDEKYANI CAD. ORTA MAH.101/B - BARTIN-TEL.:0378 228 34 22 BATMAN-fiAH‹NLER ELEKTRON‹K-CUMHUR‹YET
CD. NO:20 2000 ‹fi MERKEZ‹ KARfiISI-TEL.:0488 213 17 02 B‹LEC‹K-EDEBAL‹ TEKN‹K-‹ST‹KLAL MH V.REF‹K A ÖZTÜRK CD NO: 1/ATEL.:0228 212 46 80 B‹NGÖL-KARLIOVA-MEHMET KARTAL - KARTAL ELEKTRON‹K-CUMHUR‹YET CD. NO:8-TEL.:0426 511 26 39 B‹NGÖL-
S‹MGE ELEKTRON‹K- YEN‹fiEH‹R MH. YEfi‹M SK. BO⁄ATEK‹N APT ALTI NO:14/C-TEL.:0426 213 77 56 B‹TL‹S-AHLAT-U⁄UR SO⁄UTMA-
TOK‹ KONUTLARI YUKARI ÇARfiI-TEL.:0434 412 41 72 B‹TL‹S-D‹ZAYN ELEKTR‹K-NUR CAD. EREM CENTER ‹fi MERKEZ‹KAT:2 NO:5TEL.:0434 226 74 43 BOLU-BEST ELEKTRON‹K-TABAKLAR MAH.CUMHUR‹YET CAD.NO:28/B-TEL.:0374 218 12 25 BURSA-OSMANGAZ‹-
AKYÜZ ELEKTRON‹K-ÇIRPAN MH. UYSAL SK. NO:13/B-TEL.:0224 254 60 76 BURSA-GEML‹K-AC‹L TV TAM‹R SERV‹S‹-DEM‹R SUBAfiI
MH. FIRIN SK. NO:7-TEL.:0224 514 71 20 BURSA-MUDANYA-ER T‹CARET-ÖMERBEY MH. CAM‹ SK. SU APT. NO:30-TEL.:0224 544 86 16
BURSA-MUSTAFAKEMALPAfi-AGUfi ELEKTR‹K-HAMZABEY MAHALLESI PAZARYERI SOKAK NO: 2/A-TEL.:0224 613 19 99 BURSA‹NEGÖL-S.B.S ELEKTRON‹K-OSMAN‹YE MH.DERE SK. N:25/D-TEL.:0224 715 48 94 BURSA-KARACABEY-GÜRKAN T‹CARET-RUNGUÇPAfiA
MH. 14. SK. NO:11-TEL.: 0224 676 66 80 BURSA-N‹LÜFER-ÖZME TEKN‹K-KARAMAN MH. BAYINDIR SK. NO:4/B CARREFOUR KARfiISITEL.: 0224 249 12 48 ÇANAKKALE-ÇAN-TÜRKER ELEKTRON‹K-CUMHUR‹YET MAH. ÇANAKKALE CAD.NO:41-TEL.:0286 416 13 89
ÇANAKKALE-GEL‹BOLU-GÜVEN ELEKTRON‹K-YAZICIZADE MAH. M‹RALAY fiEF‹K AKER CAD. 2. SOK NO:4 / A TEL.:0286 566 90 70
ÇANAKKALE-MERKEZ-SAM ELEKTRON‹K-‹SMETPAfiA MH. ARSLANCA SK.-TEL.:0286 212 35 59 ÇANKIRI-B‹LG‹ÇLER ELEKTRON‹K-
BUGDAY PAZARI MH. A.TALAT ONAY BULVARI SAIM A⁄A S‹T. B/BLOK TEL.:0376 213 48 19 ÇORUM-H‹T‹T SO⁄UTMA-YEN‹YOL MH. MÜFTÜ
AHMET GÖKEfiME SK. NO: 5 / I-TEL.:0364 225 70 58 ÇORUM-U⁄UR ELEKTRON‹K-ÜÇTUTLAR MAH. FAT‹H CAD. 5.SOK.EYÜP SULTAN
APT. NO:1/C-TEL.:0364 227 44 91 ÇORUM-ÖMÜR ELEKTRON‹K-CENG‹ZTOPEL CAD. NO:2/F-TEL.:0364 224 68 09 ÇORUM-ALACA-EROL
ELEKTRON‹K-AYHAN MH. ANKARA CD. NO:18-TEL.:0364 411 42 03 ÇORUM-GÜNDÜZ BEYAZ EfiYA SERV‹S‹-SUNGURLU-SUNGURO⁄LU
MH. ÇANKIRI CD. NO: 46-TEL.:0364 311 31 13 DEN‹ZL‹-KARDELEN SO⁄UTMA-EMEK CD. NO: 30-TEL.:0258 241 67 31 DEN‹ZL‹-ÖZ
ELEKTRON‹K-ÇAYBAfiI CD. ÜNAL APT. NO: 28-TEL.:0258 261 29 25 DEN‹ZL‹-MERKEZ-ÇA⁄LAYAN SO⁄UTMA-TOPRAKLIK MH. TURAN
GÜNEfi CD.NO:34 TEL. : 0258 242 85 86 D‹YARBAKIR-B‹SM‹L-fiIK ELEKTR‹K-KURTULUfi MH. AHMET AR‹F BULVARI NO: 19/F-TEL.:0412
415 05 94 D‹YARBAKIR-‹LKADIM T‹CARET-BATIKENT S‹T. A/5 BLOK ALTI NO:1 SA⁄LIK OCA⁄I YANIBA⁄LAR-TEL.:0412 235 70 89
D‹YARBAKIR-AZ‹Z ELEKTRON‹K-HATBOYU CD. 469. SK. GÜNEfi 2 APT. NO:3/B-TEL.:0412 223 33 46 D‹YARBAKIR-S‹LVAN-DIGITAL
ELEKTRONIC-KALE MH. SAM‹ SEÇK‹N CD. NO:9/B-TEL.:0412 711 44 14 D‹YARBAKIR-JAPON RECEP-YENI MAH 19 MAYIS CAD NO74-
- 59 -
Page 61

TEL.:0412 511 24 10 D‹YARBAKIR-BA⁄LAR-AZ‹Z ELEKTRON‹K-HATBOYU CD. 469 SK. NO:3/B-TEL.: 0412 236 81 10 DÜZCE-ENSAR TEK
YETK‹L‹ SERV‹SLER L‹STES‹
SU S‹STEMLER‹-AZM‹N‹LL‹ MH. AYDINPINAR CD. SERHAT SK.NO:1/B-TEL.:0380 514 34 12 DÜZCE-BULUfi ELEKTRON‹K-CED‹D‹YE
MAH. M‹MAR S‹NAN CAD.-TEL.: 0380 514 66 81 ED‹RNE-UZUNKÖPRÜ-GÜVEN TEKN‹K-GAZ‹ CAD. YUSUF SOK. YURDACAN PASAJI NO:7TEL.:0284 513 89 66 ED‹RNE-YILDIZ SO⁄UTMA-1.MURAT MH. GÜNGÖR MAZLUM CAD. SERHAT S‹TES‹ B/BLOK 35/A-TEL.:0284 235 37
63 ED‹RNE-KEfiAN-MUTLU TEKN‹K-YUKARI ZAFER‹YE MH. ‹LYASBEY CD. NO:32/B-TEL.:0284 715 22 71ELAZI⁄-ÖZDEV TEKN‹K -
‹ZZETPAfiA MAH.KAZIM BAYER CAD.NO:24/A-TEL.:0424 238 51 67 ELAZI⁄-YILMAZ BOB‹NAJ-YEN‹ MAH. KEMAL fiEDELE CAD. NO: 12/ETEL.:0424 212 08 96 ELAZI⁄-GÜNEfi ELEKTRON‹K-KÜLTÜR MAH. VAL‹ FAHR‹BEY CAD.NO:113/D-TEL.:0424 233 10 18 ERZ‹NCAN-
AYDINLAR ELEKTR‹K-‹NÖNÜ MAH. MERKEZ ÇARfiISI 15.SK NO:5 -TEL.:0446 223 59 76 ERZ‹NCAN-REFAH‹YE-B‹LG‹N ELEKTRON‹K-
ERZ‹NCAN CAD. BELED‹YE ‹fi HANI-TEL.:0446 611 26 10 ERZURUM-OLTU-GÜVEN ELEKTRON‹K-Z‹YABEY CAD. BELED‹YE PSJ. NO:6TEL.:0442 816 42 23 ERZURUM-AT‹LAY ELEKTRON‹K-KONGRE CAD. HASIRHAN PASJ. NO:87-TEL.:0442 213 30 60 ERZURUM-‹SP‹R-
YILMAZ ELEKTRON‹K-Z‹YAPAfiA CD. AfiA⁄I MH. NO:186-TEL.:0442 451 40 95 ESK‹fiEH‹R-ARZU ELEKTRON‹K-DEL‹KL‹TAfi MH. GÜRMAN
SOK. NO:37/B-TEL.:0222 234 87 15 ESK‹fiEH‹R-S‹VR‹H‹SAR-DERMAN ELEKTRON‹K-CAM‹KEB‹R MH. YUNUSEMRE CD. NO:7-TEL.:0222
711 22 60 GAZ‹ANTEP-ELEKTR‹KL‹ EV ALETLER‹ TAM‹RC‹S‹-MÜTERC‹M ASIM CAD. KÖRÜKÇÜ SOK. NO:8/A-TEL.:0342 231 00 73
GAZ‹ANTEP-ISLAH‹YE-YILMAZ SO⁄UTMA-AYDINLIK MH. GÖZ CAD.ÜNLÜ S‹TES‹ NO: 2-TEL.:0342 862 12 20 GAZ‹ANTEP-‹K‹ZO⁄LU
ELEKTRON‹K-BEY MAH. EBLEHAN ÇARfiISI NO:12/A-TEL.:0342 230 71 00 GAZ‹ANTEP-N‹Z‹P-ÇAPAN TEKN‹K-CUMHUR‹YET MAH.
MERMER SOK. NO:10-TEL.:0342 517 51 66 G‹RESUN-BULANCAK-YÜKSEL SO⁄UTMA-‹HSAN‹YE MH. CEMAL GÜRSEL. CD. NO: 257TEL.:0454 318 17 28 G‹RESUN-U⁄UR ELEKTRON‹K-HACI HÜSEY‹N MH. GAZ‹ CD. NO: 185 / 1-TEL.:0454 212 00 90 GÜMÜfiHANE-
GÜMÜfiHANE SERV‹S‹-HASANBEY MH. HASANBEY CD.NO:17/A-TEL.:0456 213 51 54 HATAY-SAMANDA⁄-GÜNEfi ELEKTR‹K-ATATÜRK
MAH. ‹SKELE CAD. HAYÜK PSJ NO:38-TEL.:0326 512 71 04 HATAY-KIRIKHAN-SEREN MAK‹NA-BARBAROS MAH. BOZTEPE CAD. NO:23/BTEL.:0326 344 32 49 HATAY-ANTAKYA-SER‹ SO⁄UTMA-KURTULUfi CD. NO:51/C-TEL.:0326 213 28 32 HATAY-ERZ‹N-YEL‹Z BOB‹NAJ-
MUSTAFAL‹ MH. ‹STASYON CD. NO: 143-TEL.:0326 68148 32 HATAY-REYHANLI-BAfi TEKN‹K SO⁄UTMA-ATATÜRK CD. DÖ⁄ÜCÜLER
‹fiHANI NO:1 -TEL.:0326 413 44 04 HATAY-REYHANLI-ÖZ ‹fi SO⁄UTMA-CUMHUR‹YET MH. TAYFUR SÖKMEN CD. NO:26/B TEL. : 0326
413 21 22 HATAY-DÖRTYOL-FAT‹H ELEKTRON‹K-SANAY‹ MH. EVREN CD. YEN‹ S‹NEMA KARfiISI NO:15 - TEL.:0326 712 86 46 HATAY-
‹SKENDERUN-GÜL‹STAN ELEKTRON‹K-KURTULUfi MH. fi.O⁄UZ YENER CD. NO:64/C-TEL.:0326 613 50 64 I⁄DIR-PARLAK TEKN‹K-
TOPÇULAR CD. NO:34-TEL.:0476 227 47 51 ISPARTA-ÖZSOYLAR SO⁄UTMA-YAYLA MAH. ‹SMETPAfiA CAD. NO: 60 fi‹FA TIP MERKEZ‹
ALTI-TEL.:0246 223 13 61 ‹ÇEL-ERDEML‹-ESEN ELEKTR‹K-MERKEZ MAH. ATATÜRK CAD. NO:11-TEL.:0324 515 68 87 ‹ÇEL-MEZ‹TL‹-
AKN‹SAN SO⁄UTMA&ELEKTRON‹K-GMK.BUL. FAT‹H MH. 18 SK.ÖZÜDO⁄RU S‹T. 3/A-TEL.:0324 359 64 34 ‹ÇEL-PINAR ELEKTRON‹K-
MAHMUD‹YE MH. 108. CD. NO:32/B-TEL.:0324 336 82 98 ‹ÇEL-TARSUS-MERT ELEKTRON‹K-GAZ‹LER MAH. ATATÜRK BULV. NO:119TEL.:0324 626 83 98 ‹ÇEL-TARSUS-TEKN‹K ‹fi ELEKTR‹K T‹C.-ATATÜRK CAD. U⁄UR ‹fi HANI NO:1-TEL.:0324 6242797 ‹ÇEL-ANAMUR-
ÇEL‹K ELEKTRON‹K-BAHÇE MH. ORMAN ‹fiLETMES‹ ALTI NO:61/B-TEL.:0324 814 85 90 ‹ÇEL-HAKAN ELEKTRON‹K-BAHÇEL‹EVLER
MH. 1809 SK. D‹NL‹ APT.ALTI NO:3/B-TEL.:0324 328 03 25 ‹ÇEL-S‹L‹FKE-SADIK ELEKTR‹K-GÖKSU MAH. O⁄UZKAAN CAD. DERYALAR
APT.NO:22/B-TEL.:0324 714 05 54 ‹STANBUL-ATAfiEH‹R-VURAL ELEKTRON‹K-KARAMAN Ç‹FTL‹K YOLU NO:12(ESK‹ PTT HAST. KARfiISI)
‹ÇERENKÖY TEL. : 0216 575 63 35 ‹STANBUL-fi‹fiL‹-YILKA T‹CARET-SEYMEN SOK. NO:27/A KURTULUfi-TEL.:0212-233 80 53 ‹STANBUL-
KÜÇÜKÇEKMECE-ÇA⁄DAfi SERV‹S-CENNET MAH.Y.KEMAL BEYATLI CAD.NO:14/D-TEL.:0212 579 35 30 ‹STANBUL-ZEYT‹NBURNUKARDEfiLER SO⁄UTMA-SEY‹T N‹ZAM MAH. fiEH‹T ERKAN ALYANAK SOK.NO:11-TEL.:0212 546 57 36 ‹STANBUL-ESENLER-YILDIRIM
ELEKTRON‹K-KAZIM KARABEK‹R MAH. 2.SOK. NO:10 -TEL.:0212 611 10 76 ‹STANBUL-EM‹NÖNÜ-IRMAK DIfi T‹CARET-TAHTAKALE CD.
TAHTAKALE T‹CARET MERKEZ‹ NO:34 2.BODRUM NO:204 -TEL.:0212 520 55 80 ‹STANBUL-ÜMRAN‹YE-GÜL-SER TEKN‹K SERV‹S-
NAMIK KEMAL MH. SÜTCÜ ‹MAM CD. SÜTÇÜ ÇIKMAZI NO:6/1- TEL.:0216 335 60 19 ‹STANBUL-ÜMRAN‹YE-GÖZDE ELEKTRON‹K-
ATATÜRK MH. ALEMDA⁄ CD. YILDIZ SK. NO:12/A-TEL.: 0216 329 57 03 ‹STANBUL-MALTEPE-GÜR TEKN‹K SERV‹S-BA⁄DAT CD. BOLAYIR
SK. NO:3/A-TEL.:0216 352 25 20 ‹STANBUL-BEYL‹KDÜZÜ-SC ELEKTRON‹K-GÜZELYURT MH. M‹MAR S‹NAN CD. NO:71-TEL.:0212 852
34 45 ‹STANBUL-GAZ‹OSMANPAfiA-DEDEO⁄LU ELEKTR‹K-2124 SOK NO:4 SULTANÇ‹FTL‹⁄‹-TEL.:0212 594 50 91 ‹STANBUL-TUZLA-
AKIN ISI TEKN‹K SERV‹S-YAYLA MH. F.ÇAKMAK CD. ‹SMA‹L A⁄A SK. NO:11 TEL.:0216 395 66 62 ‹STANBUL-SARIYER-H‹SAR SERV‹S
1-NUR‹PAfiA CD NO\48A BA⁄LAR MEVK‹ YEN‹KÖY-TEL.:0212 223 27 96 ‹STANBUL-SARIYER-H‹LAL SO⁄UTMA-KAPTAN SK. NO:2-
TEL.:0212 218 45 61 ‹STANBUL-BÜYÜKÇEKMECE-AYGÜL DEKORASYON-19 MAYIS MH. OSMAN GAZ‹ CD. NO: 7-TEL.:0212 881 33 18
‹STANBUL-GAZ‹OSMANPAfiA-ÇAM TEKN‹K-ISLAMBEY MAH NECIP FAZIL CAD 257 SK NO:25-TEL.:0212 597 86 62 ‹STANBULKÜÇÜKÇEKMECE-YILDIZ ELEKTR‹K SO⁄UTMA-HALKALI CD. ANADOLU PSJ. NO: 185-TEL.:0212 580 76 02 ‹STANBUL-KÜÇÜKÇEKMECEBATI TEKN‹K-GÜLTEPE MH. DEL‹ORMAN CD. NO:75 SEFAKÖY-TEL.:0212 599 36 79 ‹STANBUL-BAYRAMPAfiA-ÖZKAN ELEKTRON‹K-
KARTALTEPE MH. B‹LGEHAN CD. NO:36-TEL.:0212 564 33 46 ‹STANBUL-GAZ‹OSMANPAfiA-TOROS ELEKTRON‹K-MERKEZ MH. BA⁄LAR
CD. NO:77-TEL.:0212 563 50 38 ‹STANBUL-fi‹fiL‹-CHIP ELEKTRON‹K-BOZKURT CAD.NO: 235-TEL.:0212 231 65 43 ‹STANBUL-GÜNGÖREN-
YÜKSEL ELEKTRON‹K-M.FEVZ‹ ÇAKMAK MAH.‹NÖNÜ CAD.NO: 138-TEL.:0212-504 61 42 ‹STANBUL-BEYO⁄LU-TOLGA ELEKTRON‹K-
CAM‹ KEB‹R MH. DEREBOYU CAD. NO:28 KASIMPAfiA-TEL.:0212 235 65 34 ‹STANBUL-AVCILAR-NUR ELEKTRON‹K-DEN‹ZKÖfiKLER
MAH.DERYA SOK. NO:36/1-TEL.:0212 694 12 82 ‹STANBUL-BA⁄CILAR-ÇA⁄LAYAN ELEKTRON‹K-‹STOÇ 25.ADA NO.:109-TEL.:0212 659
92 49 ‹STANBUL-KADIKÖY-UMUT ELEKTRON‹K-HAL‹TA⁄A CAD. CELAL MUHTAR SOK. NO:20/2-TEL.:0216 346 39 78 ‹STANBUL-
ZEYT‹NBURNU-UZMAN ELEKTRON‹K-YEN‹DO⁄AN MH. 42.SK NO:50-TEL.:0212 582 36 37 ‹STANBUL-KADIKÖY-MICROSYSTEM
ELEKTRON‹K-1. ORTA SK. NO:18/1 GÖZTEPE-TEL.:0216 411 91 50 ‹STANBUL-MALTEPE-BEYDA⁄I TEKN‹K ELEKTRON‹K-BA⁄LARBAfiI
MAH. ‹NÖNÜ CAD.-TEL.:0216 457 63 34 ‹STANBUL-BA⁄CILAR-KUMRU ELEKTRON‹K-KEMALPAfiA MAH. NAMIK KEMAL CAD. NO: 126TEL.:0212 429 34 19 ‹STANBUL-BAKIRKÖY-‹K‹ZLER ELEKTRON‹K-SAKIZA⁄A MH. BERR‹NC‹N‹ SK. NO:16/A-TEL.:0212 543 85 83
‹STANBUL-ÜSKÜDAR-KÖYLÜBAY ELEKTRON‹K-ALBAY HÜSAMETT‹N ERTÜRK SK. NO:7/A ÇENGELKÖY TEL.:0216 318 35 13 ‹STANBULÜSKÜDAR-AKÇEL‹K T‹CARET-M‹MAR S‹NAN MH. ‹SMA‹L DÜMBÜLLÜ SK. NO:9/A TEL.:0216 342 99 22 ‹STANBUL-KADIKÖY-TELV‹D
ELEKTRON‹K-MAZHAR OSMAN SOK FERAH APT NO:24/A FENERYOLU-TEL.:0216 414 66 00 ‹STANBUL-‹K‹TELL‹-BARIfi TEKN‹K-ATATÜRK
MH. ‹K‹TELL‹ CD. DURAK SK. NO:18 TEL. : 0212 471 04 76 ‹STANBUL-K.ÇEKMECE-ENG‹N ELEKTRON‹K-TEVF‹K BEY MH. MERKEZ CD.
- 60 -
Page 62

ORK‹DE SOK. NO: 3 /1-TEL.:0212 598 44 76 ‹STANBUL-BAHÇEL‹EVLER-SEV-CAN DAYANIKLI TÜK.MALLARI.-YILDIRIM BEYAZIT CD
YETK‹L‹ SERV‹SLER L‹STES‹
.ZAFER MH. TÜRKBEY‹ SK. NO:6/2-3-TEL.:0212 552 45 87 ‹STANBUL-fi‹fiL‹-IfiIK ELEKTRON‹K-AYAZA⁄A MASLAK ATATÜRK CD NO: 25TEL.:0212 289 76 94 ‹STANBUL-PEND‹K-GÖKHAK ELEKTRON‹K-BATI MH. SABR‹ TAfiKIN CD. SEB‹L SK. NO:4/1 TEL. : 0216 354 07 00
‹STANBUL-G.O.PAfiA-ATILIM ELEKTRON‹K-CEBEC‹ MAH. 2472 SOK: NO:14/A SULTANÇ‹FTL‹⁄‹- TEL.:0212 475 85 62 ‹STANBULGÜNGÖREN-NUR ELEKTR‹K ELEKTRON‹K-MERKEZ MH. ASALET CD. NO: 22/D-TEL.:0212 641 42 09 ‹STANBUL-BEYKOZ-ULUDO⁄AN
ELEKTRON‹K-KAYABAfiI ÇIKMAZI NO: 4/B PAfiABAHÇE-TEL.:0216 322 85 85 ‹STANBUL-KARTAL-ÖZO⁄LU ELEKTRON‹K-KIZILAY BULVARI
CD. BAHADIR SK. 4/A-TEL.:0216 387 18 87 ‹STANBUL-FAT‹H-SOYLU TEKN‹K-HIRKA‹ fiER‹F CAM‹ ARKASI ESK‹ AL‹PAfiA CD. NO: 26TEL.:0212 631 85 88 ‹STANBUL-FAT‹H-IRMAK DIfi T‹CARET-HACI KADIN CD. NO:15 K.M. PAfiA TEL.: 0212 589 75 27 ‹STANBUL-S‹L‹VR‹-
PDS ELEKTRON‹K-P.M. PAfiA MH. HACI PERVANE CD. NO:35/B -TEL.:0212 728 76 75 ‹STANBUL-GÜLTEPE-B‹L‹M ELEKTRON‹K-
HARMANTEPE MH. ABD‹ ‹PEKÇ‹ CD. NO:14/D -TEL.:0212 278 72 27 ‹ZM‹R-KARfiIYAKA-AYSER ELEKTR‹KL‹ EV ALETLER‹-ZÜBEYDE
HANIM CADDES‹ NO:87/A-TEL.:0232 366 19 19 ‹ZM‹R-BERGAMA-GEZG‹N SERV‹S-K.KEMALBEY CAD. NO:82-84-TEL.:0232 633 35 15
‹ZM‹R-KONAK-TUNCA ELEKTR‹K-76 SK 10/A GÜZELYALI-TEL.:0232 246 40 62 ‹ZM‹R-ÇAMD‹B‹-KUDRET ELEKTRON‹K-BURAK RE‹S
CAD. NO: 239/A-TEL.:0232 435 81 36 ‹ZM‹R-MENEMEN-AY ELEKTRON‹K-DR. SELAHATT‹N ÖZKURT CD. NO:22/B-TEL.:0232 832 02 31
‹ZM‹R-KONAK-S‹STEM ELEKTRON‹K-2414 SK. NO:10 GÜLTEPE-TEL.:0232 469 72 69 ‹ZM‹R-KARfiIYAKA-LEVENT ELEKTR‹K
LABORATUVARI-1710 SK. NO:70/B ESHOT SOKA⁄I-TEL.:0232 381 14 42 ‹ZM‹R-KARfiIYAKA-ASMERKEZ T‹CARET-ESK‹ TRAMVAY CD.
1675. SK. NO:78/1B ALAYBEY-TEL.:0232 364 33 73 ‹ZM‹R-BORNOVA-ACEM ELEKTRON‹K-552/2 SK. NO: 4/A-TEL.:0232 339 73 31 ‹ZM‹RKONAK-KILIÇ ELEKTRON‹K-BARBAROS HAYRETT‹N PAfiA CD. NO:62/1 LEVENT-TEL.:0232 433 15 19 ‹ZM‹R-URLA-‹LTER ELEKTRON‹K‹ZM‹R 75. YILl CADDES‹NO:81/C-D-TEL.:0232 754 44 44 ‹ZM‹R-BUCA-ÇA⁄LAR ELEKTRON‹K-670/1 SK. NO:57/B-TEL.:0232 276 27 77
‹ZM‹R-YEfi‹LYURT-UMUT ELEKTR‹K & ELEKTRON‹K-YILDIZ CAD. NO: 152/A-TEL.:0232 244 65 77 ‹ZM‹R-ÖDEM‹fi-MURAT ELEKTRON‹K-
UMURBEY MH. SANAY‹ S‹T. 9.SK NO: 10 -TEL.:0232 544 41 98 KAHRAMANMARAfi-AKSUNGUR ELEKTR‹K-UZUNOLUK CAD. 20.SOKAK
NO:20/A-TEL.:0344 212 77 50 KAHRAMANMARAfi-KALE ELEKTRON‹K-FEVZ‹PAfiA MH. UZUNLUK CD.-TEL.: 0344 225 07 94 KARABÜK-
SAFRANBOLU-MEHMET SA⁄LAM - GÖKAY TEKN‹K-‹NÖNÜ MH. ESK‹ BA⁄LAR SK. NO:13-TEL.:0370 712 24 97 KARABÜK-ACAR
ELEKTRON‹K-VAKIF ‹fi HANI KAT:2 EMN‹YET MÜDÜRLÜ⁄Ü YANI-TEL.:0370 424 32 00 KARAMAN-ÖZ AS SO⁄UTMA-ABBAS MH. MUT
CD. NO: 82/A TEL. : 0338 214 56 74 KARS-AYDIN ELEKTRON‹K-KAZIM KARABEK‹R ‹fiHANI KAT:2 NO: 125 -TEL.:0474 212 87 82
KASTAMONU-TAfiKÖPRÜ-DE⁄‹fi‹M ELEKTR‹K-TABAKHANE MH. ATATÜRK CD. NO:55/A-TEL.:0366 417 42 04 KASTAMONU-TOSYADO⁄Ufi ELEKTRON‹K-VAKIF SK. 15/A-TEL.:0366 313 42 59 KASTAMONU-HARUN TELEKOMÜN‹KASYON-‹NÖNÜ MAHALLES‹ AFfi‹NBEY
SOKAK NO:8/B-TEL.:0366 212 33 66 KAYSER‹-MEL‹KGAZ‹-AKTÜRK BEYAZ EfiYA SERV‹S‹-AYDINLIKEVLER MH.FIRAT CD.KR‹STAL APT.AB NO.17 TEL.:0352 332 08 25 KAYSER‹-MEL‹KGAZ‹-AKIfi ELEKTRON‹K-ÇORAKÇILAR MH. CENG‹Z TOPEL CD.NO:20/B-TEL.:0352 320
14 00 KAYSER‹-DEVEL‹-U⁄UR SO⁄UTMA-HARMAN MAHALLES‹ BELED‹YE PASAJ‹ ÜZER‹ NO: 15-TEL.:0352 621 56 31 KAYSER‹-SÖNMEZ
ELEKTRON‹K-CAM‹ KEB‹R MAH. BASMANE SOK. NO:16/A-TEL.:0352 231 69 62 KAYSER‹-ZERO COMPUTER-SAHAB‹YE MH. METE CD.
fiAH‹R SATO⁄LU SK. SATO⁄LU AP D: 1-TEL.:0352 232 15 34 KIRIKKALE-MERKEZ-BULUT ELEKTR‹K B‹LG‹SAYAR-B.HAYRETT‹N CAD.
NO:9/C-TEL.:0318 212 31 73 KIRKLAREL‹-MERKEZ-BUSE ELEKTRON‹K-KARACA ‹BRAH‹M MH. KAPAN CAM‹ SK. ACUN PSJ. NO:23TEL.:0288 212 73 57 KIRKLAREL‹-LÜLEBURGAZ-BUSE ELEKTRON‹K-YILMAZ MH. ESK‹ KIRKLAREL‹ CD. EFSANE DÜ⁄ÜN SALONU YANI
NO:36/A TEL.: 0288 412 88 92 KIRfiEH‹R-GARANT‹ ELEKTRON‹K-ANKARA CD. C‹NGÖZ BEBE ARKASI YA⁄MUR ‹fiHANI NO:9/B-TEL.:0386
214 02 18 K‹L‹S-FLAfi ELEKTRON‹K-fiEH‹TLER PARKI KARfiISI NO:63/1-TEL.: 0348 814 55 28 KOCAEL‹-DORUK TEKN‹K H‹Z. -KARABAfi
MH. CENG‹Z TOPEL CD. MÜNECC‹M AR‹F SK. NO:6/A -TEL.:0262 331 11 66 KOCAEL‹-KARAMÜRSEL-KILINÇ ELEKTRON‹K-‹NÖNÜ CD.
M.YASEF SK. NO:10/M-TEL.:0262 452 55 55 KOCAEL‹-D‹LOVASI-SAMET ELEKTRON‹K-BA⁄DAT CAD NO: 42/2-TEL.:0262 754 79 86
KOCAEL‹-DARICA-KARDEfiLER ELEKTRON‹K-KAZIM KARABEK‹R MH. MEVALANA CAD. NO: 1/A-TEL.:0262 656 27 88 KOCAEL‹-GEBZEYILDIRIM ELEKTRON‹K-H. HAL‹L MH. 1209 SK. NO:13/C-TEL.:0262 641 35 88KONYA-BEYfiEH‹R-SELV‹ SO⁄UTMA-HACI ARMA⁄AN MH.
ANTALYA CD. NO:108/F-TEL.:0332 512 40 10 KONYA-SELÇUKLU-SAF‹R SO⁄UTMA-FER‹T PAfiA MH. GÜNEY SK. NO:3/F KULE S‹TE
C‹VARI-TEL.:0332 236 36 75 KONYA-ERKAM SO⁄UTMA-KARAKURT MH. FURKAN DEDE CD.ASBAfiKAN SK. NO:13/B-TEL.:0332 350 00
32 KONYA-ÖZCAN SO⁄UTMA VE ISITMA LTD fiT‹-N‹fiANTAfiIMH. HULUS‹ BAYBAL CD. NO:36/A-TEL.:0332 236 33 37 KONYA-SELÇUKLU-
KONSEY SOGUTMA VE ISITMA-KÜÇÜK ‹HSAN‹YE MH. fiA‹R GUBAR‹ SK.B‹NSA S‹TES‹ ALTI NO : 15 TEL.:0332 321 21 22 KONYA-AKfiEH‹REROL ELEKTRON‹K-MEYDAN MAH. ÇOCUK PARKI KOD NO:38-TEL.:0332 812 61 12 KONYA-MERAM-GÜRKAN TEKN‹K-‹HT‹YARETT‹N
MH.SIRÇALI MEDRESE CAD.‹BN‹B‹B‹ SK. NO:1/B-TEL.:0332-351 02 03 KONYA-SEYD‹fiEH‹R-TUNCER ELEKTRON‹K-KIBRIS CD. NO:26TEL.:0332 582 93 92 KONYA-DURMAZLAR ELEKTR‹K-ANKARA-KONYA CAD. NO:67-TEL.:0332 673 28 48 KONYA-ERE⁄L‹-ERDEM‹R
TEKN‹K-ÜÇ GÖZ MH. KIBRIS CD.EL‹T APT. NO:3 TEL.: 0332 713 02 53 KÜTAHYA-EL‹FO⁄LU ELEKTR‹K-FAT‹H SULTAN MEHMET BULVARI
DUAGÜR CAM‹‹ ALTI 43/B-TEL.:0274 226 32 80 MALATYA-YUVAM ELEKTRON‹K-‹ST‹KLAL MH. FUZUL‹ CD.‹MAMO⁄LU SK. NO:1-TEL.:0422
322 52 88 MALATYA-HAL‹M ELEKTRON‹K-SARAY MH. DEVECEL SK. NO:3-TEL.:0422 321 86 08MAN‹SA-SOMA-GÜRMAK TEKN‹K-
KURTULUfi MH. ‹DMAN SK. NO:47/A-TEL.:0236 613 66 56 MAN‹SA-SAL‹HL‹-AYKAR SO⁄UTMA- BEfiEYLÜL MH. BELED‹YE CD. NO:TEL.:2430236 714 88 68 MAN‹SA-AY ELEKTRON‹K MAN‹SA fiB.-YARHASANLAR MAH. ESK‹ HASA⁄A 2306 SOK.NO: 18/A-TEL.:0236 237 30 62-63
MAN‹SA-BURCU ELEKTRON‹K-TUNCA MAH. KURTULUfi CAD. NO:54-TEL.:0236-234 57 42 MAN‹SA-TURGUTLU-EM‹N ELEKTRON‹K-
ALTAY MH. SEV‹NÇ SK. NO:25-TEL.:0236 313 28 35 MAN‹SA-SARUHANLI-fiEN SO⁄UTMA-ATATÜRK MH. 7 EYLÜL CD. NO: 21/B-TEL.:0236
357 12 00 MAN‹SA-KULA-ERDAL KARAHAN-TERMO D‹NAM‹K-CAM‹‹ CED‹T MH. 62 SK. NO:67-TEL.:0236 816 70 99 MARD‹N-M‹DYAT-
SA⁄LAM ELEKTRON‹K-ESNAF SANATKARLAR KRED‹ KOOP. KARfiISI 2.CD.NO:56-TEL.:0482 462 33 90 MARD‹N-KIZILTEPE-‹BRAH‹MO⁄LU
ISITMA-fiANLIURFA CAD. ECE PASAJI NO:7-TEL.:0482 312 55 99 MARD‹N-DER‹K-UZAY ELEKTRON‹K-BELED‹YE MEYDANI NO:36-
TEL.:0482 251 34 35 MARD‹N-YEN‹fiEH‹R-MERKEZ TEKN‹K-KARAYOLLARI ARKASI BARIfi CAD GÜNAYDIN APT ALTI-TEL.:0482 212 83
06 MARD‹N-NUSAYB‹N-BÜDÜN ELEKTRON‹K-ZEYNEL AB‹D‹N MH. Ç‹LEK SK NO: 1/B-TEL.:0482 415 61 98 MU⁄LA-FETH‹YE-ANADOLU
TEKN‹K SERV‹S-ÖLÜDEN‹Z YOLU ÜZER‹ BAHA fiIKMAN CD.NO:157-TEL.:0252 611 39 12 MU⁄LA-M‹LAS-AFfi‹N YILDIRIM - TEKN‹K
SO⁄UTMA-HACI ‹LYAS MAH. PAZAR SOK.NO:14-TEL.:0252 512 14 45 MU⁄LA-YATA⁄AN-ASTEKN‹K ISITMA SO⁄UTMA SERV‹S‹-YEN‹ MH.
152. SK. NO:8-TEL.:0252 572 56 31 MU⁄LA-DALAMAN-ÖZKAN TEKN‹K SO⁄UTMA-MERKEZ MAHALLES‹ ATATÜRK CD.NO:56-TEL.:0252
- 61 -
Page 63

692 25 25 MU⁄LA-ELBO ELEKTR‹K ELEKTRON‹K-ORHAN‹YE MH. HÜRR‹YET CAD. NO:1/6-TEL.:0252 214 18 84 MU⁄LA-DATÇA-MEL‹H
YETK‹L‹ SERV‹SLER L‹STES‹
ELEKTRON‹K-‹SKELE MH. AMBARCA CD. NO:17-TEL.:0252 712 02 30 MU⁄LA-MARMAR‹S-‹LKSEL ELEKTRON‹K-YEN‹ YOL CD. N0:51/9-
TEL.:0252 412 62 60 MU⁄LA-URLA-STAR ELEKTRON‹K-‹N‹fiD‹B‹ CAD NO 1/C AKYAKA BELDES‹-TEL.:0252 243 40 42 MUfi-HAfi‹MO⁄LU
EK‹C‹ ELEKTRON‹K-HAfi‹MO⁄ULLARI EK‹C‹ ‹fi HANI BELED‹YE CD.NO:20/A-TEL.:0436 212 38 80 N‹⁄DE-HUZUR ELEKTR‹K-ILHANLI
MAH ÖZKUL MARKET KARSISI ÖZKILIÇ AP ALTI NO: 43-TEL.:0388 233 54 05 ORDU-TEK ISITMA SO⁄UTMA-SAKARYA MAH YENI KUMRU
CAD NO: 111-TEL.:0452 423 84 49 ORDU-HAZAR SO⁄UTMA-YEN‹ MAH. 26.SOK NO:17-TEL.:0452 214 04 49 ORDU-ÜNYE-STAR TEKN‹K-
KALEDERE MH. 20TEMMUZ CD. NO:16-TEL.:0452 324 82 51 ORDU-MERKEZ-M‹KRO ELEKTRON‹K-YEN‹ MH. 319 SK. NO:18 -TEL.: 0452
223 13 49 OSMAN‹YE-MODERN ELEKTRON‹K-ORTAOKUL CD. K‹fi‹O⁄LU ÇARfiISI NO:15-TEL.:0328 812 82 84 R‹ZE-ÇAYEL‹-ÖZER TEKN‹K-
MAKSUT ÖZER-EMNIYET MÜD.KARfiISI fiA‹RLER YOLU ÜZERI NO:3/2B-TEL.:0464 532 63 81 R‹ZE-CEVAH‹R ELEKTRON‹K-TOPHANE
MAH. ATATÜRK CAD. ‹fi PASAJI-TEL.:0464 213 16 17 SAKARYA-ADAPAZARI-ÇINAR ELEKTRON‹K-KÖMÜR PAZARI CAD. NO: 15 ATEL.:0264 271 39 12 SAMSUN-ÇARfiAMBA-ÖZKAN SO⁄UTMA-ORTA MH. TUNCAY KOCABAfi SK. NO:85-TEL.:0362 832 28 90 SAMSUN-
BAFRA-KARATAfi T‹CARET-KIZILIRMAK MH. F.ÇAKMAK SK. NO:18/A-TEL.: 0362 543 04 91 SAMSUN-GÜLTEK‹N SERV‹S-ATATÜRK
BULVARI NO.285-TEL.:0362 437 33 82 SAMSUN-DEN‹Z ELEKTRON‹K-KADIKÖY MH. OSMAN‹YE CD. NO: 68-TEL.:0362 432 44 80 S‹‹RT-
ERYILMAZ ELEKTRON‹K-CUMHUR‹YET CAD. NO:25 ULUCAM‹ KARfiISI-TEL.:0484 224 03 92 S‹NOP-ADA EV ALETLER‹-CAM‹ KEB‹R MH.
TÜTÜNCÜ SK. NO: 16-TEL.:0368 260 12 64 S‹NOP-AYANCIK-YILKAY SO⁄UTMA-YALI MH. DR.AZM‹ HAMZAO⁄LU CD. NO:46-TEL.:0368
613 52 12 S‹NOP-BOYABAT-ÖZTÜRK BEYAZ EfiYA BAKIM SERV‹S-GÖKDERE MH.YUSUF KEMAL BEY CD.NO:24-TEL.:0368 315 61 21
S‹VAS-EKOL ELEKTRON‹K-H‹KMET IfiIK CD.NALBANTLAR BAfiI KAVfiA⁄I NO:1/D-TEL.:0346 223 44 96 fiANLIURFA-SURUÇ-IfiIK SO⁄UTMA
TEKN‹KERL‹⁄‹-D‹K‹L‹ MH. Z‹YARET CD. NO:10-TEL.:0414 612 17 25 fiANLIURFA-AKTAfi ELEKTRON‹K-ASFALT CD. N0.22/F-TEL.:0414
217 14 87 fiANLIURFA-B‹REC‹K-YARAfiIR SO⁄UTMA-MEYDAN MAH 10 TEMMUZ CAD KÖPRÜ ÇIKIfiI NO : 9-TEL.:0414 652 36 38 fiIRNAKS‹LOP‹-ABAY ELEKTRON‹K-2. CADDE S‹EMENS BAY‹‹ KARfiISI-TEL.:0486 518 50 99 fiIRNAK-ULUDERE-ÜRÜN ELEKTRON‹K-CUMHUR‹YET
CD. PTT YANI-TEL.:0486 351 28 22 TEK‹RDA⁄-HAYRABOLU-POYRAZ TEKN‹K-H‹SAR MAH. ADELET SK. NO:24-TEL.:0282 315 55 48
TEK‹RDA⁄-SARAY-BATI TEKN‹K-YEN‹ MH. TAKS‹M CD. NO:9 TEL.:0282 768 69 34 TEK‹RDA⁄-MURATLI-AKAN ELEKTRON‹K-MURAD‹YE
MH. NAZIM SAV CD. NO:30/A-TEL.:0282 361 28 17 TEK‹RDA⁄-ÇORLU-FULL TEKN‹K-MUH‹TT‹N MH. F‹K‹R SK. NO:12/B-TEL.:0282 652
28 68 TEK‹RDA⁄-ARI ELEKTRON‹K-AYDO⁄DU MH. fiEH‹TLER CD. NO: 33/A-TEL.:0282 263 40 61 TEK‹RDA⁄-MALKARA-KER‹MO⁄ULLARI
T‹CARET-YEN‹MAHALLE GÜLDESTE SOK. NO: 4/B-TEL.:0282 427 16 61 TEK‹RDA⁄-ÇERKEZKÖY-ÇA⁄RI ELEKTRON‹K-G.O. PAfiA MH.
SAYAR SK. KARDEfiLER APT. NO:5 -TEL.:0282 726 02 66 TOKAT-ERBAA-H‹DRO ELEKT‹R‹K-CUMHUR‹YET MH. GAZ‹ BULVARI NO:144TEL.:0356 715 56 01 TOKAT-C‹HAN ELEKTRON‹K-G.O.PAfiA BULVARI S‹VAS CAD. NO:290/A- TEL.:0356 214 00 74 TOKAT-TURHAL-GÜÇLÜ
SO⁄UTMA-CELAL MH. TUNA SK. NO:11-TEL.: 0356 276 39 66 TOKAT-CEM TEKN‹K SO⁄UTMA-SO⁄UKPINAR MH. GOP BULVARI 241/A
GÖKÇE PASAJI NO:14-TEL.:0356 212 37 57 TRABZON-ÇIRAK TEKN‹K-FAT‹H MH. AYASOFYA CD. NO: 57 MÜZE KARfiISI-TEL.:0462 229
66 44 TRABZON-AKÇAABAT-ATOM ELEKTR‹K-ORTA MH. ERENLER SK. NO:5 -TEL.:0462 228 12 58 TRABZON-YET-SAN ELEKTRON‹K-
FAT‹H MH. FAT‹H CD. COfiKUNER PASAJI NO:2/B-TEL.:0462 223 15 04 TRABZON-ARAKLI-fiENGÜL TEKN‹K-BA⁄KUR ÇARfiISI NO: 10 /
A-TEL.:0462 721 74 11 UfiAK-MERKEZ-KOÇ SO⁄UTMA- ‹fiL‹CE MH. ADAfi SK. NO:29/E -TEL.:0284 513 89 66 VAN-ERC‹fi-ÖZKANAT
TAM‹RAT-EMN‹YET KARAKOL ARKASI NO:3-TEL.:0432 351 95 40 VAN-EB‹NÇ TEKN‹K-SIHKE CAD ATEfi SOK. NO 10-TEL.:0432 214 31
37 VAN-BURHAN AYDIN - ÖZ USTA TAM‹RAT-KÜLTÜR MERKEZ‹ C‹VARI DEM‹RC‹LER 1. SK. NO:1/C-TEL.:0432 216 34 58 YALOVA-
ALTINOVA-DO⁄AN TEKN‹K SO⁄UTMA-CUMHUR‹YET MH.MERKEZ DURAK KARfiISI NO:29A-TEL.:0226 461 26 21 YALOVA-TINAZTEPE
ELEKTR‹K-‹STANBUL CD. BORA SK. NO: 14-TEL.:0226 812 01 60 YOZGAT-AKDA⁄MADEN‹-AYDIN SO⁄UTMA-AHISHAVI MH. 2. HANLAR
SK. NO :10-TEL.:0354 314 64 12 YOZGAT-ÖNDER ELEKTRON‹K-UN PAZARI NO:14-TEL.:0354 212 79 67 YOZGAT-SORGUN-KARDEfiLER
ELEKTRON‹K-CUMHUR‹YET CD. NO:29 1/C-TEL.:0354 415 45 79 ZONGULDAK-KRD ERE⁄L‹-UZMAN ELEKTRON‹K-ERDEM‹R CAD NO:130-
TEL.:0372 316 31 28 ZONGULDAK-MERKEZ-EMEK ELEKTRON‹K-PAP‹LA ‹fi HANI ZEM‹N KAT NO:9 SO⁄UKSU-TEL.:0372 251 67 31
- 62 -
Page 64

- GARANT‹ fiARTLARI -
1. Garanti süresi, mal›n teslim tarihinden itibaren bafllar ve 2 y›ld›r.
2. Mal›n bütün parçalar› dahil(kullan›m hatalar›ndan kaynaklanan k›r›lmalar hariç) olmak üzere tamam› firmam›z›n
garantisi kapsam›ndad›r.
3. Mal›n garanti süresi içerisinde ar›zalanmas› durumunda, tamirde geçen süre garanti süresine eklenir. Mal›n tamir
süresi en fazla 30 ifl günüdür. Bu süre, mala iliflkin ar›zan›n servis istasyonuna servis istasyonunun olmamas›
durumunda, mal›n sat›c›s›, bayii, acentas›,temsilcili¤i, ithalatç›s› veya imalatç›s›-üreticisinden birisine bildirim tarihinden
itibaren bafllar. Mal›n ar›zas›n›n 15 ifl günü içerisinde giderilmemesi halinde, imalatç›-üretici veya ithalatç›; mal›n
tamiri tamamlan›ncaya kadar, benzer özelliklere sahip baflka mal› tüketicinin kullan›m›na tahsis etmek zorundad›r.
4. Mal›n garanti süresi içerisinde, gerek malzeme ve iflçilik, gerekse montaj hatalar›ndan dolay› ar›zalanmas› halinde,
iflçilik masraf›, de¤ifltirilen parça bedeli ya da baflka herhangi bir ad alt›nda hiçbir ücret talep etmeksizin tamiri
yap›lacakt›r.
5. Tüketicinin onar›m hakk›n› kullanmas›na ra¤men mal›n;
-Tüketiciye teslim edildi¤i tarihten itibaren, belirlenen garanti süresi içinde kalmak kayd›yla,bir y›l içerisinde; ayn›
ar›zan›n ikiden fazla tekrarlanmas› veya farkl› ar›zalar›n dörtten fazla meydan gelmesi veya belirlenen garanti süresi
içerisinde farkl› ar›zalar›n toplam›n›n alt›ndan fazla olması unsurlar›n›n yan›s›ra, bu ar›zalar›n maldan yararlanamamay›
sürekli k›lmas›,
-Tamiri için gereken azami sürenin afl›lmas›,
-Firman›n servis istasyonunun, servis istasyonunun mevcut olmamas› halinde s›rayla sat›c›s›, bayii, acentesi temsilcili¤i,
ithalatç›s› veya imalatç› - üreticisinden birisine düzenleyece¤i raporla ar›zan›n tamirine mümkün bulunmad›¤›n›n
belirlenmesi,durumlar›nda, tüketici mal›n ücretsiz de¤ifltirilmesini, bedel iadesi veya ay›p oran›nda bedel indirimi
talep edebilir.
6. Mal›n kullanma k›lavuzunda yer alan hususlara ayk›r› kullan›lmas›ndan kaynaklanan ar›zalar garanti kapsam›
d›fl›ndad›r.
7. Garanti Belgesi ile ilgili olarak ç›kabilecek sorunlar için Sanayi ve Ticaret Bakanl›¤› Tüketicinin ve Rekabetin
Korunmas› Genel Müdürlü¤ü’ne baflvurulabilir.
‹THALATÇI F‹RMA
DE‹MA ELEKTROMEKAN‹K ÜRÜNLER ‹NfiAAT SPOR MALZEMELER‹ ‹MALAT SAN. VE T‹C. A.fi.
Cihangir Mh. Güvercin Cd. No:4 Haramidere Mevkii Avcılar - ‹stanbul - Türkiye
Tel : (0212) 422 94 94 & Fax : (0212) 422 03 49
www.sinbo.com.tr - info@sinbo.com.tr
- 63 -
Page 65

- SK 2396 ELEKTR‹KL‹ TERMOS -
- GARANT‹ BELGES‹ -
Garanti Belge No : 78607
SSHY Belge No : 25551
‹THALATÇI F‹RMA
Ünvanı : DE‹MA ELEKTROMEKAN‹K ÜRÜNLER‹ ‹Nfi. SPOR MALZ.
‹MALAT SAN. ve T‹C. A.fi.
Adresi : Cihangir Mah. Güvercin Cad. No:4 Haramidere Mevkii
Avc›lar / ‹STANBUL
Tel. : 0212 422 94 94 & Fax: 0212 422 03 49
Yetkili Kifli :
Yönetim Kurulu Baflkan›
Ürünün Cinsi : ELEKTR‹KL‹ TERMOS
Markası : S‹NBO
Modeli : SK 2396
Alt Modeli : Bandrol ve Seri No :
Teslim Tarihi ve Yeri :
Garanti Süresi : 2 Yıldır
Azami Tamir Süresi : 30 ‹fl Günü
Kullanım Ömrü : Bakanl›kça belirlenen ve ilan edilen kullan›m ömrü 7 y›ld›r.
(Ürünün fonksiyonlar›n› yerine getirebilmesi için gereken yedek parça temin süresi)
SATICI F‹RMA
Ünvanı :
Adresi :
Tel.Fax :
Fatura Tarihi ve No :
Teslim Tarihi ve Yeri :
‹mza ve Kafle :
Bu bölüm, ürünü sat›n ald›¤›n›z Yetkili Sat›c› taraf›ndan imzalanacak ve kaflelenecektir.
Bu belgenin kullan›lmas›na; 4077 say›l› Tüketicinin Korunması Hakkında Kanun ve bu Kanun’a dayan›larak yürürlü¤e konulan Garanti Belgesi
Uygulama Esaslar›na Dair Tebli¤ uyar›nca, TC Sanayi ve Ticaret Bakanl›¤› Tüketicinin ve Rekabetin Korunmas› Genel Müdürlü¤ü tarafından
izin verilmifltir.
Garanti Belge Onay Tarihi : 04/02/2010
SSHY Belge Onay Tarihi : 30/03/2010
- 64 -
Page 66

MÜfiTER‹ H‹ZMETLER‹
De¤erli Müflterimiz,
En uygun fiyata en iyi ürünü vermenin yan› s›ra; en iyi hizmeti vermenin de
önemli oldu¤una inan›yoruz. Bu nedenle siz bilinçli tüketicilere daha yak›n
olabilmek için, internet adresimizdeki eriflim formlar›n›n yan› s›ra, tüketici
dan›flma hatlar›m›z› da hizmetinize açm›fl durumday›z.
TÜKET‹C‹
DANIfiMA HATTI
444 66 86
MERKEZ
TEKN‹K SERV‹S
(0212) 422 94 94
www.sinbo.com.tr
Dan›flma Hatlar›m›z›,
- Hafta içi her gün 08.30-18.00 saatleri aras›nda arayabilir; istek, öneri ve
flikayetlerinizi firmam›za iletebilirsiniz.
Tüketicinin Dikkatine:
Ürünlerimizle ilgili hizmetleri tam olarak alabilmek için afla¤›daki önerilere
uyman›z› rica ederiz:
1. Ürünü ald›¤›n›zda Garanti Belgesini mutlaka yetkili sat›c›n›za onaylatt›r›n›z.
2. Ürünü kullanma k›lavuzu esaslar›na göre kullan›n›z.
3. Ürününüzle ilgili hizmet talebiniz oldu¤unda yukar›daki telefon
numaralar›ndan, Tüketici ‹liflkileri Merkezi'ne baflvurunuz.
4. Ürünü promosyon arac›l›¤› ile edinmiflseniz, ürüne ait garanti belgesini en
yak›n yetkili servisimize giderek onaylatt›r›n›z.
5. Teknik servisteki ifliniz bitti¤inde "Hizmet Fifli" almay› unutmay›n›z.
Alaca¤›n›z bu fifl, ileride ürününüzde meydana gelebilecek herhangi bir
sorunda size yarar sa¤layacakt›r.
6. Cihaz›n›z ilk çal›flt›rmada çal›flm›yor veya ar›zal› ise, size en yak›n S‹NBO
Yetkili Servisine baflvurabilir veya S‹NBO Dan›flma Hatlar›ndan yard›m
alabilirsiniz.
- 65 -
Page 67

Made in China
‹mal Y›l› : 2010
- TEDAR‹KÇ‹ F‹RMA / EXPORTER United Favour Development Limited
Unit B, 10/F Lee May Building 788-790
Nathan Road, Mongkok, Kowloon, HK.
- UYGUNLUK BEYANI / CE CONFORMITY TÜV Rheinland Product Safety GmbH
Am Grauen Stein D-51105, Köln, Germany
AN50124873 0001
EEE Yönetmeli¤ine uygundur.
 Loading...