

Page 1

SK 2395 ELECTRIC AIR POT
INSTRUCTION MANUAL
EN
RU
www.sinbo.com
Page 2
ENGLISH
SINBO SK 2395 ELECTRIC AIR POT
INSTRUCTION MANUAL
Before operating this appliance, please read these instructions completely.
Thank you for choosing SINBO appliances. May you have an enjoyable experience using
our products.
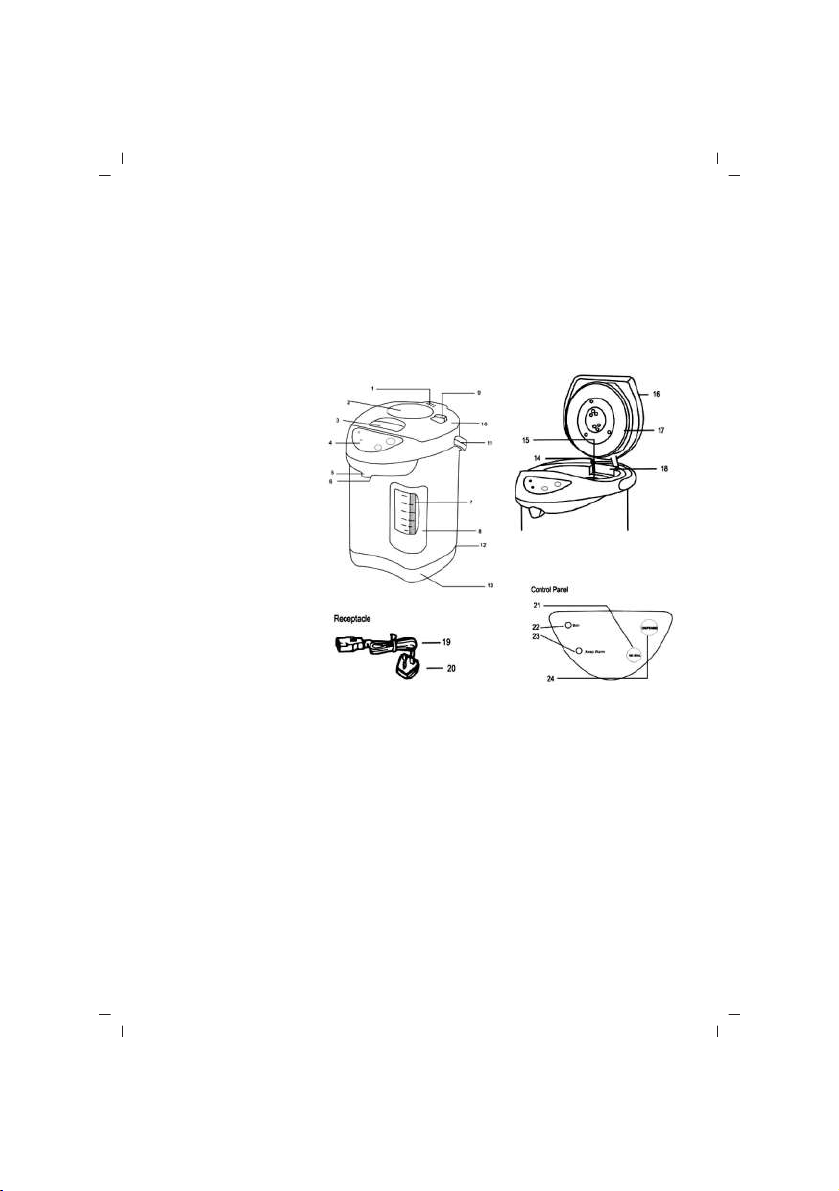
Parts Introduction
1. Steam Escape Holes
2. Water Pump Lid
3. Knob of Lid Lock
4. Control Panel
5. Spout
6. Cup Switch
7. Water Level Gauge
8. Empty Mark
9. Pump Lock
10. Upper Lid
11. Handle
12. Power Inlet
13. Rotating Base
14. Upper Lid Hinge
15. Full Mark
16. Detachable Upper Lid
17. Gasket
18. Water Tank
19. Power Cord
20. Plug
21. Re-boil Button
22. Boil Light Indicator
23. Keep Warm Light Indicator
24. Auto Dispense Button
Technical Specifications
• 3 Way water dispenser (Auto dispenser function, manual dispenser function, cup switch
function)
• Re-boiling function (by auto and by manual)
• Double dry-boiling protection
• Stainless steel inner pot
• 360 degree rotating base
• Capacity: 3.20L
- 1 -
Page 3

TECHNICAL SPECIFICATIONS
• Auto pump lock
• AC230V, 50Hz, 730W
• Specifications are subject to change without prior notice with the development of
technology.
Before Using
1. Please read these instructions carefully before using and keep them for future
reference.
2. Check your local main voltage whether it is the same as stated on the appliance.
3. Handle power cord carefully.Do not bend or pull cord.Unplug from wall socket whem
not in use.
4. Always use Air pot in a vertical upright position.
5. Allow Air pot to cool before cleaning.
6. Air pot may be deformed or damaged when exposed to heat or used in unstable
surroundings(excess water or humidity.)
7. Boiling without any contents in the Air pot would damage the unit.
8. Avoid touching outer body of this Air pot during operation.Always allow unit to cool
before handling.
9. Do not wash power cord or immerse Air pot in any water or liquid.
10. Close supervision is necessary when Air pot is used by or near to children.Never
leave appliance unattended.
11. Do not operate any appliance with a damaged cord or plug or malfunctions or has
been damaged in any manner.
12. Do not attempt to repair the Air pot,always return to service agent for rectification,as
special tools may be required.
13. The use of unnecessary attachments is not recommended by the manufacturer as
it may result in hazards.
14. The appliance is not in ended for outdoor use or in damp areas,it is for household
use only.
15. Power cord should not be knotted,left on hot surfaces or left hanging over table
edges.
16. Air pot should be given ample air circulation on all sides.An insulated hot pad is
recommended on surfaces where heat may cause problems.
17. Do not use appliance for other then its intended usage.
18. Beware of hidden steam under lid.
19. Place Steam vent of lid away from power point switch and furniture.
20. Do not place flam mable material near Air pot.
21. Handle power cord carefully,cord may malfunction if dropped.
22. It is normal for smoke and smell to emitted during first use,Be cautions it will stop
after a short period of usage.
23. When moving Air pot filled with hot liquids.
24. Do not fill device exceeding the “Full”water indicator scale.
- 2 -
Page 4
BEFORE USING
25. Do not cover steam vent with cloth or any material.
26. Always ensure that Air pot lid is closed properly.
27. Make full use of handle when moving Air pot around.
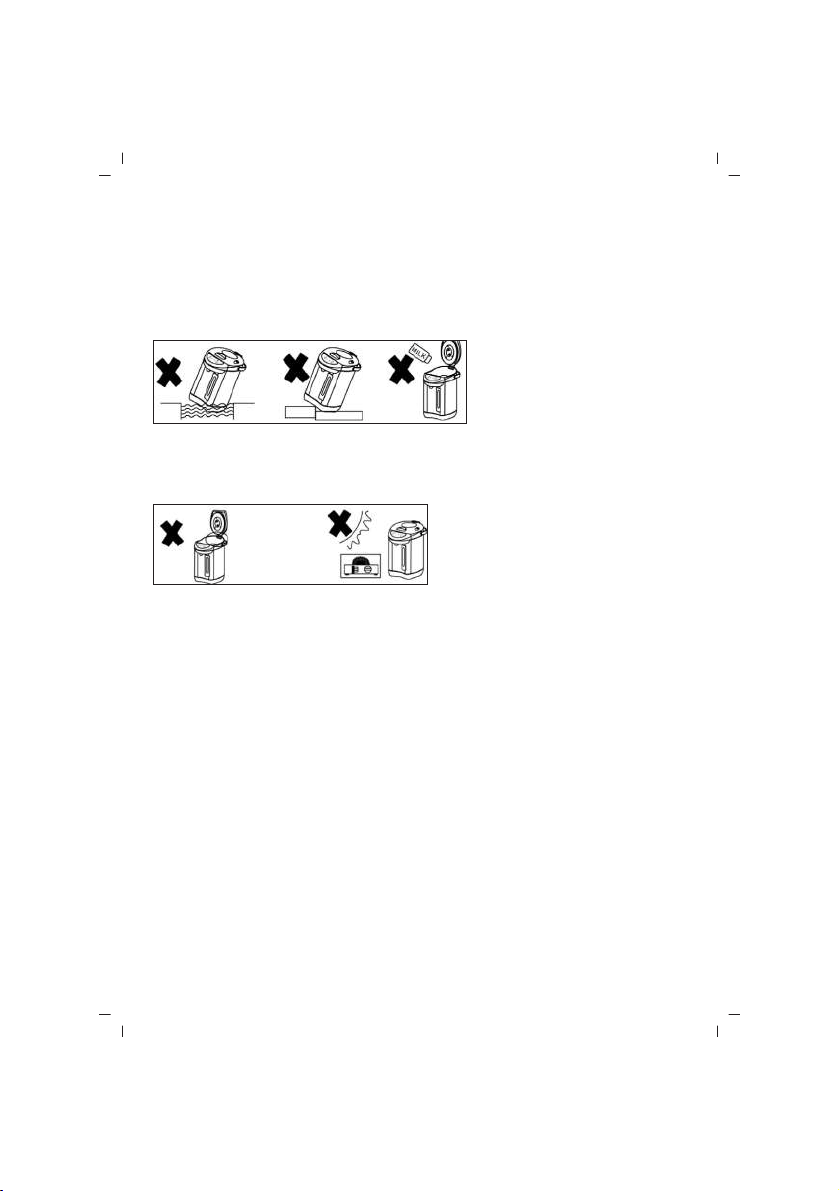
How To Operate Air pot
HAZARDS
To protect against electric shock.
Do not immerse base,cord or plug in water or other liquid.
Do not place the Thermo Flask on unstable surfaces.
Only fill with pure water (not milk or anything similar.)
Do not fill the Air pot above the maximum level mark inside the tank or lower than the
minimum level to avoid damage to the product.
Do not place on or near a hot gas or electric bumer,or a heated oven.
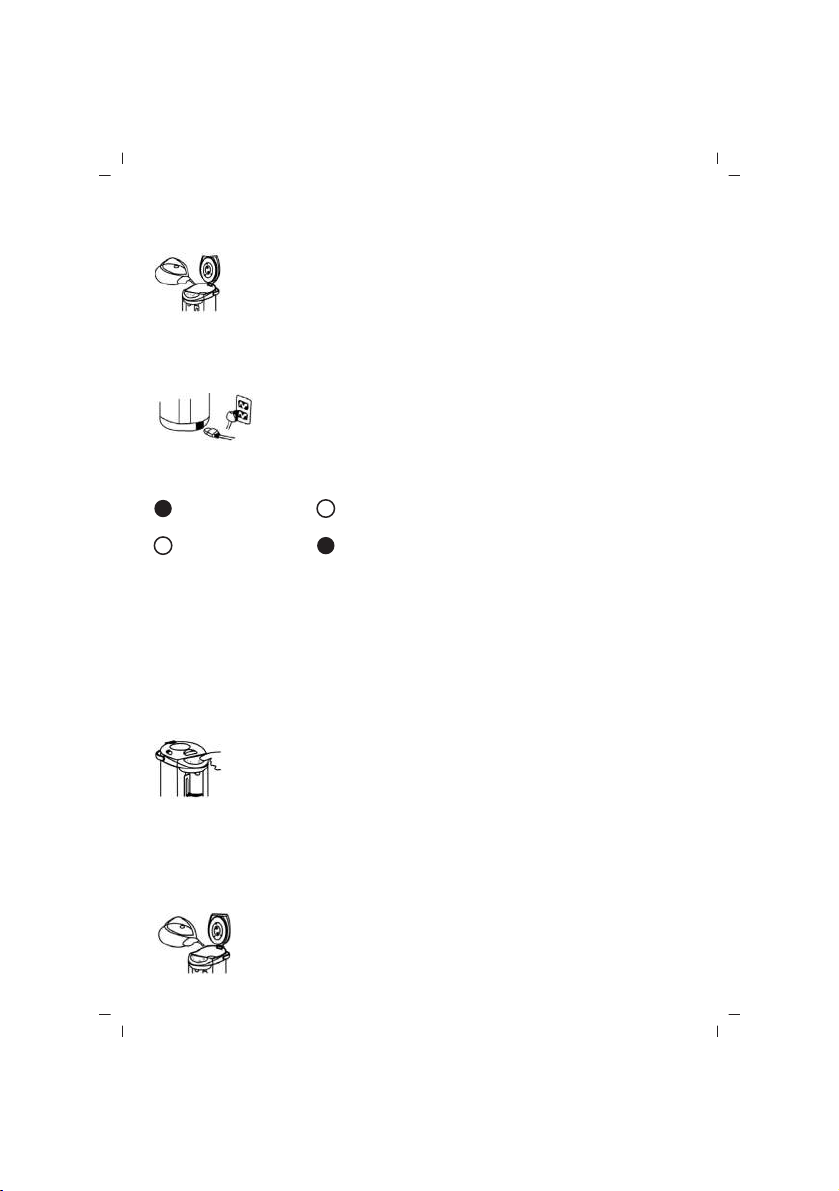
• Detaching Top Lid
Place the handle towards the rear side of the Air pot.Open the lid by lifting the lid
lock(Beware of hidden steam.)Positioning the lid at a 45C angle,pull lid out of securing
hinge.
1. Never remove lid while the appliance is operating.
2. Beware of hidden steam.
• Attaching Top Lid
Place the handle towards the rear side of the Air pot.Insert the shaft of the hinge on the
lid into the hinge holder.Ensure that lid attached properly.Close and press on lid until
it clicks.
• Using The Air pot For The First Time
1. Wash and rinse inner tank with water.
2. Fill water up to full line.
3. Boil once and disca rd water by pumping it out.
- 3 -
Page 5
USING
OPENING TOP LID
GLOSING TOP LID
Carefully close lid by pressing down untill a click sound is heard.
• Do not close the upper lid forcefully.(Hot water may gush out and cause scalds.)
• When rotating the body,be careful that the power cord does not get in the way.
BOIL KEEP WARM
BOIL BOIL
KEEP WARM KEEP WARM
1. “Boil” light is on during boiling process.
2. It will switch to “keep warm”automatically after the water is boiled.
• Do not open the upper lid.
• Do not touch the steam coming out of the steam vent.
• Do not place cloth or any other items covering the steam vent.
• Do not dispense hot water while the water is boiling.
Set Air pot on table top.Open top lid and fill water to
desired capaciity.
• Always fill water above the minimum mark but below the maximum water
level line indicator.
1. Insert the receptacle “Fully”into the Air pot power inlet.Plug into
the wall socket.
2. Do not switch on.When the container is empty.
POURING HOT WATER
• Do not press the dispensing button when the inner water reservoir is empty.(Doing so
can cause damage.)
• You cannot dispense hot water by pressing Auto Dispense button or the Cup Switch if
the Thermo Flask is unplugged.
REFILL WATER
1. The hot water might not dispense smoothly right after boiling.
2. Press on the”AUTO DISPENSE”button to dispense hot water.
• CAUTION: Always keep the lid away from you as there is hot steam trapped
under the lid.
When water reaches to “Refill water”line,add water for automatic boiling.
• Do not add water above full-water indicator scale.Water level below
refill mark may cause malfun.
- 4 -
Page 6

ATTENTION BEFORE USING
RE-BOIL THE HOT WATER UNDER THE KEEP WARM MODE.
steam as you open the top lid.
• Once the Re-boil button is pressed,the boiling process cannot be reset until the Thermo
Flask.Automatically switches to the keep warm mode.
• Do not press the Re-boil button repeatedly,as the continuous oiling process will cause
malfunction.
AFTER USE
Unplug the power cord
Remove the lid and
Dispose the water.
• Allow the Thermo Flask to dry thoroughly.
• Do not place the Air pot in a dishwasher or dish dryer,This will damage the Air pot.
• If not in use,seal in a plastic bag to protect it from dust and insects.
Cleaning And Maintenance
1. Always allow appliance to cool before cleaning.
2. Remember to unplug power cord from wall socket and power inlet.
3. Detach upper lid and pour out remaining water.
4. If mincral deposits are allowed to accumulate,loud noises may be heard during boiling
and you may face diffculties dispensing hot water.Regular cleaning will avoid such
problems.
Wipe upper lid and body with a damp cloth.
• Never immerse any part of the Thermo Flask in water.
• Re-boiling a full container takes about 3 minutes.
• Before Re-boiling,make sure the water level is above the refill mark.
• The Re-boil key may have no effect right after the water has boiled.
• When adding water to the Air pot ,be careful not to get bumty hot
• Never splash water on the operation panel.
• Do not use abrasive materials to clean appliance.
water.
• Cut a lemon into four pieces,wrap the lemon in the cloth and place in the inner container.
• Pour water up to the full level into the inner container.
• Boil and then retain heat for about one hour.
• Pour out the water and use a nylon brush to clean the container.
• To remove the smell of the lemon,boil water again and dispose the water.
Discoloration of the inner container and white particles floating in the
• Red rust-like spots,milky or black discoloration,and white floating objects
are caused by minerals in the water and are not caused by discoloration or
deterioration of the inner container itself.Although this is not a hygiene
problem,clean the inner container periodically.
- 5 -
Page 7

CLEANING AND MAINTENANCE
Stainless steel water reservoir.
• Wash with a sponge and then rinse with clean water.IMPORTANT:Do not use the
following to clean the container.
• Dish soap(This causes an unpleasant odor.)Scrubbing powder or scrubbing brushes(These
will damage the container and lid.)
• Benzine or inner thinner(These will damage the plastic of the lid and casing.)
Important Guidelines
A short power cord is provided to minimie the hazards involved with tripping over longer
cords.
Longerextension cords canbe easily purchased,however one should exercise care during
use.The extension cord should have 1) a minimum acceptable marked electrical rating
similar to that kind of appliance 2)should be a grounding-type three-wire cord and
3)should be arranged so that it will not drape over counter top or table top where it can
be easily pulled or tripped.
WARNING:THIS APPLIANCE MUST BE EARTHED
The wires in this main are coloured in accordance with the follwing code:
Green and yellow : Earth
Blue : Neutral
Brown : Live
If the colours above do not match those terminals identified in your plug,connect as
follow:
The wire coloured green and yellow must be connected to the terminal marked “E”or by
the earth symbol or coloured green or green and yellow:
The wire coloured blue must be connected to terminal marked N or coloured black.
The wire coloured brown must be connected to terminal marked L or coloured red.
(If terminals of plug are unmarked or in any doubt,kindly consult a qualified electrician)
Correct Disposal of this product
This marking indicates that this product should not be disposed with other
household wastes throughout the nation.To prevent possible harm to the
environment or human health from uncontrolled waste disposal,recycle if
responsibly to promote the sustainable reuse of material resources.To return your used
device,please use the return and collection systems or contact the retailer where the
product was purchased.They can take this product for environmental safe recycling.
- 6 -
Page 8

Page 9

Page 10

Page 11

Page 12

Page 13

- 12 -
Page 14

12-2018
- 13 -
 Loading...