

Simrad PI SEINESOUNDER PURSE SEINERS - QUICK REFERENCE GUIDE REV B, PI SeineSounder Quick Reference Manual
Page 1
Quick reference guide
Simrad PI SeineSounder for purse seiners
Purpose
The Simrad PI SeineSonder does
two jobs at the same time. From
its position on the footrope it will
measure the depth from the sea
surface and the height over the
seabed.
Daily operation
Once installed and put to use, the
sensor will automatically be switched
on once the waterswitch (the LONG
bolt) is activated. After an initial
startup, the sensor starts transmission
of the current depth and height.
When the sensor is not in use, check
that the lamp (D) is not flashing, as
this indicates that the sensor is active
and discharging its batteries. In this
case, wash the sensor in fresh water.
If you operate with Fast update rate,
the sensors must be charged approx.
every 24 hours. Used with Normal or
Slow update rates, the operational life
is approx. 60 or 80 hours respectively.
Optimal sensor charging temperature
is from +10 to +25° C.
Note: Charging sensors at sub-zero
temperatures can create explosive
gasses. Simrad assumes no liability
for improper charging of sensors,
or the use of chargers not specified
in Simrad’s sensor or charger
documentation.
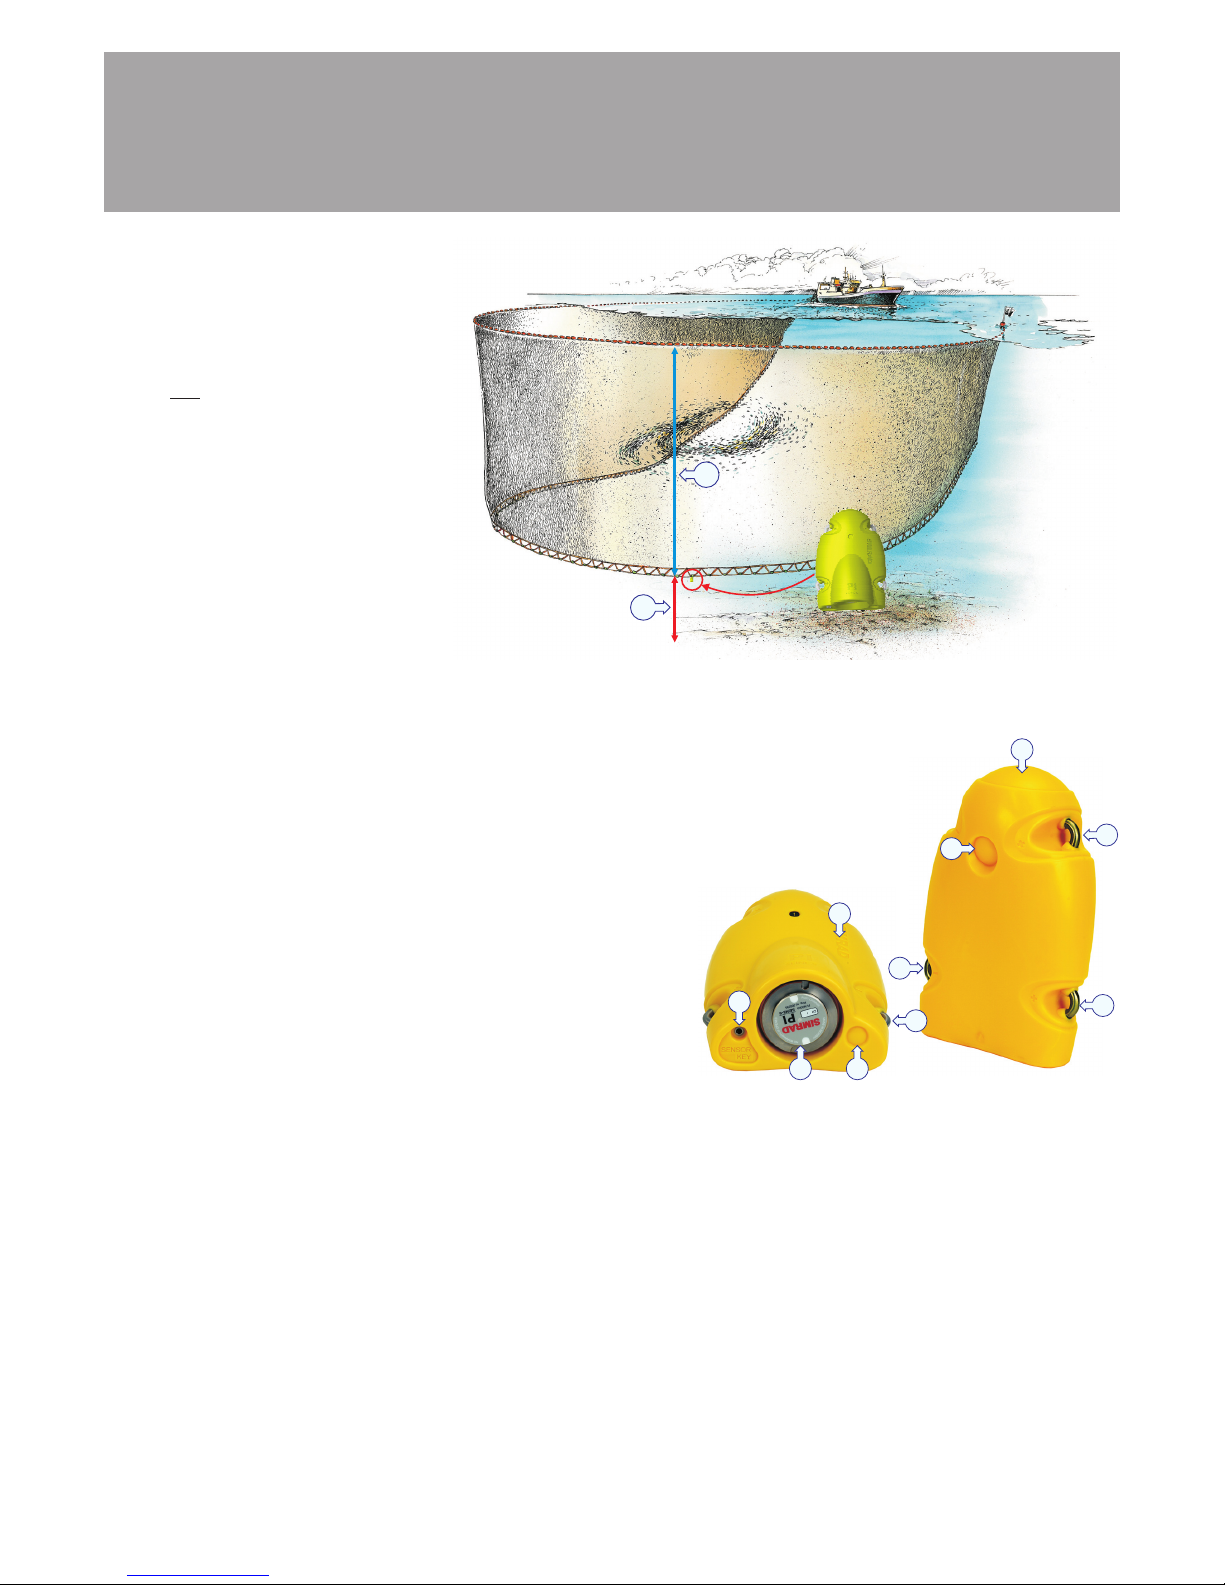
The Simrad SeineSounder is placed vertically on the footrope, and measures
both the depth (A) and the height above the seabed (B).
Sensor conguration
On delivery, all SeineSounders are
set up to channel 14 (Height) and
channels 5 (depth 300 m), 9 (600 m)
or 1 (1000 m), and with Fast update
rate.
Note: The sensor and the PI system
setup must correspond, otherwise the
communication will not work.
To change the sensor setup (channel
selection), use the PI Configurator
utility.
The sensor update rate controls how
often the sensor reads and reports the
height. Three settings are available.
Note that a faster update rate will
decrease the battery life.
Fast: Recommended for new
equipment, or if you are not familiar
with the bottom conditions.
Normal: Provided for normal use.
Slow: Recommended for long
operational time. The system will be
less sensitive due to the slow data
update.
A
B
(CD012205B)
A
A
B
B
C
D
E
F
G
H
(CD012205E)
System conguration
The sensor must be configured with
to unique sensor numbers. Select the
same update rate for both, and use
channel numbers according to the
sensor’s configuration. Write down
this configuration for future reference.
On the receiver, the Interference
filter must be switched on. Set it to
Level 9 if you have noise problems
from other hydroacoustic sources.
Note that this filters will influence the
signal spectrum shown in the Status
display.
We recommend that you set the
sensor filter to Light.
Main parts
(A) Negative charging and fastening lug
(B) Positive charging and fastening lug
(C) Communication link
(D) Location of sensor lamp
(E) Sensor “key” and water
switch sensor
(F) Echo sounder
transducer for trawl
(G) Echo sounder
transducer for purse seine
(H) Depth sensor
Page 2
302733 / Rev.B / October 2007
(CD012206C)
6
D1 [m]
43.5
1
H1 [m]
21.8
(CD012205D)
A
B
C
I
J
K
E
D
F
H
G
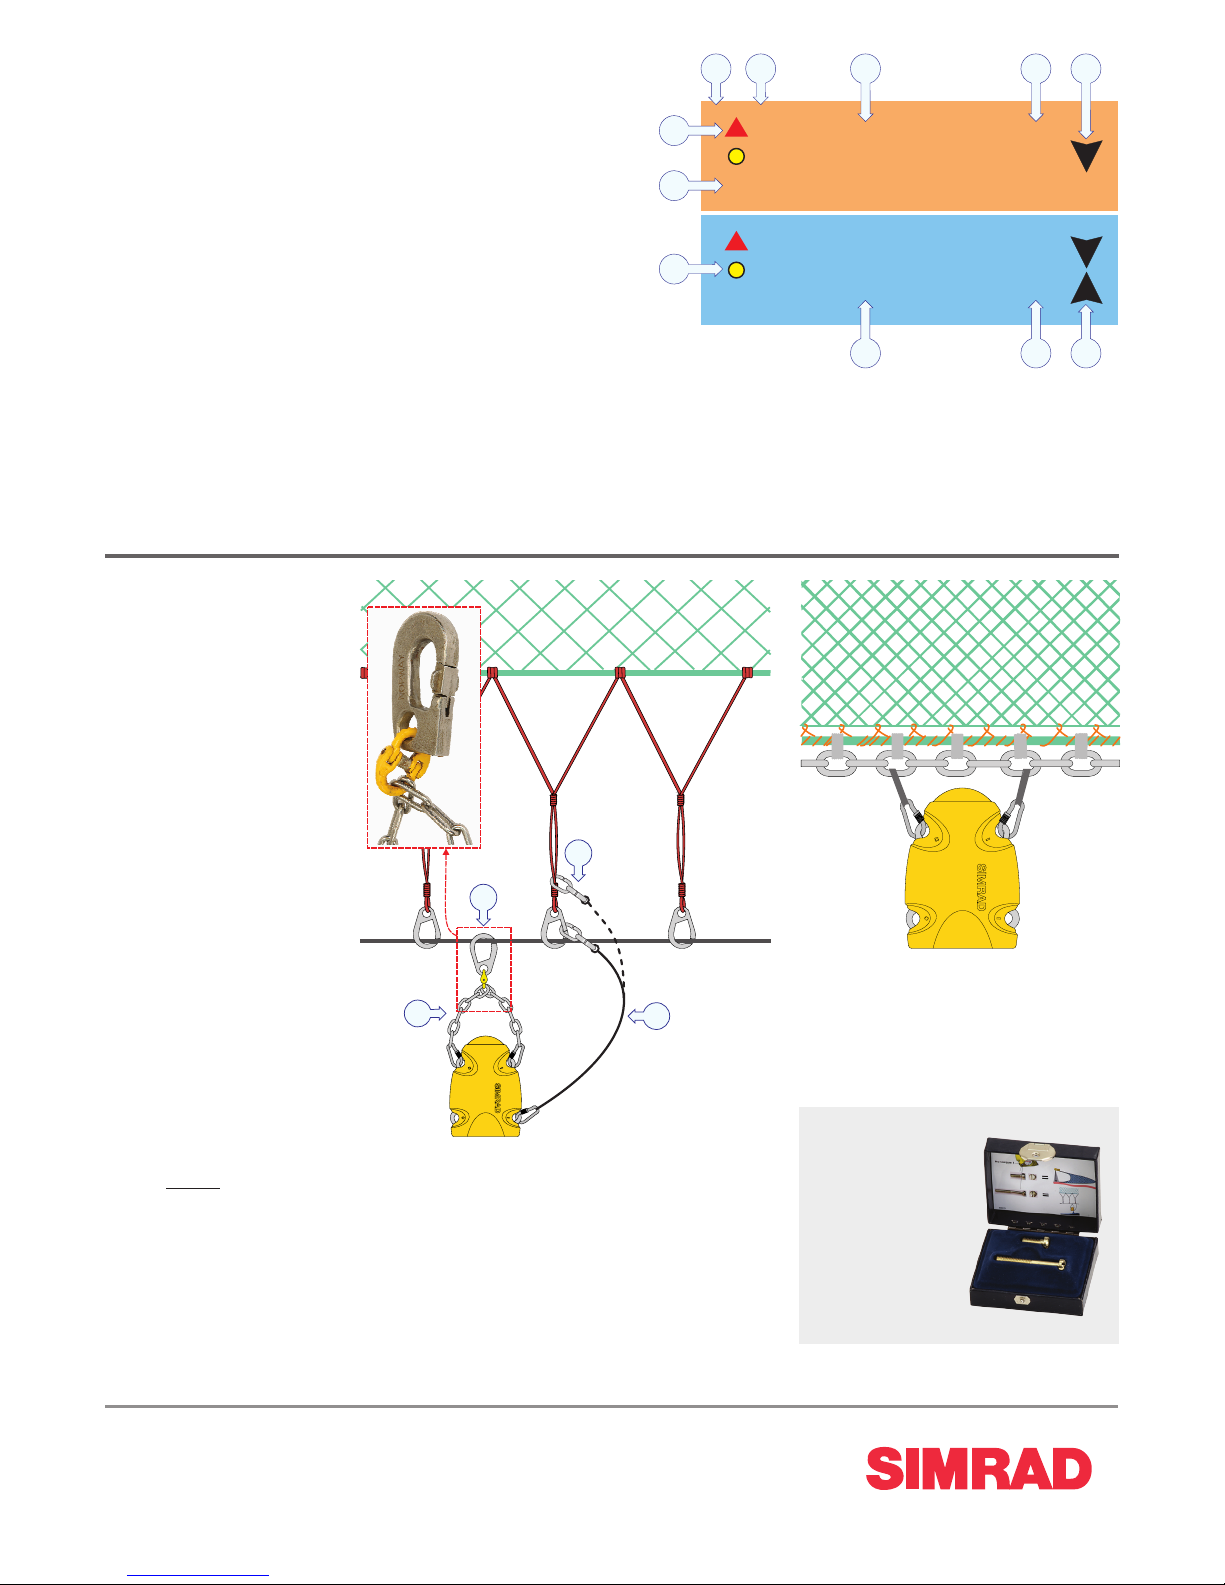
Tuna purse: The sensor must not be
attached to the footrope wire, but to
the foot-rope chain. Use a safety wire
in addition in case the sensor is ripped
off the net.
REMEMBER!
For purse seine
applications you
must use the
LONG key bolt!
(CD012205G)
A
C
B
D
Numerical presentation
On the PI display, you must use two
channels to receive the information
from the SeineSounder. The depth
and height values are then shown in
the numeric display. If the height or
depth is increasing or decreasing, this
is shown with two arrows and the
variation in meters per minute.
You can also see the depth and
height changes as a function of time in
a graphical presentation.
When the readings are stable, the
digits are shown in black colour. If the
contact is lost, the characters *** are
shown in grey. If the height is out of
range, the displays shows ???.
(A) Sensor identification
(B) Unit of measurement
(C) Depth
(D) Depth change/
minute
(E) Arrow indicates that
the depth is increasing
(F) Visual alarm
(G) Sensor transmission
indicator
(H) Interference
warning
(I) Height
(J) Height change/minute
(K) Arrows pointing “out” means
that the depth is increasing, arrows
pointing “in” means that height is
decreasing
Mounting
In order to secure a stable
communication with the
vessel, and to measure the
height, it is very important
that the sensor is allowed to
hang freely with the top end
pointing towards the surface
during shooting and pursing.
Attach the sensor to a
standard purse
ring with two separate
chains (A). Mount one end
of each chain to a common
snap hook (B), and secure the
hook on the footrope. Mount
the other end of each chain
to one of the sensor’s lower
using two sturdy quick links.
Mount a safety wire (C)
between one of the sensor’s
lower lugs and anywhere on
the net except on the footrope. Make
sure that security line does not prevent
the sensor from hanging freely!
Note: Remove the sensor from
the purse seine before it passes
through the power block. Ensure that
mounting material “permanently”
attached to the charging lugs do not
form an electrical connection, as this
will short the charging current.
Kongsberg Maritime AS
Stra ndpromenaden 50
P.O.Box 111
N-3191 Horten, Norway
Sim rad
Telephone: +47 33 03 40 00
Telefax: +47 33 04 29 87
simrad. sales@simrad.com
www .si mra d.c om
 Loading...