

Page 1

Operator manual
TECHNOLOGY FOR SUSTAINABLE FISHERIES
www.simrad.com
Simrad PI Congurator
“User” mode
Page 2

Page 3

SimradPICongurator
Operatormanual
Release4.3.X
Thismanualprovidesyouwiththebasicinformation
requiredtoinstallandusetheSimradPIConguratorutility.
Programmingmode:User
164924/D
31.05.2010
©
KongsbergMaritimeAS
Page 4

History
Documentnumber:164924/ISBN-13:978-82-8066-040-4
Rev.A01.03.2004
Rev.B
Rev.C01.01.2008
Rev.D
Copyright
©2010KongsbergMaritimeAS
TheinformationcontainedinthisdocumentremainsthesolepropertyofKongsbergMaritimeAS.Nopart
ofthisdocumentmaybecopiedorreproducedinanyformorbyanymeans,andtheinformationcontained
withinitisnottobecommunicatedtoathirdparty ,withoutthepriorwrittenconsentofKongsberg
MaritimeAS.Thedocument,oranypartofit,maynotbetranslatedtoanyotherlanguagewithoutthe
writtenapprovalfromKongsbergMaritimeAS.
01.11.2005
31.05.2010
Firstversion.
RevisedforSWversion3.40
RevisedforSWversion4.0x
RevisedforSWversion4.3.X.
Disclaimer
KongsbergMaritimeASendeavourstoensurethatallinformationinthisdocumentiscorrectandfairly
stated,butdoesnotacceptliabilityforanyerrorsoromissions.
Warning
Theequipmenttowhichthismanualappliesmustonlybeusedforthepurposeforwhichit
wasdesigned.Improperuseormaintenancemaycausedamagetotheequipmentand/orinjury
topersonnel.Theusermustbefamiliarwiththecontentsoftheappropriatemanualsbefore
attemptingtoinstall,operateorworkontheequipment.
KongsbergMaritimeASdisclaimsanyresponsibilityfordamageorinjurycausedbyimproper
installation,useormaintenanceoftheequipment.
Supportinformation
Ifyourequiremaintenanceorrepair,contactyourlocaldealer.Y oucanalsocontactususingthefollowing
address:contact@simrad.com.Ifyouneedinformationaboutourotherproducts,visitourwebsite.On
thewebsiteyouwillalsondalistofourdealersanddistributors.
KongsbergMaritimeAS
www.kongsberg.com
Page 5

Operatormanual
Tableofcontents
INTRODUCTION................................................................5
Basicinformation.....................................................................................................5
Defaultsensorsettings..................................................................................5
WhocanprogramPIsensors?........................................................................6
Necessaryequipment....................................................................................6
EquipmentavailablefromSimrad..................................................................6
Aboutsensorconguration......................................................................................7
Defaultcommunicationchannelsandupdaterates...........................................7
Changingacommunicationchannel...............................................................7
Changingtheupdaterate...............................................................................8
SpreadandRemotesensorsconguration................................................................8
GeometryandMini-Rsensorsconguration...........................................................9
Programmingmodes...............................................................................................10
MAINDIALOG.................................................................11
Screencapture........................................................................................................12
Communication......................................................................................................13
Conguration..........................................................................................................14
Parameterdisplays..................................................................................................15
Filemenu................................................................................................................16
Helpmenu..............................................................................................................16
OPERATIONALPROCEDURES..........................................17
Connectingthesensor............................................................................................18
Initialsetup................................................................................................18
Connectthesensor......................................................................................18
Sensorconguration...............................................................................................20
Howtodobasicconguration.....................................................................20
HowtodoTwinSpreadconguration..........................................................21
HowtodoGeometryconguration..............................................................23
Howtouploadfactorydefaults....................................................................26
Softwareprocedures...............................................................................................27
HowtoinstallthePIConguratorsoftware..................................................27
HowtoobtainthePIConguratorlicense....................................................28
HowtoupgradethePIConguratorsoftware...............................................28
HowtoremovethePIConguratorsoftware................................................28
COMMANDREFERENCES..................................................29
Communicationcommands....................................................................................31
EstablishCommunication............................................................................31
ReadSensor...............................................................................................31
164924/D
3
Page 6

SimradPICongurator
ProgramSensor..........................................................................................32
TerminateCommunication..........................................................................32
DefaultSensorSetting.................................................................................32
Congurationcommands.......................................................................................34
Sensor........................................................................................................34
Update.......................................................................................................34
Measure.....................................................................................................35
Channel......................................................................................................35
PingControl...............................................................................................36
Remote......................................................................................................36
Mini-R.......................................................................................................37
LEDControl...............................................................................................37
Number......................................................................................................38
ShowChannel............................................................................................39
ListeningMode..........................................................................................40
Parameterdisplays..................................................................................................41
SerialNumber............................................................................................41
BatteryV oltage...........................................................................................41
SensorTemperature....................................................................................42
BatteryTemperature....................................................................................43
SoftwareV ersion........................................................................................43
BatteryType...............................................................................................43
FPGAFunction..........................................................................................44
FPGAV ersion............................................................................................44
BatteryCapacity.........................................................................................44
Filemenucommands..............................................................................................45
CommunicationPortSetup..........................................................................45
Language...................................................................................................45
Debugwindow...........................................................................................45
Quit...........................................................................................................45
Helpmenucommands............................................................................................47
About.........................................................................................................47
Help...........................................................................................................47
MAINTENANCE................................................................48
PICICinterfacecableforUSB..............................................................................48
Purposeandpreparations.............................................................................48
Instructionsforuse.....................................................................................49
Softwaredriver...........................................................................................50
COMportidentication..............................................................................50
ProgrammingcableforRS-232..............................................................................50
Troubleshooting......................................................................................................52
4
164924/D
Page 7

Introduction
Introduction
ThepurposeofthePIConguratorutilityistobeabletosetupSimrad’scatch
monitoringsensorssothattheycanoperateondifferentcommunicationchannels.
SeveralvesselsequippedwithSimrad’sPIcatchmonitoringsystemsmaythenoperate
simultaneouslyinthesameareawithoutinterference.
ThePIConguratorutilityalsoallowsyoutochangetheupdaterateoneachPIsensor.
ThisisthetimeelapsedbetweeneachdatatransmissionfromthesensortoyourhostPI
system.TheupdateratecannotbechangedonPSsensors.
Thisdocumentdescribessoftwareversion4.3.X.
Topics
•Basicinformationonpage5
•Aboutsensorcongurationonpage7
•SpreadandRemotesensorscongurationonpage8
•GeometryandMini-Rsensorscongurationonpage9
•Programmingmodesonpage10
Basicinformation
ThissectionprovidesbasicinformationaboutthePIConguratorutility.
Defaultsensorsettings
PIandPSsensorsaredeliveredfromSimradreadilysetupwithcommondefaultsettings.
Whenrequired,theindividualsensorsmaybeprogrammedwithregardto:
•Communicationchannel
•LEDcontrol
•Pingcontrol
•Dataupdaterate
•RemoteandMini-R
•ShowchannelwithLEDashatstartup
164924/D
5
Page 8

SimradPICongurator
ThedefaultsettingsprovidedwiththeindividualsensorsarespeciedinsectionDefault
communicationchannelsandupdateratesonpage7.
WhocanprogramPIsensors?
SensorcongurationisnormallyperformedbyauthorizedSimradtechnicians.However,
individualswithbasiccomputerskillsandaccesstothenecessaryequipmentshould
notnditdifcult.
Necessaryequipment
Thefollowinghard-andsoftwareisrequiredtousethePIConguratorutility:
•PIConguratorsoftware
•Apersonalcomputerwithaseriallineand/orUSBcommunicationport
Thefollowingoperatingsystemsaresupported:
–Microsoft
–Microsoft
®
WindowsXP
®
Windows7
®
•Asensorprogrammingcableforeitherastationary(desktop)orportable(laptop)
computer(ifcomputer’sRS-232seriallineinterfaceisused).
•PICICInterfaceunit(ifcomputer’sUSBinterfaceistobeused)
Notethatthesensorprogrammingcablesforstationaryandportablecomputersare
designeddifferentlyandaren
o t interchangeable.
EquipmentavailablefromSimrad
ThefollowingequipmentareavailablefromSimrad.Theordernumbersareprovidedin
brackets.
•Instructionmanual[857-164924]
•Software[889-204037]
•Programmingserialcableforstationary[desktop]computers[380-204624]
•Programmingserialcableforportable[laptop]computers[380-208429]
•PICICInterfaceunitforUSBcommunication[326157]
•Servicehydrophone[314-204480]
Thecongurationequipmentisalsoisavailableinkits:
•KIT1:Instructionmanualandsoftware[KIT-208780]
•KIT2:Instructionmanual,softwareandprogrammingcableforstationary[desktop]
computer[KIT -208781]
•KIT3:Instructionmanual,softwareandprogrammingcableforportable[laptop]
computers[KIT -208782]
6
164924/D
Page 9

Aboutsensorconguration
AllsensorsareprovidedfromSimradwithpredenedcommunicationchannelsand
updaterates.BymeansofthePIConguratorutility,thesedefaultparametersettings
maybemodiedtosuityourpreferences.
Defaultcommunicationchannelsandupdaterates
Seethetablebelowfortheinitialvaluesforthecommunicationchannelsandupdate
ratesforthevarioussensors.
Table1Defaultcommunicationchannelsandupdaterates
Introduction
SensorCom.channel(s)
PIBottomContact6
PICatch
PIDepthDepth300M:16
PIHeight
PIHeight/DepthMk.1Depth300M:5
PIHeight/DepthMk.2
PISeineSounder
PIRemote/DepthDepth300M:11
PISpread
PISpread/DepthDepth300M:16
PIT winSpread2and7Normal
PIT emperature
PIGeometry
4
Depth600M:12
Depth1000M:10
14
Depth600M:9
Depth1000M:1
Height:14
Depth300M:3
Depth600M:9
Depth1000M:1
Height:14
Depth600M:15
Depth1000M:13
2
Depth600M:12
Depth1000M:10
Spread:2
8
Standard:1and3
Extendedrange(XT):1and3
Differential(DF):1
Updaterate
Normal
Normal
Fast
Fast
Fast
Normal
Fast
Fast
Fast
Fast
Fast
Fast
Normal
Sameasdepth
Normal
Normal
Normal
Normal
Normal
Normal
Normal
Normal
Normal
Normal
Normal
Normal
Changingacommunicationchannel
Itmayberequiredtochangeoneormorecommunicationchannels,andtheremaybe
manyreasonsforthis.
•Youhavemorethanoneofeachsensor.Forexample,ifyouhavethreetemperature
sensors,theyMUSTcommunicateonthreedifferentchannels.
•OthervesselsnearyourusethesamePIcatchmonitoringsystem(orasimilar),and
theyhaveoneormoreoftheirsensorssetuptothesamecommunicationchannelsas
youhave.Thiswillcreateinterference,asyouwill"read"eachotherssensors.
164924/D
7
Page 10

SimradPICongurator
•Ifyoursensorsaresetuptousecommunicationchannelstooclosetoeachother(for
example,youhavechosenchannels4,5and6),thiswilllimitthevesselspeed.The
reasonforthisistheDopplereffect.Ifthespeedistoohigh,theDopplerwillcause
thetransmissionfrequenciestochangesomuchthattheyoverlap,andthiswillcreate
interference.ThePIsystemwillprovideawarningifthisisabouttohappen!Y ou
musttheneitherchangetoothercommunicationchannelsfurtherapart,orreduce
themaximumshootingspeed.
•Ifyouoperateatthemaximumrangeofthesensors,youmaybeabletoincreasethis
rangeslightlyifyouuselowercommunicationchannels.Thisisbecausethelower
communicationchannelsuselowertransmissionfrequencies.
AllsensorsareprovidedfromSimradwithadefaultcommunicationchannel.Insome
casesyoumayndthatthechosenchanneldoesnotsuityouroperationalneeds,for
exampleifyouhavemorethanonesensorofanygiventype.Thisisadecisionyou
havetomakedependingonhowmanysensorsyouuse,andhowmanyofthesethat
areidentical.
→Defaultcommunicationchannelsandupdateratesonpage7
Changingtheupdaterate
Itmayberequiredtochangetheupdaterateonasensor,thatishowoftenitsends
informationbacktothePIcatchmonitoringsystem.Ahighupdateratewillgive
frequentinformationupdates,butthesensorwillusemorebatterypower.Ifyouneed
yourbatteriestolastaslongaspossible,youmustconsiderloweringtheupdaterate.
•Alowupdateratewillprovideyouwithfewerinformationupdates,butthebattery
willlastverylong.
•Ahighupdateratewillgiveyoufrequentinformationupdates,butthebatterywill
runoutfaster.
AllsensorsareprovidedfromSimradwithadefaultupdateratesetting.Insomecases
youmayndthatthisupdateratedoesnotsuityouroperationalneeds.Thisisadecision
youhavetomakedependingonthelocalshingconditions.
→Defaultcommunicationchannelsandupdateratesonpage7
SpreadandRemotesensorsconguration
WheneveryouusethePISpreadandPIRemotesensors,youmustmakesurethatthese
communicatecorrectly.Shouldincorrecttransmissionparametersbechosen,thesensors
willnotbeabletocommunicatewitheachother,andthePIsystemwilldisplay“±±±".
Singletrawl
•Spread1mustcommunicatewithRemote1.
•Spread2mustcommunicatewithRemote2.
8
164924/D
Page 11

Introduction
Twintrawl
•TwinSpread1mustcommunicatewithRemote1and3.
•TwinSpread2mustcommunicatewithRemote2and4.
ATwinSpreadsensorusestwochannelstocommunicatewiththeRemotesensors;one
channelforeachRemote.
Dualtwintrawl
•TwinSpread1mustcommunicatewithRemote1and3.
•TwinSpread2mustcommunicatewithRemote2and4.
Tosetupadualtwintrawlconguration,thetwosetsofTwinSpreadsensorsmustwork
withdifferentcommunicationchannels.
GeometryandMini-Rsensorsconguration
WheneveryouusethePIGeometrysensors,youmustmakesurethatthesecommunicate
correctly.Shouldincorrecttransmissionparametersbechosen,thesensorsand
responderswillnotbeabletocommunicatewitheachother,andthePIsystemwill
display“±±±".
ThefollowingPIGeometryversionsexist:
•GeometryFine–Highresolutionicontodetectsmallerchanges
•GeometryCoarse–Lowresolutionicontodetectlargerchanges
•GeometryXT(Extended)Fine–Extendedrange,highresolutionicontodetectsmaller
changes
•GeometryXT(Extended)Coarse–Extendedrange,lowresolutionicontodetect
largerchanges
•GeometryDF(Differential)Fine–differentialmeasurement(singlechannel),high
resolutionicontodetectsmallerchanges
•GeometryDF(Differential)Coarse–differentialmeasurement(singlechannel),low
resolutionicontodetectlargerchanges
TheDF(Differential)GeometrysensorsettingwillonlyuseonechannelonthePIsystem,
butwillnotprovidedextendedrange.
TheCoarseorFinesettingsarenotdenedbythesensorconguration,butinthePI
menusystem.
OnthePI44/54systemsthephrasesSensitiveandCoarseareused.
AllGeometryversionsaresetupaccordingtothefollowingprinciples:
Singletrawl
•Geometry1mustcommunicatewithMini–R1andMini-R3.
•Geometry2mustcommunicatewithMini–R2andMini-R4.
164924/D
9
Page 12

SimradPICongurator
Twintrawl
•Geometry1mustcommunicatewithMini–R1andMini-R3.
•Geometry2mustcommunicatewithMini–R2andMini-R4.
Programmingmodes
ThePIConguratorcongurationsoftwarehasthreeprogrammingmodes:
•User
•Distributor
•Factory
Thedifferentmodeswilldisableorenablevariousfunctionsprovidedbytheutility.
Caution
TheuseofPIConguratorsoftwareintheDistributorandFactorymodes
isforqualiedSimradpersonnelonly.ImproperuseofPICongurator
softwareinthesemodescancausepermanent,irreparabledamageto
sensors.Itmustthereforeneverbeactivatedbyunqualiedpersonnel.
ThisoperatormanualdescribestheUserfunctionality.
Table2Availablefunctionsfortheprogrammingmodes
Function
Sensor
Update
Measure1/2
Channel1/2
PingControl
RemoteandMini-R
LEDControl
Number
ShowChannel
SerialNumber
ProgrammingMode
User
—
OKOKOK
—
OKOKOK
—
OKOKOK
—
OKOKOK
—
——
—
Distributor
OKOK
OKOK
OKOK
OKOK
OKOK
OKOK
Factory
OK
10
164924/D
Page 13

Maindialog
Observetheillustrationanddescriptionsbelow.Notethattheappearanceoffunction
buttonswilldifferdependingonthesensortypeconnectedtotheutility.Whenfunctions
areunavailable,theeldsareidentiedaccordinglywithashadedappearance.
Themenusystemprovidedonthemaindialogueisdividedintothreegroups:
1Communication
Maindialog
2Conguration
3Parameters
Inaddition,themainmenuonthetopofthedialogueofferstwochoices;FileandHelp.
Topics
•Screencaptureonpage12
•Communicationonpage13
•Congurationonpage14
•Parameterdisplaysonpage15
•Filemenuonpage16
•Helpmenuonpage16
164924/D
11
Page 14
SimradPICongurator
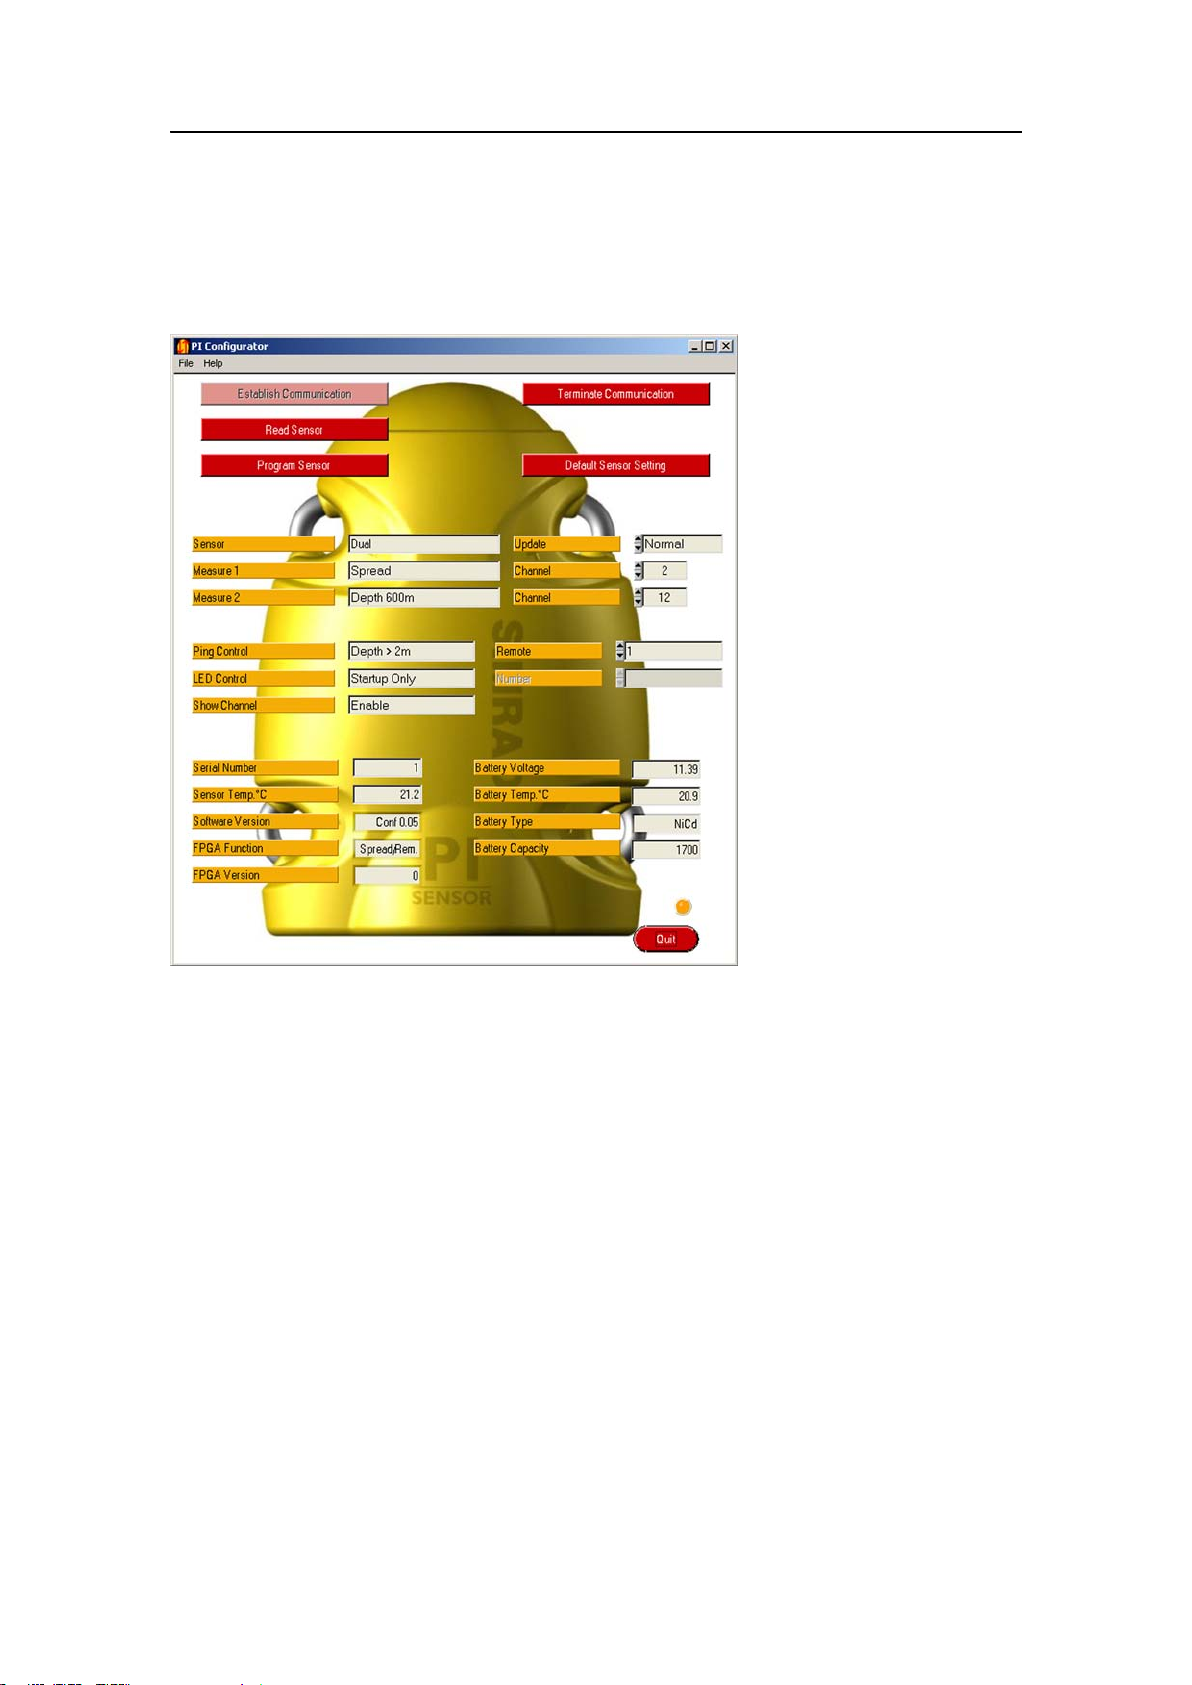
Screencapture
Figure1PICongurator
ThisscreencapturesshowstheappearanceofthePICongurator’sMaindialogwhenit
isconnectedtoaPISpread/Depthsensor.Thefunctionsrelatedtospecicsensorsare
onlyactivatedwhentherelevantsensorisconnected.Forothersensors,dependingon
sensortype,thebuttonsarefadeddowntoreectunavailability.
12
164924/D
Page 15

Maindialog
Communication
Thefollowingcommunicationoptionsareavailable.Theseareeasilyrecognizeddueto
theredbackgroundcolourinthebuttons.
1EstablishCommunication:Oncethesensorisphysicallyconnectedtothecomputer,
clicktoinitiatesensorinterface.
2ReadSensor:Clicktodownloadthecurrentparametersettingsfromthesensor.The
informationisshownintheCongurationandParametereldsbelow.
3ProgramSensor:Clicktouploadthenewcongurationparametersyouhave
denedforthesensor.
4TerminateCommunication:Clicktodisablethecommunicationbetweenthesensor
andthecomputer.
5DefaultSensorSetting:Clicktoprogramthesensorwiththecorrespondingfactory
defaultsettings.
Formoreinformation,see:
•EstablishCommunicationonpage31
•ReadSensoronpage31
•ProgramSensoronpage32
•TerminateCommunicationonpage32
•DefaultSensorSettingonpage32
164924/D
13
Page 16

SimradPICongurator
Conguration
Thefollowingcongurationoptionsareavailable.
1Sensor:Thiselddisplaysthesensortype;SingleorDual.
2Update:Selectthetimeintervalbetweenthedatatransmissionsfromthesensor.
3Measure:Theseeldsdisplaythemeasurementsthecurrentsensorismaking.
4Channel:Selectthetransmissionchannelnumber(s)tobeuploadedtothesensor.If
adualoraT winSpreadsensorisconnected,twocommunicationchannelsmustbe
dened.
5Pingcontrol:Clicktocontrolhowoftenthesensorwilltransmititsinformation
backtothevessel.
6Remote:ThiscongurationeldisusedduringTwinSpreadconguration,when
itisusedtodenetheRemotesensorscombinationtobeusedinthetwinspread
system.WhenaRemotesensorisconnected,thebuttonisrenamedRemoteNumber,
anditisusedtodenethesensor’snumber.
7LEDcontrol:Clicktocontrolthebehaviourofthesensor’sinternalLED.
8Number:SelectthenumberfortheRemotesensor.
9Showchannel:Clicktoactivateordeactivatethesensor’sinternalLEDidentication
ash.
10ListeningMode:Clicktochangelisteningmode(forsingleordualtrawl)forthe
RemoteMk.1sensors.
Formoreinformation,see:
•Sensoronpage34
•Updateonpage34
•Measureonpage35
•Channelonpage35
•PingControlonpage36
•Remoteonpage36
•Mini-Ronpage37
•LEDControlonpage37
•Numberonpage38
•ShowChannelonpage39
•ListeningModeonpage40
14
164924/D
Page 17

Maindialog
Parameterdisplays
Thefollowingparameterdisplayoptionsareavailable.
1Serialnumber:Thiselddisplaysthesensor’sserialnumber.Notethatthis
parameterisnotavailableforPSsensors.
2Batteryvoltage:Thiselddisplaythecurrentbatteryvoltage.
3Sensortemperature:Thiselddisplaysthecurrenttemperatureinsidethesensor.
4Batterytemperature:Thiselddisplaysthecurrenttemperatureofthesensor
battery.
5Softwareversion:Thiselddisplaysthecurrentversionofthesensor’scontrol
software.
6Batterytype:Thiselddisplaysthetypeofbatterycurrentlyinstalledinthesensor.
7FPGAfunction:Thiselddisplaysthefunction(s)supportedbythesensorsoftware.
8FPGAversion:Thiselddisplaysthecurrentversionofthesensor’sprocessing
software.
9Batterycapacity:Thiselddisplaysthecapacityofthebattery.
Formoreinformation,see:
•SerialNumberonpage41
•BatteryV oltageonpage41
•SensorT emperatureonpage42
•BatteryT emperatureonpage43
•SoftwareVersiononpage43
•BatteryTypeonpage43
•FPGAFunctiononpage44
•FPGAV ersiononpage44
•BatteryCapacityonpage44
164924/D
15
Page 18

SimradPICongurator
Filemenu
ThefollowingoptionsareavailableontheFilemenu.
1Com.portsetup:Thiscommandallowsyoutosetupthecommunicationportused
tointerfacethesensor.
2Language:Thiscommandallowsyoutoselectthelanguageusedonthemain
dialogue.
3Quit:ThiscommandclosesthePIConguratorutility.
Formoreinformation,see:
•CommunicationPortSetuponpage45
•Languageonpage45
•Debugwindowonpage45
•Quitonpage45
Helpmenu
ThefollowingoptionsareavailableontheHelpmenu.
1Help:Thiscommandopenstheon-linehelp.
Youcanalsor
2About:Thiscommandprovidesinformationaboutthecurrentsoftwareversion.
Formoreinformation,see:
•Helponpage47
•Aboutonpage47
i g h t - c l i c k onanybuttontoopenthehelpsystem.
16
164924/D
Page 19

Operationalprocedures
Operationalprocedures
ThefollowingproceduresareprovidedtoofferyoueasyuseofthePIConguratorutility.
Topics
•Connectingthesensoronpage18
–Initialsetuponpage18
–Connectthesensoronpage18
•Sensorcongurationonpage20
–Howtodobasiccongurationonpage20
–HowtodoT winSpreadcongurationonpage21
–HowtodoGeometrycongurationonpage23
–Howtouploadfactorydefaultsonpage26
•Softwareproceduresonpage27
–HowtoinstallthePIConguratorsoftwareonpage27
–HowtoobtainthePIConguratorlicenseonpage28
–HowtoupgradethePIConguratorsoftwareonpage28
–HowtoremovethePIConguratorsoftwareonpage28
164924/D
17
Page 20

SimradPICongurator
Connectingthesensor
Beforeyoucanprogramthesensor,youneedtoconnectittothecomputer.Observethe
proceduresbelow.
•Initialsetuponpage18
•Connectthesensoronpage18
Initialsetup
Thisprocedureexplainshowtosetupthecommunicationbetweenthecomputerand
thesensortobesetup.
Wheneveryouprepareasensorforcongurationand/orcharging,makesurethat
mountingmaterialattachedtothecharginglugsdonotformanelectricalconnection,as
thiswillshortthechargingcurrent.
Thisprocedureisonlyrequiredthe
Note
IfyouusethePICICinterfaceunit,makesurethatyouhaveinstalledtherequired
softwaredriver .ThedriverisprovidedontheCDthatfollowsthePICICunit.
1Plugtheserialprogrammingcableintoavacantseriallinesocketonyourcomputer.
IfyouusethePICICinterfaceunit,plugtheUSBconnectorintoavacantUSB
socketonyourcomputer.
Note
Ifyouunplugtheprogrammingcable,rememberwhichsocketyouused.Thenext
timeyouplugitin,usethes
2StartthePIConguratorutility.
3OnthePIConguratormainmenu,selectFile→Com.portSetup.
4ClicktoselecttheserialCOMporttheprogrammingcableispluggedinto,then
clickOK.
IfyouusethePICICinterfaceunit,youmayneedtotryoutseveralportstond
therightone.
r s t t i m e thesensorisconnectedtoyourcomputer.
a m e socket.
Connectthesensor
Thisprocedureisusede
1Plugtheserialprogrammingcableintoavacantseriallinesocketonyourcomputer.
IfyouusethePICICinterfaceunit,plugtheUSBconnectorintoavacantUSB
socketonyourcomputer.
18
v e r y t i m e youconnectasensortothecomputer.
164924/D
Page 21

Operationalprocedures
EstablishCommunication
Note
Ifyouunplugtheprogrammingcable,rememberwhichsocketyouused.Thenext
timeyouplugitin,usethes
a m e socket.
2StartthePIConguratorutility.
3Ensurethatthesensortobeconnectedisswitchedoff.
Checkthatthesensor’sinternalLEDdoesnotash,andthattheseawaterswitchis
notactivatedinanyway.
4Attachtheprogrammingcable’spositive(red)alligatorcliptooneofthesensor’s
positivefasteninglugs(designatedwithaplussymbol).
5Attachtheprogrammingcable’snegative(black)alligatorcliptooneofthesensor’s
negativefasteninglugs(designatedwithaminussymbol).
6ClickEstablishCommunication,andwaitforthePIConguratorutilitytointerface
withthesensor.
Whencommunicationisestablished,thePIConguratorutilitywillautomatically
adapttothesensortypecurrentlyconnected.Thismeansthatbuttonsanddisplays
thatarenotapplicableforthesensorwillbeunavailable.
7ObservethattheinformationprovidedbythesensorisreadanddisplayedbythePI
Congurator.
Ifthereisamalfunction,youwillbenotiedaccordingly.
164924/D
19
Page 22

SimradPICongurator
EstablishCommunication
ReadSensor
Channel
15
Update
Fast
Sensorconguration
Thissectionprovidesstandardproceduresrelatedtosensorconguration.
•Howtodobasiccongurationonpage20
•HowtodoTwinSpreadcongurationonpage21
•HowtodoGeometrycongurationonpage23
•Howtouploadfactorydefaultsonpage26
Howtodobasicconguration
Oncethesensorisconnectedtothecomputer,andyouhaveestablishedcommunication,
youcanusethePIConguratorutilitytochangethebasicsensorparameters.
Note
WhenthePIConguratorissetupforuseinUsermode,thesearetheonlysettingsyou
arepermittedtochange.
→Aboutsensorcongurationonpage7
1StartthePIConguratorutility,andconnectthesensortothecomputerwiththe
programmingcable.
→Connectthesensoronpage18
2ClickEstablishCommunication,andwaitforthePIConguratorutilitytointerface
withthesensor.
Whencommunicationisestablished,thePIConguratorutilitywillautomatically
adapttothesensortypecurrentlyconnected.Thismeansthatbuttonsanddisplays
thatarenotapplicableforthesensorwillbeunavailable.
3ClicktheReadSensorbutton.
Observethatthecurrentsensorcongurationparametersaredisplayedinthe
appropriateelds.
4Ifrequired,selectnewcommunicationchannelintheChannelspinbox.
5Ifrequired,selectanewupdaterateintheUpdatespinbox.
20
164924/D
Page 23

Operationalprocedures
ProgramSensor
TerminateCommunication
EstablishCommunication
6ClicktheProgramSensorbuttontouploadthenewparameters.
7ClicktheT erminateCommunicationbuttontodisablethecommunicationbetween
thecomputerandthesensor.
8Disconnectthealligatorclipsfromthesensor.
Ifyoudonotwishtoprogramadditionalsensors,disconnecttheentireprogramming
cable,andclosethePIConguratorutility.
HowtodoT winSpreadconguration
TheseproceduresexplainhowtosetupaTwinSpreadsensorwithitscorresponding
Remotesensors.
ObservetheinformationaboutSpreadandRemotesensorsprovidedintheIntroduction
chapter.
Topics
•TwinSpreadsensorcongurationonpage21
•Remotesensorscongurationonpage22
Relatedtopics
•SpreadandRemotesensorscongurationonpage8
TwinSpreadsensorconguration
ThisprocedureexplainshowtosetupaTwinSpreadsensor.
1StartthePIConguratorutility,andconnectthesensortothecomputerwiththe
programmingcable.
→Connectthesensoronpage18
2ClickEstablishCommunication,andwaitforthePIConguratorutilitytointerface
withthesensor.
Whencommunicationisestablished,thePIConguratorutilitywillautomatically
adapttothesensortypecurrentlyconnected.Thismeansthatbuttonsanddisplays
thatarenotapplicableforthesensorwillbeunavailable.
164924/D
21
Page 24

SimradPICongurator
ReadSensor
Channel
15
Update
Fast
ProgramSensor
TerminateCommunication
3ClicktheReadSensorbutton.
Observethatthecurrentsensorcongurationparametersaredisplayedinthe
appropriateelds.
4Ifrequired,selectnewcommunicationchannelsinthetwoChannelspinboxes.
TwocommunicationchannelsareusedtoreadtheinformationfromtheTwin
Spreadsensor.Thesearesimplyidentiedas#1and#2.
5Ifrequired,selectanewupdaterateintheUpdatespinbox.
6Ifrequired,selectRemotesensorcombinationintheRemotespinbox.
aYoucanuseRemotecombinations1and3or2and4.
bThenumberidentiestheRemotesensortobeused,andtheRemotesensor
u s t besetupwiththecorrespondingnumber.
m
cThecombinationyouselectherem u s t matchthetwoRemotesensorsyouwish
touse.Forexample,ifyouselectcombination1and3,thetwoRemotesensor
tobeusedm
u s t besetupas#1and#3.
7Ifapplicable,clicktosetListeningModetoDual.
8ClicktheProgramSensorbuttontouploadthenewparameters.
9ClicktheT erminateCommunicationbuttontodisablethecommunicationbetween
thecomputerandthesensor.
10Disconnectthealligatorclipsfromthesensor.
Ifyoudonotwishtoprogramadditionalsensors,disconnecttheentireprogramming
cable,andclosethePIConguratorutility.
Remotesensorsconguration
ThisprocedureexplainshowtosetuptheRemotesensorsforusewithaTwinSpread
sensor..
1StartthePIConguratorutility,andconnectthesensortothecomputerwiththe
programmingcable.
→Connectthesensoronpage18
22
164924/D
Page 25

Operationalprocedures
EstablishCommunication
ReadSensor
ProgramSensor
TerminateCommunication
2ClickEstablishCommunication,andwaitforthePIConguratorutilitytointerface
withthesensor.
Whencommunicationisestablished,thePIConguratorutilitywillautomatically
adapttothesensortypecurrentlyconnected.Thismeansthatbuttonsanddisplays
thatarenotapplicableforthesensorwillbeunavailable.
3ClicktheReadSensorbutton.
Observethatthecurrentsensorcongurationparametersaredisplayedinthe
appropriateelds.
4Ifrequired,selecttheRemotesensor’snumberintheRemotespinbox.
•TheTwinSpreadsensorcanuseRemotecombinations1and3or2and4.
•Theselectionyoumakeherem
u s t matchthecombinationyouhaveselectedfor
theTwinSpreadsensor.Forexample,ifyouhaveselectedcombination2and4,
youmustsetuponeRemotesensoras#2,andoneas#4.
5ClicktheProgramSensorbuttontouploadthenewparameters.
6ClicktheT erminateCommunicationbuttontodisablethecommunicationbetween
thecomputerandthesensor.
7Disconnectthealligatorclipsfromthesensor.
8RepeatthesameprocedureforthesecondRemotesensor.
9Disconnectthealligatorclipsfromthesensor.
Ifyoudonotwishtoprogramadditionalsensors,disconnecttheentireprogramming
cable,andclosethePIConguratorutility.
HowtodoGeometryconguration
TheseproceduresexplainhowtosetupaGeometrysensorwithitscorresponding
Mini-Runits.
ObservetheinformationabouttheGeometrysensorprovidedintheIntroductionchapter.
Topics
•Geometrycongurationonpage24
•Mini–Rcongurationonpage25
164924/D
23
Page 26

SimradPICongurator
EstablishCommunication
ReadSensor
Channel
15
Update
Fast
Mini-R
1and3
Relatedtopics
•GeometryandMini-Rsensorscongurationonpage9
Geometryconguration
ThisprocedureexplainshowtosetupaGeometrysensor.
1StartthePIConguratorutility,andconnectthesensortothecomputerwiththe
programmingcable.
→Connectthesensoronpage18
2ClickEstablishCommunication,andwaitforthePIConguratorutilitytointerface
withthesensor.
Whencommunicationisestablished,thePIConguratorutilitywillautomatically
adapttothesensortypecurrentlyconnected.Thismeansthatbuttonsanddisplays
thatarenotapplicableforthesensorwillbeunavailable.
3ClicktheReadSensorbutton.
Observethatthecurrentsensorcongurationparametersaredisplayedinthe
appropriateelds.
4Ifrequired,selectnewcommunicationchannelsinthetwoChannelspinboxes.
TwocommunicationchannelsareusedtoreadtheinformationfromtheGeometry
sensor.Thesearesimplyidentiedas#1and#2.
5Ifrequired,selectanewupdaterateintheUpdatespinbox.
6Ifrequired,selecttheMini–RcombinationintheMini-Rspinbox.
aYoucanuseMini–Rcombinations1and3or2and4.
bThenumberidentiestheMini–Rsensorstobeused,andtheGeometrysensor
m u s t thenbesetupwiththecorrespondingnumber.
cThecombinationyouselectherem
u s t matchthetwoMini–Rsensorsyouwish
touse.Forexample,ifyouselectcombination1and3,thetwoMini–Rsensors
tobeusedm
u s t besetupas#1and#3.
24
164924/D
Page 27

Operationalprocedures
ProgramSensor
TerminateCommunication
EstablishCommunication
ReadSensor
ProgramSensor
7ClicktheProgramSensorbuttontouploadthenewparameters.
8ClicktheT erminateCommunicationbuttontodisablethecommunicationbetween
thecomputerandthesensor.
9Disconnectthealligatorclipsfromthesensor.
Ifyoudonotwishtoprogramadditionalsensors,disconnecttheentireprogramming
cable,andclosethePIConguratorutility.
Mini–Rconguration
ThisprocedureexplainshowtosetuptheMini-RsensorsforusewiththeGeometry
sensor.
1StartthePIConguratorutility,andconnectthesensortothecomputerwiththe
programmingcable.
→Connectthesensoronpage18
2ClickEstablishCommunication,andwaitforthePIConguratorutilitytointerface
withthesensor.
Whencommunicationisestablished,thePIConguratorutilitywillautomatically
adapttothesensortypecurrentlyconnected.Thismeansthatbuttonsanddisplays
thatarenotapplicableforthesensorwillbeunavailable.
3ClicktheReadSensorbutton.
Observethatthecurrentsensorcongurationparametersaredisplayedinthe
appropriateelds.
4Ifrequired,selecttheMini–Rsensor’snumberintheMini–Rspinbox.
•TheGeometrysensorcanuseMini–Rcombinations1and3or2and4.
•Theselectionyoumakeherem
theGeometrysensor.Forexample,ifyouhaveselectedcombination2and4,
youmustsetuponeMini–Rsensoras#2,andoneas#4.
5ClicktheProgramSensorbuttontouploadthenewparameters.
164924/D
u s t matchthecombinationyouhaveselectedfor
25
Page 28

SimradPICongurator
TerminateCommunication
EstablishCommunication
ReadSensor
DefaultSensorSetting
6ClicktheT erminateCommunicationbuttontodisablethecommunicationbetween
thecomputerandthesensor.
7Disconnectthealligatorclipsfromthesensor.
8RepeatthesameprocedureforthesecondMini–Rsensor.
9Disconnectthealligatorclipsfromthesensor.
Ifyoudonotwishtoprogramadditionalsensors,disconnecttheentireprogramming
cable,andclosethePIConguratorutility.
Howtouploadfactorydefaults
Oncethesensorisconnectedtothecomputer,andyouhaveestablishedcommunication,
youcanusethePIConguratorutilitytouploadtheapplicablesensor’sfactorysettings.
Note
WhenthePIConguratorissetupforuseinUsermode,thesearetheonlysettingsyou
arepermittedtochange.
→Aboutsensorcongurationonpage7
1StartthePIConguratorutility,andconnectthesensortothecomputerwiththe
programmingcable.
→Connectthesensoronpage18
2ClickEstablishCommunication,andwaitforthePIConguratorutilitytointerface
withthesensor.
Whencommunicationisestablished,thePIConguratorutilitywillautomatically
adapttothesensortypecurrentlyconnected.Thismeansthatbuttonsanddisplays
thatarenotapplicableforthesensorwillbeunavailable.
3ClicktheReadSensorbutton.
Observethatthecurrentsensorcongurationparametersaredisplayedinthe
appropriateelds.
4ClicktheDefaultSensorSettingbuttontoretrievethedefaultsettingsforthecurrent
sensor.
26
164924/D
Page 29

Operationalprocedures
ProgramSensor
TerminateCommunication
5ClicktheProgramSensorbuttontouploadthenewparameters.
6ClicktheT erminateCommunicationbuttontodisablethecommunicationbetween
thecomputerandthesensor.
7Disconnectthealligatorclipsfromthesensor.
Ifyoudonotwishtoprogramadditionalsensors,disconnecttheentireprogramming
cable,andclosethePIConguratorutility.
Softwareprocedures
SoftwareupgradesareusefulifyourPIConguratorfails,andyoususpectasoftware
error.AnupgradeisalsorequiredwheneverthePIConguratorsoftwareismodied.
Ifyouexperienceproblemsduringasoftwareinstallationorupgrade,writedownthe
installationparameters.RemovethePIConguratorsoftwareentirely,thenreinstall
fromscratch.
•HowtoinstallthePIConguratorsoftwareonpage27
•HowtoobtainthePIConguratorlicenseonpage28
•HowtoupgradethePIConguratorsoftwareonpage28
•HowtoremovethePIConguratorsoftwareonpage28
HowtoinstallthePIConguratorsoftware
Usethisprocedureifyouneedtoinstallthesoftwareonacomputer.
1Powerupthecomputer.
2InsertthePIConguratorCD-ROM.
IfyourcomputerisnotttedwithaCDorDVDdrive,copythelesfromtheCDto
aUSBmemorystick.
3Observethattheinstallationprogramopens.
Iftheinstallationprogramdoesnotstartautomatically,usealemanagertoaccess
theCDorUSBmemorystick.
Double-clickontheSetup.exeletostarttheinstallation.
4Allowtheinstallationprogramtorun.Followtheinstructionsprovided.
5Oncetheinstallationhasbeencompleted,double-clicktheprogramicononthe
desktoptostarttheapplication.
164924/D
27
Page 30

SimradPICongurator
6IfyouuseWindows7operatingsystem:
aObservethatWindows7Firewallwillopenadialogrequestinginformation
aboutthenetwork.
bSelectPublic,andclickAllowaccess.
HowtoobtainthePIConguratorlicense
Nolicenseisrequired.ThePIConguratorutilityisfree.
HowtoupgradethePIConguratorsoftware
Usethisprocedureifyouwishtoreinstallthesoftware,orreceiveanewCD-ROM
withasoftwareupgrade.
1Observetheprocedureforsoftwareinstallation.
→HowtoinstallthePIConguratorsoftwareonpage27
HowtoremovethePIConguratorsoftware
YoumaywishtoremovethePIConguratorsoftwarefromyourcomputer.
1Observetheoperatingsystem’sfunctionalityforsoftwareremoval.
28
164924/D
Page 31

Commandreferences
Commandreferences
WhichfeaturesthataremadeavailablewhenusingthePIConguratorutilitydependon
thecurrentoperationalmodeandthetypeofsensorthatisinterfaced.Allcommands
aredescribedhere.
Topics
•Communicationcommandsonpage31
–EstablishCommunicationonpage31
–ReadSensoronpage31
–ProgramSensoronpage32
–T erminateCommunicationonpage32
–DefaultSensorSettingonpage32
•Congurationcommandsonpage34
–Sensoronpage34
–Updateonpage34
–Measureonpage35
–Channelonpage35
–PingControlonpage36
–Remoteonpage36
–Mini-Ronpage37
–LEDControlonpage37
–Numberonpage38
–ShowChannelonpage39
–ListeningModeonpage40
•Parameterdisplaysonpage41
–SerialNumberonpage41
–BatteryVoltageonpage41
–SensorTemperatureonpage42
–BatteryTemperatureonpage43
–SoftwareV ersiononpage43
–BatteryTypeonpage43
164924/D
29
Page 32

SimradPICongurator
–FPGAFunctiononpage44
–FPGAVersiononpage44
–BatteryCapacityonpage44
•Filemenucommandsonpage45
–CommunicationPortSetuponpage45
–Languageonpage45
–Debugwindowonpage45
–Quitonpage45
•Helpmenucommandsonpage47
–Helponpage47
–Aboutonpage47
30
164924/D
Page 33

Commandreferences
EstablishCommunication
ReadSensor
Communicationcommands
ThecommandsintheCommunicationgrouparedescribedbelow.
•EstablishCommunicationonpage31
•ReadSensoronpage31
•ProgramSensoronpage32
•TerminateCommunicationonpage32
•DefaultSensorSettingonpage32
EstablishCommunication
Thisbuttoninitiatescontactbetweenthecomputerandawellchargedsensorbysending
ita"wake-up"command.
Oncetwo-waycommunicationisestablishedthefollowingoccurs:
•Theindicatorlamp(inthelowerright-handcornerofthedialogue)willbeturned
onandoffeverytwoseconds.
•TheLEDinsidetheinterfacedsensorwillilluminateeverytwoseconds.
•Thesensorwilluploaditscurrentcongurationdatatothecomputer.Theinformation
isshowninthevariouseldsinthemaindialogue.
Tooperate,clicktheEstablishCommunicationbutton.Checkthattheeldsshowthe
interfacedsensor’scurrentcongurationparameters.
Toterminatethecommunicationwiththesensor,clicktheTerminateCommunication
button.
Relatedtopics
•TerminateCommunicationonpage32
ReadSensor
Thisbuttonrequeststhatthecurrentcongurationdatainthesensoraresentfromthe
sensortothecomputer.
WhentheReadSensorbuttonisclicked,thesensorwillautomaticallydownloadits
informationtothecomputer.Thisdataisthenshowninthededicatedparameterelds.
Tooperate,clicktheReadSensorbutton.Checkthattheappropriateeldsarepopulated
withtheinterfacedsensor’sdata.
164924/D
31
Page 34

SimradPICongurator
ProgramSensor
TerminateCommunication
DefaultSensorSetting
Note
Priortoreadthesensor’ sdata,thecommunicationbetweenthecomputerandthesensor
musthavebeenestablished.
ProgramSensor
Thisbuttonisusedtodownloadthecurrentlyinterfacedsensorwiththenewparameters
selected(thosepresentlydisplayed).
Thisoperationcannotbeundone,however,thesensor’spreviousstatusinformation
andparametercongurationisstillavailableinthemaindialogueboxandmaybe
re-enteredifnecessary.
Tooperate,clicktheProgramSensorbutton.Checkthattheappropriateeldsare
populatedwiththeinterfacedsensor’sdata.
Note
Priortouploadnewsensorconguration,thecommunicationbetweenthecomputerand
thesensormusthavebeenestablished.
TerminateCommunication
Pressthisbuttontoterminatetheserialdataowbetweenthesensorandthecomputer.
Tooperate:clicktheT erminateCommunicationbuttontodisablethecommunication,
thendisconnectthecable.Ifyoudisconnectthecablebeforeyouterminatethedataow,
thePIConguratorwillissueaerrormessage.
DefaultSensorSetting
Thisparameterisusedtorestoreasensor’sfactorydefaultvalues,accordingtothetype
ofsensorcurrentlyconnected.
Factorydefaultsettingsinclude:
•CommunicationChannel.
•LEDcontrol
•Pingcontrol
32
164924/D
Page 35

Commandreferences
•Updaterate
•Remote
•Showchannelatstart-up
Tooperate,clicktheDefaultSensorSettingbuttontoloadtheparameters.Then,clickthe
ProgramSensorbuttontoprogramtheinterfacedsensorwiththenewparameters.
Relatedtopics
•Defaultcommunicationchannelsandupdateratesonpage7
•ProgramSensoronpage32
164924/D
33
Page 36

SimradPICongurator
Sensor Single
Update
Fast
Congurationcommands
ThecommandsintheCongurationgrouparedescribedbelow.
•Sensoronpage34
•Updateonpage34
•Measureonpage35
•Channelonpage35
•PingControlonpage36
•Remoteonpage36
•Mini-Ronpage37
•LEDControlonpage37
•Numberonpage38
•ShowChannelonpage39
•ListeningModeonpage40
Sensor
ThiselddisplaysifthetypeofsensorcurrentlyconnectedtothecomputerandthePI
ConguratorutilityisaSingleorDualsensor.
Youarenotpermittedtochangethisparameter.
Update
Thisparameterisusedtoselectaninterfacedsensor’sdataupdaterate.
Note
Thisisakeyparameter .Unlessthedataupdateratedenedinthesensormatchesthe
ratedenedonthehostPIsystem,thecommunicationwillnotwork!
Thedataupdaterateisthetimeintervalbetweenindividualtransmissionsfromthe
sensorcontainingmeasurementdata.Therateselectedmustmatchthecorresponding
settinginthePIsystem’ssetup.
Tooperate,clicktheUpdatespinboxnexttoselectthedesiredrate.Then,clickthe
ProgramSensorbuttontoprogramtheinterfacedsensorwiththenewdataupdaterate
parameter.
34
164924/D
Page 37

Commandreferences
Measure1
Depth
Channel
15
Relatedtopics
•Aboutsensorcongurationonpage7
•ProgramSensoronpage32
Measure
Thiselddisplaysthetypeofmeasurementmadebythesensorcurrentlyconnectedto
thecomputerandthePIConguratorutility.
•Ifthesensorcurrentlyconnectedisa“single”type,onlyoneoftheMeasureelds
willbepopulated.
•Ifthesensorcurrentlyconnectedisa“dual”type,bothMeasureeldswillbe
populated.
Youcannotalterthecontentsofthiseld.
Channel
Thisparameterallowsyoutoredenethesensor’scommunicationchannel.
•Ifthesensorcurrentlyconnectedisa“single”type,onlyoneoftheChannelelds
willneedtobepopulated.
•Ifthesensorcurrentlyconnectedisa“dual”type,bothChanneleldswillneedto
bepopulated.
Note
Thisisakeyparameter .Unlessthecommunicationchanneldenedinthesensormatches
thechanneldenedonthehostPIsystem,thecommunicationwillnotwork!
Sensorssendinformationusingspecicfrequencies,eachdesignatedasanindividual
channel.PIandPSsensorshave30channelstochoosefrom,andtheF A701sensors
havefour.Thefrequencyrangeofthesechannelsareoffrom43.5to49.5kHzforPI
andPSsystems,and70to80kHzforF A710systems.
Tooperate,clicktheupordownarrowintheChannelspinboxuntilthedesiredchannel
isshown.ClicktheProgramSensorbuttontoprogramtheinterfacedsensorwiththe
newchannelnumberparameter.Finally ,checkthattheeldisupdatedwiththenew
parameter.
164924/D
35
Page 38

SimradPICongurator
PingControl
Always
Remote
1
Specialsettings
1SpreadsensorscanbeprogrammedtocommunicatewithRemotesensors#1or
#2.Thesemustalsobelabelledaccordinglybecausetheymustbeusedinpairs
andcannotbeinterchanged.ItisimportanttoremembertoredenetheSpread2
communicationchannel.
2SpreadsensorsprogrammedasTwinSpreadhavetwocommunicationchannel
settings.
3Dualsensorshavetwocommunicationchannelsettings.
Relatedtopics
•Aboutsensorcongurationonpage7
•ProgramSensoronpage32
PingControl
Thisparameterisonlyavailablefordepthsensors.
Theparameterisusedtocontrolwhenasensorwill“ping”(transmitanacousticsignal).
Forexample,itispossibletodisablethesensorfrombeinginadvertentlyactivatedwhen
lyinginawetnetondeck(adepthoflessthantwometers)toprolongitsbatterylife.
Theavailableparametersare:
•Always:Thesensorwill“ping“atalldepthsduringnormaloperation.
•Depth>2m:Thesensorwill“ping“onlywhenitisatameasureddepthofmore
thantwometers(deployed).
Youarenotpermittedtochangethissetting.
Remote
ThisparameterisonlyavailableforSpread,TwinSpreadandRemotesensors.The
parameterallowsselectionofthechannelsusedtocommunicatebetweentheSpread
andRemotesensors.
Note
ThesearekeyparameterswhenyouworkwithSpreadandRemotesensors.Makesure
thecorrectchannelsareselectedforallthesensors.Shouldincorrectparametersbe
chosen,thesensorswillnotbeabletocommunicatewitheachother ,andthePIOperator
Unitwilldisplay“±±±".
36
164924/D
Page 39

Commandreferences
Mini-R
1and3
LEDControl
StartupOnly
•WhenaSpreadsensorisconnected,theRemotespinboxisusedtoselectwhich
Remotesensor(s)theSpreadsensorshallcommunicatewith.Inasingletrawlsystem,
youcanselect1or2.Inatwintrawlandadualtwintrawlsystem,youmustselect
eitherpair1and3orpair2and4.
•WhenaRemotesensorisconnected,youmustusetheRemotespinboxtodenethe
identicationnumbertobeusedbythesensor.Thiscanbeanynumberbetween
1and4.
Tooperate,clicktheRemotespinboxnexttoselectthedesiredrate.Then,clickthe
ProgramSensorbuttontoprogramtheinterfacedsensorwiththenewparameter.
Relatedtopics
•HowtodoTwinSpreadcongurationonpage21
•ProgramSensoronpage32
Mini-R
ThisparameterisonlyavailablefortheGeometrysensor.Theparameterallowsselection
oftheMini-Rrespondersusedtomakethesensormeasurements.
Note
ThesearekeyparameterswhenyouworkwithGeometrysensors.Makesurethecorrect
Mini-Rrespondersareselected.Shouldincorrectparametersbechosen,theGeometry
sensorwillnotbeabletocommunicatewiththeresponders,andthePIOperatorUnit
willdisplay“±±±".
WhenaGeometrysensorisconnected,theMini-Rspinboxisusedtoselectwhichtwo
responderstheGeometrysensorshallcommunicatewith.
Tooperate,clicktheRemotespinboxnexttoselectthedesiredrate.Then,clickthe
ProgramSensorbuttontoprogramtheinterfacedsensorwiththenewparameter.
Relatedtopics
•HowtodoGeometrycongurationonpage23
•ProgramSensoronpage32
LEDControl
Thisbuttondisplaysthecurrentbehaviouroftheinterfacedsensor’sinternalLEDduring
normaloperation,chargingandcommunicationmodes.Thesettingcannotbealtered.
SensorLEDparametersare:
164924/D
37
Page 40

SimradPICongurator
Number
1
•Start-upOnly:TheLEDwillonlyilluminate(ashingitsidenticationcode)when
itisenergized.Itwillnotbeturnedonduringnormaloperation.
•OnlywhenPinging:TheLEDwillonlyilluminatewhenittransmitsdata.
•When<2m:TheLEDwillasheverytimethesensortransmitsdata,butonly
whenitisatadepthoflessthantwometers.Thisparameterisonlyavailablefor
depthsensors.
•Always:Ifthesensorisdisabledfromtransmissionatdepthslessthantwometers
bythePingControlparameterbeingsettoDepth<2m,thisAlwaysparameter
causesthesensor’sLEDtoilluminateatdepthsoflessthantwometersevenwhenthe
sensordoesnottransmit.
Number
ThisparameterisonlyavailableforRemoteandMini-Rsensors.Theparameterallows
selectionoftheRemoteorMini-Rnumber;1,23or4.
FortheRemotesensors,thisparameterisappliedasfollows:
•Remote1isusedwithaSpreadsensorsetuptocommunicatewithaRemote1,andas
oneofthetwoRemotesensorsusedwithaTwinSpread1.
•Remote2isusedwithaSpreadsensorsetuptocommunicatewithaRemote2,andas
oneofthetwoRemotesensorsusedwithaTwinSpread2.
•Remote3isusedwithaSpreadsensorsetuptocommunicatewithaRemote3,andas
oneofthetwoRemotesensorsusedwithaTwinSpread1.
•Remote4isusedwithaSpreadsensorsetuptocommunicatewithaRemote4,andas
oneofthetwoRemotesensorsusedwithaTwinSpread2.
TheGeometrysensorusesMini-Rsincombinations1and3and2and4.
Note
ThesearekeyparameterswhenyouworkwithGeometry,SpreadandRemotesensors.
Makesurethecorrectchannelsareselectedforallthesensors.Shouldincorrect
parametersbechosen,thesensorswillnotbeabletocommunicatewitheachother ,and
thePIOperatorUnitwilldisplay“±±±".
Tooperate,clicktheNumberspinboxnexttoselectthedesiredvalue.Then,clickthe
ProgramSensorbuttontoprogramtheinterfacedsensorwiththenewparameter.
Relatedtopics
•Aboutsensorcongurationonpage7
•ProgramSensoronpage32
38
164924/D
Page 41

Commandreferences
ShowChannel
Disable
(CD012202-004)
A E E EB
C
D E E E
(CD012202-003)
A B
C
D E E
ShowChannel
Thisbuttonshowsifthesensorwhenrstconnectedwillashitschannelidentication
codeusingtheinternalLED.Thesettingcannotbechanged.
Whenthisfeatureisenabled,thesensorwillashitspresentlyprogrammed
communicationchannelnumberatstart-upwheninthenormalmode(notinthecharge
orcommunicationmodes).Thisfeaturemayalsobeactivatedbytouchingasensor’slid
andcharginglugsimultaneously.Whenactivated,thesensorwillrespondbyashingits
individualLEDidenticationcodes,asfollows:
1Onelongash:Ithasadurationofapproximately1second.
2Onestartash:Thissignalsthattherstdigitofthechannelnumberisnext.
3None,one,twoorthreeshortashes:Thenumberofshortashessigniestherst
digitoftheprogrammedchannelnumber.
4Asecondstartash:Thissignalsthattheseconddigitofthechannelnumberisnext.
5Nonetonineshortashes:Thenumberofshortashessigniestheseconddigitof
theprogrammedchannelnumber.
Figure2Showchannel,example;Channel#16atstart-up
AAonesecond“longash"
BAstart"ash"
COne“quickash"(rstdigitof16is1)
DAstart"ash"
ESix"quickashes"(seconddigitof16is6)
Normaloperationstarts.
Figure3Showchannel,example;Channel#2atstart-up
AAonesecond“longash"
164924/D
39
Page 42

SimradPICongurator
ListeningMode
Single
BAstart"ash"
CNoshortashes(rstdigitof02is0)
DAstart"ash"
ETwoshortashes(seconddigitof02is2)
Normaloperationstarts.
ListeningMode
ThisparameterisonlyvalidforRemoteMk.1sensors.
ItisusedtodenehowoftenthesensorlistensforacousticrequestsfromtheSpread
sensor.Inasingletrawlsystem,theserequestsappearlessoftenthaninadualtrawl
system.
IfyouusetheRemotesensorinasingletrawlapplication,youcanselectSingleto
conservebattery .Ifyouusethesensorinadualtrawlapplication,youmustsetthis
parametertoDual.
40
164924/D
Page 43

Parameterdisplays
SerialNumber
1234
BatteryV oltage
12.1
ThedisplaysprovidedintheParametergrouparedescribedbelow.
•SerialNumberonpage41
•BatteryV oltageonpage41
•SensorT emperatureonpage42
•BatteryT emperatureonpage43
•SoftwareVersiononpage43
•BatteryTypeonpage43
•FPGAFunctiononpage44
•FPGAV ersiononpage44
•BatteryCapacityonpage44
Commandreferences
SerialNumber
TheSerialNumberelddisplaystheserialnumberofthesensorthatiscurrently
connectedtothePIConguratorutility.
Youcannotchangethisinformation.
Note
TheserialnumberonPSSensorscannotbeinvestigatedbymeansofthisfunction.
BatteryVoltage
TheBatteryV oltageelddisplaysthevoltageofthebatteryinthesensorthatiscurrently
connectedtothePIConguratorutility.Youcannotchangethisinformation.
Thevoltagedisplayedwilldependonthetypeofsensor.Asummaryofthesensor
andbatterytypesisprovidedinthetables.
Note
Ifthevoltageonarecentlychargedsensorbatteryisnohigherthanthe50%capacity
value,thebatteryshouldbereplaced.
Ifthesensorbatteryisallowedtodischargetoavoltagelessthanapproximately9
Vdc,itwillbedamaged.
164924/D
41
Page 44

SimradPICongurator
SensorT emp.°C
14.6
Table3BatterytypesinPSSensors
Sensor
PIBottomContact
PIDepthNormalcharge
PICatchNormalcharge
PIT emperature
BatterytypeFullycharged
Normalcharge
Normalcharge
Table4BatterytypesinS-TypePISensors
Sensor
PIBottomContact
PIDepthFastcharge
PICatchFastcharge
PIT emperature
PIRemoteMk.1Fastcharge
PIRemoteMk.2RemoteMk.2
BatterytypeFullycharged
Fastcharge
Fastcharge
Table5BatterytypesinL-TypePISensors
Sensor
PIHeightPIHeight
PISeineSounderPIHeight
PiSpread/DepthPIHeight
PIRemote/DepthPIHeight
PISpreadMk.1SpreadMk.1
PISpreadMk.2PIHeight
BatterytypeFullycharged
50%capacityFullydischarged
>13,5V≈12,8V<11,5V
>13,5V≈12,8V<11,5V
>13,5V≈12,8V<11,5V
>13,5V≈12,8V<11,5V
50%capacityFullydischarged
>13,5V≈12,8V<11,5V
>13,5V≈12,8V<11,5V
>13,5V≈12,8V<11,5V
>13,5V≈12,8V<11,5V
>13,5V≈12,8V<11,5V
>13,5V≈12,8V<11,5V
50%capacityFullydischarged
>12,1V≈11,5V<10,3V
>12,1V≈11,5V<10,3V
>12,1V≈11,5V<10,3V
>12,1V≈11,5V<10,3V
>13,5V≈12,8V<11,5V
>12,1V≈11,5V<10,3V
SensorT emperature
TheSensorT emperatureelddisplaysthetemperaturemeasuredinsidethesensorthatis
currentlyconnectedtothePIConguratorutility.Y oucannotchangethisinformation.
Thetemperatureisalwaysgivenin°C.
Note
Observethetemperaturelimitationsprovidedforchargingthesensor .Theseare
providedwiththecharger .
42
164924/D
Page 45

Commandreferences
BatteryT emp.°C
17.2
SoftwareV ersion
x.x
BatteryT ype
NiCd
BatteryT emperature
TheBatteryT emperatureelddisplaysthetemperatureofthebatteryinthesensor
currentlyconnectedtothePIConguratorutility.Y oucannotchangethisinformation.
Thetemperatureisalwaysgivenin°C.
Note
Observethetemperaturelimitationsprovidedforchargingthesensor .Theseare
providedwiththecharger .
SoftwareVersion
TheSoftwareVersionelddisplaysthecurrentversionofthecontrolsoftwareinthe
sensorcurrentlyconnectedtothePIConguratorutility .Youcannotchangethis
information.
Tip
ThiselddoesnotdisplaythecurrentsoftwareversionofthePIConguratorutility.In
ordertondthisinformation,selectHelp→Aboutonthemainmenu.
BatteryT ype
TheBatteryTypeelddisplaysthetypeofbatteryinthesensorcurrentlyconnectedto
thePIConguratorutility.Y oucannotchangethisinformation.
164924/D
43
Page 46

SimradPICongurator
FPGA Function
Height
FPGA Version
1.2
BatteryCapacity
1700
FPGAFunction
TheFPGAFunctionelddisplaysthecurrentfunctionoftheprocessingsoftwarein
thesensorcurrentlyconnectedtothePIConguratorutility.Youcannotchangethis
information.Typicalvaluesare:
•Height
•Spread/Remote
•Remote
•Geometry
TheabbreviationFPGAmeans“FieldProgrammableGateArray”.
FPGAVersion
TheFPGAVersionelddisplaysthecurrentversionoftheprocessingsoftwareinthe
sensorcurrentlyconnectedtothePIConguratorutility .Youcannotchangethis
information.
TheabbreviationFPGAmeans“FieldProgrammableGateArray”.
BatteryCapacity
TheBatteryCapacityelddisplaysthecapacityofbatteryinthesensorcurrently
connectedtothePIConguratorutility.ThecapacityisprovidedinmA.Y oucannot
changethisinformation.
44
164924/D
Page 47

Commandreferences
Quit
Filemenucommands
ThecommandsontheFilemenuaredescribedbelow.
•CommunicationPortSetuponpage45
•Languageonpage45
•Debugwindowonpage45
•Quitonpage45
CommunicationPortSetup
ThiscommandontheFilemenuopenstheComPortSetupdialogue.Theintegrated
sliderbarisusedtodesignatewhichCOMport(COM1toCOMn)theprogramming
cableispluggedinto.COM1isthefactorydefaultsettingandrecommendedparameter.
Tooperate,clicktheCom.portsetupcommandontheFilemenu.Then,usetheavailable
Portnumberspinboxtochoosethecorrectcommunicationport.IfthechosenCOMport
isunavailableonthecomputer,acorrespondingmessagewillinformyouaboutthis.
Notethatwhenifyouchangecommunicationport,thecomputermayusesometimeto
identifythenewcommunication.
Language
ThiscommandontheFilemenuopenstheLanguagedialogue.
TheLanguagedialogueallowsyoutoselectoperationallanguage.Selectingadifferent
languagewillconvertthePICongurator’sbuttons,information,helpfunctionsand
interfacedsensordatatotherespectivelanguage.
Tooperate,clicktheLanguagecommandontheFilemenu.Clicktoselectlanguage,or
clickCanceltoclosethedialoguewithoutreplacingthepresentlanguageinuse.
Debugwindow
ThisfunctionisonlyavailableforDistributorandFactoryusers.Thewindowallows
youtomonitorthetrafcontheRS-232seriallinebetweenthesensorandthecomputer.
Quit
YoucanexitthePIConguratorapplicationfromtwoplaces:
•SelectQuitontheFilemenu.
•ClicktheQuitbuttoninthebottomrightcornerofthemainwindow.
164924/D
45
Page 48

SimradPICongurator
BothoptionswillclosedownthePIConguratorapplicationimmediately.Ifyouhavea
sensorconnected,thecommunicationwillbeaborted.Ifyouhaveenteredparameters,
buthavenotyetclickedtheProgramSensorbutton,theparameterswilln
o t besaved
inthesensor.
46
164924/D
Page 49

Commandreferences
Helpmenucommands
ThecommandsontheHelpmenuaredescribedbelow.
•Helponpage47
•Aboutonpage47
About
ThiscommandontheHelpmenuopenstheAboutdialogue.
TheAboutdialogueprovidesinformationrelatedtothecurrentPIConguratorsoftware
versionyouhaveinstalled.
Tooperate,clicktheAboutcommandontheHelpmenu.
Help
ThiscommandontheHelpmenuopensthePIConguratorcontextsensitiveon-linehelp.
ThePIConguratordocumentationisprovidedintwoversions;on-linehelpontheCHM
format,andaprintableversiononPDFformat.ThePDFversionisalsointeractive.It
isprovidedonthePIConguratorCD,anditcanbedownloadedfromourwebsiteat
w
w w . s i m r a d . c o m .Thecontentsofthesetwoversionsareidentical!
Onon-linehelpcanalsobeopenedbyr
themainwindow.
i g h t - c l i c k i n g anyofthecommandbuttonsin
164924/D
47
Page 50

SimradPICongurator
Maintenance
Thischaptercontainsinformationrelatedtomaintenance,setupandtroubleshooting.
Topics
•PICICinterfacecableforUSBonpage48
•ProgrammingcableforRS-232onpage50
•Troubleshootingonpage52
PICICinterfacecableforUSB
ThePIConguratorInterfaceCable(CIC)offersasimplemethodtoconnectanysensor
toyourcomputerusingthecommonUSBinterfaceformat.
•Purposeandpreparationsonpage48
•Instructionsforuseonpage49
•Softwaredriveronpage50
•COMportidenticationonpage50
Purposeandpreparations
ThePIConguratorInterfaceCable(CIC)allowsyoutoconnectanyPIsensortoaUSB
portonyourcomputerforsensorsetupandconguration.
ThePIConguratorInterfaceCable(CIC)comprisesasmallblackboxwithtwocables:
•OnecableisttedwithastandardUSB“A”cable.Thiscableisconnectedtoany
vacantUSBsocketonyourcomputer.
•Theothercableisttedwithtocrocodileclips.Theseconnecttothesensor.Thered
clipmustbeconnectedtothepositivefasteninglugonthesensor,whiletheblack
clipmustbeconnectedtothenegativefasteninglug.
Wheneveryouprepareasensorforcongurationand/orcharging,makesurethat
mountingmaterialattachedtothecharginglugsdonotformanelectricalconnection,as
thiswillshortthechargingcurrent.
48
164924/D
Page 51

Figure4PIConguratorInterfaceCable(CIC)
Maintenance
InordertousethePIConguratorInterfaceCable(CIC)youmustinstallasoftware
driveronyourcomputer.
ThesoftwaredriverisavailableonthePIConguratorsoftwareCD.TheCDcanbe
downloadedfromw
w w . s i m r a d . c o m .
Instructionsforuse
ThisprocedureassumesthatyouhaveinstalledthesoftwaredriverforthePI
ConguratorInterfaceCable(CIC).
1Powerupyourcomputer.
2ConnecttheUSB“A”plugonthePIConguratorInterfaceCable(CIC)toavacant
USBportonyourcomputer.
Ifpossible,usethesameUSBporteverytime.
Ifnecessary,observeCOMportidenticationonpage50.
3StartthePIConguratorapplication.
4InthePIConguratorapplication,identifyandselectthecommunicationporttobe
usedforsensorsetupandconguration.
5Attachthepositive(red)alligatorcliptooneofthesensor’spositivefasteninglugs
(identiedwithaplussymbol).
6Attachthenegative(black)alligatorcliptooneofthesensor’snegativefastening
lugs(identiedwithaminussymbol).
7ObservetheoperationalproceduresforthePIConguratorprogram.
164924/D
49
Page 52

SimradPICongurator
Softwaredriver
ThisprocedureexplainshowtoinstallthesoftwaredriverrequiredforthePI
ConguratorInterfaceCable(CIC).
ThesoftwaredriverisavailableonthePIConguratorsoftwareCD.TheCDcanbe
downloadedfromw w w . s i m r a d . c o m .
1InsertthePIConguratorCD.
2OpenalemanagerutilitytoaccessthelesontheCD.
3Locatethesetup.exeinstallationprogramforthesoftwaredriver.
Itislocatedinfolderpi_cic_driveronthePIConguratorCD.
4Double-clickonsetup.exetostarttheinstallation.
5Followtheinstructionsgivenbytheinstallationprogram.
COMportidentication
WhenyouusethePIConguratorutilitywiththePIConguratorInterfaceCable
(CIC),thecomputerwillautomaticallyassignaCOMport.Ifyouchangethephysical
USBsocketyouuse,orifyouuseotherUSBdevicesinthesameUSBport,the
operatingsystemmayassignadifferentCOMportthenexttimeyouwishtousethePI
ConguratorInterfaceCable(CIC).SincethePIConguratorapplicationrequiresyouto
identifywhichCOMportyouuse,youmayneedtoinvestigatethis.
®
1ObservethefollowingprocedureforWindows
®
XP
:
aClicktheStartbuttoninthelowerleftcornerofyourdisplay,selectSettings,
andthenControlPanel.
bDouble-clickontheSystemicon.
cClicktheHardwaretab,andthenclicktheDeviceManagerbutton.
dOpenPorts(COM&LPT),andlocatethePIConguratorInterfaceCable(CIC)
deviceonitsassignedCOMport.
eCloseallwindows,andidentifytheCOMportwhenyoustartthePI
Conguratorapplication.
2ObservethefollowingprocedureforWindows
®
7:
aOpentheControlPanel,andselectClassicView.
bObservethesameprocedureasforWindowsXP.
ProgrammingcableforRS-232
ShouldaPIConguratorprogrammingcablenotbeavailable,itispossibletomakean
adequatesubstitutionasdescribedbelow.
Notehoweverthatnotallcomputersandsensorswillworkwiththiscable!
50
164924/D
Page 53

Maintenance
A
B
C
Itisonlypossibletomakeprogrammingcablesforstationarycomputers.Ifyouwishto
useaportablecomputerthecablemustbeorderedfromSimrad.Somenewstationary
computershavebeenfoundtoprovidethesameoutputspecicationsasportable
computersusinglowervoltageontheserialline.Onthesecomputers,a“portable“
cableisalsorequired.
Figure5Programmingcable
ARedcableconnectstopin3intheD-Connector
BBluecableconnectstopin5intheD-Connector
C9-pinfemaleD-Connector
Observethefollowingproceduretomanufactureaprogrammingcablefordesktop
computers.
Youwillneedthefollowingparts:
•A9-pin,Sub-Dfemaleconnector
•Approximatelyonetotwometersof2-wirecable
•A3kohmresistor
•Twoalligatorclamps
Proceedasfollows:
1Connectpinnumberthree(-3-)ofthe9-pin,Sub-Dfemaleconnectortooneendof
thepositive(+)leadofthe2-wirecable.Attheotherendofthepositive(+)lead,
connectthepositive(red)alligatorclamp.
2Connectpinnumberve(-5-)ofthe9-pin,Sub-Dfemaleconnectortooneendof
thenegative(-)leadofthe2-wirecable.Attheotherendofthenegative(-),connect
thenegative(black)alligatorclamp.
3Connectthe3kohmresistorbetweenpinsnumbertwo(-2-)andthree(-3-)ofthe
9-pin,Sub-Dfemaleconnector.
4Checkbothalligatorclampsandrespectivepinsforcontinuity.
164924/D
51
Page 54

SimradPICongurator
Troubleshooting
Mostproblemsareeasilysolved.Investigatetheinterface,congurationorother
complicationsbymeansofthefollowingguidelines.
•Theinterfacedsensorissufcientlycharged.
•ThecorrectPIsensorprogrammingcableisusedandingoodcondition.
•ThePIsensorprogrammingcableisconnectedtothecomputer’sCOMportcorrectly.
•ThePIsensorprogrammingcableisconnectedtothesensorcorrectly.
•ThePIsensorprogrammingcableisconnectedtotheCOMportselectedintheCom
PortSetupdialogbox.
•ThemodeofoperationforthePIConguratorsoftwarehasbeencorrectlyselected.
•Thetypeofsensorinterfacedhasthefeaturesand/orparametersattemptingtobe
setup.
•ThelatestversionofPIConguratorsoftwarehasbeencorrectlyinstalled.
52
164924/D
Page 55

Index
A
About
description,47
sensorconguration,7
Available
equipment,6
B
Basic
conguration,20
information,5
BatteryCapacity
description,44
BatteryTemperature
description,43
BatteryType
description,43
BatteryV oltage
description,41
Button
Channel,35
DefaultSensorSetting,32
Establish
Communication,31
LEDControl,37
ListeningMode,40
Measure,35
Number,38
PingControl,36
ProgramSensor,32
ReadSensor,31
Remote,36–37
Sensor,34
SerialNumber,41
ShowChannel,39
Terminate
Communication,32
Update,34
Buttons
communication,13
conguration,14
parameterdisplays,15
C
Cable
programming,50
Changing
communication
channels,7
updaterate,8
Channel
description,35
ComPortSetup
description,45
Command
About,47
Channel,35
CommunicationPort
Setup,45
Debugwindow,45
DefaultSensorSetting,32
Establish
Communication,31
Language,45
LEDControl,37
ListeningMode,40
Measure,35
Number,38
PingControl,36
ProgramSensor,32
Quit,45,47
ReadSensor,31
Remote,36–37
Sensor,34
ShowChannel,39
Terminate
Communication,32
Update,34
Commandreferences,29,48
Communication
buttons,13
Communicationchannel
changing,7
Communicationchannels
defaultvalues,7
Communication
commands,31
CommunicationPortSetup
description,45
Conguration
about,7
basic,20
buttons,14
defaultsettings,26
Geometry,24
Geometrysensors,9
Remote,22
Spread/Remotesensors,8
TwinSpread,21
Congurationcommands,34
Connectsensor,18
D
Debugwindow
description,45
Default
communication
channels,7
settings
sensors,5
updaterate,7
DefaultSensorSetting
description,32
Defaultsettings
conguration,26
Display
BatteryCapacity,44
BatteryTemperature,43
BatteryType,43
BatteryV oltage,41
FPGAFunction,44
FPGAV ersion,44
SensorTemperature,42
SerialNumber,41
SoftwareV ersion,43
Download
PICICSoftwaredriver,49–50
Dualtwintrawl
Spread/Remotesensors,8
E
Equipment
available,6
necessary,6
EstablishCommunication
description,31
F
Factorysettings
conguration,26
File
menu,16
Filemenu,45
CommunicationPort
Setup,45
Debugwindow,45
Language,45
Quit,45
FPGAFunction
description,44
FPGAV ersion
description,44
G
Geometry
conguration,9,24
H
Help
menu,16
Helpmenu,47
About,47
Quit,47
Howto
basicconguration,20
connectsensor,18
164924/D
53
Page 56

SimradPICongurator
doinitialsetup,18
Geometryconguration,24
installsoftware,27
introduction,17
Remoteconguration,22
removePICongurator
software,28
setfactorydefaults,26
TwinSpread
conguration,21
upgradePICongurator
software,28
I
Information
basic,5
Initialsetup,18
Installation
software,27
L
Language
description,45
LEDControl
description,37
ListeningMode
description,40
M
Main
dialogue,11
menu,11
Measure
description,35
Menu
File,16
Help,16
Modes
programming,10
Modifying
communication
channels,7
updaterate,8
N
Number
description,38
O
Operatingsystem
supported,6
Operational
procedures,17
Options
Filemenu,16
Helpmenu,16
P
Parameter
BatteryCapacity,44
BatteryTemperature,43
BatteryType,43
BatteryV oltage,41
FPGAFunction,44
FPGAV ersion,44
SensorTemperature,42
SerialNumber,41
SoftwareV ersion,43
Parameterdisplays,41
buttons,15
Parameters
communication,13
conguration,14
displays,15
PICIC,48
purpose,48
Softwaredriver,49
PICongurator
screencapture,12
PIConguratorInterface
Cable(CIC)
about,48
PingControl
description,36
Procedure
basicconguration,20
connectsensor,18
Geometryconguration,24
initialsetup,18
Remoteconguration,22
setfactorydefaults,26
softwareinstallation,27
softwareremoval,28
softwareupgrade,28
TwinSpread
conguration,21
Procedures
operational,17
ProgramSensor
description,32
Programming
cable,50
equipment,6
modes,10
Purpose,5
PICIC,48
Q
Quit
commanddescription,47
description,45
R
ReadSensor
description,31
Reference
Communication
commands,31
Conguration
commands,34
Filemenu,45
Helpmenu,47
information,29,48
Parameterdisplays,41
Remote
conguration,22
description,36–37
Removal
software,28
Required
equipment,6
S
Screencapture
PICongurator,12
Sensor
aboutconguration,7
conect,18
description,34
settings
default,5
SensorTemperature
description,42
SerialNumber
description,41
Settings
default,5
ShowChannel
description,39
Software
installation,27
removal,28
upgrade,28
Softwaredriver
download,49–50
PICIC,49
SoftwareV ersion
description,43
Spread/Remote
conguration,8
T
TerminateCommunication
description,32
Trawl
Spread/Remotesensors,8
Troubleshooting,52
TwinSpread
54
164924/D
Page 57

conguration,21
Twintrawl
Spread/Remotesensors,8
U
Update
description,34
Updaterate
changing,8
defaultvalues,7
Upgrade
software,28
USBinterfacecable
about,48
Index
164924/D
55
Page 58

ISBN-13:978-82-8066-040-4
©
2010KongsbergMaritimeAS
 Loading...