

Page 1
ENGLISH
Maris ECDIS900 System
Technical Manual
www.navico.com/commercial
Page 2

Table of Contents
TECHNICAL MANUAL ....................................................................................................................................... 4
STANDARD MARIS ECDIS INSTALLATION ......................................................................................................................... 4
MONITORING AND PLANNING WORKSTATIONS ................................................................................................................... 4
HARDWARE PLATFORMS ................................................................................................................................................ 5
USER INPUT ...................................................................................................................................................... 6
GENERAL ..................................................................................................................................................................... 6
STORAGE MEDIAS .......................................................................................................................................................... 6
SENSORS ..................................................................................................................................................................... 7
ETHERNET: INTERNAL AND EXTERNAL DATA FLOW ............................................................................................................... 7
TECHNICAL ....................................................................................................................................................... 9
REDUNDANCY .............................................................................................................................................................. 9
TEST FACILITIES .......................................................................................................................................................... 10
FAILURE DETECTION ..................................................................................................................................................... 11
SECURITY ................................................................................................................................................................... 12
COLOUR TABLES AND BLACK ADJUSTMENT ...................................................................................................................... 14
MAINTENANCE ........................................................................................................................................................... 15
TESTS ........................................................................................................................................................................ 17
S57 CHARTS: TECHNICAL FEATURES .............................................................................................................................. 18
INPUT OUTPUT ............................................................................................................................................... 23
GENERAL ................................................................................................................................................................... 23
SENSOR CONFIGURATION ............................................................................................................................................. 24
SETTINGS ................................................................................................................................................................... 25
AUTO DETECTION ........................................................................................................................................................ 27
ADVANCED ................................................................................................................................................................ 27
COMMUNICATION STATUS ............................................................................................................................................ 28
MASTER AND SLAVE MODES .......................................................................................................................................... 28
EXTRACTOR/TRACKER SETTINGS .................................................................................................................................... 32
AUTOPILOT ................................................................................................................................................................ 33
EXPORT/IMPORT ROUTES TO/FROM GPS ......................................................................................................................... 37
ADDITIONAL HARDWARE .............................................................................................................................. 39
MOXA SERIAL INTERFACE ............................................................................................................................................ 39
UPS ......................................................................................................................................................................... 43
VIDEO ....................................................................................................................................................................... 45
COMPUTER ................................................................................................................................................................ 46
MARIS SMARTLINE MK10 ........................................................................................................................................... 46
APPLICATION MANAGER ............................................................................................................................... 47
GENERAL ................................................................................................................................................................... 47
APPROVAL MODE ........................................................................................................................................................ 47
VIEWS MODES ............................................................................................................................................................. 47
APPLICATION MANAGER ICONIC VIEW ............................................................................................................................ 47
APPLICATION MANAGER FULL VIEW ................................................................................................................................ 49
SECURITY LEVEL MODE ................................................................................................................................................. 49
APPROVED APPLICATIONS ............................................................................................................................................. 51
ADDITIONAL APPLICATIONS .......................................................................................................................................... 51
SYSTEM TRAY APPLICATIONS ......................................................................................................................................... 51
SECURITY SETTINGS ..................................................................................................................................................... 52
ADMINISTRATIVE SETTINGS ........................................................................................................................................... 52
FILE BROWSER ............................................................................................................................................................ 54
NETWORK BROWSER .................................................................................................................................................... 56
2
Page 3

DRIVE BROWSER .......................................................................................................................................................... 56
DATA BROWSER .......................................................................................................................................................... 57
RUNNING AN EXTERNAL APPLICATION ............................................................................................................................. 57
OPENING ADMINISTRATIVE TOOLS .................................................................................................................................. 57
LAUNCHING CONTROL PANEL ........................................................................................................................................ 58
CHANGING MARIS SOFTWARE PASSWORDS .................................................................................................................... 58
DEADMAN ALARM ....................................................................................................................................................... 58
VDR WATCHDOG ....................................................................................................................................................... 60
INSTALLATION AND TROUBLESHOOTING ..................................................................................................... 62
GENERAL ................................................................................................................................................................... 62
SOFTWARE INSTALLATION AND SETTINGS ........................................................................................................................ 62
LAUNCH AND QUIT ECDIS900 ..................................................................................................................................... 63
SUPPORT ................................................................................................................................................................... 64
TROUBLESHOOTING ..................................................................................................................................................... 65
OPERATIONAL LIMITS ................................................................................................................................................... 70
SYSTEM TESTS ............................................................................................................................................................. 71
3
Page 4

Technical Manual
STANDARD MARIS ECDIS INSTALLATION
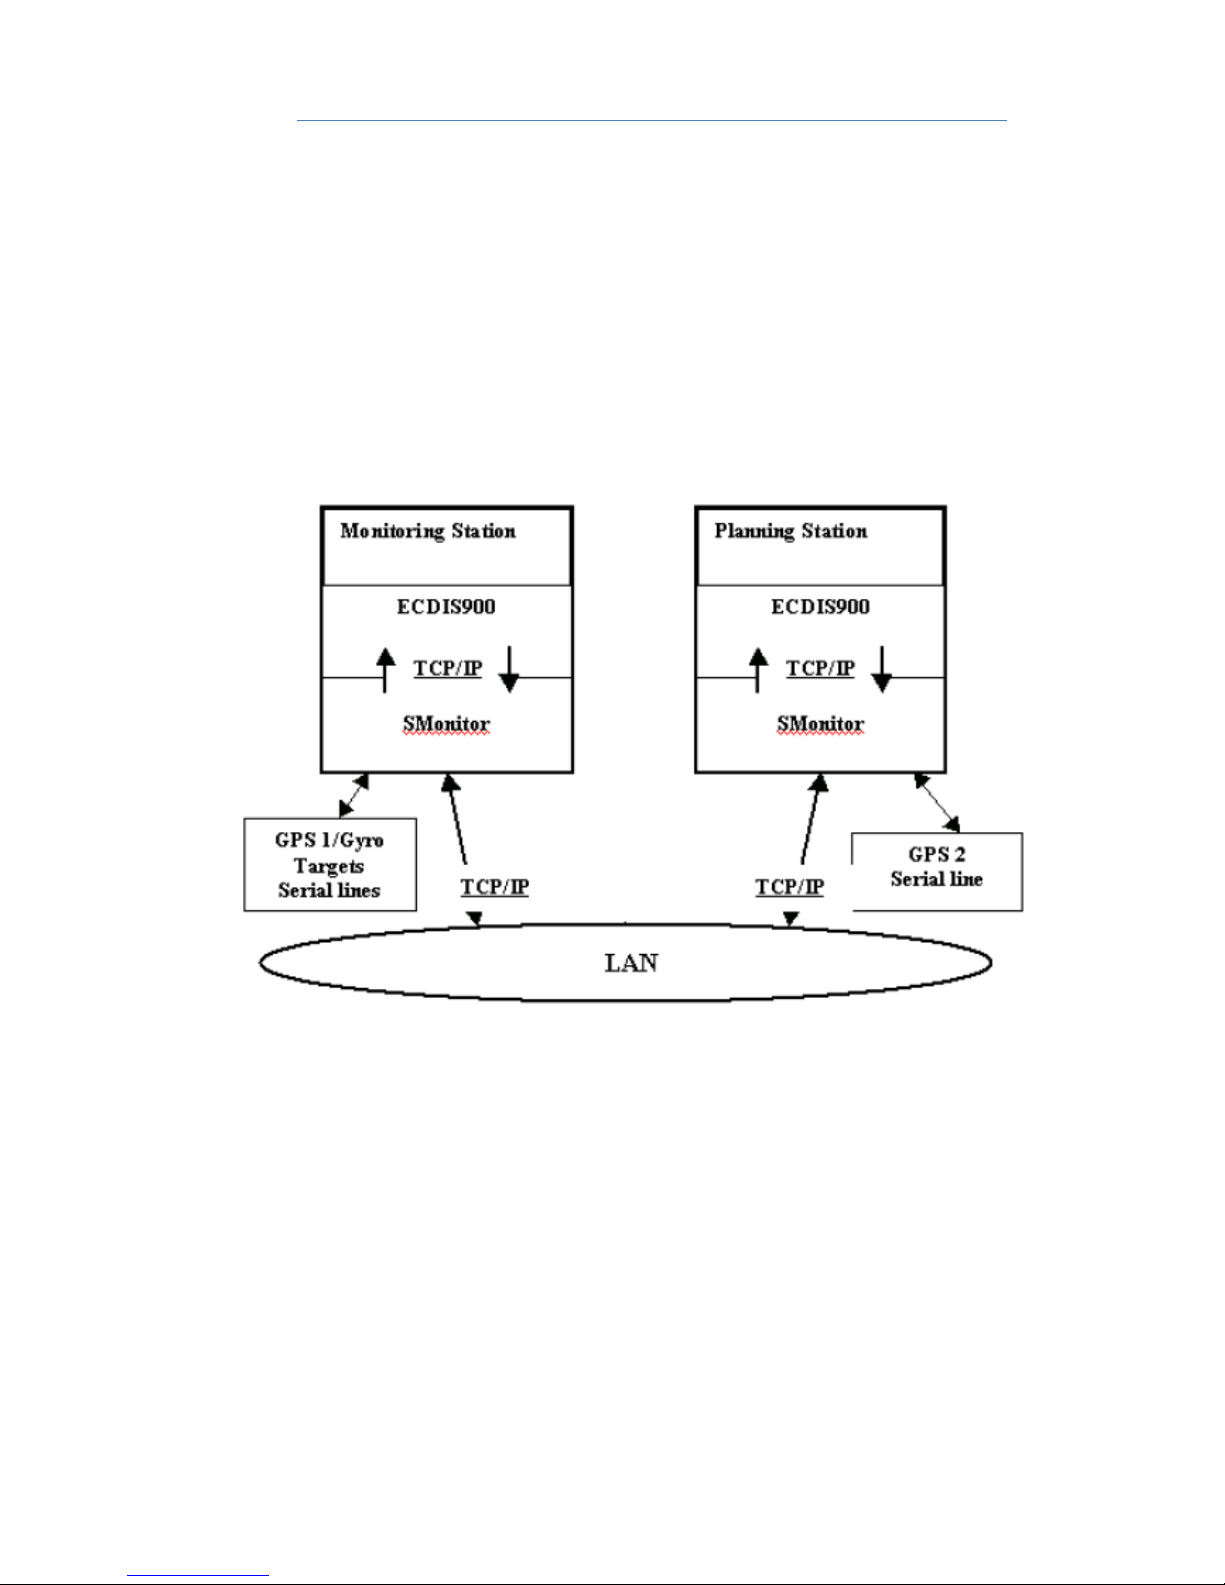
The standard installation of MARIS ECDIS includes two workstations connected by LAN: the
Monitoring workstation and the Planning station used as a Back up station.
In this chapter learn more about:
•
Monit oring and Pl anning stations
• System description
• Functional description
• Redundancy in the system
• Tests facilities
•
Input/Output management - Sensor s Moni tor appl icat ion.
•
Failure detection
•
Securi ty
•
Maintenance
• Power
MONITORING AND PLANNING WORKSTATIONS
The Monitoring workstation acquires Position, Gyro/Log and Arpa Targets data via serial lines
and a second DGPS delivers Position information to the Planning station. All serial sensor
inputs are broadcast on the network and shared by the two ECDIS stations.
REMARK
The second DGPS is optional and the same DGPS can be used on both stations. However it is
recommended to use two different DGPS for redundancy and safer installation.
INSTALLATION
During ECDIS installation process the user has to select the option Monitoring for the
monitoring station and Planning for the other ECDIS workstations.
However it is possible to switch between Monitoring and Planning modes by right
double clicking in the window title of ECDIS and activate the menu “Set as planning
station” or “ Set as Monitoring station”. The only one Monitoring workstation can exist in
the ECDIS LAN. As soon as the Planning station is switched to Monitoring, all
monitoring functions are available on this PC.
SHARED DATA
The charts and routes databases are installed on both stations. Therefore, in case of
breakdown of the Monitoring station, the Planning station can immediately be used as main
4
Page 5

Hardware Platforms
ECDIS. Then it is required to switch from Planning to Monitoring mode as described above to
access all route monitoring functions.
Planned routes
When routes have been planned on a Planning station, they can be copied to another ECDIS
workstation. Right click on the route and access menu “Synchronize”. Route will be copied to
all active ECDIS workstations. Alternatively it’s possible to import route using the following
procedure:
• On the target PC, open the dialogue Load/Unload objects panel Routes and press
Import
• Select the folder containing the route located on the Planning station: C:\\
ECDIS_userdata\Routes
• Select Routes to be imported
• Press OK and the routes are copied on the local PC.
Another way to copy a route is: right click on the route, select Synchronize; the route is
copied to all active ECDIS workstations.
ACTIVE ROUTE
A route can be activated only on the Monitoring workstation. When the route has been
activated, it will be automatically transferred and displayed to the other ECDIS workstations
running on the LAN.
IMPORTANT
Activation of route is possible only on monitoring workstation.
CHARTS
To synchronize ENC or ARCS charts collections use “Copy database” function available in the
chart handling dialogue.
HARDWARE PLATFORMS
MARIS ECDIS computers come in several variants:
• Flat panel computer MK15/16:
• MARIS ECDIS900 MK15 24” 4S
• MARIS ECDIS900 MK16 19” 4S
• MARIS ECDIS900 MK5 is delivered with 2 diffident monitors:
• MARIS ECDIS900 with Hatteland 24" monitor
• MARIS ECDIS900 with Hatteland 26" monitor
For more information about hardware see “MARIS ECDIS installation Manual”, Chapter 1
5
Page 6

General
User Input
GENERAL
The ECDIS900 is a window based Human Computer Interface (HCI) where operator requested
information is obtained from menus and dialogue boxes on the display. The mouse is the
main operating tool for the system. A keyboard is also necessary for alphanumeric data
entering .
STORAGE MEDIAS
HARD DISK
ECDIS workstation is delivered ready to work with Windows XP and Windows 7 and necessary
system drivers and libraries already installed.
When ECDIS is installed on the computer, the necessary files are copied to the hard disk and
four folders are created:
• C:\Program Files\MARIS\ECDIS900_4 or C:\Program Files(x86)\MARIS\ECDIS900_4
containing:
• The application ECDIS900 and necessary libraries in the Bin folder
• The Sensor Monitor application
• Utilities
• C-MAP library components
• C:\Charts containing all data related to chart collections
• C:\Ecdis_UserData containing user data like routes, tracks, object editor, tide database,
weather, logbook.
• C:\Program Data\MARIS containing:
• Configuration files.
• S-52 presentation library components.
• Log files of ECDIS900 including listing of chart installation and updates.
MEMORY STICK
Memory sticks are used:
• To install chart permits when S57 or ARCS permits are transmitted by memory stick or
received by email.
• To update S57 chart database when the updates are received by memory stick or email.
• To back up and restore routes, logbooks and user data stored on the hard disk.
• To boot the system when a complete restoration of the hard disk is necessary.
CD(DVD)-ROM
CD-ROM are used:
• To install and update charts
• To restore the hard disk when it has failed. ECDIS is delivered with a CD-ROM called
“Ghost”. This CD-ROM is a mirror of the hard disk. Running the Ghost application, you
6
Page 7
Sensors
restore the complete ECDIS system (Operating system, ECDIS application, basic charts,
etc.) that has the initial configuration.
SENSORS
For a complete description of the interface between Sensors and ECDIS900 see
the
I nput/Output
chapter.
ETHERNET: INTERNAL AND EXTERNAL DATA FLOW
Ethernet and TCP/IP protocol are the core of the system for the intercommunication between
software modules and also for data exchange between the ECDIS Planning (Back-up) and
Monitoring stations.
INTERCOMMUNICATION
LAN communication is basic the technology used in the system for communication between
ECDIS900 applications. For example, the ECDIS application launches the application called
Sensor Monitor responsible for I/O of the system. This application runs in parallel with ECDIS
and manages serial and TCP/IP input/output. ECDIS and Sensor Monitor use TCP/IP protocol
for data and commands exchanging.
EXTERNAL DATA EXCHANGE
Monitoring and Planning stations are on the same LAN and communicated using TCP/IP
protocol:
7
Page 8

Ethernet: internal and external data flow
• The two ECDIS share same sensor data information. Serial data is analysed and
broadcasted on the LAN and therefore the other ECDIS workstation can use the same
sensor input data.
• Routes are usually planned on the Planning station and then transferred to the
Monitoring station via Ethernet.
• The Monitoring station is in charge of active route and waypoint. Information about the
active route and waypoint is sent to the Planning station via Ethernet.
• Ship’s settings and Safety parameters are synchronized on the network. The ship’s
settings and safety parameters can be adjusted on the Planning station and then the
parameters will be updated on all Planning stations for a while.
• Alarm acknowledgement is also synchronized. When an alarm is acknowledged on the
monitoring station it is also acknowledged on other planning stations.
Chart databases on both ECDIS stations can be updated in two different ways:
• The update procedure can be run twice on both workstations.
• The update procedure is run once and the updated chart database transferred to the
other workstation via Ethernet.
8
Page 9
Redundancy
Technical
REDUNDANCY
BACKUP SYSTEM
ECDIS dual systems installation includes ECDIS Monitoring station working as Master, and a
Planning station working as Slave ECDIS. The Planning station is used as backup. In case of
breakdown of the main ECDIS Monitoring station, the Planning station can immediately
replace the Master ECDIS and can be used for navigation.
CONTINUOUS MONITORING
To avoid any interruption and discontinuities in the ship’s position monitoring, the ECDIS
backup is connected to the second GPS. If the Master ECDIS breakdown occurs, the ship is
monitored on the backup system.
ACTIVE ROUTE
Monitoring workstation is responsible for the active route and waypoint. The active route and
waypoint information is sent continuously to the Planning station, which displays same route.
Any changes of active route are prohibited.
DUPLICATE DATABASES
All ECDIS stations should use the same chart databases. The user is responsible of maintaining
the consistency of the chart collections and transferring routes from the Planning station to
the Monitoring station.
LOGBOOK
The logbook database, containing all navigation information of the current voyage, is stored
on both workstations. In case of breakdown, no data is lost and the second PC continues to
store navigation data to the logbook. Time interval of logbook recording could not be
changed and is equal to 15 seconds.
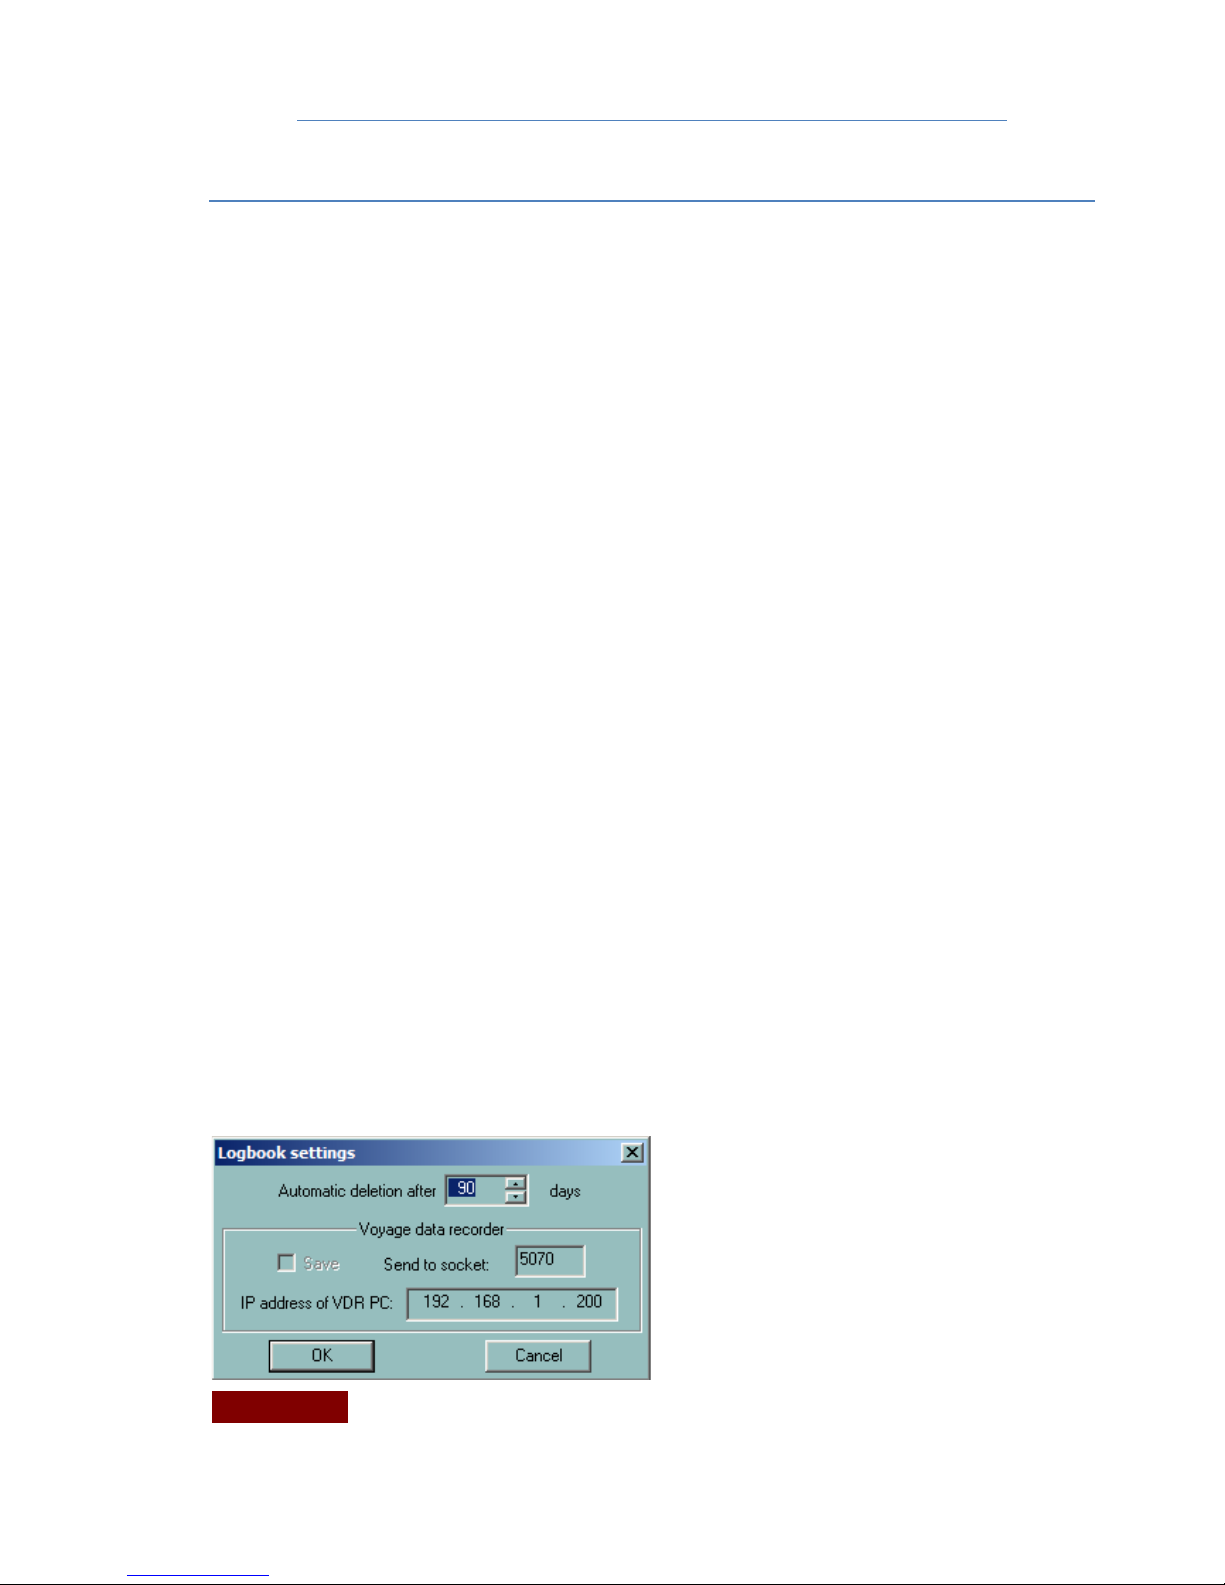
SET UP
The logbook window gives access to the button Change Settings. Tick on the check box
Save in the Voyage Data recorder section to make sure that the logbook will be recorded by
VDR. A logbook recorded in VDR could be replayed in ECDIS900 together with other data.
IMPORTANT
Logbook settings are not synchronized in the LAN.
9
Page 10

Test Facilities
POSITIONING SYSTEMS
Two ECDIS workstations are connected independently to two different GPS sensorsthrough
SIS4000 unit. However, they share the same data and both ship’s positions are displayed on
the chart: GPS1 data, acquired by one of the ECDIS workstations is sent to the other one by
Ethernet and vice versa. GPS2 data acquired by the second station are sent to the first one.
MASTER GPS
When two different GPS are used, a user has to select which GPS sensor is the master
positioning system, i.e. which position data is used for route monitoring calculations. At any
time a user gets information about the quality of the position calculation for the GPS and
another Master GPS can be selected if necessary.
GYRO AND LOG DATA
Gyro as source of heading are interfaced to both SIS4000 units.
SYNCHRONIZATION
Ship’s settings and Safety parameters (safety contour and safety depth) are synchronized on
the network. On the monitoring Station the ship’s settings and safety parameters can be
adjusted and regularly these parameters will be updated on all Planning Stations. Alarm
acknowledgement is also synchronized.
TEST FACILITIES
BOOT TESTS
When you power on or restart the computer, it goes through Power On Self Test (POST)
routine, which determines:
• The amount of real memory
• Whether the needed hardware components are present.
Once the computer has run its POST routine, each adapter card with BIOS runs its own POST
routine. The computer and adapter card manufacturers determine what appears on the
screen during the POST processing.
WINDOWS OPERATING SYSTEM CONSISTENCY
Windows XP or Windows 7 does not start up or operate correctly if any hardware components
do not initialise correctly. Start up fails if any of the files required to start Windows XP or
Windows 7 are not present in the correct folder or if one of the files has been corrupted.
CONNECTION TESTS
When one or more input and/or output devices are connected to the computer, the
connections must be tested to ensure that all is working correctly. ECDIS provides a useful
tool to help perform this test.
Hyperterminal is an application built into Windows operating systems that allows testing the
connections with input devices. If input devices are correctly connected, the Hyperterminal
displays recognisable characters. Incorrectly connected input devices will either show no
information or garbled characters.
10
Page 11

Failure detection
FAILURE DETECTION
POWER FAILURE
VISUAL FAILURE DETECTION:
• Check the LED on the UPS.
• When the system is powered the LED in the front panel of the screen is immediately
switched on.
AUDIBLE ALARMS
The UPS has an audible alarm feature to inform you about potential power problems. When
the alarm is activated the UPS beeps in different intervals according to a particular condition.
Alarm Cause Action
Power on Indicator is
not on. UPS does not
start.
The line cord is not connected
The wall outle
t is dead.
Connect the line cord to the
UPS.
Electrician test.
UPS operates in Battery
mode only.
A circuit breaker or input fuse is open
Turn off the UPS, reduce the
load and push the circuit
breaker.
UPS does not provide
the back up time
Battery must
be full discharged.
Plug the UPS into a wall outlet
for 24 hours.
UPS beeps 1 time every
4 seconds
Or the UPS is running on battery
power because the line voltage is too
high or low.
Extend the input/output
voltage range with the DIP
switches.
1 beep every second
The battery is running low
2 to 5 minutes remains.
Prepare a shut down.
1 beep every 2 seconds
Weak battery
Plug the UPS into a wall outlet
for 24 hours.
3 beeps very 20 seconds
Detecting procedure
The battery is weak and
should be replaced
3 beeps every 5 seconds
Battery replacement required.
The battery is weak and
should be replaced
11
Page 12

Security
1 beep every 0.5
seconds
Power requirements exceed UPS
capacity
Remove some of the
equipment from the UPS.
Continuous beep
Fault condition
Shut down and contact
Navico
COMPUTER HARDWARE FAILURE
AUDIBLE FAILURE DETECTION:
During the boot process an audible alarm is triggered in case of RAM or Video problems. The
sound sequences are different in accordance with the type of problem.
VISUAL DETECTION:
• If the hard disk cannot start during the boot process, a warning is displayed in grey on a
black background screen.
• During Windows operating system boot, the system displays the log of all events on a
blue background screen.
COMMUNICATION FAILURE
After Windows XP or Windows 7 has been started, ECDIS is automatically launched and the
network initialised. In case of an Ethernet problem, the different sockets cannot be created
and a warning is displayed.
If the connection with the sensors cannot be well established or a failure occurs, ECDIS warns
the navigator.
SOFTWARE FAILURE
Software failures are reported to the user in two different ways:
• Exception and memory errors messages are displayed in an alarm dialogue.
• The error freezes the system, for example, the mouse is still moving but menus are no
more accessible.
SECURITY
The computers running ECDIS are dedicated to navigation purposes and SHOULD NOT be
used for any other tasks.
SYSTEM SET-UP
Access to system set-up and configurations functions is restricted, the main window of ECDIS
is not resizable, hiding that window is impossible and the Windows task and the caption bars
are not displayed. Other applications are accessible only when operating Application
Manager in the Service mode. When the computer boots, ECDIS is automatically launched
and Windows system functions are not accessible when ECDIS900 is running in the
operational mode.
System hot keys are disabled
In the operational mode ECDIS900 restart and shutdown functions are available only through
the Application Manager. All windows system hotkeys are disabled.
12
Page 13
Security
ACCESS
The two workstations are used for navigation purpose only and no other application can
interfere with ECDIS, except for approved applications and
Application Manager
. The
workstations are connected by a point to point Ethernet connection and are not a part of the
ship’s network. Therefore no access from outside of the ship is possible. But the MBA
Application can be connected to email using a Router, configured as Firewall in order to
allow only email protocol in “Email Mode”.
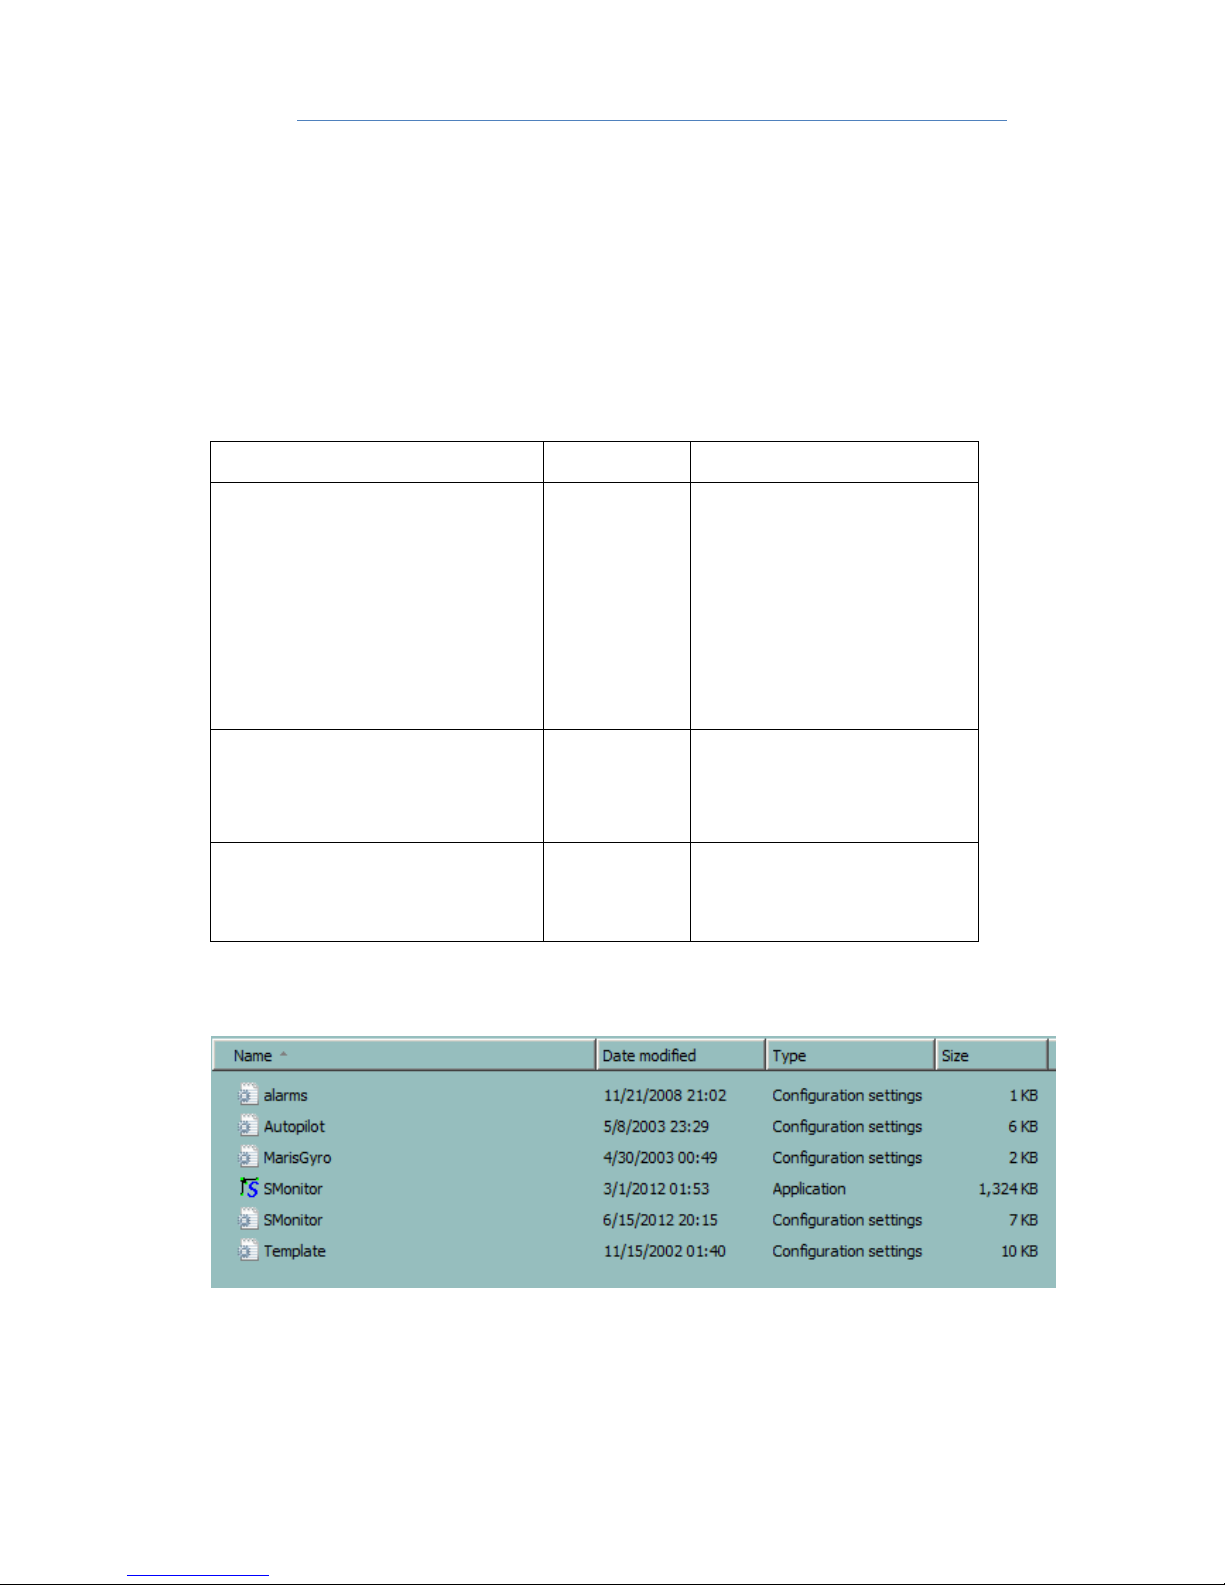
SOFTWARE MODULES
Following the list of the software modules necessary to run ECDIS:
Name Version Description
C:/Program files/MARIS/
ECDIS900_4/bin/ ECDIS900.exe
for Windows 7
C:/Program files(x86)/MARIS/
ECDIS900_4/bin/ ECDIS900.exe
4.7
ECDIS application.
Chart display and route and
logbook management
C:/Program files/MARIS/ECDIS_4/
bin/ Notepad.exe
The current
version
from the OS
application
Utility used to display and
print the logbook and the
route planning.
C:/Program
files/MARIS/ECDIS900_4/
Sensor_Monitor/SMonitor.exe
3.7
Application in charge of
management of the I/O.
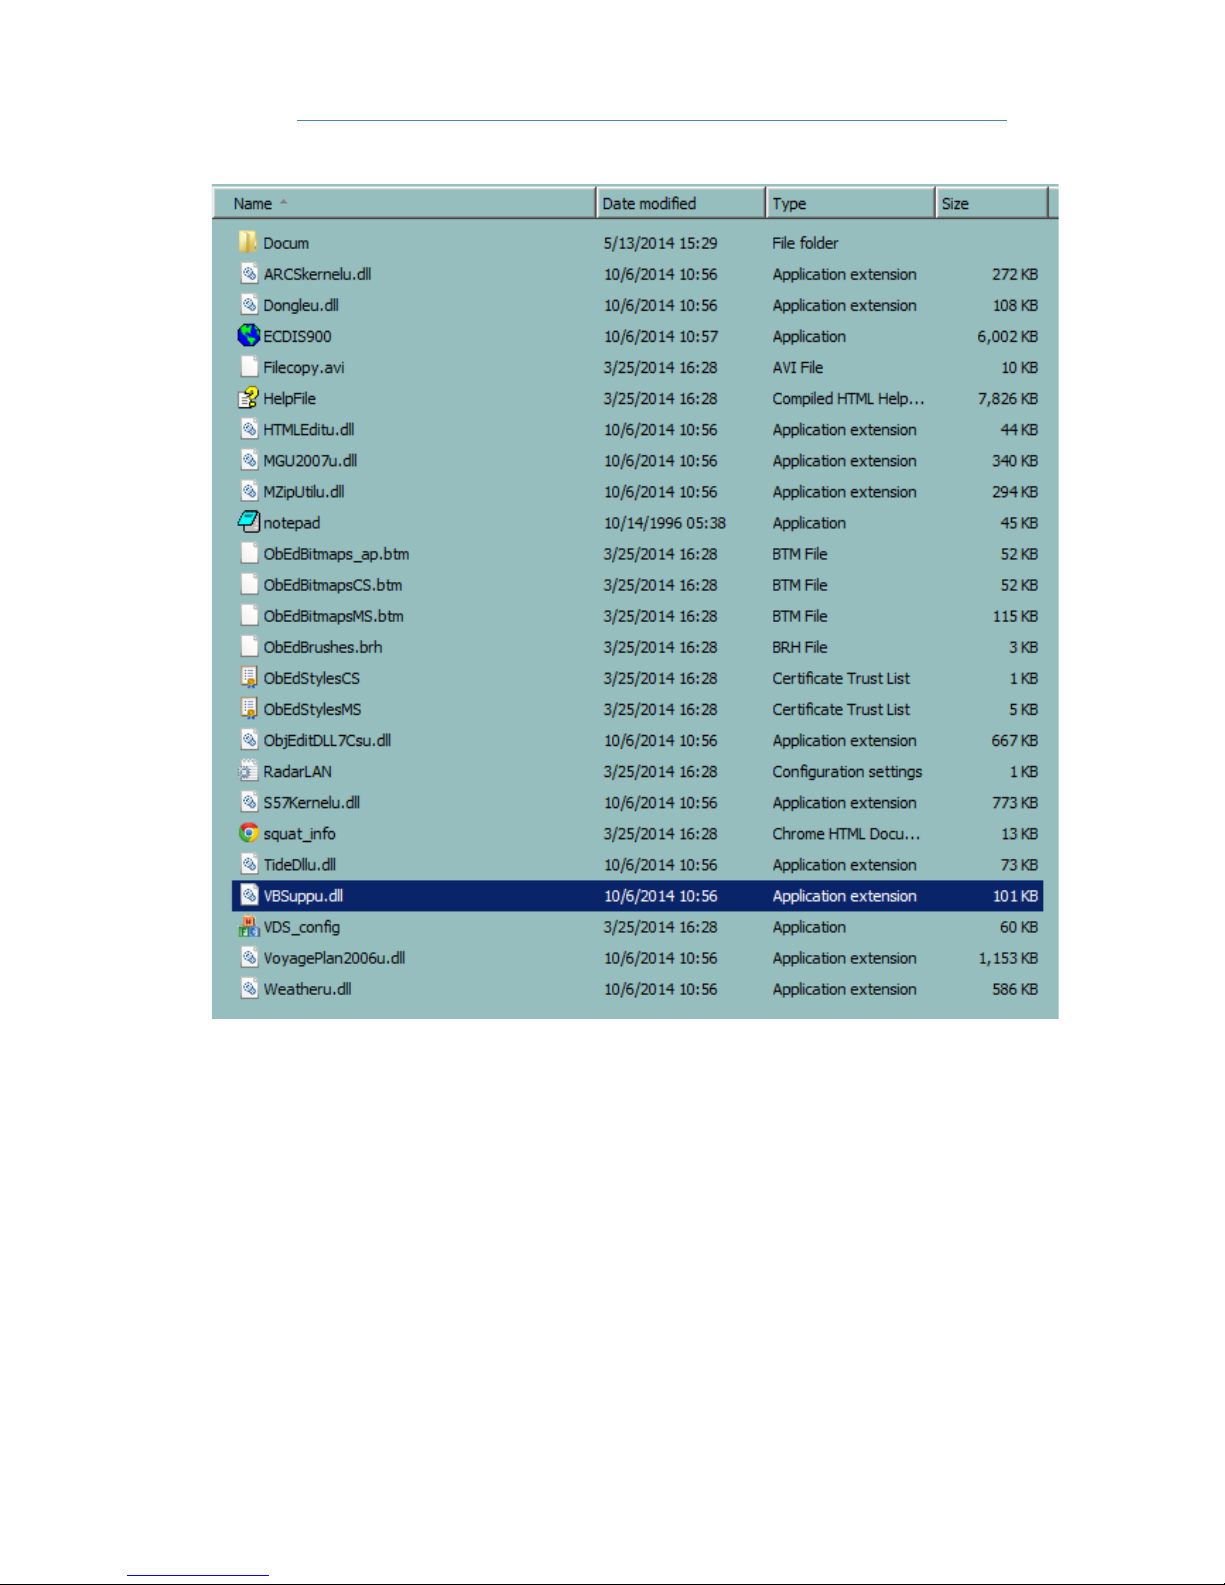
DLLS AND OTHER NECESSARY FILES
C:/PROGRAM FILES/MARIS/ECDIS900_4/SENSOR_MONITOR
13
Page 14
Colour tables and Black adjustment
C:\PROGRAM FILES\MARIS\ECDIS900_4\BIN
INPUT FILTERING
Keyboard inputs are secured, i.e. filtering functions check that the use of letters and numbers
is correct and the values are within defined limits.
In case of insufficient input, the system cancels the input or asks for additional data.
COLOUR TABLES AND BLACK ADJUSTMENT
In the Presentation Library VS52 V3.4 three colour schemes are available:
• Day bright
• Dusk
• Dark night.
The color scheme selection is possible by pressing F8 or in the Chart setting dialogue.
14
Page 15

Maintenance
BACKLIGHT ADJUSTMENTS
The monitor backlight level is automatically adjusted to the calibrated value when a colour
scheme is selected. Three levels of backlight corresponding to the three colour tables have
been defined during the colour calibration process.
MANUAL ADJUSTMENT
The monitor Pot meter is disabled. To adjust the backlight level, press the key combination
“Ctrl +” or “Ctrl –“ to increase or decrease the backlight level from the predefined backlight
value. The minimum display brightness is maintained for keeping the ECDIS alarms visible
under any conditions.
WARNING
Changing manually the backlight level may alter the colours used in ECDIS.
COLOUR DIFFERENTIATION – CHART 1
The presentation library contains colour differentiation test diagram to check that the display
can be use to discriminate important features by colour. The cell called AA5C1W00 displayed
at the scale 1/25 000 and located at 15N, 5W contains several coloured differentiation
diagrams. To access the Chart1 cell, open Chart handling, select Chart1 tab and double click
on one of cells in the list. Data will loaded and appropriate cell displayed. Use scroll and zoom
tools to review other neighbour cells from Chart1 collection.
MAINTENANCE
POWER – UPS -
BATTERIES CARE
For the best preventive maintenance, keep the area around the UPS clean and dustfree.
For full battery life, keep the UPS at an ambient temperature of 25 C.
REPLACING BATTERIES
• Turn off and unplug the computer from the UPS.
• Turn off the UPS and unplug the power cord from the power source and wait 30 seconds.
• Turn the UPS over and remove the power cord and the screws holding the battery door in
place on the bottom of the UPS. Slide the door off.
• Pull out the battery by grasping the removal tabs.
• Disconnect the two wires connecting the battery to the UPS.
• Connect the battery wires of the new battery, red to positive, black to negative.
• Carefully place the new battery into the case
• Slide the door on and reconnect the power cord to the power source. Turn on the UPS.
• Reconnect the computer to the UPS. Turn on one item at a time.
TESTING NEW BATTERIES
Press the Hold button for three seconds to initiate the battery test. The UPS automatically
distributes some of the load to the batteries for 15 seconds and tests the battery’s
performance. If there is a problem with the batteryб the UPS returns to normal mode and
alarms beeps.
15
Page 16

Maintenance
RESTORE ECDIS
ECDIS is delivered with restore facilities, i.e. it is possible to restore the hard disk, as it was
when the system has been delivered. A CD called Ghost is part of the delivery.
To restore completely the system do the following:
1. Shut down the computer.
2. Insert the CD.
3. Switch on the computer. The system boots from the CD.
4. Click 2 times OK in the presentation dialogues.
5. In the menu select Local -> Disk -> From image.
6. Select CD drive in the following dialogue and press Open.
7. Confirm by pressing OK.
Once the hard disk has been restored, insert the ECDIS installer disk and run the set up
software to reinstall the latest version of ECDIS. Then reinstall the charts with the appropriate
CDs and copy the routes backed up on a memory stick.
The hard disk will be reconfigured with the default settings:
ID
Planning station
Monitoring station
Name:
Planning
Monitoring
Workgroup
MARIS
MARIS
TCP/IP
192.168.2.151
192.168.2.150
Mask
255.255.255.0
255.255.255.0
Gateway
not defined
not defined
IMPORTANT
HDD sharing:
C drive should not be shared.
C:\\Chart – shared with full access for everyone.
C:\\ECDIS_UserData – shared with full access for everyone
C:\\ECDIS_UserData \Routes – shared with full access for everyone
SETTINGS
Colour palette
65536
Desktop area
1280 * 1024
Frequency
60 Hertz
Fonts
Small
Keyboard
English
HD
shared
ECDIS runs automatically at boot with login Administrator, password admin.
USER ACCOUNTS
Administrator. No password.
Guest. No password
STANDARD CMOS SETUP
Halt on: All but Keyboard.
16
Page 17

Tests
TESTS
FUNCTIONAL TESTING BEFORE DELIVERY
The different parts of the system shall be tested for correct functionality. They shall first be
verified as <OK> by the system itself (BIOS). Before and after burn-in a special test program
(CheckIT) shall be run, with test reports printed and saved for each unit.
COMPUTER
Check the BIOS self-test reports and verify that there are no errors.
CD(DVD)-ROM
Verify reading. Test throughput.
HARD-DISK
Verify Read/Write performance. Test throughput.
I/O PORTS
NETWORK
Ethernet 10/100 MB TP: Test connection.
Ethernet 1Gb TP: Test connection
SPEAKER
The frequency of audible alarms is about 750 Hz and the volume is set to the maximum,
which gives an audio level of 75 dB at a distance of 1 meter from the ECDIS workstation.
LCD MONITOR
The testing of the monitors must be done PRIOR TO DISMANTLING. If errors are found, the
monitor MUST NOT BE OPENED, but returned for warranty replacement.
Back Light
Verify the intensity, both maximum and minimum, to be subjectively within normal range.
Graphics
Verify that there are no ‘hanging pixels’, cracks, stripes or other visible flaws on the units, by
connecting them to a PC running in 1280 x 1024 resolution. Also there should not be any
visible ‘ghosting’ or blurring.
SYSTEM PERFORMANCE
Upon power-up, automatically start the ECDIS software. Test that it is possible to zoom and
pan on the maps. Using integrated simulator (functions Dead Reckoning and Simulation
active) test that both ‘own ship’ and ‘target ships’ move on the map.
FUNCTIONAL TESTS
INDICATORS AND ALARMS
• Disconnect the GPS cable. After the GPS alarm timeout, the GPS alarm is triggered.
17
Page 18

S57 Charts: Technical Features
• Start the logbook replay function: the GPS indicator is changed to Replay and the normal
alarm concerning the replay status is shown.
• In the panel D.R. of the ship’s properties dialogue select the simulation mode.
ROUTE ALARMS
• Activate route in the Simulation mode and when the ship arrives to the active waypoint,
all active alarms should be triggered.
• Activate route in the Simulation mode and when the ship is out of safety passage the XTE
alarm is shown.
CHART ALARMS
• Set display scale twice smaller than the compilation scale of the cell: overscale
symbolization and overscale indicator are used.
• More precise cell exists under the ship’s position.
TARGET ALARMS
• Plot a manual target close to the ship’s position. Enter speed and course of the target and
in simulation mode check that CPA / TCPA alarms are generated properly.
S57 CHARTS: TECHNICAL FEATURES
STANDARDS
TheECDIS900 chart kernel comprises several hundred software components that are
compliant to the IMO Performance Standard for ECDIS, the IHO Standards S-52 V3.4 / S-57, IEC
61174 Ed.3. , IEC 672288 Ed.1..
ENC
It is impossible to alter the contents of the ENC. If an ENC cell is modified, the ECDIS900
detects the modification and rejects the cell during the installation procedure. Official ENC are
converted and stored with a proprietary format. The conversion maintains the precision of
the data and does not alter the accuracy of the data.
CHART AREA AND RESOLUTION
The chart area size in ECDIS900 is bigger than 270 * 270 mm.
The pixel size of the screen is about 0.255 mm.
PRESENTATION
The ECDIS900 chart information has been designed to be clearly visible for more than one
observer under different light conditions. The symbols are always drawn with the size
described in the presentation library V3.4. The character size of the text may be adjusted to be
clearly visible. See User Manual for more details.
All superimposed windows are temporary and can be moved and hidden at any time.
The 64 colours used for chart and MMI displays are compliant with S52 Publications.
18
Page 19

S57 Charts: Technical Features
The redraw of the chart, including scales change or scroll of the chart takes never more than 5
seconds. During the re-generation of the data the display is maintained until the new display
is ready for redraw.
DANGERS AND WARNINGS
The Route Checking function (Route Planning and Route Monitoring) checks all dangers
inside the safety zone against the ship's draught and air draught. ECDIS senses alarms related
to both ENC cells and manual updates. The list is of object classes to be warned about by
ECDIS is displayed below:
OBJECT TYPE
C
OMMENTS
ACHBRT
ANCHOR
WARNING
ACHPNT
ANCHOR
WARNING
BCNCAR
BEACON
WARNING
BCNISD
BEACON
WARNING
BCNLAT
BEACON
WARNING
BCNSAW
BEACON
WARNING
BCNSPP
BEACON
WARNING
BERTHS
DEPTH
DRVAL1
BERTHING
DANGER
BOYCAR
BUOY
WARNING
BOYINB
BUOY
WARNING
BOYISD
BUOY
WARNING
BOYLAT
BUOY
WARNING
BOYSAW
BUOY
WARNING
BOYSPP
BUOY
WARNING
BRIDGE
HEIGHT
VERCCL
BRIDGE
DANGER
BRTFAC
BERTHING
WARNING
CAUSWY
CAUSEWAY
WARNING
CBLOHD
HEIGHT
VERCLR
VERCSA
CABLE
DANGER
CHNWIR
CHAIN
WARNING
COALNE
COAST
WARNING
#CONVYR
HEIGHT
VERCLR
DANGER
CONVEYOR
DANGER
CTNARE
CAUTION
WARNING
CTSARE
CARGO
WARNING
19
Page 20

S57 Charts: Technical Features
DEPARE
DEPTH
DRVAL1
DEPTHAREA
DANGER
DEPCNT
DEPTH
VALDCO
DEPTHCONTOUR
DANGER
DIFFUS
DEPTH
VALSOU
DIFFUSOR
DANGER
DRGARE
DEPTH
DRVAL1
DREDGEDAREA
DANGER
DRYDOC
DOCK
WARNING
FAIRWY
DEPTH
DRVAL1
FAIRWAY
DANGER
FLODOC
DOCK
WARNING
FSHFAC
FISHING
WARNING
FSHHAV
DEPTH
VALSOU
FISHING
DANGER
GATCON
DEPTH
DRVAL1
GATE
DANGER
HULKES
HULK
WARNING
ICNARE
INCINERATION
WARNING
ITDARE
INTERTIDAL
WARNING
LIGHTS
LIGHT
WARNING
LITFLT
LIGHT
WARNING
LITMOI
LIGHT
WARNING
LITVES
LAND
WARNING
LNDPLC
LAND
WARNING
LNDSTS
LAND
WARNING
LOGPON
POND
WARNING
MONUMT
MONUMENT
WARNING
MORFAC
MOORING
WARNING
MSTCON
MAST
WARNING
OBSTRN
DEPTH
VALSOUN
OBSTRUCTION
DANGER
OFSPLF
PLATFORM
WARNING
OILBAR
BARRIER
WARNING
PILPNT
PILE
WARNING
PINGOS
OBSTRUCTION
DANGER
20
Page 21

S57 Charts: Technical Features
DEPTH
VALSOU
PIPOHD
HEIGHT
VERCLR
PIPELINE
DANGER
PIPSOL
DEPTH
DRVAL1
PIPELINE
DANGER
PONTON
PONTON
WARNING
PRDINS
INSTALLATION
WARNING
PYLONS
PYLON
WARNING
RESARE
RESTRICTION
WARNING
RSCSTA
RESCUESTATION
WARNING
RTPBCN
BEACON
WARNING
SLCONS
CONSTRUCTION
WARNING
SLIPWY
SLIPWAY
WARNING
#SOUNDG
DEPTH
VALSOU
DEPTH
DANGER
#SPLARE
SEAPLANES
WARNING
SWPARE
DEPTH
DRVAL1
SWEPTAREA
DANGER
TELPHC
HEIGHT
VERCLR
HEIGHT
DANGER
TOWERS
TOWER
WARNING
TSELNE
TRAFFICZONE
WARNING
TSEZNE
TRAFFICZONE
WARNING
TSSBND
TRAFFICZONE
WARNING
UWTROC
DEPTH
VALSOU
OBSTRUCTION
DANGER
WIRLNE
WIRE
WARNING
WRECKS
DEPTH
VALSOU
WRECK
DANGER
ZEMCNT
ZEROMETER
WARNING
dnghlt
DANGERZONE
DANGER
vessel
VESSEL
WARNING
aistar
VESSEL
WARNING
21
Page 22

S57 Charts: Technical Features
TIME DEPENDENT WARNING
Each ENC object may have a time dependent behaviour. A specific object can be dangerous
during a limited period of time starting and ending at times specified by the data producers.
ACCURACY
The accuracy of calculations performed by ECDIS is independent of the characteristics of the
display and the calculation error is always less than the data accuracy of the most accurate
SENC. The resolution of the screen gives the limits of the accuracy of the displayed bearings
and distances.
22
Page 23

General
Input Output
GENERAL
IEC 61162-1 COMPLIANCE STATEMENT
ECDIS900 digital interfaces meet all requirements of IEC 61162-1.
Sensor Monitor is the application, which manages the I/O for ECDIS.
Sensor Monitor is automatically launched when the system starts and runs in parallel with
ECDIS. With Sensor Monitor, the user selects the type of communication (Serial or Network),
configures the input media, checks the input and the communication status, selects the
Master parameters and eventually route data to other receivers.
To bring to front Sensors_Monitor, click on the icon Switch to SMonitor in the tool bar .
Hardware a and connections are described in the paragraphs Hardware and Connections.
To customise the I/O according to the sensors connected to the PC, the technician must
create new sensors and adjust
settings
.
Main Window
TOOLBAR
Icon
Description
Create new sensor (by default, NMEA 0183 sensor; media type – serial; COM1;
8N1)
Open sensor configuration window for selected
23
Page 24

Sensor configuration
Delete selected sensor
Send route from ECDIS user data folder to GPS or radar
Local Mode. Forces Sensor Monitor to send all data locally
Broadcast mode. Sensor Monitor will broadcast all data unless settings for
those data demand other method. See below for details.
Browse alarm journal
Switch on/off AIS target filtering
Change AIS target filter range
Activate/deactivate radar target tables
SENSORS
SENSOR CONFIGURATION
To configure a newly created sensor select a sensor and push the button
24
Page 25

Settings
The Configuration dialogue is used to:
• Modify the communication and sensor
settings
• List the input messages
automati call y selected
• To access advanced functions to eventually adjust the selection of input messages.
•
Check t he communi cat i on
with the terminal window and the serial status.
REMARK: Sensor Monitor can accept the same data type from different sensors but only the
data master is used in ECDIS.
SETTINGS
• Media type: select between serial port of Network with the pop up menu
• Sensor ID: press the arrow and enter a proper name for the sensor.
• Norm: select the type of norm used for the communication with the sensor.
• Parameters: adjust the parameters Port number, baud rate, parity, stop bits for serial
interface or the socket port for LAN communication.
25
Page 26

Settings
MEDIA TYPE
• Serial communication: Select the COM port and parameters
• Network: data are read and sent to selected UDP ports. In general case, input and output
ports are different. Reading can be optionally filtered by sender IP address. Writing can be
sent broadcast, multicast, locally or to the certain IP address.
• File, Internet, NC Node Manager: Use only by technician
• Modbus: Modbus is a protocol used for communication with complicated hardware such
as programming logic controllers. SMonitor can work with Modbus only by TCP.
Settings:Remote host IP
DATA ROUTING
Data received on a selected serial port can be routed on the Network to a specified IP Port.
This advanced function allows other applications to use the same raw data received on the
serial port.
26
Page 27

Auto detection
MORE SETTINGS
Depending on the selected norm additional settings may be required:
• NMEA 0183: use the option when a GPS is connected to set up the route transfer
between ECDIS and the GPS
• E/T Target Output: targets acquired by Maris PC Radar Kit can be sent on serial line with
NMEA format. Then target table can be used by another application.
• Lehmkuhl Gyro.
• AIS Transponder. Adjustment may be necessary during installation.
• NMEA Gyro Emulator. Sensor Monitor can be used as Gyro repeater.
• Network repeater may be used when several PCs run ECDIS.
REMARK
Other norms are related to the VDR and are not described in this documentation
AUTO DETECTION
When the adequate norm is selected in the list, NMEA for example, the input data flow is
automatically analysed by Sensor Monitor and the different parameters extracted from the
sentences (Speed through Water, Wind direction, etc.).
When Auto detection is ON and Sensor Monitor starts, the Sensor Monitor application
selects the first valid sentence for each data type. For example, a GGA sentence may
be selected for a position.
In order to select another sentence for the same data (GLL for example), it is necessary to set
Auto detection OFF and toggle the check box in front GLL.
REMARK
This feature may be used to ignore a specific sentence and data.
CHECKSUM VALIDATION
NMEA-based and NMEA-like protocols provide CRC-based checksum to validate integrity
check for all sentences.
Checksum validation increases data reliability but takes some time and resources. For strong
and fast data flow (such as AIS) it could be significant.
ADVANCED
The button Advanced allows the user to check an input and output data flow with a terminal
window, which displays the raw data acquired on the specified serial port.
27
Page 28

Communication status
The left side of the window displays the input data and the right side the output.
LOG FILES
It is possible to record the input and output data flow and save the data in files for further
analysis. Proceed as follow:
• Press Write log
• Select Input or/and output
• Browse to get the destination folder and enter a name.
• Press OK
• After few minutes Press again Write Log to stop the recording and close the file(s).
COMMUNICATION STATUS
PARAMETER ICONS
• Green circle indicates that the parameter is correctly analysed.
• Black circle indicates that the parameter is either no longer received or is received with
errors. (Further checking recommended using Configuration Dialogue)
SENSOR ICONS
• Yellow arrow indicates that the Sensor is working properly and receives data.
• Black arrow indicates that the data source has stopped sending data
MASTER ICONS
• Master Parameter Indicator ON indicates that the parameter is the master. This is
important when several sensors deliver the same data type.
• Use for Extractor ON indicates that the value is sent to the Extractor Tracker board.
MASTER AND SLAVE MODES
Sensor Monitor can work in two modes – Master and Slave. The mode is linked to ECDIS
Monitoring and Planning mode, i.e. switching ECDIS from Monitoring to Planning
mode switches Sensor Monitor from Master mode to Slave mode automatically.
The Master or Slave mode is important only for the Extractor/Tracker data because the Master
Sensor_Monitor sends data to Extractor/Tracker.
28
Page 29

Master and Slave modes
LOCAL OR BROADCASTING MODE
Sensor Monitor may be used either in local mode or in broadcast mode.
Local mode means that data acquired by Sensor Monitor are used locally.
In broadcasting mode data are sent on the LAN to be shared with all ECDIS installed on LAN.
REMARK
The Local mode is set automatically by Sensor Monitor when it detects that there is not
network connection or a failure in the LAN connection.
EXPERT MODE
SMonitor can work in two different levels: Basic mode and Expert. To switch from one level to
the other, double right click in the grey area in the main window.
Basic mode with area to click for switching the mode
Switching dialogue box
29
Page 30

Master and Slave modes
Expert mode
Expert mode offers more possibility to tune SMonitor and is reserved to qualified persons.
Restoring default settings for the current page is possible by pressing the button Restore
Default.
ALARM LOG
Each significant event is logged into the special Alarms Log. To display the log press the
button Alarm Journal located button right of the main window.
30
Page 31

Master and Slave modes
GENERAL SETTINGS
Settings in EXPERT MODE
• Send data to IP port specifies main output UDP port to which will be sent parameter
data and target tables (non-AIS)
• Destination host specifies destination mode for this port. Smart broadcast means that
Sensor Monitor will broadcast data if there is network connection, otherwise it sends data
to 127.0.0.1.
• ECDIS autopilot port specifies port for receiving of different ECDIS feedback (autopilot
data and so on). ECDIS always broadcasts these data if possible.
• Check GPS quality controls “position quality protection”. The position is marked as faulty
if there is no GPS quality indicator or if the quality is different from Autonomous or
differential. Important: AIS sensor does not send position quality indicator.
• Assume quality if missing when ticked forces to assign good quality state to the position
when GPS quality indicator is missing but not present and invalid. This allows to use
position sources like AIS transponders
• Socket time to live allows limiting number of hops between network routers that
packets might do. It is possible to disallow packets to be sent outside of certain subnets.
This feature is an alternative to multicast groups.
• Network connection check specifies if it is necessary or not to check the network
connection periodically. If this mode is activated, Sensor Monitor will periodically check
the network connection.
31
Page 32

Extractor/Tracker Settings
• Depth emulation allows Sensor Monitor to emulate depth below keel and surface using
given offsets in case if there is only depth below transducer.
• Immediate data forward sets up special quick data transmission protocol that is used for
PC Radar Kit and for some OEM solutions. Activate it only when it is really needed (i.e. PC
Radar Kit presents) as it loads LAN traffic. You also can force it to be local only.
• Bind unspecified ports sets up how to assign "implicit" (unspecified) UDP ports to avoid
collision with other software.
• Transmitter bind address and receiver bind address (when specified) allows using the
only LAN interface card for the computer that has more than one. If these fields are
empty, the transmitter and/or receiver will use all LAN cards instead.
• Parameter filtering button enters into parameter filtering setup dialog (see above)
• Parameter substitution button enters into parameter substitution setup dialog (see
above)
• Master Mode button switches Sensor Monitor from Master mode to Slave mode and
back. This affects immediately ECDIS900.ini file so if ECDIS is running it will be also
switched from Monitoring mode to Planning mode and back.
EXTRACTOR/TRACKER SETTINGS
When the Simrad MK6.0 radar interface box is used, Sensor Monitor MASTER is in
charge of sending appropriate data to the extractor/Tracker application responsible for
radar video delivery.
It collects all information related to Extractor Tracker from other Sensor Monitor applications
running on the LAN and sends the appropriate data to the Extractor Tracker board. For
instance
The Gyro source is the most important and must be selected as follow: If one Gyro is
connected to the Planning station and another Gyro to the Monitoring station, the user has to
select which gyro data is used by the Extractor Tracker software. On the Master ECDIS
workstation it is necessary to select the source of data for E/T as follow:
• Menu Option, item Settings panel Extractor / Tracker settings.
• Select the sensor that provided the data parameter you want E/T Data Source.
• Expand it if did not expanded already.
• Select the parameter to be selected as E/T Data Source.
• Check on E/T Data Source check box.
32
Page 33

Autopilot
Settings in Expert mode
• Send data to IP port specifies main output UDP port to which is sent Extractor/Tracker
data
• Destination host specifies destination mode for this port. Smart broadcast means that
Sensor Monitor broadcasts data if there is network connection, otherwise it sends data to
127.0.0.1.
• Use following data sources tree shows all usable data presented in the network. Data
are grouped first by their kinds and then – by sending host. Only one data of each kind
can be chosen. By default Sensor Monitor chooses first coming data of each kind, but the
user can change this layout.
• Send also received data directly from the sensor specifies if Master or Slave Sensor
Monitor that receives some Extractor/Tracker-related data must send them out directly
from the sensor (immediately when received) instead of normal data dispatching.
• Internal ET data route port specifies UDP port that is used to send Extractor/Tracker
related data internally from Slave Sensor Monitors to Master Sensor Monitor. If Local
routing is switched on (applicable for standalone installation only) this routing will be
completed only for the local PC.
• ET track data output port specifies UDP port to read set and drift information
• Force sensing the following data allows Sensor Monitor to send some kinds of data
even they are not present in the input data flow (in this case data will be filled with zeros).
AUTOPILOT
The ECDIS can be interfaced with standard NMEA compatible auto pilots and with different
Track pilots including Emri Track pilot.
33
Page 34

Autopilot
WARNING
STANDARD AUTOPILOT
• Select the sentences to be sent to the Autopilot.
• Select the talker ID by double clicking on each
output.
• Select another frequency for data sending to the
Autopilot.
•
Force to check the checksum for each data received
from the Autopilot.
• Bearing out parameter to be ignored.
TRACK PILOT
This sensor has been designed to provide the Imtech autopilot with active route information.
It receives this information from ECDIS and writes it down into the serial line or UDP port as
standard NMEA RTE and WPL sentences.
This sensor is also useful to provide the radar with the active (working) route.
• Maximal sentence length specifies the maximum length of each. This defines how
many waypoints may be placed into one RTE sentence.
• Unicode mode specifies which protocol is used for the communication between ECDIS
and Sensor Monitor (UNICODE or ANSI).
• Send working mode specifies if Sensor Monitor should mark the producing route as
working and send it out to the certain UDP port (in addition to normal route output to the
serial line).
• Send working route from the active waypoint specifies if Sensor Monitor should not
send waypoints of the active route that precede the active waypoint.
34
Page 35

Autopilot
• Maximal working route size specifies if Sensor Monitor should not send the working
route longer than present number of waypoints. All extra waypoints in this case will be
ignored and sent , after the active waypoint will be reached and passed.
• Destination port specifies port to send route out.
• Period specifies how often Sensor Monitor must send the working route out.
• Talker ID specifies talker ID for working route NMEA sentences output.
EMRI AUTOPILOT
This sensor is almost similar to Standard autopilot. The only difference is that sensor provides
other NMEA sentences set oriented to EMRI autopilot type. The second difference is that
autopilot sends some NMEA sentences that inform Sensor Monitor about autopilot state and
must be transferred to ECDIS.
List of input sentences: SSA, SSD, ISC
List of output sentences: SSA, SSD, SSX, HSC, HTR, HTC, WFM
PLC AND ADC/DAC
PLC (programming logic controller) could be used for different purposes. They are used as
analog-digital converter and input and output relays. That means, PLC is able to measure
voltage or current in the electrical chain, recognize the trigger state (high/low voltage level)
and generate output trigger signal.
NMEA XDR sentence set belongs to the same sensor group because transducers provide
analog signal measurement results or trigger/valve states. So this sensor is described here
and uses the same protocol to transfer data.
ALARM RELAY BOX
This sensor is communicating with DigitalLogic PLC DL05. This device has 6 input and 8
output relays that can be queried/scheduled.
Usually DL05 is used as the link between the software and alarm control system such as
BNWAS for Dead Man alarm or Alarm buzzer.
The sensor accepts from ECDIS current alarm status and if the status is non-zero, the sensor
switches output relays into “alarm on” state.
When the user presses “Acknowledge” button in ECDIS, the sensor switches output relays into
“Acknowledge alarms” state. Normally the installer must use this state to signal hardware
alarm system to clear any alarm sound. This state will be kept for some given time and then
cleared again.
Optionally the sensor can switch output relays into “Deadman alarm” state. This happens
when nobody from officers on duty touches ECDIS for some certain period. Note that
Application Manager must be installed and configured on the same computer.
Optionally the sensor can query periodically input relays (that can be connected to
“acknowledge” or “horn off” buttons of the hardware alarm system). If they are shorted, the
sensor will force ECDIS to acknowledge alarms. Note that this feature works only if the user
has created and configured “NMEA alarms generator” sensor.
35
Page 36

Autopilot
Advanced configuration dialog
• Output mask ON specifies which relays have to be shorted when Sensor Monitor is
informed of unacknowledged alarms. This value is a mask where bit 0 represents relay
№1, bit 1 represents relay №2 , etc. Value 63 means that all 6 output relays have to be
shorted.
• Output mask OFF specifies which relays have to be shorted when Sensor Monitor is
informed that there is no unacknowledged alarm.
• Output mask ACK specifies which relays have to be shorted when Sensor Monitor is
informed that user has pressed acknowledge button.
• Output mask DEADMAN specifies which relays have to be shorted when Sensor Monitor
is informed that nobody from the watch has touched any button of the navigational
computer for some certain time.
• Time between data portions specifies how often sensor should send control signals to
the PLC.
• Keep ACK mask specifies how long Sensor Monitor should keep ACK state. After this time
PLC will be reverted to OFF state.
• Catch alarm from specifies from which software must Sensor Monitor receive and take
into account alarm state. Alarm state received from other software will be ignored. If the
user chooses “any sender” Sensor Monitor will accept any alarm state.
36
Page 37

Export/Import routes to/from GPS
• Local receptions only specify if Sensor Monitor should ignore any alarm-related
information received from other PCs.
• Query input relays and acknowledge ECDIS alarms when any is shorted ticked on
means that Sensor Monitor query input relay(s) connected to “acknowledge” or “horn
off” buttons of the hardware alarm system; in case the buttons are pressed, the
SM forces ECDIS to acknowledge all its alarms.
• Invert relay inputs specifies if the relay is open when “acknowledge” or “horn off”
buttons are pressed, and shorts the relay(s) inversely.
• Pulse the alarm specifies if Sensor Monitor must make short pulse when it receives
information that “acknowledge” or “horn off” buttons are pressed.
• Query pause specifies how often Sensor should query input relays.
• Relay mask specifies which input relays must be queried.
• Simulate alarm, Simulate Ack and Cancel Alarm buttons imitate certain situation.
EXPORT/IMPORT ROUTES TO/FROM GPS
To export and import routes to or from a GPS it is necessary to activate the export function
and select the format for the data transfer. The protocol can be different from one GPS to
another. To activate the route transfer function select the GPS type by pressing the button
More Settings in the Configuration window of the GPS port and select the format with the
pop up menu Route Download.
IMPORTANT
The two ways communication between ECDIS and GPS requires a three wires RS 232
connection (Rx, Tx and Ground) or RS 422 connection.
RECEPTION IN ECDIS
The routes sent from the GPS are automatically converted to ECDIS format and placed in the
Route/GPS folder and then can be loaded on the chart.
Two different types of route can be sent from GPS: active route or a complete route. The first
waypoint of an active route sent to ECDIS is the active waypoint.
• When an active route is received by the ECDIS, it is stored in the route database and
automatically loaded and activated in the ECDIS.
• When a non acitve route is received it is stored in the database but not loaded
automatically.
SENDING ROUTES FROM ECDIS
The routes created in ECDIS can also be sent to the GPS.
Press the button and select the route, the available serial port and the address.
The route is sent by default an integer as route name and each waypoint ID of the route is
identified by an integer starting at 0.
37
Page 38

Export/Import routes to/from GPS
38
Page 39

MOXA Serial Interface
Additional Hardware
MOXA SERIAL INTERFACE
DESCRIPTION
Both hardware platforms provide four or eight optical isolated RS422 serial ports for
communication applications in difficult environment. Serial card holds four or eight serial
ports, which are optically isolated and support the serial communication types RS-485 and RS-
422.
Smartline Mk6 has two onboard 16C550 UARTs (on-chip 16-byte FIFO buffers) making serial
I/O more reliable. By buffering data into 16-byte packets before putting it on the bus the
UARTs drastically reduce the CPU load. This makes the interface especially suitable for high
speed serial I/O applications under MS Windows.
On-board optical isolators protect the PC and equipment against damage from ground loops
to increase system reliability in harsh environments.
MOXA CP-134, 4-PORT RS232/422/485 SERIAL PCI-BOARD
MOXA CP-134 Series of Smart Multiport Serial Boards is designed by Moxa for Industrial
Automation system integrators for long distance, multi-point PC-based data acquisition.
On-chip Automatic Data Direction Control for Precision RS-485 Communication
RS-485 communication requires precise timing control for line driver enable and disable.
Powered by Moxa's Turbo Serial Engine™ chip that comes with on-chip ADDC™, sending RS485 packets over CP-134 is as easy as using RS-232.
RS-485 multidrop for up to 31 devices within 1.2 km
CP-134U V2 Universal PCI Multiport Serial Board provides 4 RS-422/485 serial ports, each
capable of data rates up to 921.6 Kbps. In RS-485 mode, the serial port can connect up to 31
daisychained RS-485 devices within a range of 1.2 km. For long distance RS-485
communication, optional 2 KV isolation protection is available (CP-134) to prevent equipment
damage.
Features:
• Over 700 Kbps data throughput, for top performance in the world 4-port RS-422/485
interface with ADDC™ and up to 921.6 Kbps 2-wire/4-wire RS-485 communication up to
1.2 km
• Built-in 15 KV ESD and optional 2 KV optical isolation protection 128-byte FIFO and on-
chip H/W, S/W flow control
• Universal PCI compatible with 3.3/5V PCI and PCI-X
• Windows 7/XP/, Linux, Unix driver support
Dimensions and layout
39
Page 40

MOXA Serial Interface
Connection Options
DB44 to DB25 Male x 4
DB44 to DB9 Male x 4
Specifications
Bus Interface
32-bit Universal PCI
Number of Ports
4
Max No. of Boards
4
I/O address/IRQ
BIOS assigned
Comm. Controller
MOXA UART (16C550C compatible)
Baud Rate
50 bps to 921.6 Kbps
Data Bits
5, 6, 7, 8
Stop Bits
1, 1.5, 2
Parity
None, Even, Odd, Space, Mark
Flow Control
RTS/ CTS, XON/ XOFF
RS-232
TxD, RxD, RTS, CTS, DTR, DSR, DCD, GND
RS-422:
TxD+(B), TxD-(A), RxD+(B), RxD-(A), RTS+(B), RTS-(A), CTS+(B),
CTS-(A), GND
4-wire RS-485
TxD+(B), TxD-(A), RxD+(B), RxD-(A), GND
40
Page 41

MOXA Serial Interface
2-wire RS-485
Data+(B), Data-(A), GND
Connectors
DB44 Female
Surge Protection
Embedded 15 KV ESD Surge Protection
Optical Isolation
2KV (CP-134U-I V2)
CP-134U V2
180mA(+5V)
CP-134U-I V2
850mA(+5V)
Operating Temperature
0 to 55°C
Storage Temperature
-20 to 85°C
Humidity
5 to 95% RH
Dimensions (W x D)
120 x 82.5 mm (4.72 x 3.24 in)(CP-134UV2) 120 x 115 mm (4.72 x
4.52 in) (CP-134U-I V2)
ME-9001
(PCI CARD)
The Multi Port Serial Board, type ME-9001 (PCI card) offers the possibility to use 8 opto
isolated serial port RS 485 or RS 422.
The card is tested according to IEC60945, as a part of the Marine PC, which is used for the
ECDIS.
Specifications
Data transmission
Interfaces
•
ME-9100i RS232: RS232 with handshakes
• ME-9100i RS485: RS422, RS485 half-duplex, RS485 full-duplex
Ports
4 or 8
Baud rates
75/110/134/150/300/600
baud,1.2/1.8/2.4/4.8/7.2/9.6/14.4/19.2/38.4/57.6/115.2/128/230.4/460.8/921.6
kBaud
Data bits
4..8
Parity
No, even, odd mark, space
Stop bits
1, 1.5 or 2
Protocol
Xon/Xoff, hardware, no
UART Type
Multiple UART(s), register compatible with 16550, with integrated send and
receive FIFOs per port
FIFO size
128 bytes each
Isolation
All lines: Opto-isolation up to 500 V
General Data
Bus interface
32 bit/33MHz StandardPCI bus or PXI/CompactPCI bus. PCI Local Bus 2.1
compatible
Size(mm)
PCI: 136x99; PXI/Compact PCI: 160x100 (# U Europa card standard)
Connectors
78-pin D-sub female; depending on version split/breakout cable with
4x/8x 9-pin D-sub male included.
ESD protection
Up to 15 kV(IEC 1000)
41
Page 42

MOXA Serial Interface
C
ONNECTION AND CABLING
The connector provided on the delivered data cable is a standard 9-pin ‘D’ connector as used
on computers. If there is an unused 9-pin serial port on the computer, then simply plug in the
cable. If the computer's serial port is the 25-pin type, an inexpensive adapter is available at
any store that sells computers and accessories.
It may be necessary to turn on NMEA data output. Refer to the GPSs instruction manual.
• Set the datum to WGS84. Refer to the GPS instruction manual.
• Connect a GPS directly as follows:
Computer cable
GPS
RX(red)
Data to Computer (RX). Connect to the NMEA+ output which may be
labelled TX, TX+, Data Out+ or NMEA OUT+ depending on the GPS
model
TX (White)
Data from Computer (TX). Not Connected
GROUND (green)
Signal Ground. Connect to the NMEA- output, or if there is no NMEA-
output, connect to the ground on the GPS instead. It may be labelled
TX-, Data Out-, NMEA OUT- or Ground, depending on the GPS model
If a standard 9-pin ‘D’ connector is used, connect the device as follows:
Computer cable
Connector
RX +
Pin 2
GROUND
Pin 5
RS422 CABLING
If the electronic equipment is compliant to RS422 type electrical characteristics, use a
standard 9-pin ‘D’ connector as used on computers and connect the device as follows:
Computer cable
Connector
RX +
Pin 1
RX -
Pin 2
GROUND
Pin 5
If the computer's serial port is the 25-pin type contact the dealer.
SERIAL NMEA RADAR CONNECTION
To display ARPA targets, the radar must output either the NMEA TLL or TTM strings. To use
this feature, ensure the radar is correctly tracking ARPA targets before attempting to connect
it to the ECDIS.
Connections to the radar system are as follows:
Computer
cable
NMEA Radar
RX
Data to Computer (RX). Connect to the NMEA+ output which may be
labelled TX, TX+, Data Out+ or NMEA OUT+depending on the radar
TX
Not Used
42
Page 43

UPS
Ground
Signal Ground. Connect to the NMEA- output, or if there is no NMEA-
output, connect to the ground on the radar instead. It may be labelled
TX-, Data Out-, NMEA OUT- or Ground, depending on the radar.
It may be necessary to turn on NMEA output. Refer to the radar systems instruction
manual.
DATA TRANSMISSION
ECDIS is able to accept different norm for the data in particular NMEA183 (4800 bps, 8 data
bits, No parity, 1 stop bit).
ECDIS is also compatible with:
• YokogaviCMZ300x (4800, 8, N, 1)
• ATLAS ARPA(4800, 8, N, 1)
• Lehmkuhk (9600, 8, N, 1)
• ARPA Sperry (1200, 8, N, 1)
The first bit is a start bit and is followed by data bits least significant bit first.
DATA FORMAT PROTOCOL NMEA
Implementation of the NMEA data analysis has been made in ECDIS according to the standard
document Standard For Interfacing Marine Electronic Devices Version 2.1, edited by the
National Marine Electronics Association.
All transmitted data are interpreted as ASCII characters. The null character is not used.
The NMEA sentence contains the following elements:
$ <Talker> <, data field> <, data field>, …..<* Check Sum> <CR> <LF>.
Different fields are separated by delimiters "," and consist in a string. The checksum field may
be transmitted in any sentence.
POWER SUPPLIES
UPS
ECDIS ON FLAT PANEL PC OR SPLIT SOLUTION
Two different UPSs are offered, depending on the user’s requirements. The UPS protects the
ECDIS computer from basic power problems: power failure, power sags and power surges. It
safely eliminates the effects of power disturbances and guards the integrity of ECDIS
equipment.
The UPSs are “plug and play”, but can be controlled via a serialport.
Both offered UPSs are EN60945 compliant and manufactured by MGE UPS System.
SPECIFICATIONS OF THE MGE UPS SYSTEMS, MODEL PULSAR EVOLUTION 800 MARINE.
• Power (VA/W) 800/560
• MIni-Tower version, vertical or horizontal
• Number of IEC 320 Outlets: 4
• Part number 66 239
43
Page 44

UPS
Performances
• Technology High-Frequency Line-Interactive
• Automatic voltage regulation Booster/Fader
• Output voltage waveform Sinewave
• Input voltage tolerances 160V/294V, adjustable to 150V/294V via supplied UPS-Driver
software
• Frequency 50/60 Hz, auto-select
• Output voltage on battery power 230V (adjustable to 200/220/240V via supplied UPS-
Driver software)
Features
• Automatic battery test Weekly (interval adjustable via supplied UPS-Driver software)
• Hot swappable batteries
• Cold start
• Deep discharge protection
• UPS-Driver for Windows® Settings: Input voltage tolerances,
• Sensitivity, Battery test, ON/OFF conditions
Standards
• Safety EN 50091-1-1/EN60950(RD),IEC 60950,Tüv
• GS-Mark, IEC 60 945
• Electromagnetic compatibility EN 50091-2,EN 50022/B,IEC 62040-2,IEC
• 61000-3-2,IEC 61000-3-3, IEC 60 945
• Design, production and services ISO 9001
• Marking CE, TÜV GS-Mark, DnV
• Dimensions and weight
• Tower dimensions (HxWxD in mm) 150x237x415
• Tower weights (in kg) 10.5
SPECIFICATIONS OF THE MGE UPS SYSTEMS, MODEL PULSAR EXTREME C RACK MARINE 1500.
• Power (VA / Watts) at full load 1500 VA / 1050 W
• # of receptacles 6 w/ 2 switchable
• Part Number UPS + EMC filter 66 353 + 5102174900
• Part number extra battery module 66 356
• Part number alarm card (dry contacts) 66 246
Features Benefits
• True On Line Technology (1) Utility power is constantly conditioned within very tight
limits without draining the batteries
• Smart battery management The built-in microprocessor optimizes the charging sequence
to prolong battery lifetime
• Complete front panel display Check the battery or capacity levels for peace of mind. Get
valuable information on the UPS status and operating parameters.
44
Page 45

Video
• Hot-swappable batteries Faulty batteries can be replaced on site without interrupting
power to the application
• Sinewave output Total compatibility with any kind of PC power supplies or other ship
electronic equipment
• Fault tolerant mode (automatic bypass) Increased availability, as the application will not
be affected should the UPS fail
• Frequency management 50/60 Hz or 40-70 Hz Works default on 50 / 60 Hz frequency
(auto (special ship feature) select) without draining batteries. Can be easily adjusted to
accept 40 – 70 Hz (max. half load) without draining batteries, or drop load.
• Suitable for frequencies powered from ship genset.
Environment
• Acoustic noise 40dBA
• Operating temperature -15 deg. C. to 55 deg. C. (IEC 60 945)
Standards
• performance EN 50091-3 / IEC 62040-3
• safety EN 50091-1, EN 60950, IEC 60945
• EMC EN 50091-2/IEC62040-2, EN 50022/B, FCC 47 Part 15- subpart B - class A, IEC 60 945
• IEC 61000-4-2/-3/-4/-5/-6/-8/-11, IEC 61000-3-2/-3
• Marking and certifications CE, TÜV/GS, UL, cUL, C-Tick, DnV
• Design and manufacturing ISO 9001
Dimensions (HxWxD in mm) and weight (Kg)
• Dimensions 132(3U)x482,6x493
• UPS weight Rack + filter 22
• Pulsar EXB battery extension weight 27,5
Battery Runtimes
• All values shown 1500 C
• are in minutes Full load/Half load
• Base module 6/19
• EXtreme C + 1 battery pack 24/79
• EXtreme C + 2 battery packs 43/119
• EXtreme C + 3 battery packs 62/168
VIDEO
• Efficiency: above 85%
• High Power Density: over 7 watts/inch.
• Ultra Miniature Size: 2" x 4" x 1"
• Lightweight: 6 ounces
• Input Voltage: 90 - 132 / 180 - 264 VAC
• FCC & CISPR Class B EMI filter
• Operating Temperature: 0 to 50 C
45
Page 46

Computer
• Convection Cooled
• Reliability: MTBFs above 100,000 hours
• Meets Worldwide Safety Standards
• CE Marked
COMPUTER
• Efficiency: above 85%
• High Power Density: over 7 watts/inch 3
• Ultra Miniature Size: 3" x 5" x 1"
• Lightweight: only 10 ounces
• Input Voltage: 90 - 264 VAC, Single Phase
• FCC & CISPR Class B EMI Filter
• Over Voltage Protection
• Operating Temperature: 0 to 50 C
• Convection Cooled
• Reliability: MTBFs above 200,000 hours
• Meets Worldwide Safety Standards
• CE Marked
PRODUCT MARKING
MARIS SMARTLINE MK10
Made in
Norway
Serial number
xxxxxxxx
Safe compass distance
5 meters
Input Voltage
230V AC / 3.2 A
Type Approval
CE
Wheel Mark
Indoor use only according to Lloyds ENV2
To be mounted only with the manufacture supplied devices. Refer to manual for proper
installation.
46
Page 47

General
Application Manager
GENERAL
Application Manager is the special software which works as Shell on the computers.
Application Manager is well specialized for the tasks. At the same time, Application Manager
gives the administrator the minimal set of required system functions in order to restrict access
to the system.
The application runs in two modes:
• Full access mode
•
Approval mode
APPROVAL MODE
ECDIS computer access is restricted to necessary function for ECDIS and others
delivered applications allowed after configuration.
In this mode, it replaces Windows Explorer and takes some important functions which
improve the reliability of the software.
In Approval Mode all standard shortcuts except some of them which are used in the
applications are unavailable. Ctrl-Alt-Del is disabled too.
Reboots, locks or switches off PC if necessary
VIEW AND ADMINISTRATOR LEVEL MODES
VIEWS MODES
Application Manager can work in two different view mode:
• Iconic (collapsed Small Square or Thin Bar on the right )
• Full (bar window).
Application Manager can run in 2 security level mode :
• Operational mode (restricted access)
• Administrator mode ( full access)
Views modes
APPLICATION MANAGER ICONIC VIEW
DISPLAY
Iconic view is normal state of the program.
2 iconic representation are available (option available during installation):
47
Page 48

Application Manager Iconic View
• Movable icon. This icon can be placed trough the screen at any position. The last
position is remembered
• Small bar on the right part of the screen.
MENU
Double Click or Right Click + Menu “Open Application manager” on the icon/bar to get access
to Application Manager full window, 2 possible modes : Operational and Administrator.
Operational mode menu
Action
Show information about the program
Open Application Manager window in Full View Mode
Change to Administrator mode: Password is required
Administrator mode menu
Action
Show information about the program
Activate File Browser (manage files and folders)
Activate Network Browser (manage remote computers and
shared resources)
Activate Data Browser (analyze MARIS internal data protocols)
Open Application Manager window in Full View Mode
Run Task Manager
Switch to Operational Mode
Stop the software (not recommended)
48
Page 49

Application Manager full view
APPLICATION MANAGER FULL VIEW
Full view gives the user maximum power of the program. The icon is transforming into
vertical-oriented window which has 4 main areas – button area, system tray and two task lists
– Approved Tasks and Additional Tasks. If the user moves the mouse out of window and
keeps it there more than 3 seconds, the window will be collapsed back to Iconic view.
Normal mode
Administrator mode
SECURITY LEVEL MODE
OPERATIONAL MODE
Reboot PC
Reboot Computer button
49
Page 50

Security level mode
Switch off PC
Switch off computer
Security settings
Open Security Settings dialogue
In the Operational Mode Application Manager completes the following functions:
• acts as a shell.
• keeps all Approved Applications running; if some of them crash it restarts them; if some of
them will be frozen it restarts them too.
• shows all enabled applications in System Tray (see Security Settings dialogue)
• controls the the applications protection system (each application is password-protected
during Approval Mode)
ADMINISTRATOR MODE
Reboot PC
Reboot Computer button
Switch off the PC
Switch off computer
Security settings
Open Security Settings dialogue
AM Settings
Open Administrative Settings
dialogue
Run external
programs
Run an external application using
Windows Run dialogue
In the Administrator Mode, Application Manager works similar as Operational Mode but some
additional functions are available:
• administrative settings
Control Panel (other than Standard Control Panel which is implemented in Windows
Explorer)
Run Windows Explorer (not recommended in Approval Mode because some shell
functions will be catched by Explorer)
Open Administrative Tools folder (and open some tools if necessary)
Open My Documents folder
Find files
Run an external application
Edit all three task lists (approved applications, additional applications, system tray
applications
• File browser (other than Windows Explorer)
• Network browser (other than Windows Explorer)
• Data browser (analyzes MARIS internal data protocols, informs administrator about size,
number and type of data packets)
50
Page 51

Approved applications
• Run Windows Task Manager
• Change MARIS application passwords
TASKS LIST
APPROVED APPLICATIONS
Approved applications have to be running all the time. If some of them crash (or are closed),
Application Manager starts them again. The built in watchdog keeps those applications if
they are frozen and restarts them then. In Administrator mode some of them could be
suspended temporarily. Each application has its own button. User (not Administrator only)
could activate any approved application and pop-up its window using one click on the
button.
Application manager watches “missing” applications. This means that if some application is
included into Approved Tasks List and the corresponding executable file is missing or
corrupted, Application Manager periodically tries to run it and immediately when problem is
resolved, the application will be started.
If application is OK, the corresponding button has image – first icon from resource list of the
executable. If application is suspended by administrator, the button is grayed. If application is
not running by some reason except missing/corrupted file, button is blinking. In case of
missing/corrupted file image is red question mark.
ADDITIONAL APPLICATIONS
Additional (other) application list is mostly similar to Approved applications list. There are the
following differences:
• Application Manager does not keep Other Applications working. If some of them crash or
are closed, Application Manager just shows their new state but does not restart them
• No freeze watchdog
• No suspend
• No auto-start (in fact the same than 1st point)
All other points are identical to Approved applications list.
SYSTEM TRAY APPLICATIONS
System Tray Applications are not started and not watched. But if they try to put some icons
into Windows System Tray, Application Manager catches them and put them into its internal
Tray Area.
WARNING in Administrator mode Application Manager shows all icons in System Tray,
not only from the list.
51
Page 52

Security settings
SETTINGS
SECURITY SETTINGS
You can see here the following buttons (in addition to labelled two):
ADMINISTRATIVE SETTINGS
52
Page 53

Administrative settings
EDITING TASK LIST
It is the common view of all three task list editing windows. The only difference is that only
Approved (Auto) Task List has the Suspend button.
OK
Save changes and close the window
Cancel
Do not save changes and close the window
Suspend
Only Auto Tasks List. If this button is pressed, the selected application will not be
traced/restarted etc.
Add...
Add new task into list
Edit...
Edit current task properties (see below)
Remove
Remove task from the list
Remove all
Clear task list
TASK LIST MEMBER EDITING
Icon Area
If executable module is chosen, here you can see its first icon
Task Name
Label of the path; this string will be shown in the tooltip when you move
mouse cursor to the corresponding button.
Task Path
Path and name of the executable module
53
Page 54

File browser
Parameters
List of command-line arguments
Hot Key
Optional keyboard accelerator used to activate this task. This is not
relevant for System Tray Task List.
Keep this window
active all the time
If this option is checked, Application Manager will keep this window
active all the time (and keep in on the front). It will have more less the
same behaviour as Windows Task Manager.
Watchdog
Task Freeze Watchdog on/off
Timeout
Assume task to be frozen if it does not respond within this time
OK
Save changes and close
Cancel
Do not save changes and close
DEFAULT PROFILE
Default profile is set of standard settings which control all three Task Lists. You can create
most-common set of settings using simple mechanism.
When you press button “Create Standard Profile” the following dialogue will be shown:
You should check the software that is installed on your PC and press OK. Or press Cancel to do
not create Default Profile.
Also you can clear completely all three Task Lists using button “Clear Profile”.
ADDITIONAL FEATURES
FILE BROWSER
Application Manager File Browser works more less the same way than Windows Explorer.
In the path line you can enter manually path to browse. Or you can press second button on
the right to choose path in the dialogue. Button elevates browser one folder level up.
Also you can choose root folder of any logical drive. Use popup menu (see below).
Menu items description
Popup
Item
Included into
the context
Meaning
54
Page 55

File browser
menu
File
Choose Drive...
Yes
Choose root folder of
selected logical drive
(Drive Browser will we
opened, see below)
Open
Yes
Open selected item (or
first selected if more than
one is selected). The
operation is completed
according to Windows
associations. Use
Windows Explorer to edit
them.
Open As...
Yes
Open standard Open As
Windows dialogue box
Print...
Yes
Print selected item to the
default printer. If more
than one item is selected,
first one will be printed
out.
Add printer...
Yes
Run Add Printer Windows
wizard
Browse
Yes
Browse for folder
Sharing
Yes
Open standard Windows
Properties dialogue on
Sharing page
Properties
Yes
Open standard Windows
Properties dialogue
Create folder
Yes
Create new folder
Map Network Drive
Yes
Open standard Windows
Map Network Drive
dialogue
Empty Recycle Bin
Empty Recycle Bin
Close
Close File Browser
window
Edit
Undo
Yes
Undo last operation (not
implemented yet)
Cut
Yes
Cut selection
Copy
Yes
Copy selection into
Clipboard
Delete
Yes
Delete selection
Paste
Yes
Paste from Clipboard
Copy to...
Yes
Copy selection into
selected folder
Move to...
Yes
Move selection into
55
Page 56

Network browser
selected folder
Rename
Yes
Rename selected (or first
selected) item
Select All
Yes
Select all items
View
Sort
Name
Yes
Change sort order, sort
and rearrange items
Extension
Creation time
Modification
time
Size
Large icons
Yes
Change the
representation (not
implemented yet)
Small icons
Yes
List
Yes
Details
Yes
WARNINGS:
1. Items could be selected using the same way as in Windows Explorer
2. You can open as many instances of File Browser as you need. They use the same Clipboard
format so you can easily copy files and folders from one to another one. But this format is not
compatible with Windows standard Clipboard format, therefore you cannot use it to copy to
and from another file managers.
NETWORK BROWSER
As long File Browser is an analog of Windows Explorer as Network Browser is an analog of
Network Neighborhood. It is simple and effective tool that lets you to browse another
workgroups, computers and their shared resources. Shared resources could be mapped or
browsed using File Browser.
When you open Network Browser, it scans first the network. Then you will see the found
network components.
There are few menu items:
• Open Browse the selected shared resource using File Browser
• Map Network Drive Run standard Windows Map Network Drive dialog for the selected
shared resource
• Close Close the window
You can open as many instances of the Network Browser as you want.
DRIVE BROWSER
Drive Browser is simple window that lets you to choose one of existing logical drives of any
type and/or browse its content.
The following pictograms are used for drives:
56
Page 57

Data browser
Hard disk
Compact disk (CD/DVD)
Mapped network resource
Removable drive (flash memory stick, etc)
If you right click any drive, the context popup menu will be activated. It contains the
following menu items:
• Select Select logical drive and close Drive Browser
• Refresh Refresh drives list (for instance when new flash disk has been mounted)
• Browse... Browse root folder of the selected drive using File Browser (see above)
• Map Network Drive... Open standard Windows Map Network Drive dialog
• Cancel Close Drive Browser
DATA BROWSER
Data Browser is tool which helps to analyse network traffic and recognize some data packets
which are passing through. The applications use more or less standardized protocols and any
data could be classified by type and sender.
You should choose UDP port that you want to trace and press Listen. The most useful are
ports 8001 (most of data from Sensor Monitor to ECDIS, ARPA and VDR), 6606 (most data from
ECDIS to Sensor Monitor), 4101 (ECDIS internal change port).
If you need you can record (log) caught data. Press Record button, choose log path and name
and keep button pressed for a while, then release and you can use log file. Warning: This
button is visible only when Data Browser is listening.
As you can see Data Browser shows for each sender its IP address and list of packet types
received from there. For each packed type are present name of type, program-sender
(because different program could send packets from the same IP), summary number of bytes
and number of packets received in packets certain type for certain program and certain IP
address and last reception type.
RUNNING AN EXTERNAL APPLICATION
It is fully identical to competing menu item Run from Start menu of Windows. The standard
Windows Run dialog opens.
OPENING ADMINISTRATIVE TOOLS
Application Manager will open special Windows folder called “Administrative Tools” using
File Browser (see above). You can work with shortcuts located in that folder on the same way
like any other folder.
57
Page 58

Launching Control panel
LAUNCHING CONTROL PANEL
Application Manager will open special window contains all Control Panel applet shortcuts.
You can work with them the same way like in Windows Explorer.
CHANGING MARIS SOFTWARE PASSWORDS
Any delivered software is protected using two passwords – user and administrator. Some
functions need user password, some – administrator password. Here you can change those
passwords. The following dialogue will be shown:
Enter old password and then new password twice. Press OK to confirm password change or
Cancel to do not change password.
DEADMAN ALARM
Application Manager version 1.1.0.0 or later is required.
During AM installation, answer yes to question use DeadMan watchdog
Default pause period is 600 seconds
APPLICATION MANAGER CONFIGURATION
In Administrative Tools press (Administrator mode is required)
58
Page 59

Deadman alarm
Check On Option “Use Deadman
Watchdog”
A pulse will be sent every “Pulse
Period” seconds, here 600 seconds
or 10 minutes, if mouse or Keyboard
were moved during the last 10 mn.
VDR Watch dog configuration : see
below
SENSOR MONITOR CONFIGURATION
Create (if does not exist yet) "Alarm Relay Box" sensor. Connect the dedicated serial port to
Relay Box using proper cable (here is COM1).
59
Page 60

VDR Watchdog
ALARM BOX SENSOR CONFIGURATION
In alarm Box sensor panel,
There is one new setting -
"output mask
DEADMAN".
It sets up which pins should be pulsed wh
en
Application Manager sends message that
mouse or Keyboard were used since last check.
(32 in example give the function to the 6th led)
Normally pulse takes 2 seconds but you can
change this length ( Keep ACK mask sec )
option. (here is 5 seconds)
VDR WATCHDOG
INSTALLATION
VDR watchdog requires Application Manager and a VDR module which is running as a service
(VdrMon) on the VDR Computer.
• Copy vdrmon.exe into VDR program folder
• Copy vdrmon.ini into VDR program folder
• Command “run vdrmon.exe –ia”
• Start Service with command line -s or via MMC
The service broadcasts the notifications immediately when VDR changes the currently-writing
file on the alternative data storage (normally, root folder of D: drive). Usually this happens
once per hour but if the crew wants to have this check more often they could reduce
timeframe length in VDR Configuration Manager.
CONFIGURATION IN APPLICATION MANAGER
The settings in Application Manager are simple and located in the same window than
Deadman Alarm Settings:
60
Page 61

VDR Watchdog
• enter Administrator mode
• click on administrative settings button (second row, middle button)
• click on watchdog settings (second row, the most right button with dog icon)
• check "Listen VDR software watchdog"
• choose proper port (by default 41117)
• choose the timeout
• (for instance, if VDR writes new file to D: once per hour,
choose something like 3620 seconds
• choose period of check; one or two seconds is ok; when
alarm window pops up, the information will refresh once
per the given seconds number
• press OK
• press Close
ALARM
When no file change will happen in given timeout, Application Manager will pop up the alarm
window with the text "VDR recorder is not writing data for ..."
Warning is refreshed continuously once per check period.
If Application Manager receives the notification from VDR software watchdog, this window
will disappear immediately.
The user can press "Acknowledge" button and then window will be hidden temporarily; but if
there will be no notification in the timeout period, then window will appear again.
VIEW LOG
Alarm log available when pressing “View Log” button.
61
Page 62

General
Installation and Troubleshooting
GENERAL
The system is delivered ready to use and no installation is necessary. However, the user may
have to re-install a new version of ECDIS900.
Installing the software:
• Insert the Installation DVD into the DVD-DRIVE or use the installation usb flash drive.
• Open the DVD: double click on My Computer and on the DVD drive icon or open the
usb flash drive
• Double click on the folder disk 1
• Double click on the file Setup.exe and follow the instructions of the set-up program.
NOTE
•
If a previous version of the ECDIS900 is installed on the hard
disk, the set-
up program saves the Sensor_Monitor
configurations, installed charts, routes and tracks.
•
Once the ECDIS900 application installed on the hard disk,
several folders containing the application, utilities and data
have been created.
Launch and quite ECDIS900
as described below.
•
ECDIS display is type approved device and should be used with
factory settings. Software does not require screen resolution
and colour mode, but it is strongly recommended to use
resolution no less than 1280 * 1024.
•
In case the Win 7 OS the Windows Classic Theme must be set. In
case of using another theme, some GUI colours could be
inconsistent.
In case of
t echni cal probl ems
or to order new charts please contact the
MARI S s upport
.
OPERATIONAL LIMITS
Operational limits
of ECDIS900 listed in the proper section.
TESTS
Regular test s
should be performed on board to check that the system works properly.
SOFTWARE INSTALLATION AND SETTINGS
The system is delivered ready to use and no software installation is necessary.
62
Page 63

Launch and quit ECDIS900
To update the software contact Navico Technical support.
NOTE
•
If a previous version of the ECDIS900 is installed on the hard
disk, the set-up program saves the Sensor_Monitor
configurations, installed charts, routes and tracks.
•
Once the ECDIS900 application installed on the hard disk,
several folders containing the application, utilities and data
have been created.
Launch and quite ECDIS900
as described below.
•
ECDIS display is type approved device and should be used with
factory settings. Software does not require screen resolution
and colour mode, but it is strongly recommended to use
resolution no less than 1280 * 1024.
•
In case the Win 7 OS the Windows Classic Theme must be set. In
case of using another theme, some GUI colours could be
inconsistent.
In case of
t echni cal probl ems
or to order new charts please contact the Navico
support
.
MULTI HARDWARE
ECDIS900 has been approved with different PCs and monitors. ECDIS900 needs a proper
colour table to be used. During installation of the ECDIS900 software it is necessary to select
the targeted display.
REMARK when Hatteland monitor are used the color table is automatically uploaded from
the monitor to the PC.
OPERATIONAL LIMITS
Operational limits of ECDIS900 are listed
here
TESTS
On board regular tests are to be performed to check that all components of the system work
properly
LAUNCH AND QUIT ECDIS900
IMPORTANT All software, including ECDIS900, should run with
Application Manager
operating
as Shell on MARIS computers.
The ECDIS900 runs under:
• Windows XP
• Windows 7
63
Page 64

Support
When the workstation is powered, Application Manager and ECDIS900 are automatically
launched, therefore the Windows file management is not accessible in the Operational mode
(see
Securi ty level mode
for details).
It is impossible to hide the application or to access to the file system not operating in the
Administrator mode.
To quite the ECDIS900 application the computer should be switched off or rebooted. These
operations are performed via Application Manager.
SUPPORT
The ECDIS900 customers can obtain free technical support from NAVICO.
IMPORTANT
Each Navico customer can have access to the MCP (
www. char tservice. no
) where the latest
updates and documentation packages are available.
If you don't have login, ask the Maris Chartservice (
service@
navico.com) for it.
BEFORE CONTACTING NAVICO
Before contacting Navico looking for help with technical problems, be sure to read the
applicable sections of the ECDIS900 User's Guide. The answers might be there without
needing to contact Navico.
WHAT IS NECESSARY TO HAVE WHEN CONTACTING NAVICO
The following information will be required when contacting Navcio:
• The dongle ID written on the dongle label.
• The ECDIS900 and Sensor_Monitor version numbers
• Make and model of the GPS receiver or/and other marine instrumentation connected to
the computer.
• Make and model of the computer.
• Detailed description of the problem.
HOW TO CONTACT NAVICO
There are a number of different ways to contact MARIS’ product support staff:
WORLD WIDE WEB
Browse the product support section of our Web site. It is located at
www. maris. no
chart ser vice. no
–The Customer Portal
INTERNET E-MAIL
Send email to
service@navi co.com
. Be sure to include email address to reply.
TELEPHONE
Call the the product support line on + 47 48 000 111. Support lines are staffed from Monday
to Friday from 8:00 a.m. to 5:00 p.m (UTM+1).
64
Page 65

Troubleshooting
BACKUP
Back up is essential and should be done regularly. In the case of computer failure, the
software and the charts will be re-installed from the setup DVD and the charts CD/DVDs. The
user data will be restored from external storages backup. See the Backup section for details.
TROUBLESHOOTING
WIRING NMEA AND RS-232 INSTRUMENT SYSTEMS
The most of installation issues and faults stem from one of two causes:
• The connecting cables are not wired correct, or are picking up interference, resulting in a
non-working or unreliable installation.
• Instruments have not been set up to ensure that the correct data gets from one point in
the system to the other.
Clearly getting the cable connection right is the first step in troubleshooting.
CONNECTION TESTS
When one or more input and/or output devices are connected to the computer, the
connections must be tested to ensure that all is working correctly. The ECDIS900 provides a
useful tool to help perform this test.
Hyperterminal is an application built into Windows XP and Windows 7 that allows testing of
connections to the input devices. If input devices are connected correct, Hyperterminal
displays recognizable characters. Incorrect connected input devices either show no
information, or garbled characters.
NOTE
The Sensor Monitor application must be closed before using Hyperterminal
SERIAL PORT BUSY
Depending on the Windows OS configuration, the serial port COM1 could be automatically
closed (busy) due to the mouse management. This will prevent any more usable data being
available for input.
To free the port COM1:
• Open the file C:\boot.ini
• Add the option /noserialmice twice at the end of the two last lines
• Restart
AUTOMATIC LOG ON PROCESS
The system starts using the latest settings including the user name and password.
WINDOWS XP
• Double click on User and Password in the control panel
• Select the panel Advanced
65
Page 66

Troubleshooting
• Check OFF the box: Require users to press Ctrl Alt Delete before logging on
• Select users panel
• Check OFF the box: Users must enter a user name and password to use this computer.
• Restart the PC.
WINDOWS 7
• Input netplwiz in the Run field of the Start menu
• The User accounts dialog appears
• Tick off the “User must enter a user name and password to use this computer” box
• Click Apply
• Go to the Advanced tab
• Press the Advanced button in the Advanced user management group
• Check that box “Password never expires” is ticked on for required groups
• Restart the PC
FAILURES AND FIX
POWER SUPPLY
Equipment
Failure
detection
Cause
Effect Action to fix
Power
cables
Power
switch
P11
Black screen
No audible start
of the computer
(Hard disk or
fan).
No
connection
to an
external
power
source.
Cables
unplugged.
Power
switch
failure
Computer
won’t run
Connect to an
external power
source.
Check cables
plug.
Change power
switch
12V power
unit
P12
Black screen
Audible start.
Defective
12V power
unit
Computer
won’t run
Replace 12V
power unit
5V power
unit
P13
No data on
screen
Faint back light
visible when
back light is
fully on
Defective 5V
power unit
Computer
won’t run
Replace 5V power
unit
Fan
P14
Computer
powered off
automatically
according to
BIOS settings
The unit
temperature
was
exceeded.
The fan may
be blocked
Computer
stops
Unit is in an
exceedingly
environment. Let
it cool down.
Ensure computer
air vents are not
66
Page 67

Troubleshooting
blocked. Check
that internal fan is
running. Replace
the fan is
necessary.
Backlight
P16
Black screen
Backlight
failure
Black screen
Check cabling.
Replace
backlight
card.
Buzzer
P17
No Audible start
Power or
Buzzer unit
failure
No audible
alarms
Replace buzzer
board
Replace mother
board
BOOT
Equipment
Failure
detection
Cause
Effect
Action to fix
RAM
Long beep (4
s)
Silence 2s.
No Picture
RAM failure
Computer
won’t boot.
Check the RAM
plugs.
Replace faulty
RAM module.
Keyboard
None
Bad plug
Keyboard
failure
No light on the
keyboard.
Keyboard does
not respond
Reconnect the
keyboard with
computer off.
Ensure that
none of the
keys are
depressed.
Replace the
keyboard
Processor
Main board
P13
Fan on.
No audible
start
Mother board
failure
Processor
failure
No boot
Check that the
motherboard
and the
processor
are
well plugged.
Replace the
motherboard
Hard disk
controller
Long response
time
HDD failure
Hard Drive
circuitry error
HD does not
start
Run Computer
set up
Check cables
seating
Run HD
diagnostics
Replace the
HD.
Replace
mother board.
Hard disk
Long response
Hard Drive
Warning in the
Run Computer
67
Page 68

Troubleshooting
time
HDD failure
Fan on.
Bios starts
error
system
configuration
window:” Pri.
Master disk
None.
Sec. Master
disk None”.
set up
Check cables
Run HDD
diagnostics
Replace the
HDD.
Ethernet
controller
Network driver
does not
detect network
controller
Network
controller is
disabled
No access to
network
Run computer
set up and
enable
controller
network.
Ethernet
controller
System
software set
up.
Network status
link light does
not turn on or
flashes
N
o active
network is
detected
Network
controller is
not set up
properly
Network driver
is not correctly
loaded
SMonitor
cannot be
launched.
Check cabling
Use the
network
control
application to
verify that
device is
working
properly.
Reinstall
network
drivers
Replace
system board
VIDEO
Equipment
Failure detection
Cause
Effect
Action to fix
Video cable
V1
Black screen
The video cables
are unplugged.
No display
Check cables
seating
Backlight
Front panel
P12 , P16
Black screen
Backlight is
turned down.
On/Off display
button of the
front panel Off.
No display
Adjust the back
light.
Button on.
DATA ACQUISITION
Equipment
Failure detection
Cause
Effect
Action to fix
System set up
Cannot use the 4
serial ports
IRQ conflicts.
Quit ECDIS900.
Launch Windows
NT diagnostic,
open the panel:
“Resources”.
IRQ for serial ports
should be 03,
68
Page 69

Troubleshooting
04,07,08.
If not reboot the
computer, enter
the set up and
change IRQ.
Run the recovery
CD.
Check the board
plug.
Replace the serial
board.
Serial ports.
Serial cables
Sensor output set
up.
S_Monitor
configurations
Monitoring
station: Warning
“GPS – DR alarm”
in ECDIS900
In SMonitor GPS1
data not available
or faulty.
Same for the
second GPS and
planning station
Bad connection
with the GPS
1.
GPS 1 failure.
Bad selected data
format.
The ship’s
position is not
monitored on the
chart.
Check the serial
cable plugged in
the computer and
in the GPS.
Check the wiring
RS232 or 422 …
(See technical
manual).
Open the terminal
window in
SMonitor
and
check the
incoming data
format.
Select another
format (NMEA
or..) ij the
configuration
window of the
serial port
Check the output
configuration of
the GPS.
Click right button
in the GPS
indicator and
select GPS1 as
master.Check the
serial cable
plug
ged in the
computer and in
the GPS.
Check the wiring
RS232 or 422 …
(See technical
manual).
Open the terminal
69
Page 70

Operational limits
window in
SMonitor and
check the
incoming data
format.
Select another
format (NMEA
or..) ij the
configuration
window of the
serial port
Check
the output
configuration of
the GPS.
Click right button
in the GPS
indicator and
select GPS1 as
master.
Serial ports.
Serial cables
Sensor output set
up.
S_Monitor
configurations
C1
Other data
acquisition faulty
in SMonitor
Bad connection
with the se
nsor.
Sensor failure.
Bad selected data
format.
Data not correctly
acquired. No
display.
See above.
Serial ports.
Ethernet com.
Serial cables
Sensor output set
up.
S_Monitor
configurations
Second GPS
position not
correctly acquired
in the Monitoring
station.
Same on Planning
Station.
GPS2 failure.
Bad Ethernet
connection.
Second ship’s
position not
available (No
cross icon
displayed on the
chart at the
second GPS
location).
Check the cabling.
(Serial and
Ethernet).
Ethernet problem:
see above S1 and
S2.
OPERATIONAL LIMITS
OVERSCALING CHARTS
The accuracy of the overscaled charts is not as good as it should be for a safe navigation.
OUTPUT DATUM SELECTION FOR THE GPS
When the GPS sensor does not deliver on serial line information about the datum used for the
positioning, ECDIS900 supposes that the datum in use is WGS84. Therefore it is required to
select the datum WGS84 in the GPS sensor.
S57 LIMITED COVERAGE
S57 database coverage is still limited therefore ARCS must be used when no vector data are
available.
70
Page 71

System tests
MOVE THE ROUTES
When the route is not locked, it is extremely easy to move and modify them in ECDIS900.
NO PASSWORD CONTROL FOR CHART AND ROUTE MANAGEMENT
No password is required to load or delete charts or edit the routes.
ROUTE DATABASE
When a route is created or modified on the planning station, there is no automatic update of
the route database on the monitoring station. The update is performed manually.
BACK UP MANUALLY FOR LOGBOOK, ROUTE USER DATA
The user has the responsibility to make his back up regularly and in the proper way.
LOGBOOK
One logbook file is created every 24 hours. Therefore the replay a manual selection of the files
is necessary.
SYSTEM TESTS
DVD-ROM
The test of the DVD reader can be done when the chart is updated. Insert the update CD (S57
update CD or ARCS update CD) and run the update procedure.
SENSOR INPUT
The Sensor Monitor application displays a list of sensors and serial ports. Check that data
flow is correct.
Then for each serial port check that the data is analysed correctly.
ETHERNET COMMUNICATIONS
Check that the data received from a sensor connected to the workstation is available for the
all ECDIS900 stations.
For example, when two different GPS are connected to the two stations, check that the two
GPS positions are displayed on the chart.
MOUSE AND KEYBOARD
Perform visual check of a screen for a mouse or a track-ball.
In the waypoint information window or any kind of text edit box enter a string with the
keyboard.
The keyboard can also be tested with the chart hot keys: when the focus is on the chart scroll
the chart with the arrows keys.
71
Page 72

*988-10959-001*
www.navico.com/commercial
 Loading...