


Sewing Machine Model SA2200
INSTRUCTION MANUAL & REFERENCE GUIDE
Simplicity Sewing Machine Education Helpline: 636-651-0030

IMPORTANT SAFETY INSTRUCTIONS
When using the sewing machine, basic safety precautions should always be followed, including the following:
READ ALL INSTRUCTIONS BEFORE USING MACHINE
DANGER - To reduce risk of electric shock:
1.The sewing machine should never be left unattended when plugged in.
2.Always unplug this sewing machine from the electrical outlet immediately after using and before cleaning.
3.Always unplug before changing the light bulb. Replace bulb with same type rated 15 watts. WARNING - To reduce the risk of burns, fire, electric shock, or injury to persons:
1.Do not allow this machine to be used as a toy. Close attention is necessary when the sewing machine is used by or near children.
2.Use this sewing machine only for its intended use as described in this manual. Use only attachments recommended by the manufacturer as contained in this manual.
3.Never operate this sewing machine if it has a damaged cord or plug, if it is not working properly, if it has been dropped or damaged, or dropped into water. Return the sewing machine to the nearest authorized dealer or service center for examination, repair, and electrical or mechanical adjustment.
4.Never operate the sewing machine with any air openings blocked. Keep the ventilation openings of the sewing machine and foot controller free from the accumulation of lint, dust and loose cloth.
5.Never drop or insert any object into any openings.
6.Do not use this machine outdoors.
7.Do not operate this machine where aerosol spray products are being used or where oxygen is being administered.
8.To disconnect, turn all controls to the off position then remove the plug from the outlet.
9.Do not unplug by pulling on the cord. To unplug, grasp the plug, not the cord.
10.Keep fingers away from all moving parts. Special care is required around the sewing machine needle.
11.Always use the proper needle plate. The wrong plate can cause the needle to break.
12.Do not use a bent needle.
13.Do not pull or push the fabric while stitching. It may deflect the needle causing it to break.
14.Unplug the sewing machine when making any adjustments in the needle area, such as threading the needle, changing the needle, threading the bobbin, or changing the presser foot.
15.Always unplug the sewing machine from the electrical outlet when removing covers, lubricating, or when making any other user servicing adjustments mentioned in this instruction manual.
SAVE THESE INSTRUCTIONS
This sewing machine is intended for household use.
1

FORWARD
WELCOME TO THE CREATIVE WORLD OF SEWING WITH SIMPLICITY!
Congratulations on being the owner of a new Simplicity sewing machine. Whether you’re new to sewing, a lifelong sewer, or returning to sewing, we at Simplicity Sewing Machines are dedicated to providing you with simply the BEST features, quality, and customer service to ensure you many pleasurable hours of sewing satisfaction and success.
Before starting a sewing project, here are a few recommendations to help you become acquainted with your new machine:
•Read through the instruction book and become familiar with the sewing terms.
•Review the machine, using the instruction book as a guide, to identify each part and function of the machine.
•Practice sewing on a variety of fabric scraps using various stitches and stitch settings.
•Make a stitch sampler of your favorite techniques in the instruction book, marking your machine setting preferences for future reference.
• • •
Thank you for choosing a Simplicity sewing machine.
If you have any questions or comments, give us a call – we’ll be glad to help you!
• • •
Simplicity Sewing Machine Education Department
636-651-0030
2

TABLE OF CONTENTS
KNOW YOUR SIMPLICITY SEWING MACHINE |
|
PRINCIPAL PARTS........................................................................ |
4-5 |
ACCESSORIES ................................................................................. |
6 |
SIMPLICITY SEWING MACHINE SET-UP |
|
PREPARATION FOR SEWING ......................................................... |
7 |
ACCESSORY STORAGE ................................................................... |
7 |
CHANGING PRESSER FEET............................................................. |
7 |
Snap-on feet ........................................................................... |
7 |
Screw-on feet.......................................................................... |
7 |
FREE-ARM SEWING ........................................................................ |
8 |
PRESSER FOOT PRESSURE REGULATOR ........................................ |
8 |
DROP FEED .................................................................................... |
8 |
LEVELING BAR................................................................................ |
8 |
STRETCH STITCH ADJUSTMENT. ................................................... |
8 |
CUSTOM STITCH SELECTION |
|
STITCH SELECTION ........................................................................ |
9 |
Stitch selector dial .................................................................. |
9 |
Stitch width dial...................................................................... |
9 |
Stitch length dial..................................................................... |
9 |
Needle plate seam guides....................................................... |
9 |
Reverse sewing lever .............................................................. |
9 |
STITCH SELECTION TABLE ........................................................... |
10 |
TENSION ADJUSTMENTS ............................................................. |
10 |
Upper thread tension ........................................................... |
10 |
Lower thread tension ............................................................ |
10 |
THREADING YOUR MACHINE |
|
WINDING THE BOBBIN............................................................... |
11 |
LOWER THREADING.................................................................... |
12 |
Removing the bobbin ........................................................... |
12 |
Inserting new bobbin ............................................................ |
12 |
Placing bobbin case in shuttle .............................................. |
12 |
UPPER THREADING ..................................................................... |
13 |
Using the needle threader..................................................... |
13 |
Raising the bobbin thread..................................................... |
13 |
SEWING |
|
SEWING TIPS ................................................................................ |
14 |
BEGINNING TO SEW.................................................................... |
14 |
NEEDLE, THREAD & FABRIC GUIDE ............................................ |
15 |
BUILT-IN STITCHES |
|
STITCH “A” STRAIGHT STITCH .................................................... |
16 |
Seaming................................................................................ |
16 |
Basting.................................................................................. |
16 |
Topstitching and edgestitching .............................................. |
16 |
Gathering.............................................................................. |
16 |
Zipper insertion .................................................................... |
17 |
Piping insertion..................................................................... |
17 |
Narrow hemming.................................................................. |
17 |
STITCH “A” ZIGZAG ..................................................................... |
18 |
Overedging light to medium fabrics...................................... |
18 |
Bartacking............................................................................. |
18 |
Satin stitch appliqué ............................................................. |
18 |
Attaching buttons.................................................................. |
19 |
Seaming knits ....................................................................... |
19 |
STITCH “B, D, E” DECORATIVE SATIN STITCH ............................ |
20 |
STITCH “C” SCALLOP HEM.......................................................... |
20 |
STITCH “F” BLINDHEM ................................................................ |
20 |
STITCH “G” SHELL STITCH .......................................................... |
21 |
Seaming nylon tricot............................................................. |
21 |
Decorative picot hem ........................................................... |
21 |
Folk art appliqué................................................................... |
21 |
Decorative braid application................................................. |
21 |
STITCH “H” DOUBLE ACTION .................................................... |
22 |
Encasing elastic .................................................................... |
22 |
STITCH “I” THREE-STEP ZIGZAG.................................................. |
22 |
Attaching flat elastic ............................................................. |
22 |
Overcasting .......................................................................... |
22 |
Mending ............................................................................... |
22 |
STITCH “J” MULTI-CORD SEWING .............................................. |
23 |
STITCH “K” FEATHER STITCH ...................................................... |
23 |
STITCH “L” HONEYCOMB ........................................................... |
24 |
Decorative ribbon attaching.................................................. |
24 |
Mock smocking .................................................................... |
24 |
STITCH “M” OVERLOCK .............................................................. |
24 |
Attaching rib knit trim........................................................... |
24 |
STITCH “N” SLANT OVERCAST.................................................... |
25 |
Seaming and overcasting heavyweight fabrics ...................... |
25 |
STITCH “O” ARROWHEAD .......................................................... |
25 |
Decorative flat fell seams...................................................... |
25 |
STITCH “P, Q” DECORATIVE EDGING......................................... |
25 |
STITCH “R” DECORATIVE TRIM ................................................... |
26 |
STITCH “S” TRIPLE STRETCH STRAIGHT STITCH ........................ |
27 |
Seaming bias curves ............................................................. |
27 |
Seaming double knits............................................................ |
27 |
Triple topstitching ................................................................. |
27 |
STITCH “S” RICK RACK ................................................................ |
27 |
Overcasting heavy fabrics ..................................................... |
27 |
Decorative rick rack.............................................................. |
27 |
BUTTONHOLES............................................................................ |
28 |
Classic buttonholes............................................................... |
28 |
Corded buttonholes .............................................................. |
28 |
FREE-MOTION SEWING |
|
MONOGRAMMING ..................................................................... |
29 |
OUTLINE QUILTING .................................................................... |
29 |
DARNING ..................................................................................... |
29 |
SPECIALTY SEWING TECHNIQUES |
|
SEWING WITH TWO THREADS ................................................... |
30 |
TWIN NEEDLE SEWING ............................................................... |
30 |
Double stitched hem ............................................................ |
30 |
SEWING OVER DENSE SEAMS ..................................................... |
30 |
CARE AND MAINTENANCE |
|
NEEDLES ....................................................................................... |
31 |
CLEANING FEED TEETH AND SHUTTLE AREA ............................ |
31 |
CHANGING THE LIGHT BULB..................................................... |
31 |
OILING ......................................................................................... |
31 |
TROUBLESHOOTING ............................................................. |
32-33 |
3
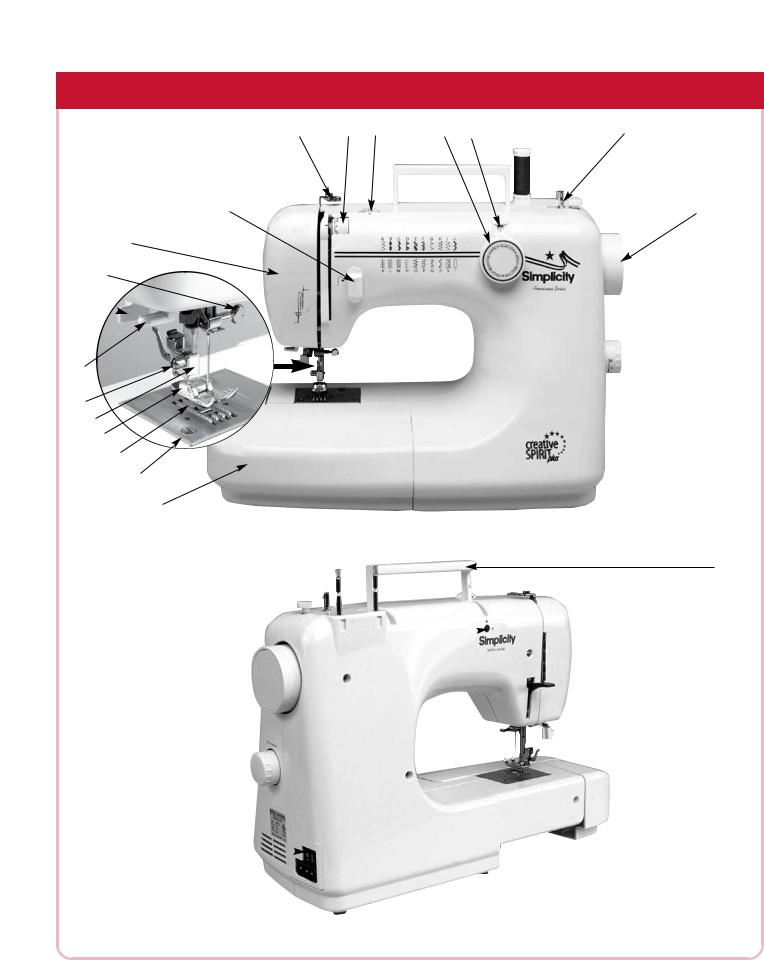
KNOW YOUR SIMPLICITY SEWING MACHINE
O |
O O |
OO |
||
3 |
4 |
5 |
6 |
7 |
FRONT VIEW
O2
O1
O19
O18
O17
O16
O15
O14
O13 O12
O11
O26
O25
O24
O23 
O8
O9
 O10
O10
O20
 O21
O21
 O22
O22
BACK VIEW
4

KNOW YOUR SIMPLICITY SEWING MACHINE
FRONT VIEW
O1 FACE COVER
Opens to provide access to the light bulb and the presser foot pressure regulator.
O2 REVERSE LEVER
Press this lever down and hold in place to sew in reverse.
O3 BOBBIN WINDING TENSION DISC
Used to wind a bobbin when threading the machine.
O4 THREAD TENSION DIAL
Controls the upper thread for proper stitch formation.
O5 STITCH WIDTH DIAL
Sets the width of a stitch.
O6 STITCH SELECTOR DIAL
Turn the dial in either direction to select a stitch.
O7 STITCH SELECTOR WINDOW
The letter of the selected stitch appears in this window.
O8 BOBBIN WINDER SPINDLE
Winds thread on a bobbin for lower threading.
O9 HAND WHEEL
Turn the hand wheel toward you to raise the needle up and down.
O10 STITCH LENGTH DIAL
Sets the length of the stitch.
O11 FREE-ARM COVER
Provides a flat surface for most sewing. Remove it to convert to free-arm sewing.
O12 NEEDLE PLATE
Supports the fabric while sewing. Has seam guide markings on right side.
O13 FEED TEETH
The metal teeth under the needle plate that push or feed the fabric through the machine.
O14 PRESSER FOOT
Holds the fabric firmly against the feed teeth for proper stitch formation.
O15 PRESSER FOOT HOLDER
Holds the snap-on presser foot in sewing position. The presser foot holder is removed when using screw-on feet.
O16 PRESSER FOOT THUMB SCREW
Secures the presser foot or presser foot holder to the presser foot bar.
O17 BUILT-IN NEEDLE THREADER
Threads the eye of the needle, front to back.
O18 BUTTONHOLE LEVER
Pull this lever down when using the one-step buttonhole foot.
O19 NEEDLE CLAMP SCREW
Loosen to remove a needle; tighten to secure a needle in position.
BACK VIEW
O20 CARRY HANDLE
Simply lift to carry the Simplicity sewing machine from one place to another.
O21 PRESSER FOOT LEVER
Lift to raise the presser foot and release the thread tension; lower to lower the presser foot and engage the thread tension.
O22 THREAD CUTTER ON NEEDLE BAR
Use to cut threads after completing a seam.
O23 POWER CORD RECEPTACLE
Connect the three-prong power plug here.
O24 MAIN SWITCH
Turns the main power and built-in sewing light on or off.
O25 STRETCH STITCH ADJUSTMENT SCREW
Adjust this screw if stretch stitches (color-coded red) are not forming properly.
O26 RETRACTABLE SPOOL PINS
Raise the spool pin to hold the spools of thread.
5

KNOW YOUR SIMPLICITY SEWING MACHINE
ACCESSORIES
The SIMPLICITY sewing machine comes with the presser feet and accessories you will need, conveniently stored in the free arm cover. This low shank machine uses snap-on or screw-on presser feet.
|
O |
|
|
2 |
O |
O |
|
3 |
|
|
|
1 |
|
|
|
O |
|
|
4 |
|
|
O |
O |
|
5 |
6 |
|
|
|
|
O |
9 |
O |
8 |
O |
|
||
7 |
|
|
O11
O10
O12
O13
O15
O14
O1
O2
O3
O4
O5
O6
O7
O8
O9
O10
O11
O12
O13
O14
O15
ALL-PURPOSE FOOT - snap-on
Use for most straight and zigzag seams. The needle opening is rectangular to accommodate the swing of the needle in a zigzag stitch. (The machine comes with this foot already attached.)
BUTTONHOLE FOOT - snap-on
Use for sewing made-to-measure buttonholes in one step.
BUTTON ATTACHING FOOT - snap-on
Holds flat buttons secure for machine stitching in place.
ZIPPER FOOT - screw-on
Adjusts to stitch close to either side of the zipper without catching the zipper coil.
BLIND HEM FOOT - snap-on
Features an adjustable guide for positioning and evenly stitching blind hems, topstitching, or edgestitching.
OPEN TOE SATIN STITCH FOOT - snap-on
Satin stitching glides comfortably under the sole of this foot and the open toe provides clear visibility of stitches.
OVERCASTING FOOT - snap-on
A pin on the foot holds fabric flat when overcasting fabric edges. The guide ensures perfect sewing alignment.
HEMMER FOOT - snap-on
Rolls fabric edge for narrow hemming.
EMBROIDERY FOOT - screw-on
Prevents fabric from “flagging” or popping when sewing free-motion techniques.
CORDING FOOT - snap-on
Grooves on the foot guide lightweight cords under the stitches for decorative applications.
PLASTIC BOBBINS (10)
Holds lower thread. These are “Class 15” bobbins.
SEAM RIPPER
Use to remove stitching and to open buttonholes.
SCREWDRIVER
Use to loosen and tighten the presser foot thumb screw, needle clamp screw, and needleplate screw.
FELT CUSHIONS (2)
Fits on the spool pin beneath the thread spool, stabilizing the spool and preventing the thread from wrapping around the spool pin.
NEEDLES
The most commonly used “universal” needles, size #11 and #14, are included. This machine uses 15x1 household sewing machine needles.
6
SIMPLICITY SEWING MACHINE SET-UP
The Simplicity sewing machine has many conversion options for a multitude of sewing applications.
on/off
Fig. 1 |
Fig. 2 |
Fig. 3 |
Fig. 4 |
Fig. 5 |
Fig. 6 |
Fig. 7 |
Fig. 8 |
Fig. 9 |
Fig. 10 |
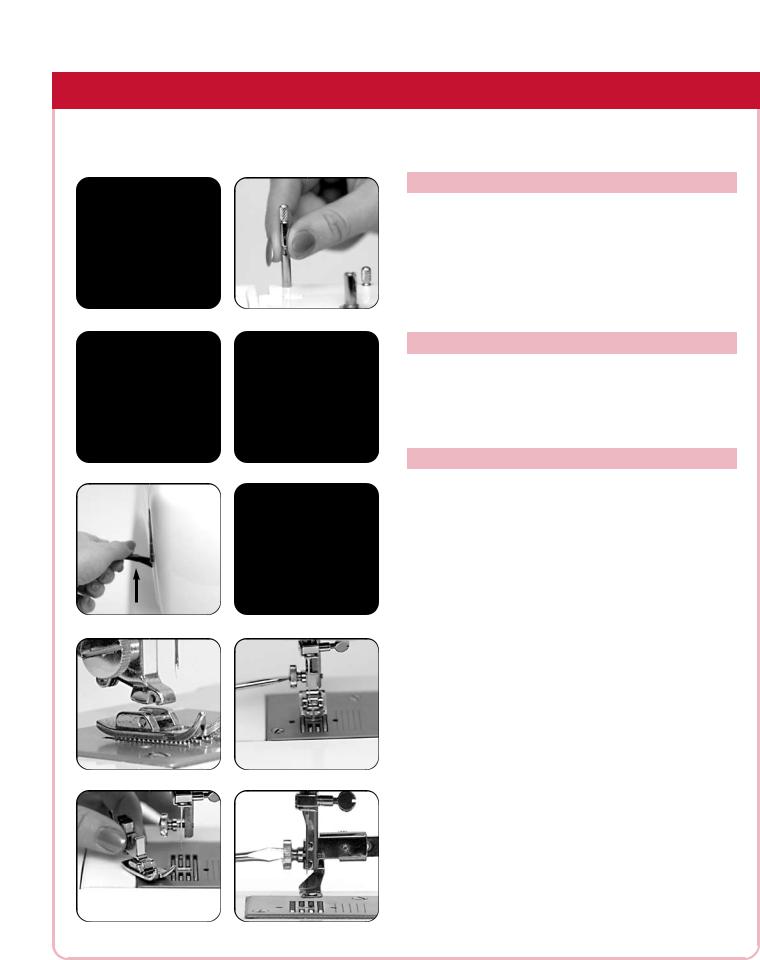
PREPARATION FOR SEWING
The power cord and foot control are one unit.
Insert the three-prong plug into the machine [Fig. 1]. Insert the power supply plug into a wall outlet. Turn the power switch to “on” [Fig.1].
Raise the left retractable thread spool pin for most sewing [Fig. 2]. Raise both the left and right retractable thread spool pins for twin needle or dual thread sewing.
ACCESSORY STORAGE
Accessories and presser feet are conveniently stored in the free-arm cover.
Grasp the free-arm cover with your left hand and gently pull up and toward you to open the storage tray [Fig.3].
CHANGING PRESSER FEET
Your Simplicity sewing machine comes with both snapon and screw-on presser feet. They're easy to change and each foot helps make a specific sewing task easier.
Removing and Attaching Snap-on Presser Feet
1.Turn the handwheel toward you [Fig. 4] to bring the needle to its highest position.
2.Raise the presser foot lever [Fig. 5].
3.Release the foot by pushing the presser foot release lever located behind the presser foot holder [Fig. 6].
4.Place the desired foot on the needle plate, aligning the metal bar on the presser foot with the groove of the presser foot holder [Fig. 7].
5.Lower the presser foot lever to snap the foot in place.
Removing and Attaching Screw-on Presser Feet
1.Loosen the thumb screw located on the left side of the presser foot on the presser foot bar [Fig. 8]. You may need to use the screwdriver. It is not necessary to remove the screw completely.
2.Remove the presser foot holder and foot [Fig. 9].
3.Attach the desired screw-on presser foot onto the presser bar.
4.Tighten the thumb screw with the screwdriver to hold the presser foot securely in place [Fig. 10].
Note: After attaching a presser foot, select the desired stitch and turn the hand-wheel toward you several times to make sure the needle clears the opening in the foot. Some presser feet require a straight or narrow width stitch only.
7
SIMPLICITY SEWING MACHINE SET-UP OPTIONS
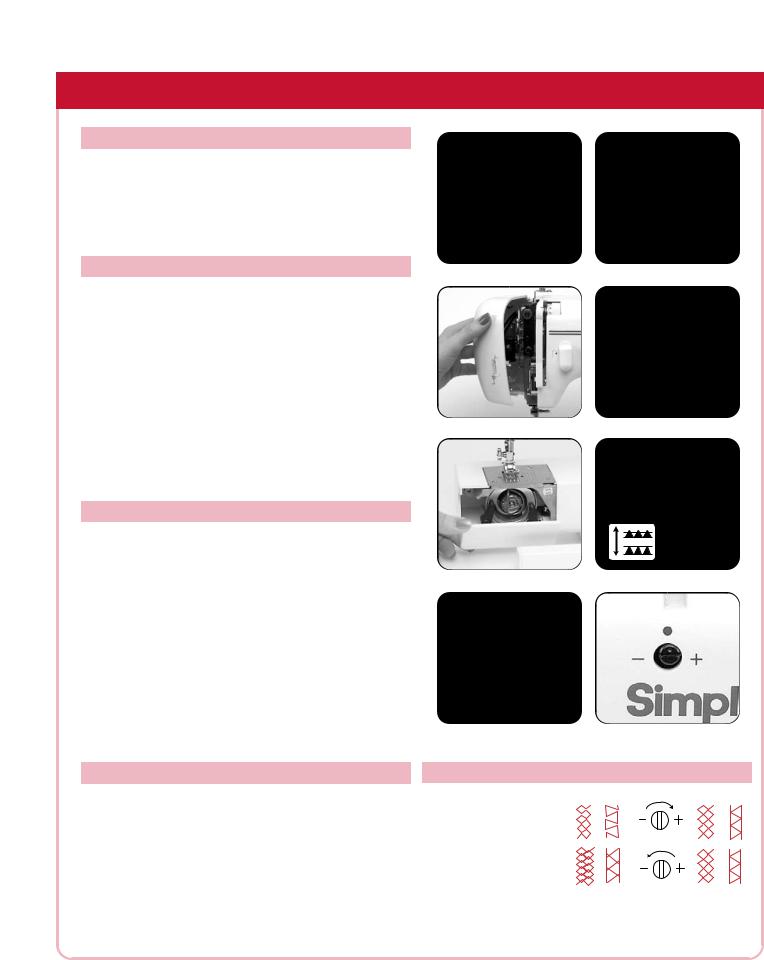
CONVERTING TO FREE-ARM SEWING
Free arm sewing makes it easy to sew hard to reach areas such as sleeves, pant legs, and necklines.
To convert to free arm sewing, grasp the left end of the freearm cover and pull it out to the left to remove [Fig. 1]. Slip the sleeve or pant leg on the free arm as shown and sew [Fig. 2].
PRESSER FOOT PRESSURE REGULATOR
The pressure on the presser foot can be adjusted to accommodate sewing on various weights of fabric to ensure proper fabric feeding and to eliminate skipped stitches.
1.Open the face cover [Fig. 3].
2.Rotate the dial until the desired pressure number is aligned with the indicator [Fig. 4]. Standard setting is 2. To increase pressure move to a higher number. To
decrease pressure move to a lower number. Set lever at 1 for heavyweight fabrics
Set lever at 2 for mediumweight fabrics Set lever at 3 for lightweight fabrics
Set the lever at 0 for darning and free-motion sewing.
DROP FEED
The drop feed mechanism lowers the feed teeth below the needle plate, eliminating the need to make stitch length adjustments. When the feed teeth are lowered, the fabric is guided by hand, allowing free movement of the fabric in any direction.
1.Turn the handwheel toward you to raise the needle to its highest position.
2.Open the face cover and set the presser foot pressure regulator to 0.
3.Remove the free arm cover and open the front bobbin cover [Fig. 5].
4.Push down on the drop feed lever and the feed teeth will drop below the needle plate [Fig. 6].
5.Push the lever up to return to normal sewing.
LEVELING BAR
Fig. 1 |
Fig. 2 |
Fig. 3 |
Fig. 4 |
Fig. 5 |
Fig. 6 |
Fig. 7 |
Fig. 8 |
STRETCH STITCH ADJUSTMENT
If the machine is not sitting on a level surface turn the leveling screw to stabilize the machine.
1.Remove the free arm cover to access the screw under the leveling bar [Fig. 7].
2.Turn the screw to the right to lower the machine. Turn the screw to the left to elevate the machine.
When stretch stitches (color-coded red) are not forming properly, turn the adjustment screw with a flat blade screwdriver [Fig. 8].
8

SIMPLICITY CUSTOM STITCH SELECTION
Each built-in stitch can be customized by making stitch length and stitch width adjustments. The stitches are color-coded to correspond with the stitch length and width settings. Select a stitch, then set the stitch length and width dials within the color range. These color ranges are guidelines and may vary for some sewing techniques.
Fig. 1
Fig. 2 |
Fig. 3 |
1⁄2” 5⁄8” 3⁄4” 7⁄8” 1”
Fig. 4
Fig. 5
STITCH SELECTION
STITCH SELECTOR DIAL [Fig. 1]
To select a stitch, turn the stitch selector dial until the letter that corresponds with the desired stitch shows in the window.
STITCH WIDTH DIAL [Fig. 2]
The stitch width dial is numbered 0 - 5, representing the various stitch widths in millimeters. The higher the number, the wider the stitch. The yellow color-coding between 3 and 5 represent the width range for making buttonholes.
To select a stitch width, turn the dial until the desired width setting is aligned with the indicator dot.
STITCH LENGTH DIAL [Fig. 3]
The stitch length dial is numbered 0 - 4 representing the various stitch lengths in millimeters. The higher the number, the longer the stitch.
To select a stitch length turn the dial until the desired length setting is aligned with the indicator dot.
When set at 0 the fabric will not feed under the presser foot.
NEEDLE PLATE SEAM GUIDES [Fig. 4]
The five seam guide markings on the right side of the needle plate are set at 1/8” intervals. The first mark is 1/2" from the needle; the second, 5/8” and so on. Align the fabric edge at a seam guide marking for a consistent seam width. The standard seam allowance width is 5/8”.
REVERSE SEWING LEVER [Fig. 5]
Use the reverse sewing lever to secure the beginning and ends of seams.
With the foot control depressed, push and hold the reverse lever down to sew in reverse. Release the lever to return to forward sewing.
9

SIMPLICITY CUSTOM STITCH SELECTION
|
STITCH |
PATTERN |
STITCH |
STITCH |
PRESSER |
DROP |
|
WIDTH |
LENGTH |
FOOT |
FEED |
||
A |
Straight |
|
0 |
1-4 |
All feet |
Up |
A |
Zigzag |
|
1-5 |
1-4 |
All-purpose |
Up |
B C D E |
Decorative satin |
|
3-5 |
.5-1 |
Open toe |
Up |
F |
Blindhem |
|
3-5 |
4 |
Blind hem |
Up |
G |
Shell stitch |
|
3-5 |
1-4 |
All-purpose |
Up |
H |
Double Action |
|
5 |
4 |
All-purpose |
Up |
I |
3-step zigzag |
|
3-5 |
2-4 |
Overcast |
Up |
J |
Multi-cord |
|
5 |
.5-2 |
Overcast |
Up |
K |
Feather |
|
3-5 |
4 |
Open toe |
Up |
L |
Honeycomb |
|
3-5 |
4 |
Open toe |
Up |
M |
Overlock |
|
3-5 |
4 |
Overcast |
Up |
N |
Slant overcast |
|
3-5 |
4 |
Open toe |
Up |
O |
Arrowhead |
|
3-5 |
4 |
Open toe |
Up |
P Q R |
Decorative |
|
3-5 |
4 |
Open toe |
Up |
S |
Triple stretch straight |
|
0 |
4 |
All-purpose |
Up |
S |
Rick rack |
|
1-5 |
4 |
All-purpose |
Up |
T |
Buttonhole |
|
3-5 |
.5-1 |
Buttonhole |
Up |
TENSION ADJUSTMENTS
The upper thread tension dial controls the amount of needle thread delivered to the bobbin case. Most thread tension adjustments should be made using the upper thread tension dial. In some cases, the lower thread tension on the bobbin case may need to be adjusted for specialty sewing techniques.
UPPER THREAD TENSION
The numbers 0-9 on the dial represent upper thread tension settings. The higher the number, the stronger the upper tension. Tension settings between 3-5 are most commonly used [Fig. 1]. In a balanced stitch, needle thread and bobbin thread interlock in the center of the two fabric layers [Fig. 2]. If needed, adjust an unbalanced stitch by turning the dial until the new setting is aligned with the indicator line on the machine [Fig. 1].
If the fabric gathers or the threads break, the upper thread tension is too tight [Fig. 3]. Loosen the tension by moving the dial to a lower number.
If loops form on the under side of the seam then the upper tension is too loose [Fig. 4]. Tighten the upper tension by turning the dial to a higher number.
LOWER THREAD TENSION
The lower thread tension can be adjusted by turning the screw on the bobbin case slightly to the right (clockwise) to increase the tension [Fig. 5]. Turn the tension slightly to the left (counterclockwise) to decrease the tension [Fig. 6].
Fig. 1 |
Fig. 2 |
Upper thread too tight |
Upper thread too loose |
Fig. 3 |
Fig. 4 |
Increase tension |
Decrease tension |
Fig. 5 |
Fig. 6 |
10
 Loading...