

Page 1
Sewing Machine Model SA200
INSTRUCTION MANUAL
& REFERENCE GUIDE
Simplicity S e
wing Machine Education Helpline: 636-651-0030
Page 2

IMPORTANT SAFETY INSTRUCTIONS
When using the sewing machine, basic safety precautions should always be followed, including
the following:
READ ALL INSTRUCTIONS BEFORE USING MACHINE
DANGER - To reduce risk of electric shock:
1. The sewing machine should never be left unattended w
2. Always unplug this sewing machine from the electrical outlet immediately after using and
before cleaning.
3. Always unplug before changing the light bulb. Replace bulb with same type rated 15 watts.
WARNING - To reduce the risk of burns, fire, electric shock, or injury to persons:
1. Do not allow this machine to be used as a toy. Close attention is necessary when the
sewing machine is used by or near children.
2. Use this sewing machine only for its intended use as described in this manual. Use only
attachments recommended by the manufacturer as contained in this manual.
3. Never operate this sewing machine if it has a damaged cord or plug, if it is not working
properly, if it has been dropped or damaged, or dropped into water. Return the sewing
machine to the nearest authorized dealer or service center for examination, repair, and
electrical or mechanical adjustment.
4. Never operate the sewing machine with any air openings blocked. Keep the ventilation
openings of the sewing machine and foot controller free from the accumulation of lint, dust
and loose cloth.
5. Never drop or insert any object into any openings.
6. Do not use this machine outdoors.
7. Do not operate this machine where aerosol spray products are being used or where oxygen
is being administered.
To disconnect, turn all controls to the off position then remove the plug from the outlet.
8.
Do not unplug by pulling on the cord. To unplug, grasp the plug, not the cord.
9.
Keep fingers away from all moving parts. Special care is required around the sewing
10.
hine needle.
mac
Always use the proper needle plate. The wrong plate can cause the needle to break.
11.
Do not use a bent needle.
12.
Do not pull or push the fabric while stitching. It may deflect the needle causing it to break.
13.
Unplug the sewing machine when making any adjustments in the needle area, such as
14.
threading the needle, c
Always unplug the sewing machine from the electrical outlet when removing covers,
15.
lubricating, or w
instruction manual.
hanging the needle, threading the bobbin, or changing the presser foot.
hen making any other user servicing adjustments mentioned in this
hen plugged in.
VE THESE INSTRUCTIONS
SA
his sewing machine is intended for household use.
T
1
Page 3

FORWARD
WELCOME TO THE CREATIVE WORLD OF SEWING WITH SIMPLICITY!
Congr
new to sewing, a lifelong sewer, or returning to sewing, we at Simplicity Sewing
Machines are dedicated to providing y
tomer service to ensure you many pleasurable hours of sewing satisfaction and success.
Before starting a sewing project, here are a few recommendations to help you become
acquainted with your new machine:
atulations on being the owner of a new Simplicity sewing machine. Whether you’re
ou with simply the BEST features, quality, and cus-
• Read through the instruction book and become familiar with the sewing
terms.
• Review the machine, using the instruction book as a guide, to identify each
part and function of the machine.
• Practice sewing on a variety of fabric scraps using various stitches and stitch
settings.
• Make a stitch sampler of your favorite techniques in the instruction book,
marking your machine setting preferences for future reference.
• • •
Thank you for choosing a Simplicity sewing machine.
If you have any questions or comments, give us a call – we’ll be glad to help you!
• • •
Simplicity Sewing Machine Education Department
636-651-0030
2
Page 4

TABLE OF CONTENTS
KNOW YOUR SIMPLICITY SEWING MACHINE
PRINCIPAL PARTS............................................................4-5
ACCESSORIES .....................................................................
SIMPLICITY SEWING MACHINE SET-UP
PREPARATION FOR SEWING .............................................7
CHANGING PRESSER FEET.................................................7
Snap-on feet.................................................................7
Screw-on feet...............................................................7
ATTACHING SEAM GUIDE .................................................7
FREE-ARM SEWING ............................................................8
ACCESSORY STORAGE .......................................................8
PRESSER FOOT PRESSURE REGULATOR............................8
DROP FEED ........................................................................8
LEVELING BAR....................................................................8
OM STITCH SELECTION
CUST
STITCH SELECTION ............................................................9
Stitch width selector dial..............................................9
Stitch length dial ..........................................................9
Needle plate seam guides............................................9
Reverse sewing lever....................................................9
STITCH SELECTION TABLE ...............................................10
TENSION ADJUSTMENTS .................................................10
Upper thread tension dial ..........................................10
Lower thread tension .................................................10
THREADING YOUR MACHINE
WINDING THE BOBBIN...................................................11
LOWER THREADING........................................................12
Removing the bobbin.................................................12
Inserting new bobbin .................................................12
Placing bobbin case in shuttle ...................................12
UPPER THREADING..........................................................13
Raising the bobbin thread..........................................13
SEWING
SEWING TIPS ....................................................................14
6
BEGINNING TO SEW........................................................14
NEEDLE, THREAD & F
ABRIC GUIDE ................................15
BUILT-IN STITCHES
STRAIGHT STITCH............................................................16
Seaming.....................................................................16
Basting.......................................................................16
Topstitching and edgestitching ...................................16
Gathering...................................................................17
Zipper insertion .........................................................17
Piping insertion..........................................................17
ZIGZAG STITCH ...............................................................18
Overedging................................................................18
Bartacking..................................................................18
Satin stitch for appliqué .............................................18
Attaching buttons.......................................................19
Seaming knits.............................................................19
BUTTONHOLE SEWING...................................................20
FREE-MOTION SEWING
FREE-MOTION MONOGRAMMING.................................21
FREE-MO
DARNING.........................................................................21
TION QUILTING................................................21
SPECIALTY SEWING TECHNIQUES
CHANNEL QUIL
HEMMING JEANS
SEWING WITH
TING .......................................................22
.............................................................22
TWO THREADS........................................22
CARE AND MAINTENANCE
NEEDLES
CLEANING FEED
CHANGING
OILING
TROUBLESHOO
...........................................................................23
TEETH AND SHUTTLE AREA.................23
THE LIGHT BULB .........................................23
.............................................................................23
TING .................................................24-25
3
Page 5
KNOW YOUR SIMPLICITY SEWING MACHINE
O
13
O
12
O
O
14
11
O
15
O
10
1
O
9
O
FRONT VIEW
2
O
3
O
4
O
5
O
6
O
7
O
8
O
20
O
19
O
18
O
CK VIEW
BA
16
O
17
O
4
Page 6

KNOW YOUR SIMPLICITY SEWING MACHINE
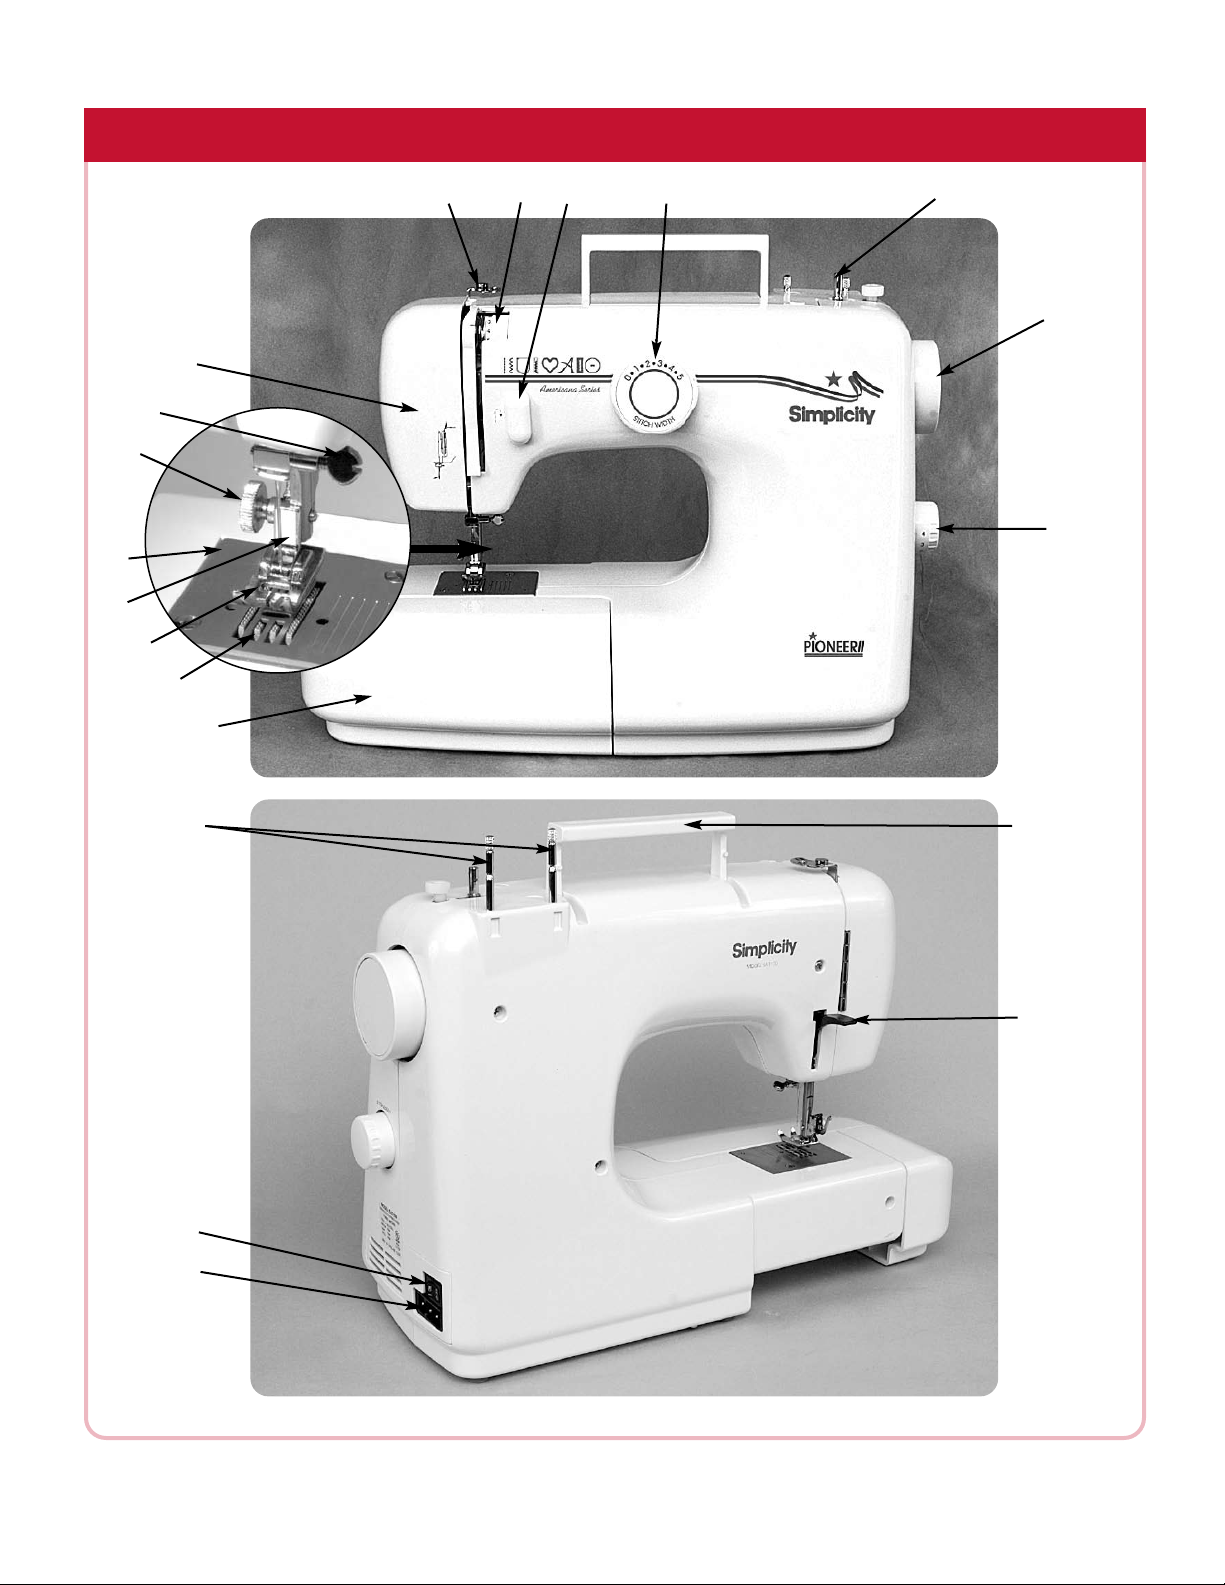
FRONT VIEW
1 FACE COVER
O
Opens to provide access to the light bulb and the
presser foot pressure regulator.
12 PRESSER FOOT HOLDER
O
Holds the snap-on presser foot in sewing position.
The presser foot holder is removed when using
screw-on feet.
2 BOBBIN WINDING TENSION DISC
O
Used when threading machine for bobbin winding.
3 THREAD TENSION DIAL
O
Controls the upper thread tension for proper stitch
formation.
4 REVERSE LEVER
O
Press this lever down and hold in place to sew in
reverse.
5 STITCH WIDTH SELECTOR DIAL
O
Sets the width of a stitch.
6 BOBBIN WINDER SPINDLE
O
Winds thread on a bobbin for lower threading.
7 HAND WHEEL
O
Turn the hand wheel toward you to raise the
needle up and down.
8 STITCH LENGTH DIAL
O
Sets the length of the stitch.
13 NEEDLE PLATE
O
Supports the fabric while sewing. Has seam guide
markings on right side.
14 PRESSER FOOT THUMB SCREW
O
Secures the presser foot or presser foot holder to
the presser foot bar.
15 NEEDLE CLAMP SCREW
O
Loosen to remove a needle; tighten to secure a
needle in position.
BACK VIEW
16 CARRY HANDLE
O
Simply lift to carry the Simplicity sewing
machine from one place to another
17 PRESSER FOOT LEVER
O
Lift to raise the presser foot and release the thread
tension; lower to lower the presser foot and engage
the thread tension.
.
9 FREE-ARM COVER/ACCESSORY STORAGE
O
Provides a flat surface for most sewing. Remove
it to convert to free-arm sewing.
10 FEED TEETH (FEED DOGS)
O
The metal teeth under the needle plate that push
or feed the fabric through the machine.
11 PRESSER FOOT
O
Holds the fabric firmly against the feed teeth for
proper feeding.
18 POWER CORD RECEPTACLE
O
Connect the three-prong power plug here.
19 MAIN SWITCH
O
Turns the main power and built-in sewing light
on or off.
20 RETRACTABLE SPOOL PINS
O
Raise the spool pins to hold the spools of thread.
5
Page 7

KNOW YOUR SIMPLICITY SEWING MACHINE
ACCESSORIES
The SIMPLICITY sewing machine comes with the presser feet and accessories you will need,
veniently stored in the free arm cover. This low shank machine uses snap-on or screw-on presser feet.
con
1
ALL-PURPOSE FOOT - snap-on
O
1
O
4
O
2
O
5
O
3
O
Use for most straight and zigzag seams. The needle
opening is rectangular to accommodate the swing of the
needle in a zigzag stitch.
2
BUTTON ATTACHING FOOT - snap-on
O
Holds flat buttons secure for machine stitching in place.
3
OPEN TOE SATIN STITCH FOOT - snap-on
O
Satin stitching glides comfortably under the sole of this
foot and the open toe provides clear visibility of stitches.
4
ZIPPER FOOT - screw-on
O
Adjusts to stitch close to either side of the zipper without
catching the zipper coil.
7
O
O
5
SEAM GUIDE
O
Use to sew evenly spaced, parallel rows of stitching.
6
PLASTIC BOBBINS (10)
O
Hold lo
6
O
8
10
O
9
O
7
SEAM RIPPER
O
Use to remove stitching and to open buttonholes.
8
SCREWDRIVER
O
Use to loosen and tighten the presser foot thumb screw,
needle clamp screw, and needleplate screw.
9
FELT CUSHIONS (2)
O
Fit on the spool pin beneath the thread spool, stabilizing
the spool and preventing the thread from wrapping
around the spool pin.
10
NEEDLES (5)
O
The most commonly used “universal” needles, size #11 and
#14, are included. This machine uses 15x1 household
sewing machine needles.
wer thread. These are “Class 15” bobbins.
6
Page 8
SIMPLICITY SEWING MACHINE SET-UP
The Simplicity sewing machine has many conversion options for a multitude of sewing
applications.
Fig. 1
Fig. 3
Fig. 5
Fig. 7
on/off
Fig. 2
g. 4
Fi
Fig. 6
Fig. 8
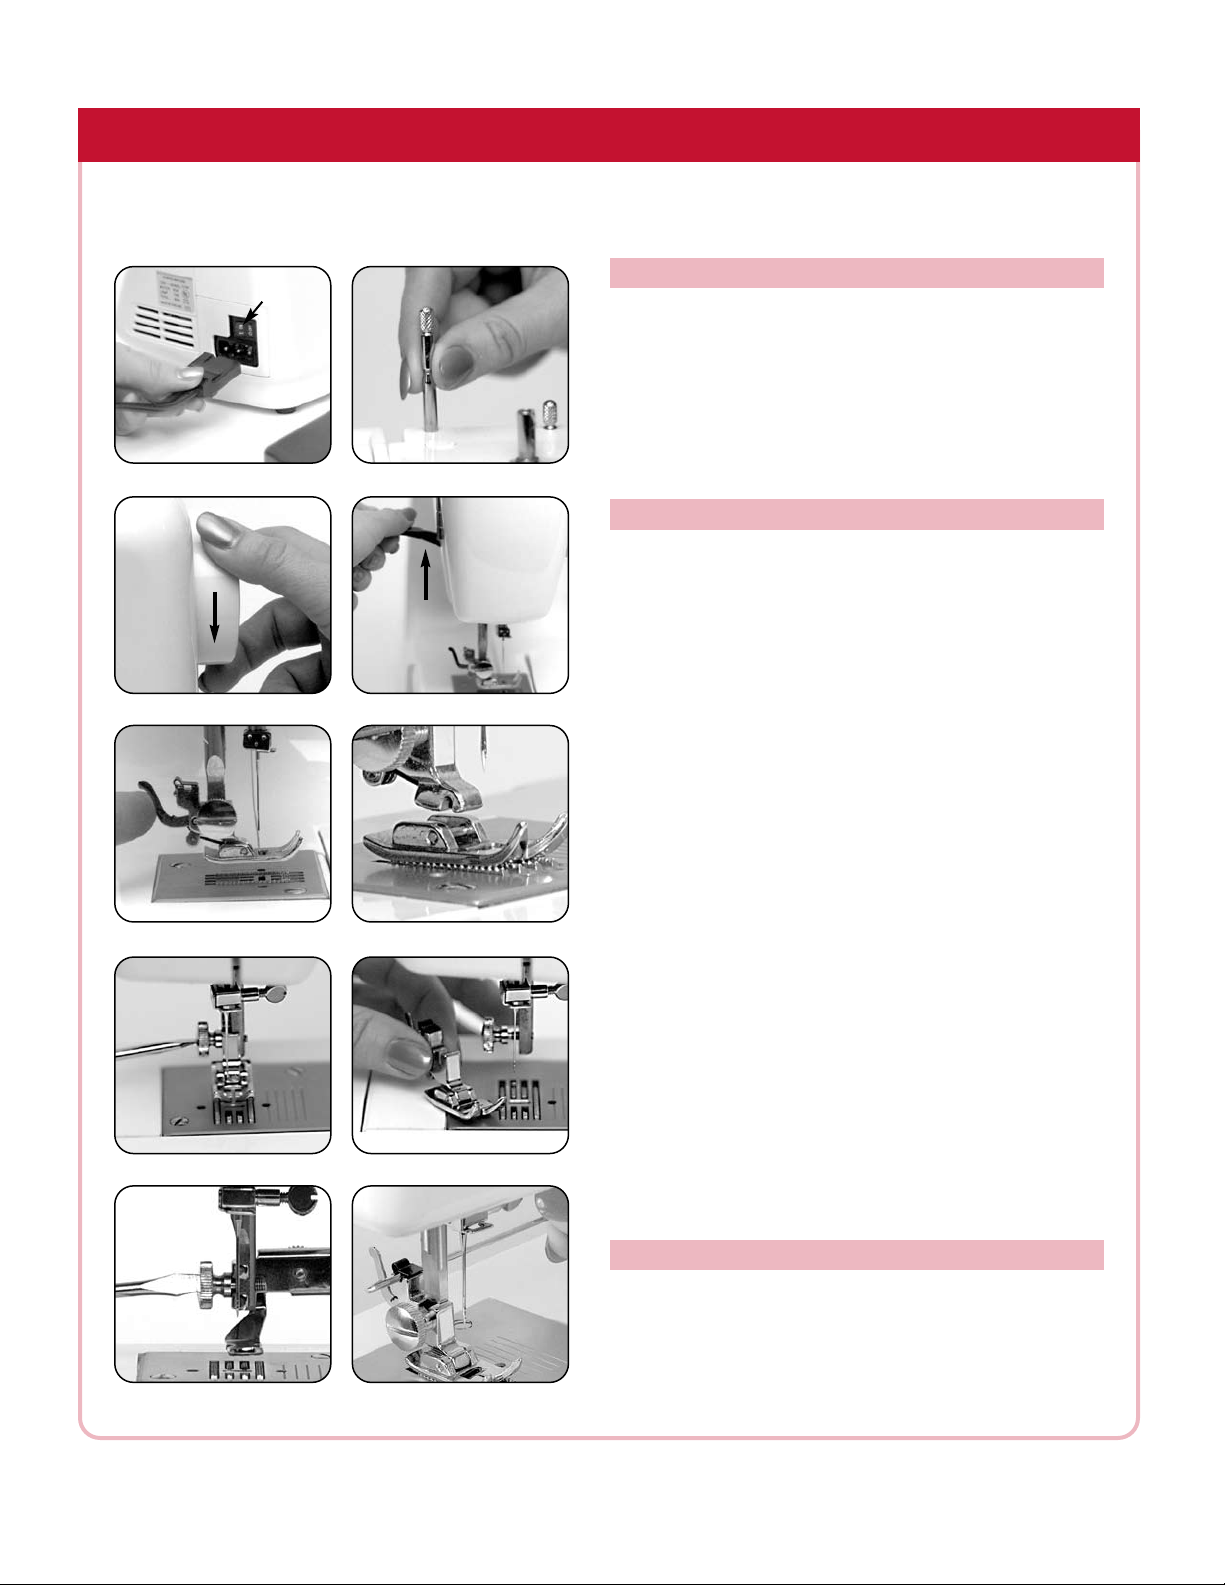
PREPARATION FOR SEWING
wer cord and foot control are one unit.
The po
Insert the three-prong plug into the machine [Fig. 1].
Insert the power supply plug into a wall outlet. Turn the
power switch to “on” [Fig.1].
Raise the left retractable thread spool pin for most sewing
[Fig. 2]. Raise both the left and right retractable thread
spool pins for twin needle or dual thread sewing.
CHANGING PRESSER FEET
Your Simplicity sewing machine comes with both snapon and screw-on presser feet. They're easy to change
and each foot helps make a specific sewing task easier.
Removing and Attaching Snap-on Presser Feet
1. Turn the handwheel toward you [Fig. 3] to bring the
needle to its highest position.
2. Raise the presser foot lever [Fig. 4].
3. Release the foot by pushing the presser foot release
lever located behind the presser foot holder [Fig. 5].
4. Place the desired foot on the needle plate, aligning
the metal bar on the presser foot with the groo
the presser foot holder [Fig. 6].
5.
Lower the presser foot lever to snap the foot in place.
Removing and Attaching Screw-on Presser Feet
1. Loosen the thumb screw located on the left side of the
presser foot on the presser foot bar [Fig. 7]. You may
need to use the screwdriver. It is not necessary to
remove
Remove the presser foot holder and foot [Fig. 8].
3.
4. Attach the desired screw-on presser foot onto the
presser bar.
Tighten the thumb screw with the screwdriver to hold
5.
the presser foot securely in place [Fig. 9].
Note: After attaching a presser foot, select the desired
stitc
make sure the needle clears the opening in the foot. Some
presser feet require a straight or narrow width stitch only.
the screw all the way.
h and turn the hand-wheel toward you several times to
ve of
Fig. 9
ATTACHING SEAM GUIDE
Insert the guide, from right to left, through the small
hole near the back of the presser foot holder [Fig. 10].
Fig. 10
7
Page 9
SIMPLICITY SEWING MACHINE SET-UP OPTIONS
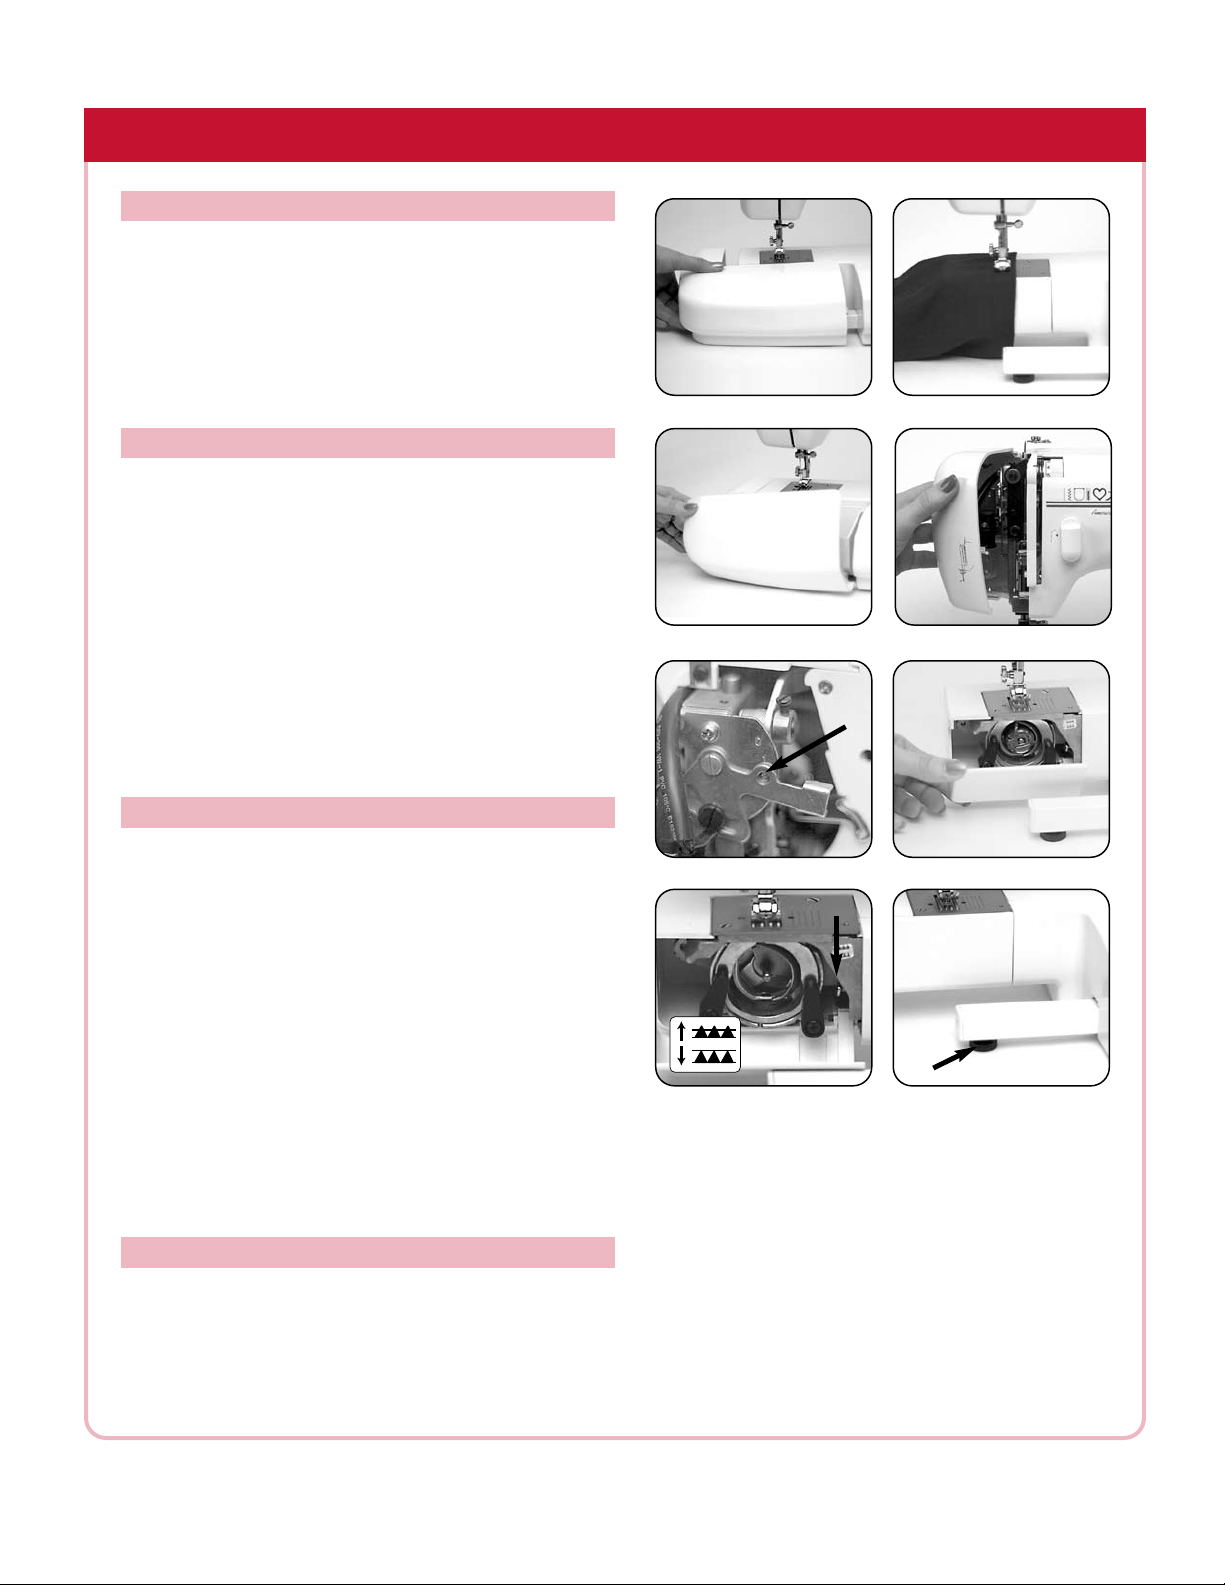
FREE-ARM SEWING/ACCESSORY STORAGE
Free arm sewing makes it easy to sew hard-to-reach
areas such as sleeves, pant legs, and necklines.
To convert to free arm sewing, grasp the left end of the
free-arm cover and pull it out to the left to remove
Slip the sleeve or pant leg on the free arm as sho
sew [Fig. 2]. Accessories and presser feet are conv
stored in the free-arm cover [Fig.3].
PRESSER FOOT PRESSURE REGULATOR
The pressure on the presser foot can be adjusted for sewing
on various weights of fabric to ensure proper fabric feeding
and eliminate skipped stitches.
1. Open the face cover [Fig. 4].
2. Move the lever until the desired number is displayed in
the opening of the lever [Fig. 5]. Standard setting is 2
for most sewing. To increase pressure, move to a higher
number. To decrease pressure, move to a lower number.
Set lever at 1 for heavyweight fabrics.
Set lever at 2 for mediumweight fabrics.
Set lever at 3 for lightweight fabrics.
Set lever at 0 for darning and free-motion sewing.
[Fig. 1].
wn and
eniently
Fig. 1
Fig. 3
Fig. 2
Fig. 4
DROP FEED
The drop feed mechanism lowers the feed teeth below the
needleplate for darning, free-motion
gramming and free-motion quilting. This eliminates the
need to make stitch length adjustments. When the feed
teeth are lowered, the fabric is guided by hand, allowing
free movement of the fabric in any direction.
1. Turn the handwheel toward you to raise the needle to
its highest position.
2. Open the face cover and set the presser foot pressure
regulator to 0.
Remove the free arm cover and open the front bobbin
3.
cover [Fig. 6].
Push down on the drop feed lever and the feed teeth
4.
will drop below the needle plate [Fig. 7].
5. Push the lever up to return to normal sewing.
embroidery, mono-
LEVELING BAR
If the machine is not sitting on a level surface, turn the
leveling screw to stabilize the machine.
Remove the free arm to access the screw under the
1.
leveling bar [Fig. 8].
2. Turn the screw to the right to lower the machine.
Turn the screw to the left to elevate the machine.
Fig. 5
Fig. 7
Fig. 6
Fig. 8
8
Page 10

SIMPLICITY CUSTOM STITCH SELECTION
Each built-in stitch can be customized for specific sewing needs by making stitch length and
h width adjustments. The machine is color-coded for easy stitch length and width selection.
stitc
STITCH SELECTION
WIDTH SELECTOR DIAL [Fig. 1]
Fig. 1
STITCH
The stitch width selector dial is numbered 0 - 5, representing the various stitch widths in millimeters. The
higher the number, the wider the stitch.
To select a stitch width turn the dial until the desired
width setting is aligned with the indicator dot.
STITCH LENGTH DIAL [Fig. 2]
The stitch length dial is numbered 0 - 4 representing the
various stitch lengths in millimeters. The higher the
number, the longer the stitch.
To select a stitch length turn the dial until the desired
length setting is aligned with the indicator dot.
When set at 0 the fabric will not feed under the foot.
Fig. 4
g. 2
Fi
Fig. 5
NEEDLE PLATE SEAM GUIDES [Fig. 3]
The five seam guide markings on the right side of the
1
”
5
”
3
”
7
”
2
8
⁄
⁄
”
4
⁄
8
⁄
1
needle plate are set at 1/8” intervals. The first mark is
1/2" from the needle; the second, 5/8” and so on. Align
the fabric edge at a seam guide marking for a consistent
seam width. The standard seam allowance width is 5/8”.
REVERSE SEWING LEVER [Fig. 4]
Use the reverse sewing lever to secure the beginning
and ends of seams.
With the foot control depressed, push and hold the
reverse lever down to sew in reverse. Release the lever
to return to forward sewing.
9
Page 11

SIMPLICITY BASIC STITCH SELECTION
STITCH
STITCH WIDTH
STITCH LENGTH
Straight Zigzag Bartack Zipper Appliqué Monogram Buttonhole Button
0 0.5-5 4-5 0 3-5 4-5 2-5 4-5
1-4 1-4 n/a 3 1 n/a 0.5-1 n/a
All-Purpose
PRESSER FOOT
Any
Open Toe
All-Purpose Zipper Open Toe None Open Toe
DROP FEED
Up Up Down Up Up Down Up Down
TENSION ADJUSTMENTS
The upper thread tension dial controls the amount of needle
thread delivered to the bobbin case. Most thread tension
adjustments should be made using the upper thread
tension dial. In some cases, the lower thread tension on
the bobbin case may need to be adjusted for specialty
sewing techniques.
UPPER THREAD TENSION
The numbers 0-9 on the dial represent upper thread
tension settings. The higher the number, the stronger the
upper tension.
commonly used [Fig. 1]. In a balanced stitch, needle
thread and bobbin thread interlock in the center of the
two fabric layers [Fig. 2]. If needed, adjust an unbalanced
stitch by turning the dial until the new setting is aligned
with the indicator line on the machine [Fig. 1].
If the fabric gathers or the threads break, the upper thread
tension is too tight [Fig. 3]. Loosen the tension by moving
the dial to a lower number.
If loops form on the under side of the seam then the
upper tension is too loose [Fig. 4]. Tighten the upper
tension by turning the dial to a higher number.
Tension settings between 3-5 are most
Fig. 1
Upper thread too tight
Fig. 3
ig. 2
F
Upper thread too loose
Fig. 4
Button
Attaching
LOWER THREAD TENSION
The lower thread tension can be adjusted by turning the
screw on the bobbin case slightly to the right (clockwise)
to increase the tension [Fig. 5]. Turn the tension slightly to
the left (counterclockwise) to decrease the tension [Fig. 6].
10
Increase tension
Fig. 5
Decrease tension
Fig. 6
Page 12

THREADING YOUR SIMPLICITY SEWING MACHINE
For best sewing results, use a top quality, long staple, polyester or poly/cotton thread for all-purpose
sewing. Skipped stitc
thread. Use the same type of thread for both upper and lower threading for a consistent stitch quality.
Fig. 2
hes, broken threads, and poor stitch quality are often a result of using old or inferior
WINDING THE BOBBIN
To release the clutch for bobbin winding, pull out the
1.
handwheel until it clicks [Fig. 1].
2. Place a spool of thread on the spool pin and bring
the thread around the bobbin winding tension disc as
shown [Fig. 2].
3. Place the thread end through a small hole in the bobbin
Fig. 1
from the inside to the outside [Fig. 3].
4. Place the bobbin on the bobbinwinder spindle
matching the small groove on the bobbin with the
spring on the spindle [Fig. 4]. Push the spindle to
the right [Fig. 5].
5. Hold the end of the thread [Fig. 6] and depress the
foot control [Fig. 7]. When the thread has wound on
the bobbin several times, stop the machine and clip
the thread end close to the hole in the bobbin [Fig. 8].
Depress the foot control again to continue winding the
bobbin.
6. When the bobbin is fully wound, stop the machine.
Push the bobbinwinder spindle to the left, clip the
thread and remove
Reengage the clutch by pushing the handwheel until
7.
it clicks into place [Fig. 10].
the bobbin [Fig. 9].
Fig. 3
Fig. 5
Fig. 7
Fig. 4
Fig. 6
g. 8
Fi
Fig. 9
Fig. 10
11
Page 13

THREADING YOUR SIMPLICITY SEWING MACHINE
LOWER THREADING
Removing the bobbin from the bobbin case:
1. Turn the handwheel toward you to raise the needle to
its highest position.
2. Remove the free-arm cov
er [Fig. 1].
cov
3. Open the hinged latch of the bobbin case and pull
the bobbin case out of the machine [Fig. 2].
4. Release the latch to remove the bobbin [Fig. 3].
Inserting a new bobbin:
1. Hold the bobbin case in your left hand. Hold the filled
bobbin in your right hand [Fig. 4]. Unwind about six
inches of thread, making certain the thread unwinds
over the top of the bobbin as illustrated. Place the
bobbin in the bobbin case.
2. With the bobbin in the bobbin case, pull the thread
into the slot on the edge of the bobbin case [Fig. 5].
3. Pull the thread under the tension spring and into the
thread outlet [Fig. 6]. Leave about six inches of
thread extending from the bobbin case.
Note: It’s important to be sure the bobbin is turning
CLOCKWISE [Fig. 7] as you pull thread from the bobbin
case. If it is turning counterclockwise, remove the bobbin
from the case, turn the bobbin over, place it back into the
case, and rethread the bobbin case.
er and open the bobbin
Fig. 1
Fig. 3
Fig. 2
Fig. 4
Placing the bobbin case into the shuttle:
1. Open the latch of the bobbin case and hold it with the
long finger pointing upward [Fig. 8]. Place the bobbin
case over the pin of the shuttle aligning the long finger
with the notch at the top of the shuttle [Fig. 9].
2. Release the latch and push the bobbin case firmly
into place [Fig. 10]. Close the bobbin cover.
Note: Be sure the bobbin thread (about six inches) falls
loose from the bobbin case and is not caught or tangled
in any way.
Fig. 5
Fig. 7
Fig. 9
Fig. 6
C L O C K W I S E
Fig. 8
Fig. 10
12
Page 14
THREADING YOUR SIMPLICITY SEWING MACHINE
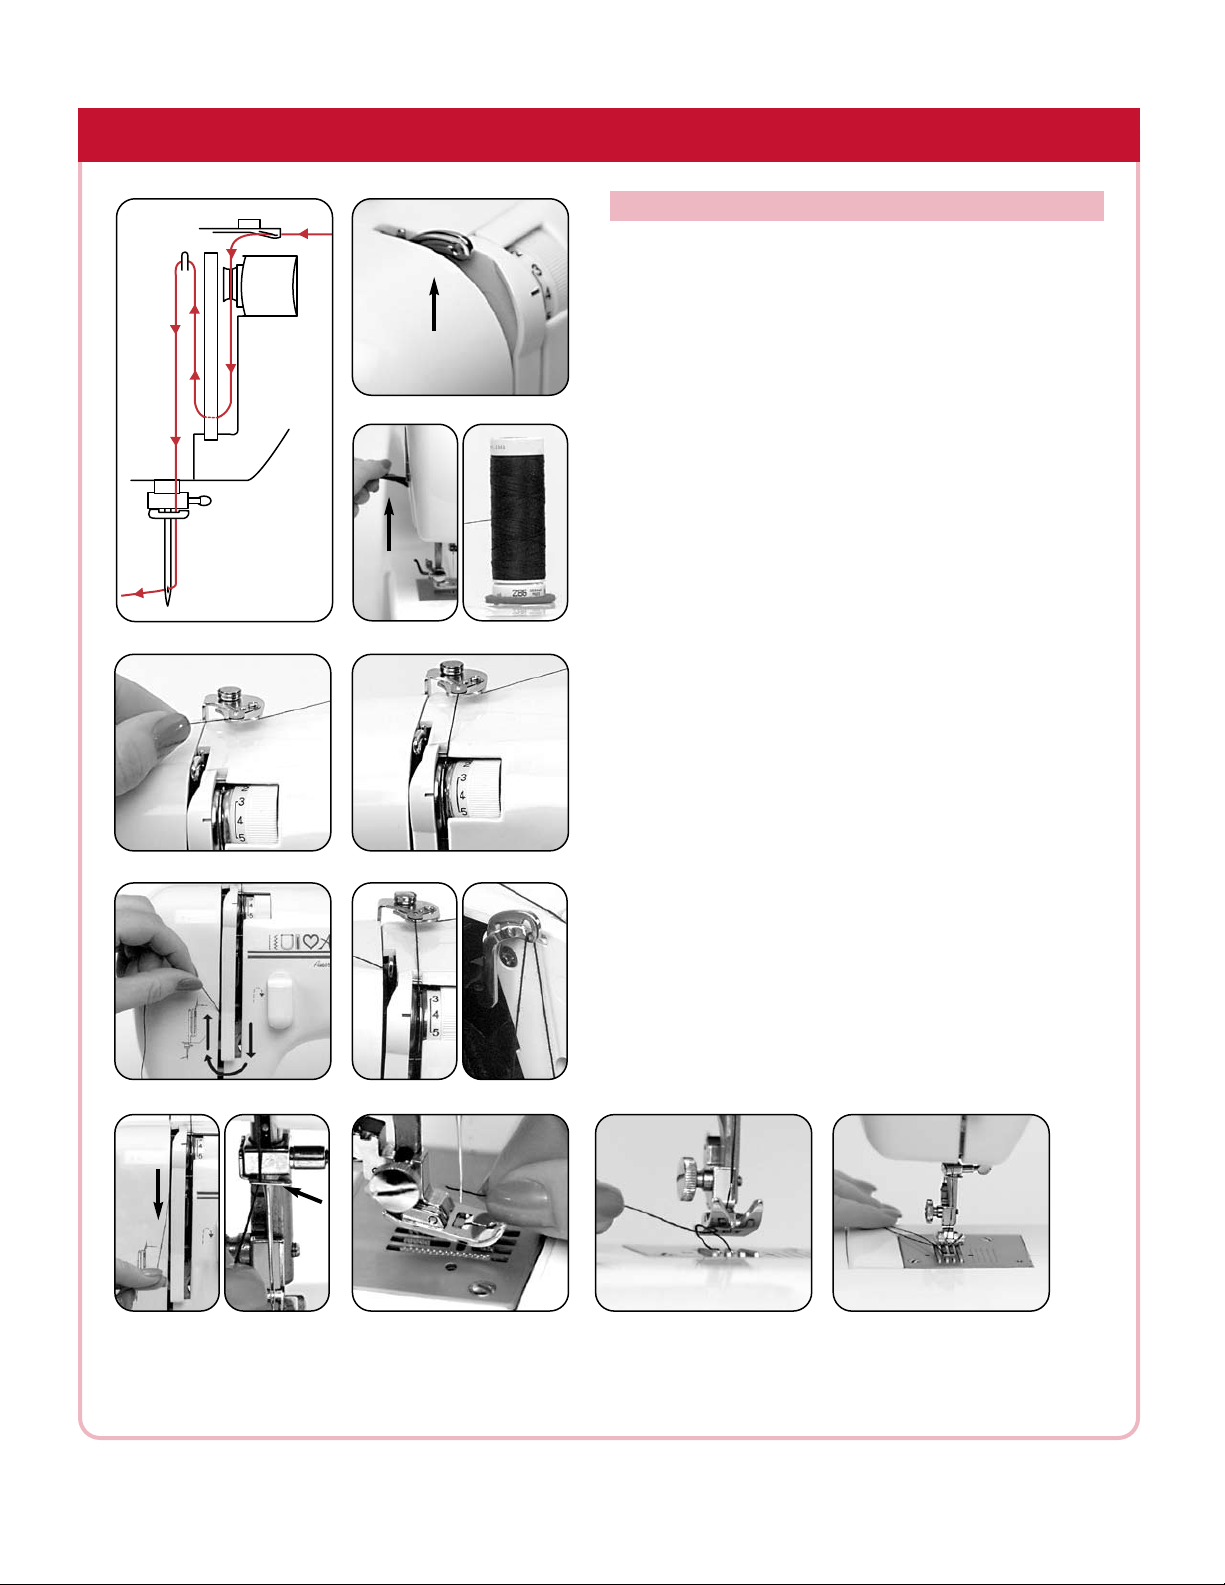
UPPER THREADING
1. Turn the handwheel toward you to raise the take-up
lever to its highest position [Fig. 1].
2. Raise the presser foot to release the thread tension
[Fig. 2].
3. Place felt cushion on spool pin. Place a spool of
thread on the spool pin with the thread coming from
the back of the spool [Fig. 3].
4. Snap the thread into the first thread guide at the top
of the machine [Fig. 4].
5. Bring the thread down between the tension discs [Fig. 5].
6. Bring the thread down the right slot of the threading
path, then across to and up the left slot [Fig. 6].
7. Bring the thread through the take-up lever from right
to left [Fig. 7], making sure the thread falls into the
take-up lever slot [F
ig. 8].
8. Bring the thread back down the left slot of the
threading path [Fig. 9] and into the thread guide
above the needle [Fig. 10].
9. Thread the needle eye from front to back [Fig. 11].
(Clip the thread end with sharp scissors for easier
needle threading.)
Threading Diagram
Fig. 1
Fig. 2
Fig. 3
Fig. 4
Fig. 6
Fig. 9
Fig. 10
Fig. 5
Fig. 7
ig. 11
F
Fig. 8
Raising the bobbin thread
1. Make sure the presser foot lever is raised.
2. Hold the end of the needle thread with your left
hand. Turn the hand wheel toward you with your
right hand until the needle goes down once and
comes back up, stopping when the needle is at its
highest position.
3. Gently pull up on the needle thread [Fig. 12]. The
bobbin thread, looped around the needle thread, will
be drawn up through the needle hole.
4. Pull about six inches of both the upper and lower
threads toward the back of the machine, placing
them under the presser foot [Fig. 13].
ig. 12
F
Fig. 13
13
Page 15

SEWING
Several synchronized parts of the sewing machine interact to form a stitch. The needle moves up
and do
thread through the layers of fabric. To maintain this perfectly tuned timing, here are a few sewing
tips you'll want to follow:
• Always begin sewing with the needle in the highest
position. Always place the needle in the highest position
at the end of a seam before removing the fabric from the
machine.
• Always turn the handwheel toward you, not away
from you. Never “rock” the handwheel.
• Be sure to lower the presser foot before sewing to
engage the tension discs for perfect stitch balance. This
is an easy step to miss when sewing extr
• Gently guide the fabric as you sew; never push or
pull the fabric under the needle.
• Don't sew over pins. Simply remove the pins as they
approach the needle. Sewing over pins can damage
your machine, nick the needle or cause personal injury.
• Use the proper needle/thread/fabric combination.
See chart on page 15.
wn as the shuttle spins in perfect time so that the bobbin thread interlocks with the needle
SEWING TIPS
Fig. 1
a thick fabrics.
Fig. 2
BEGINNING TO SEW
1. Select a stitch. Make the appropriate stitch width
and length adjustments.
2. Turn the hand wheel toward you to raise the needle
to its highest position.
3. Raise the presser foot and pull about six inches of
thread to the back of the machine and under the
presser foot.
4. Place the fabric under the presser foot aligning the
cut edge of the fabric with the seam guide marking
on the needle plate. Position the fabric so the needle
is about 3/8” from the beginning fabric edge [Fig. 1].
5. Lower the presser foot and depress the foot controller to
begin sewing. The sewing speed is determined by the
amount of pressure you apply to the foot controller.
6. To secure the beginning of a seam, take 3-4 stitches
forward, then push down and hold the reverse lever
to take 3-4 stitches in reverse.
7. Release the lever and continue sewing forward at a
consistent speed while guiding the fabric along the
seam guide marking.
8. At the end of the seam, press and hold the reverse
lever to take 3-4 backstitches to secure the seam end.
9. Before removing the fabric raise the needle to the
highest position [Fig. 2].
Fig. 3
Fig. 4
Raise the presser foot and gently pull the fabric to
10.
the left, releasing at least six inches of thread
from needle and bobbin [Fig. 3].
Use the thread cutter on the back of the presser
11.
foot bar to cut both threads close to the fabric
[Fig. 4].
14
Page 16

SEWING
NEEDLE, THREAD & FABRIC GUIDE
Knit Fabrics NEEDLE STYLE NEEDLE SIZE
Lightweight: Tricot Universal or Ballpoint 9/65, 10/70
Medium: Interlock, Lycra Universal or Ballpoint 11/75, 12/80, 14/90
Heavyweight: Double Knit, Velour Universal or Ballpoint 12/80, 14/90
Fake Furs, Napped Fabrics Universal or Ballpoint 14/90, 16/100
Woven Fabrics NEEDLE STYLE NEEDLE SIZE
Sheer: Chiffon, Fine Lace, Tulle,
Georgette, Net, Organdy, Organza Universal 8/60, 9/65
Lightweight: Batiste, Chambray,
Voile, Crepe de Chine, Silk Jersey,
Handkerchief Linen, Sheer Crepe Universal 9/65, 10/70
Medium Lightweight: Challis,
Gingham, Taffeta, Percale,
Wool Crepe, Wool Jersey Universal 11/75
Medium Weight: Broadcloth, Chintz,
Velour, Corduroy, Crepe Backed
Satin, Faille, Flannel, Linen, Velvet,
Pique, Poplin, Satin, Shantung,
Velveteen Universal 12/80
Medium Heavyweight: Brocade,
Denim, Felt, Flannel, Fleece,
Gabardine, Quilted Fabrics,
Textured Linen, Tweed, Twill Universal 14/90
Heavyweight: Double-faced Wool,
Fake Fur, Heavy Coating,
Sail Cloth, Ticking Universal 16/100
Leather NEEDLE STYLE NEEDLE SIZE
Ultrasuede, Ultra Leather Stretch 11/75
Vinyl Leather Point 14/90
Vinyl with Knit Backing Leather Point 14/90
Light to Medium Weight Leather Leather Point 12/80
Heavy Leather Leather Point 16/100, 18/110
15
Page 17

BUILT-IN STITCHES
STRAIGHT STITCH
SEAMING
Use for seaming two or more layers of fabric together.
STITCH WIDTH STITCH LENGTH PRESSER FOOT
0 2.5-3.5 All-purpose
Align the fabric edge with the seam guide marking on
the needle plate and begin sewing [Fig. 1]. Take a few
stitches in reverse (backstitch) to secure the seam.
Continue stitching forward at a consistent speed, while
guiding the fabric along the seam guide marking.
Backstitch at the end of the seam [Fig. 2].
Use a shorter stitch length (2-3) when patchwork piecing
[Fig. 3] or sewing sheer fabrics. Use a longer stitch (3.5-4)
when sewing heavy, thick, or napped fabrics such as
denim, polar fleece, or velvet [Fig. 4].
BASTING
Use a basting stitch to sew temporar
to use when you need to test fit a garment
sewing the seams permanently.
STITCH WIDTH STITCH LENGTH PRESSER FOOT
0 4 All-purpose
y seams. It is ideal
before
Fig. 1
Fig. 3
Fig. 2
Fig. 4
Align the fabric edge with the seam guide markings and
sew at a consistent speed. Do not backstitch at the
beginning or end of the seam. After completing the
permanent seam, pull the basting stitch bobbin thread
to remove the basting stitches [Fig. 5].
OPSTITCHING and EDGESTITCHING
T
Embellish a garment or special project with topstitching.
Use a contrasting thread
STITCH WIDTH STITCH LENGTH PRESSER FOOT
0 3 All-purpose
color for extra dimension.
To topstitch, align the finished edge of the fabric with
the right edge of the presser foot. Lower the foot and
sew [Fig. 6].
To edgestitch, place the fabric so the needle is 1/8” from
the finished fabric edge. Lower the foot and sew [Fig. 7].
Fig. 5
Fig. 7
Fig. 6
16
Page 18

Fig. 1
Fig. 2
BUILT-IN STITCHES
STRAIGHT STITCH
GATHERING
Create beautiful ruffles and flounces with the gathering
technique.
STITCH WIDTH STITCH LENGTH PRESSER FOOT
0 4 All-purpose
Sew a row of basting stitches 1/4” away from the fabric
edge. Sew a second row of basting
the fabric edge [Fig. 1]. Do not backstitch.
Gently pull the bobbin thread from the underside of the
fabric [
Fig. 2].Adjust gathers evenly by pushing the fabric
along the stitching.
ZIPPER INSERTION
The zipper foot is designed to allow you to sew close to
raised edges. Easily and accurately insert zippers and
covered cording or piping in seams using the zipper foot.
stitches 1/2” away from
g. 3
Fi
Fig. 5
Fig. 7
Fig. 4
Fig. 6
STITCH WIDTH STITCH LENGTH PRESSER FOOT
0 3 Zipper
Remove the presser foot holder
the presser foot bar
The foot can be adjusted to the left or right side of
tion.
. Raise the needle to the highest posi-
. Attach the zipper foot to
the needle by loosening the screw on the foot, sliding
the foot and re-tightening the screw [Fig. 3].
To sew the right side of the zipper, adjust the zipper foot so
it is on the right side of the needle and the needle clears
the notch on the left side of the zipper foot [Fig. 4].
To sew the left side of the zipper, adjust the zipper foot so
it is on the left side of the needle and the needle clears
h on the right side of the zipper foot [Fig. 5].
notc
Use the str
aight stitch ONLY with this foot.
PIPING INSERTION
Add decorative detail to home decorating projects and
designer fashion looks by inserting covered cord
create
or purchased piping within seams.
STITCH WIDTH STITCH LENGTH PRESSER FOOT
0 3-4 Zipper
Attach the zipper foot and adjust the sliding foot to the
right side of the needle. Baste the cord or piping to the
right side of one fabric piece along the seamline, using
the longest stitch length setting of 4 [Fig. 6].
Place the second layer of fabric with the first layer, right
sides together. Shorten the stitch length to 3 and stitch
the seam close to the piping [Fig. 7].
17
Page 19

BUILT-IN STITCHES
ZIGZAG STITCH
OVEREDGING
The zigzag stitch is handy for overedging facings, hems,
and seam allowances to minimize raveling.
STITCH WIDTH STITCH LENGTH PRESSER FOOT
3-5 2 All-purpose
Position the fabric under the presser foot so the right
swing of the stitch forms just inside the edge of the fabric
[Fig. 1]. Test the position by turning the handwheel
toward you and manually "walking" the needle before
you begin sewing. Sew, guiding the fabric evenly.
BARTACKING
This stitch is excellent for reinforcing pocket corners and
belt loops. Because the feed teeth are lowered, there is
no need to make stitch length adjustments.
STITCH WIDTH DROP FEED PRESSER FOOT
4-5 Lowered All-purpose
Determine the location for the bar tac
fabric under the needle.
Sew 4-6 stitc
hes [Fig. 2].
Raise the needle to its highest position.
width dial to 0 and sew 3-4 stitches to secure the stitch.
k and position the
Turn the stitch
Fig. 1
Fig. 2
Bartacking
SATIN STITCH for APPLIQUÉ
Use this popular, zigzag stitch creatively to sew appliqués.
STITCH WIDTH STITCH LENGTH PRESSER FOOT
3-5 0.5-1 Open Toe
Fuse a fabric appliqué shape to a base fabric. Place a
stabilizer beneath the base fabric [F
ig. 3].
Satin stitch around the cut edges of the appliqué shape
guiding the fabric so the right swing of the stitch falls just
er the appliqué edge and into the base fabric [Fig. 4].
ov
Fig. 3
Appliqué
Fig. 4
18
Page 20

Fig. 1
g. 3
Fi
Fig. 2
g. 4
Fi
BUILT-IN STITCHES
ATTACHING BUTTONS
Use this foot to quickly and securely attach flat buttons.
STITCH WIDTH DROP FEED PRESSER FOOT
5 L
Attach the button sewing foot.
Set the stitch width to 0.
Position the button and fabric under the foot. Position the
needle over the left hole [Fig. 1]. Turn the handwheel to
make sure the needle clears the hole, and sew several
stitches to secure threads.
Turn the stitch width dial to 5 and reposition the fabric and
button to the left slightly so the needle is again aligned with
the left hole. Turn the handwheel to make sure the zigzag
stitch clears the holes of the button [Fig. 2]. Adjust the
stitch width, if needed. Sew 8-10 stitches [Fig. 3].
To secure the stitches, set the stitch width to 0, reposition
the needle over the button hole and sew a few stitches.
Remove the fabric and button from the machine and clip
the threads [Fig. 4].
ZIGZAG STITCH
owered Button Attaching
Fig. 5
Seaming knits
SEAMING KNITS
A narro
it suitable for medium to lightweight
w zigzag stitch is very flexible and durable making
knit fabrics.
STITCH WIDTH STITCH LENGTH PRESSER FOOT
1.5 2-3 All-purpose
Align the edge of the fabric with the seam guide markings
on the needle plate and sew the seam being careful not
to stretc
h the fabric as you sew [Fig. 5].
19
Page 21

BUTTONHOLE SEWING
ZIGZAG STITCH
BUTTONHOLES
Make simple bartack buttonholes with the Simplicity
Pioneer II.
STITCH WIDTH STITCH LENGTH PRESSER FOOT
1.5 and 5 0.5-1 Open Toe
Mark the location of buttonhole on your garment
1.
[Fig. 1].
2. Attach the open toe foot. Set the stitch length dial to
the buttonhole mark between 0 and 1 [Fig. 2].
3. Position the fabric under the presser foot so the first
bartack marking is just under the needle and the center
mark is centered under the foot [Fig. 3]. Set the stitch
width dial to 5. Sew 6-7 stitches. Stop with the needle
in the right side of the bartack stitch [Fig. 4].
4. Raise the presser foot and set the stitch width dial to
1.5. This will also move the fabric slightly to the left.
Lower the foot and sew the right leg of the buttonhole,
stopping at the second bartack marking. Stop with the
needle in the right side of the stitch [Fig. 5].
5. Raise the presser foot and set the stitch width dial to 5.
Lower the foot and sew 6-7 stitches. Stop with the
needle in the left side of the bartack stitch [Fig. 6].
6. Raise the presser foot and set the stitch width dial to
1.5. Lower the foot and hold down the reverse sewing
lever to sew the left leg of the buttonhole [Fig. 7],
stopping at the first bartack [Fig. 8].
7. Raise the needle to the highest position and raise the
presser foot. Remove the fabric and trim the thread
ends near the stitching. Using the seam ripper, carefully cut an opening in the middle of the buttonhole
[Fig. 9]. Be careful not to cut any stitches. You may
want to put a straight pin across both ends of the
buttonhole to help prevent cutting the buttonhole
bartacks.
Fig. 1
Fig. 3
Fig. 5
Fig. 2
Fig. 4
Fig. 6
20
Fig. 7
ig. 9
F
Fig. 8
Page 22

Fig. 1
g. 3
Fi
FREE-MOTION SEWING
Darning or free-motion sewing and quilting are easily
accomplished by lowering the feed teeth and removing the
presser foot and presser foot holder [Fig. 1]. This allows
“free” movement of the fabric in any direction. There is
no need to adjust the stitch length because you will
actually be guiding the fabric movement. Use freemotion sewing to monogram, embroider, quilt, or darn.
FREE-MOTION MONOGRAMMING
Fig. 2
Fig. 4
Mark the letter or letters to be monogrammed on the fabric
with a wash-out marker. Place the fabric and stabilizer
into a machine embroidery hoop. Raise the needle to its
highest position and slide the hoop under the needle.
Lower the presser foot lever.
To lock the stitching, set the width at 0, hold the needle
thread in the left hand and turn the hand wheel toward
you to draw up the bobbin thread [Fig. 2].
firmly, take three to
width to 5. Begin sewing at a medium speed. Move
hoop left to right, forward and bac
marked letter [Fig. 3].
STITCH WIDTH DROP FEED PRESSER FOOT
4-5 Lowered None
ve stitc
fi
Holding threads
hes in one spot. Set the stitch
the
kward, following the
Fig. 5
Note: Relax y
ou work. Place hands firmly around the hoop,
y
our shoulders and breathe while
using your index and middle fingers to guide the
fabric. Be sure to lo
wer the presser foot lever
before sewing!
FREE-MOTION QUILTING
STITCH WIDTH DROP FEED PRESSER FOOT
0 Lowered None
Baste or pin-baste the fabric, batting, and backing together.
It is not necessary to place this in a hoop.
Select a design alread
y in the fabric or transfer your own
design using a template. Continue with the directions
above following the design line [Fig. 4].
ARNING
D
STITCH WIDTH DROP FEED PRESSER FOOT
3-5 Lowered None
Place a stabilizer under the hole or tear.
Place the fabric under the foot. Lower the foot and sew,
moving the fabric from left to right and up and down
until the hole is completely covered [Fig. 5].
Use a thread to match the fabric color for a nearly
invisible mend.
21
Page 23

SPECIALTY SEWING TECHNIQUES
CHANNEL QUILTING
Quilt fabrics using the seam guide to sew evenly spaced,
parallel rows of stitching.
STITCH WIDTH STITCH LENGTH PRESSER FOOT
0 3 All-purpose w/sewing guide
Insert the seam guide into the presser foot holder (see
page 7). Set the guide the desired distance from the
needle by sliding it to the right or left. After sewing a row
of stitching, move the fabric to the right, placing the curved
arm of the bar on the previous row of stitches
HEMMING JEANS
STITCH WIDTH STITCH LENGTH PRESSER FOOT
0 3-4 All-purpose
The size 14 needle, included with the Simplicity sewing
machine, is designed for sewing through multiple layers
of heavy fabric. Use it when hemming jeans to penetrate
the fabric more easily when sewing over the dense side
seam. When you come to the side seam of the pant hem,
place a shim (such as a piece of cardboard the same thickness as the seam) under the foot and against the seam
[Fig. 2]. This levels the foot so the machine can sew
through the extra thickness.
[Fig. 1]
.
Fig. 1
Fig. 2
SEWING WITH TWO THREADS
STITCH WIDTH STITCH LENGTH PRESSER FOOT
0-5 2-4 Any
Create a bold look or add extr
a color to a stitch by
sewing with two threads through the upper threading
path. Use the size 14 needle which has a larger eye to
accommodate two threads.
Place a spool of thread on the left spool pin with the
thread coming off the back. Thread the machine as usual.
Place a second spool of thread on the right spool pin with
the thread coming off the front [Fig. 3]. Thread the machine
along the same path and through the needle eye as for the
first thread. Select a stitch and sew.
Fig. 3
22
Page 24

23
Fig. 1
Fig. 5
Fig. 2
Fig. 6
Fig. 7
Fig. 8
Fig. 3
Fig. 4
R ace
Shuttle
keepers
Shuttle
Shuttle ra ce cover
Bo bbin case
Shuttle area
The Simplicity sewing machine uses standard sewing
machine needles (15x1). The size and type of your needle should be compatible with the fabric (see page 15).
Change the needle often – after every other project is a
good habit. Bent or dull needles will cause skipped
stitches and thread breakage.
To change the needle, loosen the needle clamp screw
[Fig. 1]. Remove the needle by pulling it downward [Fig.
2]. Insert the new needle by pushing it up into the shaft
as far as it will go with the flat side toward the back of
the machine. Tighten the needle clamp screw.
Raise the needle to its highest position. Remove both the
needle plate screws and the needle plate [Fig. 3].
Remove the bobbin case from the shuttle. Push aside the
two shuttle keepers and remove the shuttle race cover
and shuttle. Clean the feed teeth and shuttle area with a
lint brush [Fig. 4]. Turn the hand wheel until you see the
race forming a half moon as pictured [Fig. 5]. Holding
the shuttle by its center pin, place it on top of the race so
that it forms a half moon on the top side [Fig. 6]. Place
the shuttle race cover over the shuttle and race. Snap the
shuttle keepers back into position. Replace bobbin case.
Replace the needle plate and screws.
Open the left side face cover. Turn the light bulb clockwise
to unscrew and remove the bulb. Install a new bulb by
turning it counter clockwise to screw it in place [Fig. 7].
Use a 15W (max.) screw-in type bulb.
Put 2-3 drops of sewing machine oil at each of the
points indicated [F
ig. 8].
Run the machine unthreaded for 30-60 seconds. Wipe
off any excess oil. Oil every 7-10 hours of use. Use
sewing mac
hine oil ONLY.
NEEDLES
CHANGING the LIGHT BULB
CLEANING FEED TEETH and SHUTTLE AREA
OILING
To ensure the best possible operation of your machine, it is necessary to keep the essential parts clean
at all times. Disconnect the mac
hine from the power source before performing any maintenance.
CARE and MAINTENANCE
Page 25

TROUBLESHOOTING GUIDE
Problem Possible Cause Solution
TOP THREAD BREAKS Machine is threaded incorrectly . . . . . Rethread machine and needle
Tension is too tight . . . . . . . . . . . . . . . Reduce tension on top to a smaller number
Thread is too heavy for needle size . . . Use
Needle is inserted incorrectly
Needle is damaged . . . . . . . . . . . . . . . Insert new needle
hread is caught on spool pin . . . . . . . Remove spool, unwind excess thread, clip, turn spool
T
LOWER THREAD BREAKS Bobbin case is not inserted correctly . . Reposition bobbin. If thread pulls smoothly, it is correct
Bobbin case is improperly threaded . . . . Refer to instructions for correct threading
Bobbin tension is too tight. . . . . . . . . . Change bobbin tension according to instructions
SKIPPED STITCHES Needle is not inserted correctly. . . . . . Reinsert needle with flat side toward back
Needle is damaged . . . . . . . . . . . . . . . Insert new needle
Wrong type of needle is used . . . . . . . Match needle size to fabric and thread weight
Wrong presser foot is used . . . . . . . . . Check the proper presser foot needed for specific task
Foot pressure is wrong. . . . . . . . . . . . . Check foot pressure regulation for proper setting
. . . . . . . Reinsert needle with flat side toward back
a larger needle
over, and use felt disc on spool pin
NEEDLE BREAKS
STITCHING FORMS LOOPS Needle is not threaded correctly . . . . . Thread needle from front to back
SEAMS SHRINK OR PUCKER Presser foot pressure is too heavy . . . . Reduce presser foot pressure to a lower number
THREAD BUNCHING OR Top tension is too loose. . . . . . . . . . . . Increase top tension to a higher number. Normal
“NESTING” ON UNDERSIDE settings are between 3-5.
OF FABRIC Machine is not threaded correctly . . . . Rethread machine making sure presser foot is raised
Needle is damaged . . . . . . . . . . . . . . . Insert new needle
Needle is not inserted correctly. . . . . . Reinsert needle with flat side toward back
Fabric is too heavy/wrong needle size
abric is being pulled during sewing . . Chec
F
Bobbin is not threaded correctly . . . . . Check instructions for proper bobbin threading
Improper needle and/or thread used . . Match needle size to fabric and thread weight
Bobbin case is improperly threaded. . . . Refer to instructions for correct threading
Thread is of poor quality . . . . . . . . . . . Use quality thread
Needle is too large for fabric . . . . . . . . Use a smaller size needle
Wrong stitch length is used . . . . . . . . . Adjust length for proper stitches
Top and bottom threads are not. . . . . . Draw both threads back under the presser foot and
drawn back under the presser hold until a few stitches have formed
foot before sewing
. . Match needle size to fabric and thread weight
k for proper foot pressure; make sure feed teeth
are raised and operating correctly; lengthen stitch
length. Fabric should feed automatically. Pulling the
fabric will thro
and the take-up lever eye is threaded. Raising the
presser foot will help seat the thread between the
tension discs.
w the machine out of time.
24
Page 26

TROUBLESHOOTING GUIDE
Problem Possible Cause Solution
IRREGULAR STITCHING Thread is of poor quality . . . . . . . . . . . Use quality thread
AND FEEDING Presser foot pressure is too light . . . . . Increase presser foot pressure to a higher number
Bobbin is not threaded correctly . . . . . Thread bobbin again and c
abric is being pulled during sewing . . Check for proper foot pressure; make sure feed teeth
F
are raised and operating correctly; lengthen stitch
length. F
fabric will throw the machine out of time.
MACHINE IS NOISY AND Machine needs oil . . . . . . . . . . . . . . . . Refer to cleaning and maintenance instructions
ROUGH WHEN SEWING Lint and oil residue have collected . . . Clean race and hook according to instructions
in hook or on needle bar
Inferior oil has been used . . . . . . . . . . Clean and oil again. Use only fine sewing machine
oil. Do not use WD40.
Needle is damaged . . . . . . . . . . . . . . . Insert new needle
Stitch length and/or width dials are set . Refer to instructions for proper machine settings
incorrectly for the type of stitch used
abric should feed automatically. Pulling the
heck for proper insertion
25
Page 27

1760 Gilsinn Lane
Fenton, MO 63026
For Sewing Machine assistance call:
Simplicity Education Department
636-651-0030
Monday-Friday 9:00 a.m. - 5:00 p.m. CT
IBSA200©2002 Tacony Corporation
 Loading...