

Page 1

(The chances are you’re
never going to read me)
Owner’s Manual
S20SC, S20E and S20ENT
www.SimplicityVac.com
Page 2

Page 3

Contents
Getting Started
Important Safety Instructions ............................................................................ 2
Polarization Instructions ..................................................................................... 3
State of California Proposition 65 Warnings ..................................................... 3
Description of the Vacuum ............................................................................... 4
Assembling the Vacuum .................................................................................. 6
Operation
Unwinding the Power Cord ............................................................................... 7
Turning the Vacuum On/Off ............................................................................. 7
Vacuuming Under Furniture ............................................................................... 8
Carrying the Vacuum ........................................................................................ 9
Carpet Height Adjustment ................................................................................ 9
Attachment Cleaning
Wand Cleaning ................................................................................................ 10
Cleaning Tools .................................................................................................. 11
Adjusting The Suction Power ............................................................................ 12
Optional Cleaning Tools .................................................................................... 13
Connecting Attachment Hose ........................................................................... 14
Maintenance and Care
Replacing the Vacuum Bag .............................................................................. 15
When to Change the Filters .............................................................................. 16
Replacing the Post Filter ................................................................................... 16
Replacing the Secondary Filter ......................................................................... 17
Removing and Reinstalling the Bottom Plate ..................................................... 18
Replacing the Agitator Belt .............................................................................. 19
Edge Cleaning ................................................................................................ 20
Annual Checkup Reminder ............................................................................... 20
Problem Solving Guide
Unclogging the Nozzle and Hose ...................................................................... 21
Thermal Motor Protection ................................................................................. 22
Troubleshooting ................................................................................................ 23
How to Contact Your Authorized Retailer .......................................................... 23
Visit Simplicity Online ....................................................................................... 23
Warranty ................................................................................................................. 24
1
Page 4

IMPoRtAnt sAFetY InstRUCtIons
When using an electrical appliance, basic precautions should always be followed,
including the following:
READ ALL INSTRUCTIONS BEFORE
USING THIS APPLIANCE
The manufacturer cannot accept responsibility for damage
IMPoRtAnt:
To reduce the risk of fire, electric shock or injury:
caused when the appliance is not used according to the
instructions or for uses other than those for which it
was intended.
• Do not leave appliance when plugged in.
Unplug from outlet when not in use and
before servicing.
• WARNING: ELECTRIC SHOCK COULD
OCCUR IF USED OUTDOORS OR ON
WET SURFACES.
• Do not allow to be used as a toy. Close
attention is necessary when used by or
near children.
• Use only as described in this manual.
Use only manufacturer’s recommended
attachments.
• Do not use with damaged cord or plug. If
appliance is not working as it should, has
been dropped, damaged, left outdoors,
or dropped into water, return it to your
Authorized Retailer for service.
• Do not pull or carry by cord, use cord as
a handle, close a door on the cord, or pull
cord around sharp edges or corners. Do
not run appliance over cord. Keep cord
away from heated surfaces.
• Do not unplug by pulling on cord. To
unplug, grasp the plug, not the cord.
• Do not handle plug or appliance with
wet hands.
• Do not put any object into openings. Do
not use with any opening blocked; keep
free of dust, lint, hair and anything that
may reduce air ow.
• Keep hair, loose clothing, ngers and all
parts of body away from openings and
moving parts.
• Do not pick up anything that is burning or
smoking, such as cigarettes, matches or
hot ashes.
• Do not use without vacuum bag and/or
lters in place.
• Turn off all controls before unplugging.
• Use extra care when cleaning on stairs.
• Do not use to pick up ammable or
combustible liquids, such as gasoline, or
use in areas where they may be present.
• Do not attempt to service the unit while
appliance is plugged in.
sAVe tHese InstRUCtIons.
2
Page 5
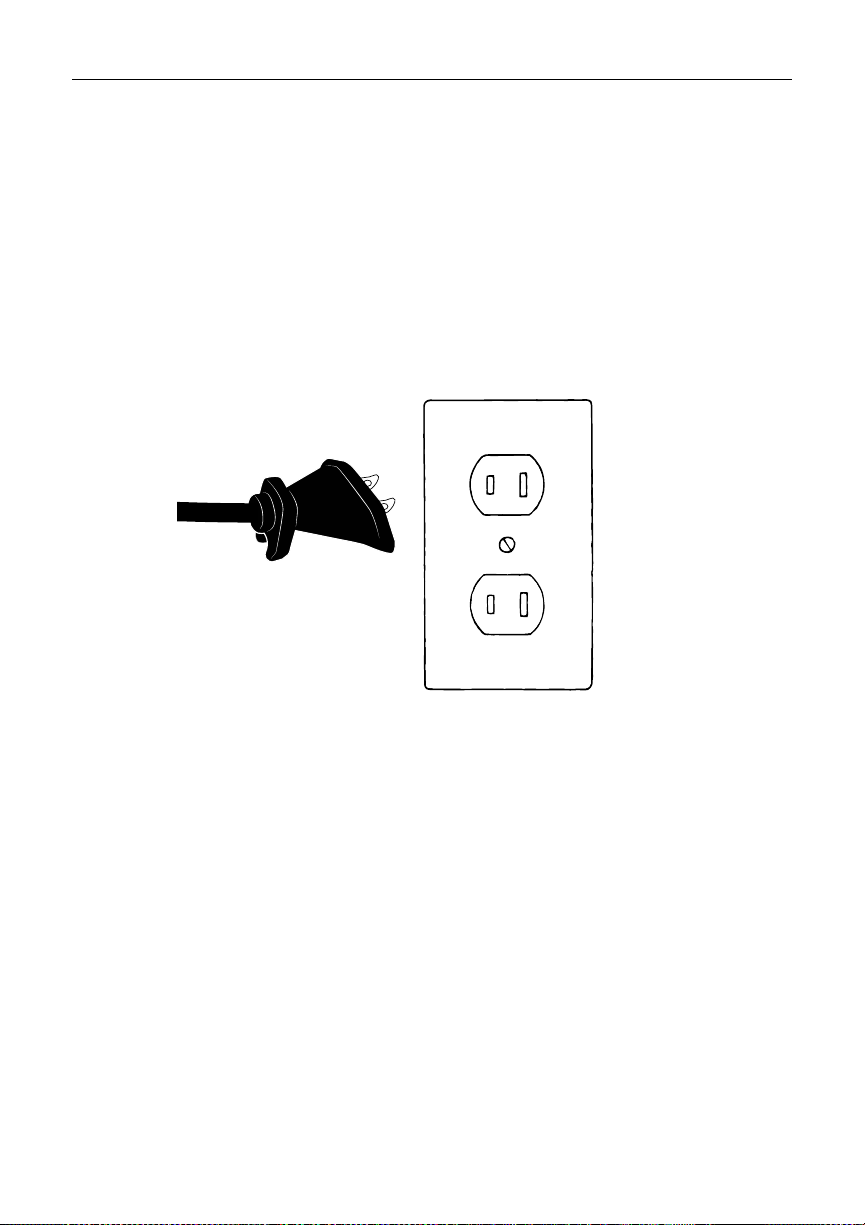
PolARIzAtIon InstRUCtIons
POWER CORD, 2-WIRE POLARIZED CORD
To reduce the risk of electric shock, this product is equipped with a polarized alternating
current line plug (a plug having one blade wider than the other). This plug will fit into the
power outlet only one way. This is a safety feature. If you are unable to insert the plug fully into
the outlet, try reversing the plug. If the plug should still fail to fit, contact a qualified electrician
to replace the obsolete outlet. Do not defeat the safety purpose of the polarized plug.
State of California Proposition 65 Warnings:
WARNING: This product contains one or more chemicals known to the State of California to
cause cancer.
WARNING: This product contains one or more chemicals known to the State of California to
cause birth defects or other reproductive harm.
3
Page 6
DesCRIPtIon oF tHe VACUUM
1
6
2
7
3
8
9
10
4
13
14
5
4
12
11
Page 7

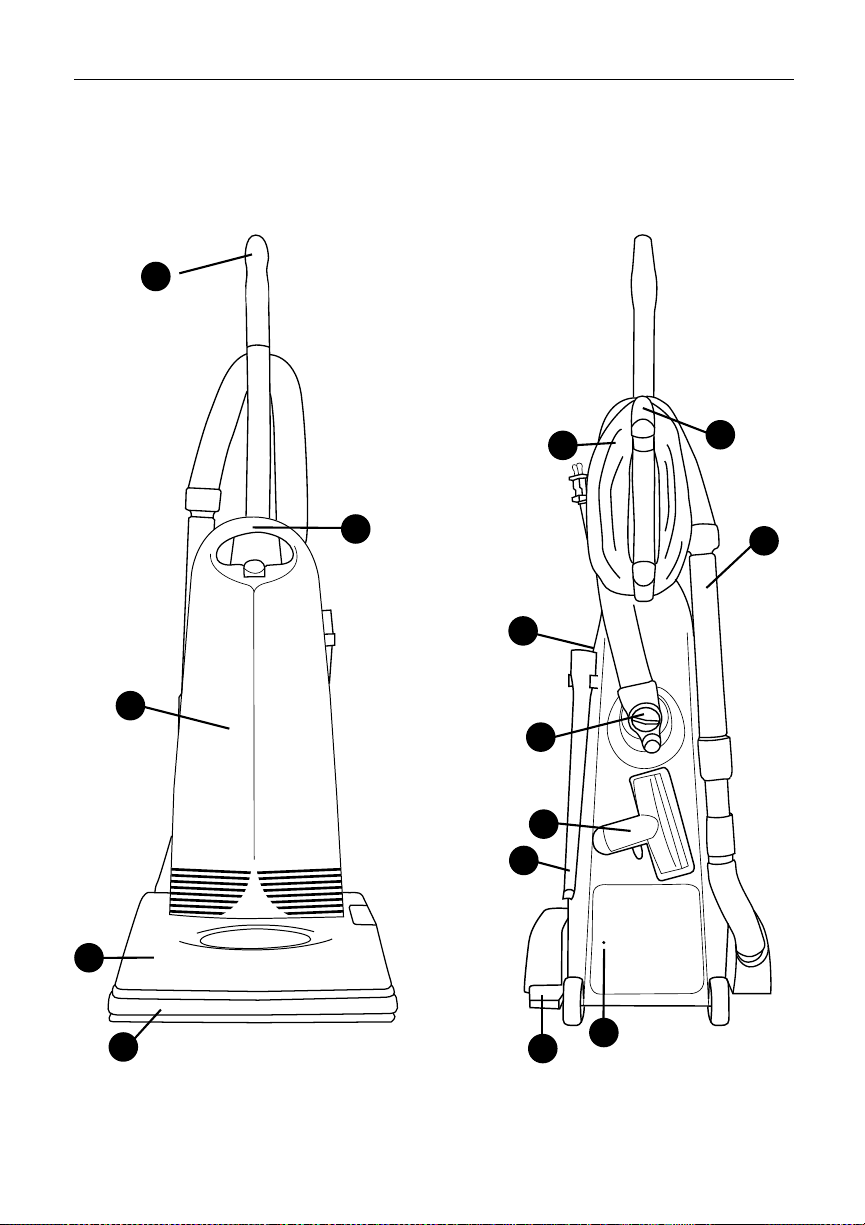
DesCRIPtIon oF tHe VACUUM
1 Ergonomic Handle
2 Carrying Handle
3 Bag Compartment Cover (to Replace Vacuum Bag)
4 Vacuum Nozzle
5 Furniture Guard
6 Power Cord
7 Main On/Off Power Switch
8 Suction Control Dial
9 Combination Dusting/Upholstery Brush (Models S20SC & S20E)
10 Crevice Tool (Models S20SC & S20E)
11 Handle Release Pedal
12 Thermal Motor Protection Reset Button
13 Quick Release Upper Cord Hook
14 Ready Reach™ Tools (Models S20SC & S20E)
5
Page 8
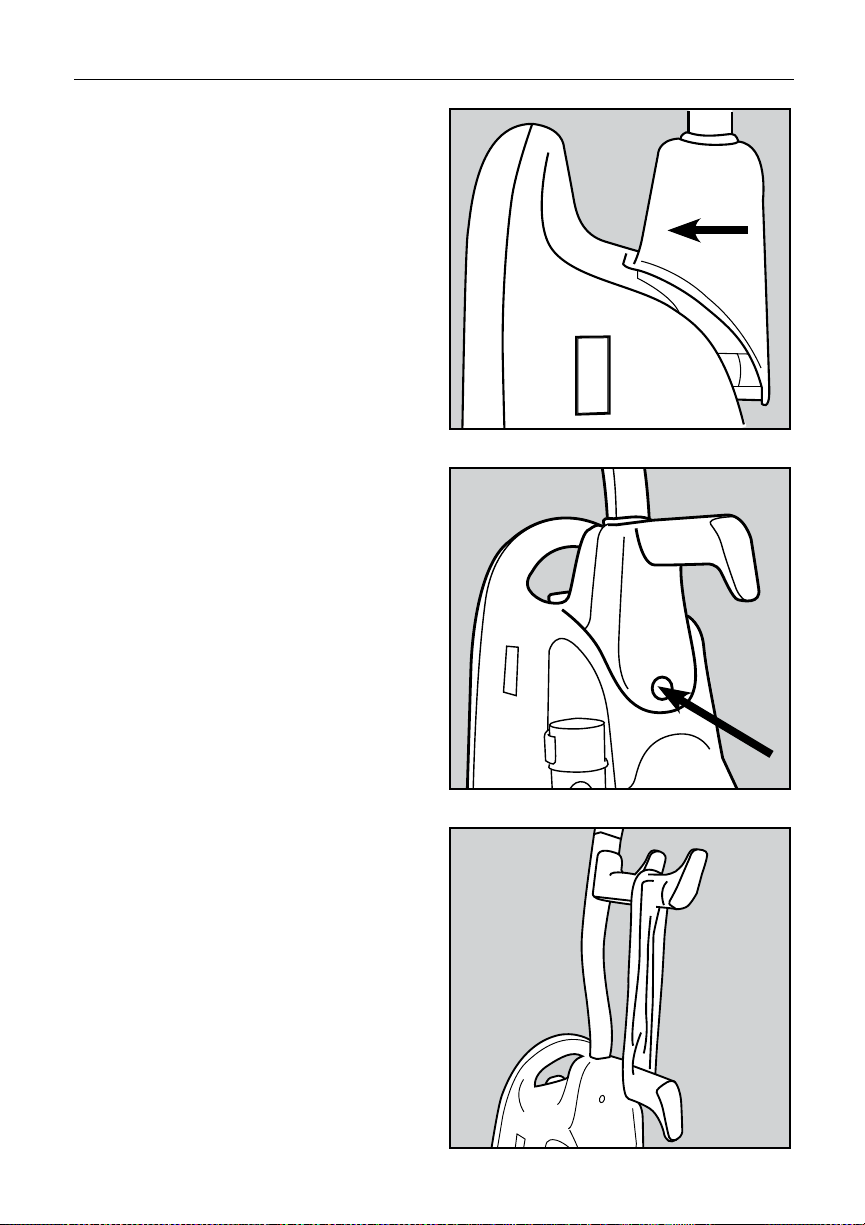
AsseMblIng tHe VACUUM
Attaching The Handle To The Vacuum
The vacuum cleaner and the handle are
packed separately.
• After first removing the handle screw,
position the handle behind the vacuum
cleaner and level with the top of the unit.
Hold the power cord down and away
from the vacuum while the handle is being
attached.
• On the bottom of the handle are two
“T-shaped” rails that slide forward onto
two guides located on the top of the
vacuum cleaner. Line up the handle so
that the “T” rails will slide into the guides
and push the handle forward (Fig. 1).
• Insert the handle screw and tighten
securely (Fig. 2).
Fig. 1
• Turn the upper cord storage hook to
the upright position and wind the power
cord around the cord storage hooks
when storing the vacuum cleaner (Fig. 3).
Fig. 2
Fig. 3
6
Page 9
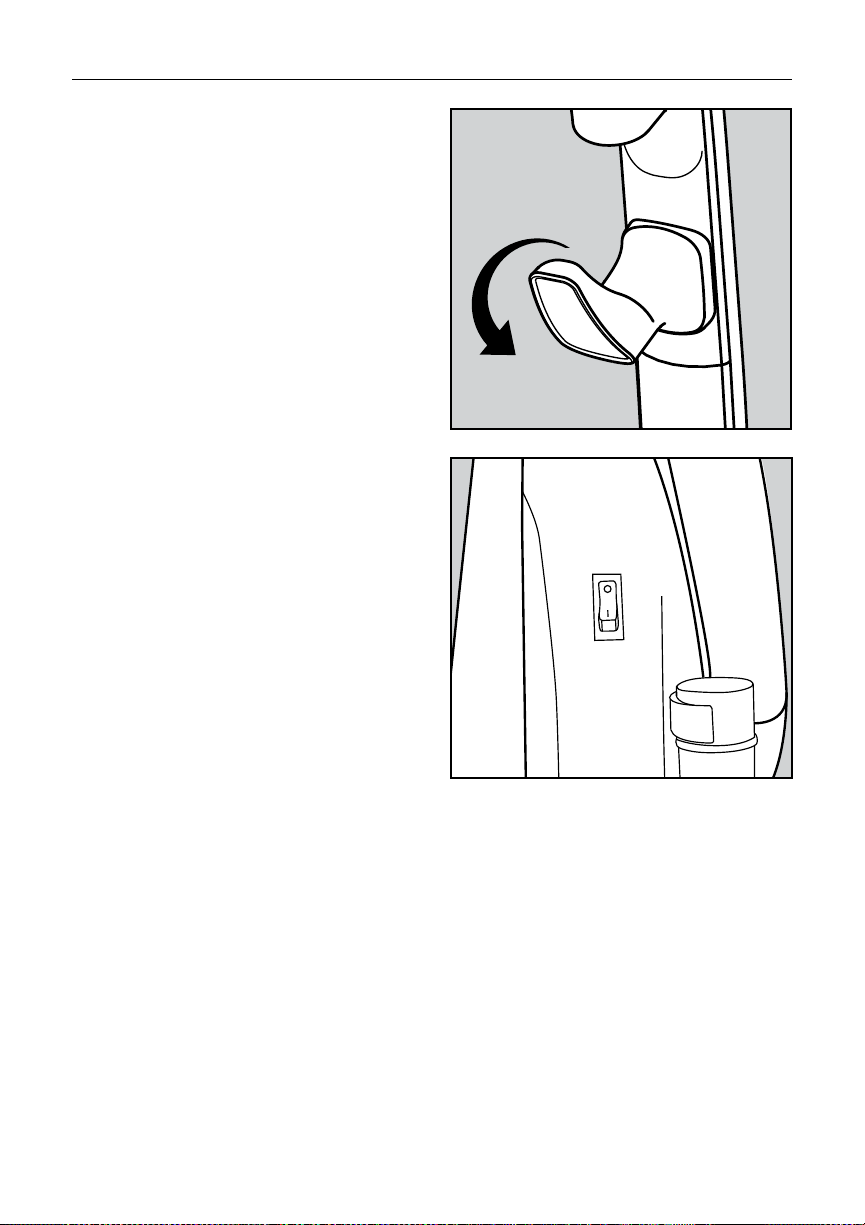
Unwinding the Power Cord
• The upper cord hook rotates to allow for
quick access to the power cord.
Turning the Vacuum On/Off
• To start the vacuum cleaner, flip the
“on/off” switch located on the side of
the bag compartment to the “on” position
as indicated on the switch.
• To stop the vacuum cleaner, flip the
“on/off” switch to the “off” position
as indicated on the switch.
oPeRAtIon
• Turn the vacuum cleaner off before
unplugging from the electrical outlet.
7
Page 10

oPeRAtIon
Vacuuming Under Furniture
Your Simplicity Symmetry will lie flat on the
floor for effective cleaning under beds
and tables (Fig. 1).
• Press the foot pedal release once for
normal vacuum cleaning (Fig. 2).
• Press the foot pedal release a second
time to enable the vacuum to lay flat
on the floor (Fig. 3).
Fig. 1
Fig. 2
Fig. 3
8
Page 11

Carrying the Vacuum
To safely transport your vacuum, especially
when carrying the vacuum up and down
stairs, use the carrying handle.
Carpet Height Adjustment
Your Simplicity Symmetry is designed with an
automatic self-adjusting rug nozzle. No manual
adjustments are required. The height of the rug
nozzle is instantly and automatically adjusted
to carpet pile height. This self-adjusting feature
allows the rug nozzle to float evenly over all
carpet pile surfaces.
oPeRAtIon
9
Page 12
AttACHMent CleAnIng
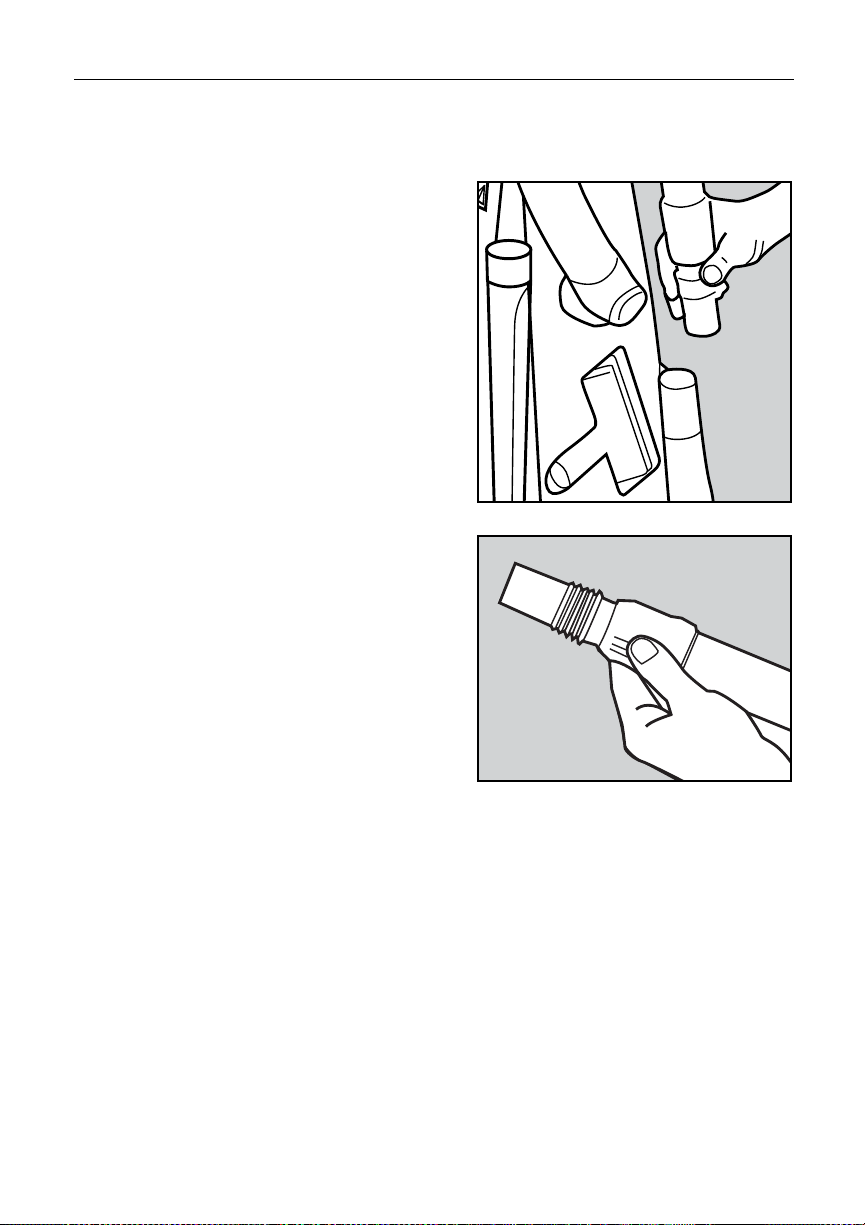
Wand Cleaning
Models: S20SC & S20E
With the on-board cleaning tools and vacuum
wand, your Simplicity Symmetry becomes a
comprehensive cleaning system. The model
equipped with on-board tools includes an
upholstery tool, dusting brush, crevice tool,
extension wand and stretch hose.
• Remove the telescopic wand from the body
of the vacuum. Unlock the wand collar
(located on end of wand), extend
the wand and re-lock the wand collar.
NOTE: The wand collar locking rotation is
marked with arrows on the wand. The wand
collar lock and unlock functions require only a
1/2 turn of the collar.
NOTE: You can connect any of the cleaning
tools to the end of the extension wand(s) and
twist for a secure fit. To remove the cleaning
tool from the extension wand(s), simply twist
and pull apart.
10
Page 13

Ready Reach™ Cleaning tools
Models: S20SC & S20E
Your vacuum is equipped with a dusting
brush, upholstery brush and crevice tool.
Other tools are available at your Authorized
Simplicity Retailer.
• Remove the cleaning wand from
the vacuum.
• Insert any of the tools onto the end
of the wand.
AttACHMent CleAnIng
Dusting Brush:
Ideal for table tops, shelves, blinds or
hard surface floors.
Upholstery Tool:
Ideal for soft surfaces like chairs and couches.
Remove the dusting brush clip for upholstery
cleaning.
Crevice Tool:
Ideal for tight places like between seat
cushions or corners.
Wand with Dusting Brush
Dusting/Upholstery Tool
11
Crevice Tool
Page 14
AttACHMent CleAnIng
Adjusting the Suction Power for
Tool Cleaning
On the back of the vacuum, locate the
suction control dial and turn it to the desired
position. This reduces the suction power
coming through the hose. Close the suction
control dial when finished to restore full
suction power.
12
Page 15

Optional Cleaning Tools
All Simplicity Symmetry vacuum cleaners offer
an attachment port that enables you to insert
optional cleaning tools (available through your
Simplicity Retailer). Should you have carpeted
stairs, for example, it is highly recommended
to use one of the two kits pictured, since each
offers either a 12- or 15-foot hose for safe stair
cleaning. These kits are effective overall cleaning
tools to address some of the hard to reach
areas of your home or car. Talk to your Simplicity
Retailer to see which tools might be beneficial
for your home.
Deluxe Attachment Set (TWK12)
12-foot wire hose
Curved handle
Extension wand (2 pieces)
Dusting brush
Crevice tool
Upholstery tool
Upholstery brush insert
Deluxe floor brush
AttACHMent CleAnIng
Deluxe Attachment Set (TDK15)
15-foot crush proof hose
Curved handle
Extension wand (2 pieces)
Deluxe floor brush
13
Page 16

AttACHMent CleAnIng
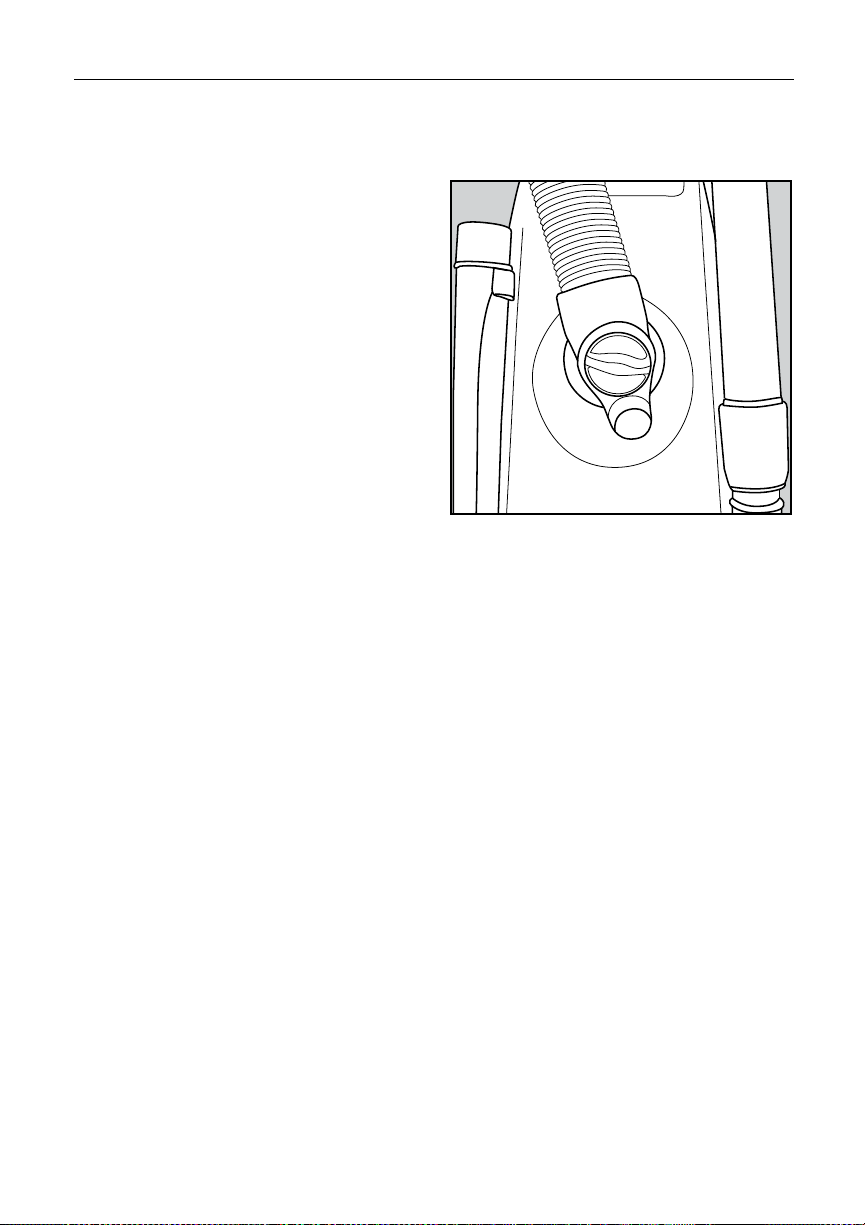
Connecting the Optional Attachment
Hose to the Vacuum Cleaner
Pull out and open the suction control dial
by turning the lid located on the back of the
vacuum cleaner. Insert the soft, rubber end of
the hose into the cleaning attachment opening.
Push in while twisting the hose end to ensure
the hose is fastened securely.
NOTE: You can connect any of the cleaning
tools to the end of the extension wand(s) and
twist for a secure fit. To remove the cleaning
tool from the extension wand(s), simply twist
and pull apart.
WARNING
There is no way to turn the brushroll off.
Therefore, when using the cleaning tools it
is important to keep your Simplicity vacuum
from running in the same spot for a period of
time, as carpet or flooring damage could
result. If you need to keep the vacuum in the
same spot for a period of time, such as at the
base of the stairs when cleaning the stairs,
place something, like a flattened cardboard
box, under the vacuum to prevent damage to
the floor.
14
Page 17

Replacing the Vacuum Bag
• Open the bag compartment lid.
• Remove vacuum bag by pulling the bag
collar off the bag holder.
• Attach the new vacuum bag onto the
bag holder.
• Tuck the bag corners into the vacuum
before replacing the bag compartment
lid.
• Replace the lid and press onto the
vacuum until it snaps into place.
MAIntenAnCe AnD CARe
15
Page 18

MAIntenAnCe AnD CARe
When to Change the Filters
At minimum, it’s recommended to replace
the filters once a year or after using 12
vacuum bags, whichever comes first.
If someone in your household is highly
sensitive to airborne allergens, it is
recommended to change the filter set after
every six vacuum bags.
Replacing the Foam Post Filter
• Open the bag compartment lid and
locate the filter on the inside of the lid.
• Remove the used filter from the lid.
• The foam filter can be washed and reused.
If washed, make sure the filter is completely
dry before reinstalling.
• When inserting the new filter, align the new
filter over the Velcro strips on the inside of the
dust compartment lid and press it securely
into place.
• Close the bag compartment lid.
16
Page 19

Replacing the Foam Secondary Filter
The secondary filter protects the motor
from dust and dirt. Before installing a new
vacuum bag, check the filter. Accumulated
dirt in the bag compartment will be
collected on this filter and may restrict motor
performance when the filter becomes dirty.
• Open the bag compartment lid and locate
the secondary filter on the bottom of the
bag compartment.
• Remove the secondary filter from the
bottom of the bag compartment.
• The foam secondary filter can be washed
and reused. If washed, make sure the filter
is completely dry before reinstalling.
• Insert the washed or new filter by sliding it
under the bag support.
MAIntenAnCe AnD CARe
• Close the bag compartment lid.
17
Page 20

MAIntenAnCe AnD CARe
Removing and Reinstalling the
Bottom Plate
WARNING! To Reduce the Risk of Electrical
Shock or Injury From Moving Parts, Unplug
Before Servicing or Cleaning.
• Press the handle release pedal twice and
place the vacuum cleaner in the flat position.
• Turn the vacuum cleaner over, exposing
the bottom plate.
• Slide the two locking latches toward
the center.
• Press the tabs inward on each side and
remove the bottom plate.
• Reinstall by placing the lower edge of the
bottom plate along the lower edge of the
nozzle. Snap the plate into place. Slide the
locking latches to the outside edges.
18
Page 21

Replacing the Agitator Belt
NOTE: To ensure maximum cleaning efficiency,
the condition of the belt should be checked
regularly. If the belt is stretched, cracked or if
excessive slipping is occurring, replace the belt.
• Unplug the vacuum cleaner from the electrical
outlet.
• Turn the unit over and remove the bottom
plate (See "Removing and Reinstalling the
Bottom Plate") (Fig. 1).
• Remove the agitator and worn or broken belt.
• Loop the new belt around the motor drive shaft
and the agitator pulley (Fig. 2).
• Reinstall the agitator by inserting the belt end of
the agitator into the housing first, then press the
other end of the agitator into the housing.
MAIntenAnCe AnD CARe
Fig. 1
• Rotate the agitator, making sure that the belt is
not twisted.
• Reinstall the bottom plate (See “Removing and
Reinstalling the Bottom Plate”).
19
Fig. 2
Page 22

MAIntenAnCe AnD CARe
Edge Cleaning
The edge cleaning feature provides for
improved cleaning of carpets near walls
and stationary furniture. For maximum edge
cleaning, place the right side of the nozzle
against the wall or furniture.
Annual Checkup Reminder
To keep your vacuum in peak operating
condition, it is recommended you bring
your vacuum to an Authorized Simplicity
Retailer for an annual checkup. Your Retailer
will conduct a comprehensive examination
to ensure your vacuum is in top operating
condition.
20
Page 23

Unclogging the Nozzle and Hose
WARNING! To Reduce the Risk of Electrical
Shock or Injury From Moving Parts, Unplug
Before Servicing or Cleaning.
The hose located on the back of the vacuum
carries the dirt from the nozzle to the
vacuum bag. The hose also functions as
the attachment cleaning hose. First check
to see that a bag is properly installed.
If the Hose Should Become Clogged
• Pull out and turn the lid of the cleaning
attachment opening. Remove the clog
or blockage.
PRobleM solVIng gUIDe
• Remove the hose cuff from the nozzle inlet
and check for a clog.
• Turn the unit over and remove the bottom
plate (See “Removing and Reinstalling the
Bottom Plate”). Check the nozzle inlet tube
for obstructions. Clear tube and reinstall
the bottom plate.
Inlet Tube
21
Page 24

PRobleM solVIng gUIDe
Thermal motor protection
Your Symmetry is equipped with a safeguard
to recognize when the vacuum heats up and
shuts itself down to protect your vacuum
cleaner. Common reasons why a vacuum may
overheat include operating a vacuum with a
full bag or when there is a clog in the vacuum.
• Unplug the vacuum.
• Inspect your vacuum for a full bag condition
or a hose clog and correct the problem.
• Locate the Thermal Motor Reset button on
the back of the vacuum. Press button and
resume vacuuming.
If problem continues, contact an Authorized
Simplicity Retailer.
1. Unplug machine
Thermal Reset
2. Locate problem
source (clogged
hose or full bag)
Thermal Reset Button
3. Correct problem
4. Press reset button
If problem persists,
consult owner’s manual
or contact retailer.
22
Page 25

PRobleM solVIng gUIDe
Troubleshooting
WARNING! To Reduce the Risk of Electrical Shock or Injury From Moving Parts, Unplug
Before Servicing or Cleaning.
CAUTION! To reduce the risk of electric shock, do not handle plug or appliance with wet hands.
PROBLEM
Vacuum won’t turn on
Vacuum won’t pick up or
low suction
Dust escaping from
vacuum
Any other service should be performed by an Authorized Simplicity Retailer.
To locate your nearest Authorized Simplicity Retailer visit our website
at www.SimplicityVac.com or call 888-9-SIMPLY.
POSSIBLE REASON
• Power cord not rmly
plugged in
• Blown fuse or tripped
breaker
• Needs service
• Vacuum bag full
• Clogged lter
• Hose clogged
• Broken belt
• Dust cover not installed
properly
• Filter not installed
correctly
• Vacuum bag not installed
correctly
Key Replacement Parts
• Genuine HEPA Media Vacuum Bags: SAH-6
• Genuine Paper Vacuum Bags: S6-3 and S6-12
• Genuine Vacuum Belts: SB6-2
• Genuine Filters: SSF-2
POSSIBLE SOLUTION
• Plug unit in rmly
• Check house fuse or
breaker. Replace fuse /
reset breaker.
• Take to Authorized
Retailer (1-888-9-SIMPLY)
• Install new bag
• Install new lter
• Remove obstacle
• Replace belt
• Reinstall the dust cover
• Review lter installation
(page 16-17)
• Review bag installation
(page 15)
For Best Performance
• Keep your vacuum clean and in good operating condition.
• Change vacuum bags once a month or when the bag is 2/3 full to maximize cleaning performance.
• Always use genuine Simplicity vacuum bags and replacement parts. Use of other products may
result in poor cleaning performance, potential vacuum cleaner damage and may void vacuum
warranty. Genuine products are designed for maximum cleaning performance.
• Have your vacuum checked annually by your Authorized Simplicity Retailer.
• Store your vacuum carefully in a dry area.
• For optimum cleaning performance and safety, follow your owner’s manual instructions.
23
Page 26

WARRAntY
What is Covered:
This warranty covers any defects in material and workmanship in your new Simplicity
Symmetry vacuum.
How Long Coverage Lasts:
Warranty coverage for Simplicity Symmetry models S20SC, S20E and S20ENT lasts
three years. Household models used commercially are only warranted for 90 days.
What is Not Covered:
• Damage to the vacuum which occurs from neglect, abuse, alterations, accident,
misuse or improper maintenance.
• Normal replacement items: belts, disposable bags and disposable filters.
What Simplicity Vacuums Will Do:
This warranty provides, at no cost to you, all labor and parts to keep this vacuum in
correct operating condition during the warranted period.
How to Get Service:
Warranty service can only be obtained by presenting the vacuum to an Authorized
Simplicity Retailer. A proof-of-purchase and product serial number will be required
before service is rendered. To locate your nearest Simplicity Retailer, please call
1-888-9-SIMPLY or visit the Simplicity website at www.SimplicityVac.com.
THIS WARRANTY IS EXCLUSIVE AND IN LIEU OF ANY AND ALL OTHER WARRANTIES
WHETHER WRITTEN, ORAL, EXPRESSED OR IMPLIED, (INCLUDING ANY WARRANTY
OF MERCHANTABILITY OR FITNESS FOR A PARTICULAR PURPOSE). THIS WARRANTY
DISCLAIMS LIABILITY FOR INCIDENTAL OR CONSEQUENTIAL DAMAGES.
How State Law Applies:
This warranty gives you specific legal rights, and you may also have other rights which
vary from state to state.
Register your warranty online at www.SimplicityVac.com
24
Page 27

Date of purchase
Serial number
Model number
Purchased from:
Store name
oWneR’s WARRAntY InFoRMAtIon
keep this for your records…
Address
City, State, Zip
Telephone
25
Page 28

www.SimplicityVac.com
B503-3400G 5.15©2015 Tacony Corporation
 Loading...