

Page 1

en
Not for
Reproduction
Operator’s Manual
Manuale dell’operatore
it
cs
da
de
el
es
fr
Návod k obsluze
Betjeningsvejledning
Bedienungsanleitung
Εγχειρίδιο Χειριστή
Manual del operario
Manuel de l’opérateur
nl
no
pl
pt
ru
tr
Gebruiksaanwijzing
Brukerhåndbok
Instrukcja obsługi
Manual do operador
Руководство по эксплуатации
Kullanma kılavuzu
Regent RD Series Hydro Tractors
Mfg. No. Description
2690849 Regent 1840RD
2690850 Regent 2440RD
2690853 Regent 1840RDF
2690854 Regent 2440RDF
1739152
Revision D
Page 2
C
A
A
B
4
Not for
Reproduction
7
A
8
B
5
A
C
B
C
6
A
B
9
E
A
D
A
B
C
B
D
2
Page 3
10
Not for
Reproduction
B
13
A
11
A
A
B
14
A
B
15
A
12
C
A
B
D
B
E
3
Page 4
16
Not for
Reproduction
E
A
D
17
B
D
F
J
G
18
A
C
H
I
B
D
C
4
Page 5
CONTENTS
Not for
Reproduction
Illustrations ..........................................................................................................2
Operator Safety....................................................................................................6
Features and Controls.......................................................................................11
Operation............................................................................................................14
Maintenance.......................................................................................................19
Troubleshooting.................................................................................................23
Warranty .............................................................................................................25
Specifications ....................................................................................................26
Parts and Accessories ......................................................................................26
General Information
Thank you for purchasing this quality-built SIMPLICITY riding mower. We’re pleased that you’ve placed your confidence in
the SIMPLICITY brand. When operated and maintained according to the instructions in this manual, your SIMPLICITY
product will provide many years of dependable service.
This manual contains safety information to make you aware of the hazards and risks associated with riding mowers and
how to avoid them. This riding mower is designed and intended only for cutting grass and is not intended for any other
purpose. It is important that you read and understand these instructions thoroughly before attempting to start or operate the
equipment. Save these original instructions for future reference.
Product Reference Data
Record your model name/number, manufacturer’s
identification numbers, and engine serial numbers in the
space provided for easy access. These numbers can be
found in the locations shown.
When contacting your authorized dealer for
replacement parts, service, or information you MUST
have these numbers.
PRODUCT REFERENCE DATA
Model Description Name/Number
Unit MFG Number Unit SERIAL Number
Mower Deck MFG Number Mower Deck SERIAL Number
Dealer Name Date Purchased
ENGINE REFERENCE DATA
Engine Make Engine Model
Engine Type/Spec Engine Code/Serial Number
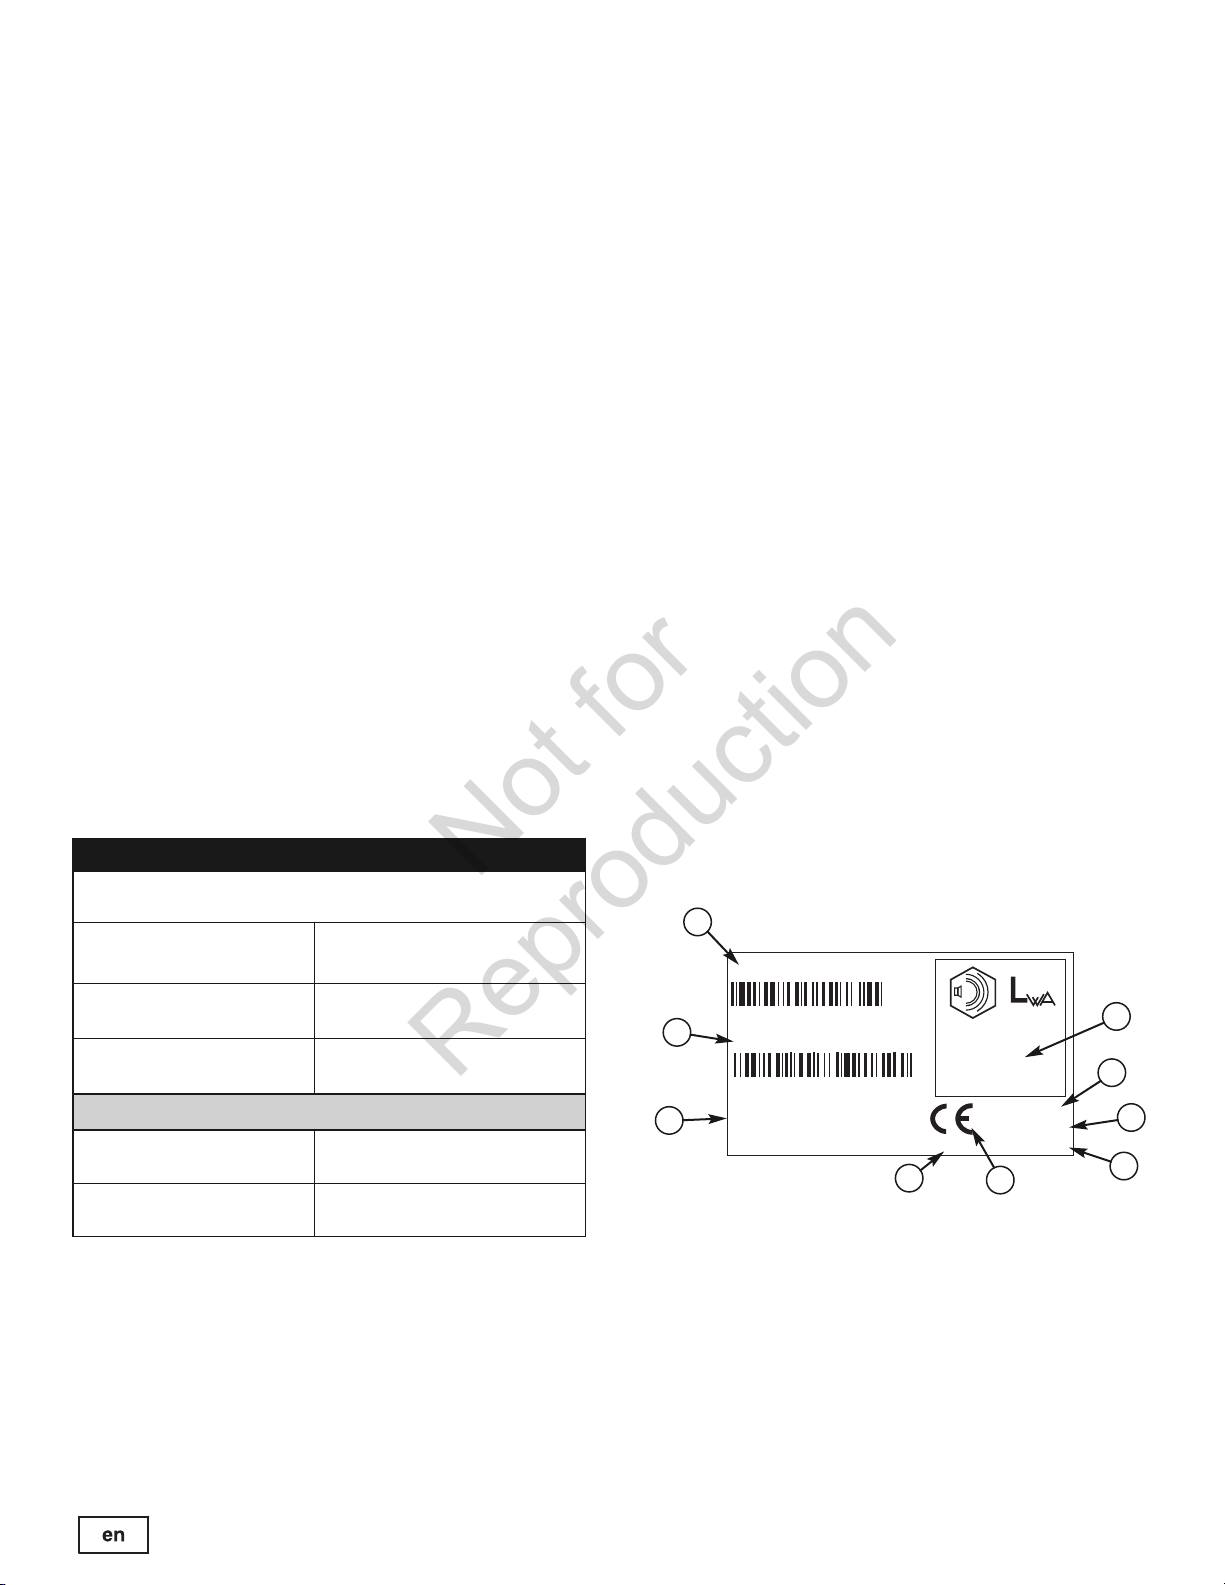
CE Identification Tag
A. Manufacturer’s Identification Number
B. Manufacturer’s Serial Number
C. Power Rating in Kilowatts
D. Maximum Engine Speed in Rotations per Minute
E. Manufacturer’s Name and Address
F. Year of Manufacture
G. CE Compliance Logo
H. Mass of Unit in Kilograms
I. Guaranteed Sound Power in Decibels
A
Part No. xxxxxxx
B
E
xxxxxxxxxxxxxxx
Serial No. xxxxxxxxxx
xxxxxxxxxxxxxxxxxxxxxxx
xxxxxxxxxxxxxxxxxxxxxxx
xxxxxxxxxxxxxxxxxxxxxxx
xxxxxxxxxxxxxxxxxxxxxxx
xxx dB
20xx
F
kg: xxx
kW: x.xx
xxxx max
G
I
H
C
D
The Illustrated Parts List for this machine can be downloaded from www.simplicitymfg.com. Please provide model and
serial number when ordering replacement parts.
Copyright © 2010 Briggs & Stratton Power Products Group, LLC
Milwaukee, WI, All rights reserved.
SIMPLICITY is a trademark of Briggs & Stratton Power Products
Group, LLC Milwaukee, WI USA.
5
Page 6

OPERATOR SAFETY
Not for
Reproduction
Read these safety rules and follow them closely. Failure to obey these rules could result in loss of control
of unit, severe personal injury or death to you, or bystanders, or damage to property or equipment.
This mowing deck is capable of amputating hands and feet and throwing objects.
The triangle in text signifies important cautions or warnings which must be followed.
GENERAL OPERATION
1. Read, understand, and follow all instructions in the
manual and on the unit before starting.
2. Do not put hands or feet near rotating parts or under
the machine. Keep clear of the discharge opening at
all times.
3. Only allow responsible adults, who are familiar with
the instructions, to operate the unit (local regulations
can restrict operator age).
4. Clear the area of objects such as rocks, toys, wire,
etc., which could be picked up and thrown by the
blade(s).
5. Be sure the area is clear of other people before mowing. Stop the unit if anyone enters the area.
6. Never carry passengers.
7. Do not mow in reverse unless absolutely necessary.
Always look down and behind before and while travelling in reverse.
8. Never direct discharge material toward anyone. Avoid
discharging material against a wall or obstruction.
Material may ricochet back toward the operator. Stop
the blade(s) when crossing gravel surfaces.
9. Do not operate the machine without the entire grass
catcher, discharge guard (deflector), or other safety
devices in place.
10. Slow down before turning.
11. Never leave a running unit unattended. Always disengage the PTO, set parking brake, stop engine, and remove keys before dismounting.
12. Disengage blades (PTO) when not mowing. Shut off
engine and wait for all parts to come to a complete
stop before cleaning the machine, removing the grass
catcher, or unclogging the discharge guard.
13. Operate the machine only in daylight or good artificial
light.
14. Do not operate the unit while under the influence of
alcohol or drugs.
15 Watch for traffic when operating near or crossing
roadways.
16. Use extra care when loading or unloading the unit
into a trailer or truck.
17. Always wear eye protection when operating this unit.
18. Data indicates that operators, age 60 years and
above, are involved in a large percentage of power
equipment-related injuries. These operators should
evaluate their ability to operate the equipment safely
enough to protect themselves and others from injury.
19. Follow the manufacturer’s recommendations for wheel
weights or counterweights.
20. Keep in mind the operator is responsible for accidents
occurring to other people or property.
21. All drivers should seek and obtain professional and
practical instruction.
22. Always wear substantial footwear and trousers.
Never operate when barefoot or wearing sandals.
23. Before using, always visually check that the blades
and blade hardware are present, intact, and secure.
Replace worn or damaged parts.
24. Disengage attachments before: refueling, removing
an attachment, making adjustments (unless the adjustment can be made from the operator’s position).
25. When the machine is parked, stored, or left unattended, lower the cutting means unless a positive mechanical lock is used.
26. Before leaving the operator’s position for any reason,
engage the parking brake (if equipped), disengage
the PTO, stop the engine, and remove the key.
27. To reduce fire hazard, keep the unit free of grass,
leaves, & excess oil. Do not stop or park over dry
leaves, grass, or combustible materials.
TRANSPORTING AND STORAGE
1. When transporting the unit on an open trailer, make
sure it is facing forward, in the direction of travel. If
the unit is facing backwards, wind lift could damage
the unit.
2. Always observe safe refueling and fuel handling practices when refueling the unit after transportation or
storage.
3. Never store the unit (with fuel) in an enclosed poorly
ventilated structure. Fuel vapors can travel to an ignition source (such as a furnace, water heater, etc.)
and cause an explosion. Fuel vapor is also toxic to
humans and animals.
6 www.simplicitymfg.com
4. Always follow the engine manual instructions for
storage preparations before storing the unit for both
short and long term periods.
5. Always follow the engine manual instructions for
proper start-up procedures when returning the unit to
service.
6. Never store the unit or fuel container inside where
there is an open flame or pilot light, such as in a
water heater. Allow unit to cool before storing.
Page 7

OPERATOR SAFETY
Not for
Reproduction
SLOPE OPERATION
Slopes are a major factor related to loss-of-control and tipover accidents, which can result in severe injury or death.
Operation on all slopes requires extra caution. If you cannot back up the slope or if you feel uneasy on it, do not operate on it.
Control of a walk-behind or ride-on machine sliding on a
slope will not be regained by the application of the brake.
The main reasons for loss of control are: insufficient tire
grip on the ground, speed too fast, inadequate braking, the
type of machine is unsuitable for its task, lack of awareness
of the ground conditions, incorrect hitching and load distribution.
1. Mow up and down slopes, not across.
2. Watch for holes, ruts, or bumps. Uneven terrain could
overturn the unit. Tall grass can hide obstacles.
3. Choose a slow speed so that you will not have to stop
or change speeds while on the slope.
4. Do not mow on wet grass. Tires may loose traction.
5. Always keep unit in gear especially when traveling
down slopes. Do not shift to neutral and coast downhill.
6. Avoid starting, stopping, or turning on a slope. If tires
lose traction, disengage the blade(s) and proceed
slowly straight down the slope.
7. Keep all movement on slopes slow and gradual. Do
not make sudden changes in speed or direction,
which could cause the machine to rollover.
8. Use extra care while operating machines with grass
catchers or other attachments; they can affect the
stability of the unit. Do not use on steep slopes.
9. Do not try to stabilize the machine by putting your
foot on the ground (ride-on units).
10. Do not mow near drop-offs, ditches, or embankments.
The mower could suddenly turn over if a wheel is
over the edge of a cliff or ditch, or if an edge caves in.
11. Do not use grass catchers on steep slopes.
12. Do not mow slopes you cannot back up them.
13. See your authorized dealer/retailer for recommendations of wheel weights or counterweights to improve
stability.
14. Remove obstacles such as rocks, tree limbs, etc.
15. Use slow speed. Tires may lose traction on slopes
even through the brakes are functioning properly.
16. Do not turn on slopes unless necessary, and then,
turn slowly and gradually downhill, if possible.
WARNING
Never operate on slopes greater than 17.6 percent
(10°) which is a rise of 3-1/2 feet (106 cm) vertically in
20 feet (607 cm) horizontally.
When operating on slopes use additional wheel
weights or counterweights. See your dealer/retailer to
determine which weights are available and
appropriate for your unit.
Select slow ground speed before driving onto slope.
In addition to front weights, use extra caution when
operating on slopes with rear-mounted grass
catchers.
Mow UP and DOWN the slope, never across the face,
use caution when changing directions and DO NOT
START OR STOP ON SLOPE.
CHILDREN
Tragic accidents can occur if the operator is not alert to the
presence of children. Children are often attracted to the
unit and the mowing activity. Never assume that children
will remain where you last saw them.
1. Keep children out of the mowing area and under the
watchful care of another responsible adult.
2. Be alert and turn unit off if children enter the area.
3. Before and during reverse operation, look behind and
down for small children.
4. Never carry children, even with the blade(s) off. They
may fall off and be seriously injured or interfere with
safe unit operation. Children who have been given
rides in the past may suddenly appear in the mowing
area for another ride and be run over or backed over
by the machine.
5. Never allow children to operate the unit.
6. Use extra care when approaching blind corners,
shrubs, trees, or other objects that may obscure vision.
EMISSIONS
1. Engine exhaust from this product contains chemicals
known, in certain quantities, to cause cancer, birth
defects, or other reproductive harm.
2. Look for the relevant Emissions Durability Period and
Air Index information on the engine emissions label.
TOWED EQUIPMENT (RIDE-ON UNITS)
1. Tow only with a machine that has a hitch designed for
towing. Do not attach towed equipment except at the
hitch point.
2. Follow the manufacturer’s recommendations for
weight limit for towed equipment and towing on
slopes.
3. Never allow children or others in or on towed equipment.
4. On slopes, the weight of the towed equipment may
cause loss of traction and loss of control.
5. Travel slowly and allow extra distance to stop.
6. Do not shift to neutral and coast down hill.
7
Page 8

OPERATOR SAFETY
Not for
Reproduction
SERVICE AND MAINTENANCE
Safe Handling of Gasoline
1. Extinguish all cigarettes, cigars, pipes, and other
sources of ignition.
2. Use only approved gasoline containers.
3. Never remove the gas cap or add fuel with the engine
running. Allow the engine to cool before refueling.
4. Never fuel the machine indoors.
5. Never store the machine or fuel container where there
is an open flame, spark, or pilot light such as near a
water heater or other appliance.
6. Never fill containers inside a vehicle or on a truck bed
with a plastic bed liner. Always place containers on
the ground away from your vehicle before filling.
7. Remove gas-powered equipment from the truck or
trailer and refuel it on the ground. If this is not possible, then refuel such equipment on a trailer with a
portable container, rather than from a gasoline dispenser nozzle.
8. Keep nozzle in contact with the rim of the fuel tank or
container opening at all times until fueling is complete. Do not use a nozzle lock-open device.
9. If fuel is spilled on clothing, change clothing immediately.
10. Never over-fill the fuel tank. Replace gas cap and
tighten securely.
11. Use extra care in handling gasoline and other fuels.
They are flammable and vapors are explosive.
12. If fuel is spilled, do not attempt to start the engine but
move the machine away from the area of spillage and
avoid creating any source of ignition until fuel vapors
have dissipated.
13. Replace all fuel tank caps and fuel container caps securely.
Service & Maintenance
1. Never run the unit in an enclosed area where carbon
monoxide fumes may collect.
2. Keep nuts and bolts, especially blade attachment
bolts, tight and keep equipment in good condition.
3. Never tamper with safety devices. Check their proper
operation regularly and make necessary repairs if
they are not functioning properly.
4. Keep unit free of grass, leaves, or other debris buildup. Clean up oil or fuel spillage. and remove any fuelsoaked debris. Allow machine to cool before storage.
5. If you strike an object, stop and inspect the machine.
Repair, if necessary, before restarting.
6. Never make adjustments or repairs with the engine
running.
7. Check grass catcher components and the discharge
guard frequently and replace with manufacturer’s recommended parts, when necessary.
8. Mower blades are sharp. Wrap the blade or wear
gloves, and use extra caution when servicing them.
9. Check brake operation frequently. Adjust and service
as required.
10. Maintain or replace safety and instructions labels, as
necessary.
11. Do not remove the fuel filter when the engine is hot
as spilled gasoline may ignite. Do not spread fuel line
clamps further than necessary. Ensure clamps grip
hoses firmly over the filter after installation.
12. Do not use gasoline containing METHANOL, gasohol
containing more than 10% ETHANOL, gasoline additives, or white gas because engine/fuel system damage could result.
13. If the fuel tank must be drained, it should be drained
outdoors.
14. Replace faulty silencers/mufflers.
15. Use only factory authorized replacement parts when
making repairs.
16. Always comply with factory specifications on all settings and adjustments.
17. Only authorized service locations should be utilized
for major service and repair requirements.
18. Never attempt to make major repairs on this unit unless you have been properly trained. Improper service
procedures can result in hazardous operation, equipment damage and voiding of manufacturer’s warranty.
19. On multiple blade mowers, take care as rotating one
blade can cause other blades to rotate.
20. Do not change engine governor settings or overspeed the engine. Operating the engine at excessive
speed can increase the hazard of personal injury.
21. Disengage drive attachments, stop the engine, remove the key, and disconnect the spark plug wire(s)
before: clearing attachment blockages and chutes,
performing service work, striking an object, or if the
unit vibrates abnormally. After striking an object, inspect the machine for damage and make repairs before restarting and operating the equipment.
22. Never place hands near the moving parts, such as a
hydro pump cooling fan, when the tractor is running.
(Hydro pump cooling fans are typically located on top
of the transaxle).
23. Units with hydraulic pumps, hoses, or motors: WARNING: Hydraulic fluid escaping under pressure may
have sufficient force to penetrate skin and cause serious injury. If foreign fluid is injected into the skin it
must be surgically removed within a few hours by a
doctor familiar with this form of injury or gangrene
may result. Keep body and hands away from pin
holes or nozzles that eject hydraulic fluid under high
pressure. Use paper or cardboard, and not hands, to
search for leaks. Make sure all hydraulic fluid connections are tight and all hydraulic hoses and lines
are in good condition before applying pressure to the
system. If leaks occur, have the unit serviced immediately by your authorized dealer.
24. WARNING: Stored energy device. Improper release
of springs can result in serious personal injury.
Springs should be removed by an authorized technician.
25. Models equipped with an engine radiator: WARNING:
Stored energy device. To prevent serious bodily injury
from hot coolant or steam blow-out, never attempt to
remove the radiator cap while the engine is running.
Stop the engine and wait until it is cool. Even then,
use extreme care when removing the cap.
8
www.simplicitymfg.com
Page 9
OPERATOR SAFETY
Not for
Reproduction
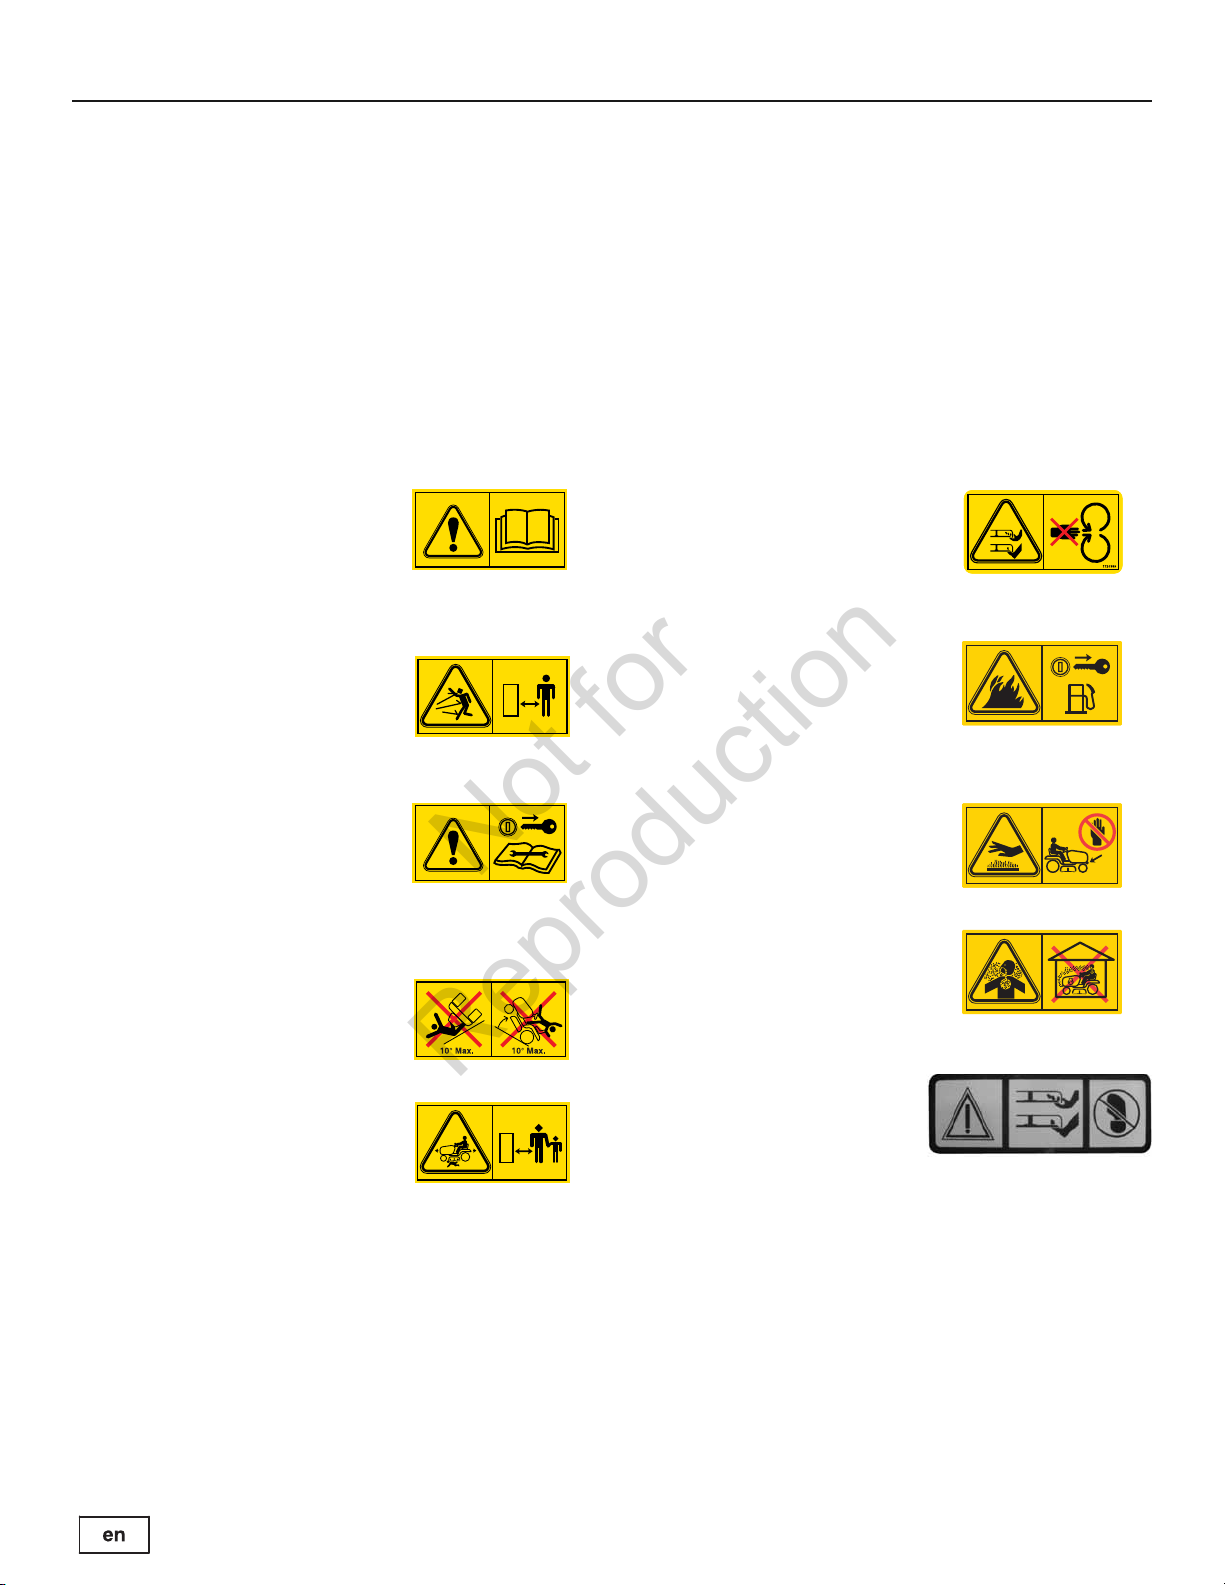
Safety Decals
All DANGER, WARNING, CAUTION and instructional
messages on your rider and mower should be carefully
read and obeyed. Personal bodily injury can result when
these instructions are not followed. The information is for
your safety and it is important! The safety decals below
are on your rider and mower.
Safety Icons
Warning: Read Operator’s Manual.
Read and understand the Operator’s Manual before using this machine.
Danger: Thrown Objects.
This machine is capable of throwing objects and debris. Keep bystanders away.
If any of these decals are lost or damaged, replace them
at once. See your local dealer for replacements.
These labels are easily applied and will act as a constant
visual reminder to you, and others who may use the
equipment, to follow the safety instructions necessary for
safe, effective operation.
Danger: Dismemberment.
This mower deck can amputate
limbs. Keep hands and feet away
from blades.
Danger: Fire Hazard.
Do not add fuel while engine is hot
or running. Stop engine and allow to
cool for 3 minutes prior to adding
fuel.
Warning: Remove Key Before
Servicing.
Remove the key and consult technical literature before performing
repairs or maintenance.
Danger: Machine Rollover.
Do not use this machine on slopes
greater than 10°.
Danger: Dismemberment.
This machine can amputate limbs.
Keep bystanders and children
away when engine is running.
Danger: Hot Surface.
Allow machine to cool before touching this area.
Danger: Carbon Monoxide Poisoning.
Do not operate the engine in an unventilated area.
Danger: Dismemberment.
This mower deck can amputate
limbs. Keep hands and feet away
from blades.
9
Page 10
OPERATOR SAFETY
Not for
Reproduction
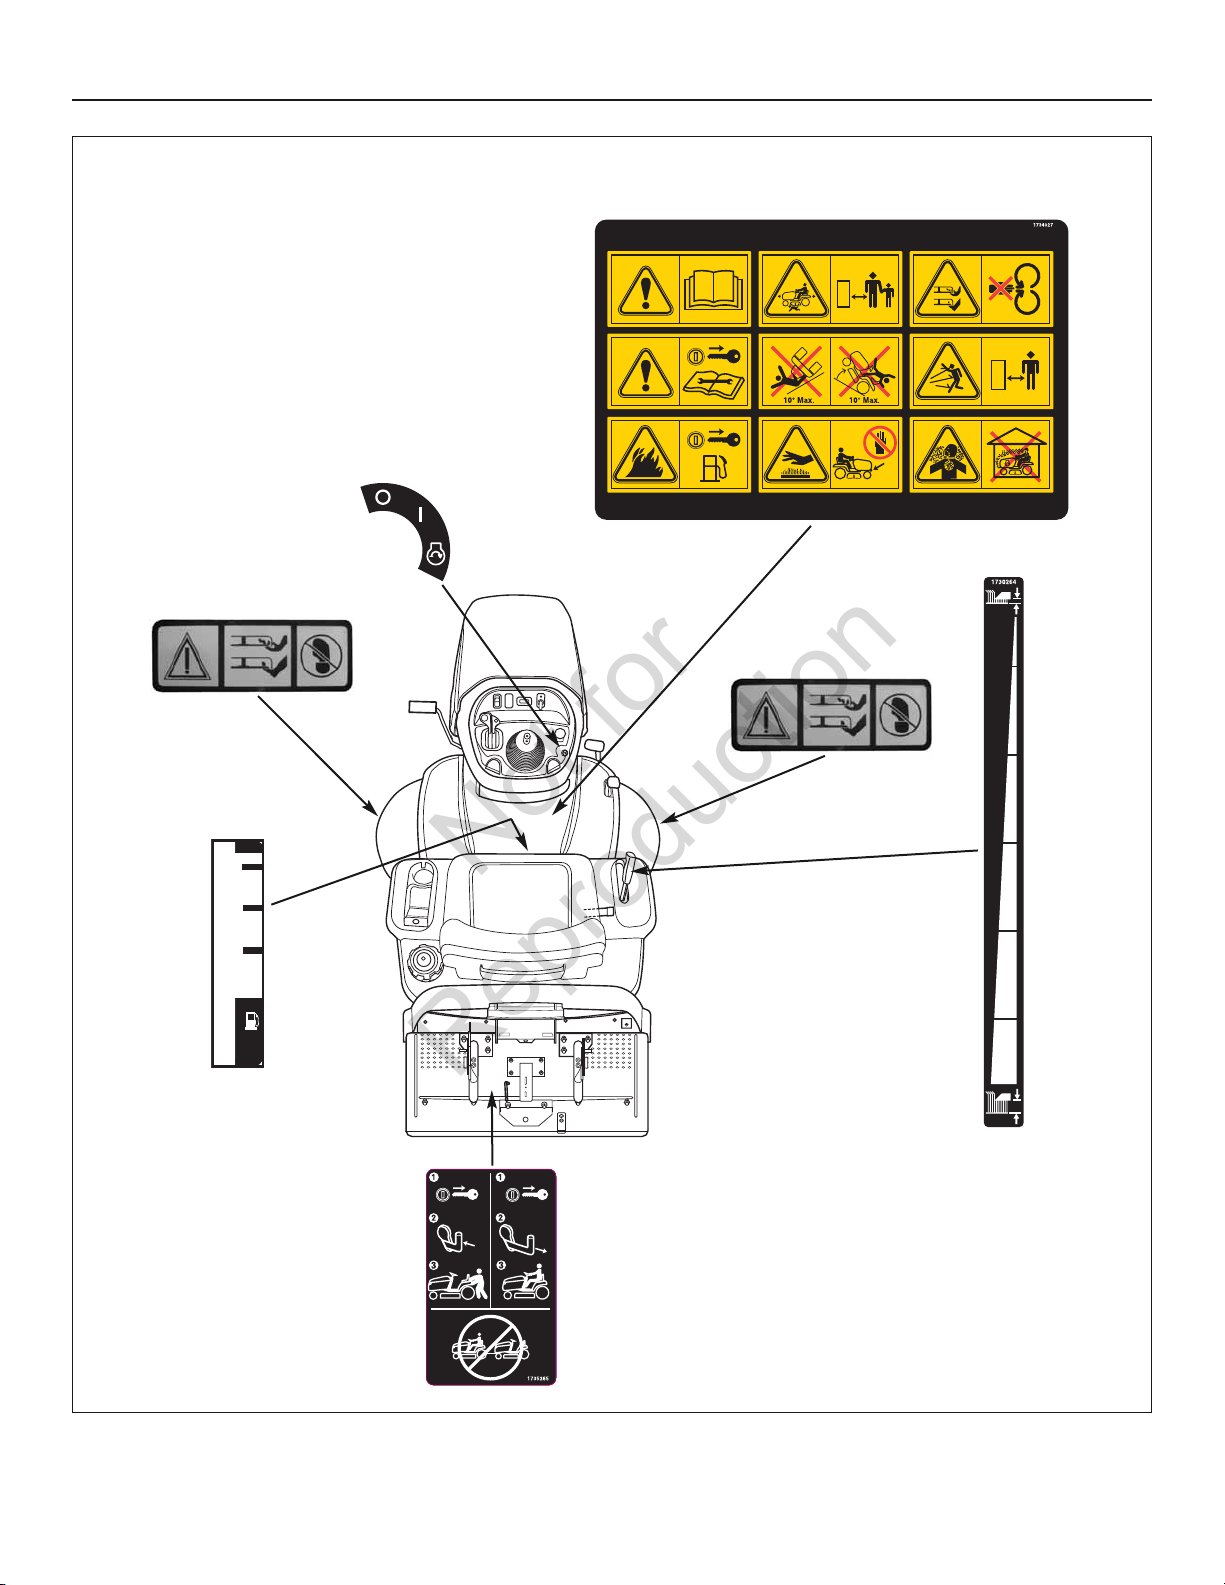
Safety Icon
Part No. 1735890
Safety Icons,
Part No. 1734027
Ignition Switch
Positions
Part No. 1722806
Safety Icon
Part No. 1735890
4
4
3
3
2
2
R
R
Fuel Level
Part No. 1735889
Mower Lift
Part No. 1730264
Transmission
Safety Decals Figure 1
Release
Part No. 1735265
10
www.simplicitymfg.com
Page 11
12V
FEATURES AND CONTROLS
Not for
Reproduction
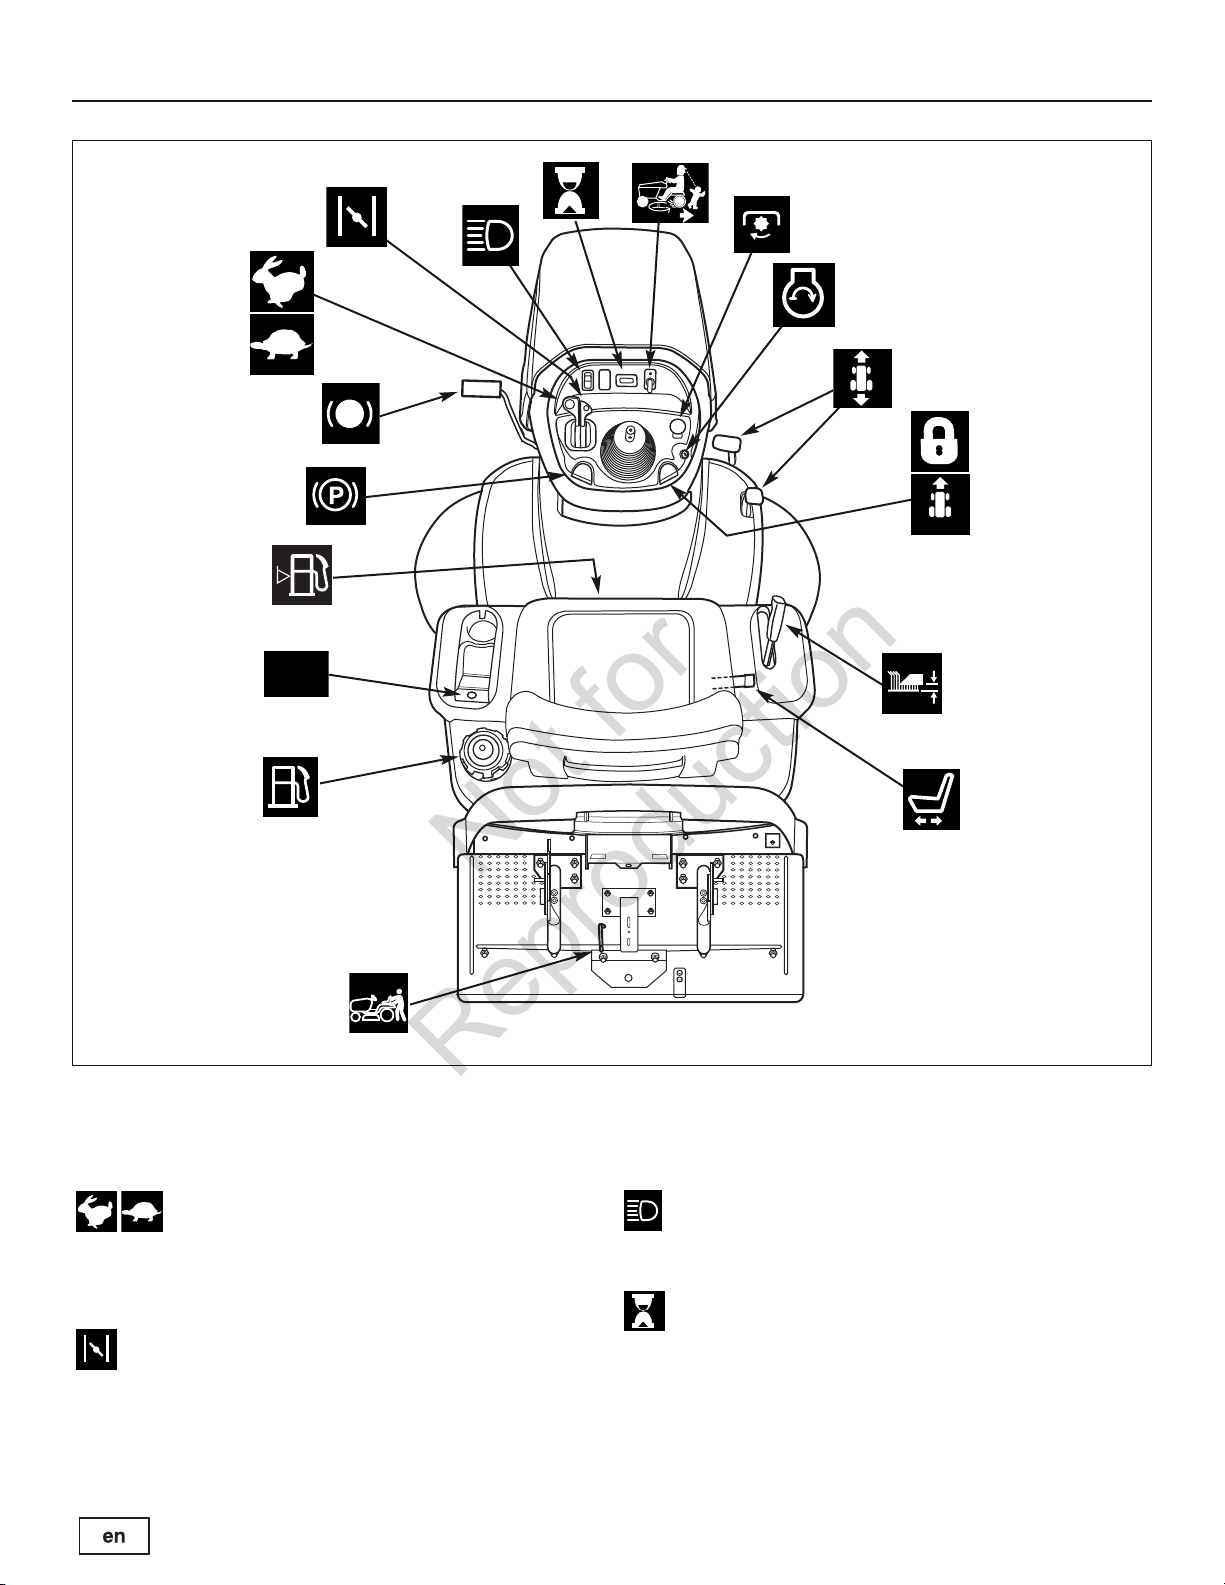
Tractor Controls Figure 2
TRACTOR CONTROLS
Throttle Control
The throttle controls engine speed. Move the throttle forward to increase engine speed and back to decrease engine speed. Always operate at FULL throttle.
Choke
Close the choke for cold starting. Open the choke once the
engine starts. A warm engine may not require choking.
Move the lever forward to close the choke.
Headlights
The light switch turns the tractor headlights on and off.
Hour Meter (Select Models)
The hour meter measures the number of hours the key has
been in the RUN position.
11
Page 12

12V
FEATURES AND CONTROLS
Not for
Reproduction
Reverse Mowing Option (RMO)
The Reverse Mowing Option allows for mowing (or use of
other PTO driven attachments) while traveling in reverse.
If you choose to mow in reverse, turn the RMO key after
the PTO is engaged. The L.E.D. light will illuminate, and
the operator can then mow in reverse. Each time the PTO
is engaged the RMO needs to be reactivated if desired.
PTO Switch
The PTO (Power Take-Off) switch engages and disengages attachments that use the PTO. To engage the PTO,
pull UP on the switch. Push DOWN to disengage.
the operator must be seated firmly in the tractor seat for
the PTO to function.
Note that
Ignition Switch
The ignition switch starts and stops the engine, it has three
positions:
OFF Stops the engine and shuts off the
electrical system.
RUN Allows the engine to run and powers the
electrical system.
Mower Lift Lever
The mower lift lever controls the mower cutting height.
Pull lever to lower the height and pull up to raise the
height.
Seat Adjustment Lever
The seat can be adjusted forward and back. Move the
lever, position the seat as desired, and release the lever
to lock the seat into position.
Transmission Release Valve Lever
The transmission release valve lever deactivates the
transmission so that the tractor can be pushed by hand.
See
Pushing the Tractor By Hand.
Fuel Tank
To remove the cap, turn counterclockwise.
Power Outlet (Select Models)
The power outlet is 12V-DC. Accessory must be rated at
9 amps or less.
START Cranks the engine for starting.
NOTE: Never leave the ignition switch in the RUN position
with the engine stopped–this drains the battery.
Ground Speed Pedals
The tractor’s forward ground speed is controlled by the forward ground speed control pedal. The tractor’s reverse
ground speed is controlled by the reverse ground speed
control pedal.
Depressing either pedal will increase ground speed. Note
that the further down the pedal is depressed, the faster the
tractor will travel.
Cruise Control
The cruise control is used to lock the ground speed control
in forward. The cruise control has five lock positions.
Fuel Level Gauge
Displays the fuel level in the tank.
Parking Brake
The parking brake knob is used to lock the parking brake
when the tractor is stopped. Fully depressing the brake
pedal and pulling up on the knob engages the parking
brake.
Brake Pedal
Depressing the brake pedal applies the tractor brake.
12
www.simplicitymfg.com
Page 13
FEATURES AND CONTROLS
Not for
Reproduction
F
N
I
C
M
M
J
J
A
K
B
G
F
D
H
C
B
L
E
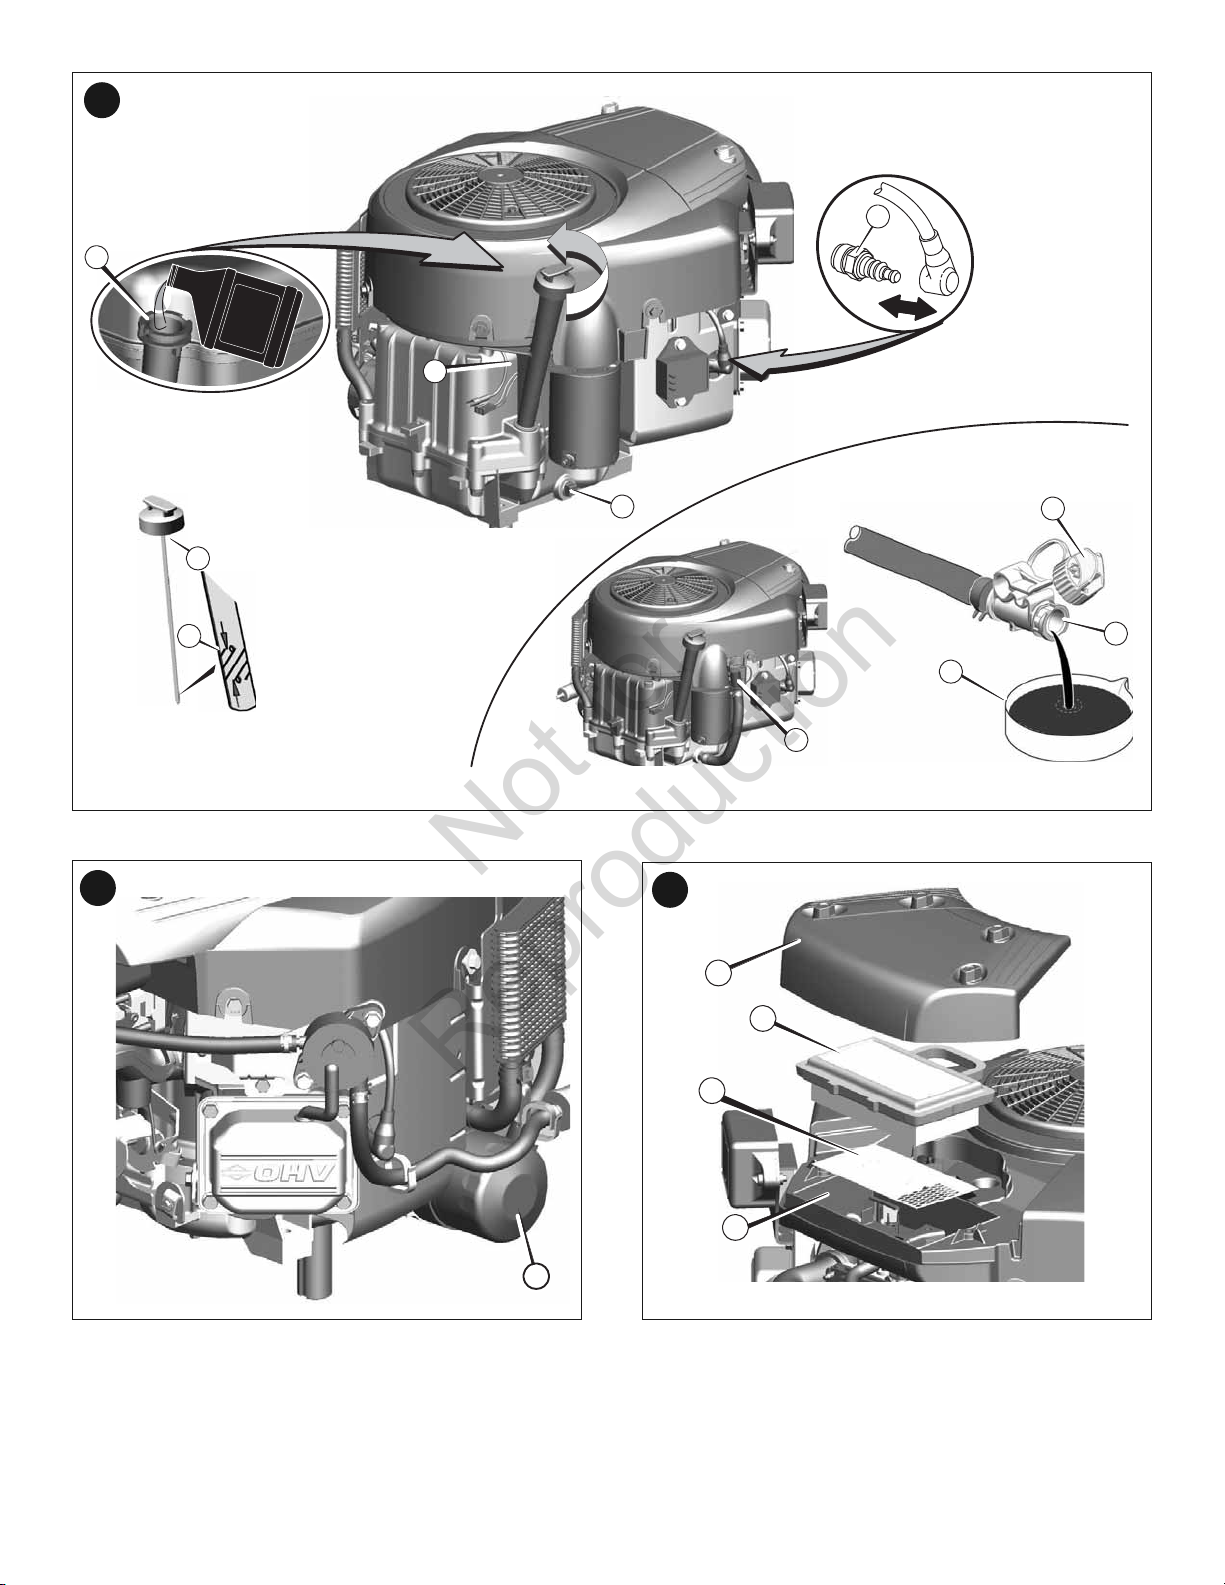
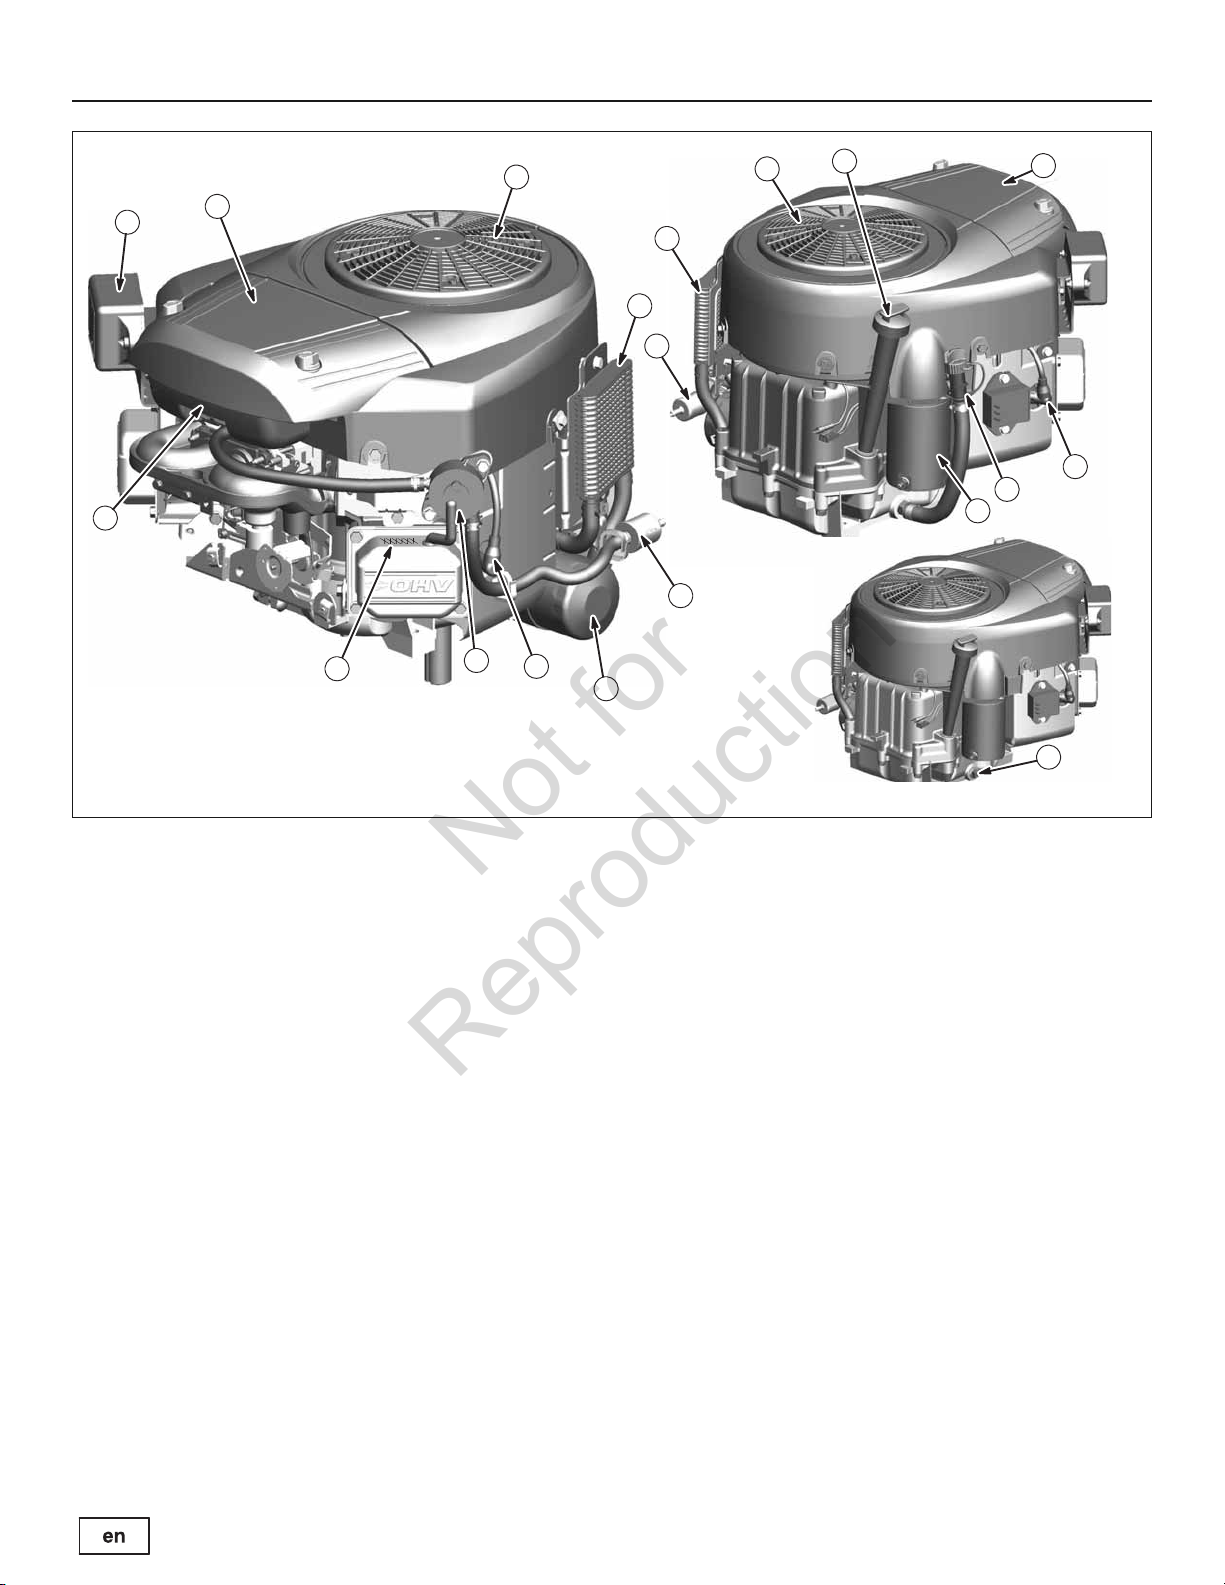
Engine Controls Figure 3
ENGINE CONTROLS
A. Engine Identification
B. Spark Plug
C. Air Cleaner
D. Dipstick
E. Oil Drain Plug
F. Rotating Screen
G. Oil Filter
H. Electric Starter
I. Carburetor
J. Fuel Filter (optional)
K. Fuel Pump (optional)
L. Quick Oil Drain (optional)
M. Oil Cooler (optional)
N. Electronic Control Unit (optional)
13
Page 14
OPERATION
Not for
Reproduction
Safety Interlock System Tests
This unit is equipped with safety interlock switches and
other safety devices. These safety systems are present
for your safety: do not attempt to bypass safety switches,
and never tamper with safety devices.
WARNING
If the unit does not pass a safety test, do not
operate it. See an authorized dealer.
Test 1 — Engine should NOT crank if:
• PTO switch is ON, OR
• Brake pedal is NOT fully depressed (parking brake
OFF), OR
• The cruise control lever is NOT in NEUTRAL.
Test 2 — Engine SHOULD crank and start if:
• Operator is sitting in seat, AND.
• PTO switch is OFF, AND
• Brake pedal is fully depressed (parking brake ON),
AND
• The cruise control lever is in NEUTRAL.
Test 3 — Engine should SHUT OFF if:
• Operator rises off seat with PTO engaged, OR
• Operator rises off seat with brake pedal NOT fully depressed (parking brake OFF).
Test 4 — Check Mower Blade Stopping Time
Mower blades and mower drive belt should come to a complete stop within five seconds after electric PTO switch is
turned OFF (or operator rises off seat). If mower drive belt
does not stop within five seconds, see an authorized dealer.
Test 5 — Reverse Mow Option (RMO) Check
• Engine should shut off if reverse travel is attempted if the
PTO has been switched on and RMO has not been activated.
• RMO light should illuminate when RMO has been activated.
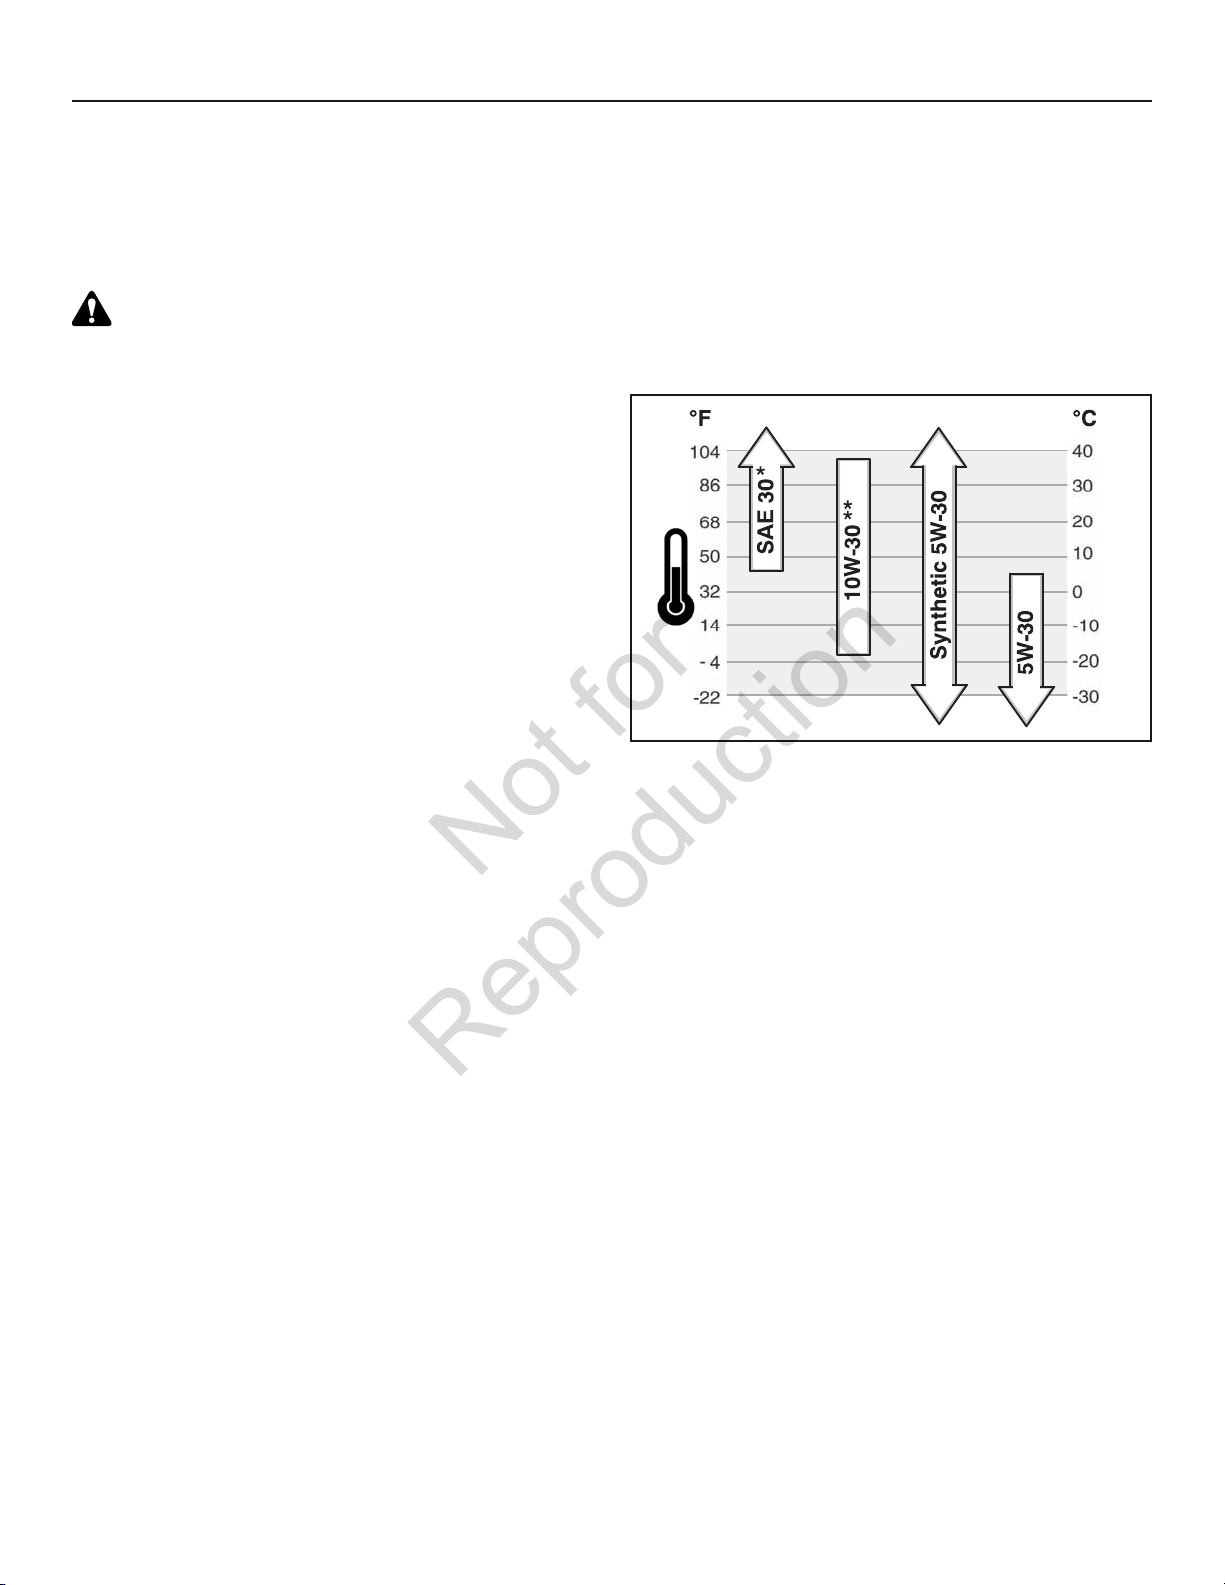
Oil Recommendations
We recommend the use of Briggs & Stratton Warranty
Certified oils for best performance. Other high-quality detergent oils are acceptable if classified for service SF, SG,
SH, SJ or higher. Do not use special additives.
Outdoor temperatures determine the proper oil viscosity
for the engine. Use the chart to select the best viscosity for
the outdoor temperature range expected.
* Below 40°F (4°C) the use of SAE 30 will result in hard starting.
** Above 80°F (27°C) the use of 10W-30 may cause increased oil consumption. Check oil
level more frequently.
Checking/Adding Oil
Before adding or checking the oil
• Place engine level.
• Clean the oil fill area of any debris.
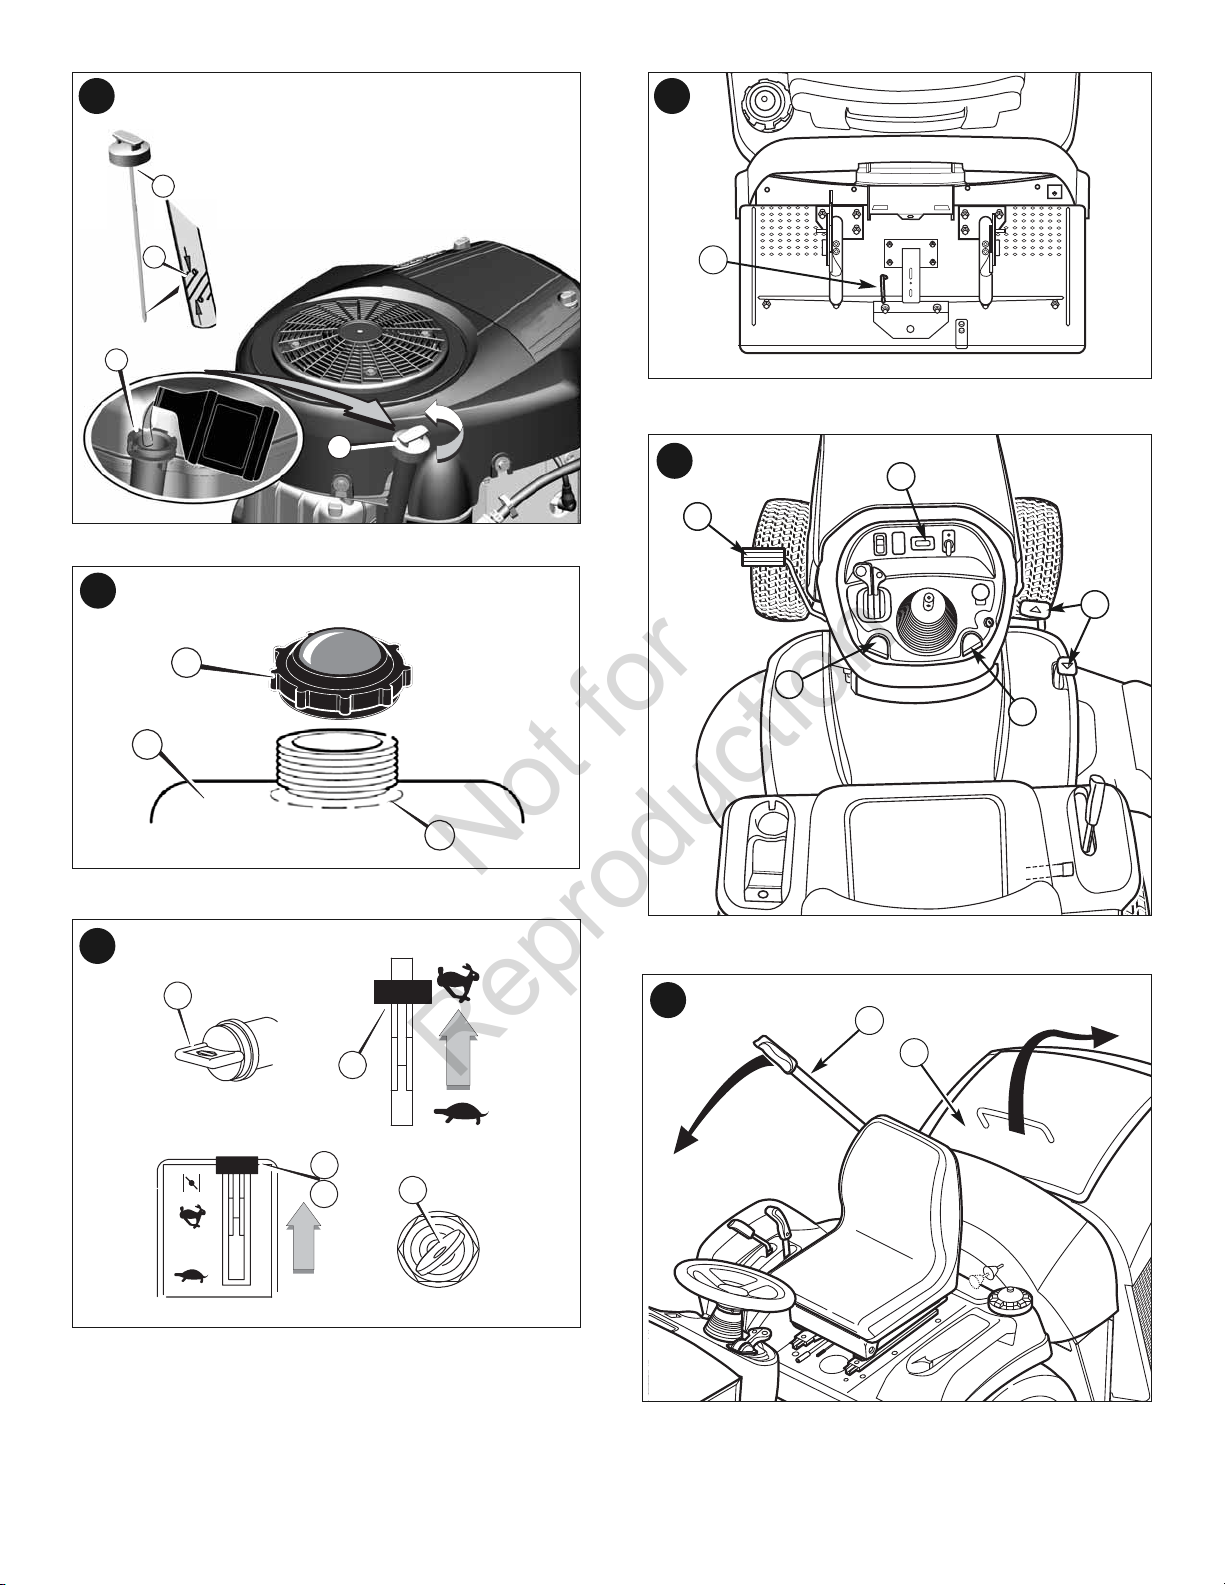
1. Remove the dipstick (A, Figure 4) and wipe with a
clean cloth.
2. Insert and tighten the dipstick.
3. Remove the dipstick and check the oil level. It should
be at the FULL mark (B) on the dipstick.
4. If low, add oil slowly into the engine oil fill (C). Do not
overfill. After adding oil, wait one minute and then
recheck the oil level.
14
NOTE: Do not add oil at the quick oil drain (L, Figure 3) (if
equipped).
5. Replace and tighten the dipstick.
www.simplicitymfg.com
Page 15

OPERATION
Not for
Reproduction
Oil Pressure
If the oil pressure is too low, a pressure switch (if
equipped) will either stop the engine or activate a warning
device on the equipment. If this occurs, stop the engine
and check the oil level with the dipstick.
If the oil level is below the ADD mark, add oil until it
reaches the FULL mark. Start the engine and check for
proper pressure before continuing to operate.
If the oil level is between the ADD and FULL marks, do
not start the engine. Contact an authorized dealer to have
the oil pressure problem corrected.
Fuel Recommendations
Fuel must meet these requirements:
• Clean, fresh, unleaded gasoline.
• A minimum of 87 octane/87 AKI (91 RON). High altitude use, see below.
• Gasoline with up to 10% ethanol (gasohol) or up to
15% MTBE (methyl tertiary butyl ether) is acceptable.
CAUTION: Do not use unapproved gasolines, such as
E85. Do not mix oil in gasoline or modify the engine to run
on alternate fuels. This will damage the engine components and void the engine warranty.
To protect the fuel system from gum formation, mix a fuel
stabilizer into the fuel. See the
not the same. If starting or performance problems occur,
change fuel providers or change brands. This engine is
certified to operate on gasoline. The emissions control
system for this engine is EM (Engine Modifications).
Storage
section. All fuel is
High Altitude
At altitudes over 5,000 feet (1,524 meters), a minimum 85
octane/85 AKI (89 RON) gasoline is acceptable. To remain
emissions compliant, high altitude adjustment is required.
Operation without this adjustment will cause decreased
performance, increased fuel consumption, and increased
emissions. See an authorized dealer for high altitude adjustment information.
Operation of the engine at altitudes below 2,500 feet (762
meters) with the high altitude kit is not recommended.
Adding Fuel
WARNING
Fuel and its vapors are extremely flammable
and explosive.
Fire or explosion can cause severe burns or
death.
When Adding Fuel
• Turn engine off and let engine cool at least 3
minutes before removing the fuel cap.
• Fill fuel tank outdoors or in well-ventilated area.
• Do not overfill fuel tank. To allow for expansion of
the fuel, do not fill above the bottom of the fuel tank
neck.
• Keep fuel away from sparks, open flames, pilot
lights, heat, and other ignition sources.
• Check fuel lines, tank, cap, and fittings frequently
for cracks or leaks. Replace if necessary.
• If fuel spills, wait until it evaporates before starting
engine.
1. Clean the fuel cap area of dirt and debris. Remove
the fuel cap (A, Figure 5).
2. Fill the fuel tank (B) with fuel. To allow for expansion
of the fuel, do not fill above the bottom of the fuel tank
neck (C).
3. Reinstall the fuel cap.
Starting the Engine
WARNING
Fuel and its vapors are extremely flammable
and explosive.
Fire or explosion can cause severe burns or
death.
When Starting Engine
• Ensure that spark plug, muffler, fuel cap and air
cleaner (if equipped) are in place and secured.
• Do not crank engine with spark plug removed.
• If engine floods, set choke (if equipped) to OPEN/RUN
position, move throttle (if equipped) to FAST position
and crank until engine starts.
15
Page 16

OPERATION
Not for
Reproduction
WARNING
Engines give off carbon monoxide, an
odorless, colorless, poison gas.
Breathing carbon monoxide can cause
nausea, fainting or death.
• Start and run engine outdoors.
• Do not start or run engine in enclosed area, even if
doors or windows are open.
NOTICE: This engine was shipped from Briggs & Stratton
without oil. Before you start the engine, make sure you add
oil according to the instructions in this manual. If you start
the engine without oil, it will be damaged beyond repair
and will not be covered under warranty.
1. Check the oil level. See the
tion.
2. Make sure equipment drive controls are disengaged.
3. Turn the fuel shut-off valve (A, Figure 6), if equipped, to
the ON position.
4. Move the throttle control (B) to the FAST position. Operate the engine in the FAST position.
5. Move the combination choke/throttle lever (C) to the
CHOKE position.
NOTE: Choke is usually unnecessary when restarting a
warm engine.
6. Turn the electric start switch (D) to the ON/START position.
NOTE: If the engine does not start after repeated attempts, contact an authorizedd dealer.
NOTICE: To extend the life of the starter, use short starting
cycles (five seconds maximum). Wait one minute between
starting cycles.
7. As the engine warms up, move the choke control (C) to
the RUN position.
Checking/Adding Oil
sec-
Driving the Tractor
1. Sit in the seat and adjust the seat so that you can comfortably reach all the controls and see the dashboard
display.
2. Engage the parking brake.
3. Make sure the PTO switch is disengaged.
4. Start the engine (see
5. Disengage the parking brake and release the brake
pedal.
6. Depress the forward ground speed control pedal to
travel forward. Release the pedal to stop. Note that the
further down the pedal is depressed the faster the tractor will travel.
7. Stop the tractor by releasing the ground speed control
pedals, setting the parking brake, and stopping the engine (see
Stopping the Tractor and Engine
Starting the Engine
).
).
Mowing
1. Set the mower cutting height to the desired level using
the mower lift lever.
2. Engage the parking brake. Make sure the PTO switch is
disengaged.
3. Start the engine (see
4. Set the throttle to FULL.
5. Engage the PTO to activate the mower blades.
6. Begin mowing.
NOTE: When the “catcher full” alarm sounds, turn off the
PTO immediately to prevent the discharge tube from plugging. Travel to the desired location and empty the catcher
(see Emptying the Catcher).
7. When finished, shut off the PTO and raise the deck
using the mower lift lever.
8. Stop the engine (see
gine
).
Starting the Engine
Stopping the Tractor and En-
).
16
WARNING
The engine will shut off if the reverse ground speed
pedal is depressed while the PTO is on and the
RMO has not been activated. The operator should
always turn the PTO off prior to driving across on
roads, paths or any area that maybe used by other
vehicles. Sudden loss of drive could create a
hazard.
www.simplicitymfg.com
Page 17

OPERATION
Not for
Reproduction
WARNING
Mowing in reverse can be hazardous to bystanders.
Tragic accidents can occur if the operator is not
alert to the presence of children. Never activate
RMO if children are present. Children are often
attracted to the unit and the mowing activity.
Mowing in Reverse
If an operator chooses to mow in reverse, the RMO system can be used. To use the Reverse Mowing Option
(RMO) turn the RMO key after the PTO is engaged. The
L.E.D. light will illuminate, and the operator can then mow
in reverse. Each time the PTO is engaged the RMO needs
to be reactivated if desired. The key should be removed to
restrict access to the RMO feature.
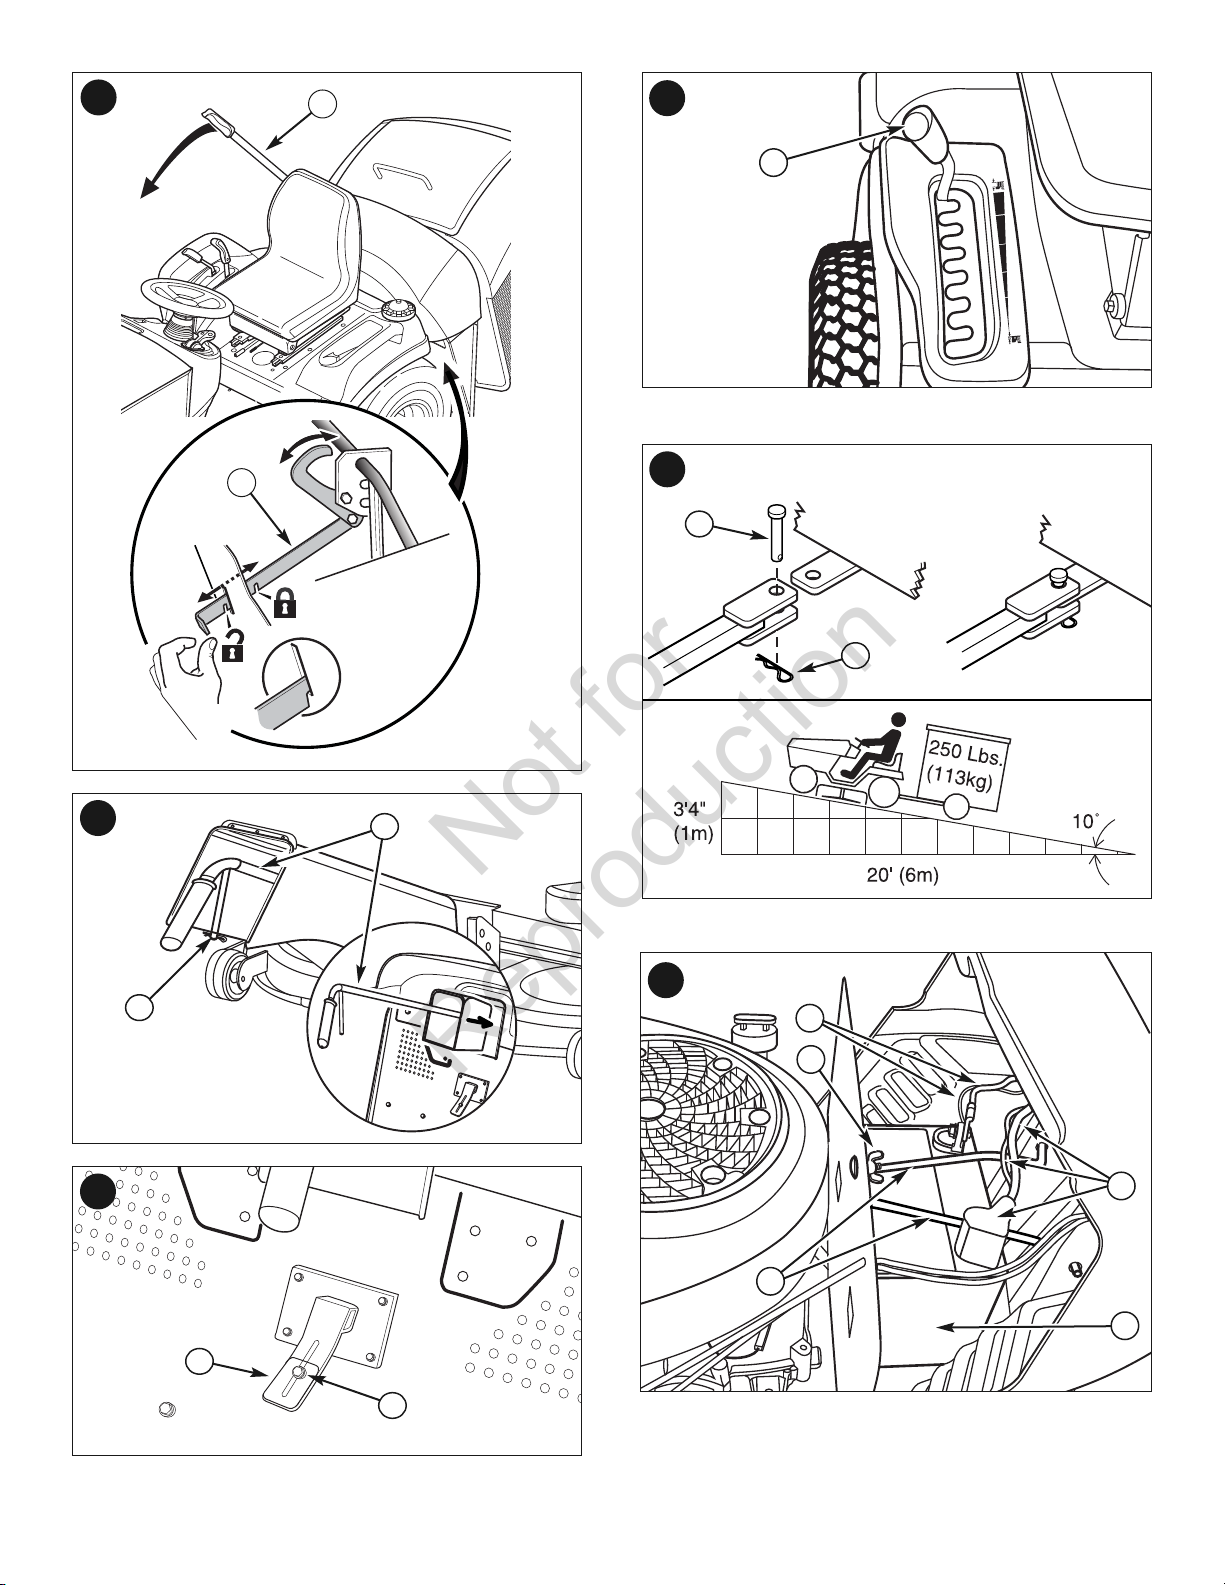
Pushing the Tractor by Hand
1. Disengage the PTO and turn the engine off.
2. Push the lever approximately 2-3/8” (6 cm) to release
the transmission (A, Figure 7).
3. The tractor can now be pushed by hand.
DO NOT TOW
TRACTOR
Towing the unit will
cause transmission
damage. • Do not use
another vehicle to
push or pull this unit.
• Do not actuate the
transmission release
valve lever while the
engine is running.
Parking Brake Function
Applying the Parking Brake - See Figure 8. To lock the
parking brake, release the ground speed pedals (A), fully
depress the brake pedal (B), pull UP on the parking brake
knob (C), and then release brake pedal.
Releasing the Parking Brake - See Figure 8. To release
the parking brake, depress the brake pedal (B).
Cruise Control Operation
TO ENGAGE:
1. Pull up on the cruise control knob (D, Figure 8).
2. Depress the forward ground speed pedal (A).
3. Lift up the cruise control knob (D) when desired speed
is reached. The Cruise will lock in one of its five locking
positions.
TO DISENGAGE:
1. Depress the brake pedal (B, Figure 8).
OR
2. Depress the forward ground speed pedal (A).
Hour Meter (if equipped)
The hour meter (E, Figure 8) measures the number of
hours the key has been in the RUN position.
Stopping the Tractor and Engine
1. Return the ground speed control(s) to neutral.
2. Disengage the PTO and wait for all moving parts to stop.
3. Move the throttle control to SLOW position and turn the
ignition key (D, Figure 6) to OFF. Remove the key.
Emptying the Catcher
To empty the catcher:
1. Extend the catcher lever and push forward (A, Figure 9)
to empty the catcher (B).
2. Use the catcher lever to close the catcher, and slide it
back into the catcher.
17
Page 18

OPERATION
Not for
Reproduction
Catcher Removal and Installation
WARNING
Do not operate the unit without the hopper or
deflector in place.
1. Unlock the catcher latch (A, Figure 10) located behind
left-hand rear wheel.
2. Lift catcher latch up and push backwards.
3. Use the catcher lever (B) to open the catcher slightly.
4. Lift the catcher off the rear support arms.
5. Install in reverse order of removal. To assist installing
the catcher, be sure to line up the alignment arrows on
the catcher and rear of the tractor.
Mulch Plug Installation and Removal
WARNING
For your personal safety, do not handle the sharp
mower blades with bare hands. Careless or
improper handling of blades may result in serious
injury.
1. Remove the catcher.
2. Holding the handle (A, Figure 11), slide plug into the
tunnel. Make sure casing slides on top of sliding guides
inside of the deck.
3. Push the handle to compress the inside spring.
4. Insert the tube extension into the hole at the end of the
tunnel and secure with hairpin (B).
5. Reinstall the catcher.
6. Remove the mulch plug in the reverse order.
Catcher-Full Alarm Adjustment
The grass volume in the catcher can be modified by adjusting the alarm paddle (see Figure 12).
Grass Volume Adjustment
Sliding the paddle bracket (A, Figure 12) up increases
the volume of grass in the collector before the alarm
goes off. Sliding the paddle bracket down decreases the
volume of grass in the collector before the alarm goes
off.
1. Loosen bracket hardware (B).
2. Slide paddle bracket (A) up or down.
3. Tighten bracket hardware.
Cutting Height Adjustment
The mower lift lever (A, Figure 13) is used to lower and
raise the deck to the desired cutting height.
To lower the deck, pull back slightly on the mower lift
lever, push it to the left and slide it down. To raise the
deck, pull up on the mower lift lever and lock in notch to
the right.
Attaching a Trailer
The maximum horizontal drawbar force allowed is 280
Newton. The maximum vertical drawbar force is 160
Newton. This equates to a 250 lbs (113 kg) trailer on a
10 degree hill. Secure the trailer with an appropriately
sized clevis pin (A, Figure 14) and clip (B).
18
www.simplicitymfg.com
Page 19
Maintenance Chart
Not for
Reproduction
MAINTENANCE
TRACTOR AND MOWER
Every 8 Hours or Daily
Check safety interlock system
Clean debris off tractor and mower deck
Clean debris from engine compartment
Every 25 Hours or Annually *
Check tire pressure
Check mower blade stopping time
Check tractor and mower for loose hardware
Every 50 Hours or Annually *
Clean battery and cables
Check tractor brakes
See Dealer Annually to
Lubricate tractor and mower
Check mower blades **
* Whichever comes first
** Check blades more often in regions with sandy soils or
high dust conditions.
ENGINE
First 5 Hours
Change engine oil
Every 8 Hours or Daily
Check engine oil level
Every 25 Hours or Annually *
Clean engine air filter and pre-cleaner **
Every 50 Hours or Annually *
Change engine oil
Replace oil filter
Annually
Replace air filter
Replace pre-cleaner
See Dealer Annually to
Inspect muffler and spark arrester
Replace spark plug
Replace fuel filter
Clean engine air cooling system
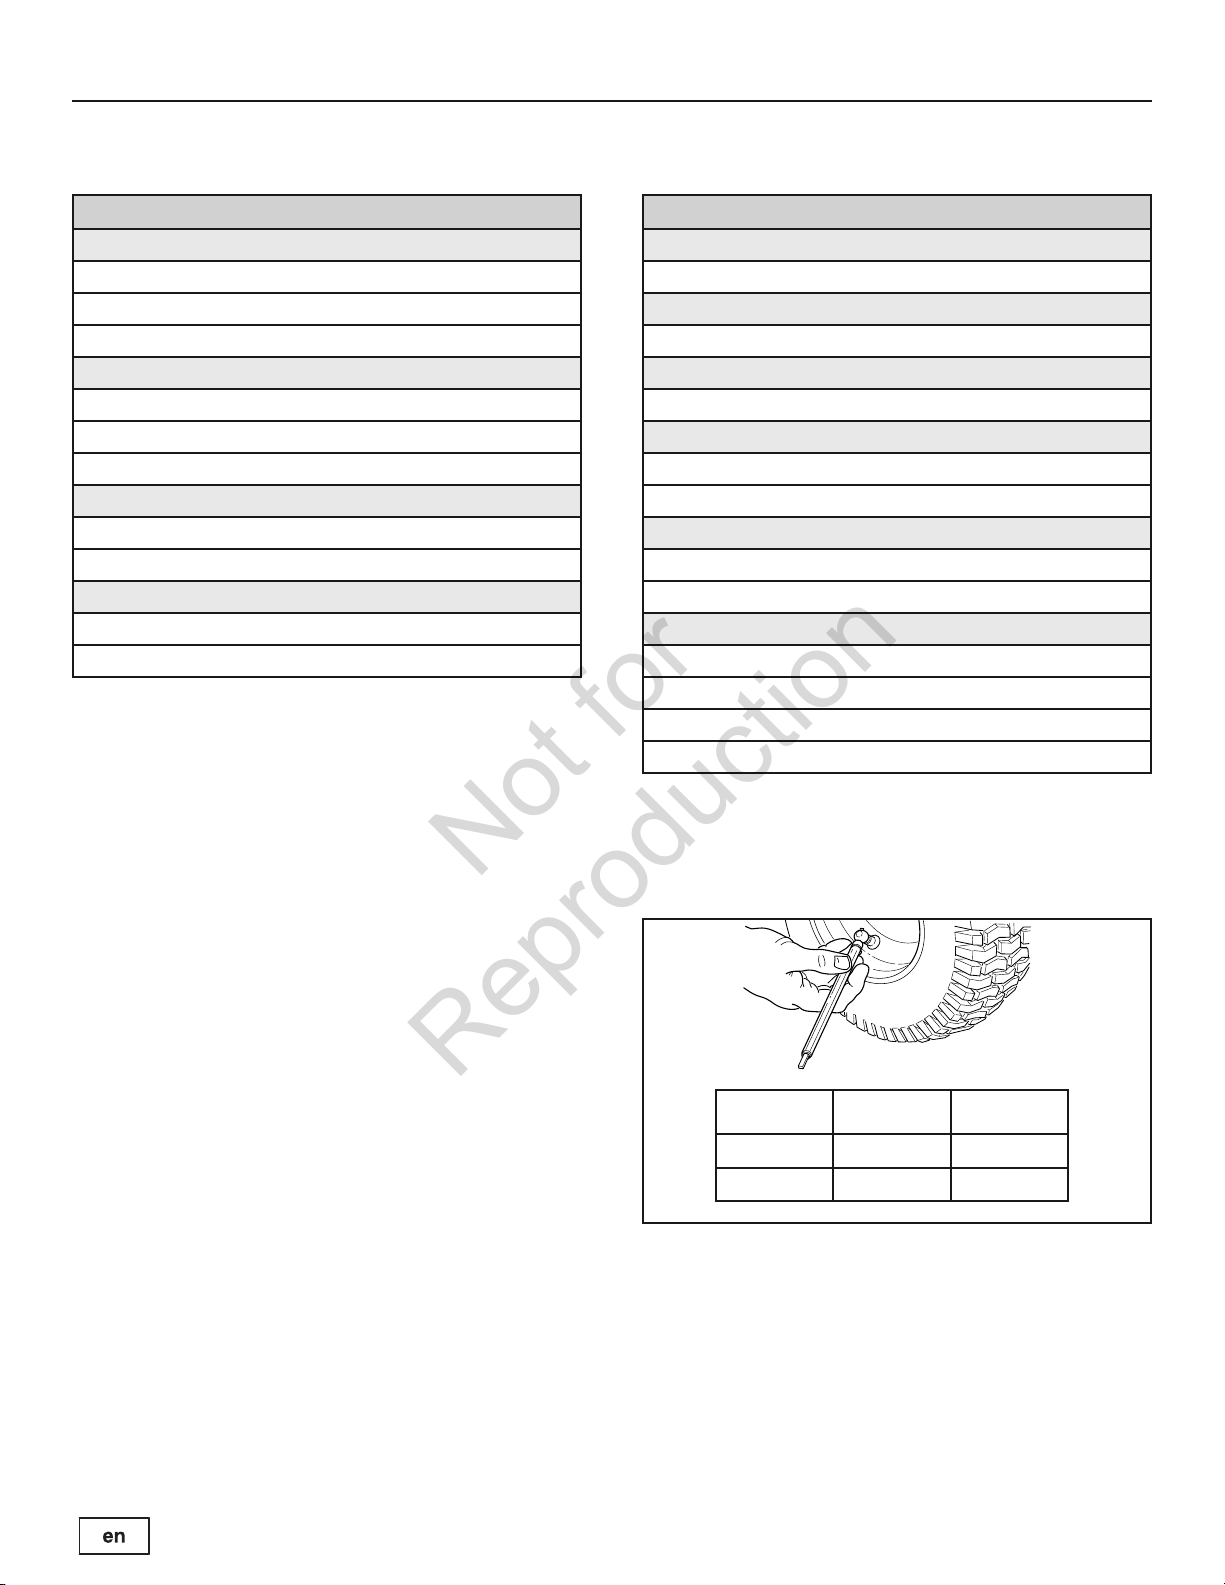
Check Tire Pressure
Tire pressure should be checked periodically, and maintained at the levels shown in the chart. Note that these pressures may differ slightly from the “Max Inflation” stamped on
the side-wall of the tires. The pressures shown provide
proper traction, improve cut quality, and extend tire life.
* Whichever comes first
** Clean more often in dusty conditions or when airborne
debris is present.
Size PSI bar
22 x 8.8 10 0,68
15 x 6.6 14 0,96
19
Page 20

MAINTENANCE
Not for
Reproduction
Check Mower Blade Stopping Time
Mower blades and mower drive belt should come to a complete stop within five seconds after the electric PTO switch
is turned off.
1. With tractor in neutral, PTO disengaged and operator in
seat, start the engine.
2. Look over the left-hand footrest at the mower drive belt.
Engage the PTO and wait several seconds. Disengage
the PTO and check the amount of time it takes for the
mower drive belt to stop.
3. If mower drive belt does not stop within five seconds,
see an authorized dealer.
Battery Maintenance
WARNING
When removing or installing battery cables,
disconnect the negative cable FIRST and
reconnect it LAST. If not done in this order,
the positive terminal can be shorted to the
frame by a tool.
Cleaning the Battery and Cables
1. Disconnect the cables from the battery, negative cables
first (A, Figure 15) then the cover and positive cables
(B).
2. Loosen the wingnut and washer (D).
3. Pivot the hold-down rod (C) up and away from battery.
Secure to steering tower.
4. Remove the battery (E).
5. Clean the battery compartment with a solution of baking soda and water.
6. Clean the battery terminals and cable ends with a wire
brush and battery terminal cleaner until shiny.
7. Reinstall the battery (E) in the battery compartment.
Secure with the battery hold-down rod (C) and wingnut
and washer (D).
8. Re-attach the battery cables, positive cables and cover
first (B) then the negative cables (A).
9. Coat the cable ends and battery terminals with petroleum jelly or non-conducting grease.
Battery Charging
WARNING
Keep open flames and sparks away from
the battery; the gasses coming from it are
highly explosive. Ventilate the battery well
during charging.
A dead battery or one too weak to start the engine may be
the result of a defect in the charging system or other electrical component. If there is any doubt about the cause of
the problem, see your dealer. If you need to replace the
battery, see the
tion.
To charge the battery, follow the instructions provided by
the battery charger manufacturer as well as all warnings
included in the
Charge the battery until fully charged. Do not charge at a
rate higher than 10 amps.
Cleaning the Battery and Cables
Operator Safety
section of this manual.
sec-
20
www.simplicitymfg.com
Page 21

MAINTENANCE
Not for
Reproduction
Seat Adjustment
The seat can be adjusted forward and back. Move the lever
Tractor Controls
(see
release the lever to lock the seat into position.
) position the seat as desired, and
Brake Adjustment
This unit does not have a manually adjustable brake. If the
brake does not function properly, see an authorized dealer.
Changing the Oil
Used oil is a hazardous waste product and must be disposed of properly. Do not discard with household waste.
Check with your local authorities, service center, or dealer
for safe disposal/recycling facilities.
Remove Oil
1. With engine off but still warm, disconnect the spark
plug wire (A, Figure 16) and keep it away from the
spark plug.
2. Remove the dipstick (D).
Standard Oil Drain Plug
1. Remove the oil drain plug (B, Figure 16). Drain the oil
into an approved container.
2. After the oil has drained, install and tighten the oil
drain plug.
Optional Quick Oil Drain
1. Disconnect the oil drain hose (G, Figure 16) from the
side of the engine.
2. Turn and remove the oil drain cap (H). Carefully lower
the quick oil drain (I) into an approved container (J).
3. After the oil has drained, install the oil drain cap. Attach the oil drain hose to the side of the engine.
Changing the Oil Filter
For replacement intervals, see the
1. Drain the oil from the engine. See
tion.
2. Remove the oil filter (C, Figure 17) and dispose of
properly.
3. Before you install the new oil filter, lightly lubricate the
oil filter gasket with fresh, clean oil.
4. Install the oil filter by hand until the gasket contacts
the oil filter adapter, then tighten the oil filter 1/2 to 3/4
turns.
5. Add oil. See
6. Start and run the engine. As the engine warms up,
check for oil leaks.
7. Stop the engine and check the oil level. It should be at
the FULL mark on the dipstick.
Add Oil
section.
Maintenance Chart.
Remove Oil
sec-
Add Oil
• Place engine level.
• Clean the oil fill area of any debris.
• See the
1. Remove the dipstick (D, Figure 16) and wipe with a
clean cloth.
2. Pour the oil slowly into the engine oil fill (E). Do not
overfill. After adding oil, wait one minute and then
check the oil level.
3. Install and tighten the dipstick.
4. Remove the dipstick and check the oil level. It should
be at the FULL mark (F) on the dipstick.
5. Install and tighten the dipstick.
Specifications
section for oil capacity.
21
Page 22

MAINTENANCE
Not for
Reproduction
Servicing the Air Filter
WARNING
Fuel and its vapors are extremely flammable
and explosive.
Fire or explosion can cause severe burns or
death.
• Never start or run the engine with the air cleaner
assembly (if equipped) or the air filter (if equipped)
removed.
NOTICE: Do not use pressurized air or solvents to clean
the filter. Pressurized air can damage the filter and solvents will dissolve the filter.
1. Remove the cover (A, Figure 18).
2. Remove the filter (C) and the pre-cleaner (B).
3. To loosen debris, gently tap the filter on a hard surface. If the filter is excessively dirty, replace with a
new filter.
4. Wash the pre-cleaner in liquid detergent and water.
Then allow it to thoroughly air dry. Do not oil the pre-
-cleaner.
5. Assemble the dry pre-cleaner and the filter into the
engine base (D).
6. Install the cover.
Storage
WARNING
Never store the unit (with fuel) in an enclosed,
poorly ventilated structure. Fuel vapors can travel to
an ignition source (such as a furnace, water
heater, etc.) and cause an explosion. Fuel
vapor is also toxic to humans and animals.
When Storing Fuel Or Equipment With Fuel In Tank
• Store away from furnaces, stoves, water heaters or
other appliances that have pilot lights or other ignition
sources because they can ignite fuel vapors.
Equipment
Disengage the PTO, set the parking brake, and remove
the key.
Battery life will be increased if it is removed. Put in a cool,
dry place and fully charged about once a month. If the
battery is left in the unit, disconnect the negative cable.
Fuel System
Fuel can become stale when stored over 30 days. Stale
fuel causes acid and gum deposits to form in the fuel system or on essential carburetor parts. To keep fuel fresh,
use Briggs & Stratton FRESH START® fuel stabilizer,
available as a liquid additive or a drip concentrate cartridge.
There is no need to drain gasoline from the engine if a
fuel stabilizer is added according to instructions. Run the
engine for 2 minutes to circulate the stabilizer throughout
the fuel system. The engine and fuel can then be stored
up to 24 months.
If gasoline in the engine has not been treated with a fuel
stabilizer, it must be drained into an approved container.
Run the engine until it stops from lack of fuel. The use of a
fuel stabilizer in the storage container is recommended to
maintain freshness.
22
Engine Oil
While the engine is still warm, change the engine oil. See
Changing the Oil
Before starting the unit after it has been stored:
• Check all fluid levels. Check all maintenance items.
• Perform all recommended checks and procedures
found in this manual.
• Allow the engine to warm up for several minutes before use.
section
.
www.simplicitymfg.com
Page 23

Cleaning the Battery and Cables
Oil Recommendations Chart
Oil Recommendations Chart
Servicing the Air Filter
Troubleshooting the Tractor
Not for
Reproduction
PROBLEM LOOK FOR REMEDY
Brake pedal not depressed. Fully depress brake pedal.
PTO (electric clutch) switch is in
ON position.
Cruise control engaged. Move knob to NEUTRAL/OFF position.
Out of fuel. If engine is hot, allow it to cool, then refill the fuel tank.
Engine flooded. Disengage the choke.
Fuse is blown. See authorized dealer.
Engine will not turnover
or start.
Battery terminals require
cleaning.
Battery discharged or dead. Recharge or replace battery.
Wiring loose or broken. Visually check wiring. If wires are frayed or broken, see authorized dealer.
Solenoid or starter motor faulty. See authorized dealer.
Safety interlock switch faulty. See authorized dealer.
Place in OFF position.
See
TROUBLESHOOTING
section.
Engine starts hard or runs
poorly.
Engine knocks.
Excessive oil consumption.
Engine exhaust is black.
Engine runs, but tractor
will not drive.
Water in fuel. See authorized dealer.
Gas is old or stale. See authorized dealer.
Fuel mixture too rich. Clean air filter.
Engine has other problem. See authorized dealer.
Low oil level. Check/add oil as required.
Using wrong grade oil. See
Engine running too hot. See authorized dealer.
Using wrong grade oil. See
Too much oil in crankcase. Drain excess oil.
Dirty air filter. See
Choke closed. Open choke.
Ground speed control pedals
not depressed.
Transmission release lever in
PUSH position.
Parking brake is engaged. Disengage parking brake.
Traction drive belt is broken or
slipping.
Depress pedals.
Move into DRIVE position.
See authorized dealer.
.
.
section.
23
Page 24

TROUBLESHOOTING
Check Tire Pressure
Check Tire Pressure
Servicing Air Filter
Not for
Reproduction
Troubleshooting the Tractor (Continued)
PROBLEM LOOK FOR REMEDY
Brake will not hold.
Internal brake worn. See authorized dealer.
Steering linkage is loose. See authorized dealer.
Tractor steers hard or
handles poorly.
Improper tire inflation. See
Front wheel spindle bearings
dry.
Troubleshooting the Mower
PROBLEM LOOK FOR REMEDY
Mower will not raise.
Mower cut is uneven.
Mower cut is rough
looking.
Lift linkage not properly
attached or damaged.
Mower not leveled properly. See authorized dealer.
Tractor tires not properly
inflated.
Engine speed too slow. Set to full throttle.
Ground speed too fast. Slow down.
Mower has other problem. See authorized dealer.
Engine speed too slow. Set to full throttle.
See authorized dealer.
See authorized dealer.
See
section.
section.
Engine stalls easily with
mower engaged.
Excessive mower vibration.
Engine runs and tractor
drives, but mower will not
drive.
Ground speed to fast. Slow down.
Dirty or clogged air filter. See
Cutting height set too low. Cut tall grass at maximum cutting height during first pass.
Engine not up to operating
temperature.
Starting mower in tall grass. Start the mower in a cleared area.
Mower has other problem. See authorized dealer.
PTO not engaged. Engage the PTO.
Mower has other problem. See authorized dealer.
Run engine for several minutes to warm-up.
section.
24
www.simplicitymfg.com
Page 25

BRIGGS & STRATTON POWER PRODUCTS GROUP, L.L.C. OWNER WARRANTY POLICY
Not for
Reproduction
LIMITED WARRANTY
Briggs & Stratton Power Products Group, LLC will repair and/or replace, free of charge, any part(s) of the equipment that is
defective in material or workmanship or both. Briggs & Stratton Corporation will repair and/or replace, free of charge, any
part(s) of the Briggs & Stratton engine* (if equipped) that is defective in material or workmanship or both. Transportation
charges on product submitted for repair or replacement under this warranty must be borne by purchaser. This warranty is
effective for the time periods and subject to the conditions stated below. For warranty service, find the nearest Authorized
Service Dealer using our dealer locator at www.BriggsandStratton.com.
There is no other express warranty. Implied warranties, including those of merchantability and fitness for a particular
purpose, are limited to one year from purchase or to the extent permitted by law. Liability for incidental or consequential
damages are excluded to the extent exclusion is permitted by law.
Some states or countries do not allow limitations on how long an implied warranty lasts, and some states or countries do
not allow the exclusion or limitation of incidental or consequential damages, so the above limitation and exclusion may not
apply to you. This warranty gives you specific legal rights and you may also have other rights which vary from state to state
or country to country.
WARRANTY PERIOD
Item Consumer Use Commercial Use
Equipment 2 Years 90 Days
Engine* 2 Years 1 Year
Battery 1 Year 1 Year
The warranty period begins on the date of purchase by the first retail consumer or commercial end user, and continues for the
period of time stated above. “Consumer use” means personal residential household use by a retail consumer. “Commercial
use” means all other uses, including use for commercial, income producing or rental purposes. Once product has experienced
commercial use, it shall thereafter be considered as commercial use for purposes of this warranty.
No warranty registration is necessary to obtain warranty on Briggs & Stratton products. Save your proof of purchase receipt. If you
do not provide proof of the initial purchase date at the time warranty service is requested, the manufacturing date of the product will
be used to determine warranty eligibility.
ABOUT YOUR WARRANTY
We welcome warranty repair and apologize to you for being inconvenienced. Warranty service is available only through servicing
dealers authorized by Briggs & Stratton or BSPPG, LLC.
Most warranty repairs are handled routinely, but sometimes requests for warranty service may not be appropriate. This warranty
only covers defects in materials or workmanship. It does not cover damage caused by improper use or abuse, improper
maintenance or repair, normal wear and tear, or stale or unapproved fuel.
Improper Use and Abuse - The proper, intended use of this product is described in the Operator’s Manual. Using the product in
a way not described in the Operator’s Manual or using the product after it has been damaged will void your warranty. Warranty is
not allowed if the serial number on the product has been removed or the product has been altered or modified in any way, or if the
product has evidence of abuse such as impact damage, or water/chemical corrosion damage.
Improper Maintenance or Repair - This product must be maintained according to the procedures and schedules provided in the
Operator’s Manual, and serviced or repaired using genuine Briggs & Stratton parts. Damage caused by lack of maintenance or use
of non-original parts is not covered by warranty.
Normal Wear - Like all mechanical devices, your unit is subject to wear even when properly maintained. This warranty does not
cover repairs when normal use has exhausted the life of a part or the equipment. Maintenance and wear items such as filters,
belts, cutting blades, and brake pads (engine brake pads are covered) are not covered by warranty due to wear characteristics
alone, unless the cause is due to defects in material or workmanship.
Stale Fuel - In order to function correctly, this product requires fresh fuel that conforms to the criteria specified in the Operator’s
Manual. Damage caused by stale fuel (carburetor leaks, clogged fuel tubes, sticking valves, etc) is not covered by warranty.
* Applies to Briggs & Stratton engines only. Warranty coverage of non-Briggs & Stratton engines is provided by the engine manufacturer.
Page 26

SPECIFICATIONS
Not for
Reproduction
ENGINE
Briggs & Stratton
Make Briggs & Stratton®,
Intek SeriesTM7180 OHV
Displacement 40.03 cu in. (656 cc)
Electrical System 12 Volt, 16 amp Alternator, Battery: 230 CCA
Oil Capacity 62-64 oz (1,8-1,9 L)
Spark Plug Gap 0.030 in. (0,76 mm)
Spark Plug Torque 180 in-lbs (20 Nm)
Briggs & Stratton
Make Briggs & Stratton®,
Intek SeriesTM8240 OHV
Displacement 44.18 cu in. (724 cc)
Electrical System 12 Volt, 16 amp Alternator, Battery: 230 CCA
Oil Capacity 62-64 oz (1,8-1,9 L)
Spark Plug Gap 0.030 in. (0,76 mm)
Spark Plug Torque 180 in-lbs (20 Nm)
Service Parts Part Number
Resistor Spark Plug 491055
Life Long Platinum 5066
Spark Plug
Air Filter 499486
Pre-Cleaner 273638
Oil Filter 492932
Fuel Filter 691035
TRANSMISSION
K46
Type Hydrostatic Tuff Torq K46
Engine Oil Synthetic 5W30
Speeds Forward: 0-5.4 MPH (0-8,7 km/h)
@ 3400 rpm Reverse: 0-2.3 MPH (0-3,7 km/h)
Continuous Torque 170 ft-lbs
Output
Drawbar Rating 227 lbs (103 kg)
Maximum Weight 675 lbs (306 kg)
on Axle
MOWER
Width of Cut 40” (102 cm)
Number of Blades 2
Base Deck Platform Rear Discharge
Cutting Height 0.98-3.15 in. (2,5-8.0 cm)
Cutting Positions 7
DIMENSIONS
Overall Length 79.9” (2030 mm)
Overall Width 42.1” (1070 mm)
Height 46.9” (1190 mm)
Weight 595 lbs (270 kg)
CHASSIS
Fuel Tank Capacity Capacity: 2.6 gal (10 L)
Rear Wheels Tire Size: 22 x 8.8
Front Wheels Tire Size: 15 x 6.6
Inflation Pressure: 10 psi (0,68 bar)
Inflation Pressure: 14 psi (0,96 bar)
PARTS AND ACCESSORIES
Contact an authorized dealer for details.
26
www.simplicitymfg.com
Page 27

OBSAH
Not for
Reproduction
Ilustrace................................................................................................................2
Bezpečnost obluhy..............................................................................................6
Vlastnosti a ovládání.........................................................................................11
Ovládání..............................................................................................................14
Údržba.................................................................................................................19
Odstraňování problémů....................................................................................23
Záruka.................................................................................................................25
Technické údaje .................................................................................................26
Součástky a doplňky.........................................................................................26
Obecné informace
Děkujeme vám za zakoupení této kvalitní traktorové sekačky od firmy SIMPLICITY. Jsme rádi, že věříte značce
SIMPLICITY. Když se se zařízením od firmy SIMPLICITY zachází v souladu s pokyny v tomto návodu, váš výrobek vám
nabídne spoustu roků spolehlivé služby.
Tento návod obsahuje bezpečnostní informace, které vás seznamují s riziky a nebezpečími spojenými s traktorovými
sekačkami a jak se jim můžete vyvarovat. Tato traktorová sekačka je postavena a určena pouze k sekání trávy a není
určena k žádným jiným účelům. Je důležité, abyste si před pokusem o startování a provoz tohoto zařízení přečetli tyto
pokyny a důkladně jim porozuměli. Tyto původní pokyny si uložte pro pozdější použití.
Referenční údaje výrobku
Zapište si název/číslo vašeho modelu, identifikační čísla
výrobce a sériová čísla motoru do poskytnutého prostoru
pro snadný přístup. Tato čísla je možno nalézt v
zobrazených místech.
Při kontaktování vašeho autorizovaného prodejce
kvůli náhradním dílům, servisu či informacím
MUSÍTE mít tato čísla.
REFERENČNÍ ÚDAJE VÝROBKU
Název/Číslo popisu modelu
Výrobní číslo jednotky SÉRIOVÉ číslo jednotky
Výrobní číslo plošiny frézy SÉRIOVÉ číslo plošiny frézy
Jméno prodejce Datum zakoupení
REFERENČNÍ ÚDAJE MOTORU
Značka motoru Model motoru
Typ/Spec motoru Kód/Sériové číslo motoru
Identifikační značka CE
A. Identifikační číslo výrobce
B. Sériové číslo výrobce
C. Výkon v kilowattech
D. Maximální rychlost motoru v otáčkách za minutu
E. Název a adresa výrobce
F. Rok výroby
G. Logo shody CE
H. Hmotnost jednotky v kilogramech
I. Zaručený zvukový výkon v decibelech
A
Part No. xxxxxxx
B
E
xxxxxxxxxxxxxxx
Serial No. xxxxxxxxxx
xxxxxxxxxxxxxxxxxxxxxxx
xxxxxxxxxxxxxxxxxxxxxxx
xxxxxxxxxxxxxxxxxxxxxxx
xxxxxxxxxxxxxxxxxxxxxxx
xxx dB
20xx
F
kg: xxx
kW: x.xx
xxxx max
G
I
H
C
D
Seznam součástek s ilustracemi pro toto zařízení je možno stáhnout z webových stránek www.simplicitymfg.com. Při
objednávce náhradních součástek prosím zadejte model a sériové číslo.
Copyright © 2010 Briggs & Stratton Power Products Group, LLC
Milwaukee, WI, Všechna práva vyhrazena
SIMPLICITY je ochranná známka společnosti Briggs & Stratton Power Products
5
Page 28

BEZPEČNOST OBLUHY
Not for
Reproduction
Přečtěte si tato bezpečnostní pravidla a pečlivě se jimi řiďte. Jejich zanedbání může mít za následek ztrátu kontroly
nad strojem, vážné poranění nebo usmrcení vás či osob ve vaší blízkosti, škodu na majetku nebo poškození stroje.
Sestava sekačky může amputovat ruce nebo nohy a odhazovat předměty.
Symbol trojúhelníku v textu zdůrazňuje důležitá upozornění nebo výstrahy, kterými se musíte řídit.
HLAVNÍ ZÁSADY PROVOZU STROJE
1. Před zahájením provozu si přečtěte všechny pokyny v
tomto návodu; musíte jim rozumět a řídit se jimi.
2. Nepřibližujte ruce nebo nohy k rotujícím součástem
nebo prostoru pod strojem. Vždy se držte stranou od
otvoru výstupu sekačky.
3. Dovolte používat stroj výhradně zodpovědným
dospělým osobám, které jsou podrobně seznámeny s
pokyny pro jeho provoz (věková hranice pro obsluhu
může být vymezena místními předpisy).
4. Odstraňte z pracovního prostoru všechny předměty
(jako jsou kameny, hračky, dráty atd.), které by mohly
být nožem/noži sekačky zachyceny a odhozeny.
5. Před sekáním trávy se ujistěte, že se v prostoru nenacházejí žádní lidé. Jakmile někdo do tohoto prostoru
vstoupí, okamžitě zastavte stroj.
6. Nikdy na stroji nevozte jiné osoby.
7. Pokud to není naprosto nezbytné, nesekejte trávu při
jízdě vzad. Před jízdou i během jízdy vzad se vždy
dívejte směrem dolů a dozadu.
8. Nikdy nedovolte, aby materiál vyletoval z výhozu
sekačky směrem k jiným osobám. Zabraňte tomu, aby
vyletující materiál narážel do zdi nebo jakékoli
překážky. Materiál se může odrazit zpět směrem k obsluze stroje. Při jízdě přes štěrkovaný povrch zastavte
nůž/nože.
9. Neuvádějte stroj do činnosti, pokud na něj není instalován kompletní sběrný koš nebo ochranný kryt
výhozu sekačky (směrovací nástavec) nebo jiná
bezpečnostní zařízení.
10. Před zatáčením zpomalte.
11. Nikdy neponechávejte běžící stroj bez dozoru. Před
sesednutím se stroje vždy vypojte VPP (výstup pohonu příslušenství), zapojte parkovací brzdu a vytáhněte klíček ze zapalování.
12. Pokud nesekáte trávu, vypojte pohon nožů (VPP).
Před čištěním stroje, sejmutím sběrného koše nebo
uvolňováním ucpaného výhozu sekačky vypněte
motor a počkejte, dokud se všechny součásti zcela
nezastaví.
13. Používejte stroj pouze za denního světla nebo dobrého umělého osvětlení.
14. Nepoužívejte tento stroj, pokud jste pod vlivem alkoholu nebo léků.
15 Pokud pracujete blízko cest nebo přes ně přejíždíte,
dávejte pozor na okolní dopravu.
16. Buďte zvláště opatrní při nakládání stroje nebo jeho
vykládání z návěsu nebo nákladního vozidla.
17. Při práci s tímto strojem vždy používejte ochranu zraku.
18. Zjištěné údaje uvádějí, že k vysokému procentu úrazů
při používání motory poháněných zařízení dochází u
osob starších 60 let. Tito uživatelé musejí zhodnotit
svoji schopnost používat toto zařízení natolik
bezpečně, aby neohrožovali úrazem sebe ani ostatní.
19. Řiďte se pokyny výrobce pro používání závaží a protizávaží na kolech stroje.
20. Pamatujte na to, že osoba obsluhující stroj zodpovídá
za nehody, které v souvislosti s jeho použitím postihnou jiné osoby nebo jejich majetek.
21. Všichni uživatelé by se měli snažit získat profesionální
a praktické rady a pokyny.
22. Vždy používejte důkladnou obuv a oděv. Nikdy
nepoužívejte stroj bosí nebo v sandálech.
23. Před používáním stroje vždy pohledem zkontrolujte,
zda jsou na stroji bezpečně instalovány nože a jejich
příslušenství a zda nejsou poškozeny. Vyměňte
jakékoli opotřebované nebo poškozené díly.
24. Vypojte pohon příslušenství před: plněním paliva, demontáží příslušenství a úpravami jeho nastavení
(pokud nastavení nelze provést ze stanoviště obsluhy).
25. Když je stroj zaparkován, uskladněn nebo ponechán
bez dozoru, vždy spusťte sekací nástroje do dolní
polohy (pokud nepoužíváte spolehlivý mechanický zámek).
26. Předtím, než opustíte z jakéhokoli důvodu stanoviště
obsluhy, zapojte parkovací brzdu (pokud je jí stroj vybaven), vypojte VPP a vytáhněte klíček ze zapalování.
27. Pro snížení nebezpečí vzniku požáru očistěte ze stroje
trávu, listí a přebytečný olej. Nezastavujte a neparkujte
nad suchým listím, trávou nebo hořlavými materiály.
PŘEPRAVA A SKLADOVÁNÍ
1. Pokud přepravujete tento stroj na otevřeném návěsu,
musí jeho přední část směřovat ve směru jízdy. Pokud
směřuje vpřed zadní část stroje, může být stroj
poškozen účinky odporu vzduchu.
2. Když do stroje plníte palivo po jeho přepravě nebo
uskladnění, vždy dodržujte při plnění a manipulaci s
palivem bezpečné postupy.
3. Nikdy neskladujte stroj (obsahující palivo) v uzavřených, špatně větraných prostorech. Výpary paliva
mohou putovat vzduchem ke zdrojům vznícení (např.
ke spalovacímu kotli, ohřívači vody apod.) a vyvolat
explozi. Výpary paliva jsou také toxické pro lidi a
zvířata.
6
4. Při přípravě stroje pro krátkodobé i dlouhodobé
uskladnění se vždy řiďte pokyny v návodu k obsluze
motoru.
5. Vždy postupujte podle návodu k obsluze motoru i pro
jeho správné startování při opětném uvádění do
provozu po uskladnění stroje.
6. Nikdy neskladujte stroj nebo kanistr s palivem v prostoru, ve kterém se nachází otevřený oheň nebo pilotní
plamének (např. ohřívače vody). Před uskladněním
nechejte stroj vychladnout.
www.simplicitymfg.com
Page 29

BEZPEČNOST OBLUHY
Not for
Reproduction
PRÁCE NA SVAZÍCH
Svahy jsou hlavním faktorem při vzniku nehod způsobených
ztrátou kontroly nad strojem a jeho převrácením, při kterých
může dojít k vážným úrazům nebo usmrcení Práce na
jakýchkoli svazích vyžaduje zvýšenou opatrnost. Pokud do
svahu nedokážete vycouvat, nebo pokud se na něm cítíte
nejistě, nepracujte na něm.
Jestliže trávní sekačka (ať již ruční nebo traktorová) klouže
ze svahu, nepodaří se vám nad ní znovu získat kontrolu
použitím brzdy. Hlavní příčiny ztráty kontroly jsou: nedostatečný záběr pneumatik na povrchu terénu, příliš
vysoká rychlost, nedostatečné brždění, použití stroje
nevhodného pro daný účel, nedostatečná pozornost na
stav terénu, nesprávné připojování návěsů a nesprávné rozložení váhy stroje.
1. Sekejte trávu na svazích vždy pouze směrem nahoru
nebo dolů, ne napříč vůči sklonu svahu.
2. Dávejte pozor na propadliny, vyježděné koleje a
terénní hrby. Nerovný terén může způsobit převrácení
stroje. Vysoká tráva může zakrývat překážky.
3. Zvolte pomalou rychlost, abyste se při jízdě po svahu
nemuseli zastavovat nebo měnit rychlostní stupně.
4. Nejezděte se strojem po mokré trávě. Pneumatiky
mohou ztratit záběr.
5. Vždy jezděte se zařazeným rychlostním stupněm,
zvláště při jízdě dolů ze svahu. Nezařazujte neutrál
pro jízdu ze svahu na "volnoběh".
6. Nestartujte, nevypínejte a neotáčejte stroj na svahu.
Jestliže pneumatiky ztrácejí záběr, vypojte pohon
nože(ů) a sjíždějte pomalu v přímém směru ze svahu.
7. Udržujte všechny pohyby na svahu pomalé a plynulé.
Neměňte náhle rychlost ani směr jízdy, což by mohlo
způsobit převrácení stroje.
8. Buďte zvláště opatrní při provozu strojů se sběrnými
koši nebo jiným příslušenstvím, které může ovlivnit jejich stabilitu. Nepoužívejte je na strmých svazích.
9. Nepokoušejte se stroj stabilizovat tím, že se budete
nohou opírat o zem (u traktorových sekaček).
10. Nesekejte trávu v blízkosti srázů, příkopů nebo okrajů
náspů. Pokud kolo stroje sjede přes okraj srázu nebo
příkopu, nebo pokud se okraj sesune, může se stroj
převrátit.
11. Nepoužívejte sběrné koše na strmých svazích.
12. Nepracujte na svazích, do kterých nedokážete vycouvat.
13. Požádejte svého pověřeného prodejce o doporučení
ohledně závaží nebo protizávaží kol pro zvýšení stability stroje.
14. Odstraňte z pracovního prostoru překážky, jako jsou
kameny, větve apod.
15. Používejte pomalou rychlost. Pneumatiky mohou na
svahu ztratit záběr dokonce i tehdy, kdy správně fungují brzdy.
16. Neotáčejte se na svazích, pokud to není zcela
nezbytné; v takovém případě se otáčejte pomalu a
plynule ve směru dolů ze svahu.
PŘÍVĚSNÁ ZAŘÍZENÍ (TRAKTOROVÉ
SEKAČKY)
1. K tahání používejte pouze stroj, který je vybaven
2. Řiďte se doporučeními výrobce zařízení pro hmotnostní
tažným zařízením určeným výslovně pro tahání.
Nepřipojujte přívěsná zařízení k jiným částem stroje,
ale pouze k tažnému zařízení.
limity přívěsných zařízení a tahání na svazích.
VAROVÁNÍ
Nikdy nepoužívejte stroj na svazích se stoupáním vyšším
než 17,6 procent (10°), což představuje vertikální
zvýšení terénu o 106 cm na 607 cm horizontální délky.
Při práci na svazích používejte přídavná závaží nebo
protizávaží pro kola. Požádejte svého prodejce o
informace o tom, která závaží jsou k dispozici a
vhodná pro váš stroj.
Před jízdou do svahu zvolte pomalou rychlost. Má-li
váš stroj instalován sběrný koš v zadní části, pracujte
na svazích se zvýšenou opatrností i tehdy, když máte
instalována přední závaží.
Sekejte trávu pouze při jízdě svahem směrem NAHORU a DOLŮ, nikdy napříč svahu; buďte opatrní při
změnách směru jízdy a NESTARTUJTE A NEVYPÍNEJTE STROJ NA SVAHU.
3. Nikdy nedovolte dětem ani jiným osobám jízdu na
přívěsném zařízení.
4. Hmotnost přívěsného zařízení může na svahu způsobit ztrátu záběru kol a kontroly nad strojem.
5. Jezděte pomalu a počítejte s delší brzdnou dráhou stroje.
6. Nezařazujte neutrál pro jízdu ze svahu na "volnoběh".
DĚTI
Pokud obsluha stroje nedává pozor na přítomnost dětí, může
dojít k tragické nehodě. Děti často přitahuje jak samotný
stroj, tak činnost při sekání trávy. Nikdy nespoléhejte na to,
že děti zůstanou tam, kde jste je viděli naposledy.
1. Zajistěte, aby děti byly mimo pracovní prostor a pod
soustavným dohledem zodpovědné dospělé osoby.
2. Buďte opatrní; jestliže se dítě dostane do pracovního
prostoru, vypněte stroj.
3. Před jízdou i během jízdy vzad se vždy dívejte směrem
dolů a dozadu tak, abyste mohli uvidět malé děti.
4. Nikdy na stroji nevozte děti - dokonce ani tehdy, když
je pohon nože(ů) vypojen. Mohou se stroje spadnout
a utrpět vážný úraz, nebo vám překážet při bezpečném
provozu stroje. Děti, které jste někdy předtím vozili na
stroji, se k němu mohou náhle přiblížit s úmyslem dát
se znovu povozit tehdy, kdy to nečekáte - a vy je
můžete při jízdě vpřed nebo vzad přejet.
5. Nikdy nedovolte dětem používat tento stroj.
6. Buďte mimořádně opatrní, když se přibližujete k
rohům budov, keřům, stromům, nebo jiným objektům
zhoršujícím viditelnost.
KOUŘOVÉ ZPLODINY
1. Výfukové zplodiny tohoto stroje obsahují chemické
látky, o nichž je známo, že v určitých množstvích
vyvolávají rakovinu, vrozené vady u novorozenců nebo
jiná poškození lidských reprodukčních funkcí.
2. Informace o době, po kterou motor vyhovuje předpisům o zplodinách a informace o indexu vzdušných
zplodin (Emissions Durability Period and Air Index)
jsou uvedeny na štítku motoru.
7
Page 30

BEZPEČNOST OBLUHY
Not for
Reproduction
SERVIS A BĚŽNÁ ÚDRŽBA
Bezpečné zacházení s benzinem
1. Bezpečně uhaste cigarety, doutníky, dýmky a jakékoli
jiné zdroje vznícení.
2. Používejte pouze schválené benzinové kanistry.
3. Nikdy nesnímejte uzávěr palivové nádrže a neplňte ji
palivem s motorem v chodu. Před plnění nádrže
palivem nechejte motor vychladnout.
4. Nikdy neplňte nádrž palivem v uzavřených prostorách.
5. Nikdy neskladujte stroj nebo kanistr s palivem v prostoru, ve kterém se nachází otevřený oheň, jiskry nebo
pilotní plamének (např. ohřívače vody nebo jiného
spotřebiče).
6. Nikdy neplňte kanistry palivem uvnitř vozidla nebo na
ložné ploše nákladního vozu, která má obložení z plastické hmoty. Před plněním vždy postavte kanistry
stranou svého vozidla.
7. Před plněním paliva přemístěte stroje s benzinovým
pohonem z návěsu nebo nákladního vozu na zem.
Pokud to není možné, plňte nádrže strojů na návěsu
nebo nákladním voze z přenosných kanistrů, nikoli pomocí systému s přívodní hadicí a plnicí pistolí.
8. Udržujte ústí plnicí pistole nebo nástavce kanistru v
kontaktu s okrajem palivové nádrže po celou dobu
plnění paliva. Nepoužívejte západku, která udržuje
ventil plnicí pistole v otevřené poloze.
9. Pokud si potřísníte palivem oděv, okamžitě se převlékněte.
10. Nepřeplňujte palivovou nádrž. Instalujte a pevně utáhněte uzávěr nádrže.
11. S benzinem i jinými palivy zacházejte velmi opatrně.
Jsou vysoce hořlavá a jejich výpary jsou výbušné.
12. Pokud rozlijete palivo, nepokoušejte se nastartovat
motor, ale přemístěte stroj od místa s rozlitým palivem;
dokud se palivo neodpaří, dávejte pozor, aby se v
tomto prostoru nevyskytl žádný zdroj jeho vznícení.
13. Pečlivě instalujte a utáhněte uzávěry palivových nádrží
a kanistrů.
Servis a běžná údržba
1. Nikdy stroj nespouštějte a nepoužívejte v uzavřeném
prostoru, kde se může hromadit kysličník uhelnatý.
2. Udržujte matice a šrouby (především šrouby nožů
sekačky) pevně utažené; udržujte stroj v dobrém technickém stavu.
3. Nikdy se nepokoušejte jakkoli ovlivňovat funkce
bezpečnostních zařízení stroje. Pravidelně kontrolujte
jejich správnou činnost a jestliže správně nefungují,
zabezpečte okamžitě jejich opravu.
4. Pečlivě čistěte ze stroje trávu, listí nebo jiný nahromaděný
odpad. Očistěte jakýkoli rozlitý olej nebo palivo, a
odstraňte ze stroje všechen palivem nasáklý odpad.
Před uskladněním nechejte stroj vychladnout.
5. Pokud při práci narazíte na jakýkoli objekt, zastavte
stroj a zkontrolujte jej. Pokud je zapotřebí, proveďte
příslušnou opravu před jeho opětovným nastartováním.
6. Nikdy neprovádějte úpravy nastavení stroje nebo
opravy s běžícím motorem.
7. Kontrolujte často součásti sběrného koše a kryt
výhozu sekačky; pokud je zapotřebí, opravte je s
použitím dílů doporučených výrobcem stroje.
8. Nože žacího ústrojí jsou ostré. Při jejich údržbě pos-
9. Kontrolujte často činnost brzdy. Podle potřeby ji
10. Udržujte čisté bezpečnostní a instruktážní štítky a
8
tupujte velmi opatrně - vhodně je obalte nebo používejte rukavice.
okamžitě nastavte nebo opravte.
nálepky na stroji; jsou-li poškozeny, instalujte nové.
11. Neprovádějte demontáž palivového flitru v době, kdy
je motor horký; benzin se může vznítit. Neuvolňujte
spony hadic vedení paliva více, než kolik je to nezbytné.
Po instalaci nového filtru spony hadic opět pevně utáhněte.
12. Nepoužívejte benzin obsahující METANOL, benzin ve
směsi s více než 10% ETANOLU, přísady do benzinu,
nebo technický benzin - může dojít k poškození motoru nebo palivového systému.
13. Pokud musíte vypustit palivovou nádrž, je nutno to
provést na otevřeném prostranství.
14. Pokud dojde k poruše tlumiče výfuku, instalujte nový
tlumič.
15. Při opravách používejte pouze schválené tovární
náhradní díly.
16. Všechna nastavení a úpravy nastavení provádějte v
souladu s továrními technickými údaji.
17. Rozsáhlejší servisní úkony nebo opravy je nutno svěřit
pouze výrobcem schválenému servisními středisku.
18. Pokud k tomu nemáte příslušnou odbornou kvalifikaci,
nikdy se nepokoušejte provádět větší opravy tohoto
stroje. Nesprávné servisní postupy mohou mít za
následek nebezpečný provoz, poškození stroje a
zrušení výrobcovy záruky.
19. Buďte opatrní při manipulaci s žacím ústrojím s více
noži - otáčení jedním nožem uvede do pohybu také
ostatní nože.
20. Neměňte nastavení regulátoru motoru a nenastavujte
motor na nadměrně vysoké otáčky. Motor běžící v
příliš vysokých otáčkách může zvýšit nebezpečí úrazu.
21. Vypojte pohon příslušenství, zastavte motor, vytáhněte
klíček ze spínače zapalování a odpojte kabel(y) od
svíček, jestliže: čistíte ucpané příslušenství nebo výstupní otvory, provádíte servis, narazili jste na předmět,
nebo jestliže stroj abnormálně vibruje. Pokud jste
narazili na jakýkoli předmět, zkontrolujte, zda stroj není
poškozen a před jeho nastartováním a další činností
proveďte nezbytnou opravu.
22. Jestliže je stroj v činnosti, nikdy nepokládejte ruce do
blízkosti pohybujících se součástí, např. chladicího
větráku čerpadla hydrostatické převodovky. (Chladicí
větráky čerpadla hydrostatické převodovky jsou typicky umístěny nad nápravou.)
23. Stroje s hydraulickými čerpadly, hadicemi a motory:
VÝSTRAHA: Hydraulická kapalina unikající pod tlakem
může proniknout pokožkou a způsobit vážný úraz.
Cizí kapalinu vstříknutou pod pokožku musí do několika hodin chirurgicky odstranit lékař, obeznámený s tímto
typem zranění - jinak hrozí nebezpečí vzniku gangrény.
Udržujte své tělo a ruce stranou od drobných otvorů
nebo trysek, ze kterých uniká hydraulická kapalina
pod vysokým tlakem. Při hledání míst úniku kapaliny
použijte kus papíru nebo lepenky, nikoli své ruce. Před
natlakováním systému se ujistěte, že jsou všechny
spoje vedení hydraulické kapaliny utaženy a že jsou
hydraulické hadice a vedení v dobrém stavu. Pokud
dochází k úniku kapaliny, okamžitě požádejte
pověřeného prodejce o zajištění opravy stroje.
24. VÝSTRAHA: Zařízení s akumulovanou energií. Nesprávné
uvolnění pružin může způsobit vážný úraz. Pružiny
musí demontovat kvalifikovaný pověřený technik.
25. Modely vybavené chladičem motoru: VÝSTRAHA: Zařízení s akumulovanou energií. Abyste předešli
vážnému úrazu opařením horkým chladivem nebo
vytrysklou párou, nikdy se nepokoušejte sejmout
uzávěr chladiče v době, kdy je motor v činnosti. Zastavte motor a počkejte, až vychladne. I pak při snímání
uzávěru postupujte velmi opatrně.
www.simplicitymfg.com
Page 31
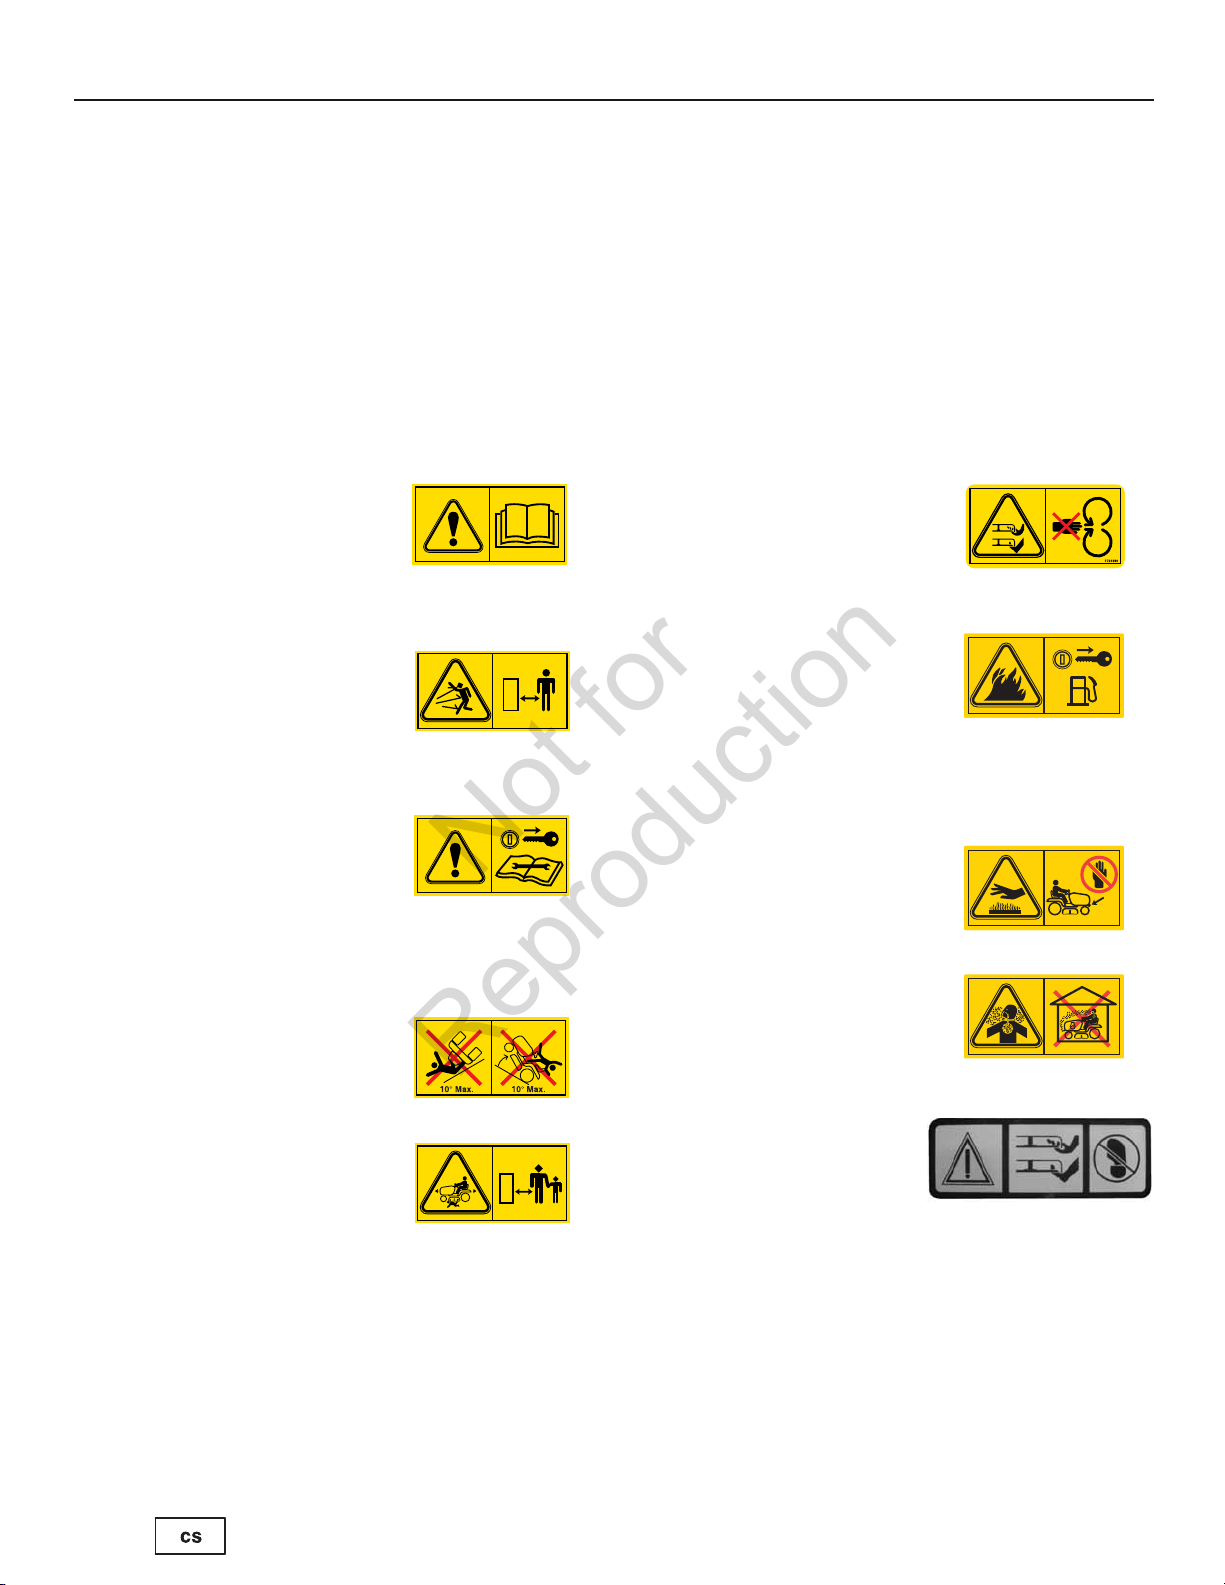
BEZPEČNOST OBLUHY
Not for
Reproduction
Bezpečnostní výstražné štítky
Pečlivě si přečtěte všechny zprávy s označením NEBEZPEČÍ,
VÝSTRAHA a UPOZORNĚNÍ i instruktážní zprávy na svém
traktoru a žacím ústrojí a řiďte se jimi. Pokud se nebudete
řídit těmito instrukcemi, můžete utrpět úraz. Tyto instrukce
slouží pro zajištění vaší bezpečnosti a jsou důležité! Na
vašem traktoru a žacím ústrojí jsou níže zobrazené
bezpečnostní výstražné štítky.
Bezpečnostní ikony
Výstraha: Přečtěte si Návod k
obsluze.
Před používáním tohoto stroje si
přečtěte Návod k obsluze; musíte
mu rozumět a řídit se jím.
Nebezpečí: Odhazované předměty.
Tento stroj může odhazovat předměty a odpad. Zajistěte, aby se
nikdo nedostal do jeho blízkosti.
Pokud kterýkoli z těchto štítků chybí nebo je poškozen,
okamžitě instalujte nový štítek. Nové štítky získáte od svého
místního prodejce.
Štítky lze snadno připevnit a budou sloužit vám i ostatním osobám používajícím toto zařízení jako stálá vizuální
připomínka, že pro jeho bezpečnou a efektivní činnost je
nutno dodržovat bezpečnostní instrukce.
Nebezpečí: Amputace končetiny.
Nože žací jednotky mohou amputovat končetiny. Udržujte ruce a nohy v
bezpečné vzdálenosti od nožů.
Nebezpečí: Nebezpečí vzniku
požáru.
Neplňte stroj palivem v době, kdy je
motor horký nebo v běhu. Před
plněním paliva vypněte motor a
nechejte jej chladnout po dobu 3
minut.
Výstraha: Před údržbou stroje
vytáhněte klíček ze zapalování.
Před prováděním oprav nebo běžné
údržby vytáhněte klíček ze zapalování a přečtěte si příslušnou
technickou dokumentaci.
Nebezpečí: Převrácení stroje.
Nepoužívejte stroj na svazích se
stoupáním vyšším než 10°.
Nebezpečí: Amputace končetiny.
Tento stroj může amputovat
končetiny. Jakmile je motor v
chodu, zajistěte, aby se nikdo
(především děti) nedostal do jeho
blízkosti.
Nebezpečí: Horký povrch.
Než se dotknete tohoto povrchu,
nechejte stroj vychladnout.
Nebezpečí: Otrava kysličníkem
uhelnatým.
Nepoužívejte tento stroje v nevětraných prostorách.
Nebezpečí: Amputace
končetiny.
Nože žací jednotky mohou amputovat končetiny. Udržujte ruce
a nohy v bezpečné vzdálenosti od
nožů.
9
Page 32

BEZPEČNOST OBLUHY
Not for
Reproduction
Bezpečnostní ikona
Díl č. 1735890
Bezpečnostní ikony,
Díl č. 1734027
Polohy spínače
zapalování
Díl č. 1722806
Bezpečnostní ikona
Díl č. 1735890
4
4
3
3
2
2
R
R
Úroveň hladiny paliva
Díl č. 1735889
Zvedač sekačky
Díl č. 1730264
Vypojení
převodovky
Bezpečnostní obtisky Obrázek 1
Díl č. 1735265
10
www.simplicitymfg.com
Page 33

12V
VLASTNOSTI A OVLÁDÁNÍ
Not for
Reproduction
Ovladače traktoru Obrázek 2
OVLADAČE TRAKTORU
Ovladač plynu
Ovladač plynu slouží k ovládání otáček motoru. Posuňte
ovladač plynu směrem vpřed pro zvýšení otáček motoru a
směrem vzad pro jejich snížení. Při provozu vždy používejte NEJVYŠŠÍ otáčky ("plný plyn").
Sytič
Zavřete klapku sytiče při startování studeného motoru. Jakmile motor nastartuje, otevřete ji. Použití sytiče nemusí být
zapotřebí při startování zahřátého motoru. Pro zavření
klapky sytiče posuňte páčku vpřed.
Čelní světla
Spínač světel zapíná a vypíná čelní světla traktoru.
Počitadlo hodin (Vybrané modely)
Počitadlo hodin udává celkový počet hodin, po který byl
klíček zapalování v poloze CHOD.
11
Page 34

VLASTNOSTI A OVLÁDÁNÍ
12V
Not for
Reproduction
Možnost sekání při jízdě vzad (SJV)
Možnost sekání při jízdě vzad dovoluje sekat trávu (nebo
používat jiné příslušenství poháněná z VPP) při jízdě vzad.
Jestliže chcete sekat trávu při jízdě vzad, otočte klíčkem SJV
po zapojení VPP (výstupu pohonu příslušenství). Rozsvítí se
světelný LED indikátor, a obsluha pak může sekat trávu při
jízdě vzad. Při každém zapojení VPP lze SJV podle potřeby
znovu aktivovat
Spínač VPP
Spínač VPP (výstupu pohonu příslušenství) zapojuje a vypojuje příslušenství, které používá VPP. Pro zapojení VPP
povytáhněte spínač NAHORU. Pro vypojení stlačte spínač
DOLŮ. Aby VPP fungoval, musí obsluha pevně sedět na
sedačce traktoru.
Spínač zapalování
Spínač zapalování startuje a vypíná motor; má tři polohy:
VYPNUTO Vypíná motor a elektrický systém.
CHOD Umožňuje chod motoru a napájení
elektrického systému.
Páka úpravy nastavení sedačky
Polohu sedačky lze měnit posouváním vpřed a vzad.
Pohněte pákou, umístěte sedačku do požadované polohy
a pak páku uvolněte pro uzamčení sedačky ve zvolené
poloze.
Páčka uvolňovacího ventilu převodovky
Páčka uvolňovacího ventilu převodovky deaktivuje
převodovku, takže je možno traktor ručně tlačit. Viz
provozní pokyny v části Ruční tlačení traktoru.
Palivová nádrž
Pro sejmutí uzávěru jím otáčejte proti směru hodinových
ručiček.
Napájecí zásuvka (Vybrané modely )
Výstupní napětí napájecí zásuvky je 12 V. Jmenovitý
odběrový proud příslušenství nesmí přesáhnout 9 ampérů.
Palivoměr
Zobrazuje úroveň hladiny paliva v nádrži.
START Roztáčí motor pro nastartování.
POZNÁMKA: Nikdy neponechávejte spínač zapalování v
poloze CHOD, jestliže je motor vypnut - vybíjí se tím baterie.
Pedály ovládání rychlosti jízdy
Rychlost jízdy traktoru vpřed je ovládána pedálem ovládání
rychlosti jízdy vpřed. Rychlost jízdy traktoru vzad je ovládána
pedálem ovládání rychlosti jízdy vzad.
Sešlápnutí kteréhokoli z těchto pedálů zvýší rychlost jízdy.
Pamatujte na to, že čím více je pedál sešlápnut dolů, tím
rychleji se traktor bude pohybovat.
Systém automatické kontroly
rychlosti jízdy
Systém automatické kontroly rychlosti jízdy slouží k uzamčení ovládání rychlosti při jízdě vpřed. Tento systém má pět
uzamykacích poloh.
Páka zvedání/spouštění žacího ústrojí
Páka zvedání/spouštění žacího ústrojí ovládá řezací výšku
žacího ústrojí. Přitáhněte tuto páku zpět pro zmenšení výšky
a zatlačte ji vpřed ji pro zvětšení výšky.
Parkovací brzda
Knoflík parkovací brzdy slouží k uzamčení parkovací brzdy
při zastavení traktoru. Sešlápněte zcela brzdový pedál a
povytáhněte knoflík pro zapojení parkovací brzdy.
Brzdový pedál
Sešlápnutí pedálu uvádí do činnosti brzdu traktoru.
12
www.simplicitymfg.com
Page 35

VLASTNOSTI A OVLÁDÁNÍ
Not for
Reproduction
F
N
I
C
M
M
J
J
A
K
B
G
F
D
H
C
B
L
E
Ovladače motoru Obrázek 3
OVLADAČE MOTORU
A. Identifikace motoru
B. Svíčka
C. Čistič vzduchu
D. Měrka
E. Zátka k vypouštění oleje
F. Rotační síto
G. Olejový filtr
H. Elektrický startér
I. Karburátor
J. Palivový filtr (doplňkový)
J. Palivová pumpa (doplňková)
L. Rychlé vypouštění oleje (doplňkové)
M. Chladič oleje (doplňkový)
N. Elektrická řídící jednotka (doplňková)
13
Page 36

OVLÁDÁNÍ
Not for
Reproduction
Testy bezpečnostního blokovacího systému
Tento stroj je vybaven spínači bezpečnostního blokování funkcí a
dalšími bezpečnostními zařízeními. Tyto bezpečnostní systémy
jsou určeny pro vaši bezpečnost: nikdy se nepokoušejte vyřazovat
z provozu bezpečnostní spínače a nikdy neovlivňujte činnost
bezpečnostních zařízení.
VAROVÁNÍ
Pokud stroj nesplňuje požadavky na výsledky
bezpečnostních testů jeho funkce, nepoužívejte jej.
Kontaktujte svého pověřeného prodejce.
Testy bezpečnostního blokovacího systému
Tento stroj je vybaven spínači bezpečnostního blokování funkcí a
dalšími bezpečnostními zařízeními. Tyto bezpečnostní systémy
jsou určeny pro vaši bezpečnost: nikdy se nepokoušejte vyřazovat
z provozu bezpečnostní spínače a nikdy neovlivňujte činnost
bezpečnostních zařízení.
Kontroly PROVOZNÍ BEZPEČNOSTI
Váš stroj je vybaven systémem bezpečnostního spínače v
sedačce. Zkontrolujte činnost spínače v sedačce vždy na podzim
a na jaře pomocí následujících testů.
Test 1 — Klikový hřídel motoru se NESMÍ začít otáčet, jestliže:
• Spínač VPP je ZAPOJEN, NEBO
• Brzdový pedál NENÍ zcela stlačen (parkovací brzda je VYPOJENA), NEBO
• Ovladač automatické kontroly rychlosti jízdy NENÍ v NEUTRÁLNÍ poloze.
Test 2 — Klikový hřídel motoru BY SE MĚL začít
otáčet a motor startovat, jestliže:
• Obsluha sedí na sedačce A
• Spínač VPP je VYPOJEN A
• Brzdový pedál je zcela stlačen (parkovací brzda je ZAPOJENA) A
• Ovladač automatické kontroly rychlosti jízdy je v NEUTRÁLNÍ
poloze.
Test 3 — Motor by se měl VYPNOUT, jestliže:
• Obsluha vstane ze sedačky s aktivovanou PTO, NEBO
• Obsluha vstane ze sedačky, když NENÍ plně stisknut
pedál brzdy (je VYPNUTA parkovací brzda).
Test 4 — Překontrolujte dobu zastavení nože sekačky
Nože žacího ústrojí a jeho pohonný řemen se musí zcela zastavit
do pěti sekund poté, co je elektrický spínač VPP uveden do
polohy VYPNUTO (nebo poté, co obsluha vstane ze sedačky).
Jestliže se hnací řemen sekačky nezastaví do pěti sekund, kontaktujte autorizovaného prodejce výrobků.
Test 5— Kontrola funkce možnosti sekání při jízdě vzad (SJV)
• Motor se musí zastavit, jestliže se pokusíte o jízdu vzad tehdy,
když je vypojen VPP a možnost SJV není aktivována.
• Když je možnost SJV aktivována, její světelný indikátor se
musí rozsvítit.
Doporučení pro olej
Pro nejlepší výkon doporučujeme použití olejů schválených
pro použití s výrobky Briggs & Stratton. Přijatelné jsou i jiné
kvalitní čistící oleje za předpokladu, že jsou označené pro
servis SF, SG, SH, SJ či vyšší. Nepoužívejte speciální
přídavky.
Venkovní teplota určuje řádnou viskozitu pro motor. K
výběru nejlepší viskozity pro očekávanou venkovní teplotu
použijte tabulku.
Syntetický 5W-30
* Při teplotách pod 4°C (40°F) povede použití SAE 30 k obtížnému startování.
** Při teplotách nad 27°C (80°F) povede použití 10W-30 ke zvýšené spotřebě oleje.
Pravidelně kontrolujte množství oleje.
Kontrola/Přidávání oleje
Před přidáním či kontrolou oleje
• Motor umístěte na rovinu.
• Plochu pro plnění oleje vyčistěte.
1. Vyndejte měrku (A, Obrázek 4) a očistěte s čistým
hadrem.
2. Vložte a utáhněte měrku.
3. Měrku vyndejte a překontrolujte množství oleje. Měl by
být na značce PLNÝ (B) na měrce.
4. Jestliže je množství nízké, pomalu přidejte motorový olej
k doplnění (C). Nepřeplňujte. Po přidání oleje vyčkejte
jednu minutu a pak množství oleje zkontrolujte ještě
jednou.
POZNÁMKA: Olej nevlévejte do otvoru pro rychlé
vypouštění oleje (L, Obrázek 3) (jestliže existuje).
5. Vložte zpět a utáhněte měrku.
14
www.simplicitymfg.com
Page 37

OVLÁDÁNÍ
Not for
Reproduction
Tlak oleje
Jestliže je tlak oleje příliš nízký, tlakový spínač (kde
existuje) zastaví motor či aktivuje varovné zařízení na
přístroji. Jestliže k tomu dojde, zastavte motor a s měrkou
zkontrolujte množství oleje.
Jestliže je olej pod značkou PŘIDAT, přidejte olej, až
dosáhne na značku PLNÝ. Nastartujte motor a před dalším
provozem překontrolujte řádný tlak.
Jestliže je hladina oleje mezi značkami PŘIDAT a PLNÝ,
motor nestartujte. K nápravě problému s tlakem oleje
kontaktujte autorizovaného prodejce.
Doporučení paliva
Palivo musí splňovat tyto požadavky:
• Čistý, čerstvý, bezolovnatý benzín.
• Minimálně 87 oktanů/87 AKI (91 RON). Pro použití ve
vysokých nadmořských výškách, viz. níže.
• Přijatelný je benzín až s 10% ethanolu (gasohol) či až
15% MTBE (metylterciárbutyléter).
POZOR: Nepoužívejte neschválené benzíny, jako je
například E85. Do benzínu nepřidávejte olej a motor
nemodifikujte tak, aby fungoval s jinými palivy. Došlo by tak
k poškození součástek motoru a porušení záruky motoru.
K ochraně palivového systému před tvorbou gumy do paliva
přimíchejte stabilizátor paliva. Viz Skladování. Různá
paliva se liší. Jestliže dojde k problémům se startováním či
výkonem, změňte dodavatele či značku paliva. Tento motor
je určený pro funkci na benzín. Systém pro kontrolu emisí
pro tento motor je EM (Modifikace motoru).
Vysoká nadmořská výška
Při nadmořských výškách nad 1524 metrů (5000 stop) se
vyžaduje benzín s minimem 85 oktanů/85 AKI (89 RON).
Abyste dodržovali předpisy o emisích, vyžaduje se úprava
pro vysokou nadmořskou výšku. Provoz bez této úpravy
povede ke zhoršení výkonu, zvýšené spotřebě paliva a
větším emisím. K obdržení informací o úpravě pro vyšší
nadmořskou výšku kontaktujte autorizovaného prodejce.
Nedoporučuje se používání se soupravou pro vysoké
nadmořské výšky při nadmořské výšce pod 762 metrů
(2500 stop).
Přidávání paliva
VAROVÁNÍ
Palivo a jeho páry jsou velice hořlavé a výbušné.
Oheň či exploze mohou způsobit vážné popáleniny
nebo smrt.
Při přidávání paliva
• Vypněte motor a před odstraněním uzávěru ho nechte
vychladit alespoň po dobu 3 minut.
• Tankujte venku nebo v dobře ventilovaném prostoru.
• Nádrž nepřeplňujte. Aby se umožnila expanze paliva,
netankujte nad spodní část hrdla nádrže.
• Palivo udržujte mimo otevřený oheň, jiskry, pilotní
světla, teplo nebo jiné zdroje vzplanutí.
• Palivové trubičky, nádrž a uzávěr často kontrolujte pro
známky poškození. Jestliže je to nutné, nahraďte je
novými
• Jestliže dojde k rozlití paliva, před dalším startováním
vyčkejte, než znovu vyschne.
1. Plochu kolem palivového víčka očistěte od nečistot.
Sundejte palivové víčko (A, Obrázek 5).
2. Palivovou nádrž (B) naplňte palivem. Aby se umožnila
expanze paliva, netankujte nad spodní část hrdla
nádrže (C).
3. Palivovou zátku vraťte zpět.
Startování motoru
VAROVÁNÍ
Palivo a jeho páry jsou velice hořlavé a výbušné.
Oheň či exploze mohou způsobit vážné popáleniny
nebo smrt.
Při startování motoru
• Ujistěte se, že svíčky, výfuk, uzávěr nádrže a filtr (kde
existují) jsou na svém místě a bezpečné.
• Nestartuje s odstraněnými svíčkami.
• Jestliže dojde k přeplnění motoru palivem, nastavte
sytič, kde existuje, do polohy OTEVŘÍT/JET, plyn, kde
existuje, přeneste do polohy RYCHLE a startujte, až se
motor nastartuje.
15
Page 38

OVLÁDÁNÍ
Not for
Reproduction
VAROVÁNÍ
Z motoru vychází oxid uhelnatý (bezbarvý
nezapáchající otravný plyn).
Vdechování oxidu uhelnatého může vést
k nevolnostem, mdlobám nebo smrti.
• Motor startujte a provozujte venku.
• Motor nespouštějte uvnitř, i když jsou otevřená okna a
dveře.
UPOZORNĚNÍ: Tento motor byl z továrny Briggs & Stratton
vyexpedován bez oleje. Než motor nastartujete, ujistěte se,
že přidáte olej podle pokynů v tomto návodu. Jestliže motor
nastartujete bez oleje, dojde k jeho nenapravitelnému
poškození a na toto se nebude vztahovat záruka.
1. Zkontrolujte množství oleje. Viz část
Kontrola/Přidávání oleje.
2. Ujistěte se, že ovladače pohonu zařízení jsou neaktivní.
3. Palivový ventil (A, Obrázek 6), jestliže na zařízení je,
přepněte do polohy ZAPNUT.
4. Páčku plynu (B) posuňte do polohy RYCHLE. Motor
používejte v poloze RYCHLE.
5. Kombinovanou páčku sytiče/plynu (C) přeneste do
polohy SYTIČ.
POZNÁMKA: Při startování teplého motoru není normálně
sytič potřeba.
6. Tlačítko elektrického startéru (D) přepněte do polohy
ZAPNUT/START.
POZNÁMKA: Jestliže motor nenastartuje po
opakovaných pokusech, kontaktujte autorizovaného
prodejce.
UPOZORNĚNÍ: K prodloužení životnosti startéru používejte
krátké startovací cykly, maximálně pět sekund. Mezi
startovacími cykly čekejte jednu minutu.
7. Jak se motor ohřeje, nastavte páčku sytiče (C) do
polohy JET.
Řízení traktoru
1. Posaďte se na sedačku a nastavte ji tak, abyste pohodlně dosáhli na všechny ovládací prvky a dobře viděli
displej palubní desky.
2. Zapojte parkovací brzdu.
3. Ověřte, zda je vypojen spínač VPP.
4. Nastartujte motor (viz část Startování motoru).
5. Vypojte parkovací brzdu a uvolněte brzdový pedál.
6. Pro jízdu vpřed sešlápněte pedál ovládání rychlosti jízdy
vpřed. Pro zastavení uvolněte pedál. Pamatujte na to,
že čím více je pedál sešlápnut dolů, tím rychleji se traktor bude pohybovat.
7. Pro zastavení traktoru uvolněte pedály ovládání rychlosti
jízdy, zapojte parkovací brzdu a zastavte motor (viz část
Zastavení traktoru a motoru).
Sekání
1. Sekací výšku sekačky nastavte na požadovaný stupeň s
pomocí páky zvedání sekačky.
2. Aktivujte parkovací brzdu. Ujistěte se, že spínač PTO je
vypnutý.
3. Nastartujte motor (viz. Startování motoru).
4. Plyn nastavte na PLNÝ.
5. K aktivaci nožů sekačky zapněte PTO.
6. Začněte sekat.
POZNÁMKA: Po rozeznění alarmu „plný koš“ ihned vypněte PTO, aby nedošlo k ucpání výhozu. Zajeďte do
požadovaného místa a vyprázdněte koš (viz.
Vyprazdňování koše).
7. Po ukončení vypněte PTO a zvedněte sekací část s
použitím páky zvedání sekačky.
8. Zastavte motor (viz. Zastavení traktoru a motoru).
16
VAROVÁNÍ
Motor se vypne, jestliže je sešlápnut pedál ovládání
rychlosti jízdy vzad v době, kdy je zapojen VPP a
možnost sekání při jízdě vzad (SJV) nebyla
aktivována. Obsluha vždy musí vypojit VPP před
přejížděním přes silnice, cestičky nebo jakékoli
plochy, které mohou být používány jinými vozidly.
Náhlá ztráta pohonu a zastavení stroje může
vyvolat nebezpečnou situaci.
www.simplicitymfg.com
Page 39

OVLÁDÁNÍ
Not for
Reproduction
VAROVÁNÍ
Sekání trávy při jízdě vzad může být nebezpečné
pro osoby v blízkosti stroje. Pokud obsluha stroje
nedává pozor na přítomnost dětí, může dojít k
tragické nehodě. Nikdy nezapojujte VPP, pokud jsou
v blízkosti stroje děti. Děti často přitahuje jak
samotný stroj, tak jeho činnost při sekání trávy.
Sekání trávy při jízdě vzad
Jestliže se obsluha rozhodne sekat trávu při jízdě vzad, je
možno použít systém SJV. Jestliže chcete použít možnost
sekání při jízdě vzad (SJV), otočte klíčkem SJV po zapojení
VPP. Rozsvítí se světelný LED indikátor, a obsluha pak
může sekat trávu při jízdě vzad. Při každém zapojení VPP
lze SJV podle potřeby znovu aktivovat. Pro znemožnění
přístupu k funkci SJV je nutno vytáhnout klíček.
Používání příslušenství při jízdě vzad
Jestliže se obsluha rozhodne používat příslušenství poháněné z VPP při jízdě vzad, je možno použít systém SJV.
Jestliže chcete použít možnost sekání při jízdě vzad (SJV),
otočte klíčkem SJV po zapojení VPP. Rozsvítí se světelný
LED indikátor, a obsluha pak může použít příslušenství při
jízdě vzad. Po každém vypojení VPP je nutno SJV podle
potřeby znovu aktivovat. Pro znemožnění přístupu k funkci
SJV je nutno vytáhnout klíček.
Ruční tlačení traktoru
1. Vypojte VPP a vypněte motor.
2. Páku zatlačte asi 6 cm (2 a 3/8″) k uvolnění převodovky
(A, Obrázek 7).
3. Traktor je nyní možno ručně tlačit.
Funkce parkovací brzdy
Zapojení parkovací brzdy - Viz Obrázek 8. Pro uzamčení
parkovací brzdy uvolněte pedál ovládání rychlosti jízdy (A),
zcela sešlápněte brzdový pedál (B), povytáhněte VZHŮRU
knoflík pro zapojení parkovací brzdy (C) a pak uvolněte brz-
dový pedál.
Vypojení parkovací brzdy - Viz Obrázek 8. Pro vypojení
parkovací brzdy sešlápněte brzdový pedál (B).
Používání systému automatické kontroly
rychlosti jízdy
PRO ZAPOJENÍ SYSTÉMU:
1. Povytáhněte vzhůru knoflík automatické kontroly
rychlosti jízdy (D, Obrázek 8).
2. Sešlápněte pedál ovládání rychlosti jízdy (A).
3. Při dosažení požadované rychlosti povytáhněte vzhůru
ovládací knoflík (D). Systém automatické kontroly
rychlosti jízdy bude uzamčen v jedné z pěti uzamykacích
poloh.
PRO VYPOJENÍ SYSTÉMU:
1. Sešlápněte brzdový pedál (B, Obrázek 8).
NEBO
2. Sešlápněte pedál ovládání rychlosti jízdy (A).
Počitadlo hodin (kde existují)
Počitadlo hodin (E, Obrázek 8) udává celkový počet hodin,
po který byl klíček zapalování v poloze CHOD.
Zastavení traktoru a motoru
1. Vraťte ovladač(e) rychlosti jízdy do neutrální polohy.
2. Vypojte VPP a počkejte, až se všechny jeho pohybující se
NETAHEJTE
TRAKTOR
Tahání tohoto stroje
způsobí poškození
převodovky.
• Nepoužívejte jiné
vozidlo pro tlačení
nebo tahání tohoto
stroje. • Neaktivujte
páčku uvolňovacího
ventilu převodovky,
jestliže je motor v
chodu.
součásti zcela zastaví.
3. Posuňte ovladač plynu do polohy pro POMALÉ otáčky
motoru a otočte klíček zapalování do polohy VYPNUTO
(Obr. 6). Vytáhněte klíček.
Vyprázdnění koše
Vyprázdnění koše:
1. K vyprázdnění koše (A, Obrázek 9) vytáhněte a zatlačte
směrem dopředu páku koše (B).
2. Pákou koše koš uzavřete a zasuňte ji zpět do koše.
17
Page 40

OVLÁDÁNÍ
Not for
Reproduction
Demontáž a montáž koše
VAROVÁNÍ
Neprovozujte zařízení bez namontovaného
zásobníku nebo deflektoru.
1. Odblokujte západku koše (A, Obrázek 10) umístěnou za
levým zadním kolem.
2. Nadzdvihněte západku koše a zatlačte směrem
dozadu.
3. Pomocí páky koše (B) pootevřete koš.
4. Zvedněte koš ze zadních podpůrných ramen.
5. Při montáži postupujte opačným způsobem. Abyste si
usnadnili zpětnou montáž koše, vyrovnejte šipky na koši
a na zadní části traktoru.
Montáž a demontáž mulčovací ucpávky
VAROVÁNÍ
Z důvodu své vlastní bezpečnosti se nedotýkejte
ostrých nožů sekačky holýma rukama. Nedbalost
nebo nesprávné zacházení s noži může způsobit
vážné zranění.
1. Demontujte koš.
2. Přidržte rukojeť (A, Obrázek 11) a zasuňte ucpávku do
tunelu. Ujistěte se, že hlava (B) vklouzne do horní části
kluzných vodítek uvnitř krytu.
3. Zatlačte na rukojeť a stlačte vnitřní pružinu.
4. Vložte do otvoru na konci tunelu prodlužovací trubku a
zajistěte kotevním drátkem (B).
5. Namontujte zpět koš.
6. Demontáž mulčovací zátky proveďte v obráceném
pořadí.
Nastavení alarmu plného koše
Množství trávy v koši lze upravit nastavením lopatky
alarmu (viz Obrázek 12).
Nastavení množství trávy
Vysunutím držáku lopatky (A, Obrázek 12) směrem
nahoru se množství trávy ve sběracím koši před
spuštěním alarmu zvýší. Přesunutím držáku lopatky
směrem dolů se množství trávy ve sběracím koši před
spuštěním alarmu sníží.
1. Uvolněte držák (B).
2. Přesuňte držák lopatky (A) nahoru nebo dolů.
3. Utáhněte držák.
Úprava výšky sekání
Páka zvedání sekačky (A, Obrázek 13) se používá ke
snížení a zvýšení plochy k získání požadované výšky
sekání.
Ke snížení plochy páku zvedání sekačky zatáhněte mírně
zpět, zatlačte ji směrem doleva a posuňte směrem dolů.
Ke zvýšení plochy zatáhněte za páku zvedání sekačky a
uzamkněte ji v otvoru na pravé straně.
Připojení návěsu
Maximální přípustná hodnota pro horizontální sílu působící na tažnou tyč je 280 newtonů (N). Maximální přípustná hodnota pro vertikální sílu působící na tažnou tyč
je 160 newtonů (N). Tyto hodnoty odpovídají silám při
tažení návěsu o hmotnosti 113 kg do svahu se stoupáním
10 stupňů. Zajistěte návěs pomocí příslušně velkého třmenového čepu (A, Obrázek 14) a závlačky (B).
18
www.simplicitymfg.com
Page 41
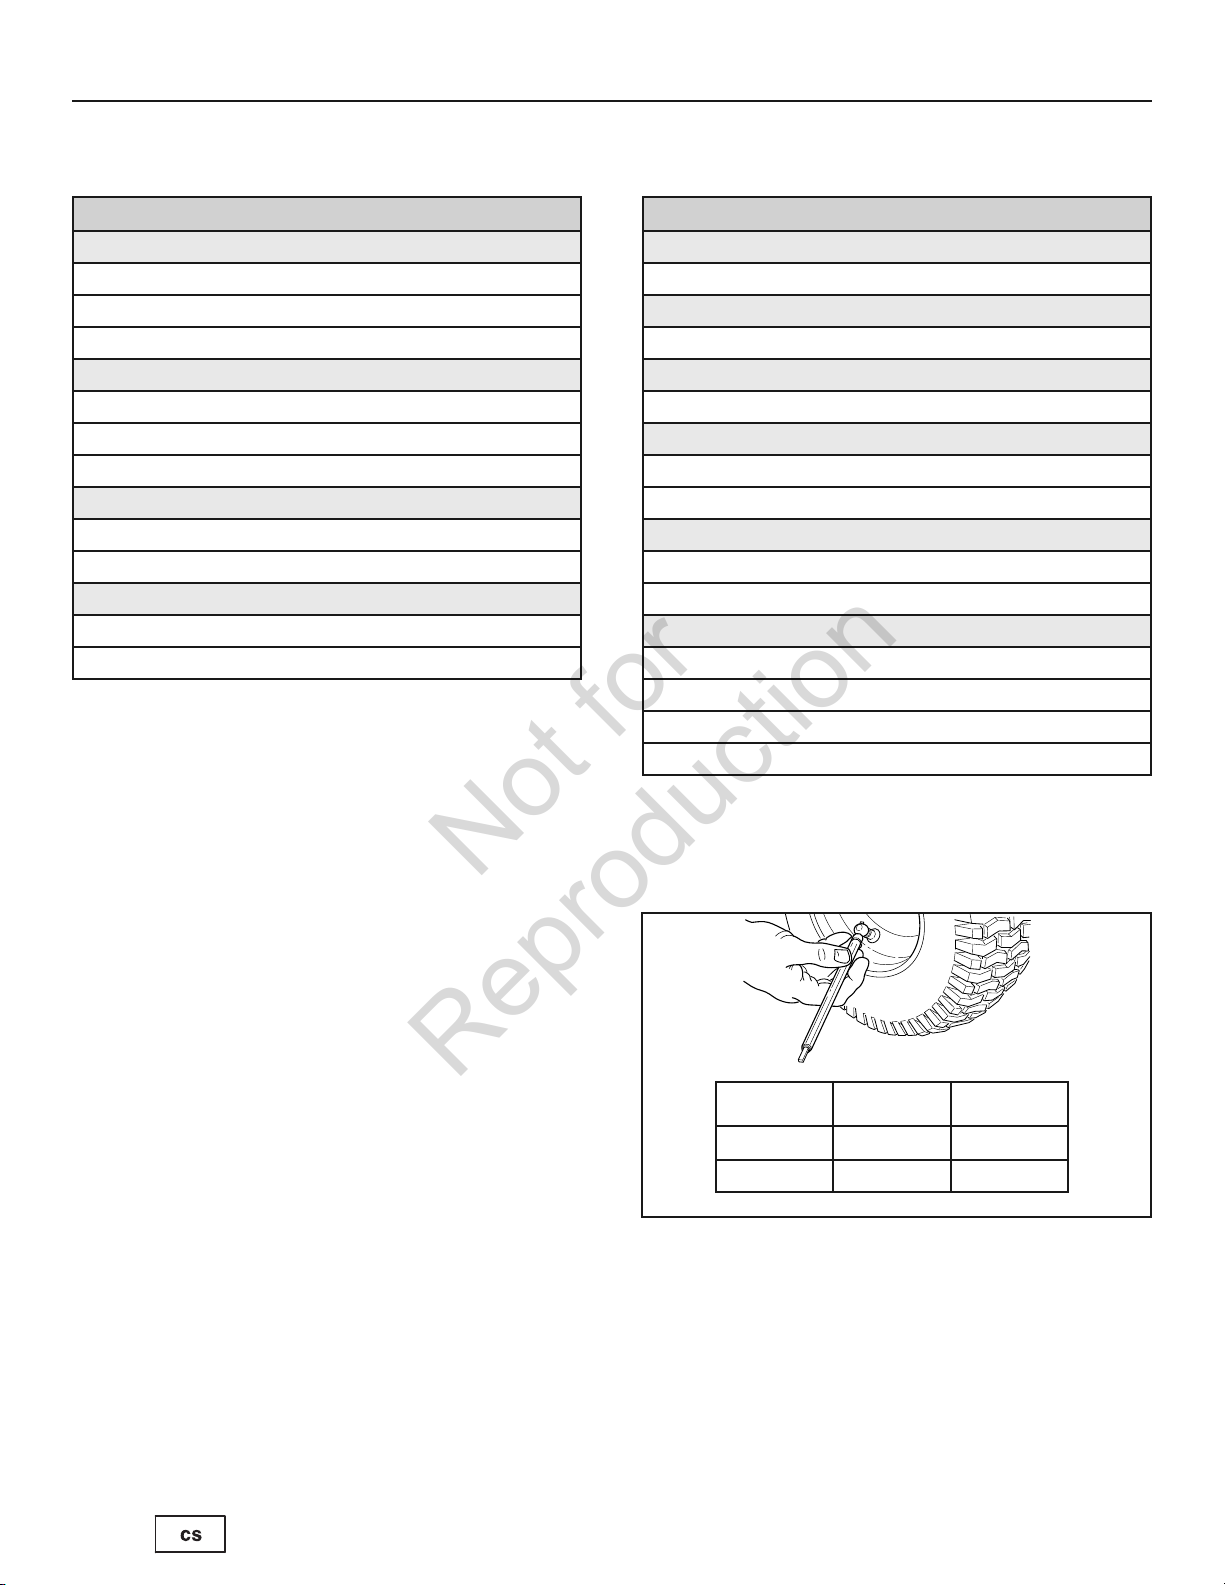
Plán údržby
Not for
Reproduction
ÚDRŽBA
TRAKTOR A SEKAČKA
Každých 8 hodin či denně
Překontrolujte bezpečnostní zamykací systém
Očistěte odpad z traktoru a plošiny sekačky
Očistěte odpad z motoru
Každých 25 hodin či ročně *
Překontrolujte tlak pneumatik
Překontrolujte dobu zastavení nože sekačky
Traktor a sekačku překontrolujte pro volné součástky
Každých 50 hodin či ročně *
Vyčistěte baterii a kabely
Překontrolujte brzdy traktoru
Každý rok navštivte prodejce pro následující
Traktor a sekačku namažte
Překontrolujte nože sekačky **
* Kterékoli nastane první
** Nože překontrolujte častěji v místech s písčitou půdou
či za prašných podmínek.
MOTOR
Prvních 5 hodin
Vyměňte motorový olej
Každých 8 hodin či denně
Zkontrolujte množství oleje
Každých 25 hodin či ročně *
Překontrolujte filtr motoru a předběžný čistič **
Každých 50 hodin či ročně *
Vyměňte motorový olej
Vyměňte olejový filtr
Ročně
Vyměňte vzduchový filtr
Vyměňte předčistící část
Každý rok navštivte prodejce pro následující
Překontrolujte tlumič a zachycovač jisker
Vyměňte svíčku
Vyměňte palivový filtr
Vyčistěte vzduchový chladící systém motoru
Zkontrolujte tlak v pneumatikách
Musíte pravidelně kontrolovat tlak v pneumatikách a udržovat
jej na hodnotách uvedených v tabulce. Pamatujte na to, že
tyto hodnoty se mohou poněkud lišit od hodnoty pro maximální nafukovací tlak ("Max Inflation") uvedené na boku pneumatiky. Uvedené hodnoty zajišťují správný záběr kol, zlepšují
kvalitu sekání trávy a prodlužují životnost pneumatik.
* Kterékoli nastane první
** Za prašných podmínek či v přítomnosti nečistot ve
vzduchu čistěte častěji.
Size PSI bar
22 x 8.8 10 0,68
15 x 6.6 14 0,96
19
Page 42

ÚDRŽBA
Not for
Reproduction
Překontrolujte dobu zastavení nože sekačky
Nože žacího ústrojí a jeho pohonný řemen se musí zcela
zastavit do pěti sekund poté, co je elektrický spínač VPP
uveden do polohy VYPNUTO.
1. S ovládacími prvky traktoru v neutrální poloze, vypojeným VPP a obsluhou sedící na sedačce nastartujte
motor.
2. Dívejte se směrem přes levé opěradlo ruky na řemen
pohonu žacího ústrojí. Zapojte VPP a čekejte několik
sekund. Vypojte VPP a změřte, jak dlouho trvá, než se
zcela zastaví řemen pohonu žacího ústrojí.
3. Jestliže se hnací řemen sekačky nezastaví do pěti
sekund, kontaktujte autorizovaného prodejce výrobků.
Údržba baterie
VAROVÁNÍ
Při odpojování a připojování kabelů baterie odpojte
záporný kabel jako PRVNÍ a připojte jej zpět jako
POSLEDNÍ. Pokud nebudete postupovat v tomto
pořadí, může použitý nástroj způsobit zkrat kladného vývodu baterie na kostru stroje.
Čištění baterie kabelů
1. Odpojte od baterie kabely; jako první odpojte záporný
kabel (A, Obrázek 15), pak sejměte krytku a odpojte
kladný kabel (B).
2. Sejměte křídlovou matici a podložku (D).
3. Nakloňte držák (C) směrem vzhůru a od baterie.
Zachyťte držák na kryt sloupku řízení.
4. Vyjměte baterii (E).
5. Vyčistěte skříňku pro baterii roztokem jedlé sody ve vodě.
6. Očistěte vývody baterie a svorky kabelů tvrdým
drátěným kartáčem a čisticím prostředkem na vývody
baterií tak, aby byly lesklé.
7. Vložte baterii (E) do skříňky pro baterii. Upevněte baterii
pomocí držáku (C), křídlové matice a podložky (D).
8. Připojte k baterii kabely; jako první připojte kladný kabel a
nasaďte krytku (B), pak připojte záporný kabel (A).
9. Potřete konce kabelů a vývody baterie vazelínou na
ropné bázi nebo nevodivým mazacím tukem.
Výměna baterie
VAROVÁNÍ
Otevřený plamen a jiskry udržujte mimo
dosah baterie, protože plyny, které z ní
vycházejí, jsou vysoce výbušné. Při nabíjení
baterii dobře větrejte.
Mrtvá baterie či baterie, která je příliš slabá k nastartování
motoru, může vést k poškození nabíjení či jiných
elektrických součástek. Jestliže máte jakékoli pochybnosti
o příčinách tohoto problému, kontaktujte vašeho prodejce.
Jestliže baterii potřebujete vyměnit, postupujte podle části
Čištění baterie a kabelů.
K nabití baterie postupujte podle pokynů uvedených
výrobcem nabíječky baterií a podle varování zahrnutých v
části Bezpečnost obluhy v tomto návodu. Baterii nabíjejte
do té doby, až bude plná. Nenabíjejte rychleji než při 10
ampérech.
20
www.simplicitymfg.com
Page 43

ÚDRŽBA
Not for
Reproduction
Úprava sedačky
Sedačku je možno upravit dopředu či zpět. Přeneste páku
(Viz část Ovladače traktoru) sedačku dejte do
požadované polohy a páku uvolněte k uzamčení sedačky v
dané poloze.
Úprava brzdy
Tato jednotka nemá ručně upravitelnou brzdu. Jestliže
brzda řádně nefunguje, kontaktujte oprávněného prodejce.
Výměna oleje
Použitý olej je nebezpečný odpad a je nutná jeho řádná
likvidace. Nelikvidujte s domácím odpadem. Pro bezpečnou
likvidaci či recyklování kontaktujte vaši místní správu,
servisní středisko či prodejce.
Odstranění oleje
1. S vypnutým ale stále teplým motorem odpojte drát
svíčky (A, Obrázek 16) a udržujte ho mimo svíčku.
2. Vyndejte měrku (D).
Standartní zátka k vypouštění oleje
1. Vyndejte zátku k vypouštění oleje (B, Obrázek 16). Olej
vyprázdněte do schválené nádoby.
2. Po vypuštění oleje zátku vložte zpět a utáhněte.
Volitelné rychlé vypouštění oleje
1. Ze strany motoru odpojte hadici vypouštění oleje (G,
Obrázek 16).
2. Otočte a vyndejte zátku k vypouštění oleje (H). Rychlé
vypouštění oleje (I) snižte do schválené nádoby (J).
3. Po vypuštění oleje zátku vložte zpět a utáhněte. Hadici k
vypouštění oleje připevněte ke straně motoru.
Výměna olejového filtru (kde existuje)
Vhodnou dobu mezi výměnami naleznete v Plán údržby.
1. Z motoru odstraňte olej. Viz část Odstranění oleje.
2. Vyndejte olejový filtr (C, Obrázek 17) a řádně ho
zlikvidujte.
3. Před instalací nového olejového filtru lehce namažte
těsnění olejového filtru s čerstvým a čistým olejem.
4. Ručně namontujte olejový filtr do té doby, až se bude
dotýkat adaptéru olejového filtru, pak ho utáhněte o 1/2
až 3/4 otočení.
5. Přidejte olej. Viz část Přidání oleje.
6. Nastartujte motor a nechte ho běžet. Po zahřátí motoru
hledejte stopy úniku oleje.
7. Zastavte motor a překontrolujte množství oleje. Měl by
být na značce PLNÝ na měrce.
Přidejte olej
• Motor umístěte na rovinu.
• Plochu pro plnění oleje vyčistěte.
• Údaje o kapacitě oleje naleznete v části Specifikace.
1. Vyndejte měrku (D, Obrázek 16) a očistěte s čistým
hadrem.
2. Pomalu přidejte motorový olej k doplnění (E).
Nepřeplňujte. Po přidání oleje vyčkejte jednu minutu a
pak zkontrolujte množství oleje.
3. Vložte a utáhněte měrku.
4. Měrku vyndejte a překontrolujte množství oleje. Olej by
měl být na značce PLNÝ (F) na měrce.
5. Vložte a utáhněte měrku.
21
Page 44

ÚDRŽBA
Not for
Reproduction
Servis vzduchového filtru
VAROVÁNÍ
Palivo a jeho páry jsou velice hořlavé a
výbušné.
Oheň či exploze mohou způsobit vážné
popáleniny nebo smrt.
• Motor nikdy nestartujte ani nenechávejte běžet s
vyndaným čističem vzduchu nebo vzduchovým filtrem
(kde existují).
POZOR: K čistění filtru nepoužívejte stlačený vzduch či
ředidla. Stlačený vzduch může poškodit filtr a ředidla ho
mohou rozpustit.
1. Sundejte víčko (A, Obrázek 18).
2. Vyndejte filtr (C) a předběžný čistič (B).
3. K uvolnění nečistot filtrem opatrně poklepejte na tvrdém
povrchu. Jestliže je filtr nadměrně špinavý, vyměňte ho
za nový filtr.
4. Předčistící část čistěte v čistící látce s vodou. Pak ji
ponechte na vzduchu vyschnout. Předčistící část
nemažte.
5. Suchou předčistící část a filtr vmontujte do základny
motoru (D).
6. Namontujte kryt.
Skladování
VAROVÁNÍ
Nikdy neskladujte stroj (obsahující palivo) v
uzavřených, špatně větraných prostorech.
Výpary paliva mohou putovat vzduchem ke
zdrojům vznícení (např. ke spalovacímu kotli,
ohřívači vody apod.) a vyvolat explozi. Výpary
paliva jsou také toxické pro lidi a zvířata.
Při skladování paliva či zařízení s palivem v nádrži
• Skladujte odděleně od kamen, trub, ohřívačů vody či
jiných zařízení, která mají pilotní světlo nebo jiný zdroj
vznětu, protože by mohlo dojít ke vznícení palivových
plynů.
Zařízení
Deaktivujte PTO, zapněte parkovací brzdu a vyndejte klíč.
Vyndáním baterie se prodlouží její životnost. Uložte na
chladném suchém místě a plně nabijte asi jednou za
měsíc. Jestliže je baterie ponechána v jednotce, odpojte
negativní kabel.
Palivový systém
Jestliže je palivo skladováno po dobu delší 30 dnů, může
se zkazit. Zkažené palivo vede ke sraženinám kyselin a
gumy v palivovém systému či v nezbytných částech
karburátoru. Aby bylo palivo i nadále v čerstvém stavu,
používejte stabilizátor paliva Briggs & Stratton FRESH
START®, který je v obchodech jako tekutá přísada či
nádoba s koncentrátem.
Jestliže je do paliva přidán stabilizátor v souladu s pokyny,
není potřeba benzín vypouštět. Motor po dobu 2 minut
zapněte, aby stabilizátor mohl cirkulovat skrze palivový
systém. Motor a palivo je možno ukládat po dobu 24
měsíců.
Jestliže nebyl do paliva v motoru přidán stabilizátor, palivo
je nutno vypustit do schválené nádoby. Motor nechte běžet
do té doby, než se zastaví kvůli nedostatku paliva. K
udržování dobrého stavu paliva se doporučuje použití
stabilizátoru paliva ve skladovací nádobě.
22
Motorový olej
Motorový olej vyměňte, zatímco je motor stále teplý. Viz
Výměna oleje.
Před startováním jednotky po skladování:
• Překontrolujte množství všech kapalin. Překontrolujte
všechny položky, které si vyžadují údržbu.
• Vykonejte doporučené kontroly a postupy uvedené v
návodu.
• Před použitím ponechte motoru několik minut, aby se
ohřál.
www.simplicitymfg.com
Page 45

Řešení problémů pro traktor
Not for
Reproduction
PROBLÉM ZKONTROLUJTE ŘEŠENÍ
Není stisknut pedál brzdy. Plně stiskněte pedál brzdy.
Spínač PTO (elektrická spojka)
je v ZAPNUTÉ poloze.
Je aktivována regulace
rychlosti jízdy.
Došlo palivo. Jestliže je motor horký, nechte ho vychladnout a pak natankujte nádrž.
Motor je zalitý. Deaktivujte sytič.
Spálená pojistka. Kontaktujte oprávněného prodejce.
Motor se neotáčí či
nestartuje.
Obtížné startování motoru či
problémy s funkcí motoru.
Póly baterie si vyžadují čištění. Viz část Čištění baterie a kabelů.
Baterie je vybitá či mrtvá. Baterii znovu nabijte či vyměňte.
Elektrická instalace je volná či
rozbitá.
Porucha elektromagnetu či
startéru.
Porucha spínače
bezpečnostního zámku.
Voda v palivu. Kontaktujte oprávněného prodejce.
Palivo je staré či zvětralé. Kontaktujte oprávněného prodejce.
Směs paliva je příliš bohatá. Vyčistěte vzduchový filtr.
Motor má jiný problém. Kontaktujte oprávněného prodejce.
ODSTRAŇOVÁNÍ PROBLÉMŮ
Dejte ho do VYPNUTÉ polohy.
Knoflík přeneste do polohy NEUTRÁL/VYPNUT.
Zrakem překontrolujte elektrickou instalaci. Jestliže jsou některé dráty
poškozené, kontaktujte autorizovaného prodejce.
Kontaktujte oprávněného prodejce.
Kontaktujte oprávněného prodejce.
Motor rachotí.
Nadměrná spotřeba oleje.
Výfuk motoru je černý.
Motor běží, ale traktor
nejede.
Nedostatečné množství oleje. Podle potřeby překontrolujte/přidejte olej.
Použití nesprávného druhu
oleje.
Motor je při běhu příliš horký. Kontaktujte oprávněného prodejce.
Použití nesprávného druhu
oleje.
Příliš mnoho oleje ve skříni
zalomené hřídele.
Špinavý vzduchový filtr. Viz část Servis vzduchového filtru.
Sytič je zavřený. Otevřete sytič.
Nejsou stisknuty pedály
ovládání pozemní rychlosti.
Páka uvolnění převodovky je v
poloze TLAČIT.
Je zapnutá parkovací brzda. Vypněte parkovací brzdu.
Řemen pohonu trakce je
rozbitý či padá.
Viz Tabulka doporučeného oleje.
Viz Tabulka doporučeného oleje.
Vypusťte nadbytečný olej.
Stiskněte pedály.
Přeneste ji do polohy ŘÍDIT.
Kontaktujte oprávněného prodejce.
23
Page 46

ODSTRAŇOVÁNÍ PROBLÉMŮ
Not for
Reproduction
Řešení problémů pro traktor (pokračování)
PROBLÉM ZKONTROLUJTE ŘEŠENÍ
Brzda nedrží.
Traktor se obtížně řídí či
ovládá.
Řešení problémů pro sekačku
PROBLÉM ZKONTROLUJTE ŘEŠENÍ
Sekačka se nezvedne.
Sekání je nerovnoměrné.
Výsledky sekání nejsou
uspořádané.
S připevněnou sekačkou
dojde k častějšímu
zhasínání motoru.
Nadměrné vibrace sekačky.
Motor běží a traktor jede, ale
sekačka nefunguje.
Vnitřní část brzdy je
opotřebovaná.
Je rozbité spojení řízení. Kontaktujte oprávněného prodejce.
Nesprávné nahuštění
pneumatik.
Ložiska předního kola jsou
suchá.
Spojení zvedání není řádně
připojeno či je poškozeno.
Sekačka není řádně
vyrovnána.
Pneumatiky traktoru nejsou
řádně nahuštěny.
Rychlost motoru je příliš nízká. Nastavte plný plyn.
Pozemní rychlost je příliš
vysoká.
Sekačka má jiný problém. Kontaktujte oprávněného prodejce.
Rychlost motoru je příliš nízká. Nastavte plný plyn.
Pozemní rychlost je příliš
vysoká.
Špinavý či ucpaný vzduchový
filtr.
Výška sekání je nastavena
příliš nízko.
Motor není zahřátý na
provozní teplotu.
Startování sekačky ve vysoké
trávě.
Sekačka má jiný problém. Kontaktujte oprávněného prodejce.
Není zapnuto PTO. Zapněte PTO.
Sekačka má jiný problém. Kontaktujte oprávněného prodejce.
Kontaktujte oprávněného prodejce.
Prostudujte si část Kontrola tlaku pneumatik.
Kontaktujte oprávněného prodejce.
Kontaktujte oprávněného prodejce.
Kontaktujte oprávněného prodejce.
Prostudujte si část Kontrola tlaku pneumatik.
Zpomalte.
Zpomalte.
See Viz část Servis vzduchového filtru.
V prvním kole sekejte vysokou trávu na nejvyšším nastavení sekání.
Motor nechte několik minut běžet k zahřátí.
Sekačku startujte na čisté ploše.
24
www.simplicitymfg.com
Page 47

Not for
Reproduction
Page 48

TECHNICKÉ ÚDAJE
Not for
Reproduction
MOTOR
Briggs & Stratton
Značka Briggs & Stratton®,
Intek SeriesTM7180 OHV
Obsah válců 656 cc (40,03 kub palců)
Elektrický systém 12 voltů, 16 amp alternátor,
Baterie: 230 CCA
Kapacita oleje 1,8-1,9 l (62-64 uncí)
Mezera svíčky 0,76 mm (0,030 palce)
Utažení svíčky 20 Nm (180 in-lbs)
Briggs & Stratton
Značka Briggs & Stratton®,
Intek SeriesTM8240 OHV
Obsah válců 724 cc (44,18 kub palců)
Elektrický systém 12 voltů, 16 amp alternátor,
Baterie: 230 CCA
Kapacita oleje 1,8-1,9 l (62-64 uncí)
Mezera svíčky 0,76 mm (0,030 palce)
Utažení svíčky 20 Nm (180 in-lbs)
Náhradní díly Číslo součástky
Odporová svíčka 491055
Platina s dlouhou životností 5066
Svíčka
Vzduchový filtr 499486
Předčistící část 273638
Olejový filtr 492932
Palivový filtr 691035
PŘEVODOVKA
K46
Ty p Hydrostatická Tuff Torq K46
Motorový olej Syntetický 5W30
Rychlosti při 3400 otáčkách Vpřed: 0-8,7 km/h (0-5,4 mílí za hodinu)
Zpátečka: 0-3,7 km/h
(0-2,3 mílí za hodinu)
Trvalý točivý výkon 170 stop-libru
Tažný výkon 103 kg (227 liber)
Maximální hmotnost na osu 306 kg (675 liber)
SEKAČKA
Šíře sekání 102 cm (40 palců)
Počet nožů 2
Základna Zadní výstup
Sekací výška 2,5-8,0 cm (0,98-3,15 palců)
Sekací polohy 7
ROZMĚRY
Celková délka 2030 mm (79,9 palců)
Celková šířka 1070 mm (42,1 palců)
Výška 1190 mm (46,9 palců)
Hmotnost 270 kg (595 liber)
PODVOZEK
Kapacita nádrže Kapacita: 10 l (2,6 gal)
Zadní kola Velikost pneumatik: 22 x 8,8
Přední kola Velikost pneumatik: 15 x 6,6
Inflační tlak: 0,68 bar (10 psi)
Inflační tlak: 0,96 bar (14 psi)
SOUČÁSTKY A DOPLŇKY
K obdržení dalších informací kontaktujte oprávněného
prodejce výrobků.
26
www.simplicitymfg.com
Page 49

INDHOLD
Not for
Reproduction
Illustrationer.........................................................................................................3
Førersikkerhed.....................................................................................................6
Funktioner og Betjeningsorganer....................................................................11
Brug.....................................................................................................................14
Vedligeholdelse..................................................................................................19
Fejlfinding...........................................................................................................23
Garanti ................................................................................................................25
Specifikationer...................................................................................................26
Reservedele og tilbehør....................................................................................26
Generel Information
Ta k for at du har købt denne kvalitetsbyggede rider-plæneklipper fra SIMPLICITY. Det glæder os, at du har tillid til
SIMPLICITY-mærket. Hvis du bruger og vedligeholder dit SIMPLICITY-produkt ifølge instruktionerne i denne vejledning, vil
det give dig mange års pålidelig drift.
Denne manual indeholder sikkerhedsinformation, som gør dig opmærksom på farer og risici forbundet med rider
plæneklippere, samt hvordan de kan undgås. Denne rider-plæneklipper er udelukkende konstrueret og beregnet til
græsslåning. Den er ikke beregnet til noget andet formål. Det er vigtigt, at du læser og forstår disse instruktioner fuldt ud før
du forsøger at starte eller betjene dette udstyr. Gem denne vejledning til fremtidigt brug.
Produktets referencedata
Notér modellens navn/nummer, producentens
identifikationsnumre og motorens serienumre i de angivne
felter, så de er lette at finde frem. Disse numre forefindes
på de viste steder.
Når du henvender dig til din autoriserede forhandler
for at få reservedele, service eller vejledning SKAL
du bruge disse numre.
PRODUKTETS REFERENCE DATA
Model Beskrivelse Navn/Nummer
Maskine MFG-nummer Apparat SERIE-nummer
Klippeaggregat MFG nummer Klippeaggregat SERIE-nummer
Forhandlernavn Købsdato
MOTORENS REFERENCE DATA
Motorfabrikat Motormodel
Motortype/Specif. Motorkode/Serienummer
CE-identifikationsmærkat
A. Producentens Identifikationsnummer
B. Producentens Serienummer
C. Motoreffekt i Kilowatt
D. Højeste Motorhastighed i Omdrejninger per Minut
E. Producentens navn og adresse
F. Fabrikationsår
G. CE-Mærke
H. Maskinens Vægt i Kilogram
I. Garanteret lydstyrke i decibel
A
Part No. xxxxxxx
B
E
xxxxxxxxxxxxxxx
Serial No. xxxxxxxxxx
xxxxxxxxxxxxxxxxxxxxxxx
xxxxxxxxxxxxxxxxxxxxxxx
xxxxxxxxxxxxxxxxxxxxxxx
xxxxxxxxxxxxxxxxxxxxxxx
xxx dB
20xx
F
kg: xxx
kW: x.xx
xxxx max
G
I
H
C
D
Den illustrerede reservedelsliste til denne maskine kan downloades fra www.simplicitymfg.com. Oplys venligst model og
serienummer ved bestilling af reservedele.
Copyright © 2010 Briggs & Stratton Power Products Group, LLC
Milwaukee, WI, alle rettigheder forbeholdes.
SIMPLICITY er et varemærke tilhørende Briggs & Stratton Power Products
Group, LLC Milwaukee, WI USA.
5
Page 50

FØRERSIKKERHED
Not for
Reproduction
Læs disse sikkerhedsregler og følg dem omhyggeligt. Hvis du ikke overholder disse sikkerhedsregler, kan det
medføre tab af kontrol over maskinen, personlig tilskadekomst eller død for dig selv eller omkringstående,
eller beskadigelse af maskinen eller anden ejendom.
Klipperen er i stand til at amputere hænder og fødder og til at kaste genstande omkring.
Trekanten hvor den forekommer i teksten, angiver vigtige forholdsregler eller advarsler, som skal følges.
GENEREL BETJENING
1. Læs, forstå og følg alle anvisninger i håndbogen og
på maskinen før start.
2. Hold ikke hænder eller fødder nær de roterende dele
eller under maskinen. Hold dig altid på afstand af udkaståbningen.
3. Tillad kun ansvarsbevidste voksne, som er bekendt
med betjeningsanvisningerne, at køre med dette udstyr (lokale forordninger kan muligvis pålægge begrænsninger vedrørende førerens alder).
4. Gør området rent for genstande som sten, legetøj,
ståltråd og andet, som ellers kan blive samlet op og
kastet ud fra klipperen knive.
5. Vær sikker på, at omkringstående har forladt området, før du begynder at klippe. Stands maskinen,
hvis nogen kommer ind i området.
6. Tillad aldrig passagerer.
7. Klip ikke under baglænskørsel, med mindre det er
strengt nødvendigt. Se altid nedad og bagud, før og
imens du kører baglæns.
8. Vend aldrig udkastmaterialet efter nogen. Undgå at
udkaste materiale imod en mur eller nogen anden
forhindring. Materialet kan slynges tilbage mod føreren. Stands kniven(e), når du kører over grusbelagte overflader.
9. Brug ikke maskinen med mindre hele græsopsamleren, udkastskærmen (deflektor) eller andet nødvendigt sikkerhedsudstyr er installeret.
10. Tag farten af, før du drejer.
11. Efterlad aldrig en maskine gående uden opsyn. Slå
altid knivene (PTO) fra, sæt parkeringsbremsen til,
stands motoren og fjern nøglerne, før du står af maskinen.
12. Kobl knivene (PTO) fra, når du ikke umiddelbart er i
færd med at klippe. Sluk for motoren og vent, indtil
alle maskinens dele er standset helt, før rengøring af
maskinen, aftagning af græsopsamleren eller udrensning af udkastskærmen.
13. Brug kun maskinen i dagslys eller ved godt kunstigt lys.
14. Brug ikke maskinen, mens du er under indflydelse af
alkohol, medicin eller narkotika.
15 Hold øje med trafikken, når du bruger maskinen nær
ved eller kører over veje.
16. Vær ekstra forsigtig ved af- eller pålæsning af maskinen på en påhængsvogn eller lastvogn.
17. Brug altid sikkerhedsbriller under kørsel med maskinen.
18. Statistikker antyder, at førere på 60 år eller derover er
involveret i en stor andel af ulykker, som involverer
selvkørende maskiner. Disse førere bør kritisk
overveje deres evne til at betjene sådanne maskiner
på en sikker måde, så hverken de selv eller andre
risikerer tilskadekomst.
19. Følg fabrikantens anbefalinger for brug af hjulvægte
eller kontravægte.
20. Hold dig for øje, at føreren er ansvarlig for uheld, som
medfører personskade eller materiel skade på andres
ejendom.
21. Alle førere bør opsøge og få professionel undervisning i betjeningen af udstyret.
22. Brug altid solidt fodtøj og benklæder. Kør aldrig med
maskinen barfodet eller med sandaler.
23. Før brug skal du sikre, at knivene og alt tilhørende
isenkram er solidt på plads og i god stand. Udskift
slidte eller beskadigede dele.
24. Kobl udstyret ud før: påfyldning af brændstof, aftagning af udstyr eller udførelse af justeringer (medmindre
disse kan foretages fra førersædet).
25. Når maskinen parkeres, opbevares eller efterlades
uden opsyn, skal klipperknivene sænkes, medmindre
der anvendes en absolut, mekanisk låsemekanisme.
26. Før du forlader førersædet, uanset grunden dertil,
skal du slå parkeringsbremsen til (hvis maskinen har
en), slå knivene (PTO) fra, standse motoren og fjerne
nøglen.
27. Hold maskinen fri for græs, blade og overskydende
olie for at mindske brandfare. Undgå at standse eller
parkere over tørre blade, græs eller andet antændeligt materiale.
TRANSPORT OG OPBEVARING
1. Under transport af maskinen på en åben
påhængsvogn skal det sikres, at den vender fremad, i
kørselsretningen. Hvis den vender baglæns, kan opdrift fra vinden beskadige maskinen.
2. Påfyldning af brændstof efter transport eller opbevaring skal altid gøres i overensstemmelse med
gældende sikkerhedsanvisninger.
3. Maskinen må aldrig opbevares (med brændstof) i en
indelukket, dårligt ventileret bygning. Brændstofdampe kan drive hen til antændelseskilder (som
f.eks. varmefyr eller varmtvandsbeholdere) og kan
forårsage eksplosion. Brændstofdampe er også
giftige for både mennesker og dyr.
6
4. Følg altid anvisningerne i motorhåndbogen for nødvendigt forberedende arbejde, før maskinen opbevares i såvel korte som længere perioder.
5. Følg altid anvisningerne i motorhåndbogen for korrekt
startprocedure, når maskinen tages i brug igen.
6. Opbevar aldrig maskinen eller brændstoftanke inden
døre, hvor der forefindes åben flamme eller et vågeblus som i f.eks. en varmtvandsbeholder. Lad motoren køle af før opbevaring.
www.simplicitymfg.com
Page 51

FØRERSIKKERHED
Not for
Reproduction
KØRSEL PÅ SKRÅNINGER
Skråninger er ofte årsag til tab af kontrol over maskinen
eller væltning, hvilket kan medføre alvorlig tilskadekomst
eller død. Kørsel på skråninger kræver ekstra påpasselighed.
Hvis du ikke er i stand til at bakke op ad en skråning eller
ikke føler dig godt tilpas ved at køre der, bør du ikke gøre det.
Kontrol over en maskine, som glider ned ad en skråning,
kan ikke genvindes ved brug af bremsen, hvad enten det
er en maskine, man sidder på eller går bagved. De
væsentligste grunde til tab af kontrol er: utilstrækkelig kontakt mellem dækkene og jorden, for høj hastighed, utilstrækkelig bremsning, forkert anvendelse af maskinen til et
givent stykke arbejde, manglende overblik over jordbundsforholdene, forkert tilkobling af udstyr eller forkert vægtfordeling.
1. Klip op og ned ad skråninger, ikke på tværs.
2. Hold øjnene åbne for huller, hjulspor og ujævnheder.
Ujævnt terræn kan vælte maskinen. Højt græs kan
gemme forhindringer.
3. Vælg en langsom hastighed, så det ikke vil være
nødvendigt at standse eller skifte hastighed, mens du
befinder dig på skråningen.
4. Klip ikke græs, når det er vådt. Hjulene kan miste
deres traktion.
5. Hold altid traktoren i gear, især ved kørsel ned ad
skråninger. Skift aldrig til frigear og rul ned ad bakken.
6. Undgå at starte, standse eller vende på en skråning.
Hvis hjulene mister traktion, skal man koble knivene
fra og fortsætte langsomt lige ned ad skråningen.
7. Hold al kørsel på skråninger i et langsomt og gradvist
tempo. Foretag ingen pludselige ændringer i fart eller
retning, som kunne få maskinen til at vælte.
8. Vær ekstra forsigtig, mens du bruger maskinen med
græsopsamlere eller andet tilbehør, idet de kan
påvirke maskinens stabilitet. Anvend ikke maskinen
på stejle skråninger.
9. Prøv aldrig at stabilisere maskinen ved at sætte en
fod på jorden (med maskiner, som man sidder på).
10. Klip ikke tæt på stejle skrænter, grøfter eller andre
stejle terrænændringer. Maskinen kan pludeselig
vælte, hvis et hjul kommer ud over kanten af en grøft
eller skrænt, eller hvis en kant skrider sammen.
11. Brug ikke græsopsamlere på stejle skråninger.
12. Klip ikke græs på skråninger, der er for stejle til at
bakke op ad.
13. Henvend dig til den autoriserede forhandler for anbefalinger vedrørende hjulvægte eller kontravægte, som
kan forbedre maskinens stabilitet.
14. Fjern forhindringer så som sten, og grene.
15. Kør langsomt. Hjulene kan miste deres traktion på
skråninger, selv om bremserne fungerer, som de skal.
16. Drej ikke på skråninger medmindre det er nødvendigt,
og i så fald drej langsomt og gradvist ned ad bakke,
hvis det er muligt.
BUGSERET UDSTYR (MASKINER TIL AT
SIDDE PÅ)
1. Udstyr må kun bugseres med en maskine, der har
2. Følg fabrikantens anvisninger vedr. vægtgrænser for
træktøj beregnet til bugsering. Bugseret udstyr må
kun fastgøres til træktøjet.
bugseret udstyr og bugsering på skråninger.
ADVARSEL
Traktoren må aldrig køres på skråninger på mere end
10 ° (17 %), hvilket er en hældning på 1 m vertikalt for
hver 6 m horisontalt (17 cm/m).
Ved kørsel på skråninger skal der bruges ekstra
hjulvægte eller modvægte. Henvend dig til
forhandleren for oplysninger om, hvilke vægte, der
kan fås, og er hensigtsmæssige for din traktor.
Vælg langsom kørehastighed, før du kører på en
skråning. Udover at have monteret vægte fortil skal
du udvise speciel forsigtighed ved kørsel på
skråninger med græsopsamler monteret bagtil.
Kør OP og NED ad bakke, aldrig på tværs af skråningen, når du klipper græs, og vær yderst forsigtig, når
du er nødt til at dreje. MAN MÅ IKKE STANDSE
ELLER STARTE PÅ EN SKRÅNING.
3. Lad aldrig børn eller andre sidde i eller på det
bugserede udstyr.
4. På skråninger kan vægten af det bugserede udstyr
forårsage tab af traktion og tab af kontrol.
5. Kør langsomt, og tillad ekstra plads til at standse på.
6. Skift aldrig til frigear så du blot ruller ned ad bakke.
BØRN
Tragiske ulykker kan forekomme, hvis føreren ikke er bevidst om tilstedeværende børn. Børn føler sig ofte tiltrukket
af maskinen og klippeaktiviteten. Gå aldrig ud fra, at
børnene vil forblive, hvor du sidst så dem.
1. Hold børn væk fra klippeområdet og under opsyn af
en anden ansvarlig voksen.
2. Vær opmærksom, og sluk for maskinen, hvis børn
kommer ind på arbejdsområdet.
3. Se bagud og nedefter for småbørn før og under
baglænskørsel.
4. Lad aldrig børn køre med på maskinen, selv med
kniven(e) standset. De kan falde af og komme
alvorligt til skade, eller de kan være til hinder for
sikker kørsel med maskinen. Børn, som man har ladt
køre med på et tidligere tidspunkt, kan pludselig
dukke op, hvor man klipper, for at køre med igen og
kan blive påkørt, for-eller baglæns, af maskinen.
5. Lad aldrig børn føre maskinen.
6. Vær ekstra forsigtig, når du kører omkring blinde
hjørner, buske, træer eller andre ting, som kan nedsætte udsynet.
EMISSION
1. Udstødnigsgasser fra dette produkt indeholder
kemikalier, som i visse mængder vides at forårsage
cancer, fødselsmisdannelser eller anden reproduktiv
skade.
2. Se efter de relevante emissions varighed- og luftindeksoplysninger på motorens emissionsmærkat.
7
Page 52

FØRERSIKKERHED
Not for
Reproduction
SERVICE OG VEDLIGEHOLDELSE
Sikker håndtering af benzin
1. Sluk alle cigaretter, cigarer, piber og alle andre antændelseskilder.
2. Brug kun godkendte benzindunke.
3. Tag aldrig benzindækslet af eller fyld brændstof på
med motoren gående. Lad motoren køle af før påfyldning af brændstof.
4. Fyld aldrig brændstof på inden døre.
5. Opbevar aldrig maskinen eller brændstoftanke, hvor
der forefindes åben flamme, gnister eller et vågeblus
som i f.eks. en varmtvandsbeholder eller andre husholdningsmaskiner.
6. Fyld aldrig beholdere inden i et køretøj eller på ladet
af en lastbil med en plastikindsats. Placer altid beholdere på jorden i nogen afstand fra køretøjer før påfyldning.
7. Fjern benzindrevet udstyr fra ladet på en lastbil eller
påhængsvogn og påfyld brændstof på jorden. Hvis
dette ikke er muligt, skal sådant udstyr, som sidder på
en påhængsvogn, fyldes op med en dunk i stedet for
med benzinstationens slange.
8. Hold slangens mundstykke i kontakt med kanten af
benzintankens eller dunkens åbning hele tiden, indtil
du er færdig med at fylde brændstof på. Brug ikke
anordninger, der holder mundstykket åbent.
9. Hvis du spilder benzin på tøjet, skal du omgående
skifte tøj.
10. Overfyld aldrig brændstoftanken. Sæt benzindækslet
på og stram det forsvarligt igen.
11. Vær ekstra forsigtig under håndtering af benzin og
andet brændstof. De er brandfarlige, og dampene kan
eksplodere.
12. Hvis du spilder brændstof, må du ikke forsøge at
starte motoren, men skal flytte maskinen bort fra det
område, hvor der blev spildt, og undgå at skabe antændelseskilder, indtil brændstofdampene er afluftet.
13. Sæt dækslerne forsvarligt på benzintanke og -dunke
igen.
Service og vedligeholdelse
1. Lad aldrig maskinen køre i et lukket rum, hvor
kuliltedampe kan samles.
2. Se efter, at bolte og møtrikker, især dem, der holder
knivene på plads, sidder godt fast, og hold maskinen i
god stand.
3. Sæt aldrig sikkerhedsudstyr ud af kraft. Efterse dets
funktion regelmæssigt og foretag nødvendige reparationer, hvis det ikke fungerer, som det skal.
4. Hold maskinen ren for græs, blade og andet ophobet
materiale. Visk spildt olie eller brændstof op og fjern
materiale, som er blevet gennemvædet dermed. Lad
motoren køle af før opbevaring.
5. Hvis du rammer en genstand, bør du standse og
efterse maskinen. Foretag nødvendige reparationer,
før du starter maskinen igen.
6. Foretag aldrig justeringer eller reparationer med motoren gående.
7. Efterse græsopsamlerens komponenter og udkastskærmen ofte og udskift med reservedele som anbefalet af fabrikanten, når det er nødvendigt.
8. Klipperknivene er skarpe. Vikl noget om knivene eller
9. Efterse bremsernes funktion regelmæssigt og ofte.
10. Vedligehold sikkerheds- og anvisningsmærkater, og
8
brug handsker og vær ekstra forsigtig ved servicearbejde, som involverer knivene.
Juster eller reparer efter behov.
udskift dem, hvis det er nødvendigt.
11. Fjern ikke benzinfilteret, mens motoren er varm, idet
spildt benzin kan antændes. Spred ikke benzinslangeklemmerne mere end nødvendigt. Vær
sikker på, at klemmerne holder slangerne godt fast på
filteret efter installation.
12. Brug ikke benzin, som indeholder METANOL, eller
benzin som indeholder mere end 10 % ETANOL, benzinadditiver eller hvid benzin, idet det kan resultere i
beskadigelse at motoren/brændstofsystemet.
13. Hvis brændstoftanken skal tømmes, skal det gøres
udendørs.
14. Udskift lydpotter, som er i dårlig stand.
15. Brug kun fabrikantautoriserede reservedele ved reparation.
16. Overhold altid fabrikantens specifikationer ved justeringer og indstillinger.
17. For væsentligt service- eller reparationsarbejde bør
du kun anvende autoriserede serviceforhandlere.
18. Prøv aldrig at udføre væsentligt reparationsarbejde på
maskinen, medmindre du har den rette træning. Forkert udført servicearbejde kan gøre anvendelse af
maskinen farlig, medføre beskadigelse af maskinen
og ugyldiggøre fabrikantens garanti.
19. På klippere med flere knive skal man være forsigtig,
idet drejning af én kniv kan få andre knive til at drejes.
20. Lav ikke modifikationer på motorens regulator eller
andre hastighedskontroller. Kørsel med motoren ved
for høj hastighed kan øge faren for personskade.
21. Kobl udstyrsdrev fra, stands motoren, tag startnøglen
ud, og tag tændrørskabler af før rengøring af udkaståbninger, ved alt servicearbejde, hvis knivene har
ramt noget, eller hvis maskinen vibrerer unormalt.
Efter at man har ramt en genstand, skal maskinen
efterses for beskadigelse og nødvendigt reparationsarbejde udføres, før maskinen startes og køres
igen.
22. Hold hænderne borte fra roterende dele som f.eks.
hydrauliske pumpers køleventilator, mens traktoren
går. (Hydrauliske pumpers køleventilatorer er typisk
placeret ovenpå transakslen).
23. Enheder med hydrauliske pumper, slanger eller motorer: ADVARSEL: Hydraulisk væske, som slippes ud
under tryk, kan ramme hårdt nok til at gennemtrænge
huden og forårsage alvorlig tilskadekomst. Hvis
fremmedartet væske skydes ind i huden, skal den
fjernes operativt indenfor nogle få timer af en doktor,
som er bekendt med denne form for skade. Ellers kan
det forårsage gangræn. Hold krop og fingre væk fra
små huller og dyser, som udsender hydraulisk væske
under højt tryk. Brug papir eller pap - ikke hænderne
- til at søge efter lækager. Vær sikker på, at alle
tilslutninger, der fører hydraulisk væske, sidder stramt,
og at alle hydrauliske slanger og rør er i god stand, før
der sættes tryk på systemet. Hvis der forekommer
lækager, skal enheden omgående til service hos den
autoriserede forhandler.
24. ADVARSEL: Dele og væsker kan være under tryk.
Forkert udløsning af fjedre kan forårsage alvorlig personskade. Fjedre bør kun fjernes af en autoriseret
reparatør.
25. Modeller, som er udstyret med en motorkøler: ADVARSEL: Dele og væsker kan være under tryk. For
at undgå alvorlig legemsbeskadigelse fra varm
kølervæske eller udløst damp, må man aldrig forsøge
at fjerne kølerdækslet, mens motoren går. Stands
motoren, og vent indtil den er kølet af. Så skal man
endda stadig udvise forsigtighed.
www.simplicitymfg.com
Page 53

FØRERSIKKERHED
Not for
Reproduction
Sikkerhedsmærkater
Alle advarende mærkater (FARE, ADVARSEL og FORSIGTIG) og alle instruktive mærkater på traktor og klipper bør læses omhyggeligt og efterleves. Det kan føre til
personskade, hvis disse anvisninger ikke følges. De
gives af hensyn til din sikkerhed, og de er vigtige! De nedenstående sikkerhedsmærkater er at finde på traktoren
og klipperen.
Sikkerhedssymboler
Advarsel: Se Betjeningsvejledningen.
Læs og forstå betjeningsvejledningen før brug af maskinen.
Fare: Udslyngende genstande.
Denne maskine er i stand til at
kaste genstande og andet materiale. Hold omkringstående væk.
Hvis nogen af disse mærkater er beskadiget eller gået tabt
skal de omgående udskiftes. Henvend dig til din lokale
forhandler for nye mærkater.
Disse mærkater er nemme at montere, og de fungerer som
en stadig og synlig påmindelse til dig selv og andre, som
måtte betjene udstyret, om at følge alle de sikkerhedsanvisninger, som er af betydning for betryggende og hensigtsmæssig betjening.
Fare: Fare for amputering.
Denne maskine kan amputere lemmer. Hold hænder og fødder borte
fra knivene.
Fare: Brandfare.
Brændstof må ikke påfyldes, mens
motoren er varm eller går. Stands
motoren og lad den køle af i 3 minutter, før du fylder brændstof på.
Advarsel: Fjern startnøglen før
servicearbejde.
Fjern nøglen og gennemlæs den
tekniske vejledning, før du udfører
reparationer eller vedligeholdelsesarbejde.
Fare: Fare for at vælte.
Brug ikke denne maskine på
skråninger over 10°.
Fare: Fare for amputering.
Denne maskine kan amputere
lemmer. Hold omkringstående,
deriblandt børn borte, når motoren
går.
Fare: Varme komponenter.
Lad motoren køle af, før du berører
området.
Fare: Kulilteforgiftning.
Lad ikke motoren gå i et dårligt ventileret område.
Fare: Fare for amputering.
Denne maskine kan amputere
lemmer. Hold hænder og fødder
borte fra knivene.
9
Page 54

FØRERSIKKERHED
Not for
Reproduction
Sikkerhedsikon
Reservedelsnr.
1735890
Sikkerhedssymboler,
Reservedelsnr. 1734027
Tændingskontaktpositioner
Reservedelsnr. 1722806
Sikkerhedsikon
Reservedelsnr.
1735890
4
4
3
3
2
2
R
R
Brændstofniveau
Reservedelsnr.
1735889
Plæneklipper lift
Reservedelsnr. 1730264
Transmissionsudløser
Sikkerhedsskilte figur 1
Reservedelsnr. 1735265
10
www.simplicitymfg.com
Page 55

12V
FUNKTIONER OG BETJENINGSORGANER
Not for
Reproduction
Traktor betjeningshåndtag figur 2
TRAKTOR BETJENINGSHÅNDTAG
Gasspjældskontrol
Gashåndtaget kontrollerer motorens hastighed. Når
gashåndtaget skubbes fremad, øger det motorens
hastighed, når det trækkes tilbage mindsker det motorens
hastighed. Kør altid motoren ved FULD gas.
Choker
Luk chokeren ved koldstart. Luk op for chokeren, så snart
motoren starter. En varm motor kræver ofte ingen choker.
Skub håndtaget fremad for at lukke chokeren.
Forlygter
Lyskontakten tænder og slukker for traktorens forlygter.
Timetæller (Udvalgte modeller)
Timetælleren måler det antal timer, nøglen har været i
RUN-stillingen.
11
Page 56

FUNKTIONER OG BETJENINGSORGANER
12V
Not for
Reproduction
Baglæns klipning (Reverse Mowing
Option, RMO)
Sædejusteringshåndtag
Baglæns klipning tillader klipning (eller brug af andet PTOdrevet udstyr) under baglænskørsel. For at bruge baglæns
klipning (RMO) skal RMO-nøglen drejes, efter PTO er koblet
til. Lysdioden vil tændes og føreren kan nu udføre baglæns
klipning. Hver gang PTO kobles fra, skal der tændes for
RMO igen, hvis man ønsker at fortsætte i baglæns retning.
PTO-kobling
PTO koblingen (Power Take-Off, kraftudtag) starter og
standser udstyr, som bruger PTO’et. PTO’et kobles til ved at
trække OP på koblingsomskifterhåndtaget. Tryk NED for at
koble fra.
sæde for at PTO’et kan fungere.
Bemærk, at føreren skal sidde solidt i traktorens
Tændingskontakt
Tændingskontakten starter og standser motoren, og har tre
stillinger:
OFF (slukket) Standser motoren og slukker for
det elektriske system.
RUN (kør) Tillader motoren at køre og sætter
strøm på det elektriske system.
START Tørner motoren under start.
BEMÆRK: Lad aldrig tændingskontakten sidde i RUN-stillingen med motoren standset – dette vil aflade batteriet.
Sædet kan justeres frem og tilbage. Ved greb i håndtaget
kan sædet indstilles efter ønske, og håndtaget slippes,
hvilket fastlåser sædet i den nye position.
Transmissions udløserventilhåndtag
Transmissionens udløsningsventiler deaktiverer transmissionen, så traktoren kan skubbes med håndkraft. Se
afsnittet
yderligere anvisninger.
Skubning af traktoren med håndkraft
for
Brændstoftank
Dækslet tages af ved at skrue det mod uret.
Strømudtag (Udvalgte modeller)
Strømudtaget er 12 V jævnstrøm. Tilbehør, som det
bruges til, skal være nomineret til 9 A eller derunder.
Brændstofniveaumåler
Viser brændstofniveauet i tanken.
Parkeringsbremse
Parkeringsbremseknappen bruges til at låse parkeringsbremsen, når traktoren er standset. Træd bremsepedalen
helt i bund, og træk opad på knappen for at aktivere parkeringsbremsen.
Kørehastighedspedaler
Traktorens kørehastighed fremad kontrolleres vha. fremadkørehastighedspedalen. Traktorens kørehastighed baglæns
kontrolleres vha. baglæns-kørehastighedspedalen.
Tryk på en af pedalerne vil øge kørehastigheden. Bemærk,
at jo mere pedalen trædes ned, jo hurtigere kører traktoren.
Cruise Control
Cruise control bruges til at fastlåse fremadgående kørehastighed. Cruise control har 5 låsestillinger.
Klipperløftestang
Klipperløftestangen kontrollerer klippehøjden. Træk tilbage
på klippeløftestangen for at løfte højden, og skub fremad for
at mindske højden.
12
Bremsepedal
Bremsen engageres, når bremsepedalen trædes ned.
www.simplicitymfg.com
Page 57

FUNKTIONER OG BETJENINGSORGANER
Not for
Reproduction
F
N
I
C
M
M
J
J
A
K
B
G
F
D
H
C
B
L
E
Motorens betjeningsanordninger figur 3
MOTORENS BETJENINGSANORDNINGER
A. Motor-id
B. Tændrør
C. Luftfilter
D. Oliepind
E. Bundprop
F. Rotorskærm
G. Oliefilter
H. Elektrisk starter
I. Karburator
J. Brændstoffilter (valgfrit)
K. Brændstofpumpe (valgfri)
L. Hurtig-oliedræn (valgfrit)
M. Oliekøler (valgfri)
N. Elektronisk styreenhed (valgfri)
13
Page 58
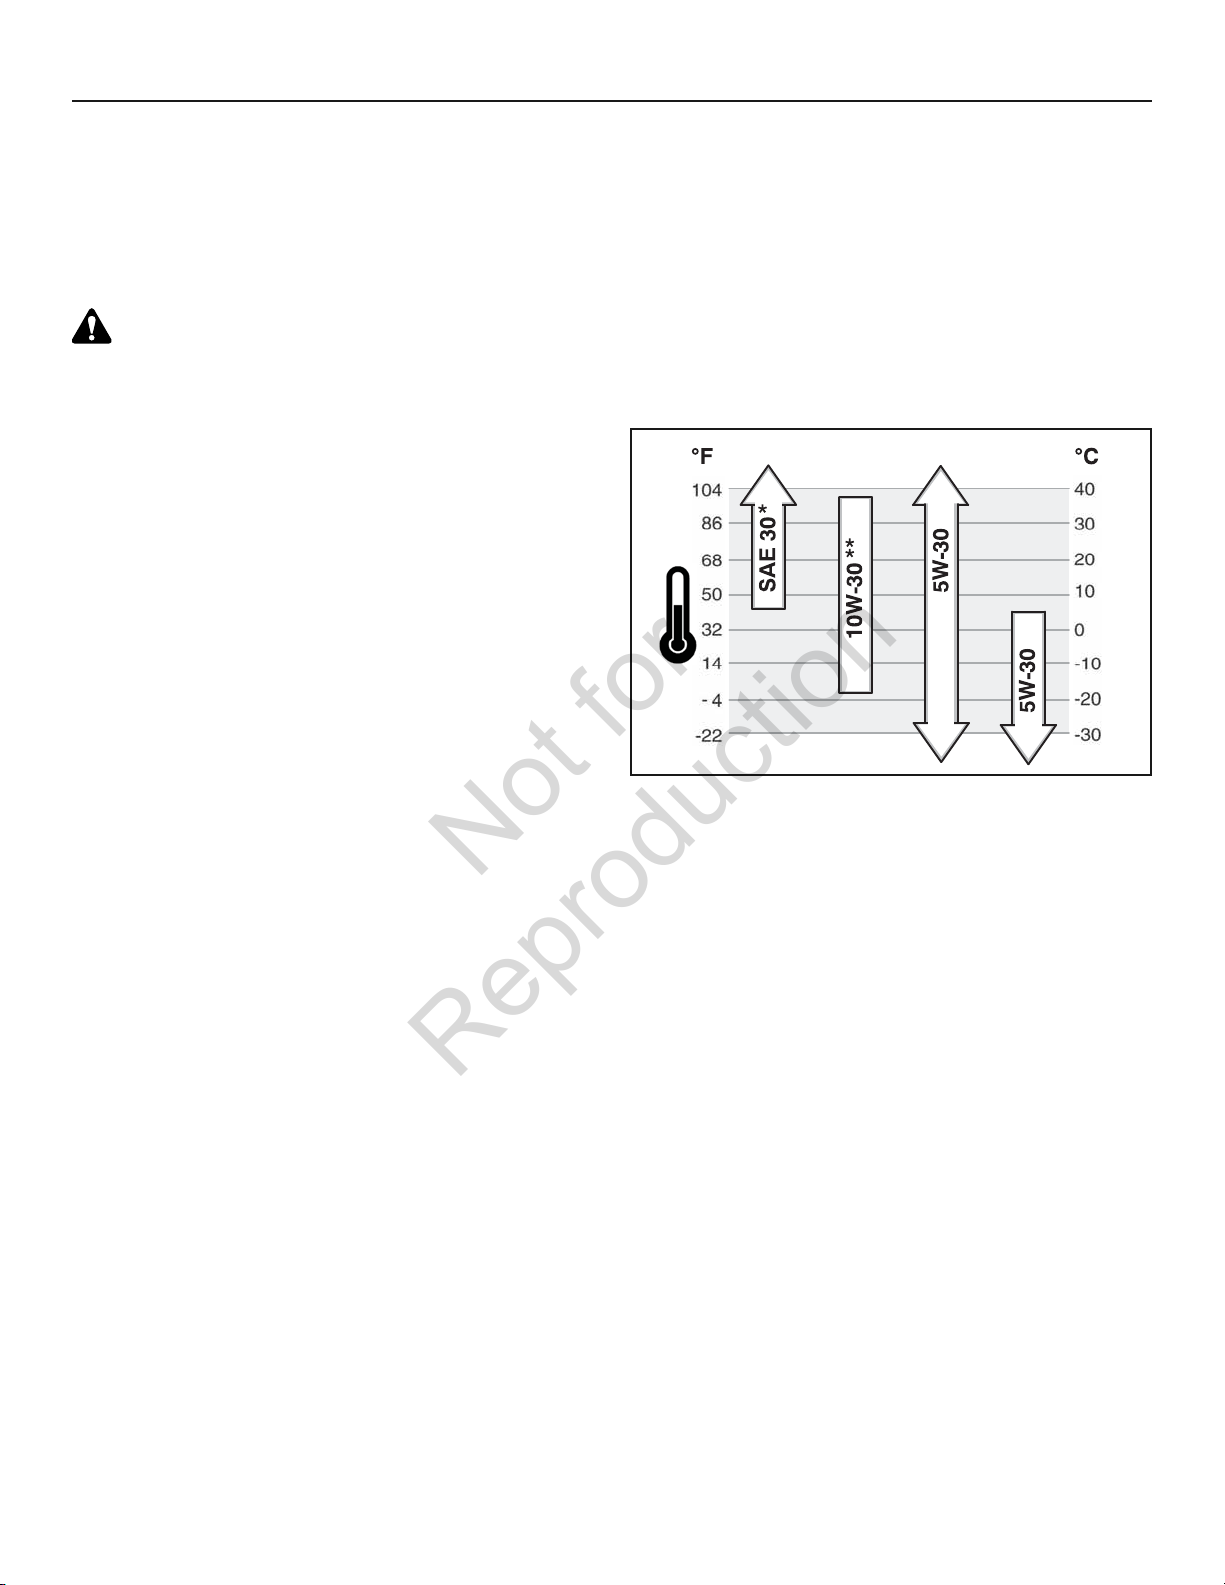
BRUG
Not for
Reproduction
Test af sikkerhedsblokeringssystemet
Denne maskine er udstyret med et sikkerhedsblokeringssystem og andet sikkerhedsudstyr. Dette sikkerhedssystem er installeret af hensyn til din sikkerhed. Forsøg ikke at omgå
sikkerhedsafbryderne, eller på anden måde sætte sikkerhedssystemet ud af kraft.
ADVARSEL
Hvis maskinen ikke består en af disse
sikkerhedsprøver, må den ikke bruges. Henvend dig
til din autoriserede forhandler.
Prøve 1 — Motoren bør IKKE tørne, hvis:
• PTO-koblingen er slået TIL, ELLER
• Bremsepedalen IKKE er helt trådt i bund (med parkeringsbremsen slået FRA), ELLER
• Cruise control-håndtaget IKKE er i NEUTRAL.
Prøve 2 — Motoren BØR tørne og starte, hvis:
• Føreren sidder i sædet, OG
• PTO er koblet fra (OFF), OG
• Bremsepedalen er helt trådt i bund (med parkeringsbremsen slået TIL), OG
• Cruise control-håndtaget er i NEUTRAL.
Prøve 3 — Motor skulle STOPPE hvis:
• Føreren hæver sig fra sædet mens kraftudtaget er koblet
til ELLER
• Føreren hæver sig fra sædet mens bremsepedalen IKKE
er helt trådt ned (uden håndbremse)
Prøve 4 —
knive
Knivene og klipperens drivremme skal standse fuldstændigt
inden for 5 sekunder efter, at den elektriske PTO-koblingskontakt er slået fra (eller føreren rejser sig fra sædet). Hvis plæneklipperens drivrem ikke standser indenfor fem sekunder, besøg en
autoriseret forhandler.
Prøve 5 — Baglæns klipning (RMO) afprøvning
• Motoren skal standse, hvis det forsøges at køre baglæns
med PTO allerede tilkoblet, men hvor RMO ikke er blevet
aktiveret.
• RMO -lyset skal lyse op, når RMO aktiveres.
Kontroller stoptiden af plæneklipperens
Anbefalinger vedrørende olie
Vi anbefaler at bruge Briggs & Stratton Garanti-godkendte
olier for den bedste ydelse. Andre olier af høj kvalitet kan
accepteres, såfremt disse hører under serviceklassificering SF, SG, SH, SJ eller er af bedre kvaliteter. Anvend ikke
specielle additiver.
Udendørs temperaturer bestemmer motorens rette
olieviskositet. Brug skemaet til at udvælge den bedste
viskositet for de forventede udendørs temperaturintervaller.
Syntetisk
* Hvis en SAE 30 olie benyttes ved temperaturer under 40°F (4°C), vil det resultere i
startproblemer.
** Ved temperaturer over 80°F (27°C) vil brugen af 10W-30 medføre et olieforbrug, der
er højere end normalt. Kontrollér oliestanden hyppigere.
Kontrol/påfyldning af olie
Før påfyldning eller kontrol af olien
• Sørg for, at motoren er vandret.
• Rengør oliepåfyldningsområdet for eventuelt snavs.
1. Tag oliepinden (A, figur 4) ud, og tør den af med en ren
klud.
2. Sæt oliepinden tilbage, og spænd den fast.
3. Tag oliepinden ud, og kontrollér oliestanden. Kontrollér,
at oliestanden er ved FULL-mærket (B) på oliepinden.
4. Hvis oliestanden er lav, fyld langsomt olie ind i mo-
torens oliepåfyldning (C). Overfyld ikke. Efter oliepå-
fyldning skal du vente et minut og derefter kontrollere
oliestanden igen.
BEMÆRK: Undlad at påfylde olie via anordningen til hurtig
olieaftapning (L, figur 3) (hvis monteret).
14 www.simplicitymfg.com
5. Udskift og fastspænd oliepinden.
Page 59

BRUG
Not for
Reproduction
Olietryk
Hvis olietrykket er for lavt, vil en trykkontakt (hvis monteret) enten stoppe motoren eller aktivere en advarselsanordning på udstyret. Hvis dette sker, stop motoren og
kontroller oliestanden med oliepinden.
Hvis oliestanden er under ADD mærket, påfyld olie indtil
FULL mærket nås. Start motoren og kontroller, at der er
korrekt tryk før du fortsætter driften.
Hvis oliestanden er mellem ADD og FULL mærkerne,
start ikke motoren. Kontakt en autoriseret forhandler for at
få udbedret fejlen med olietrykket.
Anbefalinger vedr. brændstof
Benzinen skal leve op til disse krav:
• Ren, frisk, blyfri benzin.
• Oktantal på mindst 87/87 AKI (91 RON). Hvis motoren
skal anvendes i højtbeliggende områder, henvises til
nedenstående.
• Benzin med op til 10 % ethanol (gasohol) eller op til 15
% MTBE (methyl-tertiær-butylæter) kan
anvendes.
FORSIGTIG: Der må ikke anvendes ikke-godkendt benzin,
såsom E85. Der må ikke blandes olie i benzinen, og motoren må ikke modificeres, så den kan køre med alternative brændstoffer. I så fald vil motorens komponenter blive
beskadiget, og garantien på motoren bortfalder.
For at beskytte brændstofsystemet fra gummidannelse
bland en brændstofstabilisator i brændstoffet. Se afsnittet
Opbevaring
lemer ved start eller ydelse, skift da brændstofleverandør
eller skift brændstofmærke. Denne motor er anerkendt til
benzinbrug. Emissionsreguleringssystemet for denne
motor er EM (Engine Modifications) såkaldte justeringer.
. Intet brændstof er ens. Hvis der opstår prob-
Anvendelse i højtbeliggende områder
Påfyldning af brændstof
ADVARSEL
Benzin og benzindampe er yderst brandfarlige
og eksplosive. Brand eller eksplosion kan
medføre alvorlige forbrændinger eller døden.
Påfyldning af brændstof
• Sluk for motoren, og lad motoren køle af i mindst 3
minutter, før tankdækslet fjernes.
• Påfyld kun benzin udendørs eller på et sted med god
udluftning.
• Undlad at fylde for meget brændstof i
brændstoftanken. Undlad at fylde helt op til kanten på
påfyldningsstudsen, således at der er plads til at
brændstoffet kan udvide sig.
• Brændstof skal opbevares i sikker afstand fra gnister,
åben ild, vågeblus, varme og andre mulige
antændelseskilder.
• Foretag hyppige eftersyn af brændstofslanger, tanken
og tankdækslet samt fittings for revner og utætheder.
Udskift om nødvendigt.
• Hvis du spilder benzin, så vent med at starte motoren,
indtil benzinen er fordampet.
1. Rengør brændstofdækselområdet for snavs og rester.
Fjern brændstofdækslet (A, figur 5).
2. Fyld brændstoftanken (B) op med brændstof. Undlad at
fylde helt op til kanten på påfyldningsstudsen (C),
således at der er plads til at brændstoffet kan udvide
sig.
3. Genmontér tankdækslet.
Start af motoren
I højtbeliggende områder på over 5.000 fod (1524 meter),
er benzin med et oktantal på mindst 85/85 AKI (89 RON)
acceptabelt. For at være følgagtig over for emissionerne,
er det nødvendigt at foretage justeringer i højtbeliggende
områder. Drift uden foretagelse af denne justering vil forårsage formindsket ydelse, forøget brændstofforbrug og stigende emissioner. Besøg en autoriseret forhandler for at få
oplysninger om højde tilpasning.
Betjening af motoren i højtbeliggende områder på under
2.500 fod (762 meter) med sættet beregnet til anvendelse i
højtbeliggende områder er ikke anbefalet.
ADVARSEL
Benzin og benzindampe er yderst brandfarlige
og eksplosive.
Brand eller eksplosion kan medføre alvorlige
forbrændinger eller døden.
Start af motoren
• Sørg for, at tændrøret, lyddæmperen, tankdækslet og
luftfilteret (hvis monteret) er på plads og forsvarligt
fastgjort.
• Tørn ikke motoren, når tændrøret er afmonteret.
• Hvis motoren er druknet, sættes chokeren (hvis
monteret) i ”OPEN/RUN”-position (kør) og
gasspjældsregulatoren i fast-position (hurtig),
hvorefter motoren tørnes, indtil den starter.
15
Page 60

BRUG
Not for
Reproduction
ADVARSEL
Motorer udsender kulilte, der er en lugtfri og
farveløs, giftig gasart.
Indånding af kulilte kan medføre kvalme,
besvimelse eller døden.
• Motoren må kun startes og anvendes udendørs.
• Motoren må aldrig startes og anvendes i lukkede rum.
Dette gælder også, selv om døre og vinduer er åbne.
BEMÆRK: Denne motor blev afsendt fra Briggs & Stratton
uden olie. Før du starter motoren, sørg altid for at påfylde
olie i henhold til de instruktioner angivet i denne manual.
Hvis du starter motoren uden påfyldning af olie, vil denne
blive beskadiget og vil ikke kunne repareres mere og derfor ikke være dækket af garantien.
1. Kontrollér oliestanden. Se afsnittet
af olie.
2. Sørg for, at udstyrets kørselsbetjeningsanordninger,
hvis monteret, er frakoblet.
3. Drej brændstofhanen (A, figur 6), hvis monteret, på
ON-position.
4. Flyt gasregulatoren (B) til stillingen fast Betjen motoren
i hurtig stilling.
5. Flyt kombinationen chokergreb/gasspjældsarm (C) til
CHOKER stilling.
BEMÆRK: Brug af choker er normalt unødvendigt, når
motoren er varm.
6. Drej den elektriske startkontakt (D) til stillingen
ON/START.
BEMÆRK: Hvis motoren ikke starter efter gentagne
forsøg, bør du opsøge en autoriseret forhandler.
BEMÆRK: For at forlænge starterens levetid, brug korte
startperioder (maksimalt i fem sekunder). Vent et minut
mellem hver startperiode.
7. Medens motoren opvarmes, sæt chokergrebet (C) på
run stilling.
Kontrol/påfyldning
Kørsel med traktoren
1. Sæt dig i sædet og juster sædet, så du nemt kan nå
alle betjeningsgreb og se instrumentbrættet.
2. Slå parkeringsbremsen til.
3. Forvis dig om, at PTO er koblet fra.
4. Start motoren (se
5. Slå parkeringsbremsen fra og tag foden af bremsepedalen.
6. Træd ned på fremad-kørehastighedspedalen. Tag foden
af pedalen for at standse. Bemærk, at jo mere pedalen
trædes ned, jo hurtigere kører traktoren.
7. Stop traktoren ved at tage foden af kørehastighedspedalen; slå så parkeringsbremsen til og stop motoren
(se
Stop af traktor og motor
Start af motoren
).
).
Græsslåning
1. Indstil plæneklipperens klippehøjde på den ønskede
indstilling med håndtaget til klippehøjde.
2. Træk parkeringsbremsen. Sørg for at kontakten til
kraftudtaget er frakoblet.
3. Start motoren (se afsnittet
4. Sæt gasreguleringen til FULD.
5. Tilkobl PTO’en for at aktivere plæneklipperknivene.
6. Begynd at slå græs.
BEMÆRK: Når alarmen for ”fyldt opsamler” lyder, sluk
øjeblikkeligt PTO’en for at forhindre at udstødningsrøret
tilstoppes. Kør til det ønskede sted og tøm opsamleren
(se afsnittet Tømning af opsamleren).
7. Når du er færdig, slå PTO/kraftudtaget fra og hæv
plæneklipperen med lift håndtaget.
8. Stop motoren (se afsnittet
toren
).
Start motoren
Stop traktoren og mo-
).
ADVARSEL
Motoren vil slukkes, hvis baglænskørehastighedspedalen trædes ned, mens PTO er
koblet til eller RMO (baglæns klipning – Reverse
Mowing Option) ikke er blevet aktiveret. Føreren
skal altid slukke for PTO, før der køres over veje,
stier eller andre områder, der muligvis anvendes af
andre køretøjer. Pludseligt tab af drivkraft kan
medføre sikkerhedsfare.
16 www.simplicitymfg.com
Page 61

BRUG
Not for
Reproduction
ADVARSEL
Baglæns klipning kan være farligt for
omkringstående. Tragiske ulykker kan forekomme,
hvis føreren ikke er bevidst om tilstedeværende
børn. Brug aldrig RMO, hvis der er børn til stede.
Børn føler sig ofte tiltrukket af maskinen og
klippeaktiviteten.
Baglæns klipning
Hvis føreren ønsker at bruge andet PTO-drevet udstyr
under baglænskørsel, kan RMO-systemet bruges. For at
bruge baglæns klipning (RMO) skal RMO-nøglen drejes,
efter PTO er koblet til. Lysdioden vil tændes, og føreren
kan nu bruge udstyret under baglæns kørsel. Hver gang
PTO kobles fra, skal der tændes for RMO igen, hvis man
ønsker at fortsætte i baglæns retning. Nøglen skal fjernes
for at mindske muligheden for uforvaret omstilling til RMO.
Betjening af ekstraudstyr ved baglænskørsel
If an operator chooses to operate a PTO driven attachment in reverse, the RMO system can be used. To use the
Reverse Mowing Option (RMO) turn the RMO key after the
PTO is engaged. The L.E.D. light will illuminate, and the
operator can then operate the attachment in reverse.
Each time the PTO is disengaged the RMO needs to be
reactivated if desired. The key should be removed to restrict access to the RMO feature.
Skubning af traktoren med håndkraft
Parkeringsbremsens funktion
Brug af parkeringsbremsen - Se figur 8. Sådan sættes
parkeringsbremsen: Tag foden af kørehastighedspedalen
(A), træd helt ned på bremsepedalen (B), træk OPAD på
parkeringsbremseknappen (C) og tag så foden af bremsepedalen.
Udløsning af parkeringsbremsen - Se figur 8. Sådan
udløses parkeringsbremsen: Træd ned på bremsepedalen
(B).
Brug af cruise control
SÅDAN ENGAGERES CRUISE CONTROL:
1. Træk opad på cruise control-knappen (D, figur 8).
2. Træd nedad på fremad-kørehastighedspedalen (A).
3. Løft opad på cruise control-knappen (D), når den
ønskede hastighed er nået. Cruise control vil så låses
fast i en af de 5 indstillinger.
SÅDAN AFBRYDES CRUISECONTROL:
1. Træd på bremsepedalen (B, figur 8).
ELLER
2. Træd nedad på fremad-kørehastighedspedalen (A).
Timetæller (hvis udstyret)
Timetælleren (E, Figur 8) måler det antal timer, nøglen har
været i RUN-stillingen.
1. Kobl PTO fra og stop motoren.
2. Skub håndtaget ca. 6 cm (2-3/8″) for at frigøre trans-
missionen (A, figur 7).
3. Traktoren kan nu skubbes med håndkraft.
TRAKTOREN MÅ
IKKE BUGSERES
Bugsering af traktoren
vil forårsage beskadigelse af transmissionen.
• Brug aldrig noget
andet køretøj til at
skubbe eller trække
denne maskine med.
• Transmissionsudløserventilens håndtag må
ikke aktiveres, mens
motoren går.
Stop af traktor og motor
1. Tag foden af kørehastighedspedalen.
2. Kobl PTO fra, og vent til alle roterende dele er standset.
3. Skub gaskontrollen til LANGSOM, og drej startnøglen til
OFF (D, figur 6). Fjern nøglen.
Tømning af opsamleren
For at tømme opsamleren skal du:
1. Forlæng opsamlerstangen og skub fremad (A, figur 9)
for at tømme opsamleren (B).
2. Anvend opsamlerstangen til at lukke opsamleren og
skub den tilbage ind i opsamleren.
17
Page 62

BRUG
Not for
Reproduction
Opsamler demontering og montering
ADVARSEL
Brug aldrig enheden mindre enten tragten eller
skærmen er på plads.
1. Lås opsamlerens spærhage op (A, figur 10) placeret
bag venstre baghjul.
2. Løft opsamlerens spærhage op og skub den tilbage.
3. Anvend opsamlerstangen (B) til at åbne opsamleren
lidt.
4. Løft opsamleren af de bagerste støttestænger.
5. Montér i modsat rækkefølge af demontering. For at
lette monteringen af opsamleren, sørg for at stille
indstillingspilene på opsamleren og bagenden af
traktoren på linje.
Finsnitningskontakt montering og
demontering
ADVARSEL
Justering af alarmen for fyldt opsamler
Græsmængden i opsamleren kan ændres ved at justere
alarmens skovlhjul (se figur 12).
Justering af græsmængde
Skub skovlhjulets beslag (A, figur 12) op for at øge
græsmængden i opsamleren inden alarmen udløses.
Skub skovlhjulets beslag ned for at mindske
græsmængden i opsamleren inden alarmen udløses.
1. Løsning af hardwarebeslag (B).
2. Skub skovlhjuletsbeslag (A) op eller ned.
3. Spænd hardwarebeslagget.
Klippehøjdejustering
Plæneklipperens lift håndtag (A, figur 13) bruges til at
sænke og hæve skærene til den ønskede klippehøjde.
For at sænke skærene skal man trække let tilbage i
plæneklipperens lift håndtag, skubbe det til venstre og
skyde det nedad. For at løfte skærene skal man trække i
lift håndtaget og fastlåse det i hakket til højre.
Brug af påhængsvogn
Af sikkerhedsmæssige årsager skal du ikke
håndtere de skarpe klipperknive med de bare
hænder. Skødesløs eller forkert håndtering af
knive kan medføre alvorlige kvæstelser.
1. Fjern opsamleren.
2. Mens håndtaget holdes (A, figur 11), skubbes
kontakten ind i tunnelen. Vær sikker på at hylsteret
glider oven over glidestyringen inde i aggregatet.
3. Tryk håndtaget for at sammenpresse den indre fjeder.
4. Indfør rørforlængeren ind i hullet i enden af tunnelen
og fastgør med hårnål (B).
5. Genmonter opsamleren.
6. Fjern finsnitningskontakten i den modsatte
rækkefølge.
Den maksimale tilladelige horisontale kraftpåvirkning på
trækstangen er 280 Newton. Den maksimale tilladelige
vertikale kraftpåvirkning på trækstangen er 160 Newton.
Dette svarer til en 113 kg påhængsvogn på en 10°
bakke. Fastgør påhængsvognen med en passende splitpind (A, figur 14) og en clips (B).
18
www.simplicitymfg.com
Page 63
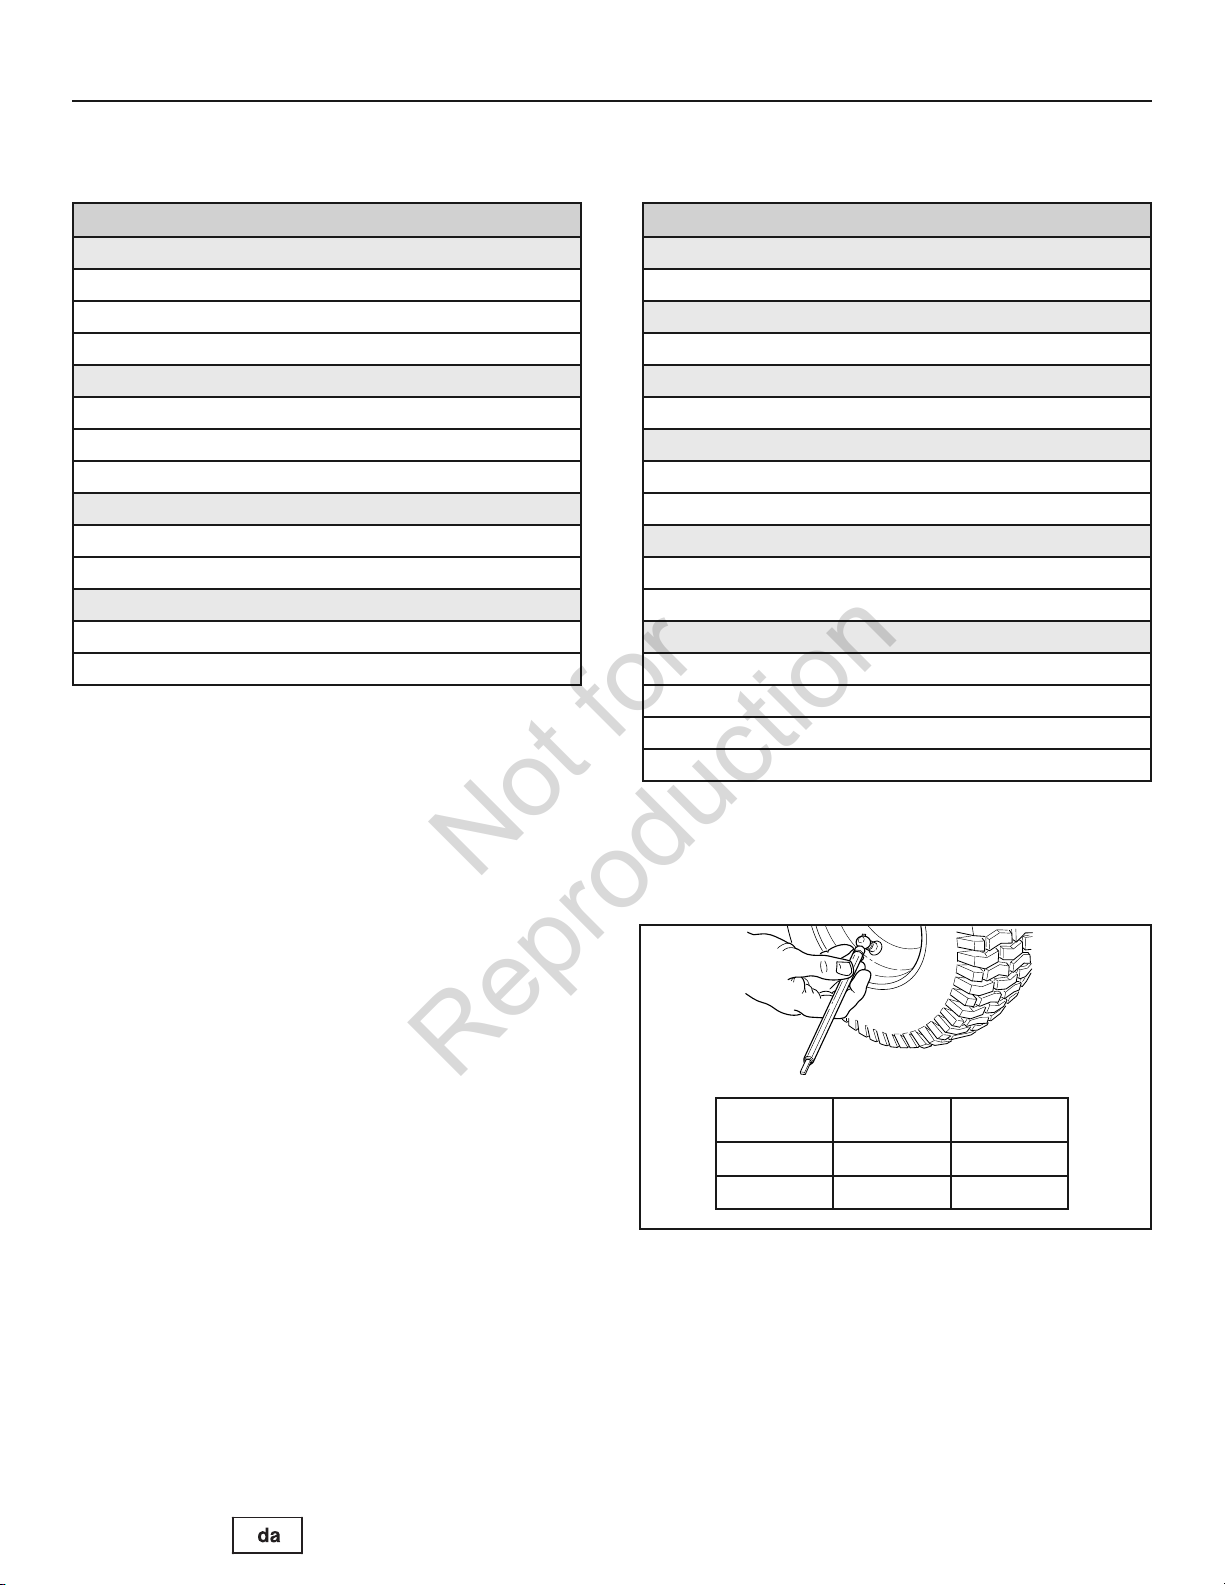
Vedligeholdelses diagrammet
Not for
Reproduction
VEDLIGEHOLDELSE
TRAKTOR OG PLÆNEKLIPPER
Hver 8 timer eller dagligt
Kontroller sikkerhedslåsesystemet
Rengør traktor og plæneklipper
Rengør motorafdelingen
Hver 25 timer eller årligt *
Kontroller dæktrykket
Afprøv klipperknivenes bremsetid
Kontroller traktor og plæneklipper for løst hardware
Hver 50 timer eller årligt *
Rens batteri og kabler
Kontroller traktorens bremser
Besøg en forhandler en gang om året for at
Smør traktor og plæneklipper
Kontrollér plæneklipperens knive **
* Hvad der end kommer først
** Kontroller skærene oftere i tilfælde af meget sandet
jord eller høje forekomster af støv.
MOTOR
Første 5 timer
Skiftmotorolie
Hver 8 timer eller dagligt
Kontroller motorens olieniveau
Hver 25 timer eller årligt *
Rengør motorens luftfilter og forfilter **
Hver 50 timer eller årligt *
Skift motorolie
Udskift oliefilteret
Årligt
Udskift luftfilter
Udskift forfilter
Besøg en forhandler en gang om året for at
Kontroller lydpotte og gnistfanger
Udskift tændrør
Udskift brændstoffilter
Rengør motorens luftkølingssystem
Eftersyn af dæktrykket
Dæktrykket skal efterses regelmæssigt og holdes inde for de
rammer, som er angivet i skemaet. Bemærk at disse tryk kan
variere en smule fra det ”maksimale tryk”, som angives på
siden af dækkene. Det angivne tryk giver den rette traktion,
forbedrer klippekvaliteten og forlænger dækkets levetid.
* Hvad der end kommer først
** Hyppigere rengøring er påkrævet i støvede omgivelser
eller hvis der findes urenheder i luften.
Størrelse psi bar
22 x 8.8 10 0,68
15 x 6.6 14 0,96
19
Page 64

VEDLIGEHOLDELSE
Not for
Reproduction
Kontroller stoptiden af plæneklipperens knive
Klipperens knive og remme skal standse helt indenfor 5
sekunder efter, at den elektriske PTO-kobling er blevet
slået fra.
1. Med traktoren i neutral skal PTO kobles fra og føreren
skal sidde i sædet og starte motoren.
2. Se ud over venstre sides fodhviler og iagttag klipperens
drivrem. Kobl PTO til og vent i adskillige sekunder. Kobl
PTO ud og tag tid på, hvor længe klipperens rem er om
at standse.
3. Hvis plæneklipperens drivrem ikke standser indenfor
fem sekunder, besøg en autoriseret forhandler.
Batterivedligeholdelse
ADVARSEL
Når man fjerner eller installerer batterikabler
skal det negative kabel tages af FØRST og
sættes på SIDST igen. Hvis det ikke gøres i
denne rækkefølge, kan den positive terminal
nemt blive kortsluttet til chassiset af et stykke
værktøj.
Rengøring af batteri og kabler
1. Kobl batterikablerne fra batteriet, de negative kabler
først (A, figur 15), derefter dækslet og de positive
kabler (B).
2. Løsn fløjmøtrikken og spændeskiven (D).
3. Sving holdebeslaget (C) op og bort fra batteriet. Fastgør det til ratsøjlen.
4. Fjern batteriet (E).
5. Gør batterirummet rent med en opløsning af bagesoda
og vand.
6. Gør batteriterminalerne og kabelenderne rene med en
stålbørste og terminalrenser indtil de skinner.
7. Sæt batteriet (E) i batterirummet igen. Sæt batteriets
holdebeslag (C) og fløjmøtrik og spændeskive (D) på.
8. Sæt batterikabler på igen, de positive kabler og dækslet først (B), derefter de negative kabler (A).
9. Påfør vaselin eller et andet ikke-ledende smøremiddel
på batteriterminalerne og kabelklemmerne.
Batteriopladning
ADVARSEL
Hold ild og gnister væk fra batteriet; det
afgiver gasser der er højeksplosive. Sørg for
ordentlig ventilation under opladning af
batteriet.
Hvis dit batteri er dødt eller for svagt til at starte motoren,
kan det være på grund af en fejl i ladesystemet eller en
anden elektrisk komponent. Hvis der er tvivl om årsagen til
problemet, skal du henvende dig til din forhandler. Hvis du
er nødt til at udskifte batteriet, så se
og kabler
For at oplade batteriet, skal du følge instruktionerne fra
producenten af batteriopladeren såvel som alle advarsler
indeholdt i
batteriet indtil det er fuldt opladet. Oplad ikke med en
ladestrøm højere end 10 ampere.
afsnittet.
Førersikkerhed
afsnittet i denne manual. Oplad
Rengøring af batteri
20
www.simplicitymfg.com
Page 65

VEDLIGEHOLDELSE
Not for
Reproduction
Justering af Sædet
Sædet kan justeres frem og tilbage. Flyt stangen (Se i
Traktor betjeningshåndtag) anbring sædet i den
ønskede stilling og slip stangen for at låse sædet i
position.
Bremsejustering
Der findes ingen manuel justerbar bremse. Hvis bremsen
ikke virker ordentligt, bør du besøge en autoriseret
forhandler.
Olieskift
Brugt olie er et farligt affaldsprodukt, og brugt olie skal
bortskaffes korrekt. Må ikke bortsmides med husholdningsaffald. Skal bortskaffes i overensstemmelse med
gældende lokale bestemmelser (kontakt de kommunale
myndigheder, forhandleren eller nærmeste/nærgenbrugsstation).
Aftapning af olie
1. Medens motoren er slukket men stadig er varm,
frakobl tændrørsledningen (A, figur 16) og hold
denne væk fra tændrøret.
2. Tag oliepinden ud (D).
Standard olieaftapningsprop
1. Fjern olieaftapningsproppen (B, figur 16). Tøm olien
ned i en godkendt beholder.
2. Efter at olien er blevet aftappet, sæt olieaftapning
sproppen på igen, og tilspænd denne.
Anordning til hurtig olieaftapning som ekstraudstyr
1. Afbryd olieaftapningsslangen (G, figur 16) fra siden af
moteren.
2. Drej og fjern olieaftapningsdækslet (H). Sænk forsigtigt anordningen til hurtig olieaftapning (I) ned i en
godkendt beholder (J).
3. Efter aftapning af olien, monteres olieaftapningsdækslet. Fastgør olieaftapningsslangen på siden af motoren.
Udskiftning af oliefilter
For udskiftningsintervaller, se i oversigten
else diagrammet
1. Tøm olien fra motoren. Se i
tet.
2. Fjern oliefiltret (C, figur 17), og sørg for at bortskaffe
dette på korrekt vis.
3. Før du påmonterer det nye oliefilter, smør let
oliefiltrets pakning med frisk, ren olie.
4. Monter oliefiltret med hånden indtil pakningen er i
kontakt med oliefilteradapteren, og stram derefter
oliefiltret 1/2 til 3/4 omgange.
5. Påfyld olie. Se i
6. Start og kør motoren. Mens motoren varmes op, kontroller for olielækager.
7. Stop motoren og kontroller oliestanden. Kontrollér, at
oliestanden er ved FULL-mærket på oliepinden.
.
Aftapning af olie
Påfyldning af olie
Vedligehold-
afsnit-
afsnittet.
Påfyldning af olie
• Sørg for, at motoren er vandret.
• Rengør oliepåfyldningsområdet for eventuelt snavs.
• Oliekapaciteten fremgår af afsnittet
1. Tag oliepinden ud (D, figur 16), og tør den af med en
ren klud.
2. Hæld langsomt olien ind i motorens oliepåfylder (E).
Overfyld ikke. Efter oliepåfyldning skal du vente et
minut, og derefter kontrollere oliestanden igen.
3. Sæt oliepinden på plads og fastspænd denne.
4. Tag oliepinden ud, og kontrollér oliestanden. Kontrollér, at oliestanden er ved FULL-mærket (F) på oliepinden.
5. Sæt oliepinden på plads og fastspænd denne.
Specifikationer
.
21
Page 66

VEDLIGEHOLDELSE
Not for
Reproduction
Eftersyn af luftfilteret
ADVARSEL
Benzin og benzindampe er yderst brandfarlige
og eksplosive.
Brand eller eksplosion kan medføre alvorlige
forbrændinger eller døden.
• Start aldrig motoren eller lad aldrig motoren køre med
luftfilterenheden (hvis monteret) eller luftfiltret (hvis
monteret) fjernet.
BEMÆRK: Anvend ikke trykluft eller opløsningsmidler til
rengøring af filtret. Trykluft kan beskadige filtret, og opløsningsmidler opløser det. Luftfiltersystemet anvender
enten en flad eller en oval filterindsats. Nogle modeller er
udstyret med et forfilter, som kan vaskes og genanvendes.
1. Fjern dækslet (A, figur 18).
2. Fjern filtret (C) og forfiltret (B).
3. For at løsne snavs, bank forsigtigt filtret mod en hård
overflade. Hvis filtret er ekstremt snavset, udskift dette
med et nyt filter.
4. Vask forfilteret i flydende rensemiddel og vand. Lad
det derefter tørre helt. Smør ikke forfilteret med olie.
5. Saml det tørre forfilter og montér filtret ind i motorhuset (D).
6. Montér dækslet.
Opbevaring
ADVARSEL
Rideren må aldrig opbevares (med brændstof)
i en indelukket, dårligt ventileret bygning.
Brændstofdampe kan drive hen til
antændelseskilder (som f.eks. varmefyr eller
varmtvandsbeholdere) og forårsage
eksplosion. Brændstofdampe er også giftige
for både mennesker og dyr.
Når brændstof eller udstyr med brændstof i tanken
opbevares
• Opbevar væk fra fyr, ovne, vandvarmere eller andet
udstyr, som kan have en tændflamme eller anden
antændelseskilde, fordi de kan antænde benzindampe.
Udstyr
Frakobl PTO, træk håndbremsen og tag nøglen ud.
Batteriets levetid vil blive forlænget hvis det udtages.
Opbevar på et køligt og tørt sted og oplad fuldstændigt ca.
en gang om måneden. Hvis batteriet forbliver i maskinen,
skal det negative kabel tages af.
Brændstofsystem
Brændstof kan blive forældet når det opbevares i over
30 dage. Gammelt brændstof kan forårsage dannelse af
syre- og gummiaflejringer i brændstofsystemet eller på
væsentlige karburatordele. For at bevare brændstoffet
frisk, brug Briggs & Stratton FRESH START® brændstof
stabilisator der er tilgængelig som et flydende additiv eller
en dryp koncentratpatron.
Der er ingen grund til at tømme motoren for brændstof hvis
en brændstof stabilisator anvendes ifølge vejledningen.
Lad motoren køre i 2 minutter for at stabilisatoren kan
cirkulere gennem brændstofsystemet. Motoren og
brændsoffet kan derefter opbevares i op til 24 måneder.
Hvis benzinen i motoren ikke er blevet behandlet med en
brændstof stabilisator, skal den udtømmes i en godkendt
beholder. Lad motoren køre indtil der ikke er mere
brændstof tilbage. Brugen af en brændstof stabilisator i
opbevaringsbeholderen anbefales for at bevare det frisk.
22
Motorolie
Skift motorolien mens motoren stadig er varm. Se
Udskiftning af olie.
Før du starter maskinen efter opbevaring:
• Kontrollér alle væskeniveauer. Kontrollér alle
vedligeholdelsesdetaljer.
• Udfør samtlige anbefalede kontroller og procedurer der
er beskrevet i denne manual.
• Lad motoren varme op i et par minutter, inden du
bruger maskinen.
www.simplicitymfg.com
Page 67

Rengøring af batteri og kabler
Olie anbefalinger diagram
Olie anbefalinger diagram
Servicering af luftfilter
Fejlfinding af traktoren
Not for
Reproduction
PROBLEM SE EFTER AFHJÆLPNING
Motor vil ikke dreje eller
starte.
Motor svær at starte eller
kører ujævnt.
Motor banker.
For højt olieforbrug.
Sort udstødningsrøg.
Motoren kører men
traktoren vil ikke bevæge
sig.
FEJLFINDING
Der er ikke trykket på
bremsepedalen.
PTO (elektrisk kobling)
kontakten er i TÆND position.
Cruisekontrol er aktiveret. Skift knappen til NEUTRAL/SLUK position.
Løbet tør for brændstof. Hvis motoren er varm, lad den køle ned, fyld så brændstoftanken op.
Motoren er druknet. Deaktiver chokeren.
Sikringen er sprunget. Henvend dig til din autoriserede forhandler.
Batteriterminaler skal renses. Se
Batteri er afladt eller fladt. Genoplad eller udskift.
Løse eller afbrudte forbindelser. Undersøg manuelt ledningerne. Hvis ledninger er flosset eller ødelagte så besøg en
Magnetspole eller selvstarter
defekt.
Sikkerhedsaflåsningskontakt
defekt.
Der er vand i brændstoffet. Henvend dig til din autoriserede forhandler.
Brændstoffet er gammelt eller
forurenet.
Brændstofblandingen er for fed. Rens luftfilteret.
Motoren har et andet problem. Henvend dig til din autoriserede forhandler.
Lavt olieniveau. Kontrollér/påfyld olie efter behov.
Brug af forkert oliekvalitet. Se
Motoren bliver overophedet. Henvend dig til din autoriserede forhandler.
Brug af forkert oliekvalitet. Se
For meget olie i krumtaphuset. Aftap overskydende olie.
Snavset luftfilter. Se
Choker lukket. Åbn chokeren.
Der er ikke trykket på
speederen.
Håndtagene til gearudløsning i
SKUB position.
Håndbremsen er ikke trukket. Slå håndbremsen fra.
Drivremmen er knækket eller
den glider.
Tryk bremsepedalen helt i bund.
Sæt den i SLUK position.
autoriseret forhandler.
Henvend dig til din autoriserede forhandler.
Henvend dig til din autoriserede forhandler.
Henvend dig til din autoriserede forhandler.
Tryk på pedalerne.
Gå til KØR position.
Henvend dig til din autoriserede forhandler.
afsnittet.
.
.
afsnittet.
23
Page 68

FEJLFINDING
Kontroller dæktryk
Kontroller dæktryk
Servicering af luftfilter
Not for
Reproduction
Fejlfinding af traktoren (fortsat)
PROBLEM SE EFTER AFHJÆLPNING
Bremsen kan ikke holde.
Traktoren styrer hårdt eller
er svær at håndtere.
Fejlfinding af plæneklipperen
PROBLEM SE EFTER AFHJÆLPNING
Plæneklipperen løfter sig
ikke.
Plæneklipperen klipper
uensartet.
Græsklippet ser groft ud.
Motoren går nemt i stå
med klipperen tilkoblet.
For kraftig klippervibration.
Motoren er i gang og
traktoren kører men
plæneklipperen vil
ikke køre.
Indvendig bremse er slidt. Henvend dig til din autoriserede forhandler.
Styretilkoblingen er løs. Henvend dig til din autoriserede forhandler.
Forkert dæktryk. Se
Forhjuls spindellejer er tørre. Henvend dig til din autoriserede forhandler.
Løftetilkoblingen er ikke
fastgjort korrekt eller er defekt.
Klippeaggregatet er ikke parallelt
med jordoverfladen.
Dækkene er ikke korrekt
pumpet.
Motorhastighed for lav. Sæt den på fuld gas.
For høj kørselshastighed. Sæt farten ned.
Plæneklipperen har et andet
problem.
Motorhastighed for lav. Sæt den på fuld gas.
For høj kørselshastighed. Sæt farten ned.
Snavset eller tilstoppet luftfilter. Se
Klippehøjden er indstillet for
lavt.
Motoren har ikke nået
driftstemperatur.
Start af plæneklipperen i højt
græs.
Plæneklipperen har et andet
problem.
PTO’en er ikke aktiveret. Aktiver PTO’en.
Plæneklipperen har et andet
problem.
Henvend dig til din autoriserede forhandler.
Henvend dig til din autoriserede forhandler.
Se
Henvend dig til din autoriserede forhandler.
Klip højt græs med maksimal klippehøjde i første omgang.
Lad motoren køre i adskillige minutter for at varme op.
Start græsslåning i et ryddet område.
Henvend dig til din autoriserede forhandler.
Henvend dig til din autoriserede forhandler.
afsnittet.
afsnittet.
afsnittet.
24
www.simplicitymfg.com
Page 69
Not for
Reproduction
Page 70

SPECIFIKATIONER
Not for
Reproduction
MOTOR
Briggs & Stratton
Fabrikat Briggs & Stratton®,
Intek SeriesTM7180 OHV
Slagvolumen 656 cc (40,03 cu in.)
Elektrisk System 12 Volt, 16 amp. generator,
batteri: 230 CCA
Oliemængde 1,8-1,9 L (62-64 oz)
Tændrørs mellemrum 0,76 mm (0,030 in.)
Tændrør moment 20 Nm (180 in-lbs)
Briggs & Stratton
Fabrikat Briggs & Stratton®,
Intek SeriesTM8240 OHV
Slagvolumen 724 cc (44,18 cu in.)
Elektrisk System 12 Volt, 16 amp. generator,
batteri: 230 CCA
Oliemængde 1,8-1,9 L (62-64 oz)
Tændrørs mellemrum 0,76 mm (0,030 in.)
Tændrør moment 20 Nm (180 in-lbs)
Reservedele Delnummer
Modstands tændrør 491055
Life Long Platinum 5066
Tændrør
Luftfilter 499486
Forfilter 273638
Oliefilter 492932
Brændstoffilter 691035
TRANSMISSION
K46
Type Hydrostatisk Tuff Torq K46
Motorolie Syntetisk 5W30
Hastigheder @ 3400 o./min. Fremad: 0-8,7 km/h (0-5,4 MPH)
Bak: 0-3,7 km/h (0-2,3 MPH)
Vedvarende drejningsmoment 170 ft-lbs
Trækkrogeffekt 103 kg (227 lbs)
Maksimalt akseltryk 306 kg (675 lbs)
PLÆNEKLIPPER
Klippebredde 102 cm (40 in.)
Antal knive 2
Base Deck Platform Bagudslip
Klippehøjde 2,5-8,0 cm (0,98-3,15 in.)
Klippepositioner 7
DIMENSIONER
Totallængde 2.030 mm (79,9 in.)
Totalbredde 1.070 mm (42,1 in.)
Højde 1.190 mm (46,9 in.)
Vægt 270 kg (595 lbs)
CHASSIS
Brændstoftank Indhold Indhold: 10 L (2,6 gal)
Baghjul Dækstørrelse: 22 x 8,8
Forhjul Dækstørrelse: 15 x 6,6
Dæktryk: 0,68 bar (10 psi)
Dæktryk: 0,96 bar (14 psi)
RESERVEDELE OG TILBEHØR
Kontakt en autoriseret forhandler for yderligere
oplysninger.
26
www.simplicitymfg.com
Page 71

INHALT
Not for
Reproduction
Abbildungen.........................................................................................................2
Betriebssicherhei.................................................................................................6
Funktionen und Steuerungen...........................................................................11
Betrieb ................................................................................................................14
Wartung ..............................................................................................................19
Fehlersuche und -behebung ............................................................................23
Garantie ..............................................................................................................25
Technische Daten ..............................................................................................26
Teile und Zubehör ..............................................................................................26
Allgemeine Informationen
Vielen Dank, dass Sie sich für den Kauf dieses qualitativ hochwertigen Aufsitzmähers von SIMPLICITY entschieden
haben und Ihr Vertrauen auf unsere Marke gesetzt haben. Bedienen und warten Sie das Produkt gemäß den Angaben
dieser Bedienungsanleitung, damit ein zuverlässiger und jahrelanger Betrieb gewährleistet ist.
Dieses Handbuch beinhaltet Sicherheitsinformationen, um Ihnen die Gefahren und Risiken im Zusammenhang mit
Aufsitzmähern bewusst zu machen, und Ihnen zu vermitteln, wie man sie vermeidet. Dieser Aufsitzmäher wurde
ausschließlich zum Schneiden von Gras entwickelt und sollte zu keinem anderen Zweck verwendet werden. Es ist wichtig,
dass Sie sich diese Bedienungsanleitung durchlesen und sie verstehen, bevor Sie die Maschine in Betrieb nehmen oder
nutzen. Bewahren Sie diese Original-Bedienungsanleitung für späteres Nachschlagen auf.
Produktdaten
Geben Sie den Namen und die Nummer des Modells, die
Identifikationsnummern des Herstellers und die
Seriennummern des Motors in den entsprechenden
Feldern an. Diese Nummern stehen auf den jeweiligen
abgebildeten Teilen.
Sie MÜSSEN über diese Angaben verfügen, um
Ersatzteile, Serviceleistungen oder Informationen
vom zugelassenen Fachhändler zu erhalten.
PRODUKTDATEN
Modellbezeichnung, Name/Nummer
Nummer der Baueinheit Seriennummer
Baugruppennummer der
Schneidwerkabdeckung
Händlername Kaufdatum
MOTORANGABEN
Motorbezeichnung Motormodell
Seriennummer der Schneidwerkabdeckung
CE Identifikationsetikett
A. Indentifikationsnummer des Herstellers
B. Seriennummer des Herstellers
C. Nutzleistung in Kilowatt
D. Maximale Motorendrehzahl in Umdrehung pro Minute
E. Name und Adresse des Herstellers
F. Herstellungsjahr
G. CE-Qualitätslogo
H. Masseneinheit in Kilogramm
I. Gwährte Schalleistung in Dezibel
A
Part No. xxxxxxx
B
E
xxxxxxxxxxxxxxx
Serial No. xxxxxxxxxx
xxxxxxxxxxxxxxxxxxxxxxx
xxxxxxxxxxxxxxxxxxxxxxx
xxxxxxxxxxxxxxxxxxxxxxx
xxxxxxxxxxxxxxxxxxxxxxx
xxx dB
20xx
F
kg: xxx
kW: x.xx
xxxx max
G
I
H
D
C
Motortyp/Spezif. Motorkennzeichen/Seriennummer
Die Liste der abgebildeten Bauteile für diese Maschine kann unter diesem Link runtergeladen werden:
www.simplicitymfg.com. Bitte geben Sie das Modell und die Seriennummer bei der Bestellung von Ersatzteilen an.
Copyright © 2010 Briggs & Stratton Power Products Group, LLC
Milwaukee, WI, USA, Alle Rechte vorbehalten.
SIMPLICITY ist eine Handelsmarke der Gruppe Briggs & Stratton Power Products
Group, LLC Milwaukee, WI USA.
5
Page 72

BETRIEBSSICHERHEIT
Not for
Reproduction
Diese Sicherheitsvorschriften müssen gelesen und genau befolgt werden. Die Nichtbeachtung dieser Vorschriften könnte zu einem Verlust der Kontrolle über das Gerät, bei Ihnen oder umstehenden Personen zu ernsthaften Verletzungen
oder zum Tode oder zu Schäden an Eigentum oder Ausrüstung führen.
Dieses Mähwerk kann Hände und Füße durchschneiden und Gegenstände wegschleudern.
Das im Text aufgeführte Dreieck weist auf wichtige Vorsichts- oder Achtungshinweise hin, die befolgt werden müssen.
ALLGEMEINER BETRIEB
1. Vor dem Start alle Anweisungen im Handbuch und am
Gerät lesen, verstehen und befolgen.
2. Hände und Füße nicht in die Nähe rotierender Teile oder
unter die Maschine bringen. Stets einen ausreichenden
Abstand von der Auswurföffnung einhalten.
3. Nur verantwortungsbewusste Erwachsene, die mit den Anweisungen vertraut sind, dürfen das Gerät bedienen (das
Alter des Bedieners kann durch örtliche Vorschriften
beschränkt sein).
4. Den Bereich von Gegenständen wie Steinen, Spielzeug,
Draht usw. säubern, die von dem/den Messer(n) erfasst und
weggeschleudert werden könnten.
5. Vor dem Mähen sicherstellen, dass sich keine Personen im
Bereich befinden. Das Gerät sofort anhalten, wenn jemand
den Bereich betritt.
6. Auf keinen Fall irgendwelche Fahrgäste mitführen.
7. Nicht rückwärts mähen, wenn dies nicht absolut notwendig
ist. Vor und während der Rückwärtsfahrt stets nach unten
und hinten blicken.
8. Auf keinen Fall mit Auswurfmaterial auf jemanden zielen.
Der Auswurf von Material gegen eine Wand oder ein Hindernis sollte vermieden werden. Das Material könnte nämlich abprallen und zurück zum Bediener geschleudert
werden. Beim Überqueren von Kiesflächen das/die
Messer anhalten.
9. Die Maschine darf nicht benutzt werden, wenn nicht der
gesamte Grasfänger, der Auswurfschutz (Abweiser) bzw.
sonstige Sicherheitsvorrichtungen richtig angebracht sind.
10. Vor dem Wenden die Fahrt verlangsamen.
11. Einen Mäher mit laufendem Motor auf keinen Fall unbeaufsichtigt lassen. Stets den Zapfwellenantrieb auskuppeln, die
Parkbremse feststellen, den Motor abstellen und die
Schlüssel abziehen, bevor Sie absteigen.
12. Die Messer (Zapfwellenantrieb) auskuppeln, wenn nicht
gemäht wird. Den Motor abstellen und warten, bis alle Teile
völlig zum Stillstand gekommen sind, bevor das Gerät gereinigt, der Grasfänger ausgebaut oder der Auswurfschutz
gesäubert wird.
13. Die Maschine nur bei Tageslicht oder bei guter künstlicher
Beleuchtung bedienen.
14. Wenn Sie unter dem Einfluss von Alkohol oder Medikamenten stehen, das Gerät nicht benutzen.
15 Auf den Verkehr achten, wenn Sie in der Nähe von Straßen
arbeiten oder diese überqueren müssen.
16. Beim Auf- und Abladen des Geräts auf einen Anhänger
oder LKW besonders vorsichtig vorgehen.
17. Bei der Bedienung dieses Geräts stets einen Augenschutz tragen.
18. Laut Statistik sind Bediener mit einem Alter von 60 Jahren
oder darüber an einem großen Prozentsatz der Verletzungen
im Zusammenhang mit Geräten und Maschinen beteiligt.
Diese Bediener sollten ihre Fähigkeit, das Gerät so sicher
zu bedienen, dass sie selbst und andere vor Verletzungen
geschützt werden, eingehend überprüfen.
19. Für Radgewichte oder Gegengewichte die Empfehlungen
des Herstellers befolgen.
20. Sie müssen sich dessen bewusst sein, dass der Bediener
für Unfälle, in die andere Personen oder Gegenstände verwickelt sind, verantwortlich ist.
21. Alle Fahrer sollten an professionellen und praktischen
Schulungsmaßnahmen teilnehmen.
22. Immer gutes Schuhwerk und lange Hosen tragen. Auf
keinen Fall das Gerät barfuß oder in Sandalen bedienen.
23. Vor der Verwendung stets visuell überprüfen, ob die Messer
und die Befestigungsmittel der Messer vorhanden, intakt
und sicher befestigt sind. Abgenutzte oder beschädigte
Teile ersetzen.
24. Zubehörgeräte müssen ausgekuppelt werden, bevor folgende Vorgänge ausgeführt werden: Kraftstoff nachfüllen,
Zubehörgerät ausbauen, Einstellungen vornehmen (wenn
die Einstellung nicht von der Bedienerposition aus
vorgenommen werden kann).
25. Wenn die Maschine geparkt, gelagert und unbeaufsichtigt
gelassen wird, das Schneidwerk absenken, es sei denn, es
wird eine mechanische Verriegelung verwendet.
26. Bevor Sie aus irgendeinem Grund die Bedienerposition verlassen, müssen die Parkbremse betätigt (falls vorhanden),
der Zapfwellenantrieb ausgekuppelt, der Motor abgestellt
und der Schlüssel abgezogen werden.
27. Um die Brandgefahr zu reduzieren, das Gerät frei von Gras,
Blättern und überschüssigem Öl halten. Nicht auf trockenen Blättern, Gras oder brennbaren Materialien stoppen
oder parken.
TRANSPORT UND LAGERUNG
1. Beim Transport des Geräts auf einem offenen Anhänger muss sichergestellt werden, dass es nach
vorne und in Fahrtrichtung weist. Wenn das Gerät
nach hinten weist, könnte es durch Windeinwirkung
beschädigt werden.
2. Beim Betanken des Geräts nach Transport oder
Lagerung stets auf Sicherheit beim Umgang mit dem
Kraftstoff achten.
3. Das Gerät auf keinen Fall (mit Kraftstoff) in einem
geschlossenen, schlecht belüfteten Raum lagern.
Kraftstoffdämpfe können mit einer Zündquelle in
Berührung kommen (z. B. einem Brennofen, Wassererhitzer usw.) und eine Explosion verursachen. Kraftstoffdämpfe sind außerdem für Menschen und Tiere
giftig.
6
4. Stets die Anweisungen im Motorhandbuch bezüglich
der Vorbereitungen für eine Lagerung befolgen, bevor
das Gerät über eine kurze oder lange Zeit gelagert
wird.
5. Stets die Anweisungen im Motorhandbuch bezüglich
der korrekten Verfahren zur Inbetriebnahme befolgen,
wenn das Gerät wieder in Betrieb genommen wird.
6. Das Gerät oder den Kraftstoffbehälter auf keinen Fall
in Innenräumen lagern, wo eine offene Flamme oder
eine Zündflamme (z. B. Wassererhitzer) vorhanden
ist. Das Gerät vor der Lagerung abkühlen lassen.
www.simplicitymfg.com
Page 73

BETRIEBSSICHERHEIT
Not for
Reproduction
BETRIEB AUF GEFÄLLEN
Gefälle sind ein wesentlicher Faktor im Zusammenhang mit Unfällen durch den Verlust der Kontrolle oder durch Umkippen, was
zu ernsthaften Verletzungen oder zum Tod führen kann. Die Bedienung auf Gefällen erfordert besondere Umsicht. Wenn Sie auf
einem Gefälle nicht zurückfahren können oder wenn Sie sich unsicher fühlen, sollten Sie das Gerät nicht bedienen.
Wenn ein handgeführter oder Aufsitzmäher auf einem Gefälle zu
rutschen beginnt, kann die Kontrolle über das Gerät nicht durch
Betätigen der Bremse wieder erlangt werden. Die Hauptgründe für
den Verlust der Kontrolle sind: unzureichende Bodenhaftung der
Reifen, zu hohe Geschwindigkeit, ungenügendes Bremsen, die
Art der Maschine ist für die Aufgabe nicht geeignet, Unkenntnis
über die Bodenverhältnisse, fehlerhaft vorgenommene Anbauten
und falsche Lastverteilung.
1. Auf einem Gefälle auf und ab, nicht in Querrichtung mähen.
2. Auf Löcher, Rinnen oder Buckel achten. Unebenes
Gelände könnte zum Umkippen des Geräts führen. Hohes
Gras kann Hindernisse verdecken.
3. Eine langsame Geschwindigkeit wählen, damit Sie auf dem
Gefälle nicht anhalten oder die Geschwindigkeit ändern müssen.
4. Nicht auf nassem Gras mähen. Die Reifen können die Bodenhaftung verlieren.
5. Stets einen Gang einlegen, besonders bei Abwärtsfahrten
auf Gefällen. Die Maschine nicht in die Neutralposition
schalten und hangabwärts rollen lassen.
6. Auf einem Gefälle sollte möglichst nicht angefahren, angehalten oder gewendet werden. Wenn die Reifen die Bodenhaftung verlieren, die Messer auskuppeln und langsam den
Hang herunterfahren.
7. Alle Bewegungen auf einem Gefälle langsam und allmählich
durchführen. Keine plötzlichen Geschwindigkeitsänderungen
oder Richtungswechsel durchführen, die zum Umkippen
der Maschine führen könnten.
8. Beim Bedienen von Maschinen mit Grasfängern oder sonstigen Zubehörgeräten muss besonders vorsichtig vorgegangen werden; sie können die Stabilität des Geräts
beeinträchtigen. Nicht auf steilen Gefällen verwenden.
9. Es darf nicht versucht werden, die Maschine durch Aufstellen
der Füße auf den Boden zu stabilisieren (Aufsitzmäher).
10. Nicht in der Nähe von Böschungen, Gräben oder Dämmen
mähen. Der Mäher könnte plötzlich umkippen, wenn ein
Rad über den Rand eines Kliffs oder Grabens ragt oder
wenn ein Rand einbricht.
11. Auf steilen Gefällen keine Grasfänger verwenden.
12. Nicht auf Gefällen mähen, wenn Sie auf Ihnen nicht rückwärts fahren können.
13. Empfehlungen zu Radgewichten oder Gegengewichten zur
Verbesserung der Stabilität erhalten Sie von Ihrem Vertragshändler/Einzelhändler.
14. Hindernisse wie Steine, Äste usw. aus dem Weg räumen.
15. Eine langsame Geschwindigkeit verwenden. Auf Gefällen
kann die Bodenhaftung der Reifen verloren gehen, selbst
wenn die Bremsen richtig funktionieren.
16. Auf abschüssigem Gelände nur dann wenden, wenn es
unbedingt erforderlich ist. Dabei langsam und nach
Möglichkeit allmählich hangabwärts fahren.
GEZOGENE GERÄTE (AUFSITZMÄHER)
1. Nur mit einer Maschine ziehen, die über einen Anbau
speziell zum Ziehen von Geräten ausgestattet ist. Gezogene Geräte nur am Anbaupunkt befestigen.
2. Beim Ziehen von Geräten und Ziehen auf Gefällen die Empfehlungen
des Herstellers bezüglich der Gewichtsgrenze befolgen.
3. Auf keinen Fall Kinder oder andere Personen in oder auf
4. Auf Gefällen kann das Gewicht des gezogenen Geräts zu
5. Langsam fahren und zum Anhalten eine zusätzliche Entfer-
6. Die Maschine nicht in die Neutralposition schalten und
gezogenen Geräten fahren lassen.
einem Verlust der Bodenhaftung und Kontrolle führen.
nung einkalkulieren.
hangabwärts rollen lassen.
WARNUNG
Das Gerät darf auf keinen Fall auf Gefällen betrieben
werden, die eine Neigung von mehr als 17,6 Prozent (10°)
aufweisen, d. h. einen vertikalen Anstieg von 106 cm bei
einer Horizontalen von 607 cm.
Beim Einsatz auf Gefällen müssen zusätzliche Radgewichte
oder Gegengewichte verwendet werden. Wenden Sie sich
an Ihren Händler, um zu erfragen, welche Gewichte für Ihr
Gerät erhältlich und angemessen sind.
Bevor Sie auf ein Gefälle fahren, muss eine langsame
Fahrtgeschwindigkeit gewählt werden. Benutzen Sie nicht
nur vorne zusätzliche Gewichte, sondern seien Sie auch
besonders vorsichtig bei der Verwendung von
heckmontierten Grasauffangvorrichtungen.
Auf einem Gefälle sollte immer nach OBEN und nach UNTEN
gemäht werden, niemals in Querrichtung. Seien Sie vorsichtig, wenn Sie die Richtung wechseln. AUF KEINEN
FALL AUF EINEM GEFÄLLE STARTEN ODER ANHALTEN.
KINDER
Es können tragische Unfälle passieren, wenn der Bediener
nicht auf Kinder achtet. Kinder fühlen sich häufig von einer
solchen Maschine und dem Vorgang des Mähens angezogen. Man darf niemals davon ausgehen, dass Kinder an
der Stelle bleiben, an der sie zuletzt gesichtet wurden.
1. Kinder aus dem zu mähenden Bereich fern halten
und unter die Aufsicht eines verantwortungsbewussten Erwachsenen stellen.
2. Stets aufmerksam sein und das Gerät ausschalten,
wenn sich Kinder dem Bereich nähern.
3. Vor und während dem Rückwärtsfahren nach hinten
und unten schauen und auf kleine Kinder achten.
4. Auf keinen Fall Kinder mitfahren lassen, selbst wenn
keine Messer installiert sind. Sie können herunterfallen und sich ernsthaft verletzen oder den sicheren
Betrieb des Geräts beeinträchtigen. Kinder, die in der
Vergangenheit schon einmal mitfahren durften, können plötzlich in dem zu mähenden Bereich auftauchen, um wieder mitgenommen zu werden. Dabei
könnten sie überfahren werden.
5. Kinder dürfen auf keinen Fall das Gerät bedienen.
6. Besondere Vorsicht ist angesagt, wenn Sie sich toten
Winkeln, Büschen, Bäumen oder anderen Objekten
nähern, welche die Sicht verdecken können.
EMISSIONEN
1. Motorauspuff von diesem Produkt enthält
Chemikalien, von denen es bekannt ist, dass sie in
gewissen Mengen zu Krebs, Geburtsschäden oder
sonstigen Schäden des Reproduktionssystems
führen.
2. Die relevanten Informationen zur Emissions Durability Period (Emissionsbeständigkeitsperiode – EDP)
und zum Luftindex finden Sie auf dem Emissionsschild des Motors.
7
Page 74

BETRIEBSSICHERHEIT
Not for
Reproduction
SERVICE UND WARTUNG
Sicherer Umgang mit Kraftstoff
1. Alle Zigaretten, Zigarren, Pfeifen und sonstige
Zündquellen löschen.
2. Nur zugelassene Kraftstoffbehälter verwenden.
3. Auf keinen Fall bei laufendem Motor den Kraftstofftankdeckel abnehmen oder Kraftstoff nachfüllen. Vor
dem Auftanken den Motor abkühlen lassen.
4. Auf keinen Fall die Maschine in geschlossenen Räumen
auftanken.
5. Die Maschine oder den Kraftstoffbehälter auf keinen Fall
dort lagern, wo eine offene Flamme, ein Funke oder
eine Zündflamme (z. B. in der Nähe eines Wassererhitzers oder sonstigen Haushaltsgeräts) vorhanden ist.
6. Behälter auf keinen Fall in einem Fahrzeug oder auf
einer Pritschenfläche mit einem Pritschenschutz aus
Kunststoff füllen. Behälter stets auf den Boden und vom
Fahrzeug weg stellen, bevor Sie sie füllen.
7. Mit Kraftstoff betriebene Geräte aus dem LKW oder Anhänger abladen und auf dem Boden betanken. Wenn
dies nicht möglich ist, solche Geräte auf einem Anhänger mit einem tragbaren Behälter und nicht direkt mit
einem Kraftstoffeinfüllstutzen betanken.
8. Der Einfüllstutzen muss bis zum Abschluss des Tankvorgangs immer den Rand des Kraftstofftanks oder der Behälteröffnung berühren. Keinen offen arretierbaren
Einfüllstützen verwenden.
9. Wenn Kraftstoff auf die Kleidung gelangt, müssen Sie
sich sofort umziehen.
10. Auf keinen Fall den Kraftstofftank überfüllen. Den Kraftstofftankdeckel wieder aufsetzen und fest zudrehen.
11. Beim Umgang mit Benzin und anderen Kraftstoffen
besonders vorsichtig vorgehen. Sie sind brennbar und
die Dämpfe sind explosiv.
12. Wenn Kraftstoff verschüttet wird, den Motor nicht
starten, sondern die Maschine aus dem Bereich des
verschütteten Kraftstoffs bringen und jegliche
Zündquellen vermeiden, bis die Kraftstoffdämpfe verflogen sind.
13. Alle Kraftstofftankdeckel und Kraftstoffbehälterdeckel
fest zudrehen.
Service u. Wartung
1. Das Gerät nie in einem geschlossenen Bereich laufen
lassen, wo sich Kohlenmonoxiddämpfe ansammeln können.
2. Muttern und Schrauben, insbesondere Schrauben zur
Befestigung von Messern, auf ihren festen Sitz überprüfen und das Gerät in gutem Zustand halten.
3. Auf keinen Fall irgendwelche Sicherheitsvorrichtungen
manipulieren. Ihren ordnungsgemäßen Betrieb
regelmäßig überprüfen und notwendige Reparaturen
durchführen, wenn sie nicht richtig funktionieren.
4. Das Gerät von Gras, Blättern und sonstigen Verschmutzungen frei halten. Verschüttetes Öl oder Benzin
aufwischen und alle mit Kraftstoff getränkten Verschmutzungen beseitigen. Vor der Lagerung die Maschine abkühlen lassen.
5. Wenn Sie gegen ein Objekt fahren, anhalten und die
Maschine inspizieren. Vor dem erneuten Start nach Bedarf reparieren.
6. Keine Einstellungen oder Reparaturen vornehmen,
wenn der Motor läuft.
7. Die Bauteile des Grasfängers und den Auswurfschutz
häufig überprüfen und nach Bedarf gegen vom Hersteller empfohlene Teile austauschen.
8. Die Mähermesser sind scharf. Bei der Durchführung
9. Den Betrieb der Bremse häufig überprüfen. Einstellen
10. Ggf. Sicherheits- und Anweisungsaufkleber wiederher-
von Servicearbeiten an den Messern besonders vorsichtig vorgehen und diese umwickeln oder Handschuhe
tragen.
und nach Bedarf warten.
stellen oder ersetzen.
11. Den Kraftstofffilter nicht ausbauen, wenn der Motor noch
heiß ist, da verschüttetes Benzin sich entzünden kann.
Die Kraftstoffleitungsklemmen auf keinen Fall mehr als
notwendig spreizen. Sicherstellen, dass die Klemmen
nach dem Einbau die Schläuche über dem Filter fest
greifen.
12. Keinen Kraftstoff mit METHANOL, kein Gasohol mit
mehr als 10% ETHANOL, keine Benzinadditive bzw. kein
Weißbenzin verwenden, da ansonsten das
Motor-/Kraftstoffsystem beschädigt werden könnte.
13. Falls der Kraftstofftank entleert werden muss, sollte dies
im Freien geschehen.
14. Defekten Schalldämpfer/Auspuff ersetzen.
15. Bei der Durchführung von Reparaturen nur ab Werk
zugelassene Ersatzteile verwenden.
16. Bei allen Einstellungen und Justierungen stets die werkseitigen Spezifikationen einhalten.
17. Für größere Wartungs- und Reparaturarbeiten sollten
nur Vertragswerkstätten verwendet werden.
18. Auf keinen Fall irgendwelche größeren Reparaturen an
diesem Gerät durchführen, wenn Sie nicht entsprechend
geschult wurden. Falsche Serviceverfahren können zu
einer Gefährdung des Betriebs, zu Geräteschäden und
zur Ungültigkeit der Herstellergarantie führen.
19. Bei Mähwerken mit mehreren Messern muss vorsichtig
vorgegangen werden, da sich beim Drehen eines
Messers auch andere Messer drehen können.
20. Auf keinen Fall die Motorreglereinstellungen ändern oder
den Motor überdrehen. Das Bedienen des Motors bei
überhöhter Geschwindigkeit kann zu einer größeren Verletzungsgefahr führen.
21. Antriebszubehörgeräte auskuppeln, den Motor abstellen, den Schlüssel abziehen und die Zündkerzendrähte abtrennen, bevor Sie folgende Vorgänge
ausführen: verstopfte Zubehörgeräte und Schächte reinigen, Servicearbeiten durchführen, gegen ein Objekt
fahren oder bei abnormen Vibrationen. Nachdem Sie
gegen ein Objekt fahren, die Maschine auf Schäden
überprüfen und Reparaturen vornehmen, bevor das
Gerät wieder gestartet und in Betrieb genommen wird.
22. Auf keinen Fall die Hände in die Nähe von beweglichen
Teilen (z. B. Hydropumpenlüfter) bringen, wenn der Traktor läuft. (Hydropumpenlüfter befinden sich in der Regel
oben auf der Transachse).
23. Geräte mit Hydraulikpumpen, -schläuchen oder -motoren:
ACHTUNG: Unter Druck austretende Hydraulikflüssigkeit
kann u. U. so stark spritzen, dass die Haut durchdrungen
wird und ernsthafte Verletzungen entstehen. Wenn Fremdflüssigkeit in die Haut eindringt, muss sie innerhalb
einiger weniger Stunden von einem Arzt, der mit dieser
Art von Verletzung vertraut ist, chirurgisch entfernt werden, da ansonsten eine Gewebenekrose eintreten kann.
Körper und Hände von Nadellöchern oder Düsen, die
Hydraulik-flüssigkeit unter hohem Druck spritzen, fern
halten. Bei der Suche nach Leckagen Papier oder
Pappe verwenden, nicht die Hände. Sicherstellen, dass
alle Hydraulikflüssigkeitsanschlüsse fest sitzen und dass
alle Hydraulikschläuche und -leitungen sich in gutem Zustand befinden, bevor das System unter Druck gesetzt
wird. Wenn Leckagen auftreten, muss das Gerät sofort
von Ihrem Vertragshändler repariert werden.
24. ACHTUNG: Energiespeichervorrichtung. Das unsachgemäße Lösen von Federn kann zu ernsthaften
Verletzungen führen. Federn sollten nur von einem autorisierten Techniker ausgebaut werden.
25. Modelle mit einem Motorwasserkühler: ACHTUNG: Energiespeichervorrichtung. Um ernsthafte Körperverletzungen durch heißes Kühlmittel oder austretenden
Dampf zu vermeiden, darf auf keinen Fall versucht werden, den Kühlerdeckel bei laufendem Motor
abzunehmen. Den Motor stoppen und warten, bis er
abgekühlt ist. Selbst dann muss beim Abnehmen des
Deckels äußerst vorsichtig vorgegangen werden.
8
www.simplicitymfg.com
Page 75
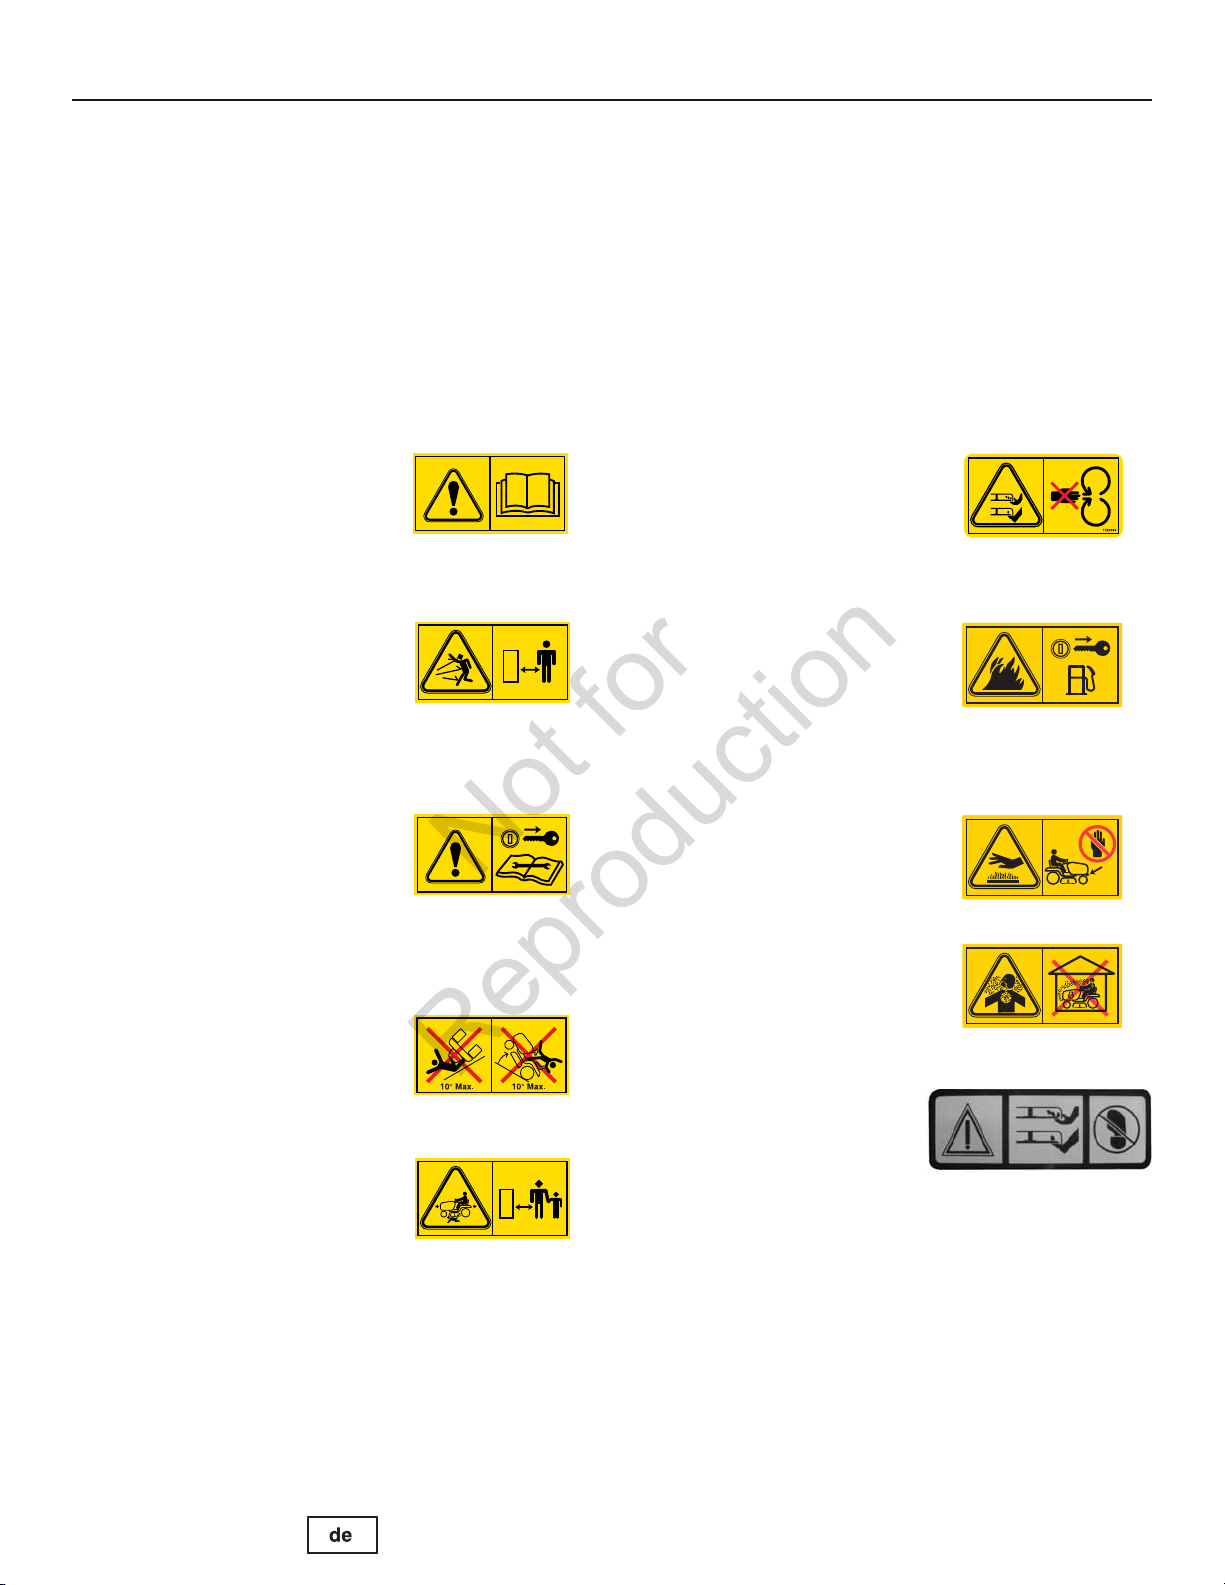
BETRIEBSSICHERHEIT
Not for
Reproduction
Sicherheitsaufkleber
Alle Hinweise mit der Bezeichnung GEFAHR, ACHTUNG,
VORSICHT sowie Anweisungen auf Ihrem Aufsitzmäher
und Mähwerk sollten sorgfältig gelesen und beachtet werden. Die Nichtbeachtung dieser Anweisungen kann zu Verletzungen führen. Diese Informationen dienen zu Ihrer
Sicherheit und sind wichtig! Die nachstehenden Sicherheitsaufkleber befinden sich auf Ihrem Aufsitzmäher und Mähwerk.
Sicherheitssymbole
Achtung: Benutzerhandbuch
lesen.
Vor dem Gebrauch dieser Maschine das Benutzerhandbuch
lesen und verstehen.
Gefahr: Umherschleudern von
Gegenständen.
Diese Maschine kann Gegenstände und Schmutzteile umherschleudern. Umstehende
Personen fern halten.
Falls irgendwelche Aufkleber verloren gehen oder beschädigt
werden, müssen sie sofort ersetzt werden. Ersatzaufkleber erhalten Sie von Ihrem örtlichen Händler.
Diese Aufkleber lassen sich leicht aufbringen und dienen
Ihnen und anderen, die eventuell dieses Gerät benutzen, als
visuelle Gedächtnisstütze, die Sicherheitsanweisungen zu befolgen, die für einen sicheren, effektiven Betrieb notwendig sind.
Gefahr: Abtrennen von Gliedmaßen.
Dieses Mähwerk kann Gliedmaßen
abtrennen. Hände und Füße von
Messern entfernt halten.
Gefahr: Brandgefahr.
Wenn der Motor heiß ist oder läuft,
keinen Kraftstoff nachfüllen. Den
Motor anhalten und 3 Minuten
abkühlen lassen, bevor Sie ihn betanken.
Achtung: Vor der Wartung
Schlüssel abziehen.
Vor der Durchführung von Reparaturen oder Wartungsarbeiten den
Schlüssel abziehen und die technischen Handbücher konsultieren.
Gefahr: Umkippen der Maschine.
Diese Maschine nicht auf Gefällen
von mehr als 10 Grad verwenden.
Gefahr: Abtrennen von Gliedmaßen.
Diese Maschine kann Gliedmaßen
abtrennen. Bei laufendem Motor
umstehende Personen und Kinder
fern halten.
Gefahr: Heiße Oberfläche.
Vor Berühren dieses Bereichs Maschine abkühlen lassen.
Gefahr: Kohlenmonoxidvergiftung.
Den Motor nicht in einem unbelüfteten Bereich laufen lassen.
Gefahr: Abtrennen von Gliedmaßen.
Dieses Mähwerk kann Gliedmaßen abtrennen. Hände und
Füße von Messern entfernt halten.
9
Page 76

BETRIEBSSICHERHEIT
Not for
Reproduction
Zündschalterpositionen
Teilenr. 1722806
Sicherheitsymbol
Teilenr. 1735890
Sicherheitssymbole
Teilenr. 1734027
Sicherheitsymbol
Teilenr. 1735890
4
4
3
3
2
2
R
R
Kraftstoffstand
Teilenr. 1735889
Mäher-Lift
Teilenr. 1730264
Getriebe-
Sicherheitsschilder Abbildung 1
ausrückhebel
Teilenr. 1735265
10
www.simplicitymfg.com
Page 77
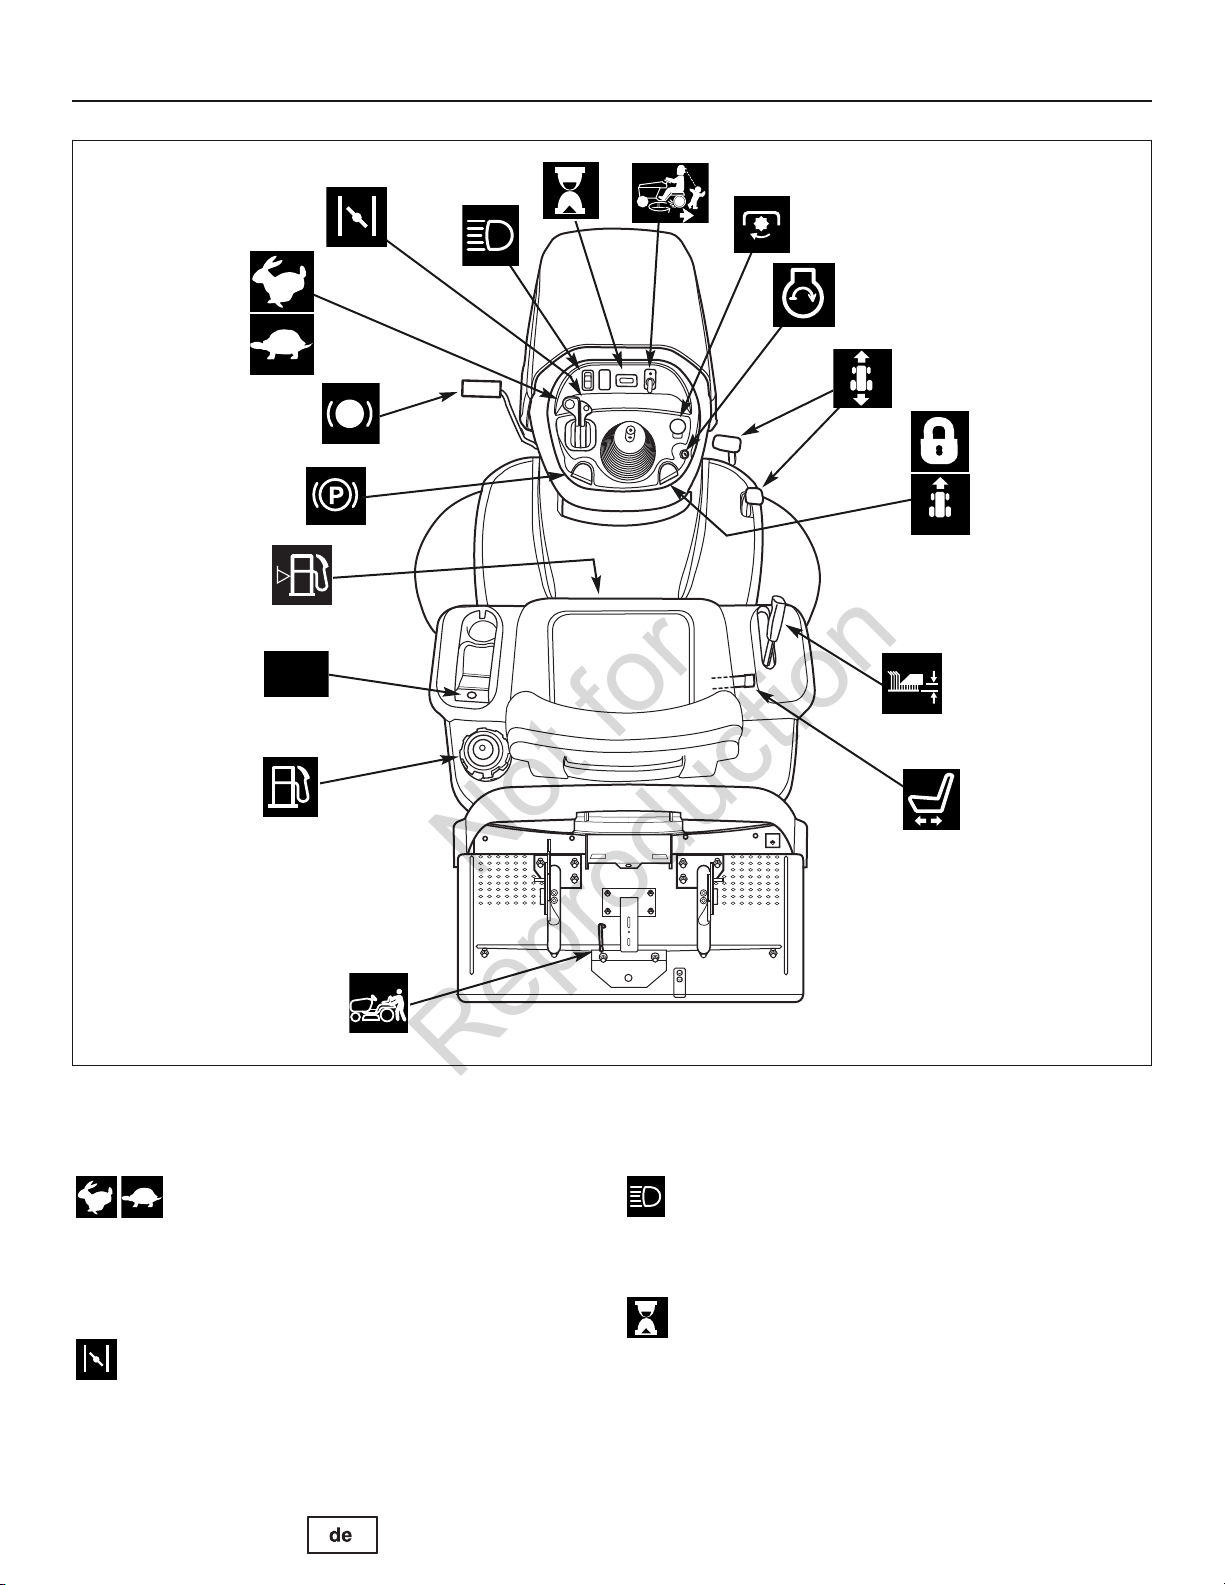
12V
FUNKTIONEN UND STEUERUNGEN
Not for
Reproduction
Steuerungen der Zugmaschine Abbildung 2
STEUERUNGEN DER ZUGMASCHINE
Gashebel
Der Gashebel regelt die Motorgeschwindigkeit. Zum Erhöhen
der Motorgeschwindigkeit den Hebel nach vorne bewegen,
und zum Verringern der Motorgeschwindigkeit den Hebel
zurück bewegen. Stets mit VOLLGAS arbeiten.
Choke
Beim Kaltstart wird der Choke geschlossen. Nachdem der
Motor startet, den Choke öffnen. Bei einem warmen Motor
braucht der Choke eventuell nicht betätigt werden. Zum
Schließen des Choke den Hebel nach vorne bewegen.
Scheinwerfer
Mit dem Lichtschalter werden die Scheinwerfer des Traktors ein- und ausgeschaltet.
Stundenzähler (Ausgewählte Modelle)
Der Stundenzähler zählt, wie viele Stunden der Schlüssel
in der RUN-Position steht.
11
Page 78

FUNKTIONEN UND STEUERUNGEN
12V
Not for
Reproduction
Rückwärtsmähoption
(RMO)
Die Rückwärtsmähoption ermöglicht das Mähen (bzw. die Verwendung anderer Zubehörgeräte mit Zapfwellenantrieb) während
der Rückwärtsfahrt. Wenn Sie im Rückwärtsgang mähen
möchten, den RMO-Schlüssel drehen, nachdem der
Zapfwellenantrieb eingekuppelt ist. Die LED-Lampe leuchtet,
und der Bediener kann jetzt im Rückwärtsgang mähen. Jedes
Mal, wenn der Zapfwellenantrieb eingekuppelt wird, muss die
RMO nach Wunsch neu aktiviert werden.
Zapfwellenantriebsschalter
Der Zapfwellenantriebsschalter kuppelt die Zubehörgeräte, die
den Zapfwellenantrieb benutzen, ein und aus. Zum Einkuppeln
des Zapfwellenantriebs wird der Schalter nach OBEN gezogen.
Zum Auskuppeln wird er nach UNTEN gedrückt.
dass der Bediener fest im Traktorsitz sitzen muss, damit der
Zapfwellenantrieb funktioniert.
Zündschalter
Beachten Sie,
Mähwerkhubhebel
Der Mähwerkhubhebel regelt die Schnitthöhe des Mähwerks.
Zum Reduzieren der Höhe wird der Mähwerkhubhebel
zurückgezogen und zum Erhöhen nach oben gezogen.
Sitzeinstellhebel
Der Sitz kann zur Einstellung nach vorne und hinten
geschoben werden. Den Hebel anheben, den Sitz in die
gewünschte Position bringen und den Hebel loslassen,
um den Sitz in der Position zu verriegeln.
Getriebeausrückventilhebel
Der Getriebeausrückventilhebel deaktiviert das Getriebe,
sodass der Traktor von Hand geschoben werden kann.
Betriebsinformationen finden Sie unter
schieben
.
Traktor von hand
Der Zündschalter startet und stoppt den Motor; er hat drei Positionen:
AUS Hält den Motor an und schaltet das
Elektrosystem aus.
RUN Der Motor kann laufen, und das
Elektrosystem wird gespeist.
START Kurbelt die Maschine zum Anlassen.
HINWEIS: Den Zündschalter bei angehaltenem Motor auf
keinen Fall in der Position RUN stehen lassen - dadurch läuft
die Batterie leer.
Fahrtgeschwindigkeitspedale
Die Vorwärtsfahrtgeschwindigkeit des Traktors wird durch das
Steuerpedal für die Vorwärtsfahrtgeschwindigkeit geregelt. Die
Rückwärtsfahrtgeschwindigkeit des Traktors wird durch das
Steuerpedal für die Rückwärtsfahrtgeschwindigkeit geregelt.
Durch Drücken eines der Pedale wird die Fahrtgeschwindigkeit erhöht. Beachten Sie, dass der Traktor umso schneller fährt, je
mehr Sie das Pedal durchtreten.
Tempomat
Kraftstofftank
Zum Abnehmen des Deckels wird dieser gegen den
Uhrzeigersinn gedreht.
Strombuchse (Ausgewählte Modelle)
Die Strombuchse hat 12 V-DC. Zubehörteile müssen eine
Nennleistung von höchstens 9 Amp aufweisen.
Kraftstoffanzeige
Zeigt den Kraftstoffstand im Tank an.
Parkbremse
Der Parkbremsenknopf wird zum Verriegeln der Parkbremse verwendet, wenn der Traktor angehalten hat.
Durch vollständiges Durchtreten des Bremspedals und
Hochziehen des Knopfs wird die Parkbremse betätigt.
Bremspedal
Durch Treten des Bremspedals wird die Traktorbremse
betätigt.
Der Tempomat wird dazu verwendet, die Fahrtgeschwindigkeitsteuerung im Vorwärtsgang zu arretieren. Er hat fünf Arretierpositionen.
12
www.simplicitymfg.com
Page 79

FUNKTIONEN UND STEUERUNGEN
Not for
Reproduction
F
N
I
C
M
M
J
J
A
K
B
G
F
D
H
C
B
L
E
Motorsteuerungen Abbildung 3
MOTORSTEUERUNGEN
A. Motoridentifikation
B. Zündstecker
C. Luftreiniger
D. Ölmessstab
E. Ölablassschraube
F. Rotierende Anzeige
G. Ölfilter
H. Elektrischer Anlasser
I. Vergaser
J. Kraftstofffilter (optional)
K. Kraftstoffpumpe (optional)
L. Öl-Schnellablassrohr (optional)
M. Ölkühler (optional)
N. Elektronische Steuereinheit (optional)
13
Page 80

BETRIEB
Not for
Reproduction
Tests des Sicherheitssperrsystems
Dieses Gerät ist mit einem Sicherheitssperrschalter und anderen Sicherheitsvorrichtungen ausgestattet. Diese Sicherheitssysteme dienen zur Ihrer Sicherheit: Auf keinen Fall
versuchen, Sicherheitsschalter zu umgehen und irgendwelche
Sicherheitsvorrichtungen zu manipulieren.
WARNUNG
Wenn das Gerät eine Sicherheitsprüfung nicht
besteht, darf es nicht in Betrieb genommen werden.
Wenden Sie sich an Ihren Vertragshändler.
Test 1 — Motor sollte NICHT kurbeln, wenn:
• der Zapfwellenantriebsschalter auf EIN steht ODER
• das Bremspedal NICHT ganz gedrückt ist (Parkbremse auf
AUS) ODER
• der Tempomathebel sich NICHT in der Stellung NEUTRAL
befindet.
Test 2 — Motor SOLLTE kurbeln und starten, wenn:
• der Bediener im Sitz sitzt UND
• der Zapfwellenantriebsschalter auf AUS steht UND
• das Bremspedal vollständig gedrückt ist (Parkbremse auf
EIN) UND
• der Tempomathebel sich in der Stellung NEUTRAL befindet.
Test 3 — Motor SOLLTE kurbeln und starten, wenn:
• sich die Bedienperson bei eingekuppelter PTO vom Sitz erhebt ODER
• wenn sich die Bedienperson bei NICHT vollständig durchgedrücktem Bremspedal (Parkbremse AUS) vom Sitz erhebt.
Test 4 —
Die Messer des Mähwerks und der Mähwerkantriebsriemen
sollten nach Ausschalten des elektrischen Zapfwellenantriebsschalters (oder wenn der Bediener vom Sitz aufsteht) innerhalb
von fünf Sekunden zum Stillstand kommen. Wenn der MäherAntriebsriemen nicht innerhalb von fünf Sekunden stoppt, setzen
Sie sich mit Ihrem autorisierten Händler in Verbindung.
Test 5 — Rückwärtsmähoption (RMO) prüfen
• Der Motor sollte sich ausschalten, wenn versucht wird, den
• Die RMO-Lampe sollte leuchten, wenn die aktiviert wurde.
Stoppzeit der Mäher-Klinge überpüfen
Rückwärtsgang einzulegen und der Zapfwellenantrieb
eingeschaltet, die RMO aber nicht aktiviert wurde.
Empfehlungen zum Öl
Für optimale Leistung empfehlen wir Öle mit Briggs &
Stratton-Garantiezertifikat. Andere hochwertige HD-Öle
mit der Klassifizierung ”for service SF, SG, SH, SJ” oder
höher sind zulässig. Keine speziellen Zusätze verwenden.
Die Umgebungstemperaturen bestimmen die richtige
Ölviskosität für den Motor. Wählen Sie die beste Viskosität
für den voraussichtlichen Temperaturbereich anhand desDiagramms aus.
Kunststoff 5W-30
* Unter 4°C (40°F) führt der Nutzen von SAE 30 zu einem schweren Start.
** Über 27°C (80°F) kann die Verwendung von 10W-30 zu einem höheren Ölverbrauch
führen. Überprüfen Sie den Ölstand öfter.
Kontrolle/Nachfüllen von öl
Vor dem Nachfüllen von Öl bzw. der Ölstandskontrolle
• Den Motor waagerecht stellen.
• Den Öleinfüllbereich von Fremdkörpern reinigen.
1. Den Peilstab (A, Abb. 4) herausziehen und mit einem
sauberen Lappen abwischen.
2. Den Peilstab einsetzen und festziehen.
3. Den Peilstab herausziehen und den Ölstand kontro
lieren. Er sollte an der FULL-Marke (B) am Peilstab
stehen.
4. Bei niedrigem Ölstand Öl langsam in die Motoröleinfül-
löffnung (C) nachfüllen. Nicht überfüllen. Nach dem
Einfüllen des Öls eine Minute warten und dann den
Ölstand nachkontrollieren.
14
HINWEIS: Kein Öl am Öl-Schnellablass (L, Abb. 3) einfüllen (falls vorhanden).
5. Den Peilstab wieder einsetzen und festziehen.
www.simplicitymfg.com
Page 81

BETRIEB
Not for
Reproduction
Öldruck
Wenn der Öldruck abfällt, stoppt ein Öldruckschalter (falls
vorhanden) entweder den Motor oder aktiviert eine Warnvorrichtung am Gerät. Falls dies auftritt, den Motor stoppen und den Ölstand mit dem Peilstab kontrollieren.
Wenn der Ölstand unter der Marke ADD am Peilstab steht,
Öl einfüllen, bis der Ölstand die Marke FULL erreicht. Den
Motor starten und vor dem weiteren Betrieb kontrollieren,
ob der richtige Öldruck wiederhergestellt ist.
Wenn der Ölstand zwischen den Marken ADD und FULL
am Peilstab steht, nicht versuchen, den Motor wieder zu
starten. Wenden Sie sich an einen autorisierten Händler,
um das Öldruck-Problem beheben zu lassen.
Kraftstoffempfehlungen
Kraftstoff muss diese Anforderungen erfüllen:
• Sauberes, frisches, bleifreies Benzin.
• Mindestens 87 Oktan/87 AKI (91 RON). Bei Einsatz in
großen Höhen siehe unten.
• Benzin mit bis zu 10% Ethanol oder bis zu 15% MTBE
ist akzeptabel.
VORSICHT: Kein nicht zugelassenes Benzin wie E85 verwenden. Kein Öl mit dem Benzin mischen. Den Motor
nicht so modifizieren, dass er mit alternativen Kraftstoffen
laufen kann. Bei Nichtbeachtung dieser Punkte werden
Motorkomponenten beschädigt, und die Motorgarantie
wird aufgehoben.
Zum Schutz der Kraftstoffanlage vor Kraftstoffrückständen
sollte dem Kraftstoff ein Kraftstoffstabilisator beigemischt
werden. Siehe
Wenn es zu Start- oder Leistungsproblemen kommt, sollte
der Kraftstoff anderswo gekauft oder die Marke gewechselt werden. Dieser Motor ist für den Betrieb mit Benzin
zugelassen. Der Motor hat das Abgassystem EM (Engine
Modifications).
Lagerung
. Nicht jeder Kraftstoff ist gleich.
Nachfüllen von Kraftstoff
WARNUNG
Kraftstoff und Kraftstoffdämpfe sind extrem
leicht entflammbar und explosiv.
Feuer oder Explosionen können zu schweren
Verbrennungen oder Tod führen.
Beim Nachfüllen von Kraftstoff
• Den Motor ausschalten und mindestens 3 Minuten
lang abkühlen lassen, bevor der Tankdeckel
abgenommen wird.
• Den Kraftstofftank im Freien oder in einem gut
belüfteten Bereich füllen.
• Den Kraftstofftank nicht überfüllen. Um dem Kraftstoff
Platz zum Ausdehnen zu lassen, nicht über die
Unterkante des Kraftstofftankstutzens hinaus füllen.
• Kraftstoff von Funken, offenen Flammen,
Dauerflammen, Wärmequellen und anderen
Entzündungsherden fernhalten.
• Kraftstoffleitungen, Tank, Deckel und Anschlüsse
regelmäßig auf Sprünge und undichte Stellen
untersuchen und bei Bedarf austauschen.
• Wenn Kraftstoff verschüttet wurde, warten, bis sich die
Dämpfe verflüchtigt haben, bevor der Motor gestartet
wird.
1. Den Bereich um den Tankdeckel von Schmutz und
Fremdkörpern reinigen. Den Tankdeckel (A, Abb. 5) abnehmen.
2. Den Kraftstofftank (B) mit Kraftstoff füllen. Um dem
Kraftstoff Platz zum Ausdehnen zu lassen, nicht über
die Unterkante des Kraftstofftankstutzens (C) hinaus
füllen.
3. Den Tankdeckel wieder anbringen.
Starten des Motors
Einsatz in Großen Höhen
In Höhen über 1524 m ist Benzin mit mindestens 85
Oktan/85 AKI (89 RON) akzeptabel. Damit die Emissionsbestimmungen weiterhin erfüllt werden, ist eine Einstellung für große Höhen erforderlich. Wenn der Motor ohne
diese Einstellung läuft, kommt es zu Leistungsabfall, erhöhtem Kraftstoffverbrauch und mehr Emissionen. Bitten
Sie einen autorisierten Händler um Informationen über
Einstellungen für große Höhen.
Es wird nicht empfohlen, den Motor in Höhen unter 762 m
einzusetzen, wenn der Satz für große Höhen installiert ist.
WARNUNG
Kraftstoff und Kraftstoffdämpfe sind extrem
leicht entflammbar und explosiv.
Feuer oder Explosionen können zu schweren
Verbrennungen oder Tod führen.
Beim Start des Motors
• Darauf achten, dass Zündkerze, Schalldämpfer,
Tankdeckel und Luftfilter (falls vorhanden) an ihrem
Platz und sicher befestigt sind.
• Nicht den Motor anlassen, wenn die Zündkerze
entfernt wurde.
• Wenn der Motor überfettet ist, den Choke (falls
vorhanden) auf offene/Betriebs-Position und den
Gashebel (falls vorhanden) auf schnelle Position
stellen und den Motor anlassen, bis er anspringt.
15
Page 82

BETRIEB
Not for
Reproduction
WARNUNG
Motoren erzeugen Kohlenmonoxid, ein
geruchloses, farbloses, giftiges
Gas. Wenn Kohlenmonoxid eingeatmet wird, kann
es zu Übelkeit, Ohnmacht oder Tod kommen.
• Den Motor im Freien starten und laufen lassen.
• Den Motor nicht in geschlossenen Räumen starten
oder laufen lassen, selbst wenn Türen oder Fenster
geöffnet sind.
ANMERKUNG: Dieser Motor wird von Briggs & Stratton
ohne Öl geliefert. Vor Start des Motors muss entsprechend
den Anweisungen in dieser Anleitung Öl nachgefüllt werden. Wenn der Motor ohne Öl gestartet wird, wird er so
beschädigt, dass er nicht mehr repariert werden kann.
Dieser Schaden wird nicht von der Garantie abgedeckt.
1. Den Ölstand kontrollieren. Siehe den Abschnitt
trolle/Nachfüllen von Öl.
2. Darauf achten, dass die Bedienungselemente für den
Geräteantrieb (falls vorhanden) ausgeschaltet sind.
3. Den Kraftstoffhahn (A, Abb. 6) (falls vorhanden) aufdrehen.
4. Den Gashebel (B) auf SCHNELLE Position stellen.
Den Motor in SCHNELLER Position laufen lassen.
5. Den kombinierten Choke-/Gashebel (C) auf CHOKEPosition laufen lassen.
HINWEIS: Der Choke wird gewöhnlich beim erneuten
Start eines warmen Motors nicht gebraucht.
6. Den E-Startschalter (D) auf Position ON/START
stellen.
HINWEIS. Falls der Motor nach wiederholten Ver
suchen nicht startet, wenden Sie sich bitte an einen
autorisierten Händler.
ANMERKUNG: Um die Lebensdauer des Anlassers zu
verlängern, den Anlasser jeweils nur kurz betätigen (maximal fünf Sekunden). Zwischen den Betätigungen jeweils
eine Minute warten.
7. Wenn sich der Motor aufwärmt, den Chokehebel (C)
auf BETRIEBS-Position stellen.
Kon-
Traktor fahren
1. So in den Sitz setzen und den Sitz so einstellen, dass
Sie bequem alle Bedienelemente erreichen und die Instrumententafelanzeige sehen können.
2. Die Parkbremse betätigen.
3. Sicherstellen, dass der Zapfwellenantriebsschalter ausgekuppelt ist.
4. Den Motor starten (siehe
5. Die Parkbremse lösen und den Fuß vom Bremspedal
nehmen.
6. Auf das Vorwärts-Fahrtgeschwindigkeitspedal treten,
um vorwärts zu fahren. Zum Anhalten den Fuß vom
Pedal nehmen. Beachten Sie, dass der Traktor umso
schneller fährt, je mehr Sie das Pedal durchtreten.
7. Der Traktor wird angehalten, indem Sie den Fuß von
den Fahrtgeschwindigkeitspedalen nehmen, die Parkbremse betätigen und den Motor ausschalten (siehe
Anhalten des traktors und motors
Starten des motors
).
).
Mähen
1. Stellen Sie die Schnitthöhe des Mähers mithilfe des
Mäher-Hebearms auf die gewünschte Höhe ein.
2. Lassen Sie die Parkbremse einrasten. Vergewissern
Sie sich, dass die Antriebswelle ausgekuppelt ist.
3. Starten Sie den Motor (siehe
4. Stellen Sie die Geschwindigkeit auf VOLLGAS.
5. Kuppeln Sie die Antriebswelle ein, um die Mäherklingen
zu aktivieren.
6. Beginnen Sie mit dem Mähen.
HINWEIS: Wenn der Alarmton „Grasfangeinrichtung
voll“ ertönt, kuppeln Sie die Antriebswelle sofort aus,
um ein Verstopfen des Auswurfkanals zu verhindern.
Fahren Sie in die gewünschte Richtung und entleeren
Sie die Grasfangeinrichtung (siehe Entleeren der
Grasfangeinrichtung).
7. Wenn Sie damit fertig sind, kuppeln Sie die Antriebswellenkupplung aus und heben Sie das Gehäuse mithilfe des Mäher-Hebearms an.
8. Stoppen Sie den Motor (siehe
chine und des Motors
Den Motor starten
Stoppen der Zugmas-
).
).
WARNUNG
Der Motor schaltet sich aus, wenn das RückwärtsFahrtgeschwindigkeitspedal betätigt wird, während der
16 www.simplicitymfg.com
Zapfwellenantrieb eingeschaltet ist und die RMO nicht
aktiviert wurde. Der Bediener sollte den
Zapfwellenantrieb vor dem Überqueren von Straßen,
Wegen oder sonstigen Bereichen, in denen auch andere
Fahrzeuge fahren, stets ausschalten. Ein plötzlicher
Antriebsverlust könnte zu einer Gefahr werden.
Page 83

BETRIEB
Not for
Reproduction
WARNUNG
Das Mähen im Rückwärtsgang kann für umstehende
Personen gefährlich sein. Es können tragische Unfälle
passieren, wenn der Bediener nicht auf Kinder achtet.
Auf keinen Fall die RMO aktivieren, wenn Kinder
vorhanden sind. Kinder fühlen sich häufig von einer
solchen Maschine und dem Vorgang des Mähens
angezogen.
Im Rückwärtsgang mähen
Wenn ein Bediener im Rückwärtsgang mäht, dann das RMOSystem verwendet werden. Um die Rückwärtsmähoption
(RMO) zu verwenden, den RMO-Schlüssel drehen, nachdem
der Zapfwellenantrieb eingekuppelt ist. Die LED-Lampe
leuchtet, und der Bediener kann jetzt im Rückwärtsgang
mähen. Jedes Mal, wenn der Zapfwellenantrieb eingekuppelt
wird, muss die RMO nach Wunsch neu aktiviert werden. Der
Schlüssel sollte abgezogen werden, um den Zugriff auf die
RMO-Funktion einzuschränken.
Zubehör im Rückwärtsgang bedienen
Wenn ein Bediener ein per Zapfwellenantrieb betriebenes
Zubehörteil im Rückwärtsgang verwendet, dann kann das
RMO-System benutzt werden. Um die Rückwärtsmähoption
(RMO) zu verwenden, den RMO-Schlüssel drehen, nachdem
der Zapfwellenantrieb eingekuppelt ist. Die LED-Lampe
leuchtet, und der Bediener kann jetzt das Zubehörteil im
Rückwärtsgang benutzen. Jedes Mal, wenn der
Zapfwellenantrieb ausgekuppelt ist, muss die RMO nach
Wunsch neu aktiviert werden. Der Schlüssel sollte abgezogen
werden, um den Zugriff auf die RMO-Funktion einzuschränken.
Parkbremsenfunktion
Betätigen der Parkbremse - Siehe Abb. 8. Zum Ver-
riegeln der Parkbremse den Fuß von den Fahrtgeschwindigkeitspedalen (A) nehmen, das Bremspedal (B)
ganz durchtreten, den Parkbremsenknopf (C) nach OBEN
ziehen und dann das Bremspedal loslassen.
Lösen der Parkbremse - Siehe Abb. 8. Zum Lösen der
Parkbremse auf das Bremspedal (B) treten.
Bedienung des Tempomats
SO WIRD SIE BETÄTIGT:
1. Den Tempomatknopf (D, Abb. 8) nach oben ziehen.
2. Auf das Vorwärts-Fahrtgeschwindigkeitspedal (A)
treten.
3. Den Tempomatknopf (D) hochziehen, wenn die gewün-
schte Geschwindigkeit erreicht ist. Der Tempomat arretiert in einer der fünf Arretierpositionen.
SO WIRD ER DEAKTIVIERT:
1. Auf das Bremspedal (B, Abb. 8) nach oben ziehen.
ODER
2. Depress the forward ground speed pedal (A).
Stundenzähler (falls vorhanden)
Der Stundenzähler (E, Abb. 8) zählt, wie viele Stunden der
Schlüssel in der RUN-Position steht.
Traktor mit der Hand schieben
1. Den Zapfwellenantrieb auskuppeln und den Motor ab-
schalten.
2. Drücken Sie ein Hebel ca. 6 cm (2-3/8 Zoll), um das
Getriebe auszukuppeln (A, Abb. 7).
3. Der Traktor kann jetzt von Hand geschoben werden.
TRAKTOR NICHT
ZIEHEN
Das Ziehen des
Geräts verursacht
Getriebeschäden.
• Dieses Gerät nicht
mit einem anderen
Fahrzeug schieben
oder ziehen. • Den
Getriebeausrück-ventilhebel nicht betätigen, während der
Motor läuft.
Traktor u. Motor anhalten
1. Den/die Grundgeschwindigkeitssteuerung(en) in die
Neutralposition zurückstellen.
2. Die Zapfwellenkupplung auskuppeln und warten, bis
alle beweglichen Teile zum Stillstand gekommen sind.
3. Den Gashebel in die Position LANGSAM stellen und
den Zündschlüssel auf AUS drehen. Den Zündschlüssel abziehen.
Entleeren des Grasfangbehälters
Den Grasfangbehälter wie folgt entleeren:
1. Den Hebel des Grasfangbehälters herausziehen und
nach vorn drücken (A, Abb. 9), um den Grasfangbehälter (B) zu entleeren.
2. Den Grasfangbehälter mit dem Hebel schließen und
den Hebel wieder in den Grasfangbehälter einschieben.
17
Page 84

BETRIEB
Not for
Reproduction
Aus- und einbau des grasfangbehälters
WARNUNG
Den Mäher nur verwenden, wenn das Auswurfrohr
oder Leitblech installiert ist.
1. Die Verriegelung des Grasfangbehälters (A, Abb. 10)
hinter dem linken Hinterrad entriegeln.
2. Die Verriegelung anheben und nach hinten drücken.
3. Den Grasfangbehälter etwas mit dem Hebel (B)
öffnen.
4. Den Grasfangbehälter von den hinteren Stützarmen
abheben.
5. Den Grasfangbehälter in umgekehrter Reihenfolge des
Ausbaus einbauen. Die Ausrichtungspfeile am
Grasfangbehälter und am Heck des Mähers
ausrichten, um den Einbau des Grasfangbehälters zu
erleichtern.
Ein- und Ausbau des Mulchstopfens
WARNUNG
Die scharfen Mähmesser nicht mit bloßen Händen
anfassen. Unvorsichtiger oder unsachgemäßer
Umgang mit den Messern kann zu schweren
Verletzungen führen.
1. Den Grasfangbehälter ausbauen.
2. Den Griff (A, Abb. 11) festhalten und den Stopfen in
den Tunnel schieben. Sicherstellen, dass die
Verkleidung oben auf den Schiebeführungen im
Mähwerk gleitet.
3. Den Griff eindrücken, um die Innenfeder zu
komprimieren.
4. Die Rohrverlängerung in die Öffnung am Ende des
Tunnels einsetzen und mit dem Splint (B) befestigen.
5. Den Grasfangbehälter wieder einbauen.
6. Den Mulchstopfen in umgekehrter Reihenfolge des
Einbaus ausbauen.
Einstellung des „Grasfangbehälter voll“Alarms
Das zum Auslösen des Alarms erforderliche
Grasvolumen im Grasfangbehälter kann durch Verstellen
der Einstellhalterung geändert werden (siehe Abb. 12).
Einstellung auf Grasvolumen
Die Einstellhalterung (A, Abb. 12) nach oben schieben,
um das zum Auslösen des Alarms erforderliche
Grasvolumen im Grasfangbehälter zu erhöhen. Die
Einstellhalterung nach unten schieben, um das zum
Auslösen des Alarms erforderliche Grasvolumen im
Grasfangbehälter zu verringern.
1. Die Befestigungselemente (B) der Halterung lösen.
2. Die Einstellhalterung (A) nach oben oder unten
verschieben.
3. Die Befestigungselemente wieder anziehen.
Anpassung der Schnitthöhe
Der Mäher-Hebearm (A, Abb. 13) wird verwendet, um
das Mähergehäuse auf die gewünschte Schnitthöhe
anzuheben.
Zum Absenken des Gehäuses den Mäher-Hebearm leicht zurück ziehen, nach links drücken und nach unten
schieben. Zum Anheben des Gehäuses den MäherHebearm nach oben ziehen und in der rechten Einkerbung einrasten lassen.
Anhänger befestigen
Die maximale horizontale, zulässige Zugstangenleistung
ist 280 Newton. Die maximale vertikale Zugstangenleistung
ist 160 Newton. Dies entspricht einem Anhängergewicht
von 113 kg (250 lbs) auf einem Hang mit 10 Grad Neigung.
Den Anhänger mit einem ausreichend großen Lastösenbolzen
(A, Abb. 14) und einer Klammer (B) befestigen.
18
www.simplicitymfg.com
Page 85

Wartungstabelle
Not for
Reproduction
WARTUNG
ZUGMASCHINE UND MÄHER
Alle 8 Stunden oder täglich
Sicherheitsverriegelungssystem überprüfen
Beseitigen Sie Ablagerungen von der Zugmaschine
und dem Motorgehäuse
Beseitigen Sie Ablagerungen vom Motorfach
Alle 25 Stunden oder jährlich *
Überprüfen Sie den Reifendruck
Überprüfen Sie die Zeit, die Mäherklinge zum Anhalten
braucht
Überprüfen Sie die Zugmaschine auf lose Teile
Alle 50 Stunden oder jährlich *
Säubern Sie Batterie und Kabel
Überprüfen Sie die Bremsen der Zugmaschine
Suchen Sie Ihren Händler einmal jährlich auf, um
Schmieren Sie Zugmaschine und Mäher
Überprüfen Sie die Mäherklingen **
* Je nachdem, was zuerst eintritt
** Überprüfen Sie die Klingen in Gegenden mit sandigen
Böden oder starkem Staub öfter. * Je nachdem, was zuerst eintritt
MOTOR
Erste 5 Stunden
Wechseln Sie das Motoröl
Alle 8 Stunden oder täglich
Prüfen Sie den Ölstand des Motors
Alle 25 Stunden oder jährlich *
Reinigen Sie den Motorluftfilter und Vorreiniger **
Alle 50 Stunden oder jährlich *
Wechseln Sie das Motoröl
Wechseln Sie den Ölfilter
Jährlich
Wechseln Sie den Luftfilter aus
Wechseln Sie den Vorreiniger aus
Suchen Sie Ihren Händler einmal jährlich auf, um
Untersuchen Sie Schalldämpfer und Funkenfänger
Wechseln Sie die Zündkerze aus
Wechseln Sie den Kraftstofffilter aus
Reinigen Sie das Luftkühlsystem
** Bei staubigen Umwelbedigungen oder wenn in der Luft
schwebende feste Teilchen vorhanden sind, häufiger
reinigen.
Reifendruck prüfen
Der Reifendruck sollte regelmäßig überprüft werden, wobei
der im Diagramm aufgeführte Wert aufrechterhalten werden
muss. Beachten Sie, dass diese Drücke sich leicht von dem
Wert für „Max. Fülldruck“ unterscheiden können, der auf der
Seitenwand der Reifen aufgeprägt ist. Die aufgeführten
Drücke gewährleisten eine gute Bodenhaftung, verbessern
die Schnittqualität und verlängern die Reifenlebensdauer.
Größe PSI bar
22 x 8.8 10 0,68
15 x 6.6 14 0,96
19
Page 86

WARTUNG
Not for
Reproduction
Stoppzeit der Mäher-Klinge überpüfen
Die Messer des Mähwerks und der Mähwerkantriebsriemen sollten nach Ausschalten des elektrischen
Zapfwellenantriebsschalters innerhalb von fünf Sekunden
zum Stillstand kommen.
1. Während der Traktor in der Neutral-Stellung steht, der
Zapfwellenantrieb ausgekuppelt ist und der Bediener
auf dem Traktor sitzt, den Motor starten.
2. Über die linke Fußstütze am Mähwerkantriebsriemen
blicken. Den Zapfwellenantrieb einkuppeln und einige
Sekunden warten. Den Zapfwellenantrieb auskuppeln
und prüfen, wie lange es dauert, bis der Mähwerkantriebsriemen zum Stillstand kommt.
3. Wenn der Mäher-Antriebsriemen nicht innerhalb von
fünf Sekunden stoppt, setzen Sie sich mit Ihrem autorisierten Händler in Verbindung.
Batteriewartung
WARNUNG
Beim Ausbauen oder Einbauen von Batteriekabeln das negative Kabel ZUERST abtrennen
und ZULETZT wieder anschließen. Wenn diese
Reihenfolge nicht eingehalten wird, kann die
positive Klemme durch ein Werkzeug am Rahmen kurz geschlossen werden.
Reinigen der Batterie und Kabel
1. Die Kabel von der Batterie abtrennen, das negative
Kabel zuerst (A, Abb. 15) dann die Abdeckung und
positiven Kabel (B).
2. Die Flügelmutter und Unterlegscheibe lösen (D).
3. Die Haltestange (C) nach oben und von der Batterie
weg drehen. Am Lenkturm befestigen.
4. Die Batterie (E) ausbauen.
5. Das Batteriefach mit einer Lösung aus Backnatron und
Wasser reinigen.
6. Die Batterieklemmen und Kabelenden mit einer Drahtbürste und einem Batterieklemmenreiniger reinigen, bis
sie glänzen.
7. Die Batterie (E) erneut in das Batteriefach einlegen. Mit
der Batteriehaltestange (C) und der Flügelmutter und
Unterlegscheibe (D) sichern.
8. Die Batteriekabel wieder anbringen, die positiven Kabel
und die Abdeckung zuerst (B), dann das negative Kabel
(A).
9. Die Kabelenden und Batterieklemmen mit Vaseline
oder nicht leitendem Fett beschichten.
Aufladen der Batterie
WARNUNG
Halten Sie offene Flammen und Funkten von
der Batterie fern; die austretenden Gase sind
hoch explosiv. Die Batterie beim Aufladen gut
belüften.
Eine tote Batterie oder eine, die zu schwach ist, um den
Motor zu starten, kann zu einem Defekt im Aufladesystem
oder an anderen elektrischen Komponenten führen. Wenn
Zweifel an der Ursache des Problems bestehen, setzen Sie
sich mit Ihrem lokalen Händler in Verbindung. Wenn sie die
Batterie auswechseln müssen, siehe im Abschnitt
Reinigen der Batterie und Kabel
Um die Batterie auszuwechsln, befolgen Sie die
Anleitungen, die vom Hersteller des Batterieladegeräts
angegeben werden, sowie den Warnungen in diesem Buch
im Kapitel bezüglich der
Batterie vollständig auf. Laden Sie nicht bei einer höheren
Frequenz als 10 amps.
Betriebssicherheit
.
. Laden Sie die
20
www.simplicitymfg.com
Page 87

WARTUNG
Not for
Reproduction
Sitzeinstellung
Der Sitz kann nach vorn und nach hinten eingestellt
werden. Bringen Sie den Hebel (Siehe
Zugmaschine
und lassen Sie den Hebel los, um den Sitz in dieser
Position einzurasten.
) positionieren Sie den Sitz wie gewünscht
Steuerungen der
Einstellung der Bremse
Diese Einheit hat keine manuell einstellbare Bremse. Wenn
die Bremse nicht ordnungsgemäß funktioniert, suchen Sie
einen autorisierten Händler auf.
Ölwechsel
Altöl ist ein gefährliches Abfallprodukt und muss richtig
entsorgt werden. Es gehört nicht in den Hausmüll. Informationen zur Entsorgung von Altöl erhalten Sie bei Behörden,
Werkstätten oder Fachhändlern.
Ölablass
1. Bei abgestelltem aber noch warmem Motor das Zünd
kabel (A, Abb. 16) abziehen und von der Zündkerze
fern halten.
2. Den Peilstab (D) herausnehmen.
Standard-Ölablassschraube
1. Die Ölablassschraube (B, Abb. 16) abnehmen. Das Öl
in einen zugelassenen Behälter ablassen.
2. Nachdem das Öl abgelassen worden ist, die
Ölablassschraube einsetzen und festziehen.
Schneller Ölablass (Zubehör)
1. Den Ölablassschlauch (G, Abb. 16) von der Motorseite lösen.
2. Den Ölablassverschluss (H) losdrehen und ab
nehmen. Den Öl-Schnellablass (I) vorsichtig in einen
zugelassenen Behälter (J) senken.
3. Nachdem das Öl abgelassen worden ist, den
Ölablassverschluss anbringen. Den Ölablassschlauch
an der Motorseite befestigen.
Wechsel des Ölfilters
Zu Austauschintervallen siehe den
1. Das Öl vom Motor ablassen. Siehe den Abschnitt
Ölablass.
2. Den Ölfilter (C, Abb. 17) herausnehmen und ord-
nungsgemäß entsorgen.
3. Bevor der neue Ölfilter angebracht wird, die Ölfilterdichtung leicht mit frischem sauberem Öl schmieren.
4. Den Ölfilter mit den Hand so einsetzen, dass die
Dichtung den Ölfilteradapter berührt. Dann den Ölfilter
um 1/2 bis 3/4 Umdrehung festziehen.
5. Öl nachfüllen. Siehe den Abschnitt
Öl.
6. Den Motor starten und laufen lassen. Während der
Motor warmläuft, überprüfen, ob Ölleckagen vorhanden sind.
7. Den Motor abstellen und den Ölstand kontrollieren. Er
sollte an der FULL-Marke am Peilstab stehen.
Wartungstabelle.
Nachfüllen von
Nachfüllen von Öl
• Den Motor waagerecht stellen.
• Den Öleinfüllbereich von Fremdkörpern reinigen.
• Zum Ölfassungsvermögen siehe den Abschnitt
fikationen.
1. Den Peilstab (D, Abb. 16) herausziehen und mit
einem sauberen Lappen abwischen.
2. Das Öl langsam in die Motoröleinfüllöffnung (E)
gießen. Nicht überfüllen. Nach dem Einfüllen des
Öls eine Minute warten und dann den Ölstand erneut
kontrollieren.
3. Den Peilstab einsetzen und festziehen.
4. Den Peilstab herausziehen und den Ölstand kontrollieren. Er sollte an der FULL-Marke (F) am Peilstab
stehen.
5. Den Peilstab einsetzen und festziehen.
Spezi-
21
Page 88

WARTUNG
Not for
Reproduction
Wartung des Luftfilters
WARNUNG
Kraftstoff und Kraftstoffdämpfe sind extrem
leicht entflammbar und explosiv.
Feuer oder Explosionen können zu schweren
Verbrennungen oder Tod führen.
• Niemals den Motor mit abgenommenem Luftfilter (falls
vorhanden) oder Filtereinsatz (falls vorhanden) starten
oder laufen lassen.
ANMERKUNG: Zur Reinigung des Filters keine Druckluft
und keine Lösungsmittel verwenden. Druckluft kann den
Filter beschädigen, Lösungsmittel zersetzen ihn. Im Luftfiltersystem wird entweder ein flacher oder ein ovaler Filtereinsatz verwendet. Einige Modelle sind außerdem mit
einem Vorfilter ausgestattet, der gewaschen und
wiederverwendet werden kann.
1. Die Abdeckung (A, Abb. 23) abnehmen.
2. Filter (C) und Vorfilter (B) abnehmen.
3. Um Fremdkörper zu lösen, mit dem Filter leicht auf
eine harte Oberfläche klopfen. Wenn der Filter sehr
schmutzig ist, muss er ausgetauscht werden.
4. Den Vorfilter in flüssigem Reinigungsmittel und
Wasser waschen. Dann gründlich an der Luft trocknen
lassen. Den Vorfilter nicht ölen.
5. Den trockenen Vorfilter und den Filter in der Motorbasis (D) anbringen.
6. Die Abdeckung anbringen.
Lagerung
WARNUNG
Das Gerät auf keinen Fall (mit Kraftstoff) in
einem geschlossenen, schlecht belüfteten Raum
lagern. Kraftstoffdämpfe können mit einer
Zündquelle in Berührung kommen (z. B. einem
Brennofen, Wassererhitzer usw.) und eine
Explosion verursachen. Kraftstoffdämpfe sind
außerdem für Menschen und Tiere giftig.
Beim Lagern von Kraftstoff oder der Maschine mit
Kraftstoff im Tank
• Die Lagerung findet immer außerhalb der Reichweite von
Brennöfen, Heizöfen, Wasserkochern oder anderen
Geräten, die über eine Zündflamme oder andere
Glühquellen verfügen die die Kraftstoffdämpfe anzünden
könnten.
Equipment
Kuppeln Sie die Antriebswelle aus, ziehen Sie die
Parkbremse und ziehen Sie den Schlüssel ab.
Die Lebenszeit der Batterie, wenn diese herausgenommen
wird. Lagern Sie sie vollstädig geladen ca. einen Monat lang
an einem kühlen, trockenen Ort. Wird die Batterie im Gerät
gelassen, ziehen Sie das negative Kabel ab.
Kraftstoffsystem
Kraftstoff kann abgestanden werden, wenn er über 30 Tage
lag gelagert wird. Abgestandener Kraftstoff führt dazu, dass
sich Säure und Gummiablagerungen im Kraftstoffsystem oder
auf wichtige Teile des Vergasers bilden. Um den Kraftstoff
frisch zu halten, verwenden Sie Briggs & Stratton FRESH
START®-Kraftstoffstabilisierer, der als flüssiger Zusatz oder
Tropfkonzentrat-Patrone erhältlich ist.
Es ist nicht nötig, den Kraftstoff aus dem Motor abzulassen,
wenn ein Kraftstoffstabilisierer gemäß den Anweisungen
hinzugefügt wird. Lassen Sie den Motor 2 Minuten lang
laufen, um den Stabilisierer durch das Kraftstoffsystem laufen
zu lassen. Der Motor und Kraftstoff kann dann bis zu 24
Monate lag gelagert werden.
Falls der Kraftstoff im Motor nicht mit eiem
Kraftstoffstabilisierer behandelt wurde, muss er in einen
zugelassenen Behälter abgelassen werden. Lassen Sie de
Motor so lange laufen, bis er aufgrund von Kraftstoffmangel
stoppt. Die Verwendung eines Kraftstoffstabilisierers im
Lagerungsbehälter wird empfohlen, um die Frische aufrecht zu
erhalten.
22
Motoröl
Wechseln Sie das Motoröl, so lange der Motor noch warm ist.
Siehe
Ölwechsel
Bevor Sie die Einheit nach der Lagerung starten:
• Überprüfen Sie alle Flüssigkeitsstände. Überprüfen Sie
alle Wartungsbereiche.
• Führen Sie alle im Motorhandbuch empfohlenen
Überprüfungen und Verfahren durch.
• Lassen Sie den Motor vor der Verwendung einige Minuten
warmlaufen.
.
www.simplicitymfg.com
Page 89

Reinigen der Batterie und Kabel
Tabelle Empfehlungen zum Öl
Tabelle Empfehlungen zum Öl
Wartung des Luftfilters
Fehlersuche und-behebung bei der Zugmaschine
Not for
Reproduction
PROBLEM ÜBERPRÜFEN PROBLEMLÖSUNG
Bremspedal nicht durchgedrückt. Bremspedal vollständig durchdrücken.
Der Motor überträgt oder
startet nicht.
Der Motor startet schwer
oder läuft schlecht.
Motor klopft.
Zu hoher Ölverbrauch.
Motorauspuff ist schwarz.
Motor läuft aber die
Zugmaschine fährt nicht.
Antriebswellenkupplungsschalter
(elektrische Kupplung) steht in der
Position EIN.
Fahrkontrolle ist eingekuppelt. Bewegen Sie den Knopf in die Stellung NEUTRAL/AUS.
Kraftstoff ist alle. Lassen Sie den Motor abkühlen, wenn er heiß ist, und dann füllen Sie den
Motor abgesoffen. Kuppeln Sie die Klingen aus.
Sicherung durchgebrannt. Suchen Sie einen autorisierten Händler auf.
Batterieanschlüsse müssen
gereinigt werden.
Batterien sind leer oder tot. Laden Sie die Batterie neu auf oder ersetzten Sie sie.
Kabel lose oder gebrochen. Sichtinspektion der Kabel durchführen. Falls die Kabel gebrochen oder
Zylinderspule oder
Startermotorschaden.
Sicherheitsverriegelungsschalter
defekt.
Wasser im Kraftstoff. Suchen Sie einen autorisierten Händler auf.
Kraftstoff ist alt oder abgestanden. Suchen Sie einen autorisierten Händler auf.
Kraftstoffgemisch zu stark. Den Luftfilter reinigen.
Der Motor hat ein anderes
Problem.
Niedriger Ölstand. Überprüfen Sie das Öl/füllen Sie gegebenenfalls etwas nach.
Es wurde Öl mit dem falschen Grad
verwendet.
Motor läuft zu heiß. Suchen Sie einen autorisierten Händler auf.
Es wurde Öl mit dem falschen Grad
verwendet.
Zuviel Öl im Motorgehäuse. Lassen Sie überschüssiges Öl ab.
Den schmutzigen Luftfilter
reinigen.
Choke geschlossen. Den Choke öffnen.
Die Grundgeschwindigkeitspedale
sind nicht durchgedrückt.
Die Übertragungs-Lösehebel
stehen in der Position SCHIEBEN.
Parkbremse ist eingerastet. Lösen Sie die Parkbremse.
Der Fahrantriebsriemen ist
gerissen oder rutscht.
Stellen Sie ihn auf die Position AUS.
Kraftstofftank wieder auf.
Sieh hierzu im Abschnitt
ausgefranst sind, wenden Sie sich an einen autorisierten Händler.
Suchen Sie einen autorisierten Händler auf.
Suchen Sie einen autorisierten Händler auf.
Suchen Sie einen autorisierten Händler auf.
Siehe hierzu die
Siehe hierzu die
Siehe hierzu im Abschnitt
Pedale durchdrücken.
Hebel in die Position FAHRE bringen.
Suchen Sie einen autorisierten Händler auf.
FEHLERSUCHE UND -BEHEBUNG
.
.
.
.
23
Page 90

FEHLERSUCHE UND -BEHEBUNG
Überprüfen des Reifendrucks
Überprüfen des Reifendrucks
Wartung des Luftfilters
Not for
Reproduction
Fehlersuche und-behebung bei der Zugmaschine (Fortsetzung)
PROBLEM ÜBERPRÜFEN PROBLEMLÖSUNG
Parkbremse lässt sich nicht
feststellen.
Zugmaschine lenkt schlecht
oder lässt sich nicht gut
handhaben.
Fehlersuche beim Mäher
PROBLEM ÜBERPRÜFEN PROBLEMLÖSUNG
Mäher lässt sich nicht
anheben.
Der Schnitt ist uneben.
Der Schnitt sieht grob aus.
Motor stirbt leicht ab wenn
der Mäher angestellt ist.
Übermäßige Vibration des
Mähers.
Notor läuft und
Zugmaschine fährt, der
Mäher fährt jedoch nicht.
Bremse abgenutzt. Suchen Sie einen autorisierten Händler auf.
Lenkstange ist locker. Suchen Sie einen autorisierten Händler auf.
Reifendruck stimmt nicht. Siehe hierzu im Abschnitt
Achslager der Vorderräder sind
trocken.
Hebegestänge ist nicht richtig
befestigt oder beschädigt.
Der Mäher ist nicht richtig
nivelliert.
Die Reifen der Zugmaschine sind
nicht richtig aufgepumpt.
Motorgeschwindigkeit zu niedrig. Setzen Sie die Geschwindigkeit auf Vollgas.
Grundgeschwindigkeit zu schnell. Verlangsamen.
Der Mäher hat ein anderes
Problem.
Motorgeschwindigkeit zu niedrig. Setzen Sie die Geschwindigkeit auf Vollgas.
Grundgeschwindigkeit zu schnell. Verlangsamen.
Schmutziger oder verstopfter
Luftfilter.
Schnitthöhe ist zu niedrig
eingestellt.
Motor hat keine
Betriebstemperatur.
Starten des Mähers in hohem Gras. Starten Sie den Mäher in einem bereinigten Bereich.
Der Mäher hat ein anderes
Problem.
PTO nicht eingekuppelt. PTO einkuppeln.
Der Mäher hat ein anderes
Problem.
Suchen Sie einen autorisierten Händler auf.
Suchen Sie einen autorisierten Händler auf.
Suchen Sie einen autorisierten Händler auf.
Siehe hierzu im Abschnitt
Suchen Sie einen autorisierten Händler auf.
Siehe hierzu im Abschnitt
Schneiden Sie hohes Gras während des ersten Schnitts bei maximaler
Schnitthöhe.
Lassen Sie den Motor einige Minuten lang warm laufen.
Suchen Sie einen autorisierten Händler auf.
Suchen Sie einen autorisierten Händler auf.
.
.
.
24
www.simplicitymfg.com
Page 91
Not for
Reproduction
Page 92

TECHNISCHE DATEN
Not for
Reproduction
MOTOR
Briggs & Stratton
Fabrikat Briggs & Stratton®,
Schwenkbereich 40,03 cm3(656 Kubikzoll)
Elektrisches System 12 Volt, 16 amp Generator,
Ölinhalt 1,8-1,9 L (62-64 Unzen)
Zündkerzenspalt 0,76 mm (0,030 Zoll)
Drehmoment des
Zündkerzensteckers 20 Nm (180 in-lbs)
Briggs & Stratton
Fabrikat Briggs & Stratton®,
Schwenkbereich 44,18 cm
Elektrisches System 12 Volt, 16 amp Generator,
Ölinhalt 1,8-1,9 L (62-64 Unzen)
Zündkerzenspalt 0,76 mm (0,030 Zoll)
Drehmoment des
Zündkerzensteckers 20 Nm (180 in-lbs)
Serviceteile Bestellnummer
Zündkerze mit Entstörwiderstand 491055
zur Kontrolle der Zündsignale
Zündkerzenstecker aus 5066
langlebigem Platin
Luftfilter 499486
Vorreiniger 273638
Ölfilter 492932
Kraftstofffilter 691035
Intek SeriesTM7180 OHV
Batterie: 230 CCA
Intek SeriesTM8240 OHV
Batterie: 230 CCA
3
(724 Kubikzoll)
KRAFTÜBERTRAGUNG
K46
Type Hydrostatisch Tuff Torq K46
Motoröl Synthetisch 5W30
Geschwindigkeiten @ 3400 U/min Vorwärts: 0-8,7 km/h (0-5,4 MPH)
Rückwärts: 0-3,7 km/h (0-2,3 MPH)
Antriebsdrehmoment 170 ft-lbs
Kupplungsstangen-Belastung 103 kg (227 lbs)
Maximalgewicht auf der Achse 306 kg (675 lbs)
Mäher
Schnittbreite 102 cm (40 Zoll)
Anzahl der Klingen 2
Grundabdeckung Auswurf hinten
Schnitthöhe 2,5-8,0 cm (0,98-3,15 Zoll)
Schneidpositionen 7
MASSE
Gesamtlänge 2030 mm (79,9 Zoll)
Gesamtbreite 1070 mm (42,1 Zoll)
Höhe 1190 mm (46,9 Zoll)
Gewicht 270 kg (595 lbs)
FAHRGESTELL
Volumen des Kraftstofftanks Volumen: 10 L (2,6 Gallonen)
Heckräder Reifengröße: 22 x 8,8
Vorderräder Reifengröße: 15 x 6,6
Auffülldruck: 0,68 bar (10 psi)
Auffülldruck: 0,96 bar (14 psi)
OPTIONEN UND ZUBEHÖR
Für nähere Informationen kontaktieren Sie einen
autorisierten händler.
26
www.simplicitymfg.com
Page 93

ΠΕΡΙΕΧΟΜΕΝΑ
Not for
Reproduction
Απεικόνιση...........................................................................................................2
Ασφάλεια χειριστή .............................................................................................6
Χαρακτηριστικά και χειριστήρια.....................................................................11
Λειτουργία .........................................................................................................14
Συντήρηση .........................................................................................................19
Αντιμετώπιση προβλημάτων..........................................................................23
Εγγύηση .............................................................................................................25
Προδιαγραφές...................................................................................................26
Ανταλλακτικά και εξαρτήματα........................................................................26
Γενικές πληροφορίες
Σας ευχαριστούμε που αγοράσατε αυτό το εξαιρετικής ποιότητας χλοοκοπτικό της SIMPLICITY. Χαιρόμαστε που
εμπιστεύεστε το όνομα SIMPLICITY. Αν η λειτουργία και η συντήρηση γίνονται σύμφωνα με τις οδηγίες στο παρόν
εγχειρίδιο, το προϊόν SIMPLICITY θα σας παρέχει αξιόπιστες υπηρεσίες για πολλά χρόνια.
Το παρόν εγχειρίδιο περιέχει πληροφορίες για θέματα ασφάλειας ώστε να έχετε επίγνωση των κινδύνων και των
ρίσκων που ενέχει η χρήση χλοοκοπτικών και να ξέρετε πώς θα αποφύγετε τους κινδύνους αυτούς. Το συγκεκριμένο
χλοοκοπτικό σχεδιάζεται και προορίζεται μόνο για την κοπή χλόης και όχι για κάποιον άλλο σκοπό. Είναι σημαντικό να
διαβάσετε και να κατανοήσετε αυτές τις οδηγίες πριν προσπαθήσετε να ξεκινήσετε ή να λειτουργήσετε το μηχάνημα
αυτό. Κρατήστε αυτές τις οδηγίες για μελλοντικές αναφορές.
Δεδομένα αναφοράς προϊόντος
Καταγράψτε τον αριθμό/το όνομα του μοντέλου σας,
τους αριθμούς αναγνώρισης του κατασκευαστή και τους
σειριακούς αριθμούς της μηχανής στον παρεχόμενο
χώρο για εύκολη πρόσβαση. Μπορείτε να βρείτε τους
αριθμούς αυτούς στις υποδεικνυόμενες θέσεις.
Όταν επικοινωνείτε με τον εξουσιοδοτημένο
αντιπρόσωπό σας για ανταλλακτικά, σέρβις ή
πληροφορίες ΠΡΕΠΕΙ να έχετε αυτούς τους
αριθμούς.
ΔΕΔΟΜΈΝΑ ΑΝΑΦΟΡΆΣ ΠΡΟΪΟΝΤΟΣ
Ονομασία περιγραφής/Αριθμός μοντέλου
Αριθμός ΚΑΤ μονάδας ΣΕΙΡΙΑΚΟΣ αριθμός μονάδας
Αριθμός ΚΑΤ ντεκ χλοοκοπτικού ΣΕΙΡΙΑΚΟΣ αριθμός ντεκ χλοοκοπτικού
Όνομα αντιπροσώπου Ημερομηνία αγοράς
ΔΕΔΟΜΈΝΑ ΑΝΑΦΟΡΆΣ ΜΗΧΑΝΗΣ
Μάρκα μηχανής Μοντέλο μηχανής
Τύπος/Προδιαγραφές μηχανής Κωδικός/Σειριακός αριθμός μηχανής
Ετικέτα αναγνώρισης Ευρωπαϊκής
Κοινότητας
A. Αριθμός αναγνώρισης κατασκευαστή
B. Σειριακός αριθμός κατασκευαστή
C. Ονομαστική ισχύς σε κιλοβάτ
D. Μέγιστη ταχύτητα μηχανής σε περιστροφές ανά
λεπτό
E. Επωνυμία και διεύθυνση κατασκευαστή
F. Έτος κατασκευής
G. Λογότυπο συμμόρφωσης της Ευρωπαϊκής
Κοινότητας
H. Βάρος της μονάδας σε κιλά
I. Εγγυημένη ηχητική ισχύς σε ντεσιμπέλ
Á
Part No. xxxxxxx
B
E
xxxxxxxxxxxxxxx
Serial No. xxxxxxxxxx
xxxxxxxxxxxxxxxxxxxxxxx
xxxxxxxxxxxxxxxxxxxxxxx
xxxxxxxxxxxxxxxxxxxxxxx
xxxxxxxxxxxxxxxxxxxxxxx
xxx dB
20xx
F
kg: xxx
kW: x.xx
xxxx max
G
I
H
C
D
Η εικονογραφημένη λίστα εξαρτημάτων για το συγκεκριμένο μηχάνημα είναι διαθέσιμη για λήψη στον ιστότοπο
www.simplicitymfg.com. Όταν παραγγέλνετε ανταλλακτικά, πρέπει να αναφέρετε το μοντέλο και το σειριακό αριθμό.
Πνευματικά δικαιώματα © 2010 Briggs & Stratton Power Products Group, LLC
Milwaukee, WI. Με επιφύλαξη κάθε νόμιμου δικαιώματος.
Η ονομασία SIMPLICITY είναι εμπορικό σήμα της Briggs & Stratton Power Products
Group, LLC Milwaukee, WI USA.
5
Page 94

ΑΣΦΆΛΕΙΑ ΧΕΙΡΙΣΤΉ
Not for
Reproduction
Διαβάστε αυτούς τους κανόνες ασφαλείας και ακολουθήστε τους πιστά. Η μη τήρηση των κανόνων αυτών θα μπορούσε
να οδηγήσει στην απώλεια ελέγχου του μηχανήματος, τον σοβαρό σωματικό τραυματισμό ή το θάνατό για εσάς, ή για
τους παρευρισκομένους, ή σε υλικές ζημίες ή ζημιά στο μηχάνημα. Το ντεκ κοπτικού μπορεί να ακρωτηριάσει τα
χέρια και τα πόδια, καθώς και να εκτοξεύσει αντικείμενα. Το τριγωνικό σήμα με το θαυμαστικό υποδηλώνει
σημαντικές προφυλάξεις ή προειδοποιήσεις που θα πρέπει να λαμβάνονται υπόψη.
ΓΕΝΙΚΉ ΛΕΙΤΟΥΡΓΊΑ
1. Διαβάστε, κατανοήστε και ακολουθήστε όλες τις οδηγίες που
δίνονται στο εγχειρίδιο και στο μηχάνημα προτού ξεκινήσετε.
2. Μην τοποθετείτε τα χέρια ή τα πόδια κοντά σε περιστρεφόμενα
μέρη ή κάτω από το μηχάνημα. Κρατάτε πάντα απόσταση από το
στόμιο εκκένωσης.
3. Να επιτρέπετε μόνο σε υπεύθυνους ενήλικες που γνωρίζουν τις
οδηγίες να χειρίζονται το μηχάνημα (οι κανονισμοί κάθε περιοχής
μπορεί να περιορίζουν τα ηλικιακά όρια του χειριστή).
4. Απομακρύνετε από την περιοχή αντικείμενα όπως πέτρες,
παιχνίδια, σύρματα και ό,τι άλλο μπορούν να πιάσουν και να
εκτοξεύσουν οι λεπίδες.
5. Βεβαιωθείτε ότι δεν υπάρχουν άλλοι άνθρωποι στην περιοχή
προτού ξεκινήσετε το κούρεμα του γκαζόν. Σταματήστε το μηχάνημα
αν πλησιάσει κανείς στην περιοχή.
6. Ποτέ μη βάζετε άλλους επιβάτες στο μηχάνημα.
7. Μην κουρεύετε το γρασίδι με την όπισθεν παρά μόνο αν είναι
απολύτως απαραίτητο. Προτού ξεκινήσετε με όπισθεν αλλά και όσο
προχωράτε με όπισθεν, να κοιτάτε πάντα κάτω και πίσω από το
μηχάνημα.
8. Μην κατευθύνετε ποτέ το υλικό που απομακρύνεται προς το μέρος
κάποιου ανθρώπου. Αποφεύγετε την εκκένωση υλικού σε τοίχο ή
εμπόδιο. Το υλικό μπορεί να αναπηδήσει προς τη μεριά του
χειριστή. Σταματάτε τη λεπίδα (ή τις λεπίδες) όταν διασχίζετε
επιφάνειες με χαλίκι.
9. Μη χρησιμοποιείτε το μηχάνημα αν δεν είναι τοποθετημένος σωστά
ολόκληρος ο συλλέκτης χλόης, ο προφυλακτήρας εκκένωσης
(εκτροπέας) ή άλλοι μηχανισμοί ασφαλείας.
10. Μειώνετε ταχύτητα πριν τις στροφές.
11. Μην αφήνετε ποτέ το μηχάνημα να λειτουργεί μόνο του. Να
αποσυμπλέκετε πάντα το δυναμοδότη, να βάζετε χειρόφρενο, να
σταματάτε τον κινητήρα και να βγάζετε τα κλειδιά προτού κατεβείτε
από το μηχάνημα.
12. Απενεργοποιείτε τις λεπίδες (δυναμοδότη) όταν δεν κουρεύετε το
γρασίδι. Σβήστε τη μηχανή και περιμένετε να ακινητοποιηθούν όλα
τα μέρη τελείως προτού καθαρίσετε το μηχάνημα, αφαιρέσετε το
συλλέκτη χλόης ή αποφράξετε τον προφυλακτήρα εκκένωσης.
13. Χρησιμοποιείτε το μηχάνημα μόνο με το φως του ήλιου ή με πολύ
καλό φωτισμό.
14. Μη χρησιμοποιείτε το μηχάνημα υπό την επήρεια αλκοόλ ή
φαρμάκων.
15. Προσέχετε τα αυτοκίνητα όταν χρησιμοποιείτε το μηχάνημα κοντά
στο δρόμο ή όταν διασχίζετε το δρόμο.
16. Προσέχετε πάρα πολύ όταν φορτώνετε ή εκφορτώνετε το
μηχάνημα από ρυμουλμκούμενο όχημα ή φορτηγό.
17. Φοράτε πάντα προστατευτικά γυαλιά όταν χειρίζεστε το μηχάνημα.
18. Σύμφωνα με στοιχεία, οι χειριστές ηλικίας 60 ετών και άνω
εμπλέκονται σε μεγάλο ποσοστό ατυχημάτων με ισχυρά
μηχανήματα. Οι χειριστές αυτοί θα πρέπει να αξιολογήσουν την
ικανότητά τους να χρησιμοποιήσουν το μηχάνημα με αρκετή
ασφάλεια ώστε να προστατέψουν τον εαυτό τους και τους άλλους
από τραυματισμούς.
19. Ακολουθείτε τις συμβουλές του κατασκευαστή για τα βάρη τροχών
και τα αντίβαρα.
20. Να έχετε υπόψη σας ότι για ατυχήματα που προκαλούνται σε άλλα
άτομα ή ιδιοκτησίες ευθύνεται ο χειριστής.
21. Όλοι οι οδηγοί θα πρέπει να αναζητούν και να αποκτούν
επαγγελματική και πρακτική εκπαίδευση.
22. Να φοράτε πάντα ανθεκτικά παπούτσια και παντελόνια. Μη
χειρίζεστε ποτέ το μηχάνημα ξυπόλητοι ή με παντόφλες.
23. Πριν από τη χρήση, να ελέγχετε πάντα αν οι λεπίδες και το υλικό
των λεπίδων είναι στη σωστή θέση, ανέπαφο και ασφαλές. Να
αντικαθιστάτε εξαρτήματα που έχουν φθαρεί ή έχουν υποστεί
βλάβη.
24. Να αποσυμπλέκετε τα προσαρτήματα πριν από: τον ανεφοδιασμό
καυσίμου, την αφαίρεση προσαρτήματος, τη διενέργεια ρυθμίσεων
(εκτός αν η ρύθμιση μπορεί να γίνει από τη θέση του χειριστή).
25. Όταν το μηχάνημα είναι σταθμευμένο, αποθηκευμένο ή χωρίς
επίβλεψη, να χαμηλώνετε το μέσο κοπής εκτός αν χρησιμοποιείται
θετική μηχανική ασφάλιση.
26. Πριν απομακρυνθείτε από τη θέση του χειριστή για οποιονδήποτε
λόγο, βάζετε χειρόφρενο (αν υπάρχει), αποσυμπλέκετε το
δυναμοδότη, σταματάτε τη μηχανή και βγάζετε το κλειδί.
27. Για να μειώσετε τον κίνδυνο πυρκαγιάς, φροντίστε το μηχάνημα να
μην έχει γρασίδι, φύλλα και περίσσεια λαδιού. Μη σταματάτε ή
σταθμεύετε σε ξερά φύλλα, γρασίδι ή καύσιμα υλικά.
ΜΕΤΑΦΟΡΆ ΚΑΙ ΑΠΟΘΉΚΕΥΣΗ
1. Όταν μεταφέρετε το μηχάνημα σε ανοιχτό ρυμουλκούμενο όχημα,
βεβαιωθείτε ότι βλέπει μπροστά, προς την κατεύθυνση που
κινείστε. Αν το μηχάνημα βλέπει προς τα πίσω, η ανύψωση του
ανέμου μπορεί να το καταστρέψει.
2. Τηρείτε πάντα τις πρακτικές ασφαλούς ανεφοδιασμού και χειρισμού
καυσίμων κατά τον ανεφοδιασμό του μηχανήματος μετά τη
μεταφορά ή την αποθήκευσή του.
3. Μην αποθηκεύετε ποτέ το μηχάνημα (με το καύσιμο) σε κλειστό
χώρο με κακό αερισμό. Οι αναθυμιάσεις του καυσίμου μπορεί να
φτάσουν σε κάποια πηγή ανάφλεξης (όπως ο λέβητας, το μπόιλερ
κ.λπ.) και να προκαλέσουν έκρηξη. Επίσης, οι αναθυμιάσεις του
καυσίμου είναι τοξικές για τους ανθρώπους και τα ζώα.
6
4. Τηρείτε πάντα τις οδηγίες του εγχειριδίου του κινητήρα σχετικά με
τις προετοιμασίες αποθήκευσης, πριν από την αποθήκευση του
μηχανήματος για μικρά και μεγάλα χρονικά διαστήματα.
5. Τηρείτε πάντα τις οδηγίες του εγχειριδίου του κινητήρα σχετικά με
τις κατάλληλες διαδικασίες εκκίνησης κατά την επιστροφή της
μονάδας σε λειτουργία.
6. Ποτέ μην αποθηκεύετε το μηχάνημα ή τη δεξαμενή καυσίμου μέσα
σε χώρους όπου υπάρχει φλόγα ή πηγή ανάφλεξης, όπως είναι το
μπόιλερ. Αφήστε το μηχάνημα να κρυώσει πριν το αποθηκεύσετε.
www.simplicitymfg.com
Page 95

ΑΣΦΆΛΕΙΑ ΧΕΙΡΙΣΤΉ
Not for
Reproduction
ΛΕΙΤΟΥΡΓΊΑ ΣΕ ΈΔΑΦΟΣ ΜΕ ΚΛΊΣΗ
Η κλίση του εδάφους ευθύνεται σε μεγάλο βαθμό για ατυχήματα στα
οποία χάνει τον έλεγχο ο χειριστής ή ανατρέπεται το μηχάνημα, και τα
οποία μπορούν να προκαλέσουν σοβαρούς τραυματισμούς ή και θάνατο.
Σε κάθε περίπτωση, όταν γίνεται χρήση του μηχανήματος σε έδαφος με
κλίση απαιτείται ιδιαίτερη προσοχή. Αν δε μπορείτε να κάνετε όπισθεν σε
συγκεκριμένο έδαφος με κλίση ή δεν αισθάνεστε άνετα, μη
χρησιμοποιείται το μηχάνημα σε αυτό.
Όταν ένα χλοοκοπτικό μηχάνημα, είτε ο χειριστής το σπρώχνει είτε
επιβαίνει σε αυτό, γλιστρήσει σε έδαφος με κλίση, ο έλεγχος δεν μπορεί
να ανακτηθεί με χρήση του φρένου. Τα κύρια αίτια που χάνει τον έλεγχο ο
χειριστής είναι τα εξής: ανεπαρκής πρόσφυση στο έδαφος, απότομη
επιτάχυνση, ανεπαρκής χρήση φρένων, τύπος μηχανής ακατάλληλος για
τη συγκεκριμένη εργασία, έλλειψη επίγνωσης όσον αφορά τις συνθήκες
εδάφους, λανθασμένη προσάρτηση και κατανομή φορτίου.
1. Σε έδαφος με κλίση, κουρεύετε το γκαζόν από πάνω προς τα κάτω
και από κάτω προς τα πάνω, όχι οριζόντια.
2. Προσέχετε μήπως υπάρχουν τρύπες, αυλάκια ή λακούβες. Αν το
έδαφος είναι ανώμαλο το μηχάνημα μπορεί να ανατραπεί. Το ψηλό
γρασίδι μπορεί να κρύβει εμπόδια.
3. Επιλέξτε χαμηλή ταχύτητα για να μη χρειαστεί να σταματήσετε ή να
αλλάξετε ταχύτητα όταν βρίσκεστε σε έδαφος με κλίση.
4. Μην κουρεύετε βρεγμενο γρασίδι. Οι τροχοί μπορεί να χάσουν την
πρόσφυσή τους στο έδαφος.
5. Να έχετε πάντα ταχύτητα στο μηχάνημα, ειδικά όταν κατεβαίνετε σε
έδαφος με κλίση. Μη βάζετε νεκρά όταν είστε σε έδαφος με κλίση
και προχωράτε προς τα κάτω.
6. Αποφεύγετε να ξεκινάτε, να σταματάτε και να στρίβετε σε έδαφος
με κλίση. Αν οι τροχοί χάσουν την πρόσφυσή τους, αποσυμπλέξτε
τη λεπίδα (λεπίδες) και προχωρήστε αργά προς τα κάτω.
7. Φροντίστε όλες σας οι κινήσεις σε έδαφος με κλίση να γίνονται
αργά και σταδιακά. Μην κάνετε απότομες αλλαγές ταχύτητας ή
κατεύθυνσης, που θα μπορούσαν να κάνουν το μηχάνημα να
ανατραπεί.
8. Προσέχετε ιδιαίτερα όταν χρησιμοποιείτε μηχανήματα με συλλέκτες
γκαζόν ή άλλα προσαρτήματα, καθώς μπορούν να επηρεάσουν τη
σταθερότητα του μηχανήματος. Μη χρησιμοποιείτε το μηχάνημα σε
απότομες πλαγιές.
9. Μην προσπαθείτε να σταθεροποιήσετε το μηχάνημα βάζοντας το
πόδι σας στο έδαφος (στα μηχανήματα με κάθισμα).
10. Μην κουρεύτε το γκαζόν κοντά σε ανοιχτά φρεάτια, χαντάκια και
αναχώματα. Το χλοοκοπτικό μπορεί να ανατραπεί ξαφνικά αν ένας
τροχός βρίσκεται στην άκρη ενός λόφου ή ρέματος, ή αν
υποχωρήσει το έδαφος στην άκρη του γκρεμού.
11. Μη χρησιμοποιείτε τους συλλέκτες γκαζόν σε απότομες πλαγιές.
12. Μην κουρεύτε γκαζόν σε πλαγιές στις οποίες δεν μπορείτε να
κάνετε όπισθεν.
13. Επικοινωνήστε με εξουσιοδοτημένο αντιπρόσωπο/κατάστημα για
οδηγίες όσον αφορά τα βάρη των τροχών και τα αντίβαρα για να
βελτιώσετε τη σταθερότητα του μηχανήματος.
14. Αφαιρέστε εμπόδια, όπως πέτρες, κλαδιά, κ.λπ.
15. Χρησιμοποιείτε χαμηλή ταχύτητα. Τα λάστιχα μπορεί να χάσουν την
πρόσφυσή τους σε έδαφος με κλίση, ακόμη και αν τα φρένα
λειτουργούν κανονικά.
16. Μη στρίβετε σε έδαφος με κλίση παρά μόνο αν είναι απαραίτητο.
Σε αυτή την περίπτωση, να στρίβετε αργά και σταδιακά προς τα
κάτω, αν είναι δυνατόν.
ΡΥΜΟΥΛΚΟΎΜΕΝΟΣ ΕΞΟΠΛΙΣΜΌΣ
(ΧΛΟΟΚΟΠΤΙΚΆ ΜΕ ΚΆΘΙΣΜΑ)
1. Να ρυμουλκείτε μόνο με μηχάνημα που διαθέτει πόλο έλξης ειδικά
σχεδιασμένο για ρυμούλκηση. Μην προσαρτείτε εξοπλισμό προς
ρυμούλκηση παρά μόνο στον πόλο έλξης.
2. Ακολουθήστε τις οδηγίες του κατασκευαστή σχετικά με το όριο
βάρους όσον αφορά τον εξοπλισμό που ρυμουλκείτε και τη
ρυμούλκηση σε έδαφος με κλίση.
3. Ποτέ μην αφήνετε παιδιά ή τρίτους κοντά ή πάνω σε εξοπλισμό
που ρυμουλκείται.
ΠΡΟΕΙΔΟΠΟΙΗΣΗ
Μη χρησιμοποιείτε ποτέ το μηχάνημα σε πλαγιές με κλίση
μεγαλύτερη από 17,6 τοις εκατό (10°), δηλαδή με ύψος 106 cm
και μήκος 607 cm.
Όταν χρησιμοποιείτε το μηχάνημα σε έδαφος με κλίση,
χρησιμοποιείτε πρόσθετα βάρη τροχών και αντίβαρα.
Επικοινωνήστε με τον αντιπρόσωπο/κατάστημά σας για να
προσδιορίσετε ποια βάρη είναι διαθέσιμα και κατάλληλα για το
δικό σας μηχάνημα.
Βάλτε χαμηλή ταχύτητα προτού οδηγήσετε σε έδαφος με κλίση.
Εκτός από τα μπροστινά βάρη, να είστε ιδιαίτερα προσεκτικοί
όταν χρησιμοποιείτε το μηχάνημα σε πλαγιές αν έχετε
τοποθετήσει συλλέκτες γκαζόν στο πίσω μέρος του
μηχανήματος.
Κουρεύετε το γκαζόν ΑΠΟ ΚΑΤΩ ΠΡΟΣ ΤΑ ΠΑΝΩ και ΑΠΟ
ΠΑΝΩ ΠΡΟΣ ΤΑ ΚΑΤΩ, ποτέ οριζόντια σε έδαφος με κλίση. Να
είστε ιδιαίτερα προσεκτικοί όταν αλλάζετε κατεύθυνση και ΜΗΝ
ΞΕΚΙΝΑΤΕ Ή ΣΤΑΜΑΤΑΤΕ ΣΕ ΕΔΑΦΟΣ ΜΕ ΚΛΙΣΗ.
4. Σε έδαφος με κλίση, το βάρος του εξοπλισμού που ρυμουλκείται
μπορεί να προκαλέσει απώλεια της πρόσφυσης των τροχών και
απώλεια του ελέγχου.
5. Να προχωράτε αργά και να αφήνετε περιθώρια ασφαλείας.
6. Μη βάζετε νεκρά όταν είστε σε έδαφος με κλίση και προχωράτε
προς τα κάτω.
ΠΑΙΔΙΆ
Τραγικά ατυχήματα μπορεί να προκληθούν, εάν ο χειριστής δεν είναι σε
επαγρύπνηση για την παρουσία παιδιών. Το μηχάνημα και η
δραστηριότητα της κοπής του γκαζόν κινούν συνήθως το ενδιαφέρον των
παιδιών. Μη θεωρείτε σε καμία περίπτωση ότι τα παιδιά θα παραμείνουν
στο ίδιο μέρος που ήταν πριν.
1. Κρατάτε τα παιδιά μακριά από την περιοχή που κουρεύετε το
γκαζόν και υπό την άγρυπνη επίβλεψη κάποιου άλλου υπεύθυνου
ενήλικου ατόμου.
2. Να είστε σε εγρήγορση και να κλείνετε το μηχάνημα, αν εισέλθουν
παιδιά στην περιοχή.
3. Πριν και κατά τη διάρκεια της κίνησης με την όπισθεν, κοιτάζετε
πίσω και κάτω μήπως υπάρχουν μικρά παιδιά.
4. Ποτέ μη μεταφέρετε παιδιά, ακόμη και όταν είναι
απενεργοποιημένες οι λεπίδες. Μπορεί να πέσουν και να
τραυματιστούν σοβαρά ή να εμποδίσουν την ασφαλή λειτουργία
του μηχανήματος. Αν έχετε πάει τα παιδιά βόλτα με το μηχάνημα
στο παρελθόν, τότε μπορεί να εμφανιστούν ξαφνικά στον χώρο
κοπής του γκαζόν για άλλη μια βόλτα και να τα πατήσει το
μηχάνημα είτε προς τα εμπρός είτε με την όπισθεν.
5. Μην επιτρέπετε ποτέ σε παιδιά να χρησιμοποιούν το μηχάνημα.
6. Επιδεικνύετε ιδιαίτερη προσοχή κατά την προσέγγιση τυφλών
στροφών, θάμνων, δέντρων, ή άλλων αντικειμένων που μπορεί να
περιορίζουν την ορατότητα.
ΕΚΠΟΜΠΈΣ
1. Τα καυσαέρια του συγκεκριμένου μηχανήματος περιέχουν χημικές
ουσίες, οι οποίες είναι γνωστό ότι σε ορισμένες ποσότητες
προκαλούν καρκίνο, συγγενείς ανωμαλίες ή άλλες αναπαραγωγικές
βλάβες.
2. Αναζητήστε τη σχετική περίοδο διάρκειας των εκπομπών και τις
πληροφορίες δείκτη αέρα στην ετικέτα εκπομπών του κινητήρα.
7
Page 96

ΑΣΦΆΛΕΙΑ ΧΕΙΡΙΣΤΉ
Not for
Reproduction
ΣΈΡΒΙΣ ΚΑΙ ΣΥΝΤΉΡΗΣΗ
Ασφαλής χειρισμός βενζίνης
1. Σβήστε όλα τα τσιγάρα, πούρα, πίπες και άλλες πηγές ανάφλεξης.
2. Να χρησιμοποιείτε μόνο εγκεκριμένους περιέκτες βενζίνης.
3. Μην βγάζετε το πώμα καύσιμου ή μην προσθέτετε καύσιμο ενώ
λειτουργεί η μηχανή. Αφήστε το μηχάνημα να κρυώσει πριν του
προσθέσετε καύσιμο.
4. Μην γεμίζετε με καύσιμο τη μηχανή σε εσωτερικό χώρο.
5. Ποτέ μην αποθηκεύετε το μηχάνημα ή τη δεξαμενή καυσίμου όπου
υπάρχει ανοιχτή φωτιά ή πηγή ανάφλεξης, όπως είναι το μπόιλερ ή
άλλη συσκευή.
6. Μην γεμίζετε ποτέ τους περιέκτες μέσα σε ένα όχημα ή σε ένα
καρότσα φορτηγού με πλαστική επένδυση. Τοποθετείτε πάντα τους
περιέκτες στο έδαφος, μακριά από το όχημά σας, πριν από την
πλήρωση.
7. Αφαιρείτε τον βενζινοκίνητο εξοπλισμό από το φορτηγό ή το τρέιλερ
και πραγματοποιείτε τον ανεφοδιασμό σε καύσιμα στο έδαφος. Εάν
αυτό δεν είναι δυνατό, τότε πραγματοποιείτε τον ανεφοδιασμό σε
καύσιμα σε ένα τρέιλερ με έναν φορητό περιέκτη, αντί με ένα
ακροφύσιο διανομής βενζίνης.
8. Κρατάτε πάντα το ακροφύσιο σε επαφή με το χείλος του στομίου
του δοχείου καυσίμων ή του περιέκτη, έως ότου ολοκληρωθεί ο
ανεφοδιασμός σε καύσιμα. Μην χρησιμοποιείτε μια διάταξη
ελεγχόμενου ανοίγματος του ακροφυσίου.
9. Εάν τα καύσιμα έχουν χυθεί στα ρούχα, αλλάξτε ρούχα αμέσως.
10. Μην παραγεμίζετε τη δεξαμενή καύσιμου. Να αντικαταστάτε το
πώμα καύσιμου και να το σφίγγετε πολύ.
11. Να είστε ιδιαίτερα προσεκτικοί στο χειρισμό της βενζίνης και άλλων
καυσίμων. Είναι εύφλεκτα και οι υδρατμοί ενέχουν κίνδυνο έκρηξης.
12. Εάν χυθούν καύσιμα, μην προσπαθήσετε να εκκινήσετε τον
κινητήρα αλλά μετακινήστε το μηχάνημα μακριά από την περιοχή
διαρροής και αποφύγετε οποιαδήποτε πηγή ανάφλεξης, έως ότου
έχουν εξατμιστεί οι ατμοί των καυσίμων.
13. Κλείνετε πάλι σφιχτά όλες τις τάπες δεξαμενών και δοχείων
καυσίμου.
Σέρβις και συντήρηση
1. Να μην λειτουργείτε ποτέ το μηχάνημα σε κλειστή περιοχή όπου
μπορούν να μαζευτούν αέρια μονοξειδίου άνθρακα.
2. Κρατάτε καλά σφιγμένα τα παξιμάδια και τα μπουλόνια, ειδικά τα
μπουλόνια επισύναψης λεπίδων, και διατηρείτε το μηχάνημα σε
καλή κατάσταση.
3. Μην επεμβαίνετε ποτέ στις διατάξεις ασφαλείας. Ελέγχετε τακτικά
την καλή τους λειτουργία και πραγματοποιείτε τις απαραίτητες
επισκευές, εάν δεν λειτουργούν ορθά.
4. Να διατηρείτε το μηχάνημα καθαρό από χόρτα, φύλλα ή άλλα
συσσωρευμένα απορρίματα. Να καθαρίζετε διαρροές λαδιού ή
καυσίμου και απομακρύνετε όποια απορρίματα που είναι
εμβαπτισμένα σε καύσιμο. Αφήστε το μηχάνημα να κρυώσει πριν
το αποθηκεύσετε.
5. Εάν χτυπήσετε ένα αντικείμενο, σταματήστε και επιθεωρήστε το
μηχάνημα. Επιδιορθώστε εάν είναι αναγκαίο πριν ξεκινήσετε ξανά.
6. Μην κάνετε προσαρμογές ή επιδιορθώσεις με τη μηχανή σε
λειτουργία.
7. Ελέγχετε συχνά τα εξαρτήματα συλλέκτη χλόης και προφυλακτήρα
συλλέκτη και αντικαταστήστε τα με συνιστώμενα από τον
κατασκευαστή ανταλλακτικά, όταν χρειάζεται.
8. Οι λεπίδες του κοπτικού είναι κοφτερές. Τυλίξτε τις λεπίδες ή να
φοράτε γάντα και να είστε ιδιαίτερα προσεκτικοί όταν κάνετε
σέρβις.
9. Ελέγχετε συχνά τη λειτουργία των φρένων. Ρυθμίζετε και
10. Διατηρείτε ή αντικαθιστάτε τις ετικέτες ασφαλείας και οδηγιών, κατά
11. Μην βγάετε το φίλτρο καύσιμου όταν η μηχανή είναι καυτή καθώς
πραγματοποιείτε σέρβις, όπως απαιτείται.
περίπτωση.
εάν πιτσιλιστεί βενζίνη μπορεί να εκραγεί. Μην τραβάτε τα άγκιστρα
της γραμμής καύσιμου περισσότερο από όσο χρειάζεται.
Βεβαιωθείτε ότι τα άγκριστρα έχουν ασφαλιστεί καλά στο φίλτρο
πριν την εγκατάσταση.
12. Μη χρησιμοποιείτε βενζίνη που περιέχει ΜΕΘΑΝΟΛΗ, βενζίνη που
περιέχει ποσοστό ΑΙΘΑΝΟΛΗΣ μεγαλύτερο του 10%, πρόσθετα
βενζίνης ή νάφθα γιατί μπορεί να προκύψει βλάβη στον κινητήρα ή
στο σύστημα τροφοδοσίας καυσίμου.
13. Αν πρέπει να αποστραγγιστεί η δεξαμενή καυσίμου, αυτό θα
πρέπει να γίνει σε εξωτερικό χώρο.
14. Αντικαθιστάτε σιλανσιέ που έχουν βλάβη.
15. Κατά την πραγματοποίηση επισκευών, χρησιμοποιείτε μόνο
εγκεκριμένα από το εργοστάσιο ανταλλακτικά.
16. Συμμορφώνεστε πάντα με τις εργοστασιακές προδιαγραφές για
όλες τις ρυθμίσεις και προσαρμογές.
17. Για σημαντικές ανάγκες σέρβις και επισκευής θα πρέπει να
χρησιμοποιούνται εξουσιοδοτημένα μόνο κέντρα σέρβις.
18. Μην προσπαθείτε ποτέ να πραγματοποιήσετε σημαντικές
επισκευές στην μονάδα αυτή, εκτός εάν έχετε εκπαιδευθεί
κατάλληλα. Οι λανθασμένες διαδικασίες σέρβις μπορεί να
οδηγήσουν σε επικίνδυνη λειτουργία, ζημιά στο μηχάνημα και
ακύρωση της εγγύησης του κατασκευαστή.
19. Σε κοπτικά με πολλές λεπίδες, προσέχετε γιατί η περιστροφή μιας
λεπίδας μπορεί να προκαλέσει την περιστροφή και άλλων λεπίδων.
20. Μην αλλάζετε τις ρυθμίσεις του ρυθμιστή στροφών του κινητήρα
και μην επιτρέπετε την υπερβολική αύξηση των στροφών του
κινητήρα. Η λειτουργία του κινητήρα σε πολύ υψηλές στροφές
μπορεί να αυξήσει τον κίνδυνο προσωπικού τραυματισμού.
21. Αποσυμπλέξτε τη μετάδοση κίνησης προς τα προσαρτήματα,
σβήστε τον κινητήρα, αφαιρέστε το κλειδί του διακόπτη του
κινητήρα και αποσυνδέστε το(α) μπουζί πριν να: καθαρίσετε
αποφράξεις επισυναπτόμενων μερών και χοανών, να εκτελέσετε
σέρβις, να χτυπήσετε ένα αντικείμενο ή εάν το μηχάνημα δονείται
με μη φυσιολογικό τρόπο. Όταν χτυπήσετε ένα αντικείμενο,
επιθεωρήστε το μηχάνημα για ζημιά και κάνετε επισκευές πριν
ξεκινήσετε πάλι και θέσετε σε λειτουργία το μηχάνημα,
22. Ποτέ να μην βάζετε τα χέρια σας κοντά στα κινούμενα μέρη, όπως
ο ανεμιστήρας ψύξης της υδροστατικής αντλίας, όταν λειτουργεί το
τρακτέρ. (Ο ανεμιστήρας ψύξης της υδροστατικής αντλίας τυπικά
βρίσκεται πάνω στο κιβώτιο ταχυτήτων.)
23. Οι μονάδες με υδραυλικές αντλίες, σωλήνες ή κινητήρες:
ΠΡΟΕΙΔΟΠΟΙΗΣΗ: Το υδραυλικό υγρό που διαρρέι υπό πίεση
μπορεί να έχει τόσο πίεση ώστε να διαπεράσει το δέρμα και να
προκαλέσει σοβαρό τραυματισμό. Εάν εγχυθούν υγρά στο δέρμα
τότε θα πρέπει να απομακρυνθούν χειρουργικά μέσα σε λίγες ώρες
από γιατρό εξοικειωμένο με αυτό τον τύπο τραυματισμούς
ειδάλλως θα έχει ως συνέπεια γάγγραινα. Να κρατάτε το σώμα και
τα χέρια μακριά από τις οπές πείρων ή στομίων που εκτοξεύουν
υδραυλικό υγρό υπό υψηλή πίεση. Χρησιμοποιήστε χαρτί ή χαρτόνι
και όχι τα χέρια σας για να βρείτε όποιες διαρροές. Να βεβαιωθείτε
ότι όλοι οι σύνδεσμοι υδραυλικού υγρού είναι σφιχτοί και ότι όλοι οι
υδραυλικοί σωλήνες και γραμμές είναι σε καλή κατάσταση πριν
εφαρμόσετε πίεση στο σύστημα. Εάν γίνει διαρροή, να δώσετε το
μηχάνημα αμέσως για σέρβις στον εξουσιοδοτημένο σας
αντιπρόσωπο.
24. ΠΡΟΕΙΔΟΠΟΙΗΣΗ: Αποθηκευμένη συσκευή ενέργειας.
Ακατάλληλη απελευθέρωση ελατηρίων μπορεί να έχει ως
αποτέλεσμα σοβαρό προσωπικό τραυματισμό. Τα ελατήρια θα
πρέπει να αποσυνδέονται από εξουσιοδοτημένο τεχνικό.
25. Τα μοντέλα εξοπλισμένα με ψυγείο μηχανής: ΠΡΟΕΙΔΟΠΟΙΗΣΗ:
Αποθηκευμένη συσκευή ενέργειας. Για να αποφύγετε σοβαρό
σωματικό τραυματισμό από το καυτό ψυκτικό υλικό ή από τους
ατμούς, να μην προσπαθείτε να βγάλετε το πώμα του ψυγείου ενώ
λειτουργεί η μηχανή. Να σταματάτε τη μηχανή και να περιμένετε
έως ότου κρυώσει. Ακόμα και τότε, να είστε ιδιαίτερα προσεκτικοί
όταν βγάζετε το πώμα.
8
www.simplicitymfg.com
Page 97

ΑΣΦΆΛΕΙΑ ΧΕΙΡΙΣΤΉ
Not for
Reproduction
Ετικέτες ασφαλείας
Πρέπει να διαβάσετε προσεκτικά και να τηρείτε όλα τα
μηνύματα με την ένδειξη ΚΙΝΔΥΝΟΣ, ΠΡΟΕΙΔΟΠΟΙΗΣΗ και
ΠΡΟΣΟΧΗ καθώς και όλα τα μηνύματα οδηγιών που
υπάρχουν στο μηχάνημα. Αν δεν ακολουθήσετε τις οδηγίες
αυτές μπορεί να προκληθεί σωματικός τραυματισμός. Όι
πληροφορίες αυτές αφορούν την ασφάλειά σας και είναι
σημαντικές! Οι ετικέτες ασφαλείας που ακολουθούν βρίσκονται
πάνω στο μηχάνημα και τη θέση του χειριστή.
Εικονίδια ασφαλείαςΕικονίδια ασφαλείας
Προειδοποίηση: Διαβάστε το
εγχειρίδιο του χειριστή.
Διαβάστε και κατανοήστε το εγχειρίδιο
του χειριστή πριν χρησιμοποιήσετε το
μηχάνημα.
Κίνδυνος: Εκτόξευση αντικειμένων.
Το μηχάνημα αυτό μπορεί να πετάξει
αντικείμενα και υπολείμματα.
Φροντίστε οι παρευρισκόμενοι να
βρίσκονται σε απόσταση.
Αν κάποια ετικέτα χαθεί ή καταστραφεί, αντικαταστήστε τη
αμέσως. Απευθυνθείτε στον αντιπρόσωπό σας για καινούριες
ετικέτες.
Οι ετικέτες αυτές τοποθετούνται εύκολα και λειτουργούν ως
συνεχής οπτική υπενθύμιση για εσάς και όποιον άλλο
χρησιμοποιεί το μηχάνημα, ώστε να ακολουθείτε τις
απαραίτητες οδηγίες ασφαλείας για την σσφαλή και
αποτελεσματική λειτουργία του μηχανήματος.
Κίνδυνος: Διαμελισμός.
Το ντεκ του χλοοκοπτικού μπορεί να
ακρωτηριάσει τα άκρα. Κρατάτε τα
χέρια και τα πόδια σε απόσταση από τις
λεπίδες.
Κίνδυνος: Κίνδυνος φωτιάς.
Μη βάζετε καύσιμα όταν ο κινητήρας
είναι ζεστός ή λειτουργεί. Σταματήστε
τον κινητήρα και αφήστε τον να κρυώσει
για 3 λεπτά πριν προσθέσετε καύσιμα.
Προειδοποίηση: Βγάλτε το κλειδί
πριν από το σέρβις.
Απομακρύνετε το κλειδί και
συμβουλευτείτε τα τεχνικά εγχειρίδια
πριν από οποιαδήποτε επισκευή ή
συντήρηση.
Κίνδυνος: Ανατροπή μηχανήματος.
Μη χρησιμοποιείτε το μηχάνημα αυτό
σε έδαφος με μεγαλύτερη κλίση των
10°.
Κίνδυνος: Διαμελισμός.
Το μηχάνημα αυτό μπορεί να
ακρωτηριάσει τα άκρα. Φροντίστε οι
παρευρισκόμενοι και τα παιδιά να
βρίσκονται σε απόσταση από το
μηχάνημα όταν αυτό βρίσκεται σε
λειτουργία.
Κίνδυνος: Επιφάνεια σε υψηλή
θερμοκρασία.
Αφήστε το μηχάνημα να κρυώσει πριν
αγγίξετε αυτή την επιφάνεια.
Κίνδυνος: Δηλητηρίαση μονοξειδίου
του άνθρακα.
Μη λειτουργείτε τον κινητήρα σε χώρο
που δεν αερίζεται.
Κίνδυνος: Διαμελισμός.
Το ντεκ του χλοοκοπτικού μπορεί να
ακρωτηριάσει τα άκρα. Κρατάτε τα
χέρια και τα πόδια σε απόσταση από
τις λεπίδες.
9
Page 98
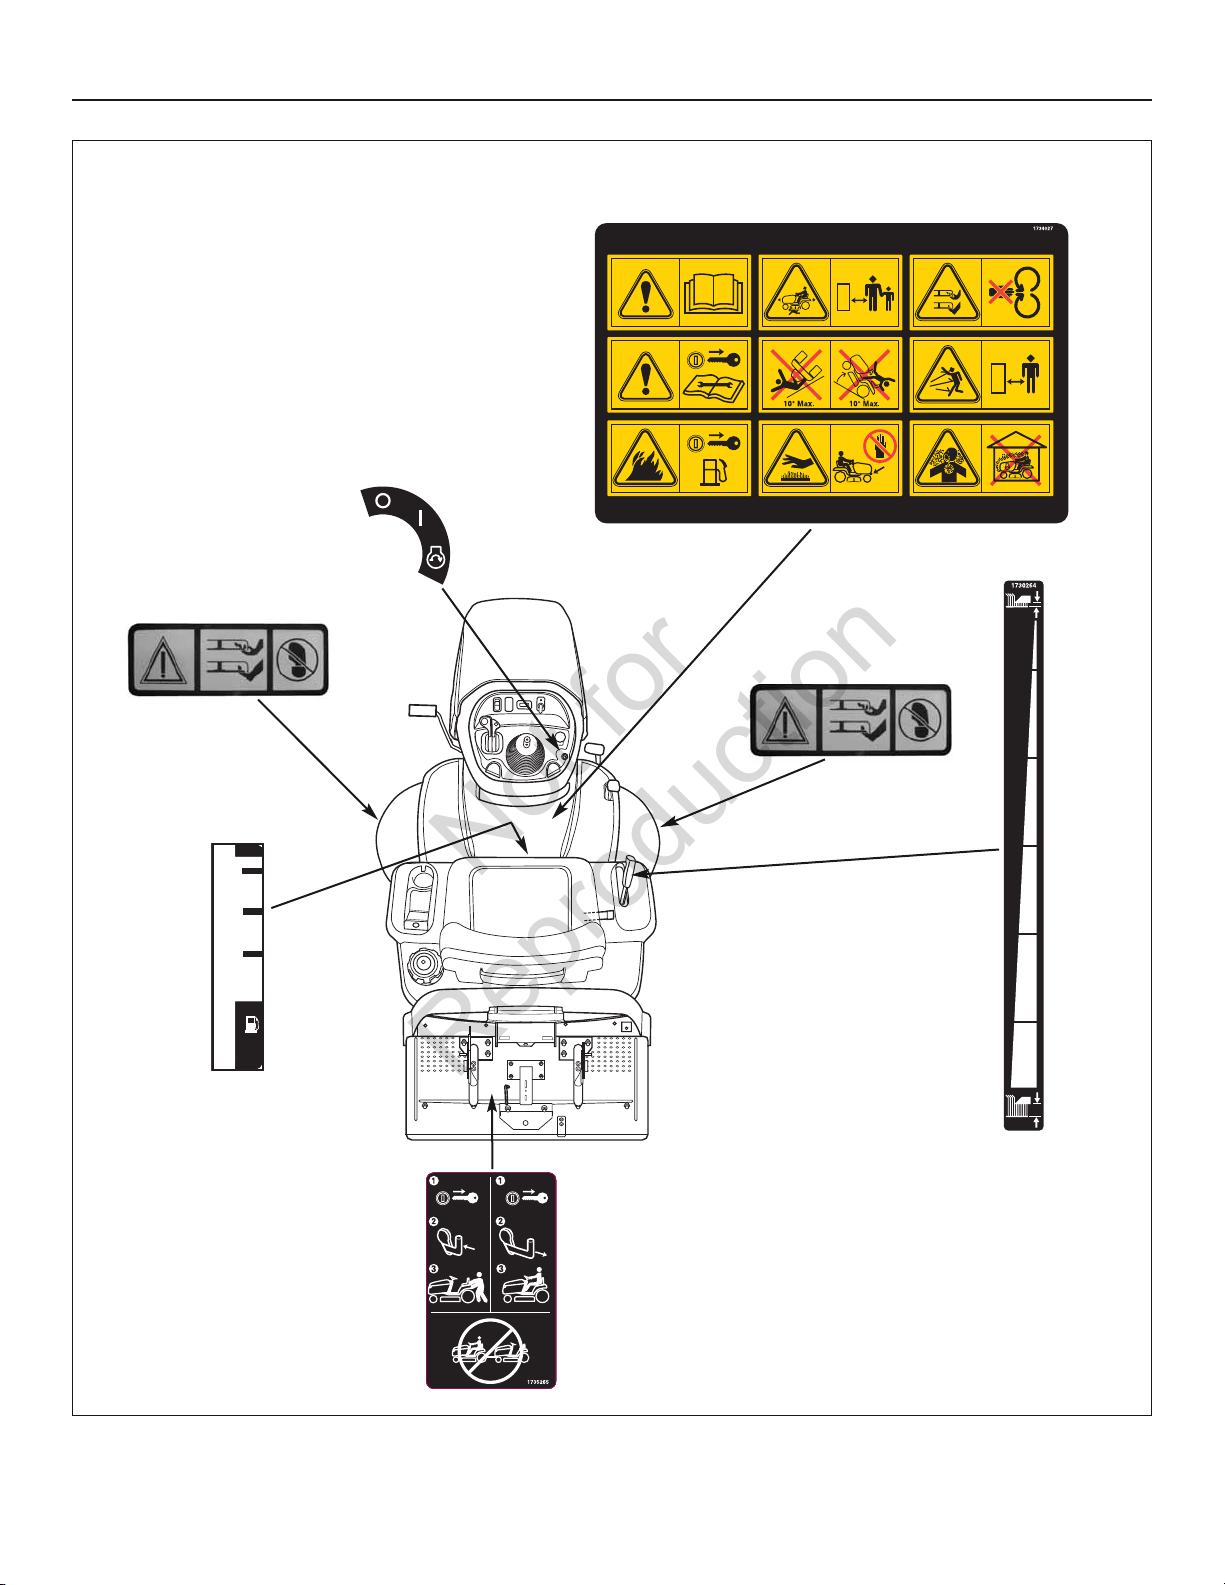
ΑΣΦΆΛΕΙΑ ΧΕΙΡΙΣΤΉ
Not for
Reproduction
Θέσεις διακοπτών κινητήρα
Κωδ. εξαρτήματος 1722806
Εικόνισμα ασφαλείας
Κωδ. εξαρτήματος
1735890
Εικονίδια ασφαλείας,
Κωδ. εξαρτήματος 1734027
Εικόνισμα ασφαλείας
Κωδ. εξαρτήματος
1735890
4
4
3
3
2
2
R
R
Στάθμη καυσίμου
Κωδ. εξαρτήματος
1735889
Ανύψωση
χλοοκοπτικού
Κωδ. εξαρτήματος
1730264
Αποδέσμευση
συστήματος
μετάδοσης
Ετικέτες ασφαλείας Εικόνα 1
Κωδ. εξαρτήματος
1735265
10
www.simplicitymfg.com
Page 99

12V
ΧΑΡΑΚΤΗΡΙΣΤΙΚΆ ΚΑΙ ΧΕΙΡΙΣΤΉΡΙΑ
Not for
Reproduction
Χειριστήρια του τρακτέρ Εικόνα 2
ΧΕΙΡΙΣΤΉΡΙΑ ΤΟΥ ΤΡΑΚΤΈΡ
Έλεγχος του χειριστηρίου του
γκαζιού
Το γκάζι ελέγχει την ταχύτητα του κινητήρα. Μετακινήστε το
χειριστήριο του γκαζιού προς τα μπροστά για να αυξήσετε την
ταχύτητα του κινητήρα ή προς τα πίσω για να μειώσετε την
ταχύτητα του κινητήρα. Να δουλεύετε πάντα με την τροφοδοτική
βαλβίδα στη θέση ΠΛΗΡΗΣ.
Τσοκ
Κλείστε το τσοκ αν ξεκινάτε με κρύο κινητήρα. Ανοίξτε το τσοκ
μόλις ξεκινήσει η μηχανή. Αν η μηχανή είναι ζεστή μπορεί να μη
χρειαστεί να χρησιμοποιήσετε το τσοκ. Μετακινήστε το μοχλό
προς τα εμπρός για να κλείσετε το τσοκ.
Προβολείς (Επιλογή μοντέλων)
Ο διακόπτης των προβολέων ανάβει και σβήνει τους προβολείς
του χλοοκοπτικού.
11
Page 100

ΧΑΡΑΚΤΗΡΙΣΤΙΚΆ ΚΑΙ ΧΕΙΡΙΣΤΉΡΙΑ
12V
Not for
Reproduction
Ωρόμετρο
Το ωρόμετρο υπολογίζει τον αριθμό των ωρών που το κλειδί
βρισκόταν στη θέση ΛΕΙΤΟΥΡΓΙΑ.
Επιλογή κουρέματος γκαζόν με την
όπισθεν (RMO)
Η επιλογή κουρέματος γκαζόν με την όπισθεν καθιστά δυνατό το
κούρεμα του γκαζόν (ή τη χρήση άλλων προσαρτημάτων που
λειτουργούν με δυναμοδότη) ενώ προχωράτε με την όπισθεν. Αν
επιλέξετε να κουρέψετε το γρασίδι με την όπισθεν, γυρίστε το
κλειδί RMO αφού συμπλεχτεί ο δυναμοδότης. Θα ανάψει η
ενδεικτική λυχνία και ο χειριστής θα μπορεί να κουρέψει το
γρασίδι με την όπικσθεν. Κάθε φορά που συμπλέκεται ο
δυναμοδότης το RMO πρέπει να ενεργοποιείται ξανά αν το
θελήσει ο χειριστής.
Διακόπτης δυναμοδότη
Ο διακόπτης του δυναμοδότη (Power Take-Off – PTO) συμπλέκει
και αποσυμπλέκει τα προσαρτήματα που κάνουν χρήση του
δυναμοδότη. Για να συμπλέξετε το δυναμοδότη, τραβήξτε το
διακόπτη προς τα ΠΑΝΩ. Ωθήστε προς τα ΚΑΤΩ για να τον
αποσυμπλέξετε. Σημειώστε ότι ο χειριστής πρέπει να κάθεται καλά
στο κάθισμα του χλοοκοπτικού για να λειτουργήσει ο
δυναμοδότης.
Cruise Control
Το σύστημα cruise control χρησιμοποιείται για να κλειδώνει το
χειριστήριο ελέγχου της ταχύτητας όταν το μηχάνημα κινείται προς
τα εμπρός. Το σύστημα cruise control έχει πέντε θέσεις.
Μοχλός ανύψωσης χλοοκοπτικού
Ο μοχλός ανύψωσης ελέγχει το ύψος κοπής του χλοοκοπτικού.
Τραβήξτε το μοχλό προς τα κάτω για να μειώσετε το ύψος ή
τραβήξτε προς τα πάνω για να αυξήσετε το ύψος.
Μοχλός προσαρμογής καθίσματος
Το κάθισμα μπορεί να μετακινηθεί προς τα εμπρός ή προς τα
πίσω. Μετακινήστε το μοχλό, τοποθετήστε το κάθισμα εκεί που
θέλετε και αποδεσμεύστε το μοχλό για να ασφαλίσετε το κάθισμα
στην επιλεγμένη θέση.
Μοχλός βαλβίδας αποδέσμευσης
συστήματος μετάδοσης
Ο μοχλός της βαλβίδας αποδέσμευσης του συστήματος
μετάδοσης απενεργοποιεί το σύστημα μετάδοσης για να μπορείτε
να σπρώξετε το χλοοκοπτικό με τα χέρια. Ανατρέξτε στην ενότητα
Σπρωχνοντας το χλοοκοπτικο με τα χερια για περισσότερες
πληροφορίες.
Διακόπτης κινητήρα
Ο διακόπτης του κινητήρα εκκινεί και σταματάει τον κινητήρα και
έχει τρεις θέσεις:
ΑΠΕΝΕΡΓΟΠΟΙΗΣΗ Σταματάει τον κινητήρα και κλείνει
το ηλεκτρικό σύστημα.
ΛΕΙΤΟΥΡΓΙΑ Επιτρέπει στον κινητήρα να
λειτουργήσει και θέτει σε
λειτουργία το ηλεκτρικό σύστημα.
ΕΚΚΙΝΗΣΗ Θέτει τον κινητήρα σε λειτουργία.
ΣΗΜΕΙΩΣΗ: Μην αφήνετε ποτέ τον διακόπτη κινητήρα στη θέση
ΛΕΙΤΟΥΡΓΙΑ όταν ο κινητήρας είναι σταματημένος – έτσι τελειώνει
η μπαταρία.
Πεντάλ ταχύτητας
Η ταχύτητα του χλοοκοπτικού όταν κινείται προς τα εμπρός
ελέγχεται από το πεντάλ ελέγχου ταχύτητας για κίνηση προς τα
εμπρός. Η ταχύτητα του χλοοκοπτικού όταν κινείται προς τα πίσω
ελέγχεται από το πεντάλ ελέγχου ταχύτητας για κίνηση προς τα
πίσω.
Πατώντας είτε το ένα είτε το άλλο πεντάλ αυξάνεται η ταχύτητα.
Σημειώστε ότι όσο περισσότερο πατάτε το πεντάλ, τόσο πιο
γρήγορα θα κινείται το μηχάνημα.
Δεξαμενή καυσίμου
Για να βγάλετε το καπάκι, περιστρέψτε αριστερόστροφα.
Ισχύς εξόδου (Επιλογή μοντέλων )
Η ισχύς εξόδου είναι 12V-DC. Το εξάρτημα πρέπει να λειτουργεί
με 9 αμπέρ ή λιγότερο.
Δείκτης στάθμης καυσίμου
Εμφανίζει τη στάθμη του καυσίμου στη δεξαμενή.
Χειρόφρενο
Η λαβή του χειρόφρενου χρησιμοποιείται για να κλειδώνει το
χειρόφρενο όταν είναι σταθμευμένο το χλοοκοπτικό. Αν πατήσετε
το φρένο μέχρι κάτω και τραβήξετε προς τα πάνω τη λαβή, τότε
μπαίνει το χειρόφρενο.
Χειρόφρενο
Αν πατήσετε το πεντάλ του φρένου μέχρι κάτω μπαίνει το
χειρόφρενο.
12 www.simplicitymfg.com
 Loading...