

Page 1

SIMPLESHARE
QUICK START
OFFICE STORAGE SERVER
Congratulations on your the SimpleShare purchase.
SimpleShare makes it possible for you to easily add highperformance storage to your home or small business
network. SimpleShare is ideal for sharing data files, digital
photos, music and games with other users on your local
network. In addition, with SimpleShare, all the users on the
network have instant access to extra storage.
What You Should Have
•
SimpleShare Office Storage Server
•
AC power adapter
•
Vertical stand (2)
•
CAT5e Ethernet cable
•
NASFinder Quick Setup CD
•
Backup Application CD
•
Quick Start guide (this guide)
•
Warranty card
If any item is missing or damaged, contact your local reseller or retailer for replacement.
French and German language versions of this guide are available online. Go to
www.simpletech.com/support, then click User Guides.
Une version française de ce guide est disponible en ligne. Rendez-vous sur
www.simpletech.com/support et cliquez sur “User Guides” (Démarrage rapide).
Eine deutsche Version dieses Handbuchs ist online verfügbar. Klicken Sie unter
www.simpletech.com/support auf “User Guides” (Kurzanleitung).
Page 2
SYSTEM REQUIREMENTS
PC Users
• Pentium® III-class PC or equivalent • iMac®, G3, G4, G5 or iBook
• 256 MB RAM (or as required by
operating system)
• Windows
• Microsoft
®
2000, 2003 or XP • Mac OS® X (v10.1 and later)
®
Internet Explorer (v 6.0 and
later)
• Available Ethernet port • Available Ethernet port
System Recommendations
• Network router or switch
• DHCP server
A DHCP server is not required. However, SimpleTech strongly recommends using a
DHCP server to assign IP addresses to the devices on your network. Otherwise,
depending on how your network is configured, you may have to manually setup the
computers on your network to communicate with SimpleShare.
®
Mac
Users
• 256 MB RAM (or as required by
operating system)
• Safari™ (v 1.0 and later)
INSTALLATION REQUIREMENTS
No drivers, special tools or equipment are required to install SimpleShare.
VISUAL TOUR
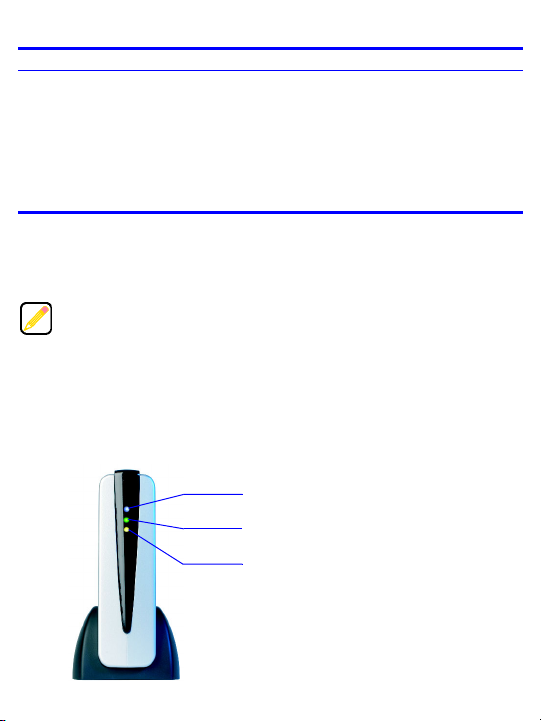
Front
Ready LED (Blue)
Indicates SimpleShare is Ready (active mode).
HDD LED (Green)
Indicates disk drive read/write activity.
Power LED (Amber)
Indicates SimpleShare's internal hard disk drive (HDD)
is receiving power.
®
2
Page 3

Back
Power Button
When the SimpleShare is on, pressing the Power button
saves your data, then places SimpleShare in standby mode.
While in standby mode, pressing the Power button returns
SimpleShare to Ready mode.
Reset Button
Pressing Reset for 5 seconds restores SimpleShare to
original factory settings.
USB Port (2)
USB A connectors for external USB disk drives or printers.
RJ-45 Network Connector (with integrated network activity
LEDs).
• Link LED (amber) indicates network connectivity.
• Activity LED (green) indicates network traffic.
DC-IN Jack
Connector for the AC power adapter.
Security Slot (not shown)
The security slot, located on the side of chassis, allows you
to attach a computer security cable to SimpleShare.
YOUR NETWORK
Below is a sample network with SimpleShare installed.
3
Page 4

HARDWARE INSTALLATION
USB
Network
DC-IN Jack
AC Power Connection
Connect the AC power adapter to the DC-IN jack on SimpleShare. Connect the power
plug to a 120V electrical outlet, power strip or UPS (uninterruptible power supply).
Only use the power adapter that came with your SimpleShare. Using a different
power adapter may damage SimpleShare and voids your warranty.
Expanding SimpleShare Capabilities
To add storage or set up printer sharing on SimpleShare, connect an additional drive or
printer to a USB port on SimpleShare. Then, run SimpleShare Administrator and setup
the device. Detailed instructions on attaching a USB drive or printer to SimpleShare are
provided in the SimpleShare User’s Guide.
Network Connection
Plug the Ethernet cable into
the Network port on
SimpleShare. Connect the
opposite end of the Ethernet
cable to an available port on
your network, network
switch or router.
RUNNING NASFINDER
NASFinder searches your network for attached SimpleShare servers, then assists you
in performing basic configuration tasks like renaming SimpleShare, changing its logon
security settings and mapping shared folders. Insert the NASFinder Setup CD into your
computer’s CD-ROM drive. If NASFinder does not start automatically, click the Start
menu, select Run. In the Run dialog box, enter x:nasfinder.exe (where x is the drive
letter of the CD-ROM drive) and click OK. Follow the onscreen instructions to locate
SimpleShare and complete the setup process.
During setup, NASFinder prompts you to enter SimpleShare’s administration username
and password. If you are setting up SimpleShare for the first time or if you have never
changed the username or password, enter the default username “admin” and password
“simple.” Refer to NASFinder online help for additional information.
4
Page 5

ACCESSING SHARED FOLDERS IN WINDOWS
1 In the Address bar of your browser, enter
\\simpleshare and press Enter.
2 In the logon dialog box, enter SimpleShare’s default
username “admin” and password “simple.” If you
want the system to remember your password, click
Remember my password. Click OK.
SimpleShare’s root directory appears in
Windows Explorer, listing its shared folders.
If the logon window does not appear, make
sure SimpleShare is in Ready mode and
properly connected to the network. Then,
try to connect to SimpleShare again. If you
are still unable to connect to SimpleShare,
use NASFinder to locate the server.
Mapping Shared Folders in Windows
1 In Windows Explorer, click Tool s>Map Network Drive to run the Map Networ k Drive
wizard.
2 Accept the next available drive letter,
displayed in the Drive list or choose a
different letter. In the Folder list, type
\\Simpleshare\NetFolder or use Browse
to locate NetFolder on SimpleShare. If you
want your computer to reconnect to
NetFolder each time you reboot your
computer, click Reconnect at logon, and
then click Finish.
5
Page 6

ACCESSING SHARED FOLDERS IN MAC OS
1 Open the Go menu and click Connect to Server.
2 In the Connect to Server window, select
SimpleShare from the servers listed in the left
pane. If Windows Workgroup names are listed,
check the Workgroup for SimpleShare. If you
can’t locate SimpleShare, enter its URL in the
Address box (where the URL consists of the
protocol "smb://" and the SimpleShare name
(“SimpleShare”) or IP address. After selecting
your SimpleShare server, click Connect.
3 In the SMB Mount window, open the SMB
Mount list, select NetFolder and click OK.
NetFolder is the default shared folder
configured on SimpleShare.
4 In the SMB/CIFS Filesystem Authentication
window, under Username, enter SimpleShare’s
default username “admin.” Under Password,
enter the default password, “simple.” If you want
the system to remember your authentication
information, click Keychain, and then click OK.
A NetFolder icon appears on the desktop.
ADVANCED CONFIGURATION OPTIONS
To access SimpleShare’s advanced configuration options through SimpleShare
Administrator, enter the name or IP address of your SimpleShare in the Address bar of
your Web browser. If SimpleShare’s configuration folder is mapped to your computer,
open the folder and double-click Configuration.html. For instructions on using
SimpleShare Administrator, refer to the SimpleShare User’s Guide.
6
Page 7

SPECIFICATIONS
Network Standards IEE 802.3 100 BASE-TX; IEEE 802.3u 10 BASE-T (RJ-45 connector)
File System Support Network: NFS, SMB/CIFS Disk: FAT 32, NTFS
USB Standards USB 2.0 compatible (USB 1.1 compliant) ( USB A host connectors)
Internal Storage 160 or 250 Gigabyte IDE disk drive (depending on model)
Operating Temperature 41° to 95° F (5° to 35° C)
Humidity (relative) 20 to 80%, non-condensing
Power AC Power Adapter: 100/240V, 50/60Hz AC input; 12V DC, 3A output
Dimensions 8.06 in (204.72 mm) x 1.62 in (41.15 mm) x 5.13 in (130.3 mm)
Weight 2.75 lbs (1.03 kg)
Specifications subject to change without notification.
A Portion of SimpleShare’s listed capacity is used for formatting and
other functions and therefore is not available for data storage.
Power Consumption: 36W (maximum)
TECHNICAL SUPPORT FROM SIMPLETECH
SimpleTech Technical Support provides unlimited customer support for the duration of
the warranty period on this product, Monday through Friday from 6:30 am until 5:30 pm
Pacific Standard Time. You can contact our Technical Support team through our
website, by e-mail or by phone.
Phone: 1-800-945-3444 or 949-476-1180
Email Response: Go to www.simpletech.com/support, click Return Merchandise (RMA), and
Online Chat: Go to www.simpletech.com/support. Click
This equipment has been tested and found to comply with the limits for a Class B digital
device, pursuant to Part 15 of the FCC Rules.
This equipment carries the CE marking in accordance with European Directives EN 55022,
EN 55024, EN 61000-3-2, EN 61000-3-3, EN 61000-4-2, EN 61000-4-3, EN 61000-4-4,
EN 61000-4-5, EN 61000-4-6, EN 61000-4-8, EN 61000-4-11.
GPL Statement: Portions of this product, in part, use GPL/LGPL software. Please see the GNU license
document on the NASFinder Quick Setup CD for information concerning the terms of the license. To obtain
a copy of our open source software, please send a message to SimpleTech Technical Support at
support@simpletech.com.
Manufacturer Warranty: SimpleShare is warranted for a period of three years from the date of retail
purchase. A full text version of the SimpleTech’s warranty policy is available online at www.simpletech.com/
warranty.
then select Need Technical Support.
.
Page 8

December 9, 2005
Copyright © 2005 SimpleTech, Inc. All rights reserved.
The SimpleTech name, logo and design are trademarks of
SimpleTech, Inc. All other products and corporate names are
trademarks or registered trademarks of their respective companies.
Worldwide Headquarters
SimpleTech, Inc.
Santa Ana, California 92705 USA
3001 Daimler Street
Tel: (949) 476-1180
Fax: (949) 476-1209
Web: www.simpletech.com
P/N: 60000-00095-003
2053r3
 Loading...