

Page 1

* Depending on the software installed or your service provider, some of the descriptions in this manual may
not match from your phone.
* Depending on your country, your phone and accessories may appear different from the illustrations
in this manual.
World Wide Web
http://www.samsungmobile.com
Printed in Korea
Code No.:GH68-06933A
English. 05/2005. Rev 1.
1
Page 2
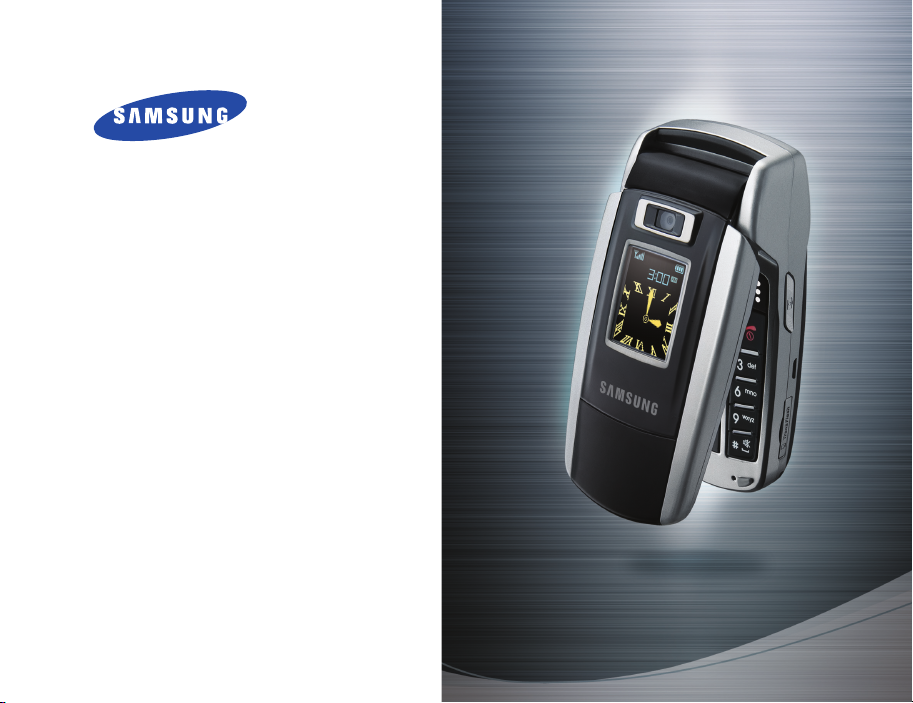
SGH-Z500
User’s Guide
Page 3
Important
safety
precautions
Failure to comply with the following
precautions may be dangerous or illegal.
Use road safety at all times
Do not use a hand-held phone while driving.
Park the vehicle first.
Switch off the phone when refuelling
Do not use the phone at a refuelling point
(service station) or near fuels or chemicals.
Switch off in an aircraft
Wireless phones can cause interference.
Using them in an aircraft is both illegal and
dangerous.
Switch off the phone near all medical
equipment
Hospitals or health care facilities may be
using equipment that could be sensitive to
external radio frequency energy. Follow any
regulations or rules in force.
Interference
All wireless phones may be subject to
interference, which could affect their
performance.
Page 4
Be aware of special regulations
Meet any special regulations in force in any area and
always switch off your phone whenever it is
forbidden to use it, or when it may cause
interference or danger.
Water resistance
Your phone is not water-resistant. Keep it dry.
Sensible use
Use only in the normal position (held to the ear).
Avoid unnecessary contact with the antenna when
the phone is switched on.
Emergency calls
Key in the emergency number for your present
location, then press .
Keep your phone away from small children
Keep the phone and all its parts, including
accessories, out of the reach of small children.
Accessories and batteries
Use only Samsung-approved accessories and
batteries. Use of any unauthorised accessories could
damage your phone and may be dangerous.
• The phone could explode if the battery is
replaced with an incorrect type.
• Dispose of used batteries according to the
manufacturer’s instructions.
Qualified service
Only qualified service personnel may repair your
phone.
For more detailed safety information, see "Health
and safety information" on page 78.
Important safety precautions
1
Page 5
About this Guide
This User’s Guide provides you with condensed
information about how to use your phone. To quickly
learn the basics for your phone, please refer to “Get
started” and “Step outside the phone.”
In this guide, the following instruction icons appear:
Indicates that you need to pay careful
attention to the subsequent
information regarding safety or phone
features.
→
[
] Indicates a key on the phone. For
< > Indicates a soft key, whose function is
2
Indicates that you can get more
information on the referenced page.
Indicates that you need to press the
Navigation keys to scroll to the
specified option and then select it.
example,
displayed on the phone screen. For
example, <
[]
Msg.>
•3G
Your phone is capable of operating
in a 3G environment, allowing
much greater data transfer speed,
video streaming, and video
conferencing.
Special
• Camera and Camcorder
Use the camera module on your
phone to take a photo or record a
video.
•Media Player
Play media files on your phone.
•IrDA
Send and receive Phonebook and
Organiser data and media files via
an infrared port.
features of your phone
Page 6
•Bluetooth
Send photos, images, videos, and
other personal data, and connect to
other devices using free, wireless
Bluetooth technology.
•WAP browser
Access the wireless web and access
various services and current
information.
• Get Personal with Photo Caller
ID
See who’s calling you with their
very own photo displays.
• Name card
Create name cards with your
number and profile whenever
introducing yourself to others use
this convenient electronic name
card.
• Multimedia Message Service (MMS)
Deliver MMS messages with a combination of
text, images, and audio.
•E-mail
Deliver e-mails with images, video, and audio
attachments.
•Java
Enjoy Java™-based embedded
games and download new games.
Special features of your phone
• Organiser
Keep track of your daily, weekly,
and monthly schedule.
• Voice recorder
Record memos or sounds.
3
Page 7
Contents
Special features of your phone 2
Unpack 6
Make sure you have each item
Your phone 6
Buttons, features, and locations
Get started 7
First steps to operating your phone
Install and charge the phone .............................. 7
Power on or off ................................................. 8
Keys and display ............................................... 9
Display ........................................................... 10
Access menu functions...................................... 11
Customise your phone ...................................... 12
Make/Answer calls............................................ 14
Step outside the phone 14
Begin with your camera, games, WAP, and other special
features
Use camera ..................................................... 14
Play media files ............................................... 15
Play games ..................................................... 16
Browse the web ............................................... 16
Use Contacts ................................................... 17
Send messages ............................................... 18
View messages ................................................ 20
Use Bluetooth wireless...................................... 20
Use a memory card .......................................... 21
Enter text 23
ABC, T9, Number, and Symbol mode
Call functions 25
Advanced calling features
Menu functions 29
All menu options listed
Solve problems 76
Help and personal needs
Health and safety information 78
Index 84
4
Page 8
Overview of menu functions
To access Menu mode, press in Idle mode.
1 Call log
1 Missed calls
2 Dialled calls
3 Received calls
4 Current contacts
5 Delete all
6 Data calls
7 Calls cost
8 Calls time
2 Contacts
1 Search contact
2 New contact
3 Groups
4 Speed dial
5 My name card
6 Copy all
7 Own number
8 Service number
9 Settings
0 Memory status
3 Applications
1 SAT
2 Media player
3 Voice memo
4 World clock
5 Calculator
6 Converter
*
*
*
p. 29
p. 29
p. 30
p. 30
p. 30
p. 30
p. 30
p. 30
p. 31
p. 31
p. 31
p. 32
p. 33
p. 33
p. 34
p. 34
p. 34
p. 34
p. 34
p. 34
p. 35
p. 35
p. 35
p. 37
p. 38
p. 38
p. 38
4 Internet
1 Go to homepage
2 Enter URL
3 Favorites
4 History
5 Browser settings
6 Network settings
5 Messages
1 Create new
2 Inbox
3 Drafts
4 Outbox
5 Sent box
6 Email inbox
7 Media Album
8 Templates
9 Broadcast
0 Delete all
* Settings
# Memory status
6 File manager
Images
Videos
Music
Sounds
Games & More
Other files
Memory card
**
***
p. 39
p. 39
p. 40
p. 40
p. 40
p. 40
p. 41
p. 41
p. 41
p. 43
p. 45
p. 45
p. 45
p. 46
p. 47
p. 47
p. 47
p. 48
p. 48
p. 52
p. 52
p. 52
p. 53
p. 55
p. 56
p. 56
p. 57
p. 57
7 Organiser
1 Alarm
2 Calendar
3 Week view
4 Today’s events
5 Schedule
6 Anniversary
7 Task
8 Memo
9 Missed event alarm
0 Memory status
8 Camera
9 Settings
1 Profiles
2 Time & date
3 Phone
4 Display
5 Call
6 Connectivity
7 Application settings
8 Security
9 Memory status
0 Reset settings
* Shows only if supported by your SIM card.
** Shows only if supported by your service
provider.
*** Shows only if a memory card is
inserted into the phone.
p. 57
p. 58
p. 58
p. 60
p. 60
p. 60
p. 61
p. 61
p. 61
p. 61
p. 61
p. 61
p. 66
p. 66
p. 67
p. 67
p. 68
p. 68
p. 70
p. 74
p. 75
p. 76
p. 76
5
Page 9
Unpack
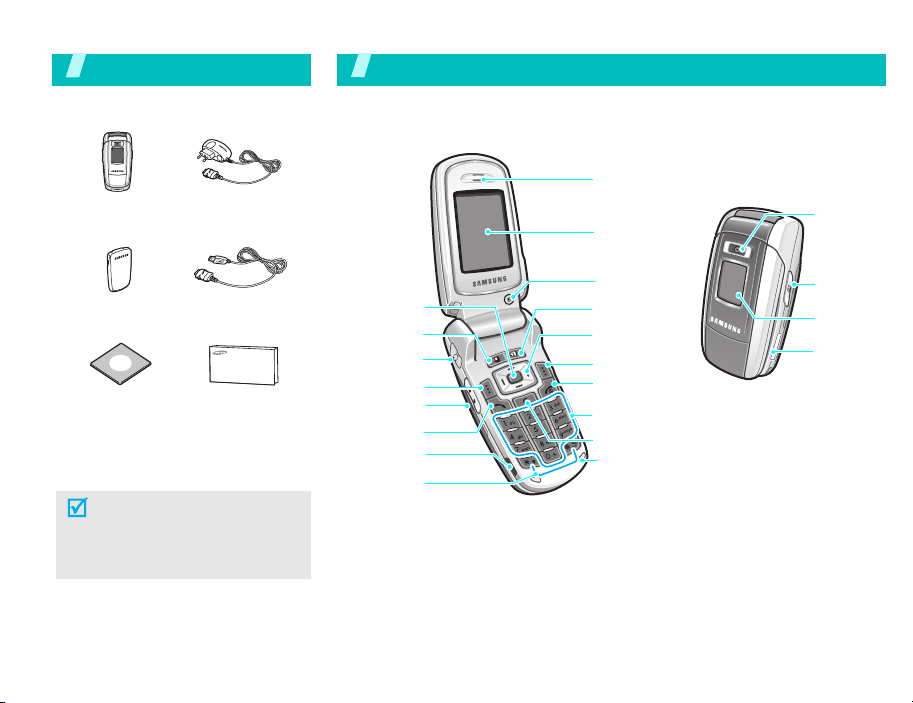
Make sure you have each item
Phone
Tra v e l Ch a r g e r
You r p ho ne
Buttons, features, and locations
Earpiece
Display
Exterior
camera
lens
Battery
PC Link CD
PC Data Cable
User’s Manual
You can obtain various accessories
from your local Samsung dealer.
The items supplied with your
phone and the accessories at
your Samsung dealer may vary,
depending on your country or
service provider.
6
Menu access/
confirm key
Application
switch key
Headset jack
Left soft key
Volume keys
Dial key
Infrared port
Special
function keys
Interior
camera lens
Video call key
Navigation keys
Right soft key
Power O n/Off /
Menu exit key
Alphanumeric keys
Delete key
Microphone
Camera
key
External
display
Memory
card slot
Page 10
Get started
First steps to operating your phone
SIM card information
When you subscribe to a cellular network, you
receive a plug-in SIM (Subscriber Identity Module)
card loaded with your subscription details, such as
your PIN and available optional services. For 3G
services, you can purchase a USIM card.
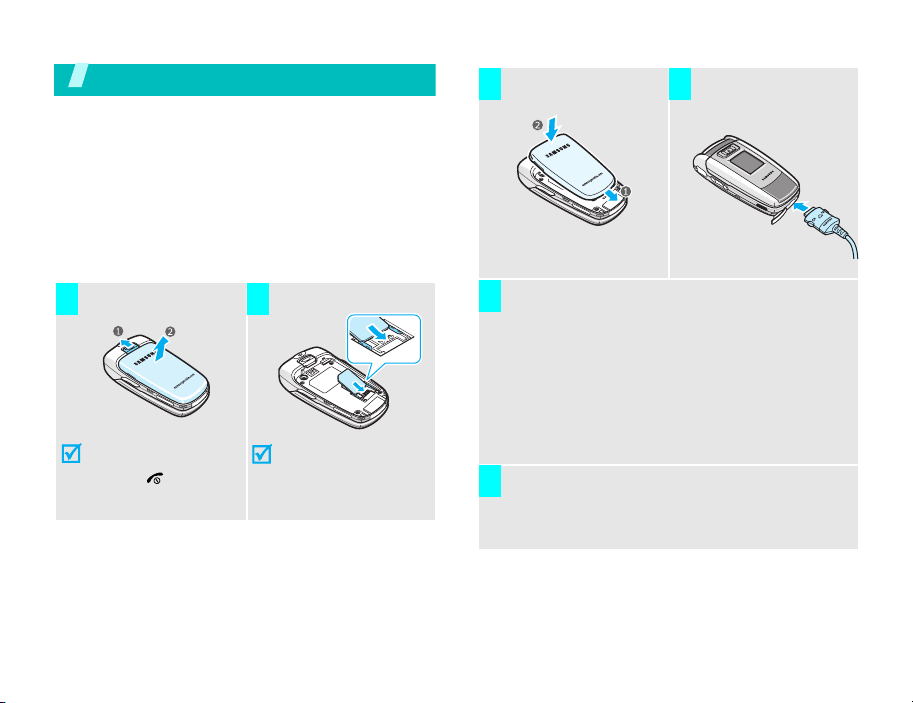
Install and charge the phone
Remove the battery.
1 2
If the
phone is already
on, first turn it off by
holding [ ].
Insert the SIM card.
Make sure that the goldcoloured contacts on the
card face down into the
phone.
Install the battery. Plug the travel
3 4
Plug the charger into a standard AC wall outlet.
5
The LED on the charger indicates the charging
progress.
• Red: the battery is being charged.
• Green: the battery is completely charged.
• Orange: the battery is not correctly installed
or is operating at a too high or too low
temperature.
When the phone is completely charged (green
6
charger LED), unplug the charger from the
power outlet.
charger into the
phone.
7
Page 11
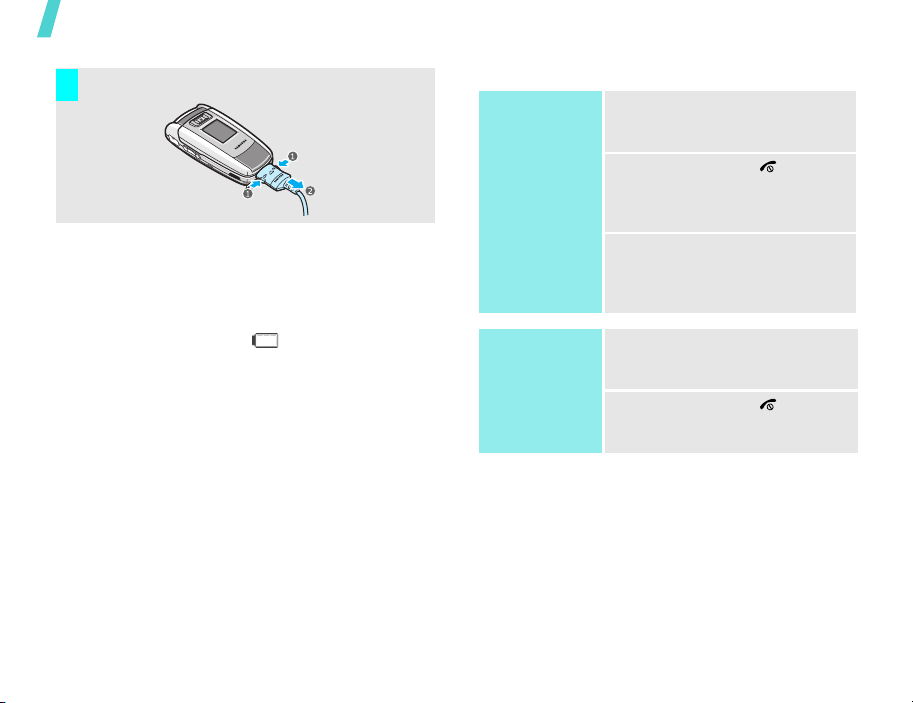
Get started
Remove the charger from the phone.
7
Low battery indicator
When the battery is low:
• a warning tone sounds,
• the battery low message displays, and
• the empty battery icon blinks.
If the battery level becomes too low, the phone
automatically turns off. Recharge your battery.
Power on or off
Power on
Do not turn on the
phone when
mobile phone use
is prohibited.
Power off
1. Open the phone.
2. Press and hold [ ] to turn
3. If necessary, enter the PIN
1. Open the phone.
2. Press and hold [ ].
on the phone.
and press <
Confirm
>.
8
Page 12
Keys and display
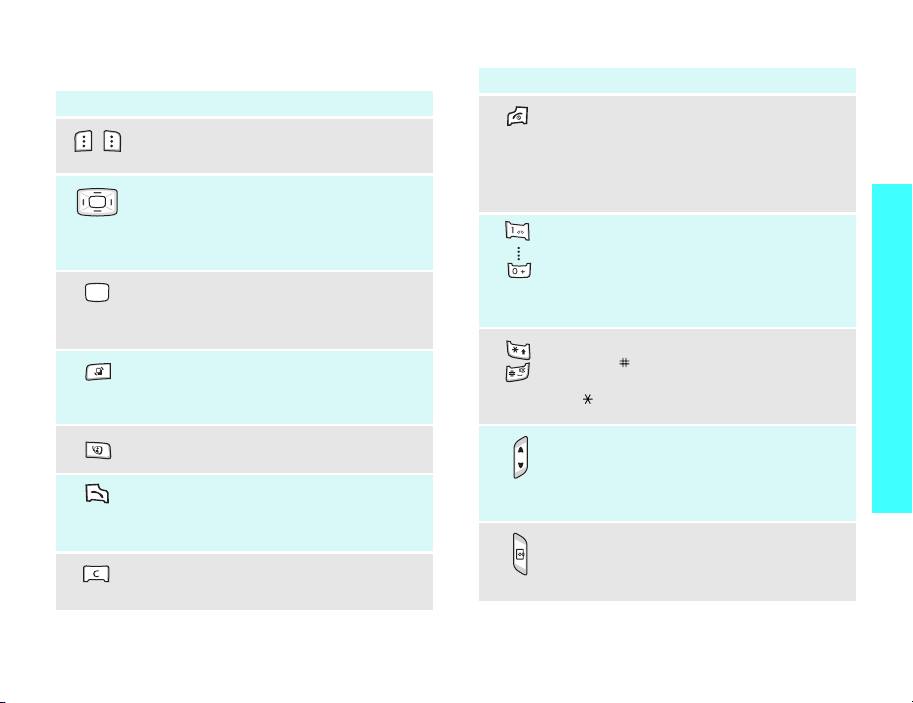
Key(s) Description
Perform the function indicated on the
bottom line of the display.
In Idle mode, access menu options
directly.p. 67
In Menu mode, scroll through the
menu options.
In Idle mode, accesses Menu mode.
In Menu mode, select a highlighted
menu option.
Opens the application switch window to
open
Call, Messages
without exiting the current application.
, and
Internet
Key(s) Description
Ends a call.
Hold down to switch the phone on and
off.
In Menu mode, cancel input and return
the phone to Idle mode.
Get started
Enter numbers, letters, and some
special characters.
In Idle mode, hold [1] down to access
your voicemail. Hold down [0] to enter
an international call prefix.
Enter special characters.
Hold [ ] down to activate or
deactivate the Silent profile. Hold down
[ ] to enter a pause.
Makes a video call.
Makes or answers a call.
In Idle mode, retrieves the recent
numbers dialled, missed, or received.
Deletes characters from the display or
an item in an application.
(on the left)
(on the right)
Adjust the phone volume.
In Idle mode, adjust the keypad tone
volume. With the phone closed, hold
down to activate the external display.
Hold down to turn on the camera.
In Camera mode, switches the camera
lens.
9
Page 13
Get started
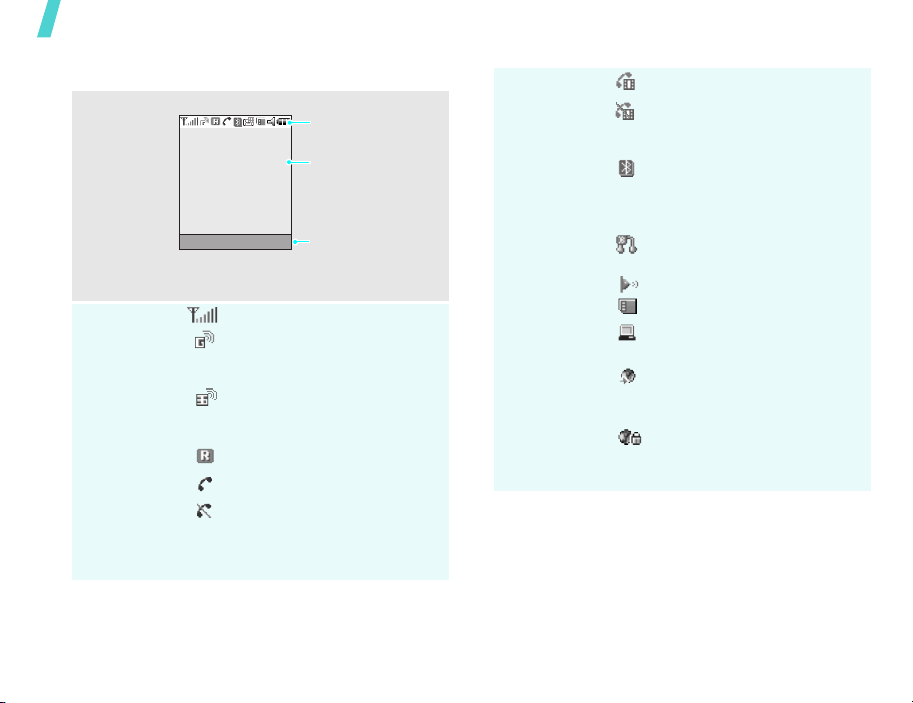
Display
Layout
Icons
The display has three areas.
Icons
displays various icons.
Text and graphics
displays messages,
instructions, and
information you enter.
Select Back
Soft key function
indicators
shows the current
functions assigned to
the two soft keys.
Received signal strength
Accessing services in a 2.5G
network; when transferring
data, this icon animates.
Accessing services in a 3G
network; when transferring
data, this icon animates.
Active roaming feature
Voice call in progress
Out of your service area; you
cannot send or receive voice
calls
Icons
(continued)
Video call in progress
Out of your service area; you
cannot send or receive video
calls
Bluetooth feature is active;
When transferring data, this
icon blinks red and blue.
p. 71
Connected with a Bluetooth
headset or hands-free kit
IrDA port is activep. 72
Memory card inserted
Connected with a computer
via a USB port
Browsing the Internet on a
PC using the phone as a
modem
Connected to a secured web
page
10
Page 14
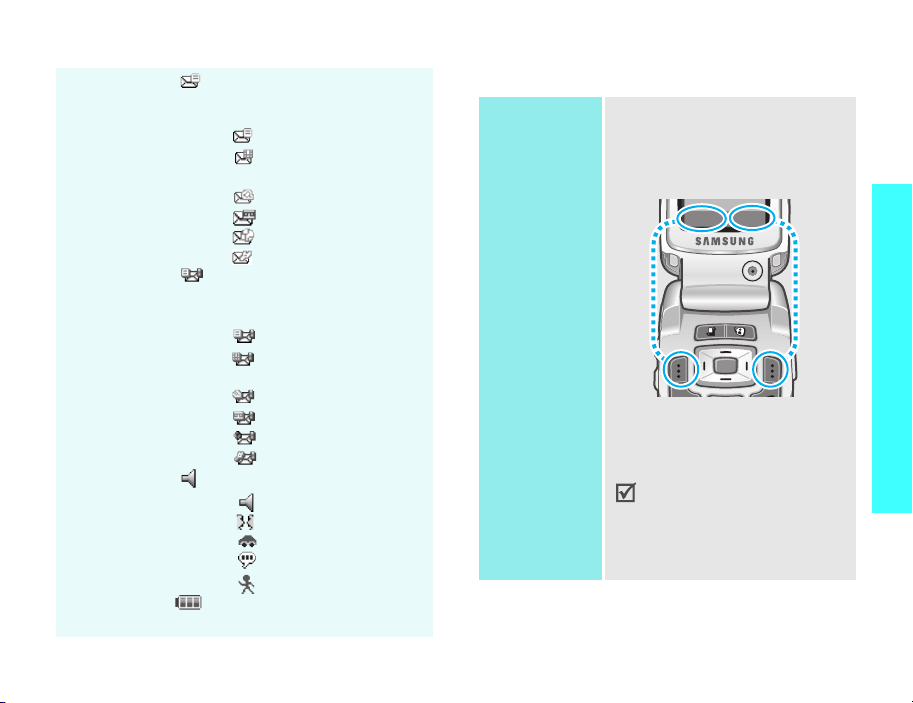
Icons
(continued)
New message; depending on
the message type, the
following icons may appear.
•: SMS
• : MMS or MMS with
attachments
•: E-mail
•: Voicemail
•: WAP push
• : Configuration message
Inbox full; depending on the
message type, the following
icons may appear.
•: SMS
• : MMS or MMS with
attachments
•: E-mail
•: Voicemail
•: WAP push
• : Configuration message
Profile settingp. 67
•: Normal
• : Meeting
•: Car
•: Silent
• : Outdoor
Battery power level
Access menu functions
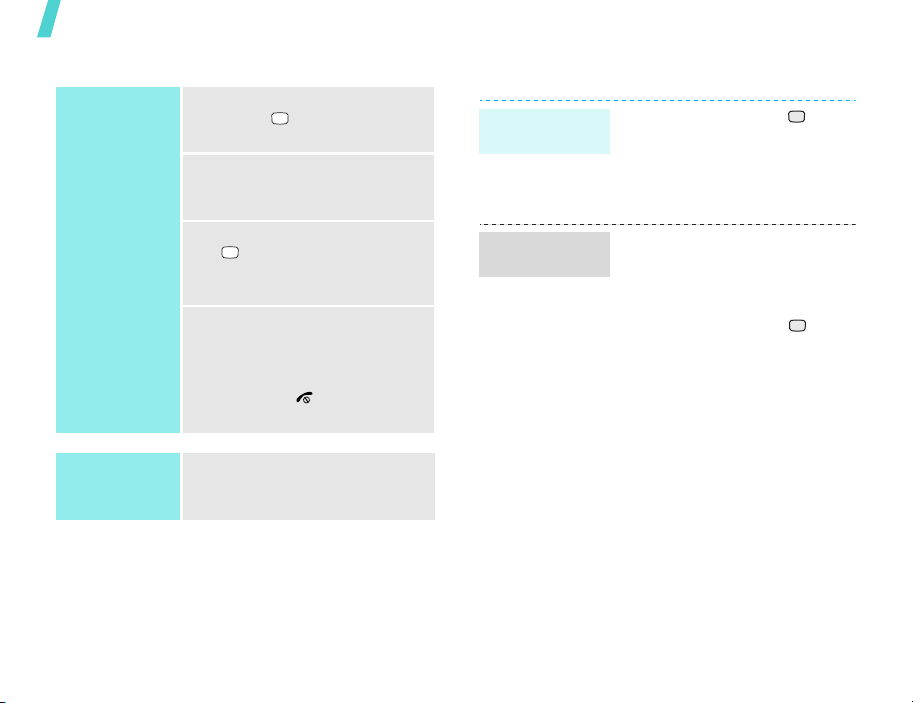
Use the soft
keys
The roles of the soft keys vary
depending on the function you are
using. The bottom line of the
display indicates their current
role.
Select Back
Press the left soft
key to confirm the
function displayed
or option
highlighted.
In each main menu, one of the
most popular sub menu is
assigned to the left soft key.
This allows you to quickly
access the most popular
menus.
Press the right soft
key to move up
one level.
Get started
11
Page 15
Get started
Select an
option
Use shortcuts
12
1. Press the appropriate soft
key or to access Menu
mode.
2. Press the Navigation keys to
move to the next or previous
option.
3. Press <
4. To exit, choose either of the
Press the number key
corresponding to the option you
want.
Select
to confirm the function
displayed or option
highlighted.
following methods:
• Press <
up one level.
• Press [ ] to return to
Idle mode.
>, <OK>, or
Back
> to move
Customise your phone
Display
language
Call ringer
melody
1. In Idle mode, press and
select
Settings → Phone →
Language → Screen text
2. Select a language.
3. Press <
You can change the call ringer by
changing the properties of the
currently active sound profile.
To change the profile properties:
1. In Idle mode, press and
select
Settings → Profiles
2. Scroll the sound profile you
are using.
3. Press <
Edit
.
4. Select
5. Press <
6. Select
7. Press <
8. Press <
Voice call ringtone
and select a ringer for voice
calls.
Video call ringtone
and select a ringer for video
calls.
Save
.
Save
>.
Options
Select
Select
Options
.
.
> and select
>.
>.
> and select
Page 16
Idle mode
Wallpaper
Silent mode
To change the sound profile:
1. In Idle mode, press and
select
Settings → Profiles
2. Select the profile you want.
You can set a wallpaper for the
idle screen.
1. In Idle mode, press and
select
Settings → Display →
Wallpaper
2. Press [Left] or [Right] to
scroll to an image box
3. Select an image and press
<
Set
You can quickly activate the
Silent profile to avoid disturbing
other people.
Press and hold [ ] in Idle mode.
.
>.
.
.
Phone lock
You can protect the phone
against unauthorised use with a
phone password.
1. In Idle mode, press and
select
Settings → Security
→ Change phone
password
2. Enter the default password,
“00000000,” and press
<
Confirm
3. Enter a new 4- to 8-digit
password and press
<
Confirm
4. Enter the new password
again and press <
5. Select
6. Select
7. Enter the password and press
<
Confirm
.
>.
>.
Phone lock
Enable
.
>.
Confirm
.
>.
Get started
13
Page 17
Make/Answer calls
Make a call
Answer a call
Adjust the
volume during
a call
To ma k e a v o ic e c a l l:
1. Enter an area code and
phone number.
2. Press [ ].
3. To end the call, press [ ].
To make a video call:
1. Enter an area code and
phone number.
2. Press [ ], and the other
person appears on the
screen.
1. When the phone is ringing,
press [ ].
2. For a video call, press
<
Show me
other person to see you.
3. To end the call, press [ ].
Press [ / ].
> to allow the
Step outside the phone
Begin with your camera, games, WAP, and other special features
Use camera
Take a photo
View a photo
1. In Idle mode, press and hold
[ ] to turn on the camera.
2. Press [ ] to switch between
the interior lens and exterior
lens.
3. Aim the camera lens at the
subject and adjust the image.
4. Press to take a photo. The
photo is saved automatically.
5. Press to take another
photo.
1. In Idle mode, press and
select
File manager →
Images
.
2. Select the photo you want.
14
Page 18
Record a video
Play a video
1. In Idle mode, press and hold
[ ] to turn on the camera.
2. Press [1] to switch to Record
mode.
3. Press [ ] to switch between
the interior lens and exterior
lens.
4. Press to start recording.
5. Press to stop recording.
The video is automatically
saved.
6. Press to record another
video.
1. In Idle mode, press and
select
File manager →
Videos
.
2. Select the video you want.
Play media files
Copy media
files to the
phone
Create a play
list
Use these methods:
• Download from the wireless
• Download from a computer
• Copy files to the supplied
• Receive via IrDA or
1. In Idle mode, press and
2. Press <
3. Press <
4. Check the files you want or
5. Press <
webp. 39
using Samsung PC Studio II
Samsung PC Studio User’s
Guide
memory card and insert the
card into the phonep. 21
Bluetoothp. 72, p. 70.
select
Applications → Media
player
.
Options
Open play list
Options
Add → Folder
scroll to the folder you want.
Add
> and select
.
> and select
or
Files
> or <
.
Select
>.
Step outside the phone
15
Page 19
Step outside the phone
Play media files
Play games
Select a game
16
1. From the Media player
screen, press .
2. Select the file you want.
3. During playback, use the
following keys:
• : Pauses or resumes
play back.
• Up: Opens the play list.
• Left: Goes to the previous
file. Moves backward in a
file when held down.
• Right: Skips to the next
file. Skips forward in a file
when held down.
•/: Adjusts the volume.
• Down: Stops playback.
1. In Idle mode, press and
select
File manager →
Games & More →
the game
you want.
2. Press any key, except for
[ ], to launch the game.
Play
Powerinlinex
1. Select
2. Select a character.
PLAY
.
3. Press <OK> to start a game.
4. Press [Up] to make the
character start.
5. Press the Navigation keys to
Play
TheLastAge
change the direction.
1. Select
2. Select
3. Press <
START GAME
New Game
SKIP
.
.
> then <OK>.
4. Press [Up] to make the
machine move forward.
5. Press the Navigation keys to
change the direction.
Browse the web
Using a built-in WAP (Wireless Access Protocol)
browser, you can get easy access to the wireless
web to receive a variety of up-to-date information
and services and to enjoy downloads of web
contents.
Launch the
browser
In Idle mode, press and
select
Internet →
homepage
Go to
.
Page 20
Navigate the
web
Use Contacts
Add an entry
• To scroll through browser
items, press [Up] or [Down].
•To select an item, press .
• To return to the previous
page, press <
• To use browser options, press
<
Options
To the phone’s memory:
1. In Idle mode, enter a phone
number.
2. Press <
Save to Contacts → Phone
→ New →
3. Specify the contact
information: First name, Last
name, Work Email, Home
Email, Group, Homepage,
Birthday, and More
information (Job title,
Department, Company,
Nickname, and Notes).
4. Press <
Save
to save the entry.
Back
>.
Options
Options
> and select
a number type.
> and select
>.
Find an entry
To the USIM/SIM card:
1. In Idle mode, enter a phone
number.
2. Press <
3. Specify the contact
4. Press to save the entry.
1. In Idle mode, press
2. Select an entry.
3. Select a number and press
Options
Save to Contacts → SIM →
New
.
information, depending on
your card type: Name, Phone
number, Group, and Location.
<
Contacts
[ ] to d ial , or <
access options.
> and select
>.
Options
> to
Step outside the phone
17
Page 21
Step outside the phone
Create and
send your
name card
Send messages
Send a text
message (SMS)
18
1. In Idle mode, press and
select
Contacts → My name
card
.
2. Specify your contact
information.
3. Press <
4. To send the name card to
5. Press <
1. In Idle mode, press <
2. Enter the message text.
3. Press .
4. Enter destination numbers.
5. Press to send the
Options
Save
to save the name card.
other people, access the
name card
Options
Send name card →
sending method you want.
and select
Text message
message.
> and select
menu again.
> and select
the
Msg.
Create new →
.
My
>
Send a
multimedia
message
(MMS)
1. In Idle mode, press <
and select
Multimedia message
2. Enter the message subject.
3. Select
4. Enter the message text and
press .
5. Select
6. Add a media file.
7. Press <
Send
8. Enter destination numbers or
e-mail addresses.
9. Press to send the
message.
Create new →
Text
.
Picture or Audio
Options
.
Msg.
>
.
.
> and select
Page 22
Send files by
MMS
1. In Idle mode, press <
and select
File messenger
2. Enter the message subject.
3. Move to the
4. Enter the message text.
5. Move to the
6. Press <
Add files, Add name card
or
7. Select images, videos,
sounds, name cards,
schedule items, or tasks.
8. Press <
Attach
9. Press .
10. Enter destination numbers
e-mail addresses.
11. Press to send the
message.
Create new →
Message
Attach files
Options
Add v-calendar
Options
.
Msg.>
.
field.
line.
> and select
.
> and select
Send an e-mail
,
1. In Idle mode, press <
and select
Email
2. Enter the e-mail subject.
3. Move to the
4. Enter the e-mail text.
5. Move to the
6. Press <
Add files, Add name card
or
7. Select images, videos,
sounds, name cards,
schedule items, or tasks.
8. Press <
Attach
9. Press .
10. Enter e-mail addresses.
11. Press to send the e-mail.
Create new →
.
Message
Attach files
Options
Add v-calendar
Options
.
Msg.>
field.
line.
> and select
.
> and select
Step outside the phone
,
19
Page 23
Step outside the phone
View messages
View a text
message
View a
multimedia
message
When a notification appears:
1. Press <
2. Select a message from the
From the Inbox:
1. In Idle mode, press <
2. Select a text message ( ).
When a notification appears:
1. Press <
2. Press <
3. Select a message from the
From the Inbox:
1. In Idle mode, press <
2. Select an MMS message
View
Inbox.
and select
View
Options
Retrieve
Inbox.
and select
().
>.
Inbox
>.
.
Inbox
Msg.
Msg.
>
>
.
> and select
.
View an e-mail
1. In Idle mode, press <
and select
2. Press <
Download
3. Select an e-mail or header.
4. If you selected a header,
press <
Retrieve
Email inbox
Options
.
Options
.
Msg.
.
> and select
> and select
Use Bluetooth wireless
Your phone is equipped with Bluetooth technology
which enables you to connect the phone wirelessly
to other Bluetooth devices and exchange data with
them, talk hands-free, or control the phone
remotely.
Turn on
Bluetooth
Search for and
pair with a
Bluetooth
device
In Idle mode, press and select
Settings → Connectivity →
Bluetooth → Activation → On
1. In Idle mode, press and
select
Settings →
Connectivity → Bluetooth
→ My devices → Search
new device
2. Select a device.
.
>
.
20
Page 24

Send data
Receive data
3. Enter a Bluetooth PIN code or
the other device’s Bluetooth
PIN code, if it has, and press
<OK>.
When the owner of the other
device enters the same code,
the pairing is complete.
1. Access an application,
Contacts, File manager
Organiser
.
, or
2. Select the item you want to
send.
3. Press <
Options
> and select
Send (name card
,
schedule, task, and etc.) →
Via bluetooth
.
4. Select a device.
5. If necessary, enter the
Bluetooth PIN and press
<OK>.
To receive data via Bluetooth,
your phone’s Bluetooth feature
must be active.
If necessary, press <
Yes
> to
confirm the reception.
Use a memory card
You can use the supplied memory card to enlarge
your phone’s capacity.
Important
memory card
information
• Frequent erasing and writing will
shorten a memory card’s
lifespan.
• Do not remove a memory card
from the phone or turn off the
phone while data is being
accessed or transferred. This
could result in loss of data and/
or damage to the card or phone.
• Do not subject memory cards to
strong shocks.
• Do not touch memory card
terminals with your fingers or
metal objects. If dirty, wipe the
card with a soft cloth.
• Keep memory cards away from
small children or pets.
• Do not expose memory cards in
a place subject to electro static
discharge and/or electrical
noise.
• Use the memory card supplied
with your phone or ones
purchased from a Samsung
dealer.
Step outside the phone
21
Page 25
Step outside the phone
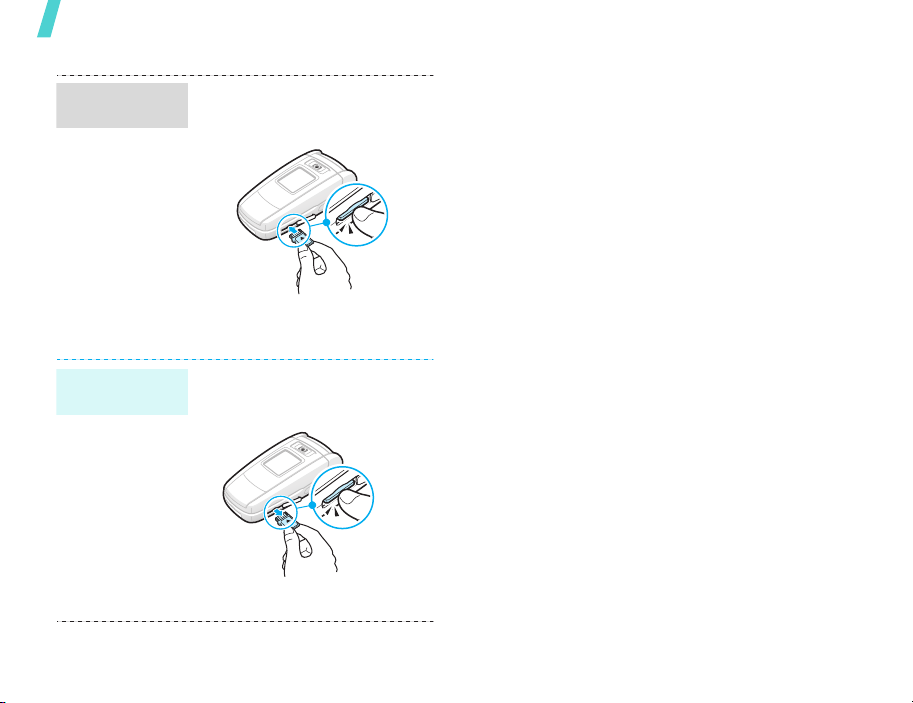
Insert a
memory card
Remove the
memory card
22
1. Slide a memory card into the
memory card slot, with the
label side face down.
2. Press the card until it locks
into place.
1. Press the memory card so
that it is disengaged from the
phone.
2. Slide the card out of the slot.
Page 26
Enter text
ABC, T9, Number, and Symbol mode
You can enter text for some features such as
Messages, Phonebook, or Organiser, using ABC
mode, T9 mode, Number mode, and Symbol mode.
Changing the text input mode
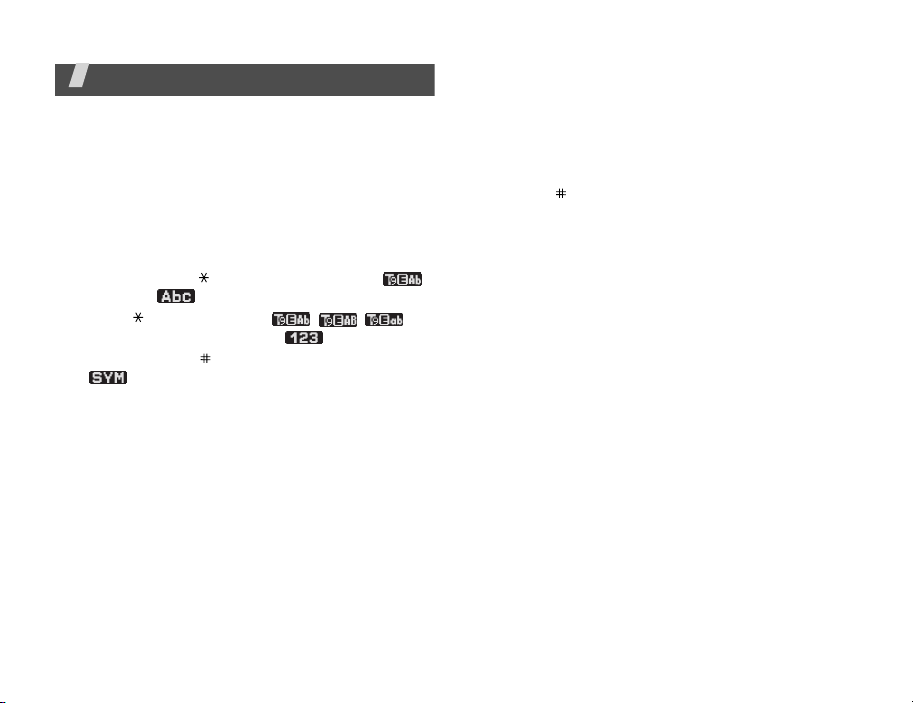
The text input mode indicator displays when the
cursor is in a text input field.
• Pr ess a nd hold [ ] to switch between T9 ( )
and ABC ( ) modes.
• Press [ ] to change case ( / / ) or
to switch to Number mode ( ).
• Press and hold [ ] to switch to Symbol mode
().
Using T9 mode
T9 is a predictive text input mode that allows you to
key in any character using single keystrokes.
Entering a word in T9 mode
1. Press [2] to [9] to start entering a word. Press
each key once for each letter.
For example, press [4], [3], [5], [5], and [6] to
enter Hello in T9 mode.
T9 predicts the word that you are typing, and it
may change with each key that you press.
2. Enter the whole word before editing or deleting
characters.
3. When the word displays correctly, go to step 4.
Otherwise, press [0] to display alternative word
choices for the keys that you have pressed.
For example, Of and Me use [6] and [3].
4. Press [ ] to insert a space and enter the next
word.
Tips for using T9 mode
• Press [1] to enter periods or apostrophes
automatically.
• Press [Left] or [Right] to move the cursor.
• Press [C] to delete characters one by one. Press
and hold [C] to clear the entire display.
Adding a new word to the T9 dictionary
This feature may not be available for some
languages.
1. Enter the word that you want to add.
2. Press [0] to display alternative words for your
key presses. When there are no more alternative
words,
Spell
displays on the bottom line.
3. Press <
4. Enter the word you want using ABC mode and
press <
Spell
Add
>.
>.
23
Page 27
Enter text
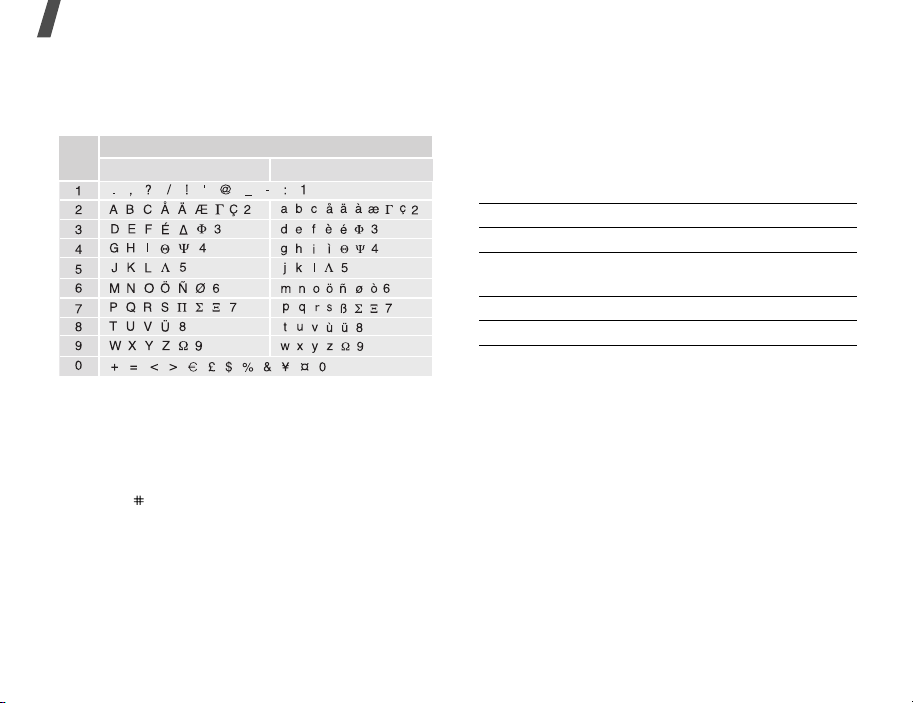
Using ABC mode
Press the appropriate key until the character you
want appears on the screen.
Key
Tips for using ABC mode
• To enter the same letter twice or to enter a
different letter on the same key, wait for the
cursor to move to the right automatically or
press [Right]. Then, enter the next letter.
• Press [ ] to insert a space.
• Press [Left] or [Right] to move the cursor.
•Press [C] to delete characters one by one. Press
and hold [C] to clear the entire display.
Characters in order displayed
Upper case Lower case
Using Number mode
Number mode enables you to enter numbers. Press
the keys corresponding to the digits you want.
Using Symbol mode
Symbol mode enables you to insert symbols.
To Press
display more symbols [Up] or [Down].
select a symbol the corresponding
number key.
clear the symbol(s) [C].
insert the symbol(s) <OK>.
24
Page 28
Call functions
Advanced calling features
Making a call
1. In Idle mode, enter the area code and phone
number.
2. Press [ ].
• Press [C] to clear the last digit or press and
hold [C] to clear the whole display. You can
move the cursor to edit an incorrect digit.
• Press and hold
numbers.
Making an international call
1. In Idle mode, press and hold [0]. The +
character appears.
2. Enter the country code, area code, and phone
number, then press [ ].
Redialling recent numbers
1. In Idle mode, press [ ] to display the list of
recent numbers.
2. Scroll to the number you want and press [ ].
Making a call from Contacts
Once you have stored a number in Phonebook, you
can dial the number by selecting it from
Phonebook.p. 31
[]
to enter a pause between
You can also use the speed dial feature to assign
your most frequently called numbers to specific
number keys.
p. 33
Dialling a number from the USIM/SIM card
1. In Idle mode, enter the location number for the
phone number you want and press [ ].
2. Find the number you want.
3. Press <
Call
<
V-Call
> or [ ] to make a voice call, or
> to make a video call.
Ending a call
Press [ ] or close the phone.
Answering a call
When you receive an incoming call, the phone rings
and displays the incoming call image.
Press [ ] or <
Tips for answering a call
• When
any key to answer a call, except for [ ] and
<
Reject
• When
call by opening the phone.p. 67
• Press <
• Press and hold [ / ] to reject an incoming call
or mute the ringer, depending on the side key
setting.p. 67
Accept
> to answer the call.
Anykey answer
>.p. 67
Active folder
Reject
is active, you can answer a
> or [ ] to reject a call.
is active, you can press
25
Page 29

Call functions
Viewing missed calls
If you have missed calls, the screen displays how
many calls you have missed.
1. Press <
2. If necessary, scroll through the missed calls.
3. Press [ ] to dial the number you want.
View
>.
Using the headset
Use the headset to make or answer calls without
holding the phone.
Connect the headset to the jack on the left side of
the phone.
The buttons on the headset work as listed below:
To Press
redial the last call the button twice.
answer a call the button.
end a call the button.
Options during a call
You can access a number of functions during a call.
Adjusting the volume during a call
Use [ / ] to adjust the earpiece volume during a
call.
Press [ ] to increase the volume level and [ ] to
decrease the volume level.
26
Placing a call on hold/Retrieving
Press <
Hold
> or <
Unhold
hold or retrieve the call.
> to place the call on
Making a second call
You can make another call if your network supports
it.
1. Press <
2. Make the second call in the normal way.
3. Press <
4. Press <
5. To end the current call, press [ ].
Hold
> to put the call on hold.
Swap
> to switch between the calls.
Options
call
to end the call on hold.
> and select
Drop →
Drop held
Answering a second call
You can answer an incoming call while already on
the phone, if your network supports it and you have
activated the call waiting feature.p. 70
1. Press [ ] to answer the call. The first call is
automatically put on hold.
2. Press <
3. Press <
4. To end the current call, press [ ].
Swap
> to switch between the calls.
Options
call
to end the call on hold.
> and select
Drop →
Drop held
Page 30
Transferring a call
You can transfer the currently active call to a caller
on hold, if your network supports it. With this
option, the two callers can talk to each other, but
you are disconnected from the call.
Press <
Options
> and select
Transfer
.
Using the loudspeaker feature
Use the speaker feature to talk and listen with the
phone a short distance away. Press <
select
Loudspeaker
or press .
Options
> and
Using a Bluetooth headset
Use an optional Bluetooth headset to talk on the
phone without holding the phone to your ear. To use
this feature, you first need to register your headset
and connect it to the phone.p. 70
Press <
Options
To switch the call back to the phone, press
<
Options
Switching off the microphone
You can temporarily switch off your phone’s
microphone so that the person on the phone cannot
hear you.
Press <
Options
To turn the microphone back on, press <
and select
> and select
> and select
> and select
Unmute
.
Switch to headset
Switch to phone
(Mute mode)
Mute
.
.
Options
.
>
Muting or sending key tones
You can turn the key tones off or on.
Press <
Options
Unmute key tone
To communicate with answering machines or
computerised telephone systems,
tone
> and select
.
must be selected.
Mute key tone
Unmute key
or
Using Phonebook
You can access the
store contacts in Phonebook.p. 31
Press <
Options
Contacts
> and select
menu to locate or
Contacts
.
Sending a text message
You can create and send a text message to other
people as well as to your current call participants.
Press <
Options
p. 41
> and select
Send text message
Sending a sequence of DTMF tones
Dual tone multi-frequency (DTMF) tones are the
tones used in phones for tone dialling.
You can send DTMF tones as a group after entering
the entire number you need to send or retrieving a
number from Phonebook. This feature is helpful for
entering a password or an account number when
you call an automated system, like a banking
service.
1. When connected with a teleservice system, press
<
Options
> and select
Send DTMF
.
Call functions
.
27
Page 31

Call functions
2. Enter the number you need to send and press
<
Send
>.
Adding a memo
You can add a memo during a call.
Press <
Options
> and select
Memo
.p. 59
Making a multi-party call
Use this feature to allow as many as six people to
join a multi-party call, or conference call.
Your service provider must support multi-party calls
for you to use this feature.
Setting up a multi-party call
1. Call the first participant.
2. Call the second participant. The first call is
automatically put on hold.
3. Press <
4. If desired, call another person or answer an
5. Press <
6. Repeat steps 4 and 5 as desired.
Options
participant is added to the multi-party call.
incoming call.
Options
> and select
> and select
Join
Join
. The first
.
Having a private conversation with one
participant
1. Press <
2. Select a name or number from the participant
list.
Options
> and select
Split
.
You can talk privately with that person, while the
other participants converse with each other.
3. To return to the multi-party call, press
<
Options
> and select
Join
.
Dropping one participant
1. Press <
2. Select a name or number from the participant
3. Press [ ] to end the multiparty call.
Options
list.
The participant is dropped from the call, but the
call continues with the other parties.
> and select
Drop call
.
Using the video call feature
In a 3G (UMTS) service area, your phone can make
or receive a video call which allows you to see
another person on the screen during a conversation.
The other person’s phone must support the video
call feature.
Making a video call
1. In Idle mode, enter the area code and phone
number.
2. Press [ ].
Answering a video call
When you receive a video call, answer a video call as
receiving a voice call. Press <
the caller to see you.
Show me
> to allow
28
Page 32
Using video call options
During a video call, press <
following options:
•
Loudspeaker/Loudspeaker off
Loudspeaker on or off.
•
Switch to headset/Switch to phone
the call to a Bluetooth headset or back to the
phone.
•
Mute camera
•
Mute voice
•
Mute camera & voice
the microphone.
•
Mute key tone
•
Zoom
•
Brightness
•
Effects
•
Hide information/Show information
display information about the video call.
•
Send DTMF
(DTMF) tones as a group after entering the entire
number you need to send or retrieving a number
from Phonebook.
•
Video quality
camera.
•
End call
: turn off the camera.
: turn off the microphone.
: display the zoom control bar.
: display the brightness control bar.
: change the colour tone of the image.
: send Dual tone multi-frequency
: change the image quality of the
: end the video call.
Options
: turn off the camera and
: turn off the key tones.
> to access the
: turn the
: switch
: hide or
Menu functions
All menu options listed
Call log
The
have dialled, received, or missed, the length of your
calls, and the cost of your calls.
To access this menu, press in Idle mode and
select
Missed calls
This menu displays the most recently received calls
that you did not answer.
Accessing a call record
1. Scroll to the name or number you want. The call
2. Press [ ] to dial the number, or to view the
Using call record options
While viewing the call list, press <
access the following options:
•
•
•
(Menu 1)
Call log
menu enables you to view the calls you
Call log
.
(Menu 1.1)
list also shows the call repetition.
details of a call.
Options
Details
: access information about the selected
call record.
Voice call
Video call
: place a voice call.
: place a video call.
> to
29
Page 33

Menu functions
•
Use number
normal dialling screen.
•
Save to Contacts:
Phonebook.
•
Send message
number using SMS, MMS, or file messenger.
•
Delete
•
Delete all
Dialled calls
This menu displays the most recent calls you have
dialled.
Received calls
This menu displays the most recent calls you have
received.
Current contacts
This menu displays all of the contacts you have
dialled, received, or missed.
Delete all
Use this menu to delete all of the records in each call
type.
1. Press to check the call type(s) to clear.
2. Press <
3. Press <
: paste the selected number to the
save the selected number in
: send a message to the selected
: delete the call record.
: delete all records.
(Menu 1.2)
(Menu 1.3)
(Menu 1.5)
Delete
>.
Yes
> to confirm the deletion.
(Menu 1.4)
Data calls
Use this menu to view the total amount of sent or
received data.
To reset a counter or all counters, press <
and select
Calls cost
This network feature displays the cost of calls. This
menu is available only if your USIM/SIM card
supports this feature. Note that this is not intended
to be used for billing purposes.
•
Total costs
calls. If the total cost exceeds the maximum cost
set in
counter before you can make another call.
•
Last call cost
•
Max cost
Press <
•
Reset call cost
•
Edit cost limit
authorised for your calls.
•
Setup currency
applied when the cost of your call is calculated.
(Menu 1.6)
Reset
or
Reset all
(Menu 1.7)
: check the total cost of all your
Edit cost limit
: check the cost of your last call.
: check the maximum cost set.
Options
> to access the following options:
: reset the cost counters.
: set the maximum cost
: set the price per unit that is
.
, you must reset the
Options
>
30
Page 34

Calls time
This menu displays the time log for voice and video
calls made and received. The actual time invoiced by
your service provider will vary.
•
calls dialled.
•
voice calls received.
•
calls dialled.
•
video calls received.
To reset a counter or all counters, press <
and select
Contacts
You can store phone numbers on your USIM/SIM
card and in your phone’s memory. The USIM/SIM
card and phone’s memory are physically separate,
but they are used as a single entity called
Phonebook. In the
your Phonebook entries.
To access this menu, press in Idle mode and
select
(Menu 1.8)
Total dialled
Total received
Total dialled
Total received
Reset
or
(Menu 2)
Contacts
Contacts
.
: check the total length of voice
: check the total length of
: check the total length of video
: check the total length of
Reset all
.
menu, you can manage
Options
>
Search contact
Use this menu to search for numbers in Phonebook.
(Menu 2.1)
Finding an entry
1. Enter the first few letters of the name that you
want to find.
2. Select the name you want from the list.
3. Press [ ] to dial the number, or to edit the
contact information.
Using contact options
While viewing the contact list, press <
access the following options:
•
Details
: access the contact information.
•
Edit
: edit the contact information.
•
Video call
•
New
•
Delete
•
Search groups
•
Service number
preset by your service provider.
•
Delete all
: make a video call.
: add a new contact.
: delete the contact.
: access the caller group list.
: access service numbers
: delete all contacts.
Options
> to
Menu functions
Contacts
(Menu 2)
31
Page 35

Menu functions
While viewing details of a contact, press <
to access the following options:
•
Edit
: edit the contact information.
•
Send message
number using SMS, MMS, or file messenger.
•
Special options
Picture
a call from the number.
Ring tone
to a call from the number.
Msg. alert tone
alert you an incoming message from the number.
•
Add to speed dial
a speed dial number.
•
Video call
•
Copy to SIM/Copy to phone
to the phone’s memory or SIM card or vice
versa.
•
Send name card
e-mail, file messenger, Bluetooth, or infrared
port.
•
Use number
normal dialling screen.
•
Delete
: delete the contact.
New contact
Use this menu to add a new contact to Phonebook.
32
: send a message to the selected
: set the following options:
: assign a caller ID image to alert you to
: assign a ringer melody to alert you
: select a melody or tone to
: set the selected number as
: make a video call.
: send the contact via SMS,
: paste the selected number to the
(Menu 2.2)
Options
: copy the number
>
Storing a number in the phone’s memory
1. Select
2. Press [Down] and change the settings or enter
3. Press <
Phone
.
information about the contact.
•
First name/Last name
•
Phone number
number.
•
Work email
address.
•
Home email
address.
•
Group
•
Homepage
•
Birthday
•
More information
department, company, nickname, and
additional note of the person.
Options
options to add additional information:
•
Special options
call ringer, or message ringer for the contact.
•
Add phone number
category to the contact.
•
Delete phone number
selected number category from the contact
entry.
•
Change type
the contact entry.
•
Mark video call
a video call number.
: assign a business e-mail
: assign a personal e-mail
: assign a caller group.
: enter a homepage address.
: enter the person’s birthday.
> and access the following
: change the number type from
: assign a name.
: add a mobile phone
: enter the job title,
: assign a caller ID image,
: add a number
: remove the
: set the selected number as
Page 36
4. Press <
Options
> and select
Save
.
Storing a number on the USIM/SIM card
1. Select
2. Press [Down] and change the settings or enter
3. Press to save the contact.
Groups
Use this menu to organise your contacts in caller
groups.
SIM
.
information about the contact:
•
Name
•
•
•
•
: assign a name.
Phone number
Email
(For USIM): assign an e-mail address.
Group
(For USIM): assign a caller group.
Location
When you are using a USIM card, press
<
Options
additional numbers.
(Menu 2.3)
: enter a phone number.
: assign a location number.
> and select
Add item
to enter
Adding members to a caller group
1. Select a group.
2. Press to check the contacts you want.
3. Press <
Save
>.
Managing caller groups
From the group list, press <
following options:
•
View members
selected group.
Options
: display the members of the
> to access the
•
Add member
group.
•
Add group
•
Rename group
•
Delete group
•
Delete all groups
default groups.
Speed dial
Use this menu to assign speed dial numbers (2 to 9)
to eight of your most frequently called numbers.
: add contacts to the selected
: add a new group.
: change the group name.
: delete the selected group.
: delete all groups including
(Menu 2.4)
Assigning speed dial entries
1. Select a key location from 2 to 9. Key 1 is
reserved for your voice mail server.
2. Select the contact you want from the contact list.
3. Scroll to a number, if it has more than one
number.
4. Press <
Managing speed dial entries
While viewing the Speed dial screen, press
<
Options
•
•
•
•
•
Select
>.
> to access the following options:
Add
: assign a number to an unassigned key.
Details
: display details about the speed dial
entry.
Video call
Change
assigned key.
Remove
: make a video call.
: assign a different number to an
: clear the speed dial setting.
Menu functions
Contacts
(Menu 2)
33
Page 37

Menu functions
Dialling speed dial entries
Press and hold the appropriate key in Idle mode.
My name card
Use this menu to create your name card and send it
to other people.
(Menu 2.5)
Saving your name card
The procedure for creating your name card is the
same as the one for saving a number in the phone’s
memory.p. 32
Using name card options
After saving your name card, press <
access the following options:
•
Edit
: edit the name card.
•
Send name card
e-mail, file messenger, Bluetooth, or infrared
port.
•
Delete
: delete the name card.
Copy all
Use this menu to copy all of the contacts stored on
the
versa.
(Menu 2.6)
USIM/
SIM card to the phone’s memory, or vice
: send the name card via SMS,
Options
> to
Own number
Use this feature to check your phone numbers, or to
assign a name to each of the numbers. Changes
made here do not affect the actual subscriber
numbers on your
Service number
Use this menu to view the list of SDNs assigned by
your service provider, including emergency
numbers, directory enquiries, and voicemail
numbers.
1. Scroll to the number you want.
2. Press <
Settings
Use this menu to change the default settings for
Phonebook entries.
•
Viewing settings
list is sorted by last name or by first name.
•
Default storage settings
memory location to save contacts. If you select
Optionally
memory location when saving a number.
Memory status
Use this menu to view the number of contacts you
have stored and total number of contacts you can
store in Phonebook.
(Menu 2.7)
USIM/
SIM card.
(Menu 2.8)
Dial
> or [ ].
(Menu 2.9)
: select whether the contact
, the phone will ask you to select a
(Menu 2.0)
: select a default
34
Page 38
Applications
Use this menu to play media files, to record a voice
memo, to set time zone, or to use the phone as a
calculator or converter.
To access this menu, press in Idle mode and
select
Applications
SAT
(Menu 3.1)
This menu is available if you use a SIM card that
supports SIM Application Tool Kit menus and
provides additional services, such as news, weather,
sports, entertainment, and location services.
Available services may vary, depending on your
service provider’s plans.
For details, see your
contact your service provider.
Media player
Use this menu to enjoy media files, such as video
clips and music files. You can also play streaming
contents.
(Menu 3)
.
USIM/
(Menu 3.2)
SIM card instructions or
Downloading or receiving media files
Use this method to save media files to your phone:
• Download from the wireless webp. 39
• Download from a computer using Samsung PC
Studio II Samsung PC Studio II User’s Guide
• Receive via IrDA or Bluetooth p. 72, p. 70
• Copy files to the supplied memory card and
insert the card into the phone
Creating the play list
Add the media files to the play list so you can play
them.
1. From the media player screen, press .
2. Press <
3. Select
4. Check the files you want or scroll to the folder
5. Press <
6. To play files, press .
Options
Folder
you want.
Add
> and select
or
Files
> or <
Select
Add
.
.
>.
Playing media files
1. From the media player screen, press .
2. Select a file. The file plays.
During playback, you can use the following keys:
Keys Function
Pauses or resumes playback.
Left Goes to the previous file. Moves backward
Right Skips to the next file. Skips forward in a
Up Opens the play list.
Down Stops playback.
in a file when held down.
file when held down.
/ Adjusts the volume.
Menu functions
Applications
(Menu 3)
35
Page 39

Menu functions
Using media player options
During playback, press <
following options:
•
Pause/Resume
•
Stop
: stop playback.
•
Send
: send the file via MMS, e-mail, file
messenger, Bluetooth, or infrared port. You can
also send the selected file to the online media
album, if provided.
•
Add to play list
current play list.
•
Open play list
•
Activate key
key for the selected DRM file expires.
•
Reactive key
when the key for the selected DRM file has not
expired.
•
Go to File Manager
•
Hidden from Bluetooth
other bluetooth devices cannot access it.
•
Visible to Bluetooth
Bluetooth devices.
•
Show controller/Hide controller
hide the control bar of Media player.
•
Details
: access the file properties.
•
Player settings
playing media files.
Play options
Options
: pause or resume playback.
: add the selected file to the
: display the play list.
: get a new license key when the
: get another license key even
: go to the
: change the default settings for
: select a repeat mode.
> to access the
Videos
: hide the file so that
: share the file with other
: display or
folder.
Volume
: select a volume level.
Controller
Media player.
Audio player skin
•
VOD settings:
used for accessing a video streaming server. You
can also make or edit a profile.p. 73
•
Key management
have acquired.
: display or hide the control bar of
: select a skin image.
select a connection profile to be
: manage license keys you
Using play list options
From the Media player screen, press [Up] to access
the play list and press <
following options:
•
Play
: play the currently selected file.
•
Add
: add files or a folder to the play list.
•
Remove
files from the current play list.
•
Move
want within the current play list or another play
list.
•
Copy
current play list or another play list.
•
Delete list
•
Rename list
•
New list
: remove the selected file or all of the
: move the selected file to the position you
: make a copy of the selected file in the
: delete the selected play list.
: add a new play list.
Options
: change the name of the play list.
> to access the
36
Page 40
Voice memo
Use this menu to record voice memos.
(Menu 3.3)
Recording a voice memo
1. Press to start recording.
2. Speak into the microphone.
Press to pause or resume the recording.
3. When you finish, press <
memo is automatically saved.
Stop
>. The voice
Playing a voice memo
1. From the voice recorder screen, press
<
Options
2. Select the
3. Select a voice memo. The memo plays.
On the player screen, you can use the following
keys:
keys Function
Up Switches to Play mode () or ba ck to
Left Moves backward.
Right Skips forward.
/ Adjusts the volume.
Down stops playback.
> and select
Voice memos
Starts playback.
Record mode ( ).
Go to sounds
folder.
.
Using voice memo options
From the player screen, press <
the following options:
•
Play/Resume
playback.
•
Stop
: stop playback.
•
Record
•
Send
: send the voice memo via MMS, e-mail,
file messenger, Bluetooth, or infrared port.
•
Go to sounds
•
Rename
•
Delete
•
Hidden from bluetooth
so that other Bluetooth devices cannot access it.
•
Visible to bluetooth
with other Bluetooth devices.
•
Details
voice memo.
•
Record settings
for recording a voice memo.
Default name
voice memo.
Recording time:
time.
: play the voice memo or resume
: record a new voice memo.
: access the
: change the name of the voice memo.
: delete the selected voice memo.
: access information about the selected
: change the default settings
: change the default prefix of the
select a maximum recording
Options
Sounds
: hide the voice memo
: share the voice memo
> to access
folder.
Menu functions
Applications
(Menu 3)
37
Page 41

Menu functions
World clock
Use this menu to set your local time zone and find
out what time it is in another part of the world.
(Menu 3.4)
Setting your local time zone
1. From the world map, press [Left] or [Right] to
select the city that corresponds to your home
time zone. As the time line moves, the time and
date of the given zone display.
2. Press to save the time zone.
Viewing and setting a foreign time zone
1. From the world map, press [Down].
2. Press [Left] or [Right] to select the foreign time
zone you want to view.
3. Press to save the time zone.
Applying Daylight Savings Time
1. From the world map, press <
select
Summer time
2. Press to check the time zone(s) you want.
3. Press <
4. Press <
Calculator
Use this menu to perform basic arithmetic functions
such as addition, subtraction, multiplication, and
division.
Select
Options
(Menu 3.5)
>.
> and select
Options
Save
> and
.
.
Performing a calculation
1. Enter the first number.
Press [ ] to include a decimal point.
2. Enter the operation for your calculation by
pressing the Navigation keys.
3. Enter the second number.
4. Press to view the result.
Using calculator options
Press <
Options
•
Equal
•
Recent calculation
calculated.
•
Save to memory
calculator memory.
•
Recall memory
•
Clear memory
Converter
Use this menu for common conversions, such as
currency and temperature.
> to access the following options:
: view the result.
: display the last result you
: save a value into the
: retrieve the saved value.
: clear the saved values.
(Menu 3.6)
Performing a conversion
1. Select the converter type you want.
2. Press [Left] or [Right] to select the original unit
and press [Down].
3. Enter the value to be converted.
• Press [ ] to insert a decimal point.
38
Page 42
• Press [ ] to change the temperature to
above zero (+) or below zero (-).
4. Press [Down].
5. Press [Left] or [Right] to select the unit you want
to convert to.
The equivalent value for the amount you entered
displays.
Using converter options
Press <
Options
•
Clear
•
Reverse
•
Currency rates
Internet
The Wireless Application Protocol (WAP) browser on
your phone allows you to access the wireless web.
Using the WAP browser, you can access up-to-theminute information and a wide variety of media
contents, such as wallpapers, ring tones, and music
files.
To access this menu, press in Idle mode and
select
Internet
Go to homepage
You can launch the WAP browser and access the
homepage of the WAP service provided by your
service provider.
> to access the following options:
: clear the current values.
: reverse the conversion.
: display the currency rate list.
(Menu 4)
.
(Menu 4.1)
Navigating the WAP browser
In the WAP browser:
To Press
scroll through browser items [Up] or [Down].
select a browser item .
return to the previous page <
Using browser menu options
From any WAP page, press <
the following browser options:
•
Go to homepage
•
Enter URL
the web page you want to access.
•
Reload
: reload the current page with updated
information.
•
Add favorite
bookmark list.
•
Favorites
•
History
: show URLs previously visited.
•
Send Link
messenger.
•
Saved pages
•
Save
: save the image of the current WAP page
or the current page.
: go back to the homepage.
: manually enter the URL address of
: add the current page to your
: access the bookmark list.
: send the URL via SMS, e-mail, or file
: access the saved web page list.
Back
Options
>.
> to access
Menu functions
Internet
(Menu 4)
39
Page 43
Menu functions
•
Advanced
access the browser settings.
Search text
phrase from the current WAP page.
Clear history
history.
Clear cookies
Clear cache
cache.
Details
page.
Browser settings
multimedia, browser display, security, and
certificates.
Network settings
to be used for connecting to the Internet. You
can also make or edit a profile.p. 73
Exiting the WAP browser
Press [ ] to exit the browser.
Enter URL
You can enter a URL of a WAP page in order to
quickly access the page.
Favorites
You can add and manage the URLs of the WAP pages
you frequently access as bookmarked items. You can
also manage URLs you have bookmarked while
navigating the Internet.
40
: clear browser information and
: search for a specific word or
: delete the URLs stored in the
: delete cookies.
: delete information stored in the
: access information about the current
: change the settings for
: select a connection profile
(Menu 4.2)
(Menu 4.3)
Adding a new bookmark
1. Press <
2. Enter a URL and press .
3. Enter a name for the item and press <OK>.
4. Press to save the item.
Using boomark options
From the bookmark list, press <
the following options:
•
•
•
•
•
•
•
History
You can access the list of pages you have accessed
recently.
Browser settings
Use this menu to change the settings for
multimedia, browser display, security, and
certificates.
New
> and select
Open
: access the page of the selected
bookmark.
Details
: access the details of the bookmark.
Send link
or file messenger.
New
Edit
Move
Delete
bookmarks.
: send the bookmark via SMS, e-mail,
: add a new bookmark or folder.
: edit the selected bookmark.
: move the bookmark to another folder.
: delete the selected bookmark or all
(Menu 4.4)
Favorite
Options
(Menu 4.5)
.
> to access
Page 44
Network settings
Use this menu to select a connection profile to be
used for connecting to the Internet. You can also
make or edit a profile.p. 73
Messages
Use the
Messages
messages, multimedia messages, and e-mails. You
can also use WAP push message, Voice mail, and
Cell broadcast message features.
To access this menu, press in Idle mode and
select
Messages
Create new
Use this menu to create and send text messages,
multimedia messages, or e-mails. You can also send
files using MMS.
Text message
Short Message Service (SMS) allows you to send or
receive text messages.
The maximum number of characters allowed in a
short message varies by your service provider. If
your message exceeds the maximum number of
characters, the phone will split the message.
(Menu 4.6)
(Menu 5)
menu to send and receive text
or press <
(Menu 5.1)
(Menu 5.1.1)
Msg.
> in Idle mode.
1. Enter your message.
Press <
Options
text template, contact entry, or bookmark.
2. Press .
3. Enter a destination number.
To send the message to more than one recipient,
press [Down] and fill in additional destination
fields.
4. Press to send the message.
Multimedia message
Multimedia Message Service (MMS) delivers
messages containing a combination of text, image,
video, and audio, from phone to phone or from
phone to e-mail.
1. Enter the message subject.
2. Select the
3. Enter the message text and press .
4. Select the
5. Select an image or audio file and press <
The maximum size allowed for an MMS
message can differ depending on the country.
If you cannot attach another file, add a new
page.
> and select
Text
line.
Picture
(Menu 5.1.2)
or
Audio
Insert
line.
to retrieve a
Add
>.
Menu functions
Messages
(Menu 5)
41
Page 45

Menu functions
6. Press <
7. When you have finished, press .
8. Enter a phone number or e-mail address.
9. Press to send the message.
42
Options
options:
•
Preview
•
Edit text/Change file
picture, or sound clip.
•
Delete text/Delete file
text, picture, or sound clip.
•
Save to Drafts
Drafts
•
Add page
by pressing [Left] or [Right] on the message
screen.
•
Move page
next or previous page.
•
Delete page
•
Edit style
-
This page
change font colour and style for the
selected page.
-
All page
and page layout.
•
Save as template
template in the
folder.
To send the message to more than one recipient,
press [Down] and fill in additional destination
fields.
> to access the following
: display the message you created.
: edit the added text,
: delete the added
: save the message in the
box.
: add a page. Move to each page
: move the current page to the
: delete the added page.
: change the page profile.
: set the page duration and
: change the background colour
: save the message as a
Multimedia templates
File messenger
Use this menu to send multiple media files by
attaching them to an MMS message.
1. Enter a subject in the
2. Move to the
message text.
3. Select the
4. Scroll to a media file folder and press to
check files.
5. Press <
6. Press <
options:
•
Attached file list
attached.
•
Add name card
format.
•
Add v-calendar
•
Delete all attachments
files.
•
Save to Drafts
box.
7. When you have finished, press .
8. Enter a phone number or e-mail address.
To send the message to more than one recipient,
press [Down] and fill in additional destination
fields.
9. Press to send the message.
(Menu 5.1.3)
Message
Attach files
Options
Options
Subject
field and enter the
> and select
> to access the following
: display the file list you
: add a contact as a Vcard
: add a calendar memo.
: save message in the
line.
line.
Attach
: delete all attached
.
Drafts
Page 46
Email
(Menu 5.1.4)
You can send and receive e-mails that include text,
audio, and images. To use this feature, you need to
subscribe to an e-mail service and set up your
e-mail account.p. 51
1. Enter the e-mail subject.
2. Move to the
Message
field and enter the
message text.
3. Select the
Attach files
line.
4. Scroll to a media file folder and press to
check files.
5. Press <
6. Press <
Options
Options
> and select
Attach
.
> to access the following
options:
•
Attached file list
: display the file list you
attached.
•
Add name card
: add a contact as a Vcard
format.
•
Add v-calendar
•
Delete all attachments
: add a calendar memo.
: delete all attached
files.
•
Save to Drafts
: save message in the
Drafts
box.
7. When you have finished, press .
8. Enter an e-mail address.
To send the e-mail to more than one recipient,
press [Down] and fill in additional destination
fields.
9. Press to send the e-mail.
Inbox
(Menu 5.2)
This folder stores all types of messages you have
received, except for e-mails. MMS, SMS, voicemail,
WAP push messages from the WAP server, and
configuration messages are stored here.
Configuration messages, which are sent from your
service provider, contain network parameters to let
you easily apply network settings to your phone.
Viewing a message at the time of its receipt
When a message has been received, the phone
alerts you by:
• Displaying a message icon and text notification
• Sounding or vibrating, depending on the
message alert setting
To read a message immediately, press <
select a message from the Inbox. To read it later,
press <
Exit
>.
For an MMS message, press <
Retrieve
. The message is downloaded from the
Options
MMS server to the phone’s memory.
Viewing a message in Inbox
On the message list, the following icons are
available, depending on the message type:
• SMS • MMS
• MMS notification • Configuration
• WAP push • USIM/SIM
View
> and
> and select
Menu functions
Messages
(Menu 5)
43
Page 47
Menu functions
• Depending on the DRM (Digital Rights
Management), you may not be able to forward
some messages. They are indicated by the
icon.
• An ! icon shows that a message was sent with
high priority. A grey icon means that the
message is of low priority.
While viewing the message list, press <
access the following options:
•
View
: display the message. For MMS
notifications, you can access the message
properties.
•
Reply
: send a reply to the sender.
•
Reply to all
recipients.
•
Forward
•
Install
message to the phone.
•
Sort by
list.
•
Retrieve
server.
•
Reject
•
Delete
•
Delete all
•
Details
44
: send a reply to the sender and all
: forward the message to other people.
: apply the configuration value in the
: change the sort order in the message
: retrieve the MMS message from the
: reject the MMS message.
: delete the message.
: delete all messages.
: access the message properties.
Options
> to
Using message options
While viewing a message, press <
access the following options:
SMS messages
•
Reply
: reply to the sender.
•
Forward
•
Call back
•
Save to Contacts
e-mail addresses from the message and save
them in Phonebook.
•
Move to SIM/Move to phone
message between the phone’s memory and the
USIM/SIM card.
•
Delete
MMS messages
•
Play:
•
Call/Go to URL/Go to RTSP
highlighted phone number or access the
highlighted web link.
•
Add to bookmarks
link to the bookmark list.
•
Create email
e-mail address.
•
Create multimedia message
message to the highlighted e-mail address.
•
Reply
•
Reply to all
recipients.
: forward the message.
: dial the phone number of the sender.
: extract phone numbers or
: delete the message.
play the message.
: save the highlighted web
: send an e-mail to the highlighted
: send a reply to the sender.
: send a reply to the sender and all
Options
: move the
: dial the
: send an MMS
> to
Page 48

•
Forward
person.
•
Send to Album
media album, if provided.
•
Call back
•
Save as template
template in the
•
Save files
into your phone’s memory or the memory card.
•
Save to Contacts
e-mail addresses from the message and save
them in Phonebook.
•
Delete
•
Details
WAP push messages
•
Go to URL
message.
•
Delete
Drafts
This folder stores messages you have saved to send
them at a later time while creating the message.
On the message list, press <
following options:
•
View
•
Edit
•
Send
•
Sort by
: forward the message to another
: send the message to the online
: dial the phone number of the contact.
: save the message as a
Multimedia templates
: save media items from the message
: extract phone numbers or
: delete the message.
: access the message properties.
: connect to the URL specified in the
: delete the message.
(Menu 5.3)
Options
: open the selected message.
: edit the selected message.
: send the selected message.
: change the sort order of the list.
> to access the
folder.
•
Delete
: delete the selected message.
•
Delete all
Outbox
This folder stores messages you have tried to send
or have being sent.
The following icons on the message icons indicates
the sending status:
• indicates the message is being sent.
• indicates the message is failed to send.
On the message list, press <
following options:
•
View
•
Send again
•
Edit
•
Cancel sending
•
Sort by
•
Delete
•
Delete all
•
Details
Sent box
This folder stores messages that you have sent
successfully.
On the message list, press <
following options:
•
View
: delete all messages.
(Menu 5.4)
Options
: display the selected message.
: resend the message.
: edit the selected message.
: cancel sending the message.
: change the sort order of the list.
: delete the message.
: delete all messages.
: access the message properties.
(Menu 5.5)
Options
: display the selected message.
> to access the
> to access the
Menu functions
Messages
(Menu 5)
45
Page 49
Menu functions
•
Forward
•
Sort by
•
Delete
•
Delete all
•
Details
Email inbox
This folder stores e-mails that you have received.
Viewing received e-mails
1. From the e-mail folder, press <
2. Select
server.
The phone checks for new e-mails and retrieve
received e-mails. The icons tell you the status of
each e-mail:
•: Retrieved e-mail
• : Retrieved e-mail with attachments.
• : E-mail not retrieved
3. Select an e-mail or header.
: forward the message to other people.
: change the sort order of the list.
: delete the message.
: delete all messages.
: access the message properties.
(Menu 5.6)
Options
Download
• Depending on the DRM (Digital Rights
Management), you may not be able to
forward some messages. They are
indicated by the icon.
• An ! icon shows that an e-mail was sent
with high priority. A grey icon means that
the e-mail is of low priority.
to get new e-mails from your
>.
4. If the e-mail has more than one page, press
[ / ] to scroll through pages one by one.
5. Select an attached file to view or play it.
Using e-mail options
While viewing the e-mail list or an e-mail, press
<
Options
•
•
•
•
•
•
•
•
•
•
•
> to access the following options:
View
: open the selected e-mail.
Retrieve
e-mail header from the e-mail server.
Reply
Reply to all
recipients.
Forward
Download
from the e-mail server.
Sort by
Save files
in the phone’s memory or on the memory card.
Save to Contacts
e-mail addresses from the e-mail and save them
in Phonebook.
Block:
subject to the Block list.
Delete from phone
or all e-mails from the phone’s memory.
: retrieve the body of the selected
: send a reply to the sender.
: send a reply to the sender and all
: forward the e-mail.
: retrieve new e-mails or headers
: change the sort order of the list.
: save the files attached to the e-mail
: extract phone numbers or
add the sender’s e-mail address or e-mail
: delete the selected e-mail
46
Page 50

•
Delete permanently
mail or all e-mails from both the phone’s
memory and the e-mail server.
•
Email accounts
account.
•
Details
: access the e-mail properties.
Media Album
Use this menu to access the
with which you can organise your own online media
album, adding media content and messages via the
wireless web. This menu is only available if
supported by your service provider.
Templates
Use this menu to create, edit, and send text
templates and MMS templates.
(Menu 5.7)
(Menu 5.8)
Text templates
Use this menu to preset frequently used messages.
Press <
New
> to create a new text template.
From the text template list, press <
access the following options:
•
Edit
: change the selected template.
•
Send:
send the template as an SMS, MMS, file
messenger, or e-mail.
•
New
: add a new template.
•
Delete
: delete the template.
•
Delete all
: delete all templates.
: delete the selected e-
: change the active e-mail
Media Album
(Menu 5.8.1)
Options
service,
> to
Multimedia templates
When you access this menu, you can view the list of
templates you have saved.
From the template list, press <
the following options:
•
View
: open the template.
•
Send:
send the template as a message.
•
New
: add a new template.
•
Edit
: change the selected template.
•
Delete
: delete the template.
•
Delete all
Broadcast
Your phone receives Cell Broadcast (CB) messages,
which are text messages related to various topics,
such as weather forecast, traffic, and news report,
from networks. Use this menu to access received CB
messages.
: delete all templates.
(Menu 5.9)
(Menu 5.8.2)
Options
> to access
Viewing a CB message
All CB messages are stored in the
and will be deleted after a period of time. If you
don’t want a message to be deleted, save it to the
Archive
folder. While viewing the message, press
<
Options
> and select <
Save
Temporary
>.
folder
Menu functions
Messages
(Menu 5)
47
Page 51

Menu functions
Using message options
On the message list, press <
following options:
•
View
: open the selected message.
•
Delete
: delete the selected message.
•
Delete all
While viewing a message, press <
access the following options:
•
Save
•
Delete
You can highlight text and, depending on the
contents, you have the following additional options:
•
Call
•
Go to URL
•
Go to RTSP
specified in the RTSP (Real Time Streaming
Protocol).
•
Create email
Delete all
Use this menu to delete all of the messages in each
message folder at once.
1. Press to check the message boxe(s) you
want.
2. Press <
3. Press <
: delete all messages.
: save the message in the
: delete the message.
: place a call to a phone number.
: go to a selected URL.
: connect to a streaming server
: create an e-mail.
(Menu 5.0)
Delete all
Yes
> to confirm the deleting.
>.
Options
Options
> to access the
> to
Archive
folder.
Settings
Use this menu to set up various options for using
messaging service.
Text message
You can configure default SMS settings.
•
•
(Menu 5. )
(Menu 5. .1)
Settings x
profile:
Centre address
your message centre.
Expiration
messages are stored in the SMS centre.
Default type
network can convert messages into the selected
format.
Name
Sending settings
for sending an SMS message:
Reply path
through your SMS centre.
Delivery report
when your message has been delivered.
Network selection
transmission method, either GSM (CS) or GPRS
(PS) network.
Keep a copy
in the
: set the following properties in a
: store or change the number of
: set the length of time your
: set the default message type. The
: enter a profile name.
: set up the following options
: allow the recipient to reply to you
: set the network to inform you
: select a preferred data
: leave the copies of your messages
Sent box
folder after sending.
48
Page 52

Character support
type. If you select
: select a character encoding
Automatic
, the phone
switches the encoding type from GSM-alphabet
to Unicode if you enter a unicode character. Use
of unicode encoding will reduce the maximum of
number in a message to about half. If this menu
is not shown, your phone provides the Automatic
encoding by default.
Multimedia message
(Menu 5. .2)
You can configure default MMS settings.
•
Sending options
: set up the following options
for sending MMS messages:
Priority
: set the priority level of your messages.
Expiration
: set the length of time your
messages are stored in the MMS centre.
Delivery
: set a time delay before messages are
sent.
Hide address
: set your address to be hidden
from the recipient’s phone.
Request delivery report
: set the network to
inform you when your message has been
delivered.
Request read report
: request a report from
each recipient as to when your message was
read by the recipient.
Keep a copy
in the
Add my name card
: leave the copies of your messages
Sent box
folder after sending.
: allow your contact
information to be attached to your messages via
the file messenger.
Add signature
: edit and attach your signature
to messages via the file messenger.
•
Receiving options
: set up the following options
for receiving MMS messages:
Home network
: determine if your phone
retrieves new messages automatically when you
are in your home service area.
Roaming network
: determine if your phone
retrieves new messages automatically when you
are roaming in another network.
Home reception and Roaming reception have the
following options:
-
Auto download
: the phone automatically
retrieves messages from the server.
-
Manual
: the phone receives notifications first
from the server. Use the
Retrieve
option to
manually download new messages.
-
Restricted
: the phone receives notifications
first from the server. When you attempt to
download new messages, the phone informs
you of additional charges.
-
Reject
: the phone rejects all messages.
Send delivery report
: set the network to send
a delivery report to sender.
Send read report
: determine whether or not
the phone sends a read-report to a sender.
Reject anonymous
: reject messages from
anonymous senders.
Reject advertisement
: reject advertisements.
Menu functions
Messages
(Menu 5)
49
Page 53
Menu functions
•
MMS profiles
used for MMS. You can also make or edit a
profile.p. 73
•
Message size
MMS attachment. This file size may vary,
depending on your country.
•
Creation mode
Restricted
messages using unsupported file formats.
Warning
create and send a message using unsupported
file formats.
Free
: you can create and send messages using
unsupported file formats.
•
Slide interval
display shows each page in a message.
Email
(Menu 5. .3)
You can configure default e-mail settings.
•
Sending options
for sending an e-mail:
From
Sending account
Priority
e-mails.
Keep a copy
the
Sent box
Include body when replying
not the phone includes the original e-mail text in
a reply.
50
: select a connection profile to be
: select the maximum file size of
: select an MMS creation mode.
: you are not able to create and send
: the phone informs you when you
: select the length of time the
: set up the following options
: set the sender name.
: select the default account.
: change the priority level of your
: leave the copies of your e-mails in
folder after sending.
: set whether or
Delivery report
when your e-mail has been delivered.
Add my name card
information to be attached to e-mails.
Add signature
e-mails.
Input signature
•
Receiving options
for receiving an e-mail:
Set download limit
size for incoming e-mails. Your phone will reject
e-mails that exceed the specified size.
Auto polling
check the e-mail server to download e-mails at
the specified intervals.
Polling frequency
checks the e-mail server for automatic polling.
Block address
reject e-mails from those addresses.
Block subject
which contain those subjects.
•
Email profiles
profile to be used for sending and receiving
e-mails. You can also make or edit a profile.
p. 73
You cannot change e-mail profile settings
while an e-mail is being sent or retrieved.
: set the network to inform you
: allow your contact
: attach your signature to
: edit your signature.
: set up the following options
: determine the maximum
: set the phone to automatically
: set how often the phone
: specify e-mail addresses to
: specify subjects to reject e-mails
: select a network connection
Page 54

•
Email accounts
and set up e-mail accounts. Press <
and select
Account name
: select an account to be used
Options
Edit
to access the following options:
: enter a name for the currently
selected account.
SMTP server
: enter the IP address or domain
name of the outgoing e-mail server.
SMTP port
Retrieving server type
: enter the SMTP port number.
: select the protocol for
the incoming e-mail server. The remaining
options depend on the protocol type setting.
POP3 server/IMAP4 server
: enter the IP
address or domain name of the POP3 or IMP4
server.
POP3 port/IMAP4 port
: enter the POP3 or
IMAP4 port number.
IMAP4 retrieving option
: (only for IMAP
protocol): set whether the phone retrieves only
new messages or all messages.
Retrieving option
: set which part of e-mails
the phone retrieves from the server.
Keep in server
: leave the copies of e-mails in
the server after retrieving.
My Address
User name
: set your e-mail address.
: set the user name for POP3 or
IMAP4 server connections.
Password
: set the password for POP3 or IMAP4
server connections.
>
Use SMTP Authentication
: activate the SMTP
authentication.
Same as POP3/IMAP4
: select if you want the
SMTP server to have the same parameters as the
POP3 or IMAP4 server.
User name
Password
Voice mail
: enter the SMTP user name.
: set the SMTP password.
(Menu 5. .4)
You can change the number of the voicemail centre.
Push message
(Menu 5. .5)
You can determine whether or not your phone
receives push messages.
Broadcast
(Menu 5. .6)
Use this menu to change the settings for the
broadcast message service.
•
Receive
: enable or disable the reception of
broadcast messages.
•
Channel
: specify the channels from which you
receive broadcast messages.
When you select
Respective channels
, you can
set up a list of active CB channels.
•
Language
: select the language in which
broadcast messages display.
Menu functions
Messages
(Menu 5)
51
Page 55
Menu functions
Memory status
Use this menu to view the memory status for SMS,
MMS, e-mail, and push messages.
File manager
The
File manager
images, videos, ringtones, sounds, and other files
stored in the phone’s memory or the memory card.
To access this menu, press in Idle mode and
select
File manager
•
As a result of the DRM (Digital Rights
Management) system, some of the media
items you download from the Internet or
receive by MMS may require a license key to
access them or forward them to other people.
You can acquire the key from the web site
which owns the rights to the content; use the
Activate key
• Your service provider supports only count based or unlimited access DRM files.
(Menu 5. )
(Menu 6)
menu allows you to access
.
option in the item options.
Images
This menu displays default wallpapers, photos you
have taken, and images downloaded or received in
messages. You can also edit a photo using various
editing options.
Viewing an image
1. Press [Left] or [Right] to scroll to an image
folder.
2. Select an image.
52
3. Press [Left] or [Right] to scroll to other images.
Editing an image
1. Select a photo.
2. Press <
3. Change the photo using the following editing
4. When you have finished, press
5. Enter a photo name and press <
Options
options:
•
Resize
•
Effects
special effect to the photo.
•
Adjust
contrast, or colour balance.
•
Frames
•
Cliparts
•
Insert text
•
Rotate
counterclockwise.
•
Flip
: flip the photo vertically or horizontally.
•
Crop
section of the photo.
> and select
: change the image size.
: change the colour tone or apply a
: adjust the image brightness,
: apply a decorative frame.
: add an image clip to the photo.
: add text to the photo.
: rotate the photo clockwise or
: select a variously sized and shaped
Edit
.
.
Save>
.
Using image options
While viewing a file, press <
following options:
•
Send
: send the selected file via MMS, e-mail, file
messenger, Bluetooth, or infrared port. You can
also send the file to the online media album, if
provided.
Options
> to access the
Page 56

•
Hidden from bluetooth
other Bluetooth devices cannot access it.
•
Visible to bluetooth
Bluetooth devices.
•
Set as
: set the image as your wallpaper for the
main display or external display, or a caller ID
image for a Phonebook entry.
•
Move
: move the file to another folder.
•
Copy
: copy the file to another folder.
•
Real size
size.
•
Slide show
show.
•
Edit
file.
•
Delete
•
Rename
•
Details
While viewing the file list, press <
access the following options:
•
View
•
Send
messenger, Bluetooth, or infrared port. You can
also send the image to the online media album,
if provided.
•
Hidden from bluetooth
other Bluetooth devices cannot access it.
•
Visible to bluetooth
Bluetooth devices.
: show the image in real size or display
: set all images to display as a slide
: edit the image and save it as a different
: delete the file.
: change the name of the file.
: access the file properties.
: open the selected file.
: send the selected file via MMS, e-mail, file
: hide the file so that
: share the file with other
Options
: hide the file so that
: share the file with other
> to
•
Set as
: set the image as your wallpaper for the
main display or external display, or as a caller ID
image for a Phonebook entry.
•
Move
: move the file to another folder.
•
Copy
: copy the file to another folder.
•
Delete
: delete the file or all of the files stored in
the folder.
•
Rename
•
Lock/Unlock
deleted, or unlock the file.
•
New folder
•
Details
•
Memory status
information for each folder in
: change the name of the file.
: lock the file to prevent from being
: add a new folder.
: access the file properties.
: access the memory
File manager
.
Downloading images
1. Press [Left] or [Right] to scroll to
2. Select
3. Search for an image and follow the onscreen
More pictures
preset website.
instructions to download it.
. You are connected to a
Downloads
Videos
This menu displays video clips you have recorded,
downloaded, or received in messages.
Playing a video clip
1. Press [Left] or [Right] to scroll to a video folder.
2. Select a video clip.
Menu functions
File manager
(Menu 6)
.
53
Page 57
Menu functions
During playback, use the following keys:
Keys Description
Pauses or resumes playback.
Up Opens the play list.
Left Goes to the previous file. Moves
Right Skips to the next file. Skips forward in
/ Adjusts the volume.
Down Stops playback.
backward in a file when held down.
a file when held down.
Using video options
During playback, press <
following options:
•
Pause/Resume
•
Stop
: stop playback.
•
Send
: send the selected file via MMS, e-mail, file
messenger, Bluetooth, or infrared port. You can
also send the file to the online media album, if
provided.
•
Add to play list
play list.
•
Open play list
•
Activate key
key for the selected DRM file expires.
Options
: pause or resume playback.
: add the selected file to the
: open the play list.
: get a new license key when the
> to access the
•
Reactive key
when the key for the selected DRM file has not
expired.
•
Hidden from bluetooth
other Bluetooth devices cannot access it.
•
Visible to bluetooth
Bluetooth devices.
•
Show controller/Hide controller
hide the control bar of Media player.
•
Details
•
Player settings
playing files.
Play options
Volume
Controller
Media player.
Audio player skin
•
VOD settings
be used for accessing a streaming server. You
can also make or edit a profile.p. 73
•
Key management
have acquired.
: get another license key even
: hide the file so that
: share the file with other
: show or
: access the file properties.
: change the default settings for
: select a repeat mode.
: select a volume level.
: show or hide the control bar of
: select a skin image.
: activate a connection profile to
: manage license keys you
Downloading video clips
1. Press [Left] or [Right] to scroll to
2. Select
3. Search for a video clip and follow the onscreen
More videos
instructions to download it.
.
Downloads
.
54
Page 58
Music
This menu displays AAC or MP3 music files you have
downloaded or received in messages.
Playing a music file
Select a music file. The selected music file plays.
During playback, use the following keys:
Keys Description
Pauses or resumes.
Up Opens the play list.
Left Goes back to the previous file. Moves
Right Skips to the next file. Skips forward in a
/ Adjusts the volume.
Down Stops playback.
backward in a file when held down.
file when held down.
Using music file options
While playing a music file, press <
access the following options:
•
Pause/Resume
•
Stop
: stop playback.
•
Send
: send the selected file via MMS, e-mail, file
messenger, Bluetooth, or infrared port. You can
also send the file to the online media album, if
provided.
: pause or resume playback.
Options
> to
•
Add to play list
list.
•
Open play list
•
Go to the File Manager
folder.
•
Activate key
key for the selected DRM file expires.
•
Reactive key
when the key for the selected DRM file has not
expired.
•
Hidden from bluetooth
other Bluetooth devices cannot access it.
•
Visible to bluetooth:
Bluetooth devices.
•
Details
: access the file properties.
•
Player settings
playing files.
Play options
Volume
Audio player skin
•
VOD settings
be used for accessing a streaming server. You
can also make or edit a profile.p. 73
•
Key management
have acquired.
: add the current file to the play
: open the play list.
: go to the
: get a new license key when the
: get another license key even
: hide the file so that
share the file with other
: change the default settings for
: select a repeat mode.
: select a volume level.
: select a skin image.
: activate a connection profile to
: manage license keys you
Music
Downloading music file
1. Select
2. Search for a music file and follow the onscreen
More music
instructions to download it.
.
Menu functions
File manager
(Menu 6)
55
Page 59
Menu functions
Sounds
This menu displays the default ringtones and sound
files you have downloaded or received in messages.
You can also access voice memos you have
recorded.
Playing a sound clip
1. Press [Left] or [Right] to scroll to a sound folder.
To access voice memos, scroll to the
memos
folder.p. 37
2. Select a sound clip. The sound is played.
During playback, you can use the following keys:
Keys Description
Up/Down//Adjusts the volume.
Left Goes to the previous file.
Right Skips to the next file.
Allows you to send the selected file to
other people.
Voice
Using sound options
During playback, press <
following options:
•
Send
: send the selected file via MMS, e-mail, file
messenger, Bluetooth, or infrared port.
•
Delete
: delete the file.
•
Rename
56
: change the name of the file.
Options
> to access the
•
Set as ringtone
ringer.
•
Set as caller ID
ID ringer.
•
Details
: access the file properties.
: set the sound clip as your call
: set the sound clip as a caller
Games & More
Use this menu to download Java games and play
them.
Playing Powerinlinex
1. From the
Powerinlinex
2. Press any key, except for [ ].
3. Select
4. Select a character.
5. Press <OK> to start a game.
6. Press [Up] to make the character move forward.
7. Press the Navigation keys to change the
direction.
During a game, press <
options.
Games & More
.
PLAY
or press <
menu, select
PLAY
>.
Options
> to access game
Playing TheLastAge
1. From the
TheLastAge
2. Press any key, except for [ ].
3. Select
4. Select
Games & More
.
START GAME
New Game
or
menu, select
or press <
Load Game
PLAY
.
>.
Page 60
5. Press <OK>.
6. Press <
7. Press [Up] to make the character move forward.
8. Press the Navigation keys to change the
SKIP
> and then <OK>.
direction.
During a game, press <
options.
Options
> to access game
Using Java game options
While viewing the game list, press <
access the following options:
•
Play
: launch the selected game.
•
Move
: move to the selected game to another
folder.
•
Delete
: delete the selected game or all games.
•
Delete folder
•
Rename
game or added game folder.
•
Lock/Unlock
being deleted, moved, and renamed, or unlock
the game.
•
Details:
•
New folder
•
Network settings
to be used for accessing a Java server. You can
also make or edit a profile.p. 73
: delete the selected game folder.
: change the name of the downloaded
: lock the game to prevent it from
access the game properties.
: add a new game folder.
: activate a connection profile
Options
> to
Downloading new games
1. Select
2. Search for a game and follow the onscreen
More games
instructions to download it.
.
Other files
Files that you have received but which are not
supported by your phone are stored in this folder.
You cannot open these files on the phone.
Unsupported file formats include *.doc, *.ppt, *.txt,
and so on.
Memory card
Use this menu to access the media files stored on
the memory card. This option is only available when
you insert the memory card into the phone.
For details about using files, see the corresponding
menu.
Organiser
The Organiser feature enables you to create and
manage your schedule, anniversaries, tasks, and
memos. You can also set alarms.
To access this menu, press in Idle mode and
select
Organiser
(Menu 7)
.
Menu functions
Organiser
(Menu 7)
57
Page 61

Menu functions
Alarm
(Menu 7.1)
Use this menu to set alarms to ring at specific times.
The alert type for a normal alarm corresponds to the
call alert type settings in the currently selected
profile. A wake-up alarm does not be affected by
your profile setting.
Setting an alarm
1. Select the type of alarm.
2. Scroll to On on the
[Down].
3. Enter the time for the alarm to sound and press
[Down].
4. Set the repeat option from the
5. Select the
6. Select an alarm melody.
7. Press <
Alert tone
Options
Stopping an alarm
When the alarm sounds, choose either of the
following options to stop the alarm:
•Press <OK> to confirm the alarm.
•Press <
Snooze
5 minutes. You can do this a maximum of 5
times.
Deactivating an alarm
1. Select the alarm you want to deactivate.
2. Select
3. Press <
58
Off
on the
Options
Alarm
line and press
Repeat
line.
line.
> and select
> to stop the wake-up alarm for
Alarm
> and select
line.
Save
Save
.
.
Calendar
Use this menu to keep track of your monthly
schedule.
(Menu 7.2)
Consulting the calendar
When you open the calendar, today’s date is marked
with a blue box. Scroll to the date you want. You can
move to the next or previous month by pressing
[/].
Press <
Options
•
View
•
New
memo. You can schedule up to 100 schedule
items, 50 anniversaries, 20 tasks, and 20
memos on the calendar, and schedule more than
one event per day.
•
Week view
•
Go to today:
•
Go to date:
•
Starting date
with Sunday or Monday.
•
Delete
•
Delete all
calendar.
> to access the following options:
: display the stored events for that date.
: add a new event, anniversary, task, or
: display the week view screen.
display the current date.
display a specific date.
: set whether the calendar starts
: delete the events for the specific period.
: delete all of the events in the
Entering a new schedule item
1. Select a date on the calendar.
2. Press <
Options
> and select
New
→
Schedule
.
Page 62

3. Press [Down] and enter information or change
the settings in the following entry fields:
•
Title
: enter the title of the event.
•
Details
: enter the event details.
•
Start
and
End
: enter the starting and ending
times for the event.
•
Start date
and
End date
: enter the starting
and ending dates for the event.
•
Location
: enter information about the event
location.
•
Alarm
: select to set an alarm for the event
and set the time for the alarm.
•
Repeat
: select to set the event to recur. You
can select a repeat unit and set the date to
end repeating.
•
Expiry
: set when the event will be deleted
from the calendar.
4. Press <
Options
> and select
Save
to save the
event.
Entering a new anniversary
1. Select a date on the calendar.
2. Press <
Options
Anniversary
> and select
.
New
→
3. Press [Down] and enter information or change
the settings in the following entry fields:
•
Occasion
: enter information about the
anniversary.
•
Date
: enter the date.
•
Alarm
: select to set an alarm for the
anniversary. You can set the number of days
before the event date and the time for the
alarm to sound.
•
Repeat every year
: select to set the phone
to remind you of the anniversary every year.
4. Press <
Options
> and select
Save
.
Entering a task
1. Select a date on the calendar.
2. Press <
Options
> and select
New
→
Task
.
3. Press [Down] and enter information or change
the settings in the following entry fields:
•
Title
: enter the title for the task.
•
Task
•
•
•
4. Press <
: enter the task content.
Start date
Due date
Priority
: enter the starting date.
: enter the ending date.
: select a priority level.
Options
> and select
Save
.
Entering a memo
1. Press <
Options
> and select
New
→
Memo
.
2. Enter the memo text and press [Down].
3. Enter the date.
4. Press <
Options
> and select
Save
.
Menu functions
Organiser
(Menu 7)
59
Page 63
Menu functions
Viewing an event
Square brackets on a calendar date indicate the type
of events scheduled for that day:
• Green: schedule • Red: anniversary
• Blue: task • Orange: memo
1. Select a date on the calendar to display the
events for that day. The list of events displays.
The following icons indicate the type of event:
• Scheduled events • Anniversaries
• Tasks • Memos
2. Select an event to view its details.
Using event options
From the event list, press <
following options:
•
View
: access the selected event.
•
New
: add a new event.
•
Completed/To do
selected task.
•
Month view
•
Week view
•
Change date/Change due date/Reschedule
change the date of the event.
•
Delete
•
Delete all
selected day.
: switch to the month view screen.
: switch to the week view screen.
: delete the selected event.
: delete all of the events for the
Options
: change the status of the
> to access the
:
•
Send schedule/Send task
SMS, e-mail, file messenger, Bluetooth, or
infrared port.
•
Send memo
Week view
Use this menu to view events for the selected week.
The current date is marked in blue. Square brackets
on a calendar date indicate the types of events
scheduled for that day.
1. Scroll up to the date line and press [Left] or
[Right] to access another week.
2. Select the time cell that contains the event you
want.
Today’s events
Use this menu to view events for the selected date.
Select an event to view its details. The event opens
in Edit mode.
Schedule
This menu displays the scheduled events. If you
have set the Repeat and Alarm options, the and
icons display.
Select a schedule item to view its details.
: send the memo via SMS.
(Menu 7.3)
(Menu 7.4)
(Menu 7.5)
: send the event via
60
Page 64
Anniversary
This menu displays anniversaries you have created.
If you have set the Repeat and Alarm options, the
and icons display.
Select an anniversary item to view its details.
Task
(Menu 7.7)
Use this menu to display tasks you have created.
The icons on the right indicate the importance; the
lower the number on the icon, the higher the
priority. A check mark appears in the status check
box if the task has been completed.
Select a task to view its details.
Memo
This menu displays memos you have created.
Select a memo to view its details.
Missed event alarm
When you are unable to acknowledge an alarm for a
scheduled event or anniversary, the phone displays
a missed alarm notification.
•Press <
•Press <
(Menu 7.6)
(Menu 7.8)
(Menu 7.9)
View
> to view the corresponding event.
Exit
>.
Viewing a missed event alarm
1. From the
alarm
Organiser
.
menu, select
Missed event
2. Select an event.
3. Press <
event.
Confirm
> to confirm and delete the
Using missed alarm options
From the event list, press <
following options:
•
View
: display the missed event.
•
Delete
: delete the missed event.
•
Delete all
Memory status
This menu displays the number of events of each
type you have created, and the total number of
events you can store.
Camera
You can use the camera module embedded in your
phone to take photos and record videos. Using the
Camera
To access this menu, press in Idle mode and
select
• Do not take photos of people without their
permission.
• Do not take photos in a place where cameras
are not allowed.
• Do not take photos in a place where you may
interfere with another person’s privacy.
: delete all missed events.
(Menu 7.0)
(Menu 8)
menu, you can turn on the camera.
Camera
.
Options
> to access the
Menu functions
Camera
(Menu 8)
61
Page 65
Menu functions
Taking a photo
The camera will produce JPEG photos.
When you take a photo in direct sunlight or in
bright conditions, shadows may appear on the
photo.
1. To turn on the camera, access the
or press and hold [ ].
2. Press [ ] to switch between the interior lens
below the display and the exterior lens on the
external of the phone.
3. Adjust the image by aiming the lens at the
subject.
• Press <
• Use the keypad to change the camera
4. Press to take a photo. The photo is saved in
the
5.
To Press
use photo options <
delete the photo <
return to Capture mode .
62
Options
See the next section.
settings or switch to other modes.p. 63
Pictures
Hold the phone still for one or two seconds
after pressing the camera shutter key to allow
the image data to process.
> to use the camera options.
folder.
Camera
Options
Delete
>.p. 64
> or [C].
menu
Using camera options in Capture mode
In Capture mode, press <
following options:
•
Take photo
•
Record video
•
Switch camera
lens and the exterior lens.
•
Go to photos
Pictures
•
Shooting mode
modes:
Single shot
Multi shot
select the number of still images the camera will.
Mosaic shot
in one frame. You can select the layout.
•
Effects
•
Frames
•
Timer
a photo.
•
Zoom
•
Brightness
•
Camera settings
for taking a photo.
Default name
file name.
Default storage
store photos.
: take a photo.
folder.p. 52
: take a photo in the normal mode.
: take several action stills. You can
: take several stills and save them
: change the colour tone of the image.
: apply a decorative frame.
: set a time delay before the camera takes
: display the zoom control bar.
: display the brightness control bar.
Options
: switch to Record mode.
: switch between the interior
: display the photos stored in the
: take a photo in the following
: change the default settings
: change the default prefix of the
: select a memory location to
> to access the
Page 66
Viewfinder:
select a preview mode, either Full
Screen mode or Normal mode with actual ratio.
Shutter sound
Capture quality:
Image size
Multi shot speed
: select a camera shutter sound.
select an image quality.
: select an image size.
: select the shutter speed
between each shot in Multi Shot mode.
Spot metering
: adjust the exposure based on a
specific area of the image. Select On to display
the spot focus frame in the middle of the image,
and change the exposure according to the
brightness of the image fragment in the frame.
ISO
: change the ISO setting, which controls the
sensitivity of your camera. For low light
situations, lower the ISO number to increase the
quality.
The higher the ISO number, the faster the
camera shutter functions and the more sensitive
the camera is to light. Higher ISO settings may
bring some distortion to an image.
White balance
: adjust the colour balance of the
photo. You can make your photo appear warmer
or cooler.
Using the keypad in Capture mode
You can use the keypad to customise your camera
settings in Capture mode.
Key Function
Flips the image vertically.
Shows the mirror image.
Left/
Adjusts the brightness of the image.
Right
Up/
Zooms in or out.
Down
1
2
3
Switches to Record mode.p. 64
Changes the image size.
Changes the image quality or switch to
the memory card where the photos are
saved.
4
Changes the shooting mode and the
number of photos for multi shots.
5
7
8
9
Changes the colour tone of the image.
Adds a decorative frame.
Sets the timer.
Goes to the
Pictures
folder.p. 52
Changes the preview mode.
Menu functions
Camera
(Menu 8)
63
Page 67
Menu functions
Using photo options
After saving a photo, press <
the following options:
•
Viewfinder
•
View
multiple photos.
•
Send
messenger, Bluetooth, or infrared port.
•
Delete
•
Set as:
or external display, or as a caller ID image for a
Phonebook entry.
•
Go to photos
Pictures
•
Rename:
: return to Capture mode.
: open the selected photo when you take
: send the photo via MMS, e-mail, file
: delete the photo.
set the photo as your wallpaper for main
: display the photos stored in the
folder.p. 52
change the name of the photo.
Options
> to access
Recording a video
You can use your phone just like a camcorder to
record what is currently displayed on the camera
screen and save it as a video file. The camera will
produce 3gp video clips.
1. To turn on the camera, access the
or press and hold [ ].
2. Press [1] to switch to Record mode.
3. Press [ ] to switch between the interior lens
below the display and the exterior lens on the
external of the phone.
Camera
menu
4. Adjust the image by aiming the lens at the
subject.
•Press <
• Use the keypad to change the camera
5. Press to start recording.
To pause, press <
6. When you have finished, press . The video
automatically saves in the
7.
To Press
use the video options <
delete the video clip <
return to Record mode .
Options
See the next section.
settings or switch to other modes.p. 63
> to use the camera options.
Pause
>.
Videos
folder.
Options
Delete
>.p. 65
> or [C].
Using camera options in Record mode
In Record mode, press <
following options:
•
Record
: start recording.
•
Take photo
•
Switch camera
lens or exterior lens.
•
Go to videos:
the
Videos
•
Effects:
•
Zoom
: switch to Capture mode.
folder.p. 53
change the colour tone of the image.
: display the zoom control bar.
Options
: switch between the interior
display the video clips stored in
> to access the
64
Page 68

•
Brightness
•
Video settings
: display the brightness control bar.
: change the following settings
for recording a video:
Default name
: change the default prefix of the
video name.
Default storage
: select a memory location to
store video clips.
Quality
: select an image quality.
Recording time
Select
Normal
: select a video recording mode.
to record a video within the limit
of the currently available memory. The length of
your video is determined by how much memory
has been used.
Select
Limit for MMS
to record a video suitable
for an MMS message.
Size
: select an image size.
Audio record
: turn the audio on or off.
Using the keypad in Record mode
Key Function
Flips the image vertically.
Shows the mirror image.
Left/Right Adjusts the image brightness.
Up/Down Zooms in or out.
1
Switches to Capture mode.p. 62
Key Function
2
3
4
5
Changes the frame size.
changes the image quality.
Changes the video recording mode.
Changes the colour tone of the
image.
7
9
Turns the audio on or off.
Goes to the
Videos
Using video options
After saving a video clip, press <
Options
the following options:
•
Play:
play back the video clip.
•
Viewfinder
•
Send:
: return to Record mode.
send the video clip via MMS, e-mail, file
messenger, Bluetooth, or infrared port.
•
Delete
: delete the video clip.
•
Go to videos
the
Videos
•
Rename
: display the video clips stored in
folder.p. 53
: change the name of the video clip.
folder.p. 53
> to access
Menu functions
Camera
(Menu 8)
65
Page 69

Menu functions
Settings
Use this menu to customise your phone settings.
You can also reset the settings to their default
values.
To access this menu, press in Idle mode and
select
Profiles
Use this menu to adjust and customise the phone
tone for different events or situations.
Editing a profile
1. Select the profile you want.
2. Press <
3. Change the sound settings:
•
•
•
•
•
•
•
66
(Menu 9)
Settings
Call alert type
type for the call ringer.
Voice call ringtone
ring tone for the call ringer of voice calls.
Video call ringtone
ring tone for the call ringer of video calls.
Tone volume
ringer.
Message alert type
alert type for the message ringer.
Message alert tone
ring tone for the message ringer.
Message alert repetition
phone repeats reminding you of a new
message.
.
(Menu 9.1)
Options
> and select
: press and select an alert
: adjust the volume for the call
Edit
.
: press and select a
: press and select a
: press and select an
: press and select a
: select if the
•
Phone sounds
various sounds on the phone on or off.
All on
: enable all tones.
Popup box alerts
when a pop-up window displays.
Minute minder
every minute during an outgoing call to keep
you informed of the length of your call.
Call connect tone
when a call is connected to the system.
Call end tone
when a call is disconnected by the other
person or the faded signal.
Power on/off
when you turn on the phone.
Folder open/close
sound when you open or close the phone.
Alerts on call
when you receive a new message or when
the time for an alarm comes during a call.
•
Key tones
sounds when you press a key.
•
Key tone volume
key tones.
•
Call answer mode
select how to answer an incoming call when
the phone is connected to a hands-free car
kit.
4. When you have finished, press <
select
Save
: press and turn the
: cause the phone to beep
: cause the phone to beep
: cause the phone to beep
: cause the phone to beep
: cause the phone to beep
: cause the phone to
: cause the phone to beep
: press and select a tone which
: adjust the volume of the
(For Car): Press and
.
Options
> and
Page 70

Changing an active profile
Select the profile you want.
Time & date
(
Menu
9.2)
Use this menu to change the time and date
displayed on your phone. Before setting the time
and date, specify your time zone in the
World clock
menu. p. 34
•
Time
: enter the current time.
•
Date:
enter the current date.
•
Time format
: select a 12-hour or 24-hour time
format.
•
Date format:
•
Summer time
•
Auto update
select a date format.
: activate daylight savings time.
: select to receive time information
from your network.
Phone
(Menu 9.3)
Many different features of your phone’s system can
be customised to suit your preferences.
Language
(Menu 9.3.1)
Use this menu to select one of several languages for
the display text or T9 input mode.
Shortcuts
(Menu 9.3.2)
You can use the Navigation keys as shortcut keys to
access specific menus directly from Idle mode. Use
this menu to change these shortcut assignments.
Assigning a shortcut to a key
1. Select the key to be used as a shortcut key.
2. Select the menu that will be assigned to the key.
3. Press <
Save
>.
Using the shortcut options
From the Shortcuts screen, press <
Options
access the following options:
•
Assign
: assign a shortcut menu to an empty
location.
•
Change
: change a shortcut menu.
•
Remove
: deactivate the shortcut assignment to
the selected key.
•
Remove all
: deactivate all shortcut
assignments.
Active folder
(Menu 9.3.3)
Use this menu to answer incoming calls by opening
the phone.
Anykey answer
(Menu 9.3.4)
Use this menu to answer an incoming call by
pressing any key, except [ ] or <
Side key
(Menu 9.3.5)
Reject
Use this menu to set how the phone reacts when
you press and hold [ / ] when a call comes in.
•
Reject
: the keys reject the call.
•
Silence
: the keys mute the call ringer.
Key management
(Menu 9.3.6)
Use this menu to manage the license keys you have
acquired to activate media contents locked by DRM
systems.
> to
Menu functions
Settings
(Menu 9)
>.
67
Page 71
Menu functions
Display
Use this menu to change settings for the display.
Greeting message
Use this menu to enter the greeting that is displayed
on the main display or external display.
Wallpaper
You can change the background image that is
displayed on the main display in Idle mode.
Cover LCD
Use this menu to change the settings for the
external display.
1. Select a display item type.
2. Select the image you want or enter the banner
3. Press <
4. Press <
LCD brightness
Use this menu to adjust the brightness of the main
display.
(Menu 9.4)
•
Clock
•
Cover title
•
Wallpaper
image.
message.
For
Wallpaper
image.
(Menu 9.4.1)
(Menu 9.4.2)
(Menu 9.4.3)
: you can select a clock type.
: you can set a banner message.
: you can change the wallpaper
, you can select a section of an
Save
> or .
Change
>.
(Menu 9.4.4)
Backlight
You can change the settings for backlight or icons for
the external display.
•
•
•
Dialing display
Use this menu to customise the settings for the
screen when entering a phone number for dialling.
•
•
•
Call
Use this menu to set options for call functions.
Caller ID
Use this menu to prevent your phone number from
being displayed on the phone of the person being
called.
(Menu 9.4.5)
On
: select the length of time the backlight stays
on in times of inactivity.
Dim
: select the length of time the display is in
Dimming mode after the backlight turns off.
Sub LCD indicator
icons are shown on the external display after the
display turns off.
Font size
Font colour
Background colour
colour.
some networks do not allow the user to change
this setting.
: select a font size.
(Menu 9.5)
(Menu 9.5.1)
: set whether on not the
(Menu 9.4.6)
: select a font colour.
: select a background
68
Page 72
•
By network
: use the default setting provided by
the network.
•
Send
: send your number each time you make a
call.
•
Hide
: ensure your number does not display on
the other person’s phone.
Diverting
(Menu 9.5.2)
This network service reroutes incoming calls to a
different phone number that you specify.
1. Select the type of calls to be diverted.
2. Select a call diverting option:
•
Always
: divert all calls.
•
Busy
: divert calls when you are on another
call.
•No
reply
: divert calls when you do not
answer the phone.
•
Unreachable
: divert calls when you are not
in an area covered by your service provider
or when your phone is switched off.
•
Cancel all
: cancel all call diverting options.
3. Enter the number to which the calls will be
diverted in the
4. If you selected
time
line and select the length of time the
Divert to
No reply
line.
, move to the
Waiting
network delays before diverting a call.
5. Press <
Options
> and select
Activate
.
To deactivate the call diverting, select
Deactivate
.
Barring
(Menu 9.5.3)
This network service allows you to restrict your calls.
1. Select the type of calls to be barred.
2. Select a call barring option:
•
All outgoing calls
: prohibit all outgoing
calls.
•
Outgoing int’l calls
: prohibit international
calls.
•
Int’l calls exc. Home
: only allow calls to
numbers within the current country when you
are abroad, and to your home country.
•
All incoming calls
•
Incoming calls when roaming
: prohibit incoming calls.
: prohibit
incoming calls when you use your phone
outside of your home country.
•
Cancel all
: cancel all call barring settings,
allowing calls to be sent and received
normally.
3. Enter the call barring password supplied by your
service provider.
4. Press <
Options
> and select
Activate
deactivate the call barring, select
. To
Deactivate
.
You can change the call barring password
obtained from your service provider. From the call
type list, press <
password
.
Options
> and select
Change
Menu functions
Settings
(Menu 9)
69
Page 73

Menu functions
Waiting
This network service informs you when someone is
trying to reach you while you are on another call.
1. Select the type of calls to which the call waiting
2. Press <
Auto redial
Use this menu to make up to ten attempts to redial
a phone number after an unsuccessful call.
Closed user group
Use this menu to set incoming and outgoing calls to
be restricted to a selected user group. For details
about how to create a closed user group, contact
your service provider.
•
•
•
•
(Menu 9.5.4)
option will apply.
Options
deactivate the call waiting, select
Use user group
Outside access
than those in the Closed user group. This feature
depends on the nature of your CUG subscription.
Default group
have set one with your service provider. When
making a call, you are given the option of using
your default CUG, instead of selecting one from
the list.
Group index
index numbers.
> and select
(Menu 9.5.5)
(Menu 9.5.6)
: activate CUG index numbers.
: enable calls to numbers other
: enable the default CUG, if you
: add, delete, or activate CUG
Activate
Deactivate
. To
.
Video call
Use this menu to change the default settings for
using the video call feature.
•
•
Connectivity
Use this menu to set options for connection available
on your phone.
Bluetooth
Using Bluetooth wireless, you can connect the phone
wirelessly to other Bluetooth devices and exchange
data with them, talk hands-free, or control the
phone remotely.
Bluetooth technology allows free wireless
connections between all Bluetooth-compliant
devices within a range of 10 metres. Since the
devices communicate using radio waves, they do not
need to be in line of sight to each other.
(Menu 9.5.7)
Show me
receipt of video calls.
Optionally
video camera is used each time you answer a
video call.
Always
Retry by
to make a video call by MMS or voice call.
: change the video camera settings for
: you can select whether or not the
: the camera is always used.
: set how to retry when the phone fails
(Menu 9.6)
(Menu 9.6.1)
70
Page 74
• It is recommended that you do not use the
Bluetooth feature while using multimedia
features such as voice recorder, camera, and
Media player, or vice versa for a good
performance.
• Some devices may not be compatible with your
phone.
Setting up the Bluetooth feature
The
Bluetooth
menu provides the following
options:
•
Activation
: activate or deactivate the Bluetooth
feature.
•
My devices:
search for connectable Bluetooth
devices. See the next section.
•
My phone’s visibility
: allow other Bluetooth
devices to connect to your phone.
•
My phone’s name
: assign a Bluetooth device
name to your phone, which is then displayed on
other devices.
•
Secure mode
: determine if the phone asks for
your confirmation when other devices access
your data.
•
Bluetooth service
: display available Bluetooth
services.
Searching for and pairing with a Bluetooth
device
1. From the Bluetooth setting options, select
devices
.
My
2. Select
Search new device
.
After searching, a list of devices to which you can
connect displays. The following icons indicate the
type of device:
• Hands-free or headset
• Mobile phone
• Computer
• PDA
• Unknown device
The colour of the icon indicates the status of the
device:
• Grey for unpaired devices
• Blue for paired devices
• Red for devices that are currently connected
to your phone
3. Select a device.
4. Enter a Bluetooth PIN code of up to 16 digits and
press <OK>.
This code is used just once and you
don’t need to memorise it.
When the owner of the other device enter the
same code, pairing is finished.
Some devices, especially headsets or hands-free
car kits, may have a fixed Bluetooth PIN, such as
0000
. If the other device has one, you must
enter the code.
Menu functions
Settings
(Menu 9)
71
Page 75

Menu functions
Using device options
From the device list, press <
following options:
•
Browse device
selected device and import data directly to your
phone.
•
Connect
device. You need to enter the Bluetooth PIN.
•
Disconnect
device.
•
Authorize/Unauthorize device
the phone asks you to permit connection when
other devices try to connect to your phone.
•
Delete
: delete the device or all devices.
•
Rename
Sending data via Bluetooth
1. Activate the Bluetooth feature.
2. Select the application in which the item you want
to send is stored.
3. Scroll to the item you want and press
<
Options
4. Select
5. Select a device.
6. If necessary, enter the Bluetooth PIN needed for
Send → Via bluetooth
The phone searches for devices within range and
displays a list of available devices.
pairing and press <OK>.
: search for data from the
: connect to the currently selected
: end the connection with the
: rename the selected device.
>.
Options
.
> to access the
: determine if
Receiving data via Bluetooth
To receive data via Bluetooth, your phone’s
Bluetooth feature must be active.
If an unauthorised Bluetooth device sends data to
your phone, the phone displays a confirmation
message.
To receive data, press <
Infrared
Use this feature to send and receive data through
the infrared port. To use an infrared connection, you
must do the following:
• Configure and activate an IrDA-compliant
• Activate the infrared feature on your phone;
• Align the IrDA port on the
If there is no communication
between your phone and the
other IrDA-compliant device
within 60 seconds of activating
the feature, it is automatically
deactivated.
(Menu 9.6.2)
infrared port on the other device.
select
Infrared → On
phone with the IrDA port on
the other device.
Yes
.
>.
72
Page 76

Network
(Menu 9.6.3)
Use this menu to change the settings for connecting
to your cellular network.
•
Network selection
: select to either
automatically or manually select the network
used when roaming outside of your home area.
You can select a network other than your home
network only if there is a valid roaming
agreement between the two.
•
Network mode
Automatic
: select the network you use.
: the phone scans for available
networks.
GSM 900/1800
: the phone operates in the
combined GSM 900/1800 network.
GSM 1900
: the phone operates in the GSM
1900 network. This option is only available in
USA.
UMTS
: the phone operates in UMTS (3G
network) networks. You can get a higher speed
quality than on lower generation networks, and
use advanced data and information services,
such as video calls.
Connections
(Menu 9.6.4)
You can set up information about your network
connection. In most cases, you don’t need to change
the settings. In case of problems, please contact
your service provider.
Creating or editing a connection profile
Press <
Options
> and select
New
, or select the
connection profile you want to edit. The following
options are available:
•
Set name
•
Access name
: edit the name of the network setting.
: edit the access point name used
for the address of the GPRS network gateway.
•
Auth type
: choose the type of authentication
used.
•
User ID
•
Password
•
Protocol
HTTP
•
Home URL
•
Proxy address/Port
: edit the server login ID.
: edit the server password.
: select the protocol from among
, and
Other
.
: enter your homepage address.
: (for the HTTP protocol)
WAP
set the proxy server address and port.
•
Gateway address
: (for the WAP protocol) set
the gateway address.
•
Secure connection
: (for the WAP protocol) turn
the secure mode on or off.
•
Linger time (sec.)
: set a time period after
which the network is disconnected if there has
been no new data traffic in that time.
•
Advanced settings:
provide you with the
following options:
Static IP
: specify if you want to manually enter
an IP address; see the Local phone IP option. If
you want the IP address to be automatically
assigned by the server, remove the check mark.
Menu functions
,
Settings
(Menu 9)
73
Page 77
Menu functions
Local phone IP
: enter the IP address obtained
from the network operator, if you checked the
Static IP option.
Static DNS
: specify if you want to manually
enter the DNS (Domain Name Server) address;
see the Server 1/2 option. If you want the
address to be automatically assigned by the
server, remove the check mark.
Server 1/2
: enter the Domain Name Server
addresses.
Traffic class
: select the traffic class, if you
selected the PS network.
Managing connection profiles
On the list of connection profiles, scroll to a profile
and press <
Options
> to access the following
options:
•
Edit
: edit the selected connection profile.
•
New
: add a new connection profile.
•
Rename
: change the name of the selected
connection profile.
•
Delete
: delete the selected connection profile.
•
Restore
: restore the changed settings to the
default status.
You cannot edit or delete the default connection
profiles.
Application settings
(Menu 9.7)
You can customise the settings for using applications
available on the phone.
Internet
(Menu 9.7.1)
Use this menu to select a connection profile to be
used for accessing the Internet. You can also make
or edit a profile.p. 73
Messages
(Menu 9.7.2)
Use this menu to change the default settings for
using the message feature. p. 48
Contacts
(Menu 9.7.3)
Use this menu to change the settings for using
Phonebook.p. 34
Camera
(Menu 9.7.4)
Use this menu to change the default settings for
taking photos.p. 62
Video recorder
(Menu 9.7.5)
Use this menu to change the default settings for
recording video clips.p. 65
Voice recorder
(Menu 9.7.6)
Use this menu to change the default settings for the
voice recorder.p. 37
74
Page 78
Media player
Use this menu to change the default settings for
playing media files in the Media player.p. 36
VOD
(Menu 9.7.8)
Use this menu to activate a connection profile to be
used for accessing streaming servers to use VOD
(Video on Demand) services. You can also make or
edit a profile.p. 73
Security
Use this menu to protect the phone against
unauthorised use by managing the several access
codes of your phone and USIM/SIM card.
If you enter an incorrect PIN/PIN2 three times in
succession, the
unblock it, you need to enter your PUK/PUK2
(Personal Unblocking Key). The codes are
supplied by your network operator.
Phone lock
The Phone Lock feature locks the phone from
unauthorised use.
When this feature is enabled, you must enter a 4- to
8-digit phone password each time the phone is
switched on.
The password is preset to
password, use the
menu.
(Menu 9.7.7)
(Menu 9.8)
USIM/
SIM card is blocked. To
(Menu 9.8.1)
00000000
Change phone password
. To change the
SIM lock
The SIM Lock feature allows your phone to work only
with the current USIM/SIM by assigning a USIM/SIM
lock code. You must enter the USIM/SIM lock code
to use a different USIM/SIM card.
PIN lock
The 4- to 8-digit PIN (Personal Identitication
Number) protects your USIM/SIM card against
unauthorised use. When this feature is enabled, the
phone requires your PIN each time it is switched on.
Fixed dialling mode
If supported by your USIM/SIM card, Fixed Dial
Number (FDN) mode restricts your outgoing calls to
a limited set of phone numbers. When this feature is
enabled, you can make calls only to phone numbers
stored on the USIM/SIM card. To use this feature,
you must enter your PIN2.
Change phone password
Use this menu to change your phone password. The
password is preset to
Privacy lock
Use this menu to lock your messages, media
contents, contacts, and call logs.
1. Press to check the item(s) to lock.
2. Press <
(Menu 9.8.2)
(Menu 9.8.3)
(Menu 9.8.4)
(Menu 9.8.5)
00000000
(Menu 9.8.6)
Save
> to lock the marked items.
.
Menu functions
Settings
(Menu 9)
75
Page 79
3. Enter the phone password and press
<
Confirm
To access a locked item, you need to enter the
phone password.
Change PIN code
Use this menu to change your PIN. The PIN Check
feature must be enabled to use this feature.
Change PIN2 code
If supported by your USIM/SIM card, the Change
PIN2 feature changes your current PIN2.
Memory status
Use this menu to check the amount of memory
being used for storing data, such as SMS, MMS,
Email, Push messages, File manager, Contacts, and
Organiser items. You can also view the amount of
shared memory or the memory card.
Reset settings
Use this menu to reset the phone to its default
settings.
1. Enter the phone password and press
<
Confirm
2. Press <
itself off and then back on.
>.
(Menu 9.8.7)
(Menu 9.8.8)
(Menu 9.9)
(Menu 9.0)
>.
The password is preset to
can change this password. p. 75
Yes
>. The phone automatically turns
00000000
. You
Solve problems
Help and personal needs
To save the time and expense of an unnecessary service
call, perform the simple checks in this section before
contacting a service professional.
When you switch on your phone, the
following messages may appear:
“Please insert SIM card”
• Be sure that the SIM card is correctly installed.
“Phone lock”
• The automatic locking function has been
enabled. You must enter the phone’s password
before you can use the phone.
“Enter PIN”
• You are using your phone for the first time. You
must enter the PIN supplied with the SIM card.
• The PIN Check feature is enabled. Every time the
phone is switched on, the PIN has to be entered.
To disable this feature, use the
“Enter PUK”
• The PIN code was entered incorrectly three times
in succession, and the phone is now blocked.
Enter the PUK supplied by your service provider.
PIN lock
menu.
76
Page 80

“No service,” “Network failure,” or “Not
done” displays
• The network connection has been lost. You may
be in a weak signal area. Move and try again.
• You are trying to access an option for which you
have no subscription with your service provider.
Contact the service provider for further details.
You have entered a number but it was not
dialled
• Be sure that you have pressed [ ].
• Be sure that you have accessed the right cellular
network.
Your correspondent cannot reach you
• Be sure that your phone is switched on. ([ ]
pressed for more than one second.)
• Be sure that you are accessing the correct
cellular network.
• Be sure that you have not set an incoming call
barring option.
Your correspondent cannot hear you
speaking
• Be sure that you have switched on the
microphone.
• Be sure that you are holding the phone close
enough to your mouth. The microphone is
located at the bottom of the phone.
The phone starts beeping and “Low battery”
flashes on the display
• Your battery is insufficiently charged. Recharge
the battery.
The audio quality of the call is poor
• Check the signal strength indicator on the
display ( ). The number of bars indicates the
signal strength from strong ( ) to weak ( ).
• Try moving the phone slightly or moving closer
to a window if you are in a building.
No number is dialled when you re-call a
Phonebook entry
• Use the Contacts Search feature to ensure the
number has been stored correctly.
• Re-store the number, if necessary.
If the above guidelines do not help you to
solve the problem, take note of:
• The model and serial numbers of your phone
• Your warranty details
• A clear description of the problem
Then contact your local dealer or Samsung aftersales service.
Solve problems
77
Page 81
Health and safety information
SAR certification information
This phone meets European Union (EU)
requirements concerning exposure to radio waves.
Your mobile phone is a radio transmitter and
receiver. It is designed and manufactured to not
exceed the limits for exposure to radio-frequency
(RF) energy, as recommended by the EU Council.
These limits are part of comprehensive guidelines
and establish permitted levels of RF energy for the
general population. The guidelines were developed
by independent scientific organisations through the
periodic and thorough evaluation of scientific
studies. The limits include a substantial safety
margin designed to ensure the safety of all persons,
regardless of age and health.
The exposure standard for mobile phones employs a
unit of measurement known as Specific Absorption
Rate (SAR). The SAR limit recommended by the EU
Council is 2.0 W/kg.
The highest SAR value for this model phone was
0.994 W/kg.
* The SAR limit for mobile phones used by the public is 2.0
watts/kilogram (W/kg) averaged over ten grams of body
tissue. The limit incorporates a substantial margin of safety
to give additional protection for the public and to account for
any variations in measurements. The SAR values may vary,
depending on national reporting requirements and the
network band.
*
SAR tests are conducted using standard operating
positions with the phone transmitting at its highest
certified power level in all tested frequency bands.
Although the SAR is determined at the highest
certified power level, the actual SAR level of the
phone while operating can be well below the
maximum value. This is because the phone is
designed to operate at multiple power levels so as to
use only the power required to reach the network. In
general, the closer you are to a base station, the
lower the power output of the phone.
Before a new model phone is available for sale to the
public, compliance with the European R&TTE
Directive must be shown. This directive includes as
one of its essential requirements the protection of
the health and safety of the user and any other
person.
Precautions when using batteries
• Never use a charger or battery that is damaged
in any way.
• Use the battery only for its intended purpose.
• If you use the phone near the network’s base
station, it uses less power. Talk and standby time
are greatly affected by the signal strength on the
cellular network and the parameters set by the
network operator.
78
Page 82

• Battery charging time depends on the remaining
battery charge, the type of battery, and the
charger used. The battery can be charged and
discharged hundreds of times, but it will
gradually wear out. When the operation time is
noticeably shorter than normal, it is time to buy
a new battery.
• If left unused, a fully charged battery will
discharge itself over time.
• Use only Samsung-approved batteries, and
recharge your battery only with Samsungapproved chargers. Disconnect the charger from
the power source when it is not in use. Do not
leave the battery connected to a charger for
more than a week, since overcharging may
shorten its life.
• Extreme temperatures will affect the charging
capacity of your battery: it may require cooling
or warming first.
• Do not leave the battery in hot or cold places
because the capacity and lifetime of the battery
will be reduced. Try to keep the battery at room
temperature. A phone with a hot or cold battery
may not work temporarily, even when the
battery is fully charged. Li-ion batteries are
particularly affected by temperatures below 0°C
(32°F).
• Do not short-circuit the battery. Accidental shortcircuiting can occur when a metallic object like a
coin, clip or pen causes a direct connection
between the + and – terminals of the battery
(metal strips on the battery). For example, do
not carry a spare battery in a pocket or bag
where the battery may contact metal objects.
Short-circuiting the terminals may damage the
battery or the object causing the short-circuiting.
• Dispose of used batteries in accordance with
local regulations. Always recycle. Do not dispose
of batteries in a fire.
Road safety
Your wireless phone gives you the powerful ability to
communicate by voice, almost anywhere, anytime.
But an important responsibility accompanies the
benefits of wireless phones, one that every user
must uphold.
When driving a car, driving is your first
responsibility. When using your wireless phone while
driving, follow local regulations in the country or
region you are in.
Operating environment
Remember to follow any special regulations in force
in the area you are in, and always switch off your
phone whenever it is forbidden to use it, or when it
may cause interference or danger.
Health and safety information
79
Page 83

Health and safety information
When connecting the phone or any accessory to
another device, read its user’s guide for detailed
safety instructions. Do not connect incompatible
products.
As with other mobile radio transmitting equipment,
users are advised that for the satisfactory operation
of the equipment and for the safety of personnel, it
is recommended that the equipment should only be
used in the normal operating position (held to your
ear with the antenna pointing over your shoulder).
Electronic devices
Most modern electronic equipment is shielded from
radio frequency (RF) signals. However, certain
electronic equipment may not be shielded against
the RF signals from your wireless phone. Consult the
manufacturer to discuss alternatives.
Pacemakers
Pacemaker manufacturers recommend that a
minimum distance of 15 cm (6 inches) be
maintained between a wireless phone and a
pacemaker to avoid potential interference with the
pacemaker. These recommendations are consistent
with the independent research and
recommendations of Wireless Technology Research.
If you have any reason to suspect that interference
is taking place, switch off your phone immediately.
Hearing aids
Some digital wireless phones may interfere with
some hearing aids. In the event of such
interference, you may wish to consult your hearing
aid manufacturer to discuss alternatives.
Other medical devices
If you use any other personal medical devices,
consult the manufacturer of your device to
determine if it is adequately shielded from external
RF energy.
Your physician may be able to assist you in obtaining
this information.
Switch off your phone in health care facilities when
regulations posted in these areas instruct you to do
so.
Vehicles
RF signals may affect improperly installed or
inadequately shielded electronic systems in motor
vehicles. Check with the manufacturer or its
representative regarding your vehicle.
You should also consult the manufacturer of any
equipment that has been added to your vehicle.
Posted facilities
Switch off your phone in any facility where posted
notices require you to do so.
80
Page 84

Potentially explosive environments
Switch off your phone when in any area with a
potentially explosive atmosphere, and obey all signs
and instructions. Sparks in such areas could cause
an explosion or fire resulting in bodily injury or even
death.
Users are advised to switch off the phone while at a
refuelling point (service station). Users are reminded
of the need to observe restrictions on the use of
radio equipment in fuel depots (fuel storage and
distribution areas), chemical plants, or where
blasting operations are in progress.
Areas with a potentially explosive atmosphere are
often but not always clearly marked. They include
the areas below decks on boats, chemical transfer or
storage facilities, vehicles using liquefied petroleum
gas, such as propane or butane, areas where the air
contains chemicals or particles, such as grain, dust
or metal powders, and any other area where you
would normally be advised to turn off your vehicle
engine.
Emergency calls
This phone, like any wireless phone, operates using
radio signals, wireless, and landline networks as well
as user-programmed functions, which cannot
guarantee connection in all conditions. Therefore,
you should never rely solely on any wireless phone
for essential communications like medical
emergencies.
To make or receive calls, the phone must be
switched on and in a service area with adequate
signal strength. Emergency calls may not be
possible on all wireless phone networks or when
certain network services and/or phone features are
in use. Check with local service providers.
To make an emergency call:
1. Switch on the phone.
2. Key in the emergency number for your present
location. Emergency numbers vary by location.
3. Press [ ].
Certain features like Call Barring may need to be
deactivated before you can make an emergency call.
Consult this document and your local cellular service
provider.
Health and safety information
81
Page 85

Health and safety information
Other important safety information
• Only qualified personnel should service the
phone or install the phone in a vehicle. Faulty
installation or service may be dangerous and
may invalidate any warranty applicable to the
device.
• Check regularly that all wireless phone
equipment in your vehicle is mounted and
operating properly.
• Do not store or carry flammable liquids, gases,
or explosive materials in the same compartment
as the phone, its parts, or accessories.
• For vehicles equipped with an air bag, remember
that an air bag inflates with great force. Do not
place objects, including installed or portable
wireless equipment, in the area over the air bag
or in the air bag deployment area. Improperly
installed wireless equipment could result in
serious injury if the air bag inflates.
• Switch off your phone before boarding an
aircraft. It is dangerous and illegal to use
wireless phones in an aircraft because they can
interfere with the operation of the aircraft.
• Failure to observe these instructions may lead to
the suspension or denial of telephone services to
the offender, or legal action, or both.
Care and maintenance
Your phone is a product of superior design and
craftsmanship and should be treated with care. The
suggestions below will help you fulfill any warranty
obligations and allow you to enjoy this product for
many years.
• Keep the phone and all its parts and accessories
out of the reach of small children.
• Keep the phone dry. Precipitation, humidity, and
liquids contain minerals that corrode electronic
circuits.
• Do not use the phone with a wet hand. Doing so
may cause an electric shock to you or damage to
the phone.
• Do not use or store the phone in dusty, dirty
areas, as its moving parts may be damaged.
• Do not store the phone in hot areas. High
temperatures can shorten the life of electronic
devices, damage batteries, and warp or melt
certain plastics.
• Do not store the phone in cold areas. When the
phone warms up to its normal operating
temperature, moisture can form inside the
phone, which may damage the phone’s
electronic circuit boards.
• Do not drop, knock, or shake the phone. Rough
handling can break internal circuit boards.
82
Page 86

• Do not use harsh chemicals, cleaning solvents,
or strong detergents to clean the phone. Wipe it
with a soft cloth slightly dampened in a mild
soap-and-water solution.
• Do not paint the phone. Paint can clog the
device’s moving parts and prevent proper
operation.
• Do not put the phone in or on heating devices,
such as a microwave oven, stove, or radiator.
The phone may explode when overheated.
• Use only the supplied or an approved
replacement antenna. Unauthorised antennas or
modified accessories may damage the phone and
violate regulations governing radio devices.
• If the phone, battery, charger, or any accessory
is not working properly, take it to your nearest
qualified service facility. The personnel there will
assist you, and if necessary, arrange for service.
Health and safety information
83
Page 87

Index
A
ABC mode, text input • 24
Alarm • 58
Answering
call • 25, 28
second call • 26
Anykey answer • 67
Auto redial • 70
B
Backlight time, set • 68
Barring, calls • 69
Battery
charging • 7
low indicator • 8
precautions • 78
Bluetooth
receiving, data • 72
sending, data • 72
settings • 71
Browser, WAP • 39
C
Calculator • 38
Call costs • 30
Call records
dialled • 30
missed • 29
received • 30
Call time • 31
Caller group, managing • 33
Caller ID • 68
Calls
answering • 25, 28
barring • 69
diverting • 69
84
holding • 26
redialling • 25
rejecting • 25
waiting • 70
Camera
photos • 62
videos • 64
Characters, enter • 23
Conference call • 28
Configuration messages • 45
Connection tone • 66
Contacts
copying • 34
deleting • 31, 34
editing • 31, 32
options • 31
setting • 34
speed-dialling • 33
Conversion • 38
Creating messages
e-mail • 43
MMS with attachments • 42
MMS • 41
SMS • 41
Creating organiser
anniversaries • 59
events • 58
memos • 59
tasks • 59
D
Deleting
contacts • 31
e-mails • 46
events • 60
missed alarms • 61
MMS messages • 45
photos • 53, 64
SMS messages • 44
video clips • 65
Delivery reports, message • 48, 49
Dialled calls • 30
Display
language • 67
settings • 68
Diverting, calls • 69
DTMF tones, send • 27
E
E-mails
creating/sending • 43
deleting • 46
settings • 50
viewing • 46
Emergency calls • 81
F
FDN (Fixed Dial Number) mode • 75
File messenger • 42
Forwarding
e-mails • 46
MMS messages • 45
G
Games • 56
Greeting message • 68
H
Health and safety • 78
Holding, call • 26
I
Icons, description • 10
Images, downloaded • 52
Inbox, messages
e-mail • 46
MMS • 43
Page 88

SMS • 43
web • 45
Infrared, connect • 72
International calls • 25
Internet • 39
K
key tone volume • 66
Keypad tones
sending • 27
settings • 66
L
Language, select • 67
Last number, redial • 25
Locking
media contents • 75
phone • 75
SIM card • 75
Loudspeaker • 27
Low battery indicator • 8
M
Memory card • 21
Memory status
contacts • 34
messages • 52
phone • 76
scheduled events • 61
Messages
configuration • 45
greeting • 68
MMS with attachments • 42
MMS • 41
SMS • 41
web • 45
Minute minder • 66
Missed alarm events • 61
Missed calls • 29
MMS messages
creating/sending • 41, 42
deleting • 45
settings • 49
viewing • 44
Multi-party calls • 28
Music files, downloaded • 55
Muting
key tones • 27
microphone • 27
N
Name card • 34
Names
entering • 23
searching • 31
Network selection • 73
O
Organiser • 57
Outbox, messages • 45
Own number • 34
P
Password
barring • 69
phone • 75
Phone
care and maintenance • 82
display • 10
icons • 10
locking • 75
password • 75
resetting • 76
switching on/off • 8
unpacking • 6
Photos
deleting • 53, 64
editing • 52
taking • 62
viewing • 52
PIN, change • 76
PIN2, change • 76
Power on/off tone • 66
Privacy • 75
Problems, solve • 76
Profiles • 66
R
Received calls • 30
Received messages
configuration • 45
e-mail • 46
MMS • 44
SMS • 44
web • 45
Recording
vidoes • 64
voice memos • 37
Redialling
automatically • 70
manually • 25
Resetting phone • 76
Road safety • 79
Roaming • 73
S
Safety
information • 78
precaution • 1
Sent messages • 45
SIM card
inserting • 7
locking • 75
SMS messages
Index
85
Page 89

creating/sending • 41
deleting • 44
settings • 48
viewing • 44
Sound settings • 66
Sounds, downloaded • 56
Speed-dial • 33
Switching on/off
microphone • 27
phone • 8
T
Templates
MMS • 47
text • 47
Text input mode, change • 23
Text, enter • 23
Tone
connect • 66
keypad • 66
message • 66
minute minder • 66
power on • 66
V
Video calls
making • 28
setting • 70
Video clips
deleting • 65
playing • 53
recording • 64
Voice mail server • 51
Voice memos
playing • 37
recording • 37
W
Waiting call • 70
Wallpaper • 68
WAP browser • 39
World time • 38
86
Page 90
*This is not the address of the Samsung Service Centre. For the address or the phone number of the Samsung Service
Centre, see the warranty card or contact the retailer where you purchased your phone.
Blackbushe Business Park, Saxony Way,
Yateley, Hampshire , GU46 6GG, UK
2005. 04. 15 Yong-Sang Park / S. Manager
(place and date of issue) (name and signature of authorised person)
For the following product:
GSM900/GSM1800/GSM1900/WCDMA
with Bluetooth
(factory name, address
Manufactured at:
(Product Name)
SGH-Z500
(Model Number)
Samsung Electronics Co., Ltd, 94-1 Imsu-Dong, Gumi City, Kyung Buk, Korea, 730-350
to which this declaration relates, is in conformity with the following standards and/or other
EN 301 489-07 v1.2.1 (2002-08)
Safety : EN 60950-1:2001
EMC : EN 301 489-01 v1.3.1 (2001-09)
normative docu ments.
(Representative in the EU)
Samsung Electronics Euro QA Lab.
Samsung Electronics Euro QA Lab.
Directive 1999/5/EC has been followed with the involvement of the following Notified Body(ies):
EN 301 511 v9.0.2 (2003-03)
SAR : EN 50360:2001
Network : EN 301 908-1 v2.2.1 (2003-10)
EN 301 489-17 v1.2.1 (2002-08)
EN 301 489-24 v1.2.1 (2002-11)
EN 50361:2001
EN 301 908-2 v2.2.1 (2003-10)
EN 300 328-1; (A1) v1.3.1 (2001-12)
EN 300 328-2; (A1) v1.2.1 (2001-12)
We hereby declare the [all essential radio test suites have been carried out and that] the above
named product is in conformity to all the essential requirements of Directive 1999/5/EC.
The conformity assessment procedure referred to in Article 10 and detailed in Annex[
BABT, Balfour House, Churchfield Road,
Walton-on-Thames, Surrey, KT12 2TD, UK
Identification mark: 0168
The technical documentation kept at:
which will be made available upon request.
Declaration of Conformity (R&TTE)
*
)
IV
] of
 Loading...