


Introduction
Congratulations on being the owner of a brand new Motorola mobile phone.
In addition to making calls, MMS, Email, and Internet access, you can use a good many other
functions just like those of a Multimedia Palm, such as multifunction Address Book, Date Book,
Note Pad, Audio Recorder, Camera, Paint, Media Center, My Document (File Manager),
Bluetooth, Modem and Data Synchronizer. Wireless GPRS downloading will extend your phone
functions and close up to your life.
The product brings innovative concepts to mobile communication with its colorful touch screen
and graphic interfaces, which offer streamlined operation, enhanced functionality, and "OneTouch" information acquisition and processing.
It is designed with a unique open display window to deliver you more careful consideration and
make your info fetching more convenient and rapid.
Either in office or at home, you'll feel more delighted with a distinct function that sends your
Date Book in short messages.
You'll enjoy your creativeness by composing pictures, photos, animations, and musical pieces in
your individual style with the Paint and distributing them in short messages.
The new Media Center will provide you with audio and video refreshment in your spare time.
The unique Camera function makes it possible to share wonderfulness with your friends any-
where and anytime, by taking pictures simply and easily.
Although the product is excellently designed for wonderfulness, you can only make perfect use
of it with your understanding and imagination. Look into the manual and see how you can enter
a splendid world of communication.
Introduction
1
ENGLISH
Introduction

Introduction
Copyright Description
1. Java and all other Java-based logos are all trademarks or registered trademarks of
SUN Corporation in America or other countries.
2. The product adopts "iType" technology and font of Agfa Monotype Corporation.
3. Refer to the Appendix for GNU copyright information.
Personal Communications Sector
(852) 2506-3888 (Hong Kong) www.motorola.com.hk (Hong Kong)
MOTOROLA and the Stylized M Logo are registered in the US Patent & Trademark Office.
Java and all other Java-based marks are trademarks or registered trademarks of Sun Microsystems, Inc. in the U.S. and
other countries. All other product or service names are the property of their respective owners. ©Motorola, Inc. 2004.
Software Copyright Notice
The Motorola products described in this manual may include copyrighted Motorola and third-party software
stored in semiconductor memories or other media. Laws in the United States and other countries preserve for
Motorola and third-party software providers certain exclusive rights for copyrighted software, such as the exclusive rights to distribute or reproduce the copyrighted software. Accordingly, any copyrighted software contained
in the Motorola products may not be modified, reverse-engineered, distributed, or reproduced in any manner to
the extent allowed by law. Furthermore, the purchase of the Motorola products shall not be deemed to grant
either directly or by implication, estoppel, or otherwise, any license under the copyrights, patents, or patent
applications of Motorola or any third-party software provider, except for the normal, non-exclusive, royalty-free
license to use that arises by operation of law in the sale of a product. Manual number: 6887301Z62
ENGLISH
2
Introduction

Contents
Introduction
Congratulations
Safety Information
Chapter 1 Getting Started
Functions of External Keys
SIM Card, Battery
Charging the Battery
Turning on Your Phone
Turning off Your Phone
Screen Display and Operation
Functions of External Display (when flip closed)
About terms and pictures used in the manual to describe operations
Chapter 2 Entry Methods
Handwriting
Pinyin Board
English Board
Numeric Pad
Functional Buttons
Contents
Contents
3
ENGLISH

Contents
ENGLISH
Chapter 3 Phone Function
Sending a Phone Call
Dialing an Emergency Number
Receiving a Phone Call
Dialing an International Call
Directly Dialing Extension or Voicemail
Dialing an Extension Number
In-Call Functions
Turbo Dial
Dialing a Number Stored in SIM Card
Multiparty Conversation (Making a Conference Call)
Transferring a Call
Calls Record
Call Cost
My Tel. Number
Network Setup
Chapter 4 Address Book
Showing Address Book List
Adding New Contacts
Copying Contact Data Information
4
Contents

Deleting a Contact
Searching for a Contact
Viewing Owner's Information
Sending Vcards
Chapter 5 Message Center
Inbox
Viewing Messages
Writing a Short Message
Signature Setup
Sending a Message
Outbox
Drafts
Trash
SIM Card
Private Folder
MMS
Chapter 6 Email
Mailbox Setup
Writing and Sending Emails
Contents
Contents
5
ENGLISH

Contents
ENGLISH
Receiving, Viewing, Reading a Mail or Sorting Mails
Private Folder
Chapter 7 Browser
Activating WAP Browser
Browsing Information and Using Access Function
Downloading Files
Chapter 8 Camera
View-Finding
Shoot
Preview or Delete Video or Photo
Effects
Setup Options
Chapter 9 Media Center
Playing Audio and Video Files
Download and Play Video Files
Chapter 10 Picsel Browser
View
Special Functions
Preferred Setting
6
Contents

Chapter 11 Date Book
Month View
Day View
Week View
Adding a New Event
Editing an Event
Deleting an Event
Date Book Setup
Chapter 12 Tasks
Viewing Tasks
Creating, Editing, and Saving a Task
Chapter 13 Note Pad
Chapter 14 Paint
Chapter 15 Recorder
Chapter 16 My Document
Editing Files and Folders
Creating a New Folder
Viewing by
Contents
Contents
7
ENGLISH

Contents
Sorting
Searching
Folder Tree
Chapter 17 Share
Receiving Data
Sending Data
Chapter 18 Alarm Clock and Worldwide Clock
Alarms
Worldwide Clock
Chapter 19 Calculator
Chapter 20 Bluetooth
Turning on Bluetooth
Viewing, Adding, and Setting Bluetooth Devices
Using Bluetooth for Information Transmission
Chapter 21 STK Application
Chapter 22 Network
Network
ENGLISH
8
Contents

ENGLISH
9
Contents
Contents
Profiles
Chapter 23 Security
Chapter 24 Theme
Selecting a theme
Configuring a theme
Chapter 25 Setup
Language
Time and Date
Volume Setup
Entry Setup
Touch Screen Calibration
Backlight Setup
Voice Recognition Setup
Infrared Receiving
Power Management
Master Reset
Master Clear

Contents
ENGLISH
Chapter 26 Voice Instruction
Loading Voice Recognition
Using Voice Recognition
Reciting
List of Voice Instruction and Functions
Chapter 27 Data Synchronization
Chapter 28 Modem
Chapter 29 VPN (Virtual Private Network)
Creating New Policy
Logging into the VPN
Chapter 30 Troubleshooting
Chapter 31 Specific Absorption Rate
This model phone meets the international requirements for exposure to radio waves.
Chapter 32 Appendix
Chapter 33 USBNET's Features
Note:The functions available on this mobile phone may vary in different regions and nations. Please contact
your local customer service centers, agencies or retailers if you have any question about the mobile phone
functions. Motorola reserves all rights to revise and change this user's manual without obligation to notify
any person of such revisions or changes.
10
Contents

Safety and General Information
IMPORTANT INFORMATION ON SAFE AND EFFICIENT OPERATION. READ THIS INFORMATION BEFORE USING YOUR PHONE.
The information provided in this document supersedes the general safety information in user
guides published prior to December 1, 2002.
Exposure To Radio Frequency (RF) Energy
Your phone contains a transmitter and a receiver. When it is ON, it receives and transmits RF
energy. When you communicate with your phone, the system handling your call controls the
power level at which your phone transmits.
Your Motorola phone is designed to comply with local regulatory requirements in your country
concerning exposure of human beings to RF energy.
Operational Precautions
To assure optimal phone performance and make sure human exposure to RF energy is within
the guidelines set forth in the relevant standards, always adhere to the following procedures.
External Antenna Care
Use only the supplied or Motorola-approved replacement antenna. Unauthorised antennas,
modifications, or attachments could damage the phone.
Do NOT hold the external antenna when the phone is IN USE. Holding the external antenna
affects call quality and may cause the phone to operate at a higher power level than needed. In
addition, use of unauthorised antennas may result in non-compliance with the local regulatory
Safety Information
Safety Information
11
ENGLISH

requirements in your country.
Phone Operation
When placing or receiving a phone call, hold your phone as you would a wireline telephone.
Body-Worn Operation
To maintain compliance with RF energy exposure guidelines, if you wear a phone on your body
when transmitting, always place the phone in a Motorola-supplied or approved clip, holder, holster, case, or body harness for this phone, if available. Use of accessories not approved by
Motorola may exceed RF energy exposure guidelines. If you do not use one of the body-worn
accessories approved or supplied by Motorola, and are not using the phone held in the normal
Safety Information
use position, ensure the phone and its antenna are at least 1 inch (2.5 centimetres) from your
body when transmitting.
Data Operation
When using any data feature of the phone, with or without an accessory cable, position the
phone and its antenna at least 1 inch (2.5 centimetres) from your body.
Approved Accessories
Use of accessories not approved by Motorola, including but not limited to batteries and antenna,
may cause your phone to exceed RF energy exposure guidelines. For a list of approved
Motorola accessories, visit our website at www.Motorola.com.
RF Energy Interference/Compatibility
ENGLISH
12
Safety Information

Note: Nearly every electronic device is susceptible to RF energy interference from external
sources if inadequately shielded, designed, or otherwise configured for RF energy compatibility.
In some circumstances your phone may cause interference.
Facilities
Turn off your phone in any facility where posted notices instruct you to do so. These facilities
may include hospitals or health care facilities that may be using equipment that is sensitive to
external RF energy.
Aircraft
When instructed to do so, turn off your phone when on board an aircraft. Any use of a phone
must be in accordance with applicable regulations per airline crew instructions.
Medical Devices
Pacemakers
Pacemaker manufacturers recommend that a minimum separation of 6 inches (15 centimetres)
be maintained between a handheld wireless phone and a pacemaker.
Persons with pacemakers should:
•
ALWAYS keep the phone more than 6 inches (15 centimetres) from your pacemaker when
the phone is turned ON.
•
NOT carry the phone in the breast pocket.
Safety Information
Safety Information
13
ENGLISH

•
Use the ear opposite the pacemaker to minimise the potential for interference.
•
Turn OFF the phone immediately if you have any reason to suspect that interference is taking place.
Hearing Aids
Some digital wireless phones may interfere with some hearing aids. In the event of such interference, you may want to consult your hearing aid manufacturer to discuss alternatives.
Other Medical Devices
If you use any other personal medical device, consult the manufacturer of your device to determine if it is adequately shielded from RF energy. Your GP may be able to assist you in obtaining
Safety Information
this information.
Use While Driving
Check the laws and regulations on the use of phones in the area where you drive. Always obey
them.
When using your phone while driving, please:
•
Give full attention to driving and to the road.
•
Use hands-free operation, if available.
•
Pull off the road and park before making or answering a call if driving conditions so require.
ENGLISH
14
Safety Information

Operational Warnings
For Vehicles With an Air Bag
Do not place a phone in the area over an air bag or in the air bag deployment area. Air bags
inflate with great force. If a phone is placed in the air bag deployment area and the air bag
inflates, the phone may be propelled with great force and cause serious injury to occupants of
the vehicle.
Potentially Explosive Atmospheres
Turn off your phone prior to entering any area with a potentially explosive atmosphere, unless it
is a phone type especially qualified for use in such areas and certified as "Intrinsically Safe." Do
not remove, install, or charge batteries in such areas. Sparks in a potentially explosive atmosphere can cause an explosion or fire resulting in bodily injury or even death.
Note: The areas with potentially explosive atmospheres referred to above include fuelling areas
such as below decks on boats, fuel or chemical transfer or storage facilities, areas where the air
contains chemicals or particles, such as grain, dust, or metal powders. Areas with potentially
explosive atmospheres are often but not always posted.
Blasting Caps and Areas
To avoid possible interference with blasting operations, turn OFF your phone when you are near
electrical blasting caps, in a blasting area, or in areas posted "Turn off electronic devices." Obey
all signs and instructions.
Safety Information
Safety Information
15
ENGLISH
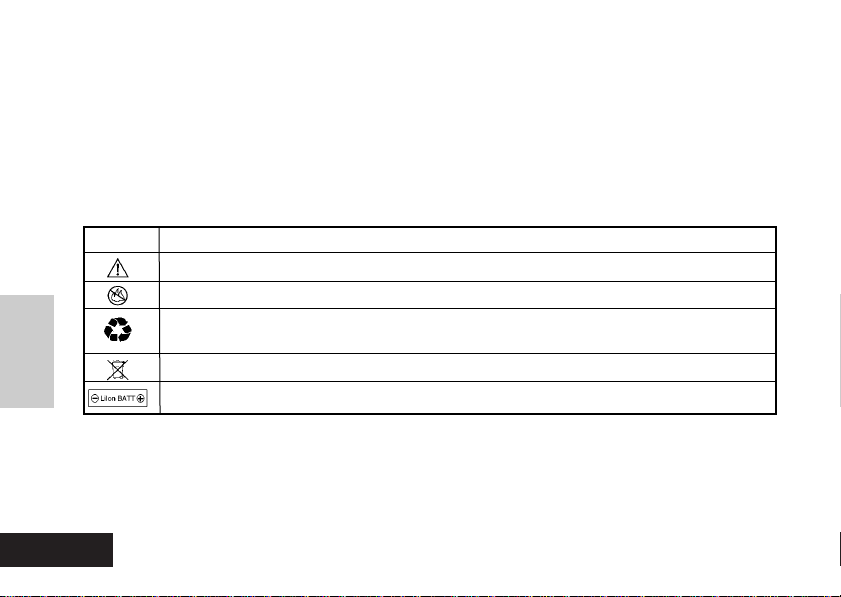
Batteries
Batteries can cause property damage and/or bodily injury such as burns if a conductive material
such as jewellery, keys, or beaded chains touch exposed terminals. The conductive material
may complete an electrical circuit (short circuit) and become quite hot. Exercise care in handling
any charged battery, particularly when placing it inside a pocket, bag, or other container with
metal objects. Use only Motorola original batteries and chargers.
Your battery or phone may contain symbols, defined as follows:
Symbols Definition
Safety Information
Seizures/Blackouts
Some people may be susceptible to epileptic seizures or blackouts when exposed to blinking
lights, such as when watching television or playing video games. These seizures or blackouts
may occur even if a person never had a previous seizure or blackout.
Important safety information will follow.
Your battery or phone should not be disposed of in a fire..
Your battery or phone may require recycling in accordance with local laws. Contact
your local regulatory authorities for more information.
Your battery or phone should not be thrown in the trash.
Your phone contains an internal lithium ion battery.
ENGLISH
16
Safety Information

If you have experienced seizures or blackouts, or if you have a family history of such occurrences, please consult with your doctor before playing video games on your phone or enabling
a blinking-lights feature on your phone. (The blinking-light feature is not available on all products.)
Parents should monitor their children's use of video game or other features that incorporate
blinking lights on the phones. All persons should discontinue use and consult a doctor if any of
the following symptoms occur: convulsion, eye or muscle twitching, loss of awareness, involuntary movements, or disorientation.
To limit the likelihood of such symptoms, please take the following safety precautions:
•
Do not play or use a blinking-lights feature if you are tired or need sleep.
•
Take a minimum of a 15-minute break hourly.
•
Play in a room in which all lights are on.
•
Play at the farthest distance possible from the screen.
Safety Information
Repetitive Motion Injuries
When you play games on your phone, you may experience occasional discomfort in your
hands, arms, shoulders, neck, or other parts of your body. Follow these instructions to avoid
problems such as tendonitis, carpal tunnel syndrome, or other musculoskeletal disorders:
•
Take a minimum 15-minute break every hour of game playing.
•
If your hands, wrists, or arms become tired or sore while playing, stop and rest for several
hours before playing again.
•
If you continue to have sore hands, wrists, or arms during or after play, stop playing and see
a doctor.
Safety Information
17
ENGLISH

European Union Directives Conformance Statement
Safety Information
The above gives an example of a typical Product
Approval Number.
You can view your product's Declaration of
Conformity (DoC) to Directive 1999/5/EC (the
R&TTE Directive) at www.motorola.com/rtte - to
find your DoC, enter the product Approval
Number from your product's label in the "Search"
bar on the Web site
ENGLISH
18
Safety Information

Chapter 1 Getting Started
Note Do not touch the touch screen with sharp objects or dirty stylus. Do not
use the stylus when its point is broken; Otherwise, your touch screen may
be damaged. It is a normal phenomenon that the screen responds slower
in low temperature.
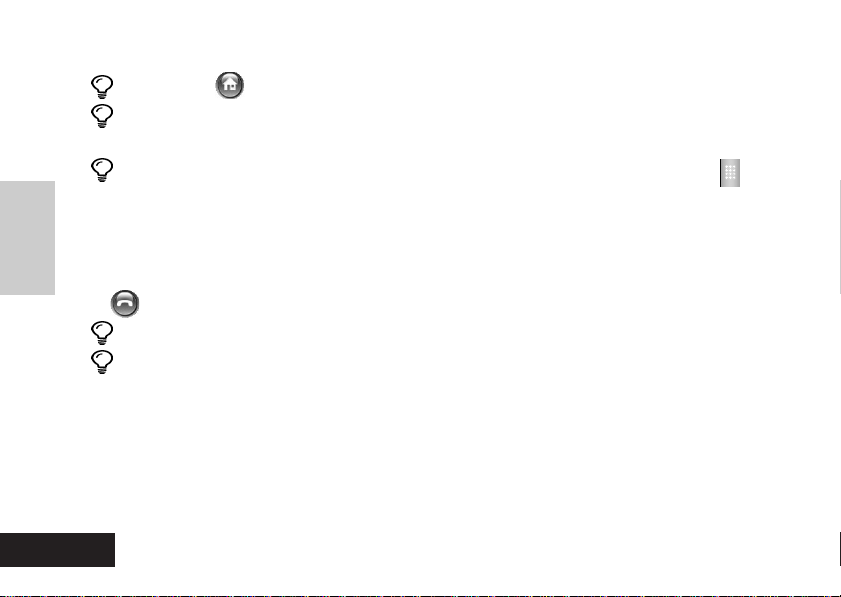
Functions of External Keys
Your phone appears as follows.
Touch Screen
Power Key
Up/Down Navigation Key
Scroll the screen to show
the content in the previous or the next screen.
Charger slot/Data line slot
Quick Function Key
In most screen status,
press the key to return to
the main screen.
Getting Started
Transparent Display Window
If the cover is closed,
the prompting message
will be shown in the window when receiving
incoming calls or short
messages.
Recorder Softkey
When you are in a call, you
can press the key to start or
terminate recording.
When your phone is idle
and the cover is closed,
you can press the key to
display the time and date.
19
Getting Started
ENGLISH

Speaker
Camera Len
Volume Key
Getting Started
ENGLISH
Select Key
(Voice Instruction Key)
Volume Key
Stylus
IR Interface
Headset Jack
1. Increase/decrease the volume in a call.
2. Navigate through and select various functional symbols on the Main Menu Screen
in combination with the Select Key.
3. Adjust the focus in the Camera function screen.
4. Silence the ringing of an incoming call when the phone cover is closed.
5. Adjust the player volume when playing back audio or video files in the media center.
20
Getting Started

Select Key
1. Perform selection function in combination with the Volume Key without touching the screen.
2. Switch between portrait and landscape in the Camera function screen.
3. Press and hold the key to active voice recognition system, enabling the voice dialing function.
SIM Card, Battery
The SIM (Subscriber Identity Module) card is used to store the telephone number
offered by your network operator as well as details on other services. You may also
use it to store frequently-used telephone numbers and information on persons.
Note The SIM card is necessary for wireless communication, such as making a
call or sending a short message. Certain networks allow you to dial emergency numbers using your phone without a SIM card being inserted.
Note Please keep your SIM card with care. Never bend or scratch it. Avoid hav-
ing it exposed to static electricity or water.
Note Power off your phone to replace the battery or remove/install the SIM card.
Operate as follows to install a battery and SIM card (it is unnecessary to remove the
battery when using the phone for the first time):
Getting Started
Getting Started
21
ENGLISH

Getting Started
1. Hold the phone body face-down in your palm;
2. Press the release button and slide down the back cover with the other hand to
remove the cover.
3. Insert the SIM card into the SIM slot. Make sure the corner cutting of the card is
aligned to the notch of the slot and the gold plate of the card faces downward.
4. Insert the battery into the compartment, with the metallic contacts facing down.
5. Push down the other end of the battery until it snaps into the compartment.
6. Replace the back cover and slide it forward completely.
Tips If problems occur on your SIM card, contact your network operator.
Tips
A new battery would reach its best performance after several full charge/discharge cycles. Do not use the battery in extremely low temperature.
Tips Battery performance and maintenance:
1. Always use the batteries and battery chargers approved by Motorola Corporation.
The phone warranty does not cover damage caused by using non-Motorolaapproved batteries and/or battery chargers.
ENGLISH
22
Getting Started

2. Maintain the battery at or near room temperature when charging.
3. Batteries to be left unused for an extended time period should be discharged and
saved in a cold, dark, and dry place.
4. Over extended periods of time, batteries gradually wear down and require longer
charging times. This is normal. If you charge your battery regularly and notice a
decrease in talk time or an increase in charging time, then it is probably time to purchase a new battery.
Charging the Battery
A travel charger may be used to charge the battery equipped in your phone as follows:
1. Ensure your phone is equipped with a battery.
2. Plug the connector of the charger into the bottom slot of your phone.
3. Plug the other end of the travel charger into an appropriate AC outlet.
Note Use a special battery charger designed for A768i ; Make sure the local AC
voltage is accordance with the rated voltage of the charger; Use an
appropriate adapter plug.
4. Your phone emits an alerting tone when the charging is initiated. You may charge
your phone when it is powered on or off.
5. When the charging is completed, disconnect the power supply and unplug the
phone from the charger.
Getting Started
Getting Started
23
ENGLISH
Turning on Your Phone
Open the phone cover Press and hold the key. Your phone starts and
opens the Main Screen.
Recent Call
Additional steps may be required to power on the phone if you enabled SIM PIN
and unlocking code for enhanced security and functional flexibility.
Email
Your phone displays "No SIM Card" if you have inserted no SIM card. In such a
case, two options are available: Antenna Off or Antenna On.
Network
Turning off Your Phone
Open the phone cover in the standby
mode. Press and hold the key for a
while until the phone screen disappears.
Screen 1
Camera
Browser
Theme
Screen Display and Operation
Getting Started
ENGLISH
The phone is designed with a brand new concept that combines functionalities of both a
mobile and a Palm PC. You may operate just
like you do on a Palm PC, using a stylus supplied with the phone to touch the transparent
GUI interface on the LCD touch screen for function selection, writing, drawing, and message
24
Getting Started
Media
Calendar
Note Pad
Tasks
Drawing Pad
Bluetooth
Network
Theme
Screen 2 Screen 3
Security
Setup

entry. The WYSIWYG interface combines information display with your operation. Sufficient
information display is available that varies according to the current function. You may proceed
with simple operations just according to screen instructions.
Functions of Internal Display
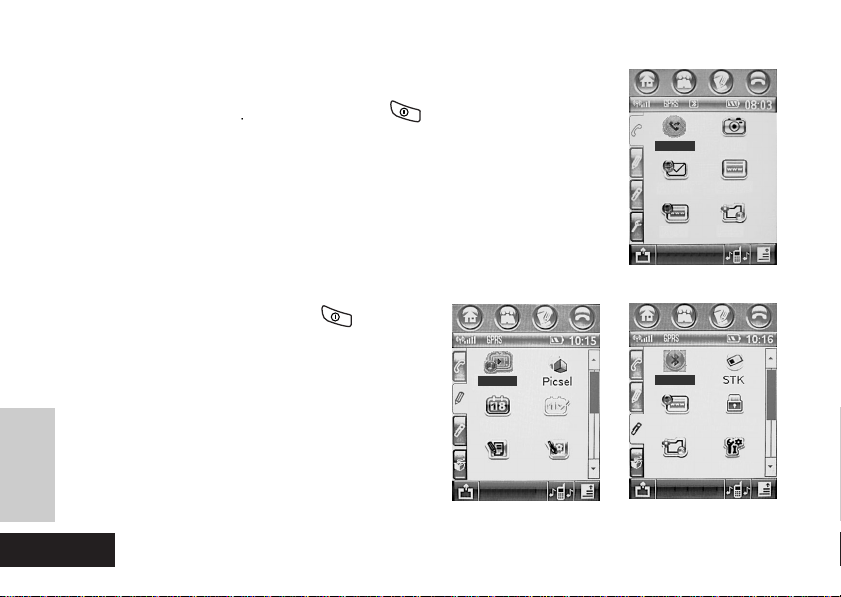
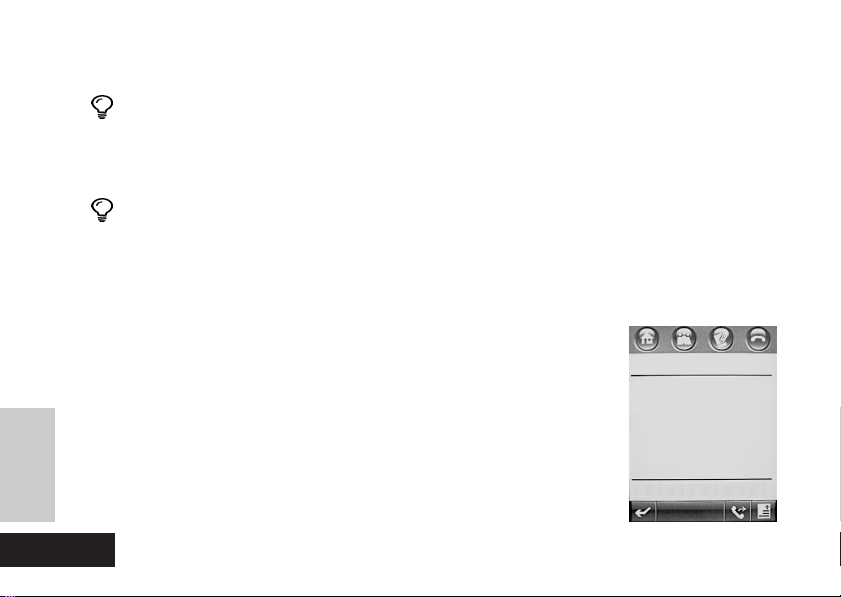
When you turn on your phone, it displays Main Screen 1, as shown in Figure 1. To access other
three Main Screens, tap the Page label on the left side of the screen and you may navigate
through Main Screen 2, 3, and 4 (see Figure 2, 3, and 4). These screens contain certain functional icons, each of which may be used to access a specific function.
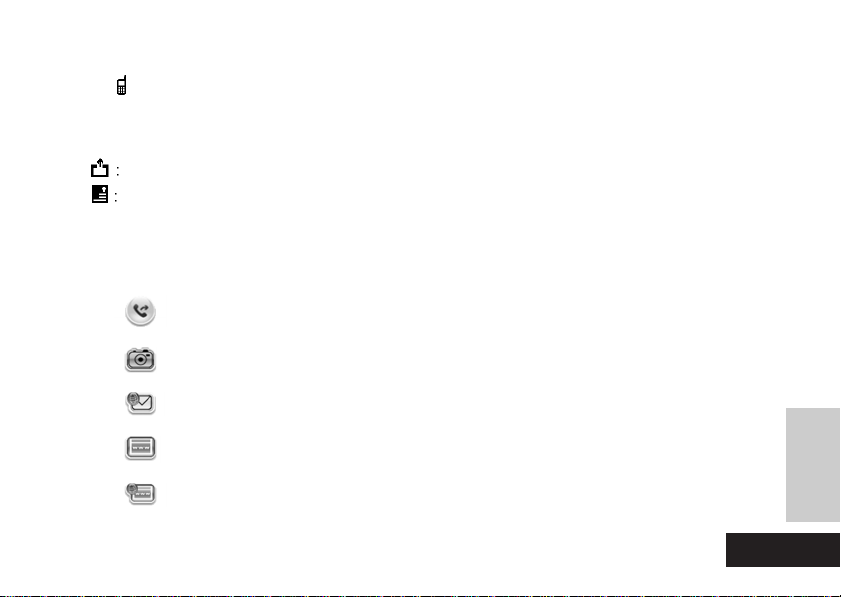
1. The top buttons bar includes:
Main Screen button: Tap the button and the phone will display the Main Screen.
Address Book button: Tap the button and the phone will display the contact list.
Message button: Tap the button to bring the phone into the message function.
Phone Function button: Tap the button and the phone will display the dialpad.
Prompt button: The button will be displayed at the top of the screen when the phone receiving a missed call or a new message. Tap the button to display a list of relevant information.
2. Icons in the status bar indicate operating mode, including:
Signal Strength Indicator: The indicator shows the signal strength. The more vertical
bars visible, the more intense the signal.
Getting Started
25
ENGLISH
Getting Started

Getting Started
Phone Function Off: Indicates the communication function (such as making calls) is
not available and the phone is in the Palm mode;
GPRS
GPRS function of your phone has been enabled. "GPRS" in dark indicates you have
not subscribed for the function or the function is not available right now. If "GPRS" is
highlighted, you have subscribed for the function and the function is available right
now. Contact your network operator for details.
Clock: Your phone shows the time.
Battery Level Indicator:
from exhausted to full.
Tap on the status bar to list the current device status. You may view the network cur-
rently in use, whether the phone function is turned on or off, or the battery level.
3. Function Bar includes:
Vibration/Ring (See the following icons): Tap the icon to select how your phone would
remind you, vibrating or just ringing.
Ring on an incoming call (message);
Vibrate first and then ring on an incoming call (message);
The indicator means your phone is in a network with GPRS support and the
Shows the amount of charge remained in your battery
Vibrate on an incoming call (message);
ENGLISH
26
Getting Started
Keep silence on an incoming call (message).
Network operator symbol: The name of the network operator will be displayed if the
SIM card you have inserted functions normally.
Return button.
Tap the icon to pop up a menu, from which you may select an option. You may
modify how or in what sequence the functional icons would be displayed, download or remove an application, or view the memory status.
4. Function icon: You may tap any of the icons from the function zone to call up a
function screen corresponding to the icon.
Recent Call
Camera
Email
Browser
Network
Records on calls received, missed, and dialed
To take a picture or record a video;
To view, send, or receive emails;
To open the WAP browser for Internet access;
To set up and connect to the network;
Getting Started
27
Getting Started
ENGLISH

For personalized configuration;
Theme
You may view files in PDF, Word, or Excel format;
To show the Date Book and make arrangements;
Calendar
A memo for daily affairs;
Tasks
To record your idea anywhere and anytime;
Note Pad
Getting Started
ENGLISH
Drawing Pad
Recorder
File Manager
Sync
28
To edit pictures;
To activate the Recorder function for quick and easy information recording;
To list, view, and manage your files;
To activate Data Synchronization for data exchange between your phone and certain devices, i.e. a computer;
Modem;
Getting Started

To playback audio and video files;
Media
Alarm Clock
WorldTime
An alarm clock to remind you at certain time and date;
To set up and view the time of the main cities in the world;
To use the Calculator function;
Calculator
To show a list of devices for data transmission;
Bluetooth
For security and codes setup;
Security
To completely personalize your phone;
Setup
To activate the STK function and show a list of available services;
To connect your phone to VPN (Virtual Private Network)
VPN
Functions of External Display(when flip closed)
Getting Started
29
Getting Started
ENGLISH

Answering a Call
Say you receive a call. If the caller's name and picture are stored in your phone, they will be displayed
on the External Screen; otherwise, only the number of the caller and a default picture displays. Open
the phone cover; press the Answer key to answer the call. You may also answer the call by simply
opening the phone cover, provided that you have enabled the "Open Cover to Answer" to answer,
Receiving Short Messages
When your phone receives a short message, the External Screen prompts you that a new message is received.
Alarm Notification
If you have specified an alarm clock and now it's time you previously specified for alerting, your
phone notifies you and the External Screen shows an alarm clock symbol as well as the time.
Ringer Volume
Press and hold the Volume Key to show a list of ringer volumes on the External
Screen. To navigate through the list, press the Volume +/- Key.
About terms and pictures used in the manual to describe operations
Getting Started
"Tap": Touch the screen using the stylus briefly, on a specific place such as a button or function icon.
"Tap and Hold": Touch the screen using the stylus for a few seconds, on a specific place such
as a button or function icon.
Pictures are given in the manual for functional description purpose only. Displays on your phone
may be different. Refer to your phone for details.
ENGLISH
30
Getting Started
Chapter 2 Entry Methods
Your phone offers several easy-to-use text entry methods to help you utilize certain
functions. Generally, you may tap a text entry area where you would enter text to bring
up a text entry box, where you can select from these methods for entry.
Tips 1. To activate an entry method, tap on the area where you want to enter
text. A method is automatically indicated on the text entry box based on
the nature (the entry requirements) of the field. For example, once you
tap on the Number field of your Address Book, a Numeric keypad automatically displays on the entry screen.
2. Sometimes you would like to specify the main Entry Method in the Entry
Setup; otherwise, the latest method you selected will be shown.
3. If you hide the entry method, you may press
the keypad icon appeared at the bottom of
the screen to reselect another method. The
entry box will never cover the part of text
entry field where the cursor locates. When
you have entered considerable amount of
text, you may tap the Up/Down arrow to view
upper or lower text.
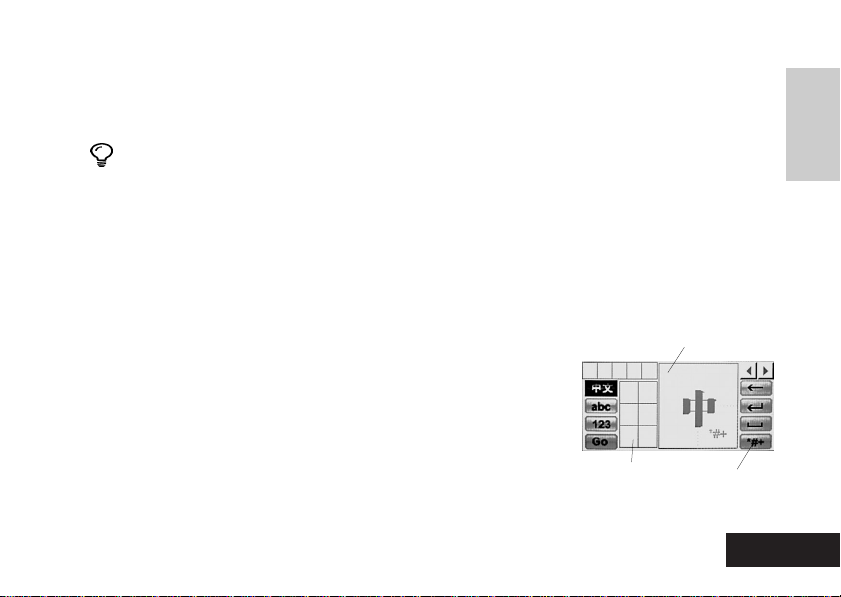
Choice Section
Prediction Section
Select Numbers
or Symbols
Entry Methods
Entry Methods
31
ENGLISH

Entry Methods
Handwriting
Pinyin Board
ENGLISH
As the primary text entry method for your phone, Handwriting pad is available in any function where
text entry is necessary. It employs Motorola's Wisdom Pen - an advanced handwriting recognition
technology - to make it simple and easy for you to enter Chinese characters, English words, and
symbols. To activate the Handwriting pad, tap the Entry Method button in the text entry window and
select Handwriting. A Handwriting pad will be shown at the bottom of screen like that in the figure.
Before entering text with the Handwriting pad, you should determine which type of text you will enter:
Chinese, abc, or 123, by tapping the appropriate symbol. Now you may write in the Writing Pane.
When you finish writing, pause to wait for your phone to select and
put recognized characters into the entry screen. If your phone puts
an undesired character, you may tap another character in the
Choice Section to replace it. The character will be inserted at the
cursor location. The entry method is designed with a predictive function. In the Prediction Section, a character may be highlighted to
indicate that it can be a second character to combine with the first
word into a common phrase. Tap the character to enter it at the cursor location.
If you select Pinyin Keyboard, a simulated Pinyin keyboard
appears on the screen to allow you enter Chinese characters by
using pinyin, as shown in figure 1. To enter a Chinese character,
32
Entry Methods
Figure 1
Figure 2

tap keyboard letters with your stylus pen, in a sequence to spell the corresponding pinyin. The
letters you enter are displayed in the Pinyin Section and corresponding
Chinese characters are shown in the Choice Section. To see additional
characters for choice, tap the Previous or Next button. Once you
find the right character, tap it to enter it at the flash cursor location on the
entry field.
Figure 1
English Board
If you select English Keyboard, a simulated English keyboard appears, as shown in the right Figure 2. You may
tap the key of a letter or number to enter the letter or number at the cursor location.
Entry Methods
Numeric Pad
The method is mainly used for code entry. You may enter digitals and symbols (typically used in codes, such as symbol 'P' and '*') quickly and easily.
Select Numeric Pad to show a simulated Numeric Pad (see Figure 1). Tap a Numeric
key to enter a digit at the cursor location.
Entry Methods
Figure 2
33
ENGLISH

Entry Methods
Functional Buttons
An icon may be seen in any of the above pads. The icon indicates the Symbol
Pad, as shown in Figure 2. To enter a symbol to the cursor location, tap the key of the
symbol you want on the pad. By tapping ,you may lock or hide the Symbol Pad.
Note:In the text input mode, you should tap the numeric symbol icon on the writepad
to enter the symbol input panel.
Tips The flash cursor indicates the current entry location in the text entry field.
To delete the character just preceding the cursor location, tap . When you are
entering characters, you may tap the Enter Key to move the cursor to the next line.
To insert a blank between two characters, tap . A blank is entered following the
cursor.
Note:Display of icons may vary in different entry pads. Please refer to
Note:your phone for details.
As you tap on the field with your stylus pen, the cursor moves to the
tapped point. Such a feature may be used to insert a new character
between two existing characters or to delete an existing character.
ENGLISH
34
Entry Methods

Chapter 3 Phone Function
Note
The phone function is available only when you have turned on the Phone
Function (i.e. in the Phone Mode) and your phone is within network coverage.
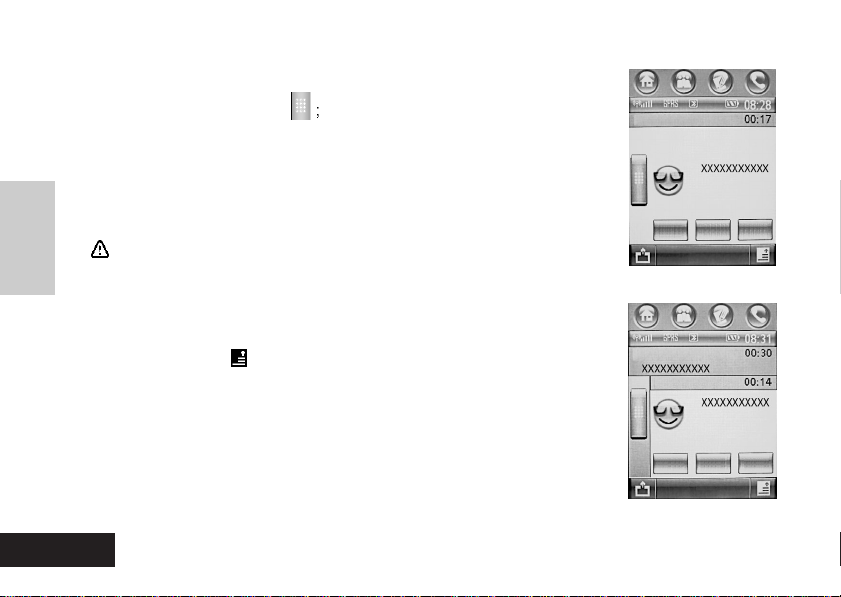
Sending a Phone Call
Tips
You have many choices to dial a number in addition to those methods you normally use. You
can: dial a number from the Address Book; dial a number stored in your SIM card; pick up and
dial a number from a received message; dial a number from a missed call; and dial a number
from a received call. You may also use the Speed Dialing function to dial specific numbers.
Your phone is equipped with a number of functions such as Call Transfer, Call Divert, and
Conference Call to improve your communication efficiency. It also records the telephone numbers of your recently received calls. In control of these functions, you will find that your phone
is powerful in making your work and life more convenient. Please refer to the relevant sections
in the manual for details on how to use these functions.
1.
Ta p in the Main Menu Screen to bring up a new screen, as shown in the Figure.
2.
To send a call, tap the digit keys. The number you entered displays in the Number
field, where the last digit before the cursor may be deleted by tapping key.
You may also tap and hold the Number field to pop up the Edit menu;
3.Tap Send to dial the number;
4.When you want to finish the call, tap End or rotate your phone's
cover closed to end it;
Tips
Ta p to select a number you want to dial from a list of calls record.
Phone Function
35
Phone Function
Send
ENGLISH
Tips Tap or a shortcut softkey to return to the Main Screen
Tips
You may tap the Redial key to show the last number you dialed during the current power-on of your phone,
provided that no number appears in the Number Field. To dial the telephone number, tap the Send key.
Tips
Phone Function
When you have established a connection to a number successfully, you may tap the Keypad button on the
left side of the screen to open the dialpad screen, on which you may dial an extension number or enter digits.
Dialing an Emergency Number
Your network operator specifies one or more emergency phone numbers (such as 112) that you may dial
under any circumstances. Wherever a network is available, you may dial the emergency number by tapping
the symbol to show up the Dialpad Screen, even when no SIM card is inserted in your phone.
Tips Network support is required to use the function.
Tips
Emergency numbers vary in different countries. Emergency number(s) in your phone
may be unavailable in certain area. Sometimes you cannot make an emergency call
due to network coverage, surrounding environments, and other interferences.
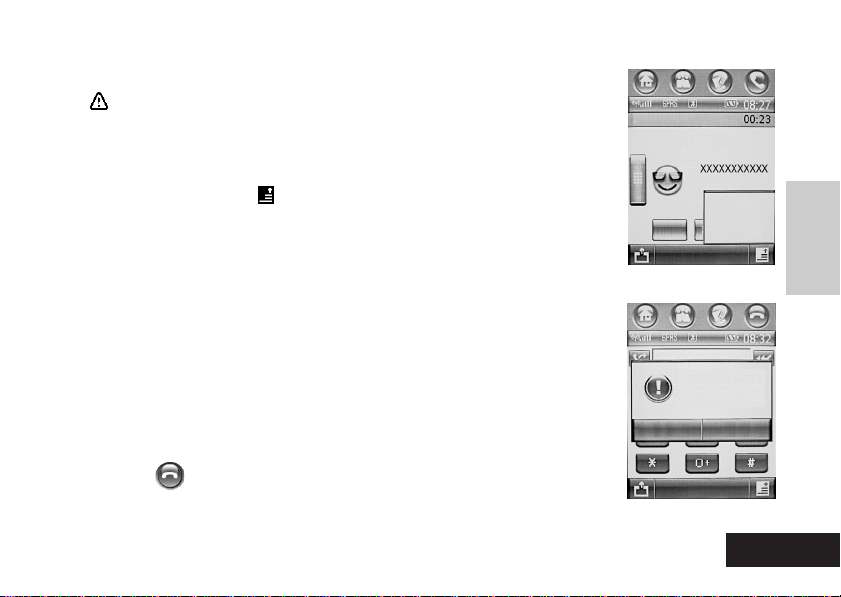
Receiving a Phone Call
When you receive a call, your phone may ring, vibrate, or keep silence, with a screen display as shown
in Figure 1. Tap Answer to answer the call. To finish the call, tap End or close your phone's cover.
Tap Ignore to hang up. Tap Busy to hang up and transmit a busy tone to the caller via the network.
ENGLISH
36
Phone Function

Tips
If "Flip Answer" is enabled (refer to description on "Flip Answer"), you may
receive a phone call by simply opening the cover.
Tips
When you are using the Phone Function, icons for phone functions visible on
the buttons bar on top of the screen may vary depending on the calling status.
Incoming Call...
The iconindicates that your have not dialed a number or you
are not talking. The icon indicates that your phone is in dialing
Busy Ignore Answer
or talking.
Tips
Both the display and the function of the functions bar may vary depending on the calling status. Tap the menu key in the function bar to pop
Figure 1
up a list of functions, as shown in Figure 2. You may tap any other function displayed on the list. These functions are corresponding to the current status. Options in the list also vary depending on the calling status.
Tips
You may press the Receive button on the headset to receive a phone call, provided
Connected
that you have inserted a headset equipped with a Receive button into the phone.
Dialing an International Call
Hold
To add the international dialing prefix "+", and then tap and hold "0" for several
seconds. Icon "+" displays in the Number Field. Alternatively, you may tap the Menu
Phone Function
Figure 2
37
End
New Call
Transfer
My Number
ENGLISH
Phone Function

Key and then tap Insert to select Insert International Dialing Prefix . Enter the international access code
for the country to which you are dialing. Enter the phone number. Tap Send to make your international call.
Directly Dialing Extension or Voicemail
Phone Function
The phone allows you to dial an extension or voicemail directly. You may insert a Pause symbol in
digits of a telephone number. When you dial the number, your phone would not dial the digits following the Pause symbol until it receives an answer from the called party. When an answer is
received, the phone proceeds with the extension number. To dial a number with a Pause symbol,
1. Enter the telephone number as normal;
When you need to insert a Pause symbol, tap the menu key and select Insert\Insert Pause
2.
from the popup menu. A symbol 'P' (the Pause symbol) displays in the Number Field.
3. Enter the extension number.
4. When all the digits have been entered, tap Send.
Tips
You may follow the above steps to insert a Wait symbol "W". When your phone dials the digits preceding the symbol "W", it waits for connecting before it proceeds with digits following the symbol.
Dialing an Extension Number
To dial an extension number during a call, tap the Keypad button to pop up the dial-
ENGLISH
38
Phone Function
pad. To return to the on-call status screen, Tap .
Note
To dial an extension number, never tap Send at the bottom of the Dial Screen.
In-Call Functions
Note Function availability varies depending on your network operator and your
subscription for the function.
When you are in a call:
Tap Hold to put the current call on hold. Tap Mute to close the speaker and tap Mute again to
resume. Tap Keypad button to switch the screen to the Dialpad screen, on which you may
dial another number or an extension number. Tap Menu key to show a menu containing:
New Call: The option functions just as the Keypad button ; that is, you may dial another number.
Call Transfer: Enter a number via the Dialpad screen. Tap Send again to transfer a
call to the number you entered. Refer to "Transferring a Call" for details.
My Tel. Number: Show your phone number.
Holding a Call and Dialing another Number
Note: Function availability varies depending on your network operator and your
subscription for the function.
Phone Function
39
ENGLISH
Phone Function
Phone Function
When you are in a call, you see a screen as shown in Figure 1:
1. Tap the Keypad button
2. Enter a new phone number and tap Send to dial it. If you dial
successfully, the first call is brought into "On Holding" and you
may talk with a third party. The screen is as Figure 2.
Connected
Switching between two Calls
Note: Function availability varies depending on your network
operator and your subscription for the function.
When a first call is on hold and a second call is in progress, as
shown in Figure 2:
1. Tap Menu key and Switch to put the current active call on
hold and bring the current on-hold one to be active. You can
talk to any of both parties in turn. However, only one of both
parties can hear your voice at a time; the party on hold can
hear nothing from you;
2. Tap End to end the current active call.
ENGLISH
40
Phone Function
Hold
End
Figure 1
On Hold
Connected
Link Mute Spkr
End
Figure 2
Mute Spkr
Transferring a Call
Note:
Function availability varies depending on your network operator
and your subscription for the function. The function allows you to
Connected
transfer the current active call to a fixed telephone or a handset.
When you are in a call:
1. Tap the menu key as shown in Figure 1. Tap Transfer in the
popup menu to show the Dialpad screen;
2. Enter a number and tap Send to dial it. The call will be transferred to the number you entered.
Turbo Dial
The Turbo dial function allows you to store up to 9 frequently used numbers
on your phone. You may dial a number anytime, by tapping and holding a
digit key, without entering the number one digit after another. However, you
must store these numbers in the Turbo Dial List beforehand.
The function is very convenient for you to dial frequently used numbers.
Note: The digit "0" is not used for storing Turbo Dial numbers.
1. Press in the Main Screen to show the Dialpad screen;
2. Press and hold a digit key until your phone dials the number
stored in the key (a location).
Phone Function
New Call
Transfer
Hold
My Number
End
Figure 1
Turbo Dialing is
not setup. Would
you like to Set it up
now?
Cancel OK
Redial
Figure 2
41
Phone Function
ENGLISH

If no number has been stored in the digit key, your phone displays a screen asking you whether
to set up Turbo Dial, as shown in Figure 2. Tap OK to call up the setup program for Turbo Dial.
3. Enter the Turbo dialing number you need for the digit key. Tap Ok to save your setting.
Dialing a Number Stored in SIM Card
Phone Function
You may directly dial numbers stored in your SIM card (Total numbers that may be saved in the SIM
card depends on the SIM card). The function enables you to dial a specific number without entering it
one digit after another.
1. Press in the Main Screen to show the Dialpad screen;
2. Tap the Digit keys to enter the serial number of the location
used to store the number in the SIM card;
3. Tap to show the Confirm screen for SIM card dialing as
shown in the right figure;
4. Tap Send to dial the number.
Tips:
If you have entered a blank location No. (On your SIM
card) where no number has been stored, your phone displays "The SIM entry
is empty".
Multiparty Conversation (Making a Conference Call)
ENGLISH
42
Phone Function
Cancel Make Call
Redial

Note:
Function availability varies depending on your network operator and your subscription for the function. The function
allows you to link the current active call and those calls on
Connected
holding. You may make a multiparty conversation.
During the conversation, voice of any conference party will be heard by
Conference
Call
all other parties. You may also add additional parties to your conference
or split any conference member as appropriately.
Initiating a Multiparty Conversation (Conference Call)
To initiate a multiparty conversation, operate as follows:
1. Dial the first party of the multiparty conversation;
Put the first call on hold and dial another phone number (another party of the multiparty conversa-
2.
tion to be made). Refer to Holding a Call and Dialing another Number for relative information;
3.
Tap Link as shown in Figure 1 to establish a multiparty conversation among the current active
Hold Mute
Figure 1
Connected
party and the party on hold. To add a new member to the multiparty conversation, you may
perform it by making a new call. When you receive a new call, you may answer the incoming
(or waiting) call. However, once the new call is connected, the original multiparty conversation is put on hold. Tap Link to establish a new multiparty conversation between the new calling party, which is currently active, and the multiparty conversation on hold.
Splitting a Multiparty Conversation (Conference Call) Member
1. Tap Menu Key in the screen as shown in Figure 2 on the multiparty
Phone Function
Hold
Figure 2
43
End
Conference
Call
New Call
End All Calls
Disconnect
My Number
End
Spkr
ENGLISH
Phone Function

conversation. Tap Disconnect
2. Select a member (telephone number or name), whom you wish to
split from the multiparty conversation, from the checkbox;
3. Tap Split to split the selected member; and then return to the in-call status;
4.
You may privately talk to the party split from the multiparty conversation
Phone Function
while keeping on hold the multiparty conversation among other parties.
And then the private call may be terminated to re-establish a multiparty
conversation with the original conference temporarily on hold.
Alternatively, you may choose not to terminate the completed private call.
If you do so, tap Link Calls to continue the multiparty conversation.
Handling a Third Incoming Call
Say your phone has an on-holding call and an active call (that is, it has two calls). If you receive
a third call, the screen will be displayed as shown in the Figure. Now, you must terminate either
of both active parties before you may receive calls from the third party:
1. If you select Drop Active Call and tap Answer, you may answer the third incoming call by terminating the
currently active call;
2. If you select Drop hold call and tap Answer, you may answer the third incoming call by terminating the
call previously on hold and putting the currently active call on hold.
3. If you tap Busy, the third incoming call will be terminated and a busy tone will be sent out. Alternatively,
you may temporarily left the third incoming call unhandled and continue your existing calls. In such a
case, the caller of the third incoming call will hear "The call waiting function is available for the other
party of the calling" or something alike, provided that you have set the call waiting status as "On".
On Hold
Incoming Call
Drop active call
Drop hold call
Busy Ignore Answer
End
ENGLISH
44
Phone Function

Actually, when you do this, you just behave as not answering the third incoming call;
4. When finished the current calling, you may return to the Step 1 to end either of
the existing calls and answer to a third incoming call.
Call Divert
Voice Calls
Fax Calls
Data Calls
Cancel All Diverts
Transferring a Call
Note: Network support is necessary for the function.
The function allows you to transfer the voice, fax, or data calls you receive to
another number. You may set what, where, and when the calls may be transferred.
Tap in the Main Screen to enter into the Dialpad. Tap and select
Setup\Call Divert to open the Transfer Setup Screen, as shown in Figure 1.
1. Select the type of calls to be transferred by tapping Voice Calls, Fax
Calls, and Data Calls;
2. The phone will show a list of options for call Divert if you select Voice
Calls. Select an option. Tap the checkbox preceding Activate Divert at
the center of the screen. An icon appears. Enter the target number
for call Divert. Tap Done.
3. If you select Data Calls or Fax Calls, tap the checkbox preceding the
Activate Divert at the center of the screen. An icon appears. Enter
the target number for call Divert. Tap Done.
Phone Function
Figure 1
Answered Calls (0)
Missed Calls (5)
Dialed Calls (9)
Figure 2
45
Phone Function
Done
ENGLISH
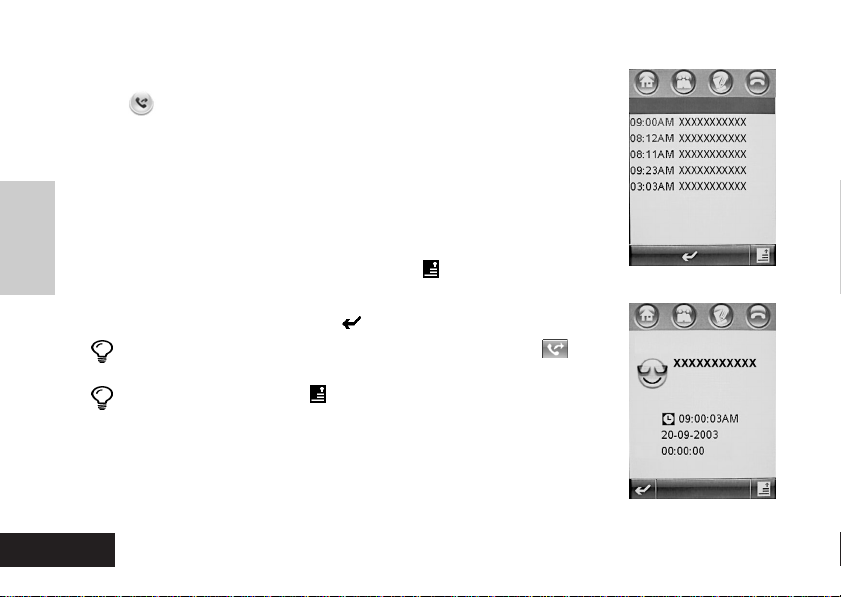
Calls Record
Phone Function
ENGLISH
Ta p in the Main Screen to show the Calls Record screen, as
Recent Call
Missed Calls
shown in Figure 2;
1.
To enter into the relevant function screen, you may tap Answered Calls, Missed Calls
Calls, or Dialed Calls. Take Missed Calls for example, as shown in Figure 1;
2. The phone numbers (or names in your Address Book corresponding
to the numbers) are listed by time and date; you may navigate
through the numbers to find a wished one using the scroll bar. To
delete all these numbers, tap the menu key and Delete All;
Figure 1
3. When you find the number you want, tap it to show its details (see Figure 2);
4. Tap Call to dial the number; Tap to return to the previous screen.
Tips:
You may show the list of Calls Record by tapping in the
Missed Calls
Dialpad screen.
Tips:
Tap the menu key in the screen as shown in Figure 2; and
then tap Store (The option is unavailable if the item has been
stored in the Address Book) in the popup menu to store the
number to the Address Book. To delete this Calls Record entry,
tap Delete. If you tap Sending a SMS or Send MMS, you enter
into a screen to compile a new message, with the number in the
Calls Record entry as the recipient.
46
Phone Function
Start:
Date:
Duration:
Dial
Figure 2

Call Meters
Note: Network support is necessary for the function.
Ta p on the Main Screen to enter Dialpad Screen. Tap and select
Setup to enter calls Setup Screen. Tap Call Meters to enter Call Meters
Screen, as shown in the Figure.
1. The "Total Call Cost" shows the Clear Call Cost for the last call
and the total cost for all the calls.
2. The "Total Call Time" shows the Clear Call Time for the last call
and the total duration for all the calls.
3. The "Call Lifetime" shows the total duration for all the calls.
4. Display Setup
In the pull-down box of the Display field, you can select the following displays: Off,
Timer, Cost, Total Cost, and Credit.
5. Audible Timer
You may set a time length. Your phone in call will beep according to your setup.
In the pull-down box of the Audible Timer field, you can select different time length or Off.
Call Meters
Total Call Cost:
Total Call Time:
Call Lifetime:
Display: Off
Audible Timer:
OK
Phone Function
Phone Function
47
ENGLISH
Phone Function
6. Call Cost Setup
In the Call Cost screen, tap Call Cost Setup. Input the PIN2 code and
confirm it to enter into the Setup screen. Select whether to specify a
Limit; Tap the direct line following the Limit and enter a value for the
charge limit in the entry area; Tap buttons below the Charge Type field to
select Unit or Currency, which determines that the cost register displays a
My SIM Number
Line 1
Name:
Number: XXX
Line 2
Name:
Number:
call time (in a time unit) or a charge (in a Currency).
7. Available Credit
Tap it to view the Available Credit
Done
Figure 1
My Number
ENGLISH
Use the function to view your phone number. You have to preset your
phone number within the phone. To save your phone number:
Current Network
Available Networks
Preferred Networks
Known Networks
1. Tap on Dialpad Screen. Tap Setup from the menu to bring
your phone into the Setup screen;
2. Tap My Number on the Setup Screen to bring your phone to a screen
to enter your phone number, as shown in figure 1. In the screen, you
48
Phone Function
Figure 2

may enter the name and number of the relevant line, and then tap
Done to store the setup. If you tap , you make no modification and
the phone returns to the Setup Screen.
Network Setup
Before you can make calls or send short messages, your phone has to
be registered in a wireless communication network currently available.
To view or configure the network, you should tap in the Dialpad
screen and then select Setup from the menu. Tap Network Setup in the
setup screen to open a new screen as shown in
Figure 2.
Network Search Setup
Ta p in the screen as shown in Figure 2 on
the above page and select Search Setup from
the menu. The Network Search Setup screen
appears as in Figure 1.
You can select any from the three band
options, including 900/1800, 1900, and Auto.
Preferred Networks
Figure 2
Search Setup
Search Network By:
Band:
Type: Automatic
Speed: Medium
Done
Figure 1
Network Priority
Cancel
Figure 3
Phone Function
OK
Phone Function
49
ENGLISH
In the Type field, you may determine how the phone will be registered to the network:
Manual or Automatic.
The Speed field allows you choose one from Slow, Medium, Fast, or Continuous.
Preferred Networks
Phone Function
Tap Preferred Network in the screen as shown in Figure 2 of the above page, and then the list
of your preferred networks will be shown in the screen as shown in figure 2. Select any one
non-preferred network. Tap and hold the network name to bring a menu list. Tap reorder to
show the dialog box as shown in figure 3. Tap and to change the priority of the network.
Tap OK. If you tap Cancel, you make no change and your phone returns to the previous screen.
Tips:
If you tap Delete on the menu, a dialog box prompts you to confirm the deleting.
Select Delete, the network is deleted from the list of preferred networks.
To add a new network to the preferred network list, tap to bring a dialog box, where
you may enter a Network ID on the direct line.
To delete all your preferred networks, tap in the Preferred Network List screen. Tap
Delete All to bring a dialog box prompting you to confirm deleting all such networks. If
you tap Delete, all preferred networks (excluding the first one) will be deleted.
To use the
reorder
function, the preferred networks should include at least three items.
ENGLISH
50
Phone Function
Chapter 4 Address Book
The Address Book allows you to record various information, including names, addresses, phone numbers, fax numbers, and e-mail
address, etc., of persons with whom you want to make contacts. You
may enter such information in your phone and use it to make calls,
send short messages (SMS), or send e-mails, and so on.
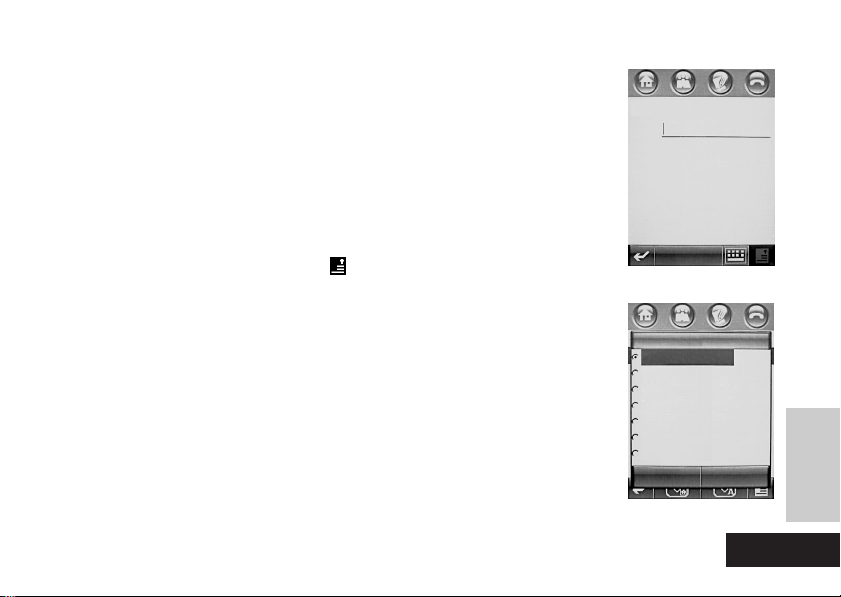
Showing Address Book List
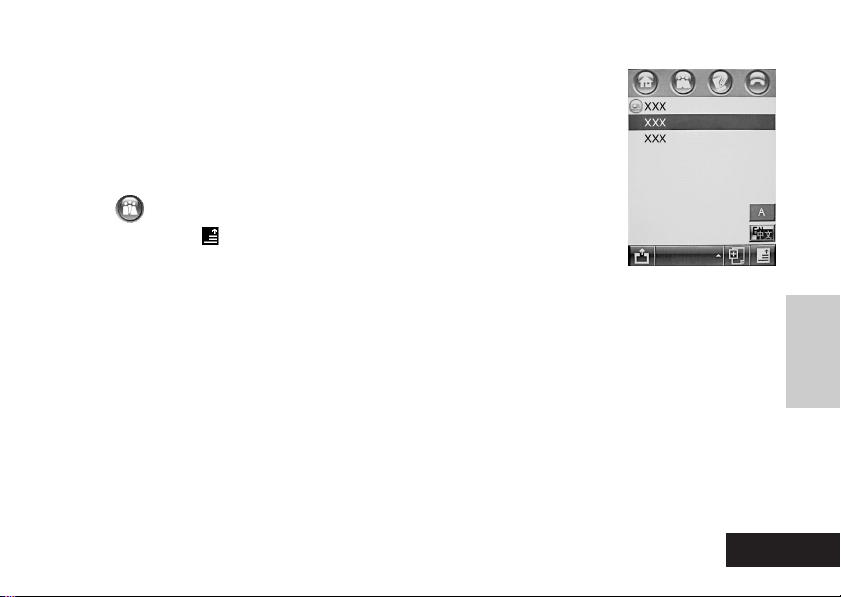
Ta p in the Main Screen to find the Address Book function as shown in
the Figure. Tap to select List View or Thumbnail View from the popup
menu. Then you may display your contacts list in different mode.
Classifying
Defining categories for your contact details helps you manage your Address Book information.
You can classify your contacts according to your need for communication. Your phone provides
the following basic categories:
All: Lists all contacts from all categories.
Unfiled: Lists contacts that have not been classified. This is the default category setting for all
new contacts.
SIM Card: Lists the contacts information saved in the SIM card.
Note: The categories are given in the manual for information purpose only. Refer to your phone
for details.
Address Book
All
51
ENGLISH
Address Book
Grouping
Grouping is defined as classifying some contacts related to each other in a same group (For
example, colleagues working on a project or members of a club). After grouping, you may send
a SMS, MMS, or e-mails to all members of the group at one time.
To create a group, tap from the Address Book list; select a New Group from the menu.
Viewing and Modifying Contact Details
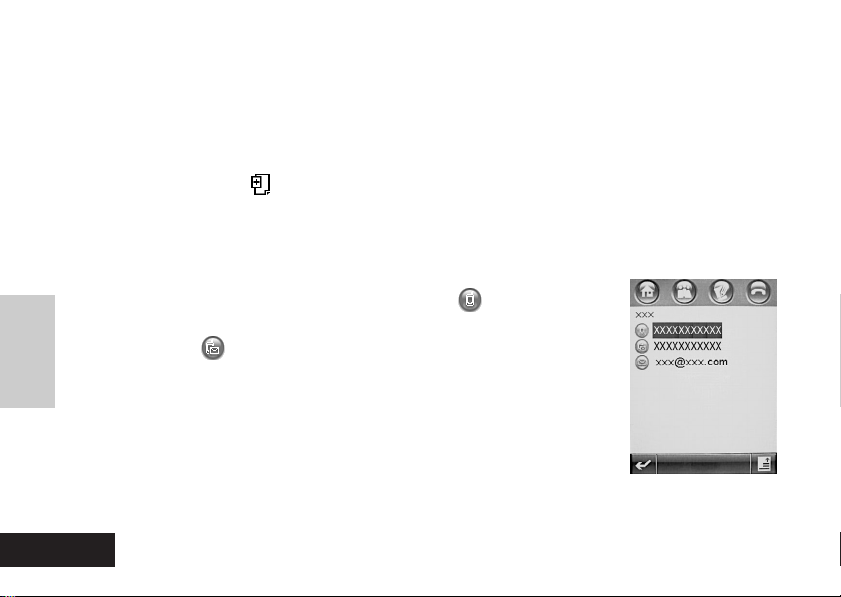
1. When the contact list displays on the screen, you may tap a contact name to show
his/her details, as shown in the Figure.
Address Book
2. By tapping the phone number following the icon on the details list,
you may dial the number. You may also tap the phone number following the icon to send SMS or MMS. If you tap Email address, a
menu appears containing options for sending email and MMS. Tap an
option to perform a corresponding operation.
3. To view the more detailed information about the contact, tap
Edit. The phone shows a detailed list on the contact.
4. To modify the content of a field, tap the direct line following it.
5. When you have finished modifying, tap Done to store your modification and return
to the previous screen.
Edit
ENGLISH
52
Address Book
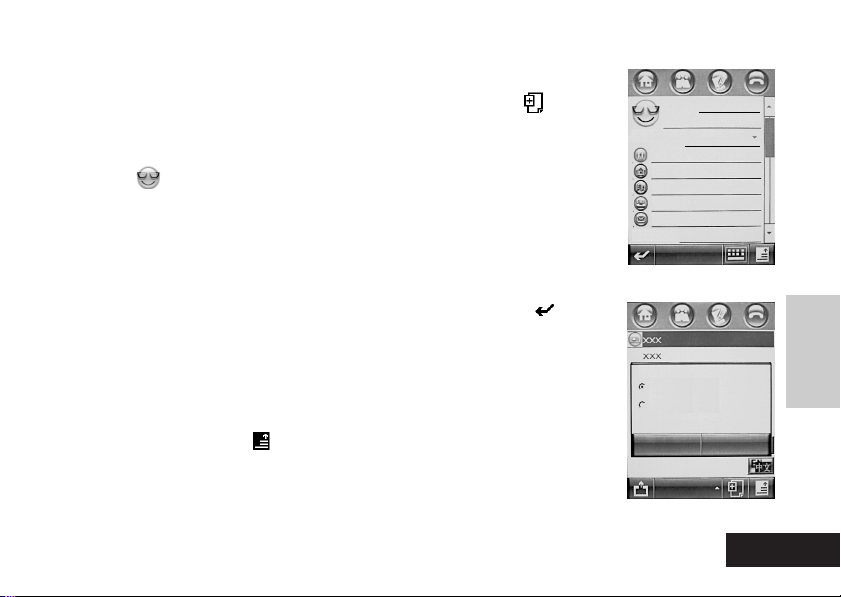
Adding New Contacts
1. When your Address Book is shown as a list, you may tap and then
select New Contact from the popup menu. The Contacts List screen
appears, as shown in Figure 1.
2.
Ta p symbol to specify a picture symbol for the contact. When your
phone receives a call from the contact, your screen displays the symbol.
3. Pull down the right scroll bar on the screen to view additional fields. To
enter data in these fields, tap the direct lines following them one by
one. A screen appears for your entry. You may enter the name, the
category, and etc.
4. Tap Done to store the data you entered. If you tap the icon , a dialog box appears asking you whether to exit the current screen. If you
tap OK, your phone returns to the contact list screen.
Copying Contact Data Information
You can copy the data information of the contacts between your phone
and the SIM card. Tap in the address book list screen. Select Copy to
SIM/Phone to enter the copy screen, as shown in Figure 2.
1. Select Phone to SIM or SIM to Phone and then tap OK. Your phone
displays a contact list, from which you may select;
Address Book
Name:
Category:Unfiled
(Mobile)
(Home)
(Work)
(Fax)
(Email)
IMID:
Done
Figure 1
Copy Number:
Phone to SIM Card
SIM Card to Phone
Cancel OK
All
Figure 2
53
Address Book
ENGLISH
2. Select numbers you want to copy.
3. If you select SIM to Phone, it is necessary to select the type of the number to be
copied. Tap OK.
4. When you finished copying, the screen returns to the Contacts List screen.
Note:
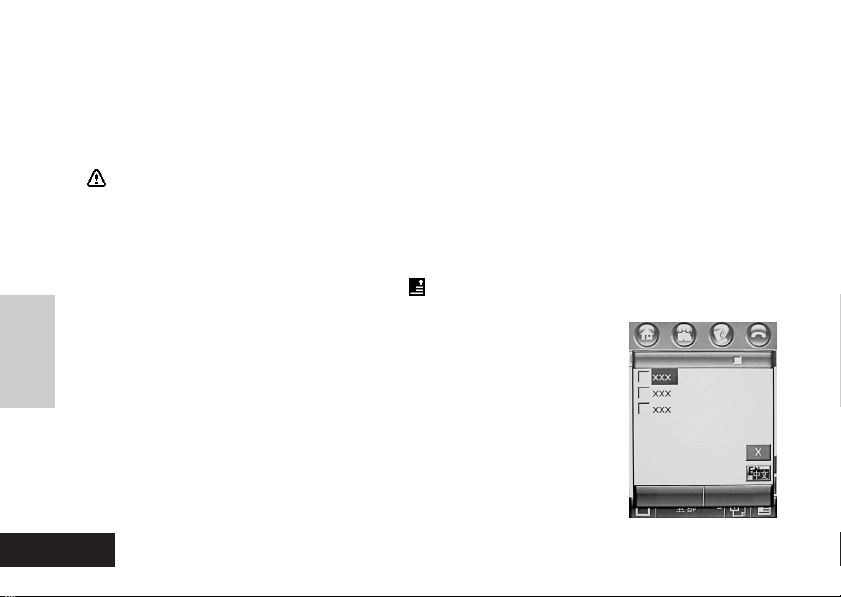
Deleting a Contact
Address Book
ENGLISH
1. On the Address Book List screen, tap and select Delete Contacts from the menu.
The phone will list all your contacts that may be deleted, as
shown in the Figure.
2. Check contacts you want to delete and tap Delete. A dialog box
appears prompting you to confirm the deleting. If you tap OK,
the phone deletes all the contacts you selected. To delete all
the contacts on the list, fist tap All to select them all; then tap
Delete and confirm your the deleting operation.
3. When you finished deleting, the phone will return to the
Address Book list screen.
The amount of the contact entries that may be copied to the SIM card depends on
the capacity of the SIM card. Types of entries that may be copied to the SIM card
may vary depending on the function of the SIM card.
Contacts: All
Cancel Delete
54
Address Book

Searching for a Contact
1. On the Address Book List Screen, tap and select Find
Contacts from the menu. Your phone opens a screen, as
shown in Figure 1;
2. Enter in the Find For field the information relative to the finding
option; Tap Contact's Name, Number, or Other in the finding
option and then tap Find.
3. Your phone will show you the searching result; however, if it
finds nothing, it will prompt you that no result has been found.
4. If you want to continue searching, tap Find New; otherwise,
tap to return to the list screen.
Viewing Owner's Information
On the Address Book List Screen, tap to select Owner's
Information from the menu. The Owner's Information screen displays as follows:
1. If the information of the owner is available in the phone,
detailed list of the owner will be shown as in Figure 2;
Address Book
Find For:
Find Options:
Contact's Name
Number(phone, Fax...)
Other
(Email, Address...)
Find
Figure 1
Edit
Figure 2
55
Address Book
ENGLISH
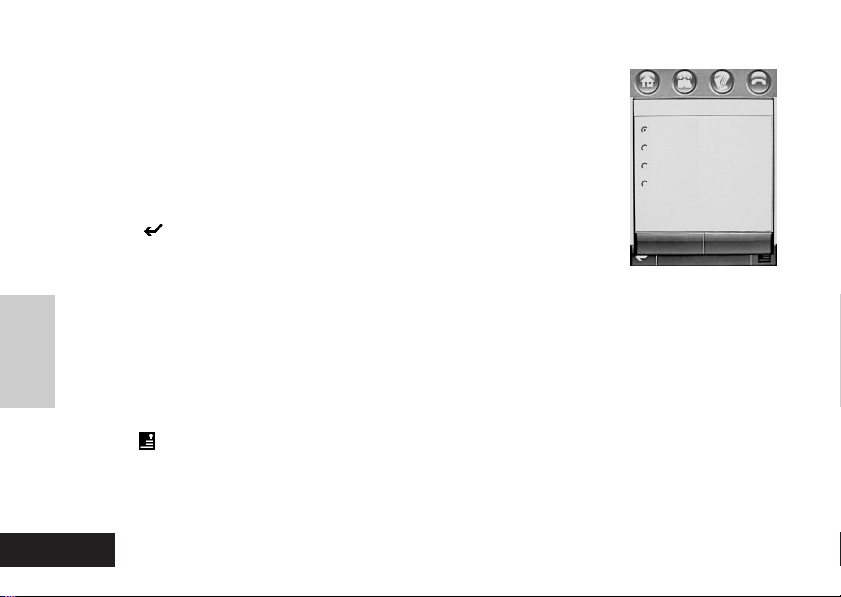
2. Tap Edit to bring up the Edit Screen, where you may edit the
owner's information;
3. If no owner's information is stored in the phone, the Owner's
Information Entry Screen appears. In such a case, you may
enter information by tapping direct lines following each field.
When your entry is completed, tap Done.
4. Tap , the phone will return to the Address Book list screen.
Sending Vcards
Address Book
Your phone is designed with a share function that facilitates data exchanging. You
may send information of any contact as a Vcard to other phones or devices, via
Infrared or Bluetooth connections or in Email/MMS.
1. In the Address Book list screen, tap the name of the contact to be transmitted. The
phone will show a screen listing information on the contact.
2. Tap and select Share Via from the menu. The Share Via screen appears, on which you
may choose how to transfer the contact information, as shown in the right figure.
3. If the method you selected has been set up and is available, tap OK to send Vcards.
Share Via:
Bluetooth
IrDA
MMS
Email
Cancel
OK
ENGLISH
56
Address Book

Chapter 5 Message Center
Your phone is designed with an open window display, super-large
touch screen, and graphical interfaces to deliver convenience for
you to utilize message functions. You can send, receive, view,
and manage various messages simply and easily.
Tap in the Main Screen to enter the message center screen, as
shown in the Figure. The center allows you to process various messages. Each list item on the screen is called a folder. If you tap a folder
title, a different function screen opens for you to manage a specific type
of message. The first column of numeric value following each title indicates the number of new or unprocessed messages. The second column
of numeric value is the number of existing messages contained in the folder. Each folder is
designed with different functions and operations. The functions of each folder are as follows:
Inbox: The Inbox saves SMS and MMS you have received.
Tips The Inbox function requires network support and is dependent on whether
you have subscribed for it.
SIM Card: Short messages stored in the SIM card, you may save such messages to
WAP msg:WAP messages are stored here.
Voice Mail:
other folders as necessary.
You may specify your phone to automatically transfer incoming calls to your voice mail service number once you cannot answer them. In such cases, the callers may have the choice to
leave messages, which will be stored in the voice mail system of your service network. You
Inbox
SIM Card
WAP msg
Voice Mail
Info Service
Drafts
Outbox
Sent Items
Trash
Message Center
Message Center
57
ENGLISH
Message Center
ENGLISH
may access and listen to voice mails contained in the system whenever possible.
Tips The voice mail function requires network support and is dependent on
whether you have subscribed for it.
Info Service (SMS): You may have various messages such as weather forecasts, time
tables, or stock market information sent to your phone.
Tips The info service function requires network support and is dependent on
whether you have subscribed for it.
Drafts: The folder temporarily saves messages you write but not completed.
Outbox: Short messages that have not been successfully sent are saved in the
Sent Items: When a short message is successfully sent, it is
Trash: The folder is designed to save messages you have
Private Folder: Except for the above folders, you may also cre-
folder for further modification or sending.
automatically saved in the Sent Items folder for
future reference.
deleted. If you have not permanently deleted a message, you may recover it.
ate your own folder as required. The folder name
may be customized. Then messages may be categorized in different folders.
58
Message Center
From:XXX
The area where you are
does not support this
service.
Time: 02:43PM 17-09-2003
Reply

Inbox
Reading Messages
Tap Inbox on the Message Center screen to list all messages contained in the inbox. To read a
message, tap it, as shown in the Figure. The screen will show you the
sender's name (if you have saved the number of the sender in the
phone) or his/her mobile number, the message content, and the sending
time. Tap to dial the number of the sender; Tap Reply to open an edit
screen, where you can edit your message in reply; Tap to return to
To:
The area where you are
does not support this
service.
the previous screen without any changes; Tap , a menu pops up for
you to delete the message or save the address.
Forwarding a Message
texts: 13/1
Send
When you receive a message, you may forward it to other persons. Tap on the message-reading
screen and then select Forward from the menu to open a screen, as shown in the Figure. Tap To: to
select contacts from your Address Book. Alternatively, you may tap the Number Entry field following
the To: to directly enter the phone number of the recipient. Tap Send to forward the message.
Replying a Message
When you receive a message, you may reply it with a MMS or a SMS.
Message Center
Message Center
59
ENGLISH

Press on the message-reading screen and select Reply by a MMS to open a
MMS Editor screen. When you complete your editing, you may send the message.
If you tap Reply, an editor screen for short messages appears. When you complete
editing a short message, you may send it. Tap and select Reply with Content
from the menu. A message editor screen appears, on which you can see the message to which you are to reply at the bottom of screen and the sender's information.
Enter your reply message at the cursor and tap Send to send the message.
Viewing Messages
On the Inbox, Outbox, or Trash Screen, you may tap and select View by
from the menu. There are three modes available: Name, Subject and Time.
Choose one item from the menu as shown in Figure 1 on the next page. After
confirming, the screen will show messages as specified by your selection.
Writing a Short Message
You may write a short message by tapping the symbol at the bottom
Message Center
ENGLISH
of the Message Center Screen.
1. Tap . Your phone displays the Message-Editor Screen, as shown in Figure 2.
2. Tap the Number Entry Field following To: to enter the number to which
the message is to be sent. Alternatively, you may tap To: to select one
or more recipients from your Address Book.
60
Message Center
View by
Name
Subject
Time
Cancel
To:
texts:
OK
Figure 1
Send
Figure 2

3. You should enter the message content where the cursor is flashing. A
number of button symbols are also available below the editing pane:
Signature Content
The icon indicates Writing Pad. Tap it to select another entry
method from Pinyin, English, Numeric, and Handwriting.
Ta p in the message editing screen and then you may select
Insert Quick Text to insert the preset phrase in your phone.
Signature Setup
Tap symbol in the Message Center Screen and select Signature
Editing as shown in figure 1 in the next page. Tap the direct line following
the Signature to enter your signature. If you want to attach your signature at the end of each message, you should tap the in front of Attach
Outbox
Signature to All New Messages Automatically to check it (that is, it
becomes ). After that, tap Done.
Sending a Message
As you finish a short message, you should tap the symbol at the lower
part of the screen and select Sending Option to specify the condition (such
as Expire After) under which your message would be sent. After that, tap
Done to return to the edit screen.
On completing the above configuration, tap Send to send the message.
Message Center
automatically include your
signature to new outgoing
SMS Messages
Done
Figure 1
delete all
Figure 2
61
ENGLISH
Message Center

Outbox
Drafts
Message Center
Trash
By tapping Outbox on the Message Center Screen, you can see the status of each message
that has not been sent out, as shown in Figure 2. The symbol preceding each message title
indicates the sending status of the message.
If you tap a message that failed to send, you can see its content and relevant information on its
recipient. When the message is opened, you may tap on it to modify and edit its content.
Tips You may also view the information in the Outbox in different methods.
By tapping Drafts on the Message Center Screen, you can see all messages contained in the
Drafts folder;
You may tap any of these messages to view its content;
When the message is opened, you may enter or modify its content. When you complete your
editing, you may send the message immediately.
By tapping Trash on the Message Center Screen, you can see a list of messages contained in the Trash. To read or edit a message, tap on it. If you tap Empty, all messages in the Trash will be removed and no recovery is available.
ENGLISH
62
Message Center
SIM Card
By tapping SIM Card on the Message Center Screen, you may view all messages stored in the SIM card. You may tap any message to view its content.
Folder Setup
Name:
Private Folder
Create a New Folder
You may create a private folder from the Message Center Screen to save
messages, in order to quicken your message viewing or retrieval. To create a new folder, you should tap on the Message Center Screen and
select New Folder. A New Folder Screen appears as shown in figure 1.
1. Tap the direct line following Name and enter the name of the new folder;
Tap Done and the new folder will be shown in the message center screen.
2.
Moving a Message
You may move a message between different folders as necessary. For example, you may move certain messages from the Inbox to a private folder or from
a private folder to the SIM card. Moving messages from the Inbox to the SIM
card is described as follows.
Tap Inbox on the Message Center Screen to open the message-viewing
screen. Tap and hold a message entry to pop up a menu, where you may
select Move to Folder to bring up the "Move to Folder" screen as shown in Figure
Message Center
Move to folder:
SIM Card
WAP msg
Voice Mail
Drafts
Outbox
Sent Items
Trash
Cancel OK
Done
Figure 1
Figure 2
63
Message Center
ENGLISH

2. Select SIM Card from the screen and tap OK. The messages you have
selected will be moved to the SIM card from the Inbox. When the moving is
completed, your phone returns to the message-viewing screen of the Inbox.
Deleting a Private Folder
You may delete private folders. To delete a private folder, tap it on the
Message Center Screen to enter it. Tap symbol and select Delete the
Folder from the popup menu. When a dialog box prompting you to confirm the deleting appears on the screen, tap OK to delete the folder.
Tips
You may delete a private folder provided it contains no message.
MMS
The MMS function allows you to insert picture, animation, or audio files
into your message, making your message more colorful and enjoyable.
Composing and Sending MMS
Message Center
ENGLISH
1. Tap symbol on the Message Center Screen to enter the MMS
function screen as shown in figure 1. Tap the animation at the center
of the screen, your phone switches to the MMS composing screen.
2. To open the previous or the next page, tap or ; to insert a
new page before the current one, tap ; to delete the current
64
Message Center
To:
Subject:
size:
Send
Figure 1
Insert image
Insert audio
Insert video
Insert quick text
Insert signature
Done
Figure 2
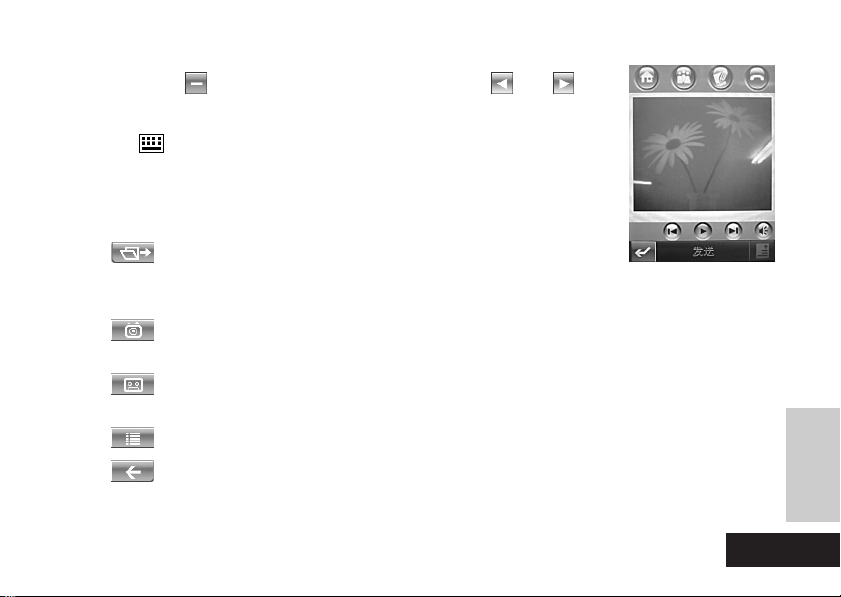
page, tap . Numeric values between symbols and indi-
cate the page number of the current page and the total pages.
3. Ta p to show a toolbar menu for input methods and media files.
Select a writing pad from the menu; the pad appears on the screen.
You may use the pad to enter text at the cursor as necessary. If you
select Media Files from the menu, a toolbar for medial files appears at
the screen bottom.
The symbol allows you to insert media files. Tap the symbol to
pop up a menu for media files. You may insert Image, Audio, Video, Quick Text
and/or Signature, as shown in Figure 2.
The symbol indicates the Camera function. Tap the symbol to enter Shoot
function and insert the picture into your message.
The symbol indicates the Recorder function. By tapping the symbol, you
may record a voice memo and insert it into your message.
You may setup the font, such as Font Size and Font Color.
The symbol is a Delete button. Tap it to delete the content preceding the
cursor or the content you selected.
Send
Message Center
Message Center
65
ENGLISH

Message Center
ENGLISH
4.
By tapping and selecting Page Color from the menu, you may setup the
page color for the MMS. You may also select Page Duration from the
menu to setup the display duration for the current page of the MMS.
To:
Subject:
5. When you complete your composing, you may preview your MMS that
you have compiled. Tap and select Preview to enter the Preview
screen, as shown in the right figure.
To go to the previous or the next page, you may tap or symbols; to
size:
play the pages of your MMS continuously, press ; Tap to close the
volume of audio files.
6.
To complete the preview, tap to return the previous screen. Press
Done. The screen displays as in Figure 1 in the next page. Enter the
Subject and the recipient, the Send button is enabled. Tap Send to send
your MMS message. If you want to send a carbon copy or blind carbon
copy to other persons, you may tap and then tap Show CC/BCC from
the menu. Select Show CC or Show BCC to show the CC or BCC fields.
7. You may tap on the MMS screen. Select Save from the menu to
save the message to Drafts.
Note
You may configure the sending options for your MMS. Refer to
Sending a Message for details.
66
Message Center
Send
Figure 1
Reply
Figure 2
Note
When composing a MMS, the inserted media files will have their displaying sizes automatically adjusted according to the page.
Downloading a MMS
Your phone will notify you when it receives a MMS. The screen shows with a new message! Tap
the message and the relative information on the MMS, such as the Sender, Subject, Time, and
Size, etc. will be shown. At the same time, you may download the new received MMS. If you
tap , the phone returns to the previous screen and download no MMS.
Viewing a MMS
Once you have downloaded a MMS, you may tap Inbox and select the new MMS information, as shown in figure 2.
1.The symbol is the relative information on the MMS. If you tap it, you can view the sender,
subject, time, and size.
2. Tap to play the MMS.
3. Tap Reply to reply a MMS message to the sender.
4. If you tap , you may choose to Reply by SMS, Save File, Save as an Usual Template,
Message Center
Move to Folder, or Delete Message.
Attachment
When completing the MMS, you may insert attachments before you send it. Tap on the MMS
Screen and select Insert Attachment.
Message Center
67
ENGLISH

Chapter 7 Email
With the Email function supplied with your phone, you can not only send and receive mails supported by general WAP sites, but can also enjoy the support for common mail servers, such as
POP3 and IMAP. The super large touch screen and other PDA functionalities even facilitate you
convenient mail operations.
There are some basics that you have to understand before utilizing the Email function.
Email
Mailbox: First access a website and apply a mailbox for yourself. The mailbox is just the one
referred to as "Mailbox" in the manual. Instead of residing in your phone, the mailbox is
hosted in your network operator's computer system, or the so-called mail server(s).
Whenever you send or receive a mail, the mail server(s) transfers it.
Mail Server: A mail server is a computer system of a network operator who delivers you mail
POP3: A POP3 mail server receives mails for you. Whenever you access the network
service. For the name, contact your network operator who offers you the service. There are two common mail server types:
and log in your mailbox, your phone automatically downloads new mails from
the POP3 server to the local Inbox of the phone. Any such mail will be deleted
on the mail server when completely downloaded. If you would rather keep theses mails on the server, you should go to "Email Setup" | "Receive Setup" and
check the "Keep on Server" option.
ENGLISH
68
Email

IMAP: As a mail server developed after POP3, the IMAP features on allowing client mail
systems to get access to and manage mails and mailboxes on the server.
Tips
For your specific mailbox type, contact your mail network operator.
Username: On applying an email box, you are required to specify a username. The server will
reference the username for authentication when you attempt to log in the mailbox.
Password: On applying a mailbox, you are required to specify a password. When you attempt
to log in a mailbox, your mail server will check your username and password to verify
whether you are the only valid owner of the mailbox.
Note
Email Address: Your email address is your address on the Internet where you receive emails.
The username and password described herein are used to authenticate you as the
valid owner of a mailbox when you attempt to access the mailbox. They are different from those you offer to access Internet, which are used to authenticate you for
Internet access.
All mails for you will be delivered to your mailbox equipped with the address.
You are assigned with an email address when applying for a mailbox and cannot make any change of it once it is created.
Tips
You have to connect your phone to the Internet before you may enjoy the email
function.
Email
Email
69
ENGLISH
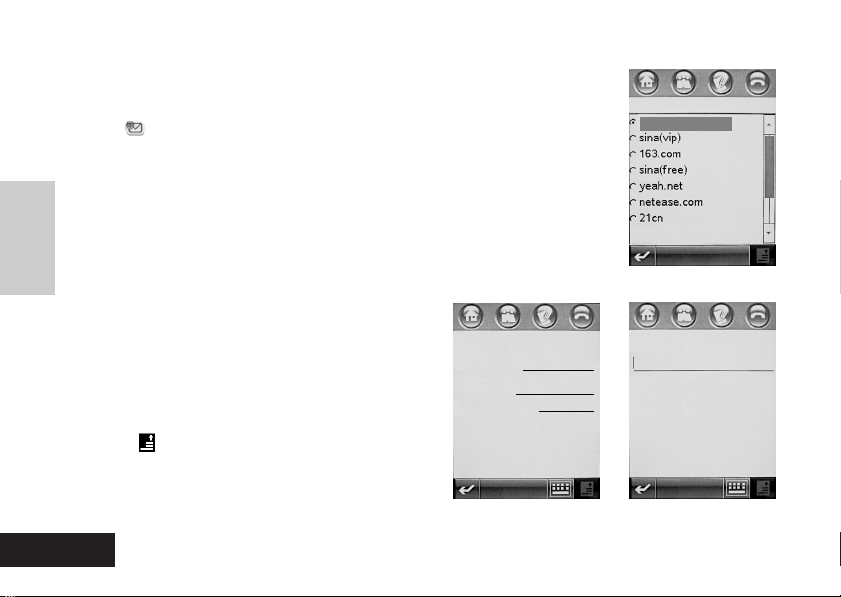
Mailbox Setup
To utilize the email function, you have to configure your mailbox.
Tap on the Main Menu Screen and your phone will check the
Internet connectivity. If the connectivity is not available, refer to Network
section for details on how to set up your network. If it is available, the
Email
phone continues to check for mailbox availability. If it finds no available
mailbox, a Mailbox Setup screen appears, as shown in figure 1, where
you may set up your mailbox either manually or automatically.
Automatic Setup
1. Select a mail network operator provided with
your phone and then tap OK. Your phone
screen will be seen as shown in figure 2.
2. Enter your Username and Password. Then
reenter your password. Tap OK.
3. Tap and select Mailbox Setup. Then reenter your password Tap the mailbox name and
you may configure mail sending, receiving,
Email
Mailbox:163.com
User Name:
Password:
Reenter password:
OK
Mailbox Setup
Setup Manually
OK
Figure 1
Mailbox Name:
Send Setup: Message
Receive Setup
Signature Setup
OK
Figure 3Figure 2
ENGLISH
70
Email
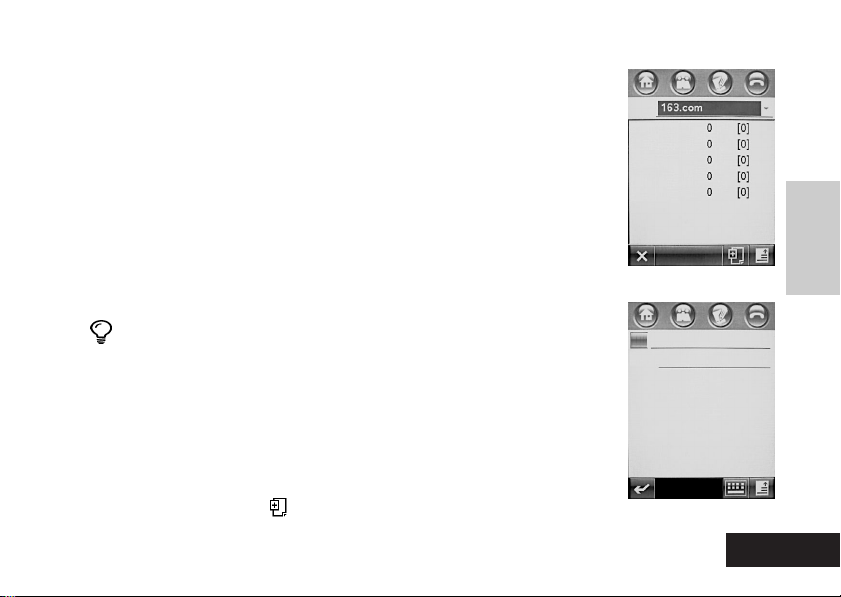
and signature on the screen.
Note:
The list (as shown in Figure 1) of Mailbox Setup varies depend-
ing on your network operator. Please refer to your phone for details.
Manual Setup
1. Select Manual Setup from the screen as shown in Figure 1 and then
tap OK. Your phone displays a screen as shown in figure 3.
2. Tap the mailbox name field and enter a name for the mailbox.
3. You may configure mail sending, receiving, and signature on the screen
and tap OK.
Tips
You may create multiple mailboxes. In such a case, if you
enter no name for each mailbox on the manual setup
screen, your phone will assigns name for such mailboxes as
Mailbox n, where n is 1, 2, 3, 4 ...
Writing and Sending Emails
Once you successfully log in a mailbox, the screen will like the one
shown in Figure 1. Tap at the bottom of the screen to bring up a
Mailbox:
Inbox
Drafts
Outbox
Sent Items
Trash
Email
Receive
Figure 1
To:
Subject:
Send
Figure 2
Email
71
ENGLISH
screen for mail writing, as shown in Figure 2. Enter the mailbox address of the recipient at the
cursor as shown in Figure 2; or tap To: and select a recipient from your Address Book. Then
you may enter the Subject and mail content. Tap Send and select link method to send your mail.
You may attach Contact, Date Book, Tasks, or Other documents to your mails. In the screen as
shown in figure 2, tap and select Insert Attachment from the popup menu. Select an option
Email
as shown above to attach these documents into your mail.
On completing a mail, you may tap at the right bottom of the screen and choose relevant
option from Save to Drafts, Insert Signature, CC, BCC or Setup Priority.
Receiving, Viewing, Reading a Mail or Sorting Mails
The function is similar to the message viewing, reading, and sorting of the Message Center.
Please refer to Message Center section for relative instructions.
Private Folder
The function is similar to the private folder of the Message Center. Please refer to previous similar instructions.
ENGLISH
72
Email

Chapter 7 Browser
Your phone is a new type of mobile communicator that is designed with the General Packet
Radio Service (GPRS) functionality. It allows you to access the Internet and receive/send emails
via GSM-based GPRS connections, in addition to CSD connections. You'll find your phone to be
a powerful tool that delivers convenience and brings you closer to the world. The super-large
touch screen makes your surfing on the Internet more enjoyable.
Note:
Note:
For WAP-based Internet access, you need:
1. Subscribe for GPRS Data service from your network operator.
2 Subscribe for a WAP service from your Internet Service Provider (ISP).
3 Set up your device to enable you to connect to the Internet.
4 Activate your WAP browser to access the Internet and perform relevant operation.
GPRS availability depends on your network operator and whether you have subscribed for it.
Options for Internet access depend on the availability of these services offered by
your network operator and whether you have subscribed for these services. Check
with your network operator regarding WAP configurations.
Tips:
Refer to descriptions on "Network" on how to set up the network connection.
Tips:
The main data gateway of your network operator will use your phone number as
your account number.
Browser
Browser
73
ENGLISH

Activating WAP Browser
1. Tap symbol in the Main Screen to enter the Browser screen;
Browser
2. If connecting to the Internet is successful, the Browser Startup screen
displays. If you have made a correct setting in the Network
Connection Setup screen, you may link to a network URL directly, as
shown in the figure.
3. After log on successfully, you may view the service item using the
scroll bar, just as you do on other list screens. Tap a service to enter
the next content level, where you may view certain content.
4. Tap menu key and you may select a number of options from the menu, including
Browser
Favorites, About, Go to Site, File, Browser Profile Setting, Security, More, and Exit.
Tips:
Different WAP page will show different contents and require different logon procedures. Some WAP pages even require you to enter your username and password.
Browsing Information and Using Access Function
Making a Selection
If your homepage includes a series of options listed in order, you may view these options by
tapping the scroll bar. When you find the option you want, tap the option and enter the next level
content for browsing. Otherwise, tap to return to the previous screen.
ENGLISH
74
Browser
My Moternet
Palm Beijing
Recommend
Net Home
Jewel Box
News & Weather
Tone & Picture
Chat & Friend
Game & Joy
Fashion
Animations

Entering Information
Some web pages contain entry fields for information exchange with the website. You may enter
information in these fields just as you do for other functions of your phone.
Disconnecting from the Internet
Ta p in the Browser screen and then tap Exit to disconnect from the Internet.
Note:
You can only disconnect from the Internet by tapping Exit. If you access the Internet via
a CSD connection, you cannot make phone calls or send messages whilst the connection remains. However, if you use GPRS to access the Internet, you can dial out or send
messages without disconnecting your phone from the Internet.
Downloading Files
The phone offers a powerful downloading function enabling you to download more applications and files simply and easily.
1. Launch the Browser. Log on a web page.
2. You may select a J2ME application or a file you want to download, provided that the web
page offers file and/or application downloading. Your phone must have sufficient spare memory space to store the J2ME applications or files to be downloaded; otherwise, you may have
to cancel the downloading or delete some old applications or files.
3. After you have confirmed for your downloading, a location should be specified to save the
application or file to be downloaded. Then you may start downloading.
4. When the downloading is completed, you may view them, return to the web page, or exit the browser.
Browser
75
ENGLISH
Browser
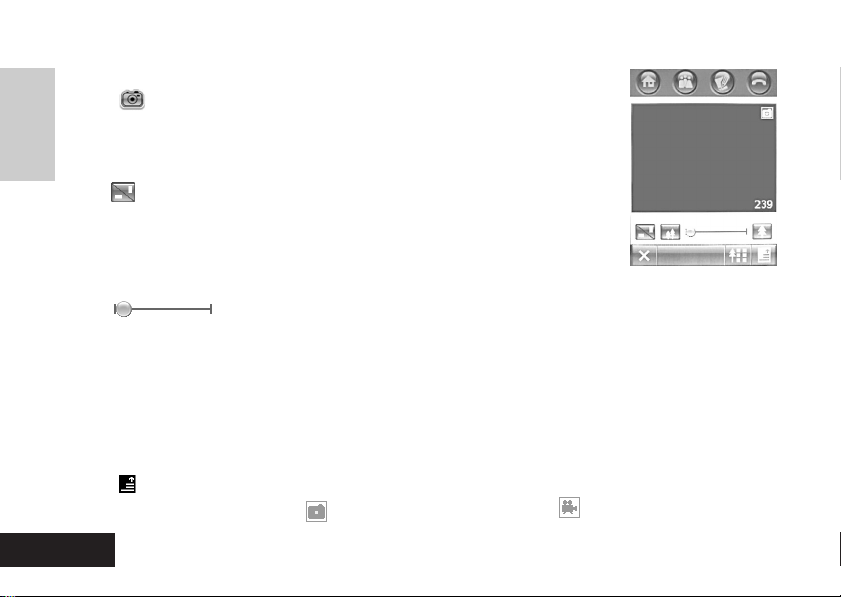
Chapter 8 Camera
View-Finding
Camera
Tap on the Main Menu Screen to enter the Camera function, as
Camera
shown in the right Figure.
1. The frame in the screen indicates the viewfinder.
2. The symbol is a View-Finding Button. Tap it to toggle between the
landscape view and portrait view.
3. The numeric value at the low-right of the viewfinder estimates the
remained recordable photos. Make sure there is enough free space to
store photos you are taking.
4. The symbol is a zoom control. It includes a slider that allows you to zoom in or
zoom out the object in the viewfinder. Alternatively, you may also adjust the viewfinder by
using the external Camera Volume Key on your phone.
5. Tap Capture to take a picture. Alternatively, you may also take a picture by pressing the
external Camera Softkey.
Shoot
Ta p in the Viewfinder screen and select Record video from the menu. The phone will enter
Record Video mode. The icon at the top of the screen turns to .
Capture
ENGLISH
76
Camera

1. Tap Record button to start taking a picture. The Done button will be shown at the bottom of
the screen.
2. Tap Done to stop shooting. The video will be saved automatically.
Preview or Delete Video or Photo
In the viewfinder screen for photographing or video recording:
1. Tap to preview the video or photo you have taken using the phone; Tap to play the
video you have recorded.
2. Tap and at the top of the screen to preview the previous or the next video or photo.
3.
If you are not satisfied with the result, you may tap to pop up a Delete dialog box, where you may
confirm your deletion to have your phone deleting the current video or photo.
4. You may tap to make your choice from the menu for certain operations.
Effects
You may take photos with different effects. Tap in the viewfinder
screen and select Effects from the popup menu; the phone's screen
enters Effects Setup Screen, as shown in the right Figure, where you
may adjust and specify the Brightness, Light, and Style of your photos.
Brightness:
Light:
Style:
Auto
Off
Done
Camera
Camera
77
ENGLISH

Camera
1. By drag the Brightness Slider on the screen, you may specify the brightness of your photos.
2. To adjust the lighting environment, tap in the Light field and select an option from the popup menu.
3. You may specify different styles for your photo. Tap following the Style field and select an
option from the popup menu to change your photo's style.
When you adjust and set the Brightness, Light and Style for your photos, the image in the
viewfinder changes accordingly. Once you feel satisfied with the photo effect in the viewfinder,
you may tap Done. The screen will return to the Viewfinder screen. Now,
you may take a picture or have a shoot.
Setup Options
Tap the symbol in the viewfinder screen and select Setup from the
menu to enter the Setup screen, as shown in the Figure. To view additional setup options, drag the scroll bar.
1. You may specify the Size of your photos or video. Tap symbol following the Size field; Select an item from the popup menu to set up
the size of your photos.
2. You may also specify the quality of photo or video display. Tap symbol following the
Quality field and select an option from the popup menu.
Photo:
Size: M( )
Quality: Best
Video:
Size: S( )
Quality: Best
Length: 5 minutes
Default Name:
Done
ENGLISH
78
Camera

3. You may name photos you want to photograph to facilitate future searching and browsing.
Each photo may be named in either of two formats: the Photographic Format numbered by
date and time and the User Defined prefix.
4. Tap following the Shutter Sound to select the shutter sound when taking a picture.
5. You may also specify a storage location for your photos or videos. Tap symbol following
the Save to field and select the location where your photos or videos will be saved.
When you finish the above setting, tap Done to return to the Viewfinder screen.
Delay-Timer
The Delay-timer allows your phone to photograph after a specified delay.
1. In the Viewfinder Screen, tap the symbol to select Delay-Timer On. A Delay-Timer
Indicator appears above the viewfinder. The Photograph or Shooting at the bottom of the
screen turns to Start.
2. Tap Start and a Stop button appearing at the bottom of the screen. The Delay-timer displays
as 10". At the same time, the indication of the second-counter successively decreases
until the photo is taken. If you tap Stop during the process, the timing action will stop.
Camera
Camera
79
ENGLISH
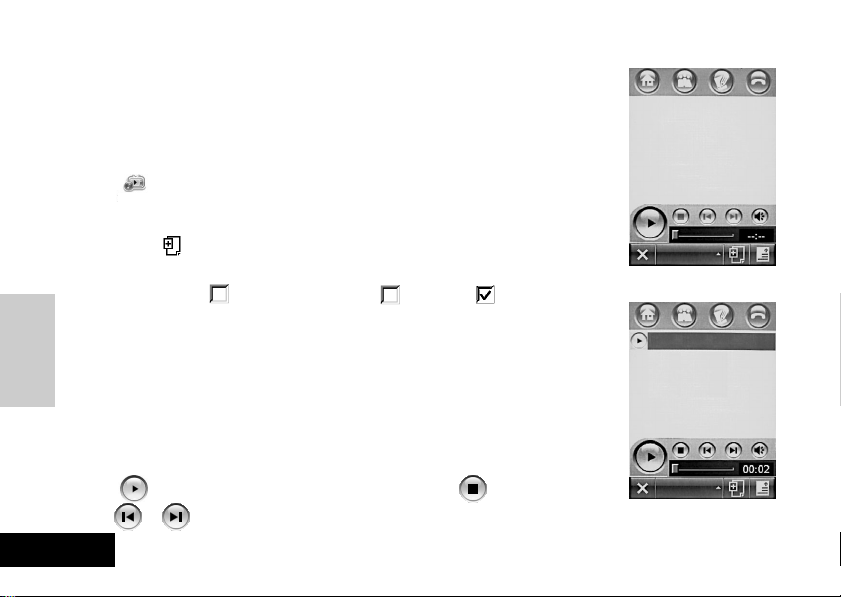
Chapter 9 Media Center
Your phone is differentiated from normal telephones by its Media Player function. It is also supplied with a Media Library, where you may select and play
audio or video files. In addition, your phone allows you to edit such files.
Playing Audio and Video Files
Ta p on the Main Screen to show a screen as Figure 1. By tapping
Media
on Audio, you may select Audio or Video.
By tapping you'll see a list for you to add files. Depending on the type you
selected (Audio or Video), the list shows only those files of the type you select-
Center
ENGLISH
ed. If you tap the followed by a file, the will turn to . By tapping OK,
Media
the file you selected will be added into the playback list, as shown in Figure 2.
Note:
A media list is shown in the manual for demonstration only. Refer
to your phone for the actual list.
Tap a file to play it.
Tap and hold a file to pop up a menu, from which you may select View
Details, Remove track, Share, or Reorder track.
Tap to play files highlighted on the list; tap to stop playing;
tap or to play the previous or the next file.
80
Media Center
Audio
Figure 1
Alert-1.mid
Flare.mid
Pizazz.mid
Sweet.mid
Audio
Figure 2
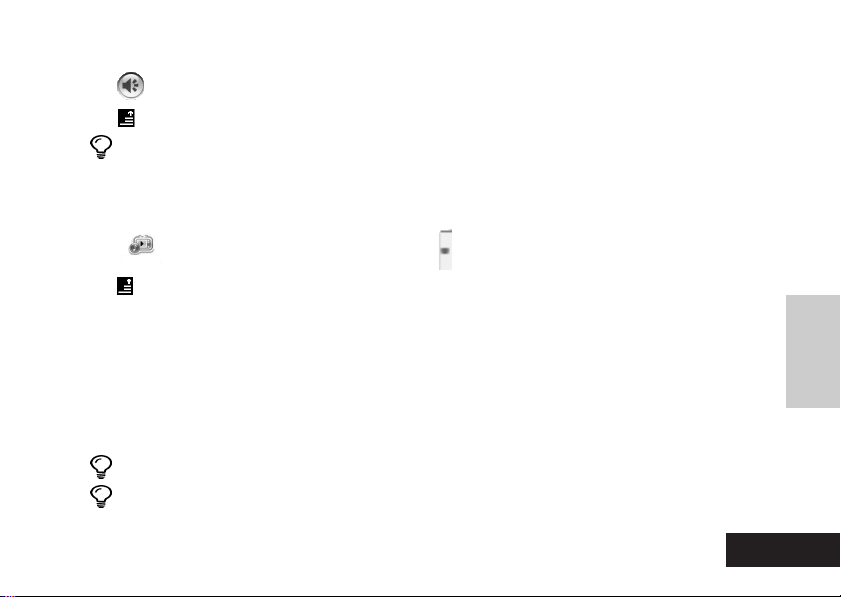
Ta p to mute the sound; tap it once again to resume.
Ta p to select Remove tracks, Reorder tracks, Shuffle, or Repeat.
Tips
A slider is available under the Play Button Bar on the List Screen. It indicates the
progress of file playing. The timer to the right indicates the elapsed time.
Download and play video files
Tap icon in the Main Screen and then tap tag, as shown in Figure 1.
Media
Ta p and then select Information->Settings. By tapping Settings, you may select a folder in which
you want to automatically save the video files to be downloaded. The folder is My Media by default.
Tap an item in the list to enable your phone logging into the webpage corresponding to the item. From the web-
page you may find and tap a video item to be downloaded. Then follow the screen prompt to download it to your
phone. The downloaded file is automatically saved in the folder which you selected for automatic saving.
When the downloading is completed, you phone will automatically play the downloaded file and add it into the In Play list.
Tips
Refer to "Playing preset audio/video files" for information on how to play videos.
Tips
The priority of video files to be played depends on the playback priority of your
media player.
Media Center
81
Center
ENGLISH
Media
Chapter 10 Picsel Browser
Picsel Browser enables on-screen reading of almost any file format. It also allows you to surf on
the Internet.
To enter the Picsel Browser function, tap from the Main Screen.
With the help of a stylus you can move a page display in any direction - by tapping the screen in
that direction, just like shifting a paper using your hands. You may also zoom in any portion of
the display by double tapping the center point of the screen (tap the screen quickly, release the
stylus, and then quickly tap the screen on the same point once again), followed by tapping on
the screen upper or lower.
To shift up or down a page, you can use the Direction key, while using the Volume key on the
left you may zoom in or out it.
Although Picsel Browser can process a variety of file formats, including PDF, Microsoft Word,
PowerPoint, and Excel, JPEG image, PNG image, Plain Text, and HTML°A display of certain
file formats may be slightly different from that on your computer. For detailed information, refer
Browser
to User's Guide.
Picsel
You may call up menu options of Picsel Browser by tapping the screen at the bottom right corner. These options allow you to open a new file, adjust the screen, configure Picsel Browser
settings, or exit a file. To learn the usage of each option, tap and hold your stylus on its icon
until a tools tip detailing the option appears.
ENGLISH
82
Picsel Browser

Bookmark Current
Page
Input URL
Open Option
Setting Dialog
Flowdown Layout*
Cancel
Bookmarks
Browse Table
of Contents
Historian
Reload
Current File
*
When you select the
function, you may
resume the display to
"Normal Layout" by calling up the menu item on
the left figure once
again. When the display
is resumed, the icon
also changes.
Refer to the figure on the next page for indication of Picsel Browser's menu options.
View
Picsel Browser is provided with a Main Menu, on which four key viewing functions are
listed to select and view files.
File Viewer
When you read this document, you are using the Picsel Browser's core function viewing files. You may scroll a file up and down, in an enlarged or de-magnified view,
to read all parts of it. If you are reading a file with many pages, you may move to the
previous or next page by tapping your stylus along the bottom side of the screen, just
Browser
Picsel
Picsel Browser
83
ENGLISH
like you turn to another page of a book. You may also rotate the screen display of a
file or toggle the display between "horizontal" and "vertical" for your preference.
Folder Explorer
The Folder Explorer function allows you to view files saved on your device just like
you do with those on a desktop computer. You may open a folder to find more files, or
reorganize the list of these files on the sorting order and display mode using several
special menu functions. (To learn how an icon functions, put your stylus on it until a
tools tip appears.) To open and read a file, select it and tap the File Viewer option. If a
folder contains a list too long to be shown on a single screen, you may scroll it up and
down as you normally do.
Historian
Browser
Picsel
Bookmarks
The Bookmarks function enables you to record your favorite files and websites so that
you can access them conveniently later on. You may add a file to the list using a File
ENGLISH
84
Picsel Browser
Viewer menu option, and remove it from the list using a Bookmarks menu option.
Special menu options are also offered to sort your favorite files in a convenient order.
Special Functions
You'll find it more enjoyable to work with Picsel Browser offering several unique functions. You may rotate the screen display, toggle between horizontal and vertical displays, or select a size for your display. All these allow you reading files more conveniently.
You may shift the current page by tapping on the screen just like moving a piece of
paper. When you draw a horizontal line along the bottom side of the screen, you turn
to the previous or the next page - as if you are flipping a book. A portion of the display
may be zoomed in or out for your preference, by double tapping the screen (on a
same point) and then tap the screen as you move your stylus up and down.
When you view a webpage, you may use the "Track Link" mode, in which you can
Browser
Picsel
Picsel Browser
85
ENGLISH

track links or complete a table. By pressing the key on the right side of your mobile
you can see a border surrounding each selectable item. You may navigate through
these boxes and select one using the Central Key. Each type of content will operate in
an appropriate manner: If you select a text box, a menu, or something alike, the
selected box changes in color, reminding you to make further selections. If you want to
cancel, press the Central Key repeatedly. Similarly, you may double tap a link to open
its target page.
Preferred Setting
Picsel Browser is supplied with several options that you may set up from the Main
Menu as you prefer. Most of these options are only those of your choice, for example,
days before a record is removed from the history list. However, other options may
determine whether the software application would run properly.
If a "Proxy" is needed to connect to your Internet service, you may select it from the
option setting of Picsel Browser or the network setting of your device. To define a
proxy, you should specify both its address and port.
Browser
ENGLISH
The internationalized Picsel Browser can recognize documents in many languages.
Picsel
However, although a range of "language codes" is available to store characters in different regions, not all these codes may be distinctly decoded from files. You should
select the default setting for ambiguous documents as the preferred character set for
your language. If you use an improper character set, the text would be shown as
meaningless characters.
86
Picsel Browser

Chapter 11 Calendar
Your Calendar allows you to make and record arrangements. When it's
time for an arranged event, your phone plays a reminder alarm alerting
you to complete it, provided that you have enable the alarm. You may
also use the share function to send your arrangements to other phones,
or synchronize the data with other devices.
Tap on the main screen to enter the Calendar function. A Month
Calendar
View screen appears as shown in Figure 1.
Sep. 2003
S M T W T F S
Calendar
Month View
1. To view your arrangement for the previous or next month, tap or .
2. To view your arrangement for a day, tap the box marked with the date.
3. Press and select Jump to day from the popup menu. Your phone
shows a calendar screen (see Figure 2), on which you may select a
date and tap OK to view your arrangement for that date.
4. To return to the main screen from the Month View screen, tap .
Day View
To list your arrangement for a day, tap the box marked with the date on
Calendar
Month
Figure 1
Jan Feb Mar Apr May Jun
Jul Aug Sep Oct Nov Dec
S M T W T F S
Cancel
Figure 2
87
OK
ENGLISH

the Calendar screen, as shown in Figure 1.The events in gray shadows
you see on the day view list are full day events. By tapping or , you
may scroll the screen to the view of the previous or the next day. To view
details on an event, tap it. If you tap and hold an event, a popup menu
appears. You may select an option from the menu to activate a certain
Calendar
function.
Sat. 20-09-2003
Meeting
Attend Class
Week View
To view your arrangement for a week, tap Month on the Calendar screen
and select Week from the popup menu, as shown in Figure 2. By
tapping or , you may scroll the screen to the view of the previous
or the next week. If you tap and hold the area for a day you want to view,
your phone shows a list of events arranged for the day.
Adding a New Event
To add a new event:
1. Tap on the Calendar/Day View/Week View screen; your phone
shows a list detailing the events arranged for the day.
2. Tap the direct line following each field to enter details of the event;
ENGLISH
88
Calendar
Day
Figure 1
Sep
Week 38
S M T W T F S
Week
Figure 2

3. When you complete your entry, tap Done. A new event is added into
your date book.
Editing an Event
On the screen listing your events:
1. Tap the title of an event. Your phone shows details on the event, as
shown in Figure 1.
2. Tap Edit. Your phone opens a screen to edit the event. To modify an
item, tap the direct line following the field.
3. When you complete your entry, tap Done. To return to the list of
events screen, tap .
Attend Class
Sat 0-09-2003
School
Calendar
Edit
Figure 1
Attend Class
Deleting an Event
To delete an event, tap and hold the event, select Delete from the popup
menu, and tap OK. Alternatively, you may operate as follows on the list
of events screen:
1. Tap an event you want to delete. Your phone shows its details.
2. Tap and select Delete event. A prompt box appears as in Figure 2.
Calendar
Permanently
delete this event?
Cancel OK
Edit
Figure 2
89
ENGLISH

3. Tap OK to delete the event.
Calendar Setup
To set up your Calendar, tap from Calendar/Day View/Week View
Calendar
screen and select Setup from the menu, as shown in the right figure.
You may configure the starting time of an event, the time period after
which an event would be deleted, lunar calendar, Open View, or
Reminder Snooze.
Tap the direct line of a setting field to select relative information. When you complete your entry,
tap Done to save your setting. To return to the previous screen without saving your changes,
tap .
Setup
Event Start Time:
Remove Event After:
Never Remove
Lunar Calendar: off
Open View:
Month View
Done
ENGLISH
90
Calendar

Chapter 12 Tasks
Viewing Tasks
Tap icon on the Main Screen. Your phone shows a list of tasks (see Figure 1).
Tasks
1. Tap a task item and you can see its details;
2. Tap and hold a task item. You may select Share, Delete, or Edit from
the popup menu and take appropriate operations;
3.
Tap All Tasks at the screen bottom. You may select an option from the
popup menu. Your phone would list your tasks according to your selection.
4. Tap on the tasks screen. You may select an option from the popup
menu to sort and view your tasks by the due date or the priority, or
delete the entire list of tasks you see on the screen.
Creating, Editing, and Saving a Task
You may tap from the tasks screen to create a new task; or select an
existing task and tap Edit. In both cases, you will enter a screen to edit
the details of the new or existing task, as shown in Figure 2.
1. You may tap the direct line following a field to enter information, or
tap to select an option from a drop list.
2. Tap Done to complete your editing; or tap to return to the previous screen.
Tasks
Meeting
Shopping
All Tasks
Figure 1
Title:
Meeting
Priority: Normal
Due Date: None
Alarm: Choose Time
Time:
Date:
Done
Figure 2
91
Tasks
ENGLISH
Chapter 13 Note Pad
Note Pad
ENGLISH
Tap icon on the main screen to enter the note pad editing mode, as
NotePad
shown in Figure 1.
1. Tap to select an entry mode; then enter the content you want to
record.
2. Tap Done to enter a name, Save in, and type for the notepad entry, as
shown in Figure 2.
3. Tap Done to save the notepad entry.
4. Tap to pop up a menu. Select New to create and edit a new notepad file.
Tips
You may tap and select Open,
as shown in Figure 3. Then you
may select a saved file to open and
Name: Diary
Save in: Phone
Type:
Open
read it.
Done
92
Note Pad
Done
Figure 1
Phone
myCamera
myVoice
Cancel Open
Figure 3Figure 2

Chapter 14 Drawing
Your phone is supplied with the Drawing Pad function which offers your
enhanced support for image editing, enabling you to create your favorite
pictures just as you will.
1. To open the Drawing Pad screen and edit an image, tap from the
main screen, as shown in Figure 1.
2.
Use tools on the tools bar appeared on top of the screen to draw a picture.
To edit an existing image file, tap and select Open; locate the picture you
want to edit and open it; use tools on the tools bar to edit the picture.
3. By tapping the Menu key , you may select New, Undo, Open,
Share, Insert Stamp, Select All, Choose Canvas, or Delete from the
popup menu and perform appropriate operations.
4. Ta p to select a display ratio for your picture from the popup
menu, such as 50%, 100%, 150%, 200%, or Fit to Page.
5. Tap Done to enter a name, save in, and type on the screen.
6. Tap Done to save the picture and return to the image editor screen.
Tips
If you tap and hold an area selected on the picture, you may
select Copy, Cut, or Paste from the popup menu and perform operations you need, as shown in Figure 2.
Tips
Proceed with the same steps to edit a picture in your camera.
Drawing Pad
Paint
Done
Figure 1
Cut
Copy
Paste
Done
Figure 2
93
Paint
ENGLISH
Chapter 15 Recorder
You may use your phone to record talks of both parties during a call, or
record a voice note when no other recording tools are available.
1.
To activate the recorder function, tap icon from the main screen, as shown in Figure 1.
2. Tap to start recording; tap to stop recording. The voice file you
Recorder
ENGLISH
record will be automatically saved into My Document.
3.Tap to play the voice file you just recorded; tap to stop playing.
4. By tapping , you may start recording a new voice note.
Tips
If you tap on the screen shown in Figure 1, you may
specify a location to save the voice file you recorded by tapping Setup, as shown in Figure 2.
Tips
When you are playing a voice file, the
date and time you see on top of the
screen are the date and time when you
created the file, while the time you see at
the bottom of the screen is the length of
the voice file, as shown in Figure 3.
Tips
When you are making a call, you may tap
the Record button to start recording the
talks of both parties. To stop recording,
tap the button once again.
94
Recorder
Recorder
Setup
Default voice name:
Date and Time
Location:
MyVoice
Done
Figure 1
Figure 3Figure 2
Chapter 16 My Document
The function enables you to manage your file simply and easily. You may
manually create a number of private folders to store and manage files
and applications.
Ta p on the Main Screen to enter the File Manager screen.
File Manager
Your phone is supplied with a number of predefined folders, as shown in
Figure 1.
Note:
Figures in the manual illustrate files and private folders to demonstrate the functions of the file manager. These files and folders may different from your phone. Refer your phone for details.
Tips
A single folder cannot include two or more subfolders or
files that have the same folder or file name.
Editing Files and Folders
Tap and hold a file or folder that you want to edit. A drop list menu
appears as shown in Figure 2.
Tips
The menu items you see when pressing and holding a file
are different from those when you press and hold a folder.
Phone
myCamera
myVoice
Phone
myCamera
myVoice
Phone
Figure 1
Copy
Cut
Move To
Rename
Delete
Properties
Phone
Figure 2
My Document
My Document
95
ENGLISH
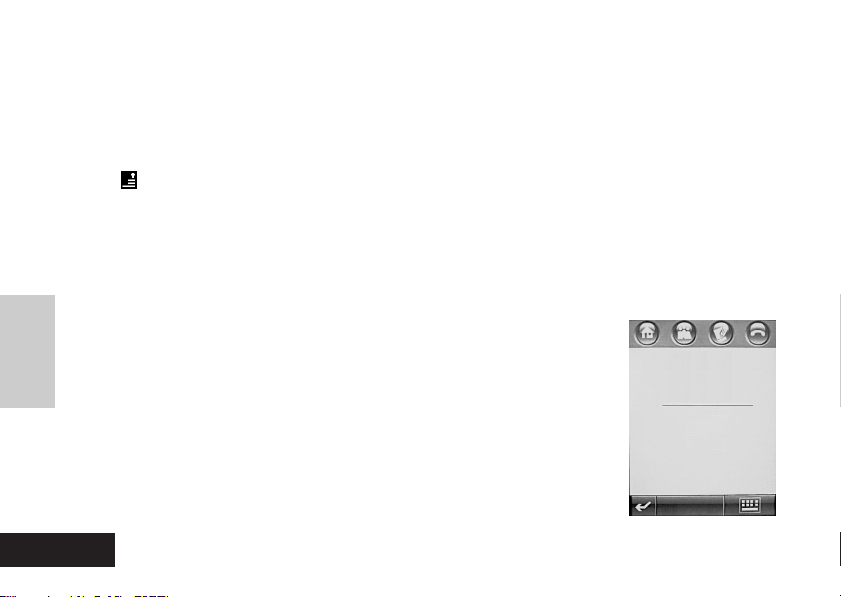
By tapping Open With, you pop up a dialog box where you may select the format to open a file
or folder. When you have made your choice, press OK.
If it is possible, you may tap Install to install the file you selected.
You may tap Copy or Cut to copy or cut the file or folder to the clip board. If you tap the Menu
Key and select Paste, files or folders (if any) contained on the clip board will be pasted to the
current folder. If you paste a file or folder that you cut to the clip board previously, the file or folder is removed from its original location.
Tap "Move to" to move the file or folder to a position you specified
My Document
Tap Rename to enter the Rename Screen, where you may choose an entry method and
rename it.
Tap Delete to open a "confirm to delete" dialog box. If you tap OK on the
box, the file or the entire folder and all files contained in the folder will be
deleted. However, if you tap Cancel on the box, you return to the previous screen.
Tap Share, a dialog box appears for you to select a share path. Select a
path and tap OK. The file will be transferred to other devices.
Tap Properties, File Properties or Folder Properties displays on the
New Personal Folder
In:Phone
Name: Animation
Done
ENGLISH
96
My Document
screen. The Properties of a file include File Name, Type, Open With,
Size, and Last Modified (date); the Properties of a folder include Folder
Name, Location, Use Size, and Contains (how many subfolders and files
it contains).
Creating a New Folder
Ta p in My Document, you may create a new folder in the current folder, as shown in Figure 2 on the right. Enter a name and tap Done.
Viewing by
If you are viewing files or folders in a list, you may tap the Menu Key
and select Thumbnail to show them as thumbnails, as shown in Figure 1
on the next page.
Sorting
Tap the Menu Key and select Sort by. You may sort files or folders by
Name, Size, Time, or Type.
Phone
myCamera
myVoice
Phone
Figure 1
Search Name:
Look in: Phone
Done
Figure 2
My Document
My Document
97
ENGLISH

Searching
Ta p and select Search from the menu to enter the Search Screen, as
shown in Figure 2, where you may enter Name of the file to be searched,
select a scope from Search From for the file to be searched, and tap
Done to initiate searching.
If the file is found, the file will be listed. By tapping the filename, you may
open the file; if you tap and hold the filename, you may see the file path.
However, if no such a file is found, "There are no match file to display."
My Document
displays on the screen. If you tap Dismiss, you return to the My Document screen. You may
also tap Try again to return the File Search screen, where you may edit your searching condition to look for another file.
Folder Tree
By tapping symbol on the My Document screen, you may view a folder tree, as shown in the
right Figure.
Select Folder
Phone
myCamera
myVoice
Cancel
OK
ENGLISH
98
My Document
Chapter 17 Share
Share of information of your phone with other phones or computers is available, by sharing
address book entries, Calendar events, tasks, notepad entries, voice notes, voices, or images
and sending or receiving messages via Bluetooth, Infrared, Email, or MMS.
Receiving Data
1. Your phone is ready to receive data once a transmission link is established via Bluetooth,
Infrared, MMS, or Email. When you receive a message, the phone alerts you to operate as
the phone's instructions.
2. Once you successfully complete the receiving, you may Edit, Save, or Delete the file(s) you
just receive.
3. If the receiving is terminated accidentally, the word "Failed to receive"
appears on the screen.
Sending Data
Select data you would send. Tap Share from the popup menu. A dialog
box appears for you to select a share path, as shown in the right figure.
Select a type as you want and then tap OK.
Tips
If you select Bluetooth or Infrared, a connection screen
appears once you tap OK. To send the data, you have to
establish a connection on the screen. However, if you select
Email or MMS, a corresponding function screen will show up, where you may edit
and send the email or MMS.
Share
Share Via:
Bluetooth
IrDA
MMS
Email
Cancel
99
OK
ENGLISH
Share

Chapter 18 Alarm Clock and WorldTime
Alarms
Ta p on the Main Screen to enter the alarm clock function, as shown
Clock
in Figure 1.
1. Check symbol preceding . Tap the time under the clock to show
the Alarm Clock Setup Screen, where you may set a time by
tapping or . When you complete your setting, tap OK.
2. Tap symbol following Snooze to pop up a drop list menu, where
you may set a snooze period for the alarm clock. The alarm clock will
alert again once the period is over.
3. If you check Alarm when power off, your
phone will automatically switch on and alert
when it's time to alert. After the alert, the
Worldwide Clock
Alarm Clock and
phone will automatically switch off.
WorldTime
Tap on the Main Screen to show the
WorldTime
WorldTime screen, as shown in Figure 2.
Beijing
Tokyo
Alarm 1
Alarm 2
Snooze: 10 min
Alarm when power off
Done
Figure 1
City
Beijing
Cancel OK
Figure 3Figure 2
ENGLISH
100
Alarm Clock and Worldwide Clock
 Loading...