

Page 1
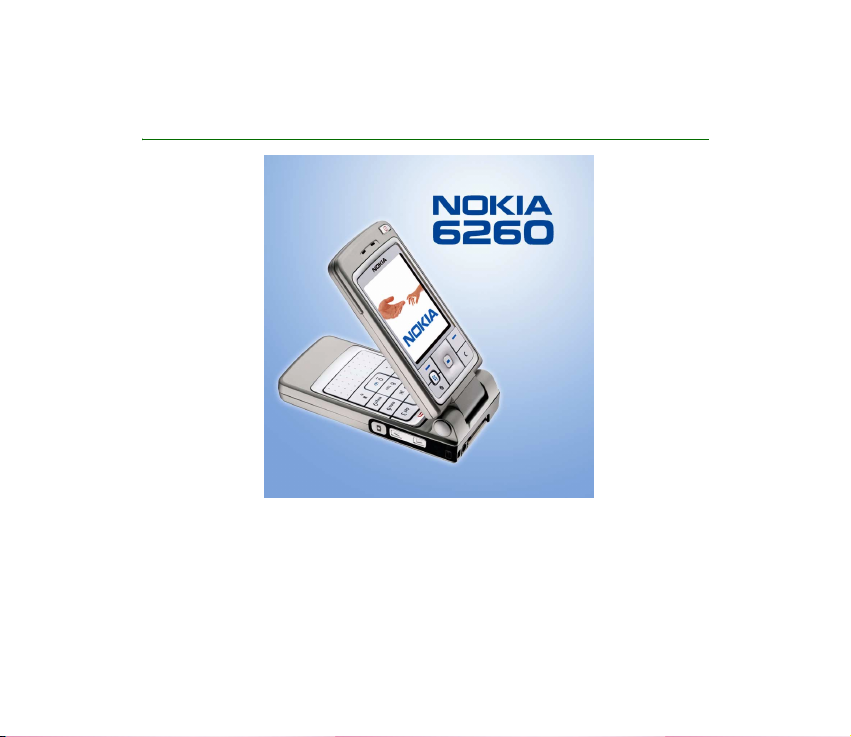
User’s Guide for Nokia 6260
9232479
Issue 1
Page 2
DECLARATION OF CONFORMITYWe, NOKIA CORPORATION declare under our sole responsibility that the
product RM-25 is in conformity with the provisions of the following Council Directive:1999/5/EC. A copy
of the Declaration of Conformity can be found at
http://www.nokia.com/phones/declaration_of_conformity/
Copyright © 2004 Nokia. All rights reserved.
Reproduction, transfer, distribution or storage of part or all of the contents in this document in any form
without the prior written permission of Nokia is prohibited.
Nokia, Nokia Connecting People, Pop-Port and Xpress-on are registered trademarks of Nokia Corporation.
Other product and company names mentioned herein may be trademarks or tradenames of their
respective owners.
Nokia tune is a sound mark of Nokia Corporation.
This product includes software licensed from Symbian Software Ltd © 1998-2004.
Symbian and Symbian OS are trademarks of Symbian Ltd.
Java™ and all Java-based marks are trademarks or registered trademarks of Sun
Microsystems, Inc.
Stac ®, LZS ®, ©1996, Stac, Inc., ©1994-1996 Microsoft Corporation. Includes one or
more U.S. Patents: No. 4701745, 5016009, 5126739, 5146221, and 5414425. Other
patents pending.Hi/fn ®, LZS ®,©1988-98, Hi/fn. Includes one or more U.S. Patents:
No. 4701745, 5016009, 5126739, 5146221, and 5414425. Other patents
reserved.m-Router Connectivity Components © 2000-2002 Intuwave Limited. All rights reserved.
(www.intuwave.com)
US Patent No 5818437 and other pending patents. T9 text input software Copyright (C) 1997-2004. Tegic
Communications, Inc. All rights reserved.
Bluetooth is a registered trademark of Bluetooth SIG, Inc.
pending.Part of the software in this product is © Copyright ANT Ltd. 1998. All rights
Page 3

Nokia operates a policy of continuous development. Nokia reserves the right to make changes and
improvements to any of the products described in this document without prior notice.
Under no circumstances shall Nokia be responsible for any loss of data or income or any special,
incidental, consequential or indirect damages howsoever caused.
The contents of this document are provided ‘as is’. Except as required by applicable law, no warranties of
any kind, either express or implied, including, but not limited to, the implied warranties of
merchantability and fitness for a particular purpose, are made in relation to the accuracy, reliability or
contents of this document. Nokia reserves the right to rev ise t his docu ment or wi thdr aw it a t any time
without prior notice.
The availability of particular products may vary by region. Check with the Nokia dealer nearest to you.
Page 4

Contents
For your safety .................................................................................................. 12
General information.......................................................................................... 16
Stickers in the sales package ................................................................................................................ 16
Access codes .............................................................................................................................................. 16
PIN code................................................................................................................................................... 16
PIN2 code................................................................................................................................................ 16
Lock code................................................................................................................................................. 17
PUK and PUK2 codes............................................................................................................................ 17
1. Getting started .............................................................................................. 18
Inserting a SIM card and a MultiMediaCard.................................................................................... 18
Charging the battery ............................................................................................................................... 20
Switching the phone on and off .......................................................................................................... 20
2. Your phone..................................................................................................... 22
Mechanical modes ................................................................................................................................... 22
Closed mode ........................................................................................................................................... 22
Work mode.............................................................................................................................................. 23
Browse mode.......................................................................................................................................... 23
Imaging mode ........................................................................................................................................ 24
Keyguard.................................................................................................................................................. 24
Keys and connectors................................................................................................................................ 25
Indicators in standby mode ................................................................................................................... 27
Menu............................................................................................................................................................ 28
Actions common to all applications ................................................................................................... 29
Volume control.......................................................................................................................................... 31
4Copyright © 2004 Nokia. All rights reserved.
Page 5

3. Call functions ................................................................................................ 33
Making a call ............................................................................................................................................. 33
Using the Contacts directory............................................................................................................. 33
Calling your voice mailbox................................................................................................................. 34
Speed dialling......................................................................................................................................... 34
Making a conference call ................................................................................................................... 34
Answering a call ....................................................................................................................................... 35
Options during a call............................................................................................................................ 36
Call waiting............................................................................................................................................. 37
Diverting calls ........................................................................................................................................ 37
Push to talk ................................................................................................................................................ 38
Settings for push to talk ..................................................................................................................... 39
Connecting to the push to talk service........................................................................................... 39
Making a push to talk call.................................................................................................................. 40
Callback requests .................................................................................................................................. 42
Using groups........................................................................................................................................... 43
Call register and general log ................................................................................................................. 45
Recent calls register............................................................................................................................. 45
Call duration........................................................................................................................................... 46
Viewing the general log ...................................................................................................................... 46
GPRS data counter................................................................................................................................ 48
4. Writing text................................................................................................... 49
Using traditional text input................................................................................................................... 49
Using predictive text input.................................................................................................................... 50
Tips for writing text................................................................................................................................. 51
Copying text to the clipboard ............................................................................................................... 52
5. Personal information..................................................................................... 53
Contacts ...................................................................................................................................................... 53
5Copyright © 2004 Nokia. All rights reserved.
Page 6

Managing contacts............................................................................................................................... 53
Adding a ringing tone.......................................................................................................................... 54
Voice dialling.......................................................................................................................................... 55
Assigning speed-dialling keys ........................................................................................................... 56
Presence ...................................................................................................................................................... 57
Changing your availability information.......................................................................................... 58
Changing who can view your Presence information .................................................................. 58
Updating your Presence information .............................................................................................. 61
Presence settings .................................................................................................................................. 62
Positioning.................................................................................................................................................. 63
Calendar...................................................................................................................................................... 64
Creating calendar entries ................................................................................................................... 64
Calendar views....................................................................................................................................... 65
To-do............................................................................................................................................................ 66
Importing data from compatible Nokia phones .............................................................................. 67
6. Media ............................................................................................................. 68
Camera......................................................................................................................................................... 68
Taking a picture or recording a video clip ..................................................................................... 68
Image size and orientation................................................................................................................. 70
Camera settings..................................................................................................................................... 71
Viewing images...................................................................................................................................... 72
RealPlayer™ ................................................................................................................................................ 73
Playing media files................................................................................................................................ 74
Changing the settings.......................................................................................................................... 75
Radio ............................................................................................................................................................ 76
Tuning and saving a radio channel.................................................................................................. 77
Using the radio ...................................................................................................................................... 77
Using the channel list.......................................................................................................................... 78
Gallery.......................................................................................................................................................... 79
6Copyright © 2004 Nokia. All rights reserved.
Page 7

Opening files........................................................................................................................................... 80
Other default folders............................................................................................................................ 81
Downloading files ................................................................................................................................. 82
Uploading images to an image server............................................................................................. 82
7. Messaging...................................................................................................... 84
Writing and sending messages............................................................................................................. 86
Settings for multimedia ...................................................................................................................... 88
Settings for e-mail................................................................................................................................ 88
Inbox - receiving messages ................................................................................................................... 89
Viewing multimedia objects .............................................................................................................. 89
Receiving smart messages.................................................................................................................. 90
Receiving service messages................................................................................................................ 91
My folders .................................................................................................................................................. 92
Mailbox........................................................................................................................................................ 92
Retrieving e-mail messages from the mailbox............................................................................. 93
Deleting e-mail messages................................................................................................................... 94
Outbox......................................................................................................................................................... 95
Viewing messages on a SIM card......................................................................................................... 96
Cell broadcast............................................................................................................................................ 96
Service command editor......................................................................................................................... 97
Messaging settings .................................................................................................................................. 97
Text messages ........................................................................................................................................ 97
Multimedia messages .......................................................................................................................... 98
E-mail messages................................................................................................................................. 100
Service messages................................................................................................................................ 102
Cell broadcast ..................................................................................................................................... 103
Settings for the Other folder .......................................................................................................... 103
Chat........................................................................................................................................................... 104
Connecting to a chat server............................................................................................................ 104
7Copyright © 2004 Nokia. All rights reserved.
Page 8

Modifying your chat settings ......................................................................................................... 105
Joining and leaving a chat group.................................................................................................. 105
Searching for chat groups and users............................................................................................ 106
Chatting in a chat group ................................................................................................................. 107
Starting and viewing individual conversations ......................................................................... 108
Chat contacts...................................................................................................................................... 109
Creating a new chat group ............................................................................................................. 110
Chat and Presence servers............................................................................................................... 112
8. Tools............................................................................................................. 113
File manager ........................................................................................................................................... 113
Receiving files via Infrared.............................................................................................................. 113
Viewing memory consumption....................................................................................................... 114
Voice commands.................................................................................................................................... 114
Adding a voice command to an application............................................................................... 115
Starting an application using a voice command ...................................................................... 116
Replaying, erasing, or changing a voice command .................................................................. 117
9. Personalising your phone............................................................................ 118
Profiles...................................................................................................................................................... 118
Themes...................................................................................................................................................... 119
Settings .................................................................................................................................................... 121
Changing general settings............................................................................................................... 121
Phone settings .................................................................................................................................... 122
Call settings......................................................................................................................................... 124
Connection settings .......................................................................................................................... 125
Date and time ..................................................................................................................................... 130
Security................................................................................................................................................. 130
Call barring .......................................................................................................................................... 134
Network ................................................................................................................................................ 134
8Copyright © 2004 Nokia. All rights reserved.
Page 9

Enhancement settings ...................................................................................................................... 135
Go to.......................................................................................................................................................... 135
10.Extras.......................................................................................................... 137
Wallet ...................................................................................................................................................... 137
Entering the wallet code.................................................................................................................. 137
Storing personal card details.......................................................................................................... 138
Creating personal notes................................................................................................................... 139
Creating a wallet profile.................................................................................................................. 139
Retrieving information from the wallet to your browser ....................................................... 140
Viewing ticket details ....................................................................................................................... 141
Wallet settings.................................................................................................................................... 141
Resetting the wallet and wallet code .......................................................................................... 142
Calculator ................................................................................................................................................ 142
Converter ................................................................................................................................................. 143
Converting units................................................................................................................................. 143
Setting a base currency and exchange rates............................................................................. 144
Notes......................................................................................................................................................... 145
Clock.......................................................................................................................................................... 145
Changing clock settings................................................................................................................... 145
Setting an alarm................................................................................................................................. 145
Recorder ................................................................................................................................................... 146
Memory card........................................................................................................................................... 147
Formatting the memory card.......................................................................................................... 148
Backing up and restoring information......................................................................................... 148
Locking the memory card ................................................................................................................ 148
Checking memory consumption .................................................................................................... 149
Quickword................................................................................................................................................ 149
Quickpoint ............................................................................................................................................... 150
9Copyright © 2004 Nokia. All rights reserved.
Page 10

11.Services and Applications.......................................................................... 151
Web (Mobile browser).......................................................................................................................... 151
Basic steps for accessing ................................................................................................................. 151
Setting up the phone for the browser service ........................................................................... 152
Making a connection ........................................................................................................................ 152
Viewing bookmarks............................................................................................................................ 153
Browsing............................................................................................................................................... 154
Downloading ....................................................................................................................................... 156
Ending a connection ......................................................................................................................... 158
Browser settings................................................................................................................................. 158
Applications ............................................................................................................................................ 159
Downloading an application........................................................................................................... 160
Installing an application.................................................................................................................. 161
Launching an application ................................................................................................................ 163
Memory status for applications..................................................................................................... 164
Removing an application ................................................................................................................. 164
Games ....................................................................................................................................................... 165
12.Connectivity ............................................................................................... 166
Bluetooth connection........................................................................................................................... 166
Bluetooth connection settings....................................................................................................... 167
Sending data via Bluetooth technology...................................................................................... 167
Paired devices view ........................................................................................................................... 169
Receiving data via Bluetooth wireless technology................................................................... 170
Disconnecting Bluetooth connection ........................................................................................... 171
Infrared connection .............................................................................................................................. 171
VPN............................................................................................................................................................ 172
Connection manager ............................................................................................................................ 173
Viewing connection details............................................................................................................. 174
Ending connections ........................................................................................................................... 174
10Copyright © 2004 Nokia. All rights reserved.
Page 11

Connecting your phone to a compatible computer..................................................................... 175
Using your phone as a modem .......................................................................................................... 175
Remote synchronisation...................................................................................................................... 175
Creating a new synchronisation profile....................................................................................... 176
Synchronising data............................................................................................................................ 177
13.Troubleshooting ......................................................................................... 178
Q&A........................................................................................................................................................... 179
14.Battery information................................................................................... 184
Care and Maintenance.................................................................................... 187
Additional safety information........................................................................ 189
11Copyright © 2004 Nokia. All rights reserved.
Page 12
For your safety
Read these simple guidelines. Not following them may be dangerous or illegal. Read the
complete user guide for further information.
SWITCH ON SAFELY
Do not switch the phone on when wireless phone use is prohibited or when it
may cause interference or danger.
ROAD SAFETY COMES FIRST
Obey all local laws. Always keep your hands free to operate the vehicle while
driving. Your first consideration while driving should be road safety.
INTERFERENCE
All wireless phones may be susceptible to interference, which could affect
performance.
SWITCH OFF IN HOSPITALS
Follow any restrictions. Switch the phone off near medical equipment.
SWITCH OFF IN AIRCRAFT
Follow any restrictions. Wireless devices can cause interference in aircraft.
SWITCH OFF WHEN REFUELLING
Do not use the phone at a refuelling point. Do not use near fuel or chemicals.
SWITCH OFF NEAR BLASTING
Follow any restrictions. Do not use the phone where blasting is in progress.
12Copyright © 2004 Nokia. All rights reserved.
Page 13
USE SENSIBLY
Use only in the normal position as explained in the product documentation. Do
not touch the antenna unnecessarily.
QUALIFIED SERVICE
Only qualified personnel may install or repair this product.
ENHANCEMENTS AND BATTERIES
Use only approved enhancements and batteries. Do not connect incompatible
products.
WATER-RESISTANCE
Your phone is not water-resistant. Keep it dry.
BACK-UP COPIES
Remember to make back-up copies or keep a written record of all important
information stored in your phone.
CONNECTING TO OTHER DEVICES
When connecting to any other device, read its user guide for detailed safety
instructions. Do not connect incompatible products.
EMERGENCY CALLS
Ensure the phone is switched on and in service. Press as many times as
needed to clear the display and return to the start screen. Key in the emergency
number, then press . Give your location. Do not end the call until given
permission to do so.
13Copyright © 2004 Nokia. All rights reserved.
Page 14

■ About your device
The wireless device described in this guide is approved for use on the EGSM 900, GSM 1800
and GSM 1900 networks. Contact your service provider for more information about
networks.
When using the features in this device, obey all laws and respect privacy and legitimate
rights of others.
Warning: To use any features in this device, other than the alarm clock, the device
must be switched on. Do not switch the device on when wireless device use may
cause interference or danger.
■ Network Services
To use the phone you must have service from a wireless service provider. Many of the
features in this device depend on features in the wireless network to function. These
Network Services may not be available on all networks or you may have to make specific
arrangements with your service provider before you can utilize Network Services. Your
service provider may need to give you additional instructions for their use and explain what
charges will apply. Some networks may have limitations that affect how you can use
Network Services. For instance, some networks may not support all language-dependent
characters and services.
Your service provider may have requested that certain features be disabled or not activated
in your device. If so, they will not appear on your device menu. Contact your service provider
for more information.
This device supports WAP 2.0 protocols (HTTP and SSL) that run on TCP/IP protocols. Some
features of this device require network support for these technologies.
14Copyright © 2004 Nokia. All rights reserved.
Page 15

■ Shared memory
The following features in this device may share memory: contacts, text messages, and
multimedia messages, images and ringing tones, video recorder, RealOne Player
and to-do notes, and downloaded applications. Use of one or more of these features may
reduce the memory available for the remaining features sharing memory. For example,
saving many images may use all of the available memory. Your device may display a message
that the memory is full when you try to use a shared memory feature. In this case, delete
some of the information or entries stored in the shared memory features before continuing.
Some of the features may have a certain amount of memory specially allotted to them in
addition to the memory shared with other features.
TM
, calendar
15Copyright © 2004 Nokia. All rights reserved.
Page 16

General information
■ Stickers in the sales package
The stickers included on the warranty card,in the sales package, contain important
information for service and customer support purposes. The sales package also
includes instructions on how to use the stickers.
■ Access codes
PIN code
The PIN (Personal Identification Number, 4 to 8 digits) code helps to protect your
SIM card against unauthorised use. The PIN code is usually supplied with the SIM
card.
After three consecutive incorrect PIN code entries, the PIN code is blocked. If the
PIN code is blocked, you need to unblock it with the PUK code before you can use
the SIM card again.
PIN2 code
The PIN2 code (4 to 8 digits), supplied with some SIM cards, is required to access
some functions.
16Copyright © 2004 Nokia. All rights reserved.
Page 17

Lock code
The lock code (5 digits) can be used to lock the phone and keypad to avoid
unauthorised use.
The factory setting for the lock code is 12345. To avoid unauthorised use of your
phone, change the lock code. Keep the new code secret and in a safe place
separate from your phone.
PUK and PUK2 codes
The PUK (Personal Unblocking Key, 8 digits) code is required to change a blocked
PIN code. The PUK2 code is required to change a blocked PIN2 code. If the codes
are not supplied with the SIM card, contact the operator whose SIM card is in your
phone for the codes.
17Copyright © 2004 Nokia. All rights reserved.
Page 18
1. Getting started
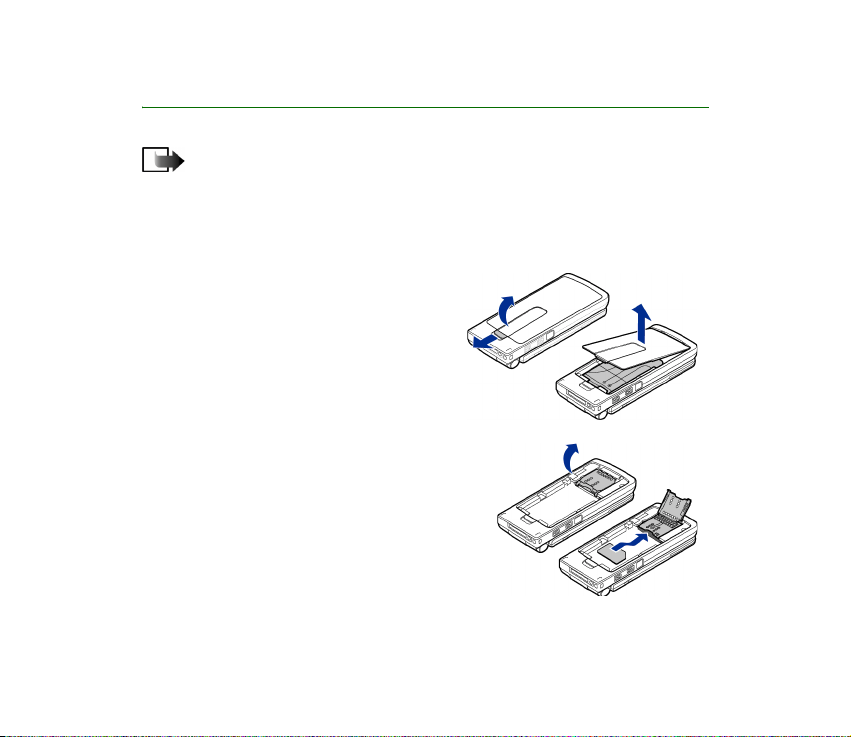
Note: Before removing the cover, always switch off the power and disconnect the
charger and any other device. Avoid touching electronic components while
changing the covers. Always store and use the device with the covers attached.
■ Inserting a SIM card and a MultiMediaCard
1. Open the phone cover: With the back of
the phone facing you, press the locking
catch in the direction of the arrow and
lift the cover.
2. Open the memory card holder by
pressing it gently. Insert the SIM card into
the bottom slot. Make sure the bevelled
corner on the SIM card is facing towards the
top of the phone and that the golden
contact area on the card is facing
downwards. To slide the SIM card out of the
slot, move the card holder towards the
battery slot.
18Copyright © 2004 Nokia. All rights reserved.
Page 19
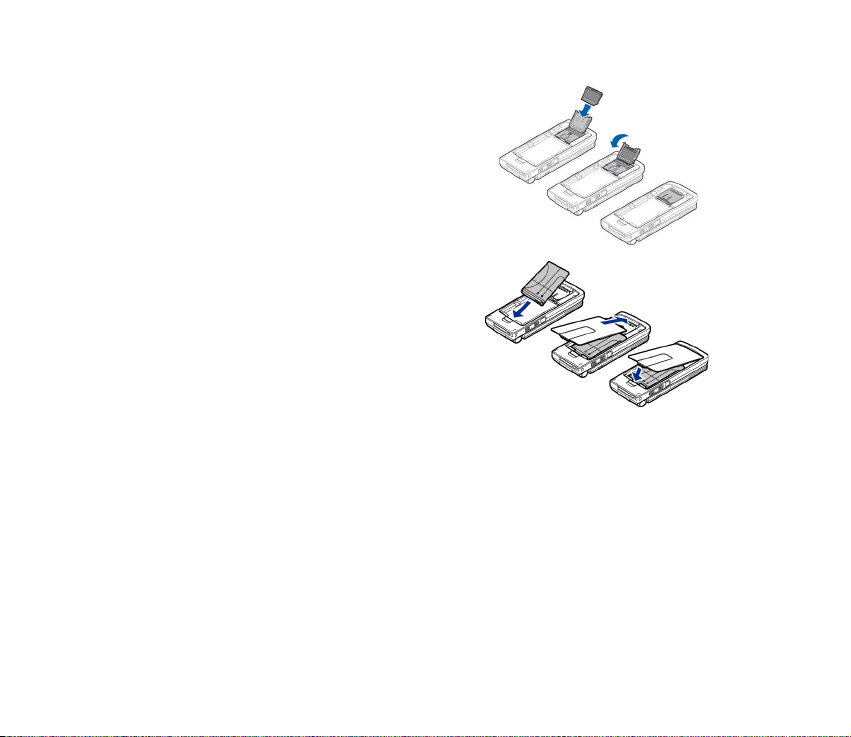
3. Insert the MultiMediaCard (MMC) into the
holder’s slot. Make sure that the bevelled
corner and golden contact area of the MMC
are facing downwards.
4. Close the memory card holder by pressing it
downwards until locked.
5. Align the golden contacts of the battery
with the corresponding connectors on the
phone, and push the opposite end of the
battery until it snaps into place.
6. Close the phone cover.
Keep all SIM cards out of the reach of small children.
For availability and information on using SIM card
services, contact your SIM card vendor. This may be
the service provider, network operator, or other vendor.
Use only compatible Multimedia cards (MMC) with this device. The compatible MMC for
your device is Reduced Size Dual Voltage MultiMediaCard. Other memory cards, such as
Secure Digital (SD) cards, do not fit in the MMC card slot and are not compatible with this
device. Using an incompatible memory card may damage the memory card as well as the
device, and data stored on the incompatible card may be corrupted.
19Copyright © 2004 Nokia. All rights reserved.
Page 20
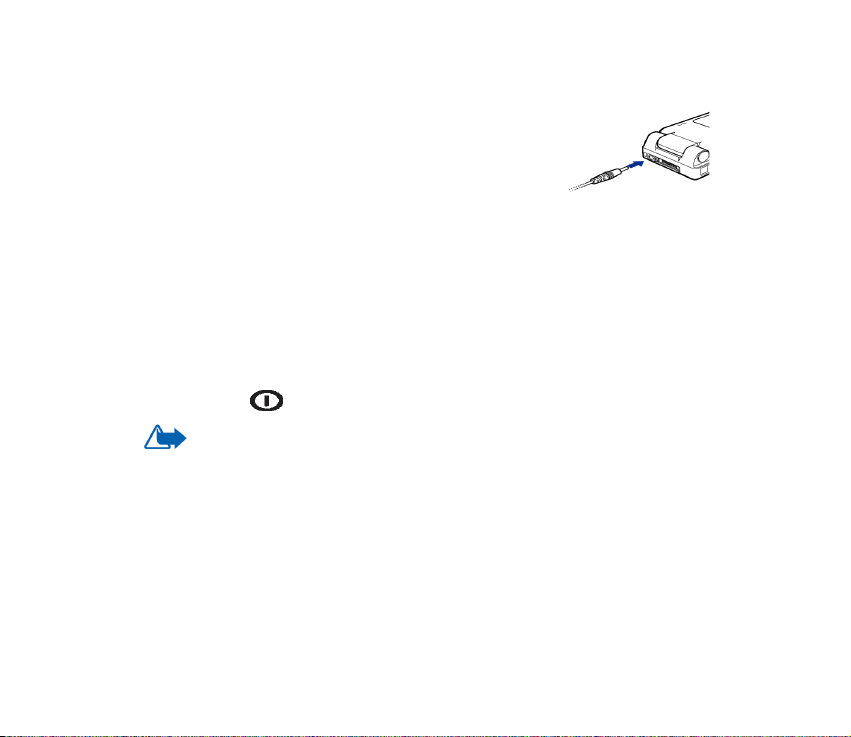
■ Charging the battery
1. Connect the power cord to the charger.
2. Connect the other end of the power cord from the
charger to the base of the phone.
3. Connect the charger to an AC wall outlet. The battery
indicator bar on the display starts scrolling if the fold is
open, and the LED light indicator on the fold starts blinking if the fold is closed.
Note that you can use the phone while charging. When the battery is fully
charged, the bar stops scrolling.
Disconnect the charger from the AC outlet and then from the phone. See
“Battery information” on page 184.
■ Switching the phone on and off
Press and hold .
WARNING! Do not switch the phone on when wireless phone use is prohibited or
when it may cause interference or danger.
Your device has an internal antenna.
20Copyright © 2004 Nokia. All rights reserved.
Page 21
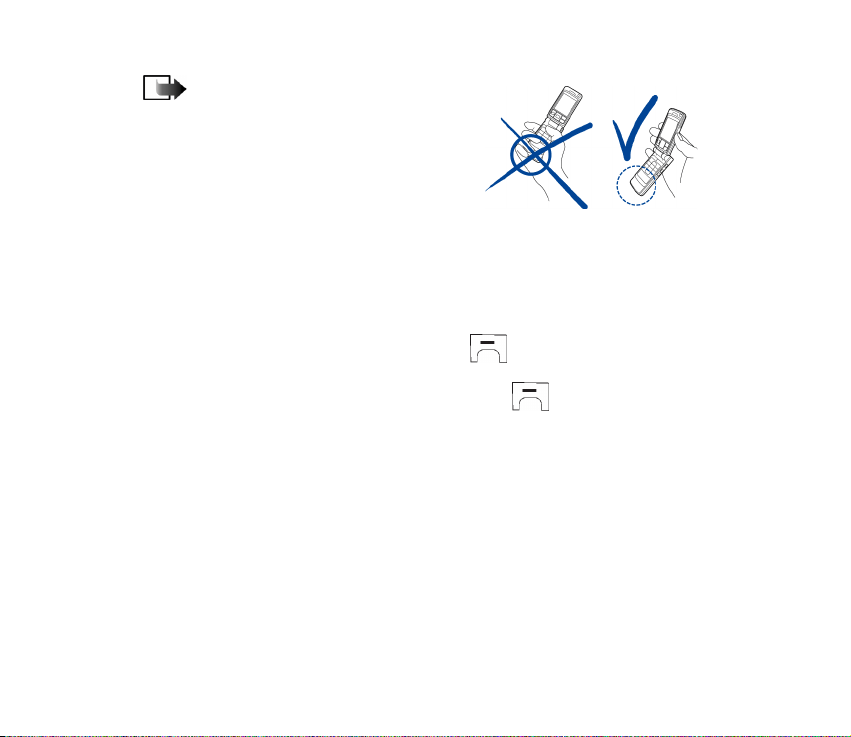
Note: As with any other radiotransmitting device, do not touch the
antenna unnecessarily when the phone is
switched on. Contact with the antenna
affects call quality and may cause the
phone to operate at a higher power level
than otherwise needed. Avoiding contact
with the antenna area when operating the
phone optimises the antenna performance and the battery life.
NORMAL POSITION: Hold the phone as shown in the picture above.
If the phone requests a PIN code:
The PIN code is usually supplied with the SIM card.
• Key in the code (displayed as ****) and press .
If the phone requests a lock code:
• Key in the lock code (displayed as *****) and press .
The factory setting for the lock code is 12345.
21Copyright © 2004 Nokia. All rights reserved.
Page 22
2. Your phone
■ Mechanical modes
Your phone has four different mechanical modes: Closed, Work, Browse, and
Imaging. You switch between the modes by turning the fold and the swivel. Note
that the swivel does not turn 180 degrees, but only to either left or right. Also note
that there is a short time-out before a mode is activated.
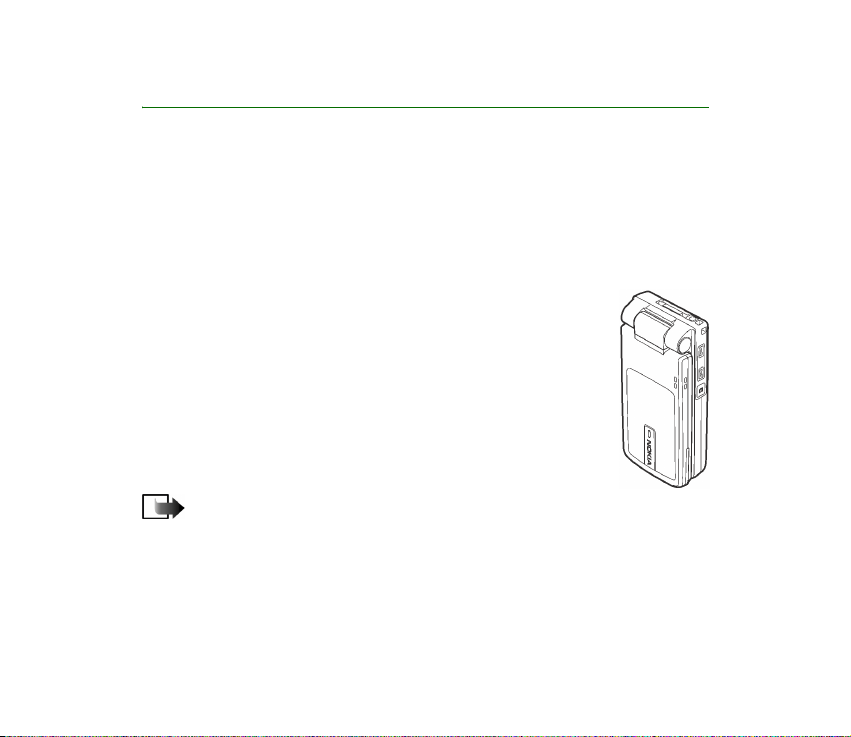
Closed mode
When the phone is in the Closed mode, all applications are sent to
the background, the screen is shut off, and ongoing calls are
ended.
Incoming calls are indicated in Closed mode by an LED
incorporated into the cover and by a ringing tone.
Note: When the phone is in the Closed mode, the keyguard will
automatically be activated for
Camera/PTT key, but not for Volume keys.
22Copyright © 2004 Nokia. All rights reserved.
Page 23
Work mode
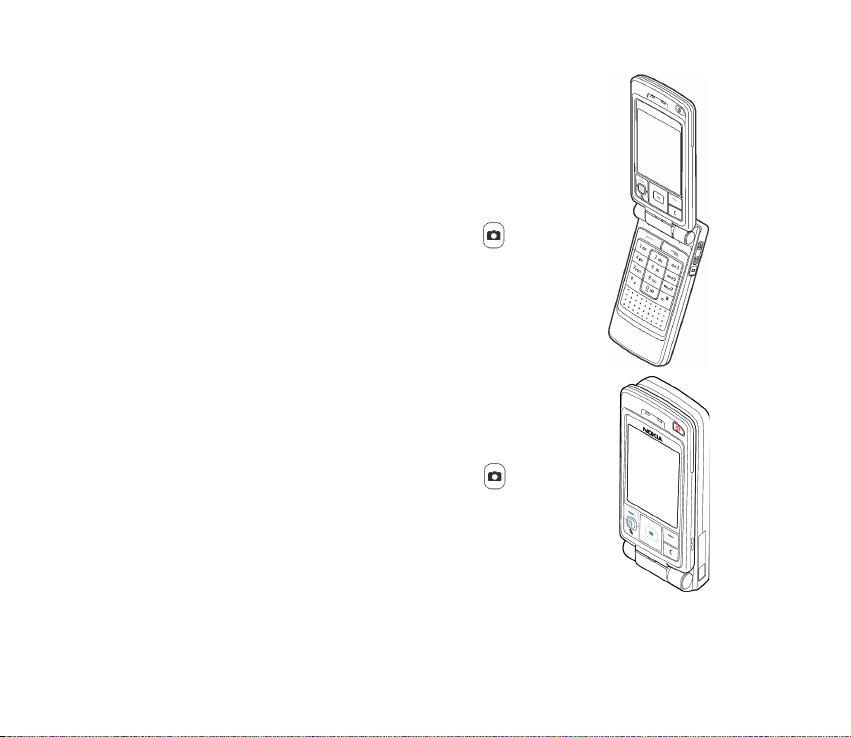
When you open the phone, Work mode is activated
automatically, the display is lit up and the keyboard is available.
Work mode is activated even if the fold is not fully open.
Incoming calls are answered automatically when the fold is fully
open.
When you are not using the camera, you can use for push to
talk.
Browse mode
Browse mode is activated when you turn the screen outwards and
close the fold. After this Browse mode is active even if you open
the fold.
When you are not using the camera, you can use for push to
talk.
23Copyright © 2004 Nokia. All rights reserved.
Page 24
Imaging mode
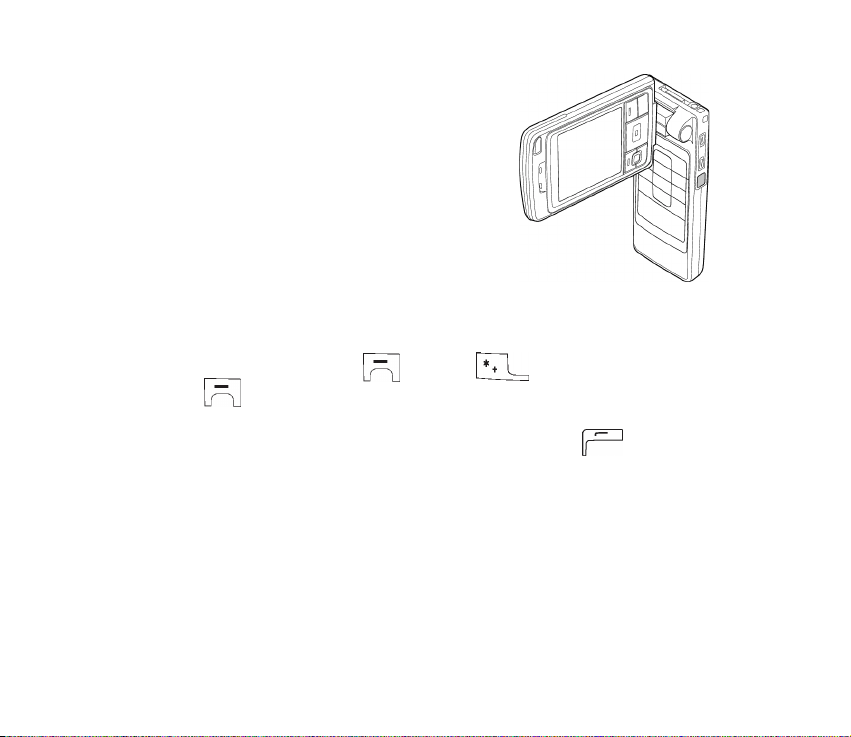
Imaging mode is activated when you turn the fold
from Work mode so that the screen is facing either
the right or the left side of the phone. If you turn the
fold to the left, you are facing both the screen and
the camera lens so that you can take pictures of
yourself.
In Imaging mode the keyboard is disabled except for
the phone’s side keys. Ongoing calls are ended when
you enter Imaging mode.
Keyguard
To activate the keyguard, press and then ,
or press and then Menu.
When the keyguard is on, calls still may be possible to the official emergency number
programmed into your device. Key in the emergency number and press .
24Copyright © 2004 Nokia. All rights reserved.
Page 25
■ Keys and connectors
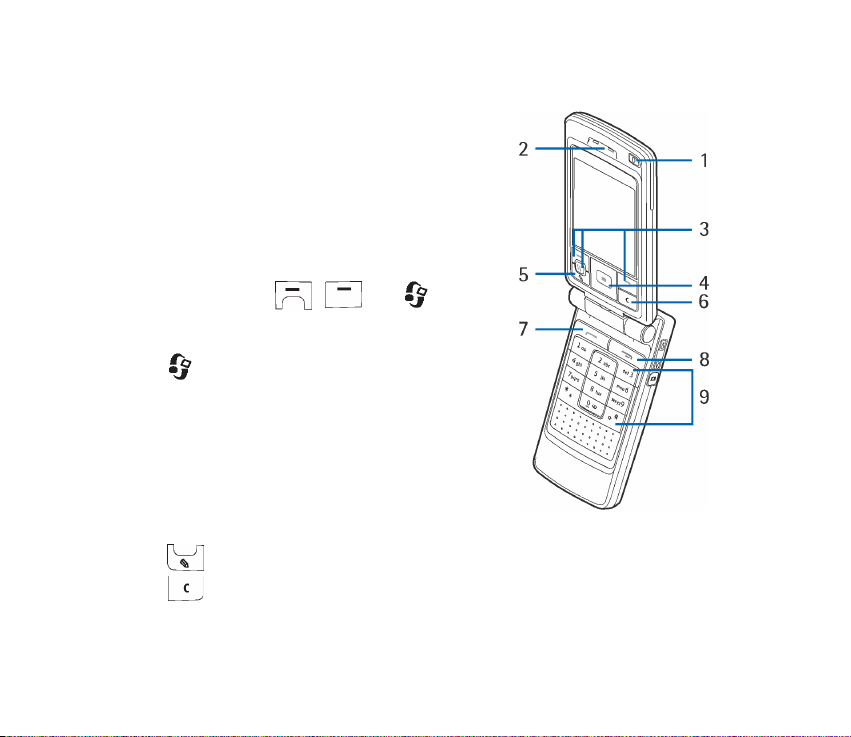
Fold open view
1. Power key
Switches the phone on and off.
When the keypad is locked, pressing the power
key turns the phone’s display lights on for
approximately 15 seconds.
2. Earpiece
3. Selection keys , and .
The functions of the keys depend on the guiding
text shown on the display above the keys. Press
to display the main Menu.
4. Scroll key
Enables scrolling through names, phone
numbers, menus or settings. The scroll key is also
used to move the cursor up and down, right and
left when writing text, using the calendar, and in
some game applications. Pressing the scroll key
briefly selects the function.
5. opens a list of commands for text editing and marking items.
6. clears an entry or deletes an item and exits from different functions.
25Copyright © 2004 Nokia. All rights reserved.
Page 26
7. dials a phone number and answers a call. In standby mode it shows the
list of most recently called numbers.
8. ends an active call. Exits from any function.
9. – enter numbers and characters.
and are used for various purposes in different functions.
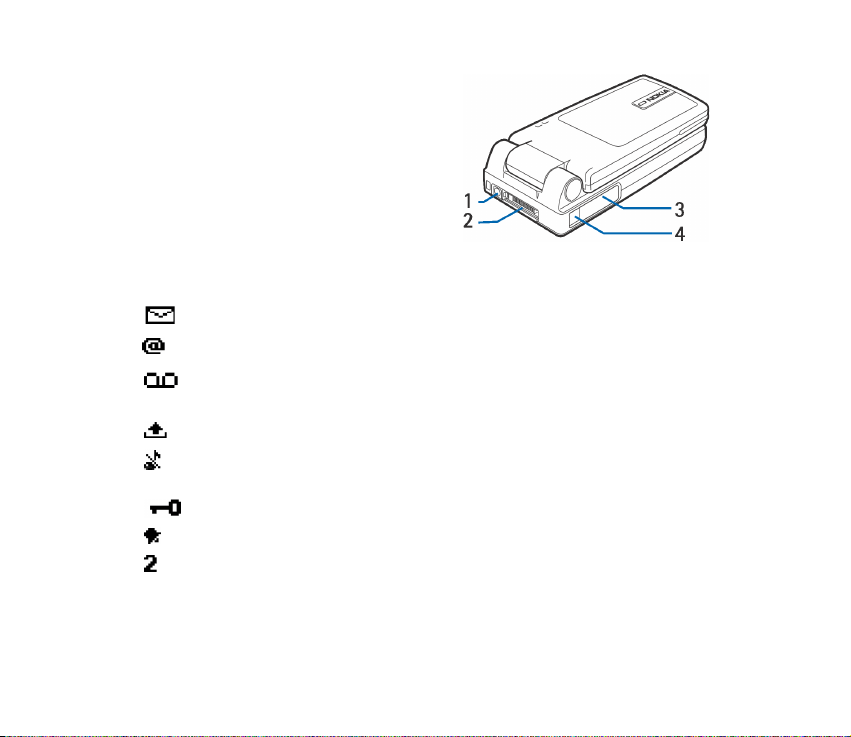
Fold closed view
1. Volume/Zoom keys
Adjust the volume of the earpiece or the
loudspeaker, or the headset when it is
connected to the phone. These keys also zoom
in and out when you are using the built-in
camera.
2. Loudspeakers
3. Camera/PTT key starts the camera
application and activates the push to talk
function.
4. LED to indicate an incoming call.
26Copyright © 2004 Nokia. All rights reserved.
Page 27
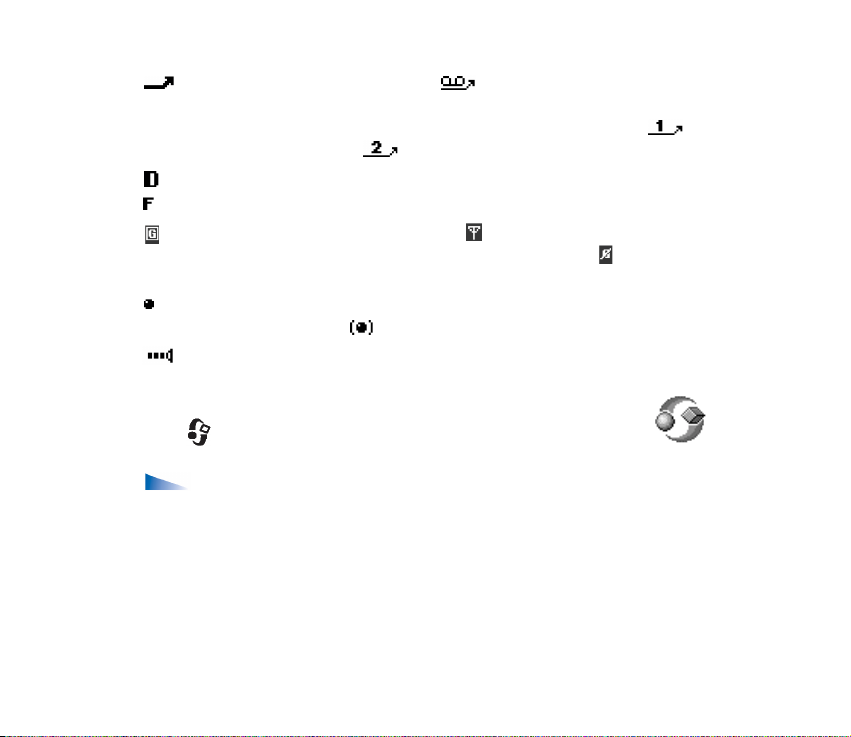
Connectors view
1. Charger connector
2. Pop-Port
TM
connector used, for
example, for headsets and the data
cable.
3. Infrared (IR) port
4. Camera lens
■ Indicators in standby mode
You have received one or several messages to the Inbox in Messaging.
You have received e-mail.
You have received one or several voice messages. See “Calling your voice
mailbox” on page 34.
There are messages waiting to be sent in the Outbox.
Ringing tone has been set to Silent, Message alert tone to None, and Chat
alert tone to None in the currently active profile.
The phone’s keypad is locked. See “Keyguard” on page 24.
You have an active alarm.
You can make calls using phone line 2 only (Network Service). See “Call
settings” on page 124.
27Copyright © 2004 Nokia. All rights reserved.
Page 28
All calls to the phone are diverted. - Indicates that all calls to the
phone are diverted to a voice mailbox. See “Diverting calls” on page 37. If
you have two phone lines, the divert indicator for the first line is
and for the second line .
A data call is active.
A fax call is active.
Shown instead of the antenna symbol (shown in the top left corner in
standby mode) when there is an active GPRS connection. - Shown
when the GPRS connection is put on hold during voice calls.
Bluetooth connection is active. When data are transmitted via Bluetooth
wireless technology , is shown.
An infrared connection is active.
■ Menu
Press to display the main Menu. In the Menu you can access all the
applications in your phone.
Options in the Menu: Open, List view/Grid view, Move, Move to folder, New
folder, App. downloads, Memory details, Help and Exit.
28Copyright © 2004 Nokia. All rights reserved.
Page 29
Moving in the Menu
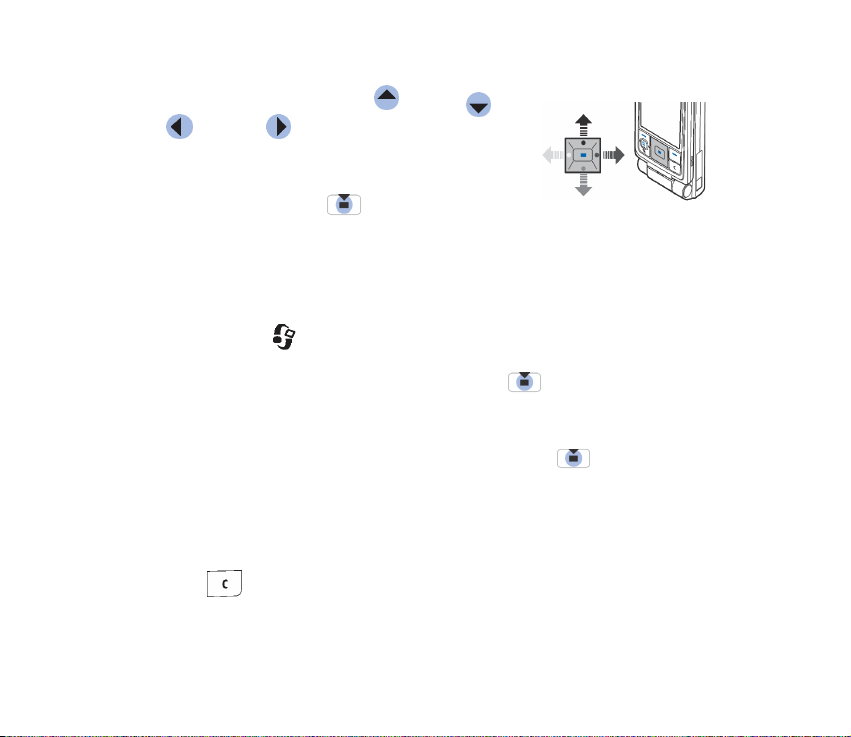
• Press the scroll key on the top , bottom , left
and right to navigate the Menu.
Opening applications or folders
• Scroll to an application or a folder and press the
centre of the scroll key to open it.
Closing applications
• Press Back or Exit as many times as needed to return to standby mode or select
Options→ Exit.
Switching between applications
• Press and hold to switch from one open application to another. The
application switching window opens showing a list of applications that are
currently open. Scroll to an application and press to go to it.
■ Actions common to all applications
• Opening items for viewing - Scroll to an item and press , or select
Options→Open.
• Editing items - Open the item for viewing and select Options→Edit. Use the
scroll key to scroll through all fields of the item.
• Removing, deleting items - Scroll to the item and select Options→Delete or
press . To delete many items at a time, you first need to mark them.
• Marking an item - There are several ways to select items when you are in a list.
29Copyright © 2004 Nokia. All rights reserved.
Page 30
• To select one item at a time, scroll to the item and select Options→ Mark/
Unmark→Mark or press and at the same time. A check mark is
placed next to the item.
• To select all items in the list, select Options→Mark/Unmark→ Mark all.
• To mark multiple items, press and hold and then move the scroll key
down or up. As the selection moves, a check mark is placed next to the
items. To end the selection, stop the scrolling with the scroll key and then
release .
After you have selected all the items that you want, you can move or delete
them by selecting Options→ Move to folder or Delete.
• Unmarking an item - Scroll to the item and select Options→Mark/
Unmark→Unmark or press and at the same time.
• Creating folders - Select Options→New folder. You are asked to give a name
to the folder (max. 35 letters).
• Moving items to a folder - Select Options→Move to folder (not shown if
there are no folders available). When you select Move to folder, a list of
available folders opens and you can also see the root level of the application
(for moving an item out of a folder). Select the location that you want the item
to be moved to and press OK.
• Sending items - Scroll to the item and select Options→Send. Select the
method, the choices are Via multimedia, Via Bluetooth, Via e-mail, Via fax and
Via infrared.
30Copyright © 2004 Nokia. All rights reserved.
Page 31
• If you choose to send the item in an e-mail or a multimedia message, an
editor opens. Press to select the recipient(s) from the Contacts
directory or write the phone number or e-mail address of the recipient in
the To: field. Add text or sound and select Options→Send. See “Writing and
sending messages” on page 86.
• Via Bluetooth. See “Sending data via Bluetooth technology” on page 167.
Copyright protections may prevent some images, ringing tones, and other content from
being copied, modified, transferred or forwarded.
■ Volume control
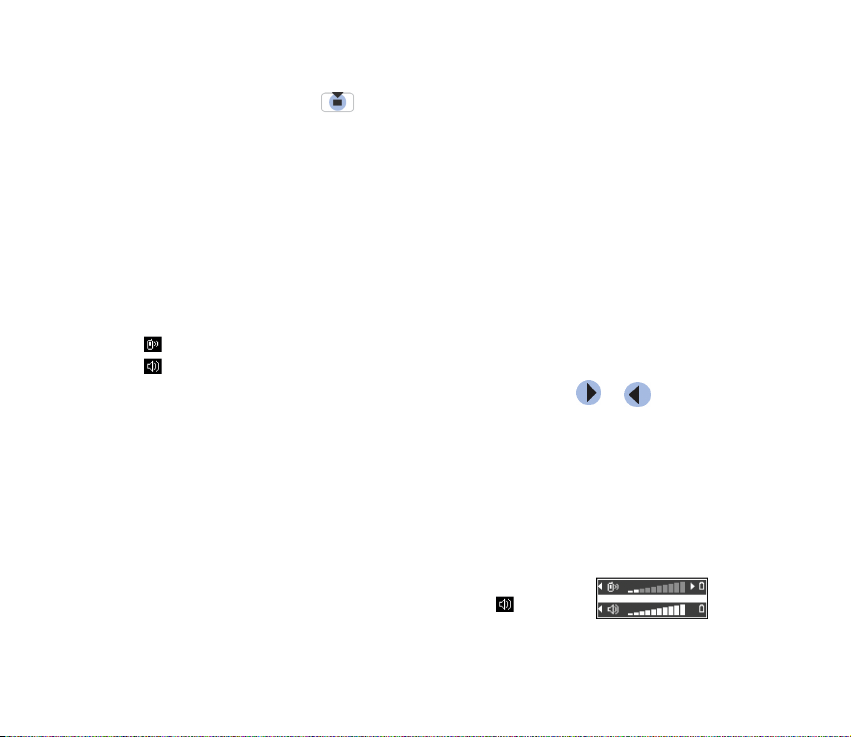
Voice volume icons:
- for earpiece mode,
- for loudspeaker mode.
When you have an active call or are listening to a sound, press or or the
volume control side keys to increase or decrease the volume level, respectively.
The loudspeaker allows you to speak and listen to the phone from a short distance
without having to hold the phone to your ear, for example, having it on a table
nearby. The loudspeaker can be used during a call, with sound and video
applications, and when viewing multimedia messages. Sound and video
applications use the loudspeaker by default. Using the loudspeaker makes it easier
to use other applications during a call.
To start using the loudspeaker during an already active call,
select Options→Activate loudsp.. A tone is played, is shown
in the navigation bar, and the volume indicator changes.
31Copyright © 2004 Nokia. All rights reserved.
Page 32

The loudspeaker cannot be activated when you have connected a headset to the
phone.
WARNING! Do not hold the device near your ear when the loudspeaker is
in use, because the volume may be extremely loud.
To turn off the loudspeaker when you have an active call, select
Options→Activate handset.
32Copyright © 2004 Nokia. All rights reserved.
Page 33
3. Call functions
■ Making a call
1. In standby mode, key in the phone number, including the area code. Press
or to move the cursor. Press to remove a number.
• For international calls, press twice for the international prefix (+)
and then key in the country code, the area code without 0, and the phone
number.
2. Press to call the number.
3. Press to end the call (or to cancel the call attempt).
Pressing ends a call even if another application is active and displayed.
You can make a call using your voice so that you do not need to look at the display
to key in the number. See “Voice dialling” on page 55.
Using the Contacts directory
Go to Menu→Contacts.
1. To find a contact, scroll to the desired name, or key in the first letters of the
name. The Search field opens automatically, and matching contacts are listed.
2. Press to start the call.
If the contact has more than one phone number, scroll to the number and press
to start the call.
33Copyright © 2004 Nokia. All rights reserved.
Page 34
Calling your voice mailbox
The voice mailbox (network service) is an answering service where callers who are
unable to reach you can leave you voice messages.
• To call your voice mailbox, press and in standby mode.
• If the phone asks for the voice mailbox number, key it in and press OK. You can
obtain this number from your service provider.
• To change the phone number of your voice mailbox, go to
Menu→Tools→Voice mailbox and select Options→Change number. Key in the
number (obtained from your service provider) and press OK.
See “Diverting calls” on page 37.
Speed dialling
Go to Menu→Tools→Speed dial.
1. Assign a phone number to one of the speed-dialling keys
( - ). See “Assigning speed-dialling keys” on page 56.
2. To call the number: In standby mode, press the corresponding speed-dialling
key and . If the Speed dialling function is set to On: press and hold the
corresponding speed-dialling key until the call is started.
Making a conference call
You can make conference calls with up to six participants (network service).
1. Make a call to the first participant.
34Copyright © 2004 Nokia. All rights reserved.
Page 35

2. To make a call to a new participant, select Options→New call. Key in or search
the memory for the phone number of the participant and press OK. The first
call is automatically put on hold.
3. When the new call has been answered, join the first participant in the
conference call. Select Options→ Conference.
4. To add a new person to the call, repeat step 2 and then select Options→
Conference→ Add to conference.
• To have a private conversation with one of the participants, select
Options→ Conference→ Private. Scroll to the desired participant and press
Private. The conference call is put on hold in your phone, and the other
participants can still continue talking with each other. Press Cancel to
return to the conference call.
• To drop one participant from the conference call, select
Options→Conference→Drop participant, then scroll to the participant and
press Drop.
5. To end the active conference call, press .
■ Answering a call
• To answer an incoming call, press .
• To end the call, press .
If you do not want to answer a call, press . The caller hears a ’line busy’
tone.
When a call comes in, press Silence to quickly mute the ringing tone.
35Copyright © 2004 Nokia. All rights reserved.
Page 36
Options during a call
Many of the options that you can use during a call are network services. For
availability, contact your network operator or service provider.
Press Options during a call for some of the following options:
Mute/Unmute, Activate handset, Activate loudsp., or Activate handsfree (if a
compatible Bluetooth headset is attached), and the network services End active
call, End all calls, Hold/Unhold, New call, Conference, Private, Drop participant,
Answer, Reject and:
Swap - Switch between the active call and the call on hold.
Transfer - Connect an incoming call or a call on hold with an active call and to
disconnect yourself from both calls.
Send DTMF - Send DTMF tone sequences, for example, passwords or bank account
numbers.
Sending DTMF tone sequences
1. Key in the digits with - . Each keystroke generates a DTMF tone,
which is transmitted while the call is active. Press repeatedly to
produce: *, p (inserts a pause of approximately 2 seconds before or between
DTMF characters.), and w (if you use this character, the remaining sequence is
not sent until you press Send again during the call). Press to produce
#.
2. To send the tone, press OK.
36Copyright © 2004 Nokia. All rights reserved.
Page 37
Call waiting
If you have activated the Call waiting service (network service), you will be
notified of a new incoming call while you have a call in progress.
1. During a call, press to answer the waiting call. The first call is put on
hold. To switch between the two calls, press Swap.
2. To end the active call, press .
Diverting calls
Go to Menu→Settings→Call divert.
When this network service is activated, you can direct your incoming calls to
another number, for example, to your voice mailbox number. For details, contact
your service provider.
• Select one of the divert options, for example, select If busy to divert voice calls
when your number is busy or when you reject incoming calls.
• Select Options→ Activate to set the divert setting on, Cancel to set the divert
setting off, or Check status to check whether the divert is activated or not.
• To cancel all active diverts, select Options→ Cancel all diverts.
See “Indicators in standby mode” on page 27.
You cannot have barring of incoming calls and call diverting active at the same
time. See “Call barring” on page 134.
37Copyright © 2004 Nokia. All rights reserved.
Page 38
■ Push to talk
Go to Menu→PTT.
Push to talk over cellular is a two-way radio service (network service) available
over a GSM/GPRS cellular network. Push to talk provides direct voice
communication connected with pressing .
You can use push to talk to have a conversation with one person or with a group
of people having compatible devices. When your call is connected, the person or
group you are calling does not have to answer the phone. Besides the GPRS
counters, the phone registers only one-to-one calls in the recent calls lists in Log.
The participants should confirm the reception of any communications where
appropriate as there is no other confirmation of whether the recipient(s)
has(have) heard the call.
To check availability and costs, and to subscribe to the service, contact your
network operator or service provider. Note that roaming services may be more
limited than for normal calls.
Before you can use the push to talk service, you must define the required push to
talk service settings.
While connected to the push to talk service, you can use the other functions of the
phone. The push to talk service is not connected to traditional voice
communication, and therefore many of the services available for traditional voice
calls (for example, voice mailbox) are not available for push to talk
communications.
38Copyright © 2004 Nokia. All rights reserved.
Page 39
Settings for push to talk
Go to Options→Settings.
For push to talk service settings, contact your network operator or service
provider. You may receive the settings over the air.
• Notification tone - A tone for incoming push to talk calls.
• Default nickname - Your nickname shown to other users.
• Domain - The default domain name.
• Access point name - The access point name for the push to talk service.
• Server address - The push to talk server address.
• User name - Your user name used to enter the push to talk service.
• PTT password - Your password used to enter the push to talk service.
After modifying the settings, restart the push to talk application.
Connecting to the push to talk service
Go to Menu→PTT. Alternatively, press and hold for a few seconds to
connect to the service.
The push to talk application automatically attempts to connect to the push to talk
service. If the login is successful, the push to talk sessions view opens.
indicates the push to talk connection. If you have added group(s) to the phone,
you are automatically joined to the active groups, and the name of the default
group is displayed in standby mode.
39Copyright © 2004 Nokia. All rights reserved.
Page 40
indicates that the service is temporarily unavailable. The phone automatically
tries to reconnect to the service until you disconnect from the push to talk service.
If the login fails, you get an error note such as Unable to switch Push to talk on.
Press Options and select Switch PTT on to try to log in again, Settings to open the
settings view, or Exit to close the error note.
To disconnect from the push to talk service, select Options→Switch PTT off.
Options in the sessions view are: Deactivate loudsp./Activate loudsp.,
Active members, PTT contacts, PTT log, Settings, Help, Switch PTT off, and Exit.
Making a push to talk call
Select Options→Deactivate loudsp./Activate loudsp. to use either loudspeaker or
earpiece for push to talk communication. When the earpiece is selected, you can
use the phone normally to your ear.
Warning: Do not hold the device near your ear when the loudspeaker is in use,
because the volume may be extremely loud.
To make a push to talk call
1. Select Options→PTT contacts and search for a contact person or a group.
To open the Push to talk groups view, press .
2. Press or . This starts a push to talk call immediately.
OR
Select Options→Send callback req.. This sends a callback request to the
selected push to talk contact or group.
40Copyright © 2004 Nokia. All rights reserved.
Page 41
A tone sounds indicating that the access is granted, and the phone displays
your nickname and group name.
3. To request a speech turn, press . The phone sends your request. Wait until
your phone receives a speech turn signal. When the phone displays Talk, you
have 30 seconds to talk on your speech turn.
Press and hold the entire time you are talking, and hold the phone in front
of you so that you can see the display. When you have finished, release the
key. Talking is allowed on a first-come, first-served basis. When someone stops
talking, the first person to press can talk next.
4. To switch between several active sessions, select Swap.
5. To end the active session, select Deactiv..
If you have other active sessions, the phone moves to the next session.
If there are no other sessions, the phone displays a note stating that there are
no active sessions.
6. To exit the push to talk application, select Options→Exit.
Receiving a push to talk call
A short tone notifies you of an incoming group or a one-to-one call. Press Accept
to receive the call or Silence to reject it.
When receiving a group call, the group name and the nickname of the caller are
displayed. When receiving a one-to-one call from a person whose information you
have saved in Contacts, the saved name is displayed if identified; otherwise, only
the nickname of the caller is displayed.
41Copyright © 2004 Nokia. All rights reserved.
Page 42

Callback requests
Go to Options→PTT contacts or PTT log.
Sending a callback request
If you make a one-to-one call and do not get a response, you can send a request
for the person to call you back. You can send a callback request in different ways:
• To send a callback request from the contacts list in the PTT menu, select
Options→PTT contacts. Scroll to a contact and press Options→Send callback
req..
• To send a callback request from the Contacts, press in standby mode, and
scroll to the desired contact. Press Details, scroll to the push to talk address
and press Options→Send callback req..
• To send a callback request from the group list in the PTT menu, select
Options→PTT contacts and press . Scroll to the desired group and press
Options→Send callback req..
• To send a callback request from the callback request list in the PTT menu,
select Options→PTT log. Select Received callback reqs. and press
Options→Open. Scroll to a contact and press Options→Send callback req..
Saving the callback request sender
When you receive a callback request from someone who is not in your contacts
list, you can save the name to your contacts.
1. To open the request, select Options→PTT log→Received callback reqs..
2. Scroll to the a contact and press Options→Add to Contacts.
42Copyright © 2004 Nokia. All rights reserved.
Page 43

Using groups
Go to Options→PTT contacts.
When you call a group, all members joined to the group hear the call
simultaneously.
Each member in the groups is identified by a user name given by the service
provider. Group members can choose a nickname for within each group, which is
shown as a caller identification.
Groups are registered with a URL address. One user registers the group URL in the
network by joining the group session the first time.
Adding a group
1. Press Options→PTT contacts and then . This opens the Push to talk groups
view.
2. Press Options→Add group→Create new.
3. Key in a Group name, and press OK.
4. Select a Group security level.
5. Key in your own nickname in Nickname in group.
6. To add a thumbnail image to the group, select Options→Add thumbnail.
7. Press Done. To add members and to send an invitation to the group, press Yes
when the phone requests for Send group invitation to all members now?. This
opens a view where you can select members for the group.
The members you invite to the open groups can also invite more members to
the group.
43Copyright © 2004 Nokia. All rights reserved.
Page 44

Joining an existing group
For group detail information, contact your network operator or service provider.
You may receive the details over the air.
1. Press Menu→PTT→PTT contacts and then . This opens the Push to talk
groups view.
2. Press Options→Add group→Join existing.
3. Key in the Group address, Group name, and Nickname in group. You can also
add a Group thumbnail.
4. Press Done.
Receiving an invitation
When you receive a text message invitation to a group,press Options and select
an option.
• From - View the contact information of the person who sent the invitation.
• Nickname - View the nickname of the person who sent the invitation.
• Group name - View the name of the group if the group is not a secured group.
• Group address - View the group address if the group is not a secured group.
• Save group - Add the group to your phone. After the group is saved, the phone
asks whether you want to connect to the saved group.
To reject the invitation, press Back and Yes.
44Copyright © 2004 Nokia. All rights reserved.
Page 45
■ Call register and general log
Go to Menu→Log.
In the log, you can monitor phone calls, text messages, packet data
connections, and fax and data calls registered by the phone. You can filter the log
to view just one type of event and create new contact cards based on the log
information.
Connections to your remote mailbox, multimedia messaging centre, or browser
pages are shown as data calls or packet data connections in the general
communications log.
Recent calls register
Go to Menu→Log→Recent calls.
The phone registers the phone numbers of missed, received, and dialled calls, and
the approximate duration of your calls. The phone registers missed and received
calls only if the network supports these functions, and the phone is switched on
and is within the network’s service area.
Options in the Missed, Received, and Dialled views: Call, Create message,
Use number, Request presence, Delete, Clear list, Add to Contacts, Help, and Exit.
Missed calls and received calls
To view a list of the last 20 phone numbers from which somebody has tried to call
you without success (network service), go to Log→Recent calls→Missed calls.
To view a list of the 20 numbers or names from which you have most recently
accepted calls (network service), go to Log→Recent calls→Received calls.
45Copyright © 2004 Nokia. All rights reserved.
Page 46
Dialled numbers
To view the 20 phone numbers that you have most recently called or attempted to
call, go to Log→Recent calls→Dialled nos..
Erasing recent call lists
• To clear all recent call lists, select Options→Clear recent calls in the Recent
calls main view.
• To clear one of the call registers, open the register you want to erase and select
Options→Clear list.
• To clear an individual event, open a register, scroll to the event, and press
.
Call duration
Go to Menu→Log→Call duration.
Allows you to view the duration of your incoming and outgoing calls.
Note: The actual time invoiced for calls by your service provider may vary,
depending on network features, rounding off for billing, and so forth.
Erasing call duration timers - Select Options→Clear timers. For this, you need
the lock code. See “Security” on page 130.
Viewing the general log
Go to Menu→Log and press .
46Copyright © 2004 Nokia. All rights reserved.
Page 47

In the general log, for each communication event, you can see the sender or
recipient name, phone number, name of the service provider, or access point.
Sub-events, such as a text message sent in more than one part and packet data
connections, are logged as one communication event.
Filtering the log
1. Select Options→Filter. A list of filters opens.
2. Scroll to a filter and press Select.
Erasing the contents of the log
• To erase all the log contents, Recent calls register, and Messaging delivery
reports permanently, select Options→Clear log. Confirm by pressing Yes.
Packet data counter and connection timer
• To view how much data, measured in kilobytes, has been transferred and the
approximate length of a certain GPRS connection, scroll to an Incoming or
Outgoing event with the access point icon and select Options→View
details.
Log settings
• Select Options→Settings. The list of settings opens.
• Log duration - The log events remain in the phone memory for a set number
of days after which they are automatically erased to free memory.
• •If you select No log, all the log contents, Recent calls register, and
Messaging delivery reports are permanently deleted.
• Show call duration. See “Call duration” on page 46.
47Copyright © 2004 Nokia. All rights reserved.
Page 48

GPRS data counter
Go to Menu→Log→GPRS counter.
The GPRS data counter allows you to check the amount of data sent and received
during packet data (GPRS) connections.
48Copyright © 2004 Nokia. All rights reserved.
Page 49
4. Writing text
You can key in text, for example, when writing messages, using traditional or
predictive text input.
■ Using traditional text input
The indicator is shown on the top right of the display when you are writing
text using traditional text input.
• Press a number key ( - ), repeatedly until the desired character
appears. Note that there are more characters available for a number key than
are printed on the key.
• To insert a number, press and hold the number key.
To switch between letter and number mode, press and hold .
• If the next letter is located on the same key as the present one, wait until the
cursor appears (or press to end the time-out period), and then key in the
letter.
• To insert a space, press . To move the cursor to the next line, press
three times.
• To switch between upper and lower case, press .
49Copyright © 2004 Nokia. All rights reserved.
Page 50
■ Using predictive text input
You can key in any letter with a single keypress using predictive text input. To
activate predictive text input, press and select Dictionary on. This activates
predictive text input for all editors in the phone. The indicator is shown at
the top of the display.
1. Write the desired word by pressing the keys - . Press each key
only once for one letter. The word changes after every key press.
2. When you have finished the word, check that it is correct.
• If the word is correct, you can confirm it by pressing or by pressing
to insert a space. The underlining disappears and you can begin to
write a new word.
• If the word is not correct, you have the following options:
• Press repeatedly to view the matching words the dictionary has
found one by one.
• Press and select Dictionary→ Matches to view a list of matching
words. Scroll to the word you want to use and press to select it.
•If the ? character is shown after the word, the word you intended to write is
not in the dictionary. To add a word to the dictionary, press Spell, key in the
word (max. 32 letters) using traditional text input, and press OK. The word
is added to the dictionary. When the dictionary becomes full, a new word
replaces the oldest added word.
• To remove the ? and clear characters one by one from the word, press .
50Copyright © 2004 Nokia. All rights reserved.
Page 51
■ Tips for writing text
• To change between the different character cases Abc, abc, and ABC, press
. Note that if you press twice quickly the predictive text
input is turned off.
• To insert a number in letter mode, press and hold the desired number key, or
press and select number mode, key in the numbers you want, and press
OK.
• The most common punctuation marks are available under . Press
repeatedly to reach the desired punctuation mark.
Press to open a list of special characters. Use the scroll key to scroll
through the list and press Select to select a character, or press and
select Insert symbol.
The predictive text input tries to guess which commonly used punctuation
mark (.,?!‘) is needed. The order and availability of the punctuation marks
depend on the language of the dictionary.
When a word has been entered with predictive text on, you can press ,
select Dictionary and select:
• Matches - To view a list of words that correspond to your key presses. Scroll to
the desired word and press .
• Insert word - To add a word (max. 32 letters) to the dictionary by using
traditional text input. When the dictionary becomes full, a new word replaces
the oldest added word.
51Copyright © 2004 Nokia. All rights reserved.
Page 52
• Edit word - To open a view where you can edit the word, available only if the
word is active (underlined).
• Off - To turn off predictive text input for all editors in the phone
Writing compound words
• Write the first half of a compound word and confirm it by pressing . Write
the last part of the compound word and complete the compound word by
pressing to add a space.
■ Copying text to the clipboard
To copy text to the clipboard, the following are the easiest methods:
1. To select letters and words, press and hold . At the same time, press
or . As the selection moves, text is highlighted.
To select lines of text, press and hold . At the same time press or
.
2. To end the selection, release pressing the scroll key while still holding .
3. To copy the text to the clipboard, while still holding , press Copy.
Or, release and then press it once to open a list of editing commands, for
example, Copy or Cut.
If you want to remove the selected text from the document, press .
4. To insert the text into a document, press and hold and press Paste.
Or, press once and select Paste .
52Copyright © 2004 Nokia. All rights reserved.
Page 53
5. Personal information
■ Contacts
Go to Menu→Contacts.
In Contacts, you can store and manage contact information, such as names,
phone numbers, and addresses.
You can also add a personal ringing tone, voice tag, or a thumbnail image to a
contact card. You can create contact groups, which allow you to send text
messages or e-mail to many recipients at the same time.
Contact information can only be sent to or received from compatible devices.
Options in the Contacts directory: Open, Call, Create message, New
contact, Edit, Delete, Duplicate, Add to group, Belongs to groups, Mark/Unmark,
Copy to SIM direct., Go to web address, Send, Contacts info, SIM directory,
Settings, Help, and Exit.
Managing contacts
Options when editing a contact: Add thumbnail/Remove thumbnail, Add
detail, Delete detail, Edit label, Help, and Exit.
1. Press in standby mode or go to Menu→Contacts.
2. Select Options→New contact.
3. Fill in the fields you want and press Done.
53Copyright © 2004 Nokia. All rights reserved.
Page 54

• To edit a contact, open it and then select Options→Edit.
• To delete a contact, open it and select Options→Delete.
• To attach a small thumbnail image to a contact, open the contact card, select
Options→Edit and then select Options→Add thumbnail.
• To assign default numbers and addresses to a contact, open the contact card
and select Options→Defaults. A pop-up window opens, listing the different
options.
• To copy names and numbers from a SIM card to your phone, select
Options→SIM directory, scroll to the name(s) you want to copy and select
Options→Copy to Contacts.
• To copy a phone, fax, or pager number from Contacts to your SIM card,
scroll to the contact card you want to copy and select Options→Copy to SIM
direct.
Adding a ringing tone
You can set a ringing tone for each contact card and group. When that contact or
group member calls you, the phone plays the chosen ringing tone (if the caller’s
telephone number is sent with the call and your phone recognises it).
1. Press to open a contact card or go to the Groups list and select a contact
group.
2. Select Options→Ringing tone. A list of ringing tones opens.
3. Use the scroll key to select the ringing tone you wish to use for the contact or
group and press Select.
54Copyright © 2004 Nokia. All rights reserved.
Page 55
• To remove the ringing tone, select Default tone from the list of ringing tones.
Voice dialling
Go to Menu→Contacts.
You can make a phone call by saying a voice tag that has been added to a contact
card. Any spoken word(s) can be a voice tag.
Before using voice tags, note that:
• Voice tags are not language-dependent. They are dependent on the speaker's voice.
• You must say the name exactly as you said it when you recorded it.
• Voice tags are sensitive to background noise. Record voice tags and use them in a quiet
environment.
• Very short names are not accepted. Use long names and avoid similar names for different
numbers.
Note: Using voice tags may be difficult in a noisy environment or during an
emergency, so you should not rely solely upon voice dialling in all circumstances.
Adding a voice tag to a phone number
Voice tags can only be added to phone numbers stored in the phone’s memory. See
“Managing contacts” on page 53.
1. In the Contacts main view, scroll to the contact that you want to add a voice
tag to, and press to open the contact card.
2. Scroll to the number that you want to add the voice tag to, and select
Options→Add voice tag.
55Copyright © 2004 Nokia. All rights reserved.
Page 56
3. Press Start to record a voice tag. After the starting tone, clearly pronounce the
word(s) you want to record as a voice tag.
4. After recording, the phone plays the recorded tag and the note Playing voice
tag is displayed.
5. When the voice tag has been successfully saved, the note Voice tag saved is
displayed and a beep sounds. A symbol can be seen next to the number in
the contact card.
Making a call by saying a voice tag
1. In standby mode, press and hold . A short tone is played and the note
Speak now is displayed.
2. To make a call by using a voice tag, hold the phone at a short distance away
from your mouth and face and pronounce the voice tag clearly.
3. The phone plays the original voice tag, displays the name and number, and
after a few seconds dials the number of the recognised voice tag.
• If the phone plays an incorrect voice tag, or you want to retry voice dialling,
press Retry.
Voice dialling cannot be used when a data call or a GPRS connection is active.
Assigning speed-dialling keys
Speed dialling is a quick way to call frequently used numbers. You can assign
speed-dialling keys to eight phone numbers. The number 1 is reserved for the
voice mailbox.
56Copyright © 2004 Nokia. All rights reserved.
Page 57
1. Open the contact card for which you want a speed-dialling key and select
Options→Assign speed dial.
2. Scroll to a number and press Assign. When you return to the contact
information view, you can see the speed-dial icon next to the number.
• To call the contact by speed-dialling, go to standby mode and press the speeddialling key and .
■ Presence
Go to Menu→Presence.
Options in the Presence view: Open, My availability, Viewers,
Update presence, Login, Logout, Settings, Help, and Exit.
Use Presence (network service) to inform others about your availability, that is,
when, where and how you want to be contacted. Presence allows you to view and
create a dynamic profile of your contact details, visible to other users of the
service, to share information or control services. Presence information can include
your availability, whether you prefer people to call or send messages, where you
are and what you are doing.
Before you can use Presence, you need to find a service that you want to use and
then save the settings of that service. You may receive the settings in a special
text message, called a smart message, from the service provider that offers the
Presence service. See “Receiving smart messages” on page 90. For more
information, contact your service provider.
57Copyright © 2004 Nokia. All rights reserved.
Page 58

The Presence application allows you to change your own published information
and manage who is authorised to see your presence. To view the presence
information of others, you must use Contacts. See “Contacts” on page 53.
Changing your availability information
Go to Options→My availability and select:
• Available - You are available for people to call or send you messages. For
example, when you have chosen this option for your general profile. See
“Profiles” on page 118.
• Busy - You may be available for people to call or send you messages, for
example, when your phone is in meeting profile.
• Not available - You are not available for people to call or send you messages,
for example, when your phone is in silent profile.
Changing who can view your Presence information
Go to Options→Viewers and select:
• Public pres. - Displays limited information, for managing ways for people to
contact you. This is available to anyone you have not blocked.
• My availability - Select Available, Busy, or Not available.
• Viewers - Opens the Current viewers view of your Public pres.. See “Public
viewers” on page 60.
• Update presence - Updates your presence information to the presence
server.
58Copyright © 2004 Nokia. All rights reserved.
Page 59

• Login/Logout - Connect to or disconnect from the presence server. See
“Chat and Presence servers” on page 112.
• Settings - Manage the publishing of your presence information.
• Private pres. - Displays private information, so you can share more personal
information. This is only available to those that you have authorised to view
your private information. You can select the following options:
• My availability - Select Available, Busy, or Not available.
• Private message- Write a text message of up to 40 characters to describe
your current availability.
• My presence logo - Add a logo to your availability information. Logo files
are stored in the Gallery. See “Gallery” on page 79.
• Viewers - Opens the Private list view of your Private pres.. See “Private
viewers” on page 60.
• Update presence - Updates your presence information on the presence
server.
• Login/Logout - Connect to or disconnect from the presence server. See
“Chat and Presence servers” on page 112.
• Settings - Manage the publishing of your presence.
• Blocked pres. - Displays a screen containing no personal details. See “Blocked
viewers” on page 61.
59Copyright © 2004 Nokia. All rights reserved.
Page 60

Public viewers
Go to Public pres. and select Options→Viewers→Current viewers to see the
names, phone numbers, or user IDs of the viewers whom you do not allow to view
your private presence messages, but who are currently viewing your public
presence. You can scroll to a viewer, press Options, and select:
• Add to private list - Allows the viewer to also see your private presence.
• Block - Prevents the viewer from seeing your presence information.
• Add to contacts - Adds the viewer to your Contacts directory.
• Reload lists - Connect to the presence server to update the viewer lists. This
option is only available when you are offline.
Private viewers
Go to Private pres. and select Options→Viewers→Private list to see the names,
phone numbers, or user IDs of the viewers who you allow to view your private
presence messages. To prevent a viewer from seeing your private presence
messages, scroll to the viewer and press . You can scroll to a viewer, press
Options, and select:
• Add new - Adds a new viewer manually or from your Contacts directory. You
can only select a contact who has a user ID in the contact card.
• Block - Prevents the viewer from seeing your presence information.
• Add to contacts - Adds the viewer to your Contacts directory.
• Remove from list - Removes the viewer from the private list. The option is
available also when there are marked items selected. If the list is empty, the
option is not available.
60Copyright © 2004 Nokia. All rights reserved.
Page 61
• View details - Shows the user ID information of the viewer.
• Reload lists - Connect to the presence server to update the viewer lists. This
option is only available when you are offline.
Blocked viewers
Go to Options→Viewers→Blocked pres. to see the viewers you prevented from
seeing your public and private presence messages. To allow a viewer to see your
presence information, scroll to a viewer and press . You can scroll to a
viewer, press Options, and select:
• Add to private list - Allows the viewer to also see your private presence.
• Add new - Add a new viewer manually or from your Contacts directory. You
can only select a contact who has a user ID in the contact card.
• Add to contacts - Adds the viewer to your Contacts directory.
• View details - Shows the user ID information of the viewer.
• Reload lists - Connect to the presence server to update the viewer lists. This
option is only available when you are offline.
Updating your Presence information
Go to Menu→Presence.
Once the connection has been established:
1. Key in your user ID and password and press to login.
You obtain the user ID and password from your service provider.
61Copyright © 2004 Nokia. All rights reserved.
Page 62

2. Select Options→Update presence. The option is available when you are logged
into the server and have changed your presence information in either the
Private pres. or Public pres. view and not updated it.
3. To log out, select Options→Logout.
Presence settings
Go to Options→ Settings.
See “Chat and Presence servers” on page 112.
• Show presence to - Select:
• Private & public - Both public and private presence is published.
• Private viewers - Only private viewers can see your presence information.
• Public viewers - Both public and private viewers see your public presence
information.
• No one - Your presence information is not published.
• New viewer status - Specifies what level of presence new viewers are allowed
to see. Select Public or Private.
• Sync. with Profiles - Defines which Presence attributes are changed when you
change your profile. Select:
• Off - The presence attributes are not changed, even if you change your
profile.
• On - Both My availability and Private message are changed when you
change your profile.
62Copyright © 2004 Nokia. All rights reserved.
Page 63
• Availability only - Private message is not changed when you change your
profile.
• Private msg. only - My availability is not changed when you change your
profile.
■ Positioning
Go to Menu→Positioning.
Positioning (network service) allows the network to detect the
approximate position of your phone. By enabling or disabling positioning, you
choose when your position information is provided to the network.
To enable positioning in your phone, select Settings→Positioning→On.
When you receive a Position request, a message is displayed showing the service
that is making the request. Press Accept to allow your position information to be
sent, or press Reject to deny the request.
Position request messages are logged in the Recv. requests list.
To view them, select Menu→Positioning→Recv. requests. The icon beside each
request indicates whether the request is new, rejected, or accepted. To see details
of a request, scroll to the request and press . To clear the Recv. requests list,
select Options→Clear list.
63Copyright © 2004 Nokia. All rights reserved.
Page 64
■ Calendar
Go to Menu→Calendar.
In the Calendar, you can keep track of your appointments, meetings, birthdays,
anniversaries, and other events. You can also set a calendar alarm to remind you
of upcoming events. The Calendar function uses shared memory. See “Shared
memory” on page 15.
Creating calendar entries
1. Go to Options→New entry and select:
• Meeting - Reminds you of an appointment that has a specific date and
time.
• Memo - Write a general entry for a day.
• Anniversary - Reminds you of birthdays or special dates. Anniversary
entries are repeated every year.
2. Fill in the fields. Use the scroll key to move between fields.
• Subject/Occasion - Write a description of the event.
• Location - The place of a meeting, optional.
• Start time, End time, Start date, and End date.
• Alarm - Press to activate the fields for Alarm time and Alarm date.
• Repeat - Press to change the entry to be repeated. Shown with in
the Day view.
64Copyright © 2004 Nokia. All rights reserved.
Page 65
• Repeat until - Set an ending date for the repeated entry, for example, the
last date of a weekly course you are taking. This option is shown only if you
have selected to repeat the event.
• Synchronisation - Private - After synchronisation the calendar entry can be
seen only by you and it will not be shown to others even if they have online
access to view the calendar. Public - The calendar entry is shown to others
who have access to view your calendar online. None - The calendar entry
will not be copied when you synchronise your calendar.
3. To save the entry, press Done.
To edit or delete a repeated entry, choose how you want the changes to take
effect: All occurrences - all repeated entries are changed This entry only - only the
current entry is changed.
Calendar views
Options in the different calendar views: Open, New entry, Week view/
Month view, Delete, Go to date, Send, Settings, Help, and Exit.
Press in the Month, Week, or Day views to automatically highlight today’s
date.
To write a calendar entry, press any number key ( - ) in any
calendar view. A Meeting entry is opened and the characters you keyed in are
added to the Subject field.
• To go to a certain date, select Options→Go to date. Write the date and press
OK.
65Copyright © 2004 Nokia. All rights reserved.
Page 66
• Icons in Day and Week views: - Memo and - Anniversary.
• Synchronisation icons in Month view:
- Private, - Public, - None, and - the day has more than one
entry.
■ To-do
Go to Menu→To-do.
In To-do, you can keep a list of tasks that you need to do. The To-do list
uses shared memory. See “Shared memory” on page 15.
1. To start to write a to-do note, press any number key ( - ). The
editor opens and the cursor blinks after the letters you have keyed in.
2. Write the task in the Subject field. Press to add special characters.
• To set the due date for the task, scroll to the Due date field and key in a
date.
• To set a priority for the to-do note, scroll to the Priority field and press
.
3. To save the to-do note, press Done. If you remove all characters and press
Done, the note is deleted, even if you edit a previously saved note.
• To open a to-do note, scroll to it and press .
• To delete a to-do note, scroll to it and select Options→Delete or press .
• To mark a to-do note as completed, scroll to it and select Options→Mark as
done.
66Copyright © 2004 Nokia. All rights reserved.
Page 67

• To restore a to-do note, select Options→Mark as not done.
■ Importing data from compatible Nokia phones
You can move calendar, contacts, and to-do data from compatible Nokia phones
to your phone using the Nokia PC Suite 6.2 Content Copier application on a
compatible PC. Instructions for using the application can be found in the help
function of PC Suite on the CD-ROM.
67Copyright © 2004 Nokia. All rights reserved.
Page 68
6. Media
■ Camera
To start the Camera application, turn the phone into Imaging
mechanical mode and press . Alternatively, when the phone is in
standby mode either in Work or Browse mechanical mode, go to Menu→Camera,
or press .
You can take photos and record video clips with the phone’s built-in Camera
application. The images are automatically saved in the Gallery application, where
you can rename and organise them in folders. See “Gallery” on page 79. The phone
memory or memory card is used to store the image or video, depending on the
Memory in use setting. See “Camera settings” on page 71.
You can also send images in a multimedia message, as an e-mail attachment, or
via Bluetooth technology or infrared connection. The camera produces images in
JPEG and video clips in 3GP file format.
Taking a picture or recording a video clip
Options available before taking a picture when the phone is either in Work
or Browse mechanical mode: Record/Capture, Mode, Go to Gallery, Settings, Help,
and Exit.
Note that these options are not available when the phone is in Imaging
mechanical mode.
68Copyright © 2004 Nokia. All rights reserved.
Page 69
1. Turn the fold to Imaging mechanical mode. You can also use the Camera
application in Work or Browse mechanical mode.
2. Press or to select the camera mode (Standard, Portrait, Night or Video
clip). By default, the camera is in Standard mode.
Note that when the phone is in Imaging mechanical mode, you need to press
to go left or to go right to select the camera mode.
Note that selection keys are not functional in the Imaging mechanical mode,
or in the Standard or Video clip camera mode. Use , and for Camera
functions.
You can see the viewfinder and the cropping lines, which show you the image
area to be captured or recorded.
You can also see the recording counter, which shows the recorded time, or the
image counter, which shows you how many images, depending on the selected
picture quality, fit in the memory of your phone or memory card, if you use one.
3. To take a picture, press quickly. When you are taking a picture, do not
move the phone before the Camera application starts to save the image. The
camera shows the image and saves it automatically in Gallery. To return to the
viewfinder, press again quickly. To take another picture, press again.
4. To start recording a video clip, make sure you have first selected the Video clip
mode. Then press quickly to start recording. To pause recording at any
time, press quickly. To resume recording, press quickly again.
5. To stop recording, press and hold for a few seconds.
69Copyright © 2004 Nokia. All rights reserved.
Page 70

6. Press to zoom in on your subject before or while taking the picture or
recording a video clip. Press to zoom out. The zoom indicator on the display
shows the zoom level.
The camera goes into battery saving mode if there has been no key presses within
a minute. To continue taking pictures, press .
You can insert an image into a contact card. See “Managing contacts” on page 53.
Image size and orientation
With the different camera modes, you can select the size and orientation of the
picture to be taken.
• Standard - Take normal landscape pictures.
• Portrait - Take a smaller icon-sized, vertical picture, which can be added to a
contact card.
• Night - The lighting is dim and the camera needs a longer exposure time for
the picture to be of good quality. Note that, in dim conditions, any movement
while taking a picture may cause it to be blurred. The image size and
orientation is the same for Standard and Night.
• Video clip - Record a video clip.
The actual image pixel size depends on the selected camera mode and the phone’s
mechanical mode. See “Mechanical modes” on page 22.
• Pictures taken in Standard or Night mode are saved in 480x360 pixel format in
the Work and Imaging mechanical modes and 640x480 pixel format in the
Browse mechanical mode.
70Copyright © 2004 Nokia. All rights reserved.
Page 71

• Pictures taken in Portrait mode are saved in 80x96 pixel format.
• Video clips are saved in 128x96 (sub-QCIF) pixel format.
Camera settings
Go to Options→Settings.
In the Camera application settings, you can adjust the image quality setting,
change the default image name, and change the memory location of saved
images.
1. Scroll to the setting you want to change:
• Image quality - High, Normal, and Basic. The better the image quality, the
more memory the image consumes.
• Default image name - By default, the camera names images in the format
‘Image.jpg’. Default image name allows you to set a name for the images
stored.
• Audio - On and Off. When the video sound is on, the maximum recording
time is shorter than with sound off. Note that this option is only available in
Video clip mode.
• Default video name - By default, the camera names video clips in the
format ‘Video.3gp’. Default video name allows you to set a name for the
video clips stored.
• Memory in use - Select whether you want to store your images and video
clips in the phone memory or on the memory card, if you use one.
2. Press Options→Change to change the selected setting.
71Copyright © 2004 Nokia. All rights reserved.
Page 72
Viewing images
Go to Menu→Gallery.
Pictures taken with the Camera application are stored as images in the Gallery.
See “Gallery” on page 79. Images can be sent to you in a multimedia or picture
message, as an e- mail attachment, or via a Bluetooth connection. After receiving
an image in the Inbox, you need to save it in the phone memory or on a memory
card. You can save graphics sent to you in picture messages to the Picture
messages folder. See “Picture messages folder” on page 81.
Options when viewing an image: Send, Set as wallpaper, Rotate, Zoom in,
Zoom out, Full screen, Delete, Rename, View details, Add to 'Go to', Help, and Exit.
Select an image from the list of images in the Images folder in the Gallery to start
the image viewer and display the image.
When viewing an image, pressing or takes you to the next or previous
image in the current folder.
In the images thumbnail view:
1. Press or to move between the phone and memory card.
2. To browse the list of images, press and .
3. Press to open an image. When the image is open, you can see the name of
the image.
You can view animated GIF files in the same way as other images.
72Copyright © 2004 Nokia. All rights reserved.
Page 73
Zooming on a saved image
1. Select Options→Zoom in or Zoom out. You can see the zooming ratio at the
top of the display. See “Shortcuts during zooming” on page 73.
2. Press to return to the initial view. The zooming ratio is not stored
permanently.
When you select Options→Full screen, the panes around the image are removed
so that you can see more of the image. Press to return to the initial view.
When you are zooming in on an image or viewing an image in full screen mode,
use the scroll key to move the focus to the left, right, up, or down, so that you can
take a closer look at one part of the image, for example, its upper right corner.
Shortcuts during zooming
• Rotate 90 degrees: - anticlockwise, - clockwise. The
rotation status is not stored permanently.
• - zoom in, - zoom out, press and hold to return to normal
view.
• - change between full screen and normal view.
■ RealPlayer™
Go to Menu→RealPlayer.
With RealPlayer™, you can play local media files stored in the phone
memory, or memory card, or stream media files over the air from a streaming link.
The streaming link can be activated during a browsing session or stored in the
phone memory or memory card.
73Copyright © 2004 Nokia. All rights reserved.
Page 74

Media files are video, music or audio clips. Files with the extensions .3gp, .aac,
.amr, .mp3, .mp4, .rm and .ram are supported by RealPlayer.
RealPlayer does not necessarily support all file formats or all the variations of a
file formats. For example, RealPlayer attempts to open all .mp4 files. However,
some .mp4 files may include content that is not compliant with 3GPP standards
and, therefore, is not supported by this phone. In this case, the operation might
fail and result in partial playback or in an error message.
RealPlayer uses shared memory. See “Shared memory” on page 15.
Options in RealPlayer when a clip has been selected: Play, Continue, Stop,
Mute, Unmute, Clip details, Send, Settings, Help, and Exit.
Playing media files
To play a media file stored in your phone’s memory or memory card, scroll to the
file and press to play it, or go to RealPlayer and select Options→ Open and:
• Most recent clips - To play one of the last six files played in RealPlayer, or
• Saved clip - To play a file saved in the Gallery. See “Gallery” on page 79.
To stream content over the air:
• Select a streaming link saved in the Gallery. Before your live content begins
streaming, your phone connects to the site and loads the file.
• Open the link to a file in the browser.
To stream live content, you must first configure your default access point. See
“Access points” on page 125.
74Copyright © 2004 Nokia. All rights reserved.
Page 75
Many service providers require you to use an Internet Access Point (IAP) for your
default access point. Other service providers allow you to use a WAP access point.
Contact your service provider for more information.
Note: In RealPlayer, you can only open an rtsp:// URL address. You cannot
open an http:// URL address; however, RealPlayer recognises an http link
to a .ram file since a .ram file is a text file containing an rtsp link.
Warning: Do not hold the device near your ear when the loudspeaker is in use,
because the volume may be extremely loud.
Shortcuts during play
When a media file is playing use the scroll key to seek (move quickly through the
media file), and to mute the sound, as follows:
Press and hold to seek forwards, or press and hold to seek backwards
through the media file.
Press and hold until the indicator is displayed to mute the sound.
Press and hold until you see the indicator to turn on the sound.
Changing the settings
Go to Options→Settings→Video or Connection.
Press or to move between the different setting tabs for Video and
Connection.
Select Video to change the following list of settings:
• Contrast - Open the slider view to change the contrast.
75Copyright © 2004 Nokia. All rights reserved.
Page 76
• Repeat - Choose On to have the currently playing video or audio file restart
automatically once it has finished.
Select Connection to change the connection settings.
■ Radio
Go to Menu→Radio.
You can listen to FM radio on your phone via the built-in
loudspeaker or a compatible headset. When using the loudspeaker, keep the
headset plugged into the phone. The lead of the headset functions as the antenna
of the radio, so let it hang freely.
The FM radio uses the wire of the headset as an antenna. A compatible headset needs to be
attached to the device for the FM radio to function properly.
Warning: Listen to music at a moderate level. Continuous exposure to high volume
may damage your hearing.
You can make or answer a call while listening to the radio. The volume of the radio
is muted. When you end the call, the radio is automatically turned on. Sending or
receiving data over an (E)GPRS or HSCSD connection may interfere with the radio.
Note that the quality of the radio broadcast depends on the radio station’s
coverage in that particular area.
1. To turn on the radio, press Menu→Radio. On the display shows
• Channel location number and the name of the radio channel.
• Frequency of the last used radio channel.
76Copyright © 2004 Nokia. All rights reserved.
Page 77
2. If you have previously saved radio channels, scroll to the channel you want to
listen to, or select the memory location of a channel by pressing the
corresponding key 1 to 9.
The display shows four graphic buttons:
• and . Select to scroll to the next or previous saved channel. The
buttons are inactive if there are no saved channels.
• and . Select to start automatic tuning upwards or downwards.
When using a compatible headset, press the headset key to scroll to the desired
saved radio channel.
3. To turn the radio off, press Exit.
Tuning and saving a radio channel
When the radio is on, press and hold or to start the channel search.
Searching stops when a channel is found. To save the channel, press Options, and
select Save channel. Select a location for the channel with the and buttons
and press Select. Key in the name of the channel and press OK.
Using the radio
When the radio is on, press Options and select
• Channels - Open the channel list. See “Using the channel list” on page 78.
• Activate loudsp. - Listen to the radio using the integrated handsfree (IHF). The
integrated handsfree allows you to speak and listen to radio or audio files
77Copyright © 2004 Nokia. All rights reserved.
Page 78

without having to hold the phone to the ear. When the integrated handsfree is
activated, the headset is muted.
• Deactivate loudsp. - Listen to the radio using the headset.
• Auto tune up and Auto tune down - Start the channel search upwards or
downwards. When a channel is found, the search stops and the channel is
played. To save the channel, see Save channel below.
• Manual tuning - Set the channel frequency manually. Briefly press or to
move the channel search 0.05 MHz upwards or downwards, or press and hold
down the keys to quickly search upwards or downwards for a channel. To save
the channel, press OK and see Save channel below.
If you know the frequency of the radio channel you would like to listen to
(between 87.5 MHz and 108.0 MHz), key it in and press OK.
• Save channel - Save the radio channel you have found. Refer to Tuning and
saving a radio channel, 77. Up to 19 radio channels can be saved.
• Help - Open the context-sensitive help.
• Exit - Turn off the radio.
Using the channel list
Go to Options→Channels.
The channel list is used for managing the saved radio channels. The list contains
19 channels. When you open the list, the currently active channel is highlighted if
it is saved. Otherwise, the first saved channel is highlighted.
Press Options and select
78Copyright © 2004 Nokia. All rights reserved.
Page 79
• Listen - Listen to the selected channel.
• Activate loudsp. - Listen to the radio using the integrated handsfree (IHF).
• Deactivate loudsp. - Listen to the radio using the headset.
• Auto-save channels - Save all available stations to the channel list. Note that
this replaces your currently saved stations. Channels are sought and saved
starting from the lowest frequency (87.5 MHz) and position 1 even if saved
channels exist in the list. The fill saves all clearly audible stations or until all 19
positions are filled. The channel names are left empty, so the channel list only
shows the channel frequencies.
• Rename - Change the name of the highlighted channel. Key in the channel
name and press OK.
• Delete - Delete the highlighted channel from the channel list.
• Help - Open the context-sensitive help.
• Exit - Turn off the radio.
■ Gallery
Go to Menu→Gallery.
Use the Gallery to store and organise your images, sound clips, playlists,
video clips, streaming links and RAM files.
The Gallery uses shared memory. See “Shared memory” on page 15.
Open the Gallery to see a list of the folders in the phone memory. Press to see
the folders on the memory card, if you use one.
79Copyright © 2004 Nokia. All rights reserved.
Page 80

Select a folder Images, Sound clips, or Video clips (or other folder that you have
created) and press to open it.
In the open folder you can see:
• an icon depicting the type of each file in the folder, or in the case of an image,
a small thumbnail picture which is a preview of the image
• the name of the file
• the date and time a file was saved or the size of the file
• subfolders, if present.
Options: Open (folder or item), Send, Delete, Create new, Move to folder,
New folder, Mark/Unmark, Rename, Gallery downloads, Image uploader, Receive
via infrared, View details, Add to 'Go to', Settings, Help, and Exit.
You can browse, open, and create folders, as well as mark, copy and move items to
folders. See “Actions common to all applications” on page 29.
Copyright protections may prevent some images, ringing tones, and other content from
being copied, modified, transferred or forwarded.
Opening files
Select any file and press to open it. Each file opens in its corresponding
application as follows:
• Images - open in the Image viewer. See “Viewing images” on page 72.
• Sound clips - open and play in the RealPlayer application. See “RealPlayer™” on
page 73.
80Copyright © 2004 Nokia. All rights reserved.
Page 81

• Video clips, RAM files, and streaming links - Open and play in the RealPlayer
application. See “RealPlayer™” on page 73.
• Subfolders - open to display contents.
Other default folders
Picture messages folder
Use this folder to store pictures sent to you in picture messages.
• Select the folder Images→Picture msgs..
Options in the Picture messages folder: Open, Send, Delete, Mark/Unmark,
Rename, View details, Help, and Exit.
To save a picture that you have received in a picture message, go to
Messaging→Inbox, open the message, and select Options→Save picture.
Wallpapers folder
Use this folder to store pictures that you want to use as background images for
multimedia messages.
• Select the folder Images→Wallpapers.
Presence logos folder
Use this folder to store logos for Presence. See “Presence” on page 57.
• Select the folder Images→Presence logos.
81Copyright © 2004 Nokia. All rights reserved.
Page 82

Downloading files
Go to Options→Gallery downloads.
Choose from Graphic downloads, Video downloads, or Tone downloads. The
browser opens and you can choose a bookmark for the site to download from. See
“Viewing bookmarks” on page 153.
To download files, you must first configure your default access point. See “Access
points” on page 125. For more information on downloading, See “Downloading”
on page 156..
Once items have been downloaded, the browser closes and the phone returns to
Gallery view.
Uploading images to an image server
Go to Options→Image uploader.
You can send your pictures to an image server to allow others to share your
pictures online (network service).
Before you can upload images, you must enter the settings for the image server.
You can get these settings from your service provider.
Setting up the image server
1. Select Settings→Image servers and press . Fill in the details for each
field. See “Access points” on page 125.
2. Press .
82Copyright © 2004 Nokia. All rights reserved.
Page 83

Uploading images
1. To begin an upload, mark the images and select Upload.
2. Enter the name of the folder on the image server that the images are stored in
and press .
83Copyright © 2004 Nokia. All rights reserved.
Page 84
7. Messaging
Go to Menu→Messaging.
In Messaging you can create, send, receive, view, edit, and organise text messages,
multimedia messages, e-mail messages, presentations, documents, smart
messages, and special text messages containing data. You can also receive
messages and data via an infrared or Bluetooth technology connection, receive
service messages, cell broadcast messages, and send service commands.
Note that only devices that offer picture message features can receive and display
picture messages.
Text messages and multimedia messages use shared memory. See “Shared
memory” on page 15.
Your device supports the sending of text messages beyond the normal 160-character limit. If
your message exceeds 160 characters, it will be sent as a series of two or more messages.
Note that each message will be invoiced separately according to your service provider’s
rates.
In the navigation bar, you can see the message length indicator counting backwards from
160. For example, 10 (2) means that you can still add 10 characters for the text to be sent as
two messages.
Note that using special (Unicode) characters such as ë, â, á, ì take up more sp ace.
If there are special characters in your message, the indicator may not show the message
length correctly. Before the message is sent, the device tells you if the message exceeds the
84Copyright © 2004 Nokia. All rights reserved.
Page 85
maximum length allowed for one message. You can cancel sending by pressing Cancel or
you can save the message in the inbox.
Options in the Messaging main view are: Create message, Connect (shown
if you have defined settings for the mailbox), or Disconnect (shown if there is an
active connection to the mailbox), SIM messages, Cell broadcast, Service
command, Settings, Help, and Exit.
When you open Messaging, you can see the New message function and a list of
default folders:
Inbox - Contains received messages except e-mail and cell broadcast
messages. E-mail messages are stored in the Mailbox. You can read cell broadcast
messages by selecting Options→Cell broadcast.
My folders - For organising your messages into folders.
Mailbox - When you open this folder, you can either connect to your remote
mailbox to retrieve your new e-mail messages or view your previously retrieved email messages offline. After you have defined settings for a new mailbox, the
name given to that mailbox replaces Mailbox in the main view. See “E-mail
messages” on page 100.
Drafts - Stores draft messages that have not been sent.
Sent - Stores the last 15 messages that have been sent. You can change the
number of messages to be saved. See “Settings for the Other folder” on page 103.
Messages or data that have been sent via an infrared or Bluetooth technology
connection are not saved in the Draft or Sent folders.
Outbox - Is a temporary storage place for messages waiting to be sent.
85Copyright © 2004 Nokia. All rights reserved.
Page 86
Reports (network service) - You can request the network to send you a
delivery report of the text messages, smart messages, and multimedia messages
you have sent. To turn on delivery report reception, select
Options→Settings→Text message or Multimedia message, scroll to Receive
report, and select Yes.
Receiving a delivery report of a multimedia message that has been sent to an email address might not be possible.
■ Writing and sending messages
Go to Menu→Messaging.
Options in the text message editor: Send, Add recipient, Insert, Delete,
Check contacts, Message details, Sending options, Help, and Exit.
Before you can create a multimedia message, or write an e-mail, or connect to
your remote mailbox, you must have the correct connection settings in place. See
“Settings for e-mail” on page 88. See “Settings for multimedia” on page 88.
1. Select New message. A list of message options opens. Select:
• Create:→Text message to create a text message.
To send a picture message, select Options→Insert→Picture.
Each picture message is made up of several text messages. Therefore,
sending one picture message may cost more than sending one text
message.
• Create:→Multimedia message to send a multimedia message (MMS).
86Copyright © 2004 Nokia. All rights reserved.
Page 87

Copyright protection may prevent some images, ringing tones, and other
content from being copied, modified, transferred or forwarded.
• Create:→E-mail to send e-mail. If you have not set up your e-mail account,
you are prompted to do so.
To add a media object to an e-mail, select Options→Insert→Image, Sound
clip, Video clip, Note or Template.
2. Press to select the recipient(s) from the Contacts directory or write the
phone number or e-mail address of the recipient in the To: field if you are
sending an MMS or e-mail to the recipient. Press to add a semicolon (;)
to separate each recipient.
3. Press to move to the message field.
4. Write the message.
• To add a media object to a multimedia message, select Options→Insert
object→Image, Sound clip or Video clip. To add a new media object, select
Options→Insert new→Image, Sound clip, Video clip or Slide. Select the
item you wish to add. When sound has been added, the icon is shown
in the navigation bar. If you select Insert new→Sound clip, Recorder opens
and you can record a new sound. The sound is automatically saved and a
copy is inserted in the message.
5. To send the message, select Options→Send or press .
87Copyright © 2004 Nokia. All rights reserved.
Page 88
Note: Picture message function can be used only if it is supported by your network
operator or service provider. Only devices that offer picture message features can
receive and display picture messages.
Only devices that offer compatible multimedia message or e-mail features can
receive and display multimedia messages.
Settings for multimedia
Go to Options→Settings→Multimedia message.
Open Access point in use and select the access point you created. See “Multimedia
messages” on page 98.
You may receive the settings as a smart message from your network operator or
service provider. See “Receiving smart messages” on page 90.
For availability of and subscription to data services, contact your network
operator or service provider.
The default setting of the multimedia message service is generally on.
The appearance of a multimedia message may vary depending on the receiving device.
Settings for e-mail
Before you can send, receive, retrieve, reply to, and forward e-mail to a separate
e-mail account, you must:
• Configure an Internet Access Point (IAP) correctly. See “Connection settings”
on page 125.
• Define your e-mail settings correctly. See “E-mail messages” on page 100.
88Copyright © 2004 Nokia. All rights reserved.
Page 89
Follow the instructions given by your remote mailbox and Internet service
provider.
■ Inbox - receiving messages
Go to Menu→Messaging→Inbox.
Options in the Inbox: Open, Create message, Delete, Message details, Move
to folder, Mark/Unmark, Help, and Exit.
When there are unread messages in Inbox, the icon changes to .
In Inbox, the message icons tell you what kind of a message it is. Here are some of
the icons that you may see:
indicates an unread text message and indicates an unread smart
message
indicates an unread multimedia message
indicates an unread WAP service message
indicates data received via infrared
indicates data received via Bluetooth technology
indicates an unknown message type.
Viewing multimedia objects
Options in the Objects view are: Open, Save, Send, Call, and Exit.
To see what kinds of media objects have been included in the multimedia
message, open the message and select Options→Objects. In the Objects view you
89Copyright © 2004 Nokia. All rights reserved.
Page 90
can view files that have been included in the multimedia message. You can choose
to save the file in your phone or to send it, for example, via infrared or Bluetooth
technology to another compatible device.
Important: Exercise caution opening messages. Messages may contain malicious
software or otherwise be harmful to your device or PC.
Receiving smart messages
Your phone can receive many kinds of smart messages, text messages that contain
data (also called Over-The-Air (OTA) messages). See “Settings for multimedia” on
page 88. and See “Settings for e-mail” on page 88. for more information on your
phone settings. To open a received smart message, open the Inbox, scroll to the
smart message ( ), and press .
• Picture message - To save the picture in the Picture messages folder in the
Gallery for later use, select Options→Save picture.
• Business card - To save the contact information, select Options→Save
business card.
• Ringing tone - To save the ringing tone to the Gallery, select Options→Save.
• Operator logo - To save the logo, select Options→Save. The operator logo can
now be seen in standby mode instead of the network operator’s own
identification.
• Calendar entry - To save the invitation to the Calendar, select Options→Save
to Calendar.
90Copyright © 2004 Nokia. All rights reserved.
Page 91

• Web message - To save the bookmark, select Options→Save to bookmarks. The
bookmark is added to the Bookmarks list in browser services.
If the message contains both browser access point settings and bookmarks, to
save the data select Options→Save all. Or, select Options→View details to
view the bookmark and access point information separately. If you do not want
to save all the data, select a setting or bookmark, open the details, and select
Options→Save to Settings or Save to bookmarks depending on what you are
viewing.
• E-mail notification - Tells you how many new e-mails you have in your remote
mailbox. An extended notification may list more detailed information such as
subject, sender, attachments, and so on.
• In addition, you can receive a text message service number, voice mailbox
number, profile settings for remote synchronisation, access point settings for
the browser, multimedia messaging or e-mail, access point login script
settings, or e-mail settings.
To save the settings, select Options→Save to SMS sett., Save to Voice mail,
Save to Settings, or Save to e-mail sett..
Receiving service messages
Service messages (network service) are notifications of, for example, news
headlines, and they may contain a text message or the address of a browser
service. For availability and subscription, contact your service provider.
91Copyright © 2004 Nokia. All rights reserved.
Page 92
■ My folders
Go to Menu→Messaging→My folders.
In My folders, you can organise your messages into folders, create
new folders, and rename and delete folders.
■ Mailbox
Go to Menu→Messaging→Mailbox.
When you open this folder, you can connect to your remote mailbox (network
service) to:
• retrieve new e-mail headings or messages, or
• view your previously retrieved e-mail headings or messages offline.
When you scroll to your mailbox and press , the phone asks you if you want
to Connect to mailbox? Select Ye s to connect to your mailbox or No to view
previously retrieved e-mail messages offline.
Another way to start a connection is to select Options→Connect.
If you select New message→Create:→E-mail or Mailbox in the Messaging main
view and you have not set up your e-mail account, you are prompted to do so. See
“Settings for e-mail” on page 88.
When you create a new mailbox, the name you give to the mailbox automatically
replaces Mailbox in the Messaging main view. You can have several mailboxes
(max. six).
92Copyright © 2004 Nokia. All rights reserved.
Page 93

When you are online, select Options→Disconnect to end the data call or GPRS
connection to the remote mailbox.
Retrieving e-mail messages from the mailbox
Go to Options→Connect.
This starts a connection to a remote mailbox.
1. When you have an open connection to a remote mailbox, select
Options→Retrieve e-mail→:
• New - To retrieve all new e-mail messages to your phone.
• Selected - To retrieve only the e-mail messages that have been marked. Use
the Mark/Unmark→Mark/Unmark commands to select messages one by
one. See “Actions common to all applications” on page 29.
• All - To retrieve all messages from the mailbox.
To cancel retrieving, press Cancel.
2. After you have retrieved the e-mail messages, you can continue viewing them
online. Select Options→Disconnect to close the connection and to view the email messages offline.
3. To open an e-mail message, scroll to the e-mail you want to view and press
. If the e-mail message has not been retrieved (arrow in the icon is
pointing outwards) and you are offline and select Open, you are asked if you
want to retrieve this message from the mailbox.
• To view e-mail attachments, open a message that has the attachment
indicator and select Options→Attachments. In the Attachments view,
93Copyright © 2004 Nokia. All rights reserved.
Page 94

you can retrieve, open, or save attachments, in supported formats. You can
also send attachments via infrared or Bluetooth technology.
If your mailbox uses the IMAP4 protocol, you can decide whether to
retrieve e-mail headings only, messages only, or messages and
attachments. With the POP3 protocol, the options are e-mail headings only
or messages and attachments. See “E-mail messages” on page 100.
Important: Exercise caution opening messages. Messages may contain malicious
software or otherwise be harmful to your device or PC.
Deleting e-mail messages
• To delete an e-mail from the phone while still retaining it in the remote
mailbox:
Select Options→Delete→Phone only.
The phone mirrors the e-mail headings in the remote mailbox. So, although
you delete the message content, the e-mail heading stays in your phone. To
remove the heading as well, delete the e-mail message from your remote
mailbox first and then make a connection from your phone to the remote
mailbox again to update the status.
• To delete an e-mail from both the phone and the remote mailbox:
Select Options→Delete→Phone and server.
If you are offline, the e-mail is deleted first from your phone. During the next
connection to the remote mailbox, it is automatically deleted from the remote
94Copyright © 2004 Nokia. All rights reserved.
Page 95
mailbox. If you are using the POP3 protocol, messages marked to be deleted are
removed only after you have closed the connection to the remote mailbox.
• To cancel deleting an e-mail from both the phone and server, scroll to an email that has been marked to be deleted during the next connection ( ), and
select Options→Undelete.
■ Outbox
Go to Menu→Messaging→Outbox.
The Outbox is a temporary storage place for messages that are waiting to be sent.
Status of the messages in the Outbox:
• Sending - A connection is being made and the message is being sent.
• Waiting/Queued - For example, if there are two similar types of messages in
the Outbox, one of them waits until the first one is sent.
• Resend at %U (time) - Sending has failed. The phone tries to send the message
again after a time-out period. Press Send if you want to restart the sending
immediately.
• Deferred - You can set documents to be ‘on hold’ while they are in the Outbox.
Scroll to a message that is being sent and select Options→Defer sending.
• Failed - The maximum number of sending attempts has been reached. If you
were trying to send a text message, open the message and check that the
Sending settings are correct.
95Copyright © 2004 Nokia. All rights reserved.
Page 96
Note: When sending messages, your device may display the words “Message Sent”.
This is an indication that the message has been sent by your device to the message
centre number programmed into your device. This is not an indication that the
message has been received at the intended destination. For more details about
messaging services, check with your service provider.
■ Viewing messages on a SIM card
Before you can view SIM messages, you need to copy them to a folder in your
phone. See “Actions common to all applications” on page 29.
■ Cell broadcast
Go to Menu→Messaging→Options→Cell broadcast.
You may be able to receive messages on various topics, such as weather
or traffic conditions from your service provider (network service). For available
topics and relevant topic numbers, contact your service provider. In the main view,
you can see:
• the status of the topic: - for new, subscribed messages and
- for new, unsubscribed messages.
Options in Cell broadcast: Open, Subscribe/Unsubscribe, Hotmark/Remove
hotmark, Topic, Settings, Help, and Exit.
• the topic number, topic name, and whether it has been flagged ( ) for followup. You will be notified when messages belonging to a flagged topic have
arrived.
96Copyright © 2004 Nokia. All rights reserved.
Page 97
A packet data (GPRS) connection may prevent cell broadcast reception. Contact
your network operator for the correct GPRS settings.
■ Service command editor
Go to Menu→Messaging→Options→Service command. Key in
and send service requests (also known as USSD commands) such as
activation commands, for network services, to your service provider.
■ Messaging settings
Go to Menu→Messaging→Options→Settings.
Text messages
Go to Text message. The following list of settings opens:
• Message centres - Lists all the defined message centres.
Options when editing message centre settings: New msg. centre, Edit,
Delete, Help, and Exit.
• Msg. centre in use (Message centre in use) - Defines which message centre is
used for delivering text messages and smart messages such as picture
messages.
• Receive report (delivery report) - When this network service is set to Yes, the
status of the sent message (Pending, Failed, Delivered) is shown in the Reports
(Network Service).
97Copyright © 2004 Nokia. All rights reserved.
Page 98

Receiving a delivery report of a multimedia message that has been sent to an
e-mail address might not be possible.
• Message validity - If the recipient of a message cannot be reached within the
validity period, the message is removed from the message service centre. Note
that the network must support this feature. Maximum time is the maximum
amount of time allowed by the network for which the message remains valid.
• Message sent as - The options are Text, Fax, Paging, and E-mail. For further
information, contact your network operator.
• Preferred connection - You can send text messages via the normal GSM
network or via GPRS, if supported by the network.
• Reply via same ctr.(network service) - By setting this option to Yes, if the
recipient replies to your message, the return message is sent using the same
message service centre number. Note that not all network services provide this
option. For availability, contact your network operator or service provider.
Multimedia messages
Go to Multimedia message. The following list of settings opens:
• Access point in use (Must be defined) - Select which access point is used as the
preferred connection for the multimedia message centre. See “Settings for
multimedia” on page 88.
If you receive multimedia message settings in a smart message and save them, the
received settings are automatically used for the Access point. See “Receiving
smart messages” on page 90.
98Copyright © 2004 Nokia. All rights reserved.
Page 99

• Multimedia reception - Select:
• Only in home net. - To receive multimedia messages only when you are in
your home network. When you are outside your home network, multimedia
message reception is turned off.
• Always on - To always receive multimedia messages.
• Off - Not to receive multimedia messages or advertisements at all.
• On receiving msg. - Select:
• Retr. immediately - To let the phone try to retrieve multimedia messages
instantly. If there are messages with Deferred status, they are retrieved as
well.
• Defer retrieval - To let the multimedia messaging centre save the message
to be retrieved later. To retrieve the message, set On receiving msg. to Retr.
immediately.
• Reject message - To reject multimedia messages. The multimedia message
centre deletes the messages.
• Allow anon. messages - Select No to reject messages coming from an
anonymous sender.
• Receive adverts - Define whether you want to allow reception of multimedia
message advertisements or not.
• Reports - Set to Yes, if you want the status of the sent message (Pending,
Failed, Delivered) to be shown in the Reports.
99Copyright © 2004 Nokia. All rights reserved.
Page 100

• Deny report sending - Choose Yes, if you do not want your phone to send
delivery reports of received multimedia messages.
• Message validity (network service) - If the recipient of a message cannot be
reached within the validity period, the message is removed from the
multimedia message centre. Maximum time is the maximum amount of time
allowed by the network for which the message remains valid.
• Image size - Define the size of the image in a multimedia message. The options
are: Small (max. of 160x120 pixels) and Large (max. 640x480 pixels).
• Default speaker - Choose Loudspeaker or Handset, depending on whether you
want the sounds in a multimedia message to be played through the
loudspeaker or the earpiece.
The default setting of the multimedia message service is generally on.
The appearance of a multimedia message may vary depending on the receiving device.
E-mail messages
Go to E-mail.
Open Mailbox in use to select which mailbox you want to use.
Settings for Mailboxes
Options when editing e-mail settings: Editing options, New mailbox,
Delete, Help, and Exit.
Select Mailboxes to open a list of defined mailboxes. If no mailboxes have been
defined, you are prompted to do so. The following list of settings is shown (this
information is available from your e-mail service provider):
100Copyright © 2004 Nokia. All rights reserved.
 Loading...