

Page 1
HELLOMOTO
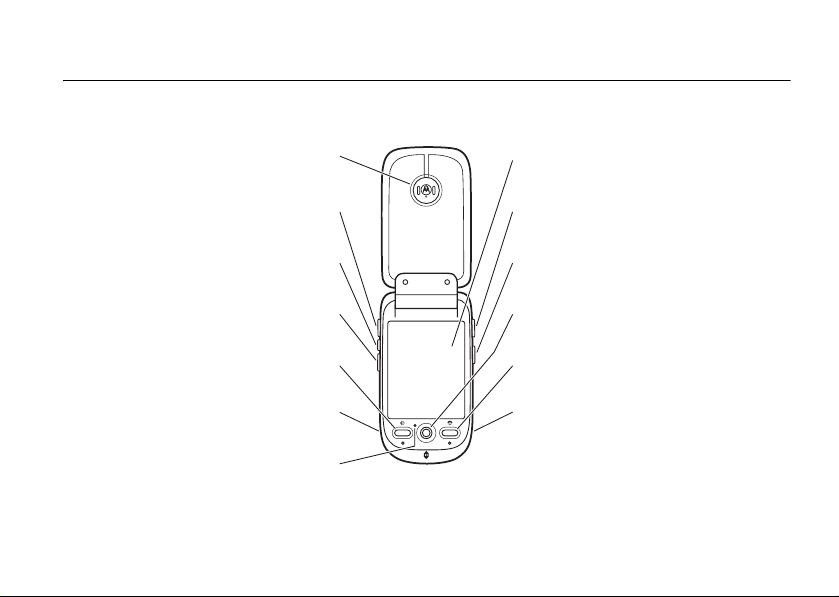
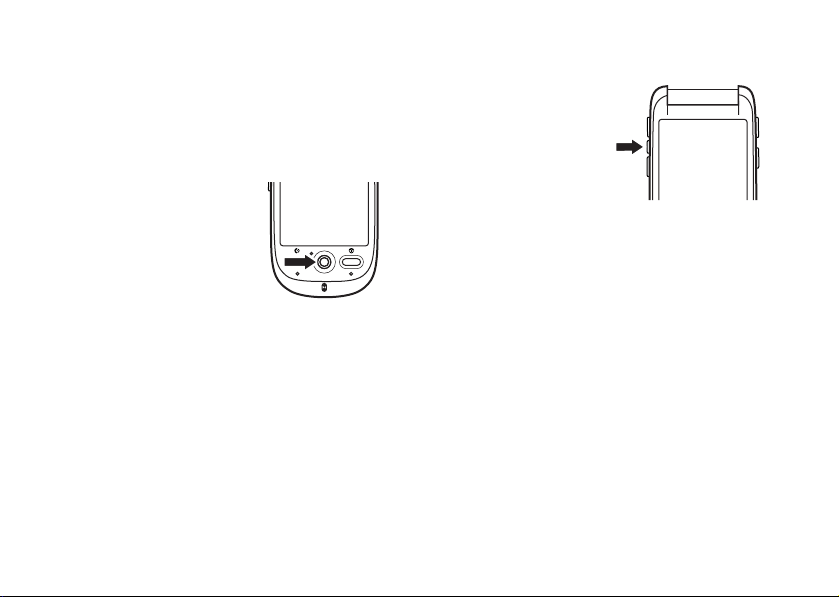
Introducing your new Motorola GSM wireless phone. Here’s a quick anatomy lesson.
Earpiece
Touchscreen Display
Up Volume Key
Smart Key
Down Volume Key
Send Key
Headset Jack
Microphone
Note:
All the illustrations, simulated screen and related images used in this manual are for
Camera Key
Voice Recognition Key
5-Way Navigation Joystick
Power/End Key
Accessory Connector Port
reference only. There may be slight difference between the handset and keys and content of
display used in this manual and those of your handset. Please refer to your handset for actuality.
1
Page 2
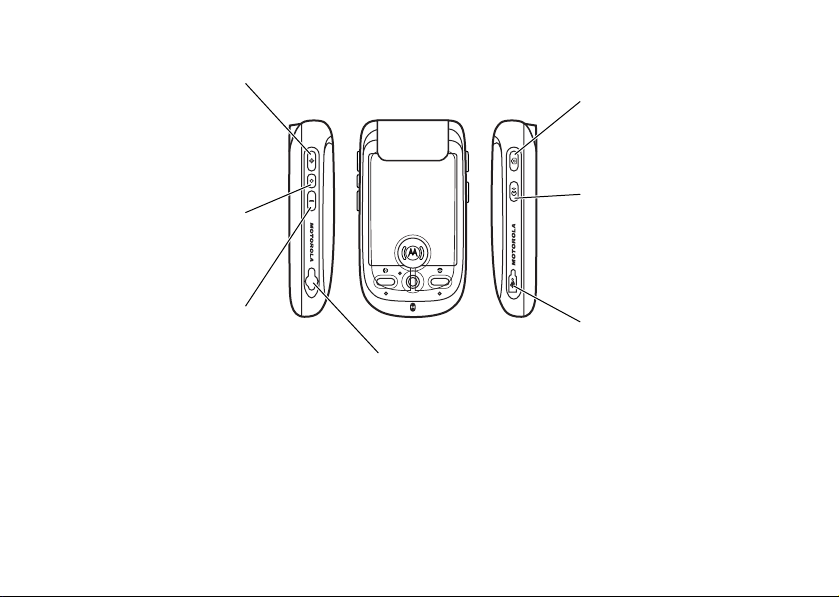
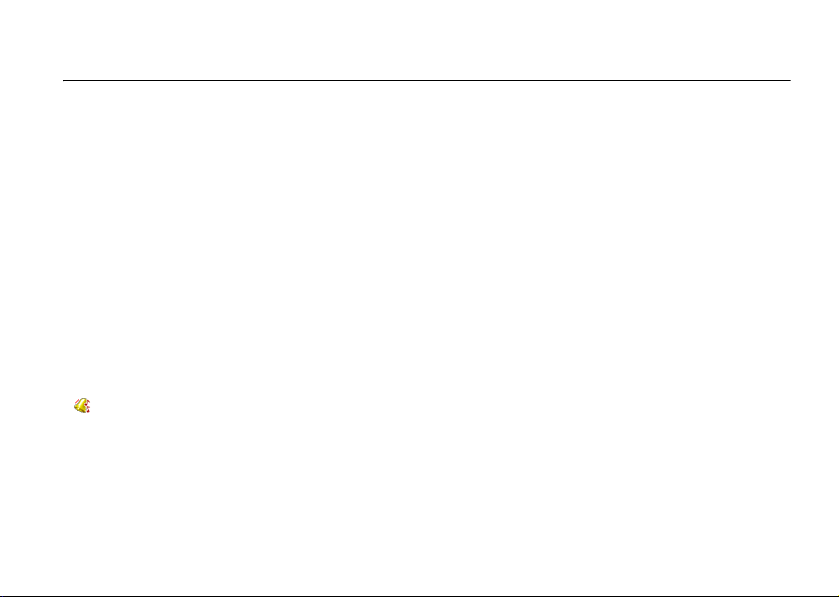
Up Volume Key
Raise earpiece/speakerphone
volume during a call, set alert
profile in flip-closed display.
Smart Key
Open quick menu in
flip-closed display.
Down Volume Key
Lower earpiece/speakerphone
volume during a call, set alert
profile in flip-closed display.
Note:
All the illustrations, simulated screen and related images used in this manual are for
Headset Jack
Remove cover, insert stereo
headset jack to listen to songs
and video clips.
Camera Key
Activate camera and take
photos.
Voice Recognition Key
Use voice commands to make
calls & perform basic phone
functions.
Accessory Connector Port
Remove cover, insert battery
charger & other phone
accessories.
reference only. There may be slight difference between the handset and keys and content of
display used in this manual and those of your handset. Please refer to your handset for actuality.
2
Page 3
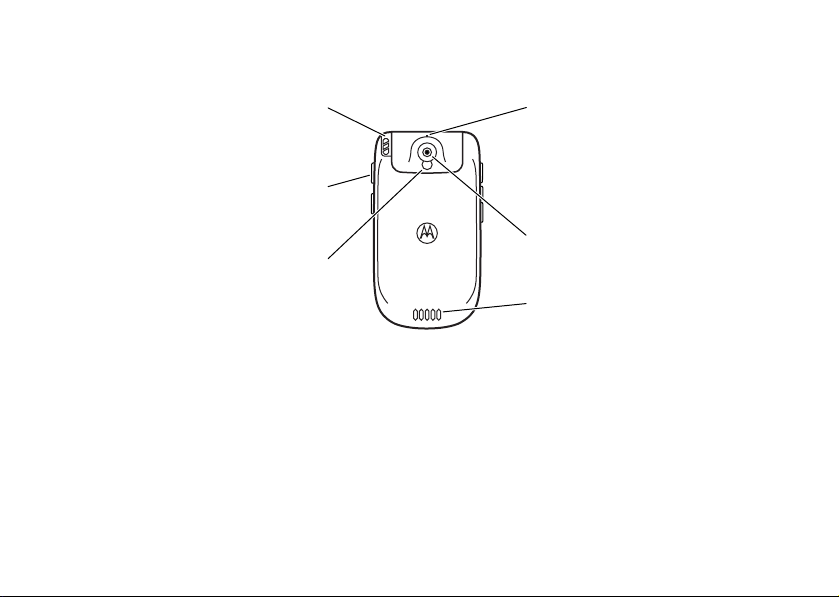
Use with touchscreen display.
Activate camera and take photos.
Aim camera lens for self-portraits.
Note:
All the illustrations, simulated screen and related images used in this manual are for
Stylus
Camera Key
Mirror
Camera Mode Switch
Slide
right
to set
normal
slide
left
to set
shots of business cards or small objects).
Camera Lens
Speaker
Listen to audio playback
of music & video clips.
picture mode,
macro
mode (for close-up
reference only. There may be slight difference between the handset and keys and content of
display used in this manual and those of your handset. Please refer to your handset for actuality.
3
Page 4

Mobile Devices Business
(852)2506-3888 (Hong Kong)
www.motorola.com.hk (Hong Kong)
MOTOROLA and the Stylized M Logo are registered
in the US Patent & Trademark Office. The Bluetooth
trademarks are owned by their proprietor and used by
Motorola, Inc. under license. Java and all other
Java-based marks are trademarks or registered
trademarks of Sun Microsystems, Inc. in the U.S. and
other countries. All other product or service names
are the property of their respective owners.
© Motorola, Inc. 2006.
Software Copyright Notice
The Motorola products described in this manual may
include copyrighted Motorola and third-party
software stored in semiconductor memories or other
media. Laws in the United States and other countries
preserve for Motorola and third-party software
providers certain exclusive rights for copyrighted
software, such as the exclusive rights to distribute or
reproduce the copyrighted software. Accordingly, any
copyrighted software contained in the Motorola
4
products may not be modified, reverse-engineered,
distributed, or reproduced in any manner to the
extent allowed by law. Furthermore, the purchase of
the Motorola products shall not be deemed to grant
either directly or by implication, estoppel, or
otherwise, any license under the copyrights, patents,
or patent applications of Motorola or any third-party
software provider, except for the normal,
non-exclusive, royalty-free license to use that arises
by operation of law in the sale of a product.
While Products specifications and features may be
subject to change without notice, we are making
every possible effort to ensure that user manuals are
updated on a regular basis to reflect product
functionality revisions. However, in the unlikely event
that your manual version does not fully reflect the
core functionality of your product, please let us know.
You may also be able to access up-to-date versions
of our manuals from our Motorola web site, at
http://www.motorola.com.hk.
Certain mobile phone features are dependent on the
capabilities and settings of your service providerís
network. Additionally, certain features may not be
Page 5

activated by your service provider, and/or the
provider's network settings may limit the featureís
functionality. Always contact your service provider
about feature availability and functionality. All
features, functionality, and other product
specifications, as well as the information contained
in this user's guide are based upon the latest
available information and are believed to be accurate
at the time of printing. Motorola reserves the right to
change or modify any information or specifications
without notice or obligation.
Manual Number: 6887370Z49
5
Page 6
contents
Safety Information . . . . . 9
Use and Care . . . . . . . . . 15
EU Conformance . . . . . . 16
Recycling Information . . 17
essentials . . . . . . . . . . . . 18
SIM card . . . . . . . . . . . 18
battery . . . . . . . . . . . . . 19
memory card . . . . . . . . 23
turn it on & off . . . . . . . 24
make a call. . . . . . . . . . 25
answer a call . . . . . . . . 25
your phone number. . . 26
basics . . . . . . . . . . . . . . . 28
display . . . . . . . . . . . . . 28
global navigation bar . . 29
application launcher. . . 29
button bar . . . . . . . . . . 31
contents
6
status bar. . . . . . . . . . . 31
text entry . . . . . . . . . . . 32
tap & hold . . . . . . . . . . 35
volume. . . . . . . . . . . . . 35
navigation joystick . . . . 36
smart key. . . . . . . . . . . 36
flip-closed features . . . 36
speakerphone . . . . . . . 38
codes & passwords. . . 39
voice print . . . . . . . . . . 39
lock & unlock phone . . 40
share information . . . . 41
customize. . . . . . . . . . . . 43
wallpaper . . . . . . . . . . . 44
color scheme. . . . . . . . 44
backlight . . . . . . . . . . . 45
flip answer. . . . . . . . . . 45
calls. . . . . . . . . . . . . . . . . 46
recent calls . . . . . . . . . 46
redial . . . . . . . . . . . . . . 47
hold or mute a call . . . . 47
call waiting. . . . . . . . . . 48
caller ID . . . . . . . . . . . . 48
cancel incoming call . . 48
emergency calls . . . . . 49
international calls . . . . . 49
turbo dial . . . . . . . . . . . 49
dial extension or voicemail
number . . . . . . . . . . . . 50
dial extension number
during a call . . . . . . . . . 51
address book . . . . . . . . . 52
view contact list . . . . . 52
add new contact . . . . . 53
create group . . . . . . . . 54
Page 7

call or send message . 54
search. . . . . . . . . . . . . 55
sort . . . . . . . . . . . . . . . 55
delete contact . . . . . . 55
storage location . . . . . 55
copy contacts . . . . . . . 56
categories. . . . . . . . . . 57
check capacity . . . . . . 58
share contact . . . . . . . 58
synchronize contacts . 59
owner’s information . . 59
messages . . . . . . . . . . . 60
message center . . . . . 60
signature. . . . . . . . . . . 61
send text message. . . 62
send multimedia
message. . . . . . . . . . . 63
unsent messages. . . . 65
tips for sending
messages. . . . . . . . . . 65
receive message . . . . 66
read and reply. . . . . . . 67
store message object. 67
sort messages . . . . . . 68
drafts . . . . . . . . . . . . . 68
deleted messages . . . 68
messages on SIM card 68
create folder . . . . . . . . 68
move messages . . . . . 69
set up message inbox 70
browser messages. . . 73
information services . . 73
office applications . . . . 75
email. . . . . . . . . . . . . . 75
calendar . . . . . . . . . . . 81
tasks . . . . . . . . . . . . . . 86
viewer. . . . . . . . . . . . . 87
calculator . . . . . . . . . . 87
alarm clock . . . . . . . . . 88
File Manager. . . . . . . . 89
business card reader . 93
world time . . . . . . . . . 95
multimedia applications 97
browser . . . . . . . . . . . 97
RealOne media player 102
camera . . . . . . . . . . . 104
voice recorder. . . . . . 108
video camera . . . . . . 109
photo editor . . . . . . . 109
FM radio . . . . . . . . . . . 111
notes . . . . . . . . . . . . . 112
extra applications. . . . 114
voice commands . . . . 114
Bluetooth™ wireless . 116
synchronize phone
information . . . . . . . . 120
modem . . . . . . . . . . . 121
stk. . . . . . . . . . . . . . . 122
other features . . . . . . . 123
advanced calling . . . . 123
setup. . . . . . . . . . . . . 124
call times & costs . . . 127
handsfree . . . . . . . . . 128
security. . . . . . . . . . . 129
MyMobileSoft.com. . 130
contents
7
Page 8

SAR Data . . . . . . . . . . . 133
WHO Information . . . . 135
GNU General Public
License . . . . . . . . . . . . . 136
index. . . . . . . . . . . . . . . 137
Note:
The functions available
on this handset may vary in
different regions and nations.
Please contact your local
customer service centres,
agencies or retailers if you
have any question about the
handset functions. Motorola
reserves all rights to revise
and change this user's
manual without obligation to
notify any person of such
revisions or changes.
contents
8
Page 9
Safety and General Information
Safety Information
This section contains important information on
the safe and efficient operation of your mobile
device. Read this information before using your
mobile device.
Exposure To Radio Frequency
(RF) Energy
Your mobile device contains a transmitter and
receiver. When it is ON, it receives and transmits RF
energy. When you communicate with your mobile
device, the system handling your call controls the
power level at which your mobile device transmits.
Your Motorola mobile device is designed to comply
with local regulatory requirements in your country
concerning exposure of human beings to RF energy.
affects call quality and may cause the mobile device to operate at a higher power level than needed.
Operational Precautions
For optimal mobile device performance and to be
sure that human exposure to RF energy does not
exceed the guidelines set forth in the relevant
standards, always follow these instructions and
precautions.
External Antenna Care
If your mobile device has an external antenna, use
only a Motorola-supplied or approved replacement
antenna. Use of unauthorized antennas,
modifications, or attachments could damage the
mobile device and/or may result in your device not
complying with local regulatory requirements in your
country.
DO NOT hold the external antenna when the mobile
device is IN USE. Holding the external antenna
Safety Information
9
Page 10

Product Operation
When placing or receiving a phone call, hold your
mobile device just like you would a landline phone.
If you wear the mobile device on your body, always
place the mobile device in a Motorola-supplied or
approved clip, holder, holster, case, or body harness.
If you do not use a body-worn accessory supplied or
approved by Motorola, keep the mobile device and its
antenna at least 2.5 centimeters (1 inch) from your
body when transmitting.
When using any data feature of the mobile device,
with or without an accessory cable, position the
mobile device and its antenna at least
2.5 centimeters (1 inch) from your body.
To maintain compliance with RF exposure guidelines
while you are transmitting with your phone attached
to this neck lanyard, hold the phone in its normal use
position at your ear or ensure that the phone and its
antenna are at least one inch (2.5 centimeters) away
from your body while transmitting.
Safety Information
10
Caution to Pacemaker Users: To avoid interference
with pacemakers while you are transmitting with
your phone attached to this neck lanyard, the
Advanced Medical Technology Association
recommends that you maintain a minimum
separation distance of six inches (15 centimeters)
between your phone and a pacemaker.
Using accessories not supplied or approved by
Motorola may cause your mobile device to exceed RF
energy exposure guidelines. For a list of
Motorola-supplied or approved accessories, visit our
website at www.motorola.com.
RF Energy
Interference/Compatibility
Nearly every electronic device is subject to RF energy
interference from external sources if inadequately
shielded, designed, or otherwise configured for RF
energy compatibility. In some circumstances your
mobile device may cause interference with other
devices.
Page 11

This device complies with Part 15 of the FCC Rules.
Operation is subject to the following two conditions:
(1) this device may not cause harmful interference,
and (2) this device must accept any interference
received, including interference that may cause
undesired operation.
Follow Instructions to Avoid
Interference Problems
Turn off your mobile device in any location where
posted notices instruct you to do so. These locations
include hospitals or health care facilities that may be
using equipment that is sensitive to external RF
energy.
In an aircraft, turn off your mobile device whenever
instructed to do so by airline staff. If your mobile
device offers an airplane mode or similar feature,
consult airline staff about using it in flight.
Pacemakers
If you have a pacemaker, consult your physician
before using this device.
Persons with pacemakers should observe the
following precautions:
•
ALWAYS keep the mobile device more than
20 centimeters (8 inches) from your
pacemaker when the mobile device is turned
ON.
•
Caution to Pacemaker Users: To avoid
interference with pacemakers while you are
transmitting with your phone attached to this
neck lanyard, the Advanced Medical
Technology Association recommends that you
maintain a minimum separation distance of
six inches (15 centimeters) between your
phone and a pacemaker.
•
DO NOT carry the mobile device in the breast
pocket.
•
Use the ear opposite the pacemaker to
minimize the potential for interference.
•
Turn OFF the mobile device immediately if
you have any reason to suspect that
interference is taking place.
Safety Information
11
Page 12

Hearing Aids
Some digital mobile devices may interfere with some
hearing aids. In the event of such interference, you
may want to consult your hearing aid manufacturer or
physician to discuss alternatives.
Other Medical Devices
If you use any other personal medical device, consult
your physician or the manufacturer of your device to
determine if it is adequately shielded from RF energy.
Driving Precautions
Check the laws and regulations on the use of mobile
devices in the area where you drive. Always obey
them.
When using your mobile device while driving, please:
•
Give full attention to driving and to the road.
Using a mobile device may be distracting.
Discontinue a call if you can’t concentrate on
driving.
•
Use handsfree operation, if available.
Safety Information
12
•
Pull off the road and park before making or
answering a call if driving conditions so
require.
Responsible driving practices can be found in the
“Smart Practices While Driving” section at the end of
this guide and/or at the Motorola website:
www.motorola.com/callsmart.
Operational Warnings
Obey all posted signs when using mobile devices in
public areas, such as health care facilities or blasting
areas.
Automobile Air Bags
Do not place a mobile device in the air bag
deployment area.
Potentially Explosive Atmospheres
Areas with potentially explosive atmospheres are
often but not always posted, and can include fueling
areas such as below decks on boats, fuel or chemical
transfer or storage facilities, or areas where the air
Page 13
contains chemicals or particles, such as grain, dust,
or metal powders.
When you are in such an area, turn off your mobile
device, and do not remove, install, or charge
batteries. In such areas, sparks can occur and cause
an explosion or fire.
Damaged Products
If your mobile device or battery has been submerged
in water, punctured, or subjected to a severe fall, do
not use it until you take it to a Motorola Authorized
Service Center. Do not attempt to dry it with an
external heat source, such as a microwave oven.
Batteries and Chargers
If jewelry, keys, beaded chains, or other conductive
materials touch exposed battery terminals, this could
complete an electrical circuit (short circuit), become
very hot, and could cause damage or injury. Be
careful when handling a charged battery, particularly
when placing it inside a pocket, purse, or other
container with metal objects.
Motorola Original ™ batteries and chargers.
Use only
Caution:
To avoid risk of personal injury, do not
dispose of your battery in a fire.
Your battery, charger, or mobile device may contain
symbols, defined as follows:
Symbol Definition
032374o
Important safety information
follows.
032376o
032375o
Do not dispose of your battery or
mobile device in a fire.
Your battery or mobile device may
require recycling in accordance
with local laws. Contact your local
regulatory authorities for more
information.
032377o
Li Ion BATT
032378o
Do not throw your battery or
mobile device in the trash.
Your mobile device contains an
internal lithium ion battery.
Safety Information
13
Page 14

Choking Hazards
Your mobile device or its accessories may include
detachable parts, which may present a choking
hazard to small children. Keep your mobile device
and its accessories away from small children.
Glass Parts
Some parts of your mobile device may be made of
glass. This glass could break if the product is dropped
on a hard surface or receives a substantial impact. If
glass breaks, do not touch or attempt to remove. Stop
using your mobile device until the glass is replaced
by a qualified service center.
Seizures/Blackouts
Some people may be susceptible to epileptic seizures
or blackouts when exposed to flashing lights, such as
when playing video games. These may occur even if
a person has never had a previous seizure or
blackout.
Safety Information
14
If you have experienced seizures or blackouts, or if
you have a family history of such occurrences, please
consult with your physician before playing video
games or enabling a flashing-lights feature (if
available) on your mobile device.
Discontinue use and consult a physician if any of the
following symptoms occur: convulsion, eye or muscle
twitching, loss of awareness, involuntary
movements, or disorientation. It is always a good
idea to hold the screen away from your eyes, leave
the lights on in the room, take a 15-minute break
every hour, and stop use if you are very tired.
Repetitive Motion
When you repetitively perform actions such as
pressing keys or entering finger-written characters,
you may experience occasional discomfort in your
hands, arms, shoulders, neck, or other parts of your
body. If you continue to have discomfort during or
after such use, stop use and see a physician.
ITC05-360
Page 15
Use and Care
Use and Care
To care for your Motorola phone, please keep it away from:
liquids of any kind dust and dirt
Don’t expose your phone to water,
rain, extreme humidity, sweat, or
other moisture.
extreme heat or cold cleaning solutions
Avoid temperatures below
-10°C/14°F or above 45°C/113°F.
microwaves the ground
Don’t try to dry your phone in a
microwave oven.
Don’t expose your phone to dust, dirt,
sand, food, or other inappropriate
materials.
To clean your phone, use only a dry
soft cloth. Don’t use alcohol or other
cleaning solutions.
Don’t drop your phone.
Use and Care
15
Page 16
European Union Directives Conformance
Statement
EU Conformance
•
•
16
Hereby, Motorola declares that this
product is in compliance with:
The essential requirements and other
relevant provisions of Directive 1999/5/EC
All other relevant EU Directives
EU Conformance
0168
The above gives an example of a typical Product
Approval Number.
You can view your product’s Declaration of
Conformity (DoC) to Directive 1999/5/EC (to R&TTE
Directive) at
your DoC, enter the product Approval Number from
your product’s label in the “Search” bar on the Web
site.
www.motorola.com/rtte
Product
Approval
Number
. To find
Page 17
Recycling Information
Caring for the Environment by Recycling
When you see this symbol on a Motorola
product, do not dispose the product with
household waste.
Recycling Mobile Phones and Accessories
Do not dispose of mobile phones or electrical
accessories, such as chargers or headsets, with your
household waste. In some countries or regions,
collection systems are set up to handle electrical and
electronic waste items. Contact your regional
authorities for more details. If collection systems
aren’t available, return unwanted mobile phones or
electrical accessories to any Motorola Approved
Service Centre in your region.
Recycling Information
17
Page 18
essentials
about this guide
This guide describes the basic features of
your Motorola wireless phone.
symbols
This means a feature is
network/subscription dependent
and may not be available in all areas.
Contact your service provider for
more information.
This means a feature requires an
optional accessory.
essentials
18
SIM card
Yo u r Subscriber Identity Module (SIM) card
contains personal information like your phone
number and contacts list.
Caution:
Keep it away from static electricity, water, and
dirt.
Don’t bend or scratch your SIM card.
Page 19
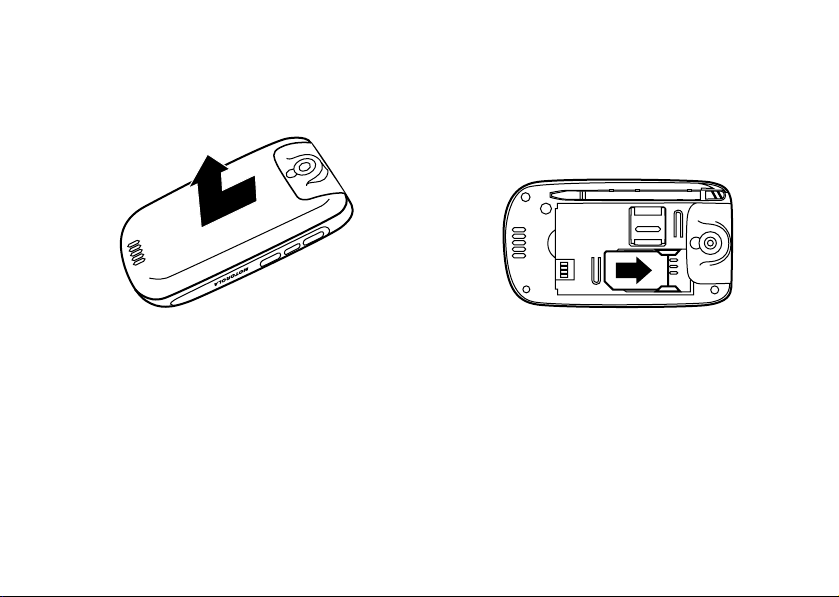
1
Slide the battery door down and away
from the camera lens to remove the
door.
2
Hold the SIM card with the notch in the
lower left corner and the gold plate
facing down. Slide the SIM card under
the metal tabs and into the card slot as
shown.
battery
battery tips
Battery life depends on the network, signal
strength, temperature, features, and
accessories you use.
essentials
19
Page 20
•
Always use
Motorola Original batteries
and chargers. The warranty
does not cover damage
caused by non-Motorola batteries
and/or chargers.
•
New batteries or batteries stored for a
long time may take more time to
charge.
•
When charging your battery, keep it
near room temperature.
•
When storing your battery, keep it
uncharged in a cool, dark, dry place.
•
Never expose batteries to
temperatures below -10°C (14°F) or
above 45°C (113°F). Always take your
phone with you when you leave your
vehicle.
•
It is normal for batteries to gradually
wear down and require longer charging
essentials
20
times. If you notice a change in your
battery life, it is probably time to
purchase a new battery.
Contact your local recycling center for
proper battery disposal.
Warning :
Never dispose of batteries in a fire
because they may explode.
Before using your phone, read the battery
safety information in the “Safety and General
Information” section included in this guide.
Page 21
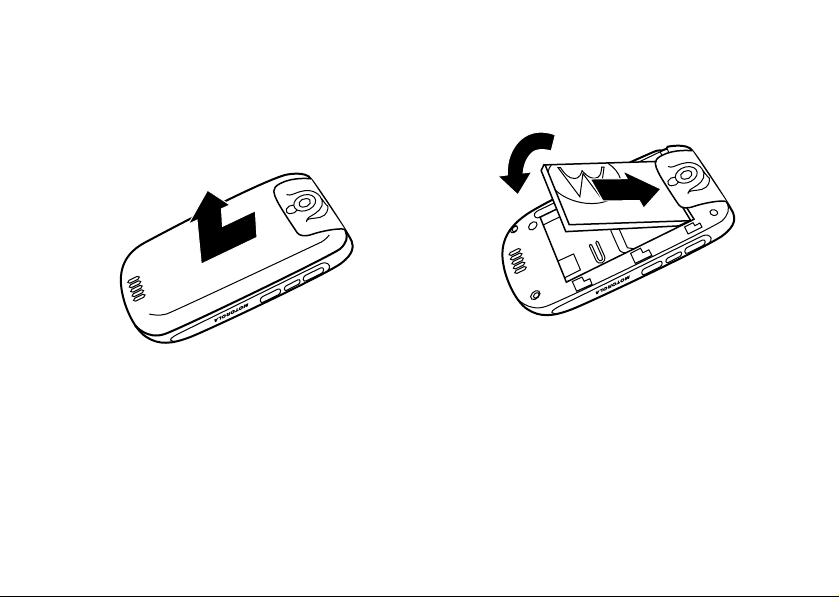
battery installation
1
Slide the battery door down and away
from the camera lens to remove the
door.
2
Insert the battery under the tab at the
top of the battery compartment and
push down.
essentials
21
Page 22
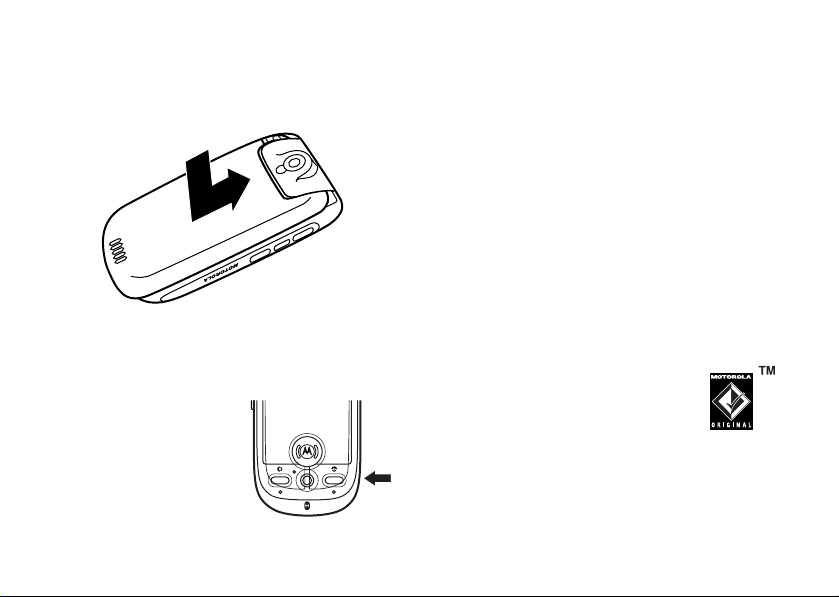
3
Place the battery door on the phone and
slide it up toward the camera lens to
lock shut.
battery charging
New batteries are not
fully charged. Open the
protective cover on your
phone’s accessory
connector port, then
insert the battery
essentials
22
charger plug into the accessory connector
port on the side of your phone as shown, and
plug the other end into an electrical outlet.
Your phone might take several seconds to
start charging the battery, and might require
several hours to charge fully. The display
shows
Charge Complete
Tip:
Relax, you can’t overcharge your battery.
It will perform best after you fully charge and
discharge it a few times.
Note:
You can charge the battery when the
phone is off or the battery is completely
discharged.
Note:
You can charge your battery
by connecting a cable from your
phone’s mini-USB port to a USB
port on a computer. Both your
phone and the computer must be turned on,
and your computer must have the correct
software drivers installed. Cables and
when finished.
Page 23
software drivers are available in
Motorola Original data kits, sold separately.
memory card
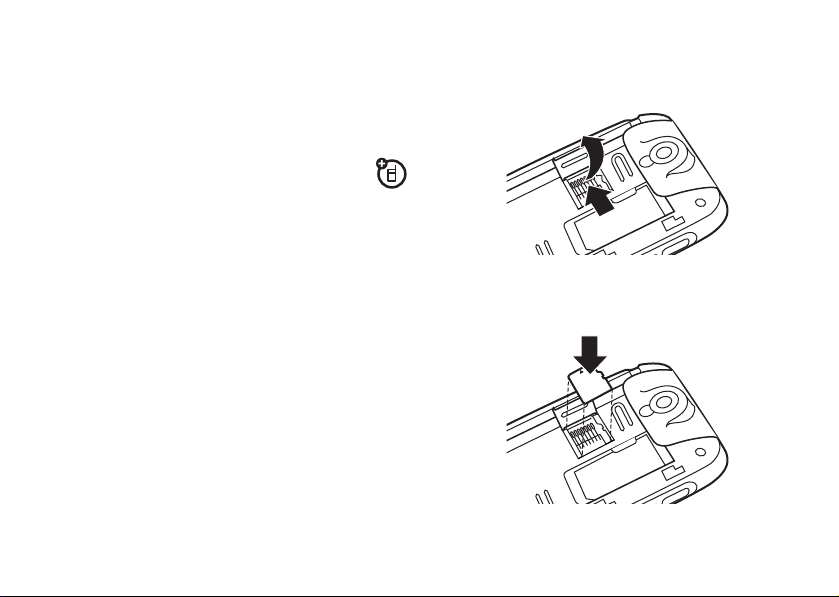
1
Slide the memory compartment door
up to unlock it, then lift the door open.
You can use an optional removable
MicroSD
phone to store and retrieve multimedia
content (such as photos, video clips, and
music files).
Caution:
card. Keep it away from static electricity,
water, and dirt.
TM
memory card with your
Don’t bend or scratch your memory
2
Insert the memory card into the tray.
essentials
23
Page 24
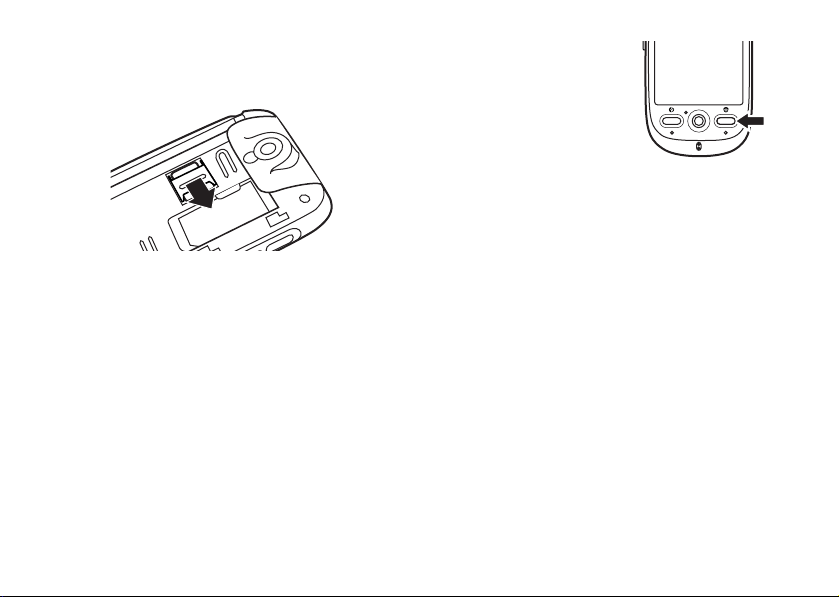
3
Close the memory compartment door,
then slide the door down to lock it shut.
turn it on & off
Caution:
prompt you to enter your SIM card PIN code
to unlock the SIM card. If you enter an
incorrect PIN code three times in a row, your
SIM card is disabled and your display shows
SIM Blocked
24
On power up, the phone may
. Contact your service provider.
essentials
To turn on your phone,
open the flip and then
press and hold the
power key
seconds. If prompted,
enter your six-digit SIM
card PIN code and/or four-digit unlock code.
If you don’t insert a SIM card, your phone
shows
make an emergency call) or
the phone’s non-calling features).
You can turn off your phone’s antenna in
locations where wireless phone use is
prohibited, or when you just want to use the
phone’s non-calling features (games, personal
organizer, multimedia player).
To activate/deactivate the antenna when
the phone is on:
of the display to open the device status
screen, then tap the
to select
O
No SIM Card
On
or
for two
. You can select
Tap the status bar at the top
Antenna
Off
.
Antenna On
Antenna Off
drop-down menu
(to use
(to
Page 25
To turn off your phone, press and holdO for
two seconds.
make a call
1
Tapo in the top
global navigation
bar to open the
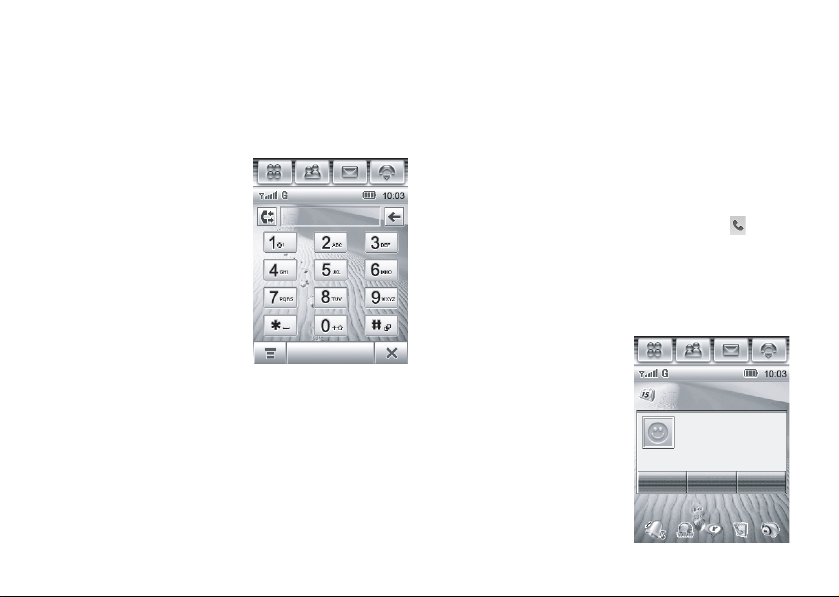
phone keypad.
2
Tap the keypad
keys to dial the
phone number.
3
Tap
Call
or press the
send key
N
to
make the call.
4
When you are finished, tap
flip, or press the end key
call.
Note:
Closing the flip doesn’t end a call when
the handsfree speaker is turned on (for more
Call
End
, close the
O
to end the
information about the handsfree speaker, see
page 38).
Tip:
TapP to select a number from a list of
recent received or dialed calls.
Tip:
If you need to use the phone keypad
during a call (for example, to dial an extension
or make a conference call), tap the keypad
button
à
from the in-call screen. Tap to
return to the in-call screen.
answer a call
When you receive a
call, your phone rings
and/or vibrates and
shows an incoming call
message.
When the flip is
closed:
Open the flip
No Meetings
Incoming Call...
+1234567890
Answer IgnoreBusy
10-16-2008
essentials
25
Page 26

to answer the call. (To activate or turn off this
feature, see page 45)
Tip:
You can press the volume keys to mute
the ringer before answering the call.
When the flip is open:
Tap
Answer
to answer
the call.
When you are finished, tap
or press the end key
Note:
Closing the flip doesn’t end a call when
End
, close the flip,
O
to end the call.
the handsfree speaker is turned on (for more
information about the handsfree speaker, see
page 38).
Tip:
If you prefer not to answer the call, you
can tap
Busy
(tapping
Ignore
to hang up on the caller, or tap
to transmit a busy tone signal to the caller
Busy
may divert the incoming call to
your voicemail inbox).
essentials
26
your phone number
To
view
your phone number:
1
Tapo in the top global navigation bar to
open the phone keypad.
2
Tap é in the bottom button bar to open
the phone menu.
3
Tap
My Number
To see your phone number while you’re on a
call, tap
To
é
store
or edit your name and phone
number on your SIM card:
1
Tapo in the top global navigation bar to
open the phone keypad.
2
Tap é, then tap
setup menu.
3
Tap
My Number
to see your phone number.
and then tap
My Number
Setup
to open the phone
to open the number editor.
.
Page 27

4
Enter your name and number (for line 1
and
line 2, if applicable), then tap
Done
to
store the information.
If you don’t know your phone number, contact
your service provider.
essentials
27
Page 28
basics
See page 1 for a basic phone diagram.
display
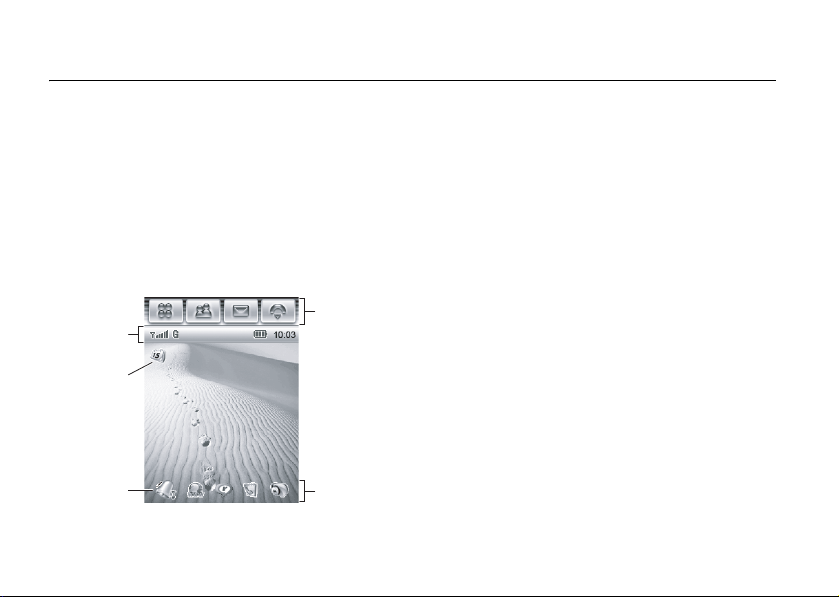
The home screen appears when you turn on
the phone.
Global
Status Bar
J
Tap
open the
calendar.
Tap C to
set a ring
alert profile.
28
No Meetings
to
10-16-2008
basics
Navigation
Bar (GNB)
Application
Icons
The home screen shows the next calendar
event (if any) scheduled for the current day.
Icons at the bottom of the screen provide
shortcuts to commonly used applications.
You can use all of your phone’s features by
tapping on the global navigation bar icons,
application icons, buttons, and text with the
provided stylus.
To change the options that you see in the
home screen, tap
launcher screen, tap
Home Screen Setup
Tip:
Tap an unused area of the homescreen to
<
to go to the application
T Setup
, then tap
.
see an unobstructed fullscreen view of the
wallpaper (background) image. Tap the
fullscreen wallpaper image to return to the
home screen display.
Page 29
global navigation bar
application launcher
Icons in the top global navigation bar give you
easy access to your phone’s primary
functions:
<
Application Launcher
>
Address Book
?
Messages
o
Phone
Additionally, your phone shows a new
message icon
!
in the global navigation bar
to notify you of a new message or a missed
call. Tap
!
to see information about the
message or missed call.
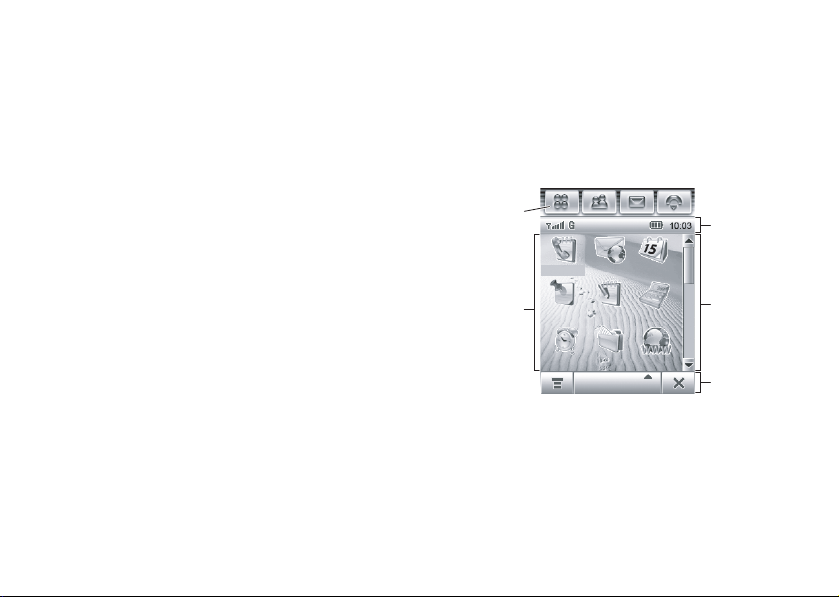
Tap the application launcher icon< in the
global navigation bar to open the application
launcher screen.
Application
Launcher
Icon
(Selected)
Applications
Calls CalendarEmail
Tasks CalculateNotes
Alarm BrowserFile Ma...
All
Status Bar
Scroll Bar
Button Bar
Tap the button in the bottom center of the
screen to see
All
application icons, or to see
application icons in predefined categories. If
necessary, tap the scroll bar on the right side
basics
29
Page 30

of the screen to see additional application
icons. Tap an application icon to select it.
Tip:
You can set your phone to show
applications in a text-based list rather than
graphic icons. Tap
change to list view. From list view, tap
then tap
icons.
The following icons identify applications
available on the application launcher screens:
Thumbnail View
é
, then tap
to reset the graphic
List View
to
é
,
office applications
multimedia applications
3 Browser G Player
F Camera % Recorder
K Video 3 Photo Editor
1 FM Radio U Notes
extra applications
T Setup , Modem
0 Bluetooth R Sync
8 STK
E Calls I Email
J Calendar L Tasks
9 Time Q Calculate
Z Alarm 2 File Manager
ñ Viewer
Help
basics
30
0 Business Card
Reader (BCR)
games
Your phone may contain Java™ games or
applications that add features and
functionality to your phone. Instructions are
included with each game. You select Java
games from the application launcher screen.
Page 31
button bar
The button bar shows functions you can
select in the active application. Typical buttons
include:
é
ó
â
Menu
Return
Exit
Tap to open context
sensitive menu.
Tap to return to
previous screen.
Tap to exit current
application.
status bar
Tip:
Tap the status bar to open the device
status screen and see phone status
information.
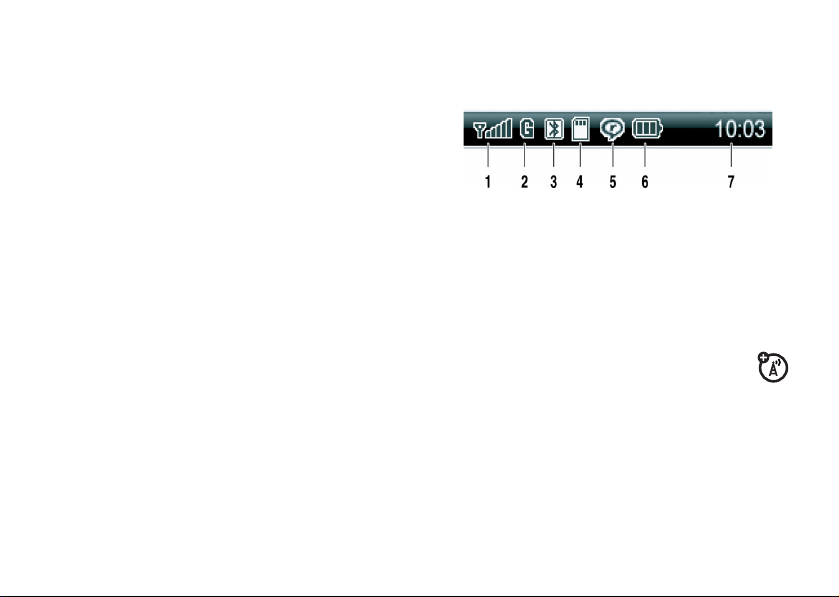
The following indicators can appear in the
status bar:
1 signal strength –
strength of the network connection. You
can’t make or receive calls when the no
signal indicator
indicator
2GPRS –
using a high-speed General Packet
Radio Service (GPRS) network
connection. A darkened indicator shows
that a GPRS connection is not available.
3 Bluetooth –
power is turned on. When Bluetooth
power is on, your phone can make a
~
Shows when your phone is
Vertical bars show the
=
or no transmission
shows.
Shows that Bluetooth™
basics
31
Page 32
wireless connection with a headset
accessory or other external device.
4memory card –
card is inserted in your phone.
5RealOne –
media player is playing media content.
6 battery level –
battery charge level. Recharge the battery
when your phone shows
7 clock –
Shows the current time.
Shows when a memory
Shows when the RealOne
Vertical bars show the
Low Battery
.
text entry
Multiple text entry methods make it easy for
you to enter names, numbers, and messages.
The method you select remains active until
you select another method.
Tap a text entry area on the screen to bring up
a text entry window. If necessary, tap the
basics
32
entry method drop-down menu at the bottom
of the screen to select a text entry method.
Tap
ë
in the lower right corner of the screen
to hide the text entry keyboard or pad when
you are finished, or when you want to use the
button bar functions.
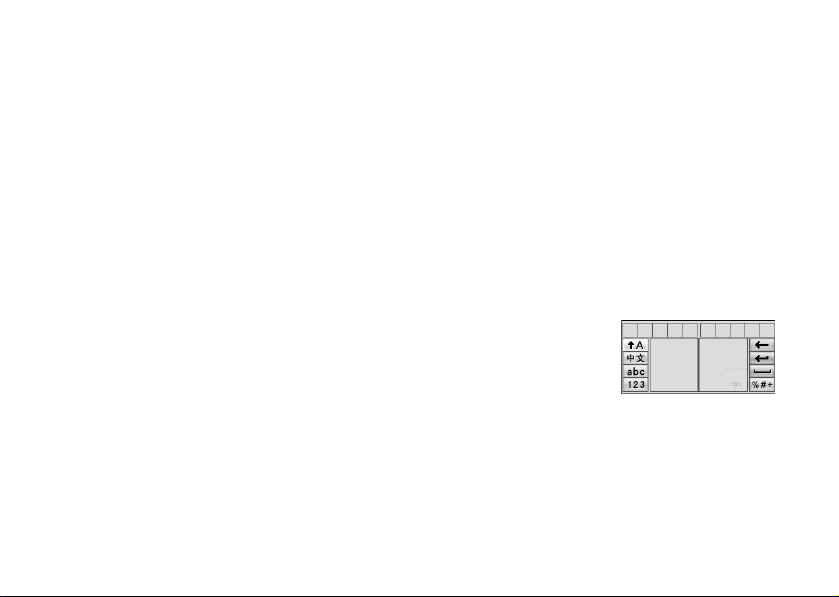
handwriting
You can use the stylus as a pen to write
letters, numbers, and punctuation directly on
the screen.
In a text entry window,
tap the entry method
drop-down menu and
tap
Handwriting
the handwriting pad (shown at right). Tap a
button on the handwriting pad to select
Chinese characters, English text, or numbers
as the type of text you want to enter.
to open
Page 33
Use the stylus to write in one of the two
writing spaces. For best performance,
alternate between the writing spaces so that
recognition can occur in one while you are
writing in the other.
Write a text character, then wait for your
phone to recognize and place it in the text
entry window. If your phone places an
incorrect character, tap the character in the
choice area that you want to replace it.
Your phone can use a predictive text function
to predict the word you are writing. Tap a
word in the prediction area to place it in the
text entry window. To activate predictive text
entry, see page 34.
To enter special characters or edit text, use
the function buttons described on page 34.
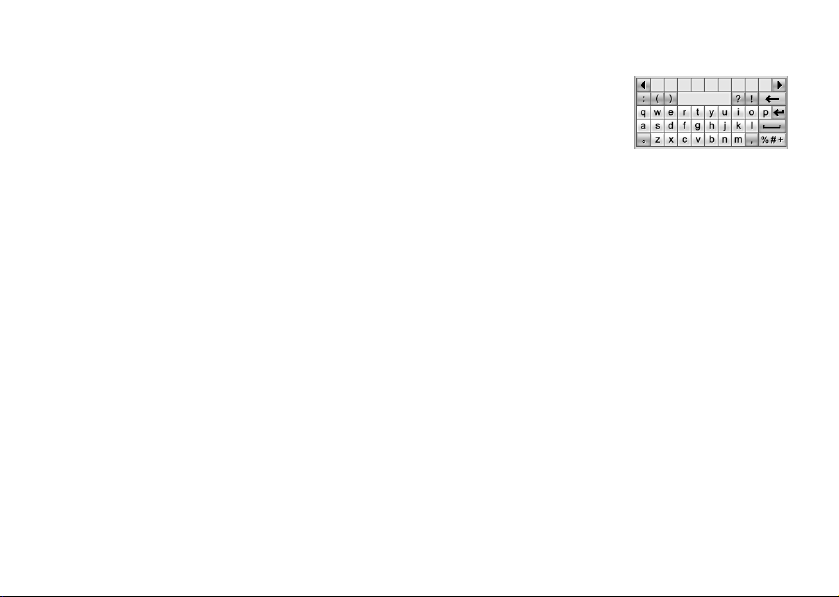
Pinyin Board
Use the Pinyin
keyboard (shown at
right) to enter Chinese
characters. Tap
keyboard characters in sequence to spell the
pinyin. The letters you enter appear in the
pinyin area, and corresponding Chinese
characters appear in the choice area. To see
additional characters, tap the previous
button
î
or next buttonì. Tap the desired
character to place it at the cursor location in
the entry window.
Your phone predicts the pinyin you are
spelling, and highlights the next letters you
can type to finish the word.
basics
33
Page 34
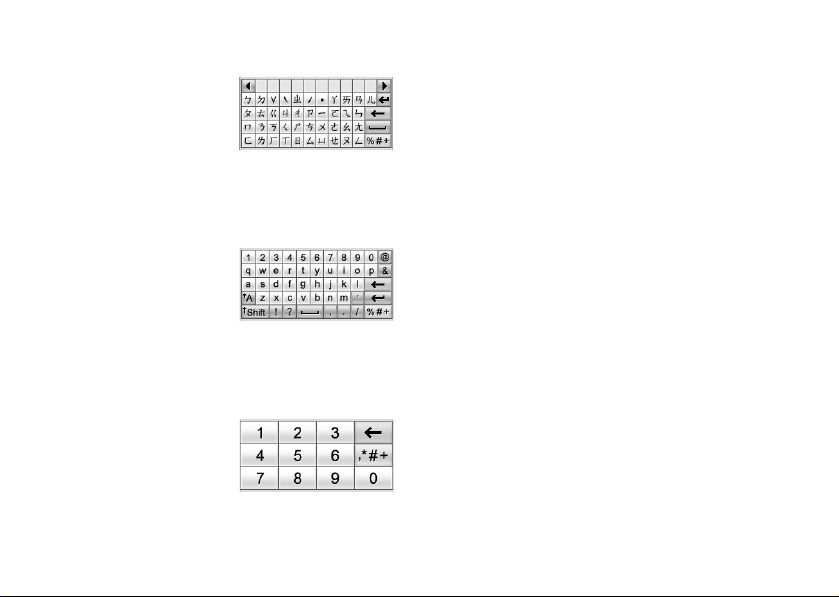
Zhuyin Board
Use the Zhuyin
keyboard (shown at
right) to enter words
using Zhuyin
characters.
English keyboard
Use the English
keyboard (shown at
right) to enter letters
and numbers at the
cursor location in the text entry window.
function buttons
Tap t with any text entry method to open
the symbol pad, to enter a symbol at the
cursor location. Tap
symbol pad.
To delete the character to the left of the
cursor, tap
To move the cursor to the next line, tap
To enter a space at the cursor location, tap
u
Tip:
move the cursor to that location.
w
.
Tap a location in the text entry window to
r
to lock or hide the
.
v
.
Numeric pad
Use the numeric pad
(shown at right) to
enter digits and/or
numeric symbols at the
cursor location in the text entry window.
basics
34
adjust text input settings
You can set your preferred input method,
primary and secondary language preferences,
specify your writing hand (left or right) and
handwriting speed, activate word prediction
and word completion, activate a user
Page 35
dictionary, and apply a watermark to the text
you enter.
Tap
T Setup
in the application launcher screen,
then tap
screen. Adjust settings, then tap
your settings and return to the setup screen.
Input Setup
to open the input setting
Save
to save
tap & hold
When using phone applications, in many
cases you can tap and hold on an icon, file, or
field to open a pop-up menu to perform
various operations on the selected item. If the
specific task you want to perform in an
application is not already listed in the display,
try using tap and hold to see if the feature you
want is available in a pop-up menu.
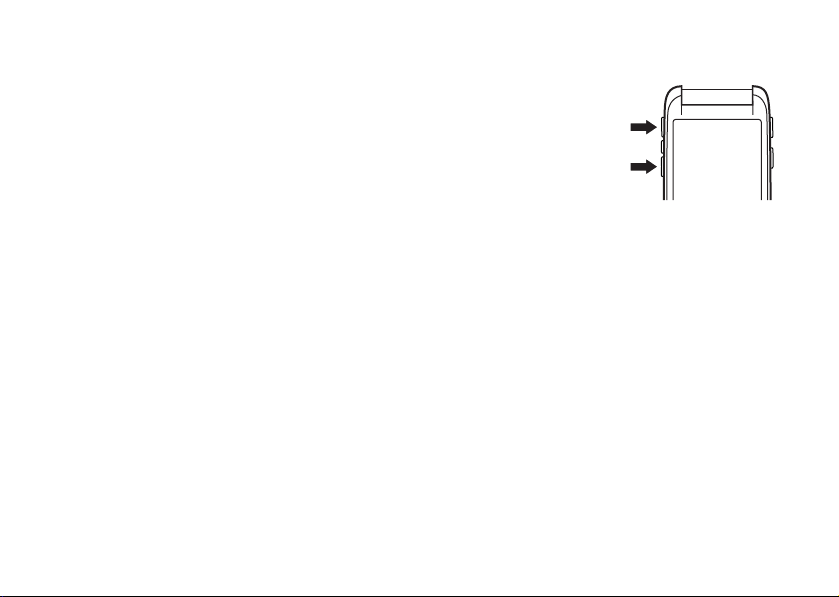
volume
Press the volume keys
to:
•
turn off an
incoming call
alert or event
alert (flip open
or closed)
•
change the earpiece or speakerphone
volume during a call (flip open or
closed)
•
change the speaker volume when
playing a song or video clip (flip open or
closed)
When the flip is closed, press the volume
keys to set your phone’s ring alert profile. For
more information, see page 37.
basics
35
Page 36
When the flip is open, tap : in the home
screen to set the ring alert profile. For more
information, see page 43.
navigation joystick
Press the five-way
navigation joystick
up, down, left, or right to
scroll to and highlight
menu items. Press in the
joystick
highlighted item.
This guide describes how to use the stylus
and touchscreen control to use features when
the flip is open. In most cases, it does not
include the equivalent joystick control for
using the feature.
36
s
basics
S
to select a
smart key
The smart key gives
you another way to do
things. When you
scroll to a menu item,
you can press the
smart key to select it
(instead of pressing in the joystick
When the phone flip is closed, you can press
the smart key to open the quick menu and
select items in the flip-closed display. For
more information, see the following section.
s
).
flip-closed features
When your phone flip is closed, the display
shows the time and date, and indicates phone
status, incoming calls, and other events. For a
list of phone status indicators, see page 31.
Page 37

You can use the volume keys and smart key to
access phone features when the flip is closed.
Features described in this section are
available with additional functionality when
the flip is open.
unlock phone keys
When the flip is closed, your phone
automatically locks the side phone keys after
a period of inactivity, to prevent accidental
keypresses (for example, when carrying the
phone is a purse or pocket). To unlock the
phone keys, press a key two times in a row
within four seconds.
set ring alert profile
1
Press the volume keys (see illustration on
page 2) to scroll to a ring alert profile.
2
Press the smart key to select the ring alert
profile.
For more information about setting and using
ring alert profiles, see page 43.
return unanswered call
Note:
You must have a headset plugged in or
paired with your phone to return a call when
the flip is closed.
Your phone keeps a record of your
unanswered calls, and shows
the flip-closed display. To
1
Press the smart key (see illustration on
page 2) to open the missed calls list.
2
Press the volume keys (see illustration on
page 2) to scroll to an unanswered call.
3
Press the smart key to call the number.
To
end
the call, press the Send/End button on
the headset, or press the smart key on your
phone.
X Missed Calls
return
in
a missed call:
basics
37
Page 38

To
exit
the missed calls list, use the volume
keys and smart key to scroll and select
the missed calls list.
Back
in
use the quick menu
To open the quick menu in the flip-closed
display, press the smart key when the home
screen is visible. You can select the following
features in the quick menu:
• Realone Player
•
Camera
•
Hide Menu
To select a feature, press the volume keys
(see illustration on page 2) to scroll to it, then
press the smart key to select it.
When the RealOne media player is active,
press the smart key to open the controls
menu, then use the volume keys and smart
key to scroll and select menu options. To exit
the media player, select
basics
38
Exit Realone Player
in the
controls menu. For more information about
using the RealOne media player, see
page 103.
When the camera is active, press the camera
key or select
take a picture. To exit the camera, select
in the active viewfinder. For more information
about using the camera, see page 106.
Note:
with your phone, you can also select the
Recent Calls
information on how to call a number in the
recent calls list, see “return unanswered call”
on page 37.
Capture
in the active viewfinder to
Back
When a headset is plugged in or paired
list from the quick menu. For
speakerphone
When you activate your phone’s handsfree
speakerphone, you can talk to the other party
without holding the phone to your ear.
Page 39

During a call, tap
speakerphone on or off. The handsfree
speakerphone remains on until you tap
again or turn the phone off.
The handsfree speakerphone is disabled
when you connect your phone to a handsfree
car kit or headset accessory.
Spkr
to turn the handsfree
Spkr
codes & passwords
Your phone’s four-digit
originally set to
code
is originally set to
service provider didn’t change these codes,
you should change them.
You can also change your
barring passwords.
To change a code or password, tap
the application launcher screen, tap
then tap
passwords screen.
Change Passwords
unlock code
1234
. The six-digit
000000
SIM PIN
to open the change
is
security
. If your
or call
T Setup
Security
in
,
If you forget your unlock code:
Enter Unlock Code
last four digits of your phone number. If that
doesn’t work, tap
bypass screen. Enter your security code, then
tap
OK
If you forget other codes:
security code, SIM PIN code, PIN2 code, or
call barring password, contact your service
provider.
prompt, try entering 1234 or the
é
to open the unlock code
to submit the security code.
At the
If you forget your
voice print
The voice print feature prompts you speak a
password to unlock the phone when you turn
the phone on. To use voice print, you must
record a voice print password.
To
record
your voice print password: Tap
T Setup
in the application launcher screen, tap
Security
, then tap
Voice Print
to open the voice
basics
39
Page 40

print screen. Tap
onscreen prompts to record your voice print.
To
activate or deactivate
T Setup
in the application launcher screen, tap
Security
, then tap
print screen. Tap the
then tap
speak your voice print password to confirm
your identity.
When voice print is activated, the phone
prompts you to press the voice recognition
key (see illustration on page 1) and speak your
voice print password to unlock the phone
each time you turn it on.
If you forget your voice print password:
When prompted to speak your voice print
password, tap
then tap
40
On
OK
basics
Training
, and follow the
voice print: Tap
Voice Print
or
Off
é
to go to the home screen.
to open the voice
Voice Print
pulldown menu,
. The phone prompts you to
, enter your unlock code,
Tip:
Change your unlock code to ensure that
unauthorized users can’t bypass voice print
security by entering the default unlock code.
Note:
You can make emergency calls on a
locked phone (for more information, see
page 49). You can also receive and answer
incoming calls when the phone is locked.
lock & unlock phone
You can lock your phone to keep others from
using it. To lock or unlock your phone, you
need the voice print password or four-digit
unlock code. For instructions on how to lock
or unlock your phone using voice print, see
the previous section.
To
automatically lock
specified period of inactivity: Tap
the application launcher screen, tap
then select a
Phone Lock
your phone after a
T Setup
Security
timer setting. Your
in
,
Page 41

phone prompts you to enter the unlock code.
Enter your unlock code to activate phone lock.
To automatically lock your phone whenever
you turn it off: Tap
launcher screen, tap
to
Power On
.
To
unlock
your phone: When you see the
Enter Unlock Code
T Setup
in the application
Security
, then set
Phone Lock
prompt, enter your unlock code
to unlock the phone.
Tip:
Your phone’s unlock code is originally set
to 1234. Many service providers reset the
unlock code to the last four digits of your
phone number.
Note:
You can make emergency calls on a
locked phone (for more information, see
page 49). You can also receive and answer
incoming calls when the phone is locked.
share information
You can share information with another
phone, PC, or hand-held device. You can share
address book contacts, calendar events,
tasks, note pad entries, voice records,
pictures, photos, and sound files by sending
or receiving the data through a Bluetooth
wireless connection, or in an MMS or email
message.
Tip:
In some cases, the share option is only
available from the tap and hold pop-up menu.
send data
1
Locate the data you want to share (such
as contact details, or a list of files in the
File Manager, tap
select one or more items to share.
or
é
, then tap
Share
to
basics
41
Page 42

Tap and hold an item to open a pop-up
menu, then tap
options.
2
Tap
Bluetooth
data through a Bluetooth wireless
connection.
or
Tap
Message
data in an MMS or email message.
3
Complete the setup procedure for the
transfer method you selected.
4
TapOK to send the data.
For more information about using a Bluetooth
wireless connection, see page 116.
Share
to see a list of share
, then tap OK to exchange the
or
Email
, then tap OK to send the
receive data
The sending device must establish a
transmission link with your phone through a
Bluetooth, MMS, or email connection.
basics
42
If necessary, turn on Bluetooth power on your
phone to let the other device establish a
wireless link (to turn Bluetooth power on, see
page 117.
Your phone alerts you when it receives a data
transfer request from the other device. If
necessary, tap
Your phone notifies you when data transfer is
complete. If the transfer is not successful,
your phone shows the message
OK
to accept the data.
Receive Failed
.
Page 43
customize
profiles
You can quickly change your phone’s ring alert
profile to match your activity, environment, or
personal requirements. Each profile uses a
different set of sounds or vibrations for
incoming calls and other events. The
profile silences your phone until you set
another profile. Here are the profiles you can
choose:
E Ring Loud C Vibe then Ring Soft
Vibe and Ring Loud B Silent
D Vibe then Ring Loud A Vibrate
@ Ring Soft
The profile indicator shows in the lower-left
corner of the home screen.
Silent
set the ring alert profile
When the flip is closed:
keys to scroll to the ring alert profile you want,
then press the smart key to select it.
When the flip is open:
screen to set the ring alert profile.
Press the volume
Tap : in the home
edit a ring alert profile
You can change the alerts that a profiles uses
to notify you of incoming calls and other
events.
Note:
You can’t set an alert for the
profile, or change some settings for some
profiles.
1
Tap
T Setup
in the application launcher
screen, then tap
Ringer Alert Style
customize
.
Silent
43
Page 44

2
Tap a profile, then tap
Edit
to adjust alert
settings to personalize the profle. You can
change the alerts used to notify you of
incoming calls and messages, set ringer
IDs, and adjust alert volume, touchscreen
volume, and keypad volume. Any changes
you make are saved to the profile.
wallpaper
Set a photo, picture, or animation as a
wallpaper (background) image in your phone’s
display. The wallpaper image appears as a
faint watermark in text and menu displays.
1
Tap
T Setup
in the application launcher
screen, then tap
2
Tap a photo/picture thumbnail image to
set it as the wallpaper image. Tap the
fullscreen image preview to return to the
wallpaper menu.
3
Tap OK to save your setting.
customize
44
Wallpaper
.
Tip:
Tap an unused area of the homescreen to
see an unobstructed fullscreen view of the
wallpaper image. Tap the fullscreen wallpaper
image to return to the home screen.
color scheme
Set the colors that your phone uses for
buttons, highlights, and the status bar.
Note:
This feature changes the look and feel
of the phone’s user interface, including the
icons that you see in the top global navigation
bar.
1
Tap
T Setup
in the application launcher
screen, then tap
2
Tap a thumbnail image to select it as the
color scheme. Your phone shows a brief
preview of the selected color scheme.
3
Tap OK to save your setting.
Color Scheme
.
Page 45

backlight
1
Tap
T Setup
in the application launcher
screen, then tap
2
Tapî andì to decrease or increase
backlight brightness.
3
Tap
Backlight Sleep Time
time that the backlight remains on.
4
Tap
Save
to save your settings.
Tip:
Press and hold the send keyN in any
screen to maximize backlight brightness.
Press and hold
default brightness setting.
Note:
Your phone’s display normally is visible
only when the display backlight is on, or when
the display is viewed in direct sunlight. To
extend battery life, the backlight turns off
automatically when no activity is detected for
a period of time. The backlight turns back on
when you tap the screen or press any key.
Backlight Setup
.
to set the amount of
N
again to return to the
flip answer
Set your phone to automatically answer calls
when you open the flip.
1
Tapo in the global navigation bar to
open the phone keypad.
2
Tap é, then tap
setup menu.
3
Tap the check box e beside
check mark
activated.
4
Tap ó to exit the phone setup menu.
Setup
to open the phone
Flip Answer
d
indicates that flip answer is
. A
customize
45
Page 46
calls
To make and answer calls, see page 25.
recent calls
Your phone keeps lists of incoming and
outgoing calls, even for calls that didn’t
connect. The most recent calls are listed first.
The oldest calls are deleted as new calls are
added.
Shortcut:
recent calls list. Press the five-way
navigation joystick
then press
To
1
2
46
Press the send keyN to go to the
S
to scroll to a number,
N
to call it.
dial
a number in the recent calls list:
Tapo in the global navigation bar to
open the phone keypad.
Tap P to open the recent calls menu.
calls
3
Tap
Answered Calls, Missed Calls
, or
Dialed Calls
select a call list.
4
Tap an entry to call its number.
To
see
details or perform other operations on
an entry in the recent calls list:
1
Tap
E Calls
in the application launcher
screen to open the call history screen.
2
Tap
Answered Calls, Missed Calls
, or
Dialed Calls
select a call list.
3
Tap an entry to see call details (time, date,
duration).
4
Tap
Call
to call its number, or tap é to
perform the following operations:
to
to
Page 47
options
Store
Create an address book entry
with the number stored in the
number type field you specify.
Send SMS
Send MMS
Open a new text message with
the number in the
To
Open a new multimedia
message with the number in
the
To
field.
Delete
Delete the entry.
redial
1
Tapo in the global navigation bar to
open the phone keypad.
2
Tap P, then tap
dialed calls list.
3
Tap the number you want to redial.
Dialed Calls
to open the
field.
If you hear a
busy signal
Call Failed, Number Busy
, tap
and you see
Redial
to
automatically redial the number.
To
activate
1
the automatic redial feature:
Tapo in the global navigation bar to
open the phone keypad.
2
Tap é, then tap
Setup
to open the phone
setup menu.
3
Tap the check box e beside
check mark
d
indicates that automatic
Auto Redial
. A
redial is activated.
4
Tap ó to exit the phone setup menu.
hold or mute a call
To put all active calls on hold, tap
again to resume the call.
To turn off your phone’s microphone during a
call, tap
Mute
. Tap
Mute
again to resume the call.
Hold
. Tap
Hold
calls
47
Page 48
call waiting
When you’re on a call, you’ll hear an
alert if you receive a second call.
Tap
Answer
to put the first call on hold and
answer the new call.
To switch between calls, tap
To connect the two calls, tap
Switch
Link
.
.
caller ID
Calling line identification (caller ID)
shows the phone number for an
incoming call in your phone’s display.
Your phone shows the caller’s name and
picture when they’re stored in your address
book, or
isn’t available.
48
Incoming Call
calls
when caller ID information
You can set your phone to play a unique call
alert for an entry stored in your address book
(for more information, see page 53).
To show or hide
calls that you make:
1
Tapo in the global navigation bar to
open the phone keypad.
2
Tap é, then tap
setup menu.
3
Tap
Show ID
hide your caller ID for outgoing calls.
4
Tap ó to exit the phone setup menu.
Tip:
Select
determine your caller ID status.
your phone number
Setup
to open the phone
, then tap On or
Network Controlled
to let the network
Off
to show or
for the
cancel incoming call
While the phone is ringing or vibrating,
tap
Ignore
to cancel the incoming call.
Page 49

Depending on your phone settings and/or
service subscription, the call may be
forwarded to another number, or the caller
may hear a busy signal.
2
Tap the keypad keys to dial the
emergency number.
3
Tap
Call
to make the call.
emergency calls
Your service provider programs one or more
emergency phone numbers, such as 999 or
112, that you can call under any
circumstances, even when your phone is
locked or the SIM card is not inserted.
Note:
Emergency numbers vary by country.
Your phone’s preprogrammed emergency
number(s) may not work in all locations, and
sometimes an emergency call cannot be
placed due to network, environmental, or
interference issues.
1
Tapo in the global navigation bar to
open the phone keypad.
international calls
Open the phone keypad, tap é, tap
Insert
, then select
local international access code
(indicated by
dial the country code and phone number.
Shortcut:
phone keypad to insert your international
access code.
Insert +
to insert your
+
). Then, tap the keypad keys to
Tap and hold the0 key on the
turbo dial
You can store up to nine phone numbers in
the turbo dial list, then dial the numbers by
tapping and holding a single keypad number
key.
calls
49
Page 50

To
turbo dial
1
Tapo in the global navigation bar to
a phone number:
open the phone keypad.
2
Tap and hold a keypad key to dial the
phone number assigned to the key.
If no number is stored, your phone prompts
you to store a phone number in the turbo dial
numbers list.
To
set up
the turbo dial numbers list:
1
Tapo in the global navigation bar to
open the phone keypad.
2
Tap é, then tap
Setup
to open the phone
setup menu.
3
Tap
Turbo Dialing
4
Enter phone numbers in the turbo dial list.
calls
50
to open the turbo dial list.
dial extension or voicemail number
To
direct dial
voicemail number, you can insert a pause
character (
1
Use the keypad key to dial the phone
number.
2
When you need to insert a pause, tap é,
tap
at the cursor location.
3
Dial the extension number.
4
Tap
Your phone dials the phone number, waits for
the call to connect, then dials the remaining
digits.
Tip:
Use the same procedure to insert a wait
character (
phone dials the number, waits for the call to
an extension number or
P
) in the dialing sequence.
Insert
, then select
Call
to make the call.
W
) in the dialing sequence. Your
Insert Pause
to insert a P
Page 51

connect, then prompts you for confirmation
before it dials the remaining digits.
dial extension number during a call
1
Tap the keypad button à to open the
phone keypad.
2
Dial the extension number.
3
Tap to return to the in-call screen.
calls
51
Page 52
address book
You can store a contact list of names, phone
numbers, and email addresses in your
phone’s electronic address book.
view contact list
Tap> in the global navigation bar to open
the address book. To change the way your
contact list is shown, tap
tap the
DefaultListDisplay
select
List View
or
Thumbnail View
use category views
Defining categories for your contacts helps
you manage address book information. You
can classify contacts in different categories
according to your communication needs, and
address book
52
é
, tap
Setup
, then
drop-down menu to
.
see contacts by category. Your phone
provides the following basic categories:
All
– Lists all contacts stored on your phone
and on your SIM card.
Unfiled
– Lists contacts stored on your phone
that are not assigned to a user-defined
category. This is the default category setting
for new contacts.
SIM Card
– Lists contacts stored on your SIM
card.
In the contact list, tap the category button in
the bottom button bar and select a category
name to see only the contacts in that
category.
Page 53
view and edit contact details
1
In the contact list, tap a contact name to
see its details.
2
Tap
Edit
to edit the contact. Your phone
shows complete contact details.
3
To edit contact information, tap the direct
line in the field you want to edit.
4
When you are finished editing contact
information, tap
Done
to store your changes
and return to the contact list.
add new contact
Contacts can be stored to phone memory or
SIM card memory. To set the default storage
location, see page 55.
Note:
You can enter only a name and a single
phone number for each contact that you store
on the SIM card.
1
Tap> in the
global navigation
bar to open the
address book.
2
Tap é, then tap
New Contact
3
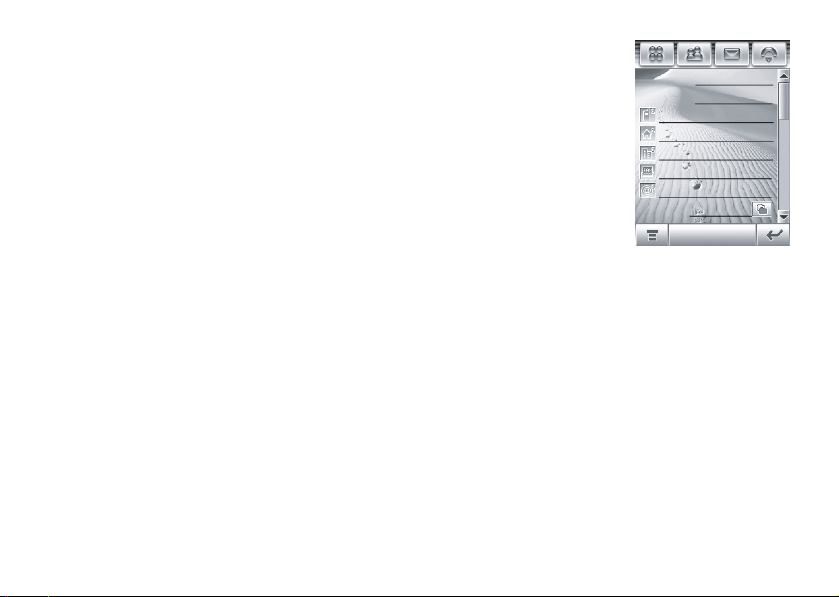
On the new
contact screen
(shown at right),
tap the
.
Photo
field to assign a picture ID to
First Name:
Last Name:
<Mobile>
<Home>
<Work>
<Fax>
<Email>
Category: Unfiled
Done
the entry. Your phone shows the picture
when you receive a call from this contact.
4
Tap the direct line in a field to enter
contact details. Pull down the scroll bar to
see additional fields.
5
To set a distinctive ring tone for the
contact, tap the
Browse
. Scroll to select the desired tone
and tap
OK
Ring Tone
field and select
. Your phone sounds the tone
when you receive a call from this contact.
address book
53
Page 54

6
When you are finished entering
information, tap
Done
to store the contact.
create group
You can create a group mailing list consisting
of multiple contacts stored in the address
book. Groups make it easy for you to send a
message to multiple recipients
simultaneously.
1
Tap> in the global navigation bar to
open the address book.
2
Tap é, then tap
3
Tap
Messaging
type of message to send to the group,
then tap
the group, and the group must contain at
least one member.
4
When you finish entering information, tap
Save
to store the group.
address book
54
New Distribution List
or
Email
to specify the default
OK
. You must enter a name for
.
call or send message
1
Tap> in the global navigation bar to
open the address book.
2
Tap a contact name to see its details.
3
In the details list:
•
Tap the phone number following the
mobile phone indicator
contact’s mobile phone. Other
indicators may identify other numbers
stored for the contact (such as home,
work, or fax).
•
Tap the message indicatora to the
right
of a phone number to send an
SMS or MMS message to the number.
•
Tap the email address following the
email indicator to send an email
message to the address. Alternatively,
tap the message indicator
c
to call the
a
to the
Page 55

right
of the email address to send an
MMS message to the address.
search
1
Tap> in the global navigation bar to
open the address book.
2
Tap é,
More
then tap
3
Select
Contact’s Name, Number
the desired information in the
field, then tap
Find
Find Contacts
.
, or
.
Other
, enter
Search Text
Your phone shows the search result, or
notifies you that no match can be found.
To continue searching, tap
To return to the contact list, tap
Find New
ó
.
.
sort
1
Tap> in the global navigation bar to
open the address book.
2
Tap é, then tap
3
Tap the
Sort Names By
sort the contact list by
Last Name
.
4
Tap
Save
to save the setting.
Setup
.
drop-down menu to
First Name
or
delete contact
1
Tap> in the global navigation bar to
open the address book.
2
Tap é, then tap
3
Check the contact(s) you want to delete,
then tap
4
Tap OK to confirm the deletion.
Delete
Delete Contacts
.
.
storage location
Contacts can be stored to phone memory or
SIM card memory. You can set the default
address book
55
Page 56

memory location where new address book
contacts are stored.
Note:
You can enter only a name and a single
phone number for each contact that you store
on the SIM card.
1
Tap> in the global navigation bar to
open the address book.
2
Tap é, then tap
3
Tap the
Default Memory Location
Setup
.
drop-down
menu to set the default memory location.
4
Tap
Save
to save the setting.
copy contacts
You can copy contacts between your phone
and SIM card. This procedure does
the original contact.
Note:
The SIM card can store only a name
and one phone number per contact. When
address book
56
not
delete
you copy an entry from the phone to the SIM
card, your phone prompts you to specify the
number you want to store for the contact.
1
Tap> in the global navigation bar to
open the address book.
2
Tap é, then tap
3
Select
PhonetoSIM
OK
.
4
Check the number(s) you want to copy. If
Copy to SIM/Phone
or
SIM to Phone
.
, then tap
you copy from the SIM card to phone
memory, specify the number type.
5
Tap OK to copy the numbers to the new
location.
Note:
The number of entries you can store on
your SIM card depends on the SIM card
capacity. The types of entries that can be
copied to the SIM card may vary depending
on the function of the SIM card.
Page 57

categories
Your can create user-defined categories to
organize your contacts.
create a new category
1
Tap> in the global navigation bar to
open the address book.
2
Tap the category button in the bottom
button bar, then tap
3
Tap é, then tap
category.
4
Tap the
Name
field to assign a name to the
category, then tap
5
Tap
Add Members
you want to add to the category.
6
Tap
Select
to add the selected contacts to
the category.
Edit Category
New
to create a new
OK
.
.
, then check the contacts
add members to a user
category
1
Tap> in the global navigation bar to
open the address book.
2
Tap the category button in the bottom
button bar, then tap
3
Select the category, tap
Edit Category
Add Members
.
check the contacts you want to add to the
category.
4
Tap
Select
to add the selected contacts to
the category.
delete a user category
Note:
You can
categories in your address book.
1
Tap> in the global navigation bar to
open the address book.
2
Tap the category button in the bottom
button bar, then tap
not
delete the predefined
Edit Category
.
, then
address book
57
Page 58

3
Select the category, tap é, then tap
4
Tap OK to confirm the deletion.
Delete
check capacity
You can see the number of address book
entries currently stored on the phone and SIM
card, and the total number of entries you can
store on the SIM card.
1
Tap> in the global navigation bar to
open the address book.
2
Tap é, tap
phone shows the number of phone and
SIM card contacts, and the SIM card
capacity (number of contacts).
3
Tap ó to return to the address book.
58
More
, then tap
address book
Memory Status
. Your
.
share contact
You can share contact information with others
by sending the data as a vCard to another
phone, PC, or hand-held device.
1
Tap> in the global navigation bar to
open the address book.
2
Tap the name of the contact you want to
send. Your phone shows contact details.
3
Tap é, then tap
4
Tap
Bluetooth
Share
.
, then tap OK to exchange the
data through a Bluetooth™ wireless
connection.
or
Tap
Message
or
Email
, then tap OK to send the
contact data in an MMS or email
message.
5
Complete the setup procedure for the
transfer method you selected.
Page 59
6
Tap OK to send the contact information in a
vCard.
For more information about using a Bluetooth
wireless connection, see page 116.
synchronize contacts
You can synchronize contacts with your
PC through a Bluetooth wireless
connection or USB cable connection
using Motorola mobile PhoneTools software.
For more information, see page 120.
owner’s information
You can store information about yourself in
the address book. Then, if you lose your
phone, the person who finds it can contact
you to return the phone.
1
Tap> in the global navigation bar to
open the address book.
2
Tap é, then tap
3
If owner’s information is stored, the
phone show the owner’s contact details.
Tap
Edit
to edit the owner’s information.
4
If owner’s information is not stored, the
phone shows the owner’s information
entry screen. Enter information as you
would for a new contact (see page 53.).
5
When you are finished entering
information, tap
information.
Owner’s Information
Done
to store the owner’s
.
address book
59
Page 60
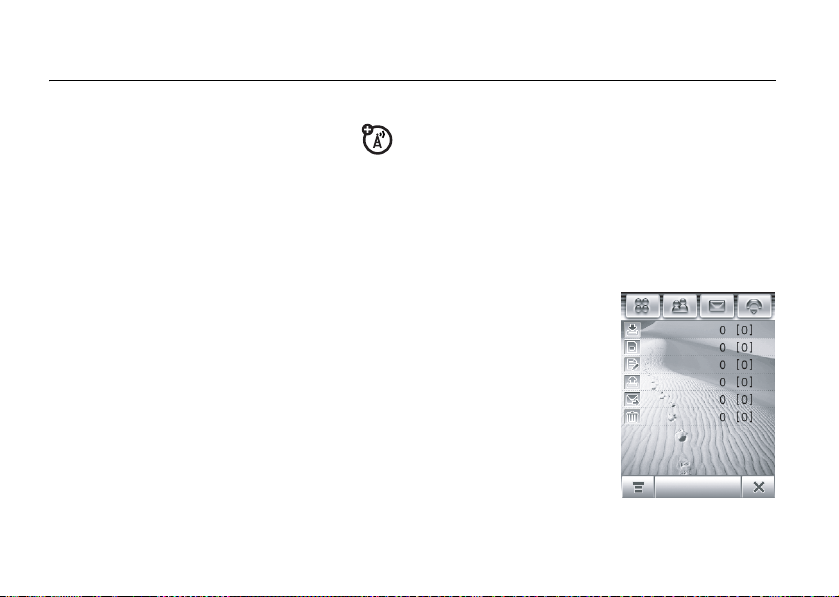
messages
You can send and receive short
text-based SMS messages, and
multimedia MMS messages containing
media objects such as photos, pictures,
animations, sounds, voice records, and video
clips.
Note:
Your phone sends an SMS text
message by default, unless you insert
multimedia content or perform a function
reserved for MMS multimedia messages.
Instant messaging lets you exchange
messages in real time with other wireless
phone users.
messages
60
message center
Note:
You must set up your message inbox
before
you can send and receive messages.
Usually, your service provider has already set
up the message inbox for you. For setup
instructions, see page 70.
Tap
?
in the global
navigation bar to go to
the message center
(shown at right).
Your messages are
stored in different
folders in the message
center. The number to
the right of each folder
name indicates the
Inbox
SIM Card
Drafts
Outbox
Sent Items
Trash
Compose
Page 61

number of messages it contains. Tap a folder
to see its contents.
The message center contains the following
folders:
Inbox –
Stores SMS and MMS messages you
have received.
SIM Card –
Contains SMS messages stored
on your SIM card. You can move these
messages to other folders.
Drafts –
Temporarily stores messages that
you are still writing.
Outbox –
Stores your messages that have
not yet been sent.
Sent Items –
Stores copies of messages you
have sent.
Tr a sh –
Stores messages you have deleted. If
you have not permanently deleted a message,
you can retrieve it.
You can create additional personal folders to
organize and store your messages.
signature
You can store your signature, and manually or
automatically append it to the messages you
send.
1
Tap? in the global navigation bar to go
to the message center.
2
Tap é, then tap
signature editing screen.
3
Tap the direct line in the
to enter your signature.
4
If you want your phone to automatically
add your signature to all outgoing
messages, tap the check box
the signature. A check mark
that automatic signature is activated.
5
Tap
Save
to store your signature.
Signature Editing
Signature Content
to open the
field
e
below
d
indicates
messages
61
Page 62
send text message
You can send an SMS short text
message to other wireless phone
users, and to email addresses.
To compose and send an SMS message:
1
Tap? in the global navigation bar to go
to the message center.
2
Tap
Compose
.
3
Tap the message field, then tap the text
entry method drop-down menu at the
bottom of the screen and select an entry
method to enter text in the message field.
When you are finished, tap
lower right corner of the screen to hide
the text entry keyboard or pad.
Alternatively, you can tap
tap
Quick Text
to insert a prewritten quick
text note in the message field
messages
62
é
ë
, tap
in the
Load
, then
4
Tap To to select contacts from your
address book, or tap the direct line in the
To
field to enter a phone number or email
address.
5
Tap
Send
to send the message.
When composing an SMS message, you can
tap
é
to perform various operations on the
message prior to sending it. The SMS menu
can include the following options:
options
Load
Insert a quick text note or
auto-signature in the message.
Save To
Save the message to the
Drafts
folder.
Send
Options
Receipt Request
: Request a delivery
report for the message.
Expire After
: Set the expiration
time for an undelivered
message.
Page 63
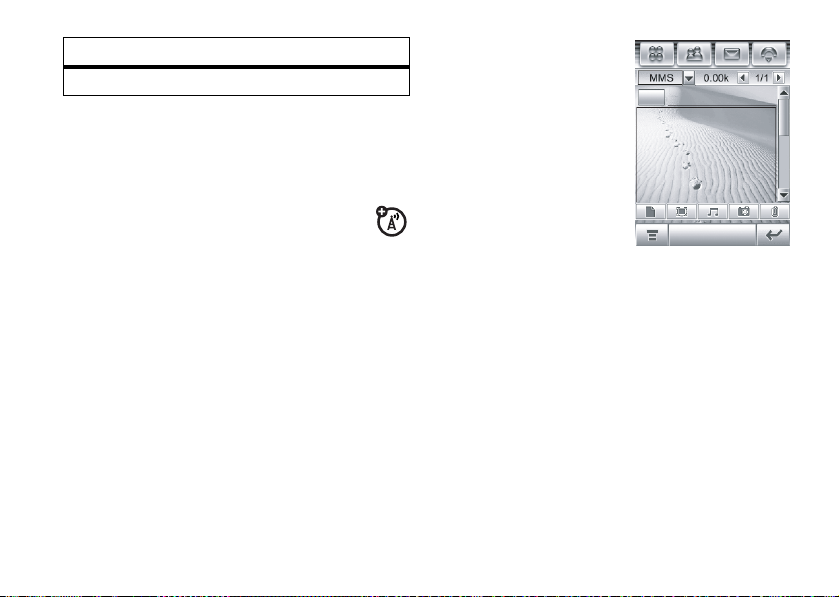
options
Delete
Delete the message.
send multimedia message
A Multimedia Messaging Service
(MMS) multimedia message contains
one or more pages with text and
embedded media objects (including photos,
pictures, animations, sounds, voice records,
and/or video clips). You can send an MMS
message to other wireless phone users, and
to email addresses.
To compose and send an MMS message:
1
Tap? in the global navigation bar to go
to the message center.
2
Tap
Compose
to open
the message
composition
To...
screen (shown at
right).
3
Tap the message
field, then tap the
text entry method
drop-down menu
Send
at the bottom of
the screen and select an entry method to
enter text in the message field. When you
are finished, tap
ë
in the lower right
corner of the screen to hide the text entry
keyboard or pad.
4
Tap a button in the media toolbar at the
bottom of the screen to insert media
objects on the page or attach files to the
message.
•
Tapj to insert a picture, video, or
new drawing on the page.
messages
63
Page 64
•
TapF to insert a sound file or new
voice record on the page.
•
TapG to activate the camera, take a
photo or record a video clip, and insert
it on the page.
•
Taph to attach a contact, event,
task, or file to the message.
5
To add a new page after the current page,
tap
i
. Repeat steps 3 and 4 to enter
contents for the new page.
6
Tap To to select contacts from your
address book, or tap the direct line in the
To
field to enter a phone number or email
address.
7
Tap Cc,
Bcc
, or
Subject
to enter additional
recipients or a message subject. (Use the
MMS menu, described below, to show or
hide these fields.)
8
Tap
Send
to send the message.
messages
64
When composing an MMS message, you can
tap
é
to perform various operations on the
message prior to sending it. The MMS menu
can include the following options:
options
Load
Insert a quick page, quick text,
or auto-signature in the
message.
Save To
Save the message to the
Drafts
folder, or save it as a quick page.
Page
Duration
Preview
Show
Set the number of seconds each
page is shown.
Preview the MMS message.
Show or hide the Cc,
Subject
header fields. Use Cc or
Bcc
, and/or
Bcc
to carbon-copy or
blind-carbon-copy the message
to additional recipients. Use
Subject
to specify a subject for the
message.
Page 65
options
Send
Options
Delete
Receipt Request
report for the message.
Expire After
time for an undelivered
message.
Priority
Send later
your phone to send the
message.
Delete the current page, delete
an object on the page, or delete
the message.
: Request a delivery
: Set the expiration
: Set message priority.
: Set a time and date for
unsent messages
Outgoing messages that failed to send or
have not yet been sent are stored in the
outbox.
On the message center screen, tap
see its contents. Messages in the outbox are
sorted from newest to oldest.
Tap a message to read it. You can edit the
message while it is open.
Outbox
to
tips for sending messages
•
When you enter an SMS text message,
a counter at the top right corner of the
display shows the number of
characters left on the current page, and
the number of pages you have written
(character#/ page#). Network charges
are based on the number of pages
sent.
•
When you enter an MMS multimedia
message, a counter at the top of the
display shows the current message
messages
65
Page 66
size in kilobytes. Another counter
shows the number of pages.
•
When you manually enter phone
numbers and/or email addresses in the
To
field, you must insert a comma
between each entry.
receive message
Your phone shows the new message
icon
!
in the global navigation bar
when you receive a new message.
Tap
!
to see message details (sender,
subject, time, and size).
Tap
Read
to read an SMS message. Tap
to download an MMS message to your
phone, then tap
Tap
ó
to return to the previous screen
without reading the message. The message
is stored in the inbox.
messages
66
Read
to read it.
Download
Tap
é
to perform various operations on the
message. The received message menu can
include the following options:
options
Reply With
Original
Call Back
Forward
Save
Address
Save Object
Include a copy of the original
message in your reply. (SMS
only)
Call a phone number embedded
in the message header or
message body.
Open a copy of the message,
with an empty
Save the sender’s email
address.
Save a media object in the
message. (MMS only)
To
field.
Page 67
options
Save As
Quick Page
Move To
Folder
Delete
Message
When your phone shows
must delete some existing messages from
your inbox, outbox, or drafts folder to receive
new messages.
Save the current MMS page as
a quick Page. You can insert the
quick Page into MMS messages
that you compose. (MMS only)
Move the message to another
folder.
Delete the message.
Memory is Full!
, you
read and reply
Messages that you receive are stored in the
inbox.
Inbox
On the message center screen, tap
see its contents. Messages in the inbox are
sorted from newest to oldest.
Tap a message to read it. Your phone shows
the sender’s name (if stored in your address
book) or phone number, the message
contents, and the time it was sent.
•
Tap
Reply
to send a reply to the
message
•
Tapó to return to the previous screen
without making any changes.
to
store message object
To store a media object contained in a
multimedia message, tap and hold the
object to open a pop-up menu, then
select
Save
to store the object on your phone.
If the object is contained in a message
attachment, tap and hold the attachment to
messages
67
Page 68

open a pop-up menu, then select
the object.
sort messages
On the
tap
Name
Inbox, Outbox
Sort By
to sort messages by
.
, or
Trash
screen, tapé, then
Time, Subject
drafts
Save
to store
, or
deleted messages
Messages that you delete are stored in the
trash folder.
On the message center screen, tap
see its contents. Tap a message to read it.
You can edit the message while it is open.
Tap
Delete All
to permanently delete all
messages in the trash folder.
Trash
to
Messages that you are still writing are stored
in the drafts folder.
On the message center screen, tap
see its contents. Tap a message to read it.
You can edit the message while it is open, and
then send it immediately.
messages
68
Drafts
to
messages on SIM card
On the message center screen, tap
see the messages stored on your SIM card.
Tap a message to read it.
SIM Card
to
create folder
You can create one or more personal folders
to store your messages, and lock your
Page 69

personal folders to prevent other users from
reading the messages stored in them.
To create a personal folder:
1
Tap? in the global navigation bar to go
to the message center.
2
Tapé, then tap
3
Tap the direct line in the
New Folder
.
Name
field to enter
a name for the folder.
4
To lock the folder to prevent unauthorized
access, tap the check box
Protected by lock code?
. A check markd
e
beside
indicates that the folder lock feature is
activated.
5
Tap
Done
to save the folder.
The personal folder is listed on the message
center screen along with your other folders. If
the personal folder is locked, your phone
prompts you to enter the phone unlock code
when you try to open the folder or move a
message to it. Enter your unlock code to open
the folder.
To
edit
a personal folder, open it and tapé,
then tap
Folder Setup
. You can change the folder
name, and turn the folder lock feature on or
off as desired.
To
delete
a personal folder, open it and
tap
é
, then tap
Delete Folder
. Tap OK to confirm
the deletion.
Note:
You must remove all messages from a
personal folder in order to delete it.
move messages
You can move messages between folders. For
example, you can move a message from the
inbox to the SIM card folder and take it with
you when you use your SIM card in another
phone, or move it to a locked personal folder
to prevent others from reading it.
messages
69
Page 70

To move messages to another folder:
1
Tap? in the global navigation bar to go
to the message center.
2
Open the folder that contains the
message(s) you want to move.
3
Tapé, then tap
4
Tap the check boxe beside each
Move
.
message you want to move, or tap the
check box beside
messages. A check mark
All
to select all
d
indicates that
the message is selected.
5
Tap OK to open the move to folder screen.
6
Tap the destination folder, then tap OK to
move the messages.
Tip:
To quickly move a single message, tap
and hold the message to open a pop-up
menu, then select
messages
70
Move to Folder
.
set up message inbox
1
Tap? in the global navigation bar to go
to the message center.
2
Tapé, then tap
3
Tap
Short Message
configure your SMS or MMS inbox
settings as described in the following
section.
4
When you’re finished, tap OK to save your
settings.
SMS setup options
Note:
Actual field names and values may vary
depending on the technologies available to
your service provider. Some settings may not
be available for all phone models.
Service Setup
or
Multimedia Message
.
to
Page 71
options
Server
Center
Number
Expire After
Use GPRS
Number of the center that
handles your outgoing text
messages.
Number of days your network
should attempt to send
undelivered text messages.
Use a high-speed GPRS
connection to send and receive
text messages
.
MMS setup options
Note:
Actual field names and values may vary
depending on the technologies available to
your service provider. Some settings may not
be available for all phone models.
options
Default
Profile
Expire After
Auto
Download
Show My
Number
Allow
Delivery
Report
Select an MMS network profile.
(See next section to edit profile
settings or create a new
network profile.)
Number of days your network
should attempt to send
undelivered MMS messages.
Automatically download MMS
messages to your phone. You
can set this function to be
disabled when roaming, and set
a maximum file size for
auto-downloaded messages.
Send your number with
outgoing MMS messages.
Send a delivery report for an
incoming MMS message when
requested.
messages
71
Page 72
options
Block
Senders
Reject Read
Reply
Request
Auto Retry
Block incoming MMS messages
from specific senders.
Do not send a reply to the
sender when you read a new
received message.
Automatically attempt to resend
messages when delivery fails.
MMS network profile setup
You can edit an existing MMS network profile
or create a new MMS network profile.
1
Tap? in the global navigation bar to go
to the message center.
2
Tapé, then tap
3
Tap
Multimedia Message
inbox setup editor.
messages
72
Service Setup
.
to open the MMS
4
Tap the folder tree icon in the
Default Profile
field to open the MMS profile
list.
5
To edit an existing MMS network profile,
highlight the profile, tap
é
, then tap
Edit
or
To create a new MMS network profile,
tap
é
, then tap
6
When you’re finished, tap
New
.
Save
to save
your settings.
You must enter the following configuration
settings. If necessary, contact your service
provider to obtain the following information:
options
Profile
Enter the profile name.
Name
.
Page 73
options
MMSC
Network
Profile
Select the server you want to
use (information may be
viewable only).
Select a network connection
profile to connect to the
Internet. For more information,
see page 99.
browser messages
Your network’s Web server can send
you browser messages that you read in
your micro-browser.
Your phone shows the new message
icon
!
in the global navigation bar when
you receive a new browser message. Tap
to read the message.
You must activate the feature to receive
browser messages.
Read
1
Tap? in the global navigation bar to go
to the message center.
2
Tapé, then tap
3
Tap
Browser Message
editor.
4
Tap
Receive All
messages, or
browser messages you receive.
5
Tap
Save
to save the setting.
Service Setup
to open the WAP push
to receive all browser
Restricted
to restrict the
information services
Information service messages are
broadcast messages that you can
receive, such as stock updates, news
headlines, or sports scores.
Your phone shows the new message
icon
!
in the global navigation bar when
you receive a new information service
message. Tap
Read
to read the message.
.
messages
73
Page 74

Note:
You must set up your information
services message inbox
before
you can
receive information service messages.
Usually, your service provider has already set
up the information services message inbox
for you.
1
Tap? in the global navigation bar to go
to the message center.
2
Tapé, then tap
3
Tap
Info Service
Service Setup
.
to open the info service
inbox setup editor.
4
Tap
Service On
to activate info service on
your phone.
5
Tap
Active Channels
to set subscription
channels.
6
Tapé, then tap
New Channel
to add a new
channel.
or
messages
74
Tapé, then tap
Delete Channels
to delete one
or more channels.
7
Tap
Save
to save your settings.
8
Tap OK to exit the active channels menu.
9
Tap
Languages
to set the languages in which
you receive cell broadcasts.
10
Set the first and second languages, then
tap
Save
to save the language settings.
11
Tap
Save
to save your info service settings.
Page 75
office applications
You can send and receive email
messages with your wireless phone.
Tip:
To send and receive email messages, you
must have an Internet connection, and have a
POP3, IMAP, or SMTP email account on the
Internet or your service provider’s network. If
necessary, see page 99 for information on
how to set up a network connection profile.
mailboxes and folders
Note:
You must set up your email mailbox
before
you can send and receive email
messages. Usually, your service provider has
already set up the email mailbox for you. For
setup instructions, see page 78.
Tap
I Email
in the application launcher screen
to launch the email application.
Email messages are stored in different folders
in your email mailbox:
Inbox –
Email messages you have received.
Outbox –
yet been sent.
You may have additional folders in an email
mailbox, such as
personal folders that you create.
If you have separate mailboxes for different
email accounts, tap the
of the email message screen to select the
mailbox you want to use. Your phone shows
the folders associated with the selected
mailbox.
Your emaill messages that have not
Drafts, Sent Items, Trash
Mailbox
, or
field at the top
office applications
75
Page 76
send an email message
You can send an email message to one
or more recipients. You can manually
enter each recipient’s email address, or
select addresses from the address book.
When you manually enter email addresses,
you must insert a comma, semicolon, or colon
between each address.
To compose and send an email message:
1
Tap
I Email
in the application launcher
screen to launch the email application.
2
Tapé, then tap
email message composition screen.
3
Tap the direct line in the
enter a subject for the message.
4
Tap the message field, then tap the text
entry method drop-down menu at the
bottom of the screen and select an entry
method to enter text in the message field.
office applications
76
New Email
to open the
Subject
field to
When you are finished, tap
ë
in the
lower right corner of the screen to hide
the text entry keyboard or pad.
5
Tap To to select contacts from your
address book, or tap the direct line in the
To
field to enter an email address.
6
Tap
Send
to send the message.
When composing an email message, you can
tap
é
to perform various operations on the
message prior to sending it. The email menu
can include the following options:
options
Save to
Draft
Insert
Signature
Save the message to the
Drafts
folder.
Append your signature to the
end of the message.
Page 77
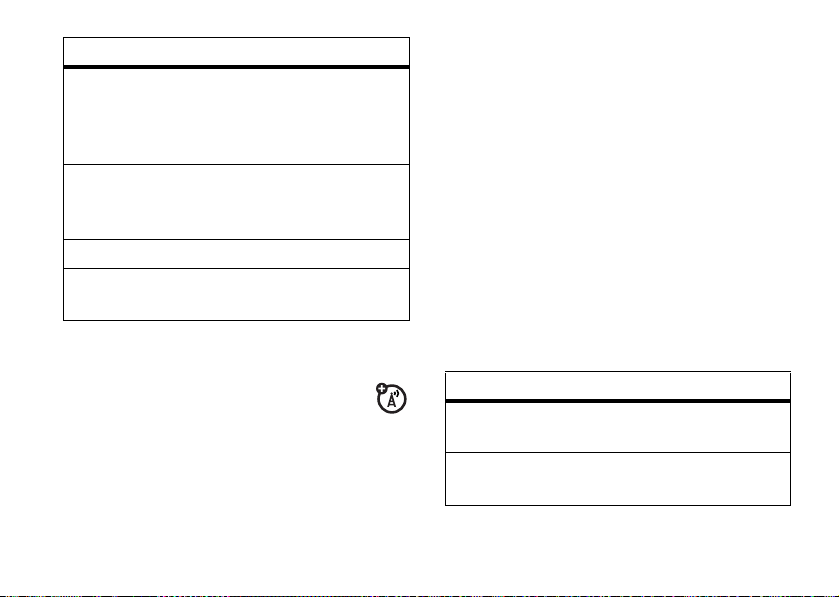
options
CC/BCC
options
Attachments
Priority
Delete
Attachments
Show Cc and/or
to carbon-copy or
blind-carbon-copy the message
to additional recipients.
Attach a contact, calendar
event, task, or media object to
the message.
Set message priority.
Delete message attachments.
Bcc
header fields
receive an email message
Email messages that you receive are
stored on your service provider’s email
server until you download them to your
phone.
Tap
I Email
in the application launcher screen
to launch the email application. Tap
Send/Rec.
to
download new received messages to your
phone.
When you download an email message:
•
Tap. to see message details (sender,
subject, time, and size).
•
Tap the message to read it.
•
Tap
Reply
to send an email reply to the
message.
•
Tapé to perform various operations
on the message. The received email
message menu can include the
following options:
options
Save File
Move To
Folder
Save a media object attached to
the message.
Move the message to another
folder.
office applications
77
Page 78
options
Delete
Delete the message.
Message
create a personal folder
The procedures for creating and using a
personal folder are similar to the
corresponding message center procedures.
See page 70 for more information.
set up the email inbox
If the phone cannot locate your email mailbox,
it opens the mailbox setup screen for you to
configure your mailbox settings.
automatic setup
1
Select your email service provider from
the mailbox setup list, then tap
office applications
78
OK
.
2
Enter your
User Name
and
Password
in the
appropriate fields, confirm your password
in the
Re-enter Password
3
To edit email sending, receiving,
field, then tap OK.
signature, connections options, tap the
mail box name you wish to edit. Then
enter settings as described in the
following section.
manual setup
If your service provider is not listed on the
mailbox setup list, you can manually set up
your email mailbox as follows:
1
Tap
Setup Manually
on the mailbox setup
screen to manually enter email settings,
2
then tap
Tap t h e
OK
.
Mailbox Name
field and enter your
mailbox name.
3
Tap
Send Setup
and
Receive Setup
to configure
your email sending server and receiving
server settings as described below.
Page 79
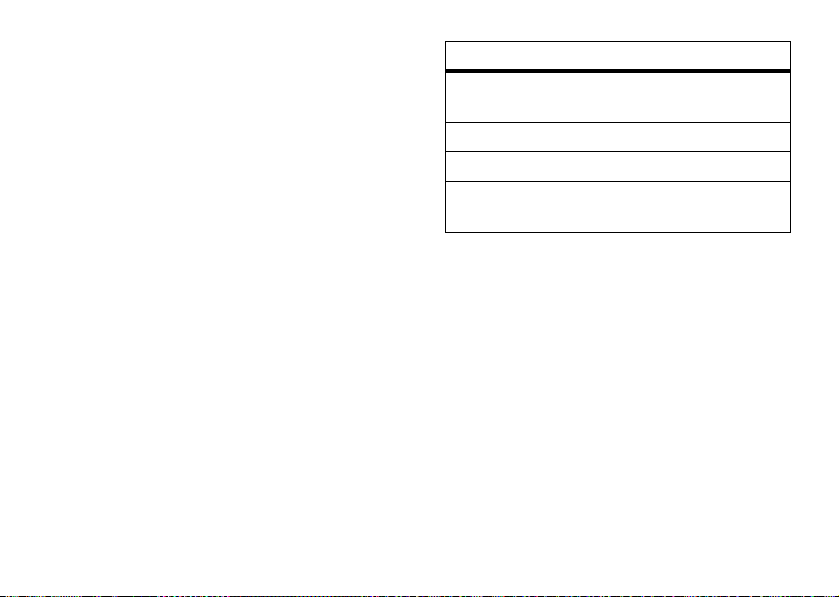
4
Tap
Signature Setup
, If you want your phone
to automatically append your signature to
all outgoing email messages, tap the
check box
messages
e
beside
Add signature to all outgoing
. A check markd indicates that
automatic signature is activated.
5
Tap the signature field and enter your
signature.
6
Tap OK to save your signature.
7
Tap
Connections Setup
connection desired and tap
8
Tap OK to store your mailbox settings.
, then select the type of
OK
.
send setup options
Note:
Actual field names and values may vary
depending on the technologies available to
your service provider. Some settings may not
be available for all phone models.
options
Server
Port
Email
Nickname
IP address or host name that
handles your outgoing email.
Port number for sending host.
Your email address.
Name to be inserted before
your return address, if desired.
office applications
79
Page 80
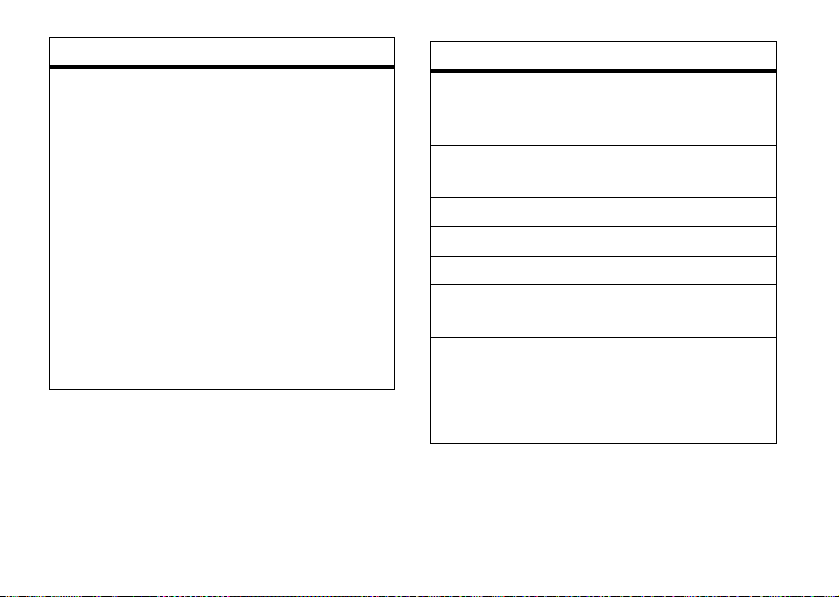
options
Authentication
Set
Authentication
to On if you
need a user name and
password to access your
outgoing email server.
Set
Same as Receive Setup
if user
name and password are the
same as for your incoming
email server.
Otherwise, enter your
outgoing email server
and
Password
, and confirm your
User Name
password in the
Re-enter Password
field.
receive setup options
Note:
Actual field names and values may vary
depending on the technologies available to
your service provider. Some settings may not
be available for all phone models.
office applications
80
options
POP3
or
Select the protocol to
IMAP
Server
communicate with the receiving
host:
POP3
or
IMAP
.
IP address or host name that
handles your incoming email.
Port
User Name
Password
Re-enter
Password
Check All
Folders
Port number for receiving host.
Your user name.
Your user password.
Confirm your user password.
Select to check all folders for
email.
Set the
Root Folder Path
that your
phone should search.
Page 81
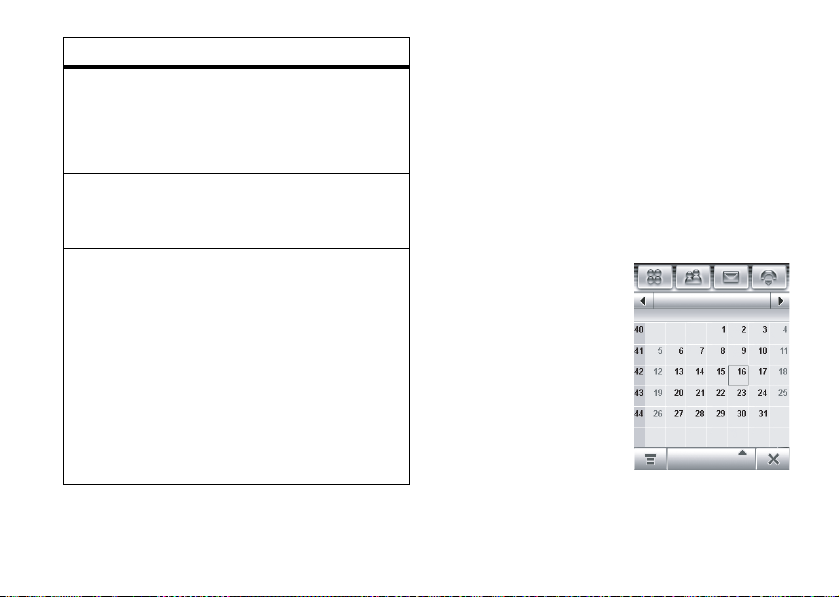
options
Save
Special
Folders
Incoming
Message
Size Limit
Keep on
Server
Select to specify additional
email folders.
You can set the
the
Drafts Path
Sent Items Path
.
and
Maximum size of an email
message to be downloaded to
your phone.
Select to save copies of your
email messages on the remote
server. (For POP3, prevents
message deletion on remote
server after message is
downloaded to your phone. For
IMAP, prevents message
deletion on remote server after
message is deleted on your
phone.)
calendar
You can use your phone’s calendar to
schedule and organize events such as
appointments and meetings.
Tap
J Calendar
screen to schedule or review calendar events.
month view
The calendar initially
shows a calendar for
the month.
Tap
î
orì to go to the
previous or next
month.
An indicator in the
lower left corner of the
date box indicates that
one or more events are scheduled for the day.
in the application launcher
10-16-2008
SFTWTMS
Month
office applications
81
Page 82
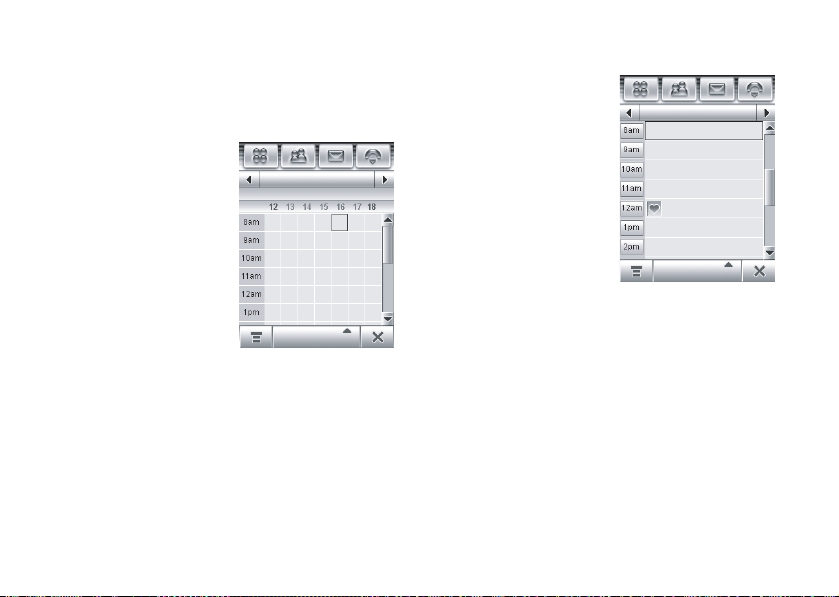
Tap the date box to see the day’s events. Tap
an event to see event details.
week view
Tap the
Month
button in
the bottom button bar,
then select
Week
to see
the week view.
Tap
î
orì to go to the
previous or next week.
Vertical bars indicate
scheduled events for
the day. A horizontal
bar below the date indicates a full-day event.
Tap the day to see the day’s events. Tap an
event to see event details.
office applications
82
Oct 2008 Week 42
SSFTWTM
Week
day view
Tap a day in the month
or week view to see
the day’s events.
Alternatively, you can
tap the
Month
button in
the bottom button bar,
then select
Day
to see
Date
the highlighted day.
Tap
î
orì to go to the
previous or next day.
Tap an event to see event details.
add new event
Note:
You must create an event to use the
reminder alarm.
1
Tap
J Calendar
screen to open the calendar.
in the application launcher
10-16-2008
Day
Page 83
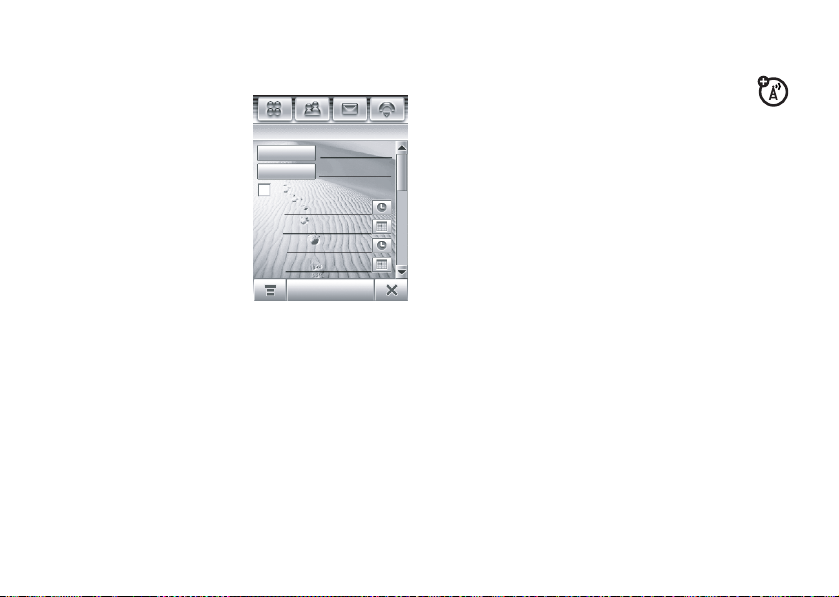
2
Tap the day to which you want to add an
event. Your phone lists the day’s events.
3
Tapé, then tap
New Event
to open
the new event
editor (shown at
right).
4
Tap the direct line
in a field to enter
event details. Pull
down the scroll bar
Create new event
Subject...
Location...
All day event
Start:
12:00
10-16-2008
End:
13:00
10-16-2008
Save
to see additional
fields.
5
When you’re finished entering
information, tap
Tap
ó
to exit without storing the event.
Save
to store the event.
schedule a meeting
You can send a meeting request
message to other wireless phone
users, and to email addresses. The
meeting is added to your calendar, and to the
calendars of the message recipients.
1
Tap
J Calendar
screen to open the calendar.
2
Tapé, then tap
the meeting request editor.
3
Tap the direct line in a field to enter
meeting details. Pull down the scroll bar
to see additional fields.
4
When you’re finished entering
information, tap
request and add the meeting to your
calendar.
Tap
ó
to exit without sending the meeting
request.
in the application launcher
New Meeting Request
Send
to send the meeting
to open
office applications
83
Page 84

edit an event
1
Tap the event to see event details.
2
Tap
Edit
to open the event editor.
3
Tap the direct line in a field to edit its
contents. Pull down the scroll bar to see
additional fields.
4
When you’re finished editing information,
tap
Save
to store the event.
delete an event
1
Tap the event to see event details.
2
Tapé, then tap
3
Tap OK to confirm the deletion.
Alternatively, to delete an event, tap and hold
the event title, then select
pop-up menu.
office applications
84
Delete
.
Delete
from the
dismiss reminder alarm
When you set a reminder alarm for an event,
the phone shows an event reminder and
sounds a reminder alarm.
Tap
Snooze
to turn off the reminder alarm for a
short period of time. The reminder alarm
sounds again when the snooze period
expires.
Tap
Cancel
to dismiss the reminder alarm.
If you have more than one event set up for the
same time, the phone shows each event in
sequence. As you read and dismiss each
event reminder, the next event is shown.
change the calendar setup
You can set the calendar’s default view
(month, week, day), weekly start day, daily
start time, reminder snooze period, event
storage period, alarm timeout, and lunar
calendar.
Page 85

When you select
Alarm when powered off
in the
calendar setup screen, your phone turns itself
on if necessary to remind you about
scheduled events.
1
Tap
J Calendar
in the application launcher
screen to open the calendar.
2
Tapé, then tap
3
Tap a field to change its setting. Pull down
Setup
.
the scroll bar to see additional fields.
4
When you’re finished changing settings,
tap
Save
to store the settings.
share event information
You can share calendar events with others by
sending the data as a vCalendar entry to
another phone, PC, or hand-held device.
1
Tap
J Calendar
screen to open the calendar.
in the application launcher
2
Tap the name of the event you want to
send. Your phone shows event details.
3
Tapé, then tap
4
Tap
Bluetooth
Share
.
, then tap OK to exchange the
data through a Bluetooth™ wireless
connection.
or
Tap
Message
or
Email
, then tap OK to send the
event data in an MMS or email message.
5
Complete the setup procedure for the
transfer method you selected.
6
Tap OK to send the event information in a
vCalendar entry.
For more information about using a Bluetooth
wireless connection, see page 116.
office applications
85
Page 86
synchronize calendar entries
You can synchronize calendar entries
with your PC through a Bluetooth
wireless connection or USB cable
connection using Motorola mobile
PhoneTools software. For more information,
see page 120.
tasks
You can create and review a checklist of tasks
you need to perform, and set your phone to
notify you when task deadlines arrive.
add new task
1
Tap
L Tasks
in the application launcher
screen to open the task list.
2
Tapé, then tap
3
Tap the direct line in a field to enter task
details.
office applications
86
New
.
4
When you’re finished entering
information, tap
Save
to store the task.
view tasks
Tap
L Tasks
in the application launcher screen
to open the task list. Tap a task to see its
details.Tap the check box
name to indicate that you’ve completed the
task.
Tap and hold on a task to open a pop-up menu
from which you can
To sort the task list, tap the sort order button
in the bottom button bar. You can choose to
see
All Tasks, Unchecked
Completed
tasks.
Tap
é
to perform various operations on the
task list.
e
Share, Edit
tasks,
Due Tasks
beside the task
, or
Delete
the task.
, or
Page 87
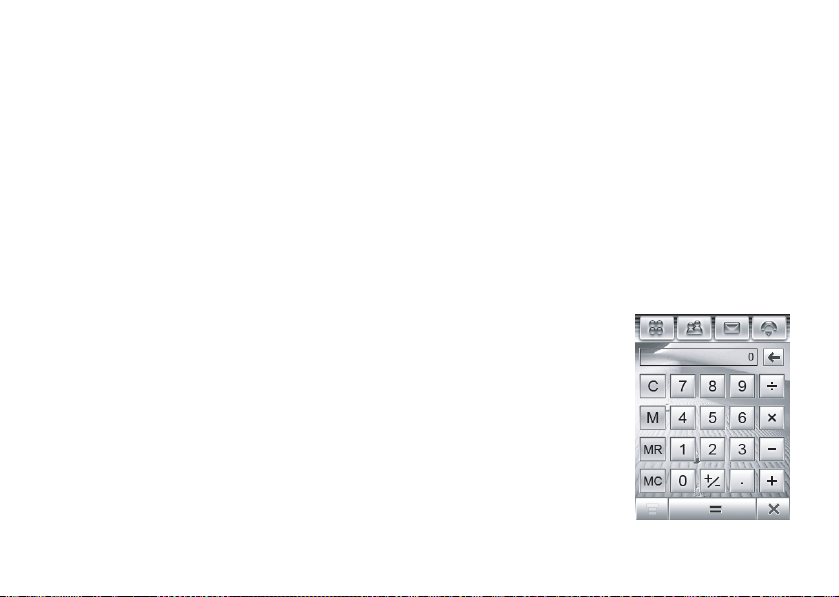
viewer
The viewer application provides an easy way
for you to read documents stored on your
phone.
Tap
ñ Viewer
screen to open the viewer application.
Your phone shows the file folders included on
your phone (see page 87 for folder
descriptions). Tap a folder to see its contents.
Tap a document to open it in the viewer.
You can scroll through a large document by
dragging the stylus across the screen and
“dragging” the document in the direction you
want to move.
To zoom in or out on a document, tap the
center of the screen, release, then quickly tap
and hold the screen and drag the stylus up or
down to adjust the document size.
in the application launcher
To reflow the text or make other view
adjustments, tap
View
, then tap
document,
For more information about how to use the
viewer, tap
Help
.
é
to open the menu, tap
Reflow, Rotate screen, Reload
Fit to width
é
, or
Fit to height
to open the menu, then tap
.
the
calculator
You can use your phone as a calculator.
Tap
Q Calculate
application launcher
screen to open the
calculator.
Tap the numeric and
calculation keys to
perform a calculation.
Tap
=
to calculate the
result.
in the
office applications
87
Page 88
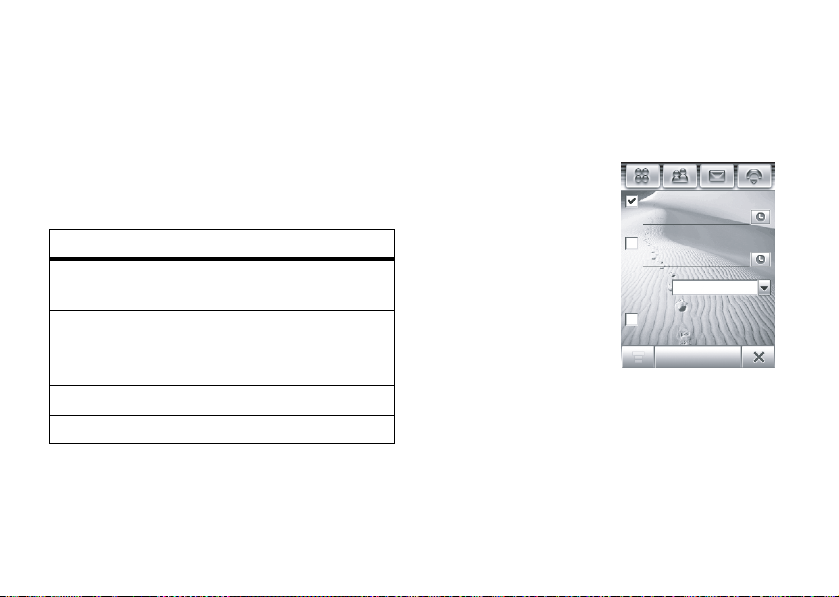
TapC to clear the calculation. Tapò to clear
the last entry, one digit at a time, when
performing a calculation.
Tap
â
to return to the application launcher
screen.
Tap the following keys to perform the
described functions:
functions
+/-
Change the entry’s sign
(positive/negative).
M
Store the sum of the current
calculation result, and the
stored number.
MR
MC
88
Show the stored number.
Clear the stored number.
office applications
alarm clock
Your phone has an alarm clock with two
separate alarms that you can set to alert you
at the time(s) you specify.
1
Tap
Z Alarm
in the
application
launcher screen to
open the alarm
clock setup screen.
2
Tap the check
box
e
beside an
alarm to activate it.
A check mark
d
indicates that the
alarm is activated.
3
Tap below the alarm name to set the
alarm time. Set the desired time, then tap
OK
to store it.
4
Tap
Snooze
to set the snooze period.
Alarm 1
17:00
Alarm 2
17:15
Snooze: 5 min
Alarm when powered off
Save
Page 89

5
Tap
Save
to store your settings.
When the alarm expires, your phone shows
an alarm reminder and sounds an alert.
Tap
Snooze
to turn off the event reminder for a
short period of time. The alarm sounds again
when the snooze period expires.
Tap
Cancel
to turn off the alarm.
When you select
alarm clock setup screen, your phone turns
itself on if necessary to alert you when the
alarm expires.
Alarm when powered off
in the
File Manager
The File Manager application makes it easy for
you to create personal folders to store and
manage your files and applications.
Tap
2 File Manager
screen to open the File Manager.
in the application launcher
Your phone lists the available storage devices
(such as
removable
storage device to see the root directory for
the device.
Your phone includes several predefined
folders:
MyImages
MyAudio
MyVideo
MyNotes
Phone
memory, and an optional
MicroSDTM memory card). Tap a
Stores photos that you take
with your phone’s
Stores ring tones you
download to your phone, and
sound files you record with the
% Recorder
Stores video clips that you
record with your phone’s
K Video
Stores notes that you write
with the
application.
.
U Notes
F Camera
application.
.
office applications
89
Page 90
MyPrograms
Preload
Note:
from those listed above.
Stores applications that you
download and install on your
phone.
Stores preloaded media files
installed on your phone.
Your phone’s files and folders may differ
edit files and folders
Tap and hold a file or folder to open a pop-up
menu to perform various operations on the
file/folder. The edit menu can include the
following options:
options
Open With
90
Specify the application your
phone should use to open the
file (files only).
office applications
options
Share
Install
Copy
or
Move To
Rename
Delete
Properties
Send the file to another
phone, PC, or hand-held
device (files only).
Install the selected file (files
only).
Cut
Copy or cut the file or folder to
the clipboard. (Tap
tap
Paste
to paste the clipboard
contents in the current folder.)
Move the file or folder to a
new location.
Rename the file or folder.
Delete the file or folder.
See information about the file
or folder.
é
, then
Page 91

create new folder
1
Tap
2 File Manager
in the application
launcher screen to open the File Manager.
2
If necessary, tap the folder tree icon to
select the location (phone or memory
card) where you want to create the folder.
3
Tapé, then tap
4
Enter a name for the folder.
5
Tap
Save
to save the folder.
New Folder
.
view
To change the way your files and folders are
shown, tap
Thumbnail View
é
, then select
.
List View
or
sort
To change the way your files and folders are
sorted, tap
files or folders by
é
, then tap
Sort by
Time, Name, Size
. You can sort
, or
Type
.
search
To search for a specific file:
1
Tapé, tap
2
Enter the name of the file in the
More
, then tap
Search
.
File Name
field.
3
Specify the file type in the
4
Tap
Search
to begin the search.
File Type
field.
If the file is found, the filename is listed. Tap
the filename to open the file. Tap and hold the
filename to see the file path.
If the file is not found, tap
File Manager screen, or tap
ó
to return to the
Retry
to try another
search.
folder tree
Tap the folder tree icon in the File
Manager screen to see the folder structure
and organization of your phone, or a storage
device connected to the phone.
office applications
91
Page 92
removable memory card
You can use an optional removable
MicroSD
phone to store and retrieve multimedia
objects (such as photos, video clips, and
music files). To insert a memory card in your
phone, see page 23.
Tap
name to see its root directory.
Tip:
to open a pop-up menu to
card or see memory card
Tap
memory card. The storage device menu can
include the following options:
92
TM
memory card with your
2 File Manager
, then tap the memory card’s
Tap and hold on the memory card’s name
Format
the memory
Properties
.
é
to perform various operations on the
options
New Folder
Create a new folder on the
memory card.
office applications
options
List View
or
See memory card files and
Thumbnail
View
Share
folders in a text-based
or graphic icon
Send a file to another phone,
PC, or hand-held device.
Move
Paste
Move a file to a new location.
Paste the clipboard contents
at the current location.
Sort By
Sort memory card files or
folders by
Type
Delete
Delete a memory card file or
folder.
More Search
folder. Tap
information about a file or
folder.
List View
Thumbnail View
Time, Name, Size
, or
.
for a memory card file or
Properties
to see
.
Page 93
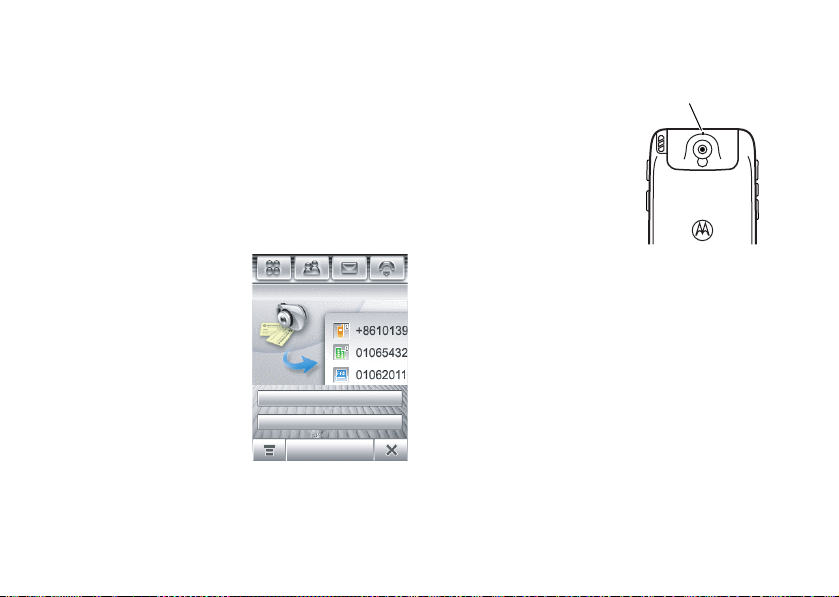
business card reader
The business card reader application lets you
use your phone’s camera to capture a
business card image, then store the card’s
information as a contact in the phone’s
electronic address book.
capture business card image
Tap
0 BCR
in the
application launcher
screen to open the
business card reader
application.
Tip:
Tap
Help
to see
instructions on how to
position and frame the
business card that you
want to capture.
Business Card Reader
Capture Business Card
Help
Push the camera
mode switch to the
left
to put the
Camera Mode Switch
Î
=
normal
picture mode.
Í
=
macro
mode.
camera lens in
macro mode.
Tap
Capture Business
Card
to activate the
camera and go to
the Optical
Character
Recognition (OCR) viewfinder.
Use the red border in the OCR viewfinder to
vertically frame the business card you want to
capture. Position the camera so that the card
fills the frame without extending beyond the
frame borders. The framing border and center
indicator turn green when the business card is
framed properly.
Your phone automatically captures a business
card image when the card is properly framed
office applications
93
Page 94

in the OCR viewfinder. (To activate the
auto-capture feature, see page 94).
If auto-capture is turned off, tap the
to manually capture the business card.
Alternatively, you can press the camera key or
press in the joystick
business card.
s
to capture the
Capture
key
edit business card information
Your phone interprets the text on the captured
business card image, and sorts the text into
logical categories.
The character recognition software may
misinterpret a text string or assign it to the
wrong category. On the edit business card
screen, tap a category name to change the
assigned category. Tap the direct line in a
category to edit its contents. If more
categories are available, pull down the scroll
bar on the right side of the screen to see and
edit their contents.
office applications
94
To
add
another category to the list, tapé,
then tap
To
list, tap
To
details, tap
move
in the direction you want to move. To
in/out
Zoom In
small box to the left of an outlined text string
to see its assigned category and content in
the upper part of the screen.
When you’re finished editing business card
details, tap
new contact in your phone’s address book.
Add Items
.
delete
one or more categories from the
é
, then tap
see the business card
é
the card image, tap and drag the image
on the card image, tapé, then tap
or
Zoom Out
Save
Delete Items
, then tap
. On the card image, tap the
to save the information as a
.
while you edit its
Show Card Image
. To
zoom
business card reader settings
Tapé, then tap
reader settings.
Setup
to adjust business card
Page 95
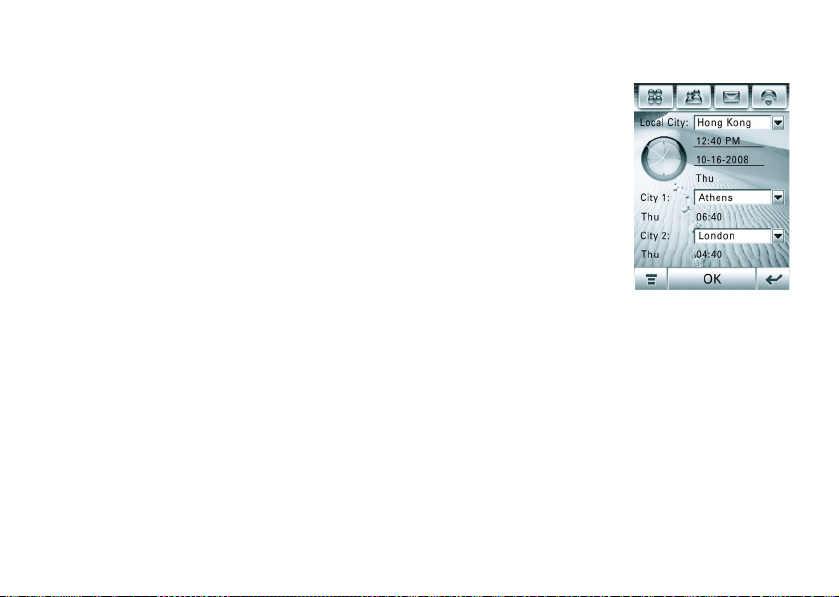
Select
Auto Capture
automatically capture a business card image
when the card is properly framed in the OCR
viewfinder.
You can set your phone to automatically
Delete Image
card after you save its contact information in
the address book.
Use the
categories that you always want to show in
the edit business card screen.
to have your phone
or
Save Image
Always Show
list to select information
for a captured business
recognize stored business card
To recognize and edit a business card image
that you’ve already captured and stored on
your phone, tap
launcher screen to open the business card
reader application, tap
then tap the card you want to recognize and
add to the contact list.
0 BCR
in the application
é
, tap
Open Business Card
world time
Your phone can show
the current time and
date for multiple cities
around the world.
Tap
9 Time
in the
application launcher
screen to see the
world time screen
(shown at right).
You can reset the time and date for a listed
city. Tap the time and/or date field to change
it. Tap
OK
to save your changes.
,
office applications
95
Page 96
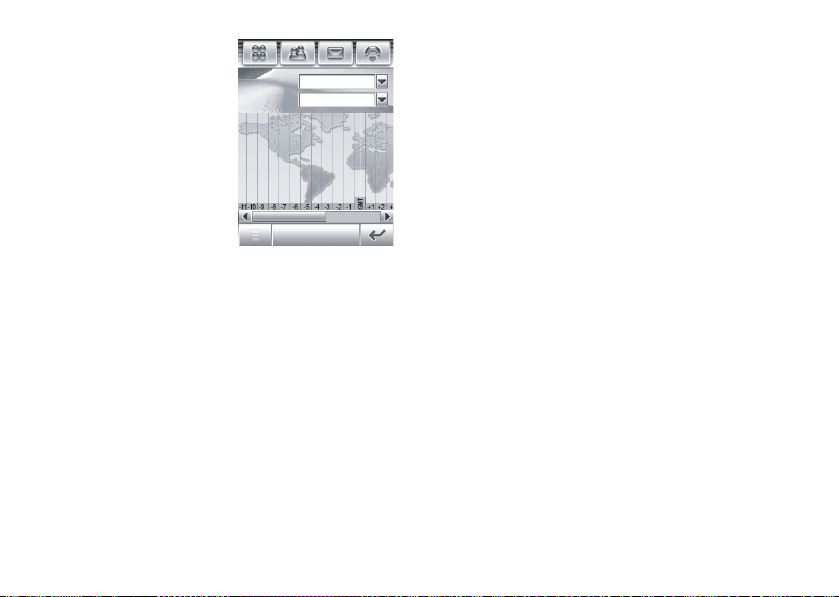
To replace a city listing
in the world time
screen, tap the city
name, then tap
Browse...
City:
Time Zone:
Hong Kong
GMT +08:00
to see the time zone
map (shown at right).
Tap the city name
again to see a city list.
Select a new city, then
tap
OK
to store it.
OK
Alternatively, tap a time zone in the time zone
map to see a list of cities in that time zone.
Select a new city, then tap
office applications
96
OK
to store it.
Page 97
multimedia applications
Tap
ó
browser
The browser lets you access Web
pages and Web-based applications on
your phone. Contact your service
provider to set up access, if necessary.
start a browser session
Tap
3 Browser
screen to start the browser.
If you are unable to establish a network
connection with the browser, contact your
service provider.
interact with web pages
Pull down the scroll bar to scroll through a text
page or option list. Tap an option to select it.
in the application launcher
at any time to return to the previous
screen.
Some Web pages may contain text fields for
exchanging information with a Web site. Tap
the field and enter text in the usual way.
Tap
é
to perform various browser operations.
The browser menu can include the following
options:
options
Go To Page
Home
Enter a Web address (URL) to
go to a Web site.
Go to the homepage of the
current Browser profile.
multimedia applications
97
Page 98
options
Bookmarks
History
File Save
View
98
See a list of your bookmarks.
Tap
or
Open, Edit, Delete
highlighted bookmark.
See a list of Web sites you
have visited. Tap
Delete
browser window,
tap
information.
Set browser view to
or
Full Screen
Small, Medium
or out on the Web page, or
select a
multimedia applications
é
to add a
the highlighted Web site.
a file or
About Opera
New
bookmark,
, or
Share
é
to
Save All
files in the
Copy
to see browser
Fit to Screen
, set text size to
, or
Large
, zoom in
Custom Zoom
setting.
the
Open
a file,
or
options
Active Page
Setup
Bookmark the active page,
show the security level, or
change encoding of the active
page.
Add and edit browser profiles,
adjust browser preferences,
show SSL and WTLS
certificates, empty the cache,
and delete cookies.
download files
You can download a file, game, or application
from a Web page onto your phone by
selecting its link.
You must specify the location where you want
to save the file, and your phone must have
sufficient memory storage space to store the
file.
Page 99

You can purchase games, applications, and
multimedia content for your phone. In most
cases, you can download and preview content
before you purchase it. After previewing the
content, you can choose to discard it, or
purchase it and install it on your phone.
Notes:
•
Call charges apply during download
sessions.
•
Some games might make your phone
vibrate. Some ring tones vibrate
automatically. If you use one of these
tones, your phone vibrates even when
it is not set to a vibrate ring style.
close the browser
Tapâ to close and exit the browser
application.
network connection profiles
You can use different Internet accounts
to connect to the Internet in different
ways. Use the network feature to select
or create a network connection profile for an
Internet account.
select a profile
To select a network connection profile, tap
T Setup
in the application launcher screen, tap
Data Network
then tap
using the selected profile.
create a new profile
To create a new network connection profile:
1
2
. tap the profile you want to use,
Connect
to connect to the Internet
Tap
T Setup
in the application launcher
screen, then tap
Tapé, then tap
Data Network
New
to open the new
profile menu.
.
multimedia applications
99
Page 100
3
Enter configuration settings as described
in the following table. Tap the direct line in
a field to enter the setting. Pull down the
scroll bar to see additional fields.
4
When you are finished entering
information, tap
Save
to store the profile.
options
Profile Name
GPRS APN
Enter the profile name.
GPRS access point name (the
name of the WAP service
provider).
GPRS User
Name
GPRS
Password
GPRS Timeout
User name for GPRS APN
connection.
Password for GPRS APN
connection.
Inactivity interval at which the
phone disconnects the GPRS
connection.
multimedia applications
100
options
Primary
gateway IP
Port
Secondary
gateway IP
Port
GPRS DNS
Server 1
and
2
CSD Dial In
Number
CSD User
Name
CDS Password
CSD Baud Rate
Primary service gateway IP
address for your WAP service
provider.
Primary service port number.
Secondary service gateway IP
address.
Secondary service port
number.
Primary and backup DNS IP
servers.
Phone number to use to set
up a CSD connection.
User name for CSD
connection.
Password for CSD connection.
Connection speed for CSD
connection.
 Loading...