

Page 1

Hitch
USB Transfer Device
Model USB-101
To register your product, visit us at:
www.gethitch.com
Page 2

USB-101 User manual Introduction
Congratulations and thank you for purchasing the Hitch™ USB transfer device from
Sima Products Corporation. This product is a designed to provide power while
transferring data between two USB Mass Storage Class complaint devices -- without
the need for a PC. The user can also transfer PTP digital camera files. It is a perfect
solution for anyone who wants to transfer data, images or music between media
players, USB thumb drives, digital cameras & camcorders and even USB external
hard drives. Hitch™ units support USB 1.1 and USB 2.0 devices.
Note: The Hitch™ transfer device is designed to work with the latest USB
devices. Regular firmware updates are available on our website. To download
updates for your Hitch
www.gethitch.com
TM
unit, check out the HitchTM website at
Introduction
©2006 Sima Products Corporation
140 Pennsylvania Ave.
Bldg #5
Oakmont, PA 15139
www.simaproducts.com
www.gethitch.com
800-345-7462
PN21746
Page 2
Page 3

USB-101 User manual Introduction
Table of Contents
Introduction...................................................................................................................... 2
Hitch™ Features ............................................................................................................5
Package Includes............................................................................................................ 5
Front panel drawings....................................................................................................... 6
Side and top panel drawings ........................................................................................... 7
Getting Started.................................................................................................................8
Power up ........................................................................................................................ 8
Hitch mode - transferring files...................................................................................... 10
Connecting USB devices..........................................................................................11
Transferring Files.....................................................................................................12
Music Mode – transferring music files.........................................................................15
Updating with iTunes*.................................................................................................20
Copy Protected files..................................................................................................... 21
Optional Features........................................................................................................... 22
Run User Program.................................................................................................... 22
Backlight Setting (Hitch Mode)............................................................................... 24
Idle Power Off (Hitch Mode).................................................................................. 25
Horizontal Scroll (Hitch Mode) ............................................................................... 25
Here/There (< >) button........................................................................................... 25
Install User File (Hitch Mode)................................................................................. 27
Remove User File (Hitch Mode).............................................................................. 28
Here/There View (Music mode).............................................................................. 29
Send Mode (Music mode)........................................................................................ 30
Troubleshooting ............................................................................................................. 30
Specifications.................................................................................................................. 32
Warranty ........................................................................................................................ 33
90 Day Limited Warranty ........................................................................................ 33
Page 3
Page 4

USB-101 User manual Introduction
FCC NOTICE TO USERS
The system may cause interference to a TV or radio even when it is operating properly. To determine whether the system is causing the
interference, turn it off. If the interference goes away, the system is causing the interference. This equipment has been tested and found to
comply with the limits for a Class B digital device, pursuant to Part 15 of the FCC Rules. These limits are designed to provide reasonable
protection against harmful interference in a residential installation.
This equipment generates, uses and can radiate radio frequency energy and, if not installed and used in accordance with the instructions,
may cause harmful interference to radio communications. However, there is no guarantee that interference will not occur in a particular
installation. If this equipment does cause harmful interference to radio or television reception, which can be determined by turning the
equipment off and on, the user is encouraged to try to correct the interference by one or more of the following measures:
• Reorient or relocate the receiving antenna.
• Increase the separation between the equipment and receiver.
• Connect the equipment into an outlet on a circuit different from that to which the receiver is needed.
• Contact your dealer for help.
This device complies with Part 15 of the FCC Rules. Operation is subject to the following two conditions:
1. This device may not cause harmful interference.
2. This device must accept any interference received, including interference that may cause undesired operation.
WARNING: changes or modifications to this unit not expressly approved by the party responsible for compliance could void the user’s
authority to operate the equipment.
When using electrical appliances, the following basic safety precautions should always be followed.
The Manufacture does not represent this unit to be waterproof. To reduce the risk of fire, electrical shock, or damage to the unit, do not
expose this unit to rain or moisture or immerse in water.
To reduce the risk of electric shock, do not disassemble this product. Take it to a manufacture authorized service personnel when service or
repair work is required. Opening or removing cover voids warranty. This unit does not contain any parts that can be repaired by the users.
Page 4
Page 5

USB-101 User manual Introduction
Hitch™ Features
- Copy data (files or folders) between any two Mass Storage Devices without a computer
- Delete data (files or folders) on any Mass Storage Device without a computer
- User selectable copy destination location
- Uses Linux 2.4.31 operating system
- Compliant with OTG supplement Rev. 1.0 and USB specification version 2.0 for full-speed (12Mbps)
USB host and device
- Supports USB storage devices with USB Mass Storage Device Class compliance
- One Power Button
- One Reset Button
- Mode switch (<>) for Full disk or Root directory copy
- Uses internal LiPolymer rechargeable battery pack
Package Includes
- 1 Hitch™ unit
- User manual
- AC adapter
Page 5
Page 6
USB-101 User manual Getting Started
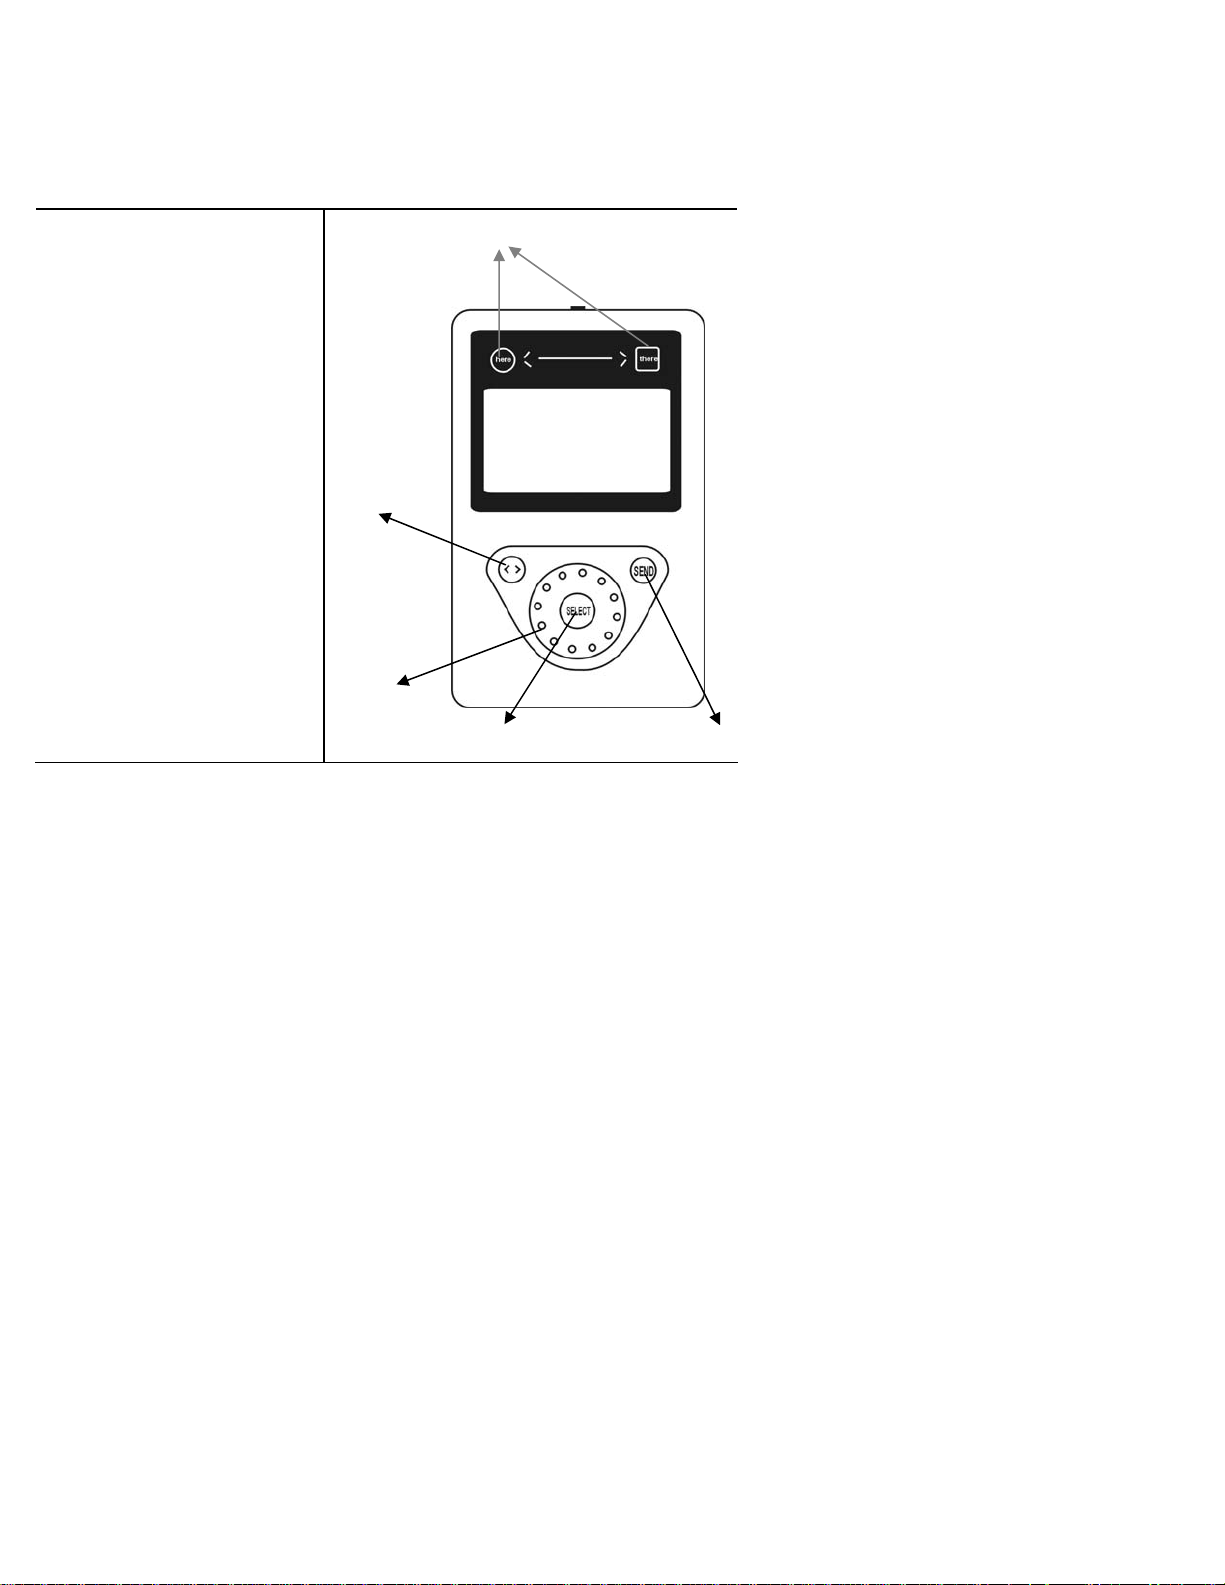
Front panel drawings
Front panel controls
1. Here/There USB device
indicators - indicate that
a recognized device is
connected to the Here or
There port and is being
viewed on the display
2. HERE/THERE button
Retreats through the active
menu tree or toggles the
display between Here and
There devices
3. Scroll wheel
To scroll between menu
options
4. SELECT button
To select menu options
and view file information
5. SEND button
To execute file transfers
1
2
3
4 5
Page 6
Page 7

USB-101 User manual Getting Started
Side and top panel drawings
1
1
2
Top Panel
Side panel
1. 5V DC adapter input
1. USB connection
2. Power Button – Press and hold for 3
sec. to turn on. Press to turn off
Page 7
Page 8

USB-101 User manual Getting Started
Getting St arted
Power up
Step 1 – Power Up
Press and hold the POWER button on the top of the
unit for 3 sec. to power up your Hitch
TM
unit. You will
see the start-up screen for about 15 seconds, followed
by the Settings menu on the LCD screen. Press the
SELECT button to advance to the Main Menu. Do not
connect a USB device to the Hitch
TM
unit before power
up.
Note: The Hitch™ unit is equipped with an
internal Lithium polymer rechargeable battery
pack that is capable of powering itself and two
other USB devices. It is charged at the factory.
If the battery has discharged, you can use the
included AC adapter to initially test and operate
the unit. We recommend fully charging your
Hitch™ unit (3 – 4 hours) before using it.
When the battery is completely discharged, the
Hitch will not boot up, only the Here and There
icons will light. You must charge it for
approximately 1 minute with the AC adapter
before using.
When the Hitch
TM
unit first powers up, it is
automatically in Hitch Mode and ready to connect to
any USB mass storage devices. To connect to an Apple
iPod*, see the Music Mode section on page 15.
Page 8
Page 9
USB-101 User manual Getting Started
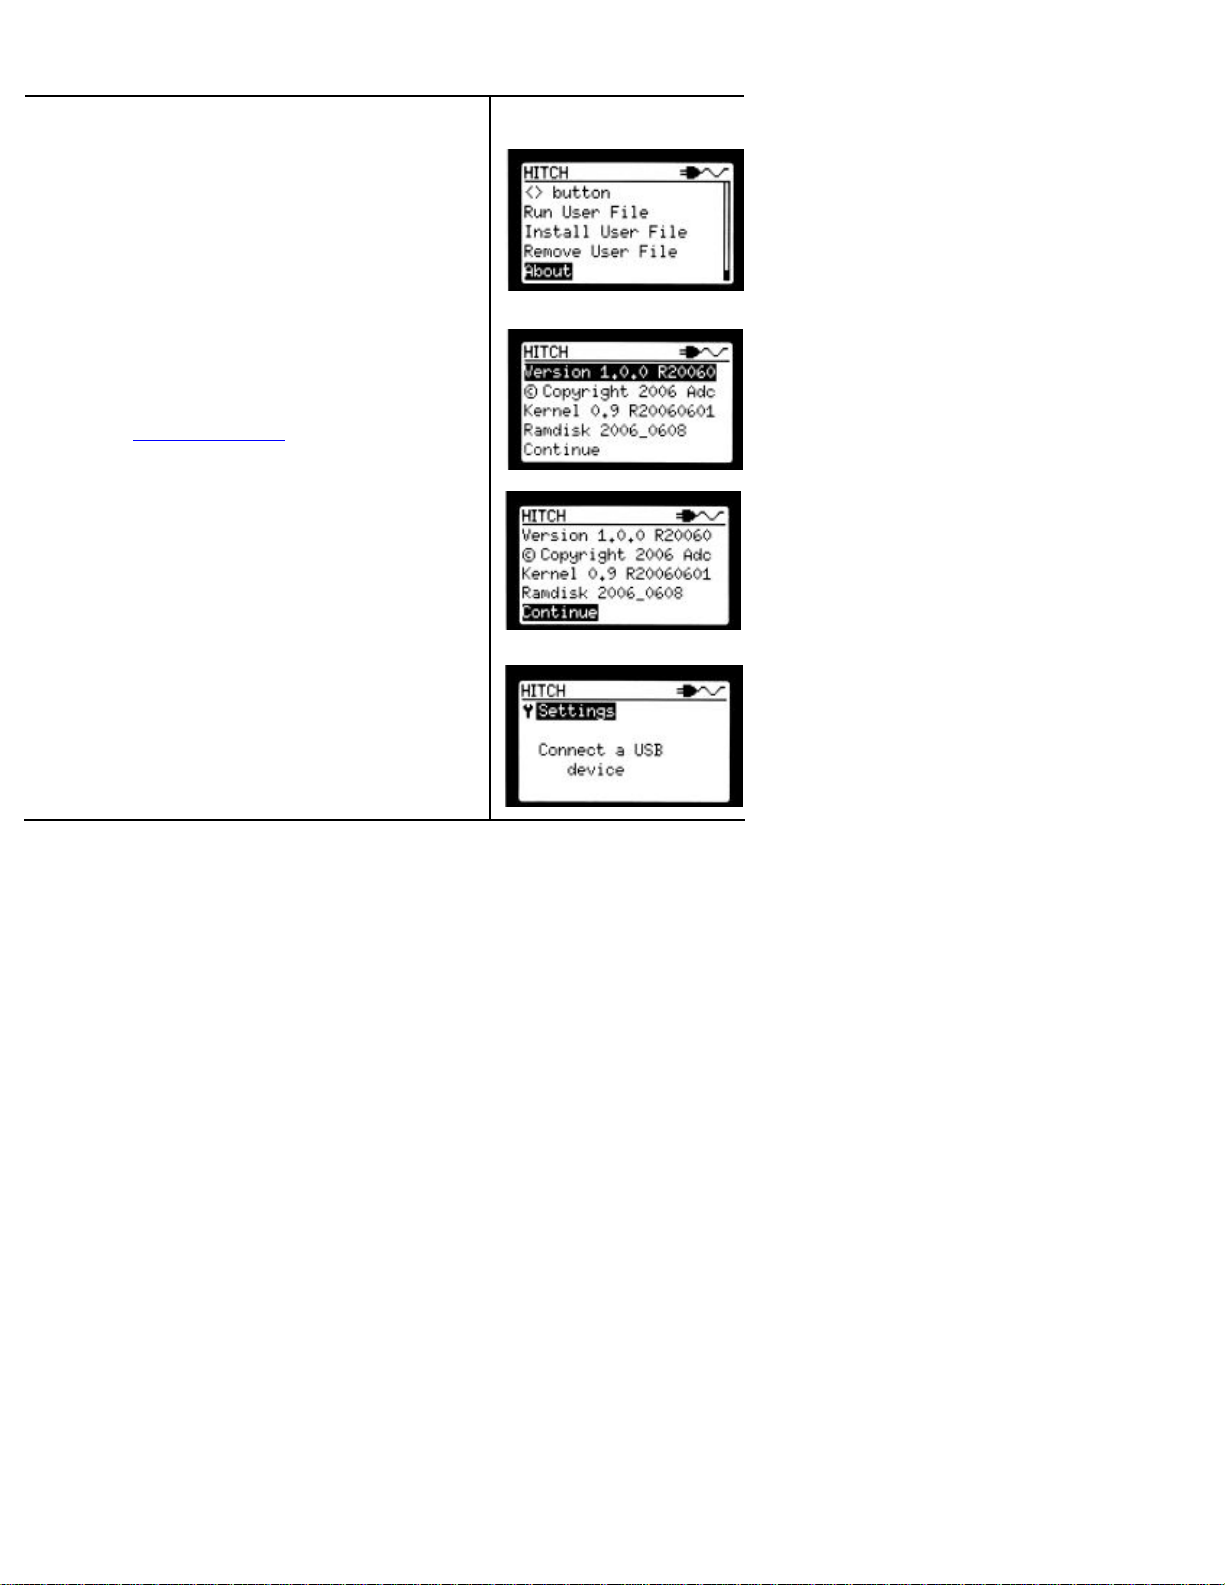
Step 2 – Check your software version
Turn the scroll wheel to clockwise to scroll down to
the bottom of the main menu to highlight the About
menu.
Press the SELECT button. The software version
number will be displayed on the top line.
Please note the software version that your Hitch
TM
unit
is running. The newest version of firmware is always
available at
on the website is higher than the version on your
Hitch
www.gethitch.com. If the version number
TM
unit, we recommend you download the
firmware upgrade.
To download new firmware, refer to the Install User
File section on page 27.
To continue, scroll down to Continue and press the
SELECT button to return to the Settings menu
Note: When navigating through menus with the scroll
wheel, you advance by highlighting your selection and
pressing the SELECT button. To retreat back through
menus, highlight the Back selection and press the
SELECT button. The Back selection is always the second
item on a menu list.
Page 9
Page 10
USB-101 User manual Transferring Files
Hitch mode - transferring files
TM
TM
unit, you are ready
unit.
After successfully powering up the Hitch
to connect two devices and transfer files. To transfer files
between devices, you must c onnect two devices e quipped wit h
USB device connectors to the Hitch
File transfers fall into two categories:
1. Hitch Mode - Transferring fil es between 2 USB mass
storage devices. We call this Hitch mode.
2. Music Mode – A special mode that supports specific MP3
players to view music database file information in Artist,
Album, Song format. Music Mode does not support PTP
cameras.
To get started , we will transfer files in Hitch mode between 2
USB mass storage devices, such as a digit al camera, camcorder
or thumb drive .
Start at the Settings menu.
Page 10
Page 11

USB-101 User manual Transferring Files
Connecting USB devices
Connect a “Here” device…
1. Connect one end of the USB connector into the device that
you want to transfer from.
2. Connect the other end into the Here side of the Hitch
unit. It will scan your device and display the root directory
tree on the screen, as illustrated at right.
Note: The Hitch
devices, however, it always transfers from the device you
have currently selected as indicated by the active Here or
There icon and direction arrow. You can easily tell which
device you are accessing by looking at the Here or There
icons at the top of the unit. The active icon will be lit.
TM
unit can transfer interchangeably between
Connect a There device…
3. Connect one end of the USB connector into the
device that you want to transfer to.
4. Connect the other end into the There side of the
TM
Hitch
unit. It will scan your device and display the
root directory tree on the screen.
TM
Page 11
Page 12

USB-101 User manual Transferring Files
Transferring Files
The HitchTM unit can transfer all of the folders,
individual folders with multiple files or individual files
from your device.
To select files for transfer:
1. Press the HERE/THERE (< >) button to select the
Here device. The appropriate icon at the top of the
unit will light up.
2. Use the scroll wheel to select the folder or file you
want to transfer.
3. Press the SEND button to transfer files.
Important note: The first time you connect a device to
the Hitch
creates a master folder called “hitch’ in the root
directory of the receiving device. Inside the “hitch”
master folder, it creates a “session” folder – named
sav_0001 - that stores all of the files transferred by the
Hitch
TM
unit and transfer files to it, it automatically
TM
unit during that session.
A transfer session begins when a device is connected to
the Hitch
disconnected. For each transfer session, the Hitch
TM
unit and ends when the device is
TM
unit
creates a new session folder. The folders are
incrementally named: sav_0001, sav_0002, sav_0003
and so on. The most recent file transfers are stored in the
most recently created session folder.
Page 12
Page 13

USB-101 User manual Transferring Files
To verify that the files have transferred successfully:
1. Press the HERE/THERE (< >) button and select th e
There device.
2. Scroll do wn to the hitch folder
3. Press the SELECT button to open the folder.
4. Select the folder named sav_0001 and press the
SELECT button.
5. You will see the files that were transferred.
Save to a folder of your choice:
You also have the option to designate a specific folder
to transfer files into. By selecting a designated folder,
the Hitch
TM
unit will not create the master and session
folder structure on the receiving device.
To transfer to a folder of your choice:
1. Starting from the There device, use the scroll wheel to
select the destination folder you want.
2. Press and hold the SELECT button for 3 seconds. The
Folder Selection screen will be displayed.
3. To select the desired destination folder, use the scroll
wheel to select the Save to this folder option and press
the SELECT button.
4. Press the HERE/THERE button (< >) to return to the
Here menu which will show the selected files or
folders to be transferred.
5. Press the SEND button. Depending on the file size,
the file transfer will take from several seconds to
several hours. There is no limit to the amount of data
the HitchTM unit can transfer.
Page 13
Page 14

USB-101 User manual Transferring Files
The following chart illustrates transfer times for typical
files
USB 2.0 High Speed Transfer times
Song
Album
Video
Video
4 MB 5 sec
15 songs 80 sec
30 min 3 min
2 hrs 12 min
Note: Use the AC adapter when your file transfer will exceed
the battery life of the
plug the AC adapter in during file transfers and not interrupt
the operation of the Hitch
TM
Hitch
unit. ( 1-4 hours). Also, you can
TM
unit.
Notes:
− You will not see photos or video on the screen of
the Hitch
displayed.
− The Hitch
TM
unit. Only the names of files will be
TM
unit does not store data.
Note: To access the menu shown to the right, press and hold the
SELECT button. From this prompt you can access the following:
Remove here or there, access the setting menu, delete files in
the hitch mode only, and save to a designated folder. This is the
only way to toggle between Hitch & Music mode when USB
devices are connected to the Hitch
TM
unit.
Page 14
Page 15

USB-101 User manual Transferring Files
Music Mode – transferring music files
The Hitch
TM
unit can also transfer music, photo and
video files between two media players including
Apple iPods*.
We call this Music Mode. Music Mode is a special
mode that places transferred music files into the
Artist, Album & Song database format in the
receiving iPod* device.
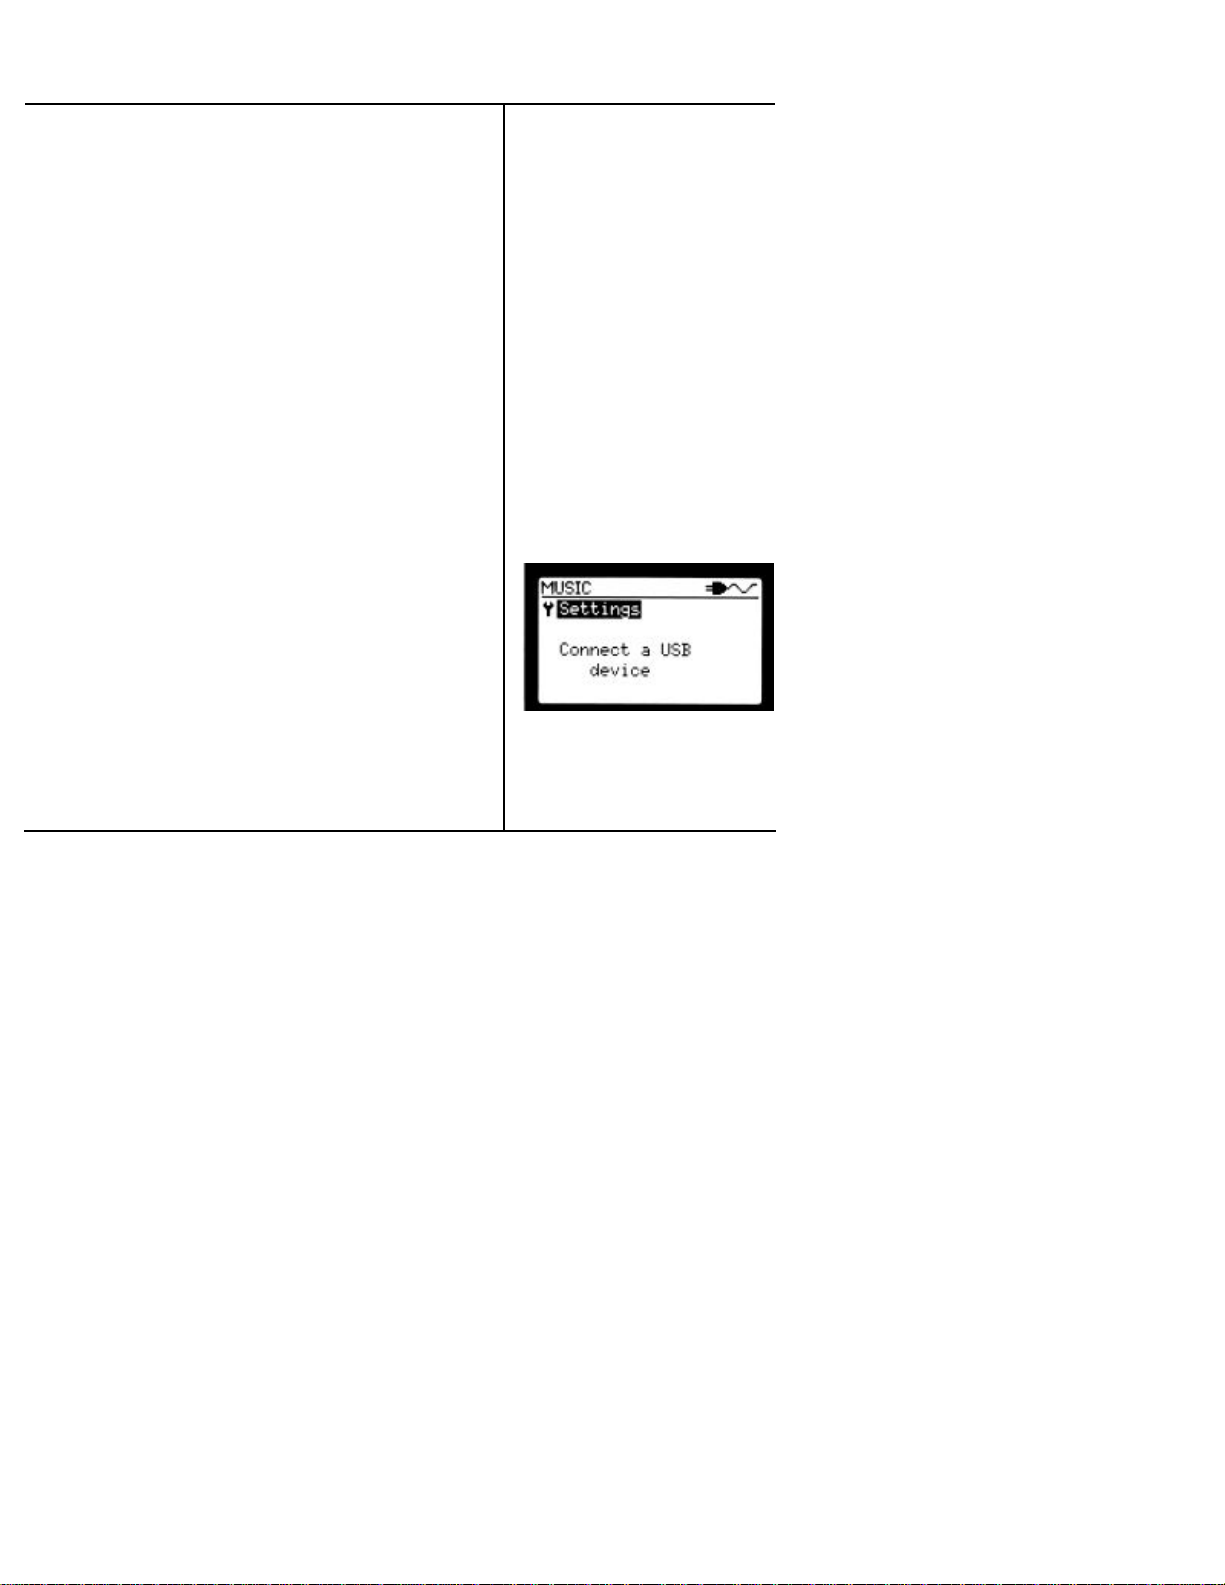
Note: To determine what mode the Hitch
look in the upper left hand corner of the screen. It will
display either “Hitch” or “Music”.
TM
unit is in,
To get from Hitch Mode to Music Mode, Press the
SELECT button, scroll down to Music Mode and
press the SELECT button again.
We are now ready to transfer a music file between
2 iPods*
Page 15
Page 16

USB-101 User manual Transferring Files
Connect to the Here side
1. Connect the USB end of one iPod* cable into
the Here side of the Hitch
TM
unit.
2. Conn ect the iPod* end of your cable into your
iPod*.
3. The Hitch
TM
unit will read the iPod* database.
When finished the Here icon and arrow will be
lit.
4. The screen will disp lay the Artist, Album &
Song folders.
5. The iPod* will display a “Do Not Disconnect”
screen
Connect to the There side
6. Connect the USB end of the second iPod* cable
into the There side of the Hitch
TM
unit.
7. Connect the iPod* end of the cable into the
iPod*.
8. The Hitch
TM
unit will read the iPod* database.
When finished the transfer bar and There arrow
will be lit. The There icon will not be lit.
9. The screen will continue to display the Artist,
Album & Song folders on the Here device.
10. The iPod* will display a “Do Not Disconnect”
screen
The Hitch
TM
unit will continue looking at the Here
device. To view the music database in the Here
iPod*, select one of the music folders and press the
SELECT button.
Page 16
Page 17

USB-101 User manual Transferring Files
To view the music database in the There iPod*,
Press the HERE/THERE (< >) button, select one
of the music folders and press the SELECT button.
Now, return to the Here device by pressing the
HERE/THERE (< >) button.
Transferring a Music file
1. To select a song to transfer, turn the scroll
wheel clockwise to scroll down the list to the
Songs menu.
2. Press the SELECT button to enter the Songs
menu.
3. Turn the scroll wheel clockwise to select the
song you want to transfer.
4. Press the SEND button to transfer the song to
the receiving device.
Note: You will notice that the HitchTM unit transfers the
file twice. The extra file will come into play when the
receiving iPod* is synched up with iTunes* on a
computer.
Page 17
Page 18

USB-101 User manual Transferring Files
As the file is transferring, a progress screen will
be displayed. When complete a Copy Complete
screen will also be displayed.
Scroll down to continue and press the SELECT
button.
The song you have transferred can now be
recognized by and played on the receiving
iPod*. To verify that the files have successfully
transferred:
1. Press the HERE/THERE (< >) button to
view the There iPod*.
2. Choose the Songs folder and press the
SELECT button to enter.
3. Your song will be listed in the database of
the receiving iPod*.
Note: In Music Mode, the HitchTM unit transfers music files
according to the music database file structure as shown
below.
Artist Album Song
Transfers all of
the music from
that artist
including all
albums and
songs by that
artist into the
respective folders
on the receiving
device
Transfers
all of the
songs on
that album.
Albums will
not appear
in the Artist
folder
Transfers
selected
songs.
Songs will
not appear
in the Artist
or Album
folder
Page 18
Page 19

USB-101 User manual Transferring Files
After completing all of your file transfers, you
can remove the iPod*s.
To remove the There iPod*:
1. Press the SELECT button.
2. Scroll down to the “Remove There” option
and
3. Press the SELECT button. The screen will
prompt you to “Unplug there”.
4. Disconnect the iPod* cable from the There
device.
The Hitch
TM
unit will automatically switch to
the Here iPod*. Follow the same sequence to
disconnect the units.
Once disconnected, the Hitch
TM
unit will return
to the Settings menu in Music Mode and the
iPod*s will return to normal operation. Now
you can enjoy the music that you just
transferred with the Hitch
TM
unit.
Note: To access this menu shown to the right “hold down
the select button”. From this prompt you can access the
following: Remove here or there, access the setting menu,
delete files in the hitch mode only, and save to a
designated folder. This is the only way to access the
settings menu to toggle between hitch & music mode when
USB devices are connected to the Hitch
TM
unit.
Page 19
Page 20

USB-101 User manual Transferring Files
Updating with iTunes*
After transferring music to an iPod*, you can synchronize the database in your
iPod* with the database in iTunes*.
To sync up with iTunes* files:
Open iTunes* on your computer.
Connect your iPod* to your computer. iTunes* will load your iPod* and synch
the iTunes* library to the iPod* library, deleting 1 of the 2 copies that was
transferred with Hitch
To add the remaining copies to your iTunes* library go to My computer and
locate your iPod*. It will appear as a removable drive. Double click to open and
view the root directory. You must copy the Hitch folder into the iTunes* music
folder. To do so, double click on the Hitch folder, right click and select Cop y.
1. Click on the Start button.
2. Select the My Music folder. Double click to open.
3. Select the iTunes* folder. Double click to open.
4. Select the iTunes* music folder.
5. Double click to open.
6. Right click and Paste the Hitch folder.
7. Close the iTunes* and iTunes* Music folders and return to iTunes*.
TM
.
Page 20
Page 21

USB-101 User manual Transferring Files
TM
You must add the iTunes* music folder (with files transferred by the Hitch
unit) to your iTunes* music library. iTunes* will automatically update your
music library with new music. It will not make copies of existing music files.
To add the iTunes* music folder:
1. Select Add Folder
2. H ighlight th e iTunes* Music folder
3. Click OK
You will now see all of the files transferred by the Hitch
TM
unit in your iTunes*
library.
Copy Protected files
There are many types of music files, some of which are copyright protected. A
copy protected song cannot be played on your iPod* until it has been enabled by
iTunes*. Permission to unlock the copy protection must come from the music’s
owner.
The Hitch
file extension. Music with the file extension M4P are copy protected.
To view song properties on the Hitch
Use the scroll wheel to highlight a song.
Press the SELECT button to see song properties.
While the Hitch
you to play it. The Hitch
protected music. If you attempt to play copy protected music on your iPod*
without the appropriate permissions, the song will not play. If you attempt to play
copy protecrted music on your computer, iTunes* will notify you that it have
must authorization for your computer from the owner of that iTunes* music store
account.
TM
unit allows you to view the song properties of a file including the
TM
unit:
TM
unit will transfer copy protected music, it does not authorize
TM
unit does not permit unauthorized playing of copy
Page 21
Page 22

USB-101 User manual Specifications
Optional Features
Run User Program
Run User Program will run user applications compiled
specifically for the Hitch
feature is to execute the application necessary to update
the firmware on your Hitch
user program according to instructions on page 28, you
must run the program and reboot to re-configure your
TM
Hitch
unit
1. Go to the Settings menu and press the SELECT
button to advance to the Main menu.
2. Turn the scroll wheel clockwise to select Run User
Program.
3. Press the SELECT button. The files loaded during
the Install User File step will be displayed.
4. Highlight the file you want to run and press the
SELECT button to begin the file transfer.
5. The application selected will begin to execute.
6. In the case of a firmware update, the AC power jack
MUST be connected in order for the update
application to proceed. DO NOT disconnect the USB
drive or the AC power during the update process.
The screen will display a Copy files progress bar
followed by a Checking files screen and an Updating
files screen.
Page 22
TM
. One major use of this
TM
unit. After installing the
Page 23

USB-101 User manual Specifications
Upon completing the file transfer, the Hitch
TM
unit will
proceed to shut itself down. You will see a Shutting
down countdown screen after which the unit will power
off.
When powered up, the Hitch
TM
unit will have the new
firmware or program installed.
Page 23
Page 24

USB-101 User manual Specifications
Backlight Setting (Hitch Mode)
To adjust the backlight setting for the HitchTM unit, use
the scroll wheel to select the Backlight Setting menu
from the Main menu. To enter the Backlight Setting
menu Press the SELECT button. Use the scroll wheel to
select the backlight setting you desire.
Always OFF – backlight will not come on
Always ON – backlight will not go off.
20 sec idle (factory default) – After the scroll wheel is
used or any button is pressed, the backlight will stay
on for 20 sec then turn off. Using the scroll wheel or
pressing any button will turn the backlight on again.
40 sec idle – After the scroll wheel is used or any button
is pressed, the backlight will stay on for 40 sec then
turn off. Using the scroll wheel or pressing any button
will turn the backlight on again.
Press the SELECT button to save your choice and return
to the Settings menu
Page 24
Page 25

USB-101 User manual Specifications
Idle Power Off (Hitch Mode)
To adjust the duration of time which your HitchTM unit
will sit idle before powering off choose from the settings
in the Idle Power Off menu. To enter the Idle Power Off
menu, scroll down through the Main menu and Select
Idle Power Off. Press the SELECT button. Use the scroll
wheel to select the power option you desire.
Timer OFF – will not automatically power off.
1 min idle – will power off after 1 min idle.
2 min idle – will power off after 2 min idle.
5 min idle– will power off after 5 min idle. (factory
default)
Press the SELECT button to save your choice and return
to the Settings menu
Horizontal Scroll (Hitch Mode)
When the highlighted text is greater than the number of
viewable characters on the display, the text will scroll
left to display the full content. (Note: requires that the
line is highlighted to be scrolled) To adjust the speed at
which text is scrolled on the display, choose from the
settings in the Horizontal Scroll menu. To enter the
Horizontal Scroll menu, scroll down through the Main
menu and select Horizontal Scroll.
Press the SELECT button.
Use the scroll wheel to select the scroll speed you desire.
0 to 10 – 0 is the slowest. 10 is the fastest
Press the SELECT button to save your choice and return
to the Settings menu
Here/There (< >) button
Page 25
Page 26

USB-101 User manual Specifications
The Here/ There button performs several functions.
Note: You can only enter the Here/There (< >) menu when no
devices are attached to the Hitch
TM
unit
TAP:SWAP
In this mode, the Here/There button toggles between the
Here and There devices.
TAP:BACK, HOLD:SWAP
Tapping the Here/ There button retreats back through the
active menu tree. (Note: When at the root directory
tapping will toggle between devices.)
Pressing and Holding the button will toggle between
devices
Page 26
Page 27

USB-101 User manual Specifications
Install User File (Hitch Mode)
You can upgrade firmware for HitchTM units by
downloading the latest version from our website –
www.gethitch.com . You can also download other
programs to run on the Hitch
To download firmware upgrades for Hitch
1. Go to www.gethitch .com and download the latest
firmware version - called hitch_install – onto a USB
Mass storage device such as a thumbdrive or iPod*.
The hitch_install folder must be located at the root of
the USB Mass Storage device.
2. Connect the device to the Here side of the Hitch
unit. Make sure the AC power is supplied to the
TM
Hitch
.
Note: The file installation can only be completed
with the device connected to the Here side and the
TM
unit must be in Hitch mode.
Hitch
3. Go to the Main menu by pressing and holding down
the SELECT button. Use the scroll wheel to highlight
TM
unit.
TM
products:
TM
Settings and press the SELECT button.Scroll down to
select the Install User File.
4. Press the SELECT button
Note: If the AC adapter is not connected, you cannot
enter the Install User File menu. Please connect AC
adapter to continue.
5. The Hitch
TM
unit will automatically download the
necessary files to complete the firmware upgrade.
The actual upgrade is not complete at this time. To
complete the upgrade proceed to the Run User
Program menu on pages 22 -23.
Page 27
Page 28

USB-101 User manual Specifications
Remove User File (Hitch Mode)
Remove User File is used to remove old versions of
firmware and other programs that have been installed on
the Hitch
To remove a user installed file:
1. Go to the Main Menu in Hitch
2. Scroll down to the Remove User File menu. Press the
3. Use the scroll wheel to select the file you want.
4. Press the SELECT button. The Delete menu is
5. Choose the file(s ) you want to delete and press
TM
unit.
TM
mode.
SELECT button.
displayed. Note: to exit, select the quit option.
SELECT. The file will be been deleted.
Page 28
Page 29

USB-101 User manual Specifications
Here/There View (Music mode)
Here/There View will change the mode that is displayed
on the screen when an iPod* is connected to the
Here/There side. The options are Music (DB) to view
the contents of the iPod’s* database or File to view the
iPod* as a hard drive.
Each side can have its specific view mode.
To enter Here/There view:
1. Go to the Settings Menu in Music mode.
2. Scroll down to the Here View or There View menu.
Press the SELECT button.
3. Use the scroll wheel to select the mode you want.
4. Press the SELECT button.
Page 29
Page 30

USB-101 User manual Specifications
Send Mode (Music mode)
Send Mode provides the option of copying a music file
to either the destination iPod’s* Music (DB) only, to a
folder only, or to both the iPod’s Music (DB) and folder
(default). If the destination is not an iPod*, any file will
only be copied to a folder.
To enter Send Mode:
5. Go to the Settings Menu in Music mode.
6. Scroll down to the Send Mode menu. Press the
SELECT button.
7. Use the scroll wheel to select the mode you want.
8. Press the SELECT button.
Troubleshooting
Page 30
Page 31

USB-101 User manual Specifications
Problem
1. How do I switch from Music
mode to hitch mode when
devices are connected to the
TM
Hitch
unit?
2. When I power up my
TM
Hitch
unit, only the Here and
There icons will light. It will
not power up.
3. When I plug my AC Adapter
into the unit for charging the
battery it doesn’t display any
charging indicator?
4. Why does the Hitch
TM
unit
deliver 2 files to the receiving
IPod* when transferring in
music mode?
Solution
1. Hold down select button until a new
menu pops up. Scroll down and access
the select settings. You will find
depending on your current mode either
Hitch mode or Music mode. Highlight
and press select.
2. When the battery is completely
discharged, the unit will not boot up. You
must charge it for approximately 1 minute
with the AC adapter before using.
3. When charging the Hitc h
TM
unit in the
“off” position it will not display any
charging light. To check if the Hitch
unit is charging power up the device and
make sure the plug icon is on up in the
right hand corner of the display.
4. One file is written to the iPod* music
database so you can view and listen
immediately after the transfer. The
second file is written to the IPod*s hard
drive as a back up. This will be used
when connecting the IPod* back to
ITunes* it deletes the first copy so the
backup copy is needed.
TM
Page 31
Page 32

USB-101 User manual Specifications
Specifications
Hitch Unit Only
Supports Mass Storage (MS) devices including FAT 8/16/32
Supports USB Picture Transfer Protocol (PTP) -Hitch™ unit will
recognize a connected camera automatically
LED file transfer indicator lights
Supports MP3 ID3 file identification for title and artist file information
Supports USB 2.0 and USB 1.1 Standards
2.5” monochrome LCD screen with back light
Provides up to 500mA at 5V to both ports simultaneously
Provides file copy and deletion functionality to choice of destination folder
LINUX based O/S
Firmware Upgradeable through simaproducts.com
4.3” x 2.6” x 0.9”, 8 oz weight (including battery)
AC Wall Adapter
Input: AC 100-240V 50/60Hz .3A
Output: DC 5V 2.5A
Hitch Battery
3.7 Volt Rechargeable Lithium Polymer Battery
Page 32
Page 33

USB-101 User manual Warranty
Warranty
90 Day Limited Warranty
Sima Products Corporation, (“Sima”) warrants that if the accompanying
product proves to be defective to the original purchaser in material
Or workmanship within 90 days from the original retail purchase, the
Company will, at the its option, either repair or replace same without
Charge (but no cash refund will be made).
What you must do to enforce Warranty
You must deliver, mail or ship the product, together with the original bill of
sale, this limited Warranty statement as proof of warranty coverage to:
Sima Products Corporation
Attn: Customer Service
140 Pennsylvania Ave., Bldg. #5,
Oakmont, PA 15139
To receive special offers and discounts, register your product online at
www.simacorp.com
Limitation of Liability and Remedies
This warranty is void if any defects are caused by abuse, misuse, negligence or unauthorized repairs. All
liability for incidental or consequential damages is specifically excluded. The Company shall have no liability
for any damages due to lost profits, loss of use or anticipated benefits, or other incidental, consequential, special
or punitive damages arising from the use of, or the inability to use, this product, whether arising out of contract,
negligence, tort or under any warranty, even if the Company has been advised of the possibility of such
damages. The Company's liability for damages in no event shall exceed the amount paid for this product. The
Company neither assumes nor authorizes anyone to assume for it any other liabilities.
Some states do not allow for the exclusion or limitation of incidental or consequential damages, so the above
limitation or exclusion may not apply to you. This warranty gives you specific legal rights and you may have
other rights, which vary from state to state.
Copyright 2006 © Sima Products Corp.
140 Pennsylvania Ave. Bldg #5 Oakmont, PA 15139
www.simacorp.com 800-345-7462 PN# 21746
Hitch is a trademark of Sima Products Corporation
* - Apple, iPod and iTunes are trademarks of Apple Computer, Inc.
Page 33
 Loading...