

Page 1
Warranty
90 Day Limited Warranty
Sima Products Corporation warrants this product against defects in
materials and workmanship for a period of 90 days from the date of
purchase. During the warranty period, the product will be repaired or
replaced, at Sima’s option.
Conditions
1. Ship your unit, freight prepaid, including reasonable proof of purchase and
description of problem to:
Attn: Customer Service
Sima Products
140 Pennsylvania Ave.,
Bldg #5,
Oakmont, PA 15139
(412) 828-3700 or 800-345-7462
This warranty is void if any defects are caused by abuse, misuse, negligence or
unauthorized repairs.
4. All liability for incidental or consequential damages is specifically excluded.
Some states do not allow the exclusion or limitation of incidental or
consequential damages, so the above limitation or exclusion may not apply to
you. This warranty gives you specific legal rights, and you may also have other
rights which vary from state to state.
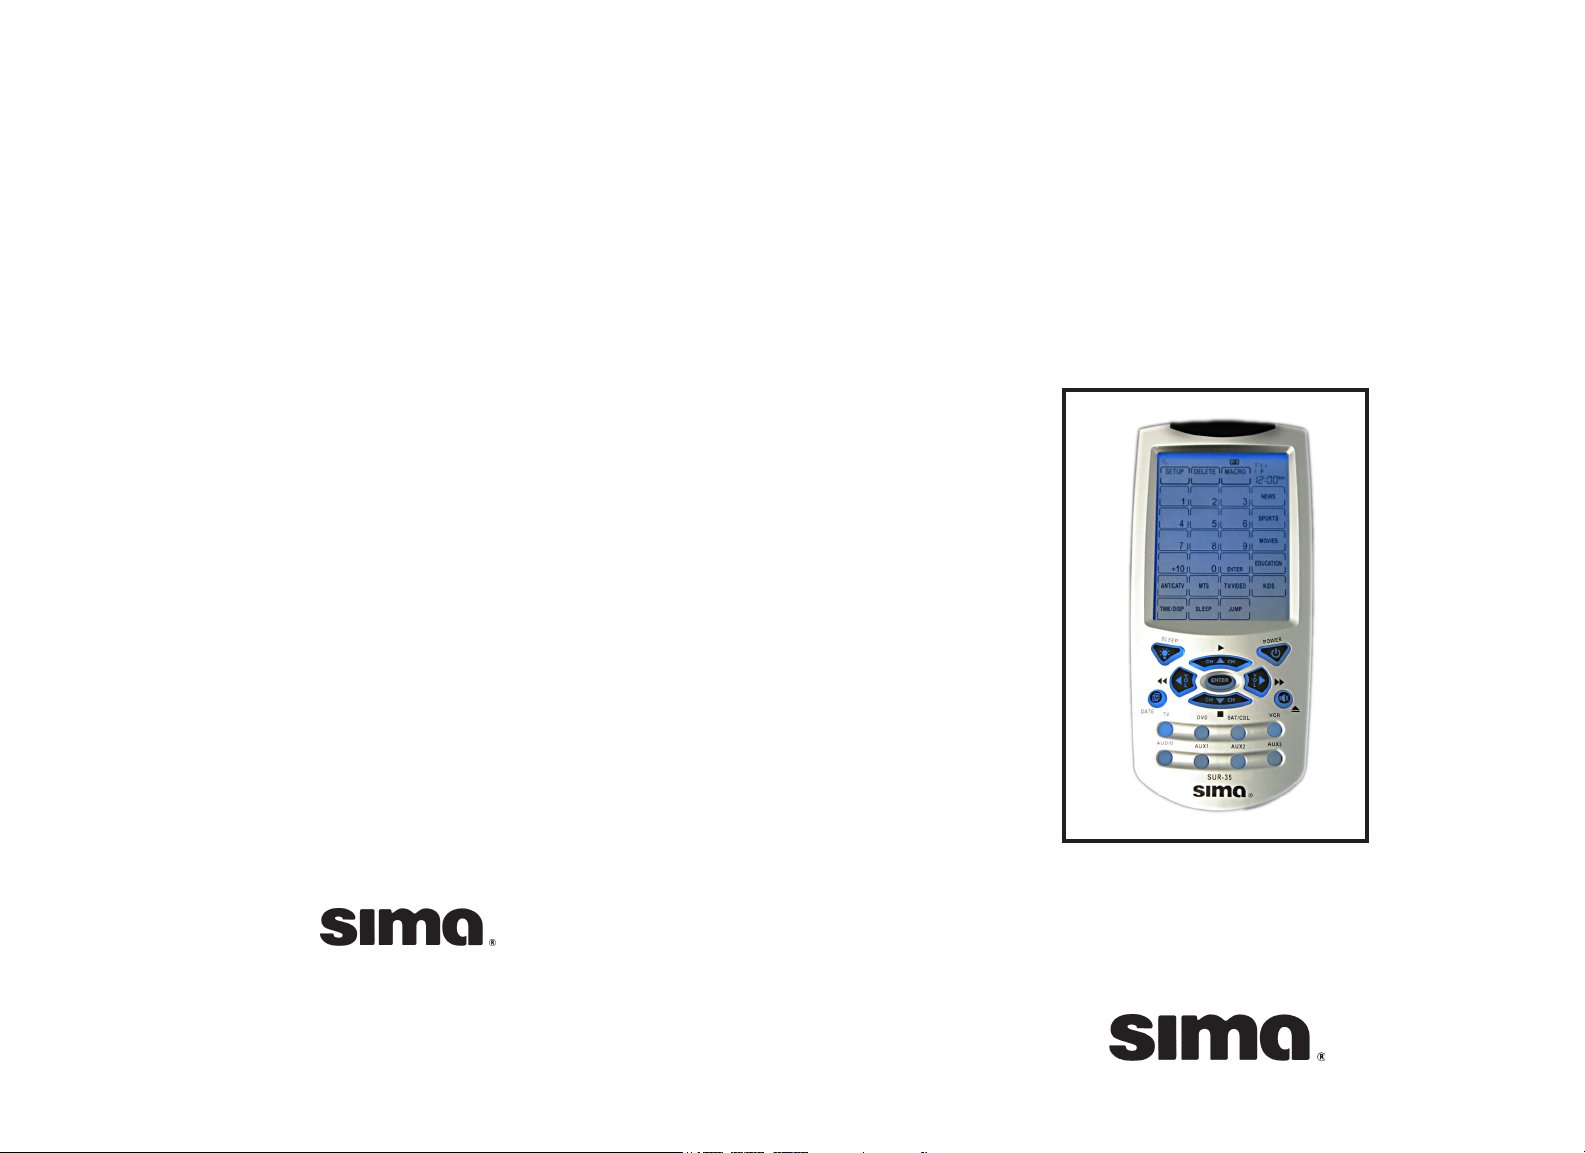
Model SUR-35
Touch Screen
Universal Remote Control
To see our full line of products,
visit us at www.simacorp.com
140 Pennsylvania Ave.
Bldg. #5
Oakmont, PA 15139
1-800-345-7462
Simple, Fun, Affordable
User’s Manual
Page 2
PP
refacereface
P
reface
PP
refacereface
SUR-35 User Manual
SUR-35 User Manual
TT
roubleshootingroubleshooting
T
roubleshooting
TT
roubleshootingroubleshooting
Preface
About this manual
This manual is designed to make using the SUR-35 Touch Screen
Remote Control as easy as possible. Information in this document
has been carefully checked for accuracy; however, no guarantee is
given to the correctness of the contents. The information in this
document is subject to change without notice.
Copyright
© Copyright Sima Products Corporation 2002
This document contains proprietary information protected by
copyright. All rights are reserved. No part of this manual may be
reproduced by any mechanical, electronic or other means, in any
form, without prior written permission of Sima Products Corporation.
Trademarks
All trademarks and registered trademarks are the property of their
respective owners.
Problem
IR LEARNING
cannot be made
successfully.
Macro does not
work.
Solution
Replace batteries in the SUR-35 and the
remote you are trying to learn from.
Keep distance between remotes to about 2~4
inches.
Do not learn near an incandescent lamp.
Memory capacity is full (56 keys for each of
16 models).
The learning process has no errors, but you
still can’t control your AV devices: repeat the
learning procedure again. If you still can’t
solve the problem, use the code collection
feature and email codes to Sima. (page 38)
Original remote might not be compatible with
learning procedure.
Be sure to aim the SUR-35 at the devices
while the macro commands are being sent.
Macro was not properly set up. Repeat
macro set-up procedure. (page 47)
Ch.
ii
Sima Products Corporation
140 Pennsylvania Ave.
Bldg #5
Oakmont, PA 15139
800-345-7462 412-828-3700
www.simacorp.com
PN 21672
A button of your
existing remote
performs two or
more functions
The LCD screen
turns off.
Some remotes issue multiple commands
when a button is held down.Please be sure
to teach different buttons of SUR-35 for
these different commands. Each button of
SUR-35 can only learn one command.
The SUR-35 is preset automatically to switch
the LCD off after the PowerDown time. Just
tap the LCD screen or any button to turn
the SUR-35 back on again. You can also
reset the Power Down time period.
Ch.
CC
C
CC
77
7
77
77
7
77
Page
59
Page 3
TT
roubleshootingroubleshooting
T
roubleshooting
TT
roubleshootingroubleshooting
SUR-35 User Manual
SUR-35 User Manual
TT
able of Contentsable of Contents
T
able of Contents
TT
able of Contentsable of Contents
Problem
You see “ERROR”
display on the LCD
during the learning
procedure.
You see “ERROR”
display during
operation.
Your VCR will not
record.
Problems changing
channels.
Won’t go into SETUP
mode
Backlight doesn’t
work
Solution
Make sure you hold the other remote’s
button down for about 2 seconds.
Make sure you did not program more than
one remote for a given device.
Make sure the two remotes are not too
close or too far apart and are aiming
directly at each other - keep apart
between 2~4 inches (5~10cm ).
The button that you pressed has not been
taught.
Teach the button using the learning
procedure. (page 31)
If unit locks up, remove one battery - wait
ten seconds - and re-install battery
As a safety feature on SUR-35, you
must press the REC key for 3 seconds.
If your original remote requires the
ENTER key to be pressed after a channel
is selected, press the ENTER key to
select the channel.
Batteries are low. Replace batteries.
Backlight disabled. See Backlight
Time Period (pg. 53)
Table of Contents
Chapter 1 - Introducing the SUR-35 ................ 5
SUR-35 Features ........................................................... 5
Unpacking the SUR-35 ................................................. 6
Identifying Components ............................................... 6
Chapter 2 - Getting Started ............................... 7
Features Overview ........................................................ 7
Features (cont.) ............................................................. 8
Low Battery Indicator ................................................................... 9
Installing Batteries ........................................................ 9
Touch Screen ............................................................... 10
Turning the Touch Screen On ...................................................... 10
Touch Screen Buttons .................................................................. 11
Rubber Buttons ........................................................... 11
Menus ........................................................................... 12
Setup Menu .................................................................................. 13
Delete Menu ................................................................................. 14
Macro Menu ................................................................................. 15
Chapter 3 – Setting Up the SUR-35 ................ 16
Date and Clock ............................................................ 16
Choosing a Device ....................................................... 17
Creating a New Device ................................................................ 18
Labeling a Device ........................................................ 19
Changing the Touch Screen Layout .......................... 19
Programming Infrared Codes.................................... 22
Using Pre-programmed Manufacturer Codes .............................. 23
Using the Learning Function ........................................................ 25
Learning from Another Remote Control ...................................... 27
Ch.
CC
C
CC
Page
58
Ch.
Page
iii
Page 4
TT
able of Contentsable of Contents
T
able of Contents
TT
able of Contentsable of Contents
SUR-35 User Manual
Collecting Unrecognized Infrared Codes.................. 31
Deleting a Specific Key ............................................... 32
Deleting a Device ......................................................... 33
Chapter 4 – Controlling Devices ..................... 35
Changing Touch Screen Pages ................................... 35
Selecting a Device to Control ..................................... 35
Controlling the Device ................................................ 36
Chapter 5 – Creating and Using Macros ....... 37
Introduction to Macros............................................... 37
Creating a Macro Sequence ......................................................... 37
Using Macros ............................................................................... 42
Deleting a Macro .......................................................................... 42
Chapter 6 – Other Features ............................. 43
Using Timers................................................................ 43
Setting Up a New Timer ............................................................... 44
Using Quick Channel Lists......................................... 46
Setting up Channel Lists .............................................................. 46
Deleting Channels from a Quick Channel List ............................ 48
Using Quick Channel Lists .......................................................... 49
Transmitting System Setup ........................................ 49
Using Sleep Mode ........................................................ 50
Displaying Version Number ....................................... 51
Chapter 7 – Changing SUR-35 Parameters ... 52
Power Down Time Period........................................... 52
Backlight Time Period ................................................ 53
Resetting to Factory Defaults ..................................... 54
Beep Toggling .............................................................. 54
Appendix A – Specifications ............................ 55
Appendix B – Accessories ................................ 56
Appendix C – Troubleshooting .................... 57
Warranty ....................................................... 60
Ch.
Page
iv
TT
roubleshootingroubleshooting
T
roubleshooting
TT
SUR-35 User Manual
Appendix C – Troubleshooting
SolutionSolution
Solution
PrPr
obob
lemlem
Pr
ob
lem
PrPr
obob
lemlem
LCD does not
show anything
when you touch it
or press the
rubber buttons.
The SUR-35
doesn’t operate a
device.
You cannot
operate a device
even after
teaching the
device using the
learning function.
“Full” message
appears.
SolutionSolution
Batteries may be dead. Replace the batteries
with new Alkaline Batteries.
Check that the batteries are properly installed.
Make sure switch in battery compartment is set
to “NORM”
Make sure that the desired device screen on
the SUR-35 LCD panel has been selected.
Move closer to the device. The maximum
operating distance is approximately 30 feet.
Ensure that you are aiming the SUR-35 directly
at the device and that there are no obstructions
between the SUR-35 and the device.
Ensure programming with the learning function
or using the manufacturer codes has been
properly done.
If “error” message, try re-teaching button.
Make sure that you have correctly “taught” your
device’s remote control to the SUR-35.
Delete the device data from the SUR-35 and
carry out the learning function again.
Make sure you did not program more
than one remote for a given device.
Device button capacity is full. Delete
a device.
roubleshootingroubleshooting
Ch.
CC
C
CC
Page
57
Page 5
AccessoriesAccessories
Accessories
AccessoriesAccessories
SUR-35 User Manual
Appendix B – Accessories
SUR -35 Link caSUR -35 Link ca
SUR -35 Link ca
SUR -35 Link caSUR -35 Link ca
The link cable kit is an optional link cable that enables
transmission of system setup to a personal computer or another
SUR-35. The following information can be transferred using the
TRAN selection in the SETUP Menu:
• MCU Program
• Flash Memory Data
To perform a data transfer you will need to first purchase a
link cable. Please see the manual that accompanies the cable
for more information on how to do the transfer.
Contact Sima or visit our website at www.simacorp.com for
more information concerning the link cable kit.
bb
le kitle kit
b
le kit
bb
le kitle kit
SUR-35 User Manual
IntroducIntroduc
Introduc
IntroducIntroduc
titi
ti
titi
oo
nn
o
n
oo
nn
Chapter 1 - Introducing the SUR-35
Congratulations on your purchase of the SUR-35 TouchScreen Remote Control. The SUR-35 is a digital universal
remote control that is easy to use, enabling you to control all of
your electronic devices equipped with an infrared (IR) remote.
The SUR-35 uses a touch screen panel and control buttons
and is simple to use. Simply select a device and the appropriate
screen appears. You can control up to sixteen devices, such as
VCRs, DVDs, TVs, and satellite dishes. The SUR-35 is easy to
set up. You can quickly configure each device in your
household or office using the “learning eye”.
In addition, the advanced macro function enables you to
initiate a chain of up to 60 commands with the touch of a single
button. Convenient and easy to use, the SUR-35 provides you
with a central control solution.
Note: This manual will help you learn how to use all the advanced
features of the SUR-35. It will not explain how to use the functions
for your devices. Please refer to your device’s user manual for
information related to your device.
11
1
11
Ch.
BB
B
BB
Page
56
SUR-35 FeaturesSUR-35 Features
SUR-35 Features
SUR-35 FeaturesSUR-35 Features
The following list identifies the SUR-35’s key features.
• Large touch screen display.
• Each macro can store a sequence of 60 commands.
• Controls up to sixteen devices including DVDs, TVs,
Satellite dishes VCRs and CDs.
• Learns the IR codes from existing remote controls to
quickly set up devices.
• Pre-programmed manufacturer’s codes for many models.
• Programmable buttons for each device include seven
rubber buttons, the device key and forty-eight soft buttons.
• Optional PC Interface for connection to a computer.
• Five Quick Channel classifications for easy channel
grouping
Ch.
11
1
11
Page
5
Page 6
OverOver
Over
OverOver
Unpacking the SUR-35Unpacking the SUR-35
Unpacking the SUR-35
Unpacking the SUR-35Unpacking the SUR-35
This package includes:
1 SUR-35
1 User’s Manual (this document)
1 Pre-programmed code guide
If any of these items are missing or appear damaged,
contact your dealer immediately. Keep the shipping
carton in case you need to ship your SUR-35.
IdentifIdentif
Identif
IdentifIdentif
Please refer to the following illustrations to identify the
components of the SUR-35.
TT
ouch Screenouch Screen
T
ouch Screen
TT
ouch Screenouch Screen
The Touch Screen
panel enables you to
configure and operate
your devices by
touching the screen.
Tap the screen once
to turn on the SUR-35
LL
earning Eyeearning Eye
L
earning Eye
LL
earning Eyeearning Eye
Point your device’s
remote control at this eye
to enable the SUR-35 to learn
your device’s
infrared codes.
viewview
view
viewview
ying Componentsying Components
ying Components
ying Componentsying Components
SUR-35 User Manual
Infrared EyeInfrared Eye
Infrared Eye
Infrared EyeInfrared Eye
Point the infrared eye at
the device you want to
operate
BatterBatter
Batter
BatterBatter
Remove this cover to
replace the four AAA
Alkaline batteries.
y Covery Cover
y Cover
y Covery Cover
SUR-35 User Manual
Appendix A – Specifications
Model
Dimensions (WxHxD):
Weight (With Batteries):
Weight (W/out Batteries):
Number of Device:
LCD Screen (WxH) :
Soft Buttons
Hard Buttons:
Backlighting:
Learning Frequency:
Memory:
Batteries:
Power consumption:
Battery Life:
Operating Distance:
PC Interface:
SpecificationsSpecifications
Specifications
SpecificationsSpecifications
SUR-35
3.2" x 7.3" x 1.1"
(8.2cm x18.5cm x 2.8cm)
9oz (260g)
7.8 oz (220g)
16 devices
2.7" x 3.2" (6.0cm x 8.0cm)
2 pages / 24 keys :
total of 48 keys
7 usable
Blue (LCD)
10kHz - 125kHz, 455KHZ & Pulse
256KB non-volatile flash memory
4 AAA Alkaline Batteries
LCD Off : 50uA
LCD On : 200uA
Operate : 30 - 100 mA
Approx. 3 - 6 months
Approx. 30 feet
optional
Ch.
11
1
11
Page
6
Figure 1: Front and Rear Views
All specifications subject to change without notice
Ch.
AA
A
AA
Page
55
Page 7
BeepBeep
Beep
BeepBeep
Beep TogglingBeep Toggling
Beep Toggling
Beep TogglingBeep Toggling
This setting specifies whether you want the SUR-35 to
beep each time a button is pressed.
Use the BEEP selection in the
SETUP Menu to change this
setting:
1. Use the OK button to toggle the
beep from ON to OFF.
SUR-35 User Manual
Getting StartedGetting Started
Getting Started
SUR-35 User Manual
Getting StartedGetting Started
Chapter 2 - Getting Started
This chapter will give you the information you need to know
to use the SUR-35 as your single remote control.
Features OverFeatures Over
Features Over
Features OverFeatures Over
The following illustration highlights the different sections of
the SUR-35.
viewview
view
viewview
2
Resetting to FactorResetting to Factor
Resetting to Factor
Resetting to FactorResetting to Factor
y Defaultsy Defaults
y Defaults
y Defaultsy Defaults
CAUTION: This setting will erase all user specified
settings and reset the SUR-35 back to factory defaults.
To reset the SUR-35, use the RST selection in the DELETE
Menu:
1. Press the number keys (2, 4, 6,
8) to confirm RESET selection.
2. Press OK to reset the SUR-35.
Ch.
77
7
77
Page
54
LCD Indicators
Beep On
Battery Low
Infrared OK
Error
Page1
Page 2
UART Port
Backlight /
Sleep Key
Page / Date Key
Learning Eye
Figure 2: SUR-35 Overview
Function Keys
SETUP Menu
DELETE Menu
MACRO Menu
Touch Screen
Device Keys
Ch.
22
2
22
Page
7
Page 8
FF
eatureseatures
F
eatures
FF
eatureseatures
SUR-35 User Manual
SUR-35 User Manual
BacklightBacklight
Backlight
BacklightBacklight
2
• LCD Indicators: LCD stands for Liquid Crystal Display and
these indicators at the top of the display give you feedback and
information. You can look here to see if the beep is turned on, if
the battery has low power, if the infrared signal was sent OK or if
there was an ERROR, and also to see which page of Touch
Screen buttons you are looking at.
• UART Port: This port allows you to connect the SUR-35 to a
personal computer. See Appendix B – Accessories for more
information.
• Backlight / Sleep Key: If pressed quickly, this key will
activate the Touch Screen backlight. If held down for three
seconds you will enter the Sleep menu.
• Page / Date Key: This key allows you to switch between
Page 1 and Page 2 of Touch Screen Buttons.
• Learning Eye: This is an infrared sensor used to detect
other remote controls infrared signals. Aim your existing remote
control here when using the SUR-35’s Learning Function.
• Device Buttons: These 8 buttons allow you to switch
between different devices. Each button may have more than one
device. (For example, the TV button may have TV1 and TV2 for
different TVs in your house.) Repeatedly press the same device
button to cycle through all the device names . The SUR-35 has
the capability to operate a total of 16 devices maximum.
• Touch Screen: The touch screen acts as a “virtual”
keyboard on the SUR-35. The display is normally blank when the
remote is not in use and can be activated by simply touching it.
• Function Keys: These keys allow you to enter the SETUP,
DELETE, and MACRO menus. To enter any function menu,
press and hold the appropriate function key for three seconds.
Features (contFeatures (cont
Features (cont
Features (contFeatures (cont
.).)
.)
.).)
Backlight Time PeriodBacklight Time Period
Backlight Time Period
Backlight Time PeriodBacklight Time Period
This setting specifies how long the SUR-35 will keep
the backlight on after the user presses the BACKLIGHT
button. This setting can be changed from 1 second to 60
seconds by using the LITE selection of the SETUP
Menu:
To enter the SETUP menu
press SETUP button for three
seconds. Complete the
password protection sequence
2...4...6...8.... Use the arrow
buttons to select the LITE menu.
1. Use the arrow keys to set the
backlight period. Set the time
period from 02 to 60 seconds.
You can disable the backlight by
setting the time to 0. Press OK
when finished and EXIT to
return to the SETUP Menu.
Ch.
22
2
22
Page
8
Ch.
77
7
77
Page
53
Page 9
PP
ower Downower Down
P
ower Down
PP
ower Downower Down
SUR-35 User Manual
Chapter 7 – Changing SUR-35
Parameters
Many of the SUR-35 parameters can be changed. This
chapter explains the different customizations you can make.
Power Down Time PeriodPower Down Time Period
Power Down Time Period
Power Down Time PeriodPower Down Time Period
This setting specifies the time delay the SUR-35 will wait
until it automatically shuts down. (The touch screen will go
blank to conserve battery usage.)
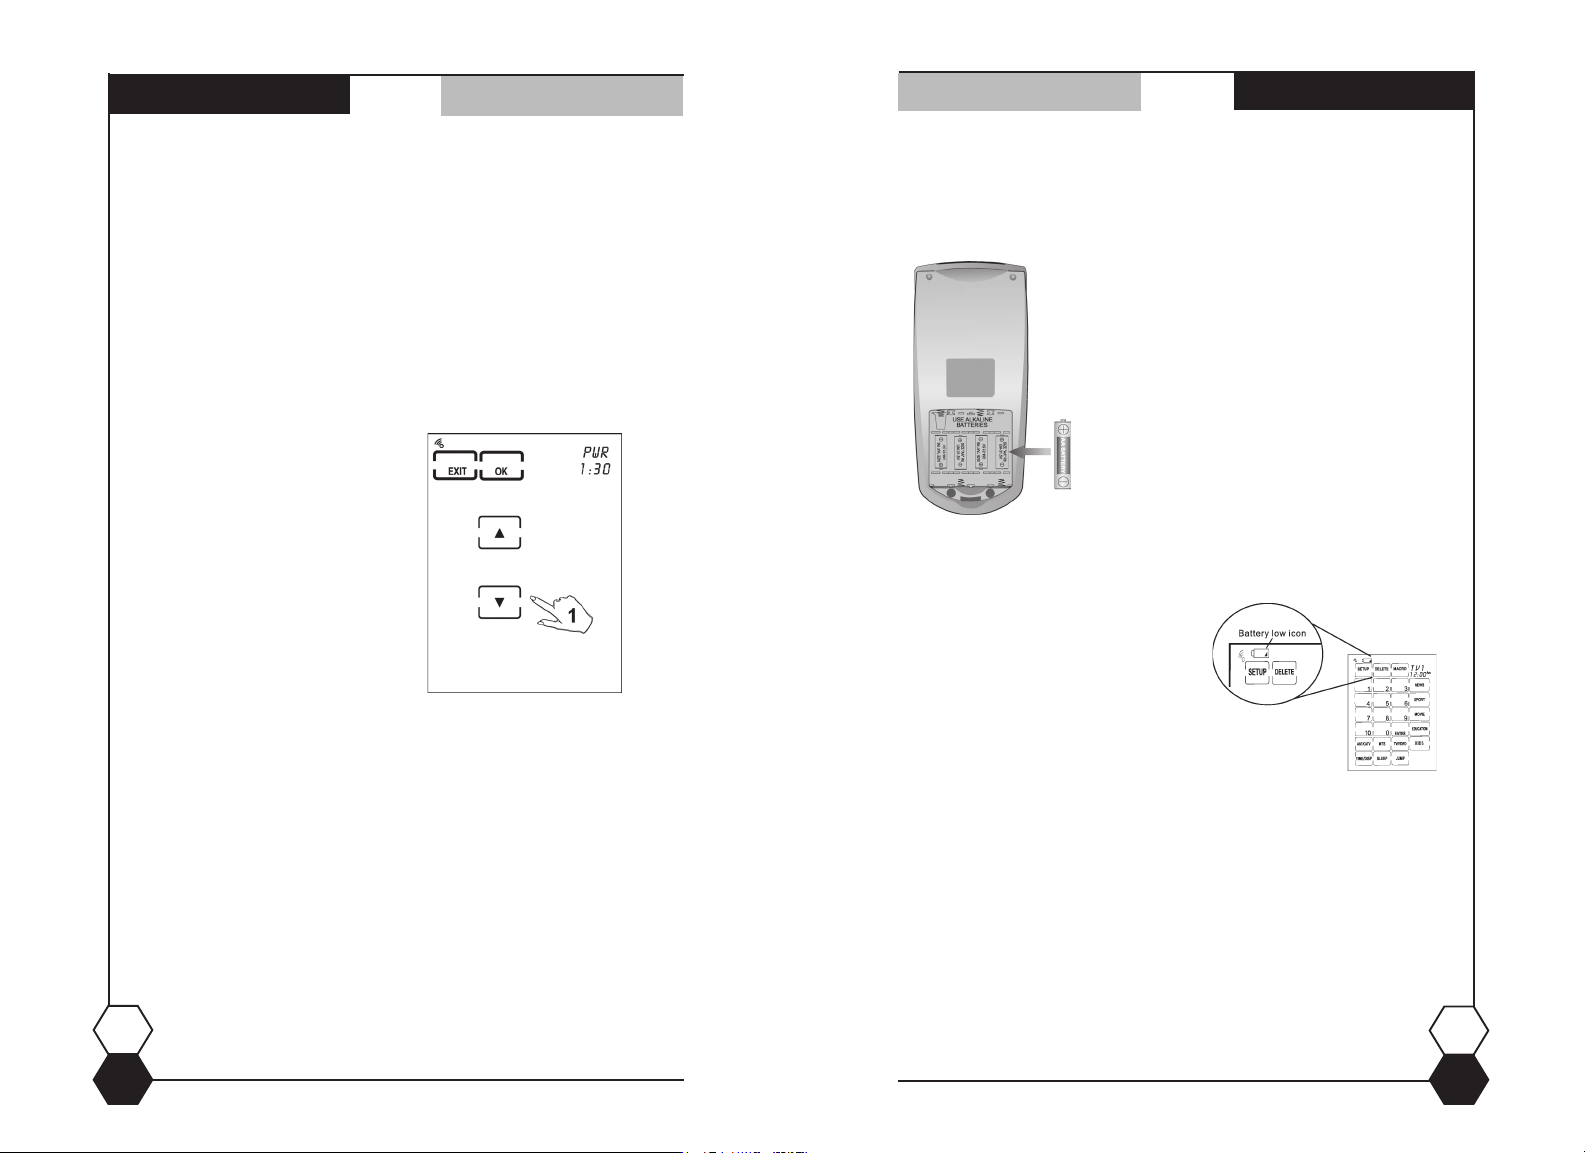
BatteriesBatteries
Batteries
SUR-35 User Manual
Installing BatteriesInstalling Batteries
Installing Batteries
Installing BatteriesInstalling Batteries
The SUR-35 operates on four AAA Alkaline batteries
(not included). Batteries must be inserted before you can
operate the SUR-35. To insert the batteries, refer to the
following illustration:
1. Turn the remote over, push on the tab
and lift the cover off.
2. Insert the batteries, matching the
batteries to the (+) and (-) marks inside
the battery case. Note: Make sure the
data switch located in the battery
compartment is set to “NORM”.
3. Snap the battery cover back into place.
BatteriesBatteries
This setting can be changed
from 1 to 90 minutes.
1. Press and hold the
SETUP button for three
seconds.
2. Use the up and down
arrows to select PWDN
3. Use the up/down arrows
to select a time period
ranging from 1 to 90
minutes. Press OK to return
to the SETUP menu.Press
EXIT to return to the main
menu. The unit will power
down when the time period
expires
Ch.
77
7
77
Page
52
Figure 3:
Installing Batteries
Low Battery Indicator
When the batteries are low, the battery low icon will be displayed
in the upper left-hand corner just above the SETUP button:
Figure 4: The Battery Low Icon
Battery Tips and Precautions
• Immediately replace batteries when the battery low icon appears.
• The SUR-35 will retain data when batteries are replaced
• Always use fresh batteries. Alkaline batteries are recommended.
Do not mix different types of batteries.
• Be sure that the positive (+) and negative (-) polarities of the
batteries match the diagram shown in the compartment.
• Do not expose the batteries to excessive heat or flame.
• Keep batteries out of the reach of children.
• Weak batteries reduce the effective distance of the unit.
• To reduce danger of leakage and damage, remove
used batteries when used longer than two years.
Ch.
Page
22
2
22
9
Page 10

TT
ouch Screenouch Screen
T
ouch Screen
TT
ouch Screenouch Screen
Touch ScreenTouch Screen
Touch Screen
Touch ScreenTouch Screen
The touch screen reduces the number of buttons by
changing its configuration for each device selected. In this way,
the touch screen can provide a total of 768 buttons (16 devices
x 2 pages x 24 buttons per page).
SUR-35 User Manual
Turning the Touch Screen On
Using the touch screen is easy. Simply touch the screen or
any hard button to activate it. The SUR-35 will turn itself off
automatically. (To change the
programmable power down time, see
Power Down Time Period in Chapter 7 –
Changing SUR-35 Parameters.)
Figure 5: Touch the Screen To Turn It On
Touch Screen Precautions
Please read the following instructions carefully:
• Tap the LCD touch screen gently; never use force.
• Do not use a pen or any sharp object to tap the screen.
You might damage the surface.
• Keep the touch screen dry. Wipe off any spills
immediately. The SUR-35 is not waterproof; never
immerse it in liquid.
• Don’t expose the SUR-35 to extreme temperatures. Keep
it away from heat sources.
• Avoid dropping the SUR-35.
• Don’t drop anything on the touch screen.
• Clean the LCD touch screen with a soft cloth. If needed,
Ch.
Page
10
dampen the cloth slightly before cleaning. Never use
abrasives or cleaning solutions.
22
2
22
VV
ersion numberersion number
V
ersion number
VV
SUR-35 User Manual
Displaying Version NumberDisplaying Version Number
Displaying Version Number
Displaying Version NumberDisplaying Version Number
For technical support reasons, the Program and Data
version numbers might be needed by Sima.
To display the version number, use the VER selection
in the SETUP Menu.
1. Press and hold the SETUP button on the Touch
Screen for 3 sec. Press each number button (2, 4, 6, 8)
until it disappears.
2. Use the arrow buttons on the Touch Screen to
select VER (displayed in the upper right corner) and
then press the OK button.
Press the OK button again. Use arrow buttons to select
PROG. The software version number appears under the
PROG menu.
Use the arrows again to select DATA. The data version
number appears under the DATA menu.
Press EXIT to exit.
ersion numberersion number
Ch.
66
6
66
Page
51
Page 11

Sleep modeSleep mode
Sleep mode
Sleep modeSleep mode
Using Sleep ModeUsing Sleep Mode
Using Sleep Mode
Using Sleep ModeUsing Sleep Mode
Sleep mode allows the SUR-35 to send a command or
start a Macro after a specified time delay. One example is you
could use sleep mode to shut off a TV after you have already
fallen asleep.
To use sleep mode:
1. Press and hold the BACKLIGHT
(SLEEP) key for three seconds.
SUR-35 User Manual
1
&&
&
&&
Hard/Soft ButtonsHard/Soft Buttons
Hard/Soft Buttons
SUR-35 User Manual
Hard/Soft ButtonsHard/Soft Buttons
Touch Screen Buttons
The touch screen buttons enable you to operate the SUR35 and external devices. Use these buttons to program codes
from existing remotes, control your devices and set up macro
command sequences. You will hear a beep when you press a
button. To activate or deactivate the beep, please see Beep
Toggling in Chapter 7. The SUR-35 will turn itself off after a
user specified time period. To change the time period, please
see Power Down Time Period also in Chapter 7.
2. Use the arrow keys to specify
the sleep timeout period in 10
minute increments. (24 hours
maximum)
3. Press OK to confirm.
Select the Device using the device
keys
4. Press the button you want the
SUR-35 to send after when the
sleep timer reaches zero.
Note: This key should already have
a command or macro assigned to it.
A macro can have up to 60
commands.
5. Press OK when finished.
Note: If you want to cancel the
Sleep function:
• Press and hold the BACKLIGHT
(SLEEP) key for three seconds.
• Press Exit to cancel.
Ch.
66
6
66
Page
50
Rubber ButtonsRubber Buttons
Rubber Buttons
Rubber ButtonsRubber Buttons
The buttons on the bottom part of the SUR-35 allow you to
operate devices as well as help program the SUR-35. There
are three rubber buttons that have special functions:
Page / Date Button: Toggles between Page 1 and
Page 2 of the Touch Screen buttons. If held down, the unit will
also display the date and year in the upper right hand corner,
followed by the day and the time .
Power Button: Can turn your devices on and off
but also during Touch Screen Layout will display all possible
LCD choices.
Backlight / Sleep Button: Pressing it quickly will
turn on the backlight, while holding it down for three seconds
will enter the SLEEP Menu.
Ch.
22
2
22
Page
11
Page 12

PP
rogram Menusrogram Menus
P
rogram Menus
PP
rogram Menusrogram Menus
MenusMenus
Menus
MenusMenus
In order to use the SETUP, DELETE, and MACRO
menus you will first need to press and hold the desired
menu button for 3 seconds.
FigurFigur
e 6:e 6:
Confir Confir
m Menm Men
u Entru Entr
Figur
e 6:
Confir
FigurFigur
e 6:e 6:
bb
y Pry Pr
b
y Pr
bb
y Pry Pr
Four numbers will appear which will need to be
pressed before the desired menu will appear. This is
simply to make sure you meant to enter the menu.
You can press the numbers in any order you like and
they will vanish when pressed. When all of the
numbers have vanished, the desired menu will
appear.
m Men
Confir Confir
m Menm Men
essing Numberessing Number
essing Number
essing Numberessing Number
u Entr
u Entru Entr
ss
s
ss
yy
y
yy
SUR-35 User Manual
This activates a
password protection
sequence to prevent
accidentally entering a
programmable menu .
Channel listsChannel lists
Channel lists
SUR-35 User Manual
3. Press the UP and DOWN
arrows to rotate through the
channels currently assigned.
4. Press OK to delete a
particular channel.
5. Repeat above steps to delete
other channels.
6. Press OK when finished.
Channel listsChannel lists
Using Quick Channel Lists
Press the Quick Channel button you wish to use. (It will
begin to flash.) Now use the Channel Up and Channel Down
buttons to scroll through all channels in this classification.
When finished, press the Channel button again to return to
normal operation.
Transmitting System SetupTransmitting System Setup
Transmitting System Setup
Transmitting System SetupTransmitting System Setup
The SUR-35 allows transmission of system setup to a
personal computer or another SUR-35. The following
information can be transferred using the TRAN selection in
the SETUP Menu:
• MCU Program
• Flash Memory Data
• Pre-programmed codes (CODE)
To perform a data transfer you will need to purchase a
link cable. Please see the manual that accompanies the
cable for more information on how to do the transfer. For
more information on the link cable please see Appendix B –
Accessories.
Ch.
22
2
22
Page
12
Ch.
66
6
66
Page
49
Page 13

Delete channelsDelete channels
Delete channels
Delete channelsDelete channels
SUR-35 User Manual
SUR-35 User Manual
Setup MenuSetup Menu
Setup Menu
Setup MenuSetup Menu
Deleting Channels from a Quick Channel List
Press and hold the DELETE
button on the Touch Screen.
Press each number button
(2, 4, 6, 8) until it disappears.
Use the arrow buttons on the
Touch Screen to select Q CH
and then press the OK button.
1. Use the device keys to select
a device and the Page button to
select a Touch Screen page.
&&
&
&&
1
&&
&
&&
Q CH
2. Select the Quick Channel
classification you want to delete.
(The selected classification will
flash.)
metIuneMnoitpircseD
ETAD.etaddnakcolcmetsysehtteS
WENhctarcsmorfecivedwenaetaerC
EDOC
LBALecivedaeman-eR
YAL
NRL
NDWP.doirepemitffo-rewopcitamotuaehtteS
ETIL.doirepemitthgilkcabehtteS
GUBD
NART
REV.rebmunnoisevehtyalpsiD
PEEB.peebsserp-yekehtelggoT
Setup Menu
s'rerutcafunamdemmargorp-erpangissA
.ecivedaotedoc
aroftuoyalneercshcuotehtegnahC
.ecivedcificeps
gnitsixenamorfsedocderarfninraeL
.lortnocetomer
gnitsixemorfsedocRIelbanrael-nutcelloC
.slortnocetomer
sedocderarfniroerawtfosmetsystimsnarT
aotrorehtonaot53-RUSenomorf
.retupmoclanosrep
Ch.
66
6
66
Page
48
Ch.
22
2
22
Page
13
Page 14

Delete MenuDelete Menu
Delete Menu
Delete MenuDelete Menu
metIuneMnoitpircseD
SUR-35 User Manual
Delete Menu
SUR-35 User Manual
2. Use the number keys to
enter a channel number.
Some devices may need you to
also press ENTER (if they
normally require you to press
ENTER after a channel
change).
Channel ListsChannel Lists
Channel Lists
Channel ListsChannel Lists
sedocderarfniehteteledotuoyswollA
YEK
nottub
:EDOC derarfnillaeteledotuoyswolla
KNAB
TSR
HCQ
.emas
LLA dnasedocderarfnihtobseteled:
.ecived
.sgnittes
rebburroneercshcuotcificepsarof
elihwecivedcificepsarofsedoc
ehttuoyalneercshcuotehtgnivael
cificepsaroftuoyalneercshcuoteht
yrotcafotkcab53-RUSehtsteseR
eratahtslennahcesareotuoyswollA
lennahCkciuQehtfoenoniderots
,STROPS,SWEN(.seirogetac
)SDIKroNOITACUDE,EIVOM
3. Select which Quick Channel
classification to put this channel
into. (For example press the
NEWS button.)
4. Repeat Steps 2 & 3 to add
additional channels.
5. Press EXIT to return to the MACRO menu. Press
EXIT again to return to the main menu.
Note: The SUR-35 can store up to 50 channels that can
be sorted using the five quick channel classifications.
To use the Quick Channel menu, press a Quick
Channel button such as NEWS, SPORTS etc.... The
selected category will blink when active. Use the Channel
up and down hard buttons to cycle through the channels
in that category. When switching between categories, the
SUR-35 will retain the last channel selected in each
category. One minute after the last button press, the unit
will return to the main menu.
Ch.
22
2
22
Page
14
Ch.
66
6
66
Page
47
Page 15

Quick ChannelsQuick Channels
Quick Channels
Quick ChannelsQuick Channels
Using Quick Channel ListsUsing Quick Channel Lists
Using Quick Channel Lists
Using Quick Channel ListsUsing Quick Channel Lists
Quick Channel lists allow you to group channels together
into different categories for ease of scrolling. You can store up
to 50 channels using the five Quick Channel buttons. Each
button can store up to 50 channels, however, the unit can only
store a total of 50 using all 5 buttons. Available categories
include:
• News
• Sports
• Movies
• Educational
• Kids
Setting up Channel Lists
Press and hold the MACRO
button on the Touch Screen.
Press each number button (2, 4,
6, 8) until it disappears. Use the
arrow buttons on the Touch
Screen to select Q CH and then
press the OK button.
SUR-35 User Manual
SUR-35 User Manual
metIuneMnoitpircseD
YEK
RMIT
HCQ
Macro Menu
snoitca
Macro MenuMacro Menu
Macro Menu
Macro MenuMacro Menu
mrofrepotsremitthgieehtfoenotratS
.etadcificepsanonoitcadeyaledaro
)...cteEIVOM,STROPS,SWEN
foecneuqesamrofrepotorcaMaetaerC
)...cteyliad,ylkeeW(noitcaralugerarehtie
otpuorglennahCkciuQaotslennahcddA
foepytralulcitrapahguorhtgnilcycekam
:elpmaxE(.reisaegnimmargorpnoisivelet
1. Use the device keys to
select a device and the Page
button to select the Touch
Screen page containing the
number pad.
Ch.
66
6
66
Page
46
&&
&
&&
1
&&
&
&&
Ch.
22
2
22
Page
15
Page 16

Setting UpSetting Up
Setting Up
Setting UpSetting Up
SUR-35 User Manual
Chapter 3 – Setting Up the SUR-35
Before the SUR-35 can be used to control a device, it
needs to be configured to display your existing remote control
buttons and also programmed to send the correct infrared
signals. This chapter guides you through the Touch Screen
layout and SUR-35 setup procedure.
To get started, you will first set the date and time. Then you
can proceed to create devices and program the SUR-35.
Date and ClockDate and Clock
Date and Clock
Date and ClockDate and Clock
To use the Date selection in the
SETUP Menu:
1. Press and hold the SETUP
button on the Touch Screen for 3
sec. Press each number button (2, 4,
6, 8) until it disappears.
1
SUR-35 User Manual
4. Use the arrow keys to select
the time.
5. Press OK
Note: If you used SPEC (Specific
Day/Time) you will also have to set
the date.
6. Select the key that the timer will
press. If you want, you can switch
devices (use device keys) or Touch
Screen pages. (Use the
button.)
Macro TimersMacro Timers
Macro Timers
Macro TimersMacro Timers
2. Use the arrow buttons on the
Touch Screen to select DATE
(displayed in the upper right
corner) and then press the OK
button.
Enter the year, month and date first.
3. Use the LEFT and RIGHT arrow
keys to move the curser and the UP
and DOWN arrows to change the
selection. Press OK when finished.
Now set the hour, and minutes.
4. Use the arrow keys as in Step 3.
5. Press OK when finished and then
EXIT to leave the SETUP menu.
Ch.
33
3
33
Page
16
5
%
At the selected time and date, the
SUR-35 will send the infrared code
or start the macro associated with
the key selected in step 6. When
2
3
finished press the EXIT key to leave
the MACRO Menu.
Ch.
66
6
66
Page
45
Page 17

Macro TimersMacro Timers
Macro Timers
Macro TimersMacro Timers
SUR-35 User Manual
SUR-35 User Manual
Choose DeviceChoose Device
Choose Device
Choose DeviceChoose Device
Setting Up a New Timer
Press and hold the MACRO
button on the Touch Screen
for 3 seconds.
Press each number button (2,
4, 6, 8) until it disappears. Use
the arrow buttons on the Touch
Screen to select TIMR and then
press the OK button.
1. Choose one of the eight
available timers by pressing
the number on the Touch
Screen.
2. Use the arrow keys to select
the timer type.
OFF : Off (no timer)
DAIL : Daily
SPEC : Specific Day/Time
1-5 : Every Mon – Fri
1-6 : Every Mon – Sat
SUN : Every Sunday
MON : Every Monday
TUE : Every Tuesday
WED : Every Wednesday
THU : Every Thursday
FRI : Every Friday
SAT : Every Saturday
Ch.
66
3. Press OK to confirm timer type.
6
66
Page
44
Choosing a DeviceChoosing a Device
Choosing a Device
Choosing a DeviceChoosing a Device
Before you can program the SUR-35 to operate your
TV. VCR etc... you have to create a device screen for
each device to use. Once programmed, devices are
selected by pressing one of the eight device buttons
located at the bottom of the unit. Keep pressing a button
to cycle through the devices available with that button.
Each device button is capable of storing from 0 to 10
devices. For example, you may have two TVs stored in
the TV button and three VCRs stored in the VCR button,
while having nothing stored in the AUX button. The unit is
capable of storing a total of sixteen devices using any
combination of the 8 device buttons.
The display window in the upper right hand corner of
the unit shows the name of the device or its “label”. If
there is no device programmed for that button, it will
display “EMPT” meaning empty.
When you create a new device you give it a name or
“label”. After creating a device, you will be able to enter a
pre-programmed code, “teach” an existing remote or
customize the control layout to suit your needs. There are
two ways to do this based on what starting point you want
to work from:
• Create new Device: Use this method for setting up
a new device.
• Modify Existing Device: Use this if you are having
a problem with an already setup device and want to
make a change or enhancement.
Ch.
33
3
33
Page
17
Page 18

New deviceNew device
New device
New deviceNew device
Creating a New Device
To create a new device, follow these
steps:
Press and hold the SETUP button on
the Touch Screen for 3 sec. Press
each number button (2, 4, 6, 8) until it
disappears.
Use the arrow buttons on the Touch
Screen to select NEW (displayed in
the upper right corner) and then
press the OK button.
1. Press the device key you wish to
use for this device.
The name of the selected device will be
displayed in the upper right hand corner
of the screen and will be blinking.
2. After selecting a device, use the
arrow keys to change the letters and
create your own label for that device.
SUR-35 User Manual
1
&&
&
&&
3
%
SUR-35 User Manual
Other FOther F
Other F
Other FOther F
eatureseatures
eatures
eatureseatures
Chapter 6 – Other Features
The SUR-35 has the following additional features:
• Timers: Can be used to start a macro or send a command
at a later time. Many timers are available including: daily,
weekly, weekends only, weekdays only, or specific days
and times.
• Quick Channel Lists: Used to group certain TV or Satellite
channels together. For example, group all news channels
together to make it easy to cycle through only the news
channels. The five Quick Channel buttons can store a total
of 50 channels.
• Unrecognized Code Collection: Used to collect
unrecognized codes that can later be emailed to Sima for
analysis.
• System Setup Transmission: Can be used to transmit
system setup to either a personal computer or another
SUR-35.
• Sleep Mode: Can be used to issue a command after a
specified time.
• Version: Will display the version number of your SUR-35.
3. Press the OK button.
4. Now you must select a device
default screen. Use the up and down
arrows to cycle through the selections.
Note: the device screen you select
must match the type of device or
accessing pre-programmed codes may
not be successful. For example, if you
are adding a TV, select a TV default
screen.
Ch.
5. Press OK to exit.
33
3
33
Page
18
5
&&
&
&&
Using TimersUsing Timers
Using Timers
2
4
Using TimersUsing Timers
Timers are fantastic way to automate functions to occur in
the future. At a pre-set time, the SUR-35 will “wake up” and
send the command or macro of your choice. Combined with a
Macro you can use the SUR-35 to record movies, turn on
music, act as an alarm clock, or perhaps make your home look
and sound like someone is home – even if you’re not.
Note: you can program up to eight timers at one time.
Ch.
66
6
66
Page
43
Page 19

MacrosMacros
Macros
MacrosMacros
SUR-35 User Manual
Using Macros
To start a Macro for a specific device, first select the
device and then simply press the key assigned to the
Macro. If you forget which keys have Macros assigned to
them, press the MACRO button and all keys with valid
Macros will be shown. During the Macro transmission, all
commands will be shown on the Touch Screen as they are
sent.
Naming devicesNaming devices
Naming devices
SUR-35 User Manual
Labeling a DeviceLabeling a Device
Labeling a Device
Labeling a DeviceLabeling a Device
The SUR-35 can store more than one device in each device
button. For example, you may use the SUR-35 to operate two
televisions sets . To reduce confusion, you can assign names
or labels to each device. The label
appears in the upper right hand
display window.
Step 1 - Press and hold the SETUP
button on the Touch Screen. Press
each number button (2, 4, 6, 8) until it
disappears. Use the arrow buttons on
the Touch Screen to select LABL and
then press the OK button.
Naming devicesNaming devices
Deleting a Macro
Deleting a Macro is actually simply a matter of deleting
the key that the Macro has been assigned to. For example if
you assigned a Macro to the TV1 device’s #1 key, you can
erase the Macro by deleting the number “1” key in the TV1
device. For more information on how to delete a specific key
please see page 32.
Ch.
33
3
33
Page
42
Step 2 - Use the UP and DOWN
arrows to change the letters. Use the
LEFT and RIGHT arrows to position
the cursor. (Labels can be 4 digits
long.)
Step 3 - Press the OK button when
finished.
Ch.
33
3
33
Page
19
Page 20

LCD layoutLCD layout
LCD layout
LCD layoutLCD layout
Changing the Touch Screen LayoutChanging the Touch Screen Layout
Changing the Touch Screen Layout
Changing the Touch Screen LayoutChanging the Touch Screen Layout
The layout edit mode enables you to customize the SUR35’s Touch Screen display to match your existing remote
controls. The following steps show you how to make the display
on the SUR-35 correspond to an existing remote.
SUR-35 User Manual
SUR-35 User Manual
12. Use the UP and DOWN
arrows to select a time delay (in
seconds).
Note: You can select a time
delay between 1-15 seconds.
MacrosMacros
Macros
MacrosMacros
Use the LAY selection in the
SETUP Menu:
Press and hold the SETUP
button on the Touch Screen.
Press each number button (2, 4, 6,
8) until it disappears. Use the arrow
buttons on the Touch Screen to
select LAY and then press the OK
button.
1. Press a device button to select
the device you want to modify.
Press the button (Page/Date
Button) to change to the Touch
Screen page you want to modify.
Press the button to show all
1
&&
&
&&
Press OK to confirm time delay.
13
%
13. Press the PLAY button.
14. Press OK to save the Macro.
available LCD choices for all
buttons.
Ch.
33
3
33
Page
20
Then press EXIT to leave the
MACRO menu
Ch.
55
5
55
Page
41
Page 21

MacrosMacros
Macros
MacrosMacros
8. Press the TV/Video button.
SUR-35 User Manual
SUR-35 User Manual
2. Touch the button that you
wish to change. It will first go
blank
(You may change as many
buttons as you wish.)
LCD LLCD L
LCD L
LCD LLCD L
ayoutayout
ayout
ayoutayout
9. Press the DVD device button.
10. Press the POWER button.
11. Press the TIME DELAY button.
Ch.
55
5
55
Page
40
9
%
10
%
33
3
33
3. Each time you touch the button
its appearance will change. If you
press another button and then
return, the first button will default
to a blank setting.
4. Press OK to confirm your
changes.
Then press EXIT to leave the
SETUP Menu.
Ch.
33
3
33
Page
21
Page 22

PP
rogrammingrogramming
P
rogramming
PP
rogrammingrogramming
Programming Infrared CodesProgramming Infrared Codes
Programming Infrared Codes
Programming Infrared CodesProgramming Infrared Codes
There are two methods you can use to program infrared
codes into the SUR-35:
• Using Manufacturer Codes: Use this method to
automatically configure all buttons on the SUR-35 for use
with a specific manufacturer’s model number. This feature is
the fastest way to program the SUR-35 but requires that
your device be located in the Manufacturer Code Tables .
(Some newer or less common devices may not be preprogrammed and must be learned using the Learning
Function.)
SUR-35 User Manual
SUR-35 User Manual
4. Select a device using the
device buttons on the SUR-35.
For this example press the TV
button.
5. On the Touch Screen select
one of the buttons to assign the
macro to.
You will hear three beeps.
Note: If you select a key that
already has a macro assigned to it
you will replace the old macro.
4
&&
&
&&
MacrosMacros
Macros
MacrosMacros
• Using the Learning Function: Use this method to directly
learn the proper infrared signals from another remote
control. The learning eye of the SUR-35 will learn the proper
signals to send. This method is perfect for newer or less
common devices or if a certain button still not does perform
the desired function after using pre-programmed
manufacturer codes. However, in rare cases, the SUR-35
may not be able to copy the codes from another remote and
it may be necessary to collect unrecognized codes and
send them to Sima. (See Collecting Unrecognized Infrared
Codes in Chapter 3.)
Ch.
33
3
33
Page
22
Note: You cannot assign a macro to
the Quick Channel buttons.
Define Macro
6. Press the TV device button.
7. Press the POWER button.
&&
&
&&
33
3
33
7
%
6
Ch.
55
5
55
Page
39
Page 23

MacrosMacros
Macros
MacrosMacros
Set up the macro using the
following steps:
1. Press and hold the MACRO
button for three seconds on the
Touch Screen.
Note: When you press the MACRO
button, the screen will display the
buttons which currently are
programmed with macros. If no
buttons are displayed, then no
macros have been programmed for
that device.
2. Press each number button (2, 4,
6, 8) until it disappears.
SUR-35 User Manual
PP
re-set codesre-set codes
P
re-set codes
PP
SUR-35 User Manual
re-set codesre-set codes
Using Pre-programmed Manufacturer Codes
The SUR-35 is pre-programmed with many
manufacturers’ codes to operate a wide range of TVs,
VCRs, DVDs etc… These are useful if you have lost the
original remote. However, because of the great variety and
number of remotes on the market, not all functions may
work when using the pre-programmed codes. If you have
the original remote, it is recommended you teach the SUR35 the functions most important to you. (See Using the
Learning Function.)
Note: Some codes are designed to operate more than one
model. It may take several tries to find the code that works
with your unit.
To program a manufacturer’s code for a device, follow
these steps:
Press and hold the SETUP
button on the Touch Screen
for 3 seconds.
Press each number button (2,
4, 6, 8) until it disappears.
Use the arrow buttons on the
Touch Screen to select CODE
and then press the OK button.
3. Use the arrow buttons on the
Touch Screen to select KEY and
then press the OK button.
Ch.
55
5
55
Page
38
1. Use the device buttons to
select the device you want to
change.
You will see the label changing
in the display window in the
upper right-hand corner of the
screen.
1
&&
&
&&
Ch.
33
3
33
Page
23
Page 24

PP
re-set codesre-set codes
P
re-set codes
PP
re-set codesre-set codes
There are two ways to program the manufacture’s codes.
1. Manual Entry - Directly enter the code; go to step M1.
2. Automatic Search - The SUR-35 will search known
codes; skip to step A1.
SUR-35 User Manual
MacrosMacros
Macros
SUR-35 User Manual
MacrosMacros
Chapter 5 – Creating and Using
Before beginning, locate your
devices in the Manufacturer
Code Tables and have the
code numbers handy.
The Code Tables are supplied
on a separate sheet or can be
found on our website at
www.simacorp.com
To use manual entry:
M1. Enter the manufacturer’s
code using the Touch Screen
number buttons.
M2. Press the POWER button
to test the code.
The device you are trying to
control should turn on (or off)
as you press this button. If not,
return to Step 2 and try another
code.
M3. You may also use the
TUNING buttons to increase
or decrease the code
number. Try different codes
until one passes the power
button test described above.
M1
M4
M2
%
M3
Macros
Introduction to MacrosIntroduction to Macros
Introduction to Macros
Introduction to MacrosIntroduction to Macros
A macro is simply a series of commands. The MACRO
feature enables you to initiate a sequence of up to 60
commands with a single button. You can create a macro on
any control button and also insert time delays into the
sequence. Remember, however, assigning a macro
eliminates the button’s original function. You cannot assign
a macro to any of the 8 Device keys, the Page/Date key,
the Backlight/ Sleep key, the three functions keys (SETUP,
DELETE, MACRO), or the five Quick Channel
Classification keys.
Creating a Macro Sequence
The following example will help you to better
understand the creating a macro sequence. It is
provided to teach you how to record a macro but by no
means is it the only macro sequence you can create.
You can create macros using any sequence of
commands you desire.
The following macro will:
1. Turn the TV on.
2. Switch the TV to video mode.
3. Turn the DVD on.
4. Create a two-second delay.
5. Instruct the DVD to play a disc.
M4. When finished, press
Ch.
Page
the OK button to return to
the Setup Menu.
33
3
33
24
Ch.
55
5
55
Page
37
Page 25

OperationOperation
Operation
OperationOperation
SUR-35 User Manual
SUR-35 User Manual
To use automatic search:
Auto searchAuto search
Auto search
Auto searchAuto search
Controlling the DeviceControlling the Device
Controlling the Device
Controlling the DeviceControlling the Device
Make sure the SUR-35 is pointing at the device you are
trying to control and simply press the button you want to
send:
• Press the Touch Screen buttons.
• Press one of the rubber buttons on the bottom half of
the SUR-35’s.
Note - Record Button Must Be Held Down for 3 Seconds:
As a safety feature, the record button needs to be pressed
for 3 seconds. This is to prevent accidentally pressing the
VCR record button and overwriting a tape.
Automatic Search
A1. Make sure the SUR-35 is
pointing at the device you want
to control and press the AUTO
button.
A2. The AUTO button will flash
while the SUR-35 automatically
cycles through the codes. A
POWER command is sent with
each code. The correct code will turn your TV on if it is off. The
code numbers will be displayed in the upper right-hand corner
display window. Wait for the device to turn on and then press
the POWER button to stop the automatic search. The last
tried code will be displayed in the upper right hand corner. You
can test this code by pressing the POWER button. (You may
need to press TUNING Down and try the previous few codes.)
The code numbers will continually repeat. If the sequence
begins again without turning your device on, it did not find your
code. Stop by pressing EXIT if it did not find your code.
A1
Ch.
44
4
44
Page
36
A3. Once your device turns on
or off when you press the
POWER button, press the OK
button to return to the SETUP
menu.
A3
Ch.
33
3
33
Page
25
Page 26

LL
earning codesearning codes
L
earning codes
LL
earning codesearning codes
SUR-35 User Manual
SUR-35 User Manual
OperationOperation
Operation
OperationOperation
Using the Learning Function
If you have the original remote, the SUR-35 has the ability
to directly learn infrared codes.
Before Using the Learning Function
Before you start using the SUR-35’s learning function,
please heed the following precautions:
• Teach only one remote for each device . For example,
don’t assign some of the buttons on the TV device screen
to operate a TV in the living room, while assigning others
to operate a different model TV in the bedroom. Each
device button is capable of storing up to ten separate
devices. Create a second device to teach a second TV.
• To change from a device that has already been
programmed, delete all of the commands for the first
device before teaching new ones. For example, to
operate the living room TV instead of the bedroom TV,
delete all commands for the bedroom TV first. (See the
Deleting a Device section.) Then re-configure the TV
device screen for the living room TV.
• When using the learning function, you must press each
button within 2 minutes of pressing the last button.
Otherwise, the SUR-35 will exit the learning mode and
return to its normal operation mode.
• A very small number of infrared codes are not
learnable by the SUR-35. You may need to first collect
the codes (see Collecting Unrecognized Infrared Codes
for more information) and then email them to Sima.
Chapter 4 – Controlling Devices
The SUR-35 is designed to be simple and straightforward to
operate. This chapter explains how to use the SUR-35 to
control all your devices. This Chapter assumes you have
already setup the SUR-35 and assigned Infrared codes to
different buttons. See Chapter 3 – Setting Up the SUR-35 to
Control a Device for more information on assigning codes.
Selecting a Device Selecting a Device
Selecting a Device
Selecting a Device Selecting a Device
1. Press one of the eight device
buttons to pick the device. Each
device button can store up to ten
devices. Press the same device
button again to cycle through the
different devices in that bank.
Changing Touch Screen PagesChanging Touch Screen Pages
Changing Touch Screen Pages
Changing Touch Screen PagesChanging Touch Screen Pages
1. Press and release the
Page Button to alternate
between Page 1 and Page
2 of available Touch Screen
buttons.
to Controlto Control
to Control
to Controlto Control
&&
&
&&
1
&&
&
&&
1
Ch.
33
3
33
Page
26
Ch.
44
4
44
Page
35
Page 27

Deleting devicesDeleting devices
Deleting devices
Deleting devicesDeleting devices
2. Select the device you
wish to delete. Make sure the
device name displayed in the
upper right hand corner of the
touch screen is the device you
wish to erase.
3. Press OK to erase this device.
Or press EXIT to cancel without
erasing the device.
SUR-35 User Manual
2
&&
&
&&
LL
earning codesearning codes
L
earning codes
LL
SUR-35 User Manual
earning codesearning codes
Learning from Another Remote Control
To teach the codes from your remote, set both remotes on
a flat surface facing each other. Be sure to point your device’s
remote control at the SUR-35’s learning eye, which is located
at the bottom of the unit. Do not use the other eye located at
the top of the SUR-35. You do not have to turn on the actual
device (TV, VCR, etc…). Refer to the following illustration.
Ch.
33
3
33
Page
34
FigurFigur
Figur
FigurFigur
e 7:e 7:
Using the Lear Using the Lear
e 7:
Using the Lear
e 7:e 7:
Using the Lear Using the Lear
ning Eyning Ey
ning Ey
ning Eyning Ey
ee
e
ee
Ch.
33
3
33
Page
27
Page 28

LL
earning codesearning codes
L
earning codes
LL
earning codesearning codes
To learn infrared codes directly from a device’s remote
control, follow these steps:
Press and hold the SETUP button
on the Touch Screen for 3
seconds.
Press each number button (2, 4, 6, 8)
until it disappears.
SUR-35 User Manual
Deleting devicesDeleting devices
Deleting devices
SUR-35 User Manual
Deleting a DeviceDeleting a Device
Deleting a Device
Deleting a DeviceDeleting a Device
If you have an unused or an unwanted device, you
may erase the infrared codes for the device and keep
the Touch Screen layout , or you
may erase the codes and the
Touch Screen layout.
To delete a device from the
SUR-35 follow these steps:
Press and hold the DELETE
button on the Touch Screen.
Press each number button (2, 4,
6, 8) until it disappears. Use the
arrow buttons on the Touch
Screen to select BANK and then
press the OK button.
1. Use the Arrow keys to
chose CODE: Erase infrared
codes only but keep Touch
Screen display the same.
Deleting devicesDeleting devices
Use the arrow buttons on the Touch
Screen to select LRN and then press
the OK button.
Ch.
33
3
33
Page
28
or
ALL: Erase both codes and
Touch Screen layout.
Ch.
33
3
33
Page
33
Page 29

Deleting buttonsDeleting buttons
Deleting buttons
Deleting buttonsDeleting buttons
Deleting a Specific KeyDeleting a Specific Key
Deleting a Specific Key
Deleting a Specific KeyDeleting a Specific Key
To erase the infrared codes for a
specific Touch Screen or Rubber
button and retain it in the layout,
follow these steps:
Press and hold the DELETE
button on the Touch Screen for
3 seconds. Press each number
button (2, 4, 6, 8) until it
disappears. Use the arrow
buttons on the Touch Screen to
select KEY and then press the
OK button.
1. Select the device that has
the key that you want to erase.
SUR-35 User Manual
LL
earning codesearning codes
L
earning codes
LL
SUR-35 User Manual
1. Use the device keys to select the
device you want to program. Make
sure the other remote control is
pointed directly at the SUR-35’s
Learning eye. Keep them 2~4 inches
apart. (5~10 cm)
Rubber Keys
The touch screen will display a set of buttons that correspond to the
rubber keys on the bottom half of the SUR-35. Although these
buttons appear on the touch screen, in programming them, you are
actually programming the rubber buttons.
For example: The upper
right button corresponds
to the Power button as
shown at right.
earning codesearning codes
1
&&
&
&&
2. Select the key you want to
erase.If you want to erase more
keys, you may select them now.
3. When finished, press OK to
confirm erasing the keys or press
EXIT to cancel without erasing.
Then press the EXIT key to
leave the DELETE Menu.
Ch.
33
3
33
Page
32
The up and down arrows represent the Channel up and down keys
(or Play and Stop). The left and right arrows represent the Volume up
and down buttons (or FF/Rew). The center button is the Enter button.
and the lower right button is the Mute button. The bottom button
corresponds to the device buttons and you can program it to send a
command to turn on a device when you select it. You can program
each rubber button by using this screen.
2. The Power button (upper right) should now be flashing on the
touch screen.
3. Press and hold the Power button on the other remote control
for at least 2 seconds.
4. Check to see whether ERROR or OK is displayed on the top of the
SUR-35 Touch Screen. If ERROR appears, try again. The next
programmable button on the Touch Screen will flash automatically .
When all buttons on the current page are programmed, it will
automatically switch to the next page.
Ch.
33
3
33
Page
29
Page 30

LL
earning codesearning codes
L
earning codes
LL
earning codesearning codes
SUR-35 User Manual
SUR-35 User Manual
Collecting codesCollecting codes
Collecting codes
Collecting codesCollecting codes
You can directly select the next
button to program by touching it or
press the
page 1 of the Softkeys.
5. SoftKey Page 1
The screen represents Page 1 of
the Touch Screen buttons.
Repeat the above process for
each button and press the
button when finished.
6. SoftKey Page 2
This screen represents the
Page 2 Touch Screen buttons
that will be available when using
the device. Repeat the above
process for each button.
7. When finished programming
all the buttons you want to
assign infrared codes to,
press the EXIT button.
8. Press the EXIT button one
more time to leave the SETUP
Menu.
Page Key to go to
SoftKey Page 1
SoftKey Page 2
8
Collecting Unrecognized Infrared CodesCollecting Unrecognized Infrared Codes
Collecting Unrecognized Infrared Codes
Collecting Unrecognized Infrared CodesCollecting Unrecognized Infrared Codes
Use this procedure in the rare instance when the SUR-35 is
unable to recognize the infrared signals from another remote
control. (You only see the ERROR indicator when Using the
Learning Function.)
Once collected you can use the Remote Connector (see
Appendix B – Accessories) to upload the unrecognized codes
to your personal computer and then email them to Sima for
analysis. Sima can then update the system software and send
you an updated version that will recognize the codes. Sima’s
service email address is: www.simacorp.com. All unrecognized
codes should be sent to this address.
When you enter the Code Collection mode, the SUR-35 will
immediately erase the previously stored unrecognized codes. If
you have more than one remote that is not programmable,
please upload the first remote’s unrecognized codes and then
gather the second remote’s.
To collect unrecognized
codes:
Press and hold the SETUP
button on the
Touch Screen.
Press each number
button (2, 4, 6, 8)
until it disappears.
Use the arrow
buttons on the
Touch Screen to
select DBUG and
then press the OK
button.
Ch.
33
3
33
Page
30
The rest of the collection procedure is the same as
Using the Learning Function. When finished press the
EXIT button.
Ch.
33
3
33
Page
31
 Loading...