

Page 1
SUR-20
Learning Universal Remote
With LCD touch screen
User Manual
Page 2

Page 3

The SUR-20 User’s Manual
Preface
About this manual
This manual is designed to make using the SUR-20 Smart Remote
Control as easy as possible. Information in this document has been
carefully checked for accuracy; however, no guarantee is given to the
correctness of the contents. The information in this document is
subject to change without notice.
Copyright
© Copyright 2001
This document contains proprietary information protected by
copyright. All rights are reserved. No part of this manual may be
reproduced by any mechanical, electronic or other means, in any
form, without prior written permission of Sima Products Corp..
Trademarks
All trademarks and registered trademarks are the property of their
respective owners.
Sima Products Corp.
140 Pennsylvania Ave.
Bldg. # 5
Oakmont, PA 15139
800-345-7462 412-828-3700
412-828-3775 FAX
www.simacorp.com
Pn 21632 rev.20013
i
Page 4

Table of Contents
CHAPTER 1 - INTRODUCING THE SUR-20 ...................................... 1
Unpacking the SUR-20............................................................ 2
SUR-20 features....................................................................... 2
Identifying components.......................................................... 3
CHAPTER 2 -GETTING STARTED ...................................................... 4
Batteries ................................................................................... 4
Battery low icon ................................................................. 5
Battery tips and precautions............................................. 5
The LCD.................................................................................... 6
Turning the LCD on............................................................ 6
Touch screen precautions ................................................ 6
SUR-20 touch screen buttons ................................................ 7
CHAPTER 3 - OPERATING THE SUR-20..............................................
Changing the LCD layout ....................................................... 8
The AUX device button ......................................................... 11
CHAPTER 4 -THE LEARNING FUNCTION .........................................
Before you use the learning function.................................. 12
Using the learning function............................................. 13-16
CHAPTER 5 - LOADING PRE-PROGRAMMED CODES...................
Loading the Manufacturer's Code ..................................17-19
Manufacturer's Code Tables ...........................................20-25
CHAPTER 6 -THE DELETE FUNCTION...............................................
Using the delete function ..................................................... 26
Delete device button................................................... 26-29
CHAPTER 7 -THE MACRO FUNCTION ...............................................
Macro
Setting up a Macro example............................................ 30-33
Running the Macro................................................................ 33
......................................................................
Quick Start Macro setup Guide....................................... 34
30
ii
Page 5

Table of Contents
CHAPTER 8 - SPECIAL FEATURES......................................................
Adjusting the LCD backlight............................................35-37
Turning off the beep signal ..................................................38
Recalling the original LCD layout ........................................ 39
APPENDIX A.......................................................................................
Specifications and Accessories........................................... 40
APPENDIX B.......................................................................................
Troubleshooting ...............................................................41-42
Quick Start Function Guide.......................................................... 43
WARRANTY........................................................................ 44
iii
Page 6

Page 7

Chapter 1
Chapter 1
Chapter 1Chapter 1
Introducing the SUR-20
Congratulations on your purchase of the Sima SUR-20 Universal Remote Control. The SUR-20 is a digital universal remote control that is easy to use, enabling you to control all of your electronic devices equipped with an infra-red (IR) remote.
The SUR-20 uses a touch screen control panel,
which changes its display when you select a different
device. The touch screen eliminates the need for
dozens of buttons. It’s easy to find the functions you
want. Simply select a device and the appropriate screen
appears. You can control up to eight devices, including
VCRs, DVDs, TVs, and satellite dishes.
The SUR-20 is easy to set up. You can quickly
configure each device in your household or office using
the “learning eye”. In addition, the advanced macro
function enables you to initiate a chain of up to 25
commands with the touch of a single button.
Convenient and easy to use, the SUR-20 provides
you with a central control solution.
This manual will help you learn how to use all the
advanced features of the SUR-20. It will not explain
how to use the functions for your devices. Please
refer to your device’s user manual for information
related to your device.
1
Page 8

The SUR-20 User’s Manual
Unpacking the SUR-20
After you have unpacked the SUR-20, check the
contents to make sure the following items are included.
• SUR-20
• This User’s Manual
If any of the above items are missing or appear
damaged, contact your dealer immediately. Do not
throw the shipping carton away in case you need to ship
your SUR-20.
SUR-20 features
The following list identifies the SUR-20’s key features.
For more information on getting the most from these
features, refer to Chapters 2 and 3.
• Large touch screen display with automatic backlighting for
visibility in dim lighting.
• Macro sequence function—each macro can store 25
commands.
• Controls up to eight devices including DVD, TV, Satellite,
VCR and CD.
• Learns the IR codes from your existing remote controls to
quickly set up devices.
• Adjustable backlight with four levels of ambient light
sensitivity.
• Pre-programmed manufacturer’s codes for many models.
2
Page 9
Chapter 1 —Identifying Components
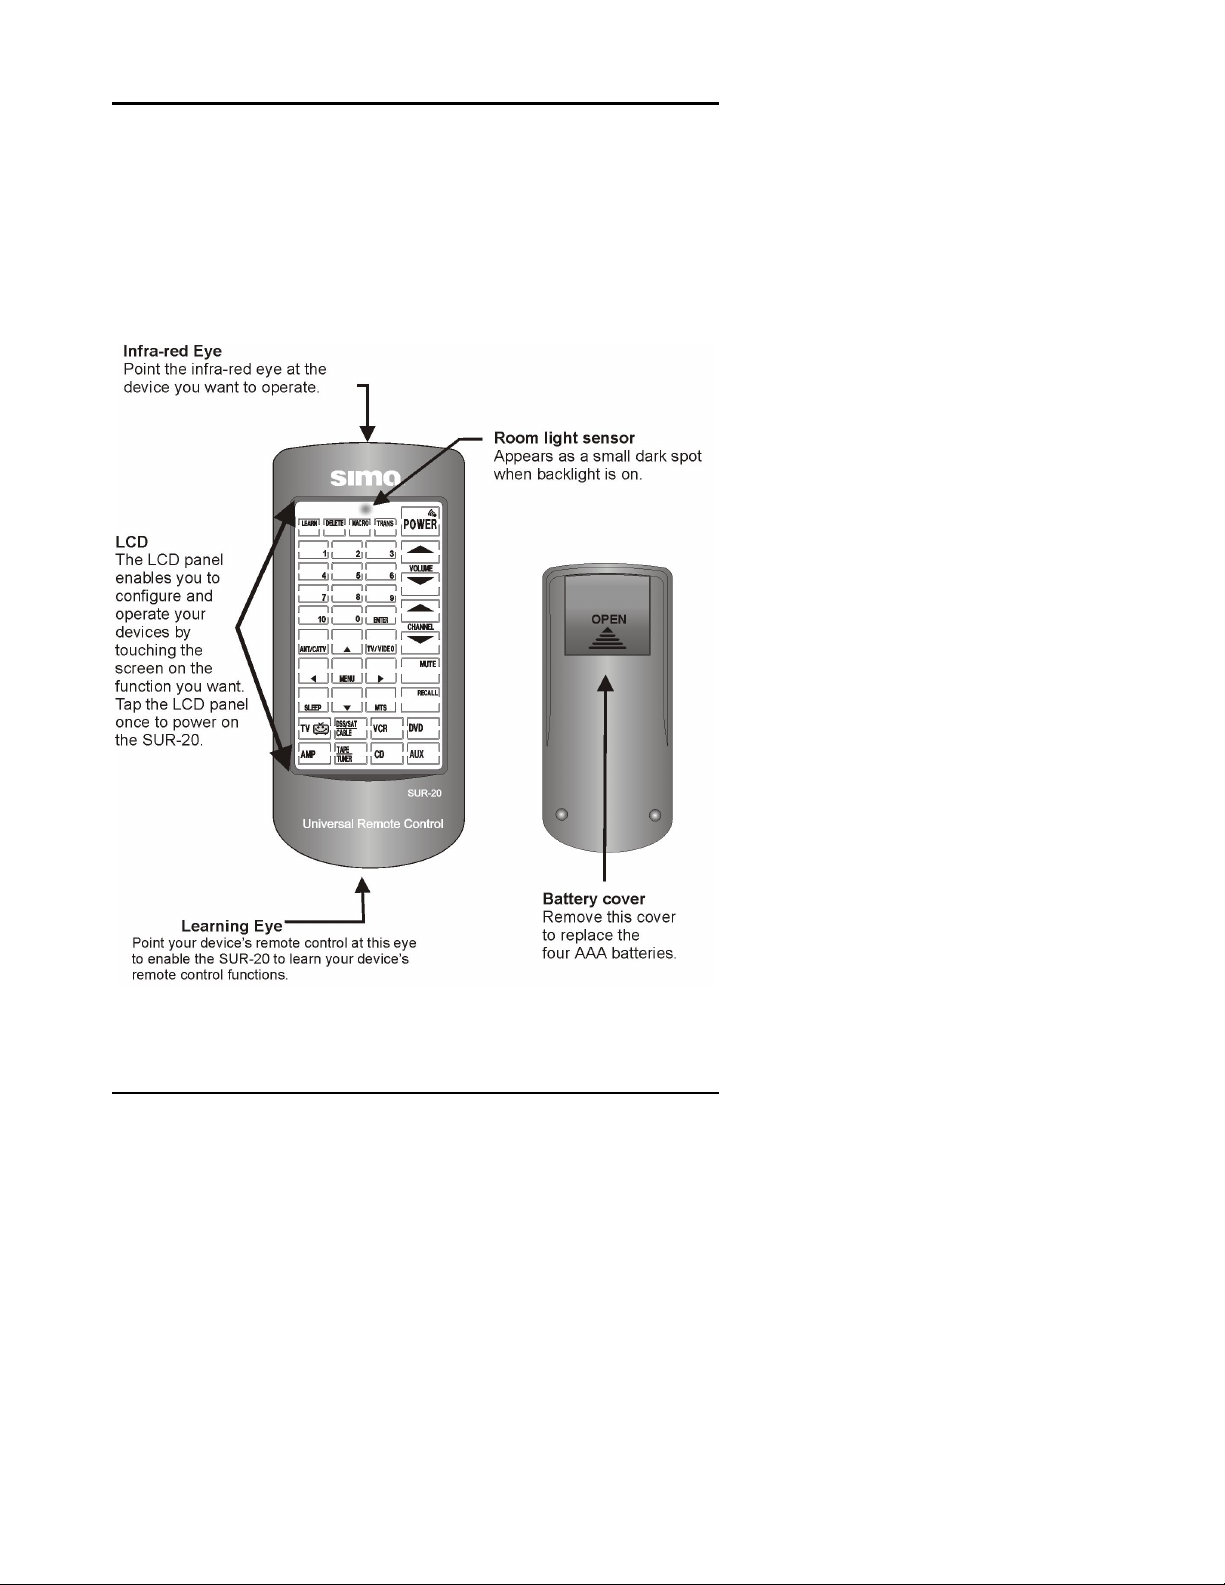
Identifying components
Please refer to the following illustrations to identify the
features of the SUR-20. This section provides an
overview of the SUR-20’s features and controls. Refer
to Chapters 3-8 for detailed descriptions on using the
LCD panel and controls.
Figure 1-1: Front and rear view
3
Page 10
Chapter 2
Getting Started
This chapter will guide you through the steps for
inserting the batteries and using the many features.
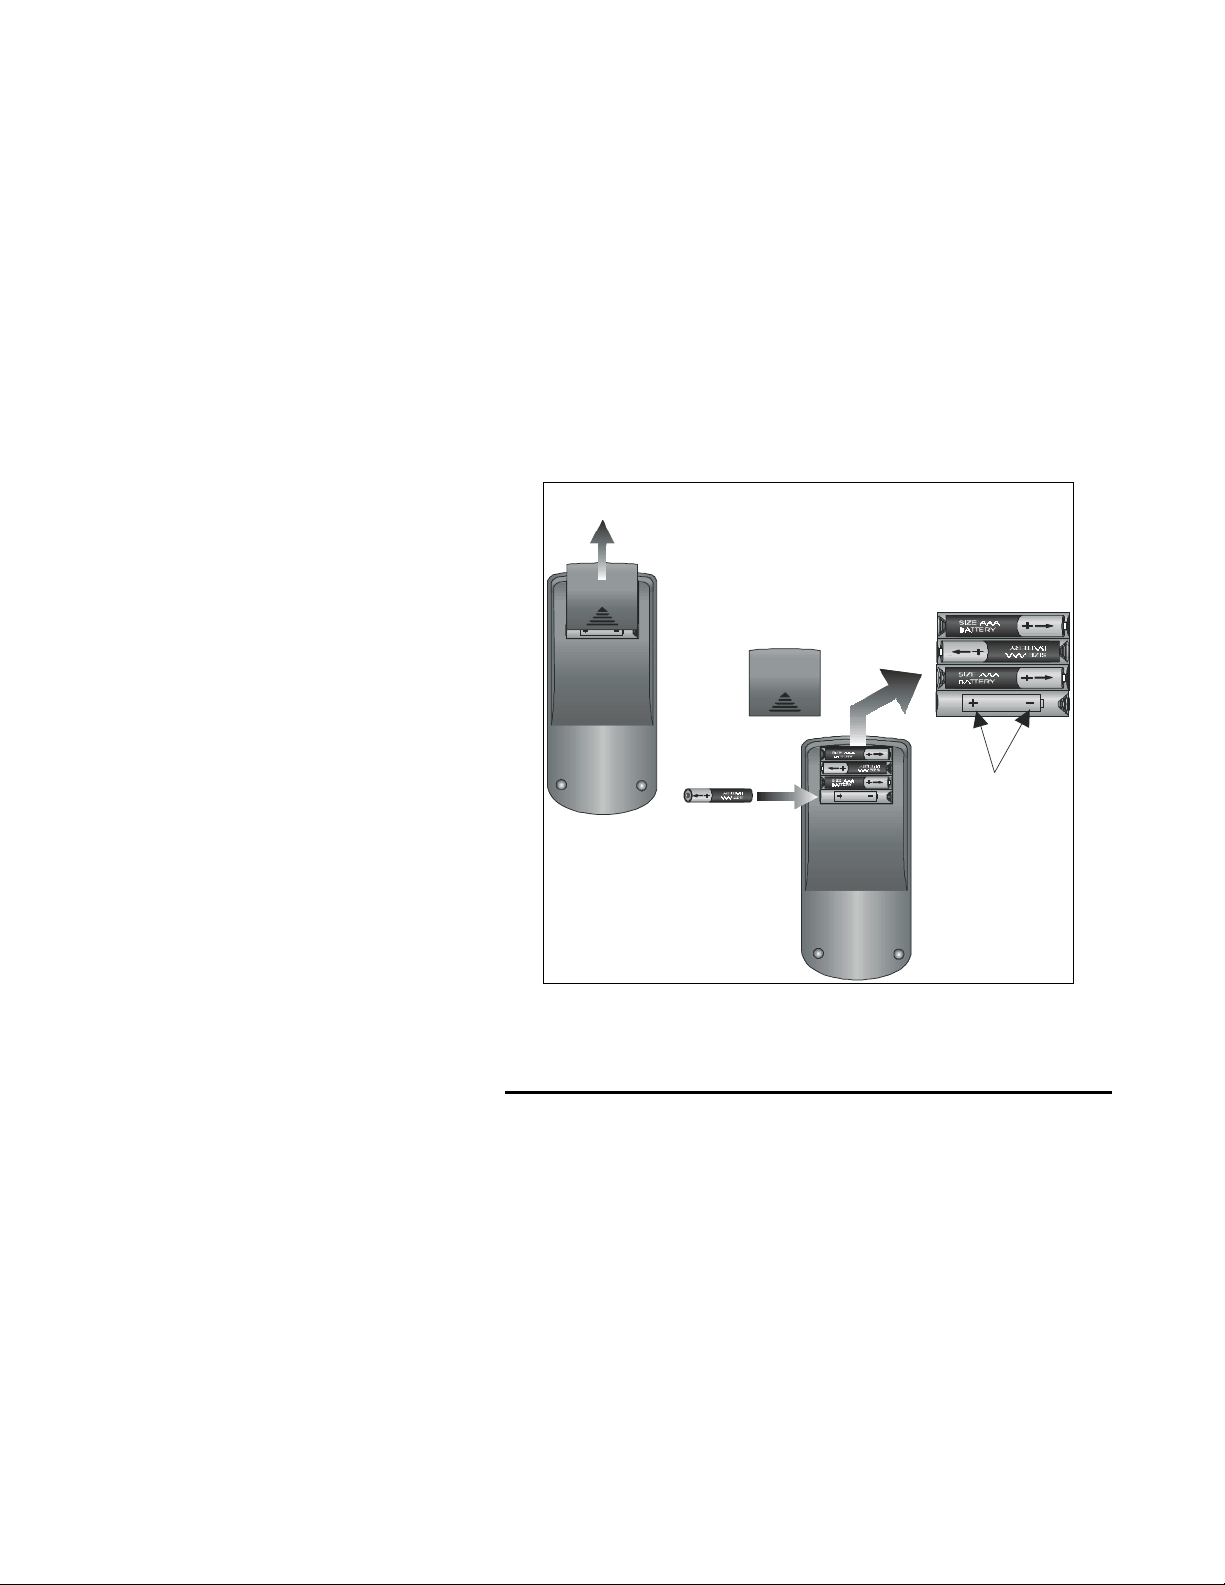
Batteries
The SUR-20 operates on four AAA batteries (not
included). Batteries must be inserted before you can
operate the SUR-20. To insert the batteries, refer to the
following illustration:
Open the battery
case cover by
A.
pushing in the
direction of the
arrow.
OPEN
OPEN
Ensure
that you
Insert the
batteries.
B.
Figure 2-1: Inserting the batteries
4
insert
the batteries
according to
the marking
inside the
battery case.
Page 11
Chapter 2 —Getting Started
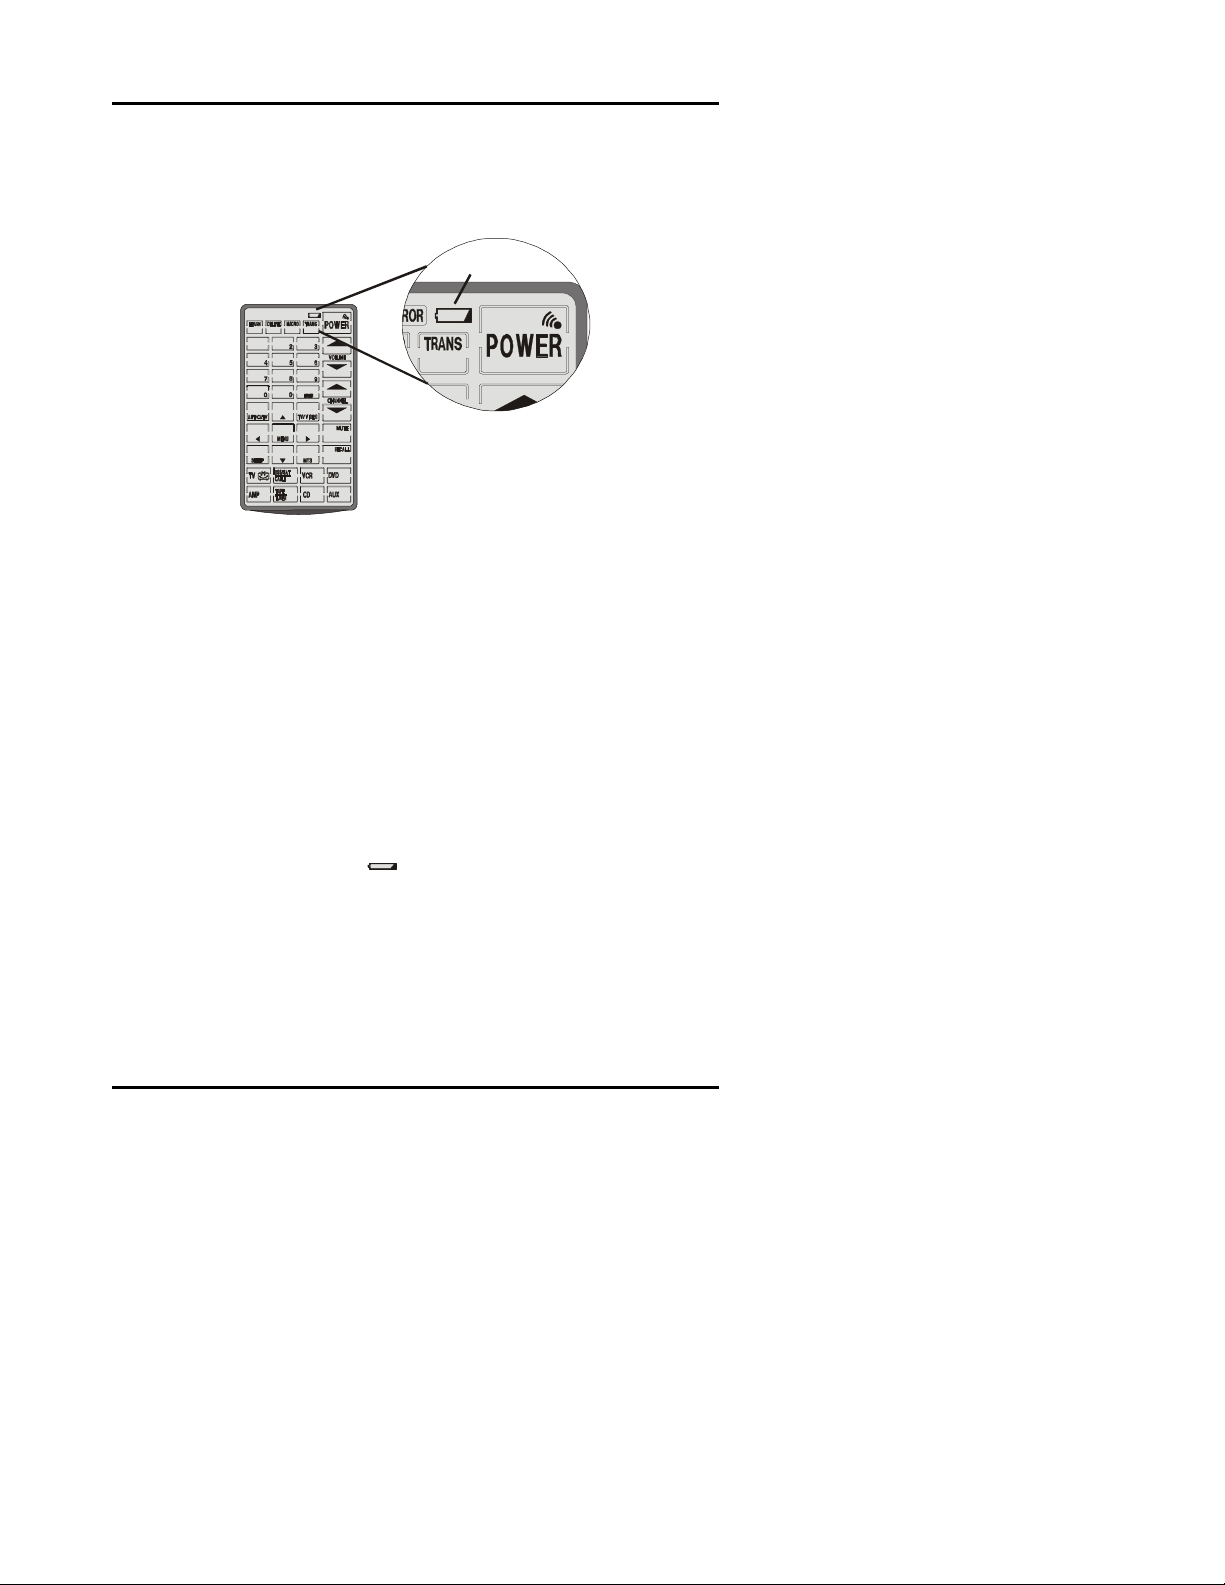
Battery low icon
When the batteries are low, the battery low icon will be displayed
next to the power button
1
1
:
Battery low icon
Figure 2-2: The battery low icon
You should replace the batteries with new ones immediately.
Battery tips and precautions
• Always use fresh batteries. Alkaline batteries
recommended. Do not mix different types of batteries.
• Be sure that the positive (+) and negative (-) polarities of
the batteries match the diagram shown in the compartment.
• Do not expose the batteries to excessive heat or flame.
• Keep batteries out of the reach of children.
• Weak batteries reduce the effective distance of the unit.
• Replace the batteries immediately when the battery low-
power warning icon
• To reduce danger of leakage and damage, remove used
batteries when used longer than two years.
• The SUR-20 will not lose programmed data when batteries
are replaced
appears in the information screen.
5
Page 12
The SUR-20 User’s Manual
The LCD
(Liquid Crystal Display)
Turning the LCD on.
Using the LCD touch screen is easy. Simply touch the
screen to activate it. The touch screen reduces the number
of buttons by changing its configuration for each device
selected. In this way, the touch screen can provide a total of
224 buttons (8 devices x 28 buttons each).
It will turn itself off about 20 minutes after the last use.
1
1
Figure 2-3: Turning the LCD on
Touch screen precautions - Please read the
following instructions carefully:
• Tap the LCD touch screen gently; never use force.
• Do not use a pen or any sharp object to tap the screen.
You might damage the surface.
• Keep the touch screen dry. Wipe off any spills
immediately. The SUR-20 is not waterproof; never
immerse it in liquid.
• Don’t expose the SUR-20 to extreme temperatures. Keep
it away from heat sources.
• Avoid dropping the SUR-20.
• Don’t drop anything on the touch screen.
• Clean the LCD touch screen with a soft cloth. If needed,
dampen the cloth slightly before cleaning. Never use
abrasives or cleaning solutions.
6
Page 13
Chapter 2 —Getting Started
SUR-20 touch screen buttons
The touch screen buttons enable you to operate the SUR-20.
Use these buttons to program codes from your existing
remotes, control your devices and set up command
sequences called macros. You will hear a beep when you
press a button. To activate or deactivate the beep, press any
device button twice. (For more info see Chpt. 8) The SUR-20
will turn itself off 20 minutes after the last use.
* Note:
second safety delay. To instruct any device to record, you must press and
hold the REC button for three seconds.
To prevent accidental activation, the record button has a three
Special function keys
LEARN - DELETE - MACRO -TRANS:
These four buttons activate program
modes that enable the SUR-20 to
perform advanced functions.
TRANS button used only with optional
link cable - see Appendix A.
Control buttons:
After programming, these buttons
operate devices in your home. The
LCD shows a different set of control
buttons for each device. These buttons
control functions such as: volume, play,
power off/on and more for your VCRs,
DVDs, TVs, etc… *
Device buttons:
These eight buttons select the device
you want to use. After pressing a
device button, a corresponding set of
control buttons will appear. An icon
indicates which device is active. In the
figure at left, TV is selected.
7
Page 14
Chapter 3
Chapter 3
Chapter 3 Chapter 3
Operating the SUR-20
Overview: This chapter will tell you how to set up the
SUR-20 LCD display. Read the following chapters to
• Edit the LCD layout to match your devices (Chpt. 3)
• Teach existing remote controls to the SUR-20 (Chpt. 4)
• Access pre-programmed manufacturers codes in the
SUR-20, for lost remotes. (Chpt. 5)
•
Set up a macro sequence of commands (Chpt. 7)
Changing the LCD layout
The layout edit mode enables you to customize the
SUR-20’s display to match your existing remote
controls. Use the following steps to make the display on
the SUR-20 correspond to an existing remote.
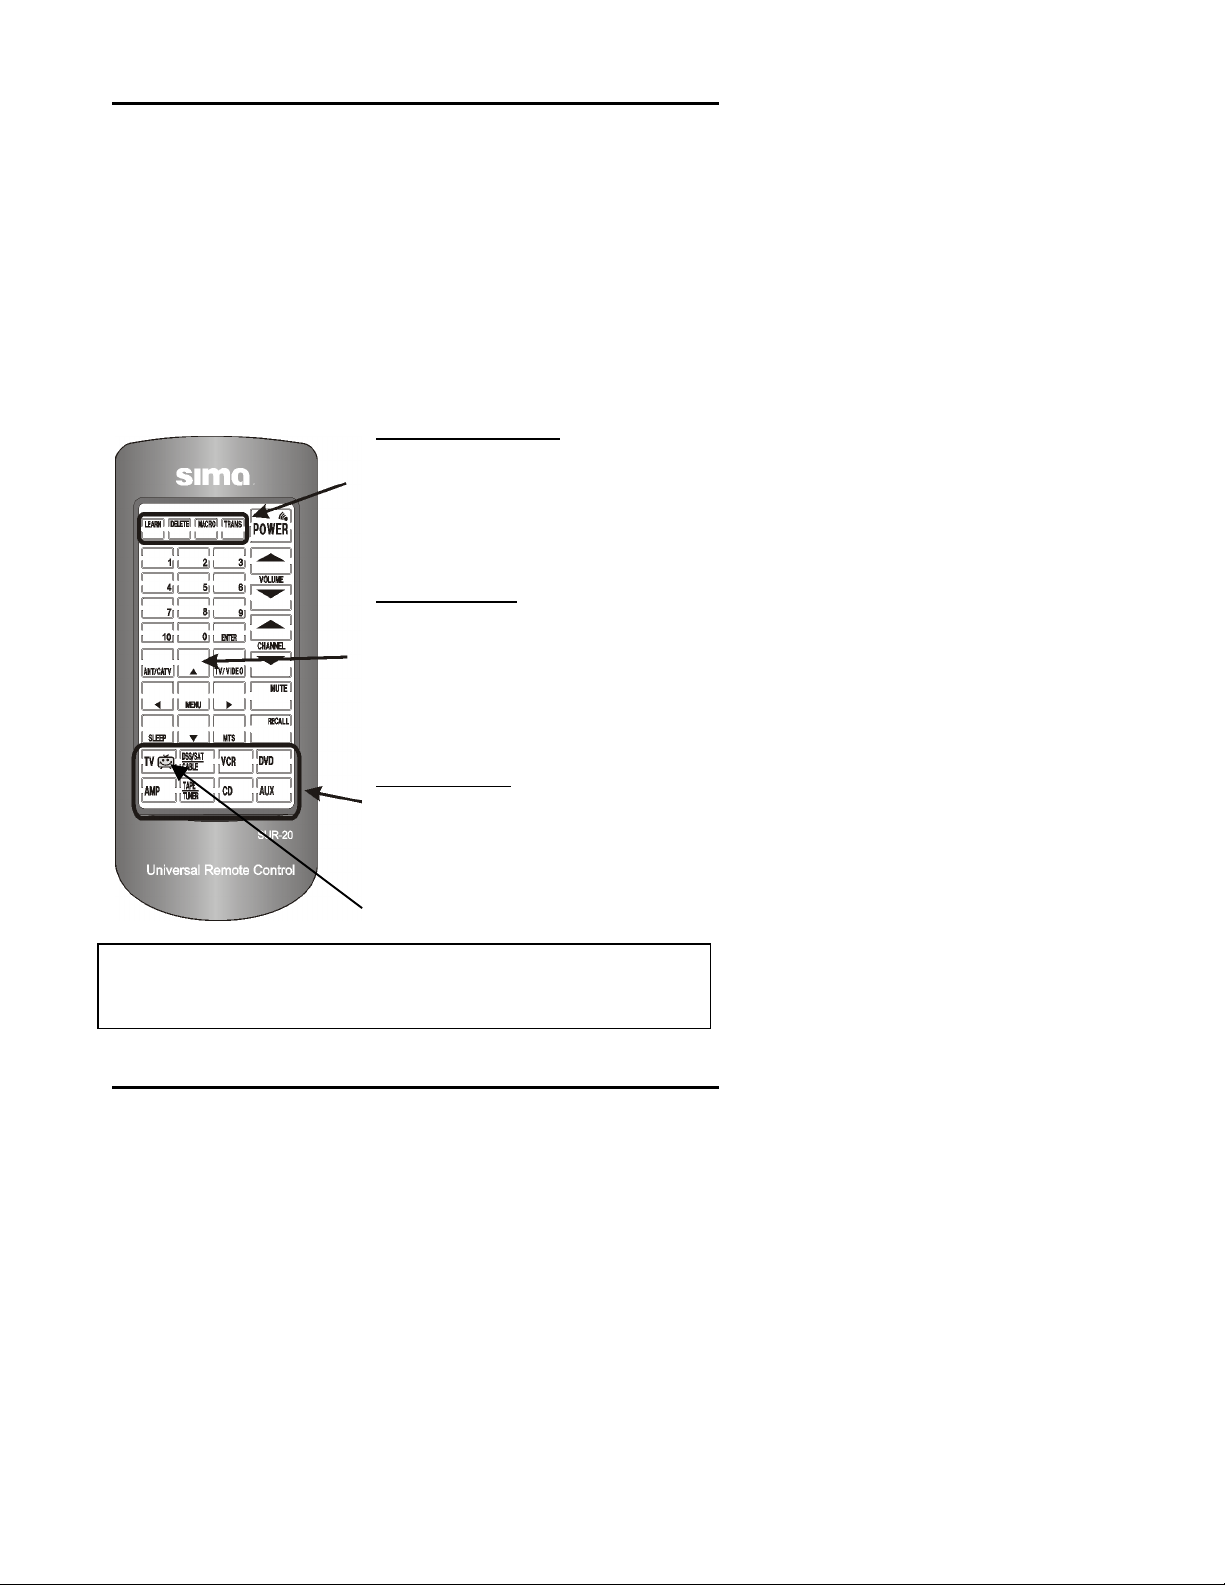
Select the device you
want to use.
Press that device
screen button and
hold for three
seconds.
:
8
Page 15
Chapter 3 —Changing the LCD Layout
You will hear a beep
and see the password
screen to the right.
Note: This screen
prevents you from
accidentally modifying
your SUR-20.
TIP: To exit the
password screen
touch any other button
once. The SUR-20 will
return to its normal
operation screen in 15
sec. if left untouched.
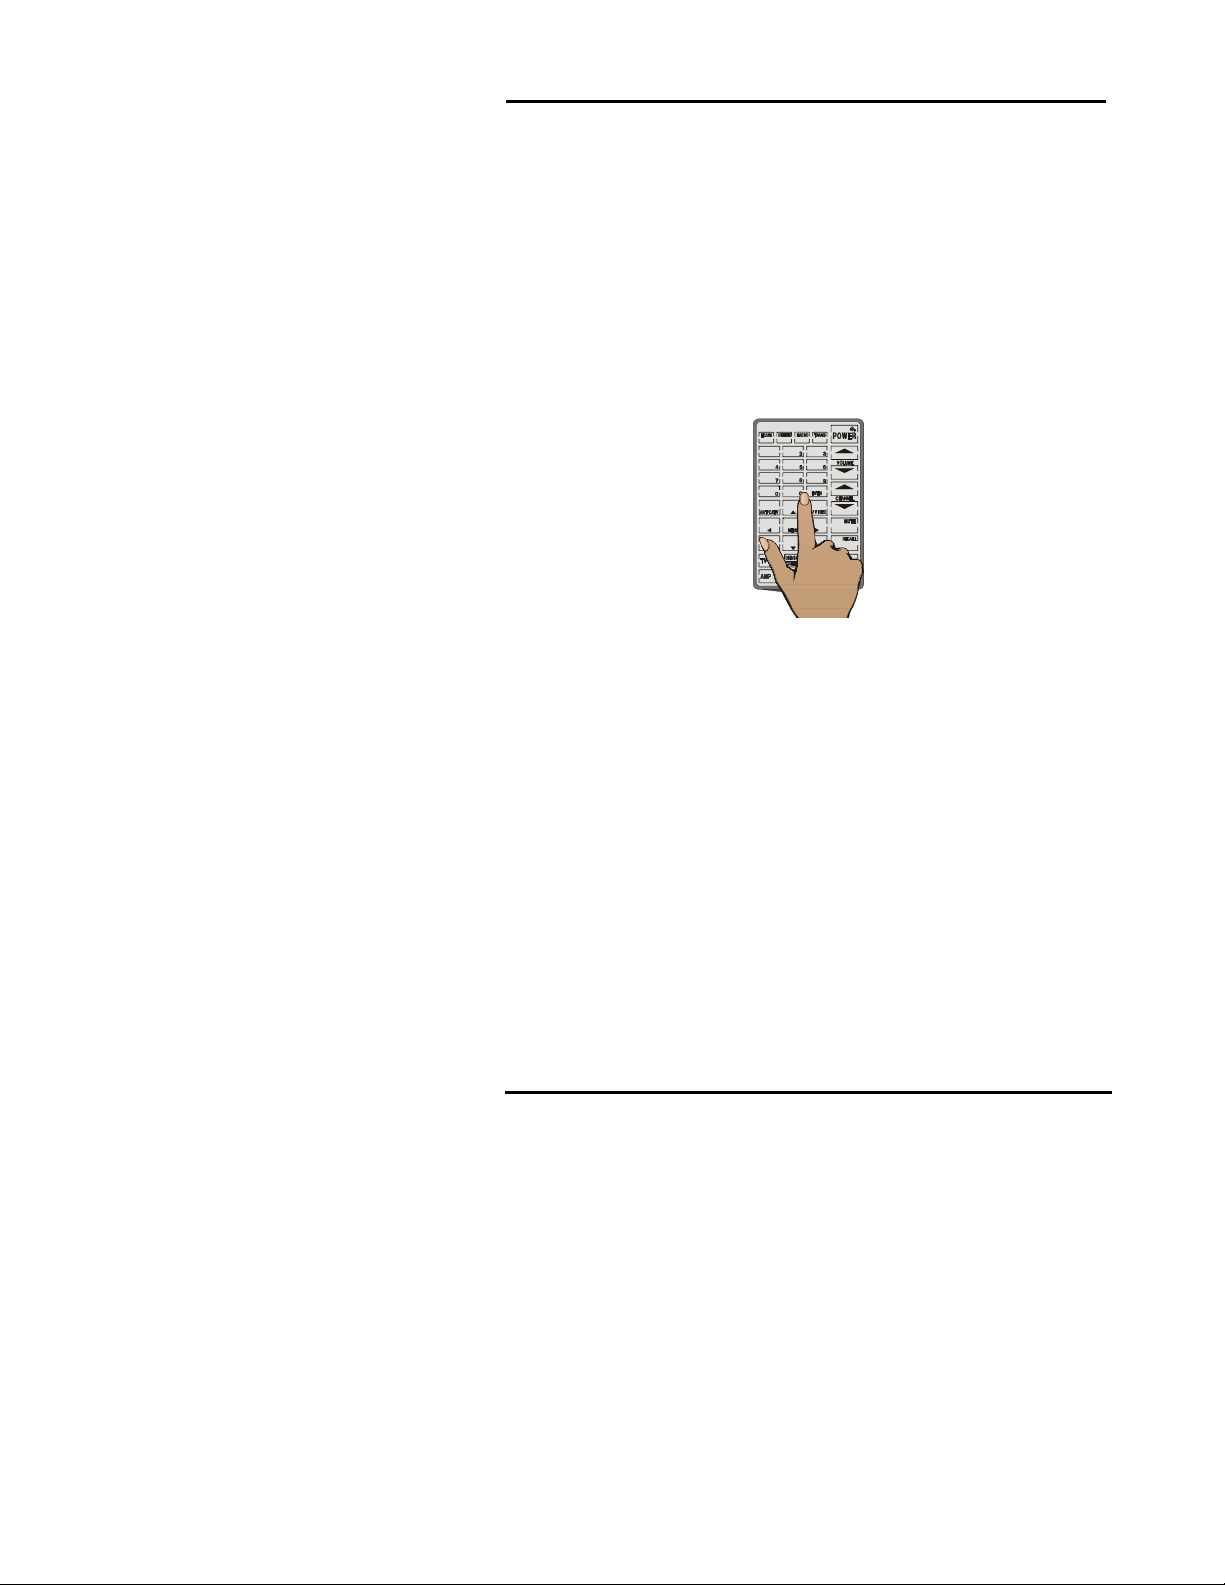
Press each number
button ( 2, 4, 6, 8)
until it disappears.
The LCD display will
begin flashing.
Tap the screen once.
The display will stop
flashing. (If a button
disappears where you
tapped, tap again and
it will re-appear.)
You are now ready to
change the layout of
the SUR-20 to match
your remote.
Select the button
whose configuration
you want to change.
Press once to delete
it.
,
9
Page 16
The SUR-20 User’s Manual
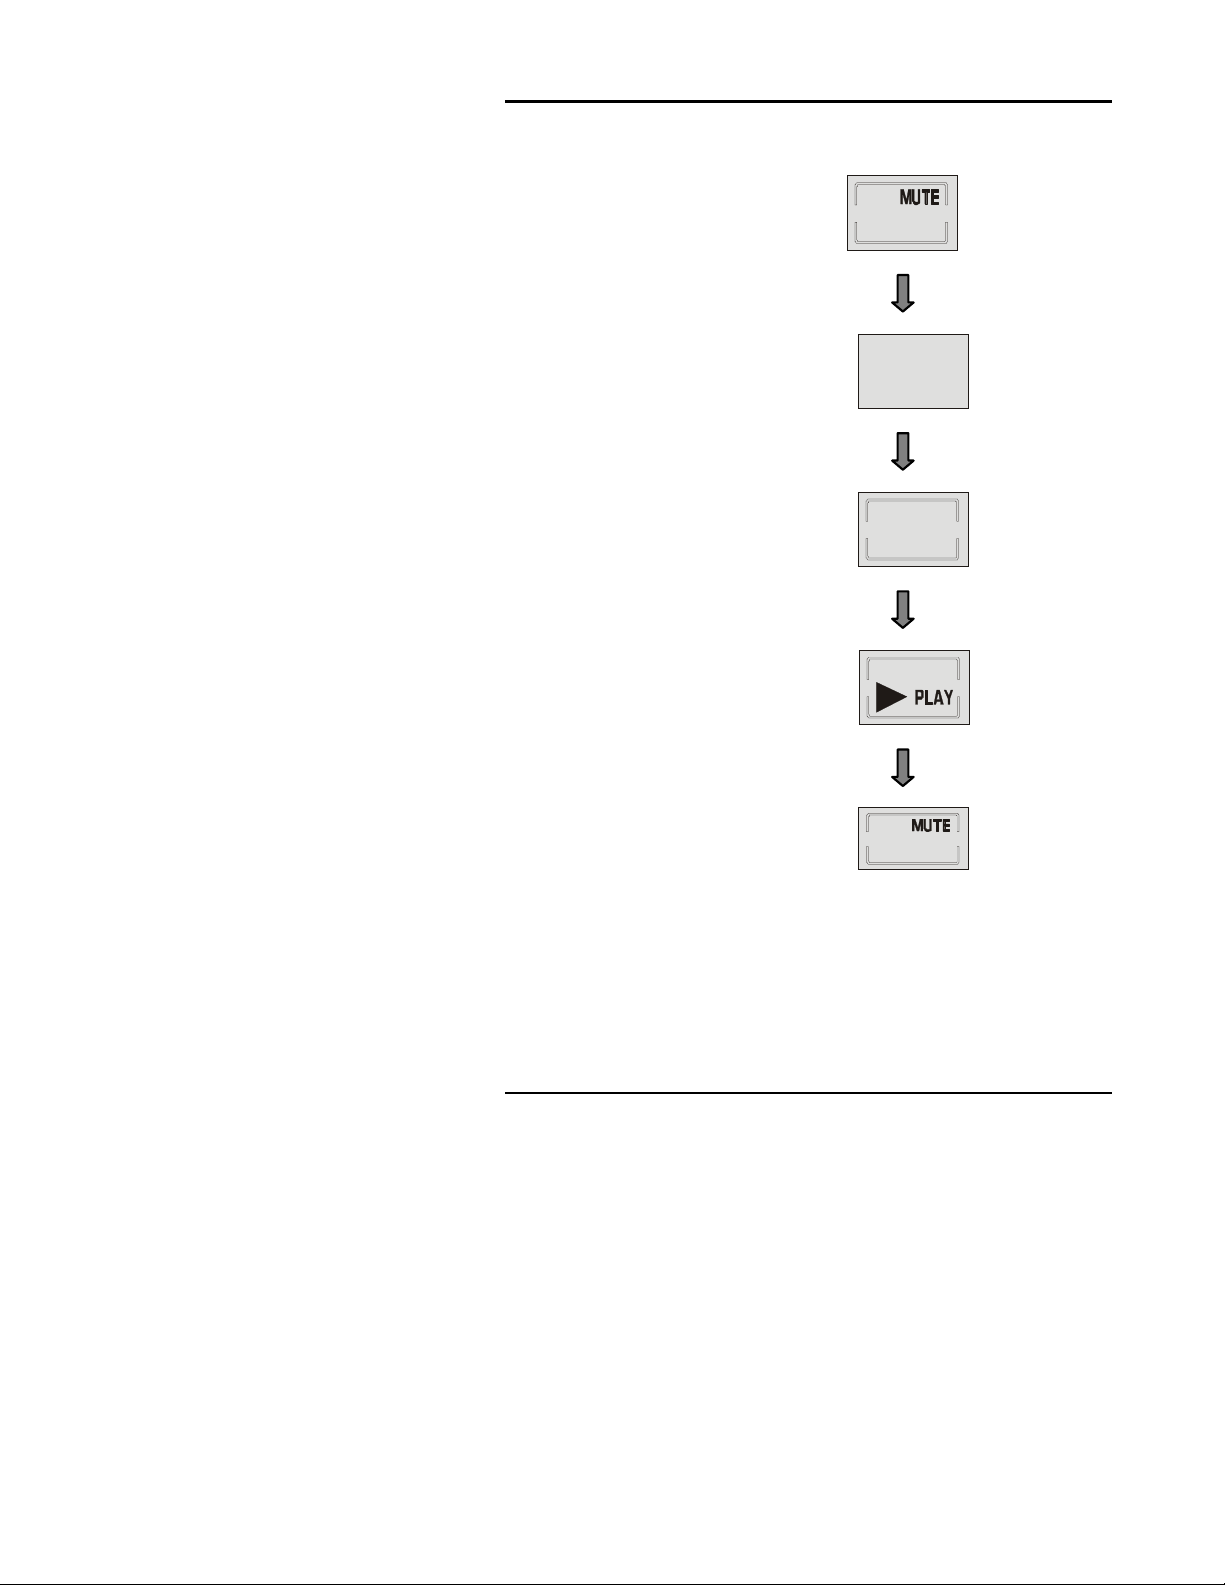
Press the button
again to scroll
through other
functions that can be
assigned to that
button.
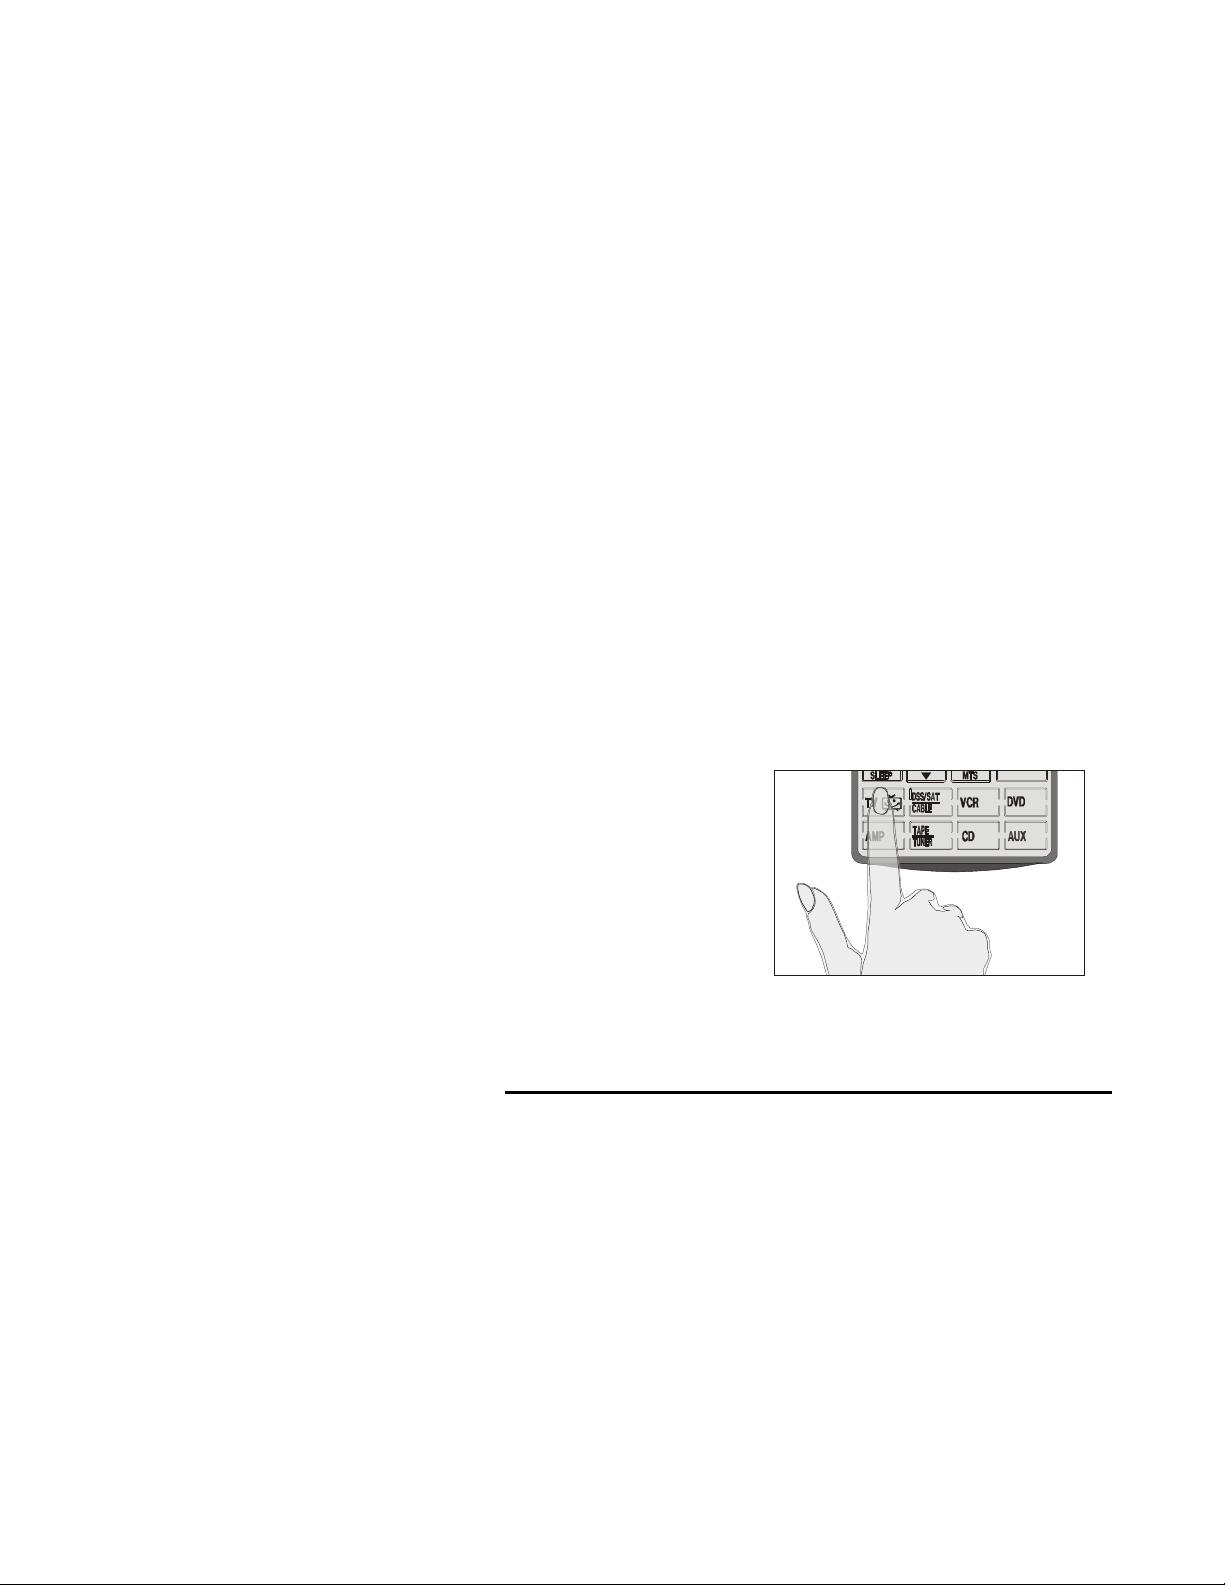
In the example at right,
successive taps on the
“Mute” button in the TV
device screen shown
in fig. A will:
Remove it. (Fig. B)
Change it to a generic
button to perform any
function. (Fig. C)
Use generic
Tip:
buttons to represent
buttons the SUR-20
does not have.
Change to “Play”
(Fig. D)
Return to its original
function. (Fig. A)
Tip: Press and hold the power button while in layout edit mode to
see all of the available icons for each button simultaneously.
When you have finished making changes, press the device screen
button again. You will hear three beeps and the SUR-20 returns to
its normal operational mode.
A.
B.
C.
D.
A.
10
Page 17

Chapter 3 —Changing the LCD Layout
The AUX device button
The AUX device button is equipped with a special
feature that no other button has. The control buttons on
the AUX device screen can easily be made identical to
the control buttons on any other device screen. You can
use it to operate a second TV, VCR, etc. In order to
re-configure the AUX device screen in this way:
1. Press AUX button for three seconds.
2. Press each number button until it disappears.
3. Tap screen once.
4. Then press any of the device buttons. The selected
device layout is copied to the AUX button.
5. Press the AUX button again. You will hear three beeps
and the SUR-20 returns to its normal operating mode.
11
Page 18

Chapter 4
Chapter 4
Chapter 4Chapter 4
The Learning function
Overview: In this chapter you will learn how to teach
the SUR-20 codes used by your other remote controls.
The SUR-20 has the ability to learn how to operate any
infra-red controlled device.
Before you use the learning function
Before you start using the SUR-20’s learning function,
please heed the following precautions:
• Teach only one remote for each device screen. For example,
don’t assign some of the buttons on the TV device screen to
operate a TV in the living room, while assigning others to operate
a different TV in the bedroom. Tip: the AUX device screen can
be used to duplicate any other device screen (see AUX device
button -Chpt. 3).
• To change from a device that has already been programmed,
delete all of the commands for the first device before teaching
new ones. For example, to operate the living room TV instead of
the bedroom TV, delete all commands for the bedroom TV first.
(See Using the delete function in Chpt. 6.) Then re-configure the
TV device screen for the living room TV. (See Using the Learn
function - Chpt. 4)
• When using the learning function, you must press each button
within 2 minutes of pressing the last button. Otherwise, the SUR20 will exit the learning mode and return to its normal operation
mode.
12
Page 19

Chapter 4 —The Learning Function
Using the learning function
To teach the codes from your remote, set both remotes on a
flat surface facing each other. Be sure to point your device’s
remote control at the SUR-20’s learning eye, which is located
at the bottom of the unit. Do not use the other eye located at
the top of the SUR-20. You do not have to turn on the actual
device (TV, VCR etc…). Refer to the following illustration:
Figure 3-1: Using the learning eye
13
Page 20

The SUR-20 User’s Manual
. Follow these instructions:
Press the LEARN button
for three seconds.
You will hear a beep and
then see the
screen
Note: This screen
prevents you from
accidentally modifying the
SUR-20.
Press each number
button until it
disappears
The touch screen appears
again, with the
icon appearing above the
LEARN button. The
power button icon is
blinking, awaiting a signal
from your device’s remote
control.
password
to the right.
.
LEARN
Learning icon
1
1
Blinking icon
14
Page 21

Chapter 4 —The Learning Function
Select the device you
want to operate.
Press that device
screen button.
: You can exit this
TIP
operation by pressing the
LEARN key at any time.
Line up your remote
control and the SUR-20
learning eye, according to
the diagram at right.
The SUR-20 is now ready
to learn your remote
controls buttons. The
power button is the first
button to be assigned.
While pointing your
device’s remote control at
the SUR-20’s learning
eye, press the device’s
power button.
When you hear a beep
and see the
release the button. The
power button has been
assigned. The next
button to be assigned will
start blinking on the touch
screen.
Continue to press the
buttons on your
device’s remote control,
which correspond to the
blinking buttons on the
SUR-20’s touch screen.
OK
icon,
15
Page 22

The SUR-20 User’s Manual
You can change the order of
assigning buttons by
pressing any button on the
SUR-20’s LCD touch screen
display panel…
… and then pressing the
corresponding button on
your device’s remote
control.
To customize the SUR-20
device screen buttons to
match your remote control’s,
(see Changing the LCD
in Chpt. 3).
Layout
To teach another remote
control while in this mode,
select a different device
screen and repeat the steps
in the learning sequence.
When you are done
assigning the buttons for the
devices you desire,
the learn button to
complete the learning
mode.
You will hear three beeps
and exit the learning mode.
press
1
1
1
16
Note
:
If you see an “error” message when
assigning a button, refer to the troubleshooting
section in Appendix B
Page 23

Chapter 5
Chapter 5
Chapter 5Chapter 5
Loading pre-programmed codes
The SUR-20 is pre-programmed with many manufacturers’ codes to
operate a wide range of TVs, VCRs, DVDs etc… These are useful if
you have lost the original remote. However, because of the great
variety and number of remotes on the market, not all functions may
work when using the pre-programmed codes. If you have the
original remote, it is recommended you teach the SUR-20 the
functions most important to you (Ch. 4). You can directly access the
manufacturer’s code for your device by following the steps below.
Note: some codes are designed to operate more than one model. It
may take several tries to find the code that works with your unit.
Press the LEARN
button for three
seconds.
You will hear two beeps
and then see the
password screen
right.
Note: This screen
prevents you from
accidentally modifying
the SUR-20.
Press each number
button until it
disappears.
to the
1
17
Page 24

The SUR-20 User’s Manual
The device screen
appears again, with the
LEARN
icon above the
LEARN button. The
POWER button icon is
blinking, to wait for a
signal from your
device’s remote control.
Select the device button
for which you want to
load a manufacturer’s
code.
Press and hold for 5
seconds.
You will hear a beep
and then see the
password screen shown
in the right diagram
again.
Note:
prevents you from
accidentally modifying
the SUR-20..
Press each number
button until it
disappears.
This screen
Learning icon
Blinking icon
18
Page 25

Chapter 5 - Loading Pre-programmed Codes
You will hear 2 beeps
and then see the digital
pad screen shown in
diagram at right.
Enter a number from
the manufacturers’
code table that you
think will operate your
device. Manufacturer
code tables are found
on pages 20 - 25.
After entering the code,
you will hear 3 beeps
immediately, then see a
set of control buttons
corresponding to the
manufacturer’s device
you have selected.
If these controls do not
work, you may have to
enter another code from
the code table. Some
manufacturers have
several codes for their
products. Repeat the
previous steps using
another code number.
1
19
Page 26

The SUR-20 User’s Manual
Manufacturers’ Codes Table 1 – Televisions
Vendor Code Vendor Code
Admiral 12, 13 Daytron 08
Aiko 07 Dimensia 11, 13
Alleron 05 Dumont 08
Akai 15 Dynasty 16
Amtron 20 Elektra 12
Anam National 16, 18, 20 Electroband 01, 15
AOC 01, 02, 08 Electrohome 08, 18
Audiovox 20 Emerson 01, 05, 08, 16,
Belcor 08 Envision 08
Bell & Howell 11, 12 Fisher 19
Bradford 20 Fujitsu 05
Brokwood 08 Funai 05, 16, 20
Candle 06, 08 FutureTech 16, 20
Celebrity 15 General Electric 03, 08, 11, 13,
Centurion 08 Gibraltar 08
Centronic 16 Goldstar 02, 08
Citizen 04, 06, 07, 08,
12, 16, 20
Clairtone 01 Hallmark 08
Classic 16 Harvard 20
Colortyme 08 Hitachi 08, 12, 19, 22
Concerto 08 IMA 20
Contec/Cony 01, 16, 19, 20 Infinity 17
Craig 16, 20 JBL 17
Crown 16, 20 JCB 15
Curtis Mathis 04, 08, 11, 12,
13
CXC 16, 20 Jensen 08
Daewoo 02, 07, 08, 16,
21
Grundy 05, 20
JC Penny 02, 03, 04, 06,
JVC 03, 10, 19
20
14, 18
08, 11, 13, 14
20
Page 27

Chapter 5 - Loading Pre-programmed Codes
Manufacturers’ Codes Table 1 – Televisions (cont.)
Vendor Code Vendor Code
Kawasho 08, 15 Nikko 07, 08
KEC 16 NTC 07
Kenwood 08 Onking 16
Kloss Novabeam 09 Onwa 16, 20
KTV 01, 16, 20 Optonica 23
Lodgenet 11, 12 Panasonic 03, 17, 18
Loewe 17 Philco 02, 06, 08, 09,
Logik 11, 12 Philips 06, 08, 09, 10,
Luxman 08 Pilot 08
LXI 08, 11, 13, 14,
Magnavox 06, 08, 10, 17 Portland 02, 07, 08
Majestic 11, 12 Price Club 04
Marantz 08, 17 Prism 03
Matsui 17 Proscan 11, 13, 14
Megatron 08 Proton 08
MEI 01 Pulser 08
Memorex 05, 08, 11, 12 Quasar 03, 18
MGA 02, 05, 08 Radio Shack/
Midland 03, 14 RCA 02, 08, 11, 13,
Mitsubishi 02, 05, 08, 10 Rhapsody 01
Montgomery
Ward
Motorola 18, 23 Sampo 08
MTC 01, 02, 04, 08 Sanyo 08, 19
Multitech 20 Scotch 08
NAD 08 Scott 05, 08, 16, 20
NEC 02, 08, 10, 18 Sears 04, 05, 08, 11,
Nikei 16 Sharp 08, 23
17
11, 12 Samsung 02, 04, 08
Pioneer 08
Realistic
17, 18
17, 18
08, 11, 13, 16,
20
18, 21
13, 14, 19
21
Page 28

The SUR-20 User’s Manual
Manufacturers’ Codes Table 1 – Televisions (cont.)
Vendor Code Vendor Code
Shogun 08 Technics 03
Signature 11, 12 Technwood 03, 08
Simpson 06 Teknika 02, 04, 05, 06,
Sonic 01 Telerent 11, 12
Sony 15 Tera 08
Soundesign 05, 06, 08, 16,
SSS 08, 16, 20 Toshiba 04, 10, 19
Starlite 20 Vidtech 02, 08
Supreme 15 Wards 02, 05, 08, 11,
Sylvania 06, 08, 09, 17
Tandy 23 Yupiteru 16
Tatung
20
20
18 Zenith 07, 08, 11, 12
TMK 08
Yamaha
Symphonic
07, 08, 11, 12,
16, 19, 20
12, 13, 17
02, 08
Manufacturers’ Codes Table 2 – Cable Boxes
Vendor Sima Code Vendor Sima Code
ABC 39 Jerrold 39
Archer 38, 40 Philips 40
Century 40
Citizen 40
Garrard 40
GC Electronics 38
General
Instrument
Jasco 40
39
Manufacturers’ Code Table 3- VCRs
22
Realistic 38
Scientific Atlanta 38
Starcom 39
Unika 38, 40
Universal 38, 40
Page 29

Chapter 5 - Loading Pre-programmed Codes
Vendor Code Vendor Code
Admiral 31 Goldstar 25, 28
Adventura 27, 33 Gardiente 27
Aiwa 27, 33 Harley Davidson 27
American High 30, 32 Harman Kardon 28
Asha 35 Hitachi 33
Audio Dynamics 28 Instant Replay 30, 32
Audiovox 25 Inteq 25
Beaumark 35 JCL 30, 32
Calix 25 JC Penney 25, 28, 30, 36
Candle 25, 26, 28, 35 JVC 28, 36
Canon 30, 32 Kenwood 28, 36
Citizen 25, 26, 28, 35 Kodack 25, 30, 32
Colortyme 28 Lloyd 33
Craig 25, 35 LXI 25
Curtis Mathes 28, 30, 32, 33 Magnavox 30, 32, 34
Cybernex 35 Magnin 35
Daewoo 26, 27 Marantz 28, 30, 34, 36
DBX 28, 36 Marta 25
Dyntech 27, 33 Masushita 30, 32
Electrohome 25
Electrophonic 25 Memorex 25, 27, 30, 31,
Emerson 25, 26, 27, 30,
32, 33
Fisher 28, 34 Mitsubishi 36
Fuji 32 Montgomery
Funai 27, 33 Motorola 30, 31, 32
Garrard 27 MTC 27, 33, 35
General Electric 30, 32, 35 Multitech 27, 33, 35
MEI 30, 32
32, 33, 35
MGN
Technology
Ward
35
31
23
Page 30

The SUR-20 User’s Manual
Manufacturers’ Code Table 3- VCRs (cont.)
Vendor Code Vendor Code
NEC 28, 36 Signature 33
Nikko 25 Singer 30, 32
Noblex 35 Sony 29
Olympus 30, 32 STS 30, 32
Optimus 25, 31 Sylvania 27, 30, 33, 34
Panasonic 30, 32 Symphonic 27, 33
Pentex Research 28 Tandy 33
Philco 30, 32 Tashiko 25
Philips 30, 32, 34 Teac 25, 33
Pilot 25 Technics 30, 32
Pioneer 36 Teknika 25, 27, 30, 32,
Quasar 32 Toshiba 26, 34
RCA 30, 32, 35 Totevision 25, 35
Radio
Shack/Realistic
Radix 25 Unitech 35
Randex 25 Vector Research 26, 28, 36
Samsung 26, 35 Victor 36
Sanky 31 Video Concepts 26, 28, 36
Sansui 36 Video Sonic 35
Sanyo 35 Wards 25, 26, 29, 30,
Scott 26 White West 33
Sears 25, 30, 32, 34
Sharp 31, 33 Yahama 28, 36
Shogun 35 Zenith 25, 36
25, 27, 30, 31,
32, 33, 35
TMK 35
XR-1000 27, 30, 32
33
31, 33, 35
24
Page 31

Chapter 5 - Loading Pre-programmed Codes
Manufacturers’ Codes Table 4 – Satellite Dishes
Vendor Sima Code Vendor Sima Code
Dish Network 42 Proscan 43
Drake 41 RCA DBS 43
Echoshere 42 Sony 44
Echostar 42 Video Cypher 41
General
Electric
43 Zenith 41
Manufacturers’ Codes Table 5 - DVDs
Vendor Sima Code Vendor Sima Code
Denon 45 Philips 47, 48
Hitachi 46 Pioneer 46
Magnavox 47, 48 Toshiba 47
Marantz 47 Yamaha 45
Panasonic 45
Vendor Sima Code
Sima
SVS-4
49
For easy reference, write down the manufacturers’
codes you have chosen below.
TV ____ DVD ____ CABLE ____ CD ____
VCR ____ SAT ____ AUX ____ STEREO ____
25
Page 32

Chapter 6
Chapter 6
Chapter 6Chapter 6
Using the delete function
The DELETE function enables you to:
1. erase the commands for selected buttons for a device
2. erase commands for all buttons for a device
3. erase the commands for all devices
Delete device button
Follow these instructions to delete taught commands:
Press the delete
button for three
seconds.
1
You will hear two
beeps and then see
the password screen
to the right.
This screen
Note:
prevents you from
accidentally modifying
your SUR-20.
26
1
Page 33

Chapter 6 – The Delete Function
Press each number
button until it
disappears.
The touch screen
appears again, with
DELETE
the
above the DELETE
button.
Press the device
screen button to
select the device for
which you want to
delete data.
icon
Delete icon
27
Page 34

The SUR-20 User’s Manual
Press the button
whose data you
want to delete. You
will hear a beep and
see the
The button’s data has
been deleted.
Note: Pressing the
button deletes only
the taught data; it
does not remove the
button. To learn how
to remove buttons,
refer to Changing the
LCD Layout in Chpt. 3.
Continue pushing
buttons whose data
you want to delete.
When finished,
the LEARN button
to exit the delete
function and return
to normal operation.
To delete the taught
data for an entire
device, press the
DELETE button
while in delete
mode. The
BANK
under the DELETE
button.
OK
icon.
press
icon appears
OK icon
1
1
Bank icon
1
1
28
Page 35

Chapter 6 – The Delete Function
Press the device
screen button to
select the device
whose data you
want to delete.
You will hear two
beeps and see the
OK
icon.
The taught data for
the entire device has
been erased.
To exit the delete
function,
press the
LEARN button to
return to normal
operation.
To delete the taught data for all of the devices at once, press
the DELETE button for three seconds, while in the delete
mode.
The display will flash and you will hear six beeps. Taught data for all
devices has been erased.
When you have
finished deleting
data, press the
1
LEARN button to
exit the DELETE
function and return
to normal operation.
1
29
Page 36

Chapter 7
Chapter 7
Chapter 7Chapter 7
Macro Function
A macro is simply a series of commands. The MACRO
feature enables you to initiate a sequence of up to 25
commands with a single button. You can create a macro on
any control button. Remember, however, assigning a macro
eliminates the button’s original function.
Macro example
The following example will help you to better understand
creating a macro sequence. It is provided to teach you how
to record a macro. By no means is it the only macro
sequence you can create. You can create macros using any
sequence of commands you desire.
The following macro will:
1. Turn the TV on.
2. Switch the TV to video mode.
3. Turn the VCR on.
4. Create a two-second delay.
5. Instruct the VCR to play a tape.
Set up the macro using the following steps:
Press the MACRO
button for three
seconds to enter the
password mode.
1
30
1
Page 37

Chapter 7 – Macro Function
Press each number
button until it
disappears.
LEARN
The
appear above the
LEARN button.
First, select a device
screen.
For this example, we
have chosen the AUX
screen.
A. Press the AUX
button.
B. Press 1.
You will hear three
beeps.
The 1 button in the
AUX device screen will
be used to start the
macro in the normal
operation mode.
Note: The 1 button will
no longer perform its
original function.
Do not use one of the
8 device buttons to
run your macro.
Press the TV button.
This will enable you to
construct a series of
commands for the
operation of your TV.
Note
icon will
: Your TV, VCR,
1
31
Page 38

The SUR-20 User’s Manual
etc… will not be
activated as the macro
commands are being
entered. The macro
only works when the
SUR-20 is in its normal
operational mode.
Press the power
button.
power the TV on when
the macro is running.
Press TV/Video. This
command will switch
the TV mode to Video
mode so that you can
watch the VCR tape.
Press the VCR device
screen button to
switch to the VCR
device menu.
This will enable you to
construct a series of
commands for the
VCR.
Press the power
button. This powers
your VCR on while the
macro is running.
This will
1
1
1
You may need to set a
time delay between
turning on the VCR
32
Page 39

Chapter 7 – Macro Function
and sending the tape
play command.
Push the MACRO
button to scroll
through the 3 options:
A = 2 sec. B = 5 sec.
and C = 10 sec.
Select the 2-second
delay (fig. A.).
Note: You can set a
time delay between
any two commands.
A.
B.
C.
MACRO
2
MACRO
5
MACRO
10
Press play. This
command will start
playing the tape in
your VCR when the
macro is running.
Press LEARN to exit
the macro sequence.
You can create another macro at this time by selecting another macro-run
button and entering another sequence of commands.
…or press LEARN again to exit the macro function.
Running the macro
To run the macro, press the AUX device button. Press the 1 button. Be
sure to aim the SUR-20 at the devices while the macro sequence is
being sent.
1. TV turns on
2. TV switches to video mode
3. VCR turns on
To restore the AUX’s 1 button to its original function delete the macro
using the delete button function. Refer to Using the delete function in
Chpt. 6.
The following macro will begin:
4. Two-second delay.
5.
VCR starts playing tape
Quick start guide to setting up a Macro.
33
Page 40

The SUR-20 User’s Manual
Follow these instructions to set up a macro:
1. Press the macro
button for three
seconds.
2. Press each number
button until it
disappears.
1
1
LEARN
The
icon appears
above the learn
button.
3. Select a device
screen.
4. Select a control
button to run the
macro.
5. Input your macro
sequence using up to
25 commands.
6. Press LEARN to
complete the macro
sequence.
You can teach another
macro by going back to
step 3 or…
7. Press LEARN again
to exit macro function.
Learning icon
1
1
1
34
Page 41

Chapter 8
Chapter 8
Chapter 8Chapter 8
Overview:
• Adjust the sensitivity of the backlight.
• Turn off the beep signal.
• Recall the original LCD layout.
Adjusting the LCD backlight
You can adjust the LCD backlight sensitivity and the length of
time that the backlight stays on after you press the LCD
panel. Important Note: the room light sensor appears as a
small dark spot located above the MACRO button at the top
of the unit and it may be visible when the backlight is on. This
is normal. Refer to these instructions
The following section will tell you how to:
:
Press the AMP and
the AUX buttons at
the same time for
three seconds to
enter the LCD
backlight configuration
mode.
You will hear two
beeps and then see
the
password screen
to the right.
Note: This screen
prevents you from
accidentally modifying
your SUR-20.
35
Page 42

The SUR-20 User’s Manual
Press each number
button until it
disappears.
You will see the
screen to the right. It
enables you to set the
length of time that the
LCD backlight stays on
after touching the LCD
panel.
Two buttons showing
the current setting will
be flashing.
Press 1 to turn
backlight on for
10 sec.
Press 2 to turn
backlight on for
20 sec.
Press 3 to turn
backlight on for
30 sec.
After you have made
the adjustment, press
the power button to
move to the next
screen.
1
1
1
1
1
36
Page 43

Chapter 8 – Special Features
The SUR-20 detects
the level of ambient
light and adjusts the
backlight to respond
according to the
setting in this screen.
Press the up arrow
key to increase the
sensitivity of the
backlight to the
ambient lighting.
When set to 1, the
backlight will
automatically switch on
in a normally lit room.
Press the down
arrow key to
decrease the
sensitivity of the
backlight to the
ambient lighting.
When set to 10, the
backlight will
automatically switch
on only in a dark room.
When you have
finished making your
adjustment, press any
of the device buttons
to exit.
Current
level
1
1
37
Page 44

The SUR-20 User’s Manual
Turning off the beep signal
To turn off the beep signal, press any device button
twice. To turn it back on press any other device button
twice.
Turning on/off the beep signal
If you don’t hear a beep when
you press the screen, you may
have deactivated the beep.
Press any device button twice to
activate the beep function. If you
still don’t hear a beep, press the
button a little more firmly.
Finding the beep indicator
38
The beep indicator is
located in the Power button.
If the indicator is not shown,
the beep signal is turned off.
Page 45

Chapter 8 – Special Features
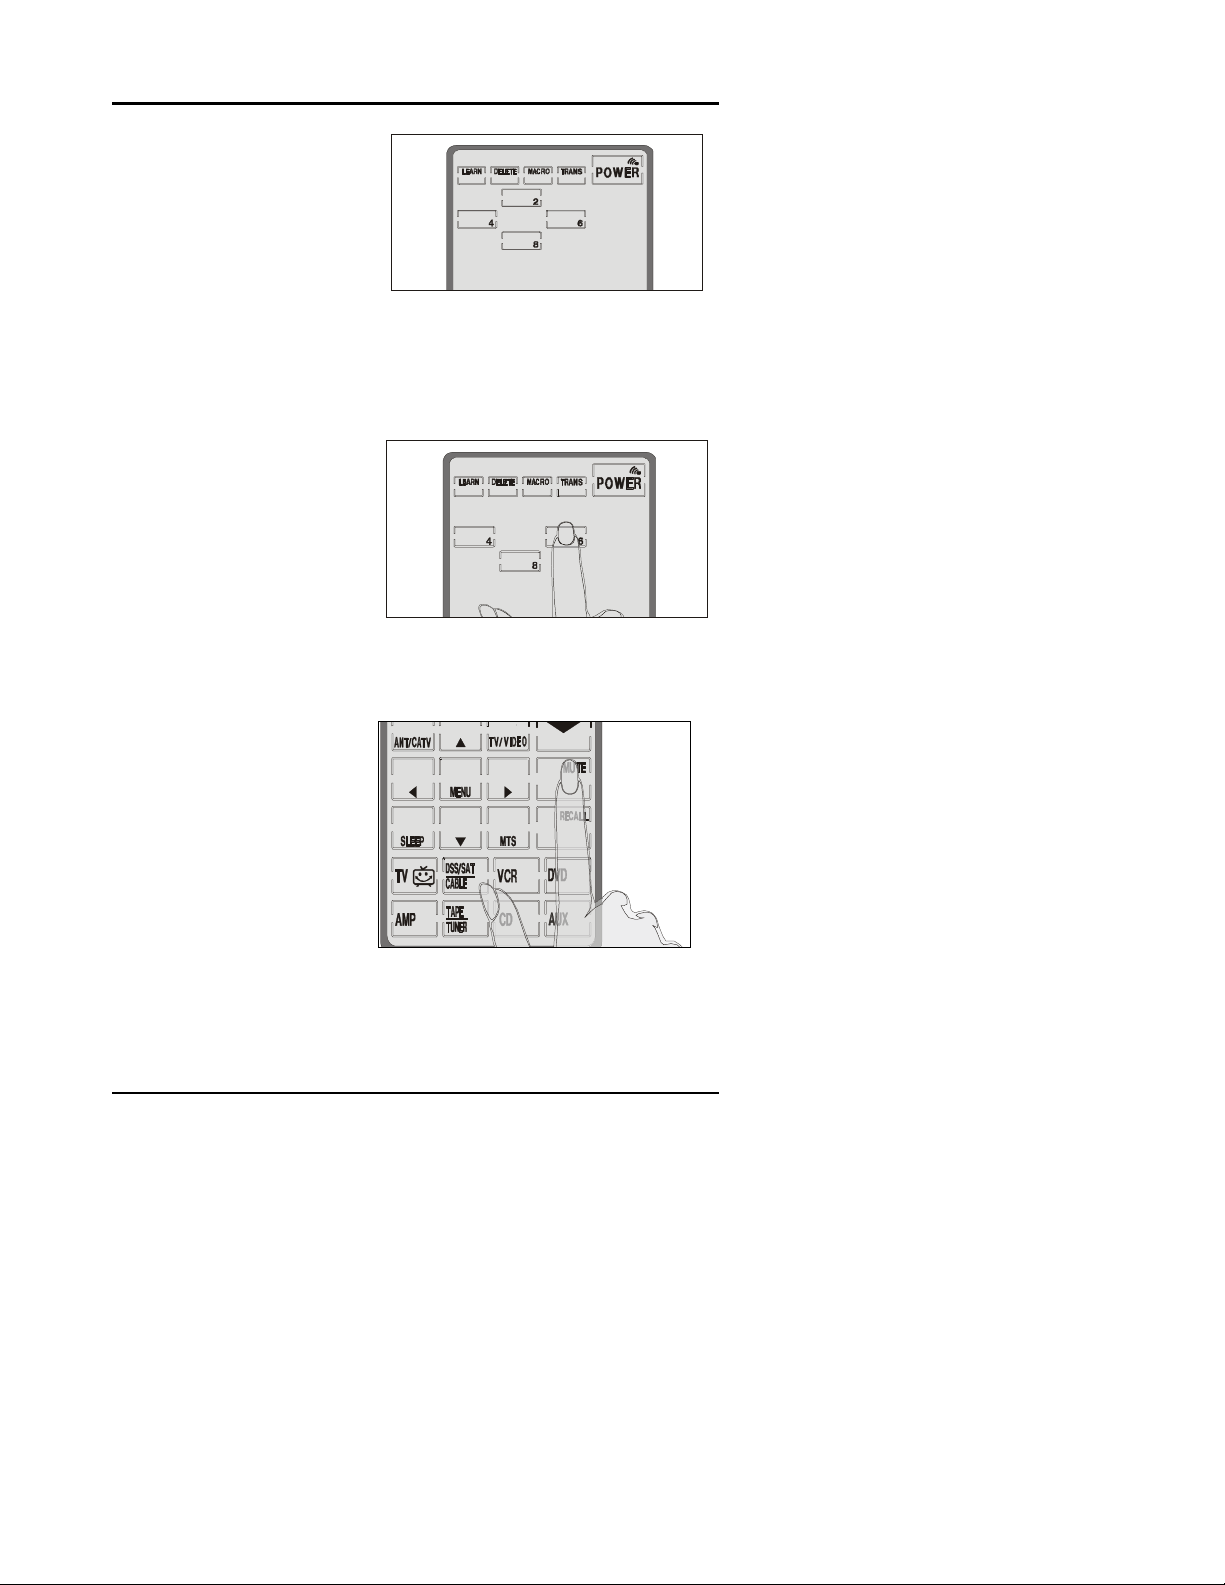
Recalling the original LCD layout
You can reset the LCD panel buttons to their original
factory configuration. Any configurations you have made
will be lost. To recall the original LCD layout, press the
TV and DVD device buttons at the same time for five
seconds:
Figure 3-3: Recalling the original LCD panel configuration
You will hear two beeps
and then see the
password screen to the
right.
Press each button
until it disappears.
The SUR-20 beeps six times and returns to normal
view. The original LCD panel configuration has been
recalled.
39
Page 46

Appendix A
Appendix A
Specifications
Model
Battery
Dimensions
Weight
Power saving
Battery consumption
Display
Remote capability
Display types
Accessories
SUR-20
4 AAA alkaline batteries (not included)
7” (L) x 3.2” (W) x 1.1” (H)
7.7 oz. (with batteries )
LCD turns off 20 minutes after last
operation
In use: 50mA
Standby: 125µA
LCD off: 25µA
Touch liquid crystal display
8 remotes x 28 keys
TV, DSS/SAT/cable, VCR, DVD, AMP,
tape/tuner, CD, AUX
User’s manual
Optional Accessories
An optional link cable to connect two SUR-20’s is available. The
cable enables you to transfer data between the SUR-20 units. To
perform a data transfer you will use the TRANS special function
button. Please see the manual which accompanies the cable when
purchased. Link cable is available from Sima Corporation. To order
link cable contact:
Sima Products Corp.
140 Pennsylvania Ave.
Bldg. # 5
Oakmont, PA 15139
or call 800-345-7462 412-828-3700 412-828-3775 FAX
or look up our website at
www.simacorp.com
40
Page 47

Troubleshooting
Appendix B
Troubleshooting
If you have trouble configuring or operating the SUR-20, first check
that you have inserted the batteries correctly (page 4). Then check
the items below.
Symptom Remedy
The SUR-20
doesn’t operate
your device.
You cannot
operate a device
even after
teaching the
device using the
learning function
(Chpt. 4).
You see an “error”
display during the
learning
procedure.
You see an “error”
display during
operation.
• Batteries may be dead. Replace with fresh
alkaline batteries.
• Make sure that the desired device screen on
the SUR-20 LCD panel has been selected.
• Move closer to the device. The maximum
operating distance is approximately 30 feet.
• Ensure that you are aiming the SUR-20 directly
at the device and that there are no obstructions
between the SUR-20 and the device.
• Ensure that programming the learning function
(Chpt. 4) or the manufacturer codes (Chpt.5 )
has been properly done. Re-teach the button.
• Make sure that you have correctly “taught” your
device’s remote control to the SUR-20.
• Delete the device data from the SUR-20 (Chpt.
26) and carry out the learning function again
(Chpt. 4).
• Make sure you did not program more than one
remote for a given device.
• Make sure you did not program more than one
remote for a given device.
• Make sure the two remotes are not too far apart
and are aiming directly at each other.
• The button that you pressed has not been
taught. Teach the button using the learning
procedure (Chpt. 4).
41
Page 48

The SUR-20 User’s Manual
Troubleshooting Guide (Cont.)
Macro does not
work
Record button
does not work
A button performs
its function two or
more times
The LCD screen
turns off.
See our web site www.simacorp.com for more
information. Or call Sima at 800-345-7462
• Be sure to aim SUR-20 at devices while macro
commands are being sent.
• Macro was not properly set up. Repeat macro
set-up procedure ( Chpt. 7).
• Record button has a three-second safety delay
to prevent accidental recording. Press and
hold REC button for three seconds.
• Some remotes issue multiple commands when
a button is held down. Re-teach the button
being sure to release the button on your
existing remote quickly when teaching the
SUR-20.
• The SUR-20 is preset at the factory to
automatically switch the LCD off after 20
minutes if left unused. Just tap the LCD
screen to turn the SUR-20 back on again.
42
Page 49

Quick Start Guide
Quick Start Guide
NOTE: In place of device key press the TV, AMP, VCR, etc… key
Function Enter Exit Chpt.
Change LCD
Layout and button
functions
Press and hold device
key for 3 sec. Press
buttons to change
functions.
Press
device key
3
Teach Remote
Control Codes to
SUR-20
Turn beep on or off
Adjust Backlight
Delete Codes
Delete code for
just one key
Delete code for
one device
Delete code for
all devices
Edit Macro
LEARN
Hold
seconds. Push buttons on
remote following cues
from SUR-20.
Press any device key
twice
Press and hold
AUX
POWER button will toggle
between time delay and
sensitivity adjustments.
Hold
seconds
Press appropriate key
Press DELETE and then
press device key
Press and hold DELETE
key for 3 seconds
Press and hold MACRO
key for 3 seconds. Select
device screen. Select
macro button. Enter
commands.
key for 3
AMP
keys for 3 seconds.
DELETE
and
key for 3
Press
LEARN
key
8
Press any
device key
Press
LEARN
key
Press
LEARN
key
Press
LEARN
key
Press
LEARN
key
twice
4
8
6
6
6
7
43
Page 50

90 Day Limited Warranty
Sima Products Corporation warrants this product against defects in
materials and workmanship for a period of 90 days from the date of
purchase. During the warranty period, the product will be repaired or
replaced, at Sima’s option.
1. Ship your unit, freight prepaid,
including reasonable proof of
purchase and description of
problem to: Sima Products,140
Pennsylvania Ave., Bldg
#5,Oakmont, PA 15139 (412)
828-3700
2. This warranty is void if any
defects are caused by abuse,
misuse, negligence or
unauthorized repairs.
Conditions
3. All liability for incidental or
consequential damages is
specifically excluded. Some states
do not allow the exclusion or
limitation of incidental or
consequential damages, so the
above limitation or exclusion may
not apply to you. This warranty
gives you specific legal rights, and
you may also have other rights
which vary from state to state.
Simple, Fun, Affordable
44
Page 51

Notes
45
Page 52

To see our full line of products, visit us
at: www.simacorp.com
Home Theater
I-Mix™ Digital Audio Recorder & CD Player
Universal Remotes
A/V Selectors
Speaker Selectors
Photo
Image Bank Digital Photo Storage
FilmShield
Tripods
Lens Pens
Cap Keepers
Video
Audio/Video Editors
Video Mixers
Battery Chargers
Rewinders
Power Accessories
12V Power Inverters
Simple, Fun, Affordable
 Loading...