

Page 1

SIMADO GDT11
System Manual
Page 2

Page 3
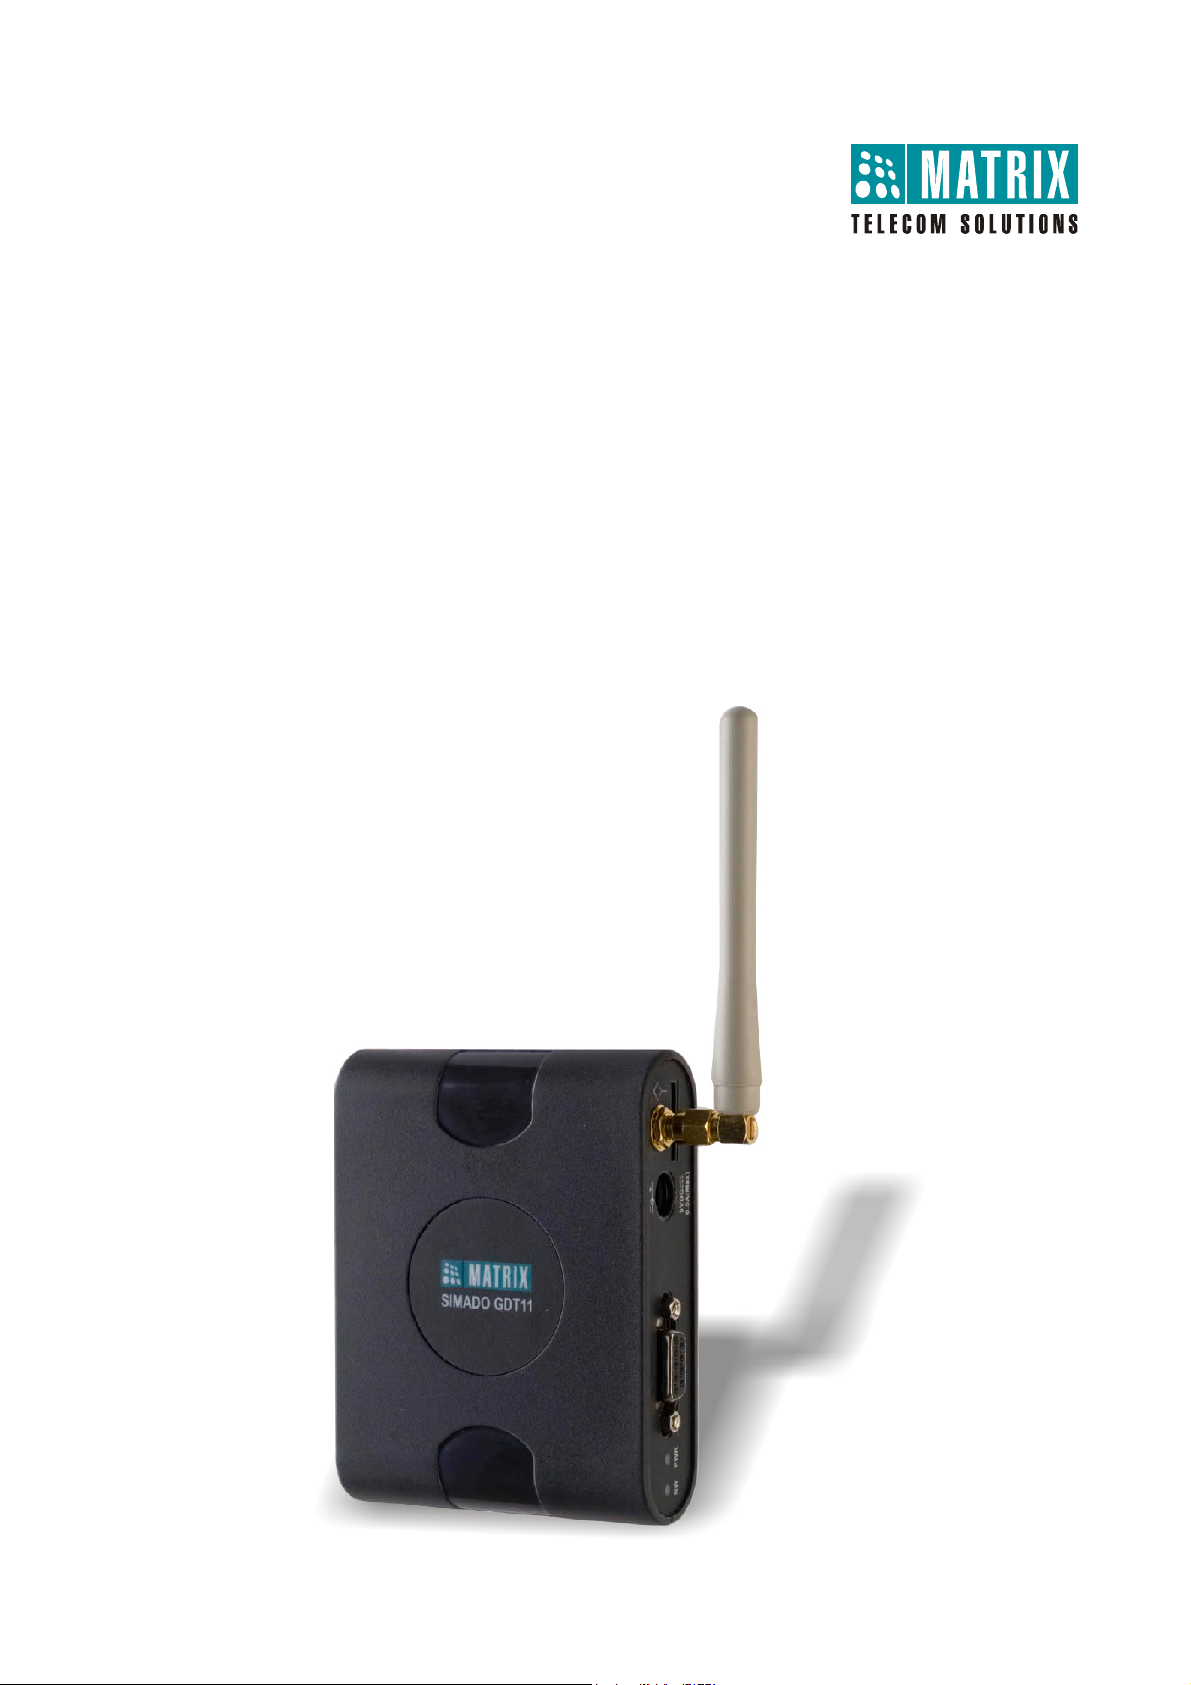
SIMADO GDT11
GSM/CDMA Fixed Cellular Terminal for Data Applications
System Manual
Page 4

Documentation Disclaimer
Matrix Comsec reserves the right to make changes in the design or components of the product as engineering
and manufacturing may warrant. Specifications are subject to change without notice.
This is a general documentation for all models of the product. The product may not support all the features and
facilities described in the documentation.
Information in this documentation may change from time to time. Matrix Comsec reserves the right to revise
information in this publication for any reason without prior notice. Matrix Comsec makes no warranties with
respect to this documentation and disclaims any implied warranties. While every precaution has been taken in
the preparation of this system manual, Matrix Comsec assumes no responsibility for errors or omissions. Neither
is any liability assumed for damages resulting from the use of the information contained herein.
Neither Matrix Comsec nor its affiliates shall be liable to the purchaser of this product or third parties for
damages, losses, costs or expenses incurred by the purchaser or third parties as a result of: accident, misuse or
abuse of this product or unauthorized modifications, repairs or alterations to this product or failure to strictly
comply with Matrix Comsec's operating and maintenance instructions.
Copyright
All rights reserved. No part of this system manual may be copied or reproduced in any form or by any means
without the prior written consent of Matrix Comsec.
Version 3
Release date: July 26, 2010
Page 5

Contents
Section 1: Introduction ......................................................................................................................................7
Welcome .........................................................................................................................................................9
Know your SIMADO GDT11 ......................................................................................................................... 10
Installing the System .....................................................................................................................................11
Getting Started ..............................................................................................................................................14
Section 2: Features and Facilities ..................................................................................................................19
Data Services ...............................................................................................................................................21
GPRS (General Packet Radio Service) ........................................................................................................ 31
Voice Services ..............................................................................................................................................44
SMS (Short Message Service) .....................................................................................................................47
Fax Services ................................................................................................................................................. 51
Section 3: Appendices .....................................................................................................................................65
Appendix A: Technical Specifications ...........................................................................................................67
Appendix B: Regulatory Information ............................................................................................................. 68
Warranty Statement ...................................................................................................................................... 70
Page 6

Page 7

Section 1: Introduction
Page 8

Page 9

Welcome
Thank you for choosing the Matrix SIMADO GDT11. We hope you will make optimum use of this product. Please
read this document carefully to get acquainted with the product before installing and operating it.
This document provides detailed information and instructions for installing and operating the SIMADO GDT11.
This document contains three broad sections:
• “Section 1: Introduction”: provides an overview of the product, instructions for installing and operating
it.
• “Section 2: Features and Facilities”: describes the features of SIMADO GDT11 and provides
instructions for configuring and using these features.
• “Section 3: Appendices”: contains the technical specifications of SIMADO GDT11 and information on
product certification, and warranty statement.
If you run into technical difficulties, we are here to help. You are welcome to call your dealer or Matrix Support
team.
SIMADO GDT11 System Manual 9
Page 10
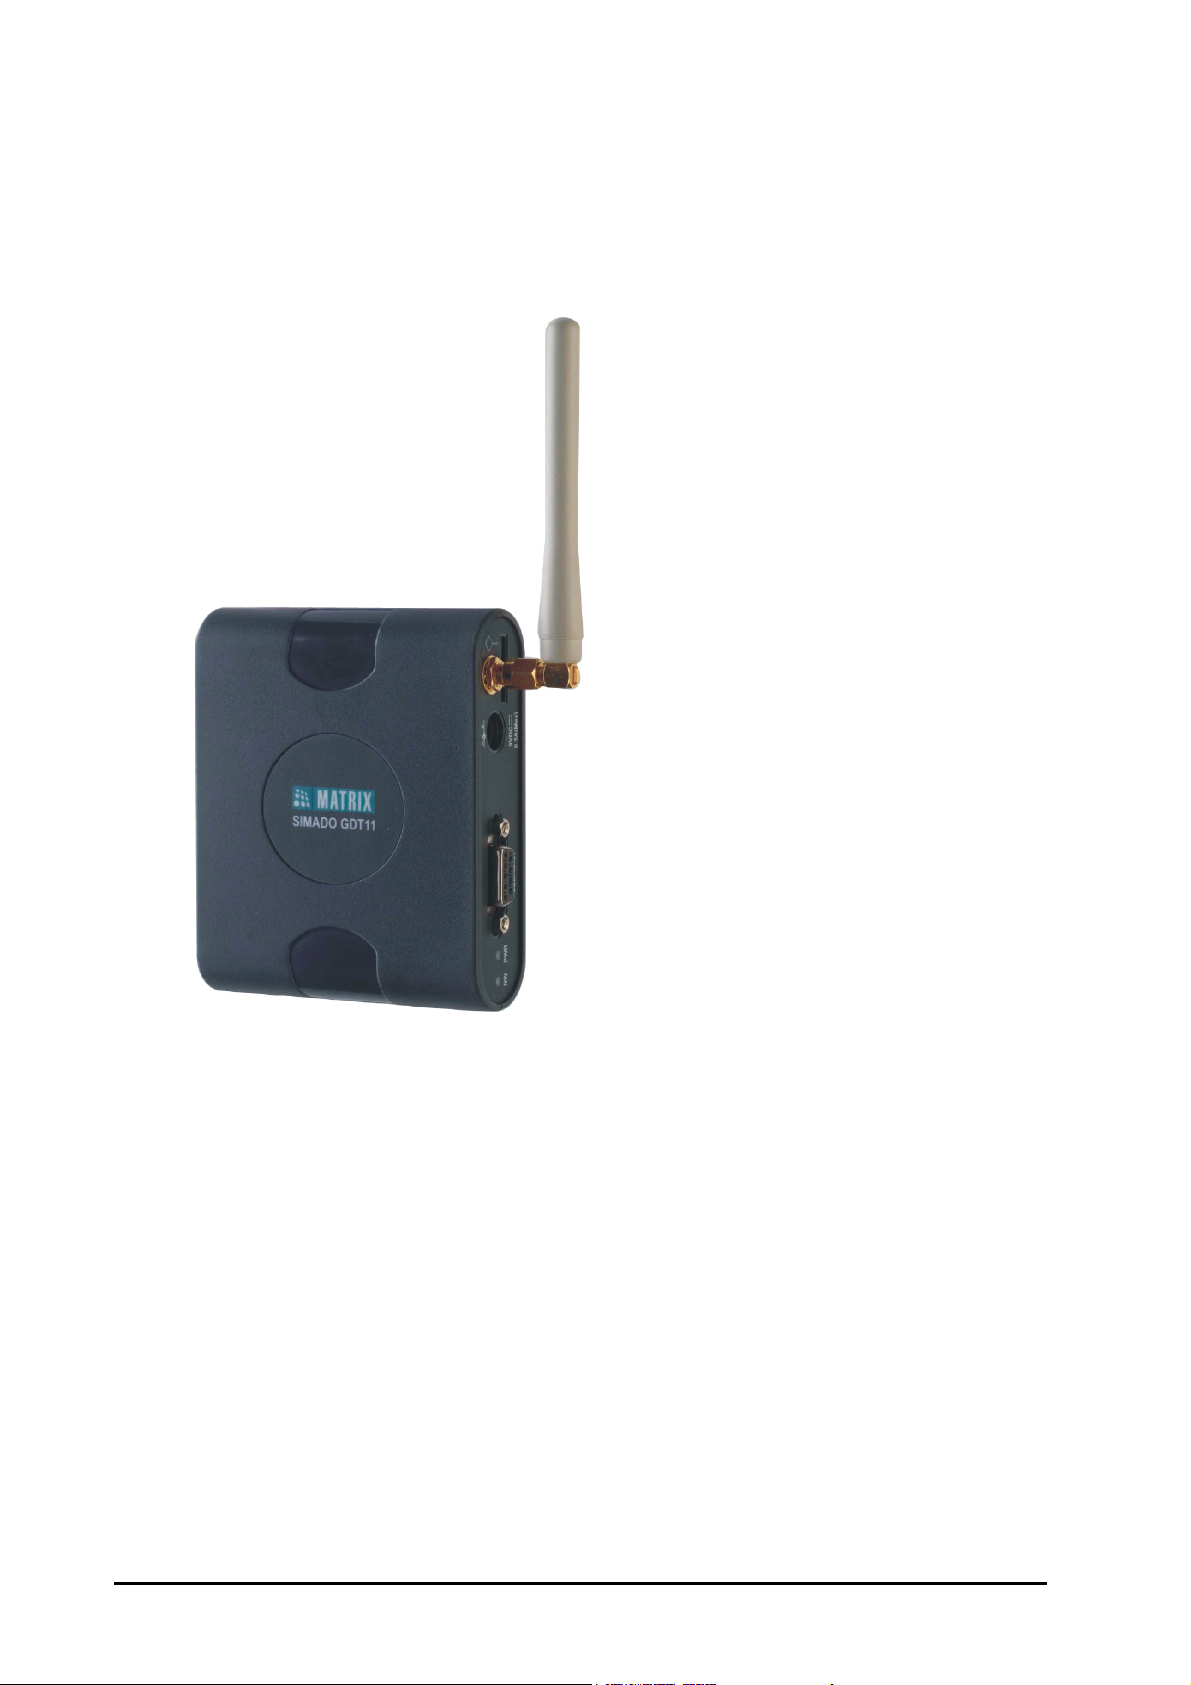
Know your SIMADO GDT11
The Matrix SIMADO GDT11 is a compact Fixed Cellular Terminal used for data communication through the GSM
network.
The SIMADO GDT11 supports the following features:
• Short Message Services (Sending and Receiving of SMS).
• Data Services (Sending and Receiving Data files).
• Web Browsing (Exploring the Internet).
• Fax Services (Sending and Receiving Fax).
• Voice Services.
You can connect the SIMADO GDT11 to a PC and use it efficiently for web browsing, sending and receiving
SMS, data transfer and fax services.
The SIMADO GDT11 is easy to install, and finds its application in enterprises and institutions of varying sizes.
SIMADO GDT11 is supplied with GSM or CDMA module, as per user requirement.
10 SIMADO GDT11 System Manual
Page 11

Installing the System
Safety Instructions
• Do not install this product
• near any water source or water body, such as faucets, wash bowls, laundry tub, bathtub, etc.
• in any area where it is exposed to direct sunlight, excessive heat, cold or damp conditions.
• near high frequency generating devices such as Electric Welders, Microwave Oven, etc.
• Do not use the unit with damaged antenna.Do not open the system in power ON condition. Never try to
remove the SIM card in power ON condition.
• When you connect external devices like headset and handset, make sure they are of standard make and
good quality, so that the functioning of the system is not affected.
• When cleaning the product, first unplug it from the wall outlet. Use a dry cloth. Do not use liquid cleaners or
aerosol cleaners. Never spill liquid of any kind on the product.
• Unplug this product from the wall outlet and refer servicing to a qualified service person under the following
conditions:
• If liquid has been spilled into the product.
• If the product has been exposed to rain or water.
• If the product has been dropped or the cabinet has been damaged.
• If the product exhibits a distinct change in performance.
Warning for RF Safety
The product complies with RF exposure guidelines as per standard FCC 47 CFR part 2. However, please
observe the following precautions.
• Make sure that the RF Antenna is installed at least 20cm away from other electronic and radio
transmission devices.
• Make sure that the RF Antenna is installed at a place at 20cm away from people's vicinity.
• Do not place magnetic storage media near the product.
• People carrying medical implants like cardiac pacemakers are advised to maintain appropriate distance
from the system. They are also advised to avoid being in the vicinity of the product for a long time.
Installing the SIMADO GDT11
• Select an appropriate site for installing the product, taking into consideration the above listed safety
instructions.
• Make sure that the installation site you choose has good signal strength, from the network.
• Unpack SIMADO GDT11 and verify its contents.
SIMADO GDT11 System Manual 11
Page 12

• Your package must contain the following items:
Sr. Accessories Qty.
01 SIMADO GDT11 1
02 Antenna 1
03 Modem Cable 1
04 Adapter 9VDC 1 Amp. 1
05 Screw M 7/30 1
06 Screw Grip 1
07 Warranty Card Set 1
08 Support Card 1
09 SIMADO GDT11 CD 1
• If any of the above listed items is missing or damaged, contact the source from where you have purchased
the system.
• Fix the system at the selected site. You may refer to the ‘SIMADO GDT11 Dimensions’ provided at the end of
this topic.
• Check the voltage at the power point from where the supply is to be provided to the adapter of SIMADO
GDT11. It should be between 90 to 265VAC, 47-65Hz.
• Connect the DC power output terminal of the power adapter (supplied with SIMADO GDT11) into the power
jack of the GDT11 and plug the adapter into the wall outlet for AC Mains.
• Insert the SIM Card in the SIM card holder. Do not power ON the system before you install the SIM Card, as
this may cause damage to the SIM Card. Card.
• Connect the COM Port of a PC to the COM Port of SIMADO GDT11 using the modem cable provided by
Matrix.
• Connect any headphone of standard make to the headset jack of SIMADO GDT11.
• Connect any standard handset to the RJ11 connector of the SIMADO GDT11
• Switch on power supply.
12 SIMADO GDT11 System Manual
Page 13

SIMADO GDT11 Dimensions
104.00 mm (4.09 Inch)
80.00 mm(3.15 Inch)
27.00 mm
(1.06 Inch)
SIMADO GDT11
SIMADO GDT11 System Manual 13
Page 14
Getting Started
When you switch ON power supply,
• The LED labelled ‘PWR’ glows.
• The system automatically detects the SIM card.
• If no SIM card is present then LED marked ‘NW’ remains continuously ‘ON’.
• When SIM card is inserted, and the network is available this LED starts blinking.
• The SIMADO GDT11 is now ready for use.
• Now create Connection Type using HyperTerminal.
Creating Connection Type using HyperTerminal
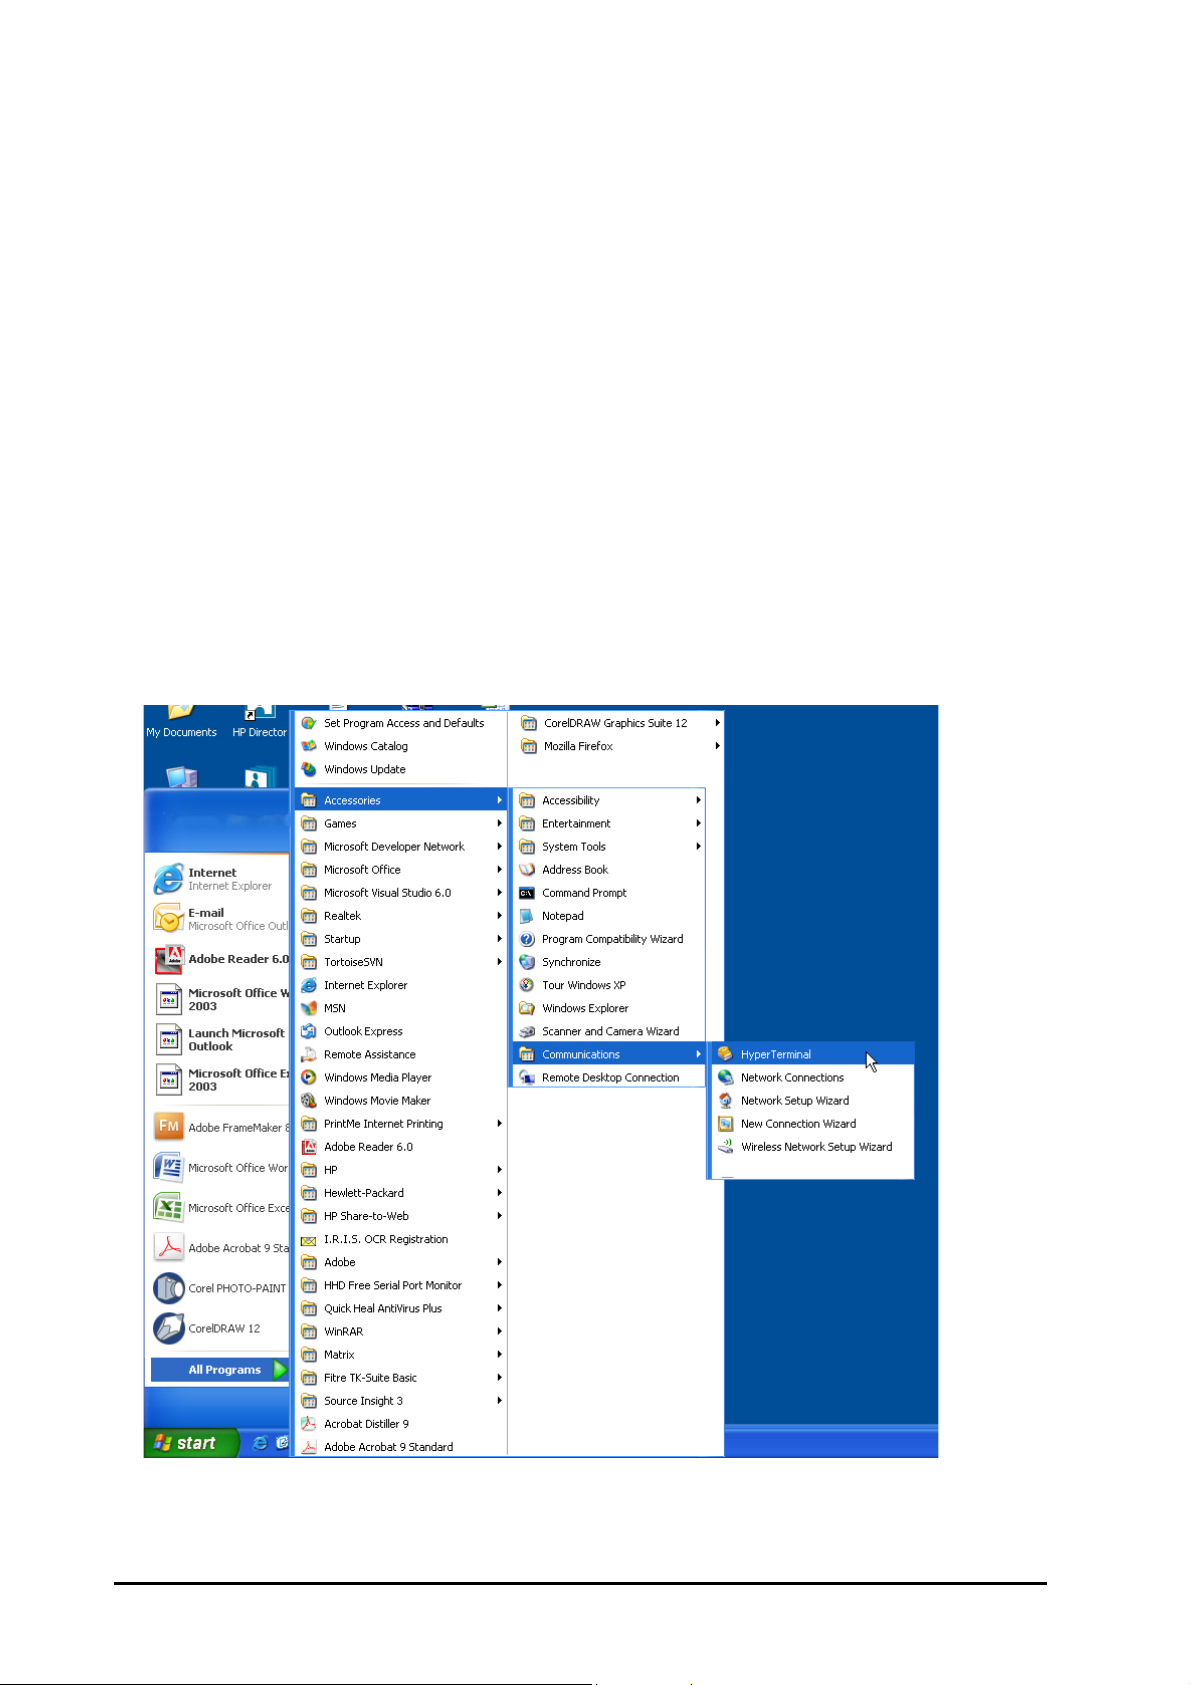
1. Click Start All Programs Accessories Communications HyperTerminal.
14 SIMADO GDT11 System Manual
Page 15
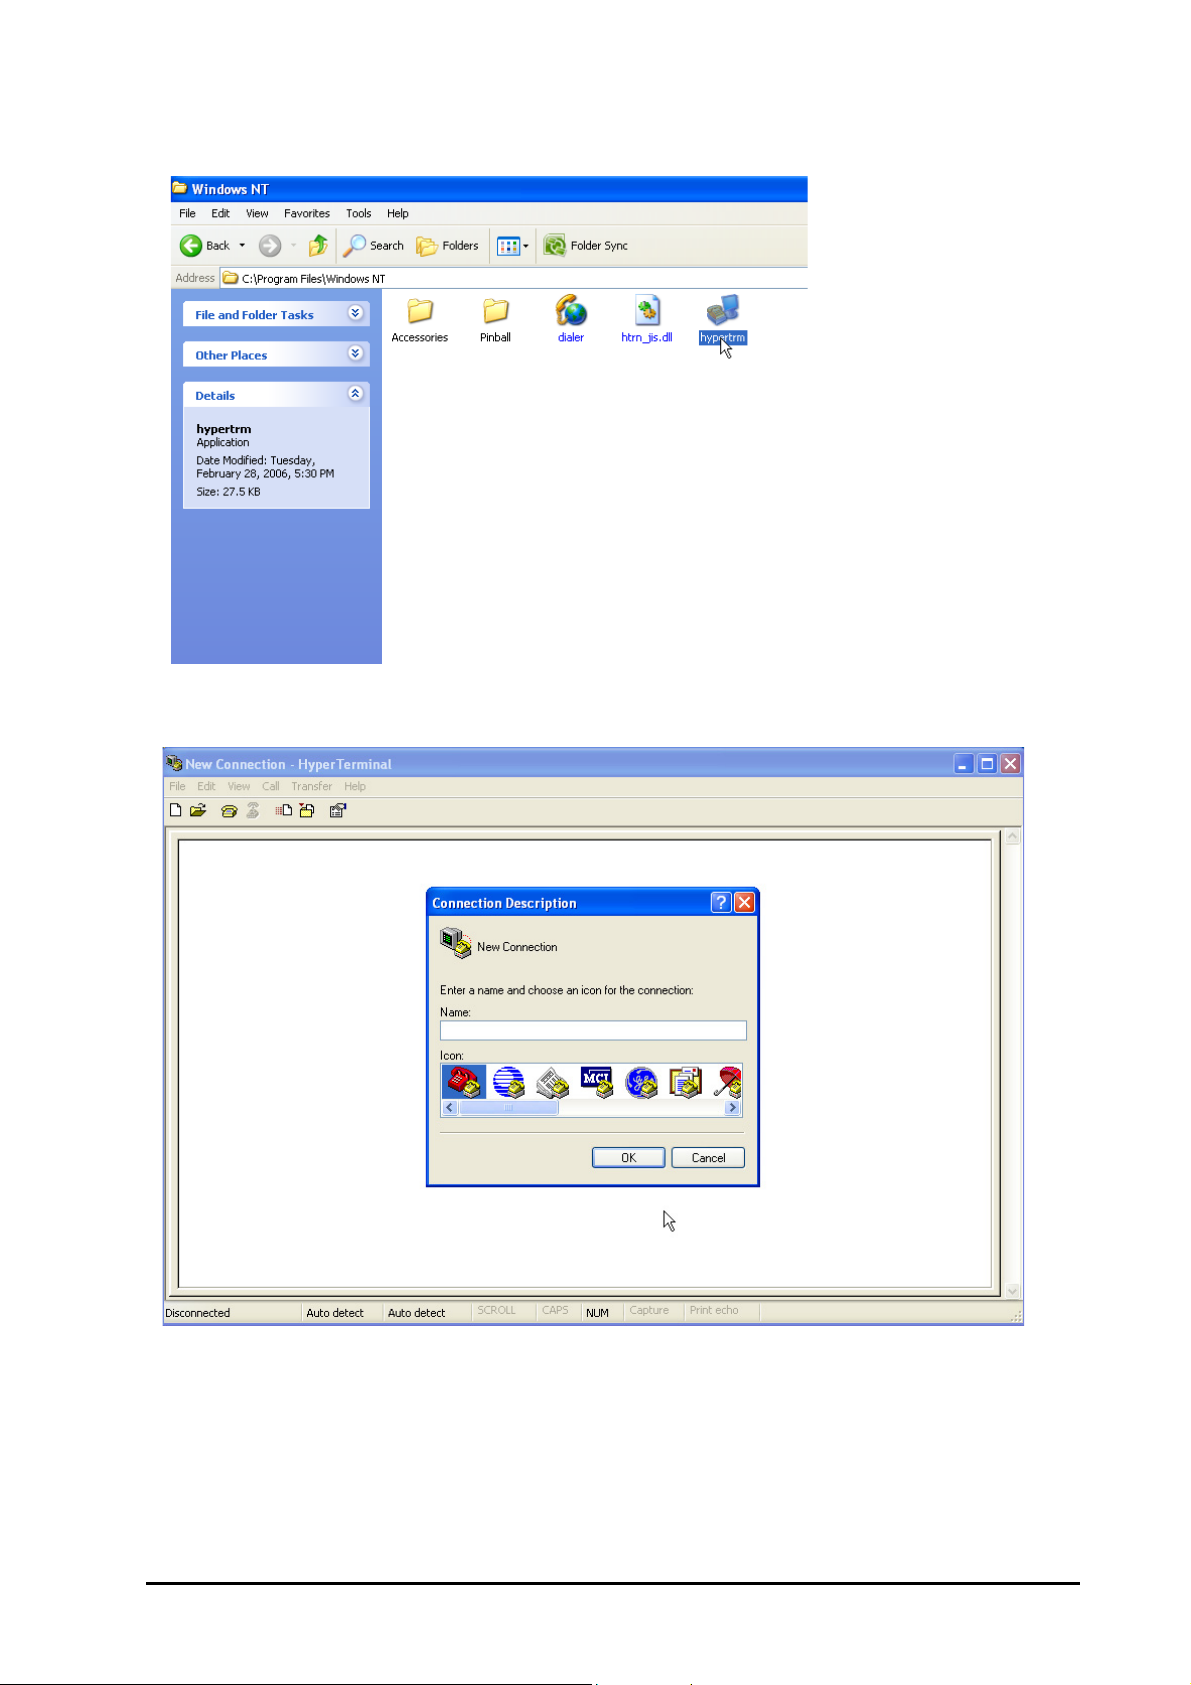
2. Double click Hypertrm Icon.
3. A New Connection Dialog Box with a text box for connection description appears.
SIMADO GDT11 System Manual 15
Page 16
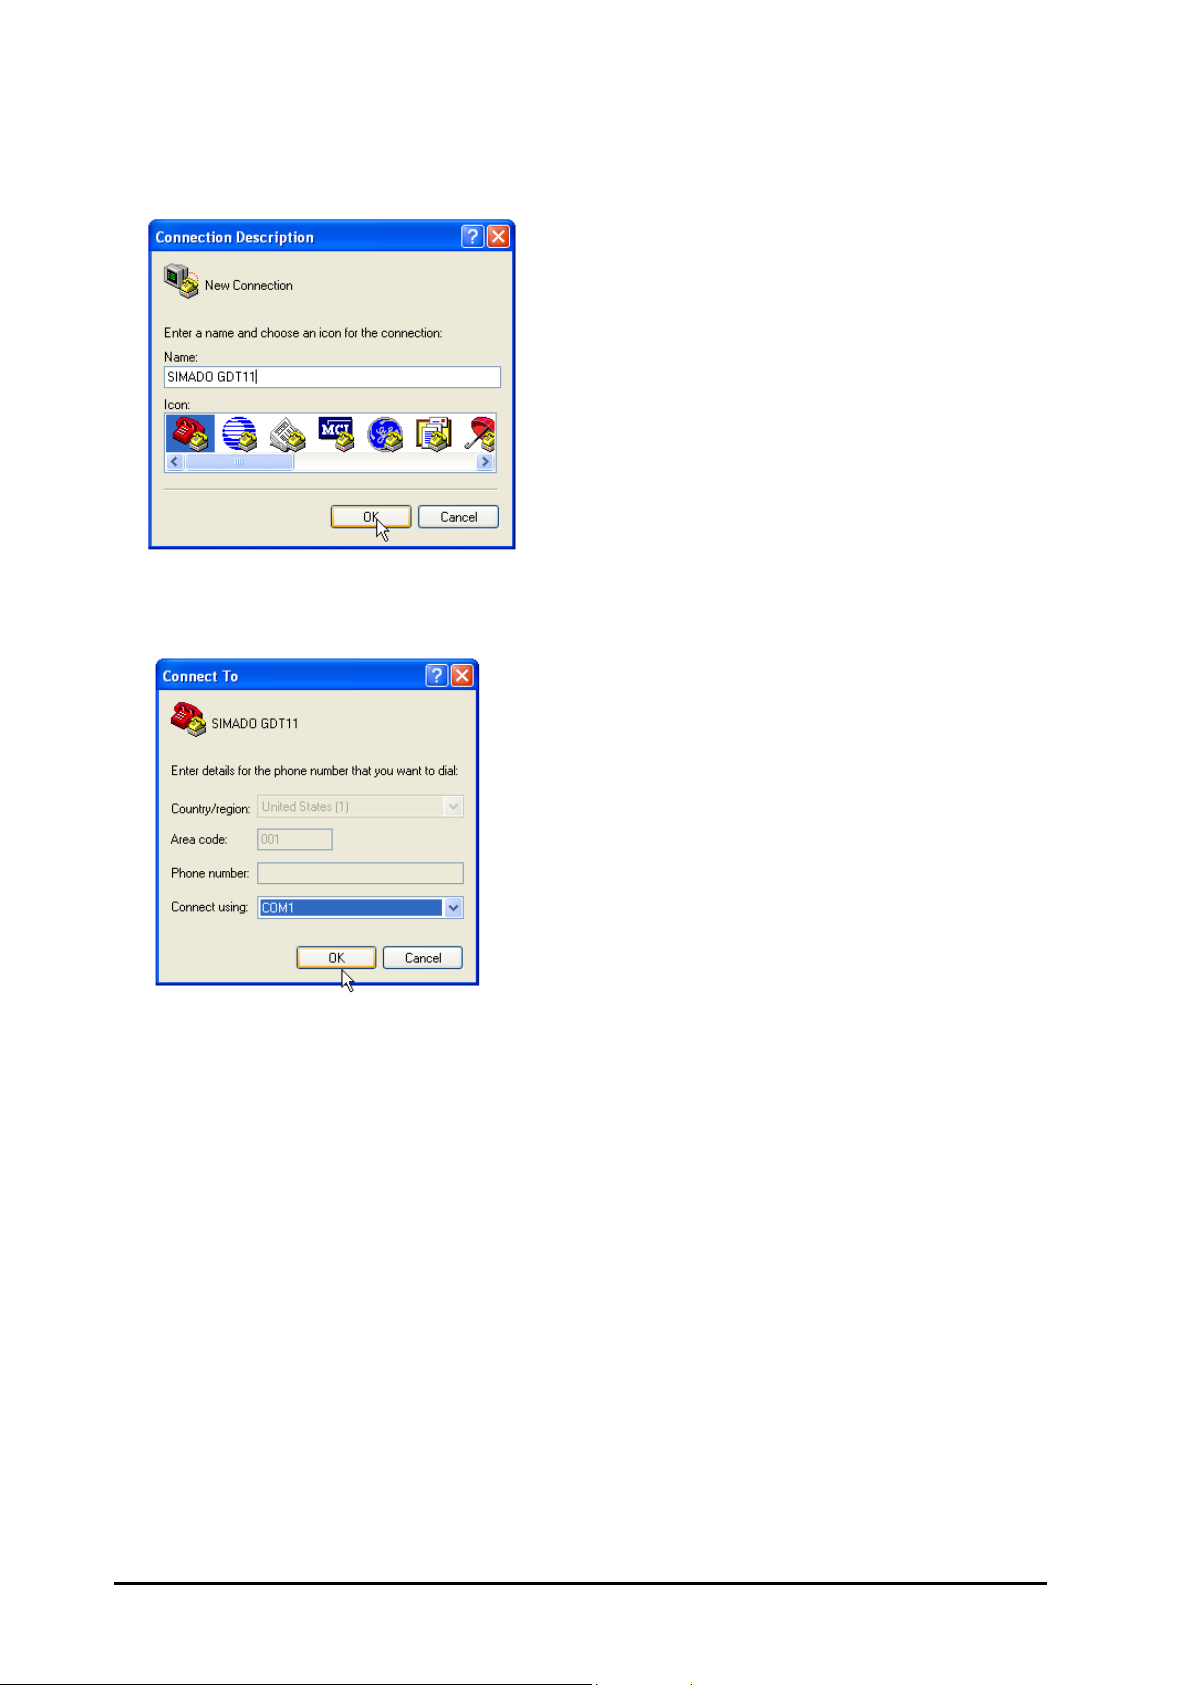
4. Enter an appropriate name for the new connection in the text box (e.g. SIMADO GDT11), choose an Icon
from the Icons listed. Click OK button.
5. In the response Window ‘Connect To’, go to ‘Connect Using’ and select the COM Port to which SIMADO
GDT11 is connected. All other options in the window are disabled automatically. Click OK button.
16 SIMADO GDT11 System Manual
Page 17
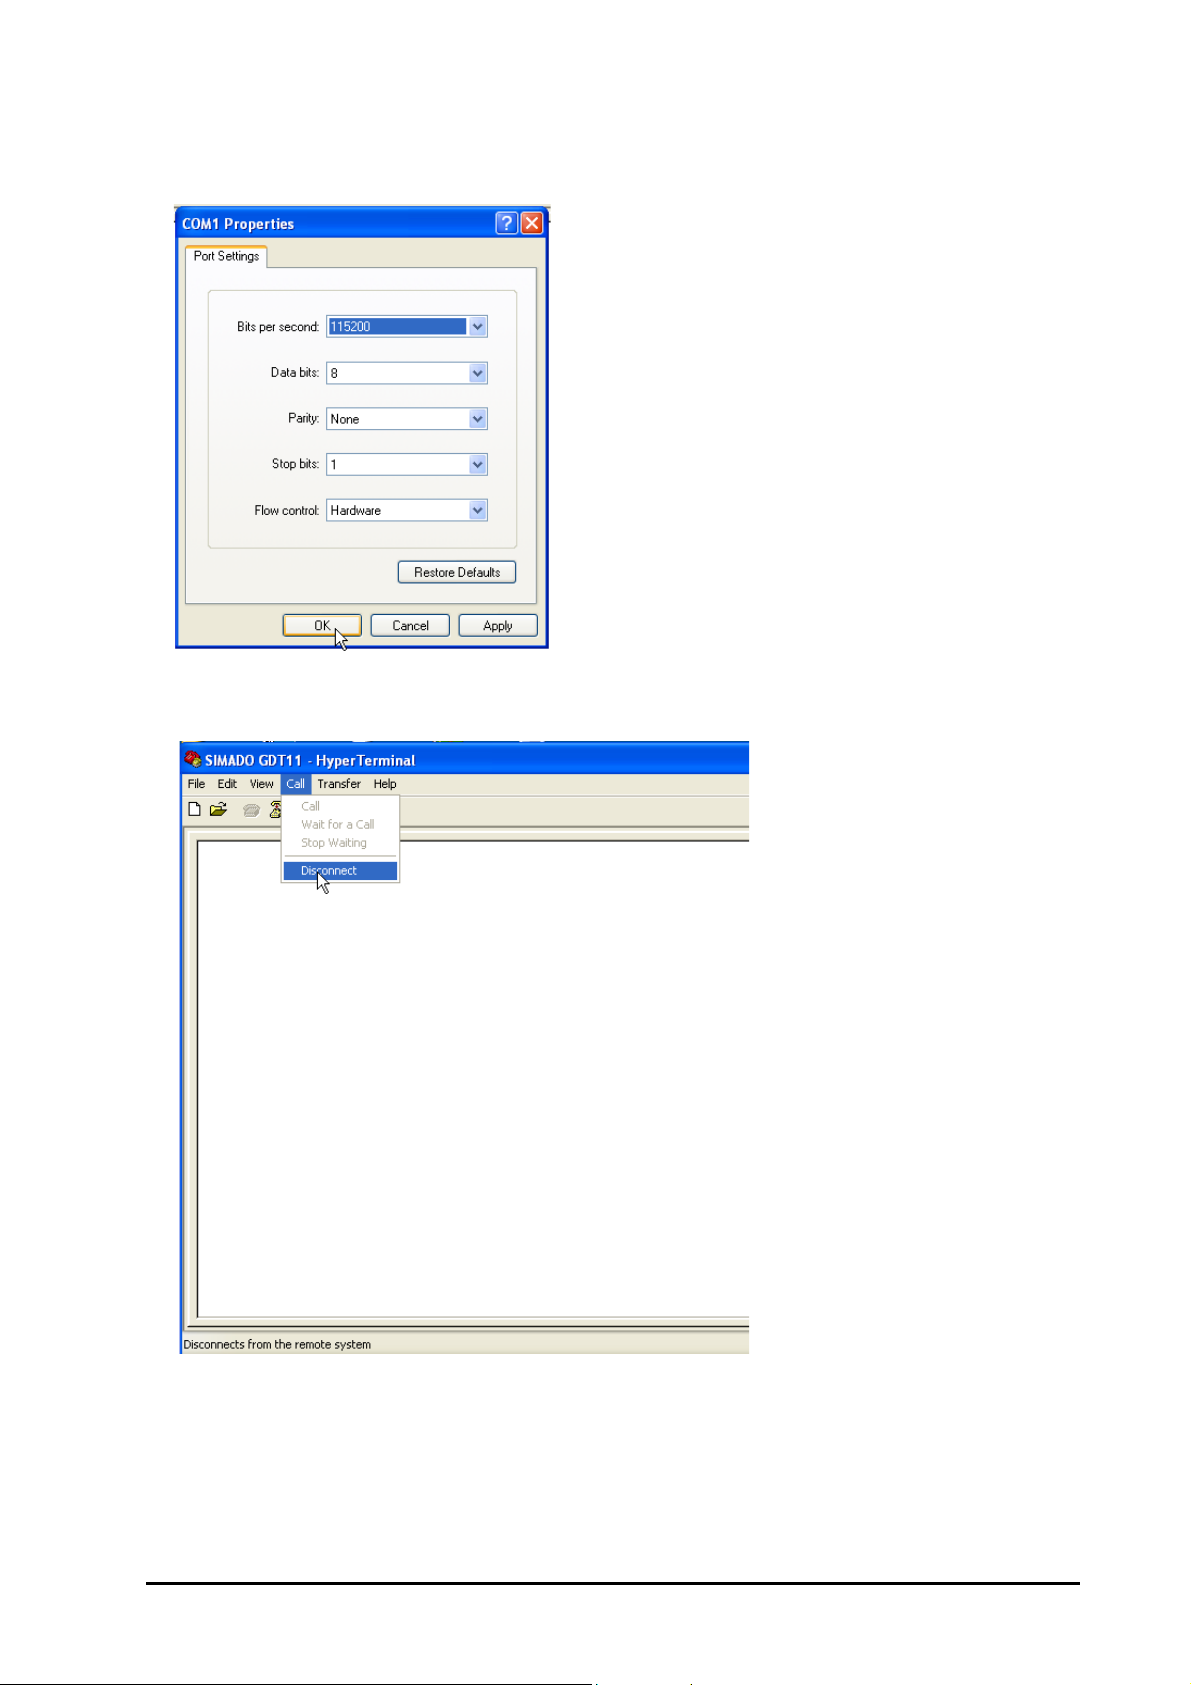
6. In the response Window make the following entries. Bits per seconds=115200, Data bits = 8, Parity = None,
Stop bits = One, Flow control = Hardware. Click OK button.
7. In the ‘HyperTerminal’ Window, click the Call Menu, then click the Menu Item Disconnect.
Relevant Topic:
1. “Installing the System” 11
SIMADO GDT11 System Manual 17
Page 18

18 SIMADO GDT11 System Manual
Page 19

Section 2: Features and Facilities
Page 20

Page 21
Data Services
What’s this?
The GSM Data Services allows GSM users to send and receive data files over the GSM network.
How to send and receive Data
• Set up the Modem.
• Create a connection type using HyperTerminal.
• Make all settings same on both PCs. The receiving PC should be in 'Wait for Call', when user is in
dialing state.
• You can successfully send/receive data using the SIMADO GDT11.
How to configure Data Services
Set up the Modem
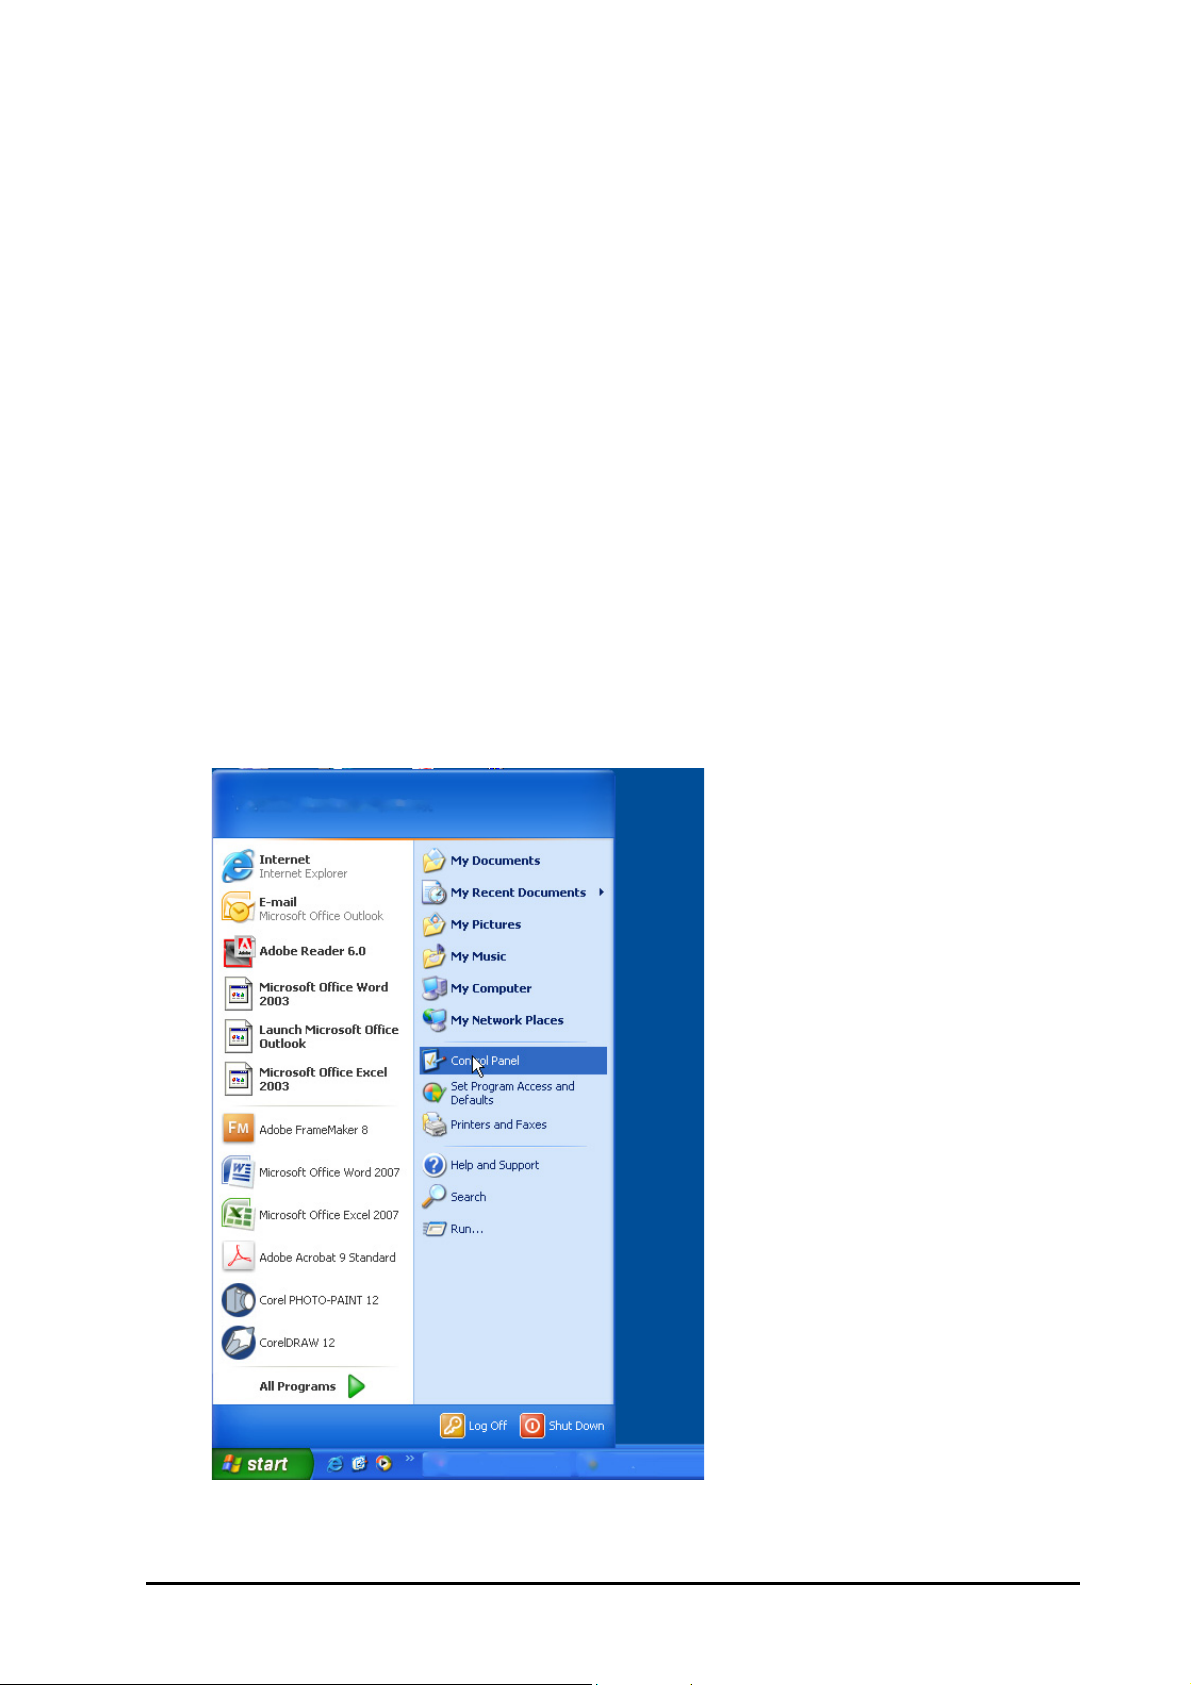
1. Click Start Control Panel.
SIMADO GDT11 System Manual 21
Page 22
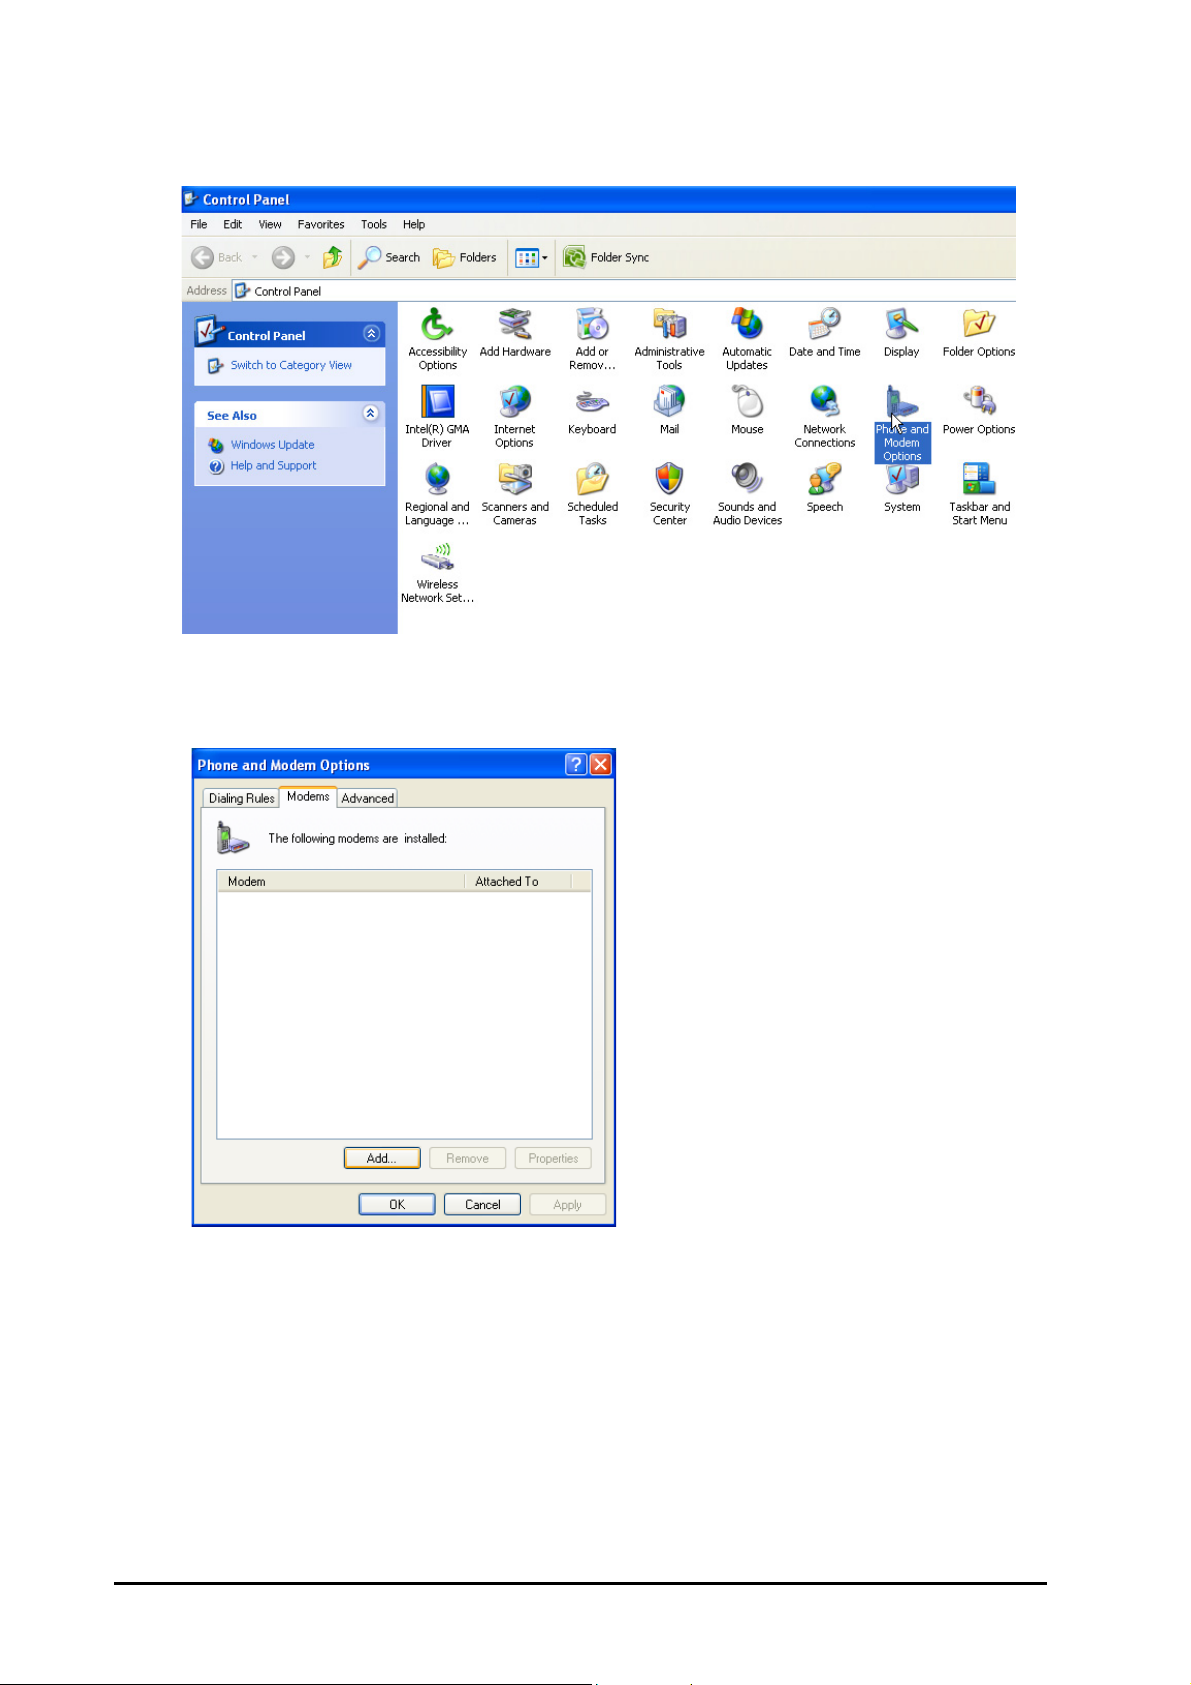
2. Control Panel window will open up as shown below. Double click the Phone and Modem Options icon.
3. 'Phone and Modem Options' window will open as shown below. Click Add button.
22 SIMADO GDT11 System Manual
Page 23
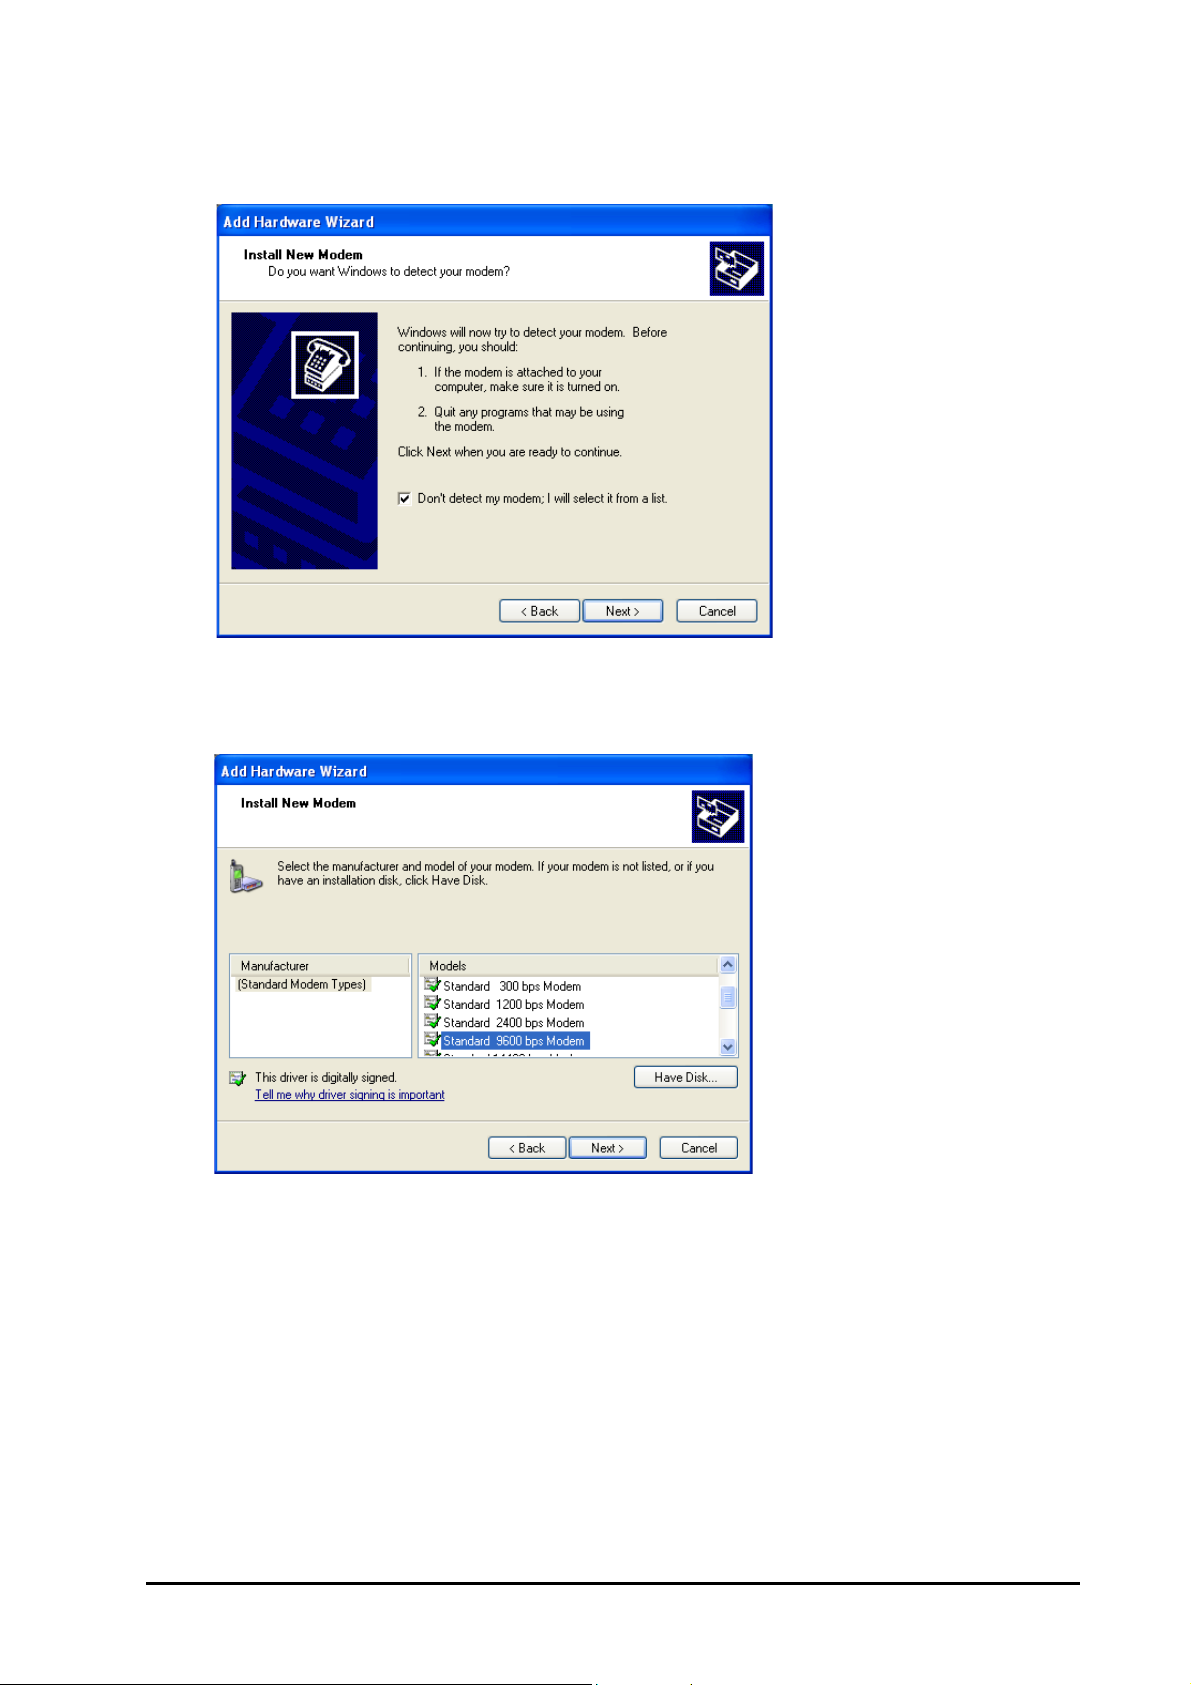
4. 'Add Hardware Wizard' window will open. Select Don't detect my modem; I will select from a list
option in the window. Click Next button.
5. Select Standard 9600bps Modem from the available modem options in the window and click Next
button.
SIMADO GDT11 System Manual 23
Page 24
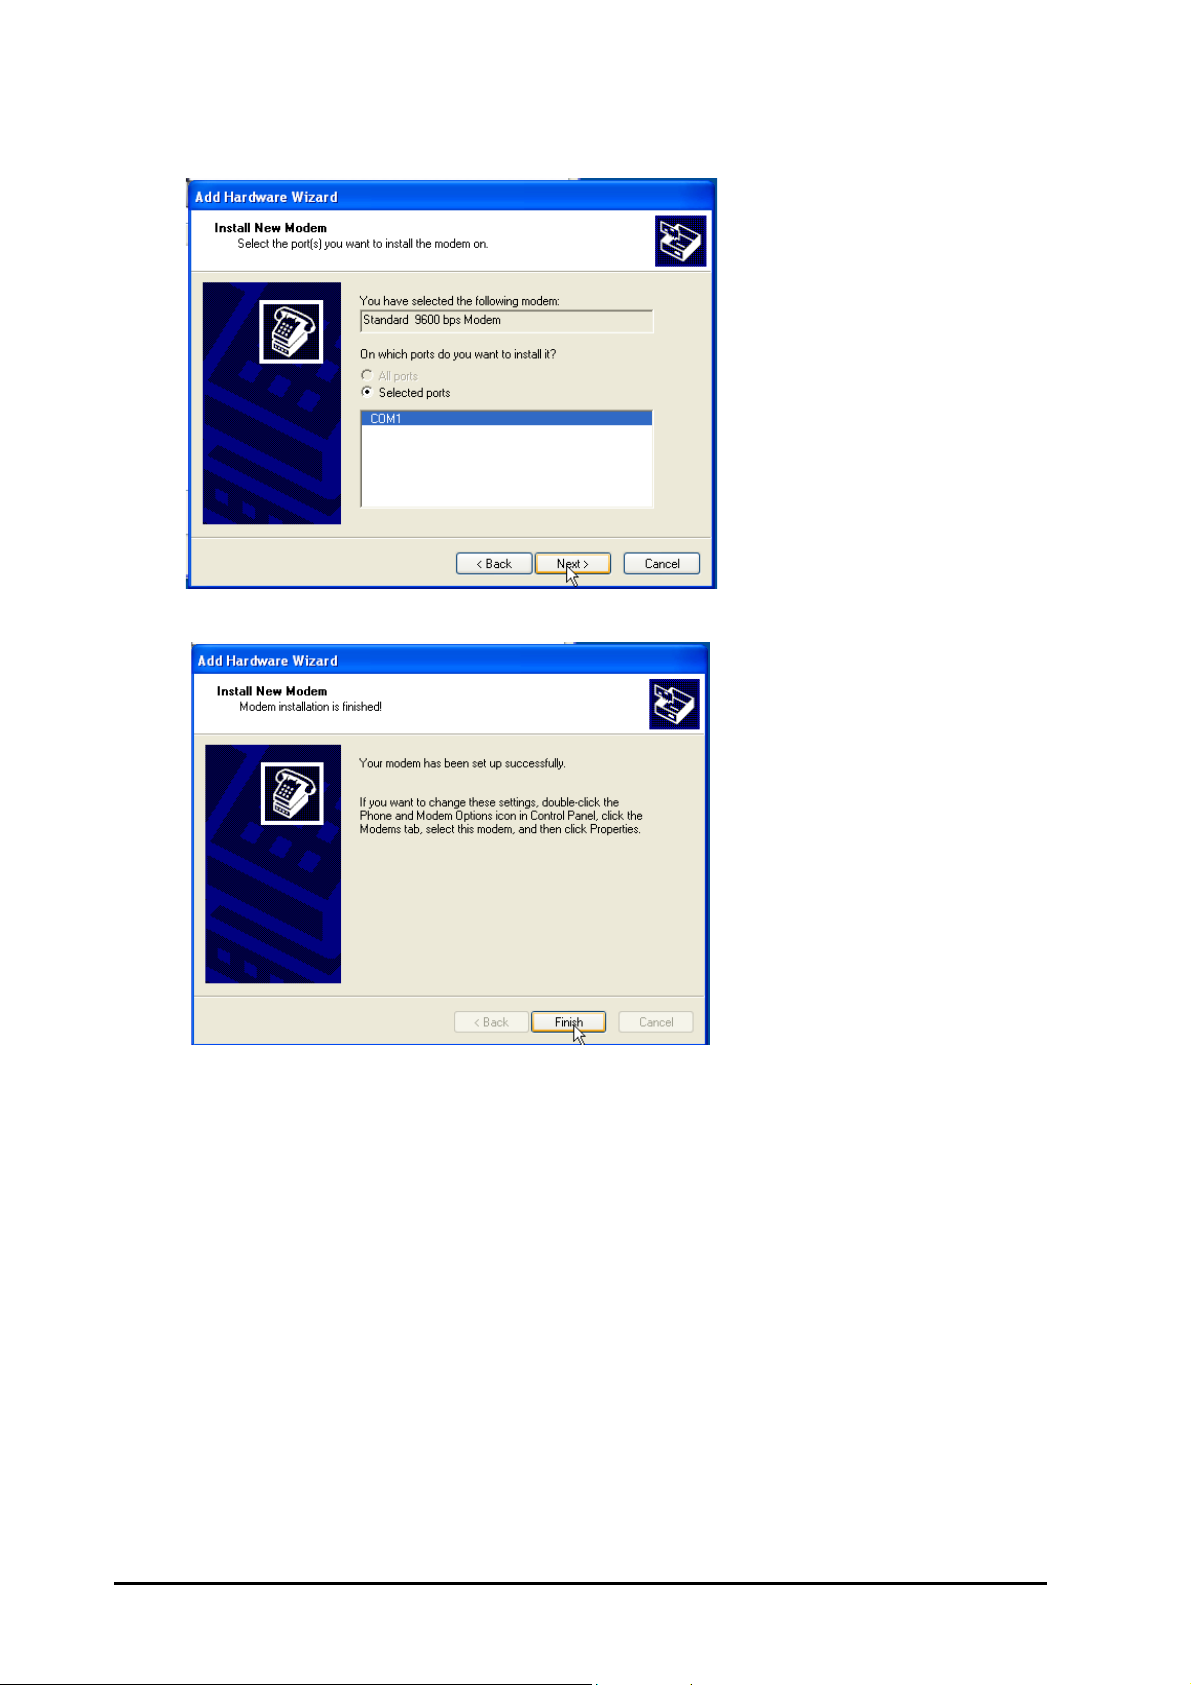
6. Select COM1 port in the window and click Next button.
7. Click Finish button.
24 SIMADO GDT11 System Manual
Page 25
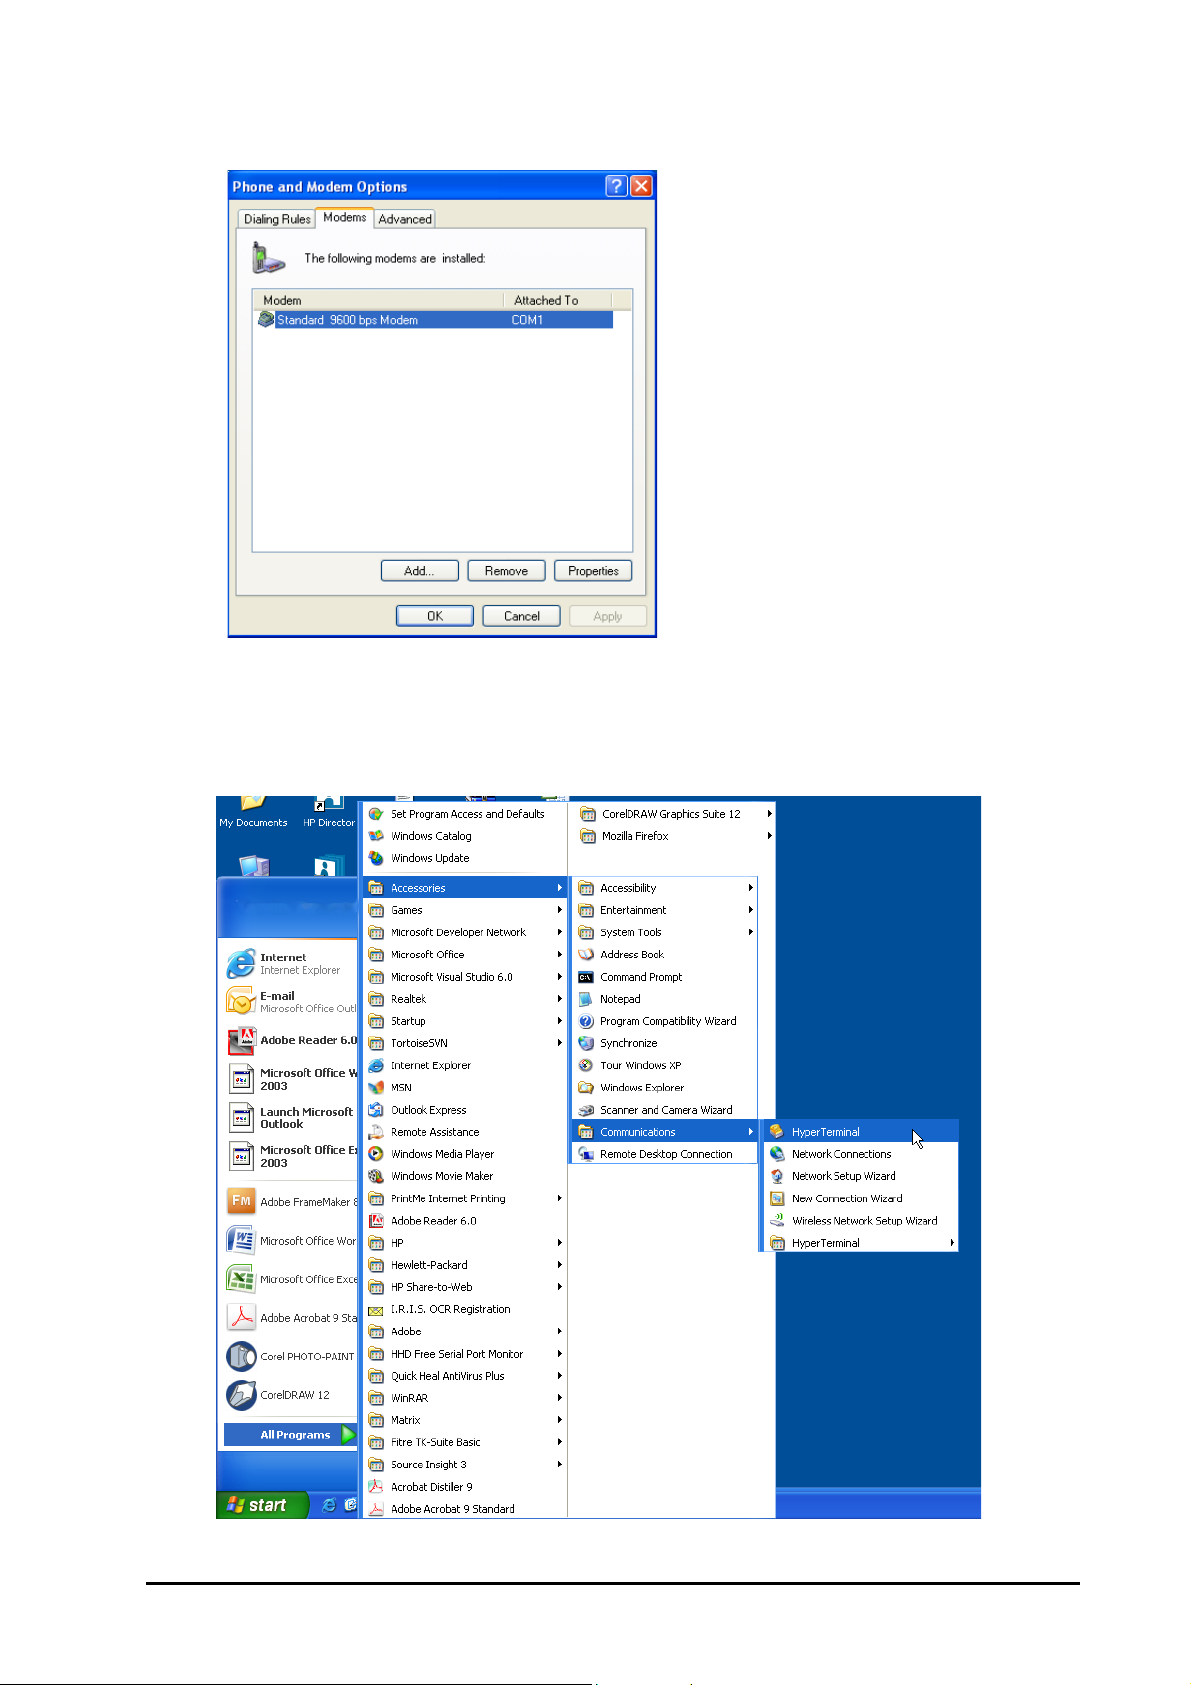
The Modem will be installed as shown below:
8. Click OK' button.
Create Connection Type using HyperTerminal
1. Click Start Programs Accessories Communications HyperTerminal.
SIMADO GDT11 System Manual 25
Page 26
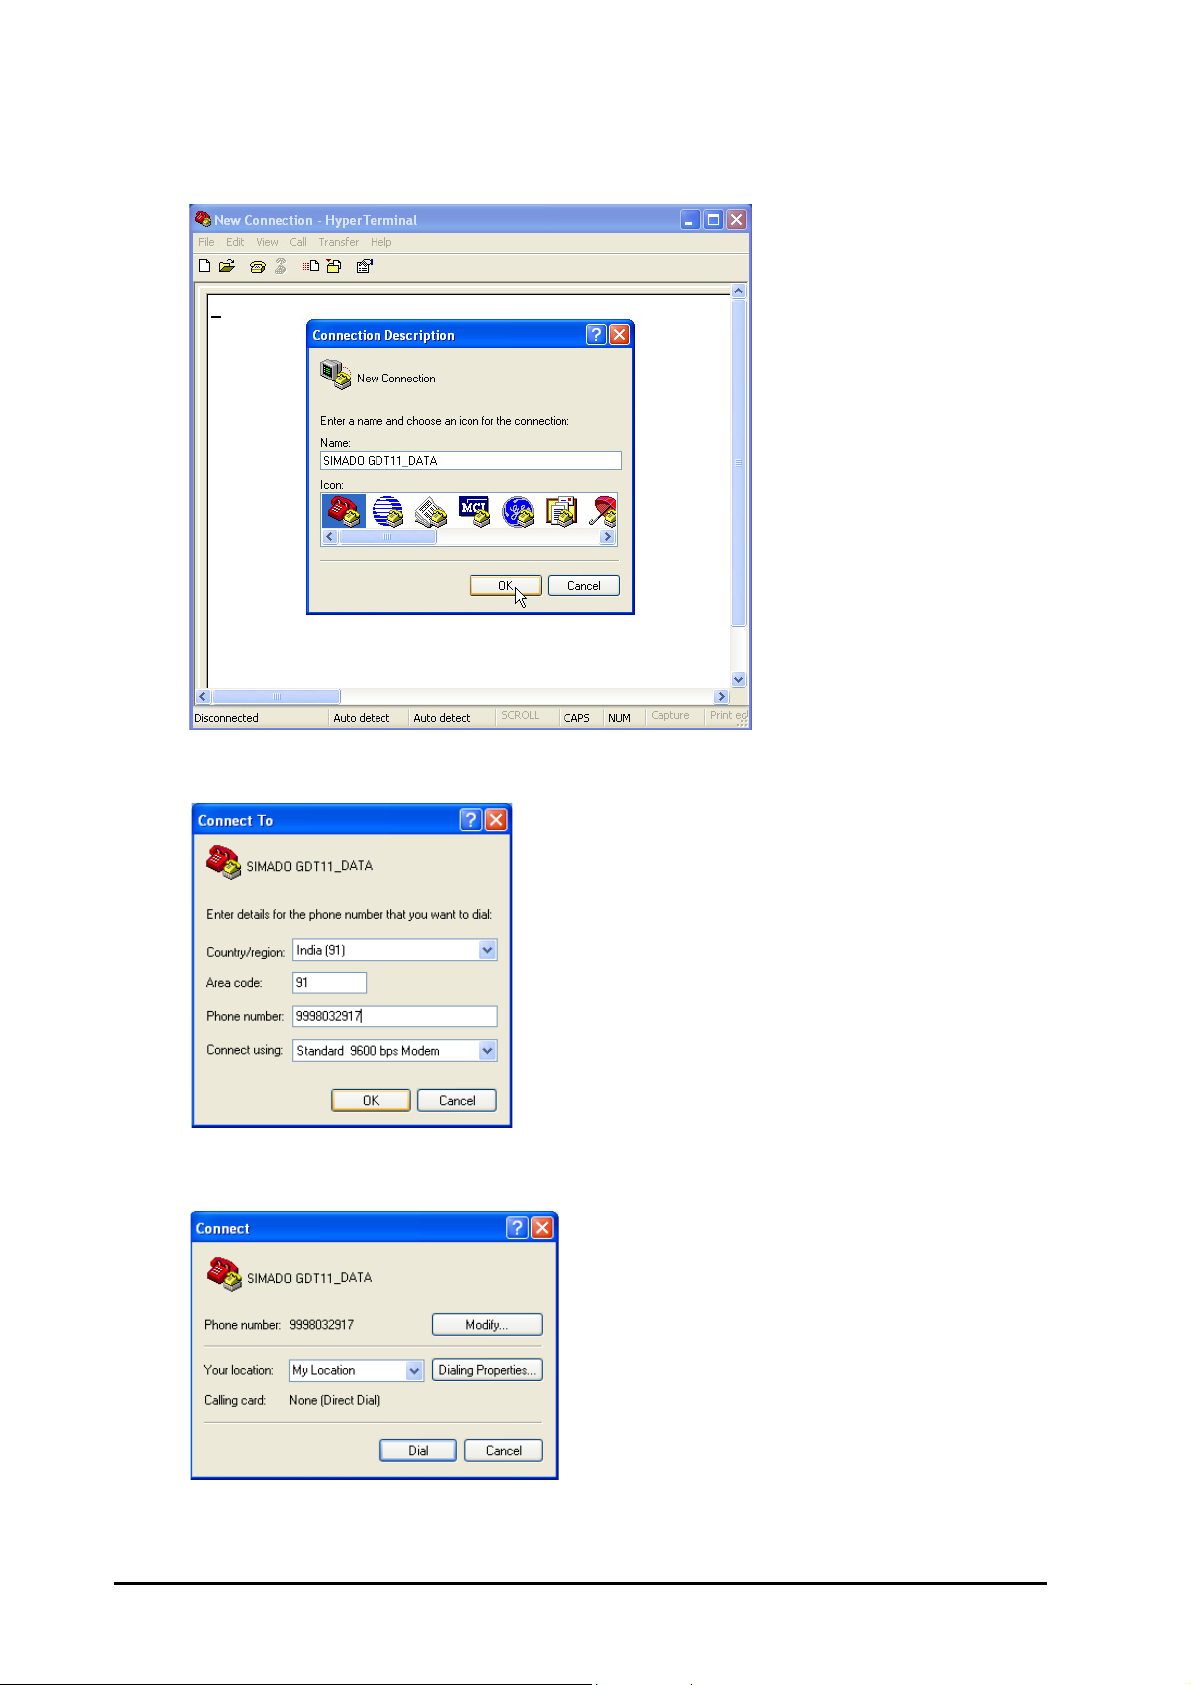
2. New Connection window will appear. Enter name for the connection in 'Name' field as shown below and
then click OK.
3. 'Connect To' window will appear on the screen. Enter area code and phone number as well as select
country in Country/region field and modem in Connect using field as shown below. Click OK.
4. 'Connect' window will appear on the screen.
5. If phone number is to be modified, click Modify button.
26 SIMADO GDT11 System Manual
Page 27
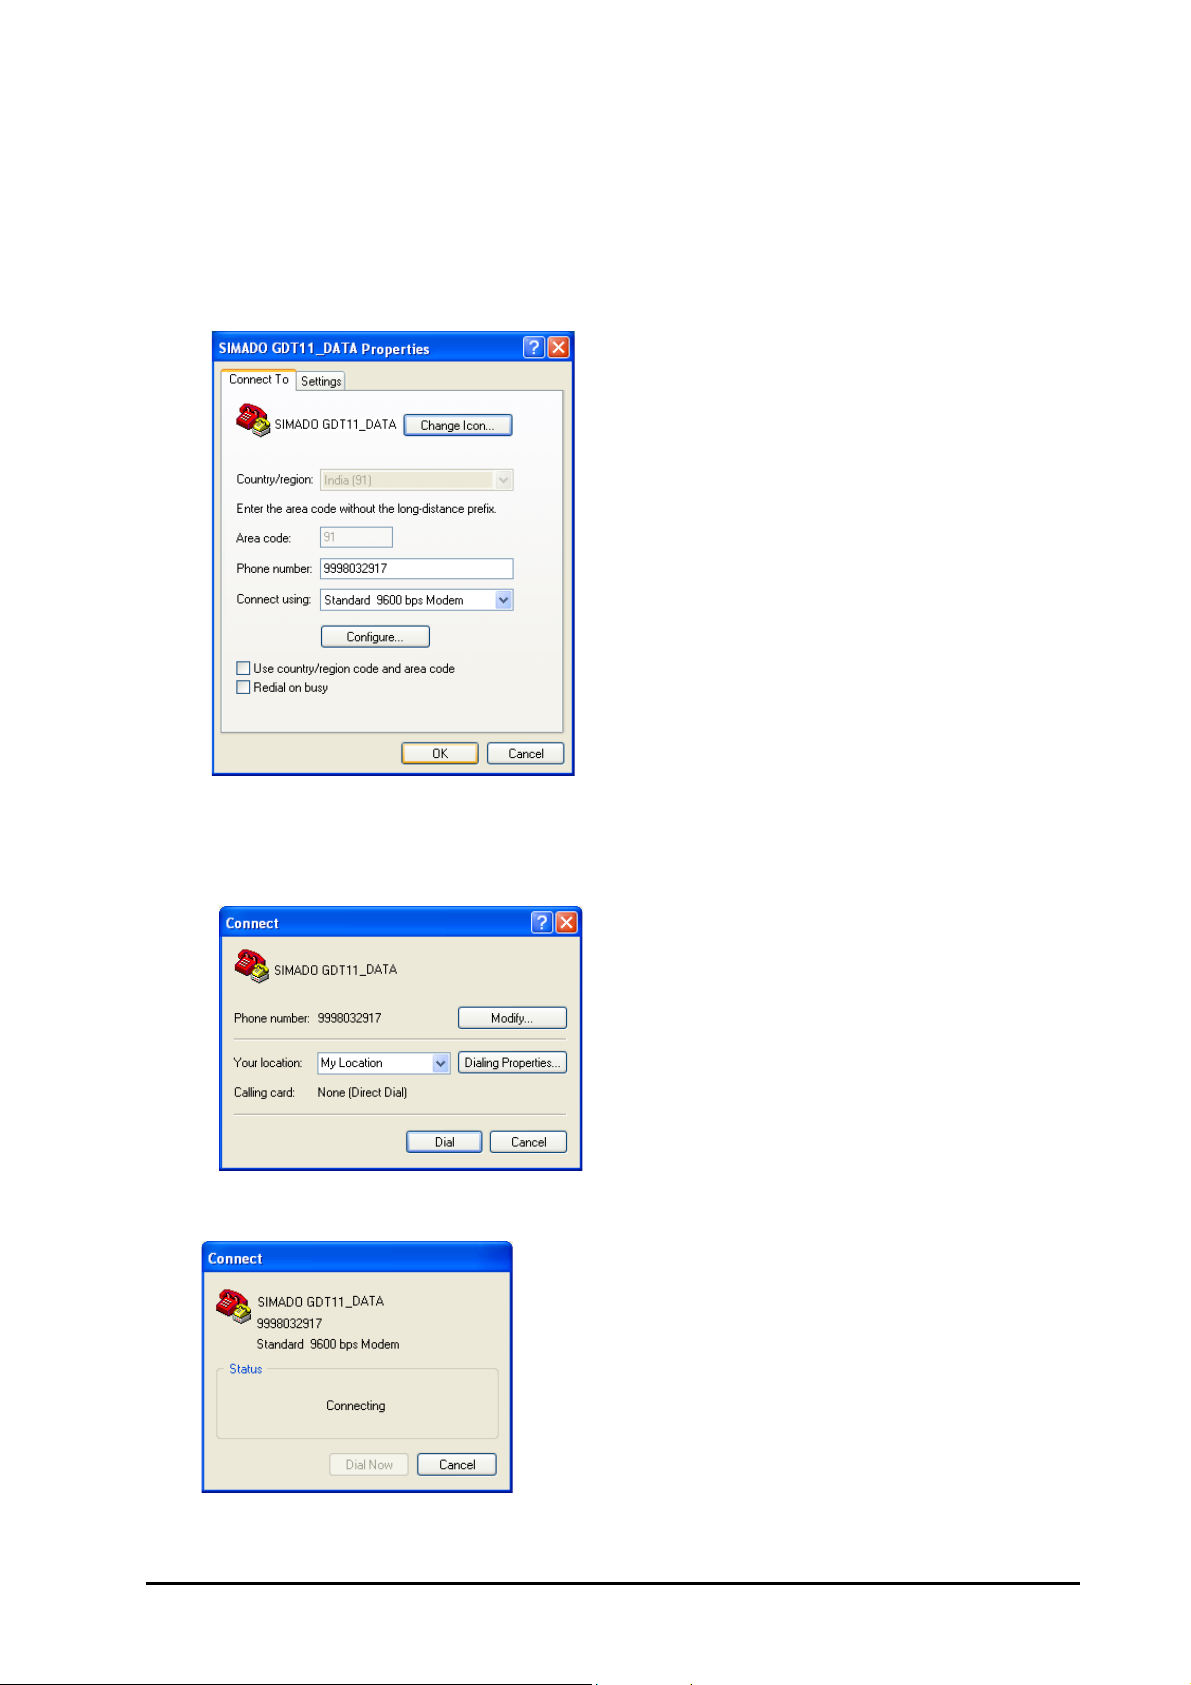
OR
Click File Properties of HyperTerminal screen.
If required, clear the checkbox Use country/region code and area code, clear the checkbox Redial on
busy, and click OK.
Sending Data Files
1. Click Call Dial.
2. System will give the message ‘Connecting', followed by ‘Dialing’.
SIMADO GDT11 System Manual 27
Page 28
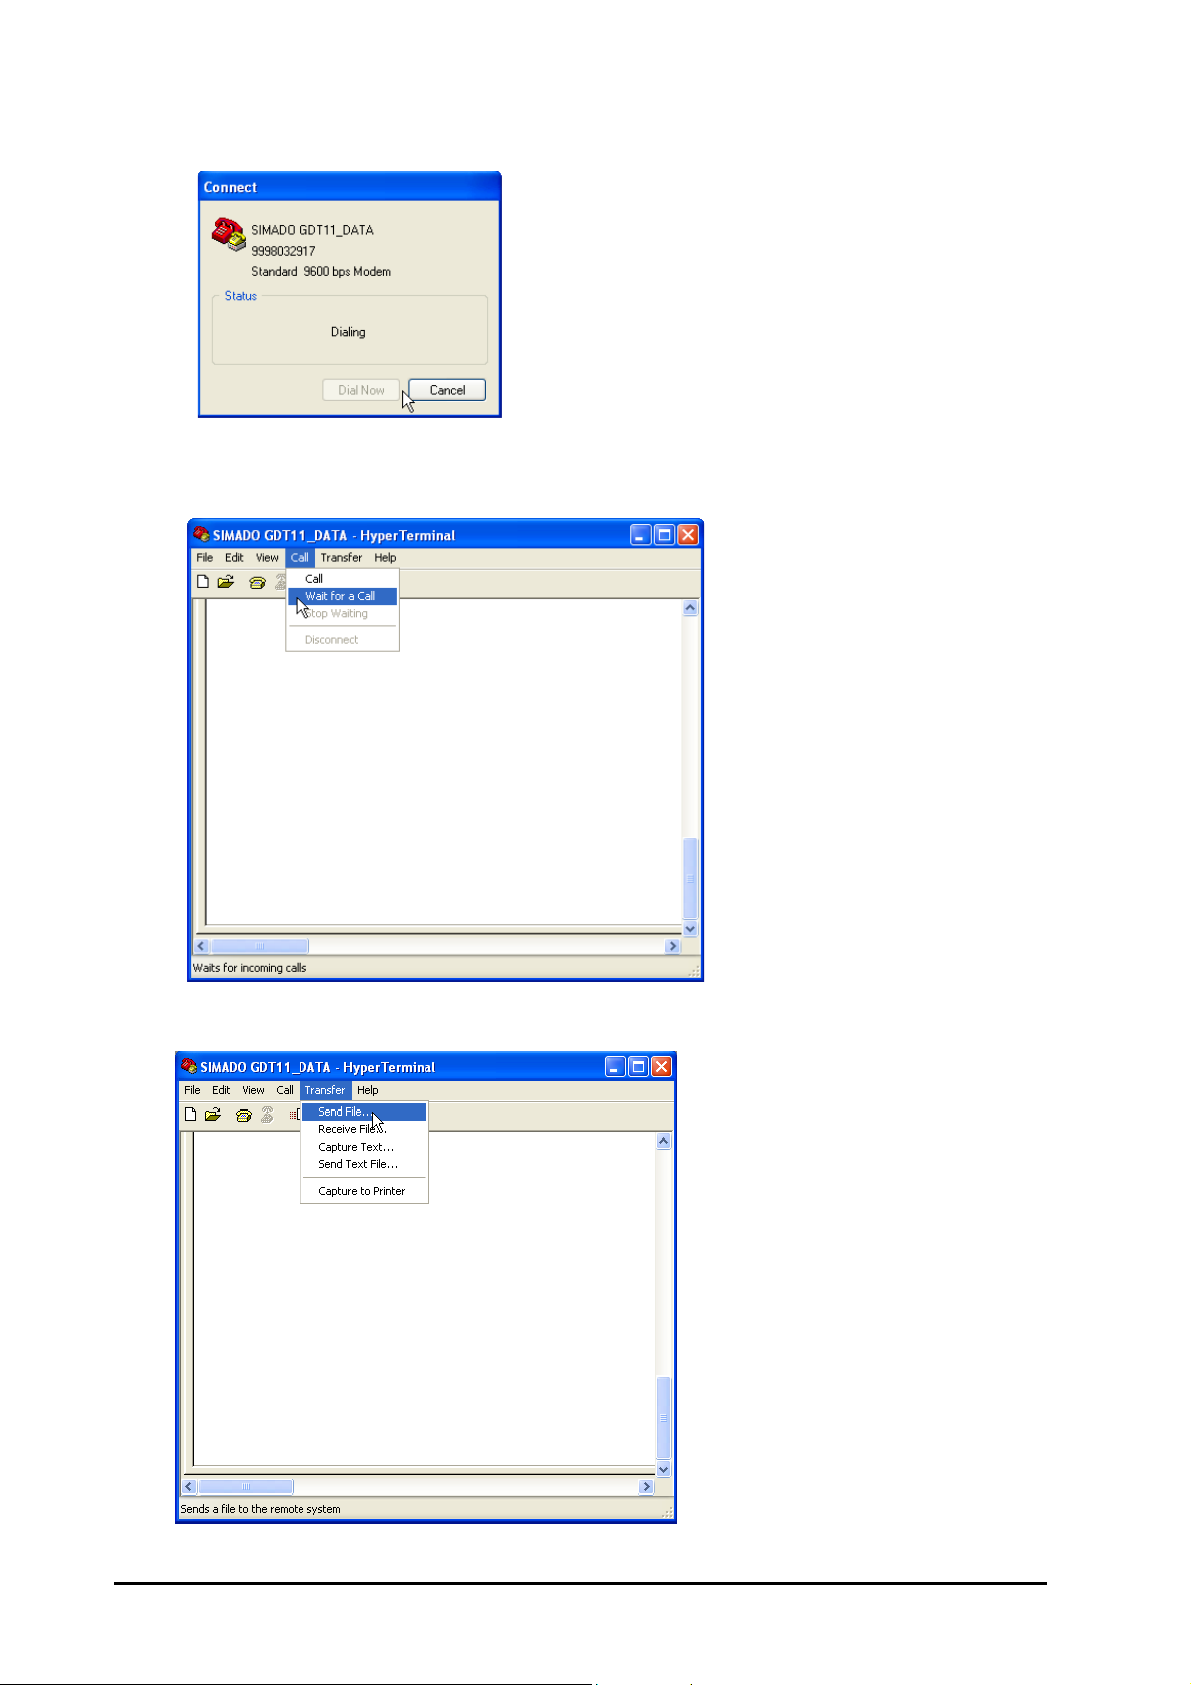
3. To connect HyperTerminal of your computer to the receiving computer, ensure that the HyperTerminal of
the receiving computer is set to 'Wait for a call' mode, when you click Call as shown below, else you will
not be able to send or receive any file.
4. Click Transfer File Send File.
28 SIMADO GDT11 System Manual
Page 29
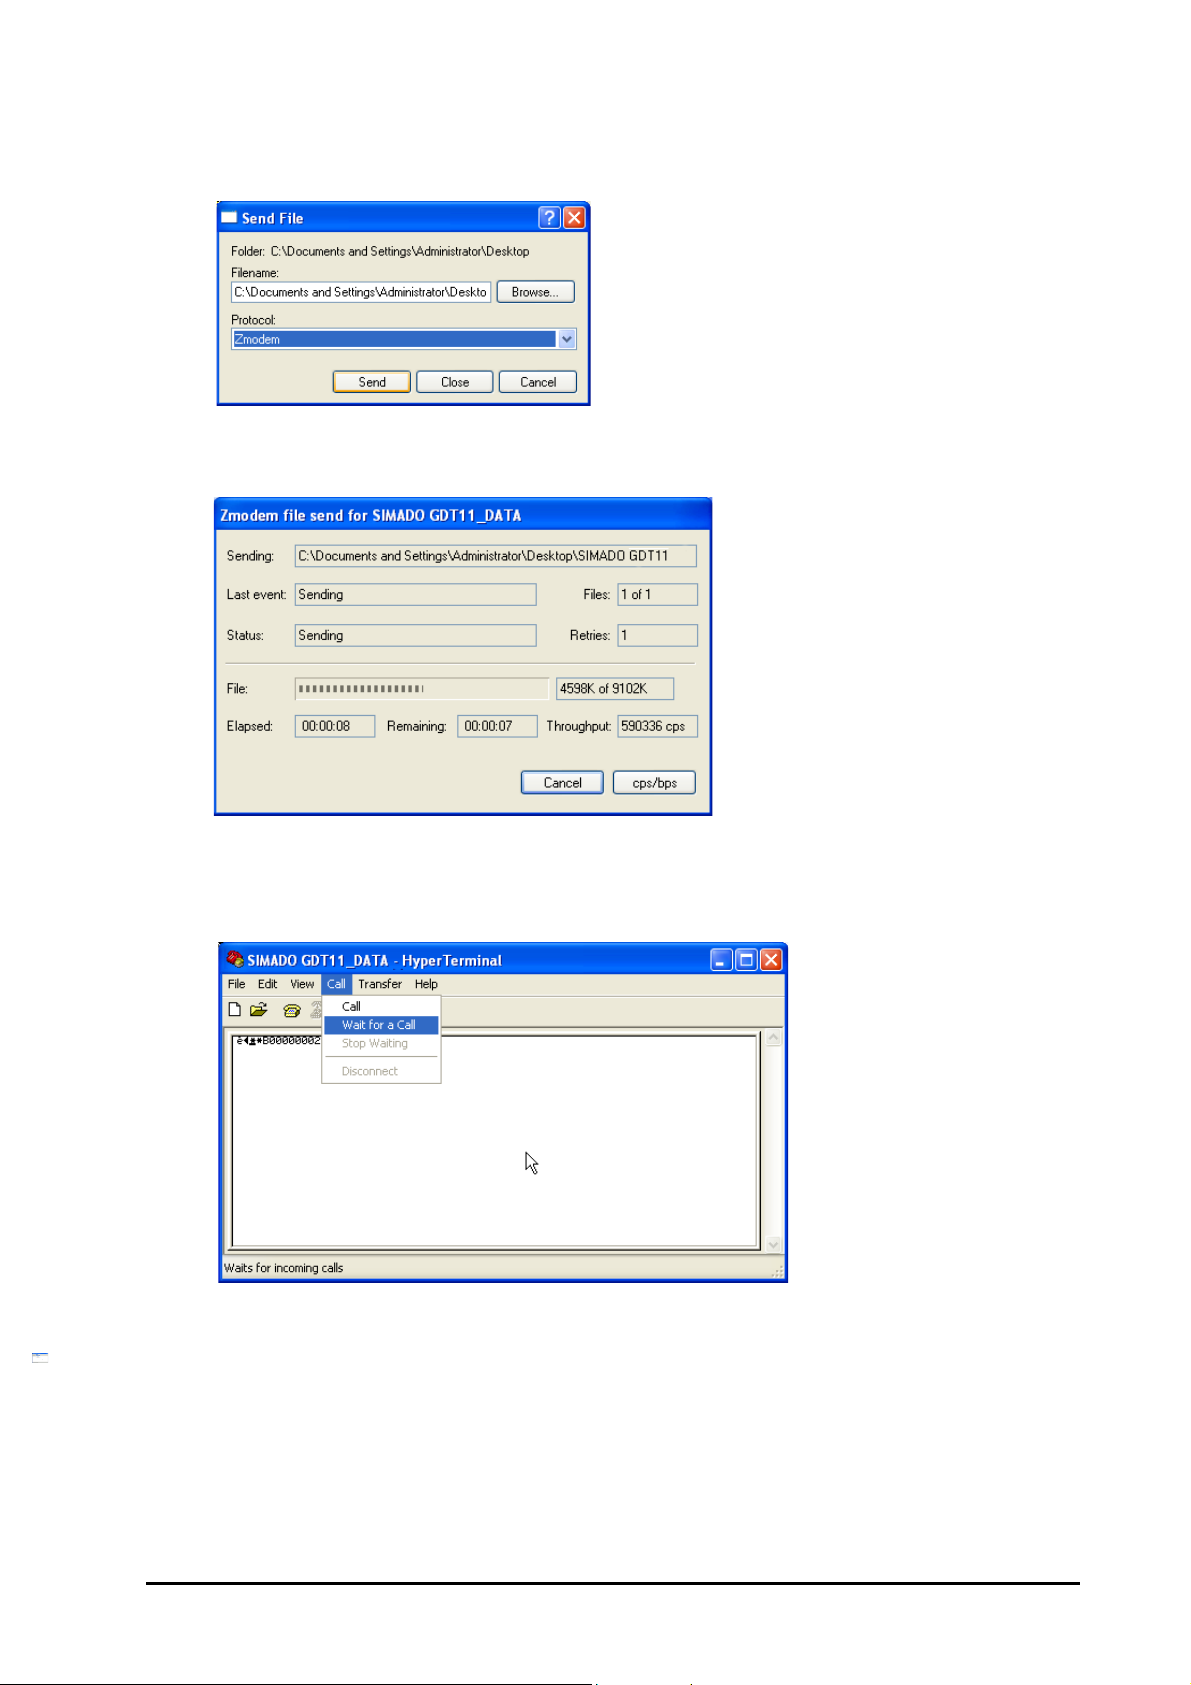
5. Browse and select the file to be sent. Select Zmodem as the setup protocol. Click Send.
6. Message 'Sending' will appear as shown below:
Receiving Data Files
1. On HyperTerminal, click Call Wait for a call.
SIMADO GDT11 System Manual 29
Page 30
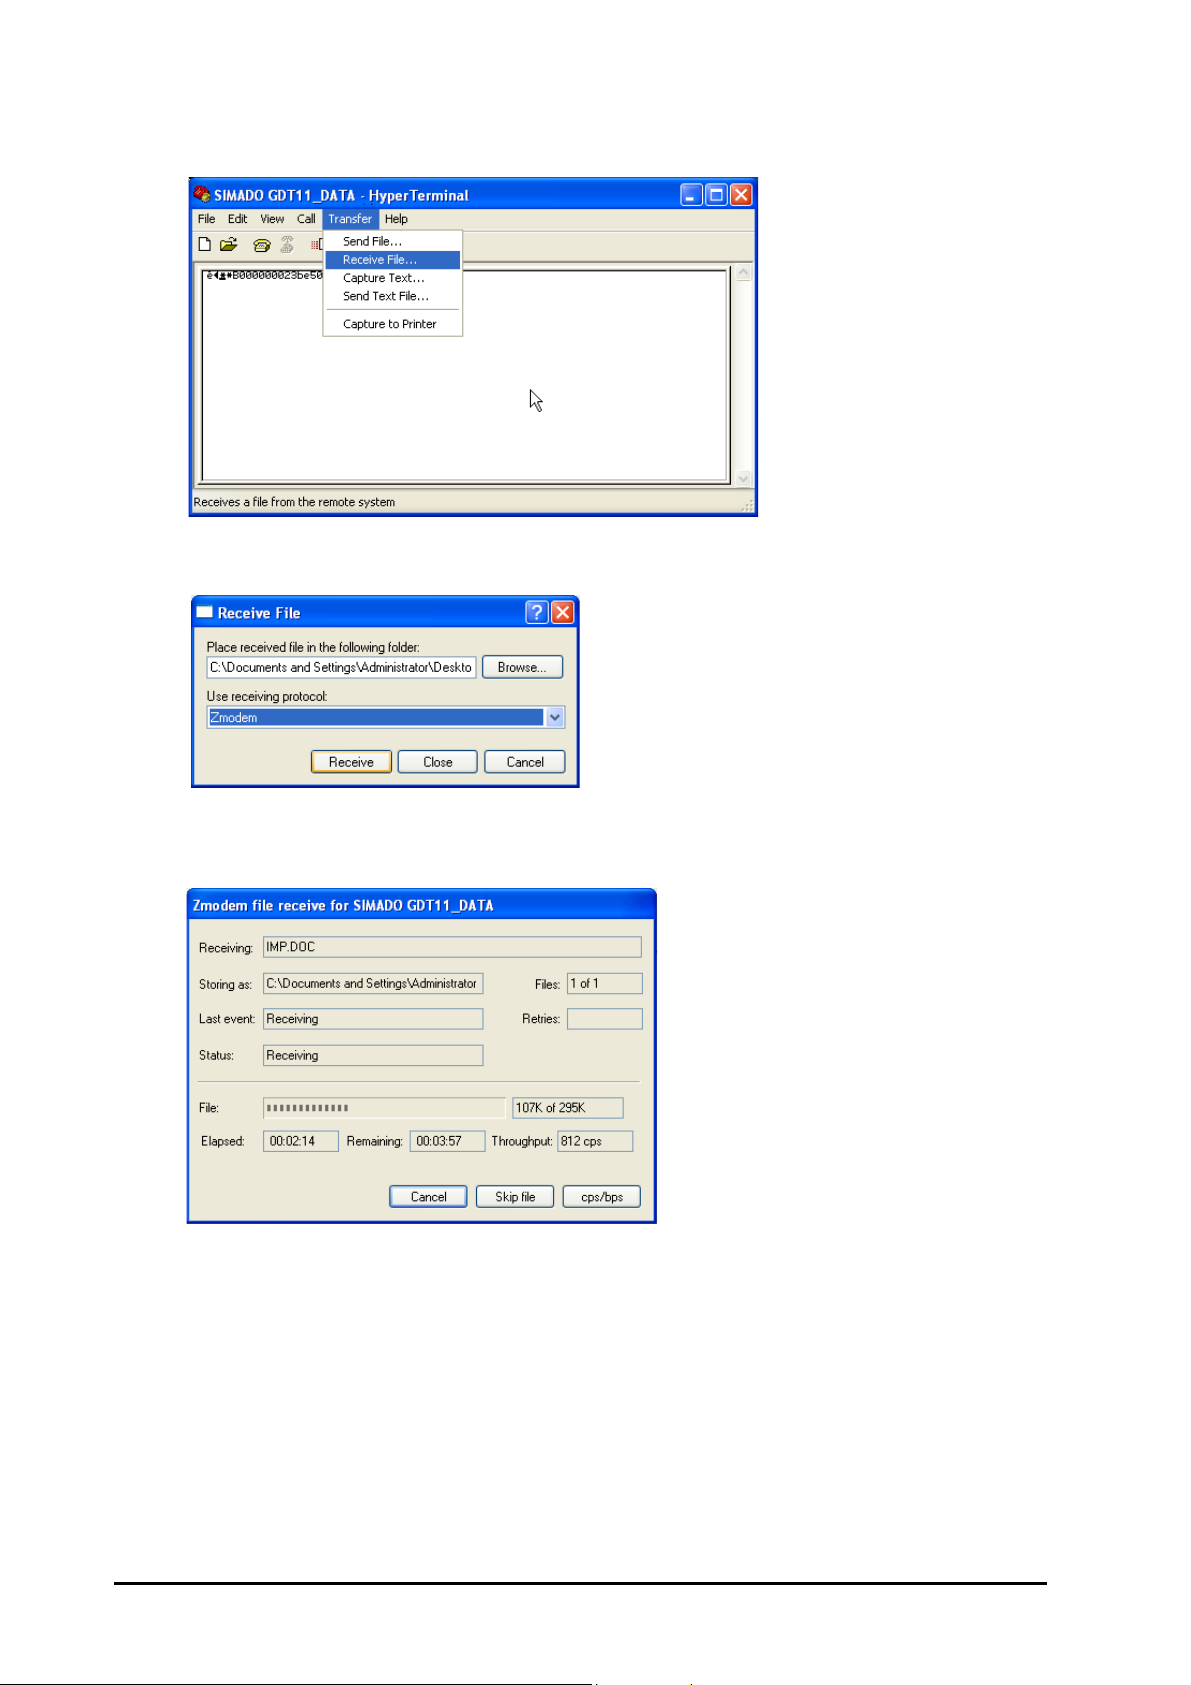
2. During 'Receive', Click Transfer Receive File.
3. Select the location to store received file. Select Zmodem as receiving protocol. Click Receive.
4. When a remote GDT11 unit or some other GSM terminal transmits data to your GDT11 unit, the
following message will appear.
30 SIMADO GDT11 System Manual
Page 31
GPRS (General Packet Radio Service)
What’s this?
The General Packet Radio Service (GPRS) is a new, value-added service that allows information to be sent and
received across a mobile telephone network. Some important applications of GPRS are Chat, transfer of textual/
visual information, transfer of still and moving images, Web Browsing, File Transfer.
How to use GPRS
To be able to use GPRS, you must do the following:
1. Get the GPRS service for the SIM used in the SIMADO GDT11 enabled by the service provider.
2. Set up a Modem.
3. Create a connection type.
4. Set up the Dial-Up network.
5. Get connected to the New GPRS connection.
How to configure GPRS Services
Setting up a Modem
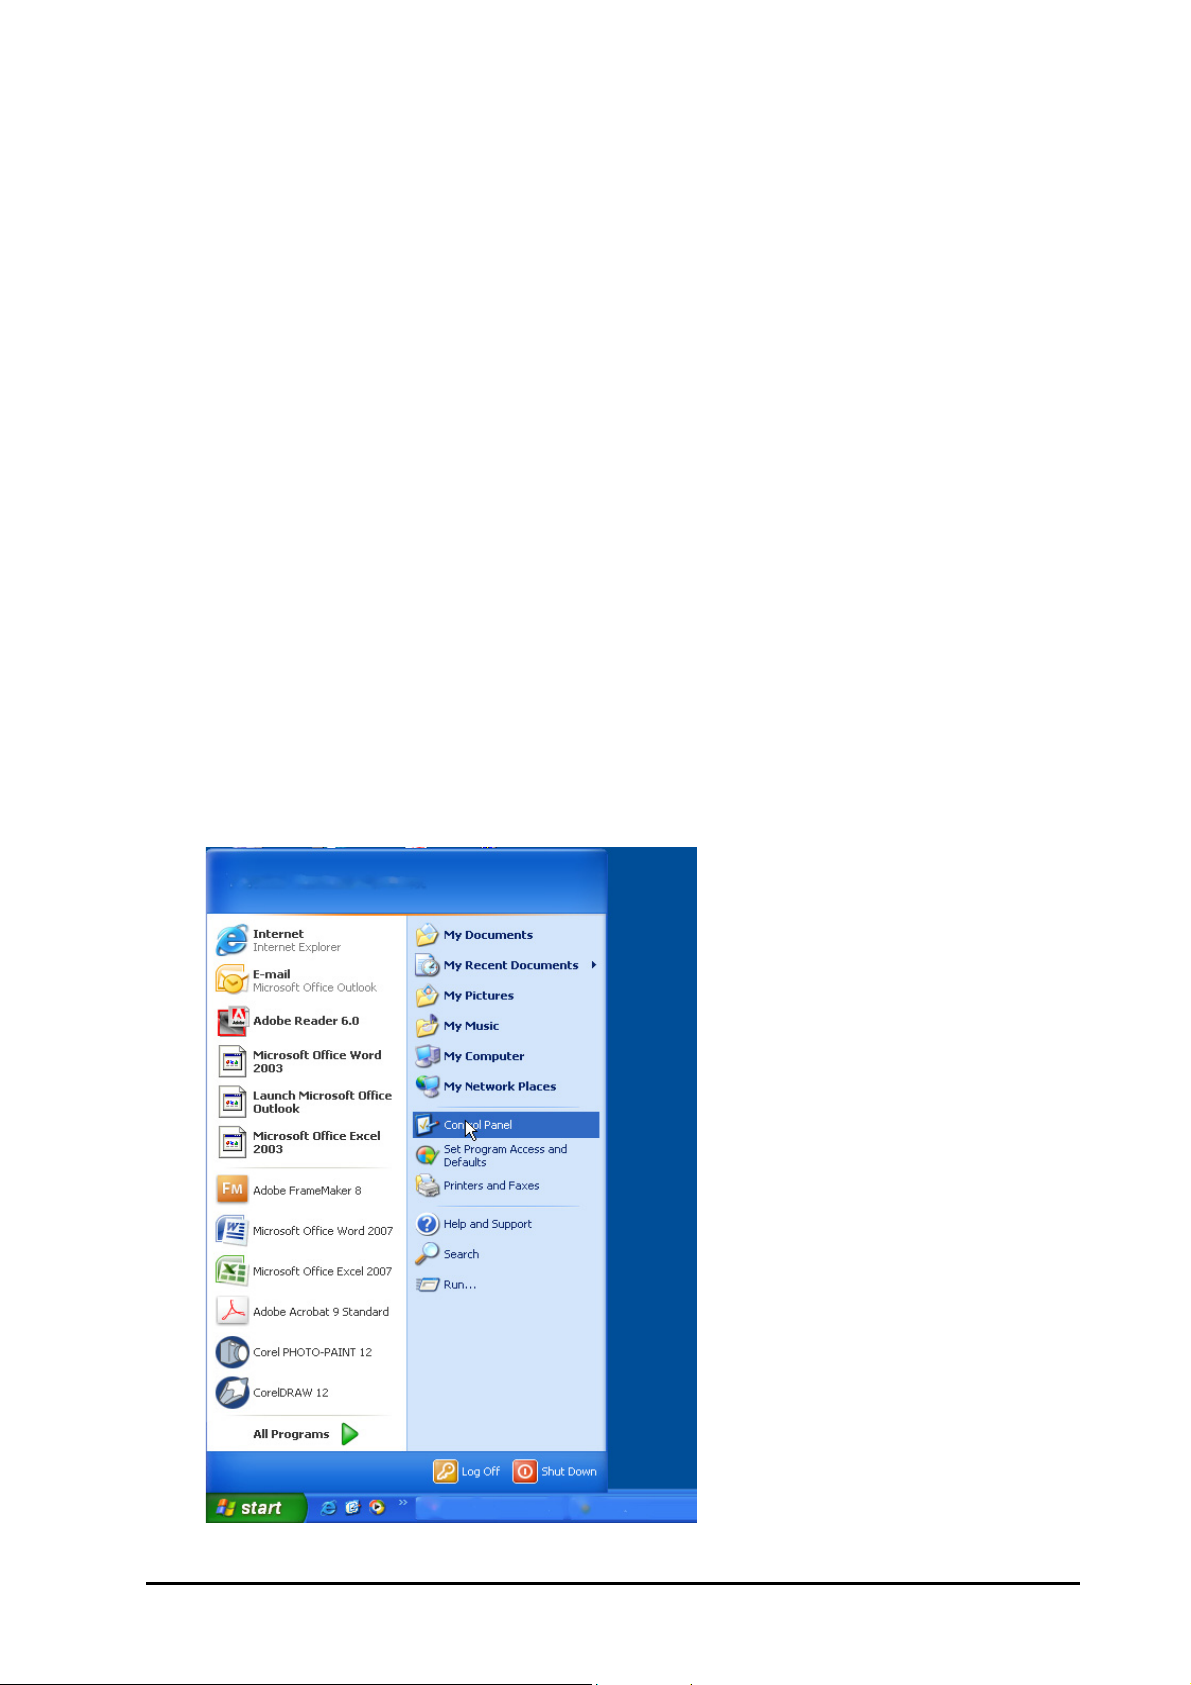
1. On Operating System-Windows 2000, Windows XP, Windows NT: Click Start Control Panel.
SIMADO GDT11 System Manual 31
Page 32
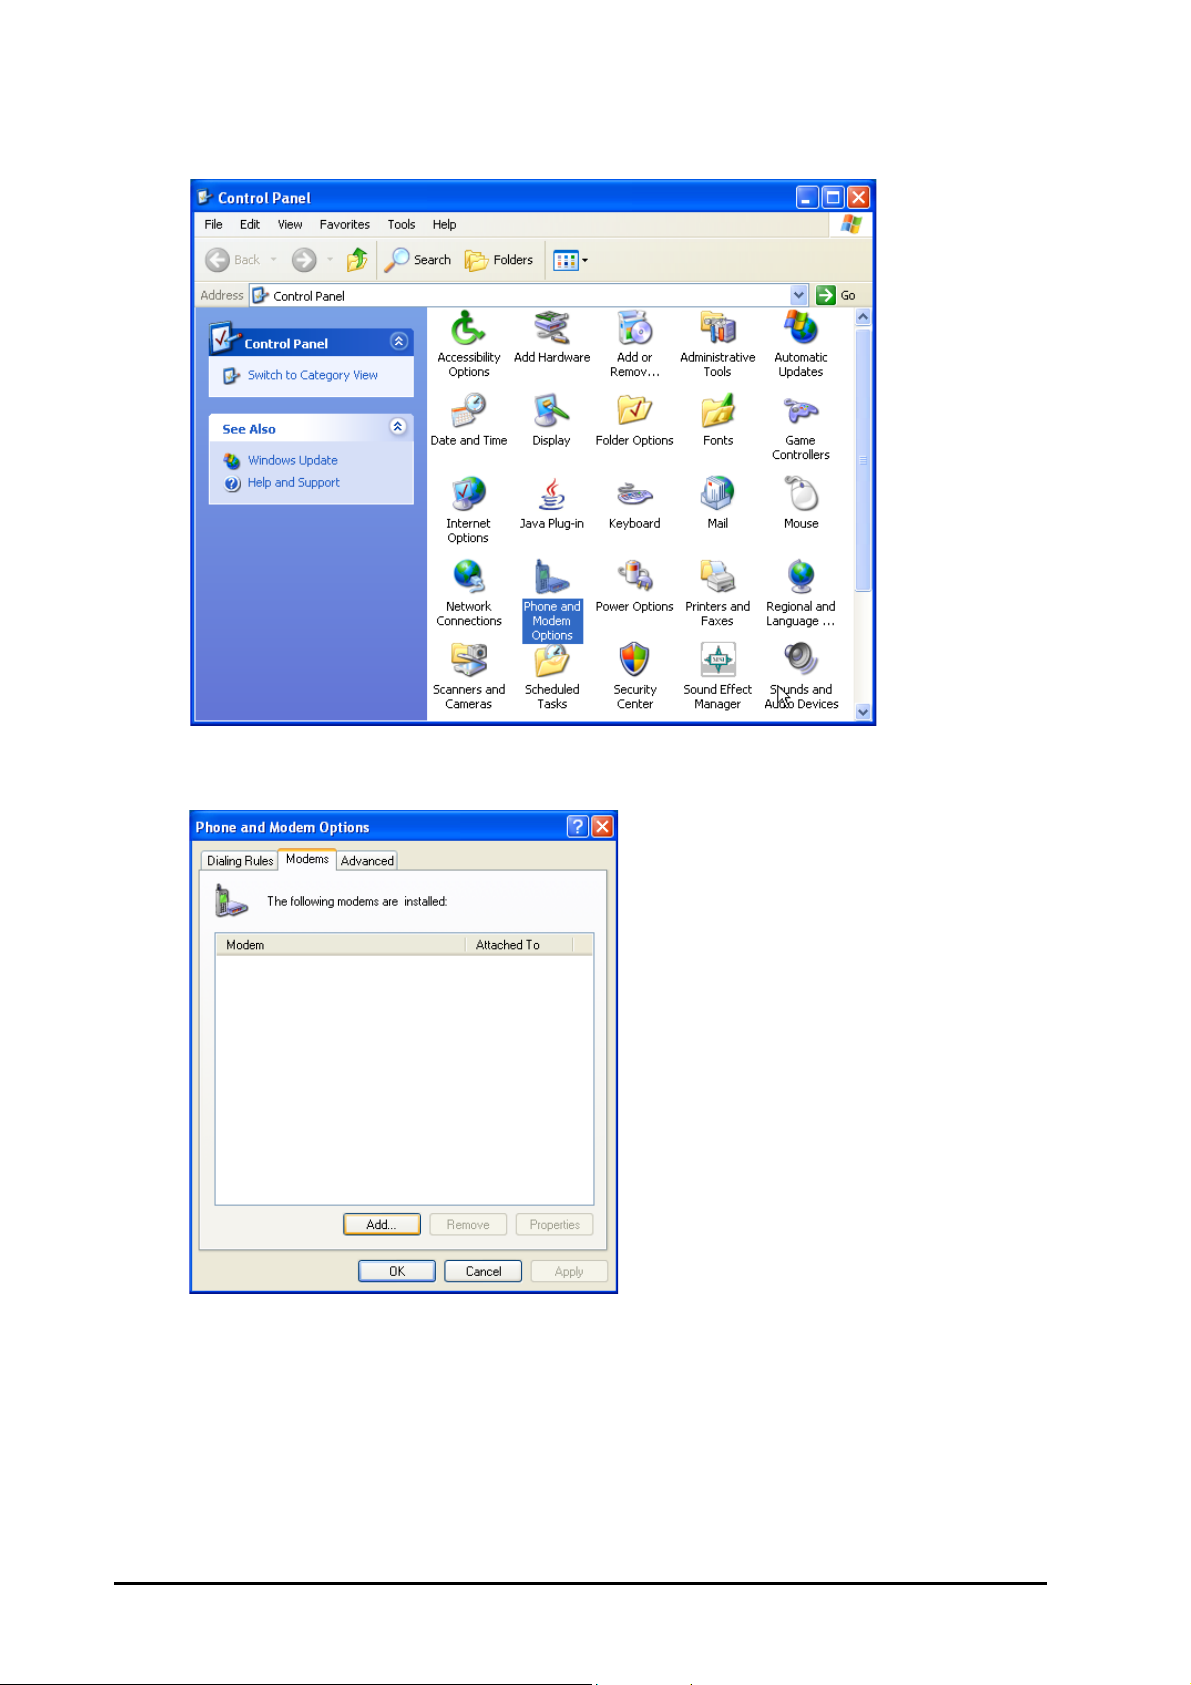
2. Control Panel window will open up as shown below. Double click the Phone and Modem Options icon.
3. 'Phone and Modem Options' window will open as shown below. Click Add button.
32 SIMADO GDT11 System Manual
Page 33
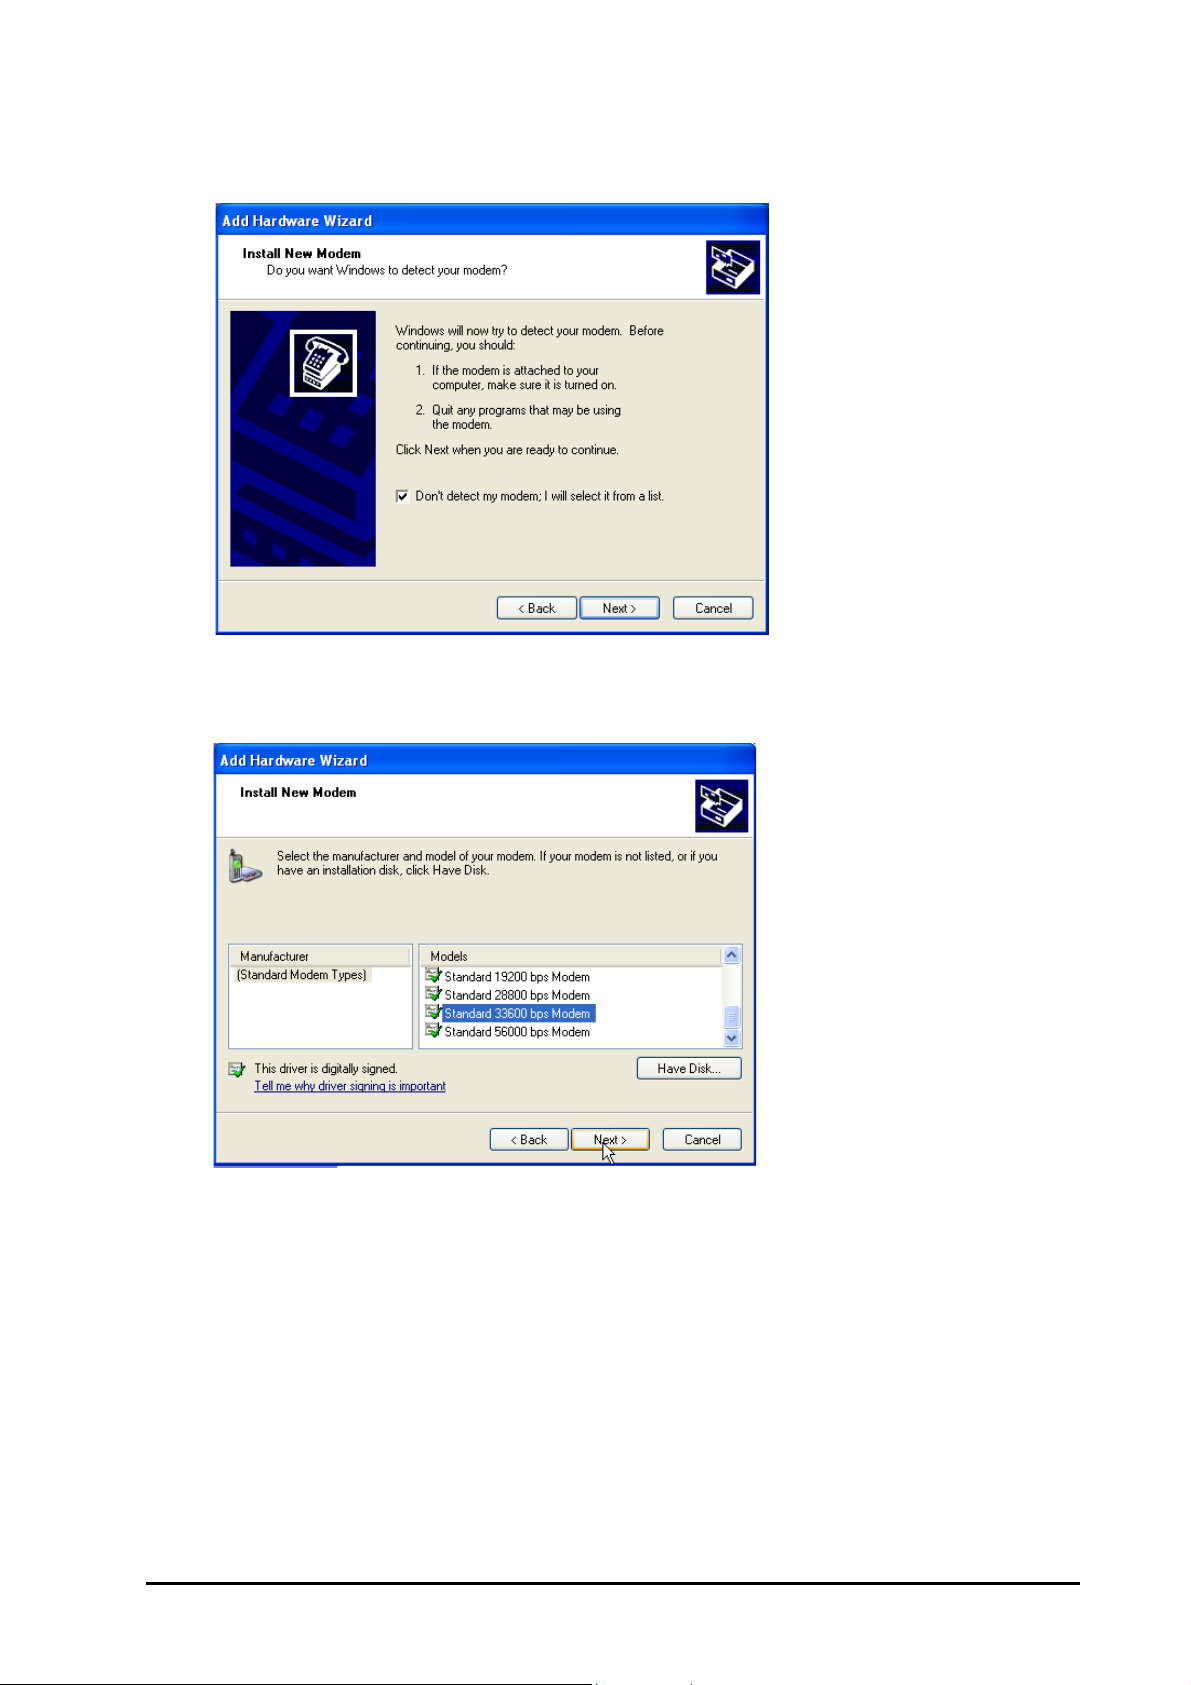
4. 'Add Hardware Wizard' window will open. Select the option Don't detect my modem; I will select
from a list in the window. Click Next button.
5. Select 'Standard 33600bps Modem' from the available modem options in the window and click Next
button.
SIMADO GDT11 System Manual 33
Page 34
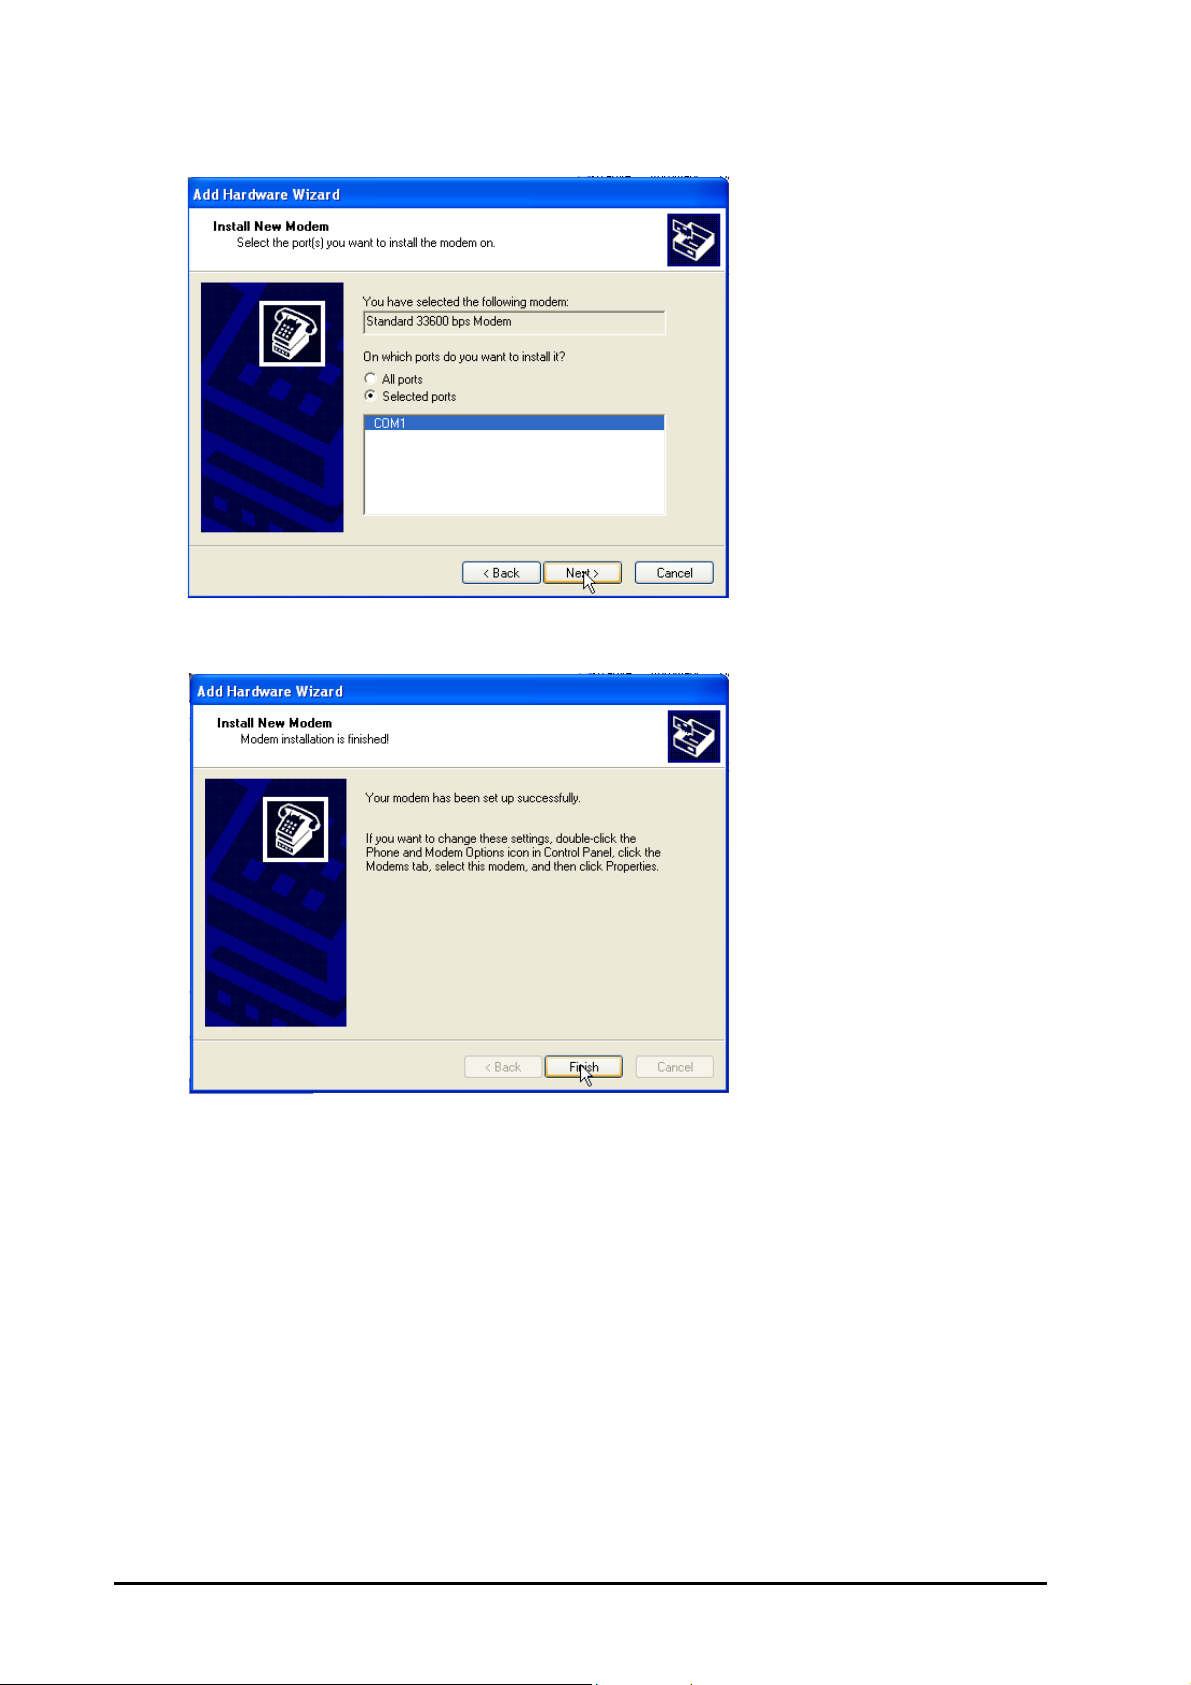
6. Select 'COM1' port in the window and click Next button.
7. Click Finish button.
34 SIMADO GDT11 System Manual
Page 35
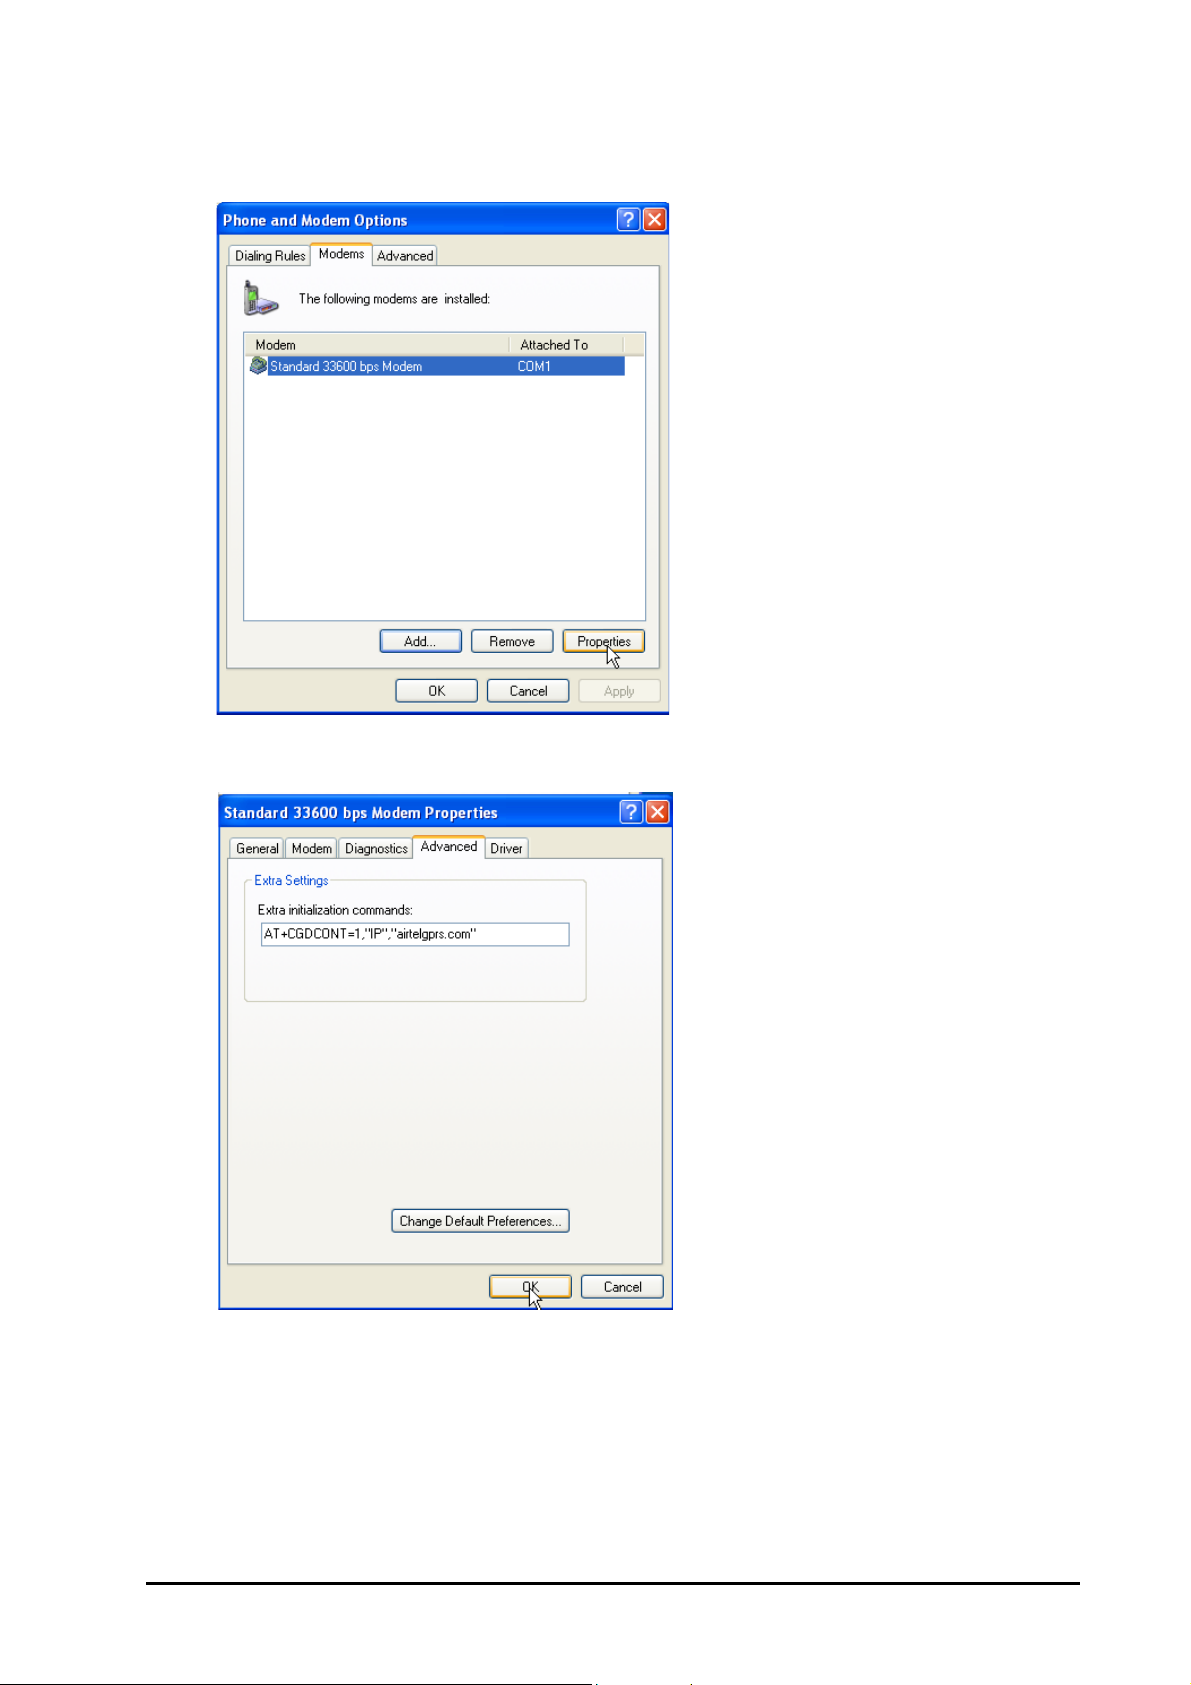
8. Phone and Modem Options window will appear on the screen as shown below. Select the installed
modem and click Properties button.
9. In Modem Properties window, click Advanced tab and enter the 'Extra Initialization Commands' as
given by the service provider. For example enter: AT+CGDCONT=1, "IP", "airtelgprs.com". Click OK.
10. You return to the Phone and Modem Options window, click OK.
SIMADO GDT11 System Manual 35
Page 36
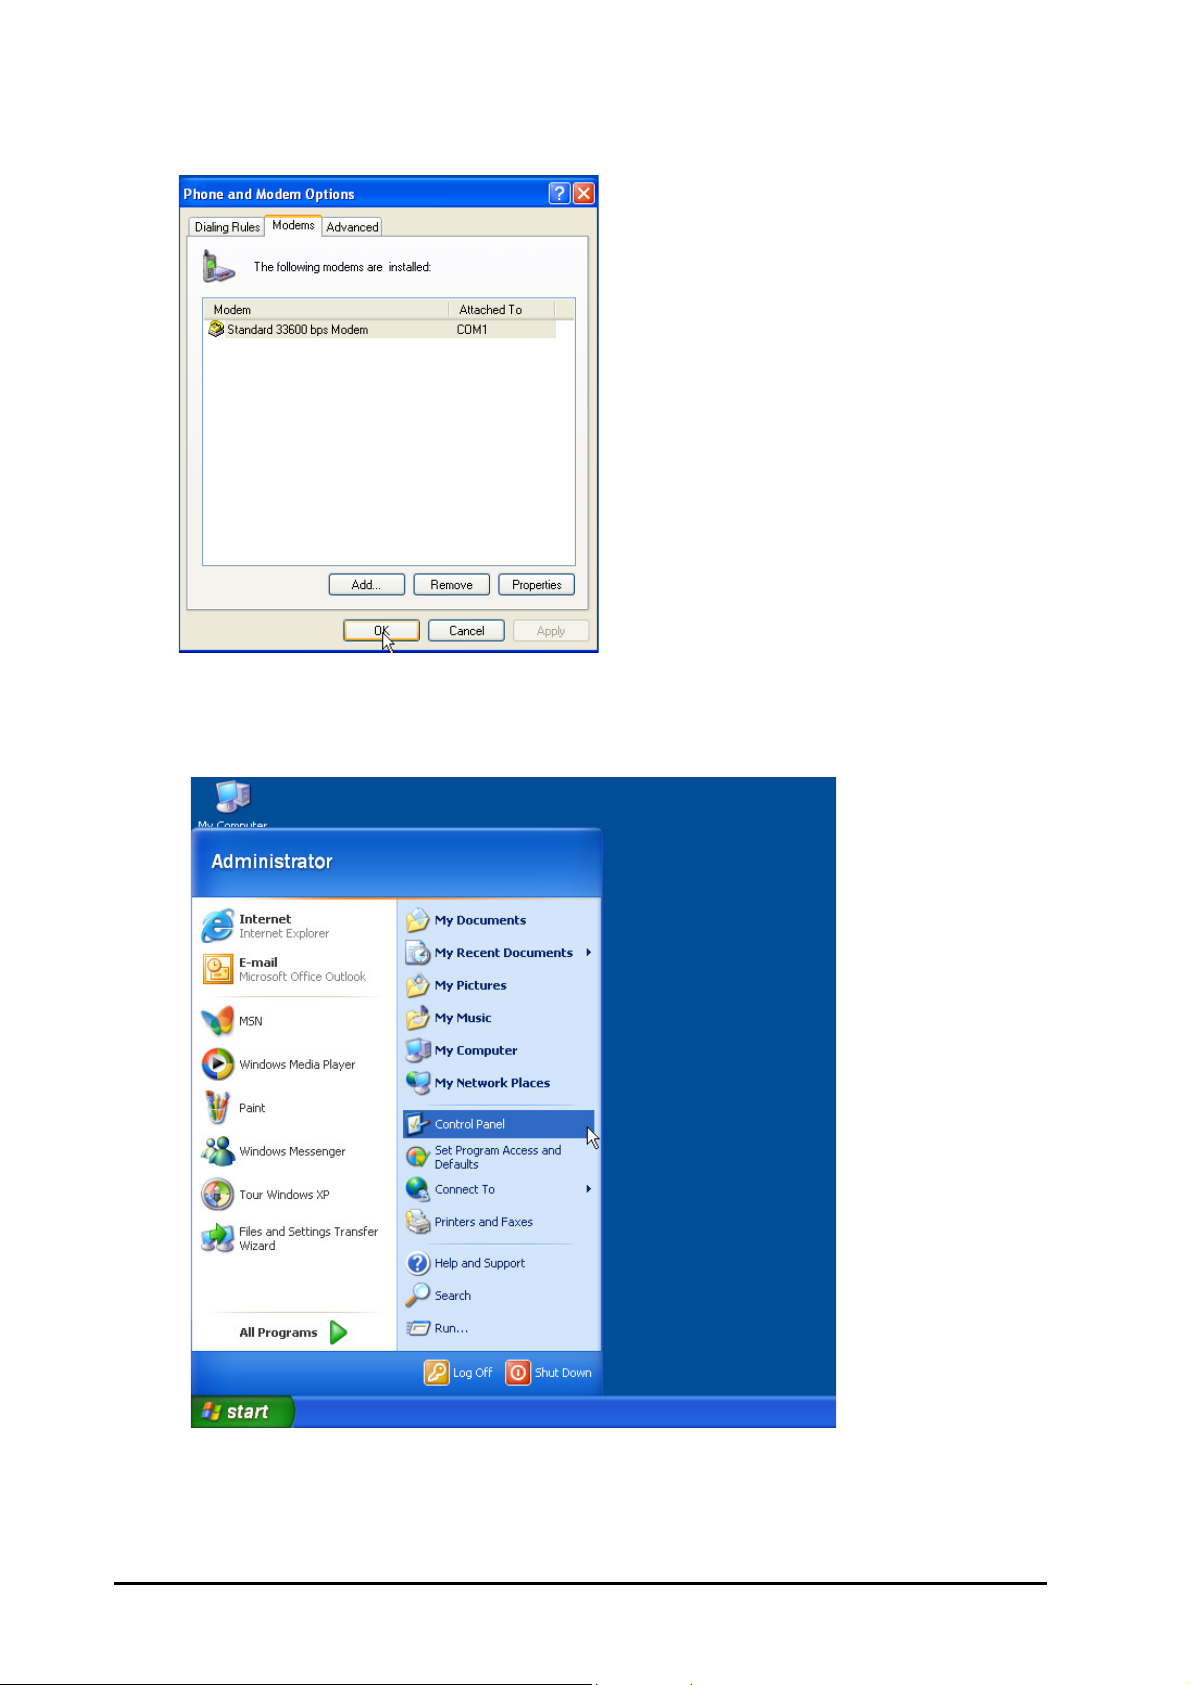
Establishing a GPRS Dial-Up Connection
1. Click Start Control Panel.
36 SIMADO GDT11 System Manual
Page 37
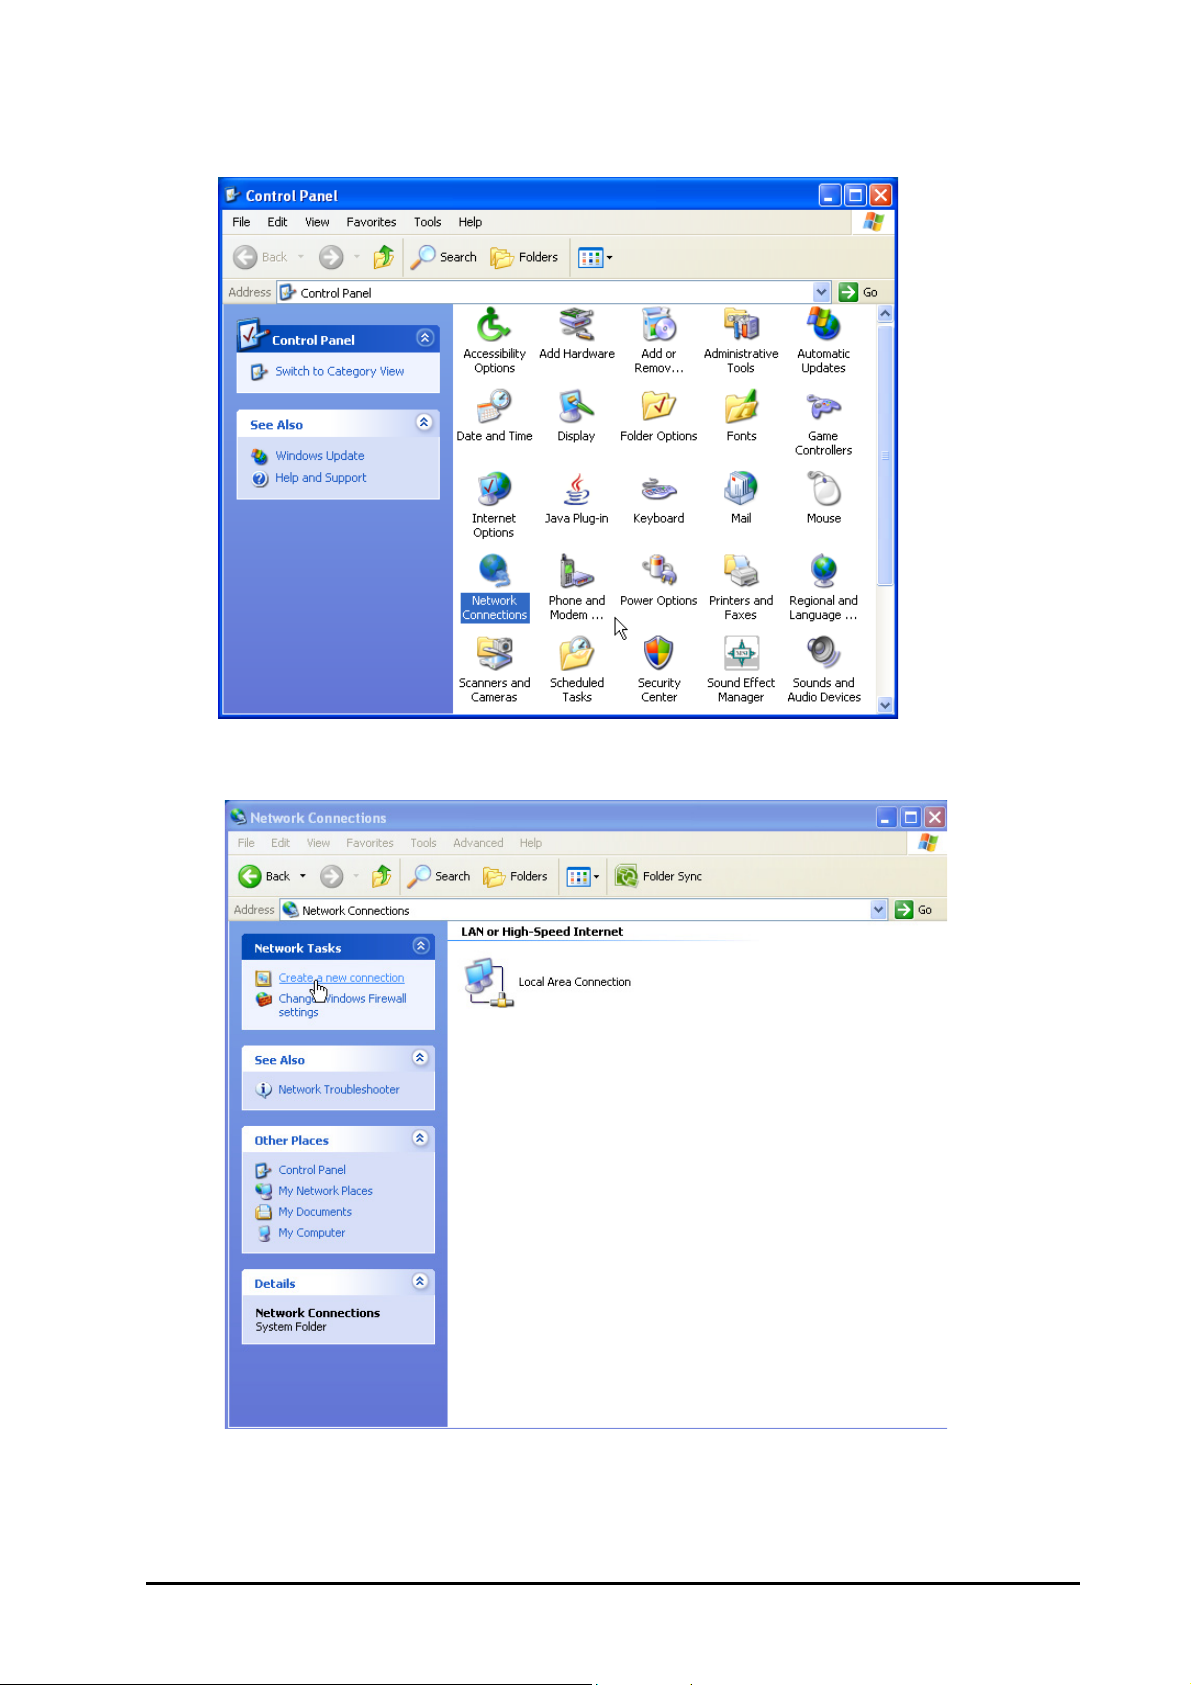
2. Control Panel window will open up. Click Network Connections icon.
3. Click ‘Create a New Connection’ in the Network Connection window.
SIMADO GDT11 System Manual 37
Page 38
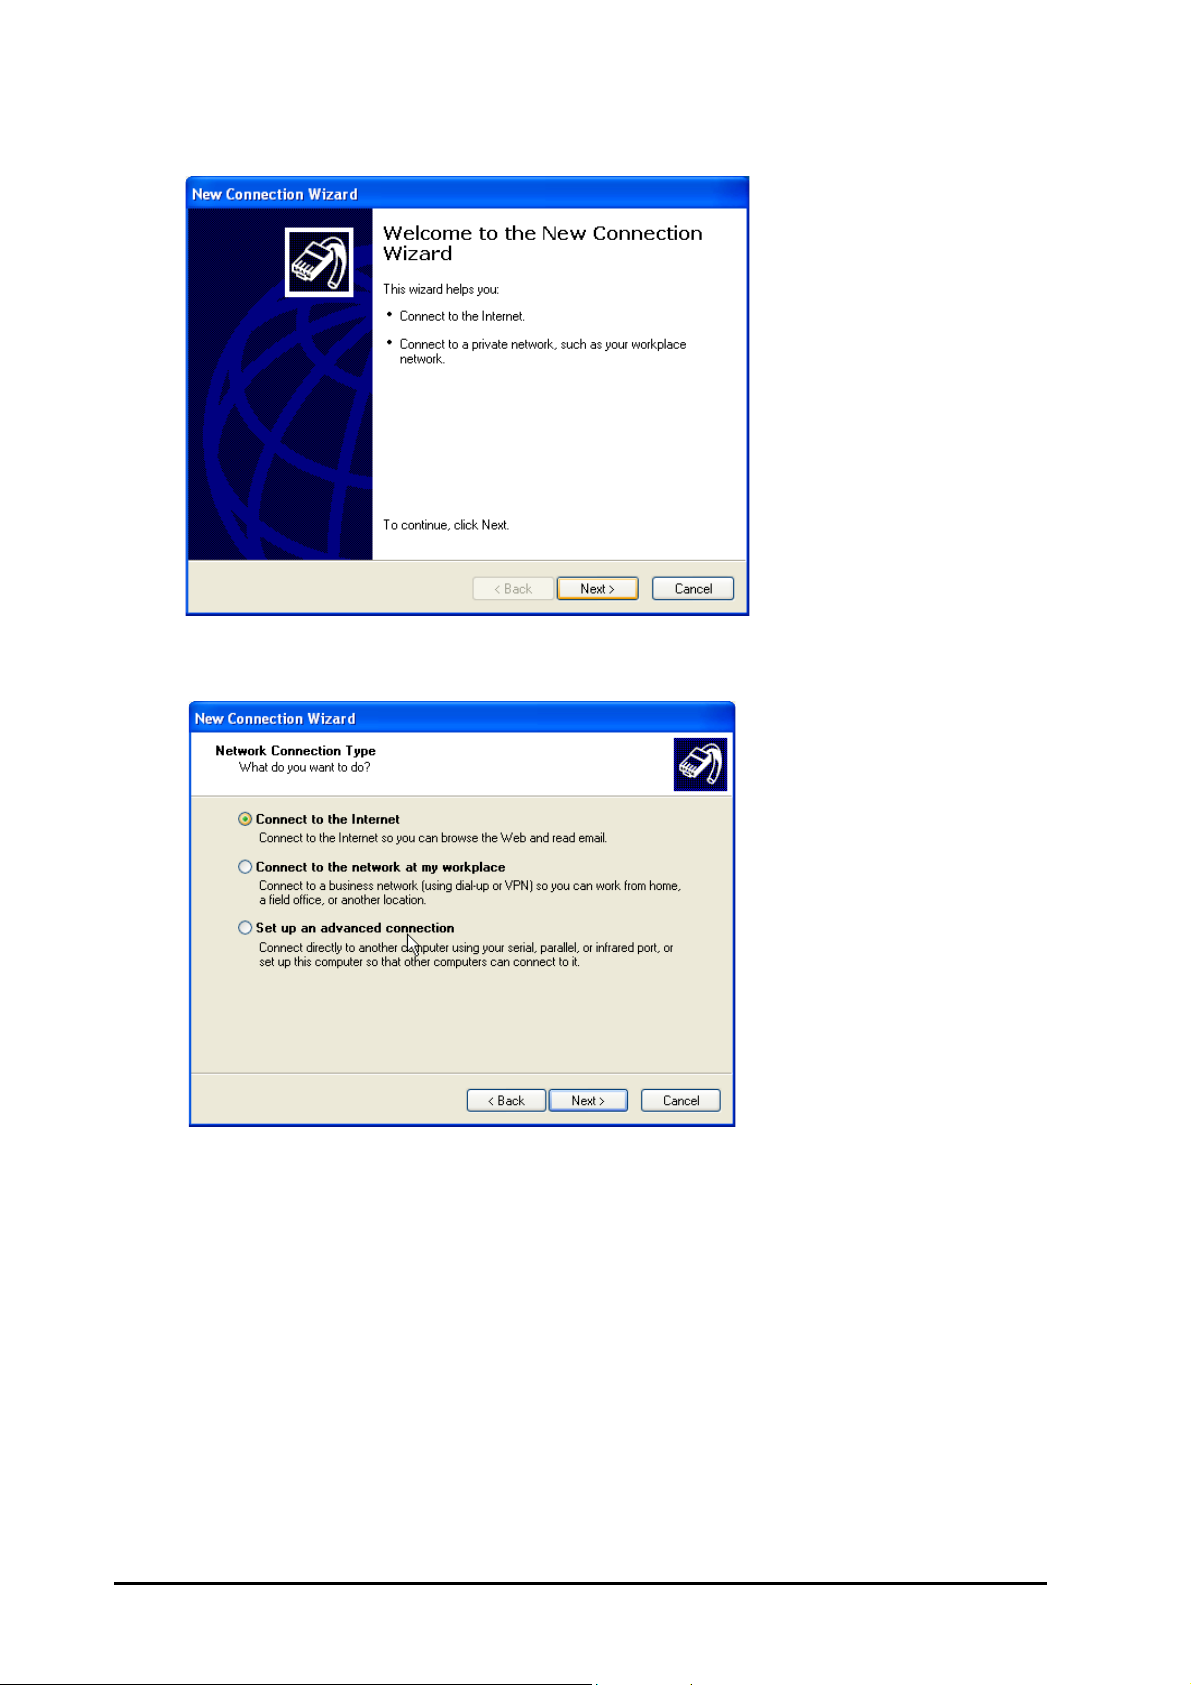
4. New Connection Wizard will open. Click Next button.
5. Select Connect to the Internet option and click Next button.
38 SIMADO GDT11 System Manual
Page 39
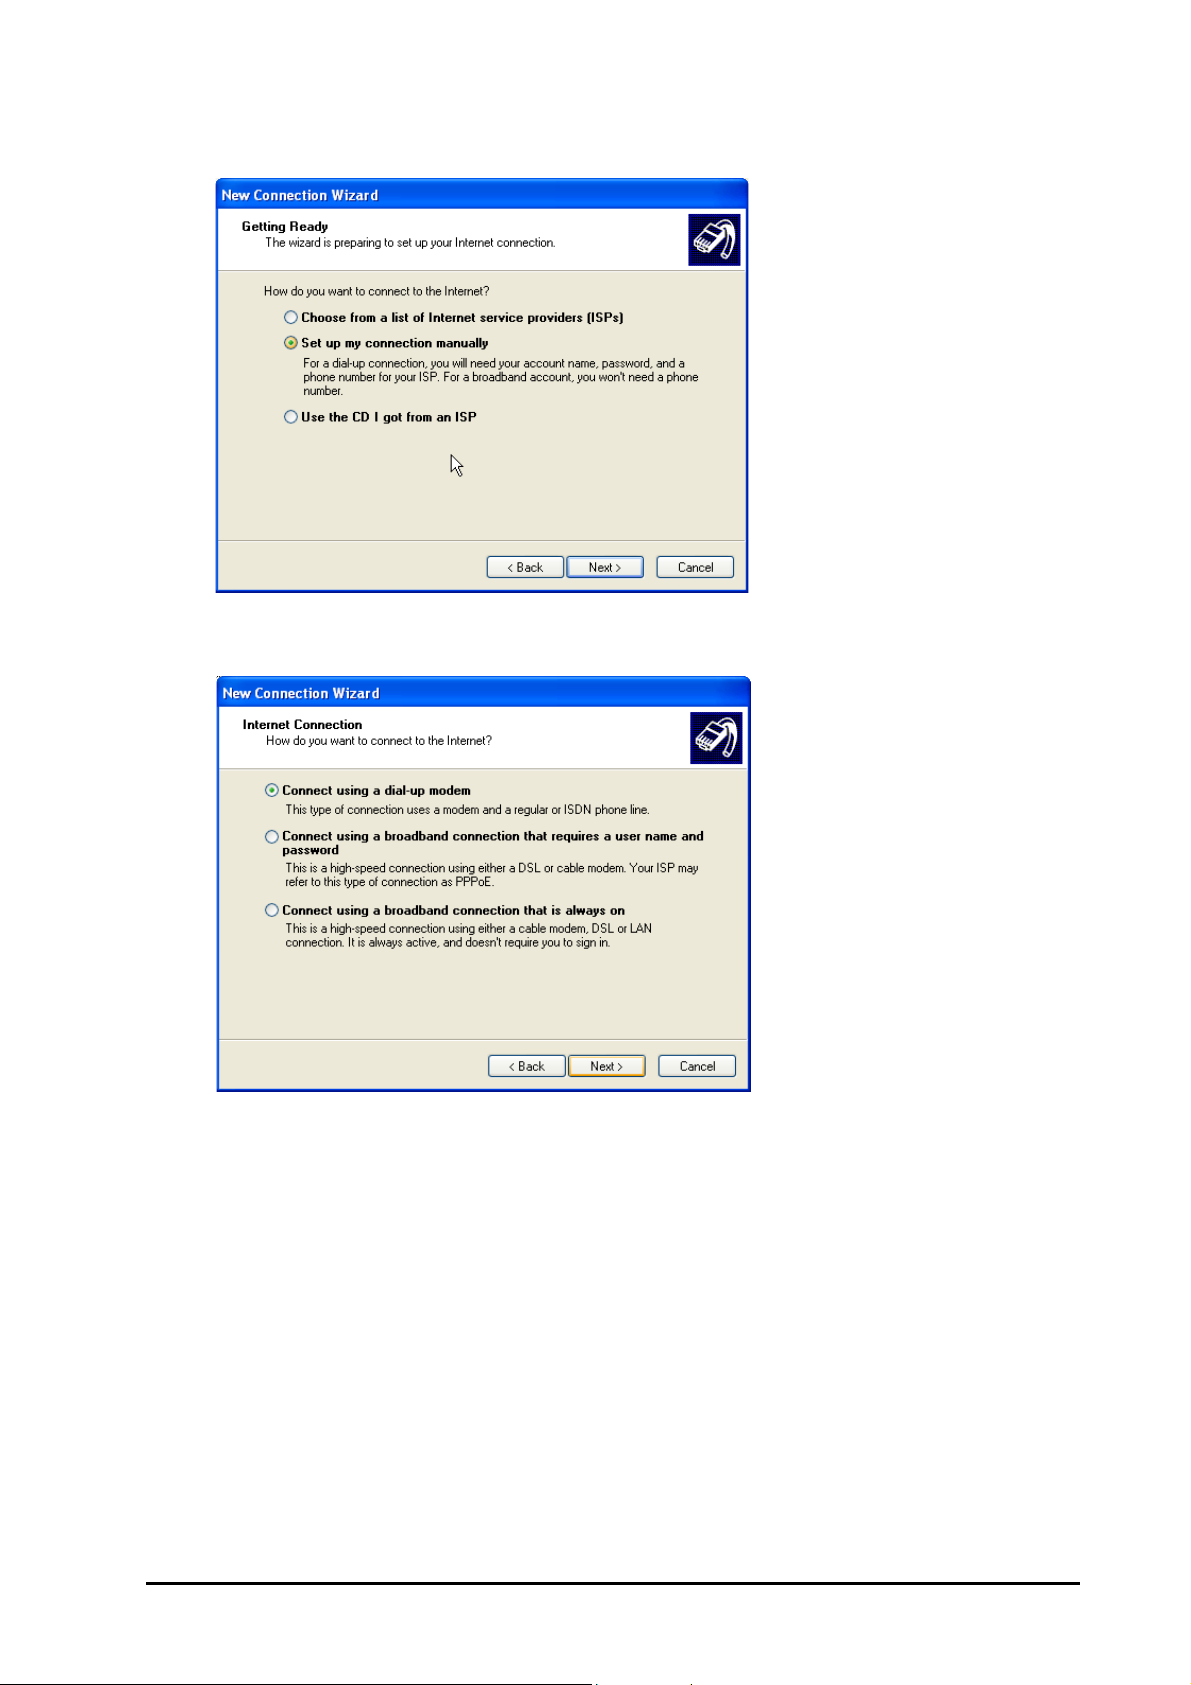
6. Select Set my connection manually and click Next button.
7. Select Connect using a dial up modem and click Next button.
SIMADO GDT11 System Manual 39
Page 40
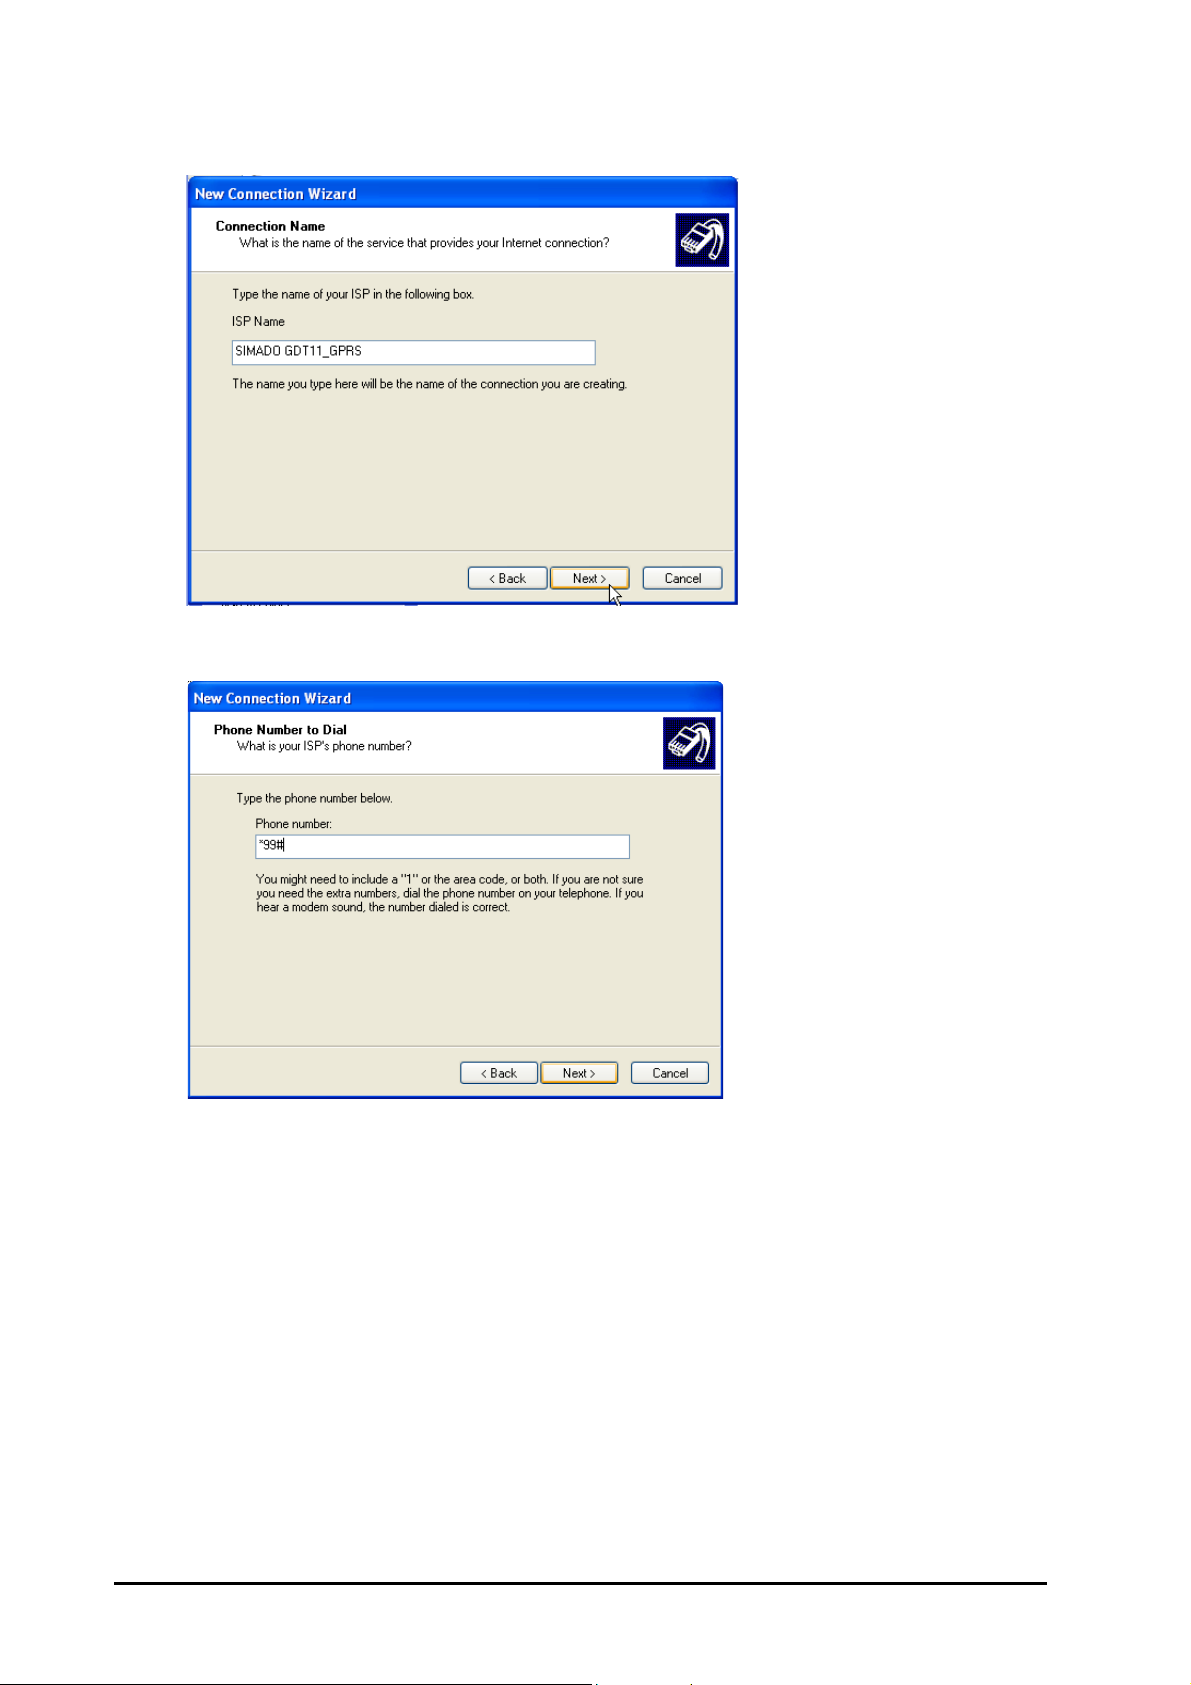
8. Enter the name of your Internet Service Provider (ISP) in ISP Name field and click Next button.
9. Enter phone number in Type phone number below field and click Next button.
40 SIMADO GDT11 System Manual
Page 41
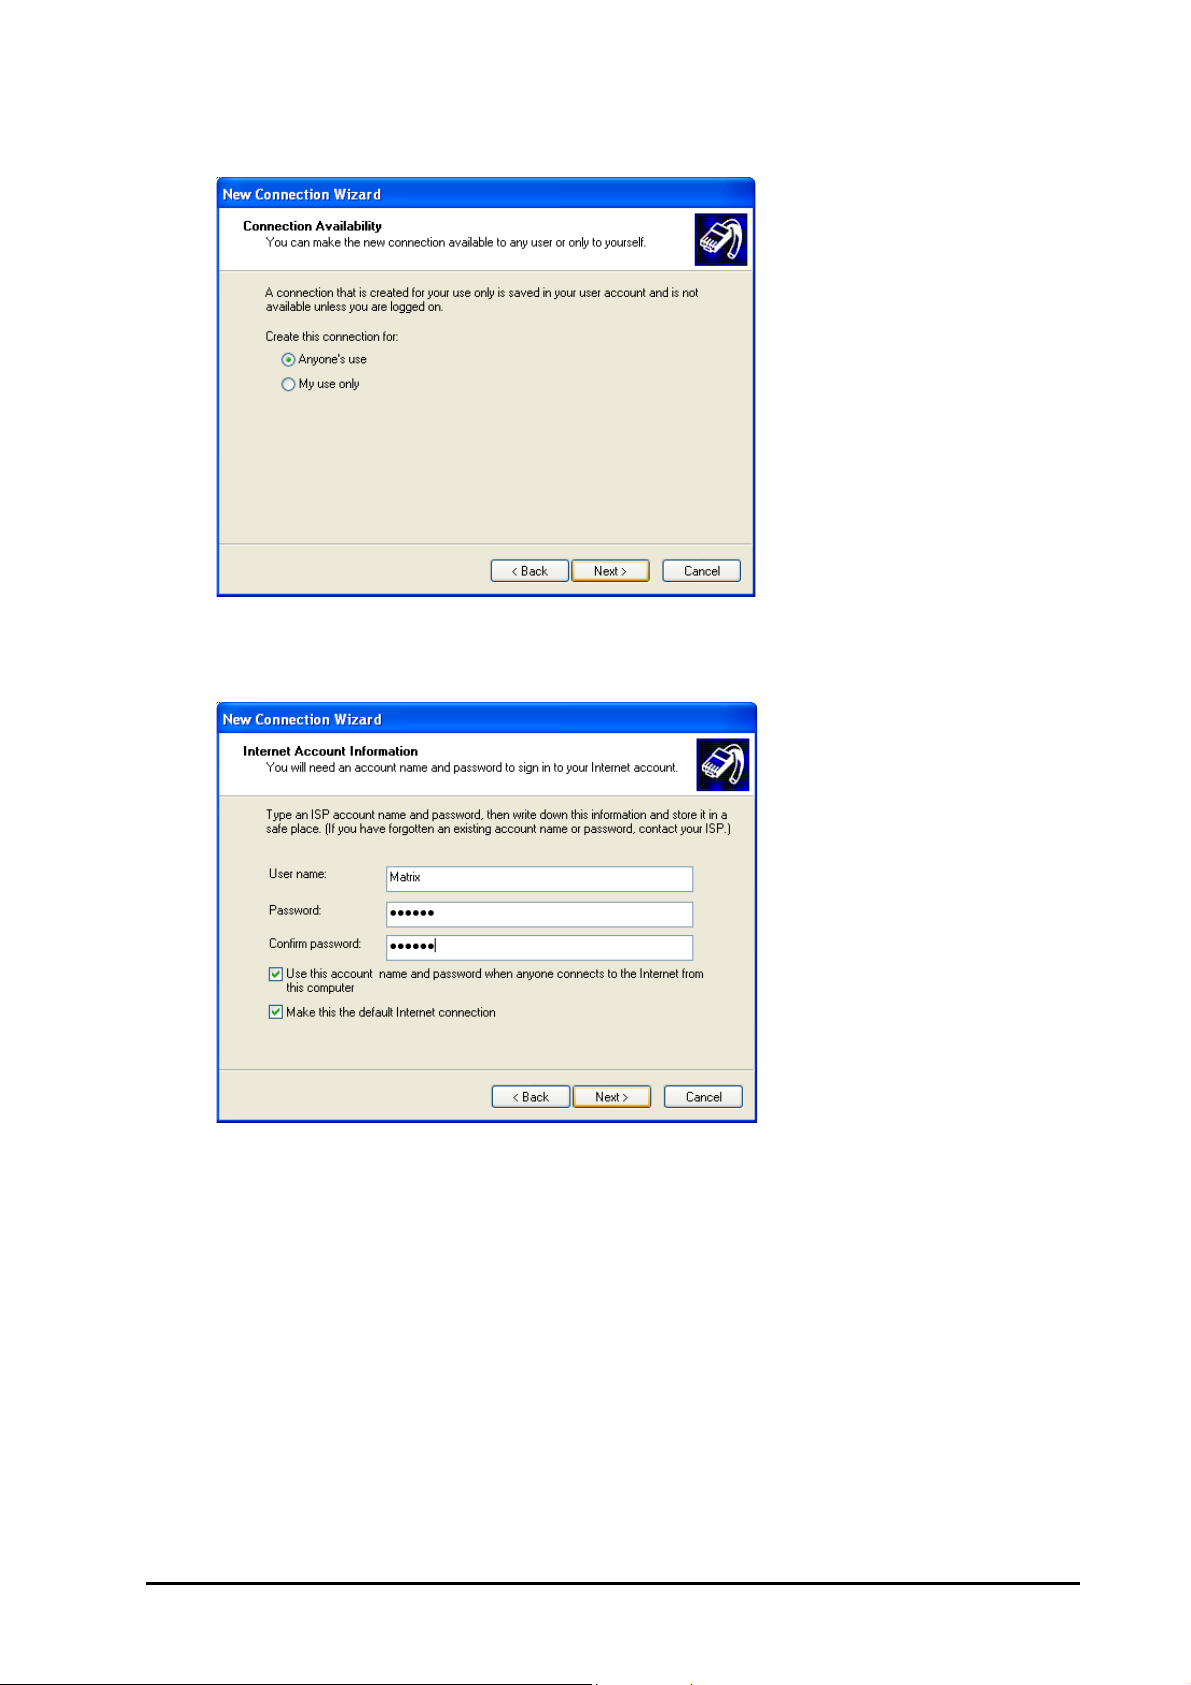
10. Select Anyone's Use radio button and click Next button.
11. Enter User Name and Password in the fields Username, Password and Confirm Password respectively.
Select the other two check boxes given on the Internet Account Information page. Click Next button.
SIMADO GDT11 System Manual 41
Page 42
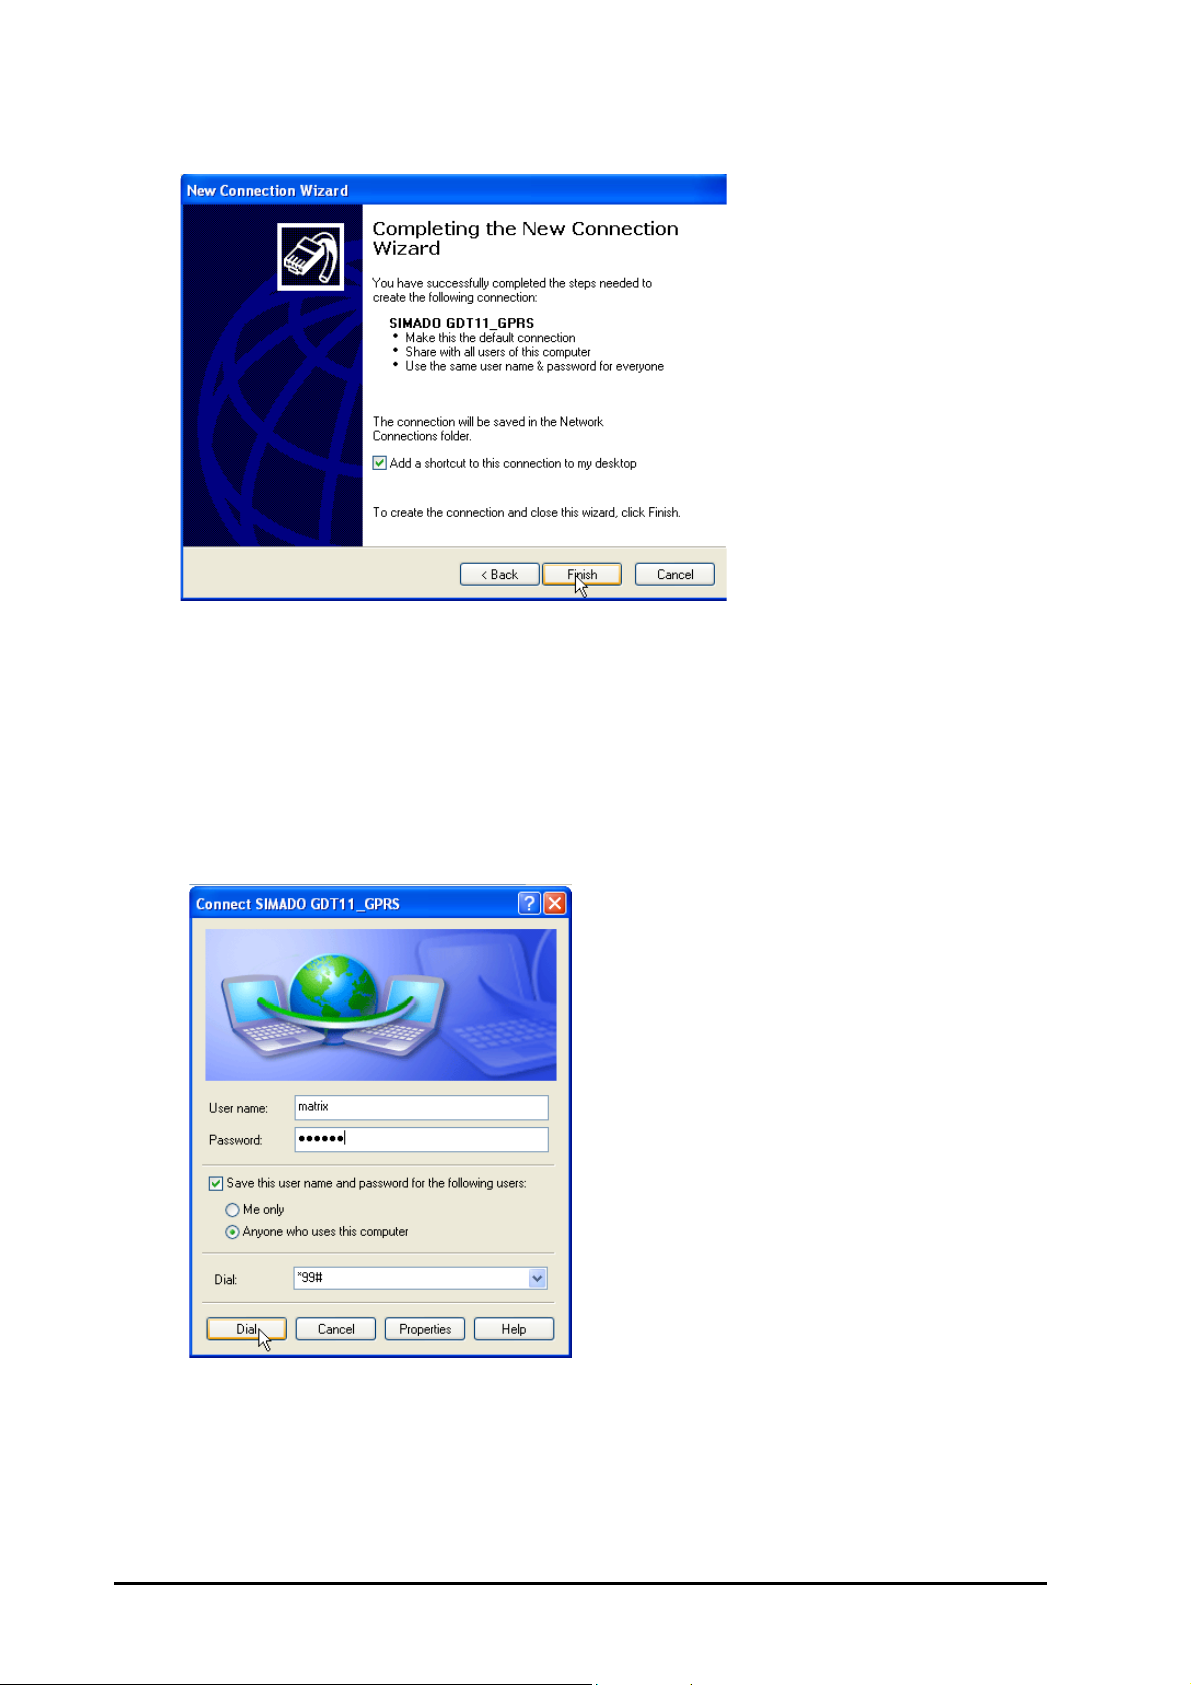
12. Select Add a shortcut to this connection to my desktop check box and click Finish button.
13. A shortcut to SIMADO GDT11_GPRS dial up will be created on your desktop.
Sending/Receiving GPRS Data
1. Double click the shortcut SIMADO GDT11_GPRS on your desktop OR click Start 'My Network Places
Setting' View Network Connections and double click Dial up SIMADO GDT11_GPRS.
The Dialer SIMADO GDT11_GPRS will open. Enter 'Username' and 'Password' and click Dial button
to establish GPRS connection.
42 SIMADO GDT11 System Manual
Page 43
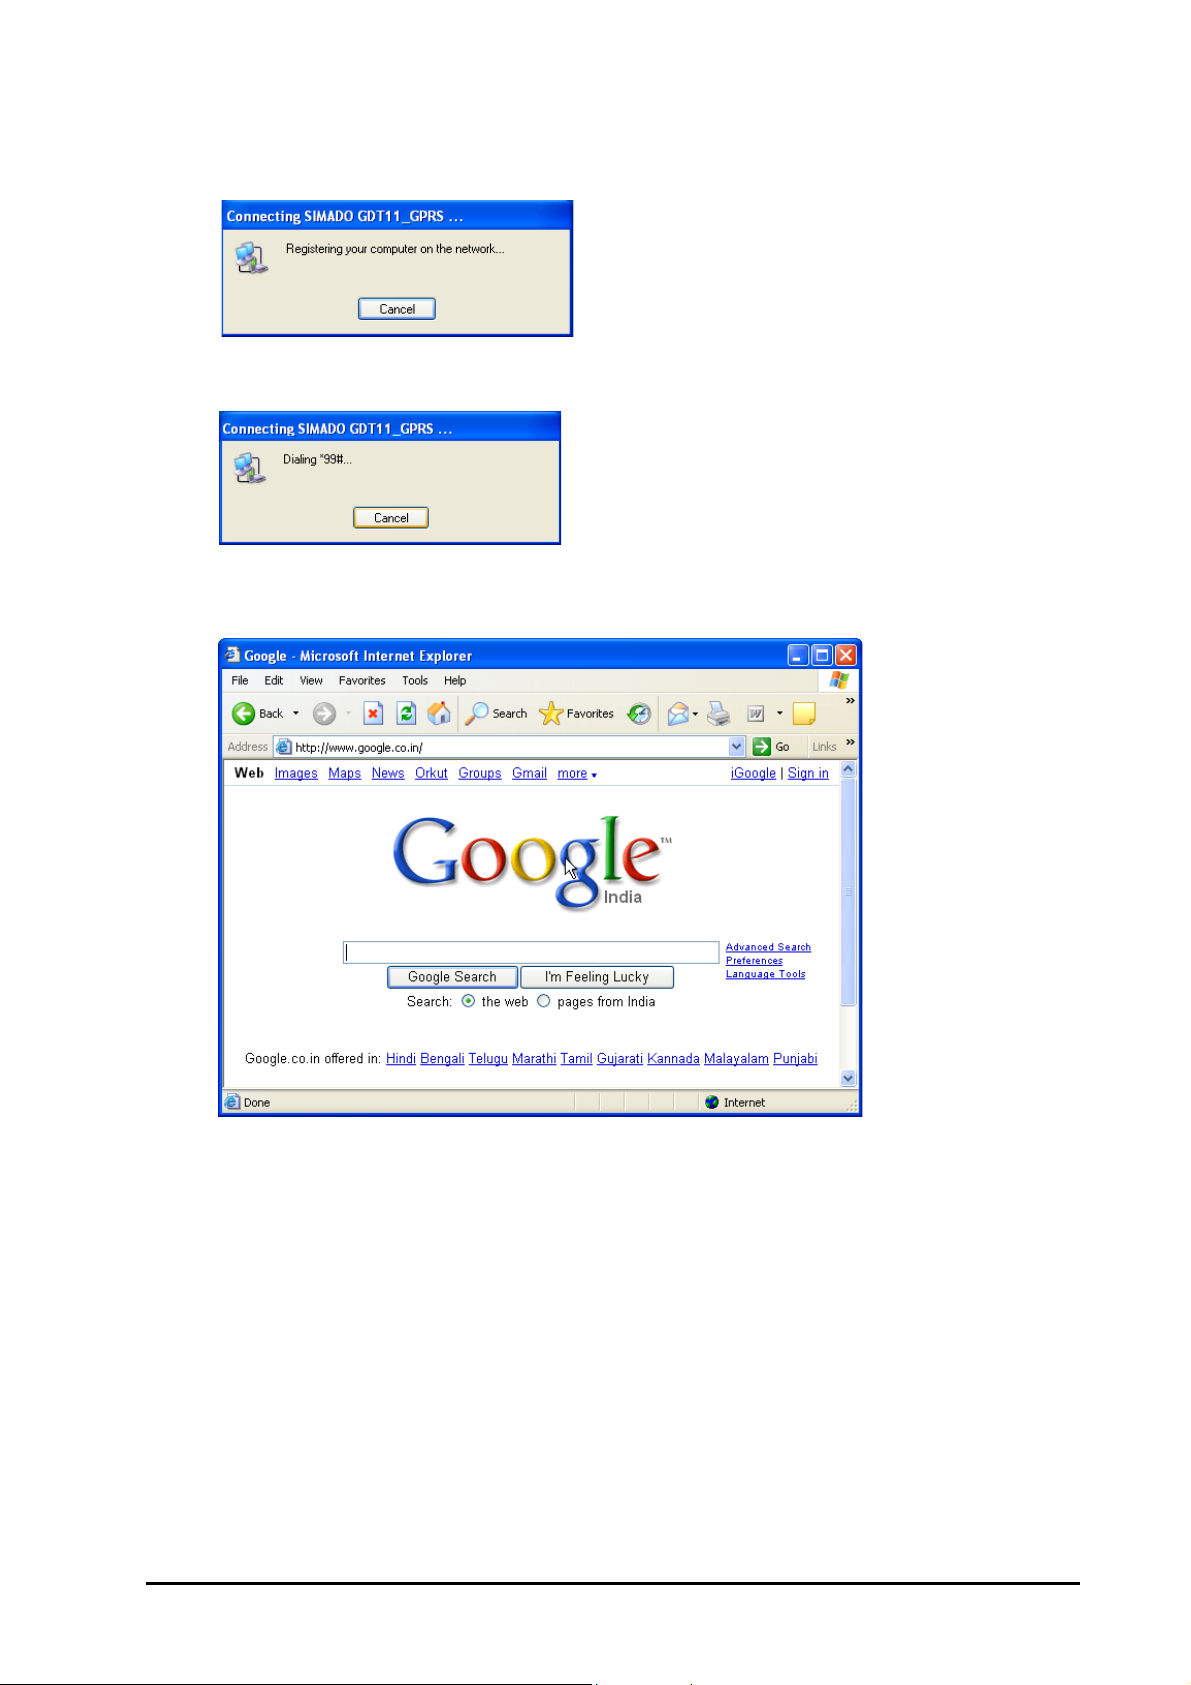
2. Connection process will be displayed as shown below.
3. Once the connection is established, you can access the Internet through GPRS connection. For
example access: www.google.com in the Address Bar of the web browser.
SIMADO GDT11 System Manual 43
Page 44

Voice Services
What’s this?
• SIMADO GDT11 supports making and receiving voice calls.
• User has to just connect Headphone to the jack provided at rear side of the GDT11 and use AT commands.
User can also connect Handset for sending and receiving voice signal.
Note:
• Do not connect Handset and Headphone simultaneously (parallel).
How Voice Services work
• Incoming call is indicated by appearance of ‘RING’ on the HyperTerminal connection.
• Speech is routed to head phone and can be answered with proper audio gain setting. Audio gain setting is
programmable.
• The side tone signal can be minimized by setting level of MIC feedback to speaker.
How to use Voice Services
Audio Signals
Following voice related commands are used:
• Audio Path Setting.
• Receive Gain Setting.
• Transmit Gain Setting.
• Sidetone Setting.
Initiating Voice Call
• Activate voice call by ATD <string>;
• Dial the number by ATD<n>; from the HyperTerminal. Where n = number to be dialed.
• When called party attends the call, speech is established.
Receiving a Voice Call
• When incoming call is for GDT11, RING is indicated on HyperTerminal.
• Enter ATA command on indication of RING.
• Speech is established.
• Terminate the call by ATH command.
44 SIMADO GDT11 System Manual
Page 45

How to configure
Create a connection type:
Refer chapter “Getting Started” for creating connection type using HyperTerminal.
Selecting Audio Path:
Select the Audio Path using command:
• AT+CHFA=<path>
Where,
<path> = 0 for Normal Audio Channel
<path> = 1 for Auxilliary Audio Channel
Default = 0.
Receive Gain Settings:
• Set the speaker gain, using command AT + CLVL = <level>, if required.
Where,
<level> = 0 -100
By default, Level is 70.
Transmit Gain Setting:
• Set the microphonegain using command AT+CMIC = <channel>, <gain level>, if required.
Where,
<channel> = 0 - Main Microphone
<channel> = 1 - Auxilliary Microphone
<gain level> = 0 - 15
Level Gain
00 dB
1 +1.5 dB
2 +3.0 dB
3 +4.5 dB
4 +6.0 dB
5 +7.5 dB
6 +9.0 dB
7 +10.5 dB
8 +12.0 dB
9 +13.5 dB
10 +15.0 dB
11 +16.5 dB
12 +18.0 dB
13 +19.5 dB
14 +21.0 dB
15 +22.5 dB
By default, Channel is Main Microphone and gain level is 2.
• Initiating Voice Call:
• Initiate the voice call using the following command:
ATD <string>;
Dial the number by ATD <n>;
Where,
SIMADO GDT11 System Manual 45
Page 46
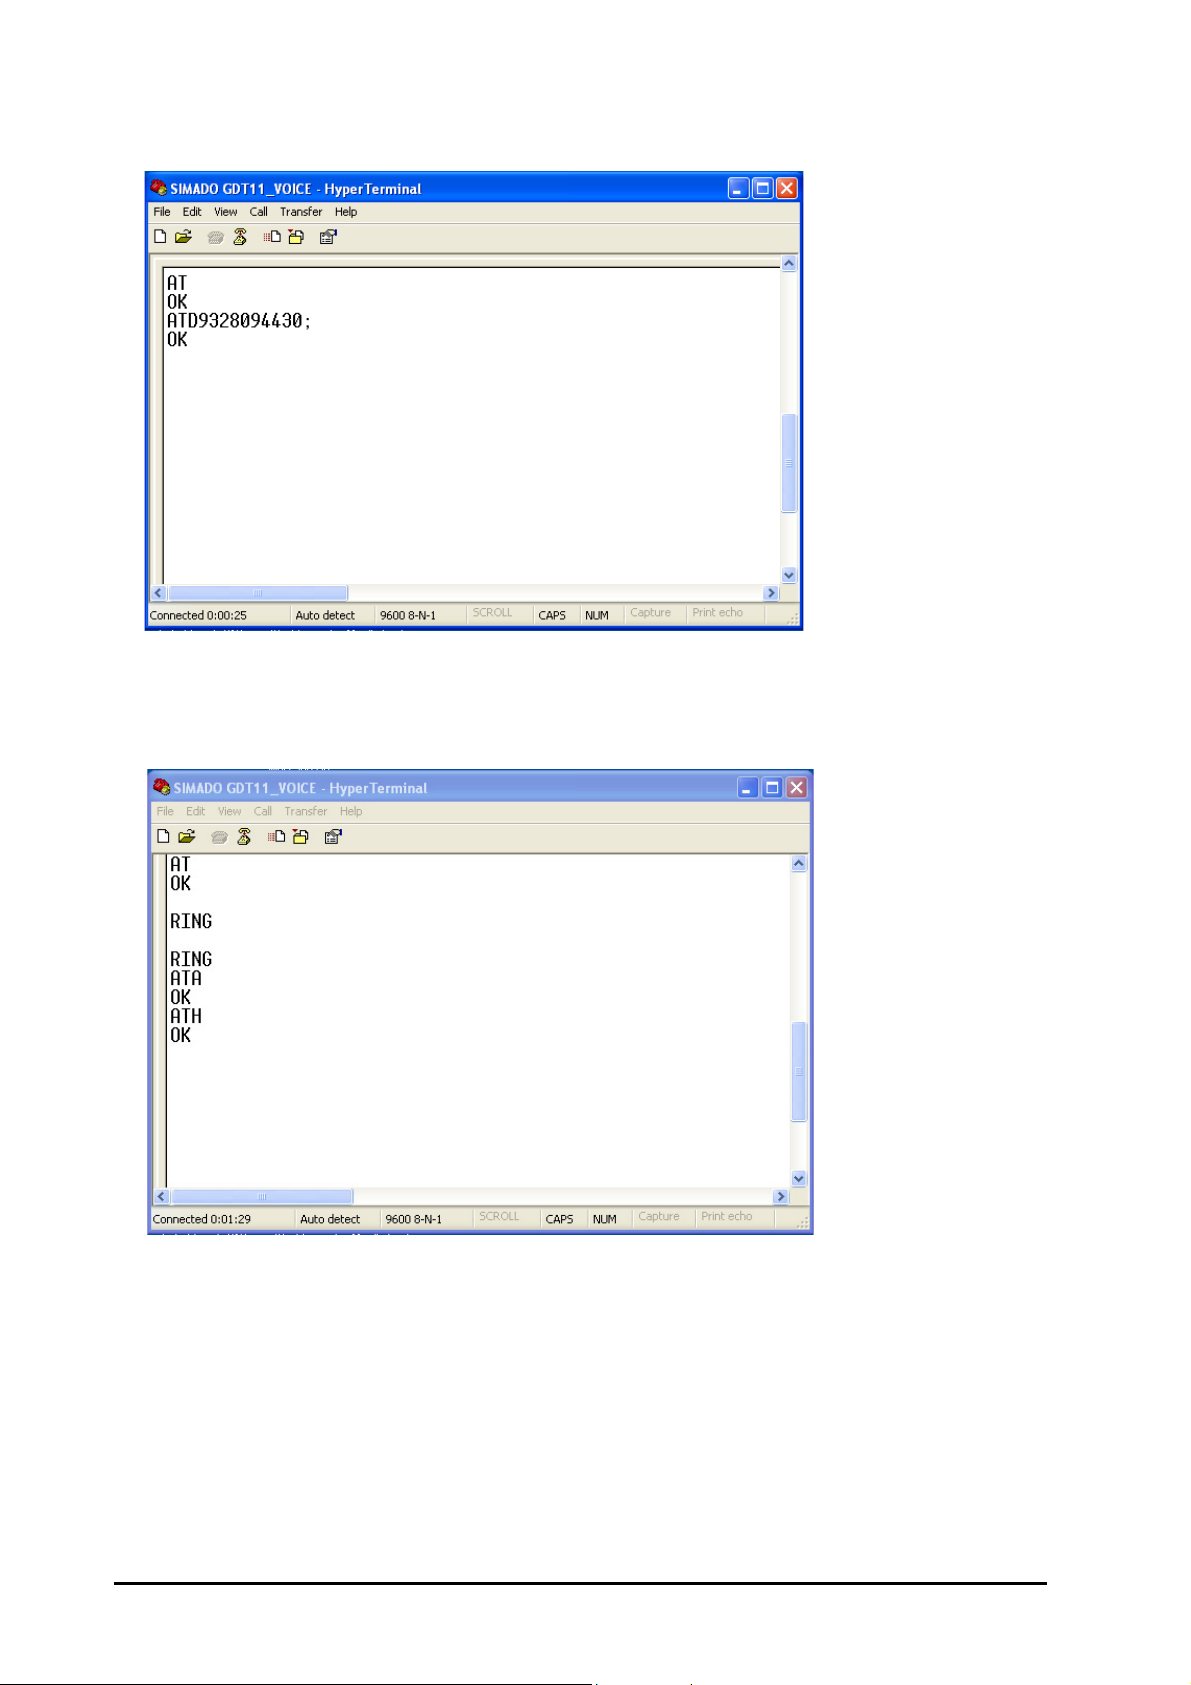
n = number to be dialed.
Receiving a Voice Call:
• Incoming call is identified by display ‘RING’ on the screen.
• Answer the call by ‘ATA’ command.
• Terminate the call by ‘ATH’ command.
46 SIMADO GDT11 System Manual
Page 47
SMS (Short Message Service)
What’s this?
• The SIMADO GDT11 supports Short Message Services (SMS).
• It allows sending and receiving of messages using a computer.
• Receipt of an SMS by the SIMADO GDT11 is indicated to the user on the computer.
How to Send/Receive SMS through Computer?
To send and receive SMS,
• Open Hyper Terminal window and enter name for the connection. In the 'Connect To' window select
COM1 and click OK button.
• COM1 Properties window will appear on the screen. Select the following values for COM 1:
• Bits Per Second= 9600
• Data Bits = 8
• Stop Bit = 1
• Flow Control = None.
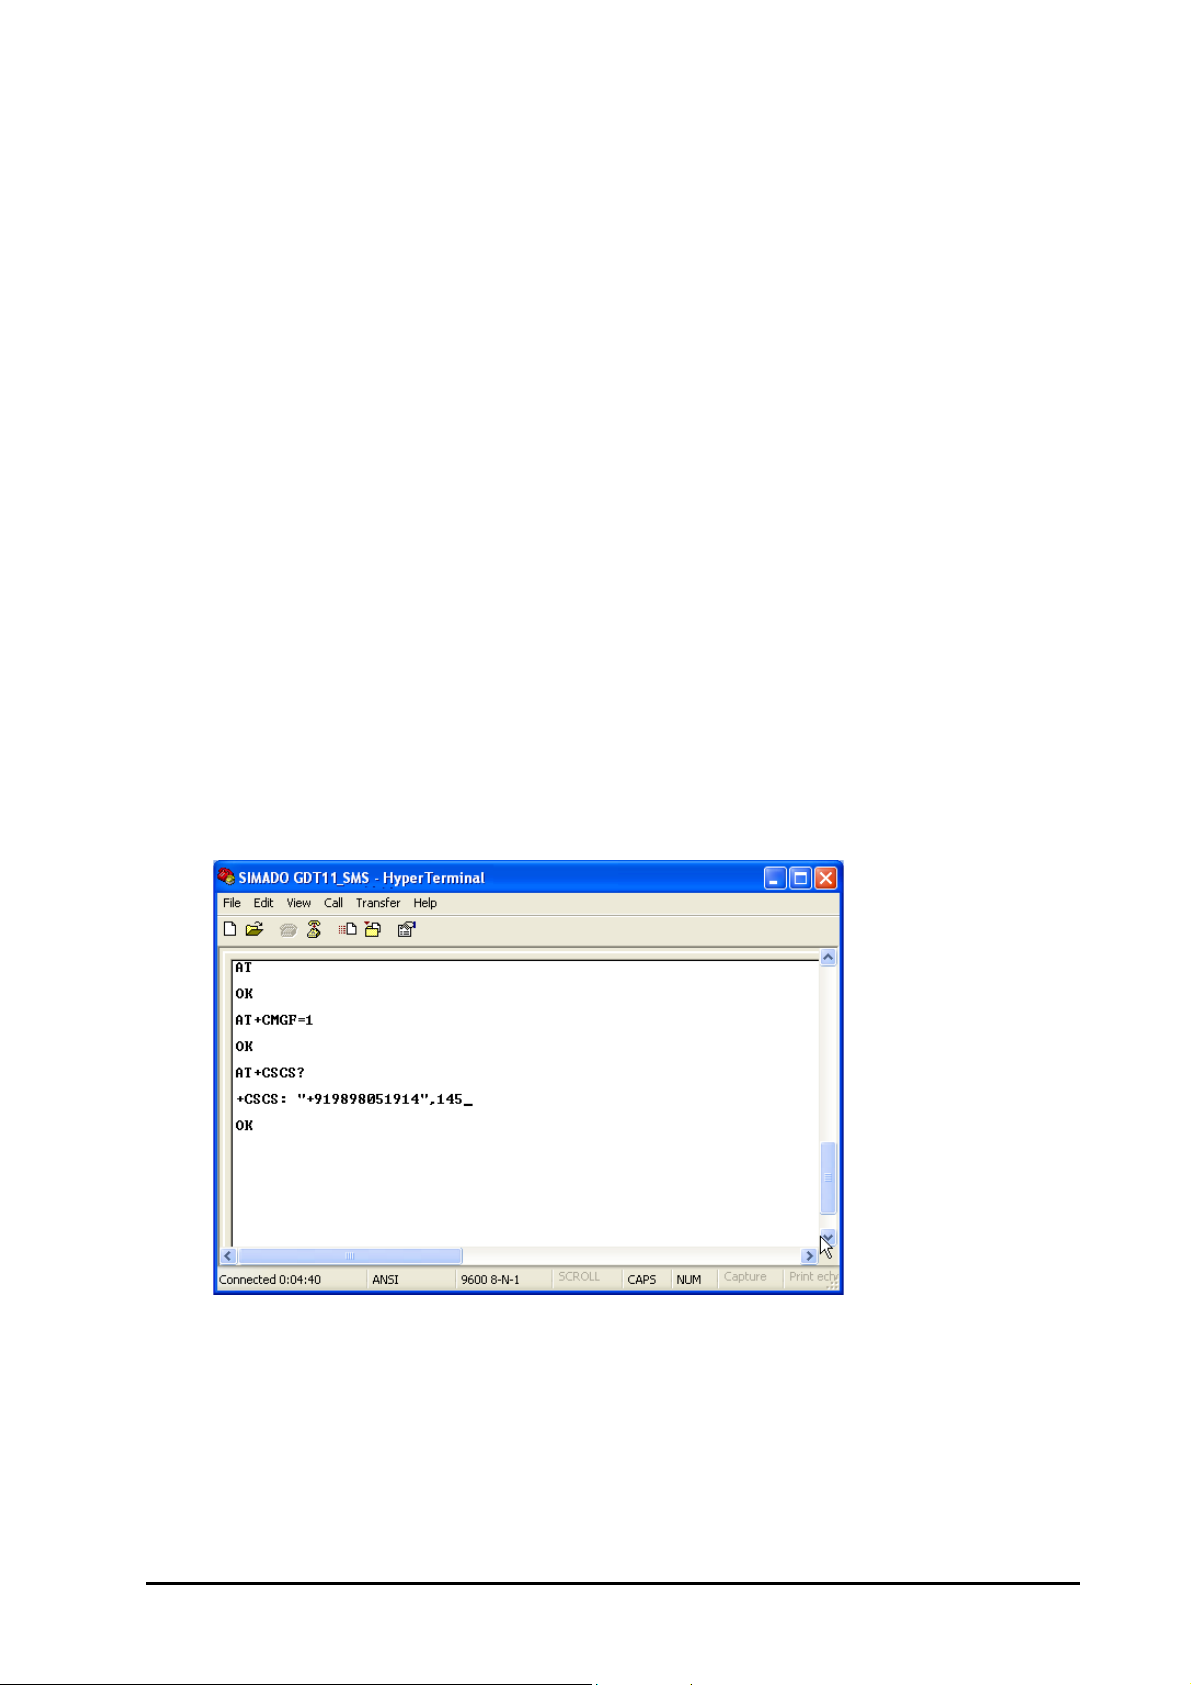
• In the Hyper Terminal window, enter command AT+CMGF=1 to set text message format and press
Enter. Also enter AT+CSCA? command to check whether the SMS service center number is set to SIM
card. Press Enter.
SIMADO GDT11 System Manual 47
Page 48
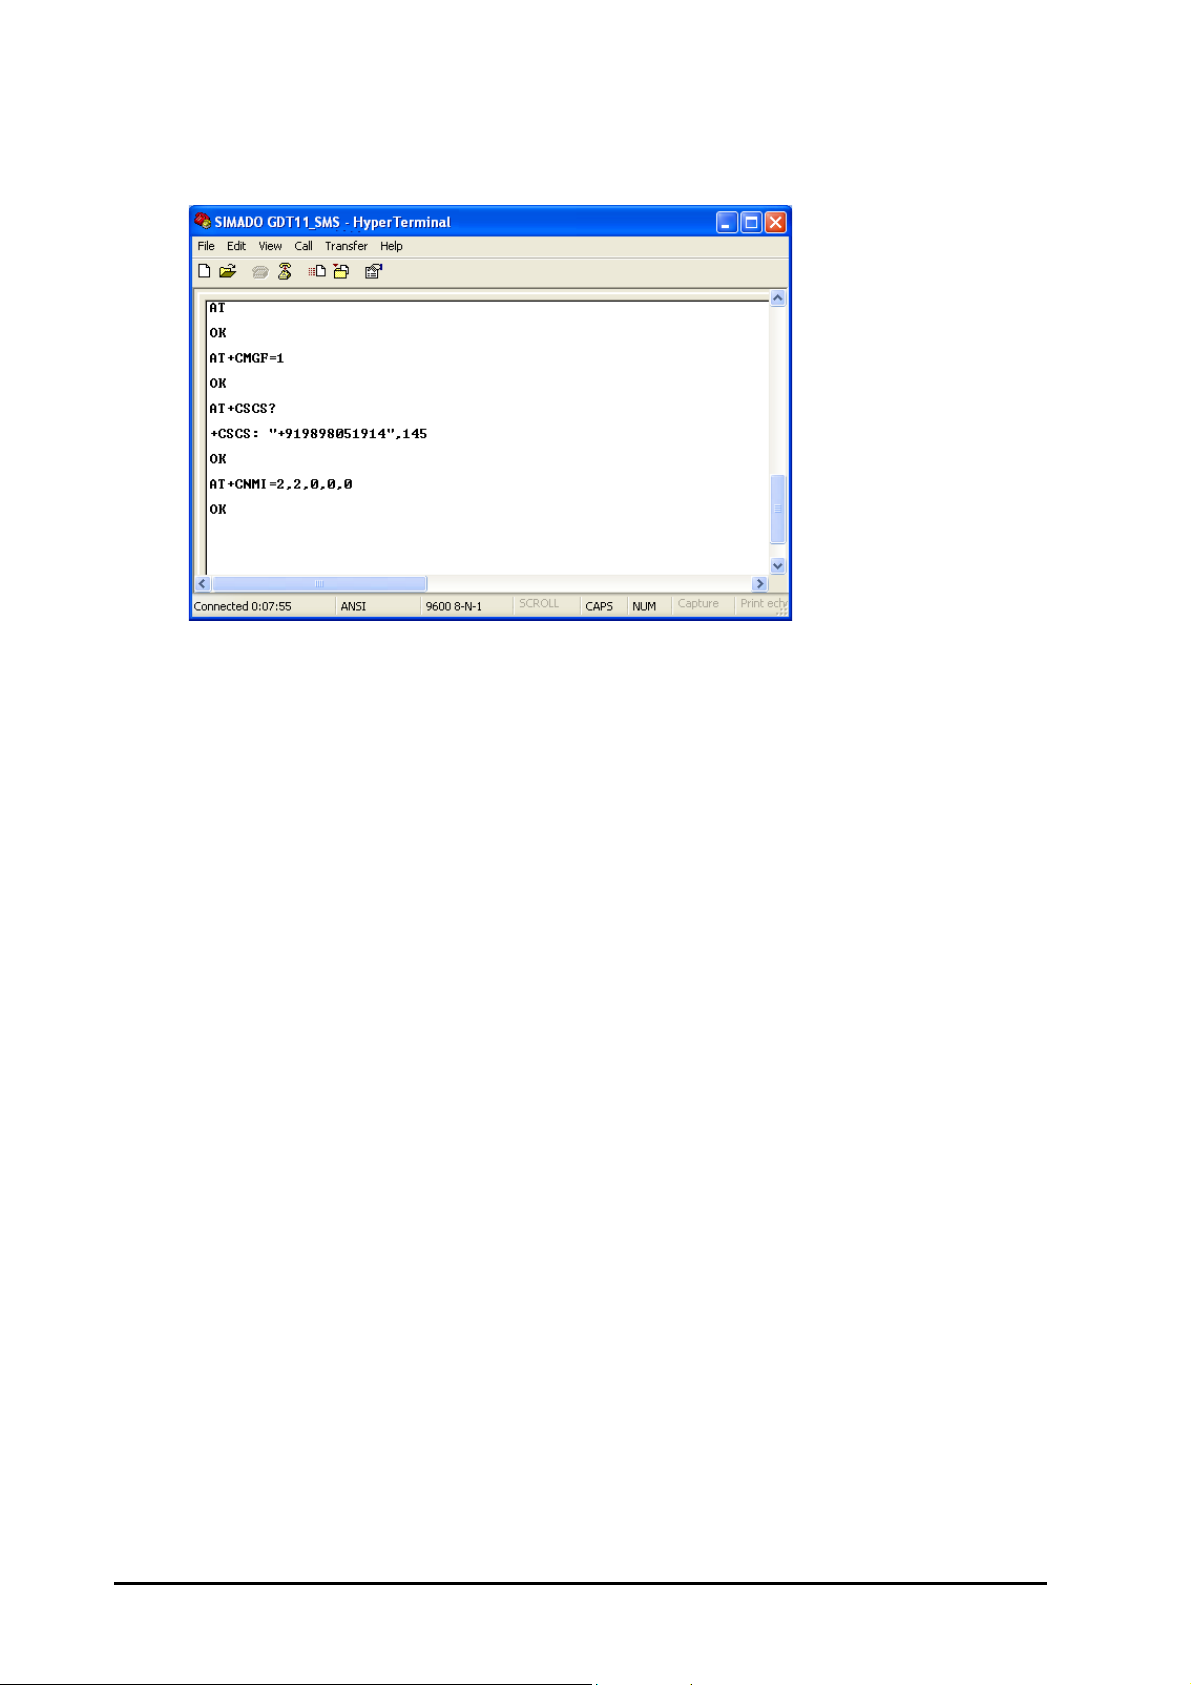
• To have the incoming message on the HyperTerminal window displayed immediately, type the comand
AT+CNMI=2,2,0,0,0 and press Enter.
Reading the received messages
Received messages (SMS) are stored at various locations in the memory of the SIM card. These locations are
referred to as indexes.
To read received messages,
• Type AT on the HyperTerminal Screen. OK will appear in response.
• Enter command AT+ CMGF =1 to set text message format
• Enter AT+CMGR=(Index) to read SMS
Where,
Index is the index number at which SMS is stored. (The index of the message is displayed when the
SIMADO GDT11 indicates the arrival of a new message).
48 SIMADO GDT11 System Manual
Page 49
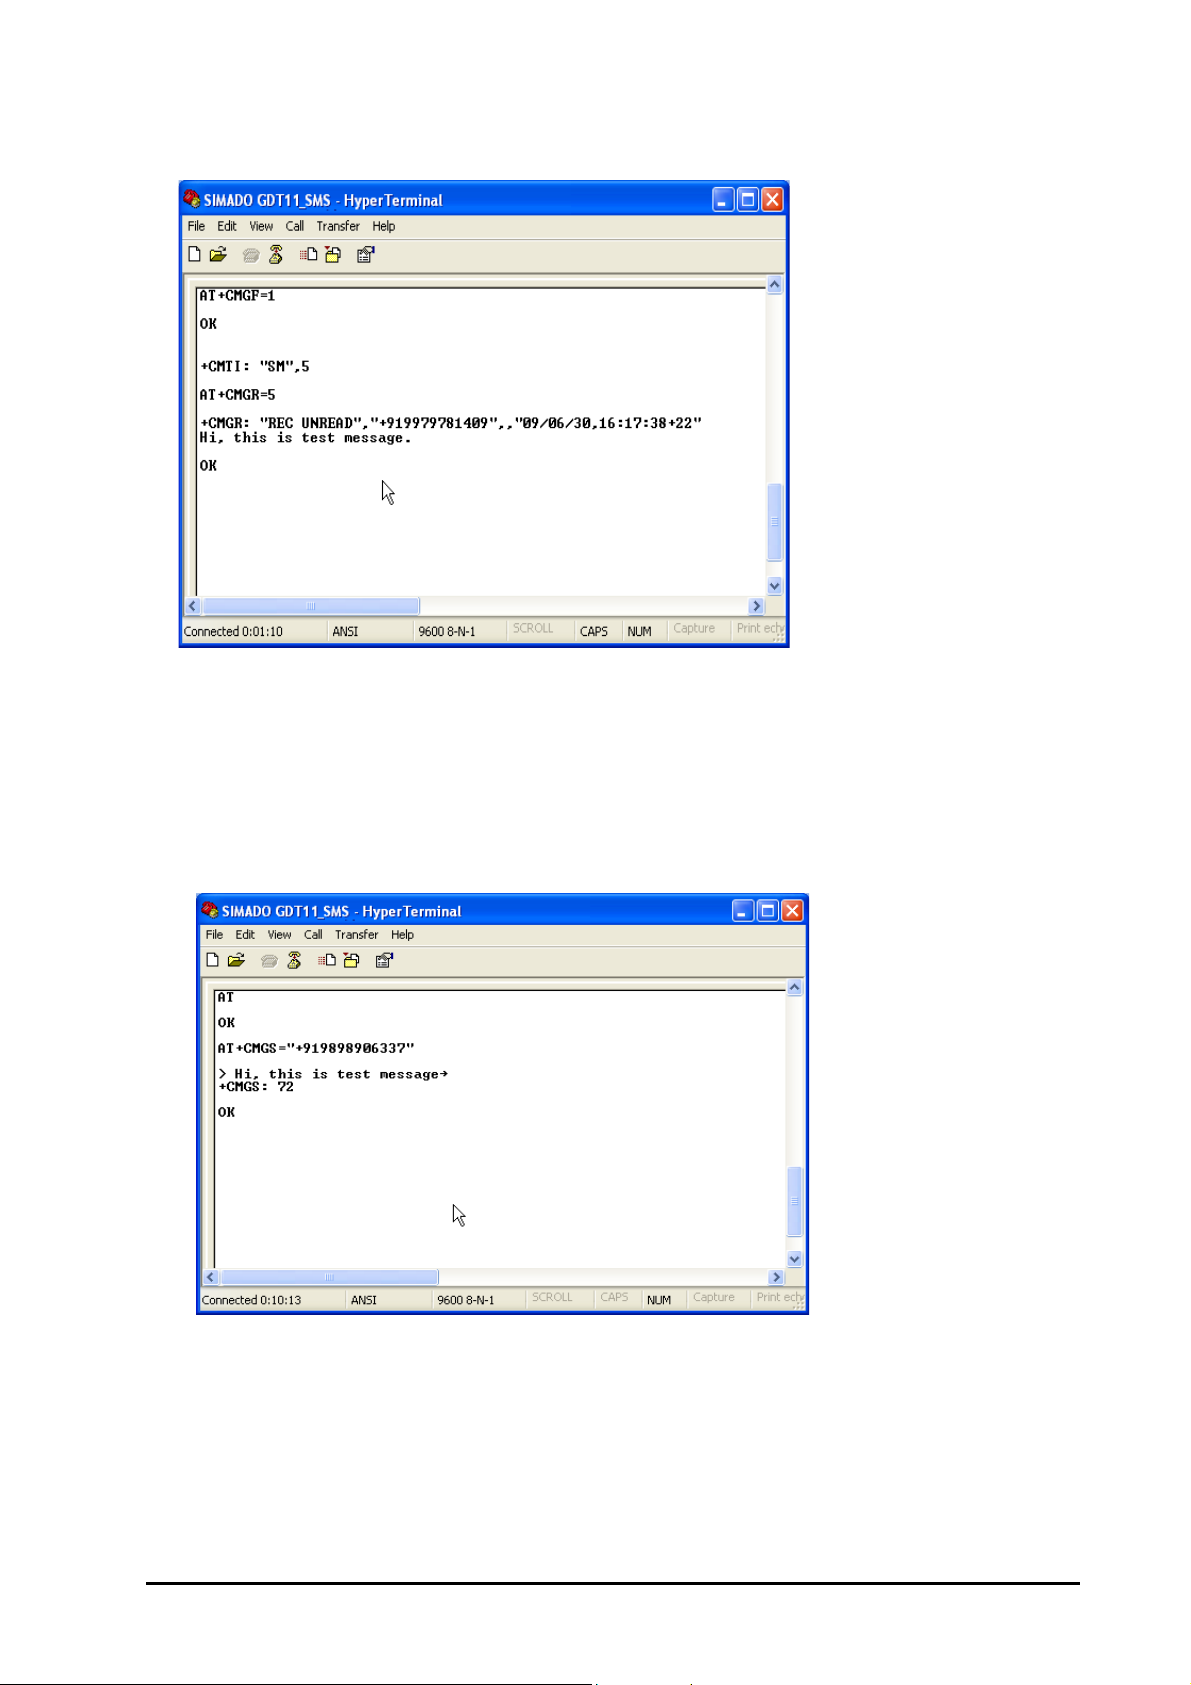
• After this command, the message will appear in HyperTerminal window.
Sending messages
• Enter AT+CMGS=“Telephone Number” (The telephone number is the number to which you want to send
the SMS), on the HyperTerminal screen.
• Now type the message.
• When the message is completed, press CRTL+Z.
• On successful transmission of the message, the confirmation OK will appear.
Deleting the messages
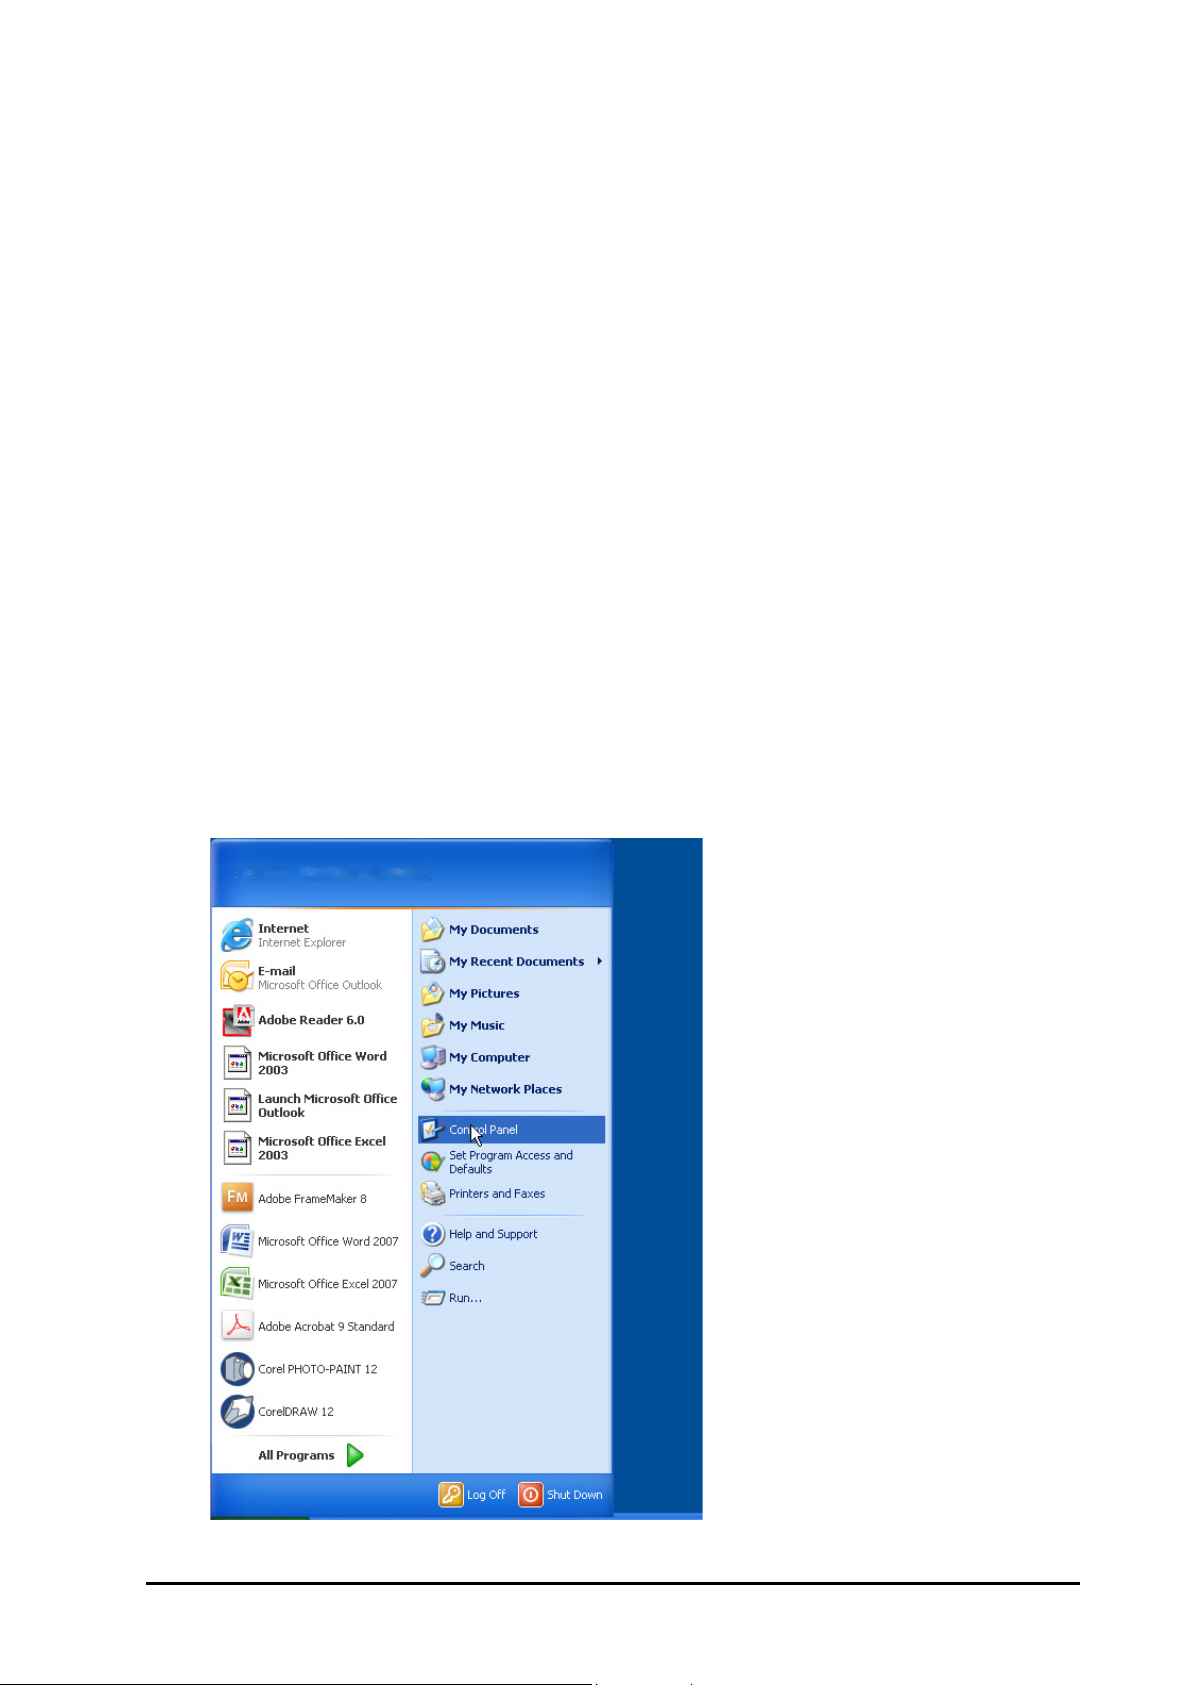
• Enter AT+ CMGD=(Index), on the HyperTerminal screen
Where,
SIMADO GDT11 System Manual 49
Page 50
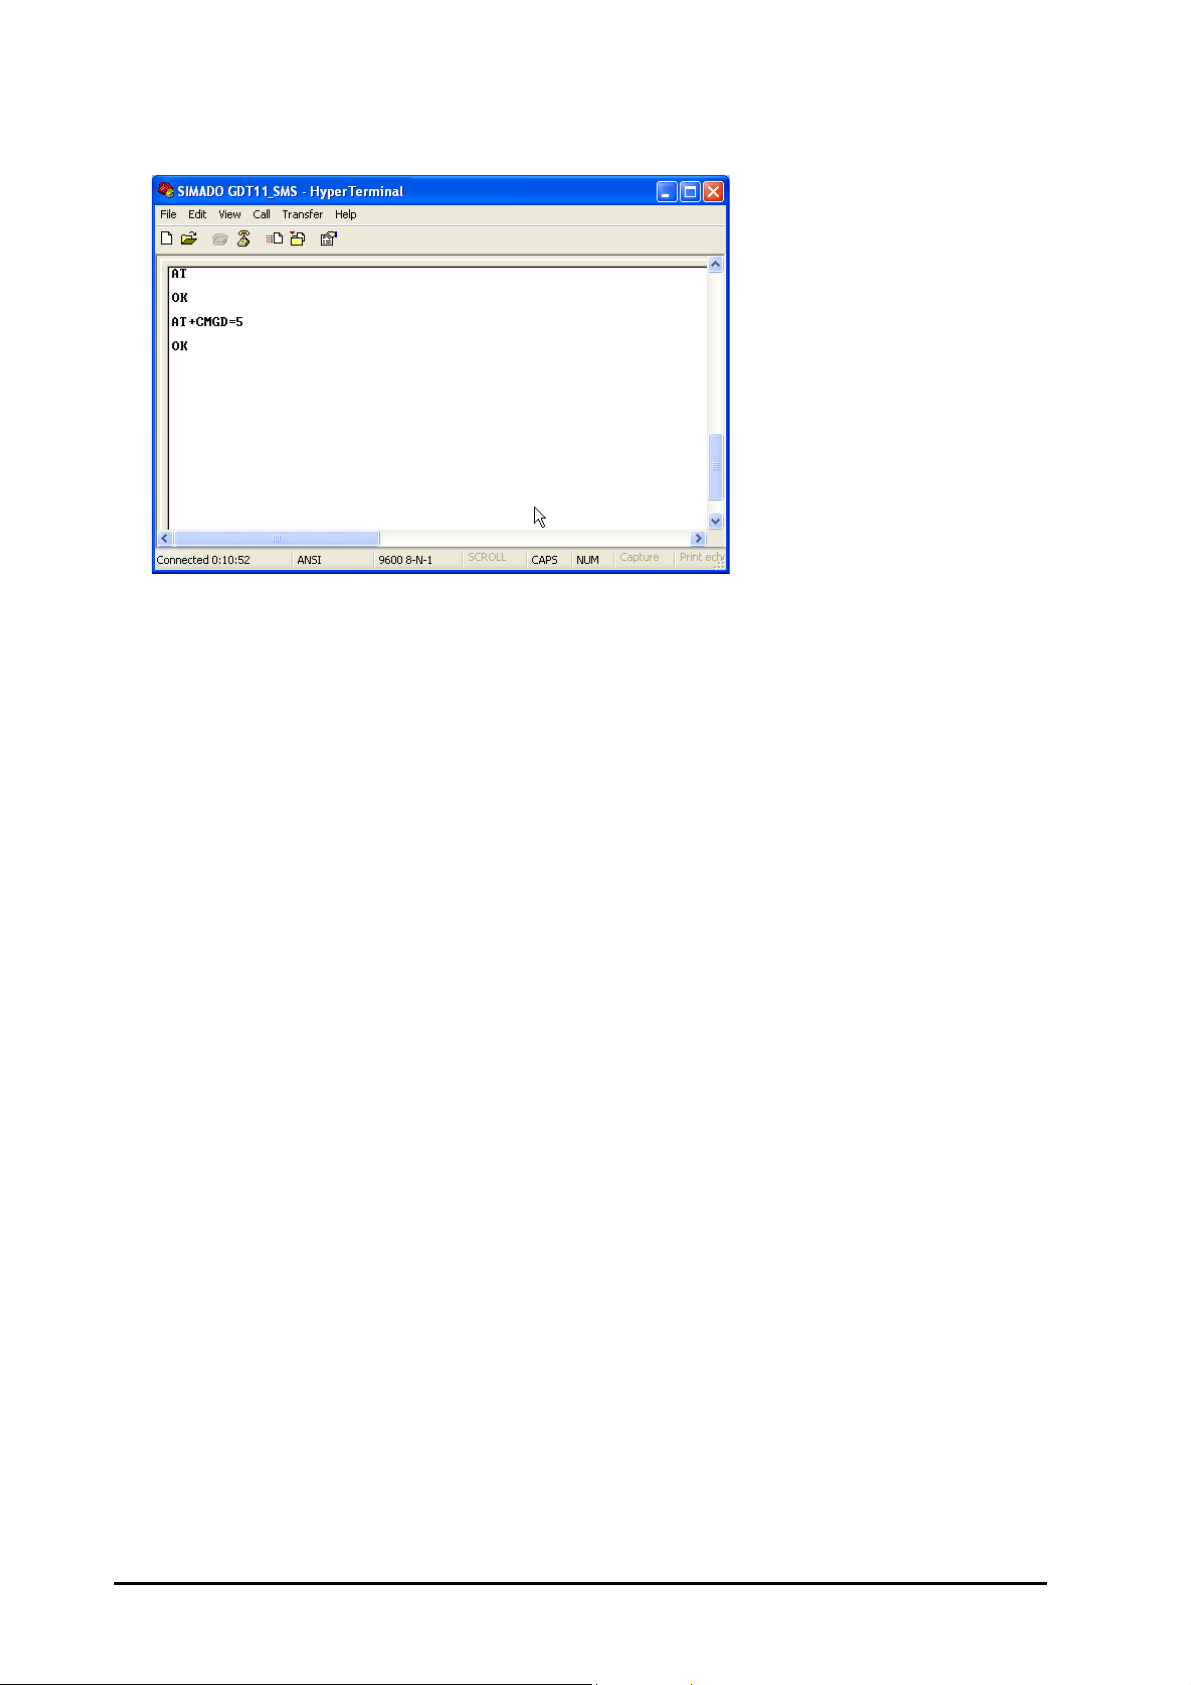
Index is the index number of the message to be deleted.
50 SIMADO GDT11 System Manual
Page 51
Fax Services
What’s this
SIMADO GDT11 can be used for sending and receiving fax over the GSM network.
How to send and receive FAX
• The Fax Service for the SIM used in the SIMADO GDT11 must be enabled from the service provider.
• A PC Fax application which is Fax Class 1 or Fax Class 2 compliant must be installed on the Computer.
• Set up the modem
• Create connection type using HyperTerminal.
• Proceed with the further Setup as per the WinFax Application requirement.
How to configure FAX services
• Install the PC Fax application on your computer using the wizard of the PC Fax application.
• Connect COM port of the SIMADO GDT11 to the COM port of the computer using modem cable
(Provided with the system).
Set up the Modem
1. Click Start Control Panel.
SIMADO GDT11 System Manual 51
Page 52
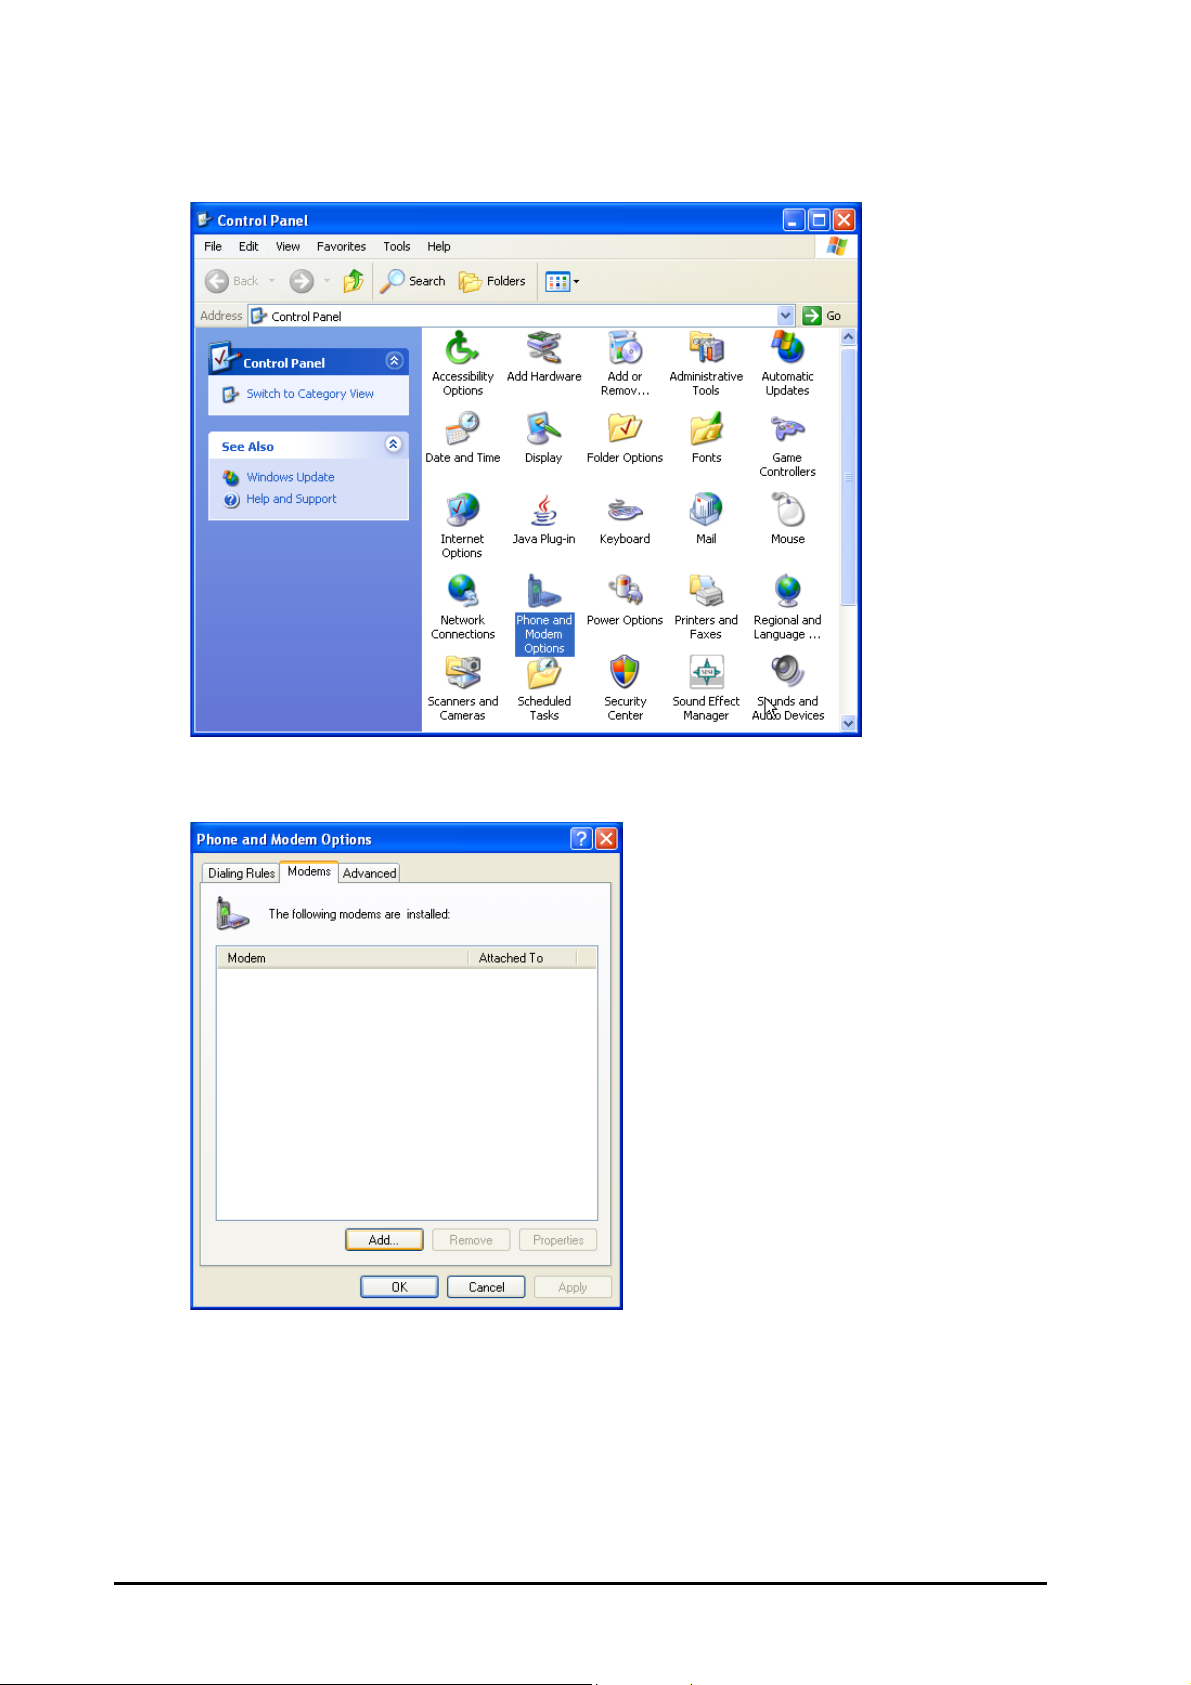
2. Control Panel window will open up as shown below. Double click the Phone and Modem Options icon.
3. 'Phone and Modem Options' window will open as shown below. Click Add button.
52 SIMADO GDT11 System Manual
Page 53
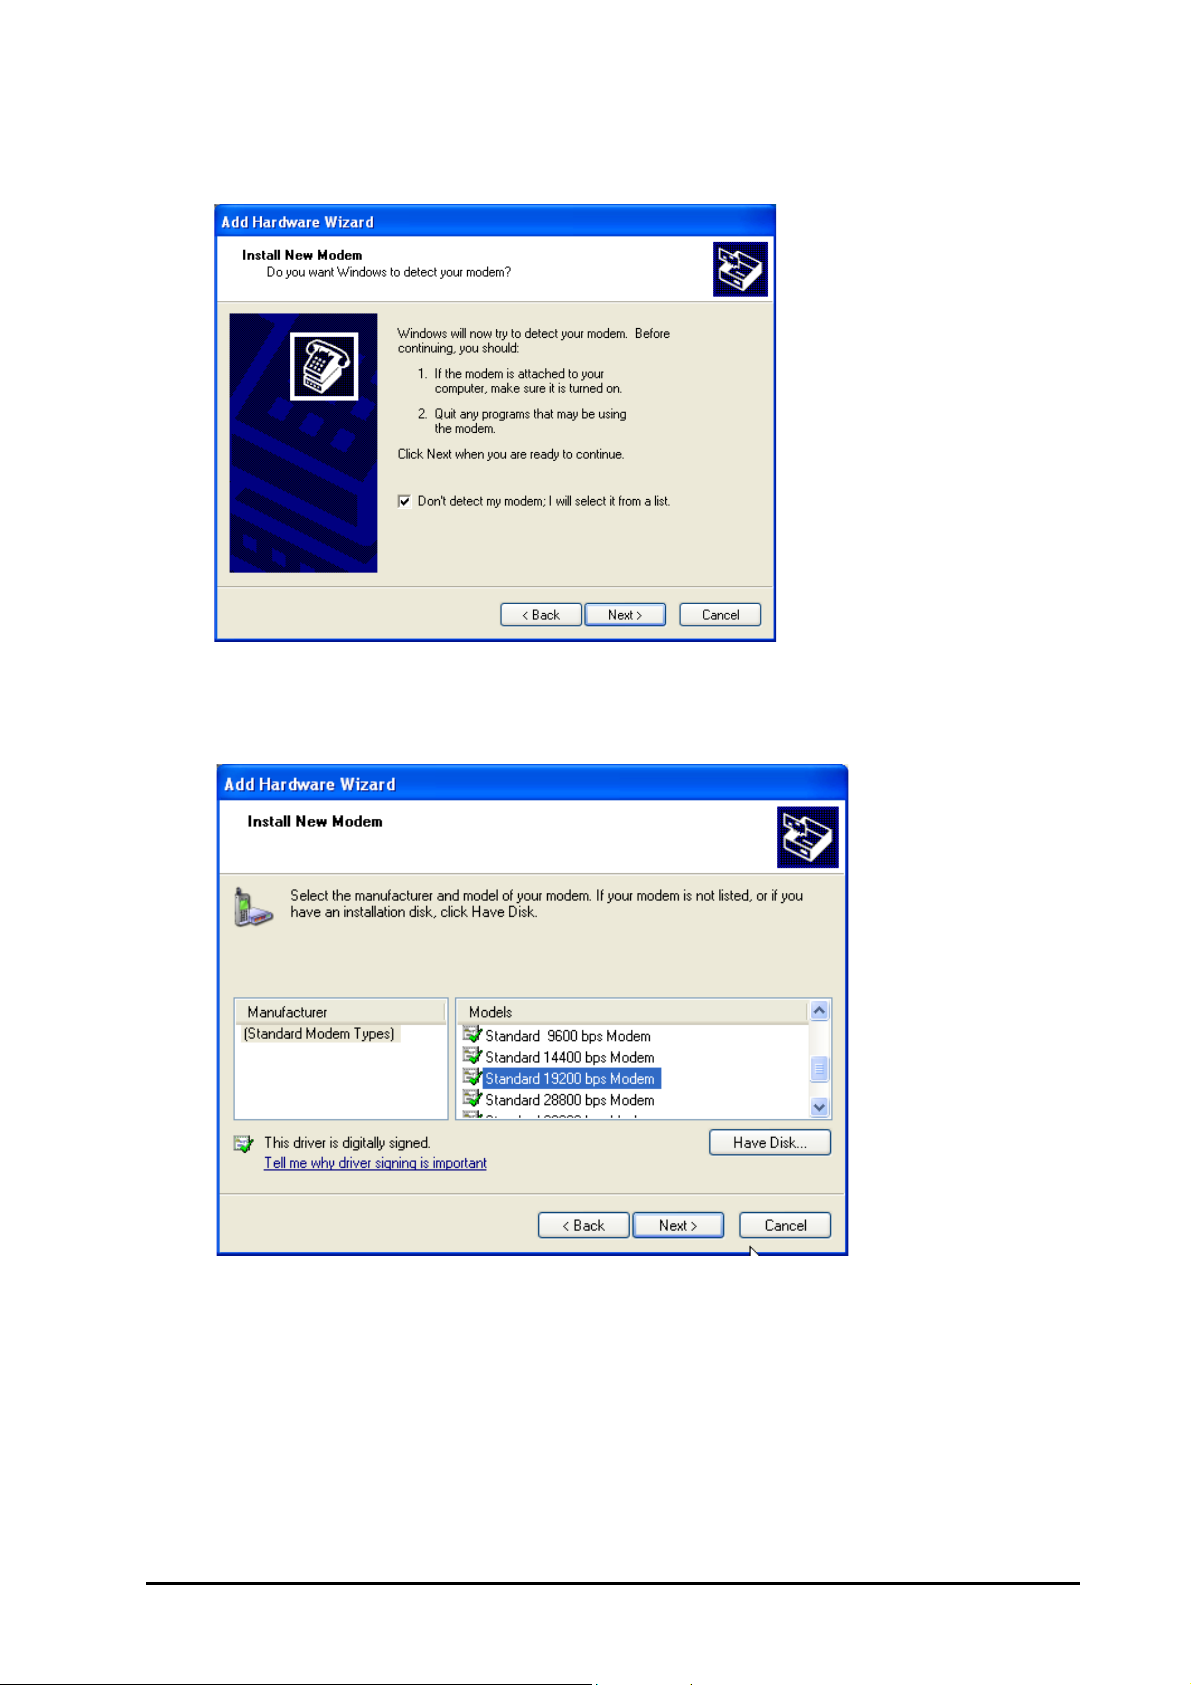
4. 'Add Hardware Wizard' window will open. Select Don't detect my modem; I will select from a list
option in the window. Click Next button.
5. Select Standard 19200bps Modem from the available modem options in the window and click Next
button.
SIMADO GDT11 System Manual 53
Page 54
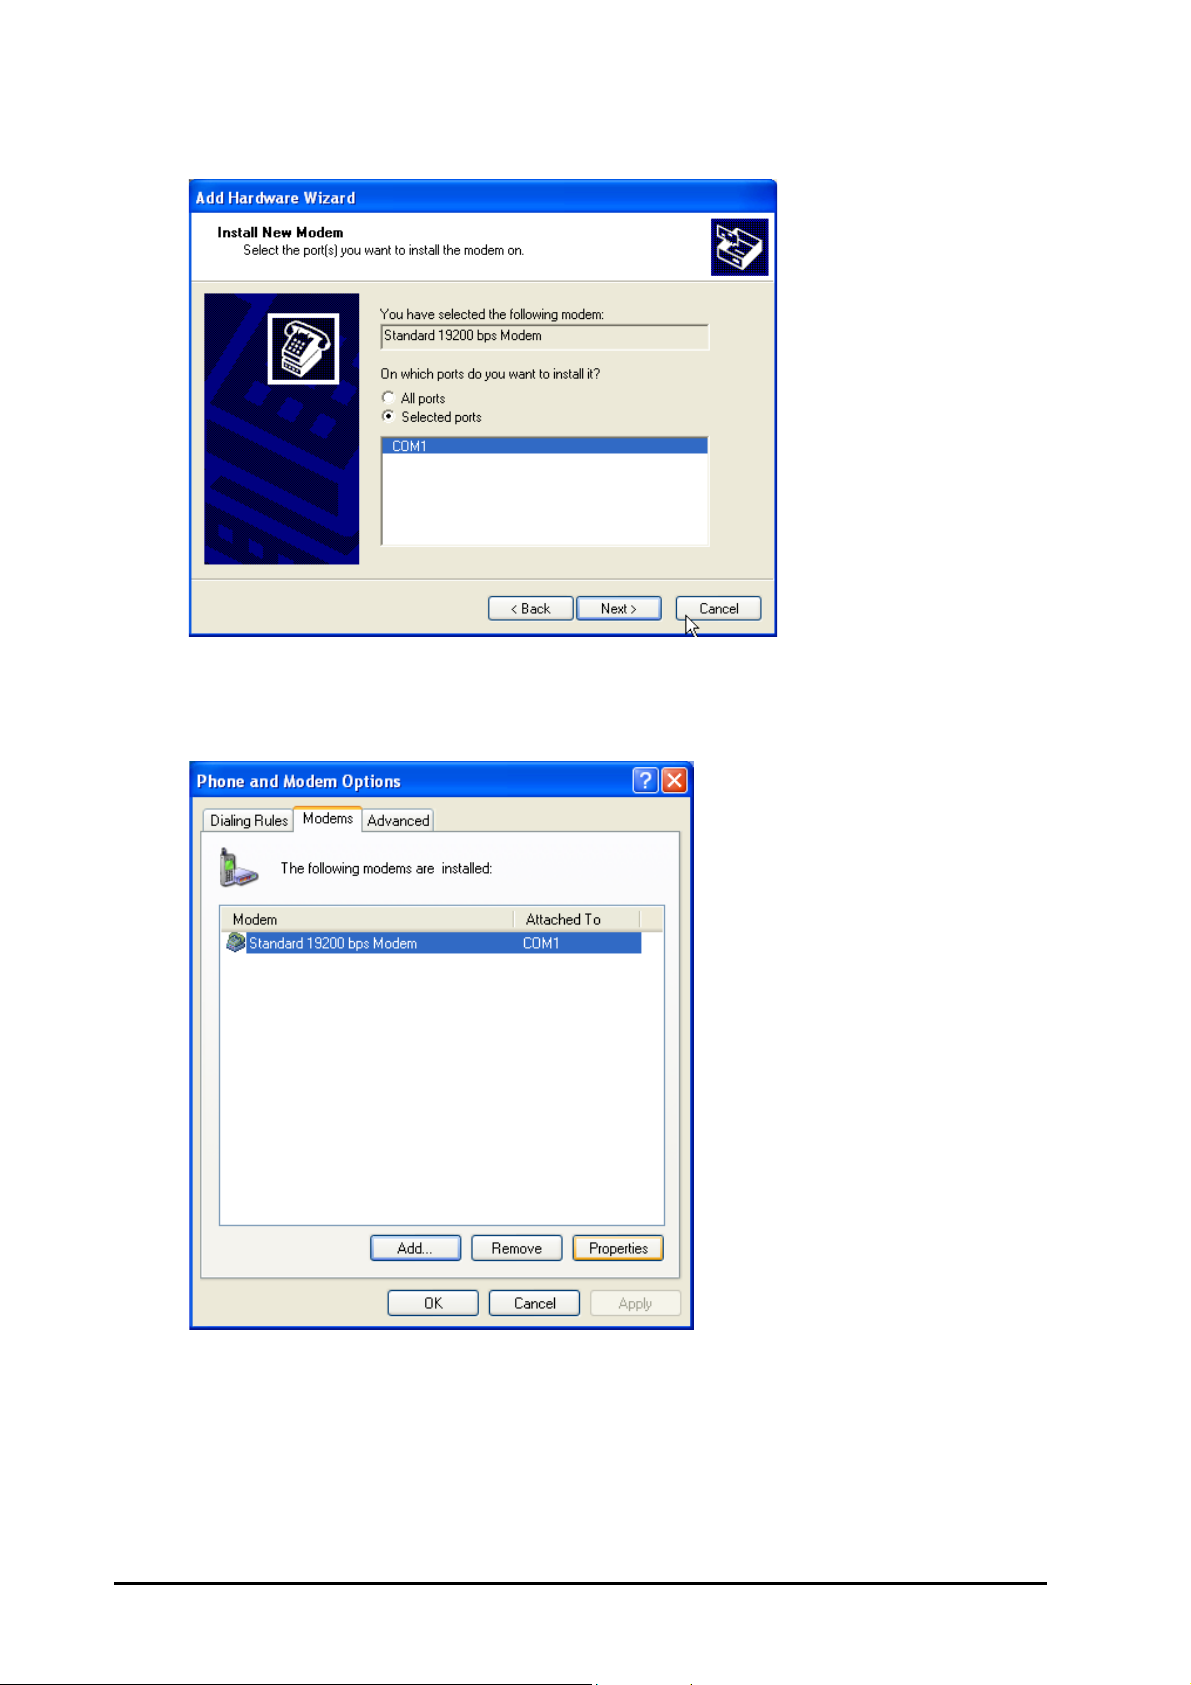
6. Select COM1 port in the window and click Next button.
7. Click Finish button. Modem will be installed as shown below. Click Properties button.
54 SIMADO GDT11 System Manual
Page 55
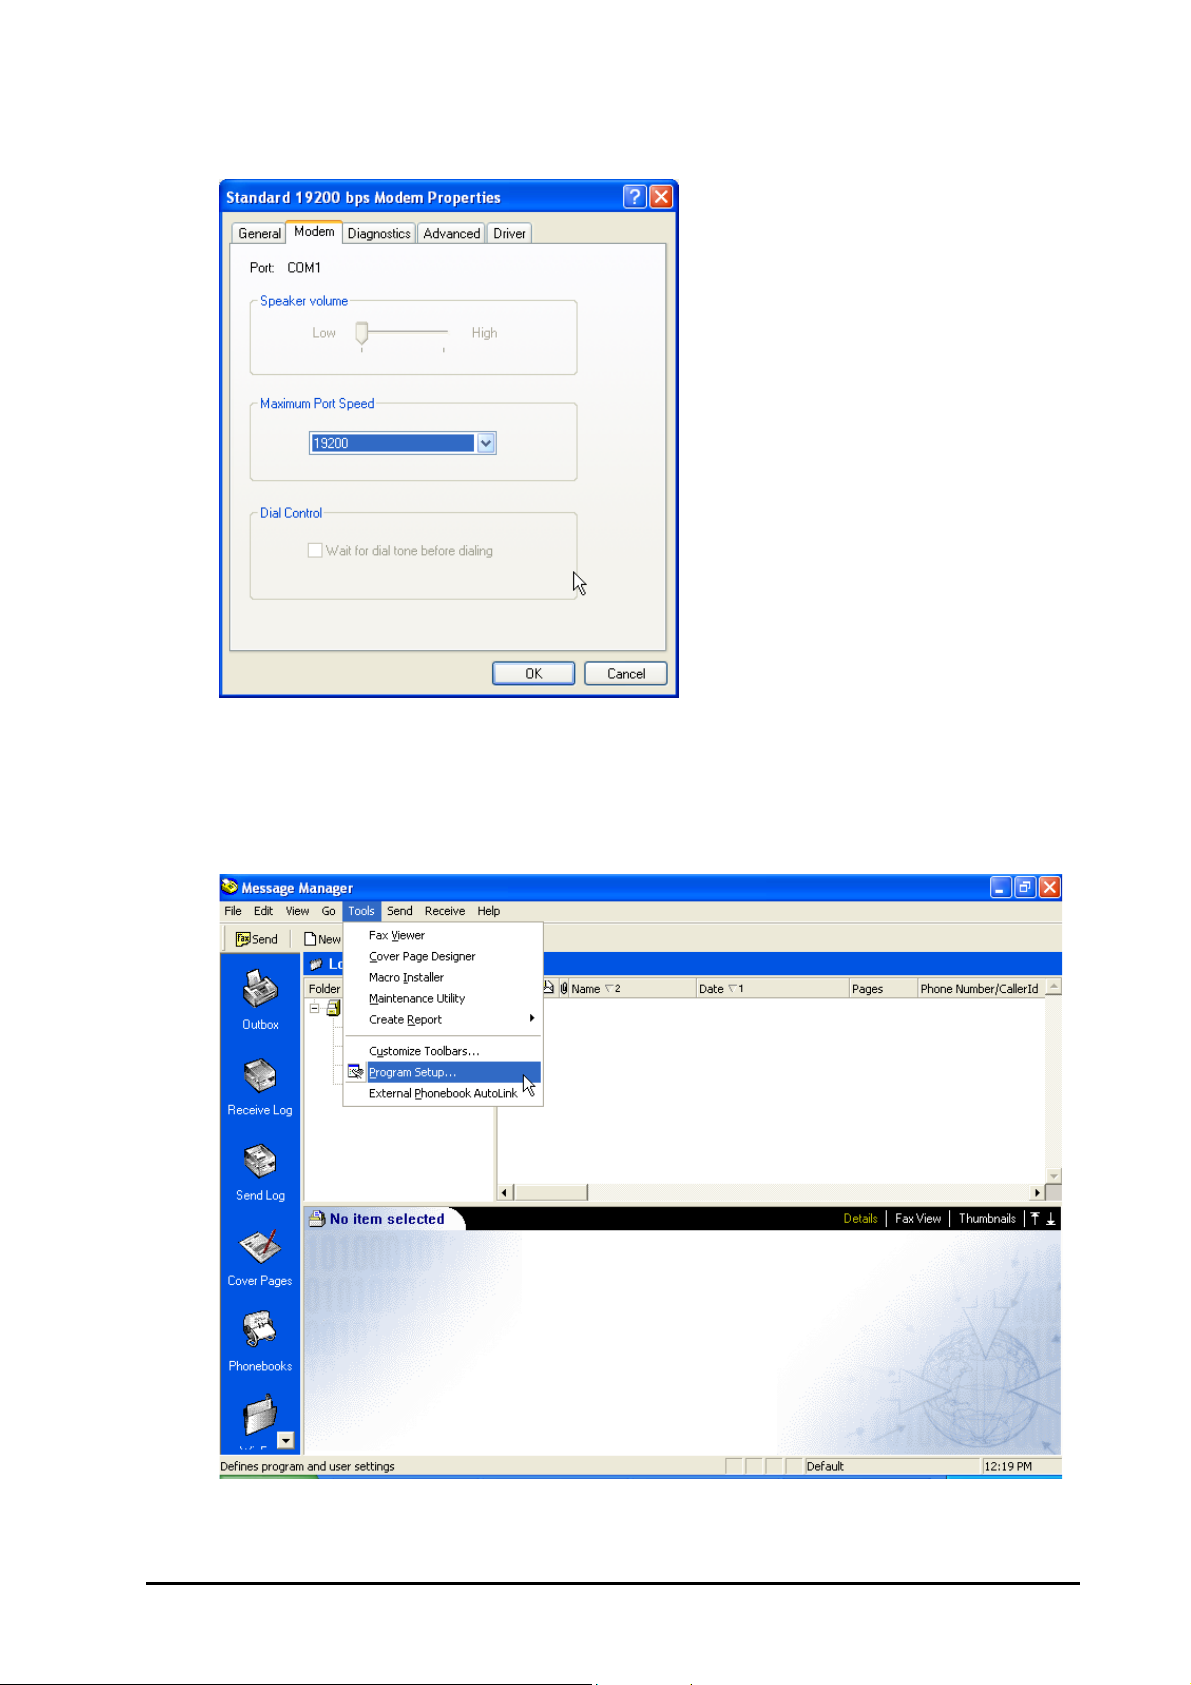
8. Select Maximum port speed, as '19200' and click OK.
Set up for Sending FAX
1. Click Start Program Symantec WinFax PRO WinFax PRO Message Manager.
2. Click Tools Program Setup.
SIMADO GDT11 System Manual 55
Page 56
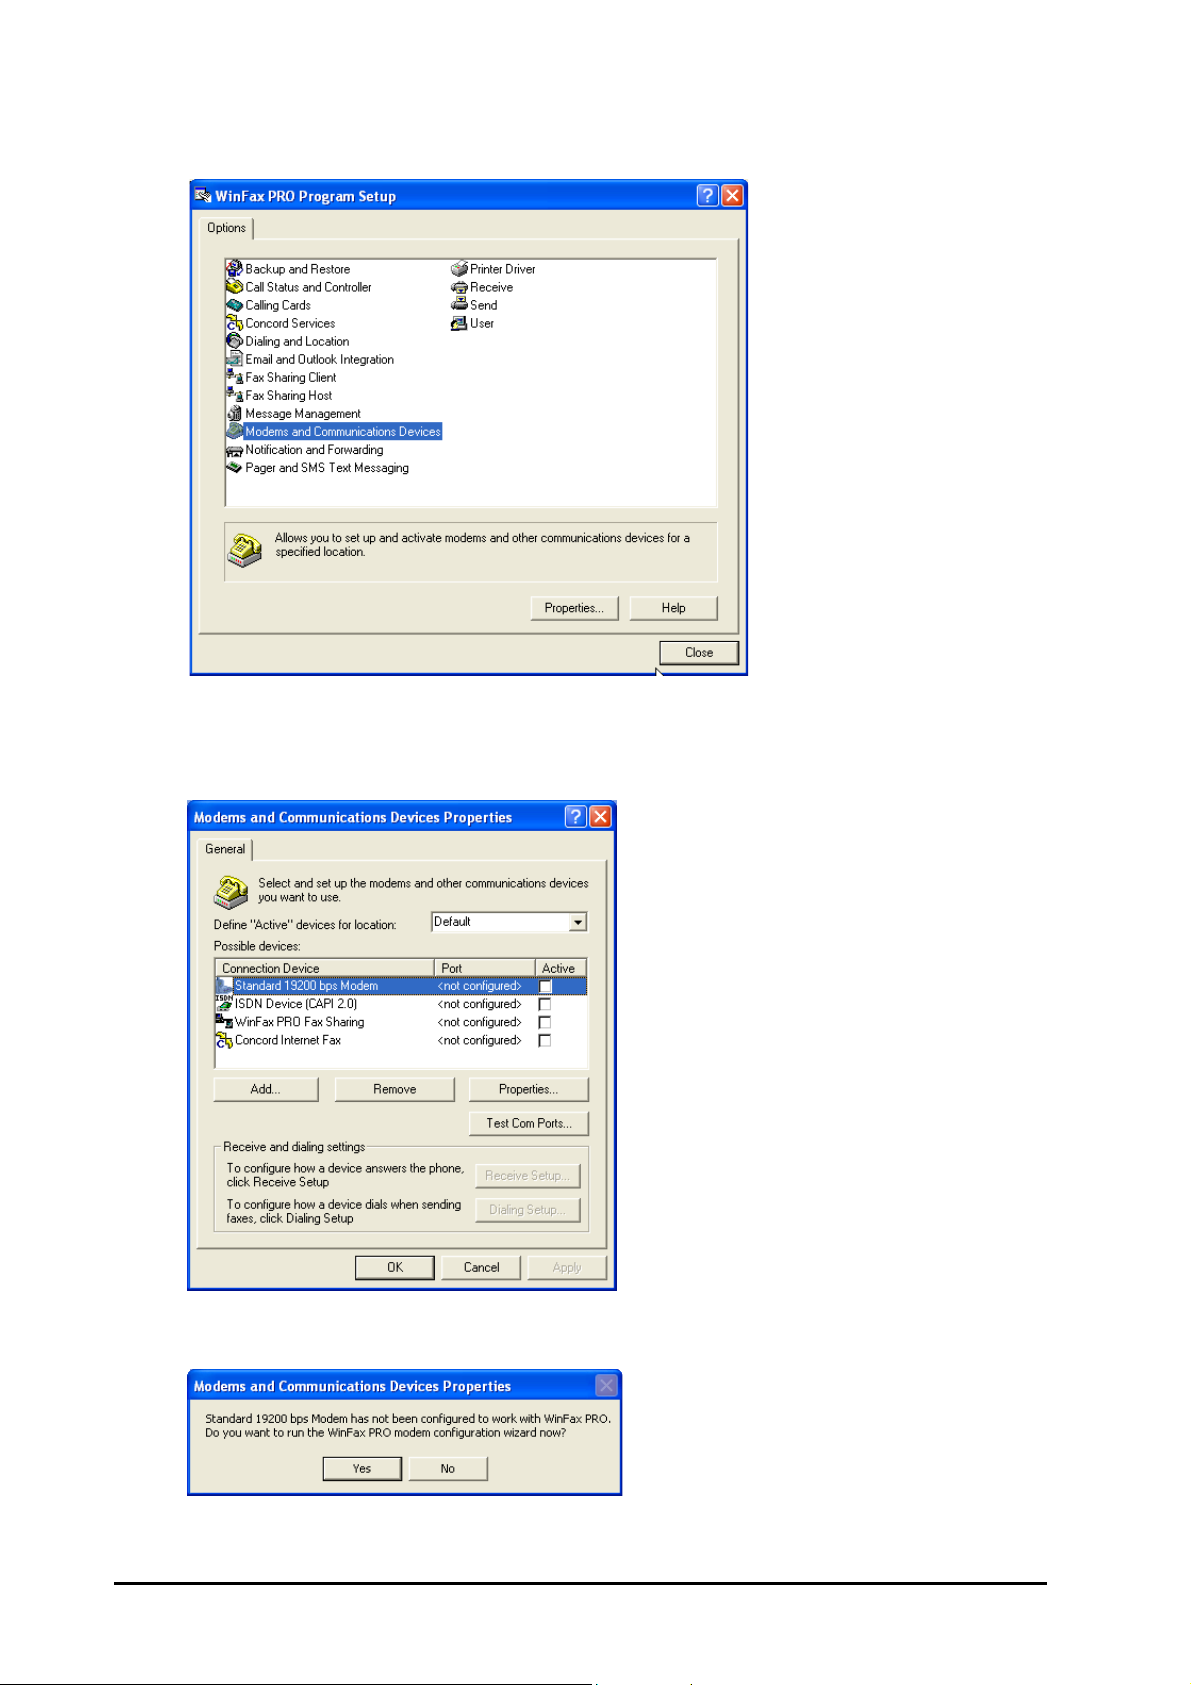
3. Select 'Modem and Communication Device' and click Properties button.
4. Modems and Communication Devices window will appear as shown below. Select Standard 19200 bps
Modem and select the Active check box of the selected modem and click OK.
5. Following message will appear on the screen. Click Yes button.
56 SIMADO GDT11 System Manual
Page 57
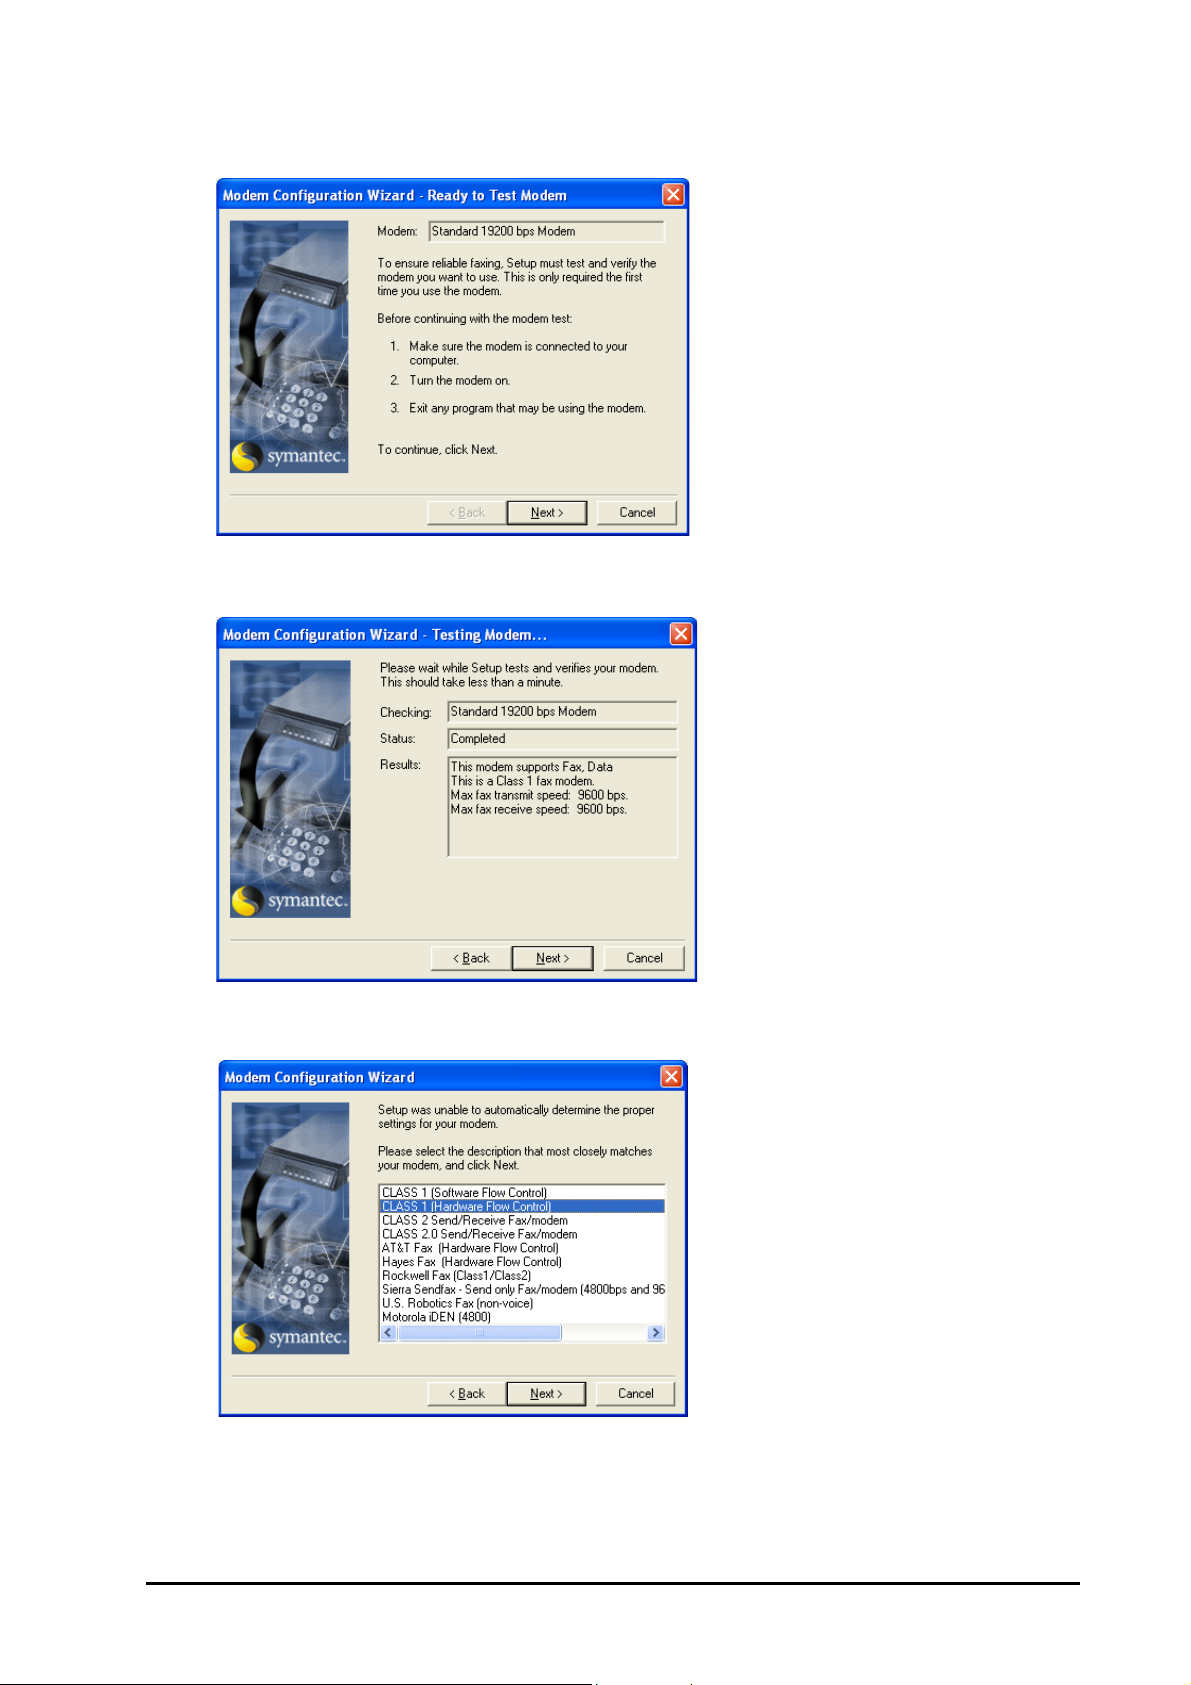
6. Modem Configuration Wizard: Ready to Test window will appear on the screen. Click Next button.
7. Modem Configuration Wizard: Testing modem window will appear. Again click Next button.
8. Select 'Class 1 (Hardware Flow Control)' in the window that appears on the screen. Click Next.
SIMADO GDT11 System Manual 57
Page 58
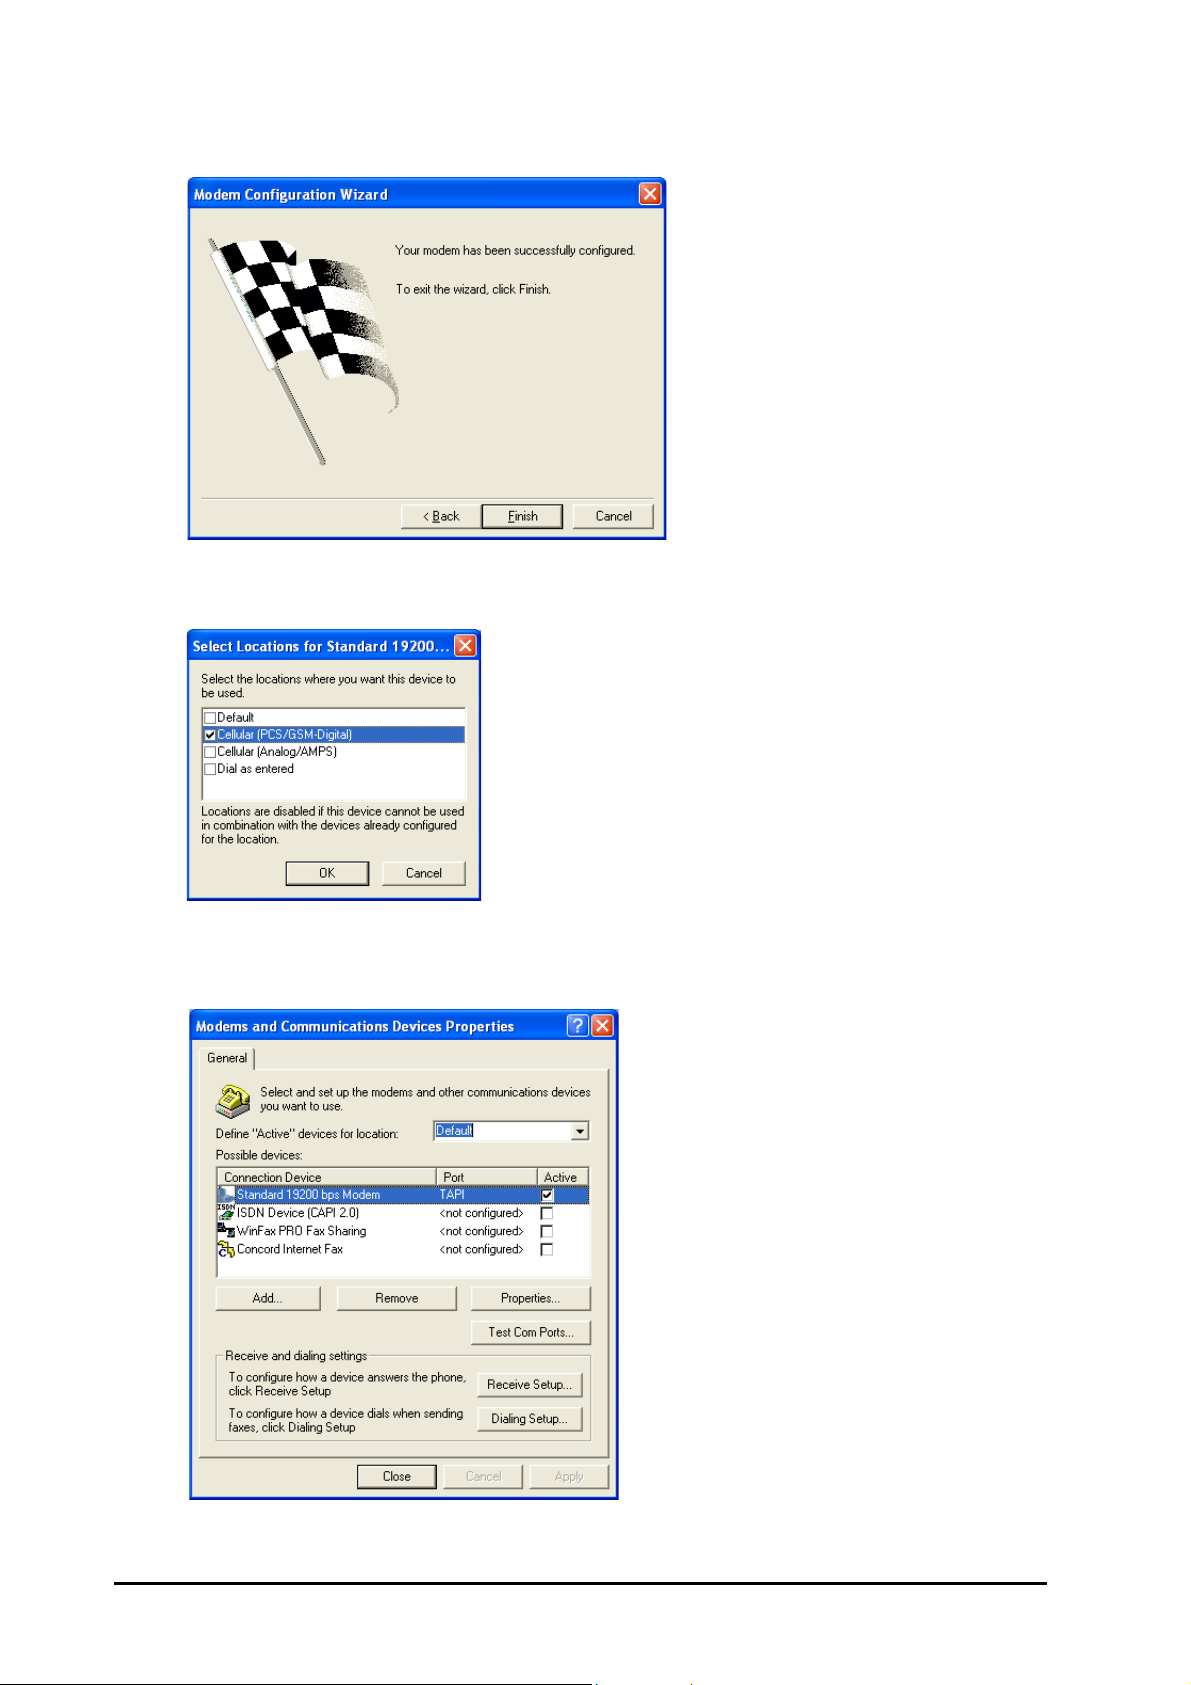
9. Modem Configuration exit Wizard will appear on the screen. Click Finish button.
10. Now, select location for the standard modem and click OK.
11. Modems and Communication Devices Properties window will appear on the screen. Select Standard
19200 Modem and select Active checkbox. Click Properties button.
58 SIMADO GDT11 System Manual
Page 59
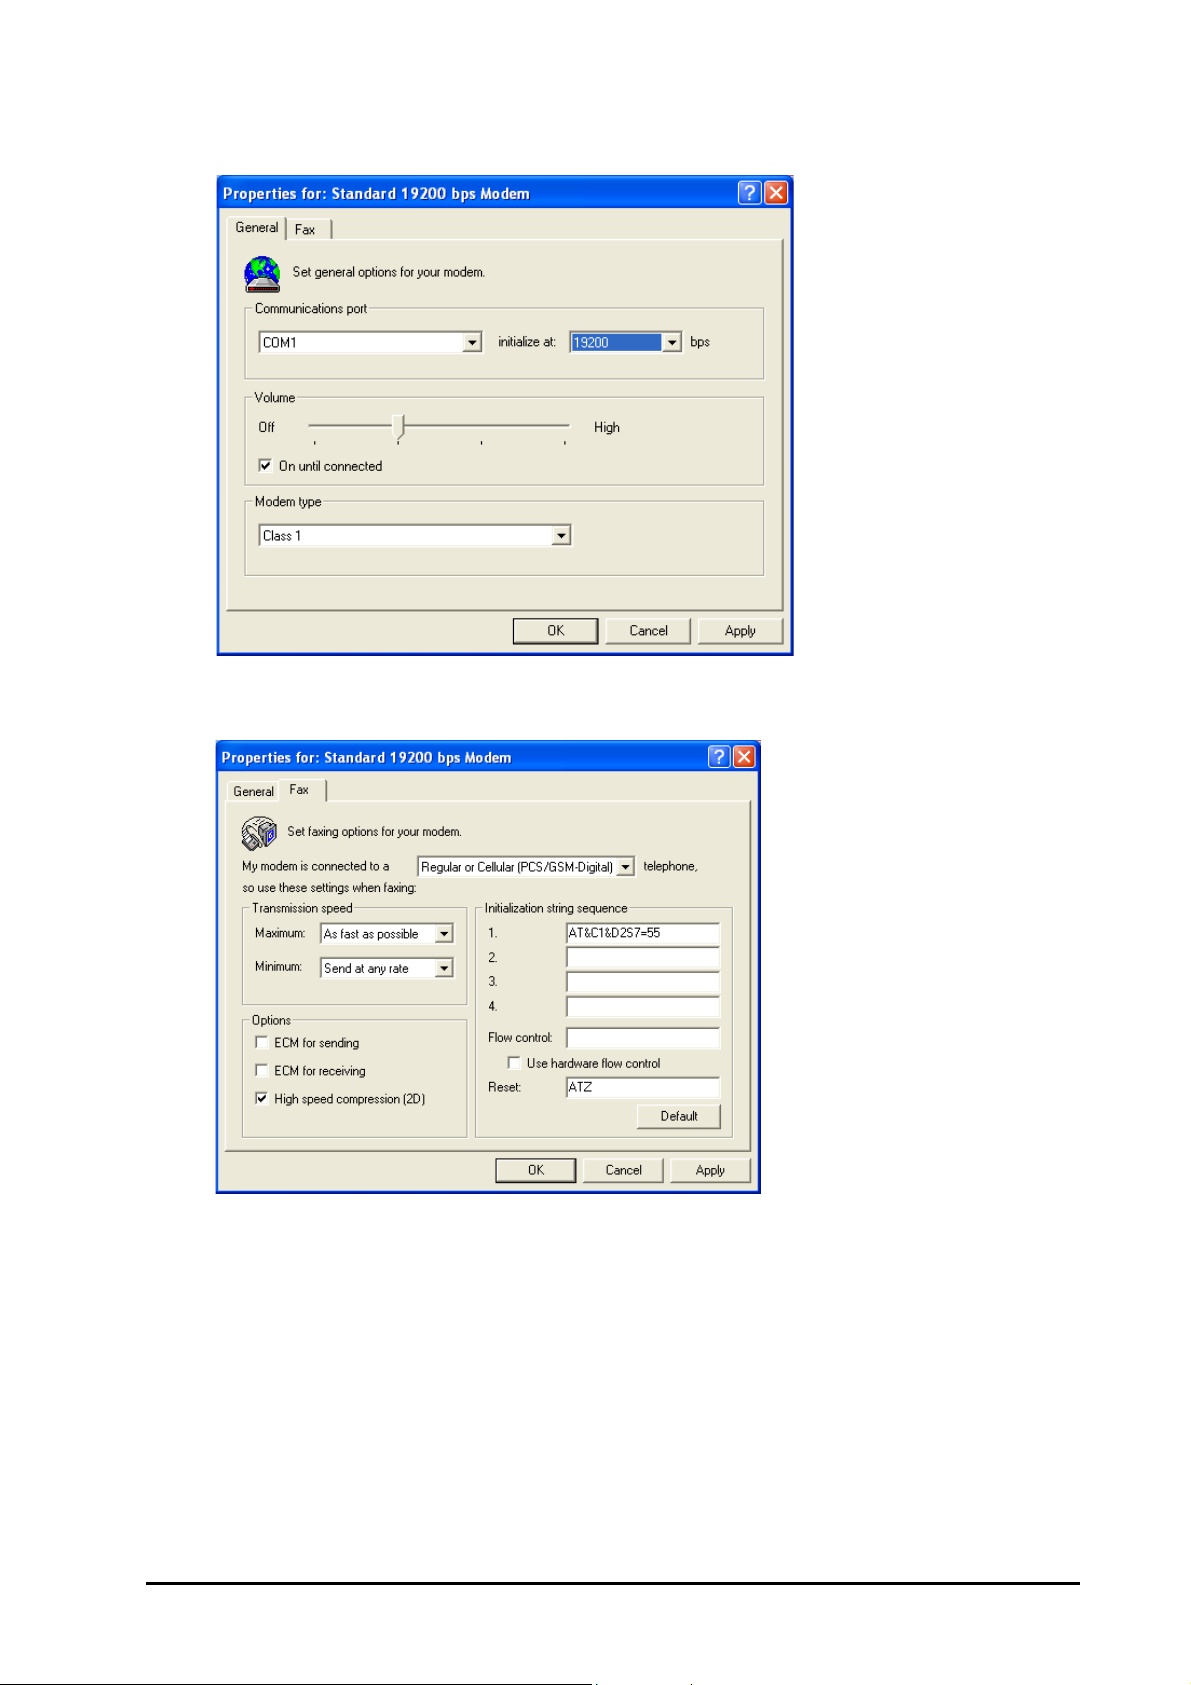
12. Select COM1 in communication port, initialize at 19200 bps and Modem Type: Class 1.0. Click FAX.
13. Enter Initializing string sequence: AT&C1&D2S7=55 and Reset=ATZ. Click Apply button and OK.
SIMADO GDT11 System Manual 59
Page 60
Setup for Receiving Fax
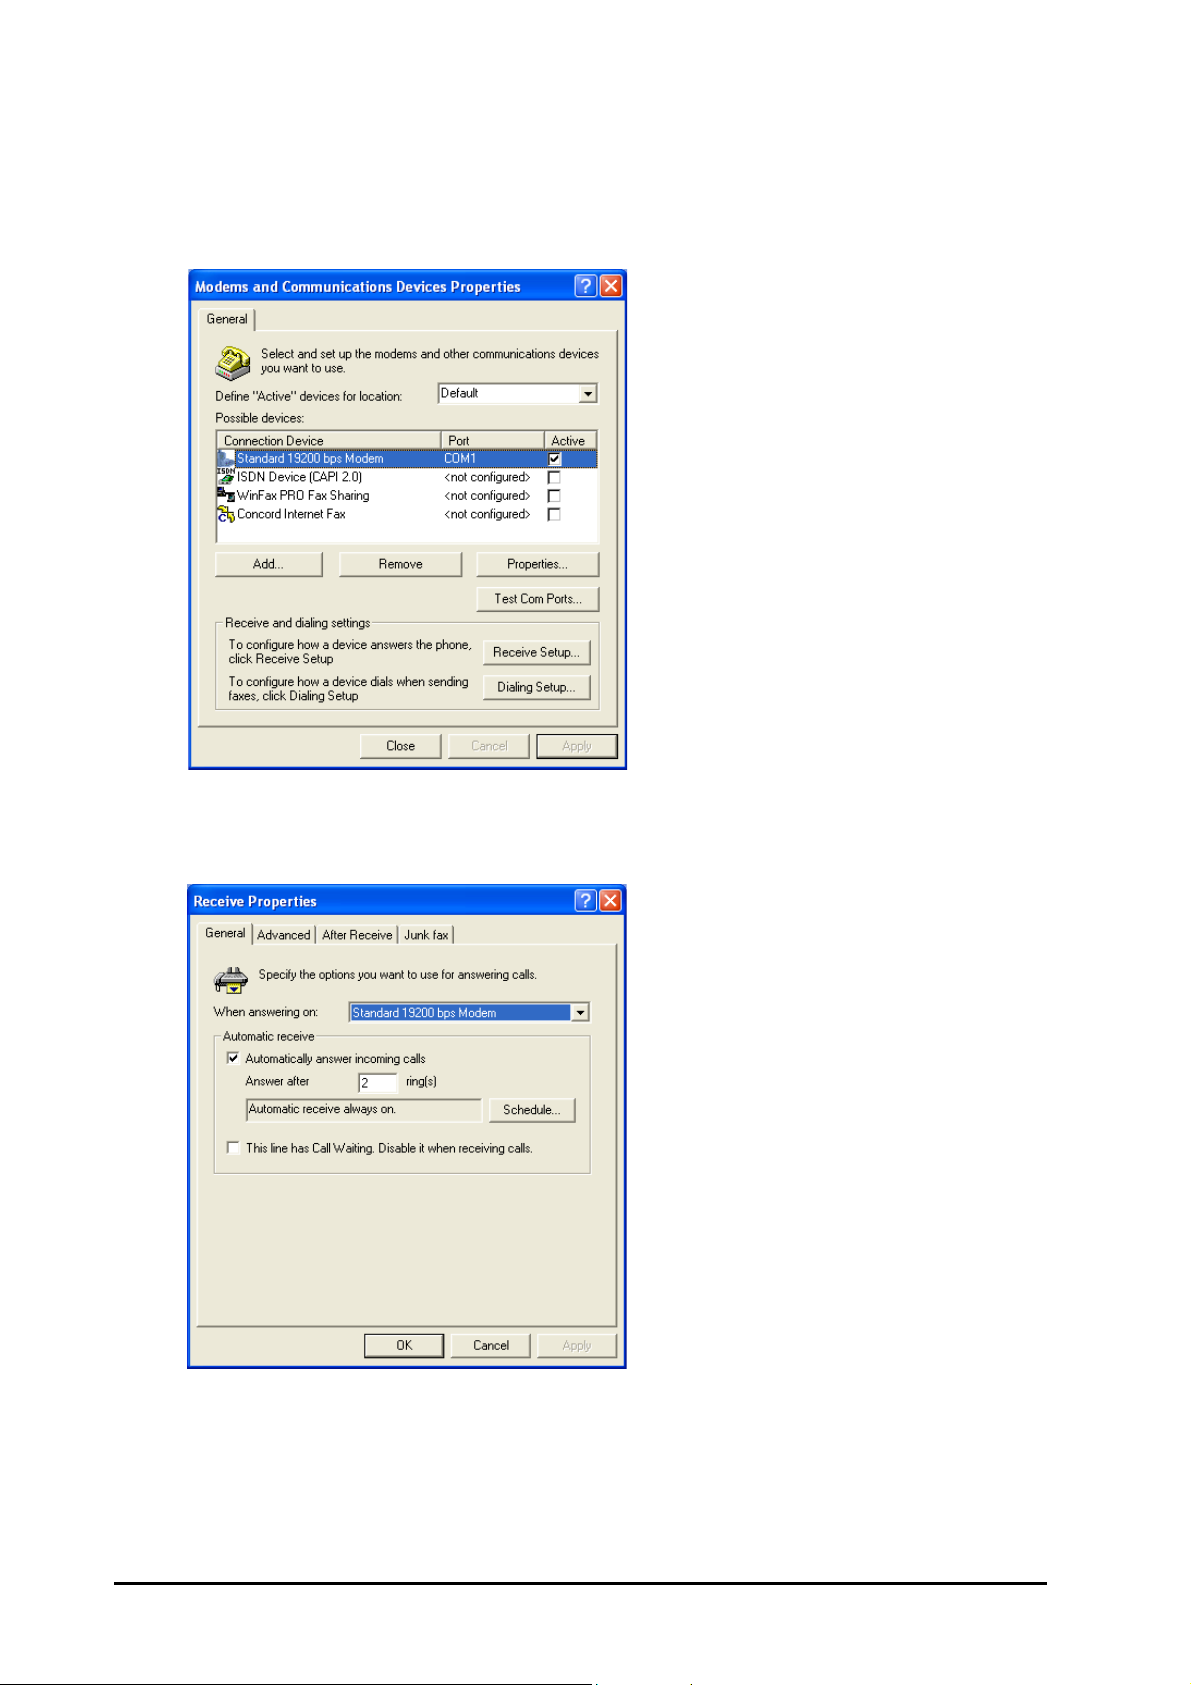
1. For 'Receive Setup', go to 'Modems and Communication Devices Properties' screen. Select Connection
Device as Standard 19200 bps Modem and select the checkbox Active as shown below. Click Receive
Setup button.
2. In 'Receive Properties', ensure that: When answering on = Standard 19200bps Modem, Answer after =
2 rings. Click Apply and OK.
60 SIMADO GDT11 System Manual
Page 61
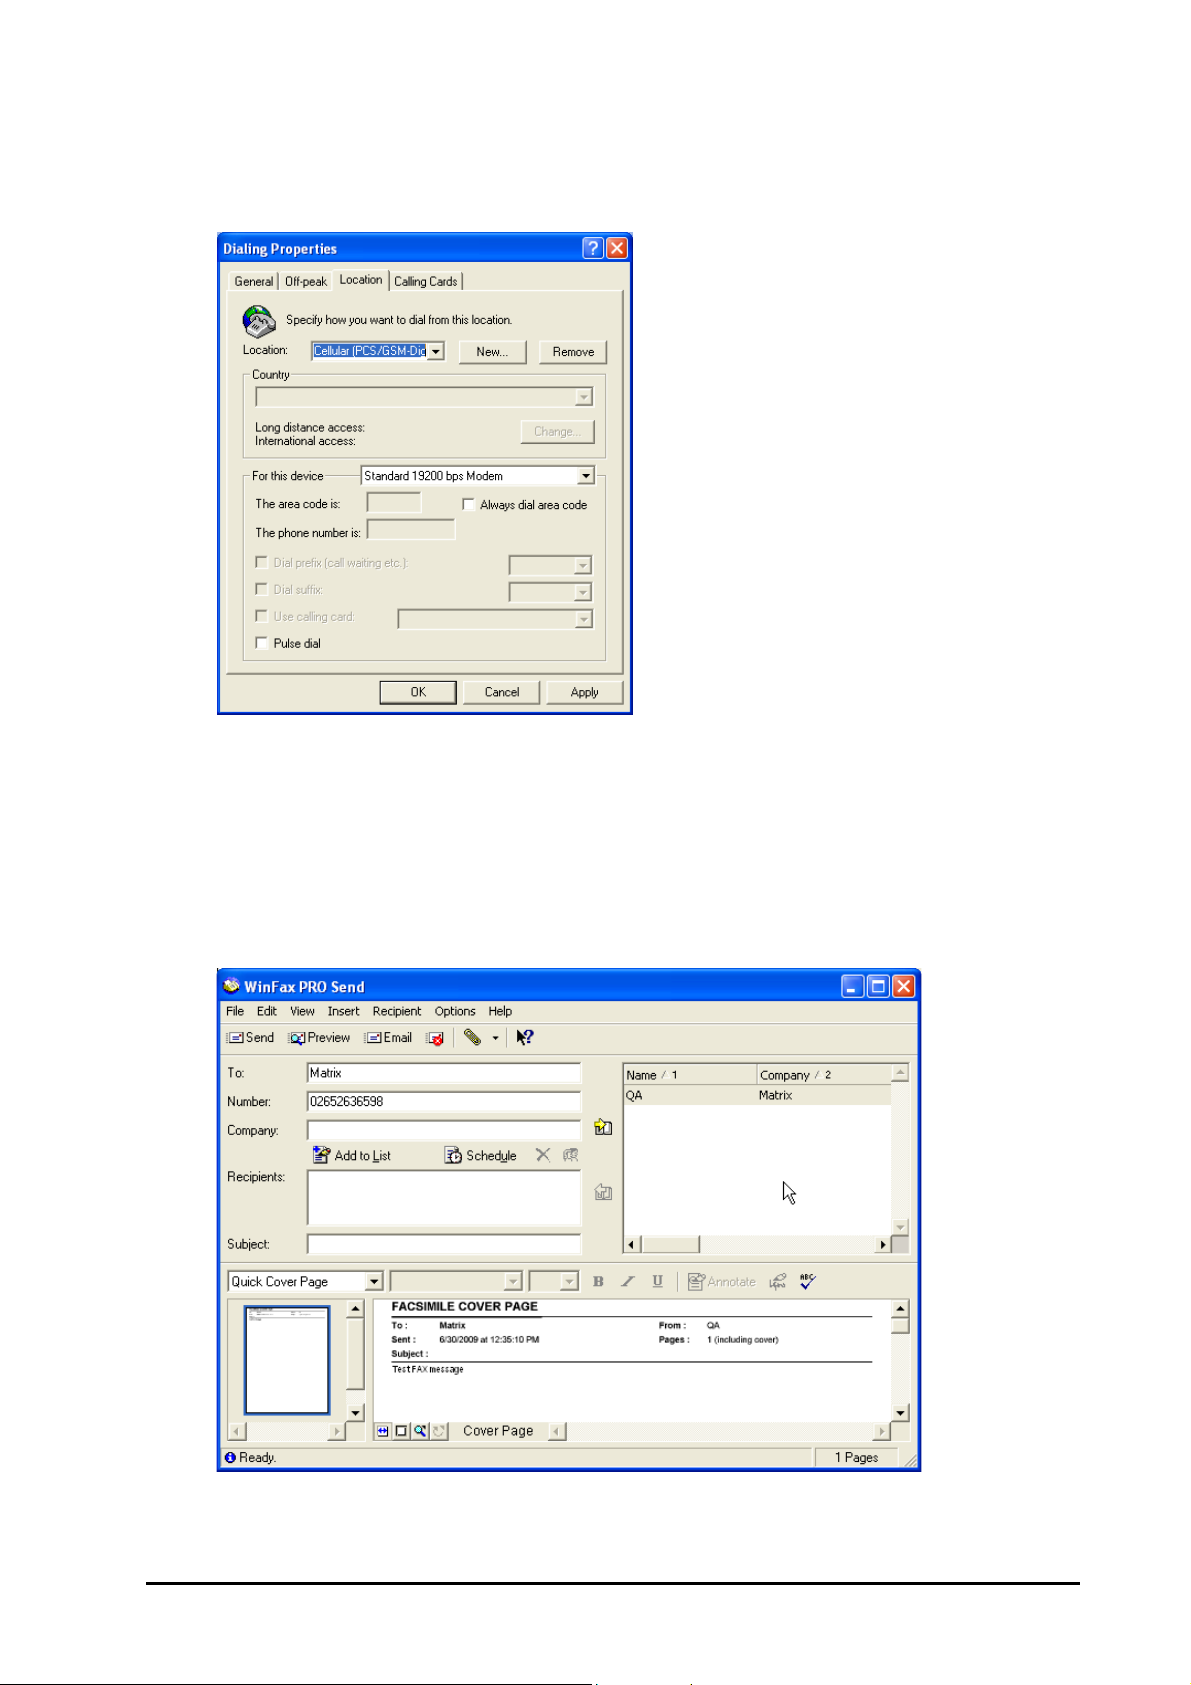
3. For Transmit Setup, go to Modem and Communication Device properties screen. (as per point no.3)
Select Connection Device as Standard 19200 bps Modem and select the checkbox Active as shown
below. Click Dialing Setup. Ensure that 'Dialing Properties' are as shown below. Click OK.
Sending and Receiving Fax
To Send Fax:
1. Open WinFax PRO Message Manager screen. Click Send To: Matrix (or Name), Number: Enter the
number where fax is to be sent. Enter the text content of the Fax message on the 'Cover Page'. Click
'Send'.
SIMADO GDT11 System Manual 61
Page 62
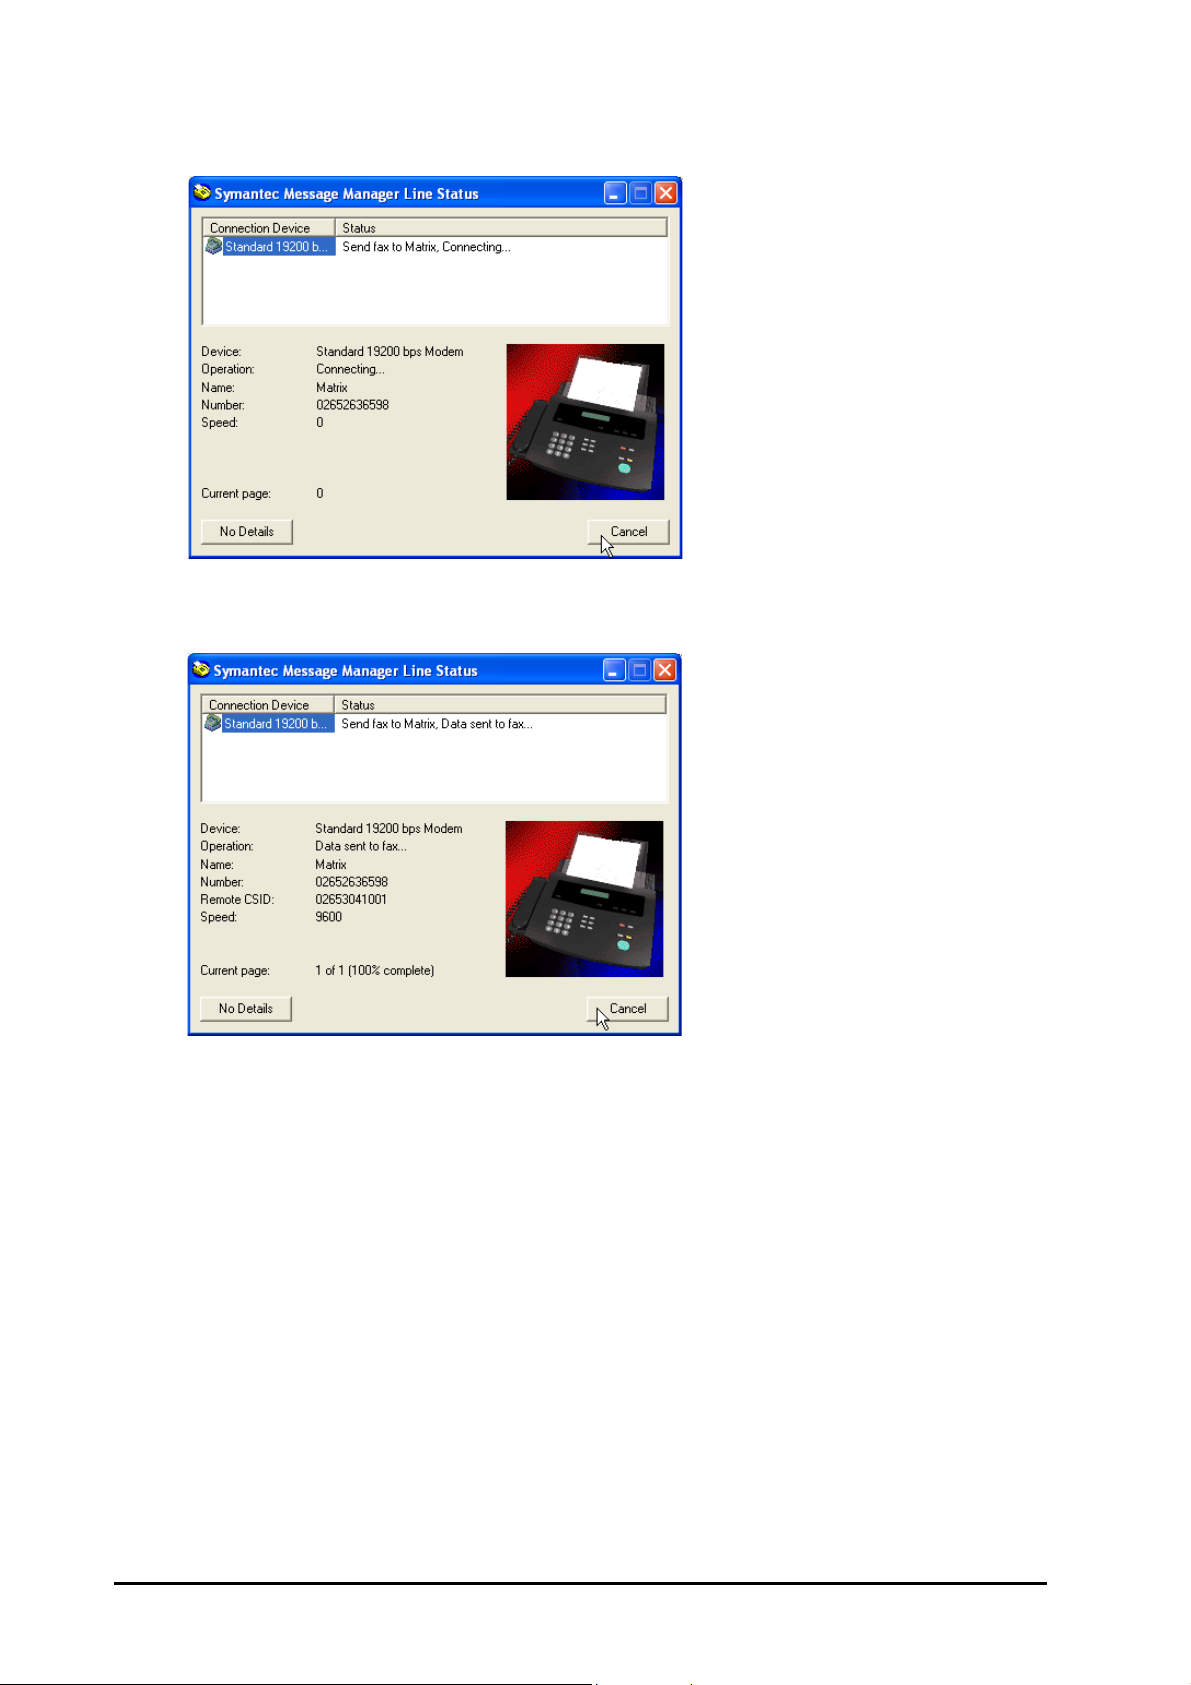
2. While sending the operation message is displayed as shown below:
3. Following screen shown that sending is in progress:
62 SIMADO GDT11 System Manual
Page 63
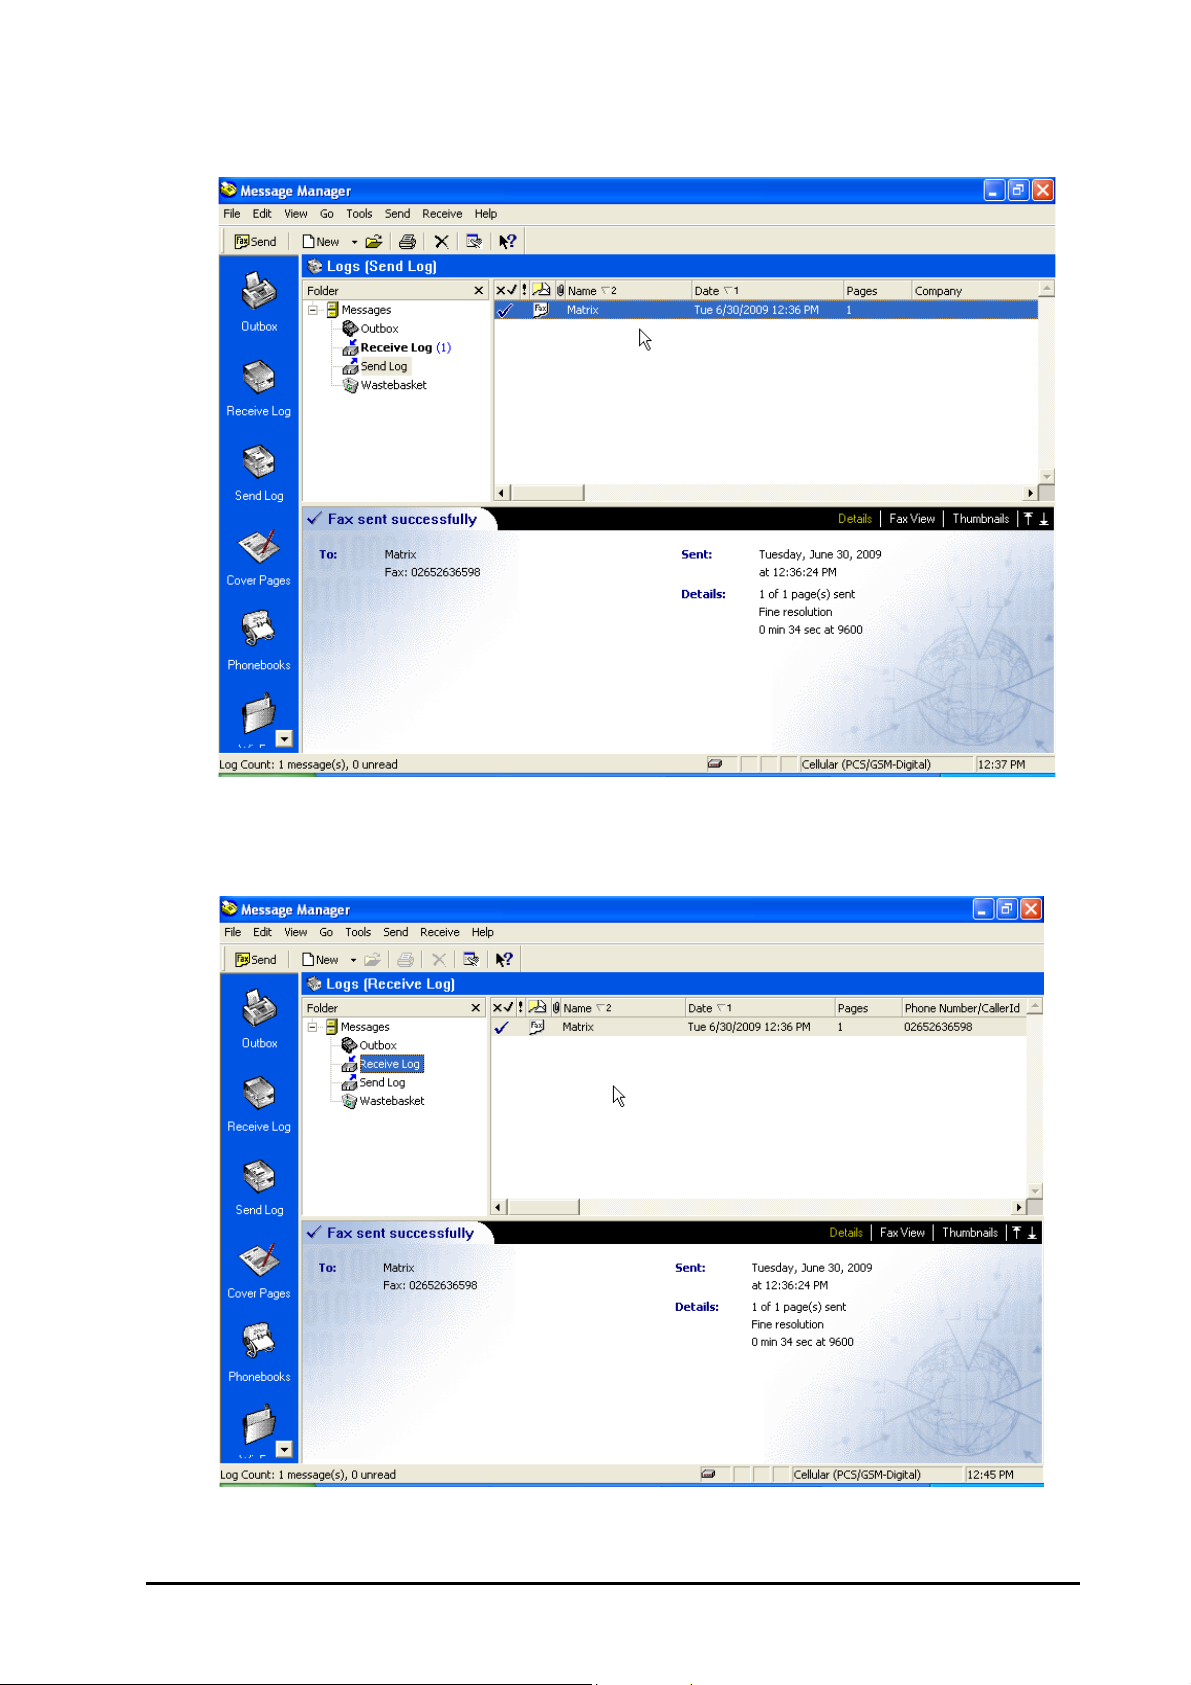
4. On successful transmitting, you can check the 'Send Log' as shown below:
To Receive Fax:
1. On receiving Fax, you can check the 'Receive Log' as shown:
SIMADO GDT11 System Manual 63
Page 64

64 SIMADO GDT11 System Manual
Page 65

Section 3: Appendices
Page 66

Page 67

Appendix A: Technical Specifications
System Capacity
SIM Connection : 1
Communication Port : 1 (RS232C)
Headset Port : 1 (Audio jack to connect the headphone)
Handset Port : 1 (RJ11 to connect the handset)
GSM Port
GSM Type : Phase 2 + features
GSM Quad Band : GSM 850, EGSM 900, DCS 1800, PCS 1900MHz.
GSM 850MHz : Rx=869-894,Tx=824-849
EGSM 900MHz : Rx=925-960,Tx=880-915
DCS 1800MHz : Rx=1805-1880, Tx=1710-1785
PCS 1900MHz : Rx=1930-1990, Tx=1850-1910
GPRS : Class 10
RF Power : 2W (900MHz) & 1W (1800MHz)
RF Sensitivity : Better than -102dBm
Antenna Type : Dipole, Fixed or Roof-Top with Flexible Cable (3 meter [118.11 Inch])
Antenna Gain : 2.5 dBi
Antenna Connector : SMA (Female)
RS232C (COM) Port
Signals : Tx, Rx, RTS, CTS, DTR, DSR
Connector : DB9 Female
Power Supply
Supply Input : [email protected]. External adaptor (90-265VAC, 47-63HZ) supplied with
Matrix SIMADO GDT11
Power Consumption : 5W (Typical)
Connector : DC power Jack
LED Indication
LED Indications : Power Supply, Network
Mechanical Parameters
Dimensions (WxHXD) : 104x80x27mm (4.09x3.15x1.03Inches)
Weight : 0.3Kg. (0.66lbs)
Mounting : Wall Mounting or Table-Top
Operational Conditions
Temperature :
Humidity : 5-95% RH, non-condensing
o
-10
C to +55oC(14o to131o Fahrenheit)
Storage Conditions
Temperature :
Humidity : 0-95% RH, non-condensing
SIMADO GDT11 System Manual 67
o
-40
C to +85oC(-40o to 185o Fahrenheit)
Page 68
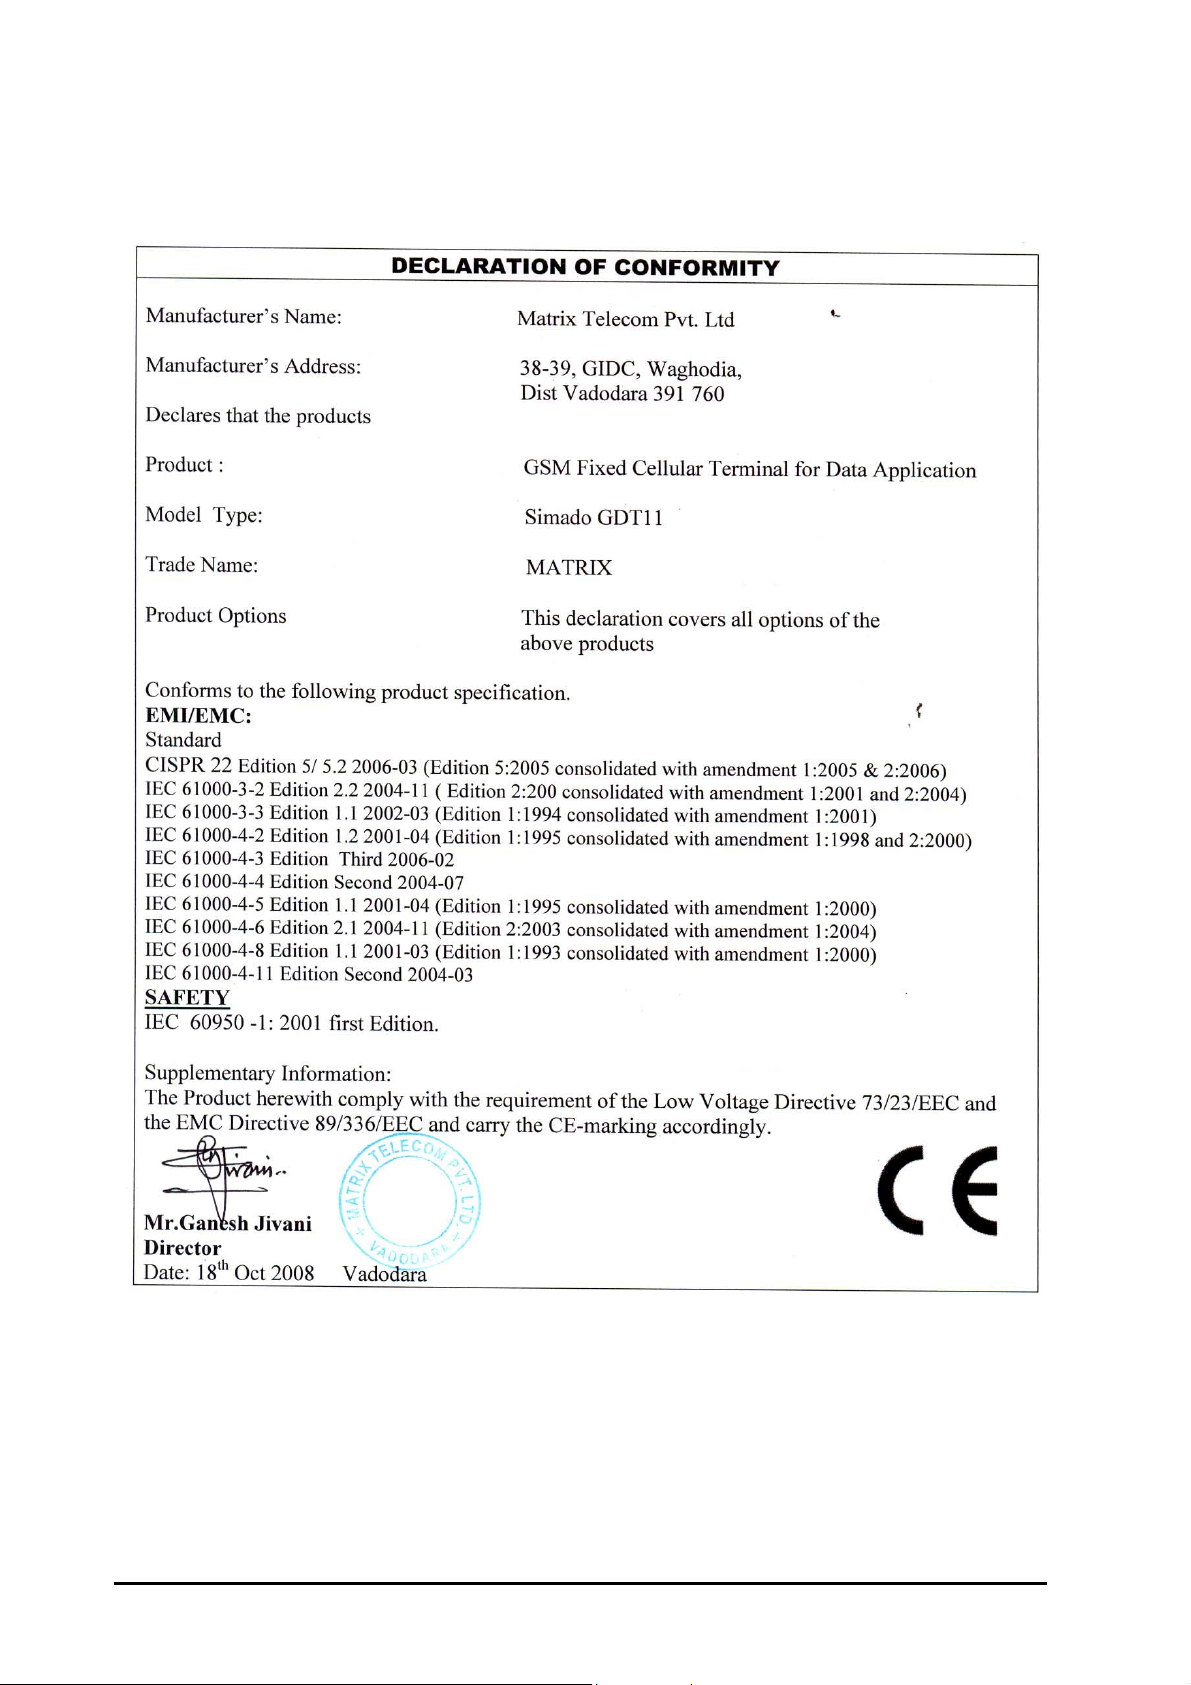
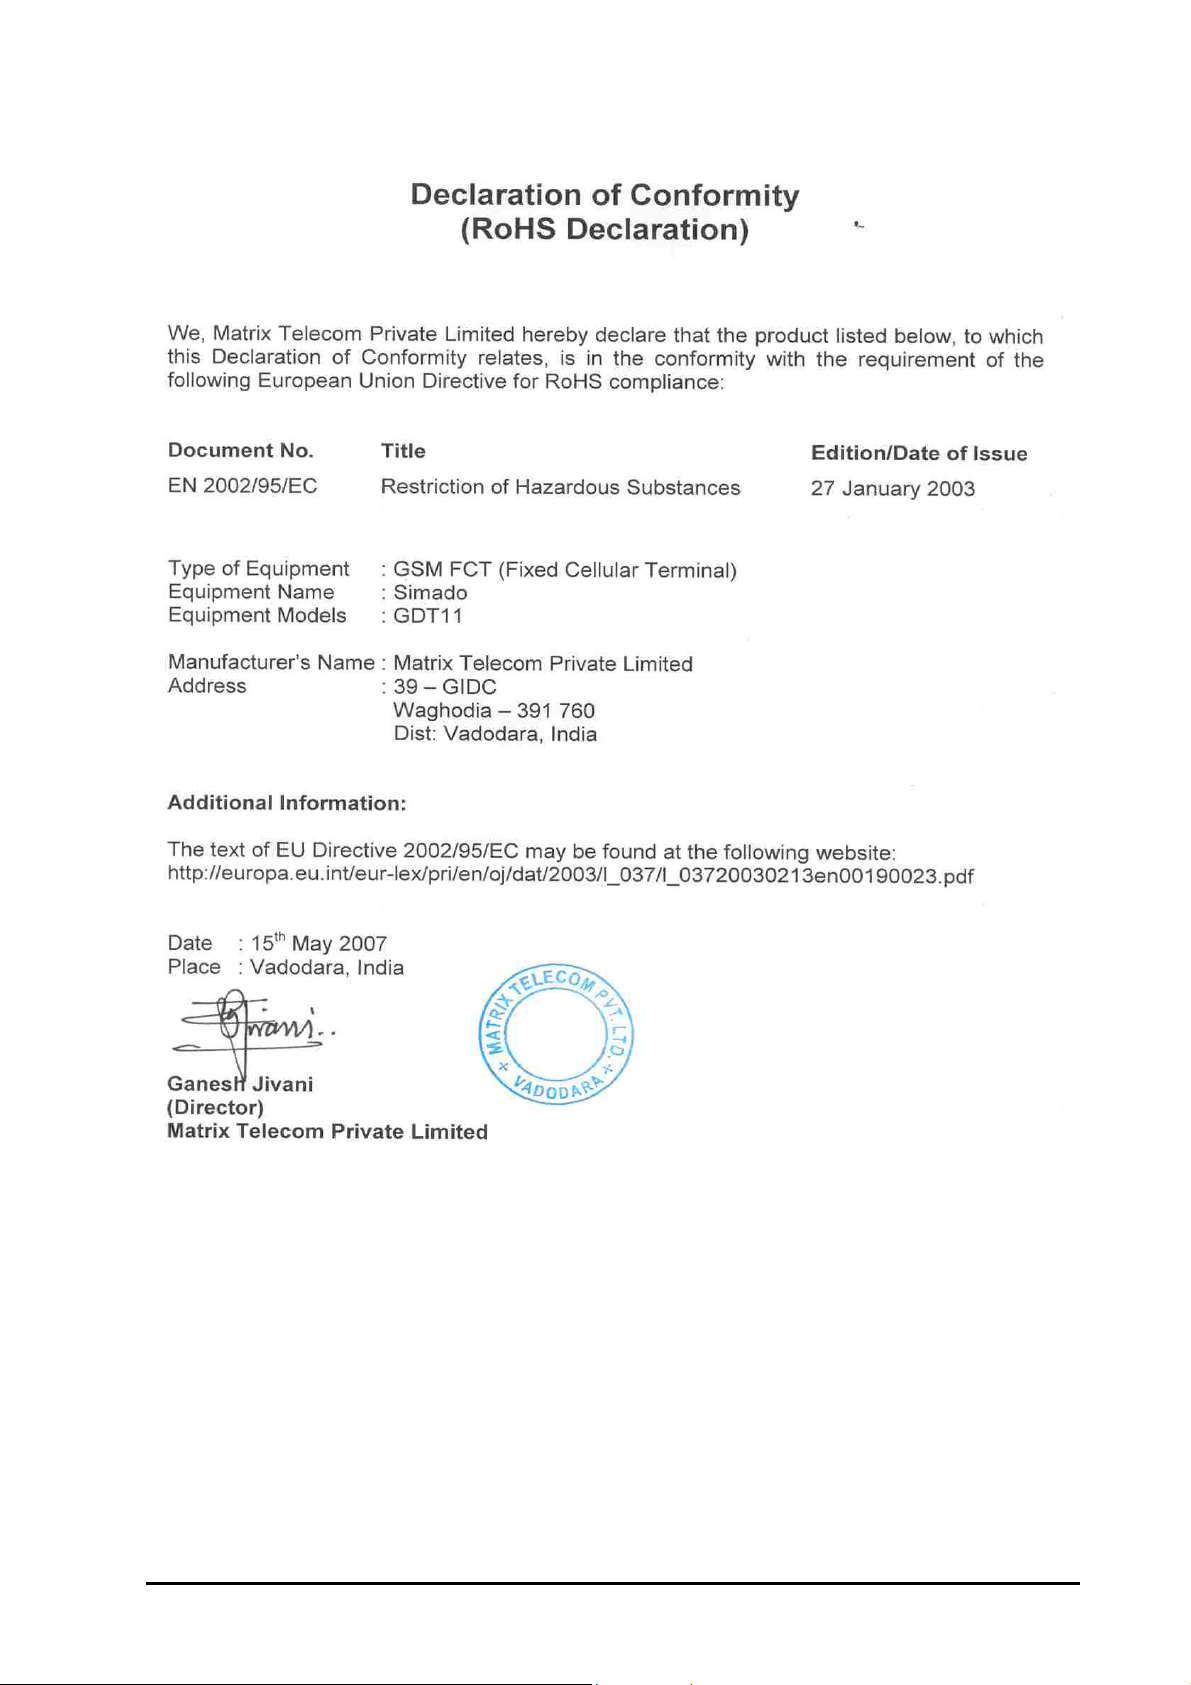
Appendix B: Regulatory Information
68 SIMADO GDT11 System Manual
Page 69
SIMADO GDT11 System Manual 69
Page 70

Warranty Statement
Matrix Comsec Pvt. Ltd. (Matrix) warrants to its consumer purchaser any of its products to be free of defects in
material, workmanship and performance for a period of 15 months from date of manufacturing or 12 months
from the date of installation which ever is earlier.
During this warranty period, Matrix will at its option, repair or replace the product at no additional charge if the
product is found to have manufacturing defect. Any replacement product or part/s may be furnished on an
exchange basis, which shall be new or like-new, provided that it has functionality at least equal to that of the
product, being replaced. All replacement parts and products will be the property of Matrix. Parts repaired or
replaced will be under warranty throughout the remainder of the original warranty period only.
This limited warranty does not apply to:
1. Products that have been subjected to abuse, accident, natural disaster, misuse, modification, tampering,
faulty installation, lack of reasonable care, repair or service in any way that is not contemplated in the
documentation for the product or if the model or serial number has been altered, tampered with, defaced or
removed.
2. Products which have been damaged by lightning storms, water or power surges or which have been
neglected, altered, used for a purpose other than the one for which they were manufactured, repaired by
customer or any party without Matrix’s written authorization or used in any manner inconsistent with Matrix’s
instructions.
3. Products received improperly packed or physically damaged.
4. Products damaged due to operation of product outside the products’ specifications or use without designated
protections.
Warranty valid only if:
• Primary protection on all the ports provided.
• Mains supply is within limit and protected.
• Environment conditions are maintained as per the product specifications.
Warranty Card:
• When the product is installed, please return the warranty card with:
• Date, signature and stamp of the customer
• Date, signature and stamp of the channel partner
• Matrix assumes that the customer agrees with the warranty terms even when the warranty card is not signed
and returned as suggested.
The Purchaser shall have to bear shipping charges for sending product to Matrix for testing/rectification. The
product shall be shipped to the Purchaser at no-charge if the material is found to be under warranty. The
Purchaser shall have to either insure the product or assume liability for loss or damage during transit.
Matrix reserves the right to waive off or make any changes in its warranty policy without giving any notice.
If Matrix is unable to repair or replace, as applicable, a defective product which is covered by Matrix warranty,
Matrix shall, within a reasonable time after being notified of the defect, refund the purchase price of the product
provided the consumer/purchaser returns the product to Matrix.
In no event will Matrix be liable for any damages including lost profits, lost business, lost savings, downtime or
delay, labor, repair or material cost, injury to person, property or other incidental or consequential damages
arising out of use of or inability to use such product, even if Matrix has been advised of the possibility of such
damages or losses or for any claim by any other party.
70 SIMADO GDT11 System Manual
Page 71

Except for the obligations specifically set forth in this Warranty Policy Statement, in no event shall Matrix be
liable for any direct, indirect, special, incidental or consequential damages whether based on contract or any
other legal theory and where advised of the possibility of such damages.
Neither Matrix nor any of its distributors, dealers or sub-dealers makes any other warranty of any kind, whether
expressed or implied, with respect to Matrix products. Matrix and its distributors, dealers or sub-dealers
specifically disclaim the implied warranties of merchantability and fitness for a particular purpose.
This warranty is not transferable and applies only to the original consumer purchaser of the Product. Warranty
shall be void if the warranty card is not completed and registered with Matrix within 30 days of installation.
All legal course of action subjected to Vadodara (Gujarat, India) Jurisdiction only.
SIMADO GDT11 System Manual 71
Page 72

MATRIX COMSEC PVT. LTD.
Corporate Office:
394-GIDC, Makarpura, Vadodara - 390010, India.
Tel.:+91 265 2630555, Fax: +91 265 2636598
E-mail: [email protected]
Factory:
39-GIDC, Waghodia - 391760, Dist. Vadodara, India.
Tel.: +91 2668 262056/57
Technical Support:
Tel.: +91 2668 263172/73, Fax: +91 2668 262631
E-mail: [email protected]
www.MatrixComSec.com
Version 3, July 2010
 Loading...