

Page 1
Mobile accessories
ccessori
e
s
portable power bank with Quick
6
10000mAh portable power bank with Quick
Charge 2.0 and jump starter
PB06
B0
Page 2
Page 3
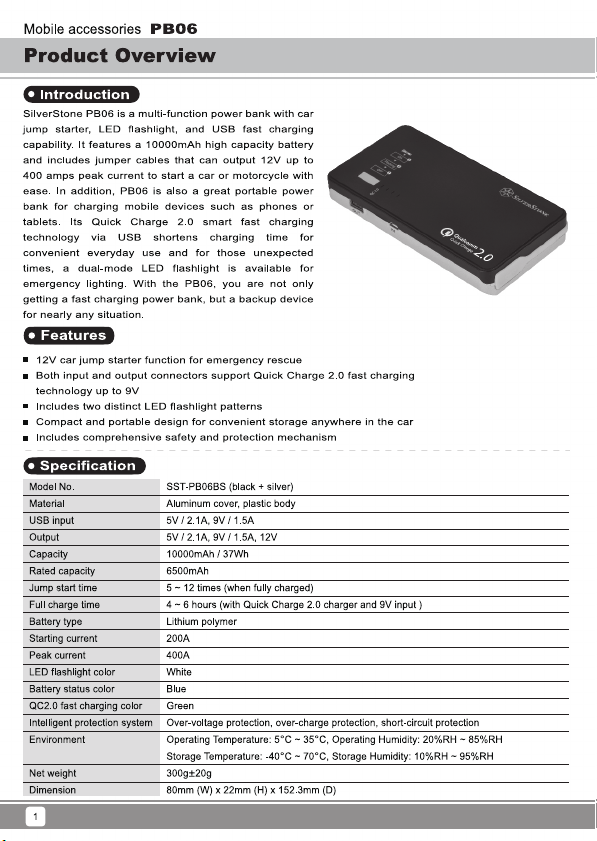
Package Content
■
PB06 x 1
■
Portable box x 1
■
Micro USB cable x 1
■
Jumper cables x 1
Mobile accessories PB06
Product Overview
2
Page 4
Mobile accessories PB06
Product Overview
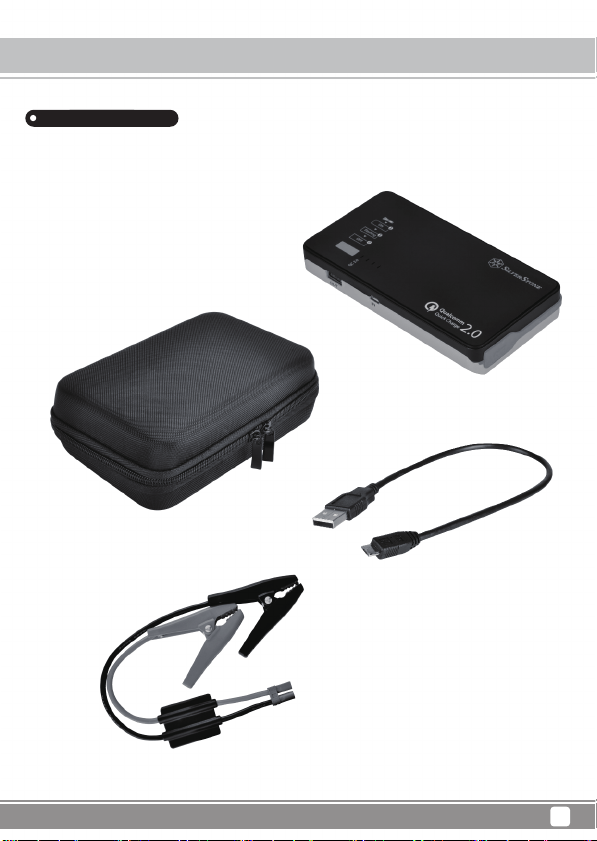
Product layout
1 2
4
3
1 Function ON/OFF button
2 Battery status and Quick Charge 2.0 indicator
3 12V jump start socket
4 USB output port
5 Micro USB input port
6 LED flashlight/SOS flashing mode
3
5
6
Page 5
Mobile accessories PB06
Indicators
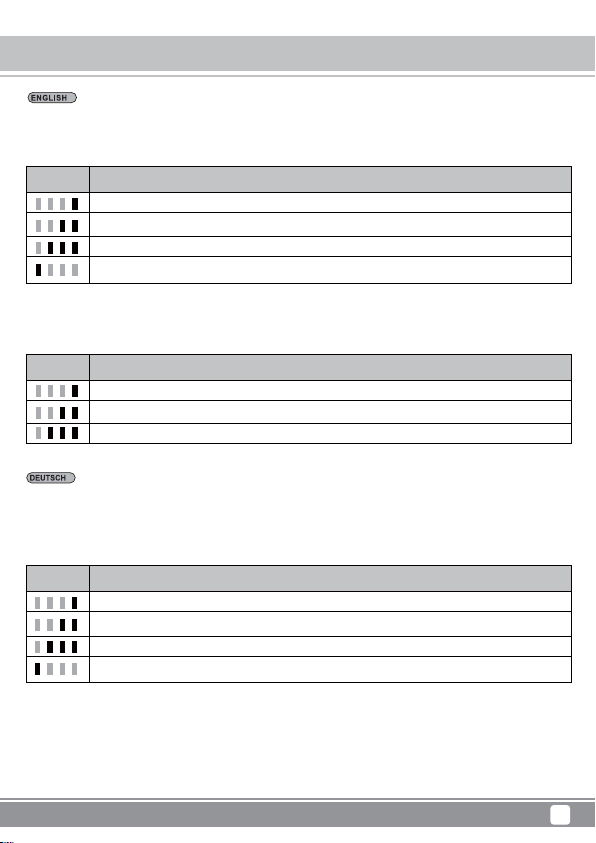
1.Charging PB06
Plug included USB cable to Micro USB input port on one end and power adapter on the other to
start charging. Indicators will light up according to battery power status:
Indicator Battery status
0% ~ 30% (First indicator flashing)
30% ~ 70% (First indicator lights up, second indicator flashing)
70% ~ 100% (First and second indicators light up, third indicator flashing)
QC 2.0 charging (Green indicator flashing)
2.Charging your device from PB06
Connect USB cable between PB06’s USB port and device to be charged, press the Function
ON/OFF button to start charging.
Indicator Battery status
0% ~ 30%
30% ~ 70%
70% ~ 100%
1. PB06 aufladen
Schließen Sie zum Aufladen ein Ende des USB-Kabels am Micro-USB-Eingang und das andere
Ende am Netzteil an. Die Anzeigen leuchten entsprechend dem Akkustand auf:
Anzeige Akkustand
0% ~ 30% (erste Anzeige blinkt)
30% ~ 70% (erste Anzeige leuchtet, zweite Anzeige blinkt)
70% ~ 100% (erste und zweite Anzeige leuchten, dritte Anzeige blinkt)
QC 2.0-Aufladung (grüne Anzeige blinkt)
2. Ihr Gerät per PB06 aufladen
Verbinden Sie das USB-Kabel mit dem USB-Port der PB06 und dem Gerät, das Sie aufladen
möchten; drücken Sie zum Starten der Aufladung die Funktion-ein/aus-Taste.
4
Page 6
Mobile accessories PB06
Indicators
Anzeige Akkustand
0% ~ 30%
30% ~ 70%
70% ~ 100%
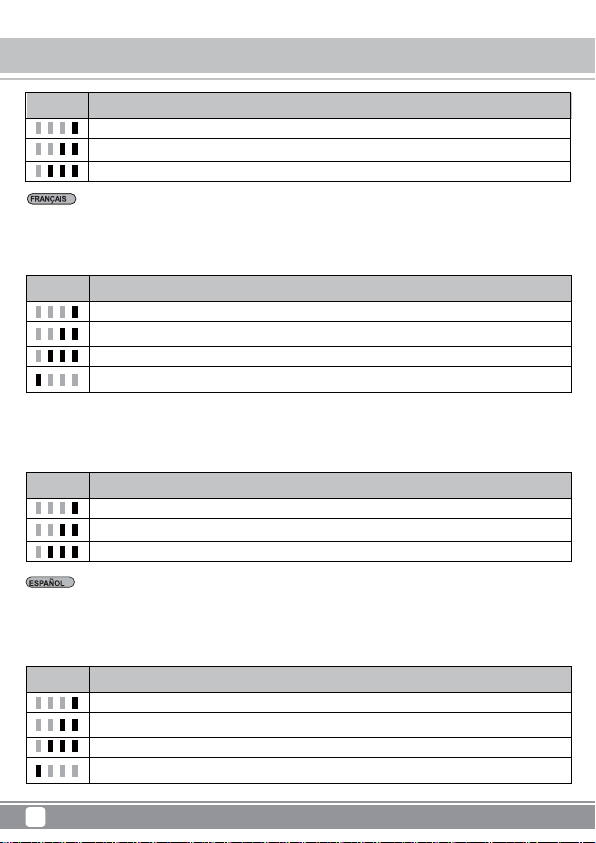
1. Chargement PB06
Branchez le câble USB inclus au port d'entrée micro USB sur une extrémité et l'adaptateur secteur
sur l'autre pour commencer à charger. Les indicateurs seront allumés selon l' état de charge de la
batterie :
Indicateur État de la batterie
0% ~ 30% (Le premier indicateur clignotte)
30% ~ 70% (Le premier indicateur est allumé, le second clignotte)
70% ~ 100% (Premier et second indicateur allumé, le troisième clignotte)
QC 2.0 chargement (Indicateur vert clignotte)
2. Chargement de votre appareil avec le PB06
Branchez le câble USB entre le port USB du PB06 et le périphérique à charger, appuyez sur le
bouton ON/OFF pour commencer à charger.
Indicateur État de la batterie
0% ~ 30%
30% ~ 70%
70% ~ 100%
1. Cargar PB06
Conecte el cable USB incluido al puerto de entrada Micro USB en un extremo y el adaptador de
corriente en el otro para empezar a cargar. Los indicadores se encenderán según el estado de
potencia de la batería:
Indicador Estado de la bacteria
0% ~ 30% (Primer indicador parpadeando)
30% ~ 70% (Primer indicador encendido, Segundo indicador parpadeando)
70% ~ 100% (Primer y Segundo indicador encendidos, tercer indicador parpadeando)
QC 2.0 cargando (Indicador verde parpadeando)
5
Page 7
Mobile accessories PB06
Indicators
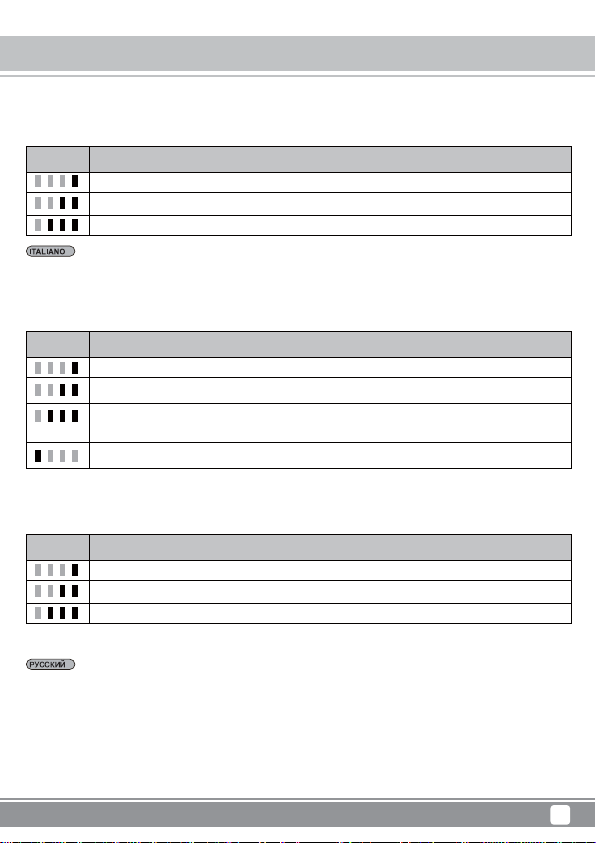
2. Cargar su dispositivo desde la PB06
Conecte el cable USB entre el puerto USB de la PB06 y el dispositivo a cargar, presione el botón
de ON/OFF para iniciar la carga.
Indicador Estado de la bacteria
0% ~ 30%
30% ~ 70%
70% ~ 100%
1. Carica PB06
Collegare il cavo USB in dotazione alla porta di ingresso micro USB su una estremità e l'adattatore
di alimentazione all'altra estremità per avviare la carica. Gli indicatori si accendono in base allo
stato di carica della batteria:
Indicatore Stato della batteria
0% ~ 30% (primo indicatore lampeggiante)
30% ~ 70% (il primo indicatore si accende, il secondo indicatore lampeggia)
70% ~ 100% (il primo e il secondo indicatore si accendono, il terzo
indicatore lampeggia)
Carica QC 2.0 (l'indicatore verde lampeggia)
2. Carica del dispositivo da PB06
Collegare il cavo USB tra la porta USB di PB06 e il dispositivo da caricare, quindi premere il tasto
ON/OFF della funzione per avviare la carica.
Indicatore Stato della batteria
0% ~ 30%
30% ~ 70%
70% ~ 100%
1. Зарядка PB06
Подключите USB-кабель из комплекта поставки во входной порт MicroUSB чтобы начать
зарядку. Индикатор загорится в зависимости от состояния батареи:
6
Page 8
Mobile accessories PB06
Indicators
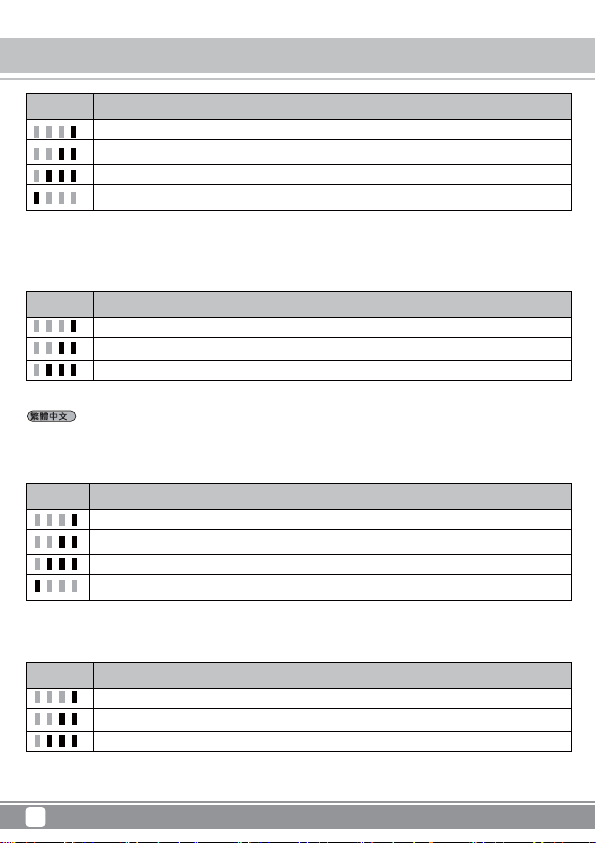
Индикатор Состояние батареи
0% ~ 30% (Мигает первый индикатор)
30% ~ 70% (Первый индикатор горит, второй мигает)
70% ~ 100% (Первый и второй индикаторы горя т, третий индикатор мигает)
Быстрая зарядка QC 2.0 (Индикатор мигает зелёным)
2. Зарядка устройства от PB06
Подключите кабель USB к вашему устройству и к выходному порту PB06, нажмите
функциональную кнопку ON/OFF для старта зарядки.
Индикатор Состояние батареи
0% ~ 30%
30% ~ 70%
70% ~ 100%
1.本體充電
將內附USB線一端插入Micro USB孔,另一端插入充電器開始充電,此時電量指示燈亮起,將依照以下電池電
量顯示燈號。
燈號指示 電池狀態
0% ~ 30%
(第1顆燈閃爍)
30% ~ 70%
70% ~ 100%
QC 2.0
(第1顆燈長亮 第2顆閃爍)
(第1 ,2顆燈長亮, 第3顆閃爍)
充電顯示燈號 (綠燈閃爍)
2.外部產品充電(本體放電)
將USB線連接至PB06的USB插座及需充電裝置,按下功能開關按鈕,開始充電。
燈號指示 電池狀態
0% ~ 30%
30% ~ 70%
70% ~ 100%
7
Page 9

Mobile accessories PB06
Indicators
1.本体充电
将内附USB线一端插入Micro USB孔,另一端插入充电器开始充电,此时电量指示灯亮起,将依照以下电池电
量显示灯号:
灯号指示 电池状态
2.外部产品充电(本体放电)
将USB线连接至PB06的USB插座及需充电装置,按下功能开关按钮,开始充电。
灯号指示 电池状态
0% ~ 30%
30% ~ 70%
70% ~ 100%
1.充電PB06
付属のUSBケーブルの一端をMicro USB入力ポートに接続し、他端をアダプタに接続すると、充電が
始まります。インジケーターがバッテリー電力に応じて点灯します:
インジケーター バッテリー状態
0% ~ 30%
30% ~ 70%
70% ~ 100%
QC 2.0
(第1颗灯闪烁)
(第1颗灯长亮 第2颗闪烁)
(第1 ,2颗灯长亮, 第3颗闪烁)
充电显示灯号 (绿灯闪烁)
0% ~ 30%
(1個目のインジケーターが点滅)
30% ~ 70%
70% ~ 100%
QC 2.0
充電中 (緑のインジケーターが点滅)
(1個目のインジケーターが点灯、2個目のインジケーターが点滅)
(2個目のインジケーターが点灯、3個目のインジケーターが点滅)
2.お持ちの装置のPB06からの充電
USBケーブルをPB06のUSBポートおよび充電する装置に接続し、機能ON/OFFボタンを押すと、充電が
始まります。
インジケーター バッテリー状態
0% ~ 30%
30% ~ 70%
70% ~ 100%
8
Page 10

Mobile accessories PB06
Indicators
1. 충전을 시작합니다 PB06
플러그가 포함된 USB 케이블로서 한쪽 단자는 마이크로 USB 입력 포트에 연결되고 반대쪽 단자는
전원 어댑터에 연결되어 충전을 시작합니다. 배터리 전원 상태에 따라 표시등이 다음과 같이
켜집니다:
표시등 배터리 상태
0% ~ 30% (첫 번째 표시등이 깜박임)
30% ~ 70% (첫 번째 표시등이 켜지고, 두 번째 표시등이 깜박임)
70% ~ 100% (첫 번째 및 두 번째 표시등이 켜지고, 세 번째 표시등이 깜박임)
QC 2.0 충전 중 (녹색 표시등이 깜박임)
2. PB06에서 장치 충전 중
USB 케이블을 사용하여 PB06의 USB 포트와 충전할 장치를 연결한 후 기능 ON/OFF 버튼을 눌러
충전을 시작합니다.
표시등 배터리 상태
0% ~ 30%
30% ~ 70%
70% ~ 100%
LED flashlight
Double-tap power button to turn on flashlight. Double-tap again (within 0.6 seconds) to switch
to SOS flashing mode. To turn off flashlight, double-tap power button one more time.
Tippen Sie zum Einschalten der Taschenlampe zweimal auf die Ein-/Austaste. Tippen Sie zum
Umschalten in den SOS-Blinkmodus erneut zweimal (innerhalb von 0,6 Sekunden). Zum
Abschalten der Taschenlampe tippen Sie erneut zweimal auf die Ein-/Austaste.
Appuyez 2 fois sur le bouton d'alimentation pour allumer la lampe de poche. Appuyez à nouveau
2 fois ( en moins de 0,6 secondes ) pour passer en mode clignotement SOS. Pour éteindre la
lampe de poche , appuyez à nouveau 2 fois sur le bouton d'alimentation.
Presione dos veces el botón de potencia para encender la linterna. Vuelva a presionar dos veces
(en 0,6 segundos) para cambiar al modo de parpadeo de emergencia. Para apagar la linterna
presione dos veces el botón de potencia una vez más.
9
Page 11

Mobile accessories PB06
Indicators
Toccare due volte il tasto di alimentazione per accendere una torcia. Toccare di nuovo due volte
(entro 0,6 secondi) per passare alla modalità lampeggiante SOS. Per spegnere la torcia,
toccare di nuovo due volte il tasto di alimentazione.
Tippen Sie zum Einschalten der Taschenlampe zweimal auf die Ein-/Austaste. Tippen Sie zum
Umschalten in den SOS-Blinkmodus erneut zweimal (innerhalb von 0,6 Sekunden). Zum
Abschalten der Taschenlampe tippen Sie erneut zweimal auf die Ein-/Austaste.
雙擊開關鍵,即開啟手電筒。再次雙擊開關鍵 (0.6秒內),切換為SOS閃爍模式。再次雙擊,即關閉
手電筒。
双击开关键,即开启手电筒。再次双击开关键 (0.6秒内),切换为SOS闪烁模式。再次双击,即关闭
手电筒。
電源ボタンをダブルタップするとフラッシュライトが点灯します。再度ダブルタップする
(0.6秒以内) とSOS点滅モードになります。フラッシュライトを消すには、電源ボタンを再度
ダブルタップします。
전원 버튼을 두 번 눌러 플래시 라이트를 켭니다. 0.6초 내에 다시 두 번 누르면 SOS 점멸 모드로
전환합니다. 플래시 라이트를 끄려면, 전원 버튼을 다시 두 번 누르십시오.
10
Page 12

Mobile accessories PB06
Installation Guide
Car jump start steps
2.1. 2. 3. 4. 5.
STAR
ON
T
C
C
A
F
F
O
1. Clamp jumper cables to the correct positive and negative terminals on the car battery
2. Connect to PB06
3. Start car engine
4. Remove PB06
5. Remove jumper cables
Warning: Do not clamp positive and negative cables to each other to avoid arcing or short. Also
make sure jumper cables are connected with correct polarity to vehicle battery. PB06 requires
minimum 75% power to jump start your vehicle.
1. Klemmen Sie die Starthilfekabel an den entsprechenden positiven und negativen Anschluss
der Fahrzeugbatterie
2. Verbinden Sie sie mit der PB06
3. Lassen Sie den Fahrzeugmotor an
4. Trennen Sie die PB06
5. Entfernen Sie die Starthilfekabel
Warnung: Achten Sie darauf, positive und negative Kabel nicht miteinander zu verbinden;
andernfalls kann es zu einem Lichtbogenüberschlag oder Kurzschluss kommen. Beachten Sie
beim Anschließen der Starthilfekabel an die Fahrzeugbatterie außerdem die richtige Polarität. Die
PB06 benötigt zum Anlassen Ihres Fahrzeugs mindestens 75 % ihrer Leistung.
1. Fixer correctement les câbles sur les bornes positives et négatives sur la batterie du véhicule
2. Connectez au PB06
3. Démarrer le véhicule
4. Retirer le PB06
5. Retirer les câbles de raccordement
Attention: Ne pas faire se toucher les câbles positifs et négatifs pour éviter un arc électrique ou
un court circuit. Assurez-vous également que les câbles de démarrage sont connectés avec la
bonne polarité sur la batterie du véhicule. Le PB06 requiert un minimum de puissance de 75%
pour démarrer rapidement votre véhicule.
11
Page 13

Mobile accessories PB06
Installation Guide
1. Conecte los cables de arranque a los terminales positivo/negativo correctos en la batería del
coche
2. Conecte la PB06
3. Arranque el motor
4. Retire la PB06
5. Retire los cables de arranque
Advertencia: No conecte los cables negativo/positivo entre sí para evitar arcos o cortos
eléctricos. Asegúrese también de que los cables de arranque están conectados con la polaridad
correcta en la batería del vehículo. La PB06 necesita un mínimo del 75% de su carga para
arrancar su vehículo.
1. Collegare i cavi di connessione ai corretti terminali positivo e negativo della batteria per auto
2. Collegare a PB06
3. Avviare il motore dell'auto
4. Rimuovere PB06
5. Rimuovere i cavi di connessione
Avviso: Non collegare i cavi positivo e negativo tra essi per evitare arco elettrico o cortocircuito.
Assicurarsi che i cavi di connessione siano collegati con la corretta polarità alla batteria del
veicolo. PB06 richiede un minimo del 75% di alimentazione per l'avvio di emergenza del veicolo.
1. Подключите зажимы к аккумулятору автомобиля с соблюдением полярности
2. Подключите кабель к PB06
3. Запустите двигатель автомобиля
4. Отключите от PB06
5. Снимите зажимы с аккумулятора
Внимание: Не прикасайтесь положительным и отрицательным кабелем друг к другу,
чтобы избежать искрения и короткого замыкания. Также убедитесь в том, что соблю
дена полярность при подключении к аккумулятору автомобиля. Для того, чтобы запу
стить двигатель вашего автомобиля, уровень заряда PB06 должен быть не менее
75%.
1.將啟動線對準電瓶正負極夾上
2.插入行動電源
3.發動汽車引擎
4.拔除行動電源
5.取下電瓶夾
警告:使用過程中請勿互夾鱷魚夾造成短路,與汽車電瓶連結時,正負極切勿接反,本產品需75%以上
電量才能確保啟動汽車。
12
Page 14

Mobile accessories PB06
Installation Guide
1.将启动线对准电瓶正负极夹上
2.插入行动电源
3.发动汽車引擎
4.拔除行动电源
5.取下电瓶夹
警告:使用过程中请勿互夹鳄鱼夹造成短路,与汽车电瓶连结时,正负极切勿接反,本产品需75%以上电量才
能确保启动汽车。
1.ジャンパーケーブルを車のバッテリーの正極と負極に正しくクランプ止めします。
2.PB06に接続します。
3.車のエンジンを始動させます。
4.PB06を外します。
5.ジャンパーケーブルを外します。
重要な注意:正極のケーブルと負極のケーブルは、アークやショートを起こさぬよう、互いにクラ
ンプしないでください。またジャンパーケーブルから車のバッテリーへの接続が正しい極性になっ
ていることを確認してください。車のジャンプスタートにはPB06側に最低75%の残量が必要です。
1. 점퍼 케이블을 차량 배터리의 양극 및 음극 단자에 올바로 고정합니다.
2. PB06에 연결합니다.
3. 차량 엔진의 시동을 겁니다.
4. PB06을 제거합니다.
5. 점퍼 케이블을 제거합니다.
경고: 아크 또는 단락 발생을 피하기 위해 양극 및 음극 케이블을 서로 고정하지 마십시오. 또한 점퍼
케이블이 극성에 맞게 차량 배터리에 연결되었는지 확인하십시오. 점프로 차량 시동을 걸려면 PB06
에 최소 75%의 전원이 남아 있어야 합니다.
13
Page 15

Troubleshooting
Mobile accessories PB06
Q&A
Safety
Short circuit
protection
Over current
protection
Under voltage
protection
Sicherheit
Kurzschlussschutz
Überstromschutz
Unterspannungsschutz
Sécurité
Protection
court-circuit
Protection
surtension
Protection Sous
voltage
Condition
Please unplug micro USB connector form your device for 5 seconds and
then plug USB connector in “Input Micro USB Port” again to reboot.
3 ~ 6A MAX. You will need to recharge PB06 in order to turn it on after
OCP is engaged.
PB06 will go into sleep mode if there is no output load after 30 seconds.
To wake up your device, press the power button again.
Bedingung
Bitte trennen Sie den Micro-USB-Anschluss 5 Sekunden lang von Ihrem
Gerät und schließen Sie den USB-Anschluss dann zum Neustarten
erneut am Micro-USB-Eingang an.
3 – 6 A (max.). Sie müssen die PB06 aufladen, damit Sie sie nach
Auslösung des Überstromschutzes wieder einschalten können.
Die PB06 tritt in den Ruhezustand ein, wenn 30 Sekunden lang keine
Leistungsabgabe erfolgt. Drücken Sie zum Aufwecken des Geräts erneut
die Ein-/Austaste.
Conditions
S'il vous plaît débrancher le connecteur micro USB de votre appareil
pendant 5 secondes et rebrancher le connecteur USB dans “Port entrée
Micro USB ” pour redémarrer.
3 ~ 6A MAX. Vous devrez recharger le PB06 pour le démarrer après
l'engagement de l'OCP.
PB06 passera en mode veille s'il n'y a aucune charge en sortie au bout de
30 secondes. Pour réactiver votre appareil appuyez à nouveau sur le
bouton d'alimentation
14
Page 16

Mobile accessories PB06
Q&A
Protección
Protección
cortocircuitos
Protección por
exceso de corriente
Protección por
bajo voltaje
Sicurezza
Protezione da
cortocircuito
Protezione da
sovracorrente
Protezione da
sottotensione
Безопасность
Защита от
короткого
замыкания
Защита от
тока высокой
мощности
Защита от
высокого
напряжения
Conditions
S'il vous plaît débrancher le connecteur micro USB de votre appareil
pendant 5 secondes et rebrancher le connecteur USB dans “Port entrée
Micro USB ” pour redémarrer.
3 ~ 6A MAX. Vous devrez recharger le PB06 pour le démarrer après
l'engagement de l'OCP.
PB06 passera en mode veille s'il n'y a aucune charge en sortie au bout de
30 secondes. Pour réactiver votre appareil appuyez à nouveau sur le
bouton d'alimentation
Condizione
Scollegare il connettore micro USB dal dispositivo per 5 secondi, quindi
collegare di nuovo il connettore USB in "Porta di ingresso micro USB"
per il riavvio.
3 ~ 6 A MAX. È necessario ricaricare PB06 per accenderlo dopo
l'inserimento dell'OCP.
PB06 entra in modalità di sospensione in assenza di carico di uscita dopo
30 secondi. Per riattivare il dispositivo, premere di nuovo il tasto di
alimentazione.
Состояние
Пожалуйста, отключите кабель от разъёма MicroUSB на 5 секунд, а
затем снова подключите в выходной порт MicroUSB и перезагрузите
устройство.
Максимальный ток 3 ~ 6А. Вам нужно будет перезарядит PB06 после
воздействия более высоких значений тока.
PB06 перейдёт в режим сна, если выходная нагрузка отсутствует в
течении 30 секунд. Для того, чтобы включить устройство снова
нажмите кнопку питания.
15
Page 17

Mobile accessories PB06
Q&A
安全機制
輸出短路保護
輸出過流保護
輸出智能保護
安全机制
输出短路保护
输出过流保护
输出智能保护
安全性
短絡回路保護
過電流保護(OCP)
過小電圧保護
안전
단락 방지
과전류 방지
과소전압 방지
狀態
輸出短路保護後,需重新充電以開啟行動電源
3 ~ 6A MAX,保護後需重新充電以開啟行動電源
電源檢測輸出端無負載時,30秒後自動關閉輸出,進入睡眠狀態以節省電路
自身損耗,按壓啟動按鈕即可恢復USB輸出
状态
输出短路保护后,需重新充电以开启行动电源
3 ~ 6A MAX,保护后需重新充电以开启行动电源
电源检测输出端无负载时,30秒后自动关闭输出,进入睡眠状态以节省电路
自身损耗,按压启动按钮即可恢复USB输出
条件
再起動するには、micro USBコネクタをお持ちの装置から5秒間外して
から、再度USBコネクタを「Micro USB入力ポート」に挿してください。
最大3 ~ 6A。OCP作動後に再起動させるには、PB06の再充電が必要です。
PB06は30秒間出力負荷がないとスリープモードに入ります。再度ウェイ
クさせるには電源ボタンを押してください。
조건
장치에서 5초 동안 마이크로 USB 커넥터를 분리한 후 USB 커넥터를
“마이크로 USB 입력 포트”에 다시 연결하여 재부팅하십시오.
3 ~ 6A 최대. OCP가 체결되면 PB06을 켜려면 이를 다시 충전해야 합니다.
30초 동안 출력 부하가 없으면 PB06가 절전 모드로 전환됩니다. 장치의
절전 모드를 해제하려면 전원 버튼을 다시 누르십시오.
16
Page 18

Mobile accessories PB06
Warning
■ Avoid exposing PB06 in high temperature environment such as in the car right under wind shield
during sunny day, or in the glove box of motorcycle.
■ Conductive hardware such as key, wires, power cords should be avoided from touching the input
and output ports of PB06 to prevent short-circuit.
■ Keep PB06 away from fire. Avoid bashing, squeezing, violently shaking, or soaking PB06 in liquid
substance such as water.
■ PB06 Should be stored in clean, dry indoors with good air circulation. Keep PB06 away from
corrosive substances. Please recharge PB06 at least once every three months to extend its lifetime.
■ PB06 does not support charge-discharge simultaneously.
■ When USB output meets Quick Charge 2.0 standard, green indicator will flash to indicate charging
voltage increasing from 5V to 9V.
■ PB06 does not support diesel vehicle.
■ Quick Charge 2.0 compatible models: Samsung Galaxy S6/S6 Edge/Edge+, Note 5, Note 4/Edge,
Nexus 6, Sony Xperia Z4, Z4 Tablet, Z3, Z3 Compact, Z3 Tablet Compact, Z2 Tablet, Motorola
Droid Turbo, Moto X 2014, HTC One M9, HTC One (M8), One Remix (Verizon Mini 2), Desire EYE,
LG G Flex2, G4, Xiaomi Mi3, Mi4, Mi Note, Sharp Aquos Pad, Zeta,Sharp SH01G/02G,Fujitsu
Arrows NX,F-02G,F-03G,F-05F,Kyocera Urbano L03,LeTV One Max,Pro, Panasonic CM-1,and
more.
■ Setzen Sie die PB06 keinen hohen Temperaturen aus; lassen Sie sie beispielsweise nicht im
Sommer unter der Windschutzscheibe des Fahrzeugs oder in der Handschuhbox des Motorrads
liegen.
■ Halten Sie leitende Gegenstände wie Schlüssel, Drähte, Netzkabel usw. von den Ein- und Ausgänge
der PB06 fern; andernfalls könnte es zu einem Kurzschluss kommen.
■ Halten Sie die PB06 von Feuer fern. Achten Sie darauf, die PB06 weder Schlägen noch großem
Druck oder massiven Vibrationen auszusetzen; tauchen Sie sie nicht in Flüssigkeiten wie etwa
Wasser.
■ Die PB06 sollte an einem sauberen, trockenen Ort mit guter Luftzirkulation aufbewahrt werden.
Halten Sie die PB06 von korrosiven Substanzen fern. Bitte laden Sie die PB06 zur Verlängerung
ihrer Lebenszeit mindestens einmal alle drei Monate auf.
■ Die PB06 unterstützt kein gleichzeitiges Auf- und Entladen.
■ Wenn der USB-Ausgang den Quick Charge 2.0-Standard erfüllt, zeigt die grüne Anzeige durch
Blinken an, dass die Ladespannung von 5 V auf 9 V gestiegen ist.
■ Die PB06 unterstützt keine Dieselfahrzeuge.
■ Quick Charge 2.0-kompatible Modelle: Samsung Galaxy S6/S6 Edge/Edge+, Note 5, Note 4/Edge,
Nexus 6, Sony Xperia Z4, Z4 Tablet, Z3, Z3 Compact, Z3 Tablet Compact, Z2 Tablet, Motorola
Droid Turbo, Moto X 2014, HTC One M9, HTC One (M8), One Remix (Verizon Mini 2), Desire EYE,
LG G Flex2, G4, Xiaomi Mi3, Mi4, Mi Note, Sharp Aquos Pad, Zeta,Sharp SH01G/02G, Fujitsu
Arrows NX, F-02G, F-03G, F-05F, Kyocera Urbano L03, LeTV One Max, Pro, Panasonic CM-1 und
weitere.
17
Page 19

Mobile accessories PB06
Warning
■ Evitez d'exposer le PB06 dans un environnement à haute température tel que sous le parebrise
d'une voiture lors d'une journée ensoleillée ou dans la boite à gants d'une moto.
■ Evitez de toucher les ports d'entrée et de sortie du PB06 avec des matériaux conducteurs tels que
les clés, ls câbles ou les câbles d'alimentation pour éviter les courts-circuits.
■ Gardez le PB06 loin du feu. Evitez de le secouer violemment ou de le mouiller avec des substances
liquides comme l'eau.
■ Le PB06 doit être stocké à l'intérieur dans un endroit propre et sec avec une bonne
aération. Conservez votre PB06 loin des substances corrosives. S'il vous plaît, rechargez votre
PB06 au moins une fois tous les 3 mois pour prolonger sa durée de vie.
■ PB06 ne supporte par la charge/décharge simultanée.
■ Quand la sortie USB rentre en Quick Charge 2.0, le voyant vert clignote pour indiquer la
tension croissante de charge de 5V à 9V.
■ PB06 n'est pas compatible avec les véhicules diesel.
■ Quick Charge 2.0 est compatible avec les modèles: Samsung Galaxy S6/S6 Edge/Edge+, Note 5,
Note 4/Edge, Nexus 6, Sony Xperia Z4, Z4 Tablet, Z3, Z3 Compact, Z3 Tablet Compact, Z2 Tablet,
Motorola Droid Turbo, Moto X 2014, HTC One M9, HTC One (M8), One Remix (Verizon Mini 2),
Desire EYE, LG G Flex2, G4, Xiaomi Mi3, Mi4, Mi Note, Sharp Aquos Pad,Zeta,Sharp SH01G/
02G,Fujitsu ArrowsNX,F-02G,F-03G,F-05F,Kyocera Urbano L03,LeTV OneMax,Pro,Panasonic
CM-1,et plus.
■ Evite exponer la PB06 a un entorno con altas temperaturas como en el coche justo bajo el
parabrisas durante un día soleado o en el cofre de la moto.
■ Los objetos conductores como llaves y cables de corriente ó alimentación no deberían tocar
los puertos de entrada y salida de la PB06 para evitar cortocircuitos.
■ Mantenga la PB06 lejos del fuego. Evite golpearla, aplastarla, agitarla violentamente ó empaparla
en líquidos como el agua.
■ La PB06 debería almacenarse en interiores limpios y secos con buena circulación del aire.
Mantenga a la PB06 lejos de sustancias corrosivas. Por favor, recargue la PB06 al menos una
vez cada tres meses para extender su esperanza de vida.
■ La PB06 no acepta cargas-descargas de forma simultánea.
■ Cuando la salida USB cumpla con el estándar Carga Rápida 2.0, el indicador verde parpadeará
para indicar que el voltaje de carga aumenta de 5V a 9V.
■ La PB06 no acepta los vehículos diesel.
■ Modos compatibles con Carga Rápido 2.0: Samsung Galaxy S6/S6 Edge/Edge+, Note 5, Note 4/
Edge, Nexus 6, Sony Xperia Z4, Z4 Tablet, Z3, Z3 Compact, Z3 Tablet Compact, Z2 Tablet, Motorola
Droid Turbo, Moto X 2014, HTC One M9, HTC One (M8), One Remix (Verizon Mini 2), Desire EYE,
LG G Flex2, G4, Xiaomi Mi3, Mi4, Mi Note, Sharp Aquos Pad, Zeta,Sharp SH01G/02G,Fujitsu Arrows
NX,F-02G,F-03G,F-05F,Kyocera Urbano L03,LeTV One Max,Pro, Panasonic CM-1 y otros.
■ Evitare di esporre PB06 ad ambienti a temperature elevate, ad esempio in auto sotto il parabrezza
in una giornata soleggiata o nel vano portaoggetti della moto.
■ Gli elementi conduttivi, come chiavi, cavi e cavi di alimentazione, non devono venire a contatto con
le porte di ingresso e uscita di PB06 per evitare cortocircuito.
■ Tenere PB06 lontano dal fuoco. Evitare di colpire, comprimere, agitare violentemente o
immergere PB06 in sostanze liquide come l'acqua.
■ Conservare PB06 in un ambiente pulito e asciutto con una buona circolazione dell'aria. Tenere
PB06 lontano da sostanze corrosive. Ricaricare PB06 almeno una volta ogni tre mesi per
estenderne la vita utile.
18
Page 20

Mobile accessories PB06
Warning
■ PB06 non supporta la carica/scarica simultanea.
■ Se l'uscita USB soddisfa lo standard Quick Charge 2.0, l'indicatore verde lampeggia per indicare
un incremento della tensione di carica da 5 V a 9 V.
■ PB06 non supporta veicoli diesel.
■ Modelli compatibili Quick Charge 2.0: Samsung Galaxy S6/S6 Edge/Edge+, Note 5, Note 4/Edge,
Nexus 6, Sony Xperia Z4, Z4 Tablet, Z3, Z3 Compact, Z3 Tablet Compact, Z2 Tablet, Motorola
Droid Turbo, Moto X 2014, HTC One M9, HTC One (M8), One Remix (Verizon Mini 2), Desire
EYE, LG G Flex2, G4, Xiaomi Mi3, Mi4, Mi Note, Sharp Aquos Pad, Zeta,Sharp SH01G/02G,Fujitsu
Arrows NX,F-02G,F-03G,F-05F, Kyocera Urbano L03,LeTV One Max,Pro, Panasonic CM-1 e altri.
■ Не храните PB06 в условиях повышенной температуры, например, под ветровым стеклом
автомобиля в солнечный день или в ящике для перчаток в мотоцикле.
■ Для предотвращения короткого замыкания не следует допускать контакта портов PB06
с проводящими инструментами, такими как ключи, провода или шнуры питания.
■ Храните PB06 в дали от огня. Также избегайте попадания на корпус устройства жидкостей.
■ PB06 должен храниться в чистом, сухом помещении с хорошей вентиляцией. Держите PB06
подальше от агрессивных веществ. Пожалуйста, заряжайте PB06 хотя бы один раз в 3 месяца,
чтобы аккумулятор не потерял свои свойства.
■ PB06 не поддерживает одновременную зарядку и разрядку.
■ Если выход USB работает в режиме быстрой зарядки Quick Change 2.0, то будет мигать
зелёный индикатор, указывая на напряжение 5 - 9В.
■ PB06 не поддерживает работу с дизельными автомобилями.
■ Режим быстрой зарядки Quick Charge 2.0 поддерживают следующие модели: Samsung Galaxy
S6/S6 Edge/Edge+, Note 5, Note 4/Edge, Nexus 6, Sony Xperia Z4, Z4 Tablet, Z3, Z3 Compact, Z3
Tablet Compact, Z2 Tablet, Motorola Droid Turbo, Moto X 2014, HTC One M9, HTC One (M8), One
Remix (Verizon Mini 2), Desire EYE, LG G Flex2, G4, Xiaomi Mi3, Mi4, Mi Note, Sharp Aquos Pad,
Zeta, Sharp SH01G/02G, Fujitsu Arrows NX, F-02G,F-03G, F-05F, Kyocera Urbano L03, LeTV One
Max, Pro,Panasonic CM-1 и другие.
■ 請勿將電池放在高溫處,例如中午時汽車擋風玻璃下、機車的置物箱等。
■ 舉凡金屬物如鑰匙、鐵絲、電線等,應避免接觸電池電源插孔以免產生短路情形。
■ 電池應遠離火源且避免受到重擊、擠壓、劇烈震動或泡水。
■ 電池應儲存於-20°C ~ 60°C之清潔、乾燥通風之室內。避免與腐蝕性物質接觸。每三個月充電一次,
以延長產品壽命。
■ 本產品不具備同時充放電功能。
■ 當被充電裝置符合QC2.0規範時,此時綠燈閃爍,輸出電壓從5V升為9V。
■ 本產品不支援柴油車。
■ QC 2.0 快充支援型號: Samsung Galaxy S6/S6 Edge/Edge+, Note 5, Note 4/Edge, Nexus 6, Sony
Xperia Z4, Z4 Tablet, Z3, Z3 Compact, Z3 Tablet Compact, Z2 Tablet, Motorola Droid Turbo,
Moto X 2014, HTC One M9, HTC One (M8), One Remix (Verizon Mini 2), Desire EYE, LG G Flex2,
G4, Xiaomi Mi3, Mi4, Mi Note, Sharp Aquos Pad,Zeta,Sharp SH01G/02G,Fujitsu Arrows
NX,F-02G,F-03G,F-05F,Kyocera Urbano L03,LeTV One Max,Pro,Panasonic CM-1,及其他
■ 请勿将电池放在高温处,例如中午时汽车挡风玻璃下、机车的置物箱等。
■ 举凡金属物如钥匙、铁丝、电线等,应避免接触电池电源插孔以免产生短路情形。
■ 电池应远离火源且避免受到重击、挤压、剧烈震动或泡水。
■ 电池应储存于-20°C ~ 60°C之清洁、干燥通风之室内。避免与腐蚀性物质接触。每三个月充电一次,
以延长产品寿命。
19
Page 21

Mobile accessories PB06
Warning
■ 请勿将电池放在高温处,例如中午时汽车挡风玻璃下、机车的置物箱等。
■ 举凡金属物如钥匙、铁丝、电线等,应避免接触电池电源插孔以免产生短路情形。
■ 电池应远离火源且避免受到重击、挤压、剧烈震动或泡水。
■ 电池应储存于-20°C ~ 60°C之清洁、干燥通风之室内。避免与腐蚀性物质接触。每三个月充电一次,
以延长产品寿命。
■ 本产品不具备同时充放电功能。
■ 当被充电装置符合QC2.0规范时,此时绿灯闪烁,输出电压从5V升为9V。
■ 本产品不支持柴油车。
■ QC 2.0 快充支援型号: Samsung Galaxy S6/S6 Edge/Edge+, Note 5, Note 4/Edge, Nexus 6, Sony
Xperia Z4, Z4 Tablet, Z3, Z3 Compact, Z3 Tablet Compact, Z2 Tablet, Motorola Droid Turbo,
Moto X 2014, HTC One M9, HTC One (M8), One Remix (Verizon Mini 2), Desire EYE, LG G Flex2,
G4, Xiaomi Mi3, Mi4, Mi Note, Sharp Aquos Pad,Zeta,Sharp SH01G/02G,Fujitsu Arrows
NX,F-02G,F-03G,F-05F,Kyocera Urbano L03,LeTV One Max,Pro,Panasonic CM-1,及其他
■ PB06を晴天時の車のフロントガラス越しやバイクのグローブボックスなど高温の環境にさらさない
でください。
■ ショート防止のため、カギ、ワイヤー、電源コードなど導電性の金物は、PB06の入出力ポートに触
れないようにしてください。
■ PB06は火気に近づけないでください。またPB06をたたいたり、ねじったり、激しく振ったり、水な
どの液体に浸けたりしないでください。
■ PB06は、通気の良い清潔で乾燥した屋内に保管してください。PB06は腐食性物質に近づけないでく
ださい。製品寿命を延ばすには、PB06を最低3ヶ月に1度充電してください。
■ PB06は充電と放電の同時実行には対応していません。
■ When USB出力がQuick Charge 2.0規格に合致している場合、緑のインジケーターが点滅して、充電
電圧が5Vから9Vに増加していることを表示します。
■ PB06はディーゼル車には対応しません。
■ Quick Charge 2.0対応モデル:Samsung Galaxy S6/S6 Edge/Edge+, Note 5, Note 4/Edge, Nexus
6, Sony Xperia Z4, Z4 Tablet, Z3, Z3 Compact, Z3 Tablet Compact, Z2 Tablet, Motorola
Droid Turbo, Moto X 2014, HTC One M9, HTC One (M8), One Remix (Verizon Mini 2), Desire
EYE, LG G Flex2, G4, Xiaomi Mi3, Mi4, Mi Note, Sharp Aquos Pad, Zeta,Sharp
SH01G/02G,Fujitsu Arrows NX,F-02G,F-03G,F-05F,Kyocera Urbano L03,LeTV One Max,Pro,
Panasonic CM-1,その他。
■ 맑은 날에 차량의 윈드 실드 바로 아래 또는 오토바이의 글로브 박스 안과 같이 온도가 높은 환경에
PB06을 노출하지 마십시오.
■ 단락을 방지하려면, 키, 와이어, 전원 코드와 같이 전도성이 있는 하드웨어가 PB06의 입력 및 출력
포트와 접촉되지 않아야 합니다.
■ PB06를 불로부터 멀리 하십시오. PB06에 타격을 가하거나, 압착하거나, 심하게 흔들거나, 물과
같은 액체에 담그지 마십시오.
■ PB06은 환기가 잘 되는 깨끗하고 건조한 실내에 보관해야 합니다. PB06을 부식성 물질에서 멀리
하십시오. 수명을 연장하려면 최소 3개월마다 한 번 PB06을 재충전하십시오.
■ PB06은 충전-방전을 동시에 지원하지 마십시오.
■ USB 출력이 Quick Charge 2.0 표준을 충족하면, 녹색 표시등이 깜박이면서 충전 전압이 5V에서 9V
로 증가하고 있다는 것을 표시합니다.
■ PB06은 디젤 차량을 지원하지 않습니다.
■ Quick Charge 2.0 호환 가능 모델: 삼성 갤럭시 S6/S6 엣지/엣지+, 노트 5, 노트 4/엣지, Nexus 6,
Sony Xperia Z4, Z4 Tablet, Z3, Z3 Compact, Z3 Tablet Compact, Z2 Tablet, Motorola Droid
Turbo, Moto X 2014, HTC One M9, HTC One (M8), One Remix (Verizon Mini 2), Desire EYE, LG
G Flex2, G4, Xiaomi Mi3, Mi4, Mi Note, Sharp Aquos Pad, Zeta,Sharp SH01G/02G, Fujitsu
Arrows NX, F-02G, F-03G, F-05F, Kyocera Urbano L03, LeTV One Max, Pro, Panasonic CM-1
등.
20
Page 22

Mobile accessories PB06
Warranty Information
This product has a limited 1 year warranty in North America and Australia.
For information on warranty periods in other regions, please contact your reseller or SilverStone authorized distributor.
Warranty terms & conditions
1. Product component defects or damages resulted from defective production is covered under warranty.
Defects or damages with the following conditions will be fixed or replaced under SilverStone Technology’s jurisdiction.
a) Usage in accordance with instructions provided in this manual, with no misuse, overuse, or other inappropriate actions.
b) Damage not caused by natural disaster (thunder, fire, earthquake, flood, salt, wind, insect, animals, etc…)
c) Product is not disassembled, modified, or fixed. Components not disassembled or replaced.
d) Warranty mark/stickers are not removed or broken.
Loss or damages resulted from conditions other than ones listed above are not covered under warranty.
2. Under warranty, SilverStone Technology’s maximum liability is limited to the current market value for the product (depreciated value, excluding
shipping, handling, and other fees). SilverStone Technology is not responsible for other damages or loss associated with the use of product.
3. Under warranty, SilverStone Technology is obligated to repair or replace its defective products. Under no circumstances will SilverStone
Technology be liable for damages in connection with the sale, purchase, or use including but not limited to loss of data, loss of business, loss of
profits, loss of use of the product or incidental or consequential damage whether or not foreseeable and whether or not based on breach of warranty,
contract or negligence, even if SilverStone Technology has been advised of the possibility of such damages.
4. Warranty covers only the original purchaser through authorized SilverStone distributors and resellers and is not transferable to a second hand
purchaser.
5. You must provide sales receipt or invoice with clear indication of purchase date to determine warranty eligibility.
6. If a problem develops during the warranty period, please contact your retailer/reseller/SilverStone authorized distributors or SilverStone
http://www.silverstonetek.com.
Please note that: (i) You must provide proof of original purchase of the product by a dated itemized receipt; (ii) You shall bear the cost of shipping
(or otherwise transporting) the product to SilverStone authorized distributors. SilverStone authorized distributors will bear the cost of shipping
(or otherwise transporting) the product back to you after completing the warranty service; (iii) Before you send the product, you must be issued a
Return Merchandise Authorization (“RMA”) number from SilverStone. Updated warranty information will be posted on SilverStone’s official website.
Please visit http://www.silverstonetek.com for the latest updates.
Additional info & contacts
For North America (usasupport@silverstonetek.com)
SilverStone Technology in North America may repair or replace defective product with refurbished product that is not new but has been
functionally tested.
Replacement product will be warranted for remainder of the warranty period or thirty days, whichever is longer. All products
should be sent back to the place of purchase if it is within 30 days of purchase, after 30 days, customers need to initiate RMA
procedure with SilverStone Technology in USA by first downloading the “USA RMA form for end-users” form from the below link
and follow its instructions.
http://silverstonetek.com/contactus.php
21
Page 23

Mobile accessories PB06
Warranty Information
For Australia only (support@silverstonetek.com)
Our goods come with guarantees that cannot be excluded under the Australian Consumer Law.
You are entitled to a replacement or refund for a major failure and for compensation for any other reasonably foreseeable loss or
damage.
You are also entitled to have the goods repaired or replaced if the goods fail to be of acceptable quality and the failure does not
amount to a major failure.
Please refer to above “Warranty terms & conditions” for further warranty details.
SilverStone Technology Co., Ltd. 12F No. 168 Jiankang Rd., Zhonghe Dist.,
New Taipei City 235 Taiwan R.O.C. + 886-2-8228-1238
(standard international call charges apply)
For Europe (support.eu@silverstonetek.de)
For all other regions (support@silverstonetek.com)
22
Page 24

G11226480
 Loading...