

Page 1
Mammoth Series
1
f
MMS01
MS0
Military-grade IP65 water resistant and dust proof
external 2.5” drive enclosure with USB 3.0
ter resistant and dust proo
Page 2
Mammoth Series
01
UASP i
dditi
pos
S
MMS01
Product Overview
Introduction
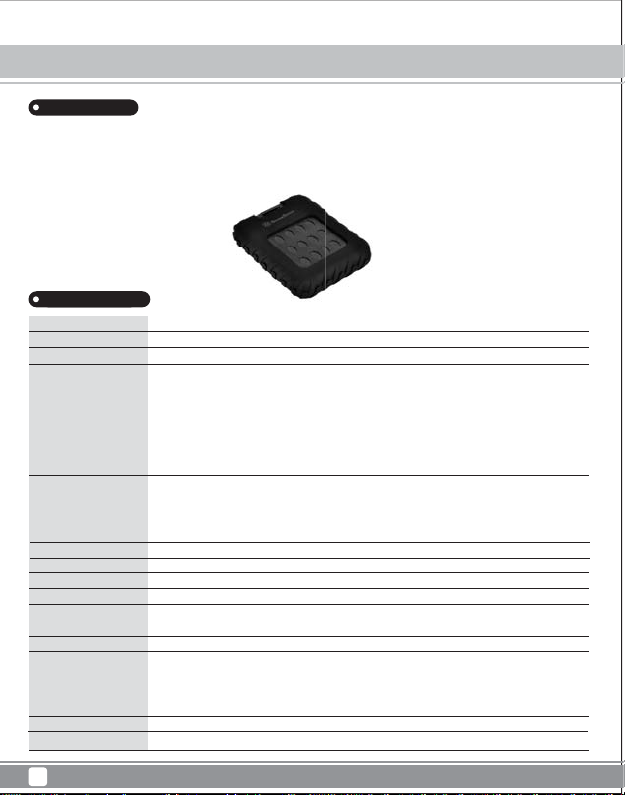
The MMS01 is a military-grade external 2.5” drive enclosure with USB 3.0 capability. Its thick, protective enclosure is certified for IP65 standard
so it is dust proof and water resistant. Under multiple testing regime based on US military standard, the MMS01 has also proven to be immune
or resistant to rapid temperature change, vibration, 1.2 meter drop, salt spray, sand, and fungal growth. Despite the extraordinary durability,
there are no sacrifices in performance as the MMS01 supports UASP in addition to its already speedy USB 3.0 interface. If you are looking for
an enclosure that can protect your drive in the harshest environment possible, the MMS01 is the one to get.
Specifications
Model No
Enclosure material
Color
Military Standard
Ingress protection
HDD size support
HDD interface
Enclosure interface
Transfer speed
Support OS
Extra function
Environment
Net Weight
Dimension
SST-MMS01B
ABS with silicone sleeve
Black
MIL-STD-810G, Method 503.5 (thermal shock)
MIL-STD-810G, Method 507.5 (humidity)
MIL-STD-810G, Method 508.6 (fungus)
MIL-STD-810G, Method 509.5 (salt spray)
MIL-STD-810G, Method 510.5, Procedure I (sand and dust)
MIL-STD-810G, Method 514.6 (vibration)
MIL-STD-810G, Method 516.6 (shock)
IP6X
Dustproof: No ingress of dust; complete protection against contact (dust tight)
IPX5
Water resistant: Water projected by a nozzle (6.3 mm) against enclosure from any direction shall have no harmful effects
7mm or 9.5mm 2.5” SATA HDD/SSD
SATA III / II / I
Micro USB 3.0 type B (compatible with USB 2.0/USB 1.1)
Max. 5Gbps
Microsoft Windows 10/8.1/8/7/VISTA (32 and 64 bit) or future release versions
Mac OS 10.6 or future release versions
UASP
Operating Temperature: 5°C ~ 35°C
Operating Humidity: 20%RH ~ 80%RH
Storage Temperature: -20°C ~ 50°C
Storage Humidity: 20%RH ~ 80%RH
280g ± 20g
100mm (W) x 20mm (H) x 135 mm (D) (without silicone sleeve)
supports
hest environment
n a
sible, the MM
on to its a
1
Page 3
Instruction
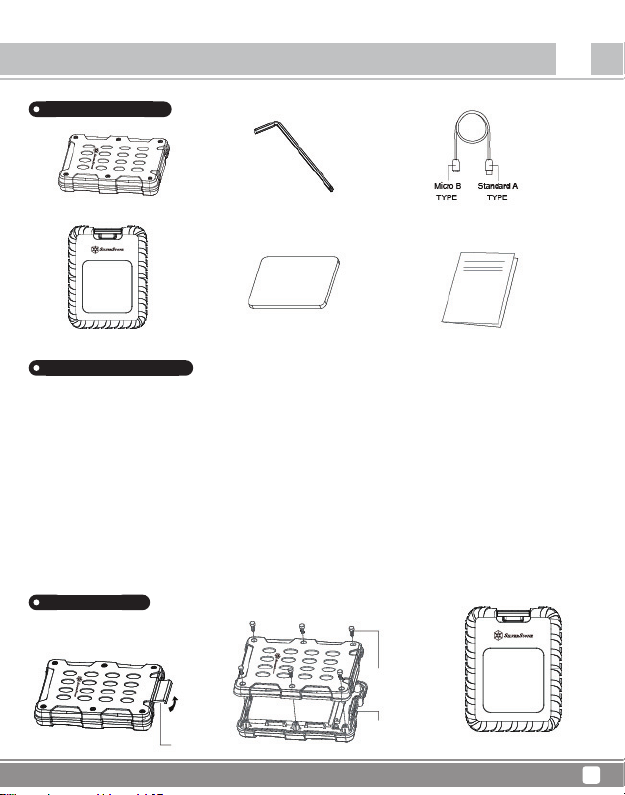
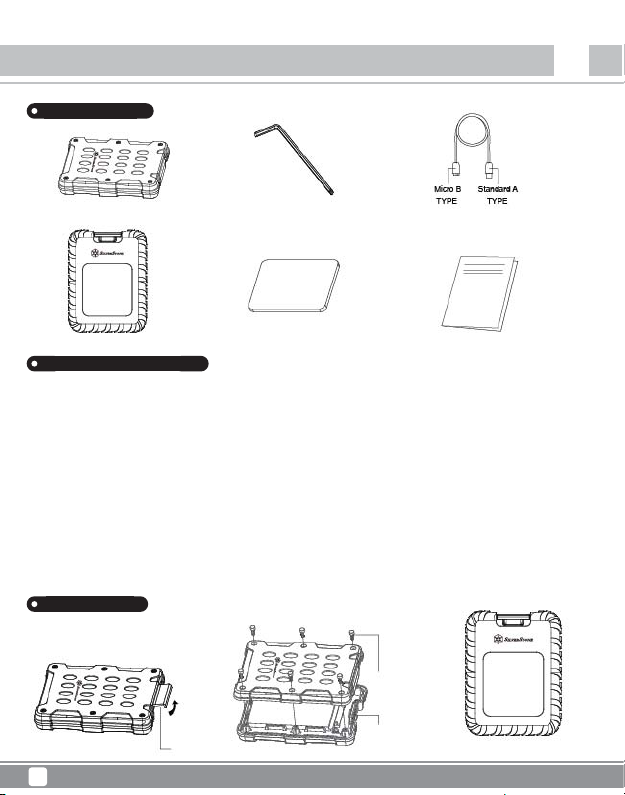
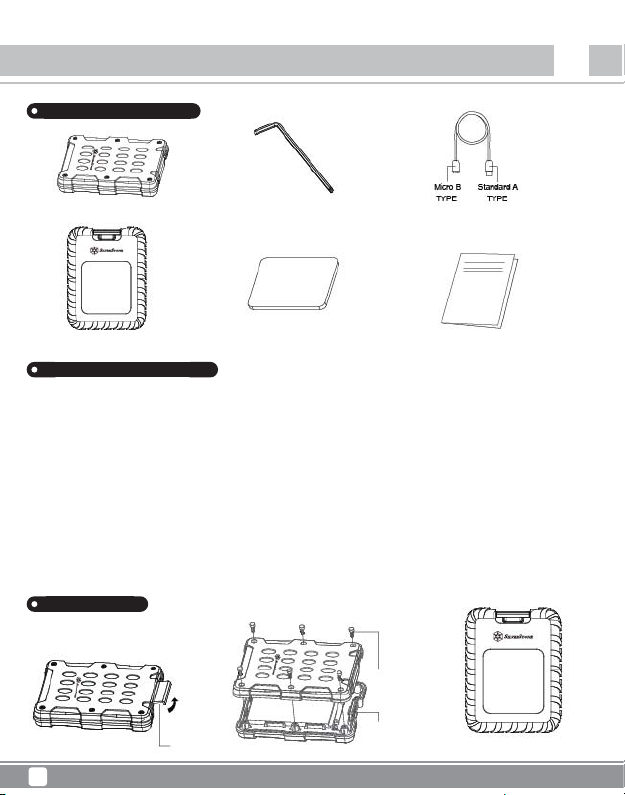
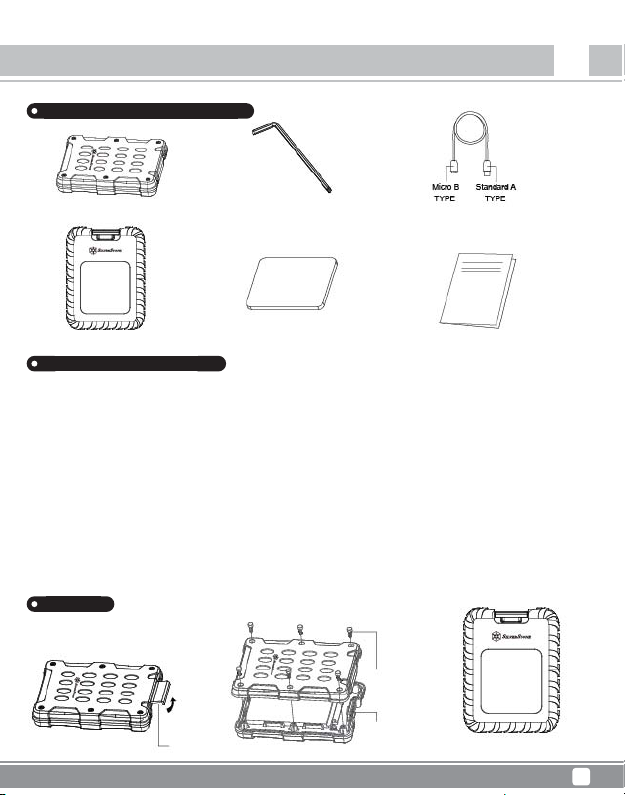
Package Content
Mammoth Series
MMS01
EN
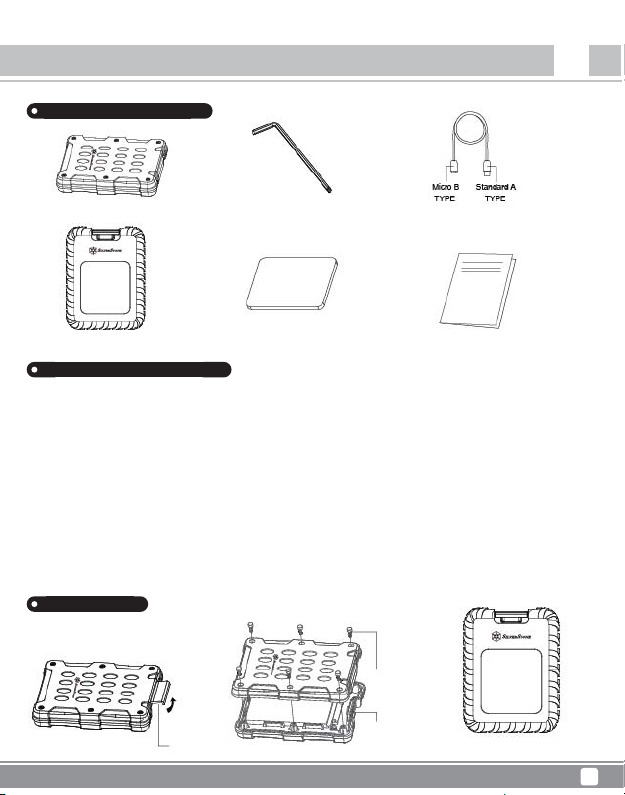
MMS01B enclosure
Protective sleeve
Anti-vibration pad
Product Description
Application for 2.5”SATA HDD/SSD( SATA III 6Gbps /SATA II 3.0Gbps /SATA I 1.5Gbps)
■
This product is designed for SATA HDD/SSD only and is not applicable for PATA(IDE) based HDD.
■
This product can support hard drives with more than 4TB capacity.
■
Windows XP operating system limits HDD capacity to 2TB.
■
Loading / Removing hard drive may cause slight scratching.
The following USB Host controller models have been validated.
■
Intel H87 chipset USB 3.0 Host controller
■
ETron EJ168 USB 3.0 Host controller
■
Intel Z77 chipset USB 3.0 Host controller
■
ASMedia ASM1042 USB 3.0 Host controller
■
Frescologic FL1100 USB 3.0 Host controller
■
ASMedia ASM1142 USB 3.1 Host controller
■
FL1100 USB 3.0 Host controller
※Please update each host controller (adapter) driver to the latest version.
Appearance
Back
Latch
Screw
Micro USB 3.0
connector
Micro USB3.0 cableSix hand corner
User manual
Protective sleeve
2
Page 4
Mammoth Series
MMS01
Instruction
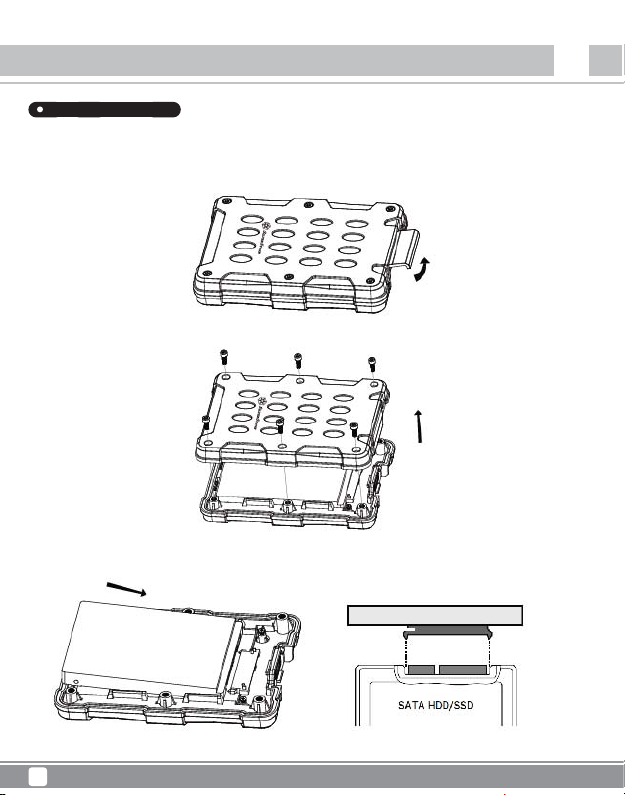
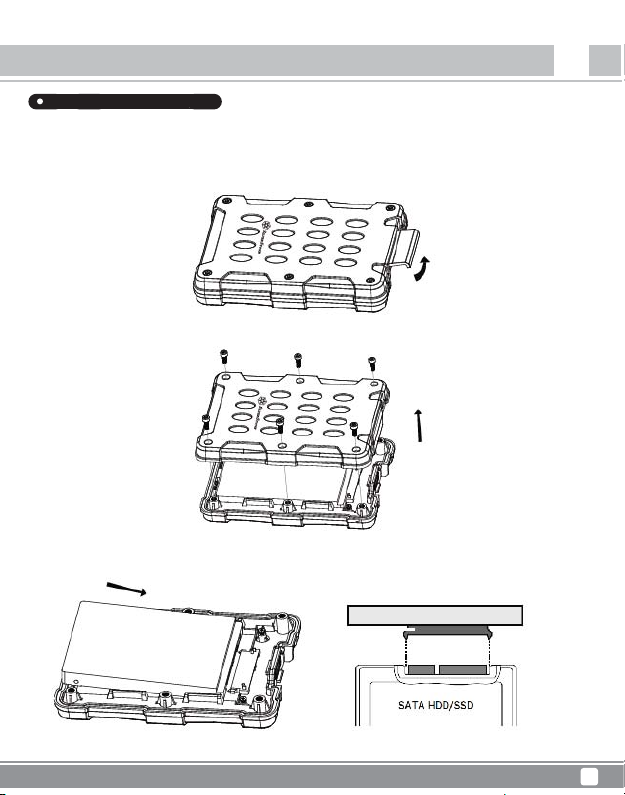
Installation Guide
Package Content
■ When mounting a hard drive, please be mindful of static electricity as it can cause device malfunction. Please touch other metal objects to
discharge or wear antistatic gloves before handling hard drive.
■ If hard drive already contains data, please backup it up before installation to prevent data loss.
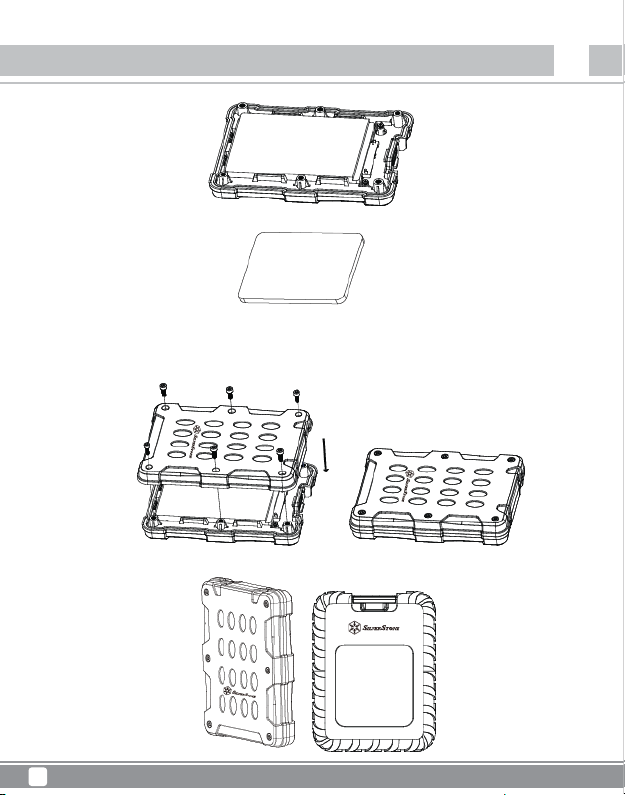
1.Open the latch
2.Using included hex key to remove the hex screws for opening the MMS01 enclosure
3.Install HDD or SSD into MMS01 enclosure
EN
3
Page 5

Mammoth Series
Instruction
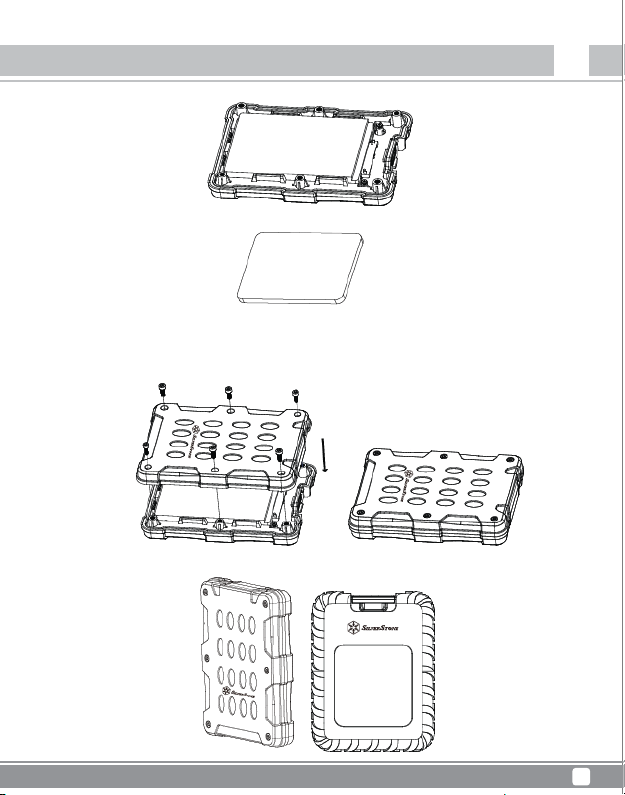
4. Drive securely seated
4.1 Installation the crash pad
Anti-vibration pad
* If 7mm thick 2.5” HDD/SSD is installed, please place the anti-vibration pad on it. For 9.5mm thick 2.5” HDD/SSD, it is not necessary to
use the anti-vibration pad.
5. Reinstall all hex screws
6. Slip the protective sleeve over the enclosure
MMS01
EN
4
Page 6
Mammoth Series
MMS01
Caution
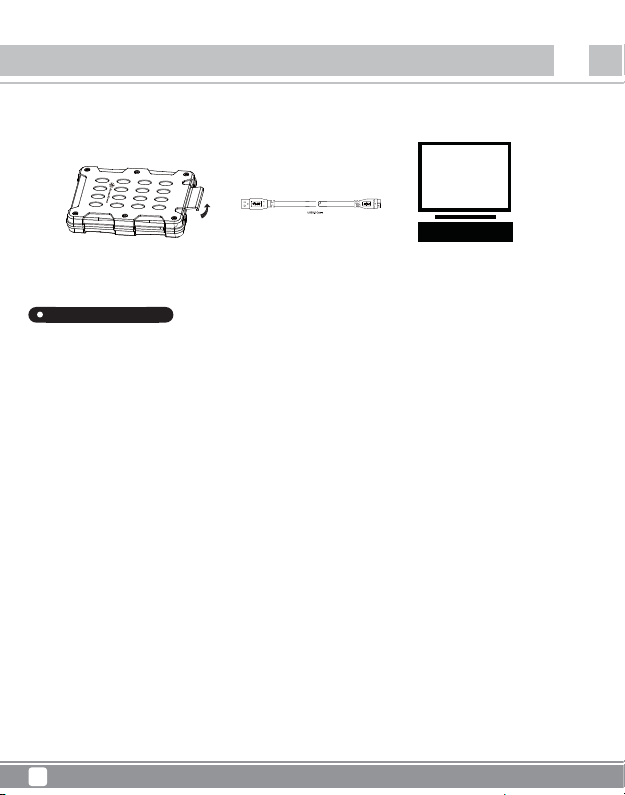
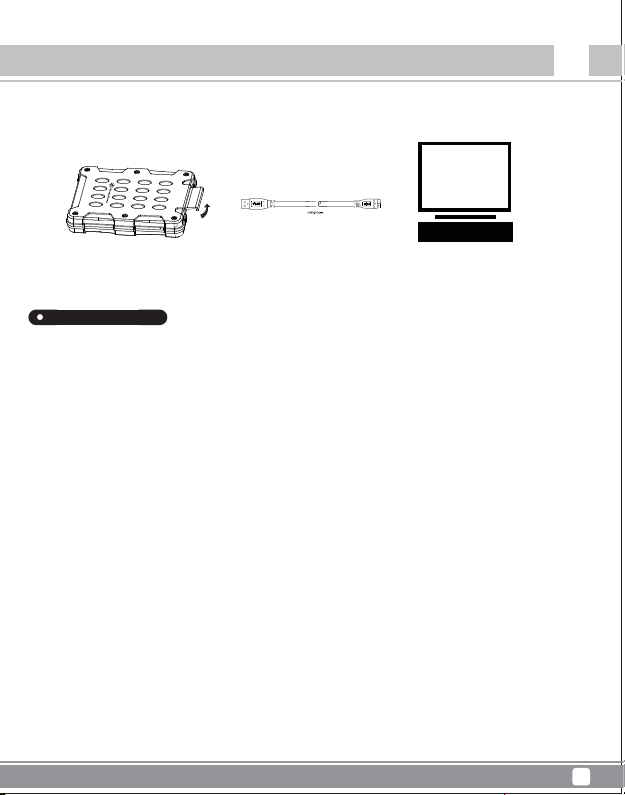
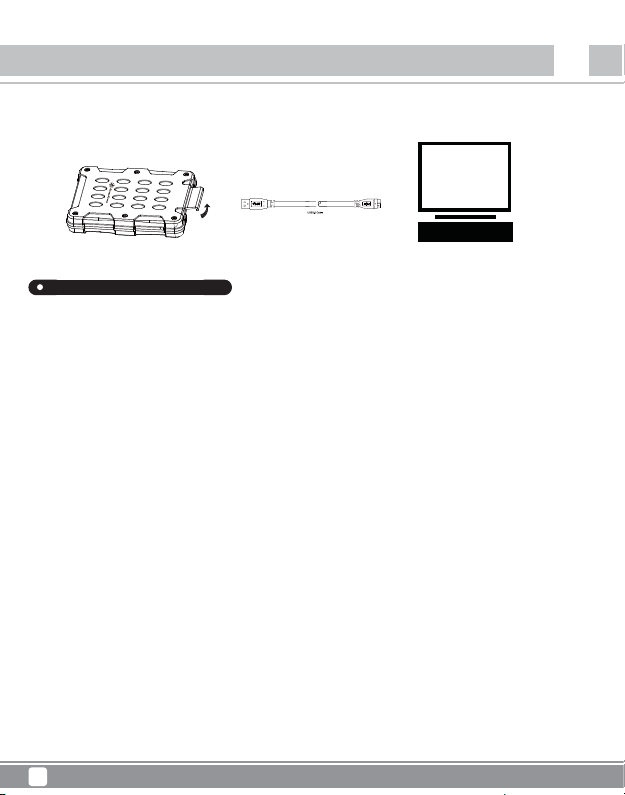
7. Connect MMS01 to your computer
Troubleshooting
Package Content
If a suspected case of failure occurs, please check for the following:
■ My device is recognized as USB 2.0, not USB 3.0?
→Try to power off your computer and connect the cable again.
■ Only 2TB capacity can be identified when using a drive over 2TB (Windows Vista/7/8/10)?
→Please use GPT format for over 2TB capacity.
■ When connected as a USB 3.0 device, my system cannot recognize it after a period of time?
→Please update the USB 3.0 driver.
■ Why some drives don’t show up in “My Computer” (Windows) ?
→Make sure the hard disk letter is assigned in C ~ Z range.
■ When using a new drive, it cannot be recognized by my OS?
→Please format the drive.
■ When using a 2TB drive, the capacity in the OS only shows 1.8TB?
→Most hard drive manufacturers use decimal, but the OS uses binary to calculate drive capacity.
Due to different calculation methods, you will see 200GB less capacity on a 2TB drive.
EN
5
Page 7
Mammoth Series
Caution
FAQ
Q:Can I use drives that already have existing data?
A:Mostly yes, but depending on the environment in which the drive was previously used, there may be incompatibility,
so to avoid unpredictable data loss, please backup first before using it in MMS01B.
Q:What kinds of hard drives are supported?
A:The product can support 2.5” SATA HDD/SSD, but not IDE, SAS, SCSI HDD.
Q:How many drive insertion cycles can MMS01B withstand?
A:This product’s SATA connector durability is rated up to 10,000 cycles.
Q:Why does disk format take so much time in Windows?
A:You can select quick format when performing the format function.
Q:Why can’t my drive access S.M.A.R.T information?
A:This product does not support S.M.A.R.T function.
Q: Does MMS01B support USAP function?
A: Yes, but your system also needs to support USAP for it to work.
MMS01
EN
6
Page 8
Mammoth Series
Einleitung
Lieferumfang
MMS01
DE
MMS01B-Gehäuse
Protective sleeve
Vibrationsdämpfendes Polster
Produktbeschreibung
Unterstützt 2,5-Zoll-SATA-Festplatten/-SSDs (SATA III, 6 Gb/s /SATA II, 3,0 Gb/s /SATA I, 1,5 Gb/s)
■
Dieses Produkt wurde nur für SATA-Festplatten/-SSDs entwickelt und unterstützt keine PATA-
(IDE-)basierten Datenträger.
■
Dieses Produkt kann Datenträger mit mehr als 4 TB unterstützen.
■
Das Windows XP-Betriebssystem beschränkt die Laufwerkskapazität auf 2 TB.
■
Beim Installieren/Entfernen eines Datenträgers kann dieser leicht am Produkt kratzen.
Folgende USB-Host-Controller-Modelle wurden überprüft.
■
USB 3.0-Host-Controller mit Intel H87-Chipsatz
■
USB 3.0-Host-Controller ETron EJ168
■
USB 3.0-Host-Controller mit Intel Z77-Chipsatz
■
USB 3.0-Host-Controller ASMedia ASM1042
■
USB 3.0-Host-Controller Frescologic FL1100
■
USB 3.1-Host-Controller ASMedia ASM1142
■
USB 3.0-Host-Controller FL1100
*Bitte aktualisieren Sie den Treiber des jeweiligen Host-Controllers (Adapters) auf die neueste Version.
Appearance
Zurück
Sechskantschrauben
Riegel
7
Micro USB 3.0-Kabel
Micro USB 3.0-KabelSix hand corner
Bedienungsanleitung
Protective sleeve
Page 9
Mammoth Series
MMS01
Einleitung
Installationsanleitung
Package Content
■ Bitte ergreifen Sie bei der Installation eines Datenträgers entsprechende Maßnahmen aufgrund statischer Elektrizität, da diese das Gerät
beschädigen kann. Berühren Sie zum Entladen andere metallische Objekte oder legen Sie ein Antistatik-Armband an, bevor Sie den
Datenträger installieren.
■ Falls der Datenträger bereits Daten enthält, sichern Sie diese zur Vermeidung von Datenverlust bitte vor der Installation.
1. Riegel öffnen
2.Mit dem mitgelieferten Sechskantschlüssel Sechskantschrauben zum Öffnen des MMS01-Gehäuses entfernen
3. Festplatte oder SSD in MMS01-Gehäuse installieren
DE
8
Page 10
Mammoth Series
MMS01
Einleitung
4.Laufwerk sicher installiert
4.1 Vibrationsdämpfendes Polster installieren
Vibrationsdämpfendes Polster
* Falls eine 7 mm dicke 2,5-Zoll-Festplatte/-SSD installiert wird, platzieren Sie bitte das vibrationsdämpfende Polster darauf. Bei einer
9,5 mm dicken 2,5-Zoll-Festplatte/-SSD muss das vibrationsdämpfende Polster nicht verwendet werden.
5. Alle Sechskantschrauben wieder installieren
6. Schutzhülle über das Gehäuse schieben
DE
9
Page 11
Mammoth Series
Achtung
7. MMS01 mit Ihrem Computer verbinden
Problemlösung
Package Content
Wenn ein Fehler auftritt, prüfen Sie bitte Folgendes:
■ Mein Gerät wird als USB 2.0-, nicht als USB 3.0-Gerät erkannt?
→Versuchen Sie das Problem zu beheben, indem Sie Ihren Computer ausschalten und das Kabel erneut anschließen.
■ Warum können bei Verwendung eines Datenträgers mit mehr als 2 TB nur 2 TB Kapazität identifiziert werden (Windows Vista/ 7/ 8/ 10)?
→Bitte verwenden Sie bei Datenträgern mit einer Kapazität von mehr als 2 TB das GPT-Format.
■ Warum kann mein System das Gerät bei Verbindung per USB 3.0 nach einiger Zeit nicht mehr erkennen?
→Bitte aktualisieren Sie den USB 3.0-Treiber.
■ Warum erscheinen einige Laufwerke nicht unter „My Computer (Arbeitsplatz)“ (Windows)?
→Stellen Sie sicher, dass ein Laufwerksbuchstabe im Bereich von C bis Z zugewiesen wurde.
■ Warum kann das Gerät bei Verwendung eines neuen Datenträgers nicht von meinem Betriebssystem erkannt werden?
→Bitte formatieren Sie den Datenträger.
■ Warum wird ein 2-TB-Datenträger im Betriebssystem nur mit einer Kapazität von 1,8 TB angezeigt?
→Die meisten Datenträgerhersteller nutzen Dezimalzahlen, während das Betriebssystem die Laufwerkskapazität anhand von Binärwerten
berechnet. Aufgrund unterschiedlicher Berechnungsmethoden werden bei einem 2-TB-Datenträger 200 GB weniger angezeigt.
MMS01
DE
10
Page 12

Mammoth Series
Achtung
MMS01
DE
Häufig gestellte Fragen
F:Kann ich Datenträger nutzen, auf denen sich bereits Daten befinden?
A:Meist ist dies möglich; allerdings können je nach Umgebung, in der der Datenträger zuvor genutzt wurde, Kompatibilitätsprobleme auftreten.
Bitte sichern Sie Daten daher vor Verwendung des Datenträgers im MMS01B.
F:Welche Datenträgerarten werden unterstützt?
A:Das Produkt funktioniert mit 2,5-Zoll-SATA-Festplatten/-SSDs; IDE-, SAS- oder SCSI-Datenträger werden hingegen nicht unterstützt.
F:Wie viele Datenträger-Installationszyklen übersteht die MMS01B?
A:SATA-Anschluss dieses Produktes hält bis zu 10.000 Zyklen stand.
F:Warum dauert die Datenträgerformatierung unter Windows so lange?
A:Sie können den Vorgang durch Auswahl der Schnellformatierung-Option beschleunigen.
F:Warum kann mein Datenträger nicht auf S.M.A.R.T.-Informationen zugreifen?
A:Dieses Produkt unterstützt die S.M.A.R.T.-Funktion nicht.
F:Unterstützt MMS01B die UASP-Funktion?
A:Ja, allerdings muss auch Ihr System UASP unterstützen.
11
Page 13
Instruction
Contenido del paquete
Mammoth Series
MMS01
ES
Carcasa MMS01B
Protective sleeve
Vibrationsdämpfendes Polster
Descripción del producto
Este producto soporta HDD/SSD SATA 6Gbps. Si el HDD solo soporta SATA II 3,0Gbps, la
velocidad de transferencia se limitará a 3,0Gbps
■
Este producto está diseñado solo para HDD/SSD SATA y no es adecuado para HDD tipo PATA (IDE).
■
Este producto puede soportar discos duros con más de 4TB de capacidad.
■
El sistema operativo Windows XP limita la capacidad del HDD a 2TB.
■
Conectar/Desconectar el disco duro podría provocar ligeros arañazos.
Los siguientes modelos de controlador USB han sido comprobados
■
Controlador Intel H87 chipset USB 3.0
■
Controlador ETron EJ168 USB 3.0
■
Controlador Intel Z77 chipset USB 3.0
■
Controlador ASMedia ASM1042 USB 3.0
■
Controlador Frescologic FL1100 USB 3.0
■
Controlador ASMedia ASM1142 USB 3.1
■
Controlador FL1100 USB 3.0
※Por favor, actualice cada controlador (adaptador) a la última versión.
Apariencia
Atrás
① Tornillo
② Micro Cable
① Latch
USB 3.0
Micro Cable USB 3.0Six hand corner
User manual
Protective sleeve
12
Page 14

Mammoth Series
Introducción
Guía de instalación
Package Content
■ Cuando monte un disco duro, por favor tenga en cuenta la electricidad estática, ya que podría causar un mal funcionamiento del dispositivo.
Por favor, toque otros objetos de metal para descargarse o lleve guantes antiestáticos antes de manejar el disco duro.
■ Si el disco duro ya contiene datos, por favor haga una copia de seguridad antes de la instalación para evitar pérdida de datos.
1.Abra el pestillo
2.Use la llave hexagonal incluida para retirar los tornillos hexagonales para abrir la carcasa MMS01
3.Instale el HDD o SSD en la carcasa MMS01
MMS01
ES
13
Page 15

Mammoth Series
Introducción
4.Disco fijado
4.1 Instale la almohadilla anti-vibración
Almohadilla anti-vibración
* Si se instala un HDD/SDD 2,5” de 7mm de grosor, por favor coloque en él la almohadilla anti-vibración. Para un HDD/SSD 2,5” de
9,5mm de grosor, no es necesario usar la almohadilla anti-vibración.
5.Reinstale todos los tornillos hexagonales
6.Deslice la funda protectora sobre la carcasa
MMS01
ES
14
Page 16
Mammoth Series
MMS01
ATENCIÓN
7.Conecte la MMS01 a su ordenador
Resolución de problemas
Package Content
Si sospecha que existe un posible fallo, por favor compruebe lo siguiente:
■Mi dispositivo es reconocido como USB 2.0, no USB 3.0?
→Intente apagar su ordenador y vuelva a conectar el cable.
■Solo se puede identificar una capacidad de 2TB cuando se usa un dispositivo de más de 2TB (Windows/Vista/7/8/10) ?
→Por favor, use un formato GPT para una capacidad superior a 2TB
■Cuando se conecta como un dispositivo USB 3.0, mi sistema no puede reconocerlo tras cierto periodo de tiempo?
→Por favor, actualice el controlador USB 3.0
■¿Por qué no aparecen algunos dispositivos en “Mi PC” (Windows)?
→Asegúrese de que la letra del disco duro está asignada en el rango C ~ Z.
■Cuando se usa un nuevo dispositivo, no se puede reconocer por mi SO?
→Por favor, formatee el dispositivo.
■Cuando se usa un dispositivo de 2TB, la capacidad en el SO solo muestra 1,8TB?
→La mayoría de los fabricantes de discos duros usan el sistema decimal, pero el SO usa el sistema duodecimal para calcular la
capacidad del disco.
Debido a los diferentes métodos de cálculo, verá 200GB menos de capacidad en un disco de 2TB.
ES
15
Page 17
Mammoth Series
MMS01
ATENCIÓN
Preguntas frecuentes
P: ¿Puedo usar discos que ya tienen datos?
R: Sí en general, pero dependiendo de dónde fuera usado antes el disco, podría haber incompatibilidad, luego para evitar una pérdida de
datos impredecible, por favor haga una copia de seguridad antes de usarlo en la MMS01B.
P: ¿Qué tipo de discos duros son aceptados?
R: El producto puede aceptar HDD/SSD SATA de 2,5” y 3,5”, pero no HDD IDE, SAS, SCSI.
P: ¿Cuántos ciclos de inserción de discos puede soportar el MMS01B?
R: La resistencia del conector SATA de este producto está establecida en 10.000 ciclos.
P: ¿Por qué hace falta tanto tiempo para el formateo en Windows?
R: Puede seleccionar formateo rápido cuando realice la función de formateo.
P: ¿Por qué no puede acceder mi dispositivo a la información SMART?
R: Este producto no acepta la función SMART
P: ¿Acepta la MMS01B la función USAP?
R: Si, pero su sistema también necesita soportar USAP para que funcione.
ES
16
Page 18
Mammoth Series
Instruction
Contenu de la boîte
MMS01
FR
Boîtier MMS01B
Protective sleeve
Tampon anti-vibrations
Micro Câble USB 3.0Six hand corner
Manuel de l'utilisateur
Description du produit
Application pour disque dur/SSD SATA 2,5" (SATA III 6 Gbit/s / SATA II 3,0 Gbit/s / SATA I 1,5
Gbit/s)
■
Ce produit est conçu pour les disques durs/SDD SATA uniquement et n'est pas applicable pour les disques durs PATA(IDE).
■
Ce produit peut prendre en charge les disques durs avec une capacité supérieure à 4 To.
■
Le système d'exploitation Windows XP limite la capacité des disques durs à 2 To.
■
Charger / Retirer le disque dur peut causer de légères éraflures.
Les modèles suivants de contrôleurs d'hôte USB ont été validés.
■
Contrôleur d'hôte USB 3.0 à chipset Intel H87
■
Contrôleur d'hôte USB 3.0 ETron EJ168
■
Contrôleur d'hôte USB 3.0 à chipset Intel Z77
■
Contrôleur d'hôte USB 3.0 ASMedia ASM1042
■
Contrôleur d'hôte USB 3.0 Frescologic FL1100
■
Contrôleur d'hôte USB 3.1 ASMedia ASM1142
■
Contrôleur d'hôte USB 3.0 FL1100
※Veuillez mettre à jour le pilote de chaque contrôleur d'hôte (adaptateur) à la dernière version.
Appearance
Arrière
① Tornillo
② Micro Câble
① Loquet
17
USB 3.0
Protective sleeve
Page 19

Mammoth Series
MMS01
Instruction
Guide d'installation
Package Content
■ Lors du montage d'un disque dur, veuillez être attentif à l'électricité statique car elle peut causer un dysfonctionnement de l'appareil.
Veuillez toucher d'autres objets métalliques pour vous décharger ou porter des gants antistatiques avant de manipuler le disque dur.
■ Si le disque dur contient déjà des données, veuillez le sauvegarder avant l'installation pour éviter la perte des données.
1.Ouvrez le loquet
2.Utilisez la clé hexagonale fournie pour retirer les vis hexagonales afin d'ouvrir le boîtier MMS01
3.Installez le disque dur ou le SSD dans le boîtier MMS01
FR
18
Page 20

Mammoth Series
MMS01
Instruction
4.Lecteur bien placé
4.1 Installer le tampon anti-vibrations
Tampon anti-vibrations
* Si un disque dur/disque SSD 2,5” de 7 mm d'épaisseur est installé, veuillez placer le tampon anti-vibrations dessus. Pour un disque
dur/disque SSD 2,5” de 9,5 mm d'épaisseur, il n'est pas nécessaire d'utiliser le tampon anti-vibrations
5.Réinstallez toutes les vis hexagonales
6.Faites glisser la housse de protection sur le boîtier
FR
19
Page 21

Mammoth Series
MMS01
Attention
7.Connectez le MMS01 à votre ordinateur
Dépannage
Package Content
Si un cas présumé de panne se produit, veuillez vérifier ce qui suit :
■ Mon périphérique est reconnu en USB 2.0, et non en USB 3.0?
→Essayez de mettre hors tension votre ordinateur et de rebrancher le câble.
■ Une capacité de seulement 2 To peut être identifiée lors de l'utilisation d'un disque de plus de 2 To (Windows Vista/7/8/10)?
→Veuillez utiliser un format GPT pour une capacité supérieure à 2 To.
■ Cuando se conecta como un dispositivo USB 3.0, mi sistema no puede reconocerlo tras cierto periodo de tiempo?
→Por favor, actualice el controlador USB 3.0
■ Por qué no aparecen algunos dispositivos en “Mi PC” (Windows)?
→Asegúrese de que la letra del disco duro está asignada en el rango C ~ Z.
■ Cuando se usa un nuevo dispositivo, no se puede reconocer por mi SO?
→Por favor, formatee el dispositivo.
■ Lors de l'utilisation d'un disque de 2 To, la capacité dans le système d'exploitation indique seulement 1,8 To ?
→La plupart des fabricants de disques durs utilisent le système décimal, mais le système d'exploitation utilise le système binaire pour
calculer la capacité du disque.
En raison des méthodes de calcul différentes, vous verrez une capacité inférieure de 200 Go sur un disque de 2 To.
FR
20
Page 22

Mammoth Series
Attention
MMS01
FR
FAQ
Q:Puis-je utiliser des disques qui contiennent déjà des données existantes ?
A:Oui dans la plupart des cas, mais en fonction de l'environnement dans lequel le disque a été précédemment utilisé, il peut y avoir une
incompatibilité, par conséquent pour éviter une perte de données imprévisible, veuillez d'abord effectuer une sauvegarde avant de l'utiliser
dans le MMS01B.
Q:Quels types de disques durs sont pris en charge?
A:Le produit peut prendre en charge les disques durs/SSD SATA 2,5”, mais pas les disques durs IDE, SAS, SCSI.
Q:Combien de cycles d'insertion de disques le MMS01B peut-il supporter ?
A:La durabilité du connecteur SATA de ce produit est évaluée à jusqu'à 10 000 cycles.
Q:Pourquoi le formatage de disque prend-il tellement de temps dans Windows ?
R:Vous pouvez sélectionner le formatage rapide lors de l'exécution de la fonction de formatage.
Q:Pourquoi mon disque ne peut-il pas accéder aux informations S.M.A.R.T ?
R:Ce produit ne prend pas en charge la fonction S.M.A.R.T.
Q : Le MMS01B prend-il en charge la fonction USAP ?
R : Oui, mais votre système doit également prendre en charge USAP pour lui permettre de fonctionner.
21
Page 23
Introduzione
Contenuto della confezione
Mammoth Series
MMS01
IT
Box MMS01B
Protective sleeve
Gommini antivibrazione
Descrizione del prodotto
Per HDD/SSD SATA da 2,5” (SATA III 6Gbps / SATA II 3,0Gbps / SATA I 1,5Gbps)
■
Questo prodotto è progettato solo per HDD/SSD SATA e non è applicabile per HDD PATA (IDE).
■
Questo prodotto può supportare dischi rigidi con capacità superiore ai 4TB.
■
Il sistema operativo Windows XP limita la capacità HDD a 2 TB.
■
L’inserimento / rimozione del disco rigido può causare lievi graffi.
I seguenti modelli di controller host USB sono stati ratificati.
■
Controller host USB 3.0 Intel H87 chipset
■
Controller host USB 3.0 ETron EJ168
■
Controller host USB 3.0 Intel Z77 chipset
■
Controller host USB 3.0 ASMedia ASM1042
■
Controller host USB 3.0 Frescologic FL1100
■
Controller host USB 3.1 ASMedia ASM1142
■
Controller host USB 3.0 FL1100
※Veuillez mettre à jour le pilote de chaque contrôleur d'hôte (adaptateur) à la dernière version.
Aspetto
Indietro
Chiavistello
Vite
Micro Cavo USB 3.0
Micro Cavo USB 3.0Six hand corner
Manuale d’uso
Protective sleeve
22
Page 24

Mammoth Series
MMS01
Introduzione
Guida d'installazione
Package Content
■ Quando si installa un disco rigido, prestare attenzione all’elettricità statica in quanto può causare guasti al dispositivo. Toccare altri oggetti
metallici per scaricare l’energia statica, oppure indossare guanti antistatici prima di maneggiare il disco rigido.
■ Se il disco rigido contiene già dati, eseguire il backup prima dell'installazione per evitare la perdita dei dati.
1. Aprire il fermo
2.Utilizzare la chiave esagonale fornita in dotazione per rimuovere le viti esagonali ed aprire il box MMS01
3.Installare l’unità HDD o SSD nel box MMS01
IT
23
Page 25
Mammoth Series
Introduzione
4.Unità installata in modo sicuro
4.1 Installare i gommini antivibrazione
Gommini antivibrazione
* Se è installata una unità HDD/SSD da 2,5” di spessore 7 mm, installare il gommino antivibrazione. Per le unità HDD/SSD da 2,5”
di spessore 9,5 mm non è necessario utilizzare il gommino antivibrazione.
5.Reinstallare tutte le viti esagonali
6.Infilare la guaina protettiva sul box
MMS01
IT
24
Page 26

Mammoth Series
MMS01
Attenzione
7.Collegare MMS01 al computer
Risoluzione dei problemi
Package Content
Verificare quanto segue in caso di guasto:
■ Il dispositivo è riconosciuto come USB 2.0, non come USB 3.0?
→Provare a spegnere il computer ed a collegare di nuovo il cavo.
■ È riconosciuta una capacità di soli 2 TB quando si utilizzano unità con capacità superiore ai 2 TB (Windows Vista/7/8/10)?
→Utilizza il formato GPT per unità con capacità superiore ai 2 TB.
■ Quando è collegato come dispositivo USB 3.0, il sistema non è in grado di riconoscerlo dopo un certo periodo di tempo?
→Aggiornare il driver USB 3.0.
■ Perché alcune unità non sono visualizzate nella cartella "Risorse del computer" (Windows)?
→Assicurarsi che la lettera del disco rigido sia assegnata nell’intervallo C ~ Z.
■ Quando si utilizza una nuova unità, non è riconosciuta dal sistema operativo?
→Formattare l’unità.
■ Quando si utilizza un'unità da 2 TB, la capacità nel sistema operativo visualizza solo 1,8 TB?
→La maggior parte dei produttori di dischi rigidi utilizza il sistema decimale, ma il sistema operativo utilizza il sistema binario per
calcolare la capacità del disco.
A causa di diversi metodi di calcolo, si vedranno 200 GB di capacità in meno su un disco da 2 TB.
IT
25
Page 27

Mammoth Series
Attenzione
MMS01
IT
FAQ
D: Posso utilizzare unità che contengono già dei dati?
R: Per lo più sì, ma in base all'ambiente in cui è stata utilizzata in precedenza l'unità, ci potrebbero essere delle incompatibilità, quindi, per evitare
una imprevedibile perdita di dati, eseguire il backup prima di usarlo su MMS01B.
D: Che tipo di dischi rigidi sono supportati?
R: Il prodotto supporta HDD/SSD SATA da 2,5", ma non supporta HDD IDE, SAS, SCSI.
D: Quanti cicli di inserimento unità può supportare MMS01B?
R: La durata del connettore SATA di questo prodotto è valutata fino a 10.000 cicli.
D: Perché la formattazione del disco impiega così tanto tempo in Windows?
R: È possibile selezionare la formattazione rapida quando si esegue la funzione di formattazione.
D: Perché l’unità non può accedere alle informazioni S.M.A.R.T?
R: Questo prodotto non supporta la funzione S.M.A.R.T..
D: MMS01B supporta la funzione USAP?
R: Sì, ma anche il sistema deve supportare USAP perché funzioni.
26
Page 28

Mammoth Series
Введение
Комплектность
MMS01
RU
Корпус док-станции MMS01B
Protective sleeve
Six hand corner
Виброизоляционная прокладка
Micro кабель USB 3.0
Руководство пользователя
Описание продукта
Применяется с 2,5-дюймовыми жесткими/твердотельными дисками SATA (SATA III 6 Гбит/с /SATA II 3,0 Гбит/с /SATA I 1,5 Гбит/с)
■
Данное устройство предназначено для использования только с жесткими/твердотельными дисками
SATA и не пригодно для использования с жесткими дисками PATA (IDE).
■
Данное устройство может поддерживать жесткие диски с объемом памяти более 4 ТБ.
■
Операционная система Windows XP ограничивает емкость жесткого диска до 2 ТБ.
■
При загрузке/извлечении жесткого диска возможно образование мелких царапин.
Проверку прошли следующие модели хост-контроллеров USB.
■
Хост-контроллер USB 3.0 на базе чипсета Intel H87.
■
Хост-контроллер ETron EJ168 USB 3.0
■
Хост-контроллер USB 3.0 на базе чипсета Intel Z77.
■
Хост-контроллер ASMedia ASM1042 USB 3.0.
■
Хост-контроллер Frescologic FL1100 USB 3.0.
■
Хост-контроллер ASMedia ASM1142 USB 3.1.
■
Хост-контроллер FL1100 USB 3.0.
※Обновите драйвер каждого хост-контроллера (адаптера) до последней версии.
Внешний вид
назад
винт
защелка
Micro кабель USB 3.0
27
Protective sleeve
Page 29

Mammoth Series
Введение
Инструкция по установке
Package Content
■ Во избежание нарушения нормальной работы устройства при установке жесткого диска принимайте во внимание статическое
электричество. Перед обращением с жестким диском для снятия электростатического заряда прикоснитесь к нему металлическим
предметом или наденьте антистатические перчатки.
■ Если диск уже содержит информацию, во избежание потери данных создайте резервную копию этой информации.
1.Откройте защелку
2.С помощью шестигранного ключа из комплекта отверните винты с шестигранной головкой, чтобы открыть корпус MMS01
3.Установите в корпус MMS01 жесткий или твердотельный диск
MMS01
RU
28
Page 30

Mammoth Series
MMS01
Введение
4.Проверьте надежность установки диска
4.1 Yстановите виброизоляционную прокладку
Виброизоляционная прокладка
* При установке 2,5-дюймового жесткого/твердотельного диска толщиной 7 мм уложите на него виброизоляционную
прокладку. При установке 2,5-дюймового жесткого/твердотельного диска толщиной 9,5 мм использование
виброизоляционной прокладки не требуется.
5.Заверните винты с шестигранной головкой
6.Наденьте защитную оболочку на корпус
RU
29
Page 31

Mammoth Series
Внимание
7. Подключите устройство MMS01 к компьютеру
Устранение неполадок
Package Content
В случае подозрения на сбой проверьте следующее:
■ Устройство определяется как USB 2.0, а не USB 3.0?
→Попробуйте выключить компьютер и повторно подключить кабель
■ При использовании диска емкостью свыше 2 ТБ определяется объем памяти не более 2 ТБ (Windows Vista/7/8/10)?
→Используйте формат GPT для дисков емкостью свыше 2 ТБ.
■ При подключении
→Обновите драйвер USB 3.0.
■ Некоторые диски не отображаются в папке "Мой компьютер" (Windows)?
→Имя жесткого диска задается в диапазоне букв C ~ Z (лат.).
■ При использовании нового диска он не распознается моей ОС?
→Отформатируйте диск.
■ При использовании диска емкостью 2 ТБ в
→Большинство производителей для расчета емкости диска используют десятичную систему, но в ОС используется двоичная
система.
Из-за разных способов вычисления при использовании диска емкостью 2 ТБ его размер отображается на 200 ГБ меньше.
как устройства USB 3.0 через некоторое время система не распознает его?
ОС отображается только 1,8 ТБ?
MMS01
RU
30
Page 32

В : Можно ли использовать диски с уже имеющейся на них информацией?
О : Обычно можно, однако в зависимости от предыдущих условий применения диска может быть несовместимость,
поэтому во избежание непредвиденной потери данных перед использованием диска с устройством MMS01B
создайте резервные копии ваших данных.
В :
Какие типы жестких дисков поддерживаются данным устройством?
О : Данное устройство поддерживает 2,5-дюймовые и 3,5-дюймовые жесткие/твердотельные диски SATA HDD/SSD,
но не поддерживает жесткие диски IDE, SAS, SCSI.
В : Сколько циклов установки дисков выдерживает устройство MMS01B?
О : Разъем SATA данного устройства рассчитан на 10000 таких циклов.
В : Почему форматирование диска в ОС Windows занимает так много времени?
О : Для выполнения процедуры форматирования вы можете выбрать режим ускоренного форматирования.
В : Почему мой диск не может получить доступ к информации S.M.A.R.T. (самотестирование и самоанализ)?
О : Данное устройство не поддерживает функцию S.M.A.R.T.
В : Поддерживает ли устройство MMS01B функцию USAP?
О : Да, но для ее использования ваша система также должна поддерживать функцию USAP.
Page 33

紹介
パッケージ内容
Mammoth Series
MMS01
JP
MMS01Bエンクロージャー
Protective sleeve
Six hand corner
防振パッド
マイクロUSB3.0ケーブル
ユーザーマニュアル
製品の説明
2.5”SATAHDD/SSD対応(SATAIII6Gbps/SATAII3.0Gbps/SATAI1.5Gbps)
■
当製品はSATAHDD/SSDのみを対象として設計されており、PATA(IDE)ベースのHDDには使用できません。
■
当製品は、容量が4TBを超えるハードディスクドライブにも対応します。
■
WindowsXPオペレーティングシステムの場合、HDD容量は2TBに制限されます。
■
ハードディスクドライブの装着/取り外しは多少の接点キズを生じる可能性があります。
下記のUSBホストコントローラモデルは検証されていません。
■
IntelH87チップセットUSB3.0ホストコントローラ
■
ETronEJ168USB3.0ホストコントローラ
■
ntelZ77チップセットUSB3.0ホストコントローラ
■
ASMediaASM1042USB3.0ホストコントローラ
■
FrescologicFL1100USB3.0ホストコントローラ
■
ASMediaASM1142USB3.1ホストコントローラ
■
FL1100USB3.0ホストコントローラ
*BitteaktualisierenSiedenTreiberdesjeweiligenHost-Controllers(Adapters)aufdieneuesteVersion.
外観
バック
①
ネジ
マイクロUSB3.0
②
①
ラッチ
ケーブル
Protective sleeve
32
Page 34

Mammoth Series
紹介
インストー ルガイド
Package Content
■ ハードディスクドライブをインストールする際は、装置の故障の原因となる静電気にご注意ください。ハードディスクド
ライブ取扱いの前に金属部分に触れて放電するか、静電防止グローブを着用ください。
■ ハードディスクドライブにデータが保存されている場合、データ消失を防止するためにデータのバックアップを行って
ください。
1.留め金を開きます。
2.付属のヘキサゴンレンチでヘキサゴンねじを外し、MMS01エンクロージャーを開きます。
3.HDDまたはSSDをMMS01エンクロージャ ーに 装着しま す。
MMS01
JP
33
Page 35

Mammoth Series
紹介
4.正しく装着され たドライブ
4.1 防振パッドを装着します。
防振パッド
*7mm厚2.5”HDD/SSDを装着の場合、防振パッドを設置します。9.5mm厚2.5”HDD/SSDの場合は、防振パッドは
不要です。
5.ヘキサゴンねじを全部締めます。
6.エンクロージャーに保護スリーブをかぶせます。
MMS01
JP
34
Page 36

Mammoth Series
MMS01
ご注意
7. をコンピューターに接続します。
トラブ ル シュ ー ティング
Package Content
エラーと思われる状況が生じた場合は、以下をチェックしてください。
■ 私のデバイスはUSB3.0ではなく、USB2.0として認識されています。
→コンピューターの電源をオフにしてケーブルを再度接続してみます。
■ 2TBを超えるドライブは、容量が2TBまでしか認識されませんか(WindowsVista/7/8/10)?
→2TBを超える容量には、GPT形式を利用します。
■ USB3.0デバイスとして接続した場合、時間が経つとシステムが認識できなくなるんですが?
→USB3.0ドライバを更新してください。
■ ドライブによって「マイコンピューター」に表示されないものがありますが(Windows)?
→ハードディスクのドライブ文字がC~Zの範囲であることを確かめます。
■ 新しいドライブを使用しても、使用中のOSから認識されませんが?
→ドライブをフォーマットします。
■ 2TBドライブを使用していますが、OSには容量が1.8TBしかないと表示されますが?
→多くのハードディスクドライブ製造元は10進数表示ですが、OSはドライブ容量算出に2進数(Notduodecimal
(12進数),butbinary:translator)を使用します。
計算法の違いゆえ、2TBドライブで容量が200GB少なく見えます。
JP
35
Page 37

Mammoth Series
ご注意
MMS01
JP
FAQ
Q:デ ータが保存されて いるドライブを使用できますか ?
A:ほとんどの場合問題ありませんが、以前ドライブ使用時の環境によっては互換性がない可能性もあります。それで予想
外のデータ消失を防ぐために、MMS01Bでの使用前にデータのバックアップを行うようにしてください。
Q:対応するハードディスクドライブはどんな種類ですか?
A:当製品は2.5” および SATA HDD/SSDに対応しますが、IDE, SAS, SCSI HDDには対応しません。
Q:MMS01Bはドライブ装着回数の耐用性はどの程度ですか?
A:当製品のSATAコネクタ耐用性は最大10,000回です。
Q:Windowsでディスクのフォーマットに非常に長くかかるのはなぜですか?
A:フォーマット機能実行時にクイックフォーマットが選択可能です。
Q:使用中のドライブでS.M.A.R.T情報にアクセスできないのはなぜですか?
A:当製品はS.M.A.R.T機能に対応していません。
Q: MMS01BはUSAP機能に対応していますか?
A: はい、ただし正常に動作するにはご使用のシステムもUSAP対応である必要があります。
36
Page 38

Mammoth Series
소개
포장 내용물
MMS01
KR
MMS01B 함체
Protective sleeve
Six hand corner
진동 방지 패드
제품 설명
2.5" SATA HDD/SSD (SATA III 6Gbps /SATA II 3.0Gbps /SATA I 1.5Gbps) 전용
■
본 제품은 SATA HDD/SSD 전용으로 제작되었으며 PATA(IDE) 기반 HDD용이 아닙니다.
■
본 제품은 4TB 이상의 용량을 갖는 하드 드라이브를 지원할 수 있습니다.
■
Windows XP 운영 체제는 HDD 용량을 2TB로 제한합니다.
■
하드 드라이브를 적재하거나 제거할 때 흠집이 약간 생길 수 있습니다.
아래 나열된 USB 호스트 컨트롤러 모델은 유효성이 확인되었습니다.
■
Intel H87 칩셋 USB 3.0 호스트 컨트롤러
■
ETron EJ168 USB 3.0 호스트 컨트롤러
■
Intel Z77 칩셋 USB 3.0 호스트 컨트롤러
■
ASMedia ASM1042 USB 3.0 호스트 컨트롤러
■
Frescologic FL1100 USB 3.0 호스트 컨트롤러
■
ASMedia ASM1142 USB 3.1 호스트 컨트롤러
■
FL1100 USB 3.0 호스트 컨트롤러
※각각의 호스트 컨트롤러(어댑터) 드라이버를 최신 버전으로 업데이트하십시오.
외관
백
①나사
②마이크로USB 3.0
① 걸쇠
37
케이블
마이크로USB 3.0 케이블
사용 설명서
Protective sleeve
Page 39

Mammoth Series
소개
설치 설명서
Package Content
■
하드 드라이브를 장착할 때 정전기에 유의하십시오. 장치가 오작동할 수 있습니다. 하드 드라이브를 취급하기
전에 다른 금속 물체를 만져서 방전시키거나 정전기 방지용 장갑을 착용하십시오.
■
하드 드라이브에 데이터가 이미 들어있을 경우, 설치 전에 데이터를 백업하여 데이터 손실을 방지하십시오.
1.래치을 엽니다
2. c포함된 렌치를 사용하여 육각 나사를 풀어 MMS01 인클로저를 엽니다.
3.HDD 또는 SSD를 MMS01 인클로저에 설치합니다.
MMS01
KR
38
Page 40

Mammoth Series
MMS01
소개
4.드라이브를 꽉 맞게 넣습니다.
4.1진동 방지 패드를 설치합니다.
진동 방지 패드
* 7mm 두께의 2.5" HDD/SSD를 설치한 후 그 위에 진동 방지 패드를 올려놓습니다. 9.5mm 두께의
2.5" HDD/SSD의 경우 진동 방지 패드를 사용할 필요가 없습니다.
5.모든 육각 나사를 다시 설치합니다.
6. 보호 슬리브를 인클로저 위로 밀어놓습니다
KR
39
Page 41

Mammoth Series
주의
7. MMS01을 컴퓨터에 연결합니다.
문제 해결
Package Content
고장이 의심되는 경우 다음 사항을 확인하십시오:
■
내 장치가 USB 3.0이 아닌 USB 2.0으로 인식됩니다?
→컴퓨터를 끄고 케이블을 다시 연결해 보십시오.
■
용량이 2TB를 초과하는 드라이브를 사용할 때 2TB 용량만 식별할 수 있습니까(Windows Vista/7/8/10)?
→용량이 2TB를 초과할 경우 GPT 형식을 사용하십시오.
■
USB 3.0 장치로서 연결했을 때 일정 기간이 지난 다음 시스템이 이것을 인식하지 못합니까?
→USB 3.0 드라이버를 업데이트하십시오.
■
일부 드라이브가 "내 컴퓨터"(Windows)에 표시되지 않습니까?
→드라이브 문자가 C ~ Z 범위에서 할당되었는지 확인하십시오.
■
새 드라이브를 사용할 때 내 OS가 이것을 인식하지 못합니까?
→드라이브를 포맷하십시오.
■
2TB 용량의 드라이브를 사용할 때 OS에 1.8TB만 표시됩니까?
→대부분의 하드 드라이브 제조업체는 10진수를 사용하지만 OS는 2진수를 사용해서 드라이브 용량을 계산합
니다.
계산 방법이 다르기 때문에 2TB 드라이브에 있는 용량이 200GB 적게 표시됩니다.
MMS01
KR
40
Page 42

Mammoth Series
MMS01
주의
FAQ
Q:이미 기존 데이터가 들어있는 드라이브를 사용해도 됩니까?
A:대개의 경우 사용해도 되지만 이전에 드라이브를 사용한 환경에 따라 호환되지 않을 수도 있습니다.
그러므로 예상치 못한 데이터 손실을 피하려면 MMS01B에서 이 드라이브를 사용하기 전에 데이터를
백업하십시오.
Q:어떤 종류의 하드 드라이브가 지원됩니까?
A:본 제품은 2.5" SATA HDD/SSD를 지원하지만 IDE, SAS, SCSI HDD는 지원하지 않습니다.
Q:MMS01B가 견뎌낼 수 있는 드라이브 삽입 횟수는 몇 회입니까?
A:본 제품의 SATA 커넥터 내구성은 최대 10,000회로 평가됩니다.
Q:Windows에서 디스크 포맷에 시간이 많이 걸리는 이유는 무엇입니까?
A:포맷 기능을 수행할 때 빠른 포맷을 선택하면 됩니다.
Q:내 드라이브에서 S.M.A.R.T 정보에 액세스할 수 없는 이유는 무엇입니까?
A:이 제품은 S.M.A.R.T 기능을 지원하지 않습니다.
Q: MMS01B에서 USAP 기능이 지원됩니까?
A: 그렇습니다. 그러나 이 기능을 사용할 수 있으려면 사용자의 시스템도 USAP 기능을 지원해야 합니다.
KR
41
Page 43

簡介
內含包裝物
Mammoth Series
MMS01
TW
MMS01B 硬碟盒
矽膠防護套
防震墊
產品說明
应用于2.5吋 SATA HDD/SSD( SATA III 6Gbps /SATA II 3.0Gbps /SATA I 1.5Gbps)
■
本产品仅支持SATA硬盘,不支持PATA(IDE)硬盘
■
本产品可支持4TB以上之硬盘容量
■
请注意Windows XP限制硬盘容量不得超过2TB
■
装入/取出硬盘可能会造成轻微的划伤
以下USB Host controller型号已通过验证可使用于本产品
■
Intel H87 chipset USB 3.0 Host controller
■
ETron EJ168 USB 3.0 Host controller
■
Intel Z77 chipset USB 3.0 Host controller
■
ASMedia ASM1042 USB 3.0 Host controller
■
Frescologic FL1100 USB 3.0 Host controller
■
ASMedia ASM1142 USB 3.1 Host controller
■
FL1100 USB 3.0 Host controller
※请更新驱动程序至最新版本
外觀圖
背面
①螺絲
②Micro
①防護蓋
USB 3.0 接頭
Micro USB 3.0 線材六角螺絲扳手
使用手冊
防護套
42
Page 44

Mammoth Series
MMS01
簡介
安裝步驟
Package Content
■ 當連結硬碟時請注意靜電,人體的靜電可能導致機器故障,操作前請觸摸金屬物品放電或穿戴防靜電手套
■ 若硬碟內已有資料,請先進行備份以避免資料遺失
1.打開防護蓋
2.請使用六角螺絲扳手打開MMS01B內盒
3.將硬碟或固態硬碟安裝至MMS01B主機內
TW
43
Page 45

Mammoth Series
簡介
4.硬碟安裝完成
4.1 安裝防震墊
防震墊
*若安裝7mm 厚度的2.5吋硬碟/固態硬碟,請在硬碟/固態硬碟上安裝防震墊,若是9.5mm的 2.5吋硬碟/固態硬碟,
則不需安裝防震墊。
5. 鎖回六角螺絲
6. 將防護套套上主機
MMS01
TW
44
Page 46

Mammoth Series
MMS01
簡介
7. 將MMS01B接上電腦
故障排除
Package Content
假設出現一些故障狀況,您可試著尋找下列解答:
■
為何當我使用USB 3.0時會被誤認為USB 2.0?
→ 請試著重新開機,重插接頭。
■
為何當我使用2TB以上硬碟時,只抓到2TB(Windows XP / Vista / 7 / 8 / 8.1)?
→ 請使用GPT這個硬碟分割格式,它才能支援2TB以上的大容量硬碟。
■
為何在使用USB 3.0 一段時間後,會無法辨認裝置?
→ 請更新USB 3.0 驅動程式。
■
為何有些硬碟無法出現在”我的電腦”中。(Windows)?
→ 請確定硬碟序號為C~Z,不能超過此範圍。
■
為何使用新硬碟時,我的作業系統卻抓不到?
→ 請先格式化硬碟。
■
為何當接上2TB硬碟時,卻只顯示1.8TB?
→ 大多數硬碟廠商是使用十進位的計算方式 ,但作業系統卻是以二進位來計算硬碟容量。
因此計算方式不同,就會少200GB左右。
TW
45
Page 47

Mammoth Series
注意
FAQ 常見問題
Q:請問我是否可使用已有資料的硬碟?
A:基本上是可以的,但或許會在不同的使用環境下,會不能使用。但為了避免無法預料的資料損失,請確實備份資料
Q:請問此產品支援什麼種類的硬碟?
A:此產品支援2.5吋 SATA HDD / SSD,但並不支援 IDE、SAS、SCSI 硬碟
Q:請問硬碟大約可在MMS01B上插拔次數?
A:此產品具有高度耐久性,因此大約可在MMS01B上插拔10,000 次
Q:為何在Windows作業系統下,格式化會花很多時間?
A:當您進行格式化時,可以選擇快速格式化,可以縮短時間
Q:為何我的硬碟 S.M.A.R.T 功能無法作用?
A:本產品不支援S.M.A.R.T 功能
Q: 請問MMS01B是否可支援UASP 加速功能?
A: 可以,要使用 UASP 加速功能,請先確認系統是否有支援 UASP 功能
MMS01
TW
46
Page 48

Mammoth Series
简介
内含包装物
MMS01
CN
MMS01B 硬盘盒
六角螺丝扳手
防震垫
产品说明
应用于2.5吋 SATA HDD/SSD( SATA III 6Gbps /SATA II 3.0Gbps /SATA I 1.5Gbps)
■
本产品仅支持SATA硬盘,不支持PATA(IDE)硬盘
■
本产品可支持4TB以上之硬盘容量
■
请注意Windows XP限制硬盘容量不得超过2TB
■
装入/取出硬盘可能会造成轻微的划伤
以下USB Host controller型号已通过验证可使用于本产品
■
Intel H87 chipset USB 3.0 Host controller
■
ETron EJ168 USB 3.0 Host controller
■
Intel Z77 chipset USB 3.0 Host controller
■
ASMedia ASM1042 USB 3.0 Host controller
■
Frescologic FL1100 USB 3.0 Host controller
■
ASMedia ASM1142 USB 3.1 Host controller
■
FL1100 USB 3.0 Host controller
※请更新驱动程序至最新版本
外观图
背面
① 螺丝
② Micro
① 防护盖
47
USB 3.0 接头
Micro USB 3.0 线材
使用手册硅胶防护套
防护套
Page 49

Mammoth Series
MMS01
简介
4. 硬盘安装完成
4.1 安装防震垫
防震垫
*若安装7mm 厚度的2.5吋硬盘/固态硬盘,请在硬盘/固态硬盘上安装防震垫,若是9.5mm的 2.5吋硬盘/固态硬盘,
则不需安装防震垫。
5. 锁回六角螺丝
6.防护套套上主机
CN
49
Page 50

Mammoth Series
MMS01
简介
4. 硬盘安装完成
4.1 安装防震垫
防震垫
*若安装7mm 厚度的2.5吋硬盘/固态硬盘,请在硬盘/固态硬盘上安装防震垫,若是9.5mm的 2.5吋硬盘/固态硬盘,
则不需安装防震垫。
5. 锁回六角螺丝
6.防护套套上主机
CN
49
Page 51

注意
7. 将MMS01B接上计算机
故障排除
Package Content
假设出现一些故障状况,您可试着寻找下列解答:
■
为何当我使用USB 3.0时会被误认为USB 2.0?
→ 请试着重新启动,重插接头。
■
为何当我使用2TB以上硬盘时,只抓到2TB(Windows XP / Vista / 7 / 8 / 8.1)?
→ 请使用GPT这个硬盘分割格式,它才能支持2TB以上的大容量硬盘。
■
为何在使用USB 3.0 一段时间后,会无法辨认装置?
→ 请更新USB 3.0 驱动程序。
■
为何有些硬盘无法出现在”我的计算机”中。(Windows)?
→ 请确定硬盘序号为C~Z,不能超过此范围。
■
为何使用新硬盘时,我的操作系统却抓不到?
→ 请先格式化硬盘。
■
为何当接上2TB硬盘时,却只显示1.8TB?
→ 大多数硬盘厂商是使用十进制的计算方式 ,但操作系统却是以二进制来计算硬盘容量。
因此計算方式不同,就會少200GB左右。
Mammoth Series
MMS01
CN
50
Page 52

Mammoth Series
MMS01
注意
FAQ 常见问题
Q:请问我是否可使用已有数据的硬盘?
A:基本上是可以的,但或许会在不同的使用环境下,会不能使用。但为了避免无法预料的数据损失,请确实备
份资料
Q:请问此产品支持什么种类的硬盘?
A:此产品支持2.5吋 SATA HDD / SSD,但并不支持 IDE、SAS、SCSI 硬盘
Q:请问硬盘大约可在MMS01B上插拔次数?
A:此产品具有高度耐久性,因此大约可在MMS01B上插拔10,000 次
Q:为何在Windows操作系统下,格式化会花很多时间?
A:当您进行格式化时,可以选择快速格式化,可以缩短时间
Q:为何我的硬盘 S.M.A.R.T 功能无法作用?
A:本产品不支持S.M.A.R.T 功能
Q: 请问MMS01B是否可支持UASP 加速功能?
A: 可以,要使用 UASP 加速功能,请先确认系统是否有支持 UASP 功能
CN
51
Page 53

Mammoth Series
System Setup
Format
Package Content
Caution:This instruction is intended for those who do no plan on partitioning the installed drive. For
detailed partition operation, please refer to Windows Help and Support, or other related books.
※Performing the following steps to format the drive will erase all data on it. Please do not format the drive
if there is important data on it.
Achtung: Diese Anweisungen gelten all jenen, die das installierte Laufwerk nicht partitionieren möchten.
Detaillierte Anweisungen zum Partitionieren entnehmen Sie bitte Hilfe und Support von Windows bzw.
anderen relevanten Anleitungen.
※Wird das Laufwerk anhand der nachstehenden Schritte formatiert, werden alle Daten darauf gelöscht.
Bitte formatieren Sie das Laufwerk nicht, falls wichtige Daten darauf gespeichert sind.
Attention:Ces consignes sont destinées aux utilisateurs qui ne prévoient pas de partitionner le disque i
nstallé. Pour connaître le fonctionnement détaillé des partitions, veuillez consulter la rubrique Aide et
support de Windows ou d'autres ouvrages dédiés.
※Effectuer les étapes suivantes pour formater le disque effacera toutes les données présentes dessus.
Veuillez ne pas formater le disque s'il contient des données importantes.
Advertencia: Estas instrucciones son para los que no piensen particionar el disco instalado. Para una
partición detallada, por favor consulte el soporte técnico de Windows o cualquier otra fuente relacionada.
※Al realizar los pasos siguientes para formatear el disco borrará todos los datos que se encuentren en
él. Por favor, no formatee el disco si contiene datos importantes.
MMS01
Attenzione: le istruzioni che seguono sono destinate solo a coloro che non intendono eseguire alcuna
partizione dell'unità installata. Per i dettagli sul funzionamento delle partizioni, fare riferimento alla Guida
ed all’Assistenza di Windows, o altri documenti in merito.
※L’esecuzione delle operazioni che seguono per formattare l'unità cancellerà tutti i dati contenuti su di
essa. Non formattare l'unità se contiene dati importanti.
52
Page 54

Mammoth Series
MMS01
System Setup
Внимание. Данная операция предназначена для тех, кто планирует создавать на установленном диске
разделы. Описание создания разделов на диске см. в Центре справки и поддержки Windows или других
аналогичных источниках.
※При форматировании диска все данные на диске стираются. Не форматируйте диск, если на нем
содержится важная информация.
ご注意:この操作方法は、装着したドライブにパーティションを行わないユーザーを対象としています。
パーティション操作の詳細は、Windowsヘルプおよびサポート、またはその他関連文書をご参照ください。
※ドライブをフォーマットする以下のステップを実行すると、ドライブ上のデータは全部消去されます。
重要なデータがあるドライブはフォーマットしないでください。
주의:이지침은설치된드라이브의
세한파티션작업은Windows도움말및지원또는기타관련서적을참조하십시오.
※다음단계를수행하여드라이브를포맷하면드라이브의모든데이터가지워집니다.드라이브에중요한데
이터가있으면드라이브를포맷하지마십시오.
警告:本說明是以不分割硬碟磁區為前提的操作說明。有關詳細的硬碟分割操作說明,請參閱Windows相關
設定或參考相關書籍。
※請執行以下步驟來格式化硬碟,將所有資料刪除。若您的硬碟有重要資料,請勿格式化硬碟。
警告:本说明是以不分割硬盘扇区为前提的操作说明。有关详细的硬盘分割操作说明,请参阅Windows相关
设定或参考相关书籍。
※请执行以下步骤来格式化硬盘,将所有数据删除。若您的硬盘有重要数据,请勿格式化硬盘。
53
파티션분할을실행할계획이없는사용자에게는해당되지않습니다.자
Page 55

Mammoth Series
System Setup
Microsoft Windows 10/ 8.1 / 8 / 7 / Vista
01
In Windows 10 / 8.1 / 8
Please right-click on the lower left corner of the Start button, select "Disk Management."
(as shown in the illustration).
In Windows 7 / Vista or prior versions
Please right-click "Computer" on the Start menu, and open "Manage." (as shown in the illustration).
Unter Windows 10/ 8.1/ 8
Bitte rechtsklicken Sie auf die Start-Schaltfläche unten links und wählen Sie „Disk Management
(Datenträgerverwaltung)“. (Vgl. Abbildung).
Unter Windows 7/ Vista oder älteren Versionen
Bitte klicken Sie mit der rechten Maustaste im Startmenü auf „Computer(Computer)“ und öffnen Sie
„Manage (Verwalten)“. (Vgl. Abbildung).
Sur Windows 10 / 8.1 / 8
Veuillez faire un clic droit dans le coin inférieur gauche du bouton Démarrer, sélectionnez
« Disk Management (Gestion des disques) ». (comme indiqué dans l'illustration).
Sur Windows 7 / Vista ou versions antérieures
Veuillez faire un clic droit sur « Computer (Ordinateur) » dans le menu Démarrer et ouvrez
« Manage (Gérer) ». (comme indiqué dans l'illustration).
MMS01
En Windows 10/8.1/8
Por favor, haga clic con el botón derecho en la esquina inferior izquierda del botón Inicio, seleccione
“Administración de discos” (como se muestra en la ilustración)
En Windows 7/Vista o versiones anteriores
Por favor, haga clic con el botón derecho en “Equipo” en el menú de Inicio y abra “Administrar”
(como se muestra en la ilustración)
54
Page 56

Mammoth Series
MMS01
System Setup
Windows 10 / 8.1 / 8
Fare clic col tasto destro del mouse nell'angolo in basso a sinistra del tasto Start,
selezionare " Disk Management (Gestione disco)." (come mostrato nell’illustrazione).
Windows 7 / Vista o versioni precedenti
Fare clic col tasto destro del mouse su "Computer (Computer) " nel menu Start ed aprire "
Manage (Gestisci)." (come mostrato nell’illustrazione).
В ОС Windows 10/8.1/8
Щелкните правой кнопкой мыши кнопку Пуск в левом нижнем углу экрана, выберите "Disk Management
(Управление дисками)" (как показано на рисунке).
В ОС Windows 7/Vista или в предыдущих версиях
Щелкните правой кнопкой мыши "Computer (Компьютер)" в меню "Start (Пуск)" и откройте экран "Manage
(Управление)" (как показано на рисунке).
Windows10/8.1/8の場合
スタートボタンの左下付近を右クリックして、「ディスクの管理」を選びます(図を参照)。
Windows7/Vistaまたは以前のバージョンの場合
スタートメニューの
Windows 10 / 8.1 / 8의 경우
왼쪽 하단에 있는 시작 버튼을 마우스 오른쪽 버튼으로 클릭한 다음 "Disk Management(디스크 관리)"
를 선택하십시오(아래 그림 참조).
Windows 7 / Vista 또는 이전 버전의 경우
시작 메뉴에서 "Computer(컴퓨터)"를 마우스 오른쪽 버튼으로 클릭한 다음 "Manage(관리)"
를 여십시오(아래 그림 참조).
於Windows 10 / 8.1 / 8
在左下角"開始"的圖示上按右鍵,選擇"磁碟管理"(如圖示)
在Windows 7 / Vista 或之前版本
在左下角"開始"的"我的電腦"圖示上按右鍵,選擇"管理" (如圖示)。
「コンピュータ」を 右 クリックし て「管理」を開きます(図を参照)
于Windows 10 / 8.1 / 8
在左下角"开始"的图示上右键单击,选择"磁盘管理"(如图标)
在Windows 7 / Vista 或之前版本
在左下角"开始"的"我的计算机"图标上右键单击,选择"管理" (如图示)。
55
Page 57

Mammoth Series
System Setup
02
In the "Computer Management" window, select "Disk Management."
It will show disk drive as "not initialized". Please Right-click and select "Disk initialization."
Wählen Sie im Fenster „Computer Management (Computerverwaltung)“ die Option „Disk Management
(Datenträgerverwaltung)“.
Der Datenträger wird als „Not initialized (Nicht initialisiert)“ angezeigt. Klicken Sie mit der rechten
Maustaste und wählen Sie „Initialize Disk (Datenträger initialisieren)“.
ns la fenêtre « Computer Management (Gestion de l'ordinateur) », sélectionnez « Disk Management
(Gestionnaire de disque) ».
Il signale le disque comme « not initialized (non initialisé) ». Veuillez faire un clic droit et sélectionner
« Disk initialization (Initialisation du disque) ».
En la ventana de “Administración de equipos”, seleccione “Administración de discos”
Mostrará el disco como “no inicializado”. Por favor, haga clic con el botón derecho y seleccione
“Inicialización del disco”
MMS01
Nella finestra " Computer Management (Gestione computer) " selezionare" Disk Management
(Gestione disco)."
Le unità disco saranno visualizzate come " not initialized (non inizializzato)". Fare clic col tasto destro
del mouse e selezionare " Disk initialization (Inizializzazione disco)".
56
Page 58

Mammoth Series
MMS01
System Setup
В окне "Computer Management (Управление компьютером)" выберите "Disk Management (Управление
дисками)". Диск отображается как "not initialized (Не инициализировано)". Щелкните правой кнопкой и
выберите "Disk initialization (Форматирование диска)."
「コンピューターの管理 」ウィンド ウ か ら「ディスクの管理」を選択します。
ここで ディス クドラ イブ が「初期化されていません」と表 示され ます。右クリックして「ディスクの初期化」を
選びます。
"Computer Management(컴퓨터 관리)" 창에서 "Disk Management(디스크 관리)"를 선택합니다.
디스크 드라이브가 "not initialized(초기화 안 됨)" 상태로 표시됩니다. 마우스 오른쪽 버튼으로 클릭한
다음 "Disk initialization(디스크 초기화)" 를 선택하십시오.
在"電腦管理"的視窗中,選擇"磁碟管理",會出現"尚未安裝",請按右鍵選擇"磁碟安裝"(如圖示)。
在"计算机管理"的窗口中,选择"磁盘管理",会出现"尚未安装",请右键单击选择"磁盘安装"(如图标)。
57
Page 59

Mammoth Series
System Setup
03
The window “Disk initialization” will appear. Press the OK button.
※About partition format MBR partition formatted capacity limit is 2TB. We suggest using GPT format on
disk drives with capacity of 2TB or above, but GPT may not be recognized by Windows 2000 and XP In
addition, some older hardware cannot divide sectors with over 2TB capacity.
Das Fenster „Initialize Disk (Datenträger initialisieren)“ erscheint. Klicken Sie auf OK.
*Über das Partitionsformat
Die Kapazität einer MBR-formatierten Partition ist auf 2 TB beschränkt. Wir empfehlen bei Datenträgern
mit einer Kapazität von 2 TB und mehr ein GPT-Format; allerdings wird GPT unter Windows 2000 und
XP möglicherweise nicht erkannt.
Zudem können einige ältere Hardwaresystem Sektoren mit einer Kapazität von mehr als 2 TB nicht
unterteilen.
La fenêtre « Disk initialization (Initialisation du disque) » apparaît. Appuyez sur le bouton OK.
※À propos du format de la partition
La limite de capacité formatée de la partition MBR est de 2 To. Nous conseillons d'utiliser le format GPT
sur les disques avec une capacité de 2 To ou plus, mais GPT peut ne pas être reconnu par
Windows 2000 et XP De plus, certains anciens matériels ne peuvent pas diviser les secteurs avec plus
de 2 To de capacité.
Aparecerá la ventana “Inicialización del disco”. Presione el botón OK.
※Sobre el formato de la partición.
El límite de capacidad para la partición formateada MBR es de 2TB. Le sugerimos usar el formato GPT
en discos con capacidad de 2TB o superior, pero GPT podría no ser reconocido por
Windows 2000 y XP. Además, algunos equipos antiguos no pueden dividir sectores con más de 2TB
de capacidad.
MMS01
Apparirà la finestra “Disk initialization (Inizializzazione disco)”. Premere il tasto OK.
※ Informazioni sul formato della partizione
Il limite di capacità della partizione formattata MBR è di 2 TB. Si consiglia di utilizzare il formato GPT su
unità disco con capacità di 2 TB o più, tuttavia il formato GPT potrebbe non essere riconosciuto da
Windows 2000 e XP Inoltre, alcuni componenti hardware meno recenti non possono dividere settori con
capacità superiore ai 2 TB.
58
Page 60

Mammoth Series
MMS01
System Setup
Откроется окно "Disk initialization (Форматирование диска)". Нажмите кнопку "OK".
※Форматирование раздела
Ограничение на размер форматирования раздела MBR (главная загрузочная запись) составляет 2 ТБ.
Мы предлагаем использовать формат GPT с дисками объемом 2 ТБ и более, однако формат GPT
может не распознаваться в Windows 2000 и XP.
Кроме того, некоторое устаревшее аппаратное оборудование не сможет выполнять разделение на
секторы на дисках объемом свыше
「ディスクの初期化」ウィンド ウ が 現 わ れ ま す 。OKボタンを押します。
※パーティション形式について
MBRパーティションのフォーマット容量限界は2TBです。容量が2TB以上のディスクドライブに対してはGPT形
式を使用することをお勧めします。ただしGPTはWindows2000およびXPからは検出できません。
加えて、以前のハードウェアによっては”TBを超える容量でのセクター分割が行えない物もあります。
"Disk initialization(디스크 초기화)" 창이 나타납니다. 확인 버튼을 누릅니다.
※파티션 형식 정보
MBR 파티션 포맷 용량은 2TB로 제한됩니다. 용량이 2TB 이상인 디스크 드라이브에서는 GPT 형식을 사
용할 것을 제안하지만 Windows 2000 및 XP에서 GPT가 인식되지 않을 수도 있습니다.
또한 일부 이전 버전의 하드웨어의 경우 용량이 2TB를 초과하는 섹터를 분할할 수 없습니다.
在當"磁碟安裝"的視窗出現,請按OK鍵(如圖示)。
※關於格式化
MBR硬碟分割格式只能定址約2TB左右的大小容量,若您有一顆2TB以上的硬碟,建議您使用GPT這個硬碟分
割格式,它才能支援2TB以上的大容量硬碟。但GPT這個硬碟分割格式未必能相容於Windows 2000 and
Windows XP或舊作業系統上。此外,某些舊硬體不能支援分割超過2TB硬碟容量的分割區。
2 ТБ.
在当"磁盘安装"的窗口出现,请按OK键(如图示)。
※关于格式化
MBR硬盘分割格式只能寻址约2TB左右的大小容量,若您有一颗2TB以上的硬盘,建议您使用GPT这个硬盘
分割格式,它才能支持2TB以上的大容量硬盘。但GPT这个硬盘分割格式未必能兼容于Windows 2000 and
Windows XP或旧操作系统上。此外,某些旧硬件不能支持分割超过2TB硬盘容量的分割区。
59
Page 61

Mammoth Series
System Setup
04
The state of disks will turn to "connection" , when the "Initialization Disk" is completed.
This state still cannot be used, you must create a partition and format it.
Please right click the "unallocated" sector and select "New Simple Volume."
Der Datenträgerzustand wird zu „Connection (Verbindung)“, wenn „Initialize Disk
(Datenträger initialisieren)“ abgeschlossen ist.
In diesem Zustand kann der Datenträger immer noch nicht genutzt werden; Sie müssen eine Partition
erstellen und diese formatieren.
Bitte rechtsklicken Sie auf den Bereich „Unallocated (Nicht zugeordnet)“ und wählen Sie „New Simple
Volume (Neues einfaches Volume)“.
Le statut des disques passe à « connection (connexion) » une fois l'« (Disk Initialization) Initialisation du
disque » terminée.
Ce statut ne peut toujours pas être utilisé, vous devez créer une partition et la formater.
Veuillez faire un clic droit sur le secteur « unallocated (non alloué) » et sélectionnez
« New Simple Volume (Nouveau volume simple) ».
El estado de los discos cambiará a “conexión”, cuando se complete el “Disco de inicialización”
Este estado no se puede usar aún, se debe crear una partición y formatearla.
Por favor, haga clic con el botón derecho en el sector “no asignado” y seleccione “Nuevo volumen simple”.
MMS01
Lo stato dei dischi passa a " connection (connessione) " , quando l’ " Initialization Disk (Inizializzazione
disco)" è completata.
In questo stato non è ancora possibile utilizzare le unità, è necessario creare una partizione e formattarla.
Fare clic col tasto destro del mouse sul settore " unallocated (non allocato)" e selezionare " New Simple
Volume (Nuovo volume semplice)."
60
Page 62

Mammoth Series
MMS01
System Setup
Статус диска переключается на "connection (Подключение)" после завершения процедуры "Initialization
Disk (Форматирование диска)".
Этот статус пока нельзя использовать, вы должны создать раздел и отформатировать его.
Щелкните правой кнопкой сектор "unallocated (не распределено)" и выберите "New Simple Volume
(Создать простой том)."
「ディスクの初期化」が完了すると、ディスク の ステ ー タス は「オンライン」となります。
これではまだ使用できません。さらにパーティションを作成してフォーマットする必要があります。
「未割り当て」セクターを 右クリックして「 新しいシンプル ボリューム」を選 択します。
"Initialization Disk(디스크 초기화)" 가 완료되면 디스크의 상태가 "connection(연결)" 상태로 바뀌게
됩니다.
이 상태로 계속 사용해서는 안 되며 반드시 파티션을 만들어서 포맷해야 합니다.
"unallocated(할당되지 않음)" 섹터를 마우스 오른쪽 버튼으로 클릭하고 "New Simple Volume
(새 단순 볼륨)"을 선택하십시오.
當"磁碟安裝"完成後,會出現”已連線”。
此時還不能使用,您必須分割與格式化硬碟。
在"未配置"選擇"新增簡單磁區"
当"磁盘安装"完成后,会出现”已联机”。
此时还不能使用,您必须分割与格式化硬盘。
在"未配置"选择"新增简单扇区"
61
Page 63

Mammoth Series
System Setup
05
The “New Simple Volume Wizard” window will open, then press “Next”.
Das Fenster „New Simple Volume Wizard (Assistent zum Erstellen neuer einfacher Volumes)“
öffnet sich; klicken Sie dann auf „Next (Weiter)“.
La fenêtre « New Simple Volume Wizard (Assistant nouveau volume simple) » s'ouvre, appuyez ensuite
« Next (Suivant) ».
La ventana del “Asistente para nuevo volumen simple” se abrirá, luego presione “Siguiente”.
Si aprirà la finestra “New Simple Volume Wizard (Creazione guidata nuovo volume semplice)”,
quindi premere “Next (Avanti)”.
Откроется окно "New Simple Volume Wizard (Мастер создания простых томов)", нажмите кнопку "
Next (Далее)".
「新しいシンプル ボリュームウィザード」ウィンドウが表示されるので、「次へ」を クリックします。
MMS01
"New Simple Volume Wizard(단순 볼륨 만들기 마법사)" 창이 열리면 "Next(다음)"를 누릅니다.
當" 新增簡單磁區精靈 "視窗出現後,請按”下一步” 。
当" 新增简单扇区精灵 "窗口出现后,请按”下一步” 。
62
Page 64

Mammoth Series
MMS01
System Setup
06
When the “specify volume size” pop up, you can set partition size to arbitrary value.
The size is not particularly specified as the maximum capacity setting.
After the setup is complete, press “Next.”
Wenn „Specify Volume Size (Volumegröße festlegen)“ erscheint, können Sie die Partitionsgröße auf
einen beliebigen Wert festlegen.
Die Größe ist nicht genau auf die maximale Kapazitätseinstellung festgelegt.
Klicken Sie nach Abschluss der Einrichtung auf „Next (Weiter)“.
Quand « specify volume size (spécifier taille de volume) » s'affiche, vous pouvez définir une taille de
partition avec une valeur arbitraire.
La taille n'est pas particulièrement spécifiée en tant que paramètre de capacité maximale.
Une fois la configuration terminée, appuyez sur « Next (Suivant) ».
Cuando aparezca “especifique tamaño del volumen”, podrá fijar el tamaño de la partición a un valor
arbitrario.
The size is not particularly specified as the maximum capacity setting.
After the setup is complete, press “Next.”
Quando appare “specify volume size (Specifica dimensione volume)”, è possibile impostare le dimensioni
della partizione su un valore arbitrario.
Le dimensioni non sono specificate come impostazione della capacità massima.
Quando l'installazione è completa, premere “Next (Avanti).”
63
Page 65

Mammoth Series
MMS01
System Setup
В открывшемся окне "Specify Volume Size (Укажите размер тома)" задайте произвольный размер
раздела.
Размер не обязательно соответствует максимальному объему памяти.
После завершения настройки нажмите кнопку "Next (Далее)".
「ボリュームサイズの指定」がポップアップ表示されたら、パーティションのサイズは任意に設定できます。
サイズを特に指定しない場合は最大ディスク領域と同じくします。
設定が完了したら、「次へ」を クリックしま す 。
"specify volume size(파티션 크기 지정)" 팝업 창이 나타나면 파티션 크기를 임의의 값으로 설정할 수
있습니다.
크기는 특별히 최대 용량 설정으로 지정되지 않습니다.
설정이 완료되면 "Next(다음)"를 누릅니다.
當“指定磁碟區大小”的視窗跳出,您可以切割硬碟容量。
這未必是您所需要的最大容量設定,您可自行設定,設定完成後請按”下一步”。
当“指定磁盘区大小”的窗口跳出,您可以切割硬盘容量。
这未必是您所需要的最大容量设定,您可自行设定,设定完成后请按”下一步”。
64
Page 66

Mammoth Series
MMS01
System Setup
07
In the “assigned drive letter and path” window.
■ Assign drive letter. Drive letter is usually done in alphabets starting with letter C, if not specified, it will
be assigned in alphabetical order.
■ Do not select “hanging in the following empty NTFS folder” and “does not assign a drive letter or drive
path” under normal circumstances.
※ When selecting these options, please refer to your Windows documentation or other related
materials.
■ Press “Next.”
Fenster „Assign Drive Letter or Path (Laufwerkbuchstaben oder -pfad zuordnen)“.
■ Laufwerksbuchstaben zuweisen. Der Laufwerksbuchstabe wird üblicherweise in alphabetischer
Reihenfolge beginnend mit C vergeben; falls nichts angegeben wird, wird der nächste verfügbar
Buchstabe in alphabetischer Reihenfolge gewählt.
■ Wählen Sie die Optionen „Mount in the following empty NTFS folder: (In folgendem leeren
NTFS-Ordner bereitstellen:)“ und „Do not assign a drive letter or drive path (Keinen
Laufwerkbuchstaben oder -pfad zuweisen)“ unter normalen Umständen nicht aus.
*Bei Auswahl dieser Optionen beachten Sie bitte Ihre Windows-Dokumentation oder andere
relevante Quellen.
■ Klicken Sie auf „Next (Weiter)“.
Dans la fenêtre « assigned drive letter and path (lettre et chemin attribués au lecteur) ».
■ Attribuer une lettre au disque. La lettre du disque est habituellement un caractère alphabétique en
commençant par la lettre C, si elle n'est pas spécifiée, elle sera attribuée par ordre alphabétique.
■ Ne sélectionnez pas « hanging in the following empty NTFS folder (monter dans le dossier NTFS
vide suivant) » et « does not assign a drive letter or drive path (n'attribue pas une lettre de disque ou
un emplacement de disque) » dans des circonstances normales.
※ Lors de la sélection de ces options, veuillez consulter votre documentation Windows ou d'autres
documents liés.
■ Appuyez sur « Suivant ».
65
Page 67

Mammoth Series
MMS01
System Setup
En la ventana de “letra y ruta asignadas”.
■ Asigne la letra de la unidad. La letra de la unidad se suele fijar en los alfabetos empezando con la
letra C si no se especifica y se fijará por orden alfabético.
■ No seleccione “Montar en la siguiente carpeta NTFS vacía” y “No asignar una letra para el dispositivo
o ruta” bajo circunstancias normales.
※ Cuando seleccione estas opciones, por favor consulte su documentación de Windows u otros
recursos asociados.
■ Presione “Siguiente”
Nella finestra “assigned drive letter and path (assegna lettera o percorso unità)”.
■ Assegna la lettera dell'unità. La lettera dell’unità di solito è una lettera alfabetica che inizia con la C,
se non specificato, sarà assegnata in ordine alfabetico.
■ In circostanze normali, non selezionare “hanging in the following empty NTFS folder (montare in
questa cartella vuota NTFS)” e “does not assign a drive letter or drive path (non assegnare lettera o
percorso unità)”.
※ Quando si selezionano queste opzioni, consultare la documentazione o altro materiale di Windows.
■ Premere il tasto "Avanti".
В окне "assigned Drive Letter and Path (назначить букву диска и каталог)":
■ Назначьте диску букву. Идентификатору диска обычно присваивается буква из алфавита, начиная с
буквы C (лат.), если буква не указана, назначается следующая буква по алфавиту.
■ В стандартном случае не выбирайте варианты "Hanging in the Following Empty NTFS Folder
(Подключить том как пустую NTFS-папку)" и "Does Not Assign a Drive Letter Or Drive Path
(Не назначать буквы диска
※ При выборе данных параметров обращайтесь к описанию в документации Windows или другим
соответствующим материалам.
■ Нажмите кнопку "Next (Далее)".
「ドライブ文字とパスの変更」ウィンドウでの操作
■ ドライブ文字 を割り当てます。ドライブ文字は通常Cから始まるアルファベット1文字で、特に指定がない場
合はアルファベット順に割り当てられます。
■ 「次の空のNTFSフォルダーフォルダにマウントする」と「ドライブ 文字またはドライブパスを割り当てな い」
は通常選ばないでください。
※これらオプションの選択については、ご使用のWindowsのドキュメンテーションまたは関連資料をご参
照ください。
■ 「次 へ」をクリックし ま す。
или пути диска)".
66
Page 68

Mammoth Series
MMS01
System Setup
"assigned drive letter and path(할당된 드라이브 문자 및 경로)" 창에서 다음을 수행하십시오.
■ 드라이브 문자를 할당합니다. 드라이브 문자는 일반적으로 영문자로 할당되며 C부터 시작하고,
달리 지정되지 않은 경우 사전 순으로 할당됩니다.
■ 정상적인 상황에서는 "hanging in the following empty NTFS folder(다음 빈 NTFS 폴더에서 중단)"
와 "does not assign a drive letter or drive path(드라이브 문자 또는 드라이브 경로를 할당하지
않음)" 를 선택하지 마십시오.
※ 이러한 옵션을 선택했다면 사용자의 Windows 문서나 그밖의 관련 자료를 참조하십시오.
■ "다음" 을 누릅니다.
出現”指派磁碟機代號或路徑”視窗
■ 選擇磁碟序號,通常是為英文字母代碼,開始若沒指定,通常由C開始,接著按字母順序排列。
■ 建議不用點選”掛在下列空的NTFS資料夾上”與”不指派磁碟機代號或磁碟機路徑”
※當要選擇這些選項設定時,請參閱Windows相關設定或參考相關書籍。
■ 按下一步
出现”指派驱动器号或路径”窗口
■ 选择磁盘序号,通常是为英文字母代码,开始若没指定,通常由C开始,接着按字母顺序排列。
■ 建议不用点选”挂在下列空的NTFS文件夹上”与”不指派驱动器号或磁盘驱动器路径”
※当要选择这些选项设定时,请参阅Windows相关设定或参考相关书籍。
■ 按下一步
67
Page 69

Mammoth Series
System Setup
08
The “Format Partition” window.
■ For “File System”, choose NTFS. Please do not use other file format.
■ You can specify the size of the allocation unit size when configuring partition. If you don’t need
to specify, then please select default volume.Set the name of volume for display in “My Computer”.
■ Check this option to perform a quick format, it will perform a quick format.
■ Boot files and Compression folders.
Check this option to enable file and folder compression.
You can increase available drive capacity with this option, but drive speed will be lower than with no
compression.When setup is complete, press "Next.”
Das „Format Partition (Partition formatieren)“-Fenster.
■ Wählen Sie bei „File System (Dateisystem)“ NTFS. Bitte verwenden Sie kein anderes Dateiformat.
■ Sie können beim Konfigurieren der Partition die zugewiesene Größe angeben. Wenn Sie keine
Angabe machen müssen, wählen Sie bitte das Standardvolume.
Legen Sie fest, unter welchem Namen das Volume unter „My Computer (Arbeitsplatz)“ angezeigt
werden soll.
■ Wählen Sie zur Durchführung einer schnellen Formatierung die Option „Schnellformatierung
durchführen“.
■ Startdateien und Komprimierungsordner.
Wählen Sie zur Aktivierung von Datei- und Ordnerkomprimierung die Option „Komprimierung für
Dateien und Ordner aktivieren“.
Sie können die verfügbare Laufwerkskapazität mit dieser Option erhöhen, die
Laufwerksgeschwindigkeit ist jedoch geringer als ohne Komprimierung.
Klicken Sie bei Abschluss der Einrichtung auf „Next (Weiter)“.
La fenêtre « Format Partition (Formater partition) ».
■ Pour le « File System (Système de fichiers) », choisissez NTFS. Veuillez ne pas utiliser d'autre
format de fichier.
■ Vous pouvez spécifier la taille de l'unité d'allocation lors de la configuration de la partition. Si vous
n'avez pas besoin de la spécifier, veuillez sélectionner le volume par défaut.
Définissez le nom du volume à afficher dans « My Computer (Mon ordinateur) ».
■ Cochez cette option pour effectuer un formatage rapide, le système effectuera alors un formatage
rapide.
■ Fichiers de démarrage et dossiers de compression.
Cochez cette option pour activer la compression des fichiers et des dossiers.
Vous pouvez augmenter la capacité de disque disponible avec cette option, mais la vitesse du
disque sera inférieure par rapport à sans compression.
Une fois la configuration terminée, appuyez sur « Next (Suivant) ».
76
MMS01
68
Page 70

Mammoth Series
MMS01
System Setup
La ventana “Formato de la partición”
■ Para “Archivo del sistema” escoja NTFS. Por favor, no use otro formato de archivo.
■ Puede especificar el tamaño de la unidad de asignación cuando configure la partición. Si no necesita
especificarlo, entonces seleccione el valor por defecto.
Elija el nombre del volumen que aparecerá en “Mi PC”.
■ Marque esta opción para realizar un formateo rápido, realizará un formateo rápido.
■ Archivos de arranque y carpetas de compresión
Marque esta opción para activar la compresión de archivos y carpetas.
Puede incrementar la capacidad disponible del disco con esta opción, pero la velocidad del disco
será inferior que sin la compresión.
Cuando la configuración se complete, presione “Siguiente”.
Appare la finestra “Format Partition (Formatta partizione)”.
■ Scegliere NTFS per “File System (File System)”. Non utilizzare altri formati di file.
■ È possibile specificare le dimensioni dell’unità di allocazione per la configurazione della partizione.
Se non è necessario specificare, selezionate il volume predefinito.
Impostare il nome del volume da visualizzazione in “My Computer (Risorse del computer)”.
■ Selezionare questa opzione per eseguire una formattazione rapida, e la formattazione rapida sarà
eseguita.
■ File di avvio e Cartelle di compressione.
Selezionare questa opzione per abilitare la compressione di file e cartelle.
Con questa opzione è possibile aumentare la capacità disponibile del disco, ma la velocità dell’unità
sarà inferiore rispetto a quella senza compressione.
Al termine della configurazione premere " Next (Avanti).”
Окно "Format Partition (Форматирование раздела)".
■ Для поля "File System (Файловая система)" выберите NTFS. Не используйте другие файловые
форматы.
■ При настройке раздела вы можете указать размер единицы распределения. В противном случае
выберите том по умолчанию.Задайте имя тома для отображения в папке "My Computer
(Мой компьютер)".
■ Установите флажок для поля "Выполнить ускоренное форматирование".
■ Файлы загрузки и сжатие папок.
Установите флажок для поля "Сжатие файлов и папок".
Данный параметр позволяет увеличить объем рабочего дискового пространства, но при этом
снижается скорость работы диска по сравнению с режимом работы без сжатия.
После завершения настройки нажмите кнопку "Next (Далее)".
69
Page 71

Mammoth Series
MMS01
System Setup
「パーティションのフォーマット」ウィンドウでの操作。
■ 「ファイルシステム」にはNTFSを選択します。その他のファイルフォーマットは使用しないでください。
■ パーティションを設定すると、アロケーションユニットサイズが指 定できます。指定する必要がない場合は、
デフォルト値を選びます。
「マイコンピュータ」に表示されるボリューム名を設定します。
■ クイックフォーマットするにチェックを入れると、クイックフォーマットが実行されます。
■ ファイルとフォルダーの圧縮を有効にする。
このオプ ションに チェックを 入れると、ファイルとフォルダーの圧縮が有効になります。
このオプションによっ利用可能なドライブ容量は増えますが、非圧縮時と比べてドライブの速度は遅くなります。
設定が完了したら「次へ」をクリックします。
"Format Partition(파티션 포맷)" 창에서 다음을 수행하십시오.
■ "File System(파일 시스템)" 에서 NTFS를 선택합니다. 다른 파일 형식을 사용하지 마십시오.
■ 파티션을 구성할 때 할당 단위의 크기를 지정할 수 있습니다. 지정할 필요가 없다면 기본 볼륨을
선택하십시오.
"My Computer(내 컴퓨터)" 에서 디스플레이의 볼륨 이름을 설정합니다.
■ 빨리 포맷하려는 경우 이 옵션을 선택하면 포맷이 신속하게 수행됩니다.
■ 부팅 파일 및 압축 폴더.
이옵션을 선택하면 파일과 폴더 압축 기능이 활성화됩니다.
이옵션으로 사용 가능한 드라이브 용량을 늘릴 수 있지만 압축하지 않은 때보다 드라이브 속도가 느려지게
됩니다.
설정이 완료되면 "Next(다음)" 를 누릅니다.
出現”磁碟分割格式化”視窗
■ 檔案系統選擇NTFS,請不要選擇其他檔案格式
■ 您可定義配置單位大小,若不需要定義請選擇預設值輸入出現在”我的電腦”的磁碟區標籤
■ 執行快速格式化
■ 選擇是否啟用檔案及資料夾壓縮若勾選可節省儲存空間,但會影響檔案資料的存取效能設定完成後
請按”下一步”
出现”磁盘分区格式化”窗口
■ 文件系统选择NTFS,请不要选择其他文件格式
■ 您可定义配置单位大小,若不需要定义请选择默认值输入出现在”我的计算机”的磁盘区卷标
■ 执行快速格式化
■ 选择是否启用档案及文件夹压缩若勾选可节省储存空间,但会影响档案数据的存取效能设定完成后
请按”下一步”
70
Page 72

Mammoth Series
MMS01
System Setup
09
“Completing the New Simple Volume Wizard” window.
If settings are correct, press Finish and formatting will begin.
Das „Completing the New Simple Volume Wizard (Fertigstellen des Assistenten)“-Fenster.
Wenn die Einstellungen stimmen, klicken Sie auf „Fertigstellen“; die Formatierung beginnt.
Fenêtre « Completing the New Simple Volume Wizard (Terminer l'assistant nouveau volume simple) ».
Si les réglages sont corrects, appuyez sur Terminer, le formatage commence alors.
Ventana “Completar el asistente para nuevo volumen simple”
Si la configuración es correcta, presione Finalizar y el formateo comenzará
Appare la finestra “Completing the New Simple Volume Wizard (Completamento della Creazione guidata
nuovo volume semplice)”.
Se le impostazioni sono corrette, premere Fine e la formattazione si avvierà.
Окно "Completing the New Simple Volume Wizard (Завершение мастера создания простого тома)".
Проверьте правильность заданных параметров и нажмите кнопку "Завершить" для запуска
процедуры форматирования.
「新しいシンプルボリュームウィザードの完了」ウィンドウでの操作。
設定が正しければ、「完了」をクリックするとフォーマットが開始されます。
"Completing the New Simple Volume Wizard(단순 볼륨 만들기 마법사 완료)" 창에서 다음을
수행하십시오.
설정 내용이 맞을 경우 마침을 누르면 포맷이 시작됩니다.
出現”完成新增簡單磁碟區精靈”視窗若設定正確,請按”完成” 。
出现”完成新增简单磁盘区精灵”窗口若设定正确,请按”完成” 。
71
Page 73

Mammoth Series
MMS01
System Setup
10
When formatting, disk window will display the format condition. After formatting is complete, this disk icon
will appear in “My Computer”.
Now you can start using the formatted drive.
Bei der Formatierung zeigt das Datenträgerfenster den Fortschritt. Nach Abschluss der Formatierung
erscheint das Datenträgersymbol unter „My Computer (Arbeitsplatz)“.
Nun können Sie mit der Benutzung des formatierten Laufwerks beginnen.
Lors du formatage, la fenêtre du disque affiche l'état du formatage. Une fois le formatage terminé, l'icône
de ce disque apparaîtra dans « My Computer (Mon ordinateur) ».
Vous pouvez alors commencer à utiliser le disque formaté.
Cuando formatee, la ventana del disco mostrará la condición del formateo. Tras completar el formateo,
el icono del disco aparecerá como “Mi PC”.
Ahora puede empezar a usar el disco formateado.
Durante la formattazione, la finestra del disco mostrerà lo stato della formattazione. Al termine della
formattazione, nella cartella “My Computer (Risorse del computer)”apparirà l’icona del disco.
Adesso si può iniziare ad utilizzare il disco formattato.
После завершения форматирования в окне диска отобразится состояние форматирования. После
завершения форматирования в папке "My Computer (Мой компьютер)" отобразится значок данного
диска.
Теперь можно пользоваться отформатированным диском.
フォーマット中は、ディスクウィンドウが進行情況を表示します。フォーマットが完了すると、このディスクのアイ
コンが「マイコンピュータ」に表示されます。これでフォーマットされたドライブが使用可能になりました。
포맷할 때 디스크 창에 포맷 상태가 표시됩니다. 포맷이 완료되면 이 디스크 아이콘이 "My Computer
(내 컴퓨터)" 에 표시됩니다.
이제 포맷된 드라이브를 사용할 수 있습니다.
當硬碟格式化正在進行,視窗會出現格式化的狀態,當格式化完成,硬碟的圖示就會出現在”我的電腦”
中,您就可開始使用。
当硬盘格式化正在进行,窗口会出现格式化的状态,当格式化完成,硬盘的图标就会出现在”我的计算机”
中,您就可开始使用。
72
Page 74

Mammoth Series
MMS01
System Setup
Caution
■ While in the formatting process, a warning window will appear but it does not mean formatting has
failed.
■ While in the formatting process, please do not power off the PC, power off the docking station,
unplug cables, or turn off Windows, etc…
■ Während der Formatierung erscheint ein Warnfenster; das bedeutet jedoch nicht, dass die
Formatierung fehlgeschlagen ist.
■ Während der Formatierung sollten Sie folgende Dinge nicht tun: PC abschalten, Dockingstation
abschalten, Kabel ziehen, Windows herunterfahren etc.
■ Lors du processus de formatage, une fenêtre d'avertissement apparaît mais cela ne signifie pas que
le formatage a échoué.
■ Lors du processus de formatage, veuillez ne pas mettre hors tension le PC, mettre hors tension la
station d'accueil, débrancher les câbles, arrêter Windows, etc…
■ Mientras se realice el proceso de formateo, aparecerá una ventana de aviso pero eso no significará
que el formateo haya fallado.
■ Mientras se realice el proceso de formateo, por favor no apague el PC, desconecte la estación de
carga, los cables, no apague Windows, etc…
■ Durante la procedura di formattazione, apparirà una finestra di avviso ma non significa che la
formattazione non è riuscita.
■ Durante la procedura di formattazione non spegnere il PC, non spegnere la Docking Station, non
scollegare cavi, no spegnere Windows, eccetera.
73
Page 75

Mammoth Series
MMS01
System Setup
■ В процессе форматирования на экране отображается предупреждающее сообщение, которое не
означает сбой форматирования.
■ В процессе форматирования не выключайте ПК, питание док-станции, не отключайте кабели, не
отключайте Windows и т. д.
■ フォーマット処理中に警告ウィンドウが表示されますが、フォーマットの失敗を表わすものではありま
せん。
■ フォーマット処理中にPCやドックステーションの電源を切ったり、ケーブルを抜いたり、Windowsをシ
ャットダウンしたりしないでください。
■ 포맷이 진행되는 동안 경고 창이 나타나지만 이것이 포맷에 실패했다는 의미는 아닙니다.
■ 포맷이 진행되는 동안에는 PC와 도킹 스테이션의 전원을 끄고 케이블을 뽑거나 Windows 등을
끄십시오.
■ 在格式化過程中,會出現一個警告視窗,但這並不意味著格式化失敗。
■ 在格式化過程中,請不要關閉電源與拔掉線材、關閉視窗等動作,以免造成格式化失敗。
■ 在格式化过程中,会出现一个警告窗口,但这并不意味着格式化失败。
■ 在格式化过程中,请不要关闭电源与拔掉线材、关闭窗口等动作,以免造成格式化失败。
74
Page 76

Mammoth Series
MMS01
System Setup
MAC OSX
01
Open the "Disk Utility." ※ "Disk Utility " in the “Applications” “Utilities” folder.
The left column displays the disks that can be formatted, this docking will be displayed as "Xx GB
(HDD / SSD capacity) Media."
Click to format it.
Öffnen Sie „Disk Tools (Festplattendienstprogramm)“. *„Disk Tools (Festplattendienstprogramm)“ unter
„Applications (Programme)“ > „Utilities (Dienstprogramme)“.
Die linke Spalte zeigt Datenträger, die formatiert werden können; die Dockingstation wird als „Xx GB
(HDD / SSD capacity) Media (Xx-GB-Medium (Festplatten- / SSD-Kapazität)) “ angezeigt.
Klicken Sie sie zum Formatieren an.
Ouvrez les « Disk Tools (Outils disque) ». ※ « Disk Tools (Outils disque) » dans le dossier « Applications
(Applications) » « Utilities (Utilitaires) ».
La colonne gauche affiche les disques qui peuvent être formatés, cette station sera affichée en tant que
« Xx GB (HDD / SSD capacity) Media (Support Xx Go (capacité disque dur / SSD)) ».
Cliquez pour le formater.
Abra las “Herramientas de disco” – “Herramientas de disco” en la carpeta de “Aplicaciones” “Utilidades”.
La columna izquierda muestra los discos que se pueden formatear, esta bahía se mostrará como “Xx
GB (HDD/SSD capacidad)”
Haga clic para formatearlo.
Aprire "Disk Tools(Utilità dischi)". ※ " Disk Tools(Utilità dischi)" nella cartella “Applications(Applicazioni)”
- “Utilities(Utilità)” .
La colonna di sinistra visualizza i dischi che possono essere formattati, questa Docking Station sarà
visualizzata come "Xx GB (HDD / SSD capacity) Media (Supporto Xx GB (capacità HDD / SSD))".
Fai clic per formattare.
75
Page 77

Mammoth Series
MMS01
System Setup
Откройте окно "Disk Tools (Дисковые утилиты)". ※ "Disk Tools (Дисковые утилиты)" находятся в папке
"Applications (Приложения)" "Utilities (Служебные программы)".
В левом столбце отображаются диски для форматирования, данная док-станция отображается как
"Xx GB (HDD/SSD capacity) Media (Носитель Xx ГБ (емкость HDD/SSD))".
Щелкните ее для форматирования.
「ディスクツール」を開きます。※「ディスクツール」は「アプリケーション」「ユーティリティ」フォル ダ ー 内
にあります。
左の欄にフォーマット可能なディスクが表示されます。当ドッキ ング は「XxGB(HDD/SSD容量)Media」
として 表 示 さ れ ま す。
クリックして フォー マ ットしま す 。
"Disk Tools(디스크 도구)" 를 엽니다. ※ "Disk Tools(디스크 도구)" 는 "Applications(응용 프로그램)"
"Utilities(유틸리티)" 폴더에 들어있습니다.
왼쪽 열에 포맷할 수 있는 디스크가 표s시되고 이 도킹 스테이션이 "Xx GB (HDD / SSD capacity)
Media(Xx GB (HDD / SSD 용량) 미디어)" 로 표시됩니다.
클릭해서 포맷합니다.
打開”工具程式” 資料夾裡面的”磁碟工具程式”。
左邊對話框出現可被格式化的硬碟字樣"Xx GB (HDD / SSD capacity) Media.",點選以進行格式化。
打開”工具程式” 資料夾裡面的”磁碟工具程式”。
左邊對話框出現可被格式化的硬碟字樣"Xx GB (HDD / SSD capacity) Media.",點選以進行格式化。
76
Page 78

Mammoth Series
MMS01
System Setup
02
The disk information will show on this page.
Die Datenträgerinformationen werden auf dieser Seite angezeigt.
Les informations du disque s'afficheront sur cette page.
La información del disco se mostrará en esta página.
In questa pagina saranno mostrate le informazioni sul disco.
На данной странице отображается информация о диске.
ディスク情報がこのページに表示されます。
이 페이지에 디스크 관련 정보가 표시됩니다.
硬碟的資訊會出現在視窗中。
硬盘的信息会出现在窗口中。
77
Page 79

Mammoth Series
System Setup
03
Click the “Partition.” You can change the partition setting.
Klicken Sie auf „Partition(Partition)“. Sie können die Partitionseinstellungen ändern.
Cliquez sur « Partition (Partition) ». Vous pouvez modifier le paramétrage de la partition.
Haga clic en “Partición”. Puede cambiar la configuración de la partición.
Fare clic su “Partition (Partizione)”. È possibile modificare l'impostazione della partizione.
Щелкните вкладку "Partition (Раздел)". Здесь вы можете изменить параметры раздела.
「パーティション」をクリックしま す。パーティションの設定は変更可能です。
"Partition(파티션)" 을 클릭합니다. 파티션 설정은 변경할 수 있습니다.
MMS01
按”分割”,開始進行切割硬碟設定。
按”分割”,开始进行切割硬盘设定。
78
Page 80

Mammoth Series
MMS01
System Setup
04
Click the lower right corner “Apply” after setting.
The warning window wills popup.
Click “Partition” to confirm. If not, click "Cancel.”
Klicken Sie nach der Einrichtung unten links auf „Apply (Anwenden)“.
Ein Warnfenster wird angezeigt.
Klicken Sie zum Bestätigen auf „Partition (Partitionieren)“. Andernfalls klicken Sie auf „
Cancel (Abbrechen)“.
Cliquez dans le coin inférieur droit « Apply (Appliquer) » après le paramétrage.
La fenêtre d'avertissement apparaît.
Cliquez sur « Partition (Partition ) » pour confirmer. Sinon, cliquez sur « Cancel (Annuler) ».
Haga clic en la esquina inferior derecha “Aplicar” tras la configuración.
Aparecerá la ventana de aviso.
Haga clic en “Partición” para confirmar. Si no, haga clic en “Cancelar”.
Dopo avere eseguito l’impostazione, fare clic in basso a destra su “Apply (Applica)”.
Appare una finestra di avviso.
Fare clic su ““Partition (Partizione)” per confermare. In caso contrario, fare clic su "Cancel (Annulla)”.
79
Page 81

Mammoth Series
MMS01
System Setup
После настройки щелкните кнопку "Apply (Применить)" в нижнем правом углу окна.
Отобразится предупреждающее сообщение.
Щелкните кнопку "Partition (Раздел)" для подтверждения. В противном случае щелкните кнопку
"Cancel (Отмена)".
設定後、右下にある「適 用」をクリックしま す。
警告ウィンドウがポップアップ表示されます。「 パ ー ティション 」をクリックして確定します。そうしない場合
は「キャンセル」をクリックし ま す。
설정한 다음 오른쪽 아래에 있는 "Apply(적용)" 버튼을 클릭합니다.
경고 팝업 창이 나타납니다.
설정을 확인하려면 "Partition(파티션)" 을 클릭합니다. 아닐 경우 "Cancel(취소)" 을 클릭합니다.
進行設定後,點選”套用”。
之後會出現警告的對話視窗,按下”分割區”確定,若不執行就按”取消”。
进行设定后,点选”套用”。
之后会出现警告的对话窗口,按下”分割区”确定,若不执行就按”取消”。
80
Page 82

Mammoth Series
MMS01
System Setup
05
The disk partition will appear on the desktop.
Die Datenträgerpartition erscheint am Desktop.
La partition du disque apparaît sur le bureau.
La partición del disco aparecerá en el escritorio.
Sul desktop apparirà la partizione del disco.
Раздел диска отобразится на рабочем столе.
デス クトップ に ディス クの パ ー ティション が 表 示 さ れ ま す。
디스크 파티션이 바탕 화면에 나타납니다.
硬碟的圖示將出現在桌面上
硬盘的图标将出现在桌面上
81
Page 83

Mammoth Series
System Setup
Remove the disk
1 When you want to remove MMS01B, please click the safety remove icon on the lower right corner.
2 When the screen shows "Safe to Remove Hardware" means the hardware has been removed.
remove the cable connections.
※The process of removing the hard disk depends on the version of the operating system, please refer
to the Windows operating manual.
Please note: The wrong way to remove the product may cause damage to the hard disk data.
1 Wenn Sie das MMS01 entfernen möchten, klicken Sie bitte auf das Symbol zum sicheren Auswerfen
unten rechts.
2 Wenn der Bildschirm „Hardware kann nun sicher entfernt werden“ erscheint, können Sie das MMS01
sicher entfernen.
※Der Vorgang des Entfernens von Festplatten hängt von der Betriebssystemversion ab, bitte beachten
Sie die Anleitung des Windows-Betriebssystems.
Bitte beachten: Wird das Laufwerk falsch entfernt, können Laufwerksdaten beschädigt werden.
1 Si vous souhaitez retirer le MMS01, veuillez cliquer sur l'icône « Retirer en toute sécurité » dans le
coin inférieur droit.
2 Quand l'écran affiche « Retrait du matériel en toute sécurité », vous pouvez déconnecter le MMS01
en toute sécurité.
※ Le processus de retrait du disque dur dépend de la version du système d'exploitation, veuillez consulter
le manuel d'utilisation de Windows
Veuillez noter : Retirer incorrectement le disque peut endommager les données présentes sur le disque.
MMS01
1 Cuando desee quitar la MMS01, por favor haga clic en el icono de quitar de forma segura en la
esquina inferior derecha.
2 Cuando la ventana muestre “Es seguro retirar el hardware” será seguro desconectar la MMS01.
※ El proceso de retirar el disco duro depende de la versión del sistema operativo, por favor consulte el
manual de Windows.
Por favor tenga en cuenta: Retirar el disco de forma incorrecta podría causar daños a los datos del
disco.
82
Page 84

Mammoth Series
MMS01
System Setup
1.Quando si vuole rimuovere MMS01, fare clic sull’icona rimozione sicura dell’hardware nell'angolo in
basso a destra.
2.Quando lo schermo visualizza il messaggio "È possibile rimuovere l'hardware", è possibile scollegare
in sicurezza MMS01.
※La procedura per rimuovere il disco rigido dipende dalla versione del sistema operativo; fare riferimento
al manuale operativo di Windows.
Nota bene: La rimozione dell’unità in modo non corretto può danneggiare i dati del disco.
1.Для отключения устройства MMS01 щелкните значок безопасного извлечения в правом нижнем
углу экрана.
2.При отображении сообщения Safe to Remove Hardware (Безопасное отключение устройства) можно
отключить устройство MMS01.
※Порядок отключения жесткого диска зависит от версии операционной системы, см. руководство по
использованию Windows.Примечание. Ненадлежащее отключение диска может привести к
повреждению данных на диске.
1.MMS01を取り外すには、右下の安全な取り外しアイコンをクリックします。
2.「ハードウェアの取り外しが安全」が表示されたら、MMS01を安全に取り外すことができます。
※ハードディスクドライブ取り外しの手順はオペレーティングシステムのバージョンによって異なるので、
Windowsの取扱いマニュアルをご参照ください。
ご注意:ドライブの不適切な取り外しは、ドライブ上のデータに損傷を与える可能性があります。
【드라이브 제거하기】
1.MMS01을 제거하려면, 오른쪽 아래에 있는 안전하게 제거 아이콘을 클릭하십시오.
2.화면에 "하드웨어를 안전하게 제거"가 표시되면, MMS01을 분리해도 안전합니다.
※하드 드라이브 제거 과정은 운영 체제의 버전에 따라 다릅니다. Windows 운영 설명서를
참조하십시오.참고: 드라이브를 잘못 제거하면 드라이브 데이터가 손상될 수 있습니다.
1.當您要移除MMS01B,請點擊視窗右下角的安全移除圖示。
2.當螢幕顯示"可安全移除硬碟"時,指硬體已被移除,即可拆下連接線。
※移除硬碟的方法,請依據各作業系統的版本,參考Windows 操作手冊。
請注意:錯誤的方式移除硬碟,可能會損害硬碟中的資料。
1.当您要移除MMS01B,请点击窗口右下角的安全移除图示。
2.当屏幕显示"可安全移除硬盘"时,指硬件已被移除,即可拆下连接线。
※移除硬盘的方法,请依据各操作系统的版本,参考Windows 操作手册。
请注意:错误的方式移除硬盘,可能会损害硬盘中的数据。
83
Page 85

System Setup
1當您要移除MMS01B,請點擊視窗右下角的安全移除圖示。
2當螢幕顯示"可安全移除硬碟"時,指硬體已被移除,即可拆下連接線。
※移除硬碟的方法,請依據各作業系統的版本,參考Windows 操作手冊。
請注意:錯誤的方式移除硬碟,可能會損害硬碟中的資料。
1当您要移除MMS01B,请点击窗口右下角的安全移除图示。
2当屏幕显示"可安全移除硬盘"时,指硬件已被移除,即可拆下连接线。
※移除硬盘的方法,请依据各操作系统的版本,参考Windows 操作手册。
请注意:错误的方式移除硬盘,可能会损害硬盘中的数据。
Mammoth Series
MMS01
84
Page 86

Mammoth Series
MMS01
Warranty Information
85
Page 87

Page 88

G11225360
 Loading...