

Page 1
1500W SDS Plus Drill
FR Marteau perforateur burineur SDS Plus 1500 W
DE SDS-Plus-Bohrhammer, 1500 W
ES Taladro SDS Plus 1500 W
IT Trapano SDS Plus 1500 W
NL 1500 W SDS-Plus boorhamer
PL Wiertarka SDS Plus 1500 W
268819
3
ANS DE GARANTIE
JAHRE GARANTIE
AÑOS DE GARANTÍA
ANNI DI GARANZIA
JAAR GARANTIE
LATA GWARANCJI
Register online: silverlinetools.com
YEAR
GUARANTEE
XXXXXX
Version date: 02.01.18
silverlinetools.com
Page 2
321 4 5
2
1
22
6
7
10
13
9
8
20
11
15
12
19
14
16
2
1817
Page 3
silverlinetools.com
Fig. I
Fig. II
Fig. IV
Fig. III
Fig. V
Fig. VI
1
3
Page 4

4
Page 5

silverlinetools.com
English ................6
Français ...............12
Deutsch ................18
Español ................ 24
Italiano ................ 30
Nederlands ..........36
Polski ..................42
5
Page 6

GB
Original Instructions
Introduction
Thank you for purchasing this Silverline tool. This manual contains information necessary
for safe and effective operation of this product. This product has unique features and, even if
you are familiar with similar products, it is necessary to read this manual carefully to ensure
you fully understand the instructions. Ensure all users of the tool read and fully understand
this manual.
Description of Symbols
The rating plate on your tool may show symbols. These represent important information about the
product or instructions on its use.
Wear hearing protection.
Wear eye protection.
Wear breathing protection.
Wear head protection.
Wear hand protection.
Read instruction manual.
Caution!
Always disconnect from the power supply when adjusting, changing accessories,
cleaning, carrying out maintenance and when not in use!
Class II construction (double insulated for additional protection)
Environmental Protection
Waste electrical products should not be disposed of with household waste. Please
recycle where facilities exist. Check with your local authority or retailer for recycling
advice.
Conforms to relevant legislation and safety standards.
DO NOT use in rain or damp environments!
Technical Abbreviations Key
V Volts
~, AC Alternating current
A, mA Ampere, milli-Amp
n
0
Ø Diameter
Hz Hertz
W, kW Watt, kilowatt
-1
/min or min
rpm Revolutions per minute
bpm Blows (impacts) per minute (drill)
dB(A) Decibel sound level (A weighted)
2
m/s
No load speed
Operations per minute
Metres per second squared (vibration magnitude)
Specication
Voltage: . . . . . . . . . . . . . . . . . . . . . . . . . . . . . . . . . . . . . . . . . . . . . . . . . . . .230-240V~, 50Hz
Power: ..............................................................1500W
No load speed: ....................................................0-880min
Impact rate:...................................................... 0-4350bpm
Impact energy: ..........................................................5.5J
Chuck: .............................................................SDS Plus
Accessory keyed chuck capacity:........................................0-13mm
Gearbox grease capacity:..................................................80g
Ingress protection: .......................................................IP20
Protection Class:..........................................................
Power cable length: . . . . . . . . . . . . . . . . . . . . . . . . . . . . . . . . . . . . . . . . . . . . . . . . . . . . . . .2m
Max drilling capacity Concrete: ........................................Ø 32mm
Max drilling capacity Wood: ...........................................Ø 40mm
Max drilling capacity Steel:............................................Ø 13mm
Dimensions (L x W x H):......................................390 x 95 x 280mm
Weight: ...............................................................5.5kg
As part of our ongoing product development, specications of Silverline products
Sound & vibration information
Sound pressure LPA: .................................................96.4dB(A)
Sound power LWA: ..................................................107.4dB(A)
Uncertainty K: ...........................................................3dB
Weighted vibration (Hammer drill mode): . . . . . . . . . . . . . . . . . . . . . . . . . . . 19,327m/s
Weighted vibration (Chisel mode): .................................. 17,879m/s
Uncertainty:..........................................................1.5m/s
The sound intensity level for the operator may exceed 85dB(A) and sound protection
may alter without notice.
measure are necessary.
-1
2
2
2
6
WARNING: Always wear ear protection where the sound level exceeds 85dB(A) and limit the
time of exposure if necessary. If sound levels are uncomfortable, even with ear protection, stop
using the tool immediately and check the ear protection is correctly tted and provides the correct
level of sound attenuation for the level of sound produced by your tool.
WARNING: User exposure to tool vibration can result in loss of sense of touch, numbness,
tingling and reduced ability to grip. Long-term exposure can lead to a chronic condition. If necessary,
limit the length of time exposed to vibration and use anti-vibration gloves. Do not operate the tool
with hands below a normal comfortable temperature, as vibration will have a greater effect. Use the
gures provided in the specication relating to vibration to calculate the duration and frequency
of operating the tool.
Page 7

1500W SDS Plus Drill268819
silverlinetools.com
Sound and vibration levels in the specication are determined according to international standards.
The gures represent normal use for the tool in normal working conditions. A poorly maintained,
incorrectly assembled, or misused tool, may produce increased levels of noise and vibration. www.
osha.europa.eu provides information on sound and vibration levels in the workplace that may be
useful to domestic users who use tools for long periods of time.
Carefully read and understand this manual and any label attached to the tool before use. Keep these
instructions with the product for future reference. Ensure all persons who use this product are fully
acquainted with this manual.
Even when used as prescribed it is not possible to eliminate all residual risk factors. Use with
caution. If you are at all unsure of the correct and safe manner in which to use this tool, do not
attempt to use it.
General Power Tool Safety Warnings
WARNING: Read all safety warnings, instructions, illustrations and specications
provided with this power tool. Failure to follow all instructions listed below may result in electric
shock, re and/or serious injury.
Save all warnings and instructions for future reference.
The term “power tool” in the warnings refers to your mains-operated (corded) power tool or battery-
operated (cordless) power tool.
1) Work area safety
a) Keep work area clean and well lit. Cluttered or dark areas invite accidents.
b) Do not operate power tools in explosive atmospheres, such as in the presence of
ammable liquids, gases or dust. Power tools create sparks which may ignite the dust or
fumes.
c) Keep children and bystanders away while operating a power tool. Distractions can cause you
to lose control.
2) Electrical safety
a) Power tool plugs must match the outlet. Never modify the plug in any way. Do not use
any adapter plugs with earthed (grounded) power tools. Unmodied plugs and matching
outlets will reduce risk of electric shock.
b) Avoid body contact with earthed or grounded surfaces, such as pipes, radiators, ranges
and refrigerators. There is an increased risk of electric shock if your body is earthed or grounded.
c) Do not expose power tools to rain or wet conditions. Water entering a power tool will increase
the risk of electric shock.
d) Do not abuse the cord. Never use the cord for carrying, pulling or unplugging the power
tool. Keep cord away from heat, oil, sharp edges or moving parts. Damaged or entangled
cords increase the risk of electric shock.
e) When operating a power tool outdoors, use an extension cord suitable for outdoor use.
Use of a cord suitable for outdoor use reduces the risk of electric shock.
f) If operating a power tool in a damp location is unavoidable, use a residual current device
(RCD) protected supply. Use of an RCD reduces the risk of electric shock.
3) Personal safety
a) Stay alert, watch what you are doing and use common sense when operating a power
tool. Do not use a power tool while you are tired or under the inuence of drugs, alcohol
or medication. A moment of inattention while operating power tools may result in serious
personal injury.
b) Use personal protective equipment. Always wear eye protection. Protective equipment
such as a dust mask, non-skid safety shoes, hard hat or hearing protection used for appropriate
conditions will reduce personal injuries.
c) Prevent unintentional starting. Ensure the switch is in the OFF-position before connecting
to power source and/or battery pack, picking up or carrying the tool. Carrying power tools
with your nger on the switch or energising power tools that have the switch ON invites accidents.
d) Remove any adjusting key or wrench before turning the power tool ON. A wrench or a key
left attached to a rotating part of the power tool may result in personal injury.
e) Do not overreach. Keep proper footing and balance at all times. This enables better control
of the power tool in unexpected situations.
f) Dress properly. Do not wear loose clothing or jewellery. Keep your hair and clothing away
from moving parts. Loose clothes, jewellery or long hair can be caught in moving parts.
g) If devices are provided for the connection of dust extraction and collection facilities,
ensure these are connected and properly used. Use of dust collection can reduce dust-related
hazards.
h) Do not let familiarity gained from frequent use of tools allow you to become complacent
and ignore tool safety principles. A careless action can cause severe injury within a fraction of a
second.
4) Power tool use and care
a) Do not force the power tool. Use the correct power tool for your application. The correct
power tool will do the job better and safer at the rate for which it was designed.
b) Do not use the power tool if the switch does not turn it ON and OFF. Any power tool that
cannot be controlled with the switch is dangerous and must be repaired.
c) Disconnect the plug from the power source and/or remove the battery pack, if detachable,
from the power tool before making any adjustments, changing accessories, or storing
power tools. Such preventive safety measures reduce the risk of starting the power tool
accidentally.
d) Store idle power tools out of the reach of children and do not allow persons unfamiliar
with the power tool or these instructions to operate the power tool. Power tools are
dangerous in the hands of untrained users.
e) Maintain power tools and accessories. Check for misalignment or binding of moving
parts, breakage of parts and any other condition that may affect the power tool’s
operation. If damaged, have the power tool repaired before use. Many accidents are caused
by poorly maintained power tools.
f) Keep cutting tools sharp and clean. Properly maintained cutting tools with sharp cutting edges
are less likely to bind and are easier to control.
g) Use the power tool, accessories and tool bits, etc. in accordance with these instructions,
taking into account the working conditions and the work to be performed. Use of the power
tool for operations different from those intended could result in a hazardous situation.
h) Keep handles and grasping surfaces dry, clean and free from oil and grease. Slippery
handles and grasping surfaces do not allow for safe handling and control of the tool in
unexpected situations.
5) Service
a) Have your power tool serviced by a qualied repair person using only identical
replacement parts. This will ensure that the safety of the power tool is maintained.
Specic Safety
Additional Safety for SDS Plus Drills
WARNING: If you suspect or discover asbestos is present in any area you are working seek
professional advice immediately. Removal of asbestos should be done by a licensed contractor.
Contact the HSE in the UK (www.hse.gov.uk) or your national health and safety authority in your
country for further information about dealing with asbestos. European Directive 2009/148/EC
provides additional information related to exposure to asbestos at work.
• It is imperative to follow all national safety regulations concerning the type of work being
undertaken., operation and maintenance
• Do not allow anyone under the age of 18 years to use this tool, and ensure that operators are
qualied and familiar with the operating and safety instructions
• Masonry drilling or chiselling can create sharp particles that will impact the operator. Wear
impact-resistant safety glasses and protective clothing, including safety boots
• Core drills should only be used with SDS drills featuring a safety clutch to prevent jamming,
which could cause an injury to the operator
• If the safety clutch operates during use, quickly release the trigger and remove the core drill or
bit from the masonry surface being drilled. Do not continue work until the cause of the safety
clutch operating is understood
• Do not operate SDS drills whilst up a ladder or in any location where there is a risk of falling. SDS
drills are heavy and produce strong vibration and high torque in use
• Wear suitable protective anti-vibration gloves that are non-fabric or coated fabric to prevent loose
strands of material catching in the rotating drill bit. Discard gloves immediately if material is
visibly frayed
• Drilling can produce large volumes of dust and debris that may be toxic. Wear respiratory
protection suitable for the work being undertaken. A minimum rating of FFP2 is recommended
• SDS drills produce high volumes of noise and suitable ear protection must be worn at all times
while operating the tool
• SDS drills produce a very high level of vibration when operating in hammer or chisel mode.
Frequent breaks are advised
• Only use SDS Chisels or Points with SDS drills that can disengage rotary drilling mode
• Use metal and voltage detectors to locate concealed electric, water or gas lines. Avoid touching
live components or conductors
• Extension cable reels used with this tool must be completely unwound. Minimum conductor
cross section: 1.25mm2
• Extension reels used outside should be designed for outdoor use and should feature waterprotected sockets and correct cable insulation
• When using an SDS drill outdoors, an RCD device must be used either by connecting to a socket
which incorporates an RCD, or through use of an inline RCD
• Ensure that the chisel or drill bit is securely xed in the chuck before operating the tool. Insecure
drill bits can be ejected from the machine, causing a hazard
• Ensure lighting is adequate
• Use both hands when operating this tool
• Always use the auxiliary handle supplied with the tool
• Do not place pressure on the tool - to do so could shorten its service life
• Drill bits become hot during operation. Allow to cool prior to handling
• If you are interrupted when operating the drill, complete the process and switch off before
diverting your attention elsewhere
• Always disconnect the SDS drill from the electric supply before changing a chisel or drill bit
• Examine the chuck regularly for signs of wear or damage. Have damaged parts repaired by a
qualied service centre
• Always wait until the drill has come to a complete stop before placing it down
• On completion of the work, disconnect the tool from the power source and remove the chisel/bit
from the machine
7
Page 8
GB
• Periodically check all nuts, bolts and other xings and tighten where necessary
• Visibly check the tool after use, especially the power cable, which can be damaged by sharp
masonry
• Always t the dust guard to the bit in use to prevent damage from debris entering the SDS chuck
• If operating the tool causes discomfort in any way, stop immediately and review your method of
use
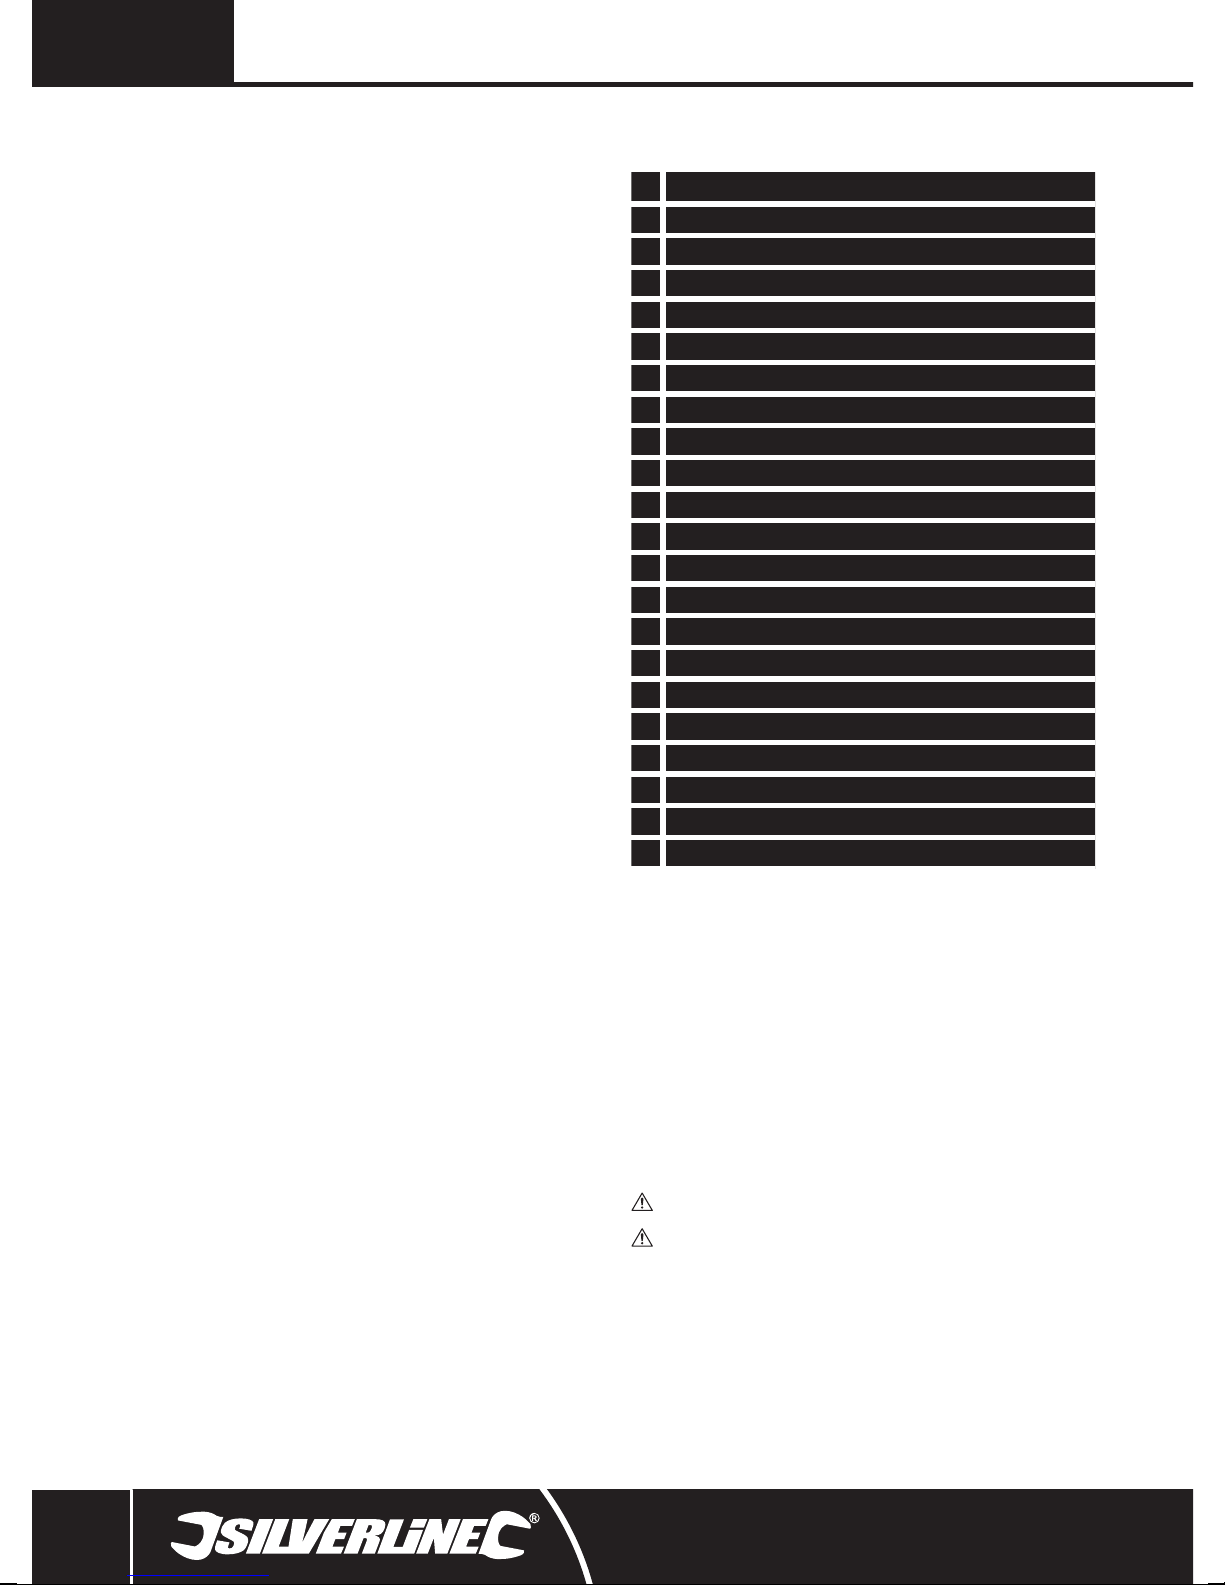
Product Familiarisation
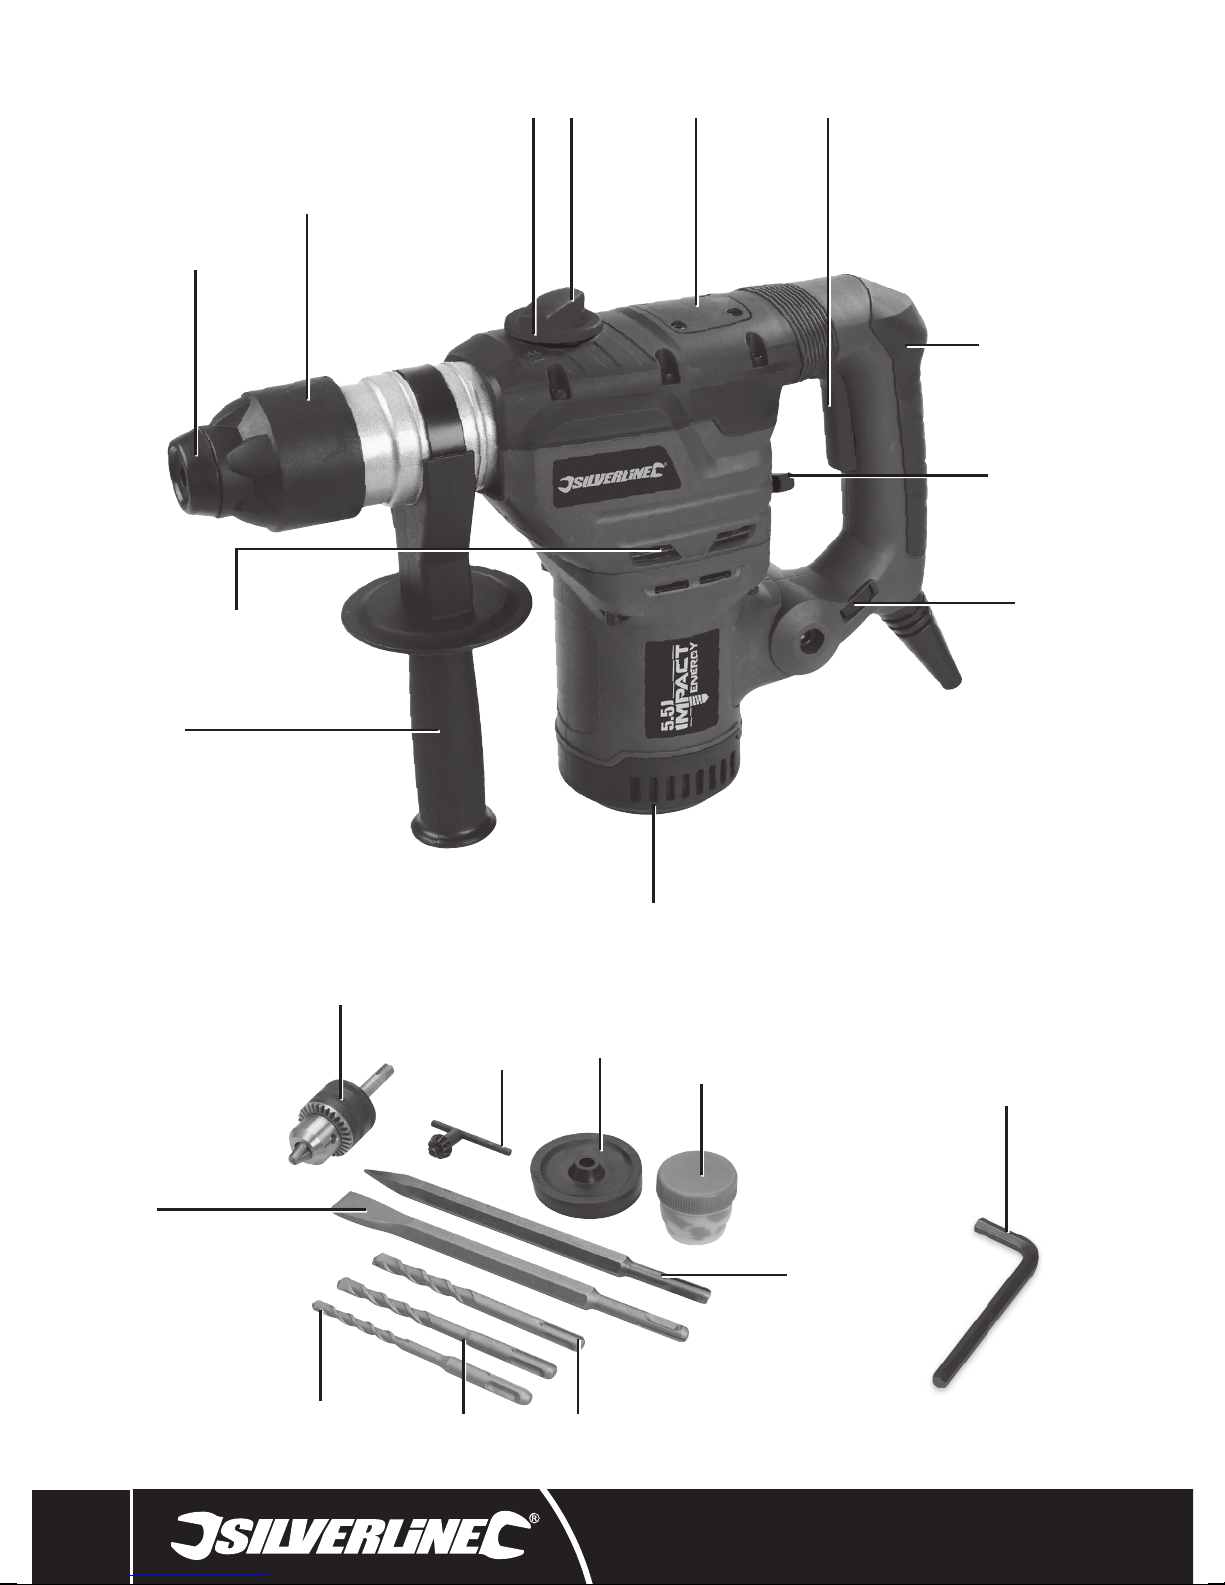
1. SDS Plus Chuck
2. SDS Plus Chuck Collar
3. Mode Selector
4. Gearbox Cover
5. ON/OFF Trigger Switch
6. Standard/Hammer Drill Selector
7. Variable Speed Control
8. Brush Access Cover
9. Auxiliary Handle
10. Motor Vents
11. Chuck Key
12.
Pot of Grease
13.
Chisel
14.
Point
15.
Dust Guard
16.
8mm Masonry SDS Plus Drill Bit
17.
10mm Masonry SDS Plus Drill Bit
18.
12mm Masonry SDS Plus Drill Bit
19.
Hex Key
20.
13mm Keyed Chuck
21.
Mode Selector Lock
22.
Main Handle
Additional Supplied Accessories (not shown)
• Blow moulded case
Intended Use
Portable medium-duty mains powered SDS drill optimally designed for drilling masonry and
breaking light masonry. It is also capable of drilling wood and metal with the supplied standard
chuck with SDS Plus tment.
Unpacking Your Tool
• Carefully unpack and inspect your product. Fully familiarise yourself with all its features and
functions
• Ensure all parts of the product are present and in good condition. If any parts are missing or
damaged, have such parts replaced before attempting to use this product
Before Use
WARNING: Ensure the tool is disconnected from the power supply before attaching or
changing any accessories, or making any adjustments.
WARNING: Always use this tool with the Auxiliary Handle (9) tted. Using without the Handle
tted may result in personal injury
IMPORTANT: Before rst use and after every 6 hours (approx.) of use, ll the gearbox cavity
with gearbox grease (max 80g). A Pot of Grease (12) is supplied for initial use (See ‘Gearbox
Maintenance’ section)
IMPORTANT: Always check there is sufcient grease in the gearbox cavity before using the drill
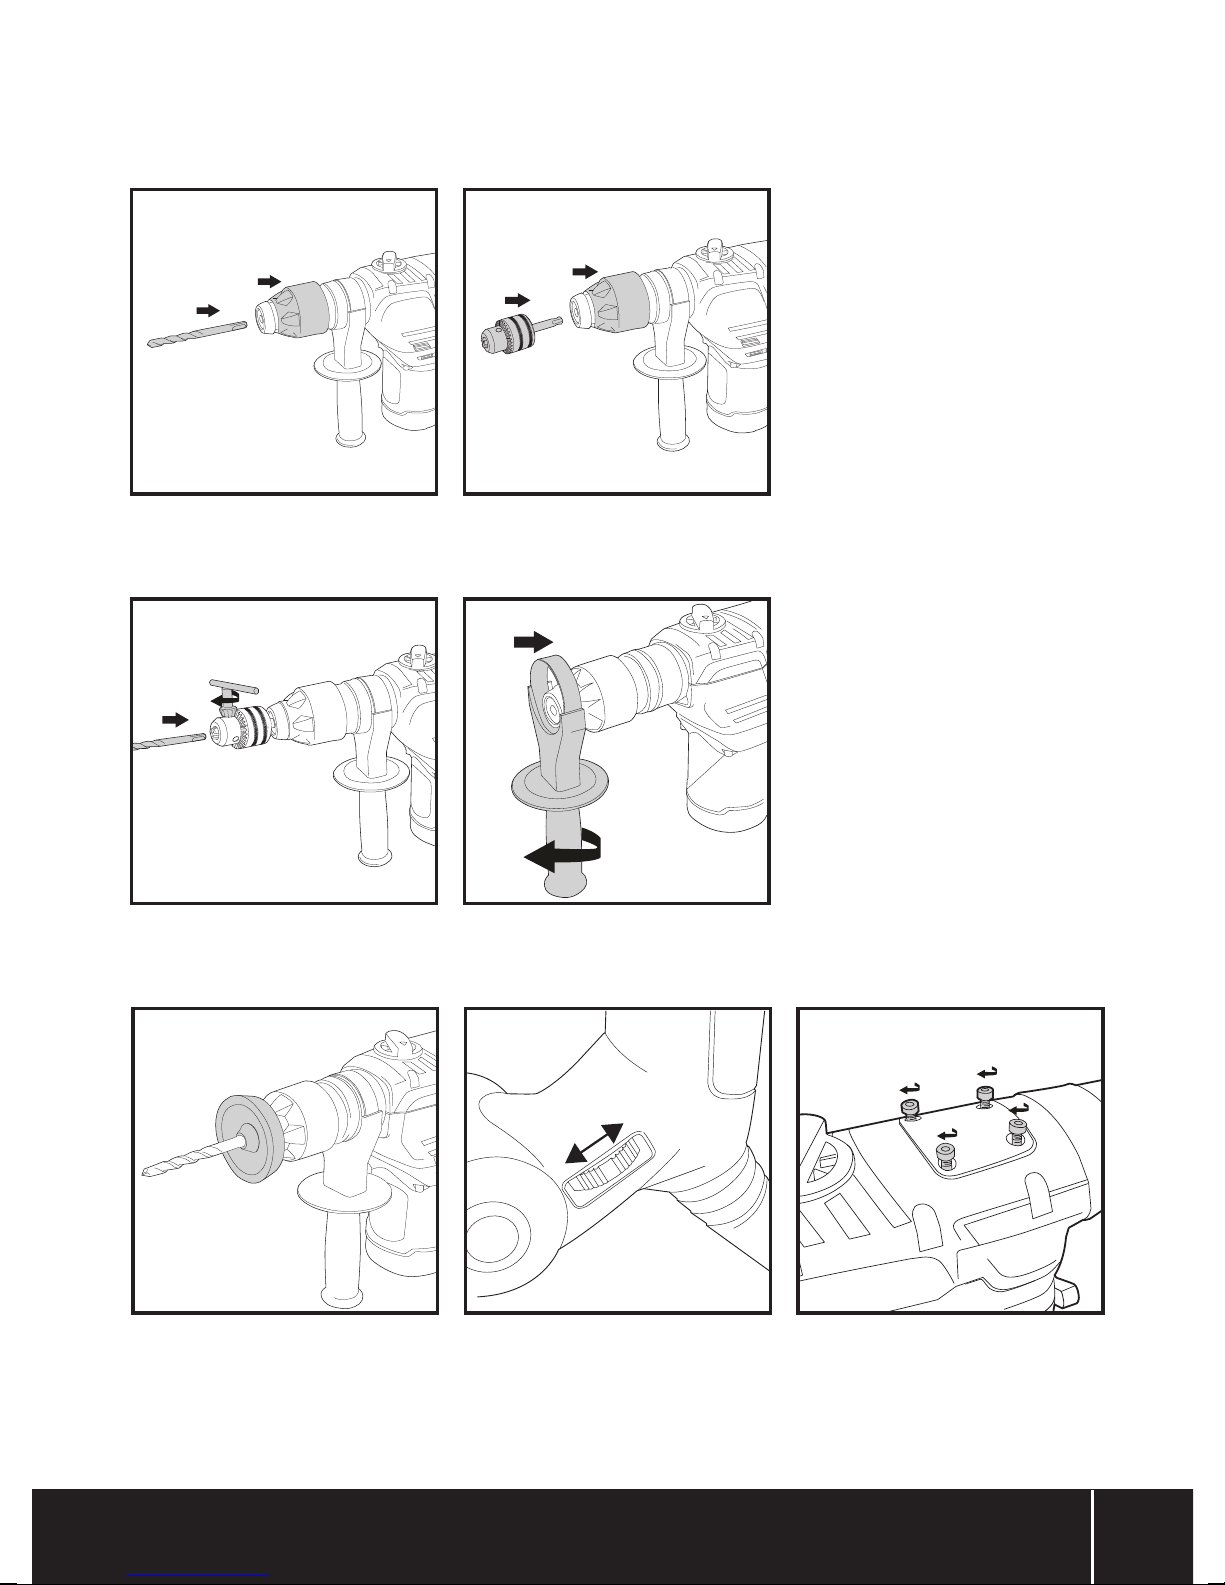
Installing/removing SDS accessories or Keyed Chuck
See Fig. I
Note: The SDS Plus system allows the bit to move slightly within the chuck when inserted correctly.
• This tool is equipped with an SDS Plus attachment system. SDS Plus accessories have slotted
shanks to align and locate with the tabs within the SDS Plus Chuck (1)
• To attach an accessory:
1. Hold the tool securely and slide the Chuck Collar (2) towards the tool
2. Insert the accessory into the Chuck until resistance is felt against the accessory
3. Release the Chuck Collar to lock the accessory in place.
4. Check the accessory cannot be removed before attempting to use the tool. If removal is possible,
repeat the installation procedure
• To remove an accessory:
1. Pull the Chuck Collar towards the tool and remove the tted accessory
Adjusting the Keyed Chuck
See Fig. II
WARNING: The Keyed Chuck is not to be used for hammer drilling or chiselling applications
WARNING: Always ensure the Chuck Key is removed from the Chuck before using the tool
• This drill comes with a Keyed Chuck (20) accessory that is more suited to drilling wood or steel
than the SDS Plus Chuck alone
• To adjust the Keyed Chuck:
1. Attach the Keyed Chuck to the SDS Plus Chuck (see ‘Installing/removing SDS accessories or Keyed
Chuck’)
2. Loosen or tighten the Keyed Chuck by inserting the Chuck Key (11) into the holes on the side of
the Keyed Chuck and rotating the Key; clockwise to tighten, anticlockwise to loosen
Installing the Auxiliary Handle
See Fig. III
1. Loosen the hand grip of the Auxiliary Handle (9) by rotating anticlockwise
2. Slide the Handle onto the drill
3. Tighten the Auxiliary Handle by rotating the hand grip clockwise
IMPORTANT: Ensure the Auxiliary Handle is not tightened onto any moving parts of the tool
before use
Operation
WARNING: ALWAYS wear eye protection, adequate respiratory and hearing protection, as well
as suitable gloves, when working with this tool.
Note: The Dust Guard (15) should be tted to the drill or chisel bit to prevent debris and dust
entering the chuck (Fig. IV). This is especially important when the drill is used at a raised angle when
working on walls or ceilings. For larger drill bits the Dust Guard may need to be tted before the bit
is tted in the chuck.
WARNING: As the drill bit penetrates the workpiece, it may 'catch' or 'snag'. This can cause the
tool to suddenly 'kick'. Prevent any possibility of injury by always holding the drill securely, using
the Auxiliary (9) and Main Handle (22), and using sharp drill bits
WARNING: Always ensure workpiece is secure. If appropriate use a vice or clamp to hold the
workpiece, and always keep two hands on the drill
Variable speed selection
See Fig. V
• The Variable Speed Control (7) is used to adjust the speed of the tool. Increasing the number
indicated on the Control will increase the speed of the tool operation, decreasing slows the speed
8
Page 9

1500W SDS Plus Drill268819
silverlinetools.com
Hammer drill mode selection
Hammer drill mode is to be used for drilling masonry and concrete.
Note: The Keyed Chuck (20) is not suitable for using in hammer drill mode
1. Adjust the Mode Selector (3) to the position by pressing the Mode Selector Lock (21) on
the Mode Selector (3) inward, and rotating the Selector
2. Release the Mode Selector Lock
3. Rotate the Standard/Hammer Drill Selector (6) to the position
• Do not attempt to move the Mode Selectors while the drill is Running
• Do not attempt to operate the drill with the Mode Selectors in a mid-position
Rotary drill mode selection
Rotary drill mode is to be used when drilling wood or metal.
Note: Use the Keyed Chuck (20) for standard drilling, using standard type wood and metal drill bits
(not supplied) (see ‘Installing/removing SDS accessories or Keyed Chuck’)
1. Adjust the Mode Selector (3) to the position by pressing the Mode Selector Lock (21) on the
Mode Selector inward and rotating the Selector
2. Release the Mode Selector Lock
3. Rotate the Standard/Hammer Drill Selector (6) to the position
• Do not attempt to move the Mode Selectors while the drill is Running
• Do not attempt to operate the drill with the Mode Selectors in a mid-position
Chisel mode selection
Chisel mode is to be used for chiselling operations only. Only use SDS Plus chisels for chiselling
operations.
Note: The Keyed Chuck (20) is not suitable for using in chisel mode
1. Adjust the Mode Selector (3) to the position by pressing the Mode Selector Lock (21) on the
Mode Selector inward and rotating the Selector
2. Release the Mode Selector Lock
3. Rotate the Standard/Hammer Drill Selector (6) to the position
• Do not attempt to move the Mode Selectors while the drill is Running
• Do not attempt to operate the drill with the Mode Selectors in a mid-position
Switching ON & OFF
1. To activate the drill, squeeze the ON/OFF Trigger Switch (5)
2. To stop the drill, release the ON/OFF Trigger Switch
Note: The maximum speed of the drill is governed by the Variable Speed Control (7). Take time
adjusting the Variable Speed Control Switch to ensure the maximum speed is correctly set before
use
Drilling concrete
1. Set the drill to hammer drill mode (see ‘Hammer drill mode selection’)
2. Install a Masonry SDS Plus Drill Bit (16,17,18) to the SDS Plus Chuck (1) (see ‘Installing/
removing SDS accessories or Keyed Chuck’)
3. Switch the drill ‘ON’ (see ‘Switching ON & OFF’)
4. Contact the drill bit with the workpiece and apply light to moderate pressure to the rear of the
drill in line with the drill bit.
5. Remove the drill from the workpiece before switching the drill ‘OFF’
IMPORTANT: Do not apply excessive pressure while drilling as this will damage the motor and
drill bit.
Note: The drilled hole may ll with debris while drilling. To clear the debris, slow the speed of the
drill and remove the bit from the hole before continuing
Drilling wood and metal
1. Set the drill to rotary drill mode (see ‘Rotary drill mode selection’)
2. Install the Keyed Chuck (20) to the drill (see ‘Installing/removing SDS accessories or Keyed
Chuck’)
3. Install a standard type wood or metal drill bit (not supplied) to the Keyed Chuck (see ‘Adjusting
the Keyed Chuck’)
4. Switch the drill ‘ON’ (see ‘Switching ON & OFF’)
5. Contact the drill bit with the workpiece and apply light to moderate pressure to the rear of the
drill in line with the drill bit.
6. Remove the drill from the workpiece before switching the drill ‘OFF’
IMPORTANT: Ensure that the drill bit being used is suitable for the workpiece
Note: The drilled hole may ll with debris while drilling. To clear the debris, slow the speed of the
drill and remove the bit from the hole before continuing
Accessories
• A full range of accessories including SDS Plus drill and chisel bits is available from your Silverline
stockist
• Spare parts can be obtained from toolsparesonline.com
Maintenance
WARNING: ALWAYS disconnect from the power supply before carrying out any inspection,
maintenance or cleaning.
Gearbox maintenance
See Fig. VI
After every 6 hours of use (approx.), the gearbox must be re-greased
1. Use the Hex Key (19) to remove the Gearbox Cover (4)
2. Use a spatula or similar instrument to apply grease into the gearbox
cavity until it is full (max 80g)
Note: Take care not to scratch or otherwise damage the gearbox internal mechanism
3. Replace the Gearbox Cover (4)
• A Pot of Grease (12) is supplied. When purchasing additional grease select a general purpose
lithium based grease
• Do not over-tighten the gearbox cover or overll the gearbox with grease
General inspection
• Regularly check that all the xing screws are tight
• Inspect the supply cord of the tool, prior to each use, for damage or wear. Repairs should be
carried out by an authorised Silverline service centre. This advice also applies to extension cords
used with this tool
Cleaning
• Keep your tool clean at all times. Dirt and dust will cause internal parts to wear quickly and
shorten the machine’s service life. Clean the body of your tool with a soft brush, or dry cloth. If
available, use clean, dry, compressed air to blow through the ventilation holes
• Clean the tool casing with a soft damp cloth using a mild detergent. Do not use alcohol, petrol or
strong cleaning agents
• Never use caustic agents to clean plastic parts
Lubrication
• Slightly lubricate all moving parts at regular intervals with a suitable spray lubricant with the
exception of the gearbox, which requires lithium based grease
Brushes
• Over time the carbon brushes inside the motor may become worn
• Excessively worn brushes may cause loss of power, intermittent failure, or visible sparking
• To replace the brushes, remove the Motor Vents (10) & Brush Access Cover (8). The worn brushes
can then be withdrawn, and replaced with new.
• Always replace worn brushes in pairs.
• Ret the brush access cover.
• Alternatively, have the tool serviced at an authorised Silverline service centre
Contact
For technical or repair service advice, please contact the helpline on (+44) 1935 382 222
Web: silverlinetools.com/en-GB/Support
Address:
Powerbox
Boundary Way
Lufton Trading Estate
Yeovil, Somerset
BA22 8HZ, United Kingdom
Storage
• Store this tool carefully in a secure, dry place out of the reach of children
Disposal
Always adhere to national regulations when disposing of power tools that are no longer functional
and are not viable for repair.
• Do not dispose of power tools, or other waste electrical and electronic equipment (WEEE), with
household waste
• Contact your local waste disposal authority for information on the correct way to dispose of power
tools
9
Page 10

GB
Troubleshooting
Problem Possible cause Solution
While core drilling the core drill has locked/jammed in the
material
Tool will not start Blown fuse Check and replace fuse. If problem persists immediately contact
Slow rotation speed Tool is overheating Switch the tool ‘OFF’ and allow it to cool down to room
Slow rotation speed or no rotation plus possible visible sparking
from motor vents
Vibration or abnormal noise Gearbox low on grease Add or replace grease
Excessive pressure on tool at the point of breakthrough in
the material
Core drill is not suitable for drill Use compatible core drill accessory
Large build-up of debris inside core drill while operating Regularly empty the build-up of debris to ensure safe operation
Power cable damaged Contact an authorised Silverline service centre
ON/OFF Trigger Switch faulty
Faulty motor
Carbon brushes worn Replace the brushes or contact an authorised service centre to
Internal moving parts excessively worn Contact an authorised Silverline service centre
Reduce pressure before breakthrough
an authorised Silverline service centre
temperature. Inspect and clean the ventilation slots
have the carbon brushes replaced
10
Page 11
1500W SDS Plus Drill268819
silverlinetools.com
Silverline Tools Guarantee
This Silverline product comes with a 3 year
guarantee
Register this product at www.silverlinetools.com within 30 days of purchase in order to qualify
for the 3 year guarantee. Guarantee period begins according to the date of purchase on your
sales receipt.
Terms & Conditions
Guarantee period becomes effective from the date of retail purchase as detailed on your sales
receipt.
PLEASE KEEP YOUR SALES RECEIPT
If this product develops a fault within 30 days of purchase, return it to the stockist where it
was purchased, with your receipt, stating details of the fault. You will receive a replacement
or refund.
If this product develops a fault after the 30 day period, return it to:
Silverline Tools Service Centre
PO Box 2988
Yeovil
BA21 1WU, UK
The guarantee claim must be submitted during the guarantee period.
You must provide the original sales receipt indicating the purchase date, your name, address
and place of purchase before any work can be
carried out.
You must provide precise details of the fault requiring correction.
Claims made within the guarantee period will be veried by Silverline Tools to establish if the
deciencies are related to material or manufacturing of the product.
Carriage will not be refunded. Items for return must be in a suitably clean and safe state for
repair, and should be packaged carefully to prevent damage or injury during transportation. We
may reject unsuitable or
unsafe deliveries.
All work will be carried out by Silverline Tools or its authorized
repair agents.
The repair or replacement of the product will not extend the period
of guarantee
Defects recognised by us as being covered by the guarantee shall be corrected by means of
repair of the tool, free of charge (excluding carriage charges) or by replacement with a tool in
perfect working order.
Retained tools, or parts, for which a replacement has been issued, will become the property of
Silverline Tools.
The repair or replacement of your product under guarantee provides benets which are
additional to and do not affect your statutory rights as a consumer.
Registering your purchase
Registration is made at silverlinetools.com by selecting the Guarantee Registration button. You
will need to enter:-
• Your personal details
• Details of the product and purchase information
Once this information is entered your guarantee certicate will be created in PDF format for you
to print out and keep with your purchase.
What is covered:
The repair of the product, if it can be veried to the satisfaction of Silverline Tools that the
deciencies were due to faulty materials or workmanship within the guarantee period.
If any part is no longer available or out of manufacture, Silverline Tools will replace it with a
functional replacement part.
Use of this product in the EU.
What is not covered:
Silverline Tools does not guarantee repairs required as a result of:
Normal wear and tear caused by use in accordance with the operating instructions eg blades,
brushes, belts, bulbs, batteries etc.
The replacement of any provided accessories drill bits, blades, sanding sheets, cutting discs and
other related items.
Accidental damage, faults caused by negligent use or care, misuse, neglect, careless operation
or handling of the product.
Use of the product for anything other than normal domestic purposes.
Change or modication of the product in any way.
Use of parts and accessories which are not genuine Silverline Tools components.
Faulty installation (except installed by Silverline Tools).
Repairs or alterations carried out by parties other than Silverline Tools or its authorized repair
agents.
Claims other than the right to correction of faults on the tool named in these guarantee
conditions are not covered by the guarantee.
Battery Guarantee
Silverline batteries are guaranteed for 12 months. If a defect occurs on a registered battery
during the term of the Battery Guarantee, due to material or manufacturing fault, then Silverline
will replace it free of charge. This guarantee does not apply to commercial use nor does it extend
to normal wear and tear or damage as a result of accident, abuse or misuse.
CE Declaration of Conformity
The undersigned: Mr Darrell Morris
as authorised by: Silverline Tools
Declares that
This declaration has been issued under the sole responsibility of the manufacturer.
The object of the declaration is in conformity with the relevant Union harmonisation Legislation.
Identication code: XXXXXX
Description: XXXXXXXXXX
Conforms to the following directives and standards:
• Machinery Directive 2006/42/EC
• Low Voltage Directive 2014/35/EU
• EMC Directive 2014/30/EU
• RoHS Directive 2011/65/EU
• Outdoor Noise Directive 2000/14/EC
Notied body: XXXXXXXXXXXXXXX
The technical documentation is kept by: Silverline Tools
Date: XX/XX/XX
Signed:
Mr Darrell Morris
Managing Director
Name and address of the manufacturer:
Powerbox International Limited, Company No. 06897059. Registered address:
Powerbox, Boundary Way, Lufton Trading Estate, Yeovil, Somerset BA22 8HZ, United Kingdom.
11
Page 12
FR
Traduction des instructions originales
Introduction
Nous vous remercions d’avoir choisi cet équipement Silverline. Ces instructions contiennent les
informations nécessaires pour vous en garantir un fonctionnement efcace et en toute sécurité.
Veuillez lire attentivement ce manuel pour vous assurer de tirer pleinement avantage des
caractéristiques uniques de votre nouvel équipement.
Gardez ce manuel à portée de main et assurez-vous que tous les utilisateurs l’aient lu et bien
compris avant toute utilisation. Conservez-le pour toute référence ultérieure.
Description des symboles
La plaque signalétique gurant sur votre outil peut présenter des symboles. Ces symboles
constituent des informations importantes relatives au produit ou des instructions concernant son
utilisation.
Port de protection auditive
Port de lunettes de sécurité
Port de masque respiratoire
Port de casque
Port de gants
Lire le manuel d’instructions
Attention!
Débranchez toujours l’appareil avant d’effectuer un réglage, de changer d’accessoire,
de le nettoyer, de l’entretenir, ou lorsqu’il n’est plus utilisé !
Chargeur: Construction de classe II (Double isolation pour une protection
supplémentaire)
Protection de l’environnement
Les produits électriques usagés ne doivent pas être jetés avec les ordures ménagères.
Veuillez les recycler dans les centres prévus à cet effet. Pour de plus amples
informations, veuillez contacter votre municipalité ou point de vente.
Conforme à la réglementation et aux normes de sécurité pertinentes
DO NOT use in rain or damp environments!
Abréviations pour les termes
techniques
V Volt
~, AC Courant alternatif
A, mA Ampère, Milliampère
n
0
Ø Diamètre
Hz Hertz
W, kW Watt, Kilowatt
-1
/min or min
rpm Tours par minute
bpm Coups par minute (perceuse)
dB(A) Puissance acoustique en décibel (A pondéré)
2
m/s
Vitesse à vide
(Opérations) par minute
Mètres par seconde au carré (magnitude des vibrations)
Caractéristiques techniques
Tension : ..................................................230-240 V~, 50 Hz
Puissance :...........................................................1500 W
Vitesse à vide : ................................................... 0-880 min
Fréquence de frappe : .............................................0-4350 bpm
Force de frappe :........................................................ 5,5 J
Mandrin :...........................................................SDS-Plus
Capacité du mandrin à clé :............................................0-13 mm
Capacité de la boîte de vitesse en graisse :...................................80 g
Indice de protection :.....................................................IP20
Classe de protection :......................................................
Longueur du câble d’alimentation :......................................... 2 m
Capacité de perçage maxi. Béton :..................................... Ø 32 mm
Capacité de perçage maxi. Bois : ......................................Ø 40 mm
Capacité de perçage maxi. Acier :...................................... Ø 13 mm
Dimensions (L x l x h) :.......................................390 x 95 x 280 mm
Poids : ...............................................................5,5 kg
Du fait de l’évolution constante de notre développement produit, les caractéristiques
des produits Silverline peuvent changer sans notication préalable.
Informations sur le niveau sonore et vibratoire
Pression acoustique LPA : ............................................ 96,4 dB(A)
Puissance acoustique LWA :..........................................107,4 dB(A)
Incertitude K : . . . . . . . . . . . . . . . . . . . . . . . . . . . . . . . . . . . . . . . . . . . . . . . . . . . . . . . . . . .3 dB
Vibration pondérée (mode perforateur) : ............................19.327 m/s
Vibration pondérée (mode burineur) : ...............................17.879 m/s
Incertitude :......................................................... 1,5 m/s
L’intensité sonore peut dépasser 85 dB(A) et il est nécessaire que l’utilisateur
prenne des mesures de protection sonore.
-1
2
2
2
12
AVERTISSEMENT : Portez toujours des protections auditives lorsque le niveau d’intensité est
supérieur à 85 dB(A) et limitez le temps d’exposition si nécessaire. Si l’intensité sonore devient
inconfortable, même avec les protections, arrêtez immédiatement d’utiliser l’appareil, vériez que
les protections sont bien en places et adaptés avec le niveau sonore produit par l’appareil.
AVERTISSEMENT : L’exposition de l’utilisateur aux vibrations peut engendrer une perte du toucher,
des engourdissements, des picotements et ainsi réduire la capacité de préhension. De longues
expositions peuvent également provoquer ces symptômes de façon chronique. Si nécessaire,
limitez le temps d’exposition aux vibrations et portez des gants anti-vibrations. N’utilisez pas cet
appareil lorsque la température de vos mains est en dessous des températures normales, car l’effet
vibratoire en est accentué. Référez-vous aux chiffres indiqués dans les caractéristiques techniques
des caractéristiques relatifs aux vibrations pour calculer le temps et la fréquence d’utilisation de
l’appareil.
Page 13

Marteau perforateur burineur SDS Plus 1500 W268819
silverlinetools.com
Les niveaux sonores et vibratoires indiqués dans la section « Caractéristiques techniques »
du présent manuel sont déterminés en fonction de normes internationales. Ces données
correspondent à un usage normal de l’appareil, et ce dans des conditions de travail normales.
Un appareil mal entretenu, mal assemblé ou mal utilisé peut augmenter les niveaux sonores et
vibratoires. Le site www.osha.europa.eu offre de plus amples informations sur les niveaux sonores
et vibratoires sur le lieu de travail, celles-ci pourront être utiles à tout particulier utilisant des outils
électriques pendant des périodes prolongées.
Veuillez lire attentivement et assimiler les informations contenues dans le présent manuel ainsi que
toute mention éventuellement apposée sur une étiquette présente sur votre appareil même avant
d’entreprendre d’utiliser cet appareil. Veuillez conserver ces instructions et consignes de sécurité
pour référence ultérieure. Assurez-vous que toutes les personnes qui utiliseront ce produit aient pris
pleinement connaissance des présentes instructions.
Même s’il est utilisé selon l’usage conforme et dans le respect des présentes consignes de sécurité,
il est impossible d’éliminer tout facteur de risque. À utiliser en prenant une extrême précaution.
Si vous avez un quelconque doute sur la manière d’utiliser cet appareil en toute sécurité,
n’entreprenez pas de vous en servir.
Consignes générales de sécurité
relatives à l’utilisation d’appareils
électriques
AVERTISSEMENT : Veuillez lire toutes les consignes de sécurité et toutes les instructions
dispensées dans le présent manuel. Le non-respect des instructions et consignes de sécurité peut
entraîner un risque de décharge électrique, d’incendie et/ou se traduire par des blessures graves.
Veuillez conserver ces instructions et consignes de sécurité pour référence ultérieure.
L’expression « appareil/outil électrique » employée dans les présentes consignes recouvre aussi bien
les appareils laires à brancher sur secteur que les appareils sans ls fonctionnant avec batterie.
1. Sécurité sur la zone de travail
a. Maintenir une zone de travail propre et bien éclairée. Des zones encombrées et mal éclairées
sont sources d’accidents.
b. Ne pas utiliser d’outils électriques dans des environnements explosifs, tels qu’à proximité
de liquides, de gaz ou de poussières inammables. Les outils électriques produisent des
étincelles susceptibles d’enammer la poussière ou les vapeurs présentes.
c. Éloigner les enfants et toute personne se trouvant à proximité pendant l’utilisation d’un
outil électrique. Ceux-ci pourraient vous distraire et vous faire perdre la maîtrise de l’appareil.
2. Sécurité électrique
a. Les prises des outils électriques doivent correspondre aux prises du secteur. Ne modiez
jamais la prise en aucune façon. N’utilisez jamais d’adaptateur avec les outils électriques
mis à la terre. Des prises non modiées, adaptées aux boîtiers de prise de courant, réduiront les
risques de décharge électrique.
b. Éviter le contact corporel avec les surfaces mises à la terre telles que tuyaux, radiateurs,
cuisinières et réfrigérateurs. Le risque de décharge électrique est plus important si votre corps
est mis à la terre.
c. Ne pas exposer votre outil électrique à la pluie ou à l’humidité. L’inltration d’eau dans un
outil électrique augmentera le risque de décharge électrique.
d. Ne pas maltraiter le cordon électrique. N’utilisez jamais le cordon électrique pour porter,
tirer ou débrancher l’outil électrique. Conservez le cordon électrique à l’écart de la chaleur,
de l’essence, de bords tranchants ou de pièces en mouvement. Un cordon électrique
endommagé ou entortillé accroît le risque de décharge électrique.
e. Au cas où l’outil électroportatif serait utilisé à l’extérieur, servez-vous d’une rallonge
appropriée à une utilisation en extérieur. Cela réduit le risque de décharge électrique.
f. Si une utilisation de l’outil dans un environnement humide ne peut être évitée, utilisez
une alimentation protégée par un disjoncteur différentiel. L’utilisation d’un disjoncteur
différentiel réduit le risque de décharge électrique.
3. Sécurité des personnes
a. Rester vigilant et faire preuve de bon sens lors de la manipulation de l’outil. Ne pas
utiliser d’outil électrique en état de fatigue ou sous l’inuence de drogues, d’alcool ou
de médicaments. Un moment d’inattention pendant l’utilisation d’un outil électrique peut se
traduire par des blessures graves.
b. Porter des équipements de protection. Porter toujours des lunettes de protection. Le port
d’équipements de protection tels que des masques à poussières, des chaussures de sécurité
antidérapantes, un casque de sécurité ou des protections antibruit, selon le travail à effectuer,
réduira le risque de blessures aux personnes.
c. Éviter tout démarrage accidentel. S’assurer que l’interrupteur marche-arrêt soit en
position d’arrêt (Off) avant de brancher l’outil sur l’alimentation secteur. Porter un outil
électrique tout en maintenant le doigt posé sur l’interrupteur ou brancher un outil électrique dont
l’interrupteur est sur la position de marche (On) est source d’accidents.
d. Enlever toute clé ou tout instrument de réglage avant de mettre l’outil électrique en
marche. Une clé ou un instrument de réglage resté xé à un élément en rotation de l’outil
électrique peut entraîner des blessures physiques.
e. Ne pas essayer d’atteindre une zone hors de portée. Se tenir toujours en position stable
et conserver l’équilibre. Cela permet de mieux contrôler l’outil électrique dans des situations
inattendues.
f. Porter des vêtements appropriés. Ne pas porter de vêtements amples ou des bijoux pendants.
Les vêtements amples, les bijoux pendants ou les cheveux longs peuvent être happés par les
pièces en mouvement.
g. Si l’outil est pourvu de dispositifs destinés au raccord d’équipements d’extraction et
de récupération de la poussière/sciure, s’assurer qu’ils soient bien xés et utilisés
correctement. L’utilisation de ces dispositifs peut réduire les risques dus à la poussière.
h. Ne relâchez pas votre vigilance sous prétexte qu’un usage fréquent vous donne
l’impression de vous sentir sufsamment en conance et familier avec l’outil et son
utilisation. Les consignes de sécurité ne doivent en aucun cas être ignorées. Une action
inconsidérée qui ne durerait ne serait-ce qu’une fraction de seconde pourrait entraîner un
accident impliquant de graves blessures.
4. Utilisation et entretien des outils électriques
a. Ne pas surcharger l’outil électrique. Utiliser l’outil électrique approprié au travail à
effectuer. Un outil électrique adapté et employé au rythme pour lequel il a été conçu permettra
de réaliser un travail de meilleure qualité et dans de meilleures conditions de sécurité.
b. Ne pas utiliser un outil électrique dont l’interrupteur marche-arrêt est hors service.
Tout outil électrique dont la commande ne s’effectue plus par l’interrupteur marche-arrêt est
dangereux et doit être réparé.
c. Débrancher l’outil électrique avant d’effectuer tout réglage, changement d’accessoire ou
avant de le ranger. De telles mesures préventives réduiront les risques de démarrage accidentel.
d. Ranger les outils électriques inutilisés hors de portée des enfants et ne pas permettre
l’utilisation de ces outils aux personnes novices ou n’ayant pas connaissance de ces
instructions. Les outils électriques sont dangereux dans les mains d’utilisateurs inexpérimentés.
e. Veiller à l’entretien des outils électriques. Vérier que les éléments rotatifs soient bien
alignés et non grippés. S’assurer de l’absence de pièces cassées ou endommagées
susceptibles de nuire au bon fonctionnement de l'outil. Si l’outil électrique est
endommagé, le faire réparer avant toute utilisation. De nombreux accidents sont causés par
l’utilisation d’outils électriques mal entretenus.
f. Garder les outils de coupe affûtés et propres. Des outils de coupe bien entretenus, aux
tranchants bien affûtés, sont moins susceptibles de se gripper et sont plus faciles à contrôler.
g. Utiliser l’outil électrique, les accessoires et les outils à monter, etc., conformément à ces
instructions et selon l’utilisation prévue pour le type d’outil donné, en tenant compte des
conditions de travail et de la tâche à réaliser. Toute utilisation de cet outil électrique autre
que celle pour laquelle il a été conçu peut entraîner des situations à risque et entraînerait une
annulation de sa garantie.
h. Veillez à ce que les poignées et toute surface de préhension de l’appareil soient toujours
propres, sèches et exemptes d’huile et de graisse. Une poignée ou une surface de préhension
rendue glissante ne consentirait pas à l’utilisateur de conserver une parfaite maîtrise de son outil
en toutes circonstances.
5. Entretien
a. Ne faire réparer l’outil électrique que par un réparateur qualié utilisant uniquement
des pièces de rechange identiques. Cela permettra d’assurer la sécurité continue de cet outil
électrique.
Consignes de sécurité spéciques
Consignes de sécurité supplémentaires pour les
appareils de perçage SDS Plus
AVERTISSEMENT : Si vous suspectez la présence d’amiante, ou si vous en découvrez à l’endroit
où vous travaillez, consultez immédiatement un professionnel. Le retrait de l’amiante doit être
effectué par un entrepreneur certié. En Grande-Bretagne, contactez le HSE (www.hse.gov.uk),
ou faites appel à un professionnel certié selon la réglementation de votre pays. La directive
européenne 2009/148/CE procure des informations relatives à l’exposition à l’amiante au travail.
• Il est impératif de suivre toutes les réglementations nationales de sécurité concernant le type de
travail à effectuer.
• Il est interdit à toute personne de moins de 18 ans d’employer cet appareil. Tout utilisateur de
l’appareil doit être formé à son utilisation et à ses mesures de sécurité.
• Le perçage ou le burinage des matériaux de maçonnerie peut créer des particules tranchantes
pour l’utilisateur. Portez les équipements personnels de sécurité nécessaires tels que lunettes ou
visière de sécurité, et chaussures de sécurité.
• Les scies-trépans ne doivent être utilisées qu’avec des machines SDS disposant d’un embrayage
de sécurité pour éviter les blocages qui peuvent être dangereux pour l’utilisateur.
• Si l’embrayage de sécurité se déclenche lors de l’utilisation, relâchez vite la gâchette et retirez la
scie-trépan ou le foret de la surface de maçonnerie que vous percez. Ne continuez pas à travailler
avant d’avoir compris la cause du déclenchement.
• N’utilisez pas de perceuse/perforateur SDS sur une échelle ou à tout endroit favorisant les
risques de chute. Ces appareils sont lourds et produisent de fortes vibrations et un couple
important.
• Portez des gants visant à réduire les effets vibratoires : ils ne doivent pas être en tissu ou
alors présenter un revêtement permettant d’éviter que des ls se prennent sur le foret. Jetez
immédiatement des gants eflochés.
• Le perçage peut produire une quantité importante de poussière et de débris qui peuvent être
toxiques. Portez une protection respiratoire adéquate à la tâche à effectuer. Il est recommandé
d’utiliser au moins une protection FFP2.
13
Page 14
FR
• Les perceuses/perforateurs SDS produisent un volume sonore important, et des protections
auditives adéquates doivent être portées pendant toute la durée d’utilisation.
• Les perceuses/perforateurs SDS produisent une intensité vibratoire élevée en mode de
perforation/burinage. Il est recommandé de prendre régulièrement des pauses.
• Utilisez uniquement des burins SDS Plus ou des burins SDS qui peuvent désenclencher le mode
de perçage rotatif.
• Détectez la présence de câbles électriques et de conduites d’eau ou de gaz à l’aide d’un détecteur
de métal et de tension. Ne touchez pas les composants ou conducteurs électriques sous tension.
• Toute rallonge électrique sur dévidoir éventuellement utilisée avec cet appareil doit être
totalement dévidée. La rallonge doit présenter un câble de section transversale d’au moins 1,25
mm2.
• Toute rallonge pour un usage en extérieur doit comporter des prises étanches et une isolation du
câble appropriée.
• Lors de l’utilisation de cet outil en extérieur, utilisez un disjoncteur différentiel (RCD) soit en
ligne, soit branché sur la prise.
• Assurez-vous que les forets et burins soient bien xés dans le mandrin. Les forets mal insérés
peuvent être éjectés de la machine et représentent un danger.
• Assurez-vous de disposer d’un éclairage sufsant.
• Servez-vous de vos deux mains lorsque vous utilisez cet outil.
• Servez-vous toujours de la poignée auxiliaire fournie avec cet outil.
• N’exercez pas de pression sur l’appareil – cela pourrait réduire la durée de service de l’appareil.
• Les accessoires (forets, etc.) pourront avoir atteint des températures élevées lors du perçage,
laissez-les refroidir avant de les manipuler.
• Si l’on vous interrompt pendant le perçage, terminez l’opération et éteignez l’appareil avant de
vous concentrer sur autre chose.
• Débranchez toujours l’appareil avant de changer tout accessoire.
• Examinez le mandrin régulièrement à la recherche de tout signe d’usure ou de dommage. Faites
réparer les pièces endommagées par un centre de réparation homologué.
• Attendez toujours que la machine soit parvenue à un arrêt complet avant de la déposer.
• Une fois le travail terminé, débranchez l’appareil et retirez toujours l’accessoire (burin, foret) de
l’appareil.
• Vériez régulièrement que les écrous, boulons et autres dispositifs de xation soient bien serrés.
• Inspectez l’état de l’appareil après chaque utilisation, surtout le câble d’alimentation qui peut
être facilement endommagé par le tranchant des matériaux.
• Installez la protection anti-poussière sur l’embout pour éviter que la poussière ne rentre dans le
mandrin SDS.
• Si l’utilisation de l’appareil devient inconfortable, arrêtez immédiatement et revoyez la manière
dont vous l’utilisez.
Descriptif du produit
1 Mandrin SDS Plus
2 Collerette du mandrin SDS Plus
3 Sélecteur de mode
4 Cache de la boîte de vitesse
5 Gâchette marche/arrêt
6 Sélecteur mode standard/perforateur
7 Variateur de vitesse
8 Cache d’accès aux charbons
9 Poignée auxiliaire
10 Orices de ventilation du moteur
11 Clé du mandrin
12
Pot de graisse
13
Burin
14
Burin pointu
15
Protection anti-poussière
16
Mèche à maçonnerie SDS Plus 8 mm
17
Mèche à maçonnerie SDS Plus 10 mm
18
Mèche à maçonnerie SDS Plus 12 mm
19
Clé mâle
20
Mandrin de 13 mm à clé
21
Verrouillage du sélecteur de mode
22
Poignée principale
Accessoires fournis supplémentaires (non illustrés)
• Mallette moulée
Usage conforme
Appareil électroportatif laire pour les tâches moyennes, conçu principalement pour percer et
casser les matériaux de maçonnerie. Cet appareil peut également percer le bois et le métal avec le
mandrin standard à raccord SDS Plus fourni.
Déballage
• Déballez le produit avec soin. Veillez à retirer tout le matériau d’emballage et familiarisez-vous
avec toutes les caractéristiques du produit.
• Si des pièces sont endommagées ou manquantes, faites-les réparer ou remplacer avant d’utiliser
l’appareil
Avant utilisation
AVERTISSEMENT : Assurez-vous que l’outil soit débranché de l’alimentation électrique avant
d’installer ou de changer des accessoires, ou d’effectuer des réglages.
AVERTISSEMENT : Employez toujours la poignée auxiliaire (9) an d’éviter au mieux le risque
de blessures personnelles.
IMPORTANT : Avant la première utilisation et toutes les 6 heures d’utilisation environ, remplissez
de graisse la cavité contenant les engrenages (80 g au maximum). Un pot de graisse (12) est fourni
avec l’appareil pour la première fois. Consultez la section « Entretien des engrenages » pour plus
de conseils.
IMPORTANT : Vériez toujours que la cavité des engrenages contienne sufsamment de graisse
avant toute utilisation du marteau perforateur.
14
Page 15

Marteau perforateur burineur SDS Plus 1500 W268819
silverlinetools.com
Installation et retrait des accessoires SDS ou du
mandrin à clé
Voir Fig. I
Remarque : Le système SDS laisse un certain jeu au foret au sein du mandrin lorsqu’il est inséré
correctement.
• L’appareil est doté d’un système de xation SDS Plus. Les accessoires SDS Plus présentent une
queue à encoches qui coopère avec des reliefs présents à l’intérieur du le mandrin SDS Plus (1).
• Pour installer un accessoire :
1. Tenez l’appareil fermement et rétractez la collerette du mandrin (2) vers l’appareil.
2. Introduisez à fond l’accessoire dans le mandrin.
3. Relâchez la collerette du mandrin pour bloquer l’accessoire en place.
4. Vériez que l’accessoire ne peut pas être enlevé avant de commencer à utiliser l’appareil. Si
l’accessoire peut être enlevé, reprenez les étapes précédentes.
• Pour retirer un accessoire :
1. Rétractez la collerette du mandrin vers l’appareil et retirer l’accessoire.
Réglage du mandrin à clé
Voir Fig. II
AVERTISSEMENT : Le mandrin à clé ne doit pas être utilisé pour le perçage en mode
perforateur ou pour le burinage.
AVERTISSEMENT : Veillez à toujours bien enlever la clé du mandrin avant de mettre en
marche l’appareil.
• Ce perforateur/burineur possède en accessoire un mandrin à clé (20) permettant de percer dans
le bois ou l’acier, en l’installant sur le mandrin SDS Plus.
• Pour régler le mandrin à clé :
1. Fixez le mandrin à clé sur le mandrin SDS Plus (voir « Installation et retrait des accessoires SDS ou
du mandrin à clé »).
2. Desserrez ou resserrez le mandrin à clé en introduisant la clé du mandrin (11) dans les trous
présents sur le côté du mandrin à clé et en tournant la clé : dans le sens des aiguilles d’une
montre pour serrer, dans le sens contraire des aiguilles d’une montre pour desserrer.
Installation de la poignée auxiliaire
Voir Fig. III
1. Desserrez la poignée auxiliaire (9) en tournant sa partie de préhension dans le sens contraire des
aiguilles d’une montre.
2. Placez la poignée sur l’appareil en la faisant coulisser.
3. Resserrez la poignée auxiliaire en tournant sa partie de préhension dans le sens des aiguilles
d’une montre.
IMPORTANT : Veillez à ne pas serrer la poignée auxiliaire sur des parties de l’appareil qui seront en
rotation en cours d’utilisation.
Instructions d’utilisation
AVERTISSEMENT : Portez TOUJOURS une protection oculaire, une protection respiratoire et
auditive adéquate, ainsi que des gants appropriés, lorsque vous travaillez avec cet appareil.
Remarque : La protection anti-poussière (15) doit être montée sur le foret ou le burin pour éviter
que la poussière et les débris ne s’inltrent dans le mandrin (Fig. IV). Cette remarque est très
importante si vous travaillez avec une certaine inclinaison sur un mur ou un plafond. Pour les forets
de taille plus importante, mettez d’abord le cache anti-poussière avant de mettre le foret.
AVERTISSEMENT : Au fur et à mesure que le foret pénètre dans la matière à percer, il peut se
trouver bloqué ou accroché. Cela peut provoquer un rebond soudain de la machine. Pour écarter
tout risque de blessure, tenez toujours l’appareil par sa poignée auxiliaire (9) et principale (22), en
utilisant toujours des forets bien aflés.
AVERTISSEMENT : Assurez-vous toujours que la pièce à percer est bien immobilisée. Au
besoin, utilisez un étau ou des presses pour maintenir l’ouvrage, et gardez toujours les deux mains
sur l’appareil.
Sélection de la vitesse variable
Voir Fig. V
• Le variateur de vitesse (7) permet de régler la vitesse de l’appareil. Plus le nombre indiqué par le
variateur est élevé, plus la vitesse de fonctionnement de l’appareil sera grande, et inversement.
Sélection du mode perforateur
Le mode perforateur est adapté au perçage de la maçonnerie et du béton.
Remarque : Le mandrin à clé (20) ne convient au mode perforateur.
1. Réglez le sélecteur de mode (3) sur la position en enfonçant le verrouillage du sélecteur de
mode (21) présent sur le sélecteur de mode (3) et en tournant le sélecteur.
2. Relâchez le verrouillage du sélecteur de mode.
3. Placez le sélecteur de mode standard/perforateur (6) sur la position .
• N’actionnez pas les sélecteurs de mode pendant que l’appareil est en marche.
• Ne mettez pas l’appareil en marche tandis que les sélecteurs de mode sont en position
intermédiaire.
Sélection du mode perçage
Le mode perçage est adapté au perçage du bois et du métal.
Remarque : Employez le mandrin à clé (20) pour les activités de perçage classique, au moyen de
forets pour bois et métal classiques (non fournis) (voir « Installation et retrait des accessoires SDS
ou du mandrin à clé »).
1. Réglez le sélecteur de mode (3) sur la position en enfonçant le verrouillage du sélecteur de
mode (21) présent sur le sélecteur de mode et en tournant le sélecteur.
2. Relâchez le verrouillage du sélecteur de mode.
3. Placez le sélecteur de mode standard/perforateur (6) sur la position .
• N’actionnez pas les sélecteurs de mode pendant que l’appareil est en marche.
• Ne mettez pas l’appareil en marche tandis que les sélecteurs de mode sont en position
intermédiaire.
Sélection du mode burinage
Le mode burinage est adapté aux activités de burinage uniquement. N’utilisez que des burins à
emmanchement SDS Plus.
Remarque : Le mandrin à clé (20) ne convient au mode burinage.
1. Réglez le sélecteur de mode (3) sur la position en enfonçant le verrouillage du sélecteur de
mode (21) présent sur le sélecteur de mode et en tournant le sélecteur.
2. Relâchez le verrouillage du sélecteur de mode.
3. Placez le sélecteur de mode standard/perforateur (6) sur la position .
• N’actionnez pas les sélecteurs de mode pendant que l’appareil est en marche.
• Ne mettez pas l’appareil en marche tandis que les sélecteurs de mode sont en position
intermédiaire.
Mise en marche et arrêt
1. Pour mettre l’appareil en marche, appuyez sur la gâchette marche/arrêt (5).
2. Pour arrêter l’appareil, relâchez la gâchette marche/arrêt.
Remarque : La vitesse maximale de l’appareil est régulée par le variateur de vitesse (7). Prenez le
temps de bien régler le variateur de vitesse pour adapter la vitesse maximale à la tâche envisagée.
Perçage du béton
1. Réglez l’appareil sur le mode perforateur (voir « Sélection du mode perforateur »).
2. Installez un foret SDS Plus pour maçonnerie (16, 17, 18) dans le mandrin SDS Plus (1) (voir «
Installation et retrait des accessoires SDS ou du mandrin à clé »).
3. Mettez l’appareil en marche (voir « Mise en marche et arrêt »).
4. Placez le foret sur la pièce d’ouvrage et exercez une pression légère à modérée sur l’arrière de
l’appareil, dans l’alignement du foret.
5. Retirez le foret de la pièce d’ouvrage avant d’éteindre l’appareil.
IMPORTANT : N’appliquez pas trop de force pendant le perçage car cela abimera le moteur et le
foret.
Remarque : Le trou percé pourra se remplir de débris au cours du perçage. Pour éliminer ces
débris, réduisez la vitesse de l’appareil et retirez le foret du trou avant de continuer.
Perçage du bois et métal
1. Réglez l’appareil sur le mode perçage (voir « Sélection du mode perçage »).
2. Installez le mandrin à clé (20) sur l’appareil (voir « Installation et retrait des accessoires SDS ou
du mandrin à clé »).
3. Installez un foret pour bois ou métal classique (non fourni) dans le mandrin à clé (voir « Réglage
du mandrin à clé »).
4. Mettez l’appareil en marche (voir « Mise en marche et arrêt »).
5. Placez le foret sur la pièce d’ouvrage et exercez une pression légère à modérée sur l’arrière de
l’appareil, dans l’alignement du foret.
6. Retirez le foret de la pièce d’ouvrage avant d’éteindre l’appareil.
IMPORTANT : Vériez que le foret employé est adapté à la pièce d’ouvrage.
Remarque : Le trou percé pourra se remplir de débris au cours du perçage. Pour éliminer ces
débris, réduisez la vitesse de l’appareil et retirez le foret du trou avant de continuer.
Accessoires
• Toute une gamme d’accessoires, y compris des forets et burins SDS Plus, est disponible chez
votre revendeur Silverline.
• Des pièces de rechange sont disponibles sur www.toolsparesonline.com.
15
Page 16

FR
Entretien
AVERTISSEMENT : Débranchez toujours l’appareil avant d’effectuer toute inspection, entretien
ou nettoyage.
Entretien des engrenages de la boîte de vitesse
Voir Fig. VI
Toutes les 6 heures d’utilisation environ, les engrenages doivent être graissés de nouveau.
• À l’aide de la clé mâle (19), enlevez le cache de la boîte de vitesse (4).
• Avec une spatule ou un ustensile similaire, introduisez de la graisse machine dans la cavité des
engrenages jusqu’à la remplir (80 g au maximum).
Remarque : Prenez soin de ne pas rayer ou endommager le mécanisme interne.
• Remettez le cache (4) en place.
• Un pot de graisse (12) est fourni pour le premier graissage. Pour les autres graissages, procurezvous de la graisse à base de lithium pour utilisation générale.
• Ne pas trop serrer le cache ni faire déborder la graisse de la cavité.
Inspection générale
• Vériez régulièrement que les vis de xation soient bien serrées.
• Inspectez le câble d’alimentation de la machine régulièrement, avant chaque utilisation, pour
tout signe de dégât ou d’usure. Les réparations doivent être effectuées par un centre de service
agréé Silverline. Ce conseil s’applique également aux rallonges utilisées avec cet outil.
Nettoyage
• Gardez l’appareil propre. La poussière et la saleté provoquent l’usure rapide des éléments
internes de l’appareil, ce qui réduit sa durabilité. Utilisez une brosse souple ou un chiffon sec
pour le nettoyage. Si possible, nettoyez les orices de ventilation à l’air comprimé propre et sec.
• Nettoyez le boitier de la machine avec un chiffon doux et humide. N’utilisez pas d’alcool,
d’essence ou de détergents forts.
• N’utilisez jamais d’agents caustiques sur les parties plastiques.
Lubrication
• Lubriez légèrement les parties en mouvement à intervalles réguliers avec un lubriant à
vaporiser.
Remplacement des balais de charbon
• Avec le temps, les balais de charbon du moteur s’usent. Ce processus d’usure est accéléré si la
machine est surchargée ou utilisée dans des environnements poussiéreux.
• Si les balais sont excessivement usés, le rendement du moteur peut diminuer, la machine peut
ne pas démarrer ou une quantité anormale d’étincelles peut être observée
• Pour remplacer les balais, retirez le cache d’accès aux charbons (8). Les balais usés peuvent être
retirés et remplacés par des neufs.
• Remplacez toujours les balais usés par paires.
• Remettez en place de cache d’accès aux charbons.
Pour nous contacter
Pour tout conseil technique ou réparation, vous pouvez nous contacter par l’un des moyens
ci-dessous :
Téléphone : (+44) 1935 382 222
Site web :
silverlinetools.com/fr-FR/Support
Adresse postale :
Powerbox
Boundary Way
Lufton Trading Estate
Yeovil, Somerset (Royaume-Uni)
Entreposage
• Ranger cet outil et ses accessoires dans sa mallette, dans un endroit sûr, sec et hors de portée des
enfants.
Recyclage
Lorsque l’appareil n’est plus en état de fonctionner et qu’il n’est pas réparable, recyclez l’appareil en
accordance avec les régulations nationales.
• Ne jetez pas les outils électriques et autres équipements électriques ou électroniques (DEEE)
avec les ordures ménagères.
• Contactez les autorités locales compétentes en matière de gestion des déchets pour vous
informer de la procédure à suivre pour recycler les outils électriques.
En cas de problème
Problème Cause possible Solution
La scie-trépan se bloque dans le matériau Pression excessive sur l’appareil au moment où le foret traverse
L’appareil ne démarre pas Le fusible a grillé Vériez et remplacez le fusible. Si le problème se reproduit,
Vitesse de rotation au ralenti L’appareil surchauffe Eteignez l’appareil et laissez-le refroidir à température ambiante.
Vitesse de rotation au ralenti ou nulle, voire étincelles sortant au
niveau des orices de ventilation du moteur
Vibration ou bruit anormal Manque de graisse dans la boîte de vitesse Ajoutez de la graisse ou remplacez-la totalement
le matériau
La scie-trépan n’est pas compatible avec l’appareil Utilisez une scie-trépan compatible
Grande accumulation de débris à l’intérieur de la scie-trépan
lors de l’utilisation
Câble d’alimentation endommagé Contactez un centre de réparation agréé Silverline
Gâchette marche/arrêt défectueuse
Moteur défectueux
Balais de charbon usés Remplacez les balais de charbon ou contactez un centre de
Parties internes excessivement usées Contactez un centre de réparation agréé Silverline
Réduisez la pression exercée juste avant que la scie trépan
traverse le matériau
Enlevez régulièrement les débris pour garantir une utilisation
sûre
contactez immédiatement un centre de réparation agréé
Silverline
Vériez et nettoyez les orices de ventilations
réparation agréé pour les faire remplacer
16
Page 17

Marteau perforateur burineur SDS Plus 1500 W268819
silverlinetools.com
Garantie des outils Silverline
Ce produit Silverline bénécie d’une garantie
de 3 ans
Enregistrez ce produit sur le site silverlinetools.com dans les 30 jours suivant l’achat an de
bénécier de la garantie de 3 ans. La période de garantie commence à partir de la date d’achat
gurant sur votre facture.
Enregistrement de votre achat
La période de garantie prend effet à compter de la date de l’achat en magasin indiquée sur
votre facture.
VEUILLEZ CONSERVER VOTRE PREUVE D’ACHAT.
Si ce produit est défectueux pendant les 30 jours qui suivent l’achat, retournez-le au magasin
où vous l’avez acheté, avec votre facture, en expliquant en détail le problème. Le produit sera
remplacé ou vous serez remboursé(e).
Si ce produit est défectueux après cette période de 30 jours, retournez-le à :
Silverline Tools Service
Centre PO Box 2988
Yeovil
BA21 1WU, Royaume-Uni
Toute demande de service sous garantie doit être soumise pendant la période de garantie.
Avant toute intervention sous garantie, vous devez présenter la facture originale sur laquelle
doivent gurer la date d’achat, votre nom, votre adresse et le lieu d’achat.
Vous devez expliquer en détail la défaillance nécessitant réparation.
Les demandes de service sous garantie faites pendant la période de garantie seront vériées
par Silverline Tools pour établir si la défaillance du produit est liée à un vice de matériau ou
de fabrication.
Les frais de port ne seront pas remboursés. Les articles retournés doivent être convenablement
propres et sûrs pour être réparés et devraient être emballés soigneusement pour éviter tout
dommage ou toute blessure pendant le transport. Nous pouvons refuser les livraisons qui ne
sont pas convenables ou sûres.
Toute intervention sera effectuée par Silverline Tools ou ses agents de réparation agréés.
La réparation ou le remplacement du produit ne prolongera pas la période de garantie.
Les anomalies que nous reconnaissons être couvertes par la garantie seront rectiées par la
réparation de l’outil, sans frais (hormis les frais de port) ou par son remplacement par un outil
en parfait état de fonctionnement.
Les pièces ou les outils remplacés deviendront la propriété de Silverline Tools.
La réparation ou le remplacement de votre produit sous garantie vous apporte des avantages
; ces avantages s’ajoutent à vos droits statutaires en tant que consommateur sans les affecter
aucunement.
Conditions générales
Rendez-vous sur silverlinetools.com pour enregistrer votre produit. Il vous faudra saisir :
• Vos informations personnelles
• Les informations concernant le produit et l’achat
Vous recevrez le certicat de garantie au format PDF. Veuillez l’imprimer et le conserver avec
votre article.
La période de garantie prend effet à compter de la date de l’achat en magasin indiquée sur
votre facture.
La présente garantie couvre :
La réparation du produit, s’il peut être vérié, à la satisfaction de Silverline Tools, que les
défaillances du produit ont été provoquées par un vice de matériau ou de fabrication au cours
de la période de garantie.
Si une pièce n’est plus disponible ou n’est plus fabriquée, Silverline Tools la remplacera par une
pièce de rechange opérationnelle.
Une utilisation de ce produit dans l’UE.
La présente garantie ne couvre pas :
Le remplacement de tout accessoire fourni tel que les forêts, les lames, les feuilles abrasives, les
outils de coupe et autres articles similaires.
Les dommages et les défaillances accidentels causés par des négligences à l’utilisation ou
à l’entretien, une mauvaise utilisation, un manque d’entretien ou une utilisation ou une
manipulation abusive du produit.
L’utilisation du produit à des ns autres que son utilisation domestique normale.
Le moindre changement ou la moindre modication du produit.
L’utilisation de pièces et d’accessoires qui ne sont pas des composants d’origine Silverline Tools.
Une installation défectueuse (sauf si l’installation a été réalisée par Silverline Tools).
Les réparations ou les modications réalisées par des tiers autres que Silverline Tools ou ses
agents de réparation agréés.
Les demandes de service autres que le droit de rectier les défaillances de l’outil indiquées dans
les présentes conditions de garantie ne sont pas couvertes par cette garantie.
Garantie relative aux batteries
Les batteries Silverline sont garanties pour 12 mois. En cas de défaut sur une batterie
enregistrée lors de la période de garantie batterie, Silverline la remplacera gratuitement. Cette
garantie ne s’applique pas à l’utilisation commerciale et ne s’étend pas non plus à l’usure
normale ou aux dommages causés par des accidents, des négligences ou une utilisation non
conforme.
Déclaration de conformité CE
Le soussigné : M. Darrell Morris
Autorisé par : Silverline Tools
Déclare que :
La présente déclaration est établie sous la responsabilité exclusive du fabricant ;
La présente déclaration de conformité est rédigée conformément à la législation d’harmonisation
de l’Union Européenne pertinente ; et que
Le produit :
Code d’identication : XXXXXX
Description : XXXXXXXXXX
Est conforme aux normes et directives suivantes :
• Directive sur les machines 2006/42/CE
• Directive sur les basses tensions 2014/35/UE
• Directive sur la compatibilité électromagnétique 2014/30/UE
• Directive RoHS 2011/65/UE
• Directive sur les émissions sonores des matériels utilisés à l'extérieur des bâtiments 2000/14/CE
Organisme notié : XXXXXXXXXXXXXXX
La documentation technique est conservée par : Silverline Tools
Date : XX/XX/XX
Signature :
M. Darrell Morris
Directeur général
Nom et adresse du fabricant ou de son représentant agréé :
Powerbox International Limited, entreprise enregistrée sous le numéro 06897059. Siège social :
Powerbox, Boundary Way, Lufton Trading Estate, Yeovil, Somerset BA22 8HZ, Royaume-Uni.
17
Page 18

DE
Übersetzung der Originalbetriebsanleitung
Einführung
Vielen Dank, dass Sie sich für dieses Silverline-Produkt entschieden haben. Dieses Produkt verfügt
über einzigartige Funktionen. Die vorliegende Anleitung enthält wichtige Informationen für das
sichere und effektive Arbeiten mit diesem Produkt. Selbst wenn Sie bereits mit ähnlichen Produkten
vertraut sind, lesen Sie diese Anleitung bitte sorgfältig durch, um den größtmöglichen Nutzen aus
diesem Werkzeug ziehen zu können. Bewahren Sie diese Anleitung griffbereit auf und sorgen Sie
dafür, dass alle Benutzer dieses Geräts sie gelesen und verstanden haben.
Symbolerklärung
Auf dem Typenschild des Werkzeugs sind möglicherweise Symbole abgebildet. Sie vermitteln
wichtige Informationen über das Produkt oder dienen als Gebrauchsanweisung.
Gehörschutz tragen
Augenschutz tragen
Atemschutz tragen
Kopfschutz tragen
Schutzhandschuhe tragen
Bedienungsanleitung sorgfältig lesen
Achtung, Gefahr!
Vor Einstellungsänderungen, Zubehörwechseln, Reinigungs- und
Instandhaltungsarbeiten sowie bei Nichtgebrauch stets von der
Spannungsversorgung trennen!
Schutzklasse II (doppelt isoliert)
Umweltschutz
Elektroaltgeräte dürfen nicht über den Haushaltsmüll entsorgt werden. Nach
Möglichkeit bitte über entsprechende Einrichtungen entsorgen. Lassen Sie sich
bezüglich der sachgemäßen Entsorgung von Elektrowerkzeugen von der zuständigen
Behörde oder dem Händler beraten.
Erfüllt die einschlägigen Rechtsvorschriften und Sicherheitsnormen
Nicht im Regen oder in feuchter Umgebung verwenden!
Verzeichnis der technischen
Symbole und Abkürzungen
V Volt
~, AC Wechselspannung
A, mA Ampere, Milliampere
n
0
Ø Durchmesser
Hz Hertz
W, kW Watt, Kilowatt
/min oder min
Schl./Min. Schläge pro Minute (Bohrhammer)
dB(A) Schallpegel in Dezibel (A-bewertet)
m/s
-1
2
Leerlaufdrehzahl
Drehzahl, d.h. Umdrehungen pro Minute
Quadratmeter pro Sekunde (Schwingungsstärke)
Technische Daten
Spannung: ................................................230–240 V~, 50 Hz
Leistung: ............................................................1500 W
Leerlaufdrehzahl: . . . . . . . . . . . . . . . . . . . . . . . . . . . . . . . . . . . . . . . . . . . . . . . . . 0–880 min
Schlagzahl: ................................................0–4.350 Schl./Min.
Schlagenergie: ......................................................... 5,5 J
Bohrfutter:..........................................................SDS-Plus
Zahnkranzbohrfutter (Zubehör):....................................... 0–13 mm
Fettfüllmenge im Getriebe:................................................80 g
Schutzart:..............................................................IP 20
Schutzklasse:.............................................................
Netzkabellänge: . . . . . . . . . . . . . . . . . . . . . . . . . . . . . . . . . . . . . . . . . . . . . . . . . . . . . . . . . 2 m
Max. Bohrleistung in Beton:.......................................... Ø 32 mm
Max. Bohrleistung in Holz: ........................................... Ø 40 mm
Max. Bohrleistung in Stahl:........................................... Ø 13 mm
Abmessungen (L x H x B): ....................................390 x 280 x 95 mm
Gewicht:..............................................................5,5 kg
Aufgrund der fortlaufenden Weiterentwicklung unserer Produkte können sich die
technischen Daten von Silverline-Produkten ohne vorherige Ankündigung ändern.
Geräusch- und Vibrationsinformationen
Schalldruckpegel LPA................................................ 96,4 dB(A)
Schallleistungspegel LWA ...........................................107,4 dB(A)
Unsicherheit K...........................................................3 dB
Hand-Arm-Vibration (Hammerbohrmodus) ...........................19,327 m/s
Hand-Arm-Vibration (Meißelmodus) . . . . . . . . . . . . . . . . . . . . . . . . . . . . . . . . .17,879 m/s
Unsicherheit ........................................................ 1,5 m/s
Der Schallintensitätspegel kann für den Bediener 85 dB(A) übersteigen und
Lärmschutzmaßnahmen sind notwendig.
-1
2
2
2
18
WARNUNG! Tragen Sie in Bereichen, in denen der Lärmpegel 85 dB(A) überschreitet,
unbedingt angemessenen Gehörschutz und begrenzen Sie nach Möglichkeit die Belastungsdauer.
Sollte trotz Gehörschutz Unbehagen irgendeiner Art auftreten, beenden Sie die Arbeit unverzüglich
und überprüfen Sie den Gehörschutz auf korrekten Sitz und Funktion und stellen Sie sicher,
dass dieser einen angemessenen Schutz für den Lärmpegel bietet, der von den verwendeten
Werkzeugen ausgeht.
WARNUNG! Bei der Benutzung mancher Werkzeuge wird der Benutzer Vibrationen ausgesetzt,
welche zum Verlust des Tastsinns, zu Taubheitsgefühl, Kribbeln und zu einer Verminderung der
Handgreifkraft führen können. Langfristige Belastung kann zu chronischen Beschwerden führen.
Begrenzen Sie, falls nötig, die Exposition zu Vibrationen und tragen Sie vibrationsmindernde
Handschuhe. Verwenden Sie dieses Werkzeug nicht mit kalten Händen, da Vibrationen bei
Temperaturen unter dem individuellen Komfortbereich eine stärkere Wirkung zeigen. Beurteilen Sie
die Vibrationsbelastung unter Zuhilfenahme der Technischen Daten des jeweiligen Werkzeuges und
bestimmen Sie die zulässige Belastungsdauer und -häugkeit.
Page 19

SDS-Plus-Bohrhammer, 1500 W 268819
silverlinetools.com
Die in den Technischen Daten angegebenen Geräusch- und Vibrationsinformationen werden
nach internationalen Standards bestimmt. Die angegebenen Werte beziehen sich auf eine
normale Benutzung des Werkzeuges unter normalen Arbeitsbedingungen. Schlecht gewartete,
inkorrekt montierte und unsachgemäß verwendete Werkzeuge können erhöhte Schallpegel und
Vibrationswerte aufweisen. Weitere Informationen zur EU-Vibrationsrichtlinie und zu Schall- sowie
Vibrationsbelastungen, die auch für Heimanwender relevant sein können, nden Sie auf den
Seiten der Europäischen Agentur für Sicherheit und Gesundheitsschutz am Arbeitsplatz: www.
osha.europa.eu.
Betreiben Sie das Gerät erst, nachdem Sie diese Gebrauchsanweisung und alle am Gerät
angebrachten Etiketten aufmerksam gelesen und verstanden haben. Bewahren Sie diese Anleitung
zusammen mit dem Gerät für spätere Nachschlagezwecke auf. Vergewissern Sie sich, dass alle
Benutzer dieses Gerätes die Gebrauchsanweisung vollständig verstanden haben.
Auch wenn dieses Gerät wie vorgeschrieben verwendet wird, ist es nicht möglich, sämtliche
Restrisiken auszuschließen. Gerät stets mit Vorsicht verwenden. Sollten Sie sich bezüglich der
sachgemäßen und sicheren Verwendung dieses Gerätes nicht vollkommen sicher sein, verwenden
Sie es nicht.
Sicherheitshinweise für
Elektrowerkzeuge
WARNUNG! Beachten Sie alle mit dem Gerät gelieferten Sicherheitshinweise,
Anweisungen, Abbildungen und technischen Daten. Versäumnisse bei der Einhaltung
der Anweisungen können elektrischen Schlag, Brand und/oder schwere Verletzungen
verursachen.
Bewahren Sie alle Sicherheitshinweise und Anweisungen für die Zukunft auf.
Der in den Sicherheitshinweisen verwendete Begriff „Elektrowerkzeug“ bezieht sich auf
netzbetriebene Elektrowerkzeuge (mit Netzkabel) und auf akkubetriebene Elektrowerkzeuge
(ohne Netzkabel).
1) Arbeitsplatzsicherheit
a) Halten Sie Ihren Arbeitsbereich sauber und gut beleuchtet. Unordnung oder unbeleuchtete
Arbeitsbereiche können zu Unfällen führen.
b) Arbeiten Sie mit dem Elektrowerkzeug nicht in explosionsgefährdeter Umgebung, in
der sich brennbare Flüssigkeiten, Gase oder Stäube benden. Elektrowerkzeuge erzeugen
Funken, die den Staub oder die Dämpfe entzünden können.
c) Halten Sie Kinder und andere Personen während der Benutzung des Elektrowerkzeugs
fern. Bei Ablenkung können Sie die Kontrolle über das Gerät verlieren.
2) Elektrische Sicherheit
a) Der Anschlussstecker des Elektrowerkzeuges muss in die Steckdose passen. Der Stecker
darf in keiner Weise verändert werden. Verwenden Sie keine Adapterstecker gemeinsam
mit schutzgeerdeten Elektrowerkzeugen. Unveränderte Stecker und passende Steckdosen
verringern das Risiko eines elektrischen Schlages.
b) Vermeiden Sie Körperkontakt mit geerdeten Oberächen wie von Rohren, Heizungen,
Herden und Kühlschränken. Es besteht ein erhöhtes Risiko durch elektrischen Schlag, wenn Ihr
Körper geerdet ist.
c) Halten Sie Elektrowerkzeuge von Regen oder Nässe fern. Das Eindringen von Wasser in ein
Elektrowerkzeug erhöht das Risiko eines elektrischen Schlages.
d) Zweckentfremden Sie das Kabel nicht, um das Elektrowerkzeug zu tragen, aufzuhängen
oder um den Stecker aus der Steckdose zu ziehen. Halten Sie das Kabel fern von Hitze, Öl,
scharfen Kanten oder sich bewegenden Geräteteilen. Beschädigte oder verwickelte Kabel
erhöhen das Risiko eines elektrischen Schlages.
e) Wenn Sie mit einem Elektrowerkzeug im Freien arbeiten, verwenden Sie nur
Verlängerungskabel, die auch für den Außenbereich geeignet sind. Die Anwendung eines
für den Außenbereich geeigneten Verlängerungskabels verringert das Risiko eines elektrischen
Schlages.
f) Wenn der Betrieb des Elektrowerkzeuges in feuchter Umgebung nicht vermeidbar ist,
verwenden Sie einen Fehlerstromschutzschalter. Der Einsatz eines Fehlerstromschutzschalters
vermindert das Risiko eines elektrischen Schlages.
3) Sicherheit von Personen
a) Seien Sie aufmerksam, achten Sie darauf, was Sie tun, und gehen Sie mit Vernunft an
die Arbeit mit einem Elektrowerkzeug. Benutzen Sie kein Elektrowerkzeug, wenn Sie
müde sind oder unter dem Einuss von Drogen, Alkohol oder Medikamenten stehen.
Ein Moment der Unachtsamkeit beim Gebrauch des Elektrowerkzeuges kann zu ernsthaften
Verletzungen führen.
b) Tragen Sie persönliche Schutzausrüstung und immer eine Schutzbrille. Das Tragen
persönlicher Schutzausrüstung, wie Staubmaske, rutschfeste Sicherheitsschuhe, Schutzhelm
oder Gehörschutz, je nach Art und Einsatz des Elektrowerkzeuges, verringert das Risiko von
Verletzungen.
c) Vermeiden Sie eine unbeabsichtigte Inbetriebnahme. Vergewissern Sie sich, dass das
Elektrowerkzeug ausgeschaltet ist, bevor Sie es an die Stromversorgung und/oder den
Akku anschließen, es aufnehmen oder tragen. Wenn Sie beim Tragen des Elektrowerkzeuges
den Finger am Schalter haben oder das Gerät eingeschaltet an die Stromversorgung anschließen,
kann dies zu Unfällen führen.
d) Entfernen Sie Einstellwerkzeuge oder Schraubenschlüssel, bevor Sie das Elektrowerkzeug
einschalten. Ein Werkzeug oder Schlüssel, der sich in einem drehenden Geräteteil bendet, kann
zu Verletzungen führen.
e) Vermeiden Sie eine unnatürliche Körperhaltung. Sorgen Sie für einen sicheren Stand
und halten Sie jederzeit das Gleichgewicht. Auf diese Weise lässt sich das Elektrowerkzeug in
unerwarteten Situationen besser kontrollieren.
f) Tragen Sie geeignete Kleidung. Tragen Sie keine weite Kleidung oder Schmuck. Halten
Sie Haare, Kleidung und Handschuhe fern von sich bewegenden Teilen. Lockere Kleidung,
Schmuck oder lange Haare können von sich bewegenden Teilen erfasst werden.
g) Wenn Staubabsaug- und -auffangeinrichtungen montiert werden können, vergewissern
Sie sich, dass diese angeschlossen sind und richtig verwendet werden. Verwendung einer
Staubabsaugung kann Gefährdungen durch Staub verringern.
h) Vernachlässigen Sie bei häuger Arbeit mit Elektrowerkzeugen trotz der Vertrautheit
mit den Geräten nicht die Sicherheitsprinzipien. Fahrlässiges Handeln kann in
Sekundenbruchteilen zu schwersten Verletzungen führen.
4) Verwendung und Behandlung des Elektrowerkzeugs
a) Überlasten Sie das Gerät nicht. Verwenden Sie für Ihre Arbeit das dafür bestimmte
Elektrowerkzeug. Mit dem passenden Elektrowerkzeug arbeiten Sie besser und sicherer im
angegebenen Leistungsbereich.
b) Benutzen Sie kein Elektrowerkzeug, dessen Schalter defekt ist. Ein Elektrowerkzeug, das sich
nicht mehr ein- oder ausschalten lässt, ist gefährlich und muss repariert werden.
c) Ziehen Sie den Stecker aus der Steckdose und/oder entfernen Sie den Akku, bevor Sie
Geräteeinstellungen vornehmen, Zubehörteile wechseln oder das Gerät weglegen. Diese
Vorsichtsmaßnahme verhindert den unbeabsichtigten Start des Elektrowerkzeuges.
d) Bewahren Sie unbenutzte Elektrowerkzeuge außerhalb der Reichweite von Kindern auf.
Lassen Sie Personen das Gerät nicht benutzen, die mit diesem nicht vertraut sind oder
diese Anweisungen nicht gelesen haben. Elektrowerkzeuge sind gefährlich, wenn sie von
unerfahrenen Personen benutzt werden.
e) Pegen Sie Elektrowerkzeuge mit Sorgfalt. Kontrollieren Sie, ob bewegliche Teile
einwandfrei funktionieren und nicht klemmen, ob Teile gebrochen oder so beschädigt
sind, dass die Funktion des Elektrowerkzeuges beeinträchtigt ist. Lassen Sie beschädigte
Teile vor dem Einsatz des Gerätes reparieren. Viele Unfälle haben ihre Ursache in schlecht
gewarteten Elektrowerkzeugen.
f) Halten Sie Schneidwerkzeuge scharf und sauber. Sorgfältig gepegte Schneidwerkzeuge mit
scharfen Schneidkanten verklemmen sich weniger und sind leichter zu führen.
g) Verwenden Sie Elektrowerkzeug, Zubehör, Einsatzwerkzeuge usw. entsprechend diesen
Anweisungen. Berücksichtigen Sie dabei die Arbeitsbedingungen und die auszuführende
Tätigkeit. Der Gebrauch von Elektrowerkzeugen für andere als die vorgesehenen Anwendungen
kann zu gefährlichen Situationen führen.
h) Halten Sie Griffe und Griffächen trocken, sauber und frei von Fett und Öl. Rutschige
Hände und Griffächen machen die sichere Handhabung des Werkzeugs in unvorhergesehenen
Situationen unmöglich.
5) Service
a) Lassen Sie Ihr Elektrowerkzeug nur von qualiziertem Fachpersonal und nur mit Original-
Ersatzteilen reparieren. Damit wird sichergestellt, dass die Sicherheit des Elektrowerkzeuges
erhalten bleibt.
Zusätzliche Sicherheitshinweise
Sicherheitshinweise für SDS-Plus-Bohrhämmer
WARNUNG! Falls Grund zur Annahme besteht, dass Asbest in Ihrem Arbeitsumfeld
vorhanden ist, holen Sie umgehend fachmännischen Rat ein. Mit dem Abbau von Asbest sollte ein
entsprechend lizensiertes Unternehmen beauftragt werden. Wenden Sie sich an die zuständigen
Behörden, wenn Sie weitere Informationen zum Umgang mit Asbest benötigen. Die Richtlinie
2009/148/EG des Europäischen Parlaments und des Rates vom 30. November 2009 gibt zusätzlich
Auskunft zum Schutz von Arbeitnehmern gegen Gefährdung durch Asbest am Arbeitsplatz.
• Wichtiger Hinweis: Es ist unbedingt notwendig, alle national geltenden
Sicherheitsbestimmungen hinsichtlich der auszuführenden Arbeit zu befolgen.
• Dieses Gerät darf nicht von Personen unter 18 Jahren verwendet werden. Bediener müssen im
Gebrauch des Gerätes geschult und mit den Sicherheitsvorschriften vertraut sein.
• Beim Bohren in und Meißeln von Mauerwerk können scharfkantige Partikel entstehen, die
den Bediener treffen. Tragen Sie daher eine schlagfeste Schutzbrille und Schutzkleidung
einschließlich Sicherheitsschuhen.
• Kernbohrer dürfen nur mit SDS-Bohrhämmern mit Sicherheitskupplung verwendet werden, um
ein Verklemmen des Bohrers und ein daraus resultierendes Verletzungsrisiko für den Bediener
zu verhindern.
• Falls die Sicherheitskupplung während des Betriebs auslöst, geben Sie sofort den Auslöser frei
und entfernen Sie den Kernbohrer bzw. das Einsatzwerkzeug aus dem Mauerwerk. Stellen Sie
die Arbeit ein, bis der Grund für das Auslösen der Sicherheitskupplung gefunden ist.
• Betreiben Sie SDS-Bohrhämmer nicht von einer Leiter aus oder aus einer anderen Position, in
der ein Sturzrisiko besteht. SDS-Bohrhämmer sind schwer und erzeugen während des Betriebs
starke Vibrationen und ein hohes Drehmoment.
• Tragen Sie geeignete Antivibrationshandschuhe aus Kunstfaser oder beschichtetem Stoff, um zu
verhindern, dass sich lose Stofffasern im sich drehenden Bohrer verfangen können. Entsorgen
Sie die Schutzhandschuhe umgehend, wenn sie ausgefranst sind.
• Beim Bohren können großen Mengen möglicherweise giftigen Staubs und Schmutzes
entstehen. Tragen Sie eine für die durchzuführende Aufgabe geeignete Atemschutzmaske. Als
Mindestanforderung an die Schutzwirkung wird Klasse FFP 2 empfohlen.
19
Page 20

DE
• Da SDS-Bohrhämmer ein hohes Geräuschvolumen erzeugen, ist während des gesamten
Arbeitseinsatzes ein geeigneter Gehörschutz zu tragen.
• Da SDS-Bohrhämmer im Meißel- und Hammerbohrbetrieb sehr starke Schwingungen erzeugen,
müssen regelmäßige Arbeitspausen eingelegt werden.
• Setzen Sie ausschließlich SDS-Plus-Meißel bzw. SDS-Plus -Spitzmeißel bei SDS-Bohrmaschinen
ein, bei denen sich die Drehbohrfunktion ausschalten lässt.
• Verwenden Sie Metall- und Spannungssuchgeräte, um verdeckt geführte Strom-, Wasser- und
Gasleitungen zu orten. Berühren Sie keine spannungsführenden Bauteile oder Leiter.
• Kabeltrommeln für mit diesem Gerät verwendete Verlängerungskabel müssen vollständig
abgewickelt werden. Mindestleiterquerschnitt: 1,25 mm2.
• Im Freien verwendete Kabeltrommeln müssen ausdrücklich für einen derartigen Gebrauch
vorgesehen sein und wassergeschützte Stecker sowie die korrekte Kabelisolierung aufweisen.
• Schließen Sie das Gerät bei Verwendung im Freien an eine Stromquelle mit
Fehlerstromschutzschalter an bzw. verwenden Sie einen festeingebauten FI-Schalter.
• Vergewissern Sie sich, dass der Bohrer bzw. Meißel sicher im Bohrfutter befestigt ist.
Locker sitzende Einsatzwerkzeuge können aus dem Gerät geschleudert werden und eine
Sicherheitsgefahr darstellen.
• Sorgen Sie für ausreichende Beleuchtung des Arbeitsbereiches.
• Halten Sie das Gerät während des Betriebs stets mit beiden Händen.
• Benutzen Sie mit dem Gerät gelieferte Zusatzhandgriffe.
• Üben Sie keinen Druck auf das Gerät aus, weil dadurch seine Lebensdauer verkürzt würde.
• Einsatzwerkzeuge werden während des Betriebs heiß. Lassen Sie sie vor dem Berühren
abkühlen.
• Falls Sie beim Betrieb der Bohrmaschine unterbrochen werden, führen Sie den begonnenen
Arbeitsschritt zu Ende und schalten Sie das Gerät aus, bevor Sie aufschauen.
• Trennen Sie das Gerät stets von der Stromversorgung, bevor Sie ein Einsatzwerkzeug wie z.B.
Meißel oder Bohrer auswechseln.
• Untersuchen Sie das Bohrfutter regelmäßig auf Verschleißerscheinungen und Schäden. Lassen
Sie defekte Teile von einer zugelassenen Vertragswerkstatt reparieren bzw. ersetzen.
• Warten Sie stets, bis das Einsatzwerkzeug zum völligen Stillstand gekommen ist, bevor Sie das
Gerät ablegen.
• Trennen Sie das Gerät nach Beendigung der Arbeit vom Stromnetz und entfernen Sie das
Einsatzwerkzeug aus dem Gerät.
• Überprüfen Sie in regelmäßigen Abständen sämtliche Schrauben, Muttern und anderen
Befestigungselemente auf festen Sitz und ziehen Sie sie bei Bedarf an.
• Unterziehen Sie das Gerät nach dem Gebrauch einer Sichtprüfung und richten Sie dabei
besonderes Augenmerk auf das Netzkabel, welches durch scharfe Mauerwerkspartikel
beschädigt worden sein kann.
• Bringen Sie stets eine Staubschutzkappe am zu verwendenden Einsatzwerkzeug an, um das
SDS-Bohrfutter vor eindringendem Schmutz zu schützen.
• Falls es durch den Gebrauch des Gerätes zu Unwohlsein jeglicher Art kommt, stellen Sie den
Betrieb umgehend ein und überprüfen Sie Ihre Arbeitsweise.
Geräteübersicht
1. SDS-Plus-Bohrfutter
2. Bohrfutterhülse
3. Betriebsartenwahlschalter
4. Getriebedeckel
5. Ein-/Ausschalter
6. Standard-/Hammerbohrwahlschalter
7. Drehzahlregler
8. Kohlenfachdeckel
9. Zusatzgriff
10. Lüftungsschlitze
11. Bohrfutterschlüssel
12.
Schmierfett
13.
Breitmeißel
14.
Spitzmeißel
15.
Staubschutzkappe
16.
8-mm-SDS-Plus-Steinbohrer
17.
10-mm-SDS-Plus-Steinbohrer
18.
12-mm-SDS-Plus-Steinbohrer
19.
Innensechskantschlüssel
20.
13-mm-Zahnkranzbohrfutter
21.
Arretiertaste für Betriebsartenwahlschalter
22.
Hauptgriff
Standardzubehör (nicht abgebildet):
Formkoffer
Bestimmungsgemäße Verwendung
Tragbare, netzbetriebene SDS-Bohrmaschine für Bohr- und Stemmarbeiten in leichtem Mauerwerk
sowie unter Verwendung des mitgelieferten Standard-Bohrfutters mit SDS-Plus-Aufnahme zum
Bohren in Holz und Metall.
Auspacken des Gerätes
• Packen Sie Ihr Werkzeug vorsichtig aus und überprüfen Sie es. Machen Sie sich vollständig mit
all seinen Eigenschaften und Funktionen vertraut.
• Vergewissern Sie sich, dass sämtliche Teile des Werkzeugs vorhanden und in einwandfreiem
Zustand sind. Sollten Teile fehlen oder beschädigt sein, lassen Sie diese ersetzen, bevor Sie das
Werkzeug verwenden.
Vor Inbetriebnahme
WARNUNG! Trennen Sie das Gerät stets vom Stromnetz, bevor Sie Zubehörwechsel oder
Einstellungsänderungen vornehmen.
WARNUNG! Verwenden Sie dieses Gerät nur bei montiertem Zusatzgriff (9). Andernfalls kann
es zu Verletzungen kommen.
ACHTUNG! Geben Sie vor dem ersten Gebrauch und dann nach jeweils etwa sechs Betriebsstunden
Getriebefett (max. 80 g) in das Getriebegehäuse. Ein Töpfchen Schmierfett (12) für den Ersteinsatz
wird mitgeliefert. Befolgen Sie die Anweisungen im Abschnitt „Getriebewartung“.
ACHTUNG! Vergewissern Sie sich vor dem Gebrauch des Bohrhammers stets, dass sich ausreichend
Schmierfett im Getriebegehäuse bendet.
20
Page 21

SDS-Plus-Bohrhammer, 1500 W 268819
silverlinetools.com
SDS-Einsatzwerkzeug bzw. Zahnkranzbohrfutter
montieren/demontieren
Siehe Abb. I
Hinweis: Das SDS-Plus-System erlaubt es bei ordnungsgemäßer Montage dem Bohrer, sich leicht
im Bohrfutter zu bewegen.
• Dieses Gerät verfügt über ein SDS-Plus-Aufnahmesystem. SDS-Plus-Zubehör ist mit Schäften
mit Steckplätzen ausgestattet, damit die richtige Ausrichtung und der feste Sitz im SDS-PlusBohrfutter (1) gewährleistet ist.
• Einsatzwerkzeug anbringen:
1. Halten Sie das Gerät gut fest und schieben Sie dann die Bohrfutterhülse (2) in Richtung Gerät.
2. Setzen Sie das Einsatzwerkzeug in das Bohrfutter ein, bis ein Widerstand spürbar ist.
3. Geben Sie nun die Bohrfutterhülse frei, um das Einsatzwerkzeug zu arretieren.
4. Vergewissern Sie sich vor Inbetriebnahme, dass sich das Einsatzwerkzeug nicht lösen kann. Falls
es sich herausnehmen lässt, muss der obige Vorgang wiederholt werden.
• Einsatzwerkzeug abnehmen:
1. Ziehen Sie die Bohrfutterhülse in Richtung Gerät und nehmen Sie das eingesetzte
Einsatzwerkzeug wieder ab.
Zahnkranzbohrfutter einstellen
Siehe Abb. II
WARNUNG! Das Zahnkranzbohrfutter darf nicht zum Hammerbohren oder Meißeln verwendet
werden.
WARNUNG! Vergewissern Sie sich vor Inbetriebnahme stets, dass sich der Bohrfutterschlüssel
nicht mehr im Bohrfutter bendet.
• Im Lieferumfang dieses Bohrhammers ist ein Zahnkranzbohrfutter (20) enthalten. Dieses eignet
sich besser zum Bohren in Holz und Stahl als nur das SDS-Plus-Bohrfutter allein.
• Zahnkranzbohrfutter einstellen:
1. Montieren Sie das Zahnkranzbohrfutter am SDS-Plus-Bohrfutter (siehe „SDS-Einsatzwerkzeug
bzw. Zahnkranzbohrfutter montieren/demontieren“).
2. Lösen Sie das Zahnkranzbohrfutter bzw. ziehen Sie es an, indem Sie den Bohrfutterschlüssel (11)
in die Bohrungen seitlich am Zahnkranzbohrfutter setzen und den Schlüssel wie folgt drehen:
zum Anziehen im Uhrzeigersinn, zum Lösen im Gegenuhrzeigersinn.
Zusatzgriff montieren
Siehe Abb. III
1. Lösen Sie die Griffäche am Zusatzgriff (9) durch Drehen im Gegenuhrzeigersinn.
2. Schieben Sie den Zusatzgriff auf den Bohrhammer.
3. Drehen Sie die Griffäche zum Anziehen des Zusatzgriffs im Uhrzeigersinn.
ACHTUNG! Vergewissern Sie sich vor Inbetriebnahme, dass der Zusatzgriff nicht auf beweglichen
Geräteteilen sitzt.
Betrieb
WARNUNG! Tragen Sie bei der Arbeit mit diesem Gerät stets angemessenen Augen-, Atem-
und Gehörschutz sowie geeignete Schutzhandschuhe.
Hinweis: Die Staubschutzkappe (15) sollte stets am Bohrer bzw. am Meißel montiert werden,
um ein Eindringen von Staub und Schmutz in das Bohrfutter zu verhindern (siehe Abb. IV). Dies
gilt insbesondere dann, wenn der Bohrer bei der Arbeit an oberen Wandabschnitten und Decken
in einem höheren Winkel verwendet wird. Bei größeren Bohrern muss die Staubschutzkappe
möglicherweise vor dem Montieren des Bohrers am Bohrfutter eingesetzt werden.
WARNUNG! Beim Eindringen des Bohrers in den Werkstoff kann sich der Bohrer mitunter
verklemmen oder verhaken. Dabei kann der Bohrhammer ruckartig ausschlagen. Halten Sie
den Bohrhammer deshalb zur Verhütung von Verletzungen stets gut am Hauptgriff (22) und am
Zusatzgriff (9) fest und verwenden Sie nur scharfe Bohrer.
WARNUNG! Sorgen Sie stets dafür, dass das zu bearbeitende Werkstück sicher xiert ist.
Verwenden Sie dazu ggf. einen Schraubstock oder eine Schraubzwinge und halten Sie immer beide
Hände am Bohrhammer.
Drehzahlregelung
Siehe Abb. V
• Die Arbeitsgeschwindigkeit des Bohrhammers lässt sich über den Drehzahlregler (7) ändern.
Eine höhere Ziffer am Drehzahlregler steht dabei für eine schnellere Drehzahl und eine
niedrigere Ziffer für eine geringere Geschwindigkeit.
Hammerbohrbetrieb
Der Hammerbohrmodus dient zum Bohren in Beton und Mauerwerk.
Hinweis: Das Zahnkranzbohrfutter darf im Hammerbohrmodus nicht verwendet werden.
1. Stellen Sie den Betriebsartenwahlschalter (3) auf , indem Sie die Arretiertaste (21) am
Betriebsartenwahlschalter (3) eindrücken und den Schalter drehen.
2. Geben Sie die Arretiertaste wieder frei.
3. Drehen Sie den Standard-/Hammerbohrwahlschalter (6) auf .
• Verstellen Sie die Wahlschalter niemals bei eingeschaltetem Bohrhammer.
• Lassen Sie den Bohrhammer nicht laufen, wenn sich die Wahlschalter in einer Zwischenposition
benden.
Drehbohrbetrieb
Der Drehbohrmodus dient zum Bohren in Holz und Metall.
Hinweis: Verwenden Sie zum herkömmlichen Bohren das Zahnkranzbohrfutter (20) und
Standardbohrer für Holz bzw. Metall (nicht im Lieferumfang enthalten) (siehe „SDS-Einsatzwerkzeug
bzw. Zahnkranzbohrfutter montieren/demontieren“).
1. Stellen Sie den Betriebsartenwahlschalter (3) auf , indem Sie die Arretiertaste (21) am
Betriebsartenwahlschalter eindrücken und den Schalter drehen.
2. Geben Sie die Arretiertaste wieder frei.
3. Drehen Sie den Standard-/Hammerbohrwahlschalter (6) auf .
• Verstellen Sie die Wahlschalter niemals bei eingeschaltetem Bohrhammer.
• Lassen Sie den Bohrhammer nicht laufen, wenn sich die Wahlschalter in einer Zwischenposition
benden.
Meißeln
Der Meißelmodus darf nur zum Meißeln verwendet werden. Setzen Sie zum Meißeln ausschließlich
SDS-Plus-Meißeleinsätze ein!
Hinweis: Das Zahnkranzbohrfutter (20) darf im Meißelmodus nicht verwendet werden.
1. Stellen Sie den Betriebsartenwahlschalter (3) auf , indem Sie die Arretiertaste (21) am
Betriebsartenwahlschalter eindrücken und den Schalter drehen.
2. Geben Sie die Arretiertaste wieder frei.
3. Drehen Sie den Standard-/Hammerbohrwahlschalter (6) auf .
• Verstellen Sie die Wahlschalter niemals bei eingeschaltetem Bohrhammer.
• Lassen Sie den Bohrhammer nicht laufen, wenn sich die Wahlschalter in einer Zwischenposition
benden.
Ein- und Ausschalten
1. Drücken Sie zum Einschalten des Bohrhammers den Ein-/Ausschalter (5).
2. Geben Sie zum Anhalten des Bohrhammers den Ein-/Ausschalter (5) wieder frei.
Hinweis: Die Höchstgeschwindigkeit des Bohrhammers lässt sich über den Drehzahlregler (7)
kontrollieren. Lassen Sie sich bei der Wahl der gewünschten Drehzahl Zeit, damit sie bei Aufnahme
der Arbeit richtig eingestellt ist.
In Beton bohren
1. Stellen Sie Hammerbohrbetrieb ein (siehe „Hammerbohrbetrieb“).
2. Montieren Sie einen SDS-Plus-Steinbohrer (16, 17, 18) am SDS-Plus-Bohrfutter (1) (siehe „SDSEinsatzwerkzeug bzw. Zahnkranzbohrfutter montieren/demontieren“).
3. Schalten Sie den Bohrhammer ein (siehe „Ein- und Ausschalten“).
4. Stellen Sie Kontakt zwischen Steinbohrer und der zu bearbeitenden Fläche her und üben Sie
in einer Linie mit dem Bohrer leichten bis mittleren Druck auf den hinteren Abschnitt des
Bohrhammers aus.
5. Nehmen Sie den Bohrer vom Werkstück, bevor Sie den Bohrhammer ausschalten.
ACHTUNG! Üben Sie beim Bohren keinen übermäßigen Druck aus, da Bohrer und Motor andernfalls
Schaden nehmen könnten.
Hinweis: Falls Bruchstücke das Bohrloch blockieren, lassen Sie den Bohrhammer langsam laufen
und ziehen Sie den Bohrer dabei aus dem Loch, bevor Sie mit der Arbeit fortfahren.
In Holz und Metall bohren
1. Stellen Sie Drehbohrbetrieb ein (siehe „Drehbohrbetrieb“).
2. Montieren Sie das Zahnkranzbohrfutter (20) am Bohrhammer (siehe „SDS-Einsatzwerkzeug bzw.
Zahnkranzbohrfutter montieren/demontieren“).
3. Montieren Sie einen Standardbohrer für Holz bzw. Metall (nicht im Lieferumfang enthalten) am
Zahnkranzbohrfutter (siehe „Zahnkranzbohrfutter einstellen“).
4. Schalten Sie den Bohrhammer ein (siehe „Ein- und Ausschalten“).
5. Stellen Sie Kontakt zwischen Bohrer und der zu bearbeitenden Fläche her und üben Sie in einer
Linie mit dem Bohrer leichten bis mittleren Druck auf den hinteren Abschnitt des Bohrhammers
aus.
6. Nehmen Sie den Bohrer vom Werkstück, bevor Sie den Bohrhammer ausschalten.
ACHTUNG! Vergewissern Sie sich, dass der zu verwendende Bohrer für das Werkstück geeignet ist.
Hinweis: Falls Bruchstücke das Bohrloch blockieren, lassen Sie den Bohrhammer langsam laufen
und ziehen Sie den Bohrer dabei aus dem Loch, bevor Sie mit der Arbeit fortfahren.
Zubehör
• Ein umfangreiches Sortiment an Zubehör für diesen Bohrhammer, darunter z.B. SDS-Plus-Bohrer
und -Meißel, ist über Ihren Silverline-Fachhändler erhältlich.
• Ersatzteile können unter www.toolsparesonline.com bezogen werden.
21
Page 22

DE
Wartung und Pege
WARNUNG! Trennen Sie das Gerät immer vom Stromnetz, bevor Sie Inspektions-, Wartungs- oder
Reinigungsarbeiten daran vornehmen.
Getriebewartung
Siehe Abb. VI
Nach jeweils etwa sechs Betriebsstunden muss das Getriebe geschmiert werden.
1. Schrauben Sie den Getriebedeckel (4) mit dem Innensechskantschlüssel (19) ab.
2. Füllen Sie Maschinenfett mit einem Spachtel o.ä. in das Getriebegehäuse, bis dieses voll ist (max.
80 g).
Hinweis: Gehen Sie vorsichtig vor, damit der Getriebemechanismus nicht beschädigt wird.
3. Setzen Sie den Getriebedeckel (4) wieder auf.
• Für die ersten Schmierungen wird ein Töpfchen Schmierfett (12) mitgeliefert. Achten Sie beim
Kauf zusätzlichen Schmierfetts darauf, dass es sich um lithiumbasiertes Universal-Schmierfett
handelt.
• Füllen Sie nicht zu viel Schmierfett in das Getriebegehäuse ein und ziehen Sie den
Getriebedeckel nicht zu fest an.
Allgemeine Überprüfung
• Überprüfen Sie alle Befestigungsschrauben in regelmäßigen Abständen auf festen Sitz.
• Kontrollieren Sie das Netzkabel des Gerätes vor jedem Gebrauch auf Schäden und Verschleiß.
Reparaturen müssen durch eine zugelassene Silverline-Reparaturwerkstatt erfolgen. Dies gilt
auch für mit dem Gerät verwendete Verlängerungskabel.
Reinigung
• Halten Sie Ihr Gerät stets sauber. Durch Schmutz und Staub verschleißen die inneren Teile schnell
und die Lebensdauer des Gerätes wird verkürzt. Reinigen Sie das Gerät mit einer weichen Bürste
oder einem trockenen Tuch. Die Entlüftungsöffnungen mit sauberer, trockener Druckluft reinigen,
sofern verfügbar.
• Säubern Sie das Gerätegehäuse mit einem feuchten, weichen Lappen und einem milden
Reinigungsmittel. Verwenden Sie keinesfalls benzin- oder alkoholhaltige oder andere scharfe
Reinigungsmittel.
• Reinigen Sie Kunststoffteile niemals mit Ätzmitteln.
Schmierung
• Schmieren Sie alle beweglichen Teile mit Ausnahme des Getriebegehäuses in regelmäßigen
Abständen leicht mit einem geeigneten Sprühschmiermittel. Für das Getriebegehäuse muss
lithiumbasiertes Schmierfettverwendet werden.
Kohlebürsten
• Mit der Zeit unterliegen die Kohlebürsten des Motors dem Verschleiß.
• Wenn der Verschleiß der Bürsten fortgeschritten ist, kann dadurch die Motorleistung abnehmen,
die Maschine kurzzeitig ausfallen oder es kann zu sichtbarer Funkenbildung kommen.
• Entfernen Sie zum Wechseln der Kohlen die Lüftungsschlitze (10) und Kohlenfachdeckel (8). Die
abgenutzten Kohlen können nun entfernt und durch neue ersetzt werden.
• Verschlissene Kohlebürsten müssen immer paarweise ausgewechselt werden.
• Setzen Sie die Kohlenfachdeckel wieder auf.
• Alternativ können Sie das Gerät bei einer zugelassenen Silverline-Reparaturwerkstatt warten
lassen.
Kontakt
Informationen zu Reparatur- und Kundendiensten erhalten Sie unter der Rufnummer (+44)
1935/382222.
Webseite: silverlinetools.com/en-GB/Support
Postanschrift:
Powerbox
Boundary Way
Lufton Trading Estate
Yeovil, Somerset
BA22 8HZ
Großbritannien
Lagerung
• Gerät an einem trockenen Ort außerhalb der Reichweite von Kindern lagern.
Entsorgung
Beachten Sie bei der Entsorgung von defekten und nicht mehr reparablen Elektrowerkzeugen die
geltenden Vorschriften und Gesetze.
• Elektrowerkzeuge und andere elektrische und elektronische Altgeräte nicht über den Hausmüll
entsorgen.
• Lassen Sie sich von der zuständigen Behörde bezüglich der ordnungsgemäßen Entsorgung von
Elektrowerkzeugen beraten.
Fehlerbehebung
Störung Mögliche Ursache Empfohlene Abhilfe
Kernbohrer beim Kernbohren im Werkstoff verklemmt/
steckengeblieben
Gerät läuft nicht an Sicherung durchgebrannt Sicherung überprüfen und ggf. ersetzen. Brennt die Sicherung
Niedrige Drehzahl Gerät überhitzt Gerät ausschalten und auf Zimmertemperatur abkühlen lassen.
Niedrige Drehzahl oder keine Umdrehungen sowie
möglicherweise Funkenbildung an Lüftungsöffnungen des
Motors sichtbar
Vibration oder anomale Geräusche Zu wenig Schmierfett im Getriebe Schmierfett auffüllen bzw. ersetzen
Übermäßiger Druck auf das Gerät zum Zeitpunkt des
Durchbruchs in den Werkstoff
Kernbohrer nicht mit Bohrhammer kompatibel Mit dem Bohrhammer kompatiblen Kernbohrer einsetzen
Während der Anwendung starke Partikelansammlung im
Kernbohrer
Netzkabel beschädigt An zugelassenen Silverline-Kundendienst wenden
Auslöseschalter defekt
Motor defekt
Kohlebürsten abgenutzt Kohlebürsten wechseln bzw. durch zugelassenen Kundendienst
Bewegliche Innenteile übermäßig abgenutzt An zugelassenen Silverline-Kundendienst wenden
Ausgeübten Druck vor Durchbruch verringern
Schmutz und Partikel regelmäßig entfernen, um sicheren
Betrieb zu gewährleisten
nach dem Auswechseln erneut durch, sofort mit einem
zugelassenen Silverline-Kundendienst in Verbindung setzen
Lüftungslöcher kontrollieren und ggf. reinigen
ersetzen lassen
22
Page 23

SDS-Plus-Bohrhammer, 1500 W 268819
silverlinetools.com
Silverline-Tools-Garantie
Dieser Silverline-Artikel wird mit einer
3-Jahres-Garantie angeboten
Registrieren Sie diesen Artikel unter silverlinetools.com innerhalb von 30 Tagen nach dem Kauf,
um die 3-Jahres-Garantie zu aktivieren.
Der Garantiezeitraum beginnt mit dem Kaufdatum auf Ihrem Kaufbeleg.
Garantiebedingungen
Der Garantiezeitraum beginnt mit dem Kaufdatum im Einzelhandel, das auf dem Kaufbeleg
angegeben ist.
BITTE BEWAHREN SIE DEN KAUFBELEG AUF!
Falls dieser Artikel innerhalb von 30 Tagen nach dem Kauf einen Defekt aufweisen sollte,
bringen Sie es bitte mit Ihrem Kaufbeleg zu dem Fachhändler, bei dem es gekauft wurde,
und informieren Sie ihn über die Mängel. Das Gerät wird daraufhin ersetzt oder der Kaufpreis
zurückerstattet.
Falls dieser Artikel nach Ablauf von 30 Tagen nach dem Kauf einen Mangel aufweist, senden
Sie es bitte an:
Silverline Tools Service Centre
PO Box 2988
Yeovil
BA21 1WU, Großbritannien
Der Garantieanspruch muss während der Garantiezeit gestellt werden.
Sie müssen den Originalkaufbeleg mit Angabe des Kaufdatums einreichen und Ihren Namen
und Ihre Adresse sowie den Ort des Kaufs angeben, bevor etwaige Arbeiten durchgeführt
werden können.
Sie müssen genaue Angaben über den zu behebenden Defekt machen.
Alle innerhalb der Garantiefrist gemachten Forderungen werden von Silverline Tools daraufhin
überprüft werden, ob es sich bei den Mängeln um einen Material- oder Fertigungsfehler handelt.
Versandkosten werden nicht zurückerstattet. Alle Artikel sollten sich in sauberem und sicherem
Zustand benden und sorgfältig verpackt zur Reparatur eingeschickt werden, um Schäden
oder Verletzungen während des Transports zu vermeiden. Die Annahme unangemessener oder
unsicherer Lieferungen kann von uns verweigert werden.
Alle Arbeiten werden von Silverline Tools oder seinen autorisierten Reparaturwerkstätten
durchgeführt.
Die Reparatur oder der Ersatz des Artikels führt nicht zur Verlängerung des Garantiezeitraums.
Mängel, bei denen unsere Prüfung ergibt, dass sie unter die Garantie fallen, werden durch
kostenlose Reparatur des Werkzeugs (ohne Versandkosten) oder Ersatz durch ein Werkzeug in
einwandfreiem Zustand behoben.
Einbehaltene Werkzeuge oder Teile, die ersetzt wurden, gehen in den Besitz von Silverline
Tools über.
Die Reparatur bzw. der Ersatz Ihres Artikels unter dieser Garantie erfolgt zusätzlich zu Ihren
gesetzlichen Rechten als Verbraucher und hat keine nachteiligen Folgen auf diese.
Registrierung Ihres Kaufs
Gehen Sie auf silverlinetools.com, klicken Sie auf „Registrierung“’ und geben Sie Folgendes
ein:
• Ihre persönlichen Angaben
• Produktdetails und Kaunformationen
Sobald dieser Artikel registriert worden ist, wird Ihre Garantiebescheinigung im PDF-Format
erzeugt. Bitte drucken Sie sie aus und bewahren Sie sie zusammen mit Ihrem Produkt auf.
Durch die Garantie abgedeckt ist:
Die Reparatur des Artikels, nachdem zur Zufriedenheit von Silverline Tools nachgewiesen wurde,
dass der Defekt durch fehlerhaftes Material oder mangelhafte Arbeitsausführung bedingt ist und
in den Garantiezeitraum fällt.
Wenn ein Ersatzteil nicht mehr erhältlich ist oder nicht mehr hergestellt wird, kann Silverline
Tools es gegen einen funktionellen Ersatz austauschen.
Verwendung des Artikels innerhalb der EU.
Durch die Garantie nicht abgedeckt ist:
Silverline Tools garantiert keine Reparaturen, die durch Folgendes erforderlich geworden sind:
Normale Verschleißerscheinungen, die trotz Verwendung entsprechend der
Bedienungsanleitung entstehen, z.B. an Messern, Bürsten, Riemen, Glühbirnen, Batterien usw.
Ersatz von mitgeliefertem Zubehör wie etwa Bohrspitzen, Klingen, Schleifblättern,
Schneidscheiben und anderen zugehörigen Teilen.
Unfallschäden und Fehler, die durch unsachgemäße Verwendung oder Wartung, Missbrauch,
Nachlässigkeit oder fahrlässige Bedienung oder Handhabung des Artikels entstanden sind.
Verwendung des Artikels für andere als normale Haushaltszwecke.
Jegliche Veränderungen oder Modikationen des Artikels.
Die Verwendung von Teilen oder Zubehör, die keine Originalkomponenten von Silverline Tools
sind.
Fehlerhafte Montage (außer, wenn von Silverline Tools vorgenommen).
Reparaturen oder Änderungen, die von anderen als Silverline Tools oder seinen autorisierten
Reparaturwerkstätten durchgeführt wurden.
Ansprüche, die über die Rechte zur Behebung von Mängeln an dem in diesen
Garantiebedingungen genannten Werkzeug hinausgehen.
nicht auf natürliche Abnutzung oder Schäden infolge von Unfällen, unsachgemäßer Verwendung
oder Zweckentfremdung.
Akku-Garantie
Die Garantie auf Silverline -Akkus beträgt 12 Monate. Falls innerhalb der Akku-Garantiefrist
aufgrund von Material- oder Verarbeitungsfehlern ein Defekt an einem registrierten Akku auftritt,
ersetzt Silverline diesen kostenlos. Diese Garantie gilt nicht bei gewerblicher Nutzung und
erstreckt sich nicht auf natürliche Abnutzung oder Schäden infolge von Unfällen, unsachgemäßer
Verwendung oder Zweckentfremdung.
EG-Konformitätserklärung
Name des Unterzeichners: Mr. Darrell Morris
Bevollmächtigt durch: Silverline Tools
Erklärt hiermit Folgendes:
Die alleinige Verantwortung für die Ausstellung dieser Erklärung trägt der Hersteller. Der Gegenstand
der Erklärung erfüllt die einschlägigen Harmonisierungsrechtsvorschriften der Gemeinschaft.
Produktkennung: XXXXXX
Produktbezeichnung: XXXXXXXXXX
Entspricht den folgenden Richtlinien und Normen:
• Maschinenrichtlinie 2006/42/EG
• Niederspannungsrichtlinie 2014/35/EU
• EMV-Richtlinie 2014/30/EU
• RoHS-Richtlinie 2011/65/EU
• Lärmschutzrichtlinie 2000/14/EG
Benannte Stelle: XXXXXXXXXXXXXX
Techn. Unterlagen bei: Silverline Tools
Datum: XX.XX.XXXX
Unterzeichnet von:
Mr. Darrell Morris,
Geschäftsführender Direktor
Name und Anschrift des Herstellers:
Powerbox International Limited, Handelsregisternummer 06897059. Eingetragene Anschrift:
Powerbox, Boundary Way, Lufton Trading Estate, Yeovil, Somerset BA22 8HZ, Großbritannien
23
Page 24

ES
Traducción del manual original
Introducción
Gracias por haber elegido esta herramienta Silverline. Estas instrucciones contienen la información
necesaria para utilizar este producto de forma segura y ecaz. Lea atentamente este manual para
obtener todas las ventajas y características únicas de su nueva herramienta. Conserve este manual
a mano y asegúrese de que todas las personas que utilicen esta herramienta lo hayan leído y
entendido correctamente.
Descripción de los símbolos
Los siguientes símbolos pueden aparecer en la placa de características de su herramienta. Estos
símbolos representan información importante sobre el producto o instrucciones relativas a su uso.
Lleve protección auditiva
Lleve protección ocular
Lleve protección respiratoria
Lleve un casco de seguridad
Lleve guantes de seguridad
Lea el manual de instrucciones
¡Peligro!
Desconecte siempre la herramienta de la toma eléctrica antes de realizar cualquier
tarea de mantenimiento, sustituir accesorios o cuando no la esté utilizando
Class II construction (double insulated for additional protection)
Environmental Protection
Waste electrical products should not be disposed of with household waste. Please
recycle where facilities exist. Check with your local authority or retailer for recycling
advice.
Conforms to relevant legislation and safety standards.
No utilizar en ambientes húmedos o bajo la lluvia
Abreviaturas de términos técnicos
V Voltio/s
~, AC Corriente alterna
A, mA Amperio/s, miliamperio/s
n
0
Ø Diámetro
Hz Hercio/s
W, kW Vatio/s, kilovatio/s
-1
/min or min
rpm (revoluciones/oscilaciones) por minuto
bpm Golpes por minuto (taladro percutor)
dB(A) Nivel de decibelios (ponderada A)
2
m/s
Velocidad sin carga
(revoluciones/oscilaciones) por minuto
Metros cuadrados por segundo (vibración)
Características técnicas
Tensión: ....................................................230 - 240 V, 50 Hz
Potencia: ............................................................1500 W
Velocidad sin carga: ..............................................0 – 880 min
Cadencia de impacto: ...........................................0 - 4.350 gpm
Energía de impacto:..................................................... 5,5 J
Portabrocas: ........................................................SDS Plus
Portabrocas con llave (accesorio):......................................0 -1 3 mm
Capacidad de grasa para los engranajes: ....................................80 g
Grado de protección: .....................................................IP20
Clase de protección .......................................................
Longitud del cable de alimentación: . . . . . . . . . . . . . . . . . . . . . . . . . . . . . . . . . . . . . . . . 2 m
Capacidad máxima de perforación (hormigón):...........................Ø32 mm
Capacidad máxima de perforación (madera):.............................Ø40 mm
Capacidad máxima de perforación (acero):...............................Ø13 mm
Dimensiones (L x An x A): ........................390 x 95 x 280 mm
Peso: ................................................................5,5 kg
Como parte de nuestra política de desarrollo de productos, los datos técnicos de los
Información sobre ruido y vibración:
Presión acústica LPA: ................................................ 96,4 dB(A)
Potencia acústica LWA:.............................................. 107,4 dB(A)
Incertidumbre K: ........................................................3 dB
Vibración ponderada ah (taladro percutor):............................19,327 m/s
Vibración ponderada ah (cincel):.....................................17,879 m/s
Incertidumbre: ...................................................... 1,5 m/s
productos Silverline pueden cambiar sin previo aviso.
El nivel de intensidad sonora para el usuario puede exceder de 85 dB(A).
Se recomiendan usar medidas de protección auditiva.
-1
2
2
2
24
ADVERTENCIA: Utilice siempre protección auditiva cuando el nivel ruido exceda 85 dB(A) o
cuando esté expuesto durante largos periodos de tiempo. Si por algún motivo nota algún tipo de
molestia auditiva incluso llevando orejeras de protección, detenga inmediatamente la herramienta
y compruebe que las orejeras de protección estén colocadas adecuadamente. Asegúrese de que el
nivel de atenuación y protección de las orejeras sea adecuado dependiendo del tipo de herramienta
y el trabajo a realizar.
Page 25

Taladro SDS Plus 1500 W 268819
silverlinetools.com
ADVERTENCIA: La exposición a la vibración durante la utilización de una herramienta puede
provocar pérdida del sentido del tacto, entumecimiento, hormigueo y disminución de la capacidad
de sujeción. La exposición durante largos periodos de tiempo puede provocar enfermedad crónica.
Si es necesario, limite el tiempo de exposición a la vibración y utilice guantes anti-vibración. No
utilice la herramienta cuando sus manos estén muy frías, las vibraciones tendrán un mayor efecto.
Utilice los datos técnicos de su herramienta para evaluar la exposición y medición de los niveles
de ruido y vibración.
Los niveles de vibración y ruido están determinados según las directivas internacionales vigentes.
Los datos técnicos se reeren al uso normal de la herramienta en condiciones normales. Una
herramienta defectuosa, mal montada o desgastada puede incrementar los niveles de ruido y
vibración. Para más información sobre ruido y vibración, puede visitar la página web www.osha.
europa.eu
Lea cuidadosamente este manual y cualquier otra indicación antes de usar este producto. Guarde
estas instrucciones con el producto para poderlas consultar en el futuro. Asegúrese de que todas las
personas que utilizan este producto están completamente familiarizadas con este manual.
Incluso cuando se esté utilizando según lo prescrito, tenga siempre precaución. Si no está
completamente seguro de cómo utilizar este producto correctamente, no intente utilizarlo.
Instrucciones de seguridad para
herramientas eléctricas
ADVERTENCIA: Lea siempre cuidadosamente todas las advertencias e instrucciones
seguridad para utilizar este producto de forma segura. No seguir estas instrucciones podría
causar una descarga eléctrica, incendio y/o lesiones graves.
Conserve estas instrucciones de seguridad para futura referencia.
El término “herramienta eléctrica” descrito en este manual se reere a una herramienta alimentada
por conexión eléctrica mediante cable (herramienta alámbrica) o una herramienta eléctrica
alimentada por batería (herramienta inalámbrica).
1) Seguridad en el área de trabajo
a) Mantenga el área de trabajo limpia y bien iluminada. Las áreas de trabajo desordenadas y
oscuras son peligrosas y pueden provocar un accidente.
b) No utilice herramientas eléctricas en atmósferas explosivas que contengan líquidos, gases
o polvos inamables. Las herramientas eléctricas producen chispas que pueden incendiar el
polvo o los vapores.
c) Mantenga a los niños y personas alejadas mientras esté trabajando con una herramienta
eléctrica. Las distracciones pueden hacerle perder el control de la herramienta.
2) Seguridad eléctrica
a) El enchufe de su herramienta eléctrica debe coincidir con la toma de corriente. Nunca
realice ningún tipo de modicación en el enchufe. No utilice adaptadores de enchufe
sin toma de tierra. No modique los enchufes y tomas de corriente para reducir el riesgo de
descargas eléctricas.
b) Evite el contacto corporal con materiales conductores tales como tuberías, radiadores,
estufas y refrigeradores. El riesgo de descarga eléctrica se incrementa si su cuerpo está
expuesto a materiales conductores.
c) No utilice las herramientas eléctricas bajo la lluvia o en zonas extremadamente húmedas.
El contacto de agua dentro de la herramienta aumentará el riesgo de descargas eléctricas.
d) No doble el cable de alimentación. No use nunca el cable de alimentación para
transportar la herramienta eléctrica, tirar de ella o desenchufarla. Mantenga el cable de
alimentación alejado de fuentes de calor, aceite, bordes alados o piezas móviles. Los
cables de alimentación dañados o enredados aumentan el riesgo de descargas eléctricas.
e) Use un cable de extensión adecuado para uso exterior cuando utilice la herramienta
eléctrica en áreas exteriores. El uso de un cable adecuado para exteriores reducirá el riesgo de
descargas eléctricas.
f) Si es inevitable trabajar con una herramienta eléctrica en lugares húmedos, use un
suministro protegido por un interruptor diferencial o disyuntor por corriente diferencial o
residual (RCD). El uso de un RCD reduce el riesgo de descargas eléctricas.
3) Seguridad personal
a) Manténgase alerta, fíjese en lo que está haciendo y use el sentido común cuando esté
utilizando una herramienta eléctrica. No use una herramienta eléctrica cuando esté
cansado o bajo la inuencia de drogas, alcohol o medicamentos. Distraerse mientras esté
utilizando una herramienta eléctrica puede provocar lesiones corporales graves.
b) Utilice siempre equipo de protección personal. Use siempre protección ocular. El uso de
dispositivos de seguridad personal (mascarillas antipolvo, calzado de seguridad antideslizante,
casco de protección y protección auditiva) reducirá el riesgo de lesiones corporales.
c) Evite el arranque accidental de la herramienta. Asegúrese de que el interruptor esté en la
posición de apagado antes de enchufar la herramienta. Nunca transporte herramientas con
el dedo colocado en el interruptor o con el interruptor en posición de encendido.
d) Retire todas las llaves de ajuste antes de encender la herramienta. Una llave colocada sobre
una parte móvil de la herramienta eléctrica puede causar lesiones graves.
e) No adopte posturas forzadas. Colóquese en posición rme y mantenga el equilibrio
en todo momento. Esto le permitirá controlar mejor la herramienta eléctrica en situaciones
inesperadas.
f) Vístase de manera apropiada. No lleve ropa holgada ni joyas. Mantenga el cabello, la ropa
y guantes lejos de las piezas en movimiento. La ropa holgada, las joyas o el cabello largo
pueden quedar atrapados en las piezas en movimiento.
g) Extracción de polvo. Utilice siempre un sistema de extracción de polvo/aspiradora y asegúrese
de utilizarlos de manera apropiada. El uso de estos dispositivos reducirá los peligros relacionados
con el polvo.
h) No deje que la familiaridad con el producto a base de utilizarlo repetidamente sustituya
las normas de seguridad indicadas para utilizar esta herramienta. Utilizar esta herramienta
de forma incorrecta puede causar daños y lesiones personales.
4) Uso y mantenimiento de las herramientas eléctricas
a) Nunca fuerce la herramienta eléctrica. Utilice esta herramienta eléctrica de forma
adecuada. Utilice su herramienta de forma correcta para cada aplicación.
b) No use esta herramienta eléctrica cuando el interruptor de encendido/apagado esté
averiado. Cualquier herramienta eléctrica que no se pueda controlar con el interruptor de
encendido/apagado será peligrosa y debe ser reparada inmediatamente.
c) Desenchufe siempre la herramienta o retire la batería antes de realizar cualquier ajuste,
cambiar accesorios o almacenar la herramienta. Estas medidas de seguridad preventivas
evitarán el arranque accidental de su herramienta eléctrica.
d) Guarde siempre las herramientas eléctricas fuera del alcance de los niños. No permita que
las personas que no estén familiarizadas con estas instrucciones utilicen la herramienta.
Las herramientas eléctricas son peligrosas en manos de personas que no estén capacitadas para
su uso.
e) Compruebe regularmente el funcionamiento de sus herramientas eléctricas. Asegúrese
de que no haya piezas en movimiento desalineadas o trabadas, piezas rotas o cualquier
otro problema que pueda afectar al funcionamiento de la herramienta. Repare siempre
las piezas dañadas antes de utilizar la herramienta. La falta de mantenimiento es la causa de
la mayoría de accidentes.
f) Las herramientas de corte deben estar siempre aladas y limpias. Las herramientas de corte
correctamente aladas son menos propensas a trabarse y son más fáciles de controlar.
g) Utilice esta herramienta eléctrica y los accesorios según el manual de instrucciones
y teniendo en cuenta las condiciones y el trabajo que necesite realizar. El uso de esta
herramienta eléctrica con un propósito distinto al cual ha sido diseñada podría ser peligroso y
causar lesiones.
h) Mantenga siempre las empuñaduras y supercies de agarre limpias y libres de grasa. Las
empuñaduras y supercies resbaladizas pueden provocar la pérdida de control de la herramienta
de forma inesperada.
5) Mantenimiento y reparación
a) Repare siempre su herramienta eléctrica en un servicio técnico autorizado. Utilice
únicamente piezas de recambio idénticas y homologadas. Esto garantizará un
funcionamiento óptimo y seguro de su herramienta eléctrica.
Instrucciones de seguridad
especícas
Instrucciones de seguridad para taladros SDS Plus
IMPORTANTE: Solicite asesoramiento profesional si encuentra restos de asbestos en la zona
de trabajo. El asbesto debe ser retirado por una persona cualicada. Póngase en contacto con el
organismo o autoridad pertinente. Para más información véase la directiva europea 2009/148/CE
relacionados con la exposición al amianto durante el trabajo.
• Es esencial seguir todos los reglamentos de seguridad nacionales respecto al tipo de trabajo que
esté realizando.
• Nunca permita que las personas menores de 18 años utilicen esta herramienta. Asegúrese de
estar completamente familiarizado con las instrucciones de seguridad descritas en este manual.
• El taladro puede provocar que los restos de partículas salgan disparadas hacia usted. Utilice
siempre equipo de protección adecuado incluidas gafas de seguridad, vestimenta y calzado
adecuado.
• Utilice coronas perforadoras sólo con taladros SDS con embrague de seguridad, de lo contrario
podrían trabarse y provocar daños al usuario.
• Si el embrague de seguridad queda bloqueado durante el funcionamiento del taladro, suelte
el gatillo y retire la corona perforadora inmediatamente. No utilice el taladro hasta que el
embrague de seguridad no funcione correctamente.
• No utilice nunca taladros SDS en escaleras o sobre plataformas sin protección anti-caídas. Los
taladros SDS son pesados, producen niveles de vibración y par de torsión altos.
• Lleve siempre guantes de protección anti-vibración que no sean de tela para evitar que el tejido
pueda quedar atrapado entre los mecanismos rotativos del taladro. Nunca utilice guantes que
estén el mal estado.
• Perforar puede provocar gran cantidad de polvo que podría ser tóxico. Lleve siempre protección
respiratoria adecuada. Se recomienda utilizar mascarillas FFP2.
• Los taladros SDS producen altos niveles de ruido. Lleve siempre protección auditiva cuando
utilice esta herramienta.
• Los taladros SDS producen altos niveles de vibración, especialmente en modo percutor y cincel.
Se recomienda realizar descansos periódicamente.
• Utilice solo cinceles SDS Plus con taladros percutores SDS Plus.
• Utilice detectores de metales y de tensión para localizar cables eléctricos y conductos de agua o
de gas ocultos. Evite tocar los componentes o conductores bajo tensión.
• Los cables de extensión deben estar completamente desenrollados. El cable alargador debe
presentar una sección transversal mínima de 1,25 mm2.
25
Page 26

ES
• Los cables de extensión para exteriores deben de disponer de cable aislado y enchufes
protegidos contra el agua.
• Cuando se utilice esta herramienta al aire libre, conéctela a una fuente de alimentación
equipada con un dispositivo RCD (interruptor diferencial).
• Asegúrese de que la broca o el cincel esté correctamente colocado. Las brocas y cinceles que no
se hayan jado correctamente pueden salir expulsadas bruscamente y ser un peligro para el
usuario.
• Asegúrese de que el área de trabajo esté sucientemente iluminada.
• Utilice siempre ambas manos para sujetar la herramienta.
• No presione la herramienta cuando esté trabajado, podría dañar la herramienta.
• Las brocas se calientan, déjelas que se enfríen antes de cambiarlas.
• Nunca se distraiga, desconecte siempre la herramienta antes de realizar otra acción.
• Desenchufe siempre el taladro SDS antes de cambiar un accesorio.
• Examine el portabrocas con regularidad en busca de signos de desgaste o daños. Repare la
herramienta en un servicio técnico cualicado.
• Espere siempre hasta que la broca se detenga por completo antes de dejar la herramienta.
• Al nalizar el trabajo, retire el accesorio de la herramienta y desenchúfela de la red eléctrica.
• Examine periódicamente todos los elementos de jación de su herramienta y apriételos si es
necesario.
• Inspeccione la herramienta regularmente, compruebe el estado del cable de alimentación
después de cada uso.
• Mantenga siempre colocado el protector anti-polvo para evitar que las partículas de polvo
puedan entrar dentro del portabrocas SDS.
• Si experimenta algún tipo de molestia al utilizar esta herramienta, no la utilice.
Características del producto
1. Portabrocas SDS Plus
2. Collar del portabrocas SDS Plus
3. Selector de función
4.
Tapa de la caja de engranajes
5.
Interruptor de encendido/apagado
6.
Selector de modo taladro/percutor
7.
Selector de velocidad
8.
Tapa de acceso a las escobillas
9.
Empuñadura auxiliar
10.
Ranuras de ventilación
11.
Llave para portabrocas
12.
Bote de grasa
13.
Cincel
14.
Cincel en punta
15. Protector para polvo
16. Broca SDS Plus para mampostería 8 mm
17. Broca SDS Plus para mampostería 10 mm
18. Broca SDS Plus para mampostería 12 mm
19. Llave hexagonal
20. Portabrocas llave 13 mm
21. Bloqueo de función
22. Empuñadura principal
Aplicaciones
Taladro percutor diseñado para perforar y realizar tareas ligeras de cincelado en mampostería.
Esta herramienta puede usarse para perforar madera y metal utilizando un portabrocas SDS Plus
suministrado.
Desembalaje
• Desembale e inspeccione la herramienta con cuidado. Familiarícese con todas sus características
y funciones.
• Asegúrese de que el embalaje incluya todas las piezas y compruebe que estén en buenas
condiciones. Si faltan piezas o están dañadas, sustitúyalas antes de utilizar esta herramienta.
Antes de usar
ADVERTENCIA: Desconecte siempre la herramienta de la toma de corriente antes de cambiar
o sustituir cualquier accesorio.
ADVERTENCIA: Utilice siempre la empuñadura auxiliar (9) para evitar accidentes y lesiones
personales.
IMPORTANTE: Antes de utilizar la herramienta por primera vez y después de cada 6 horas (aprox.)
de uso, deberá rellenar la caja de engranajes con grasa (máx 80 g). Utilice el bote de grasa (12)
suministrado para uso inicial. Para más información, véase la sección “Mantenimiento de la caja
de engranajes”.
IMPORTANTE: Compruebe siempre que haya suciente grasa en el compartimento de la caja de
engranajes antes de utilizar esta herramienta.
Instalar/desmontar accesorios y portabrocas SDS Plus
Fig. I
Nota: El sistema SDS Plus permite que la broca se mueva dentro del portabrocas. Esto signica que
no es necesario apretar la broca en el portabrocas.
• Esta herramienta está equipada con sistema de sujeción SDS Plus. Los accesorios SDS Plus
disponen de un vástago acanalado que se alinea con las lengüetas del portabrocas SDS Plus (1).
• Instalación de un accesorio:
1. Sujete la herramienta rmemente y deslice el collar del portabrocas (2) hacia la herramienta.
2. Introduzca el accesorio en el portabrocas hasta que note cierta resistencia.
3. Suelte el collar del portabrocas para jar el accesorio.
4. Compruebe que el accesorio no se mueva. Vuelva a realizar el proceso de instalación si el
accesorio se mueve o no está sujeto de forma correcta.
• Retirar un accesorio:
1. Deslice el collar del portabrocas en dirección hacia la herramienta para retirar un accesorio.
Ajuste del portabrocas con llave
Fig. II
ADVERTENCIA: Este portabrocas no está diseñado para usar en modo cincel o percutor.
ADVERTENCIA: Asegúrese de que la llave de ajuste no esté colocada en el portabrocas antes
de utilizar la herramienta.
• Esta herramienta se suministra con portabrocas con llave (20) adicional indicado para perforar
madera y acero.
• Ajuste del portabrocas:
1. Coloque el portabrocas con llave en el portabrocas SDS Plus (véase “Instalar/desmontar
accesorios y portabrocas SDS Plus”).
2. Aoje o apriete el portabrocas introduciendo la llave (11) en los oricios situados en el
portabrocas con llave. Gire la llave en sentido antohorario para aojarlo y sentido horario para
apretarlo.
Instalación de la empuñadura auxiliar
Fig. III
1. Aoje la empuñadura auxiliar (9) girándola en sentido antihorario.
2. Deslice la empuñadura dentro del taladro.
3. Apriete la empuñadura auxiliar (9) girándola en sentido horario.
IMPORTANTE: Asegúrese de que la empuñadura auxiliar no esté colocada en cualquier otra parte
de la herramienta.
Accesorios adicionales (no mostrados):
• Maletín de transporte
26
Page 27

Taladro SDS Plus 1500 W 268819
silverlinetools.com
Funcionamiento
ADVERTENCIA: Lleve siempre protección adecuada cuando utilice esta herramienta, incluido
protección ocular, protección auditiva y guantes de protección. Lleve mascarilla respiratoria cuando
esté expuesto al humo o el polvo.
Nota: El protector para polvo (15) debe instalarse cuando utilice una broca o cincel. Esto evitará que
el polvo y la suciedad entren en el portabrocas (Fig. IV). Esto es especialmente importante cuando
se trabaja sobre techos o paredes inclinadas. Cuando utilice brocas de gran longitud puede que
necesite instalar el protector anti-polvo antes de instalar la broca dentro del portabrocas.
ADVERTENCIA: Cuando la broca penetra el material, puede quedar 'atascada' o 'enganchada'.
Esto puede causar que la herramienta recule súbitamente. Para evitar daños, sujete siempre la
herramienta de forma segura usando la empuñadura auxiliar (9) y la empuñadura principal (22).
Utilice solamente brocas bien aladas.
ADVERTENCIA: Utilice un tornillo de banco o una abrazadera para sujetar la pieza de trabajo
rmemente. Sujete siempre el taladro con ambas manos.
Selector de velocidad
Fig. V
Utilice el selector de velocidad (7) para ajustar la velocidad de la herramienta. A mayor número
seleccionado mayor será la velocidad, a menor número, menor será la velocidad.
Modo percutor
Esta herramienta puede utilizarse en modo percutor para perforar mampostería y hormigón.
Nota: El portabrocas con llave (20) no es compatible con el modo percutor.
1. Ajuste selector de función (3) en la posición apretando el bloqueo de función (21) hacia
dentro y girando el selector de función (3).
2. Suelte el bloqueo de función.
3. Ajuste el selector de modo taladro/percutor (6) en la posición .
• No intente mover el selector de función mientras el taladro está funcionando.
• No utilice el taladro cuando el selector de función esté en posición intermedia.
Modo taladro
Esta herramienta puede utilizarse en modo taladro para perforar metal y madera.
Nota: utilice el portabrocas con llave (20) para perforar madera o metal utilizando las brocas
correspondientes (no suministradas) (véase “Instalar/desmontar accesorios y portabrocas SDS Plus”).
1. Ajuste selector de función (3) en la posición apretando el bloqueo de función (21) hacia
dentro y girando el selector de función (3).
2. Suelte el bloqueo de función.
3. Ajuste el selector de modo taladro/percutor (6) en la posición .
• No intente mover el selector de función mientras el taladro está funcionando.
• No utilice el taladro cuando el selector de función esté en posición intermedia.
Modo cincel
Utilice esta función solamente para cincelar. Utilice solamente cinceles SDS Plus.
Nota: El portabrocas con llave (20) no es compatible con el modo cincel.
1. Ajuste selector de función (3) en la posición apretando el bloqueo de función (21) hacia
dentro y girando el selector de función (3).
2. Suelte el bloqueo de función.
3. Ajuste el selector de modo taladro/percutor (6) en la posición .
• No intente mover el selector de función mientras el taladro está funcionando.
• No utilice el taladro cuando el selector de función esté en posición intermedia.
Encendido/apagado
1. Para encender la herramienta, apriete el interruptor de encendido/apagado (5).
2. Para detener la herramienta, suelte el interruptor de encendido/apagado.
Nota: Utilice el selector de velocidad (7) para ajustar el taladro a la velocidad requerida. Asegúrese
de la velocidad sea la correcta para el trabajo que vaya a realizar.
Perforación en hormigón
1. Ajuste el taladro en modo percutor (véase “Modo percutor”).
2. Instale una broca SDS Plus para mampostería (16, 17 y 18) en el portabrocas SDS Plus (1) (véase
“Instalar/desmontar accesorios y portabrocas SDS Plus”)
3. Encienda el taladro (véase “Encendido/apagado”).
4. Coloque la broca sobre la pieza de trabajo y presione ligeramente a través de la parte posterior
del taladro.
5. Retire la broca fuera de la pieza de trabajo antes de apagar el taladro.
IMPORTANTE: No presione excesivamente mientras esté perforando, podría dañar la broca y el
taladro.
Nota: El agujero puede quedar obstruido por el polvo. Para limpiar el agujero, disminuya la
velocidad del taladro y retire la broca del agujero.
Perforación de madera y metal
1. Seleccione el modo taladro (véase “Modo taladro”)
2. Instale el portabrocas con llave (20) en el taladro (véase “Instalar/desmontar accesorios y
portabrocas SDS Plus”).
3. Utilice brocas compatibles para metal o madera (no suministradas).
4. Encienda el taladro (véase “Encendido y apagado”).
5. Coloque la broca sobre la pieza de trabajo y presione ligeramente a través de la parte posterior
del taladro.
6. Retire la broca fuera de la pieza de trabajo antes de apagar el taladro.
IMPORTANTE: No presione excesivamente mientras esté perforando, podría dañar la broca y el
taladro.
Nota: El agujero puede quedar obstruido por el polvo. Para limpiar el agujero, disminuya la
velocidad del taladro y retire la broca del agujero.
Accesorios
• Existen gran variedad de accesorios SDS Plus para esta herramienta disponibles en su
distribuidor Silverline.
• Las piezas de repuesto pueden obtenerse a través de www.toolsparesonline.com
Mantenimiento
ADVERTENCIA: Desconecte SIEMPRE la herramienta de la toma de corriente antes de realizar
cualquier tarea de mantenimiento. Retire siempre el cargador antes de limpiar el taladro.
Mantenimiento de la caja de engranajes
Fig. VI.
Después de cada 6 horas de uso (aprox.), la caja de engranajes debe de volver a engrasarse.
1. Utilice la llave hexagonal (19) para retirar la tapa de la caja de engranajes (4).
2. Utilice una espátula o un instrumento similar para aplicar grasa en el compartimento de la caja
de engranajes (máx. 80 g).
Nota: Tenga precaución para no rayar o dañar el mecanismo interno de la caja de engranajes.
3. Vuelva a colocar la tapa de la caja de engranajes (4).
• Esta herramienta se suministra con un bote de grasa (12) que podrá utilizar varias veces. Cuando
necesite adquirir grasa adicional, asegúrese de utilizar grasa universal con base de litio.
• No apriete excesivamente la tapa de la caja de engranajes ni llene excesivamente de grasa la
caja de engranajes.
Inspección general
• Compruebe regularmente que todos los tornillos y elementos de jación estén bien apretados.
Con el paso del tiempo pueden vibrar y aojarse.
• Inspeccione el cable de alimentación antes de utilizar esta herramienta y asegúrese de que no
esté dañado. Las reparaciones deben realizarse por un servicio técnico Silverline autorizado.
Limpieza
• Mantenga la herramienta siempre limpia. La suciedad y el polvo pueden dañar y reducir la
vida útil su herramienta. Utilice un cepillo suave o un paño seco para limpiar la herramienta.
Si dispone de un compresor de aire comprimido, sople con aire seco y limpio para limpiar los
oricios de ventilación.
• Limpie la carcasa de la herramienta con un paño húmedo y detergente suave. Nunca utilice
alcohol, combustible o productos de limpieza.
• Nunca utilice agentes cáusticos para limpiar las piezas de plástico.
Lubricación
• Aplique regularmente spray lubricante en las piezas móviles.
Sustitución de las escobillas
• Con el tiempo, las escobillas de carbono del motor se desgastarán.
• Si las escobillas se han desgastado excesivamente, el rendimiento del motor puede disminuir, la
herramienta tal vez no arranque o quizás observe una excesiva presencia de chispas.
• Para sustituir las escobillas, retire las ranuras de ventilación (10) y las tapas de acceso a las
escobillas (8) de la herramienta. Retírelas y sustitúyalas por unas nuevas. Vuelva a colocar
las tapas de acceso a las escobillas. Si tiene dudas sobre como sustituir las escobillas, lleve la
herramienta a un servicio técnico autorizado.
27
Page 28

ES
Contacto
Servicio técnico de reparación Silverline – Tel: (+44) 1935 382 222
Web: www.silverlinetools.com/es-ES/Support
Dirección:
Powerbox
Boundary Way
Lufton Trading Estate
Yeovil, Somerset
BA22 8HZ, Reino Unido
Almacenaje
• Guarde esta herramienta y accesorios en un lugar seco y seguro fuera del alcance de los niños.
Reciclaje
Deshágase siempre de las herramientas eléctricas adecuadamente respetando las normas de
reciclaje indicadas en su país.
• No deseche las herramientas y aparatos eléctricos junto con la basura convencional. Recíclelos
siempre en puntos de reciclaje.
• Póngase en contacto con la autoridad local encargada de la gestión de residuos para obtener más
información sobre cómo reciclar este tipo de herramientas correctamente.
Solución de problemas
Problema Causa Solución
La broca se ha atascado en el material Presión excesiva sobre la herramienta Reduzca la presión en la herramienta
Corona perforadora incompatible Utilice una corona perforadora compatible
Restos de suciedad acumulados dentro de la corona perforadora Limpie regularmente los restos de suciedad acumulados en la
La herramienta no se enciende Fusible fundido Sustituya el fusible. Si vuelve a fundirse el fusible, contacte
Cable de alimentación dañado Contacte con un servicio técnico autorizado Silverline
Interruptor de encendido/apagado averiado
corona perforadora
inmediatamente con un servicio técnico Silverline
Motor averiado
Velocidad de rotación lenta Sobrecalentamiento del motor Apague la herramienta y deje que se enfríe. Compruebe que los
Velocidad de rotación lenta, no rota o chispas en las ranuras de
ventilación del motor
Vibración o ruido anormal Falta de grasa en la caja de engranajes Add or replace grease
Escobillas de carbón desgastadas Sustituya las escobillas de carbón o contacte con un servicio
Partes internas excesivamente desgastadas Contacte con un servicio técnico Silverline
oricios de ventilación no estén obstruidos
técnico Silverline
28
Page 29

Taladro SDS Plus 1500 W 268819
silverlinetools.com
Garantía
Este producto Silverline dispone de una garantía
de 3 años.
Para obtener la garantía de 3 años, deberá registrar el producto en www.silverlinetools.com
antes de que transcurran 30 días. El periodo de garantía será válido desde la fecha indicada en
su recibo de compra.
Condiciones
El periodo de garantía entra en vigor a partir de la fecha indicada en el recibo de compra.
GUARDE EL RECIBO DE COMPRA
Si el producto se ha averiado antes de que transcurran 30 días desde la fecha de compra, deberá
devolverlo a su lugar de compra, junto con el recibo de compra y los detalles de la avería. En
este caso, le sustituiremos el producto o le reembolsaremos el importe.
Si el producto se ha averiado después de que transcurran 30 días desde la fecha de compra,
devuélvalo a:
Servicio Técnico Silverline Tools
PO Box 2988
Yeovil
BA21 1WU, Reino Unido.
La reclamación siempre debe presentarse durante el periodo de garantía.
Antes de poder realizar cualquier trabajo de reparación, deberá entregar el recibo de compra
original en el que se indica la fecha de compra, su nombre, dirección y el lugar donde lo
adquirió.
También deberá indicar claramente los detalles del fallo a reparar.
Las reclamaciones presentadas dentro del periodo de garantía deberán ser vericadas por
Silverline Tools para averiguar si las deciencias son consecuencia de los materiales o de la
mano de obra del producto.
Los gastos de transporte no son reembolsables. Los productos enviados deben estar limpios y
en buenas condiciones para su reparación, deberán empaquetarse cuidadosamente con el n
de evitar que se produzcan daños durante el transporte. Silverline Tools se reserva el derecho a
rechazar envíos incorrectos o inseguros.
Todas las reparaciones serán realizadas por Silverline Tools o por un servicio técnico autorizado.
La reparación o sustitución del producto no prolongará el periodo de garantía.
Si la avería está cubierta por la garantía, la herramienta será reparada sin cargo alguno (salvo
los gastos de envío), o bien la sustituiremos por una herramienta en perfecto estado de
funcionamiento.
Las herramientas o piezas que hayan sido sustituidas serán propiedad de Silverline Tools.
La reparación o sustitución del producto bajo garantía aporta benecios adicionales a sus
derechos legales como consumidor, sin afectarlos.
Registro del producto
Visite: silverlinetools.com, seleccione el botón de registro e introduzca:
• Sus datos personales
• Detalles del producto e información de compra
El certicado de garantía le será enviado en formato PDF. Imprímalo y guárdelo con el producto.
Qué está cubierto:
Silverline Tools deberá comprobar si las deciencias se deben a materiales o mano de obra
defectuosos dentro del periodo de garantía.
En caso de que cualquier pieza no estuviera disponible o estuviera fuera de fabricación,
Silverline Tools la sustituirá por una pieza funcional con las mismas características.
Uso del producto en la Unión Europea.
Qué no está cubierto:
Silverline Tools no garantiza las reparaciones causadas por:
Desgaste normal por uso adecuado de la herramienta, por ejemplo hojas, escobillas, correas,
bombillas, baterías, etc...
La sustitución de cualquier accesorio suministrado: brocas, hojas, papel de lija, discos de corte
y otras piezas relacionadas.
Daño accidental, averías debidas a uso o cuidado negligente, uso incorrecto, negligencia,
funcionamiento o manejo indebido del producto.
Utilizar del producto para una nalidad distinta.
Cualquier cambio o modicación del producto.
El uso de piezas y accesorios que no sean recambios originales de Silverline Tools.
Instalación incorrecta (excepto si fue realizada por Silverline Tools).
Reparaciones o alteraciones realizadas por servicios técnicos no autorizados por Silverline Tools.
Las reclamaciones distintas a las indicadas en las presentes condiciones de garantía no estarán
cubiertas.
Garantía para baterías
Las baterías Silverline disponen de 12 meses de garantía. Si durante el período de garantía
apareciera algún defecto en la batería debido a la fabricación o materiales defectuosos,
Silverline se hará cargo de la reparación o sustitución del producto de forma gratuita. Está
garantía no se aplica al uso comercial por desgaste de uso normal, daños accidentales o por
mal uso de este producto.
Declaración de conformidad CE
El abajo rmante: Mr Darrell Morris
Autorizado por: Silverline Tools
Declara que el producto:
La presente declaración de conformidad se expide bajo la exclusiva responsabilidad del
Fabricante. El objeto de la declaración descrita anteriormente es conforme a la legislación
comunitaria de armonización pertinente.
Código de identicación: XXXXXX
Descripción: XXXXXXXXXX
Está en conformidad con las directivas:
• Directiva de máquinas 2006/42/CE
• Directiva de baja tensión 2014/35/UE
• Compatibilidad electromagnética 2014/30/UE
• Directiva RoHS 2011/95/UE
• Directiva de emisiones sonoras debidas a las máquinas de uso al aire libre
Organismo noticado: XXXXXXXXXXXXXXXXXX
La documentación técnica se conserva en: Silverline Tools
Fecha: XX/XX/XX
Firma:
Mr Darrell Morris
Director General
Nombre y dirección del fabricante:
Powerbox International Limited, Nº de registro: 06897059. Dirección legal:
Powerbox, Boundary Way, Lufton Trading Estate, Yeovil, Somerset BA22 8HZ, Reino Unido.
29
Page 30

IT
Traduzione delle istruzioni originali
Introduzione
Grazie per aver acquistato questo utensile Silverline. Queste istruzioni contengono informazioni
utili per il funzionamento sicuro ed afdabile del prodotto. Per essere sicuri di utilizzare al meglio
il potenziale dell’utensile si raccomanda pertanto di leggere a fondo questo manuale. Conservare il
manuale in modo che sia sempre a portata di mano e accertarsi che l’operatore dell’elettroutensile
lo abbia letto e capito a pieno.
Descrizione dei simboli
La targhetta sul vostro utensile può mostrare simboli. Questi rappresentano informazioni importanti
riguardanti il prodotto o istruzioni sul suo utilizzo.
Indossare la protezione acustica
Indossare occhiali di protezione
Indossare una protezione per la respirazione
Indossare il casco
Indossare la protezione delle mani
Leggere il manuale di istruzioni
Attenzione!
Scollegare sempre dalla rete elettrica durante la regolazione, la sostituzione degli
accessori, la pulizia, la manutenzione e quando non in uso!
Costruzione di classe II (doppio isolamento per una protezione supplementare)
Protezione ambientale
I riuti elettrici non possono essere smaltiti con i riuti domestici. Riciclare dove
esistono strutture idonee. Vericare con le autorità locali o con il vostro rivenditore
per consigli sul riciclaggio.
Conforme agli standard legislativi e di sicurezza.
NON utilizzare in caso di pioggia o in ambienti umidi!
Abbreviazioni tecniche
V Volt
~, AC Corrente alternate
A, mA Ampere, milliampere
n
0
Ø Diametro
Hz Hertz
W, kW Watt, kilowatt
-1
/min or min
Rpm o giri/min. Rivoluzioni al minute/Giri al minuto
bpm Impatti al minute
dB(A) Livello del suono in decibel (A ponderato)
2
m/s
Velocità a vuoto
Operazioni al minute
Metri per secondo quadrato (magnitudo della vibrazione)
Speciche tecniche
Tensione:..................................................230-240 V~, 50 Hz
Potenza:.............................................................1500 W
Velocità a vuoto: .................................................. 0-880 min
Frequenza di impatto: .............................................0-4350 ipm
Impatto energetico: . . . . . . . . . . . . . . . . . . . . . . . . . . . . . . . . . . . . . . . . . . . . . . . . . . . . . 5,5 J
Mandrino: ..........................................................SDS Plus
Capacità accessori mandrino con chiave: ................................0-13 mm
Capacità di lubricazione scatola ingranaggi: ................................80 g
Protezione di ingresso: ...................................................IP20
Classe di protezione: .....................................................
Lunghezza cavo di alimentazione: ..........................................2 m
Capacità max. di foratura in calcestruzzo: ...............................Ø 32 mm
Capacità max. di foratura in legno: ....................................Ø 40 mm
Capacità max. di foratura in acciaio:.................................... Ø 13 mm
Dimensioni (L x l x H): ...............................390 mm x 95 mm x 280 mm
Peso: ................................................................5,5 kg
Come parte del nostro continuo sviluppo del prodotto, le speciche dei prodotti
Sound & vibration information
Sound pressure LPA: ................................................ 96,4 dB(A)
Sound power LWA: .................................................107,4 dB(A)
Uncertainty K: ...........................................................3 dB
Weighted vibration (Hammer drill mode): ...........................19.327 m/s
Weighted vibration (Chisel mode): ..................................17.879 m/s
Uncertainty:......................................................... 1,5 m/s
Il livello di intensità del suono per l'operatore può superare i 85 dB (A), sono quindi
Silverline possono variare senza preavviso.
necessarie delle misure di protezione dal suono
-1
2
2
2
30
ATTENZIONE: Indossare sempre protezioni per le orecchie, quando il livello sonoro supera i
85 dB (A) e limitare il tempo di esposizione, se necessario. Se i livelli sonori diventano sgradevoli,
anche con la protezione per le orecchie, smettere di usare lo strumento immediatamente e
controllare che la protezione acustica sia montata correttamente e che fornisca il corretto livello di
isolamento acustico per il livello del suono prodotto dal vostro strumento.
ATTENZIONE: L'esposizione dell'utente alle vibrazioni dell’utensile può causare la perdita
del senso del tatto, intorpidimento, formicolio e riduzione della capacità di presa. Una lunga
esposizione può portare ad una condizione cronica. Se necessario, limitare la durata di esposizione
alle vibrazioni e utilizzare guanti anti-vibrazione. Non utilizzare l’utensile se la temperatura delle
mani è al di sotto del normale, in quanto ciò farà sì che l’effetto delle vibrazioni sia maggiore.
Utilizzare i dati forniti nella specica relativa alle vibrazioni per calcolare la durata e la frequenza di
funzionamento dello strumento.
Page 31

Trapano SDS Plus 1500 W268819
silverlinetools.com
I livelli sonori e le vibrazioni nella specica sono determinati secondo standard internazionali.
Le gure rappresentano un normale utilizzo per lo strumento in normali condizioni di lavoro. Un
utensile tenuto in cattive condizioni, montato in modo errato o utilizzato in maniera impropria
può essere causa di un aumento dei livelli sonori e delle vibrazioni. www.osha.europa.eu fornisce
informazioni sui livelli sonori e delle vibrazioni nei luoghi di lavoro utili agli utenti domestici che
utilizzano utensili per lunghi periodi di tempo.
Leggere con attenzione e comprendere il presente manuale e le eventuali etichette incollate prima
dell'uso. Conservare le istruzioni insieme al prodotto per poterle consultare in futuro. Vericare che
chiunque usi il prodotto conosca bene il presente manuale di istruzioni.
Anche attenendosi alle istruzioni non sarà comunque possibile eliminare tutti i fattori di rischio
residui. Usare con cautela. In caso di incertezza relativamente a un uso corretto e sicuro del
dispositivo, non cercare di usarlo a tutti i costi.
Norme generali di sicurezza sugli
elettroutensili
ATTENZIONE: Leggere ed assimilare tutte le istruzioni. La non osservanza delle seguenti
istruzioni può causare scosse elettriche, incendi e/o lesioni gravi.
Conservare tutte le avvertenze di pericolo e le istruzioni operative per ogni esigenza futura.
Il termine “elettroutensile” si riferisce all’utensile a rete ssa (con lo) o un utensile a batteria (senza
lo).
1. Area di lavoro.
a) Mantenere l’area di lavoro pulita e adeguatamente illuminata. Il disordine e le zone di
lavoro non illuminate possono essere fonte di incidenti.
b) Non usare gli elettroutensili in presenza di atmosfere esplosive, ad es. in presenza di
liquidi, gas e polveri inammabili. Gli elettroutensili producono scintille che potrebbero
accendere le polveri o i fumi.
c) Tenere altre persone e i bambini a distanza di sicurezza durante l’impiego dell’utensile
elettrico. Eventuali distrazioni potrebbero far perdere il controllo dell’utensile all’operatore.
2. Sicurezza elettrica
a) Le spine degli elettroutensili devono essere compatibili con le prese di corrente. Non
modicare in alcun modo la spina dell’elettroutensile. Non usare adattatori con gli
elettroutensili dotati di collegamento di messa a terra. L’uso delle spine originali non
modicate e delle prese corrispondenti ridurrà il rischio di scosse elettriche.
b) Evitare il contatto del corpo con le superci collegate a massa come i tubi, i radiatori, le
cucine e i frigoriferi. Se il corpo dell’operatore è collegato alla terra o alla massa il rischio di
scosse elettriche è maggiore.
c) Non esporre gli elettroutensili alla pioggia e non lasciarli in ambienti umidi o bagnati.
L’ingresso dell’acqua in un utensile aumenta il rischio di scosse elettriche.
d) Non usare il cavo in modo improprio. Non afferrare mai il cavo per trasportare, tirare o
staccare l’elettroutensile dalla presa di corrente. Tenere il cavo lontano da fonti di calore,
olio e sostanze afni, bordi appuntiti o parti in movimento. I cavi danneggiati o attorcigliati
aumentano il rischio di scosse elettriche.
e) Qualora si voglia usare l’utensile all’aperto, usare cavi di prolunga compatibili con l’uso in
ambienti esterni. Un cavo idoneo all’uso in ambienti esterni riduce il rischio di scosse elettriche.
f) Se l’utilizzo di un elettroutensile in ambiente umido è inevitabile, utilizzare una fonte di
alimentazione protetta da un dispositivo differenziale. L’uso di un dispositivo differenziale
riduce notevolmente il rischio di scosse elettriche.
3. Sicurezza personale
a) Quando si usa un elettroutensile lavorare sempre con la massima attenzione e
concentrazione, lasciandosi guidare dal buon senso. Non usare mai un elettroutensile
quando si è stanchi o sotto l’effetto di medicinali e/o sostanze alcoliche o stupefacenti.
Quando si usa un elettroutensile un attimo di distrazione è sufciente a causare gravi lesioni alle
persone.
b) Usare dispositivi per la protezione personale. Indossare sempre protezioni per gli occhi.
I dispositivi per la sicurezza personale, come le mascherine antipolvere, le calzature di sicurezza
antiscivolo, il casco e la cufa, se usati in maniera appropriata, riducono i rischi di lesioni alle
persone.
c) Evitare l’avviamento accidentale. Assicurarsi del fatto che l’interruttore sia in posizione
arresto (OFF) prima di attaccare la presa e/o batteria, prendere in mano o trasportare
l’utensile. Trasportare gli elettroutensili con il dito al di sopra dell’interruttore o connettere
l’elettroutensile con l’interruttore acceso, aumenta il rischio di incidenti.
d) Rimuovere tutte le chiavi di regolazione e le chiavi inglesi prima di accendere
l’elettroutensile. Una chiave inglese o una chiave di regolazione collegata a una parte in
movimento dell’elettroutensile potrebbe causare lesioni alle persone.
e) Mantenere sempre i piedi poggiati su superci solide e un punto di appoggio sicuro.
Un buon equilibrio consente di avere il massimo controllo sull’elettroutensile nelle situazioni
inaspettate.
f) Vestirsi con abbigliamento adeguato. Non indossare abiti larghi o gioielli. Tenere i capelli,
vestiti e guanti lontano da parti in movimento. Vestiti lenti, gioielli o capelli lunghi possono
impigliarsi nelle parti in movimento.
g) Se il dispositivo utilizzato è dotato di una bocchetta per l’aspirazione della polvere
accertarsi che sia collegato e utilizzato correttamente. L’uso di tali dispositivi riduce i rischi
correlati alle polveri.
h) Non permettere che la familiarità acquisita in seguito a un uso frequente degli strumenti
porti a un atteggiamento di noncuranza relativamente ai principi di sicurezza della
strumentazione. Un uso noncurante può causare gravi lesioni e ferite in una frazione di secondo.
4. Utilizzo e cura di un elettroutensile
a) Non forzare l’elettroutensile. Usare sempre l’elettroutensile corretto per il lavoro da
eseguire. L’elettroutensile corretto sarà in grado di svolgere il lavoro in modo più efciente e
sicuro nell’ambito della gamma di potenza indicata.
b) Non usare l’elettroutensile se l’interruttore di accensione non si accende e si spegne. Gli
elettroutensili con un interruttore di accensione difettoso sono pericolosi e devono essere riparati
immediatamente.
c) Staccare la spina dalla presa di corrente prima di effettuare qualsiasi regolazione,
sostituire gli accessori o riporre gli attrezzi a motore. Queste misure di sicurezza preventive
riducono il rischio di avvio involontario.
d) Conservare l’elettroutensile fuori dalla portata dei bambini e non lasciare che venga
utilizzato da persone non adeguatamente addestrate e competenti nell’uso degli
elettroutensili o che non abbiano letto questo manuale di istruzioni. Gli elettroutensili
diventano estremamente pericolosi nelle mani di persone non addestrate.
e) Effettuare la manutenzione degli elettroutensili. Controllare che non ci sia un
disallineamento o un blocco delle parti in movimento, la rottura di alcune componenti
e altre condizioni che possano inuire sul funzionamento dell’apparecchio. In caso di
danneggiamento, fare riparare prima di riutilizzarlo. Molti incidenti sono causati da una
scarsa manutenzione dell’utensile.
f) Mantenere le lame pulite e aflate. Gli utensili da taglio tenuti in buone condizioni operative e
con i bordi taglienti aflati sono meno soggetti a bloccarsi e più facili da controllare.
g) Utilizzare l’elettroutensile e tutti i componenti e gli accessori in conformità con le
istruzioni di questo manuale e nella maniera prevista per ciascun tipo di utensile,
tenendo conto delle condizioni lavorative e del compito da eseguire. L’utilizzo degli
elettroutensili per ni diversi da quelli previsti rappresenta un rischio per le persone.
h) Tenere asciutte le maniglie e le impugnature, e fare in modo che siano pulite e senza olio
e grasso. Le impugnature scivolose e le superci particolarmente rigide non consentono una
gestione e un controllo sicuri dell’apparecchiatura in condizioni impreviste.
5. Assistenza
a) Qualsiasi intervento sull’elettroutensile deve essere eseguito da personale qualicato
utilizzando unicamente pezzi di ricambio compatibili e approvati. Ciò garantisce la sicurezza
dell’elettroutensile.
Norme di sicurezza speciche
Misure di sicurezza supplementari per l’utilizzo
trapani SDS Plus
ATTENZIONE: se si sospetta o si scopre la presenza di amianto sul luogo di lavoro, sarà
necessario consultare personale esperto. La rimozione dell’amianto deve e può essere eseguita
esclusivamente da personale qualicato. Se ci si trova nel Regno Unito, contattare la HSE (www.hse.
gov.uk). In qualsiasi altro Paese, contattare l’autorità nazionale per la sanità e sicurezza sul lavoro e
chiedere informazioni riguardo alle procedure da seguire in questi casi.
La direttiva europea sull’amianto 2009/148/CE fornisce ulteriori informazioni utili riguardo alla
protezione dei lavoratori contro i rischi connessi con un'esposizione all'amianto durante il lavoro.
• È indispensabile seguire le normative nazionali sulla sicurezza concernenti il tipo di lavoro che si
intende eseguire.
• Non permettere a nessun minore di 18 anni di utilizzare l’elettroutensile. Assicurarsi che gli
operatori siano qualicati e conoscano tutte le istruzioni di utilizzo e di sicurezza.
• La scalpellatura e trapanatura su muratura creano particelle afliate che potrebbero entrare
in contatto con l’operatore. Indossare una protezione per gli occhi resistente all’impatto e
abbigliamento protettivo, compresi gli stivali.
• I carotatori andrebbero utilizzati esclusivamente con trapani SDS con frizione di sicurezza per
prevenire inceppamento che potrebbe causare un ferimento dell’operatore.
• Se la frizione dovesse attivarsi durante il lavoro di trapanatura, rilasciare il grilletto e rimuovere
la punta dalla supercie che si sta trapanando. Non continuare a trapanare, se non si è capita la
causa di attivazione della frizione di sicurezza.
• Non utilizzare il trapano SDS quando si è su una scala o in qualsiasi posto da cui si rischia di
cadere. I trapani SDS sono pesanti e producono forti vibrazioni e una coppia alta.
• Indossare dei guanti antivibrazione adatti in non tessuto o in tessuto rivestito per evitare che si
inceppino nella punta in rotazione. Smaltire immediatamente I guanti se il materiale dovesse
essere visibilmente logorato.
• Trapanare produce una gran quantità di polvere e di detriti che potrebbero risultare tossici.
Indossare una protezione respiratoria adatta al lavoro che si intende intraprendere. Si
raccomanda una protezione minima FFP2.
• I trapani SDS causano rumori di volume molto alto. Utilizzare sempre una protezione uditiva
adatta durante il loro utilizzo.
• I trapani SDS un livello di vibrazioni molto alto quando in modalità martello pneumatico o
scalpello. Si consigliano pause frequenti durante l’utilizzo di queste modalità.
• Utilizzare esclusivamente scalpelli o punte SDS con trapani SDS che possono disattivare la
modalità di trapanatura a rotazione.
31
Page 32

IT
• Utilizzare rilevatori di metallo e di line elettriche per individuare eventuali line elettriche,
dell’acqua o del gas. Evitare di toccare component sotto tensione o conduttori elettrici durante la
trapanatura.
• Eventuali avvolgicavo o prolunghe utilizzati con questo utensile dovranno essere srotolati
completamente. La sezione minima del conduttore deve corrispondere 1,25 mm2.
• Eventuali avvolgicavo o prolunghe utilizzati con questo utensile all’esterno, dovranno essere
appositamente pensati per l’utilizzo in ambiente esterno e provvisti di prese impermeabili e con
un cavo isolato.
• Se si intende utilizzare il trapano SDS all’aperto, sarà necessario un dispositivo di corrente
residua.
• Assicurarsi del fatto che le punte del trapano o dello scalpello siano ben ssate al mandrino
prima di accendere l’utensile. Delle punte montate male potrebbero volare via dall’utensile
durante il suo utilizzo e potrebbero causare il ferimento dell’operatore.
• Assicurarsi del fatto che la zona di lavoro sia adeguatamente illuminata.
• Tenere l’utensile con entrambe le mani durante il suo utilizzo.
• Utilizzare sempre l’impugnatura ausiliaria in dotazione.
• Non esercitare una pressione eccessiva sull’utensile. Ciò potrebbe pregiudicarne la durata di vita
in servizio.
• Le punte si riscaldano durante la trapanatura. Prima di toccarle, aspettare che si raffreddano.
• Se si viene interrotti durante la trapanatura, completare prima la procedura, quindi spegnere
l’utensile e, per ultima cosa, rivolgere l’attenzione altrove.
• Disconnettere sempre il trapano SDS prima di cambiare le punte.
• Controllare regolarmente che il mandrino non sia danneggiato o consumato. Le parti
danneggiate dovrebbero essere riparate da personale specializzato.
• Attendere SEMPRE che il trapano si sia completamente fermato prima di metterlo giù.
• Una volta completato il lavoro, spegnere l’utensile e rimuovere la punta.
• Controllare periodicamente tutti i dadi, bulloni e altri ssaggi e stringere se necessario.
• Esaminare regolarmente segni visibili di danneggiamento, in particolare sul cavo.
• Inserire la guardia antipolvere sulla punta per evitare danni causati da detriti al mandrino.
• Se l’utilizzo dell’utensile dovesse diventare disagevole, smettere immediatamente di utilizzarlo e
pensare a un metodo di utilizzo più comodo.
Familiarizzazione con il prodotto
1. Mandrino SDS Plus
2. Anello di serraggio mandrino SDS Plus
3. Modalità selettore
4. Coperchio vano ingranaggi
5. Interruttore ON/OFF
6. Selettore modalità standard/battente
7. Controllo velocità variabile
8. Coperchio del vano delle spazzole
9. Impugnatura ausiliaria
10. Ventole del motore
11. Chiave del mandrino
12.
Contenitore di grasso lubricante
13.
Scalpello
14.
Punta
15.
Guardia antipolvere
16.
Punta SDS Plus per muratura 8 mm
17.
Punta SDS Plus per muratura 10 mm
18.
Punta SDS Plus per muratura 12 mm
19.
Chiave esagonale
20.
Mandrino con chiave 13 mm
21.
Blocco selettore di modalità
22.
Impugnatura principale
Accessori in dotazione (non mostrati)
• Custodia sagomata
Destinazione d’uso
Trapano SDS per progetti di media entità, progettato per trapanare in muratura. Può trapanare
anche in legno e metallo se si trasforma il mandrino standard in un mandrino SDS Plus.
Disimballaggio dell’utensile
• Disimballare e ispezionare l’utensile. Familiarizzare completamente con tutte le sue
caratteristiche e funzioni.
• Assicurarsi che tutte le parti dell’utensile siano presenti e in buone condizioni. In caso di parti
mancanti o danneggiate, sostituire tali parti prima di utilizzare questo utensile.
Prima dell’uso
ATTENZIONE: Assicurarsi che l’utensile sia scollegato dalla rete elettrica prima di collegare o
cambiare gli accessori o di effettuare qualsiasi intervento.
ATTENZIONE: Utilizzare sempre l’impugnatura ausiliaria (9) in dotazione. Il suo mancato
utilizzo potrebbe essere causa di ferimento.
IMPORTANTE: Prima del primo impiego e dopo ogni 6 ore (circa) di utilizzo, lubricare gli
ingranaggi (max. 80 g). Per la prima lubricazione, l’utensile viene fornito in dotazione con un
contenitore di grasso lubricante (12) (vedi sezione “Manutenzione degli ingranaggi”).
IMPORTANTE: Controllare sempre che gli ingranaggi siano adeguatamente lubricante prima di
usare il trapano.
Montare/smontare accessori SDS o mandrino con
chiave
Vedi Fig. I
NB: Il sistema SDS Plus permette alla punta di muoversi leggermente all'interno del mandrino
quando viene inserito correttamente.
• Questo utensile è dotato di un sistema di connessione SDS Plus. Gli accessori SDS Plus sono
dotati di un codolo scanalato che si allineano perfettamente con le scanalature del mandrino
SDS Plus (1).
• Per montare un accessorio:
1. Tenere strettamente l’utensile e far scorrere l’anello di serraggio del mandrino (2) verso
l’utensile.
2. Inserire l’accessorio nel mandrino aspettando di incontrare una certa resistenza.
3. Quindi rilasciare l’anello di serraggio per bloccare l’accessorio in posizione.
4. Controllare che l’accessorio non possa muoversi prima di utilizzare l’utensile. Se dovesse
muoversi, ripetere le operazioni di montaggio.
• Per rimuovere un accessorio:
1. Tirare l’anello di serraggio verso l’utensile e rimuovere l’accessorio.
Regolare il mandrino con chiave
Vedi Fig. II
ATTENZIONE: Non utilizzare il mandrino con chiave con la funzione battente o per scalpellare.
ATTENZIONE: Assicurarsi sempre del fatto che la chiave sia stata rimossa dal mandrino prima
di utilizzare l’utensile.
• Il trapano viene fornito in dotazione con un mandrino con chiave (20), accessorio utile in
particolare per trapanare legno e acciaio
• Per regolare il mandrino con chiave:
1. Connette il mandrino con chiave al mandrino SDS plus (vedi “Montare/smontare accessori SDS o
mandrino con chiave”).
2. Allentare o stringere il mandrino con chiave inserendo la chiave del mandrino (11) nei fori del
mandrino con chiave e ruotando la chiave. In senso orario per stringere e antiorario per allentare.
Montare l’impugnatura ausiliaria
Vedi Fig. III
1. Allentare l’impugnatura ausiliaria (9) ruotandola in senso antiorario.
2. Far scorrere l’impugnatura nel trapano.
3. Stringere l’impugnatura ausiliaria ruotando la presa in senso orario.
IMPORTANTE: Assicurarsi del fatto che l’impugnatura ausiliaria non ostruisca nessuna parte in
movimento prima di utilizzare l’utensile.
32
Page 33

Trapano SDS Plus 1500 W268819
silverlinetools.com
Funzionamento
ATTENZIONE: Indossare sempre occhiali di protezione, un'adeguata protezione dell'apparato
respiratorio e dell'udito, nonché guanti adatti, quando si lavora con questo utensile.
NB: La guardia antipolvere (15) dovrebbe essere montata sulla punta o sullo scalpello per evitare
che detriti e polvere entrino nel mandrino (Fig. IV). Questo è particolarmente importante quando il
trapano viene utilizzato con un angolo sollevato quando si lavora su pareti o softti. Per le punte più
grandi la guardia antipolvere deve essere montata prime che la punta venga montata nel mandrino.
ATTENZIONE: Durante la foratura la punta potrebbe incastrarsi nel materiale. Ciò potrebbe
causare un improvviso rinculo dell’utensile. Per prevenire la possibilità di ferimenti, sorreggere
saldamente l’utensile dall’impugnatura ausiliaria (9) e dall’impugnatura principale (22) e utilizzare
punte aflate.
ATTENZIONE: Assicurare il pezzo da lavoro con una morsa e tenere sempre l’utensile con
due mani.
Regolare la velocità variabile
Vedi Fig. V
1. Controllo di velocità variabile (7) viene utilizzato per regolare la velocità dell’utensile. Un numero
più alto corrisponde a una velocità maggiore, un numero più basso corrisponde a una velocità
inferiore.
IMPORTANTE: Non applicare una pressione eccessivo durante le operazioni di trapanatura. Ciò
potrebbe danneggiare motore e punta.
NB: Il foro creato potrebbe riempirsi di detriti mentre si trapana. Per rimuovere i detriti, rallentare la
velocità del trapano e rimuovere la punta dal foro prima di continuare.
Trapanare legno e metallo
1. Selezionare la modalità di trapanatura rotante (vedi “Selezionare la modalità di trapanatura
rotante”).
2. Montare il mandrino con chiave (20) al trapano (vedi “Montare/smontare accessori SDS o
mandrino con chiave”).
3. Montare una punta standard per legno o per metallo (non in dotazione) al mandrino con chiave
(vedi “Regolare il mandrino con chiave”).
4. Accendere l’utensile (vedi “Accendere e spegnere”).
5. Mettere il trapano a contatto con il pezzo e applicare una pressione moderata nella parte
posteriore del trapano in linea con la punta.
6. Rimuovere il trapano dal pezzo prima di spegnerlo.
IMPORTANTE: Assicurarsi del fatto che la punta sia adatta al pezzo che si intende trapanare.
NB: Il foro creato potrebbe riempirsi di detriti mentre si trapana. Per rimuovere i detriti, rallentare la
velocità del trapano e rimuovere la punta dal foro prima di continuare.
Selezionare la modalità battente
La modalità battente è adatta alla trapanatura di muratura e calcestruzzo.
NB: Il mandrino con chiave (20) non è adatto all’utilizzo con modalità battente.
1. Portare il selettore di modalità (3) su premendo il blocco selettore di modalità (21) sul
selettore di modalità (3) verso l’interno e ruotando il selettore.
2. Rilasciare il blocco.
3. Ruotare il selettore modalità standard/battente (6) portandolo su .
• Non spostare il selettore di modalità mentre il trapano è in funzione.
• Non utilizzare il trapano quando il selettore è posizionato nel medio.
Selezionare la modalità di trapanatura rotante
La modalità di trapanatura rotante è adatta alla trapanatura di legno e metallo.
NB: Utilizzare il mandrino con chiave (20) per le operazioni di trapanatura standard, utilizzando
punte standard per legno o metallo (non in dotazione) (vedi “Montare/smontare accessori SDS o
mandrino con chiave”).
1. Portare il selettore di modalità (3) su premendo il blocco selettore di modalità (21) sul
selettore di modalità (3) verso l’interno e ruotando il selettore.
2. Rilasciare il blocco.
3. Ruotare il selettore modalità standard/battente (6) portandolo su .
• Non spostare il selettore di modalità mentre il trapano è in funzione.
• Non utilizzare il trapano quando il selettore è posizionato nel medio.
Selezionare la modalità scalpello
La modalità scalpello va utilizzata esclusivamente se si intende scalpellare. Se si intende utilizzare
scalpelli, utilizzare un mandrino SDS Plus.
NB: Il mandrino con chiave (20) non è adatto all’utilizzo con modalità scalpello.
1. Portare il selettore di modalità (3) su premendo il blocco selettore di modalità (21) sul
selettore di modalità (3) verso l’interno e ruotando il selettore.
2. Rilasciare il blocco.
3. Ruotare il selettore modalità standard/battente (6) portandolo su .
• Non spostare il selettore di modalità mentre il trapano è in funzione.
• Non utilizzare il trapano quando il selettore è posizionato nel medio.
Accendere e spegnere
1. Per accendere l’utensile, premere l’interruttore ON/OFF (5).
2. Per fermare l’utensile, rilasciare l’interruttore ON/OFF.
NB: La massima velocità del trapano viene regolata con il controllo velocità variabile (7). Assicurarsi
del fatto che la velocità massima sia correttamente impostata prima di cominciare a utilizzare
l’utensile.
Trapanare il calcestruzzo
1. Selezionare la modalità battente (vedi “Selezionare la modalità battente”).
2. Installare una punta SDS Plus per muratura (16, 17, 18) nel mandrino SDS Plus (1) (vedi
“Montare/smontare accessori SDS o mandrino con chiave”).
3. Accendere il trapano (vedi “Accendere e spegnere).
4. Mettere il trapano a contatto con il pezzo e applicare una pressione moderata nella parte
posteriore del trapano in linea con la punta del trapano.
5. Rimuovere il trapano dal pezzo prima di spegnerlo.
Accessori
• Un'ampia gamma di accessori per questo utensile è disponibile presso i nostri rivenditori
Silverline.
• I pezzi di ricambio sono disponibili sul sito www.toolsparesonline.com.
Manutenzione
ATTENZIONE: Scollegare sempre dalla rete elettrica prima di effettuare qualsiasi controllo,
manutenzione o pulizia.
Manutenzione cambio
Vedi Fig. VI
Dopo ogni 6 ore di utilizzo (circa), gli ingranaggi vanno nuovamente sgrassati.
1. Utilizzare la chiave esagonale (19) per rimuovere il coperchio del vano ingranaggi (4).
2. Utilizzare una spatola o uno strumento simile per applicare il grasso nel vano ingranaggi no a
quando non è pieno (max. 80 g).
NB: Fare attenzione a non grafare o danneggiare il meccanismo
3. Sostituire il coperchio del cambio (4)
• Un contenitore di grasso lubricante (12) è fornito per le prime operazioni di lubricazione.
Quando si decider di acquistare grasso lubricante, sceglierne uno a base di litio per uso
generale.
• Non serrare eccessivamente il coperchio degli ingranaggi o utilizzare una quantità eccessiva di
lubricante.
Ispezione generale
• Controllare regolarmente che tutte le viti di ssaggio siano serrate.
• Prima di ogni utilizzo, controllare che il cavo di alimentazione, non presenti danni o segni di
usura. Le riparazioni devono essere eseguite da un centro assistenza autorizzato Silverline.
Questo consiglio vale anche per prolunghe utilizzate con questo utensile.
Pulizia
• Mantenere pulito l’utensile in ogni momento. La sporcizia e la polvere causano una rapida usura
delle componenti interne e riducono la durata di vita del dispositivo stesso. Pulire il corpo della
macchina con una spazzola morbida o un panno asciutto. Ove disponibile, usare aria pulita, secca
e compressa tramite i fori di ventilazione.
• Pulire il corpo dell’utensile con un panno umido, utilizzando un detergente delicato. Non
utilizzare alcol, petrolio o detergenti troppo aggressivi.
• Non utilizzare mai agenti caustici per pulire le parti in plastica.
Lubricazione
• Lubricare leggermente le parti in movimento a intervalli regolari con uno spray lubricante
adatto.
33
Page 34

IT
Spazzole
• Nel corso del tempo le spazzole di carbonio all’interno del motore si potrebbero usurare.
• Delle spazzole eccessivamente usurate possono causare perdita di corrente, funzionamento a
intermittenza o scintille visibili a occhio nudo.
• Per sostituire le spazzole, rimuovere le ventole del motore (10) ei coperchi dei vani spazzole (8).
Rimuovere e sostituire le spazzole.
• Sostituire sempre le spazzole consumate in coppia.
• Riposizionare i coperchi.
• In alternativa, far eseguire la manutenzione alla macchina presso un centro di assistenza
autorizzato.
Conservazione
• Conservare questo utensile con cura in un luogo sicuro, asciutto e lontano dalla portata dei
bambini.
Smaltimento
Rispettare sempre le normative nazionali per lo smaltimento di elettroutensili che non sono più
funzionali e non sono atti alla riparazione.
• Non gettare utensili elettrici o apparecchiature elettriche ed elettroniche (RAEE) con i riuti
domestici.
• Contattare l'autorità locale di smaltimento riuti per informazioni sul modo corretto di smaltire
gli utensili elettrici.
Contatto
Per consigli tecnici e per eventuali riparazioni, contattare il nostro servizio di assistenza telefonico al
numero (+44) 1935 382 222
Pagina web: silverlinetools.com/en-GB/Support
Indirizzo:
Powerbox
Boundary Way
Lufton Trading Estate
Yeovil, Somerset
BA22 8HZ, United Kingdom
Risoluzione dei problemi
Problema Possibile causa Soluzione
La corona a forare si è bloccata/inceppata nel materiale. Pressione eccessiva sull’utensile al punto di rottura nel
materiale.
Ridurre la pressione prima della rottura.
La corona a forare non è adatta. Utilizzare una corona a forare compatibile.
Eccessivo accumulo di detriti. Svuotare regolarmente i detriti accumulati per garantire un
L’utensile non si avvia. Fusibile bruciato. Controllare e sostituire il fusibile. Se il problema dovesse
Cavo di alimentazione danneggiato. Contattare un centro servizi autorizzato Silverline.
Interruttore ON/OFF difettoso
Motore difettoso.
Bassa velocità di rotazione L’utensile si è surriscaldato. Spegnere e lasciare che l’utensile torni alla temperatura
Bassa velocità di rotazione o nessuna rotazione e scintille
evidenti.
Vibrazioni o rumori anomali Lubricazione ingranaggi insufciente Lubricare gli ingranaggi.
Spazzole consumate Sostituire le spazzole o contattare un centro servizi autorizzato
Componenti interne eccessivamente consumate Contattare un centro servizi autorizzato Silverline
funzionamento sicuro.
persistere, contattare un centro serv8izi autorizzato Silverline.
ambiente. Ispezionare e pulire i fori di ventilazione.
per farsi sostituire le spazzole.
34
Page 35

Trapano SDS Plus 1500 W268819
silverlinetools.com
Garanzia Silverline Tools
Questo prodotto Silverline è protetto da una
garanzia di 3 anni
Per attivare la garanzia di 3 anni è necessario registrare il prodotto sul sito www.silverlinetools.
com entro 30 giorni dalla data d’acquisto. La data d’inizio del periodo di garanzia corrisponde
alla data d’acquisto riportata sullo scontrino di vendita.
Termini e condizioni
Il periodo di garanzia decorre dalla data dell’acquisto presso il rivenditore indicata sulla ricevuta
d’acquisto.
SI PREGA DI CONSERVARE LA RICEVUTA D'ACQUISTO
Nel caso in cui il prodotto risultasse difettoso entro 30 giorni dalla data d’acquisto, sarà necessario
restituirlo al punto vendita presso cui è stato acquistato, presentando la ricevuta e spiegando
chiaramente la natura del difetto riscontrato. Il prodotto difettoso sarà sostituito o sarà rimborsato
l'importo d'acquisto.
Nel caso in cui il prodotto risultasse difettoso dopo 30 giorni dalla data d’acquisto, sarà necessario
inviare una richiesta di indennizzo in garanzia a:
Silverline Tools Service Centre
PO Box 2988
Yeovil
BA21 1WU, GB
Le richieste di indennizzo devono essere presentate durante il periodo della garanzia.
Afnché la richiesta sia approvata, è necessario presentare anche la ricevuta d’acquisto originale,
indicando il luogo e la data dell’acquisto del prodotto e il proprio nome e indirizzo.
Sarà necessario inoltre fornire una descrizione dettagliata del guasto riscontrato.
Le richieste effettuate durante il periodo di garanzia saranno vericate da Silverline Tools per
stabilire se il difetto del prodotto è dovuto a problemi di materiali o di lavorazione.
Le spese di spedizione non saranno rimborsate. Tutti i prodotti devono essere spediti puliti e
in condizioni tali da garantire l'esecuzione della riparazione in modo sicuro. I prodotti devono
essere imballati con cura per evitare danni o lesioni durante il trasporto. Silverline Tools si riserva
il diritto di non accettare prodotti spediti in condizioni non idonee o non sicure.
Le riparazioni saranno eseguite da Silverline Tools o da un centro di riparazione autorizzato.
La riparazione o la sostituzione del prodotto non estende o rinnova il periodo di garanzia.
Nel caso in cui determini che il prodotto e il difetto riscontrato sono coperti dalla garanzia,
Silverline Tools provvederà a riparare l'utensile
gratuitamente (esclusi i costi di spedizione) o, a propria discrezione, a sostituirlo con un nuovo
utensile.
Gli utensili o le parti trattenuti da Silverline Tools in cambio di un prodotto o componente
sostitutivo diventano proprietà di Silverline Tools.
La riparazione o la sostituzione di un prodotto in garanzia estende i diritti del consumatore
previsti per legge, senza modicarli.
Registrazione dell'acquisto
Accedere al sito: silverlinetools.com e selezionare il tasto registra
per inserire:
• Dati personali
• Informazioni sul prodotto
Una volta che queste informazioni sono state inserite, Il vostro certicato di garanzia sarà inviato
per posta elettronica nel formato PDF. Si prega di stampare e conservare il Certicato insieme
alla ricevuta d’acquisto.
Cosa copre la garanzia:
La riparazione del prodotto, nel caso in cui Silverline Tools determini che il problema sia dovuto a
difetti dei materiali o difetti di lavorazione riscontrati durante il periodo della garanzia.
Nel caso in cui un componente non sia più disponibile o fuori produzione, Silverline Tools si
riserva il diritto di sostituirlo con un componente adeguato.
Prodotti acquistati e utilizzati all’interno dell’Unione Europea.
Cosa non copre la garanzia:
La Garanzia Silverline Tools non copre le riparazioni se il difetto è stato causato da:
La normale usura dei componenti per via dell’utilizzo del prodotto come indicato nelle istruzioni
d’uso (ad esempio, lame, spazzole, cinghie, lampadine, batterie, ecc.).
La sostituzione di accessori forniti a corredo, come ad esempio punte, lame, fogli abrasivi, dischi
di taglio e altri componenti correlati.
I danni accidentali, causati dall'uso improprio, dall'abuso e dalla manipolazione, conservazione e
cura inadeguata dell'utensile da parte del proprietario.
L’uso del prodotto per ni non domestici.
La modica o alterazione del prodotto.
Difetti causati dall’uso di parti e accessori che non siano componenti originali Silverline Tools.
Installazione difettosa (fatto salvo quando l'installazione viene eseguita da Silverline Tools).
Riparazioni o alterazioni eseguite da terze parti che non siano la Silverline Tools o i centri di
riparazione autorizzati da quest'ultima.
Richieste diversi dal diritto alla correzione degli errori con lo strumento denominato in queste
condizioni di garanzia non sono coperti dalla garanzia.
Garanzia della batteria
Le batterie Silverline sono garantite per 12 mesi. Se si dovesse riscontrare un difetto, che sia
di materiale o di fabbricazione, su una batteria registrata durante il periodo di garanzia della
batteria, Silverline la sostituirà gratuitamente. Questa garanzia non si applica ad uso commerciale
né si estende alla normale usura o ai danni a seguito di incidenti, abuso o uso improprio
dell’utensile.
Dichiarazione di conformità CE
Il sottoscritto: Sig. Darrell Morris
come autorizzato di: Silverline Tools
Dichiara che il prodotto:
Questa dichiarazione è stata emessa unicamente sotto la responsabilità del produttore.
L'obiettivo della dichiarazione è in conformità con la pertinente Normativa di Armonizzazione
dell'Unione.
Codice di identicazione: XXXXXX
Descrizione: XXXXXXXXXX
Si conforma alle seguenti direttive
• Direttiva macchine 2006/42/CE
• Direttiva bassa tensione 2014/35/UE
• Direttiva compatibilità elettromagnetica 2014/30/UE
• Direttiva RoHS 2011/65/UE
• Direttiva sui Rumori Esterni 2000/14/CE
Organismo noticato: XXXXXXXXXXXXXXXXXX
La documentazione tecnica è conservata da: Silverline Tools
Data: XX/XX/XXXX
Firma:
Darrell Morris
Direttore generale
Nome e indirizzo del fabbricante:
Powerbox International Limited, N°. Società 06897059. Indirizzo registrato:.
Powerbox, Boundary Way, Lufton Trading Estate, Yeovil, Somerset BA22 8HZ, Regno Unito.
35
Page 36

NL
Vertaling van de originele instructies
Inleiding
Hartelijk dank voor de aanschaf van dit Silverline-gereedschap. Deze instructies bevatten
informatie die u nodig hebt voor een veilige en doeltreffende bediening van dit product.
Dit product heeft een aantal unieke eigenschappen. Lees deze handleiding aandachtig door,
ook al bent u bekend bent met soortgelijke machines, zodat u alle voordelen van dit unieke
ontwerp kunt benutten.
Zorg ervoor dat alle gebruikers van dit gereedschap de handleiding voor gebruik hebben
gelezen en volledig hebben begrepen.
Beschrijving symbolen
Op het gegevensplaatje van uw gereedschap kunnen zich symbolen bevinden. Deze
vertegenwoordigen belangrijke productinformatie en gebruiksinstructies.
Draag gehoorbescherming
Draag een veiligheidsbril
Draag een stofmasker
Draag een veiligheidshelm
Draag handschoenen
Lees de handleiding
Voorzichtig!
Ontkoppel de machine van de stroombron voor het maken van aanpassingen, het
verwisselen van accessoires, het schoonmaken, het uitvoeren van onderhoudt en
wanneer de machine niet in gebruik is!
Beschermingsklasse II (dubbel geïsoleerd voor bijkomende bescherming)
Milieubescherming
Elektrische producten mogen niet met het normale huisvuil worden afgevoerd.
Indien de mogelijkheid bestaat, dient u het product te recyclen. Vraag de plaatselijke
autoriteiten of winkelier om advies betreffende recyclen.
Voldoet aan de relevante wetgeving en veiligheidsnormen
Gebruik niet in regen of in vochtige omstandigheden!
Technische afkortingen en
symbolen
V Volt
~, AC Wisselspanning
A, mA Ampère, milliampère
n
0
Ø Diameter
Hz Hertz
W, kW Watt, kilowatt
-1
/min or min
rpm Toeren per minuut
bpm Slagen per minuut (boormachine)
dB(A) Decibel geluidsniveau (A-gewogen)
2
m/s
Onbelaste snelheid
Operaties per minuut
Meters per seconde (trillingsamplitude)
Specicaties
Spanning: .................................................230-240 V~, 50 Hz
Vermogen: ..........................................................1500 W
Onbelaste snelheid:............................................... 0-880 min
Slagfrequentie:..................................................0-4350 s/min
Stootkracht:............................................................ 5,5 J
Spankop:...........................................................SDS-Plus
Spankopsleutel capaciteit: ............................................0-13 mm
Versnellingsbak vet capaciteit: .............................................80 g
Beschermingsgraad: .....................................................IP20
Beschermingsklasse: .....................................................
Stroomsnoer lengte: .....................................................2 m
Max. boorcapaciteit beton: ........................................... Ø 32 mm
Max. boorcapaciteit hout: ............................................Ø 40 mm
Max. boorcapaciteit staal: ............................................Ø 13 mm
Afmetingen (L x B x H): ......................................390 x 95 x 280 mm
Gewicht:..............................................................5,5 kg
In het kader van onze voortgaande productontwikkeling kunnen de specicaties van
Silverline producten zonder voorafgaande kennisgeving worden gewijzigd.
Geluids- en trillingsgegevens
Geluidsdruk LPA.................................................... 96,4 dB(A)
Geluidsvermogen LWA..............................................107,4 dB(A)
Onzekerheid K ..........................................................3 dB
Gewogen trilling (hamerboormodus): ...............................19.327 m/s
Gewogen trilling (beitelmodus): ....................................17.879 m/s
Onzekerheid: .......................................................1,5 m/s
De geluidsintensiteit voor de bediener kan 85 dB(A) overschrijden en
gehoorbescherming is noodzakelijk
-1
2
2
2
36
WAARSCHUWING: Bij een geluidsinstallatie van 85 dB(A) of hoger is het dragen van
gehoorbescherming en het beperken van de blootstellingstijd noodzakelijk. Bij oncomfortabel hoge
geluidsniveaus, zelfs met gehoorbescherming, dient u het gebruik van de machine onmiddellijk
te stoppen. Controleer de pasvorm en ook of het geluidsdempingsniveau is aangepast aan het
geluidsniveau dat door uw gereedschap wordt geproduceerd.
Page 37

1500 W SDS-Plus boorhamer268819
silverlinetools.com
WAARSCHUWING: Blootstelling van een gebruiker aan trillingen van het gereedschap
kan aanleiding geven tot gevoelloosheid, een dof gevoel, tintelingen, en een verminderd
gripvermogen. Langdurige blootstelling kan aanleiding geven tot een chronische aandoening.
Beperk, indien nodig, de blootstellingstijd aan trillingen, en gebruik steeds trilling dempende
handschoenen. Gebruik het gereedschap niet wanneer uw handen een temperatuur bezitten die
lager is dan een normale comfortabele temperatuur omdat trillingen in dat geval een groter effect
hebben. Maak gebruik van de informatie in de specicaties met betrekking tot trillingen om de
duur en de frequentie te berekenen waarmee het gereedschap kan gebruikt worden.
Geluid- en trillingsniveaus in de specicatie zijn vastgesteld volgens internationale norm.
De waarden gelden voor een normaal gebruik in normale werkomstandigheden. Een slecht
onderhouden, onjuist samengestelde of onjuist gebruikte machine produceert mogelijk hogere
geluids- en trillingsniveaus. www.osha.europa.eu biedt informatie met betrekking tot geluids- en
trillingsniveaus op de werkplek wat mogelijk nuttig is voor regelmatige gebruikers van machines.
Lees voor gebruik deze handleiding en alle etiketten op het gereedschap zorgvuldig na. Bewaar
deze handleiding bij het product voor toekomstig gebruik. Zorg ervoor dat iedereen die dit product
gebruikt, de handleiding heeft doorgenomen.
Zelfs indien het gereedschap wordt gebruikt volgens de aanwijzingen, is het onmogelijk om alle
risicofactoren te elimineren. Wees dus voorzichtig. Gebruik dit gereedschap niet als u twijfelt aan de
juiste en veilige gebruikswijze
Algemene veiligheid voor elektrisch
gereedschap
WAARSCHUWING Lees alle bediening- en veiligheidsvoorschriften. Het niet opvolgen van
alle voorschriften die hieronder vermeld staan, kan resulteren in een elektrische schok, brand en/
of ernstig letsel.
Bewaar deze voorschriften voor toekomstig gebruik.
De term “elektrisch gereedschap” in alle hieronder vermelde waarschuwingen heeft betrekking op
uw elektrische gereedschap dat op het netwerk is aangesloten (met een snoer) of met een accu wordt
gevoed (snoerloos).
1) Veiligheid in de werkruimte
a) Houd de werkruimte schoon en zorg voor een goede verlichting. Rommelige en donkere
ruimtes leiden vaak tot ongelukken.
b) Werk niet met elektrisch gereedschap in explosieve omgevingen, bijvoorbeeld in de
aanwezigheid van ontvlambare vloeistoffen, gassen of stof. Elektrisch gereedschap brengt
vonken teweeg die stof of dampen kunnen doen ontbranden.
c) Houd kinderen en omstanders uit de buurt wanneer u elektrisch gereedschap bedient.
Door aeiding kunt u de controle over het gereedschap verliezen.
2) Elektrische veiligheid
a) De stekkers van het elektrische gereedschap moeten passen bij het stopcontact. Pas de
stekker niet aan. Gebruik geen adapterstekkers bij geaard elektrisch gereedschap. Het
gebruik van ongewijzigde stekkers en passende stopcontacten vermindert het risico op een
elektrische schok.
b) Vermijd lichamelijk contact met geaarde oppervlakken zoals pijpen, radiatoren, fornuizen
en koelkasten. Het risico op een elektrische schok neemt toe als uw lichaam geaard wordt.
c) Laat elektrisch gereedschap niet nat worden. Wanneer elektrisch gereedschap nat wordt,
neemt het risico op een elektrische schok toe.
d) Beschadig het snoer niet. Gebruik het snoer nooit om het elektrische gereedschap te
dragen, te trekken of om de stekker uit het stopcontact te trekken. Houd het snoer uit de
buurt van hitte, olie, scherpe randen of bewegende delen. Een beschadigd of in de knoop geraakt
snoer verhoogt het risico op een elektrische schok.
e) Wanneer u elektrisch gereedschap buiten gebruikt, maak dan gebruik van een
verlengsnoer dat geschikt is voor gebruik buitenshuis. Gebruik een verlengsnoer dat
geschikt is voor gebruik buitenshuis om het risico op een elektrische schok te verminderen.
f) Indien het onvermijdelijk is om elektrisch gereedschap te gebruiken in een vochtige
omgeving, gebruik dan een energiebron met een aardlekschakelaar (Residual Currency
Device). Het gebruik van een RCD vermindert het risico op een elektrische schok.
3) Persoonlijke veiligheid
a) Blijf alert en gebruik uw gezonde verstand wanneer u elektrisch gereedschap bedient.
Gebruik het elektrische gereedschap niet wanneer u vermoeid bent of onder invloed
bent van drugs, alcohol of medicijnen. Onoplettendheid tijdens het bedienen van elektrisch
gereedschap kan leiden tot ernstig letsel.
b) Maak gebruik van persoonlijke bescherming. Draag altijd een veiligheidsbril. Passende
bescherming voor de omstandigheden, zoals een stofmasker, niet-slippende veiligheidsschoenen
een helm of gehoorbescherming, vermindert het risico op persoonlijk letsel.
c) Zorg ervoor dat het apparaat niet per ongeluk wordt gestart. Controleer of de schakelaar in
de ‘uit’-stand staat voordat u de stekker in het stopcontact steekt. Het dragen van elektrisch
gereedschap met uw vinger op de schakelaar of het aansluiten van elektrisch gereedschap op het
netwerk met de schakelaar ingeschakeld kan tot ongelukken leiden.
d) Verwijder alle stel- of moersleutels voordat u het elektrische gereedschap inschakelt. Een
moer- of stelsleutel die zich op een draaiend onderdeel van het elektrische gereedschap bevindt,
kan leiden tot letsel.
e) Reik niet te ver. Blijf altijd stevig en in balans staan. Zo houdt u meer controle over het
elektrische gereedschap in onverwachte situaties.
f) Draag geschikte kleding. Draag geen loshangende kleding of sieraden. Houd haren,
kleding en handschoenen uit de buurt van bewegende delen. Loshangende kleding,
sieraden en los hangende haren kunnen vast komen te zitten in bewegende delen.
g) Als er onderdelen voor stofafvoer- en stofverzameling worden meegeleverd, sluit deze dan
aan en gebruik deze op de juiste wijze. Het gebruik van deze onderdelen kan het risico op stof
gerelateerde ongelukken verminderen.
h) Laat vertrouwdheid door het veelvoudig gebruik van gereedschap u niet zelfgenoegzaam
maken en negeer nooit de veiligheidsprincipes. Een roekeloze handeling kan in een fractie
van een seconde een ernstige verwonding veroorzaken.
4) Gebruik en onderhoud van elektrisch gereedschap
a) Forceer elektrisch gereedschap niet. Gebruik elektrisch gereedschap dat geschikt is voor
het werk dat u wilt uitvoeren. Geschikt elektrisch gereedschap werkt beter en veiliger op een
passende snelheid.
b) Gebruik het elektrische gereedschap niet als de schakelaar van het apparaat niet in- en
uitschakelt. Elektrisch gereedschap dat niet bediend kan worden met de schakelaar is gevaarlijk
en moet gerepareerd worden.
c) Haal de stekker uit het stopcontact voordat u instellingen aanpast, toebehoren verwisselt
of het elektrische gereedschap opbergt. Dergelijke voorzorgsmaatregelen verminderen het
risico op het per ongeluk starten van het elektrische gereedschap.
d) Berg elektrisch gereedschap dat niet in gebruik is op buiten bereik van kinderen. Laat
mensen die niet bekend zijn met het elektrische gereedschap of met deze instructies het
elektrische gereedschap niet bedienen. Elektrisch gereedschap is gevaarlijk in de handen van
onervaren gebruikers.
e) Onderhoud uw elektrisch gereedschap. Controleer op foutieve uitlijning of het vastslaan
van bewegende delen, gebroken onderdelen en elke andere afwijking die de werking van
het elektrische gereedschap zou kunnen beïnvloeden. Indien het elektrische gereedschap
beschadigd is, moet u het laten repareren voordat u het weer gebruikt. Veel ongelukken worden
veroorzaakt door slecht onderhouden elektrisch gereedschap.
f) Houd snijwerktuigen scherp en schoon. Goed onderhouden snijwerktuigen met scherpe
messen slaan minder snel vast en zijn gemakkelijker te bedienen.
g) Gebruik het elektrische gereedschap, de accessoires en onderdelen, etc. volgens deze
instructies en volgens bestemming voor het specieke type elektrisch gereedschap, en
houd daarbij rekening met de werkomstandigheden en het uit te voeren werk. Gebruik
van elektrisch gereedschap voor werkzaamheden die verschillen van die waarvoor het apparaat
bestemd is, kan leiden tot gevaarlijke situaties.
h) Zorg dat de handvaten en grepen droog, schoon en vrij van olie en vet zijn. Glibberige
handvaten en grepen zijn niet veilig te gebruiken en zorgen voor minder controle in onverwachte
situaties.
5) Onderhoud
a) Laat uw elektrische gereedschap onderhouden door een gekwaliceerde vakman en
gebruik alleen identieke vervangstukken. Zo bent u er zeker van dat de veiligheid van het
elektrische gereedschap gewaarborgd blijft
Specieke veiligheid
Veiligheid voor SDS-Plus boormachines
WAARSCHUWING: Bij de aanwezigheid van asbest, tracht u onmiddellijk professionele hulp. Het
verwijderen van asbest dient uitgevoerd te worden door een geautoriseerd persoon. Neem contact
op met uw lokale autoriteit voor meer informatie betreft de verwijdering van asbest. De Europese
richtlijn 2009/148/EG voorziet informatie betreft de blootstelling aan asbest op de werkplek
• Het is noodzakelijk alle nationale veiligheidsregels met betrekking tot het uit te voeren werk na
te leven
• Laat personen jonger dan 18 jaar de boorhamer niet gebruiken. Tevens horen alle gebruikers
met de gebruik- en veiligheidsinstructies bekend te zijn
• Het boren in beton en beitelen creëert mogelijk scherpe afvaldeeltjes. Draag de benodigde
beschermende uitrusting waaronder een veiligheidsbril en beschermende schoenen
• Kernboren horen enkel op boormachines met een veiligheidskoppeling gebruikt te worden. Zo
wordt vastlopen, wat persoonlijk letsel kan veroorzaken, voorkomen
• Wanneer de veiligheidskoppeling tijdens gebruik ingrijpt, laat u de trekker schakelaar los en
haalt u de boor uit het werkoppervlak. Vindt de oorzaak van ingrijpen
• Gebruik de machine niet op een trap/ladder of op een locatie met valgevaar. SDS-Plus
boormachines zijn erg zwaar en produceren sterke trillingen
• Draag geschikte beschermende handschoenen zonder loshangende vezels die door het roteren
bit gegrepen kunnen worden. Gooi handschoenen met rafelig materiaal onmiddellijk weg
• Boren brengt mogelijk een grote hoeveelheid stof met zich mee. Draag een geschikt stofmasker
met een minimale waarde van FFP2
• Boormachines produceren hoge geluidsniveaus. Het dragen van geschikte gehoorbescherming
is vereist
• Boormachines produceren hoge trillingsniveaus. Neem regelmatig pauze
• Gebruik SDS-Plus beitels enkel met boormachines waarop de rotatie boorfunctie uitgeschakeld
kan worden
• Gebruik metaal- en spanningszoekers voor het vinden van verborgen water- , gas- en/of
elektrische leidingen. Vermijdt het contact met componenten die onder spanning staan
• Verlengkabels die in combinatie met de boorhamer gebruikt worden horen volledig afgerold te
worden. Minimale aderdikte: 1,25 mm2
• Wanneer de boorhamer buiten gebruikt wordt, maakt u gebruik van verlengkabels, ontworpen
voor buiten gebruik met waterdichte stekkers en de juiste kabelisolatie
37
Page 38

NL
• Wanneer de boorhamer buiten gebruikt wordt, sluit u deze aan op een stroombron met een
aardlekschakelaar
• Zorg ervoor dat beitel of boor bits stevig in de span kop vast zitten. Losse bits kunnen losschieten
en ongelukken veroorzaken
• Zorg voor een goede verlichting
• Houdt de machine stevig, met beide handen vast
• Het hulphandvat dient te allen tijd gebruikt te worden
• Oefen geen druk op de machine uit – dit kan de levensduur van de machine aanzienlijk
verkorten
• Boor bits worden erg heet tijdens gebruik. Laat ze na gebruik afkoelen
• Wanneer u tijdens het gebruik van de boorhamer gestoord wordt, maakt u het werk af en
schakelt u de machine uit voordat u opkijkt
• Ontkoppel de stekker van het stopcontact voordat bits gewisseld worden
• Controleer de spankop regelmatig op tekenen van slijtage en/of schade. Beschadigde
onderdelen horen door een gekwaliceerd persoon vervangen te worden
• Wacht met het neerleggen van de boor totdat deze volledig tot stilstand is gekomen
• Wanneer het werk voltooid is, ontkoppelt u de stekker van het stopcontact en verwijdert u de
beitel/bit uit de span kop
• Controleer bouten, moeren en andere bevestigingsmiddelen regelmatig en draai deze wanneer
nodig aan
• Controleer de machine na gebruik. Het stroomsnoer kan door scherpe betonstukken
beschadigen
• Bevestig de stofkap op het te gebruiken bit om de ingang van stof in de spankop te voorkomen
• Wanneer het gebruik van de machine oncomfortabel is herziet u de gebruikswijze
Gebruiksdoel
Draagbare via het net gevoede SDS-Plus boorhamer voor gemiddeld zwaar werk, optimaal
ontworpen voor het boren in metselwerk en het opbreken van licht metselwerk. Eveneens geschikt
voor het boren in hout en metaal met de meegeleverde standaard kop met SDS Plus accessoire.
Het uitpakken van uw gereedschap
• Haal uw nieuwe gereedschap voorzichtig uit de verpakking en inspecteer het. Zorg dat u op de
hoogte bent van alle kenmerken en functies ervan.
• Zorg ervoor dat alle onderdelen van het gereedschap aanwezig zijn en in goede staat verkeren.
Indien er onderdelen ontbreken of beschadigd zijn, dienen deze vervangen te worden alvorens
het gereedschap te gebruiken
Voorafgaand aan het gebruik
WAARSCHUWING: Zorg ervoor dat het gereedschap is losgekoppeld van de voeding alvorens
accessoires aan te brengen of te vervangen, of alvorens aanpassingen door te voeren.
WAARSCHUWING: Gebruik dit gereedschap steeds met het hulphandvat (9) aangebracht.
Zonder dat dit handvat is aangebracht, kan het gebruik van het gereedschap aanleiding geven tot
persoonlijk letsel.
BELANGRIJK: Voorafgaand aan het eerste gebruik en na elke 6 uren gebruik (ongeveer) dient
de tandwielkast gevuld te worden met tandwielvet (max. 80 g). Een pot met vet (12) wordt
meegeleverd voor het eerste gebruik (Zie "Onderhoud Tandwielkast")
BELANGRIJK: Controleer steeds of er voldoende vet aanwezig is in de ruimte van de
tandwieloverbrenging alvorens de boormachine te gebruiken
Productbeschrijving
1. SDS Plus Kop
2. SDS Plus Kop Kraag
3. Modusselectie
4. Deksel tandwielkast
5. Aan/Uit-triggerschakelaar
6. Standaard/klopboor selectie
7. Variabele snelheidscontrole
8. Borsteldoppen
9. Hulpgreep
10. Motorventilatiegaten
11. Boorhoudersleutel
12.
Vetpot
13.
Beitel
14.
Punt
15.
Stofbescherming
16.
8 mm Metselwerk SDS-Plus Boorbit
17.
10mm Metselwerk SDS-Plus Boorbit
18.
12mm Metselwerk SDS-Plus Boorbit
19.
Zeskantsleutel
20.
13 mm Boorkop met sleutel
21.
Vergrendeling Modusselectie
22.
Hoofdhandvat
Installeren/verwijderen SDS accessoires of spankop
met sleutel
Zie Fig. I
Opmerking: Het SDS Plus systeem maakt het het bit mogelijk om enigszins te bewegen in de kop
wanneer het correct is aangebracht.
• Dit gereedschap is uitgerust met een SDS Plus verbindingssysteem. SDS Plus accessoires zijn
voorzien van een schacht met een sleuf voor een uitlijning en positionering in de SDS Plus Kop
(1)
• Om een accessoire aan te brengen:
1. Houd het gereedschap stevig vast en schuif de kraag van de kop (2) in de richting van het
gereedschap
2. Plaats het accessoire in de boorkop tot u een weerstand voelt tegen het accessoire.
3. Laat de kopkraag los om het accessoire te vergrendelen.
4. Controleer dat het accessoire niet kan verwijderd worden alvorens het gereedschap te gebruiken.
Indien u het accessoire kunt verwijderen, herhaal dan de installatieprocedure
• Om een accessoire te verwijderen:
1. Trek de kopkraag naar het gereedschap en verwijder het aangebrachte accessoire
Instellen van de standaard spankop
Zie Fig. II
WAARSCHUWING: De sleutelkop mag niet gebruikt worden in de klopboormodus of voor
beiteltoepassingen
WAARSCHUWING: Zorg er steeds voor dat de sleutel uit de kop is verwijderd alvorens het
gereedschap te gebruiken
• Deze boormachine wordt geleverd met een sleutelkop (20) die meer geschikt is om in hout of in
staal te boren dan enkel de SDS Plus Kop.
• Om de sleutelkop in te stellen;
1. Verbind de sleutelkop met de SDS Plus Kop (zie "Installeren /Verwijderen SDS accessoire of
sleutelkop")
2. Los de sleutelkop of span hem aan door de kopsleutel (11) aan te brengen in de gaten aan
de zijkant van de sleutelkop en door de sleutel te draaien; in wijzerzin om aan te spannen, in
tegenwijzerzin om te lossen
Plaatsen van de hulpgreep
Zie Fig. III
1. Los de handgreep van het hulphandvat (9) door in tegenwijzerzin te roteren
2. Schuif het handvat op de boormachine
3. Spanmoeren het hulphandvat aan door de handgreep in wijzerzin te roteren
BELANGRIJK: Zorg ervoor dat het hulphandvat voorafgaand aan het gebruik niet is aangespannen
tegen welke bewegende delen van het gereedschap dan ook
Bijkomende meegeleverde accessoires (niet
afgebeeld)
• Vormgeblazen doos
38
Page 39

1500 W SDS-Plus boorhamer268819
silverlinetools.com
Werking
WAARSCHUWING: Draag bij het werken met deze machine STEEDS oogbescherming,
geschikte ademhalings- en oorbescherming, alsook geschikte handschoenen.
Opmerking: De stofbescherming (15) dient aangebracht te zijn op het boor- of beitelbit om te
voorkomen dat gruis en stof in de kop terechtkomen (guur IV). Dit is met name van belang
wanneer de boormachine gebruikt wordt onder een opwaartse hoek wanneer op wanden
of plafonds gewerkt wordt. Voor grotere boorbits kan het zijn dat de stofbescherming dient
aangebracht te worden alvorens het bit in de kop wordt geplaatst.
WAARSCHUWING: Wanneer het boorbit in het geboorde materiaal dringt, kan het vasthaken
of blijven hangen. Dit kan ervoor zorgen dat het gereedschap plots een terugslag geeft. Voorkomt
welke risico op letsel dan ook door de boormachine steeds meer vast te houden, door gebruik
te maken van het hulphandvat (9) en van het hoofdhandvat (22), en door gebruik te maken van
scherpe boorbits.
WAARSCHUWING: Zorg er steeds voor dat het materiaal veilig is. Indien dat nodig is, maak
dan gebruik van een schroef of van klem om het werkstuk vast te houden, en houd steeds de twee
handen op de boormachine
Variabele snelheidsselectie
Zie Fig. V
• De Variabele Snelheidscontrole (7) wordt gebruikt om de snelheid van het gereedschap in te
stellen. Hoe hoger het dat wordt aangegeven op de instelknop, hoe hoger de snelheid van het
gereedschap, waarbij een lager getal de snelheid reduceert
Selectie klopboormodus
De klopboormodus is bedoeld om te boren in metselwerk en in beton.
Opmerking: De sleutelkop (20) is niet geschikt om gebruikt te worden in de klopboormodus
1. Plaats de modusselectie (3) in de positie die wordt aangegeven door het hamer & boorsymbool,
door de modusselectievergrendeling (21) op de modusselectie (3) naar binnen te drukken,
en door de selectieknop te verdraaien
2. Laat de modusselectievergrendeling los
3. Verdraai de standaard/klopboorselectieknop (6) naar de positie die wordt aangegeven door het
hamer+boorsymbool
• Probeer de modusselectievergrendeling niet van positie te wijzigen terwijl de boormachine in
werking is
• Probeer de boormachine niet te gebruiken wanneer de modusselectieknop zich tussen twee
posities bevindt
In- en uitschakelen
1. Om de boormachine in te schakelen, drukt u de AAN/UIT trekkerschakelaar (5) in
2. Om de boormachine te stoppen, laat u de AAN/UIT trekkerschakelaar los
Opmerking: De maximum snelheid van de boor wordt geregeld door de Variabele
Snelheidscontrole (7). Neem de nodige tijd om de Variabele Snelheidscontroleknop in te stellen om
er zeker van te zijn dat de snelheid correct is ingesteld alvorens te boren
Boren in beton
1. Plaats de boormachine in de klopboormodus (zie "Selectie Klopboormodus")
2. Installeer een Metselwerk SDS Plus Boorbit (16,17,18) in de SDS Plus Kop (1) (zie ‘Installeren/
verwijderen van SDS accessoires of sleutelkop’)
3. Schakel de boormachine "IN" (zie "AAN- & UITschakelen")
4. Breng het boorbit in contact met het werkstuk en oefen een lichte tot gematigde druk uit op de
achterzijde van de boormachine, uitgelijnd met het boorbit.
5. Verwijder de boormachine van het werkstuk alvorens ze "UIT" te schakelen
BELANGRIJK: Oefen geen overmatige druk uit terwijl er geboord wordt omdat dit de motor en het
boorbit zal beschadigen.
Opmerking: Het geboorde gat kan vol zitten met gruis terwijl er geboord wordt. Om het gruis
te verwijderen, reduceert u de snelheid van de boormachine en verwijdert u het bit uit het gat
alvorens verder te gaan.
Boren van hout en metaal
1. Plaats de boormachine in de boormodus (zie "Selectie boormodus")
2. Plaats de Sleutelkop (20) op de boormachine (zie "Installeren /Verwijderen SDS accessoire of
sleutelkop")
3. Plaats een standaard hout- of metaalboorbit (niet meegeleverd) in de sleutelkop (zie "Instellen
van de Sleutelkop")
4. Schakel de boormachine "IN" (zie "AAN- & UITschakelen")
5. Breng het boorbit in contact met het werkstuk en oefen een lichte tot gematigde druk uit op de
achterzijde van de boormachine, uitgelijnd met het boorbit.
6. Verwijder de boormachine van het werkstuk alvorens ze "UIT" te schakelen
BELANGRIJK: Controleer of het gebruikte boorbit geschikt is voor het werkstuk
Opmerking: Het geboorde gat kan vol zitten met gruis terwijl er geboord wordt. Om het gruis
te verwijderen, reduceert u de snelheid van de boormachine en verwijdert u het bit uit het gat
alvorens verder te gaan.
Selectie boormodus
De boormodus is bedoeld om te boren in hout en in staal.
Opmerking: Gebruik de sleutelkop (20) voor standaard boorwerk met behulp van standaard
boorbits voor hout en metaal (niet meegeleverd) (zie "Installeren/verwijderen van SDS-accessoires
of sleutelkop"
1. Plaats de modusselectie (3) in de positie die wordt aangegeven door het hamer & boorsymbool,
door de modusselectievergrendeling (21) op de modusselectie naar binnen te drukken, en
door de selectieknop te verdraaien
2. Laat de modusselectievergrendeling los
3. Verdraai de standaard/klopboorselectieknop (6) naar de positie die wordt aangegeven door het
hamer+boor-symbool
• Probeer de modusselectievergrendeling niet van positie te wijzigen terwijl de boormachine in
werking is
• Probeer de boormachine niet te gebruiken wanneer de modusselectieknop zich tussen twee
posities bevindt
Selectie beitelmodus
De beitelmodus mag enkel gebruikt worden wanneer er gebeiteld wordt. Enkel SDS Plus
beitels mogen voor beitelbewerkingen gebruikt worden.
Opmerking: De sleutelkop (20) is niet geschikt om gebruikt te worden in de beitelmodus
1. Plaats de modusselectie (3) in de positie die wordt aangegeven door het hamersymbool, door
de modusselectievergrendeling (21) op de modusselectie naar binnen te drukken, en door de
selectieknop te verdraaien
2. Laat de modusselectievergrendeling los
3. Verdraai de standaard/klopboorselectieknop (6) naar de positie die wordt aangegeven door het
hamer+boorsymbool
• Probeer de modusselectievergrendeling niet van positie te wijzigen terwijl de boormachine in
werking is
• Probeer de boormachine niet te gebruiken wanneer de modusselectieknop zich tussen twee
posities bevindt
Accessories
• Verschillende accessoires en verbruiksmiddelen, waaronder SDS-Plus boorbits en beitels zijn
verkrijgbaar bij uw Triton handelaar.
• Reserve onderdelen zijn verkrijgbaar op toolsparesonline.com
Onderhoud
WAARSCHUWING: Haal de stekker uit het stopcontact voordat u de machine schoonmaakt of
enig onderhoud uitvoert
Onderhoud tandwielkast
Zie Fig. VI
Na elke 6 uren gebruik (ongeveer) dient de tanwielkast gesmeerd te worden.
1. Gebruik de zeskantsleutel (19) om het deksel (4) van de tandiwielkast te verwijderen
2. Gebruik een spatula of een gelijkaardig instrument om vet in de ruimte van de tandwielkast aan
te brengen tot deze vol is (max. 80 g)
Opmerking: Let op dat u het inwendige mechanisme van de tandwielkast niet krast of op een
andere wijze beschadigt
3. Breng het deksel (4) van de tandwielkast terug aan
• Een pot met vet (12) wordt meegeleverd. Wanneer u daarna vet koopt, zorg ervoor dat dit vet
voor algemene toepassingen is op basis van lithium
• Span het deksel van de tanwielkast niet overmatig aan of vul de tandwielkast niet overmatig met
vet
Algemene inspectie
• Controleer regelmatig of alle bevestigingsschroeven en –bouten nog goed vast zitten.
• Inspecteer het stroomsnoer voor elk gebruik op slijtage en beschadiging. Reparaties dienen
uitgevoerd te worden door een geautoriseerd Silverline service center. Dit geldt tevens voor
verlengsnoeren die, gebruikt worden met de machine
39
Page 40

NL
Schoonmaak
• Houd uw machine te allen tijde schoon. Vuil en stof doen de interne onderdelen snel slijten, wat
de levensduur aanzienlijk vermindert. Maak de machine met een zachte borstel of droge doek
schoon. Gebruik wanneer mogelijk zuivere, droge perslucht om door de luchtgaten te blazen
• Maak de behuizing met een vochtige doek en een licht schoonmaakmiddel schoon. Gebruik
geen alcohol, benzine of hardnekkig schoonmaakmiddel
• Gebruik geen bijtende stoffen voor het schoonmaken van plastic onderdelen
Smeren
• Smeer alle bewegende onderdelen lichtjes en op regelmatige tijdstippen met behulp van een
geschikt sproeismeermiddel
Borstels
• In de loop van de tijd kunnen de koolstofborstels van de motor afslijten
• Overmatig afgesleten borstels kunnen de oorzaak zijn van vermogensverlies, van defecten, of
van zichtbare vonkvorming
• Om de borstels te vervangen, verwijdert men de ventilatiegaten (10) en de koolstofborstel
toegangsdoppen (8). Verwijder de versleten borstels en vervang ze door nieuwe exemplaren.
• Vervang koolstofborstels steeds paarsgewijs
• Bevestig de toegangsdop terug op de machine
• Als alternatief kunt u de machine laten nakijken door een geautoriseerd Silverline
servicecentrum
Contact
Voor technische ondersteuning of voor reparatieadvies, gelieve contact op te nemen met de hulplijn
op (+44) 1935 382 222
Web: tritontools.com/en-GB/Support
Adres:
Powerbox
Boundary Way
Lufton Trading Estate
Yeovil, Somerset
BA22 8HZ, Verenigd Koninkrijk
Opberging
• Berg de machine op een droge en veilige plek, buiten het bereik van kinderen op
Afvoer
Bij het buiten gebruik stellen en de afvoer van elektrische machines die niet langer werken en die
niet gerepareerd kunnen worden, neemt u de nationale voorschriften in acht.
• Elektrische en elektronische apparaten (WEEE) mogen niet met huishoudelijk afval worden
weggegooid
• Neem contact op met uw gemeente voor informatie betreffende de verwijdering en afvoer van
elektrisch gereedschap
Probleemopsporing
Probleem Oorzaak Mogelijke oplossing
De kernboor loopt tijdens het gebruik vast in het materiaal Overmatige druk op de machine op het breekpunt van het
materiaal
Verlaag de druk voor het breekpunt
De kernboor is niet geschikt voor de machine Gebruik compatibele booraccessoires
Grote afval ophoping in de boor Verwijder het afval regelmatig
De machine start niet Geen stroom, gesprongen zekering, ingesprongen stroombreker Controleer en vervang de zekering wanneer nodig, of reset
Beschadigde stroomkabel Neem contact op met een geautoriseerd service center
Foutieve aan-/uitschakelaar
Foutieve motor
Lage rotatiesnelheid De machine is oververhit Schakel de machine uit en laat deze volledig afkoelen.
Lage rotatiesnelheid/geen rotatie en zichtbare vonken uit de
motor ventilatiegaten
Trilling of abnormaal geluid Het vetniveau in de versnellingsbak is erg laag Voeg vet toe of vervang het vet
De koolstofborstels zijn versleten Neem contact op met een geautoriseerd service center om de
Interne bewegende onderdelen zijn versleten Neem contact op met een geautoriseerd Silverline service center
de stroombreker. Wanneer de stroombreker na het resetten
gelijk weer inspringt, neemt u onmiddellijk contact op met een
geautoriseerd service center
Inspecteer en maak de ventilatiegaten schoon
borstels te vervangen
40
Page 41

1500 W SDS-Plus boorhamer268819
silverlinetools.com
Silverline Tools Garantie
Dit Silverline product komt met 3 jaar garantie.
Registreer dit product binnen 30 dagen van aankoop op
www.silverlinetools.com om in aanmerking te komen voor 3 jaar garantie. De garantieperiode
begint op de datum van aankoop op het ontvangstbewijs.
Voorwaarden
De garantieperiode gaat in vanaf de datum van aankoop op het ontvangstbewijs.
BEWAAR HET ONTVANGSTBEWIJS OP EEN VEILIGE
PLAATS
Als dit product binnen 30 dagen van de aankoopdatum een fout heeft, breng het dan naar de
winkelier waar u het heeft gekocht, met uw ontvangstbewijs, en met vermelding van de details
van de storing. U kunt om een nieuwe vragen of om uw geld terug.
Als dit product na de periode van 30 dagen een fout heeft, stuur het dan naar:
Silverline Tools Service Centre
PO Box 2988
Yeovil
BA21 1WU, GB
Alle claims moeten binnen de garantieperiode worden ingediend.
U moet het originele ontvangstbewijs geven met de datum van aankoop, uw naam, adres en
plaats van aankoop voordat er aan kan worden gewerkt.
U moet nauwkeurige gegevens verschaffen van de fout die verholpen moet worden.
Claims die binnen de garantieperiode worden ingediend, worden door Silverline Tools
nagelopen om te kijken of het probleem een kwestie is van de materialen of de fabricage van
het product.
De verzendkosten worden niet vergoed. De geretourneerde items moeten voor de reparatie
in een redelijk schone en veilige staat verkeren en moeten zorgvuldig worden verpakt om
schade en letsel tijdens het vervoer te voorkomen. Ongeschikte en onveilige leveringen kunnen
worden afgewezen.
Al het werk wordt uitgevoerd door Silverline Tools of een ofciële reparatiedienst.
De garantieperiode wordt niet door de reparatie of vervanging van het product verlengd.
Defecten waarvan wij beschouwen dat ze onder de garantie vallen, worden verholpen door
middel van gratis reparatie van het gereedschap (exclusief verzendingskosten) of door
vervanging door een gereedschap in perfecte staat van werking.
De ingehouden gereedschappen of onderdelen die zijn vervangen, worden het eigendom van
Silverline Tools.
De reparatie of vervanging van het product onder garantie zijn voordelen die bijkomstig zijn aan
uw wettelijke rechten als consument, en hebben daar geen invloed op.
Het gekochte product registreren
Ga naar: silverlinetools.com, kies Registration (registratie) en voer het volgende in:
• Uw persoonlijke gegevens
• De gegevens van het product en de aankoop
U ontvangt het garantiebewijs in PDF-vorm. Druk het af en bewaar het
bij het product.
Wat is gedekt:
De reparatie van het product, mits naar tevredenheid van Silverline Tools kan worden
vastgesteld dat de gebreken het gevolg zijn van defecte materialen of fabrieksfouten binnen
de garantieperiode.
Onderdelen die niet meer verkrijgbaar zijn en die niet meer worden vervaardigd worden door
Silverline Tools vervangen door een functionele vervanging.
Gebruik van dit product in de EU.
Wat niet is gedekt:
Silverline Tools geeft geen garantie op reparaties als gevolg van:
Normale slijtage veroorzaakt door gebruik in overeenstemming met de bedieningsinstructies
zoals zaagbladen, borstels, riemen, gloeilampen, batterijen enz.
De vervanging van geleverde accessoires zoals boortjes, zaagbladen, schuurvellen, snijschrijven
en aanverwante producten.
Accidentele schade, storingen veroorzaakt door nalatigheid in gebruik of verzorging, misbruik,
verwaarlozing, onvoorzichtige bediening en hantering van het product.
Gebruik van het product voor andere doeleinden dan normaal huishoudelijk gebruik.
Alle soorten wijzigingen en modicaties van het product.
Gebruik van andere onderdelen en accessoires dan de originele onderdelen van Silverline Tools.
Defecte installatie (behalve wanneer geïnstalleerd door Silverline Tools).
Reparaties of wijzigingen die zijn uitgevoerd door anderen dan Silverline Tools of diens ofciële
reparatiediensten.
Behalve claims voor het recht op correctie van fouten van het gereedschap volgens de
bepalingen van deze garantie zijn geen andere claims gedekt.
Accu garantie
Silverline accu’s zijn voorzien van 12 maanden garantie. Wanneer er binnen de garantieperiode
een fout optreedt dankzij een materiaal- of fabrieksfout, vervangt Silverline de accu gratis.
Deze garantie heeft geen betrekking op commercieel gebruik en strekt zich niet uit tot normale
slijtage of schade ten gevolge van een ongeluk, verkeerd gebruik of misbruik.
EG-verklaring van overeenstemming
De ondergetekende: Mr. Darrell Morris
Gemachtigd door: Silverline Tools
Verklaart dat
Deze verklaring wordt verstrekt onder de volledige verantwoordelijkheid van de fabrikant.
Het hierboven beschreven voorwerp is conform de desbetreffende communautaire
harmonisatiewetgeving
Identicatienummer: XXXXXX
Beschrijving: XXXXXXXXXX
Voldoet aan de volgende richtlijnen:
• Machinerichtlijn 2006/42/EG
• Richtlijn laagspanning 2014/35/EU
• Elektromagnetische verenigbaarheid 2014/30/EU
• RoHS-richtlijn 2011/65/EG
• Richtlijn 2000/14/EG Geluid door mobiele werktuigen
Keuringsinstantie: XXXXXXXXXXXXXXXXX
De technische documentatie wordt bijgehouden door: Silverline Tools
Datum: XX-XX-XXXX
Handtekening:
Darrell Morris
Algemeen directeur
Naam en adres van fabrikant:
Powerbox International Limited, handelsregister nummer 06897059. Geregistreerd adres: Powerbox,
Boundary Way, Lufton Trading Estate, Yeovil, Somerset BA22 8HZ, Verenigd Koninkrijk
41
Page 42

PL
Tłumaczenie oryginalnej instrukcji
Wprowadzenie
Dziękujemy za zakup narzędzia marki Silverline. Zalecamy zapoznaj się z niniejszymi
instrukcjami: zawierają one informacje niezbędne dla bezpiecznej i wydajnej obsługi produktu.
Produkt posiada szereg unikalnych funkcji, dlatego też, nawet, jeśli jesteś zaznajomiony z
podobnymi produktami, przeczytanie instrukcji obsługi umożliwi Ci pełne wykorzystanie
tego wyjątkowego projektu. Przechowuj niniejsze instrukcje w zasięgu ręki i upewnij się, że
użytkownicy narzędzia przeczytali i w pełni zrozumieli wszystkie zalecenia.
Opis symboli
Tabela znamionowa zawiera symbole dotyczące narzędzia. Stanowią one istotne informacje o
produkcie lub instrukcje dotyczące jego stosowania.
Należy nosić środki ochrony słuchu
Należy nosić okulary ochronne
Należy nosić środki ochrony dróg oddechowych
Należy używać kasku ochronnego
Należy nosić rękawice ochronne
Należy w całości przeczytać instrukcję obsługi
Uwaga!
Należy zawsze odłączać urządzenie od zasilania elektrycznego, podczas regulacji,
wymiany akcesoriów, czyszczenia, konserwacji oraz gdy nie jest w użytku!
Konstrukcja klasy II (podwójnie izolowana w celu dodatkowej ochrony)
Ochrona środowiska
Nie należy wyrzucać zużytych produktów elektrycznych wraz z odpadami
komunalnymi. Jeśli jest to możliwe, należy przekazać produkt do punktu recyklingu.
W celu uzyskania wskazówek dotyczących recyklingu należy skontaktować się z
władzami lokalnymi lub sprzedawcą.
Urządzenie zgodne z odpowiednimi przepisami i normami bezpieczeństwa.
NIE WOLNO korzystać z urządzenia w przypadku deszczu lub w wilgotnym
środowisku!
Kluczowe skróty techniczne
V Wolt
~, AC Prąd przemienny
A, mA Amper, milli-Amp
n
0
Ø Średnica
Hz Herc
W, kW Wat, kilowat
-1
/min or min
rpm Obroty na minutę
bpm Obciążeń (udarów) na minutę (wiertarka)
dB(A) Poziom hałasu w decybelach (A mierzony)
2
m/s
Prędkość bez obciążenia
Obroty lub ruch postępowo zwrotny na minutę
Metry na sekundę do kwadratu (wartość drgań)
Dane techniczne
Napięcie: ..................................................230-240 V~, 50 Hz
Moc:................................................................1500 W
Prędkość bez obciążenia:...........................................0 - 880 min
Ilość udarów:.....................................................0-4350 bpm
Energia uderzenia:...................................................... 5,5 J
Uchwyt: ............................................................SDS Plus
Zębaty uchwyt wiertarski: ...........................................0 – 13 mm
Pojemność skrzyni biegów (smar):..........................................80 g
Stopień ochrony: ........................................................IP20
Klasa ochrony:............................................................
Długość przewodu zasilającego:............................................ 2 m
Maksymalna średnica wiercenia w murze: .............................. Ø 32 mm
Maksymalna średnica wiercenia w drewnie:............................. Ø 40 mm
Maksymalna średnica wiercenia w stali: ................................ Ø 13 mm
Wymiary (dł.x szer. x wys.): ...................................390 x 95 x 280 mm
Waga:................................................................5,5 kg
W wyniku nieprzerwanego procesu rozwojowego produktów dane techniczne
poszczególnych produktów Silverline mogą ulec zmianie bez uprzedniego powiadomienia.
Parametry emisji dźwięku i wibracji
Poziom ciśnienia akustycznego LPA: ................................... 96,4 dB(A)
Poziom mocy akustycznej LWA:.......................................107,4 dB(A)
Niepewność pomiaru K: ..................................................3 dB
Wartość emisji wibracji (tryb młotowiertarki): .........................19 327 m/s
Wartość emisji wibracji (tryb dłuta): .................................17 879 m/s
Niepewność pomiaru: ................................................ 1,5 m/s
Poziom natężenia dźwięku dla operatora może przekroczyć 85dB(A) dlatego konieczne jest
zastosowanie środków ochrony słuchu.
-1
2
2
2
42
OSTRZEŻENIE: Jeżeli poziom hałasu przekracza 85dB(A) należy zawsze stosować środki ochrony
słuchu oraz, jeśli to konieczne, ograniczyć czas narażenia słuchu na nadmierny hałas. Jeśli poziom
hałasu powoduje dyskomfort, nawet w przypadku zastosowania środków ochrony słuchu, należy
niezwłocznie przestać korzystać z narzędzia i sprawdzić, czy środki ochrony słuchu są prawidłowo
zamontowane i zapewniają odpowiedni poziom tłumienia dźwięku w odniesieniu do poziomu
hałasu wytwarzanego przez narzędzie.
Page 43

Wiertarka SDS Plus 1500 W268819
silverlinetools.com
OSTRZEŻENIE: Narażenie użytkownika na wibracje podczas korzystania z narzędzia może
spowodować utratę zmysłu dotyku, drętwienie, mrowienie i zmniejszenie zdolności uchwytu.
Długotrwałe narażenie może prowadzić do stanu przewlekłego. Jeśli jest to konieczne, ogranicz czas
narażenia na wibracje i stosuj rękawice antywibracyjne. Nie korzystaj z urządzenia w trybie ręcznym
w temperaturze niższej niż normalna komfortowa temperatura otoczenia, ponieważ zwiększy to efekt
wywoływany przez wibracje. Skorzystaj z wartości liczbowych podanych w specykacji dotyczącej
wibracji, aby obliczyć czas trwania i częstotliwość pracy z narzędziem.
Poziom hałasu i drgań w specykacji określone są zgodne z międzynarodowymi normami. Wartości
te reprezentują korzystanie z urządzenia w normalnych warunkach roboczych. Niedbała konserwacja,
nieprawidłowy montaż lub nieprawidłowe użytkowanie urządzenia mogą spowodować wzrost
poziomu hałasu oraz wibracji. www.osha.europa.eu dostarcza informacji na temat poziomów
hałasu i wibracji w środowisku pracy, które mogą być przydatne dla użytkowników prywatnych,
korzystających z urządzenia przez długi czas.
Należy uważnie przeczytać poniższą instrukcję oraz dołączone etykiety ze zrozumieniem przed
zastosowaniem narzędzia. Przechowaj tę instrukcję wraz z produktem do wykorzystania w przyszłości.
Ponadto upewnij się, że wszystkie osoby, które korzystają z tego narzędzia w pełni zapoznały się z
tą instrukcją.
Pomimo zastosowania się do następujących instrukcji nie jest możliwe wyeliminowanie wszystkich
pozostałych czynników ryzyka. Zawsze należy zachować ostrożność. Jeśli nie jesteś pewny, co do
prawidłowego i bezpiecznego korzystania z danego narzędzia, nie należy go używać.
Ogólne instrukcje dotyczące
bezpieczeństwa użytkowania
elektronarzędzia
OSTZREŻENIE: Należy przeczytać wszystkie instrukcje przed rozpoczęciem pracy oraz
zachować ją na przyszłość. Postępuj zgodnie z podaną instrukcją podczas ich użytkowania dla
zmniejszenia ryzyka pożaru, porażenia prądem obrażeń ciała
Zachowaj wszystkie instrukcje do wykorzystania w przyszłości.
Termin „elektronarzędzie“ odnosi się do urządzenia zasilanego sieciowo (przewodowego) lub
urządzenia zasilanego za pomocą baterii (bezprzewodowego).
1)Bezpieczeństwo obszaru pracy
a) Zadbaj o prawidłową higienę i prawidłowe oświetlenie obszaru pracy. Zanieczyszczenie lub
brak wystarczającego oświetlenia obszaru pracy mogą doprowadzić do wypadków.
b) Nie należy używać elektronarzędzi w przestrzeniach zagrożonych wybuchem, np. w
obecności łatwopalnych cieczy, gazów lub pyłów. Urządzenia elektryczne wytwarzają iskry,
które mogą podpalić pył lub opary.
c) Nie dopuszczaj dzieci ani innych osób do obszaru pracy elektronarzędzi. Nieuwaga może
spowodować utratę kontroli.
2) Bezpieczeństwo elektryczne
a) Wtyczka elektronarzędzia musi pasować do gniazda zasilania. Nie wolno modykować
wtyczki w żaden sposób. W przypadku elektronarzędzi z uziemieniem nie należy stosować
przejściówek. Oryginalne wtyczki i pasujące gniazda zmniejszają ryzyko porażenia prądem.
b) Unikaj dotykania uziemionych powierzchni, takich jak rury, grzejniki, piece i lodówki.
Uziemienie ciała powoduje zwiększenie ryzyka porażenia prądem.
c) Nie wystawiaj elektronarzędzi na działanie deszczu lub wilgoci. Przedostanie się wody do
urządzenia zwiększa ryzyko porażenia prądem.
d) Nie należy nadwyrężać kabla. Nigdy nie używaj go do przenoszenia, przeciągania lub
odłączania elektronarzędzia. Trzymaj przewód z dala od źródeł ciepła, oleju, ostrych
krawędzi lub ruchomych części urządzenia. Uszkodzone lub poplątane kable zwiększają ryzyko
porażenia prądem.
e) W przypadku korzystania z urządzenia na wolnym powietrzu używaj przedłużacza
przystosowanego do używania na zewnątrz. Korzystanie z przedłużacza przystosowanego do
używania na zewnątrz zmniejsza ryzyko porażenia prądem.
f) W przypadku korzystania z elektronarzędzia w miejscu o dużym natężeniu wilgoci należy
używać gniazda zasilania wyposażonego w wyłącznik różnicowoprądowy (RCD). Korzystanie
z wyłącznika różnicowoprądowego zmniejsza ryzyko porażenia prądem.
3) Bezpieczeństwo osobiste
a) Podczas korzystania z elektronarzędzi bądź czujny, uważaj, co robisz i zachowaj zdrowy
rozsądek. Nie używaj ich, gdy jesteś zmęczony albo pod wpływem narkotyków, alkoholu
lub leków. Chwila nieuwagi podczas obsługi urządzenia może spowodować poważne obrażenia
ciała.
b) Korzystaj ze środków ochrony osobistej. Zawsze stosuj środki ochrony oczu. Wyposażenie
ochronne, takie jak maska przeciwpyłowa, obuwie robocze antypoślizgowe na szorstkiej
podeszwie, kask ochronny lub nauszniki ochronne używane w odpowiednich warunkach,
zmniejsza ryzyko obrażeń.
c) Zapobiegaj przypadkowemu włączeniu urządzenia. Przed podłączeniem do źródła
zasilania i / lub akumulatora, podnoszeniem lub przenoszeniem narzędzia, upewnij
się, że przełącznik zasilania znajduje się w pozycji wyłączonej. Przenoszenie urządzenia z
palcem umieszczonym na wyłączniku zasilania lub podłączanie elektronarzędzi przy włączonym
przełączniku zasilania stwarza ryzyko wypadku.
d) Przed włączeniem elektronarzędzia usuń z niego wszelkie klucze regulacyjne. Narzędzie lub
klucz pozostawiony w obracającej się części elektronarzędzia może spowodować obrażenia ciała.
e) Nie wychylaj się. W każdej chwili zachowuj odpowiednią pozycje i równowagę. Umożliwia
to lepszą kontrolę nad elektronarzędziem w nieoczekiwanych sytuacjach.
f) Noś odpowiednią odzież. Nie zakładaj do pracy z elektronarzędziem luźnej odzieży ani
biżuterii. Trzymaj włosy, odzież i rękawice z dala od ruchomych części urządzenia. Luźne ubranie,
biżuteria lub długie włosy mogą zostać wciągnięte przez ruchome części urządzenia.
g) Jeśli do zestawu załączone są urządzenia do podłączenia mechanizmów odsysania i
zbierania pyłu, sprawdź czy są one przyłączone i prawidłowo zamocowane. Korzystanie z
urządzenia odsysającego pył może zmniejszyć zagrożenie pyłami.
h) Nie pozwól aby znajomość urządzenia, pozwoliła na ignorowanie zasad bezpieczeństwa .
Nieostrożne działanie może doprowadzić do poważnych obrażeń w ciągu sekund.
4) Użytkowanie i pielęgnacja elektronarzędzi.
a) Nie należy przeciążać urządzenia. Używaj narzędzi odpowiednich do danego zastosowania.
Prawidłowe narzędzie wykona zadanie lepiej i bezpieczniej w podanym zakresie sprawności.
b) Nie należy używać urządzenia, jeśli nie można go włączyć lub wyłączyć za pomocą
odpowiedniego przełącznika. Urządzenia, które nie mogą być kontrolowane za pomocą
przełącznika są niebezpieczne i muszą zostać oddane do naprawy.
c) Przed dokonaniem regulacji, wymiany akcesoriów lub przechowywaniem elektronarzędzia
odłącz wtyczkę od źródła zasilania i / lub akumulator od urządzenia. Te prewencyjne środki
bezpieczeństwa zmniejszają ryzyko przypadkowego uruchomienia elektronarzędzia.
d) Nieużywane elektronarzędzie przechowuj w miejscu niedostępnym dla dzieci i nie
dopuszczaj do nich osób nie znających elektronarzędzi lub ich instrukcji obsługi.
Elektronarzędzia stanowią niebezpieczeństwo w rękach niedoświadczonych użytkowników.
e) Przeprowadzaj konserwacje elektronarzędzi. Sprawdź urządzenie pod kątem
nieprawidłowego ustawienia lub zablokowania elementów ruchomych, pęknięć części
lub innych usterek, które mogą mieć negatywny wpływ na funkcjonowanie urządzenia.
W przypadku usterki należy naprawić urządzenie przed ponownym użyciem. Niewłaściwa
konserwacja elektronarzędzi jest przyczyną wielu wypadków.
f) Utrzymuj narzędzia tnące w czystości i dobrze naostrzone. Zadbane narzędzia tnące z ostrymi
krawędziami tnącymi rzadziej się zacinają i łatwiej nimi sterować.
g) Używaj elektronarzędzia, akcesoria, końcówki itp. zgodnie z tymi instrukcjami, biorąc
pod uwagę warunki pracy i realizowane zadania. Używanie narzędzi do wykonywania prac
niezgodnych z ich przeznaczeniem może doprowadzić do niebezpiecznych sytuacji.
h) Utrzymuj rękojeści oraz powierzchnię uchwytów suchą, czystą bez oleju i smaru. Śliskie
uchwyty nie zapewniają bezpiecznej obsługi i kontroli narzędzia w nieoczekiwanych sytuacjach.
5) Serwis
a) Urządzenie powinno być serwisowane przez wykwalikowany personel naprawczy
przy użyciu wyłącznie oryginalnych części zamiennych. Zagwarantuje to bezpieczeństwo
elektronarzędzia.
Szczególne zasady bezpieczeństwa
Wskazówki dotyczące bezpieczeństwa korzystania z
wiertarek udarowych i młotów obrotowo-udarowych
SDS Plus
UWAGA: Jeżeli istnieje podejrzenie występowania azbestu w miejscu pracy, należy
niezwłocznie zasięgnąć porady profesjonalisty. Usuwanie azbestu powinno być wykonywane tylko
przez uprawnioną do tego osobę. Należy skontaktować się z HSE w Wielkiej Brytanii (www.hse.gov.
co.uk) lub krajowym organem ds. zdrowia i bezpieczeństwa w swoim kraju, aby uzyskać dodatkowe
informacje na temat postępowania z azbestem. Europejska Dyrektywa 2009/148/WE zawiera
dodatkowe informacje związane z narażeniem na działanie azbestu podczas pracy.
• Należy przestrzegać wszystkich przepisów bezpieczeństwa dotyczących podejmowanych rodzajów
pracy.
• Nie wolno pozwolić, aby ktokolwiek w wieku poniżej 18 lat korzystał z tego narzędzia. Należy się
upewnić, że operatorzy są wykwalikowani i zapoznali się z instrukcją obsługi i bezpieczeństwa.
• Używanie trybu udar lub dłuto podczas pracy może tworzyć odpryski z ostrymi krawędziami, które
mogą uderzać w operatora. Należy nosić odporne na uderzenia okulary, odzież ochronną oraz
ochronne obuwie.
• Wiertła rdzeniowe należy używać tylko z wiertarkami wyposażonymi w sprzęgło bezpieczeństwa,
aby zapobiec blokowaniu, które może spowodować obrażenia operatora.
• Jeżeli sprzęgło bezpieczeństwa działa w trakcie użytkowania, należy szybko zwolnić spust i
wyciągnąć wiertło rdzeniowe z muru. Nie należy kontynuować pracy dopóki przyczyna włączenia
sprzęgła nie zostanie wyjaśniona.
• Wiertarek udarowych oraz młotów obrotowo-udarowych SDS Plus nie należy używać na
rusztowaniach i drabinach, gdzie istnieje ryzyko upadku. Wiertarki udarowe oraz młoty obrotowoudarowe SDS Plus SDS Plus są ciężkie i wytwarzają niezwykle wysoki poziom wibracji i wysoki
moment obrotowy.
• Należy nosić odpowiednie rękawice ochronne antywibracyjne, które są nie materiałowe lub
powlekane, aby zapobiec zaczepieniu się materiału o narzędzie lub mechanizm wiertarki. Należy
wyrzucić rękawice, jeśli materiał, z którego zostały wykonane jest postrzępiony.
• Wiercenie może wytwarzać duże ilości pyłu i zanieczyszczeń, które mogą być również toksyczne.
Należy nosić środki ochrony dróg oddechowych odpowiednie dla podejmowanych prac.
Minimalna klasykacja zalecana FFP2.
43
Page 44

PL
• Wiertarki udarowe i młoty obrotowo-udarowe SDS Plus wytwarzają wysoki poziom dźwięku.
Należy nosić środki ochrony słuchu przez cały czas pracy z narzędziem
• Wiertarki udarowe oraz młoty obrotowo-udarowe SDS Plus są ciężkie i wytwarzają niezwykle
wysoki poziom wibracji. Zaleca się częste przerwy podczas pracy.
• Należy używać tylko dłut punktaków z systemem montażu SDS Plus wejściem, z którymi należy
wyłączyć tryb obrotowy wiertarki.
• Należy używać odpowiednich przyrządów wyszukiwawczych w celu lokalizacji ukrytych
przewodów elektrycznych, gazowych lub wodnych. Należy unikać kontaktu z przewodami i
instalacjami.
• W razie potrzeby skorzystania z przedłużacza bębnowego należy upewnić się, że jest on
całkowicie rozwinięty. Minimalna średnica przewodu powinna wynosić 1,25 mm2.
• W przypadku pracy elektronarzędzia pod gołym niebem, jeżeli nie da się uniknąć jego
zastosowania w wilgotnym otoczeniu należy podłączyć urządzenie do wyłącznika ochronnego
różnicowo-prądowego lub połączyć bezpośrednio przewód z wyłącznikiem ochronnym.
• Przed uruchomieniem elektronarzędzia, należy się upewnić, że wiertło lub dłuto zostało
prawidłowo umocowane w uchwycie. Niepewnie umocowane wiertło lub dłuto może być
wyrzucone z urządzenia i spowodować tym samym zagrożenie dla użytkownika.
• Należy się upewnić, że oświetlenie miejsca pracy jest odpowiednie.
• Należy używać obu rąk podczas pracy z tym elektronarzędziem.
• Należy zawsze używać dołączonego do zestawu dodatkowego uchwytu.
• Nie należy wywierać nacisku podczas wiercenia, może to skrócić żywotność elektronarzędzia.
• Wiertła i dłuta, które zostały nagrzane podczas pracy, należy pozostawić do ostygnięcia przed
dalszym użyciem.
• Jeśli praca wiertarki lub młota obrotowo-udarowego musi zostać przerwana podczas jej obsługi,
należy zakończyć proces jej obsługi odłączając wiertarkę od zasilania elektrycznego, zanim uwaga
operatora będzie skierowana gdzie indziej.
• Przed wymianą wiertła lub dłuta zawsze należy odłączyć elektronarzędzie od sieci elektrycznej.
• Należy regularnie kontrolować czy uchwyt wiertarski nie ma śladów zużycia. Uszkodzone części
należy naprawiać w autoryzowanych centrach serwisowych.
• Należy zawsze odczekać aż wiertarka lub młot obrotowo-udarowy zatrzyma się całkowicie. Nie
wolno próbować zatrzymać urządzenia przytrzymując uchwytu. NIGDY nie wolno odkładać
elektronarzędzia przed całkowitym zatrzymaniem się.
• Po zakończeniu pracy należy odłączyć narzędzie od zasilania elektrycznego i wyjąć dłuto lub
wiertło z elektronarzędzia.
• Należy okresowo skontrolować wszystkie śruby i nakrętki i dokręcać w razie potrzeby.
• Należy skontrolować elektronarzędzie po użyciu, zwracając uwagę na przewód zasilający, który
można łatwo uszkodzić.
• Należy zamontować osłonę przeciwpyłową na wiertło lub dłuto, aby zapobiec uszkodzeniom i
zanieczyszczeniom uchwytu wiertarskiego.
• W przypadku uczucia jakiegokolwiek dyskomfortu podczas obsługi elektronarzędzia, należy
natychmiast przerwać pracę i skontrolować sposób jego użycia przez operatora.
Przedstawienie produktu
1 Uchwyt SDS Plus
2 Kołnierz SDS Plus
3 Przełącznik wyboru trybu
4 Pokrywa przekładni
5 Przełącznik zasilania
6 Przełącznik trybu standardowego / młotowiertarki
7 Regulacja prędkości
8 Pokrywa dostępu do szczotek
9 Uchwyt dodatkowy
10 Otwory wentylacyjne
11 Klucz do uchwytu
12
Pojemnik na smar
13
Dłuto płaskie
14
Dłuto punktowe
15
Osłona pyłu
16
Bit SDS Plus do muru 8 mm
17
Bit SDS Plus do muru 10 mm
18
Bit SDS Plus do muru 12 mm
19
Klucz sześciokątny
20
Uchwyt SDS 13 mm
21
Blokada wyboru trybu
22
Rękojeść główna
Akcesoria dodatkowe (nie pokazane)
• Walizka z formowanego wtryskowo plastiku
Przeznaczenie
Przenośne urządzenie SDS przeznaczone do zadań o średnim stopniu trudności; zasilana sieciowo
wiertarka służy do wiercenia i łamania lekkiego muru. Posiada również funkcje wiercenia w drewnie
i metalu z dostarczonym standardowym uchwytem ze złączem SDS Plus.
Rozpakowanie narzędzia
• Ostrożnie rozpakuj i sprawdź narzędzie. Zapoznaj się wszystkimi mechanizmami i funkcjami.
• Upewnij się, że narzędzie zawiera wszystkie części i są one w dobrym stanie. Jeśli brakuje
pewnych części lub są one uszkodzone, należy uzupełnić lub wymienić je przed rozpoczęciem
korzystania z narzędzia.
Przygotowanie do eksploatacji
UWAGA: Przed montażem lub wymianą akcesorium należy zawsze odłączać urządzenie od
źródła zasilania.
UWAGA: Zawsze używaj narzędzia z zamontowanym uchwytem pomocniczym (9). Używanie
urządzenia bez założonego uchwytu może doprowadzić do obrażeń ciała.
UWAGA: Przed pierwszym użyciem, a także co 6 godzin pracy (w przybliżeniu) należy wypełnić
zagłębienie w przekładni smarem (maks. 80 g) Do narzędzia dołączono pojemnik ze smarem do
pierwszego użycia (patrz ‘Konserwacja przekładni’)
WAŻNE: Należy zawsze upewnić się, że w przekładni znajduje się wystarczająca ilość smaru przed
przystąpieniem do pracy.
44
Page 45

Wiertarka SDS Plus 1500 W268819
silverlinetools.com
Montaż/demontaż akcesorii SDS oraz uchwytu
wiertarskiego
Patrz Rys. I
Uwaga: SDS Plus system pozwala na to by wiertło lekko się poruszało w uchwycie, kiedy zostanie
prawidłowo zainstalowane.
• Urządzenie wyposażone jest w system przyłączy SDS Plus. Akcesoria SDS Plus posiadają nacięcia
pozwalające na zrównanie ich z wypustkami uchwytu SDS Plus (1)
• Aby zainstalować bit w maszynie;
1. Trzymając narzędzie bezpiecznie i przesuń obręcz (2) w kierunku narzędzia
2. Wsuń akcesorium do uchwytu, aż wyczucia oporu względem akcesorium
3. Zwolnij kołnierz w celu zamocowania akcesoria.
4. Bit powinien być teraz zamontowany w maszynie, pociągnij, aby sprawdzić, czy został prawidłowo
zablokowany. Jeśli bit może zostać wyciągnięty, należy powtórzyć powyższy póki bit nie zostanie
prawidłowo ulokowany
• Aby wyjąć bit z maszyny:
1. Przesuń obręcz w kierunku narzędzia a następnie wyjmij akcesorium
Regulacja uchwytu wiertarskiego
Patrz Rys. II
UWAGA: Uchwyt wiertarski nie może być używany do wiercenia w trybie młotowiertarki lub
dłutowania.
UWAGA: Zawsze upewnij się, że klucz do uchwytu został usunięty z uchwytu wiertarskiego
przed użyciem narzędzia
• Niniejsze narzędzie posiada w zestawie akcesoria do uchwytu wiertarskiego (20), które bardziej
niż uchwyt SDS Plus nadaje się do wiercenia w drewnie lub stali
• Regulowanie uchwytu;
1. Zamocuj uchwyt wiertarski w uchwycie SDS Plus (patrz "Instalowanie / usuwanie akcesoriów SDS
lub uchwytu wiertarskiego")
2. Poluzuj lub dokręć uchwyt z kluczem, wkładając klucz (11) w otwory z boku uchwytu i obracając
kluczem; w prawo, aby dokręcić, w lewo, aby poluzować
Montaż rękojeści dodatkowej
Patrz Rys. III
1. Poluzować uchwyt dodatkowy (9) obracając go w lewo
2. Przesuń uchwyt w kierunku wiertarki
3. Dokręć uchwyt dodatkowy, obracając go w prawo
WAŻNE: Upewnij się, że uchwyt pomocniczy nie jest dokręcony do żadnych ruchomych części
narzędzia przed jego użyciem
Obsługa
UWAGA: Podczas pracy z tym narzędziem należy ZAWSZE stosować ochronę oczu, odpowiednią
ochronę dróg oddechowych, ochronniki słuchu i odpowiednie rękawice.
Uwaga: Osłona przeciwpyłowa (15) powinna być zamocowana do wiertła lub dłuta, aby zapobiec
przedostawaniu się drobin i pyłu do uchwytu (Rys. IV). Jest to szczególnie ważne, gdy wiertło jest
używane pod pewnym kątem podczas pracy na ścianach lub sutach. W przypadku większych
wierteł, osłona przeciwpyłowa może wymagać zamontowania, zanim wiertło znajdzie się w uchwycie.
UWAGA: Gdy wiertło penetruje wywiercony materiał, może ono "złapać" lub "zaczepić" się.
Może to spowodować, że narzędzie nagle "kopnie". Zapobiegaj obrażeniom, zawsze trzymając
wiertło w sposób bezpieczny, używając uchwytu dodatkowego (9) i głównego (22) oraz używając
ostrych wierteł
UWAGA: Zawsze upewnij się, że materiał jest zabezpieczony. W razie potrzeby użyj imadła lub
zacisku, aby przytrzymać obrabiany przedmiot i zawsze trzymaj obie dłonie na narzędziu.
Wbór prędkości
Patrz Rys. V
• Pokrętło regulacji prędkości (7) służy do regulacji prędkości narzędzia. Zwiększenie liczby
wskazanej na sterowniku zwiększy prędkość działania narzędzia, a zmniejszenie prędkości
zmniejszy je.
Tryb młotowiertarki
Niniejszy tryb przeznaczony jest do wiercenia w murze oraz betonie.
Uwaga: Uchwyt wiertarski nie jest przeznaczony do użytku w trybie młotowiertarki
1. Ustaw przełącznik trybu (3) w pozycji , naciskając blokadę wyboru trybu (21) na przełączniku
(3) w kierunku do wewnątrz obróć pokrętło
2. Zwolnij blokadę
3. Obrócić pokrętło wyboru między trybem standardowym / trybem młotowiertarki (6) do pozycji
Tryb wiertarki
Tryb wiertarki należy stosować podczas wiercenia w drewnie lub metalu.
Uwaga: Użyj uchwytu (20) do wiercenia standardowego, używając standardowych wierteł do
drewna i metalu (brak w zestawie) (patrz "Instalowanie / zdejmowanie akcesoriów SDS lub Uchwyt
wiertarski")
1. Ustaw przełącznik trybu (3) w pozycji , naciskając blokadę wyboru trybu (21) na przełączniku
w kierunku do wewnątrz obróć pokrętło
2. Zwolnij blokadę
3. Obrócić pokrętło wyboru między trybem standardowym / trybem młotowiertarki (6) do pozycji
• Nie należy zmieniać pozycji przełącznika trybów podczas pracy wiertarki
• Nie należy operować wiertarką, gdy wskaźnik przełącznika trybu znajduje się pomiędzy trybami
Tryb dłuta
Tryb ten przeznaczony jest jedynie do dłutowania. Do tego celu należy używać jedynie dłut SDS Plus.
Uwaga: Uchwyt wiertarski (20) nie nadaje się do użytku w tym trybie
1. Ustaw przełącznik trybu (3) w pozycji , naciskając blokadę wyboru trybu (21) na przełączniku w
kierunku do wewnątrz obróć pokrętło
2. Zwolnij blokadę
3. Obrócić pokrętło wyboru między trybem standardowym / trybem młotowiertarki (6) do pozycji
• Nie należy zmieniać pozycji przełącznika trybów podczas pracy wiertarki
• Nie należy operować wiertarką, gdy wskaźnik przełącznika trybu znajduje się pomiędzy trybami
Włączanie i wyłączanie
1. Aby uruchomić wiertarkę, wciśnij przełącznik On/Off (5)
2. Aby zatrzymać wiertarkę, zwolnij przycisk On/Off
Uwaga: Maksymalna szybkość wiertarki jest regulowana przez przełącznik regulacji prędkości (7).
Należy poświęcić odrobinę czasu, aby upewnić się, że ustawiono prawidłową prędkość.
Wiercenie w murze
1. Ustawić narzędzie w trybie młotowiertarki (patrz ‘Tryb młotowiertarki’)
2. Zamontować wiertło SDS Plus (16,17,18) do uchwytu SDS Plus (1) (patrz " Montaż/demontaż
akcesorii SDS oraz uchwytu wiertarskiego")
3. Włącz wiertarkę (patrz ’Włączanie i wyłączanie’)
4. Przyłóż wiertło do obrabianego elementu i zastosuj lekki do urmiakowanego docisk na tył
wiertarki, na linii z wiertłem.
5. Wyjmij wiertło z obrabianego elementu przed wyłączeniem narzędzia
WAŻNE: Nie należy stosować nadmiernego nacisku podczas wiercenia, gdyż może to doprowadzić
do uszkodzenia silnika oraz wiertła.
Uwaga: Wywiercony otwór może wypełniać się opiłkami podczas wiercenia. Aby usunąć resztki,
zwolnij prędkość wiertła i wyjmij je z otworu przed kontynuowaniem pracy.
Wiercenie w drewnie i metalu
1. Ustaw wiertarkę w tryb wiercenia (patrz ‘Tryb wiertarki’)
2. Zainstaluj uchwyt wiertarski (20) w wiertarce (patrz ‘Montaż/demontaż akcesorii SDS oraz
uchwytu wiertarskiego’)
3. Zamontuj standardowe wiertło do drewna lub metalu (brak w zestawie) w uchwycie wiertarskim
(patrz ‘Regulacja uchwytu wiertarskiego’)
4. Włącz narzędzie (patrz ‘Włączanie i wyłączanie’)
5. Przyłóż wiertło do obrabianego elementu i zastosuj lekki do urmiakowanego docisk na tył
wiertarki, na linii z wiertłem
6. Wyjmij wiertło z obrabianego elementu przed wyłączeniem narzędzia
WAŻNE: Upewnij się, że wiertło nadaje się do pracy z obrabianym przedmiotem.
Uwaga: Wywiercony otwór może wypełniać się opiłkami podczas wiercenia. Aby usunąć resztki,
zwolnij prędkość wiertła i wyjmij je z otworu przed kontynuowaniem pracy.
Akcesoria
• Szeroki zakres akcesoriów, w tym wierteł SDS Plus i dłut jest dostępny u dystrybutora Silverline.
• Części zamienne są dostępne na stronie toolsparesonline.com.
• Nie należy zmieniać pozycji przełącznika trybów podczas pracy wiertarki
• Nie należy operować wiertarką, gdy wskaźnik przełącznika trybu znajduje się pomiędzy trybami
45
Page 46

PL
Konserwacja
OSTRZEŻENIE: Przed przeprowadzeniem kontroli, czynności konserwacyjnych lub czyszczenia
ZAWSZE odłączaj urządzenie od źródła zasilania.
Konserwacja skrzyni biegów
Patrz Rys. VI
Po każdych 6 godzinach użytkowania (w przybliżeniu) skrzynia biegów musi zostać ponownie
nasmarowana
1. Za pomocą klucza sześciokątnego zdejmij obudowę skrzyni biegów (4)
2. Do smarowania przekładni użyj szpatułki lub podobnego przyrządu w celu wypełnienia
zagłębienia (maks. 80 g)
Uwaga: Uważaj, aby nie zarysować lub w inny sposób nie uszkodzić wewnętrznego mechanizmu
przekładni
3. Przymocuj ponownie osłonę skrzyni biegów
• Do narzędzia dołączono pojemnik smaru (12). Przy zakupie dodatkowego smaru należy wybrać
dowolne środek litowy smarujący
• Nie należy nadmiernie dokręcać pokrywy skrzyni biegów ani przepełniać przekładni smarem
Kontrola rutynowa
• Regularnie sprawdzaj, czy wszystkie śruby mocujące są odpowiednio dokręcone. Wibracje mogą
powodować ich poluzowanie.
• Sprawdź przewód zasilania urządzenia pod kątem uszkodzeń i zużycia za każdym razem przed
rozpoczęciem użytkowania urządzenia. Zalecenie to dotyczy również przewodów zasilania
wykorzystywanych przy urządzeniu.
Czyszczenie
• Należy zawsze dbać o czystość urządzenia. Brud i kurz powodują szybsze zużycie elementów
wewnętrznych i skracają okres eksploatacji urządzenia. Należy czyścić korpus urządzenia
miękką szczotką lub suchą ścierką. Jeśli to możliwe, przedmuchaj otwory wentylacyjne czystym
powietrzem sprężonym.
• Obudowę narzędzia czyścić miękką, wilgotną ściereczką z łagodnym detergentem. Nie używaj
alkoholu, benzyny ani silnych środków czyszczących
• Nigdy nie używaj środków żrących do czyszczenia części plastikowych
Szczotki
• Wraz z upływem czasu szczotki węglowe wewnątrz silnika mogą się zużywać.
• Nadmiernie zużyte szczotki mogą prowadzić do utraty mocy, okresowych usterek lub pojawienia
się iskier.
• Wymiana szczotek: zdejmij osłonę otworów wentylacyjnych (10) i pokrywę dostępu do szczotek
(8). Zużyte szczotki można następnie wyjąć i wymienić na nowe
• Zawsze wymieniaj zużyte szczotki parami
• Zamontuj ponownie osłony
• Alternatywnie, należy oddać narzędzie do naprawy w autoryzowanym centrum serwisowym
Silverline
Kontakt
W celu uzyskania porady technicznej lub naprawy, skontaktuj się z infolinią pod numerem (+44)
1935 382 222
Strona online: silverlinetools.com/en-GB/Support
Adres:
Powerbox
Boundary Way
Lufton Trading Estate
Yeovil, Somerset
BA22 8HZ, United Kingdom
Przechowywanie
• Należy przechowywać narzędzie w bezpiecznym, suchym miejscu niedostępnym dla dzieci.
Utylizacja
Należy zawsze przestrzegać przepisów krajowych dotyczących utylizacji elektronarzędzi, które nie są
już funkcjonalne i nie nadają się do naprawy.
• Nie wyrzucaj elektronarzędzi lub innych odpadów elektrycznych i elektronicznych (WEEE) wraz z
odpadami komunalnymi.
• Skontaktuj się z władzami lokalnymi zajmującymi się utylizacją odpadów, aby uzyskać informacje
na temat prawidłowego sposobu utylizacji elektronarzędzi.
Smarowanie
Regularnie smaruj wszystkie elementy ruchome urządzenia odpowiednim środkiem smarnym w
aerozolu, wszystkie poza skrzynią biegów, która wymaga smaru litowego
Rozwiązywanie problemów
Problem Prawdopodobna przyczyna Rozwiązanie
Podczas wiercenia rdzeniowego, wiertło zostało zablokowane/
utknęło w materiale
Narzędzie nie chce się uruchomić Przepalony bezpiecznik Sprawdź i dokonaj wymiany bezpiecznika. Jeżeli problem nie
Niska prędkość obrotowa Narzędzie zostało przergrzane Wyłącz urządzenie i pozwól mu się schłodzić do temperatury
Powolna prędkość obrotowa lub brak obrotów oraz możliwe
widoczne iskrzenie od otworów wentylacyjnych
Nadmierny nacisk na narzędzie w momencie przełamania
materiału
Wiertło rdzeniowe nie jest odpowiednie do danego rodzaju
wiercenia
Nagromadzona podczas pracy duża ilość zanieczyszczeń
wewnątrz wiertła rdzeniowego
Uszkodzony kabel zasilania Skontaktuj się z autoryzowanym centrum serwisowym
Uszkodzony przełącznik ON/OFF
Uszkodzony silnik
Zużyte szczotki węglowe Wymień szczotki lub skontaktuj się z autoryzowanym centrum
Zmniejsz nacisk nakładany na urządzenie przed przełamaniem
materiału
Użyj kompatybilnego wiertła rdzeniowego
Regularnie opróżniaj nagromadzone zanieczyszczenia, co
zapewni bezpieczne działanie
ustaje należy skontaktować się z autoryzowanym centrum
serwisowym.
pokojowej. Sprawdź i wyczyść otwory wentylacyjne.
serwisowym, w celu wymiany szczotek
Wibracje lub nadmierny hałas Mało smaru w przekładni Dodaj lub wymień smar
46
Nadmiernie zużyte wewnętrzne części ruchome Skontaktuj się z autoryzowanym centrum serwisowym
Page 47

Wiertarka SDS Plus 1500 W268819
silverlinetools.com
Gwarancja narzędzi Silverline
Niniejszy produkt Silverline posiada 3 letnią gwarancję
Aby zakwalikować się do uzyskania powyższej gwarancji należy zarejestrować niniejszy produkt
na stronie www.silverlinetools.com w ciągu 30 dni od daty zakupu. Okres gwarancji rozpoczyna
się w dniu zakupu produktu widocznym na paragonie.
Zasady i warunki
Okres gwarancji zaczyna obowiązywać od daty zakupu detalicznego znajdującej się na
paragonie.
PROSIMY O ZACHOWANIE PARAGONU
Jeśli produkt wykaże jakiekolwiek usterki w ciągu 30 dni od daty zakupu, należy go zwrócić do
dystrybutora/sklepu , w którym towar zakupiono, od którego został zakupiony okazując przy
tym dowód zakupu.
Jeśli usterka pojawi się po 30 dniach, należy zwrócić produkt do:
Silverline Tools Service Centre
PO Box 2988
Yeovil
BA21 1WU, UK
Roszczenia gwarancyjne należy zgłaszać w okresie gwarancji. Należy dostarczyć dowód zakupu,
swoje imię i nazwisko, adres miejsca zakupu przed wykonaniem jakichkolwiek napraw.
Należy podać dokładne dane usterki wymagające naprawy.
Wnioski złożone w okresie gwarancji będą werykowane przez Silverline Tools, do ustalenia czy
usterki są związane z materiałem lub wyrobem produktu.
Koszty transportu nie zostaną pokryte. Produkt przeznaczony do zwrotu musi być starannie
oczyszczony. Należy zapakować produkt prawidłowo i bezpiecznie tak, aby nie został uszkodzony
podczas transportu do nas. Możemy odrzucić roszczenia niewłaściwie dostarczonych produktów.
Wszystkie naprawy będą przeprowadzone przez rmę Silverline Tools lub agencje upoważnione
do tego.
Naprawa lub wymiana produktu nie przedłuży okresu gwarancyjnego.
Usterki uznane przez nas, jako objęte gwarancją będą poddane naprawie bezpłatnie (bez
kosztów transportowych) lub poprzez wymianę na narzędzie pracujące w idealnym stanie.
Narzędzia lub części zamienne, do których wydano zamiennik staną się własnością Silverline
Tools.
Naprawa lub wymiana produktu w ramach gwarancji zapewnia korzyści, które są dodatkiem i nie
wpływają w żaden sposób na ustawowe prawa konsumenta.
Rejestracja produktu
Rejestracji produktu można dokonać na stronie www.silverlinetools.com, wybierając przycisk
„Rejestracja”. Należy wprowadzić:
• Dane osobowe
• Szczegóły dotyczące produktu oraz informacje dotyczące zakupu
Po wprowadzeniu tych informacji zostanie utworzony certykat gwarancji niniejszego produktu,
jako dokument w formacie PDF, który należy wydrukować i zachować wraz z dowodem zakupu.
Gwarancja pokrywa:
Naprawę produktu ( w okresie gwarancji), jeśli zostanie on zakwalikowany zgodnie z
wymogami Silverline Tools w związku z usterkami, które wynikły z wad materiałowych lub wad
związanych z produkcją.
Jeżeli jakaś część zastępcza nie jest już dostępna lub wycofana z produkcji, Silverline Tools
zastąpi ją funkcjonalnym zamiennikiem.
Produkty używane w EU.
Czego nie pokrywa gwarancja:
Silverline Tools nie pokrywa napraw powstałych w wyniku:
• normalnego zużycia spowodowanego przez normalne użytkowanie zgodne z instrukcją
obsługi, np: noże, szczotki, pasy, żarówki akumulatory itp.
• wymiany dowolnego dołączonego wyposażenia np.: noży, wierteł, papieru ściernego, tarcz
do cięcia i innych podobnych elementów.
• przypadkowego uszkodzenia spowodowanego niewłaściwym używaniem lub zaniedbaniem,
nieostrożnym działaniem lub niestarannym obchodzeniem się z produktem.
• stosowania produktu do innych celów.
• zmiany lub modykacji produktu w jakikolwiek sposób.
• usterek wynikających z wykorzystania części zamiennych i akcesoriów, które nie są
oryginalnymi elementami Silverline Tools.
• niewłaściwej instalacji (z wyjątkiem instalacji przeprowadzonej Silverline Tools).
• naprawy lub modykacji przeprowadzonej przez osoby inne niż z Centrum Usług Silverline
Tools lub autoryzowanych punktów serwisowych.
• roszczeń innych niż związanych z usterkami ujętymi w gwarancji produktu.
Gwarancja akumulatora
Silverline akumulator posiada gwarancję na okres 12 miesięcy. Jeśli podczas okresu
gwarancyjnego akumulatora, pojawi się usterka, w wyniku wady mateiałowej bądź
fabrycznej, wtedy Silverline wymieni go bezpłatnie. Powyższa gwarancja nie pokrywa szkód
spowodowanych naturalnym zużyciem, nieprawidłowym użytkowaniem, nieprzestrzeganiem
zaleceń obsługi, wypadkami lub wykorzystaniem urządzenia do celów komercyjnych.
Deklaracja Zgodności WE
Niżej podpisany: Mr Darrell Morris
upoważniony przez: Silverline
Oświadcza, że:
Powyższa deklaracja została wydana na wyłączną odpowiedzialność producenta.
Opisany powyżej przedmiot deklaracji jest zgodny z właściwymi przepisami Unijnego prawodawstwa
harmonizacyjnego
Kod identykacyjny: Xxxxxx
Opis: Xxxxxxxxxxx
Produkt jest zgodny z następującymi dyrektywami oraz normami:
Dyrektywa maszynowa 2006/42/EC
Dyrektywa niskonapięciowa 2014/35/EU
Dyrektywa kompatybilności elektromagnetycznej 2014/30/EU
Dyerktywa RoHS 2011/65/EU
Zastosowana dyrektywa oceny zgodności: Xxxxxxxx
Dokumentacja techniczna produktu znajduje się w posiadaniu: Silverline
Data: XX/XX/XXXX
Podpis:
Mr Darrell Morris
Dyrektor naczelny
Nazwa i adres producenta:
Powerbox International Limited, Company No. 06897059. Registered address: Powerbox, Boundary
Way, Lufton Trading Estate, Yeovil, Somerset BA22 8HZ, United Kingdom.
47
Page 48

GB 3 Year Guarantee. Register online within
30 days. Terms and Conditions apply.
FR Garantie de 3 ans. Enregistrez votre
produit en ligne dans un délai de 30 jours
suivant la date d’achat. Des conditions
générales s’appliquent.
DE 3 Jahre Garantie. Innerhalb von 30
Tagen online registrieren. Es gelten die
Allgemeinen Geschäftsbedingungen
silverlinetools.com
ES 3 años de garantía. Registre su producto online durante
los primeros 30 días. Se aplican términos y condiciones.
IT 3 anni di garanzia. Registra il tuo prodotto on-line
entro 30 giorni dall’acquisto. Vengono applicati i
termini e le condizioni generali.
NL 3 jaar garantie. Registreer uw product binnen 30
dagen online. Algemene voorwaarden zijn van toepassing
PL 3 Letnia Gwarancja. Zarejestruj się online
w ciągu 30 dni.Obowiązują Zasady i Warunki
 Loading...