

Page 1
3 Year Guarantee
*Register online within 30
days. Terms & Conditions apply
Garantie de 3 ans
*Enregistrez votre produit en ligne
dans les 30 jours. Sous réserve des
termes et conditions appliquées
3 Jahre Garantie
*Innerhalb von 30 Tagen online
registrieren. Es gelten die Allgemeinen
Geschäftsbedingungen
www.silverlinetools.com
3 años de garantía
*Registre su producto online durante
los primeros 30 días. Se aplican
términos y condiciones
3 anni di garanzia
*Registrarsi on-line entro 30 giorni.
Termini e Condizioni si applicano
3 jaar garantie
*Registreer uw product binnen 30
dagen online. Algemene voorwaarden
zijn van toepassing
Page 2
R
E
L
I
V
N
L
I
E
S
R
E
A
G
N
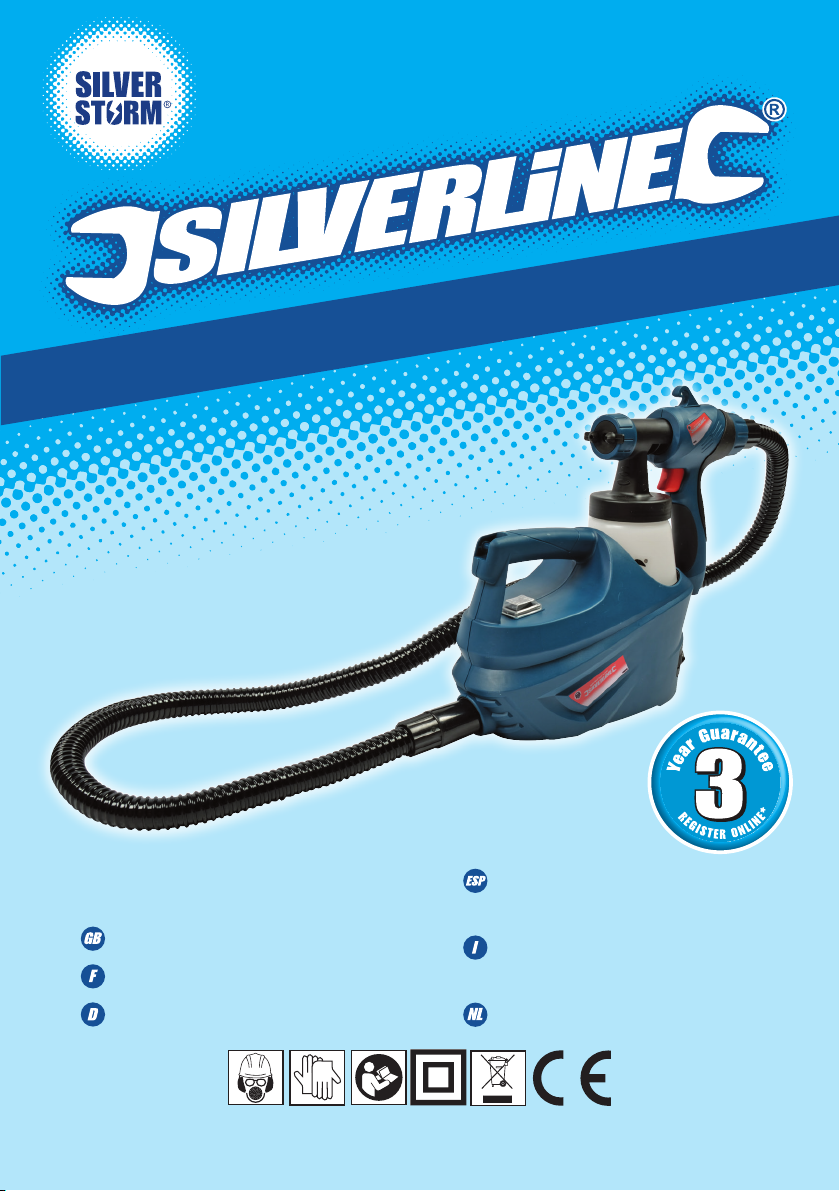
798866
500W HVLP Paint Sprayer
500W HVLP Paint Sprayer
Pulvérisateur HVLP 500 W
Niederdruck-Spritzpistole 500 W
www.silverlinetools.com
Pulverizador de baja
presión HVLP 500 W
Spruzzatore a vapore
HVLP 500 W
HVLP spuitsysteem 500 W
Page 3
16
1
2
3 4 515
14
13
1112
Fig.A Fig.B Fig.C
10
6
7
89
2
Page 4

500W HVLP Paint Sprayer
English .................. 4
Français ................ 10
Deutsch ................. 16
®
Español ................. 22
Italiano .................. 28
Nederlands ............ 34
www.silverlinetools.com
3
Page 5
GB
Description of Symbols
The rating plate on your tool may show symbols. These represent important
information about the product or instructions on its use.
Wear hearing protection
Wear eye protection
Wear breathing protection
Wear head protection
Wear hand protection
Read instruction manual
Double insulated for additional protection
Conforms to relevant legislation and safety standards
Environmental Protection
Waste electrical products should not be disposed of with household
waste. Please recycle where facilities exist. Check with your local
authority or retailer for recycling advice.
Specification
Input: ............................................................220-240V~ 50/60Hz
Power: ..........................................................500W
Paint reservoir: .............................................700ml
Max. viscosity: ..............................................50din/sec
Max flow: .....................................................320ml/min
Nozzle: .........................................................Ø1.8mm
Hose length: .................................................1.8m
Power cable length: ......................................2m
Weight: .........................................................3kg
Protection class: ...........................................
Noise and vibration information
Sound pressure: ........................................... L
Sound power: ............................................... LWA = 82dB(A)
Uncertainty: .................................................. K = 3dB(A)
Vibration: ...................................................... <2.5m/s
As part of our ongoing product development, specifications
of Silverline products may alter without notice.
The sound intensity level for the operator may exceed
85dB(A) and sound protection measures are necessary.
WARNING: Always wear ear protection where the sound level exceeds 85dB(A)
and limit the time of exposure if necessary. If sound levels are uncomfortable, even
with ear protection, stop using the tool immediately and check the ear protection is
correctly fitted and provides the correct level of sound attenuation for the level of
sound produced by your tool.
WARNING: User exposure to tool vibration can result in loss of sense of touch,
numbness, tingling and reduced ability to grip. Long term exposure can lead to a
chronic condition. If necessary, limit the length of time exposed to vibration and
use anti-vibration gloves. Do not operate the tool with hands below a normal
comfortable temperature, as vibration will have a greater effect. Use the figures
provided in the specification relating to vibration to calculate the duration and
frequency of operating the tool.
PA
= 71dB(A)
2
Sound and vibration levels in the specification are determined according to
EN60745 or similar international standards. The figures represent normal use for
the tool in normal working conditions. A poorly maintained, incorrectly assembled,
or misused tool, may produce increased levels of noise and vibration.
www.osha.europa.eu provides information on sound and vibration levels in the
workplace that may be useful to domestic users who use tools for long periods
of time.
General Safety
WARNING: Read all safety warnings and all instructions. Failure to follow the
warnings and instructions may result in electric shock, fire and/or serious injury.
WARNING: This appliance is not intended for use by persons (including children)
with reduced, physical or mental capabilities or lack of experience or knowledge
unless they have been given supervision or instruction concerning use of the
appliance by a person responsible for their safety. Children must be supervised to
ensure that they do not play with the appliance.
Save all warnings and instructions for future reference.
The term "power tool" in the warnings refers to your mains-operated (corded)
power tool or battery-operated (cordless) power tool.
Work area safety
a) Keep work area clean and well lit. Cluttered or dark areas invite accidents
b) Do not operate power tools in explosive atmospheres, such as in the
presence of flammable liquids, gases or dust. Power tools create sparks
which may ignite the dust or fumes
c) Keep children and bystanders away while operating a power tool.
Distractions can cause you to lose control
Electrical safety
a) Power tool plugs must match the outlet. Never modify the plug in any
way. Do not use any adapter plugs with earthed (grounded) power
tools. Unmodified plugs and matching outlets will reduce risk of electric
shock
b) Avoid body contact with earthed or grounded surfaces, such as pipes,
radiators, ranges and refrigerators. There is an increased risk of electric
shock if your body is earthed or grounded
c) Do not expose power tools to rain or wet conditions. Water entering a
power tool will increase the risk of electric shock
d) Do not abuse the cord. Never use the cord for carrying, pulling or
unplugging the power tool. Keep cord away from heat, oil, sharp edges
or moving parts. Damaged or entangled cords increase the risk of electric
shock
e) When operating a power tool outdoors, use an extension cord suitable
for outdoor use. Use of a cord suitable for outdoor use reduces the risk of
electric shock
f) If operating a power tool in a damp location is unavoidable, use a
residual current device (RCD) protected supply. Use of an RCD reduces
the risk of electric shock
NOTE: The term “residual current device (RCD)” may be replaced by the
term “ground fault circuit interrupter (GFCI)” or “earth leakage circuit breaker
(ELCB)”.
Personal safety
a) Stay alert, watch what you are doing and use common sense when
operating a power tool. Do not use a power tool while you are tired
or under the influence of drugs, alcohol or medication. A moment of
inattention while operating power tools may result in serious personal injury
b) Use personal protective equipment. Always wear eye protection.
Protective equipment such as dust mask, non-skid safety shoes, hard hat,
or hearing protection used for appropriate conditions will reduce personal
injuries
c) Prevent unintentional starting. Ensure the switch is in the off-position
before connecting to power source and/or battery pack, picking up or
carrying the tool. Carrying power tools with your finger on the switch or
energising power tools that have the switch on invites accidents
d) Remove any adjusting key or wrench before turning the power tool on.
A wrench or a key left attached to a rotating part of the power tool may result
in personal injury
e) Do not overreach. Keep proper footing and balance at all times. This
enables better control of the power tool in unexpected situations
f) Dress properly. Do not wear loose clothing or jewellery. Keep your hair,
clothing and gloves away from moving parts. Loose clothes, jewellery or long
hair can be caught in moving parts
g) If devices are provided for the connection of dust extraction and
collection facilities, ensure these are connected and properly used. Use
of dust collection can reduce dust-related hazards
4
Page 6

798866
500W HVLP Paint Sprayer
Power tool use and care
a) Do not force the power tool. Use the correct power tool for your
application. The correct power tool will do the job better and safer at the
rate for which it was designed
b) Do not use the power tool if the switch does not turn it on and off. Any
power tool that cannot be controlled with the switch is dangerous and must
be repaired
c) Disconnect the plug from the power source and/or the battery pack
from the power tool before making any adjustments, changing
accessories, or storing power tools. Such preventive safety measures
reduce the risk of starting the power tool accidentally
d) Store idle power tools out of the reach of children and do not allow
persons unfamiliar with the power tool or these instructions to operate
the power tool. Power tools are dangerous in the hands of untrained users
e) Maintain power tools. Check for misalignment or binding of moving
parts, breakage of parts and any other condition that may affect the
power tool’s operation. If damaged, have the power tool repaired before
use. Many accidents are caused by poorly maintained power tools
f) Keep cutting tools sharp and clean. Properly maintained cutting tools with
sharp cutting edges are less likely to bind and are easier to control
g) Use the power tool, accessories and tool bits etc. in accordance with
these instructions, taking into account the working conditions and the
work to be performed. Use of the power tool for operations different from
those intended could result in a hazardous situation
Service
a) Have your power tool serviced by a qualified repair person using only
identical replacement parts. This will ensure that the safety of the power
tool is maintained
Spray Gun Safety
Dangerous environment
• Ensure there is adequate clear space around the work area. Only use spraying
tools in a well-ventilated area or a specialist spray booth. Be aware that air
hoses can present a trip hazard; always lay hoses in a way that minimises
hazards
Protect your eyes
• Always wear safety goggles or safety glasses
Protective clothing
• Always wear appropriate protective equipment including but not limited to
overalls, gloves, facemask etc
• It is the user’s responsibility to ensure that other persons in the vicinity of the
work area are also equipped with the appropriate protective equipment.
Use of spray guns
• Do not aim a spray gun at people or animals!
• When spraying keep away from heat and naked flames!
WARNING: Solvents and paints are harmful and can even be toxic. Some
solvents and paints are extremely flammable. Handle with care, according to the
manufacturer’s recommendations. Store solvents and paint in sealed, leak proof
containers made of a material that is chemically resistant to the specific solvent.
Always wear suitable protective equipment and dispose of solvents and paints, as
well as contaminated items, as special waste, according to laws and regulations.
WARNING: Solvents that are chemically based on halogenated hydrocarbon, like
trichloroethane and methylene chloride 1,1,1, may cause chemical reactions in
combination with aluminium and galvanised or hot galvanised components, and
may therefore represent a potential explosion hazard.
WARNING: When spraying coating materials, dangerous vapours or aerosols,
which are detrimental to your health, are produced. Please read all labels
and safety instructions carefully, and observe all indicated instructions and
recommendations. In case of doubt, please ask the material supplier. Use
respiratory protection when spraying. The respiratory equipment used must
be suitable for the material in use and adapted to the degree of the vapour
concentration. When spraying paint, use respiratory equipment independent of the
ambient atmosphere, or equipment with filter combination A1/A2-P2. Ensure a
sufficient protection of your skin during all spraying and cleaning procedures. Wear
appropriate protective clothes and use suitable protective skin ointments.
WARNING: DO NOT spray acids, caustic solutions, removers and similar
substances.
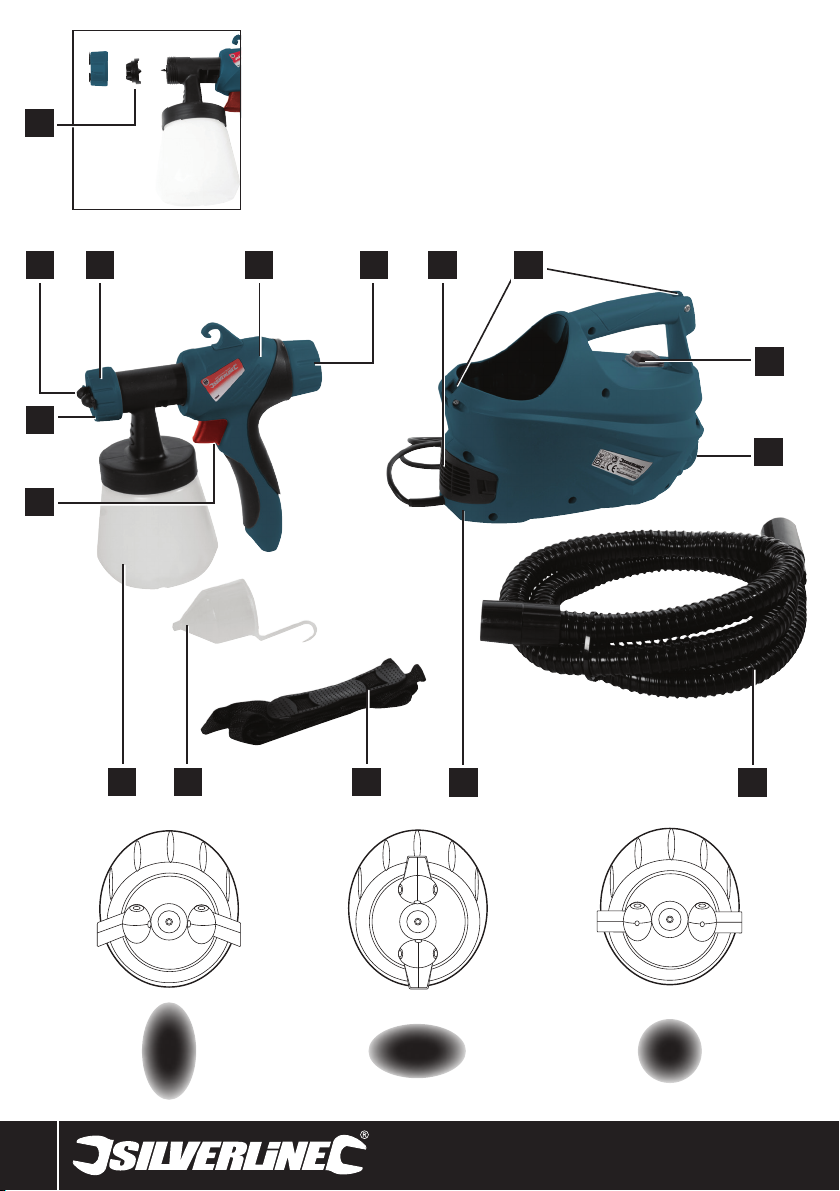
Product Familiarisation
1 Nozzle Assembly Cap
2 Spray Gun
3 Air Volume Adjuster
4 Air Filter Compartment
5 Shoulder Strap Mounts
6 On/Off Switch
7 Air Outlet
8 Air Hose
9 Turbine Unit
10 Shoulder Strap
11 Viscosity Test Cup
12 Paint Container
13 Trigger
14 Air Cap
15 Spray Pattern Adjusters
16 Nozzle
Intended Use
This paint sprayer is for applying paints and coatings to various surfaces and
should not be adapted for other uses or liquids that are not normally sprayed.
Ensure the manual is fully read before using this tool.
Unpacking Your Tool
• Carefully unpack and inspect your tool. Familiarise yourself with all its features
and functions.
• Ensure that all parts of the tool are present and in good condition. If any parts
are missing or damaged, have such parts replaced before attempting to use
this tool.
www.silverlinetools.com
5
Page 7
GB
Before Use
Assembly
Attaching shoulder strap
• Attach Shoulder Strap (10) to the Shoulder Strap Mounts (5) on the Turbine
Unit (9)
Connect the air hose
• Push-fit the Air Hose (8) into the Air Outlet (7) on the Spray Machine (9) and Air
Inlet/Volume Regulator (3) on the Spray Gun (2)
• Insert air hose tightly to ensure a secure connection
Preparation of work area
• Cover all surfaces and objects that are not to be sprayed, or remove them from
the work area
• Silicate paint corrodes glass and ceramic surfaces upon contact. If you are
using silicate paint, ensure you completely cover all such surfaces
Paint preparation
WARNING: This sprayer is not compatible with textured wall paints, latex paint,
caustic solutions, acidic coatings or paint or solutions containing granules or solids.
• Before use, most paints and other coatings need to be thinned (diluted) to the
proper viscosity for use with the Spray Gun (2):
1. Stir the paint thoroughly, then dip the Viscosity Test Cup (11) fully in the paint
2. Lift the Viscosity Test Cup out of the paint and measure the time in seconds
that it takes for the liquid to drain fully out of the cup
3. Refer to the viscosity table below for required draining times. If the coating
drains too slowly, it requires thinning
Note: When mixing colours make a note of the mix quantities to ensure that
subsequent mixes are consistent with the first mix
• Dilute the paint in a separate container with suitable thinner or water until the
paint achieves the required draining time
• Only mix a small quantity of paint at a time
• Always recheck viscosity before refilling the Spray Gun
• If the feed rate of the paint is too low even at maximum flow setting, dilute in
steps of 5 – 10% until the feed rate meets requirements
Viscosity table
Coating Draining Time (secs)
Water-based paints* 20 - 40
Water-based primers 25 – 40
Water-based varnishes 20 – 35
Oil-based primers 25 – 40
Oil-based varnishes 15 – 40
Wood preservatives,
strippers, oils
Disinfectants, plant
protectants
Automobile spray paint 20 – 35
use undiluted
use undiluted
Operation
*See also paint manufacturer’s instructions
Preparing paint container
1. Unscrew Paint Container (12) from Spray Gun (2)
2. Align the feed tube in the container as follows:-
For horizontal spraying (e.g. walls): turn feed tube so that it faces towards the
surface to be sprayed- To spray surfaces overhead (e.g. ceilings): turn feed
tube so that it faces away from the surface to be sprayed
3. Fill Paint Container with paint to be sprayed. Place Paint Container on level
surface. Stir the prepared paint so that it is thoroughly mixed together.
Carefully fill the Paint Container to a maximum capacity of 700ml
4. Screw Paint Container tightly back onto Spray Gun
Adjusting the spray pattern
Three settings are available to meet different spraying requirements:
• Vertical flat jet (A) for spraying onto vertical surfaces (e.g. onto walls)
• Horizontal flat jet (B) for spraying onto horizontal surfaces (e.g. onto ceilings)
• Circular jet (C) for spraying into corners, edges and hard-to-reach areas
Fig A - Spray Pattern Adjusters (15) horizontal and raised
Fig B - Spray Pattern Adjusters vertical and raised
Fig C - Spray Pattern Adjusters flat with Air Cap (14). May be in horizontal or
vertical position
WARNING: Never pull the Trigger (13) whilst adjusting the spray pattern
1. Unscrew the Nozzle Assembly Cap (1) slightly
2. Rotate the Air Cap (14) to the required position
3. Set the Spray Pattern Adjusters on the Air Cap to required setting (see
Settings above)
4. Tighten the Nozzle Assembly Cap
IMPORTANT: The Spray Pattern Adjusters adjust between 0 - 45° only.
Preparing to spray
• Insert plug into mains outlet
• Place the Spray Gun (2) in the gun holder on the Turbine Unit (9)
• Lift the machine and place the strap over your shoulder if carrying. Adjust for
comfort
• Remove Spray Gun from gun holder and check you can comfortably reach all
areas for spraying
Switch the machine on
• Set the On/Off Switch (6) to the ON position to switch on power
• To switch off power after use, set the On/Off Switch to the OFF position and
remove the mains plug from the mains socket
Adjusting the flow rate
• The flow rate of the paint can be adjusted by using the Air Volume Adjuster (3) to
increase or decrease the amount of paint sprayed
• Turn Air Volume Adjuster anti-clockwise to reduce flow rate
• Turn Air Volume Adjuster clockwise to increase flow rate
NOTE: For most wall paints, an average flow setting provides best results
Spraying technique
• Test the Spray Gun (2) on cardboard or a similar surface to find the correct
flow rate
• Squeeze the Trigger (13) to start spraying. Release the Trigger to stop spraying
• Start at the edge of the area to be sprayed
Note: The maximum viscosity of paint that can be used is 50din/sec but it is
recommended to keep to 40din/sec as shown in the chart above as the maximum
for general use.
6
Page 8
500W HVLP Paint Sprayer798866
• Hold the Spray Gun so that the Air Cap (14) is 250 to 300mm from the surface
to be sprayed, depending on the required width of the spray jet
• Start the spray movement first, then squeeze the Trigger
Note: The spray movement should come from the arm, not just the wrist. This
helps to maintain a uniform distance between Spray Gun and surface being
sprayed.
Note: An uneven distance between Spray Gun and surface will result in uneven
paint application.
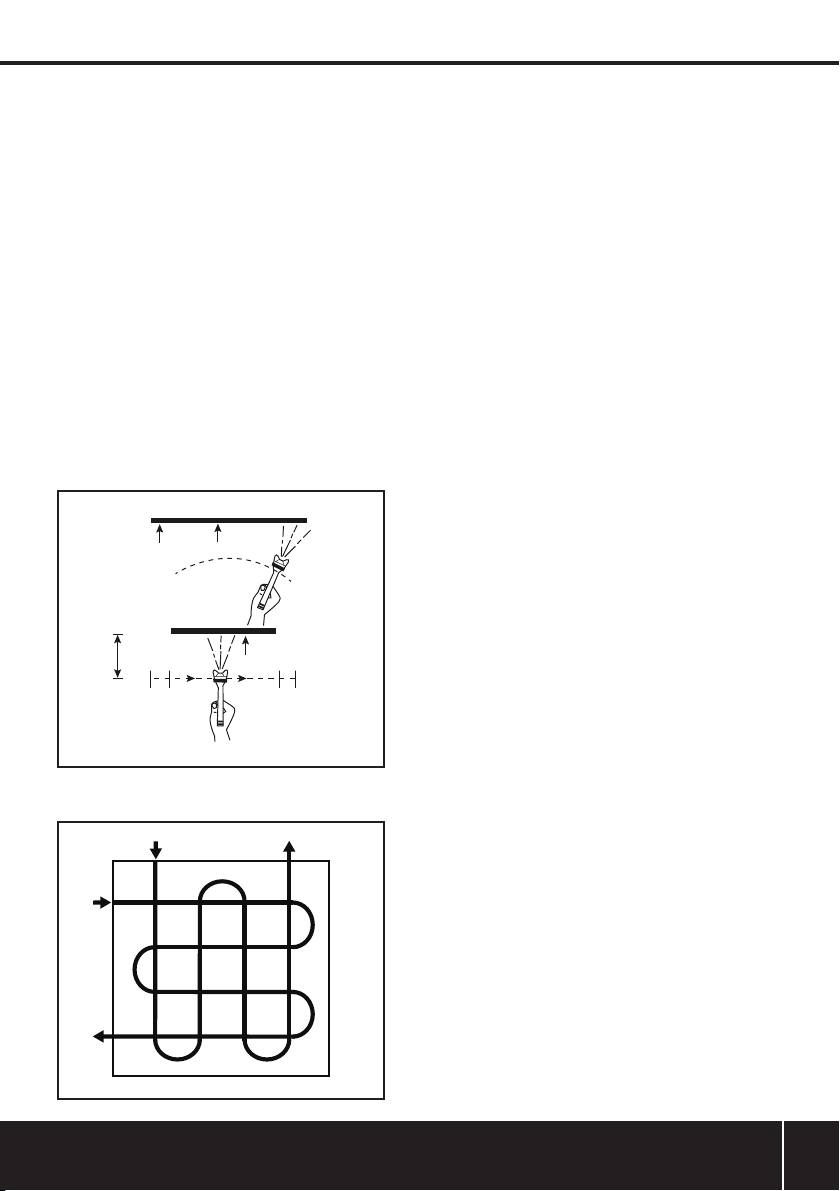
• Move the Spray Gun evenly across the surface and avoid interruptions. See
Fig. A below.
Note: An even movement of the Spray Gun will achieve an even surface quality.
• If coating material builds up on the Nozzle (16) and Air Cap, cease spraying,
turn off power, disassemble and clean both parts with solvent or water as
appropriate
• Clean Spray Gun thoroughly as soon as you have finished spraying
Tips
• The most effective way to spray a vertical surface is to use a ‘cross-coat’
method, spraying in a zigzag pattern first in horizontal bands, then in vertical
bands. Use a flowing, serpentine motion as opposed to stopping and starting.
See Fig. B below.
• Move a flat section of cardboard parallel to the paint jet to mask edges
• When using strong colour shades, or painting over strong shades with a lighter
colour, apply at least two coats, allowing each coat to dry before applying the
next. This will ensure good coverage
• You can also use a cut-out stencil technique to paint shapes on the wall
WARNING: Immediately after use the Spray Gun must be cleaned to prevent paint
drying within the Spray Gun. If you wish to mix or dilute another batch of paint
only do so without cleaning if there is no risk of the paint drying.
200-250mm
Coating will be
light at this point
Start
stroke
Coating will be
heavy at this point
Pull
trigger
Wrong
Coating should be even
and wet when spraying
Release
End of
trigger
Stroke
Maintenance
Cleaning
Note: It is essential that this spray equipment is cleaned thoroughly after each
use in order to maintain trouble-free operation. Failure to clean and maintain your
equipment in accordance with advice below may invalidate your guarantee.
Always ensure that the machine is disconnected from the mains power supply
before performing any maintenance procedures
After each use:
1. Switch off the Turbine Unit (9)
2. Unscrew Paint Container (12) and empty container of any residue of coating
material
3. Pre-clean the Paint Container and feed tube with suitable solvent or warm
water and a soft brush
4. Fill the Paint Container with warm water (or suitable solvent) and reassemble
Spray Gun (2)
5. Switch on the machine and spray the water (or solvent) into a container
or cloth
6. Repeat the above procedure until the liquid being sprayed is clear
7. Switch off the machine
8. Empty the Paint Container completely. Always keep the container seal free of
any residue of coating material and check for any damage
9. Unscrew the Nozzle Assembly Cap (1) and remove the Air Cap (14) and
Nozzle (16)
10. Clean Air Cap and Nozzle thoroughly with suitable solvent or warm water
and a soft brush.
WARNING: Never use a sharp metal object to clean the nozzle or air holes
11. Clean the exterior of the Spray Gun and Paint Container with a cloth soaked
in solvent or water
Air filter
• Check the air filter in the Air Filter Compartment (4) periodically and replace if
dirty or clogged
WARNING: Never operate the wall sprayer without the air filter in place; dirt could
be sucked in and damage the motor
Disposal
Always adhere to national regulations when disposing of power tools that are no
longer functional and are not viable for repair.
• Do not dispose of power tools, or other waste electrical and electronic
equipment (WEEE), with household waste
• Contact your local waste disposal authority for information on the correct way
to dispose of power tools
Fig. A
Fig. B
Correct
www.silverlinetools.com
7
Page 9
GB
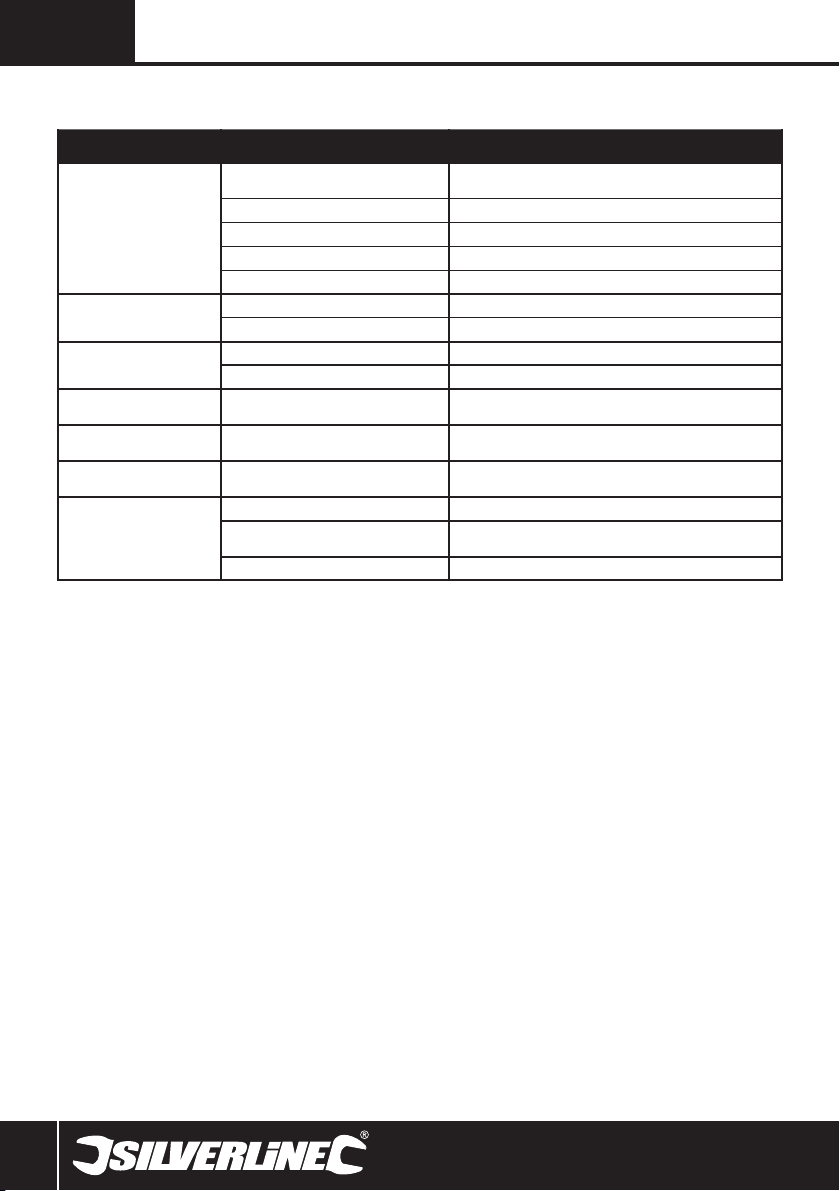
Troubleshooting
Problem Cause Solution
Motor working but irregular or no
spraying
Atomization of spray is poor
Paint running or drips on surface
Motor louder than normal
Turbine Unit (9) not working
Incorrect operating sound
Orange-peel effect on painted
surface
Feed tube within Paint Container (12) in wrong
position
Feed tube blocked Flush through with soapy water or thinners depending on blockage
Wrong setting of Air Volume Adjuster (3) Adjust to correct position
Nozzle (16) blocked Remove and clean
Blocked filter Check condition and replace if necessary
Air volume setting incorrect Adjust setting
Paint too thick Check viscosity
Too much paint applied Adjust air volume downwards
Paint too thin Check viscosity
Spray Gun (2) not clean or possible blockage Disassemble Spray Gun and clean the Nozzle (16) and other parts with thinners
No power Check Turbine Unit is switched on, and the power plug is correctly inserted into
Paint Container near empty causing air to be
sucked in
Paint too thick Check viscosity
Spray Gun incorrect distance from surface or poor
angle
Incorrect solvent used with paint Use correct solvent
Adjust position
thoroughly
the mains socket and switched on
Refill with paint
Correct position
8
Page 10

Silverline Tools Guarantee
This Silverline product comes with a 3 year
guarantee
Register this product at www.silverlinetools.com within 30 days of
purchase in order to qualify for the 3 year guarantee. Guarantee period
begins according to the date of purchase on your sales receipt.
Terms & Conditions
Guarantee period becomes effective from the date of retail purchase as
detailed on your sales receipt.
PLEASE KEEP YOUR SALES RECEIPT
If this product develops a fault within 30 days of purchase, return it to the
stockist where it was purchased, with your receipt, stating details of the
fault. You will receive a replacement or refund.
If this product develops a fault after the 30 day period, return it to:
Silverline Tools Service Centre
PO Box 2988
Yeovil
BA21 1WU, UK
The guarantee claim must be submitted during the guarantee period.
You must provide the original sales receipt indicating the purchase date,
your name, address and place of purchase before any work can be
carried out.
You must provide precise details of the fault requiring correction.
Claims made within the guarantee period will be verified by Silverline Tools
to establish if the deficiencies are related to material or manufacturing of
the product.
Carriage will not be refunded. Items for return must be in a suitably clean
and safe state for repair, and should be packaged carefully to prevent
damage or injury during transportation. We may reject unsuitable or
unsafe deliveries.
All work will be carried out by Silverline Tools or its authorized
repair agents.
The repair or replacement of the product will not extend the period
of guarantee
Defects recognised by us as being covered by the guarantee shall be
corrected by means of repair of the tool, free of charge (excluding carriage
charges) or by replacement with a tool in perfect working order.
Retained tools, or parts, for which a replacement has been issued, will
become the property of Silverline Tools.
EC Declaration of Conformity
The undersigned: Mr Darrell Morris
as authorised by: Silverline Tools
Declares that
Identification code: 798866
Description: HVLP Spray System 500W
Conforms to the following directives and standards:
• Machinery Directive 2006/42/EC
• Low Voltage Directive 2006/95/EC
• EMC Directive 2004/108/EC
• RoHS Directive 2011/65/EU
• EN60745-1:2009+A11
• EN50580:2012
• EN55014-1:2006
• EN55014-2:1997+A1
• EN61000-3-2:2006
• EN61000-3-3:1995+A1+A2
500W HVLP Paint Sprayer798866
Registering your purchase
Registration is made at silverlinetools.com by selecting the Guarantee
Registration button. You will need to enter:-
• Your personal details
• Details of the product and purchase information
Once this information is entered your guarantee certificate will be created
in PDF format for you to print out and keep with your purchase.
The repair or replacement of your product under guarantee provides
benefits which are additional to and do not affect your statutory rights as
a consumer.
What is covered:
The repair of the product, if it can be verified to the satisfaction of Silverline
Tools that the deficiencies were due to faulty materials or workmanship
within the guarantee period.
If any part is no longer available or out of manufacture, Silverline Tools will
replace it with a functional replacement part.
Use of this product in the EU.
What is not covered:
Silverline Tools does not guarantee repairs required as a result of:
Normal wear and tear caused by use in accordance with the operating
instructions eg blades, brushes, belts, bulbs, batteries etc.
The replacement of any provided accessories drill bits, blades, sanding
sheets, cutting discs and other related items.
Accidental damage, faults caused by negligent use or care, misuse,
neglect, careless operation or handling of the product.
Use of the product for anything other than normal domestic purposes.
Change or modification of the product in any way.
Use of parts and accessories which are not genuine Silverline Tools
components.
Faulty installation (except installed by Silverline Tools).
Repairs or alterations carried out by parties other than Silverline Tools or its
authorized repair agents.
Claims other than the right to correction of faults on the tool named in
these guarantee conditions are not covered by the guarantee.
Notified body: TUV Rheinland, Shanghai, China
The technical documentation is kept by: Silverline Tools
Date: 27/06/13
Signed by:
Director
Name and address of Manufacturer or Authorised representative:
Powerbox, Boundary Way, Lufton Trading Estate, Yeovil, Somerset,
BA22 8HZ United Kingdom
www.silverlinetools.com
9
Page 11
F
Description des symboles
La plaque signalétique figurant sur votre outil peut présenter des symboles.
Ces symboles constituent des informations importantes relatives au produit
ou des instructions concernant son utilisation.
Port de protection auditive
Port de lunettes de sécurité
Port de masques respiratoires
Port du casque
Lire le manuel d’instructions
Conforme à la réglementation et aux normes de sécurité
pertinentes
Protection de l’environnement
Les produits électriques usagés ne doivent pas être jetés
avec les ordures ménagères. Veuillez les recycler dans
les centres prévus à cet effet. Pour de plus amples informations,
veuillez contacter votre municipalité ou point de vente
Port de gants
Double isolation pour une protection supplémentaire
Caractéristiques techniques
Tension d’entrée : ......................................220 – 240 V~ 50/60 Hz
Puissance : ................................................500 W
Réservoir de la peinture : ..........................700 ml
Viscosité maximale :..................................50 DIN/sec
Débit maxi : ...............................................320ml/min
Buse : ........................................................Ø 1,8 mm
Longueur du tuyau : ..................................1,8 m
Longueur du câble d’alimentation : ...........2 m
Poids : .......................................................3 kg
Classe de protection : ................................
Informations sur le niveau sonore et vibratoire
Pression acoustique : ................................L
Puissance acoustique : ..............................LWA = 82 dB(A)
Incertitude : ...............................................K = 3d B(A)
Vibration : ..................................................2,5 m/s
Du fait de l’évolution constante de nos produits, les
caractéristiques des produits Silverline peuvent changer
sans notification préalable.
L’intensité sonore peut dépasser 85 dB(A) et il est nécessaire
que l’utilisateur porte des protections auditives.
Attention : Toujours porter des protections sonores lorsque le niveau d’intensité
est supérieur à 85 dB(A) et limiter le temps d’exposition si nécessaire. Si
l’intensité sonore devient inconfortable, même avec les protections, arrêter
immédiatement d’utiliser l’appareil, vérifier que les protections soient bien mises
et qu’elles soient adéquates avec le niveau sonore produit par l’appareil.
Attention : L’exposition de l’utilisateur aux vibrations peut engendrer une perte du
toucher, des engourdissements, des picotements et ainsi réduire la capacité de
préhension. De longues expositions peuvent également provoquer ces symptômes
de façon chronique. Si nécessaire, limiter le temps d’exposition aux vibrations, et
porter des gants anti-vibrations. Ne pas utilisez cet appareil avec vos mains sous
des conditions en dessous de températures normales, car l’effet vibratoire en est
accentué. Se référer au cas de figures des caractéristiques relatives aux vibrations
pour calculer le temps et fréquence d’utilisation de l’appareil.
PA
= 71 dB(A)
2
Les niveaux sonores et vibratoires des caractéristiques techniques sont
déterminés en fonction de la norme EN60745 ou autres normes internationales.
. Ces données correspondent à un usage normale de l’appareil, et ce dans des
conditions de travail normales. Un appareil mal entretenu, mal assemblé ou mal
utilisé peut augmenter les niveaux sonores et vibratoires. Pour plus d’informations
sur la directive des émissions sonores et vibratoires, visitez le site http://osha.
europa.eu/fr.
Consignes générales de
sécurité relatives aux appareils
électriques
AVERTISSEMENT Veuillez lire l’intégralité des consignes de sécurité et des
instructions. Le non-respect de ces consignes et instructions peut entraîner un
risque de choc électrique, d’incendie et/ou se traduire par des blessures graves.
Attention : Cet appareil n’est pas conçu pour être utilisé par des personnes
(enfants compris) ayant des capacités physiques ou mentales réduites, ou n’ayant
pas la connaissance ou l’expérience requise, à moins d’être sous la supervision
d’une personne responsable de leur sécurité ou d’avoir reçu les instructions
nécessaires. Les enfants ne doivent pas s’approcher et jouer avec cet appareil.
Veuillez conserver ces instructions et consignes de sécurité pour référence
ultérieure.
L’expression « appareil électrique » employée dans les présentes consignes
recouvre aussi bien les appareils filaires à brancher sur le secteur que les
appareils sans fils fonctionnant sous batterie.
Sécurité sur la zone de travail
a) Maintenir une zone de travail propre et bien éclairée. Des zones
encombrées et mal éclairées sont sources d’accidents.
b) Ne pas utiliser d’outils électriques dans des environnements explosifs,
tels qu’à proximité de liquides, de gaz ou de poussières inflammables.
Les appareils électriques produisent des étincelles susceptibles d’enflammer
la poussière ou les vapeurs présentes.
c) Eloigner les enfants et les passants pendant l’utilisation d’un appareil
électrique. Ceux-ci peuvent provoquer une perte d’attention et faire perdre
la maîtrise de l’appareil.
Sécurité électrique
a) La prise d’un appareil électrique doit être adaptée à la prise du secteur.
Ne jamais modifier la prise en aucune façon. Ne jamais utiliser
d’adaptateur sur la prise électrique d’appareil mis à la terre. Des prises
non modifiées, adaptées aux boîtiers de prise de courant, réduiront le risque
de décharge électrique.
b) Eviter le contact corporel avec les surfaces mises à la terre telles que
tuyaux, radiateurs, cuisinières et réfrigérateurs. Le risque de décharge
électrique est plus important si le corps est mis à la terre.
c) Ne pas exposer l’appareil électrique à la pluie ou à l’humidité.
L’infiltration d’eau dans un appareil électrique accroît le risque de décharge
électrique.
d) Ne pas maltraiter le cordon électrique. Ne jamais utiliser le cordon
électrique pour porter, tirer ou débrancher l’appareil. Protéger le
cordon électrique de la chaleur, du contact avec l’essence, des bords
tranchants et pièces rotatives. Un cordon électrique endommagé ou
entortillé accroît le risque de décharge électrique.
e) Lors d’une utilisation de l’appareil électrique en extérieur, se servir
d’une rallonge appropriée à une utilisation en extérieur. Cela réduit le
risque de décharge électrique.
f) Si une utilisation de l’appareil électrique dans un environnement
humide ne peut être évitée, utiliser une alimentation protégée par un
disjoncteur différentiel. L’utilisation d’un disjoncteur différentiel réduit le
risque de décharge électrique.
Sécurité des personnes
a) Rester vigilent et faire preuve de bon sens lors de la manipulation de
l’appareil. Ne pas utiliser un appareil électrique lorsque l’on se trouve
dans un état de fatigue, ou sous l’influence de drogues, d’alcool ou
de médicaments. Un moment d’inattention pendant l’utilisation d’un outil
électrique peut se traduire par des blessures graves.
b) Porter un équipement de protection approprié. Toujours porter une
protection oculaire. Le port de masque à poussières, chaussures de
sécurité antidérapantes, casque de sécurité et protections antibruit adaptés
aux différentes conditions de travail réduit le risque de blessures corporelles.
c) Eviter tout démarrage accidentel. S’assurer que l’interrupteur
marche-arrêt soit en position d’arrêt avant de brancher l’appareil sur
l’alimentation secteur ou d’installer la batterie, de prendre l’appareil ou
de le transporter. Porter un appareil électrique tout en maintenant le doigt
posé sur l’interrupteur ou brancher un appareil électrique dont l’interrupteur
est sur la position de marche est source d’accidents.
10
Page 12

798866
Pulvérisateur HVLP
d) Enlever toute clé et tout instrument de réglage avant de mettre
l’appareil électrique en marche. Une clé ou un instrument de réglage
laissé fixé à un élément en rotation de l’appareil électrique peut entraîner des
blessures physiques.
e) Ne pas essayer d’atteindre une zone hors de portée. Se tenir toujours
en position stable permettant de conserver l’équilibre. Cela permet de
mieux contrôler l’appareil électrique dans des situations inattendues.
f) Porter des vêtements appropriés. Ne pas porter de vêtements amples
ou des bijoux pendants. Eloigner cheveux, vêtements et gants des
pièces en mouvement. Les vêtements amples, les bijoux pendants et
cheveux longs peuvent être happés par les pièces en rotation.
g) Si l’appareil est pourvu de dispositifs destinés au raccord
d’équipements d’extraction et de récupération de la poussière/sciure,
s’assurer qu’ils soient bien fixés et utilisés correctement L’utilisation de
ces dispositifs peut réduire les risques dus à la poussière.
Utilisation et entretien des appareils électrique
a) Ne pas forcer sur l’appareil électrique. Utiliser l’appareil électrique
approprié au travail à effectuer. Un appareil électrique adapté et employé
au rythme pour lequel il a été conçu permettra de réaliser un travail de
meilleure qualité et dans de meilleures conditions de sécurité.
b) Ne pas utiliser un appareil électrique dont l’interrupteur marche-arrêt
est hors service. Tout appareil électrique dont la commande ne s’effectue
plus par l’interrupteur marche-arrêt est dangereux et doit être réparé.
c) Débrancher l’appareil électrique ou démonter sa batterie avant
d’effectuer tout réglage ou changement d’accessoire et avant de le
ranger. De telles mesures préventives réduiront les risques de démarrage
accidentel.
d) Ranger les appareils électriques inutilisés hors de portée des enfants
et ne pas permettre l’utilisation de cet appareil aux personnes
non habituées à son maniement ou n’ayant pas lu les présentes
instructions. Les appareils électriques sont dangereux dans les mains
d’utilisateurs inexpérimentés.
e) Veiller à l’entretien des appareils électriques. Vérifier que les éléments
rotatifs soient bien alignés et non grippés. S’assurer de l’absence
de pièces cassées ou endommagées susceptibles de nuire au bon
fonctionnement de l'appareil. Si l’appareil électrique est endommagé,
le faire réparer avant toute utilisation. De nombreux accidents sont dus à
l’utilisation d’appareils électriques mal entretenus.
f) Veiller à ce que les outils de coupe soient tenus affûtés et propres. Des
outils de coupe bien entretenus, aux tranchants bien affûtés, sont moins
susceptibles de se gripper et sont plus faciles à contrôler.
g) Utiliser l’appareil électrique, les accessoires et outils à monter
conformément à ces instructions, en tenant compte des conditions de
travail et de la tâche à réaliser. Toute utilisation d’un appareil électrique
autre que celle pour laquelle il a été conçu peut entraîner des situations
à risque.
Révision
a) Ne faire réparer votre appareil électrique que par un réparateur qualifié
utilisant uniquement des pièces de rechange identiques. Cela permet de
maintenir la sécurité d’utilisation de l’appareil électrique.
Consignes de sûreté relatives aux
pistolets pulvérisateur
Environnements dangereux
• Assurez-vous de disposer d’un espace suffisamment dégagé autour de la zone
de travail. Sachez que les tuyaux flexibles d’alimentation en air comprimé
peuvent représenter un danger de trébuchage. Veillez à les disposer de manière
à réduire autant que possible ce danger.
Protégez vos yeux
• Portez toujours des lunettes de sécurité.
Portez un équipement de protection
• Portez toujours un équipement de protection adapté, comprenant entre autres
une combinaison de travail, des gants, un masque, etc.
• Il est de la responsabilité de l’utilisateur de s’assurer que toute personne
se trouvant à proximité de la zone de travail soit également pourvue d’un
équipement de sécurité approprié.
Utilisation des pistolets à peinture
• Ne dirigez pas le pistolet à peinture vers une personne ou un animal
• Lors de la pulvérisation de peinture, tenez-vous à l’écart des sources de chaleur
et des flammes nues
ATTENTION : Les solvants et les peintures sont nocifs et peuvent être toxique.
Certains de ces produits peuvent être également extrêmement inflammables.
Manipulez-les avec précautions, selon les recommandations du fabricant.
Entreposez les solvants et peintures dans des récipients hermétiques conçus pour
résister aux propriétés chimiques de ces produits. Portez toujours des équipements
de protection et disposez des solvants, peintures et récipients en accordance avec
les lois et régulations.
ATTENTION : Les solvants à base d'hydrocarbures halogénés, comme le
trichloroéthane et chlorure de méthylène 1,1,1 peuvent engendrer des réactions
chimiques avec des corps en aluminium et galvanisés ou galvanisé à chaud, et
éventuellement provoquer des risques d’explosion.
ATTENTION : Lors de la pulvérisation de matériaux de revêtements, des vapeurs et
aérosols sont produits qui sont nocifs pour votre santé. Veuillez lire attentivement
les étiquettes et instructions de sécurité et respectez toutes les recommandations
et instructions indiqués. En cas de doute, contactez votre revendeur. Utilisez
des protections respiratoires lors de la pulvérisation. Les équipements de
protections respiratoires doivent être adéquats au matériau utilisé et au niveau
de concentration de vapeur dégagée. Pour la pulvérisation de la peinture, utilisez
des équipements respiratoires indépendant de l’air ambiant ou avec des filtres A1/
A2-P2. Assurez-vous également de protéger votre peau pendant la pulvérisation
ou les opérations de nettoyages. Portez les vêtements de sécurité adéquats et des
crèmes de protections de la peau.
ATTENTION : Ne pulvérisez pas d’acides, solutions caustiques, détachant ou
autres produits similaires.
Se familiariser avec le produit
1 Bouchon de la buse
2 Pistolet
3 Régulateur du volume d’air
4 Compartiment du filtre à air
5 Points de fixations de la bandoulière
6 Bouton de marche/arrêt
7 Sortie d’air
8 Tuyau d’air
9 Boitier du moteur à turbine
10 Bandoulière
11 Gobelet testeur de la viscosité
12 Réservoir de peinture
13 Gâchette
14 Bouchon d’admission d’air
15 Régleurs du jet de pulvérisation
16 Buse
Usage conforme
Ce pistolet à peinture permet d’appliquer des peintures et surfaces de revêtements
sur de nombreuses surfaces, et il n’est pas conçu pour d’autres utilisations ou
autres liquides qui ne sont pas pulvérisable. Lisez attentivement et entièrement ce
manuel avant d’utiliser cet appareil.
Déballage
• Déballez le produit avec soin. Veillez à retirer tout le matériau d’emballage et
familiarisez-vous avec toutes les caractéristiques du produit.
• Si des pièces sont endommagées ou manquantes, faites-les réparer ou
remplacer avant d’utiliser l’appareil.
www.silverlinetools.com
11
Page 13

F
Avant utilisation
Assemblage
Attacher la bandoulière
• Attachez la bandoulière (10) sur les points de fixations (5) du boitier du moteur
(5).
Branchement du tuyau d’air
• Introduisez le tuyau d’air (8) sur la sortie d’air (7) du boitier du moteur (9) et le
régulateur de volume d’air (3) sur le pistolet (2).
• Insérez le tuyau d’air fermement pour assurer un bon raccord.
Préparation de la surface de travail
• Couvrez toutes les surfaces et objets qui ne doivent pas être peints, ou
déplacez-les de la surface de travail.
• Les peintures au silicate corrodent le verre et les surfaces en céramique.
Protégez bien ces surfaces si vous utilisez ce type de peinture.
Préparation du produit de revêtement
ATTENTION : Le pulvérisateur n’est pas compatible avec les peintures murales
texturées, les peintures à latex, les solutions caustiques, les revêtements à solution
acide ou des solutions granulées.
• Avant utilisation, la plupart des revêtements et peintures doivent être dilués
pour obtenir la viscosité appropriée à la peinture au pistolet (2):
1. Remuer soigneusement le produit de revêtement, puis plonger complètement
le gobelet de test de viscosité (11) dans le produit de revêtement.
2. Sortir le gobelet testeur de viscosité (11) du produit de revêtement et
mesurer les secondes mises pour que le liquide s’écoule complètement
du gobelet.
3. Se reporter au tableau de viscosité donné ci-dessous pour les temps
d’écoulement requis. Si le revêtement s’écoule trop lentement, il faudra
le diluer.
Remarque : Lorsque vous mélangez des couleurs, prenez note des quantités de
mélanges pour s’assurer que le prochain mélange soit homogène avec le premier
mélange
• Diluer la peinture dans un autre récipient avec un diluant approprié ou de l’eau
jusqu’à ce que le produit s’écoule dans les délais requis.
• Uniquement mélanger de petites quantités de peinture à la fois.
• Toujours revérifier la viscosité du produit avant de remplir à nouveau le pistolet
à peinture.
• Si le débit de la peinture est trop faible, même si le réglage de débit maximum
est sélectionné, diluer par étapes de 5 à 10% jusqu’à ce que le débit réponde
aux exigences
Tableau de viscosité
Revêtement Temps d’écoulement
Peintures à l’eau*
Peintures primaires à l’eau
Vernis à l’eau
Peintures primaires à l’huile
Vernis à l’huile
Huiles, traitements et décapants
pour bois
Désinfectants, traitements fongicides
Peinture au pistolet pour automobile
Remarque : La viscosité maximale de la peinture pour cet appareil est de 50 DIN/
sec mais il est recommandé d’avoir une viscosité de 40 DIN/sec comme indiqué
dans le tableau ci-dessus pour des utilisations générales.
(secondes)
20 à 40
25 à 40
20 à 35
25 à 40
15 à 40
Utilisation non diluée
Utilisation non diluée
20 à 35
Instructions d’utilisation
*Voir également les consignes du fabricant de peinture.
Préparation du réservoir de produit de revêtement
1. Dévisser le réservoir de peinture(12) du pistolet (2).
2. Aligner le tube d’alimentation dans le réservoir de la façon suivante :
- Pour une pulvérisation horizontale (par exemple, sur les murs) : faire
tourner le tube d’alimentation afin qu’il soit tourné vers la surface à peindre.
- Pour la peinture au pistolet de surfaces au-dessus de la tête (par exemple
les plafonds) : faire tourner le tube d’alimentation afin qu’il soit orienté à
l’opposé de la surface à peindre.
3. Remplir le réservoir avec la peinture à pulvériser : Poser le réservoir sur une
surface plate. Remuer la préparation de produit de revêtement afin qu’elle
soit bien mélangée. Remplir le réservoir en faisant très attention – capacité
maximale : 700 ml
4. Bien fixer le réservoir sur le pistolet à peinture en le vissant.
Réglage du jet de pulvérisation
Trois réglages sont disponibles pour régler la pulvérisation du pistolet :
• Jet plat vertical (A) pour la pulvérisation sur des surfaces verticales (par
exemple, sur des murs).
• Jet plat horizontal (B) pour la pulvérisation sur des surfaces horizontales (par
exemple, sur des plafonds).
• Jet circulaire (C) pour la pulvérisation dans les coins, les extrémités et les zones
difficiles d’accès.
Fig. A – Régleurs du jet de pulvérisation (15) en position horizontale et levés.
Fig. B - Régleurs du jet de pulvérisation (15) en position verticale et levés.
Fig. C - Régleurs du jet de pulvérisation (15) à plat sur le bouchon d’admission
d’air (14). Ils peuvent être réglés en position horizontale ou verticale.
ATTENTION : Ne jamais appuyer sur la gâchette (13) lors du réglage du jet.
1. Dévisser le bouchon de la buse (1) légèrement
2. Tourner le bouchon d’admission d’air (14) à la position requise
3. Ajuster les régleurs du jet de pulvérisation (15) du bouchon d’air à la position
requise (voir réglages ci-dessus).
4. Revisser le bouchon de la buse
Important : Les régleurs du jet de pulvérisation s’ajustent uniquement entre
0 et 45°
Préparation à la pulvérisation
• Brancher l’appareil à l’alimentation secteur.
• Placer le pistolet à peinture (2) dans le support pour pistolet situé sur le boitier
du moteur (9).
• Soulever le moteur et placer la bandoulière par-dessus l’épaule. Ajuster la
bandoulière pour plus de confort.
• Retirer le pistolet à peinture de son support et vérifier que toutes les zones à
peindre au pistolet peuvent être atteintes confortablement.
Mise en marche de l’appareil
• Placer l’interrupteur de marche/arrêt (6) sur la position « ON ».
• Pour éteindre l’appareil, placer l’interrupteur de marche/arrêt sur la position «
OFF » et débrancher l’appareil de l’alimentation secteur
Réglage du débit
• Le débit de la peinture peut se régler en utilisant le régulateur du volume d’air
(3) pour augmenter ou réduire la quantité de peinture pulvérisée.
• Faire tourner le régulateur dans le sens inverse des aiguilles d’une montre pour
réduire le débit.
• Faire tourner le régulateur dans le sens des aiguilles d’une montre pour
augmenter le débit
REMARQUE : Pour la plupart des peintures pour murs, un réglage moyen du débit
fournit un meilleur résultat.
Technique de peinture au pistolet
• Essayer le pistolet à peinture (2) sur du carton ou une surface similaire pour
trouver le bon débit.
• Appuyer sur la gâchette (13) pour commencer à peindre au pistolet. Relâcher la
gâchette pour arrêter la pulvérisation.
• Commencer par l’extrémité de la surface de travail.
• Tenir le pistolet à peinture de sorte que le bouchon d’admission d’air (15) soit
entre 250 et 300 mm de la surface de travail, en fonction de la largeur du rayon
de projection désiré.
• Avant d’appuyer sur la gâchette, commencer en premier par effectuer le
mouvement utilisé pour la peinture au pistolet.
12
Page 14

798866
Pulvérisateur HVLP
Remarque : Le mouvement utilisé pour la peinture au pistolet devrait venir
du bras, et non pas seulement du poignet. Cela permet de conserver la même
distance entre le pistolet à peinture et la surface de travail.
Remarque : Une distance inégale entre le pistolet à peinture et la surface de
travail aura pour résultat une application de peinture inégale.
• Déplacer le pistolet à peinture uniformément sur toute la surface de travail et
éviter d’interrompre la pulvérisation. Voir Fig. A.
Remarque : Un mouvement uniforme du pistolet à peinture aura pour résultat une
surface de qualité uniforme.
• S’il y a une accumulation du produit de revêtement sur la buse (16) et le
bouchon d’admission d’air (15), arrêter de peindre, arrêter l’appareil, démonter
et nettoyer ces deux pièces avec du solvant ou de l’eau, selon le besoin.
• Nettoyer à fond le pistolet à peinture après avoir terminé le projet de peinture
au pistolet.
Astuces
• La façon la plus efficace de peindre au pistolet une surface verticale, c’est
d’utiliser une méthode de ‘couches croisées’, c'est-à-dire de peindre en zigzag
en faisant en premier des bandes horizontales, puis verticales. Effectuer des
mouvements réguliers et harmonieux au lieu de mouvements saccadés. Voir
Fig.B.
• Déplacer un morceau plat de carton parallèlement au jet de peinture pour
masquer les extrémités de la surface de travail. Voir illustration ci-dessous.
• Pour l’utilisation de couleurs vives ou pour peindre par-dessus des teintes vives
avec une couleur plus claire, au moins appliquer deux couches, en laissant
chaque couche sécher avant l’application de la suivante. Cela assurera une
bonne couverture.
• Il est également possible d’utiliser une technique de peinture au pochoir pour
peindre des formes sur les murs.
ATTENTION : Le pistolet doit être nettoyé près chaque utilisation pour éviter que la
peinture sèche sur le pistolet.
Fig. A
Légère couche
à cet endroit
200-250 mm
Début de
la passe
Appui sur
la gâchette
Couche trop épaisse
à cet endroit
Faux
Relâche de
la gâchette
Correct
La couche doit être
régulière et humide
Fin de
la passe
Entretien
Nettoyage
REMARQUE : il est essentiel de nettoyer à fond cet appareil après chaque
utilisation afin de le conserver en parfait état de marche. Le non-respect des
conseils de nettoyage et d’entretien de l’appareil donnés ci-dessous pourra
annuler la garantie.
Toujours s’assurer que l’appareil est débranché de l’alimentation secteur avant
d’effectuer toute procédure d’entretien.
Après chaque utilisation :
1. Eteindre et débrancher l’appareil
2. Retirer le réservoir de peinture (0) en le dévissant et le vider complètement
de tout restant de produit de revêtement.
3. Pré-nettoyer le réservoir et le tube d’alimentation avec un solvant approprié
ou de l’eau tiède et une brosse douce.
4. Remplir le réservoir d’eau tiède (ou d’un solvant approprié) et réassembler
le pistolet à peinture.
5. Mettre en marche l’appareil et vaporiser l’eau tiède (ou le solvant) dans un
récipient ou sur un chiffon.
6. Répéter la procédure décrite ci-dessus jusqu’à ce que le liquide vaporisé
n’ait plus aucune trace de peinture.
7. Arrêter l’appareil.
8. Vider complètement le réservoir. Toujours conserver le joint d’étanchéité du
réservoir propre (dénué de tout produit de revêtement) et vérifier qu’il n’est
pas endommagé.
9. Dévisser le bouchon de la buse (1) et enlever le bouchon d’admission d’air
(14) et la buse (16).
10. Nettoyer à fond le bouchon d’admission d’air et la buse avec un solvant
approprié ou de l’eau tiède et une brosse douce.
AVERTISSEMENT : ne jamais nettoyer la buse ou les trous de ventilation avec un
objet métallique coupant.
11. Nettoyer le réservoir et l’extérieur du pistolet à peinture avec un chiffon
imbibé de solvant ou d’eau.
Filtre à air
• Vérifier le filtre à air dans le compartiment (4) périodiquement et le remplacer
s’il est encrassé ou bouché.
AVERTISSEMENT : ne jamais utiliser cet appareil si le filtre à air n’est pas en place
; la saleté pourrait être aspirée dans le moteur et pourrait endommager ce dernier.
Recyclage
Lorsque l’appareil n’est plus en état de fonctionner et qu’il n’est pas réparable,
recyclez l’appareil en accordance avec les régulations nationales.
• Ne jetez pas les outils électriques et autres équipements électriques ou
électroniques(DEEE) avec les ordures ménagères
• Contactez les autorités locales compétentes en matière de gestion des déchets
pour vous informer de la procédure à suivre pour recycler les outils électriques
Fig. B
www.silverlinetools.com
13
Page 15

F
En cas de problème
Problème Cause Solution
Le tube d’alimentation dans le réservoir (12) est
mal positionné
Le moteur fonctionne mais il n’y
a pas de pulvérisation ou elle est
irrégulière.
Pulvérisation faible
La peinture coule sur la surface
Le moteur fait plus de bruit que
d’habitude
Le moteur (9) ne fonctionne pas Pas d’alimentation Vérifier le branchement de la prise
Son anormal lors du fonctionnement
Effet peau d’orange sur la surface
Tube d’alimentation bloqué Débloquer avec de l’eau savonneuse ou solvant selon le blocage.
Régulateur du volume d’air (3) mal réglé. Régler à la position correcte
La buse (16) est bolquée La retirer pour la nettoyer
Filtre bloqué Vérifier et changer le si nécessaire
Régulateur du volume d’air mal réglé. Régler à la position correcte
Peinture trop épaisse Vérifier la viscosité
Trop de peinture appliquée Réduire le volume d’air
Peinture trop liquide Vérifier la viscosité
Le pistolet (2) n’est pas propre ou il y a un blocage Retirer le pistolet et nettoyer la buse et autres éléments avec un solvant.
Le réservoir est presque vide ce qui produit une
aspiration de l’air
Peinture trop épaisse Vérifier la viscosité
Distance incorrect du pistolet par rapport à la
surface, ou mauvais angle du pistolet
Mauvais solvant utilisé avec la peinture Utiliser le solvant adéquat
Ajuster la position
Remplir le réservoir
Ajuster la position
14
Page 16

Garantie Silverline Tools
Ce produit Silverline bénéficie d’une garantie
de 3 ans
Enregistrez ce produit à www.silverlinetools.com dans les 30 jours suivant
l’achat afin de bénéficier de la garantie de 3 ans. La période de garantie
commence à partir de la date d’achat figurant sur votre facture d’achat.
Conditions de Garantie des Outils Silverline
La période de garantie prend effet à compter de la date de l’achat en
magasin, comme indiqué sur votre facture d’achat.
VEUILLEZ CONSERVER VOTRE FACTURE D’ACHAT.
Si ce produit est défectueux pendant les 30 jours qui suivent l’achat,
retournez-le au magasin où vous l’avez acheté, avec votre facture, en
expliquant en détail le problème. Le produit sera remplacé ou vous serez
remboursé(e).
Si ce produit est défectueux après cette période de 30 jours,
retournez-le à :
Silverline Tools Service Centre
PO Box 2988
Yeovil
BA21 1WU, Royaume Uni
Toute demande de service sous garantie doit être soumise pendant la
période de garantie.
Avant toute intervention sous garantie, vous devez présenter la facture
d’achat originale sur laquelle doivent figurer la date d’achat, votre nom,
votre adresse et le lieu d’achat.
Vous devez expliquer en détail la défaillance nécessitant réparation.
Les demandes de service sous garantie faites pendant la période de
garantie seront vérifiées par Silverline Tools pour établir si la défaillance du
produit est liée à un vice de matériau ou de fabrication.
Les frais de port ne seront pas remboursés. Les articles retournés doivent
être convenablement propres et sûrs pour être réparés et devraient être
emballés soigneusement pour éviter tout dommage ou toute blessure
pendant le transport. Nous pouvons refuser les livraisons qui ne sont pas
convenables ou sûres.
Toute intervention sera effectuée par Silverline Tools ou ses agents de
réparation agréés.
La réparation ou le remplacement du produit ne dépassera pas la période
de garantie.
Les anomalies que nous reconnaissons être couvertes par la garantie
seront rectifiées par la réparation de l’outil, sans frais (hormis les
frais de port) ou par son remplacement par un outil en parfait état de
fonctionnement.
Les pièces ou les outils remplacés deviendront la propriété de
Déclaration de conformité CE
Le soussigné : Mr Darrell Morris
Autorisé par : Silverline Tools
Déclare que le produit :
Code d’identification : 798866
Description : Pulvérisateur HVLP 500 W
Est conforme aux directives suivantes :
• Directive sur les machines 2006/42/CE
• Directive sur les basses tensions 2006/95/CE
• Directive sur la compatibilité électromagnétique 2004/108/CE
• Directive RoHS 2011/65/UE
• EN60745-1:2009+A11
• EN50580:2012
• EN55014-1:2006
• EN55014-2:1997+A1
• EN61000-3-2:2006
• EN61000-3-3:1995+A1+A2
Pulvérisateur HVLP 798866
Enregistrement de votre achat
Visitez silverlinetools.com, sélectionnez le bouton d’enregistrement
et saisissez :
• Vosinformationspersonnelles
• Lesinformationsconcernantleproduitetl’achat
Vous recevrez le Certificat de garantie en format PDF. Veuillez l’imprimer et
le conserver avec votre achat.
Silverline Tools.
La réparation ou le remplacement de votre produit sous garantie vous
apporte des avantages ; ces avantages s’ajoutent à vos droits statutaires
en tant que consommateur sans les affecter aucunement.
La présente garantie couvre:
La réparation du produit, s’il peut être vérifié, à la satisfaction de Silverline
Tools, que les défaillances du produit ont été provoquées par un vice de
matériau ou de fabrication au cours de la période de garantie.
Si une pièce n’est plus disponible ou n’est plus fabriquée, Silverline Tools la
remplacera par une pièce de rechange opérationnelle.
Utilisation de ce produit dans l’UE.
La présente garantie ne couvre pas:
Silverline Tools ne garantit pas les réparations nécessaires du produit
engendrées par :
L’usure normale provoquée par l’utilisation conforme aux instructions
d’utilisation, par exemple les lames, les charbons, les courroies, les
ampoules, les batteries, etc.
Le remplacement de tout accessoire fourni tel que les forêts, les lames, les
feuilles abrasives, les outils de coupes et les autres articles associés.
Les dommages et les défaillances accidentels causés par une utilisation ou
un entretien négligent, une mauvaise utilisation, un manque d’entretien ou
une utilisation ou une manipulation imprudente du produit.
L’utilisation du produit à des fins autres que son utilisation domestique
normale.
Le moindre changement ou la moindre modification du produit.
L’utilisation de pièces et d’accessoires qui ne sont pas des composants
véritables de Silverline Tools.
Une installation défectueuse (sauf si l’installation a été réalisée par
Silverline Tools).
Les réparations ou les modifications réalisées par des tiers autres que
Silverline Tools ou ses agents de réparation agréés.
Les demandes de service autres que le droit de rectifier les défaillances
de l’outil indiquées dans ces conditions de garantie ne sont pas couvertes
par cette garantie.
Organisme notifié : TUV Rheinland, Shanghai, Chine
La documentation technique est conservée par : Silverline Tools
Date : 27/06/13
Signature :
Directeur
Nom et adresse du fabricant ou de son représentant agréé :
Powerbox International Ltd., Boundary Way, Lufton Trading Estate, Yeovil,
Somerset, BA22 8HZ Royaume-Uni
www.silverlinetools.com
15
Page 17

D
Beschreibung der Symbole
Auf dem Leistungsschild des Werkzeugs sind möglicherweise Symbole abgebildet.
Sie vermitteln wichtige Informationen über das Produkt oder dienen als
Gebrauchsanweisung
Ohrenschutz tragen
Augenschutz tragen
Atemschutz tragen
Kopfschutz tragen
Handschutz tragen
Bedienungsanleitung sorgfältig lesen
Für zusätzlichen Schutz doppelt isoliert
Erfüllt die entsprechenden rechtlichen Vorschriften und
Sicherheitsnormen
Umweltschutz
Elektroaltgeräte dürfen nicht über den Haushaltsmüll entsorgt
werden. Nach Möglichkeit bitte über entsprechende Einrichtungen
entsorgen. Lassen Sie sich bezüglich der sachgemäßen
Entsorgung von Elektrowerkzeugen von der zuständigen Behörde
oder dem Händler beraten
Technische Daten
Aufnahme: ....................................................220–240 V~, 50/60 Hz
Leistung: ......................................................500 W
Farbbehälter: ................................................700 ml
Max. Viskosität: ............................................50 din/s
Max. Durchfluss: ..........................................320 ml/min
Schlauchlänge: .............................................Ø1,8 mm
Schlauchlänge: .............................................1,8 m
Netzkabellänge:............................................2 m
Gewicht: .......................................................3 kg
Schutzklasse: ...............................................
Geräusch- und Vibrationsinformationen:
Schalldruckpegel: ......................................... L
Schallleistungspegel:....................................LWA = 82 dB(A)
Unsicherheit: ................................................ K = 3 dB(A)
Vibration: ...................................................... <2,5 m/s
Aufgrund der fortlaufenden Weiterentwicklung unserer
Produkte können sich die technischen Daten von SilverlineProdukten ohne vorherige Ankündigung ändern.
Der Schallintensitätspegel kann für den Bediener 85 dB(A)
übersteigen und Lärmschutzmaßnahmen sind notwendig.
WARNUNG: Tragen Sie in Bereichen, wo der Lärmpegel 85 dB(A) überschreitet,
unbedingt angemessenen Gehörschutz und begrenzen Sie nach Möglichkeit die
Belastungsdauer. Sollte trotz Gehörschutz Unbehagen irgendeiner Art auftreten,
beenden Sie die Arbeit unverzüglich und überprüfen Sie den Gehörschutz
auf korrekten Sitz und Funktion und stellen Sie sicher, dass dieser einen
angemessenen Schutz für den Lärmpegel bietet, der von den verwendeten
Werkzeugen ausgeht.
WARNUNG: Bei der Benutzung mancher Werkzeuge wird der Benutzer Vibrationen
ausgesetzt, welche zum Verlust des Tastsinns, zu Taubheitsgefühl, Kribbeln und zu
einer Verminderung der Handgreifkraft führen können. Langfristige Belastung kann
zu chronischen Beschwerden führen. Begrenzen Sie, falls nötig, die Exposition
zu Vibrationen und tragen Sie vibrationsmindernde Handschuhe. Verwenden Sie
dieses Werkzeug nicht mit kalten Händen, da Vibrationen bei Temperaturen unter
dem individuellen Komfortbereich eine stärkere Wirkung zeigen. Beurteilen Sie
die Vibrationsbelastung unter Zuhilfenahme der Technischen Daten des jeweiligen
Werkzeuges und bestimmen Sie die zulässige Belastungsdauer und -häufigkeit.
PA
= 71 dB(A)
2
Die in den Technischen Daten angegebenen Geräusch- und
Vibrationsinformationen werden nach EN 60745 bzw. vergleichbaren
internationalen Standards bestimmt. Die angegebenen Werte beziehen sich auf
eine normale Benutzung des Werkzeuges unter normalen Arbeitsbedingungen.
Schlecht gewartete, inkorrekt montierte und unsachgemäß verwendete Werkzeuge
können erhöhte Schallpegel und Vibrationswerte aufweisen. Weitere Informationen
zur EU-Vibrationsrichtlinie und zu Schall- sowie Vibrationsbelastungen, die auch für
Heimanwender relevant sein können, finden Sie auf den Seiten der Europäischen
Agentur für Sicherheit und Gesundheitsschutz am Arbeitsplatz: www.osha.
europa.eu.
Allgemeine Sicherheitshinweise
WARNUNG! Lesen Sie alle Sicherheitshinweise und Anweisungen. Versäumnisse
bei der Einhaltung der Sicherheitshinweise und Anweisungen können elektrischen
Schlag, Brand und/oder schwere Verletzungen verursachen.
WARNUNG! Dieses Gerät darf nicht von Personen (wie z.B. Kindern) mit
eingeschränkten körperlichen oder geistigen Fähigkeiten oder von Personen
ohne Erfahrung im Umgang mit einem solchen Gerät betrieben werden, außer
wenn sie von einer für ihre persönliche Sicherheit verantwortlichen Person in
der Benutzung unterwiesen worden sind und dabei beaufsichtigt werden. Kinder
müssen beaufsichtigt werden, um sicherzustellen, dass sie das Gerät nicht als
Spielzeug verwenden.
Bewahren Sie alle Sicherheitshinweise und Anweisungen für die Zukunft auf.
Der in den Sicherheitshinweisen verwendete Begriff „Elektrowerkzeug“ bezieht
sich auf netzbetriebene. Elektrowerkzeuge (mit Netzkabel) und auf akkubetriebene
Elektrowerkzeuge (ohne Netzkabel).
Arbeitsplatzsicherheit
a) Halten Sie Ihren Arbeitsbereich sauber und gut beleuchtet. Unordnung
oder unbeleuchtete Arbeitsbereiche können zu Unfällen führen.
b) Arbeiten Sie mit dem Elektrowerkzeug nicht in explosionsgefährdeter
Umgebung, in der sich brennbare Flüssigkeiten, Gase oder Stäube
befinden. Elektrowerkzeuge erzeugen Funken, die den Staub oder die
Dämpfe entzünden können.
c) Halten Sie Kinder und andere Personen während der Benutzung des
Elektrowerkzeugs fern. Bei Ablenkung können Sie die Kontrolle über das
Gerät verlieren.
Elektrische Sicherheit
a) Der Anschlussstecker des Elektrowerkzeuges muss in die Steckdose
passen. Der Stecker darf in keiner Weise verändert werden.
Verwenden Sie keine Adapterstecker gemeinsam mit schutzgeerdeten
Elektrowerkzeugen. Unveränderte Stecker und passende Steckdosen
verringern das Risiko eines elektrischen Schlages.
b) Vermeiden Sie Körperkontakt mit geerdeten Oberflächen wie von
Rohren, Heizungen, Herden und Kühlschränken. Es besteht ein erhöhtes
Risiko durch elektrischen Schlag, wenn Ihr Körper geerdet ist.
c) Halten Sie Elektrowerkzeuge von Regen oder Nässe fern. Das Eindringen
von Wasser in ein Elektrowerkzeug erhöht das Risiko eines elektrischen
Schlages.
d) Zweckentfremden Sie das Kabel nicht, um das Elektrowerkzeug zu
tragen, aufzuhängen oder um den Stecker aus der Steckdose zu ziehen.
Halten Sie das Kabel fern von Hitze, Öl, scharfen Kanten oder sich
bewegenden Geräteteilen. Beschädigte oder verwickelte Kabel erhöhen
das Risiko eines elektrischen Schlages.
e) Wenn Sie mit einem Elektrowerkzeug im Freien arbeiten, verwenden Sie
nur Verlängerungskabel, die auch für den Außenbereich geeignet sind.
Die Anwendung eines für den Außenbereich geeigneten Verlängerungskabels
verringert das Risiko eines elektrischen Schlages.
f) Wenn der Betrieb des Elektrowerkzeuges in feuchter Umgebung nicht
vermeidbar ist, verwenden Sie einen Fehlerstromschutzschalter. Der
Einsatz eines Fehlerstromschutzschalters vermindert das Risiko eines
elektrischen Schlages.
Sicherheit von Personen
a) Seien Sie aufmerksam, achten Sie darauf, was Sie tun, und gehen Sie
mit Vernunft an die Arbeit mit einem Elektrowerkzeug. Benutzen Sie
kein Elektrowerkzeug, wenn Sie müde sind oder unter dem Einfluss
von Drogen, Alkohol oder Medikamenten stehen. Ein Moment der
Unachtsamkeit beim Gebrauch des Elektrowerkzeuges kann zu ernsthaften
Verletzungen führen.
b) Tragen Sie persönliche Schutzausrüstung und immer eine Schutzbrille.
Das Tragen persönlicher Schutzausrüstung, wie Staubmaske, rutschfeste
Sicherheitsschuhe, Schutzhelm oder Gehörschutz, je nach Art und Einsatz
des Elektrowerkzeuges, verringert das Risiko von Verletzungen.
c) Vermeiden Sie eine unbeabsichtigte Inbetriebnahme. Vergewissern
Sie sich, dass das Elektrowerkzeug ausgeschaltet ist, bevor Sie es an
die Stromversorgung und/oder den Akku anschließen, es aufnehmen
oder tragen. Wenn Sie beim Tragen des Elektrowerkzeuges den Finger
am Schalter haben oder das Gerät eingeschaltet an die Stromversorgung
anschließen, kann dies zu Unfällen führen.
16
Page 18

798866
Niederdruck-Spritzpistole 500 W
d) Entfernen Sie Einstellwerkzeuge oder Schraubenschlüssel, bevor Sie
das Elektrowerkzeug einschalte. Ein Werkzeug oder Schlüssel, der sich in
einem drehenden Geräteteil befindet, kann zu Verletzungen führen.
e) Vermeiden Sie eine unnatürliche Körperhaltung. Sorgen Sie für einen
sicheren Stand und halten Sie stets das Gleichgewicht. Auf diese
Weise lässt sich das Elektrowerkzeug in unerwarteten Situationen besser
kontrollieren.
f) Tragen Sie geeignete Kleidung. Tragen Sie keine weite Kleidung oder
Schmuck. Halten Sie Haare, Kleidung und Handschuhe fern von sich
bewegenden Teilen. Lockere Kleidung, Schmuck oder lange Haare können
von sich bewegenden Teilen erfasst werden.
g) Wenn Staubabsaug- und -auffangeinrichtungen montiert werden
können, vergewissern Sie sich, dass diese angeschlossen sind und
richtig verwendet werden. Verwendung einer Staubabsaugung kann
Gefährdungen durch Staub verringern.
Verwendung und Behandlung des
Elektrowerkzeuges
a) Überlasten Sie das Gerät nicht. Verwenden Sie für Ihre Arbeit das dafür
bestimmte Elektrowerkzeug. Mit dem passenden Elektrowerkzeug arbeiten
Sie besser und sicherer im angegebenen Leistungsbereich.
b) Benutzen Sie kein Elektrowerkzeug, dessen Schalter defekt ist. Ein
Elektrowerkzeug, das sich nicht mehr ein- oder ausschalten lässt, ist
gefährlich und muss repariert werden.
c) Ziehen Sie den Stecker aus der Steckdose und/oder entfernen Sie den
Akku, bevor Sie Geräteeinstellungen vornehmen, Zubehörteile wechseln
oder das Gerät weglegen. Diese Vorsichtsmaßnahme verhindert den
unbeabsichtigten Start des Elektrowerkzeuges.
d) Bewahren Sie unbenutzte Elektrowerkzeuge außerhalb der Reichweite
von Kindern auf. Lassen Sie Personen das Gerät nicht benutzen, die
mit diesem nicht vertraut sind oder diese Anweisungen nicht gelesen
haben. Elektrowerkzeuge sind gefährlich, wenn sie von unerfahrenen
Personen benutzt werden.
e) Pflegen Sie Elektrowerkzeuge mit Sorgfalt. Kontrollieren Sie, ob
bewegliche Teile einwandfrei funktionieren und nicht klemmen,
ob Teile gebrochen oder so beschädigt sind, dass die Funktion des
Elektrowerkzeuges beeinträchtigt ist. Lassen Sie beschädigte Teile vor
dem Einsatz des Gerätes reparieren. Viele Unfälle haben ihre Ursache in
schlecht gewarteten Elektrowerkzeugen.
f) Halten Sie Schneidwerkzeuge scharf und sauber. Sorgfältig gepflegte
Schneidwerkzeuge mit scharfen Schneidkanten verklemmen sich weniger
und sind leichter zu führen.
g) Verwenden Sie Elektrowerkzeug, Zubehör, Einsatzwerkzeuge usw.
entsprechend diesen Anweisungen. Berücksichtigen Sie dabei die
Arbeitsbedingungen und die auszuführende Tätigkeit. Der Gebrauch von
Elektrowerkzeugen für andere als die vorgesehenen Anwendungen kann zu
gefährlichen Situationen führen.
Service
a) Lassen Sie Ihr Elektrowerkzeug nur von qualifiziertem Fachpersonal
und nur mit Original-Ersatzteilen reparieren. Damit wird sichergestellt,
dass die Sicherheit des Elektrowerkzeuges erhalten bleibt.
Zusätzliche Sicherheitshinweise
für Spritzpistolen
Gefährliche Arbeitsumgebung
• Achten Sie immer darauf, dass ausreichend freier Raum um den Arbeitsbereich
verfügbar ist. Verwenden Sie Spritzwerkzeuge nur in gut belüfteten Bereichen
oder speziellen Spritzkabinen. Beachten Sie, dass Luftschläuche eine
Stolpergefahr darstellen können. Legen Sie Schläuche stets so, dass die Gefahr
möglichst gering gehalten wird.
Augen schützen
• Tragen Sie immer eine Schutzbrille.
Schutzkleidung
• Tragen Sie stets geeignete Schutzausrüstung einschließlich, aber nicht
beschränkt auf Arbeitsschutzanzüge, Handschuhe, Gesichtsmasken usw.
• Es liegt in der Verantwortung des Benutzers, dafür zu sorgen, dass allen in
der Nähe des Arbeitsbereichs befindlichen Personen ebenfalls angemessene
Schutzausrüstung zur Verfügung steht.
Verwendung von Spritzpistolen
• Richten Sie Spritzpistolen weder auf Menschen noch auf Tiere.
• Halten Sie sich beim Sprühen von Hitzequellen und offenen Flammen fern.
WARNUNG! Lösungsmittel und Anstrichstoffe sind schädlich und können
giftig sein. Einige Lösungsmittel und Anstrichstoffe sind hochentzündlich.
Mit Vorsicht und gemäß den Herstellerangaben handhaben. Lösungsmittel
und Anstrichstoffe in verschlossenen, dichten Behältern aus gegenüber dem
jeweiligen Lösungsmittel chemisch beständigem Material lagern. Immer geeignete
persönliche Schutzausrüstung tragen und Lösungsmittel und Anstrichstoffe sowie
kontaminierte Gegenstände vorschriftsmäßig als Sondermüll entsorgen.
WARNUNG! Lösungsmittel auf Halogenkohlenwasserstoffbasis wie Trichlorethan
und Methylenchlorid 1.1.1 können in Verbindung mit Aluminium oder heißen,
verzinkten Komponenten chemische Reaktionen hervorrufen. Sie stellen somit
möglicherweise eine Explosionsgefahr dar.
WARNUNG! Beim Versprühen von Anstrichstoffen entstehen gefährliche,
gesundheitsschädliche Dämpfe und Aerosole. Lesen Sie bitte alle Etiketten
und Sicherheitshinweise sorgfältig durch und befolgen Sie alle Anweisungen
und Vorschriften. Wenden Sie sich im Zweifelsfalle bitte an den Hersteller des
Anstrichstoffes. Tragen Sie beim Sprühen einen angemessenen Atemschutz. Der
verwendete Atemschutz muss für den auszubringenden Anstrichstoff geeignet und
dem Grad der Dampfkonzentration angepasst sein. Beim Sprühen von Farbe oder
Lack muss ein von der Umgebungsatmosphäre unabhängiger Atemschutz oder
Schutzausrüstung mit der Filterkombination A1/A2-P2 verwendet werden. Sorgen
Sie während des gesamten Sprüh- und Reinigungsvorgangs für ausreichenden
Hautschutz. Tragen Sie geeignete Arbeitsschutzkleidung und verwenden Sie
entsprechend schützende Hautsalbe.
WARNUNG! KEINE Säuren, Laugen, Entfernungsmittel u.ä. Substanzen versprühen!
Produktübersicht
1 Spritzbildkappe
2 Spritzpistole
3 Luftmengenregler
4 Luftfilterabdeckun
5 Schultergurtverankerungen
6 Ein-/Ausschalter
7 Luftauslass
8 Luftschlauch
9 Turbinengehäus
10 Schultergurt
11 Viskositätsmessbecher
12 Farbbehälter
13 Abzug
14 Luftkappe
15 Spritzbildregler
16 Düse
Bestimmungsgemäße
Verwendung
Spritzpistole zum Ausbringen von dafür geeigneten Farben, Lacken und anderen
Beschichtungsmaterialien auf verschiedenste Oberflächen.
Auspacken des Gerätes
• Packen Sie Ihr Werkzeug vorsichtig aus und überprüfen Sie es. Machen Sie sich
vollständig mit allen seinen Eigenschaften und Funktionen vertraut.
• Vergewissern Sie sich, dass sämtliche Teile des Werkzeugs vorhanden und in
einwandfreiem Zustand sind. Sollten Teile fehlen oder beschädigt sein, lassen
Sie diese ersetzen, bevor Sie das Werkzeug verwenden.
www.silverlinetools.com
17
Page 19

D
Vor Inbetriebnahme
Montage
Schultergurt anbringen
• Befestigen Sie den Schultergurt (10) an den Schultergurtverankerungen
(5) am Turbinengehäuse (9).
Luftschlauch anschließen
• Stecken Sie den Luftschlauch (8) mit einem Ende in den Luftauslass (7) am
Turbinengehäuse (9) und mit dem anderen Ende in den Luftmengenregler (3)
an der Spritzpistole (2).
• Achten Sie dabei auf einen festen Sitz des Luftschlauchs.
Arbeitsbereich vorbereiten
• Decken Sie alle Oberflächen und Gegenstände ab, die nicht mit Farbe versehen
werden sollen, oder entfernen Sie sie aus dem Arbeitsbereich.
• Silikatfarbe hinterlässt auf Glas und Keramik irreversible Flecken. Bei
Verwendung von Silikatfarben gläserne und keramische Flächen sorgfältig
abdecken!
Beschichtungsstoff vorbereiten
WARNUNG! Diese Spritzpistole eignet sich nicht für strukturierte Wandfarben,
Latexfarben, Laugen, säurehaltige Beschichtungsstoffe sowie Granulat oder andere
Feststoffe enthaltende Farben und Lösungen.
• Vor dem Gebrauch müssen die meisten Farben bzw. Beschichtungsstoffe durch
Verdünnen auf die richtige Viskosität für diese Spritzpistole (2) gebracht werden.
1. Rühren Sie den Beschichtungsstoff gründlich durch und tauchen Sie dann
den Viskositätsmessbecher (11) ganz in den Beschichtungsstoff ein.
2. Heben Sie den Viskositätsmessbecher aus dem Beschichtungsstoff und
zählen Sie, wie viele Sekunden die Flüssigkeit benötigt, um vollständig aus
dem Becher zu laufen.
3. Die erforderlichen Auslaufzeiten werden in der Viskositätstabelle unten
aufgeführt. Wenn der Beschichtungsstoff zu langsam trocknet, muss er
verdünnt werden.
Hinweis: Es wird empfohlen, beim Mischen von Farben die Mengenanteile zu
notieren, um bei später angerührten Farbmischungen denn gleichen Farbton zu
treffen.
• Verdünnen Sie den Beschichtungsstoff in einem separaten Behälter mit einem
geeigneten Verdünnungsmittel bzw. Wasser, bis das Material die erforderliche
Auslaufzeit aufweist.
• Mischen Sie immer nur eine geringe Menge an Beschichtungsstoff auf einmal
an.
• Überprüfen Sie vor dem Einfüllen in die Spritzpistole stets die Viskosität.
• Ist der Farbfluss auch bei maximaler Durchflusseinstellung zu gering, geben
Sie schrittweise 5–10 % Verdünnung bei, bis der Farbfluss den Anforderungen
entspricht.
Viskositätstabelle
Beschichtungsstoff Auslaufzeit (Sek.)
Farben auf Wasserbasis
Grundierungen auf
Wasserbasis
Lacke auf Wasserbasis
Grundierungen auf Ölbasis
Lacke auf Ölbasis
Holzkonservierungsmittel,
Farbentferner, Öle
Desinfektionsmittel,
Pflanzenschutzmittel
Kfz-Decklacke
Hinweis: Die maximale Viskosität des zu verwendendem Beschichtungsstoffs liegt
bei 50 din/s. Es wird jedoch empfohlen, bei allgemeinen Anwendungen 40 din/s
nicht zu überschreiten (siehe Tabelle oben).
* 20 - 40
25 – 40
20 – 35
25 – 40
15 – 40
Nicht verdünnen
Nicht verdünnen
20 – 35
Bedienung
*Auch Anweisungen des Farbherstellers beachten.
Farbbehälter vorbereiten
1. Schrauben Sie den Farbbehälter (12) von der Spritzpistole (2) ab.
2. Richten Sie das Steigrohr wie folgt zum Behälter aus:
Für das Spritzen horizontaler Oberflächen (z.B. Wände): Drehen Sie das
Steigrohr so, dass es in Richtung der zu bearbeitenden Fläche zeigt.
Für das Spritzen von über Kopf liegenden Flächen (z.B. Zimmerdecken):
Drehen Sie das Steigrohr so, dass es von der zu bearbeitenden Fläche
fortweist.
3. Befüllen Sie den Farbbehälter mit dem gewünschten Beschichtungsstoff.
Stellen Sie den Farbbehälter auf eine ebene Oberfläche. Rühren Sie den
vorbereiteten Beschichtungsstoff auf, so dass er gleichmäßig vermischt ist.
Befüllen Sie den Farbbehälter vorsichtig – max. Füllmenge: 700 ml.
4. Schrauben Sie den Farbbehälter wieder fest auf die Spritzpistole auf.
Spritzbild einstellen
Für verschiedene Spritzanforderungen sind drei Einstellungen möglich:
• Vertikaler Flachstrahl (A) zum Besprühen vertikaler Oberflächen (z.B. Wände).
• Horizontaler Flachstrahl (B) zum Besprühen horizontaler Oberflächen (z.B.
Zimmerdecken).
• Rundstrahl (C) zum Besprühen von Ecken, Kanten und von schwer zugänglichen
Bereichen.
Abb. A - Spritzbildregler (15) horizontal und angehoben,
Abb. B - Spritzbildregler vertikal und angehoben,
Abb. C - Spritzbildregler flach auf der Luftkappe (14). In horizontaler und vertikaler
Position möglich.
WARNUNG! Drücken Sie niemals den Abzug (13), während Sie das Spritzbild
einstellen.
1. Lösen Sie die Spritzbildkappe (1) leicht.
2. Drehen Sie die Luftkappe (14) in die gewünschte Position.
3. Bringen Sie die Spritzbildregler (15) an der Luftkappe in die gewünschte
Position (siehe Einstellungen oben).
4. Ziehen Sie die Spritzbildkappe wieder fest.
WICHTIGER HINWEIS: Die Spritzbildregler sind nur zwischen 0° und 45° drehbar.
Spritzvorgang vorbereiten
• Schließen Sie den Netzstecker an das Stromnetz an.
• Setzen Sie die Spritzpistole (2) in den Pistolenhalter auf dem Turbinengehäuse
(9).
• Heben Sie das Gerät hoch und legen Sie sich den Gurt so über die Schulter,
dass er bequem sitzt, sofern Sie das Gerät tragend bedienen möchten.
• Nehmen Sie die Spritzpistole aus dem Pistolenhalter und überprüfen Sie, ob Sie
die zu bespritzenden Bereiche gut erreichen können.
Gerät einschalten
• Stellen Sie den Ein-/Ausschalter (6) auf I, um das Gerät einzuschalten.
• Um das Gerät auszuschalten, stellen Sie den Ein-/Ausschalter auf O und trennen
Sie den Netzstecker vom Stromnetz.
Farbfluss einstellen
• Die Durchflussmenge des Beschichtungsstoffes kann über den
Luftmengenregler (3) eingestellt werden, um den Farbfluss nach Bedarf zu
erhöhen bzw. zu verringern.
• Drehen Sie den Luftmengenregler gegen den Uhrzeigersinn, um den Farbfluss
zu verringern.
• Drehen Sie den Luftmengenregler im Uhrzeigersinn, um den Farbfluss zu
erhöhen.
HINWEIS: Bei den meisten Wandfarben erzielt man mit mittlerer Durchflussmenge
die besten Ergebnisse.
Spritztechnik
• Testen Sie die Spritzpistole (2) auf Karton oder einem ähnlichen Untergrund, um
die geeignete Durchflussmenge zu ermitteln.
• Drücken Sie den Abzug (13), um mit dem Spritzen zu beginnen. Lassen Sie den
Abzug los, um den Spritzvorgang zu beenden.
• Beginnen Sie am Rand der zu besprühenden Fläche.
• Halten Sie die Spritzpistole so, dass die Luftkappe (14) 250 bis 300 mm von der
zu besprühenden Fläche entfernt ist, je nach gewünschter Spritzstrahlbreite.
• Beginnen Sie zuerst die Spritzbewegung und drücken Sie erst dann den Abzug.
HINWEIS: Die Spritzbewegung sollte aus den Armen und nicht nur aus dem
Handgelenk kommen. Auf diese Weise ist es einfacher, einen gleichmäßigen
Abstand zwischen der Spritzpistole und der zu besprühenden Fläche einzuhalten.
HINWEIS: Ein ungleichmäßiger Abstand zwischen Spritzpistole und Fläche führt zu
ungleichmäßigem Farbauftrag.
18
Page 20

798866 Niederdruck-Spritzpistole 500 W
• Bewegen Sie die Spritzpistole gleichmäßig über die Oberfläche und vermeiden
Sie Unterbrechungen (siehe Abb. A).
HINWEIS: Durch eine gleichmäßige Bewegung der Spritzpistole wird eine
gleichmäßige Oberflächenqualität erzielt.
• Wenn sich Beschichtungsstoff an der Düse (16) und Luftkappe (14) absetzt,
unterbrechen Sie den Spritzvorgang, schalten Sie das Gerät aus, demontieren
Sie die beiden Teile und reinigen Sie diese entsprechend mit Lösungsmittel
oder Wasser.
• Reinigen Sie die Spritzpistole gründlich, sobald Sie den Spritzvorgang beendet
haben.
Tipps
• Bei vertikalen Oberflächen ist die effektivste Methode das Spritzen über
Kreuz, d.h. das Spritzen in einem Zickzack-Muster erst in horizontaler, dann
in vertikaler Richtung. Verwenden Sie gleichmäßige, schlangenförmige
Bewegungen, anstatt immer wieder abzusetzen und neu zu beginnen (siehe
Abb. B).
• Verwenden Sie für das Verdecken von Kanten einen parallel zum Spritzstrahl
verlaufenden geraden Pappkarton.
• Tragen Sie bei kräftigen Farbtönen oder beim Überspritzen kräftiger Farben mit
helleren Farbtönen mindestens zwei Schichten auf, wobei Sie die zweite Schicht
erst auftragen sollten, wenn die erste Schicht getrocknet ist. Auf diese Weise
wird gute Deckkraft erzielt.
• Für das Spritzen von Formen auf der Wand können Schablonen verwendet
werden.
WARNUNG! Die Spritzpistole (2) muss unmittelbar nach dem Gebrauch gereinigt
werden, um dem Antrocknen von Farbe in der Spritzpistole vorzubeugen. Mehr
Farbe zum Fortsetzen der Arbeit sollte nur angerührt werden, wenn keine Gefahr
des Antrocknens besteht.
Abb. A
Hier dünne
Farbschicht
200-250 mm
Anfang des
Farbauftrags
Abzug
betätigen
Hier dicke
Farbschicht
Falsch
Richtig
Farbauftrag muss beim Sprühen
gleichmäßig und nass sein
Abzug
Ende des
freigeben
Farbauftrags
Wartung
Reinigung
HINWEIS: Um störungsfreien Betrieb zu ermöglichen, ist es dringend erforderlich,
die Spritzausrüstung nach jedem Gebrauch gründlich zu reinigen. Nichtbeachtung
der unten aufgeführten Hinweise bezüglich der Reinigung und Wartung des
Gerätes kann zum Erlöschen der Garantie führen.
Trennen Sie das Gerät vor der Durchführung von Wartungsarbeiten stets vom
Stromnetz.
Nach jedem Gebrauch:
1. Schalten Sie das Gerät aus.
2. Schrauben Sie den Farbbehälter (12) ab und entfernen Sie die Rückstände
des Beschichtungsstoffs vollständig.
3. Reinigen Sie den Farbbehälter und das Steigrohr zunächst mit einem
geeigneten Lösungsmittel oder warmem Wasser und einer weichen Bürste.
4. Befüllen Sie den Farbbehälter mit warmem Wasser (oder einem geeigneten
Lösungsmittel) und bauen Sie die Spritzpistole (2) wieder zusammen.
5. Schalten Sie das Gerät ein und spritzen Sie das Wasser (oder Lösungsmittel)
in einen Behälter oder auf ein Tuch.
6. Wiederholen Sie diesen Vorgang, bis die Spritzflüssigkeit klar ist.
7. Schalten Sie das Gerät wieder aus.
8. Leeren Sie den Farbbehälter vollständig. Halten Sie den Behälterverschluss
stets frei von Rückständen des Beschichtungsstoffs und überprüfen Sie ihn
auf Beschädigungen.
9. Lösen Sie die Spritzbildkappe (1) und entfernen Sie die Luftkappe (14) und
die Düse (16).
10. Reinigen Sie die Luftkappe und Düse gründlich mit einem geeigneten
Lösungsmittel oder warmem Wasser und einer weichen Bürste.
WARNUNG! Verwenden Sie für die Reinigung der Düse und Luftzugänge niemals
scharfe, metallische Gegenstände.
11. Reinigen Sie das Äußere der Spritzpistole und des Farbbehälters mit einem
mit Lösungsmittel oder Wasser getränkten Tuch.
Luftfilter
• Überprüfen Sie den Luftfilter hinter der Luftfilterabdeckung (4) regelmäßig und
ersetzen Sie verschmutzte oder verstopfte Luftfilter.
WARNUNG! Verwenden Sie das Spritzgerät nie ohne Luftfilter. Dies kann dazu
führen, dass Schmutz eingesaugt und der Motor beschädigt wird.
Entsorgung
Beachten Sie bei der Entsorgung von defekten und nicht mehr reparablen
Elektrowerkzeugen die geltenden Vorschriften und Gesetze.
• Elektrowerkzeuge und andere elektrische und elektronische Altgeräte nicht über
den Hausmüll entsorgen.
• Lassen Sie sich von der zuständigen Behörde bezüglich der ordnungsgemäßen
Entsorgung von Elektrowerkzeugen beraten.
Abb. B
www.silverlinetools.com
19
Page 21

D
Fehlerbehebung
Problem Ursache Abhilfe
Zuführrohr im Farbbehälter (12) in falscher Position Position des Zuführrohrs ändern
Motor läuft, aber Farbausgabe
unregelmäßig oder nicht zerstäubend
Minderwertiger Sprühnebel
Bildung von Farbnasen oder Tropfen
Motor ungewöhnlich laut
Gerät funktioniert nicht
Unnormales Betriebsgeräusch Farbbehälter fast leer, dadurch Luftansaugung Beschichtungsstoff nachfüllen
Effet peau d’orange sur la surface
Zuführrohr verstopft Je nach Art der Verstopfung mit Seifenlauge oder Verdünnungsmittel ausspülen
Luftmengenregler (3) falsch eingestellt Luftmengenregler in die richtige Position bringen
Düse (16) verstopft Düse abnehmen und reinigen
Verstopfter Filter Zustand überprüfen und ggf. Filter ersetzen
Falsche Einstellung des Luftvolumens Einstellung ändern
Farbe zu dickflüssig Viskosität überprüfen
Zu viel Beschichtungsstoff aufgebracht Luftvolumen verringern
Beschichtungsstoff zu dünnflüssig Viskosität überprüfen
Spritzpistole (2) verschmutzt oder verstopft Spritzpistole auseinandernehmen, Düse (16) und andere Teile gründlich mit
Kein Stromanschluss Prüfen, ob der Netzstecker ordnungsgemäß eingesteckt und mit dem Stromnetz
Beschichtungsstoff zu dickflüssig Viskosität überprüfen
Spritzpistole in falschem Abstand oder falschem
Winkel zur Oberfläche
Für den jeweiligen Beschichtungsstoff falsches
Lösungsmittel verwendet
Verdünnungsmittel reinigen
verbunden und das Gerät eingeschaltet ist
Position der Spritzpistole verändern
Richtiges Lösungsmittel verwenden
20
Page 22

Pulverizador de baja presión HVLP 500 W 798866
Silverline Tools Garantie
Dieses Silverline-Produkt wird mit einer 3-JahresGarantie angeboten
Registrieren Sie dieses Produkt unter silverlinetools.com innerhalb von
30 Tagen nach dem Kauf, um die 3-Jahres-Garantie zu aktivieren. Der
Garantiezeitraum beginnt mit dem Kaufdatum auf Ihrem Kaufbeleg.
Garantiebedingungen für Silverline Tools
Der Garantiezeitraum beginnt mit dem Kaufdatum im Einzelhandel, das auf
dem Kaufbeleg angegeben ist.
BITTE BEWAHREN SIE IHREN KAUFBELEG AUF
Falls dieses Produkt innerhalb von 30 Tagen nach dem Kauf einen
Defekt aufweisen sollte, bringen Sie es bitte mit Ihrem Kaufbeleg zu dem
Fachhändler, bei dem es gekauft wurde, und informieren Sie ihn über die
Mängel. Das Gerät wird ersetzt oder der Kaufpreis zurückerstattet.
Falls dieses Produkt nach Ablauf von 30 Tagen nach dem Kauf einen Mangel
aufweist, senden Sie es an:
Silverline Tools Service Centre
PO Box 2988
Yeovil
BA21 1WU, Großbritannien
Der Garantieanspruch muss während der Garantiezeit gestellt werden.
Sie müssen den Originalkaufbeleg mit Angabe des Kaufdatums einreichen
und Ihren Namen und Ihre Adresse sowie den Ort des Kaufs angeben, bevor
etwaige Arbeiten durchgeführt werden können.
Sie müssen genaue Angaben über den zu behebenden Defekt machen.
Alle innerhalb der Garantiefrist gemachten Forderungen werden von
Silverline Tools daraufhin überprüft werden, ob es sich bei den Mängeln um
einen Material- oder Fertigungsfehler handelt.
Versandkosten werden nicht zurückerstattet. Alle Produkte sollten sich
in sauberem und sicherem Zustand befinden und sorgfältig verpackt zur
Reparatur eingeschickt werden, um Schäden oder Verletzungen während
des Transports zu vermeiden. Die Annahme ungeeigneter oder unsicherer
Lieferungen kann von uns verweigert werden.
Alle Arbeiten werden von Silverline Tools oder seinen autorisierten
Reparaturwerkstätten durchgeführt.
Die Reparatur oder der Ersatz des Produkts führt nicht zur Verlängerung des
Garantiezeitraums.
Mängel, bei denen unsere Prüfung ergibt, dass sie unter die Garantie fallen,
werden durch kostenlose Reparatur des Werkzeugs (ohne Versandkosten)
oder Ersatz durch ein Werkzeug in einwandfreiem Zustand behoben.
Registrierung Ihres Kaufs
Gehen Sie zu: silverlinetools.com, wählen Sie den Link Registrierung und
geben Sie Folgendes ein:
• IhrepersönlichenAngaben
• ProduktdetailsundKaunformationen
Sobald dieses Produkt registriert worden ist, wird Ihre
Garantiebescheinigung im PDF-Format erzeugt. Bitte drucken Sie sie aus
und bewahren Sie sie zusammen mit Ihrem Produkt auf.
Einbehaltene Werkzeuge oder Teile, die ersetzt wurden, gehen in den Besitz
von Silverline Tools über.
Die Reparatur bzw. der Ersatz Ihres Produkts unter dieser Garantie erfolgt
zusätzlich zu Ihren gesetzlichen Rechten als Verbraucher und hat keine
nachteiligen Folgen auf diese.
Durch die Garantie abgedeckt ist:
Die Reparatur des Produkts, nachdem zur Zufriedenheit von Silverline Tools
nachgewiesen wurde, dass der Defekt durch fehlerhaftes Material oder
mangelhafte Arbeitsausführung bedingt ist und in den Garantiezeitraum fällt.
Wenn ein Ersatzteil nicht mehr erhältlich ist oder nicht mehr hergestellt
wird, kann Silverline Tools es gegen einen funktionellen Ersatz austauschen.
Verwendung des Produkts innerhalb der EU.
Durch die Garantie nicht abgedeckt ist:
Silverline Tools garantiert keine Reparaturen, die durch Folgendes
erforderlich geworden sind:
Normale Verschleißerscheinungen, die trotz Verwendung entsprechend
der Bedienungsanleitung entstehen, z.B. an Messern, Bürsten, Riemen,
Glühbirnen, Batterien usw.
Ersatz von mitgeliefertem Zubehör wie etwa Bohrspitzen, Messern,
Sandpapier, Schneidscheiben und anderen zugehörigen Teilen.
Unfallschäden und Fehler, die durch unsachgemäße Verwendung oder
Wartung, Missbrauch, Nachlässigkeit oder fahrlässige Bedienung oder
Handhabung des Produkts entstanden sind.
Verwendung des Produkts für andere als normale Haushaltszwecke.
Jegliche Veränderungen oder Modifikationen des Produkts.
Die Verwendung von Teilen oder Zubehör, die keine Originalkomponenten
von Silverline Tools sind.
Fehlerhafte Montage (außer, wenn von Silverline Tools vorgenommen).
Reparaturen oder Änderungen, die von anderen als Silverline Tools oder
seinen autorisieren Reparaturwerkstätten durchgeführt wurden.
Ansprüche, die über die Rechte zur Behebung von Mängeln an dem in
diesen Garantiebedingungen genannten Werkzeug hinausgehen.
EU-Konformitätserklärung
Name des Unterzeichners: Mr Darrell Morris
Bevollmächtigt durch: Silverline Tools
Erklärt hiermit, dass das Produkt:
Ident.-Nr.: 798866
Produktbeschreibung: Niederdruck-Spritzpistole 500 W
Den folgenden Richtlinien entspricht:
• Maschinenrichtlinie 2006/42/EG
• Niederspannungsrichtlinie 2006/95/EG
• EMV-Richtlinie 2004/108/EG
• RoHS-Richtlinie 2011/65/EU
• EN 60745-1:2009+A11
• EN 50580:2012
• EN 55014-1:2006
• EN 55014-2:1997+A1
• EN 61000-3-2:2006
• EN 61000-3-3:1995+A1+A2
Benannte Stelle: TÜV-Rheinland, Shanghai, China
Techn. Unterlagen bei: Silverline Tools
Datum: 27.06.13
Unterzeichnet von:
Geschäftsführender Direktor
Name und Anschrift des Herstellers oder seines niedergelassenen
Bevollmächtigten:
Powerbox International Ltd., Boundary Way, Lufton Trading Estate, Yeovil,
Somerset, BA22 8HZ Großbritannien
www.silverlinetools.com
21
Page 23

ESP
Descripción de los símbolos
Los símbolos siguientes pueden aparecer en la placa de características
de su herramienta. Éstos representan información importante sobre el
producto o instrucciones relativas a su uso.
Lleve protección auditiva
Lleve protección ocular
Lleve protección respiratoria
Lleve un casco de seguridad
Lleve guantes de seguridad
Lea el manual de instrucciones
Doble aislamiento para mayor protección
legislación correspondientes
Protección medioambiental
Los productos eléctricos usados no se deben mezclar con
la basura casera. Están sujetos al principio de recogida
selectiva. Solicite información a su ayuntamiento o
distribuidor sobre las opciones de reciclaje
Conforme a las normas de seguridad y a la
Características técnicas
Entrada: ........................................................220 – 240 V, 50/60 Hz
Potencia: ......................................................500 W
Capacidad del depósito de pintura: ..............700 ml
Viscosidad máxima: .....................................50 din/seg
Caudal máximo: ...........................................320 ml/min
Diámetro de la boquilla: ...............................1,8 mm
Longitud de la manguera:.............................1,8 m
Longitud del cable de alimentación: .............2 m
Peso: ............................................................3 kg
Clase de protección: .....................................
Información sobre ruido y vibración:
Presión acústica : ......................................... L
Potencia acústica : .......................................LWA = 82 dB(A)
Incertidumbre: .............................................. K = 3 dB(A)
Vibración: ..................................................... <2,5m/s
Como parte de nuestra política de desarrollo de productos,
los datos técnicos de los productos Silverline pueden
cambiar sin previo aviso.
El nivel de intensidad sonora para el usuario puede exceder
de 85 dB(A). Se recomiendan usar medidas de protección
auditiva.
ADVERTENCIA: Utilice siempre protección auditiva cuando el nivel ruido exceda
85 dB(A) o cuando esté expuesto durante largos periodos de tiempo. Si por
algún motivo nota algún tipo de molestia auditiva incluso llevando orejeras de
protección, detenga inmediatamente la herramienta y compruebe que las orejeras
de protección estén colocadas adecuadamente. Asegúrese de que el nivel de
atenuación y protección de las orejeras sea adecuado dependiendo del tipo de
herramienta y el trabajo a realizar.
ADVERTENCIA: La exposición a la vibración durante la utilización de una
herramienta puede provocar pérdida del sentido del tacto, entumecimiento,
hormigueo y disminución de la capacidad de sujeción. La exposición durante
largos periodos de tiempo puede provocar enfermedad crónica. Si es necesario,
limite el tiempo de exposición a la vibración y utilice guantes anti-vibración. No
utilice la herramienta cuando sus manos estén muy frías, las vibraciones tendrán
un mayor efecto. Utilice los datos técnicos de su herramienta para evaluar la
exposición y medición de los niveles de ruido y vibración.
PA
= 71 dB(A)
2
Los niveles de vibración y ruido están determinados por la directiva EN60745 y
otras directivas internacionales similares. Los datos técnicos se refieren al uso
normal de la herramienta en condiciones normales. Una herramienta defectuosa,
mal montada o desgastada puede incrementar los niveles de ruido y vibración.
Para más información sobre ruido y vibración, puede visitar la página web www.
osha.europa.eu
Instrucciones generales de
seguridad
ADVERTENCIA: Lea todas las advertencias de seguridad e instrucciones.
No respetar estas advertencias e instrucciones puede causar descargas eléctricas,
incendios y/o lesiones graves.
ADVERTENCIA: No permita que los niños, personas discapacitadas o personas
no cualificadas utilicen esta herramienta. Mantenga esta herramienta fuera del
alcance de los niños.
Conserve estas instrucciones de seguridad para futuras referencias.
Seguridad en el área de trabajo
a) Mantenga el área de trabajo limpia y bien iluminada. Las áreas
desordenadas y oscuras invitan a que se produzcan accidentes.
b) No maneje herramientas eléctricas en atmósferas explosivas, como
por ejemplo en presencia de líquidos, gases o polvos inflamables. Las
herramientas eléctricas producen chispas que pueden incendiar el polvo o
los vapores.
c) Mantenga alejados a los niños y a las personas que estén presentes
mientras esté trabajando con una herramienta eléctrica. Las
distracciones pueden hacerle perder el control de la herramienta.
Seguridad eléctrica
a) El enchufe de la herramienta eléctrica debe coincidir con el
tomacorriente. No modifique nunca el enchufe de ninguna manera. No
utilice ningún enchufe adaptador con herramientas eléctricas puestas
a tierra. Los enchufes no modificados y los tomacorrientes coincidentes
reducirán el riesgo de descargas eléctricas.
b) Evite el contacto del cuerpo con superficies puestas a tierra tales como
tuberías, radiadores, estufas y refrigeradores. El riesgo de descarga
eléctrica se incrementa si su cuerpo está puesto a tierra.
c) No exponga las herramientas eléctricas a la lluvia o la humedad. La
entrada de agua en una herramienta eléctrica aumentará el riesgo de
descargas eléctricas.
d) No maltrate el cable de alimentación. No use nunca el cable de
alimentación para transportar la herramienta eléctrica, tirar de ella o
desenchufarla. Mantenga el cable de alimentación alejado de fuentes
de calor, del aceite, de los bordes afilados o de las piezas móviles.
Los cables de alimentación dañados o enredados aumentan el riesgo de
descargas eléctricas.
e) Cuando utilice una herramienta eléctrica en el exterior, use un cable de
extensión adecuado para uso en exteriores. La utilización de un cable
adecuado para exteriores reduce el riesgo de descargas eléctricas.
f) Si es inevitable trabajar con una herramienta eléctrica en lugares
húmedos, use un suministro protegido por un dispositivo de corriente
residual (RCD). El uso de un RCD reduce el riesgo de descargas eléctricas.
Seguridad personal
a) Manténgase alerta, fíjese en lo que está haciendo y use el sentido
común cuando esté utilizando una herramienta eléctrica. No use una
herramienta eléctrica si se encuentra cansado o bajo la influencia de
drogas, alcohol o medicamentos. Un momento de distracción mientras
esté utilizando una herramienta eléctrica puede provocar lesiones corporales
graves.
b) Use equipo de protección individual. Use siempre protección ocular. El
uso de equipamientos de seguridad tales como máscara antipolvo, calzado
de seguridad antideslizante, casco duro y protecciones auditivas adecuadas
reducirá el riesgo de lesiones corporales.
c) Evite el arranque accidental. Asegúrese de que el interruptor está
en la posición de apagado antes de enchufar la herramienta. Si se
transportan las herramientas con el dedo en el interruptor o se enchufan
con el interruptor en la posición de encendido, se invita a que se produzcan
accidentes.
d) Quite toda llave de ajuste o de tuercas antes de encender la
herramienta eléctrica. Una llave de tuercas o de ajuste que se ha dejado
colocada en una parte móvil de la herramienta eléctrica puede causar
lesiones corporales.
e) No adopte posturas forzadas. Manténgase en posición firme y en
equilibrio en todo momento. De este modo, podrá controlar mejor la
herramienta eléctrica en situaciones inesperadas.
22
Page 24

798866
Pulverizador de baja presión HVLP 500 W
f) Vístase adecuadamente. No lleve ropa holgada ni joyas. Mantenga
el pelo, la ropa y los guantes alejados de las piezas móviles.La ropa
holgada, las joyas o el pelo largo pueden quedar atrapados en las piezas
móviles.
g) Si se proporcionan dispositivos para la conexión de sistemas de
extracción y recolección de polvo, asegúrese de que estén conectados
y se usen correctamente. El uso de estos dispositivos puede reducir los
peligros relacionados con el polvo.
Uso y cuidado de las herramientas eléctricas
a) No fuerce la herramienta eléctrica. Use la herramienta eléctrica correcta
para el trabajo a realizar. La herramienta correcta funcionará mejor y con
más seguridad a la velocidad para la que se ha diseñado.
b) No use la herramienta eléctrica si el interruptor no la enciende ni
la apaga. Toda herramienta eléctrica que no se pueda controlar con el
interruptor es peligrosa y debe ser reparada.
c) Desconecte el enchufe de la fuente de alimentación y/o el paquete de
batería de la herramienta antes de realizar cualquier ajuste, cambio
de accesorios o almacenamiento de la herramienta eléctrica. Estas
medidas de seguridad preventivas reducen el riesgo de arranque accidental
de la herramienta eléctrica.
d) Guarde las herramientas eléctricas que no esté usando fuera
del alcance de los niños y no deje que personas que no estén
familiarizadas con ellas o estas instrucciones las utilicen. Las
herramientas eléctricas son peligrosas en manos de usuarios que no hayan
recibido capacitación.
e) Mantenga sus herramientas eléctricas. Revise que no haya piezas en
movimiento mal alineadas o trabadas, piezas rotas o cualquier otra
condición que pueda afectar el funcionamiento de la herramienta
eléctrica. Si encuentra daños, haga reparar la herramienta eléctrica
antes de utilizarla. Muchos accidentes son causados por herramientas
eléctricas que carecen de un mantenimiento adecuado.
f) Mantenga las herramientas de corte afiladas y limpias. Las herramientas
de corte con bordes de corte afilados son menos propensas a trabarse y son
más fáciles de controlar.
g) Utilice la herramienta eléctrica, los accesorios y las brocas etc. de
acuerdo con estas instrucciones y de la forma prevista para el tipo
específico de herramienta eléctrica, teniendo en cuenta las condiciones
de trabajo y el trabajo a realizar. El uso de la herramienta eléctrica para
operaciones distintas de aquellas para las que fue diseñada podría causar
une situación peligrosa.
Servicio y reparaciones
a) Haga que su herramienta eléctrica reciba servicio de un técnico de
reparaciones calificado, utilizando únicamente piezas de recambio
idénticas. Esto asegurará que se mantenga la seguridad de la herramienta
eléctrica.
Instrucciones de seguridad para
pistolas neumáticas
Área de trabajo
• Asegúrese que haya suficiente espacio alrededor del área de trabajo. Utilice
pistolas neumáticas únicamente en áreas ventiladas o destinadas para esta
tarea. Tenga precaución con los tubos conectados a la pistola, coloque siempre
los tubos de la forma más adecuada para evitar riesgos.
Protéjase los ojos
• Póngase gafas de protección o anteojos.
Equipo de protección
• Lleve siempre equipo de protección apropiado, especialmente lentes o gafas de
seguridad, guantes de seguridad y una mascarilla antipolvo.
• Es responsabilidad del usuario asegurarse de que cualquiera persona que
se encuentre en proximidades de la zona de trabajo disponga también de un
equipo de protección apropiado.
Uso de las pistolas neumáticas
• Nunca dirija la pistola neumática hacia personas o animales.
• Al pulverizar pintura, manténgase siempre alejado de fuentes de calor y de
llamas expuestas.
ADVERTENCIA: Los disolventes y la pintura son inflamables, dañinos, y puede que
hasta tóxicos. Ciertos disolventes y pinturas son extremadamente inflamables.
Manéjelos con cuidado y siguiendo las recomendaciones del fabricante. Almacene
los disolventes y la pintura en contenedores adecuados, antifugas y sellados.
Utilice siempre equipamiento de protección adecuado y elimine los disolventes y
las pinturas, además de los elementos contaminados, como residuos especiales,
según la normativa local.
ADVERTENCIA: Los disolventes que se basan químicamente en hidrocarburos
halogenados, como el cloruro de metileno y 1,1,1 tricloroetano, pueden causar
reacciones químicas en combinación con componentes de aluminio y aluminio
galvanizado caliente, por lo que puede existir el riesgo de explosión.
ADVERTENCIA: Al rociar materiales con revestimiento, se reducen vapores
o aerosoles peligrosos perjudiciales para su salud. Lea todas las etiquetas e
instrucciones de seguridad con atención y siga todas las recomendaciones
indicadas en este manual. En caso de duda, consulte con su proveedor. Use
protección respiratoria cuando utilice la pistola. Los equipos de respiración
utilizados deben ser adecuados para el material en uso y adaptado para el grado
de la concentración de vapor. Al rociar pintura, utilizar equipo respiratorio, o el
equipo con filtro combinado A1/A2-P2. Proteja la piel durante todo el rociado y los
procedimientos de limpieza. Use siempre ropa de protección y productos para la
piel adecuados.
ADVERTENCIA: Nunca utilice ácidos, soluciones cáusticas, desatascadores o
productos similares.
Características del producto
1 Conjunto de la boquilla
2 Pistola pulverizadora
3 Ajuste del volumen de aire
4 Filtro de aire
5 Anclajes de la correa para el hombro
6 Interruptor de encendido/apagado
7 Salida de aire
8 Manguera de aire
9 Turbina
10 Correa para el hombro
11 Copa de viscosidad
12 Recipiente para pintura
13 Gatillo
14 Tapa de aire
15 Ajuste del patrón de pulverización
16 Boquilla
Aplicaciones
Pistola pulverizadora para aplicar pinturas y revestimientos. No apta para uso con
otro tipo de substancias líquidas. Lea el manual antes de utilizar esta herramienta.
Desembalaje
• Desembale e inspeccione la herramienta con cuidado. Familiarícese con todas
sus características y funciones.
• Asegúrese de que el embalaje contiene todas las partes y que están en buenas
condiciones. Si faltan piezas o están dañadas, solicite su sustitución antes de
utilizar esta herramienta.
www.silverlinetools.com
23
Page 25

ESP
Antes de usar
Montaje
Instalación de las correas para el hombro
• Inserte la correa para el hombro (10) en los anclajes (5) de la turbina (9).
Conexión de la manguera de aire
• Conecte la manguera de aire (8) en la salida de aire (7) de la turbina (9) y el
ajuste de aire (3) de la pistola pulverizadora (2).
• Inserte la manguera de aire firmemente hasta que quede bien segura.
Preparación del área de trabajo
• Cubra toda la superficie de los objetos que no deban pintarse o retírelos del
área de trabajo
• La pintura al silicato corroe las superficies de vidrio y cerámica al contacto.
Si utiliza pintura al silicato, asegúrese de que cubre completamente dichas
superficies.
Preparación de la pintura
ADVERTENCIA: Esta pistola pulverizadora no es compatible con pinturas con
textura, pinturas con látex, soluciones cáusticas, revestimientos con ácido o
pinturas con sólidos y granulados.
• Antes de utilizarse, la mayoría de materiales de revestimientos necesitan
diluirse a la viscosidad adecuada para utilizarse con la pistola pulverizadora.
1. Mezcle bien la pintura y luego sumerja la copa de viscosidad (11)
completamente en la pintura.
2. Retire la taza de viscosidad de la pintura y mida el tiempo (segundos) que
tarda el líquido en vaciarse de la taza.
3. Para ver los tiempos de vaciado requeridos, consulte la tabla de
viscosidades, a continuación. Si la taza se vacía lentamente, necesitará
diluir la pintura.
Nota: Cuando mezcle diferentes colores asegúrese de tomar nota de la cantidad
empleada en la primera mezcla.
• Diluya la pintura en un recipiente separado con agua o un diluyente adecuado
hasta que el material produzca el tiempo de vaciado requerido.
• Mezcle solamente una pequeña cantidad de pintura a la vez.
• Compruebe siempre la viscosidad del material antes de llenar la pistola
pulverizadora.
• Si el funcionamiento de la pistola es demasiado baja incluso con el ajuste de
flujo máximo, diluya el material en pasos de 5 – 10% hasta que la tasa de
alimentación cumpla con los requisitos.
Tabla de viscosidad
Producto Tiempo de vacíado
Pintura con base de agua*
Imprimación con base de agua
Barniz con base de agua
Imprimación con base de aceite
Barniz con base de aceite
Conservantes para madera,
decapantes, aceites
Desinfectantes, tratamientos
fungicidas
Pintura para vehículos
Nota: La viscosidad recomendada para esta herramienta es de 50 din/s, aunque
se recomienda no sobrepasar de 40 din/s, tal como se muestra en la tabla anterior.
(segundos)
20 - 40
25 – 40
20 – 35
25 – 40
15 – 40
No diluir
No diluir
20 – 35
Funcionamiento
*Lea las instrucciones suministradas por el fabricante de pintura.
Llenado del recipiente de pintura
1. Desenrosque el recipiente de pintura (12) de la pistola pulverizadora (2).
2. Alinee el tubo de alimentación de la forma siguiente:
Para pulverización horizontal (por ej. paredes): gire el tubo de alimentación
de forma que esté encarado hacia la superficie a pulverizar.
Para pulverizar superficies por encima de la cabeza (por ej. techos ): gire el
tubo de alimentación de forma que esté encarado en sentido contrario de la
superficie a pulverizar.
3. Llene el recipiente pintura, coloque el recipiente sobre una superficie
nivelada, mezcle la pintura adecuadamente y llene con cuidado el recipiente
– capacidad máxima 700 ml.
4. Vuelva a enroscar el recipiente de pintura en la pistola pulverizadora.
Ajuste del patrón de pulverización
Existen tres ajustes disponibles:
• Chorro plano vertical (A) para pulverizar superficies verticales (por ej. paredes)
• Chorro plano horizontal (B) para pulverizar superficies horizontales (por ej.
techos )
• Chorro circular (C) para vaporizar rincones, bordes y lugares de difícil acceso.
Fig. A – Ajuste de patrón de pulverización (15) horizontal y elevado.
Fig. B - Ajuste de patrón de pulverización (15) vertical y elevado.
Fig. C - Ajuste de patrón de pulverización con la tapa de aire (14). Puede estar en
posición horizontal o vertical.
ADVERTENCIA: No apriete nunca el gatillo (13) mientras ajusta el patrón de
pulverización.
1. Desenrosque ligeramente el conjunto de la boquilla (1).
2. Gire la tapa de aire (14) en la posición requerida.
3. Ajuste el patrón de pulverización en la posición requerida (véase ajustes,
más arriba).
4. Apriete el conjunto de la boquilla.
IMPORTANTE: Los ajustes de patrón de pulverización pueden ajustarse entre
solamente entre 0 - 45°.
Antes de pintar
• Enchufe la herramienta en la toma de corriente.
• Coloque la pistola pulverizadora (2) en el soporte de la turbina (9).
• Colóquese las correas en el hombro y ajústelas correctamente.
• Retire la pistola del soporte y compruebe que puede alcanzar la superficie de
trabajo cómodamente.
Encendido
• Ponga el interruptor (6) en la posición (ON) para encender la herramienta.
• Para detener la herramienta, ponga el interruptor en la posición (OFF) y
desenchúfela de la toma de corriente.
Ajuste del caudal de pintura
• La cantidad de pintura dispensada se puede regular mediante el ajuste de
volumen de pintura (3).
• Gire el ajuste de volumen de pintura hacia la izquierda para disminuir la
cantidad de pintura.
• Gire el ajuste de volumen de pintura hacia la derecha para incrementar la
cantidad de pintura.
NOTA: Para la mayoría de pinturas de pared, un ajuste de flujo medio produce los
mejores resultados
Procedimiento de pulverización
• Pruebe la pistola pulverizadora (2) en un cartón o superficie similar para el
flujo adecuado.
• Apriete el gatillo (13) para comenzar a pulverizar. Suelte el gatillo para detener
la herramienta.
• Empiece en el borde del área a pulverizar.
• Sostenga la pistola de forma que la tapa de aire (14) esté entre 250 y 300
mm de la superficie a vaporizar, según la anchura deseada del chorro de
vaporización
• Inicie el movimiento de pulverización antes de apretar el gatillo.
24
Page 26

798866
Pulverizador de baja presión HVLP 500 W
• El movimiento de vaporización debe realizarse con el brazo, no solamente con
la muñeca. Esto ayuda mantener una distancia uniforme entre la pistola y la
superficie de trabajo.
• Una distancia desigual entre la pistola y la superficie causará una aplicación
de pintura desigual.
• Mueva la pistola uniformemente a través de la superficie y evite interrupciones.
Fig. A.
• Un movimiento uniforme de la pistola producirá un acabado irregular.
• Si se acumula material de revestimiento en la boquilla (16) y la tapa de aire,
deje de pulverizar, desactive el dispositivo y desmonte y limpie ambas piezas
con disolvente o agua según sea apropiado.
• Limpie a fondo la pistola tan pronto como termine de pulverizar.
Consejos
• La forma más eficaz de vaporizar una superficie vertical es emplear un método
de ‘capas cruzadas', vaporizando con un patrón de zigzag, primero en bandas
horizontales y después en bandas verticales. Utilice un movimiento fluido y en
zig zag en lugar de intermitente. Fig. B.
• Mueva una sección plana del cartón paralelamente con el chorro de pintura,
para enmascarar los bordes.
• Cuando utilice colores intensos o pinte sobre colores intensos colores más
pálidos, aplique por lo menos dos capas, permitiendo que cada capa se seque
antes de aplicar la siguiente. Esto garantiza una buena cobertura.
• También puede utilizar una técnica de plantilla recortada para pintar formas
en la pared.
ADVERTENCIA: Limpie la herramienta completamente después de utilizarla para
evitar que los restos de pintura seca se puedan acumular dentro de la pistola.
Si necesita utilizar/diluir otro color de pintura puede realizarlo sin necesidad de
limpiar la herramienta.
200-250 mm
Inicio A priete
Pulverización
más fina
el gatillo
Pulverización
más gruesa
Incorrecto
Pulverización húmeda
y constante
Suelte el
gatillo
Final
Mantenimiento
Limpieza
Nota: Es esencial que esta herramienta se limpie a fondo después de cada uso
para que funcione continuamente sin problemas. No seguir estos procedimientos
invalidará la garntía del producto.
Asegúrese siempre que la máquina esté desconectada de la red eléctrica antes de
realizar cualquier procedimiento de mantenimiento.
Después de cada uso:
1. Apague la turbina (9).
2. Desenrosque el recipiente de pintura (12) y vacíelo de los restos de pintura.
3. Limpie previamente el recipiente y el tubo de alimentación con un disolvente
adecuado o agua caliente y un cepillo suave.
4. Llene el recipiente con agua caliente (o un solvente adecuado) y vuelva a
montar la pistola pulverizadora (2).
5. Encienda la pistola y pulverice el agua (o disolvente) en un recipiente o
utilizando un paño.
6. Repita el procedimiento anterior hasta que el líquido se haya vaporizado.
7. Apague la herramienta.
8. Vacíe completamente el recipiente. Mantenga siempre la junta del recipiente
libre de cualquier residuo de pintura y compruebe que esté en buen estado.
9. Desenrosque el conjunto de la boquilla (1) y retire el tapón de aire (14) y la
boquilla (16).
10. Limpie bien el tapón de aire y la boquilla con un disolvente adecuado o agua
caliente y un cepillo suave.
ADVERTENCIA: No utilice nunca un objeto metálico afilado para limpiar la boquilla
o los orificios de aire.
11. Limpie el exterior de la pistola y el recipiente con un paño empapado con
disolvente o agua.
Filtro de aire
• Compruebe el filtro de aire (4) periódicamente y cámbielo si está sucio u
obstruido
ADVERTENCIA: No haga funcionar nunca la pistola sin el filtro de aire colocado;
podría aspirar suciedad que dañar el motor.
Eliminación
Deshágase siempre de las herramientas eléctricas adecuadamente respetando las
normas indicadas en su país.
• No elimine sus herramientas u otro equipo eléctrico o electrónico junto con la
basura convencional. Recíclelos si hay puntos de reciclaje.
• Póngase en contacto con la autoridad local encargada de la gestión de residuos
si necesita más información sobre cómo eliminar este tipo de herramientas
correctamente.
Fig. A
Fig. B
Correcto
www.silverlinetools.com
25
Page 27

ESP
Solución de problemas
Problema Causa Solución
Tubo de alimentación del recipiente de pintura (12)
mal colocado
Motor en funcionamiento pero no
pulveriza
Pulverización baja
Chorretes y derrames
Motor más ruidoso de lo habitual Pistola (2) sucia o bloqueada Desmonte la pistola y limpie la boquilla (16) y otras piezas
La turbina (9) no funciona
Ruido anormal durante el
funcionamiento
Efecto color anaranjado al pintar la
superficie
Tubo de alimentación obstruido Límpielo con agua con jabón o disolvente, según requiera
Ajuste de volumen de pintura (3) incorrecto Ajústelo correctamente
Boquilla (16) bloqueada Retire y limpie la boquilla
Filtro bloqueado Compruebe el filtro y reemplácelo si es necesario
Volumen de aire incorrecto Ajuste el volumen de aire
Pintura demasiado espesa Compruebe el nivel de viscosidad
Demasiada pintura aplicada Disminuya el volumen de aire
Pintura demasiado diluida Compruebe el nivel de viscosidad
Falta de electricidad Compruebe que la turbina esté encendida y que la herramienta esté conectada
Recipiente de pintura casi vacío. El aire entra dentro Rellene el recipiente de pintura
Pintura demasiado diluida Compruebe el nivel de viscosidad
Pistola colocada a una distancia / ángulo incorrecto Corrija la distancia /ángulo
Disolvente no adecuado Utilice un disolvente adecuado
Colóquelo en la posición correcta
al suministro eléctrico y encendida.
26
Page 28

Pulverizador de baja presión HVLP 500 W 798866
Garantía de Silverline Tools
Garantía Silverline Tools
Este producto Silverline viene con una garantía de
3 años
Registre el producto en www.silverlinetools.com antes de que transcurran
30 días a partir de la fecha de compra para poder acogerse a la garantía
de 3 años. El periodo de garantía comienza en la fecha de compra que
consta en el comprobante.
Condiciones
El periodo de garantía entra en vigor en la fecha de compra que consta en
el recibo de ventas.
GUARDE EL RECIBO DE VENTAS
En caso de que el producto se averíe antes de que transcurran 30 días
desde la fecha de compra, devuélvalo al distribuidor donde lo compró,
junto con el recibo y los detalles de la avería. Recibirá una sustitución o
un reembolso.
Si el producto se avería después de que transcurran 30 días desde la fecha
de compra, devuélvalo a:
Centro de Servicio de Silverline Tools
PO Box 2988
Yeovil
BA21 1WU, Reino Unido
La reclamación bajo garantía debe presentarse durante el periodo de
garantía.
Antes de poder realizar cualquier trabajo de reparación, deberá entregar
el recibo de compra original en el que se indica la fecha de compra, su
nombre, dirección y el lugar donde lo adquirió.
También deberá indicar claramente los detalles del fallo a reparar.
Las reclamaciones presentadas dentro del periodo de garantía deberán ser
verificadas por Silverline Tools con el fin de establecer si las deficiencias
son consecuencia de los materiales o de la mano de obra del producto.
Los gastos de transporte no son reembolsables. Todo producto a devolver
deberá estar en un estado limpio y seguro para su reparación, debiendo
empaquetarse cuidadosamente con el fin de prevenir daños o lesiones
durante el transporte. Nos reservamos el derecho a rechazar envíos
incorrectos o inseguros.
Todas las reparaciones serán realizadas por Silverline Tools o sus agentes
de reparación autorizados.
La reparación o sustitución del producto no prolongará el periodo de
garantía.
Los defectos reconocidos por nosotros como cubiertos por la garantía
serán corregidos reparando la herramienta, sin cargo alguno (salvo los
gastos de envío), o bien sustituyéndola por una herramienta en perfecto
estado de funcionamiento.
Registro de la compra
Visite: silverlinetools.com y seleccione el botón de registro, introduciendo:
• Susdatospersonales
• Detallesdelproductoeinformacióndecompra
El Certificado de Garantía le será enviado en formato PDF. Imprímalo y
guárdelo con el producto.
Las herramientas o piezas retenidas que hayan sido sustituidas serán
propiedad de Silverline Tools.
La reparación o sustitución del producto bajo garantía aporta beneficios
adicionales a sus derechos legales como consumidor, sin afectarlos.
Qué está cubierto:
La reparación del producto, si se puede comprobar a satisfacción de
Silverline Tools que las deficiencias se deben a materiales o mano de obra
defectuosos dentro del periodo de garantía.
En caso de que cualquier pieza no estuviera disponible o estuviera fuera de
fabricación, Silverline Tools la sustituirá por una pieza funcional.
Uso del producto en la Unión Europea.
Qué no está cubierto:
Silverline Tools no garantiza las reparaciones necesarias como
consecuencia de:
Desgaste normal por uso en cumplimiento de las instrucciones de por
ejemplo hojas, escobillas, correas, bombillas, baterías, etc...
La sustitución de cualquier accesorio suministrado: brocas, hojas, papel de
lija, discos de corte y otras piezas relacionadas.
Daño accidental, averías debidas a uso o cuidado negligente, uso
incorrecto, negligencia, funcionamiento o manejo indebido del producto.
El uso del producto para un fin distinto al normal doméstico.
Cualquier cambio o modificación del producto.
El uso de piezas y accesorios que no sean recambios originales de
Silverline Tools.
Instalación incorrecta (excepto si fue realizada por Silverline Tools).
Reparaciones o alteraciones realizadas por agentes distintos a Silverline
Tools o sus agentes de reparación autorizados.
Las reclamaciones distintas al derecho a corrección de fallos en la
herramienta indicados en las presentes condiciones de garantía no están
cubiertas por ella.
Declaración de conformidad CE
El abajo firmante: Mr Darrell Morris
Autorizado por: Silverline Tools
Declara que el producto:
Código de identificación: 798866
Descripción: Pulverizador de baja presión HVLP 500 W
Está en conformidad con las directivas:
• Directiva de máquinas 2006/42/CE
• Directiva de baja tensión 2006/95/CE
• Compatibilidad electromagnética 2004/108/CE
• Directiva RoHS 2004/1085/UE
• EN60745-1:2009+A11
• EN50580:2012
• EN55014-1:2006
• EN55014-2:1997+A1
• EN61000-3-2:2006
• EN61000-3-3:1995+A1+A2
Organismo notificado: TUV Rheinland, Shanghai, China.
La documentación técnica se conserva en: Silverline Tools
Fecha: 27/06/13
Firma:
Director General
Nombre y dirección del fabricante o representante autorizado:
Powerbox, Boundary Way, Lufton Trading Estate, Yeovil, Somerset, BA22 8HZ
Reino Unido
www.silverlinetools.com
27
Page 29

I
Descrizione dei simboli
La targhetta identificativa del vostro elettroutensile potrebbe riportare dei
simboli. Tali simboli sono una rappresentazione grafica che mira a evidenziare
importanti informazioni sul prodotto o istruzioni per il suo utilizzo corretto e
sicuro.
Indossare protezioni per l’udito
Indossare protezioni per gli occhi
Indossare una protezione per le vie respiratorie
Indossare una protezione per la testa
Indossare protezioni per le mani
Leggere il manuale d’uso
Doppio isolamento per una protezione supplementare
Il prodotto è conforme alle vigenti normative e norme di
sicurezza applicabili
Protezione Ambientale
l simbolo del cestino barrato indica che i prodotti elettrici non
devono essere mischiati con i rifiuti domestici ma conferito ad
un centro di raccolta appropriato. Per ulteriori informazioni sul
riciclaggio si prega di contattare la Sua amministrazione comune
locale o il punto vendita
Specifiche tecniche
Ingresso: ......................................................220-240 V~ 50/60 Hz
Potenza: .......................................................500 W
Serbatoio vernice: ........................................700 ml
Max. Viscosità:..............................................50 din/sec
Max flusso: ...................................................320 ml/min
Ugello: ..........................................................Ø1.8 mm
Lunghezza tubo: ...........................................1.8 m
Lunghezza cavo di alimentazione: ................2 m
Peso: ............................................................3 kg
Classe di protezione: ....................................
Dati di suono e vibrazione
Pressione sonora: ......................................... L
Potenza sonora: ............................................LWA = 82dB (A)
Tolleranza: .................................................... K = 3dB (A)
Vibrazione: ................................................... <2.5m/s
Come parte del nostro continuo sviluppo del prodotto, le
specifiche dei prodotti Silverline possono variare senza
preavviso.
Il livello di intensità del suono per l'operatore può superare
85 dB (A) e le misure di protezione del suono sono necessari.
PA
= 71dB (A)
2
ATTENZIONE: Indossare sempre protezioni per le orecchie, dove il livello sonoro
supera i 85 dB (A) e limitare il tempo di esposizione, se necessario. Se i livelli
sonori sono scomodi, anche con la protezioni per le orecchie, smettere di usare
lo strumento immediatamente e controllare la protezione acustica sia montata
correttamente e fornisce il corretto livello di isolamento acustico per il livello del
suono prodotto dal vostro strumento.
ATTENZIONE: l'esposizione dell'utente alle vibrazioni dello strumento può causare
la perdita del senso del tatto, intorpidimento, formicolio e riduzione della capacità
di presa. Esposizione a lungo termine può portare ad una condizione cronica. Se
necessario, limitare la lunghezza del tempo esposti a vibrazioni e utilizzare guanti
anti-vibrazione. Non utilizzare lo strumento con le mani sotto ad una temperatura
normale comoda, siccome le vibrazioni avranno un effetto maggiore. Utilizzare
i dati forniti nella specifica relativa alle vibrazioni per calcolare la durata e la
frequenza di funzionamento dello strumento.
I livelli sonori e vibrazioni nella specifica sono determinate a secondo
EN60745 o simili standard internazionali. Le figure rappresentano un
normale utilizzo per lo strumento in normali condizioni di lavoro. Uno
strumento a mal tenuta, montata in modo errato, o usato in modo improprio,
possono produrre un aumento dei livelli di rumore e vibrazioni. www.osha.
europa.eu fornisce informazioni sui livelli sonori e vibrazioni nei luoghi
di lavoro che possono essere utili per gli utenti domestici che utilizzano
strumenti per lunghi periodi di tempo.
Norme generali di sicurezza
AVVERTENZA: Leggere ed assimilare tutte le istruzioni. La non osservanza delle
seguenti istruzioni può causare scosse elettriche, incendi e/o lesioni gravi.
ATTENZIONE: Questo apparecchio non è destinato all'uso da parte di persone
(inclusi i bambini) con capacità ridotta, fisiche o mentali o con mancanza di
esperienza o di conoscenza, a meno che non siano controllati o istruiti all'uso
dell'apparecchio da una persona responsabile della loro sicurezza. I bambini
devono essere sorvegliati per assicurarsi che non giochino con l'apparecchio.
Conservare tutte le avvertenze di pericolo e le istruzioni operative per ogni
esigenza futura.
Il termine “elettroutensile” si riferisce all’utensile a rete fissa (con filo) o un utensile
a batteria (senza filo).
Area di lavoro
a) Mantenere l’area di lavoro pulita e adeguatamente illuminata. Il
disordine e le zone di lavoro non illuminate possono essere fonte di incidenti.
b) Non usare gli elettroutensili in presenza di atmosfere esplosive, come
liquidi, gas e polveri infiammabili. Gli elettroutensili producono scintille che
potrebbero accendere le polveri o i fumi.
c) Tenere altre persone e i bambini a distanza di sicurezza durante
l’impiego dell’utensile elettrico. Eventuali distrazioni potrebbero far
perdere il controllo dell’utensile all’operatore.
Sicurezza elettrica
a) Le spine degli elettroutensili devono essere compatibili con le prese di
corrente. Non modificare in alcun modo la spina dell’elettroutensile. Non
usare adattatori con gli elettroutensili dotati di collegamento di messa a terra.
L’uso delle spine originali non modificate e delle prese corrispondenti ridurrà
il rischio di scosse elettriche.
b) Evitare il contatto del corpo con le superfici collegate a massa come
i tubi, i radiatori, le cucine e i frigoriferi. Se il corpo dell’operatore è
collegato alla terra o alla massa il rischio di scosse elettriche è maggiore.
c) Non esporre gli elettroutensili alla pioggia e non lasciarli in ambienti
umidi o bagnati. L’ingresso dell’acqua in una macchina utensile aumenta il
rischio di scosse elettriche.
d) Non usare il cavo in modo improprio. Non afferrare mai il cavo per
trasportare, tirare o staccare l’elettroutensile dalla presa di corrente.
Tenere il cavo lontano da fonti di calore, olio, e sostanze affini, bordi appuntiti
o parti in movimento. I cavi danneggiati o attorcigliati aumentano il rischio
di scosse elettriche.
e) Qualora si voglia usare l’utensile all’aperto, usare cavi di prolunga
compatibili con l’uso in ambienti esterni. Un cavo idoneo all’uso in
ambienti esterni riduce il rischio di scosse elettriche.
f) Se l’utilizzo di un elettroutensile in ambiente umido è inevitabile,
utilizzare una fonte di alimentazione protetta da un dispositivo
differenziale. L’uso di un dispositivo differenziale riduce notevolmente il
rischio di scosse elettriche.
Sicurezza personale
a) Quando si usa un elettroutensile lavorare sempre con la massima
attenzione e concentrazione, lasciandosi guidare dal buon senso.
Non usare mai un elettroutensile quando si è stanchi o sotto l’effetto
di medicinali e/o sostanze alcoliche o stupefacenti. Quando si usa un
elettroutensile un attimo di distrazione è sufficiente a causare gravi lesioni
alle persone.
28
Page 30

798866
Spruzzatore a vapore HVLP 500 W
b) Usare dispositivi per la protezione personale. Indossare sempre
protezioni per gli occhi. I dispositivi per la sicurezza personale, come
le mascherine antipolvere, le calzature di sicurezza antiscivolo, il casco e
la cuffia, se usati in maniera appropriata, riducono i rischi di lesioni alle
persone.
c) Evitare l’avviamento accidentale. Garantire che l’interruttore è in
posizione arresto (OFF) prima di attaccare la presa. Trasportare
gli elettroutensili con il dito al di sopra dell’interruttore o attaccando
l’elettroutensile con l’interruttore acceso, aumenta il rischio di accidenti.
d) Rimuovere tutte le chiavi di regolazione e le chiavi inglesi prima di
accendere l’elettroutensile. Una chiave inglese o una chiave di regolazione
collegata a una parte in movimento dell’elettroutensile potrebbe causare
lesioni alle persone.
e) Non andare oltre l’altezza consentita. In qualsiasi momento mantenere i
piedi poggiati su superfici solide e un punto di appoggio sicuro. Un buon
equilibrio consente di avere il massimo controllo sull’elettroutensile nelle
situazioni inaspettate.
f) Vestirsi con abbigliamento adeguato. Non indossare abiti larghi o
gioielli.Tenere i capelli, vestiti e guanti lontano da parti in movimento.
g) Se il dispositivo utilizzato è dotato di bocchetta per l’aspirazione della
polvere accertarsi che sia collegato e utilizzato correttamente. L’uso di
tali dispositivi riduce i rischi correlati alle polveri.
Maneggio ed impiego accurato di utensili elettrici
a) Non forzare l’elettroutensile. Usare sempre l’elettroutensile corretto per
il lavoro da eseguire. L’elettroutensile corretto sarà in grado di svolgere il
lavoro in modo più efficiente e sicuro nell’ambito della gamma di potenza
indicata.
b) Non usare l’elettroutensile se l’interruttore di accensione non si
accende e si spegne. Gli elettroutensili con un interruttore di accensione
difettoso sono pericolosi e devono essere riparati immediatamente.
c) Staccare la spina dalla presa di corrente prima di effettuare qualsiasi
regolazione, sostituire gli accessori o riporre gli attrezzi a motore.
Queste misure di sicurezza preventive riducono il rischio di avvio involontario.
d) Conservare l’elettroutensile fuori dalla portata dei bambini e non
lasciare che venga utilizzato da persone non adeguatamente
addestrate e competenti nell’uso degli elettroutensili o che non
abbiano letto questo manuale di istruzioni. Gli elettroutensili diventano
estremamente pericolosi nelle mani di persone non addestrate.
e) Mantenere gli elettroutensili. Controllare per disallineamento o la
legatura delle parti in movimento, la rottura di parti e altre condizioni
che possono influire il funzionamento dell’apparecchio. In caso di
danneggiamento, fare riparare prima dell’uso. Molti incidenti sono causati
da una scarsa manutenzione dell’utensile.
f) Mantenere le lame pulite e affilate. Gli utensili da taglio tenuti in buone
condizioni operative e con i bordi taglienti affilati sono meno soggetti a
bloccarsi e più facili da controllare.
g) Utilizzare l’elettroutensile e tutti i componenti e gli accessori in
conformità con le istruzioni di questo manuale e nella maniera prevista
per ciascun tipo di utensile, tenendo conto delle condizioni lavorative
e del compito da eseguire. L’utilizzo degli elettroutensili per fini diversi da
quelli previsti rappresenta un rischio per le persone.
Assistenza
a) Qualsiasi intervento sull’elettroutensile deve essere eseguito da
personale qualificato utilizzando unicamente pezzi di ricambio
compatibili e approvati. Ciò garantisce la sicurezza dell’utensile elettrico.
Sicurezza della pistola a spruzzo
Ambiente pericoloso
• Assicurarsi che ci sia sufficiente spazio libero attorno alla zona di lavoro.
Utilizzare solo strumenti ad aria in una zona ben ventilata o una cabina di
verniciatura specialista. Essere consapevoli del fatto che i tubi dell'aria possono
presentare un rischio di caduta; posare sempre i tubi in modo da minimizzare
rischi.
Indossare protezioni per gli occhi
• Indossare sempre gli occhiali di sicurezza o adeguate protezioni per gli occhi.
Indossare indumenti di protezione
• Sempre indossare equipaggiamento protettivo compreso ma non limitato a tute,
guanti, mascherina, ecc.
• È responsabilità dell'utente assicurarsi che altre persone nelle vicinanze
dell'area di lavoro sono inoltre dotati di un equipaggiamento protettivo idoneo
L'uso di pistole a spruzzo
• Non puntare una pistola a spruzzo verso persone o animali
• Durante la spruzzatura tenere lontano da fonti di calore e fiamme libere
AVVERTENZA: I solventi e vernici sono dannose e possono anche essere tossici.
Alcuni solventi e le vernici sono estremamente infiammabili. Maneggiare con
cura, secondo le raccomandazioni del fabbricante. Conservare solventi e vernici,
in contenitori ermeticamente sigillati fatti di un materiale che è chimicamente
resistente al solvente specifico. Indossare sempre dispositivi di protezione idonei
ed eliminare solventi e vernici, così come oggetti contaminati, come rifiuti speciali,
in base alle leggi e regolamenti.
ATTENZIONE: Solventi che si basano sulla chimica degli idrocarburi alogenati,
come il tricloroetano e cloruro di metilene 1,1,1, può causare reazioni chimiche in
combinazione con l'alluminio e componenti zincati o zincati a caldo, e può quindi
rappresentare un potenziale pericolo di esplosione.
ATTENZIONE: Durante la spruzzatura di materiali di rivestimento, vapori o aerosol
pericolosi, che sono dannosi per la salute, sono prodotti. Si prega di leggere
attentamente tutte le etichette e le istruzioni di sicurezza, e di osservare tutte le
istruzioni e le raccomandazioni indicate. In caso di dubbio, si prega di chiedere
al fornitore del materiale. Utilizzare protezione delle vie respiratorie durante
la spruzzatura. L'apparecchio respiratorio utilizzato deve essere adatto per il
materiale in uso e adattato al grado di concentrazione del vapore. Durante la
spruzzatura di vernice, usare un apparecchio respiratorio indipendentemente
dall'aria ambiente o apparecchiature con filtro combinato A1/A2-P2. Garantire una
sufficiente protezione della vostra pelle durante tutta la spruzzatura e procedure
di pulizia. Indossare indumenti protettivi ed utilizzare idonei unguenti per la pelle
di protezione.
ATTENZIONE: Non spruzzare acidi, soluzioni caustiche, soluzioni di rimozione e
sostanze simili
Familiarizzazione con il prodotto
1 Coperchio dell’assemblaggio ugello
2 Pistola a spruzzo
3 Regolatore di volume aria
4 Compartimento del filtro d’aria
5 Fissaggi tracolla
6 Pulsante On/Off
7 Presa di uscita aria
8 Tubo d’aria
9 Unità Turbina
10 Tracolla
11 Tazza da test viscosità
12 Contenitore vernice
13 Grilletto
14 Tappo d’aria
15 Regolatori di modello getto
16 Ugello
Uso previsto
This paint sprayer is for applying paints and coatings to various surfaces and
should not be adapted for other uses or liquids that are not normally sprayed.
Ensure the manual is fully read before using this tool.
Disimballagio
• Togliere con cura l’utensile dallo scatolo. Verificare di averlo disimballato
completamente. Acquisire la necessaria familiarità con tutte le parti/funzionalità
dell’utensile
• In caso di parti mancanti o danneggiate, sarà necessario far riparare o sostituire
tali parti prima di utilizzare il prodotto
www.silverlinetools.com
29
Page 31

I
Prima dell’uso
Assemblaggio
Attaccare la tracolla a spalla
• Attaccare la tracolla a spalla (10) ai fissaggi della tracolla (5) sull’unità del
turbino (9)
Connettere il tubo per l’aria
• Applicare il tubo per l’aria (8) nello sbocco d’aria (7) sull’unità del turbino (9) e
Regolatore di volume aria (3) sulla pistola a spruzzo (2)
• Inserire il tubo per l’aria in modo fermo per assicurare una connessione sicura
Preparazione dell’area di lavoro
• Coprire tutte le superfici ed oggetti che non devono essere verniciati, o
rimuoveteli dall’area di lavoro.
• La vernice ai silicati corrode superfici di vetro e ceramica in caso di contatto. Se
usate vernici ai silicati, assicuratevi di coprire tali superfici.
Preparazione della vernice
ATTENZIONE: Questo spruzzatore non è compatibile con le vernici a fibra, vernici
di lattice, soluzioni caustiche, rivestimenti acidi o vernici o soluzioni contenenti
granuli o solidi.
• Prima dell’uso, la maggior parte di pitture e altri rivestimenti hanno bisogno
di essere allungati (diluiti) fino alla viscositá corretta per usarli con la Pistola
a Spruzzo (2):
1. Mescolare accuratamente la pittura, poi immergere completamente la Tazza
per il Test della Viscositá (11) pienamente nella pittura
2. Sollevare la Tazza per il Test della Viscosità fuori dalla pittura e misurare
quanti secondi ci mette il liquido a drenare completamente fuori dalla tazza.
3. Fate riferimento alla tabella per la viscositá qui sotto per il tempo di
drenaggio necessario. Se il rivestimento si asciuga troppo lentamente,
bisogna diluirlo.
NB: Quando miscelando i colori prendere nota dei quantitativi di mix per garantire
che miscele successive sono consistenti con la prima miscela
• Diluite la pittura in un contenitore separato con un diluente più adatto o acqua
fino a che la pittura raggiunge il tempo di drenaggio necessario.
• Mescolate solo una piccola quantitá di pittura alla volta
• Ricontrollate sempre la viscositá prima di ricaricare la Pistola a Spruzzo.
• Se i tempi di avanzamento della vernice sono troppo lenti, persino al flusso
di valore massimo, diluire in passi 5-10% fino a che il tasso di avanzamento
soddisfa i requisiti
Tabella di viscositá
Rivestimento Tempo di drenante (sec)
Pitture a base d’acqua*
Primers a base d’acqua
Vernici a base d’acqua
Primers a base d’olio
Vernici a base d’olio
Conservanti del legno,
sverniciatori, oli
Disinfettanti, trattamenti
fungicidi
Vernice a spruzzo per auto
NB: La viscosità massima di vernice che può essere utilizzato è 50din/sec ma si
raccomanda di mantenere a 40din/sec come mostrato nella tabella sopra come
massima per uso generale.
20 - 40
25 – 40
20 – 35
25 – 40
15 – 40
Usati non diluiti
Usati non diluiti
20 – 35
Funzionamento
*Fate riferimento anche alle istruzioni del produttore delle vernici.
Preparazione del contenitore di pittura
1. Svitare il Contenitore della Pittura (12) dalla Pistola a Spruzzo (2)
2. Allineare il tubo di alimentazione nel contenitore nel modo seguente:
- Per spruzzare in modo orizzontale (per esempio muri): girate il tubo di
alimentazione in modo che sia rivolto verso la superfice da spruzzare.
- Per spruzzare le superfici in alto (per esempio soffitti): girate il tubo di
alimentazione in modo che sia rivolto lontano dalla superfice da spruzzare.
3. Riempite il Contenitore della Pittura con pittura da spruzzare. Posizionare
il Contenitore di Pittura su una superfice livellata. Mescolare la pittura
preparata in modo che sia completamente mischiata insieme. Riempite con
attenzione il Contenitore di Pittura ad una massima capacitá di 700ml
4. Riavvitare in modo fermo il contenitore di pittura alla pistola a spruzzo
Regolazione del getto
Sono disponibili tre impostazioni per soddisfare le diverse esigenze di spruzzatura:
• Getto piatto verticale (A) per spruzzare su superfici verticali (ad esempio sui
muri)
• Getto piatto orizzontale (B) per spruzzare su superfici orizzontali (ad esempio
sul soffitto)
• Getto circolare (C) per spruzzare in angoli, spigoli e zone difficili da raggiungere
Fig. A - Regolatori a Modello di Spruzzo (15) orizzontale e cresciuto
Fig. B - Regolatori a Modello di Spruzzo verticale e cresciuto
Fig. C - Regolatori a Modello di Spruzzo piani con Tappo d’Aria (14). Può essere in
posizione orizzontale o verticale
ATTENZIONE: Non premere il Grilletto (13), mentre la regolazione del getto
1. Svitare il Tappo dell’Assemblea Ugello (1) leggermente
2. Ruotare il Tappo dell'Aria (14) nella posizione desiderata
3. Impostare i Regolatori a modello di spruzzo sul tappo d’aria all’impostazione
desiderata (vedere Impostazioni di cui sopra)
4. Serrare il Tappo di Assemblea Ugello
IMPORTANTE: I regolatori a modello getto si regolano solo tra 0 - 45 °.
Preparazione per la spruzzatura
• Inserire la spina nella presa di corrente principale
• Posizionare la Pistola a Spruzzo (2) nel porta pistola sull’Unità a Turbino (9)
• Sollevate la macchina e posizionare la cinghia sulla vostra spalla se
trasportando. Regolatela per il comfort
• Rimuovete la Pistola a Spruzzo dalla porta pistola e controllate che potete
raggiungere facilmente tutte le aree da spruzzare
Accendere la macchina
• Impostare l'interruttore On / Off (6) sulla posizione ON
• Per spegnere l’utensile dopo l'uso, impostare l'interruttore On / Off in posizione
OFF ed estrarre la spina dalla presa di corrente
Regolazione della portata di flusso
• La portata di flusso della vernice può essere regolata mediante l’uso del
Regolatore del Volume dell'Aria (3) per aumentare o diminuire la quantità di
vernice spruzzata
• Girare il Regolatore del Volume Aria in senso antiorario per ridurre la portata
• Girare il Regolatore del Volume Aria in senso orario per aumentare la portata
NB: Per la maggior parte delle pitture murali, un impostazione di un valore medio
del flusso fornisce risultati migliori
Tecnica di spruzzatura
• Testate la Pistola a Spruzzo (2) su un cartone o una superfice simile per trovale
la corretta regolazione di flusso
• Premete il Grilletto (13) per cominciare la spruzzatura. Rilasciate il Grilletto per
smettere la spruzzatura.
• Cominciate dal bordo dell’area da spruzzare
• Tenete la Pistola a Spruzzo in modo che il Tappo ad Aria (14) è da 250 a 300mm
dalla superfice da spruzzare, a seconda dell’ampiezza del getto
• Cominciate il movimento di spruzzatura, poi premete il Grilletto
30
Page 32

798866
Spruzzatore a vapore HVLP 500 W
NB: Il movimento di spruzzatura dovrebbe cominciare dal braccio, non dal polso.
Questo aiuta a mantenere una distanza uniforme tra la Pistola a Spruzzo e la
superfice da spruzzare
NB: Una distanza irregolare tra la Pistola a Spruzzo e la superfice risulteranno in
un’applicazione di vernice irregolare.
• Muovete la Pistola a Spruzzo in modo uniforme attraverso la superfice ed
evitate interruzioni. Vedi Fig. A di sotto.
NB: Un movimento regolare della Pistola a Spruzzo fará si di avere una qualitá di
superfice regolare
• Se il materiale di rivestimento si accumula su l’ugello (16) e Tappo d’aria,
smettete di spruzzare, spegnete la macchina, smontate e pulite le parti con
solvente o acqua a seconda dei casi
• Pulite completamente la Pistola a Spruzzo appena avete finito la spruzzatura
Suggerimenti
• Il modo più efficace per spruzzare una superfice verticale è di usare un metodo
“cross-coat”, spruzzando prima a zig-zag in fasce verticali, poi in fasce verticali.
Utilizzate un movimento a flusso serpentino invece di fermarsi e ricominciare.
Vedi Fig.B di seguito
• Spostate una sezione piatta di cartone parallela al getto di vernice per
mascherare i bordi.
• Quando si usano colori a tinte forti, o si pittura sopra dei colori a tinte forti con
un colore più chiaro, applicare almeno due mani, lasciando asciugare ogni
mano prima di applicare la seconda. Questo assicura una buona copertura
• Potete anche usare una tecnica a matrice cut-out per dipingere forme sul muro
ATTENZIONE: Subito dopo l'uso della Pistola a Spruzzo deve essere pulito per
evitare l'essiccazione della vernice all'interno della Pistola a Spruzzo. Se si
desidera miscelare o diluire un altro lotto di vernice farlo solo senza pulire se non
c’è alcun rischio di essiccazione della vernice.
Fig. A
Rivestimento sarà
leggero a questo punto
200-250 mm
Avviare
corsa
Rivestimento sarà
pesante a questo punto
Non corretto
Tirare
grilletto
Corretto
Rivestimento deve essere
uniforme e bagnato quando
si spruzza
Rilasciare
Fine
grilletto
corsa
Manutenzione
Pulizia
NB: E’ essenziale che queste attrezzature di spruzzatura siano pulite
completamente dopo ogni uso in modo da mantenere un funzionamento senza
problemi. Se non si pulisce e non si mantiene l’attrezzatura in conformitá con i
consigli qui sotto questo può invalidare la vostra garanzia.
Assicuratevi sempre di disconnettere la macchina dalle prese di corrente prima di
effettuare procedure di manutenzione.
Dopo ogni utilizzo:
1. Spegnere la Unità del Turbino (9)
2. Svitate il Contenitore di Vernici (12) e svuotate il contenitore da ogni residuo
di materiale di rivestimento
3. Pre-pulite il Contenitore Vernice ed alimentate il tubo con un solvente adatto
o acqua calda ed una spazzola soffice
4. Riempite il Contenitore Vernice con acqua calda (o solvente adatto) e
rimontate la Pistola a Spruzzo (2)
5. Accendete la macchina e spruzzate l’acqua (o solvente) in un contenitore
o panno
6. Ripetete la procedura sopra fino a che il liquido spruzzato è chiaro
7. Spegnete la macchina
8. Svuotate completamente il Contenitore Vernice. Mantenete sempre il sigillo
del contenitore privo di residui di materiale di rivestimento e controllate se
ci sono danni.
9. Svitate il il Tappo di Assemblaggio Ugello (1) e rimuovete il Tappo d’Aria (14)
ed il Ugello (16)
10. Pulite completamente il Tappo d’Aria ed l’ugello con un solvente adatto o
acqua calda ed una spazzola soffice.
ATTENZIONE: Non usare mai un oggetto in metallo affilato per pulire il boccaglio
o i buchi per l’aria.
11. Pulite la parte esterna della Pistola a Spruzzo ed il Contenitore Vernice con un
panno impregnato di solvente o d’acqua.
Filtro aria
• Controllare il filtro dell'aria nel vano del filtro dell'aria (4) periodicamente e
sostituirlo se sporco o intasato
ATTENZIONE: Non utilizzare mai lo spruzzatore parete senza il filtro dell'aria in
atto; sporcizia potrebbe essere aspirato e danneggiare il motore
Smaltimento
Rispettare sempre le normative nazionali per lo smaltimento di strumenti elettrici
che non sono più funzionali e non sono vitali per la riparazione.
• Non gettare elettroutensili, o altre apparecchiature elettriche ed elettroniche
(RAEE), con i rifiuti domestici
• Contattare l'ente locale per lo smaltimento dei rifiuti per informazioni sul modo
corretto di disporre di strumenti elettrici
Fig. B
www.silverlinetools.com
31
Page 33

I
Risoluzione dei problemi
Problema Causa Soluzione
Motore lavora ma irregolare o non
spruzza
Atomizzazione di spruzzatura
è povera
Vernice scorre o gocciola sulla
superficie
Motore è più rumoroso del normale
Unità a Turbino (9) non funziona
Rumore di funzionamento scorretto
Effetto a buccia d'arancia sulla
superficie
Tubo di alimentazione all'interno del Contenitore di
Vernice (12) nella posizione scoretta
Tubo di alimentazione ostruito Sciacquare a fondo con acqua e sapone o solventi a seconda del blocco
Impostazione scorretta del Regolatore di Volume
Aria (3)
Ugello (16) bloccato Rimuovere e pulire
Filtro ostruito Controllare la condizione e sostituire se necessario
Impostazione di volume d’aria scorretto Regola impostazione
Vernice troppo densa Controlla viscosità
Troppa vernice applicata Regolare il volume dell’aria verso il basso
Vernice troppo fina Controlla viscosità
Pistola a Spruzzo (2) non pulita o ha una possibile
ostruzione
Nessuna alimentazione Controllare l’unità a Turbino è accesa, e la spina di alimentazione sia
Contenitore Vernice quasi svuoto causando all’aria
di essere aspirata
Vernice troppo densa Controlla viscosità
Pistola a Spruzzo a distanza scorretta dalla superficie
o ad un angolo povero
Solvente scorretto usato con la vernice Usare solvente corretto
Regolare posizione
Regolare la posizione corretta
Smontare pistola a spruzzo e pulire l'ugello (16) e le altre parti con diluenti
accuratamente
correttamente inserita nella presa di corrente
Riempire con vernice
Posizione corretta
32
Page 34

Garanzia Silverline Tools
Questo prodotto Silverline è protetto da una
garanzia di 3 anni
Per attivare la garanzia di 3 anni è necessario registrate il prodotto sul
sito www.silverlinetools.com entro 30 giorni dalla data d'acquisto. La data
d'inizio del periodo di garanzia corrisponde alla data d'acquisto riportata
sullo scontrino di vendita.
Condizioni Della Garanzia
Il periodo di garanzia decorre dalla data dell’acquisto presso il rivenditore
indicata sulla ricevuta d’acquisto.
SI PREGA DI CONSERVARE LA RICEVUTA D'ACQUISTO
Nel caso in cui il prodotto risultasse difettoso entro 30 giorni dalla data
d’acquisto, sarà necessario restituirlo al punto vendita presso cui è stato
acquistato, presentando la ricevuta e spiegando chiaramente la natura del
difetto riscontrato. Il prodotto difettoso sarà sostituito o sarà rimborsato
l'importo d'acquisto.
Nel caso in cui il prodotto risultasse difettoso dopo 30 giorni dalla data
d’acquisto, sarà necessario inviare una richiesta di indennizzo in garanzia
a:
Silverline Tools Service Centre
PO Box 2988
Yeovil
BA21 1WU, GB
Le richieste di indennizzo devono essere presentate durante il periodo
della garanzia.
Affinché la richiesta sia approvata, è necessario presentare anche la
ricevuta d’acquisto originale, indicante il luogo e la data dell’acquisto del
prodotto e il proprio nome e indirizzo.
Sarà necessario inoltre fornire una descrizione dettagliata del guasto
riscontrato.
Le richieste effettuate durante il periodo di garanzia saranno verificate da
Silverline Tools per stabilire se il difetto del prodotto è dovuto a problemi di
materiali o di lavorazione.
Le spese di spedizione non saranno rimborsate. Tutti i prodotti devono
essere spediti puliti e in condizioni tali da garantire l'esecuzione della
riparazione in modo sicuro. I prodotti devono essere imballati con cura
per evitare danni o lesioni durante il trasporto. Silverline Tools si riserva
il diritto di non accettare prodotti spediti in condizioni non idonee o non
sicure.
Le riparazioni saranno eseguite da Silverline Tools o da un centro di
riparazione autorizzato.
La riparazione o la sostituzione del prodotto non estende o rinnova il
periodo di garanzia.
Nel caso in cui determini che il prodotto e il difetto riscontrato sono coperti
dalla garanzia, Silverline Tools provvederà a riparare l'utensile
Dichiarazione di Conformità CE
Il sottoscritto: Mr Darrell Morris
come autorizzato di: Silverline Tools
Dichiara che il prodotto:
Codice di identificazione: 798866
Descrizione: Spruzzatore a vapore HVLP 500 W
Potenza netta installata: 350W
È conforme alle seguenti direttive e norme:
• Direttiva Macchine 2006/42/CE
• Direttiva Bassa Tensione 2006/95/CE
• Direttiva EMC 2004/108/CE
• Direttiva RoHS 2011/65/UE
• EN60745-1: 2009 + A11
• EN50580: 2012
• EN55014-1: 2006
• EN55014-2: 1997 + A1
• •EN61000-3-2:2006
• •EN61000-3-3:1995+A1+A2
Spruzzatore a vapore HVLP 500 W 798866
Registrazione dell'acquisto
Accedere al sito: silverlinetools.com e selezionare il tasto Registrazione
per inserire:
• Informazionipersonali
• Dettaglidelprodottoeinformazionisull'acquisto
Il Certificato di Garanzia sarà inviato per posta elettronica nel formato
PDF. Si prega di stampare e conservare il Certificato insieme alla ricevuta
d'acquisto.
gratuitamente (esclusi i costi di spedizione) o, a propria discrezione, a
sostituirlo con un nuovo utensile.
Gli utensili o le parti trattenuti da Silverline Tools in cambio di un prodotto o
componente sostitutivo diventano proprietà di Silverline Tools.
La riparazione o la sostituzione di un prodotto in garanzia estende i diritti
del consumatore previsti per legge, senza modificarli.
Cosa copre la garanzia:
La riparazione del prodotto, nel caso in cui Silverline Tools determini che il
problema sia dovuto a difetti dei materiali o difetti di lavorazione riscontrati
durante il periodo della garanzia.
Nel caso in cui un componente non sia più disponibile o fuori produzione,
Silverline Tools si riserva il diritto di sostituirlo con un componente
adeguato.
Prodotti acquistati e utilizzati all’interno dell’Unione Europea.
Cosa non copre la garanzia:
La Garanzia Silverline Tools non copre le riparazioni se il difetto è stato
causato da:
La normale usura dei componenti per via dell’utilizzo del prodotto come
indicato nelle istruzioni d’uso (ad esempio, lame, spazzole, cinghie,
lampadine, batterie, ecc.).
La sostituzione di accessori forniti a corredo, come ad esempio punte,
lame, fogli abrasivi, dischi di taglio e altri componenti correlati.
I danni accidentali, causati dall'uso improprio, dall'abuso e dalla
manipolazione, conservazione e cura inadeguata dell'utensile da parte del
proprietario.
L’uso del prodotto per fini non domestici.
La modifica o alterazione del prodotto.
Difetti causati dall’uso di parti e accessori che non siano componenti
originali Silverline Tools.
Installazione difettosa (fatto salvo quando l'installazione viene eseguita da
Silverline Tools).
Riparazioni o alterazioni eseguite da terze parti che non siano la Silverline
Tools o i centri di riparazione autorizzati da quest'ultima.
Silverline Tools non fornisce alcuna garanzia per le richieste formulate per
la correzione dei difetti dell'utensile oggetto della garanzia fatto salvo per
quanto previsto nelle condizioni di cui sopra.
Organismo notificato: TUV Rheinland, Shanghai, Cina
La documentazione tecnica è conservata da: Silverline Tools
Data: 27/06/13
Firma:
Direttore
Nome e indirizzo del fabbricante oppure persona autorizzata:
Powerbox LTD., Boundary Way, Lufton Trading Estate, Yeovil, Somerset, BA22
8HZ, Regno Unito
www.silverlinetools.com
33
Page 35

NL
Beschrijving symbolen
Op het gegevensplaatje van uw gereedschap kunnen zich symbolen
bevinden. Deze symbolen belangrijke informatie over het product of
instructies voor het gebruik.
Draag gehoorbescherming
Draag een veiligheidsbril
Draag een stofmasker
Draag een veiligheidshelm
Voldoet aan de relevante wetgeving en veiligheidsnormen
Milieubescherming
Elektrische producten mogen niet worden afgevoerd met
het normale huisvuil. Indien de mogelijkheid bestaat, dient
u het product te recyclen. Vraag uw gemeente of winkelier
om advies betreffende recyclen
Draag handschoenen
Lees de handleiding
Dubbel geïsoleerd voor extra bescherming
Specificaties
Input: ............................................................220-240 V~, 50/60 Hz
Output: .........................................................500 W
Verfcontainer: ...............................................700 ml
Maximale viscositeit: ....................................50 din/sec
Maximale stroming: ......................................320 ml/min
Mondstuk: ....................................................1,8 mm diameter
Slang lengte: ................................................1,8 m
Stroomsnoer lengte: .....................................2 m
Gewicht: .......................................................3 kg
Beschermingsklasse: ...................................
Geluid en trilling
Geluidsdruk: ................................................. L
Geluidsvermogen: ........................................ LWA = 82 dB(A)
Onzekerheid: ................................................ K = 3 dB(A)
Trilling: ......................................................... <2,5 m/s
Met het oog op onze aanhoudende productontwikkeling
kunnen de specificaties van Silverline producten zonder
voorafgaande kennisgeving worden gewijzigd.
De geluidsintensiteit voor de bediener kan 85 dB(A)
overschrijden en de gehoorbescherming is noodzakelijk.
PA
= 71 dB(A)
2
WAARSCHUWING: Bij een geluidsintensiteit van 85 dB(A) of hoger is het dragen
van gehoorbescherming en het limiteren van de blootstellingstijd vereist. Bij
oncomfortabel hoge geluidsniveaus, zelfs met het dragen van gehoorbescherming,
stopt u het gebruik van de machine onmiddellijk. Controleer de pasvorm en het
geluiddempingsniveau van de bescherming.
WAARSCHUWING: Blootstelling aan trilling resulteert mogelijk in gevoelloosheid,
tinteling en een vermindert gripvermogen. Langdurige blootstelling kan leiden
tot chronische condities. Limiteer de blootstellingsduur en draag anti-vibratie
handschoenen. Vibratie heeft een grotere invloed op handen met een temperatuur
lager dan een normale, comfortabele temperatuur. Maak gebruik van de informatie
in de specificaties voor het bereken van de gebruiksduur en frequentie van de
machine.
Geluid- en trillingsniveaus in de specificatie zijn vastgesteld volgens EN60745
of een gelijksoortige internationale norm. De waarden gelden voor een normaal
gebruik in normale werkomstandigheden. Een slecht onderhouden, onjuist
samengestelde of onjuist gebruikte machine produceert mogelijk hogere geluidsen trillingsniveaus. www.osha.europa.eu biedt informatie met betrekking tot
geluids- en trillingsniveaus op de werkplek wat mogelijk nuttig is voor regelmatige
gebruikers van machines.
Algemene veiligheid voor
elektrisch gereedschap
WAARSCHUWING: Lees alle bediening- en veiligheidsvoorschriften. Het niet
opvolgen van alle voorschriften die hieronder vermeld staan, kan resulteren in een
elektrische schok, brand en/of ernstig letsel.
WAARSCHUWING: De lader is niet geschikt voor gebruik door personen met een
verminderde mentale of fysieke gesteldheid of een gebrek aan ervaring, tenzij de
persoon wordt begeleid of geïnstrueerd door een persoon verantwoordelijk voor
de veiligheid
Bewaar deze voorschriften voor toekomstig gebruik.
De term “elektrisch gereedschap” in alle hieronder vermelde waarschuwingen
heeft betrekking op uw elektrische gereedschap dat op de stroom is aangesloten
(met een snoer) of met een accu wordt gevoed (snoerloos).
Veiligheid in de werkruimte
a) Houd de werkruimte schoon en zorg voor een goede verlichting.
Rommelige en donkere ruimtes leiden vaak tot ongelukken.
b) Werk niet met elektrisch gereedschap in explosieve omgevingen,
bijvoorbeeld in de aanwezigheid van ontvlambare vloeistoffen, gassen
of stof. Elektrisch gereedschap brengt vonken teweeg die stof of dampen
kunnen doen ontbranden.
c) Houd kinderen en omstanders uit de buurt wanneer u elektrisch
gereedschap bedient. Door afleiding kunt u de controle over het
gereedschap verliezen.
Elektrische veiligheid
a) De stekkers van het elektrische gereedschap moeten passen bij het
stopcontact. Pas de stekker niet aan. Gebruik geen adapterstekkers bij
geaard elektrisch gereedschap. Het gebruik van ongewijzigde stekkers en
passende stopcontacten vermindert het risico op een elektrische schok.
b) Vermijd lichamelijk contact met geaarde oppervlakken zoals pijpen,
radiatoren, fornuizen en koelkasten. Het risico op een elektrische schok
neemt toe als uw lichaam geaard wordt.
c) Laat elektrisch gereedschap niet nat worden. Wanneer elektrisch
gereedschap nat wordt, neemt het risico op een elektrische schok toe.
d) Beschadig het snoer niet. Gebruik het snoer nooit om het elektrisch
gereedschap te dragen, te trekken of om de stekker uit het stopcontact
te trekken. Houd het snoer uit de buurt van hitte, olie, scherpe randen of
bewegende delen. Een beschadigde of in de knoop geraakte snoer verhoogt
het risico op een elektrische schok toe.
e) Wanneer u elektrisch gereedschap buiten gebruikt, maak dan gebruik
van een verlengsnoer dat geschikt is voor gebruik buitenshuis. Gebruik
een verlengsnoer dat geschikt is voor gebruik buitenshuis om het risico op
een elektrische schok te verminderen.
f) Indien het onvermijdelijk is elektrisch gereedschap te gebruiken in
een vochtige omgeving, gebruik dan een energiebron met een aardlek
beveiliging (Residual Currency Device). Het gebruik van een RCD
vermindert het risico op een elektrische schok.
Persoonlijke veiligheid
a) Blijf alert en gebruik uw gezonde verstand wanneer u elektrisch
gereedschap bedient. Gebruik het elektrisch gereedschap niet wanneer
u vermoeid bent of onder invloed bent van drugs, alcohol of medicijnen.
Onoplettendheid tijdens het bedienen van elektrisch gereedschap kan leiden
tot ernstig letsel.
b) Maak gebruik van persoonlijke bescherming. Draag altijd een
veiligheidsbril. Passende bescherming voor de omstandigheden,
zoals een stofmasker, niet-slippende veiligheidsschoenen een helm of
gehoorbescherming, vermindert het risico op persoonlijk letsel.
34
Page 36

798866
HVLP spuitsysteem 500 W
c) Zorg ervoor dat het apparaat niet per ongeluk wordt gestart. Controleer
of de schakelaar in de ‘uit’ stand staat voordat u de stekker in het
stopcontact steekt. Het dragen van elektrisch gereedschap met uw vinger
op de schakelaar of het aansluiten op de stroom van elektrisch gereedschap
met de schakelaar ingeschakeld kan tot ongelukken leiden.
d) Verwijder alle stel- of moersleutels voordat u het elektrische
gereedschap inschakelt. Een moer- of stelsleutel die zich op een draaiend
onderdeel van het elektrische gereedschap bevindt, kan leiden tot letsel.
e) Reik niet te ver. Blijf altijd stevig en in balans staan. Zo houdt u meer
controle over het elektrische gereedschap in onverwachte situaties.
f) Draag geschikte kleding. Draag geen loshangende kleding of sieraden.
Houd haren, kleding en handschoenen uit de buurt van bewegende
delen. Loshangende kleding, sieraden en los hangende haren kunnen vast
komen te zitten in bewegende delen.
g) Als er onderdelen voor stofafvoer- en stofverzameling worden
meegeleverd, sluit deze dan aan en gebruik deze op de juiste wijze. Het
gebruik van deze onderdelen kan het risico op stofgerelateerde ongelukken
verminderen.
Gebruik en verzorging van elektrisch gereedschap
a) Forceer elektrisch gereedschap niet. Gebruik elektrisch gereedschap
dat geschikt is voor het werk dat u wilt uitvoeren. Geschikt elektrisch
gereedschap werkt beter en veiliger op een passende snelheid.
b) Gebruik het elektrische gereedschap niet als de schakelaar van het
apparaat niet in- en uitschakelt. Elektrisch gereedschap dat niet bediend
kan worden met de schakelaar is gevaarlijk en moet gerepareerd worden.
c) Haal de stekker uit het stopcontact voordat u instellingen aanpast,
toebehoren verwisselt of het elektrische gereedschap opbergt.
Dergelijke voorzorgsmaatregelen verminderen het risico op het per ongeluk
starten van het elektrische gereedschap.
d) Berg elektrisch gereedschap dat niet in gebruik is op buiten bereik
van kinderen en laat mensen die niet bekend zijn met het elektrische
gereedschap of met deze instructies het elektrische gereedschap niet
bedienen. Elektrisch gereedschap is gevaarlijk in de handen van onervaren
gebruikers.
e) Onderhoud uw elektrisch gereedschap. Controleer op foutieve uitlijning
of het vastslaan van bewegende delen, gebroken onderdelen en elke
andere afwijking die de werking van het elektrische gereedschap zou
kunnen beïnvloeden. Indien het elektrische gereedschap beschadigd is,
moet u het laten repareren voordat u het weer gebruikt. Veel ongelukken
worden veroorzaakt door slecht onderhouden elektrisch gereedschap.
f) Houd snijwerktuigen scherp en schoon. Goed onderhouden snijwerktuigen
met scherpe messen slaan minder snel vast en zijn gemakkelijker te
bedienen.
g) Gebruik het elektrische gereedschap, de accessoires en onderdelen, etc.
volgens deze instructies en volgens bestemming voor het specifieke
type elektrisch gereedschap, en houd daarbij rekening met de
werkomstandigheden en het uit te voeren werk. Gebruik van elektrisch
gereedschap voor werkzaamheden die verschillen van die waarvoor het
apparaat bestemd is, kan leiden tot gevaarlijke situaties.
Onderhoud
a) Laat uw elektrische gereedschap onderhouden door een
gekwalificeerde vakman en gebruik alleen identieke vervangstukken.
Zo bent u er zeker van dat de veiligheid van het elektrische gereedschap
gewaarborgd blijft.
Verfspuit veiligheid
Gevaarlijke omgeving
• Zorg er altijd voor dat er voldoende vrije ruimte is rond het werkgebied.
Luchtslangen kunnen een struikelgevaar kunnen vormen. Leg slangen altijd
zodanig dat de risico’s zo veel mogelijk beperkt worden
Bescherm uw ogen
• Draag altijd een veiligheidsbril
Beschermende uitrusting
• Draag de juiste beschermende uitrusting. Denk daarbij aan overal,
handschoenen, gezichtsbescherming etc.
• Het is de verantwoordelijk van de gebruiken, omstanders te voorzien van de
juiste beschermende uitrusting
Het gebruik van spuitpistolen
• Richt het pistool niet op personen en dieren
• Houd het pistool uit de buurt van hitte en open vlammen
WAARSCHUWING: Oplosmiddelen en verf zijn ontvlambaar, schadelijke en
mogelijk giftig. Sommige stoffen zijn extreem ontvlambaar. Hanteer voorzichtig,
volgens de instructies van de fabrikant. Berg de middelen in afgesloten,
lekkagebestendige containers op. Draag de geschikte beschermende uitrusting en
verwijder verf en oplosmiddelen volgens de wettelijke regulaties
WAARSCHUWING: Oplosmiddelen op halogeenkoolwaterstofbasis als
trichloorethaan en methyleenchloride 1,1,1, creëren mogelijk een chemische
reactie wanneer deze in aanraking komen met aluminium en gegalvaniseerde
componenten en worden mogelijk gezien als potentieel explosiegevaar
WAARSCHUWING: Bij het spuiten van coatingmaterialen worden gevaarlijke
dampen geproduceerd. Lees alle labels en veiligheidsinstructies aandachtig door.
Bij enige twijfel neemt u contact op met de fabrikant. Tijdens het spuiten is het
dragen van een stofmasker verplicht. Het stofmasker hoort te passen bij het te
spuiten materiaal. Bij het spuiten van verf draagt u een stofmasker onafhankelijk
van de omgevingsatmosfeer, of met een ingebouwde filtercombinatie A1/A2-P2.
Zorg voor een goede huidbescherming tijdens spuit en schoonmaakprocedures.
Draag geschikte beschermende kleding.
WAARSCHUWING: Spuit geen zuren, bijtende oplosmiddelen,
verwijderingsmiddelen en gelijksoortige stoffen
Productbeschrijving
1 Wartelmoer
2 Spuitpistool
3 Luchtvolume regelaar
4 Luchtfiltercompartiment
5 Schouderband bevestigingspunten
6 Aan-/uitschakelaar
7 Luchtuitlaat
8 Luchtslang
9 Motoreenheid
10 Schouderband
11 Viscositeit testbeker
12 Verfcontainer
13 Trekker
14 Lucht kap
15 Spuitpatroonregelaars
16 Mondstuk
Intentioneel gebruik
De machine is geschikt voor het aanbrengen van verf- en coatlagen op
verschillende oppervlakken en mag niet aangepast worden voor enig ander
gebruik. Lees de handleiding volledig door voordat u de machine gebruikt
Het uitpakken van uw
gereedschap
• Pak uw toestel / gereedschap uit. Inspecteer het en zorg dat u met alle
kenmerken en functies vertrouwd raakt.
• Controleer of alle onderdelen aanwezig zijn en in goede staat verkeren. Als er
onderdelen ontbreken of beschadigd zijn, zorg dan dat deze vervangen worden
voor u dit toestel / gereedschap gebruikt.
www.silverlinetools.com
35
Page 37

NL
Voor gebruik
Montage
Het bevestigen van de schouderband
• Bevestig de schouderband (10) op de bevestigingspunten (5) op de
motoreenheid (9)
Het bevestigen van de luchtslang
• Druk de luchtslang (8) op de luchtuitlaat (7) op de motoreenheid (9) en de
luchtvolume verstelschroef (3) van het spuitpistool (2)
• Zorg ervoor dat de luchtslang goed vast zit
Voorbereiding van de werkomgeving
• Bedek alle oppervlakken en voorwerpen die niet gespoten mogen worden, of
neem deze uit de werkomgeving
• Silicaatverf bijt in op glazen en keramische oppervlakken. Bij het gebruik van
silicaatverf horen alle oppervlakken bedekt te worden
Verf voorbereiding
WAARSCHUWING: De machine is niet geschikt voor structuurverf, latexverf,
bijtende stoffen, zuurhoudende stoffen of verf/stoffen met korrels of vaste stoffen
• De meeste verf en andere coatings horen voor gebruik met het spuitpistool (2)
verdunt te worden
1. Roer de verf grondig en dompel de viscositeit testbeker (11) volledig in
de verf
2. Til de beker uit de verf en meet hoe lang het duurt voordat al het vloeistof uit
de beker is gelopen. Haal de testbeker uit de verf en kijk hoeveel seconden
het duurt voordat de vloeistof volledig uit de cup gelopen is.
3. Zie ook de viscositeitstabel voor de gewenste vloeitijden. Als de verf te
langzaam droogt, moet hij verdund worden.
Let op: Bij het mengen van kleuren schijft u de kleurverhouding op, zodat
opeenvolgende mengsels gelijk zijn aan het eerste mengsel
• Verdun de verf in een aparte container met een geschikte verdunner of water
totdat het materiaal de gewenste vloeitijd behaalt.
• Meng telkens een klein beetje verf.
• Controleer altijd de viscositeit opnieuw voordat u het spuitpistool opnieuw vult.
• Als de toevoersnelheid van de verf zelfs in de maximale stroominstelling te laag
is, verdun de verf dan in stappen van 5-10% totdat de toevoersnelheid aan de
eisen voldoet.
Viscositeit tabel
Doorlooptijd Verf vloeitijd (sec)
Verf op waterbasis*
Primer op waterbasis
Vernis op waterbasis
Primer op oliebasis
Vernis op oliebasis
Houtpreservering, strippers, oliën
Desinfecteermiddelen,
plantbescherming
Autospuitverf
Let op: De maximale viscositeit van de verf is 50 din/sec. De aangeraden
viscositeit is 40 din/sec, als afgebeeld in de tabel
20 - 40
25 – 40
20 – 35
25 – 40
15 – 40
Onverdund gebruiken
Onverdund gebruiken
20 – 35
Gebruik
*Zie ook de instructies van de verffabrikant
Het voorbereiden van de verfcontainer
1. Schroef de verfcontainer (12) los van het verfpistool (2).
2. Zet de toevoerslang als volgt in de container:
Voor horizontaal spuiten (bijv. muren): draai de toevoerslang zodat deze naar
het te spuiten oppervlak wijst
Voor het spuiten boven uw hoofd (bijv. plafonds): draai de toevoerslang zodat
deze niet naar het te spuiten oppervlak wijst
3. Vul de verfcontainer met de te spuiten verf:
Plaats de container op een vlakke ondergrond. Roer de voorbereide verf
goed door elkaar. Vul de container voorzichtig tot een maximale capaciteit
van 700 ml
4. Schroef de verfcontainer weer stevig op het verfpistool vast
Het aanpassen van het spuitpatroon
De machine is voorzien van drie instellingen voor verschillende spuitpatronen:
• Verticale platte straal (A) voor het spuiten op verticale oppervlakken (bijv. muren)
• Horizontale platte straal (B) voor het spuiten op horizontale oppervlakken (bijv.
plafonds)
• Ronde straal (C) voor het spuiten in hoeken, randen en moeilijk bereikbare
plekken
Fig. A - Spuitpatroonregelaars (15) horizontaal en omhoog
Fig. A - Spuitpatroonregelaars (15) Verticaal en omhoog
Fig. C - Spuitpatroonregelaars (15) plat met de lucht kap (14) in horizontale of
verticale positie
WAARSCHUWING: Trek nooit aan de trekker (13) wanneer u het spuitpatroon aan
het veranderen bent
1. Schroef de wartelmoer (1) iets los
2. Draai de lucht kap (14) in de vereiste positie
3. Zet de spuitpatroonregelaars (15) op de lucht kap in de gewenste positie. (Zie
instellingen hierboven).
4. Draai de wartelmoer (1) vast
BELANGRIJK: De spuitpatroonregelaars kunnen enkel tussen 0-45° draaien
Voorbereiding voor spuiten
• Steek de stekker in het stopcontact
• Plaats het verfpistool in de houder op de motoreenheid (9)
• Til de machine op en plaats de riem over uw schouder. Stel de riem af zodat
deze comfortabel zit
• Haal het verfpistool uit de houder en controleer of u alle te spuiten plekken
gemakkelijk kunt bereiken
Het inschakelen van de machine
• Zet de aan-/uitschakelaar (6) in de ON-positie
• Om de stroom uit te zetten, zet u de aan-/uitschakelaar in de OFF-positie en
haalt u de stekker uit het stopcontact
De toevoersnelheid aanpassen
• Met de volumeregelaar (3) kunt u de toevoersnelheid (d.w.z. het volume) van
het materiaal regelen
• Draai de regelaar linksom om de toevoersnelheid te verlagen
• Draai de regelaar rechtsom om de toevoersnelheid te verhogen
NB: Voor de meeste muurverf geeft de gemiddelde stroominstelling de beste
resultaten.
Spuittechniek
• Test het spuitpistool (2) op een stuk karton of iets dergelijks om de juiste
toevoersnelheid te bepalen
• Knijp de trekker (13) in om met spuiten te beginnen. Laat de trekker los om te
stoppen met spuiten
• Begin aan de rand van het te spuiten oppervlak
• Houd het spuitpistool zodanig dat de lucht kap op ongeveer 250 tot 300 mm
afstand is van het te spuiten oppervlak, afhankelijk van de gewenste breedte
van de spuitstraal
• Begin met de spuitbeweging voordat u de trekker inknijpt
Let op: De spuitbeweging dient vanuit de arm te komen en niet alleen vanuit de
pols. Zo krijgt u een uniforme afstand tussen het spuitpistool en het te spuiten
oppervlak
Let op: Door een ongelijke afstand tussen het spuitpistool en het oppervlak wordt
de verf ongelijk aangebracht
• Beweeg het spuitpistool gelijkmatig over het oppervlak en vermijd
onderbrekingen. Zie Fig. A
36
Page 38

798866
HVLP spuitsysteem 500 W
Let op: Een gelijkmatige beweging van het spuitpistool zorgt voor een gelijkmatige
kwaliteit van het oppervlak
• Wanneer het verf zich in het mondstuk (16) en de lucht kap ophoopt, stop
dan met spuiten, schakel de stroom uit, demonteer het geheel en reinig beide
onderdelen met water of oplosmiddelen
• Maak het spuitpistool grondig schoon zodra het werk voltooid is
Tips
• De meest effectieve manier om een verticaal oppervlak te spuiten is om
'gekruist' te spuiten. Hierbij spuit u eerst zigzag in horizontale banen en daarna
in verticale banen. Gebruik een vloeiende, heen-en-weerbeweging in plaats van
telkens stoppen en weer starten. Zie Fig. B
• Beweeg een plat stuk karton parallel aan de verfstraal om randen af te
schermen
• Wanneer u felle kleuren gebruikt, of met een lichtere kleur over een donkere tint
verft, breng dan minimaal twee lagen aan, en laat elke laag drogen voordat u de
volgende laag aanbrengt. Zo krijgt u een goede dekking
• U kunt ook stencils gebruiken om vormen op de muur te verven
WAARSCHUWING: Maak het spuitpistool na gebruik onmiddellijk schoon zodat
verfresten niet in het pistool kunnen opdrogen. Bij het mengen of verdunnen van
verf hoeft de machine niet schoon gemaakt te worden wanneer de verfresten geen
kans krijgen om op te drogen
Fig. A
Op dit punt is de
bedekking licht
200-250 mm
Begin van
de strook
Op dit punt is de
bedekking dik
Knijp in de
trekker
Onjuist
Juist
De coating hoort egaal en nat
te zijn tijdens het sprayen
Laat de
Einde van de
trekker los
strook
Onderhoud
Schoonmaak
Let op: Het is essentieel dat de machine na elk gebruik grondig schoongemaakt
wordt, zodat deze probleemloos kan blijven werken. Als uw machine niet volgens
de onderstaande richtlijnen wordt gereinigd en onderhouden, kan dit uw garantie
ongeldig maken. Zorg er voor dat de stekker te allen tijde uit het stopcontact
gehaald is voordat u onderhoud gaat uitvoeren
Na elk gebruik:
1. Schakel de motoreinheid (9) uit
2. Schroef de verfcontainer (12) los en leeg deze indien nodig
3. Maak de container en toevoerslang vast een beetje schoon met een geschikt
oplosmiddel of warm water en een zachte borstel
4. Vul de container met warm water (of een geschikt oplosmiddel) en zet het
spuitpistool weer in elkaar
5. Zet de machine aan en spuit het water (of oplosmiddel) in een container
of doek
6. Herhaal de bovenstaande procedure totdat de spuitvloeistof helder is
7. Schakel de machine uit
8. Leeg de container volledig. Zorg ervoor dat er geen verf achter kan blijven op
de containerafdichting en controleer op eventuele beschadigingen
9. Schroef de wartelmoer (1) los en verwijder de lucht kap (14) en het
mondstuk (16)
10. Reinig de lucht kap en het mondstuk grondig met een geschikt oplosmiddel
of warm water en een zachte borstel
WAARSCHUWING: Gebruik nooit een scherp, metalen voorwerp om het mondstuk
of de luchtgaten te reinigen
11. Maak de buitenkant van het spuitpistool en de container met een doek en
een oplosmiddel of water schoon
Luchtfilte
• Controleer de luchtfilter (4) regelmatig en vervang wanneer deze vuil of
verstopt is.
WAARSCHUWING: Gebruik de verfspuit nooit zonder de luchtfilter; vuil kan
ingezogen worden waardoor de motor mogelijk beschadigd
Verwijdering
Bij de verwijdering van elektrische machines neemt u de nationale voorschriften
in acht.
• Elektrische en elektronische apparaten mogen niet met uw huishoudelijk afval
worden weggegooid
• Neem contact op met uw gemeente voor informatie betreffende de verwijdering
van elektrisch gereedschap
Fig. B
www.silverlinetools.com
37
Page 39

NL
Probleemopsporing
Probleem Oorzaak Oplossing
Buis in de verfcontainer (12) zit in een foute positie Pas de positie aan
Motor werkt maar onregelmatige
spray
Slechte verfverstuiving
Verf loopt uit of drupt op het
werkstuk
Motor luider dan normaal De verfspuit (2) is niet schoon en mogelijk verstopt Demonteer de eenheid en maak het mondstuk (16) grondig schoon
Motoreenheid (9) functioneert niet Geen vermogen Controleer of de eenheid is ingeschakeld en de stekker in
Onjuist gebruiksgeluid
Oranje schilfer effect op het geverfde
oppervlak
Buis geblokkeerd Spoel de buis met zeepwater of een oplosmiddel door
Foute instelling volume regelaar (3) Pas aan naar de juiste positie
Verstopt mondstuk (16) Maak schoon
Verstopte filter Controleer de staat en vervang wanneer nodig
Onjuiste luchtvolume instelling Past de instellingen aan
Te dikke verf Controleer de vloeibaarheid
Te veel verf aangebracht Verlaag het luchtvolume
Te dunne verf Controleer de vloeibaarheid
Lege verfcontainer (12) waardoor lucht wordt
ingezogen
Te dikke verf Controleer de vloeibaarheid
Verfspuit wordt op een foute afstand/hoek van het
oppervlak gehouden
Ongeschikt verdunningsmiddel Gebruik een geschikt verdunningsmiddel
Vul de container
Corrigeer de positie
38
Page 40

Silverline Tools Garantie
Dit Silverline product komt met 3 jaar garantie.
U heeft recht op 3 jaar garantie als u dit product binnen 30 dagen na
aankoop op silverlinetools.com registreert. De garantieperiode gaat in
vanaf de aankoopdatum op het ontvangstbewijs.
Voorwaarden
De garantieperiode gaat in vanaf de datum van aankoop op het
ontvangstbewijs.
BEWAAR HET ONTVANGSTBEWIJS OP EEN VEILIGE PLAATS
Als dit product binnen 30 dagen van de aankoopdatum een fout heeft,
breng het dan naar de winkelier waar u het heeft gekocht, met uw
ontvangstbewijs, en met vermelding van de details van de storing. U kunt
om een nieuwe vragen of om uw geld terug.
Als dit product na de periode van 30 dagen een fout heeft, stuur het dan
naar:
Silverline Tools Service Centre
PO Box 2988
Yeovil
BA21 1WU, GB
Alle claims moeten binnen de garantieperiode worden ingediend.
U moet het originele ontvangstbewijs geven met de datum van aankoop,
uw naam, adres en plaats van aankoop voordat er aan kan worden
gewerkt.
U moet nauwkeurige gegevens verschaffen van de fout die verholpen
moet worden.
Claims die binnen de garantieperiode worden ingediend, worden door
Silverline Tools nagelopen om te kijken of het probleem een kwestie is van
de materialen of de fabricage van het product.
De verzendkosten worden niet vergoed. De geretourneerde items moeten
voor de reparatie in een redelijk schone en veilige staat verkeren en
moeten zorgvuldig worden verpakt om schade en letsel tijdens het vervoer
te voorkomen. Ongeschikte en onveilige leveringen kunnen worden
afgewezen.
Al het werk wordt uitgevoerd door Silverline Tools of een officiële
reparatiedienst.
De garantieperiode wordt niet door de reparatie of vervanging van het
product verlengd.
Defecten waarvan wij beschouwen dat ze onder de garantie vallen, worden
verholpen door middel van gratis reparatie van het gereedschap (exclusief
verzendingskosten) of door vervanging door een gereedschap in perfecte
staat van werking.
EG-Verklaring van Overeenstemming
De ondergetekende: Mr Darrell Morris
Gemachtigd door: Silverline Tools
Verklaart dat
Identificatienummer: 798866
Beschrijving: HVLP spuitsysteem, 500 W
Voldoet aan de volgende richtlijnen:
• Machinerichtlijn 2006/42/EG
• Richtlijn laagspanning 2006/95/EG
• Elektromagnetische verenigbaarheid 2004/108/EG
• RoHS-richtlijn 2002/95/EG
• EN 60745-1:2009+A11:2010
• EN 60745-2-4:2009
• EN 55014-1:2006+A1:2009+A2:2011
• EN 55014-2:1997+A1:2001+A2:2008
• EN 61000-3-2:2006+A1 :2009+A2 :2009
• EN 61000-3-3:2008
HVLP spuitsysteem 500 W 798866
Het gekochte product registreren
Ga naar: silverlinetools.com, klik op de ‘Guarantee Registration ‘(registratie)
knop en voer het volgende in:
Uw persoonlijke gegevens
De productinformatie en de aankoopdatum
Het garantiebewijs wordt vervolgens in PDF-formaat aangemaakt. Druk het
af en bewaar het bij het product.
De ingehouden gereedschappen of onderdelen die zijn vervangen, worden
het eigendom van Silverline Tools.
De reparatie of vervanging van het product onder garantie zijn voordelen
die bijkomstig zijn aan uw wettelijke rechten als consument, en hebben
daar geen invloed op.
Wat is gedekt:
De reparatie van het product, mits naar tevredenheid van Silverline Tools
kan worden vastgesteld dat de gebreken het gevolg zijn van defecte
materialen of fabrieksfouten binnen de garantieperiode.
Onderdelen die niet meer verkrijgbaar zijn en die niet meer worden
vervaardigd worden door Silverline Tools vervangen door een functionele
vervanging.
Gebruik van dit product in de EU.
Wat niet is gedekt:
Silverline Tools geeft geen garantie op reparaties als gevolg van:
Normale slijtage veroorzaakt door gebruik in overeenstemming met de
bedieningsinstructies zoals zaagbladen, borstels, riemen, gloeilampen,
batterijen enz.
De vervanging van geleverde accessoires zoals boortjes, zaagbladen,
schuurvellen, snijschrijven en aanverwante producten.
Accidentele schade, storingen veroorzaakt door nalatigheid in gebruik of
verzorging, misbruik, verwaarlozing, onvoorzichtige bediening en hantering
van het product.
Gebruik van het product voor andere doeleinden dan normaal huishoudelijk
gebruik.
Alle soorten wijzigingen en modificaties van het product.
Gebruik van andere onderdelen en accessoires dan de originele onderdelen
van Silverline Tools.
Defecte installatie (behalve wanneer geïnstalleerd door Silverline Tools).
Reparaties of wijzigingen die zijn uitgevoerd door anderen dan Silverline
Tools of diens officiële reparatiediensten.
Behalve claims voor het recht op correctie van fouten van het gereedschap
volgens de bepalingen van deze garantie zijn geen andere claims gedekt.
Keuringsinstantie: TUV Rheinland, Shanghai, China
De technische documentatie wordt bijgehouden door: Silverline Tools
Datum: 27-06-2013
Handtekening:
Directeur
Naam en adres van fabrikant of gemachtigde:
Powerbox International Ltd., Boundary Way, Lufton Trading Estate, Yeovil,
Somerset, BA22 8HZ Verenigd Koninkrijk
www.silverlinetools.com
39
 Loading...