

Page 1
Technical Manual
and
Replacement Parts List
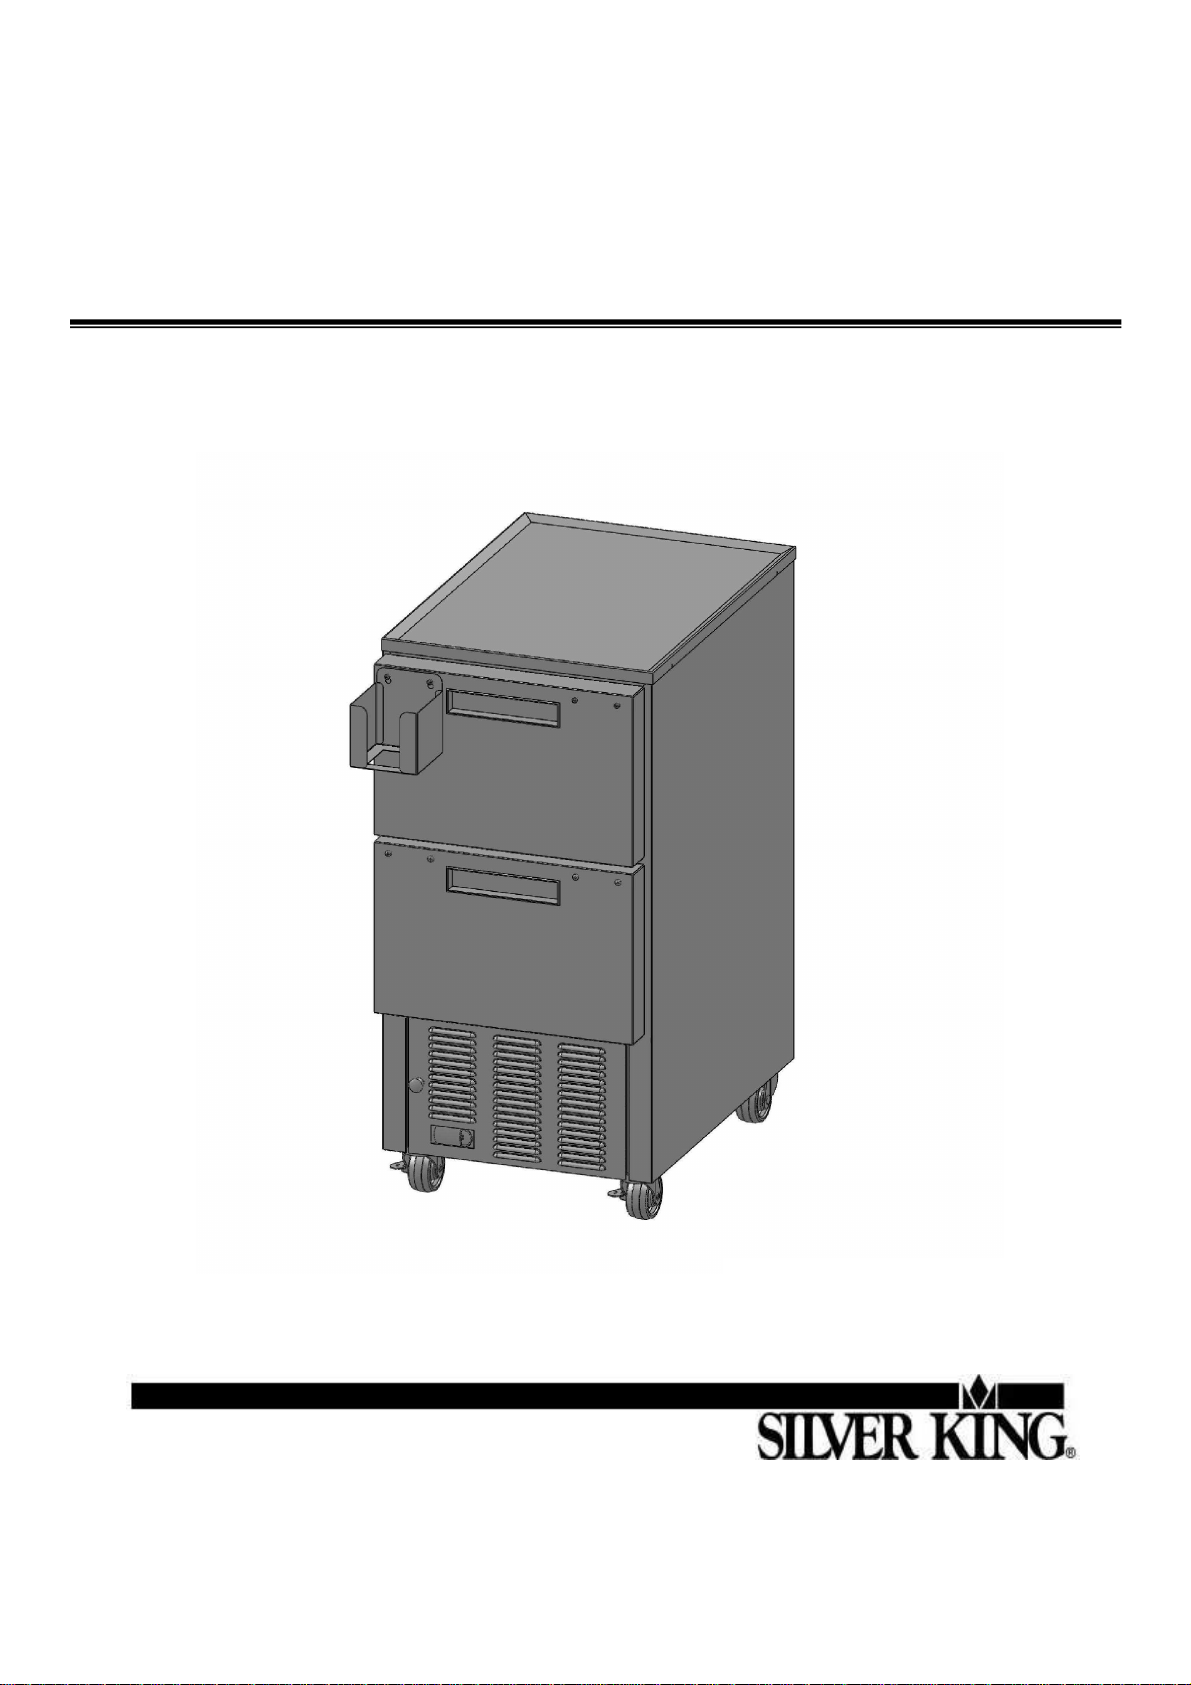
Refrigerated Salad Dispenser
MODEL: SKSD
1600 Xenium Lane North, Minneapolis, MN 55441-3787
Phone (763) 923-2441
FORM NO. 38677 REV C 8/2015
Specifications Subject to Change Without Notice.
1
Page 2

TECHNICAL MANUAL
SILVER KING REFRIGERATED SALAD DISPENSER
MODEL SKSD
Thank you for purchasing Silver King food service equipment. Our goal is to provide our customers with the most reliable
equipment in the industry today. Please read this manual and the accompanying warranty information before operating your new
Silver King unit. Be sure to complete and mail the warranty card within 10 days of purchase to validate your warranty.
INSPECT FOR DAMAGE AND UNCRATE
Upon delivery of your new Silver King unit, uncrate at once to examine and test for possible damage following the instructions
printed on the exterior of the container. Report any damages to the carrier responsible for transportation and promptly present a
claim for any evidence of mishandling. Save all packaging materials if a claim must be filed.
INSTALLATION
The stainless steel exterior of the cabinet has been protected by a plastic covering during manufacturing and shipping. This
covering can be readily stripped before installation. After removing this covering, wash the interior and exterior surfaces using a
warm, mild soapy water solution and a sponge or soft cloth. Rinse afterward with clean water and wipe dry. Do not use chlorinated
cleaners.
Location
When locating your new refrigerator, convenience and accessibility are important considerations, but the following installation
guidelines must be followed:
• Always avoid placing the refrigerator adjacent to an oven, heating element or hot air source that would affect the operation of the
unit.
• For proper ventilation, the bottom front and rear of the unit must not be obstructed. The unit must be on legs or casters to raise it
off the floor. The unit can be installed tight on the sides.
• The unit must be level or tilted backwards slightly.
Legs/Casters
The unit comes with legs or casters installed. Periodically inspect the casters to assure they are mounted tightly.
Drawers
To remove the drawers for cleaning, simply open them fully, release gray tabs, and lift up on the front of the drawer to remove the
front wheels from the drawer tracks, continue to slide the drawer out until the rear wheels reach the end of the tracks and lift the
drawer out of the tracks. To reinstall the drawer, insert the rear wheels of the drawer into the drawer tracks and slide the drawer
back until the front wheels on the drawer can be inserted into the track, push the drawer into the cabinet, pull the drawer back out
and press the gray tabs back into the locked position. The drawer pans can be removed by lifting them out with the drawer
extended. The rolling drawer tracks can be removed for cleaning when the drawers are removed from the cabinet. Pull each track
out half way, push the gray tab on the inside rear of the track back, and pull the track out.. The drawer slide system is rated for a
maximum load of 200 pounds. The drawers are not designed for or intended to be used as a surface to stand on. At no time
should the drawers be extended and used as a platform for standing on to reach elevated equipment.
1
Page 3

Electrical Connections
Be sure to check the data plate, located on the liner of the cabinet, for required voltage prior to connecting the unit to a power
source. The specifications on the data plate supersede any future discussion.
The standard unit is equipped with an eight (8) foot power cord that requires a 115 Volt, 60 Cycle, 1 Phase properly grounded
electrical receptacle. The power cord comes with a 3 prong plug for grounding purposes. Any attempt to cut off the grounding
spike or to connect to an ungrounded adapter plug will void the warranty, terminate the manufacturers responsibility and could result
in serious injury.
The circuit must be protected with a 15 or 20 ampere fuse or breaker. The unit must be isolated on a circuit and not plugged into an
extension cord.
OPERATION
Initial Start Up:
After satisfying the installation requirements, the unit is ready to start. The unit will start when the power cord is connected to the
required power source and the Power Switch is turned on. Allow the unit to run a minimum of two hours before loading it with
product.
Temperature Control
The Electronic Temperature Control is located on the front of the unit. To check the temperature control set point, push and release
the ‘set’ button on the control and the display will show the set point temperature. To adjust the set point, push and hold the ‘set’
button until display blinks, then push the up or down arrows to adjust the set point. Either press the ‘set’ button again or wait 10
seconds and the control will store the new set point. Allow the unit a minimum of one hour to respond to a control setting
adjustment.
Defrost:
The SKSD Lettuce Dispenser is a manual defrost unit. The unit should be defrosted whenever the walls accumulate a frost/ice bank
that is 1/4 inch thick. To defrost the unit, first remove any food products, then turn off the Power Switch, and open the Drawers.
After the frost/ice has melted or come loose from the cabinet walls, wipe out the cabinet interior with a dry cloth or sponge. Do not
attempt to scrape or chisel off the frost/ice as you could do irreparable damage to the cabinet.
MAINTENANCE
Preventative maintenance is minimal although these few steps are very important to continued operation and maximizing the life of
the appliance.
Cabinet Surfaces
The cabinet interior and exterior are stainless steel. These surfaces should be cleaned periodically with a solution of warm water
and mild soap. After cleaning the surfaces should be rinsed with clean water and wiped dry with a soft cloth. Stainless steel
cleaners can be used. Should a surface become stained, do not attempt to clean with an abrasive cleaner or scouring pad. Use a
soft cleanser and rub with the grain of the metal to avoid scratching the surface. Always rinse well and dry after cleaning. Do not
use chlorinated cleaners.
Condenser
Periodically, dust on the condenser coil must be cleaned. The condenser is located behind the front cover on the lower front of the
unit. Open the front cover by pulling on the knob of the cover. The condenser will be exposed. Clean the accumulated dust/debris
from the condenser with a vacuum or brush. This will need to be done regularly to maintain the compressor warranty.
Casters
Check to make sure that the casters are installed tightly to the cabinet.
MODEL SERIAL NO. DATE INSTALLED
2
Page 4

3
Page 5

WHEN ORDERING REPLACEMENT PARTS, PLEASE PROVIDE MODEL AND SERIAL NUMBERS.
4
Page 6

5
Page 7

SILVER KING LIMITED WARRANTY
Silver King Refrigeration warrants to the original purchaser of Silver King refrigerated equipment that the equipment shall be free from
defects in material and workmanship under normal use and service as outlined in the Technical Manual. This limited warranty shall
apply for a period of one (1) year from the date of original purchase. The Compressor will carry an additional four (4) year warranty.
The warranty registration card attached must be filled out and returned within 10 days of installation or the warranty will be void. All
warranties are subject to specific limitations outlined below.
This limited warranty does not apply to repair or replacement required as a result of carelessness, neglect and/or abuse, including
improper installation, incorrect voltage supply, tampering with or altering components and/or equipment or failure to perform proper
maintenance. Equipment damaged in transit, by fire, flood or an act of God is not covered. This limited warranty does not include
freight, handling, installation, labor (following the one (1) year labor warranty period) or other incidental or consequential costs including
product and/or economic loss. This limited warranty is in lieu of all other warranties, express or implied, including those of
merchantability, and is non-transferable.
Specific provisions of this limited warranty are as follows:
One (1) Year Parts Warranty
Silver King warrants to the original purchaser of new Silver King equipment that such equipment and all parts thereof will be free of
defects in material and workmanship, under normal use and service, for a period of one (1) year from the date of original purchase or
18 months from the date of shipment from the factory, whichever comes first, subject to all terms and conditions herein.
This warranty is limited to repairing or replacing any parts that, at Silver King’s discretion, are deemed to be defective within the time
period covered by this warranty. The one year parts warranty covers reasonable freight and handling charges. It does not cover
special handling charges or expedited means for transport. Use of non-OEM parts may, at Silver King’s discretion, void this warranty.
If approved, warranty credit for non-OEM parts will be issued at the OEM cost.
Replacement parts sold separately are warranted for 90-days from date of purchase.
Five (5) Year Compressor Warranty
Silver King warrants to the original purchaser for a period of five (5) years from the date of original purchase or five (5) years and six (6)
months from the date of shipment from the factory, whichever comes first, that it will replace the compressor with one of similar design
and capacity, exclusive of delivery and installation charges, if it is found to Silver King’s satisfaction to be inefficient or inoperative due
to defects in material or factory workmanship. It is the owner’s responsibility to return the serial plate of the defective compressor, or at
Silver King’s option the complete compressor, to the factory. Failure to do so will void the warranty.
Five (5) Year Heavy Duty Drawer Slide Warranty
Silver King warrants to the original purchaser for a period of five (5) years from the date of original purchase or five (5) years and six (6)
months from the date of shipment from the factory, whichever comes first, that it will replace the heavy duty drawer slides with one of
similar design and capacity, exclusive of delivery and installation charges, if it is found to Silver King’s satisfaction to be inefficient or
inoperative due to defects in material or factory workmanship.
One (1) Year Labor Warranty
Silver King warrants to the original purchaser for a period of one (1) year from the date of purchase or 18 months from the date of
shipment from the factory, whichever comes first, a limited service labor warranty on Silver King refrigerated equipment subject to the
following terms;
A factory issued Service Authorization Number must be obtained prior to work being performed under the labor warranty. Call your
supplier or Silver King. Claims submitted without a Service Authorization Number will be paid at Silver King’s discretion.
The labor warranty includes standard straight time labor charges in accordance with Silver King’s Labor Warranty Guidelines and
reasonable travel time, as determined by Silver King.
The warranty does not cover original installation, startup, normal adjustments or maintenance. Normal adjustments and maintenance
include, but are not limited to; temperature control adjustments, temperature indicator calibrations, coil and filter cleaning, condensate
drain cleaning.
A second service call for a related failure is not covered.
Use of refrigerants other than specified on the equipment serial plate voids the warranty.
All claims must include; model and serial number of equipment, date of purchase, date of failure, and a copy of the service invoice
detailing the defect and service performed. No claim will be processed without this information. All claims must be filed within 60 days
from date of service.
P/N 26355 Revision C
6
 Loading...